Антидемократичен чеклист

Post Syndicated from Светла Енчева original https://www.toest.bg/antidemokratichen-cheklist/

Антидемократичен чеклист

Понякога отмяната на демокрацията идва с преврат или с революция. Друг път – (общо взето) безкръвно, но с рязка и категорична безпардонност – нещо, което наблюдаваме например по време на втория президентски мандат на Доналд Тръмп. Може обаче да се осъществи и на малки стъпки, като бавно и почти неусетно сваряване в антидемократичен бульон.

Засега новата власт не дава ясна заявка, че е тръгнала по този път, но досегашните възгледи и действия на Румен Радев, както и на част от най-тесния кръг политици, с които се е обградил, дават основания за притеснения. Особено на фона на притъпените демократични инстинкти в България, на правосъдната система, която често се използва за политически цели, и на антидемократичните тенденции в тълкуването на Конституцията и в законодателството през последното десетилетие.

Ето защо е полезно още отсега да набележим, макар и без претенция за изчерпателност, някои индикатори, които да играят ролята на „червени лампички“, сигнализиращи, че се върви в антидемократична посока.

Лампички, които вече мигат

От изборите на 19 април измина малко повече от месец, но някои признаци, че новата власт се стреми да отдалечи България от демократичния свят, вече са налице.

Опити за неутрализиране на възможната съпротива

„Прогресивна България“ (ПБ) има пълно мнозинство в 52-рото Народно събрание – комфорт, с какъвто никоя политическа сила не е разполагала от четвърт век. Въпреки това ПБ се опитва да обезсили опозицията още в зародиш – чрез Правилника на парламента. Предложенията за промени в него обезсмислят парламентарния контрол върху правителството и силно стесняват полето на действие на опозиционните депутати, както и достъпа им до информация. Така – чрез един подзаконов акт, какъвто е правилникът – не само се подлива вода на опозицията, а и се подменя формата на управление на България, която по конституция е парламентарна република.

Как се дресира опозиция
52-рият парламент бавно се пренарежда така, че на властта да ѝ е по-удобно: по-малко парламентарен контрол, по-трудно създаване на временни комисии, министри, които могат да отсъстват колкото поискат. А опозицията ще кротува ли? От Емилия Милчева.
Антидемократичен чеклист

Разбира се, това се прави уж в името на ефективността. По-малко реплики, дуплики, парламентарен контрол и изобщо възможности за реакция – по-лесно приемане на закони и упражняване на властта. А най-лесно ще е, ако се върне премахнатият в началото на 1990 г. член първи от тоталитарната конституция – „Ръководна сила в обществото и държавата е Българската комунистическа партия“, но мястото на БКП заеме ПБ. Така ще е ясно кой е начело, и опозицията ще стане излишна.

Евроскептицизъм/антиглобализъм

След антидемократичния обрат в САЩ Европа остава основният стожер на либералната демокрация в света. Евроскептицизмът поставя под въпрос именно ценностите, които стоят в основата на европейското единство. А антиглобалистките тенденции вещаят замяна на усилията да се изгради взаимносвързан и мирен свят с борба за надмощие на по-силния. Вещаят също разпад на изградените връзки, последствията от който вече се усещат на всекидневно равнище.

На новата власт това, изглежда, ѝ харесва. Ето две реплики на премиера само от последните дни. По повод на журналистически въпрос защо евроскептикът Иво Христов ще отговаря за организацията на „Евровизия“ в България, Радев заяви:

Европа има нужда от една солидна доза евроскептицизъм, за да оцелее в съвременния изключително сложен свят.

Интересна формулировка – за да оцелее, Европа трябва да постави под въпрос… себе си. Бившият президент използва 24 май, за да противопостави България на света – той определи българската писменост като „щит“ в „глобалния свят на обезличаващи се култури и чезнещи езици“.

Нарочване на врагове

В България изобретяването на врагове и настройването на хората срещу тях е познат метод на предизборна мобилизация. Понякога се използва и за да се наложат определени промени, както беше например с кампанията срещу Истанбулската конвенция. Този случай впрочем е ярка демонстрация колко са нужни „враговете“, ако се цели антидемократичен обрат.

Вече стана дума, че според Радев България се нуждае от „щит“ срещу „глобалния свят“. Това ще рече, че глобалният свят се възприема като враг. Друг враг, посочен от новата власт, са търговските вериги. Върху тях новото правителство стоварва цялата отговорност за инфлацията, която представя с метафората „галопиращи цени“. Няма значение дали върху инфлацията оказват влияние настоящите войни, несигурността, в която управлението на Тръмп хвърля света, климатичните промени, родната корупция и т.н. Има едни лоши търговски вериги, които, разбира се, са с чужда собственост, и те са виновни за всичко.

Оправдаване на антидемократични режими

Докато Румен Радев и приближените му са критични към ЕС, те нямат такова отношение към Путин, Тръмп, Нетаняху и други диктатори. Под булото на „прагматизма“ и „реализма“ Радев защитава правото на по-силния. Или на този, когото смята за по-силен (това по правило не са европейските лидери). А според представители на ПБ, изказващи се в публичното пространство, Русия е на практика непобедима, затова няма смисъл да ѝ се противопоставяме.

Конкретно към Русия отношението на Радев е последователно, като се започне от репликата му, че Крим „в момента е руски, чий да е“. Той многократно възпроизвежда официалния руски наратив, че подкрепата за агресора (Русия) означава защита на мира, а за нападнатата страна (Украйна) – въвличане във война. А неотдавна аргументира отказа на България да се присъедини към създаването на Специален трибунал за Украйна, като заяви, че от него няма смисъл, защото Русия не е победена и Путин не е пленен.

Няма тема – няма проблем

Подходът определени теми, смятани за неудобни или нежелани, да се смитат под килима, също е широко практикуван от властта в България досега и се вписва във вече съществуващите тенденции към антидемократичност. ПБ продължава по този път – например с предложението досегашната парламентарна комисия по демографската политика, децата и семейството да мине под шапката на тази по социалната политика. Какъв е проблемът? Социалната политика се занимава със социално подпомагане. Извън фокуса ѝ са например теми като домашното насилие и детското правосъдие. Планирането на подобна реорганизация е сигнал, че подобни въпроси ще продължават системно да се игнорират.

Лампички в режим на изчакване

Ето и няколко индикатора за антидемократичен обрат, за които да си отваряме очите, макар и те още да не са на дневен ред.

Изолационизъм

Наченки на изолационизъм всъщност вече се наблюдават, но по-скоро като нюанс на евроскептицизма и антиглобализма на новата власт. Да си спомним цитираното по-горе изказване на Радев как кирилицата ни пази от глобалния свят. Но тенденцията към изолационизъм може да се засили – ако се увеличат призивите за „суверенитет“, ако се възродят призивите за „национална доктрина“, ако се настоява, че България на всяка цена трябва да пази неутралитет. И ако ескалират конфликти с други държави – например с Македония, но не само, ако се насажда враждебно отношение към ЕС и другите международни съюзи, от които България е част. Проблемът със „суверенитета“ и „неутралитета“ е, че чрез подобни мантри България просто бива тласкана към друг господар.

Антидемократично законодателство

С изключение на Правилника на НС, засега новата власт не дава заявка, че ще приема антидемократични закони. До момента успехите в това отношение бяха по-скоро спорадични – забраната на „ЛГБТ пропагандата“ в училище, отричането на еднополовите връзки със закон, публичният регистър на педофилите и още няколко пробива. Приемането на подобни закони обаче може да стане системно и да обхване целия социален живот – забрана на „ЛГБТ пропагандата“ на публични места, забрана на абортите, ограничаване на правото на протест, спънки пред политическия плурализъм и пр.

Кого не пази Законът за защита от домашно насилие?
Една трета от интервюираните в изследване на домашното насилие сред еднополови двойки са преживели насилие от партньор, а две трети – от родител. Въпреки това такова насилие според закона не съществува. Теодора Станимирова търси отговори защо е така.
Антидемократичен чеклист

Религиозен фундаментализъм

Флиртът на държавата с Българската православна църква не е от вчера. Но той може да се превърне, образно казано, в брак. Най-силната форма на съюз между БПЦ и държавата би била промяна на ролята на Църквата в Конституцията, според която все още религиозните институции са отделени от държавата, а православието е не официална, а просто традиционна религия. Но и вкарването на религията в училище, както и преследването на критици на Църквата може да изиграят сериозна антидемократична роля.

Задушаване на гражданския сектор

Разправата с гражданския сектор е възможна както с антидемократично законодателство – например с приемането на закон, подобен на руския за „чуждестранните агенти“, така и по други начини. Например чрез демонизиране на НПО-тата и „лов на вещици“, чрез кампании като тези против Закона за социалните услуги и Стратегията за детето. И досега е имало подобни опити, но индикатор за преход към антидемократичност би била систематичността на усилията.

Налагане на цензура

И тук в българския контекст става дума по-скоро за засилване на нещо съществуващо. Но ако цензурата приеме законова форма, ако преследването на журналисти и други критични гласове стане правило, а не изключение, ако засягането на определени теми стане забранено или практически невъзможно, ако правото на протест се ограничи, значи си е отишла една от най-важните характеристики на демокрацията – правото на изразяване.

Толерантност към институционалното насилие

Засега властта не дава знак, че може да постъпи по такъв начин, но пък все още няма протести срещу нея. Ако в някакъв момент обаче тя започне да бие наред, а насилието се оправдава, вместо съществуването му да се отрича, или то дори се узакони под някаква форма – това е доста сигурен знак, че държавата не се и опитва да изглежда демократична.

Промяна на формата на управление

Антидемократичният обрат може практически да се официализира чрез изменения на Основния закон, посредством които цялата власт се концентрира в управляващите. Или поне смяната ѝ да стане много трудна. Формата на управление може да се промени и по по-деликатни начини – например чрез Изборния кодекс и различни закони.

Тонът на промяната

Румен Радев идва на власт след дълго управление, макар и с известни паузи, на Бойко Борисов и партията му ГЕРБ – в разнообразни коалиционни варианти. Не може да се каже, че Борисов е радетел за либерална демокрация. Като човек, идващ от силовите структури, той е почитател на твърдата ръка, както и на онези, които управляват по този начин. Борисов обаче се отличава от Радев по искреното си желание да бъде харесван и обичан – от народа, от ЕС, от Тръмп, от папите, изобщо – от всички. Затова понякога отстъпваше пред протести, не правеше резки антиевропейски движения, опитваше се на всеки да угоди, доколкото е възможно.

За Радев популярността обаче като че не е цел, а по-скоро властови ресурс.

Той не създава впечатление на човек, който ще се трогне, ако загуби симпатиите на избирателите си. Поведението на ПБ като цяло внушава: „Ние държим властта, вие ще слушате, ще изпълнявате и няма да ни се пречкате.“ А това е качествена промяна на тона спрямо ерата на ГЕРБ. Освен това, макар и поне засега Радев да избягва пряка конфронтация с ЕС, това не означава, че си поставя за цел в ЕС да го харесват.

Тази разлика с доскорошния модел, колкото и бутафорен и корумпиран да беше той, може да се окаже ключът за кутията на антидемократичната Пандора. Разбира се, антидемократичен обрат може и да не настъпи, а Радев да продължи „прагматично“ и „реалистично“ да се опитва да балансира между силните на деня, които и да са те. Но колкото по-подготвено е едно общество и колкото по-ясно разпознава червените лампички, толкова по-способно е да противостои на отмяната на демокрацията.
[$] MOT: a tool to fight openwashing in AI

Post Syndicated from jzb original https://lwn.net/Articles/1073420/

Many large language models (LLMs) are described as open source, but
if one looks a bit deeper it turns out that is not actually so; the
model may be free to download, it may be “open weight“, but it
does not fit the Open Source
Initiative
(OSI) Open Source
Definition
(OSD). Assessing the actual openness of models is not
easy, as Arnaud Le Hors explained in his talk about the Model Openness Tool (MOT) at Open
Source Summit North America
2026. The tool is designed to help
users of LLMs understand to what degree a model is (or is not) open,
and to combat the openwashing
that is prevalent with LLMs.

Migrating your Java applications to AWS Graviton using AWS Transform custom

Post Syndicated from Hahnara Hyun original https://aws.amazon.com/blogs/compute/migrating-your-java-applications-to-aws-graviton-using-aws-transform-custom/

For Java applications, modern JVMs like Amazon Corretto and OpenJDK are highly optimized for Arm64 and modern applications that are pure Java often require zero changes to run on Graviton. In many cases, applications aren’t fully modernized or purely Java and have a range of dependencies. When you’re responsible for migrating workloads, it’s helpful to use a systematic approach that surfaces issues, proposes solutions, and does the transformation work for you at scale.

That’s why we built the Java x86 to Graviton Migration transformation for AWS Transform custom (ATX). This is an AI-powered agent that analyzes your Java codebase, creates a migration plan, and executes the transformation—complete with version-controlled commits at every step. With ATX you can efficiently assess hundreds of Java applications simultaneously and quickly learn which applications require no changes and which ones need modifications. This streamlines the process of estimating the scope of effort, while also having suggested code updates before you even start.

ATX is available as a Kiro power, a VS Code extension, and an Agent Skill if you’d like to use it directly within other AI assistants to reduce context switching. While we will be using ATX to highlight how you can rapidly accelerate a Graviton migration, we have also published an open source Graviton universal skill based on the Agent Skills open standard so that you have the flexibility to use the skill natively within Kiro, Claude Code, Codex, or the platform of your choice.

AWS Graviton processors, based on the Arm64 architecture, can provide up to 40% better price performance over comparable x86-based instances for a wide variety of workloads. Now customers can use AI tools to quickly migrate workloads to Graviton.

The Java x86 to Graviton migration transformation

At a high level, we recommend customers finish any major version Java updates prior to migrating to Graviton and there’s a separate Java Version Upgrade transformation available for this use case. The Java x86 to Graviton Migration transformation requires a minimum of Java 8 and won’t incorporate Java version updates into the code changes.

The Java x86 to Graviton Migration completes multiple steps with work divided across multiple AI agents within the AWS Transform service, covering things like:

  • Native library analysis – Identifies Java Native Interface (JNI) dependencies and finds Arm64-compatible alternatives
  • Dependency updates – Updates libraries to versions with Arm64 support
  • Build configuration – Modifies Maven/Gradle configs for multi-architecture builds
  • Architecture-specific code – Refactors hard-coded x86 assumptions
  • Unit Test – Verifies compatibility at runtime given unit tests are in the project
  • Documentation – Creates migration notes and runbooks for your team

The agent automatically detects your Java version, manages runtime switching as needed during analysis, and handles much of the environment complexity for you such as multi-module project detection or Maven or Gradle auto-detection. Transformation completion times vary, but for many applications you can expect it to take roughly an hour (ATX works well with repos under 300K lines of code).

In this post, we:

  • Walk through the requirements for running the Java x86 to Graviton Migration transformation.
  • Help you familiarize yourself with ATX using a single Java application with Interactive Mode
  • Outline how to assess Graviton compatibility across the Java applications that you want to migrate to Graviton in a single batch and summarize the results with Campaign Mode.

By the end, you should have a good idea of how Java x86 to Graviton Migration transformation functions and have a summary of the expected code changes and dependency updates needed for each of your Java applications, along with version-controlled code updates.

Graviton transformation requirement

The Java x86 to Graviton migration transformation should run on an Arm64 machine.

The agent doesn’t just read your code, it builds, loads native libraries, and validates your application’s runtime behavior on Arm64. If you run the transformation on an x86 machine, the agent can identify compatibility issues but can’t execute build validation or run tests.

If you try to run on x86, you will see the following error message:

⚠  This transformation requires Arm64 architecture.    
Detected: x86_64        
Please run ATX on an Arm64 environment. See documentation for options.

To get started you need a Graviton instance or Apple Mac laptop running Arm64 with the ATX CLI, build tools, and Java JDKs that your project requires. The project source code should also be loaded locally onto the machine running the ATX CLI. Because Apple silicon is Arm64-based, it’s possible to build, load, and verify Arm64 based dependencies for a quick proof-of-concept. However, we recommend running the transformation in an environment that reflects what you plan to deploy in production to surface any potential OS level incompatibilities.

Requirements

Requirement Details
AWS Transform custom permissions AWS Identity and Access Management (IAM) policies for the Transform service (see Authentication docs)
Arm64 execution environment Amazon Elastic Compute Cloud (Amazon EC2) Graviton instance or Apple Silicon Mac. Running on x86 limits validation to static analysis only. Phase 3 (build/test) requires Arm64.
Node.js 20+ Required by the AWS Transform CLI. Use the official installer at nodejs.org/en/download. Package managers (dnf, yum) can install an older version.
Git AWS Transform custom uses local Git for version control during the transformation.
AWS Transform CLI Installed using the setup script (see Client Setup for the curl command).
Java build tooling A JDK (Arm64 build, e.g. Amazon Corretto or OpenJDK), Maven and/or Gradle as required by the target project. These are not optional for Java transformations. The agent needs them for dependency analysis, native library scanning, and build validation.

Running the Graviton transformation with Interactive Mode

With your code on an Arm64 environment and all the prerequisites for the transformation, we can begin the transformation.

Step 1: Navigate to Your Project and create or clone a git repo

cd /home/developer/workspace # Docker 
# or 
cd ~/workspace # AMI
git init

We recommend not pointing to the main branch of the repository of your application. You can work in a local git environment or create a separate branch. ATX needs the ability to commit changes as it iteratively transforms your code. The final decision on which commits are pushed is up to the developer.

Step 2: Launch ATX Interactive Mode

Enter the following command to launch ATX interactive mode.

atx

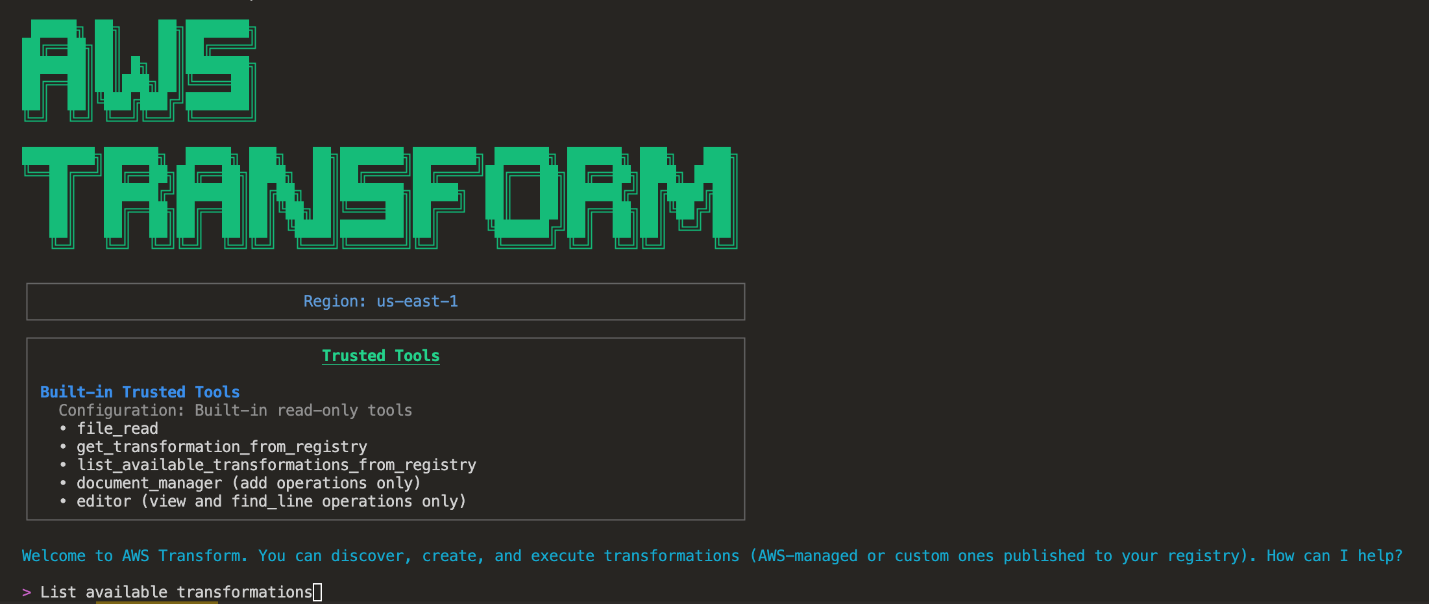
ATX starts in interactive mode:


To view available transformations, in a separate terminal enter:

atx custom def list > custom_list.txt

The AWS Managed transformations will be listed first, followed by User-created transformations that you’ve developed.

Step 3: Select the Graviton transformation

Enter the following into atx cli:

>AWS/early-access-java-x86-to-graviton

ATX will prompt you for next steps and your project details:

> Would you like to:+ c to abort or provide feedback)
1. View the entire transformation definition
2. View specific sections of the transformation definition
3. Apply this transformation to your code
4. Modify this transformation
> 3
> What is the file system path to the code repository where you want to apply this transformation?
> .

Note that because this is an AWS Managed Transformation, you can’t view the complete transformation definition or modify it. However, you can provide additional context customized to your use case. Keep in mind that the Transformation won’t make permanent changes to your code through the transformation process.

Step 4: Provide additional context

ATX might ask clarifying questions to tailor the transformation:

Step 5: Review the analysis

ATX analyzes your codebase:

Analyzing your codebase...[████████████████████████████████████████] 100%
✓ Parsed 847 Java files
✓ Analyzed 234 dependencies  
✓ Identified 12 native library usages
✓ Scanned build configuration
✓ Evaluated test coverage
Analysis complete. Preparing migration plan...

Step 6: Review the migration plan

ATX presents a detailed plan before making changes:

═══════════════════════════════════════════════════════════════
                    MIGRATION PLAN
═══════════════════════════════════════════════════════════════

I've analyzed your project and here's what I'll do:

PHASE 1: Dependency Updates (12 changes)
────────────────────────────────────────
 • Update netty-transport-native-epoll 4.1.85 → 4.1.100
   Reason: Arm64 support added in 4.1.94
   
 • Update snappy-java 1.1.8.4 → 1.1.10.5  
   Reason: Current version lacks Arm64 native binaries
   
 • Update lz4-java 1.7.1 → 1.8.0
   Reason: Arm64 optimization improvements
   
 • ... (9 more dependency updates)

PHASE 2: Build Configuration (3 changes)
────────────────────────────────────────
 • Add Arm64 classifier to native dependency declarations
 • Configure multi-architecture Docker build
 • Add Graviton-optimized JVM flags to startup scripts

PHASE 3: Code Modifications (2 changes)
────────────────────────────────────────
 • Refactor ProcessorArchitecture.java
   Current: Hard-coded x86_64 assumption
   Change: Add Arm64 detection logic
   
 • Update NativeLibraryLoader.java
   Current: Loads x86-specific .so files
   Change: Architecture-aware library loading

PHASE 4: Testing & Validation
────────────────────────────────────────
 • Run build and tests on Arm64
 • Generate migration report and documentation

═══════════════════════════════════════════════════════════════

? How would you like to proceed?
  ❯ Execute the full plan
    Execute phase by phase (review each)
    Modify the plan
    Ask questions about the plan
    Export plan and exit

Step 7: Ask questions, request changes

This is your chance to understand and adjust:

? Ask questions about the plan:

You: Why are you updating netty to 4.1.100? 

ATX: Good concern. Netty 4.1.94 was the first version with Arm64 
     native transport support, which is required for optimal 
     performance on Graviton. 
     
     However, I can adjust this:
     
     Option 1: Use 4.1.94 (minimum Arm64 support)
     Option 2: Use 4.1.97 (includes Arm64 bug fixes)
     Option 3: Keep 4.1.100 (latest stable with Arm64)
     
     Which would you prefer?

You: Let's go with 4.1.100.

Step 8: Execute the Transformation

When you’re ready:

? How would you like to proceed?
  ❯ Execute the full plan

Starting transformation...

Phase 1: Dependency Updates
───────────────────────────
[1/12] Updating netty-transport-native-epoll...
       ✓ Modified pom.xml
       ✓ Committed: "chore(deps): update netty to 4.1.97 for Arm64 support"

[2/12] Updating snappy-java...
       ✓ Modified pom.xml  
       ✓ Committed: "chore(deps): update snappy-java to 1.1.10.5 for Arm64"

... (progress continues)

Phase 2: Build Configuration
───────────────────────────
[1/3] Adding Arm64 classifiers...
      ✓ Modified pom.xml
      ✓ Committed: "build: add Arm64 native classifiers"

... (progress continues)

Phase 3: Code Modifications
───────────────────────────
[1/2] Refactoring ProcessorArchitecture.java...
      ✓ Modified src/main/java/com/example/util/ProcessorArchitecture.java
      ✓ Committed: "feat: add Arm64 architecture detection"

... (progress continues)

Phase 4: Validation
───────────────────
Running build... ✓
Running tests... ✓ (847 passed, 0 failed)

═══════════════════════════════════════════════════════════════
                 TRANSFORMATION COMPLETE
═══════════════════════════════════════════════════════════════

Summary:
 • 17 files modified
 • 3 files created  
 • 14 commits made
 • All tests passing

Generated Artifacts:
 • GRAVITON_MIGRATION_REPORT.html  - Full migration report
 • MIGRATION_RUNBOOK.md            - Deployment guide for your team
 • commit-log.txt                  - All commits with descriptions

Your code is now Graviton-ready!

After the transformation is complete, you can now performance test and load test on Graviton instances to configure your scaling policies or target thresholds to maximize price/performance on Graviton. For more guidance on performance testing, see the AWS Graviton Technical Guide.

What you get after transformation

Version-controlled history

Every logical change is a separate commit:

$ git log --oneline -10

a3f2b1c (HEAD) docs: add Graviton migration runbook
b82d4e5 test: add Arm64 architecture verification tests
c9a1f3d feat: add Arm64 architecture detection
d4e7c2a build: configure multi-arch Docker build
e5f8d1b build: add Arm64 native classifiers
f6a9e2c chore(deps): update lz4-java to 1.8.0
g7b0f3d chore(deps): update snappy-java to 1.1.10.5
h8c1a4e chore(deps): update netty to 4.1.97 for Arm64 support
...

Each commit is atomic and revertible. If something doesn’t work, you can git revert specific changes.

Migration report

A comprehensive markdown report covering:

  • What was changed and why
  • Dependencies that were updated
  • Code modifications with before and after diffs
  • Performance optimization recommendations

Migration runbook

A deployment guide for your team:

  • Pre-deployment checklist
  • JVM flags designed for Graviton
  • Monitoring and rollback procedures

Additional resources on migrating to Graviton on an infrastructure level can be found in the Transition Guide.

Assessing Graviton compatibility for multiple Java applications with Campaign Mode

When you’re ready to start migrating multiple applications, you might want to opt for an automated process that removes the manual effort of going back and forth with the transformation agent after each transformation step with campaign mode. The following command allows ATX CLI to go through a full transformation that you can check back in with after it’s completed. This limits the additional customization and context that you might want to provide the agent.

As mentioned in the first step of running a Graviton Transformation, the environment that the code is transformed in and decision of which commits are pulled into the main repo is up to the developer. Running in campaign mode across several applications doesn’t require accepting and pushing code changes. Therefore, this automated method is most useful when you want to gauge a high-level overview of effort required to migrate across several or even hundreds of applications.

atx custom def exec \
--code-repository-path /path/to/myapp \
--non-interactive \
--trust-all-tools \
--campaign  \
--repo-name myapp \
--add-repo

This command can be added into scripts, allowing further automations to be built into continuous integration and delivery (CI/CD) pipelines or scaling transformation jobs across several repos without manually entering prompts as previously shown through interactive mode.

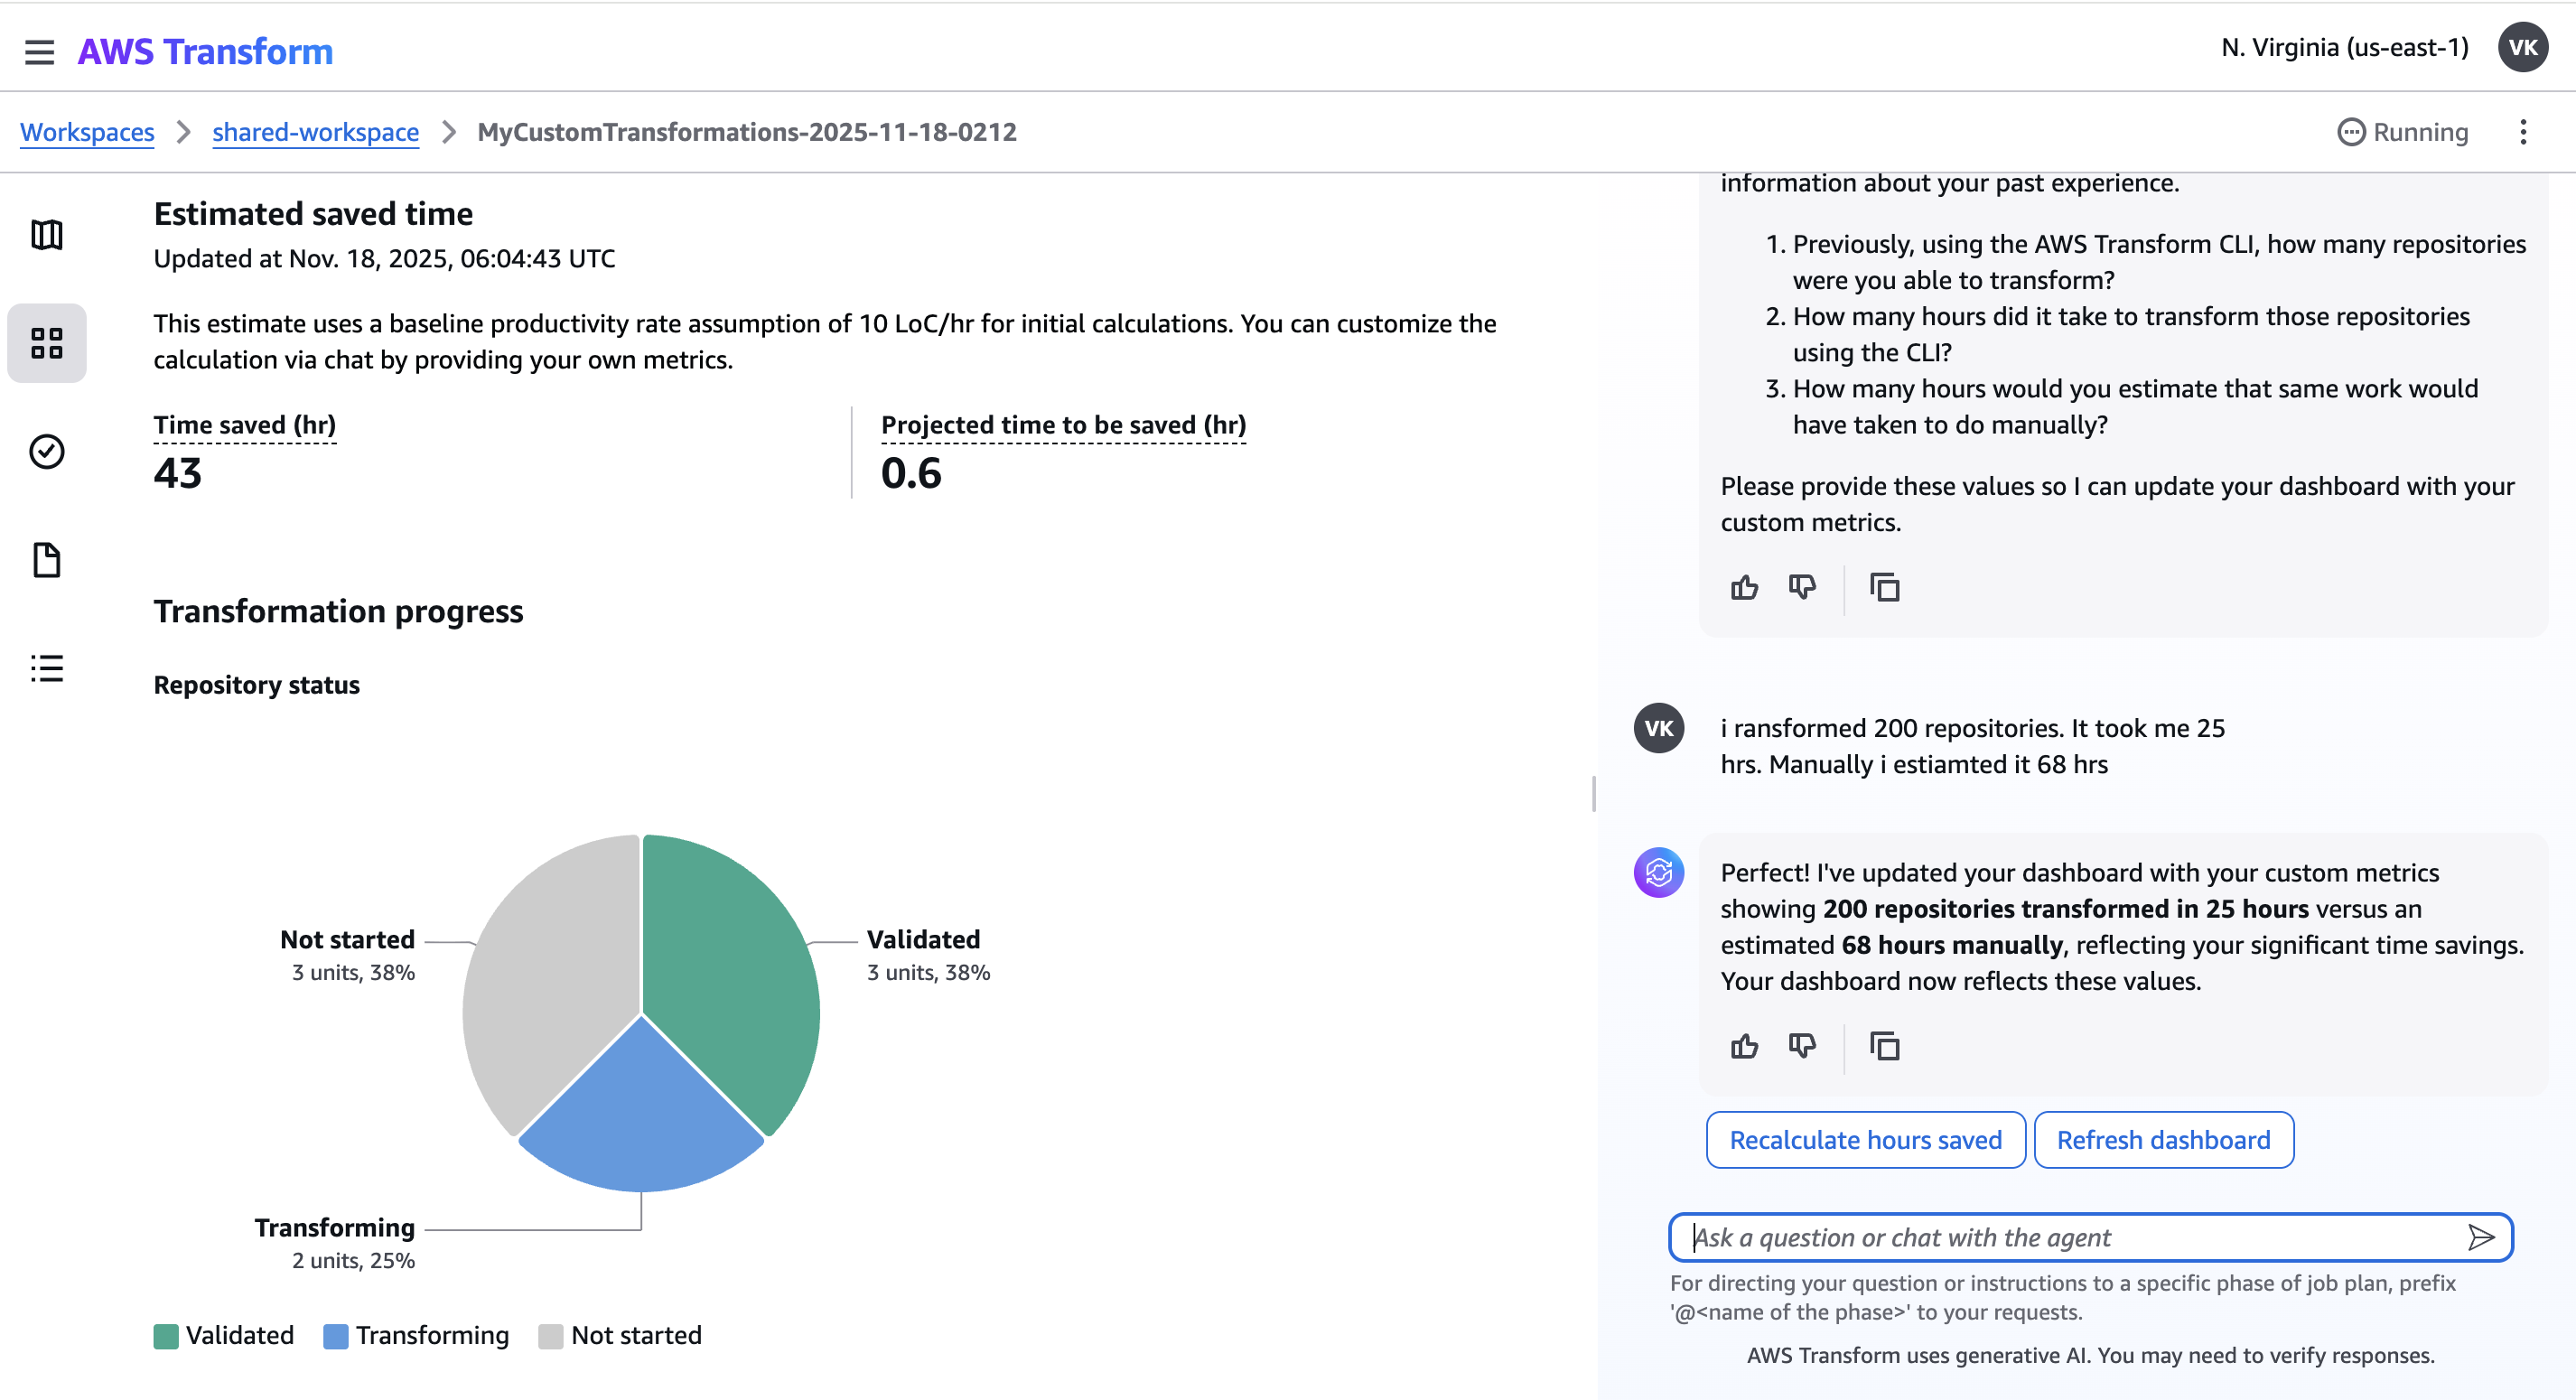
The status of transformations running with campaign mode will be displayed in the AWS Transform Web UI. Setting up the Web UI is a prerequisite to running a transformation in campaign mode.

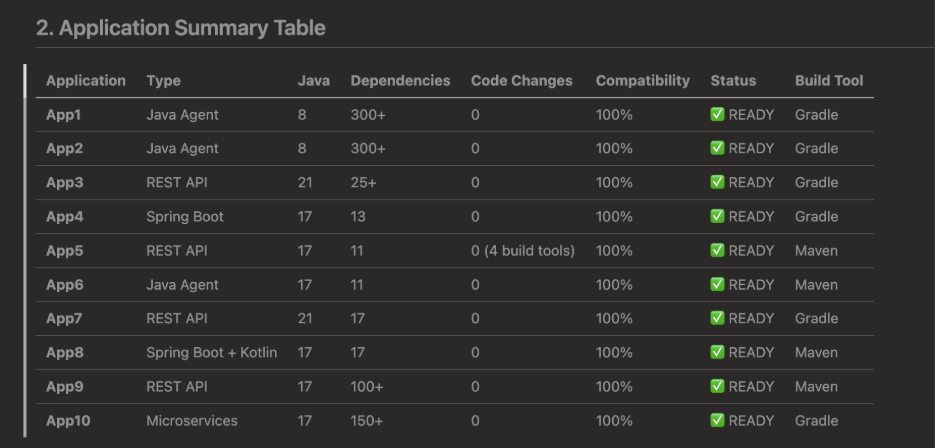
In addition to this view, if you run the transformation across multiple applications, you can generate a consolidated dashboard with an agent of your choice. Gather the transformation results into a centralized directory, then use the following prompt for example:

Analyze all Java application Graviton transformation summaries in <directory>/<path>/ and create a comprehensive dashboard that includes: 
 
1. Executive summary with key metrics (total apps, compatibility rate, code changes required) 
2. Application summary table with columns: Application name, Type, Java version, Dependencies count, Code changes, Compatibility %, Status 
3. Code changes analysis - which apps needed changes and why 
4. Dependency transformation analysis - common dependencies and their ARM64 status, any upgrades required 
5. Native library analysis - which apps use native libs and their compatibility 
6. Performance expectations - JWT/crypto improvements, general performance gains, cost-performance ratios 
7. JVM optimization patterns - common flags used across applications 
8. Build system patterns - Maven/Gradle usage, Docker multi-arch support 
9. Test results summary - pass/fail rates, pre-existing vs ARM64 issues 
10. Common libraries requiring changes (or note if none) 
11. Deployment readiness assessment 
12. Risk assessment with mitigation strategies 
13. Migration recommendations with phased approach 
14. Documentation summary - total docs created and their coverage 
 
Read graviton-validation/00-summary.md from each application subdirectory. Consolidate findings into a single comprehensive markdown dashboard with tables, metrics, and actionable insights. 
 
Focus on: compatibility rates, code change requirements, dependency issues, performance expectations, and migration readiness. 

Keep in mind that agents might output outcomes of the migration that aren’t sourced from the transformation summaries. As a result, we recommend that you use the summary as a high-level estimate of the technical effort required for migrating to Graviton.

Conclusion

The AWS Transform custom Java x86 to Graviton Migration transformation alleviates the guesswork in Graviton migrations by using AI for dependency analysis, compatibility assessment, code refactoring, and runtime validation. Development teams can evaluate hundreds of Java applications simultaneously, with each transformation providing atomic version-controlled commits for straightforward rollback and clear change tracking. The tool offers two modes: 1) interactive mode for hands-on, application-by-application migration with developer review at each step, or 2) campaign mode for automated assessment across multiple applications. ATX converts unknown Graviton migration effort into defined requirements through automated compilation and runtime testing. This provides a more efficient way to evaluate workload compatibility and migrate to Graviton.

The Java x86 to Graviton Migration transformation is one of a range of pre-built AWS Managed Transformations but you can also create custom transformations unique to your own use case that can be scaled to drive migrations across your organization. Learn more on the AWS Transform custom website or documentation.

Resources

Andrew Morton’s 2004 OLS keynote

Post Syndicated from corbet original https://lwn.net/Articles/1070746/

I recently presented a brief tribute to Andrew Morton at the 2026 Linux Storage, Filesystem, Memory
Management, and BPF Summit
; it included a suggestion that reading (or
re-reading) his 2004 Ottawa Linux Symposium keynote would be instructive.
This talk, given immediately after the Kernel
Summit session
that decided to fundamentally change the kernel’s
development model, tells a lot about how the kernel project got to where it
is today. The text of that speech was hosted on Groklaw, and has since
been replaced by crypto spam, which is rather less useful. In the hopes of
preserving this seminal moment, the transcript has been rescued from the
Wayback Machine
and is presented here.

[$] Further progress toward removing the page map count

Post Syndicated from corbet original https://lwn.net/Articles/1073418/

The mapcount field was created to track the number of mappings
(page-table entries) that refer to the given page. Among other things, a
mapcount of zero means that the page has no references and can be
reclaimed. Maintaining mapcount has become increasingly
challenging and expensive as the memory-management system has grown in
complexity, so Hildenbrand has been looking for ways to get rid of it.
This session was, he said, maybe one of the last times he will have to
bring up this topic.

Security updates for Wednesday

Post Syndicated from jzb original https://lwn.net/Articles/1074840/

Security updates have been issued by AlmaLinux (bind, buildah, compat-libtiff3, compat-openssl11, containernetworking-plugins, crun, delve, dnsmasq, dovecot, edk2, firefox, freeipmi, gdk-pixbuf2, giflib, git-lfs, glib2, go-fdo-client, go-fdo-server, golang, grafana, grafana-pcp, gstreamer1-plugins-bad-free, gstreamer1-plugins-base, gstreamer1-plugins-good, and gstreamer1-plugins-ugly-free, iputils, jq, kernel, krb5, libcap, LibRaw, libsndfile, libsoup, libsoup3, libssh, libtiff, libvirt, linux-sgx, luksmeta, mingw-glib2, NetworkManager, nginx, nginx:1.24, nginx:1.26, openexr, openssh, openssl, opentelemetry-collector, p11-kit, PackageKit, podman, python-jwcrypto, python-markdown, python-tornado, python3.11, python3.12, python3.14, python3.9, qemu-kvm, rsync, skopeo, sudo, systemd, thunderbird, tomcat, unbound, vim, xorg-x11-server, xorg-x11-server-Xwayland, yggdrasil, and yggdrasil-worker-package-manager), Debian (imagemagick, kdenlive, memcached, node-shell-quote, and samba), Fedora (chromium, curl, editorconfig, haproxy, perl-Crypt-DSA, perl-HTTP-Tiny, poppler, rust-afterburn, rust-coreos-installer, rust-eif_build, rust-rpm-sequoia, rust-sequoia-chameleon-gnupg, rust-sequoia-git, rust-sequoia-keystore-server, rust-sequoia-octopus-librnp, rust-sequoia-openpgp, rust-sequoia-sop, rust-sequoia-sq, rust-sequoia-sqv, and uriparser), Oracle (compat-libtiff3, dnsmasq, firefox, freeipmi, kernel, and uek-kernel), Slackware (mozilla), SUSE (assimp, firefox, glibc, gnutls, go1.25-openssl, go1.26-openssl, kernel, kubevirt, leancrypto, libarchive, libsndfile, mcphost, nginx, openssh, podman, python-GitPython, rsync, and samba), and Ubuntu (ayttm, dnsmasq, libssh2, linux-azure, linux-azure, linux-azure-6.17, linux-iot, linux-lowlatency-hwe-5.15, ngtcp2, onnx, opencc, protobuf, python-git, samba, xdg-dbus-proxy, and xmlrpc-c).

Celebrating young tech creators at Coolest Projects Ireland 2026

Post Syndicated from Rosie Lucas original https://www.raspberrypi.org/blog/celebrating-young-tech-creators-at-coolest-projects-ireland-2026/

In April, young tech creators gathered at Explorium in Dublin for Coolest Projects Ireland 2026, a lively, creative celebration of young makers and their digital projects. This year’s event was held as part of Kinia’s Creative Technology Week, and welcomed over 100 young people, showcasing more than 80 incredible tech projects. Participants included young people from Code Clubs, CoderDojos, and schools across Ireland, as well as young creators taking part individually.

Young people sat in an auditorium wearing Coolest Projects t-shirts.

With creations ranging from coding projects to hardware builds to AI systems, the event provided a wonderful opportunity to celebrate the creativity and passion of young tech creators across Ireland. Here are some project highlights from the day.

Jake | Enter the Kindergarten, Scratch

Jake’s project, Enter the Kindergarten, is a Scratch game where the player has to dodge babies and obstacles in a childcare setting. Jake was inspired to create the game after overcoming his own fear of babies. Here is what he shared with us about his project:

“Well, I used to be afraid of babies. So one Saturday morning, me and my dad came up with the idea to make a kindergarten game where you have to get to the end of the kindergarten.”

Aarabhi | Mystical Waterfall, Hardware

To build her hardware project, Mystical Waterfall, Aarabhi used a Raspberry Pi Pico to create a nature scene, featuring running water and LED lights. Aarabhi spoke to us about why she wanted to enter Coolest Projects:

A young person standing next to their project.

“I watched a Netflix series, The InBESTigators, where children showcase their science projects. After watching it, it was my dream to do the same!”

Arittra | Cara, AI

Arittra’s project, Cara, was chosen as the judges’ favourite in the AI category this year. Cara, which means ‘friend’ in Irish, is a large language model (LLM) that provides information on the Irish legal, housing, and administrative systems, aimed at supporting people who have emigrated to Ireland. Arittra told us more about the challenges he faced whilst building his project:

A young person working at a computer at a Coolest Projects event.

“One of the key problems with artificial intelligence is that they hallucinate, but I found a countermeasure to it. I trained it on search variety and gave it backup data, so if one part of the server starts hallucinating, another part automatically steps into its place to find maximum accuracy.”

Get involved

Congratulations and thank you to each and every young creator who joined us for Coolest Projects Ireland 2026. Sharing your projects, celebrating your achievements, and inspiring others is what Coolest Projects is all about.

Missed the fun in Dublin, or want to take your projects to a global stage? Take part in the Coolest Projects 2026 online showcase, which is open for entries from young creators anywhere in the world until 27 May. Look out for more in-person Coolest Projects events taking place around the world over the rest of the year, too!

Find out more at coolestprojects.org.

The post Celebrating young tech creators at Coolest Projects Ireland 2026 appeared first on Raspberry Pi Foundation.

ZimaCube 2 Pro Review An Unexpected 10GbE NAS with Thunderbolt and PCIe Slots

Post Syndicated from Ryan Smith original https://www.servethehome.com/zimacube-2-pro-review-intel-marvell-asmedia/

We review the ZimaCube 2 Pro NAS and see how this box combines an unexpected processor with 10GbE and many 3.5″ and M.2 SSD drive bays

The post ZimaCube 2 Pro Review An Unexpected 10GbE NAS with Thunderbolt and PCIe Slots appeared first on ServeTheHome.

Automate data discovery and centralized management with AWS Glue Data Catalog

Post Syndicated from Ramakrishna Natarajan original https://aws.amazon.com/blogs/big-data/automate-data-discovery-and-centralized-management-with-aws-glue-data-catalog/

Managing sensitive data across sprawling data environments is hard. In this post, we show you how to tackle data discovery, classification, and governance across your databases, data warehouses, and object storage to regain visibility and control over your data landscape. As you build new features, products, and services, your data naturally spreads across multiple systems to meet immediate application and business needs. Different teams spin up their own data stores, and before long, you’re dealing with a complex web of repositories—often with limited visibility into what exists where. This data sprawl becomes most challenging when you must understand and protect your sensitive data. Security teams often struggle to maintain accurate inventories of data categorization and classification. Stakeholders demand comprehensive insights into data classification and processing activities, usually on tight deadlines, and keeping up-to-date data inventories becomes increasingly daunting as your data grows. Without automation, you’re left with manual processes that stretch over weeks, leave room for human error, and create unnecessary business risk.

The need for automation

In a typical manual scenario, creating a new database triggers a chain of time-consuming events. The governance team reviews the new data source, documents its contents, and scans for sensitive data. The security team assesses its configuration and access controls. Days or weeks pass before you fully understand this new asset’s sensitivity.

With automation, creating a new database triggers immediate action. The system detects the new source, catalogs its structure, identifies sensitive data, and updates a central inventory within minutes, supporting proper governance from the moment you create it. Here’s how it works on AWS: When you create an Amazon Simple Storage Service (Amazon S3) bucket for customer orders, you add tags such as Business Function, Data Owner, and Purpose. After the bucket is in use, the system detects it, creates catalog entries, analyzes data patterns, identifies sensitive information, and updates governance records without additional input from you. This gives your organization real-time visibility. Security teams instantly see which repositories contain sensitive information. Governance teams generate up-to-date inventory reports on demand, and data teams immediately understand sensitivity levels, helping them use data responsibly.

Solution overview

The solution uses key AWS services across three layers that work together for comprehensive data visibility and categorization.

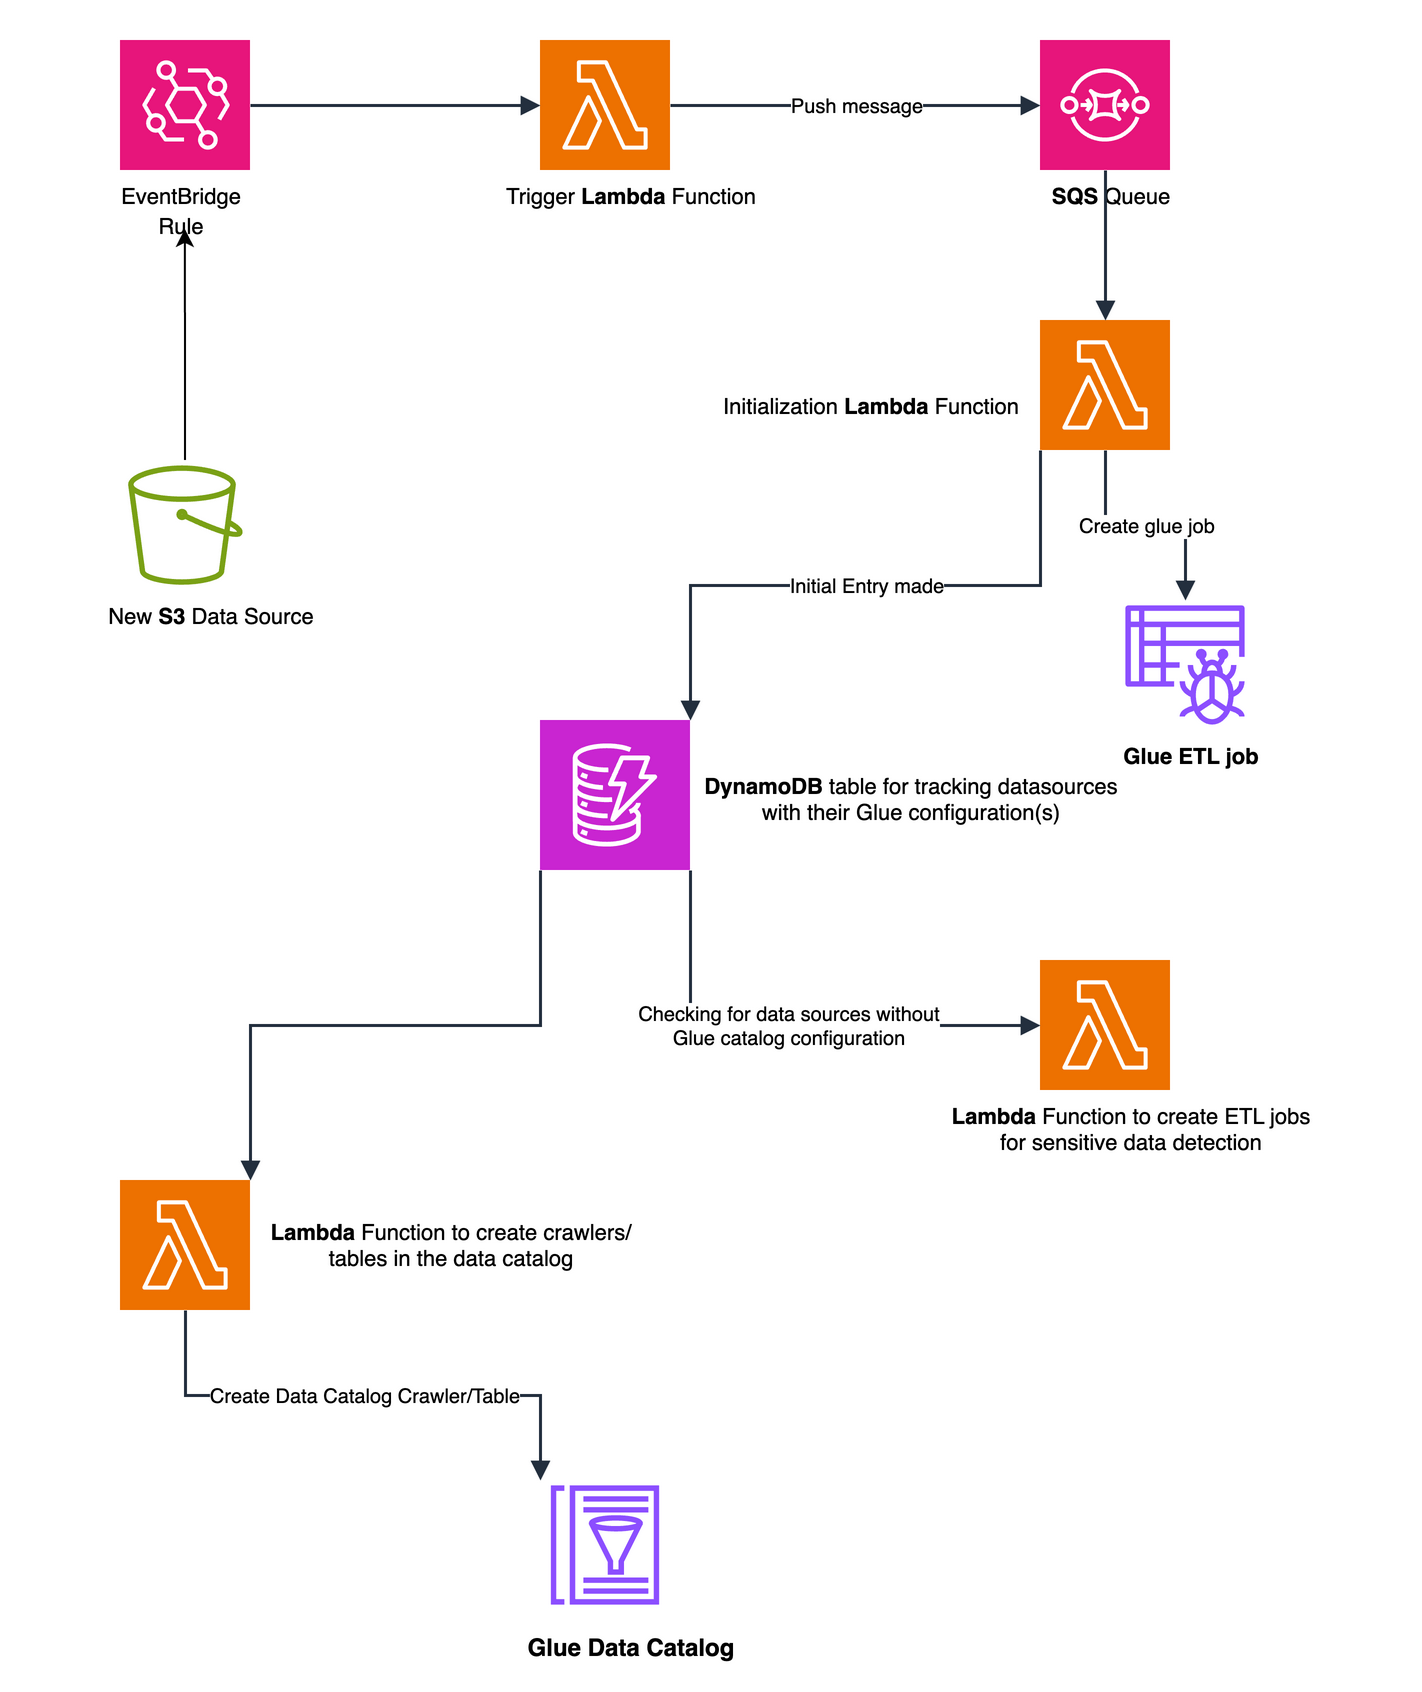
Detection Layer: Continuously monitors your AWS environment for new resource creation. When you provision an Amazon S3 bucket, Amazon Relational Database Service (Amazon RDS) database, or Amazon DynamoDB table, Amazon EventBridge rules capture this activity and initiates the governance workflow, so no data source goes unnoticed.

Architecture: EventBridge triggers Lambda and SQS to create Glue crawlers and ETL jobs for new S3 data sources
Figure 1 Automated data source discovery (S3 example) workflow using EventBridge Rules and Lambda functions

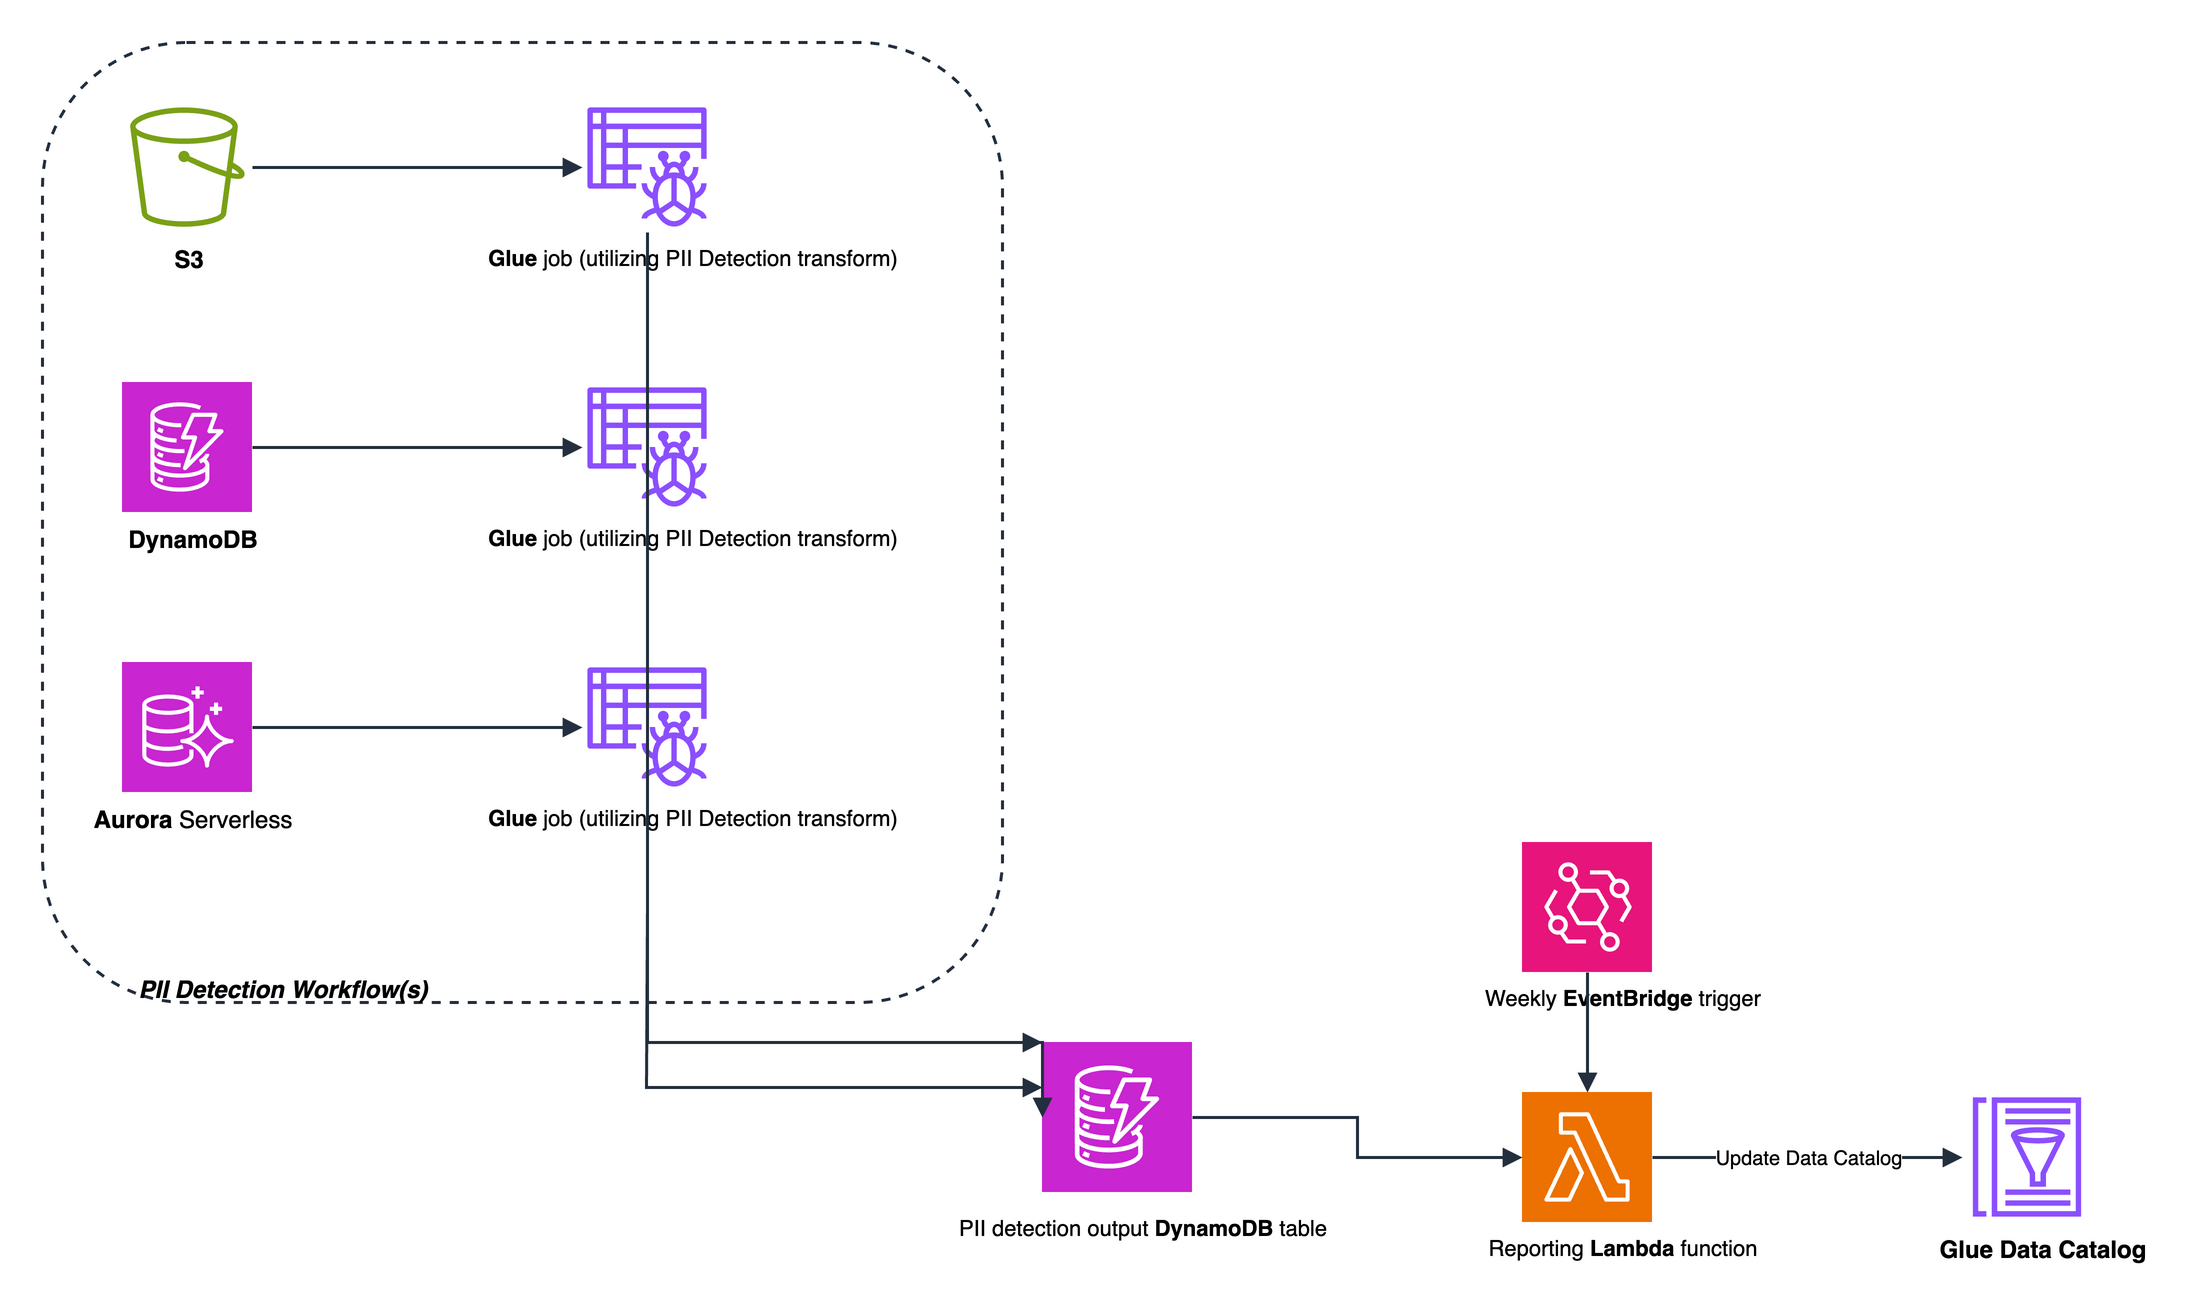
Processing Layer: After a new source is detected, AWS Glue crawlers analyze its schema while specialized jobs scan for sensitive data patterns. The system also extracts metadata from resource tags, enriching your understanding of each repository’s purpose and ownership.

Architecture: Glue PII Detection jobs scan S3, DynamoDB, and Aurora; Lambda updates Glue Data Catalog
Figure 2 PII detection and processing workflow using AWS Glue jobs and DynamoDB staging

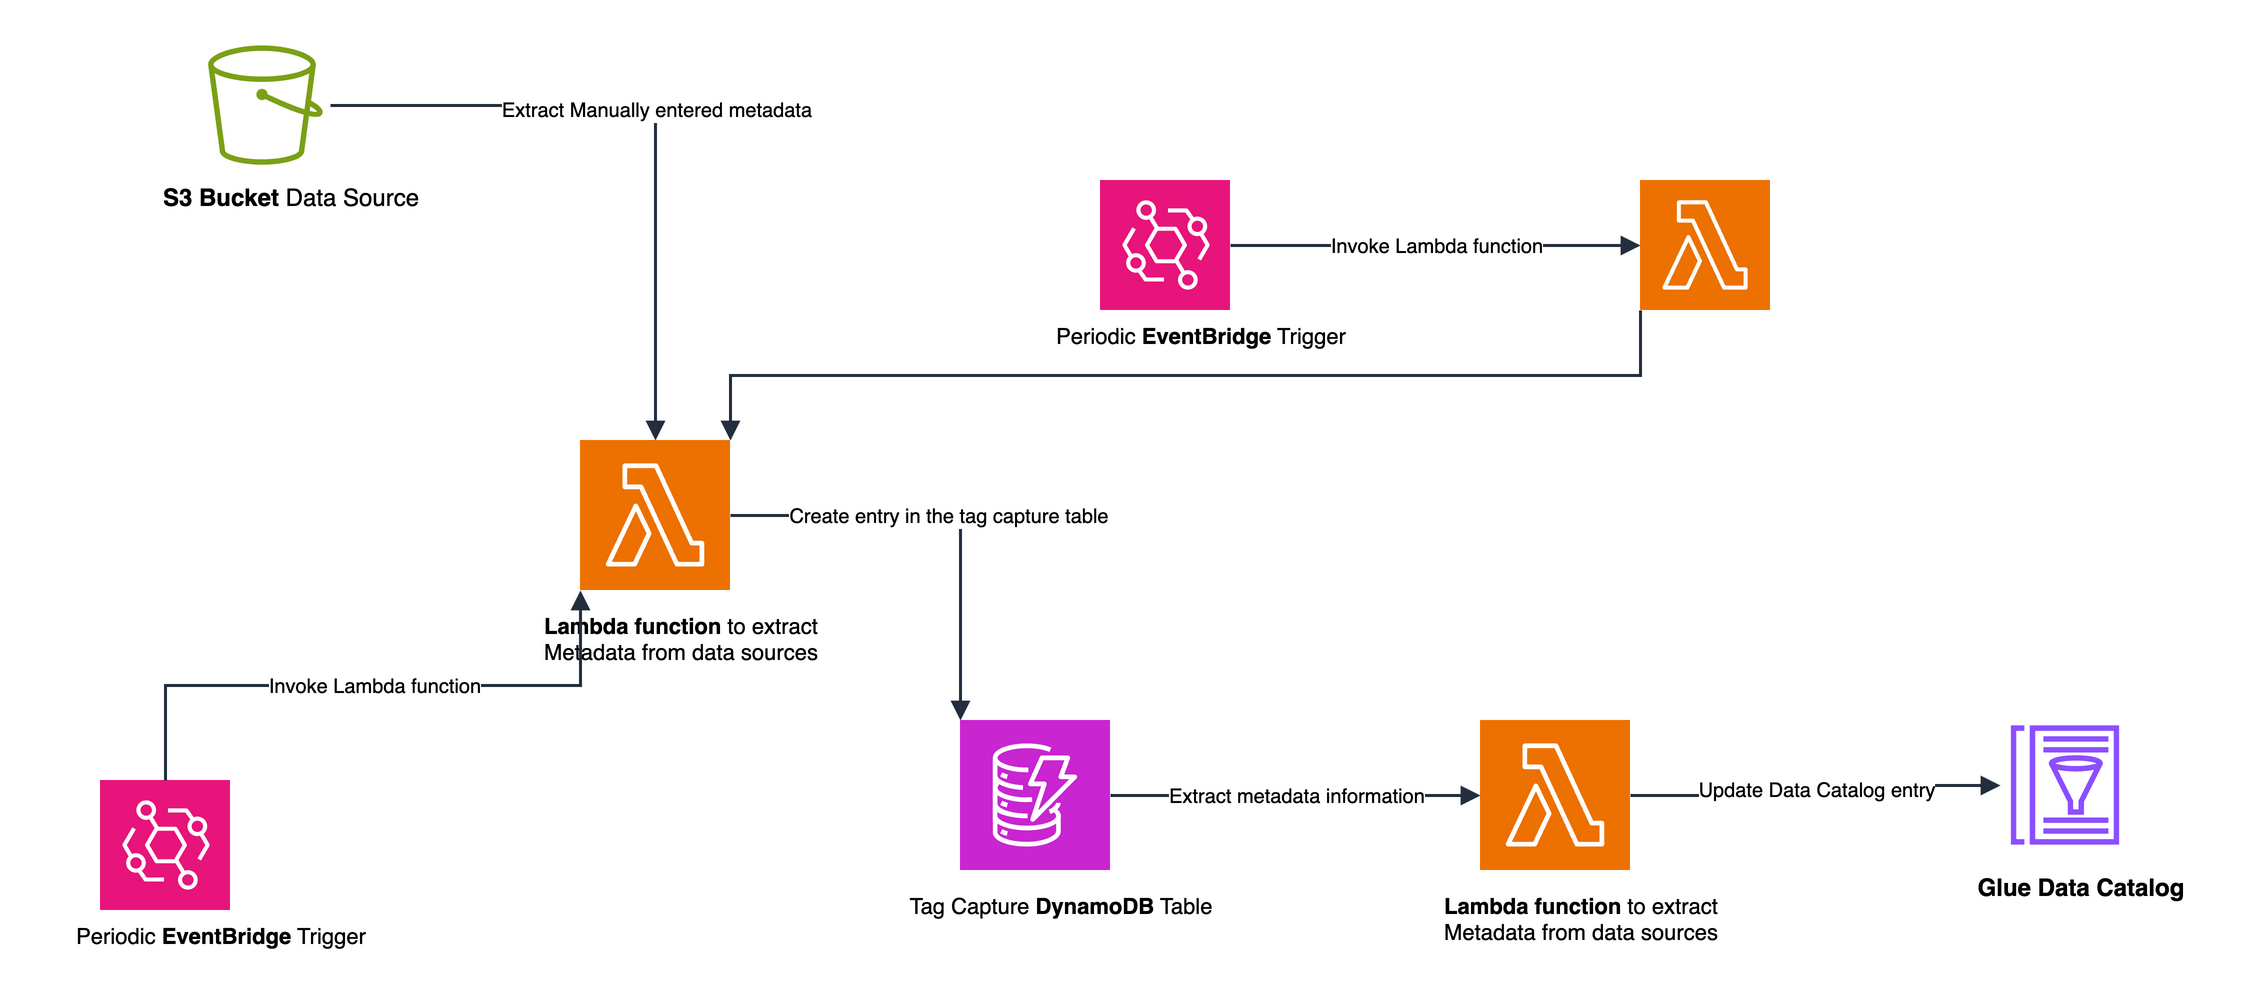
Management Layer: Maintains a central source of truth about your data assets. AWS Glue Data Catalog provides a unified view across your organization, tracking schema changes and sensitivity levels. This layer also manages the processing workflow state and generates insights for stakeholders.

Architecture: Lambda extracts S3 bucket metadata via EventBridge, stores in DynamoDB, updates Glue Data Catalog
Figure 3 Tag-based metadata capture and Data Catalog update workflow

Setting up the solution

This solution uses AWS Cloud Development Kit (AWS CDK) for deployment, organized into four stacks that build upon each other.PrerequisitesBefore deployment, verify that you have:

  • Access to an AWS account with permissions to create resources in Amazon S3, AWS Lambda, Amazon DynamoDB, AWS Glue, and Amazon EventBridge
  • Node.js (version 18 or later) and npm installed
  • Access to a terminal to run AWS CDK CLI commands
  • Basic familiarity with AWS Console navigation

Step 1: Infrastructure deployment

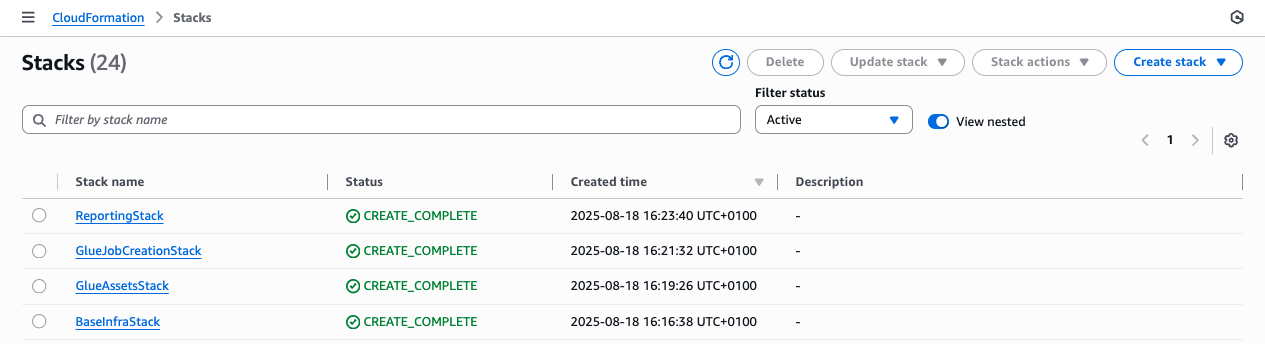
Deploy four stacks using AWS CDK. Each establishes components for data discovery, cataloging, and PII detection.

  1. BaseInfraStack: Deploys core infrastructure—Amazon Virtual Private Cloud (Amazon VPC), DynamoDB tables for state management, EventBridge rules for monitoring, and Lambda functions for orchestration.
  2. GlueAssetsStack: Sets up S3 buckets for AWS Glue ETL scripts and deploys PySpark code for PII detection.
  3. GlueJobCreationStack: Creates Data Catalog databases and deploys Lambda functions that automate the creation of AWS Glue crawlers and PII detection jobs for newly discovered data sources.
  4. ReportingStack: Deploys Lambda functions that process PII detection results and tag metadata, updating the Data Catalog accordingly.

To deploy these stacks, you will use the AWS CDK CLI, running the following commands:

# Clone and prepare repository
git clone https://github.com/aws-samples/automated-datastore-discovery-with-aws-glue.git
cd automated-datastore-discovery-with-aws-glue
npm install
npx cdk bootstrap

# Deploy infrastructure stacks sequentially
npx cdk deploy BaseInfraStack
npx cdk deploy GlueAssetsStack
npx cdk deploy GlueJobCreationStack
npx cdk deploy ReportingStack
CloudFormation Stacks console showing four stacks with CREATE_COMPLETE status including BaseInfraStack

Figure 4 CloudFormation console showing successful stack deployment

Step 2: Verify initial setup

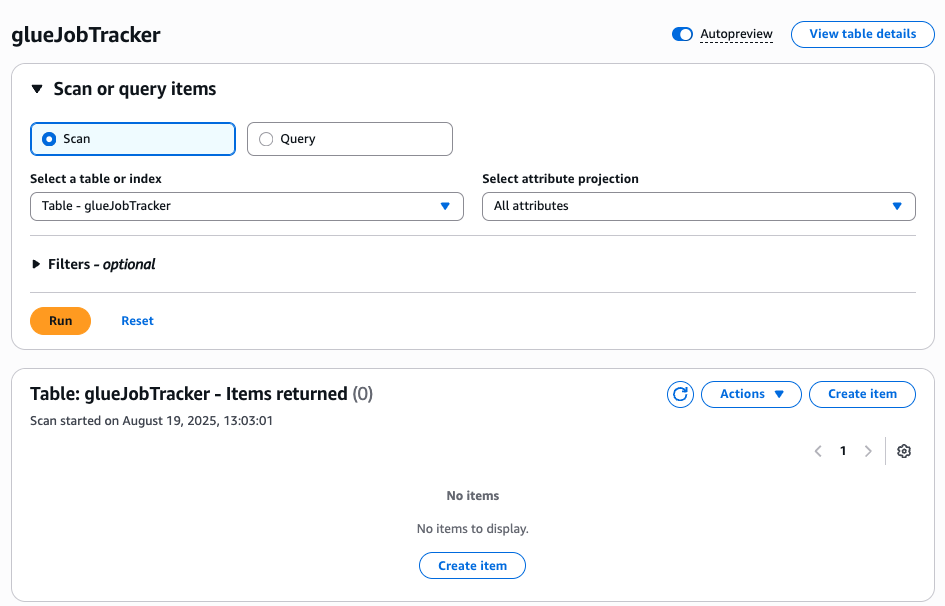
In the AWS Management Console, open DynamoDB and find the glueJobTracker table. This table is a critical component of the framework:

  • Purpose: Central state management – tracks processing states and configurations for discovered data sources.
  • Current state: The table should be empty because no discovery processes have been triggered yet.
  • Structure: Tracks states such as Data Catalog entry creation and PII detection job setup for each data source.

By verifying this table, you confirm that the infrastructure is ready to begin tracking new data sources.

DynamoDB glueJobTracker table scan returning zero items, showing empty table before pipeline execution

Figure 5 Empty DynamoDB glueJobTracker table before execution

Solution in action

This solution runs automatically in production through EventBridge triggers and scheduled AWS Glue crawlers. The following walkthrough executes each step manually so you can observe the workflow.You follow the journey of a newly created S3 bucket containing sensitive data, seeing how the solution discovers, catalog, and processes it through each stage.

Step 3: Create a new S3 bucket

  1. Open the Amazon S3 console.
  2. Choose Create bucket.
  3. Enter a unique name for your bucket (for example, demo-customer-data-20250819).
  4. In the Tags section, add the following tags:
    1. Key: gdpr-scan, Value: true
    2. Key: Business Function, Value: Sales – US
    3. Key: Data Classification, Value: Confidential
  5. Keep other settings as default and choose Create bucket.
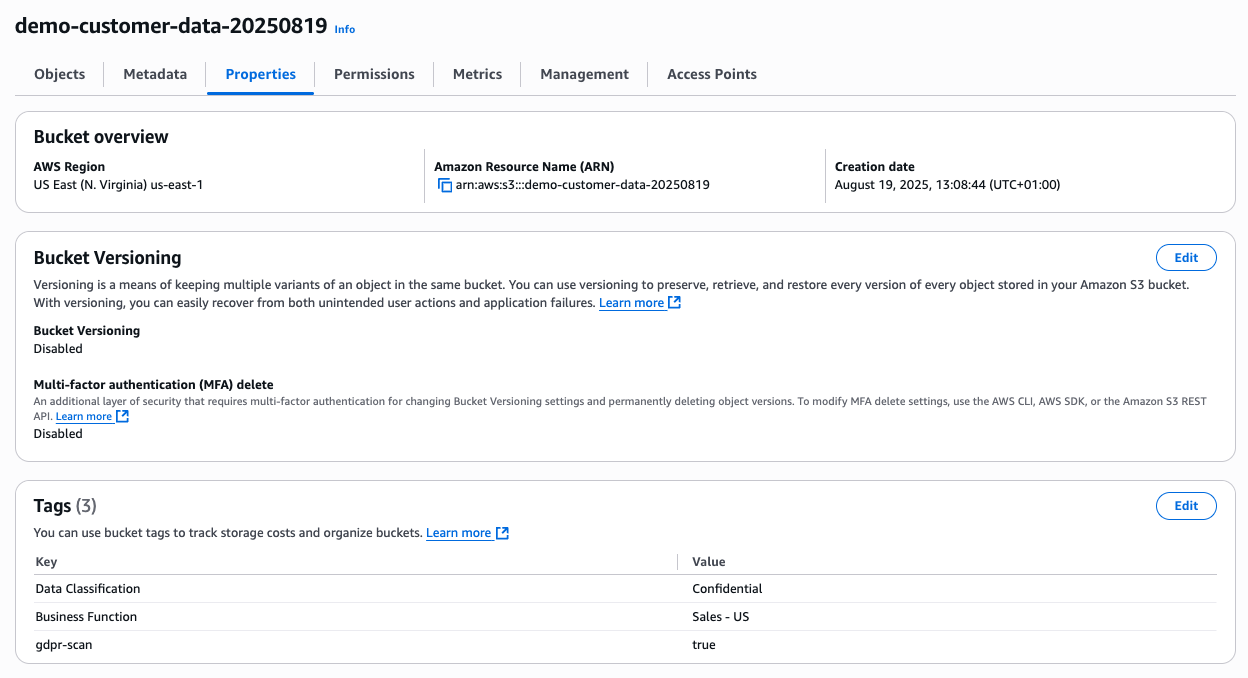
S3 bucket properties with versioning disabled and data classification tags

Figure 6 S3 console showing new bucket creation with tags

Step 4: Upload sample data

  1. In the S3 console, open your newly created bucket.
  2. Choose Upload.
  3. Create a new file named customer_orders.csv with the below content.
  4. Upload this file to a folder named orders/ in your bucket.
order_id,customer_id,email,ssn
ORD001,CUST1001,[email protected],***-**-****
ORD002,CUST1002,[email protected],***-**-****

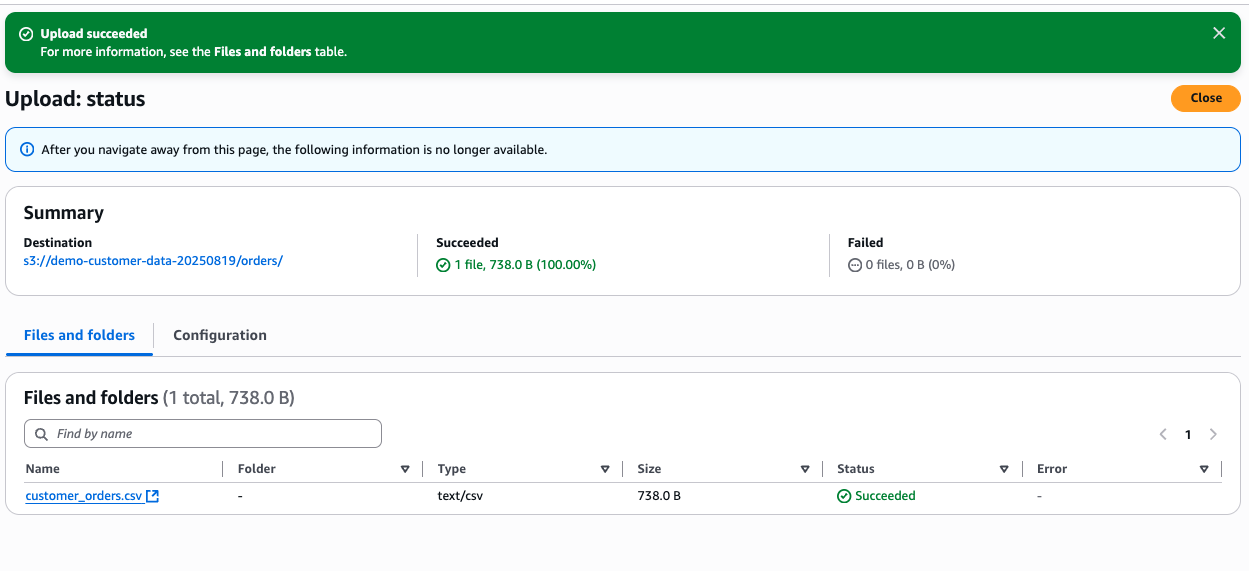
S3 upload succeeded showing customer_orders.csv uploaded

Figure 7: S3 console showing uploaded CSV file in the orders folder

Step 5: Verify automated detection

  1. Open the DynamoDB console.
  2. Navigate to the glueJobTracker table.
  3. Choose the Items tab.
  4. You should see a new item with an s3_location matching your bucket name.
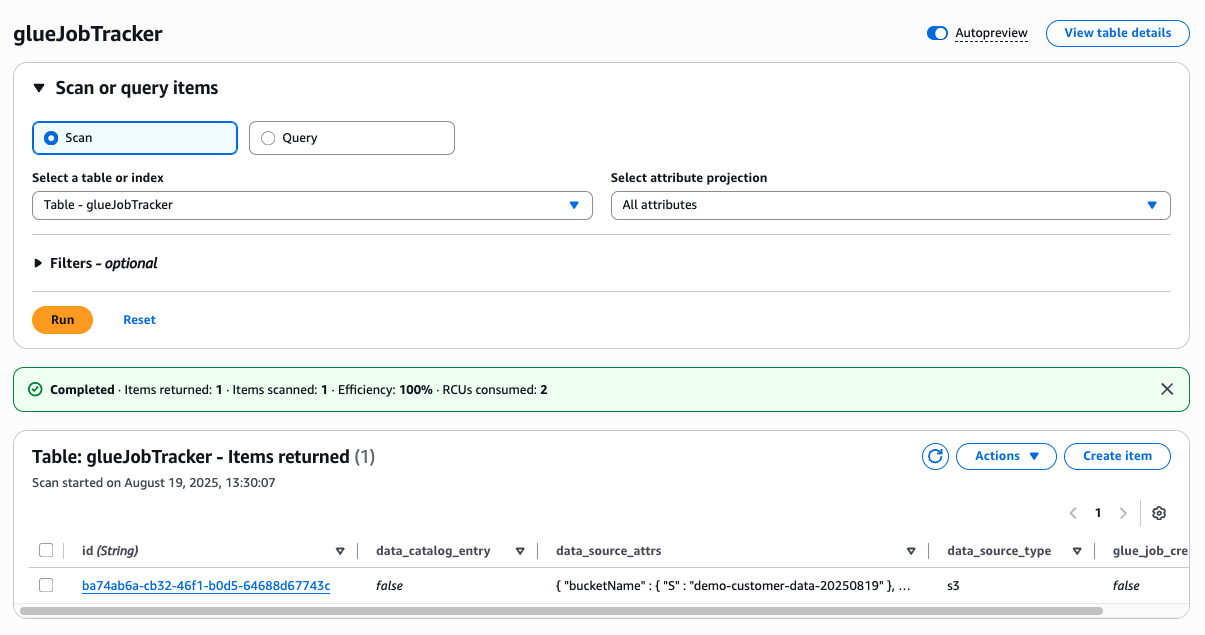
40918.pngDynamoDB glueJobTracker table scan returning 1 item with S3 data source entry

Figure 8 DynamoDB console showing detected bucket entry in glueJobTracker table

Step 6: Initiate catalog creation

  1. Open the AWS Lambda console.
  2. Find the function with a name containing s3GlueCatalogCreator.
  3. Choose the function name to open its details.
  4. Choose the Test tab.
  5. Create a new test event with an empty JSON object {}.
  6. Choose Test to invoke the function.
  7. Check the execution result for a successful response.
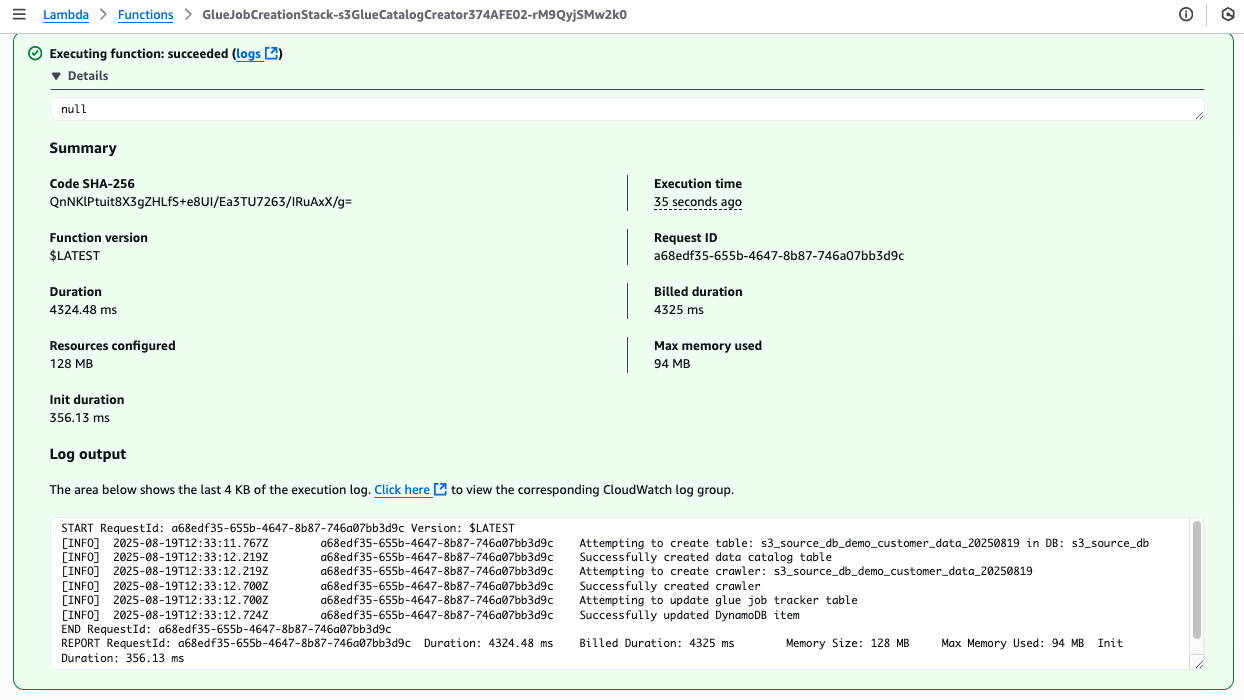
Lambda function execution succeeded with logs showing Glue table, crawler, and DynamoDB item creation

Figure 9 Lambda console showing successful function execution

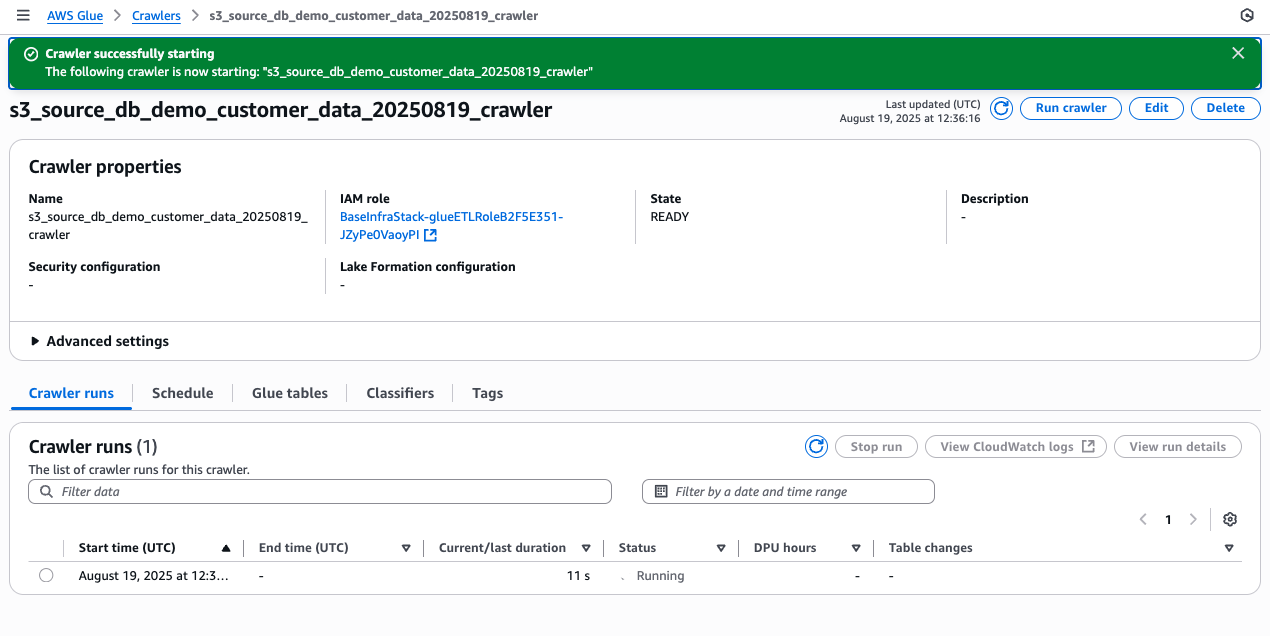
Step 7: Run the AWS Glue crawler

  1. Navigate to the AWS Glue console.
  2. In the left sidebar, choose Crawlers.
  3. Find the crawler with a name related to your S3 bucket.
  4. Select the crawler and choose Run crawler.
  5. Wait for the crawler to complete (typically 3–5 minutes).
AWS Glue crawler running

Figure 10 Glue console showing crawler in “Running” state

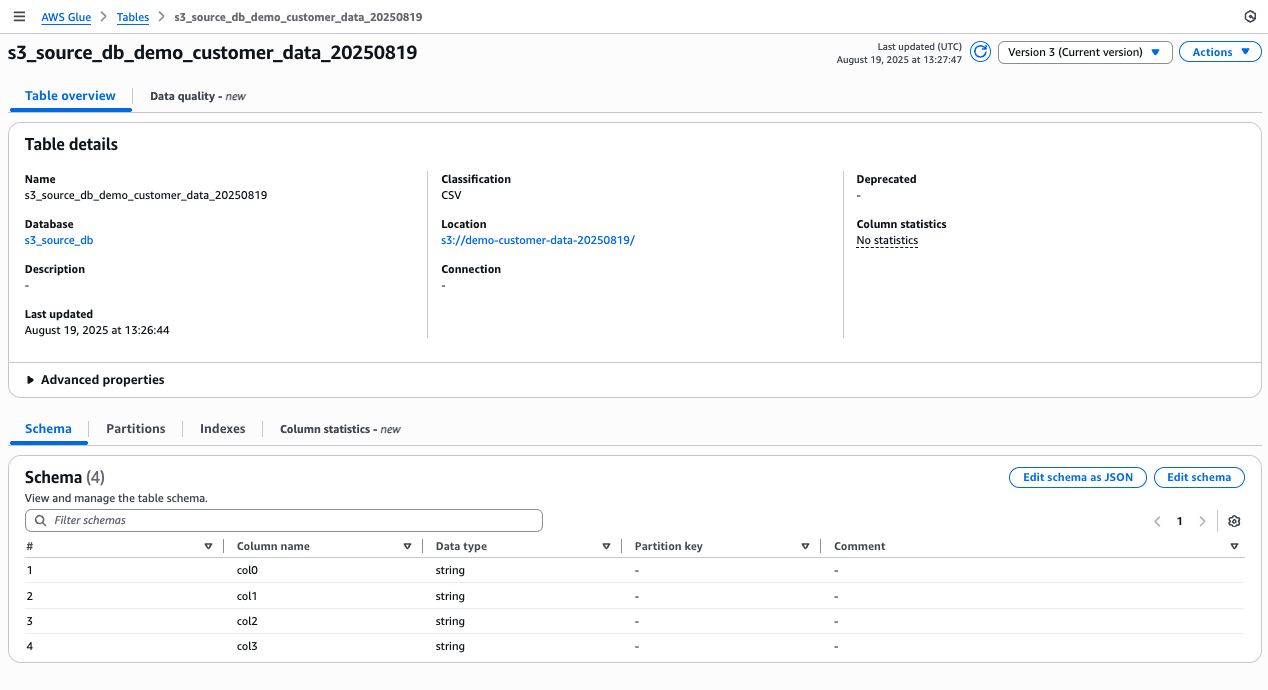
Step 8: Verify schema discovery

  1. In the AWS Glue console, go to Databases in the left sidebar.
  2. Choose the s3_source_db database.
  3. You should see a new table corresponding to your uploaded data.
  4. Choose the table name to view its schema.
Glue Data Catalog table Version 3 showing 4-column CSV schema with no sensitive data annotations yet

Figure 11 Glue console showing detected table schema

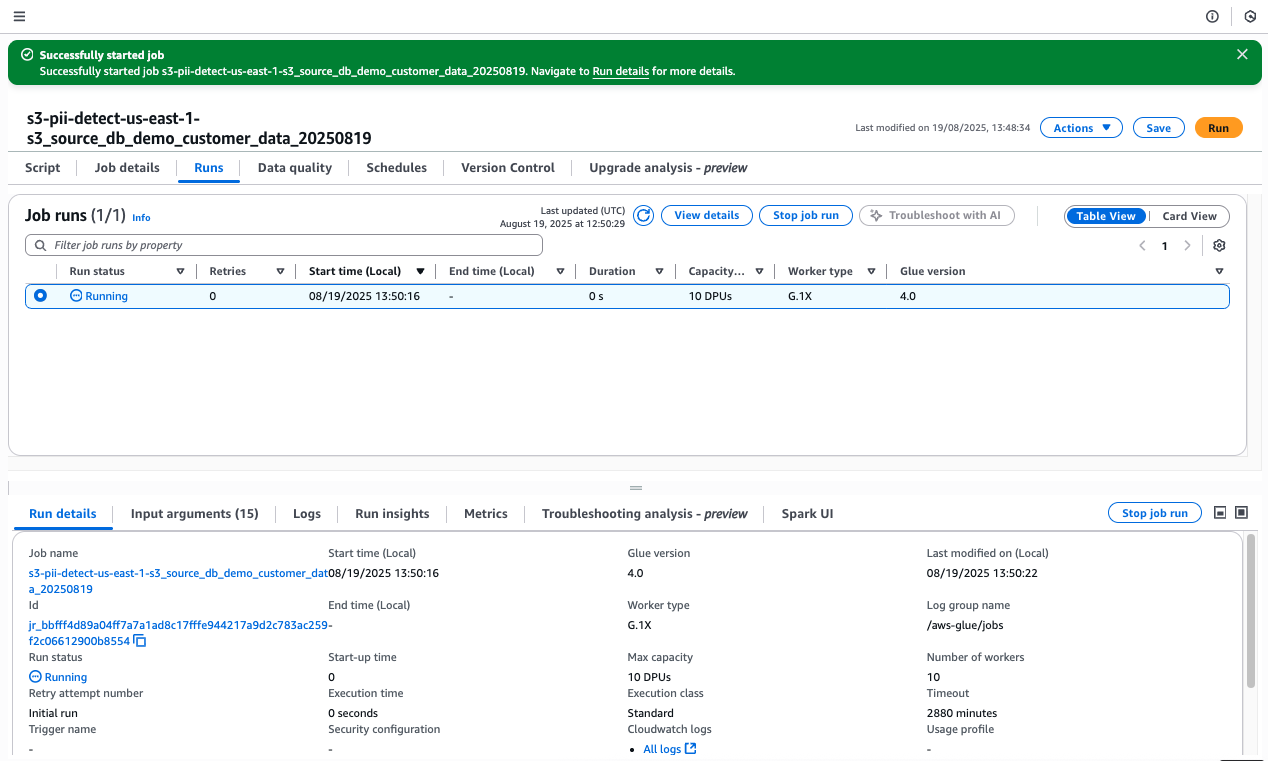
Step 9: Execute PII detection

  1. Return to the Lambda console.
  2. Find and open the function with a name containing s3GlueCreator.
  3. Use the Test tab to invoke this function with an empty JSON object {}.
  4. After successful execution, go to the AWS Glue console.
  5. Navigate to Jobs in the left sidebar.
  6. Find the newly created PII detection job (it should contain your bucket name).
  7. Select the job and choose Run job.
  8. Monitor the job execution in the Glue console.
AWS Glue PII detection job running with 10 DPUs, G.1X worker type, Glue version 4.0, showing run details

Figure 12 Glue console showing PII detection job in “Running” state

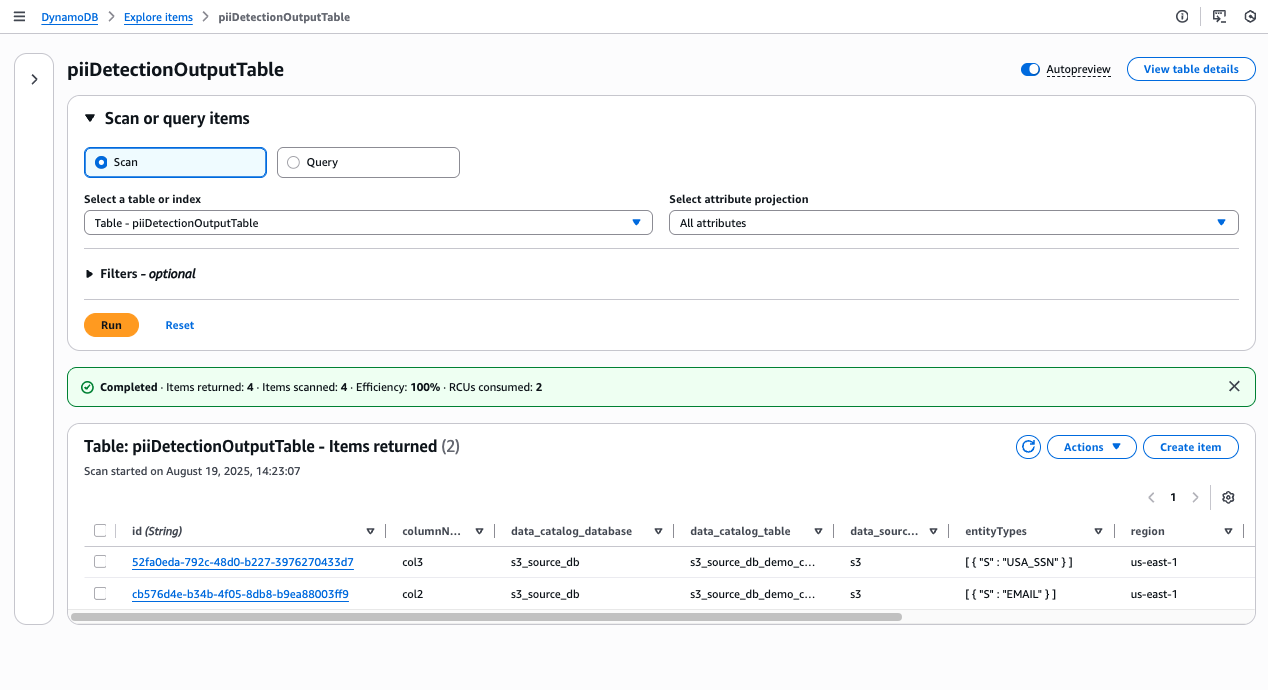
Step 10: Review PII detection results

  1. Open the DynamoDB console.
  2. Navigate to the piiDetectionOutputTable.
  3. In the Items tab, you should see new entries related to your data.
  4. These entries will show detected PII types and confidence scores.
DynamoDB piiDetectionOutputTable scan showing 2 PII detection results identifying USA_SSN and EMAIL types

Figure 13 DynamoDB console showing PII detection results in piiDetectionOutputTable

Step 11: Verify Data Catalog updates

  1. Open the AWS Lambda console.
  2. Find the function with a name containing ReportingStack-PIIReportS3.
  3. Choose the function name to open its details.
  4. Choose the Test tab.
  5. Create a new test event with an empty JSON object {}.
  6. Choose Test to invoke the function.
  7. Check the execution result for a successful response.
  8. Return to the AWS Glue console.
  9. Go to Databases > s3_source_db > Your table.
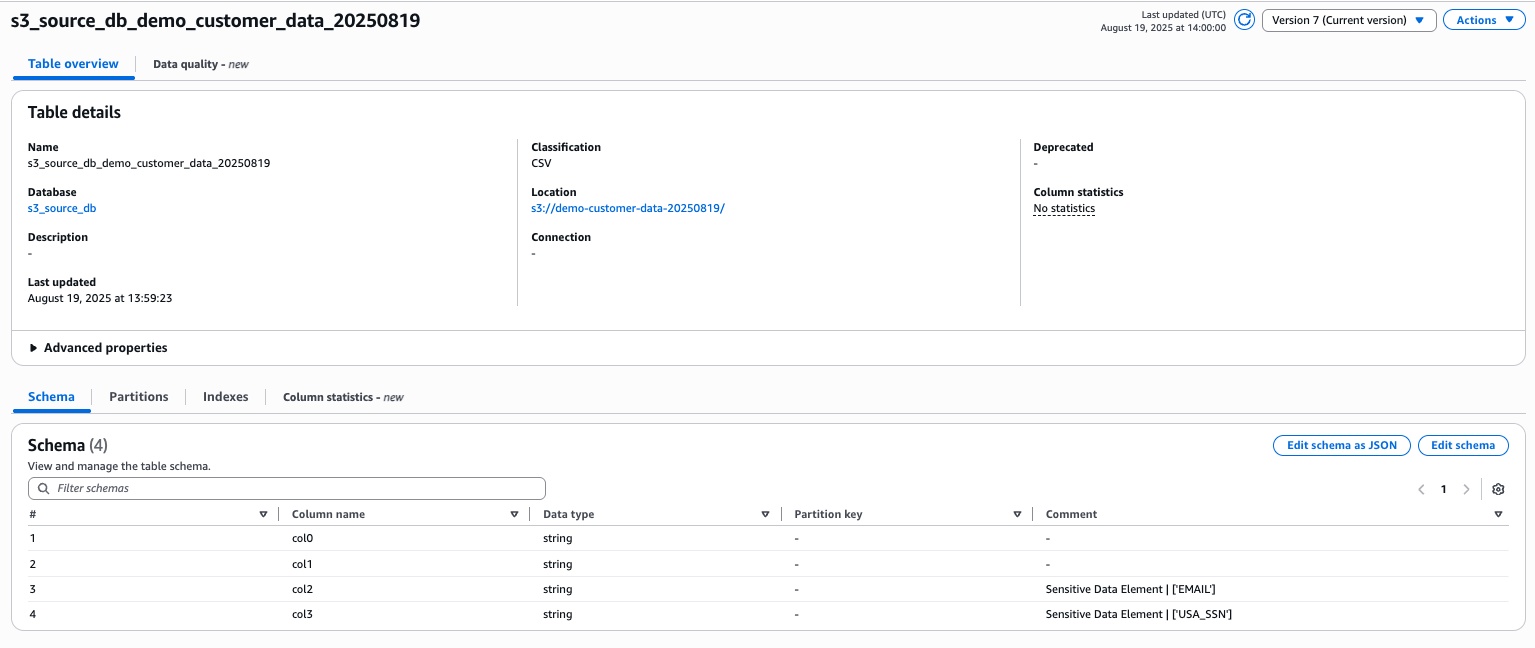
  10. Review the schema. PII columns should now have comments indicating their classification.
Glue Data Catalog table Version 7 with schema showing sensitive data element comments for EMAIL and USA_SSN

Figure 14 Glue console showing updated table schema with PII classifications

Note: While we focus on S3 data sources in this walkthrough, the framework extends to other data stores, offering a unified approach for PII detection and compliance management, so organizations can automatically discover, catalog, and monitor sensitive data elements across your entire data ecosystem. For more information, see aws-samples/automated-datastore-discovery-with-aws-glue.

Best practices and operational excellence

As you implement this solution, consider these key practices for effective results:

  • Design your tagging strategy to capture essential business context about each data source. Implement automated tag enforcement through AWS Organizations for consistency across teams.
  • Monitor automated workflows regularly and configure retention policies for processed data to manage costs.
  • For enhanced security, configure VPC endpoints for services such as Amazon S3, DynamoDB, and other data sources. This keeps traffic within the AWS network, which is especially important when processing sensitive data. Verify that server-side encryption (SSE) is enabled on your data stores. This solution uses AWS Key Management Service (AWS KMS) keys for DynamoDB tables and SSE-S3 for S3 buckets by default, aligning with data-at-rest encryption best practices.
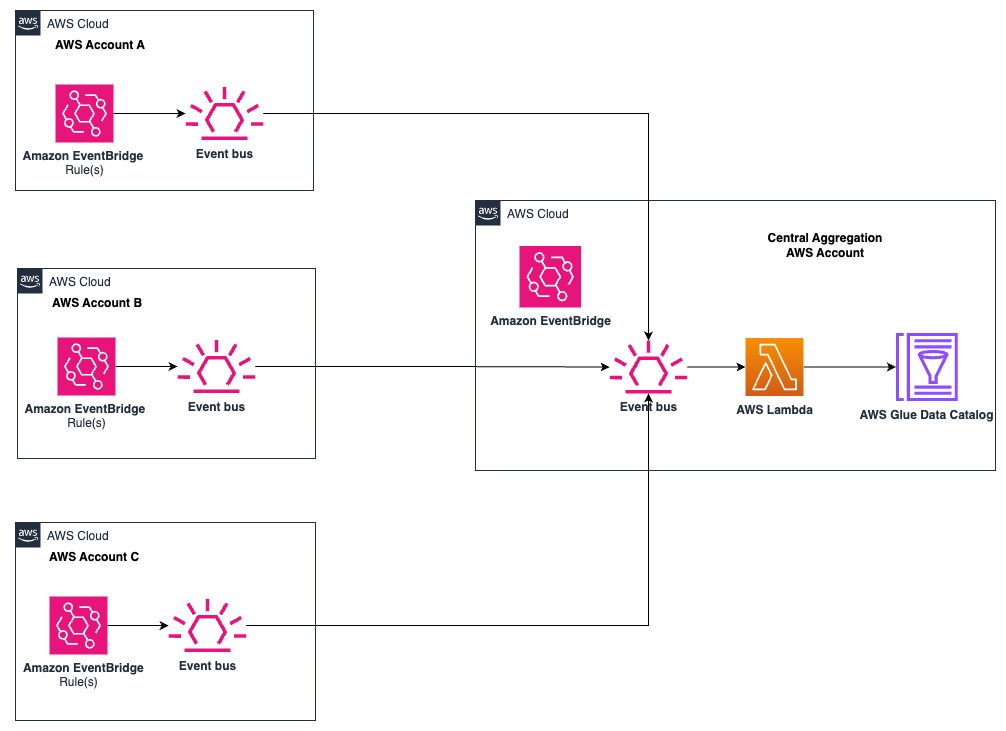
  • For teams with multiple AWS accounts, implement cross-account discovery and cataloging to maintain a comprehensive view of your data landscape.
Multi-account EventBridge buses aggregate events to central account with Lambda and Glue Data Catalog

Figure 15 Centralized Storage of Glue PII Detection Results in AWS Data Catalog

Clean up

To avoid ongoing charges and remove the resources created by this solution, follow these steps:

  1. Empty and delete the S3 buckets created for sample data and AWS Glue assets.
  2. Delete the AWS CloudFormation stacks in reverse order of creation:
    1. ReportingStack
    2. GlueJobCreationStack
    3. GlueAssetsStack
    4. BaseInfraStack
  3. Manually delete any remaining resources:
    1. DynamoDB tables (glueJobTracker, piiDetectionOutput, tagCaptureTable)
    2. AWS Glue databases and crawlers
    3. Lambda functions
    4. EventBridge rules
  4. Review your AWS account to ensure that all related resources have been removed.

Remember, deleting these resources will remove all data and configurations associated with this solution. Make sure that you have saved any important information before proceeding with the clean-up.

Conclusion

In this post, you learned how to build an automated data governance framework using AWS Glue Data Catalog. You set up detection, processing, and management layers that automatically discover, catalog, and classify your data sources.This approach improves how you manage sensitive data assets. Teams spend less time on manual discovery and categorization, freeing them to derive value from data. The system gives you current insights into your data landscape and automatically identifies sensitive data, creating a trusted source of truth that helps teams work efficiently while maintaining controls.You can extend this framework with custom sensitivity patterns for your industry. Its modular design supports continuous improvement and integrates with existing workflows. This turns data governance from a manual burden into an efficient process that scales with your organization.


About the authors

Ramakrishna Natarajan

Ramakrishna Natarajan

Ramakrishna is a Senior Partner Solutions Architect at Amazon Web Services. He is based out of London and helps AWS Partners find optimal solutions on AWS for their customers. He specialises in Telecommunications OSS/BSS and has a keen interest in evolving domains such as Data Analytics, AI/ML, Security and Modernisation. He enjoys playing squash, going on long hikes and learning new languages.

Arias: Human proof for FOSS contributions

Post Syndicated from jzb original https://lwn.net/Articles/1074534/

Rodrigo Arias Mallo, maintainer of the Dillo web browser, has written a
blog post
with a proposal on one way to ensure that a contribution is written by
a human and not AI; he suggests asking new contributors to record
their programming session using asciinema.

In the same way that LLMs generate patches, they can also generate
the asciinema recordings themselves. Then, the contributors can lie to
the reviewers pretending to have made the edits. Perhaps surprisingly,
this is not a easy task for LLMs, at least from my observations. The
corpus of recordings of developers making mistakes and thinking the
whole process of editing a file is not as large as the corpus of FOSS
programs and patches in which to train an LLM. During my very simple
tests I haven’t been able to generate an asciinema session that
remotely resembles what I would expect from a human, and even less so
from a human with a nice editor theme and editing an existing Dillo
source file.

The Dillo project is not yet requiring asciinema recordings, but he
said that he would like to test the theory further. LWN covered asciinema in
January 2026.

Well-architected best practices for software supply chain security

Post Syndicated from Trevor Schiavone original https://aws.amazon.com/blogs/security/well-architected-best-practices-for-software-supply-chain-security/

There have been multiple notable supply chain attacks using the npm Registry since September: Shai-Hulud, Chalk/Debug, one abusing tea.xyz tokens, and recently axios. Thanks to community efforts involving the Amazon Inspector team, the Open Source Security Foundation, and others, the affected packages were quickly flagged, which reduced the impact of these incidents.

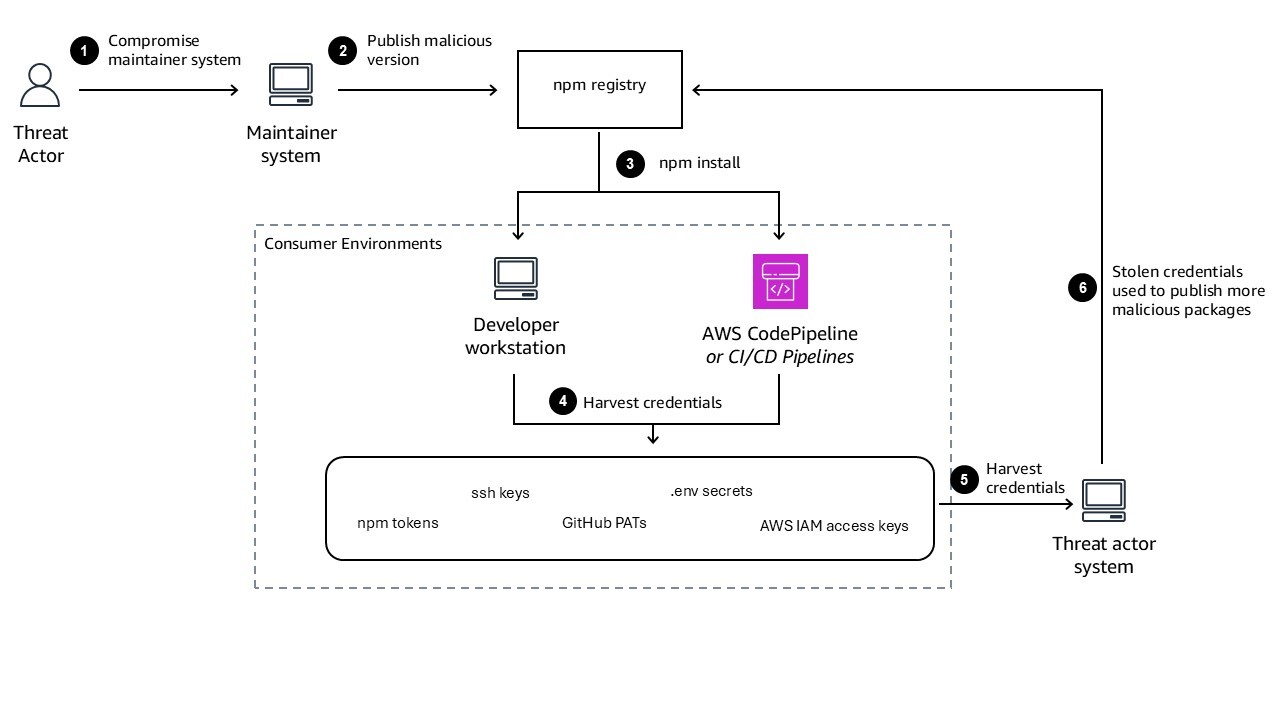
Supply chain attacks like Shai-Hulud exploit vulnerabilities on two fronts: compromised maintainer accounts that publish malicious packages, and consumer environments that download and execute those packages. The Shai-Hulud attack, shown in Figure 1, succeeded because maintainer credentials were compromised through phishing, enabling threat actors to publish malicious versions of popular packages. Incidents like these highlight the need for strong security practices within the software supply chain, and effective defense requires addressing both sides. Package maintainers need protections that prevent account compromise and limit sprawl when credentials are stolen. Package consumers need layered defenses that detect malicious packages, prevent their deployment, and limit damage when compromise occurs.

In this post, we explore best practices for package consumers. These practices are aligned with the AWS Well-Architected Framework – Security Pillar and you can use them to reduce exposure to similar threats and limit their impact if they occur.

Figure 1: Architecture diagram showing Shai-Hulud attack flow

Figure 1: Architecture diagram showing Shai-Hulud attack flow

Use temporary credentials and grant least privilege

When Shai-Hulud executed in developer environments and continuous integration and delivery (CI/CD) pipelines, it scanned for secrets such as npm tokens, GitHub tokens, and AWS Identity and Access Management (IAM) access keys. Long-term credentials exposed in this way enabled threat actors to propagate the malware further and access cloud resources. Recent incidents have shown organizations discovering multiple leaked IAM credential pairs, with concerns about additional exposed credentials and potential compromise of CI/CD pipelines.

Removing long-lived credentials from your developer environments and CI/CD pipelines reduces the scope of exposure in the event a system is compromised. For developers working locally, the new AWS CLI login command (aws login) simplifies the process of acquiring short-lived CLI credentials and removes the need to store long-lived credentials in configuration files. AWS IAM Identity Center also provides a straightforward way to acquire temporary credentials that expire automatically. For CI/CD pipelines, OpenID Connect (OIDC) federation with GitHub Actions, GitLab CI, or other platforms provide temporary credentials for each job without storing long-lived tokens. IAM can also federate AWS Identities to external services, allowing your AWS workloads to securely access external services without using long-term credentials. Temporary credentials expire automatically, limiting the window of exposure if a pipeline is compromised.

If you’re interacting with a third-party service that doesn’t support temporary credentials, consider storing the credentials to centralized storage using AWS Secrets Manager or AWS Systems Manager Parameter Store. Limit access to these secrets, require the use of temporary credentials, and apply automatic rotation and audit logging to reduce the risk of exposure of these credentials.

To reduce risk from credential exposure:

In the event of a security incident where credentials might be exposed, immediately rotate all long-term credentials to limit the scope of impact. Use Amazon GuardDuty and AWS CloudTrail to detect abnormal IAM activity and identify which credentials might have been compromised.

Implement defense in depth

Even with temporary credentials and least privilege, a single compromised account can enable threat actors to publish malicious packages or access sensitive resources. Defense in depth creates multiple layers of protection that work together to prevent sprawl after initial compromise. While adding approval workflows to every operation would dramatically decrease deployment speed, implementing them strategically for sensitive workloads provides balanced security.

The key principle is to ensure that if one credential or account is compromised, additional controls prevent that compromise from spreading across your organization. This includes multi-factor authentication (MFA) for access combined with different IAM roles for sensitive workloads. For single-developer open source projects, MFA becomes even more critical because there’s no separation of duties through multiple maintainers.

For package maintainers working in team environments, requiring multiple approvers to release packages to production creates separation of duties. However, developers can still trigger merge requests that initiate deployment pipelines, so multi-party approval should be implemented within the pipeline itself for sensitive deployments. This ensures that even if a developer’s credentials are compromised and they trigger a deployment, the pipeline requires additional approval before releasing to production.

For package consumers, multi-approval workflows in deployment pipelines help ensure that if a malicious package passes initial scanning, human review can catch suspicious changes before production deployment. Artifact signing provides a complementary cryptographic layer that works alongside these process controls.

The Shai-Hulud attack succeeded because compromised maintainer credentials allowed threat actors to publish malicious packages directly to the public npm registry. For package consumers, the defense is ensuring that packages pulled from public registries cannot reach production without verification. Artifact signing is one concrete implementation of this layered approach. By cryptographically binding a package or container image to the identity that produced it, signing creates a verification layer that is independent of the credential used to trigger the build—meaning a compromised developer credential alone isn’t sufficient to introduce an unverified artifact into your deployment pipeline.

Artifact signing as part of defense in depth

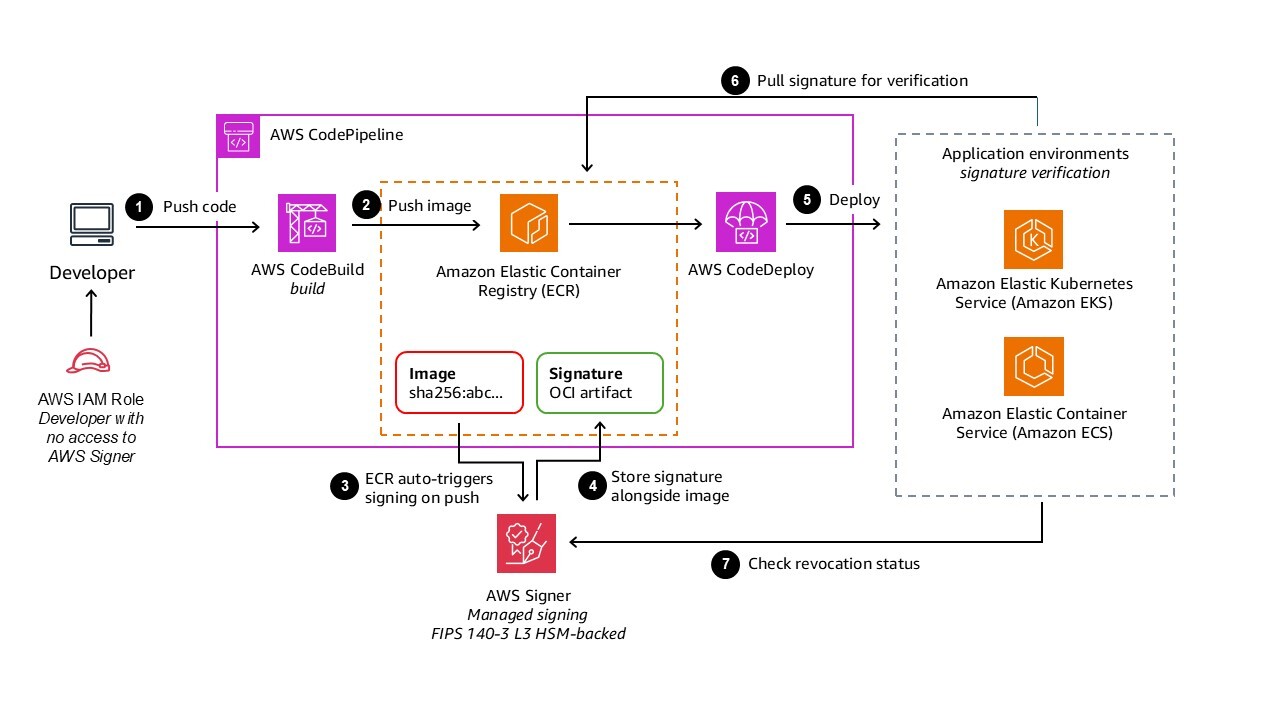
AWS Signer provides cryptographic signing for packages, creating an additional verification layer within your defense in depth strategy. The signing authorization model separates concerns: developer credentials shouldn’t have signing permissions. Only CI/CD pipeline roles should have signing permissions through the signer:StartSigningJob API. Signer uses FIPS 140-3 Level 3 validated hardware security modules (HSMs) to store signing keys, providing strong cryptographic protection.

The container image signing workflow, shown in Figure 2, demonstrates how signing integrates seamlessly into existing processes:

Figure 2: Diagram showing Signer signing workflow

Figure 2: Diagram showing Signer signing workflow

The benefits of Signer compared to building custom signing infrastructure include:

  • Fully managed: No need to build custom signing infrastructure or manage certificate lifecycle
  • Automated: Amazon ECR managed signing happens automatically on image push without manual steps
  • Centralized governance: Single signing profile can be used across multiple accounts and pipelines
  • Native integration: Built-in integration with Notation and Kyverno for signature verification in Amazon EKS
  • FIPS 140-3 Level 3 compliance: Meets stringent regulatory requirements for cryptographic operations

Audit logging for all signing operations enables detection of unusual patterns such as signing from new IP addresses, unusual times, or rapid succession of signing jobs. For every credential in your system, consider who can access what, how they prove their identity, and what second layer prevents sprawl if that credential is compromised. Artifact signing, combined with centralized storage and Software Bills of Materials (SBOMs), provides layered protection against tampering and malicious packages.

Centralize dependency management

By centralizing package and dependency management, you can validate and approve dependencies before they’re used in applications and quickly audit dependencies in the event of a supply chain security incident. Recent incidents have shown organizations discovering compromised npm packages in their internal artifact repositories, requiring rapid assessment of which applications might be affected.

On AWS, you can use AWS CodeArtifact to host and manage your organization’s software packages. You can use the package group configuration to define an approved list of upstream sources and block access to all others—a direct control against typosquatting attacks, where malicious packages are published under names that closely resemble legitimate ones. Rather than relying on developers to identify suspicious package names at install time, package group configuration enforces the boundary at the repository level. Centralization also helps you pin versions of dependencies to prevent automatic updates from pulling in malicious versions and quickly remove compromised dependencies across your software portfolio when an incident occurs.

For container images, Amazon ECR provides centralized image storage with AWS Key Management Service (AWS KMS) encryption and lifecycle policies. Combine Amazon ECR with Amazon Inspector scanning to continuously validate image integrity.

For additional guidance see SEC11-BP05: Centralize services for packages and dependencies.

npm provenance attestation

For npm packages specifically, provenance attestations provide a complementary control on the consumer side. Available since npm 9.5, npm provenance links a published package to the specific source repository and CI/CD workflow that produced it, using Sigstore as the underlying signing infrastructure. When a package is installed, the npm CLI can verify that the published artifact matches the attested build provenance—providing confidence that the package wasn’t tampered with between build and publication. For organizations consuming open source npm packages, checking for provenance attestations before adding a new dependency is a low-friction signal of supply chain integrity. Package maintainers publishing to npm can enable provenance by running npm publish with the –provenance flag from a supported CI/CD environment such as GitHub Actions.

For additional guidance see SEC11-BP06: Deploy software programatically and, from the DevOps Lens of the AWS Well-Architected Framework, DL.CS.2: Sign code artifacts after each build

Scan dependencies throughout the software development lifecycle

AWS provides services to help you scan dependencies continuously, from development through deployment:

  • In development: Kiro can perform software composition analysis during code reviews to identify vulnerable third-party code.
  • In code repositories and pipelines: Amazon Inspector scans first-party code, third-party dependencies, and Infrastructure as Code for vulnerabilities.
  • For container images: Amazon Inspector provides continuous vulnerability scanning of Amazon ECR images. Amazon Inspector can also be integrated directly into CI/CD pipelines to scan images before they are pushed to Amazon ECR or deployed, helping you block compromised dependencies earlier in the release cycle.

Traditional vulnerability scanners focus on known CVEs—publicly disclosed vulnerabilities with assigned identifiers. Supply chain attacks like Shai-Hulud involve malicious packages that function as zero-days: they’re intentionally crafted by threat actors and actively exploited before a CVE is assigned. Traditional vulnerability scanners that rely on CVE databases won’t detect these packages until they’ve been formally identified and catalogued, which can take days or weeks.

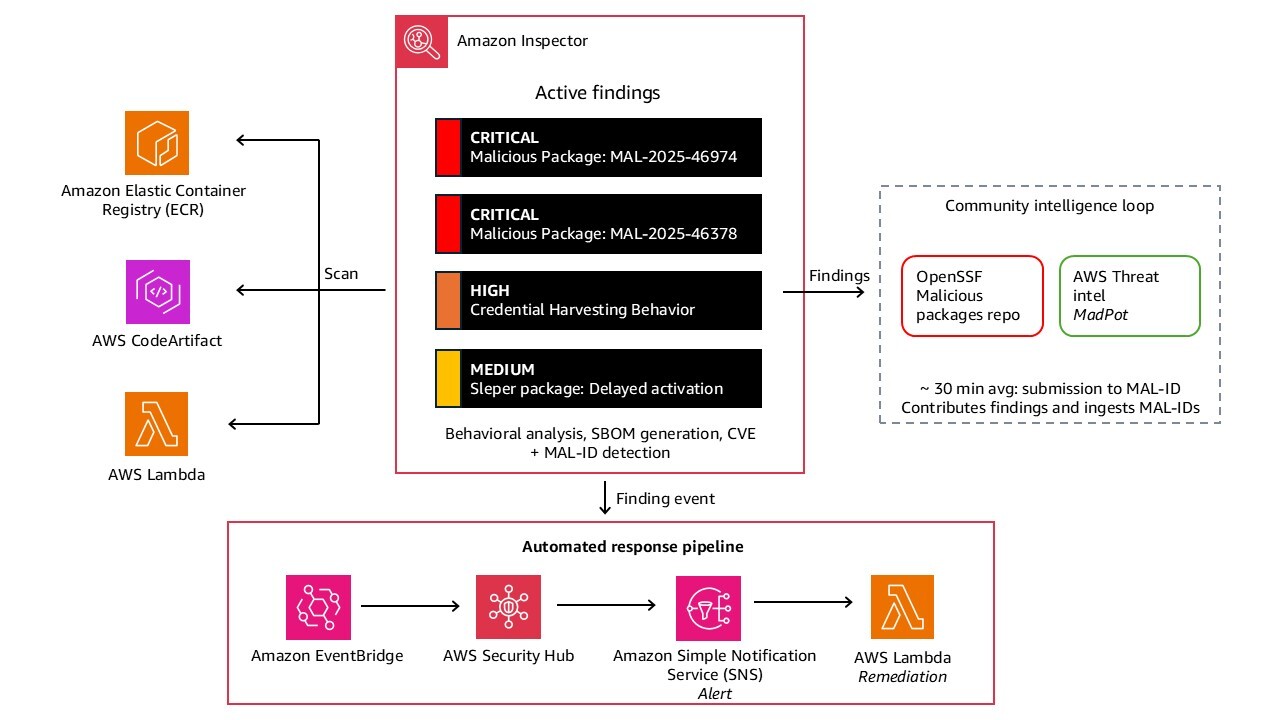
Detecting these requires behavioral analysis at scale and community collaboration, not just static signature matching. The operational scale of AWS—with threat intelligence from sources like MadPot and incident response data across millions of customers—enables detection of suspicious package behavior across multiple environments simultaneously. When a newly published package exhibits credential-harvesting behavior in multiple customer accounts within hours of publication, that cross-account signal enables rapid identification. These findings are contributed to community-maintained databases like the OpenSSF Malicious Packages Repository (github.com/ossf/malicious-packages), which assigns a formal identifier (MAL-ID) and shares it across the security community. For the tea.xyz token farming campaign, the average time from submission to formal identification was approximately 30 minutes. AWS services like Amazon Inspector participate in this community loop, contributing findings and ingesting newly assigned MAL-IDs to surface threats in your environment.

A related threat model worth understanding is the sleeper package: a package that appears benign at publication and activates malicious behavior only after a delay or trigger condition. Static analysis alone is insufficient to catch these packages because the malicious payload isn’t present or active at install time. Amazon Inspector behavioral analysis is specifically designed to detect this class of threat, complementing static vulnerability scanning.

Software Bills of Materials (SBOMs) in SPDX or CycloneDX format enable you to quickly assess exposure during incidents. When responding to supply chain incidents, use SBOMs to identify which applications contain compromised packages, prioritize remediation, and assess blast radius. In the Shai-Hulud incident, the compromised packages (MAL-2025-46974 and CVE-2025-59144) were identified early, providing actionable findings that customers could remediate quickly. Organizations that had scanning enabled but experienced alert fatigue may have missed critical alerts, highlighting the importance of proper alert routing and prioritization.

Figure 3: Screenshot of Amazon Inspector console showing malicious package findings

Figure 3: Screenshot of Amazon Inspector console showing malicious package findings

For additional guidance see SEC11-BP02: Automate testing throughout the development and release lifecycle.

Configure logging and monitoring

Visibility into activity is essential to detect anomalous behavior early. Configure logging and centralize those logs for analysis:

  • Enable application and service logging
  • Centralize and monitor logs across accounts
  • Use GuardDuty to continuously monitor for malicious activity and anomalous API calls
  • Aggregate findings with AWS Security Hub and enforce configuration best practices with AWS Config

CloudTrail logging provides audit trails for credential access and API activity. When responding to supply chain incidents, review CloudTrail logs for specific events that indicate credential compromise or malicious activity: sts:AssumeRole calls from unexpected IP addresses or regions, secretsmanager:GetSecretValue or ssm:GetParameter calls from unfamiliar sources, ecr:PutImage from developer workstations bypassing CI/CD pipelines, lambda:UpdateFunctionCode outside normal deployment windows, iam:CreateAccessKey followed by immediate API activity, and codecommit:GitPush or codebuild:StartBuild from unusual IP addresses. When combined with Amazon EventBridge rules, you can trigger automated responses when Amazon Inspector detects malicious packages or when these unusual credential access patterns occur.

Organizations affected by recent supply chain attacks have used CloudTrail analysis to determine the scope of credential exposure and identify which resources might have been accessed by compromised credentials. This forensic capability is essential for understanding blast radius and ensuring complete remediation.

For additional guidance see the best practices in SEC04: Detection.

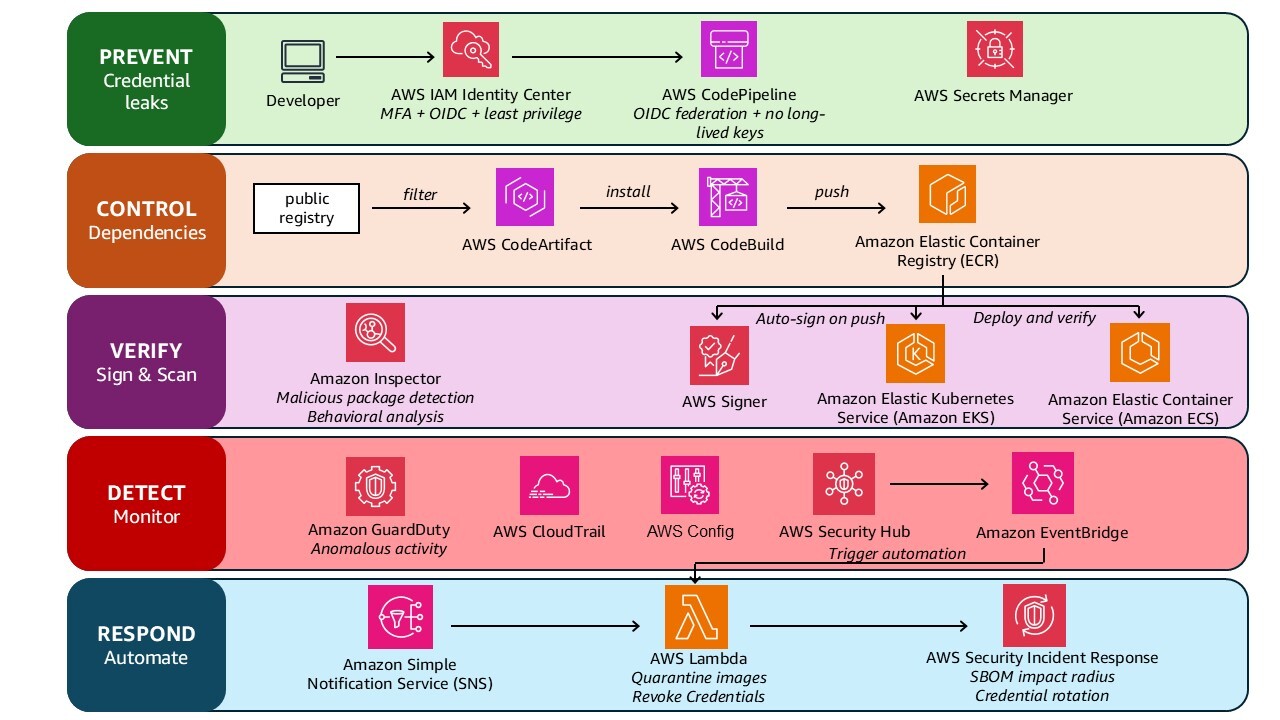
These components of a defense in depth strategy work together to prevent sprawl after initial compromise and help you to detect and respond to the event. Figure 4. shows how these fit together.

Figure 4: Architecture diagram showing defense architecture

Figure 4: Architecture diagram showing defense architecture

Additional best practices

The Security pillar of the Well-Architected Framework also provides organizational best practices that are applicable to improving security processes across all dimensions of your organization. Relevant best practices include SEC11-BP01: Train for application security; SEC11-BP08: Build a program that embeds security ownership in workload teams; and SEC10: Incident Response.

Conclusion

Recent incidents including Shai-Hulud, Chalk/Debug, and tea.xyz reflect ongoing efforts by threat actors to target the the package registries, CI/CD pipelines, and developer credentials for increased attack surface and propagation. A single compromised maintainer account or malicious package can propagate across thousands of consumer environments simultaneously. The controls described in this post are designed with that threat model in mind. Temporary credentials limit the value of stolen tokens, centralized dependency management and upstream blocking reduce the attack surface at the registry level, artifact signing ensures that even if a build pipeline is compromised, unsigned artifacts cannot reach production, and dependency scanning throughout your software lifecycle helps you identify compromised packages early, before they can impact you. Each layer narrows the window of opportunity for a threat actor.

Learn more

See the following blogs and workshops to dive deeper on this topic:

If you have feedback about this post, submit comments in the Comments section below.

Trevor Schiavone

Trevor Schiavone

Trevor is a Senior Solutions Architect with a background in application development and architecture. He brings a builder’s perspective to helping customers design secure, scalable, and innovative solutions on AWS. He is also an active part of the AWS security community with a focus on application security and identity.

Desiree Brunner

Desiree Brunner

Desiree is a Security Specialist Solutions Architect working with regulated customers as part of the AWS EMEA Security & Compliance team. She builds on her background in DevOps and platform engineering to support her customers in designing secure, compliant cloud environments. Passionate about mental health and knowledge sharing, she regularly speaks at AWS events and supports teams on their cloud security journey.

Identifying People Using Wi-Fi Routers

Post Syndicated from Bruce Schneier original https://www.schneier.com/blog/archives/2026/05/identifying-people-using-wi-fi-routers.html

Not identifying people based on their use of Wi-Fi routers, but identifying people using Wi-Fi signals.

This is accomplished through what is known as WiFi sensing, or the use of WiFi signals to infer information about a physical environment. When radio signals like WiFi travel through a space, they interact with the objects and people around them. Those signals can be reflected, scattered, or absorbed. By analyzing how the signal is expected to behave compared with how it is actually received, researchers can infer details about the surrounding environment.

“By observing the propagation of radio waves, we can create an image of the surroundings and of persons who are present,” said Thorsten Strufe, a KIT professor and study co-author, in a press release. “This works similar to a normal camera, the difference being that in our case, radio waves instead of light waves are used for the recognition.”

The collective thoughts of the interwebz