Asahi Linux 7.3 progress report

Post Syndicated from corbet original https://lwn.net/Articles/1105936/

The Asahi Linux developers have put out a new report
on their progress toward a Linux distribution for Apple devices.

Some time ago, we were made aware of multiple attempts to exploit
our permissive licensing to hijack our work, with a direct view to
replacing the project and aggressively monetising Linux on Apple
Silicon. In some extreme cases, in-development feature code was
being lifted straight out of our personal forks and published
without attribution or lazily rewritten with LLM assistance to
obfuscate its origin. The MIT licence explicitly allows this, and
has no carveouts to protect against bad faith actors.

As such, we made the difficult decision to begin the process of
transitioning all of our repositories to the GNU General Public
License version 2 or later. Going forward all Asahi Linux code will
be licenced under strong copyleft licences only. Those who do not
learn from history are doomed to repeat it.

Amutable Foundations: A Technical Overview

Post Syndicated from corbet original https://lwn.net/Articles/1105934/

Lennart Poettering, Michael Vogt, and Joaquim Rocha have put together a
detailed overview
of what the Amutable Operating System (AOS) and
associated infrastructure will look like.

The image-based OS approach enables us to enforce some very strict
but powerful security properties, which elevate the security
posture of the system substantially above traditional Linux
systems. Specifically, let’s highlight seven major essential
security properties of AOS here:

  1. No Shell + No SSH + No Language Interpreters. By default AOS
    does not install a UNIX shell, nor makes remote access via SSH
    available on the nodes. Moreover, we do not install any of the usual
    language interpreters (Python, Perl, …) by default. For most nodes a
    shell or interpreted language support is not required and it removes a
    whole class of attacks.

  2. Signed Images Only. On AOS only images that come with Verity
    data signed by a signing key listed in the Verity keyring may be
    activated.

  3. […]

Седмицата (2–7 ноември)

Post Syndicated from Боряна Телбис original https://www.toest.bg/sedmitsata-2-7-noemvri/

Седмицата (2–7 ноември)

Целият свят ври и кипи. В Америка демократите пометоха републиканците на междинните избори, войните продължават, цените растат, политиците се обвиняват взаимно, а хората тук-там дори сменят мнението си.

У нас, слава богу, подобни сътресения няма. Всичко е подредено, стройно, вчесано. Всички са от една партия и навсякъде ще се ползва само един език, за да се разбираме точно и конкретно всички. На когото не му изнася, ще му показваме izhoda.

Седмицата (2–7 ноември)
Интернет фолклорът ни порасна с няколко века през последната седмица

Иначе изборите минаха, победителят е ясен, а България вече има първата жена, избрана за президент. Това самò по себе си е историческо постижение. Дали обаче е постижение и за правата на жените, е съвсем друг въпрос. В „Имаме си президентка. Съвсем“ Светла Енчева разглежда десетте години на Илияна Йотова в сянката на Румен Радев, отношението ѝ към равноправието и шансовете най-после да докаже политическата си самостоятелност.

Имаме си президентка. Съвсем

Светла Енчева коментира избора на първата жена президент на България. Йотова дължи възможността да заеме този пост на борбата за равноправие, но не е защитавала особено правата на жените. А след 10 години в сянката на Румен Радев тепърва ще трябва да доказва политическата си самостоятелност.

За това как Йотова стигна дотук и защо Андрей Гюров не успя да я спре, пише Емилия Милчева в анализа си на президентските избори. Накратко, оказа се, че изкуственото форсиране на страх от война е по-убедително от всеки реален опит за промяна. Особено когато успееш да убедиш избирателите, че опасността идва не от този, който води войната, а от онзи, който не иска да се оставят развързани ръцете на агресора.

Йотова ли спечели, или Гюров загуби?

На президентския балотаж страхът от война победи обещанието за промяна. Емилия Милчева анализира как управляващите превърнаха мира в предизборно оръжие, защо Андрей Гюров не успя да наложи собствен дневен ред и какво политическо бъдеще очаква двамата кандидати след изборите.

И понеже толкова много държим на мира, Александър Малинов реши да провери къде точно ще се скрием, ако този мир все пак ни подмине. В „Бомбоубежища за 1%“ става ясно, че с гражданската защита положението е доста по-неутешително, отколкото с предизборните обещания. Докато други европейски държави инвестират в убежища, системи за предупреждение и планове за действие при бедствия и военни конфликти, у нас защитените места стигат за по-малко от един процент от населението. Останалите явно ще разчитаме на мира, който ни обещаха.

Бомбоубежища за 1%

Внимание, внимание! Знаете ли къде трябва да се скриете при бедствие или военна атака? Не се притеснявайте, държавата също не знае съвсем. След изборите е време да поговорим и за по-съществени неща. Александър Малинов проверява имаме ли изобщо някакъв план и разказва как е в Европа.

Отвъд океана междувременно избирателите решиха да не разчитат повече на обещания. В брой 20 на „Гласовете на Америка“ Йоанна Елми разказва как демократите постигнаха най-голямата си изборна победа от десетилетия, какво не разбраха републиканците и защо реалните проблеми на хората се оказаха по-силни от поредната порция идеологически плашила.

Гласовете на Америка – брой 20

То бива, бива, ама чак пък това никой не го е очаквал. Демократите спечелиха убедително дори там, където доскоро изглеждаше немислимо, а републиканците имат доста поводи за размисъл. Йоанна Елми с обобщение на междинните избори в САЩ в 10 точки.

Но да оставим за момент естествения интелект, който ни управлява, и да видим какво става с изкуствения, защото и той се бори за своето място под слънцето, така да се каже. Илия Тошев задава един стар въпрос в нова обстановка: „Кой пази пазачите?“ Когато ИИ агентите вече могат да кандидатстват за кредити, да вземат решения и да действат от наше име, кой контролира тях и кой контролира онези, които имат правото да ги спират?

Илия предлага конкретни правила за независим надзор, публичност и възможност за обжалване. Когато този, който определя правилата, сам контролира и спазването им, надзорът лесно се превръща във формалност. В България имаме достатъчно опит с подобни сбъркани модели, макар и без участието на изкуствен интелект, и би трябвало да сме наясно. Оу, уейт… както се казва по новия законопроект.

Кой пази пазачите?

Да оставиш ИИ да ти намери кредит звучи удобно. Но какво става, ако нещо се обърка, и към кого се обръщаш тогава? Илия Тошев ни превежда през практическата страна на живота с ИИ: кой отговаря за агентите, които действат от наше име, и как да защитим интересите си, когато вече решават вместо нас.

И докато се чудим колко власт да дадем на машините, все по-рядко си задаваме въпроса какво ни отнемат те. В разговора си със Стефан Иванов аржентинската писателка Саманта Швеблин обяснява защо литературата е противоположност на радикализацията, защо машините ни правят предвидими и скучни и какво губим, когато престанем да мислим с хора, които мислят различно от нас. Много хубав разговор, особено в страна, в която очевидно сме решили да се разбираме само на един език, буквално и преносно.

Саманта Швеблин: Да избягаме от езика, за да докоснем тялото на читателя

Преди броени дни станалата вече култова аржентинска писателка Саманта Швеблин в дискусия с Георги Господинов и Дария Карапеткова разказа за рисковете и радостите да четеш, пишеш и мислиш света през литературата днес. Часове преди това тя се срещна и със Стефан Иванов – ето техния разговор.

Тази седмица Зорница Христова ни предлага две книги за трудното изкуство да живееш с друг човек. В „По буквите: Линч, Рой“ тя представя „Отвъд морето“ на Пол Линч и „Моят подслон и моята буря“ на Арундати Рой. В едната двама мъже са заседнали в лодка насред океана, в другата майка и дъщеря цял живот се опитват да намерят правилната дистанция помежду си. И в двете се оказва, че за да оцелееш заедно с някого, се изисква повече от това да го накараш да мисли като теб.

По буквите: Линч, Рой

Тази седмица Зорница Христова поставя на фокус две чудесни съвременни книги, в които апокалипсисът е „в една лодка“ близки хора, но изплуването се оказва невъзможно без широтата на разбирането и приемането, без щедростта на протегнатата сурова и помилваща ръка.

За да продължаваме да публикуваме текстове, в които не всички мислят еднакво, имаме нужда от вашата подкрепа. „Тоест“ се издържа от читателите си. За щастие, независимата журналистика струва доста по-малко от една предизборна кампания, но все пак не може да се прави съвсем без пари. Ако харесвате това, което четете, подкрепете ни. Обещаваме да не ви казваме на какъв език да мислите и откъде да излизате, освен ако, разбира се, не търсите izhoda ot cqloto tova bezobrazie.

Приятна почивка!

Friday Squid Blogging: New Jurassic Squid Predecessors

Post Syndicated from Bruce Schneier original https://www.schneier.com/blog/archives/2026/11/friday-squid-blogging-new-jurassic-squid-predecessors.html

News story: “Scientists discover a bizarre Jurassic ‘squid’ unlike anything ever seen.”

Scientists have identified the “fattest” belemnite ever discovered, a bizarre, barrel-shaped squid relative that lived in Wyoming’s ancient seas 160 million years ago. The exceptionally rare fossils reveal a creature unlike anything previously known, potentially a predator of smaller squid-like animals and a surprising survivor of a supposedly vanished family.

As usual, you can also use this squid post to talk about the security stories in the news that I haven’t covered.

Blog moderation policy.

Addressing protocol security gaps in multi-tenant Kubernetes

Post Syndicated from Ajinkya Patil original https://aws.amazon.com/blogs/security/addressing-protocol-security-gaps-in-multi-tenant-kubernetes/

Protocols like Android Debug Bridge (ADB) and Web Real-Time Communication (WebRTC), by default, use unencrypted channels for network communications and don’t support enterprise authentication mechanisms like JSON Web Tokens (JWTs). In a multi-tenant Kubernetes cluster—including Amazon Elastic Kubernetes Service (Amazon EKS)—pods can reach other tenants’ open ports by default unless you configure network policies to restrict cross-namespace traffic. Also, modifying each protocol individually doesn’t scale. This post describes an architecture built on three reusable components: namespace-scoped mutual TLS (mTLS) gateways, managed TURN relay through Amazon Kinesis Video Streams, and JWT identity chains tied to an enterprise identity provider (IdP). The post focuses on architecture decisions and learnings rather than step-by-step deployment.

This post assumes an EKS cluster with namespace isolation configured, an enterprise IdP that issues JWTs, and AWS Private Certificate Authority (AWS Private CA)—a managed service for issuing private certificates—set up in your account. cert-manager—an open-source Kubernetes add-on that automates certificate issuance and renewal—and the AWS Private CA issuer plugin should already be running in the cluster. The architecture also assumes permissions to deploy Envoy Gateway, a Kubernetes API gateway built on the Envoy proxy. The key authentication mechanism used is mTLS, where both client and server present certificates to verify each other.

The challenge: Unauthenticated protocols in multi-tenant Kubernetes

ADB, a command-line tool for communicating with Android devices, requires a proxy or custom API to handle authentication; its unencrypted channel exposes data in transit. Virtual Network Computing (VNC), a protocol for remote desktop access, and similar TCP services share this problem: their credentials are local to the protocol, with no path to a central identity store.

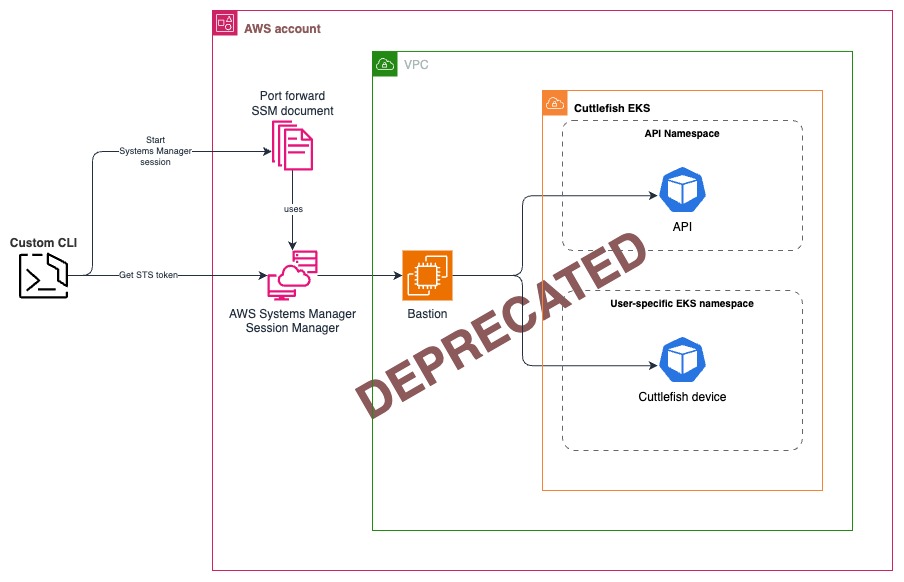
In the Cuttlefish deployment (Cuttlefish is Google’s configurable virtual Android device that runs in containers), the first approach routed this traffic through a bastion host to the Amazon EKS control plane, as Figure 1 shows.

Figure 1: Previous architecture (superseded), shown for comparison only. Communication flow between developer workstation, bastion host, and Amazon EKS control plane

Figure 1: Previous architecture (superseded), shown for comparison only. Communication flow between developer workstation, bastion host, and Amazon EKS control plane

Figure 1 shows a common pattern across the industry to access a private Amazon EKS cluster. We share it to help others identify and migrate away from similar designs for low latency environments. Do not implement this design. The current architecture is described and shown later in this post.

In the now deprecated architecture, a custom API handles authentication by checking each user’s identity against the enterprise IdP and enforcing pod-level authorization. The custom API powers a command-line interface (CLI) that lets you list pods in your assigned namespace and connect to your devices.

The JWT identity chain maps each user to an AWS Security Token Service (AWS STS) RoleSessionName, so every AWS API call in the audit log traces back to a specific person, even in a multi-tenant environment.

Those credentials set up a two-hop port forward that goes from your machine to the bastion, then from the bastion to the target pod. Because all traffic was routed through the Kubernetes API server, concurrent sessions created a throughput bottleneck even though the cluster itself stayed private.

Why self-managed relay infrastructure falls short

A TURN server—a media relay—is needed when communicating parties are behind a NAT Gateway and can’t set up direct peer-to-peer connections.

The initial deployment used STUNner, an open source Kubernetes Session Traversal Utilities for NAT (STUN) and Traversal Using Relays around NAT (TURN) gateway designed for WebRTC media ingestion. STUNner introduced three operational and security challenges.

Because STUNner had no native integration with AWS services or the enterprise IdP, we built a custom token-exchange service to convert IdP tokens into time-limited, namespace-scoped TURN credentials. As usage grew, patching, monitoring, and scaling the TURN servers became a recurring burden. Pod migrations between Availability Zones required manually updating routing rules, and STUNner dropped WebRTC connections during peak usage.

WebRTC’s signaling server introduced a separate security risk. WebRTC encrypts media using Datagram Transport Layer Security (DTLS) and Secure Real-Time Transport Protocol (SRTP) but doesn’t define authentication or encryption for the signaling server; you must build that yourself, which leaves control-plane signaling exposed.

The architecture doesn’t use the Kinesis Video Streams signaling channel because integrating it required substantial changes to the Cuttlefish source patch. The Cuttlefish source code was patched to support non-Google TURN servers, and further changes to support non-Google signaling servers deviated the deployment further from upstream Cuttlefish, risking compatibility issues. Instead, the architecture kept the default Cuttlefish signaling server, with JWT-based session validation and TLS termination at the signaling endpoint designed around it at the application layer.

Namespace-scoped mTLS gateways and managed media relay

The architecture retains namespace isolation, JWT-based authentication, the custom authorization API, and the Cuttlefish patch; the last three of which are custom to this deployment. All components except Cuttlefish patch are reusable.

The reusable components include namespace-scoped Envoy Gateway for mTLS-authenticated TCP proxying, cert-manager-driven certificate rotation through AWS Private CA, and Kinesis Video Streams as a managed TURN provider.

The mTLS gateway assumes several other controls are already in place:

  • Default-deny NetworkPolicy in each tenant namespace. Without this, traffic can bypass the gateway.
  • JWT-based authentication through the custom API. The API validates each user’s identity against the enterprise IdP before returning connection details.
  • Namespace-scoped mTLS certificates issued by AWS Private CA through cert-manager.
  • Kubernetes namespace isolation with scoped role-based access control (RBAC).

ADB connectivity through mTLS

For ADB connectivity, the architecture uses mTLS authentication with Envoy Gateway. Each namespace runs its own Envoy Gateway instance, which routes traffic only to pods within that namespace. cert-manager, running in the cluster with the AWS Private CA issuer plugin, requests short-lived mTLS certificates from AWS Private CA for each namespace at creation time. In production, apply NetworkPolicies before deploying the gateway and issuing certificates.

The certificate commonName uses the convention <user-namespace>.eks.internal so that Envoy can validate the certificate against the expected namespace during the mTLS handshake. The .eks.internal suffix is a naming convention for internal cluster certificates; choose a domain that doesn’t conflict with your organization’s DNS. The usages field specifies both client authentication and server authentication because the same certificate authenticates the client to the gateway and the gateway to the client during the mutual TLS exchange. A cluster-scoped AWSPCAClusterIssuer is used instead of a namespace-scoped AWSPCAIssuer so that a single CA configuration can issue certificates across all tenant namespaces without duplicating issuer resources in each one.

Before deploying Envoy Gateway, each tenant namespace needs a NetworkPolicy that enforces a default-deny ingress posture.

Each certificate is issued with a 12-hour lifetime. A shorter lifetime means a compromised certificate expires quickly without requiring Certificate Revocation List (CRL) or Online Certificate Status Protocol (OCSP) infrastructure, while the 4-hour renewal window gives cert-manager multiple retry attempts before expiry. cert-manager tracks expiry and re-requests a new certificate from AWS Private CA before the current one lapses (by default, renewal starts at the two-thirds mark of the certificate’s lifetime). Envoy Gateway picks up the renewed certificate through Kubernetes Secrets using its Secret Discovery Service (SDS), with no pod restart required.

You first authenticate with the enterprise IdP through the custom CLI, which calls the custom API. The API validates your JWT, confirms your namespace assignment, and returns connection details for the appropriate namespace-scoped Envoy Gateway, including the client certificate for that namespace. The API delivers the certificate over HTTPS. Because certificates are namespace-scoped and expire in 12 hours, a compromised response yields access only to the holder’s own namespace for a limited window. The CLI then presents this certificate to establish a direct mTLS connection, through Envoy, to the target pod. The JWT proves who you are, and the mTLS certificate proves which namespace the connection belongs to.

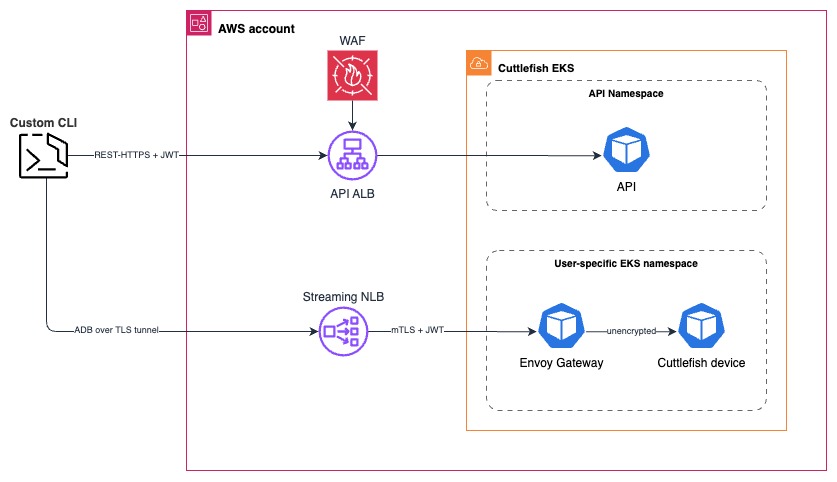
Envoy proxies the TCP stream directly to the pod and pools connections to reduce latency. The hop between Envoy and the pod isn’t encrypted by mTLS. NetworkPolicy restricts ingress so that only the namespace-scoped Envoy Gateway can reach the ADB port on the target pod. For environments with compliance requirements, extend mTLS to the pod using a sidecar proxy or pod-level certificates. Evaluate this gap against your organization’s data classification and regulatory requirements.

For the REST API path, the custom API sits behind AWS WAF. The ADB data path has no WAF protection; it relies on mTLS, NetworkPolicies, and namespace isolation.

Figure 2: ADB communication flow using Envoy Gateway and custom REST API

Figure 2: ADB communication flow using Envoy Gateway and custom REST API

Figure 2 shows this ADB communication flow using Envoy Gateway and the custom REST API. It logs your authenticated identity, namespace, and timestamp. The mTLS certificate doesn’t carry a user identifier in its subject field. This applies when namespaces are strictly 1:1 with users. For shared namespaces or regulated environments requiring granular attribution, issue per-user certificates from AWS Private CA.

WebRTC relay through Kinesis Video Streams

Kinesis Video Streams provides built-in STUN and TURN infrastructure and signaling channels. It replaced the self-managed STUNner because it integrates with AWS Identity and Access Management (IAM), so the custom token-exchange service is no longer needed. This is an important factor in reducing operational costs. For implementation details, see the Amazon Kinesis Video Streams WebRTC developer guide, which covers signaling channel setup, IAM policies, and TURN credential retrieval.

Kinesis Video Streams WebRTC charges per active signaling channel, per signaling message, and per TURN streaming minute. Idle namespaces incur no TURN cost. See Amazon Kinesis Video Streams pricing for latest pricing and Amazon Kinesis Video Streams with WebRTC service quotas for service quotas.

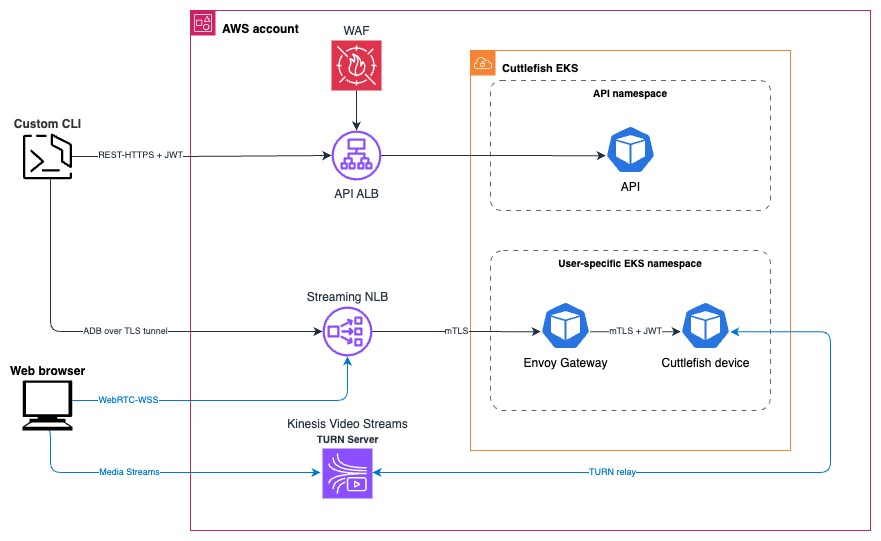
Figure 3: Final architecture with ADB and WebRTC communication channels

Figure 3: Final architecture with ADB and WebRTC communication channels

Figure 3 shows both ADB and WebRTC communication channels in the completed architecture. Each path has different controls: ADB traffic flows through the namespace-scoped Envoy Gateway, where mTLS and NetworkPolicies enforce access. WebRTC media relay runs through Kinesis Video Streams, with IAM scoping credentials per session. The custom REST API is the only HTTP-based path; it runs over HTTPS with AWS WAF at the edge.

The JWT identity chain connects all three paths: the custom API validates each user’s identity before any connection opens, so the audit log records who connected to which namespace and when.

Applying this pattern to other unauthenticated protocols

The mTLS gateway and certificate rotation pieces transfer directly to most TCP protocols. The TURN relay is specific to WebRTC and similar media-streaming protocols that need NAT traversal. The JWT identity chain requires custom work and isn’t directly transferable. You need to build the API that validates tokens and maps users to namespaces, and a client that retrieves and presents the certificate. The Cuttlefish source patch is specific to this case study and not reusable.

Two common protocol families show how the reusable parts apply:

  • VNC and RDP both store credentials locally, with no path to an enterprise identity provider. Wrapping VNC in mTLS through Envoy replaces the shared password model with certificate-based identity. RDP benefits similarly: certificate authentication works without domain-joining the containers, so you don’t need Active Directory inside each one.
  • MQTT, SIP, and similar TCP protocols often encrypt the payload but skip session-level authentication entirely; meaning you can verify what was sent but not who sent it. Wrapping these protocols in mTLS through Envoy closes that gap without modifying the protocol itself.

JWT identity chain secures session establishment at the application layer. For Internet of Things (IoT) device management, industrial control, or game streaming, Envoy Gateway adds mTLS to TCP protocols that lack built-in encryption in transit. Managed TURN through Kinesis Video Streams handles NAT traversal for WebRTC-based streaming components.

Performance results

Application installs through the dual port-forwarding chain (local machine to bastion, bastion to pod) took 3–4 minutes, and individual ADB commands took 1–2 seconds per round trip.

After migrating to the mTLS Envoy Gateway, ADB commands added under 50 ms of gateway latency compared to local setup. The latency was measured as the difference in round-trip time between a command sent through Envoy and one sent to a local Android device. Through Envoy, individual ADB commands completed in under 100 ms and application installs finished in under 30 seconds, because Envoy proxies the TCP stream directly to the pod instead of routing through the Kubernetes API server. This was an improvement from 1–2 seconds for ADB commands and 3–4 minutes for application installs using bastion host setup.

Key implementation lessons

The main concern addressed by replacing bastion-host forwarding with mTLS proxying was latency compared to local setup. Gateway overhead stayed under 50 ms and met developer expectations.

After migrating to Kinesis Video Streams, WebRTC connections stayed stable during peak usage, and pod migrations between Availability Zones no longer required manual updates to routing rules. Because Kinesis Video Streams integrates with IAM, new protocols added to the cluster are automatically covered by the same audit trail with no additional logging configuration needed.

Security considerations

mTLS authenticates both ends of a connection and encrypts traffic in transit, but it only works when other controls are in place. The NetworkPolicy and pod security controls described in the preceding ADB connectivity section must be in place before mTLS adds value. Without default-deny ingress rules, traffic bypasses the gateway entirely. At the application layer, the custom API validates each user’s JWT before issuing connection details and logs the identity, namespace, and timestamp for every session. Certificates expire after 12 hours and cert-manager rotates them automatically. Short-lived certificates reduce exposure, but if your threat model requires immediate revocation, you need CRL or OCSP infrastructure on top of AWS Private CA. Envoy Gateway is a trust boundary. Review its configuration, resource limits, and access controls against the Envoy security best practices.

The custom API is the primary trust boundary in this architecture. Apply the same rigor to its security review, logging, and access controls as you would to any authentication service.

Conclusion

With namespace-scoped mTLS gateways and managed TURN relay, you can secure unauthenticated protocols on shared EKS clusters without modifying the protocols themselves. ADB command latency drops from 1–2 seconds to under 50 ms, and WebRTC connections remain stable during pod migrations. See the Envoy Gateway documentation, cert-manager documentation, and Amazon Kinesis Video Streams WebRTC developer guide to build and deploy this architecture.

If you have questions about this post, contact AWS Support or start a new thread on AWS re:Post.

Ajinkya Patil

Ajinkya Patil

Ajinkya is a Senior Security Consultant at Amazon Professional Services, specializing in security consulting for AWS customers across the automotive, finance, and media industries since 2019. He has presented at AWS re:inforce and contributed articles to the AWS Security Blog and AWS Prescriptive Guidance. Outside of work, he enjoys traveling and photography.

Store and process large strings in Amazon Redshift SUPER columns

Post Syndicated from Ritesh Sinha original https://aws.amazon.com/blogs/big-data/store-and-process-large-strings-in-amazon-redshift-super-columns/

Storing large semi-structured data such as JSON and arrays in a data warehouse often means splitting or truncating your data. Amazon Redshift removes this with the SUPER data type and PartiQL language so you can ingest, store, transform, and analyze semi-structured data such as weblogs and sensor data at scale. When you turn on large string support, SUPER supports individual strings up to 16 million bytes and processes strings beyond the 65,535 bytes VARCHAR limit in memory. SUPER also works in case-insensitive databases.

In this post, we walk you through three key SUPER data type enhancements that simplify semi-structured data workflows and reduce common migration challenges.

  • Handling large SUPER objects with extended string support: Learn how the 16 million bytes improvement helps you work with large JSON documents that previously exceeded size limits
  • In-memory string function processing without truncation for improved efficiency
  • Migration from your data warehouse with case insensitivity support: Explore how case-insensitive database compatibility simplifies migrations from legacy databases

Prerequisites

To implement this solution, you need the following prerequisites:

Use case overview

The SUPER data type helps you process and query semi-structured or nested data. This includes web logs, industrial Internet of Things (IoT) data from machines and equipment, sensor data, genomics data, and more.

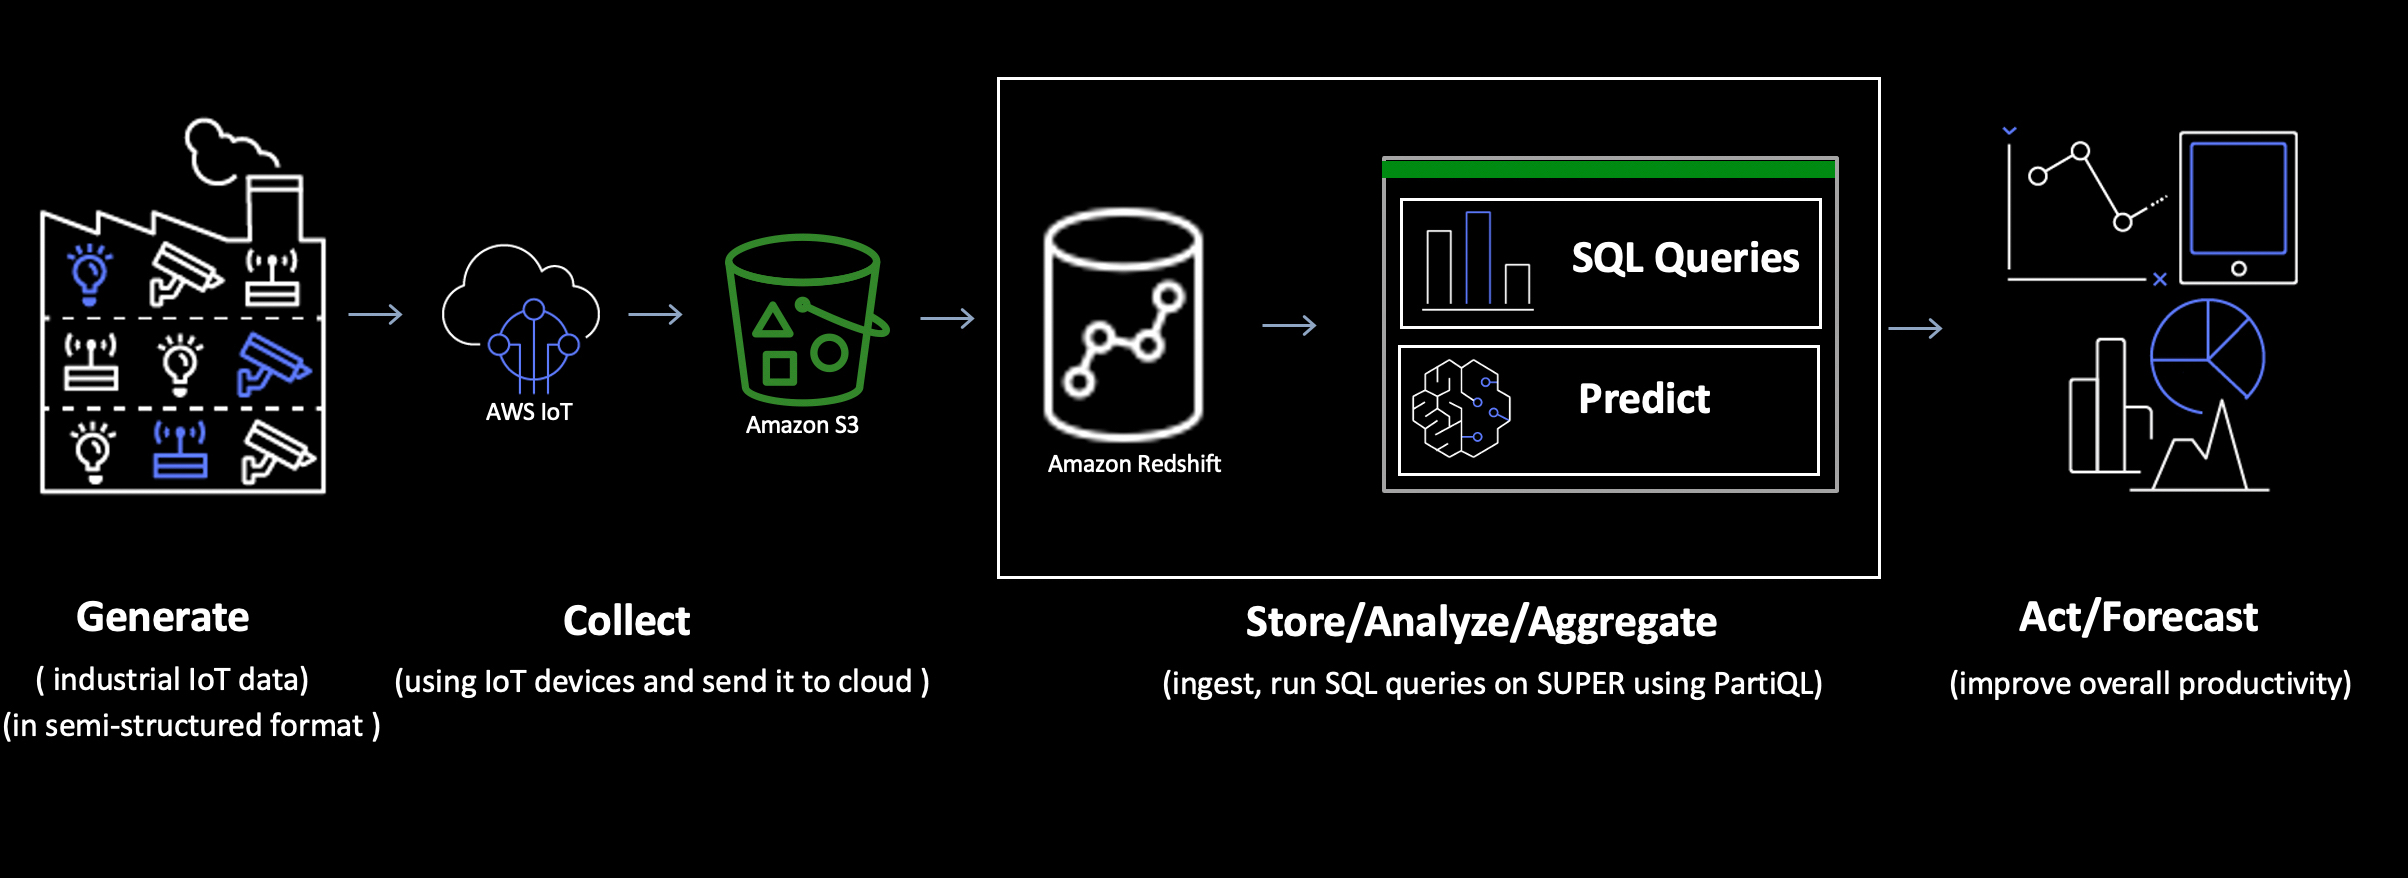
The following diagram illustrates the data flow. It shows how data is generated, collected, and stored in Amazon Redshift as the SUPER data type:

Figure 1: Use case overview flow

Use case one: Handling large JSON documents with extended string support

The challenge

Today, organizations need to store and analyze large semi-structured documents such as detailed customer profiles, comprehensive transaction records, IoT sensor data, and complex event logs.

The solution

Amazon Redshift now supports storing objects up to 16 million bytes in SUPER data type columns. When you turn on large string support, individual strings within SUPER columns now support up to 16 million bytes. You can store complete legal documents, detailed product catalogs with formatting intact, full application logs, extensive customer interaction histories, and entire articles, with no splitting or truncating your data.

To follow along with this solution, complete the following:

Turn on large string support. Create a parameter group (or edit an existing one), set enable_large_strings_opt_in to Yes, and attach the parameter group to your data warehouse. For a provisioned cluster, reboot the cluster to apply the change. For Amazon Redshift Serverless, set the enable_large_strings_opt_in configuration parameter on your workgroup instead, because Serverless doesn’t use parameter groups.

Confirm the setting:

SELECT is_large_string_enabled(); 

Create the orders table:

CREATE TABLE orders ( data SUPER);

Load large JSON documents (up to 16 million bytes) with strings > 65535 bytes into orders table using COPY:

COPY orders
FROM 's3://<your-bucket>/orders.json'
IAM_ROLE 'arn:aws:iam::1234567890:role/service-role/<Redshift-copy-unload-role>'
FORMAT JSON 'noshred';

Select data from orders table:

SELECT * FROM orders;

Figure 2: Orders result set

The following query extracts specific fields from nested JSON documents stored in the data SUPER column of the orders table. Before querying, you set enable_case_sensitive_super_attribute to true, so you can reference camelCase attribute names such as orderId and shippingAddress without double quotation marks. The SELECT clause retrieves order and customer identifiers, shipping address details, and a description field that supports up to 16 million bytes of text, along with its character length. The WHERE clause returns only orders with a status of ‘processing‘.

-- Set case sensitivity
SET enable_case_sensitive_super_attribute TO true;

-- Query nested order data with large string values
SELECT
    data.orderId::VARCHAR                     AS order_id,
    data.customerId"::VARCHAR                  AS customer_id,
    data.shippingAddress.state::VARCHAR     AS shipping_state,
    data.shippingAddress.zipCode::VARCHAR   AS zip_code,
    data.detailedDescription::VARCHAR         AS detailed_description,
    LENGTH(data."detailedDescription"::VARCHAR) AS description_length
FROM orders
WHERE data.status::VARCHAR = 'processing';

Figure 3: Large string result set

Use case two: In-memory string function operations without truncation

The challenge

Running string operations on large semi-structured data has trade-offs such as either truncating at 65,535 bytes and losing critical information, or disk spills impacting query performance. Standard SQL string functions like substring extraction, pattern matching, and text transformations become impractical when your data exceeds these limits. This leaves you with incomplete analysis or unacceptable latency.

The solution

When you set enable_large_strings_opt_in to Yes, Amazon Redshift supports in-memory string function operations on SUPER data that exceed the 65,535 bytes VARCHAR limit. By casting SUPER values to VARCHAR within string functions, Amazon Redshift processes the full string in memory without truncation to upper limit of 16 million bytes. Table columns defined as VARCHAR(MAX) stay at 65,535 bytes. The larger limit applies to in-memory operations such as CAST expressions, views, UDFs, and stored procedures.

How it works:

  • Without CAST: String functions directly on SUPER columns can cause errors
  • With CAST: Cast SUPER values to VARCHAR first, then apply string functions without truncation or errors

Problem scenario (causes error):

Run the following query to retrieve customer IDs from the orders table and convert them to lowercase; you will get an error.

SELECT
lower(data.customerId) AS customer_id
FROM orders;

Figure 4: Output without using CAST

Solution (works without truncation):

Run the following query to retrieve customer IDs from the orders table, cast them to VARCHAR and convert them to lowercase, query executes successfully.

SELECT
lower(data.customerId::VARCHAR) AS customer_id
FROM orders;

Figure 5: Query result showing customer IDs

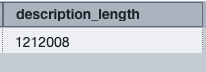
Next, let’s see how the SUPER data type accommodates string values larger than 65,535 bytes. We use the LISTAGG and LEN functions to test this enhancement. The LISTAGG window function orders rows for each group according to the ORDER BY expression, then concatenates the values into a single string. The LEN function returns the length of the specified string as the number of characters. This operation wasn’t possible with the previous 65,535 bytes limit.

SELECT
LEN(LISTAGG(data.detailedDescription::VARCHAR, ', ')WITHIN GROUP (ORDER BY data.orderId::VARCHAR)) AS description_length
FROM orders
WHERE data.status::VARCHAR = 'processing';

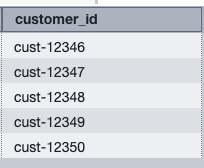
Figure 6: Query result showing description length

The output shows a string length of 1,212,008 characters. This demonstrates that SUPER can now handle strings beyond the previous 65,535-byte limit. If the output of LISTAGG exceeds the 65,535-byte limit of a VARCHAR column, you can store the result in a SUPER column, which supports up to 16 million bytes.

With large string support turned on, VARCHAR(MAX) in a view resolves to VARCHAR(16000000), so the view can return full-length strings. Because views keep the case settings from their creation, run SET first, then create the view after you turn on the setting:

SET enable_case_sensitive_super_attribute TO true;
CREATE VIEW order_descriptions AS
SELECT     
   data.orderId::VARCHAR AS order_id, 
   data.detailedDescription::VARCHAR(MAX) AS detailed_description
FROM orders; 

Views that you created before you turned on the setting stay capped at 65,535 bytes until you recreate them. For more information, see Behavior changes in Amazon Redshift.

Use case three: Migration from your data warehouse with case insensitivity support

The challenge

Organizations migrating from legacy data warehouses to Amazon Redshift face a critical decision regarding database collation. Your data warehouse operates with case-insensitive string comparisons by default, and maintaining this behavior is essential for application compatibility. However, until recently, SUPER data types were only supported in Amazon Redshift databases with case-sensitive collation, creating a migration barrier. If you created Amazon Redshift case-insensitive databases to ease your migration process (avoiding the extensive testing required for case-sensitive conversion), you couldn’t use the SUPER data type for ingesting and querying semi-structured data such as JSON and arrays in Amazon Redshift native and data lake tables.

The solution

Amazon Redshift announced support for SUPER data types in databases with case-insensitive collation, which has the following benefits:

  • Maintain case-insensitive behavior for legacy applications
  • Use SUPER columns for semi-structured data in the same database
  • Use the COLLATE function to specify case sensitivity preferences for SUPER columns

Amazon Redshift native table with SUPER data type

  1. Log in to Amazon Redshift Query Editor V2. Create database with case insensitive collation.
CREATE DATABASE custdb_case_insensitive COLLATE CASE_INSENSITIVE;
  1. Create the customer_data table with SUPER data type columns and insert sample records.
CREATE TABLE customer_data (
    customer_id    INTEGER,
    customer_name  VARCHAR(100),
    customer_profile SUPER,
    order_history  SUPER COLLATE case_sensitive,
    metadata       SUPER,
    created_date   TIMESTAMP DEFAULT GETDATE());

INSERT INTO customer_data (customer_id, customer_name, customer_profile, order_history, metadata)
VALUES (
    1,
    'John Doe',
    JSON_PARSE('{"age": 30, "email": "[email protected]", "address": {"street": "123 Main St", "city": "New York", "zipcode": "10001"}}'),
    JSON_PARSE('[{"order_id": 101, "amount": 250.50, "items": ["laptop", "mouse"]}, {"order_id": 102, "amount": 89.99, "items": ["keyboard"]}]'),
    JSON_PARSE('{"source": "web", "campaign": "spring_sale", "tags": ["premium", "verified"]}')
);
INSERT INTO customer_data (customer_id, customer_name, customer_profile, order_history, metadata)
VALUES (
    2,
    'Alice Smith',
    JSON_PARSE ('{
        "age": 35,
        "email": "[email protected]",
        "preferences": {
            "newsletter": true,
            "notifications": ["email", "sms"],
            "language": "en"
        },
        "address": {
            "street": "321 Elm St",
            "city": "Boston",
            "state": "MA",
            "zipcode": "01234"
        }
    }'),
    JSON_PARSE ('[
        {
            "order_id": 106,
            "amount": 599.99,
            "date": "2024-01-15",
            "items": [
                {"name": "smartphone", "price": 499.99, "quantity": 1},
                {"name": "screen_protector", "price": 19.99, "quantity": 2}
            ],
            "status": "delivered"
        }
    ]'),
    JSON_PARSE ('{"source": "web", "device": "desktop", "browser": "Chrome"}')
);
  1. Query customer_data table to analyze super data type columns.

SET enable_case_sensitive_super_attribute TO true;
SELECT * FROM customer_data;


Figure 7: Result set of customer_data

  1. Use the following two queries to unnest the order_history array column using PartiQL.
SELECT
customer_id,
customer_name,
customer_profile.age,
customer_profile.email,
customer_profile.address.city,
order_history[0].order_id AS first_order_id,
order_history[0].amount AS first_order_amount,
order_history[0].items[0] AS first_item
FROM customer_data c;

Figure 8: Result set of customer_data using partiql

SELECT
customer_id,
customer_name,
customer_profile.age,
customer_profile.email,
customer_profile.address.city,
orders.order_id,
orders.amount
FROM customer_data c, c.order_history AS orders;

Figure 9: Result set of customer_data and order_history using partiql

  1. Run a query that depends on the case-insensitive collation of the database. The filter uses lowercase “new york” and still matches “New York”.
    -- Matches 'New York' because the database is case insensitive 
    SELECT 
    customer_id, 
    customer_profile.address.city 
    FROM customer_data 
    WHERE customer_profile.address.city::VARCHAR = 'new york';

In this example, the order_history column uses COLLATE case_sensitive, which overrides the case-insensitive default of the database for that column. To compare both behaviors, you can also use the COLLATE function in a WHERE clause.

Query nested data type on data lake

  1. The following is the sample input data for the customer profile. Place this data into a file and upload it to Amazon S3, name the S3 prefix “customer_profile”.
{
  "customer_id": 1001,
  "name": "John Smith",
  "email": "[email protected]",
  "registration_date": "2023-01-15",
  "profile": {
    "age": 35,
    "gender": "M",
    "occupation": "Software Engineer",
    "income_range": "75000-100000",
    "preferences": {
      "communication": ["email", "sms"],
      "categories": ["electronics", "books", "sports"]
    },
    "address": {
      "street": "123 Main St",
      "city": "Seattle",
      "state": "WA",
      "zip": "98101",
      "country": "USA"
    },
    "loyalty_tier": "gold",
    "interests": ["technology", "hiking", "photography"]
  }
}
  1. Create the AWS Glue database datalake_withsuper_datatype. For instructions on how to create the AWS Glue database, see Creating databases.
  2. Create the AWS Glue crawler to crawl customer_profile prefix, use AWS Glue database datalake_withsuper_datatype in crawler. For instructions on how to create a crawler, see Tutorial: Adding an AWS Glue crawler.
  3. Create external schema on Amazon Redshift in database custdb_case_insensitive.
CREATE EXTERNAL SCHEMA IF NOT EXISTS datalake_cust_profile
FROM DATA CATALOG
DATABASE 'datalake_withsuper_datatype'
IAM_ROLE default
CREATE EXTERNAL DATABASE IF NOT EXISTS;
  1. Select the external table customer_profile to view the column profile, which is the struct column in the AWS Glue table.
SELECT * FROM
"custdb_case_insensitive"."datalake_cust_profile"."customer_profile";


Figure 10: Result set of customer_profile using glue data catlog

Best practices

In this section, we discuss the best practices that you can follow while using SUPER data type in Amazon Redshift.

  1. Configure case sensitivity settings

Set the following session setting before you query SUPER columns for accurate field name matching. With this setting on, reference field names without double quotation marks:

SET enable_case_sensitive_super_attribute TO true;

Without this setting, Amazon Redshift converts unquoted field names to lowercase. When your JSON contains orderId but Amazon Redshift searches for orderid, queries return NULL values instead of your data.

Example: Impact of enabling case sensitivity

The following example shows the difference in query results with and without case sensitivity enabled:

-- Without the setting - returns NULL
SELECT data.orderId::VARCHAR FROM orders;
-- With the setting - returns actual values
SET enable_case_sensitive_super_attribute TO true;
SELECT data.orderId::VARCHAR FROM orders;
  1. Cast SUPER values to specific data types

Always cast SUPER values to appropriate data types for better performance and accuracy:

SELECT
    data.orderId::VARCHAR          AS order_id,
    data.totalAmount::DECIMAL(10,2) AS total_amount,
    data.shippingAddress."zipCode"::VARCHAR AS zip_code,
    data.items."quantity"::INTEGER AS first_item_qty
FROM orders
WHERE data.status::VARCHAR = 'processing';

Explicit casting eliminates ambiguity and improves query performance by helping Amazon Redshift optimize execution plans.

  1. Optimize performance for production workloads

Promote frequently queried fields

Extract commonly accessed SUPER attributes to regular columns for faster queries:

ALTER TABLE orders ADD COLUMN customer_id VARCHAR(50);
UPDATE orders SET customer_id = data.customerId::VARCHAR;

Create materialized views for complex queries

Turn on enable_case_sensitive_super_attribute, then build materialized views for queries you run repeatedly:

SET enable_case_sensitive_super_attribute TO true;
CREATE MATERIALIZED VIEW order_summary AS
SELECT
    data.orderId::VARCHAR           AS order_id,
    data.customerId::VARCHAR        AS customer_id,
    data.totalAmount::DECIMAL(10,2) AS total_amount,
    LENGTH(data.detailedDescription::VARCHAR) AS description_length
FROM orders;
REFRESH MATERIALIZED VIEW order_summary;
  1. Migrate from legacy databases

Use AWS Schema Conversion Tool (AWS SCT) to convert your schema automatically, then configure case sensitivity for SUPER columns.

Set user-level configuration

Enable case sensitivity for all of a single user’s sessions:

ALTER USER myuser SET enable_case_sensitive_super_attribute TO true;

Test both column types

Verify that regular columns maintain case-insensitive behavior:

-- Regular columns remain case-insensitive
SELECT COUNT(*) FROM customer_data WHERE cust_name = 'JOHN DOE';
SELECT COUNT(*) FROM customer_data WHERE cust_name = 'john doe';
-- Both return identical results

Confirm that SUPER columns enforce case sensitivity:

SET enable_case_sensitive_super_attribute TO true;
-- Correct - matches JSON field exactly
SELECT customer_profile.address.city::VARCHAR FROM customer_data;
-- Incorrect - returns NULL due to case mismatch
SELECT customer_profile.Address.City::VARCHAR FROM customer_data;

Update application queries:

Modify your application code to use correct case and explicit casting for all SUPER column attributes. This ensures consistent results and prevents NULL values from case mismatches.

  1. Align the large string setting

Keep the enable_large_strings_opt_in setting the same on data sharing producer and consumer data warehouses.

Recreate existing views, UDFs, and stored procedures after you turn on the setting. They stay capped at 65,535 bytes until you recreate them.

After you set the parameter to Yes or No, you can’t reset it to the default value.
For more information about best practices for working with semi-structured data types, see documentation.

Conclusion

The enhanced SUPER data type of Amazon Redshift solves the previously mentioned critical challenges that you face when working with semi-structured data. This post showed you how to turn on large string support, store individual strings in JSON documents up to 16 million bytes, perform string operations without truncation errors, and maintain case-insensitive compatibility during database migrations.

With SUPER, you can handle comprehensive data objects including legal contracts, product catalogs, customer profiles, and IoT sensor readings without breaking them into smaller pieces.

You can also cast SUPER values to VARCHAR and run pattern matching, text manipulation, and data cleansing operations directly on SUPER columns, and remove the truncation errors that previously blocked your analysis workflows.

Start implementing these capabilities in your environment with the following steps:

  1. Turn on large string support
  2. Configure case sensitivity settings for your specific use case
  3. Cast data types explicitly during data extraction
  4. Create materialized views for complex queries
  5. Test thoroughly to optimize query performance

Learn more


About the authors

Ritesh Kumar Sinha

Ritesh Ritesh Kumar Sinha is an Senior Analytics Specialist Solutions Architect based out of San Francisco. He has helped customers build scalable data warehousing and big data solutions for over 16 years. He loves to design and build efficient end-to-end solutions on AWS. In his spare time, he loves reading, walking, and doing yoga.

Raghu Kuppala

Raghu is an Analytics Specialist Solutions Architect experienced working in the databases, data warehousing, and analytics space. Outside of work, he enjoys trying different cuisines and spending time with his family and friends.

Raza Hafeez

Raza is a Senior Product Manager at Amazon Redshift. He has over 13 years of professional experience building and optimizing enterprise data warehouses and is passionate about enabling customers to realize the power of their data. He specializes in migrating enterprise data warehouses to AWS Modern Data Architecture.

Harshida Patel

Harshida Patel

Harshida is a Specialist Sr. Solutions Architect for Analytics with AWS.

[$] Locking down hibernation for the winter

Post Syndicated from daroc original https://lwn.net/Articles/1103190/

When a computer hibernates, the kernel writes the contents of memory to disk and
then shuts the system down. Resuming from hibernation involves reading that data
back into memory, and then having the kernel pick up where it left off.
Unfortunately, the kernel does not have
any way to know that the data it is reading back has not been tampered with,
which is why lockdown, an optional kernel
feature that attempts to prevent modifications to the running kernel, disables hibernation.
Matthew Garrett, who has been working on lockdown for many years, has shared

a patch set
that aims to fix this problem. His solution must also protect
against downgrade attacks (where an attacker reboots the computer with an older
kernel version to bypass new protections), which complicates the implementation.

Seven stable kernels with fixes for three Xen vulnerabilities

Post Syndicated from jzb original https://lwn.net/Articles/1105902/

Hot on the heels of the previous
two stable kernels
, Greg Kroah-Hartman has announced the release of the 7.3.3, 6.18.62,
6.12.116, 6.6.162, 6.1.192,
5.15.225, and 5.10.274 stable kernels. Each one only contains
fixes for three use-after-free vulnerabilities announced today by the Xen
security team.

Two of the vulnerabilities could allow an attacker to DoS the
entire Xen host machine with possible information leakage (CVE-2026-100080,
CVE-2026-100082),
and one may allow privilege escalation as well as a DoS of the host machine (CVE-2026-100081). Users
should, of course, upgrade if they are using Xen.

Your Guide to the Developer Tools Track at AWS re:Invent 2026

Post Syndicated from Brian Beach original https://aws.amazon.com/blogs/devops/your-guide-to-the-developer-tools-track-at-aws-reinvent-2026/

AWS re:Invent 2026 is almost here, and if you’re a developer, the Developer Tools (DVT) track is where you’ll want to spend your week. This year is all about agentic development, from multi-agent workflows to autonomous agents that keep working while you sleep. And CI/CD, Infrastructure as Code, and full-stack development are still well represented. Here’s your essential guide to the week.

Must-Attend Sessions

AWS re:Invent is a learning conference, and the Developer Tools track has 46 unique sessions waiting for you. Choose from breakouts, chalk talks, workshops, builders sessions, code talks, and lightning talks. Roughly three-quarters of the slots are interactive, so bring your questions and maybe your laptop. You can find the complete schedule in the re:Invent 2026 catalog. These are the sessions I would check first.

  • DVT345: Continuous integration and continuous delivery (CI/CD) on AWS – Learn how to build complete CI/CD pipelines on AWS, from planning work and collaborating on code to deploying your applications safely.
  • DVT202: AWS infrastructure as code: A year in review – Catch up on the latest from AWS CloudFormation and AWS CDK, and see how infrastructure as code fits into the agentic development era.
  • DVT204: Beyond the pilot: How customers scaled Kiro and proved the value – Hear from multiple enterprises and share how they took Kiro from a pilot to their whole organization, and how they measured the impact.
  • DVT206: 10x or bust: How Amazon’s Frontier teams ship with Kiro – Find out how Amazon’s frontier teams are rethinking the way software gets built, and what it takes to move from incremental gains to 10x.
  • DVT316: What’s new in full-stack AWS app development – Discover the latest ways AWS helps web and mobile developers get started quickly, ship fast, and iterate.
  • DVT320: How Kiro learns: an AI coding agent that improves with every session – See how Kiro builds persistent context so it gets better the more you use it.
  • DVT405: Trusted intent: How Kiro proves your specs before writing any code – Go deep on how Kiro validates your specs before a single line of code is written, so the agent builds the right thing the first time.

Want to get hands-on? Try DVT406: Make the agent code while you sleep, a 400-level workshop on autonomous development with the Kiro CLI, or DVT207: Learn new AI development skills with Kiro, a builders session that’s a great place to start if you’re new to Kiro. Both repeat during the week, so you’ll have more than one chance to get a seat.

Kiro Galaxy Run

Start your journey at Kiro Galaxy Run in Caesars Forum. Strap into an immersive VR space mission that goes horribly off course, and use Kiro and its agents to get your crew home. Stick around for live demos at the Kiro kiosk, grab a Builder Quest stamp, and pick up some Kiro swag on your way out.

Purple-lit Kiro Galaxy Run spacecraft with an open side door and boarding ramp.

AWS Village

Visit the AWS Village in the Expo at the Venetian to talk with me and other experts at the Kiro kiosk. See Kiro in action, ask your toughest questions, and pick up stickers and Kiro credits.

AWS Village on the re:Invent expo floor, with a large illuminated AWS logo above attendees.

Builder Zone

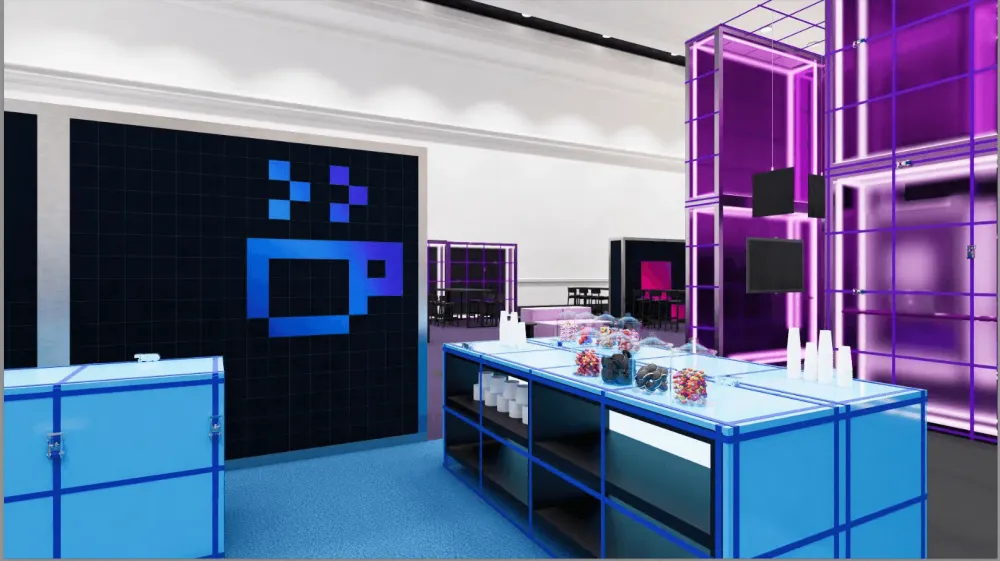
Swing by the Builder Zone to explore the Builders Fair, Agent Forge, and open source areas, along with Kiro demos. This is also where you can sign up for Builder Quest and collect stamps to earn credits and prizes.

Blue-and-purple Builder Zone space with a pixel-art coffee cup, display screens, and a refreshment counter.

Ctrl+Alt+Ship Self-Paced Labs

Learn at your own pace in the Ctrl+Alt+Ship labs at the Venetian Content Hub. Kiro has two labs: a 200-level lab to get you started with the Kiro IDE, and a 400-level lab on autonomous development.

Attendees working at rows of computer monitors during a self-paced lab at AWS re:Invent.

Conclusion

Make the most of re:Invent by attending these sessions, finding us at the AWS Village and Builder Zone, and taking on Kiro Galaxy Run. Whether you’re focused on CI/CD, infrastructure as code, full-stack development, or the next wave of agentic development, the Developer Tools track has something for you. If you are already registered, I look forward to seeing you in Las Vegas. If you are not registered, there is still time to register for re:Invent 2026.

Run Maestro tests on real Android devices using AWS Device Farm

Post Syndicated from Ronald Teijeira Fernandez original https://aws.amazon.com/blogs/devops/run-maestro-tests-on-real-android-devices-using-aws-device-farm/

ManoMano is a European online marketplace for home improvement and gardening products. Their mobile engineering team builds a React Native application that serves millions of customers across Europe. To verify app quality across a wide range of Android devices, ManoMano adopted Maestro for end-to-end (E2E) testing and needed a way to run these tests at scale on real hardware. This post shares how they solved that challenge using AWS Device Farm.

In this post, you learn how to run Maestro mobile UI tests on real Android devices using AWS Device Farm. Maestro is a mobile UI testing framework that uses a declarative YAML syntax to describe test flows. By using the custom test environment in AWS Device Farm, you can install and run Maestro flows on real physical devices in the cloud.

This post is for mobile developers and Quality Assurance (QA) engineers who use Maestro for E2E testing and want to scale their test suites across real Android devices with different brands, screen sizes, and OS versions.

Many teams that adopt React Native prefer Maestro for its YAML-based simplicity and reliable mobile testing capabilities. With the custom test environment feature in AWS Device Farm, you can run any framework that operates over Android Debug Bridge (ADB), including Maestro. This post shows you how to set it up end to end.

Solution overview

AWS Device Farm is a fully managed app testing service that you can use to test your Android and iOS apps on physical devices in the AWS Cloud. It provides officially supported frameworks (Appium, Espresso, and XCTest) with all dependencies and setup pre-configured. It also offers custom test environments that give you full control over the test host. This means you can install and run any framework that operates over ADB, including Maestro. The custom environment provides the following capabilities:

  • An Amazon Linux 2023 host machine with ADB pre-installed, fully cleaned up and not reused between runs.
  • ADB connectivity to the physical device under test.
  • The ability to install additional tooling through shell commands in the test spec from your test package, downloaded from the internet or accessed through private sources within your virtual private cloud (VPC).
  • Live log and video streaming during test execution.
  • Full artifact collection (logs, screenshots, and other test output) from specified directories.

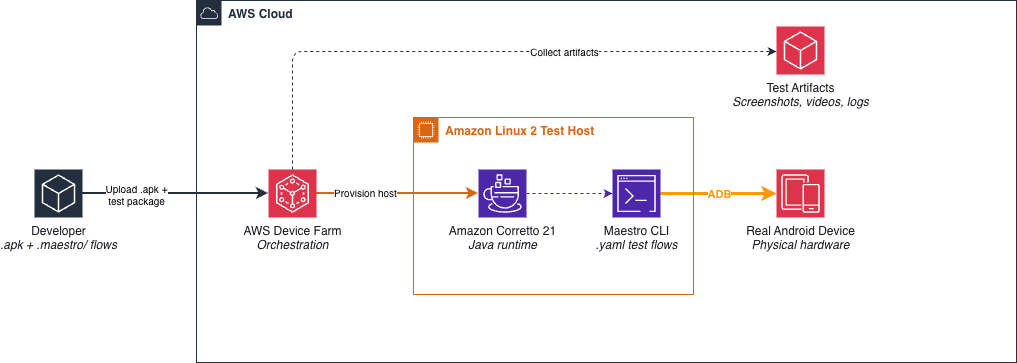
With these capabilities, you can install the Maestro CLI and, if needed, its primary dependency (for example, Java 21) on the test host. You then run your YAML-based test flows against the connected device, the same way you run them locally.

Architecture of the Maestro on AWS Device Farm solution, showing an Amazon Linux 2 test host connecting to a real Android device over ADB to run Maestro flows

Figure 1: Solution architecture

How it works

The solution uses the following workflow:

  1. AWS Device Farm provisions a real Android device and an Amazon Linux 2023 test host with ADB access to the device.
  2. During the install phase, the test spec downloads and installs Amazon Corretto 21 (Java) and the Maestro CLI on the test host.
  3. During the test phase, Maestro connects to the device through ADB and runs your .yaml test flows.
  4. Maestro writes screenshots, video recordings, and test results to the $DEVICEFARM_LOG_DIR directory.
  5. AWS Device Farm collects all artifacts and makes them available for download after the run completes.

Note: This approach currently supports Android devices only. As of 2026, Maestro iOS support is optimized for simulators and does not work with the real physical iOS devices that AWS Device Farm provides (as indicated in the Maestro documentation).

Prerequisites

To complete this walkthrough, you must have the following:

  • An AWS account with access to AWS Device Farm
  • An Android .apk file built for testing (a release build with animations disabled is recommended for stability)
  • Maestro test flows written in YAML (for more information, see Getting started in the Maestro documentation)
  • Familiarity with the AWS Device Farm Console
  • The Maestro driver APKs (dev.mobile.maestro) for uploading as Extra Apps in AWS Device Farm. After running Maestro locally at least once on a connected device, you can extract the installed APKs using adb shell pm path dev.mobile.maestro.

Walkthrough

Complete the following steps to configure and run Maestro tests on AWS Device Farm.

Step 1: Prepare your Android application package

Build your React Native (or native Android) application as an .apk file. Use a release build or a dedicated test build with animations disabled to reduce test flakiness.

Step 2: Package your Maestro test flows

AWS Device Farm expects a test package in .zip format. Use this zip file as a carrier for your Maestro .yaml flows. The following example shows a typical test directory structure:

.maestro/
├── login_flow.yaml
├── checkout_flow.yaml
└── search_flow.yaml

Run the following command to package the directory into a zip file:

zip -r maestro-tests.zip .maestro/

Upload this zip file to AWS Device Farm as your test package. AWS Device Farm extracts it to $DEVICEFARM_TEST_PACKAGE_PATH, which makes your flows accessible during test execution.

Step 3: Configure the test run

In the AWS Device Farm Console, create a test run with the following configuration:

  1. For Choose your application, upload your .apk file.
  2. For Test framework, select Appium Node.js. This selection determines the expected format of the test package you upload. Appium Node.js accepts a generic zip file containing your test scripts and binaries, which makes it suitable for packaging Maestro flows and the Maestro CLI. Other framework options (such as Instrumentation) require framework-specific package formats like compiled jar files.
  3. For Test package, select the zip file that contains your .maestro directory.
  4. For Test spec, replace the default testspec.yml with the custom configuration in Step 4.
  5. For Devices, select a curated device pool or specific Android devices.
  6. For Extra Apps (located under Additional configuration and then Install other apps), upload the Maestro driver APKs (dev.mobile.maestro). AWS Device Farm installs these on the device before the test begins to help you maintain compatibility with restrictive Android skins.
  7. Review your configuration and choose Confirm and start.

Step 4: Configure the test specification

The following test spec instructs AWS Device Farm to download Amazon Corretto 21, install the Maestro CLI, and run your test flows.

In the following code, replace {YOUR_APP_ID} with your application package ID (for example, com.example.myapp). You can find this in your application’s AndroidManifest.xml or by running adb shell pm list packages | grep <your-app-keyword>.

version: 0.1
# Use the Amazon Linux 2023 host environment
android_test_host: amazon_linux_2023

phases:
  install:
    commands:
      # Set locale (important if your app uses special characters)
      - export LANG=en_US.UTF-8
      - export LC_ALL=en_US.UTF-8
      - export LANGUAGE=en_US.UTF-8
      - locale

      # Install Amazon Corretto 21 (required by Maestro)
      - echo "Downloading Amazon Corretto 21..."
      - curl -L -o /tmp/java21.tar.gz https://corretto.aws/downloads/latest/amazon-corretto-21-x64-linux-jdk.tar.gz
      - mkdir -p /tmp/java21
      - tar -xzf /tmp/java21.tar.gz -C /tmp/java21 --strip-components=1
      - export JAVA_HOME=/tmp/java21
      - export PATH=$JAVA_HOME/bin:$PATH
      - java -version

      # Install Maestro CLI
      - curl -Ls "https://get.maestro.mobile.dev" | bash
      - export PATH="$PATH:$HOME/.maestro/bin"

  pre_test:
    commands:
      # Grant background permissions to Maestro driver (for MIUI devices)
      - adb shell appops set dev.mobile.maestro RUN_IN_BACKGROUND allow 2>/dev/null || true
      - adb shell appops set dev.mobile.maestro START_ACTIVITIES_FROM_BACKGROUND allow 2>/dev/null || true
      - maestro --version

  test:
    commands:
      # Run Maestro test flows
      - maestro test -e APP_ID={YOUR_APP_ID} "$DEVICEFARM_TEST_PACKAGE_PATH/.maestro" --test-output-dir=$DEVICEFARM_LOG_DIR/maestro-results

  post_test:
    commands:
      - echo "E2E tests completed"

artifacts:
  # Collect all Maestro output (screenshots, videos, logs)
  - $DEVICEFARM_LOG_DIR

For more information, see Custom test environments in AWS Device Farm.

Key environment variables

The test spec uses the following AWS Device Farm environment variables:

  • $DEVICEFARM_TEST_PACKAGE_PATH: The path where AWS Device Farm extracts your uploaded test package (zip file).
  • $DEVICEFARM_LOG_DIR: The default directory for storing artifacts. AWS Device Farm collects files from this directory after the run.
  • $DEVICEFARM_APP_PATH: The path to your uploaded .apk file on the test host.
  • $DEVICEFARM_DEVICE_NAME: The unique device identifier (UDID) of the device under test.
  • $DEVICEFARM_DEVICE_OS_VERSION: The Android OS version running on the device.

Reviewing test results

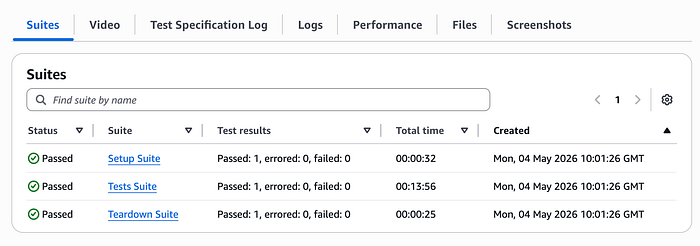
After the test run completes, AWS Device Farm displays results organized into three suites:

  • Setup suite: Contains the output from the install and pre_test phases, including Amazon Corretto and Maestro installation.
  • Tests suite: Contains the output from the maestro test command, with pass/fail status for each flow.
  • Teardown suite: Contains the post_test phase output and device cleanup.
AWS Device Farm test run results page organized into Setup, Tests, and Teardown suites

Figure 2: AWS Device Farm test run results showing the Setup, Tests, and Teardown suites

In the Test Specification Log, you can view the live console output. The following example shows typical output during a test run:

[DEVICEFARM] Setting up your device. This usually takes 2-3 minutes.
[DEVICEFARM] ########### Start executing testspec ###########

[DEVICEFARM] ########### Entering phase install ###########

[DeviceFarm] echo "Downloading Amazon Corretto 21..."
Downloading Amazon Corretto 21...
[DeviceFarm] java -version
openjdk version "21.0.11" 2026-04-21 LTS
OpenJDK Runtime Environment Corretto-21.0.11.10.1 (build 21.0.11+10-LTS)
[DeviceFarm] curl -Ls "https://get.maestro.mobile.dev" | bash
Installation was successful!

[DEVICEFARM] ########### Entering phase test ###########

[DeviceFarm] maestro test -e APP_ID=com.manomano "$DEVICEFARM_TEST_PACKAGE_PATH/.maestro" --test-output-dir=$DEVICEFARM_LOG_DIR/maestro-results

Waiting for flows to complete...
[Passed] login_flow (1m 12s)
[Passed] checkout_flow (2m 29s)
[Passed] search_flow (0m 47s)

3/3 Flows Passed

[DEVICEFARM] ########### Finish executing testspec ###########
[DEVICEFARM] Tearing down your device.

To download detailed results, including screenshots and video recordings, open the Files tab and choose Customer Artifacts. For more information, see Downloading artifacts in a custom test environment.

Handling MIUI device installation prompts

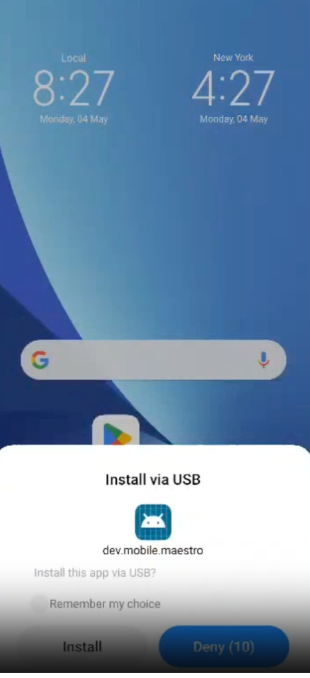
Maestro requires a driver app to be installed on the device under test. On devices with restrictive Android skins (such as Xiaomi MIUI and Oppo ColorOS, which are common in the AWS Device Farm device pool), the operating system blocks USB installations. Installation proceeds only after a user accepts a security prompt, as displayed in Figure 3.

MIUI security dialog on an Android device prompting the user to accept a driver app installation

Figure 3: MIUI installation permission dialog

The way to address this scenario is by pre-installing the Maestro driver APKs as Extra Apps in the AWS Device Farm Console. When you upload the Maestro APKs alongside your application, AWS Device Farm installs them on the device before the test begins. You can then grant the necessary background permissions through ADB using appops commands in the pre_test phase:

adb shell appops set dev.mobile.maestro RUN_IN_BACKGROUND allow
adb shell appops set dev.mobile.maestro START_ACTIVITIES_FROM_BACKGROUND allow

These commands tell the OS to trust the Maestro driver app, allowing it to run in the background and start activities without user interaction. This approach removes the need for the UI watcher script and helps make sure that Maestro can start driving your application when the test begins.

Best practices

The following recommendations are based on the AWS Device Farm best practices for custom test environments:

  • Use environment variables instead of absolute paths: AWS Device Farm provides $DEVICEFARM_TEST_PACKAGE_PATH, $DEVICEFARM_LOG_DIR, and other variables that help maintain consistent behavior across test hosts.
  • Direct artifacts to $DEVICEFARM_LOG_DIR: Use the --test-output-dir flag to write Maestro output to this directory. AWS Device Farm collects artifacts stored here automatically.
  • Verify non-zero exit codes on failure: Maestro returns a non-zero exit code when tests fail, which AWS Device Farm uses to mark the run as failed. Verify this behavior with your Maestro version.
  • Do not log sensitive data: Test spec logs are available as downloadable artifacts. Do not echo API keys or secrets in your commands.
  • Disable animations in your test build: Animations are a common source of test flakiness. Disable them at build time or add ADB commands in the pre_test phase.
  • Use Maestro tags for selective test runs: Use --include-tags or --exclude-tags to run subsets of your test suite, such as smoke tests compared with full regression.

Automate with CI/CD

You can automate this workflow by integrating AWS Device Farm into your continuous integration and continuous delivery (CI/CD) pipeline with the AWS Command Line Interface (AWS CLI) or AWS SDKs. The following are the key API operations:

  • CreateUpload: Upload your .apk and test package zip file.
  • ScheduleRun: Start a test run with your test spec, app, and device pool.
  • GetRun: Poll for run completion and retrieve the result status.
  • ListArtifacts: Download test artifacts such as screenshots, videos, and logs.

For GitHub Actions, use the official GitHub Action, which handles uploading your application and test package, scheduling the run, polling for completion, and downloading artifacts. For AWS CodePipeline, see AWS Device Farm test action reference. For other CI/CD tools or services, use the AWS CLI or AWS SDKs with the AWS Device Farm API.

Cost considerations

AWS Device Farm pricing offers two models for automated testing:

  • Pay per device minute: You pay per minute of device usage. A typical Maestro test run takes 5–15 minutes per device, depending on the number of flows.
  • Unlimited testing (flat rate): A monthly flat fee per device slot gives you unlimited testing on one device at a time. This model is cost-effective for teams that run frequent test suites.

The install phase (downloading Java and Maestro) adds approximately 1–2 minutes to each run. To optimize costs, run critical smoke tests on every commit and full regression suites on release branches only. For current pricing details, see the AWS Device Farm pricing page.

Troubleshooting

The following list describes common issues and their solutions.

  • Maestro times out waiting for the app: Verify that your .apk is a release build or that the app starts quickly. Increase the launch timeout by using the appLaunchTimeout parameter in your flow YAML file.
  • Tests fail on MIUI or Xiaomi devices only: Verify that the Maestro driver APKs are uploaded as Extra Apps in AWS Device Farm and that the appops commands in the pre_test phase grant RUN_IN_BACKGROUND and START_ACTIVITIES_FROM_BACKGROUND permissions.
  • Java not found during Maestro run: Verify that the export PATH commands in the install phase are correct. Environment variables that are set in one phase persist to subsequent phases.
  • Artifacts do not appear after the run: Verify that --test-output-dir points to $DEVICEFARM_LOG_DIR or a subdirectory. AWS Device Farm collects only files in paths that are listed under the artifacts section.
  • Test marked as passed despite flow failures: Verify that your Maestro version returns a non-zero exit code on failure. Some older versions might not exit with a non-zero code by default.

Cleaning up

To avoid incurring future charges, delete the following resources that you created during this walkthrough:

  1. In the AWS Device Farm Console, delete the test run and any associated uploads that you no longer need.
  2. If you created a device pool specifically for this walkthrough, delete it from your AWS Device Farm project.
  3. AWS Device Farm does not incur charges when no test runs are active. No additional cleanup is required unless you are using the unlimited testing plan.

Conclusion

By integrating Maestro with the AWS Device Farm custom test environment, ManoMano transformed their mobile testing strategy. They moved from manual validation on a handful of devices to automated end-to-end testing across real physical hardware on every release. This approach delivers:

  • Broader device coverage: Tests run on devices from different manufacturers with varying screen sizes and OS versions, catching device-specific rendering issues and permission dialogs that emulators miss.
  • Faster feedback cycles: Automated test runs complete in minutes rather than the hours required for manual testing across multiple devices.
  • Consistent reliability: Pre-installing the Maestro driver APKs and granting background permissions through ADB eliminates flakiness caused by restrictive Android skins like MIUI.
  • CI/CD integration: Tests run automatically on every pull request using the official AWS Device Farm GitHub Action, preventing regressions from reaching production.

The key enabler is the AWS Device Farm custom test environment. With it, you can run any framework that operates over ADB, without being limited to officially supported test frameworks. This means you can combine the YAML-based test authoring in Maestro with a managed fleet of real devices and extend the pattern to other ADB-compatible tools as your testing needs evolve.

In this post, you learned how to configure the custom test environment, package your Maestro flows, handle manufacturer-specific restrictions, and automate the workflow in your CI/CD pipeline. To get started, create an AWS Device Farm project and try running your existing Maestro flows by following the steps in this post.


About the authors

Ronald Teijeira Fernández

Ronald Teijeira Fernández

Ronald is a Senior Solutions Architect at Amazon Web Services, helping Public Sector customers in Iberia accelerate cloud adoption and maturity. He specializes in development and security, and is an active member of the Next Generation Development Experience and Security Technical Field Communities, where he enables and supports both the community and customers through technical content and guidance.

Jose Maria Elias

Jose Maria Elias

Jose is a Senior Engineering Manager at ManoMano, where he leads the Foundations team responsible for the core architecture of both web and mobile platforms. Recognizing the critical importance of app quality, he focuses on driving mobile testing automation strategies. He specializes in architecting scalable E2E testing pipelines, currently utilizing the Maestro framework and AWS Device Farm to validate mobile applications across diverse device ecosystems.

Pinpointing Location of Videos from Background Airplane Sounds

Post Syndicated from Bruce Schneier original https://www.schneier.com/blog/archives/2026/11/pinpointing-location-of-videos-from-background-airplane-sounds.html

This is fascinating:

The video describes a technique that can reveal where an otherwise unidentifiable recording was made by analyzing its audio for the faint sounds of passing aircraft. The technique is both fascinating and frightening.

It works by looking at Doppler curves, which plot the way a plane’s sound changes as it passes overhead because of the Doppler effect. This is the same familiar Doppler effect that causes the frequency of a siren to rise as it approaches and then fall as it passes by and moves away. More generally, it’s the phenomenon whereby the frequency of a wave perceived by an observer changes when the observer and the source of the wave are moving in relation to one another.

[…]

It’s sound that’s relevant here, though, and specifically the sound of aeroplanes. Early in his video, Colsto brings up a map of the flights that were in the air at the time the video he’s tracing was recorded. Much of this information is publicly available. Aircraft equipped with Automatic Dependent Surveillance–Broadcast (ADS-B) transmit data about their position, velocity, and altitude, which flight-tracking services collect and make available to the public. While not every plane is tracked, the system provides an enormous amount of information about aircraft movements.

Security updates for Friday

Post Syndicated from jzb original https://lwn.net/Articles/1105881/

Security updates have been issued by AlmaLinux (cockpit-files, container-tools:rhel8, delve, gcc-toolset-12-binutils, gimp:2.8, glibc, go-toolset:rhel8, kernel, libfastjson, mariadb:10.3, mod_auth_openidc:2.3, mysql:8.0, php:8.0, pki-core:10.6 and pki-deps:10.6, squid:4, tang, tesseract, thunderbird, and virt:rhel and virt-devel:rhel), Debian (chromium, ntfs-3g, puppet-agent, and trapperkeeper-authorization-clojure), Fedora (freerdp, goose, gpsd, hatch, perl-HTTP-Headers-ActionPack, perl-MIME-tools, perl-Plack, perl-Starman, proftpd, python-mistune, ruby-build, rust-crypto-bigint, rust-ctutils, rust-elliptic-curve, rust-num-bigint, rust-num-bigint0.4, rust-num-modular, rust-num-modular0.6, rust-num-prime, rust-zmij, rust-zstd, rust-zstd-safe, rust-zstd-safe7, rust-zstd-sys, rust-zstd0.13, scribus, sofia-sip, tailscale, tor, and wordpress), Oracle (cockpit-files, delve, firefox, gimp:2.8, kernel, and osbuild-composer), Red Hat (delve, git-lfs, go-toolset:rhel8, grafana, ignition, opentelemetry-collector, osbuild-composer, python-pillow, and yggdrasil), Slackware (openssh), SUSE (bind, brotli, cpupower, expat, fuse-overlayfs, go1.26, google-guest-agent, helm, ibus-typing-booster, kernel, kyverno, libmodplug-devel, librsvg, libX11, nvidia-open-driver-G06-signed, owntone, parted, perl-Cpanel-JSON-XS, perl-Text-CSV_XS, php8, python-Brotli, regclient, roundcubemail, rsyslog, and tomcat), and Ubuntu (ca-certificates, frr, haproxy, linux-nvidia-7.0, linux-nvidia-bos, linux-nvidia-tegra, and nginx).

The post-quantum future of web privacy

Post Syndicated from Christopher Patton original https://blog.cloudflare.com/vole-mole/

The highest priorities for the transition to post-quantum cryptography are the basic building blocks of authenticated key-agreement protocols such as TLS. Without these building blocks in place, secure communication on the Internet will not be possible once cryptographically relevant quantum computers come online. However, today we rely on quantum-vulnerable cryptography for much more than TLS.

Privacy Pass is a protocol used by site operators like Cloudflare to help protect applications from abuse. One way we do this is by rate limiting individual clients so that no one client consumes too many of the site's resources. Normally this involves some combination of friction or loss of privacy for users: CAPTCHAs or other challenges to moderate traffic, along with accounts and fingerprinting to identify traffic.Privacy Pass was designed to avoid this tradeoff between friction and privacy. The basic idea is that a client gets issued a number of tokens, which they can redeem in exchange for access to the site. Crucially, each token is unlinkable to the client it was issued to, ensuring the client can use the site as they always had without sacrificing privacy.

With 10 years of deployment experience under our belts — using Privacy Pass for applications such as privacy proxies (like iCloud Private Relay) and relays (like Privacy Gateway) — we, along with others, are collaborating to bring the next generation of this technology to the web. One of our goals is to develop more sophisticated tools for managing agentic traffic that would otherwise consume too many resources and degrade performance for human visitors. Another goal is to foster a more open ecosystem by making it easier for more types of clients to participate. Achieving these goals requires developing new capabilities beyond what Privacy Pass offers today.

Given the trajectory, in this post we look at the prospects for post-quantum. In fact, we're in better shape than one might think. Privacy Pass still relies on classical cryptography, like RSA and elliptic curves. This means that a quantum attacker will be able to forge tokens at will and use them to bypass whatever security mechanism the site operator wants to implement (such as rate limiting). On the other hand, Privacy Pass is unconditionally private, meaning no attacker, quantum or not, can link the redemption of a token to its issuance. What's more, the new capabilities we're developing for this new generation of private authentication technology  can and will be instantiated in a way that upholds the same guarantee: your interaction remains private even after Q-day.

This gives us a little breathing room, but we will need an alternative soon. This is an active area of research that has made significant strides in recent years. Still, just as is the case with other aspects of the transition, the primary challenge is the sheer size of post-quantum alternatives: ML-DSA-44 signatures are a whopping 2,420 bytes, while ECDSA-P256 signatures are just 64 bytes. And there's not much hope for drop-in replacements any time soon. Just as for TLS, we'll have to settle for primitives with higher cost and re-engineer our systems to bear this cost.

But what will those primitives be? In this post, we'll explore one potential future for post-quantum privacy on the web, made possible by a recent breakthrough in the design of blind signatures.

What we need to build: a brief look at MOLE

Let's start with an overview of this new technology, which is presently called MOLE ("Moderation Of unLinkable Endorsements"). We'll have much more to say about MOLE later on, but for now we'll highlight the details that are most relevant to cryptography.

One of the core components of Privacy Pass is a blind signature scheme, which allows a client to obtain a signature under an issuer's secret key without revealing to the issuer the message that it signed. The client can then reveal the message and blind signature later on without linking the signature to its issuance.

One type of Privacy Pass token consists of the message and blindly issued signature. To verify the token, the verifier needs the issuer's public key, and so necessarily learns the identity of the issuer. Thus while these tokens protect the identity of the client, they don't protect the identity of the issuer.

Of course, this is exactly what we want for some use cases. The identity of the issuer tells us something about what type of client is connecting to our edge, a signal we use to make decisions in some of our products and for some of our customers. For instance, a client might use a token issued by one of our customers to prove it is authorized to use the customer's VPN product.

However, for many use cases, this is more information than we actually need to make a decision to grant a client access to a resource. Normally we only care that the token was issued by some entity we trust. In fact, MOLE takes this a step further: the token should hide the identity of the issuer altogether so that we can't treat tokens differently based on who issued them. This guarantees equal treatment regardless of the type of client, making it easier for more clients to participate.

This issuer-hiding property is achieved through a new object called an endorsement. An endorsement is issued by an anchor and redeemed by a moderator. Before redemption, the client and moderator agree on an anchor set, the public keys of the anchors trusted by the moderator. During redemption, the client proves it was issued an endorsement by one of the anchors in the anchor set without revealing which one. Upon acceptance, the moderator issues the client the MOLE credential it will use to moderate the client's interaction with the site.

An endorsement can take many forms, but its key property is that it can be redeemed while hiding the identity of the anchor that issued it. There will also be many types of credentials, but because they're intended to be used by a particular moderator, they needn't be anchor-hiding or even publicly verifiable. This means that everything from blind signatures to anonymous credit tokens or anonymous rate-limited credentials can be used to instantiate MOLE credentials.

Now that we have a sense of what we're building, let's look at our options for post quantum.

A feast of cryptography

When designing cryptographic protocols, adaptability and efficiency are often in tension. Sometimes we know exactly what we want to build and can tailor a construction for that purpose; but the more we tailor the protocol for that use case, the harder it becomes to adapt that construction to a different use case.

Adaptability is essential for a system like MOLE. We're not just building one kind of credential system, but many. And the types of credentials we need are likely to change over time, especially on the web where we must constantly adapt to new traffic patterns and attacker behavior. To keep up, we need a set of building blocks that can be composed together into different protocols to meet different requirements.

Most of the post-quantum cryptographic schemes in wide use today come from larger families of constructions, but have been tuned for their particular application. ML-DSA is a good example here: the cryptographic framework from which this scheme was derived can be used to build a variety of things, but to make ML-DSA as compact as possible, its parameters have been carefully tailored to build an efficient and secure digital signature scheme. However, the same parameters would not necessarily be secure for other use cases.

We have come to view this as the central challenge for post-quantum anonymous credentials: to decouple parameter selection from protocol design. Classical credential systems take this for granted: for the most part, protocol designers don't need to think about the parameters of the elliptic curve they're using, allowing even non-experts in the design of elliptic curve cryptography to build useful things with it. Unfortunately, designing efficient post-quantum credentials still requires an enormous amount of expertise.

This situation seems to have changed, however. Earlier this year, we saw a breakthrough that represents a potential sea change for anonymous credentials.

VOLE-in-the-Head

The roots of this breakthrough go back several years. We'll pick up the story three years ago, with the VOLE-in-the-Head (VOLEitH) zero-knowledge proof system (Baum et al., Crypto 2023). A zero-knowledge proof system allows one to prove knowledge of a hidden witness, satisfying some public statement while keeping the witness private. For example, a zero-knowledge proof can be used to prove knowledge of an AES key K for which Y=AES(K,X), where X,Y  are public. This proof can be transformed into a digital signature whose security reduces to the security of AES, with X,Y as the public key and K as the secret key. This is exactly the FAEST digital signature, a candidate in NIST's ongoing signature competition.

Compared to many contemporary proof systems, VOLEitH is relatively simple to understand and implement securely. VOLE stands for "Vector Oblivious Linear Evaluation" and is an interactive technique that gives two parties correlated random values. These correlations act like authentication tags, allowing the verifier to check that a computation on the hidden witness was performed correctly. In VOLEitH, the prover prepares locally what the two parties would normally generate together — hence “in the head” — then commits to those values and uses the Fiat-Shamir transformation (a widely used tool in cryptography) to select the parts the verifier checks. This step turns the interactive VOLE process into a non-interactive zero-knowledge proof.

Apart from its simplicity, VOLEitH is a fairly unremarkable proof system. It's not succinct in the way many other proof systems are: its proofs are asymptotically linear in the size of the witness and the arithmetic complexity of the statement being proved. However, VOLEitH is concretely very efficient for a particular type of statement, namely one that can be expressed as a set of equations over small binary fields.

One example is the relation Y=AES(K,X) we just discussed. We don't normally think of AES as a set of equations, but many of its computations are designed around arithmetic in GF(28), a field whose elements are single bytes. FAEST proofs for this statement are only about 4KB (NIST Round 3, 128s).

Another example is the KuMQuat signature scheme, in which the signer proves an instance of the Multivariate Quadratic (MQ) problem. Here we're given a system of random, quadratic equations of multiple variables over a small field, like GF(28). Mathematically, this MQ map P looks something like P(s) = (sTA1s + b1s,…,sTAms + bms) where s and each bi are length n vectors and each Ai is an n-by-n matrix. Given P,P(s) for random s, the MQ problem is to find s. We call it quadratic because we multiply the elements of s by itself.

The MQ problem is believed to be hard to solve even for a quantum computer. But because P is made up of quadratic equations, proving knowledge of a solution with VOLEitH is fairly cheap, yielding KuMQuat signatures as small as 2.6KB.

When compared to other post-quantum signatures like ML-DSA or FN-DSA, these numbers don't look especially impressive. But how VOLEitH compares to other schemes in a particular category of constructions is beside the point. For MOLE, we'll need to strike a balance between performance and the ability to build many types of credential systems. To that end, we need one more ingredient.

Multivariate signatures

Another way to build signatures from MQ maps involves embedding some additional mathematical structure into the map. In the Unbalanced Oil and Vinegar (UOV) signature scheme, the public key is an MQ map P, and a signature is a vector s satisfying P(s) = t, where t is obtained by hashing and salting the message to be signed.

The secret key for this signature scheme is a trapdoor for P with which the signer can derive solutions to the MQ equations. The trapdoor reveals to the signer a hidden partitioning of the variables of each quadratic equation into “oil” and “vinegar” variables. Oil variables are never multiplied by one another, so fixing the vinegar values turns the equations into a linear system that the signer can solve for the oil values. In the public key, oil and vinegar variables are mixed together in a way that hides this structure in the map.

UOV is also a candidate in NIST's ongoing signature standardization effort. It has one of the smallest signatures among the candidates, at just 135 bytes. The trade-off is that it has the largest public keys, at 46.6KB. MAYO is another multivariate candidate with much smaller public keys, at the cost of slightly larger signatures.

The key thing to take away here is that the arithmetic complexity of evaluating a UOV (or MAYO) signature is comparable to evaluating an MQ instance. Both are public quadratic maps over small binary fields, making them a good fit for VOLEitH. This brings us to the breakthrough.

Blind signatures from VOLE-in-the-Head and UOV

Earlier this year, a blind signature called PoMFRIT was published (Baum et al., USENIX Security 2026) that achieved what at the time was a record for candidate post-quantum constructions: 6.7KB for the blind signature itself and just a few hundred bytes for issuance. PoMFRIT is based on VOLE-in-the-Head and the MAYO multivariate signature. We can easily drive the size of the signature down to 4.3KB by swapping MAYO out for UOV. (This figure uses NIST round 3 parameters for UOV (uov-Ip) and FAEST-EM-128s.) The trade-off is larger public keys, but this pays off in applications where a public key can be cached and used sufficiently often.

This is competitive with state-of-the-art lattice-based constructions. But the really good news is that building blocks of PoMFRIT can easily be reconfigured into all of the credential systems we've considered for MOLE, including endorsements. More on this in a bit: for now, let's look at how PoMFRIT works in more detail.

A well-known paradigm for designing blind signatures is the following. First, the client places the message in the cryptographic equivalent of a sealed envelope, called a commitment. For our purposes, a commitment is simply the hash of the message together with some randomness generated by the client. To complete issuance, the signer simply signs the commitment directly.

To construct the blind signature, the client produces a zero-knowledge proof of knowledge of the signature and the randomness it used to compute the commitment, called the opening. A verifier would use the signer's public key to verify this proof.

Let's define a bit of notation to make this clearer:

  1. The client generates an opening r and sends a commitment c=H(m,r) to its message m to the issuer.
  2. The issuer produces a signature s=Sign(sk,c) and sends it to the client. It doesn’t learn the message as it’s hidden behind the hash.
  3. Finally, the client produces a proof π of knowledge of s,r for which Verify(pk,H(m,r))=1,

The proof π is the blind signature. It can be verified by any party in possession of the issuer's public key pk and the message m.

Unlinkability comes from the client presenting entirely different objects during the two phases: a commitment is shown to the issuer during issuance, and a zero-knowledge proof is shown to a verifier during presentation. Even if the issuer and verifier collude or are the same entity, they cannot link the sessions.

The size of the proof π is dominated by evaluation of the hash, so we need to choose a hash function that is friendly for our proof system. For most proof systems, such proof-friendly hashes are not well studied, but for VOLEitH it turns out that the Keccak permutation used in SHAKE and TurboSHAKE is a good choice. Keccak’s bitwise operations translate natively into VOLEitH constraints: XOR becomes addition, AND becomes multiplication, and rotations simply rearrange values. (Many popular SNARKs, by contrast, are designed for large prime fields, making byte- and bit-oriented operations less natural to express.)

Nevertheless, Keccak evaluations end up being the largest component of the VOLEitH proof, so we need to make sure we're using only the minimum necessary number of permutations. PoMFRIT requires two: one for the commitment and another for the signature. Concretely, the statement we prove is roughly P(s)=H(H(m,r),rs) where s is the signature, rs is a salt chosen by the issuer, P is the issuer's UOV public key, and H denotes the Keccak permutation with the output truncated to the appropriate length, which also prevents anyone from inverting.

From blind signatures to endorsements and beyond

Recall that for MOLE endorsements, we need something like a blind signature, but one that doesn't reveal the anchor that issued it. That is, we now have a sequence of anchor keys P1,…,PN, and the statement we now want to prove is  Pi(s)=H(H(m,r),rs) for some anchor key Pi whose index i is now part of the hidden witness.

With some care, we can write this as a set of constraints with roughly the same cost: two hashes and one MQ evaluation. We need to prove a bit more about the witness. What exactly? We won't spoil it for you: ZK circuit design is part of the craft of cryptographic engineering that makes it so fun. We'll just say the kind of thinking needed here is transferable to just about any modern proof system you might encounter.

Even more advanced credential systems can be constructed in this framework, including the aforementioned anonymous credit tokens and anonymous rate-limited credentials. In both of these cases, the primary cost is an additional hash or two. Each of these also requires proving that part of the witness (e.g., the credit count) is in some expected range, but this is low cost in VOLEitH.

Indeed, for every construction we have considered so far for MOLE, the primary cost is the size of the Keccak evaluation and how many times we need to evaluate it. This means that finding ways to reduce the amount of hashing yields improvements across the board.

Optimizations

Before we go any further, we need to acknowledge that cryptanalysis of multivariate cryptography is still relatively immature. We have seen advances against several parameter regimes in just the last couple of years, Both UOV and MAYO have weathered these attacks well, and an outright break of UOV and even MAYO seems more unlikely with every passing year. But we should at least expect the parameters to change in a way that adds a bit of cost to our constructions.

On the other hand, it's not uncommon for credential systems used in practice to adopt a less-than-conservative security posture for the sake of performance in so far as it affects forgery resistance. This typically means relying on stronger-than-usual computational assumptions. That is, it's possible that a (pre-quantum) attack might come along that breaks anonymous credit tokens, but not ECDSA, despite the fact that they both use the same elliptic curve.

Using fewer hashes

PoMFRIT achieved its size record by doing precisely the same thing. Recall that the blind signature requires proving two hash evaluations, one by the client and the other by the issuer. PoMFRIT observes that VOLEitH proof generation can be split into two stages. In the first stage, the client commits to a random mask. It then hashes the message normally (outside of the ZK circuit), combines the result with the mask, and sends the masked target to the issuer. The issuer uses the UOV trapdoor to find a preimage of this target. In the second stage, the client completes the proof that the preimage and previously committed mask are consistent. The hash remains part of the protocol, but the issuer — acting as the VOLEitH verifier — can compute it directly rather than requiring the zero-knowledge proof to reproduce it.

This strategy substantially reduces proof size, but it also changes our security posture. The plain UOV assumption is that no (quantum) attacker can find a pre-image for a random target without knowledge of the trapdoor. The corresponding one-more-UOV assumption (analogous to the one-more-MAYO assumption in the PoMFRIT paper) neatly captures the additional information available to the attacker as a result of this kind of optimization. The assumption, then, is that this additional information doesn't lead to an attack.

This assumption may turn out to be overly optimistic. Recently, researchers at the University of California, San Diego, and INRIA managed to forge a 1024-bit RSA signature using a Privacy Pass issuer as a signing oracle. Fortunately, Privacy Pass uses 2048-bit RSA, which, in concert with other defense mechanisms, provides a pretty good security margin. Likewise, for UOV we might consider using NIST Level 3 parameters instead of Level 1.

In any case, a bit more study will be required before we rely too heavily on these kinds of optimizations. It's worth emphasizing that a break here would only impact an attacker's ability to forge tokens, not the attacker's ability to violate a client's privacy.

Making each hash cheaper

Standard SHAKE uses a 1600-bit Keccak state with 24 applications of an underlying round function. However, since the SHA-3 standard was published, many have come to believe that 24 rounds is just too much crypto. TurboSHAKE works the same way, except the permutation uses 12 rounds instead of 24. This substantially reduces the size of VOLEitH proofs. In fact, we're quite comfortable with this security margin, and not just for this application.

Another change to Keccak that reduces the proof size is to reduce the size of the state. 256 bits of the state are reserved for the capacity to get 128 bits security. That leaves 1344 bits that can be hashed in one go, which is more than we need. Reducing the state by half to 800 bits leaves us with a rate of 544 bits, which is plenty. On top of that, it even increases the security at the same number of rounds, as an attacker has less to play with. The smaller state means we’re using half the multiplications in our circuit, which reduces the size of the proof.

Leaning into multivariate

In an ideal world, we could avoid proving conventional hashes altogether by replacing each hash with something that composes more natively with the algebraic structure of our primitives. Indeed, those familiar with Pedersen commitments and their use in elliptic curve cryptography may wonder if commitments can be constructed from multivariate cryptography.

This might look something like this: Fix public, random MQ maps F and G and commit to a message m using c=(m+F(r),G(r)). The advantage of this approach is that the degree of the constraints is the same as the degree of the constraints for the UOV signature. Not only does this make the proof smaller, it makes it far simpler, since we avoid evaluating symmetric crypto in ZK altogether.

We experimented with this approach for our application, and it yielded some impressive results. However, it's not at all clear yet if the parameter regime in which multivariate commitments yield an improvement is also secure. Notably, the risk here is not just to unforgeability, but also to client privacy. A lot more study is needed.

Another direction is to build an MQ-friendly pseudorandom generator (PRG).

For typical VOLEitH parameters, adding an extra witness bit adds ten bits to the proof. There is a neat trick to make this a lot cheaper: only one bit of proof per bit of witness! Instead of using VOLEitH directly, we commit to a (relatively) short key. That key we stretch into a larger bitstream using a PRG with low-degree so that it can be computed cheaply in the circuit. Now, to add a witness bit w, we get one extra bit k from the PRG, and store the bit w XOR k in the proof.

There is a performance trade-off: we need to compute the PRG and the witnesses start at degree 2 instead of 1. That especially increases prover time. Also the benefits on proof size only start to pay off when you need a decent number of witness bits.

And of course you need a PRG! You can create a PRG using a random MQ instance, but that’s very slow and seems overly conservative. At the other end is the Goldreich PRG, which can be seen as an as-sparse-as-possible MQ PRG. We’d want something in between, but such PRGs haven’t received much study.

Is MOLE ready for post-quantum?

We already have post-quantum privacy today, so we have some time before we need to have a solution in place, but now is the time to develop alternatives.

Multivariate cryptography looks to be a promising basis for easily building a variety of anonymous tokens and credentials. We're currently developing two schemes in this framework: VOLE-IHAT, a candidate for MOLE endorsements, and VOLE-ACT, a candidate for MOLE credentials. Our current cost estimates for these are shown in the table below. The numbers here are subject to change as we analyze and develop these constructions. We use UOV (uov-Ip) in each case, which means the public keys are all 46.6KB. VOLEitH uses the same parameters as FAEST-EM-128s:

issuance

presentation

PoMFRIT (with UOV)

<1KB

4.3KB (redemption)

VOLE-IHAT

5.6KB

6.5KB (redemption)

VOLE-ACT

5.4KB

12.0KB (spend)

These numbers are significantly larger than their classical counterparts. This comes as no great surprise, as "PQ is big" is really the main hallmark of the transition across the board. However, replacing RSA blind signatures with PoMFRIT has comparable overhead to replacing ECDSA with ML-DSA. The runtimes of these protocols are also excellent: each operation takes just a few milliseconds with our implementation. (Runtime can be improved by quite a bit, though at the cost of higher communication.)

If these numbers hold, then we've already reached an important milestone: the transition to PQ anonymous credentials for the web can now shift from cryptography design to protocol engineering. In other words, we think we can make these numbers work. For example, whereas classical blind signatures might be cheap enough to redeem on every request, we'll have to figure out how to amortize a single redemption over multiple requests.

We have some work to do before we get there. First, we need to make sure our protocols are sound, in particular by producing security proofs for them that show they are secure as long as UOV is secure. Second, we need to wait a bit for cryptanalysis of UOV to catch up. We encourage cryptographers to spend time with multivariate cryptography. Once the parameters stabilize, we believe these schemes will find a place in a ton of useful applications. We've only just scratched the surface so far.


The collective thoughts of the interwebz