Post Syndicated from The Atlantic original https://www.youtube.com/shorts/c37ApaHGRrc
[$] Don’t fear the TPM
Post Syndicated from jzb original https://lwn.net/Articles/1032026/
There is a great deal of misunderstanding, and some misinformation, about the
Trusted
Platform Module (TPM); to combat this, Debian developer Jonathan
McDowell would like to clear the air and help users understand what it
is good for, as well as what it’s not. At DebConf25 in Brest, France,
he delivered a
talk about TPMs that explained what they are, why people might be
interested in using them, and how users might do so on a Debian
system.
Tuba v0.10.0 released
Post Syndicated from jzb original https://lwn.net/Articles/1032736/
Version
0.10.0 of the Tuba
fediverse client has been released. Notable changes in this release
include a new post composer, an in-app web browser, search history,
and many other refinements. See this thread for
more details and highlights.
Annoying People to Death
Post Syndicated from The Atlantic original https://www.youtube.com/shorts/p-UOPVy36tk
Minimize AI hallucinations and deliver up to 99% verification accuracy with Automated Reasoning checks: Now available
Post Syndicated from Danilo Poccia original https://aws.amazon.com/blogs/aws/minimize-ai-hallucinations-and-deliver-up-to-99-verification-accuracy-with-automated-reasoning-checks-now-available/
Today, I’m happy to share that Automated Reasoning checks, a new Amazon Bedrock Guardrails policy that we previewed during AWS re:Invent, is now generally available. Automated Reasoning checks helps you validate the accuracy of content generated by foundation models (FMs) against a domain knowledge. This can help prevent factual errors due to AI hallucinations. The policy uses mathematical logic and formal verification techniques to validate accuracy, providing definitive rules and parameters against which AI responses are checked for accuracy.
This approach is fundamentally different from probabilistic reasoning methods which deal with uncertainty by assigning probabilities to outcomes. In fact, Automated Reasoning checks delivers up to 99% verification accuracy, providing provable assurance in detecting AI hallucinations while also assisting with ambiguity detection when the output of a model is open to more than one interpretation.
With general availability, you get the following new features:
- Support for large documents in a single build, up to 80K tokens – Process extensive documentation; we found this can add up to 100 pages of content
- Simplified policy validation – Save your validation tests and run them repeatedly, making it easier to maintain and verify your policies over time
- Automated scenario generation – Create test scenarios automatically from your definitions, saving time and effort while helping make coverage more comprehensive
- Enhanced policy feedback – Provide natural language suggestions for policy changes, simplifying the way you can improve your policies
- Customizable validation settings – Adjust confidence score thresholds to match your specific needs, giving you more control over validation strictness
Let’s see how this works in practice.
Creating Automated Reasoning checks in Amazon Bedrock Guardrails
To use Automated Reasoning checks, you first encode rules from your knowledge domain into an Automated Reasoning policy, then use the policy to validate generated content. For this scenario, I’m going to create a mortgage approval policy to safeguard an AI assistant evaluating who can qualify for a mortgage. It is important that the predictions of the AI system do not deviate from the rules and guidelines established for mortgage approval. These rules and guidelines are captured in a policy document written in natural language.
In the Amazon Bedrock console, I choose Automated Reasoning from the navigation pane to create a policy.
I enter name and description of the policy and upload the PDF of the policy document. The name and description are just metadata and do not contribute in building the Automated Reasoning policy. I describe the source content to add context on how it should be translated into formal logic. For example, I explain how I plan to use the policy in my application, including sample Q&A from the AI assistant.

When the policy is ready, I land on the overview page, showing the policy details and a summary of the tests and definitions. I choose Definitions from the dropdown to examine the Automated Reasoning policy, made of rules, variables, and types that have been created to translate the natural language policy into formal logic.
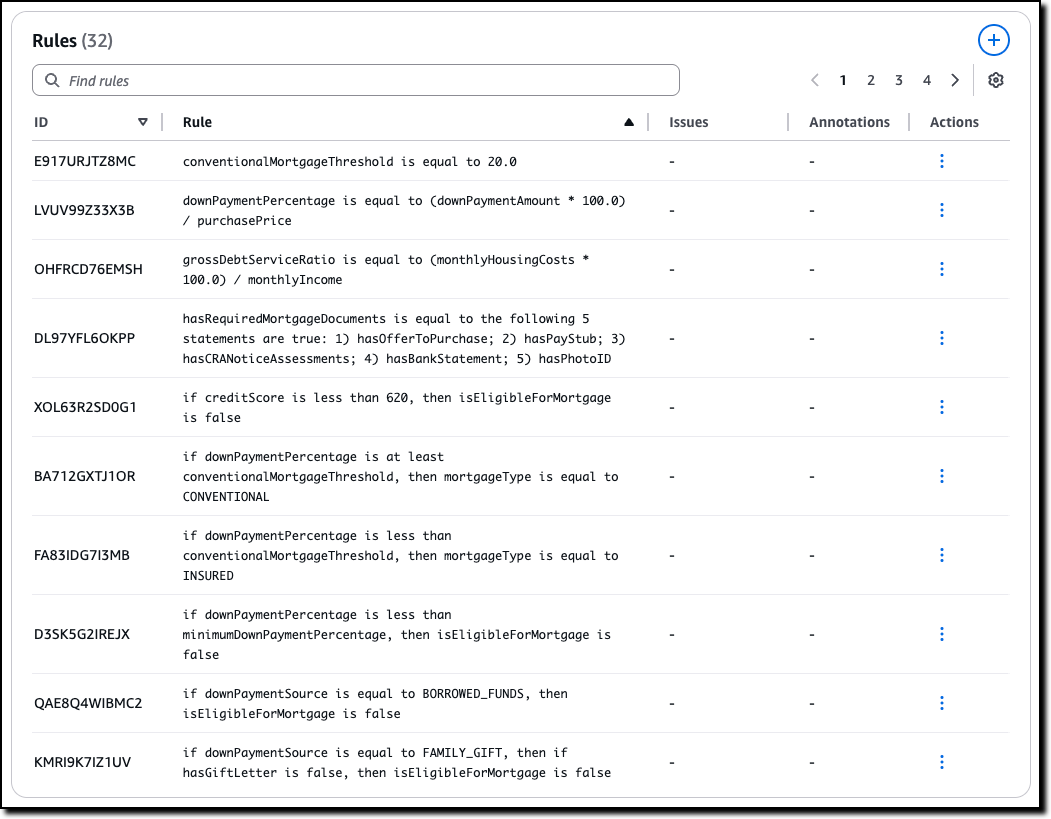
The Rules describe how variables in the policy are related and are used when evaluating the generated content. For example, in this case, which are the thresholds to apply and how some of the decisions are taken. For traceability, each rule has its own unique ID.
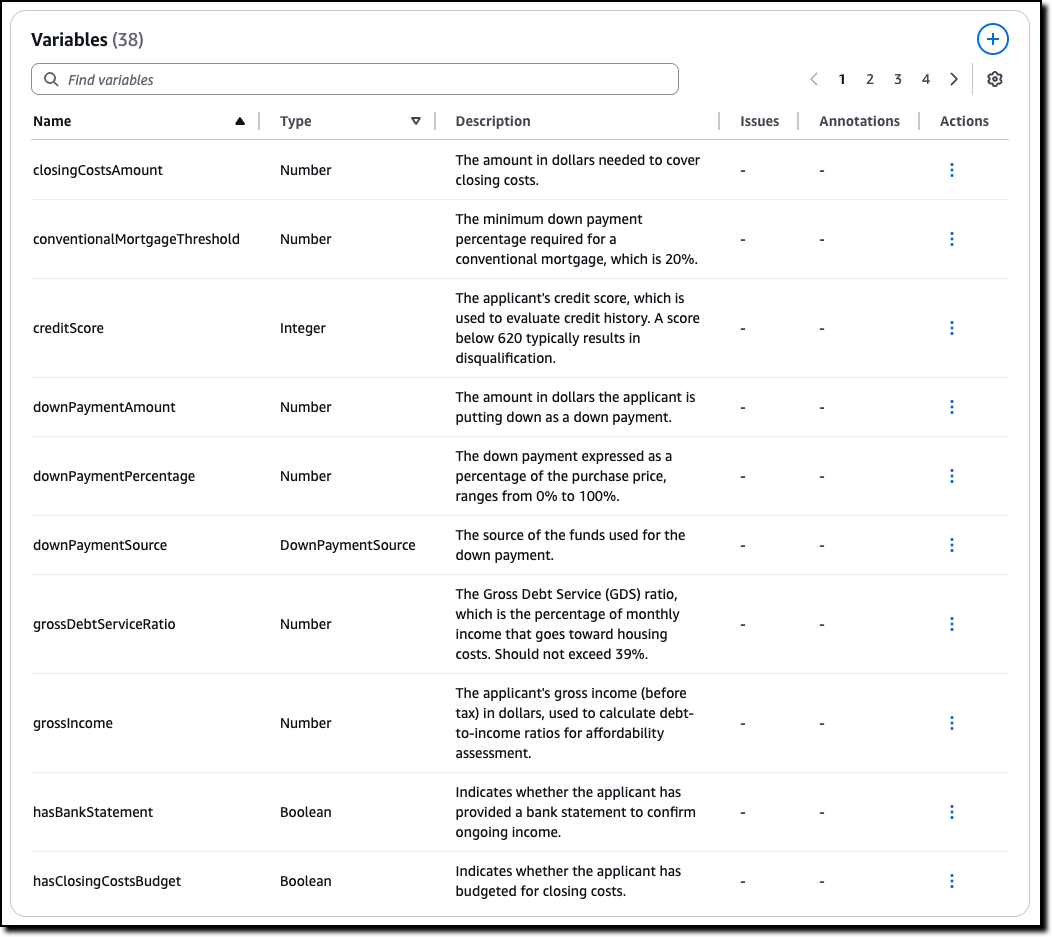
The Variables represent the main concepts at play in the original natural language documents. Each variable is involved in one or more rules. Variables allow complex structures to be easier to understand. For this scenario, some of the rules need to look at the down payment or at the credit score.
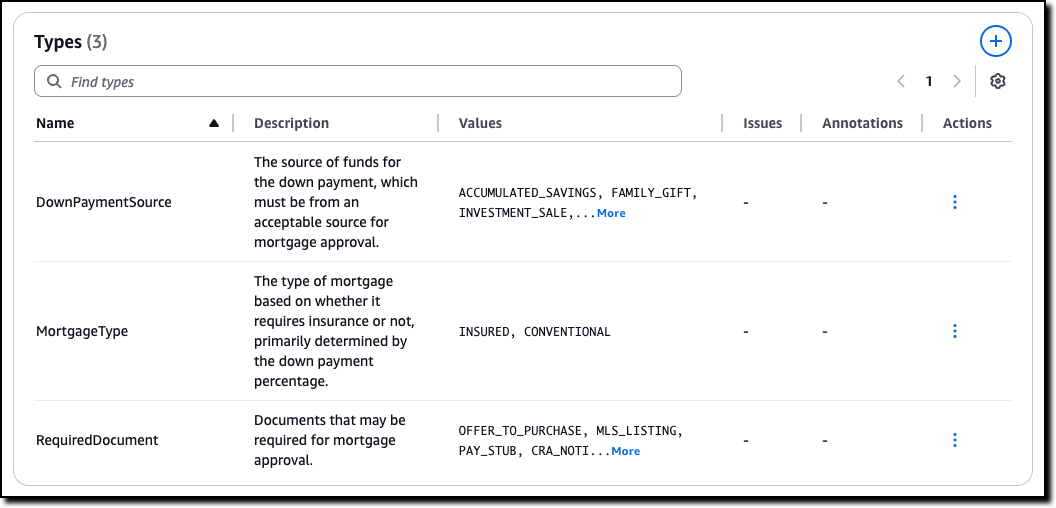
Custom Types are created for variables that are neither boolean nor numeric. For example, for variables that can only assume a limited number of values. In this case, there are two type of mortgage described in the policy, insured and conventional.
Now we can assess the quality of the initial Automated Reasoning policy through testing. I choose Tests from the dropdown. Here I can manually enter a test, consisting of input (optional) and output, such as a question and its possible answer from the interaction of a customer with the AI assistant. I then set the expected result from the Automated Reasoning check. The expected result can be valid (the answer is correct), invalid (the answer is not correct), or satisfiable (the answer could be true or false depending on specific assumptions). I can also assign a confidence threshold for the translation of the query/content pair from natural language to logic.
Before I enter tests manually, I use the option to automatically generate a scenario from the definitions. This is the easiest way to validate a policy and (unless you’re an expert in logic) should be the first step after the creation of the policy.
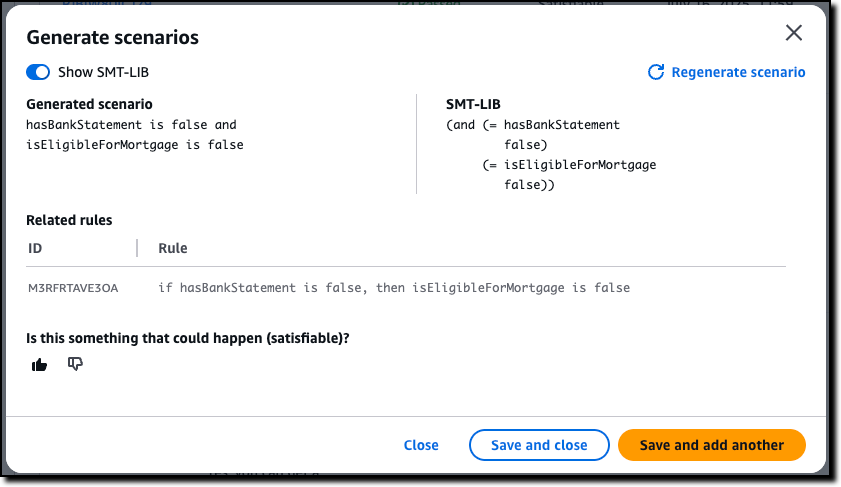
For each generated scenario, I provide an expected validation to say if it is something that can happen (satisfiable) or not (invalid). If not, I can add an annotation that can then be used to update the definitions. For a more advanced understanding of the generated scenario, I can show the formal logic representation of a test using SMT-LIB syntax.
After using the generate scenario option, I enter a few tests manually. For these tests, I set different expected results: some are valid, because they follow the policy, some are invalid, because they flout the policy, and some are satisfiable, because their result depends on specific assumptions.
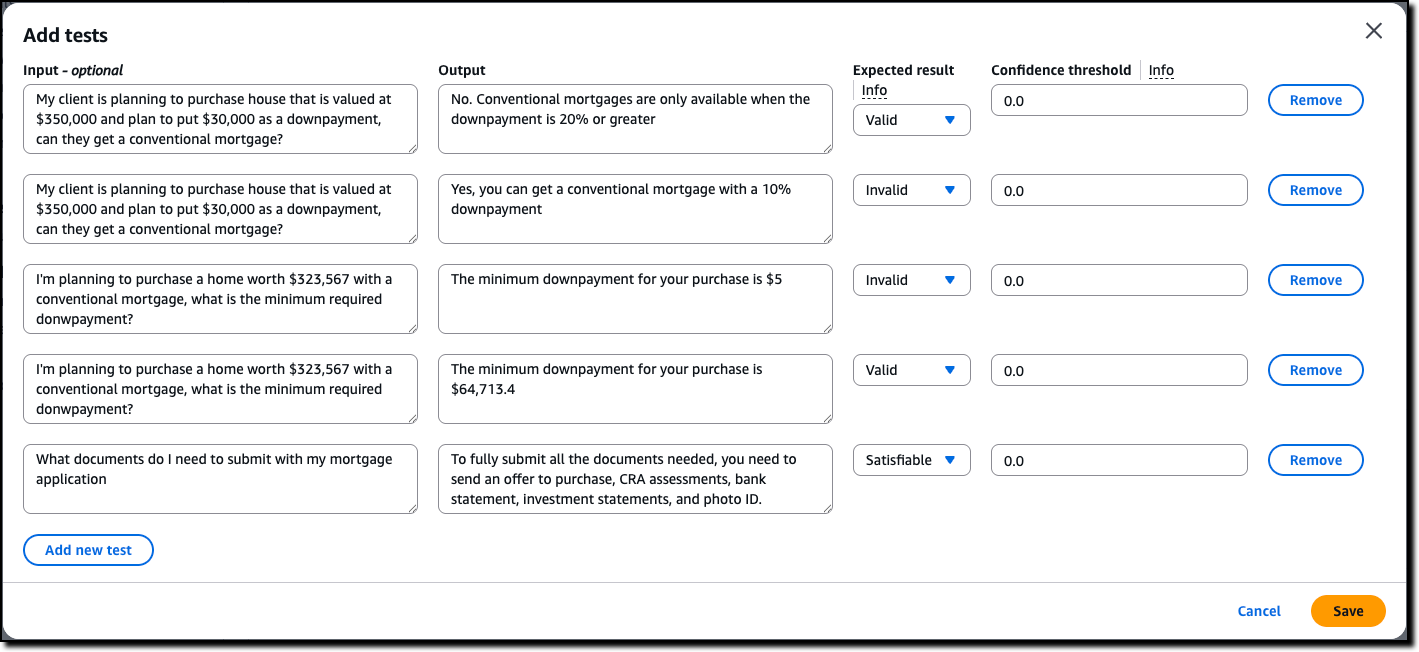
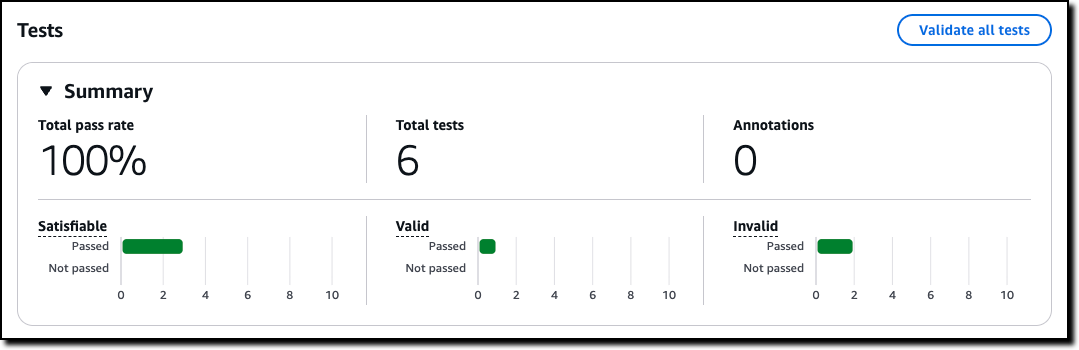
Then, I choose Validate all tests to see the results. All tests passed in this case. Now, when I update the policy, I can use these tests to validate that the changes didn’t introduce errors.
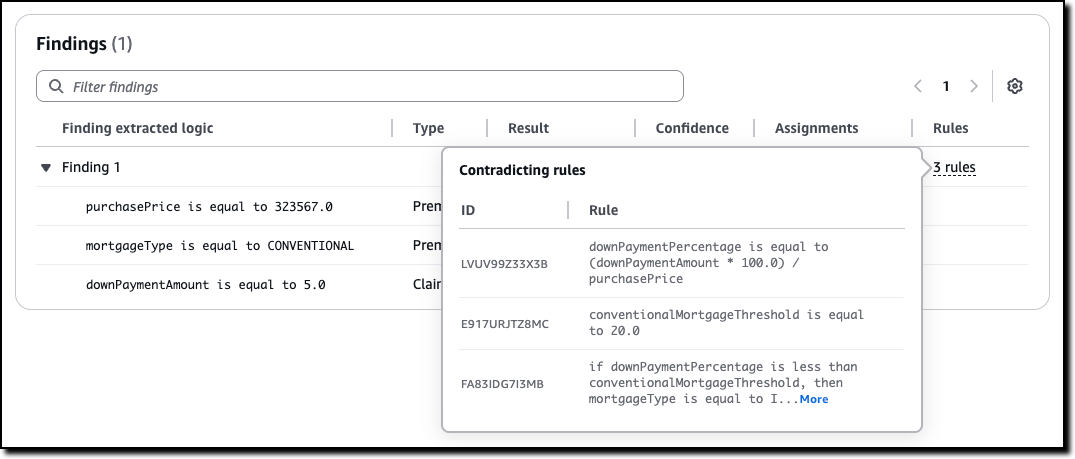
For each test, I can look at the findings. If a test doesn’t pass, I can look at the rules that created the contradiction that made the test fail and go against the expected result. Using this information, I can understand if I should add an annotation, to improve the policy, or correct the test.
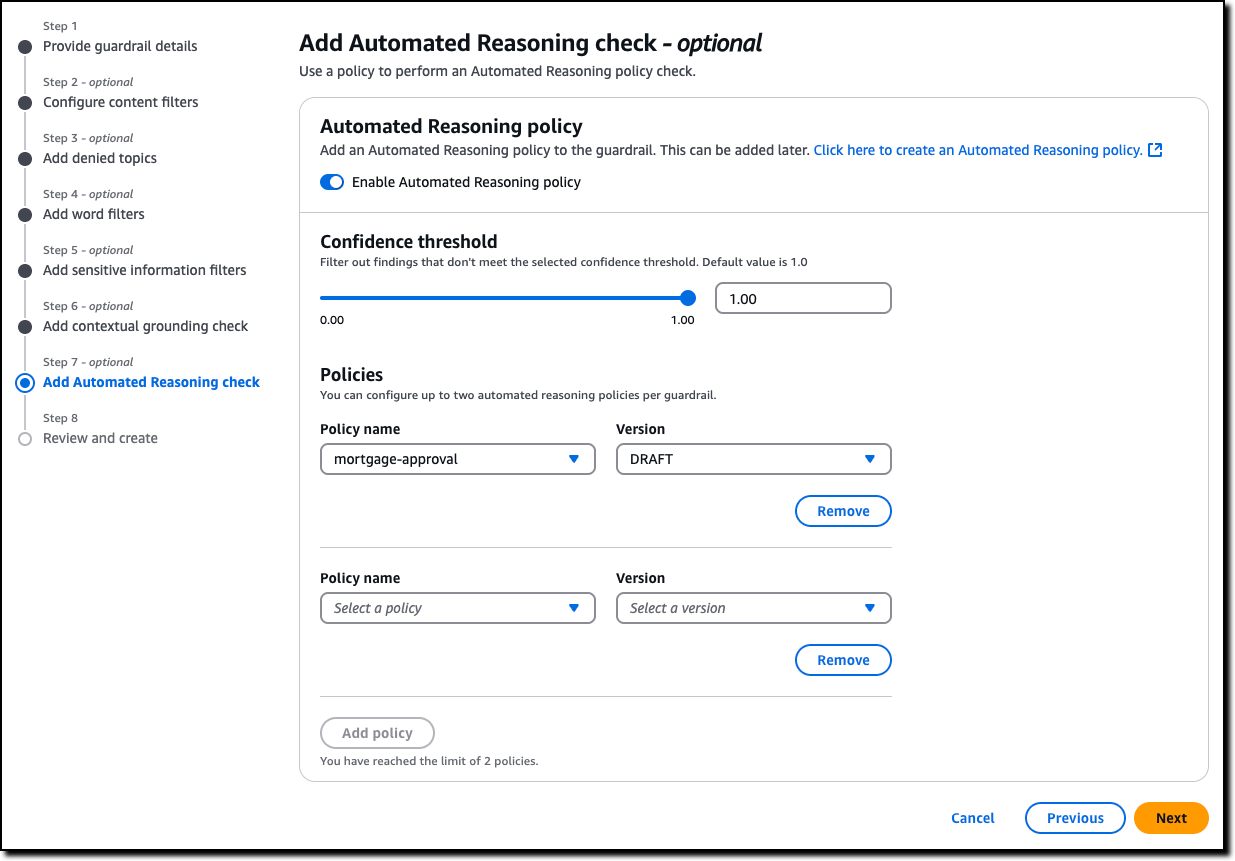
Now that I’m satisfied with the tests, I can create a new Amazon Bedrock guardrail (or update an existing one) to use up to two Automated Reasoning policies to check the validity of the responses of the AI assistant. All six policies offered by Guardrails are modular, and can be used together or separately. For example, Automated Reasoning checks can be used with other safeguards such as content filtering and contextual grounding checks. The guardrail can be applied to models served by Amazon Bedrock or with any third-party model (such as OpenAI and Google Gemini) via the ApplyGuardrail API. I can also use the guardrail with an agent framework such as Strands Agents, including agents deployed using Amazon Bedrock AgentCore.
Now that we saw how to set up a policy, let’s look at how Automated Reasoning checks are used in practice.
Customer case study – Utility outage management systems
When the lights go out, every minute counts. That’s why utility companies are turning to AI solutions to improve their outage management systems. We collaborated on a solution in this space together with PwC. Using Automated Reasoning checks, utilities can streamline operations through:
- Automated protocol generation – Creates standardized procedures that meet regulatory requirements
- Real-time plan validation – Ensures response plans comply with established policies
- Structured workflow creation – Develops severity-based workflows with defined response targets
At its core, this solution combines intelligent policy management with optimized response protocols. Automated Reasoning checks are used to assess AI-generated responses. When a response is found to be invalid or satisfiable, the result of the Automated Reasoning check is used to rewrite or enhance the answer.
This approach demonstrates how AI can transform traditional utility operations, making them more efficient, reliable, and responsive to customer needs. By combining mathematical precision with practical requirements, this solution sets a new standard for outage management in the utility sector. The result is faster response times, improved accuracy, and better outcomes for both utilities and their customers.
In the words of Matt Wood, PwC’s Global and US Commercial Technology and Innovation Officer:
“At PwC, we’re helping clients move from AI pilot to production with confidence—especially in highly regulated industries where the cost of a misstep is measured in more than dollars. Our collaboration with AWS on Automated Reasoning checks is a breakthrough in responsible AI: mathematically assessed safeguards, now embedded directly into Amazon Bedrock Guardrails. We’re proud to be AWS’s launch collaborator, bringing this innovation to life across sectors like pharma, utilities, and cloud compliance—where trust isn’t a feature, it’s a requirement.”
Things to know
Automated Reasoning checks in Amazon Bedrock Guardrails is generally available today in the following AWS Regions: US East (Ohio, N. Virginia), US West (Oregon), and Europe (Frankfurt, Ireland, Paris).
With Automated Reasoning checks, you pay based on the amount of text processed. For more information, see Amazon Bedrock pricing.
To learn more, and build secure and safe AI applications, see the technical documentation and the GitHub code samples. Follow this link for direct access to the Amazon Bedrock console.
The videos in this playlist include an introduction to Automated Reasoning checks, a deep dive presentation, and hands-on tutorials to create, test, and refine a policy.
— Danilo
Proxmox VE 9 is Out with Big New Features
Post Syndicated from John Lee original https://www.servethehome.com/proxmox-ve-9-is-out-with-big-new-features/
Proxmox VE 9 is out with some big new features like HA resource affinity, RAIDZ expansion, SDN fabrics, and even an interface name pinning tool
The post Proxmox VE 9 is Out with Big New Features appeared first on ServeTheHome.
A kbuild and kconfig maintainer change
Post Syndicated from corbet original https://lwn.net/Articles/1032722/
For eight years, Masahiro Yamada has been the sole maintainer of the
kernel’s build and configuration systems — two complex pieces of
infrastructure that many people interact with, but few truly understand.
Yamada has just stepped
down from that position. Maintenance of the build system will be taken
up by Nathan Chancellor and Nicolas Schier (in the “odd fixes” capacity),
while the configuration system is now entirely unmaintained.
Thanks are due to Yamada for all that work, and to Chancellor and Schier
for stepping up. Hopefully a way will be found to better support these
important subsystems in the near future.
Security updates for Wednesday
Post Syndicated from jzb original https://lwn.net/Articles/1032700/
Security updates have been issued by AlmaLinux (kernel and python3.12-setuptools), Fedora (perl-Crypt-CBC and unbound), Gentoo (FontForge, GPL Ghostscript, Mozilla Network Security Service (NSS), and PAM), Oracle (gdk-pixbuf2, jq, kernel, mod_security, ncurses, python-requests, and python3-setuptools), Red Hat (python-requests and socat), SUSE (docker, kernel-livepatch-MICRO-6-0-RT_Update_2, kernel-livepatch-MICRO-6-0-RT_Update_4, kernel-livepatch-MICRO-6-0-RT_Update_5, kernel-livepatch-MICRO-6-0-RT_Update_6, kernel-livepatch-MICRO-6-0-RT_Update_7, kernel-livepatch-MICRO-6-0_Update_2, kernel-livepatch-MICRO-6-0_Update_4, kernel-livepatch-MICRO-6-0_Update_5, kernel-livepatch-MICRO-6-0_Update_6, kubeshark-cli, libgcrypt, pam-config, perl, python-requests, python311, and python313), and Ubuntu (linux-raspi).
Ukraine Won’t Surrender, with Adrian Karatnycky and Tim Mak | The David Frum Show
Post Syndicated from The Atlantic original https://www.youtube.com/watch?v=I1b_TPgODKg
The Russian Revolution and the House of Fabergé
Post Syndicated from The History Guy: History Deserves to Be Remembered original https://www.youtube.com/watch?v=Q_-EK1yj_W0
Opening the box: Tools to teach young people about AI
Post Syndicated from Bonnie Sheppard original https://www.raspberrypi.org/blog/opening-the-box-tools-to-teach-young-people-about-ai/
New research by the Alan Turing Institute, published in June, shows that in the UK nearly one in four children aged 8 to 12 is using artificial intelligence (AI) tools like ChatGPT. With learners exploring these tools at such young ages, it’s more urgent than ever to develop teaching resources that help them understand how AI works.
One of the biggest challenges with AI is that it’s hard to tell how these tools function. With a chatbot, you enter a prompt and the tool returns a response, but what happens in between is invisible. For educators, that’s a problem: how can we help young people become thoughtful, creative users of AI tools if the technology feels like a closed box?


In our May research seminar, we welcomed Matti Tedre and Henriikka Vartiainen from the University of Eastern Finland. They’ve been working on how to teach about AI for years and were frustrated with existing educational platforms: many of these are either too complex, raise privacy concerns, or rely on coding skills that not all students (or teachers) have. In response, they created an award-winning, classroom-friendly tool designed to make AI technology more transparent and more hands-on.
A practical way to teach AI in schools
Matti and Henriikka began by discussing the unique challenges of teaching young learners about AI technology. Many students start with “folk theories”, for example, thinking that computers understand language like humans do. These misconceptions can be surprisingly hard to shake.
They also pointed out broader issues:
- The abstract nature of AI means there are very few research-based approaches to teaching it effectively
- Mastery of AI concepts requires sustained practice and curricular change, not just a few one-off interventions
- In countries like Finland, where programming isn’t part of the curriculum, any teaching tool must be no-code to be accessible
To address these challenges, Matti and Henriikka have spent three years co-designing tools and approaches with local schools, teachers, and over 200 students. Their approach is grounded in educational theory and a set of core AI learning principles:
- No-code for inclusivity: Removing the need for programming lowers the barrier to entry for both teachers and students
- Learner-centred co-design: Every part of the experience is developed in collaboration with schools to make sure it’s engaging and relevant
- Working with personal data: Learners create and work with their own data sets, which makes the experience more engaging and personally relevant
- Integration with school subjects: Integrating AI concepts into other subjects helps to make the uses of AI tools more concrete for learners
- Focus on specific applications: Rather than teaching about generic ‘AI’, the focus is on specific and understandable applications, such as facial recognition
- Hands-on experimentation: Practical projects help students understand tricky ideas like bias, fairness, and social impact
- Collaborative learning: Working together helps students reflect, question, and learn from each other
GenAI Teachable Machine: Opening the box
Frustrated by existing platforms that require programming skills, raise privacy concerns, or don’t allow collaboration, Matti and Henriikka’s team developed GenAI Teachable Machine: a no-code, browser-based tool designed to make key AI concepts tangible. In the central research study, the team used the tool with Finnish students in grade 4–7 (10 to 14 years of age). It’s a great introductory tool that could also be used with younger and older students.
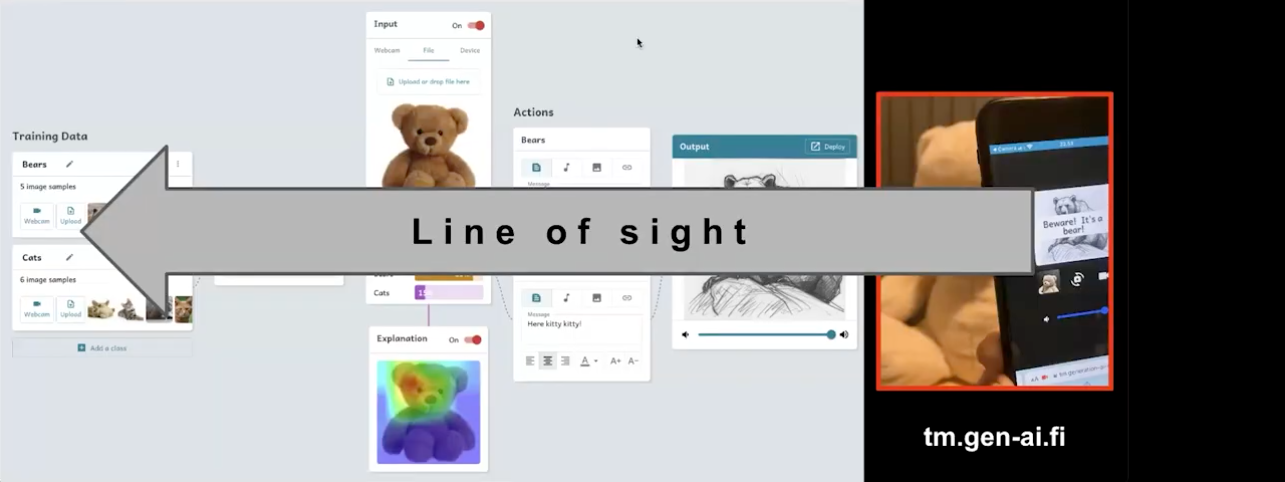
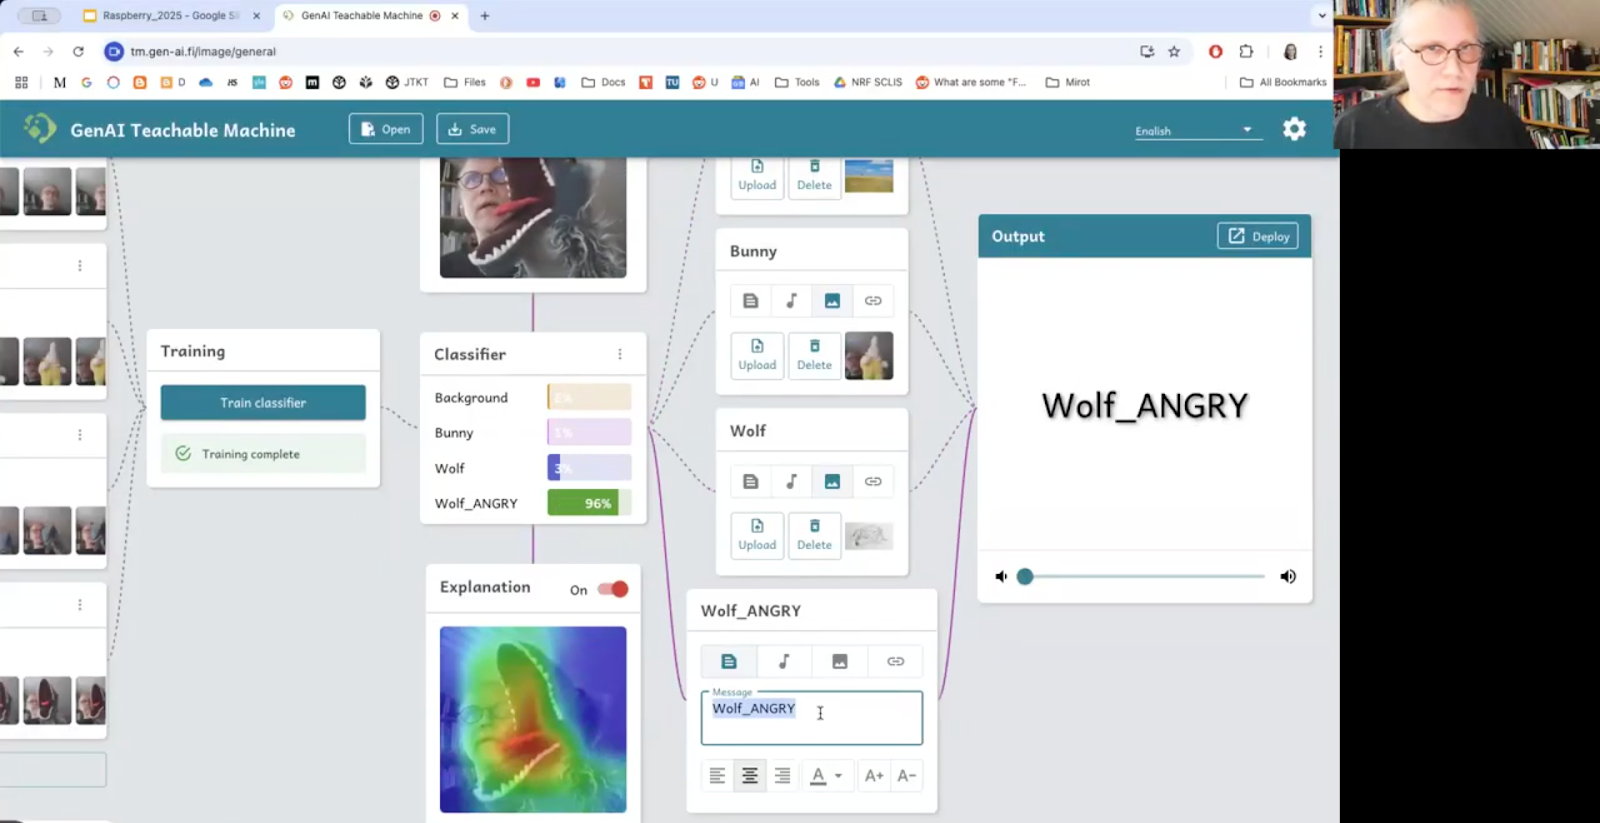
Matti demonstrated how the tool addresses their core AI learning principles with a simple, creative project. Using hand puppets, he trained a model to recognise four distinct classes: a background, a bunny, a calm wolf, and an angry wolf. For each class, he assigned a specific action: a sound, an image, or both. This hands-on process gives students a direct line of sight from the data they might create (visuals of hand puppets) to the final behaviour of the model (outputted sounds and images). They learn about classifiers, training, and confidence levels not as abstract definitions, but as creative tools they can control.
But the learning really starts when things don’t work as expected. Students can easily open their models on their phones with an automatically created QR code and then move around the classroom to test their models. At this point, they quickly notice how fragile AI technology can be. For example, in the case of a simple recognition model trained on specific colours or features, with a change of lighting or a different shirt, the model might fail. These “failures” turn into powerful lessons. For instance, a face-recognition app trained mostly on students with blonde hair might not work well for someone with brown hair — sparking immediate conversations about bias. As Matti put it, students very quickly start asking deep questions.

GenAI Teachable Machine also allows students to apply their AI models to the physical world. By connecting to a simple, low-cost robotics kit, students can use their models to control motors, lights, and other actuators. This step into the physical world teaches fundamental concepts that are difficult to grasp in a purely virtual environment. Students learn about causality, as their model’s classifications trigger real, physical actions. They also learn about the need for a world model — an understanding of how the physical world works — and see that they must take responsibility for what happens when their abstract models have real-world consequences.

By combining a no-code platform with practical, well-designed learning experiences, Matti, Henriikka, and their team are showing what AI education can look like: hands-on, accessible, and grounded in real understanding. Their work is helping students see inside the box, and giving them the tools to think critically about the AI technologies that are becoming part of their everyday lives.
Find out more
If you’re an educator interested in including the topic of AI in your teaching, you can try GenAI Teachable Machine on its official website.
You may also be interested in our own Experience AI resources, which are designed to help you and your learners navigate the fast-moving world of AI and machine learning technologies.
Join us at our next seminar
In September, Matti and his team are returning to discuss other ways to teach young people about AI technologies.
To sign up and take part in the Matti’s seminar on Tues 9 Sept at 17:00–18:30 BST, click the button below. We’ll then send you information about joining. We hope to see you there.
The schedule of our upcoming seminars is online. You can catch up on past seminars on our previous seminars page.
The post Opening the box: Tools to teach young people about AI appeared first on Raspberry Pi Foundation.
OpenAI open weight models now available on AWS
Post Syndicated from Danilo Poccia original https://aws.amazon.com/blogs/aws/openai-open-weight-models-now-available-on-aws/
AWS is committed to bringing you the most advanced foundation models (FMs) in the industry, continuously expanding our selection to include groundbreaking models from leading AI innovators so that you always have access to the latest advancements to drive your business forward.
Today, I am happy to announce the availability of two new OpenAI models with open weights in Amazon Bedrock and Amazon SageMaker JumpStart. OpenAI gpt-oss-120b and gpt-oss-20b models are designed for text generation and reasoning tasks, offering developers and organizations new options to build AI applications with complete control over their infrastructure and data.
These open weight models excel at coding, scientific analysis, and mathematical reasoning, with performance comparable to leading alternatives. Both models support a 128K context window and provide adjustable reasoning levels (low/medium/high) to match your specific use case requirements. The models support external tools to enhance their capabilities and can be used in an agentic workflow, for example, using a framework like Strands Agents.
With Amazon Bedrock and Amazon SageMaker JumpStart, AWS gives you the freedom to innovate with access to hundreds of FMs from leading AI companies, including OpenAI open weight models. With our comprehensive selection of models, you can match your AI workloads to the perfect model every time.
Through Amazon Bedrock, you can seamlessly experiment with different models, mix and match capabilities, and switch between providers without rewriting code—turning model choice into a strategic advantage that helps you continuously evolve your AI strategy as new innovations emerge. At launch, these new models are available in Bedrock via an OpenAI compatible endpoint. You can point the OpenAI SDK to this endpoint or use the Bedrock InvokeModel and Converse API.
With SageMaker JumpStart, you can quickly evaluate, compare, and customize models for your use case. You can then deploy the original or the customized model in production with the SageMaker AI console or using the SageMaker Python SDK.
Let’s see how these work in practice.
Getting started with OpenAI open weight models in Amazon Bedrock
In the Amazon Bedrock console, I choose Model access from the Configure and learn section of the navigation pane. Then, I navigate to the two listed OpenAI models on this page and request access.
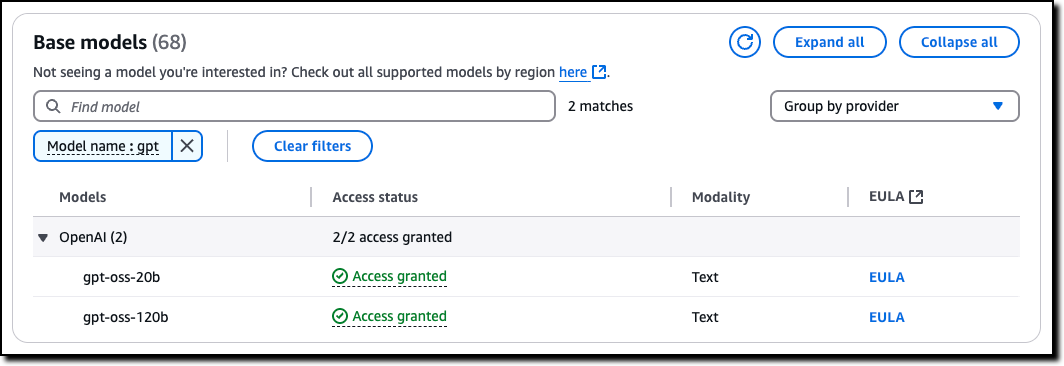
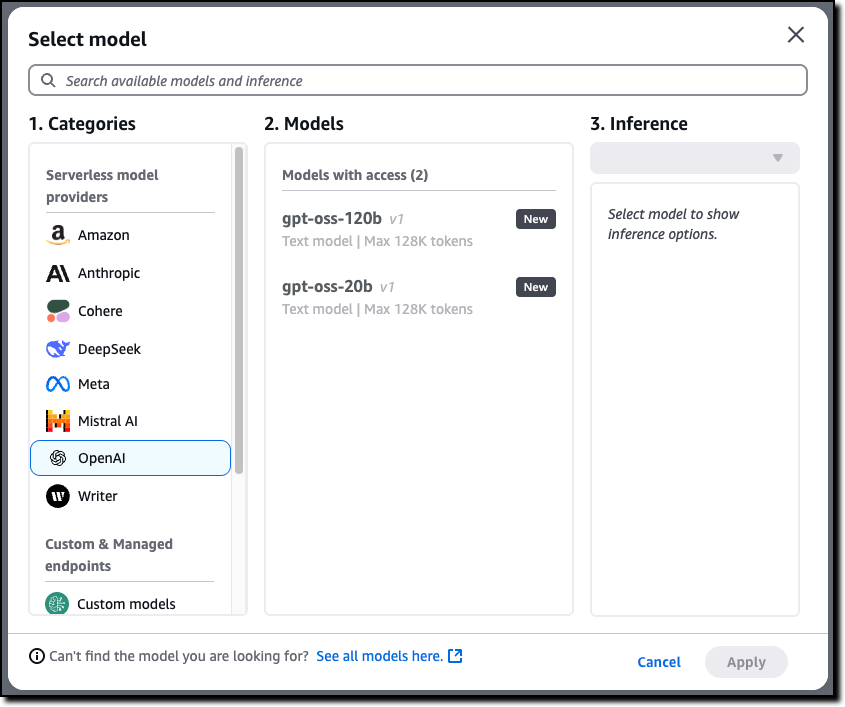
Now that I have access, I use the Chat/Test playground to test and evaluate the models. I select OpenAI as the category and then the gpt-oss-120b model.
Using this model, I run the following sample prompt:
A family has $5,000 to save for their vacation next year. They can place the money in a savings account earning 2% interest annually or in a certificate of deposit earning 4% interest annually but with no access to the funds until the vacation. If they need $1,000 for emergency expenses during the year, how should they divide their money between the two options to maximize their vacation fund?
This prompt generates an output that includes the chain of thought used to produce the result.
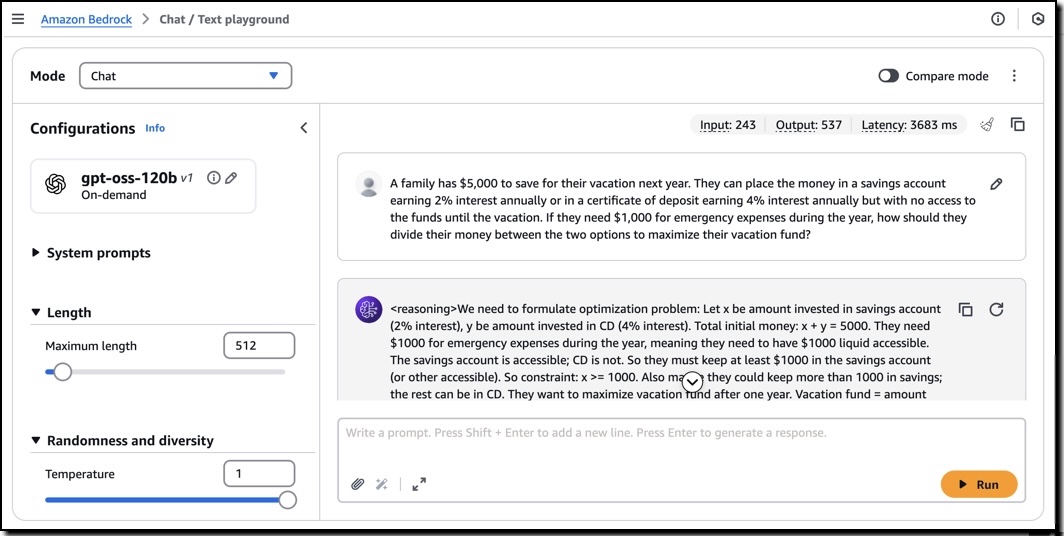
I can use these models with the OpenAI SDK by configuring the API endpoint (base URL) and using an Amazon Bedrock API key for authentication. For example, I set this environment variables to use the US West (Oregon) AWS Region endpoint (us-west-2) and my Amazon Bedrock API key:
export OPENAI_API_KEY="<my-bedrock-api-key>"
export OPENAI_BASE_URL="https://bedrock-runtime.us-west-2.amazonaws.com/openai/v1"
Now I invoke the model using the OpenAI Python SDK.
client = OpenAI()

response = client.chat.completion.create(
    messages=[{
        "role": "user",
        "content": "Hello, how are you?"
    }],
    model="openai.gpt-oss-120b-1:0",
    stream=True
)

for item in response:
    print(item)
To build an AI agent, I can choose any framework that supports the Amazon Bedrock API or the OpenAI API. For example, here’s the starting code for Strands Agents using the Amazon Bedrock API:
from strands import Agent
from strands.models import BedrockModel
from strands_tools import calculator

model = BedrockModel(
    model_id="openai.gpt-oss-120b-1:0"
)
agent = Agent(
    model=model,
    tools=[calculator]
)

agent("Tell me the square root of 42 ^ 3")
I save the code (app.py file), install the dependencies, and run the agent locally:
pip install strands-agents strands-agents-tools
python app.py
When I am satisfied with the agent, I can deploy in production using the capabilities offered by Amazon Bedrock AgentCore, including a fully managed serverless runtime and memory and identity management.
Getting started with OpenAI open weight models in Amazon SageMaker JumpStart
In the Amazon SageMaker AI console, you can use OpenAI open weight models in the SageMaker Studio. The first time I do this, I need to set up a SageMaker domain. There are options to set it up for a single user (simpler) or an organization. For these tests, I use a single user setup.
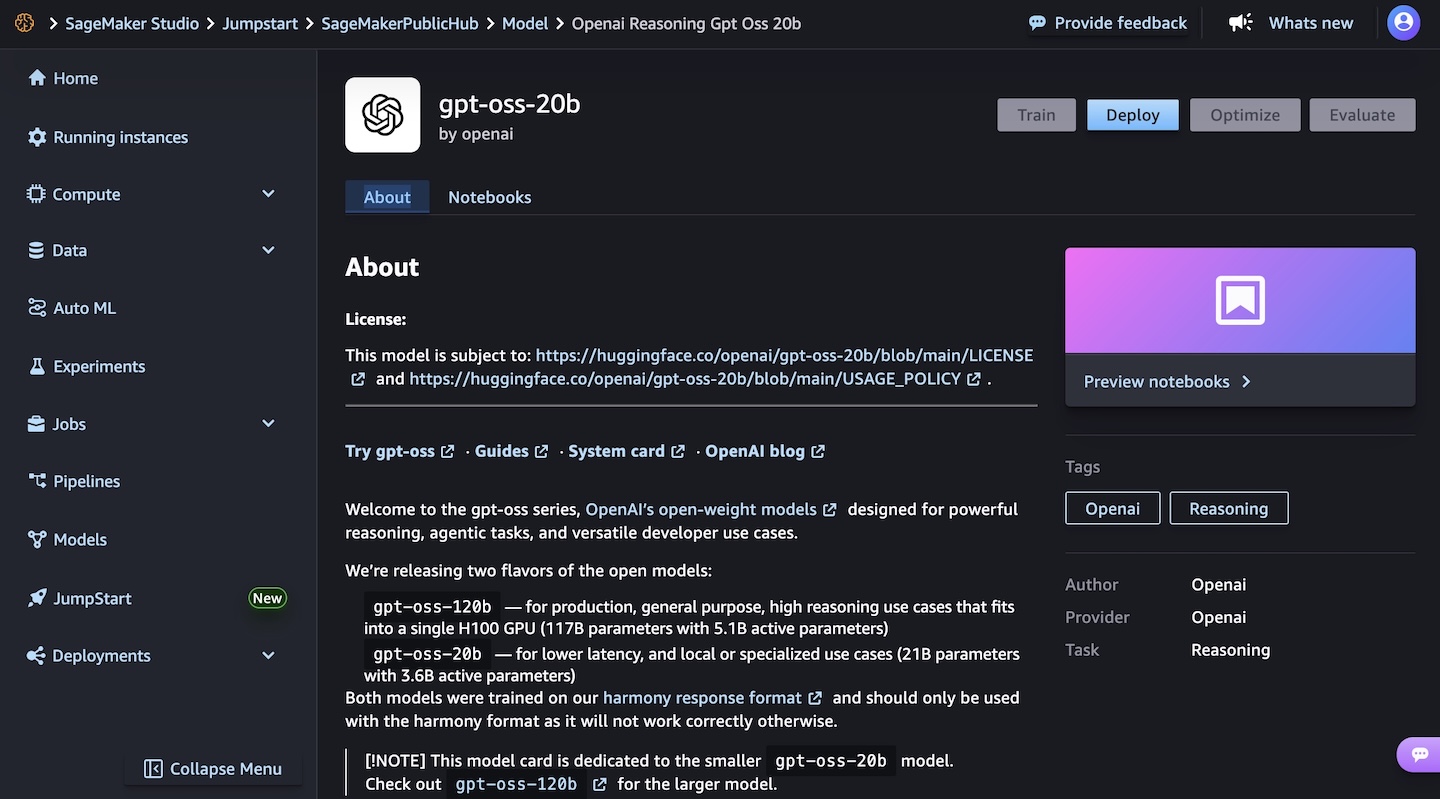
In the SageMaker JumpStart model view, I have access to a detailed description of the gpt-oss-120b or gpt-oss-20b model.
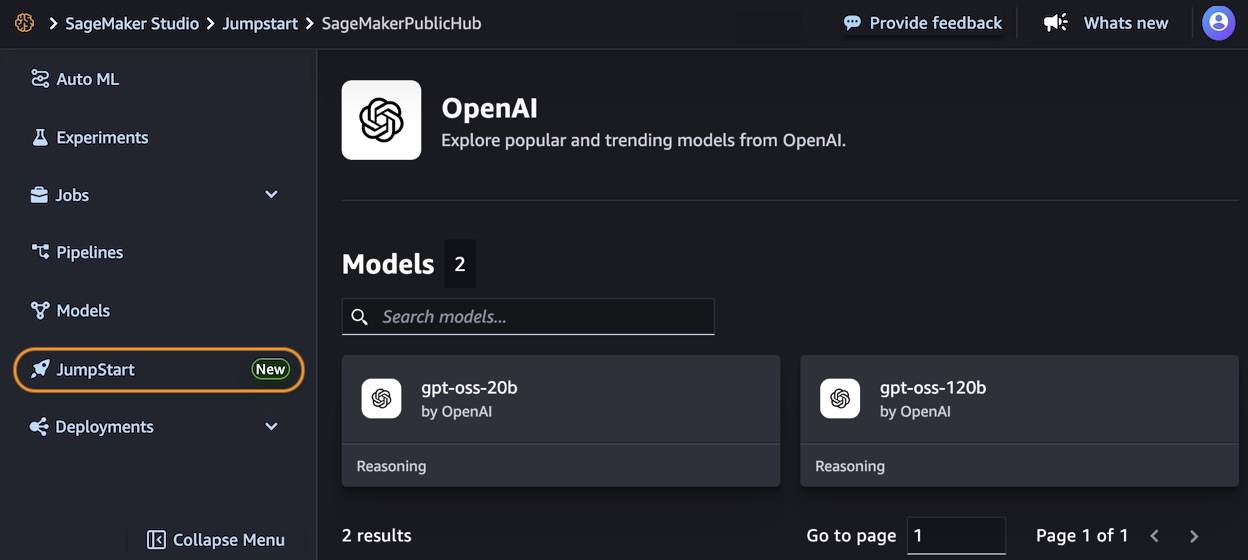
I choose the gpt-oss-20b model and then deploy the model. In the next steps, I select the instance type and the initial instance count. After a few minutes, the deployment creates an endpoint that I can then invoke in SageMaker Studio and using any AWS SDKs.
To learn more, visit GPT OSS models from OpenAI are now available on SageMaker JumpStart in the AWS Artificial Intelligence Blog.
Things to know
The new OpenAI open weight models are now available in Amazon Bedrock in the US West (Oregon) AWS Region, while Amazon SageMaker JumpStart supports these models in US East (Ohio, N. Virginia) and Asia Pacific (Mumbai, Tokyo).
Each model comes equipped with full chain-of-thought output capabilities, providing you with detailed visibility into the model’s reasoning process. This transparency is particularly valuable for applications requiring high levels of interpretability and validation. These models give you the freedom to modify, adapt, and customize them to your specific needs. This flexibility allows you to fine-tune the models for your unique use cases, integrate them into your existing workflows, and even build upon them to create new, specialized models tailored to your industry or application.
Security and safety are built into the core of these models, with comprehensive evaluation processes and safety measures in place. The models maintain compatibility with the standard GPT-4 tokenizer.
Both models can be used in your preferred environment, whether that’s through the serverless experience of Amazon Bedrock or the extensive machine learning (ML) development capabilities of SageMaker JumpStart. For information about the costs associated with using these models and services, visit the Amazon Bedrock pricing and Amazon SageMaker AI pricing pages.
To learn more, see the parameters for the models and the chat completions API in the Amazon Bedrock documentation.
Get started today with OpenAI open weight models on AWS in the Amazon Bedrock console or in Amazon SageMaker AI console.
– Danilo
The Semiconductor Industry and Regulatory Compliance
Post Syndicated from Bruce Schneier original https://www.schneier.com/blog/archives/2025/08/its-time-for-the-semiconductor-industry-to-step-up.html
Earlier this week, the Trump administration narrowed export controls on advanced semiconductors ahead of US-China trade negotiations. The administration is increasingly relying on export licenses to allow American semiconductor firms to sell their products to Chinese customers, while keeping the most powerful of them out of the hands of our military adversaries. These are the chips that power the artificial intelligence research fueling China’s technological rise, as well as the advanced military equipment underpinning Russia’s invasion of Ukraine.
The US government relies on private-sector firms to implement those export controls. It’s not working. US-manufactured semiconductors have been found in Russian weapons. And China is skirting American export controls to accelerate AI research and development, with the explicit goal of enhancing its military capabilities.
American semiconductor firms are unwilling or unable to restrict the flow of semiconductors. Instead of investing in effective compliance mechanisms, these firms have consistently prioritized their bottom lines—a rational decision, given the fundamentally risky nature of the semiconductor industry.
We can’t afford to wait for semiconductor firms to catch up gradually. To create a robust regulatory environment in the semiconductor industry, both the US government and chip companies must take clear and decisive actions today and consistently over time.
Consider the financial services industry. Those companies are also heavily regulated, implementing US government regulations ranging from international sanctions to anti-money laundering. For decades, these companies have invested heavily in compliance technology. Large banks maintain teams of compliance employees, often numbering in the thousands.
The companies understand that by entering the financial services industry, they assume the responsibility to verify their customers’ identities and activities, refuse services to those engaged in criminal activity, and report certain activities to the authorities. They take these obligations seriously because they know they will face massive fines when they fail. Across the financial sector, the Securities and Exchange Commission imposed a whopping $6.4 billion in penalties in 2022. For example, TD Bank recently paid almost $2 billion in penalties because of its ineffective anti-money laundering efforts
An executive order issued earlier this year applied a similar regulatory model to potential “know your customer” obligations for certain cloud service providers.
If Trump’s new license-focused export controls are to be effective, the administration must increase the penalties for noncompliance. The Commerce Department’s Bureau of Industry and Security (BIS) needs to more aggressively enforce its regulations by sharply increasing penalties for export control violations.
BIS has been working to improve enforcement, as evidenced by this week’s news of a $95 million penalty against Cadence Design Systems for violating export controls on its chip design technology. Unfortunately, BIS lacks the people, technology, and funding to enforce these controls across the board.
The Trump administration should also use its bully pulpit, publicly naming companies that break the rules and encouraging American firms and consumers to do business elsewhere. Regulatory threats and bad publicity are the only ways to force the semiconductor industry to take export control regulations seriously and invest in compliance.
With those threats in place, American semiconductor firms must accept their obligation to comply with regulations and cooperate. They need to invest in strengthening their compliance teams and conduct proactive audits of their subsidiaries, their customers, and their customers’ customers.
Firms should elevate risk and compliance voices onto their executive leadership teams, similar to the chief risk officer role found in banks. Senior leaders need to devote their time to regular progress reviews focused on meaningful, proactive compliance with export controls and other critical regulations, thereby leading their organizations to make compliance a priority.
As the world becomes increasingly dangerous and America’s adversaries become more emboldened, we need to maintain stronger control over our supply of critical semiconductors. If Russia and China are allowed unfettered access to advanced American chips for their AI efforts and military equipment, we risk losing the military advantage and our ability to deter conflicts worldwide. The geopolitical importance of semiconductors will only increase as the world becomes more dangerous and more reliant on advanced technologies—American security depends on limiting their flow.
This essay was written with Andrew Kidd and Celine Lee, and originally appeared in The National Interest.
The Army Nuclear Power Program
Post Syndicated from The History Guy: History Deserves to Be Remembered original https://www.youtube.com/shorts/M7ZFpLqxplg
Comic for 2025.08.06 – Enemies
Post Syndicated from Explosm.net original https://explosm.net/comics/enemies
New Cyanide and Happiness Comic
Snake-in-the-Box Problem
Post Syndicated from xkcd.com original https://xkcd.com/3125/

OCSP Service Has Reached End of Life
Post Syndicated from Let's Encrypt original https://letsencrypt.org/2025/08/06/ocsp-service-has-reached-end-of-life.html
Today we turned off our Online Certificate Status Protocol (OCSP) service, as announced in December of last year. We stopped including OCSP URLs in our certificates more than 90 days ago, so all Let’s Encrypt certificates that contained OCSP URLs have now expired. Going forward, we will publish revocation information exclusively via Certificate Revocation Lists (CRLs).
We ended support for OCSP primarily because it represents a considerable risk to privacy on the Internet. When someone visits a website using a browser or other software that checks for certificate revocation via OCSP, the Certificate Authority (CA) operating the OCSP responder immediately becomes aware of which website is being visited from that visitor’s particular IP address. Even when a CA intentionally does not retain this information, as is the case with Let’s Encrypt, it could accidentally be retained or CAs could be legally compelled to collect it. CRLs do not have this issue.
We are also taking this step because keeping our CA infrastructure as simple as possible is critical for the continuity of compliance, reliability, and efficiency at Let’s Encrypt. For every year that we have existed, operating OCSP services has taken up considerable resources that can soon be better spent on other aspects of our operations. Now that we support CRLs, our OCSP service has become unnecessary.
At the height of our OCSP service’s traffic earlier this year, we handled approximately 340 billion OCSP requests per month. That’s more than 140,000 requests per second handled by our CDN, with 15,000 requests per second handled by our origin. We’d like to thank Akamai for generously donating CDN services for OCSP to Let’s Encrypt for the past ten years.
Partnering with OpenAI to bring their new open models onto Cloudflare Workers AI
Post Syndicated from Michelle Chen original https://blog.cloudflare.com/openai-gpt-oss-on-workers-ai/
OpenAI has just announced their latest open-weight models — and we are excited to share that we are working with them as a Day 0 launch partner to make these models available in Cloudflare’s Workers AI. Cloudflare developers can now access OpenAI’s first open model, leveraging these powerful new capabilities on our platform. The new models are available starting today at @cf/openai/gpt-oss-120b and @cf/openai/gpt-oss-20b.
Workers AI has always been a champion for open models and we’re thrilled to bring OpenAI’s new open models to our platform today. Developers who want transparency, customizability, and deployment flexibility can rely on Workers AI as a place to deliver AI services. Enterprises that need the ability to run open models to ensure complete data security and privacy can also deploy with Workers AI. We are excited to join OpenAI in fulfilling their mission of making the benefits of AI broadly accessible to builders of any size.
The OpenAI models have been released in two sizes: a 120 billion parameter model and a 20 billion parameter model. Both of them are Mixture-of-Experts models – a popular architecture for recent model releases – that allow relevant experts to be called for a query instead of running through all the parameters of the model. Interestingly, these models run natively at an FP4 quantization, which means that they have a smaller GPU memory footprint than a 120 billion parameter model at FP16. Given the quantization and the MoE architecture, the new models are able to run faster and more efficiently than more traditional dense models of that size.
These models are text-only; however, they have reasoning capabilities, tool calling, and two new exciting features with Code Interpreter and Web Search (support coming soon). We’ve implemented Code Interpreter on top of Cloudflare Containers in a novel way that allows for stateful code execution (read on below).
We’re landing these new models with a few tweaks: supporting the new Responses API format as well as the historical Chat Completions API format (coming soon). The Responses API format is recommended by OpenAI to interact with their models, and we’re excited to support that on Workers AI.
If you call the model through:
-
Workers Binding, it will accept/return Responses API –
env.AI.run(“@cf/openai/gpt-oss-120b”) -
REST API on /run endpoint, it will accept/return Responses API –
https://api.cloudflare.com/client/v4/accounts/<account_id>/ai/run/@cf/openai/gpt-oss-120b -
REST API on new /responses endpoint, it will accept/return Responses API –
https://api.cloudflare.com/client/v4/accounts/<account_id>/ai/v1/responses -
REST API for OpenAI Compatible endpoint, it will return Chat Completions (coming soon)–
https://api.cloudflare.com/client/v4/accounts/<account_id>/ai/v1/chat/completions
curl https://api.cloudflare.com/client/v4/accounts/<account_id>/ai/v1/responses \
  -H "Content-Type: application/json" \
  -H "Authorization: Bearer $CLOUDFLARE_API_KEY" \
  -d '{
    "model": "@cf/openai/gpt-oss-120b",
    "reasoning": {"effort": "medium"},
    "input": [
      {
        "role": "user",
        "content": "What are the benefits of open-source models?"
      }
    ]
  }'

To effectively answer user queries, Large Language Models (LLMs) often struggle with logical tasks such as mathematics or coding. Instead of attempting to reason through these problems, LLMs typically utilize a tool call to execute AI-generated code that solves these problems. OpenAI’s new models are specifically trained for stateful Python code execution and include a built-in feature called Code Interpreter, designed to address this challenge.
We’re particularly excited about this. Cloudflare not only has an inference platform (Workers AI), but we also have an ecosystem of compute and storage products that allow people to build full applications on top of our Developer Platform. This means that we are uniquely suited to support the model’s Code Interpreter capabilities, not only for one-time code execution, but for stateful code execution as well.
We’ve built support for Code Interpreter on top of Cloudflare’s Sandbox product that allows for a secure environment to run AI-generated code. The Sandbox SDK is built on our latest Containers product and Code Interpreter is the perfect use case to bring all these products together. When you use Code Interpreter, we spin up a Sandbox container scoped to your session that stays alive for 20 minutes, so the code can be edited for subsequent queries to the model. We’ve also pre-warmed Sandboxes for Code Interpreter to ensure the fastest start up times.
We’ll be publishing an example of how you can use the gpt-oss model on Workers AI and Sandboxes with the OpenAI SDK to make calls to Code Interpreter on our Developer Docs.
We’re beyond excited for OpenAI’s new open models, and we hope you are too. Super grateful to our friends from vLLM and HuggingFace for supporting efficient model serving on launch day. Read up on the Developer Docs to learn more about the details and how to get started on building with these new models and capabilities.

Proxmox Virtual Environment 9.0 released
Post Syndicated from jzb original https://lwn.net/Articles/1032622/
Proxmox Virtual Environment 9.0, based on Debian 13
(“trixie”), has been released. Notable
new features include snapshots for thick-provisioned LVM shared
storage, affinity rules for high availability (HA) clusters, and a
modernized mobile web interface for managing Proxmox systems. See the
release
notes and known
issues for more details about the release.
Streamlining outbound emails with Amazon SES Mail Manager
Post Syndicated from Manoj Gaddam original https://aws.amazon.com/blogs/messaging-and-targeting/streamlining-outbound-emails-with-amazon-ses-mail-manager/
In today’s digital landscape, efficient email management is crucial for businesses of all sizes. Amazon Simple Email Service (Amazon SES) has long been a go-to solution for handling transactional and marketing emails. Through Mail Manager, Amazon SES offers powerful tools to enhance your email infrastructure, particularly for outbound email handling and archiving.
In this post, we explore how Mail Manager can modernize your approach to outbound email management. We’ll dive into the various options available for controlling email flows and archiving all outgoing emails. By the end of this article, you’ll have a clear understanding of how you can use Mail Manager to:
- Strengthen your email infrastructure
- Simplify outbound email workflow management
- Help meet compliance through robust email archiving
In this post, we consider a real-world customer use case from a university where students should receive clean emails free from malware and phishing attempts. Amazon SES Mail Manager provides a comprehensive email pipeline that handles security screening, message archival, and reliable delivery. By implementing this system, the university significantly improved its email infrastructure, helping to ensure that important communications reach students safely and efficiently.
Walkthrough
In this walkthrough, we guide you through the process of configuring Amazon SES Mail Manager with the following components:
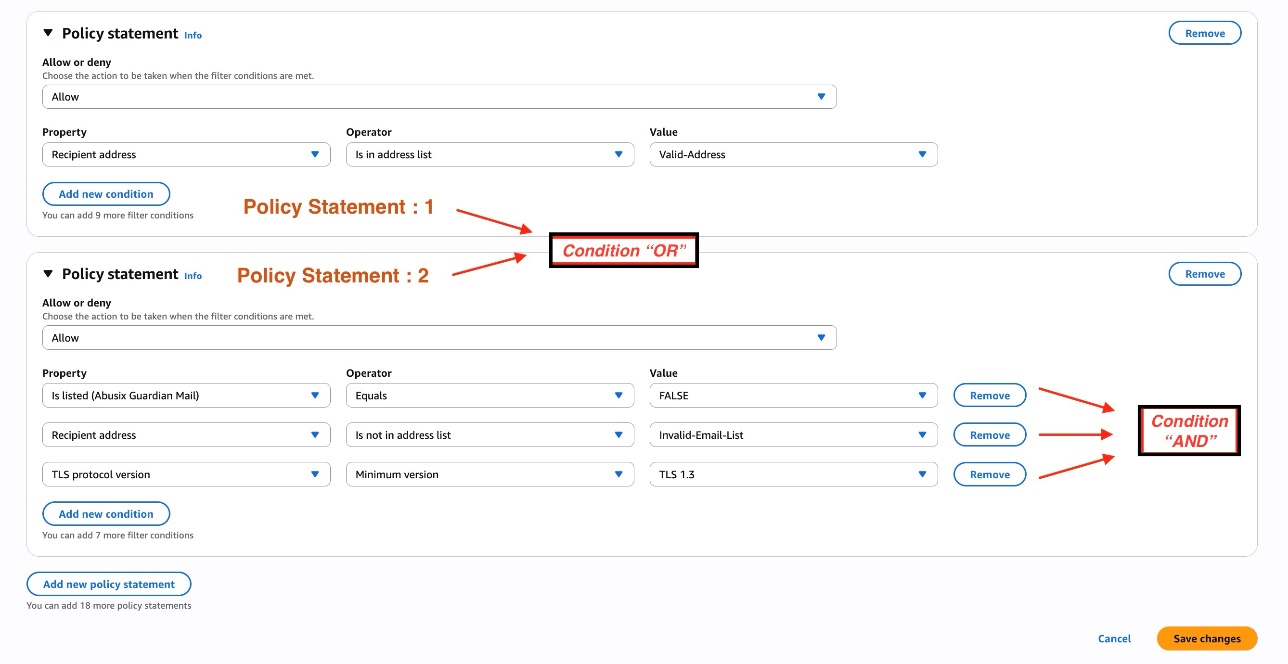
- Traffic policy: You’ll create a traffic policy designed to help ensure that students receive only clean, secure emails. The default action is set to
Deny all, providing a strict baseline. The policy includes two key statements connected by anORcondition. Policy Statement 1 allows emails if the recipient address is in theValid-Addresslist. Policy Statement 2 allows emails that meet all of the following conditions: not listed in Abusix Guardian Mail, recipient address is not in theInvalid-Email-List, and uses TLS protocol version 1.3 or higher. This configuration effectively filters potential threats while allowing legitimate communications to reach students’ inboxes, maintaining a secure email environment for the university. - Rule set: You’ll create a rule set containing two rules that execute in sequential order:
- Rule 1: Scan and isolate malicious content: Scans messages and, if the scan fails, stores emails in an Amazon Simple Storage Service (Amazon S3) bucket for further validation and halts sending email.
- Rule 2: Archive and send clean emails to recipients: Archives all outgoing emails for audit and compliance after passing the security scan and routes emails to recipients.
- Ingress endpoint: You’ll create a Mail Manager ingress endpoint that will receive, route, and manage emails based on your configured policies and rules.
After setting up these components, you’ll use sample Python code to send an email through the ingress endpoint. To verify functionality, we’ll check the email archive to confirm that all incoming emails are archived for compliance or audit purposes and confirm email is received in the intended inbox. The workflow is shown in the following figure.

Prerequisites
Before beginning, make sure that you have completed domain verification in your desired AWS Region and moved out of the Amazon SES sandbox. Domain verification is a crucial first step that validates your authority to send emails through SES from your domain. In this tutorial, you’ll use a sample Python program to send emails programmatically through an ingress SMTP endpoint. You can run this program either on your local machine or using AWS CloudShell.
You should have:
- An active AWS account.
- Amazon SES
- AWS Secrets Manager
- AWS CloudShell
- A user signed in to the AWS Management Console must have permissions to the preceding above services.
Before creating traffic policies and rule sets, you will first set up Email Add Ons, and email archiving, and AWS Identity and Access Management (IAM) roles, which will be needed while creating traffic policies and rules.
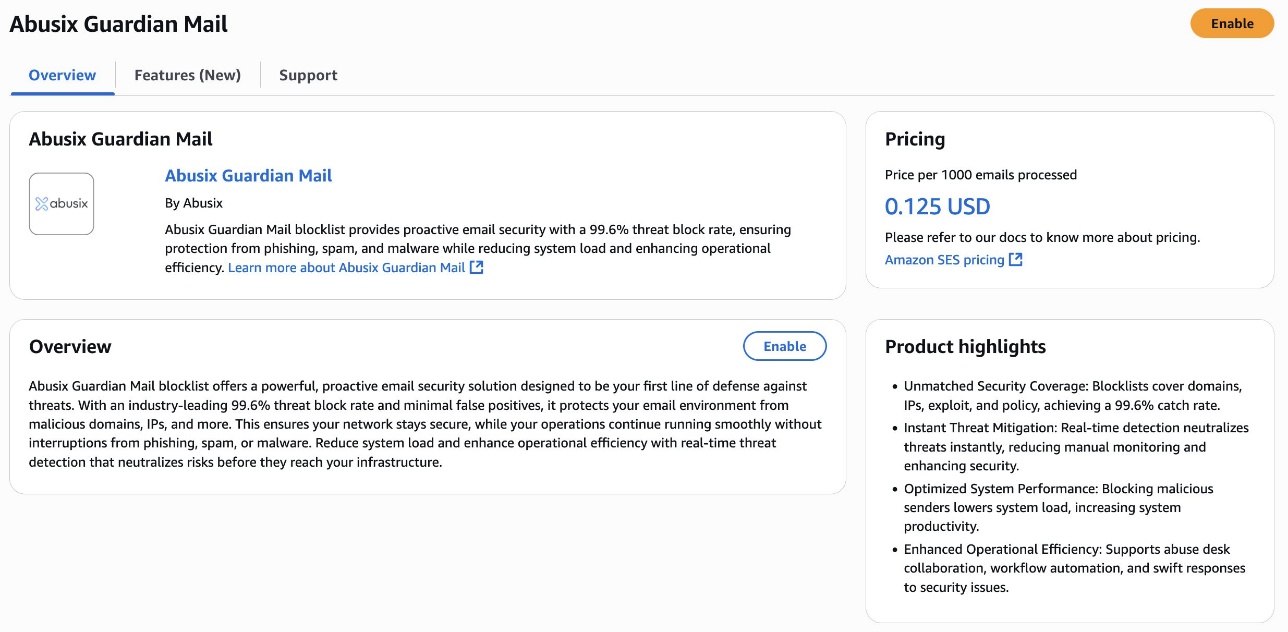
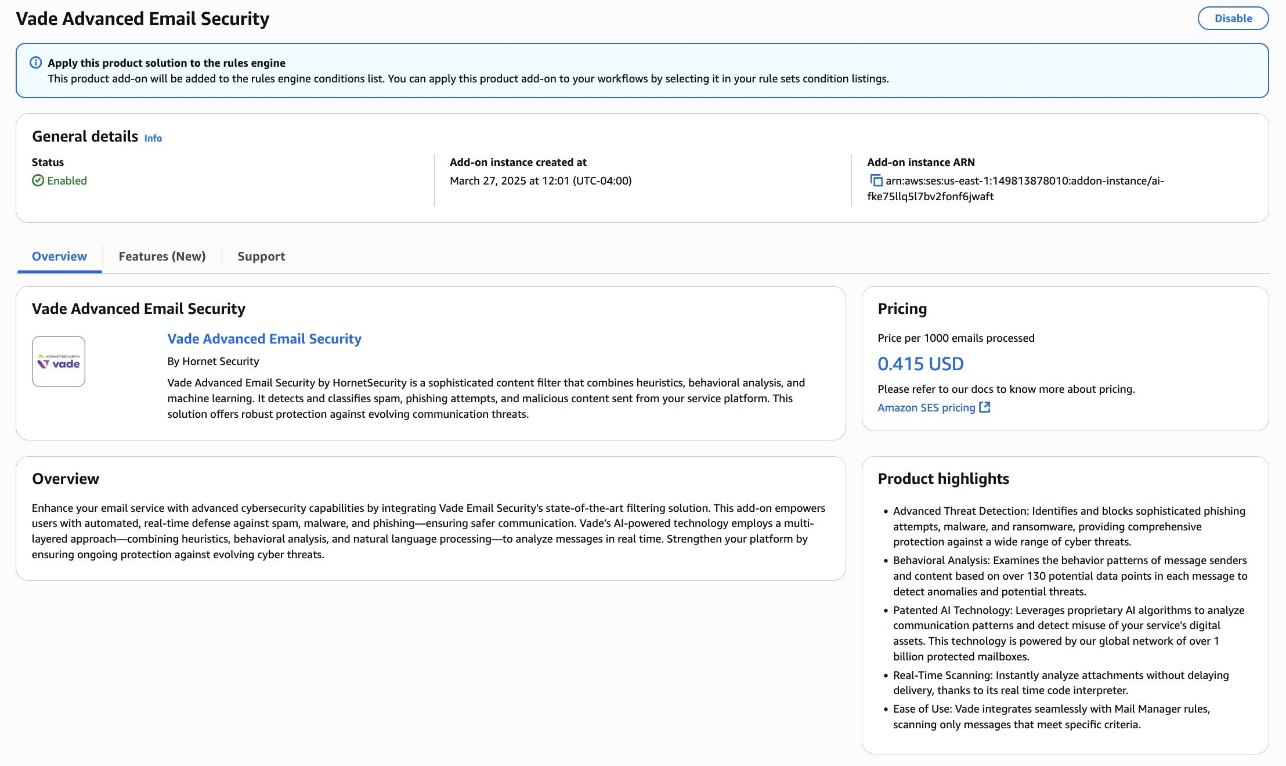
Step 1: Enable Email Add Ons for Amazon SES Mail Manager
To implement security features such as malicious content scanning in your email workflow, first enable the necessary Email Add Ons:
- Open the AWS Management Console for Amazon SES.
- Choose Mail Manager and then Email Add Ons.
- Select your desired Add Ons:
- Trend Micro Virus Scanning
- Abusix Guardian Mail
- Spamhaus Domain Block List (DBL)
- Vade Advanced Email Security
- Choose Enable.
Important Notes:
- Email Add Ons are third-party security products integrated with Mail Manager
- Once subscribed, you can use them in your traffic policies or rule sets
As part of this post, you will be using the Abusix Guardian Mail and Vade Advanced Email Security Add Ons to enhance email security posture. It doesn’t mean you have to use all of them—you can subscribe to the ones that best fit your requirements based on your use case.
Step 2: Configure an email archive for compliance and retention
You will create an email archive to store outgoing messages to use as part of configuring Rule 2. This archive will serve as a repository for outgoing messages.
- Navigate to Mail Manager and then to Email Archiving.
- Choose Create archive.
- Complete the archive configuration:
- Enter a unique name in the Archive name field.
- (Optional) Select a retention period to override the default of 180 days.
- (Optional) Set up encryption by either entering your own AWS Key Management System (AWS KMS) key in the KMS key ARN field or selecting Create new key.
- Choose Create archive.
- After being created, this archive will store your emails according to the rules you’ll define in the next step.
Step 3: Create and S3 bucket and IAM role for S3 access
When emails fail the Vade security scan, they need to be stored securely for further investigation. In this step, we’ll create an S3 bucket to store these flagged emails and set up the necessary IAM permissions.
- Create an S3 bucket to quarantine suspicious and malicious emails identified by the Vade scanner. This bucket will store these emails for further investigation by the security team. Note the bucket name, because you’ll need it in the next step.
- Create an IAM role that allows Mail Manager to upload suspicious emails to an S3 bucket. This IAM role will be used in Rule 1 when configuring the Write to S3 rule action for storing emails that fail the security scan.
- Go to the IAM console.
- Choose Roles and then choose Create role.
- For trusted entity, select Custom trust policy and paste the following (replace
"XXXXXXXXXXX"with your AWS account ID). - Choose Next and create an inline policy with the following permissions (replace
"MyDestinationBucketName"with your S3 bucket name). - Enter a name your role and choose Create role.
Step 4: Create and IAM role permission policy for send to internet rule action
Configure an IAM role that permits Mail Manager to send emails to external domains. This role will be referenced in Rule 2 for delivering validated emails to recipients.
- You can either:
- Use the same IAM role created in Step 3 and add this policy, or
- Create a new IAM role and add the following permission policy (Replace
example.comwith your verified domain,"XXXXXXXXXXX"with your AWS account ID andmy-configuration-setwith your configuration set name if applicable).
This policy grants the necessary permissions to send emails to recipients on the internet, which will be used in rule 2 of your rule set.
- If adding to an existing role:
- Go to the IAM console and select your role
- Choose Add permissions and then select Create inline policy.
- Paste the preceding JSON and choose Review policy.
- Enter a name for the policy and choose Create policy.
- If you create a new role, name it appropriately and choose Create role.
Step 5: Create a traffic policy
Traffic policies serve as security checkpoints for your email infrastructure, controlling which messages can enter your system based on defined security rules. To create a traffic policy that enforces security requirements for your emails:
- Open the Amazon SES console.
- Go to Mail Manager and choose Traffic policies.
- Choose Create traffic policy.
- Enter a unique name for your policy.
- Set Default action to Allow (this handles emails that don’t match any specific rules).
- Add policy statements by choosing Add new policy statement:
- Choose Deny for emails that don’t meet security requirements.
- Add condition: TLS Protocol Version select Less than and then select 1.2.
- Add conditions for any Email Add-Ons you’ve subscribed to, such as Spamhaus, Abusix, and so on.)
- Choose Create traffic policy.
Traffic policies are evaluated in a specific sequence:
- First, all
Denypolicy statements are evaluated in order. If any match, the email is immediately blocked and no further evaluation occurs. - If no
Denystatements match, allAllowpolicy statements are evaluated in order. Multiple statements within a policy are connected byORlogic. If any statement matches, the email is allowed. - Within each individual policy statement, multiple conditions are connected by
ANDlogic. All conditions must be true for the statement to match. - If no policy statements match (neither
DenynorAllow), the default action of the traffic policy (eitherAlloworDeny) is applied.
In this step, you’ll establish a robust policy that enforces strict TLS security protocols while harnessing the power of specialized email security add-ons such as Abusix Guardian Mail to preemptively identify and block potentially harmful messages before they can penetrate your system. In this traffic policy configuration, you’ll create two policy statements that work together to provide security and flexibility:
Default policy statement:
- Deny-by-default where all email traffic is initially blocked unless explicitly allowed by below policy statements
Policy statement 1:
- Allows emails if the recipient address is in a list called
Valid-Address
Policy statement 2 (with three conditions connected by AND):
- Must NOT be listed in Abusix Guardian Mail (
FALSEcondition) - The recipient address must NOT be in the
Invalid-Email-List - The TLS protocol version must be at least TLS 1.3
In basic terms, this policy will allow emails that either:
- Have recipients from an approved address list, or
- Meet all three security conditions (not deny-listed, not on the invalid list, and using secure TLS 1.3)

Step 6: Create a rule set
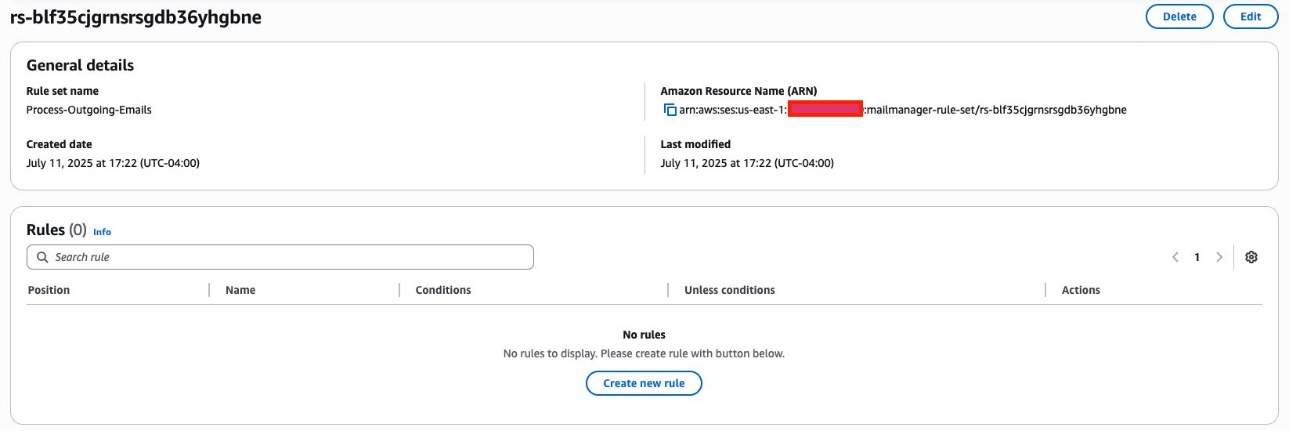
Rule sets define how your emails are processed after they pass through your traffic policy. In this example, the rule set establishes a sequential email processing workflow. First, you will perform email scanning (marking and segregating spam emails while allowing clean ones to proceed) and archiving outgoing messages, then finally delivering clean messages to recipients. To create a rule set:
- Open the Amazon SES console.
- Go to Mail Manager and choose Rule sets.
- Choose Create rule set.
- Enter a unique name for your rule set.
- On the rule set’s overview page, choose Edit, then choose Create new rule
Step 7: Create rules
After creating your rule set, you’ll need to add rules that define how your emails are processed. Follow these steps to create and configure your rules:
- On the rule set’s overview page, choose Edit, then Create new rule.
- In the Rule details sidebar, enter a unique name for your rule.
- Add conditions or exceptions as needed:
- Select Add new condition to specify what messages the rule applies to.
- Select EXCEPT in the case of and select Add new exception for exclusions.
- Configure actions by choosing Add new action.
- For multiple actions, use the up and down arrows to set the execution order.
- When finished creating your rules, choose Save rule set to apply your changes.
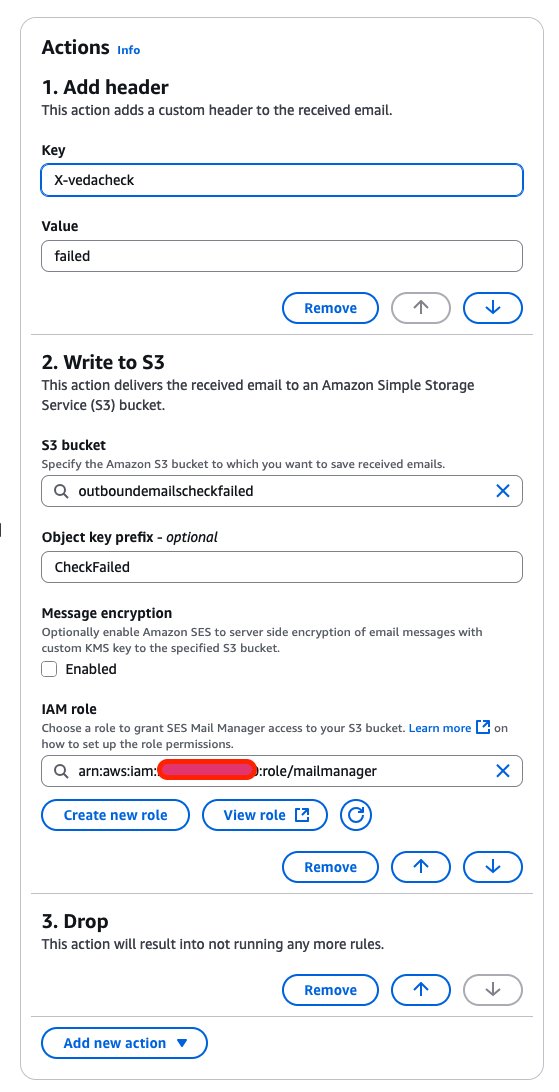
Rule 1: Scan and isolate malicious content
This rule targets emails flagged by Vade Advanced Email Security as potentially harmful. It applies to messages identified as scams, suspect content, phishing attempts, or containing malware. When a message is flagged as malicious, the rule marks it with a custom header, stores a copy in Amazon S3 for investigation, and prevents it from reaching recipients. An exception allows emails with Action required in the subject line to bypass this security check.
Use the following settings to create and configure Rule 1:
- Rule name: Scan and isolate
- Conditions:
- Property: Select Verdict (Vade Advanced Email Security).
- Operator: Select Equals.
- Value: Select scam, suspect, phishing, and malware.
- Actions:
- Add header: For Key, enter
X-vedacheckand for Value, enterfailed. - Write to S3: Enter the name of an S3 bucket to store the message for investigation.
- Drop: Stop processing the message.
- Add header: For Key, enter
Rule 2: Archive and send clean emails to recipients
This final rule processes messages that have successfully passed through the previous security checks. With no additional conditions, it forwards clean emails to their intended recipients, completing the secure email delivery workflow for the university’s communication system. Use the following settings to create and configure Rule 2:
- Rule name: SendEmail
- Action:
- Add header: For Key , enter
Add X-vedacheckwith a Value ofApproved. - Archive resource name: Select your Mail Manager archive (Email_Archive)
- Send to internet: Send email to intended recipient.
- Add header: For Key , enter
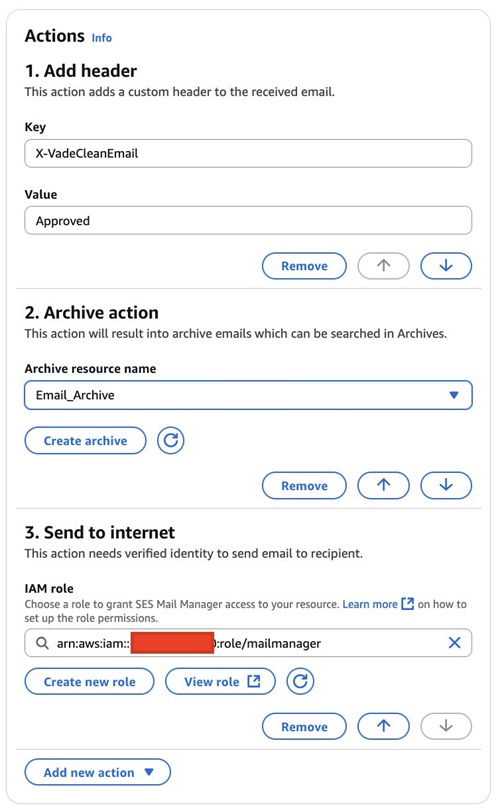
The workflow makes sure that:
- All outbound emails are securely archived
- Each email undergoes scanning
- Scan results are documented in email headers
- Clean emails are delivered to their intended recipients
Step 8 : Store password in AWS Secrets Manager for the ingress endpoint
Before creating an ingress endpoint, you need to set up a password in AWS Secrets Manager:
- Go to the AWS Secrets Manager console and choose Store a new secret.
- Select Other type of secret.
- Enter
passwordas the key and your desired password as the value. - For Encryption key: Use a custom KMS key (not AWS managed keys).
- KMS customer managed key (CMK) key policy for ingress endpoint. Replace
XXXXXXXXXXXwith your AWS account ID.
- KMS customer managed key (CMK) key policy for ingress endpoint. Replace
- Choose Next to proceed
- Enter a secret name and choose Edit permissions and update the resource policy. Replace
XXXXXXXXXXXwith your AWS account ID.
- Choose Next and create your secret
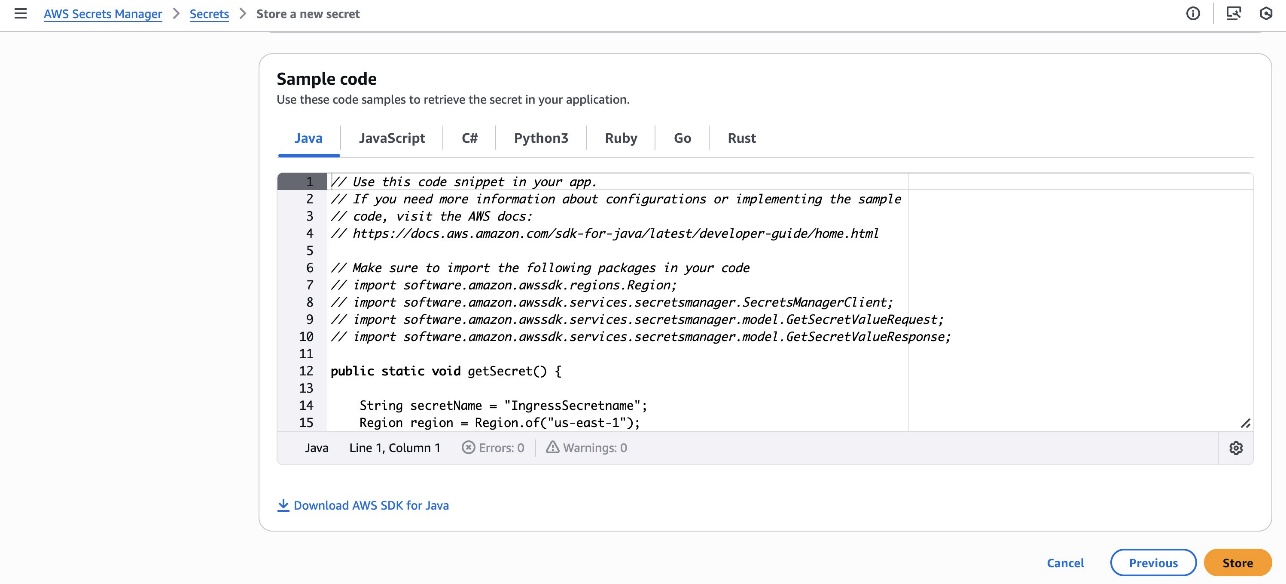
For step-by-step guidance, see the Developer guide for Ingress endpoints.
Step 9: Create an authenticated ingress endpoint
Now that you’ve created your traffic policy, rule set, and stored your credentials, you can create the ingress endpoint:
- In the Amazon SES console, choose Mail Manager and then choose Ingress endpoints.
- Choose Create ingress endpoint.
- Configure your endpoint:
- Select the Traffic policy you created earlier.
- Select the Rule set you created earlier.
- Enter a unique name for your endpoint.
- For authentication, select the Secret ARN you created in Secrets Manager.
- Choose Create ingress endpoint.
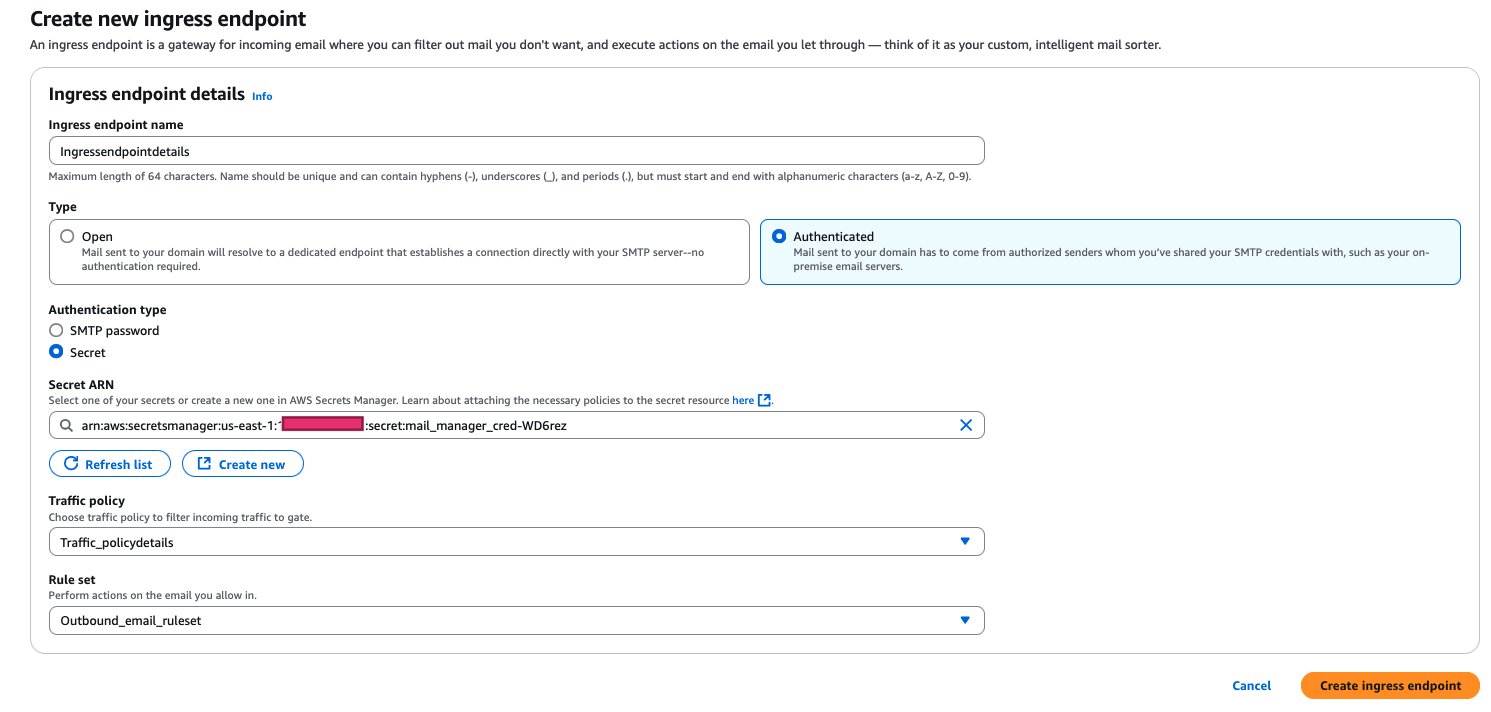 After your ingress endpoint is created, note down the following details from the General details section:
- Amazon Resource Name (ARN):
arn:aws:ses:us-east-1:XXXXXXXXXXX:mailmanager-ingress-point/inp-XXXXXXXXXXXX - Username:
inp-XXXXXXXXXXXX - Host:
XXXXXXXXX.fips.wmjb.mail-manager-smtp.amazonaws.com(ARecord)
You’ll need these details when configuring your email client or application to send emails through this endpoint.
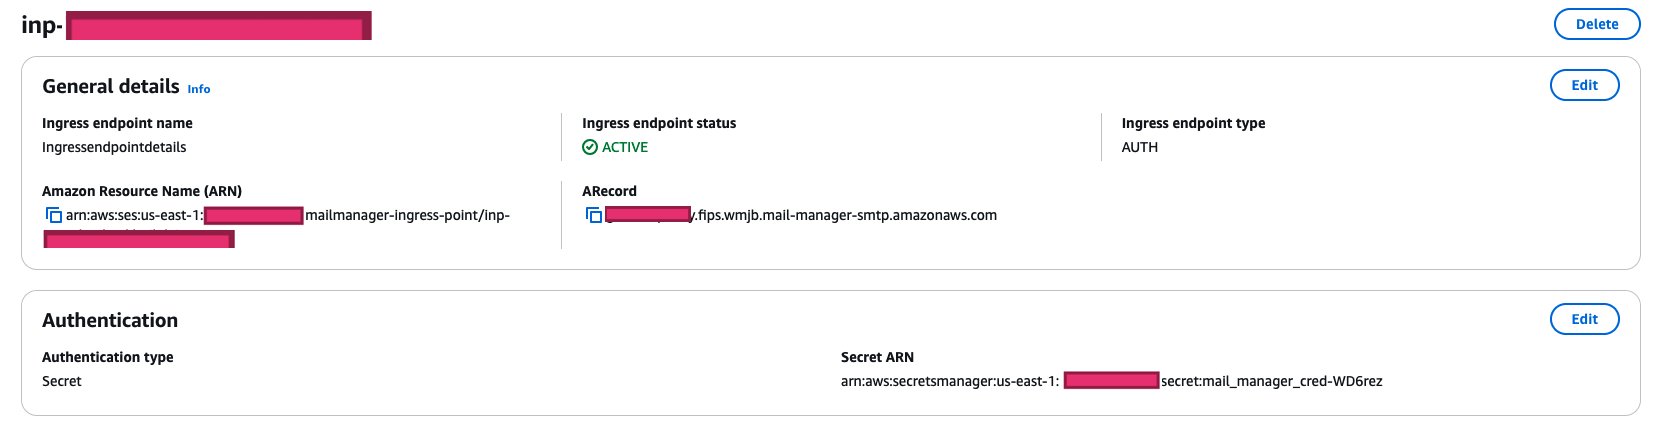
Step 10: Send email using an ingress endpoint
The following Python sample code can be executed from your local machine with the appropriate AWS credentials, but for this post you’ll run the script from the AWS CloudShell terminal from within the Amazon SES console. When running the sample Python code, the email will pass through an ingress endpoint and, if all policies are met, the email will be sent to the recipient’s email address.
Running the Python script in CloudShell
- Sign in to the console and open CloudShell.
- Create the script file and paste the following Python code into the editor.
- Paste the following Python code:
- Replace all placeholders
INGRESS_SERVER =XXXXXXXXXXX.fips.wmjb.mail-manager-smtp.amazonaws.comis your ingress endpoint hostname.INGRESS_PORT= Supported ports: 25, 587INGRESS_USERNAME = inp-XXXXXXXXXXXXis your ingress endpoint username.- Recipient and sender=
[email protected]is your verified sender and recipient email addresses.
- Save the file.
- Run the script:
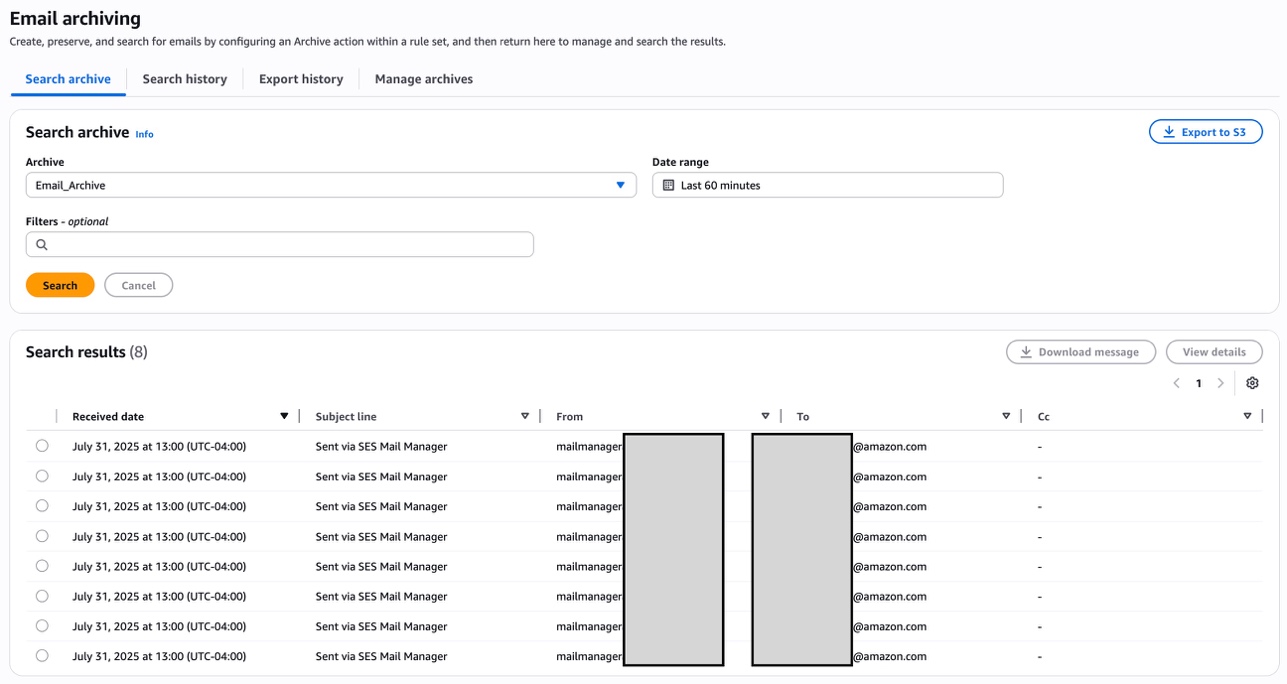
- Verify the results:
- Check the recipient’s inbox for the email.
- Check the Mail Manager archive to confirm the message was archived.
To search the Mail Manager archive for the specific message sent by the Python script:
- Navigate to the Amazon SES console and choose Mail Manager.
- Under Email Archiving, choose the Search archive tab.
- Under Archive, select the archive you created and choose Search. This should return all the emails you have sent.
Clean up
Clean up your AWS environment by removing all resources created during this walkthrough, including Mail Manager configurations, S3 buckets, secrets, and any associated Lambda functions.
Conclusion
In this post, we’ve demonstrated the implementation of sophisticated traffic policies, multi-layered rule systems, and automated archiving capabilities—all seamlessly integrated into a scalable architecture. The ability of Amazon SES Mail Manager to enforce TLS requirements, conduct email scanning, and maintain searchable archives while providing programmatic access through ingress endpoints makes it an invaluable tool for organizations seeking to modernize their email infrastructure.As businesses continue to rely heavily on email communication, Amazon SES Mail Manager emerges as a powerful ally, helping organizations navigate the complexities of modern digital correspondence while ensuring rock-solid security, seamless compliance, and optimal efficiency.
References:
- Amazon SES Mail Manager Documentation
- Traffic policies and policy statements
- Rule sets and rules
- Email archiving
- Ingress endpoints
- Email Add Ons
- AWS Secrets Manager