Post Syndicated from Techmoan original https://www.youtube.com/watch?v=5QS9Sc8J91Y
Седмицата (29 януари – 3 февруари)
Post Syndicated from Боряна Телбис original https://www.toest.bg/sedmitsata-29-yanuari-3-fevruari/

Знаете ли как се окабелява за интернет и телевизия чисто нов дом, в който никой не се е сетил, че трябва да се сложат кабелите и да се направят дупките за тях преди фината шпакловка и боята?
Единственото описание, което ми идва наум е: не че не е красиво, просто е много грозно.
Отчупват се цели парчета от идеално боядисаната стена, разпробиват се великолепни дървени первази, разместват се мебели, чупят се вази, поставени някъде с идеята, че може да съществува красота и уют. Но красотата и уютът си отиват възмутено през вратата, пред която чака съседката, за да пита нервно (и с право!) защо се пробива между 2 и 4 следобед.
Как да ѝ обясниш, че си чакал тази бормашина като малко дете Коледа, защото трета седмица плащаш за нещо, което не ползваш, тъй като мобилният оператор, предоставящ услугата, не знае кога ще има технически екип, техническа възможност и техническо време – технически може да е след ден, може да е след три месеца. И когато най-сетне кажат: „Идваме между 2 и 4 да пробиваме, да чупим и да се бесим дружно в кабели“, плясваш с ръце и се самопрегръщаш от радост.
България изглежда като апартамента, чийто ремонт приключва с разпробиване на чисто новите врати, за да се сложат чисто нови кабели. Но тя в същото време е и монополистът на личното ти щастие, разпореждащ се с услугата, за която плащаш, без да ползваш. И междувременно ти пуска есемес, че считано от тази календарна година, ще увеличи цените си с 4,7%.
Изумително място е България. Може да е няколко противоречащи си неща едновременно. Всичко навсякъде наведнъж.
Ей така – с всичко и по много, започна тази седмица, когато президентът и председателят на ПГ на ДПС решиха да си скачат един на друг, наричайки се на галено „г-н Магнитски“ и „мистър Кеш“. Емилия Милчева разсъждава защо сега и какво стои зад тези изблици в текста си „Г-н Магнитски“ стана разобличител“. Дали скоковете всъщност не са покана за танц?
Светла Енчева ни кани не на танц, а да се погледнем хубаво отстрани и да си дадем сметка за вечния двоен стандарт, в който живеем. (Вдигам поглед няколко изречения по-горе, когато казах, че България може да е няколко противоречащи си неща едновременно.) В текста си „Права на семейството или права на детето?“ Светла обръща внимание на скорошния случай с дете, поискало самò закрила от България, тъй като не желае да живее с родителите си в Бразилия. Разбира се, когато институциите се застъпиха за интереса на детето, широката общественост остана възмутена защо се вземат деца от родителите им и откъде накъде ще слушаме едно дете – та то не знае какво е най-добро за него!
Възмутени бяхме и от възможността норвежците да ни вземат българчетата. Но когато преди няколко години родители от ромските махали в няколко града панически прибираха децата си от училище, защото някой им беше подшушнал, че държавата ще им ги вземе, същата дълбоко загрижена широка общественост се присмя на тези наплашени хора, обявявайки ги за „първобитни“.
За права става дума и в текста на Марина Лякова, който идва директно от площадите на Германия, където се провеждат десетки демонстрации. Причината за тях – на тайна сбирка на дяснорадикални лидери в Потсдам с участието на представители на „Алтернатива за Германия“ и на Съюза на ценностите (фракция на Християндемократическия съюз) е обсъждана идеята за насилствена масова „ремиграция“. Какво стои зад възхода на крайната десница в Германия – обяснява Марина Лякова.
Тази седмица в „Тоест“ намери своето място и чудесното ревю на Антония Апостолова, посветено на „Странните преживелици на един пощальон“. „Повест – изящна, поетична и философски задълбочена, с щипка мистериозност и чувствена романтика“, казва Антония за книгата, която е част от каталога на издателство „Лист“ и може да си купите с отстъпка в размер на 20% от коричната цена, ако сте сред активните дарители на „Тоест“.
За накрая оставих радостното вълнение, което още от първите редове на този бюлетин ме рита по душевните кокалчета, за да го пусна да излезе на свобода и да извика: ЧЕСТИТ ШЕСТИ РОЖДЕН ДЕН, ТОЕСТ! Обаче аз, не, стоически удържам и пиша за президенти и мигранти. Сега обаче му дойде времето да кажа, че на 1 февруари „Тоест“ стана на шест години.
Целият ни екип ви благодари, че сте такава активна и вярна публика и че ни подкрепяте през всички тези години. Без вас медията не може да съществува. Затова да си знаете – и вие станахте на шест години.
Comic for 2024.02.03 – Go Outside
Post Syndicated from Explosm.net original https://explosm.net/comics/go-outside
New Cyanide and Happiness Comic
Beak
Post Syndicated from Oglaf! -- Comics. Often dirty. original https://www.oglaf.com/beak/


Friday Squid Blogging: Illex Squid in Argentina Waters
Post Syndicated from Bruce Schneier original https://www.schneier.com/blog/archives/2024/02/friday-squid-blogging-illex-squid-in-argentina-waters.html
Argentina is reporting that there is a good population of illex squid in its waters ready for fishing, and is working to ensure that Chinese fishing boats don’t take it all.
As usual, you can also use this squid post to talk about the security stories in the news that I haven’t covered.
Read my blog posting guidelines here.
Metasploit Weekly Wrap-Up 02/02/2024
Post Syndicated from Simon Janusz original https://blog.rapid7.com/2024/02/02/metasploit-weekly-wrap-up-02-02-2024/
Shared RubySMB Service Improvements
This week’s updates include improvements to Metasploit Framework’s SMB server implementation: the SMB server can now be reused across various SMB modules, which are now able to register their own unique shares and files. SMB modules can also now be executed concurrently. Currently, there are 15 SMB modules in Metasploit Framework that utilize this feature.
New module content (2)
Mirth Connect Deserialization RCE
Authors: Naveen Sunkavally, Spencer McIntyre, and r00t
Type: Exploit
Pull request: #18755 contributed by zeroSteiner
Path: multi/http/mirth_connect_cve_2023_43208
Description: This PR adds an exploit module for Mirth Connect. Versions < 4.4.1 are vulnerable to CVE-2023-43208 and CVE-2023-37679, where the former is a patch bypass for the latter. In both cases, an attacker can execute an OS command in the context of the target service using a specially crafted HTTP request and Java deserialization gadget. A technical analysis of CVE-2023-37679 is available in AttackerKB.
Puppet Config Gather
Author: h00die
Type: Post
Pull request: #18628 contributed by h00die
Path: linux/gather/puppet
Description: This PR adds a post gather module to get Puppet configs and other sensitive files.
Enhancements and features (2)
- #18680 from zeroSteiner – This adds a service compatible with
Rex::ServiceManagerfor SMB that can be shared among modules. - #18742 from sjanusz-r7 – Enhances the
post/multi/gather/memory_searchwith additional UX improvements such as outputting a list of matched processes that are being targeted, as well as improved error handling if the process architecture is not correct.
Bugs fixed (2)
- #18750 from adfoster-r7 – Updates the
to_handlercommand for payload modules to support option overrides. Theto_handlercommand is a convenient way of usingmulti/handler, setting the payload, and setting datastore options. - #18760 from adfoster-r7 – Fixes an issue where Metasploit fails to start when
resolv.confcannot be found.
Documentation
You can find the latest Metasploit documentation on our docsite at docs.metasploit.com.
Get it
As always, you can update to the latest Metasploit Framework with msfupdate
and you can get more details on the changes since the last blog post from
GitHub:
If you are a git user, you can clone the Metasploit Framework repo (master branch) for the latest.
To install fresh without using git, you can use the open-source-only Nightly Installers or the
commercial edition Metasploit Pro
David Kahn
Post Syndicated from Bruce Schneier original https://www.schneier.com/blog/archives/2024/02/david-kahn.html
David Kahn has died. His groundbreaking book, The Codebreakers was the first serious book I read about codebreaking, and one of the primary reasons I entered this field.
He will be missed.
EDITED TO ADD (2/4): Funeral website.
EDITED TO ADD (2/10): New York Times obituary.
New Video New Set
Post Syndicated from Patrick Kennedy original https://www.servethehome.com/new-video-new-set-gigabyte-r183-z95-video-kioxia-amd/
Today marks the first full video that we have done on the new studio set. It has taken a lot of work to get to this point
The post New Video New Set appeared first on ServeTheHome.
Let’s unbox, assemble and do FAST print – all in one stream!
Post Syndicated from BeardedTinker original https://www.youtube.com/watch?v=Bh3HBQRXFdQ
Import entire applications into AWS CloudFormation
Post Syndicated from Dan Blanco original https://aws.amazon.com/blogs/devops/import-entire-applications-into-aws-cloudformation/
AWS Infrastructure as Code (IaC) enables customers to manage, model, and provision infrastructure at scale. You can declare your infrastructure as code in YAML or JSON by using AWS CloudFormation, in a general purpose programming language using the AWS Cloud Development Kit (CDK), or visually using Application Composer. IaC configurations can then be audited and version controlled in a version control system of your choice. Finally, deploying AWS IaC enables deployment previews using change sets, automated rollbacks, proactive enforcement of resource compliance using hooks, and more. Millions of customers enjoy the safety and reliability of AWS IaC products.
Not every resource starts in IaC, however. Customers create non-IaC resources for various reasons: they didn’t know about IaC, or they prefer to work in the CLI or management console. In 2019, we introduced the ability to import existing resources into CloudFormation. While this feature proved integral for bringing resources into IaC on an individual basis, the process of manually creating templates to match those resources wasn’t ideal. Customers were required to look up documentation on resources and painstakingly copy values manually. Customers also told us they traditionally engaged with applications (that is, groupings of related resources), so dealing with individual resources didn’t match that experience. We set out to create a more holistic flow for managing resources and their relations.
Recently, we announced the IaC generator and CDK Migrate, an end-to-end experience that enables customers to create an IaC configuration based off a resource as well as its relationships. This works by scanning an AWS account and using the CloudFormation resource type schema to find relationships between resources. Once this configuration is created, you can use it to either import those resources into an existing stack, or create a brand new stack from scratch. It’s now possible to bring entire applications into a managed CloudFormation stack without having to recreate any resources!
In this post, I’ll explore a common use case we’ve seen and expect the IaC generator to solve: an existing network architecture, created outside of any IaC tool, needs to be managed by CloudFormation.
IaC generator in Action
Consider the following scenario:
As a new hire to an organization that’s just starting its cloud adoption journey, you’ve been tasked with continuing the development of the team’s shared Amazon Virtual Private Cloud (VPC) resources. These are actively in use by the development teams. As you dig around, you find out that these resources were created without any form of IaC. There’s no documentation, and the person who set it up is no longer with the team. Confounding the problem, you have multiple VPCs and their related resources, such subnets, route tables, and internet gateways.
You understand the benefits of IaC – repeatability, reliability, auditability, and safety. Bringing these resources under CloudFormation management will extend these benefits to your existing resources. You’ve imported resources into CloudFormation before, so you set about the task of finding all related resources manually to create a template. You quickly discover, however, that this won’t be a simple task. VPCs don’t store relations to items; instead, relations are reversed – items know which VPC they belong to, but VPCs don’t know which items belong to them. In order to find all the resources that are related to a VPC, you’ll have to manually go through all the VPC-related resources and scan to see which vpc-id they belong to. You’ll have to be diligent, as it’s very easy to miss a resource because you weren’t aware that it existed or it may even be different class of resource altogether! For example, some resources may use an elastic network interface (ENI) to attach to the VPC, like an Amazon Relational Database Service instance.
You, however, recently learned about the IaC generator. The generator works by running a scan of your account and creating an up-to-date inventory of resources. CloudFormation will then leverage the resource type schema to find relationships between resources. For example, it can determine that a subnet has a relationship to a VPC via a vpc-id property. Once these relationships have been determined, you can then select the top-level resources you want to generate a template for. Finally, you’ll be able to leverage the wizard to create a stack from this existing template.
You can navigate to the IaC generator page in the Amazon Management Console and start a scan on your account. Scans last for 30 days, and you can run three scans per day in an account.

Once the scan completes, you create a template by selecting the Create Template button. After selecting Start from a new template, you fill out the relevant details about the stack, including the Template name and any stack policies. In this case, you leave it as Retain.

On the next page, you’ll see all the scanned resources. You can add filters to the resource such as tags to view a subset of scanned resources. This example will only use a Resource type prefix filter. More information on filters can be found here. Once you find the VPC, you can select it from the list.
![A VPC selected in the scanned resources list]](https://d2908q01vomqb2.cloudfront.net/7719a1c782a1ba91c031a682a0a2f8658209adbf/2024/01/11/add-resources-to-template.png)
On the next page, you’ll see the list of resources that CloudFormation has determined to have a link to this VPC. You see this includes a myriad of networking related resource. You keep these all selected to create a template from them.

At this point, you select Create template and CloudFormation will generate a template from the existing resources. Since you don’t have an existing stack to import these resource into, you must create a new stack. You now select this template and then select the Import to stack button.

After entering the Stack name, you can then enter any Parameters your template needs.

CloudFormation will create a change set for your new stack. Change sets allow you to see the changes CloudFormation will apply to a stack. In this example, all of the resources will have the Import status. You see the resources CloudFormation found, and once you’re satisfied, you create the stack.

At this point, the create stack operation will proceed as normal, going through each resource and importing it into the stack. You can report back to your team that you have successfully imported your entire networking stack! As next steps, you should source this template in a version control system. We recently announced a new feature to keep CloudFormation templates synced with popular version control systems. Finally, make sure to make any changes through CloudFormation to avoid a configuration drift between the stated configuration and the existing configuration.
This example was primarily CloudFormation-based, but CDK customers can use CDK Migrate to import this configuration into a CDK application.
Available Now
The IaC generator is now available in all regions where CloudFormation is supported. You can access the IaC generator using the console, CLI, and SDK.
Conclusion
In this post, we explored the new IaC generator feature of CloudFormation. We walked through a scenario of needing to manage previously existing resources and using the IaC generator’s provided wizard flow to generate a CloudFormation template. We then used that template and created a stack to manage these resources. These resources will now enjoy the safety and repeatability that IaC provides. Though this is just one example, we foresee other use cases for this feature, such as enabling a console-first development experience. We’re really excited to hear your thoughts about the feature. Please let us know how you feel!
Announcing CDK Migrate: A single command to migrate to the AWS CDK
Post Syndicated from Adam Keller original https://aws.amazon.com/blogs/devops/announcing-cdk-migrate-a-single-command-to-migrate-to-the-aws-cdk/
Today we’re excited to announce the general availability of CDK Migrate, a component of the AWS Cloud Development Kit (CDK). This feature enables users to migrate AWS CloudFormation templates, previously deployed CloudFormation stacks, or resources created outside of Infrastructure as Code (IaC) into a CDK application. This feature is being launched in tandem with the CloudFormation IaC Generator, which helps customers import resources created outside of CloudFormation into a template, and into a newly generated, fully managed CloudFormation stack. To read more on this feature, check out the launch post.
There are various ways to create and manage resources in AWS, whether that be via “ClickOps” (creating and updating via the AWS Console), via AWS API’s, or using Infrastructure as Code (IaC). While it’s a good and recommended practice to manage the lifecycle of resources using IaC, there can be an on-ramp to getting started. For those that aren’t ready to use IaC, it is likely that they use the console to create the resources and update them accordingly. While this can be acceptable for smaller use cases or for testing out a new service, it becomes more challenging as the complexity of the environment grows. This is further exacerbated when there is a need to re-deploy the exact configuration to other accounts, environments, or regions, as the process becomes very error prone when trying to replicate it. IaC is built to help solve this problem by allowing users to define once and deploy everywhere. For those who have been putting off the move to IaC, now is the time to take the plunge with the IaC generator functionality and CDK migrate, which can accelerate and simplify the move.
Getting Started
The first step when migrating resources into the AWS CDK is to understand the best mechanism for how the users would prefer to interact with their IaC.
- For users that are looking to define their IaC declaratively (manage resources via a configuration language like YAML), it is recommended that they look at IaC generator, which can generate a CloudFormation template as well as manage the existing resources in a CloudFormation stack.
- For users that are looking to manage their IaC via a higher level programming language as well as build on top of those templates with higher level abstractions and automation, the AWS Cloud Development Kit and CDK migrate serve as an excellent option,
There is also functionality in the CDK CLI to import resources into an existing CDK application. Let’s review the use cases for when to use CDK migrate vs when to use CDK import.
CDK Migrate
- Users are looking to migrate one or many resources into a new CDK application.
- Examples of existing resources in the AWS region to be migrated:
- Resources created outside of IaC
- A deployed CloudFormation Stack
- Examples of existing resources in the AWS region to be migrated:
- Users want to migrate from CloudFormation templates into a new CDK application
- Users are looking for a managed experience to generate CDK code from existing resources and/or CloudFormation templates.
- While the CDK migrate feature is designed to help accelerate those users looking to use the AWS CDK, it’s important to understand that there are limitations. For more information on the limitations, please review the documentation.
CDK Import
- Users have an existing CDK application and want to import one or many resources that were created outside of the CDK.
- Examples of existing resources in the AWS region to be migrated:
- Resources created outside of IaC (via ClickOps)
- A deployed CloudFormation Stack
- The user must define the resources in their CDK app on their own, and ensure that the resources defined in the CDK code map directly to the resource as it exists in the account. There is a multi-step process to follow when using this feature, for more information see here.
- Examples of existing resources in the AWS region to be migrated:
This post will walk through an example of how to take a local CloudFormation template and convert it into a new CDK application.
Walkthrough
To start, take the CloudFormation template below that will be converted to a CDK application. The template creates an AWS Lambda Function, AWS Identity and Access Management (IAM) role, and an Amazon S3 Bucket along with some parameters to help make some of the inputs dynamic. Below is the template in full:
AWSTemplateFormatVersion: "2010-09-09"
Description: AWS CDK Migrate Demo Template
Parameters:
  FunctionResponse:
    Description: Response message from the Lambda function
    Type: String
    Default: Hello World
  BucketTag:
    Description: The tag value of the S3 bucket
    Type: String
    Default: ChangeMe
Resources:
  LambdaExecutionRole:
    Type: AWS::IAM::Role
    Properties:
      AssumeRolePolicyDocument:
        Version: "2012-10-17"
        Statement:
          - Effect: Allow
            Principal:
              Service: lambda.amazonaws.com
            Action: sts:AssumeRole
      ManagedPolicyArns:
        - arn:aws:iam::aws:policy/service-role/AWSLambdaBasicExecutionRole
  HelloWorldFunction:
    Type: AWS::Lambda::Function
    Properties:
      Role: !GetAtt LambdaExecutionRole.Arn
      Code:
        ZipFile: |
          import os
          def lambda_handler(event, context):
            function_response = os.getenv('FUNCTION_RESPONSE')
            return {
              "statusCode": 200,
              "body": function_response
            }
      Handler: index.lambda_handler
      Runtime: python3.11
      Environment:
        Variables:
          FUNCTION_RESPONSE: !Ref FunctionResponse
  S3Bucket:
    Type: AWS::S3::Bucket
    Properties:
      PublicAccessBlockConfiguration:
        BlockPublicAcls: true
        BlockPublicPolicy: true
        IgnorePublicAcls: true
        RestrictPublicBuckets: true
      BucketEncryption:
        ServerSideEncryptionConfiguration:
          - ServerSideEncryptionByDefault:
              SSEAlgorithm: AES256
      Tags:
        - Key: Application
          Value: Git-Sync-Demo
        - Key: DynamicTag
          Value: !Ref BucketTag
Outputs:
  S3BucketName:
    Description: The name of the S3 bucket
    Value: !Ref S3Bucket
    Export:
      Name: !Sub ${AWS::StackName}-S3BucketName
This is the template that you will use when running the migration command. As a reminder, this demo migrates a CloudFormation template to a CDK application, but you can also migrate a previously deployed stack or non IaC created resources.
Migrate
The migration from the CloudFormation template to the CDK is done with a single command: cdk migrate. Simply point to the local CloudFormation template file (let’s call it demo-template.yaml), and watch as the CLI converts the template into a CDK application. The output and result from running the command will be a directory comprised of the CDK code and dependencies, but will not deploy the stack.
cdk migrate --stack-name CDK-Local-Template-Migrate-Demo --language typescript --from-path ../demoTemplate.yaml

In the above command, you’re instructing the CDK CLI to consume the CloudFormation template file using the --from-path parameter, and choose the language as the output for the CDK application. The CDK CLI will convert the template as well as create a project folder along with the required dependencies for the CDK application.
When the migration is complete, the CDK application along with the project structure and files are available and ready to use, but have not yet been deployed. Below is the file structure of what was generated:

The above output represents the scaffold for your CDK Typescript application, ready for deployment. The two directories that house the CDK code are bin and lib. Within the bin directory you’ll find the code that creates our CDK app and calls the CDK Stack class. The name of the files will match the input that was passed into the –stack-name parameter when running the migrate command, so in this case the file is named: bin/cdk-local-template-migrate-demo.ts. Below is the generated code:

The CdkLocalTemplateMigrateDemoStack is imported and then instantiated. This is where the code that was converted from the existing CloudFormation template (or stack, or resources) resides. Again, similar to how the file was named above, the filename and location for the CDK stack code is lib/cdk-local-template-migrate-demo-stack.ts. Let’s look at the code that was converted.

Comparing the above auto generated code to the original CloudFormation template, the definitions of the resources look similar. This is because the migrate command is generating the CDK code using L1 constructs, which represent all resources available in CloudFormation. For more information on CDK constructs and the various levels of abstraction they offer, check out this video.
The CloudFormation parameters were converted to properties inside of an interface, which are passed in to the Stack class. Inside of the Stack class code, it honors the defaults set in the properties based on the defaults were set in the original CloudFormation parameters. If you wanted to override those defaults, you could pass those properties into the CDK stack as follows:

With your newly created CDK application, you’re ready to deploy it to your AWS account.
Deploy
If this is the first time that you are using the CDK in the account and region, you will need to run the cdk bootstrap command, which creates assets required for the CDK to properly deploy resources to the region and account. For more information see here. Assuming the bootstrap process has happened, you can proceed to deployment.
The Infrastructure as Code is ready to deploy, but prior to deploying you should run a cdk diff to see what will be deployed. Running the diff command creates a change set and surfaces the changes being proposed (in this case it is a brand new stack with new resources).

From the output you can see that all new resources are being created. If the cdk diff command was run against existing resources or stacks, assuming nothing changed (like above where I updated the properties), the diff would show no changes to the existing resources.
Next, deploy the stack (by running the cdk deploy command) and once the deployment is complete, head over to the AWS console and find your Lambda function. Run a test on your lambda function, and the response should match the functionResponse property that was updated as “CDK Migrate Demo Blog”.
Wrapping up
In this post, we discussed how the CDK migrate command can help you move your resources to the CDK to manage your infrastructure as code, whether it’s from a CloudFormation template, previously deployed CloudFormation stack, or from importing resources via the CloudFormation IaC generator feature. As always, we encourage you to test this feature and provide feedback and/or feature requests in our GitHub repo. In addition, if you’re new to the CDK there are some resources that can help you get started.
- CDK hands on workshop
- CDK Live! (Youtube channel with live streams and walkthroughs)
- CDK Best Practices Guide
How to migrate your on-premises domain to AWS Managed Microsoft AD using ADMT
Post Syndicated from Austin Webber original https://aws.amazon.com/blogs/security/how-to-migrate-your-on-premises-domain-to-aws-managed-microsoft-ad-using-admt/
February 2, 2024: We’ve updated this post to fix broken links and added a note on migrating passwords.
Customers often ask us how to migrate their on-premises Active Directory (AD) domain to AWS so they can be free of the operational management of their AD infrastructure. Frequently they are unsure how to make the migration simple. A common approach using the CSVDE utility doesn’t migrate attributes such as user passwords. This makes migration difficult and necessitates manual effort for a large part of the migration that can cause operational and security challenges when migrating to a new directory. So, what’s changed?
You can now use the Active Directory Migration Toolkit (ADMT) along with the Password Export Service (PES) to migrate your self-managed AD to AWS Directory Service for Microsoft Active Directory, also known as AWS Managed Microsoft AD. This enables you to migrate AD objects and encrypted passwords for your users more easily.
AWS Managed Microsoft AD is a managed service built on Microsoft Active Directory. AWS provides operational management of the domain controllers, and you use standard AD tools to administer users, groups, and computers. AWS Managed Microsoft AD enables you to take advantage of built-in Active Directory features, such as Group Policy, trusts, and single sign-on and helps make it simple to migrate AD-dependent workloads into the AWS Cloud. With AWS Managed Microsoft AD, you can join Amazon EC2 and Amazon RDS for SQL Server instances to a domain, and use AWS Enterprise IT applications, such as Amazon WorkSpaces, and AWS IAM Identity Center with Active Directory users and groups.
In this post, we will show you how to migrate your existing AD objects to AWS Managed Microsoft AD. The source of the objects can be your self-managed AD running on EC2, on-premises, co-located, or even another cloud provider. We will show how to use ADMT and PES to migrate objects including users (and their passwords), groups, and computers.
The post assumes you are familiar with AD and how to use the Remote Desktop Protocol client to sign and use EC2 Windows instances.
Background
In this post, we will migrate user and computer objects, as well as passwords, to a new AWS Managed Microsoft AD directory. The source will be an on-premises domain.
This example migration will be for a fairly simple use case. Large customers with complex source domains or forests may have more complex processes involved to map users, groups, and computers to the single OU structure of AWS Managed Microsoft AD. For example, you may want to migrate an OU at a time. Customers with single domain forests may be able to migrate in fewer steps. Similarly, the options you might select in ADMT will vary based on what you are trying to accomplish.
To perform the migration, we will use the Admin user account from the AWS Managed Microsoft AD. AWS creates the Admin user account and delegates administrative permissions to the account for an organizational unit (OU) in the AWS Managed Microsoft AD domain. This account has most of the permissions required to manage your domain, and all the permissions required to complete this migration.
In this example, we have a Source domain called source.local that’s running in a 10.0.0.0/16 network range, and we want to migrate users, groups, and computers to a destination domain in AWS Managed Microsoft AD called destination.local that’s running in a network range of 192.168.0.0/16.
To migrate users from source.local to destination.local, we need a migration computer that we join to the destination.local domain on which we will run ADMT. We also use this machine to perform administrative tasks on the AWS Managed Microsoft AD. As a prerequisite for ADMT, we must install Microsoft SQL Express 2019 on the migration computer. We also need an administrative account that has permissions in both the source and destination AD domains. To do this, we will use an AD trust and add the AWS Managed Microsoft AD admin account from destination.local to the source.local domain. Next we will install ADMT on the migration computer, and run PES on one of the source.local domain controllers. Finally, we will migrate the users and computers.
Note: If you migrate user passwords by using ADMT and PES, and if the supported Kerberos encryption type RC4_HMAC_MD5 is disabled on client computers, Kerberos authentication fails for the users until they reset their passwords. This occurs because of the design of the PES tool and the method that it uses to synchronize passwords. We recommend for the user to reset their password after migration.
For this example, we have a handful of users, groups, and computers, shown in the source domain in these screenshots, that we will migrate:
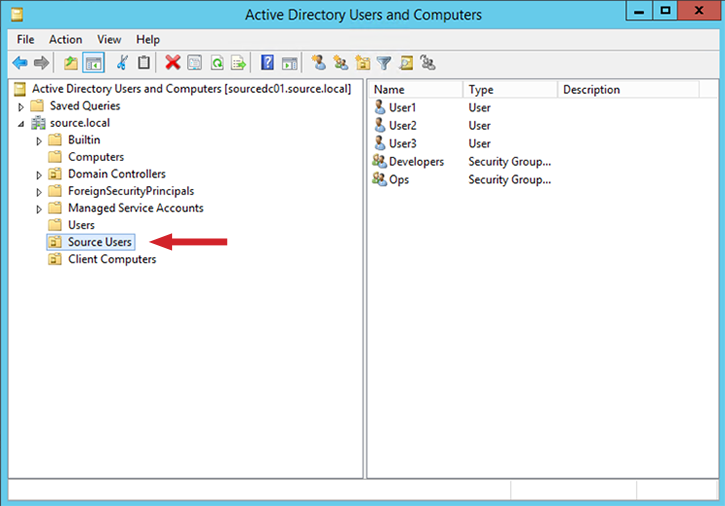
Figure 1: Example source users
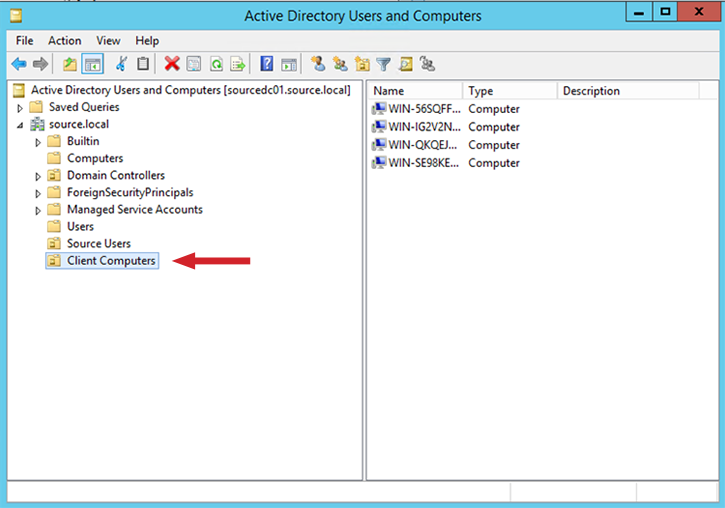
Figure 2: Example client computers
In the remainder of this post, we will show you how to do the migration in 5 main steps:
- Prepare the forests, migration computer, and administrative account.
- Install SQL Express and ADMT on the migration computer.
- Configure ADMT and PES.
- Migrate users and groups.
- Migrate computers.
Step 1: Prepare the forests, migration computer, and administrative account
To migrate users and passwords from the source domain to AWS Managed Microsoft AD, you must have a 2-way forest trust. The trust from the source domain to AWS Managed Microsoft AD enables you to add the admin account from the AWS Managed Microsoft AD to the source domain. This is necessary so you can grant the AWS Managed Microsoft AD Admin account permissions in your source AD directory so it can read the attributes to migrate. We’ve already created a two-way forest trust between these domains. You should do the same by following this guide. Once your trust has been created, it should show up in the AWS console as Verified.
The ADMT tool should be installed on a computer that isn’t the domain controller in the destination domain destination.local. For this, we will launch an EC2 instance in the same VPC as the domain controller and we will add it to the destination.local domain using the EC2 seamless domain join feature. This will act as the ADMT transfer machine.
- Launch a Microsoft Windows Server 2019 instance.
- Complete a domain join to the target domain destination.local. You can complete this manually, or alternatively you can use AWS Systems Manager to complete a seamless domain join as covered here.
- Sign into the instance using RDP and use Active Directory Users and Computers (ADUC) to add the AWS Managed Microsoft AD admin user from the destination.local domain to the source.local domain’s built-in administrators group (you will not be able to add the Admin user as a domain admin). For information on how to set up this instance to use ADUC, please see this documentation.

Figure 3: the “Administrator’s Properties” dialog box

Step 2: Install SQL Express and ADMT on the migration computer
Next, we need to install SQL Express and ADMT on the migration computer by following these steps.
- Install Microsoft SQL Express 2019 on the migration computer with a basic install.
- Download ADMT version 3.2 from Microsoft.
- Run the installer and, when setting the tool up, on the Database Selection page of the wizard, for Database (Server\Instance), type the local instance of Microsoft SQL Express we previously installed to work with ADMT.

Figure 4: Specify the “Database (Server\Instance)”
- On the Database Import page of the wizard, select No, do not import data from an existing database (Default).

Figure 5: The “Database Import” dialog box
- Complete the rest of the installation using all of the default options.


Step 3: Configure ADMT and PES
We’ll use PES to take care of encrypted password synchronization. Before we configure that, we need to create an encryption key that will be used during this process to encrypt the password migration.
- On the ADMT transfer machine, open an elevated Command Prompt and use the following format to create the encryption key.
Here’s an example:
Note: If you get an error stating that the command is not found, close and reopen Command Prompt to refresh the path locations to the ADMT executable, and then try again.
- Copy the outputted key file onto one of the source.local domain controllers.
- Download the Password Export Server on one of the source.local domain controllers.
- Start the install and, in the ADMT Password Migration DLL Setup window, browse to the encryption file you created in the previous step.
- When prompted, enter the password used in the ADMT encryption command.
- Run PES using the local system account. Note that this will prompt a restart of the domain controller you’re installing PES on.
- Once the domain controller has rebooted, open services.msc and start the Password Export Server Service, which is currently set to Manual. You might choose to set this to automatic if it’s likely your DC will be rebooted again before the end of your migration.

Figure 6: Start the Password Export Server Service
- You can now open the Active Directory Migration Tool: Control Panel > System and Security > Administrative Tools > Active Directory Migration Tool.
- Right-click Active Directory Migration Tool to see the migration options:

Figure 7: List of migration options


Step 4: Migrate users and groups
- In the Domain Selection page, select or type the Source and Target domains, and then select Next.
- On the User Selection page, select the users to migrate. You can use an include file if you have a large domain. Select Next.
- On the Organizational Unit Selection page, select the destination OU that you want to migrate your users across to, and then select Next. AWS Managed Microsoft AD gives you a managed OU where you can create your OU tree structure.
In this example, we will place them in Users OU:
- On the Password Options page, select Migrate passwords, and then select Next. This will contact PES running on the source domain controller.
- On the Account Transitions Page, decide how to handle the migration of user objects. In this example, we’re going to replicate the state from the source domain. Migrating SID history is beneficial when you’re doing long, staged migrations where users may need to access resources in the source and destination domain before migration is complete. At this time, AWS Managed Microsoft AD doesn’t support migrating user SIDs. We select Target same as source, and then select Next. Again, what you choose to do might be different.

Figure 8: The “Account Transition Options” dialog
- Now, let’s customize the transfer. The following screen shot shows the commonly selected options on the User Options page of the User Account Migration Wizard:

\Figure 9: Common user options
It’s likely that you’ll have more than one migration pass, so choosing how you handle existing objects is important. This will be a single run for us, but the default behavior is to not migrate if the object already exists (see the image of the Conflict Management page below). If you’re running multiple passes, you’ll will want to look at options that involve merging conflicting objects. The method you select will depend on your use case. If you don’t know where to start, read this article.

Figure 10: The “Conflict Management” dialog box
In our example, you can see that our 3 users, and any groups they were members of, have been migrated.

Figure 11: The “Migration Progress” window
We can verify this by checking that the users exist in our destination.local domain:

Figure 12: Checking the users exist in the destination.local domain


Step 5: Migrate computers
Now, we’ll move on to computer objects.
- Open the Active Directory Migration Tool: Control Panel > System and Security > Administrative Tools > Active Directory Migration Tool.
- Right-click Active Directory Migration Tool and select Computer Migration Wizard.
- Select the computers you want to migrate to the new domain. We’ll select four computers for migration.

Figure 13: Four computers that will be migrated
- On the Translate Objects page, select which access controls you want to reapply during the migration, and then select Next.

Figure 14: The “Translate Objects” dialog box
The migration process will show completed, but we need to make sure the entire process worked.
- To verify that the migration was successful, select Close, and the migration tool will open a new window that has a link to the migration log. Check the log file to see that it has started the process of migrating these four computers:
2017-08-11 04:09:01 The Active Directory Migration Tool Agent will be installed on WIN-56SQFFFJCR1.source.local
2017-08-11 04:09:01 The Active Directory Migration Tool Agent will be installed on WIN-IG2V2NAN1MU.source.local
2017-08-11 04:09:01 The Active Directory Migration Tool Agent will be installed on WIN-QKQEJHUEV27.source.local
2017-08-11 04:09:01 The Active Directory Migration Tool Agent will be installed on WIN-SE98KE4Q9CR.source.local
If the admin user doesn’t have access to the C$ or admin$ share on the computer in the source domain share, then then installation of the agent will fail as shown here:
2017-08-11 04:09:29 ERR2:7006 Failed to install agent on \\WIN-IG2V2NAN1MU.source.local, rc=5 Access is denied.
Once the agent is installed, it will perform a domain disjoin from source.local and perform a join to desintation.local. The log file will update when this has been successful:
2017-08-11 04:13:29 Post-check passed on the computer ‘WIN-SE98KE4Q9CR.source.local’. The new computer name is ‘WIN-SE98KE4Q9CR.destination.local’.
2017-08-11 04:13:29 Post-check passed on the computer ‘WIN-QKQEJHUEV27.source.local’. The new computer name is ‘WIN-QKQEJHUEV27.destination.local’.
2017-08-11 04:13:29 Post-check passed on the computer ‘WIN-56SQFFFJCR1.source.local’. The new computer name is ‘WIN-56SQFFFJCR1.destination.local’.
You can then view the new computer objects in the destination domain.
- Log in to one of the old source.local computers and, by looking at the computer’s System Properties, confirm that the computer is now a member of the new destination.local domain.

Figure 15: Confirm the computer is member of the destination.local domain


Summary
In this simple example we showed how to migrate users and their passwords, groups, and computer objects from an on premises deployment of Active Directory, to our fully AWS Managed Microsoft AD. We created a management instance on which we ran SQL Express and ADMT, we created a forest trust to grant permissions for an account to use ADMT to move users, we configured ADMT and the PES tool, and then stepped through the migration using ADMT.
The ADMT tool gives us a great way to migrate to our managed Microsoft AD service that allows powerful customization of the migration, and it does so in a more secure way through encrypted password synchronization. You may need to do additional investigation and planning if the complexity of your environment requires a different approach with some of these steps.
If you have feedback about this post, submit comments in the Comments section below. If you have questions about this post, start a new thread on the AWS Directory service forum or contact AWS Support.
Want more AWS Security news? Follow us on X.
Highlights: Julie Andrews & Emma Walton Hamilton | Home Work | Talks at Google
Post Syndicated from Talks at Google original https://www.youtube.com/watch?v=KiJSH0Jj4qU
UniFi U7 Pro w/ 2.5 Gigabit Speeds over WiFi 7 6ghz
Post Syndicated from digiblurDIY original https://www.youtube.com/watch?v=u5-s85jjvks
Rapid7 in Prague: Pete Rubio Shares Insights and Excitement for the New Office
Post Syndicated from Rapid7 original https://blog.rapid7.com/2024/02/02/rapid7-in-prague-pete-rubio-shares-insights-and-excitement-for-the-new-office/

As we continue to grow our customer base here at Rapid7, we’re growing our offices as well – this time with a new location in the Czech Republic. With a successful history of building innovation hubs from Boston to Belfast, our teams can’t wait to bring new talent from Prague into the business.
Pete Rubio joined Rapid7 in December of 2020, and is the Senior Vice President, Platform & Engineering. In this role he leads our data and engineering teams as they work to develop, optimize, and deliver security products and solutions to more than 11,000 customers worldwide.
Here, he talks about what he’s excited to see in Prague, what makes working at Rapid7 unique, and how he has experienced growth and development in his role as a leader.
What can you share about our new office location in Prague?
As a cybersecurity company, the need to constantly evolve and bring new, innovative ideas to the table is paramount to our success and the success of our customers. When it comes to expanding our global presence with a new location in Prague, we are excited to grow our talent pool and bring new perspectives and ideas into the business. Creating an innovation hub like this isn’t new to us; we’ve seen success in our Belfast office when it comes to creating a global hub for innovation. I see Prague as a location that will follow that model and have that same impact.
What makes Rapid7 unique as an employer?
At Rapid7, it’s our culture that sets us apart from other global companies. We have really interesting problems to solve and breakthrough innovations to deliver, but it’s how we do things and the culture we’ve created here that makes us quite different. We believe in working together to challenge convention and deliver excellence. We value perspectives and ideas from all areas of the business, and there are no egos or personal agendas when it comes to delivering for our customers.
We also place an extremely high emphasis on giving employees opportunities to stretch themselves, try new things, and really grow their careers in a way that compliments our business strategy. Rapid7 has created an environment where you can grow your career, grow your leadership skills, clearly measure your impact on the business — and have a lot of fun along the way.
People all over the world spend a lot of time at work, and if you don’t like your co-workers or the environment you’re spending one third of your day in – it’s going to be a struggle. One thing I’ve found is that our culture has allowed us to work through our challenges and come out even stronger.

So what exactly are we building, and what can future employees expect?
There are a few sites at Rapid7 that represent a cross section of the company and have almost every discipline represented. Prague will be one of those sites. We’ll have engineering, product, a SOC location, finance, sales, support, and more. This is more than an engineering location or satellite office. Employees here will be working on critical path initiatives across the whole business. This is exciting for our employees because it creates a lot of opportunities for collaboration as well as growing your career and skills. If you want to lean into different areas of the business, being in a place where you can learn from other people and participate in rotational projects is important to help you get there.
As I mentioned before, professional growth is a critical component of our culture and our values. We are always open to people having new ideas and suggestions that are aligned with or help evolve our strategy in a positive direction. By giving employees the opportunity to have discussions and set their own goals for professional development – while holding managers accountable for having those conversations – we become a place where learning, innovation, and growth are taking place all around us every day. When our people are thriving and doing really impactful work and growing their skills, we’re able to succeed as a business and deliver better products and services to our customers.
Why should someone consider working in Cybersecurity?
There isn’t a more dynamic sector than Cybersecurity. Not a single day has been boring for me since I’ve been in the industry. I also think the ability to make a positive impact on the world is rewarding. We work to secure companies from bad actors. We have well known brand names that we secure, and there’s a level of job satisfaction that comes from knowing we built technology that is actively working to make the world a safer place and stop the bad guys. The role between defender and attacker is always going to be a big cat-and-mouse game. We constantly need to be thinking three steps ahead in order to keep customers secure.

What customer challenges are we solving?
When you look at the security landscape, our portfolio is probably one of the richest in the industry. So when we approach a customer to understand their security needs, we have almost everything they could possibly need in our offering. Additionally, the experience across our products and services are second to none. When I talk to our customers, I share that we are looking to be the leading platform consolidator.
When customers do business with us, we will make it so that their security programs are much more impactful for every dollar they spend with us. There are a lot of other companies that have a one-point solution, and that limits your ability to expand and grow with your customer. From the employee perspective, that also limits their ability to grow and work on new things. We have multiple products for our employees to work on and explore, and that means you don’t need to leave the company to grow.
You can do new and innovative things by changing product teams or working on a new offer. There are a lot of different ways we can increase customer efficiency as well as the efficacy of our programs, while providing really interesting career paths and opportunities for our people along the way.
What have you found to be most rewarding in your role at Rapid7?
The most rewarding part of my job has been the opportunities I’ve had to lead; these opportunities go beyond what I was initially hired to do. It’s fantastic to see the breadth and depth of impact I’ve been able to have in just three short years. There are company-wide challenges I’ve been able to support that have not always been in my domain, but I’ve been given the trust and opportunity to come in and help. Leaning in like that has truly evolved my career – I’ve been able to grow my leadership skills, develop a team, and deliver favorable outcomes for customers.
My story of growth is not unique within the company. As our business becomes more successful, we see opportunities for each person to become more successful as well. Our People Strategy team is intentional about looking at employees as individuals and recognizing that growth and success isn’t always a linear journey. We’re giving employees the opportunity to have ownership of their career trajectory. As leaders, our job is to support their goals, give feedback, and align that evolution and growth to business objectives.
How does Rapid7 maintain a consistent culture across global offices?
Every site has their own microculture that is a core part of our macro culture. Each office has a unique flavor that compliments the culture and employee experience we’re known for. Every time I arrive at a Rapid7 office, it FEELS like a Rapid7 office. This goes beyond the spaces and the way things look. It’s about the people I interact with, the sense of a common goal, and a feeling of being welcomed and included.
When I walk into the Belfast office, I feel like I’m in the Austin office. When I’m at the Boston office, I feel the same way I do when I’m in the Tampa office. Getting the culture to a place where it feels consistent across each and every site is a really hard thing to do – and yet we’ve done that here.
When I think about what makes that possible, I feel it comes down to the way we think about people. We don’t have a Human Resources team, we have a People Strategy team. It’s a simple shift, but it’s deliberate. We don’t look at people as resources, we look at them as people. The intellectual property we produce and the value we deliver as a business is created by people. They are our most valuable asset, and the way we support, grow, and engage them has a direct impact on our success as a business.

What would you say to someone in Prague looking for a new opportunity?
If you are looking for a place that intentionally values you as a person and gives you incredible opportunities to do your best work, I can’t think of a better environment than Rapid7. We’re committed to Prague as our next center for innovation, and we look forward to welcoming some of the most talented and collaborative professionals to join us in building a secure digital future.
View all current openings in Prague.
View all worldwide Product and Engineering openings.
[$] Zig 2024 roadmap
Post Syndicated from daroc original https://lwn.net/Articles/959915/
The Zig language
2024 roadmap
was presented in a talk last week on
Zig Showtime (a show covering
Zig news). Andrew Kelley, the benevolent dictator for life of the Zig project,
presented his goals
for the language, largely focusing on compiler performance and continuing
progress toward stabilization for the language. He discussed details of his plan
for incremental compilation, and addressed the sustainability of the project in
terms of both code contributions and financial support.
Comic for 2024.02.02 – Blunt Rotation
Post Syndicated from Explosm.net original https://explosm.net/comics/blunt-rotation
New Cyanide and Happiness Comic
How I Killed my Nikon Z9…
Post Syndicated from Matt Granger original https://www.youtube.com/watch?v=OJNbElHrJlw
Phipps: The European regulators listened to the Open Source communities
Post Syndicated from corbet original https://lwn.net/Articles/960606/
Simon Phipps writes
on the Open Source Initiative blog that the latest version of the
European Cyber Resilience Act is much improved: “As a result of all this
”
effort from so many people, the final text of the CRA mitigated pretty much
all the risks we had identified to individual developers and to Open Source
foundations.
Security updates for Friday
Post Syndicated from corbet original https://lwn.net/Articles/960604/
Security updates have been issued by Debian (chromium, man-db, and openjdk-17), Fedora (chromium, indent, jupyterlab, kernel, and python-notebook), Gentoo (glibc), Oracle (firefox, thunderbird, and tigervnc), Red Hat (rpm), SUSE (cpio, gdb, gstreamer, openconnect, slurm, slurm_18_08, slurm_20_02, slurm_20_11, slurm_22_05, slurm_23_02, squid, webkit2gtk3, and xerces-c), and Ubuntu (imagemagick and xorg-server, xwayland).