Weave your own global, private, virtual Zero Trust network on Cloudflare with WARP-to-WARP

Post Syndicated from Abe Carryl original https://blog.cloudflare.com/warp-to-warp/

Weave your own global, private, virtual Zero Trust network on Cloudflare with WARP-to-WARP

Weave your own global, private, virtual Zero Trust network on Cloudflare with WARP-to-WARP

Millions of users rely on Cloudflare WARP to connect to the Internet through Cloudflare’s network. Individuals download the mobile or desktop application and rely on the Wireguard-based tunnel to make their browser faster and more private. Thousands of enterprises trust Cloudflare WARP to connect employees to our Secure Web Gateway and other Zero Trust services as they navigate the Internet.

We’ve heard from both groups of users that they also want to connect to other devices running WARP. Teams can build a private network on Cloudflare’s network today by connecting WARP on one side to a Cloudflare Tunnel, GRE tunnels, or IPSec tunnels on the other end. However, what if both devices already run WARP?

Starting today, we’re excited to make it even easier to build a network on Cloudflare with the launch of WARP-to-WARP connectivity. With a single click, any device running WARP in your organization can reach any other device running WARP. Developers can connect to a teammate’s machine to test a web server. Administrators can reach employee devices to troubleshoot issues. The feature works with our existing private network on-ramps, like the tunnel options listed above. All with Zero Trust rules built in.

To get started, sign-up to receive early access to our closed beta. If you’re interested in learning more about how it works and what else we will be launching in the future, keep scrolling.

The bridge to Zero Trust

We understand that adopting a Zero Trust architecture can feel overwhelming at times. With Cloudflare One, our mission is to make Zero Trust prescriptive and approachable regardless of where you are on your journey today. To help users navigate the uncertain, we created resources like our vendor-agnostic Zero Trust Roadmap which lays out a battle-tested path to Zero Trust. Within our own products and services, we’ve launched a number of features to bridge the gap between the networks you manage today and the network you hope to build for your organization in the future.

Ultimately, our goal is to enable you to overlay your network on Cloudflare however you want, whether that be with existing hardware in the field, a carrier you already partner with, through existing technology standards like IPsec tunnels, or more Zero Trust approaches like WARP or Tunnel. It shouldn’t matter which method you chose to start with, the point is that you need the flexibility to get started no matter where you are in this journey. We call these connectivity options on-ramps and off-ramps.

A recap of WARP to Tunnel

The model laid out above allows users to start by defining their specific needs and then customize their deployment by choosing from a set of fully composable on and offramps to connect their users and devices to Cloudflare. This means that customers are able to leverage any of these solutions together to route traffic seamlessly between devices, offices, data centers, cloud environments, and self-hosted or SaaS applications.

One example of a deployment we’ve seen thousands of customers be successful with is what we call WARP-to-Tunnel. In this deployment, the on-ramp Cloudflare WARP ensures end-user traffic reaches Cloudflare’s global network in a secure and performant manner. The off-ramp Cloudflare Tunnel then ensures that, after your Zero Trust rules have been enforced, we have secure, redundant, and reliable paths to land user traffic back in your distributed, private network.

Weave your own global, private, virtual Zero Trust network on Cloudflare with WARP-to-WARP

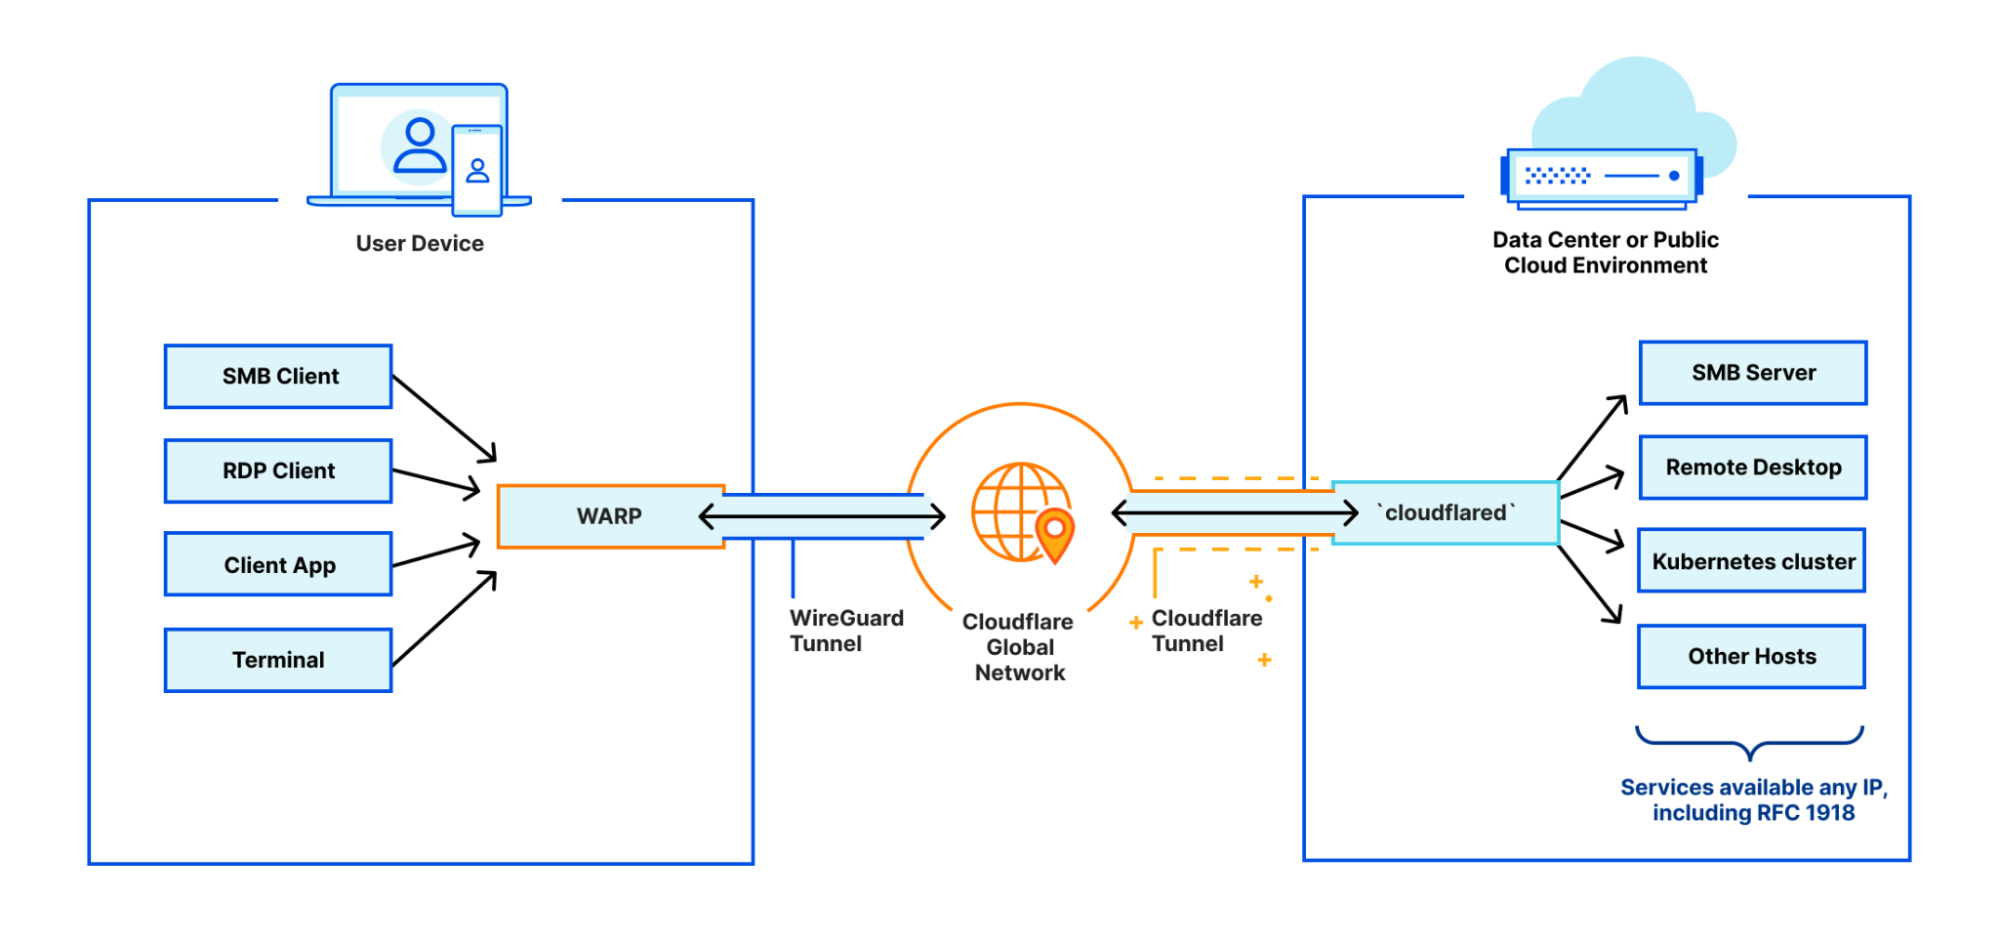
This is a great example of a deployment that is ideal for users that need to support public to private traffic flows (i.e. North-South)

But what happens when you need to support private to private traffic flows (i.e. East-West) within this deployment?

With WARP-to-WARP, connecting just got easier

Starting today, devices on-ramping to Cloudflare with WARP will also be able to off-ramp to each other. With this announcement, we’re adding yet another tool to leverage in new or existing deployments that provides users with stronger network fabric to connect users, devices, and autonomous systems.

Weave your own global, private, virtual Zero Trust network on Cloudflare with WARP-to-WARP

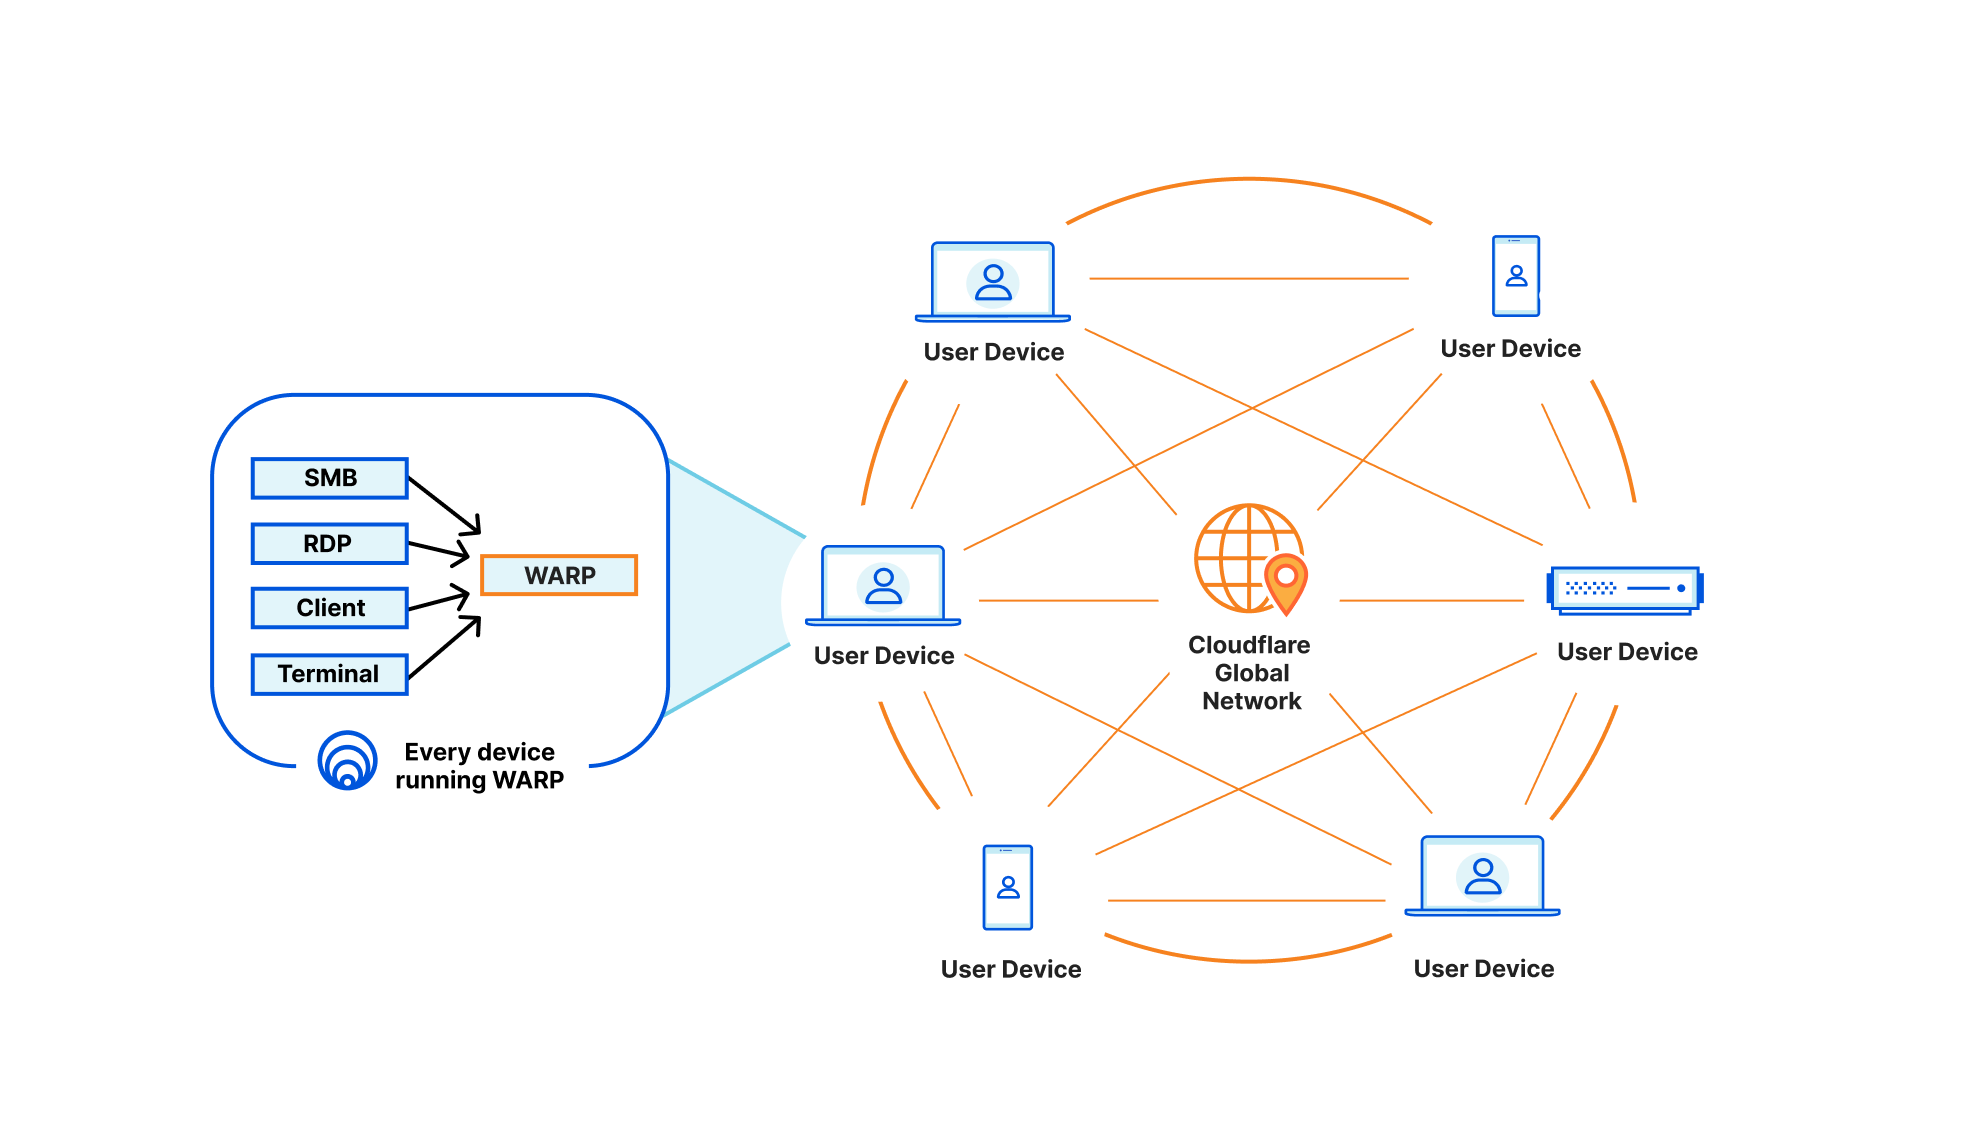
This means any of your Zero Trust-enrolled devices will be able to securely connect to any other device on your Cloudflare-defined network, regardless of physical location or network configuration. This unlocks the ability for you to address any device running WARP in the exact same way you are able to send traffic to services behind a Cloudflare Tunnel today. Naturally, all of this traffic flows through our in-line Zero Trust services, regardless of how it gets to Cloudflare, and this new connectivity announced today is no exception.

To power all of this, we now track where WARP devices are connected to, in Cloudflare’s global network, the same way we do for Cloudflare Tunnel. Traffic meant for a specific WARP device is relayed across our network, using Argo Smart Routing, and piped through the transport that routes IP packets to the appropriate WARP device. Since this traffic goes through our Zero Trust Secure Web Gateway — allowing various types of filtering — it means we upgrade and downgrade traffic from purely routed IP packets to fully proxied TLS connections (as well as other protocols). In the case of using SSH to remotely access a colleague’s WARP device, this means that your traffic is eligible for SSH command auditing as well.

Get started today with these use cases

If you already deployed Cloudflare WARP to your organization, then your IT department will be excited to learn they can use this new connectivity to reach out to any device running Cloudflare WARP. Connecting via SSH, RDP, SMB, or any other service running on the device is now simpler than ever. All of this provides Zero Trust access for the IT team members, with their actions being secured in-line, audited, and pushed to your organization’s logs.

Or, maybe you are done with designing a new function of an existing product and want to let your team members check it out at their own convenience. Sending them a link with your private IP — assigned by Cloudflare — will do the job. Their devices will see your machine as if they were in the same physical network, despite being across the other side of the world.

The usefulness doesn’t end with humans on both sides of the interaction: the weekend has arrived, and you have finally set out to move your local NAS to a host provider where you run a virtual machine. By running Cloudflare WARP on it, similarly to your laptop, you can now access your photos using the virtual machine’s private IP. This was already possible with WARP to Tunnel; but with WARP-to-WARP, you also get connectivity in reverse direction, where you can have the virtual machine periodically rsync/scp files from your laptop as well. This means you can make any server initiate traffic towards the rest of your Zero Trust organization with this new type of connectivity.

What’s next?

This feature will be available on all plans at no additional cost. To get started with this new feature, add your name to the closed beta, and we’ll notify you once you’ve been enrolled. Then, you’ll simply ensure that at least two devices are enrolled in Cloudflare Zero Trust and have the latest version of Cloudflare WARP installed.

This new feature builds upon the existing benefits of Cloudflare Zero Trust, which include enhanced connectivity, improved performance, and streamlined access controls. With the ability to connect to any other device in their deployment, Zero Trust users will be able to take advantage of even more robust security and connectivity options.

To get started in minutes, create a Zero Trust account, download the WARP agent, enroll these devices into your Zero Trust organization, and start creating Zero Trust policies to establish fast, secure connectivity between these devices. That’s it.

Identifying People Using Cell Phone Location Data

Post Syndicated from Bruce Schneier original https://www.schneier.com/blog/archives/2023/01/identifying-people-using-cell-phone-location-data.html

The two people who shut down four Washington power stations in December were arrested. This is the interesting part:

Investigators identified Greenwood and Crahan almost immediately after the attacks took place by using cell phone data that allegedly showed both men in the vicinity of all four substations, according to court documents.

Nowadays, it seems like an obvious thing to do—although the search is probably unconstitutional. But way back in 2012, the Canadian CSEC—that’s their NSA—did some top-secret work on this kind of thing. The document is part of the Snowden archive, and I wrote about it:

The second application suggested is to identify a particular person whom you know visited a particular geographical area on a series of dates/times. The example in the presentation is a kidnapper. He is based in a rural area, so he can’t risk making his ransom calls from that area. Instead, he drives to an urban area to make those calls. He either uses a burner phone or a pay phone, so he can’t be identified that way. But if you assume that he has some sort of smart phone in his pocket that identifies itself over the Internet, you might be able to find him in that dataset. That is, he might be the only ID that appears in that geographical location around the same time as the ransom calls and at no other times.

There’s a whole lot of surveillance you can do if you can follow everyone, everywhere, all the time. I don’t even think turning your cell phone off would help in this instance. How many people in the Washington area turned their phones off during exactly the times of the Washington power station attacks? Probably a small enough number to investigate them all.

Welcome to CIO Week 2023

Post Syndicated from Corey Mahan original https://blog.cloudflare.com/welcome-to-cio-week-2023/

Welcome to CIO Week 2023

Welcome to CIO Week 2023

When you are the Chief Information Officer (CIO), your systems need to just work. A quiet day when users go about their job without interruption is a celebration. When they do notice, something has probably fallen apart.

We understand. CIOs own some of an organization’s most mission-critical challenges. Your security counterparts expect safety to be robust while your users want it to be unintrusive. Your sales team continues to open offices in new locations while those new hires need rapid connectivity to your applications. You own a budget that never seems to grow fast enough to match price increases from point solution vendors. On top of that, CIOs must support their organizations’ shifts to new remote and hybrid work models, which means modernizing applications and infrastructure faster than ever before.

Today marks the start of CIO Week, our celebration of the work that you and your teams accomplish every day. We’ve assembled this week to showcase features, stories, and tools that you can use to continue to deliver on your mission while also improving the experience of your users and administrators. We’ve even included announcements to help on the budget front.

We’re doing this because we’ve been in the same places. Our own security team could not compromise on tools to safeguard Cloudflare while we grew beyond the walls of a couple of locations. We hired new staff members around the globe to manage one of the world’s largest networks, and they needed access to be fast. We were also predominantly a work-from-office organization. Today, we’re hiring for in-office, remote and hybrid opportunities all over the world.

We believe CIOs are shaping the future of the modern organization. From securely connecting employees and third-parties to critical applications, to safeguarding sensitive company data from phishing and other malicious threats, CIOs are effectively tasked with protecting an organization’s crown jewels. This week we’ll demonstrate how Cloudflare is helping CIOs to accelerate digital transformation and maximize employee collaboration and productivity – all while strengthening security. Welcome to CIO Week.

All eyes on digital transformation

CIOs own, sponsor, or support an organization’s digital transformation strategy that touches all parts of a business. These cross-functional efforts can include moving applications and data to the cloud, building new competencies in areas like data analytics or automation, and developing new digital products and services to drive growth.

While these initiatives are largely driven by the motivation to go faster, CIOs recognize that speed cannot come at the expense of safety. Balancing both goals, however, can quickly become complicated. Layering on new technologies can add overhead and increase total cost of ownership. Administrators can struggle if products require different management interfaces and control planes or work differently in different locations. Plus, poor integrations and interoperability can mean precious time is wasted just getting services to work together.

We think about hidden challenges like these often when building new products at Cloudflare. As Cloudflare’s CIO, who you’ll hear from shortly, likes to phrase it, we’re helping CIOs by “bringing the glue”. That is, when building anything new, we ask ourselves to focus on delivering benefits that could not be obtained using individual products in silos. Throughout this innovation week, you’ll see announcements highlighting how organizations can realize more value when services work natively together.

Designing our security products to be composable and easy to use helps our customers speed up their digital strategy.  But we think about speed in other ways too. First, we optimize our services to enforce protections for any request, from anywhere around the globe, so that security doesn’t get in the way of end users. (In fact, we’re so proud of this that we even dedicated an entire innovation week to delivering speedy user experiences across the Internet). Second, we pride ourselves on being speedy in innovation, delivering new capabilities and services at such high velocity that we not only solve the problems you’re facing today, but also help you proactively plan for fixing your problems of tomorrow.

SASE, Zero Trust and the CIO

For many organizations, an increasingly critical goal of digital transformation is revamping networking and security. As applications, users, and data have shifted outside the walls of the corporate perimeter, the traditional tools of the castle-and-moat model no longer make sense.

Instead, modernized architectures like SASE (or Secure Access Service Edge) are gaining traction, advocating to unify all networking and security controls to a single control plane in the cloud. On that journey, we’re seeing organizations turning to Zero Trust for best practices and principles to enable the broader visibility and granular controls needed to steer the modern workforce.

While concepts like SASE and Zero Trust still need the occasional explainer, the benefits are real, and CIOs are turning to our SASE platform – Cloudflare One – to start realizing those business benefits. When customers start their SASE and Zero Trust journeys with Cloudflare, they are connecting their employees to our global network to inspect and apply controls to as much traffic and data as they want. Whether your traffic is traversing from on-premise to the cloud, from one cloud to another, or something in between, Cloudflare has a way to secure and accelerate traffic.

This week, we will be announcing even more capabilities and products that make the single-vendor SASE dream a reality.

If you want to go far, let’s go together

Before taking on any long-term digital transformation challenge, it’s vital to make sure you’re surrounded by the right people and partners to go the distance.

With our broad mission to help build a better Internet, it means that we must do the same at Cloudflare. We partner with fellow industry leaders to help CIOs with efforts like the Critical Infrastructure Defense Project to quickly improve the cyber readiness of vulnerable infrastructure or our partnership with Yubico to provide security keys at “Good for the Internet” pricing (for as low as $10 per key!).

This collaborative ethos extends far beyond just these types of focused initiatives. Over recent years, Cloudflare has invested in our ecosystem of alliances, channel partners (including system integrators and advisory / consulting firms), and technology partners to make sure customers have options to pursue digital transformation in the way that makes the most sense for them. In particular, we have seen more customers and partners collaborating on long term SASE and Zero Trust use cases with our Cloudflare One platform.

Over the course of this week, we’ll share more about strategic partnerships, including opportunities to enable a Zero Trust strategy using Cloudflare One platform services and deeper integrations with key partners like Microsoft.

The expertise of partners combined with Cloudflare’s network scale and simplicity helps CIOs modernize security at their own pace.

Cloudflare is the neutral supercloud control plane

When CIOs think about a multi-cloud strategy it tends to center around applications. Multi-cloud strategies devise careful plans for migrating applications, ensuring that efficiency, scale and speed of delivery goals are met in the cloud.

But often overlooked are the highways of connectivity that are essential for a speedy connection from one cloud to another or from an on-premise data center to another network in a cloud provider. While speeding up applications is the focus, having a global endpoint and identity-neutral network fabric for consistency and composability is equally important.

This week, we’ll highlight how Cloudflare is able to connect you to/from anything. Whether a request is coming to or from other cloud providers, IoT devices, or in challenging regions or areas, Cloudflare provides a global control plane to help your business stay secure and keep things moving fast.

We believe that Cloudflare is the neutral supercloud control plane. Over the course of this week, we’ll show you how our platform is built to work seamlessly with multiple cloud providers, allowing organizations to easily and securely manage their cloud infrastructure.

A warm welcome from Cloudflare’s CIO

New project kickoff, budget planning update, security compliance report, hiring review board, hybrid tooling workshop and the list goes on.

All this and it’s only Monday morning. Sound familiar?

My job as  Cloudflare’s CIO shares most of the challenges that any other CIO post faces in these uncertain times. Today business technology leaders have to balance managing short term budget pressure, while at the same time having to keep strategic areas properly funded to not mortgage the company’s future. On the other hand one of the perks of being Cloudflare’s CIO is being a direct participant in the incredible rate of innovation we hold ourselves to at Cloudflare, and in return, the benefit we can deliver to our customers.

I can’t wait for us to share all the exciting announcements and new product features this week. Why? Well, my team has been using a lot of them from even the early versions.

One of the awesome things about getting to be CIO here is being Customer Zero for most of Cloudflare’s products, getting to try everything first, and play Product Manager from time to time… Before we ask you to trust us with your networks, security, or data, we’ve put ourselves through the test first. Securing Cloudflare using Cloudflare, or “Dog Fooding” as we call it internally, is something ingrained in our culture.

But don’t just take it from me, during the week you’ll hear from other fellow CIOs who view Cloudflare as a trusted partner. My hope is at the end of the week, you’ll consider having Cloudflare as a trusted partner too.

Welcome to CIO Week!

ASUS RS720A-E12-RS24U Review AMD EPYC Genoa 2P with 9x PCIe Gen5 Slots

Post Syndicated from Patrick Kennedy original https://www.servethehome.com/asus-rs720a-e12-rs24u-review-amd-epyc-genoa-2p-with-9x-pcie-gen5-slots/

The ASUS RS720A-E12-RS24U is a high-end dual socket AMD EPYC 9004 Genoa server with up to 24x NVMe drive bays and 9x PCIe Gen5 expansion slots

The post ASUS RS720A-E12-RS24U Review AMD EPYC Genoa 2P with 9x PCIe Gen5 Slots appeared first on ServeTheHome.

Asking ChatGPT to write my security-sensitive code for me

Post Syndicated from original https://mjg59.dreamwidth.org/64090.html

I have a patchset that makes it safe to use hibernation under Linux even in a secure boot world but it relies on preventing userland from using one of the TPM PCRs[1] that would otherwise be available to it. TPM 2 devices support emulating PCRs in NVRAM, which would obviously be beneficial in not taking away a scare resource, but the docs suggest there’s no way to tie a key generation to an NVRAM value which makes this more complicated.

So, why not ask a computer to do this for me? I asked ChatGPT to write me some code that would bind a TPM key to an NVRAM value. After a couple of false starts it told me:To bind an encryption key to the value of a TPM NV index, you can use the TPM2_NV_DefineSpace command to define an NV index with the TPMA_NV_BIND attribute. Woo! That sounds perfect. Only one problem – I can’t actually find the TPMA_NV_BIND attribute defined anywhere in the spec. Well, ask the AI again.

Here is the definition of TPMA_NV_BIND from the TPM 2.0 specification:
TPMA_NV_BIND (BIT 17) If SET, the contents of the NV Index are bound to the platform hierarchy.

Ok, that sounds convincing. Where is it in the spec?

The definition of TPMA_NV_BIND is on page 126 of the TPM 2.0 specification, in section 9.7.1 “TPMA_NV”.

Huh. Nope. Page 126 says nothing about this. Section 9.7.1 says nothing about this. The TPMA_NV bits are actually described on page 168 of volume 2 of the spec, in section 13.4. Bit 17 is TPMA_NV_OWNERREAD. TPMA_NV_BIND does not appear in the spec anywhere. I told the AI that.

I apologize for the error in my previous response. You are correct that the TPMA_NV_BIND attribute does not appear in the TPM 2.0 specification.

To bind an encryption key to the value of a TPM NV index, you can use the TPM2_NV_DefineSpace command with the TPMA_NV_BIND attribute.

I’m not afraid of being unemployed in the near future.

[1] “Platform Configuration Registers” – a modern TPM has 24 of these. When something security sensitive happens, you generate a hash of that event and pass it to the TPM. The TPM appends that to an existing PCR value and then hashes that concatenated value and sets the PCR to that. This means the PCR value depends not only on the values provided, but also the order they’re provided in. Various TPM operations can be made conditional on the PCR values meeting specific criteria.

comment count unavailable comments

Build a search application with Amazon OpenSearch Serverless

Post Syndicated from Aish Gunasekar original https://aws.amazon.com/blogs/big-data/build-a-search-application-with-amazon-opensearch-serverless/

In this post, we demonstrate how to build a simple web-based search application using the recently announced Amazon OpenSearch Serverless, a serverless option for Amazon OpenSearch Service that makes it easy to run petabyte-scale search and analytics workloads without having to think about clusters. The benefit of using OpenSearch Serverless as a backend for your search application is that it automatically provisions and scales the underlying resources based on the search traffic demands, so you don’t have to worry about infrastructure management. You can simply focus on building your search application and analyzing the results. OpenSearch Serverless is powered by the open-source OpenSearch project, which consists of a search engine, and OpenSearch Dashboards, a visualization tool to analyze your search results.

Solution overview

There are many ways to build a search application. In our example, we create a simple Java script front end and call Amazon API Gateway, which triggers an AWS Lambda function upon receiving user queries. As shown in the following diagram, API Gateway acts as a broker between the front end and the OpenSearch Serverless collection. When the user queries the front-end webpage, API Gateway passes requests to the Python Lambda function, which runs the queries on the OpenSearch Serverless collection and returns the search results.

To get started with the search application, you must first upload the relevant dataset, a movie catalog in this case, to the OpenSearch collection and index them to make them searchable.

Create a collection in OpenSearch Serverless

A collection in OpenSearch Serverless is a logical grouping of one or more indexes that represent a workload. You can create a collection using the AWS Management Console or AWS Software Development Kit (AWS SDK). Follow the steps in Preview: Amazon OpenSearch Serverless – Run Search and Analytics Workloads without Managing Clusters to create and configure a collection in OpenSearch Serverless.

Create an index and ingest data

After your collection is created and active, you can upload the movie data to an index in this collection. Indexes hold documents, and each document in this example represents a movie record. Documents are comparable to rows in the database table. Each document (the movie record) consists of 10 fields that are typically searched for in a movie catalog, like the director, actor, release date, genre, title, or plot of the movie. The following is a sample movie JSON document:

{
"directors": ["David Yates"],
"release_date": "2011-07-07T00:00:00Z",
"rating": 8.1,
"genres": ["Adventure", "Family", "Fantasy", "Mystery"],
"plot": "Harry, Ron and Hermione search for Voldemort's remaining Horcruxes in their effort to destroy the Dark Lord.",
"title": "Harry Potter and the Deathly Hallows: Part 2",
"rank": 131,
"running_time_secs": 7800,
"actors": ["Daniel Radcliffe", "Emma Watson", "Rupert Grint"],
"year": 2011
}

For the search catalog, you can upload the sample-movies.bulk dataset sourced from the Internet Movies Database (IMDb). OpenSearch Serverless offers the same ingestion pipeline and clients to ingest the data as OpenSearch Service, such as Fluentd, Logstash, and Postman. Alternatively, you can use the OpenSearch Dashboards Dev Tools to ingest and search the data without configuring any additional pipelines. To do so, log in to OpenSearch Dashboards using your SAML credentials and choose Dev tools.

To create a new index, use the PUT command followed by the index name:

PUT movies-index

A confirmation message is displayed upon successful creation of your index.

After the index is created, you can ingest documents into the index. OpenSearch provides the option to ingest multiple documents in one request using the _bulk request. Enter POST /_bulk in the left pane as shown in the following screenshot, then copy and paste the contents of the sample-movies.bulk file you downloaded earlier.

You have successfully created the movies index and uploaded 1,500 records into the catalog! Now let’s integrate the movie catalog with your search application.

Integrate the Lambda function with an OpenSearch Serverless endpoint

In this step, you create a Lambda function that queries the movie catalog in OpenSearch Serverless and returns the result. For more information, see our tutorial on creating a Lambda function for connecting to and querying an OpenSearch Service domain. You can reuse the same code by replacing the parameters to align to OpenSearch Serverless’s requirements. Replace <my-region> with your corresponding region (for example, us-west-2), use aoss instead of es for service, replace <hostname> with the OpenSearch collection endpoint, and <index-name> with your index (in this case, movies-index).

The following is a snippet of the Lambda code. You can find the complete code in the tutorial.

import boto3
import json
import requests
from requests_aws4auth import AWS4Auth

region = '<my-region>'
service = 'aoss'
credentials = boto3.Session().get_credentials()
awsauth = AWS4Auth(credentials.access_key, credentials.secret_key, region, service, session_token=credentials.token)

host = '<hostname>' 
# The OpenSearch collection endpoint 
index = '<index-name>'
url = host + '/' + index + '/_search'

# Lambda execution starts here
def Lambda_handler(event, context):

This Lambda function returns a list of movies based on a search string (such as movie title, director, or actor) provided by the user.

Next, you need to configure the permissions in OpenSearch Serverless’s data access policy to let the Lambda function access the collection.

  1. On the Lambda console, navigate to your function.
  2. On the Configuration tab, in the Permissions section, under Execution role, copy the value for Role name.
  3. Add this role name as one of the principals of your movie-search collection’s data access policy.

Principals can be AWS Identity and Access Management (IAM) users, role ARNs, or SAML identities. These principals must be within the current AWS account.

After you add the role name as a principal, you can see the role ARN updated in your rule, as show in the following screenshot.

Now you can grant collection and index permissions to this principal.

For more details about data access policies, refer to Data access control for Amazon OpenSearch Serverless. Skipping this step or not running it correctly will result in permission errors, and your Lambda code won’t be able to query the movie catalog.

Configure API Gateway

API Gateway acts as a front door for applications to access the code running on Lambda. To create, configure, and deploy the API for the GET method, refer to the steps in the tutorial. For API Gateway to pass the requests to the Lambda function, configure it as a trigger to invoke the Lambda function.

The next step is to integrate it with the front end.

Test the web application

To build the front-end UI, you can download the following sample JavaScript web service. Open the scripts/search.js file and update the apigatewayendpoint variable to point to your API Gateway endpoint:

var apigatewayendpoint = 'https://kxxxxxxzzz.execute-api.us-west-2.amazonaws.com/opensearch-api-test/';
// Update this variable to point to your API Gateway endpoint.

You can access the front-end application by opening index.html in your browser. When the user runs a query on the front-end application, it calls API Gateway and Lambda to serve up the content hosted in the OpenSearch Serverless collection.

When you search the movie catalog, the Lambda function runs the following query:

    # Put the user query into the query DSL for more accurate search results.
    # Note that certain fields are boosted (^).
    query = {
        "size": 25,
        "query": {
            "multi_match": {
                "query": event['queryStringParameters']['q'],
                "fields": ["title", "plot", "actors"]
            }
        }
    }

The query returns documents based on a provided query string. Let’s look at the parameters used in the query:

  • size – The size parameter is the maximum number of documents to return. In this case, a maximum of 25 results is returned.
  • multi_match – You use a match query when matching larger pieces of text, especially when you’re using OpenSearch’s relevance to sort your results. With a multi_match query, you can query across multiple fields specified in the query.
  • fields – The list of fields you are querying.

In a search for “Harry Potter,” the document with the matching term both in the title and plot fields appears higher than other documents with the matching term only in the title field.

Congratulations! You have configured and deployed a search application fronted by API Gateway, running Lambda functions for the queries served by OpenSearch Serverless.

Clean up

To avoid unwanted charges, delete the OpenSearch Service collection, Lambda function, and API Gateway that you created.

Conclusion

In this post, you learned how to build a simple search application using OpenSearch Serverless. With OpenSearch Serverless, you don’t have to worry about managing the underlying infrastructure. OpenSearch Serverless supports the same ingestion and query APIs as the OpenSearch Project. You can quickly get started by ingesting the data into your OpenSearch Service collection, and then perform searches on the data using your web interface.

In subsequent posts, we dive deeper into many other search queries and features that you can use to make your search application even more effective.

We would love to hear how you are building your search applications today. If you’re just getting started with OpenSearch Serverless, we recommend getting hands-on with the Getting started with Amazon OpenSearch Serverless workshop.


About the authors

Aish Gunasekar is a Specialist Solutions architect with a focus on Amazon OpenSearch Service. Her passion at AWS is to help customers design highly scalable architectures and help them in their cloud adoption journey. Outside of work, she enjoys hiking and baking.

Pavani Baddepudi is a senior product manager working in search services at AWS. Her interests include distributed systems, networking, and security.

Metasploit Weekly Wrap-Up

Post Syndicated from Brendan Watters original https://blog.rapid7.com/2023/01/06/metasploit-weekly-wrap-up-4/

Back from a quiet holiday season

Metasploit Weekly Wrap-Up

Thankfully, it was a relatively quiet holiday break for security this year, so we hope everyone had a relaxing time while they could. This wrapup covers the last three Metasploit releases, and contains three new modules, two updates, and five bug fixes.

Make sure that your OpenTSDB isn’t too open

Of particular note in this release is a new module from community contributors Erik Wynter and Shai rod
which adds a new exploit module for CVE-2020-35476, an unauthenticated command injection vulnerability in the yrange parameter in OpenTSDB <= 2.4.0.

OpenTSDB is a monitoring software that runs on top of Hadoop and HBase to allow users to serve large amounts of time-series data without losing any granularity in the data itself. If you are wondering what that host mess of buzzwords means, it simply means that it is a database optimized to store events or measurements that are time-stamped. This also means that the target is likely to be storing a lot of metrics data, which may also include sensitive internal operations, making it a prime target for exploitation.

Successful exploitation of this vulnerability will result in remote code execution as the root user, meaning that an attacker can go from being completely unauthenticated to having full control over affected OpenTSDB devices. This could then allow the attacker
to pivot further into the target network, using either the privileges they have gained on the OpenTSDB device, or details from the logs on the OpenTSDB device, which may provide insight into weaknesses of the network or give access to sensitive information.

New module content (3)

Enhancements and features (2)

  • #17258 from h00die – This updates the SharpHound post module to use version 1.1.0 of SharpHound, which works with Bloodhound 4. This includes both the .ps1 and binary from the original repository.
  • #17380 from smashery – The list of user agent strings inside lib/rex/user_agent.rb has been updated to reflect the latest user agents as of December 2022.

Bugs fixed (5)

  • #17334 from bcoles – Multiple improvements to modules/post/linux/gather/enum_commands, including fixing a crash when attempting to search a path that doesn’t exist
  • #17389 from ErikWynter – log4shell_header_injection bugfix to prevent NoMethodError for nil:NilClass
  • #17409 from adfoster-r7 – Update rhost walker to handle interrupt signal
  • #17416 from MegaManSec – The jenkins_gather.rb module has been updated to use .blank? instead of .empty? when handling SSH Key details to prevent crashes should the various elements of the SSH Key be empty or nil.
  • #17435 from jmartin-r7 – A bug has been fixed whereby some modules were accidentally updated to use smtp_send_recv when they did not import the required Exploit::Remote::SMTPDeliver mixin. These modules have been updated to use the appropriate raw_send_recv method instead.

Get it

As always, you can update to the latest Metasploit Framework with msfupdate
and you can get more details on the changes since the last blog post from
GitHub:

If you are a git user, you can clone the Metasploit Framework repo (master branch) for the latest.
To install fresh without using git, you can use the open-source-only Nightly Installers or the
binary installers (which also include the commercial edition).

Building a Cloud in the Cloud: Running Apache CloudStack on Amazon EC2, Part 2

Post Syndicated from Sheila Busser original https://aws.amazon.com/blogs/compute/building-a-cloud-in-the-cloud-running-apache-cloudstack-on-amazon-ec2-part-2/

This blog is written by Mark Rogers, SDE II – Customer Engineering AWS.

In part 1, I showed you how to run Apache CloudStack with KVM on a single Amazon Elastic Compute Cloud (Amazon EC2) instance. That simple setup is great for experimentation and light workloads. In this post, things will get a lot more interesting. I’ll show you how to create an overlay network in your Amazon Virtual Private Cloud (Amazon VPC) that allows CloudStack to scale horizontally across multiple EC2 instances. This same method could work with other hypervisors, too.

If you haven’t read it yet, then start with part 1. It explains why this network setup is necessary. The same prerequisites apply to both posts.

Making things easier

I wrote some scripts to automate the CloudStack installation and OS configuration on CentOS 7. You can customize them to meet your needs. I also wrote some AWS CloudFormation templates you can copy in order to create a demo environment. The README file has more details.

The scalable method

Our team started out using a single EC2 instance, as described in my last post. That worked at first, but it didn’t have the capacity we needed. We were limited to a couple of dozen VMs, but we needed hundreds. We also needed to scale up and down as our needs changed. This meant we needed the ability to add and remove CloudStack hosts. Using a Linux bridge as a virtual subnet was no longer adequate.

To support adding hosts, we need a subnet that spans multiple instances. The solution I found is Virtual Extensible LAN (VXLAN). It’s lightweight, easy to configure, and included in the Linux kernel. VXLAN creates a layer 2 overlay network that abstracts away the details of the underlying network. It allows machines in different parts of a network to communicate as if they’re all attached to the same simple network switch.

Another example of an overlay network is an Amazon VPC. It acts like a physical network, but it’s actually a layer on top of other networks. It’s networks all the way down. VXLAN provides a top layer where CloudStack can sit comfortably, handling all of your VM needs, blissfully unaware of the world below it.

An overlay network comes with some big advantages. The biggest improvement is that you can have multiple hosts, allowing for horizontal scaling. Having more hosts not only gives you more computing power, but also lets you do rolling maintenance. Instead of putting the database and file storage on the management server, I’ll show you how to use Amazon Elastic File System (Amazon EFS) and Amazon Relational Database Service (Amazon RDS) for scalable and reliable storage.

EC2 Instances

Let’s start with three Amazon EC2 instances. One will be a router between the overlay network and your Amazon VPC, the second one will be your CloudStack management server, and the third one will be your VM host. You’ll also need a way to connect to your instances, such as a bastion host or a VPN endpoint.

Three EC2 instances are connected to an AWS subnet. There's an overlay network that spans all three instances.The router instance connects the overlay network to the AWS subnet. The management instance contains the CloudStack management service, which is attached to the overlay network. The host instance contains the CloudStack agent and some VMs, all of which are connected to the overlay network.VXLAN must send and receive multicast traffic. Only Nitro instances can be multicast senders. As you plan, look at the list of Nitro instance types.

The router won’t need much computing power, but it will need enough network bandwidth to meet your needs. If you put Amazon EFS in the same subnet as your instances, then they’ll communicate with it directly, thereby reducing the load on the router. Decide how much network throughput you want, and then pick a suitable Nitro instance type.

After creating the router instance, configure AWS to use it as a router. Stop source/destination checking in the instance’s network settings. Then update the applicable AWS route tables to use the router as the target for the overlay network. The router’s security group needs to allow ingress to the CloudStack UI (TCP port 8080) and any services you plan to offer from VMs.

For the management server, you’ll want a Nitro instance type. It’s going to use more CPU than your router, so plan accordingly.

In addition to being a Nitro type, the host instance must also be a metal type. Metal instances have hardware virtualization support, which is needed by KVM. If you have a new AWS account with a low on-demand vCPU limit, then consider starting with an m5zn.metal, which has 48 vCPUs. Otherwise, I suggest going directly to a c5.metal because it provides 96 vCPUs for a similar price. There are bigger types available depending on your compute needs, budget, and vCPU limit. If your account’s on-demand vCPU limit is too low, then you can file a support ticket to have it raised.

Networking

All of the instances should be on a dedicated subnet. Sharing the subnet with other instances can cause communication issues. For an example, refer to the following figure. The subnet has an instance named TroubleMaker that’s not on the overlay network. If TroubleMaker sends a request to the management instance’s overlay network address, then here’s what happens:

  1. The request goes through the AWS subnet to the router.
  2. The router forwards the request via the overlay network.
  3. The CloudStack management instance has a connection to the same AWS subnet that TroubleMaker is on. Therefore, it responds directly instead of using the router. This isn’t the return path that AWS is expecting, so the response is dropped.

This diagram depicts the steps described in the previous paragraph.

If you move TroubleMaker to a different subnet, then the requests and responses will all go through the router. That will fix the communication issues.

The instances in the overlay network will use special interfaces that serve as VXLAN tunnel endpoints (VTEPs). The VTEPs must know how to contact each other via the underlay network. You could manually give each instance a list of all of the other instances, but that’s a maintenance nightmare. It’s better to let the VTEPs discover each other, which they can do using multicast. You can add multicast support using AWS Transit Gateway.

Here are the steps to make VXLAN multicasts work:

  1. Enable multicast support when you create the transit gateway.
  2. Attach the transit gateway to your subnet.
  3. Create a transit gateway multicast domain with IGMPv2 support enabled.
  4. Associate the multicast domain with your subnet.
  5. Configure the eth0 interface on each instance to use IGMPv2. The following sample code shows how to do this.
  6. Make sure that your instance security groups allow ingress for IGMP queries (protocol 2 traffic from 0.0.0.0/32) and VXLAN traffic (UDP port 4789 from the other instances).

CloudStack VMs must connect to the same bridge as the VXLAN interface. As mentioned in the previous post, CloudStack cares about names. I recommend giving the interface a name starting with “eth”. Moreover, this naming convention tells CloudStack which bridge to use, thereby avoiding the need for a dummy interface like the one in the simple setup.

The following snippet shows how I configured the networking in CentOS 7. You must provide values for these variables:

  • $overlay_host_ip_address, $overlay_netmask, and $overlay_gateway_ip: Use values for the overlay network that you’re creating.
  • $dns_address: I recommend using the base of the VPC IPv4 network range, plus two. You shouldn’t use 169.654.169.253 because CloudStack reserves link-local addresses for its own use.
  • $multicast_address: The multicast address that you want VXLAN to use. Pick something in the multicast range that won’t conflict with anything else. I recommend choosing from the IPv4 local scope (239.255.0.0/16).
  • $interface_name: The name of the interface VXLAN should use to communicate with the physical network. This is typically eth0.

A couple of the steps are different for the router instance than for the other instances. Pay attention to the comments!

yum install -y bridge-utils net-tools

# IMPORTANT: Omit the GATEWAY setting on the router instance!
cat << EOF > /etc/sysconfig/network-scripts/ifcfg-cloudbr0
DEVICE=cloudbr0
TYPE=Bridge
ONBOOT=yes
BOOTPROTO=none
IPV6INIT=no
IPV6_AUTOCONF=no
DELAY=5
STP=no
USERCTL=no
NM_CONTROLLED=no
IPADDR=$overlay_host_ip_address
NETMASK=$overlay_netmask
DNS1=$dns_address
GATEWAY=$overlay_gateway_ip
EOF

cat << EOF > /sbin/ifup-local
#!/bin/bash
# Set up VXLAN once cloudbr0 is available.
if [[ \$1 == "cloudbr0" ]]
then
    ip link add ethvxlan0 type vxlan id 100 dstport 4789 group "$multicast_address" dev "$interface_name"
    brctl addif cloudbr0 ethvxlan0
    ip link set up dev ethvxlan0
fi
EOF

chmod +x /sbin/ifup-local

# Transit Gateway requires IGMP version 2
echo "net.ipv4.conf.$interface_name.force_igmp_version=2" >> /etc/sysctl.conf
sysctl -p

# Enable IPv4 forwarding
# IMPORTANT: Only do this on the router instance!
echo 'net.ipv4.ip_forward=1' >> /etc/sysctl.conf
sysctl -p

# Restart the network service to make the changes take effect.
systemctl restart network

Storage

Let’s look at storage. Create an Amazon RDS database using the MySQL 8.0 engine, and set a master password for CloudStack’s database setup tool to use. Refer to the CloudStack documentation to find the MySQL settings that you’ll need. You can put the settings in an RDS parameter group. In case you’re wondering why I’m not using Amazon Aurora, it’s because CloudStack needs the MyISAM storage engine, which isn’t available in Aurora.

I recommend Amazon EFS for file storage. For efficiency, create a mount target in the subnet with your EC2 instances. That will enable them to communicate directly with the mount target, thereby bypassing the overlay network and router. Note that the system VMs will use Amazon EFS via the router.

If you want, you can consolidate your CloudStack file systems. Just create a single file system with directories for each zone and type of storage. For example, I use directories named /zone1/primary, /zone1/secondary, /zone2/primary, etc. You should also consider enabling provisioned throughput on the file system, or you may run out of bursting credits after booting a few VMs.

One consequence of the file system’s scalability is that the amount of free space (8 exabytes) will cause an integer overflow in CloudStack! To avoid this problem, reduce storage.overprovisioning.factor in CloudStack’s global settings from 2 to 1.

When your environment is ready, install CloudStack. When it asks for a default gateway, remember to use the router’s overlay network address. When you add a host, make sure that you use the host’s overlay network IP address.

Cleanup

If you used my CloudFormation template, delete the stack and remove any route table entries you added.

If you didn’t use CloudFormation, here are the things to delete:

  1. The CloudStack EC2 instances
  2. The Amazon RDS database and parameter group
  3. The Amazon EFS file system
  4. The transit gateway multicast domain subnet association
  5. The transit gateway multicast domain
  6. The transit gateway VPC attachment
  7. The transit gateway
  8. The route table entries that you created
  9. The security groups that you created for the instances, database, and file system

Conclusion

The approach I shared has many steps, but they’re not bad when you have a plan. Whether you need a simple setup for experiments, or you need a scalable environment for a data center migration, you now have a path forward. Give it a try, and comment here about the things you learned. I hope you find it useful and fun!

“Apache”, “Apache CloudStack”, and “CloudStack” are trademarks of the Apache Software Foundation.

Building a Cloud in the Cloud: Running Apache CloudStack on Amazon EC2, Part 1

Post Syndicated from Sheila Busser original https://aws.amazon.com/blogs/compute/building-a-cloud-in-the-cloud-running-apache-cloudstack-on-amazon-ec2-part-1/

This blog is written by Mark Rogers, SDE II – Customer Engineering AWS.

How do you put a cloud inside another cloud? Some features that make Amazon Elastic Compute Cloud (Amazon EC2) secure and wonderful also make running CloudStack difficult. The biggest obstacle is that AWS and CloudStack both want to manage network resources. Therefore, we must keep them out of each other’s way. This requires some steps that aren’t obvious, and it took a long time to figure out. I’m going to share what I learned, so that you can navigate the process more easily.

Apache CloudStack is an open-source platform for deploying and managing virtual machines (VMs) and the associated network and storage infrastructure. You would normally run it on your own hardware to create your own cloud. But there can be advantages to running it inside of an Amazon Virtual Private Cloud (Amazon VPC), including how it could help you migrate out of a data center. It’s a great way to create disposable environments for experiments or training. Furthermore, it’s a convenient way to test-drive the new CloudStack support in Amazon Elastic Kubernetes Service (Amazon EKS) Anywhere. In my case, I needed to create development and test environments for a project that uses the CloudStack API. The environments needed to be shared and scalable. Our build pipelines were already in AWS, so it made sense to put the new environments there, too.

CloudStack can work with a number of hypervisors. The instructions in this article will use Kernel-based Virtual Machine (KVM) on Linux. KVM will manage the VMs at a low level, and CloudStack will manage KVM.

Prerequisites

Most of the information in this article should be applicable to a range of CloudStack versions. I targeted CloudStack 4.14 on CentOS 7. I also tested CloudStack versions 4.16 and 4.17, and I recommend them.

The official CentOS 7 x86_64 HVM image works well. If you use a different Linux flavor or version, then you might have to modify some of the implementation details.

You’ll need to know the basics of CloudStack. The scope of this article is making CloudStack and AWS coexist peacefully. Once CloudStack is running, I’m assuming that you’ll handle things from there.  Refer to the AWS documentation and CloudStack documentation for information on security and other best practices.

Making things easier

I wrote some scripts to automate the installation. You can run them on EC2 instances with CentOS 7, and they’ll do all the installation and OS configuration for you. You can use them as they are, or customize them to meet your needs. I also wrote some AWS CloudFormation templates you can copy in order to create a demo environment. The README file has more details.

Amazon EC2 instance types

KVM requires hardware virtualization support. Most EC2 instances are VMs that don’t support nested virtualization. To get access to the bare hardware, you need a metal instance type.

I like c5.metal because it’s one of the least expensive metal types, and has a low cost per vCPU. It has 96 vCPUs and 192 GiB of memory. If you run 20 VMs on it, with 4 CPU cores and 8 GiB of memory each, then you’d still have 16 vCPUs and 32 GiB to share between the operating system, CloudStack, and MySQL. Using CloudStack’s overprovisioning feature, you could fit even more VMs if they’re running light loads.

Networking

The biggest challenge is the network. AWS knows which IP and MAC addresses should exist, and it knows the machines to which they should belong. It blocks any traffic that doesn’t fit its idea of how the network should behave. Simultaneously, CloudStack assumes that any IP or MAC address it invents should work just fine. When CloudStack assigns addresses to VMs on an AWS subnet, their network traffic gets blocked.

You could get around this by enabling network address translation (NAT) on the instance running CloudStack. That’s a great solution if it fits your needs, but it makes it hard for other machines in your Amazon VPC to contact your VMs. I recommend a different approach.

Although AWS restricts what you can do with its layer 2 network, it’s perfectly happy to let you run your own layer 3 router. Your EC2 instance can act as a router to a new virtual subnet that’s outside of the jurisdiction of AWS. The instance integrates with AWS just like a VPN appliance, routing traffic to wherever it needs to go. CloudStack can do whatever it wants in the virtual subnet, and everybody’s happy.

What do I mean by a virtual subnet? This is a subnet that exists only inside the EC2 instance.  It consists of logical network interfaces attached to a Linux bridge. The entire subnet exists inside a single EC2 instance. It doesn’t scale well, but it’s simple. In my next post, I’ll cover a more complicated setup with an overlay network that spans multiple instances to allow horizontal scaling.

The simple way

The simple way is to put everything in one EC2 instance, including the database, file storage, and a virtual subnet. Because everything’s stored locally, allocate enough disk space for your needs. 500 GB will be enough to support a few basic VMs. Create or select a security group for your instance that gives users access to the CloudStack UI (TCP port 8080). The security group should also allow access to any services that you’ll offer from your VMs.

EC2 instance summary info showing 1 instance, CentOS 7 (x86_64) AMI, c5.metal instance type, a security group name, and a 500 GiB volume

When you have your instance, configure AWS to treat it as a router.

  1. Go to Amazon EC2 in the AWS Management Console.
  2. Select your instance, and stop source/destination checking.

In the EC2 Actions menu, select Networking, then Change source/destination check.

3. Update the subnet route tables.

a. Go to the VPC settings, and select Route Tables.

b. Identify the tables for subnets that need CloudStack access.

c. In each of these tables, add a route to the new virtual subnet. The route target should be your EC2 instance.

4. Depending on your network needs, you may also need to add routes to transit gateways, VPN endpoints, etc.

Because everything will be on one server, creating a virtual subnet is simply a matter of creating a Linux bridge. CloudStack must find a network adapter attached to the bridge. Therefore, add a dummy interface with a name that CloudStack will recognize.

A single EC2 instance contains the CloudStack management service, the CloudStack agent, a dummy network interface, several virtual machines, and a router. All of those things are connected to each other by a virtual subnet that exists inside the instance. The instance's elastic network interface is connected between the router and the Amazon VPC.The following snippet shows how I configure networking in CentOS 7. You must provide values for the variables $virutal_host_ip_address and $virtual_netmask to reflect the virtual subnet that you want to create. For $dns_address, I recommend the base of the VPC IPv4 network range, plus two. You shouldn’t use 169.654.169.253 because CloudStack reserves link-local addresses for its own use.

yum install -y bridge-utils net-tools

# The bridge must be named cloudbr0.

cat << EOF > /etc/sysconfig/network-scripts/ifcfg-cloudbr0
DEVICE=cloudbr0
TYPE=Bridge
ONBOOT=yes
BOOTPROTO=none
IPV6INIT=no
IPV6_AUTOCONF=no
DELAY=5
STP=yes
USERCTL=no
NM_CONTROLLED=no
IPADDR=$virtual_host_ip_address
NETMASK=$virtual_netmask
DNS1=$dns_address
EOF

# Create a dummy network interface.
cat << EOF > /etc/sysconfig/modules/dummy.modules
#!/bin/sh
/sbin/modprobe dummy numdummies=1
/sbin/ip link set name ethdummy0 dev dummy0
EOF

chmod +x /etc/sysconfig/modules/dummy.modules
/etc/sysconfig/modules/dummy.modules

cat << EOF > /etc/sysconfig/network-scripts/ifcfg-ethdummy0
TYPE=Ethernet
BOOTPROTO=none
NAME=ethdummy0
DEVICE=ethdummy0
ONBOOT=yes
BRIDGE=cloudbr0
NM_CONTROLLED=no
EOF

# Turn the instance into a router

echo 'net.ipv4.ip_forward=1' >> /etc/sysctl.conf
sysctl -p

# Must kill dhclient or the network service won't restart properly.
# A reboot would also work, if you’d rather do that.

pkill dhclient
systemctl restart network

CloudStack must know which IP addresses to use for inter-service communication. It will select by resolving the machine’s fully qualified domain name (FQDN) to an address. The following commands will make it to choose the right one. You must provide a value for $virtual_host_ip_address.

hostnamectl set-hostname cloudstack.localdomain

echo "$virtual_host_ip_address cloudstack.localdomain" >> 
/etc/hosts

You can finish the setup by following the Quick Installation Guide.

Remember that CloudStack is only directly connected to your virtual network. The EC2 instance is the router that connects the virtual subnet to the Amazon VPC. When you’re configuring CloudStack, use your instance’s virtual subnet address as the default gateway.

Use the EC2 instance's virtual subnet IP address as the default gateway in CloudStack. In this example, the virtual subnet is 10.100.0.0/16, and the instance's address in that subnet is 10.100.0.1. CloudStack then uses 10.100.0.1 as the default gateway.

To access CloudStack from your workstation, you’ll need a connection to your VPC. This can be through a client VPN or a bastion host. If you use a bastion, its subnet needs a route to your virtual subnet, and you’ll need an SSH tunnel for your browser to access the CloudStack UI. The UI is at http://x.x.x.x:8080/client/, where x.x.x.x is your CloudStack instance’s virtual subnet address. Note that CloudStack’s console viewer won’t work if you’re using an SSH tunnel.

If you’re just experimenting with CloudStack, then I suggest saving money by stopping your instance when it isn’t needed. The safe way to do that is:

  1. Disable your zone in the CloudStack UI.
  2. Put the primary storage into maintenance mode.
  3. Wait for the switch to maintenance mode to be complete.
  4. Stop the EC2 instance.

When you’re ready to turn everything back on, simply reverse those steps. If you have any virtual routers in CloudStack, then you may need to start those, too.

Cleanup

If you used my CloudFormation template, then delete the stack and remove any route table entries you added. If you didn’t use CloudFormation, then terminate the EC2 instance, delete the security group you created for it, and remove any route table entries that you added.

Conclusion

Getting CloudStack to run on AWS isn’t so bad. The hardest part is simply knowing how. The setup explained here is great for small installations, but it can only scale vertically. In my next post, I’ll show you how to create an installation that scales horizontally. Instead of using a virtual subnet that exists in a single EC2 instance, we’ll build an overlay network that spans multiple instances. It will use more components and features, including some that might be new to you. I hope you find it interesting!

Now that you can create a simple setup, give it a try! I hope you have fun and learn something new along the way. Comment with the results of your experiments.

“Apache”, “Apache CloudStack”, and “CloudStack” are trademarks of the Apache Software Foundation.

The collective thoughts of the interwebz