Tag Archives: Amazon Pinpoint

Solving abandoned cart scenarios using Amazon Pinpoint event-triggered journeys

Post Syndicated from Ryan Lowe original https://aws.amazon.com/blogs/messaging-and-targeting/solving-abandon-cart-scenarios-using-amazon-pinpoints-event-triggered-journeys/

In this post, we will walk through building an abandoned shopping cart user journey in Amazon Pinpoint. Journeys are multi-step user engagements with channels sends (SMS, email or push) based on conditional logic with a goal to drive a high value action. This journey will enable customers to identify users who added a product to their shopping cart but have not purchased, and follow up with them via email to encourage them to complete the transaction. Though the example will be specific to this use case, the steps used can be adapted to fit similar user journeys.

Abandoned Shopping Cart Journey

The Baynard Institute states the average cart abandonment rate is 69.57%, which means over half of users add a product to cart but do not check out. Any improvement in this metric has a direct impact on revenue, and is easily measurable. This makes it a no brainer for marketers to support through campaigns. Previously, customers did not have a way to immediately react to a cart abandonment or other important events within a journey. This meant customers would need to create a segment of users who abandoned their cart and do a daily send. By this time, the user might have purchased an item somewhere else, or lost interest in the product or service.

Solution Overview

The solution that we will build relies on Amazon Pinpoint’s events API to report two application events: AddToCartEvent, CartPurchasedEvent. These events should be reported to Amazon Pinpoint from your electronic shopping cart system. The integration with the online shopping cart system is out of scope for this article. Please refer to the Amazon Pinpoint developer guide for more information.

Architecture Diagram

When a user of your e-commerce shopping cart adds items to their shopping cart, you can report the AddToCartEvent to Amazon Pinpoint. At a later time, when the user completes their purchase, you can report the CartPurchasedEvent. If the CartPurchasedEvent does not get reported to Amazon Pinpoint within an hour of receiving the AddToCartEvent, then you can trigger our abandon shopping cart email to encourage the user to return and complete their purchase.

Using these events, you are able to use Amazon Pinpoint’s journey feature to orchestrate our user experience. You will use the first event, AddToCartEvent, to trigger your journey. After an hour wait, you will then use the second event, CartPurchasedEvent, to filter out users who have completed the purchase. The remaining users will receive your abandon shopping cart email message urging them to return to their cart and complete their order.

Step 1: Create Add to Cart and Purchase custom events

The first step in setting up this solution is to create and report the two custom events. There are multiple ways to report events in your application. For demonstration purposes, we have included two example event calls in the proceeding code chunk using the AWS SDK for Python (Boto3) from inside an AWS Lambda Function.

It is important to note that the Amazon Pinpoint events API can also be used to update endpoints at the same time that the event gets registered. In the proceeding example, the first API call will update the endpoint’s attribute Cart with the contents of the shopping cart. In the second example, the API call update the endpoint’s attribute Purchased with the flag Yes.

Sample Event: Item Hat was added to cart with a price of $29.95

import boto3

client = boto3.client('pinpoint')
app_id = '[PINPOINT_PROJECT_ID]'
endpoint_id = '[ENDPOINT_ID]'
address = '[EMAIL_ADDRESS]'

def lambda_handler(event, context):
    
    client.put_events(
        ApplicationId = applicationId,
        EventsRequest={
            'BatchItem': {
                endpoint_id: {
                    'Endpoint': {
                        'ChannelType': 'EMAIL',
                        'Address': address,
                        'Attributes': {
                            'Cart': ['Hat'],
                            'Purchased': ['No']
                        }
                    },
                    'Events':{
                        'cart-event-2': {
                            'Attributes':{
                                'AddedToCart': 'Hat'
                            },
                            'EventType': 'AddToCartEvent',
                            'Metrics': 29.95,
                            'Timestamp': datetime.datetime.fromtimestamp(time.time()).isoformat()
                        }
                    }
                }
            } 
        }
    )

Sample Event: Cart purchased

import boto3

client = boto3.client('pinpoint')
app_id = '[PINPOINT_PROJECT_ID]'
endpoint_id = '[ENDPOINT_ID]'
address = '[EMAIL_ADDRESS]'

def lambda_handler(event, context):
    
    client.put_events(
        ApplicationId = applicationId,
        EventsRequest={
            'BatchItem': {
                endpoint_id: {
                    'Endpoint': {
                        'ChannelType': 'EMAIL',
                        'Address': address,
                        'Attributes': {
                            'Cart': ['Hat'],
                            'Purchased': ['Yes']
                        }
                    },
                    'Events':{
                        'cart-event-2': {
                            'Attributes':{
                                'Purchased': 'Yes'
                            },
                            'EventType': 'CartPurchasedEvent',
                            'Timestamp': datetime.datetime.fromtimestamp(time.time()).isoformat()
                        }
                    }
                }
            } 
        }
    )

Note: Both events above must be reported to Amazon Pinpoint in order to complete the remaining steps in this post.

Step 2: Create a “Made a Purchase” Dynamic Segment

The second step in our solution is to create a dynamic segment to filter out users who have made a purchase. To do this, you will look for users with the endpoint attribute of Purchased to be the value Yes.

  1. Navigate to your project in the Amazon Pinpoint Console, then Segments.
  2. Choose Create a segment.
  3. Select Build a segment.
  4. Provide the name Made a Purchase into the name field.
  5. Configure Segment Group 1 to add segment filters.
    1. Under the Add filters to refine your segment choose Filter by endpoint.
    2. For the Choose an endpoint attribute dropdown choose Purchased
    3. Ensure Is is chosen in the middle dropdown.
    4. In the Choose values dropdown choose Yes.
  6. Click Create Segment to create your first dynamic segment. Note, a pop-up will appear highlighting that this segment targets multiple endpoint channels. Select I Understand.

Step 3: Create our Abandon Cart Journey

The last step is to design out the journey itself.

  1. Navigate to your project in the Amazon Pinpoint Console, then Journeys.
  2. Choose Create journey to create a new journey.
  3. Give the Journey the name Abandon Cart by replacing the Untitled text.
  4. Define a Journey entry criteria
    1. Choose Set entry condition to expand the Journey entry activity.
    2. Choose Add participants when they perform an activity and choose AddToCartEvent in the Events field.
    3. Choose Save
  5. Create a branch to target users who did not make a purchase
    1. Choose Add activity directly under the Journey entry activity
    2. Under Choose a journey activity choose Yes/no split.
    3. Under Select a condition type choose Segment.
    4. Under Segments choose the Made a Purchase dynamic segment created earlier.
    5. Under Condition evaluation choose Evaluate after and then choose 1 hours.
    6. Choose Save
  6. Add an email activity to send our abandon cart message
    1. Choose Add activity directly under the No split path.
    2. Under Choose a journey activity choose Send email.
    3. Choose Choose an email template and select your messaging template and choose Choose template.
    4. Choose Save.

At this point, your journey should look like the screenshot below. You can now choose Review to walkthrough steps to publish your journey.

Next Steps

You can continue to iterate on this experience using the journeys tool to create a custom user-experience for your users without any code changes.

  • Filter the journey entry event to only high dollar cart items by adding Event metrics filters in the Journey entry criteria.
  • Test out different channels by sending message to users over SMS instead of email.
  • Add additional splits to send messages on users’ preferred channels.
  • Add a second wait of 24 hours and send a final reminder with a 10% off coupon code.
  • Add random splits to do A/B testing of different messages and channels.

Cleanup

To stop and remove the journey in order to not incur further charges, please follow the steps below.

  1. Navigate to your project in the Amazon Pinpoint Console, then Journeys.
  2. Select the Abandon Cart journey.
  3. Choose Stop journey then choose Stop journey again in the Stop journey confirmation.
  4. To fully delete the journey choose Delete from the Actions menu.

Conclusion

Cart abandonment is a major issue that has a direct impact on revenue. This solution allows customers to recognize a user has abandoned a critical flow and allows a marketer to re-engage them through a messaging channel before it is too late. Different components of the user journey can also be A/B tested and targeted with different user segments to drive the highest return from different user cohorts. Once set up, the journey can be always-on and independently drive incremental revenue for a business.

Log into the Amazon Pinpoint Console to get started creating your own abandon shopping cart journey.

Send SMS messages at scale using 10DLC and Amazon Pinpoint

Post Syndicated from Brent Meyer original https://aws.amazon.com/blogs/messaging-and-targeting/send-sms-messages-at-scale-using-10dlc-and-amazon-pinpoint/

This week, we’re adding support for 10DLC phone numbers to Amazon Pinpoint. You can use 10DLC phone numbers to send SMS text messages at scale quickly and affordably.

What is 10DLC?

The abbreviation 10DLC stands for Ten-Digit Long Code. 10DLC phone numbers are intended specifically for sending Application-to-Person (A2P) messages—that is, messages that are sent from applications like Amazon Pinpoint to individual recipients. 10DLC is a concept that’s unique to the SMS industry in the United States. If you don’t send text messages to recipients in the US, then 10DLC doesn’t apply to you.

Before the launch of 10DLC, you could purchase unregistered US long codes instantly through the Amazon Pinpoint console. These long codes didn’t require a registration process—anyone could purchase them for $1 per month. However, the mobile carriers never intended for senders to use them to send A2P messages. For these reasons, their capabilities were limited. To prevent bad actors from sending spam and other malicious content, unregistered long codes could only send one message per second, and about 100 messages in a 24-hour period. Carriers applied heavy filtering to these phone numbers and blocked them for sending high volumes of messages, or as a penalty for sending unsolicited messages.

The alternative to using unregistered long codes is to use a short code. Short codes are a premium SMS product. They offer high rates of deliverability and high throughput (starting at 100 messages per second and going up to thousands of messages per second). The mobile carriers apply a rigorous approval process to short code applications. This process takes several weeks to complete. Short codes cost $995 per month, plus a one-time setup fee of $650. We continue to offer and support short codes in Amazon Pinpoint. Short codes are the right solution for many of our customers, and will continue to be part of the US SMS landscape well into the future.

For many customers though, the ideal solution is somewhere in the middle. 10DLC was designed to cover that middle ground. With 10DLC, senders are required to register both their company and their campaign. This registration information is added to The Campaign Registry (TCR), an industry-wide database of companies and use cases that are authorized to send messages using 10DLC phone numbers. Some use cases, such as one-time passwords and other authentication systems, can be approved within a week. Other use cases, such as promotional messaging, are subject to additional scrutiny, but can still be approved in a few weeks. While 10DLC phone numbers don’t offer the high throughput rates that short codes do, they can exceed the one message per second limit of unregistered long codes while offering higher deliverability rates. And importantly for many customers, they don’t come with the price tag associated with short codes. You pay a one-time fee of $4 to register your company, and a $10 monthly fee for each 10DLC campaign that you register. You also pay a $1 monthly charge for each 10DLC long code that you lease.

Note: On March 1, 2021, T-Mobile will begin to charge a one-time, $50 fee for registering your company. This fee will be charged in addition to the $4 company registration fee. No other carriers have announced similar fees.

The following table compares the costs associated with obtaining and using a short code against the costs of obtaining and using a 10DLC phone number. This table assumes that you only register one 10DLC company and campaign. It also assumes that you only use a single long code with your 10DLC campaign.

Short code 10DLC
One-time fees $650 $54 ($4 company registration + $50 T-Mobile registration fee)
Monthly fees $995 $11 ($1 phone number lease + $10 campaign registration fee)

Senders with very low throughput and volume requirements can register a “low-volume” 10DLC campaign for $2 per month, as opposed to the standard campaign fee of $10 per month. This option is a good choice for test and proof-of-concept use cases.

Drawbacks of using 10DLC phone numbers

For users of Amazon Pinpoint, 10DLC phone numbers offer several benefits. However, they also come with a few drawbacks. One drawback is the different ways that the US carriers support 10DLC. As I mentioned earlier, when you apply for a 10DLC phone number, you have to provide information about your company or brand, and information about your specific messaging use case. The carriers use this information to calculate a trust score. They then use this trust score to determine the capabilities of your 10DLC phone number. On T-Mobile and Sprint, your trust score determines the maximum number of messages that you can send each day through your 10DLC phone number. But for AT&T, your trust score determines the number of messages that you can send each minute, with no limit on the daily number of messages that you can send. (As of this writing, Verizon hasn’t announced their throughput plan.) These differences mean that you must carefully manage your messaging program to stay within the daily and per-second limits imposed by the different carriers.

A final drawback to using 10DLC phone numbers is related to throughput. If your use case requires you to send a large number of text messages in a short amount of time (100 messages per second or more), you need a short code.

10DLC Capabilities

10DLC phone numbers typically have higher per-second and daily sending limits than unregistered long codes. The actual performance of your 10DLC phone number is based on the trust score for the company that you registered. The following table shows the trust score tiers and their associated limits.

Tier Message parts per minute (AT&T) Maximum daily messages (T-Mobile & Sprint)
High 1,800 200,000
Medium-High 300 40,000
Medium-Low 30 10,000
Basic 12 2,000

Setting up 10DLC

To set up 10DLC, you have to do three things. First, you must register your company. Second, you must register your use case. And third, you must add a phone number to your 10DLC campaign.

Important: When you complete the steps in this section, you are charged for registering both your company and your use case. These registration charges can’t be reversed. Only complete these steps if you agree to pay these charges.

Step 1: Register your company

When you register your company, you provide your company details to The Campaign Registry (TCR). The mobile carriers use this data to determine the trustworthiness of your use cases. Company approvals are usually granted instantly.

To register your company:

  1. Sign in to the Amazon Pinpoint console at https://console.aws.amazon.com/pinpoint.
  2. In the navigation pane, under Settings, choose SMS and voice.
  3. On the 10DLC campaigns tab, choose Register company, as shown in the following image.
    Shows the location of the Create 10DLC Company button on the SMS and voice settings page of the Amazon Pinpoint console.
  4. On the Register your company page, fill out the form completely. There are a few things to note in this process:
    • The Doing business as (DBA) or brand name field is mandatory. The value that you provide can be the same as your company name.
    • The Support email and Support phone number are the email address and phone number that your customers can use to contact you when they have questions.
  5. When you finish, choose Create.

Step 2: Register a 10DLC campaign

After you register a company, you can begin to register campaigns. In 10DLC terms, a campaign is a use case or set of closely related use cases. Amazon Pinpoint also sends this information to TCR. Carriers use this information to determine whether traffic that they see from a certain phone number is legitimate. Campaigns associated with common, low-risk use cases can typically be approved in about a week.

To register a 10DLC campaign:

  1. On the SMS and voice settings page, on the 10DLC campaigns tab, choose Create 10DLC Campaign, as shown in the following image.
    Shows the location of the Create 10DLC Campaign button on the SMS and voice settings page of the Amazon Pinpoint console.
  2. On the Create 10DLC Campaign page, do the following:
    1. For Company name, choose the company that you registered in the preceding section.
    2. For 10DLC campaign name, enter a name that describes your messaging use case, such as “Example Corp One-Time Passwords.”
    3. For Vertical, choose the category that most accurately describes your company and use case. For example, if you develop software for the healthcare industry, choose Healthcare.
    4. For Help message, enter the response that will be returned to recipients who reply to your messages with the keyword HELP. A good help message describes the purpose of the campaign. It also provides your customers with a method of contacting you for more help (typically an email address or phone number).
    5. For Stop message, enter the response that will be returned to recipients who reply to your messages with the keyword STOP. A typical stop message tells your customer what type of messages they’re unsubscribing from, and lets them know that you won’t send them any more messages.
    6. Under Campaign use case, choose the use case that most accurately describes how you plan to use the 10DLC phone number. Many common use cases—including two-factor authentication (2FA), marketing, security and fraud alerts, and public service announcements—are considered Standard use cases. Use cases that involve a greater degree of risk for carriers—such as political, sweepstakes, and emergency notifications—are considered Special use cases.
  3. When you finish, choose Create.

Step 3: Associate phone numbers with your 10DLC campaign

After your 10DLC company and campaign are approved, you can purchase new long codes. When you purchase a long code, you choose which 10DLC campaign to associate it with.

To purchase a long code:

  1. On the SMS and voice settings page, on the Phone numbers tab, choose Request long code/toll-free.
  2. On the Define your phone numbers page, in the Phone number 1 section, do the following:
    1. For Country, choose United States.
    2. For Number type, choose 10DLC.
    3. For Assign to existing 10DLC campaign, choose the 10DLC campaign that you created in the preceding section.
    4. For Default message type, choose the option that most accurately describes your use case.
    5. In the Summary section, for Quantity, specify how many phone numbers you want to purchase.
  3. Choose Next. Then, on the Review and request page, choose Request.

Cleanup

If you no longer need the long codes that are associated with your 10DLC campaign registration, you can delete them. If you delete a long code, you’re no longer charged the $1 monthly lease charge. However, you’re still charged the recurring 10DLC campaign registration fee, unless you delete your 10DLC campaign as well.

If you want to delete the 10DLC company or campaign registration information in Amazon Pinpoint, you can do so by opening a case in the AWS Support Center. The SMS and voice settings page in the Amazon Pinpoint console contains links that you can use to quickly open these cases.

Conclusion

If you need to start sending SMS messages to your customers quickly, and without the expense of a short code, 10DLC is a great option. With common use cases such as two-factor authentication, your 10DLC campaigns and phone numbers can be ready to use relatively quickly. Messages that you send using 10DLC will have the high deliverability rates that were previously reserved only for short codes.

Updating opt-in status for Amazon Pinpoint channels

Post Syndicated from Varinder Dhanota original https://aws.amazon.com/blogs/messaging-and-targeting/updating-opt-in-status-for-amazon-pinpoint-channels/

In many real-world scenarios, customers are using home-grown or 3rd party systems to manage their campaign related information. This includes user preferences, segmentation, targeting, interactions, and more. To create customer-centric engagement experiences with such existing systems, migrating or integrating into Amazon Pinpoint is needed. Luckily, many AWS services and mechanisms can help to streamline this integration in a resilient and cost-effective way.

In this blog post, we demonstrate a sample solution that captures changes from an on-premises application’s database by utilizing AWS Integration and Transfer Services and updates Amazon Pinpoint in real-time.

If you are looking for a serverless, mobile-optimized preference center allowing end users to manage their Pinpoint communication preferences and attributes, you can also check the Amazon Pinpoint Preference Center.

Architecture

Architecture

In this scenario, users’ SMS opt-in/opt-out preferences are managed by a home-grown customer application. Users interact with the application over its web interface. The application, saves the customer preferences on a MySQL database.

This solution’s flow of events is triggered with a change (insert / update / delete) happening in the database. The change event is then captured by AWS Database Migration Service (DMS) that is configured with an ongoing replication task. This task continuously monitors a specified database and forwards the change event to an Amazon Kinesis Data Streams stream. Raw events that are buffered in this stream are polled by an AWS Lambda function. This function transforms the event, and makes it ready to be passed to Amazon Pinpoint API. This API call will in turn, change the opt-in/opt-out subscription status of the channel for that user.

Ongoing replication tasks are created against multiple types of database engines, including Oracle, MS-SQL, Postgres, and more. In this blog post, we use a MySQL based RDS instance to demonstrate this architecture. The instance will have a database we name pinpoint_demo and one table we name optin_status. In this sample, we assume the table is holding details about a user and their opt-in preference for SMS messages.

userid phone optin lastupdate
user1 +12341111111 1 1593867404
user2 +12341111112 1 1593867404
user2 +12341111113 1 1593867404

Prerequisites

  1. AWS CLI is configured with an active AWS account and appropriate access.
  2. You have an understanding of Amazon Pinpoint concepts. You will be using Amazon Pinpoint to create a segment, populate endpoints, and validate phone numbers. For more details, see the Amazon Pinpoint product page and documentation.

Setup

First, you clone the repository that contains a stack of templates to your local environment. Make sure you have configured your AWS CLI with AWS credentials. Follow the steps below to deploy the CloudFormation stack:

  1. Clone the git repository containing the CloudFormation templates:
    git clone https://github.com/aws-samples/amazon-pinpoint-rds-integration.git
    cd amazon-pinpoint-rds-integration
  2. You need an S3 Bucket to hold the template:
    aws s3 create-bucket –bucket <YOUR-BUCKET-NAME>
  3. Run the following command to package the CloudFormation templates:
    aws cloudformation package --template-file template_stack.yaml --output-template-file template_out.yaml --s3-bucket <YOUR-BUCKET-NAME>
  4. Deploy the stack with the following command:
    aws cloudformation deploy --template-file template_out.yaml --stack-name pinpointblogstack --capabilities CAPABILITY_AUTO_EXPAND CAPABILITY_NAMED_IAM

The AWS CloudFormation stack will create and configure resources for you. Some of the resources it will create are:

  • Amazon RDS instance with MySQL
  • AWS Database Migration Service replication instance
  • AWS Database Migration Service source endpoint for MySQL
  • AWS Database Migration Service target endpoint for Amazon Kinesis Data Streams
  • Amazon Kinesis Data Streams stream
  • AWS Lambda Function
  • Amazon Pinpoint Application
  • A Cloud9 environment as a bastion host

The deployment can take up to 15 minutes. You can track its progress in the CloudFormation console’s Events tab.

Populate RDS data

A CloudFormation stack will output the DNS address of an RDS endpoint and Cloud9 environment upon completion. The Cloud9 environment acts as a bastion host and allows you to reach the RDS instance endpoint deployed into the private subnet by CloudFormation.

  1. Open the AWS Console and navigate to the Cloud9 service.
    Cloud9Console
  2. Click on the Open IDE button to reach your IDE environment.
    Cloud9Env
  3. At the console pane of your IDE, type the following to login to your RDS instance. You can find the RDS Endpoint address at the outputs section of the CloudFormation stack. It is under the key name RDSInstanceEndpoint.
    mysql -h <YOUR_RDS_ENDPOINT> -uadmin -pmypassword
    use blog_db;
  4. Issue the following command to create a table that holds the user’s opt-in status:
    create table optin_status (
      userid varchar(50) not null,
      phone varchar(50) not null,
      optin tinyint default 1,
      lastupdate TIMESTAMP NOT NULL DEFAULT CURRENT_TIMESTAMP
    );
  5. Next, load sample data into the table. The following inserts nine users for this demo:
    
    INSERT INTO optin_status (userid, phone, optin) VALUES ('user1', '+12341111111', 1);
    INSERT INTO optin_status (userid, phone, optin) VALUES ('user2', '+12341111112', 1);
    INSERT INTO optin_status (userid, phone, optin) VALUES ('user3', '+12341111113', 1);
    INSERT INTO optin_status (userid, phone, optin) VALUES ('user4', '+12341111114', 1);
    INSERT INTO optin_status (userid, phone, optin) VALUES ('user5', '+12341111115', 1);
    INSERT INTO optin_status (userid, phone, optin) VALUES ('user6', '+12341111116', 1);
    INSERT INTO optin_status (userid, phone, optin) VALUES ('user7', '+12341111117', 1);
    INSERT INTO optin_status (userid, phone, optin) VALUES ('user8', '+12341111118', 1);
    INSERT INTO optin_status (userid, phone, optin) VALUES ('user9', '+12341111119', 1);
  6. The table’s opt-in column holds the SMS opt-in status and phone number for a specific user.

Start the DMS Replication Task

Now that the environment is ready, you can start the DMS replication task and start watching the changes in this table.

  1. From the AWS DMS Console, go to the Database Migration Tasks section.
    DMSMigTask
  2. Select the Migration task named blogreplicationtask.
  3. From the Actions menu, click on Restart/Resume to start the migration task. Wait until the task’s Status transitions from Ready to Starting and Replication ongoing.
  4. At this point, all the changes on the source database are replicated into a Kinesis stream. Before introducing the AWS Lambda function that will be polling this stream, configure the Amazon Pinpoint application.

Inspect the AWS Lambda Function

An AWS Lambda function has been created to receive the events. The Lambda function uses Python and Boto3 to read the records delivered by Kinesis Data Streams. It then performs the update_endpoint API calls in order to add, update, or delete endpoints in the Amazon Pinpoint application.

Lambda code and configuration is accessible through the Lambda Functions Console. In order to inspect the Python code, click the Functions item on the left side. Select the function starting with pinpointblogstack-MainStack by clicking on the function name.

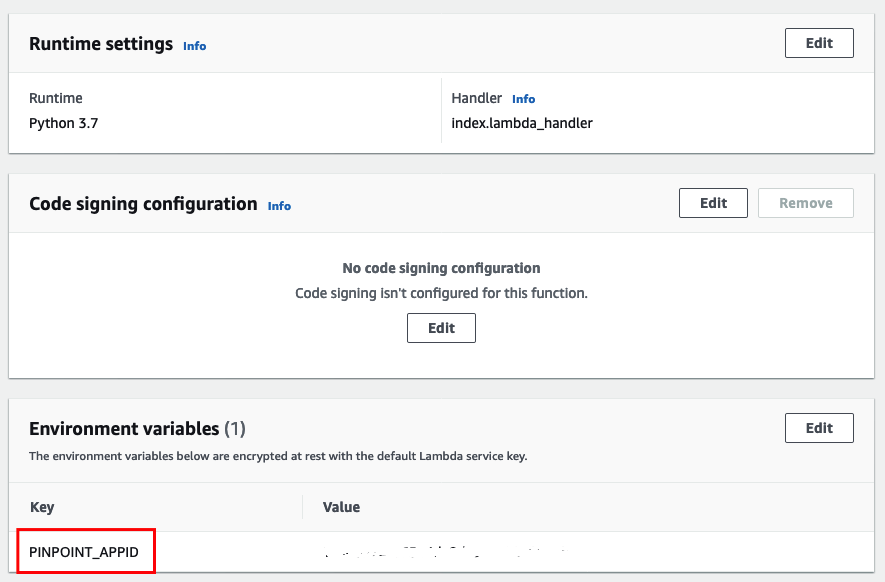
Note: The PINPOINT_APPID under the Environment variables section. This variable provides the Lambda function with the Amazon Pinpoint application ID to make the API call.

LambdaPPAPPID

Inspect Amazon Pinpoint Application in Amazon Pinpoint Console

A Pinpoint application is needed by the Lambda Function to update the endpoints. This application has been created with an SMS Channel by the CloudFormation template. Once the data from the RDS database has been imported into Pinpoint as SMS endpoints, you can validate this import by creating a segment in Pinpoint.

PinpointProject

Testing

With the Lambda function ready, you now test the whole solution.

  1. To initiate the end-to-end test, go to the Cloud9 terminal. Perform the following SQL statement on the optin_table:
    UPDATE optin_status SET optin=0 WHERE userid='user1';
    UPDATE optin_status SET optin=0 WHERE userid='user2';
    UPDATE optin_status SET optin=0 WHERE userid='user3';
    UPDATE optin_status SET optin=0 WHERE userid='user4';
  2. This statement will cause four changes in the database which is collected by DMS and passed to Kinesis Data Streams stream.
  3. This triggers the Lambda function that construct an update_endpoint API call to the Amazon Pinpoint application.
  4. The update_endpoint operation is an upsert operation. Therefore, if the endpoint does not exist on the Amazon Pinpoint application, it creates one. Otherwise, it updates the current endpoint.
  5. In the initial dataset, all the opt-in values are 1. Therefore, these endpoints will be created with an OptOut value of NONE in Amazon Pinpoint.
  6. All OptOut=NONE typed endpoints are considered as active endpoints. Therefore, they are available to be used within segments.

Create Amazon Pinpoint Segment

  1. In order to see these changes, go to the Pinpoint console. Click on PinpointBlogApp.
    PinpointConsole
  2. Click on Segments on the left side. Then click Create a segment.
    PinpointSegment
  3. For the segment name, enter US-Segment.
  4. Select Endpoint from the Filter dropdown.
  5. Under the Choose an endpoint attribute dropdown, select Country.
  6. For Choose values enter US.
    Note: As you do this, the right panel Segment estimate will refresh to show the number of endpoints eligible for this segment filter.
  7. Click Create segment at the bottom of the page.
    PinpointSegDetails
  8. Once the new segment is created, you are directed to the newly created segment with configuration details. You should see five eligible endpoints corresponding to database table rows.
    PinpointSegUpdate
  9. Now, change one row by issuing the following SQL statement. This simulates a user opting out from SMS communication for one of their numbers.
    UPDATE optin_status SET optin=0 WHERE userid='user5';
  10. After the update, go to the Amazon Pinpoint console. Check the eligible endpoints again. You should only see four eligible endpoints.

PinpointSegUpdate

Cleanup

If you no longer want to incur further charge, delete the Cloudformation stack named pinpointblogstack. Select it and click Delete.

PinpointCleanup

Conclusion

This solution walks you through how opt-in change events are delivered from Amazon RDS to Amazon Pinpoint. You can use this solution in other use cases as well. Some examples are importing segments from a 3rd party application like Salesforce and importing other types of channels like e-mail, push, and voice. To learn more about Amazon Pinpoint, visit our website.

Send localized messages using Amazon Pinpoint templates and standard demographic attributes

Post Syndicated from Mohit Palriwal original https://aws.amazon.com/blogs/messaging-and-targeting/send-localized-messages-using-pinpoint-templates-and-standard-demographic-attributes/

As your application user base expands into more countries and languages, it’s important to make sure messages are localized for each recipient to improve engagement. Localizing your messages helps you reach your audience with content specific to their language settings. Creating separate messages for each language and managing each template separately can require a lot of duplication effort. It is also challenging to manage and group templates based on all possible locales or specific campaigns.

Amazon Pinpoint‘s messaging template provides a way to build a single message with multiple localizations. You prepare localizations based on locale of your audience registered with Amazon Pinpoint project.

This blog post walks you through a solution that uses the locale of your user endpoints to build a localized messaging template. We provide you with a template that is used with an Amazon Pinpoint campaign or journeys to target your audience across multiple locale with localized message content. This solution is applicable for all supported channels under Amazon Pinpoint, SMS, email, push, voice. This blog explains the solution for a SMS channel-specific scenario.

Solution overview

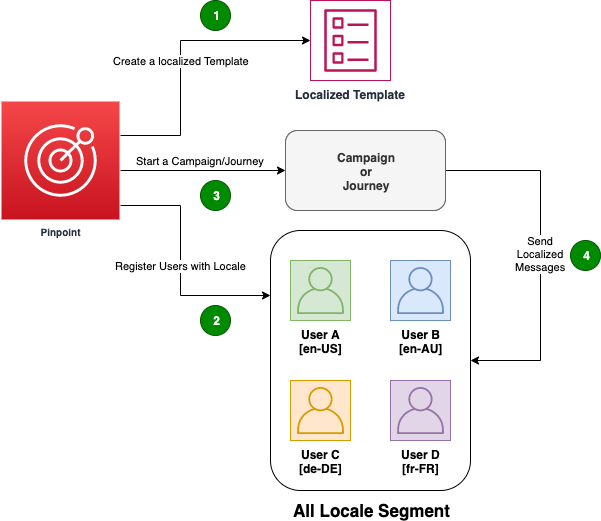
The solution below describes the workflow to send localized messaging to a group of users across various locales. The first prerequisite is to create an Amazon Pinpoint project in your AWS account and enable corresponding channels for message sending. Next, you will create an Amazon Pinpoint template using locale-specific message variables and register users endpoints with a demographic locale property. Once segment and template resources are generated, you can create a localized message in your campaign or journey.

Prerequisites

Setting up the solution

1. Set up Amazon Pinpoint

First, create a new Amazon Pinpoint project and configure the desired channels from which you want to send localized messages.

2. Create a localized template

  1. Create an Amazon Pinpoint messaging template with supported message variables of your choice. This builds more dynamic and personalized content.
  2. Use Demographic.Locale from supported Endpoint attributes to customize your message content per locale using eq comparison helper.

Below is an example of using an endpoint standard locale attribute in a template.

{{#eq Demographic.Locale "fr-FR"}} Bienvenue dans l'expérience utilisateur Pinpoint! 
{{else eq Demographic.Locale "de-DE"}} Willkommen bei Pinpoint User Experience! 
{{else}} Welcome to Pinpoint User Experience ! {{/eq}}  

3. Register your users with locale property

Register your user endpoint to pinpoint with the demographic locale/timezone standard attribute.

The below is an example for registering an SMS endpoint with de-DE locale.
aws pinpoint update-endpoint –application-id $APP_ID –endpoint-id

$ENDPOINT_ID --endpoint-request '{"Address":"+19999999999","ChannelType":"SMS","Demographic":{"Locale":"de-DE", "Timezone": "Europe/Berlin"}}'

Note: You can also register your user endpoints using the import segment feature. This accepts a .csv file with all endpoints.

4. Create a segment with all locale users

Create an Amazon Pinpoint segment to define the audience you want to target with localized message.

5. Create a journey or campaign

  1. Create an Amazon Pinpoint campaign or journey.
  2. Use the template from earlier in Step 2.
  3. Create a segment with all locale users from Step 4.Note: You can also use Amazon Pinpoint local time and quiet time features to target your audience in their local time zone or at a specific global time (for example 10am GMT). This also respects the quiet hours (for example 23:00 to 8:00) specific to their local time zone based on the EndpointDemographic.Timezone property.


6. Execution:

A marketing campaign manager wants to send a localized message to every audience based of their preferred language.

  1. Creates a single journey targeting a segment with 2 endpoints (each with unique locale) from Step 4.
  2. Create a segment with all locale users using the template defined in Step 2.
  3. Create a localized template

Conclusion

The Amazon Pinpoint messaging template provides you the ease of managing a single template for multiple locales.

With a localized messaging template you can simply target your audience across locales and receive targeted analytics. Get started today by visiting Amazon Pinpoint’s webpage.

Other useful links


Automate phone number validation with Amazon Pinpoint

Post Syndicated from Ilya Pupko original https://aws.amazon.com/blogs/messaging-and-targeting/automate-phone-number-validation-with-amazon-pinpoint/

Amazon Pinpoint allows you to engage with your customers across multiple messaging channels like SMS text, email, and voice messages. While planning and executing standard text (SMS) and voice-based campaigns, one of the challenges developers often run into is the need to verify if the phone numbers in their internal database are valid and conform to the standard E.164 format. You can attempt to verify the phone numbers manually one at a time, but it’s tedious. To overcome this issue, Amazon Pinpoint provides a phone number validation service that you can use to determine if a phone number is valid, have it automatically formatted, and obtain additional information about the phone number itself. For example, when you use the phone number validation service, it returns the following information:

  • The phone number in E.164 format.
  • The phone number type (such as mobile, landline, or VoIP).
  • The city and country where the phone number is based.
  • The service provider that is associated with the phone number.

This blog post aims to provide a step-by-step implementation guide and the necessary code to enable an integrated solution for number verification.

Process flows and architecture


This solution uses Amazon Simple Storage Service (Amazon S3), Amazon Pinpoint, AWS Step Functions, Amazon Simple Notification Service (SNS) and AWS Lambda. To initiate the process, you upload your source contact file in the CSV format to the dedicated Amazon S3 bucket. When the CSV file is uploaded, S3 triggers the associated tasks. Based on the optional configuration rules, the application code either runs the Phone Validate logic first or imports the contact information as-is into Amazon Pinpoint as a new imported segment and updates overall Amazon Pinpoint audience information. If Phone Validation is enabled, the system will first generate and save the new output file to Amazon S3 with the valid phone number, metadata, etc. and use this updated contact information during import. Additionally, the system will kick-off a scheduled campaign to all imported contacts.

This CloudFormation template will automatically create the following new resources on your first deploy:

  • AWS Lambda function: These functions contains the application code which validate the phone numbers. It also creates the segment for the uploaded contacts.
  • S3 event notification: When the CSV file is uploaded to the S3 bucket, the S3 Event Notification triggers the AWS Lambda function which initiate the AWS Step Functions State Machine. To learn more about the S3 Event Notification, check the documentation.
  • AWS Step Functions: This solution will set up an infrastructure to automatically trigger when a new file is placed in an S3 bucket. The process, managed by an AWS Step Functions state machine, will start a Pinpoint import process, wait for it to complete, and send notifications that the job started, successfully finished, or failed.
  • IAM role: The IAM role is used to make Amazon Pinpoint calls, to access S3, and interact with AWS Step Functions and Amazon SNS. You can check the IAM documentation to learn more about IAM roles.

Prerequisites and deployment steps

Step 1: Set up the Amazon Pinpoint project and the S3 bucket

In Amazon Pinpoint, a project (also sometimes referred to as “application”) is a collection of settings, customer information, segments, and campaigns. Setting up a Pinpoint project is the first step to deploy our solution. It holds the segment we will use in the later steps.

  1. Navigate to the Amazon Pinpoint from the services tab in the AWS Management Console and create a new Amazon Pinpoint project.
  2. Copy the Project ID from the Amazon Pinpoint console and save it in notepad. You will need it later.

In Amazon S3, create a new bucket to upload the files to. Make sure it is setup according to your company’s security practices. If you have an existing bucket you want to use instead, note that this solution will require a source bucket in the same region as the solution itself and it will override any triggers already in place on the bucket.

Step 2: Deploy code and services

AWS CloudFormation is a service that gives developers and businesses an easy way to create a collection of related AWS and third-party resources. You can provision them in an orderly and predictable fashion.

  1. Download the latest version of the solution from https://github.com/aws-samples/digital-user-engagement-reference-architectures/blob/master/cloudformation/S3_triggered_import.yaml
  2. Log in to your AWS account and navigate to the Amazon CloudFormation from the services tab in the AWS Management Console: https://console.aws.amazon.com/cloudformation/home
  3. Click on the Create Stack button and choose to provision New Resources. Then select Upload a template file and choose the file you just downloaded in the first step.
  4. On the Specify stack details screen all the information is pre-populated as shown in the screenshot below. Parameters:
    · Replace the PinpointProjectID field with the value you saved in Step 1
    · ValidatePhone: Choose true if you wish to validate the numbers via the Pinpoint API before importing the segment.
    · AssumeUS: Choose true if you want to assume US (+1) phone number for any phone 10 digits long or false if you want to import as-is.
    · AutoCreateCampaign: Choose true if you want to automatically create a campaign based on the imported file or false if you want to just import into the system without automatically scheduling any campaigns. This setting will be saved as an ImportSegment Lambda environment variable so you can adjust it later.
    · CampaignDelay: Number of minutes from the time of import to start of the campaign (if AutoCreateCampaign is set to true). Allows for the last-minute double check and/or pause as needed. Will be saved as CreateCampaign Lambda environment variable.
    · FileDropS3Bucket: Name of the existing Amazon S3 Bucket where new import files will be placed. Note that it has to be in the same region as you are running this template and the bucket should not have any existing notification configurations or they will be overwritten.
    · FileDropS3Prefix: Prefix (sub-folder name) of the Amazon S3 Bucket where you will be uploading new files to be imported.
  5. Settings on the configure stack options page are optional, click Next.

Select all acknowledgment boxes and click Create Stack. It takes a couple of minutes for the AWS CloudFormation to deploy all the resources.

The solution is now deployed and you can test it by uploading the sample CSV file to the Amazon S3 bucket. You will notice that the output CSV file is created in the “results” folder of the same S3 bucket, if you have validation enabled. You can also navigate to the Amazon Pinpoint console to check the Amazon Pinpoint segment. Once the deployment is complete and the segment is created, you can leverage Amazon Pinpoint campaigns to reach out to your customers.

Conclusion and Next Steps

Enabling solutions such as this provides an efficient and integrated mechanism to validate phone numbers and import customer contacts into Amazon Pinpoint. It saves time so that you can focus on creating effective campaigns to engage with your customers.

As the potential next steps, you can look into further expanding the solution by:

  1. Adjusting the default security of the Amazon S3 bucket by limiting who has access to new files. You can also adjust its encryption and the expiration of the files.
  2. Build out the lookup AWS Lambda to additionally fetch other information about the contact using your other systems of records and/or even 3rd party tools. You can also add business logic such as blocking numbers from certain countries (or vice versa, only allow certain countries).
  3. Add more dynamic segments and new endpoint (or user) attributes to more easily track the contacts based on their upload dates, type of phone number, etc.

Create a nice interface your users can use to interact with when needing to upload instead of using the S3 console directly. This “interface” may even be just a backend flow that simply integrates your system of records. This is so they don’t have to deal with any interface and uploads in the first place.

For this, and some other reference architectures you could consider, see https://github.com/aws-samples/digital-user-engagement-reference-architectures.

References

Amazon Pinpoint

https://aws.amazon.com/pinpoint/

Validating phone numbers in Amazon Pinpoint

https://docs.aws.amazon.com/pinpoint/latest/developerguide/validate-phone-numbers.html

Amazon Pinpoint Campaigns

https://docs.aws.amazon.com/pinpoint/latest/userguide/campaigns.html

Pinpoint Segment

https://docs.aws.amazon.com/pinpoint/latest/userguide/tutorials-create-a-segment.html


Send voice appointment reminders using Amazon Pinpoint custom channels and Amazon Connect

Post Syndicated from Ryan Lowe original https://aws.amazon.com/blogs/messaging-and-targeting/send-voice-appointment-reminders-using-amazon-pinpoint-custom-channels-and-amazon-connect/

Introduction

In this post, we will walk through setting up an always-on appointment reminder campaign in Amazon Pinpoint. No-show rates are a constant challenge for service providers. Industries such as hospitality estimate 20% of diners miss reservations in big cities,1 while salons average five missed appointments per week.2 Professional services such as financial institutions and sales teams have similar challenges to ensure clients do not miss meetings. To these businesses, an appointment missed represents lost revenue. As a result, the no-show rate is a key metric to improve. An outbound voice message provides another way to reach customers versus emails or SMS, and voice reminders give customers the choice of channels based on personal preferences.

Overview

Amazon Pinpoint is a multichannel communications service enabling customers to send both promotional and transactional messages across email, SMS, push notifications, voice, and custom channels. Amazon Connect is an easy to use omnichannel cloud contact center that helps companies provide superior customer service at a lower cost.

There are benefits of using these services together. Amazon Pinpoint allows you to build a segment of users which can be used within a campaign. Amazon Connect can enable customers to send outbound voice messages at scale should your user audience be large and require a high number of transactions per second (TPS).

To use these services together, you setup custom channels in Amazon Pinpoint, which can be created via an AWS Lambda function. These functions enable you to call APIs to trigger message sends as part of Amazon Pinpoint campaigns. Amazon Pinpoint has developed a new AWS Lambda function which can be used to send outbound voice messages via Amazon Connect. This configuration allows you to define the voice message to be sent, define the segment of users you would like to target, and send voice messages at scale through Amazon Connect via the Amazon Pinpoint custom channel.

The audience for this solution are technical customers who are used to working with multiple AWS services and are familiar with AWS Lambda functions. The solution built relies on the Amazon Pinpoint custom channel feature and targeting, along with the Amazon Connect outbound voice API called via a prepared AWS Lambda function. Once completed, you will be able to create an evergreen campaign which will send outbound voice messages to your patients who have an appointment the following day.

The costs associated with this solution will be:

  1. Amazon Connect outbound voice calls per minute
  2. Amazon Connect claimed phone number(s)
  3. Amazon Pinpoint Monthly Targeted Audience (MTA) costs.

The costs for a outbound voice reminder system that sends 10k messages per day, with an average length of 20 seconds per call, to an total monthly audience of 300k, in the US are as follows. Note that prices with vary for other countries. Complete Amazon Connect outbound call pricing can be found here.

Solution

Prerequisites:

For this walkthrough the article assumes:

  • An AWS account
  • Basic understanding of IAM and privileges required to create the following; IAM identity provider, roles, policies, and users
  • Basic understanding of Amazon Pinpoint and how to create a project
  • Basic understanding of Amazon Connect and experience in creating contact flows. More information on setup of Amazon Connect can be found here.

Step 1: Create an Appointment Reminder custom event

The first step in setting up this solution is to create and report a custom event to Amazon Pinpoint. There are multiple ways to report events in your application. Ffor demonstration purposes, below are two example event calls using the AWS SDK for Python (Boto3) from inside an AWS Lambda Function.

It is important to note that the Amazon Pinpoint events API can also be used to update endpoints when the event gets registered. In the below example, the first API call will update the endpoint attributes AppointmentDate and AppointmentTime with the details of the upcoming appointment. These attributes will be used in the outgoing message to the end-user

Sample Event: Appointment Coming Up

import boto3

client = boto3.client('pinpoint')
app_id = '[PINPOINT_PROJECT_ID]'
endpoint_id = '[ENDPOINT_ID]'
address = '[PHONE_NUMBER]'

def lambda_handler(event, context):

client.put_events(
ApplicationId = applicationId,
EventsRequest={
'BatchItem': {
endpoint_id: {
'Endpoint': {
'ChannelType': 'CUSTOM',
'Address': address,
'Attributes': {
'AppointmentDate': ['December 15th, 2020'],
'AppointmentTime': ['2:15pm']
}
},
'Events':{
'appointment-event': {
'Attributes':{},
'EventType': 'AppointmentReminder',
'Timestamp': datetime.datetime.fromtimestamp(time.time()).isoformat()
}
}
}
}
}
)

NOTE: The following steps assume that the AppointmentReminder event is being reported to Amazon Pinpoint. If you are unable to integrate the above API call into your application, you can manually create an AWS Lambda function using a Python runtime with the above code to trigger sample events.

Step 2: Create an Amazon Connect contact flow for outbound calls

This article assumes that you have an Amazon Connect contact center already setup and working. In this step, we will set up our Amazon Connect contact flow to dial our recipients and play read the message before hanging up.

  1. Log in to your Amazon Connect instance using your access URL (https://<alias>.awsapps.com/connect/login).
    Note: Replace alias with your instance’s alias.
  2. In the left navigation bar, pause on Routing, and then choose Contact flows.
  3. Under Contact flows, choose a template, or choose Create contact flow to design a contact flow from scratch. For more information, see Create a New Contact Flow.
  4. Download the sample JSON contact flow configuration file Outbound_calling.json.
  5. Choose the dropdown menu under Save and choose Import flow (beta).
  6. Select the Outbound_calling.json file in the Import flow (beta) dialog and choose Save.
  7. Choose Save to open the Save flow dialog. Then choose Save to close the dialog.
  8. Choose Publish to open the Publish dialog. Then choose Publish to close the dialog.
  9. In the contact flow designer, expand Show additional flow information.
  10. Under ARN, copy the Amazon Resource Name (ARN) contact flow. It looks like the following:
    arn:aws:connect:region:123456789012:instance/[ConnectInstanceId]/contact-flow/[ConnectContactFlowId]Note the ConnectInstanceId and ConnectContactFlowId from the ARN, they will be used in the next step.
  11. In the left navigation bar, pause on Routing and then choose Queues.
  12. Choose the queue you wish to use for the outbound calls.
  13. In the Edit queue screen, expand Show additional queue information.
  14. Under ARN, copy the Amazon Resource Name (ARN) for the queue. It looks like the following:
    arn:aws:connect:region:123456789012:instance/[ConnectInstanceId]/contact-flow/[ConnectQueueId]Note the ConnectQueueId from the ARN. It will be used in the next step.

Step 3: Deploy and modify the Amazon Pinpoint to the Amazon Connect custom channel with AWS Lambda function

Next, we will need to deploy an Amazon Pinpoint custom channel. Custom channels in Amazon Pinpoint allow you to send messages through any service with an API, including Amazon Connect. The AWS Serverless Application Repository contains an open-sourced AWS Lambda function that we will use for our custom channel. After deploying the AWS Lambda function, we will customize it to match our requirements.

  1. Navigate to the AWS Lambda Console, then choose Create function.
  2. Under Create function, Choose Browser serverless app repository.
  3. Under Public applications, choose the checkbox next to Show apps that create custom IAM roles or resource policies and enter amazon-pinpoint-connect-channel in the search box.
  4. Choose the amazon-pinpoint-connect-channel card from the list and review the Application details.
  5. Under Application settings enter the details for ConnectContactFlowId, ConnectInstanceId, and ConnectQueueId from the previous step.
  6. After reviewing all the details, choose the checkbox next to I acknowledge that this app creates custom IAM roles and resource policies and choose Deploy.
  7. Wait a couple minutes for the application to deploy two AWS Lambda functions and an AWS Simple Queue Service queue.
  8. Under Resources, choose the PinpointConnectQueuerFunction resource to open the AWS Lambda function configuration. This is the AWS Lambda function that Amazon Pinpoint will call when the message is crafted.
  9. Under Function code, scroll down to line 31 and replace
    message = "Hello World! -Pinpoint Connect Channel"
    with
    message = "This is a reminder of your upcoming appointment on {0} at {1}".format(endpoint_profile["Attributes"]["AppointmentDate"][0], endpoint_profile["Attributes"]["AppointmentTime"][0])
  10. Choose Deploy.

Step 4: (Optional) Modify the custom channel AWS Lambda function to meet change the rate of outgoing calls

By default, the custom channel we deployed in the previous step will place outbound calls through Amazon Connect at a rate of 1 call every 3 seconds. This allows you to configure how many active outbound calls to avoid running into service limits. Review your current service limits in Amazon Connect for more details.

  1. Navigate to the AWS Lambda Console, then choose AmazonPinpointConnectChannel-backgroundprocessor function.
  2. Under Function code, scroll down to line 73 and replace the sleep timer, currently set with 3 seconds, with your requirements.
  3. Choose Deploy.

Step 5: Create a Pinpoint custom campaign with your lambda function and segment

  1. Create a CSV file to import endpoints with the attributes of AppointmentDate and AppointmentTime.
    Example:
    Id,Address,ChannelType,Attributes.AppointmentDate,Attributes.AppointmentTime
    1,+1[PHONE_NUMBER],SMS,November 30 2020,9:00am
    2,+1[PHONE_NUMBER2],SMS,November 30 2020,10:00am
  2. Navigate to the Amazon Pinpoint console.
  3. In the All Projects list, select your project.
  4. In the navigation pane, choose Segments.
  5. Choose Create a Segment.
  6. Choose Import a segment and upload your CSV file and choose Create segment.
  7. In the navigation pane, choose Campaigns.
  8. Choose Create campaign.
  9. In the Create a campaign wizard, enter a name for campaign name.
  10. Under Channel choose Custom.
  11. Choose Next.
  12. On the Choose a segment screen, choose the segment created above, and choose Next.
  13. On the Create your message screen, do the following:
    a) For Lambda function choose AmazonPinpointConnectChannel that we deployed in Step 3 above.
    b) For endpoint Options choose SMS.
    c) Choose Next.
  14. On the Choose when to send the campaign screen, do the following:
    a) Choose When an event occurs.
    b) Under Events, choose the AppointmentReminder event.
    c) Under campaign dates, choose a Start date and time and an End date and time to be used as the campaign’s duration.
  15. Choose Next.
  16. Review the campaign details and choose Launch campaign.

Cleanup:

To remove the two AWS Lambda functions and the Amazon Simple Queue Service queue provisioned in the steps above in order not to incur further charges, please follow these steps below.

  1. Navigate to the Amazon CloudFormation Console.
  2. Choose severlessrepo-amazon-pinpoint-connect-channel and choose Delete.
  3. Choose Delete stack in the delete confirmation window.


Next Steps:

You can continue to iterate on this experience using Amazon Pinpoint and Amazon Connect to create a custom user experience.

To learn more about these services, please visit the Amazon Pinpoint or Amazon Connect web pages.

(1) https://www.scisolutions.com/uploads/news/Missed-Appts-Cost-HMT-Article-042617.pdf

(2) https://blog.carbonfreedining.org/the-ultimate-guide-to-restaurant-no-shows

Auto-reply to incoming emails using Amazon Simple Email Service (SES)

Post Syndicated from Ilya Pupko original https://aws.amazon.com/blogs/messaging-and-targeting/auto-reply-to-incoming-emails-using-amazon-simple-email-service-ses/

Both Amazon Pinpoint and Amazon Simple Email Service (SES) are known for their ability to send out transactional and promotional emails at scale and with ease. However, both are often not set up to receive email replies. Owners often assume that the “no-reply” addresses they are using do not require much consideration. This means that if a customer does reply, they would get an unhelpful server rejection indicating that the address is invalid. They would also not be able to unsubscribe via the simple reply, which is an otherwise established common practice. Automated guidance that the address is not monitored and who and how to reach for assistance would never be provided. In summary, a very unprofessional experience.

If you do have full control over the DNS and are not already receiving emails at the subdomain used for these emails, you can follow this short guide. It walks you through all the setup needed to have automated and templated responses to any address at the domain. This includes the address you use to send emails. Follow this post to ensure that your Amazon SES and Amazon Pinpoint are set up in accordance with common configuration and best business practices to have professional auto-reply to emails sent to the configured sending email addresses.

Solution overview

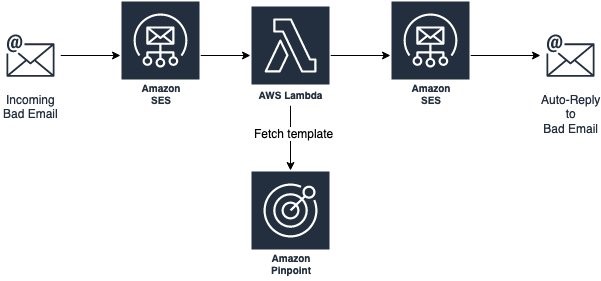
The proposed solution does not rely on any additional services. It does not add any additional charges beyond the cost directly associated with receiving and sending the emails and the minimal AWS Lambda function for the automated logic. It relies on SES built-in capability to receive emails, Amazon Pinpoint native templates, and uses Lambda for basic orchestration.

lambda diagram for response

Note, in this walkthrough and related code, we are using Amazon Pinpoint templates as they can be managed and maintained directly via the console, but you can choose to use SES templates (via the CreateTemplate API) or, if it makes better sense in your scenario, even just hardcode the template into the AWS Lambda function itself.

To complete the setup, all you must do is follow these steps:

      1. Confirm (Sub-) Domain setup in SES (even if you use Amazon Pinpoint to send your emails out, the SES portion of the console should show the validated domain as well). See SES Developer Guide.
      2. Ensure that your SES domain is verified and you are out of the sandbox. If still in the sandbox, you can only send emails to the Amazon SES mailbox simulator addresses and email addresses/domains that you have pre-verified. See Moving out of the Amazon SES sandbox.
      3. Configure SES to receive incoming emails. Please note that this must be done on the whole subdomain you use, not just a single email address. See Setting up Amazon SES email receiving.
      4. Create/add a new template you want to use via Amazon Pinpoint. Simply switch the console over to Amazon Pinpoint, select Message templates, click Create, select Email, and fill out the rest of the self-explanatory field.
        1. Plaintext portion is optional – you can either skip it or fill it out and enable in the Lambda function we are deploying in the next step.
        2. Similarly, if you prefer to use the SES template, you can instead. Just use the associated line in that same code.
        3. Same with a hardcoded template, if you prefer that for some reason.
      5. Have this pre-defined CloudFormation create the required SES receive rule, and Lambda function. This processes the incoming email and sends back the response, all using the code shared in the dedicated portion of our GitHub, AWS Digital User Engagement Reference Architectures repository. Specifically:
          1. Download the YAML from SES_Auto_Reply.yaml.
          2. Go to CloudFormation in AWS Management Console. (Remember to choose the region you want it deployed on)
          3. Click Create Stack and then choose With new resources
          4. Leave the default “Template is ready“, but switch to ”Upload a template file“ and choose the file you just downloaded
          5. Follow the wizard to give the “stack” a new name and enter the name of the template you created in step 4.
          6. Optionally you can also set the default response address, the addresses and/or domains you want to limit the auto-response to, and adjust the incoming email rule-set it should be stored under (the default should be fine, unless you have manually adjusted it in the past)
      6. Once deployed, the behavior is immediately active and you can further adjust any of these elements.


Conclusion and what’s next?

This architecture, once deployed, sends out the templated auto-response using the SES/Pinpoint domain/email address it received the original email on.

The new rule is added to the SES email receiving rule set to allow further customization:

  1. The rule can be limited to specific email address, specific domain, or just be set to be across all domains.
  2. It can also have the default response address set or reuse the address that the original rejected email was sent to.
  3. It can be moved down on the priority with other rules taking precedence and possibly even overriding it.
  4. It can have other actions added to it, like notifying SNS for additional tracking.

The Lambda function looks up the chosen Amazon Pinpoint template and uses it to reply. Here are some of the customizations you may want to consider within this function and the template:

  1. When sending the automated reply, by default, the template’s configured subject is appended with the original incoming email subject. You can adjust this to fit your company’s brand better.
  2. By default, the function supports an optional template tag %%NAME%% and %%ID%%. If the first appears in the template, it is automatically replaced with the original email’s FROM address. And if %%ID%% appears in the template, it is replaced with the SES’s original email message id, to help with any required audits.
  3. It is assumed that no additional tracking and actions are needed on such rejected and auto-replied emails, but you can further modify the flow by moving the rule around and adding more actions (as mentioned above), and even specify a particular/different SES Configuration Set for the outgoing emails.

Are you using this flow as a baseline for a more complex business flow or have other questions about it? We want to hear back – please comment here or file an issue in the GitHub repository. If you want to file a pull request to make it even more useful for others, please do so, we do appreciate community participation.

If you liked this article, we are continually expanding our Amazon Pinpoint and SES Architecture References and publish new solutions for these and other services. For most recent SES documentation, please see official SES documentation site, and for Amazon Pinpoint, please see Amazon Pinpoint documentation site.