Post Syndicated from Zip Zieper original https://aws.amazon.com/blogs/messaging-and-targeting/how-to-enable-one-click-unsubscribe-email-with-amazon-pinpoint/
Amazon Pinpoint customers who use campaigns, journeys, or the SendMesages API to send more than 5,000 marketing email messages per day are considered “bulk senders”. If your organization meets this criteria, you are now subject to new requirements that were recently established by Google, Yahoo and other large ISPs/ESPs. These providers have mandated these requirements to help protect their user’s inboxes. Detailed information about these requirements is provided in the Amazon Simple Email Service (SES) bulk sender updates blog post.
Per these new requirements, Pinpoint customers that send marketing email messages in bulk must meet all of these criteria:
- Fully authenticate their email sending domains with SPF, DKIM and DMARC. See this blog.
- Provide a clearly visible unsubscribe link in the body &/or footer of each message.
- Enable the “List-Unsubscribe” and “List-Unsubscribe-Post” one-click unsubscribe (the subbect of this blog post). You can learn more about these headers and how they are used in SES in this related blog post.
- Honor all unsubscribe POST requests within 48 hours, after which time you shouldn’t be sending emails to the now unsubscribed end-user.
- Actively monitor spam complaint rates, and take the steps needed to ensure these rates remain below acceptable levels as defined by the ESPs.
This blog post provides Pinpoint customers with the steps necessary to enable the one-click unsubscribe button via email headers for “List-Unsubscribe” and “List-Unsubscribe-Post” as defined by RFC 2369 and RFC 8058.
Unsubscribe Process Overview
Pinpoint now supports the inclusion of the “List-Unsubscribe” and “List-Unsubscribe-Post” email headers that enable compatible email client apps to render a one-click unsubscribe button when displaying emails from a subscription list. When you include these headers in the emails you send by Pinpoint, those end-users who want to unsubscribe from your emails can do so by simply clicking the unsubscribe button in their email app (see image). Once pressed, the unsubscribe button fires off a POST request to the URL you have defined in the “List-Unsubscribe” header.

You, the Pinpoint customer, are responsible for defining the “List-Unsubscribe” and “List-Unsubscribe-Post” headers, as well as supplying the system or process invoked by the “List-Unsubscribe” and “List-Unsubscribe-Post” email headers. Your system or process must, when activated by the unsubscribe action, update that end-user’s preferences accordingly so that within 48 hours, any end-user who unsubscribes will no longer receive unwanted emails.
If you only use Pinpoint’s campaigns and journeys, you may elect to use the Pinpoint endpoint’s OptOut attribute to store the user’s unsubscribe preferences. Possible values for OptOut are: ALL, the user has opted out and doesn’t want to receive any messages; and, NONE, the user hasn’t opted out and wants to receive all messages. It is important to note, however, that the SendMessages API ignores the Pinpoint endpoint’s OptOut attribute.
If you do not currently offer your recipients the option to unsubscribe to unwanted emails, you will need to develop & deploy a system or process to receive end-user unsubscribe requests to be in compliance with these new requirements. An example solution with sample code to processes email opt-out requests for Pinpoint can be found here. You can read more about this example in this blog post.
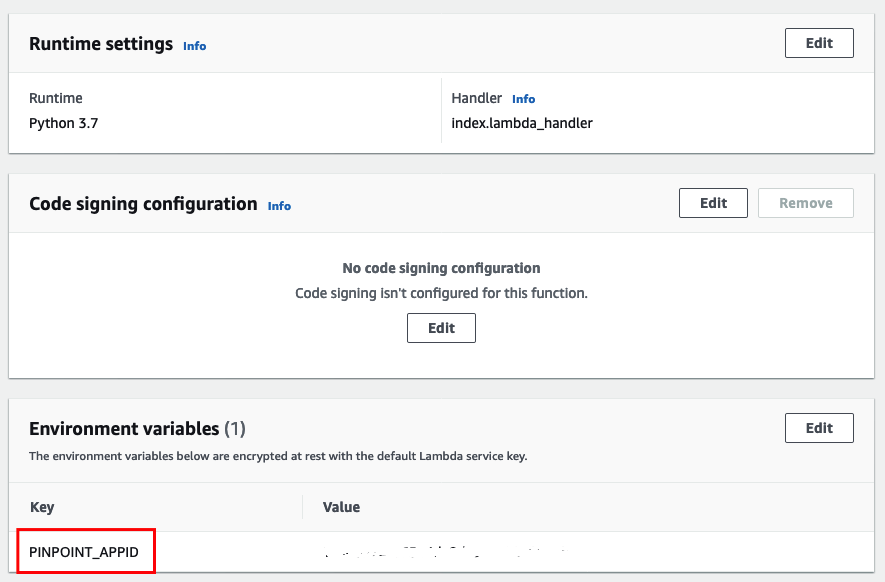
REQUIRED: Update the SES IAM role used by Pinpoint
Because Pinpoint uses SES resources for sending email messages, when using campaigns or journeys you must now create (or update) an IAM Orchestration sending role to grant Pinpoint service access to your SES resources. This allows Pinpoint to send emails via SES. To add or update the IAM role, follow the steps outlined in the Pinpoint documentation.
Note – If you are sending emails directly via the SendMesage, API you do not need an IAM Orchestration sending role, but you must have permissions for ses:SendEmail and ses:SendRawEmail.
Add easy unsubscribe email headers:
The steps you need to take to enable one-click unsubscribe in your Pinpoint emails depends on how you send emails, and whether or not you use templates, as shown below:

Use SendMessages with the AWS SDK or CLI
Using the AWS CLI: add headers for the “List-Unsubscribe” and “List-Unsubscribe-post” as shown in the example below:
aws pinpoint send-messages \
--region us-east-1 \
--application-id ce796be37f32f178af652b26eexample \
--message-request '{
    "Addresses": {
        "[email protected]": {"ChannelType": "EMAIL"},
    },
    "MessageConfiguration": {
        "EmailMessage": {
            "SimpleEmail": {
                "Subject": {"Data":"URL with easy unsubscribe headers", "Charset":"UTF-8"},
                "TextPart": {"Data":"with headers list-unsubscribe and list-unsubscribe-post.\n\nUnsubscribe: <https://www.example.com/preferences>", "Charset":"UTF-8"},
                "HtmlPart": {"Data":"<html><body>with headers list-unsubscribe and list-unsubscribe-post<br><br><a ses:tags=\"unsubscribeLinkTag:optout\" href=\"https://example.com/?address=x&topic=x\">Unsubscribe</a></body></html>", "Charset":"UTF-8"},
                "Headers": [
                    {"Name":"List-Unsubscribe", "Value":"<https://example.com/?address=x&topic=x>, <mailto: [email protected]?subject=TopicUnsubscribe>"},
                    {"Name":"List-Unsubscribe-Post", "Value":"List-Unsubscribe=One-Click"}
                ]
            }
        }
    }
}
Send an email message
Below is an example using the SendMessages API from the AWS SDK for Python (Boto3) that includes the List-Unsubscribe headers. This example assumes that you’ve already installed and updated the SDK for Python (Boto3) to the latest version available. For more information, see Quickstart in the AWS SDK for Python (Boto3) API Reference.
import logging  # Logging library to log messages
import boto3  # AWS SDK for Python
from botocore.exceptions import ClientError  # Exception handling for boto3
import hashlib  # Library to generate unique hashes

# Configure logger
logger = logging.getLogger(__name__)

# Define constants
CHARSET = "UTF-8"
REGION = 'us-east-1'

def send_email_message(
    pinpoint_client,
    project_id,
    sender,
    to_addresses,
    subject,
    html_message,
    text_message,
):
    """
    Sends an email message with HTML and plain text versions.

    :param pinpoint_client: A Boto3 Pinpoint client.
    :param project_id: The Amazon Pinpoint project ID to use when you send this message.
    :param sender: The "From" address. This address must be verified in
                   Amazon Pinpoint in the AWS Region you're using to send email.
    :param to_addresses: The list of addresses on the "To" line. If your Amazon Pinpoint account
                         is in the sandbox, these addresses must be verified.
    :param subject: The subject line of the email.
    :param html_message: The HTML content of the email.
    :param text_message: The plain text content of the email.
    :return: A dict of to_addresses and their message IDs.
    """
    try:
        # Create a dictionary of addresses with unique unsubscribe URLs
        # The addresses are encoded using the SHA256 hashing algorithm from the hashlib library
        # to create a unique and obfuscated unsubscribe URL for each recipient. This ensures
        # that the unsubscribe link is specific to each individual recipient, preventing
        # potential abuse or unauthorized unsubscribes. The hashed value is appended to the
        # base unsubscribe URL, allowing the email service to identify the intended recipient
        # when the unsubscribe link is clicked, while also protecting the recipient's personal
        # email address from being directly exposed in the URL.
        addresses = {
            address: {
                "ChannelType": "EMAIL",
                "Substitutions": {
                    "unsubscribeURL": [f"https://example.com/unsub/{hashlib.sha256(address.encode()).hexdigest()}"],
                }
            }
            for address in to_addresses
        }

        # Send email using Amazon Pinpoint
        response = pinpoint_client.send_messages(
            ApplicationId=project_id,
            MessageRequest={
                "Addresses": addresses,
                "MessageConfiguration": {
                    "EmailMessage": {
                        "FromAddress": sender,
                        "SimpleEmail": {
                            "Subject": {"Charset": CHARSET, "Data": subject},
                            "HtmlPart": {"Charset": CHARSET, "Data": html_message},
                            "TextPart": {"Charset": CHARSET, "Data": text_message},
                            "Headers": [
                                {"Name": "List-Unsubscribe", "Value": "{{unsubscribeURL}}"},
                                {"Name": "List-Unsubscribe-Post", "Value": "List-Unsubscribe=One-Click"}
                            ],
                        },
                    }
                }
            }
        )
    except ClientError as e:
        # Log exception if sending email fails
        logger.exception("Couldn't send email: %s", e)
        raise
    else:
        # Return a dictionary of addresses and their respective message IDs
        return {
            address: message["MessageId"]
        for address, message in response["MessageResponse"]["Result"].items()
        }

def main():
    # Sample data for sending email
    project_id = "ce796be37f32f178af652b26eexample"  # Amazon Pinpoint project ID
    sender = "[email protected]"  # Verified sender email address
    to_addresses = ["[email protected]", "[email protected]", "[email protected]"]  # Recipient email addresses
    subject = "Amazon Pinpoint Unsubscribe Headers Test (SDK for Python (Boto3))"  # Email subject
    text_message = """Amazon Pinpoint Test (SDK for Python)
    -------------------------------------
    This email was sent with Amazon Pinpoint using the AWS SDK for Python (Boto3).
    For more information, see https://aws.amazon.com/sdk-for-python/
                """  # Plain text message
    html_message = """<html>
    <head></head>
    <body>
      <h1>Amazon Pinpoint Test (SDK for Python (Boto3)</h1>
      <p>This email was sent with
        <a href='https://aws.amazon.com/pinpoint/'>Amazon Pinpoint</a> using the
        <a href='https://aws.amazon.com/sdk-for-python/'>
          AWS SDK for Python (Boto3)</a>.</p>
    </body>
    </html>
                """  # HTML message

    # Create a Pinpoint client
    pinpoint_client = boto3.client("pinpoint", region_name=REGION)

    print("Sending email.")
    # Send email and print message IDs
    try:
        message_ids = send_email_message(
            pinpoint_client,
            project_id,
            sender,
            to_addresses,
            subject,
            html_message,
            text_message,
        )
        print(f"Message sent! Message IDs: {message_ids}")
    except ClientError as e:
        print(f"Failed to send messages: {e}")

# Entry point of the script
if __name__ == "__main__":
    logging.basicConfig(level=logging.INFO)  # Set logging level to INFO
    main()
Send an email message with an existing email template.
If you use message templates to send email messages via AWS SDK for Python (Boto3), you can add the headers for List-Unsubscribe and List-Unsubscribe-post into the template, and then fill those variables with unique values per recipient, as shown in the code example below. First, you would create the template via the UI and add the Headers in the new fields as shown in the image below.

Or you can create the template, with headers, via the AWS CLI:
aws pinpoint create-email-template --template-name MyEmailTemplate \
--email-template-request '{
    "Subject": "Amazon Pinpoint Unsubscribe Headers Test using email template",
    "TextPart": "Hello, welcome to our service. We are glad to have you with us. If you wish to unsubscribe, click here: {{unsubscribeURL}}",
    "HtmlPart": "<html><body><h1>Hello, welcome to our service</h1><p>We are glad to have you with us.</p><p>If you wish to unsubscribe, click <a href=\"{{unsubscribeURL}}\">here</a>.</p></body></html>",
    "DefaultSubstitutions": "{\"unsubscribeURL\": \"https://example.com/unsubscribe\"}",
    "Headers": [
            {"Name": "List-Unsubscribe","Value": "{{unsubscribeURL}}"},
            {"Name": "List-Unsubscribe-Post","Value": "List-Unsubscribe=One-Click"}
        ]
  }
In this next example, we are including the use of a secret Hash key. By using this format, the unsubscribe URL will include the Pinpoint project ID and a hashed value of the email address combined with the secret key. This provides a more secure and customized unsubscribe experience for the recipients.
import logging  # Logging library to log messages
import boto3  # AWS SDK for Python
from botocore.exceptions import ClientError  # Exception handling for boto3
import hashlib  # Library to generate unique hashes

# Configure logger
logger = logging.getLogger(__name__)

# Define constants
REGION = 'us-east-1'
HASH_SECRET_KEY = "my_secret_key"  # Replace with your secret key

def send_templated_email_message(
    pinpoint_client,
    project_id,
    sender,
    to_addresses,
    template_name,
    template_version
):
    """
    Sends an email message with HTML and plain text versions.

    :param pinpoint_client: A Boto3 Pinpoint client.
    :param project_id: The Amazon Pinpoint project ID to use when you send this message.
    :param sender: The "From" address. This address must be verified in
                   Amazon Pinpoint in the AWS Region you're using to send email.
    :param to_addresses: The list of addresses on the "To" line. If your Amazon Pinpoint account
                         is in the sandbox, these addresses must be verified.
    :param template_name: The name of the email template to use when sending the message.
    :param template_version: The version number of the message template.

    :return: A dict of to_addresses and their message IDs.
    """
    try:
        # Create a dictionary of addresses with unique unsubscribe URLs
        # The addresses are encoded using the SHA256 hashing algorithm from the hashlib library
        # to create a unique and obfuscated unsubscribe URL for each recipient. This ensures
        # that the unsubscribe link is specific to each individual recipient, preventing
        # potential abuse or unauthorized unsubscribes. The hashed value is appended to the
        # base unsubscribe URL, allowing the email service to identify the intended recipient
        # when the unsubscribe link is clicked, while also protecting the recipient's personal
        # email address from being directly exposed in the URL.
        addresses = {
            address: {
                "ChannelType": "EMAIL",
                "Substitutions": {
                    "unsubscribeURL": [
                        f"https://www.example.com/preferences/index.html?pid={project_id}&h={hashlib.sha256((address + HASH_SECRET_KEY).encode()).hexdigest()}"
                    ]
                }
            }
            for address in to_addresses
        }
        # Send templated email using Amazon Pinpoint
        response = pinpoint_client.send_messages(
            ApplicationId=project_id,
            MessageRequest={
                "Addresses": addresses,
                "MessageConfiguration": {"EmailMessage": {"FromAddress": sender}},
                "TemplateConfiguration": {
                    "EmailTemplate": {
                        "Name": template_name,
                        "Version": template_version,
                    },
                },
            },
        )
    except ClientError as e:
        # Log exception if sending email fails
        logger.exception("Couldn't send email: %s", e)
        raise
    else:
        # Return a dictionary of addresses and their respective message IDs
        return {
            address: message["MessageId"]
        for address, message in response["MessageResponse"]["Result"].items()
        }


def main():
    # Sample data for sending email
    project_id = "ce796be37f32f178af652b26eexample"  # Amazon Pinpoint project ID
    sender = "[email protected]"  # Verified sender email address
    to_addresses = ["[email protected]", "[email protected]", "[email protected]"]  # Recipient email addresses
    template_name = "MyEmailTemplate"
    template_version = "1"

    # Create a Pinpoint client
    pinpoint_client = boto3.client("pinpoint", region_name=REGION)
    print("Sending email.")
    # Send email and print message IDs
    try:
        message_ids = send_templated_email_message(
            pinpoint_client,
            project_id,
            sender,
            to_addresses,
            template_name,
            template_version,
        ),
        print(f"Message sent! Message IDs: {message_ids}"),
    except ClientError as e:
        print(f"Failed to send messages: {e}")

# Entry point of the script
if __name__ == "__main__":
    logging.basicConfig(level=logging.INFO)  # Set logging level to INFO
    main()
Pinpoint Campaigns via API (runtime).
If you send emails using Pinpoint campaigns via the API call (runtime), you can add the headers as described below:
"EmailMessage":{
   "Body": "string",
   "Title": "string",
   "HtmlBody": "string",
    "FromAddress": "string",
   "Headers": [
        {
            "Name": "string",
            "Value": "string"
        }
   ]
}
Pinpoint Campaigns & Journeys via AWS Console.
The Pinpoint console enables you to create (or update) your email templates to add support for up to 15 different headers, including the “List-Unsubscribe” and “List-Unsubscribe-Post” headers. Simply open , or create a new, template in the Pinpoint console, scroll to the bottom of the visual message editor, expand the Headers option, and insert the header names and values. Note that if you only use the console UI to send your Campaigns and Journeys, you can store the encoded List-Unsubscribe URL as an attribute in the endpoint, then use that attribute as the value as shown below:

Conclusion.
In this blog, we provide Pinpoint customers with the information and guidance needed to enable a one-click unsubscribe link in their recipients’ compatible email apps via “List-Unsubscribe” and “List-Unsubscribe-Post” email headers. Following this guidance, in conjunction with properly authenticating your email sending domains and monitoring / keeping spam complaints below prescribed thresholds will help ensure high rates of Pinpoint email deliverability.
We welcome your comments on this post below. For additional information, refer to these resources, or contact your AWS account team.
About the Authors
Zip
Zip is an Amazon Pinpoint and Amazon Simple Email Service Sr. Specialist Solutions Architect at AWS. Outside of work he enjoys time with his family, cooking, mountain biking and plogging.
Darren Roback
Darren is a Senior Solutions Architect with Amazon Web Services based in St. Louis, Missouri. He has a background in Security and Compliance, Serverless Event-Driven Architecture, and Enterprise Architecture. At AWS, Darren partners with customers to help them solve business challenges with AWS technology. Outside of work, Darren enjoys spending time in his shop working on woodworking projects.
Bruno Giorgini
Bruno Giorgini is a Senior Solutions Architect specializing in Pinpoint and SES. With over two decades of experience in the IT industry, Bruno has been dedicated to assisting customers of all sizes in achieving their objectives. When he is not crafting innovative solutions for clients, Bruno enjoys spending quality time with his wife and son, exploring the scenic hiking trails around the SF Bay Area.

 ” width=”1611″ height=”680″>
 ” width=”964″ height=”732″>
 ” width=”1800″ height=”563″>


Maintain an Engaged Subscriber List by Removing Inactive Recipients
As an email marketer, you must operate under the assumption that if a subscriber is not opening your emails, or is no longer engaging with the calls-to-action in your emails, they are no longer interested in the content that you are sending. Subscribers who fall into this category should be periodically removed from your mailing lists to help ensure your subscriber lists are healthy and engaged. Increase campaign success and deliverability by periodically reviewing and updating your subscription lists with this two-pronged approach:
Track Subscriber Engagement with Amazon SES
Amazon SES provides methods to monitor your sending activity using events, metrics, and statistics. These monitoring methods can be used to measure the rates at which your customers engage with the emails you send. For example, you can identify your overall open and click through rates by utilizing SES’ event publishing when using custom email domains that you associate with configuration sets as discussed in the SES documentation.
Figure 3: Serverless Architecture to Analyze Amazon SES events
To track your email sending activities at a granular level, refer to the AWS blog post, Analyzing Amazon SES event data with AWS Analytics Services.