Tag Archives: AWS Identity and Access Management (IAM)

Enhance programmatic access for IAM users using a YubiKey for multi-factor authentication

Post Syndicated from Edouard Kachelmann original https://aws.amazon.com/blogs/security/enhance-programmatic-access-for-iam-users-using-yubikey-for-multi-factor-authentication/

Organizations are increasingly providing access to corporate resources from employee laptops and are required to apply the correct permissions to these computing devices to make sure that secrets and sensitive data are adequately protected. The combination of Amazon Web Services (AWS) long-term credentials and a YubiKey security token for multi-factor authentication (MFA) is an option for providing secure programmatic access to AWS for organizations that aren’t yet ready or able to use identity federation. For example, a user should be able to list AWS Identity and Access Management (IAM) roles with their default programmatic access, but would be required to provide MFA to assume an IAM role.

In this blog post, we show you how to use a YubiKey token for MFA with the AWS Command Line Interface (AWS CLI) to create temporary credentials with the permissions that developers need to perform tasks. The user will configure the long-term credentials and then temporarily assume a role with broader permissions by using MFA when needed. MFA adds extra security, because it requires users to provide second-factor authentication from an AWS-supported MFA mechanism in addition to static security credentials such as their user name and password.

The goal for any organization is to move to the recommended best practices for allowing individual programmatic access that include using temporary security credentials that aren’t stored with the user, but are generated dynamically and provided to the user when requested, such as identity federation due to the temporary nature of those credentials. If your organization uses AWS Single Sign-On (AWS SSO) along with an identity provider (IdP) such as Okta, Azure Active Directory (AD), or AWS Managed Microsoft AD, you can then use the instructions from this earlier blog post to leverage the AWS CLI v2 native integration with AWS SSO and take advantage of the multi-factor authentication support of your IdP.

Overview

This post describes the configuration of IAM users and roles and initialization of the YubiKey token as an MFA device by an administrator, and then how developers can use the YubiKey device to retrieve temporary credentials and assume a role with elevated permissions within the AWS CLI.

The overall process flow looks like this:

  1. Create an IAM user with programmatic access, MFA, and a policy that allows you to assume a more privileged IAM role. The user will retrieve a Time-based One-time Password (TOTP) token code by using a YubiKey as MFA.
  2. Assume the more privileged role, which is restricted by an MFA conditional, by using the TOTP token code.

Figure 1 shows the steps of the process.

Figure 1: A visual overview of the steps to assume roles with elevated permissions by using a YubiKey for MFA

Figure 1: A visual overview of the steps to assume roles with elevated permissions by using a YubiKey for MFA

Prerequisites

To get started you need:

  • An AWS account.
  • A YubiKey (available on Amazon.com). YubiKey 4 and 5 series are compatible, because they support the required OATH application.

    Note: The Yubico Security Keys (the blue tokens) aren’t supported, because they lack the OATH application. If you already have a corporate YubiKey device, this capability might have been disabled.

  • To complete the process for:

Notes:

  • AWS CLI v2 doesn’t yet support Universal 2nd factor (U2F) MFA. As a workaround, we use a YubiKey as a virtual device MFA.
  • OATH (Initiative for Open Authentication) is an organization that specifies two open authentication standards: TOTP and HMAC-based One-time Password (HOTP). For this solution, we use the TOTP standard.

Getting started

Initializing YubiKey for MFA

The following steps show you, as cloud administrator, how to initialize the YubiKey as a virtual MFA device and configure an IAM user that can assume a role with elevated permissions, on the condition that the user is using an MFA device. In this example, your developers will assume a role with permissions to access Amazon Elastic Compute Cloud (Amazon EC2).

To configure the IAM user and initialize the YubiKey device as MFA

  1. Create a role with elevated permissions that your developers can assume.
    1. Sign in to the AWS IAM console, and in the right-hand pane, choose Roles. Then choose Create role.

      Figure 2: Create a role in the IAM console

      Figure 2: Create a role in the IAM console

    2. For the type of trusted entity, choose Another AWS account. Enter your account ID, which you can find by using these methods, described in the IAM User Guide. Choose Next:Permissions.

      Figure 3: Select the type of trusted entity and provide the account ID

    3. Search for the AmazonEC2FullAccess policy, and select the check box next to it. Choose Next:Tags, and add relevant tags if needed. Choose Next:Review.
    4. Name the role developer-ec2-mfa, and then choose Create role.
    5. Go back to the role you just created. Change the maximum session duration value to limit how long the developer’s session can be valid after assuming the role. For this example, we set the duration to 1 hour (3,600 seconds) by using a custom value. Limit this duration to abide by your organization’s recommended authentication time.
    6. Take note of the Amazon Resource Name (ARN) for the new role as shown on the summary page.

      Figure 4: Summary page of the new role

      Figure 4: Summary page of the new role

  2. Create a new IAM policy that provides a limited scope of actions for users when they use their long-term credentials.
    1. Navigate to the AWS IAM console, and in the navigation pane, choose Policies. Choose Create policy.

      Figure 5: Create a policy in the IAM console

      Figure 5: Create a policy in the IAM console

    2. Because we’ve already written the policy in JSON, you don’t need to use the Visual Editor, so you can choose the JSON tab and paste the content of the following JSON policy document (remember to replace the placeholder for the role ARN).Following the least privilege approach, add only the Amazon Resource Names (ARNs) of the role or roles with required elevated permissions that the developer will be able to assume. In this case, use the developer-ec2-mfa ARN for the role that you created previously.
      {
         "Version": "2012-10-17",
         "Statement": [
            {
               "Sid": "",
               "Effect": "Allow",
               "Action": "sts:AssumeRole",
               "Resource": <Elevated Role ARN(s)>,
               "Condition": {
                  "Bool": {
                     "aws:multifactorAuthPresent": true
                  }
               }
            }
         ]
      }
      

      Note: The condition “aws:MultiFactorAuthPresent”: “true” requires that the user who assumes the role has been authenticated with an AWS MFA device.

    3. Choose Review policy.
    4. Name the policy yubi-policy-mfa-level-one. Choose Create policy.
  3. Create a new IAM group that lets you specify permissions for multiple users and makes it easier to manage the permissions for those users.
    1. Navigate to the IAM console, and in the navigation pane, choose Groups. Choose Create New Group.

      Figure 6: Create a group in the IAM console

      Figure 6: Create a group in the IAM console

    2. Enter developers-mfa as the group name. Choose Next Step.
    3. On the Attach Policy screen, in the filter box, search for the policy yubi-policy-mfa-level-one that you created in the previous step. Make sure you select the check box next to the policy, and then choose Next Step.

      Figure 7: Attach the policy to the IAM group

      Figure 7: Attach the policy to the IAM group

    4. Review the group information, and then choose Create Group.
  4. Create a user in IAM for the developer using the AWS CLI.
    1. Navigate to the IAM console and in the navigation pane, choose Users. Choose Add user.
    2. On the Add user screen, enter the name for your user. In this example, our developer is named JohnDoe. For Access type, select the check box next to Programmatic access. Choose Next: Permissions.

      Figure 8: Create an IAM user with programmatic access

      Figure 8: Create an IAM user with programmatic access

    3. For permissions, select Add user to group, and select the developers-mfa group. Choose Next: Tags.
    4. Add the relevant tags if needed, and then choose Next: Review.
    5. Review the user configuration, and then choose Create user.
    6. Make sure you save the access key ID and secret access key to share with your user. Choose Close.
  5. Assign an MFA device to the user.
    1. Go back to the Users section of the IAM console. Choose the IAM user that you created previously, and go to the Security credentials tab. For Assigned MFA device, choose Manage.

      Figure 9: Assign MFA device to the IAM user

      Figure 9: Assign MFA device to the IAM user

    2. Select Virtual MFA device, because the AWS CLI doesn’t yet support U2F MFA. Choose Continue.

      Figure 10: Select the Virtual MFA device type

      Figure 10: Select the Virtual MFA device type

    3. Instead of using the QR code, choose Show secret key.

      Note: The secret key is a randomly generated string shared between IAM and the physical YubiKey. It is used to generate a one-time password using a hash function with the current timestamp.


      Figure 11: Retrieve the secret key on the virtual MFA device configuration page

      Figure 11: Retrieve the secret key on the virtual MFA device configuration page

    4. Copy the secret key to use in the next step as the MFA_SECRET to configure the MFA device.
  6. To obtain the TOTP token codes from the YubiKey to synchronize the key with the IAM user, do the following.
    1. Insert the YubiKey token in your USB port, and verify that the OATH application is enabled for your YubiKey by running the following command and looking for Enabled USB interfaces: OTP+FIDO+CCID in the output.
      $ ykman info
      
      Device type: YubiKey 5 NFC
      Serial number: 123456789
      Firmware version: 5.2.4
      Form factor: Keychain (USB-A)
      Enabled USB interfaces: OTP+FIDO+CCID
      NFC interface is enabled.
      
      Applications USB NFC
      OTP Enabled Enabled
      FIDO U2F Enabled Enabled
      OpenPGP Enabled Enabled
      PIV Enabled Enabled
      OATH Enabled Enabled
      FIDO2 Enabled Enabled
      

    2. For each MFA device, you need to generate a unique identifier that will be used during the process. We recommend that you create this identifier based on the ARN of the IAM user, by using the following template.
      arn:aws:iam::<ACCOUNT_ID>:mfa/<IAM_USERNAME>
      

    3. Add a new credential to your YubiKey based on the MFA device ARN. Use the MFA_SECRET that you copied in the previous step (step 5).
      ykman oath add -t arn:aws:iam::<ACCOUNT_ID>:mfa/<IAM_USERNAME> <MFA_SECRET>
      

    4. Obtain two TOTP token codes by using the following command (remember to replace the placeholder for the <MFA device ARN>). Wait up to 30 seconds for the device to generate the second token code (you will be prompted to touch the token).
      ykman oath code <MFA device ARN>
      

    5. After obtaining each of the TOTP token codes, go back to the IAM console where you were setting up the virtual MFA device, and enter the code in the MFA code box. After entering the two MFA codes, choose Assign MFA.

      Figure 12: Enter the two consecutive YubiKey codes in the virtual MFA device configuration page

      Figure 12: Enter the two consecutive YubiKey codes in the virtual MFA device configuration page

  7. You can then provide the following information to your developer:
    1. The YubiKey device along with the generated MFA device ARN
    2. The ARNs for the roles that will be assumed
    3. The long-term AWS credentials

Assuming a role with the YubiKey as MFA

The following steps show how you, as a developer, can retrieve temporary credentials using the YubiKey device as MFA, and assume a role with wider permissions. You can do this after the YubiKey device, one or more role ARNs, and long-term credentials have been shared with you by the cloud administrator.

To assume a role with broader permissions by using YubiKey

  1. As part of the prerequisites, you should have the AWS CLI v2 already installed. Now configure the default profile with the long-term credentials provided by your cloud administrator, by using the following command.
    $ aws configure
    
    AWS Access Key ID [None]: <Enter your AWS access key>
    AWS Secret Access Key [None]: <Enter your AWS secret access key>
    Default region name [None]: <Enter your AWS default region>
    Default output format [None]: <Enter your output default format>
    

  2. Obtain a TOTP code from YubiKey (you will be prompted to touch the token). Submit your request immediately after generating the codes. If you generate the codes and then wait too long to submit the request, the code won’t be valid anymore.
    ykman oath code arn:aws:iam::<ACCOUNT_ID>:mfa/<IAM_USERNAME>
    

  3. Using the MFA token code you obtained by using the YubiKey, assume the relevant role that will provide access to larger permissions. In our example, the ARN is for the role developer-ec2-mfa that was provided by the IAM administrator. Enter a role session name that will uniquely identify a session when the same role is assumed by different principals.
    aws sts assume-role --role-arn <Role ARN> --role-session-name <Role Name> --serial-number <MFA device ARN> --token-code <token code> --duration-seconds 3600 
    

    Note: The user should only have access to sts:AssumeRole for a specific set of roles. Here we chose the session duration of one hour. You can edit the session duration so the developer can authenticate for the duration of a workday (the default value is 1 hour and can be up to 12 hours). Limit this duration to abide by your organization’s recommended authentication time.

    You should see the following output.

    {
       "AssumedRoleUser": {
          "AssumedRoleId": "ABCD123ABCDEFGHIJKLMN:<role-session-name>",
          "Arn": "arn:aws:sts::<ACCOUNT_ID>:assumed-role/developer-ec2-mfa/<role-session-name>"
       },
       "Credentials": {
          "SecretAccessKey": <aws_secret_access_key>,
          "SessionToken": <aws_session_token>,
          "Expiration": "2020-07-13T19:24:20Z",
          "AccessKeyId": <aws_access_key_id>
       }
    }
    

  4. Edit a new AWS CLI profile named johndoe-developer-role as seen following. Copy the access key and secret key that were retrieved as temporary credentials from the get-session-token command. Then set the additional parameter aws_session_token, which was returned along with the temporary credentials. Edit your CLI with the information for the new role.
    aws configure --profile johndoe-developer-role
    aws configure --profile johndoe-developer-role set aws_session_token <Session Token> 
    

  5. Attempt to make a call to relevant services that are allowed by the newly assumed role. Here’s an example using the Amazon EC2 API to describe the EC2 instances.
    aws --profile johndoe-developer-role ec2 describe-instances
    

The developer now has access to the larger permissions set through the assumed role for the next hour.

Summary

In this post, we introduced the capability to further secure long-term AWS credentials with a YubiKey for MFA, for organizations that are still using long-term credentials. These credentials are stored in the ~/.aws/credentials file. If an unauthorized user was able to retrieve these long-term credentials, they wouldn’t be able to use them, because the user needs to have the physical MFA in order to assume a role with broader permissions. The steps in this blog post can be converted to a script that your developers can use repeatedly to simplify the process.

In general, we recommend that all customers move away from using IAM users and static credentials and instead use IAM roles and temporary credentials wherever possible. An easy way to get started down that road is by using AWS SSO for identity federation.

If you have feedback about this post, submit comments in the Comments section below. If you have questions about this post, start a new thread on the AWS IAM forum or contact AWS Support.

Want more AWS Security how-to content, news, and feature announcements? Follow us on Twitter.

Author

Edouard Kachelmann

Edouard is an Enterprise Solutions Architect at Amazon Web Services. He is a passionate technology enthusiast who enjoys working with customers and helping them build innovative solutions. Prior to his work at AWS, Edouard worked for the French National Cybersecurity Agency, sharing its security expertise and assisting government departments and operators of vital importance. In his free time, Edouard likes to explore new places to eat, try new French recipes, and play with his kid.

Author

Anthony Pasquariello

Anthony is an Enterprise Solutions Architect based in New York City. He provides technical consultation to customers during their cloud journey, especially around security best practices. He has an MS and BS in electrical & computer engineering from Boston University. In his free time, he enjoys ramen, writing nonfiction, and philosophy.

Introducing IAM and Lambda authorizers for Amazon API Gateway HTTP APIs

Post Syndicated from Julian Wood original https://aws.amazon.com/blogs/compute/introducing-iam-and-lambda-authorizers-for-amazon-api-gateway-http-apis/

Amazon API Gateway HTTP APIs enable you to create RESTful APIs with lower latency and lower cost than API Gateway REST APIs.

The API Gateway team is continuing work to improve and migrate popular REST API features to HTTP APIs. We are adding two of the most requested features, AWS Identity and Access Management (IAM) authorizers and AWS Lambda authorizers.

HTTP APIs already support JWT authorizers as a part of OpenID Connect (OIDC) and OAuth 2.0 frameworks. For more information, see “Simple HTTP API with JWT Authorizer.”

IAM authorization

AWS IAM roles and policies offer flexible, robust, and fully managed access controls, without writing any code. You can use IAM roles and policies to control who can create and manage your APIs, in addition to who can invoke them. IAM authorization for HTTP API routes is the best choice for internal or private APIs called by other AWS services like AWS Lambda.

IAM authorization for HTTP API APIs is similar to that for REST APIs. IAM access is determined by identity policies, which are attached to IAM users, groups, or roles. These policies define what identity can access which HTTP APIs routes. See “AWS Services That Work with IAM.”

Lambda authorization

A Lambda authorizer is a Lambda function which API Gateway calls for an authorization check when a client makes a request to an HTTP API route. You can use Lambda authorizers to implement custom authorization schemes to comply with your security requirements.

New authorizer features

HTTP API Lambda authorizers have some new features compared to REST APIs. There is a new payload and response format, including a simple Boolean authorization option.

New payload versions and response format

Lambda authorizers for HTTP APIs introduce a new payload format, version 2.0. If you need compatibility to use the same Lambda authorizers for both REST and HTTP APIs, you can continue to use version 1.0.

The payload format version also determines the request format and response structure that you must send to and return from your Lambda authorizer function. The version 2.0 payload context now allows non-string values. With version 1.0, your Lambda authorizer must return an IAM policy that allows or denies access to your API route. This is the same existing functionality as REST APIs. You can use standard IAM policy syntax in the policy. For examples of IAM policies, see “Control access for invoking an API.”

If you choose the new 2.0 format version when configuring the authorizer, you can now return either a Boolean value, or an IAM policy. The Boolean value enables simple responses from the authorizer without having to construct an IAM policy, and is in the format:

{
  "isAuthorized": true/false,
  "context": {
    "exampleKey": "exampleValue"
  }
}

The context object is optional. You can pass context properties on to Lambda integrations or access logs by using $context.authorizer.property. To learn more, see “Customizing HTTP API access logs.”

Caching authorizer responses

You can enable caching for a Lambda authorizer for up to one hour. To enable caching, your authorizer must have at least one identity source. API Gateway calls the Lambda authorizer function only when all of the specified identity sources are present. API Gateway uses the identity sources as the cache key. If a client specifies the same identity source parameters within the cache TTL, API Gateway uses the cached authorizer result. The Lambda authorizer function is not invoked.

Caching is enabled at the API Gateway level per authorizer. It is important to understand the effect of caching, particularly with simple responses and multiple routes. When using a simple response, the authorizer fully allows or denies all API requests that match the cached identity source values.

For example, you have two different routes using the same Lambda authorizer with a simple response. Both routes have different access requirements. The first route allows access to GET /list-users with an Authorization header with the value SecretTokenUsers. The second route denies access using the same header to GET /list-admins.

The Lambda authorizer has a single identity source, $request.header.Authorization, with the following code:

$request.header.Authorization.
exports.handler = async(event, context) => {
    let response = {
        "isAuthorized": false,
        "context": {
            "AuthInfo": "defaultdeny"
        }
    };
    if ((event.routeKey === "GET /list-users") && (event.headers.Authorization === "SecretTokenUsers")) {
        response = {
            "isAuthorized": true,
            "context": {
                "AuthInfo": "true-users"
            }
        };
    }
    if ((event.routeKey === "GET /list-admins") && (event.headers.authorization === "SecretTokenUsers")) {
        response = {
            "isAuthorized": false,
            "context": {
                "AuthInfo": "false-admins",
            }
        };
    }
    return response;
};

As both routes share the same identity source parameter, a cache result from successfully accessing /list-users with the Authorization header could allow access to /list-admins which is not intended. To cache responses differently per route, add $context.routeKey as an additional identity source. This creates a cache key that is unique for each route.

If more granular permissions are required, disable simple responses and return an IAM policy instead.

Testing Lambda authorizers

You have an existing Lambda function behind an HTTP API and want to add a Lambda authorizer using the new Boolean simple response. Create a new Lambda authorizer function with the following code.

exports.handler = async(event, context) => {
    let response = {
        "isAuthorized": false,
        "context": {
            "AuthInfo": "defaultdeny"
        }
    };
    if (event.headers.Authorization === "secretToken") {
        response = {
            "isAuthorized": true,
            "context": {
                "AuthInfo": "Customer1"
            }
        };
    }
    return response;
};

The authorizer returns true if a header called Authorization has the value secretToken.

To create an authorizer, browse to the API Gateway console. Navigate to your HTTP API, choose Authorization under Develop, select the Attach authorizers to routes tab, and choose Create and attach an authorizer.

Create and attach HTTP API authorizer

Create and attach HTTP API authorizer

Create the Lambda authorizer, pointing to your Lambda authorizer function. Select Payload format version 2.0 with a Simple response.

Create Lambda simple authorizer settings

Create Lambda simple authorizer settings

Enable caching and add two identity sources, $request.header.Authorization and $context.routeKey, to ensure that your cache key is unique when adding multiple routes.

Add caching and identity sources to Lambda authorizer

Add caching and identity sources to Lambda authorizer

Choose Create and attach. The route is now using a Lambda authorizer.

HTTP API route includes Lambda authorizer

HTTP API route includes Lambda authorizer

The following examples to test the API authentication use Postman but you can use any HTTP client.

Send a GET request to the HTTP APIs URL without specifying any authorization header.

Postman unauthorized GET request

Postman unauthorized GET request

API Gateway returns a 401 Unauthorized response, as expected. The required $request.header.Authorization identity source is not provided, so the Lambda authorizer is not called.

Enter a valid Authorization header key, but an invalid value.

Postman Forbidden GET request

Postman Forbidden GET request

API Gateway returns a 403 Forbidden response as the request is now passed to the Lambda authorizer, which has evaluated the value, and returned "isAuthorized": false.

Supply a valid Authorization header key and value.

Postman successful authorized GET request

Postman successful authorized GET request

API Gateway authorizes the request using the Lambda authorizer and sends the request to the Lambda function integration which returns a successful 200 response.

For more Lambda authorizer code examples see “Custom Authorizer Blueprints for AWS Lambda.”

AWS CloudFormation support

Lambda authorizers for HTTP APIs are configured as AWS::ApiGatewayV2::Authorizer CloudFormation resources. Today, they are imported into AWS Serverless Application Model (AWS SAM) applications as native CloudFormation resources.

LambdaAuthorizer:
    Type: 'AWS::ApiGatewayV2::Authorizer'
    Properties:
    Name: LambdaAuthorizer
    ApiId: !Ref HttpApi
    AuthorizerType: REQUEST
    AuthorizerUri: arn:aws:apigateway:{region}:lambda:path/2015-03-31/functions/arn:aws:lambda: {region}:{account id}:function:{Function name}/invocations
    IdentitySource:
        - $request.header.Authorization
    AuthorizerPayloadFormatVersion: 2.0

Conclusion

IAM and Lambda authorizers are two of the most requested features for Amazon API Gateway HTTP APIs. You can now use IAM authorization in a similar way to API Gateway REST APIs. Lambda authorizers for HTTP APIs offer the option of a simpler Boolean response with the new version 2.0 payload and response format. You configure identity sources to specify the location of data that’s required to authorize a request, which are also used as the cache key.

These authorizers are generally available in all AWS Regions where API Gateway is available. To learn more about options for protecting your APIs, you can read the documentation. For more information about Amazon API Gateway, visit the product page.

For the latest blogs, videos, and training for AWS Serverless, see https://serverlessland.com/.

Role-based access control using Amazon Cognito and an external identity provider

Post Syndicated from Eran Medan original https://aws.amazon.com/blogs/security/role-based-access-control-using-amazon-cognito-and-an-external-identity-provider/

Amazon Cognito simplifies the development process by helping you manage identities for your customer-facing applications. As your application grows, some of your enterprise customers may ask you to integrate with their own Identity Provider (IdP) so that their users can sign-on to your app using their company’s identity, and have role-based access-control (RBAC) based on their company’s directory group membership.

For your own workforce identities, you can use AWS Single Sign-On (SSO) to enable single sign-on to your cloud applications or AWS resources.

For your customers who would like to integrate your application with their own IdP, you can use Amazon Cognito user pools’ external identity provider integration.

In this post, you’ll learn how to integrate Amazon Cognito with an external IdP by deploying a demo web application that integrates with an external IdP via SAML 2.0. You will use directory groups (for example, Active Directory or LDAP) for authorization by mapping them to Amazon Cognito user pool groups that your application can read to make access decisions.

Architecture

The demo application is implemented using Amazon Cognito, AWS Amplify, Amazon API Gateway, AWS Lambda, Amazon DynamoDB, Amazon Simple Storage Service (S3), and Amazon CloudFront to achieve a serverless architecture. You will make use of infrastructure-as-code by using AWS CloudFormation and the AWS Cloud Development Kit (CDK) to model and provision your cloud application resources, using familiar programming languages.

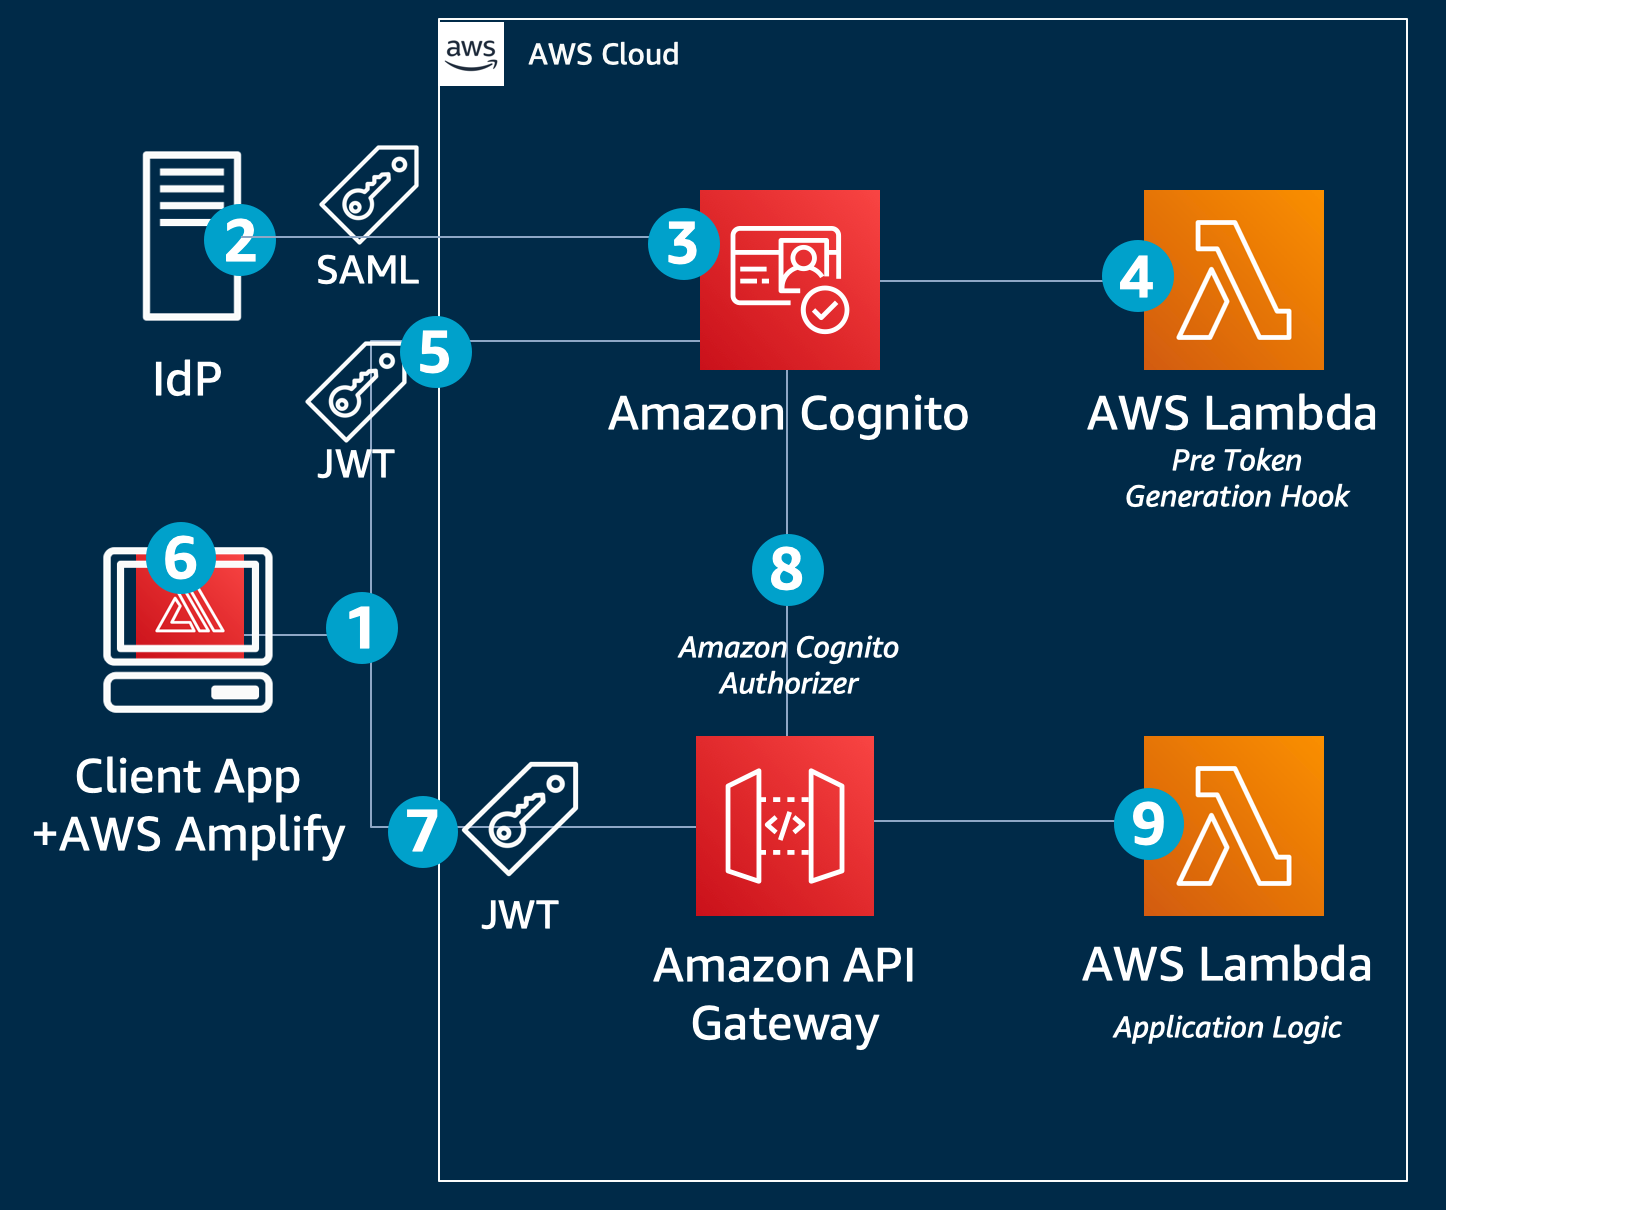
The following diagram shows an overview of this architecture and the steps in the login flow, which should help clarify what you are going to deploy.
 

Figure 1: Architecture Diagram

Figure 1: Architecture Diagram

First visit

When a user visits the web application at the first time, the flow is as follows:

  1. The client side of the application (also referred to as the front end) uses the AWS Amplify JavaScript library (Amplify.js) to simplify authentication and authorization. Using Amplify, the application detects that the user is unauthenticated and redirects to Amazon Cognito, which then sends a SAML request to the IdP.
  2. The IdP authenticates the user and sends a SAML response back to Amazon Cognito. The SAML response includes common attributes and a multi-value attribute for group membership.
  3. Amazon Cognito handles the SAML response, and maps the SAML attributes to a just-in-time user profile. The SAML groups attribute is mapped to a custom user pool attribute named custom:groups.
  4. An AWS Lambda function named PreTokenGeneration reads the custom:groups custom attribute and converts it to a JSON Web Token (JWT) claim named cognito:groups. This associates the user to a group, without creating a group.

    This attribute conversion is optional and implemented to demo how you can use Pre Token Generation Lambda trigger to customize your JWT token claims, mapping the IdP groups to the attributes your application recognizes. You can also use this trigger to make additional authorization decisions. For example, if user is a member of multiple groups, you may choose to map only one of them.

  5. Amazon Cognito returns the JWT tokens to the front end.
  6. The Amplify client library stores the tokens and handles refreshes.
  7. The front end makes a call to a protected API in Amazon API Gateway.
  8. API Gateway uses an Amazon Cognito user pools authorizer to validate the JWT’s signature and expiration. If this is successful, API Gateway passes the JWT to the application’s Lambda function (also referred to as the backend).
  9. The backend application code reads the cognito:groups claim from the JWT and decides if the action is allowed. If the user is a member of the right group then the action is allowed, otherwise the action is denied.

We will go into more detail about these steps after describing a bit more about the implementation details.

For more information about JWT tokens and claims, see Introduction to JSON Web Tokens.

Prerequisites

The following are the prerequisites for the solution described in this post:

Cost estimate

For an account under the 12-month Free Tier period, there should be no cost associated with running this example. However, to avoid any unexpected costs you should terminate the example stack after it’s no longer needed. For more information, see AWS Free Tier and AWS Pricing.

Running the demo application

In this part, you will go over the steps to setup and run the demo application. All the example code in this solution can be found on the amazon-cognito-example-for-external-idp code repository on GitHub.

To deploy the application without an IdP integration

  1. Open a bash-compatible command-line terminal and navigate to a directory of your choice. For Windows users: install Git for Windows and open Git BASH from the start menu.
  2. To get the code from the GitHub repository, enter the following:
    git clone https://github.com/aws-samples/amazon-cognito-example-for-external-idp 
    cd amazon-cognito-example-for-external-idp
    

  3. The template env.sh.template contains configuration settings for the application that you will modify later when you configure the IdP. To copy env.sh.template to env.sh, enter the following:
    cp env.sh.template env.sh

    Figure 2: Cloning the example repository and copying the template configuration file

    Figure 2: Cloning the example repository and copying the template configuration file

  4. The install.sh script will install the AWS CDK toolkit with the dependencies and will configure and bootstrap your environment:
    ./install.sh
    

    Figure 3: Installing dependencies

    Figure 3: Installing dependencies

    You may get prompted to agree to sending Angular analytics. You will also get notified if there are package vulnerabilities. If this is the case run npm audit –fix –prod in all subdirectories to resolve them.

  5. Once the environment has been successfully bootstrapped you need to deploy the CloudFormation stack:
    ./deploy.sh 
    

    Figure 4: Deploying the CloudFormation stack

    Figure 4: Deploying the CloudFormation stack

  6. You will be prompted to accept the IAM changes. These changes will allow API gateway service to call the demo application lambda function (APIFunction), Amazon Cognito to invoke Pre-Token Generation lambda function, demo application lambda function to access DynamoDB user’s table (used to implement user’s global sign out), and more. You’ll need to review these changes according to your current security approval level and confirm them to continue.

    Under Do you wish to deploy these changes (y/n)?, type y and press Enter.

    Figure 5: Reviewing and confirming changes

    Figure 5: Reviewing and confirming changes

  7. A few moments after deploying the application’s CloudFormation stack, the terminal displays the IdP settings, which should look like the following:
     
    Figure 6: IdP settings

    Figure 6: IdP settings

    Make a note of these values; you will use them later to configure the IdP.

Configure the IdP

Every IdP is different, but there are some common steps you will need to follow. To configure the IdP, do the following:

  1. Provide the IdP with the values for the following two properties, which you made note of in the previous section:
    • Single sign on URL / Assertion Consumer Service URL / ACS URL:
      https://<domainPrefix>.auth.<region>.amazoncognito.com/saml2/idpresponse
      

    • Audience URI / SP Entity ID / Entity ID:
      urn:amazon:cognito:sp:<yourUserPoolID>
      

  2. Configure the field mapping for the SAML response in the IdP. Map the first name, last name, email, and groups (as a multivalue attribute) into SAML response attributes with the names firstName, lastName, email, and groups, respectively.

    Recommended: Filter the mapped groups to only those that are relevant to the application (for example, by a prefix filter). There is a 2,048-character limit on the custom attribute, so filtering avoids exceeding the character limit, and also avoids passing irrelevant information to the application.

  3. In the IdP, create two demo groups called pet-app-users and pet-app-admins, and create two demo users, for example, [email protected] and [email protected], and then assign one to each group, respectively.

See the following specific instructions for some popular IdPs, or see the documentation for your customer’s specific IdP:

Get the IdP SAML metadata URL or file

Get the metadata URL or file from the IdP: you will use this later to configure your Cognito user pool integration with the IdP. For more information, see Integrating Third-Party SAML Identity Providers with Amazon Cognito User Pools.

To update the application with the SAML metadata URL or file

The following will configure the SAML IdP in the Amazon Cognito User Pool using the IdP metadata above:

  1. Using your favorite text editor, open the env.sh file.
  2. Uncomment the line starting with # export IDENTITY_PROVIDER_NAME (remove the # sign).
  3. Uncomment the line starting with # export IDENTITY_PROVIDER_METADATA.
  4. If you have a metadata URL from the IdP, enter it following the = sign:
    export IDENTITY_PROVIDER_METADATA=REPLACE_WITH_URL
    

    Or, if you downloaded the metadata as a file, enter $(cat path/to/downloaded-metadata.xml):

    export IDENTITY_PROVIDER_METADATA=$(cat REPLACE_WITH_PATH)
    

    Figure 7: Editing the identity provider metadata in the env.sh configuration file

    Figure 7: Editing the identity provider metadata in the env.sh configuration file

To re-deploy the application

  1. Run ./diff.sh to see the changes to the CloudFormation stack (added metadata URL).
     
    Figure 8: Run ./diff.sh

    Figure 8: Run ./diff.sh

  2. Run ./deploy.sh to deploy the update.

To launch the UI

There is both an Angular version and a React version of the same UI, both have the same functionality. You can use either version depending on your preference.

  1. Start the front end application with your chosen version of the UI with one of the following:
    • React: cd ui-react && npm start
    • Angular: cd ui-angular && npm start
  2. To simulate a new session, in your web browser, open a new window in private browsing or incognito mode, then for the URL, enter http://localhost:3000. You should see a screen similar to the following:
     
    Figure 9: Private browsing sign-in screen

    Figure 9: Private browsing sign-in screen

  3. Choose Single Sign On to be taken to the IdP’s sign-in page, where you will sign in if needed. After you are authenticated by the IdP, you’ll be redirected back to the application.

    If you have multiple IdPs, or if you have both internal and external users that will authenticate directly with the user pool, you can choose the Sign In / Sign Up button instead. This redirects you to the Amazon Cognito hosted UI sign in page, rather than taking you directly to the IdP. For more information, see Using the Amazon Cognito Hosted UI for Sign-Up and Sign-In.

  4. Using a new private browsing session (to clear any state), sign in with the user associated with the group pet-app-users and create some sample entries. Then, sign out. Open another private browsing session, and sign in with the user associated with the pet-app-admins group. Notice that you can see the other user’s entries. Now, create a few entries as an admin, then sign out. Open another new private browsing session, sign in again as the pet-app-users user, and notice that you can’t see the entries created by the admin user.
     
    Figure 10: Example view for a user who is only a member of the pet-app-users group

    Figure 10: Example view for a user who is only a member of the pet-app-users group


    Figure 11: Example view for a user who is also a member of the pet-app-admins group

    Figure 11: Example view for a user who is also a member of the pet-app-admins group

Implementation

Next, review the details of what each part of the demo application does, so that you can modify it and use it as a starting point for your own application.

Infrastructure

Take a look at the code in the cdk.ts file—a sample CDK file that creates the infrastructure. You can find it in the amazon-cognito-example-for-external-idp/cdk/src directory in the cloned GitHub repo. The key resources it creates are the following:

  1. A Cognito user pool (new cognito.UserPool…). This is where the just-in-time provisioning created users who federate in from the IdP. It also creates a custom attribute named groups, which you can see as custom:groups in the console.
     
    Figure 12: Custom attribute named groups

    Figure 12: Custom attribute named groups

  2. IdP integration which provides the mapping between the attributes in the SAML assertion from the IdP and Amazon Cognito attributes. For more information, see Specifying Identity Provider Attribute Mappings for Your User Pool.
    (new cognito.CfnUserPoolIdentityProvider…).
  3. An authorizer (new apigateway.CfnAuthorizer…). The authorizer is linked to an API resource method (authorizer: {authorizerId: cfnAuthorizer.ref}).

    It ensures that the user must be authenticated and must have a valid JWT token to make API calls to this resource. It uses Lambda proxy integration to intercept requests.

  4. The PreTokenGeneration Lambda trigger, which is used for the mapping between a user’s Active Directory or LDAP groups (passed on the SAML response from the IdP) to user pool groups (const preTokenGeneration = new lambda.Function…). For the PreTokenGeneration Lambda trigger code used in this solution, see the index.ts file on GitHub.

The application

Backend

The example application in this solution uses a serverless backend, but you can modify it to use Amazon Elastic Compute Cloud (Amazon EC2), Amazon Elastic Container Service (Amazon ECS), Amazon Elastic Kubernetes Service (Amazon EKS), AWS Fargate, AWS Elastic Beanstalk, or even an on-premises server as the backend. To configure your API gateway to point to a server-based application, see Set up HTTP Integrations in API Gateway or Set up API Gateway Private Integrations.

Middleware

Take a look at the code in the express.js sample in the app.ts file on GitHub. You’ll notice some statements starting with app.use. These are interceptors that are invoked for all requests.

app.use(eventContext());

app.use(authorizationMiddleware({
  authorizationHeaderName: authorizationHeaderName,
  supportedGroups: [adminsGroupName, usersGroupName],
  forceSignOutHandler: forceSignOutHandler,
  allowedPaths: ["/"],
}));

Some explanation:

  1. eventContext: the example application in this solution uses AWS Serverless Express which allows you to run the Express framework for Node.js directly on AWS Lambda.
  2. authorizationMiddleware is a helper middleware that does the following:
    1. It enriches the express.js request object with several syntactic sugars such as req.groups and req.username (a shortcut to get the respective claims from the JWT token).
    2. It ensures that the currently logged in user is a member of at least one of the supportedGroups provided. If not, it will return a 403 response.

Endpoints

Still in the Express.js app.ts file on GitHub, take a closer look at one of the API’s endpoints (GET /pets).

app.get("/pets", async (req: Request, res: Response) => {

  if (req.groups.has(adminsGroupName)) {
    // if the user has the admin group, we return all pets
    res.json(await storageService.getAllPets());
  } else {
    // else, just owned pets (middleware ensure that the user has at least one group)
    res.json(await storageService.getAllPetsByOwner(req.username));
  }
});

With the groups claim information, your application can now make authorization decisions based on the user’s role (show all items if they are an admin, otherwise just items they own). Having this logic as part of the application also allows you to unit test your authorization logic, and run it locally, or offline, before deploying it.

Front end

The front end can be built in your framework of choice. You can start with the sample UIs provided for either React or Angular. In both, the AWS Amplify client library handles the integration with Amazon Cognito and API Gateway for you. For more information about AWS Amplify, see the Amplify Framework page on GitHub.

Note: You can use AWS Amplify to create the infrastructure in a wizard-like way, without writing CloudFormation. In our example, because we used the AWS CDK for the infrastructure, we needed a configuration file to point Amplify to the created infrastructure.

The following are some notable files, and explanations of what they do:

  • generateConfig.ts reads the CloudFormation stack output parameters, and creates a file named autoGenConfig.js, which looks like the following:
    // this file is auto generated, do not edit it directly
    export default {
      cognitoDomain: "youruniquecognitodomain.auth.region.amazoncognito.com",
      region: "region",
      cognitoUserPoolId: "youruserpoolid",
      cognitoUserPoolAppClientId: "yourusepoolclientid",
      apiUrl: "https://yourapigwapiid.execute-api.region.amazonaws.com/prod/",
    };
    

    The file generateConfig.ts is triggered after calling ./deploy.sh, or ./config-ui.sh.

  • APIService.ts: calls the backend API, passing the user’s token. For example, calling the GET/pets API:
    public async getAllPets(): Promise<Pet[]> {
      const authorizationHeader = await this.getAuthorizationHeader();
      return await this.api.get(REST_API_NAME, '/pets', {headers: authorizationHeader});
    }
    

Step-by-step example

Now that you have an understanding of the solution, we will take you through a step-by-step example. You can see how everything works together in sequence, and how the tokens are passing between Cognito, your demo application, and the API gateway.

  1. Create a new browser session by starting a private/incognito session.
  2. Launch the UI by using the Angular example from the To launch the UI section:
    cd ui-angular && npm start
    

  3. Open the developer tools in your browser. In most browsers, you can do this by pressing F12 (in Chrome and FireFox in Windows), or Option+Command+i (Chrome, Firefox, or Safari on a Mac).
  4. In the developer tools panel, navigate to the Network tab, and ensure that it is in recording mode and logs are persisting. For more details for various browsers, see How to View a SAML Response in Your Browser for Troubleshooting.
  5. When the page loads, the following happens behind the scenes in the front end (example code available for either Angular or React):
    1. Using Amplify.js, AWS Amplify checks if the user is currently logged in
      let cognitoUser = await Auth.currentAuthenticatedUser();
      

      Because this is a new browsing session, the user is not logged in, and the Sign In / Sign Up and Single Sign On buttons will appear.

    2. Choose Single Sign On, and AWS Amplify will redirect the browser to the IdP.
      Auth.federatedSignIn(idpName)
      

  6. In the IdP sign-in page, sign in as one of the users created earlier (e.g. [email protected] or [email protected]).
  7. In the Network tab of your browser’s developer tools panel, locate the request to Amazon Cognito’s /saml2/idresponse endpoint.
  8. The following is an example using Chrome, but you can do it similarly using other browsers. In the Form Data section, you can see the SAMLResponse field that was sent back from the IdP after you authenticated.
     
    Figure 13: Inspecting the SAML response

    Figure 13: Inspecting the SAML response

  9. Copy the SAMLResponse value (drag to select the area marked in green above, and make sure you don’t include the RelayState field).
  10. At the command line, use the following example to decode the SAMLResponse value. Be sure to replace SAMLResponse by pasting the text copied in the previous step:
    echo "SAMLResponse" | base64 --decode > saml_response.xml 
    

  11. Open the saml_response.xml file, and look at the part that starts with <saml2:Attribute Name="groups". This is the attribute that contains the groups that your user belongs to, according to the IdP. For more ways to inspect and troubleshoot the SAML response, see How to View a SAML Response in Your Browser for Troubleshooting.
  12. Amazon Cognito applies the mapping defined in the CloudFormation stack to these attributes. For example, the IdP SAML response attribute named groups is mapped to the user pool custom attribute named custom:groups.
    • In order to modify the mapping, edit your local copy of the cdk.ts file.
    • In order to view the mapped attribute for a user, do the following:
      1. Sign into the AWS Management Console using the same account you used for the demo setup.
      2. Select Manage User Pools.
      3. Select the pool you created for this demo and choose Users and groups.
      4. Search for the user account you just signed in with, and choose its username.

        As you can see in the following example, the custom:groups claim is set automatically. (the custom: prefix is added to all custom attributes automatically):

    Figure 14: Mapped user attributes

    Figure 14: Mapped user attributes

  13. The PreTokenGeneration Lambda function then reads the mapped custom:groups attribute value, parses it, and converts it to an array; and then stores it in the cognito:groups claim. In order to customize the mapping, edit the Lambda function’s code in your local copy of the index.ts file and run ./deploy.sh to redeploy your application.
  14. Now that the front end has the JWT token, when the page loads, it will request to load all the items (a call to a protected API, passing the token in the form of an authorization header).
  15. Look at the Network tab again, under the GET request that starts with pets.

    Under Request Headers, look at the authorization header. The long value you see is the encoded token passed as part of the request. The following is an example of how the decoded JWT will look:

    {
      "cognito:groups": [
        "pet-app-users",
        "pet-app-admins"
      ], // <- this is what the PreTokenGeneration lambda added
      
      "cognito:username": "IdP_Alice",
      "custom:groups": "[pet-app-users, pet-app-admins]", //what we got via SAML
      "email": "[email protected]"
      …
    
    }
    

  16. Optionally, if you’d like to modify or add new requests to a new API paths, edit your local copy of the APIService.ts file by using one of the following examples.
    • Sending the request with the authorization header:
      public async getAllPets(): Promise<Pet[]> {
        const authorizationHeader = await this.getAuthorizationHeader();
        return await this.api.get(REST_API_NAME, '/pets', 
          {headers: authorizationHeader});
      }
      

    • The authorization header is obtained using this helper function:
      private async getAuthorizationHeader() {
        const session = await this.auth.currentSession();
        const idToken = session.getIdToken().getJwtToken();
        return {Authorization: idToken}
      }
      

  17. After the previous request is sent to Amazon API Gateway, the Amazon Cognito user pool authorizer validated the JWT token based on the token signature, to ensure that it was not tampered with, and that it was still valid. You can see the way the authorizer is setup in the cdk.ts file on GitHub.
  18. Based on which user you signed-in with previously, you’ll either see all items, or only items you own. How does it work? As mentioned earlier, the backend application code reads the groups claim from the validated token and decides if the action is allowed. If the user is a member of a specific group or has a specific attribute, allow; else, deny. The relevant code that makes that decision can be seen in the Express.js example app file in the app.ts file on GitHub.

Customizing the application

The following are some important issues to consider when customizing the app to your needs:

  • If you modify the app client, do not add the aws.cognito.signin.user.admin scope to it. The aws.cognito.signin.user.admin scope grants access to Amazon Cognito User Pool API operations that require access tokens, such as UpdateUserAttributes and VerifyUserAttribute. The demo application makes authorization decisions based on the custom:group attribute populated from the IdP. Because the IdP is the single source of truth for its users, they should not be able to modify any attribute, particularly the custom:groups attribute.
  • We recommend that you do not change the mapped attribute after the stack is deployed. The reason is that the attribute gets persisted in the user profile after it is mapped. For example, if you first map groups to custom:groups, and a user signs in, then later you change the mapping of groups to custom:groups2, the next time the user signs in, their profile will have both attributes: custom:groups (with the last value it was mapped to it) as well as custom:groups2 (with the current value). To avoid having to clear old mapped attributes, we recommend not changing the mapping after it is created.
  • This solution utilizes Amazon Cognito’s OAuth 2.0 flows to provide federated sign-in from an external IdP (and optionally also sign-in directly with the user pool via the hosted UI in case you would like to support both use cases). It is not applicable for non OAuth 2.0 flows (e.g. the custom UI), for example, using InititateAuth/SRP.

Conclusion

You can integrate your application with your customer’s IdP of choice for authentication and authorization for your application, without integrating with LDAP, or Active Directory directly. Instead, you can map read-only, need-to-know information from the IdP to the application. By using Amazon Cognito, you can normalize the structure of the JWT token, so that you can add multiple IdPs, social login providers, and even regular username and password-based users (stored in user pools). And you can do all this without changing any application code. Amazon API Gateway’s native integration with Amazon Cognito user pools authorizer streamlines your validation of the JWT integrity, and after it has been validated, you can use it to make authorization decisions in your application’s backend. Using this example, you can focus on what differentiates your application, and let AWS do the undifferentiated heavy lifting of identity management for your customer-facing applications.

For all the code examples described in this post, see the amazon-cognito-example-for-external-idp code repository on GitHub.

If you have feedback about this post, submit comments in the Comments section below. If you have questions about this post, start a new thread on the Amazon Cognito forum or contact AWS Support.

Want more AWS Security how-to content, news, and feature announcements? Follow us on Twitter.

Author

Eran Medan

Eran is a Software Development Manager based in Atlanta and leads the AWS Jam team, which uses Amazon Cognito and other services mentioned in this post to run their service. Other than jamming on AWS, Eran likes to jam on his guitar or fly airplanes in virtual reality.

Yuri Duchovny

Yuri is a New York-based Solutions Architect specializing in cloud security, identity, and compliance. He supports cloud transformations at large enterprises, helping them make optimal technology and organizational decisions. Prior to his AWS role, Yuri’s areas of focus included application and networking security, DoS, and fraud protection. Outside of work, he enjoys skiing, sailing, and traveling the world.

How to use trust policies with IAM roles

Post Syndicated from Jonathan Jenkyn original https://aws.amazon.com/blogs/security/how-to-use-trust-policies-with-iam-roles/

November 3, 2022: We updated this post to fix some syntax errors in the policy statements and to add additional use cases.

August 30, 2021: This post is currently being updated. We will post another note when it’s complete.


AWS Identity and Access Management (IAM) roles are a significant component of the way that customers operate on Amazon Web Service (AWS). In this post, we will dive into the details of how role trust policies work and how you can use them to restrict how your roles are assumed.

There are several different scenarios where you might use IAM roles on AWS:

  • An AWS service or resource accesses another AWS resource in your account – When an AWS resource needs access to other AWS services, functions, or resources, you can create a role that has appropriate permissions for use by that AWS resource. Services like AWS Lambda and Amazon Elastic Container Service (Amazon ECS) assume roles to deliver temporary credentials to your code that’s running in them.
  • An AWS service generates AWS credentials to be used by devices running outside AWS –
    AWS IAM Roles Anywhere, AWS IoT Core, and AWS Systems Manager hybrid instances can deliver role session credentials to applications, devices, and servers that don’t run on AWS.
  • An AWS account accesses another AWS account – This use case is commonly referred to as a cross-account role pattern. It allows human or machine IAM principals from one AWS account to assume this role and act on resources within a second AWS account. A role is assumed to enable this behavior when the resource in the target account doesn’t have a resource-based policy that could be used to grant cross-account access.
  • An end user authenticated with a web identity provider or OpenID Connect (OIDC) needs access to your AWS resources – This use case allows identities from Facebook or OIDC providers such as GitHub, Amazon Cognito, or other generic OIDC providers to assume a role to access resources in your AWS account.
  • A customer performs workforce authentication using SAML 2.0 federation – This occurs when customers federate their users into AWS from their corporate identity provider (IdP) such as Okta, Microsoft Azure Active Directory, or Active Directory Federation Services (ADFS), or from AWS Single Sign-On (AWS SSO).

An IAM role is an IAM principal whose entitlements are assumed in one of the preceding use cases. An IAM role differs from an IAM user as follows:

  • An IAM role can’t have long-term AWS credentials associated with it. Rather, an authorized principal (an IAM user, AWS service, or other authenticated identity) assumes the IAM role and inherits the permissions assigned to that role.
  • Credentials associated with an IAM role are temporary and expire.
  • An IAM role has a trust policy that defines which conditions must be met to allow other principals to assume it.

Managing access to IAM roles

Let’s dive into how you can control access to IAM roles by understanding the policy types that you can apply to an IAM role.

There are three circumstances where policies are used for an IAM role:

  • Trust policy – The trust policy defines which principals can assume the role, and under which conditions. A trust policy is a specific type of resource-based policy for IAM roles. The trust policy is the focus of the rest of this blog post.
  • Identity-based policies (inline and managed) – These policies define the permissions that the user of the role is able to perform (or is denied from performing), and on which resources.
  • Permissions boundary – A permissions boundary is an advanced feature for using a managed policy to set the maximum permissions for a role. A principal’s permissions boundary allows it to perform only the actions that are allowed by both its identity-based permissions policies and its permissions boundaries. You can use permissions boundaries to delegate permissions management tasks, such as IAM role creation, to non-administrators so that they can create roles in self-service.

For the rest of this post, you’ll learn how to enforce the conditions under which roles can be assumed by configuring their trust policies.

An example of a simple trust policy

A common use case is when you need to provide access to a role in account A to assume a role in Account B. To facilitate this, you add an entry in the role in account B’s trust policy that allows authenticated principals from account A to assume the role through the sts:AssumeRole API call.

Important: If you reference :root in an IAM role’s trust policy, you might allow more principals to assume your role than you intended, so it’s a best practice to use the Principal element or conditions to only allow specific principals or paths to assume a role. Later in this post, we show you how to limit this access to more specific principals.

{
  "Version": "2012-10-17",
  "Statement": [
    {
      "Effect": "Allow",
      "Principal": {
        "AWS": "arn:aws:iam::111122223333:root"
      },
      "Action": "sts:AssumeRole"
    }
  ]
}

This trust policy has the same structure as other IAM policies with Effect, Action, and Condition components. It also has the Principal element, but no Resource element. This is because the resource is the IAM role itself. For the same reason, the Action element will only ever be set to relevant actions for role assumption.

Note: The suffix :root in the policy’s Principal element equates to the principals in the account, not the root user of that account.

Using the Principal element to limit who can assume a role

In a trust policy, the Principal element indicates which other principals can assume the IAM role. In the preceding example, 111122223333 represents the AWS account number for the auditor’s AWS account. This allows a principal in the 111122223333 account with sts:AssumeRole permissions to assume this role.

To allow a specific IAM role to assume a role, you can add that role within the Principal element. For example, the following trust policy would allow only the IAM role LiJuan from the 111122223333 account to assume the role it is attached to.

{
  "Version": "2012-10-17",
  "Statement": [
    {
      "Effect": "Allow",
      "Principal": {
        "AWS": "arn:aws:iam::111122223333:role/LiJuan"
      },
      "Action": "sts:AssumeRole"
    }
  ]
}

The principals included in the Principal element can be a principal defined within the IAM documentation, and can refer to an AWS or a federated principal. You can’t use a wildcard (“*” or “?”) within the Principal element for a trust policy, other than one case which we will cover later. You must define precisely which principal you are referring to because there is a translation that occurs when you submit your trust policy that ties it to each principal’s ID. For more information, see Why is there an unknown principal format in my IAM resource-based policy?

If an IAM role has a principal from the same account in its trust policy directly, that principal doesn’t need an explicit entitlement in its identity-attached policy to assume the role.

Using the Condition element in a trust policy

The Condition element in a role trust policy sets additional requirements for the Principal trying to assume the role. The Condition element is a flexible way to reduce the set of users that are able to assume the role without necessarily specifying the principals.

Condition elements of role trust policies behave identically to condition elements in identity-based policies and other resource policies on AWS.

Using SAML identity federation on AWS

Federated users from a SAML 2.0 compliant IdP are given permissions to access AWS accounts through the use of IAM roles. The mapping of which enterprise users get which roles is established within the directory used by the SAML 2.0 IdP and is placed inside the signed SAML assertion by the IdP.

The Principal element of a role trust policy for SAML federation contains the ARN of the SAML IdP in the same AWS account. IdPs in other accounts can’t be referenced. Roles assumed by SAML federation can use SAML-specific condition keys in their role trust policy.

A role trust policy for a role to be assumed by SAML places the ARN of the SAML IDP in the Principal element, and checks the intended audience (SAML:aud) of the SAML assertion. Setting the audience condition is important because it means that only SAML assertions intended for AWS can be used to assume a role:

{
    "Version": "2012-10-17",
    "Statement": {
      "Effect": "Allow",
      "Action": "sts:AssumeRoleWithSAML",
      "Principal": {"Federated": "arn:aws:iam::account-id:saml-provider/PROVIDER-NAME"},
      "Condition": {"StringEquals": {"SAML:aud": "https://signin.aws.amazon.com/saml"}}
    }
  }

The AWS documentation covers creating roles for SAML 2.0 federation in detail. For information about how to manage the role trust policies of roles assumed by SAML from multiple AWS Regions for resiliency, see the blog post How to use regional SAML endpoints for failover.

For federating workforce access to AWS, you can use AWS IAM Identity Center (successor to AWS Single Sign-On) to broker access to IAM roles through SAML. Roles managed by IAM Identity Center can’t have their trust policy modified by IAM directly.

SAML IDPs used in a role trust policy must be in the same account as the role is.

Assuming a role with WebIdentity

Roles can also be assumed with tokens issued by web identity providers and OpenID Connect (OIDC) compliant providers.

After you’ve created an OpenID Connect identity provider in your account, you can configure roles to be assumed by that OpenID Connect identity provider.

The following is a trust policy that allows a role to be assumed by the identity provider auth.example.com where the value of the sub claim is equal to Administrator and the aud is equal to MyappWebIdentity.

{
    "Version": "2012-10-17",
    "Statement": [
        {
            "Effect": "Allow",
            "Principal": {
                "Federated": "arn:aws:iam::11112222333:oidc-provider/auth.example.com"
            },
            "Action": "sts:AssumeRoleWithWebIdentity",
            "Condition": {
                "StringEquals": {
                    "auth.example.com:sub": "Administrator",
  "auth.example.com:aud": "MyappWebIdentity"
                }
            }
        }
    ]
}

The condition keys used for roles assumed by OIDC identity providers are always prefixed with the name of the OIDC identity provider (for example, auth.example.com). So to use claims in the ID Token like aud, sub, and amr, they are prefixed to become auth.example.com:aud, auth.example.com:sub, and auth.example.com:amr, respectively, in a trust policy to be evaluated as a condition key. Only ID Token claims listed in the STS documentation can be used in role trust policies as condition keys.

It’s important to set the:aud condition in role trust policies to help verify that the tokens being used to assume roles in your AWS accounts are tokens that are intended to be used for that purpose, and are for your application or tenant if your web identity provider is a public or multi-tenant identity provider, such as Google or GitHub.

Amazon Elastic Kubernetes Service (Amazon EKS) clusters have OIDC identity provider capabilities and can be used to assume roles in AWS accounts.

OIDC identity providers used to assume a role must be in the same AWS account as the role.

Limiting role use based on an identifier

At times you might need to give a third-party access to your AWS resources. Suppose that you hired a third-party company, Example Corp, to monitor your AWS account and help optimize costs. To track your daily spending, Example Corp needs access to your AWS resources, so you allow them to assume an IAM role in your account. However, Example Corp also tracks spending for other customers, and there could be a configuration issue in the Example Corp environment that allows another customer to compel Example Corp to attempt to take an action in your AWS account, even though that customer should only be able to take the action in their own account. This is referred to as the cross-account confused deputy problem. This section shows you a way to mitigate this risk.

The following trust policy requires that principals from the Example Corp AWS account, 444455556666, have provided a special string, called an external ID, when making their request to assume the role. Adding this condition reduces the risk that someone from the 444455556666 account will assume this role by mistake. This string is configured by specifying an ExternalID conditional context key.

External IDs should be generated by the third-party assuming your role, like Example Corp, and associated with the other assume role calls to assume a given customer’s role by Example Corp. By doing this, other Example Corp customers won’t be able to compel Example Corp to assume your roles on their behalf because they can’t force Example Corp to use your external ID through their tenant even if they become aware of your external ID.

{
  "Version": "2012-10-17",
  "Statement": [
    {
      "Effect": "Allow",
      "Principal": {
        "AWS": "arn:aws:iam::444455556666:role/ExampleCorpRole"
      },
      "Action": "sts:AssumeRole",
      "Condition": {
        "StringEquals": {
          "sts:ExternalId": "ExampleUniquePhrase"
        }
      }
    }
  ]
}

The external IDs should be unique for every customer of a service provider. AWS doesn’t treat external IDs as secrets—they can be seen by anyone with entitlements to view a role’s trust policy.

If you assume roles in your customers’ accounts, it’s a best practice to generate unique external ID values on behalf of your customers and associate them with your customers, and you shouldn’t allow your customers to specify an external ID.

Roles with the sts:ExternalId condition can’t be assumed through the AWS console, unless there is another Allow statement without that condition.

Limiting role use based on IP addresses or CIDR ranges

You can put IP address conditions into a role trust policy to limit the networks from which a role can be assumed. For example, you can limit role assumption to a corporate network or VPN range. The following example trust policy will only allow the role to be assumed if the call is made from within the 203.0.113.0/24 CIDR range.

{
  "Version": "2012-10-17",
  "Statement": [
    {
      "Effect": "Allow",
      "Principal": {
        "AWS": "arn:aws:iam::111122223333:role/IpBoundedRole"
      },
      "Action": "sts:AssumeRole",
      "Condition": {
        "IpAddress": {
          "aws:SourceIp": "203.0.113.0/24"
        }
      }
    }
  ]
}

By using aws:SourceIP in the trust policy, you limit where the role can be assumed from, but this doesn’t limit where the credentials can be used from after they are assumed. To restrict where the credentials can be used from, you can use aws:SourceIP as a condition within the principal’s identity-based policy or the service control policies that apply to it. For more information on restricting where credentials can be used from, see Establishing a data perimeter on AWS.

Limiting role use based on tags

You can use IAM tagging capabilities to build flexible and adaptive trust policies. You can use an attribute-based access control (ABAC) model for assuming IAM roles in the same way that you can for accessing objects in an Amazon Simple Storage Service (Amazon S3) bucket. You can build trust policies that only permit principals that have already been tagged with a specific key and value to assume a specific role. The following example trust policy requires that IAM principals in the AWS account 111122223333 have the value of their principal tag department match the value of the IAM role’s tag owningDepartment.

{
  "Version": "2012-10-17",
  "Statement": [
    {
      "Effect": "Allow",
      "Principal": {
        "AWS": "arn:aws:iam::111122223333:root"
      },
      "Action": "sts:AssumeRole",
      "Condition": {
        "StringEquals": {
          "aws:PrincipalTag/department": "${aws:ResourceTag/owningDepartment}"
        }
      }
    }
  ]
}

As an example, in the preceding policy, if the role is tagged with an owningDepartment of finance, then only principals within account 111122223333 who have a tag department with a value of finance will be able to assume the role.

When using ABAC, it’s important to have governance around who can set tags on resources, principals, and sessions. If someone can change or modify tags on principals, resources, or sessions, they might be able to access resources that you didn’t intend them to. Principals from AWS accounts outside of your control might have different tag governance practices than your own organization, and you should take this into account when using principal tags as part of cross-account role assumption. You can use tag policies to help govern tags within your organization, and later in this blog post, we show how to manage tags set on assumption by using role trust policies.

For more information, see the Attribute-Based Access Control (ABAC) for AWS page.

Limiting role assumption to only principals within your organization

Since its announcement in 2016, the vast majority of enterprise customers that we work with use AWS Organizations. This AWS service allows you to create an organizational structure for your accounts by creating logical boundaries/organizational units that allow grouping of AWS accounts that need common guardrails applied. You can use the PrincipalOrgID condition key to limit the use of roles solely to principals within your organization in AWS Organizations.

The following example shows a policy that denies assumption of this role except by AWS services or by principals that are a member of the o-abcd12efg1 organization. This statement can be broadly applied to prevent someone outside your AWS organization from assuming your roles.

{
    "Version": "2012-10-17",
    "Statement": [
        {
            "Effect": "Deny",
            "Principal": {
                "AWS": "*"
            },
            "Action": "sts:AssumeRole",
            "Condition": {
                "StringNotEquals": {
                    "aws:PrincipalOrgID": "o-abcd12efg1"
                },
                "Bool": {
                    "aws:PrincipalIsAWSService": "false"
                }
            }
        }
    ]
}

In the preceding example, the StringNotEquals operator denies access to this role by a principal that doesn’t belong to a member account of the specified organization.

AWS roles that you intend to use with AWS services need to be able to be assumed by those AWS services. In the preceding example, we added the aws:PrincipalIsAWSService condition key so that an AWS service principal isn’t impacted by the explicit Deny statement. All principals, including AWS services, are still required to have an explicit Allow statement in a role’s trust policy to assume that role. Requests to customer resources by AWS service principals do so with the aws:PrincipalIsAWSService condition key set to a value of true, which means that the preceding Deny statement won’t apply to a service principal, but an Allow statement will let a service principal assume the role.

You can also use the aws:PrincipalOrgPaths condition key to limit role assumption to member accounts within a specific OU of an organization if you want role assumption to be more fine-grained.

Enforcing invariants with Deny statements

Only allowing principals in your organization to assume your roles is an example of a security invariant. Security invariants are security principles that you want to always apply. Deny statements are useful in trust policies to restrict conditions under which you would never want a role to be assumable. In AWS authorization, the presence of an applicable Deny statement overrides an applicable Allow statement. So having a Deny statement with conditions in it that should never be met such as allowing a role to be assumed by a principal outside of your organization is powerful.

Setting the source identity on role sessions to help trace actions in CloudTrail

You can configure a role session to have a source identity when assumed. This is most common when customers federate users into IAM through SAML2.0 or Web Identity/OpenID Connect to assume roles. You can configure your IdP to set the SourceIdentity attribute on the role session. Setting the source identity causes AWS CloudTrail logs for actions taken by this role session to contain the source identity so that you can trace actions taken by roles back to the user that assumed them. The SourceIdentity attribute also follows that role session if it assumes another role.

To set a source identity, you need to grant the IdP the sts:SetSourceIdentity entitlement in the role’s trust policy.

{
    "Version": "2012-10-17",
    "Statement": {
      "Effect": "Allow",
      "Action": ["sts:AssumeRoleWithSAML","sts:SetSourceIdentity"],
      "Principal": {"Federated": "arn:aws:iam::111122223333:saml-provider/PROVIDER-NAME"},
      "Condition": {"StringEquals": {"SAML:aud": "https://signin.aws.amazon.com/saml"}}
    }
  }

In order for a role session that has a SourceIdentity set to assume a second role, it must also have the sts:SetSourceIdentity entitlement in that second role’s trust policy. If it doesn’t, the first role won’t be able to assume the second role.

You can also use the sts:SourceIdentity condition key to enforce that the SourceIdentity attribute that is being set conforms to an expected standard:

            "Condition": {
                "StringLike": {"sts:SourceIdentity": "*@example.org"}
            }

In the preceding example, for the Condition element, all requests must contain @example.org.

Setting tags on role sessions

You can set tags on role sessions, which can then be used in IAM and resource policy authorization decisions. Tags on role sessions are evaluated with the same condition key that tags on IAM roles are: aws:PrincipalTag/TagKey. Tag values that are set when a role is assumed have precedence over tag values that are attached to the role.

If you’re basing authorization on principal tags in your AWS accounts, it’s important that you control who can set the session tags and principal tags in your accounts so that access isn’t granted to unintended parties.

The ability to tag a role session must be granted in a role’s trust policy using the sts:TagSession permission, and you can use conditions and condition keys to restrict which tags can be set to which values.

The following is an example statement for a role trust policy that allows a principal from account 111122223333 to assume the role and requires that the three session tags for Project, CostCenter and Department are set. The Department tag must have a value of either Engineering or Marketing. The third Condition statement allows the Project and Department tags to be set as transitive when the role is assumed. Because conditions for the tags are in the same Allow statement as the AssumeRole entitlement, these tags are required to be set.

        {
            "Effect": "Allow",
            "Action": ["sts:TagSession","sts:AssumeRole"],
            "Principal": {"AWS": "arn:aws:iam::111122223333:root"},
            "Condition": {
                "StringLike": {
                    "aws:RequestTag/Project": "*",
                    "aws:RequestTag/CostCenter": "*"
                },
                "StringEquals": {
                    "aws:RequestTag/Department": [
                        "Engineering",
                        "Marketing"
                    ]
                },
                "ForAllValues:StringEquals": {
                    "sts:TransitiveTagKeys": [
                        "Project",
                        "Department"
                    ]
                }
            }
        }

When a role session assumes another role, transitive tags from the calling role session are set to the same value within the subsequent role session. For more information, see Chaining roles with session tags.

You can use Deny statements with the sts:TagSession operation to restrict certain tags from being set. In the following example, attempts to tag a session with an Admin tag would be denied:

{
    "Effect": "Deny",
    "Action": "sts:TagSession",
    "Principal": {"AWS": "*"},
    "Condition": {
        "Null": {
            "aws:RequestTag/Admin": false
        }
    }
}

In the following example statements, we deny tagging operations on role sessions where the Team tag is equal to Admin, but we allow the setting of a different tag value.

{
    "Effect": "Deny",
    "Action": "sts:TagSession",
    "Principal": {"AWS": "*"},
    "Condition": {
        "StringEquals": {
            "aws:RequestTag/Team": "Admin"
        }
    }
},
{
    "Effect": "Allow",
    "Action": "sts:TagSession",
    "Principal": {"AWS": "*"},
    "Condition": {
        "StringLike": {
            "aws:RequestTag/Team": "*"
        }
    }
}

What happens when a role in a trust policy is deleted

When you specify a role in the Principal element of a trust policy, AWS uses that role’s unique RoleId to make the authorization decision. If the ExampleCorpRole role from the earlier policy examples was deleted and re-created in account 111122223333, then the unique RoleId would be different, and the new ExampleCorpRole wouldn’t be able to assume the roles that trusted it in the Principal element.

When a role is deleted, the trust policy of the remaining roles that referenced this now-deleted role will show the unique RoleId it trusted in the Principal element when viewed:

"Principal": {
				"AWS": "AROA1234567123456D"
			}

Because the policy references a now-invalid RoleID, it can’t be modified until the invalid RoleID is removed from it. You can retrieve the original role ARNs by looking at CloudTrail logs for UpdateAssumeRolePolicy and CreateRole events for a role and reading the trust policy from the log entries.

For more information about using the Principal element in policy statements, see IAM role principals.

Principals placed inside the Condition block of a trust policy statement are not referenced to their RoleID but instead use the ARN of the role. The following trust policy statement would allow the ExampleCorpRole to assume the role that trusted it, even if the ExampleCorpRole role was deleted and re-created.

  "Version": "2012-10-17",
  "Statement": [
    {
      "Effect": "Allow",
      "Principal": {
        "AWS": "arn:aws:iam::111122223333:root"
      },
      "Action": "sts:AssumeRole",
      "Condition": {
    "ArnEquals": {
      "aws:PrincipalArn": "arn:aws:iam::111122223333:role/ExampleCorpRole"
    }
  }
    }
  ]
}

When creating a role trust policy, you should determine the behavior that you want to occur when a role is deleted. Your organization’s security posture might dictate that a deleted and re-created role should no longer be able to assume a role in your account, so using a specific principal in the Principal element is appropriate. Or you might want to allow the role to be assumed in the event that a given principal is deleted and re-created.

If you use the aws:PrincipalArn condition with a principal of :root to allow role assumption within the same account, the principal doing the assuming will need the sts:AssumeRole action in its identity-based policy.

Wildcarding principals

Earlier we noted that wildcards can’t be placed in the Principal element of a policy as part of an ARN. However, wildcards can be used in the Condition block of a policy, so wildcarding is possible with the ArnLike and StringLike condition operators. This is useful when you don’t know the specific roles, but you do have other controls that limit the path where known roles are created, such as delegated administrator models. The following policy allows a role from account 111122223333 in the path OpsRoles to assume it.

  "Version": "2012-10-17",
  "Statement": [
    {
      "Effect": "Allow",
      "Principal": {
        "AWS": "arn:aws:iam::111122223333:root"
      },
      "Action": "sts:AssumeRole",
      "Condition": {
    "ArnLike": {
      "aws:PrincipalArn": "arn:aws:iam::111122223333:role/OpsRoles/*"
    }
  }
    }
  ]
}

It’s a best practice to restrict role assumption to specific paths or principals instead of allowing an entire account where possible.

Using multiple statements

So far, the examples in this post have been single policy statements. Trust policies, like other policies on AWS, can have multiple statements up to the quota for role trust policy length.

You can combine multiple statements together to create complex role trusts like the following, which allows ExampleRole to assume a role and tag the session, but only from the network range 203.0.113.0/24 while forbidding that the Admin tag be set:

{
    "Version": "2012-10-17",
    "Statement": [
        {
            "Effect": "Allow",
            "Principal": {
                "AWS": [
                    "arn:aws:iam::111122223333:role/ExampleRole"
                ]
            },
            "Action": [
                "sts:AssumeRole",
                "sts:TagSession"
            ],
            "Condition": {
                "IpAddress": {
                    "aws:SourceIp": "203.0.113.0/24"
                }
            }
        },
        {
            "Effect": "Deny",
            "Action": "sts:TagSession",
            "Principal": {
                "AWS": "*"
            },
            "Condition": {
                "Null": {
                    "aws:RequestTag/Admin": false 
                }
            }
        }
    ]
}

Although it’s possible to use multiple statements, it’s a best practice that you don’t use roles for unrelated purposes, and that you don’t share roles across different AWS services. It’s also a best practice to use different IAM roles for different use cases and AWS services, and to avoid situations where different principals have access to the same IAM role.

Working with services that deliver role-session credentials

IAM Roles Anywhere, AWS IoT Core, and Systems Manager can deliver AWS role session credentials to devices, servers, and applications running outside of AWS. These roles are assumed by AWS services and delivered to your devices, servers, and applications after they authenticate to their respective AWS services.

For more information about these services and their requirements, see the following documentation:

Role chaining

When a role assumes another role, it’s called role chaining. Sessions created by role chaining have a maximum lifetime of 1 hour regardless of the maximum session length that a role is configured to allow.

Roles that are assumed by other means are not considered role chaining and are not subject to this restriction.

Conclusion

In this post, you learned how to craft trust policies for your IAM roles to restrict their assumption by specific principals and under certain conditions, and to combine multiple statements with different conditions. You also learned how to use features like source identity and session tags, how to protect against the cross-account confused deputy problem, and the nuances of the Principal element. You now have the tools that you need to build robust and effective trust policies for roles in your organization.

If you have feedback about this post, submit comments in the Comments section below. If you have questions about this post, contact AWS Support.

Want more AWS Security news? Follow us on Twitter.
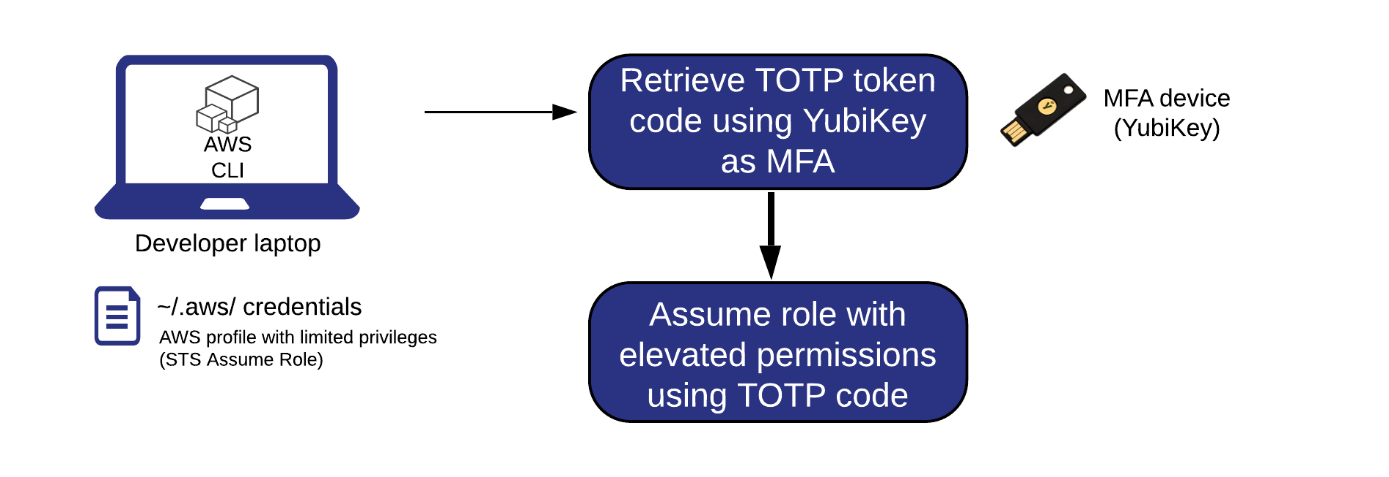
Author

Jonathan Jenkyn

Jonathan is a Senior Security Growth Strategies Consultant with AWS Professional Services. He’s an active member of the People with Disabilities affinity group, and has built several Amazon initiatives supporting charities and social responsibility causes. Since 1998, he has been involved in IT Security at many levels, from implementation of cryptographic primitives to managing enterprise security governance. Outside of work, he enjoys running, cycling, fund-raising for the BHF and Ipswich Hospital Charity, and spending time with his wife and 5 children.

Liam Wadman

Liam Wadman

Liam is a Solutions Architect with the Identity Solutions team. When he’s not building exciting solutions on AWS or helping customers, he’s often found in the hills of British Columbia on his Mountain Bike. Liam points out that you cannot spell LIAM without IAM.