Tag Archives: AWS Identity and Access Management (IAM)

Validate IAM policies in CloudFormation templates using IAM Access Analyzer

Post Syndicated from Matt Luttrell original https://aws.amazon.com/blogs/security/validate-iam-policies-in-cloudformation-templates-using-iam-access-analyzer/

In this blog post, I introduce IAM Policy Validator for AWS CloudFormation (cfn-policy-validator), an open source tool that extracts AWS Identity and Access Management (IAM) policies from an AWS CloudFormation template, and allows you to run existing IAM Access Analyzer policy validation APIs against the template. I also show you how to run the tool in a continuous integration and continuous delivery (CI/CD) pipeline to validate IAM policies in a CloudFormation template before they are deployed to your AWS environment.

Embedding this validation in a CI/CD pipeline can help prevent IAM policies that have IAM Access Analyzer findings from being deployed to your AWS environment. This tool acts as a guardrail that can allow you to delegate the creation of IAM policies to the developers in your organization. You can also use the tool to provide additional confidence in your existing policy authoring process, enabling you to catch mistakes prior to IAM policy deployment.

What is IAM Access Analyzer?

IAM Access Analyzer mathematically analyzes access control policies that are attached to resources, and determines which resources can be accessed publicly or from other accounts. IAM Access Analyzer can also validate both identity and resource policies against over 100 checks, each designed to improve your security posture and to help you to simplify policy management at scale.

The IAM Policy Validator for AWS CloudFormation tool

IAM Policy Validator for AWS CloudFormation (cfn-policy-validator) is a new command-line tool that parses resource-based and identity-based IAM policies from your CloudFormation template, and runs the policies through IAM Access Analyzer checks. The tool is designed to run in the CI/CD pipeline that deploys your CloudFormation templates, and to prevent a deployment when an IAM Access Analyzer finding is detected. This ensures that changes made to IAM policies are validated before they can be deployed.

The cfn-policy-validator tool looks for all identity-based policies, and a subset of resource-based policies, from your templates. For the full list of supported resource-based policies, see the cfn-policy-validator GitHub repository.

Parsing IAM policies from a CloudFormation template

One of the challenges you can face when parsing IAM policies from a CloudFormation template is that these policies often contain CloudFormation intrinsic functions (such as Ref and Fn::GetAtt) and pseudo parameters (such as AWS::AccountId and AWS::Region). As an example, it’s common for least privileged IAM policies to reference the Amazon Resource Name (ARN) of another CloudFormation resource. Take a look at the following example CloudFormation resources that create an Amazon Simple Queue Service (Amazon SQS) queue, and an IAM role with a policy that grants access to perform the sqs:SendMessage action on the SQS queue.
 

Figure 1- Example policy in CloudFormation template

Figure 1- Example policy in CloudFormation template

As you can see in Figure 1, line 21 uses the function Fn::Sub to restrict this policy to MySQSQueue created earlier in the template.

In this example, if you were to pass the root policy (lines 15-21) as written to IAM Access Analyzer, you would get an error because !Sub ${MySQSQueue.Arn} is syntax that is specific to CloudFormation. The cfn-policy-validator tool takes the policy and translates the CloudFormation syntax to valid IAM policy syntax that Access Analyzer can parse.

The cfn-policy-validator tool recognizes when an intrinsic function such as !Sub ${MySQSQueue.Arn} evaluates to a resource’s ARN, and generates a valid ARN for the resource. The tool creates the ARN by mapping the type of CloudFormation resource (in this example AWS::SQS::Queue) to a pattern that represents what the ARN of the resource will look like when it is deployed. For example, the following is what the mapping looks like for the SQS queue referenced previously:

AWS::SQS::Queue.Arn -> arn:${Partition}:sqs:${Region}:${Account}:${QueueName}

For some CloudFormation resources, the Ref intrinsic function also returns an ARN. The cfn-policy-validator tool handles these cases as well.

Cfn-policy-validator walks through each of the six parts of an ARN and substitutes values for variables in the ARN pattern (any text contained within ${}). The values of ${Partition} and ${Account} are taken from the identity of the role that runs the cfn-policy-validator tool, and the value for ${Region} is provided as an input flag. The cfn-policy-validator tool performs a best-effort resolution of the QueueName, but typically defaults it to the name of the CloudFormation resource (in the previous example, MySQSQueue). Validation of policies with IAM Access Analyzer does not rely on the name of the resource, so the cfn-policy-validator tool is able to substitute a replacement name without affecting the policy checks.

The final ARN generated for the MySQSQueue resource looks like the following (for an account with ID of 111111111111):

arn:aws:sqs:us-east-1:111111111111:MySQSQueue

The cfn-policy-validator tool substitutes this generated ARN for !Sub ${MySQSQueue.Arn}, which allows the cfn-policy-validator tool to parse a policy from the template that can be fed into IAM Access Analyzer for validation. The cfn-policy-validator tool walks through your entire CloudFormation template and performs this ARN substitution until it has generated ARNs for all policies in your template.

Validating the policies with IAM Access Analyzer

After the cfn-policy-validator tool has your IAM policies in a valid format (with no CloudFormation intrinsic functions or pseudo parameters), it can take those policies and feed them into IAM Access Analyzer for validation. The cfn-policy-validator tool runs resource-based and identity-based policies in your CloudFormation template through the ValidatePolicy action of the IAM Access Analyzer. ValidatePolicy is what ensures that your policies have correct grammar and follow IAM policy best practices (for example, not allowing iam:PassRole to all resources). The cfn-policy-validator tool also makes a call to the CreateAccessPreview action for supported resource policies to determine if the policy would grant unintended public or cross-account access to your resource.

The cfn-policy-validator tool categorizes findings from IAM Access Analyzer into the categories blocking or non-blocking. Findings categorized as blocking cause the tool to exit with a non-zero exit code, thereby causing your deployment to fail and preventing your CI/CD pipeline from continuing. If there are no findings, or only non-blocking findings detected, the tool will exit with an exit code of zero (0) and your pipeline can to continue to the next stage. For more information about how the cfn-policy-validator tool decides what findings to categorize as blocking and non-blocking, as well as how to customize the categorization, see the cfn-policy-validator GitHub repository.

Example of running the cfn-policy-validator tool

This section guides you through an example of what happens when you run a CloudFormation template that has some policy violations through the cfn-policy-validator tool.

The following template has two CloudFormation resources with policy findings: an SQS queue policy that grants account 111122223333 access to the SQS queue, and an IAM role with a policy that allows the role to perform a misspelled sqs:ReceiveMessages action. These issues are highlighted in the policy below.

Important: The policy in Figure 2 is written to illustrate a CloudFormation template with potentially undesirable IAM policies. You should be careful when setting the Principal element to an account that is not your own.

Figure 2: CloudFormation template with undesirable IAM policies

Figure 2: CloudFormation template with undesirable IAM policies

When you pass this template as a parameter to the cfn-policy-validator tool, you specify the AWS Region that you want to deploy the template to, as follows:

cfn-policy-validator validate --template-path ./template.json --region us-east-1

After the cfn-policy-validator tool runs, it returns the validation results, which includes the actual response from IAM Access Analyzer:

{
    "BlockingFindings": [
        {
            "findingType": "ERROR",
            "code": "INVALID_ACTION",
            "message": "The action sqs:ReceiveMessages does not exist.",
            "resourceName": "MyRole",
            "policyName": "root",
            "details": …
        },
        {
            "findingType": "SECURITY_WARNING",
            "code": "EXTERNAL_PRINCIPAL",
            "message": "Resource policy allows access from external principals.",
            "resourceName": "MyQueue",
            "policyName": "QueuePolicy",
            "details": …
        }
    ],
    "NonBlockingFindings": []
}

The output from the cfn-policy-validator tool includes the type of finding, the code for the finding, and a message that explains the finding. It also includes the resource and policy name from the CloudFormation template, to allow you to quickly track down and resolve the finding in your template. In the previous example, you can see that IAM Access Analyzer has detected two findings, one security warning and one error, which the cfn-policy-validator tool has classified as blocking. The actual response from IAM Access Analyzer is returned under details, but is excluded above for brevity.

If account 111122223333 is an account that you trust and you are certain that it should have access to the SQS queue, then you can suppress the finding for external access from the 111122223333 account in this example. Modify the call to the cfn-policy-validator tool to ignore this specific finding by using the –-allow-external-principals flag, as follows:

cfn-policy-validator validate --template-path ./template.json --region us-east-1 --allow-external-principals 111122223333

When you look at the output that follows, you’re left with only the blocking finding that states that sqs:ReceiveMessages does not exist.

{
    "BlockingFindings": [
        {
            "findingType": "ERROR",
            "code": "INVALID_ACTION",
            "message": "The action sqs:ReceiveMessages does not exist.",
            "resourceName": "MyRole",
            "policyName": "root",
            "details": …
    ],
    "NonBlockingFindings": []
}

To resolve this finding, update the template to have the correct spelling, sqs:ReceiveMessage (without trailing s).

For the full list of available flags and commands supported, see the cfn-policy-validator GitHub repository.

Now that you’ve seen an example of how you can run the cfn-policy-validator tool to validate policies that are on your local machine, you will take it a step further and see how you can embed the cfn-policy-validator tool in a CI/CD pipeline. By embedding the cfn-policy-validator tool in your CI/CD pipeline, you can ensure that your IAM policies are validated each time a commit is made to your repository.

Embedding the cfn-policy-validator tool in a CI/CD pipeline

The CI/CD pipeline you will create in this post uses AWS CodePipeline and AWS CodeBuild. AWS CodePipeline is a continuous delivery service that enables you to model, visualize, and automate the steps required to release your software. AWS CodeBuild is a fully-managed continuous integration service that compiles source code, runs tests, and produces software packages that are ready to deploy. You will also use AWS CodeCommit as the source repository where your CloudFormation template is stored. AWS CodeCommit is a fully managed source-control service that hosts secure Git-based repositories.

To deploy the pipeline

  1. To deploy the CloudFormation template that builds the source repository and AWS CodePipeline pipeline, select the following Launch Stack button.
    Select the Launch Stack button to launch the template
  2. In the CloudFormation console, choose Next until you reach the Review page.
  3. Select I acknowledge that AWS CloudFormation might create IAM resources and choose Create stack.
  4. Open the AWS CodeCommit console and choose Repositories.
  5. Select cfn-policy-validator-source-repository.
  6. Download the template.json and template-configuration.json files to your machine.
  7. In the cfn-policy-validator-source-repository, on the right side, select Add file and choose Upload file.
  8. Choose Choose File and select the template.json file that you downloaded previously.
  9. Enter an Author name and an E-mail address and choose Commit changes.
  10. In the cfn-policy-validator-source-repository, repeat steps 7-9 for the template-configuration.json file.

To view validation in the pipeline

  1. In the AWS CodePipeline console choose the IAMPolicyValidatorPipeline.
  2. Watch as your commit travels through the pipeline. If you followed the previous instructions and made two separate commits, you can ignore the failed results of the first pipeline execution. As shown in Figure 3, you will see that the pipeline fails in the Validation stage on the CfnPolicyValidator action, because it detected a blocking finding in the template you committed, which prevents the invalid policy from reaching your AWS environment.
     
    Figure 3: Validation failed on the CfnPolicyValidator action

    Figure 3: Validation failed on the CfnPolicyValidator action

  3. Under CfnPolicyValidator, choose Details, as shown in Figure 3.
  4. In the Action execution failed pop-up, choose Link to execution details to view the cfn-policy-validator tool output in AWS CodeBuild.

Architectural overview of deploying cfn-policy-validator in your pipeline

You can see the architecture diagram for the CI/CD pipeline you deployed in Figure 4.
 
Figure 4: CI/CD pipeline that performs IAM policy validation using the AWS CloudFormation Policy Validator and IAM Access Analyzer

Figure 4 shows the following steps, starting with the CodeCommit source action on the left:

  1. The pipeline starts when you commit to your AWS CodeCommit source code repository. The AWS CodeCommit repository is what contains the CloudFormation template that has the IAM policies that you would like to deploy to your AWS environment.
  2. AWS CodePipeline detects the change in your source code repository and begins the Validation stage. The first step it takes is to start an AWS CodeBuild project that runs the CloudFormation template through the AWS CloudFormation Linter (cfn-lint). The cfn-lint tool validates your template against the CloudFormation resource specification. Taking this initial step ensures that you have a valid CloudFormation template before validating your IAM policies. This is an optional step, but a recommended one. Early schema validation provides fast feedback for any typos or mistakes in your template. There’s little benefit to running additional static analysis tools if your template has an invalid schema.
  3. If the cfn-lint tool completes successfully, you then call a separate AWS CodeBuild project that invokes the IAM Policy Validator for AWS CloudFormation (cfn-policy-validator). The cfn-policy-validator tool then extracts the identity-based and resource-based policies from your template, as described earlier, and runs the policies through IAM Access Analyzer.

    Note: if your template has parameters, then you need to provide them to the cfn-policy-validator tool. You can provide parameters as command-line arguments, or use a template configuration file. It is recommended to use a template configuration file when running validation with an AWS CodePipeline pipeline. The same file can also be used in the deploy stage to deploy the CloudFormation template. By using the template configuration file, you can ensure that you use the same parameters to validate and deploy your template. The CloudFormation template for the pipeline provided with this blog post defaults to using a template configuration file.

    If there are no blocking findings found in the policy validation, the cfn-policy-validator tool exits with an exit code of zero (0) and the pipeline moves to the next stage. If any blocking findings are detected, the cfn-policy-validator tool will exit with a non-zero exit code and the pipeline stops, to prevent the deployment of undesired IAM policies.

  4. The final stage of the pipeline uses the AWS CloudFormation action in AWS CodePipeline to deploy the template to your environment. Your template will only make it to this stage if it passes all static analysis checks run in the Validation Stage.

Cleaning Up

To avoid incurring future charges, in the AWS CloudFormation console delete the validate-iam-policy-pipeline stack. This will remove the validation pipeline from your AWS account.

Summary

In this blog post, I introduced the IAM Policy Validator for AWS CloudFormation (cfn-policy-validator). The cfn-policy-validator tool automates the parsing of identity-based and resource-based IAM policies from your CloudFormation templates and runs those policies through IAM Access Analyzer. This enables you to validate that the policies in your templates follow IAM best practices and do not allow unintended external access to your AWS resources.

I showed you how the IAM Policy Validator for AWS CloudFormation can be included in a CI/CD pipeline. This allows you to run validation on your IAM policies on every commit to your repository and only deploy the template if validation succeeds.

For more information, or to provide feedback and feature requests, see the cfn-policy-validator GitHub repository.

If you have feedback about this post, submit comments in the Comments section below.

Want more AWS Security how-to content, news, and feature announcements? Follow us on Twitter.

Author

Matt Luttrell

Matt is a Sr. Solutions Architect on the AWS Identity Solutions team. When he’s not spending time chasing his kids around, he enjoys skiing, cycling, and the occasional video game.

AWS introduces changes to access denied errors for easier permissions troubleshooting

Post Syndicated from Guaravee Gandhi original https://aws.amazon.com/blogs/security/aws-introduces-changes-to-access-denied-errors-for-easier-permissions-troubleshooting/

To help you more easily troubleshoot your permissions in Amazon Web Services (AWS), we’re introducing additional context in the access denied error messages. We’ll start to introduce this change in September 2021, and gradually make it available in all AWS services over the next few months. If you’re currently relying on the exact text of the access denied error messages in your existing systems, it’s important to review the details in this post so you can determine any necessary changes that might be required in your environment.

What is the upcoming change in access denied error messages?

We’re adding information about the AWS Identity and Access Management (IAM) policy type that’s responsible for the denied access. This enables you to focus on the specific policy type that’s identified, rather than evaluating all IAM policies in your AWS environment when you troubleshoot access-related challenges. As a result of this change, you can more quickly identify the root cause for the denied access and unblock your developers by updating the relevant policies to grant the required access.

For example, when a developer who is trying to perform the CreateFunction action in AWS Lambda is denied access due to a service control policy (SCP) in her AWS organization, she can create a trouble ticket with her central security team, providing the access denied error message and highlighting the policy type that is responsible for the denied access. The security administrator can focus their troubleshooting efforts on SCPs that are related to Lambda, thus saving time and effort on troubleshooting permissions.

The policy types that will be covered in this update are SCPs, VPC endpoint policies, permissions boundaries, session policies, resource-based policies, and identity-based policies.

What should you do to prepare for this change?

If you don’t have any systems relying on the access denied error messages – There’s no action required at this point. As AWS gradually introduces this change, you’ll see additional context about the policy type in your access denied error messages.

If you’ve configured systems to rely on the access denied error messages in AWS – We recommend that you evaluate whether your existing systems and automation workflows rely on the exact access denied error message strings in AWS. If you have such configured systems, then you should update your systems to rely on the error codes instead, so that when AWS introduces changes to its access denied error messages, your systems remain unaffected.

When will this change become available?

Beginning in September 2021, this update will be introduced and will become gradually available in all AWS services in the following few months. We encourage all customers to be proactive about assessing and modifying any configured systems or automation workflows for access denied error messages.

Need more assistance?

The AWS Support tiers cover development and production issues for AWS products and services, along with other key stack components. AWS Support doesn’t include code development for client applications.

If you have any questions or issues, start a new thread on the AWS IAM forum, or contact AWS Support or your Technical Account Manager (TAM). If you have feedback about this post, submit comments in the Comments section below.

Want more AWS Security how-to content, news, and feature announcements? Follow us on Twitter.

Author

Gauravee Gandhi

Gauravee is a Senior Product Manager for AWS Identity and Access Management. She strongly believes in the customer-centric approach while building products, and is always looking for new opportunities to assist customers. Outside of work, Gauravee enjoys traveling, baking and reading. She holds a master’s degree in Information Management from the University of Washington.

Strengthen the security of sensitive data stored in Amazon S3 by using additional AWS services

Post Syndicated from Jerry Mullis original https://aws.amazon.com/blogs/security/strengthen-the-security-of-sensitive-data-stored-in-amazon-s3-by-using-additional-aws-services/

In this post, we describe the AWS services that you can use to both detect and protect your data stored in Amazon Simple Storage Service (Amazon S3). When you analyze security in depth for your Amazon S3 storage, consider doing the following:

Using these additional AWS services along with Amazon S3 can improve your security posture across your accounts.

Audit and restrict Amazon S3 access with IAM Access Analyzer

IAM Access Analyzer allows you to identify unintended access to your resources and data. Users and developers need access to Amazon S3, but it’s important for you to keep users and privileges accurate and up to date.

Amazon S3 can often house sensitive and confidential information. To help secure your data within Amazon S3, you should be using AWS Key Management Service (AWS KMS) with server-side encryption at rest for Amazon S3. It is also important that you secure the S3 buckets so that you only allow access to the developers and users who require that access. Bucket policies and access control lists (ACLs) are the foundation of Amazon S3 security. Your configuration of these policies and lists determines the accessibility of objects within Amazon S3, and it is important to audit them regularly to properly secure and maintain the security of your Amazon S3 bucket.

IAM Access Analyzer can scan all the supported resources within a zone of trust. Access Analyzer then provides you with insight when a bucket policy or ACL allows access to any external entities that are not within your organization or your AWS account’s zone of trust.

To setup and use IAM Access Analyzer, follow the instructions for Enabling Access Analyzer in the AWS IAM User Guide.

The example in Figure 1 shows creating an analyzer with the zone of trust as the current account, but you can also create an analyzer with the organization as the zone of trust.

Figure 1: Creating IAM Access Analyzer and zone of trust

Figure 1: Creating IAM Access Analyzer and zone of trust

After you create your analyzer, IAM Access Analyzer automatically scans the resources in your zone of trust and returns the findings from your Amazon S3 storage environment. The initial scan shown in Figure 2 shows the findings of an unsecured S3 bucket.

Figure 2: Example of unsecured S3 bucket findings

Figure 2: Example of unsecured S3 bucket findings

For each finding, you can decide which action you would like to take. As shown in figure 3, you are given the option to archive (if the finding indicates intended access) or take action to modify bucket permissions (if the finding indicates unintended access).

Figure 3: Displays choice of actions to take

Figure 3: Displays choice of actions to take

After you address the initial findings, Access Analyzer monitors your bucket policies for changes, and notifies you of access issues it finds. Access Analyzer is regional and must be enabled in each AWS Region independently.

Classify and secure sensitive data with Macie

Organizational compliance standards often require the identification and securing of sensitive data. Your organization’s sensitive data might contain personally identifiable information (PII), which includes things such as credit card numbers, birthdates, and addresses.

Macie is a data security and privacy service offered by AWS that uses machine learning and pattern matching to discover the sensitive data stored within Amazon S3. You can define your own custom type of sensitive data category that might be unique to your business or use case. Macie will automatically provide an inventory of S3 buckets and alert you of unprotected sensitive data.

Figure 4 shows a sample result from a Macie scan in which you can see important information regarding Amazon S3 public access, encryption settings, and sharing.

Figure 4: Sample results from a Macie scan

Figure 4: Sample results from a Macie scan

In addition to finding potential sensitive data, Macie also gives you a severity score based on the privacy risk, as shown in the example data in Figure 5.

Figure 5: Example Macie severity scores

Figure 5: Example Macie severity scores

When you use Macie in conjunction with AWS Step Functions, you can also automatically remediate any issues found. You can use this combination to help meet regulations such as General Data Protection Regulation (GDPR) and Health Insurance Portability and Accountability Act (HIPAA). Macie allows you to have constant visibility of sensitive data within your Amazon S3 storage environment.

When you deploy Macie in a multi-account configuration, your usage is rolled up to the master account to provide the total usage for all accounts and a breakdown across the entire organization.

Detect malicious access patterns with GuardDuty

Your customers and users can commit thousands of actions each day on S3 buckets. Discerning access patterns manually can be extremely time consuming as the volume of data increases. GuardDuty uses machine learning, anomaly detection, and integrated threat intelligence to analyze billions of events across multiple accounts and uses data collected in AWS CloudTrail logs for S3 data events as well as S3 access logs, VPC Flow Logs, and DNS logs. GuardDuty can be configured to analyze these logs and notify you of suspicious activity, such as unusual data access patterns, unusual discovery API calls, and more. After you receive a list of findings on these activities, you will be able to make informed decisions to secure your S3 buckets.

Figure 6 shows a sample list of findings returned by GuardDuty which shows the finding type, resource affected, and count of occurrences.

Figure 6: Example GuardDuty list of findings

Figure 6: Example GuardDuty list of findings

You can select one of the results in Figure 6 to see the IP address and details associated from this potential malicious IP caller, as shown in Figure 7.

Figure 7: GuardDuty Malicious IP Caller detailed findings

Figure 7: GuardDuty Malicious IP Caller detailed findings

Monitor and remediate configuration changes with AWS Config

Configuration management is important when securing Amazon S3, to prevent unauthorized users from gaining access. It is important that you monitor the configuration changes of your S3 buckets, whether the changes are intentional or unintentional. AWS Config can track all configuration changes that are made to an S3 bucket. For example, if an S3 bucket had its permissions and configurations unexpectedly changed, using AWS Config allows you to see the changes made, as well as who made them.

With AWS Config, you can set up AWS Config managed rules that serve as a baseline for your S3 bucket. When any bucket has configurations that deviate from this baseline, you can be alerted by Amazon Simple Notification Service (Amazon SNS) of the bucket being noncompliant.

AWS Config can be used in conjunction with a service called AWS Lambda. If an S3 bucket is noncompliant, AWS Config can trigger a preprogrammed Lambda function and then the Lambda function can resolve those issues. This combination can be used to reduce your operational overhead in maintaining compliance within your S3 buckets.

Figure 8 shows a sample of AWS Config managed rules selected for configuration monitoring and gives a brief description of what the rule does.

Figure 8: Sample selections of AWS Managed Rules

Figure 8: Sample selections of AWS Managed Rules

Figure 9 shows a sample result of a non-compliant configuration and resource inventory listing the type of resource affected and the number of occurrences.

Figure 9: Example of AWS Config non-compliant resources

Figure 9: Example of AWS Config non-compliant resources

Conclusion

AWS has many offerings to help you audit and secure your storage environment. In this post, we discussed the particular combination of AWS services that together will help reduce the amount of time and focus your business devotes to security practices. This combination of services will also enable you to automate your responses to any unwanted permission and configuration changes, saving you valuable time and resources to dedicate elsewhere in your organization.

For more information about pricing of the services mentioned in this post, see AWS Free Tier and AWS Pricing. For more information about Amazon S3 security, see Amazon S3 Preventative Security Best Practices in the Amazon S3 User Guide.

If you have feedback about this post, submit comments in the Comments section below.

Want more AWS Security how-to content, news, and feature announcements? Follow us on Twitter.

Author

Jerry Mullis

Jerry is an Associate Solutions Architect at AWS. His interests are in data migration, machine learning, and device automation. Jerry has previous experience in machine learning research and healthcare management. His certifications include AWS Solutions Architect Pro, AWS Developer Associate, AWS Sysops Admin Associate and AWS Certified Cloud Practitioner. In his free time, Jerry enjoys hiking, playing basketball, and spending time with his wife.

Author

Dave Geyer

Dave is an Associate Solutions Architect at AWS. He has a background in data management and organizational design, and is interested in data analytics and infrastructure security. Dave has advised and worked for customers in the commercial and public sectors, providing them with architectural best practices and recommendations. Dave is interested in the aerospace and financial services industries. Outside of work, he is an adrenaline junkie, and is passionate about mountaineering and high altitudes.

Author

Andrew Chen

Andrew is an Associate Solutions Architect with an interest in data analytics, machine learning, and virtualization of infrastructure. Andrew has previous experience in management consulting in which he worked as a technical lead for various cloud migration projects. In his free time, Andrew enjoys fishing, hiking, kayaking, and keeping up with financial markets.

Choosing Your VPC Endpoint Strategy for Amazon S3

Post Syndicated from Jeff Harman original https://aws.amazon.com/blogs/architecture/choosing-your-vpc-endpoint-strategy-for-amazon-s3/

This post was co-written with Anusha Dharmalingam, former AWS Solutions Architect.

Must your Amazon Web Services (AWS) application connect to Amazon Simple Storage Service (S3) buckets, but not traverse the internet to reach public endpoints? Must the connection scale to accommodate bandwidth demands? AWS offers a mechanism called VPC endpoint to meet these requirements. This blog post provides guidance for selecting the right VPC endpoint type to access Amazon S3. A VPC endpoint enables workloads in an Amazon VPC to connect to supported public AWS services or third-party applications over the AWS network. This approach is used for workloads that should not communicate over public networks.

When a workload architecture uses VPC endpoints, the application benefits from the scalability, resilience, security, and access controls native to AWS services. Amazon S3 can be accessed using an interface VPC endpoint powered by AWS PrivateLink or a gateway VPC endpoint. To determine the right endpoint for your workloads, we’ll discuss selection criteria to consider based on your requirements.

VPC endpoint overview

A VPC endpoint is a virtual scalable networking component you create in a VPC and use as a private entry point to supported AWS services and third-party applications. Currently, two types of VPC endpoints can be used to connect to Amazon S3: interface VPC endpoint and gateway VPC endpoint.

When you configure an interface VPC endpoint, an elastic network interface (ENI) with a private IP address is deployed in your subnet. An Amazon EC2 instance in the VPC can communicate with an Amazon S3 bucket through the ENI and AWS network. Using the interface endpoint, applications in your on-premises data center can easily query S3 buckets over AWS Direct Connect or Site-to-Site VPN. Interface endpoint supports a growing list of AWS services. Consult our documentation to find AWS services compatible with interface endpoints powered by AWS PrivateLink.

Gateway VPC endpoints use prefix lists as the IP route target in a VPC route table. This routes traffic privately to Amazon S3 or Amazon DynamoDB. An EC2 instance in a VPC without internet access can still directly read from and/or write to an Amazon S3 bucket. Amazon DynamoDB and Amazon S3 are the services currently accessible via gateway endpoints.

Your internal security policies may have strict rules against communication between your VPC and the internet. To maintain compliance with these policies, you can use VPC endpoint to connect to AWS public services like Amazon S3. To control user or application access to the VPC endpoint and the resources it supports, you can use an AWS Identity and Access Management (AWS IAM) resource policy. This will separately secure the VPC endpoint and accessible resources.

Selecting gateway or interface VPC endpoints

With both interface endpoint and gateway endpoint available for Amazon S3, here are some factors to consider as you choose one strategy over the other.

  • Cost: Gateway endpoints for S3 are offered at no cost and the routes are managed through route tables. Interface endpoints are priced at $0.01/per AZ/per hour. Cost depends on the Region, check current pricing. Data transferred through the interface endpoint is charged at $0.01/per GB (depending on Region).
  • Access pattern: S3 access through gateway endpoints is supported only for resources in a specific VPC to which the endpoint is associated. S3 gateway endpoints do not currently support access from resources in a different Region, different VPC, or from an on-premises (non-AWS) environment. However, if you’re willing to manage a complex custom architecture, you can use proxies. In all those scenarios, where access is from resources external to VPC, S3 interface endpoints access S3 in a secure way.
  • VPC endpoint architecture: Some customers use centralized VPC endpoint architecture patterns. This is where the interface endpoints are all managed in a central hub VPC for accessing the service from multiple spoke VPCs. This architecture helps reduce the complexity and maintenance for multiple interface VPC endpoints across different VPCs. When using an S3 interface endpoint, you must consider the amount of network traffic that would flow through your network from spoke VPCs to hub VPC. If the network connectivity between spoke and hub VPCs are set up using transit gateway, or VPC peering, consider the data processing charges (currently $0.02/GB). If VPC peering is used, there is no charge for data transferred between VPCs in the same Availability Zone. However, data transferred between Availability Zones or between Regions will incur charges as defined in our documentation.

In scenarios where you must access S3 buckets securely from on-premises or from across Regions, we recommend using an interface endpoint. If you chose a gateway endpoint, install a fleet of proxies in the VPC to address transitive routing.

Figure 1. VPC endpoint architecture

Figure 1. VPC endpoint architecture

  • Bandwidth considerations: When setting up an interface endpoint, choose multiple subnets across multiple Availability Zones to implement high availability. The number of ENIs should equal to number of subnets chosen. Interface endpoints offer a throughput of 10 Gbps per ENI with a burst capability of 40 Gbps. If your use case requires higher throughput, contact AWS Support.

Gateway endpoints are route table entries that route your traffic directly from the subnet where traffic is originating to the S3 service. Traffic does not flow through an intermediate device or instance. Hence, there is no throughput limit for the gateway endpoint itself. The initial setup for gateway endpoints consists in specifying the VPC route tables you would like to use to access the service. Route table entries for the destination (prefix list) and target (endpoint ID) are automatically added to the route tables.

The two architectural options for creating and managing endpoints are:

Single VPC architecture

Using a single VPC, we can configure:

  • Gateway endpoints for VPC resources to access S3
  • VPC interface endpoint for on-premises resources to access S3

The following architecture shows the configuration on how both can be set up in a single VPC for access. This is useful when access from within AWS is limited to a single VPC while still enabling external (non-AWS) access.

Figure 2. Single VPC architecture

Figure 2. Single VPC architecture

DNS configured on-premises will point to the VPC interface endpoint IP addresses. It will forward all traffic from on-premises to S3 through the VPC interface endpoint. The route table configured in the subnet will ensure that any S3 traffic originating from the VPC will flow to S3 using gateway endpoints.

Multi-VPC centralized architecture

In a hub and spoke architecture that centralizes S3 access for multi-Region, cross-VPC, and on-premises workloads, we recommend using an interface endpoint in the hub VPC. The same pattern would also work in multi-account/multi-region design where multiple VPCs require access to centralized buckets.

Note: Firewall appliances that monitor east-west traffic will experience increased load with the Multi-VPC centralized architecture. It may be necessary to use the single VPC endpoint design to reduce impact to firewall appliances.

Figure 3. Multi-VPC centralized architecture

Figure 3. Multi-VPC centralized architecture

Conclusion

Based on preceding considerations, you can choose to use a combination of gateway and interface endpoints to meet your specific needs. Depending on the account structure and VPC setup, you can support both types of VPC endpoints in a single VPC by using a shared VPC architecture.

With AWS, you can choose between two VPC endpoint types (gateway endpoint or interface endpoint) to securely access your S3 buckets using a private network. In this blog, we showed you how to select the right VPC endpoint using criteria like VPC architecture, access pattern, and cost. To learn more about VPC endpoints and improve the security of your architecture, read Securely Access Services Over AWS PrivateLink.

How to restrict IAM roles to access AWS resources from specific geolocations using AWS Client VPN

Post Syndicated from Artem Lovan original https://aws.amazon.com/blogs/security/how-to-restrict-iam-roles-to-access-aws-resources-from-specific-geolocations-using-aws-client-vpn/

You can improve your organization’s security posture by enforcing access to Amazon Web Services (AWS) resources based on IP address and geolocation. For example, users in your organization might bring their own devices, which might require additional security authorization checks and posture assessment in order to comply with corporate security requirements. Enforcing access to AWS resources based on geolocation can help you to automate compliance with corporate security requirements by auditing the connection establishment requests. In this blog post, we walk you through the steps to allow AWS Identity and Access Management (IAM) roles to access AWS resources only from specific geographic locations.

Solution overview

AWS Client VPN is a managed client-based VPN service that enables you to securely access your AWS resources and your on-premises network resources. With Client VPN, you can access your resources from any location using an OpenVPN-based VPN client. A client VPN session terminates at the Client VPN endpoint, which is provisioned in your Amazon Virtual Private Cloud (Amazon VPC) and therefore enables a secure connection to resources running inside your VPC network.

This solution uses Client VPN to implement geolocation authentication rules. When a client VPN connection is established, authentication is implemented at the first point of entry into the AWS Cloud. It’s used to determine if clients are allowed to connect to the Client VPN endpoint. You configure an AWS Lambda function as the client connect handler for your Client VPN endpoint. You can use the handler to run custom logic that authorizes a new connection. When a user initiates a new client VPN connection, the custom logic is the point at which you can determine the geolocation of this user. In order to enforce geolocation authorization rules, you need:

  • AWS WAF to determine the user’s geolocation based on their IP address.
  • A Network address translation (NAT) gateway to be used as the public origin IP address for all requests to your AWS resources.
  • An IAM policy that is attached to the IAM role and validated by AWS when the request origin IP address matches the IP address of the NAT gateway.

One of the key features of AWS WAF is the ability to allow or block web requests based on country of origin. When the client connection handler Lambda function is invoked by your Client VPN endpoint, the Client VPN service invokes the Lambda function on your behalf. The Lambda function receives the device, user, and connection attributes. The user’s public IP address is one of the device attributes that are used to identify the user’s geolocation by using the AWS WAF geolocation feature. Only connections that are authorized by the Lambda function are allowed to connect to the Client VPN endpoint.

Note: The accuracy of the IP address to country lookup database varies by region. Based on recent tests, the overall accuracy for the IP address to country mapping is 99.8 percent. We recommend that you work with regulatory compliance experts to decide if your solution meets your compliance needs.

A NAT gateway allows resources in a private subnet to connect to the internet or other AWS services, but prevents a host on the internet from connecting to those resources. You must also specify an Elastic IP address to associate with the NAT gateway when you create it. Since an Elastic IP address is static, any request originating from a private subnet will be seen with a public IP address that you can trust because it will be the elastic IP address of your NAT gateway.

AWS Identity and Access Management (IAM) is a web service for securely controlling access to AWS services. You manage access in AWS by creating policies and attaching them to IAM identities (users, groups of users, or roles) or AWS resources. A policy is an object in AWS that, when associated with an identity or resource, defines their permissions. In an IAM policy, you can define the global condition key aws:SourceIp to restrict API calls to your AWS resources from specific IP addresses.

Note: Throughout this post, the user is authenticating with a SAML identity provider (IdP) and assumes an IAM role.

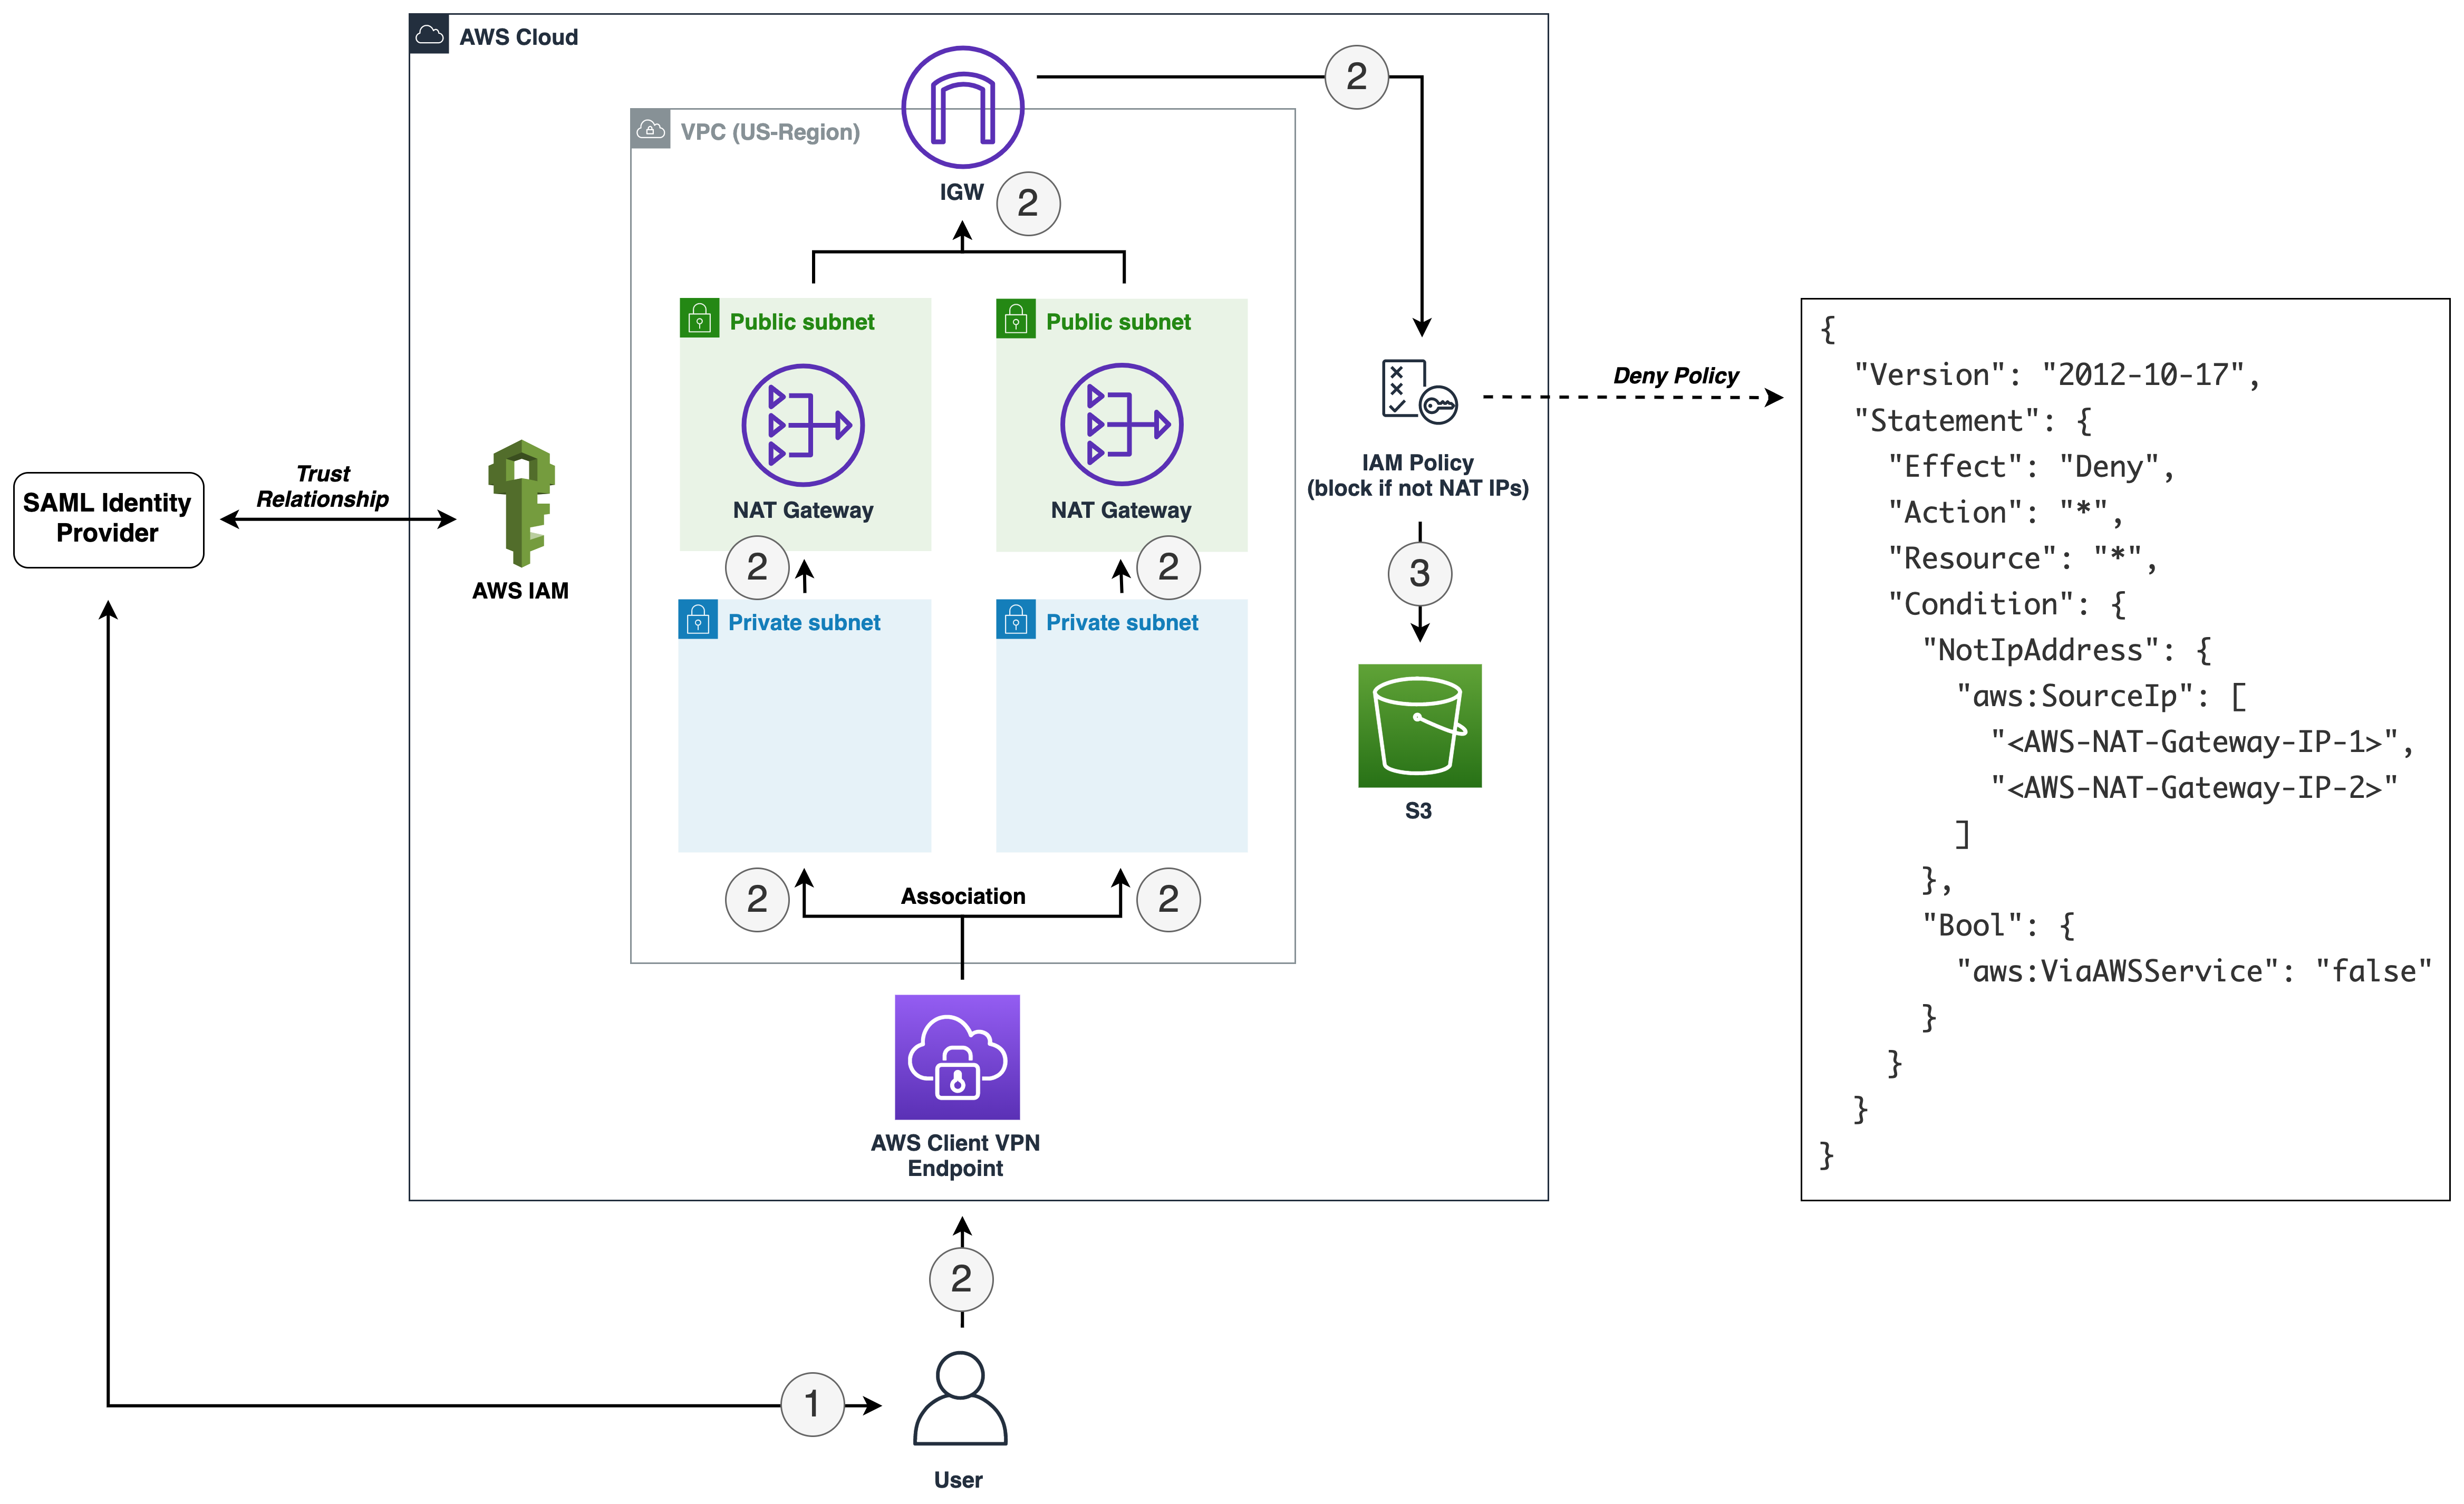
Figure 1 illustrates the authentication process when a user tries to establish a new Client VPN connection session.

Figure 1: Enforce connection to Client VPN from specific geolocations

Figure 1: Enforce connection to Client VPN from specific geolocations

Let’s look at how the process illustrated in Figure 1 works.

  1. The user device initiates a new client VPN connection session.
  2. The Client VPN service redirects the user to authenticate against an IdP.
  3. After user authentication succeeds, the client connects to the Client VPN endpoint.
  4. The Client VPN endpoint invokes the Lambda function synchronously. The function is invoked after device and user authentication, and before the authorization rules are evaluated.
  5. The Lambda function extracts the public-ip device attribute from the input and makes an HTTPS request to the Amazon API Gateway endpoint, passing the user’s public IP address in the X-Forwarded-For header.Because you’re using AWS WAF to protect API Gateway, and have geographic match conditions configured, a response with the status code 200 is returned only if the user’s public IP address originates from an allowed country of origin. Additionally, AWS WAF has another rule configured that blocks all requests to API Gateway if the request doesn’t originate from one of the NAT gateway IP addresses. Because Lambda is deployed in a VPC, it has a NAT gateway IP address, and therefore the request isn’t blocked by AWS WAF. To learn more about running a Lambda function in a VPC, see Configuring a Lambda function to access resources in a VPC.The following code example showcases Lambda code that performs the described step.

    Note: Optionally, you can implement additional controls by creating specific authorization rules. Authorization rules act as firewall rules that grant access to networks. You should have an authorization rule for each network for which you want to grant access. To learn more, see Authorization rules.

  6. The Lambda function returns the authorization request response to Client VPN.
  7. When the Lambda function—shown following—returns an allow response, Client VPN establishes the VPN session.
import os
import http.client


cloud_front_url = os.getenv("ENDPOINT_DNS")
endpoint = os.getenv("ENDPOINT")
success_status_codes = [200]


def build_response(allow, status):
    return {
        "allow": allow,
        "error-msg-on-failed-posture-compliance": "Error establishing connection. Please contact your administrator.",
        "posture-compliance-statuses": [status],
        "schema-version": "v1"
    }


def handler(event, context):
    ip = event['public-ip']

    conn = http.client.HTTPSConnection(cloud_front_url)
    conn.request("GET", f'/{endpoint}', headers={'X-Forwarded-For': ip})
    r1 = conn.getresponse()
    conn.close()

    status_code = r1.status

    if status_code in success_status_codes:
        print("User's IP is based from an allowed country. Allowing the connection to VPN.")
        return build_response(True, 'compliant')

    print("User's IP is NOT based from an allowed country. Blocking the connection to VPN.")
    return build_response(False, 'quarantined')

After the client VPN session is established successfully, the request from the user device flows through the NAT gateway. The originating source IP address is recognized, because it is the Elastic IP address associated with the NAT gateway. An IAM policy is defined that denies any request to your AWS resources that doesn’t originate from the NAT gateway Elastic IP address. By attaching this IAM policy to users, you can control which AWS resources they can access.

Figure 2 illustrates the process of a user trying to access an Amazon Simple Storage Service (Amazon S3) bucket.

Figure 2: Enforce access to AWS resources from specific IPs

Figure 2: Enforce access to AWS resources from specific IPs

Let’s look at how the process illustrated in Figure 2 works.

  1. A user signs in to the AWS Management Console by authenticating against the IdP and assumes an IAM role.
  2. Using the IAM role, the user makes a request to list Amazon S3 buckets. The IAM policy of the user is evaluated to form an allow or deny decision.
  3. If the request is allowed, an API request is made to Amazon S3.

The aws:SourceIp condition key is used in a policy to deny requests from principals if the origin IP address isn’t the NAT gateway IP address. However, this policy also denies access if an AWS service makes calls on a principal’s behalf. For example, when you use AWS CloudFormation to provision a stack, it provisions resources by using its own IP address, not the IP address of the originating request. In this case, you use aws:SourceIp with the aws:ViaAWSService key to ensure that the source IP address restriction applies only to requests made directly by a principal.

IAM deny policy

The IAM policy doesn’t allow any actions. What the policy does is deny any action on any resource if the source IP address doesn’t match any of the IP addresses in the condition. Use this policy in combination with other policies that allow specific actions.

Prerequisites

Make sure that you have the following in place before you deploy the solution:

Implementation and deployment details

In this section, you create a CloudFormation stack that creates AWS resources for this solution. To start the deployment process, select the following Launch Stack button.

Select the Launch Stack button to launch the template

You also can download the CloudFormation template if you want to modify the code before the deployment.

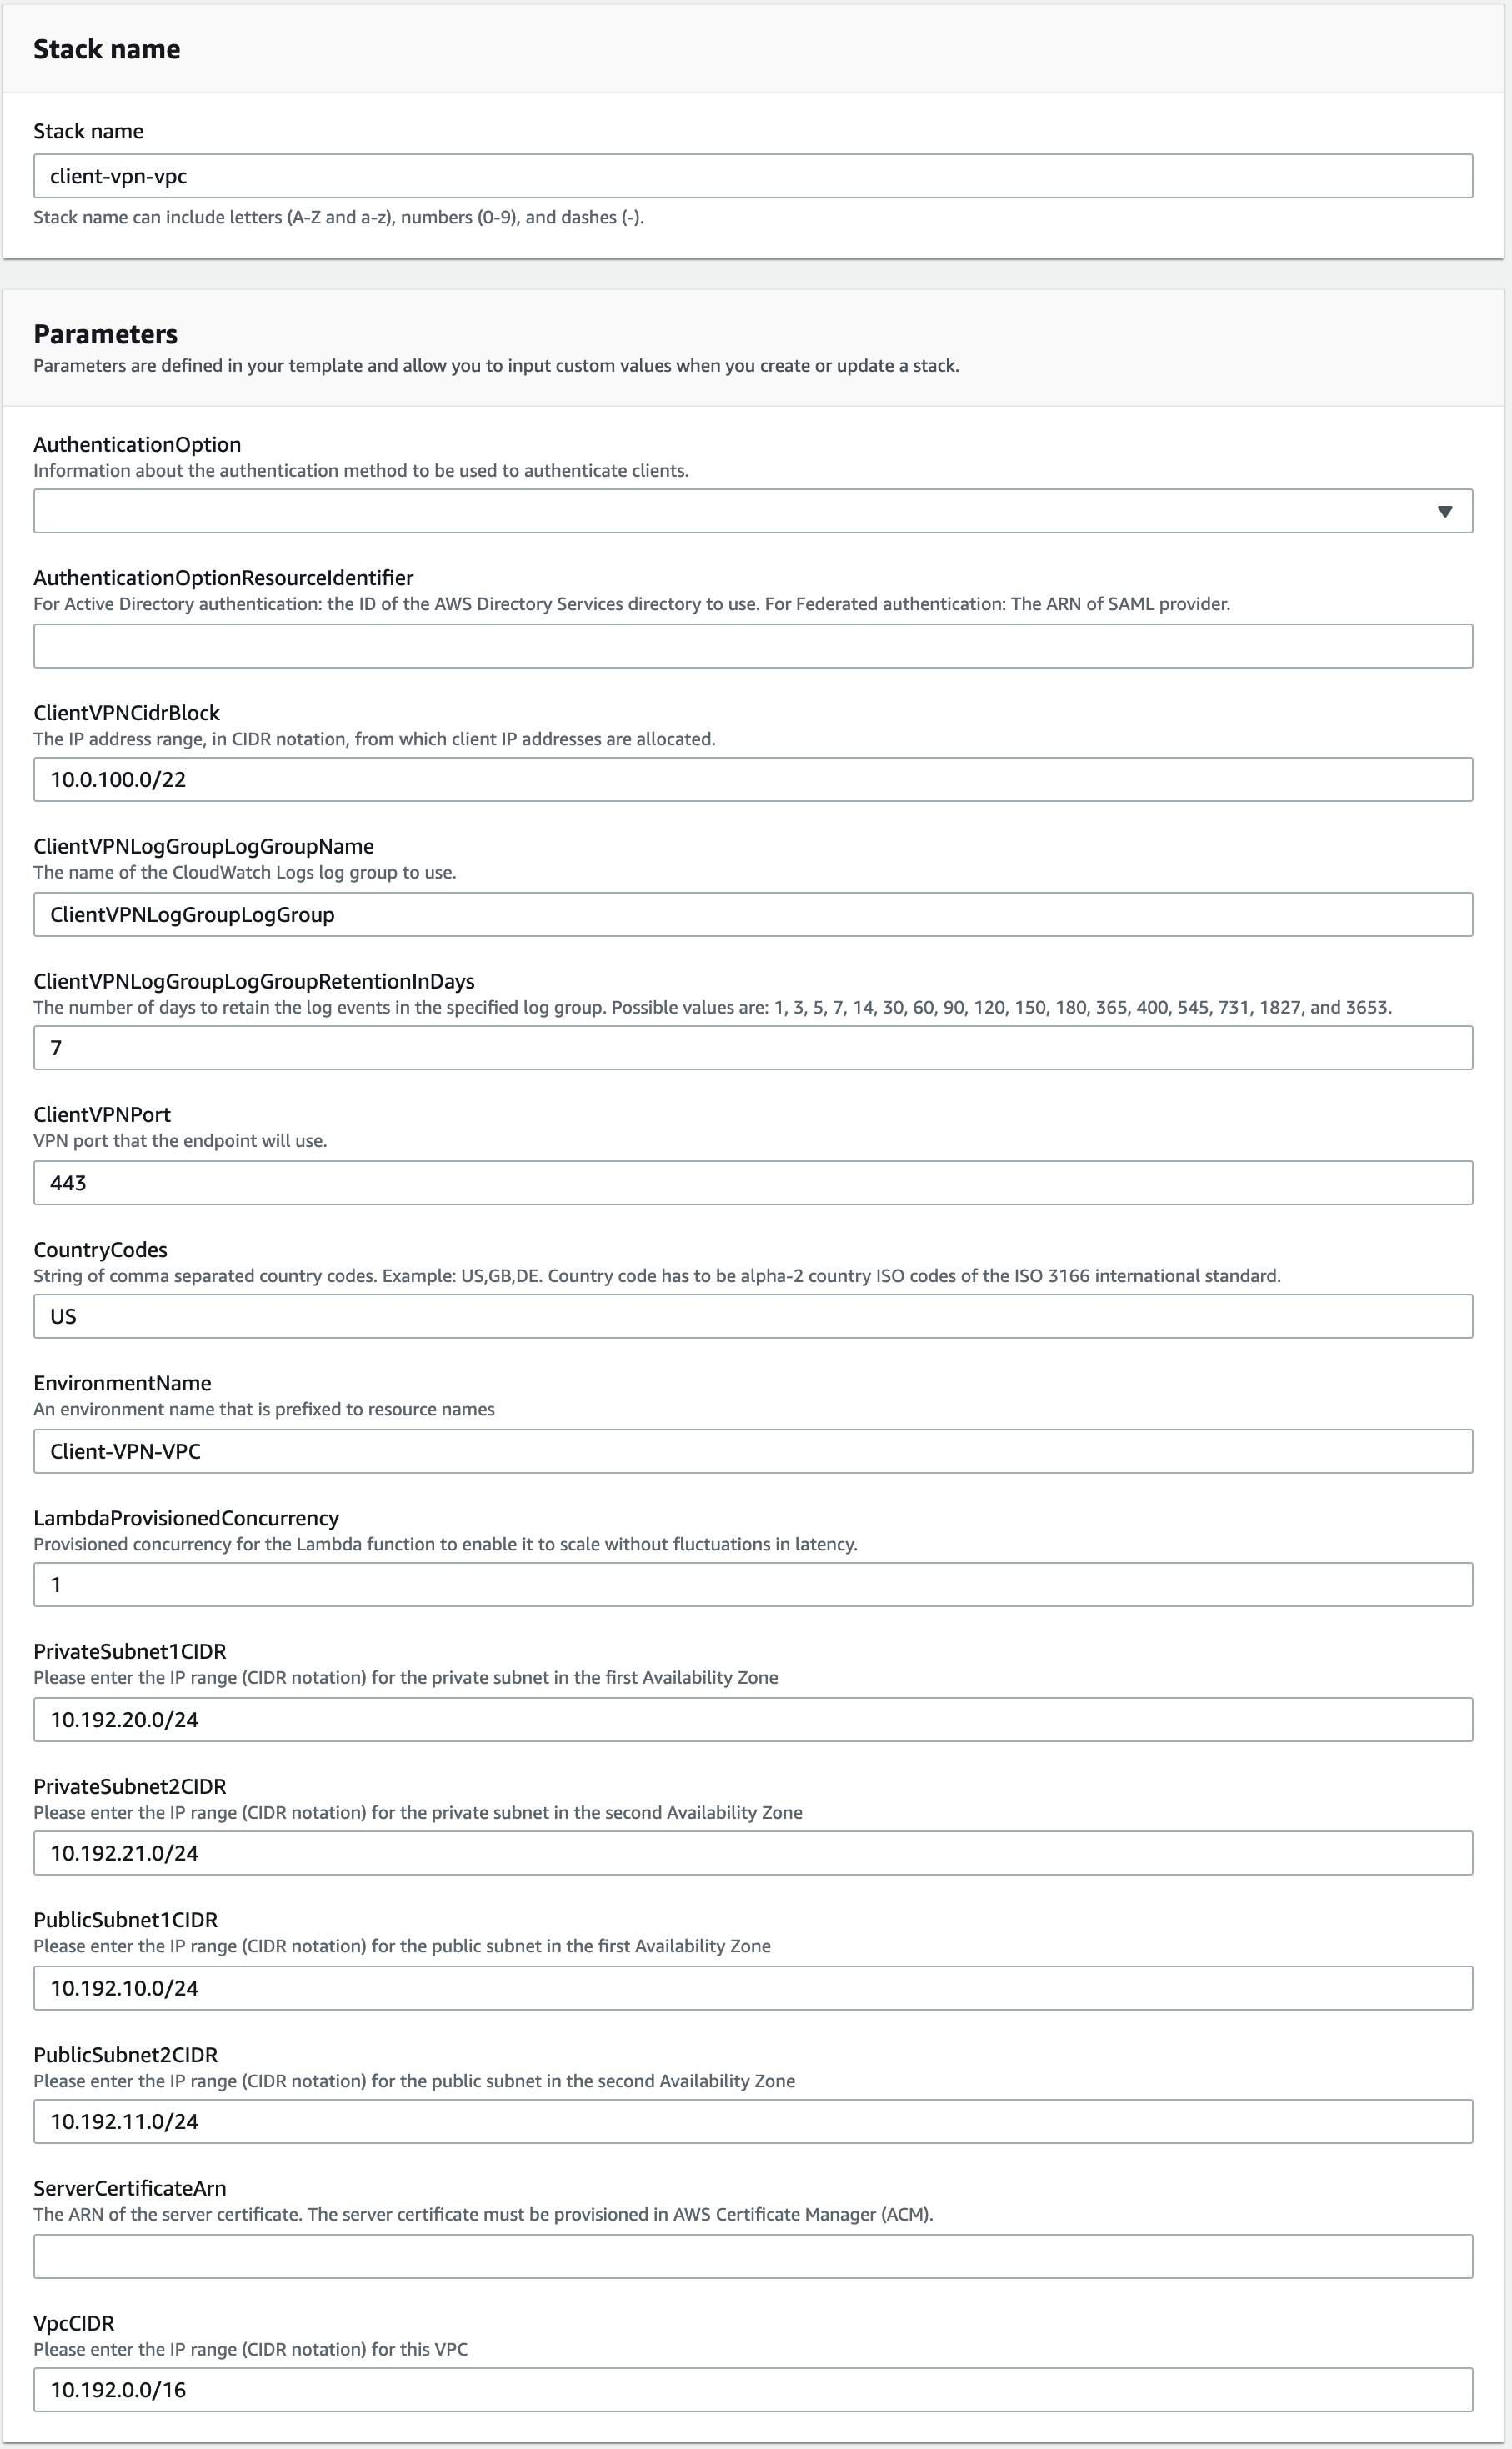
The template in Figure 3 takes several parameters. Let’s go over the key parameters.

Figure 3: CloudFormation stack parameters

Figure 3: CloudFormation stack parameters

The key parameters are:

  • AuthenticationOption: Information about the authentication method to be used to authenticate clients. You can choose either AWS Managed Microsoft AD or IAM SAML identity provider for authentication.
  • AuthenticationOptionResourceIdentifier: The ID of the AWS Managed Microsoft AD directory to use for Active Directory authentication, or the Amazon Resource Number (ARN) of the SAML provider for federated authentication.
  • ServerCertificateArn: The ARN of the server certificate. The server certificate must be provisioned in ACM.
  • CountryCodes: A string of comma-separated country codes. For example: US,GB,DE. The country codes must be alpha-2 country ISO codes of the ISO 3166 international standard.
  • LambdaProvisionedConcurrency: Provisioned concurrency for the client connection handler. We recommend that you configure provisioned concurrency for the Lambda function to enable it to scale without fluctuations in latency.

All other input fields have default values that you can either accept or override. Once you provide the parameter input values and reach the final screen, choose Create stack to deploy the CloudFormation stack.

This template creates several resources in your AWS account, as follows:

  • A VPC and associated resources, such as InternetGateway, Subnets, ElasticIP, NatGateway, RouteTables, and SecurityGroup.
  • A Client VPN endpoint, which provides connectivity to your VPC.
  • A Lambda function, which is invoked by the Client VPN endpoint to determine the country origin of the user’s IP address.
  • An API Gateway for the Lambda function to make an HTTPS request.
  • AWS WAF in front of API Gateway, which only allows requests to go through to API Gateway if the user’s IP address is based in one of the allowed countries.
  • A deny policy with a NAT gateway IP addresses condition. Attaching this policy to a role or user enforces that the user can’t access your AWS resources unless they are connected to your client VPN.

Note: CloudFormation stack deployment can take up to 20 minutes to provision all AWS resources.

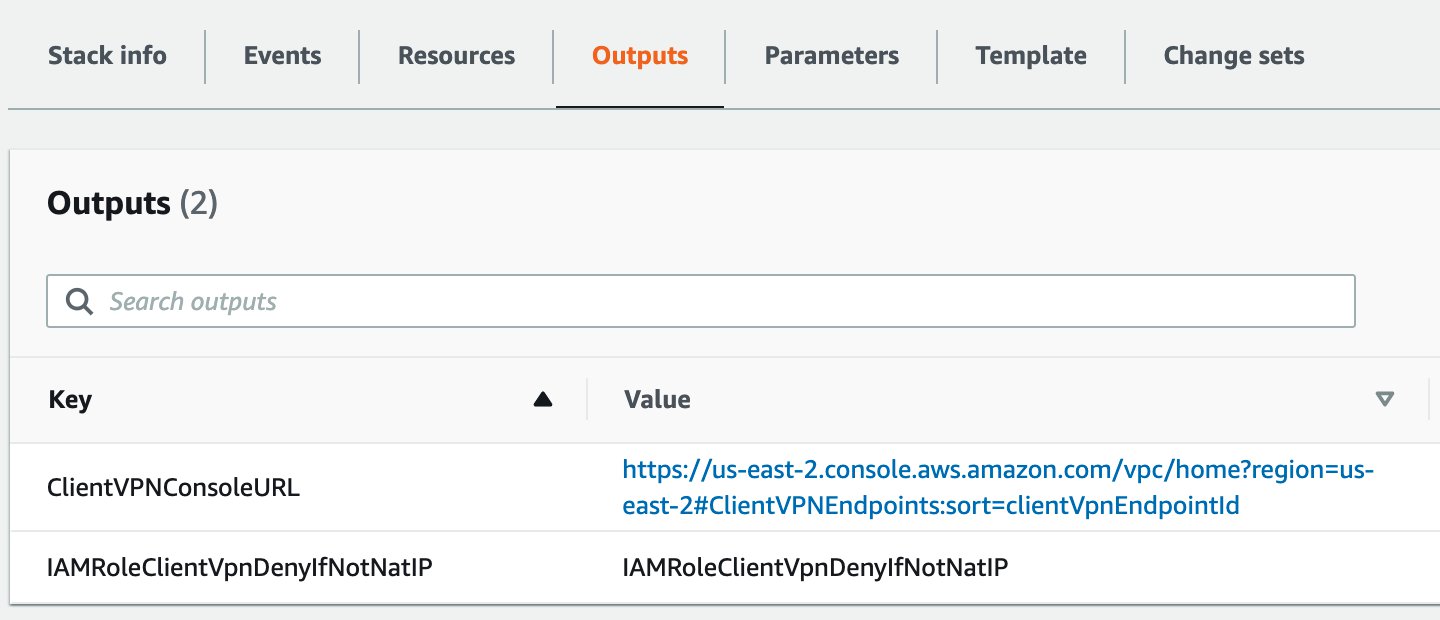
After creating the stack, there are two outputs in the Outputs section, as shown in Figure 4.

Figure 4: CloudFormation stack outputs

Figure 4: CloudFormation stack outputs

  • ClientVPNConsoleURL: The URL where you can download the client VPN configuration file.
  • IAMRoleClientVpnDenyIfNotNatIP: The IAM policy to be attached to an IAM role or IAM user to enforce access control.

Attach the IAMRoleClientVpnDenyIfNotNatIP policy to a role

This policy is used to enforce access to your AWS resources based on geolocation. Attach this policy to the role that you are using for testing the solution. You can use the steps in Adding IAM identity permissions to do so.

Configure the AWS client VPN desktop application

When you open the URL that you see in ClientVPNConsoleURL, you see the newly provisioned Client VPN endpoint. Select Download Client Configuration to download the configuration file.

Figure 5: Client VPN endpoint

Figure 5: Client VPN endpoint

Confirm the download request by selecting Download.

Figure 6: Client VPN Endpoint - Download Client Configuration

Figure 6: Client VPN Endpoint – Download Client Configuration

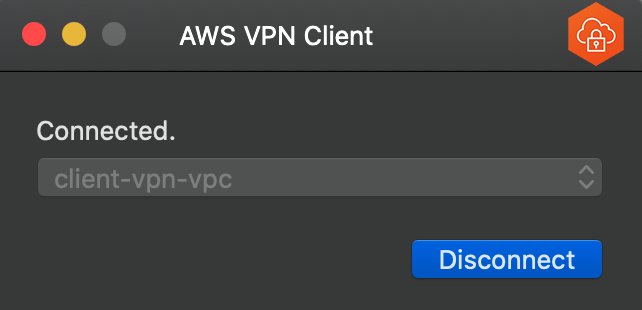
To connect to the Client VPN endpoint, follow the steps in Connect to the VPN. After a successful connection is established, you should see the message Connected. in your AWS Client VPN desktop application.

Figure 7: AWS Client VPN desktop application - established VPN connection

Figure 7: AWS Client VPN desktop application – established VPN connection

Troubleshooting

If you can’t establish a Client VPN connection, here are some things to try:

  • Confirm that the Client VPN connection has successfully established. It should be in the Connected state. To troubleshoot connection issues, you can follow this guide.
  • If the connection isn’t establishing, make sure that your machine has TCP port 35001 available. This is the port used for receiving the SAML assertion.
  • Validate that the user you’re using for testing is a member of the correct SAML group on your IdP.
  • Confirm that the IdP is sending the right details in the SAML assertion. You can use browser plugins, such as SAML-tracer, to inspect the information received in the SAML assertion.

Test the solution

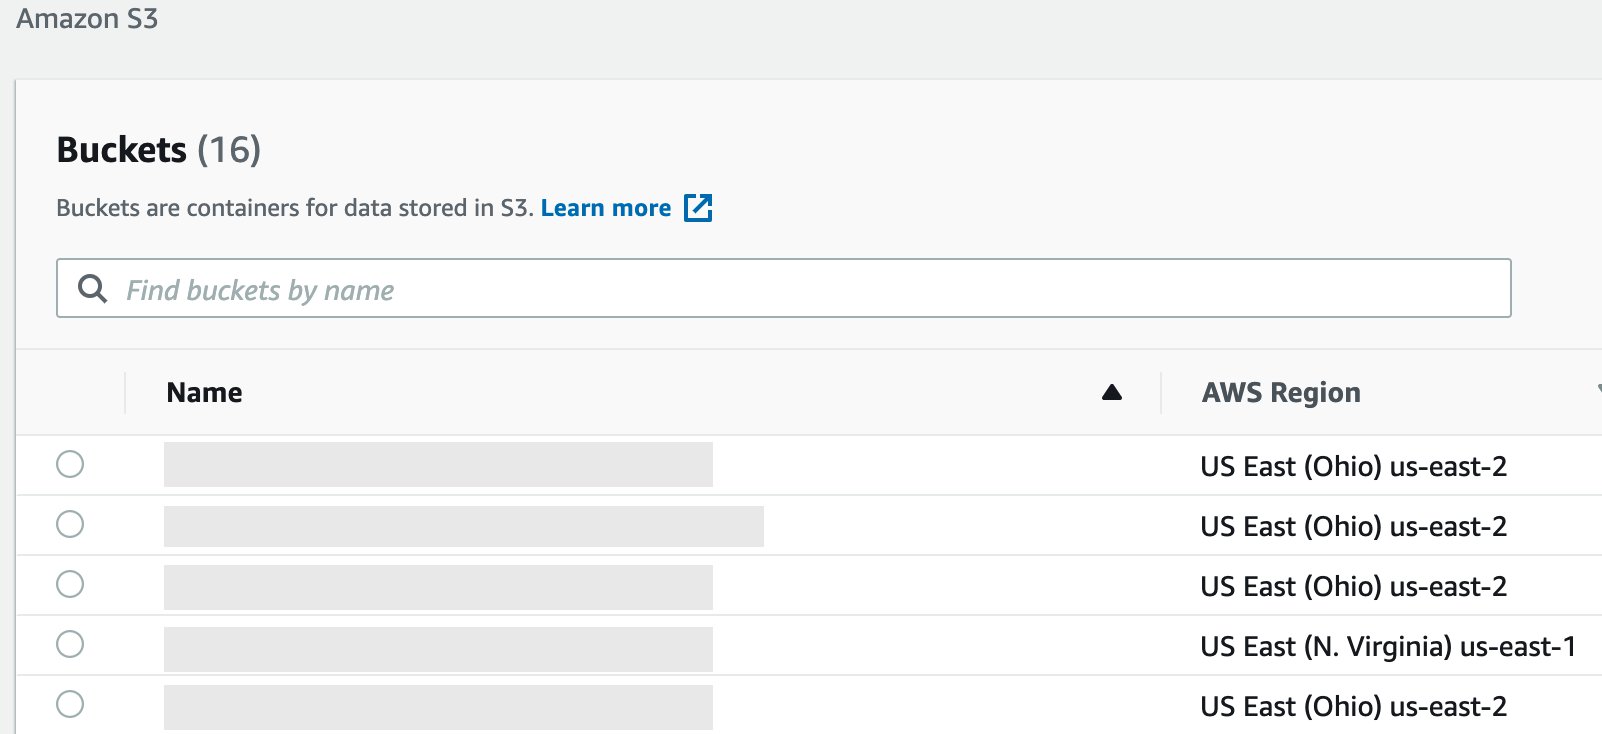
Now that you’re connected to Client VPN, open the console, sign in to your AWS account, and navigate to the Amazon S3 page. Since you’re connected to the VPN, your origin IP address is one of the NAT gateway IPs, and the request is allowed. You can see your S3 bucket, if any exist.

Figure 8: Amazon S3 service console view - user connected to AWS Client VPN

Figure 8: Amazon S3 service console view – user connected to AWS Client VPN

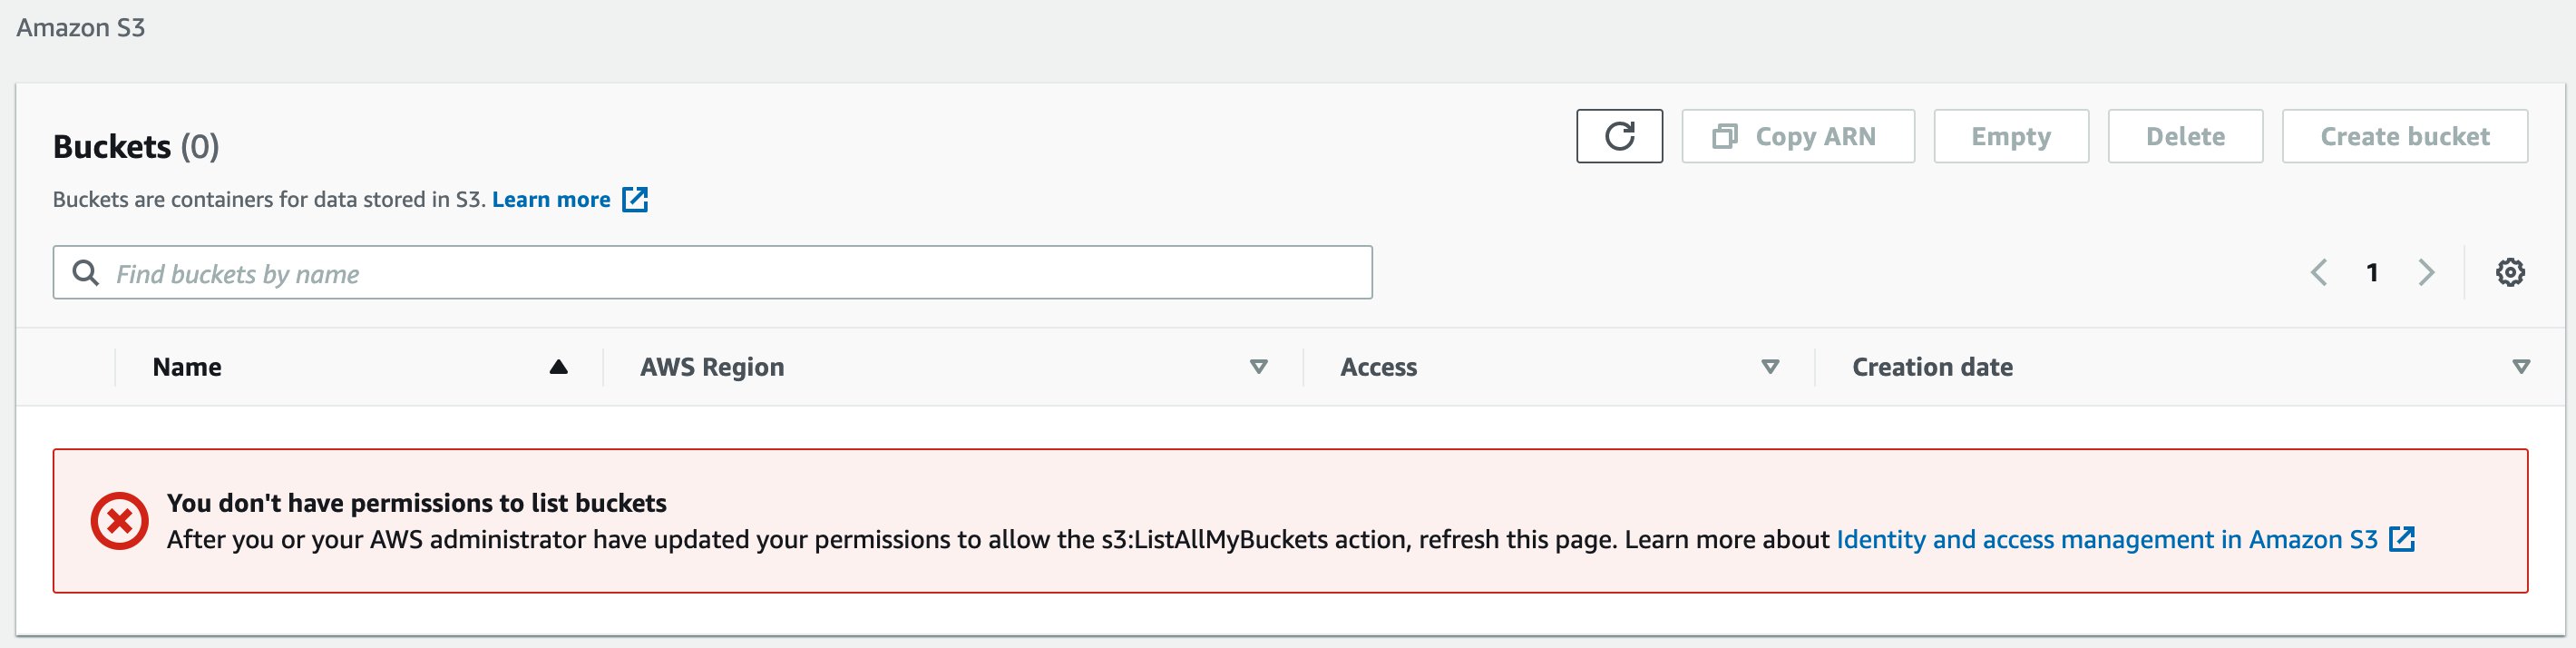
Now that you’ve verified that you can access your AWS resources, go back to the Client VPN desktop application and disconnect your VPN connection. Once the VPN connection is disconnected, go back to the Amazon S3 page and reload it. This time you should see an error message that you don’t have permission to list buckets, as shown in Figure 9.

Figure 9: Amazon S3 service console view - user is disconnected from AWS Client VPN

Figure 9: Amazon S3 service console view – user is disconnected from AWS Client VPN

Access has been denied because your origin public IP address is no longer one of the NAT gateway IP addresses. As mentioned earlier, since the policy denies any action on any resource without an established VPN connection to the Client VPN endpoint, access to all your AWS resources is denied.

Scale the solution in AWS Organizations

With AWS Organizations, you can centrally manage and govern your environment as you grow and scale your AWS resources. You can use Organizations to apply policies that give your teams the freedom to build with the resources they need, while staying within the boundaries you set. By organizing accounts into organizational units (OUs), which are groups of accounts that serve an application or service, you can apply service control policies (SCPs) to create targeted governance boundaries for your OUs. To learn more about Organizations, see AWS Organizations terminology and concepts.

SCPs help you to ensure that your accounts stay within your organization’s access control guidelines across all your accounts within OUs. In particular, these are the key benefits of using SCPs in your AWS Organizations:

  • You don’t have to create an IAM policy with each new account, but instead create one SCP and apply it to one or more OUs as needed.
  • You don’t have to apply the IAM policy to every IAM user or role, existing or new.
  • This solution can be deployed in a separate account, such as a shared infrastructure account. This helps to decouple infrastructure tooling from business application accounts.

The following figure, Figure 10, illustrates the solution in an Organizations environment.

Figure 10: Use SCPs to enforce policy across many AWS accounts

Figure 10: Use SCPs to enforce policy across many AWS accounts

The Client VPN account is the account the solution is deployed into. This account can also be used for other networking related services. The SCP is created in the Organizations root account and attached to one or more OUs. This allows you to centrally control access to your AWS resources.

Let’s review the new condition that’s added to the IAM policy:

"ArnNotLikeIfExists": {
    "aws:PrincipalARN": [
    "arn:aws:iam::*:role/service-role/*"
    ]
}

The aws:PrincipalARN condition key allows your AWS services to communicate to other AWS services even though those won’t have a NAT IP address as the source IP address. For instance, when a Lambda function needs to read a file from your S3 bucket.

Note: Appending policies to existing resources might cause an unintended disruption to your application. Consider testing your policies in a test environment or to non-critical resources before applying them to production resources. You can do that by attaching the SCP to a specific OU or to an individual AWS account.

Cleanup

After you’ve tested the solution, you can clean up all the created AWS resources by deleting the CloudFormation stack.

Conclusion

In this post, we showed you how you can restrict IAM users to access AWS resources from specific geographic locations. You used Client VPN to allow users to establish a client VPN connection from a desktop. You used an AWS client connection handler (as a Lambda function), and API Gateway with AWS WAF to identify the user’s geolocation. NAT gateway IPs served as trusted source IPs, and an IAM policy protects access to your AWS resources. Lastly, you learned how to scale this solution to many AWS accounts with Organizations.

If you have feedback about this post, submit comments in the Comments section below.

Want more AWS Security how-to content, news, and feature announcements? Follow us on Twitter.

Author

Artem Lovan

Artem is a Senior Solutions Architect based in New York. He helps customers architect and optimize applications on AWS. He has been involved in IT at many levels, including infrastructure, networking, security, DevOps, and software development.

Author

Faiyaz Desai

Faiyaz leads a solutions architecture team supporting cloud-native customers in New York. His team guides customers in their modernization journeys through business and technology strategies, architectural best practices, and customer innovation. Faiyaz’s focus areas include unified communication, customer experience, network design, and mobile endpoint security.

Building well-architected serverless applications: Implementing application workload security – part 2

Post Syndicated from Julian Wood original https://aws.amazon.com/blogs/compute/building-well-architected-serverless-applications-implementing-application-workload-security-part-2/

This series of blog posts uses the AWS Well-Architected Tool with the Serverless Lens to help customers build and operate applications using best practices. In each post, I address the serverless-specific questions identified by the Serverless Lens along with the recommended best practices. See the introduction post for a table of contents and explanation of the example application.

Security question SEC3: How do you implement application security in your workload?

This post continues part 1 of this security question. Previously, I cover reviewing security awareness documentation such as the Common Vulnerabilities and Exposures (CVE) database. I show how to use GitHub security features to inspect and manage code dependencies. I then show how to validate inbound events using Amazon API Gateway request validation.

Required practice: Store secrets that are used in your code securely

Store secrets such as database passwords or API keys in a secrets manager. Using a secrets manager allows for auditing access, easier rotation, and prevents exposing secrets in application source code. There are a number of AWS and third-party solutions to store and manage secrets.

AWS Partner Network (APN) member Hashicorp provides Vault to keep secrets and application data secure. Vault has a centralized workflow for tightly controlling access to secrets across applications, systems, and infrastructure. You can store secrets in Vault and access them from an AWS Lambda function to, for example, access a database. You can use the Vault Agent for AWS to authenticate with Vault, receive the database credentials, and then perform the necessary queries. You can also use the Vault AWS Lambda extension to manage the connectivity to Vault.

AWS Systems Manager Parameter Store allows you to store configuration data securely, including secrets, as parameter values.

AWS Secrets Manager enables you to replace hardcoded credentials in your code with an API call to Secrets Manager to retrieve the secret programmatically. You can protect, rotate, manage, and retrieve database credentials, API keys, and other secrets throughout their lifecycle. You can also generate secure secrets. By default, Secrets Manager does not write or cache the secret to persistent storage.

Parameter Store integrates with Secrets Manager. For more information, see “Referencing AWS Secrets Manager secrets from Parameter Store parameters.”

To show how Secrets Manager works, deploy the solution detailed in “How to securely provide database credentials to Lambda functions by using AWS Secrets Manager”.

The AWS Cloud​Formation stack deploys an Amazon RDS MySQL database with a randomly generated password. This is stored in Secrets Manager using a secret resource. A Lambda function behind an API Gateway endpoint returns the record count in a table from the database, using the required credentials. Lambda function environment variables store the database connection details and which secret to return for the database password. The password is not stored as an environment variable, nor in the Lambda function application code.

Lambda environment variables for Secrets Manager

Lambda environment variables for Secrets Manager

The application flow is as follows:

  1. Clients call the API Gateway endpoint
  2. API Gateway invokes the Lambda function
  3. The Lambda function retrieves the database secrets using the Secrets Manager API
  4. The Lambda function connects to the RDS database using the credentials from Secrets Manager and returns the query results

View the password secret value in the Secrets Manager console, which is randomly generated as part of the stack deployment.

Example password stored in Secrets Manager

Example password stored in Secrets Manager

The Lambda function includes the following code to retrieve the secret from Secrets Manager. The function then uses it to connect to the database securely.

secret_name = os.environ['SECRET_NAME']
rds_host = os.environ['RDS_HOST']
name = os.environ['RDS_USERNAME']
db_name = os.environ['RDS_DB_NAME']

session = boto3.session.Session()
client = session.client(
	service_name='secretsmanager',
	region_name=region_name
)
get_secret_value_response = client.get_secret_value(
	SecretId=secret_name
)
...
secret = get_secret_value_response['SecretString']
j = json.loads(secret)
password = j['password']
...
conn = pymysql.connect(
	rds_host, user=name, passwd=password, db=db_name, connect_timeout=5)

Browsing to the endpoint URL specified in the Cloud​Formation output displays the number of records. This confirms that the Lambda function has successfully retrieved the secure database credentials and queried the table for the record count.

Lambda function retrieving database credentials

Lambda function retrieving database credentials

Audit secrets access through a secrets manager

Monitor how your secrets are used to confirm that the usage is expected, and log any changes to them. This helps to ensure that any unexpected usage or change can be investigated, and unwanted changes can be rolled back.

Hashicorp Vault uses Audit devices that keep a detailed log of all requests and responses to Vault. Audit devices can append logs to a file, write to syslog, or write to a socket.

Secrets Manager supports logging API calls with AWS CloudTrail. CloudTrail captures all API calls for Secrets Manager as events. This includes calls from the Secrets Manager console and from code calling the Secrets Manager APIs.

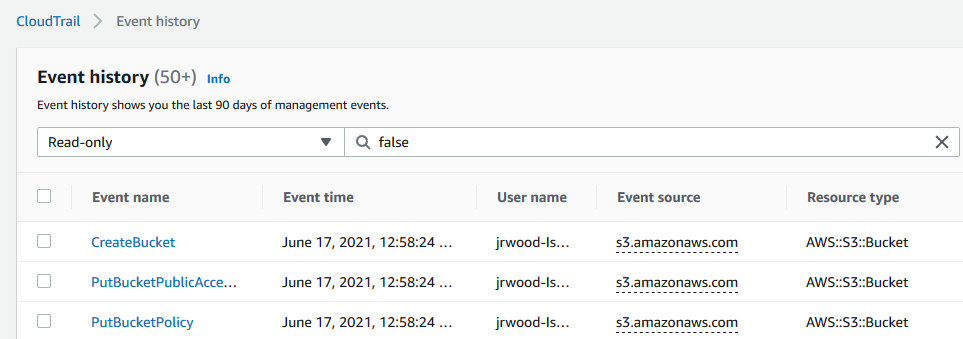
Viewing the CloudTrail event history shows the requests to secretsmanager.amazonaws.com. This shows the requests from the console in addition to the Lambda function.

CloudTrail showing access to Secrets Manager

CloudTrail showing access to Secrets Manager

Secrets Manager also works with Amazon EventBridge so you can trigger alerts when administrator-specified operations occur. You can configure EventBridge rules to alert on deleted secrets or secret rotation. You can also create an alert if anyone tries to use a secret version while it is pending deletion. This can identify and alert when there is an attempt to use an out-of-date secret.

Enforce least privilege access to secrets

Access to secrets must be tightly controlled because the secrets contain sensitive information. Create AWS Identity and Access Management (IAM) policies that enable minimal access to secrets to prevent credentials being accidentally used or compromised. Secrets that have policies that are too permissive could be misused by other environments or developers. This can lead to accidental data loss or compromised systems. For more information, see “Authentication and access control for AWS Secrets Manager”.

Rotate secrets frequently.

Rotating your workload secrets is important. This prevents misuse of your secrets since they become invalid within a configured time period.

Secrets Manager allows you to rotate secrets on a schedule or on demand. This enables you to replace long-term secrets with short-term ones, significantly reducing the risk of compromise. Secrets Manager creates a CloudFormation stack with a Lambda function to manage the rotation process for you. Secrets Manager has native integrations with Amazon RDS, Amazon Redshift, and Amazon DocumentDB. It populates the function with the Amazon Resource Name (ARN) of the secret. You specify the permissions to rotate the credentials, and how often you want to rotate the secret.

The CloudFormation stack creates a MySecretRotationSchedule resource with a MyRotationLambda function to rotate the secret every 30 days.

MySecretRotationSchedule:
    Type: AWS::SecretsManager::RotationSchedule
    DependsOn: SecretRDSInstanceAttachment
    Properties:
    SecretId: !Ref MyRDSInstanceRotationSecret
    RotationLambdaARN: !GetAtt MyRotationLambda.Arn
    RotationRules:
        AutomaticallyAfterDays: 30
MyRotationLambda:
    Type: AWS::Serverless::Function
    Properties:
    Runtime: python3.7
    Role: !GetAtt MyLambdaExecutionRole.Arn
    Handler: mysql_secret_rotation.lambda_handler
    Description: 'This is a lambda to rotate MySql user passwd'
    FunctionName: 'cfn-rotation-lambda'
    CodeUri: 's3://devsecopsblog/code.zip'      
    Environment:
        Variables:
        SECRETS_MANAGER_ENDPOINT: !Sub 'https://secretsmanager.${AWS::Region}.amazonaws.com'

View and edit the rotation settings in the Secrets Manager console.

Secrets Manager rotation settings

Secrets Manager rotation settings

Manually rotate the secret by selecting Rotate secret immediately. This invokes the Lambda function, which updates the database password and updates the secret in Secrets Manager.

View the updated secret in Secrets Manager, where the password has changed.

Secrets Manager password change

Secrets Manager password change

Browse to the endpoint URL to confirm you can still access the database with the updated credentials.

Access endpoint with updated Secret Manager password

Access endpoint with updated Secret Manager password

You can provide your own code to customize a Lambda rotation function for other databases or services. The code includes the commands required to interact with your secured service to update or add credentials.

Conclusion

Implementing application security in your workload involves reviewing and automating security practices at the application code level. By implementing code security, you can protect against emerging security threats. You can improve the security posture by checking for malicious code, including third-party dependencies.

In this post, I continue from part 1, looking at securely storing, auditing, and rotating secrets that are used in your application code.

In the next post in the series, I start to cover the reliability pillar from the Well-Architected Serverless Lens with regulating inbound request rates.

For more serverless learning resources, visit Serverless Land.

Building well-architected serverless applications: Managing application security boundaries – part 2

Post Syndicated from Julian Wood original https://aws.amazon.com/blogs/compute/building-well-architected-serverless-applications-managing-application-security-boundaries-part-2/

This series uses the AWS Well-Architected Tool with the Serverless Lens to help customers build and operate applications using best practices. In each post, I address the nine serverless-specific questions identified by the Serverless Lens along with the recommended best practices. See the introduction post for a table of contents and explanation of the example application.

Security question SEC2: How do you manage your serverless application’s security boundaries?

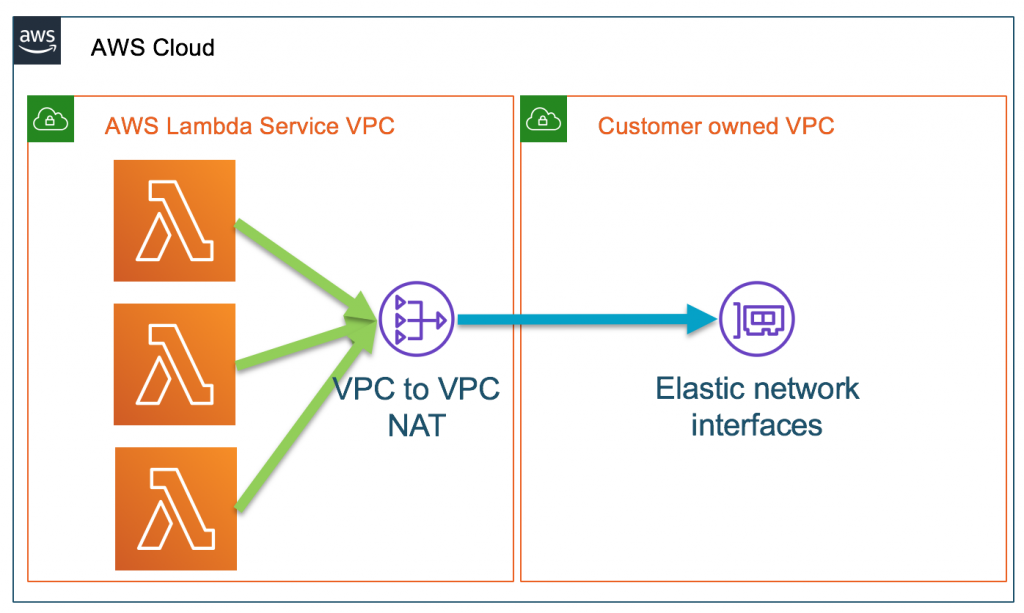
This post continues part 1 of this security question. Previously, I cover how to evaluate and define resource policies, showing what policies are available for various serverless services. I show some of the features of AWS Web Application Firewall (AWS WAF) to protect APIs. Then then go through how to control network traffic at all layers. I explain how AWS Lambda functions connect to VPCs, and how to use private APIs and VPC endpoints. I walk through how to audit your traffic.

Required practice: Use temporary credentials between resources and components

Do not share credentials and permissions policies between resources to maintain a granular segregation of permissions and improve the security posture. Use temporary credentials that are frequently rotated and that have policies tailored to the access the resource needs.

Use dynamic authentication when accessing components and managed services

AWS Identity and Access Management (IAM) roles allows your applications to access AWS services securely without requiring you to manage or hardcode the security credentials. When you use a role, you don’t have to distribute long-term credentials such as a user name and password, or access keys. Instead, the role supplies temporary permissions that applications can use when they make calls to other AWS resources. When you create a Lambda function, for example, you specify an IAM role to associate with the function. The function can then use the role-supplied temporary credentials to sign API requests.

Use IAM for authorizing access to AWS managed services such as Lambda or Amazon S3. Lambda also assumes IAM roles, exposing and rotating temporary credentials to your functions. This enables your application code to access AWS services.

Use IAM to authorize access to internal or private Amazon API Gateway API consumers. See this list of AWS services that work with IAM.

Within the serverless airline example used in this series, the loyalty service uses a Lambda function to fetch loyalty points and next tier progress. AWS AppSync acts as the client using an HTTP resolver, via an API Gateway REST API /loyalty/{customerId}/get resource, to invoke the function.

To ensure only AWS AppSync is authorized to invoke the API, IAM authorization is set within the API Gateway method request.

Viewing API Gateway IAM authorization

Viewing API Gateway IAM authorization

The IAM role specifies that appsync.amazonaws.com can perform an execute-api:Invoke on the specific API Gateway resource arn:aws:execute-api:${AWS::Region}:${AWS::AccountId}:${LoyaltyApi}/*/*/*

For more information, see “Using an IAM role to grant permissions to applications”.

Use a framework such as the AWS Serverless Application Model (AWS SAM) to deploy your applications. This ensures that AWS resources are provisioned with unique per resource IAM roles. For example, AWS SAM automatically creates unique IAM roles for every Lambda function you create.

Best practice: Design smaller, single purpose functions

Creating smaller, single purpose functions enables you to keep your permissions aligned to least privileged access. This reduces the risk of compromise since the function does not require access to more than it needs.

Create single purpose functions with their own IAM role

Single purpose Lambda functions allow you to create IAM roles that are specific to your access requirements. For example, a large multipurpose function might need access to multiple AWS resources such as Amazon DynamoDB, Amazon S3, and Amazon Simple Queue Service (SQS). Single purpose functions would not need access to all of them at the same time.

With smaller, single purpose functions, it’s often easier to identify the specific resources and access requirements, and grant only those permissions. Additionally, new features are usually implemented by new functions in this architectural design. You can specifically grant permissions in new IAM roles for these functions.

Avoid sharing IAM roles with multiple cloud resources. As permissions are added to the role, these are shared across all resources using this role. For example, use one dedicated IAM role per Lambda function. This allows you to control permissions more intentionally. Even if some functions have the same policy initially, always separate the IAM roles to ensure least privilege policies.

Use least privilege access policies with your users and roles

When you create IAM policies, follow the standard security advice of granting least privilege, or granting only the permissions required to perform a task. Determine what users (and roles) must do and then craft policies that allow them to perform only those tasks.

Start with a minimum set of permissions and grant additional permissions as necessary. Doing so is more secure than starting with permissions that are too lenient and then trying to tighten them later. In the unlikely event of misused credentials, credentials will only be able to perform limited interactions.

To control access to AWS resources, AWS SAM uses the same mechanisms as AWS CloudFormation. For more information, see “Controlling access with AWS Identity and Access Management” in the AWS CloudFormation User Guide.

For a Lambda function, AWS SAM scopes the permissions of your Lambda functions to the resources that are used by your application. You add IAM policies as part of the AWS SAM template. The policies property can be the name of AWS managed policies, inline IAM policy documents, or AWS SAM policy templates.

For example, the serverless airline has a ConfirmBooking Lambda function that has UpdateItem permissions to the specific DynamoDB BookingTable resource.

Parameters:
    BookingTable:
        Type: AWS::SSM::Parameter::Value<String>
        Description: Parameter Name for Booking Table
Resources:
    ConfirmBooking:
        Type: AWS::Serverless::Function
        Properties:
            FunctionName: !Sub ServerlessAirline-ConfirmBooking-${Stage}
            Policies:
                - Version: "2012-10-17"
                  Statement:
                      Action: dynamodb:UpdateItem
                      Effect: Allow
                      Resource: !Sub "arn:${AWS::Partition}:dynamodb:${AWS::Region}:${AWS::AccountId}:table/${BookingTable}"

One of the fastest ways to scope permissions appropriately is to use AWS SAM policy templates. You can reference these templates directly in the AWS SAM template for your application, providing custom parameters as required.

The serverless patterns collection allows you to build integrations quickly using AWS SAM and AWS Cloud Development Kit (AWS CDK) templates.

The booking service uses the SNSPublishMessagePolicy. This policy gives permission to the NotifyBooking Lambda function to publish a message to an Amazon Simple Notification Service (Amazon SNS) topic.

    BookingTopic:
        Type: AWS::SNS::Topic

    NotifyBooking:
        Type: AWS::Serverless::Function
        Properties:
            Policies:
                - SNSPublishMessagePolicy:
                      TopicName: !Sub ${BookingTopic.TopicName}
        …

Auditing permissions and removing unnecessary permissions

Audit permissions regularly to help you identify unused permissions so that you can remove them. You can use last accessed information to refine your policies and allow access to only the services and actions that your entities use. Use the IAM console to view when last an IAM role was used.

IAM last used

IAM last used

Use IAM access advisor to review when was the last time an AWS service was used from a specific IAM user or role. You can view last accessed information for IAM on the Access Advisor tab in the IAM console. Using this information, you can remove IAM policies and access from your IAM roles.

IAM access advisor

IAM access advisor

When creating and editing policies, you can validate them using IAM Access Analyzer, which provides over 100 policy checks. It generates security warnings when a statement in your policy allows access AWS considers overly permissive. Use the security warning’s actionable recommendations to help grant least privilege. To learn more about policy checks provided by IAM Access Analyzer, see “IAM Access Analyzer policy validation”.

With AWS CloudTrail, you can use CloudTrail event history to review individual actions your IAM role has performed in the past. Using this information, you can detect which permissions were actively used, and decide to remove permissions.

AWS CloudTrail

AWS CloudTrail

To work out which permissions you may need, you can generate IAM policies based on access activity. You configure an IAM role with broad permissions while the application is in development. Access Analyzer reviews your CloudTrail logs. It generates a policy template that contains the permissions that the role used in your specified date range. Use the template to create a policy that grants only the permissions needed to support your specific use case. For more information, see “Generate policies based on access activity”.

IAM Access Analyzer

IAM Access Analyzer

Conclusion

Managing your serverless application’s security boundaries ensures isolation for, within, and between components. In this post, I continue from part 1, looking at using temporary credentials between resources and components. I cover why smaller, single purpose functions are better from a security perspective, and how to audit permissions. I show how to use AWS SAM to create per-function IAM roles.

For more serverless learning resources, visit https://serverlessland.com.

Building well-architected serverless applications: Managing application security boundaries – part 1

Post Syndicated from Julian Wood original https://aws.amazon.com/blogs/compute/building-well-architected-serverless-applications-managing-application-security-boundaries-part-1/

This series of blog posts uses the AWS Well-Architected Tool with the Serverless Lens to help customers build and operate applications using best practices. In each post, I address the serverless-specific questions identified by the Serverless Lens along with the recommended best practices. See the introduction post for a table of contents and explanation of the example application.

Security question SEC2: How do you manage your serverless application’s security boundaries?

Defining and securing your serverless application’s boundaries ensures isolation for, within, and between components.

Required practice: Evaluate and define resource policies

Resource policies are AWS Identity and Access Management (IAM) statements. They are attached to resources such as an Amazon S3 bucket, or an Amazon API Gateway REST API resource or method. The policies define what identities have fine-grained access to the resource. To see which services support resource-based policies, see “AWS Services That Work with IAM”. For more information on how resource policies and identity policies are evaluated, see “Identity-Based Policies and Resource-Based Policies”.

Understand and determine which resource policies are necessary

Resource policies can protect a component by restricting inbound access to managed services. Use resource policies to restrict access to your component based on a number of identities, such as the source IP address/range, function event source, version, alias, or queues. Resource policies are evaluated and enforced at IAM level before each AWS service applies it’s own authorization mechanisms, when available. For example, IAM resource policies for API Gateway REST APIs can deny access to an API before an AWS Lambda authorizer is called.

If you use multiple AWS accounts, you can use AWS Organizations to manage and govern individual member accounts centrally. Certain resource policies can be applied at the organizations level, providing guardrail for what actions AWS accounts within the organization root or OU can do. For more information see, “Understanding how AWS Organization Service Control Policies work”.

Review your existing policies and how they’re configured, paying close attention to how permissive individual policies are. Your resource policies should only permit necessary callers.

Implement resource policies to prevent unauthorized access

For Lambda, use resource-based policies to provide fine-grained access to what AWS IAM identities and event sources can invoke a specific version or alias of your function. Resource-based policies can also be used to control access to Lambda layers. You can combine resource policies with Lambda event sources. For example, if API Gateway invokes Lambda, you can restrict the policy to the API Gateway ID, HTTP method, and path of the request.

In the serverless airline example used in this series, the IngestLoyalty service uses a Lambda function that subscribes to an Amazon Simple Notification Service (Amazon SNS) topic. The Lambda function resource policy allows SNS to invoke the Lambda function.

Lambda resource policy document

Lambda resource policy document

API Gateway resource-based policies can restrict API access to specific Amazon Virtual Private Cloud (VPC), VPC endpoint, source IP address/range, AWS account, or AWS IAM users.

Amazon Simple Queue Service (SQS) resource-based policies provide fine-grained access to certain AWS services and AWS IAM identities (users, roles, accounts). Amazon SNS resource-based policies restrict authenticated and non-authenticated actions to topics.

Amazon DynamoDB resource-based policies provide fine-grained access to tables and indexes. Amazon EventBridge resource-based policies restrict AWS identities to send and receive events including to specific event buses.

For Amazon S3, use bucket policies to grant permission to your Amazon S3 resources.

The AWS re:Invent session Best practices for growing a serverless application includes further suggestions on enforcing security best practices.

Best practices for growing a serverless application

Best practices for growing a serverless application

Good practice: Control network traffic at all layers

Apply controls for controlling both inbound and outbound traffic, including data loss prevention. Define requirements that help you protect your networks and protect against exfiltration.

Use networking controls to enforce access patterns

API Gateway and AWS AppSync have support for AWS Web Application Firewall (AWS WAF) which helps protect web applications and APIs from attacks. AWS WAF enables you to configure a set of rules called a web access control list (web ACL). These allow you to block, or count web requests based on customizable web security rules and conditions that you define. These can include specified IP address ranges, CIDR blocks, specific countries, or Regions. You can also block requests that contain malicious SQL code, or requests that contain malicious script. For more information, see How AWS WAF Works.

A private API endpoint is an API Gateway interface VPC endpoint that can only be accessed from your Amazon Virtual Private Cloud (Amazon VPC). This is an elastic network interface that you create in a VPC. Traffic to your private API uses secure connections and does not leave the Amazon network, it is isolated from the public internet. For more information, see “Creating a private API in Amazon API Gateway”.

To restrict access to your private API to specific VPCs and VPC endpoints, you must add conditions to your API’s resource policy. For example policies, see the documentation.

By default, Lambda runs your functions in a secure Lambda-owned VPC that is not connected to your account’s default VPC. Functions can access anything available on the public internet. This includes other AWS services, HTTPS endpoints for APIs, or services and endpoints outside AWS. The function cannot directly connect to your private resources inside of your VPC.

You can configure a Lambda function to connect to private subnets in a VPC in your account. When a Lambda function is configured to use a VPC, the Lambda function still runs inside the Lambda service VPC. The function then sends all network traffic through your VPC and abides by your VPC’s network controls. Functions deployed to virtual private networks must consider network access to restrict resource access.

AWS Lambda service VPC with VPC-to-VPT NAT to customer VPC

AWS Lambda service VPC with VPC-to-VPT NAT to customer VPC

When you connect a function to a VPC in your account, the function cannot access the internet, unless the VPC provides access. To give your function access to the internet, route outbound traffic to a NAT gateway in a public subnet. The NAT gateway has a public IP address and can connect to the internet through the VPC’s internet gateway. For more information, see “How do I give internet access to my Lambda function in a VPC?”. Connecting a function to a public subnet doesn’t give it internet access or a public IP address.

You can control the VPC settings for your Lambda functions using AWS IAM condition keys. For example, you can require that all functions in your organization are connected to a VPC. You can also specify the subnets and security groups that the function’s users can and can’t use.

Unsolicited inbound traffic to a Lambda function isn’t permitted by default. There is no direct network access to the execution environment where your functions run. When connected to a VPC, function outbound traffic comes from your own network address space.

You can use security groups, which act as a virtual firewall to control outbound traffic for functions connected to a VPC. Use security groups to permit your Lambda function to communicate with other AWS resources. For example, a security group can allow the function to connect to an Amazon ElastiCache cluster.

To filter or block access to certain locations, use VPC routing tables to configure routing to different networking appliances. Use network ACLs to block access to CIDR IP ranges or ports, if necessary. For more information about the differences between security groups and network ACLs, see “Compare security groups and network ACLs.”

In addition to API Gateway private endpoints, several AWS services offer VPC endpoints, including Lambda. You can use VPC endpoints to connect to AWS services from within a VPC without an internet gateway, NAT device, VPN connection, or AWS Direct Connect connection.

Using tools to audit your traffic

When you configure a Lambda function to use a VPC, or use private API endpoints, you can use VPC Flow Logs to audit your traffic. VPC Flow Logs allow you to capture information about the IP traffic going to and from network interfaces in your VPC. Flow log data can be published to Amazon CloudWatch Logs or S3 to see where traffic is being sent to at a granular level. Here are some flow log record examples. For more information, see “Learn from your VPC Flow Logs”.

Block network access when required

In addition to security groups and network ACLs, third-party tools allow you to disable outgoing VPC internet traffic. These can also be configured to allow traffic to AWS services or allow-listed services.

Conclusion

Managing your serverless application’s security boundaries ensures isolation for, within, and between components. In this post, I cover how to evaluate and define resource policies, showing what policies are available for various serverless services. I show some of the features of AWS WAF to protect APIs. Then I review how to control network traffic at all layers. I explain how Lambda functions connect to VPCs, and how to use private APIs and VPC endpoints. I walk through how to audit your traffic.

This well-architected question will be continued where I look at using temporary credentials between resources and components. I cover why smaller, single purpose functions are better from a security perspective, and how to audit permissions. I show how to use AWS Serverless Application Model (AWS SAM) to create per-function IAM roles.

For more serverless learning resources, visit https://serverlessland.com.

Getting started with serverless for developers part 5: Sandbox developer account

Post Syndicated from Benjamin Smith original https://aws.amazon.com/blogs/compute/getting-started-with-serverless-for-developers-part-5-sandbox-developer-account/

This is part 5 of the Getting started with serverless series. In part 4, you learn how the developer workflow for building serverless applications differs to a traditional developer workflow. You see how to test business logic locally before deploying to an AWS account.

In this post, you learn how to secure and manage access to your AWS Lambda functions. I show how to invoke Lambda functions in a sandbox developer account directly from an integrated developer environment (IDE) and view output logs in near-real-time. Finally, I show how this helps to test for infrastructure and security configurations before committing changes to the main branch.

A sandbox developer account

Serverless services like Lambda and Amazon API Gateway are pay-per-use, this means developers no longer need to share multiple environments (for example, dev, staging, and production). Instead, every developer can have their own sandboxed AWS developer account. This allows developers to not have to replicate everything to their local environment but rather test with real resources in the cloud.

You can still run code locally during the development of a feature. In post 4, I show how I run Lambda function code locally, using a test harness. This allows me to maintain a fast inner loop, iteratively updating and locally testing code. If my Lambda function interacts with other AWS infrastructure, I deploy them to a sandboxed AWS developer account. This allows me to test my Lambda function code locally while still being able to access managed services in the cloud.

However, it is useful to deploy your function code to a Lambda function in a sandboxed developer account. A sandbox developer account is an AWS account allocated to a developer on a 1:1 basis. It should give developers as much freedom as possible while still protecting resources and budget.

This allows you to test for security configurations and ensure that your Lambda function code behaves as expected when run in the Lambda execution environment:

Creating a sandboxed developer account

The following best practices can help to minimize costs and prevent unauthorized usage.

After creating a sandbox account, it can be useful to associate a named profile with it. A named profile is a collection of credentials that you can apply to an AWS Command Line Interface (AWS CLI) command. When you specify a profile to run a command, the settings and credentials are used to run that command. The AWS CLI supports multiple named profiles that are stored in the config and credentials files.

Configure profiles by adding entries to the config and credentials files. To learn more about named profiles refer to the AWS CLI documentation.

In the following example I configure my credentials file with two named profiles.

The profile named prod is my production account, and the profile named default is my sandbox developer account. The CLI automatically uses the profile named default, if no --profile option is specified in a CLI command.

[default]
aws_access_key_id=AKIAIOSFODNN7EXAMPLE
aws_secret_access_key=wJalrXUtnFEMI/K7MDENG/bPxRfiCYEXAMPLEKEY

[dev]
aws_access_key_id=AKIAIOSFODNN7EXAMPLE
aws_secret_access_key=wJalBBUtnFEMI/&7MDENG/bPxRfiCYEXAMPLEKEY

[prod]
aws_access_key_id=AKIAI44QH8DHBEXAMPLE
aws_secret_access_key=je7MtGbClwBF/2Zp9Utk/h3yCo8nvbEXAMPLEKEY

AWS Lambda security permissions

AWS Identity and Access Management (IAM) is the service used to manage access to AWS services. Lambda is fully integrated with IAM, allowing you to control precisely what each Lambda function can do within the AWS Cloud. There are two important things that define the scope of permissions in Lambda functions:

The resource policy: Defines which events are authorized to invoke the function.

The execution role policy: Limits what the Lambda function is authorized to do.

Using IAM roles to describe a Lambda function’s permissions, decouples it’s security configuration from the code. This helps reduce the complexity of a lambda function, making it easier to maintain.

A Lambda function’s resource and execution policy should be granted the minimum required permissions for the function to perform it’s task effectively. This is sometimes referred to as the rule of least privilege. As you develop a Lambda function, you expand the scope of this policy to allow access to other resources as required.

When building Lambda-based applications with frameworks such as AWS SAM, you describe both policies in the application’s template.

The following steps show how I deploy and test a Lambda function in a sandbox developer account from within my IDE.

Before you start

All the code relating to this example application can be found in this GitHub repository. To deploy this stage of the application, follow the steps from post 1 to clone the sample application.

  1. Run the following command from the root directory of the cloned repository:
    cd ./part_5
  2. After creating a sandbox developer account, deploy the example application into it by specifying the corresponding profile name in the AWS SAM CLI command. You can omit this if you named the profile default:
    sam deploy --config-file ../samconfig.toml  –guided  --profile default

    This produces the following output:

    Make a note of the StarWebhookLambdaFunctionName, you will use this in the following steps.

Logging with serverless applications

After deploying your serverless application to the sandboxed developer account, you need to verify that it’s operating properly. Lambda automatically monitors functions on your behalf, reporting metrics through Amazon CloudWatch. It collects data in the form of logs, metrics, and events and provides a unified view of AWS resources, applications, and services.

To help simplify troubleshooting, the AWS Serverless Application Model CLI (AWS SAM CLI) has a command called sam logs. This command lets you fetch CloudWatch Logs generated by your Lambda function from the command line.

Run the following command in a terminal window to view a live tail of logs generated by the StarWebhookHandler Lambda function. Replace StarWebhookLambdaFunctionName with the Lambda function name generated by your deployment:

sam logs -n StarWebhookLambdaFunctionName --tail

Checking Lambda function permissions in a sandbox developer account

I open a new terminal window and invoke the StarWebhookHandler Lambda function directly from my IDE by running the following AWS SAM CLI command. To invoke the function I pass an example payload located in events/testEvent.json.

aws lambda invoke --function-name <<replace-with-function-name>> \
--payload fileb://events/testEvent.json  \
out.txt

The following screenshot shows my two terminal windows side by side.

The response returned by the CLI command is on the right. The left window shows the tail of logs generated by the Lambda function. I observe that the CLI invocation shows a status 200 response, but the Lambda function logs report an ‘AccessDenied’ error. The function does not have the required permissions to write to Amazon S3.

I edit the Lambda function policy definition, adding permission for my Lambda function to write to an S3 bucket. I run sam build and sam deploy to re-deploy the application to the sandbox developer account. I invoke the Lambda function again. The logs show the following:

  1. The Lambda function responds with “StatusCode 200″.
  2. The Lambda function billed duration, memory size and running duration.
  3. The Lambda function has successfully copied the file to S3

IAM permission errors such as these may not be detected when running the function code locally. This is one of the advantages of deploying and running Lambda functions in a sandboxed developer account while developing an application.

Conclusion

This post explains the advantages of using a sandbox developer account. It shows how to deploy your business logic to a Lambda function in a sandboxed developer account. You are introduced to IAM policies, which control precisely what each Lambda function can do within the AWS Cloud. You learn that CloudWatch provides a unified view of logs for all AWS resources.

Finally, I show how to use the AWS SAM CLI and AWS CLI to invoke a Lambda function in the cloud and view its log output directly from the IDE. This helps to test for security configurations and to ensure that your business logic behaves as expected when run in the Lambda service. Invoking functions and observing their log output directly from your IDE helps to reduce context switching as you build.

How to implement SaaS tenant isolation with ABAC and AWS IAM

Post Syndicated from Michael Pelts original https://aws.amazon.com/blogs/security/how-to-implement-saas-tenant-isolation-with-abac-and-aws-iam/

Multi-tenant applications must be architected so that the resources of each tenant are isolated and cannot be accessed by other tenants in the system. AWS Identity and Access Management (IAM) is often a key element in achieving this goal. One of the challenges with using IAM, however, is that the number and complexity of IAM policies you need to support your tenants can grow rapidly and impact the scale and manageability of your isolation model. The attribute-based access control (ABAC) mechanism of IAM provides developers with a way to address this challenge.

In this blog post, we describe and provide detailed examples of how you can use ABAC in IAM to implement tenant isolation in a multi-tenant environment.

Choose an IAM isolation method

IAM makes it possible to implement tenant isolation and scope down permissions in a way that is integrated with other AWS services. By relying on IAM, you can create strong isolation foundations in your system, and reduce the risk of developers unintentionally introducing code that leads to a violation of tenant boundaries. IAM provides an AWS native, non-invasive way for you to achieve isolation for those cases where IAM supports policies that align with your overall isolation model.

There are several methods in IAM that you can use for isolating tenants and restricting access to resources. Choosing the right method for your application depends on several parameters. The number of tenants and the number of role definitions are two important dimensions that you should take into account.

Most applications require multiple role definitions for different user functions. A role definition refers to a minimal set of privileges that users or programmatic components need in order to do their job. For example, business users and data analysts would typically have different set of permissions to allow minimum necessary access to resources that they use.

In software-as-a-service (SaaS) applications, in addition to functional boundaries, there are also boundaries between tenant resources. As a result, the entire set of role definitions exists for each individual tenant. In highly dynamic environments (e.g., collaboration scenarios with cross-tenant access), new role definitions can be added ad-hoc. In such a case, the number of role definitions and their complexity can grow significantly as the system evolves.

There are three main tenant isolation methods in IAM. Let’s briefly review them before focusing on the ABAC in the following sections.

Figure 1: IAM tenant isolation methods

Figure 1: IAM tenant isolation methods

RBAC – Each tenant has a dedicated IAM role or static set of IAM roles that it uses for access to tenant resources. The number of IAM roles in RBAC equals to the number of role definitions multiplied by the number of tenants. RBAC works well when you have a small number of tenants and relatively static policies. You may find it difficult to manage multiple IAM roles as the number of tenants and the complexity of the attached policies grows.

Dynamically generated IAM policies – This method dynamically generates an IAM policy for a tenant according to user identity. Choose this method in highly dynamic environments with changing or frequently added role definitions (e.g., tenant collaboration scenario). You may also choose dynamically generated policies if you have a preference for generating and managing IAM policies by using your code rather than relying on built-in IAM service features. You can find more details about this method in the blog post Isolating SaaS Tenants with Dynamically Generated IAM Policies.

ABAC – This method is suitable for a wide range of SaaS applications, unless your use case requires support for frequently changed or added role definitions, which are easier to manage with dynamically generated IAM policies. Unlike Dynamically generated IAM policies, where you manage and apply policies through a self-managed mechanism, ABAC lets you rely more directly on IAM.

ABAC for tenant isolation

ABAC is achieved by using parameters (attributes) to control tenant access to resources. Using ABAC for tenant isolation results in temporary access to resources, which is restricted according to the caller’s identity and attributes.

One of the key advantages of the ABAC model is that it scales to any number of tenants with a single role. This is achieved by using tags (such as the tenant ID) in IAM polices and a temporary session created specifically for accessing tenant data. The session encapsulates the attributes of the requesting entity (for example, a tenant user). At policy evaluation time, IAM replaces these tags with session attributes.

Another component of ABAC is the assignation of attributes to tenant resources by using special naming conventions or resource tags. The access to a resource is granted when session and resource attributes match (for example, a session with the TenantID: yellow attribute can access a resource that is tagged as TenantID: yellow).

For more information about ABAC in IAM, see What is ABAC for AWS?

ABAC in a typical SaaS architecture

To demonstrate how you can use ABAC in IAM for tenant isolation, we will walk you through an example of a typical microservices-based application. More specifically, we will focus on two microservices that implement a shipment tracking flow in a multi-tenant ecommerce application.

Our sample tenant, Yellow, which has many users in many roles, has exclusive access to shipment data that belongs to this particular tenant. To achieve this, all microservices in the call chain operate in a restricted context that prevents cross-tenant access.

Figure 2: Sample shipment tracking flow in a SaaS application

Figure 2: Sample shipment tracking flow in a SaaS application

Let’s take a closer look at the sequence of events and discuss the implementation in detail.

A shipment tracking request is initiated by an authenticated Tenant Yellow user. The authentication process is left out of the scope of this discussion for the sake of brevity. The user identity expressed in the JSON Web Token (JWT) includes custom claims, one of which is a TenantID. In this example, TenantID equals yellow.

The JWT is delivered from the user’s browser in the HTTP header of the Get Shipment request to the shipment service. The shipment service then authenticates the request and collects the required parameters for getting the shipment estimated time of arrival (ETA). The shipment service makes a GetShippingETA request using the parameters to the tracking service along with the JWT.

The tracking service manages shipment tracking data in a data repository. The repository stores data for all of the tenants, but each shipment record there has an attached TenantID resource tag, for instance yellow, as in our example.

An IAM role attached to the tracking service, called TrackingServiceRole in this example, determines the AWS resources that the microservice can access and the actions it can perform.

Note that TrackingServiceRole itself doesn’t have permissions to access tracking data in the data store. To get access to tracking records, the tracking service temporarily assumes another role called TrackingAccessRole. This role remains valid for a limited period of time, until credentials representing this temporary session expire.

To understand how this works, we need to talk first about the trust relationship between TrackingAccessRole and TrackingServiceRole. The following trust policy lists TrackingServiceRole as a trusted entity.

{
  "Version": "2012-10-17",
  "Statement": [
    {
      "Effect": "Allow",
      "Principal": {
        "AWS": "arn:aws:iam::<account-id>:role/TrackingServiceRole"
      },
      "Action": "sts:AssumeRole"
    },
    {
      "Effect": "Allow",
      "Principal": {
        "AWS": "arn:aws:iam::<account-id>:role/TrackingServiceRole"
      },
      "Action": "sts:TagSession",
      "Condition": {
        "StringLike": {
          "aws:RequestTag/TenantID": "*"
        }
      }
    }
  ]
}

This policy needs to be associated with TrackingAccessRole. You can do that on the Trust relationships tab of the Role Details page in the IAM console or via the AWS CLI update-assume-role-policy method. That association is what allows the tracking service with the attached TrackingServiceRole role to assume TrackingAccessRole. The policy also allows TrackingServiceRole to attach the TenantID session tag to the temporary sessions it creates.

Session tags are principal tags that you specify when you request a session. This is how you inject variables into the request context for API calls executed during the session. This is what allows IAM policies evaluated in subsequent API calls to reference TenantID with the aws:PrincipalTag context key.

Now let’s talk about TrackingAccessPolicy. It’s an identity policy attached to TrackingAccessRole. This policy makes use of the aws:PrincipalTag/TenantID key to dynamically scope access to a specific tenant.

Later in this post, you can see examples of such data access policies for three different data storage services.

Now the stage is set to see how the tracking service creates a temporary session and injects TenantID into the request context. The following Python function does that by using AWS SDK for Python (Boto3). The function gets the TenantID (extracted from the JWT) and the TrackingAccessRole Amazon Resource Name (ARN) as parameters and returns a scoped Boto3 session object.

import boto3

def create_temp_tenant_session(access_role_arn, session_name, tenant_id, duration_sec):
    """
    Create a temporary session
    :param access_role_arn: The ARN of the role that the caller is assuming
    :param session_name: An identifier for the assumed session
    :param tenant_id: The tenant identifier the session is created for
    :param duration_sec: The duration, in seconds, of the temporary session
    :return: The session object that allows you to create service clients and resources
    """
    sts = boto3.client('sts')
    assume_role_response = sts.assume_role(
        RoleArn=access_role_arn,
        DurationSeconds=duration_sec,
        RoleSessionName=session_name,
        Tags=[
            {
                'Key': 'TenantID',
                'Value': tenant_id
            }
        ]
    )
    session = boto3.Session(aws_access_key_id=assume_role_response['Credentials']['AccessKeyId'],
                    aws_secret_access_key=assume_role_response['Credentials']['SecretAccessKey'],
                    aws_session_token=assume_role_response['Credentials']['SessionToken'])
    return session

Use these parameters to create temporary sessions for a specific tenant with a duration that meets your needs.

access_role_arn – The assumed role with an attached templated policy. The IAM policy must include the aws:PrincipalTag/TenantID tag key.

session_name – The name of the session. Use the role session name to uniquely identify a session. The role session name is used in the ARN of the assumed role principal and included in the AWS CloudTrail logs.

tenant_id – The tenant identifier that describes which tenant the session is created for. For better compatibility with resource names in IAM policies, it’s recommended to generate non-guessable alphanumeric lowercase tenant identifiers.

duration_sec – The duration of your temporary session.

Note: The details of token management can be abstracted away from the application by extracting the token generation into a separate module, as described in the blog post Isolating SaaS Tenants with Dynamically Generated IAM Policies. In that post, the reusable application code for acquiring temporary session tokens is called a Token Vending Machine.

The returned session can be used to instantiate IAM-scoped objects such as a storage service. After the session is returned, any API call performed with the temporary session credentials contains the aws:PrincipalTag/TenantID key-value pair in the request context.

When the tracking service attempts to access tracking data, IAM completes several evaluation steps to determine whether to allow or deny the request. These include evaluation of the principal’s identity-based policy, which is, in this example, represented by TrackingAccessPolicy. It is at this stage that the aws:PrincipalTag/TenantID tag key is replaced with the actual value, policy conditions are resolved, and access is granted to the tenant data.

Common ABAC scenarios

Let’s take a look at some common scenarios with different data storage services. For each example, a diagram is included that illustrates the allowed access to tenant data and how the data is partitioned in the service.

These examples rely on the architecture described earlier and assume that the temporary session context contains a TenantID parameter. We will demonstrate different versions of TrackingAccessPolicy that are applicable to different services. The way aws:PrincipalTag/TenantID is used depends on service-specific IAM features, such as tagging support, policy conditions and ability to parameterize resource ARN with session tags. Examples below illustrate these techniques applied to different services.

Pooled storage isolation with DynamoDB

Many SaaS applications rely on a pooled data partitioning model where data from all tenants is combined into a single table. The tenant identifier is then introduced into each table to identify the items that are associated with each tenant. Figure 3 provides an example of this model.

Figure 3: DynamoDB index-based partitioning

Figure 3: DynamoDB index-based partitioning

In this example, we’ve used Amazon DynamoDB, storing each tenant identifier in the table’s partition key. Now, we can use ABAC and IAM fine-grained access control to implement tenant isolation for the items in this table.

The following TrackingAccessPolicy uses the dynamodb:LeadingKeys condition key to restrict permissions to only the items whose partition key matches the tenant’s identifier as passed in a session tag.

{
  "Version": "2012-10-17",
  "Statement": [
    {
      "Effect": "Allow",
      "Action": [
        "dynamodb:GetItem",
        "dynamodb:BatchGetItem",
        "dynamodb:Query"
      ],
      "Resource": [
        "arn:aws:dynamodb:<region>:<account-id>:table/TrackingData"
      ],
      "Condition": {
        "ForAllValues:StringEquals": {
          "dynamodb:LeadingKeys": [
            "${aws:PrincipalTag/TenantID}"
          ]
        }
      }
    }
  ]
}

This example uses the dynamodb:LeadingKeys condition key in the policy to describe how you can control access to tenant resources. You’ll notice that we haven’t bound this policy to any specific tenant. Instead, the policy relies on the aws:PrincipalTag tag to resolve the TenantID parameter at runtime.

This approach means that you can add new tenants without needing to create any new IAM constructs. This reduces the maintenance burden and limits your chances that any IAM quotas will be exceeded.

Siloed storage isolation with Amazon Elasticsearch Service

Let’s look at another example that illustrates how you might implement tenant isolation of Amazon Elasticsearch Service resources. Figure 4 illustrates a silo data partitioning model, where each tenant of your system has a separate Elasticsearch index for each tenant.

Figure 4: Elasticsearch index-per-tenant strategy

Figure 4: Elasticsearch index-per-tenant strategy

You can isolate these tenant resources by creating a parameterized identity policy with the principal TenantID tag as a variable (similar to the one we created for DynamoDB). In the following example, the principal tag is a part of the index name in the policy resource element. At access time, the principal tag is replaced with the tenant identifier from the request context, yielding the Elasticsearch index ARN as a result.

{
  "Version": "2012-10-17",
  "Statement": [
    {
      "Effect": "Allow",
      "Action": [
        "es:ESHttpGet",
        "es:ESHttpPut"
      ],
      "Resource": [
        "arn:aws:es:<region>:<account-id>:domain/test/${aws:PrincipalTag/TenantID}*/*"
      ]
    }
  ]
}

In the case where you have multiple indices that belong to the same tenant, you can allow access to them by using a wildcard. The preceding policy allows es:ESHttpGet and es:ESHttpPut actions to be taken on documents if the documents belong to an index with a name that matches the pattern.

Important: In order for this to work, the tenant identifier must follow the same naming restrictions as indices.

Although this approach scales the tenant isolation strategy, you need to keep in mind that this solution is constrained by the number of indices your Elasticsearch cluster can support.

Amazon S3 prefix-per-tenant strategy

Amazon Simple Storage Service (Amazon S3) buckets are commonly used as shared object stores with dedicated prefixes for different tenants. For enhanced security, you can optionally use a dedicated customer master key (CMK) per tenant. If you do so, attach a corresponding TenantID resource tag to a CMK.

By using ABAC and IAM, you can make sure that each tenant can only get and decrypt objects in a shared S3 bucket that have the prefixes that correspond to that tenant.

Figure 5: S3 prefix-per-tenant strategy

Figure 5: S3 prefix-per-tenant strategy

In the following policy, the first statement uses the TenantID principal tag in the resource element. The policy grants s3:GetObject permission, but only if the requested object key begins with the tenant’s prefix.

The second statement allows the kms:Decrypt operation on a KMS key that the requested object is encrypted with. The KMS key must have a TenantID resource tag attached to it with a corresponding tenant ID as a value.

{
  "Version": "2012-10-17",
  "Statement": [
    {
      "Effect": "Allow",
      "Action": "s3:GetObject",
      "Resource": "arn:aws:s3:::sample-bucket-12345678/${aws:PrincipalTag/TenantID}/*"
    },
    {
      "Effect": "Allow",
      "Action": "kms:Decrypt",
       "Resource": "arn:aws:kms:<region>:<account-id>:key/*",
       "Condition": {
           "StringEquals": {
           "aws:PrincipalTag/TenantID": "${aws:ResourceTag/TenantID}"
        }
      }
    }
  ]
}

Important: In order for this policy to work, the tenant identifier must follow the S3 object key name guidelines.

With the prefix-per-tenant approach, you can support any number of tenants. However, if you choose to use a dedicated customer managed KMS key per tenant, you will be bounded by the number of KMS keys per AWS Region.

Conclusion

The ABAC method combined with IAM provides teams who build SaaS platforms with a compelling model for implementing tenant isolation. By using this dynamic, attribute-driven model, you can scale your IAM isolation policies to any practical number of tenants. This approach also makes it possible for you to rely on IAM to manage, scale, and enforce isolation in a way that’s integrated into your overall tenant identity scheme. You can start experimenting with IAM ABAC by using either the examples in this blog post, or this resource: IAM Tutorial: Define permissions to access AWS resources based on tags.

If you have feedback about this post, submit comments in the Comments section below. If you have questions about this post, start a new thread on the AWS IAM forum or contact AWS Support.

Want more AWS Security how-to content, news, and feature announcements? Follow us on Twitter.

Author

Michael Pelts

As a Senior Solutions Architect at AWS, Michael works with large ISV customers, helping them create innovative solutions to address their cloud challenges. Michael is passionate about his work, enjoys the creativity that goes into building solutions in the cloud, and derives pleasure from passing on his knowledge.

Author

Oren Reuveni

Oren is a Principal Solutions Architect and member of the SaaS Factory team. He helps guide and assist AWS partners with building their SaaS products on AWS. Oren has over 15 years of experience in the modern IT and Cloud domains. He is passionate about shaping the right dynamics between technology and business.

Building fine-grained authorization using Amazon Cognito, API Gateway, and IAM

Post Syndicated from Artem Lovan original https://aws.amazon.com/blogs/security/building-fine-grained-authorization-using-amazon-cognito-api-gateway-and-iam/

June 5, 2021: We’ve updated Figure 1: User request flow.


Authorizing functionality of an application based on group membership is a best practice. If you’re building APIs with Amazon API Gateway and you need fine-grained access control for your users, you can use Amazon Cognito. Amazon Cognito allows you to use groups to create a collection of users, which is often done to set the permissions for those users. In this post, I show you how to build fine-grained authorization to protect your APIs using Amazon Cognito, API Gateway, and AWS Identity and Access Management (IAM).

As a developer, you’re building a customer-facing application where your users are going to log into your web or mobile application, and as such you will be exposing your APIs through API Gateway with upstream services. The APIs could be deployed on Amazon Elastic Container Service (Amazon ECS), Amazon Elastic Kubernetes Service (Amazon EKS), AWS Lambda, or Elastic Load Balancing where each of these options will forward the request to your Amazon Elastic Compute Cloud (Amazon EC2) instances. Additionally, you can use on-premises services that are connected to your Amazon Web Services (AWS) environment over an AWS VPN or AWS Direct Connect. It’s important to have fine-grained controls for each API endpoint and HTTP method. For instance, the user should be allowed to make a GET request to an endpoint, but should not be allowed to make a POST request to the same endpoint. As a best practice, you should assign users to groups and use group membership to allow or deny access to your API services.

Solution overview

In this blog post, you learn how to use an Amazon Cognito user pool as a user directory and let users authenticate and acquire the JSON Web Token (JWT) to pass to the API Gateway. The JWT is used to identify what group the user belongs to, as mapping a group to an IAM policy will display the access rights the group is granted.

Note: The solution works similarly if Amazon Cognito would be federating users with an external identity provider (IdP)—such as Ping, Active Directory, or Okta—instead of being an IdP itself. To learn more, see Adding User Pool Sign-in Through a Third Party. Additionally, if you want to use groups from an external IdP to grant access, Role-based access control using Amazon Cognito and an external identity provider outlines how to do so.

The following figure shows the basic architecture and information flow for user requests.

Figure 1: User request flow

Figure 1: User request flow

Let’s go through the request flow to understand what happens at each step, as shown in Figure 1:

  1. A user logs in and acquires an Amazon Cognito JWT ID token, access token, and refresh token. To learn more about each token, see using tokens with user pools.
  2. A RestAPI request is made and a bearer token—in this solution, an access token—is passed in the headers.
  3. API Gateway forwards the request to a Lambda authorizer—also known as a custom authorizer.
  4. The Lambda authorizer verifies the Amazon Cognito JWT using the Amazon Cognito public key. On initial Lambda invocation, the public key is downloaded from Amazon Cognito and cached. Subsequent invocations will use the public key from the cache.
  5. The Lambda authorizer looks up the Amazon Cognito group that the user belongs to in the JWT and does a lookup in Amazon DynamoDB to get the policy that’s mapped to the group.
  6. Lambda returns the policy and—optionally—context to API Gateway. The context is a map containing key-value pairs that you can pass to the upstream service. It can be additional information about the user, the service, or anything that provides additional information to the upstream service.
  7. The API Gateway policy engine evaluates the policy.

    Note: Lambda isn’t responsible for understanding and evaluating the policy. That responsibility falls on the native capabilities of API Gateway.

  8. The request is forwarded to the service.

Note: To further optimize Lambda authorizer, the authorization policy can be cached or disabled, depending on your needs. By enabling cache, you could improve the performance as the authorization policy will be returned from the cache whenever there is a cache key match. To learn more, see Configure a Lambda authorizer using the API Gateway console.

Let’s have a closer look at the following example policy that is stored as part of an item in DynamoDB.

{
   "Version":"2012-10-17",
   "Statement":[
      {
         "Sid":"PetStore-API",
         "Effect":"Allow",
         "Action":"execute-api:Invoke",
         "Resource":[
            "arn:aws:execute-api:*:*:*/*/*/petstore/v1/*",
            "arn:aws:execute-api:*:*:*/*/GET/petstore/v2/status"
         ],
         "Condition":{
            "IpAddress":{
               "aws:SourceIp":[
                  "192.0.2.0/24",
                  "198.51.100.0/24"
               ]
            }
         }
      }
   ]
}

Based on this example policy, the user is allowed to make calls to the petstore API. For version v1, the user can make requests to any verb and any path, which is expressed by an asterisk (*). For v2, the user is only allowed to make a GET request for path /status. To learn more about how the policies work, see Output from an Amazon API Gateway Lambda authorizer.

Getting started

For this solution, you need the following prerequisites:

  • The AWS Command Line Interface (CLI) installed and configured for use.
  • Python 3.6 or later, to package Python code for Lambda

    Note: We recommend that you use a virtual environment or virtualenvwrapper to isolate the solution from the rest of your Python environment.

  • An IAM role or user with enough permissions to create Amazon Cognito User Pool, IAM Role, Lambda, IAM Policy, API Gateway and DynamoDB table.
  • The GitHub repository for the solution. You can download it, or you can use the following Git command to download it from your terminal.

    Note: This sample code should be used to test out the solution and is not intended to be used in production account.

     $ git clone https://github.com/aws-samples/amazon-cognito-api-gateway.git
     $ cd amazon-cognito-api-gateway
    

    Use the following command to package the Python code for deployment to Lambda.

     $ bash ./helper.sh package-lambda-functions
     …
     Successfully completed packaging files.
    

To implement this reference architecture, you will be utilizing the following services:

Note: This solution was tested in the us-east-1, us-east-2, us-west-2, ap-southeast-1, and ap-southeast-2 Regions. Before selecting a Region, verify that the necessary services—Amazon Cognito, API Gateway, and Lambda—are available in those Regions.

Let’s review each service, and how those will be used, before creating the resources for this solution.

Amazon Cognito user pool

A user pool is a user directory in Amazon Cognito. With a user pool, your users can log in to your web or mobile app through Amazon Cognito. You use the Amazon Cognito user directory directly, as this sample solution creates an Amazon Cognito user. However, your users can also log in through social IdPs, OpenID Connect (OIDC), and SAML IdPs.

Lambda as backing API service

Initially, you create a Lambda function that serves your APIs. API Gateway forwards all requests to the Lambda function to serve up the requests.

An API Gateway instance and integration with Lambda

Next, you create an API Gateway instance and integrate it with the Lambda function you created. This API Gateway instance serves as an entry point for the upstream service. The following bash command below creates an Amazon Cognito user pool, a Lambda function, and an API Gateway instance. The command then configures proxy integration with Lambda and deploys an API Gateway stage.

Deploy the sample solution

From within the directory where you downloaded the sample code from GitHub, run the following command to generate a random Amazon Cognito user password and create the resources described in the previous section.

 $ bash ./helper.sh cf-create-stack-gen-password
 ...
 Successfully created CloudFormation stack.

When the command is complete, it returns a message confirming successful stack creation.

Validate Amazon Cognito user creation

To validate that an Amazon Cognito user has been created successfully, run the following command to open the Amazon Cognito UI in your browser and then log in with your credentials.

Note: When you run this command, it returns the user name and password that you should use to log in.

 $ bash ./helper.sh open-cognito-ui
  Opening Cognito UI. Please use following credentials to login:
  Username: cognitouser
  Password: xxxxxxxx

Alternatively, you can open the CloudFormation stack and get the Amazon Cognito hosted UI URL from the stack outputs. The URL is the value assigned to the CognitoHostedUiUrl variable.

Figure 2: CloudFormation Outputs - CognitoHostedUiUrl

Figure 2: CloudFormation Outputs – CognitoHostedUiUrl

Validate Amazon Cognito JWT upon login

Since we haven’t installed a web application that would respond to the redirect request, Amazon Cognito will redirect to localhost, which might look like an error. The key aspect is that after a successful log in, there is a URL similar to the following in the navigation bar of your browser:

http://localhost/#id_token=eyJraWQiOiJicVhMYWFlaTl4aUhzTnY3W...

Test the API configuration

Before you protect the API with Amazon Cognito so that only authorized users can access it, let’s verify that the configuration is correct and the API is served by API Gateway. The following command makes a curl request to API Gateway to retrieve data from the API service.

 $ bash ./helper.sh curl-api
{"pets":[{"id":1,"name":"Birds"},{"id":2,"name":"Cats"},{"id":3,"name":"Dogs"},{"id":4,"name":"Fish"}]}

The expected result is that the response will be a list of pets. In this case, the setup is correct: API Gateway is serving the API.

Protect the API

To protect your API, the following is required:

  1. DynamoDB to store the policy that will be evaluated by the API Gateway to make an authorization decision.
  2. A Lambda function to verify the user’s access token and look up the policy in DynamoDB.

Let’s review all the services before creating the resources.

Lambda authorizer

A Lambda authorizer is an API Gateway feature that uses a Lambda function to control access to an API. You use a Lambda authorizer to implement a custom authorization scheme that uses a bearer token authentication strategy. When a client makes a request to one of the API operations, the API Gateway calls the Lambda authorizer. The Lambda authorizer takes the identity of the caller as input and returns an IAM policy as the output. The output is the policy that is returned in DynamoDB and evaluated by the API Gateway. If there is no policy mapped to the caller identity, Lambda will generate a deny policy and request will be denied.

DynamoDB table

DynamoDB is a key-value and document database that delivers single-digit millisecond performance at any scale. This is ideal for this use case to ensure that the Lambda authorizer can quickly process the bearer token, look up the policy, and return it to API Gateway. To learn more, see Control access for invoking an API.

The final step is to create the DynamoDB table for the Lambda authorizer to look up the policy, which is mapped to an Amazon Cognito group.

Figure 3 illustrates an item in DynamoDB. Key attributes are:

  • Group, which is used to look up the policy.
  • Policy, which is returned to API Gateway to evaluate the policy.


Figure 3: DynamoDB item

Figure 3: DynamoDB item

Based on this policy, the user that is part of the Amazon Cognito group pet-veterinarian is allowed to make API requests to endpoints https://<domain>/<api-gateway-stage>/petstore/v1/* and https://<domain>/<api-gateway-stage>/petstore/v2/status for GET requests only.

Update and create resources

Run the following command to update existing resources and create a Lambda authorizer and DynamoDB table.

 $ bash ./helper.sh cf-update-stack
Successfully updated CloudFormation stack.

Test the custom authorizer setup

Begin your testing with the following request, which doesn’t include an access token.

$ bash ./helper.sh curl-api
{"message":"Unauthorized"}

The request is denied with the message Unauthorized. At this point, the Amazon API Gateway expects a header named Authorization (case sensitive) in the request. If there’s no authorization header, the request is denied before it reaches the lambda authorizer. This is a way to filter out requests that don’t include required information.

Use the following command for the next test. In this test, you pass the required header but the token is invalid because it wasn’t issued by Amazon Cognito but is a simple JWT-format token stored in ./helper.sh. To learn more about how to decode and validate a JWT, see decode and verify an Amazon Cognito JSON token.

$ bash ./helper.sh curl-api-invalid-token
{"Message":"User is not authorized to access this resource"}

This time the message is different. The Lambda authorizer received the request and identified the token as invalid and responded with the message User is not authorized to access this resource.

To make a successful request to the protected API, your code will need to perform the following steps:

  1. Use a user name and password to authenticate against your Amazon Cognito user pool.
  2. Acquire the tokens (id token, access token, and refresh token).
  3. Make an HTTPS (TLS) request to API Gateway and pass the access token in the headers.

Before the request is forwarded to the API service, API Gateway receives the request and passes it to the Lambda authorizer. The authorizer performs the following steps. If any of the steps fail, the request is denied.

  1. Retrieve the public keys from Amazon Cognito.
  2. Cache the public keys so the Lambda authorizer doesn’t have to make additional calls to Amazon Cognito as long as the Lambda execution environment isn’t shut down.
  3. Use public keys to verify the access token.
  4. Look up the policy in DynamoDB.
  5. Return the policy to API Gateway.

The access token has claims such as Amazon Cognito assigned groups, user name, token use, and others, as shown in the following example (some fields removed).

{
    "sub": "00000000-0000-0000-0000-0000000000000000",
    "cognito:groups": [
        "pet-veterinarian"
    ],
...
    "token_use": "access",
    "scope": "openid email",
    "username": "cognitouser"
}

Finally, let’s programmatically log in to Amazon Cognito UI, acquire a valid access token, and make a request to API Gateway. Run the following command to call the protected API.

$ bash ./helper.sh curl-protected-api
{"pets":[{"id":1,"name":"Birds"},{"id":2,"name":"Cats"},{"id":3,"name":"Dogs"},{"id":4,"name":"Fish"}]}

This time, you receive a response with data from the API service. Let’s examine the steps that the example code performed:

  1. Lambda authorizer validates the access token.
  2. Lambda authorizer looks up the policy in DynamoDB based on the group name that was retrieved from the access token.
  3. Lambda authorizer passes the IAM policy back to API Gateway.
  4. API Gateway evaluates the IAM policy and the final effect is an allow.
  5. API Gateway forwards the request to Lambda.
  6. Lambda returns the response.

Let’s continue to test our policy from Figure 3. In the policy document, arn:aws:execute-api:*:*:*/*/GET/petstore/v2/status is the only endpoint for version V2, which means requests to endpoint /GET/petstore/v2/pets should be denied. Run the following command to test this.

 $ bash ./helper.sh curl-protected-api-not-allowed-endpoint
{"Message":"User is not authorized to access this resource"}

Note: Now that you understand fine grained access control using Cognito user pool, API Gateway and lambda function, and you have finished testing it out, you can run the following command to clean up all the resources associated with this solution:

 $ bash ./helper.sh cf-delete-stack

Advanced IAM policies to further control your API

With IAM, you can create advanced policies to further refine access to your APIs. You can learn more about condition keys that can be used in API Gateway, their use in an IAM policy with conditions, and how policy evaluation logic determines whether to allow or deny a request.

Summary

In this post, you learned how IAM and Amazon Cognito can be used to provide fine-grained access control for your API behind API Gateway. You can use this approach to transparently apply fine-grained control to your API, without having to modify the code in your API, and create advanced policies by using IAM condition keys.

If you have feedback about this post, submit comments in the Comments section below. If you have questions about this post, start a new thread on the Amazon Cognito forum or contact AWS Support.

Want more AWS Security how-to content, news, and feature announcements? Follow us on Twitter.

Author

Artem Lovan

Artem is a Senior Solutions Architect based in New York. He helps customers architect and optimize applications on AWS. He has been involved in IT at many levels, including infrastructure, networking, security, DevOps, and software development.

Analyze and understand IAM role usage with Amazon Detective

Post Syndicated from Sheldon Sides original https://aws.amazon.com/blogs/security/analyze-and-understand-iam-role-usage-with-amazon-detective/

In this blog post, we’ll demonstrate how you can use Amazon Detective’s new role session analysis feature to investigate security findings that are tied to the usage of an AWS Identity and Access Management (IAM) role. You’ll learn about how you can use this new role session analysis feature to determine which Amazon Web Services (AWS) resource assumed the role that triggered a finding, and to understand the context of the activities that the resource performed when the finding was triggered. As a result of this walkthrough, you’ll gain an understanding of how to quickly ascertain anomalous identity and access behaviors. While this demonstration utilizes an Amazon GuardDuty finding as a starting point, the techniques demonstrated within this post highlight how Detective can be utilized to investigate any access behaviors that are tied to using IAM roles.

IAM roles provide a valuable mechanism that you can use to delegate access to users and services for managing and accessing your AWS resources, but using IAM roles can make it more complex to determine who performed an action. AWS CloudTrail logs do track all usage tied to IAM roles, but attributing activity to a specific resource that assumed a role requires storage of CloudTrail logs and analysis of this log telemetry. Understanding role usage through log analysis gets even more complex if cross-account role assumptions are involved, since that requires you to collate and analyze logs from multiple accounts. In some cases, permissions may allow a resource to sequentially assume a series of different roles (role chaining), further complicating the attribution of activity to a specific resource.

With its built-in, multi-account log analysis, Detective’s new role session analysis feature provides visibility into role usage, cross-account role assumptions and into any role chaining activities that may have been performed across the accounts. With this feature, you can quickly determine who or what assumed a role, regardless of whether this was a federated, IAM user or other resource. The feature shows you when roles were assumed and for how long, and helps you determine the activities that were performed during the assumption. Detective visualizes these results based upon its automatic analysis of CloudTrail logs and VPC flow log traffic that it continuously processes for enabled accounts, regardless of whether these log sources are enabled on each account.

To demonstrate this feature, we’ll investigate a “CloudTrail logging disabled” finding that is triggered by Amazon GuardDuty as a result of activity performed by a resource that has assumed an IAM role. Amazon GuardDuty is an AWS service that continuously monitors for malicious or unauthorized behavior to help protect your AWS resources, including your AWS accounts, access keys, and EC2 instances. GuardDuty identifies unusual or unauthorized activity, like crypto-currency mining, access to data stored in S3 from unusual locations, or infrastructure deployments in a region that has never been used.

Start the investigation in GuardDuty

GuardDuty issues a CloudTrailLoggingDisabled finding to alert you that CloudTrail logging has been disabled in one of your accounts. This is an important finding, because it could indicate that an attacker is attempting to hide their tracks. Since Detective receives a copy of CloudTrail traffic directly from the AWS infrastructure, Detective will continue to receive API calls that are made after CloudTrail logging is disabled.

In order to properly investigate this type of finding and determine if this is an issue that you need to be concerned about, you’ll need to answer a few specific questions:

  1. You’ll need to determine which user or resource disabled CloudTrail.
  2. You’ll need to see what other actions they performed after disabling logging.
  3. You’ll want to understand if their access pattern and behavior is consistent with their previous access patterns and behaviors.

Let’s take a look at a CloudTrailLoggingDisabled finding in GuardDuty as we start trying to answer these questions. When you access the GuardDuty console, a list of your recent findings is displayed. In Figure 1, a filter has been applied to display the CloudTrailLoggingDisabled finding.

Figure 1: A GuardDuty finding showing that CloudTrail was disabled

Figure 1: A GuardDuty finding showing that CloudTrail was disabled

After you select the GuardDuty finding, you can see the finding details, including some of the user information related to the finding. Figure 2 shows the Resources affected section of the finding.

Figure 2: Viewing user data related to the GuardDuty finding

Figure 2: Viewing user data related to the GuardDuty finding

The Affected resources field indicates that the demo-trail-2 trail was where logging was disabled. You can also see that User type is set to AssumedRole and that User name contains the role AWSReservedSSO_AdministratorAccess_598c5f73f8b2b4e5. This was the role that was assumed and using which CloudTrail logging was disabled. This information can help you understand the resources this role delegates access to and the permissions it provides. You still need to identify who specifically assumed the role to disable CloudTrail logging and the activities they performed afterwards. You can use Amazon Detective to answer these questions.

Investigate the finding in Detective

In order to investigate this GuardDuty finding in Detective, you select the finding and then select Investigate in the Actions menu, as shown in Figure 3.

Figure 3: Choose 'Investigate with Detective' and select the GuardDuty finding ID on the pop-up to investigate the finding

Figure 3: Choose ‘Investigate with Detective’ and select the GuardDuty finding ID on the pop-up to investigate the finding

View the finding profile page

Choosing the Investigate action for this CloudTrailLoggingDisabled finding in GuardDuty opens the finding’s profile page in the Detective console, as shown in Figure 4. Detective has the concept of a profile page, which displays summaries and analytics gleaned from CloudTrail management logs, VPC flow traffic and GuardDuty findings for AWS resources, IP addresses, and user agents. Each profile page can display up to 12 months of information for the selected resource and is intended to help an investigator review and understand the behavior of a resource, or quickly triage and delve into potential issues. Detective doesn’t require a customer to enable CloudTrail or VPC Flog logging in order to retrieve this data and provides these 12 months of visibility regardless of the customers log retention or archiving policies.

Figure 4: Viewing a GuardDuty finding in Detective

Figure 4: Viewing a GuardDuty finding in Detective

Scope time

To help focus your investigation, Detective defaults the time range and thus the displayed information in a finding profile to cover the period of time from when the finding was created through when it was last updated. In the case of this finding, the scope time covers a 1-hour period of time. You can change the scope time by choosing the calendar icon at the top right of the page, if you want to examine additional information before or after the finding was created. The defaulted scope time is sufficient for this investigation, so we can leave it as-is.

Role session overview

Detective uses tabs to group information on profile pages, and for this finding it shows the role session overview tab by default. The role session represents the activities and behavior of the resource that assumed the role tied to our finding. In this case, the role was assumed by someone with the user name sara, as shown in the Assumed by field. (We’ll assume that the user’s first name is Sara.) By analyzing the role session information in the CloudTrail logs, Detective was able to immediately identify that sara was the user who disabled CloudTrail logging and caused the finding to be triggered. You now have an answer to the question of who did this action.

Before we move to answer our other questions about what Sara did after disabling logging and whether her behavior changed, let’s discuss role sessions in more detail. Every role session has a role session name, sara in this case, and a unique role session identifier. The role session identifier is the role ID of the role assumed and the role session name, concatenated together. Best practices dictate that for a specific role that’s assumed by a specific resource, the role session name represents the user name of the IAM or federated user, or includes other useful information about the resource that assumed the role (for more information, see the Naming of individual IAM role sessions blog post). In this case, because the best practices are being followed, Detective is able to track Sara’s activities and behavior each time she assumes the AWSReservedSSO_AdministratorAccess_598c5f73f8b2b4e5 role.

Detective tracks statistics such as when a role session was first observed (October in Sara’s case, for this role), as well as the actions performed and behavioral insights such as the geolocations where Sara initiated her role assumptions. Knowing that Sara has assumed this role before is useful, because you can now assess whether her usage of the role changed during the 1-hour window of the scope time that you’re looking at now, compared to all of her previous assumptions of this role.

Review changes in Sara’s access patterns and operations

Detective tracks changes in geographical access and operations on the New behavior tab. Let’s choose the New behavior tab for the role session to see this information, as displayed in Figure 5.

Figure 5: Viewing new role session behavior

Figure 5: Viewing new role session behavior

During a security investigation, determining that access patterns have changed can be helpful in highlighting malicious activity. Since Detective tracks Sara’s assumptions of the AWSReservedSSO_AdministratorAccess_598c5f73f8b2b4e5 role, it can show the location where Sara assumed the role and whether the current assumption took place from the same location as her previous ones.

In Figure 5, you can see that Sara has a history of assuming the AWSReservedSSO_AdministratorAccess_598c5f73f8b2b4e5 role from Bellevue, WA and Ashburn, VA, since those geographies are shown in blue. If she had assumed this role from a new location, you would see the new location indicated on the map in orange. Since the API calls being made by this user are from a previously observed location, it’s very unlikely that the user’s credentials were compromised. Making this determination through a manual analysis of CloudTrail logs would have been much more time consuming.

Other information that you can gather from the New behavior role session tab includes newly observed API calls, API calls with increased volume, newly observed autonomous system organizations, and newly observed user agents. It’s useful to be able to validate that the operations Sara performed during the current scope time are relatively consistent with the operations she has performed in the past. This helps us be more certain that it was indeed Sara who was conducting this activity.

Investigate Sara’s API activity

Now that we’ve determined that Sara’s access pattern and activities are consistent with previous behavior, let’s use Detective to look further into Sara’s activity to determine if she accidentally disabled CloudTrail logging or if there was possible malicious intent behind her action.

To investigate the user’s actions

  1. On the finding profile page, in the dropdown list at the top of the screen, select Overview: Role Session to go back to the Overview tab for the role session.

    Figure 6: Navigating to the 'Overview: Role Session' page

    Figure 6: Navigating to the ‘Overview: Role Session’ page

  2. Once you’re on the Overview tab, navigate to the Overall API call volume panel.
    Figure 7: Navigating to the Overall API call volume panel

    Figure 7: Navigating to the ‘Overall API call volume’ panel

    This panel displays a chart of the successful and failed API calls that Sara has made while she assumes the AWSReservedSSO_AdministratorAccess_598c5f73f8b2b4e5 role. The chart shows a black rectangle around activities that were performed during the CloudTrail findings scope time. It also displays historical activities and shows a baseline across the chart so that you can understand how actively she uses the permissions granted to her by assuming this role.

  3. Choose the display details for scope time button to retrieve the details of the API calls that were invoked by Sara during the scope time, so that you can determine her actions after she disabled CloudTrail logging.
    Figure 8: Displaying details based on scope time

    Figure 8: Displaying details based on scope time

    You will now see the Overall API call volume panel expand to show you all the IP addresses, API calls, and access keys used by Sara during the scope time window of this finding.

  4. Choose the API method tab to see a list of all the API calls that were made.
    Figure 9: Viewing the API methods called

    Figure 9: Viewing the API methods called

    She invoked just two API calls during this scope time: the StopLogging and AssumeRole API calls. You were already aware that Sara disabled CloudTrail logging, but you weren’t aware that she assumed another role. When a user assumes a role while they have another one assumed, this is called role chaining. Although role chaining can be used because a user needs additional permissions, it can also be used to hide activities. Because we don’t know what other actions Sara performed after assuming this second role, let’s dig further. That may shed light on why she chose to disable CloudTrail logging.

Examine chained role assumptions

To find out more about Sara’s use of role chaining, let’s look at the other role that she assumed during this role session.

To view the user’s other role

  1. Navigate back to the top of the finding profile page. In the Role session details panel, choose AWSReservedSSO_AdministratorAccess_598c5f73f8b2b4e5.
    Figure 10: Locating the 'Assumed role' name

    Figure 10: Locating the ‘Assumed role’ name

    Detective displays the AWS Role profile page for this role, and you can now see the activity that has occurred across all resources that have assumed this role. In order to highlight information that’s relevant to the time frame of your investigation, Detective maintains your scope time as you move from the CloudTrailLoggingDisabled finding profile page to this role profile page.

  2. The goal for coming to this page is to determine which other role Sara assumed after assuming the AWSReservedSSO_AdministratorAccess_598c5f73f8b2b4e5 role, so choose the Resource interaction tab. On this tab, you will see the following three panels: Resources that assumed this role, Assumed roles, and Sessions involved.In Figure 11, you can see the Resources that assumed this role panel, which lists all the AWS resources that have assumed this role, their type (EC2 instance, federated or IAM user, IAM role), their account, and when they assumed the role for the first and last time. Sara is on this list, but Detective does not show an AWS account next to her because federated users aren’t tied to a specific account. The account field is populated for other resource types that are displayed on this panel and can be useful to understand cross-account role assumptions.

    Figure 11: Viewing resources that have assumed a role

    Figure 11: Viewing resources that have assumed a role

  3. On the same Resource Interaction tab, as you scroll down you will see the Assumed Roles panel, Figure 12, which helps you understand role chaining by listing the other roles that have been assumed by the AWSReservedSSO_AdministratorAccess_598c5f73f8b2b4e5 role. In this case, the role has assumed several other roles, including DemoRole1 during the same window of time when the CloudTrailLoggingDisabled finding occurred.

    Figure 12: Viewing the roles that have been assumed

    Figure 12: Viewing the roles that have been assumed

  4. In Figure 13, you can see the Sessions involved panel, which shows the role sessions for all the resources that have assumed this role, and role sessions where this role has assumed other roles within the current scope time. You see two role sessions with the session name sara, one where Sara assumed the AWSReservedSSO_AdministratorAccess_598c5f73f8b2b4e5 role and another where AWSReservedSSO_AdministratorAccess_598c5f73f8b2b4e5 assumed DemoRole1.

    Figure 13: Viewing the role sessions this role was involved with

    Figure 13: Viewing the role sessions this role was involved with

Now that you know that Sara also used the role DemoRole1 during her role session, let’s take a closer look at what actions she performed.

View API operations that were called within the chained role

In this step, we’ll view Sara’s activity within the DemoRole1 role, focusing on the API calls that were made.

To view the user’s activity in another role

  1. In the Sessions involved panel, in the Session name column, find the row where DemoRole1 is the Assumed Role value. Choose the session name in this row, sara, to go to the role session profile page.
  2. You will be most interested in the API methods that were called during this role session, and you can view those in the Overall API call volume panel. As shown in Figure 14, you can see that Sara has accessed DemoRole1 before, because there are calls graphed prior to the calls in our scope time.
  3. Choose the display details for scope time button on the Overall API call volume panel, and then choose the API method tab.

    Figure 14: Viewing the role session API method calls

    Figure 14: Viewing the role session API method calls

In Figure 14, you can see that calls were made to the DescribeInstances and RunInstances API methods. So you now know that Sara determined the type of Amazon Elastic Compute Cloud (Amazon EC2) instances that were running in your account and then successfully created an EC2 instance by calling the RunInstances API method. You can also see that successful and failed calls were made to the AttachRolePolicy API method as a part of the session. This could possibly be an attempt to elevate permissions in the account and would justify further investigation into the user’s actions.

As an investigator, you’ve determined that Sara was the user who disabled CloudTrail logging and that her access pattern was consistent with her past accesses. You’ve also determined the other actions she performed after she disabled logging and assumed a second role, but you can continue to investigate further by answering additional questions, such as:

  • What did Sara do with DemoRole1 when she assumed this role in the past? Are her current activities consistent with those past activities?
  • What activities are being performed across this account? Are those consistent with Sara’s activities?

By using Detective’s features that have been demonstrated in this post, you will be able to answer the questions like the ones listed above.

Summary

After you read this post, we hope you have a better understanding of the ways in which Amazon Detective collects, organizes, and presents log data to simplify your security investigations. All Detective service subscriptions include the new role session analysis capabilities. With these capabilities, you can quickly attribute activity performed under a role to a specific resource in your environment, understand cross-account role assumptions, determine role chaining behavior, and quickly see called APIs.

All customers receive a 30-day free trial when they enable Amazon Detective. See the AWS Regional Services page for all the Regions where Detective is available. To learn more, visit the Amazon Detective product page or see the additional resources at the end of this post to further expand your knowledge of Detective capabilities and features.

Additional resources

Amazon Detective features

Amazon Detective overview and demo

Amazon Detective FAQs

Amazon Detective Regions, endpoints, and quotas

Naming of individual IAM role sessions

If you have feedback about this post, submit comments in the Comments section below.

Want more AWS Security how-to content, news, and feature announcements? Follow us on Twitter.

Author

Sheldon Sides

Sheldon is a Senior Solutions Architect, focused on helping customers implement native AWS security services. He enjoys using his experience as a consultant and running a cloud security startup to help customers build secure AWS Cloud solutions. His interests include working out, software development, and learning about the latest technologies.

Author

Gagan Prakash

Gagan is a Product Manager on the Amazon Detective team and is passionate about ensuring that Detective’s new features and capabilities address the needs of our customers. He leverages his past experiences in cybersecurity startups and software companies to help drive product improvements. His interests include spending time with family, reading, and learning more about the world at large.

Operating Lambda: Building a solid security foundation – Part 1

Post Syndicated from James Beswick original https://aws.amazon.com/blogs/compute/operating-lambda-building-a-solid-security-foundation-part-1/

In the Operating Lambda series, I cover important topics for developers, architects, and systems administrators who are managing AWS Lambda-based applications. This two-part series discusses core security concepts for Lambda-based applications.

In the AWS Cloud, the most important foundational security principle is the shared responsibility model. This broadly shares security responsibilities between AWS and our customers. AWS is responsible for “security of the cloud”, such as the underlying physical infrastructure and facilities providing the services. Customers are responsible for “security in the cloud”, which includes applying security best practices, controlling access, and taking measures to protect data.

One of the main reasons for the popularity of Lambda-based applications is that AWS manages even more of the security operations compared with traditional cloud-based compute. For example, Lambda customers using zip file deployments do not need to patch underlying operating systems or apply security patches – these tasks are managed automatically by the Lambda service.

This post explains the Lambda execution environment and mechanisms used by the service to protect customer data. It also covers applying the principles of least privilege to your application and what this means in terms of permissions and Lambda function scope.

Understanding the Lambda execution environment

When your functions are invoked, the Lambda service runs your code inside an execution environment. Lambda scrubs the memory before it is assigned to an execution environment. Execution environments are run on hardware virtualized virtual machines (MicroVMs) which are dedicated to a single AWS account. Execution environments are never shared across functions and MicroVMs are never shared across AWS accounts. This is the isolation model for the Lambda service:

Isolation model for the Lambda service

A single execution environment may be reused by subsequent function invocations. This helps improve performance since it reduces the time taken to prepare and environment. Within your code, you can take advantage of this behavior to improve performance further, by caching locally within the function or reusing long-lived connections. All of these invocations are handled by a single process, so any process-wide state (such as static state in Java) is available across all invocations within the same execution environment.

There is also a local file system available at /tmp for all Lambda functions. This is local to each function but shared across invocations within the same execution environment. If your function must access large libraries or files, these can be downloaded here first and then used by all subsequent invocations. This mechanism provides a way to amortize the cost and time of downloading this data across multiple invocations.

While data is never shared across AWS customers, it is possible for data from one Lambda function to be shared with another invocation of the same function instance. This can be useful for caching common values or sharing libraries. However, if you have information only intended for a single invocation, you should:

  • Ensure that data is only used in a local variable scope.
  • Delete any /tmp files before exiting, and use a UUID name to prevent different instances from accessing the same temporary files.
  • Ensure that any callbacks are complete before exiting.

For applications requiring the highest levels of security, you may also implement your own memory encryption and wiping process before a function exits. At the function level, the Lambda service does not inspect or scan your code. Many of the best practices in security for software development continue to apply in serverless software development.

The security posture of an application is determined by the use-case but developers should always take precautions against common risks such as misconfiguration, injection flaws, and handling user input. Developers should be familiar with common security concepts and security risks, such as those listed in the OWASP Top 10 Web Application Security Risks and the OWASP Serverless Top 10. The use of static code analysis tools, unit tests, and regression tests are still valid in a serverless compute environment.

To learn more, read “Amazon Web Services: Overview of Security Processes”, “Compliance validation for AWS Lambda”, and “Security Overview of AWS Lambda”.

Applying the principles of least privilege

AWS Identity and Access Management (IAM) is the service used to manage access to AWS services. Before using IAM, it’s important to review security best practices that apply across AWS, to ensure that your user accounts are secured appropriately.

Lambda is fully integrated with IAM, allowing you to control precisely what each Lambda function can do within the AWS Cloud. There are two important policies that define the scope of permissions in Lambda functions. The event source uses a resource policy that grants permission to invoke the Lambda function, whereas the Lambda service uses an execution role to constrain what the function is allowed to do. In many cases, the console configures both of these policies with default settings.

As you start to build Lambda-based applications with frameworks such as AWS SAM, you describe both policies in the application’s template.

Resource and execution role policy

By default, when you create a new Lambda function, a specific IAM role is created for only that function.

IAM role for a Lambda function

This role has permissions to create an Amazon CloudWatch log group in the current Region and AWS account, and create log streams and put events to those streams. The policy follows the principle of least privilege by scoping precise permissions to specific resources, AWS services, and accounts.

Developing least privilege IAM roles

As you develop a Lambda function, you expand the scope of this policy to enable access to other resources. For example, for a function that processes objects put into an Amazon S3 bucket, it requires read access to objects stored in that bucket. Do not grant the function broader permissions to write or delete data, or operate in other buckets.

Determining the exact permissions can be challenging, since IAM permissions are granular and they control access to both the data plane and control plane. The following references are useful for developing IAM policies:

One of the fastest ways to scope permissions appropriately is to use AWS SAM policy templates. You can reference these templates directly in the AWS SAM template for your application, providing custom parameters as required:

SAM policy templates

In this example, the S3CrudPolicy template provides full create, read, update, and delete permissions to one bucket, and the S3ReadPolicy template provides only read access to another bucket. AWS SAM named templates expand into more verbose AWS CloudFormation policy definitions that show how the principle of least privilege is applied. The S3ReadPolicy is defined as:

        "Statement": [
          {
            "Effect": "Allow",
            "Action": [
              "s3:GetObject",
              "s3:ListBucket",
              "s3:GetBucketLocation",
              "s3:GetObjectVersion",
              "s3:GetLifecycleConfiguration"
            ],
            "Resource": [
              {
                "Fn::Sub": [
                  "arn:${AWS::Partition}:s3:::${bucketName}",
                  {
                    "bucketName": {
                      "Ref": "BucketName"
                    }
                  }
                ]
              },
              {
                "Fn::Sub": [
                  "arn:${AWS::Partition}:s3:::${bucketName}/*",
                  {
                    "bucketName": {
                      "Ref": "BucketName"
                    }
                  }
                ]
              }
            ]
          }
        ]

It includes the necessary, minimal permissions to retrieve the S3 object, including getting the bucket location, object version, and lifecycle configuration.

Access to CloudWatch Logs

To log output, Lambda roles must provide access to CloudWatch Logs. If you are building a policy manually, ensure that it includes:

{
    "Version": "2012-10-17",
    "Statement": [
        {
            "Effect": "Allow",
            "Action": "logs:CreateLogGroup",
            "Resource": "arn:aws:logs:region:accountID:*"
        },
        {
            "Effect": "Allow",
            "Action": [
                "logs:CreateLogStream",
                "logs:PutLogEvents"
            ],
            "Resource": [
                "arn:aws:logs:region:accountID:log-group:/aws/lambda/functionname:*"
            ]
        }
    ]
}

If the role is missing these permissions, the function still runs but it is unable to log any output to the CloudWatch service.

Avoiding wildcard permissions in IAM policies

The granularity of IAM permissions means that developers may choose to use overly broad permissions when they are testing or developing code.

IAM supports the “*” wildcard in both the resources and actions attributes, making it easier to select multiple matching items automatically. These may be useful when developing and testing functions in specific development AWS accounts with no access to production data. However, you should ensure that “star permissions” are never used in production environments.

Wildcard permissions grant broad permissions, often for many permissions or resources. Many AWS managed policies, such as AdministratorAccess, provide broad access intended only for user roles. Do not apply these policies to Lambda functions, since they do not specify individual resources.

In Application design and Service Quotas – Part 1, the section Using multiple AWS accounts for managing quotas shows a multiple account example. This approach provisions a separate AWS account for each developer in a team, and separates accounts for beta and production. This can help prevent developers from unintentionally transferring overly broad permissions to beta or production accounts.

For developers using the Serverless Framework, the Safeguards plugin is a policy-as-code framework to check deployed templates for compliance with security.

Specialized Lambda functions compared with all-purpose functions

In the post on Lambda design principles, I discuss architectural decisions in choosing between specialized functions and all-purpose functions. From a security perspective, it can be more difficult to apply the principles of least privilege to all-purpose functions. This is partly because of the broad capabilities of these functions and also because developers may grant overly broad permissions to these functions.

When building smaller, specialized functions with single tasks, it’s often easier to identify the specific resources and access requirements, and grant only those permissions. Additionally, since new features are usually implemented by new functions in this architectural design, you can specifically grant permissions in new IAM roles for these functions.

Avoid sharing IAM roles with multiple Lambda functions. As permissions are added to the role, these are shared across all functions using this role. By using one dedicated IAM role per function, you can control permissions more intentionally. Every Lambda function should have a 1:1 relationship with an IAM role. Even if some functions have the same policy initially, always separate the IAM roles to ensure least privilege policies.

To learn more, the series of posts for “Building well-architected serverless applications: Controlling serverless API access” – part 1, part 2, and part 3.

Conclusion

This post explains the Lambda execution environment and how the service protects customer data. It covers important steps you should take to prevent data leakage between invocations and provides additional security resources to review.

The principles of least privilege also apply to Lambda-based applications. I show how you can develop IAM policies and practices to ensure that IAM roles are scoped appropriately, and why you should avoid wildcard permissions. Finally, I explain why using smaller, specialized Lambda functions can help maintain least privilege.

Part 2 will discuss security workloads with public endpoints and how to use AWS CloudTrail for governance, compliance, and operational auditing of Lambda usage.

For more serverless learning resources, visit Serverless Land.

Use tags to manage and secure access to additional types of IAM resources

Post Syndicated from Michael Switzer original https://aws.amazon.com/blogs/security/use-tags-to-manage-and-secure-access-to-additional-types-of-iam-resources/

AWS Identity and Access Management (IAM) now enables Amazon Web Services (AWS) administrators to use tags to manage and secure access to more types of IAM resources, such as customer managed IAM policies, Security Assertion Markup Language (SAML) providers, and virtual multi-factor authentication (MFA) devices. A tag is an attribute that consists of a key and an optional value that you can attach to an AWS resource. With this launch, administrators can attach tags to additional IAM resources to identify resource owners and grant fine-grained access to these resources at scale using attribute-based access control. For example, a security administrator in an AWS organization can now attach tags to all customer managed policies and then create a single policy for local administrators within the member accounts, which grants them permissions to manage only those customer managed policies that have a matching tag.

In this post, I first discuss the additional IAM resources that now support tags. Then I walk you through two use cases that demonstrate how you can use tags to identify an IAM resource owner, and how you can further restrict access to AWS resources based on prefixes and tag values.

Which IAM resources now support tags?

In addition to IAM roles and IAM users that already support tags, you can now tag more types of IAM resources. The following table shows other IAM resources that now support tags. The table also highlights which of the IAM resources support tags on the IAM console level and at the API/CLI level.

IAM resources Support tagging at IAM console Support tagging at API and CLI level
Customer managed IAM policies Yes Yes
Instance profiles No Yes
OpenID Connect Provider Yes Yes
SAML providers Yes Yes
Server certificates No Yes
Virtual MFAs No Yes

Fine-grained resource ownership and access using tags

In the next sections, I will walk through two examples of how to use tagging to classify your IAM resources and define least-privileged access for your developers. In the first example, I explain how to use tags to allow your developers to declare ownership of a customer managed policy they create. In the second example, I explain how to use tags to enforce least privilege allowing developers to only pass IAM roles with Amazon Elastic Compute Cloud (Amazon EC2) instance profiles they create.

Example 1: Use tags to identify the owner of a customer managed policy

As an AWS administrator, you can require your developers to always tag the customer managed policies they create. You can then use the tag to identify which of your developers owns the customer managed policies.

For example, as an AWS administrator you can require that your developers in your organization to tag any customer managed policy they create. To achieve this, you can require the policy creator to enter their username as the value for the key titled Owner on resource tag creation. By enforcing tagging on customer managed policies, administrators can now easily identify the owner of these IAM policy types.

To enforce customer managed policy tagging, you first grant your developer the ability to create IAM customer managed policies, and include a conditional statement within the IAM policy that requires your developer to apply their AWS user name in the tag value field titled Owner when they create the policy.

Step 1: Create an IAM policy and attach it to your developer role

Following is a sample IAM policy (TagCustomerManagedPolicies.json) that you can assign to your developer. You can use this policy to follow along with this example in your own AWS account. For your own policies and commands, replace the instances of <AccountNumber> in this example with your own AWS account ID.

{
    "Version": "2012-10-17",
    "Statement": [
        {
            "Sid": "TagCustomerManagedPolicies",
            "Effect": "Allow",
            "Action": [
                "iam:CreatePolicy",
                "iam:TagPolicy"
            ],
            "Resource": "arn:aws:iam::: <AccountNumber>:policy/Developer-*",
            "Condition": {
                "StringEquals": {
                    "aws:RequestTag/Owner": "${aws:username}"
                }
            }
        }
    ]
} 

This policy requires the developer to enter their AWS user name as the tag value to declare AWS resource ownership during customer managed policy creation. The TagCustomerManagedPolicies.json also requires the developer to name any customer managed policy they create with the Developer- prefix.

Create the TagCustomerManagedPolicies.json file, then create a managed policy using the the following CLI command:

$aws iam create-policy --policy-name TagCustomerManagedPolicies --policy-document file://TagCustomerManagedPolicies.json

When you create the TagCustomerManagedPolicies.json policy, attach the policy to your developer with the following command. Assume your developer has an IAM user profile and their AWS user name is JohnA.

$aws iam attach-user-policy --policy-arn arn:aws:iam::<AccountNumber>:policy/TagCustomerManagedPolicies --user-name JohnA

Step 2: Ensure the developer uses appropriate tags when creating IAM policies

If your developer attempts to create a customer managed policy without applying their AWS user name as the value for the Owner tag and fails to name the customer managed policy with the required prefix Developer-, this IAM policy will not allow the developer to create this AWS resource. The error received by the developer is shown in the following example.

$ aws iam create-policy --policy-name TestPolicy --policy-document file://Developer-TestPolicy.json 

An error occurred (AccessDenied) when calling the CreatePolicy operation: User: arn:aws:iam::<AccountNumber>:user/JohnA is not authorized to perform: iam:CreatePolicy on resource: policy TestPolicy

However, if your developer applies their AWS user name as the value for the Owner tag and names the policy with the Developer- prefix, the IAM policy will enable your developer to successfully create the customer managed policy, as shown in the following example.

$aws iam create-policy --policy-name Developer-TestPolicy --policy-document file://Developer-TestPolicy.json --tags '{"Key": "Owner", "Value": "JohnA"}'

{
  "Policy": {
    "PolicyName": "Developer-Test_policy",
    "PolicyId": "<PolicyId>",
    "Arn": "arn:aws:iam::<AccountNumber>:policy/Developer-Test_policy",
    "Path": "/",
    "DefaultVersionId": "v1",
    "Tags": [
      {
        "Key": "Owner",
        "Value": "JohnA"
      }
    ],
    "AttachmentCount": 0,
    "PermissionsBoundaryUsageCount": 0,
    "IsAttachable": true,
    "CreateDate": "2020-07-27T21:18:10Z",
    "UpdateDate": "2020-07-27T21:18:10Z"
  }
}

Example 2: Use tags to control which IAM roles your developers attach to an instance profile

Amazon EC2 enables customers to run compute resources in the cloud. AWS developers use IAM instance profiles to associate IAM roles to EC2 instances hosting their applications. This instance profile is used to pass an IAM role to an EC2 instance to grant it privileges to invoke actions on behalf of an application hosted within it.

In this example, I show how you can use tags to control which IAM roles your developers can add to instance profiles. You can use this as a starting point for your own workloads, or follow along with this example as a learning exercise. For your own policies and commands, replace the instances of <AccountNumber> in this example with your own AWS account ID.

Let’s assume your developer is running an application on their EC2 instance that needs read and write permissions to objects within various developer owned Amazon Simple Storage Service (S3) buckets. To allow your application to perform these actions, you need to associate an IAM role with the required S3 permissions to an instance profile of your EC2 instance that is hosting your application.

To achieve this, you will do the following:

  1. Create a permissions boundary policy and require your developer to attach the permissions boundary policy to any IAM role they create. The permissions boundary policy defines the maximum permissions your developer can assign to any IAM role they create. For examples of how to use permissions boundary policies, see Add Tags to Manage Your AWS IAM Users and Roles.
  2. Grant your developer permissions to create and tag IAM roles and instance profiles. Your developer will use the instance profile to pass the IAM role to their EC2 instance hosting their application.
  3. Grant your developer permissions to create and apply IAM permissions to the IAM role they create.
  4. Grant your developer permissions to assign IAM roles to instance profiles of their EC2 instances based on the Owner tag they applied to the IAM role and instance profile they created.

Step 1: Create a permissions boundary policy

First, create the permissions boundary policy (S3ActionBoundary.json) that defines the maximum S3 permissions for the IAM role your developer creates. Following is an example of a permissions boundary policy.

{
    "Version": "2012-10-17",
    "Statement": [
        {
            "Sid": "S3ActionBoundary",
            "Effect": "Allow",
            "Action": [
                "S3:CreateBucket",
                "S3:ListAllMyBuckets",
                "S3:GetBucketLocation",
                "S3:PutObject",
                "S3:PutObjectAcl"
            ],
            "Resource": "arn:aws:s3:::Developer-*",
            "Condition": {
                "StringEquals": {
                    "aws:RequestedRegion": "us-east-1"
                }
            }
        }
    ]
}

When used as a permissions boundary, this policy enables your developers to grant permissions to some S3 actions, as long as two requirements are met. First, the S3 bucket must begin with the Developer prefix. Second, the region used to make the request must be US East (N. Virginia).

Similar to the previous example, you can create the S3ActionBoundary.json, then create a managed IAM policy using the following CLI command:

$aws iam create-policy --policy-name S3ActionBoundary --policy-document file://S3ActionBoundary.json

Step 2: Grant your developer permissions to create and tag IAM roles and instance profiles

Next, create the IAM permission (DeveloperCreateActions.json) that allows your developer to create IAM roles and instance profiles. Any roles they create will not be allowed to exceed the permissions of the boundary policy we created in step 1, and any resources they create must be tagged according to the guideline we established earlier. Following is an example DeveloperCreateActions.json policy.

{
    "Version": "2012-10-17",
    "Statement": [
        {
            "Sid": "CreateRole",
            "Effect": "Allow",
            "Action": "iam:CreateRole",
            "Resource": "arn:aws:iam::<AccountNumber>:role/Developer-*",
            "Condition": {
                "StringEquals": {
                    "aws:RequestTag/Owner": "${aws:username}",
                    "iam:PermissionsBoundary": "arn:aws:iam::<AccountNumber>:policy/S3ActionBoundary"
                }
            }
        },
        {
            "Sid": "CreatePolicyandInstanceProfile",
            "Effect": "Allow",
            "Action": [
                "iam:CreateInstanceProfile",
                "iam:CreatePolicy"
            ],
            "Resource": [
                "arn:aws:iam::<AccountNumber>:instance-profile/Developer-*",
                "arn:aws:iam::<AccountNumber>:policy/Developer-*"
            ],
            "Condition": {
                "StringEquals": {
                    "aws:RequestTag/Owner": "${aws:username}"
                }
            }
        },
        {
            "Sid": "TagActionsAndAttachActions",
            "Effect": "Allow",
            "Action": [
                "iam:TagInstanceProfile",
                "iam:TagPolicy",
                "iam:AttachRolePolicy",
                "iam:TagRole"
            ],
            "Resource": [
                "arn:aws:iam::<AccountNumber>:instance-profile/Developer-*",
                "arn:aws:iam::<AccountNumber>:policy/Developer-*",
                "arn:aws:iam::<AccountNumber>:role/Developer-*"
            ],
            "Condition": {
                "StringEquals": {
                    "aws:ResourceTag/Owner": "${aws:username}"
                }
            }
        }
    ]
}

I will walk through each statement in the policy to explain its function.

The first statement CreateRole allows creating IAM roles. The Condition element of the policy requires your developer to apply their AWS user name as the Owner tag to any IAM role or instance profile they create. It also requires your developer to attach the S3ActionBoundary as a permissions boundary policy to any IAM role they create.

The next statement CreatePolicyAndInstanceProfile allows creating IAM policies and instance profiles. The Condition element requires your developer to name any IAM role or instance profile they create with the Developer- prefix, and to attach the Owner tag to the resources they create.

The last statement TagActionsAndAttachActions allows tagging managed policies, instance profiles and roles with the Owner tag. It also allows attaching role policies, so they can configure the permissions for the roles they create. The Resource and Condition elements of the policy require the developer to use the Developer- prefix and their AWS user name as the Owner tag, respectively.

Once you create the DeveloperCreateActions.json file locally, you can create it as an IAM policy and attach it to your developer role using the following CLI commands:

$aws iam create-policy --policy-name DeveloperCreateActions --policy-document file://DeveloperCreateActions.json 

$aws iam attach-user-policy --policy-arn arn:aws:iam::<AccountNumber>:policy/DeveloperCreateActions --user-name JohnA

With the preceding policy, your developer can now create an instance profile, an IAM role, and the permissions they will attach to the IAM role. For example, if your developer creates an instance profile and doesn’t apply their AWS user name as the Owner tag, the IAM Policy will prevent the resource creation process from occurring render an error as shown in the following example.

$aws iam create-instance-profile --instance-profile-name Developer-EC2-InstanceProfile

An error occurred (AccessDenied) when calling the CreateInstanceProfile operation: User: arn:aws:iam::<AccountNumber>:user/JohnA is not authorized to perform: iam:CreateInstanceProfile on resource: arn:aws:iam::<AccountNumber>:instance-profile/Developer-EC2

When your developer names the instance profile with the prefix Developer- and includes their AWS user name as value for the Owner tag in the create request, the IAM policy allows the create action to occur as shown in the following example.

$aws iam create-instance-profile --instance-profile-name Developer-EC2-InstanceProfile --tags '{"Key": "Owner", "Value": "JohnA"}'

{
    "InstanceProfile": {
        "Path": "/",
        "InstanceProfileName":"Developer-EC2-InstanceProfile",
        "InstanceProfileId":" AIPAR3HKUNWB24NBA3HRC",
        "Arn": "arn:aws:iam::<AccountNumber>:instance-profile/Developer-EC2-InstanceProfile",
        "CreateDate": "2020-07-30T21:24:30Z",
        "Roles": [],
        "Tags": [
            {
                "Key": "Owner",
                "Value": "JohnA"
            }
        ]

    }
}

Let’s assume your developer creates an IAM role called Developer-EC2. The Developer-EC2 role has your developer’s AWS user name (JohnA) as the Owner tag. The developer has the S3ActionBoundaryPolicy.json as their permissions boundary policy and the Developer-ApplicationS3Access.json policy as the permissions policy that your developer will pass to their EC2 instance to allow it to call S3 on behalf of their application. This is shown in the following example.

<Details of the role trust policy – RoleTrustPolicy.json>
{
    "Version": "2012-10-17",
    "Statement": [
        {
            "Effect": "Allow",
            "Principal": {
                "Service": "ec2.amazonaws.com"
            },
            "Action": "sts:AssumeRole"
        }
    ]
}
<Details of IAM role permissions – Developer-ApplicationS3Access.json>

{
    "Version": "2012-10-17",
    "Statement": [
        {
            "Sid": "S3Access",
            "Effect": "Allow",
            "Action": [
                "S3:GetBucketLocation",
                "S3:PutObject",
                "S3:PutObjectAcl"
            ],
            "Resource": "arn:aws:s3:::Developer-*"
        }
    ]
}

<Your developer creates IAM role with a permissions boundary policy and a role trust policy>

$aws iam create-role --role-name Developer-EC2
--assume-role-policy-document file://RoleTrustPolicy.json
--permissions-boundary arn:aws:iam::<AccountNumber>:policy/S3ActionBoundary --tags '{"Key": "Owner", "Value": "JohnA"}'


<Your developer creates IAM policy for the newly created IAM role>
$aws iam create-policy –-policy-name Developer-ApplicationS3Access –-policy-document file://Developer-ApplicationS3Access.json --tags '{"Key": "Owner", "Value": "JohnA"}'

<Your developer attaches newly created IAM policy to the newly created IAM role >
$aws iam attach-role-policy --policy-arn arn:aws:iam::<AccountNumber>:policy/Developer-ApplicationS3Access --role-name Developer-EC2

Step 3: Grant your developer permissions to create and apply IAM permissions to the IAM role they create

By using the AddRoleAssociateInstanceProfile.json IAM Policy provided below, you are allowing your developers the permissions to pass their new IAM role to an instance profile they create. They need to follow these requirements because the DeveloperCreateActions.json permission, which you already assigned to your developer in an earlier step, allows your developer to only administer resources that are properly prefixed with Developer- and have their user name assigned to the resource tag. The following example shows details of the AddRoleAssociateInstanceProfile.json policy.

< AddRoleAssociateInstanceProfile.json>
{
    "Version": "2012-10-17",
    "Statement": [
        {
            "Sid": "AddRoleToInstanceProfile",
            "Effect": "Allow",
            "Action": [
                "iam:AddRoleToInstanceProfile",
                "iam:PassRole"
            ],
            "Resource": [
                "arn:aws:iam::<AccountNumber>:instance-profile/Developer-*",
                "arn:aws:iam::<AccountNumber>:role/Developer-*"
            ],
            "Condition": {
                "StringEquals": {
                    "aws:ResourceTag/Owner": "${aws:username}"
                }
            }
        },
        {
            "Sid": "AssociateInstanceProfile",
            "Effect": "Allow",
            "Action": "ec2:AssociateIamInstanceProfile",
            "Resource": "arn:aws:ec2:us-east-1:<AccountNumber>:instance/Developer-*"
        }
    ]
}

Once you create the DeveloperCreateActions.json file locally, you can create it as an IAM policy and attach it to your developer role using the following CLI commands:

$aws iam create-policy –-policy-name AddRoleAssociateInstanceProfile –-policy-document file://AddRoleAssociateInstanceProfile.json

$aws iam attach-user-policy –-policy-arn arn:aws:iam::<AccountNumber>:policy/ AddRoleAssociateInstanceProfile –-user-name Developer

If your developer’s AWS user name is the Owner tag for the Developer-EC2-InstanceProfile instance profile and the Developer-EC2 IAM role, then AWS allows your developer to add the Developer-EC2 role to the Developer-EC2-InstanceProfile instance profile. However, if your developer attempts to add the Developer-EC2 role to an instance profile they don’t own, AWS won’t allow the action, as shown in the following example.

aws iam add-role-to-instance-profile --instance-profile-name EC2-access-Profile --role-name Developer-EC2

An error occurred (AccessDenied) when calling the AddRoleToInstanceProfile operation: User: arn:aws:iam::<AccountNumber>:user/Developer is not authorized to perform: iam:AddRoleToInstanceProfile on resource: instance profile EC2-access-profile

When your developer adds the IAM role to the instance profile they own, the IAM policy allows the action, as shown in the following example.

aws iam add-role-to-instance-profile --instance-profile-name Developer-EC2-InstanceProfile --role-name Developer-EC2

You can verify this by checking which instance profiles contain the Developer-EC2 role, as follows.

$aws iam list-instance-profiles-for-role --role-name Developer-EC2


<Result>
{
    "InstanceProfiles": [
        {
            "InstanceProfileId": "AIDGPMS9RO4H3FEXAMPLE",
            "Roles": [
                {
                    "AssumeRolePolicyDocument": "<URL-encoded-JSON>",
                    "RoleId": "AIDACKCEVSQ6C2EXAMPLE",
                    "CreateDate": "2020-06-07T20: 42: 15Z",
                    "RoleName": "Developer-EC2",
                    "Path": "/",
                    "Arn":"arn:aws:iam::<AccountNumber>:role/Developer-EC2"
                }
            ],
            "CreateDate":"2020-06-07T21:05:24Z",
            "InstanceProfileName":"Developer-EC2-InstanceProfile",
            "Path": "/",
            "Arn":"arn:aws:iam::<AccountNumber>:instance-profile/Developer-EC2-InstanceProfile"
        }
    ]
}

Step 4: Grant your developer permissions to add IAM roles to instance profiles based on the Owner tag

Your developer can then associate the instance profile (Developer-EC2-InstanceProfile) to their EC2 instance running their application, by using the following command.

aws ec2 associate-iam-instance-profile --instance-id i-1234567890EXAMPLE --iam-instance-profile Name="Developer-EC2-InstanceProfile"

{
    "IamInstanceProfileAssociation": {
        "InstanceId": "i-1234567890EXAMPLE",
        "State": "associating",
        "AssociationId": "iip-assoc-0dbd8529a48294120",
        "IamInstanceProfile": {
            "Id": "AIDGPMS9RO4H3FEXAMPLE",
            "Arn": "arn:aws:iam::<AccountNumber>:instance-profile/Developer-EC2-InstanceProfile"
        }
    }
}

Summary

You can use tags to manage and secure access to IAM resources such as IAM roles, IAM users, SAML providers, server certificates, and virtual MFAs. In this post, I highlighted two examples of how AWS administrators can use tags to grant access at scale to IAM resources such as customer managed policies and instance profiles. For more information about the IAM resources that support tagging, see the AWS Identity and Access Management (IAM) User Guide.

If you have feedback about this post, submit comments in the Comments section below. If you have questions about this post, start a new thread on the AWS IAM forum or contact AWS Support.

Want more AWS Security how-to content, news, and feature announcements? Follow us on Twitter.

Author

Michael Switzer

Mike is the product manager for the Identity and Access Management service at AWS. He enjoys working directly with customers to identify solutions to their challenges, and using data-driven decision making to drive his work. Outside of work, Mike is an avid cyclist and outdoorsperson. He holds a master’s degree in computational mathematics from the University of Washington.


Contributor

Special thanks to Derrick Oigiagbe who made significant contributions to this post.

Field Notes: How FactSet Uses ‘microAccounts’ to Reduce Developer Friction and Maintain Security at Scale

Post Syndicated from Tarik Makota original https://aws.amazon.com/blogs/architecture/field-notes-how-factset-uses-microaccounts-to-reduce-developer-friction-and-maintain-security-at-scale/

This is post was co-written by FactSet’s Cloud Infrastructure team, Gaurav Jain, Nathan Goodman, Geoff Wang, Daniel Cordes, Sunu Joseph and AWS Solution Architects, Amit Borulkar and Tarik Makota.

FactSet considers developer self-service and DevOps essential for realizing cloud benefits.  As part of their cloud adoption journey, they wanted developers to have a frictionless infrastructure provisioning experience while maintaining standardization and security of their cloud environment.  To achieve their objectives, they use what they refer to as a ‘microAccounts approach’. In their microAccount approach, each AWS account is allocated for one project and is owned by a single team.

In this blog, we describe how FactSet manages 1000+ AWS accounts at scale using the microAccounts approach. First, we cover the core concepts of their approach. Then we outline how they manage access and permissions. Finally, we show how they manage their networking implementation and how they use automation to manage their AWS Cloud infrastructure.

How FactSet started with AWS

They started their cloud adoption journey with what they now call a ‘macroAccounts’ approach. In the early days they would set up a handful of AWS accounts. These macroAccounts were then shared across several different application teams and projects.   They have hundreds of application teams along with thousands of developers and they quickly experienced the challenges of a macroAccounts approach. These include the following:

  1. AWS Identity and Access Management (IAM) policies and resource tagging were complex to design in order to maintain least privilege. For example, if a developer desired the ability to start/stop Amazon EC2 instances, they would need to ensure that they are limited to starting/stopping only their own instances.  This complexity kept increasing as developers wanted to automate their workflows using constructs such as AWS Lambda functions, and containers.
  2. They had difficulty in properly attributing cloud costs across departments.  More importantly they kept going back and forth on: how do we establish accountability and transparency around spends by groups, projects, or teams?
  3. It was difficult to track and manage impact of infrastructure change to FactSet applications. For example, how is maintenance off underlying security group or IAM policy affecting FactSet applications?
  4. Significant effort was required in managing service quotas and limits across various applications being under single AWS account.

FactSet’s solution – microAccounts

Recognizing the issues, they decided to take a different approach to AWS account management. Instead of creating a few shared macro-accounts, they decided to create one AWS account per project (microAccounts) with clearly defined ownership and product allocation.  An analogy might be that macro-accounts were like leaving the main door of a house open but locking individual closets and rooms to limit access. This is opposed to safeguarding the entry to the house but largely leaving individual closets and rooms open for the tenant to manage.

Benefits of microAccounts

They have been operating their AWS Cloud infrastructure using microAccounts for about two years now. Benefits of the microAccount approach include:

1.      Access & Permissions: By associating an account with a project they simplified which services are allowed, which resources that development team can access, and are able to ensure that those permissions cascade properly to underlying resources.  The following diagram shows their microAccount strategy.


Tagging versus microAccount strategy

Figure 1 – Tagging versus microAccount strategy

2.      Service Quotas & Limits: Given most service quotas are account specific, microAccounts allow their developers to plan limits based on their application needs.  In a shared account configuration, there was no mechanism to limit separate teams from using up a larger portion of the service quota, leaving other teams with less.  These limits extend beyond infrastructure provisioning to run time tasks like Lambda concurrency, API throttling limits on parameter store and more.

3.      AWS Service Permissions: microAccounts allowed FactSet to easily implement least privilege across services. By using IAM service control policies (SCPs) they limit what AWS services an account can access.  They start with a default set of services and based on business need we can grant a specific account access to other non-common services without having to worry about those services creeping into other use cases.  For example, they disable storage gateway by default, but can allow access for a specific account if needed.

4.      Blast Radius Containment:  microAccounts provides the ability to create safety boundaries. This is in the event of any stability and security issues, they stay isolated within that specific application (AWS account) and they don’t affect operations of other applications.

5.     Cost Attributions:  Clearly defined account ownership provides a simple and straightforward way to attribute costs to a specific team, project, or product.  They don’t have to enforce the tagging individual resources for cost purposes. AWS account acts like an application resource group so all resources in the account are implicitly tagged.

6.      Account Notifications & Operations:  Single threaded account ownership allows FactSet to automatically relay any required notification to right developers.  Moreover, given that account ownership is fundamental in defining who is allowed access to the account, there is a high level of confidence in the validity of this mapping as opposed to relying on just tagging.

7.      Account Standards & Extensions: we manage microAccounts through a CI/CD pipeline which allows us to standardize and extend without interruptions.  For example, all their microAccounts are provisioned with a standard AWS Key Management Service (AWS KMS) key, an AWS Backup Vault & policy, private Amazon Route 53 zone, AWS Systems Manager Parameter Store with network information for Terraform or AWS CloudFormation templates.

8.      Developer Experience: microAccount automation and guardrails allow developers to get started quickly instead of spending time debugging things like correct SCP/IAM permissions and more. Developers tend to work across multiple applications and their experience has improved as they have a standard set of expectations for their AWS environment. This is particularly useful as they move from application to application.

Access and permissions for microAccounts

FactSet creates every AWS account with a standard set of IAM roles and permissions. Furthermore, each account has its own SCP which defines the list of services allowed in the account.  Based on application needs, they can extend the permissions.  Interactive roles are mapped to an ActiveDirectory (AD) group, and membership of the AD group is managed by the development teams themselves.  Standard roles are:

  • DevOps Role – Interactive role used to provision and manage infrastructure.
  • Developer Role – Interactive role used to read/write data (and some infrastructure)
  • ReadOnly Role – Interactive role with read-only access to the account.  This can be granted to account supervisors, product developers, and other similar roles.
  • Support Roles – Interactive roles for certain admin teams to assist account owners if needed
  • ServiceExecutionRole – Role that can be attached to entities such as Lambda functions, CodeBuild, EC2 instances, and has similar permissions to a developer role.
IAM Role Privileges

Figure 2 – IAM Role Privileges

Networking for microAccounts

  • FactSet leverages AWS Resource Access Manager (RAM) to share appropriate subnets with each account.  Each microAccount provisioned has access to subnets by sing AWS Shared VPCs.  They create a single VPC per business unit per environment (Dev, Prod, UAT, and Shared Services) in each region.  RAM enabled them to easily and securely share AWS resources with any AWS account within their AWS Organization.  When an account is created they allocate appropriate subnets to that account.
  • They use AWS Transit Gateway to manage inter-VPC routing and communication across multiple VPCs in a region.  They didn’t want to limit our ability to scale up quickly.  AWS Transit Gateway is a single place to land their AWS Direct Connect circuits in each Region.  It provides them with a consolidated place to manage routing tables that propagated to each VPC when they are attached.


VPC Sharing for microAccounts

Figure 3 – VPC Sharing for microAccounts

Automation & Config Management for microAccounts

To create frictionless self-service cloud infrastructure early on, FactSet realized that automation is a must.  Their infrastructure automation uses source-control as a source of truth for defining each microAccount. This helps them ensure repeatable and standardized account provisioning process, as well as flexibility to adjust specific settings and permissions on per account needs.

Account provisioning flow

Figure 4 – Account provisioning flow

By default, their accounts are only enabled in a small set of Regions.  They control it via the following policy block.  If they add new Region(s), they would implement that change in source-control and automated enforcement checks would add it to SCP.

{
    "Sid": "DenyOtherRegions",
    "Effect": "Deny",
    "Action": "*",
    "Resource": "*",
    "Condition": {
        "StringNotEquals": {
            "aws:RequestedRegion": ["us-east-1","eu-west-2"]
        },
        "ForAllValues:StringNotLike": {
            "aws:PrincipalArn": [
                "arn:aws:iam::*:role/cloud-admin-role"
    }
}

Lessons Learned

During their journey to adopt microAccounts, FactSet came across some new challenges that are worth highlighting:

  1. IAM role creation: Their DevOps Role can create new IAM roles within the account.  To ensure that newly created role complies with least-privilege principles, they attach a standard permission boundary which limits its permissions to not extend beyond DevOps level.
  2. Account Deletion: While AWS provides APIs for account creation, currently there is no API to delete or rename an account.  This is not an issue since only a small percentage of accounts had to be deleted because of a cancelled project for example.
  3. Account Creation / Service Activation: Although automation is used to provision accounts it can still take time for all services in account to be fully activated.  Some services like Amazon EC2 have asynchronous processes to be activated in a new account.
  4. Account Email, Root Password, and MFA: Upon account creation, they don’t set up a root password or MFA.  That is only setup on the primary (master) account.  Given each account requires a unique email address, they leverage Amazon Simple Email Service (Amazon SES) to create a new email address with cloud administrator team as the recipients.  When they need to log in as root (very unusual), they go through the process of password reset before logging in.
  5. Service Control Policies: There were two primary challenges related to SCPs:
    • SCP is a property in the primary (master) account that is attached to a child microAccount.  However, they also wanted to manage SCP like any other account config and store it in source-control along with other account configuration.  This required IAM role used by our automation to have special permissions to be able to create/attach/detach SCPs in the primary (master) account.
    • There is a hard limit of 1000 SCPs in the primary (master) account.  If you have a SCP per account, this would limit you to 1000 microAccounts.  They solved this by re-using SCPs across accounts with same policies.  Content of a policy is hashed to create a unique SCP identifier, and accounts with same hashes are attached to same SCP.
  6. Sharing data (typically S3) across microAccounts: they leverage a concept of “trusted-accounts” to allow other accounts access to an account’s resources including S3 and KMS keys.
  7. It may feel like an anti-pattern to have resources with static costs like Application Load Balancers (ALB) and KMS for individual projects as opposed to a shared pool.  The list of resources with a base cost is small as most of the services are largely priced based on usage.  For FactSet, resource isolation is a key benefit of microAccounts, and therefore outweighs some of these added costs.
  8. Central Inventory & Logging: With 100s of accounts, it is worth investing in a more centralized inventory and AWS CloudTrail logs collection system.
  9. Costs, Reserved Instances (RI), and Savings Plans: FactSet found AWS Cost Explorer at the level of your primary (master) account to be a great tool for cost-transparency.  They leverage AWS Cost Explorer’s API to import that data into their internal cost transparency tools.  RIs and Savings Plans are managed centrally and leverage automatic sharing between accounts within the same master (primary) organization.

Conclusion

The microAccounts approach provides FactSet with the agility to operate according to specific needs of different teams and projects in the enterprise. They are currently deploying in twelve AWS Regions with automated AWS account provisioning happening in minutes and drift checks executing multiple times throughout the day. This frees up their developers to focus on solving business problems to maximize the benefits of cloud computing, so that their business can innovate and accelerate their clients’ digital transformations.

Their experience operating regulated infrastructure in the cloud demonstrated that microAccounts are pivotal for managing cloud at scale. With microAccounts they were able to accelerate projects onboarded to cloud by 5X, reduce number of IAM permission tickets by 10X, and experienced 3X fewer stability issues. We hope that this blog post provided useful insights to help determine if the microAccount strategy is a good fit for you.

In their own words, FactSet creates flexible, open data and software solutions for tens of thousands of investment professionals around the world, which provides instant access to financial data and analytics that investors use to make crucial decisions. At FactSet, we are always working to improve the value that our products provide.

Recommended Reading:

Defining an AWS Multi-Account Strategy for telecommunications companies

Why should I set up a multi-account AWS environment?

Field Notes provides hands-on technical guidance from AWS Solutions Architects, consultants, and technical account managers, based on their experiences in the field solving real-world business problems for customers.


Techniques for writing least privilege IAM policies

Post Syndicated from Ben Potter original https://aws.amazon.com/blogs/security/techniques-for-writing-least-privilege-iam-policies/

In this post, I’m going to share two techniques I’ve used to write least privilege AWS Identity and Access Management (IAM) policies. If you’re not familiar with IAM policy structure, I highly recommend you read understanding how IAM works and policies and permissions.

Least privilege is a principle of granting only the permissions required to complete a task. Least privilege is also one of many Amazon Web Services (AWS) Well-Architected best practices that can help you build securely in the cloud. For example, if you have an Amazon Elastic Compute Cloud (Amazon EC2) instance that needs to access an Amazon Simple Storage Service (Amazon S3) bucket to get configuration data, you should only allow read access to the specific S3 bucket that contains the relevant data.

There are a number of ways to grant access to different types of resources, as some resources support both resource-based policies and IAM policies. This blog post will focus on demonstrating how you can use IAM policies to grant restrictive permissions to IAM principals to meet least privilege standards.

In AWS, an IAM principal can be a user, role, or group. These identities start with no permissions and you add permissions using a policy. In AWS, there are different types of policies that are used for different reasons. In this blog, I only give examples for identity-based policies that attach to IAM principals to grant permissions to an identity. You can create and attach multiple identity-based policies to your IAM principals, and you can reuse them across your AWS accounts. There are two types of managed policies. Customer managed policies are created and managed by you, the customer. AWS managed policies are provided as examples, cannot be modified, but can be copied, enhanced, and saved as Customer managed policies. The main elements of a policy statement are:

  • Effect: Specifies whether the statement will Allow or Deny an action.
  • Action: Describes a specific action or actions that will either be allowed or denied to run based on the Effect entered. API actions are unique to each service. For example, s3:ListBuckets is an Amazon S3 service API action that enables an IAM Principal to list all S3 buckets in the same account.
  • NotAction: Can be used as an alternative to using Action. This element will allow an IAM principal to invoke all API actions to a specific AWS service except those actions specified in this list.
  • Resource: Specifies the resources—for example, an S3 bucket or objects—that the policy applies to in Amazon Resource Name (ARN) format.
  • NotResource: Can be used instead of the Resource element to explicitly match every AWS resource except those specified.
  • Condition: Allows you to build expressions to match the condition keys and values in the policy against keys and values in the request context sent by the IAM principal. Condition keys can be service-specific or global. A global condition key can be used with any service. For example, a key of aws:CurrentTime can be used to allow access based on date and time.

Starting with the visual editor

The visual editor is my default starting place for building policies as I like the wizard and seeing all available services, actions, and conditions without looking at the documentation. If there is a complex policy with many services, I often look at the AWS managed policies as a starting place for the actions that are required, then use the visual editor to fine tune and check the resources and conditions.

The policy I’m going to walk you through creating is to grant an AWS Lambda function permission to get specific objects from Amazon S3, and put items in a specific table in Amazon DynamoDB. You can access the visual editor when you choose Create policy under policies in the IAM console, or add policies when viewing a role, group, or user as shown in Figure 1. If you’re not familiar with creating policies, you can follow the full instructions in the IAM documentation.

Figure 1: Use the visual editor to create a policy

Figure 1: Use the visual editor to create a policy

Begin by choosing the first service—S3—to grant access to as shown in Figure 2. You can only choose one service at a time, so you’ll need to add DynamoDB after.

Figure 2: Select S3 service

Figure 2: Select S3 service

Now you will see a list of access levels with the option to manually add actions. Expand the read access level to show all read actions that are supported by the Amazon S3 service. You can now see all read access level actions. For getting an object, check the box for GetObject. Selecting the ? next to an action expands information including a description, supported resource types, and supported condition keys as shown in Figure 3.

Figure 3: Expand Read in Access level, select GetObject, and select the ? next to GetObject

Figure 3: Expand Read in Access level, select GetObject, and select the ? next to GetObject

Expand Resources, you will see that the visual editor has listed object as that is the only resource supported by the GetObject action as shown in Figure 4.

Figure 4: Expand Resources

Figure 4: Expand Resources

Select Add ARN, which opens a dialogue to help you specify the ARN for the objects. Enter a bucket name—such as doc-example-bucket—and then the object name. For the object name you can use a wildcard (*) as a suffix. For example, to allow objects beginning with alpha you would enter alpha*. This is an important step. For this least privileged policy, you are restricting to a specific bucket, and an object prefix. You could even specify an individual object depending on your use case.

Figure 5: Enter bucket name and object name

Figure 5: Enter bucket name and object name

If you have multiple ARNs (bucket and objects) to allow, you can repeat the step.

Figure 6: ARN added for S3 object

Figure 6: ARN added for S3 object

The final step is to expand the request conditions, and choose Add condition. The Add request condition dialogue will open. Select the drop down next to Condition key to list the global condition keys, then the service level condition keys are listed after. You’ll see that there’s an s3:ExistingObjectTag condition that—as the name suggests—matches an existing object tag. You can use this condition key to allow the GetObject request only when the object tag meets your condition. That means you can tag your objects with a specific tag key and value pair, and your policy condition must match this key-value pair to allow the action to execute. When you’re using condition keys with multiple keys or values, you can use condition operators and evaluation logic. As shown in Figure 7, tag-key is entered directly below the condition key. This is the key of the tag to match. For the Operator, select StringEquals to match the tag exactly. Checking If exists tests at least one member of the set of request values, and at least one member of the set of condition key values. The Value to enter is the actual tag value: tag-value as shown in figure 7.

Figure 7: ARN added for S3 object

Figure 7: ARN added for S3 object

That’s it for adding the S3 action, as shown in figure 8.

Figure 8: S3 GetObject action with resource and conditions configured

Figure 8: S3 GetObject action with resource and conditions configured

Now you need to add the DynamoDB permissions by selecting Add additional permissions. Select Choose a service and then select DynamoDB. For actions, expand the Write access level, then choose PutItem.

Figure 9: Choose write access level

Figure 9: Choose write access level

Expand Resources and then select Add ARN. The dialogue that appears will help you build the ARN just like it did for the Amazon S3 service. Enter the Region, for example the ap-southeast-2 (Sydney) Region, the account ID, and the table name. Choosing Add will add the resource ARN to your policy.

Figure 10: Enter Region, account, and table name

Figure 10: Enter Region, account, and table name

Now it’s time to add conditions. Expand Request conditions and then choose Add condition.

There are many DynamoDB conditions that you could use, however you can choose dynamodb:LeadingKeys to represent the first key, or partition keys in a table. You can see from the documentation that a qualifier of For all values in request is recommend. For the Operator you can use StringEquals as your string is going to exactly match, then a Value can use a prefix with wildcard, such as alpha* as shown in figure 11.

Figure 11: Add request conditions

Figure 11: Add request conditions

Choosing Add will take you back to the main visual editor where you can choose Review policy to continue. Enter a name and description for the policy, and then choose Create policy.

You can now attach it to a role to test.

You can see in this example that a policy can use least privilege by using specific resources and conditions. Note that sometimes when you use the AWS Management Console, it requires additional permissions to provide information for the console experience.

Starting with AWS managed policies

AWS managed policies can be a good starting place to see the actions typically associated with a particular service or job function. For example, you can attach the AmazonS3ReadOnlyAccess policy to a role used by an Amazon EC2 instance that allows read-only access to all Amazon S3 buckets. It has an effect of Allow to allow access, and there are two actions that use wildcards (*) to allow all Get and List actions for S3—for example, s3:GetObject and s3:ListBuckets. The resource is a wildcard to allow all S3 buckets the account has access to. A useful feature of this policy is that it only allows read and list access to S3, but not to any other services or types of actions.

Let’s make our own custom IAM policy to make it least privilege. Starting with the action element, you can use the reference for Amazon S3 to see all actions, a description of what each action does, the resource type for each action, and condition keys for each action. Now let’s imagine this policy is used by an Amazon EC2 instance to fetch an application configuration object from within an S3 bucket. Looking at the descriptions for actions starting with Get you can see that the only action that we really need is GetObject. You can then use the resource element to restrict an action to a set of objects prefixed with config within a specific bucket.

         "Effect": "Allow",
         "Action": "s3:GetObject",
         "Resource": "arn:aws:s3::: <doc-example-bucket>/<config*>"

Now that you’ve reduced the scope of what this policy can do for service actions and resources, you can add a condition element that uses attribute based access control (ABAC) to define conditions based on attributes—in this case, a resource tag. In this example, when you’re reading objects from a single bucket, you can set specific conditions to further reduce the scope of permissions given to an IAM principal. There’s an s3:ExistingObjectTag condition that you can use to allow the GetObject request only when the object tag meets your condition. That means you can tag your objects with a specific tag key and value pair, and your IAM policy condition must match this key-value pair to allow the API action to successfully run. When you’re using condition keys with multiple keys or values, you can use condition operators and evaluation logic. You can see that ForAnyValue tests at least one member of the set of request values, and at least one member of the set of condition key values. Alternatively, you can use global condition keys that apply to all services:

         "Effect": "Allow",
         "Action": "s3:GetObject",
         "Resource": "arn:aws:s3:::<doc-example-bucket>/<config*>",
         "Condition": {
                "ForAnyValue:StringEquals": {
                    "s3:ExistingObjectTag/<tag-key>": "<tag-value>"
            }

In the preceding policy example, the condition element only allows s3:GetObject permissions if the object is tagged with a key of tag-key and a value of tag-value. While you’re experimenting, you can identify errors in your custom policies by using the IAM policy simulator or reviewing the errors messages recorded in AWS CloudTrail logs.

Conclusion

In this post, I’ve shown two different techniques that you can use to create least privilege policies for IAM. You can adapt these methods to create AWS Single Sign-On permission sets and AWS Organizations service control policies (SCPs). Starting with managed policies is a useful strategy when an AWS supplied managed policy already exists for your use case, and then to reduce the scope of what it can do through permissions. I tend to use the visual editor the most for editing policies because it saves looking up the resource and conditions for each action. I suggest that you start by reviewing the policies you’re already using. Start with policies that grant excessive permissions—like the example Administrator policy—and tie them back to the use case of the users or things that need the access. Use the last accessed information, IAM best practices, and look at the AWS Well-Architected best practices and AWS Well-Architected tool.

If you have feedback about this post, submit comments in the Comments section below.

Want more AWS Security how-to content, news, and feature announcements? Follow us on Twitter.

Author

Ben Potter

Ben is the global security leader for the AWS Well-Architected Framework and is responsible for sharing best practices in security with customers and partners. Ben is also an ambassador for the No More Ransom initiative helping fight cyber crime with Europol, McAfee, and law enforcement across the globe. You can learn more about him in this interview.

Aligning IAM policies to user personas for AWS Security Hub

Post Syndicated from Vaibhawa Kumar original https://aws.amazon.com/blogs/security/aligning-iam-policies-to-user-personas-for-aws-security-hub/

AWS Security Hub provides you with a comprehensive view of your security posture across your accounts in Amazon Web Services (AWS) and gives you the ability to take action on your high-priority security alerts. There are several different user personas that use Security Hub, and they typically require different AWS Identity and Access Management (IAM) permissions. Those personas include: a security administrator; a security analyst or engineer on a central security team or in a Cloud Center of Excellence; and a Developer Operations (DevOps) engineer or application builder who is the primary owner of an AWS account. In this post, we show how to deploy sample IAM policies for these three personas.

The first persona, a security administrator or cloud system administrator (sysadmin), is responsible for setting up and configuring Security Hub, and they typically need access to all of the Security Hub APIs to do this work. As part of this work, the sysadmin enables Security Hub on various accounts and Regions, decides which standards and controls should be enabled on which accounts, enables product integrations, creates insights, sets up custom actions and automated remediations, and configures IAM policies for other users.

The second persona, a security analyst or engineer using Security Hub, is part of a central security team, often part of a Cloud Center of Excellence. We often see that cloud security efforts are centralized in Cloud Centers of Excellence within a company. These security analysts or engineers typically have access to the master account in Security Hub and can view and take action on findings from any of the connected member accounts. They typically are not configuring Security Hub, so they don’t need permissions to do so.

The third persona is a DevOps engineer or application builder. This user needs the ability to view findings and take action only on the findings associated with their account. For cloud workloads, security is often decentralized down to these users. Security Hub enables them to take more proactive responsibility for the security of their own account by directly viewing and taking action on findings in their account. They typically don’t need permissions to set up and configure Security Hub, because that is done by a central sysadmin.

Overview

The following reference architecture presents an overview of a Security Hub master-member account structure and three personas: a security administrator, a security analyst/engineer, and a DevOps engineer.
 

Figure 1: Reference architecture

Figure 1: Reference architecture

In this blog post, we show how you can create and use the following AWS managed and customer managed IAM policies to support these three personas:

  • The sysadmin persona needs permissions to configure and manage Security Hub, account memberships, insights, and integrations, and to create remediations and take actions and perform record and workflow updates. The AWS managed IAM policy called AWSSecurityHubFullAccess provides the permissions for this persona. An IAM user or role with these permissions can deploy and configure Security Hub in master and member accounts. They can also update findings. The sysadmin also requires permissions to configure AWS Config and Amazon CloudWatch event rules to set up automated responses and remediations.
  • The security analyst persona needs permissions to read, list, and describe findings, standards, controls, and products; to update findings; and to create and update insights for Security Hub resources in the master account. The AWS managed IAM policy called AWSSecurityHubReadOnlyAccess provides the permissions needed for read, list, and describe actions, and a customer managed policy will be attached to give permissions to create and update insights and to update findings.
  • The DevOps engineer persona needs the same permissions as the security analyst persona, but they will only have the ability to access their own Security Hub member AWS account(s) and won’t have access to the master account.

Depending on your specific use case, you might want to provide additional permissions to the security analyst and DevOps engineer personas. For example, you might want to also grant them permissions to create custom actions by using the UpdateActionTarget API. In that case, you should also ensure that they have appropriate permissions to create CloudWatch event rules. You can also restrict these personas to only be able to update certain fields in findings (for example, only update workflow status but not severity) by using IAM context keys.

Prerequisites

You must have already enabled Security Hub with one account as master and other associated accounts as members. You will use the following AWS services:

Implementation

To create the required customer managed policies and associate them to users and roles, you will perform these tasks, described in more detail later in this section:

  1. Create a customer managed policy and associate it with the user and role for the security analyst persona in the Security Hub master account, along with the AWSSecurityHubReadOnlyAccess AWS managed policy.
  2. Create a customer managed policy and associate it with the user and role for the DevOps persona in the Security Hub member account, along with the AWSSecurityHubReadOnlyAccess AWS managed policy.
  3. Create a sysadmin user and role and associate it with the AWS managed policy for AWSSecurityHubFullAccess, along with AWS Config and CloudWatch event rule permissions in the Security Hub master account.

The following policy JSON script is for those two customer managed policies.

Security Hub - Security Analyst policy 
MasterCustomer Managed Policy:
{
    "Version": "2012-10-17",
    "Statement": [
        {
            "Sid": "SecurityAnalystMasterCMP",
            "Effect": "Allow",
            "Action": [
                "securityhub:UpdateInsight",
                "securityhub:CreateInsight",
	  			"securityhub:BatchUpdateFindings"
            ],
            "Resource": "*"
        }
    ]
}

Security Hub – DevOps Engineer policy: 
MemberCustomer Managed Policy:
{
    "Version": "2012-10-17",
    "Statement": [
        {
            "Sid": "DevOpsMemberCMP",
            "Effect": "Allow",
            "Action": [
                "securityhub:UpdateInsight",
                "securityhub:CreateInsight",
                "securityhub:BatchUpdateFindings"
            ],
            "Resource": "*"
        }
    ]
}

Step 1: Create the user and role for the security analyst persona

First, create a customer managed policy and associate it with the user and role for the security analyst persona in the Security Hub master account, along with the AWSSecurityHubReadOnlyAccess AWS managed policy.

To create the IAM policy, user, and role (console method)

  1. Sign in to the AWS Management Console in the Security Hub master account and open the IAM console.
  2. In the IAM console navigation pane, choose Policies, and then choose Create Policies.
  3. Choose the JSON tab.
  4. Copy the Security Hub – Security Analyst policy JSON shown earlier in this section, and paste it into the visual editor. When you are finished, choose Review policy.
  5. On the Review policy page, enter a name and a description (optional) for the policy that you’re creating. Review the policy summary to see the permissions that are granted by your policy. Then choose Create policy to save your work.
  6. Follow the instructions in the AWS Identity and Access Management User Guide to create a user and role, and attach the policy you just created.
  7. In the IAM console navigation pane, choose the user or role (or both) that you just created, and on the Permissions tab, choose Add Permissions.
  8. Choose the permissions category Attach existing policies directly to filter and select the managed policy AWSSecurityHubReadOnlyAccess. Review the permissions and then choose Add permissions.
  9. Save all the changes and try using the user and role after few minutes.

Step 2: Create the user and role for the DevOps persona

Next, create a customer managed policy and associate it with the user and role for the DevOps persona in the Security Hub member account, along with the AWSSecurityHubReadOnlyAccess AWS managed policy.

To create the IAM policy, user, and role (console method)

  1. Sign in to the AWS Management Console in the Security Hub member account and open the IAM console.
  2. In the IAM console navigation pane, choose Policies and then choose Create Policies.
  3. Choose the JSON tab.
  4. Copy the Security Hub – DevOps Engineer policy JSON shown earlier in this section, and paste it into the visual editor. When you are finished, choose Review policy.
  5. On the Review policy page, enter a name and a description (optional) for the policy that you are creating. Review the policy summary to see the permissions that are granted by your policy. Then choose Create policy to save your work.
  6. Follow the instructions in the AWS Identity and Access Management User Guide to create a user and role, and attach the policy you just created.
  7. In the IAM console navigation pane, choose the user or role (or both) that you just created, and on the Permissions tab, choose Add Permissions.
  8. Choose the permissions category Attach existing policies directly to filter and select the managed policy AWSSecurityHubReadOnlyAccess. Review the permissions and then choose Add permissions.
  9. Save all the changes and try using the user and role after few minutes.

Step 3: Create the user and role for the sysadmin persona

Next, create a user and role for the sysadmin persona and associate it with the AWS managed policies AWSSecurityHubFullAccess, CloudWatchEventsFullAccess, and full access to AWS Config in the Security Hub master account.

To create the IAM user and role (console method)

  1. Sign in to the AWS Management Console in the Security Hub member account and open the IAM console.
  2. Follow the instructions in the AWS Identity and Access Management User Guide to create a user and role.
  3. In the IAM console navigation pane, choose the user or role (or both) that you just created, and on the Permissions tab, choose Add Permissions.
  4. Choose the permissions category Attach existing policies directly to filter and select managed policies, and attach the managed policies AWSSecurityHubFullAccess and CloudWatchEventsFullAccess.
  5. Create another policy to grant full access to AWS Config as described in the AWS Config Developer Guide, and attach the policy to the user or role. Review the permissions, and choose Add permissions.
  6. Save all the changes and try using the user and role after few minutes.

Test the users and roles in the Security Hub master and member accounts

Finally, test the three users and roles that you created for the respective personas in the preceding steps.

To test the users and roles

  1. Security analyst user and role:
    1. Sign in to the AWS Management Console in the master account and open Security Hub.
    2. Make sure that Security Hub UI features (such as the Summary, Security Standard, Insights, Findings, and Integrations) are rendered so that the Security Analyst can view them.
    3. Navigate to a finding and change the workflow status as described in the topic Setting the workflow status for findings.
  2. DevOps engineer user and role:
    1. Sign in to the AWS Management Console in the member account and open Security Hub.
    2. Make sure that Security Hub UI features (such as the Summary, Security Standard, Insights, Findings, and Integrations) are rendered so that the DevOps Engineer can view them.
    3. Create a custom insight for the member account and other attribute groupings.
  3. Sysadmin user and role:
    1. Sign in to the AWS Management Console in the master or member account, and open Security Hub.
    2. Try admin-related operations such as create a custom action, invite another account, and so on.

Adding policy conditions

You might want to further restrict the permissions for the security analyst and DevOps personas. IAM policies for Security Hub’s BatchUpdateFindings API enable you to specify conditions to prevent a user from making any update to a specific finding field. The following example disallows setting the Workflow Status field to Suppressed.

{
	"Sid": "CMPCondition",
	"Effect": "Deny",
	"Action": "securityhub:BatchUpdateFindings",
	"Resource": "*",
	"Condition": {
		"StringEquals": {
			"securityhub:ASFFSyntaxPath/Workflow.Status": "SUPPRESSED"
		}
	}
}

Summary

In this post, we showed you how to align AWS managed and customer managed IAM policies to different user personas, so that you can allow different users to access Security Hub with least privilege permissions. Security Hub enables both central security teams and individual DevOps engineers to understand and improve the security posture of the AWS accounts in their organization.

If you have feedback about this post, submit comments in the Comments section below. If you have questions about this post, start a new thread on the AWS Security Hub forum or contact AWS Support.

Want more AWS Security how-to content, news, and feature announcements? Follow us on Twitter.
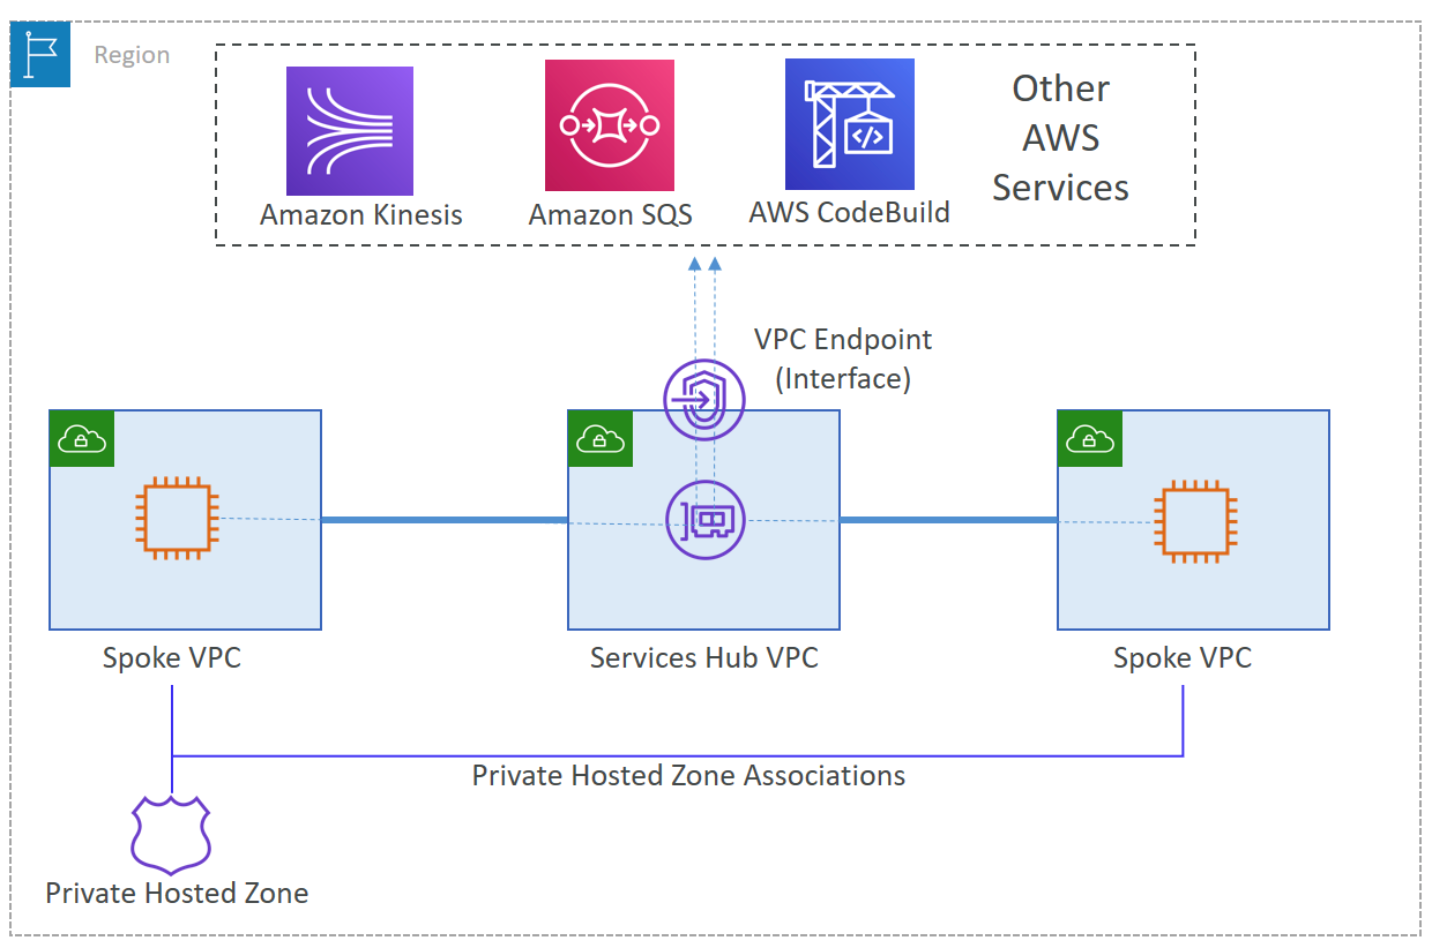
Author

Vaibhawa Kumar

Vaibhawa is a Cloud Infra Architect with AWS Professional Services. He helps customers on their cloud journey of critical workloads to the AWS cloud with infrastructure security and automations. In his free time, you can find him spending time with family, sports, and cooking.

Author

Sanjay Patel

Sanjay is a Senior Cloud Application Architect with AWS Professional Services. He has a diverse background in software design, enterprise architecture, and API integrations. He has helped AWS customers automate infrastructure security. He enjoys working with AWS customers to identify and implement the best fit solution.

Author

Ely Kahn

Ely is the Principal Product Manager for AWS Security Hub. Before his time at AWS, Ely was a co-founder for Sqrrl, a security analytics startup that AWS acquired and is now Amazon Detective. Earlier, Ely served in a variety of positions in the federal government, including Director of Cybersecurity at the National Security Council in the White House.

New! Streamline existing IAM Access Analyzer findings using archive rules

Post Syndicated from Andrea Nedic original https://aws.amazon.com/blogs/security/new-streamline-existing-iam-access-analyzer-findings-using-archive-rules/

AWS Identity and Access Management (IAM) Access Analyzer generates comprehensive findings to help you identify resources that grant public and cross-account access. Now, you can also apply archive rules to existing findings, so you can better manage findings and focus on the findings that need your attention most.

You can think of archive rules as similar to email rules. You define email rules to automatically organize emails. With IAM Access Analyzer, you can define archive rules to automatically mark findings as intended access. Now, those rules can apply to existing as well as new IAM Access Analyzer findings. This helps you focus on findings for potential unintended access to your resources. You can then easily track and resolve these findings by reducing access, helping you to work towards least privilege.

In this post, first I give a brief overview of IAM Access Analyzer. Then I show you an example of how to create an archive rule to automatically archive findings for intended access. Finally, I show you how to update an archive rule to mark existing active findings as intended.

IAM Access Analyzer overview

IAM Access Analyzer helps you determine which resources can be accessed publicly or from other accounts or organizations. IAM Access Analyzer determines this by mathematically analyzing access control policies attached to resources. This form of analysis—called automated reasoning—applies logic and mathematical inference to determine all possible access paths allowed by a resource policy. This is how IAM Access Analyzer uses provable security to deliver comprehensive findings for potential unintended bucket access. You can enable IAM Access Analyzer in the IAM console by creating an analyzer for an account or an organization. Once you’ve created your analyzer, you can review findings for resources that can be accessed publicly or from other AWS accounts or organizations.

Create an archive rule to automatically archive findings for intended access

When you review findings and discover common patterns for intended access, you can create archive rules to automatically archive those findings. This helps you focus on findings for unintended access to your resources, just like email rules help streamline your inbox.

To create an archive rule

In the IAM console, choose Archive rules under Access Analyzer. Then, choose Create archive rule to display the Create archive rule page shown in Figure 1. There, you find the option to name the rule or use the name generated by default. In the Rule section, you define criteria to match properties of findings you want to archive. Just like email rules, you can add multiple criteria to the archive rule. You can define each criterion by selecting a finding property, an operator, and a value. To help ensure a rule doesn’t archive findings for public access, the criterion Public access is false is suggested by default.
 

Figure 1: IAM Access Analyzer create archive rule page where you add criteria to create a new archive rule

Figure 1: IAM Access Analyzer create archive rule page where you add criteria to create a new archive rule

For example, I have a security audit role external to my account that I expect to have access to resources in my account. To mark that access as intended, I create a rule to archive all findings for Amazon S3 buckets in my account that can be accessed by the security audit role outside of the account. To do this, I include two criteria: Resource type matches S3 bucket, and the AWS Account value matches the security audit role ARN. Once I add these criteria, the Results section displays the list of existing active findings the archive rule matches, as shown in Figure 2.
 

Figure 2: A rule to archive all findings for S3 buckets in an account that can be accessed by the audit role outside of the account, with matching findings displayed

Figure 2: A rule to archive all findings for S3 buckets in an account that can be accessed by the audit role outside of the account, with matching findings displayed

When you’re done adding criteria for your archive rule, select Create and archive active findings to archive new and existing findings based on the rule criteria. Alternatively, you can choose Create rule to create the rule for new findings only. In the preceding example, I chose Create and archive active findings to archive all findings—existing and new—that match the criteria.

Update an archive rule to mark existing findings as intended

You can also update an archive rule to archive existing findings retroactively and streamline your findings. To edit an archive rule, choose Archive rules under Access Analyzer, then select an existing rule and choose Edit. In the Edit archive rule page, update the archive rule criteria and review the list of existing active findings the archive rule applies to. When you save the archive rule, you can apply it retroactively to existing findings by choosing Save and archive active findings as shown in Figure 3. Otherwise, you can choose Save rule to update the rule and apply it to new findings only.

Note: You can also use the new IAM Access Analyzer API operation ApplyArchiveRule to retroactively apply an archive rule to existing findings that meet the archive rule criteria.


Figure 3: IAM Access Analyzer edit archive rule page where you can apply the rule retroactively to existing findings by choosing Save and archive active findings

Figure 3: IAM Access Analyzer edit archive rule page where you can apply the rule retroactively to existing findings by choosing Save and archive active findings

Get started

To turn on IAM Access Analyzer at no additional cost, open the IAM console. IAM Access Analyzer is available at no additional cost in the IAM console and through APIs in all commercial AWS Regions, AWS China Regions, and AWS GovCloud (US). To learn more about IAM Access Analyzer and which resources it supports, visit the feature page.

If you have feedback about this post, submit comments in the Comments section below. If you have questions about this post, start a new thread on the AWS IAM forum or contact AWS Support.

Want more AWS Security how-to content, news, and feature announcements? Follow us on Twitter.

Author

Andrea Nedic

Andrea is a Sr. Tech Product Manager for AWS Identity and Access Management. She enjoys hearing from customers about how they build on AWS. Outside of work, Andrea likes to ski, dance, and be outdoors. She holds a PhD from Princeton University.

How to automatically archive expected IAM Access Analyzer findings

Post Syndicated from Josh Joy original https://aws.amazon.com/blogs/security/how-to-automatically-archive-expected-iam-access-analyzer-findings/

AWS Identity and Access Management (IAM) Access Analyzer continuously monitors your Amazon Web Services (AWS) resource-based policies for changes in order to identify resources that grant public or cross-account access from outside your AWS account or organization. Access Analyzer findings include detailed information that you can use to make an informed decision about whether access to the shared resource was intended or not. The findings information includes the affected AWS resource, the external principal that has access, the condition from the policy statement that grants the access, and the access level, such as read, write, or the ability to modify permissions.

In this blog post, we show you how to automatically archive Access Analyzer findings for expected events, such as authorized resource access. The benefit of automatically archiving expected findings is to help you reduce distraction from findings that don’t require action, enabling you to concentrate on remediating any unexpected access to your shared resources.

Access Analyzer provides you with the ability to archive findings that show intended cross-account sharing of your AWS resources. The AWS service-provided archive mechanism provides you with built-in archive rules that can automatically archive new findings that meet the criteria you define (such as directive controls). For example, your organizational access controls might allow your auditor to have read-only IAM role cross-account access from your security account into all of your accounts. In this security auditor scenario, you can define a built-in archive rule to automatically archive the findings related to the auditor cross-account IAM role that has authorized read-only access.

A limitation of the built-in archive rules is that they are static and based only on simple pattern matching. To build your own custom archiving logic, you can create an AWS Lambda function that listens to Amazon CloudWatch Events. Access Analyzer forwards all findings to CloudWatch Events, and you can easily configure a CloudWatch Events rule to trigger a Lambda function for each Access Analyzer finding. For example, if you want to look up the tags on a resource, you can make an AWS API call based on the Amazon Resource Name (ARN) for the resource in your Lambda function. As another example, you might want to compute an overall risk score based on the various parts of a finding and archive everything below a certain threshold score that you define.

In this blog post, we show you how to configure a built-in archive rule, how to add context enrichment for more complex rules, and how to trigger an alert for unintended findings. We first cover the scenario of the auditor role using a built-in archive rule. Then, we show how to perform automated archive remediation by using CloudWatch Events with AWS Step Functions to add context enrichment and automatically remediate the authorized sharing of a cross-account AWS Key Management Service (AWS KMS) key. Finally, we show how to trigger alerts for the unintended sharing of a public Amazon Simple Storage Service (Amazon S3) bucket.

Prerequisites

The solution we give here assumes that you have Access Analyzer enabled in your AWS account. You can find more details about enabling Access Analyzer in the Getting Started guide for that feature. Access Analyzer is available at no additional cost in the IAM console and through APIs in all commercial AWS Regions. Access Analyzer is also available through APIs in the AWS GovCloud (US) Regions.

How to use the built-in archive rules

In our first example, there is a security auditor cross-account IAM role that can be assumed by security automation tools from the central security AWS account. We use the built-in archive rules to automatically archive cross-account findings related to the cross-account security auditor IAM role.

To create a built-in archive rule

  1. In the AWS Management Console, choose Identity and Access Management (IAM). On the dashboard, choose Access Analyzer, and then choose Archive rules.
  2. Choose the Create archive rule button.
     
    Figure 1: Create archive rule

    Figure 1: Create archive rule

  3. You can select archive rule criteria based on your use case. For this example, in the search box, choose AWS Account as the criteria, since we want to automatically archive the security auditor account.
     
    Figure 2: Select archive rule criteria

    Figure 2: Select archive rule criteria

  4. You can now enter the value for the selected criteria. In this case, for Criteria, choose AWS Account, and then choose the equals operator.
  5. After you’ve entered your criteria, choose the Create archive rule button.
     
    Figure 3: Finish creating the archive rule

    Figure 3: Finish creating the archive rule

    You should see a message confirming that you’ve successfully created a new archive rule.
     

    Figure 4: Successful creation of a new archive rule

    Figure 4: Successful creation of a new archive rule

How to automatically archive expected findings

We now show you how to automatically archive expected findings by using a serverless workflow that you define by using AWS Step Functions. We show you how to leverage Step Functions to enrich an Access Analyzer finding, evaluate the finding against your customized rule engine logic, and finally either archive the finding or send a notification. A CloudWatch Event Rule will trigger the Step Functions workflow when Access Analyzer generates a new finding.

Solution architecture – serverless workflow

The CloudWatch event bus delivers the Access Analyzer findings to the Step Functions workflow. The Step Functions workflow responds to each Access Analyzer finding and either archives the finding for authorized access or sends an Amazon Simple Notification Service (Amazon SNS) email notification for an unauthorized access finding, as shown in figure 5.
 

Figure 5: Solution architecture for automatic archiving

Figure 5: Solution architecture for automatic archiving

The Step Functions workflow enriches the finding and provides contextual information to the rules engine for evaluation, as shown in figure 6. The Access Analyzer finding is either archived or generates an alert, based on the result of the rules engine evaluation and the associated risk level. If you’re interested in remediating the finding, you can learn more by watching the talk AWS re:Invent 2019: [NEW LAUNCH!] Dive Deep into IAM Access Analyzer (SEC309).
 

Figure 6: Finding analysis and archival

Figure 6: Finding analysis and archival

This example uses four Lambda functions. One function is for context enrichment, a second function is for rule evaluation logic, a third function is to archive expected findings, and finally a fourth function is to send a notification for findings that require investigation by your security operations team.

First, the enrichment Lambda function retrieves the tags associated with the AWS resource. The following code example retrieves the S3 bucket tags.

def lookup_s3_tags(resource_arn):
  tags = {}

  s3_client = boto3.client("s3")
  bucket_tags = s3_client.get_bucket_tagging(Bucket=resource_arn)["TagSet"]

  return bucket_tags

The Lambda function can perform additional enrichment beyond looking up tags, such as looking up the AWS KMS key alias, as shown in the next code example.

def additional_enrichment(resource_type, resource_arn):
  additional_context = {}

  if resource_type == "AWS::KMS::Key":
    kms_client = boto3.client("kms")
    aliases = kms_client.list_aliases(KeyId=resource_arn)["Aliases"]
    additional_context["key_aliases"] = [alias["AliasName"] for alias in aliases]

  return additional_context

Next, the evaluation rule Lambda function determines whether the finding is authorized and can be archived, or whether the finding is unauthorized and a notification needs to be generated. In this example, we first check whether the resource is shared publicly and then immediately alert if there’s an unexpected public sharing of a resource. Additionally, we explicitly don’t want public sharing of resources that are tagged Confidential. Our example method checks whether the value “Confidential” is set as the “Data Classification” tag and correspondingly returns False in order to trigger a notification.

Also, we allow cross-account sharing of a key in the development environment with the tag key “IsAllowedToShare” and tag value “true”, tag key “Environment” with tag value “development”, and a key alias of “DevelopmentKey”.

# Evaluate Risk Level
# Return True to raise alert if risk level exceeds threshold
# Return False to archive finding
def should_raise_alert(finding_details, tags, additional_context):
  if (
      finding_details["isPublic"]
      and not is_allowed_public(finding_details, tags, additional_context)
     ):
    return True
  elif (
        tags.get("IsAllowedToShare") == "true"
        and tags.get("Environment") == "development"
        and "DevelopmentKey" in additional_context.get("key_aliases", [])
    ):
    return False

  return True

def is_allowed_public(finding_details, tags, additional_context):
  # customize your logic here
  # for example, Data Classification is Confidential, return False for no public access
  if "Data Classification" in tags and tags["Data Classification"] == "Confidential":
    return False 

  return True
  if should_raise_alert(finding_details, tags, additional_context):
    return {"status": "NOTIFY"}
  else:
    return {"status": "ARCHIVE"}     

We then use the Choice condition to trigger either the archive or notification step.

 next(sfn.Choice(self, "Archive?"). \
  when(sfn.Condition.string_equals("$.guid.status", "ARCHIVE"), archive_task). \
  when(sfn.Condition.string_equals("$.guid.status", "NOTIFY"), notification_task) \
 )

The archive Lambda step archives the Access Analyzer finding if a rule is successfully evaluated.

def archive_finding(finding_id, analyzer_arn):
  access_analyzer_client = boto3.client("accessanalyzer")
  access_analyzer_client.update_findings(
    analyzerArn=analyzer_arn,
    ids=[finding_id],
    status="ARCHIVED"
  )

Otherwise, we raise an SNS notification because there is unauthorized resource sharing.

  resource_type = event["detail"]["resourceType"]
  resource_arn = event["detail"]["resource"]

  sns_client = boto3.client('sns')
  sns_client.publish(
      TopicArn=sns_topic_arn,
      Message=f"Alert {resource_type} {resource_arn} exceeds risk level.",
      Subject="Alert Access Analyzer Finding"
  )

Solution deployment

You can deploy the solution through either the AWS Management Console or the AWS Cloud Development Kit (AWS CDK).

Prerequisites

Make sure that Access Analyzer is enabled in your AWS account. You can find an AWS CloudFormation template for doing so in the GitHub repository. It’s also possible for you to enable Access Analyzer across your organization by using the scripts for AWS CloudFormation StackSets found in the GitHub repository. See more details in the blog post Enabling AWS IAM Access Analyzer on AWS Control Tower accounts.

To deploy the solution by using the AWS Management Console

  1. In your security account, launch the template by choosing the following Launch Stack button.
     
    Select the Launch Stack button to launch the template
  2. Provide the following parameter for the security account:
    EmailSubscriptionParameter: The email address to receive subscription notifications for any findings that exceed your defined risk level.

To deploy the solution by using the AWS CDK

Additionally, you can find the latest code on GitHub, where you can also contribute to the sample code. The following commands shows how to deploy the solution by using the AWS Cloud Development Kit (AWS CDK). First, upload the Lambda assets to S3. Then, deploy the solution to your account.

cdk bootstrap

cdk deploy --parameters EmailSubscriptionParameter=YOUR_EMAIL_ADDRESS_HERE

To test the solution

  1. Create a cross-account KMS key. You should receive an email notification after several minutes.
  2. Create a cross-account KMS key with the tags IsAllowedToShare=true and Environment=development. Also, create a KMS key alias named alias/DevelopmentKey for this key. After a few seconds, you should see that the finding was automatically archived.

Summary

In this blog post, we showed you how IAM Access Analyzer can help you identify resources in your organization and accounts that are shared with an external identity. We explained how to automatically archive expected findings by using the built-in archive rules. Then, we walked you through how to automatically archive expected shared resources. We showed you how to create a serverless workflow that uses AWS Step Functions, which performs context enrichment and then automatically archives your findings for expected shared resources.

After you follow the steps in this blog post for automatic archiving, you will only receive Access Analyzer findings for unexpected AWS resource sharing. A good way to manage these unexpected Access Analyzer findings is with AWS Security Hub, alongside your other findings. Visit Getting started with AWS Security Hub to learn more. You can also see the blog post Automated Response and Remediation with AWS Security Hub for event patterns and remediation code examples.

If you have feedback about this post, submit comments in the Comments section below.

Want more AWS Security how-to content, news, and feature announcements? Follow us on Twitter.

Author

Josh Joy

Josh is a Security Consultant with the AWS Global Security Practice, a part of our Worldwide Professional Services Organization. Josh helps customers improve their security posture as they migrate their most sensitive workloads to AWS. Josh enjoys diving deep and working backwards in order to help customers achieve positive outcomes.

Author

Andrew Gacek

Andrew is a Principal Applied Scientist in the Automated Reasoning Group at Amazon. He designs analyses to ensure the safety and security of AWS customer configurations. Prior to joining Amazon, Andrew worked at Rockwell Collins where he used automated reasoning to verify aerospace applications. He holds a PhD in Computer Science from the University of Minnesota.

New IAMCTL tool compares multiple IAM roles and policies

Post Syndicated from Sudhir Reddy Maddulapally original https://aws.amazon.com/blogs/security/new-iamctl-tool-compares-multiple-iam-roles-and-policies/

If you have multiple Amazon Web Services (AWS) accounts, and you have AWS Identity and Access Management (IAM) roles among those multiple accounts that are supposed to be similar, those roles can deviate over time from your intended baseline due to manual actions performed directly out-of-band called drift. As part of regular compliance checks, you should confirm that these roles have no deviations. In this post, we present a tool called IAMCTL that you can use to extract the IAM roles and policies from two accounts, compare them, and report out the differences and statistics. We will explain how to use the tool, and will describe the key concepts.

Prerequisites

Before you install IAMCTL and start using it, here are a few prerequisites that need to be in place on the computer where you will run it:

To follow along in your environment, clone the files from the GitHub repository, and run the steps in order. You won’t incur any charges to run this tool.

Install IAMCTL

This section describes how to install and run the IAMCTL tool.

To install and run IAMCTL

  1. At the command line, enter the following command:
    pip3 install git+ssh://[email protected]/aws-samples/[email protected]
    

    You will see output similar to the following.

    Figure 1: IAMCTL tool installation output

    Figure 1: IAMCTL tool installation output

  2. To confirm that your installation was successful, enter the following command.
    iamctl –h
    

    You will see results similar to those in figure 2.

    Figure 2: IAMCTL help message

    Figure 2: IAMCTL help message

Now that you’ve successfully installed the IAMCTL tool, the next section will show you how to use the IAMCTL commands.

Example use scenario

Here is an example of how IAMCTL can be used to find differences in IAM roles between two AWS accounts.

A system administrator for a product team is trying to accelerate a product launch in the middle of testing cycles. Developers have found that the same version of their application behaves differently in the development environment as compared to the QA environment, and they suspect this behavior is due to differences in IAM roles and policies.

The application called “app1” primarily reads from an Amazon Simple Storage Service (Amazon S3) bucket, and runs on an Amazon Elastic Compute Cloud (Amazon EC2) instance. In the development (DEV) account, the application uses an IAM role called “app1_dev” to access the S3 bucket “app1-dev”. In the QA account, the application uses an IAM role called “app1_qa” to access the S3 bucket “app1-qa”. This is depicted in figure 3.

Figure 3: Showing the “app1” application in the development and QA accounts

Figure 3: Showing the “app1” application in the development and QA accounts

Setting up the scenario

To simulate this setup for the purpose of this walkthrough, you don’t have to create the EC2 instance or the S3 bucket, but just focus on the IAM role, inline policy, and trust policy.

As noted in the prerequisites, you will switch between the two AWS accounts by using the AWS CLI named profiles “dev-profile” and “qa-profile”, which are configured to point to the DEV and QA accounts respectively.

Start by using this command:

mkdir -p iamctl_test iamctl_test/dev iamctl_test/qa

The command creates a directory structure that looks like this:
Iamctl_test
|– qa
|– dev

Now, switch to the dev folder to run all the following example commands against the DEV account, by using this command:

cd iamctl_test/dev

To create the required policies, first create a file named “app1_s3_access_policy.json” and add the following policy to it. You will use this file’s content as your role’s inline policy.

{
    "Version": "2012-10-17",
    "Statement": [
        {
            "Effect": "Allow",
            "Action": [
                "s3:Get*",
                "s3:List*"
            ],
            "Resource": [
         "arn:aws:s3:::app1-dev/shared/*"
            ]
        }
    ]
}

Second, create a file called “app1_trust_policy.json” and add the following policy to it. You will use this file’s content as your role’s trust policy.

{
  "Version": "2012-10-17",
  "Statement": [
    {
      "Effect": "Allow",
      "Principal": {
        "Service": "ec2.amazonaws.com"
      },
      "Action": "sts:AssumeRole"
    }
  ]
}

Now use the two files to create an IAM role with the name “app1_dev” in the account by using these command(s), run in the same order as listed here:

#create role with trust policy

aws --profile dev-profile iam create-role --role-name app1_dev --assume-role-policy-document file://app1_trust_policy.json

#put inline policy to the role created above
 
aws --profile dev-profile iam put-role-policy --role-name app1_dev --policy-name s3_inline_policy --policy-document file://app1_s3_access_policy.json

In the QA account, the IAM role is named “app1_qa” and the S3 bucket is named “app1-qa”.

Repeat the steps from the prior example against the QA account by changing dev to qa where shown in bold in the following code samples. Change the directory to qa by using this command:

cd ../qa

To create the required policies, first create a file called “app1_s3_access_policy.json” and add the following policy to it.

{
    "Version": "2012-10-17",
    "Statement": [
        {
            "Effect": "Allow",
            "Action": [
                "s3:Get*",
                "s3:List*"
            ],
            "Resource": [
         "arn:aws:s3:::app1-qa/shared/*"
            ]
        }
    ]
}

Next, create a file, called “app1_trust_policy.json” and add the following policy.

{
  "Version": "2012-10-17",
  "Statement": [
    {
      "Effect": "Allow",
      "Principal": {
        "Service": "ec2.amazonaws.com"
      },
      "Action": "sts:AssumeRole"
    }
  ]
}

Now, use the two files created so far to create an IAM role with the name “app1_qa” in your QA account by using these command(s), run in the same order as listed here:

#create role with trust policy
aws --profile qa-profile iam create-role --role-name app1_qa --assume-role-policy-document file://app1_trust_policy.json

#put inline policy to the role create above
aws --profile qa-profile iam put-role-policy --role-name app1_qa --policy-name s3_inline_policy --policy-document file://app1_s3_access_policy.json

So far, you have two accounts with an IAM role created in each of them for your application. In terms of permissions, there are no differences other than the name of the S3 bucket resource the permission is granted against.

You can expect IAMCTL to generate a minimal set of differences between the DEV and QA accounts, assuming all other IAM roles and policies are the same, but to be sure about the current state of both accounts, in IAMCTL you can run a process called baselining.

Through the process of baselining, you will generate an equivalency dictionary that represents all the known string patterns that reduce the noise in the generated deviations list, and then you will introduce a change into one of the IAM roles in your QA account, followed by a final IAMCTL diff to show the deviations.

Baselining

Baselining is the process of bringing two accounts to an “equivalence” state for IAM roles and policies by establishing a baseline, which future diff operations can leverage. The process is as simple as:

  1. Run the iamctl diff command.
  2. Capture all string substitutions into an equivalence dictionary to remove or reduce noise.
  3. Save the generated detailed files as a snapshot.

Now you can go through these steps for your baseline.

Go ahead and run the iamctl diff command against these two accounts by using the following commands.

#change directory from qa to iamctl-test
cd ..

#run iamctl init
iamctl init

The results of running the init command are shown in figure 4.

Figure 4: Output of the iamctl init command

Figure 4: Output of the iamctl init command

If you look at the iamctl_test directory now, shown in figure 5, you can see that the init command created two files in the iamctl_test directory.

Figure 5: The directory structure after running the init command

Figure 5: The directory structure after running the init command

These two files are as follows:

  1. iam.jsonA reference file that has all AWS services and actions listed, among other things. IAMCTL uses this to map the resource listed in an IAM policy to its corresponding AWS resource, based on Amazon Resource Name (ARN) regular expression.
  2. equivalency_list.jsonThe default sample dictionary that IAMCTL uses to suppress false alarms when it compares two accounts. This is where the known string patterns that need to be substituted are added.

Note: A best practice is to make the directory where you store the equivalency dictionary and from which you run IAMCTL to be a Git repository. Doing this will let you capture any additions or modifications for the equivalency dictionary by using Git commits. This will not only give you an audit trail of your historical baselines but also gives context to any additions or modifications to the equivalency dictionary. However, doing this is not necessary for the regular functioning of IAMCTL.

Next, run the iamctl diff command:

#run iamctl diff
iamctl diff dev-profile dev qa-profile qa
Figure 6: Result of diff command

Figure 6: Result of diff command

Figure 6 shows the results of running the diff command. You can see that IAMCTL considers the app1_qa and app1_dev roles as unique to the DEV and QA accounts, respectively. This is because IAMCTL uses role names to decide whether to compare the role or tag the role as unique.

You will add the strings “dev” and “qa” to the equivalency dictionary to instruct IAMCTL to substitute occurrences of these two strings with “accountname” by adding the follow JSON to the equivalency_list.json file. You will also clean up some defaults already present in there.

echo “{“accountname”:[“dev”,”qa”]}” > equivalency_list.json

Figure 7 shows the equivalency dictionary before you take these actions, and figure 8 shows the dictionary after these actions.

Figure 7: Equivalency dictionary before

Figure 7: Equivalency dictionary before

Figure 8: Equivalency dictionary after

Figure 8: Equivalency dictionary after

There’s another thing to notice here. In this example, one common role was flagged as having a difference. To know which role this is and what the difference is, go to the detail reports folder listed at the bottom of the summary report. The directory structure of this folder is shown in figure 9.

Notice that the reports are created under your home directory with a folder structure that mimics the time stamp down to the second. IAMCTL does this to maintain uniqueness for each run.

tree /Users/<username>/aws-idt/output/2020/08/24/08/38/49/
Figure 9: Files written to the output reports directory

Figure 9: Files written to the output reports directory

You can see there is a file called common_roles_in_dev_with_differences.csv, and it lists a role called “AwsSecurity***Audit”.

You can see there is another file called dev_to_qa_common_role_difference_items.csv, and it lists the granular IAM items from the DEV account that belong to the “AwsSecurity***Audit” role as compared to QA, but which have differences. You can see that all entries in the file have the DEV account number in the resource ARN, whereas in the qa_to_dev_common_role_difference_items.csv file, all entries have the QA account number for the same role “AwsSecurity***Audit”.

Add both of the account numbers to the equivalency dictionary to substitute them with a placeholder number, because you don’t want this role to get flagged as having differences.

echo “{“accountname”:[“dev”,”qa”],”000000000000”:[“123456789012”,”987654321098”]}” > equivalency_list.json

Now, re-run the diff command.

#run iamctl diff
iamctl diff dev-profile dev qa-profile qa

As you can see in figure 10, you get back the result of the diff command that shows that the DEV account doesn’t have any differences in IAM roles as compared to the QA account.

Figure 10: Output showing no differences after completion of baselining

Figure 10: Output showing no differences after completion of baselining

This concludes the baselining for your DEV and QA accounts. Now you will introduce a change.

Introducing drift

Drift occurs when there is a difference in actual vs expected values in the definition or configuration of a resource. There are several reasons why drift occurs, but for this scenario you will use “intentional need to respond to a time-sensitive operational event” as a reason to mimic and introduce drift into what you have built so far.

To simulate this change, add “s3:PutObject” to the qa app1_s3_access_policy.json file as shown in the following example.

{
    "Version": "2012-10-17",
    "Statement": [
        {
            "Effect": "Allow",
            "Action": [
                "s3:Get*",
                "s3:List*",
                "s3:PutObject"
            ],
            "Resource": [
         "arn:aws:s3:::app1-qa/shared/*"
            ]
        }
    ]
}

Put this new inline policy on your existing role “app1_qa” by using this command:

aws --profile qa-profile iam put-role-policy --role-name app1_qa --policy-name s3_inline_policy --policy-document file://app1_s3_access_policy.json

The following table represents the new drift in the accounts.

Action Account-DEV
Role name: app1_dev
Account-QA
Role name: app1_qa
s3:Get* Yes Yes
s3:List* Yes Yes
s3: PutObject No Yes

Next, run the iamctl diff command to see how it picks up the drift from your previously baselined accounts.

#change directory from qa to iamctL-test
cd ..
iamctl diff dev-profile dev qa-profile qa
Figure 11: Output showing the one deviation that was introduced

Figure 11: Output showing the one deviation that was introduced

You can see that IAMCTL now shows that the QA account has one difference as compared to DEV, which is what we expect based on the deviation you’ve introduced.

Open up the file qa_to_dev_common_role_difference_items.csv to look at the one difference. Again, adjust the following path example with the output from the iamctl diff command at the bottom of the summary report in Figure 11.

cat /Users/<username>/aws-idt/output/2020/09/18/07/38/15/qa_to_dev_common_role_difference_items.csv

As shown in figure 12, you can see that the file lists the specific S3 action “PutObject” with the role name and other relevant details.

Figure 12: Content of file qa_to_dev_common_role_difference_items.csv showing the one deviation that was introduced

Figure 12: Content of file qa_to_dev_common_role_difference_items.csv showing the one deviation that was introduced

You can use this information to remediate the deviation by performing corrective actions in either your DEV account or QA account. You can confirm the effectiveness of the corrective action by re-baselining to make sure that zero deviations appear.

Conclusion

In this post, you learned how to use the IAMCTL tool to compare IAM roles between two accounts, to arrive at a granular list of meaningful differences that can be used for compliance audits or for further remediation actions. If you’ve created your IAM roles by using an AWS CloudFormation stack, you can turn on drift detection and easily capture the drift because of changes done outside of AWS CloudFormation to those IAM resources. For more information about drift detection, see Detecting unmanaged configuration changes to stacks and resources. Lastly, see the GitHub repository where the tool is maintained with documentation describing each of the subcommand concepts. We welcome any pull requests for issues and enhancements.

If you have feedback about this post, submit comments in the Comments section below. If you have questions about this post, start a new thread on the AWS IAM forum or contact AWS Support.

Want more AWS Security how-to content, news, and feature announcements? Follow us on Twitter.
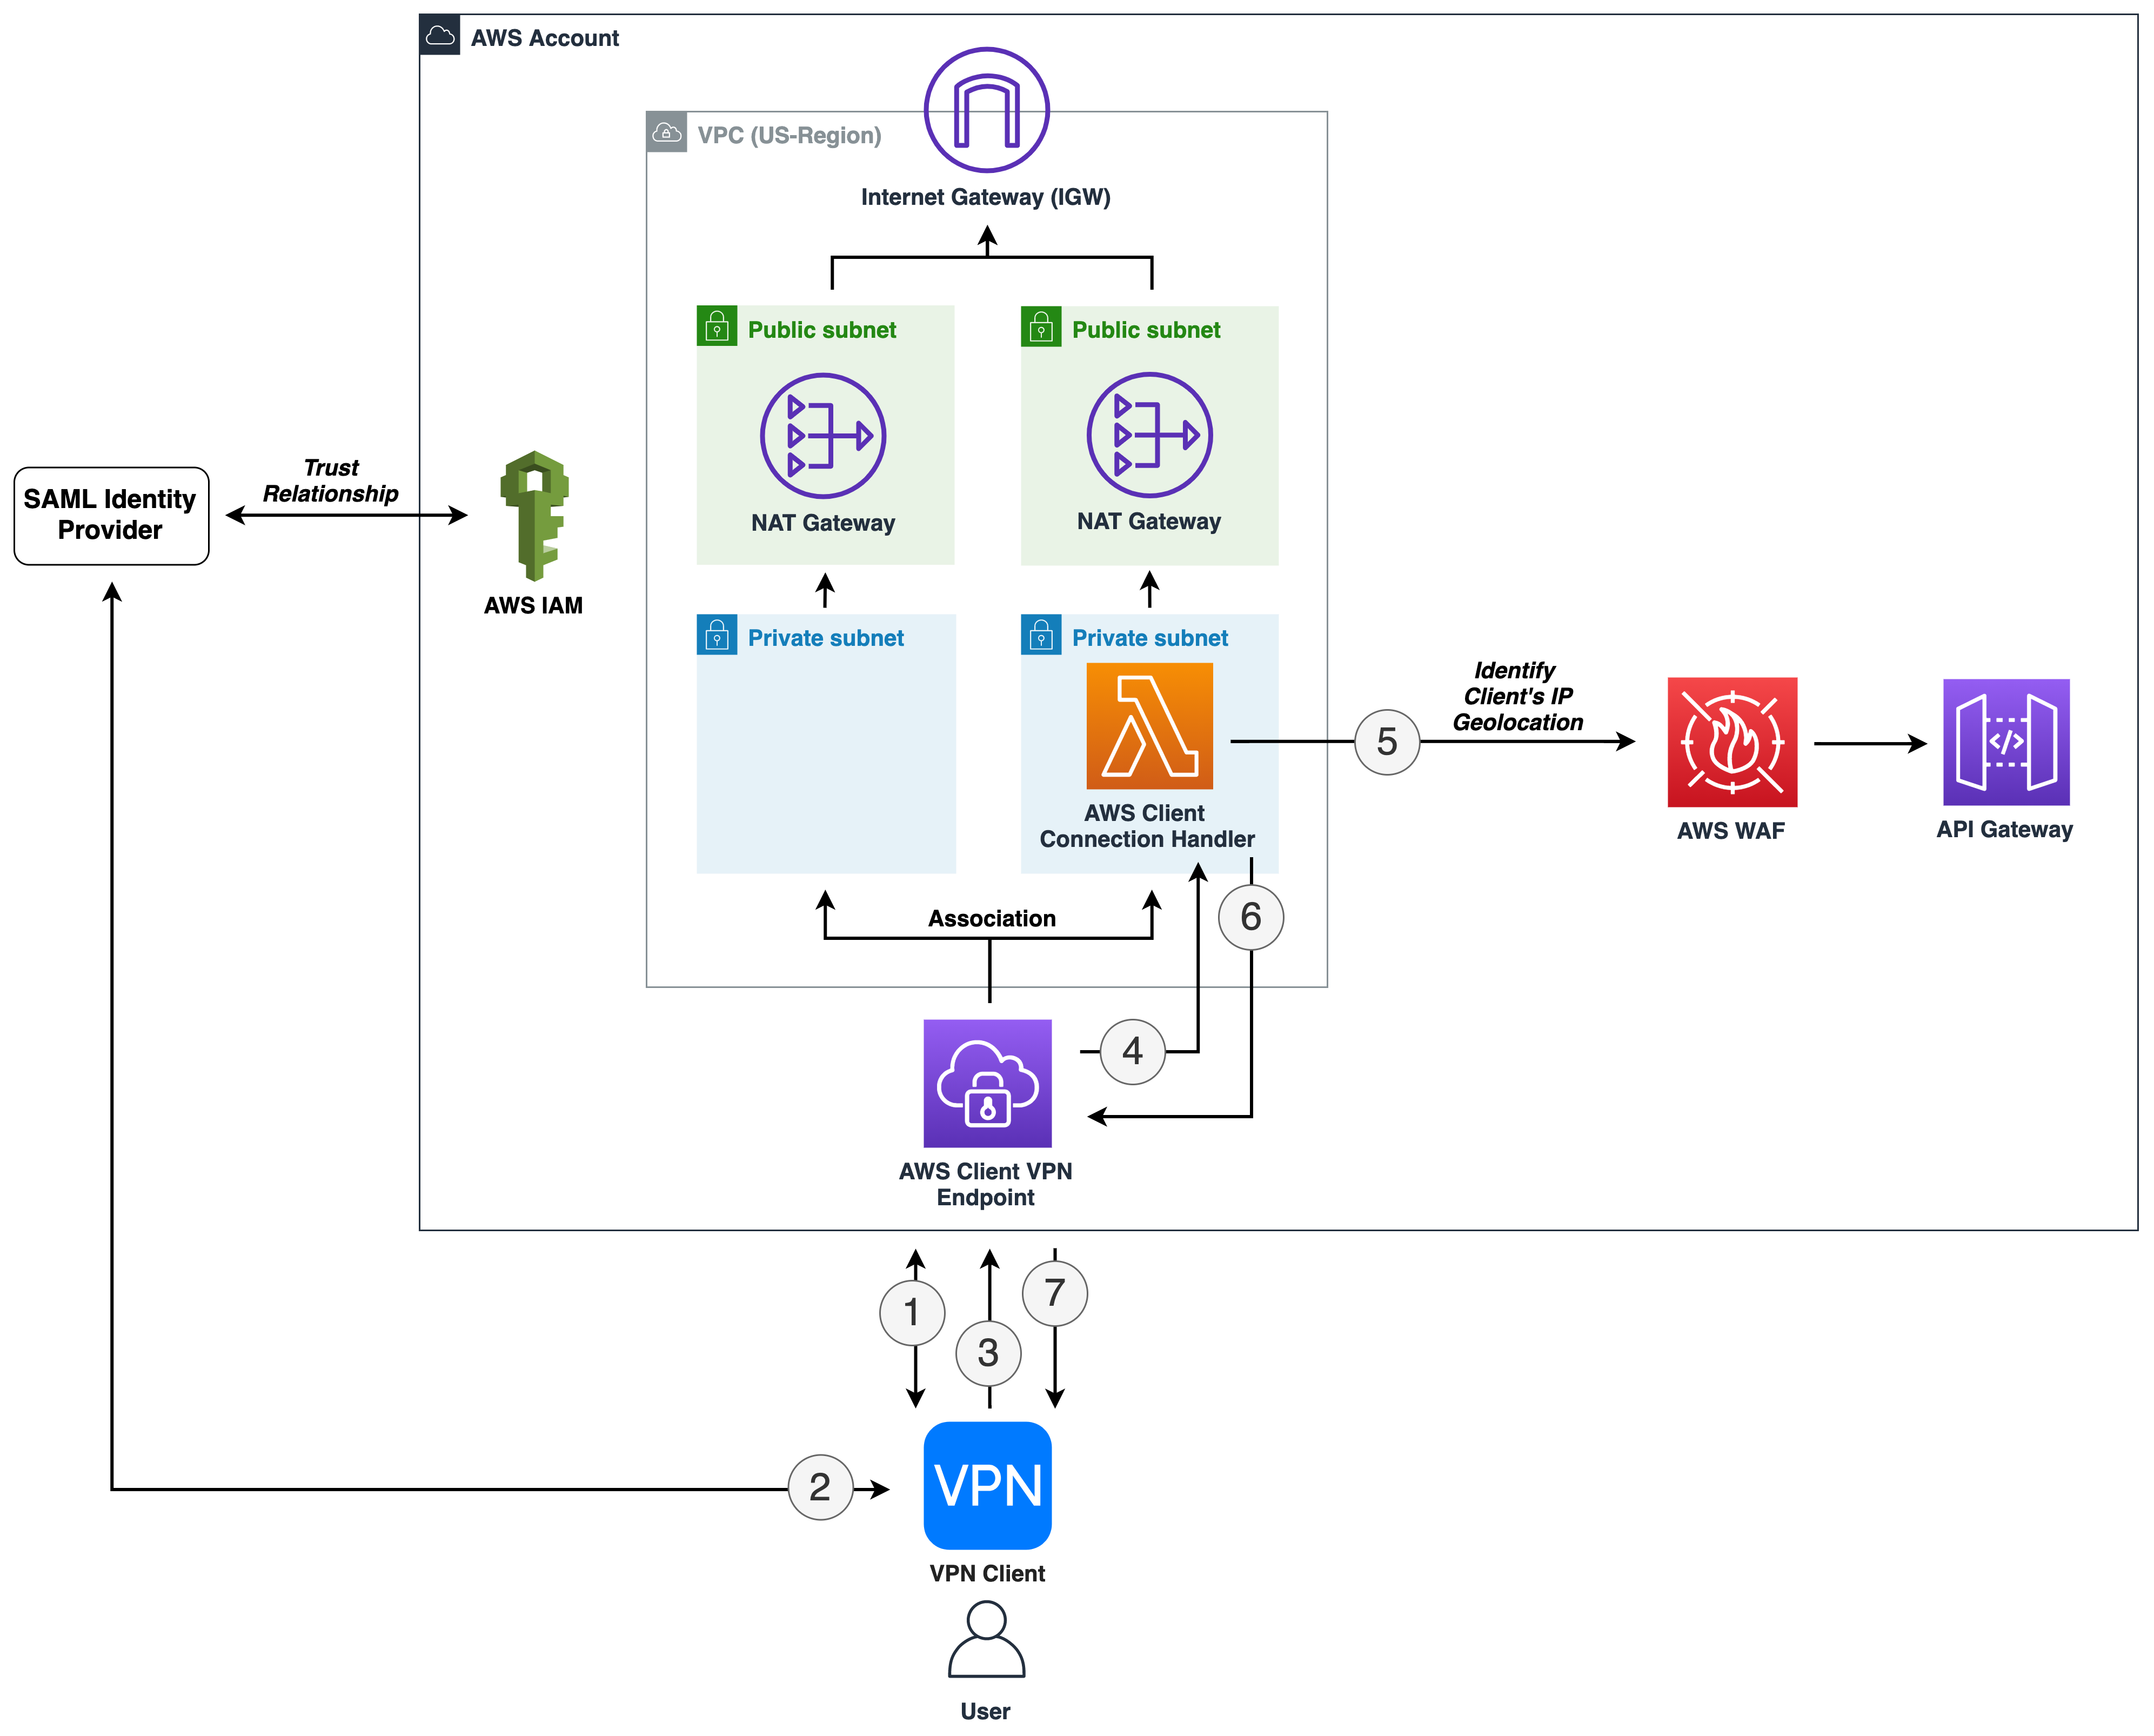
Author

Sudhir Reddy Maddulapally

Sudhir is a Senior Partner Solution Architect who builds SaaS solutions for partners by day and is a tech tinkerer by night. He enjoys trips to state and national parks, and Yosemite is his favorite thus far!

Author

Soumya Vanga

Soumya is a Cloud Application Architect with AWS Professional Services in New York, NY, helping customers design solutions and workloads and to adopt Cloud Native services.