Tag Archives: CCPA

Build a pseudonymization service on AWS to protect sensitive data: Part 2

Post Syndicated from Edvin Hallvaxhiu original https://aws.amazon.com/blogs/big-data/build-a-pseudonymization-service-on-aws-to-protect-sensitive-data-part-2/

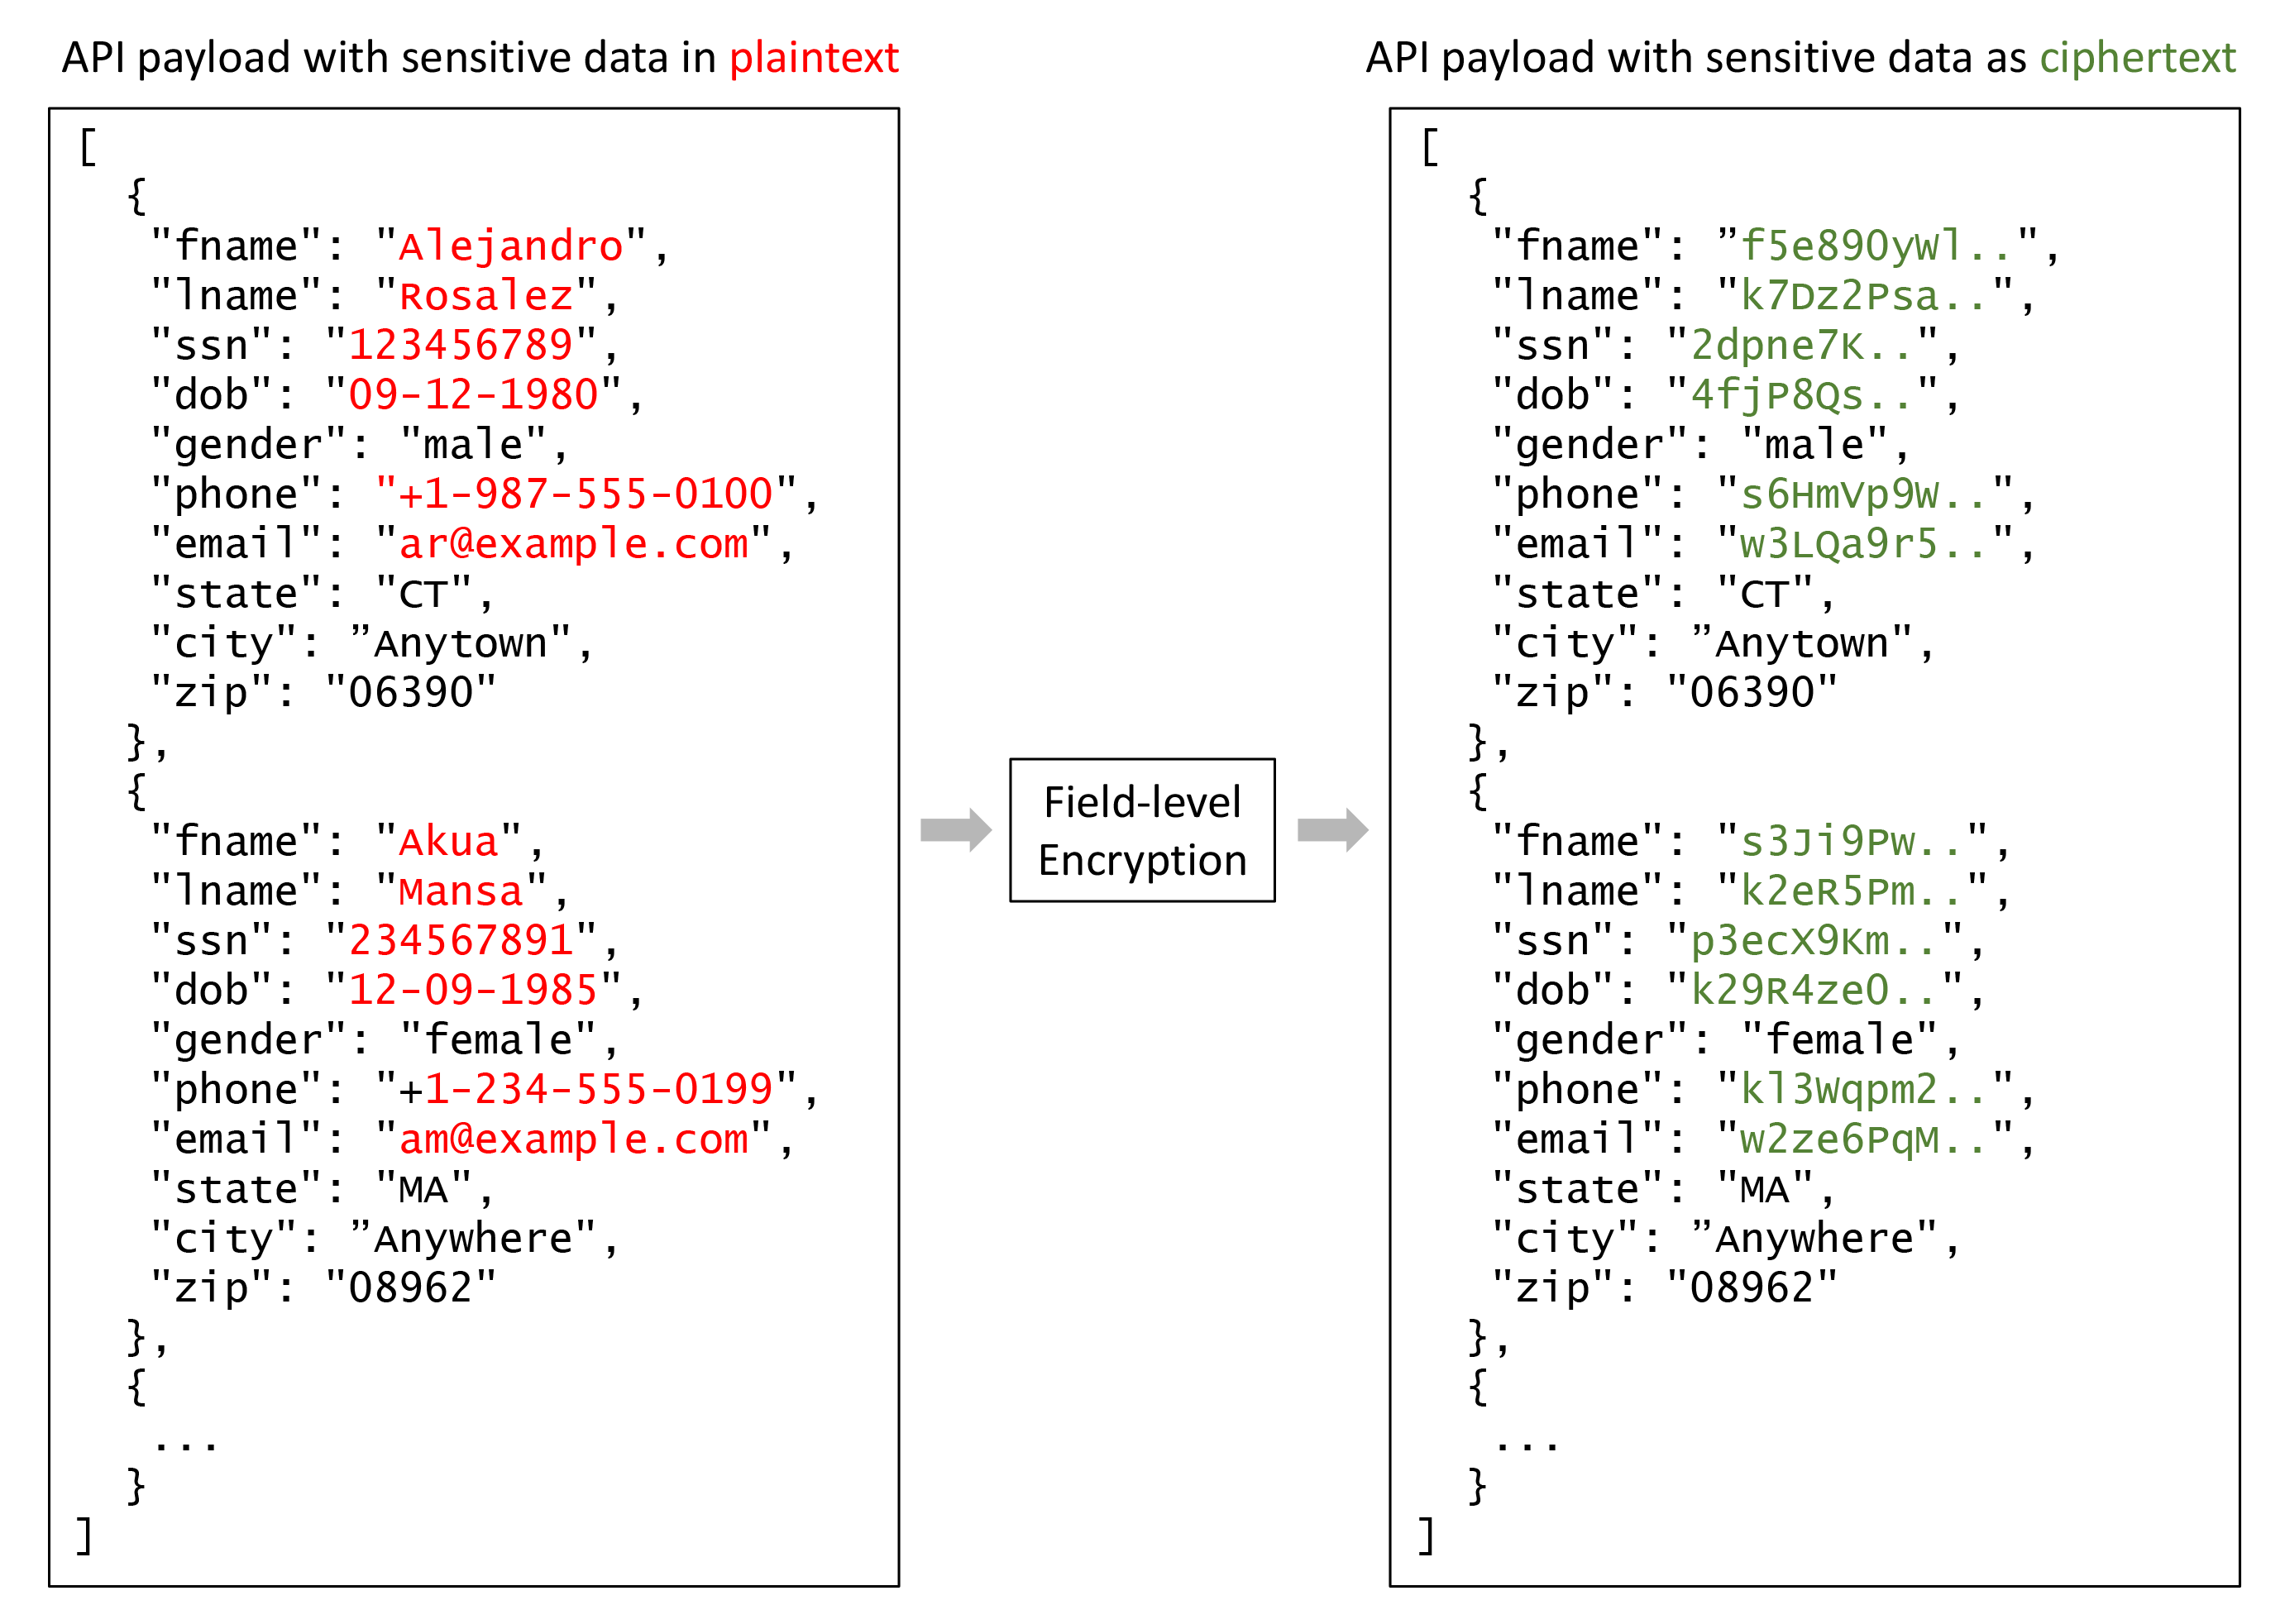
Part 1 of this two-part series described how to build a pseudonymization service that converts plain text data attributes into a pseudonym or vice versa. A centralized pseudonymization service provides a unique and universally recognized architecture for generating pseudonyms. Consequently, an organization can achieve a standard process to handle sensitive data across all platforms. Additionally, this takes away any complexity and expertise needed to understand and implement various compliance requirements from development teams and analytical users, allowing them to focus on their business outcomes.

Following a decoupled service-based approach means that, as an organization, you are unbiased towards the use of any specific technologies to solve your business problems. No matter which technology is preferred by individual teams, they are able to call the pseudonymization service to pseudonymize sensitive data.

In this post, we focus on common extract, transform, and load (ETL) consumption patterns that can use the pseudonymization service. We discuss how to use the pseudonymization service in your ETL jobs on Amazon EMR (using Amazon EMR on EC2) for streaming and batch use cases. Additionally, you can find an Amazon Athena and AWS Glue based consumption pattern in the GitHub repo of the solution.

Solution overview

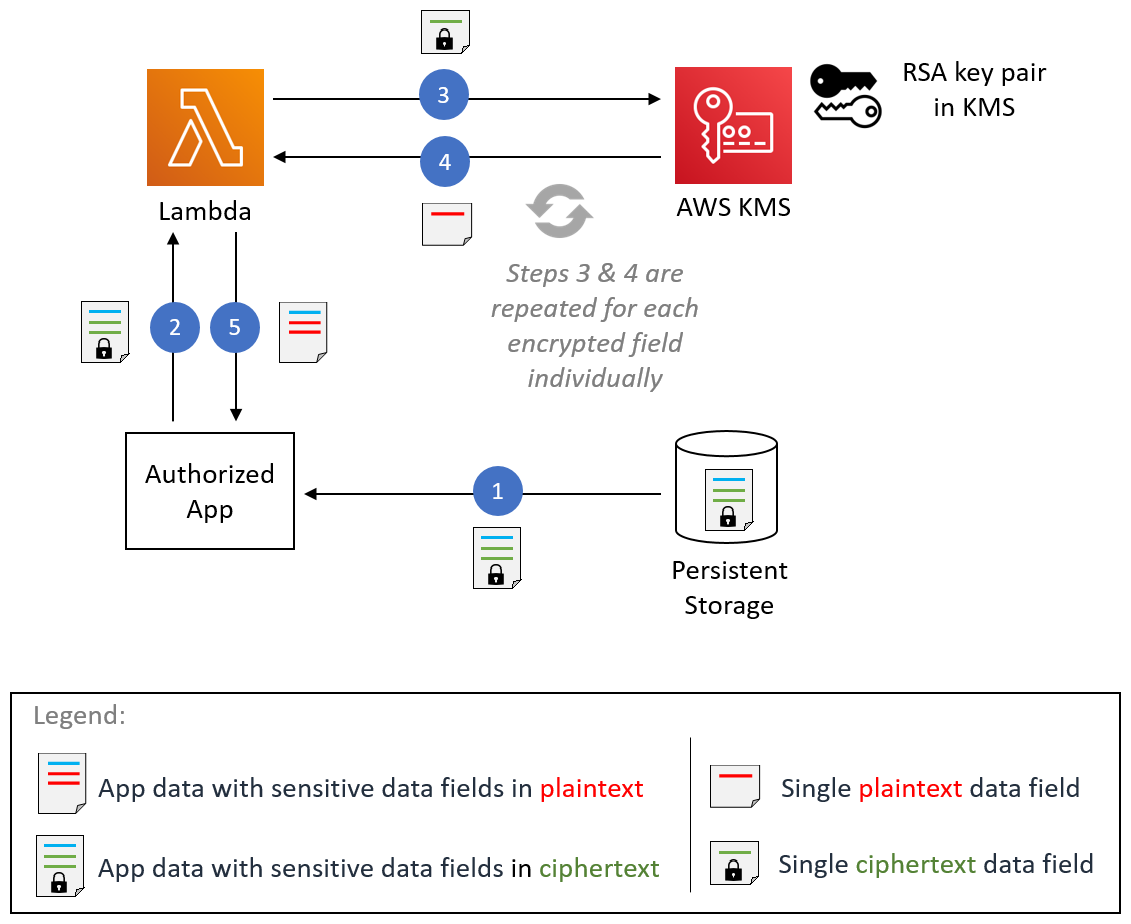
The following diagram describes the solution architecture.

The account on the right hosts the pseudonymization service, which you can deploy using the instructions provided in the Part 1 of this series.

The account on the left is the one that you set up as part of this post, representing the ETL platform based on Amazon EMR using the pseudonymization service.

You can deploy the pseudonymization service and the ETL platform on the same account.

Amazon EMR empowers you to create, operate, and scale big data frameworks such as Apache Spark quickly and cost-effectively.

In this solution, we show how to consume the pseudonymization service on Amazon EMR with Apache Spark for batch and streaming use cases. The batch application reads data from an Amazon Simple Storage Service (Amazon S3) bucket, and the streaming application consumes records from Amazon Kinesis Data Streams.

PySpark code used in batch and streaming jobs

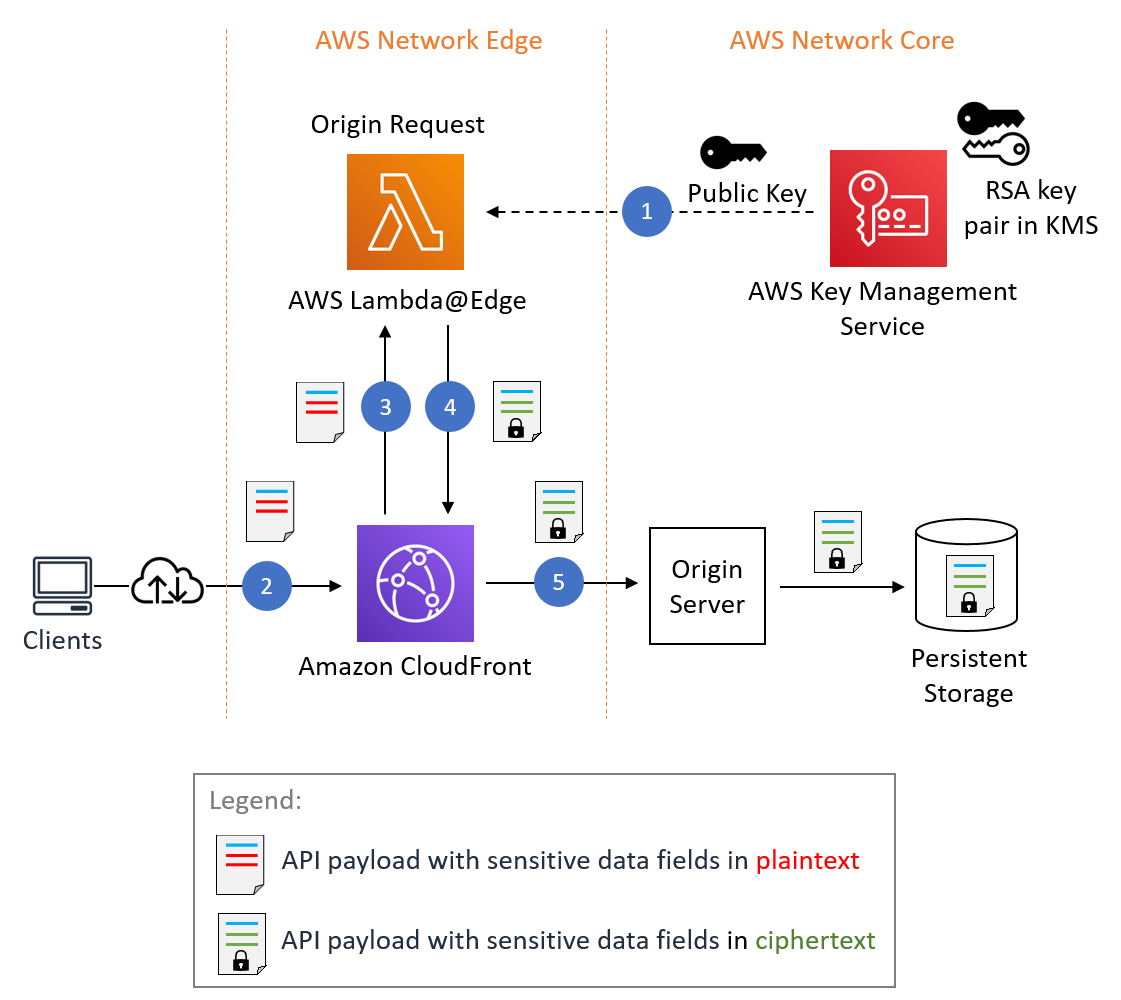
Both applications use a common utility function that makes HTTP POST calls against the API Gateway that is linked to the pseudonymization AWS Lambda function. The REST API calls are made per Spark partition using the Spark RDD mapPartitions function. The POST request body contains the list of unique values for a given input column. The POST request response contains the corresponding pseudonymized values. The code swaps the sensitive values with the pseudonymized ones for a given dataset. The result is saved to Amazon S3 and the AWS Glue Data Catalog, using Apache Iceberg table format.

Iceberg is an open table format that supports ACID transactions, schema evolution, and time travel queries. You can use these features to implement the right to be forgotten (or data erasure) solutions using SQL statements or programming interfaces. Iceberg is supported by Amazon EMR starting with version 6.5.0, AWS Glue, and Athena. Batch and streaming patterns use Iceberg as their target format. For an overview of how to build an ACID compliant data lake using Iceberg, refer to Build a high-performance, ACID compliant, evolving data lake using Apache Iceberg on Amazon EMR.

Prerequisites

You must have the following prerequisites:

  • An AWS account.
  • An AWS Identity and Access Management (IAM) principal with privileges to deploy the AWS CloudFormation stack and related resources.
  • The AWS Command Line Interface (AWS CLI) installed on the development or deployment machine that you will use to run the provided scripts.
  • An S3 bucket in the same account and AWS Region where the solution is to be deployed.
  • Python3 installed in the local machine where the commands are run.
  • PyYAML installed using pip.
  • A bash terminal to run bash scripts that deploy CloudFormation stacks.
  • An additional S3 bucket containing the input dataset in Parquet files (only for batch applications). Copy the sample dataset to the S3 bucket.
  • A copy of the latest code repository in the local machine using git clone or the download option.

Open a new bash terminal and navigate to the root folder of the cloned repository.

The source code for the proposed patterns can be found in the cloned repository. It uses the following parameters:

  • ARTEFACT_S3_BUCKET – The S3 bucket where the infrastructure code will be stored. The bucket must be created in the same account and Region where the solution lives.
  • AWS_REGION – The Region where the solution will be deployed.
  • AWS_PROFILE – The named profile that will be applied to the AWS CLI command. This should contain credentials for an IAM principal with privileges to deploy the CloudFormation stack of related resources.
  • SUBNET_ID – The subnet ID where the EMR cluster will be spun up. The subnet is pre-existing and for demonstration purposes, we use the default subnet ID of the default VPC.
  • EP_URL – The endpoint URL of the pseudonymization service. Retrieve this from the solution deployed as Part 1 of this series.
  • API_SECRET – An Amazon API Gateway key that will be stored in AWS Secrets Manager. The API key is generated from the deployment depicted in Part 1 of this series.
  • S3_INPUT_PATH – The S3 URI pointing to the folder containing the input dataset as Parquet files.
  • KINESIS_DATA_STREAM_NAMEThe Kinesis data stream name deployed with the CloudFormation stack.
  • BATCH_SIZEThe number of records to be pushed to the data stream per batch.
  • THREADS_NUM The number of parallel threads used in the local machine to upload data to the data stream. More threads correspond to a higher message volume.
  • EMR_CLUSTER_ID – The EMR cluster ID where the code will be run (the EMR cluster was created by the CloudFormation stack).
  • STACK_NAME – The name of the CloudFormation stack, which is assigned in the deployment script.

Batch deployment steps

As described in the prerequisites, before you deploy the solution, upload the Parquet files of the test dataset to Amazon S3. Then provide the S3 path of the folder containing the files as the parameter <S3_INPUT_PATH>.

We create the solution resources via AWS CloudFormation. You can deploy the solution by running the deploy_1.sh script, which is inside the deployment_scripts folder.

After the deployment prerequisites have been satisfied, enter the following command to deploy the solution:

sh ./deployment_scripts/deploy_1.sh \
-a <ARTEFACT_S3_BUCKET> \
-r <AWS_REGION> \
-p <AWS_PROFILE> \
-s <SUBNET_ID> \
-e <EP_URL> \
-x <API_SECRET> \
-i <S3_INPUT_PATH>

The output should look like the following screenshot.

The required parameters for the cleanup command are printed out at the end of the run of the deploy_1.sh script. Make sure to note down these values.

Test the batch solution

In the CloudFormation template deployed using the deploy_1.sh script, the EMR step containing the Spark batch application is added at the end of the EMR cluster setup.

To verify the results, check the S3 bucket identified in the CloudFormation stack outputs with the variable SparkOutputLocation.

You can also use Athena to query the table pseudo_table in the database blog_batch_db.

Clean up batch resources

To destroy the resources created as part of this exercise,

in a bash terminal, navigate to the root folder of the cloned repository. Enter the cleanup command shown as the output of the previously run deploy_1.sh script:

sh ./deployment_scripts/cleanup_1.sh \
-a <ARTEFACT_S3_BUCKET> \
-s <STACK_NAME> \
-r <AWS_REGION> \
-e <EMR_CLUSTER_ID>

The output should look like the following screenshot.

Streaming deployment steps

We create the solution resources via AWS CloudFormation. You can deploy the solution by running the deploy_2.sh script, which is inside the deployment_scripts folder. The CloudFormation stack template for this pattern is available in the GitHub repo.

After the deployment prerequisites have been satisfied, enter the following command to deploy the solution:

sh deployment_scripts/deploy_2.sh \
-a <ARTEFACT_S3_BUCKET> \
-r <AWS_REGION> \
-p <AWS_PROFILE> \
-s <SUBNET_ID> \
-e <EP_URL> \
-x <API_SECRET>

The output should look like the following screenshot.

The required parameters for the cleanup command are printed out at the end of the output of the deploy_2.sh script. Make sure to save these values to use later.

Test the streaming solution

In the CloudFormation template deployed using the deploy_2.sh script, the EMR step containing the Spark streaming application is added at the end of the EMR cluster setup. To test the end-to-end pipeline, you need to push records to the deployed Kinesis data stream. With the following commands in a bash terminal, you can activate a Kinesis producer that will continuously put records in the stream, until the process is manually stopped. You can control the producer’s message volume by modifying the BATCH_SIZE and the THREADS_NUM variables.

python3 -m pip install kiner
python3 \
consumption-patterns/emr/1_pyspark-streaming/kinesis_producer/producer.py \
<KINESIS_DATA_STREAM_NAME> \
<BATCH_SIZE> \
<THREADS_NUM>

To verify the results, check the S3 bucket identified in the CloudFormation stack outputs with the variable SparkOutputLocation.

In the Athena query editor, check the results by querying the table pseudo_table in the database blog_stream_db.

Clean up streaming resources

To destroy the resources created as part of this exercise, complete the following steps:

  1. Stop the Python Kinesis producer that was launched in a bash terminal in the previous section.
  2. Enter the following command:
sh ./deployment_scripts/cleanup_2.sh \
-a <ARTEFACT_S3_BUCKET> \
-s <STACK_NAME> \
-r <AWS_REGION> \
-e <EMR_CLUSTER_ID>

The output should look like the following screenshot.

Performance details

Use cases might differ in requirements with respect to data size, compute capacity, and cost. We have provided some benchmarking and factors that may influence performance; however, we strongly advise you to validate the solution in lower environments to see if it meets your particular requirements.

You can influence the performance of the proposed solution (which aims to pseudonymize a dataset using Amazon EMR) by the maximum number of parallel calls to the pseudonymization service and the payload size for each call. In terms of parallel calls, factors to consider are the GetSecretValue calls limit from Secrets Manager (10.000 per second, hard limit) and the Lambda default concurrency parallelism (1,000 by default; can be increased by quota request). You can control the maximum parallelism adjusting the number of executors, the number of partitions composing the dataset, and the cluster configuration (number and type of nodes). In terms of payload size for each call, factors to consider are the API Gateway maximum payload size (6 MB) and the Lambda function maximum runtime (15 minutes). You can control the payload size and the Lambda function runtime by adjusting the batch size value, which is a parameter of the PySpark script that determines the number of items to be pseudonymized per each API call. To capture the influence of all these factors and assess the performance of the consumption patterns using Amazon EMR, we have designed and monitored the following scenarios.

Batch consumption pattern performance

To assess the performance for the batch consumption pattern, we ran the pseudonymization application with three input datasets composed of 1, 10, and 100 Parquet files of 97.7 MB each. We generated the input files using the dataset_generator.py script.

The cluster capacity nodes were 1 primary (m5.4xlarge) and 15 core (m5d.8xlarge). This cluster configuration remained the same for all three scenarios, and it allowed the Spark application to use up to 100 executors. The batch_size, which was also the same for the three scenarios, was set to 900 VINs per API call, and the maximum VIN size was 5 bytes.

The following table captures the information of the three scenarios.

Execution ID Repartition Dataset Size Number of Executors Cores per Executor Executor Memory Runtime
A 800 9.53 GB 100 4 4 GiB 11 minutes, 10 seconds
B 80 0.95 GB 10 4 4 GiB 8 minutes, 36 seconds
C 8 0.09 GB 1 4 4 GiB 7 minutes, 56 seconds

As we can see, properly parallelizing the calls to our pseudonymization service enables us to control the overall runtime.

In the following examples, we analyze three important Lambda metrics for the pseudonymization service: Invocations, ConcurrentExecutions, and Duration.

The following graph depicts the Invocations metric, with the statistic SUM in orange and RUNNING SUM in blue.

By calculating the difference between the starting and ending point of the cumulative invocations, we can extract how many invocations were made during each run.

Run ID Dataset Size Total Invocations
A 9.53 GB 1.467.000 – 0 = 1.467.000
B 0.95 GB 1.467.000 – 1.616.500 = 149.500
C 0.09 GB 1.616.500 – 1.631.000 = 14.500

As expected, the number of invocations increases proportionally by 10 with the dataset size.

The following graph depicts the total ConcurrentExecutions metric, with the statistic MAX in blue.

The application is designed such that the maximum number of concurrent Lambda function runs is given by the amount of Spark tasks (Spark dataset partitions), which can be processed in parallel. This number can be calculated as MIN (executors x executor_cores, Spark dataset partitions).

In the test, run A processed 800 partitions, using 100 executors with four cores each. This makes 400 tasks processed in parallel so the Lambda function concurrent runs can’t be above 400. The same logic was applied for runs B and C. We can see this reflected in the preceding graph, where the amount of concurrent runs never surpasses the 400, 40, and 4 values.

To avoid throttling, make sure that the amount of Spark tasks that can be processed in parallel is not above the Lambda function concurrency limit. If that is the case, you should either increase the Lambda function concurrency limit (if you want to keep up the performance) or reduce either the amount of partitions or the number of available executors (impacting the application performance).

The following graph depicts the Lambda Duration metric, with the statistic AVG in orange and MAX in green.

As expected, the size of the dataset doesn’t affect the duration of the pseudonymization function run, which, apart from some initial invocations facing cold starts, remains constant to an average of 3 milliseconds throughout the three scenarios. This because the maximum number of records included in each pseudonymization call is constant (batch_size value).

Lambda is billed based on the number of invocations and the time it takes for your code to run (duration). You can use the average duration and invocations metrics to estimate the cost of the pseudonymization service.

Streaming consumption pattern performance

To assess the performance for the streaming consumption pattern, we ran the producer.py script, which defines a Kinesis data producer that pushes records in batches to the Kinesis data stream.

The streaming application was left running for 15 minutes and it was configured with a batch_interval of 1 minute, which is the time interval at which streaming data will be divided into batches. The following table summarizes the relevant factors.

Repartition Cluster Capacity Nodes Number of Executors Executor’s Memory Batch Window Batch Size VIN Size
17

1 Primary (m5.xlarge),

3 Core (m5.2xlarge)

6 9 GiB 60 seconds 900 VINs/API call. 5 Bytes / VIN

The following graphs depict the Kinesis Data Streams metrics PutRecords (in blue) and GetRecords (in orange) aggregated with 1-minute period and using the statistic SUM. The first graph shows the metric in bytes, which peaks 6.8 MB per minute. The second graph shows the metric in record count peaking at 85,000 records per minute.

We can see that the metrics GetRecords and PutRecords have overlapping values for almost the entire application’s run. This means that the streaming application was able to keep up with the load of the stream.

Next, we analyze the relevant Lambda metrics for the pseudonymization service: Invocations, ConcurrentExecutions, and Duration.

The following graph depicts the Invocations metric, with the statistic SUM (in orange) and RUNNING SUM in blue.

By calculating the difference between the starting and ending point of the cumulative invocations, we can extract how many invocations were made during the run. In specific, in 15 minutes, the streaming application invoked the pseudonymization API 977 times, which is around 65 calls per minute.

The following graph depicts the total ConcurrentExecutions metric, with the statistic MAX in blue.

The repartition and the cluster configuration allow the application to process all Spark RDD partitions in parallel. As a result, the concurrent runs of the Lambda function are always equal to or below the repartition number, which is 17.

To avoid throttling, make sure that the amount of Spark tasks that can be processed in parallel is not above the Lambda function concurrency limit. For this aspect, the same suggestions as for the batch use case are valid.

The following graph depicts the Lambda Duration metric, with the statistic AVG in blue and MAX in orange.

As expected, aside the Lambda function’s cold start, the average duration of the pseudonymization function was more or less constant throughout the run. This because the batch_size value, which defines the number of VINs to pseudonymize per call, was set to and remained constant at 900.

The ingestion rate of the Kinesis data stream and the consumption rate of our streaming application are factors that influence the number of API calls made against the pseudonymization service and therefore the related cost.

The following graph depicts the Lambda Invocations metric, with the statistic SUM in orange, and the Kinesis Data Streams GetRecords.Records metric, with the statistic SUM in blue. We can see that there is correlation between the amount of records retrieved from the stream per minute and the amount of Lambda function invocations, thereby impacting the cost of the streaming run.

In addition to the batch_interval, we can control the streaming application’s consumption rate using Spark streaming properties like spark.streaming.receiver.maxRate and spark.streaming.blockInterval. For more details, refer to Spark Streaming + Kinesis Integration and Spark Streaming Programming Guide.

Conclusion

Navigating through the rules and regulations of data privacy laws can be difficult. Pseudonymization of PII attributes is one of many points to consider while handling sensitive data.

In this two-part series, we explored how you can build and consume a pseudonymization service using various AWS services with features to assist you in building a robust data platform. In Part 1, we built the foundation by showing how to build a pseudonymization service. In this post, we showcased the various patterns to consume the pseudonymization service in a cost-efficient and performant manner. Check out the GitHub repository for additional consumption patterns.


About the Authors

Edvin Hallvaxhiu is a Senior Global Security Architect with AWS Professional Services and is passionate about cybersecurity and automation. He helps customers build secure and compliant solutions in the cloud. Outside work, he likes traveling and sports.

Rahul Shaurya is a Principal Big Data Architect with AWS Professional Services. He helps and works closely with customers building data platforms and analytical applications on AWS. Outside of work, Rahul loves taking long walks with his dog Barney.

Andrea Montanari is a Senior Big Data Architect with AWS Professional Services. He actively supports customers and partners in building analytics solutions at scale on AWS.

María Guerra is a Big Data Architect with AWS Professional Services. Maria has a background in data analytics and mechanical engineering. She helps customers architecting and developing data related workloads in the cloud.

Pushpraj Singh is a Senior Data Architect with AWS Professional Services. He is passionate about Data and DevOps engineering. He helps customers build data driven applications at scale.

Build a pseudonymization service on AWS to protect sensitive data, part 1

Post Syndicated from Rahul Shaurya original https://aws.amazon.com/blogs/big-data/part-1-build-a-pseudonymization-service-on-aws-to-protect-sensitive-data/

According to an article in MIT Sloan Management Review, 9 out of 10 companies believe their industry will be digitally disrupted. In order to fuel the digital disruption, companies are eager to gather as much data as possible. Given the importance of this new asset, lawmakers are keen to protect the privacy of individuals and prevent any misuse. Organizations often face challenges as they aim to comply with data privacy regulations like Europe’s General Data Protection Regulation (GDPR) and the California Consumer Privacy Act (CCPA). These regulations demand strict access controls to protect sensitive personal data.

This is a two-part post. In part 1, we walk through a solution that uses a microservice-based approach to enable fast and cost-effective pseudonymization of attributes in datasets. The solution uses the AES-GCM-SIV algorithm to pseudonymize sensitive data. In part 2, we will walk through useful patterns for dealing with data protection for varying degrees of data volume, velocity, and variety using Amazon EMR, AWS Glue, and Amazon Athena.

Data privacy and data protection basics

Before diving into the solution architecture, let’s look at some of the basics of data privacy and data protection. Data privacy refers to the handling of personal information and how data should be handled based on its relative importance, consent, data collection, and regulatory compliance. Depending on your regional privacy laws, the terminology and definition in scope of personal information may differ. For example, privacy laws in the United States use personally identifiable information (PII) in their terminology, whereas GDPR in the European Union refers to it as personal data. Techgdpr explains in detail the difference between the two. Through the rest of the post, we use PII and personal data interchangeably.

Data anonymization and pseudonymization can potentially be used to implement data privacy to protect both PII and personal data and still allow organizations to legitimately use the data.

Anonymization vs. pseudonymization

Anonymization refers to a technique of data processing that aims to irreversibly remove PII from a dataset. The dataset is considered anonymized if it can’t be used to directly or indirectly identify an individual.

Pseudonymization is a data sanitization procedure by which PII fields within a data record are replaced by artificial identifiers. A single pseudonym for each replaced field or collection of replaced fields makes the data record less identifiable while remaining suitable for data analysis and data processing. This technique is especially useful because it protects your PII data at record level for analytical purposes such as business intelligence, big data, or machine learning use cases.

The main difference between anonymization and pseudonymization is that the pseudonymized data is reversible (re-identifiable) to authorized users and is still considered personal data.

Solution overview

The following architecture diagram provides an overview of the solution.

Solution overview

This architecture contains two separate accounts:

  • Central pseudonymization service: Account 111111111111 – The pseudonymization service is running in its own dedicated AWS account (right). This is a centrally managed pseudonymization API that provides access to two resources for pseudonymization and reidentification. With this architecture, you can apply authentication, authorization, rate limiting, and other API management tasks in one place. For this solution, we’re using API keys to authenticate and authorize consumers.
  • Compute: Account 222222222222 – The account on the left is referred to as the compute account, where the extract, transform, and load (ETL) workloads are running. This account depicts a consumer of the pseudonymization microservice. The account hosts the various consumer patterns depicted in the architecture diagram. These solutions are covered in detail in part 2 of this series.

The pseudonymization service is built using AWS Lambda and Amazon API Gateway. Lambda enables the serverless microservice features, and API Gateway provides serverless APIs for HTTP or RESTful and WebSocket communication.

We create the solution resources via AWS CloudFormation. The CloudFormation stack template and the source code for the Lambda function are available in GitHub Repository.

We walk you through the following steps:

  1. Deploy the solution resources with AWS CloudFormation.
  2. Generate encryption keys and persist them in AWS Secrets Manager.
  3. Test the service.

Demystifying the pseudonymization service

Pseudonymization logic is written in Java and uses the AES-GCM-SIV algorithm developed by codahale. The source code is hosted in a Lambda function. Secret keys are stored securely in Secrets Manager. AWS Key Management System (AWS KMS) makes sure that secrets and sensitive components are protected at rest. The service is exposed to consumers via API Gateway as a REST API. Consumers are authenticated and authorized to consume the API via API keys. The pseudonymization service is technology agnostic and can be adopted by any form of consumer as long as they’re able to consume REST APIs.

As depicted in the following figure, the API consists of two resources with the POST method:

API Resources

  • Pseudonymization – The pseudonymization resource can be used by authorized users to pseudonymize a given list of plaintexts (identifiers) and replace them with a pseudonym.
  • Reidentification – The reidentification resource can be used by authorized users to convert pseudonyms to plaintexts (identifiers).

The request response model of the API utilizes Java string arrays to store multiple values in a single variable, as depicted in the following code.

Request/Response model

The API supports a Boolean type query parameter to decide whether encryption is deterministic or probabilistic.

The implementation of the algorithm has been modified to add the logic to generate a nonce, which is dependent on the plaintext being pseudonymized. If the incoming query parameters key deterministic has the value True, then the overloaded version of the encrypt function is called. This generates a nonce using the HmacSHA256 function on the plaintext, and takes 12 sub-bytes from a predetermined position for nonce. This nonce is then used for the encryption and prepended to the resulting ciphertext. The following is an example:

  • IdentifierVIN98765432101234
  • NonceNjcxMDVjMmQ5OTE5
  • PseudonymNjcxMDVjMmQ5OTE5q44vuub5QD4WH3vz1Jj26ZMcVGS+XB9kDpxp/tMinfd9

This approach is useful especially for building analytical systems that may require PII fields to be used for joining datasets with other pseudonymized datasets.

The following code shows an example of deterministic encryption.Deterministic Encryption

If the incoming query parameters key deterministic has the value False, then the encrypt method is called without the deterministic parameter and the nonce generated is a random 12 bytes. This generates a different ciphertext for the same incoming plaintext.

The following code shows an example of probabilistic encryption.

Probabilistic Encryption

The Lambda function utilizes a couple of caching mechanisms to boost the performance of the function. It uses Guava to build a cache to avoid generation of the pseudonym or identifier if it’s already available in the cache. For the probabilistic approach, the cache isn’t utilized. It also uses SecretCache, an in-memory cache for secrets requested from Secrets Manager.

Prerequisites

For this walkthrough, you should have the following prerequisites:

Deploy the solution resources with AWS CloudFormation

The deployment is triggered by running the deploy.sh script. The script runs the following phases:

  1. Checks for dependencies.
  2. Builds the Lambda package.
  3. Builds the CloudFormation stack.
  4. Deploys the CloudFormation stack.
  5. Prints to standard out the stack output.

The following resources are deployed from the stack:

  • An API Gateway REST API with two resources:
    • /pseudonymization
    • /reidentification
  • A Lambda function
  • A Secrets Manager secret
  • A KMS key
  • IAM roles and policies
  • An Amazon CloudWatch Logs group

You need to pass the following parameters to the script for the deployment to be successful:

  • STACK_NAME – The CloudFormation stack name.
  • AWS_REGION – The Region where the solution is deployed.
  • AWS_PROFILE – The named profile that applies to the AWS Command Line Interface (AWS CLI). command
  • ARTEFACT_S3_BUCKET – The S3 bucket where the infrastructure code is stored. The bucket must be created in the same account and Region where the solution lives.

Use the following commands to run the ./deployments_scripts/deploy.sh script:

chmod +x ./deployment_scripts/deploy.sh ./deployment_scripts/deploy.sh -s STACK_NAME -b ARTEFACT_S3_BUCKET -r AWS_REGION -p AWS_PROFILE AWS_REGION

Upon successful deployment, the script displays the stack outputs, as depicted in the following screenshot. Take note of the output, because we use it in subsequent steps.

Stack Output

Generate encryption keys and persist them in Secrets Manager

In this step, we generate the encryption keys required to pseudonymize the plain text data. We generate those keys by calling the KMS key we created in the previous step. Then we persist the keys in a secret. Encryption keys are encrypted at rest and in transit, and exist in plain text only in-memory when the function calls them.

To perform this step, we use the script key_generator.py. You need to pass the following parameters for the script to run successfully:

  • KmsKeyArn – The output value from the previous stack deployment
  • AWS_PROFILE – The named profile that applies to the AWS CLI command
  • AWS_REGION – The Region where the solution is deployed
  • SecretName – The output value from the previous stack deployment

Use the following command to run ./helper_scripts/key_generator.py:

python3 ./helper_scripts/key_generator.py -k KmsKeyArn -s SecretName -p AWS_PROFILE -r AWS_REGION

Upon successful deployment, the secret value should look like the following screenshot.

Encryption Secrets

Test the solution

In this step, we configure Postman and query the REST API, so you need to make sure Postman is installed in your machine. Upon successful authentication, the API returns the requested values.

The following parameters are required to create a complete request in Postman:

  • PseudonymizationUrl – The output value from stack deployment
  • ReidentificationUrl – The output value from stack deployment
  • deterministic – The value True or False for the pseudonymization call
  • API_Key – The API key, which you can retrieve from API Gateway console

Follow these steps to set up Postman:

  1. Start Postman in your machine.
  2. On the File menu, choose Import.
  3. Import the Postman collection.
  4. From the collection folder, navigate to the pseudonymization request.
  5. To test the pseudonymization resource, replace all variables in the sample request with the parameters mentioned earlier.

The request template in the body already has some dummy values provided. You can use the existing one or exchange with your own.

  1. Choose Send to run the request.

The API returns in the body of the response a JSON data type.

Reidentification

  1. From the collection folder, navigate to the reidentification request.
  2. To test the reidentification resource, replace all variables in the sample request with the parameters mentioned earlier.
  3. Pass to the response template in the body the pseudonyms output from earlier.
  4. Choose Send to run the request.

The API returns in the body of the response a JSON data type.

Pseudonyms

Cost and performance

There are many factors that can determine the cost and performance of the service. Performance especially can be influenced by payload size, concurrency, cache hit, and managed service limits on the account level. The cost is mainly influenced by how much the service is being used. For our cost and performance exercise, we consider the following scenario:

The REST API is used to pseudonymize Vehicle Identification Numbers (VINs). On average, consumers request pseudonymization of 1,000 VINs per call. The service processes on average 40 requests per second, or 40,000 encryption or decryption operations per second. The average process time per request is as follows:

  • 15 milliseconds for deterministic encryption
  • 23 milliseconds for probabilistic encryption
  • 6 milliseconds for decryption

The number of calls hitting the service per month is distributed as follows:

  • 50 million calls hitting the pseudonymization resource for deterministic encryption
  • 25 million calls hitting the pseudonymization resource for probabilistic encryption
  • 25 million calls hitting the reidentification resource for decryption

Based on this scenario, the average cost is $415.42 USD per month. You may find the detailed cost breakdown in the estimate generated via the AWS Pricing Calculator.

We use Locust to simulate a similar load to our scenario. Measurements from Amazon CloudWatch metrics are depicted in the following screenshots (network latency isn’t considered during our measurement).

The following screenshot shows API Gateway latency and Lambda duration for deterministic encryption. Latency is high at the beginning due to the cold start, and flattens out over time.

API Gateway Latency & Lamdba Duration for deterministic encryption. Latency is high at the beginning due to the cold start and flattens out over time.

The following screenshot shows metrics for probabilistic encryption.

metrics for probabilistic encryption

The following shows metrics for decryption.

metrics for decryption

Clean up

To avoid incurring future charges, delete the CloudFormation stack by running the destroy.sh script. The following parameters are required to run the script successfully:

  • STACK_NAME – The CloudFormation stack name
  • AWS_REGION – The Region where the solution is deployed
  • AWS_PROFILE – The named profile that applies to the AWS CLI command

Use the following commands to run the ./deployment_scripts/destroy.sh script:

chmod +x ./deployment_scripts/destroy.sh ./deployment_scripts/destroy.sh -s STACK_NAME -r AWS_REGION -p AWS_PROFILE

Conclusion

In this post, we demonstrated how to build a pseudonymization service on AWS. The solution is technology agnostic and can be adopted by any form of consumer as long as they’re able to consume REST APIs. We hope this post helps you in your data protection strategies.

Stay tuned for part 2, which will cover consumption patterns of the pseudonymization service.


About the authors

Edvin Hallvaxhiu is a Senior Global Security Architect with AWS Professional Services and is passionate about cybersecurity and automation. He helps customers build secure and compliant solutions in the cloud. Outside work, he likes traveling and sports.

Rahul Shaurya is a Senior Big Data Architect with AWS Professional Services. He helps and works closely with customers building data platforms and analytical applications on AWS. Outside of work, Rahul loves taking long walks with his dog Barney.

Andrea Montanari is a Big Data Architect with AWS Professional Services. He actively supports customers and partners in building analytics solutions at scale on AWS.

María Guerra is a Big Data Architect with AWS Professional Services. Maria has a background in data analytics and mechanical engineering. She helps customers architecting and developing data related workloads in the cloud.

Pushpraj is a Data Architect with AWS Professional Services. He is passionate about Data and DevOps engineering. He helps customers build data driven applications at scale.

How to protect sensitive data for its entire lifecycle in AWS

Post Syndicated from Raj Jain original https://aws.amazon.com/blogs/security/how-to-protect-sensitive-data-for-its-entire-lifecycle-in-aws/

Many Amazon Web Services (AWS) customer workflows require ingesting sensitive and regulated data such as Payments Card Industry (PCI) data, personally identifiable information (PII), and protected health information (PHI). In this post, I’ll show you a method designed to protect sensitive data for its entire lifecycle in AWS. This method can help enhance your data security posture and be useful for fulfilling the data privacy regulatory requirements applicable to your organization for data protection at-rest, in-transit, and in-use.

An existing method for sensitive data protection in AWS is to use the field-level encryption feature offered by Amazon CloudFront. This CloudFront feature protects sensitive data fields in requests at the AWS network edge. The chosen fields are protected upon ingestion and remain protected throughout the entire application stack. The notion of protecting sensitive data early in its lifecycle in AWS is a highly desirable security architecture. However, CloudFront can protect a maximum of 10 fields and only within HTTP(S) POST requests that carry HTML form encoded payloads.

If your requirements exceed CloudFront’s native field-level encryption feature, such as a need to handle diverse application payload formats, different HTTP methods, and more than 10 sensitive fields, you can implement field-level encryption yourself using the Lambda@Edge feature in CloudFront. In terms of choosing an appropriate encryption scheme, this problem calls for an asymmetric cryptographic system that will allow public keys to be openly distributed to the CloudFront network edges while keeping the corresponding private keys stored securely within the network core. One such popular asymmetric cryptographic system is RSA. Accordingly, we’ll implement a Lambda@Edge function that uses asymmetric encryption using the RSA cryptosystem to protect an arbitrary number of fields in any HTTP(S) request. We will discuss the solution using an example JSON payload, although this approach can be applied to any payload format.

A complex part of any encryption solution is key management. To address that, I use AWS Key Management Service (AWS KMS). AWS KMS simplifies the solution and offers improved security posture and operational benefits, detailed later.

Solution overview

You can protect data in-transit over individual communications channels using transport layer security (TLS), and at-rest in individual storage silos using volume encryption, object encryption or database table encryption. However, if you have sensitive workloads, you might need additional protection that can follow the data as it moves through the application stack. Fine-grained data protection techniques such as field-level encryption allow for the protection of sensitive data fields in larger application payloads while leaving non-sensitive fields in plaintext. This approach lets an application perform business functions on non-sensitive fields without the overhead of encryption, and allows fine-grained control over what fields can be accessed by what parts of the application.

A best practice for protecting sensitive data is to reduce its exposure in the clear throughout its lifecycle. This means protecting data as early as possible on ingestion and ensuring that only authorized users and applications can access the data only when and as needed. CloudFront, when combined with the flexibility provided by Lambda@Edge, provides an appropriate environment at the edge of the AWS network to protect sensitive data upon ingestion in AWS.

Since the downstream systems don’t have access to sensitive data, data exposure is reduced, which helps to minimize your compliance footprint for auditing purposes.

The number of sensitive data elements that may need field-level encryption depends on your requirements. For example:

  • For healthcare applications, HIPAA regulates 18 personal data elements.
  • In California, the California Consumer Privacy Act (CCPA) regulates at least 11 categories of personal information—each with its own set of data elements.

The idea behind field-level encryption is to protect sensitive data fields individually, while retaining the structure of the application payload. The alternative is full payload encryption, where the entire application payload is encrypted as a binary blob, which makes it unusable until the entirety of it is decrypted. With field-level encryption, the non-sensitive data left in plaintext remains usable for ordinary business functions. When retrofitting data protection in existing applications, this approach can reduce the risk of application malfunction since the data format is maintained.

The following figure shows how PII data fields in a JSON construction that are deemed sensitive by an application can be transformed from plaintext to ciphertext with a field-level encryption mechanism.

Figure 1: Example of field-level encryption

Figure 1: Example of field-level encryption

You can change plaintext to ciphertext as depicted in Figure 1 by using a Lambda@Edge function to perform field-level encryption. I discuss the encryption and decryption processes separately in the following sections.

Field-level encryption process

Let’s discuss the individual steps involved in the encryption process as shown in Figure 2.

Figure 2: Field-level encryption process

Figure 2: Field-level encryption process

Figure 2 shows CloudFront invoking a Lambda@Edge function while processing a client request. CloudFront offers multiple integration points for invoking Lambda@Edge functions. Since you are processing a client request and your encryption behavior is related to requests being forwarded to an origin server, you want your function to run upon the origin request event in CloudFront. The origin request event represents an internal state transition in CloudFront that happens immediately before CloudFront forwards a request to the downstream origin server.

You can associate your Lambda@Edge with CloudFront as described in Adding Triggers by Using the CloudFront Console. A screenshot of the CloudFront console is shown in Figure 3. The selected event type is Origin Request and the Include Body check box is selected so that the request body is conveyed to Lambda@Edge.

Figure 3: Configuration of Lambda@Edge in CloudFront

Figure 3: Configuration of Lambda@Edge in CloudFront

The Lambda@Edge function acts as a programmable hook in the CloudFront request processing flow. You can use the function to replace the incoming request body with a request body with the sensitive data fields encrypted.

The process includes the following steps:

Step 1 – RSA key generation and inclusion in Lambda@Edge

You can generate an RSA customer managed key (CMK) in AWS KMS as described in Creating asymmetric CMKs. This is done at system configuration time.

Note: You can use your existing RSA key pairs or generate new ones externally by using OpenSSL commands, especially if you need to perform RSA decryption and key management independently of AWS KMS. Your choice won’t affect the fundamental encryption design pattern presented here.

The RSA key creation in AWS KMS requires two inputs: key length and type of usage. In this example, I created a 2048-bit key and assigned its use for encryption and decryption. The cryptographic configuration of an RSA CMK created in AWS KMS is shown in Figure 4.

Figure 4: Cryptographic properties of an RSA key managed by AWS KMS

Figure 4: Cryptographic properties of an RSA key managed by AWS KMS

Of the two encryption algorithms shown in Figure 4— RSAES_OAEP_SHA_256 and RSAES_OAEP_SHA_1, this example uses RSAES_OAEP_SHA_256. The combination of a 2048-bit key and the RSAES_OAEP_SHA_256 algorithm lets you encrypt a maximum of 190 bytes of data, which is enough for most PII fields. You can choose a different key length and encryption algorithm depending on your security and performance requirements. How to choose your CMK configuration includes information about RSA key specs for encryption and decryption.

Using AWS KMS for RSA key management versus managing the keys yourself eliminates that complexity and can help you:

  • Enforce IAM and key policies that describe administrative and usage permissions for keys.
  • Manage cross-account access for keys.
  • Monitor and alarm on key operations through Amazon CloudWatch.
  • Audit AWS KMS API invocations through AWS CloudTrail.
  • Record configuration changes to keys and enforce key specification compliance through AWS Config.
  • Generate high-entropy keys in an AWS KMS hardware security module (HSM) as required by NIST.
  • Store RSA private keys securely, without the ability to export.
  • Perform RSA decryption within AWS KMS without exposing private keys to application code.
  • Categorize and report on keys with key tags for cost allocation.
  • Disable keys and schedule their deletion.

You need to extract the RSA public key from AWS KMS so you can include it in the AWS Lambda deployment package. You can do this from the AWS Management Console, through the AWS KMS SDK, or by using the get-public-key command in the AWS Command Line Interface (AWS CLI). Figure 5 shows Copy and Download options for a public key in the Public key tab of the AWS KMS console.

Figure 5: RSA public key available for copy or download in the console

Figure 5: RSA public key available for copy or download in the console

Note: As we will see in the sample code in step 3, we embed the public key in the Lambda@Edge deployment package. This is a permissible practice because public keys in asymmetric cryptography systems aren’t a secret and can be freely distributed to entities that need to perform encryption. Alternatively, you can use Lambda@Edge to query AWS KMS for the public key at runtime. However, this introduces latency, increases the load against your KMS account quota, and increases your AWS costs. General patterns for using external data in Lambda@Edge are described in Leveraging external data in Lambda@Edge.

Step 2 – HTTP API request handling by CloudFront

CloudFront receives an HTTP(S) request from a client. CloudFront then invokes Lambda@Edge during origin-request processing and includes the HTTP request body in the invocation.

Step 3 – Lambda@Edge processing

The Lambda@Edge function processes the HTTP request body. The function extracts sensitive data fields and performs RSA encryption over their values.

The following code is sample source code for the Lambda@Edge function implemented in Python 3.7:

import Crypto
import base64
import json
from Crypto.Cipher import PKCS1_OAEP
from Crypto.PublicKey import RSA

# PEM-formatted RSA public key copied over from AWS KMS or your own public key.
RSA_PUBLIC_KEY = "-----BEGIN PUBLIC KEY-----<your key>-----END PUBLIC KEY-----"
RSA_PUBLIC_KEY_OBJ = RSA.importKey(RSA_PUBLIC_KEY)
RSA_CIPHER_OBJ = PKCS1_OAEP.new(RSA_PUBLIC_KEY_OBJ, Crypto.Hash.SHA256)

# Example sensitive data field names in a JSON object. 
PII_SENSITIVE_FIELD_NAMES = ["fname", "lname", "email", "ssn", "dob", "phone"]

CIPHERTEXT_PREFIX = "#01#"
CIPHERTEXT_SUFFIX = "#10#"

def lambda_handler(event, context):
    # Extract HTTP request and its body as per documentation:
    # https://docs.aws.amazon.com/AmazonCloudFront/latest/DeveloperGuide/lambda-event-structure.html
    http_request = event['Records'][0]['cf']['request']
    body = http_request['body']
    org_body = base64.b64decode(body['data'])
    mod_body = protect_sensitive_fields_json(org_body)
    body['action'] = 'replace'
    body['encoding'] = 'text'
    body['data'] = mod_body
    return http_request


def protect_sensitive_fields_json(body):
    # Encrypts sensitive fields in sample JSON payload shown earlier in this post.
    # [{"fname": "Alejandro", "lname": "Rosalez", … }]
    person_list = json.loads(body.decode("utf-8"))
    for person_data in person_list:
        for field_name in PII_SENSITIVE_FIELD_NAMES:
            if field_name not in person_data:
                continue
            plaintext = person_data[field_name]
            ciphertext = RSA_CIPHER_OBJ.encrypt(bytes(plaintext, 'utf-8'))
            ciphertext_b64 = base64.b64encode(ciphertext).decode()
            # Optionally, add unique prefix/suffix patterns to ciphertext
            person_data[field_name] = CIPHERTEXT_PREFIX + ciphertext_b64 + CIPHERTEXT_SUFFIX 
    return json.dumps(person_list)

The event structure passed into the Lambda@Edge function is described in Lambda@Edge Event Structure. Following the event structure, you can extract the HTTP request body. In this example, the assumption is that the HTTP payload carries a JSON document based on a particular schema defined as part of the API contract. The input JSON document is parsed by the function, converting it into a Python dictionary. The Python native dictionary operators are then used to extract the sensitive field values.

Note: If you don’t know your API payload structure ahead of time or you’re dealing with unstructured payloads, you can use techniques such as regular expression pattern searches and checksums to look for patterns of sensitive data and target them accordingly. For example, credit card primary account numbers include a Luhn checksum that can be programmatically detected. Additionally, services such as Amazon Comprehend and Amazon Macie can be leveraged for detecting sensitive data such as PII in application payloads.

While iterating over the sensitive fields, individual field values are encrypted using the standard RSA encryption implementation available in the Python Cryptography Toolkit (PyCrypto). The PyCrypto module is included within the Lambda@Edge zip archive as described in Lambda@Edge deployment package.

The example uses the standard optimal asymmetric encryption padding (OAEP) and SHA-256 encryption algorithm properties. These properties are supported by AWS KMS and will allow RSA ciphertext produced here to be decrypted by AWS KMS later.

Note: You may have noticed in the code above that we’re bracketing the ciphertexts with predefined prefix and suffix strings:

person_data[field_name] = CIPHERTEXT_PREFIX + ciphertext_b64 + CIPHERTEXT_SUFFIX

This is an optional measure and is being implemented to simplify the decryption process.

The prefix and suffix strings help demarcate ciphertext embedded in unstructured data in downstream processing and also act as embedded metadata. Unique prefix and suffix strings allow you to extract ciphertext through string or regular expression (regex) searches during the decryption process without having to know the data body format or schema, or the field names that were encrypted.

Distinct strings can also serve as indirect identifiers of RSA key pair identifiers. This can enable key rotation and allow separate keys to be used for separate fields depending on the data security requirements for individual fields.

You can ensure that the prefix and suffix strings can’t collide with the ciphertext by bracketing them with characters that don’t appear in cyphertext. For example, a hash (#) character cannot be part of a base64 encoded ciphertext string.

Deploying a Lambda function as a Lambda@Edge function requires specific IAM permissions and an IAM execution role. Follow the Lambda@Edge deployment instructions in Setting IAM Permissions and Roles for Lambda@Edge.

Step 4 – Lambda@Edge response

The Lambda@Edge function returns the modified HTTP body back to CloudFront and instructs it to replace the original HTTP body with the modified one by setting the following flag:

http_request['body']['action'] = 'replace'

Step 5 – Forward the request to the origin server

CloudFront forwards the modified request body provided by Lambda@Edge to the origin server. In this example, the origin server writes the data body to persistent storage for later processing.

Field-level decryption process

An application that’s authorized to access sensitive data for a business function can decrypt that data. An example decryption process is shown in Figure 6. The figure shows a Lambda function as an example compute environment for invoking AWS KMS for decryption. This functionality isn’t dependent on Lambda and can be performed in any compute environment that has access to AWS KMS.

Figure 6: Field-level decryption process

Figure 6: Field-level decryption process

The steps of the process shown in Figure 6 are described below.

Step 1 – Application retrieves the field-level encrypted data

The example application retrieves the field-level encrypted data from persistent storage that had been previously written during the data ingestion process.

Step 2 – Application invokes the decryption Lambda function

The application invokes a Lambda function responsible for performing field-level decryption, sending the retrieved data to Lambda.

Step 3 – Lambda calls the AWS KMS decryption API

The Lambda function uses AWS KMS for RSA decryption. The example calls the KMS decryption API that inputs ciphertext and returns plaintext. The actual decryption happens in KMS; the RSA private key is never exposed to the application, which is a highly desirable characteristic for building secure applications.

Note: If you choose to use an external key pair, then you can securely store the RSA private key in AWS services like AWS Systems Manager Parameter Store or AWS Secrets Manager and control access to the key through IAM and resource policies. You can fetch the key from relevant vault using the vault’s API, then decrypt using the standard RSA implementation available in your programming language. For example, the cryptography toolkit in Python or javax.crypto in Java.

The Lambda function Python code for decryption is shown below.

import base64
import boto3
import re

kms_client = boto3.client('kms')
CIPHERTEXT_PREFIX = "#01#"
CIPHERTEXT_SUFFIX = "#10#"

# This lambda function extracts event body, searches for and decrypts ciphertext 
# fields surrounded by provided prefix and suffix strings in arbitrary text bodies 
# and substitutes plaintext fields in-place.  
def lambda_handler(event, context):    
    org_data = event["body"]
    mod_data = unprotect_fields(org_data, CIPHERTEXT_PREFIX, CIPHERTEXT_SUFFIX)
    return mod_data

# Helper function that performs non-greedy regex search for ciphertext strings on
# input data and performs RSA decryption of them using AWS KMS 
def unprotect_fields(org_data, prefix, suffix):
    regex_pattern = prefix + "(.*?)" + suffix
    mod_data_parts = []
    cursor = 0

    # Search ciphertexts iteratively using python regular expression module
    for match in re.finditer(regex_pattern, org_data):
        mod_data_parts.append(org_data[cursor: match.start()])
        try:
            # Ciphertext was stored as Base64 encoded in our example. Decode it.
            ciphertext = base64.b64decode(match.group(1))

            # Decrypt ciphertext using AWS KMS  
            decrypt_rsp = kms_client.decrypt(
                EncryptionAlgorithm="RSAES_OAEP_SHA_256",
                KeyId="<Your-Key-ID>",
                CiphertextBlob=ciphertext)
            decrypted_val = decrypt_rsp["Plaintext"].decode("utf-8")
            mod_data_parts.append(decrypted_val)
        except Exception as e:
            print ("Exception: " + str(e))
            return None
        cursor = match.end()

    mod_data_parts.append(org_data[cursor:])
    return "".join(mod_data_parts)

The function performs a regular expression search in the input data body looking for ciphertext strings bracketed in predefined prefix and suffix strings that were added during encryption.

While iterating over ciphertext strings one-by-one, the function calls the AWS KMS decrypt() API. The example function uses the same RSA encryption algorithm properties—OAEP and SHA-256—and the Key ID of the public key that was used during encryption in Lambda@Edge.

Note that the Key ID itself is not a secret. Any application can be configured with it, but that doesn’t mean any application will be able to perform decryption. The security control here is that the AWS KMS key policy must allow the caller to use the Key ID to perform the decryption. An additional security control is provided by Lambda execution role that should allow calling the KMS decrypt() API.

Step 4 – AWS KMS decrypts ciphertext and returns plaintext

To ensure that only authorized users can perform decrypt operation, the KMS is configured as described in Using key policies in AWS KMS. In addition, the Lambda IAM execution role is configured as described in AWS Lambda execution role to allow it to access KMS. If both the key policy and IAM policy conditions are met, KMS returns the decrypted plaintext. Lambda substitutes the plaintext in place of ciphertext in the encapsulating data body.

Steps three and four are repeated for each ciphertext string.

Step 5 – Lambda returns decrypted data body

Once all the ciphertext has been converted to plaintext and substituted in the larger data body, the Lambda function returns the modified data body to the client application.

Conclusion

In this post, I demonstrated how you can implement field-level encryption integrated with AWS KMS to help protect sensitive data workloads for their entire lifecycle in AWS. Since your Lambda@Edge is designed to protect data at the network edge, data remains protected throughout the application execution stack. In addition to improving your data security posture, this protection can help you comply with data privacy regulations applicable to your organization.

Since you author your own Lambda@Edge function to perform standard RSA encryption, you have flexibility in terms of payload formats and the number of fields that you consider to be sensitive. The integration with AWS KMS for RSA key management and decryption provides significant simplicity, higher key security, and rich integration with other AWS security services enabling an overall strong security solution.

By using encrypted fields with identifiers as described in this post, you can create fine-grained controls for data accessibility to meet the security principle of least privilege. Instead of granting either complete access or no access to data fields, you can ensure least privileges where a given part of an application can only access the fields that it needs, when it needs to, all the way down to controlling access field by field. Field by field access can be enabled by using different keys for different fields and controlling their respective policies.

In addition to protecting sensitive data workloads to meet regulatory and security best practices, this solution can be used to build de-identified data lakes in AWS. Sensitive data fields remain protected throughout their lifecycle, while non-sensitive data fields remain in the clear. This approach can allow analytics or other business functions to operate on data without exposing sensitive data.

If you have feedback about this post, submit comments in the Comments section below.

Want more AWS Security how-to content, news, and feature announcements? Follow us on Twitter.

Author

Raj Jain

Raj is a Senior Cloud Architect at AWS. He is passionate about helping customers build well-architected applications in AWS. Raj is a published author in Bell Labs Technical Journal, has authored 3 IETF standards, and holds 12 patents in internet telephony and applied cryptography. In his spare time, Raj enjoys outdoors, cooking, reading, and travel.