As big believers in open ecosystems, interoperability, and just making life easier for developers, Backblaze and Cloudflare share a lot—which means we’re always excited to dig into new functionality they’re providing for devs. When we heard about their new Logpush tool, I reached out to Tanushree Sharma, the product manager on this project, to learn more about why they built it, how it works with Backblaze B2 Cloud Storage, and what comes next.
Q: Tell us more about the origins of Logpush. How does it fit into the Cloudflare ecosystem and what problems is it solving for?
A: Cloudflare provides security, performance, and reliability services to customers behind our network. We analyze the traffic going through our network to perform actions such as routing traffic to the nearest data center, protecting against attacks, and blocking malicious bots. As part of providing these services for customers, we generate logs for every request in our network. Logpush makes these logs available for Enterprise customers to get visibility into their traffic, quickly and at scale.
Q: Cloudflare already offers Logpull, what’s the difference between that and Logpush?
A: Logpull requires customers to make calls to our Logpull API and then set up a storage platform and/or analytics tools to view the logs. Increasingly, we were hearing repeated use cases where customers would want to integrate with common log storage and analytics products. We also frequently heard that customers want their logs in real time or as near as possible. We decided to create Logpush to solve both these problems. Rather than the need for customers to configure and maintain a system that makes repeated API calls for the data, with Logpush, customers configure where they would like to send their logs and we push them there directly on their behalf.
Q: What makes it compelling to Cloudflare customers? Are there specific use cases you can touch on? Any light you can shed on how a beta tester used it when you first announced it?
A: Logpush makes it very easy for customers to export data. They simply set up a job using the Logpush API or with the click of a few buttons in the Cloudflare dashboard. From there, customers can combine Cloudflare logs with those of other tooling in their infrastructure, such as a SIEM or marketing tracking tools.
This combined data is very useful not only for day-to-day monitoring, but also when conducting network forensics after an attack. For example, a typical L7 DDoS attack originates from a handful of IP addresses. Customers can use platform-wide analytics to understand the activity of IP addresses from both within the Cloudflare network and other applications in their infrastructure. Platform-wide analytics are very powerful in giving customers a holistic view of their entire system.
Q: What sparked the push to support more S3-compatible storage destinations for Logpush data?
A: S3-compatible storage is becoming an industry standard for cloud storage. With the increased adoption of S3-compatible storage, we thought it would be a great spot for us to create our own endpoint to be able to serve more platforms.
Q: This isn’t the first time Backblaze and Cloudflare have worked together. In the spirit of building a better internet, we’ve helped a number of companies reduce data transfer fees via the Bandwidth Alliance. How did this affect your decision to include B2 Cloud Storage as one of these storage destinations and how is it serving Cloudflare and its customers’ needs?
A: Cloudflare values open ecosystems in technology—we believe that customers should not have to be locked in to any single provider. We started the Bandwidth Alliance to reduce or eliminate egress fees, which gives customers the ability to select a set of options that work best for them. With Backblaze as a long time Bandwidth Alliance member, including B2 Cloud Storage out of the gate was a no-brainer!
This case study on why Nodecraft made the switch from AWS S3 to Backblaze B2 Cloud Storage is a great illustration of how the Bandwidth Alliance can benefit customers.
Q: What was the process of integrating B2 Cloud Storage within the Logpush framework?
A: We worked with the great folks at Backblaze to integrate B2 Cloud Storage as a storage destination. This process began by modeling out costs, which were greatly reduced due to discounted egress costs as a result of the Bandwidth Alliance. For the S3-compatible integration, our team leveraged the AWS Go SDK to integrate with BackBlaze. Once we had verified that the integration was working, we created an intuitive UI-based workflow for our customers to make it easier for them to create and configure Logpush jobs.
Q: What can we look forward to as Logpush matures? Anything exciting on the horizon that you’d like to share?
A: One of the big areas that our team is focusing on is data sovereignty. We want customers to have control over where their data is stored and processed. We’re also working on building out Logpush by adding data sets and giving customers more customization with their logs.
Stay tuned to our Logs blog for upcoming releases!
Q: As a Cloudflare customer, where do I begin if I want to utilize Logpush? Walk us through the setup process of selecting B2 Cloud Storage as a destination for my logs.
In early startup stages, you’re developing the product, testing market fit, and refining your go-to-market strategy. Long-term infrastructure decisions may not even be on your radar, but if you want to scale beyond Series B, it pays to be planful before you’re locked in with a cloud services provider and storage costs are holding you back.
How will you manage your data? How much storage will you need to meet demand? Will your current provider continue to serve your use case? In this post, we’ll talk about how infrastructure decisions come into play in early startup development, the advantages of multi-cloud infrastructure, and best practices for implementing a multi-cloud system.
Infrastructure Planning: A Startup Timeline
Infrastructure planning becomes critical at three key points in early startup development:
In the pre-seed and seed stages.
When demand spikes.
When cloud credits run out.
Pre-seed and Seed Stages
Utilizing free cloud credits through a startup incubator like AWS Activate or the Google Cloud Startup Program at this stage of the game makes sense—you can build a minimum viable product without burning through outside investment. But you can’t rely on free credits forever. As you discover your market fit, you need to look for ways of sustaining growth and ensuring operating costs don’t get out of control later. You have three options:
Accept that you’ll stay with one provider, and manage the associated risks—including potentially high operating costs, lack of leverage, and high barriers to exit.
Plan for a migration when credits expire. This means setting up your systems with portability in mind.
Leverage free credits and use the savings to adopt a multi-cloud approach from the start with integrated providers.
Any of these options can work. What you choose is less important than the exercise of making a thoughtful choice and planning as though you’re going to be successful rather than relying on free credits and hoping for the best.
What Is Multi-cloud?
By the simplest definition, every company is probably a “multi-cloud” company. If you use Gmail for your business and literally any other service, you’re technically multi-cloud. But, for our purposes, we’re talking about the public cloud platforms you use to build your startup’s infrastructure—storage, compute, and networking. In this sense, multi-cloud means using two or more infrastructure as a service (IaaS) providers that complement each other rather than relying on AWS or Google to source all of the infrastructure and services you need in your tech stack.
Waiting Until Demand Spikes
Let’s say you decide to take full advantage of free credits, and the best possible outcome happens—your product takes off like wildfire. That’s great, right? Yes, until you realize you’re burning through your credits faster than expected and you have to scramble to figure out if your infrastructure can handle the demand while simultaneously optimizing spend. Especially for startups with a heavy data component like media, games, and analytics, increased traffic can be especially problematic—storage racks up, but more often, it’s egress fees that are the killer when data is being accessed frequently.
It’s not hard to find evidence of the damage that can occur when you don’t keep an eye on these costs:
The moment you’re successful can also be the moment you realize you’re stuck with an unexpected bill. Demand spikes, and cloud storage or egress overwhelms your budget. Consider the opposite scenario as well: What if your business experiences a downturn? Can you still afford to operate when cash flow takes a hit?
Waiting Until Cloud Credits Run Out
Sooner or later, free cloud credits run out. It’s extremely important to understand how the pricing model, pricing tiers, and egress costs will factor into your product offering when you get past “free.” For a lot of startups, these realities hit hard and fast—leaving developers seeking a quick exit.
Stay with your existing provider. This approach involves conducting a thorough audit of your cloud usage and potentially bringing in outside help to manage your spend.
Switch cloud providers completely. Weigh the cost of moving your data altogether versus the long-term costs of staying with your current provider. The barrier to exit may be high, but breakeven may be closer than you think.
Adopt an agnostic, multi-cloud approach. Determine the feasibility of moving parts of your infrastructure to different cloud providers to optimize your spend.
The Multi-cloud Guide for Startups
More companies have adopted a multi-cloud strategy in recent years. A 2020 survey by IDG found that 55% of organizations currently use multiple public clouds. The shift comes on the heels of two trends. First, AWS, Google, and Microsoft are no longer the only game in town. Innovative, specialized IaaS providers have emerged over the past decade and a half to challenge the incumbents. Second, after a period where many companies had to transition to the cloud, companies launching today are built to be cloud native. Without the burden of figuring out how to move to the cloud, they can focus on how best to structure their cloud-only environments to take advantage of the benefits multi-cloud infrastructure has to offer.
The Advantages of Multi-cloud
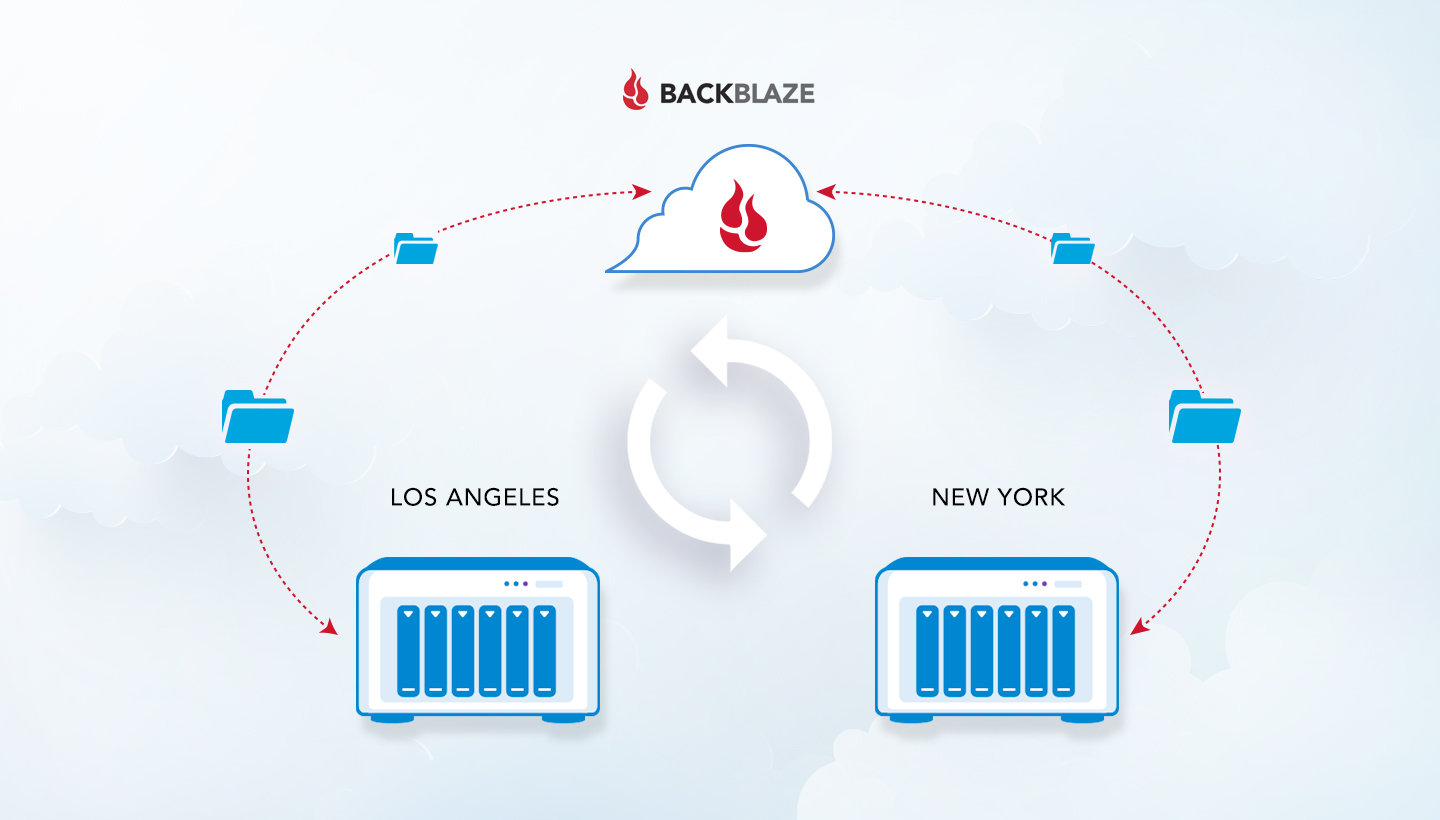
Improved Reliability: When your data is replicated in more than one cloud, you have the advantage of redundancy. If one cloud goes down, you can fall back to a second.
Disaster Recovery: With data in multiple, isolated clouds, you’re better protected from threats. If cybercriminals are able to access one set of your data, you’re more likely to recover if you can restore from a second cloud environment.
Greater Flexibility and Freedom: With a multi-cloud system, if something’s not working, you have more leverage to influence changes and the ability to leave if another vendor offers better features or more affordable pricing.
Affordability: It may seem counterintuitive that using more clouds would cost less, but it’s true. Vendors like AWS make their services hard to quit for a reason—when you can’t leave, they can charge you whatever they want. A multi-cloud system allows you to take advantage of industry partnerships and competitive pricing among vendors.
Best-of-breed Providers: Adopting a multi-cloud strategy means you can work with providers who specialize in doing one thing really well rather than doing all things just…kind of okay.
The advantages of a multi-cloud system have attracted an increasing number of companies and startups, but it’s not without challenges. Controlling costs, data security, and governance were named in the top five challenges in the IDG study. That’s why it’s all the more important to consider your cloud infrastructure early on, follow best practices, and plan ways to manage eventualities.
Multi-cloud Best Practices
As you plan your multi-cloud strategy, keep the following considerations in mind:
Cost Management: Cost management of cloud environments is a challenge every startup will face even if you choose to stay with one provider—so much so that companies make cloud optimization their whole business model. Set up a process to track your cloud utilization and spend early on, and seek out cloud providers that offer straightforward, transparent pricing to make budgeting simpler.
Data Security: Security risks increase as your cloud environment becomes more complex, and you’ll want to plan security measures accordingly. Ensure you have controls in place for access across platforms. Train your team appropriately. And utilize cloud functions like encryption and Object Lock to protect your data.
Governance: In an early stage startup, governance is going to be relatively simple. But as your team grows, you’ll need to have clear protocols for how your infrastructure is managed. Consider creating standard operating procedures for cloud platform management and provisioning now, when it’s still just one hat your CTO is wearing.
SIMMER.io: A Multi-cloud Use Case
SIMMER.io is a community site that makes sharing Unity WebGL games easy for indie game developers. Whenever games went viral, egress costs from Amazon S3 spiked—they couldn’t grow their platform without making a change. SIMMER.io mirrored their data to Backblaze B2 Cloud Storage and reduced egress to $0 as a result of the Bandwidth Alliance partnership between Backblaze and Cloudflare. They can grow their site without having to worry about increasing egress costs over time or usage spikes when games go viral, and they doubled redundancy in the process.
To learn more about how they configured their multi-cloud infrastructure to take advantage of $0 egress, download the SIMMER.io use case.
By making thoughtful choices about your cloud infrastructure and following some basic multi-cloud best practices, you plan as though you’re going to win from the start. That means deciding early on as to whether you’ll take cloud credits and stay with one provider, plan for multi-cloud, or some mix of the two along the way.
We recently spoke with Kristian Kielhofner, a developer and entrepreneur who’s on his third go-round as a startup founder and CEO after two very successful exits. He’s built a next-gen, crypto-centric media asset management platform, Tovera, which launched two days ago.
Developer customers are regularly choosing Backblaze B2 as the cloud storage platform that sits under their products and services. We feel lucky to learn about the innovations they are bringing to this world. Kristian found a clearer path to setting up CORS for B2 Cloud Storage and Cloudflare, so we asked him to share why he started Tovera, how he thought through his cloud storage options, and the exact steps he took to go live with his solution.
—Backblaze
The Tovera Backstory: Fighting Deepfakes
One morning, this story really caught my attention.
Like many technology enthusiasts, I’m familiar with deepfakes. That said, the “Pennsylvania Cheerleading Mom” story told me something: As we’ve seen time and time again, technology rapidly evolves beyond its original intended use. Sometimes for our benefit, and (unfortunately) sometimes not so much…
I realized it would only be a matter of time before this incredibly powerful technology would be in the hands of everyone—for uses good or evil. With more research, I found that (not surprisingly) the current approach to stopping misuse of the technology utilizes the same fundamental machine learning approaches powering the deepfakes themselves. It seems that what we now have is a machine learning arms race: a new model to generate deepfakes, a new model to detect them. Around and around we go.
I began thinking of approaching the deepfake problem from the other side of the coin. What if, instead of using machine learning to guess what is fake, we prove what is real? Deepfake detection models can’t provide 100% certainty today (or ever), but cryptographic authentication can. This simple idea was the genesis for Tovera.
What Does Tovera Do?
Tovera takes digital media you upload and uses existing cryptography and emerging blockchain technology to create a 100% secure validation record. When published on our platform, we can confirm (with 100% certainty) that your digital media assets are yours and haven’t been tampered with.
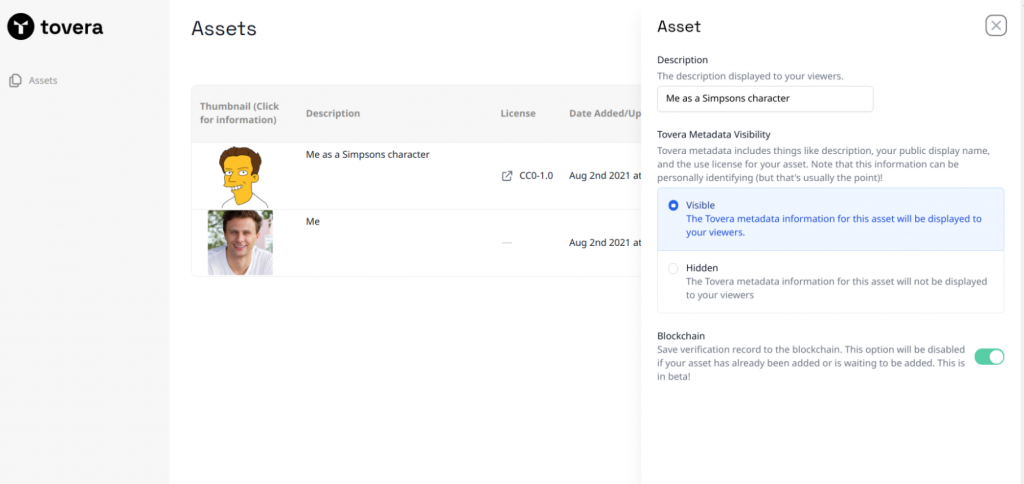
Tovera asset upload and management page.
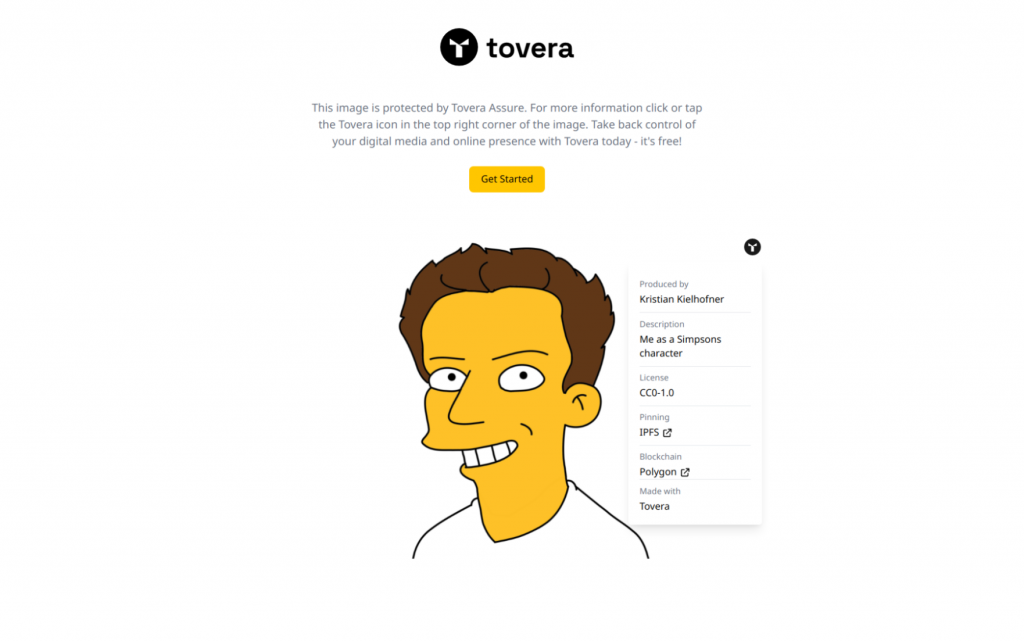
After working through the initial proof of concept, I had another revelation: “Hey, while we’re hitting our API whenever and wherever digital media is viewed, why don’t we return some extra stuff?” Now, not only can our users validate that their content is really theirs and hasn’t been modified, they can use the features provided by Tovera Publish to dynamically update their released digital content from our dashboard. With Tovera, any changes you make to your digital media and online presence are updated across social media platforms, websites, and devices globally—instantly.
An image served via Tovera, with authentication dropdown.
In keeping with our mission of ensuring everyone can protect, validate, and control their online presence, we provide this technology for free with a simple sign up and onboarding process.
The Tovera Storage Journey
To provide this service, we needed to host the digital media files somewhere. Of course, you have your go-to juggernauts—Amazon, Google, and Microsoft. The problem is Tovera is a tiny startup. Having some prior startup experience, I know that spending your money and time wisely from the beginning is one of the most important things you can do.
I took one look at pricing from the “big three” cloud providers through the lens of someone who has experience buying bandwidth and storage (long story) and I thought, “Wow, this is a good business.” As has been covered on this blog and elsewhere, the storage and (especially) bandwidth markups from the big providers is, to put it mildly, significant.
Like some of you, I’ve also been a fan of Backblaze for a long time. Since it was announced, I’ve kept an eye on their B2 Cloud Storage product. So, one morning I took it upon myself to give Backblaze B2 a try.
Sign up and initial onboarding couldn’t have been easier. I found myself in the Backblaze B2 user dashboard up and running in no time. Creating application keys for my purposes was also extremely easy.
After deciding B2 Cloud Storage would work in theory, I decided to try it out in practice. As I integrated the service into Tovera, I ran into a few different vexing issues. I thought other devs might be able to benefit from my CORS troubleshooting, and so I’m outlining my experience here.
Checking the Backblaze S3 Compatible API
We make it simple for our users to upload their assets directly to our cloud storage provider. Because B2 Cloud Storage has the Backblaze S3 Compatible API, the use of presigned URLs fits the bill. This way, Tovera users can upload their digital media assets directly to Backblaze, securely, and make them available to the world via our platform.
In case you’re not familiar with the presigned URL process, the overall flow looks something like the structure laid out in this blog post.
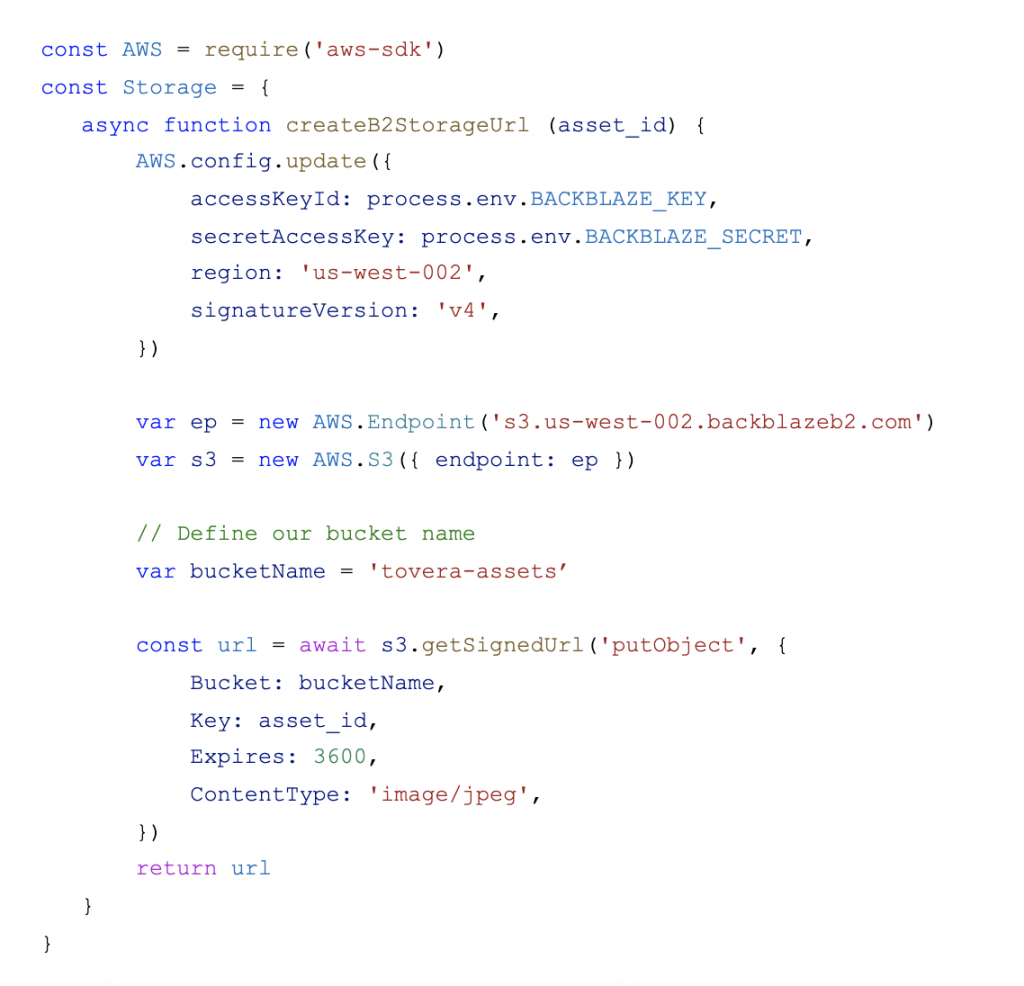
After perusing the available documentation, I started off with the following Node.js Javascript code:
With this Javascript function, Tovera API services provide a URL for our user dashboard to instantly (and securely) upload their assets to our Backblaze account. I had read Backblaze B2 has a 100% Amazon S3 Compatible API but I was a little skeptical. Is this really going to work? Sure enough, it worked on the first attempt!
Integrating Cloudflare and Setting Up CORS
Between the Bandwidth Alliance and having dealt with DDoS attacks and shady internet stuff in general before, I’m also a big fan of Cloudflare. Fortunately, Backblaze provides guidance on how to best use B2 Cloud Storage with Cloudflare to make use of their combined power.
Once I set up Cloudflare to work with B2 Cloud Storage and the Tovera API services were returning valid, presigned URLs for clients to do a direct HTTP PUT, I tried it out in our Next.js-powered user dashboard.
Uh-oh. Dreaded CORS errors. I’ll spare you the details, but here’s where things get interesting… I don’t know about you, but CORS can be a little frustrating. LONG story short, I dug in deep, feeling a little like I was wandering around a dark room looking for the light switch.
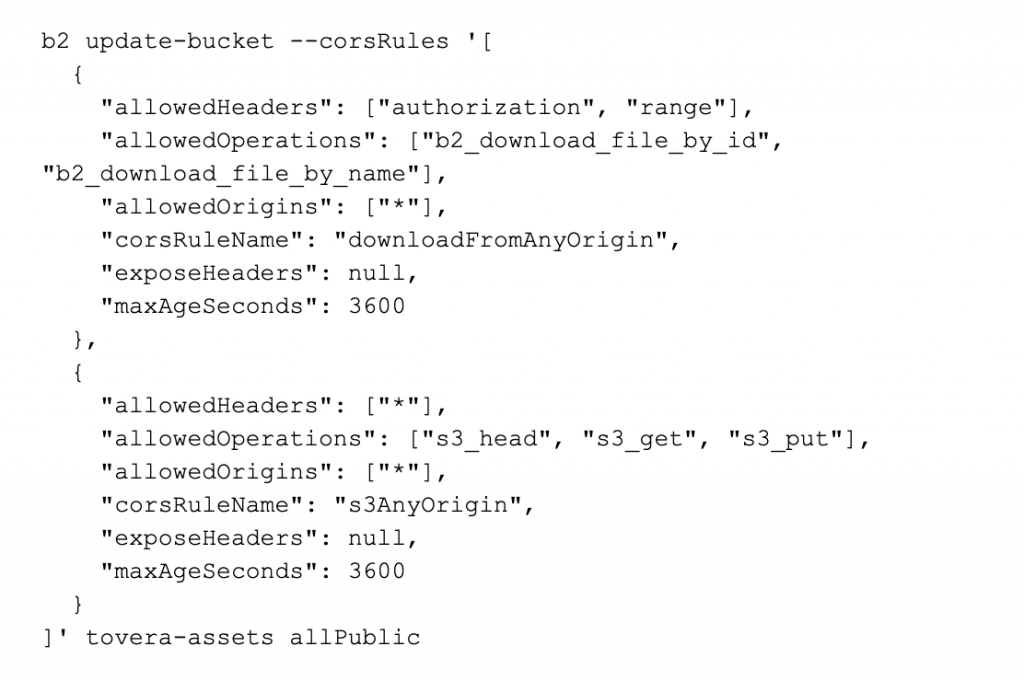
With this usage of the Backblaze B2 command line utility, we’re setting the following CORS rules on our bucket:
Allow users to download Backblaze B2 files from anywhere using the native B2 Cloud Storage interfaces.
Allow users to use the Backblaze S3 Compatible API to download and upload their files from anywhere with the authenticated presigned URL provided by the server side Javascript function above.
With these rules, Tovera users can use our embeddable verification links across any site they provide them to—existing websites, social media networks, and more. In other applications you may want to limit these CORS rules to what makes sense for your use case.
Focusing on What’s Important
With Backblaze B2, we at Tovera can focus on our mission of putting our digital media security, validation, and publishing functionality in the hands of as many people as possible. Tovera users can take back control of their online presence and address the many threats posed by deepfake technologies that threaten their likeness, reputation, and brand.
Kristian Kielhofner works on overall technical architecture, vision, and strategy for Tovera when he’s not out buying yet another whiteboard to scribble on. Kristian previously built, grew, and exited Star2Star Communications—a leading provider of business productivity solutions.
As of June 30, 2021, Backblaze had 181,464 drives spread across four data centers on two continents. Of that number, there were 3,298 boot drives and 178,166 data drives. The boot drives consisted of 1,607 hard drives and 1,691 SSDs. This report will review the quarterly and lifetime failure rates for our data drives, and we’ll compare the failure rates of our HDD and SSD boot drives. Along the way, we’ll share our observations of and insights into the data presented and, as always, we look forward to your comments below.
Q2 2021 Hard Drive Failure Rates
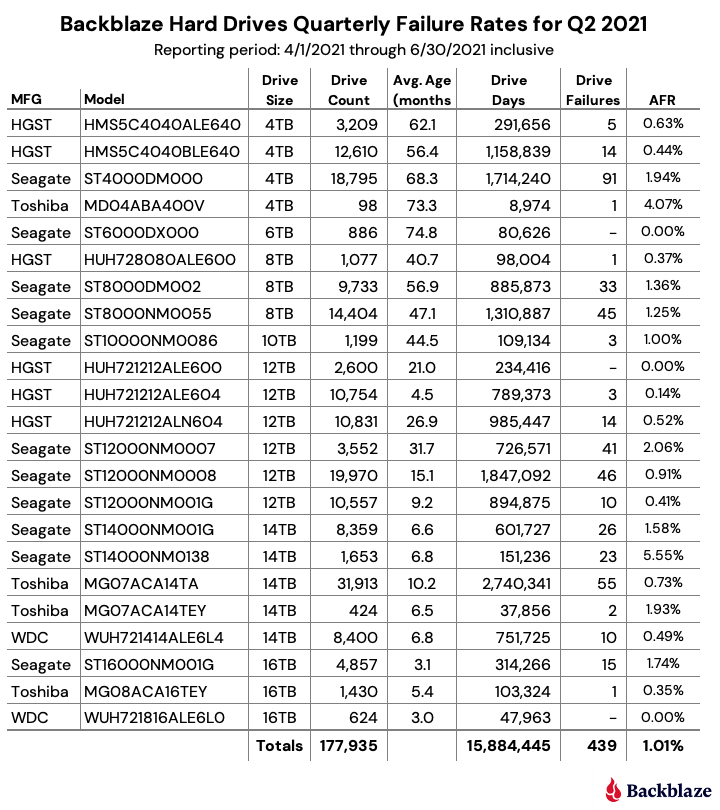
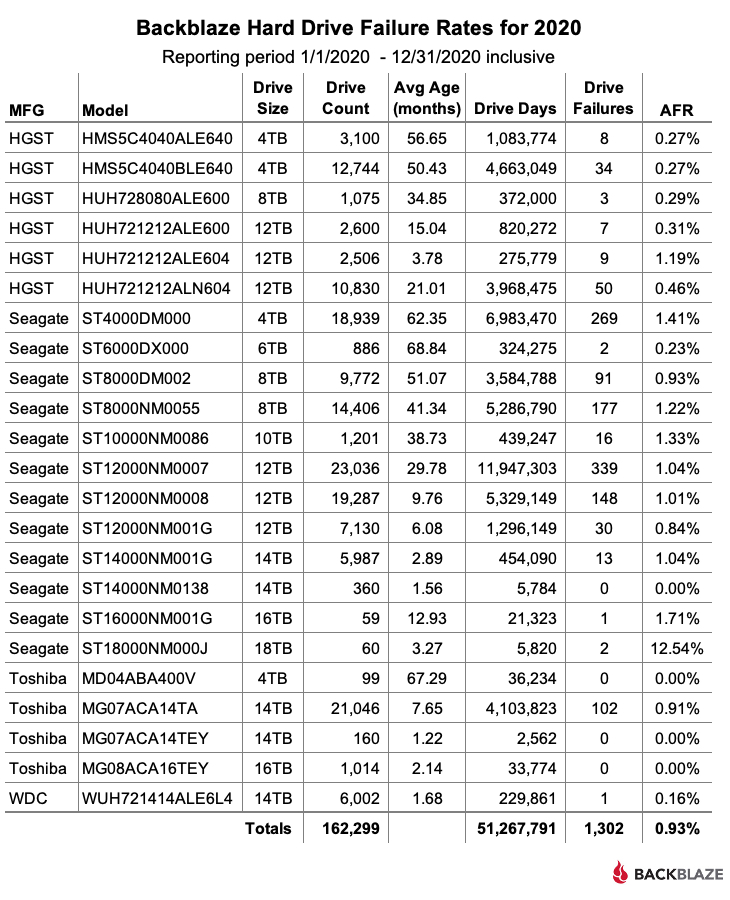
At the end of June 2021, Backblaze was monitoring 178,166 hard drives used to store data. For our evaluation, we removed from consideration 231 drives which were used for either testing purposes or as drive models for which we did not have at least 60 drives. This leaves us with 177,935 hard drives for the Q2 2021 quarterly report, as shown below.
Notes and Observations on the Q2 2021 Stats
The data for all of the drives in our data centers, including the 231 drives not included in the list above, is available for download on the Hard Drive Test Data webpage.
Zero Failures
Three drive models recorded zero failures during Q2, let’s take a look at each.
6TB Seagate (ST6000DX000): The average age of these drives is over six years (74 months) and with one failure over the last year, this drive is aging quite well. The low number of drives (886) and drive days (80,626) means there is some variability in the failure rate, but the lifetime failure rate of 0.92% is solid.
12TB HGST (HUH721212ALE600): These drives reside in our Dell storage servers in our Amsterdam data center. After recording a quarterly high of five failures last quarter, they are back on track with zero failures this quarter and a lifetime failure rate of 0.41%.
16TB Western Digital (WUH721816ALE6L0): These drives have only been installed for three months, but no failures in 624 drives is a great start.
Honorable Mention
Three drive models recorded one drive failure during the quarter. They vary widely in age.
On the young side, with an average age of five months, the 16TB Toshiba (MG08ACA16TEY) had its first drive failure out of 1,430 drives installed.
At the other end of the age spectrum, one of our 4TB Toshiba (MD04ABA400V) drives finally failed, the first failure since Q4 of 2018.
In the middle of the age spectrum with an average of 40.7 months, the 8TB HGST drives (HUH728080ALE600) also had just one failure this past quarter.
Outliers
Two drive models had an annualized failure rate (AFR) above 4%, let’s take a closer look.
The 4TB Toshiba (MD04ABA400V) had an AFR of 4.07% for Q2 2021, but as noted above, that was with one drive failure. Drive models with low drive days in a given period are subject to wide swings in the AFR. In this case, one less failure during the quarter would result in an AFR of 0% and one more failure would result in an AFR of over 8.1%.
The 14TB Seagate (ST14000NM0138) drives have an AFR of 5.55% for Q2 2021. These Seagate drives along with 14TB Toshiba drives (MG07ACA14TEY) were installed in Dell storage servers deployed in our U.S. West region about six months ago. We are actively working with Dell to determine the root cause of this elevated failure rate and expect to follow up on this topic in the next quarterly drive stats report.
Overall AFR
The quarterly AFR for all the drives jumped up to 1.01% from 0.85% in Q1 2021 and 0.81% one year ago in Q2 2020. This jump ended a downward trend over the past year. The increase is within our confidence interval, but bears watching going forward.
HDDs vs. SSDs, a Follow-up
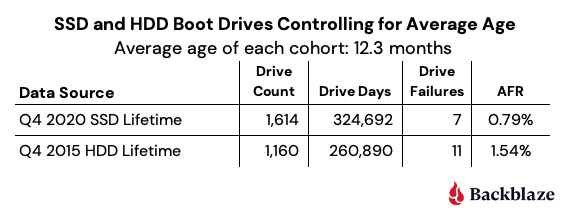
In our Q1 2021 report, we took an initial look at comparing our HDD and SSD boot drives, both for Q1 and lifetime timeframes. As we stated at the time, a numbers-to-numbers comparison was suspect as each type of drive was at a different point in its life cycle. The average age of the HDD drives was 49.63 months while the SSDs average age was 12.66 months. As a reminder, the HDD and SSD boot drives perform the same functions which include booting the storage servers and performing reads, writes, and deletes of daily log files and other temporary files.
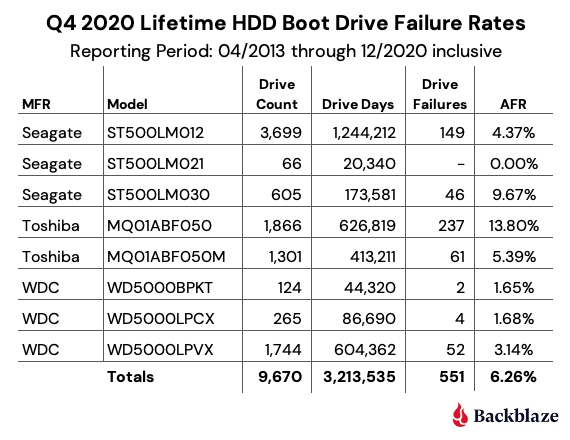
To create a more accurate comparison, we took the HDD boot drives that were in use at the end of Q4 2020 and went back in time to see where their average age and cumulative drive days would be similar to those same attributes for the SDDs at the end of Q4 2020. We found that at the end of Q4 2015 the attributes were the closest.
Let’s start with the HDD boot drives that were active at the end of Q4 2020.
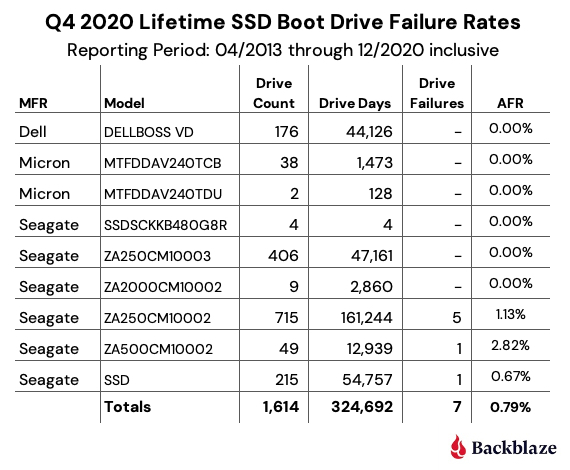
Next, we’ll look at the SSD boot drives that were active at the end of Q4 2020.
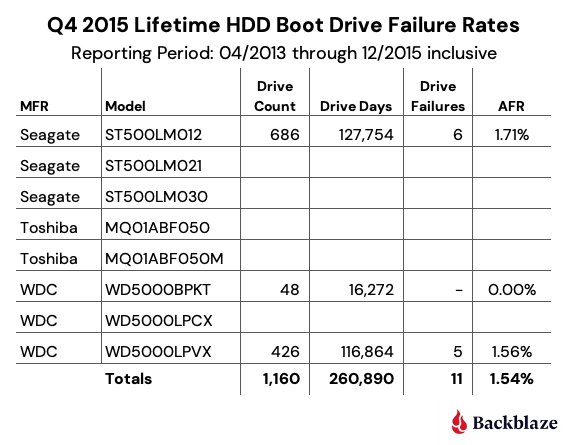
Finally, let’s look at the lifetime attributes of the HDD drives active in Q4 2020 as they were back in Q4 2015.
To summarize, when we control using the same drive models, the same average drive age, and a similar number of drive days, HDD and SSD drives failure rates compare as follows:
While the failure rate for our HDD boot drives is nearly two times higher than the SSD boot drives, it is not the nearly 10 times failure rate we saw in the Q1 2021 report when we compared the two types of drives at different points in their lifecycle.
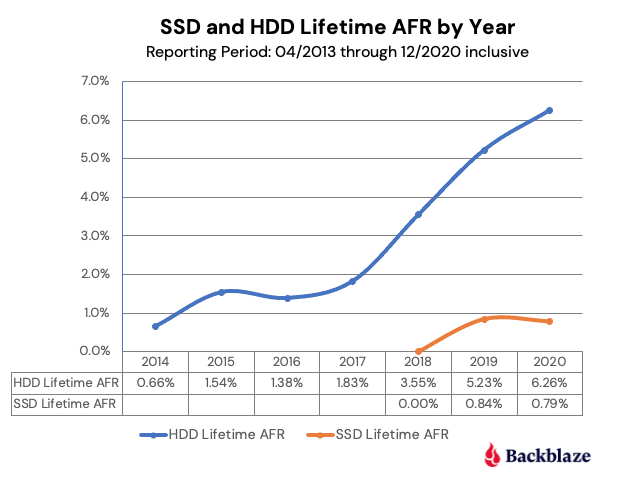
Predicting the Future?
What happened to the HDD boot drives from 2016 to 2020 as their lifetime AFR rose from 1.54% in Q4 2015 to 6.26% in Q4 2020? The chart below shows the lifetime AFR for the HDD boot drives from 2014 through 2020.
As the graph shows, beginning in 2018 the HDD boot drive failures accelerated. This continued in 2019 and 2020 even as the number of HDD boot drives started to decrease when failed HDD boot drives were replaced with SSD boot drives. As the average age of the HDD boot drive fleet increased, so did the failure rate. This makes sense and is borne out by the data. This raises a couple of questions:
Will the SSD drives begin failing at higher rates as they get older?
How will the SSD failure rates going forward compare to what we have observed with the HDD boot drives?
We’ll continue to track and report on SSDs versus HDDs based on our data.
Lifetime Hard Drive Stats
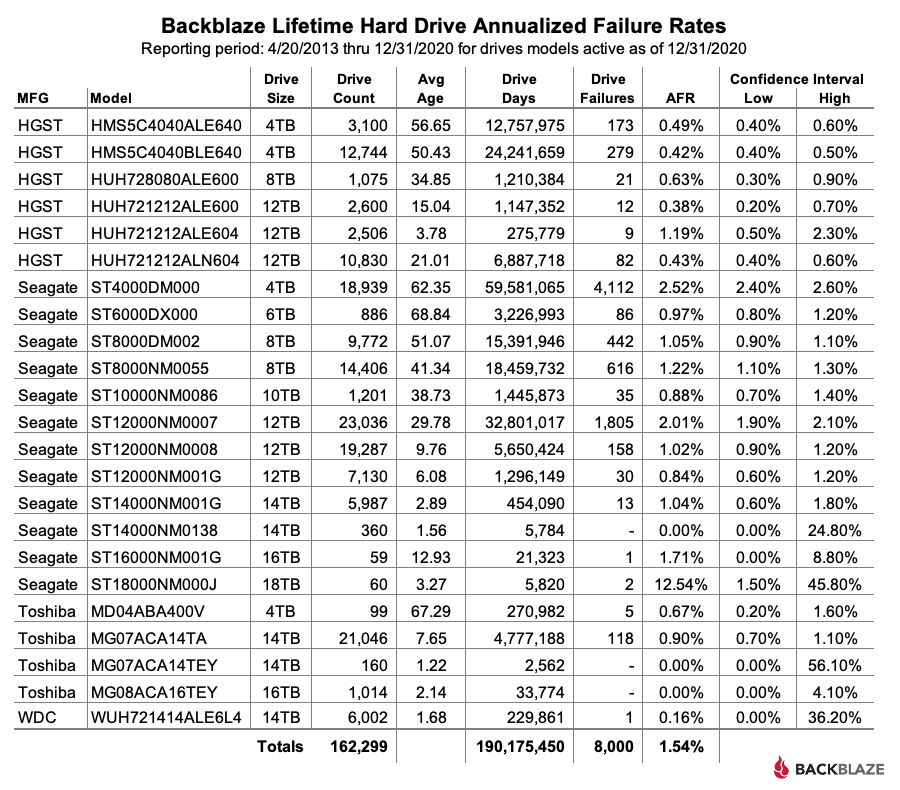
The chart below shows the lifetime AFR of all the hard drive models in production as of June 30, 2021.
Notes and Observations on the Lifetime Stats
The lifetime AFR for all of the drives in our farm continues to decrease. The 1.45% AFR is the lowest recorded value since we started back in 2013. The drive population spans drive models from 4TB to 16TB and varies in average age from three months (WDC 16TB) to over six years (Seagate 6TB).
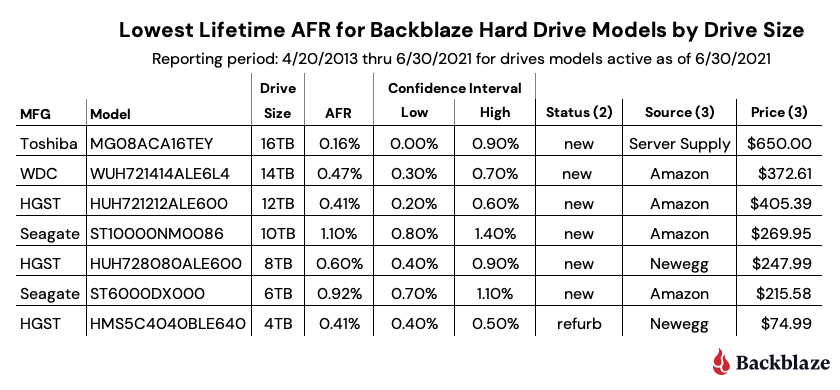
Our best performing drive models in our environment by drive size are listed in the table below.
Notes:
The WDC 16TB drive, model: WUH721816ALE6L0, does not appear to be available in the U.S. through retail channels at this time.
Status is based on what is stated on the website. Further investigation may be required to ensure you are purchasing a new drive versus a refurbished drive marked as new.
The source and price were as of 7/30/2021.
In searching for the Toshiba 16TB drive, model: MG08ACA16TEY, you may find model: MG08ACA16TE for much less ($399.00 or less). These are not the same drive and we have no information on the latter model. The MG08ACA16TEY includes the Sanitize Instant Erase feature.
The Drive Stats Data
The complete data set used to create the information used in this review is available on our Hard Drive Test Data page. You can download and use this data for free for your own purpose. All we ask are three things: 1) you cite Backblaze as the source if you use the data, 2) you accept that you are solely responsible for how you use the data, and 3) you do not sell this data to anyone; it is free.
In an era when ransomware and cybersecurity attacks on K-12 schools have nearly quadrupled, backups are critical. Today, advances in cloud backup technology like immutability and Object Lock allow school districts to take advantage of the benefits of cloud infrastructure while easing security concerns about sensitive data.
School districts have increasingly adopted cloud-based software as a service applications like video conferencing, collaboration, and learning management solutions, but many continue to operate with legacy on-premises solutions for backup and disaster recovery. If your district is ready to move your backup and recovery infrastructure to the cloud, how do you choose the right cloud partners and protect your school district’s data?
This post explains the benefits school districts can realize from moving infrastructure to the cloud, considerations to evaluate when choosing a cloud provider, and steps for preparing for a cloud migration at your district.
The Benefits of Moving to the Cloud for School Districts
Replacing legacy on-premises tape backup systems or expensive infrastructure results in a number of benefits for school districts, including:
Reduced Capital Expenditure (CapEx): Avoid major investments in new infrastructure.
Budget Predictability: Easily plan for predictable, recurring monthly expenses.
Cost Savings: Pay as you go rather than paying for unused infrastructure.
Elasticity: Scale up or down as seasonal demand fluctuates.
Workload Efficiencies: Refocus IT staff on other priorities rather than managing hardware.
Centralized Backup Management: Manage your backups in a one-stop shop.
Ransomware Protection: Stay one step ahead of hackers with data immutability.
Reduced CapEx. On-premises infrastructure can cost hundreds of thousands of dollars or more, and that infrastructure will need to be replaced or upgraded at some point. Rather than recurring CapEx, the cloud shifts IT budgets to a predictable, monthly operating expenses (OpEx) model. You no longer have to compete with other departments for a share of the capital projects budget to upgrade or replace expensive equipment.
Cloud Migration 101: Kings County
John Devlin, CIO of Kings County, was facing an $80,000 bill to replace all of the physical tapes they used for backups as well as an out-of-warranty tape drive all at once. He was able to avoid the bill by moving backup infrastructure to the cloud.
Costs are down, budgets are predictable, and the move freed up his staff to focus on bigger priorities. He noted, “Now the staff is helping customers instead of playing with tapes.”
Budget Predictability. With cloud storage, if you can accurately anticipate data usage, you can easily forecast your cloud storage budget. Since equipment is managed by the cloud provider, you won’t face a surprise bill when something breaks.
Cost Savings. Even when on-premises infrastructure sits idle, you still pay for its maintenance, upkeep, and power usage. With pay-as-you-go pricing, you only pay for the cloud storage you use rather than paying up front for infrastructure and equipment you may or may not end up needing.
Elasticity. Avoid potentially over-buying on-premises equipment since the cloud provides the ability to scale up or down on demand. If you create less data when school is out of session, you’re not paying for empty storage servers to sit there and draw down power.
Workload Efficiencies. Rather than provisioning and maintaining on-premises hardware or managing a legacy tape backup system, moving infrastructure to the cloud frees up IT staff to focus on bigger priorities. All of the equipment is managed by the cloud provider.
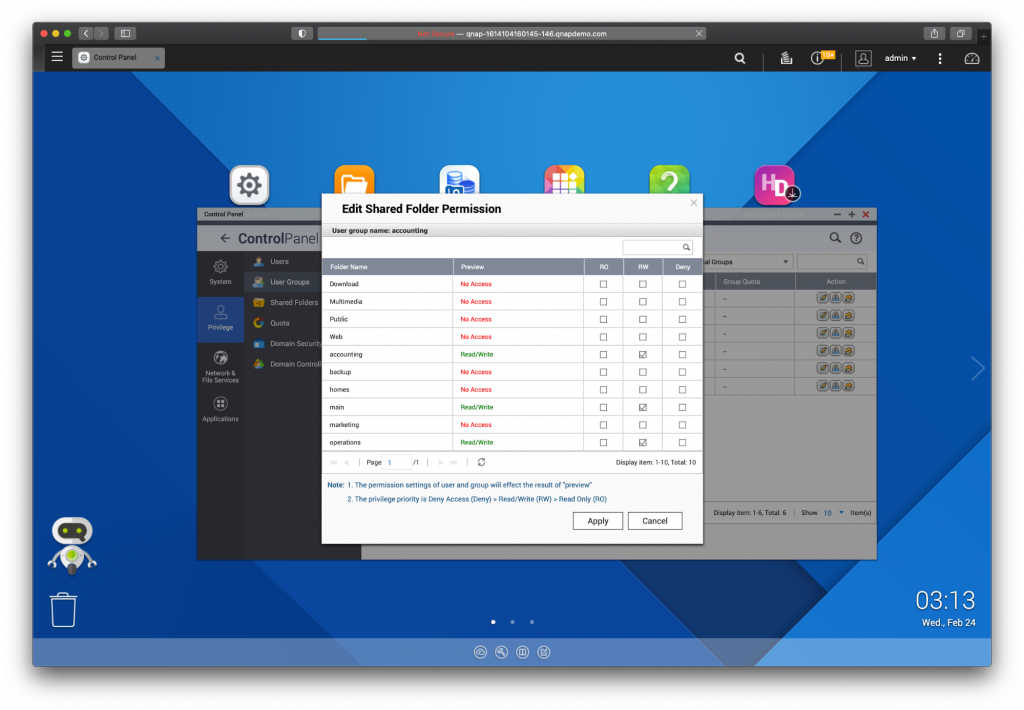
Centralized Backup Management. Managing backups in-house across multiple campuses and systems for staff, faculty, and students can quickly become a huge burden, so many school districts opt for a backup software solution that’s integrated with cloud storage. The integration allows them to easily tier backups to object storage in the cloud. Veeam is one of the most common providers of backup and replication solutions. They provide a one-stop shop for managing backups—including reporting, monitoring, and capacity planning—freeing up district IT staff from hours of manual intervention.
Ransomware Protection.With schools being targeted more than ever, the ransomware protection provided by some public clouds couldn’t be more important. Tools like Object Lock allow you to recreate the “air gap” protection that tape provides, but it’s all in the cloud. With Object Lock enabled, no one can modify, delete, encrypt, or tamper with data for a specific amount of time. Any attempts by a hacker to compromise backups will fail in that time. Object Lock works with offerings like immutability from Veeam so schools can better protect backups from ransomware.
An Important Distinction: Sync vs. Backup
Keep in mind, solutions like Microsoft OneDrive, DropBox, and Google Drive, while enabling collaboration for remote learning, are not the same as a true backup. Sync services allow multiple users across multiple devices to access the same file—which is great for remote learning, but if someone accidentally deletes a file from a sync service, it’s gone. Backup stores a copy of those files somewhere remote from your work environment, oftentimes in an off-site server—like cloud storage. It’s important to know that a “sync” is not a backup, but they can work well together when properly coordinated. You can read more about the differences here.
Considerations for Choosing a Cloud Provider for Your District
Moving to the cloud to manage backups or replace on-premises infrastructure can provide significant benefits for K-12 school districts, but administrators should carefully consider different providers before selecting one to trust with their data. Consider the following factors in an evaluation of any cloud provider:
Security: What are the provider’s ransomware protection capabilities? Does the provider include features like Object Lock to make data immutable? Only a few providers offer Object Lock, but it should be a requirement on any school district’s cloud checklist considering the rising threat of ransomware attacks on school districts. During 2020, the K-12 Cybersecurity Resource Center cataloged 408 publicly-disclosed school incidents versus 122 in 2018.
Compliance: Districts are subject to local, state, and federal laws including HIPAA, so it’s important to ensure a cloud storage provider will be able to comply with all pertinent rules and regulations. Can you easily set lifecycle rules to retain data for specific retention periods to comply with regulatory requirements? How does the provider handle encryption keys, and will that method meet regulations?
Ease of Use: Moving to the cloud means many staff who once kept all of your on-premises infrastructure up and running will instead be managing and provisioning infrastructure in the cloud. Will your IT team face a steep learning curve in implementing a new storage cloud? Test out the system to evaluate ease of use.
Pricing Transparency: With varying data retention requirements, transparent pricing tiers will help you budget more easily. Understand how the provider prices their service including fees for things like egress, required minimums, and other fine print. And seek backup providers that offer pricing sensitive to educational institutions’ needs. Veeam, for example, offers discounted public sector pricing allowing districts to achieve enterprise-level backup that fits within their budgets.
Integrations/Partner Network: One of the risks of moving to the cloud is vendor lock-in. Avoid getting stuck in one cloud ecosystem by researching the providers’ partner network and integrations. Does the provider already work with software you have in place? Will it be easy to change vendors should you need to?
Support: Does your team need access to support services? Understand if your provider offers support and if that support structure will fit your team’s needs.
As you research and evaluate potential cloud providers, create a checklist of the considerations that apply to you and make sure to clearly understand how the provider meets each requirement.
Preparing for a Cloud Migration at Your School District
Even when you know a cloud migration will benefit your district, moving your precious data from one place to another can be daunting at the least. Even figuring out how much data you have can be a challenge, let alone trying to shift a culture that’s accustomed to having hardware on-premises. Having a solid migration plan helps to ensure a successful transition. Before you move your infrastructure to the cloud, take the time to consider the following:
Conduct a thorough data inventory: Make a list of all applications with metadata including the size of the data sets, where they’re located, and any existing security protocols. Are there any data sets that can’t be moved? Will the data need to be moved in phases to avoid disruption? Understanding what and how much data you have to move will help you determine the best approach.
Consider a hybrid approach: Many school districts have already invested in on-premises systems, but still want to modernize their infrastructure. Implementing a hybrid model with some data on-premises and some in the cloud allows districts to take advantage of modern cloud infrastructure without totally abandoning systems they’ve customized and integrated.
Test a proof of concept with your new provider: Migrate a portion of your data while continuing to run legacy systems and test to compare latency, interoperability, and performance.
Plan for the transfer: Armed with your data inventory, work with your new provider to plan the transfer and determine how you’ll move the data. Does the provider have data transfer partners or offer a data migration service above a certain threshold? Make sure you take advantage of any offers to manage data transfer costs.
Execute the migration and verify results: Schedule the migration, configure your transfer solution appropriately, and run checks to ensure the data migration was successful.
An Education in Safe, Reliable Cloud Backups
Like a K-12 school district, Coast Community College District (CCCD) manages data for multiple schools and 60,000+ students. With a legacy on-premises tape backup system, data recovery often took days and all too often failed at that. Meanwhile, staff had to chauffeur tapes from campus to campus for off-site backup data protection. They needed a safer, more reliable solution and wanted to replace tapes with cloud storage.
CCCD implemented Cohesity backup solutions to serve as a NAS device, which will eventually replace 30+ Windows file servers, and eliminated tapes with Backblaze B2 Cloud Storage, safeguarding off-site backups by moving the data farther away. Now, restoring data takes seconds instead of days, and staff no longer physically transfer tapes—it all happens in the cloud.
How Cloud Storage Can Protect School District Data
Cloud-based solutions are integral to successful remote or hybrid learning environments. School districts have already made huge progress in moving to the cloud to enable remote learning. Now, they have the opportunity to capitalize on the benefits of cloud storage to modernize infrastructure as ransomware attacks become all the more prevalent. To summarize, here are a few things to remember when considering a cloud storage solution:
Using cloud storage with Object Lock to store an off-site backup of your data means hackers can’t encrypt, modify, or delete backups within a set timeframe, and schools can more easily restore backups in the event of a disaster or ransomware attack.
Increased ransomware protections allow districts to access the benefits of moving to the cloud like reduced CapEx, workflow efficiencies, and cost savings without sacrificing the security of air gapped backups.
Evaluate a provider’s security offerings, compliance capability, ease of use, pricing tiers, partner network, and support structure before committing to a cloud migration.
Take the time to plan your migration to ensure a successful transition.
Have more questions about cloud storage or how to implement cloud backups in your environment? Let us know in the comments. Ready to get started?
Every month, millions of viewers tune in to their favorite channels live streaming League of Legends, Call of Duty, Dota, and more on Twitch. With over two million streamers creating live content each month, video games and streaming go hand in hand.
Whether you’re streaming for yourself, your friends, an audience, or you’re trying to build a brand, you’re creating a lot of great content when you stream. The problem is that most services will only protect your content for a few weeks before deleting it.
Whether you want to edit or rewatch your content for fun, to build a reel for a sponsor, or to distribute content to your adoring fans, backups of the raw and edited content are essential to make sure your hard work doesn’t disappear forever. Outside of videos, you should also consider backing up other Twitch content like stream graphics including overlays, alerts, emotes, and chat badges; your stream setup; and media files that you use on stream.
Read our guide below to learn:
Two methods for downloading your Twitch stream.
How to create a backup of your Twitch stream setup.
How to Download Your Twitch Stream
Once you finish a stream, Twitch automatically saves that broadcast as a video on demand. For most accounts, videos are saved for 14 days, but if you are a Twitch Partner or have Twitch linked to your Amazon Prime account, you have access to your videos for up to 60 days. You can also create clips up to a minute long of your streams within Twitch or upload longer videos as highlights, which are stored indefinitely.
Download Method #1
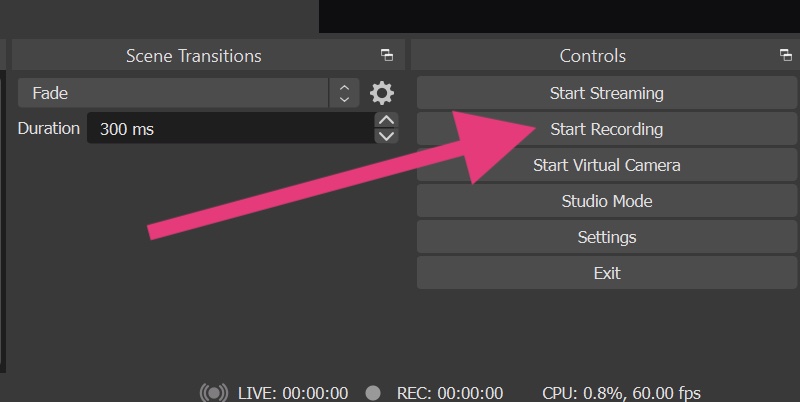
With this method, there’s almost no work required besides hitting the record button in your streaming software. Keep in mind that recording while streaming can put a strain on your output performance, so while it’s the simplest download method, it might not work best depending on your setup.
Continue reading to learn how to simultaneously stream and record a copy of your videos, or skip to method #2 to learn how to download without affecting performance during streaming.
If you, like many streamers, use software like OBS or Streamlabs OBS, you have the option of simultaneously streaming your output and recording a copy of the video locally.
Before you start recording, check to make sure that the folder for your local recordings is included in your computer backup system.
Then, go ahead with streaming. When you’re done, the video will save to your local folder.
Download Method #2
This second method for downloading and saving your videos requires a bit more work, but the benefit is that you can choose which videos you’d like to keep without affecting your streaming performance.
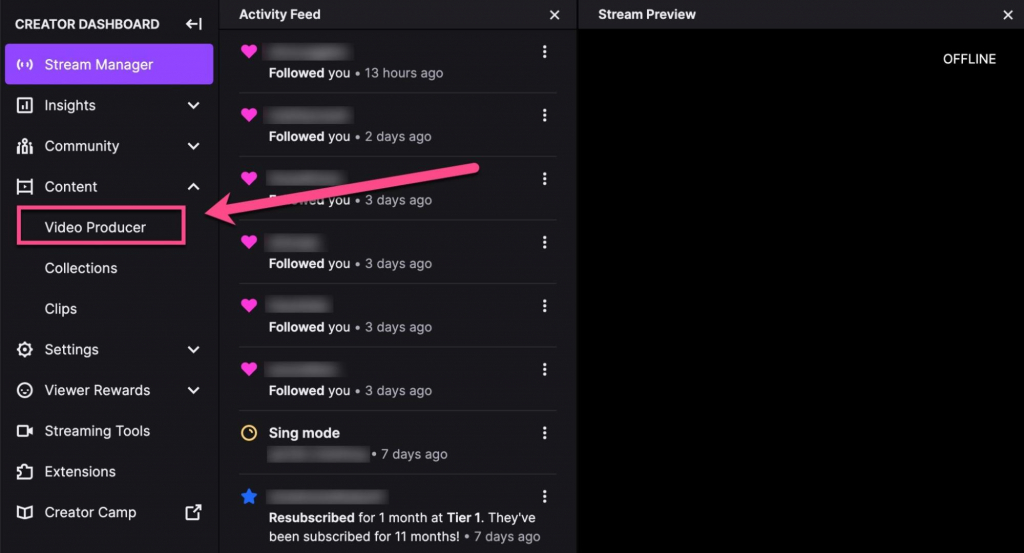
Once you’ve finished streaming, navigate to your Creator Dashboard.
On the left side of the screen, click “Content,” then “Video Producer.” Your clips and highlights live here and can be downloaded from this panel.
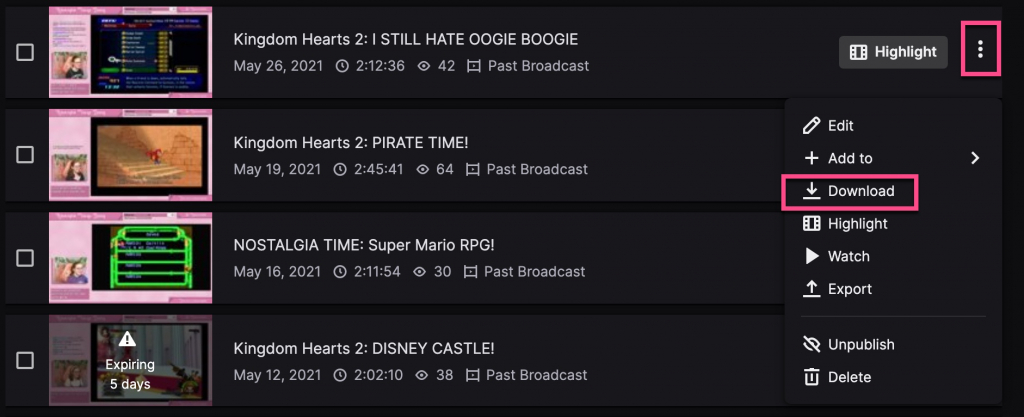
Find the video you’d like to download, then click the three vertical dots and choose “Download.” The menu will change to “Preparing” and may take several minutes.
Once the download is ready, a save screen will appear where you can choose where you’d like to save your video on your computer.
How to Download Your Stream Setup
If you’re using streaming software like OBS, most services allow you to export your Scene Profile and back it up, which will allow you to re-import without rebuilding all of your Scenes if you ever need to restore your Profile or switch computers. In OBS, go to the Profile menu, choose “Export” to download your data, and save it in a folder on your computer.
If you also use a caption program for your streams like Webcaptioner, you can follow similar steps to export and back up your caption settings as well.
How to Back Up Your Twitch Streams and Setups
Having a backup of your original videos as well as the edited clips and highlights is fundamental because data loss can happen at any time, and losing all your work is a huge setback. In case any data loss wreaks havoc on your setup or updates change your settings, you’ll always have a backup of all of your content that you can restore to your system. We recommend keeping a local copy on your computer and an off-site backup—you can learn more about this kind of backup strategy here.
Downloading your live streams will mean saving a collection of large files that will put a strain on your system to store. By creating a cloud storage archive of data you don’t need to access regularly, you can free up space on your local system. It’s quick and easy to organize your content using buckets where you simply drag and drop the files or folders you’d like to upload and save to the cloud. Take a look at how to set up and test a cloud storage archive here.
The difference between computer backup and cloud storage is that data is stored in the cloud for both options, but in backup, the data in the cloud is a copy of the data on your computer. For cloud storage, it’s just saved data without mirroring or versioning.
If you prefer to back up your files, computer backup services automatically scan your computer for new files, so all you have to do is make sure your local recordings folder is included in your backup.
Nowadays with our data scattered across multiple platforms, it’s all the more important to make sure you have a copy saved in case your media becomes inaccessible for any reason. Take a look at our other posts about downloading and backing up your data:
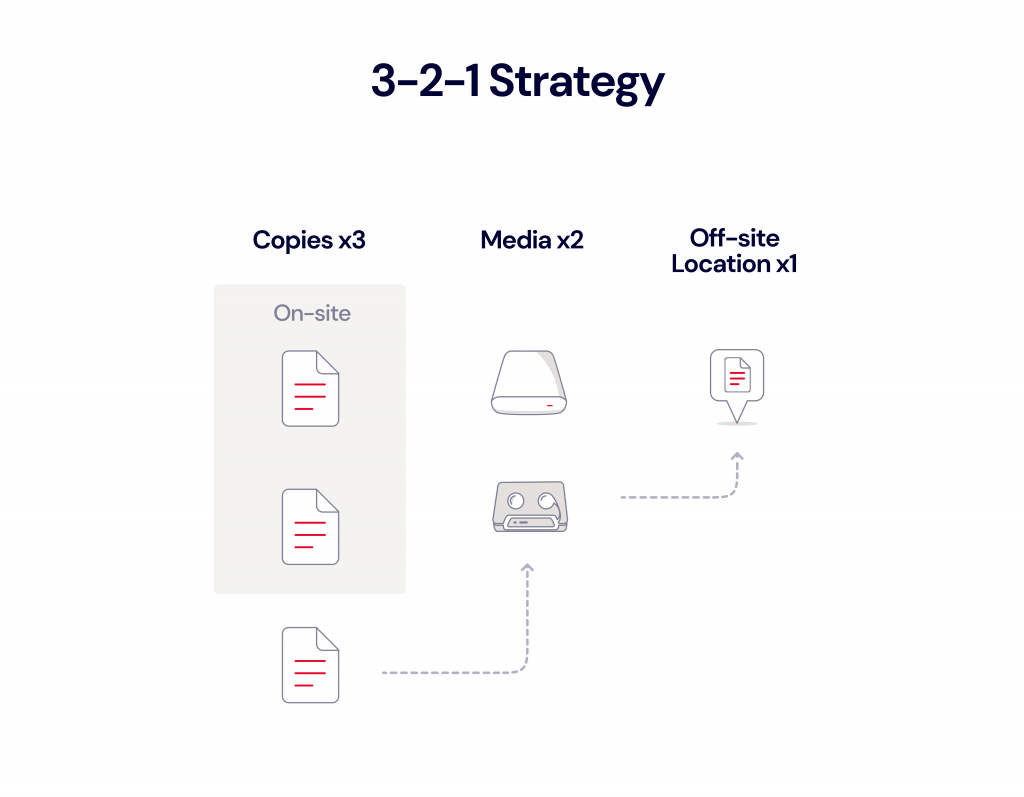
When it comes to having a backup plan, Navy SEALs go by the rule that “Two is one and one is none.” They’re not often one-upped, but in the world of computer backup, even two is none. The gold standard until recently has been the 3-2-1 rule—three copies of your data on two different media with one copy stored off-site.
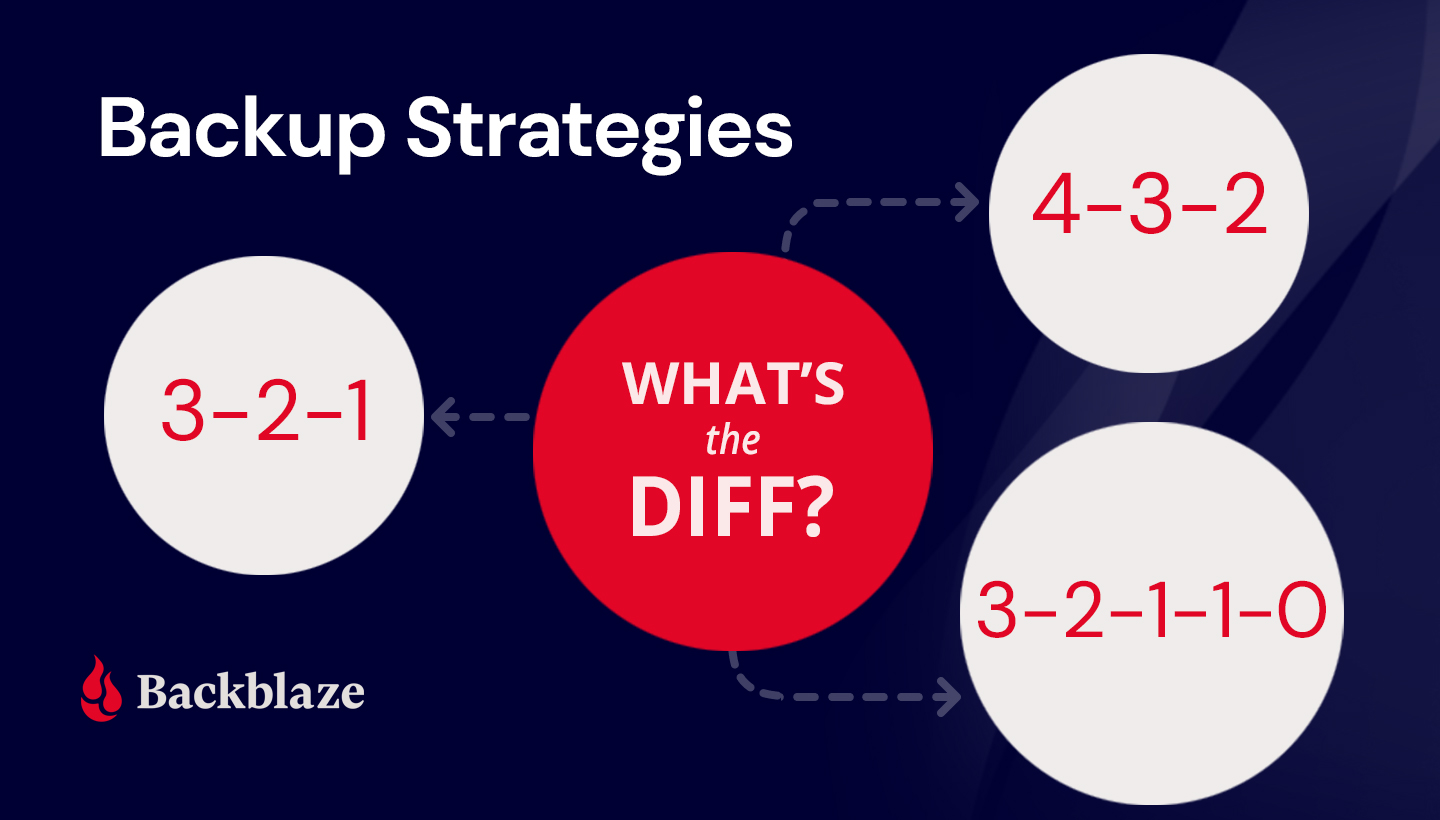
The 3-2-1 rule still has value, especially for individuals who aren’t backing up at all. But today, the gold standard is evolving. In this post, we’ll explain why 3-2-1 is being replaced by more comprehensive strategies; we’ll look at the difference between the 3-2-1 rule and emerging rules, including 3-2-1-1-0 and 4-3-2; and we’ll help you decide which is best for you.
Why Is the 3-2-1 Backup Strategy Falling Out of Favor?
When the 3-2-1 backup strategy gained prominence, the world looked a lot different than it does today, technology-wise. The rule is thought to have originated in the world of photography in Peter Krogh’s 2009 book, “The DAM Book: Digital Asset Management for Photographers.” At that time, tape backups were still widely used, especially at the enterprise level, due to their low cost, capacity, and longevity.
The 3-2-1 strategy improved upon existing practices of making one copy of your data on tape and keeping it off-site. It advised keeping three copies of your data (e.g., one primary copy and two backups) on two different media (e.g., the primary copy on an internal hard disk, a backup copy on tape, and an additional backup copy on an external HDD or tape) with one copy off-site (likely the tape backup).
Before cloud storage was widely available, getting the third copy off-site usually involved hiring a storage service to pick up and store the tape drives or physically driving them to an off-site location. (One of our co-founders used to mail a copy of his backup to his brother.) This meant off-site tape backups were “air-gapped” or physically separated from the network that stored the primary copy by a literal gap of air. In the event the primary copy or on-site backup became corrupted or compromised, the off-site backup could be used for a restore.
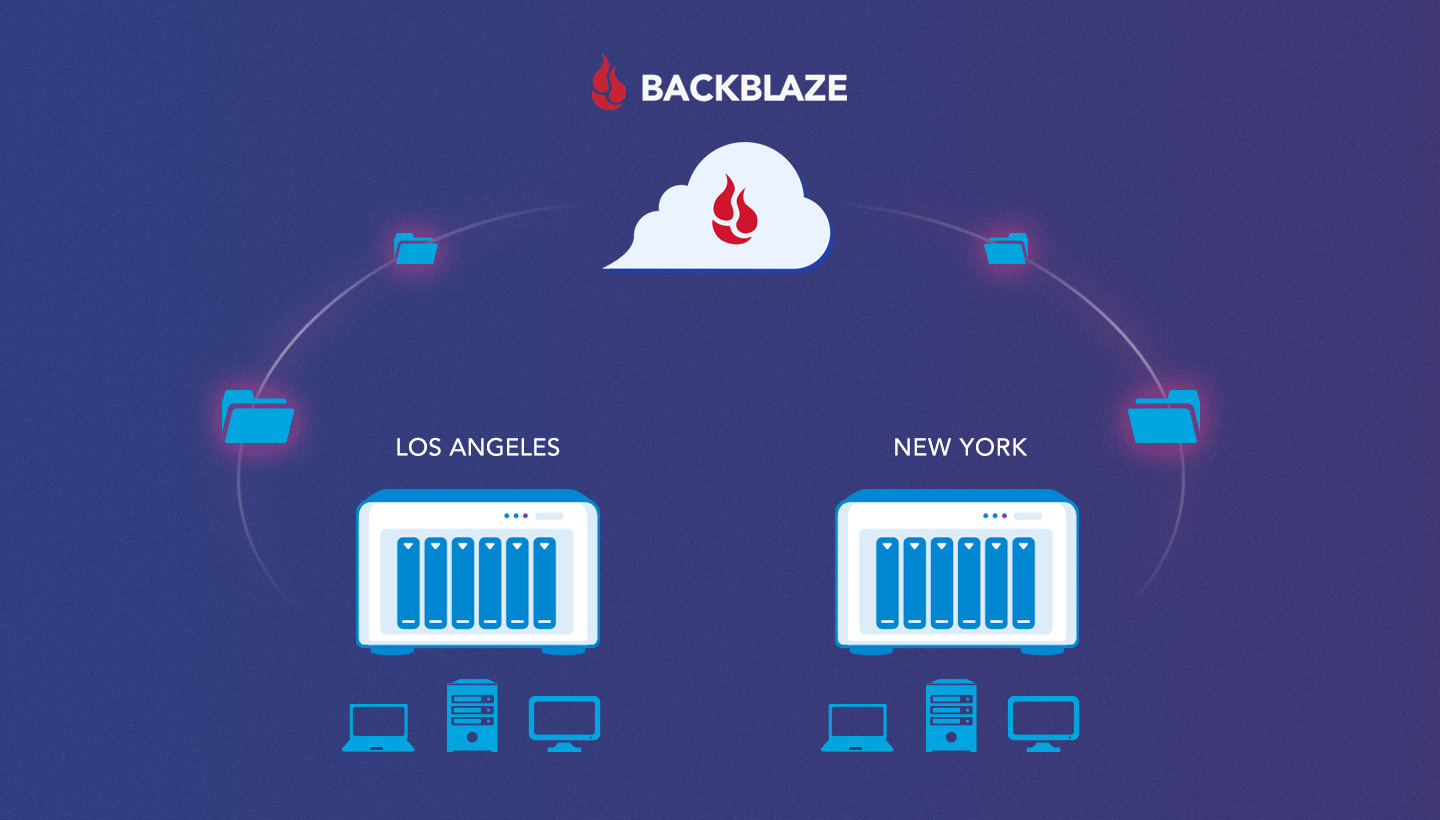
As storage technology has evolved, the 3-2-1 backup strategy has gotten a little…cloudy. A company might employ a NAS device or SAN to store backups on-site, which is then backed up to object storage in the cloud. An individual might employ a 3-2-1 strategy by backing up their computer to an external hard drive as well as the cloud.
While a 3-2-1 strategy with off-site copies stored in the cloud works well for events like a natural disaster or accidental deletion, it lost the air gap protection that tape provided. Cloud backups are sometimes connected to production networks and thus vulnerable to a digital attack.
Ransomware: The Driver for Stronger Backup Strategies
With as many high-profile ransomware incidents as the past few months have seen, it shouldn’t be news to anyone that ransomware is on the rise. Ransom demands hit an all-time high of $50 million in 2021 so far, and attacks like the ones on Colonial Pipeline and JBS Foods threatened gas and food supply supply chains. In their 2021 report, “Detect, Protect, Recover: How Modern Backup Applications Can Protect You From Ransomware,” Gartner predicted that at least 75% of IT organizations will face one or more attacks by 2025.
Backups are meant to be a company’s saving grace in the event of a ransomware attack, but they only work if they’re not compromised. And hackers know this. Ransomware operators like Sodinokibi, the outfit responsible for attacks on JBS Foods, Acer, and Quanta, are now going after backups in addition to production data.
Cloud backups are sometimes tied to a company’s active directory, and they’re often not virtually isolated from a company’s production network. Once hackers compromise a machine connected to the network, they spread laterally through the network attempting to gain access to admin credentials using tools like keyloggers, phishing attacks, or by reading documentation stored on servers. With admin credentials, they can extract all of the credentials from the active directory and use that information to access backups if they’re configured to authenticate through the active directory.
Is a 3-2-1 Backup Strategy Still Viable?
As emerging technology has changed the way backup strategies are implemented, the core principles of a 3-2-1 backup strategy still hold up:
You should have multiple copies of your data.
Copies should be geographically distanced.
One or more copies should be readily accessible for quick recoveries in the event of a physical disaster or accidental deletion.
But, they need to account for an additional layer of protection: One or more copies should be physically or virtually isolated in the event of a digital disaster like ransomware that targets all of their data, including backups.
What Backup Strategies Are Replacing 3-2-1?
A 3-2-1 backup strategy is still viable, but more extensive, comprehensive strategies exist that make up for the vulnerabilities introduced by connectivity. While not as catchy as 3-2-1, strategies like 3-2-1-1-0 and 4-3-2 offer more protection in the era of cloud backups and ransomware.
What Is 3-2-1-1-0?
A 3-2-1-1-0 strategy stipulates that you:
Maintain at least three copies of business data.
Store data on at least two different types of storage media.
Keep one copy of the backups in an off-site location.
Keep one copy of the media offline or air gapped.
Ensure all recoverability solutions have zero errors.
The 3-2-1-1-0 method reintroduced the idea of an offline or air gapped copy—either tape backups stored off-site as originally intended in 3-2-1, or cloud backups stored with immutability, meaning the data cannot be modified or changed.
If your company uses a backup software provider like Veeam, storing cloud backups with immutability can be accomplished by using Object Lock. Object Lock is a powerful backup protection tool that prevents a file from being altered or deleted until a given date. Only a few storage platforms currently offer the feature, but if your provider is one of them, you can enable Object Lock and specify the length of time an object should be locked in the storage provider’s user interface or by using API calls.
When Object Lock is set on data, any attempts to manipulate, encrypt, change, or delete the file will fail during that time. The files may be accessed, but no one can change them, including the file owner or whoever set the Object Lock and—most importantly—any hacker that happens upon the credentials of that person.
The 3-2-1-1-0 strategy goes a step further to require that backups are stored with zero errors. This includes data monitoring on a daily basis, correcting for any errors as soon as they’re identified, and regularly performing restore tests.
A strategy like 3-2-1-1-0 offers the protection of air gapped backups with the added fidelity of more rigorous monitoring and testing.
What Is 4-3-2?
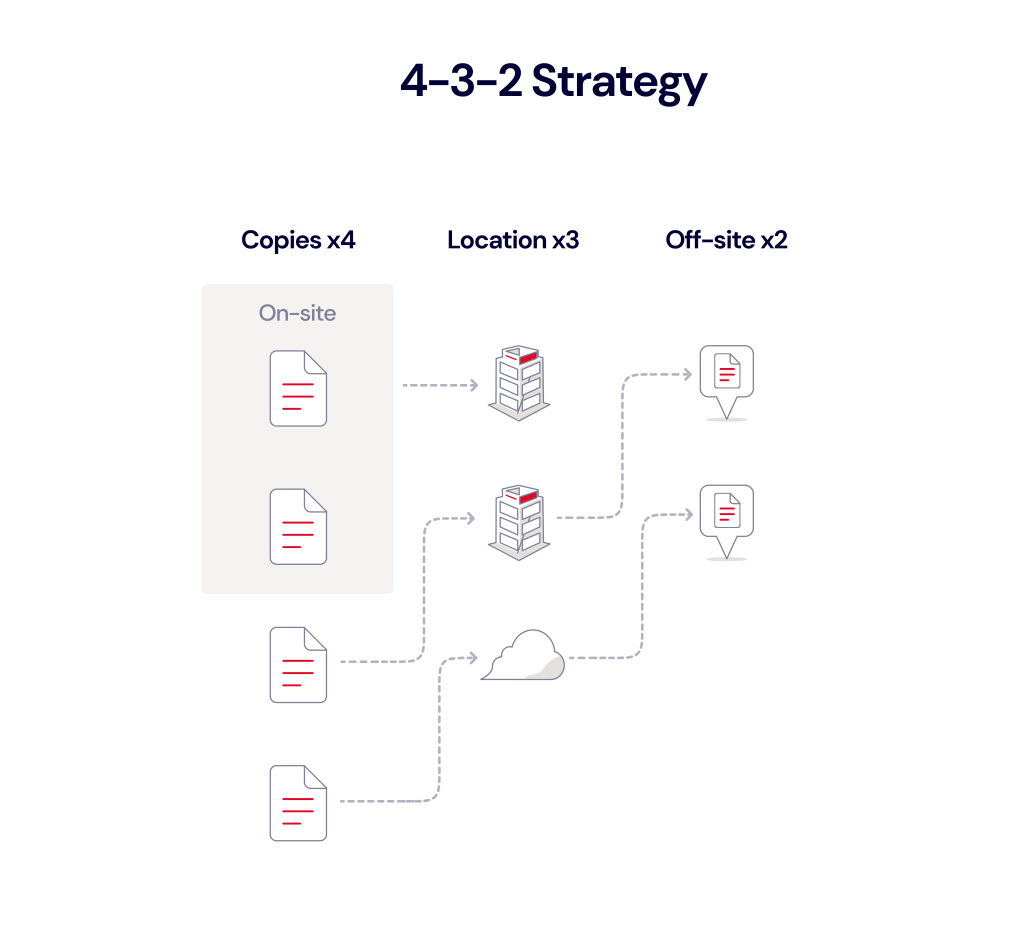
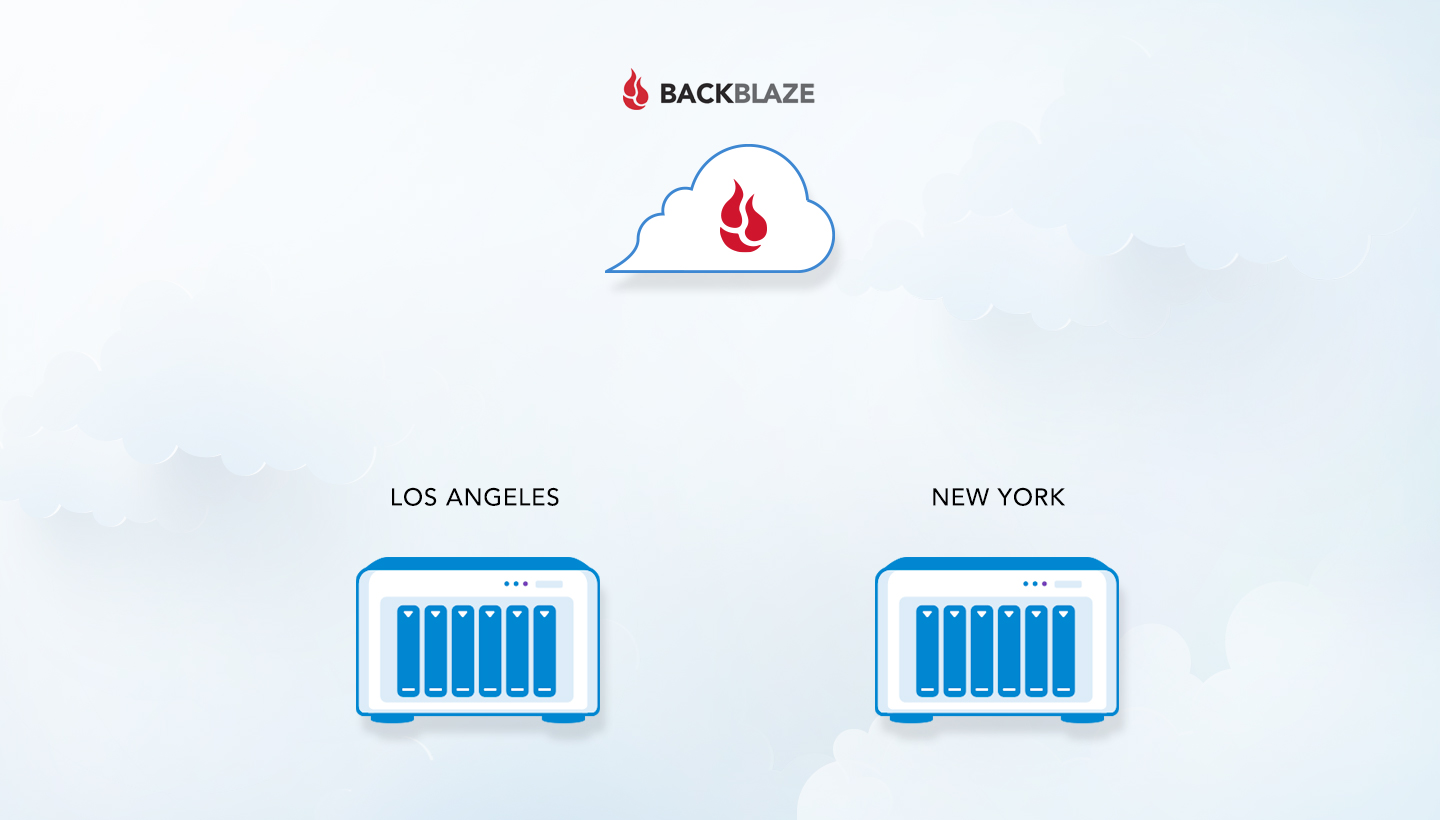
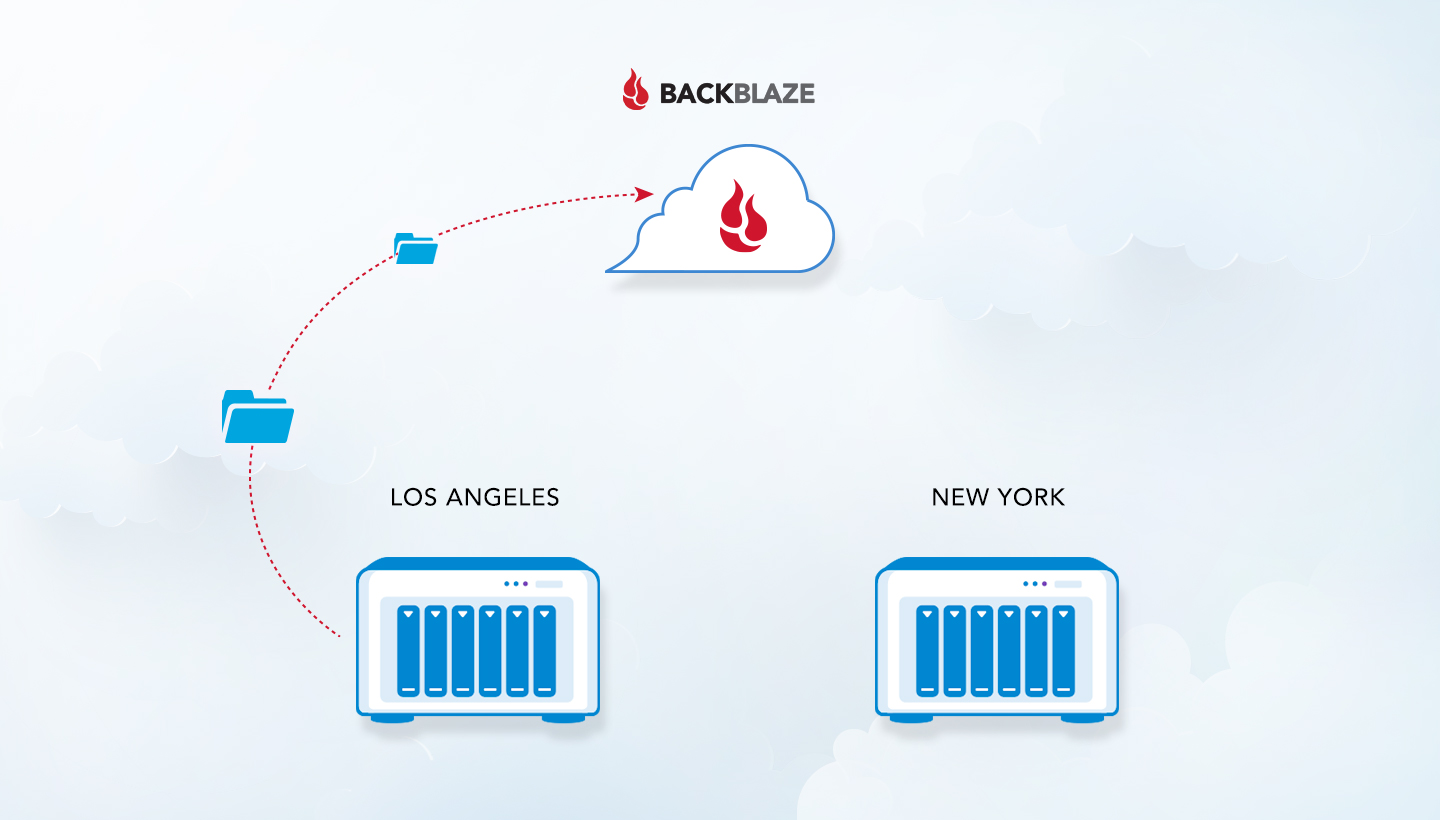
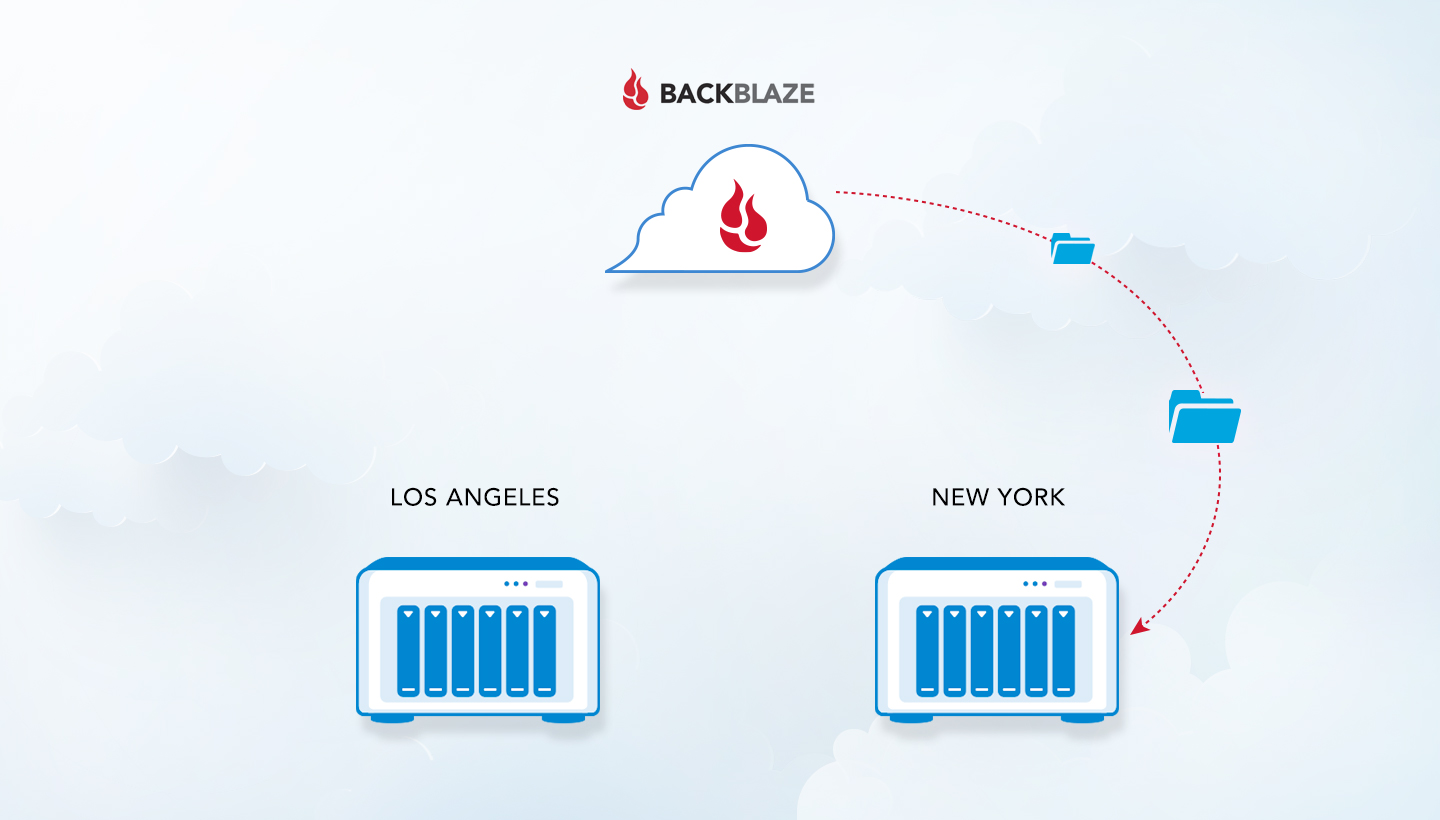
If your data is being managed by a disaster recovery expert like Continuity Centers, for example, your backups may be subscribing to the 4-3-2 rule:
Four copies of your data.
Data in three locations (on-prem with you, on-prem with an MSP like Continuity Centers, and stored with a cloud provider).
Two locations for your data are off-site.
Continuity Centers’ CEO, Greg Tellone, explained the benefits of this strategy in a session with Backblaze’s VP of Sales, Nilay Patel, at VeeamON 2021, Veeam’s annual conference. A 4-3-2 strategy means backups are duplicated and geographically distant to offer protection from events like natural disasters. Backups are also stored on two separate networks, isolating them from production networks in the event they’re compromised. Finally, backup copies are stored with immutability, protecting them from deletion or encryption should a hacker gain access to systems.
Which Backup Strategy Is Right for You?
First, any backup strategy is better than no backup strategy. As long as it meets the core principles of 3-2-1 backup, you can still get your data back in the event of a natural disaster, a lost laptop, or an accidental deletion. To summarize, that means:
Keeping multiple copies of your data—at least three.
Storing copies of your data in geographically separate locations.
Keeping at least one copy on-site for quick recoveries.
With tools like Object Lock, you can apply the principles of 3-2-1-1-0 or 4-3-2, giving your data an additional layer of protection by virtually isolating it so it can’t be deleted or encrypted for a specific time. In the unfortunate event that you are attacked by ransomware, backups protected with Object Lock allow you to recover.
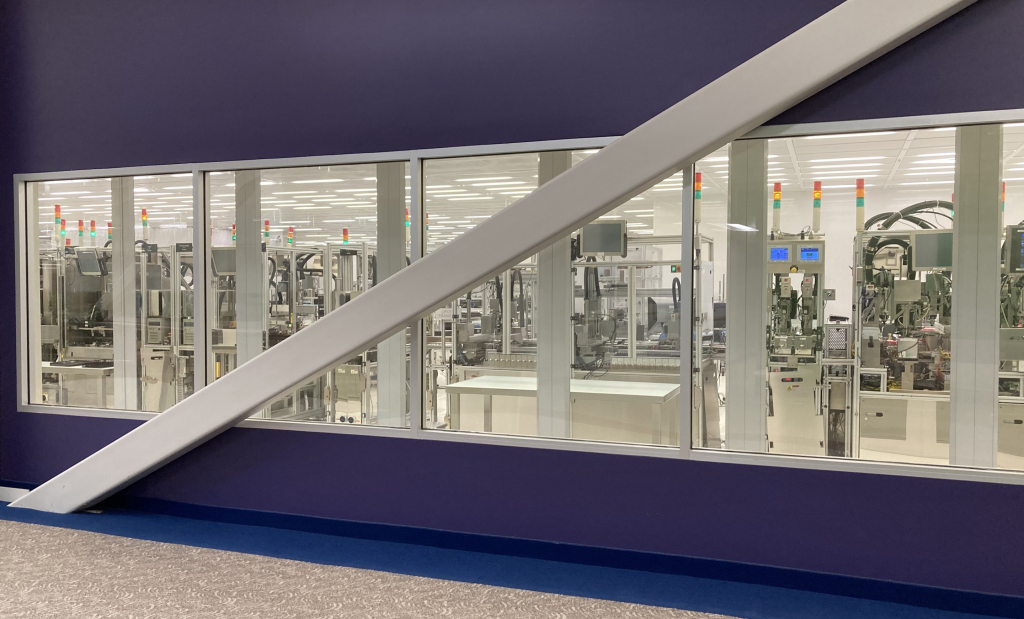
I am a sucker for a factory tour. I marvel with wide-eyed wonder as I watch how pieces and parts get created, assembled, and tested into something you can recognize and use. Whether it’s making beer or cars—sign me up. So, when Seagate Technology offered me a chance to tour their hard drive prototyping facility in Longmont, Colorado, I was powerless to resist. After all, I’d get to see how they prototype the process for building hard drives before they scale to full production. As a bonus, I also got to see their reliability lab and to talk with them about how they perform fault analysis on failed drives, but I’ll save those topics for a future post. For now, put on your lab coat and follow me to Longmont, the tour is starting.
Welcome to Longmont
Over the past 40 years, Longmont, Colorado has been home to multiple hard drive manufacturers. This accounts for the hard drive-related talent that lives in this pastoral community where such skills might otherwise be hard to find. Longmont has also come a long way from the brick shipping days of MiniScribe in the 80s to today’s ultra-sophisticated factories like the Seagate facility I have been invited to tour.
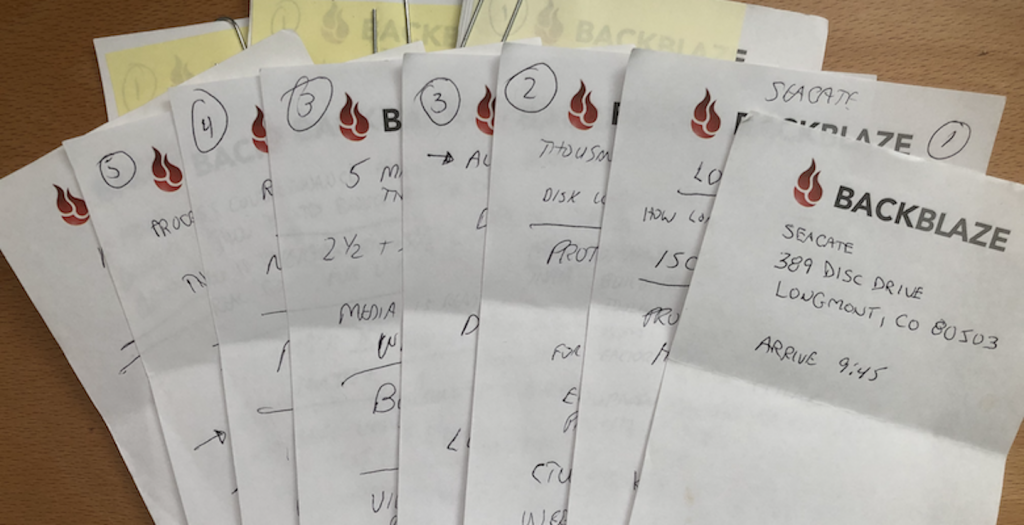
I arrive at the front desk with appointment confirmation in hand—you can’t just show up. I present appropriate credentials, electronically sign a non-disclosure agreement, get my picture taken, receive my badge—escort only—and wait for the host to arrive. I’m joined by my Backblaze colleague, Ariel, our senior director of supply chain, and a few minutes later our host arrives. Before we start, we get the rules: No pictures, in fact devices such as cell phones and tablets have to be put away. I’ll take notes, which I’ll do on my 3×5 Backblaze notepad.
My notes (as such) from the tour. Yes, there are two page three’s…
The Prototyping Line
The primary functions of the prototyping line are to define, optimize, and standardize the build processes, tooling, and bill of materials needed for the mass production of hard drives by various Seagate manufacturing facilities around the globe. In addition, the prototyping line is sometimes used to test the design and assembly of new hard drive components.
The components of a typical hard drive are:
The casing.
The platter (for storing data).
The spindle (for spinning the platters).
The head stack assembly comprised of:
The read/write arm and heads (to read and write data).
The actuator (for controlling the actions of the read/write arm).
Circuit board(s) and related electronics.
The prototyping line is a single assembly line comprised of stations that perform the various functions needed to build a hard drive—actually, many different models of 3.5in hard drives. Individual stations decide whether or not to operate on the drive based on the routing assigned to the drive. A given station can be used all of the time to do the same thing, used all the time to do a variation of the task, or used some of the time. For example, installing a serial number is done for every drive; installing drive platters is done for every drive, but can vary by the number of platters to be installed; and installing a second actuator is only required for those drives with dual actuators.
A Seagate employee likened the process to a one-way salad bar: All salads being made pass through the same sequence of steps, but not every salad gets every ingredient. As you travel down the salad bar line, you will always get several common ingredients such as a tray, a plate, a fork, lettuce, and so on. And while you always get salad dressing, you may get a different one each time. Finally, there are some ingredients like garbanzo beans or broccoli that you will never get, but the person behind you making their own salad will.
Just like a salad bar line, the prototyping line is designed to be configured to handle a large number of permutations when building a hard drive. This flexibility is important as Seagate introduces new technologies which may require changes to stations or even new stations to be created and integrated into the line.
At first blush, assembling a hard drive is nothing more than a series of incremental steps accomplished in a precise order. But there are multiple layers at work here. At the first station, we can see the simple task of picking up a motor base assembly (aka a baseplate) from a storage bin and placing it correctly on the conveyor belt to the next station. We can see the station perform perhaps 20 visibly discrete operations to accomplish this task: Move the pickup arm to the left, open the pickup mechanism, lower the arm, close the pickup mechanism around the baseplate, and so on. Beyond what we can see, for each movement of the station, there are electro-mechanical components driving those observable operations, and many operations we don’t readily see. And beyond that, controlling the components, are layers of firmware, software, and machine code orchestrating the 20 or so simple movements we do see. As we slowly shuffle from window to window gawking at each station performing its specific task, a hard drive of amazing complexity emerges in front of our eyes.
Finally, the prototyping line is used from time-to-time to assist in and validate design and build decisions. For example, the assembly line could be used to inform on the specific torque used on a fastener to determine torque retention over thermal/altitude cycles. In another example, the prototyping line could be used to assess cleanliness and manufacturability as a function of the material selected for a particular component.
Facts About the Longmont Line
The Longmont prototyping line is the longest Seagate assembly line. This is because the line needs to be able to assemble a variety of different drive models whereas a factory-based assembly line only needs to assemble one or two models at a time.
The Longmont prototyping line assembles 3.5in hard drives. The prototyping line for their 2.5in drives is in their Minnesota facility.
All of the stations on the line are designed by Seagate.
All of the software used to control the stations is designed and built by Seagate.
All of the stations in the cleanroom are modular and can be pulled from the line or moved to a different position in the assembly sequence if needed.
On average, it takes about five minutes for a drive to make its way through the entire line.
The floor is built upon a unique pier design to help minimize the transfer of vibrations from machine to machine and from people to machines.
Beyond the Line
As we reach the end of windows and the cleanroom, you might assume our tour is done. Au contraire, there’s another door. A badge swipe and we enter into a large room located just after the cleanroom. We are in the testing room. To understand what happens here, let’s take a step back in the process.
One of the primary functions of the prototyping line is to define the build process for use by factories around the world. Let’s say the line is prototyping the build of 500 drives of model XYZ. One of the last steps in the assembly process is to attach the process drive cover to enclose the drive components, and in our example, our model XYZ drives are filled with helium and sealed. Once the assembly process is complete, the drives are moved from the cleanroom to the testing room.
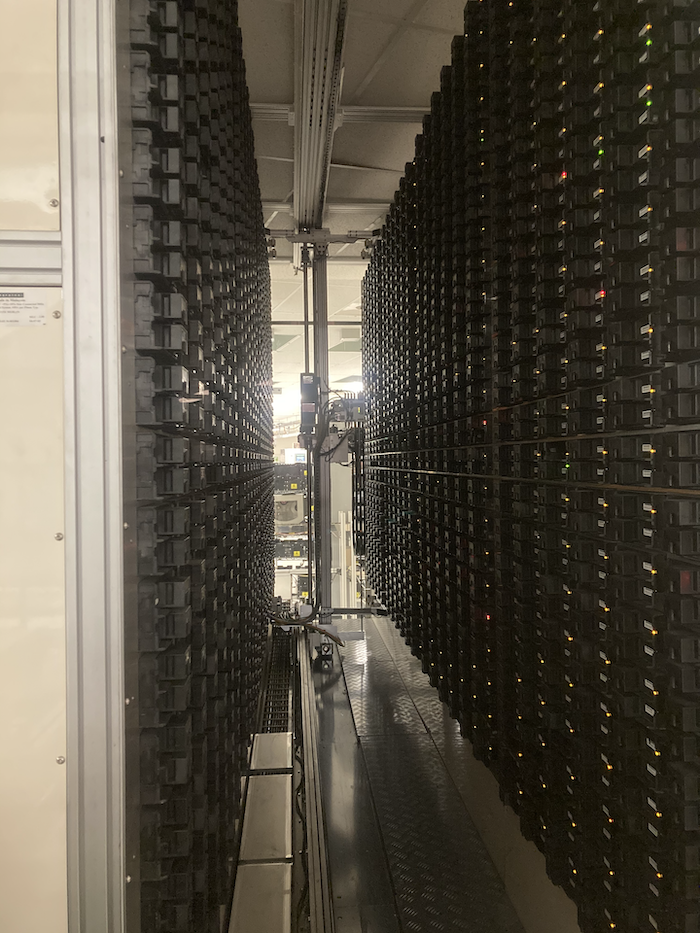
The most striking feature of the testing room is that it contains row after row of what appear to be little black boxes, stacked 40 to 50 high. Visually, each row looks like a giant wall of post office boxes.
Each post office box is a testing unit and holds one 3.5in hard drive. Inside each box are connections for a given drive model which, once connected, can run predefined test scenarios to exercise the drive inside. Load the firmware, write some data, read some data, delete some data, repeat, all while the drives are monitored to see if they are performing as expected. Easy enough, but there’s more. Each testing box can also control the temperature inside. Based on the testing plan, the temperature and test duration are dialed-in by the testing operator and testing begins. Testing in this manner typically runs for a couple of weeks and thousands of drives can be tested during this time with different tests being done on different groups of drives.
Once this first round of testing is complete on our model XYZ drives, a review is done to determine if they qualify to move on—too many failures during testing and it’s back to the proverbial drawing board, or at least the prototyping stage. Assuming our model XYZ drives pass the muster, they move on. At that point, the final cover is installed over the top of the process cover and the drives which contain helium are leak tested. All drives are then returned to the post office boxes for a quick round of testing. If everything goes according to plan, then model XYZ is ready for production—well, maybe not. The entire process, from assembly to testing, is repeated multiple times with each round being compared to the previous rounds to ensure consistency.
What happens to all the drives that Longmont produces? Good question. If they fail during the assembly process, the process engineer in charge of the product, who is usually on the cleanroom floor during the assembly process, steps in. Many issues can be fixed on the spot and the assembly process continues, but for some failures a design issue is the culprit. In that case the assembly process is stopped, and the feedback is passed back to the designers so they can correct the flaw. The same is basically true for drives which fail the testing process, the design engineers are informed of the results and can review the analytics compiled from the testing boxes.
If a given cohort of drives is successfully assembled and passes their testing plan, they could be sent to specific customers as testing units, or used for firmware testing, or be sent to the reliability lab, or they could just be recycled. The hard drives produced on the Longmont prototyping line are not production units, that’s where the factories come in.
Mass Quantities
Once Seagate is satisfied that the prototyping line can consistently produce hard drives which meet their qualifications, it is time to roll out the line to its factories. More accurately, a given factory will convert one or more of its lines to build the new product (model). To do this, they incorporate the processes developed and tested on the Longmont prototyping line, including any physical, firmware, and software changes to the various stations in the factory which will assemble the new product. On rare occasions, new stations are introduced and others are removed, but a majority of the time the factory is updating existing equipment as noted. Depending on the amount of change to the factory line, it can take anywhere from a couple of days to a couple of weeks to get the line up and running to produce drives which meet the standards defined by the prototyping line we just toured in Longmont. To make sure those standards are met, each factory has thousands upon thousands of testing boxes to test each drive coming off the factory assembly line. Only after they pass the predefined testing protocol are they shipped to distribution centers and, eventually, customers.
Next Up: The Reliability Lab
That’s the end of the tour today, next time we’ll wander through the Seagate reliability lab also at Longmont to see what happens when you heat, drop, fling, vibrate, and otherwise torture a hard drive. Good times.
Author’s Note: I wish to thank Robert who made this tour happen in the first place, Kent, Gregory, Jason, and Jen who were instrumental in reviewing this material to make sure I had it right, and the other unnamed Seagate folks who helped along the way. Thank you all.
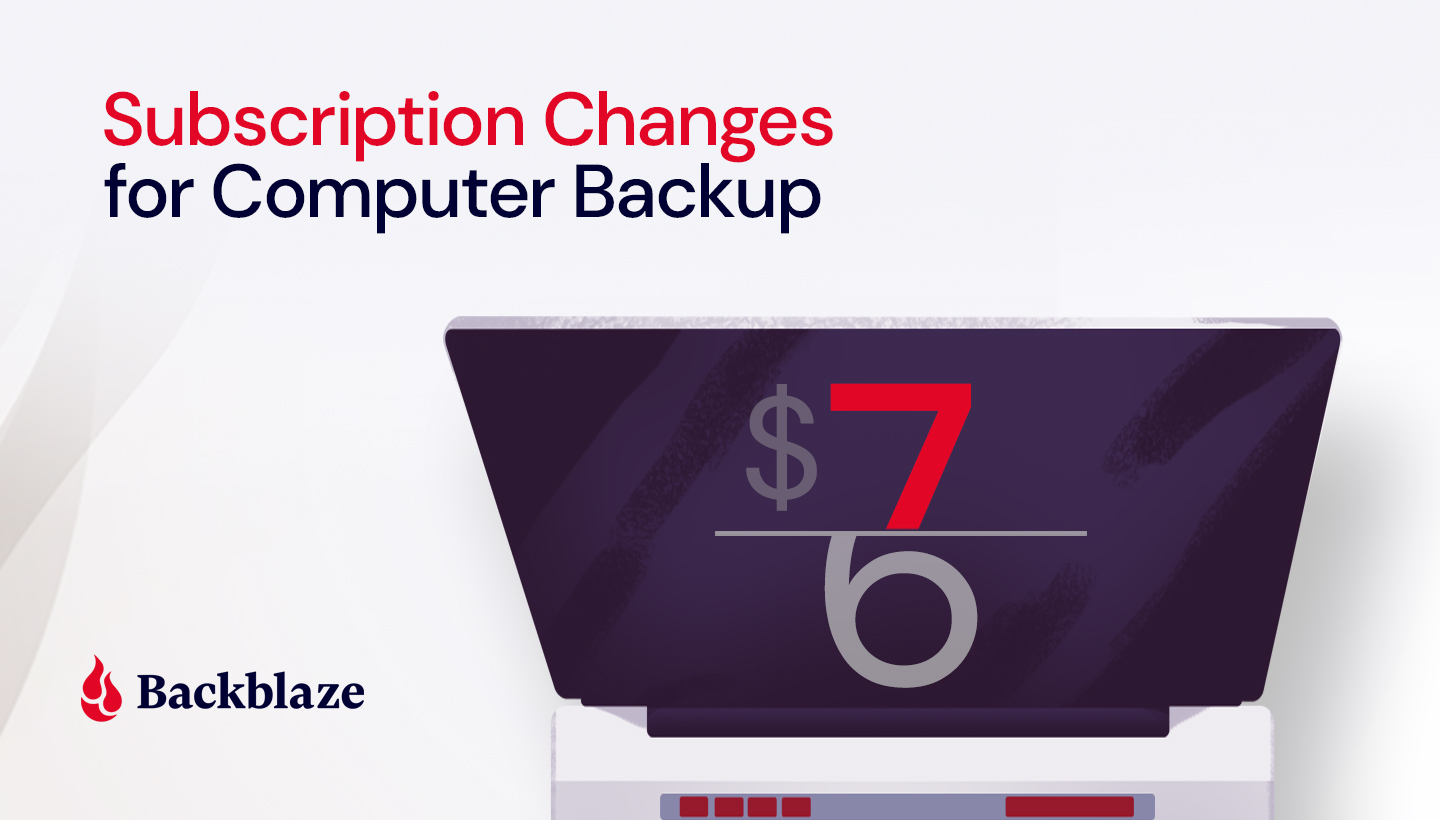
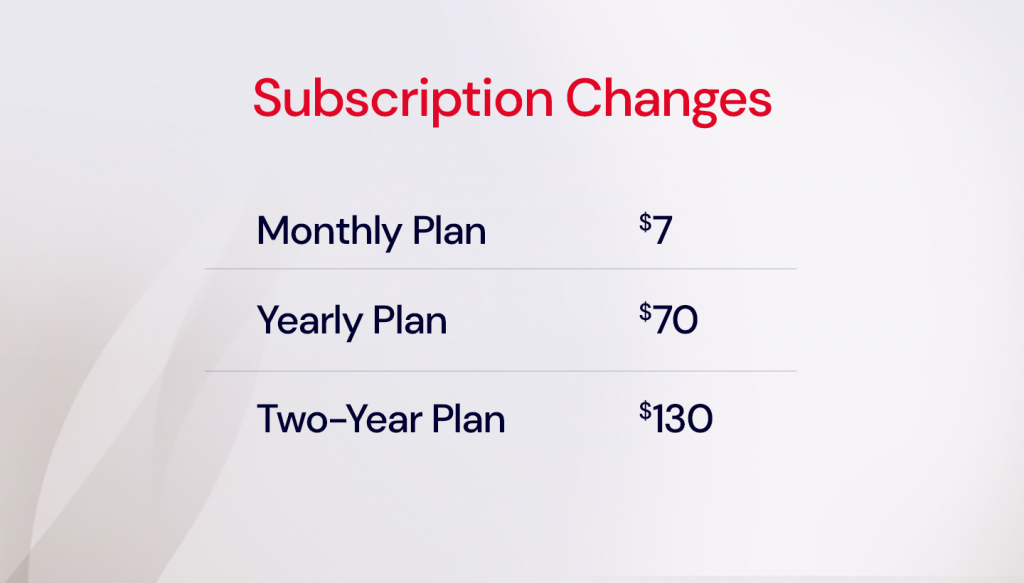
Thank you all for being Backblaze customers and fans. We’re writing today’s post to let you know that effective August 16th, 2021 at 5 p.m. Pacific, the prices for the Backblaze Computer Backup service are increasing. At that time, our prices per subscription will change to:
In short, because of a double digit growth in customer data storage, significant increases in supply chain costs, and our desire to continue investing in providing you with a great service.
Here’s a little more information:
Data Growth and Component Price Increases
Our Computer Backup service is unlimited (and we mean it). Businesses and individuals can back up as much data from their Macs and PCs as they like, and we back up external drives by default as well. This means that as our customers generate more and more data, our costs can rise while our prices remain fixed.
Over the last 14 years, we have worked diligently to keep our costs low and pass our savings on to customers. We’ve invested in deduplication, compression, and other technologies to continually optimize our storage platform and drive our costs down—savings which we pass on to our customers in the form of storing more data for the same price.
However, the average backup size stored by Computer Backup customers has spiked 15% over just the last two years. Additionally, not only have component prices not fallen at traditional rates, but recently electronic components that we rely on to provide our services have actually increased in price.
The combination of these two trends, along with our desire to continue investing in providing a great service, is driving the need to modestly increase our prices.
The Service Keeps Improving
While the cost of our Computer Backup service is increasing, you’re going to continue getting great value for your money. For example, in just the last two years (most recently with version 8.0), we have:
Added Extended Version History, which allows customers to retain their backups for longer—up to one year or even forever.
Increased backup speeds—faster networks and more intelligent threading means that you can back up quickly and get protected faster.
Optimized the app to be kinder to your computer—less load on the computer means we stay out of the way while keeping you protected, leaving your resources free for whatever else you’re working on.
Re-architected the app to reduce strain on SSDs—we’ve rewritten how the app handles copying files for backup, which reduces strain and extends the useful life of SSDs, which are common in newer computers.
Improved data access by enhancing our mobile apps—backing up your data is one thing, but accessing them is equally important. Our mobile apps give you access to all of your backed up files on the go.
Easing deployment options—for our business customers, installing and managing backups across all of their users’ machines is a huge job; we improved our silent installers and mass deployment tools to make their lives easier.
These are just some of the major improvements we’ve made in recent years—nearly every week we push big and small improvements to our service, upgrading our single sign-on options, optimizing inherit backup state functionality, and much more. (A lot of the investments are under-the-covers to silently make the service function more efficiently and seamlessly.)
Lock In Your Current Price With a Subscription Extension
As a way of thanking you for being a loyal Backblaze customer, we’re giving you the opportunity to lock in your existing Computer Backup pricing for one extra year beyond your current subscription period.
Thank you for being a customer. We really appreciate your trust in us and are committed to continuing to provide a service that makes it easy to get your data backed up, access it from anywhere in the world, protect it from ransomware, and to locate your computer should it be lost or stolen.
Answers to Questions You Might Have
Are Backblaze B2 Cloud Storage Prices Changing?
No. While data flowing into our storage cloud is up across the board, our B2 Cloud Storage platform charges for usage by the byte, so customers pay for the amount of data that they use. Meanwhile, Computer Backup is an unlimited service, and the increase in our customers’ average storage amount plus the recent spike in rising hardware costs are contributing factors to the increase.
Will You Raise Prices Again?
We have no plans to raise prices in the future. While we expect the data stored by our customers to continue growing, we also expect that the global supply chain challenges will stabilize. We work hard to drive down the cost of storage and provide a great service at an affordable price and intend to continue doing exactly that.
The arrival of Chia on the mainstream media radar brought with it some challenging and interesting questions here at Backblaze. As close followers of the hard drive market, we were at times intrigued, optimistic, cautious, concerned, and skeptical—often all at once. But, our curiosity won out. Chia is storage-heavy. We are a storage company. What does this mean for us? It was something we couldn’t ignore.
Backblaze has over an exabyte of data under management, and we typically maintain around three to four months worth of buffer space. We wondered—with this storage capacity and our expertise, should Backblaze farm Chia?
For customers who are ready to farm, we recently open-sourced software to store Chia plots using our cloud storage service, Backblaze B2. But deciding whether we should hop on a tractor and start plotting ourselves required a bunch of analysis, experimentation, and data crunching—in short, we went down the rabbit hole.
After proving out if this could work for our business, we wanted to share what we learned along the way in case it was useful to other teams pondering data-heavy cloud workloads like Chia.
Grab your gardening gloves, and we’ll get into the weeds.
Here’s a table of contents for those who want to go straight to the analysis:
If you’re new to the conversation, here’s a description of what Chia is and how it works. Feel free to skip if you’re already in the know.
Chia is a cryptocurrency that employs a proof of space and time algorithm that is billed as a greener alternative to coins like Bitcoin or Ethereum—it’s storage-intensive rather than energy-intensive. There are two ways to play the Chia market: speculating on the coin or farming plots (the equivalent of “mining” other cryptocurrencies). Plots can be thought of as big bingo cards with a bunch of numbers. The Chia Network issues match challenges, and if your plot has the right numbers, you win a block reward worth two Chia coins.
Folks interested in participating need to be able to generate plots (plotting) and store them somewhere so that the Chia blockchain software can issue match challenges (farming). The requirements are pretty simple:
A computer running Windows, MacOS, or Linux with an SSD to generate plots.
HDD storage to store the plots.
Chia blockchain software.
But, as we’ll get into, things can get complicated, fast.
Should Backblaze Support and Farm Chia?
The way we saw it, we had two options for the role we wanted to play in the Chia market, if at all. We could:
Enable customers to farm Chia.
Farm it ourselves using our B2 Native API or by writing directly to our hard drives.
Helping Backblaze Customers Farm
We didn’t see it as an either/or, and so, early on we decided to find a way to enable customers to farm Chia on Backblaze B2. There were a few reasons for this choice:
We’re always looking for ways to make it easy for customers to use our storage platform.
With Chia’s rapid rise in popularity causing a worldwide shortage of hard drives, we figured people would be anxious for ways to farm plots without forking out for hard drives that had jumped up $300 or more in price.
Once you create a plot, you want to hang onto it, so customer retention looked promising.
The Backblaze Storage Cloud provides the keys for successful Chia farming: There is no provisioning necessary, so Chia farmers can upload new plots at speed and scale.
However, Chia software was not designed to allow farming with public cloud object storage. On a local storage solution, Chia’s quality check reads, which must be completed in under 28 seconds, can be cached by the kernel. Without caching optimizations and a way to read plots concurrently, cloud storage doesn’t serve the Chia use case. Our early tests confirmed this, taking longer than the required 28 seconds.
So our team built an experimental workaround to parallelize operations and speed up the process, which you can read more about here. Short story: The experiment has worked, so far, but we’re still in a learning mode about this use case.
Should Backblaze Farm?
Enabling customers to farm Chia was a fun experiment for our Engineering team, but deciding whether we could or should farm Chia ourselves took some more thinking. First, the pros:
We maintain a certain amount of buffer space. It’s an important asset to ensure we can scale with our customer’s needs. Rather than farming in a speculative fashion and hoping to recoup an investment in farming infrastructure, we could utilize the infrastructure we already have, which we could reclaim at any point. Doing so would allow us to farm Chia in a non-speculative fashion more efficiently than most Chia farmers.
Farming Chia could make our buffer space profitable when it would otherwise be sitting on the shelves or drawing down power in the live buffer.
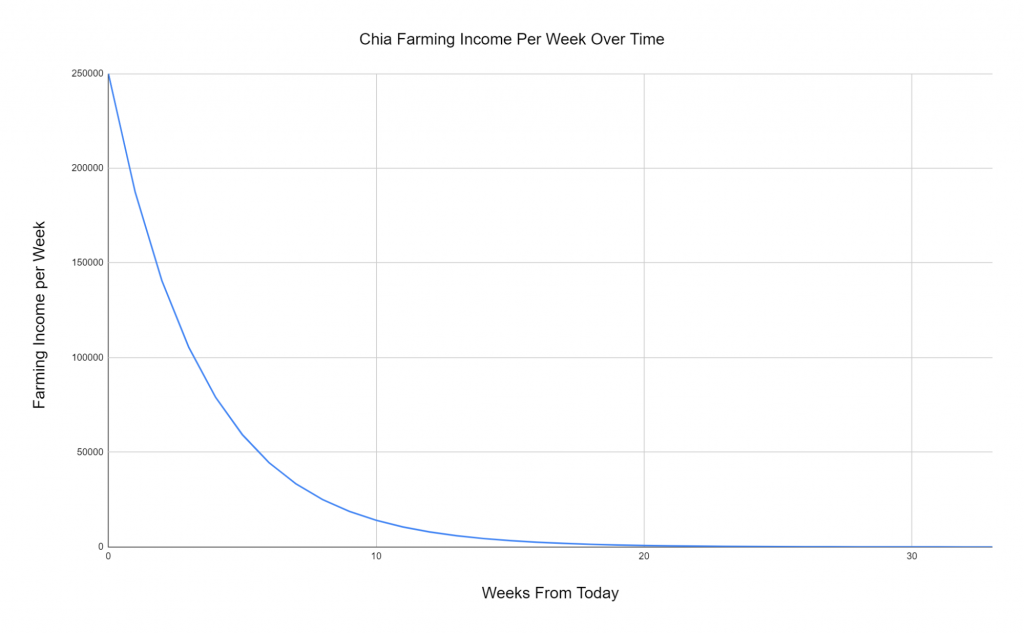
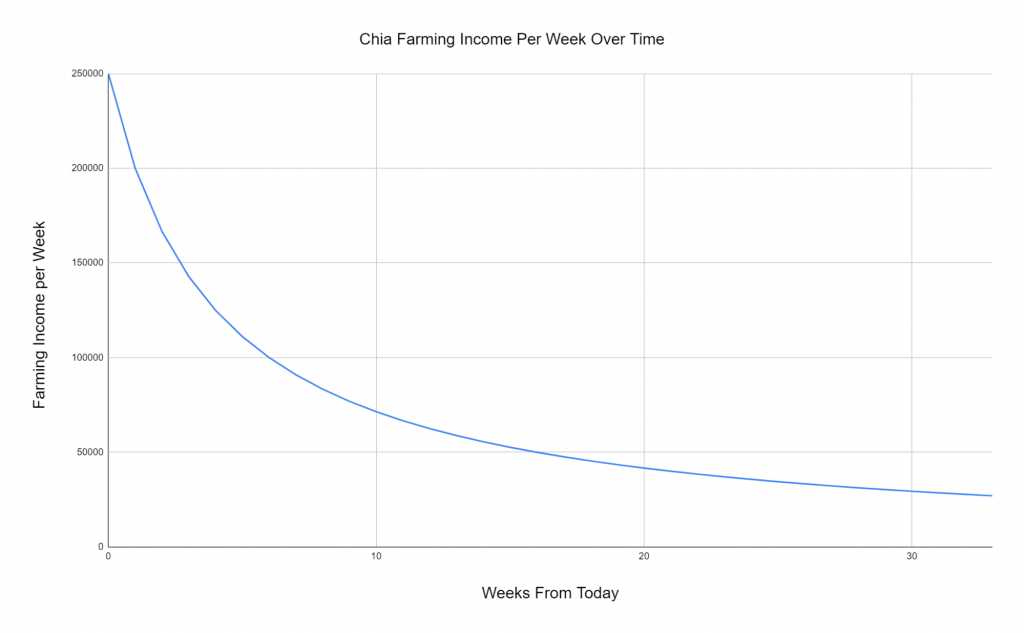
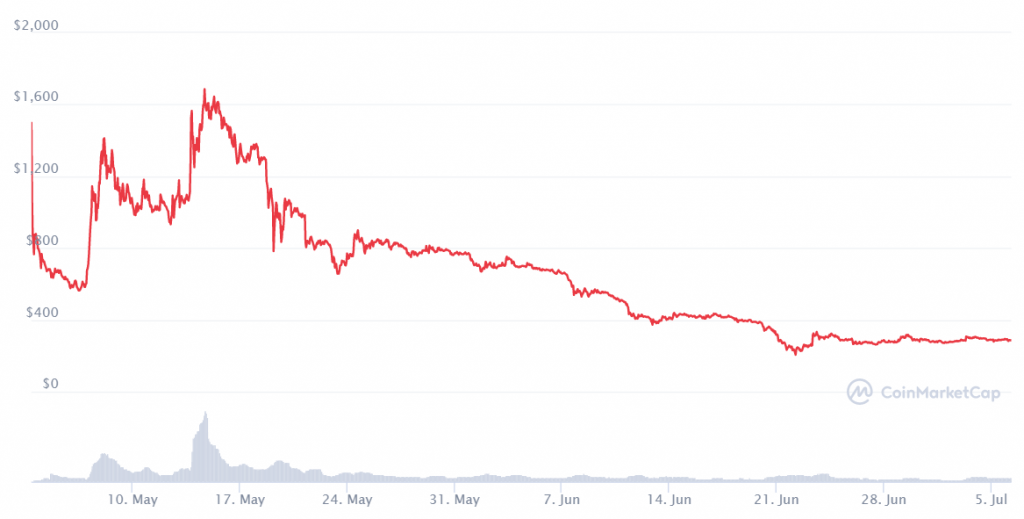
When we started investigating Chia, the Chia Calculator said we could potentially make $250,000 per week before expenses.
These were enticing enough prospects to generate significant debate on our leadership team. But, we might be putting the cart before the horse here… While we have loads of HDDs sitting around where we could farm Chia plots, we first needed a way to create Chia plots (plotting).
The Challenges of Plotting
Generating plots at speed and scale introduces a number of issues:
It requires a lot of system resources: You need a multi-core processor with fast cores so you can make multiple plots at once (parallel plotting) and a high amount of RAM.
It quickly wears out expensive SSDs: Plotting requires at least 256.6GB of temporary storage, and that temporary storage does a lot of work—about 1.8TB of reading and writing. An HDD can only read/write at 120 MB/s. So, people typically use SSDs to plot, and particularly NVMe drives which are much faster than HDD, often over 3000 MB/s. While SSD drives are fast, they wear out like tires. They’re not defective, reading and writing at the pace it takes to plot Chia just burns them out. Some reports estimate four weeks of useful farming life, and it’s not advisable to use consumer SSDs for that reason.
At Backblaze, we have plenty of HDDs, but not many free SSDs. Thus, we’d need to either buy (and wear out) a bunch of SSDs, or use a cloud compute provider to generate the plots for us.
The first option would take time and resources to build enough plotters in each of our data centers across the country and in Europe, and we could potentially be left with excess SSDs at the end. The second would still render a bunch of SSDs useless, albeit not ours, and it would be costly.
Still, we wondered if it would be worth it given the Chia Calculator’s forecasts.
The Challenges of Farming
Once we figured out a way to plot Chia, we then had a few options to consider for farming Chia: Should we farm by writing directly to the extra hard drives we had on the shelves, or by using our B2 Native API to fill the live storage buffer?
Writing directly to our hard drives posed some challenges. The buffer drives on the shelf eventually do need to go into production. If we chose this path, we would need a plan to continually migrate the data off of drives destined for production to new drives as they come in. And we’d need to dedicate staff resources to manage the process of farming on the drives without affecting core operations. Reallocating staff resources to a farming venture could be seen as a distraction, but a worthy one if it panned out. We once thought of developing B2 Cloud Storage as a distraction when it was first suggested, and today, it’s integral to our business. That’s why it’s always worth considering these sorts of questions.
Farming Chia using the B2 Native API to write to the live storage buffer would pull fewer staff resources away from other projects, at least once we figured out our plotting infrastructure. But we would need a way to overwrite the plots with customer data if demand suddenly spiked.
And the Final Question: Can We Make Money?
Even with the operational challenges above and the time it would take to work through solutions, we still wondered if it would all be worth it. We like finding novel solutions to interesting problems, so understanding the financial side of the equation was the last step of our evaluation. Would Chia farming make financial sense for Backblaze?
Farming Seemed Like It Could Be Lucrative…
The prospect of over $1M/month in income certainly caught our attention, especially because we thought we could feasibly do it “for free,” or at least without the kind of upfront investment in HDDs a typical Chia farmer would have to lay out to farm at scale. But then we came to our analysis of monetization.
Our Monetization and Cost Analysis for Farming Chia
Colin Weld, one of our software engineers, had done some analysis on his own when Chia first gained attention. He built on that analysis to calculate the amount of farming income we could make per week over time with a fixed amount of storage.
Our assumptions for the purposes of this analysis:
150PB of the buffer would be utilized.
The value of the coin is constant. (In reality, the value of the coin opened at $584.60 on June 8, 2021, when we ran the experiments. In the time since, it has dipped as low as $205.73 before increasing to $278.59 at the time of publishing.)
When we ran the calculations, the total Network space appeared to increase at a rate of 33% every week.
We estimated income in week one was 75% of the week before, with the percentage decreasing exponentially over time.
When we ran the calculations, the income per week on 150PB of storage was $250,000.
We assumed zero costs for the purposes of this experiment.
Assuming Exponential Growth of the Chia Netspace
If the Chia Netspace continued to grow at an exponential rate, our farming income per week would be effectively zero after 16 weeks. In the time since we ran the experiment, the total Chia netspace has continued to grow, but at a slightly slower rate.
Total Chia Netspace April 7, 2021–July 5, 2021
Source: Chiaexplorer.com.
For kicks, we also ran the analysis assuming a constant rate of growth. In this model, we assume a constant growth rate of five exabytes each week.
Assuming Constant Growth of the Chia Netspace
Even assuming constant growth, our farming income per week would continue to decrease, and this doesn’t account for our costs.
And Farming Wasn’t Going to Be Free
To quickly understand what costs would look like, we used our standard pricing of $5/TB/month as our effective “cost” as it factors in our cost of goods sold, overheard, and the additional work this effort would require. At $5/TB/month, 150PB costs $175,000 per week. Assuming exponential growth, our costs would exceed total expected income if we started farming any later than seven weeks out from when we ran the analysis. Assuming constant growth, costs would exceed total expected income around week 28.
A Word on the Network Price
In our experiments, we assumed the value of the coin was constant, which is obviously false. There’s certainly a point where the value of the coin would make farming theoretically profitable, but the volatility of the market means we can’t predict if it will stay profitable. The value of the coin and thus the profitability of farming could change arbitrarily from day to day. It’s also unlikely that the coin would increase in value without the triggering simultaneous growth of the Netspace, thus negating any gains from the increase in value given our fixed farming capacity. From the beginning, we never intended to farm Chia in a speculative fashion, so we never considered a possible value of the coin that would make it worth it to farm temporarily and ignore the volatility.
Chia Network Price May 3, 2021–July 5, 2021
Source: Coinmarketcap.com.
Should We Farm Chia? Our Decision and Why
Ultimately, we decided not to farm Chia. The cons outweighed the pros for us:
We wouldn’t reap the rewards the calculators told us we could because the calculators give a point-in-time prediction. The amount per week you could stand to make is true—for that week. Today, the Chia Calculator predicts we would only make around $400 per month.
While it would have been a fun experiment, figuring out how to plot Chia at speed and scale would have taken time we didn’t have if we expected it to be profitable.
We assume the total Chia Netspace will continue to grow even if it grows at a slower rate. As the Netspace grows, your chances of winning go down unless you can keep growing your plots as fast as the whole Network is growing. Even if we dedicated our whole business to it, there would come a point where we would not keep up because we have a fixed amount of storage to dedicate to farming while maintaining a non-speculative position.
It would usurp resources we didn’t want to devote. We’d have to dedicate part of our operation to manage the process of farming on the drives without affecting core operations.
If we farmed it using our B2 Native API to write to our live buffer, we’d risk losing plots if we had to overwrite them when demand spiked.
Finally, cryptocurrency is a polarizing topic. The lively debate among our team members sparked the idea for this post. Our team holds strong opinions about the direction we take, and rightfully so—we value open communication as well as unconventional opinions both for and against proposed directions. Some brought strong arguments against participation in the cryptocurrency market even as they indulged in the analysis along the way. In the end, along with the operational challenges and disappointing financials, farming Chia was not the right choice for us.
The experiment wasn’t all for nothing though. We still think it would be great to find a way to make our storage buffer more profitable, and this exercise sparked some other interesting ideas for doing that in a more sustainable way that we’re excited to explore.
Our Chia Conclusion… For Now
For now, our buffer will remain a buffer—our metaphorical fields devoid of rows upon rows of Chia. Farming Chia didn’t make sense for us, but we love watching people experiment with storage. We’re excited to see what folks do with our experimental solution for farming Chia on Backblaze B2 and to watch what happens in the market. If the value of Chia coin spikes and farming plots on B2 Cloud Storage allows farmers to scale their plots infinitely, all the better. In the meantime, we’ll put our farming tools away and focus on making that storage astonishingly easy.
Afterword: The Future of Chia
This exercise begs the question: Should anyone farm Chia? That’s a decision everyone has to make for themselves. But, as our analysis suggests, unless you can continue to grow your plots, there will come a time when it’s no longer profitable. That may not matter to some—if you believe in Chia and think it will increase in value and be profitable again at some point in the future, holding on to your plots may be worth it.
How Pooling Could Help
On the plus side, pooling technology could be a boon for smaller farmers. The Chia Network recently announced pooling functionality for all farmers. Much like the office lottery, farmers group their plots for a share of challenge rewards. For folks who missed the first wave of plotting, this approach offers a way to greatly increase their chances of winning a challenge, even if it does mean a diminished share of the winnings.
The Wastefulness Questions
Profitability aside, cryptocurrency coins are a massive drain on the environment. Coins that use proof of space and time like Chia are billed as a greener alternative. There’s an argument to be made that Chia could drive greater utilization of otherwise unused HDD space, but it still leads to an increase of e-waste in the form of burned out SSD drives.
Coins based on different algorithms might hold some promise for being more environmentally friendly—for example, proof of stake algorithms. You don’t need proof of space (lots or storage) or proof of work (lots of power), you just need a portion of money (a stake) in the system. Ethereum has been working on a transition to proof of stake, but it will take more time and testing—something to keep an eye on if you’re interested in the crypto market. As in everything crypto, we’re in the early days and the only thing we can count on is change, unpredictability, and the monetary value of anything Elon Musk Tweets about.
Announcing Backblaze Computer Backup 8.0! As a great philosopher once said, “8 is great”—and we couldn’t agree more. Our latest version is pretty great: It cranks up the speed—letting you upload at whatever rate your local system can attain—all while reducing stress on key elements of your computer by an order of magnitude.
Here’s what’s new for our app on your Mac and PC:
Performance Boost: As we’ve described in the past, thread count matters, but until today your max threading was set to 30. You now can run up to 100 threads concurrently if your system and network are up to it. From go-kart to highway speeds in one update! It’s like nitrous for uploads.
Smarter Gas Pedal: If you’re worried about stressing your motor, we’ve greatly improved our autothrottle, which will keep your bandwidth and system load in mind if you don’t want to.
Easier on the Engine: We’ve reduced the client’s load on your HDD or SSD by up to 80% by reconfiguring how reads and writes happen before encryption and upload.
A New Coat of Paint: Sometimes it helps to look faster, too, so we updated our brand a touch to keep up with what’s under the hood.
There’s more detail below for those who need it, but these are the major improvements. We look forward to hearing about how they work for you, your machines, and your data.
If you feel the need for speed and have the bandwidth at your home or office to match, version 8.0 is going to help you get backed up a lot more quickly. We’ve increased the maximum number of threads to 100 (up from 30). That means our multi-threaded app can now perform even more backup processes in parallel. Threads have also gotten a bit more intelligent—if your maximum selection of threads would cause too much system load, we’ll use fewer threads to maintain your system’s overall performance.
Optimizations
In addition to making our threading more intelligent, we’ve also taken a magnifying glass to our autothrottle feature and introduced smart throttling. If you have autothrottle enabled, and you’re using a lot of your available memory or bandwidth, we ease off until more system resources are available, helping reduce strain on the system and keeping your bandwidth clear—we’ve made that process more efficient and a lot speedier. If you don’t have autothrottle enabled, the backups will go as fast as your manual throttle and threading are set to.
We’ve also re-architected the way we handle file copies. In our previous 7.0 version of Backblaze Computer Backup, the client app running on your laptop or desktop made a copy of your file on your hard drive before uploading it. In version 8.0, this step has been removed. Now the client reads the file, encrypts it in RAM, and uploads it to the Backblaze data center. This results in better overall system performance and a reduction in strain on HDDs and SSDs on your laptops and desktops.
General Improvements
One last minor (but helpful) update we’ve made under the hood is how we handle uploads and the transmission of larger files. In version 8.0, you’ll get more information about what is getting uploaded and when. When we transfer large files, sometimes the app will appear to “hang” on uploading a part of that file, when in reality that file’s already been transmitted and we’re starting to work on the next batch of files. The UI will now reflect upload status more clearly.
And if you haven’t checked out our mobile apps, we’ve been making improvements to them (like uploading files to Backblaze B2 Cloud Storage) over the last few months as well. Learn more about them at: www.backblaze.com/mobile.html.
The Look
With our rebrand efforts in full swing, we thought it would be nice to update our icons and apps with the latest Backblaze look.
You’ll notice our icons have gotten a little smoother since our latest and greatest visual identity is in full force, but we have kept the clean feel and easy UI that you’re used to.
Backblaze Computer Backup 8.0 Available: July 6th, 2021
We hope you love this new release! We will be slowly auto-updating all users in the coming weeks, but if you can’t wait and want to update now on your Mac or PC:
Perform a “Check for Updates” (right-click on the Backblaze icon).
Join Us for a Webinar on July 29th at 10 a.m. Pacific
If you’d like to learn more, join us for a webinar where we’ll be going over version 8.0 features and answering questions during a live Q&A. The webinar will be available on BrightTalk (registration is required) and you can sign up by visiting the Backblaze BrightTalk channel.
In September of 2019, we celebrated the 10-year anniversary of open-sourcing the design of our beloved Storage Pods. In that post, we contemplated the next generation Backblaze Storage Pod and outlined some of the criteria we’d be considering as we moved forward with Storage Pod 7.0 or perhaps a third-party vendor.
Since that time, the supply chain for the commodity parts we use continues to reinvent itself, the practice of just-in-time inventory is being questioned, the marketplace for high-density storage servers continues to mature, and the continuing cost effectiveness of scaling the manufacturing and assembly of Storage Pods has proved elusive. A lot has changed.
The Next Storage Pod
As we plan for the next 10 years of providing our customers with astonishingly easy to use cloud storage at a fair price, we need to consider all of these points and more. Follow along as we step through our thought process and let you know what we’re thinking—after all, it’s your data we are storing, and you have every right to know how we plan to do it.
Storage Pod Realities
You just have to look at the bill of materials for Storage Pod 6.0 to know that we use commercially available parts wherever possible. Each Storage Pod has 25 different parts from 15 different manufacturers/vendors, plus the red chassis, and, of course, the hard drives. That’s a trivial number of parts and vendors for a hardware company, but stating the obvious, Backblaze is a software company.
Still, each month we currently build 60 or so new Storage Pods. So, each month we’d need 60 CPUs, 720 SATA cables, 120 power supplies, and so on. Depending on the part, we could order it online or from a distributor or directly from the manufacturer. Even before COVID-19 we found ourselves dealing with parts that would stock out or be discontinued. For example, since Storage Pod 6.0 was introduced, we’ve had three different power supply models be discontinued.
For most of the parts, we actively try to qualify multiple vendors/models whenever we can. But this can lead to building Storage Pods that have different performance characteristics (e.g. different CPUs, different motherboards, and even different hard drives). When you arrange 20 Storage Pods into a Backblaze Vault, you’d like to have 20 systems that are the same to optimize performance. For standard parts like screws, you can typically find multiple sources, but for a unique part like the chassis, you have to arrange an alternate manufacturer.
With COVID-19, the supply chain was very hard to navigate to procure the various components of a Storage Pod. It was normal for purchase orders to be cancelled, items to stock out, shipping dates to slip, and even prices to be renegotiated on the fly. Our procurement team was on top of this from the beginning, and we got the parts we needed. Still, it was a challenge as many sources were limiting capacity and shipping nearly everything they had to their larger customers like Dell and Supermicro, who were first in line.
Supply chain logistics aren’t getting less interesting.
Getting Storage Pods Built
When we first introduced Storage Pods, we were the only ones who built them. We would have the chassis constructed and painted, then we’d order all the parts and assemble the units at our data center. We built the first 20 or so this way. At that point, we decided to outsource the assembly process to a contract manufacturer. They would have a sheet metal fabricator construct and paint the chassis, and the contract manufacturer would order and install all the parts. The complete Storage Pod was then shipped to us for testing.
Over the course of the last 12 years, we’ve had multiple contract manufacturers. Why? There are several reasons, but they start with the fact that building 20, 40, or even 60 Storage Pods a month is not a lot of work for most contract manufacturers—perhaps five days a month at most. If they dedicate a line to Storage Pods, that’s a lot of dead time for the line. Yet, Storage Pod assembly doesn’t lend itself to being flexed into a line very well, as the Storage Pods are bulky and the assembly process is fairly linear versus modular.
In addition, we asked the contract manufacturers to acquire and manage the Storage Pod parts. For a five-day-a-month project, their preferred process is to have enough parts on hand for each monthly run. But we liked to buy in bulk to lower our cost, and some parts like backplanes had high minimum order quantities. This meant someone had to hold inventory. Over time, we took on more and more of this process, until we were ordering all the parts and having them shipped to the contract manufacturer monthly to be assembled. It didn’t end there.
As noted above, when the COVID-19 lockdown started, supply chain and assembly processes were hard to navigate. As a consequence, we started directing some of the fabricated Storage Pod chassis to be sent to us for assembly and testing. This hybrid assembly model got us back in the game of assembling Storage Pods—we had gone full circle. Yes, we are control freaks when it comes to our Storage Pods. That was a good thing when we were the only game in town, but a lot has changed.
The Marketplace Catches Up
As we pointed out in the 10-year anniversary Storage Pod post, there are plenty of other companies that are making high-density storage servers like our Storage Pod. At the time of that post, the per unit cost was still too high. That’s changed, and today high-density storage servers are generally cost competitive. But unit cost is only part of the picture as some of the manufacturers love to bundle services into the final storage server you receive. Some services are expected, like maintenance coverage, while others—like the requirement to only buy hard drives from them at a substantial markup—are non-starters. Still, over the next 10 years, we need to ensure we have the ability to scale our data centers worldwide and to be able to maintain the systems within. At the same time, we need to ensure that the systems are operational and available to meet or exceed our expectations and those of our customers, as well.
The Amsterdam Data Center
As we contemplated opening our data center in Amsterdam, we had a choice to make: use Storage Pods or use storage servers from another vendor. We considered shipping the 150-pound Storage Pods to Amsterdam or building them there as options. Both were possible, but each had their own huge set of financial and logistical hurdles along the way. The most straightforward path to get storage servers to the Amsterdam data center turned out to be Dell.
The process started by testing out multiple storage server vendors in our Phoenix data center. There is an entire testing process we have in place, which we’ll cover in another post, but we can summarize by saying the winning platform needed to be at least as performant and stable as our Storage Pods. Dell was the winner and from there we ordered two Backblaze Vaults worth of Dell servers for the Amsterdam data center.
The servers were installed, our data center techs were trained, repair metrics were established and tracked, and the systems went live. Since that time, we added another six Backblaze Vaults worth of servers. Overall, it has been a positive experience for everyone involved—not perfect, but filled with learnings we can apply going forward.
By the way, Dell was kind enough to make red Backblaze bezels for us, which we install on each of the quasi-Storage Pods. They charge us extra for them, of course, but some things are just worth it.
Faceplate on the quasi-Storage Pod.
Lessons Learned
The past couple of years, including COVID, have taught us a number of lessons we can take forward:
We can use third-party storage servers to reliably deliver our cloud storage services to our customers.
We don’t have to do everything. We can work with those vendors to ensure the equipment is maintained and serviced in a timely manner.
We deepened our appreciation of having multiple sources/vendors for the hardware we use.
We can use multiple third-party vendors to scale quickly, even if storage demand temporarily outpaces our forecasts.
Those points, taken together, have opened the door to using storage servers from multiple vendors. When we built our own Storage Pods, we achieved our cost savings from innovation and the use of commodity parts. We were competing against ourselves to lower costs. By moving forward with non-Backblaze storage servers, we will have the opportunity for the marketplace to compete for our business.
Are Storage Pods Dead?
Right after we introduced Storage Pod 1.0 to the world, we had to make a decision as to whether or not to make and sell Storage Pods in addition to our cloud-based services. We did make and sell a few Storage Pods—we needed the money—but we eventually chose software. We also decided to make our software hardware-agnostic. We could run on any reasonably standard storage server, so now that storage server vendors are delivering cost-competitive systems, we can use them with little worry.
So the question is: Will there ever be a Storage Pod 7.0 and beyond? We want to say yes. We’re still control freaks at heart, meaning we’ll want to make sure we can make our own storage servers so we are not at the mercy of “Big Server Inc.” In addition, we do see ourselves continuing to invest in the platform so we can take advantage of and potentially create new, yet practical ideas in the space (Storage Pod X anyone?). So, no, we don’t think Storage Pods are dead, they’ll just have a diverse group of storage server friends to work with.
Storage Pod Fun
Over the years we had some fun with our Storage Pods. Here are a few of our favorites.
IT departments are tasked with managing an ever-expanding suite of services and vendors. With all that, a solution that offers a “single pane of glass” can sound like sweet relief. Everything in one place! Think of the time savings! Easy access. Consolidated user management. Centralized reporting. In short, one solution to rule them all.
But solutions that wrangle your tech stack into one comprehensive dashboard risk adding unnecessary levels of complexity in the name of convenience and adding fees for functions you don’t need. That “single pane of glass” might have you reaching for the Windex come implementation day.
While it feels counterintuitive, pairing two different services that each do one thing and do it very well can offer an easier, low-touch solution in the long term. This post highlights how one managed service provider (MSP) configured a multi-pane solution to manage backups for 6,000+ endpoints on 500+ servers at more than 450 dental and doctor’s offices in the mid-Atlantic region.
The Trouble With a “Single Pane of Glass”
Nate Smith, Technical Project Manager, DTC.
Nate Smith, Technical Project Manager for DTC, formerly known as Dental Technology Center, had a data dilemma on his hands. From 2016 to 2020, DTC almost doubled their client base, and the expense of storing all their customers’ data was cutting into their budget for improvements.
“If we want to become more profitable, let’s cut down this $8,000 per month AWS S3 bill,” Nate reasoned.
In researching AWS alternatives, Nate thought he found the golden ticket—a provider offering both object and compute storage in that proverbial “single pane of glass.” At $0.01/GB, it was more expensive than standard object storage, but the anticipated time savings of managing resources with a single vendor was worth the extra cost for Nate—until it wasn’t.
DTC successfully tested the integrated service with a small number of endpoints, but the trouble started when they attempted migrating more than 75-80 endpoints. Then, the failures began rolling in every night—backups would time out, jobs would retry and fail. There were time sync issues, foreign key errors, remote socket errors, and not enough spindles—a whole host of problems.
How to Recover When the “Single Pane of Glass” Shatters
Nate worked with the provider’s support team, but after much back and forth, it turned out the solution he needed would take a year and a half of development. He gave the service one more shot with the same result. After spending 75 hours trying to make it work, he decided to start looking for another option.
Evaluate Your Cloud Landscape and Needs
Nate and the DTC team decided to keep the integrated provider for compute storage. “We’re happy to use them for infrastructure as a service over something like AWS or Azure. They’re very cost-effective in that regard,” he explained. He just needed object storage that would work with MSP360—their preferred backup software—and help them increase margins.
Knowing he might need an out should the integrated provider fail, he had two alternatives in his back pocket—Backblaze and Wasabi.
Do the Math to Compare Cloud Providers
At first glance, Wasabi looked more economical based on the pricing they highlight, but after some intense number crunching, Nate estimated that Wasabi’s 90-day minimum storage retention policy potentially added up to $0.015/GB given DTC’s 30-day retention policy.
Egress wasn’t the only scenario Nate tested. He also ran total loss scenarios for 10 clients comparing AWS, Backblaze B2 Cloud Storage, and Wasabi. He even doubled the biggest average data set size to 4TB just to overestimate. “Backblaze B2 won out every single time,” he said.
Fully loaded costs from AWS totalled nearly $100,000 per year. With Backblaze B2, their yearly spend looked more like $32,000. “I highly recommend anyone choosing a provider get detailed in the math,” he advised—sage words from someone who’s seen it all when it comes to finding reliable object storage.
Try Cloud Storage Before You Buy (to Your Best Ability)
Building the infrastructure for testing in a local environment can be costly and time-consuming. Nate noted that DTC tested 10 endpoints simultaneously back when they were trying out the integrated provider’s solution, and it worked well. The trouble started when they reached higher volumes.
Another option would have been running tests in a virtual environment. Testing in the cloud gives you the ability to scale up resources when needed without investing in the infrastructure to simulate thousands of users. If you have more than 10GB, we can work with you to test a proof of concept.
For Nate, because MSP360 easily integrates with Backblaze B2, he “didn’t have to change a thing” to get it up and running.
Phase Your Data Migration
Nate planned on phasing from the beginning. Working with Backblaze, he developed a region-by-region schedule, splitting any region with more than 250TB into smaller portions. The reason? “You’re going to hit a point where there’s so much data that incremental backups are going to take longer than a day, which is a problem for a 24/7 operation. I would parse it out around 125TB per batch if anyone is doing a massive migration,” he explained.
DTC migrated all its 450 clients—nearly 575TB of data—over the course of four weeks using Backblaze’s high speed data transfer solution. According to Nate, it sped up the project tenfold.
An Easy Multi-Pane Approach to Cloud Storage
Using Backblaze B2 for object storage, MSP360 for backup management, and another provider for compute storage means Nate lost his “single pane” but killed a lot of pain in the process. He’s not just confident in Backblaze B2’s reliability, he can prove it with MSP360’s consistency checks. The results? Zero failures.
The benefits of an “out of the box” solution that requires little to no interfacing with the provider, is easy to deploy, and just plain works can outweigh the efficiencies a “single pane of glass” might offer:
No need to reconfigure infrastructure. As Nate attested, “If a provider can’t handle the volume, it’s a problem. My lesson learned is that I’m not going to spend 75 hours again trying to reconfigure our entire platform to meet the object storage needs.”
No lengthy issue resolution with support to configure systems.
No need to learn a complicated new interface. When comparing Backblaze’s interface to AWS, Nate noted that “Backblaze just tells you how many objects you have and how much data is there. Simplicity is a time saver, and time is money.”
Many MSPs and small to medium-sized IT teams are giving up on the idea of a “single pane of glass” altogether. Read more about how DTC saved $68,000 per year and sped up implementation time by 55% by prioritizing effective, simple, user-friendly solutions.
Upgrading to a network attached storage (NAS) system is a great decision for a growing business. They offer bigger storage capacity, a central place to organize your critical files and backups, easier multi-site collaboration, and better data protection than individual hard drives or workstations. But, configuring your NAS correctly can mean the difference between enjoying a functional storage system that will serve you well for years and spending what might feel like years on the phone with support.
After provisioning the right NAS for your needs (We have a guide for that, too.), you’ll want to get the most out of your investment. Let’s talk about the right way to configure your NAS using storage deployment best practices.
In this post, we’ll cover:
Where to locate your NAS and how to optimize networking.
How to set up your file structure and assign administrator and user access.
How to configure NAS software and backup services.
Disclaimer: This advice will work for almost all NAS systems aside from the very large and complex systems typically installed in data center racks with custom network and power connections. For that, you’ve probably already advanced well beyond NAS 101.
Setup Logistics: Where and How
Choosing a good location for your NAS and optimizing your network are critical first steps in ensuring the long-term health of your system and providing proper service to your users.
Where to Keep Your NAS
Consider the following criteria when choosing where in your physical space to put your NAS. A good home for your NAS should be:
Temperature Controlled: If you can’t locate your NAS in a specific, temperature-controlled room meant for servers and IT equipment, choose a place with good airflow that stays cool to protect your NAS from higher temperatures that can shorten component life.
Clean: Dust gathering around the fans of your NAS is a sign that dust could be entering the device’s internal systems. Dust is a leading cause of failure for both system cooling fans and power supply fans, which are typically found under grills at the back of the device. Make sure your NAS’s environment is as dust-free as possible, and inspect the area around the fans and the fans themselves periodically. If you notice dust buildup, wipe the surface dust with a static-free cloth and investigate air handling in the room. Air filters can help to minimize dust.
Dust-free fans are happy fans.
Stable: You’ll want to place your system on a flat, stable surface. Try to avoid placing your NAS in rooms that get a lot of traffic. Vibration tends to be rough on the hard drives within the NAS—they value their quiet time.
Secure: A locked room would be best for a physical asset like a NAS system, but if that’s not possible, try to find an area where visitors won’t have easy access.
Finally, your NAS needs a reliable, stable power supply to protect the storage volumes and data stored therein. Unexpected power loss can lead to loss or corruption of files being copied. A quality surge protector is a must. Better yet, invest in an uninterruptible power supply (UPS) device. If the power goes out, a UPS device will give you enough time to safely power down your NAS or find another power source. Check with your vendor for guidance on recommended UPS systems, and configure your NAS to take advantage of that feature.
How to Network Your NAS
Your NAS delivers all of its file and backup services to your users via your network, so optimizing that network is key to enhancing the system’s resilience and reliability. Here are a few considerations when setting up your network:
Cabling: Use good Ethernet cabling and network router connections. Often, intermittent connectivity or slow file serving issues can be traced back to faulty Ethernet cables or ports on aging switches.
IP Addresses: If your NAS has multiple network ports (e.g. two 1GigE Ethernet ports), you have a few options to get the most out of them. You can connect your NAS to different local networks without needing a router. For example, you could connect one port to the main internal network that your users share and a second port to your internet connected cameras or IoT devices—a simple way to make both networks accessible to your NAS. Another option is to set one port with a static or specific IP address and configure the second port to dynamically retrieve an IP address via DHCP to give you an additional way to access the system in case one link goes down. A third option, if it’s available on your NAS, is to link multiple network connections into a single connection. This feature (called 802.3AD Link Aggregation, or port bonding) gets more network performance than a single port can provide.
Wait. What is DHCP again?
DHCP = Dynamic host configuration protocol. It automatically assigns an IP address from a pool of addresses, minimizing the human error in manual configuration and requires less network administration.
DNS: Your NAS relies on domain name servers—DNS—that the NAS system can query to help translate users’ web server requests to IP addresses, to provide its services. Most NAS systems will allow you to set two DNS entries for each port. You might already be running a DNS service locally (e.g. so that staging.yourcompany.local goes to the correct internal-only server), but it’s a good practice to provide a primary and secondary DNS server for the system to query. That way, if the first DNS server is unreachable, the second can still look up internet locations that applications running on your NAS will need. If one DNS entry is assigned by your local DHCP server or internet provider, set the second DNS entry to something like Cloudflare DNS (1.1.1.1 or 1.0.0.1) or Google DNS (8.8.8.8 or 8.8.4.4).
A typical network configuration interface. In this case, we’ve added Cloudflare DNS in addition to the DNS entry provided by the main internet gateway.
Access Management: Who and What
Deciding who has access to what is entirely unique to each organization, but there are some best practices that can make management easier. Here, we share some methods to help you plan for system longevity regardless of personnel changes.
Configuring Administrator Access
Who has the keys to the kingdom? What happens when that person moves departments or leaves the company? Planning ahead for these contingencies should be part of your NAS setup. We recommend two practices to help you prepare:
Designate multiple trusted people as administrators. Your NAS system probably comes with a default admin name and password which you should, of course, change, but it’s beneficial to have at least one more administrator account. If one admin isn’t available, a backup admin can still log in. Additionally, using an organization-wide password manager like Bitwarden for your business is highly recommended.
Use role-based emails for alerts. You’ll find many places in your NAS system configuration to enter an email address in case the system needs to send an alert—when power goes out or a disk has failed, for example. Instead of entering a single person’s email, use a role-based email instead. People change, but [email protected] will never leave you. Role-based emails are often implemented as a group email, allowing you to assign multiple people to the account and increasing the likelihood that someone will be available to respond to warnings.
Configuring User Access
With a NAS, you have the ability to easily manage how your users and groups access the shared storage needed for your teams to work effectively. Easy collaboration was probably one of the reasons you purchased a NAS in the first place. Building your folder system appropriately and configuring access by role or group helps you achieve that goal. Follow these steps when you first set up your NAS to streamline storage workflows:
Define your folders. Your NAS might come pre-formatted with folders like “Photo,” “Video,” “Web,” etc. This structure makes sense when only one person is using the NAS. In a multi-user scenario, you’ll want to define the folders you’ll need, for example, by role or group membership, instead.
Example Folder Structure
Here is an example folder structure you could start with:
Local Backups: A folder for local backups, accessible only by backup software. This keeps your backup data separate from your shared storage.
Shared Storage: A folder for company-wide shared storage accessible to everyone.
Group Folders: Accounting, training, marketing, manufacturing, support, etc.
Creating a shared folder.
Integrate with directory services. If you use a directory service like Active Directory or other LDAP services to manage users and privileges, you can integrate it with your NAS to assign access permissions. Integrating with directory services will let you use those tools to assign storage access instead of assigning permissions individually. Check your NAS user guide for instructions on how to integrate those services.
Use a group- or role-based approach. If you don’t use an external user management service, we recommend setting up permissions based on groups or roles. A senior-level person might need access to every department’s folders, whereas a person in one department might only need access to a few folders. For example, for the accounting team’s access, you can create a folder for their files called “Accounting,” assign every user in accounting to the “Accounting” group, then grant folder access for that group rather than for each and every user. As people come and go, you can just add them to the appropriate group instead of configuring user access permissions for every new hire.
Applying group-level permissions to a shared folder. In this case, the permissions include the main folder open to all employees, the accounting folder, and the operations folder. Any user added to this user group will automatically inherit these default permissions.
The Last Step: NAS Software and Backup Management
Once you’ve found a suitable place for your NAS, connected it to your network, structured your folders, and configured access permissions, the final step is choosing what software will run on your NAS, including software to ensure your systems and your NAS itself are backed up. As you do so, keep the following in mind:
Prioritize the services you need. When prioritizing your services, adopt the principle of least privilege. For example, if a system has many services enabled by default, it makes sense to turn some of them off to minimize the system load and avoid exposing any services that are unnecessary. Then, when you are ready to enable a service, you can thoughtfully implement it for your users with good data and security practices, including applying the latest patches and updates. This keeps your NAS focused on its most important services—for example, file system service—first so that it runs efficiently and optimizes resources. Depending on your business, this might look like turning off video-serving applications or photo servers and turning on things like SMB for file service for Mac, Windows, and Linux; SSH if you’re accessing the system via command line; and services for backup and sync.
Enabling priority file services—in this case, SMB service for Mac and Windows users.
Back up local systems to your NAS. Your NAS is an ideal local storage target to back up all systems in your network—your servers, desktops, and laptops. For example, QNAP and Synology systems allow you to use the NAS as a Time Machine backup for your Mac users. Windows users can use QNAP NetBak Replicator, or Active Backup Suite on Synology devices.
Setting a NAS device to accept Time Machine backups from local Mac systems.
Common Services for Your NAS
SMB: The most common storage access and browsing protocol to “talk” to modern OS clients. It allows these systems to browse available systems, authenticate to them, and send and retrieve files.
AFP: An older protocol that serves files for older Mac clients that do not work well with SMB.
NFS: A distributed file system protocol used primarily for UNIX and Linux systems.
FTP and SFTP: File serving protocols for multiple, simultaneous users, common for large directories of files that users will need occasional access to, like training or support documents. SFTP is more secure and highly preferred over FTP. You will likely find that it’s easier to create and manage a folder on your NAS with read-only access instead.
rsync: A file protocol for backups, allowing systems to easily connect to and backup their systems using the rsync file transfer and sync utility. If your local servers or systems back up to your NAS via rsync, this service will need to be enabled on the NAS.
The Final, Final Step: Enjoy All the Benefits Your NAS Offers
If you’ve followed our NAS 101 series, you now have a system sized for your important data and growing business that’s configured to run at its best. To summarize, here are the major takeaways to remember when setting up your NAS:
Keep your NAS in a cool, safe, clean location.
Optimize your network to ensure reliability and maximize performance.
Plan for ease of use and longevity when it comes to folder structure and access management.
Prioritize the software and services you need when first configuring your NAS.
Make sure your systems are backed up to your NAS, and your NAS is backed up to an off-site location.
Have you recently set up a NAS in your office or home office? Let us know about your experience in the comments.
When you’re growing a business, every milestone often pairs exciting opportunities with serious challenges. Gavin Wade, Founder & CEO of Cloudspot, put it best: “In any startup environment, there are fires all over the place. You touch the door handle. If it’s not too hot, you let it burn, and you go take care of the door that has smoke pouring out.”
Expanding your business to new locations or managing a remote team has the potential to become a five-alarm fire, and fast—particularly from a data management perspective. Your team needs simple, shared storage and fail-safe data backups, and all in a cost-effective package.
Installing multiple NAS devices across locations and syncing with the cloud provides all three, and it’s easier than it sounds. Even if you’re not ready to expand just yet, upgrading from swapping hard drives or using a sync service like G Suite or Dropbox to a NAS system will provide a scalable approach to future growth.
This guide explains:
Why NAS devices make sense for growing businesses.
How to implement cloud sync for streamlined collaboration in four steps.
How to protect data on your NAS devices with cloud backup.
NAS = An Upgrade for Your Business
How do you handle data sharing and workflow between locations? Maybe you rely on ferrying external hard drives between offices, and you’re frustrated by the hassle and potential for human error. Maybe you use G Suite, and their new 2TB caps are killing your bottom line. Maybe you already use a NAS device, but you need to add another one and you’re not sure how to sync them.
Making collaboration easy and protecting your data in the process are likely essential goals for your business, and an ad hoc solution can only go so far. What worked when you started might not work for the long term if you want to achieve sustainable growth. Investing in a NAS device or multiple devices provides a few key advantages, including:
More storage. First and foremost, NAS provides more storage space than individual hard drives or individual workstations because NAS systems create a single storage volume from several drives (often arranged in a RAID scheme).
Faster storage. NAS works as fast as your local office network speed; you won’t need to wait on internet bandwidth or track down the right drive for restores.
Enhanced collaboration. As opposed to individual hard drives, multiple people can access a NAS device at the same time. You can also sync multiple drives easily, as we’ll detail below.
Better protection and security. Because the drives in a NAS system are configured in a RAID, the data stored on the drives is protected from individual drive failures. And drives do fail. A NAS device can also serve as a central place to hold backups of laptops, workstations, and servers. You can quickly recover those systems if they go down, and the backups can serve as part of an effective ransomware defense strategy.
Cost-efficiency. Compared to individual hard drives, NAS devices are a bigger upfront investment. But the benefits of more efficient workflows plus the protection from data loss and expensive recoveries make the investment well worth considering for growing businesses.
Hold up. What’s a RAID again?
RAID stands for “redundant array of independent disks.” It combines multiple hard drives into one or more storage volumes and distributes data across the drives to allow for data recovery in the event of one or multiple drive failures, depending on configuration.
The Next Step: Pairing NAS + Cloud
Most NAS devices include software to achieve cloud backups and cloud sync baked in. For our purposes, we’ll look specifically at the benefits of enabling cloud solutions on a QNAP NAS system to facilitate collaboration between offices and implement a 3-2-1 backup strategy.
NAS + Cloud + Sync = Collaboration
Pairing NAS systems with cloud storage enables you to sync files between multiple NAS devices, boosting collaboration between offices or remote teams. Each location has access to the same, commonly used, up-to-date documents or assets, and you no longer need an external service to share large files—just place them in shared folders on your local NAS and they appear on synced devices in minutes.
If this seems complex or maybe you haven’t even considered using cloud sync between offices, here’s a four-step process to configure sync on QNAP NAS devices and cloud storage:
Prepare your cloud storage to serve as your content sync interchange. Create a folder in your cloud storage, separate from your backup folders, to serve as the interchange between the NAS systems in each office. Each of your NAS systems will stay synchronized with this cloud destination.
Step 1: Create cloud sync destination.
Determine the content you want to make available across all of your offices. For example, it may be helpful to have a large main folder for the entire company, and folders within that organized by department. Then, use QNAP Sync to copy the contents of that folder to a new folder or bucket location in the cloud.
Step 2: Copy first source to cloud.
Copy the content from the cloud location to your second NAS. You can speed this up by first syncing the data on your new office’s NAS on your local network, then physically moving it to the new location. Now, you have the same content on both NAS systems. If bringing your new NAS on-site isn’t possible due to geography or access issues, then copy the cloud folders you created in step two down to the second system over internet bandwidth.
Step 3: Copy cloud to second location.
Set up two-way syncs between each NAS and the cloud. Now that you have the same shared files on both NAS systems and the cloud, the last step is to enable two-way sync from each location. Your QNAP NAS will move changed files up or down continuously, ensuring everyone is working on the most up-to-date files.
Step 4: Keep both locations synchronized via cloud.
With both NAS devices synchronized via the cloud, all offices have access to common folders and files can be shared instantaneously. When someone in one office wants to collaborate on a large file with someone in the other office, they simply move the file into their local all-office shared folder, and it will appear in that folder in the other office within minutes.
NAS + Cloud Storage = Data Security
An additional benefit of combining a NAS with cloud storage for backup is that it completes a solid 3-2-1 backup strategy, which provides for three copies of your data—two on different media on-site, with one off-site. The cloud provides the off-site part of this equation. Here’s an example of how you’d accomplish this with a QNAP NAS in each office and simple cloud backup:
Back up the NAS itself to cloud storage. Here’s a step-by-step guide on how to do this with Hyper Backup 3 to Backblaze B2 Cloud Storage, which is already integrated with NAS systems from QNAP.
With backup in place, if any of those office systems fail, you can restore them directly from your NAS, and your NAS itself is backed up to the cloud if some catastrophic event were to affect all of your in-office devices.
Adding Up the Benefits of NAS + Cloud
To recap, here are a few takeaways to consider when managing data for a growing business:
NAS systems give you more storage on fast, local networks; better data protection than hard drives; and the ability to easily sync should you add locations or remote team members.
Connecting your NAS to cloud storage means every system in every office or location is backed up and protected, both locally and in the cloud.
Syncing NAS devices with the cloud gives all of your offices access to consistent, shared files on fast, local networks.
You no longer need to use outside services to share large files between offices.
You can configure backups and sync between multiple devices using software that comes baked in with a QNAP NAS system or augment with any of our Backblaze B2 integrations.
If you’re sick of putting out fires related to ad hoc collaboration solutions or just looking to upgrade from hard drives or G Suite, combining NAS systems with cloud storage delivers performance, protection, and easy collaboration between remote teams or offices.
Thinking about upgrading to a NAS device, but not sure where to start? Check out our NAS 101: Buyer’s Guide for guidance on navigating your choices. Already using NAS, but have questions about syncing? Let us know in the comments.
The world looks a lot different than it did when we published our last Media Stats Takeaways, which covered iconik’s business intelligence report from the beginning of last year. It’s likely no big surprise that the use of media management tech has changed right along with other industries that saw massive disruption since the arrival of COVID-19. But iconik’s 2021 Media Stats Report digs deeper into the story, and the detail here is interesting. Short story? The shift to remote work drove an increase in cloud-based solutions for businesses using iconik for smart media management.
Always game to geek out over the numbers, we’re again sharing our top takeaways and highlighting key lessons we drew from the data.
iconik is a cloud-based content management and collaboration app and Backblaze integration partner. Their Media Stats Report series gathers data on how customers store and use data in iconik and what that customer base looks like.
Takeaway 1: Remote Collaboration Is Here to Stay
In 2020, iconik added 12.1PB of data to cloud storage—up 490%. Interestingly, while there was an 11.6% increase in cloud data year-over-year (from 53% cloud/47% on-premises in 2019, to 65% cloud/35% on-premises in 2020), it was down from a peak of 70%/30% mid-year. Does this represent a subtle pendulum swing back towards the office for some businesses and industries?
Either way, the shift to remote work likely changed the way data is handled for the long term no matter where teams are working. Tools like iconik help companies bridge on-premises and cloud storage, putting the focus on workflows and allowing companies to reap the benefits of both kinds of storage based on their needs—whether they need fast access to local shared storage, affordable scalability and collaboration in the cloud, or both.
Takeaway 2: Smaller Teams Took the Lead in Cloud Adoption
Teams of six to 19 people were iconik’s fastest growing segment in 2020 in terms of size, increasing 171% year-over-year. Small teams of one to five came in at a close second, growing 167%.
Adjusting to remote collaboration likely disrupted the inertia of on-premises process and culture in teams of this size, removing any lingering fear around adopting new technologies like iconik. Whether it was the shift to remote work or just increased comfort and familiarity with cloud-based solutions, this data seems to suggest smaller teams are capitalizing on the benefits of scalable solutions in the cloud.
Takeaway 3: Collaboration Happens When Collaborating Is Easy
iconik noted that many small teams of one to five people added users organically in 2020, graduating to the next tier of six to 19 users.
This kind of organic growth indicates small teams are adding users they may have hesitated to include with previous solutions whether due to cost, licensing, or complicated onboarding. Because iconik is delivered via an internet portal, there’s no upfront investment in software or a server to run it—teams just pay for the users and storage they need. They can start small and add or remove users as the team evolves, and they don’t pay for inactive users or unused storage.
We also believe efficient workflows are fueling new business, and small teams are happily adding headcount. Bigger picture, it shows that when adding team members is easy, teams are more likely to collaborate and share content in the production process.
Takeaway 4: Public Sector and Nonprofit Entities Are Massive Content Producers
Last year, we surmised that “every company is a media company.” This year showed the same to be true. Public/nonprofit was the second largest customer segment behind media and entertainment, comprising 14.5% of iconik’s customer base. The segment includes organizations like houses of worship (6.4%), colleges and universities (4%), and social advocacy nonprofits (3.4%).
With organizations generating more content from video to graphics to hundreds of thousands of images, wrangling that content and making it accessible has become ever more important. Today, budget-constrained organizations need the same capabilities of an ad agency or small film production studio. Fortunately, they can deploy solutions like iconik with cloud storage tapping into sophisticated workflow collaboration without investing in expensive hardware or dealing with complicated software licensing.
Takeaway 5: Customers Have the Benefit of Choice for Pairing Cloud Storage With iconik
In 2020, we shared a number of stories of customers adopting iconik with Backblaze B2 Cloud Storage with notable success. Complex Networks, for example, reduced asset retrieval delays by 100%. It seems like these stories did reflect a trend, as iconik flagged that data stored by Backblaze B2 grew by 933%, right behind AWS at 1009% and well ahead of Google Cloud Platform at 429%.
We’re happy to be in good company when it comes to serving the storage needs of iconik users who are faced with an abundance of choice for where to store the assets managed by iconik. And even happier to be part of the customer wins in implementing robust cloud-based solutions to solve production workflow issues.
2020 Was a Year
This year brought changes in almost every aspect of business and…well, life. iconik’s Media Stats Report confirmed some trends we all experienced over the past year as well as the benefits many companies are realizing by adopting cloud-based solutions, including:
The prevalence of remote work and remote-friendly workflows.
The adoption of cloud-based solutions by smaller teams.
Growth among teams resulting from easy cloud collaboration.
The emergence of sophisticated media capabilities in more traditional industries.
The prevalence of choice among cloud storage providers.
As fellow data obsessives, we’re proud to call iconik a partner and curious to see what learnings we can gain from their continued reporting on media tech trends. Jump in the comments to let us know what conclusions you drew from the stats.
Much like gaming, starting a business means a lot of trial and error. In the beginning, you’re just trying to get your bearings and figure out which enemy to fend off first. After a few hours (or a few years on the market), it’s time to level up.
SIMMER.io, a community site that makes sharing Unity WebGL games easy for indie game developers, leveled up in a big way to make their business sustainable for the long haul.
When the site was founded in September 2017, the development team focused on getting the platform built and out the door, not on what egress costs would look like down the road. As it grew into a home for 80,000+ developers and 30,000+ games, though, those costs started to encroach on their ability to sustain and grow the business.
After rolling the dice in “A Hexagon’s Adventures” a few times (check it out below), we spoke with the SIMMER.io development team about their experience setting up a multi-cloud solution—including their use of the Bandwidth Alliance between Cloudflare and Backblaze B2 Cloud Storage to reduce egress to $0—to prepare the site for continued growth.
How to Employ a Multi-cloud Approach for Scaling a Web Application
In 2017, sharing games online with static hosting through a service like AWS S3 was possible but certainly not easy. As one SIMMER.io team member put it, “No developer in the world would want to go through that.” The team saw a clear market opportunity. If developers had a simple, drag-and-drop way to share games that worked for them, the site would get increased traffic that could be monetized through ad revenue. Further out, they envisioned a premium membership offering game developers unbranded sharing and higher bandwidth. They got to work building the infrastructure for the site.
Prioritizing Speed and Ease of Use
Starting a web application, your first priority is planning for speed and ease of use—both for whatever you’re developing but also from the apps and services you use to develop it.
The team at SIMMER.io first tried setting up their infrastructure in AWS. They found it to be powerful, but not very developer-friendly. After a week spent trying to figure out how to implement single sign-on using Amazon Cognito, they searched for something easier and found it in Firebase—Google’s all-in-one development environment. It had most of the tools a developer might need baked in, including single sign-on.
Firebase was already within the Google suite of products, so they used Google Cloud Platform (GCP) for their storage needs as well. It all came packaged together, and the team was moving fast. Opting into GCP made sense in the moment.
“The Impossible Glide,” E&T Studios. Trust us, it does feel a little impossible.
When Egress Costs Boil Over
Next, the team implemented Cloudflare, a content delivery network, to ensure availability and performance no matter where users access the site. When developers uploaded a game, it landed in GCP, which served as SIMMER.io’s origin store. When a user in Colombia wanted to play a game, for example, Cloudflare would call the game from GCP to a server node that’s geographically closer to the user. But each time that happened, GCP charged egress fees for data transfer out.
Even though popular content was cached on the Cloudflare nodes, egress costs from GCP still added up, comprising two-thirds of total egress. At one point, a “Cards Against Humanity”-style game caught on like wildfire in France, spiking egress costs to more than double their average. The popularity was great for attracting new SIMMER.io business but tough on the bottom line.
These costs increasingly ate into SIMMER.io’s margins until the development team learned of the Bandwidth Alliance, a group of cloud and networking companies that discount or waive data transfer fees for shared customers, of which Backblaze and Cloudflare are both members.
“Dragon Spirit Remake,” by Jin Seo, one of 30K+ games available on SIMMER.io.
Testing a Multi-cloud Approach
Before they could access Bandwidth Alliance savings, the team needed to make sure the data could be moved safely and easily and that the existing infrastructure would still function with the game data living in Backblaze B2.
The SIMMER.io team set up a test bucket for free, integrated it with Cloudflare, and tested one game—Connected Towers. The Backblaze B2 test bucket allows for free self-serve testing up to 10GB, and Backblaze offers a free proof of concept working with our solutions engineers for larger tests. When one game worked, the team decided to try it with all games uploaded to date. This would allow them to cash in on Bandwidth Alliance savings between Cloudflare and Backblaze B2 right away while giving them time to rewrite the code that governs uploads to GCP later.
“Connected Towers,” NanningsGames. The first game tested on Backblaze B2.
Choose Your Own Adventure: Migrate Yourself or With Support
Getting 30,000+ games from one cloud provider to another seemed daunting, especially given that games are accessed constantly on the site. They wanted to ensure any downtime was minimal. So the team worked with Backblaze to plan out the process. Backblaze solution engineers recommended using rclone, an open-source command line program that manages files on cloud storage, and the SIMMER.io team took it from there.
With rclone running on a Google Cloud server, the team copied game data uploaded prior to January 1, 2021 to Backblaze B2 over the course of about a day and a half. Since the games were copied rather than moved, there was no downtime at all. The SIMMER.io team just pointed Cloudflare to Backblaze B2 once the copy job finished.
Combining Microservices Translates to Ease and Affordability
Now, Cloudflare pulls games on-demand from Backblaze B2 rather than GCP, bringing egress costs to $0 thanks to the Bandwidth Alliance. SIMMER.io only pays for Backblaze B2 storage costs at $5/TB.
For the time being, developers still upload games to GCP, but Backblaze B2 functions as the origin store. The games are mirrored between GCP and Backblaze B2, and to ensure fidelity between the two copies, the SIMMER.io team periodically runs an rclone sync. It performs a hash check on each file to look for changes and only uploads files that have been changed so SIMMER.io avoids paying any more egress than they have to from GCP. For users, there’s no difference, and the redundancy gives SIMMER.io peace of mind while they finish the transition process.
Moving forward, SIMMER.io has the opportunity to rewrite code so game uploads go directly to Backblaze B2. Because Backblaze offers S3 Compatible APIs, the SIMMER.io team can use existing documentation to accomplish the code rework, which they’ve already started testing. Redirecting uploads would further reduce their costs by eliminating duplicate storage, but mirroring the data using rclone was the first step towards that end.
Managing everything in one platform might make sense starting out—everything lives in one place. But, like SIMMER.io, more and more developers are finding a combination of microservices to be better for their business, and not just based on affordability. With a vendor-agnostic environment, they achieve redundancy, capitalize on new functionality, and avoid vendor lock-in.
“AmongDots,” RETRO2029. For the retro game enthusiasts among us.
A Cloud to Cloud Migration Pays Off
For now, by reclaiming their margins through reducing egress costs to $0, SIMMER.io can grow their site without having to worry about increasing egress costs over time or usage spikes when games go viral. By minimizing that threat to their business, they can continue to offer a low-cost subscription and operate a sustainable site that gives developers an easy way to publish their creative work. Even better, they can use savings to invest in the SIMMER.io community, hiring more community managers to support developers. And they also realized a welcome payoff in the process—finally earning some profits after many years of operating on low margins.
Leveling up, indeed.
Check out our Cloud to Cloud Migration offer and other transfer partners—we’ll pay for your data transfer if you need to move more than 50TB.
Bonus Points: Roll the Dice for Yourself
The version of “A Hexagon’s Adventures” below is hosted on B2 Cloud Storage, served up to you via Cloudflare, and delivered easily by virtue of SIMMER.io’s functionality. See how it all works for yourself, and test your typing survival skills.
We’re determined to make moving data into cloud storage as easy as possible for you, so today we are releasing the latest improvement to our data migration pathways: a bigger, faster Backblaze Fireball.
The new Fireball increases capacity for the rapid ingest service from 70TB to 96TB and connectivity speed from 1 Gb/s to 10 Gb/s so that businesses can move larger data sets and media libraries from on-premises to the Backblaze Storage Cloud faster than before.
What Hasn’t Changed
The service is still drop-dead simple. Data is secure and encrypted during the transfer process, and you gain the benefits of the cloud without having to navigate the constraints (and sluggishness) of internet bandwidth. We’re still happy to send you two, or three, or more Fireballs as needed—you can order whatever you need right from your Backblaze B2 Cloud Storage account. Easy.
How It Works
The customer favorite (of folks like Austin City Limits and Yoga International) service works like this: We ship you the Fireball, you copy on-premises data to it directly or through the transfer tool of your choice, you send the Fireball back to us, and we quickly upload your data into your B2 Cloud Storage account.
The Fireball is not right for everyone—organizations already storing to public clouds now frequently use our cloud to cloud migration solution, while those with small, local data sets often find internet transfer tools more than sufficient. For a refresher, definitely check out this “Pathways to the Cloud” guide.
Don’t Be Afraid to Ask
However you’d like to join us, we’re here to help. So—shameless plug alert—please don’t hesitate to contact our Sales team to talk about how to best start saving with B2 Cloud Storage.
For people in the early stages of development, a cloud storage provider that offers free credits might seem like a great deal. And diversified cloud providers do offer these kinds of promotions to help people get started with storing data: Google Cloud Free Tier and AWS Free Tier offer credits and services for a limited time, and both providers also have incentive funds for startups which can be unlocked through incubators that grant additional credits of up to tens of thousands of dollars.
Before you run off to give them a try though, it’s important to consider the long-term realities that await you on the far side of these promotions.
The reality is that once they’re used up, budget items that were zeros yesterday can become massive problems tomorrow. Twitter is littered with countless experiences of developers finding themselves surprised with an unexpected bill and the realization that they need to figure out how to navigate the complexities of their cloud provider—fast.
we made the unfortunate mistake (and I'm sure this is how they get you) of not watching our cloud costs so when the generous credits ran out we were hit with big bills until we did major refactoring. Lessons learned early on
What to Do When You Run Out of Free Cloud Storage Credits
So, what do you do once you’re out of credits? You could try signing up with different emails to game the system, or look into getting into a different incubator for more free credits. If you plan on your app being around for a few years and succeeding, the solution of finding more credits isn’t scalable, and the process of applying to another incubator would take too long. You can always switch from Google Cloud Platform to AWS to get free credits elsewhere, but transferring data between providers almost always incurs painful egress charges.
If you’re already sure about taking your data out of your current provider, read ahead to the section titled “Cloud to Cloud Migration” to learn how transferring your data can be easier and faster than you think.
Because chasing free credits won’t work forever, this post offers three paths for navigating your cloud bills after free tiers expire. It covers:
Staying with the same provider. Once you run out of free credits, you can optimize your storage instances and continue using (and paying) for the same provider.
Exploring multi-cloud options. You can port some of your data to another solution and take advantage of the freedom of a multi-cloud strategy.
Choosing another provider. You can transfer all of your data to a different cloud that better suits your needs.
Path 1: Stick With Your Current Cloud Provider
If you’re running out of promotional credits with your current provider, your first path is to just continue using their storage services. Many people see this as your only option because of the frighteningly high egress fees you’d face if you try to leave. If you choose to stay with the same provider, be sure to review and account for all of the instances you’ve spun up.
Here’s an example of a bill that one developer faced after their credits expired: This user found themselves locked into an unexpected $2,700 bill because of egress costs. Looking closer at their experience, the spike in charges was due to a data transfer of 30TB of data. The first 1GB of data transferred out is free, followed by egress costing $0.09 per gigabyte for the first 10TB and $0.085 per gigabyte for the next 40TB. Doing the math, that’s:
$0.085/GB x 20,414 GB = $1735, $0.090/GB x 10,239 GB = $921
Choosing to stay with your current cloud provider is a straightforward path, but it’s not necessarily the easiest or least expensive option, which is why it’s important to conduct a thorough audit of the current cloud services you have in use to optimize your cloud spend.
Optimizing Your Current Cloud Storage Solution
Over time, cloud infrastructure tends to become more complex and varied, and your cloud storage bills follow the same pattern. Cloud pricing transparency in general is an issue with most diversified providers—in short: It’s hard to understand what you’re paying for, and when. If you haven’t seen a comparison yet, a breakdown contrasting storage providers is shared in this post.
Many users find that AWS and Google Cloud are so complex that they turn to services that can help them monitor and optimize their cloud spend. These cost management services charge based on a percentage of your AWS spend. For a startup with limited resources, paying for these professional services can be challenging, but manually predicting cloud costs and optimizing spending is also difficult, as well as time consuming.
The takeaway for sticking with your current provider: Be a budget hawk for every fee you may be at risk of incurring, and ensure your development keeps you from unwittingly racking up heavy fees.
Path 2: Take a Multi-cloud Approach
For some developers, although you may want to switch to a different cloud after your free credits expire, your code can’t be easily separated from your cloud provider. In this case, a multi-cloud approach can achieve the necessary price point while maintaining the required level of service.
Short term, you can mitigate your cloud bill by immediately beginning to port any data you generate going forward to a more affordable solution. Even if the process of migrating your existing data is challenging, this move will stop your current bill from ballooning.
Beyond mitigation, there are multiple benefits to using a multi-cloud solution. A multi-cloud strategy gives companies the freedom to use the best possible cloud service for each workload. There are other benefits to taking a multi-cloud approach:
Redundancy: Some major providers have faced outages recently. A multi-cloud strategy allows you to have a backup of your data to continue serving your customers even if your primary cloud provider goes down.
Functionality: With so many providers introducing new features and services, it’s unlikely that a single cloud provider will meet all of your needs. With a multi-cloud approach, you can pick and choose the best services from each provider. Multinational companies can also optimize for their particular geographical regions.
Flexibility: Avoid vendor lock-in if you outgrow a single cloud provider with a diverse cloud infrastructure.
Cost: You may find that one cloud provider offers a lower price for compute and another for storage. A multi-cloud strategy allows you to pick and choose which works best for your budget.
The takeaway for pursuing multi-cloud: It might not solve your existing bill, but it will mitigate your exposure to additional fees going forward. And it offers the side benefit of providing a best-of-breed approach to your development tech stack.
Path 3: Find a New Cloud Provider
Finally, you can choose to move all of your data to a different cloud storage provider. We recommend taking a long-term approach: Look for cloud storage that allows you to scale with the least amount of friction while continuing to support everything you need for a good customer experience in your app. You’ll want to consider cost, usability, and solutions when looking for a new provider.
Cost
Many cloud providers use a multi-tier approach, which can become complex as your business starts to scale its cloud infrastructure. Switching to a provider that has single-tier pricing helps businesses planning for growth predict their cloud storage cost and optimize its spend, saving time and money for use on future opportunities. You can use this pricing calculator to check storage costs of Backblaze B2 Cloud Storage against AWS, Azure, and Google Cloud.
One example of a startup that saved money and was able to grow their business by switching to another storage provider is CloudSpot, a SaaS photography platform. They had initially gotten their business off the ground with the help of a startup incubator. Then in 2019, their AWS storage costs skyrocketed, but their team felt locked in to using Amazon.
When they looked at other cloud providers and eventually transferred their data out of AWS, they were able to save on storage costs that allowed them to reintroduce services they had previously been forced to shut down due to their AWS bill. Reviving these services made an immediate impact on customer acquisition and recurring revenue.
Usability
Time spent trying to navigate a complicated platform is a significant cost to business. Aiden Korotkin of AK Productions, a full-service video production company based in Washington, D.C., experienced this first hand. Korotkin initially stored his client data in Google Cloud because the platform had offered him a promotional credit. When the credits ran out in about a year, he found himself frustrated with the inefficiency, privacy concerns, and overall complexity of Google Cloud.
Korotkin chose to switch to Backblaze B2 Cloud Storage with the help of solution engineers that helped him figure out the best storage solution for his business. After quickly and seamlessly transferring his first 12TB in less than a day, he noticed a significant difference from using Google Cloud. “If I had to estimate, I was spending between 30 minutes to an hour trying to figure out simple tasks on Google (e.g. setting up a new application key, or syncing to a third-party source). On Backblaze it literally takes me five minutes,” he emphasized.
Integrations
Workflow integrations can make cloud storage easier to use and provide additional features. By selecting multiple best-of-breed providers, you can achieve better functionality with significantly reduced price and complexity.
Content delivery network (CDN) partnerships with Cloudflare and Fastly allow developers using services like Backblaze B2 to take advantage of free egress between the two services. Game developers can serve their games to users without paying egress between their origin source and their CDN, and media management solutions that can integrate directly with cloud storage to make media assets easy to find, sort, and pull into a new project or editing tool. Take a look at other solutions integrated with cloud storage that can support your workflows.
Cloud to Cloud Migration
After choosing a new cloud provider, you can plan your data migration. Your data may be spread out across multiple buckets, service providers, or different storage tiers—so your first task is discovering where your data is and what can and can’t move. Once you’re ready, there is a range of solutions for moving your data, but when it comes to moving between cloud services, a data migration tool like Flexify.IO can help make things a lot easier and faster.
Instead of manually offloading static and production data from your current cloud storage provider and reuploading it into your new provider, Flexify.IO reads the data from the source storage and writes it to the destination storage via inter-cloud bandwidth. Flexify.IO achieves fast and secure data migration at cloud-native speeds because the data transfer happens within the cloud environment.
For developers with customer-facing applications, it’s especially important that customers still retain access to data during the migration from one cloud provider to another. When CloudSpot moved about 700TB of data from AWS to Backblaze B2 in just six days with help from Flexify.IO, customers were actually still uploading images to their Amazon S3 buckets. The migration process was able to support both environments and allowed them to ensure everything worked properly. It was also necessary because downtime was out of the question—customers access their data so frequently that one of CloudSpot’s galleries is accessed every one or two seconds.
If you’re interested in exploring a different cloud storage service for your solution, you can easily sign up today, or contact us for more information on how to run a free POC or just to begin transferring your data out of your current cloud provider.
In 2020, Backblaze added 39,792 hard drives and as of December 31, 2020 we had 165,530 drives under management. Of that number, there were 3,000 boot drives and 162,530 data drives. We will discuss the boot drives later in this report, but first we’ll focus on the hard drive failure rates for the data drive models in operation in our data centers as of the end of December. In addition, we’ll welcome back Western Digital to the farm and get a look at our nascent 16TB and 18TB drives. Along the way, we’ll share observations and insights on the data presented and as always, we look forward to you doing the same in the comments.
2020 Hard Drive Failure Rates
At the end of 2020, Backblaze was monitoring 162,530 hard drives used to store data. For our evaluation, we remove from consideration 231 drives which were used for testing purposes and those drive models for which we did not have at least 60 drives. This leaves us with 162,299 hard drives in 2020, as listed below.
Observations
The 231 drives not included in the list above were either used for testing or did not have at least 60 drives of the same model at any time during the year. The data for all drives, data drives, boot drives, etc., is available for download on the Hard Drive Test Data webpage.
For drives which have less than 250,000 drive days, any conclusions about drive failure rates are not justified. There is not enough data over the year-long period to reach any conclusions. We present the models with less than 250,000 drive days for completeness only.
For drive models with over 250,000 drive days over the course of 2020, the Seagate 6TB drive (model: ST6000DX000) leads the way with a 0.23% annualized failure rate (AFR). This model was also the oldest, in average age, of all the drives listed. The 6TB Seagate model was followed closely by the perennial contenders from HGST: the 4TB drive (model: HMS5C4040ALE640) at 0.27%, the 4TB drive (model: HMS5C4040BLE640), at 0.27%, the 8TB drive (model: HUH728080ALE600) at 0.29%, and the 12TB drive (model: HUH721212ALE600) at 0.31%.
The AFR for 2020 for all drive models was 0.93%, which was less than half the AFR for 2019. We’ll discuss that later in this report.
What’s New for 2020
We had a goal at the beginning of 2020 to diversify the number of drive models we qualified for use in our data centers. To that end, we qualified nine new drives models during the year, as shown below.
Actually, there were two additional hard drive models which were new to our farm in 2020: the 16TB Seagate drive (model: ST16000NM005G) with 26 drives, and the 16TB Toshiba drive (model: MG08ACA16TA) with 40 drives. Each fell below our 60-drive threshold and were not listed.
Drive Diversity
The goal of qualifying additional drive models proved to be prophetic in 2020, as the effects of Covid-19 began to creep into the world economy in March 2020. By that time we were well on our way towards our goal and while being less of a creative solution than drive farming, drive model diversification was one of the tactics we used to manage our supply chain through the manufacturing and shipping delays prevalent in the first several months of the pandemic.
Western Digital Returns
The last time a Western Digital (WDC) drive model was listed in our report was Q2 2019. There are still three 6TB WDC drives in service and 261 WDC boot drives, but neither are listed in our reports, so no WDC drives—until now. In Q4 a total of 6,002 of these 14TB drives (model: WUH721414ALE6L4) were installed and were operational as of December 31st.
These drives obviously share their lineage with the HGST drives, but they report their manufacturer as WDC versus HGST. The model numbers are similar with the first three characters changing from HUH to WUH and the last three characters changing from 604, for example, to 6L4. We don’t know the significance of that change, perhaps it is the factory location, a firmware version, or some other designation. If you know, let everyone know in the comments. As with all of the major drive manufacturers, the model number carries patterned information relating to each drive model and is not randomly generated, so the 6L4 string would appear to mean something useful.
WDC is back with a splash, as the AFR for this drive model is just 0.16%—that’s with 6,002 drives installed, but only for 1.7 months on average. Still, with only one failure during that time, they are off to a great start. We are looking forward to seeing how they perform over the coming months.
New Models From Seagate
There are six Seagate drive models that were new to our farm in 2020. Five of these models are listed in the table above and one model had only 26 drives, so it was not listed. These drives ranged in size from 12TB to 18TB and were used for both migration replacements as well as new storage. As a group, they totaled 13,596 drives and amassed 1,783,166 drive days with just 46 failures for an AFR of 0.94%.
Toshiba Delivers More Zeros
The new Toshiba 14TB drive (model: MG07ACA14TA) and the new Toshiba 16TB (model: MG08ACA16TEY) were introduced to our data centers in 2020 and they are putting up zeros, as in zero failures. While each drive model has only been installed for about two months, they are off to a great start.
Comparing Hard Drive Stats for 2018, 2019, and 2020
The chart below compares the AFR for each of the last three years. The data for each year is inclusive of that year only and for the drive models present at the end of each year.
The Annualized Failure Rate for 2020 Is Way Down
The AFR for 2020 dropped below 1% down to 0.93%. In 2019, it stood at 1.89%. That’s over a 50% drop year over year. So why was the 2020 AFR so low? The answer: It was a group effort. To start, the older drives: 4TB, 6TB, 8TB, and 10TB drives as a group were significantly better in 2020, decreasing from a 1.35% AFR in 2019 to a 0.96% AFR in 2020. At the other end of the size spectrum, we added over 30,000 larger drives: 14TB, 16TB, and 18TB, which as a group recorded an AFR of 0.89% for 2020. Finally, the 12TB drives as a group had a 2020 AFR of 0.98%. In other words, whether a drive was old or new, or big or small, they performed well in our environment in 2020.
Lifetime Hard Drive Stats
The chart below shows the lifetime annualized failure rates of all of the drives models in production as of December 31, 2020.
AFR and Confidence Intervals
Confidence intervals give you a sense of the usefulness of the corresponding AFR value. A narrow confidence interval range is better than a wider range, with a very wide range meaning the corresponding AFR value is not statistically useful. For example, the confidence interval for the 18TB Seagate drives (model: ST18000NM000J) ranges from 1.5% to 45.8%. This is very wide and one should conclude that the corresponding 12.54% AFR is not a true measure of the failure rate of this drive model. More data is needed. On the other hand, when we look at the 14TB Toshiba drive (model: MG07ACA14TA), the range is from 0.7% to 1.1% which is fairly narrow, and our confidence in the 0.9% AFR is much more reasonable.
3,000 Boot Drives
We always exclude boot drives from our reports as their function is very different from a data drive. While it may not seem obvious, having 3,000 boot drives is a bit of a milestone. It means we have 3,000 Backblaze Storage Pods in operation as of December 31st. All of these Storage Pods are organized into Backblaze Vaults of 20 Storage Pods each or 150 Backblaze Vaults.
Over the last year or so, we moved from using hard drives to SSDs as boot drives. We have a little over 1,200 SSDs acting as boot drives today. We are validating the SMART and failure data we are collecting on these SSD boot drives. We’ll keep you posted if we have anything worth publishing.
The complete data set used to create the information used in this review is available on our Hard Drive Test Data page. You can download and use this data for free for your own purpose. All we ask are three things: 1) you cite Backblaze as the source if you use the data, 2) you accept that you are solely responsible for how you use the data, and 3) you do not sell this data to anyone; it is free.
If you just want the summarized data used to create the tables and charts in this blog post you can download the ZIP file containing the CSV files for each chart.
Good luck and let us know if you find anything interesting.