In our previous post, we discussed how we utilize FieldMask as a solution when designing our APIs so that consumers can request the data they need when fetched via gRPC. In this blog post we will continue to cover how Netflix Studio Engineering uses FieldMask for mutation operations such as update and remove.
Example: Netflix Studio Production
Money Heist (La casa de papel) / Netflix
Previously we outlined what a Production is and how the Production Service makes gRPC calls to other microservices such as the Schedule Service and Script Service to retrieve schedules and scripts (aka screenplay) for a particular production such as La Casa De Papel. We can take that model and showcase how we can mutate particular fields on a production.
Mutating Production Details
Let’s say we want to update the format field from LIVE_ACTION to HYBRID as our production has added some animated elements. A naive way for us to solve this is to add an updateProductionFormatRequest method and gRPC endpoint just to update the productionFormat:
This allows us to update the production format for a particular production but what if we then want to update other fields such as titleor even multiple fields such as productionFormat, schedule, etc? Building on top of this we could just implement an update method for every field: one for Production format, another for title and so on:
This can become unmanageable when maintaining our APIs due to the number of fields on the Production. What if we want to update more than one field and do it atomically in a single RPC? Creating additional methods for various combinations of fields will lead to an explosion of mutation APIs. This solution is not scalable.
Instead of trying to create every single combination possible, another solution could be to have an UpdateProduction endpoint that requires all fields from the consumer:
The issue with this solution is two-fold as the consumer must know and provide every single required field in a Production even if they just want to update one field such as the format. The other issue is that since a Production has many fields the request payload can become quite large particularly if the production has schedule or scripts information.
What if, instead of all the fields, we send only the fields we actually want to update, and leave all other fields unset? In our example, we would only set the production format field (and ID to reference the production):
This could work if we never need to remove or blank out any fields. But what if we want to remove the value of the title field? Again, we can introduce one-off methods like RemoveProductionTitle, but as discussed above, this solution does not scale well. What if we want to remove a value of a nested field such as the planned launch date field from the schedule? We would end up adding remove RPCs for every individual nullable sub-field.
Utilizing FieldMask for Mutations
Instead of numerous RPCs or requiring a large payload, we can utilize a FieldMask for all our mutations. The FieldMask will list all of the fields we would like to explicitly update. First, let’s update our proto file to add in the UpdateProductionRequest, which will contain the data we want to update from a production, and a FieldMask of what should be updated:
Now, we can use a FieldMask to make mutations. We can update the format by creating a FieldMask for the format field by using the FieldMaskUtil.fromStringList() utility method which constructs a FieldMask for a list of field paths in a certain type. In this case, we will have one type, but will build upon this example later:
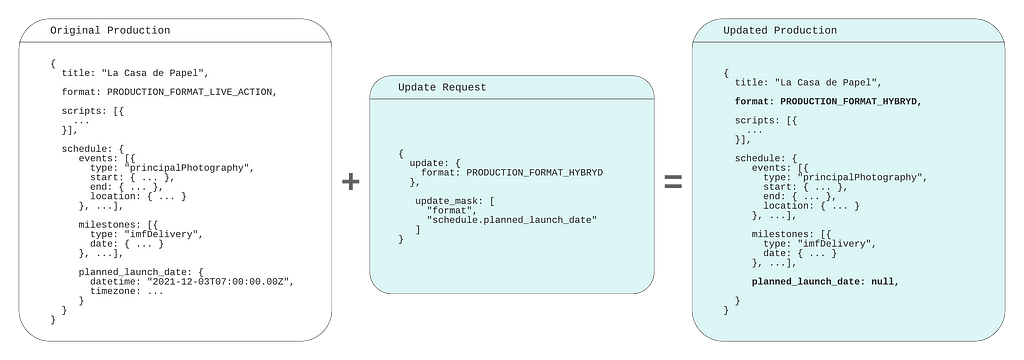
Since our FieldMask only specifies the format field that will be the only field that is updated even if we provide more data in ProductionUpdateOperation. It becomes easier to add or remove more fields to our FieldMask by modifying the paths. Data that is provided in the payload but not added in a path of a FieldMask will not be updated and simply ignored in the operation. But, if we omit a value it will perform a remove mutation on that field. Let’s modify our example above to showcase this and update the format but remove the planned launch date, which is a nested field on the ProductionSchedule as “schedule.planned_launch_date”:
In this example, we are performing both update and remove mutations as we have added “format” and “schedule.planned_launch_date” paths to our FieldMask. When we provide this in our payload these fields will be updated to the new values, but when building our payload we are only providing the format and omitting the schedule.planned_launch_date. Omitting this from the payload but having it defined in our FieldMask will function as a remove mutation:
Empty / Missing Field Mask
When a field mask is unset or has no paths, the update operation applies to all the payload fields. This means the caller must send the whole payload or, as mentioned above, any unset fields will be removed.
This convention has an implication on schema evolution: when a new field is added to the message, all the consumers must start sending its value on the update operation or it will get removed.
Suppose we want to add a new field: production budget. We will extend both the Production message, and ProductionUpdateOperation:
If there is a consumer that doesn’t know about this new field or hasn’t updated client stubs yet, it can accidentally null the budget field out by not sending the FieldMask in the update request.
To avoid this issue, the producer should consider requiring the field mask for all the update operations. Another option would be to implement a versioning protocol: force all callers to send their version numbers and implement custom logic to skip fields not present in the old version.
Bella Ciao
In this blog post series, we have gone over how we use FieldMask at Netflix and how it can be a practical and scalable solution when designing your APIs.
API designers should aim for simplicity, but make their APIs open for extension and evolution. It’s often not easy to keep APIs simple and future-proof. Utilizing FieldMask in APIs helps us achieve both simplicity and flexibility.
At Netflix, we heavily use gRPC for the purpose of backend to backend communication. When we process a request it is often beneficial to know which fields the caller is interested in and which ones they ignore. Some response fields can be expensive to compute, some fields can require remote calls to other services. Remote calls are never free; they impose extra latency, increase probability of an error, and consume network bandwidth. How can we understand which fields the caller doesn’t need to be supplied in the response, so we can avoid making unnecessary computations and remove calls? With GraphQL this comes out of the box through the use of field selectors. In the JSON:API standard a similar technique is known as Sparse Fieldsets. How can we achieve a similar functionality when designing our gRPC APIs? The solution we use within the Netflix Studio Engineering is protobuf FieldMask.
Money Heist (La casa de papel) / Netflix
Protobuf FieldMask
Protocol Buffers, or simply protobuf, is a data serialization mechanism. By default, gRPC uses protobuf as its IDL (interface definition language) and data serialization protocol.
FieldMask is a protobuf message. There are a number of utilities and conventions on how to use this message when it is present in an RPC request. A FieldMask message contains a single field named paths, which is used to specify fields that should be returned by a read operation or modified by an update operation.
Example: Netflix Studio Production
Money Heist (La casa de papel) / Netflix
Let’s assume there is a Production service that manages Studio Content Productions (in the film and TV industry, the term production refers to the process of making a movie, not the environment to run a software).
GetProduction returns a Production message by its unique ID. A production contains multiple fields such as: title, format, schedule dates, scripts aka screenplay, budgets, episodes, etc, but let’s keep this example simple and focus on filtering out schedule dates and scripts when requesting a production.
Reading Production Details
Let’s say we want to get production information for a particular production such as “La Casa De Papel” using the GetProduction API. While a production has many fields, some of these fields are returned from other services such as schedule from the Schedule service, or scripts from the Script service.
The Production service will make RPCs to Schedule and Script services every time GetProduction is called, even if clients ignore the schedule and scripts fields in the response. As mentioned above, remote calls are not free. If the service knows which fields are important for the caller, it can make an informed decision about making expensive calls, starting resource-heavy computations, and/or calling the database. In this example, if the caller only needs production title and production format, the Production service can avoid making remote calls to Schedule and Script services.
Additionally, requesting a large number of fields can make the response payload massive. This can become an issue for some applications, for example, on mobile devices with limited network bandwidth. In these cases it is a good practice for consumers to request only the fields they need.
Money Heist (La casa de papel) / Netflix
A naïve way of solving these problems can be adding additional request parameters, such as includeSchedule and includeScripts:
This approach requires adding a custom includeXXX field for every expensive response field and doesn’t work well for nested fields. It also increases the complexity of the request, ultimately making maintenance and support more challenging.
Add FieldMask to the Request Message
Instead of creating one-off “include” fields, API designers can add field_mask field to the request message:
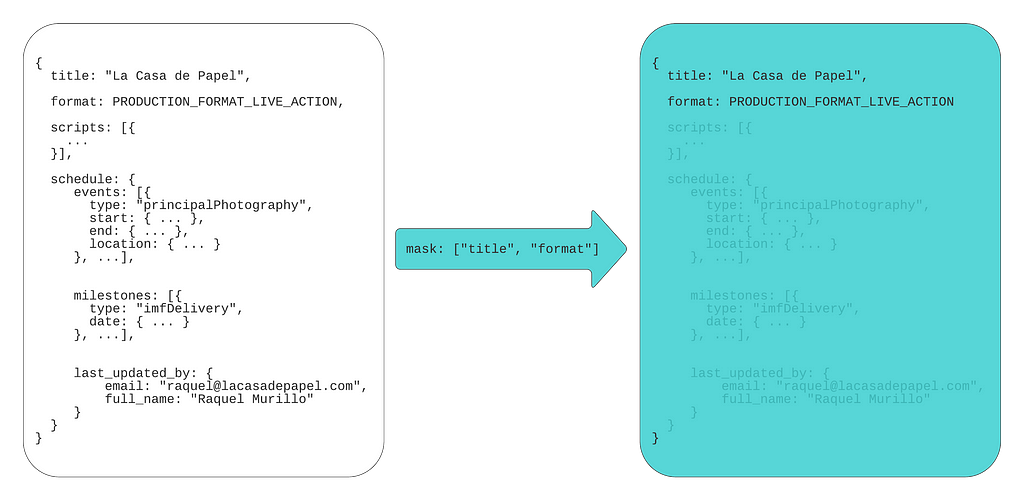
Consumers can set paths for the fields they expect to receive in the response. If a consumer is only interested in production titles and format, they can set a FieldMask with paths “title” and “format”:
Masking fields
Please note, even though code samples in this blog post are written in Java, demonstrated concepts apply to any other language supported by protocol buffers.
If consumers only need a title and an email of the last person who updated the schedule, they can set a different field mask:
By convention, if a FieldMask is not present in the request, all fields should be returned.
Protobuf Field Names vs Field Numbers
You might notice that paths in the FieldMask are specified using field names, whereas on the wire, encoded protocol buffers messages contain only field numbers, not field names. This (alongside some other techniques like ZigZag encoding for signed types) makes protobuf messages space-efficient.
To understand the difference between field numbers and field names, let’s take a detailed look at how protobuf encodes and decodes messages.
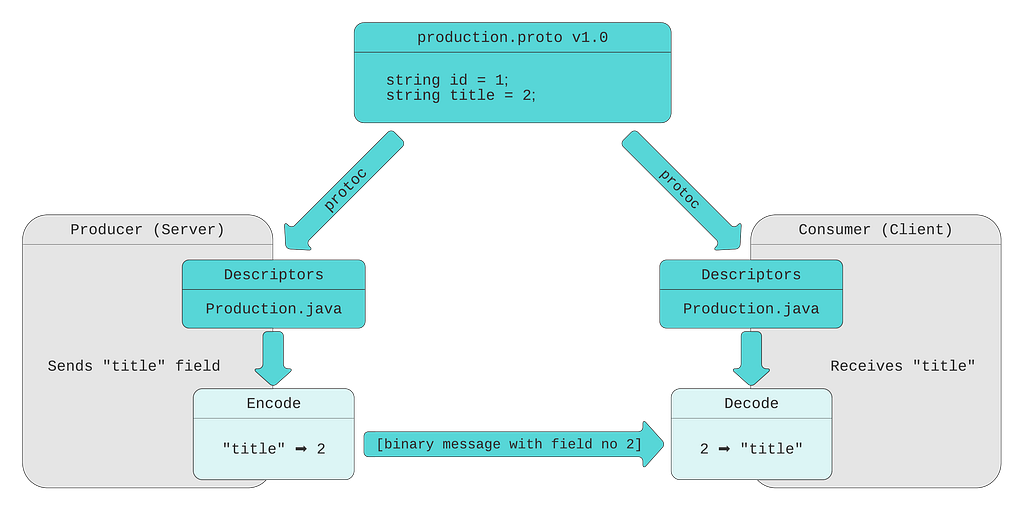
Our protobuf message definition (.proto file) contains Production message with five fields. Every field has a type, name, and number.
When the protobuf compiler (protoc) compiles this message definition, it creates the code in the language of your choice (Java in our example). This generated code contains classes for defined messages, together with message and field descriptors. Descriptors contain all the information needed to encode and decode a message into its binary format. For example, they contain field numbers, names, types. Message producer uses descriptors to convert a message to its wire format. For efficiency, the binary message contains only field number-value pairs. Field names are not included. When a consumer receives the message, it decodes the byte stream into an object (for example, Java object) by referencing the compiled message definitions.
As mentioned above, FieldMask lists field names, not numbers. Here at Netflix we are using field numbers and convert them to field names using FieldMaskUtil.fromFieldNumbers() utility method. This method utilizes the compiled message definitions to convert field numbers to field names and creates a FieldMask.
However, there is an easy-to-overlook limitation: using FieldMask can limit your ability to rename message fields. Renaming a message field is generally considered a safe operation, because, as described above, the field name is not sent on the wire, it is derived using the field number on the consumer side. With FieldMask, field names are sent in the message payload (in the paths field value) and become significant.
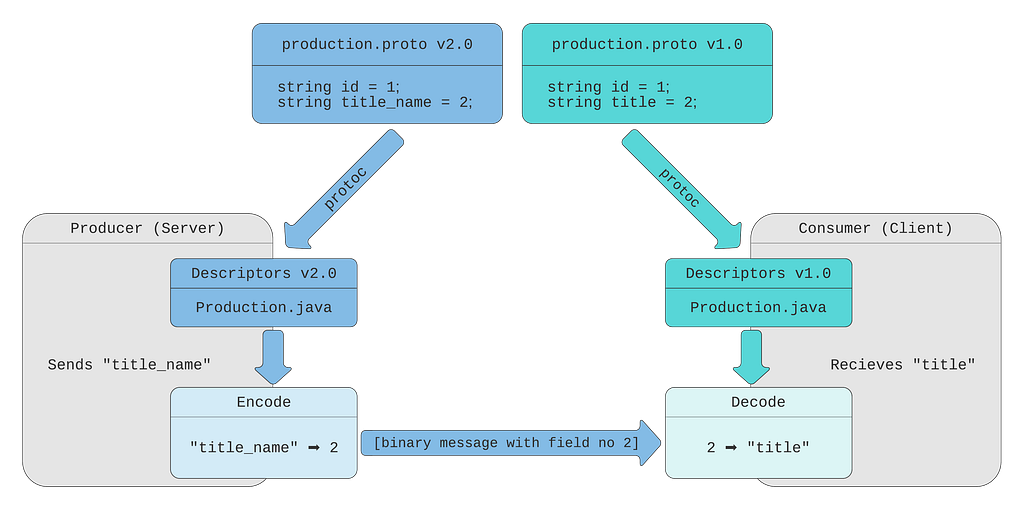
Suppose we want to rename the field title to title_name and publish version 2.0 of our message definition:
In this chart, the producer (server) utilizes new descriptors, with field number 2 named title_name. The binary message sent over the wire contains the field number and its value. The consumer still uses the original descriptors, where the field number 2 is called title. It is still able to decode the message by field number.
This works well if the consumer doesn’t use FieldMask to request the field. If the consumer makes a call with the “title” path in the FieldMask field, the producer will not be able to find this field. The producer doesn’t have a field named title in its descriptors, so it doesn’t know the consumer asked for field number 2.
As we see, if a field is renamed, the backend should be able to support new and old field names until all the callers migrate to the new field name (backward compatibility issue).
There are multiple ways to deal with this limitation:
Never rename fields when FieldMask is used. This is the simplest solution, but it’s not always possible
Require the backend to support all the old field names. This solves the backward compatibility issue but requires extra code on the backend to keep track of all historical field names
Deprecate old and create a new field instead of renaming. In our example, we would create the title_name field number 6. This option has some advantages over the previous one: it allows the producer to keep using generated descriptors instead of custom converters; also, deprecating a field makes it more prominent on the consumer side
Regardless of the solution, it is important to remember that FieldMask makes field names an integral part of your API contract.
Using FieldMask on the Producer (Server) Side
On the producer (server) side, unnecessary fields can be removed from the response payload using the FieldMaskUtil.merge() method (lines ##8 and 9):
If the server code also needs to know which fields are requested in order to avoid making external calls, database queries or expensive computations, this information can be obtained from the FieldMask paths field:
This code calls the makeExpensiveCallToScheduleServicemethod (line #21) only if the schedule field is requested. Let’s explore this code sample in more detail.
(1) The SCHEDULE_FIELD_NAME constant contains the name of the field. This code sample uses message type Descriptor and FieldDescriptor to lookup field name by field number. The difference between protobuf field names and field numbers is described in the Protobuf Field Names vs Field Numbers section above.
(2) FieldMaskUtil.normalize() returns FieldMask with alphabetically sorted and deduplicated field paths (aka canonical form).
(3) Expression (lines ##14 – 17) that yields the scheduleFieldRequestedvalue takes a stream of FieldMask paths, maps it to a stream of top-level fields, and returns true if top-level fields contain the value of the SCHEDULE_FIELD_NAME constant.
(4) ProductionSchedule is retrieved only if scheduleFieldRequested is true.
If you end up using FieldMask for different messages and fields, consider creating reusable utility helper methods. For example, a method that returns all top-level fields based on FieldMask and FieldDescriptor, a method to return if a field is present in a FieldMask, etc.
Ship Pre-built FieldMasks
Some access patterns can be more common than others. If multiple consumers are interested in the same subset of fields, API producers can ship client libraries with FieldMask pre-built for the most frequently used field combinations.
Providing pre-built field masks simplifies API usage for the most common scenarios and leaves consumers the flexibility to build their own field masks for more specific use-cases.
Limitations
Using FieldMask can limit your ability to rename message fields (described in the Protobuf Field Names vs Field Numbers section)
Repeated fields are only allowed in the last position of a path string. This means you cannot select (mask) individual sub-fields in a message inside a list. This can change in the foreseeable future, as a recently approved Google API Improvement Proposal AIP-161 Field masks includes support for wildcards on repeated fields.
Bella Ciao
Protobuf FieldMask is a simple, yet powerful concept. It can help make APIs more robust and service implementations more efficient.
This blog post covered how and why it is used at Netflix Studio Engineering for APIs that read the data. Part 2 will shed light on using FieldMask for update and remove operations.
Microservices commonly communicate with JSON over HTTP/1.1. These technologies are ubiquitous and human-readable, but they aren’t optimized for communication between dozens or hundreds of microservices.
Next-generation Web technologies, including gRPC and HTTP/2, significantly improve communication speed and efficiency between microservices. AWS offers the most compelling experience for builders implementing microservices. Moreover, the addition of HTTP/2 and gRPC support in Application Load Balancer (ALB) provides an end-to-end solution for next-generation microservices. ALBs can inspect and route gRPC calls, enabling features like health checks, access logs, and gRPC-specific metrics.
This post demonstrates .NET microservices communicating with gRPC via Application Load Balancers. The microservices run on AWS Graviton2 instances, utilizing a custom-built 64-bit Arm processor to deliver up to 40% better price/performance than x86.
Architecture Overview
Modern Tacos is a new restaurant offering delivery. Customers place orders via mobile app, then they receive real-time status updates as their order is prepared and delivered.
The tutorial includes two microservices: “Submit Order” and “Track Order”. The Submit Order service receives orders from the app, then it calls the Track Order service to initiate order tracking. The Track Order service provides streaming updates to the app as the order is prepared and delivered.
Each microservice is deployed in an Amazon EC2 Auto Scaling group. Each group is behind an ALB that routes gRPC traffic to instances in the group.
This architecture is simplified to focus on ALB and gRPC functionality. Microservices are often deployed in containers for elastic scaling, improved reliability, and efficient resource utilization. ALB, gRPC, and .NET all work equally effectively in these architectures.
Comparing gRPC and JSON for microservices
Microservices typically communicate by sending JSON data over HTTP. As a text-based format, JSON is readable, flexible, and widely compatible. However, JSON also has significant weaknesses as a data interchange format. JSON’s flexibility makes enforcing a strict API specification difficult — clients can send arbitrary or invalid data, so developers must write rigorous data validation code. Additionally, performance can suffer at scale due to JSON’s relatively high bandwidth and parsing requirements. These factors also impact performance in constrained environments, such as smartphones and IoT devices. gRPC addresses all of these issues.
gRPC is an open-source framework designed to efficiently connect services. Instead of JSON, gRPC sends messages via a compact binary format called Protocol Buffers, or protobuf. Although protobuf messages are not human-readable, they utilize less network bandwidth and are faster to encode and decode. Operating at scale, these small differences multiply to a significant performance gain.
gRPC APIs define a strict contract that is automatically enforced for all messages. Based on this contract, gRPC implementations generate client and server code libraries in multiple programming languages. This allows developers to use higher-level constructs to call services, rather than programming against “raw” HTTP requests.
gRPC also benefits from being built on HTTP/2, a major revision of the HTTP protocol. In addition to the foundational performance and efficiency improvements from HTTP/2, gRPC utilizes the new protocol to support bi-directional streaming data. Implementing real-time streaming prior to gRPC typically required a completely separate protocol (such as WebSockets) that might not be supported by every client.
Instead of working with JSON, dynamic objects, or strings, C# developers calling a gRPC service use a strongly-typed client, automatically generated from the protobuf specification. This obviates much of the boilerplate validation required by JSON APIs, and it enables developers to use rich data structures. Additionally, the generated code enables full IntelliSense support in Visual Studio.
For example, the “Submit Order” microservice executes this code in order to call the “Track Order” microservice:
using var channel = GrpcChannel.ForAddress("https://track-order.example.com");

var trackOrderClient = new TrackOrder.Protos.TrackOrder.TrackOrderClient(channel);

var reply = await trackOrderClient.StartTrackingOrderAsync(new TrackOrder.Protos.Order
{
    DeliverTo = "Address",
    LastUpdated = Timestamp.FromDateTime(DateTime.UtcNow),
    OrderId = order.OrderId,
    PlacedOn = order.PlacedOn,
    Status = TrackOrder.Protos.OrderStatus.Placed
});
This code calls the StartTrackingOrderAsync method on the Track Order client, which looks just like a local method call. The method intakes a data structure that supports rich data types like DateTime and enumerations, instead of the loosely-typed JSON. The methods and data structures are defined by the Track Order service’s protobuf specification, and the .NET gRPC tools automatically generate the client and data structure classes without requiring any developer effort.
Configuring ALB for gRPC
To make gRPC calls to targets behind an ALB, create a load balancer target group and select gRPC as the protocol version. You can do this through the AWS Management Console, AWS Command Line Interface (CLI), AWS CloudFormation, or AWS Cloud Development Kit (CDK).
This CDK code creates a gRPC target group:
var targetGroup = new ApplicationTargetGroup(this, "TargetGroup", new ApplicationTargetGroupProps
{
    Protocol = ApplicationProtocol.HTTPS,
    ProtocolVersion = ApplicationProtocolVersion.GRPC,
    Vpc = vpc,
    Targets = new IApplicationLoadBalancerTarget {...}
});
gRPC requests work with target groups utilizing HTTP/2, but the gRPC protocol enables additional features including health checks, request count metrics, access logs that differentiate gRPC requests, and gRPC-specific response headers. gRPC also works with native ALB features like stickiness, multiple load balancing algorithms, and TLS termination.
Deploy the Tutorial
The sample provisions AWS resources via the AWS Cloud Development Kit (CDK). The CDK code is provided in C# so that .NET developers can use a familiar language.
Open a terminal (such as Bash) or a PowerShell prompt.
Configure the environment variables needed by the CDK. In the sample commands below, replace AWS_ACCOUNT_ID with your numeric AWS account ID. Replace AWS_REGION with the name of the region where you will deploy the sample, such as us-east-1 or us-west-2.
If you’re using a *nix shell such as Bash, run these commands:
Throughout this tutorial, replace RED TEXT with the appropriate value.
Save the directory path where you cloned the GitHub repository. In the sample commands below, replace EXAMPLE_DIRECTORY with this path.
In your terminal or PowerShell, run these commands:
cd EXAMPLE_DIRECTORY/src/ModernTacoShop/Common/cdk
cdk bootstrap --context domain-name=PARENT_DOMAIN_NAME
cdk deploy --context domain-name=PARENT_DOMAIN_NAME
The CDK output includes the name of the S3 bucket that will store deployment packages. Save the name of this bucket. In the sample commands below, replace SHARED_BUCKET_NAME with this name.
Deploy the Track Order microservice
Compile the Track Order microservice for the Arm microarchitecture utilized by AWS Graviton2 processors. The TrackOrder.csproj file includes a target that automatically packages the compiled microservice into a ZIP file. You will upload this ZIP file to S3 for use by CodeDeploy. Next, you will utilize the CDK to deploy the microservice’s AWS infrastructure, and then install the microservice on the EC2 instance via CodeDeploy.
The CDK stack deploys these resources:
An Amazon EC2 Auto Scaling group.
An Application Load Balancer (ALB) using gRPC, targeting the Auto Scaling group and configured with microservice health checks.
A subdomain for the microservice, targeting the ALB.
A DynamoDB table used by the microservice.
CodeDeploy infrastructure to deploy the microservice to the Auto Scaling group.
The Submit Order ALB routes the gRPC call to an instance.
The Submit Order instance stores order data.
The Submit Order instance calls the Track Order service via gRPC.
The Track Order ALB routes the gRPC call to an instance.
The Track Order instance stores tracking data.
The app calls the Track Order service, which streams the order’s location during delivery.
Test the microservices
Once the CodeDeploy deployments have completed, test both microservices.
First, check the load balancers’ status. Go to Target Groups in the AWS Management Console, which will list one target group for each microservice. Click each target group, then click “Targets” in the lower details pane. Every EC2 instance in the target group should have a “healthy” status.
If a service is healthy, it will return an empty JSON object.
Run the mobile app
You will run a pre-compiled version of the app on AWS Device Farm, which lets you test on a real device without managing any infrastructure. Alternatively, compile your own version via the AndroidApp.FrontEnd project within the solution located at EXAMPLE_DIRECTORY/src/ModernTacoShop/AndroidApp/AndroidApp.sln.
Go to Device Farm in the AWS Management Console. Under “Mobile device testing projects”, click “Create a new project”. Enter “ModernTacoShop” as the project name, and click “Create Project”. In the ModernTacoShop project, click the “Remote access” tab, then click “Start a new session”. Under “Choose a device”, select the Google Pixel 3a running OS version 10, and click “Confirm and start session”.
Once the session begins, click “Upload” in the “Install applications” section. Unzip and upload the APK file located at EXAMPLE_DIRECTORY/src/ModernTacoShop/AndroidApp/com.example.modern_tacos.grpc_tacos.apk.zip, or upload an APK that you created.
Once the app has uploaded, drag up from the bottom of the device screen in order to reach the “All apps” screen. Click the ModernTacos app to launch it.
Once the app launches, enter the parent domain name in the “Domain Name” field. Click the “+” and “-“ buttons next to each type of taco in order to create your order, then click “Submit Order”. The order status will initially display as “Preparing”, and will switch to “InTransit” after about 30 seconds. The Track Order service will stream a random route to the app, updating with new position data every 5 seconds. After approximately 2 minutes, the order status will change to “Delivered” and the streaming updates will stop.
Once you’ve run a successful test, click “Stop session” in the console.
Cleaning up
To avoid incurring charges, use the cdk destroy command to delete the stacks in the reverse order that you deployed them.
In addition to deleting the stacks, you must delete the Route 53 hosted zone and the Device Farm project.
Conclusion
This post demonstrated multiple next-generation technologies for microservices, including end-to-end HTTP/2 and gRPC communication over Application Load Balancer, AWS Graviton2 processors, and .NET 5. These technologies enable builders to create microservices applications with new levels of performance and efficiency.
Matt Cline
Matt Cline is a Solutions Architect at Amazon Web Services, supporting customers in his home city of Pittsburgh PA. With a background as a full-stack developer and architect, Matt is passionate about helping customers deliver top-quality applications on AWS. Outside of work, Matt builds (and occasionally finishes) scale models and enjoys running a tabletop role-playing game for his friends.
Ulili Nhaga
Ulili Nhaga is a Cloud Application Architect at Amazon Web Services in San Diego, California. He helps customers modernize, architect, and build highly scalable cloud-native applications on AWS. Outside of work, Ulili loves playing soccer, cycling, Brazilian BBQ, and enjoying time on the beach.
Cloudflare launched support for gRPC® during our 2020 Birthday Week. We’ve been humbled by the immense interest in the beta, and we’d like to thank everyone that has applied and tried out gRPC! In this post we’ll do a deep-dive into the technical details on how we implemented support.
What is gRPC?
gRPC is an open source RPC framework running over HTTP/2. RPC (remote procedure call) is a way for one machine to tell another machine to do something, rather than calling a local function in a library. RPC has been around in the history of distributed computing, with different implementations focusing on different areas, for a long time. What makes gRPC unique are the following characteristics:
It requires the modern HTTP/2 protocol for transport, which is now widely available.
A full client/server reference implementation, demo, and test suites are available as open source.
It does not specify a message format, although Protocol Buffers are the preferred serialization mechanism.
Both clients and servers can stream data, which avoids having to poll for new data or create new connections.
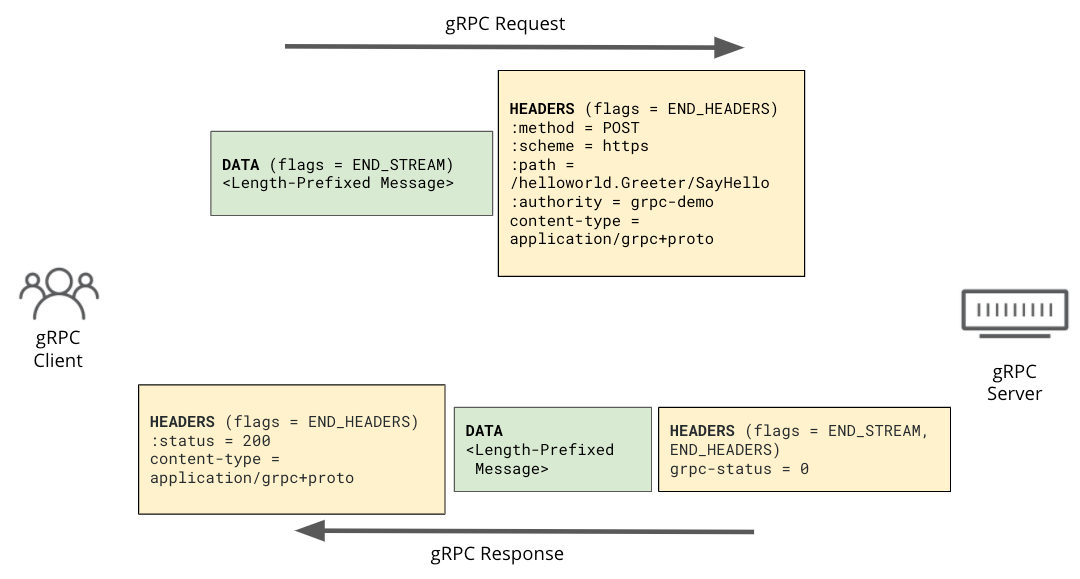
In terms of the protocol, gRPC uses HTTP/2 frames extensively: requests and responses look very similar to a normal HTTP/2 request.
What’s unusual, however, is gRPC’s usage of the HTTP trailer. While it’s not widely used in the wild, HTTP trailers have been around since 1999, as defined in original HTTP/1.1 RFC2616. HTTP message headers are defined to come before the HTTP message body, but HTTP trailer is a set of HTTP headers that can be appended after the message body. However, because there are not many use cases for trailers, many server and client implementations don’t fully support them. While HTTP/1.1 needs to use chunked transfer encoding for its body to send an HTTP trailer, in the case of HTTP/2 the trailer is in HEADER frame after the DATA frame of the body.
There are some cases where an HTTP trailer is useful. For example, we use an HTTP response code to indicate the status of request, but the response code is the very first line of the HTTP response, so we need to decide on the response code very early. A trailer makes it possible to send some metadata after the body. For example, let’s say your web server sends a stream of large data (which is not a fixed size), and in the end you want to send a SHA1 checksum of the data you sent so that the client can verify the contents. Normally, this is not possible with an HTTP status code or the response header which should be sent at the beginning of the response. Using a HTTP trailer header, you can send another header (e.g. Checksum: XXX) after having sent all the data.
gRPC uses HTTP trailers for two purposes. To begin with, it sends its final status (grpc-status) as a trailer header after the content has been sent. The second reason is to support streaming use cases. These use cases last much longer than normal HTTP requests. The HTTP trailer is used to give the post processing result of the request or the response. For example if there is an error during streaming data processing, you can send an error code using the trailer, which is not possible with the header before the message body.
Here is a simple example of a gRPC request and response in HTTP/2 frames:
Adding gRPC support to the Cloudflare Edge
Since gRPC uses HTTP/2, it may sound easy to natively support gRPC, because Cloudflare already supports HTTP/2. However, we had a couple of issues:
The HTTP request/response trailer headers were not fully supported by our edge proxy: Cloudflare uses NGINX to accept traffic from eyeballs, and it has limited support for trailers. Further complicating things, requests and responses flowing through Cloudflare go through a set of other proxies.
HTTP/2 to origin: our edge proxy uses HTTP/1.1 to fetch objects (whether dynamic or static) from origin. To proxy gRPC traffic, we need support connections to customer gRPC origins using HTTP/2.
gRPC streaming needs to allow bidirectional request/response flow: gRPC has two types of protocol flow; one is unary, which is a simple request and response, and another is streaming, which allows non-stop data flow in each direction. To fully support the streaming, the HTTP message body needs to be sent after receiving the response header on the other end. For example, client streaming will keep sending a request body after receiving a response header.
Due to these reasons, gRPC requests would break when proxied through our network. To overcome these limitations, we looked at various solutions. For example, NGINX has a gRPC upstream module to support HTTP/2 gRPC origin, but it’s a separate module, and it also requires HTTP/2 downstream, which cannot be used for our service, as requests cascade through multiple HTTP proxies in some cases. Using HTTP/2 everywhere in the pipeline is not realistic, because of the characteristics of our internal load balancing architecture, and because it would have taken too much effort to make sure all internal traffic uses HTTP/2.
Converting to HTTP/1.1?
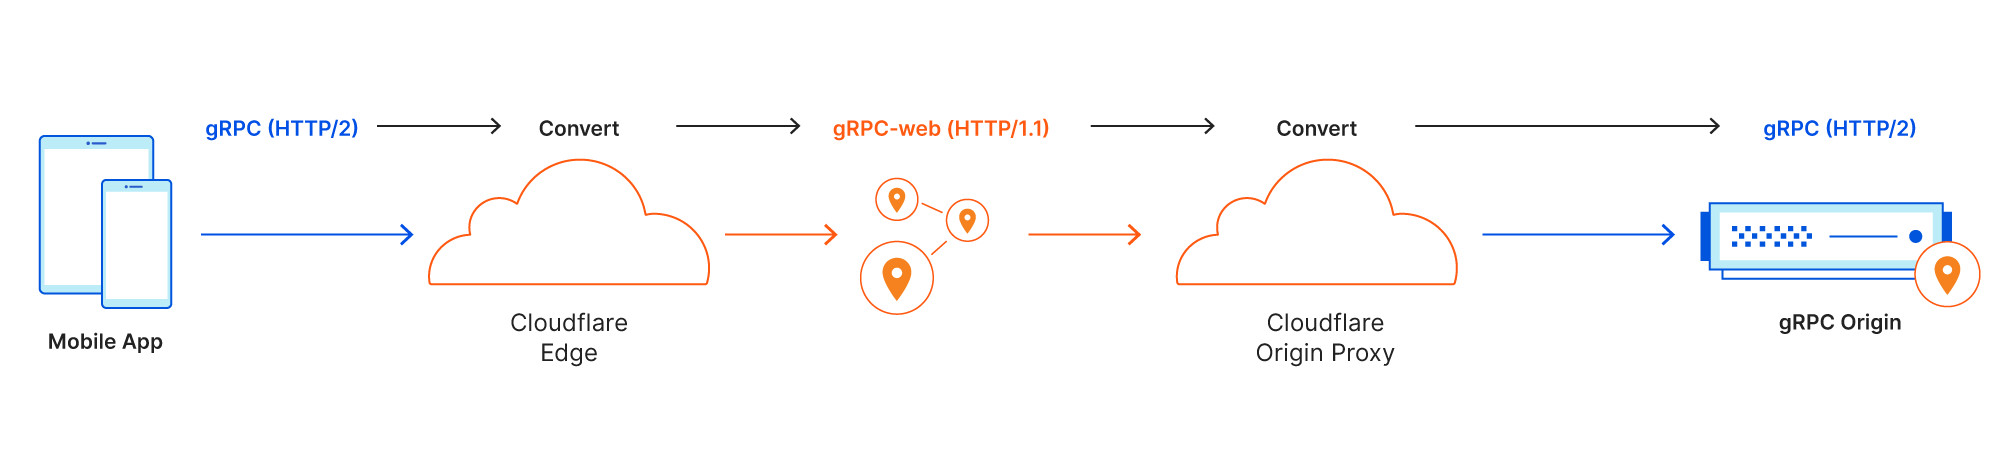
Ultimately, we discovered a better way: convert gRPC messages to HTTP/1.1 messages without a trailer inside our network, and then convert them back to HTTP/2 before sending the request off to origin. This would work with most HTTP proxies inside Cloudflare that don’t support HTTP trailers, and we would need minimal changes.
Rather than inventing our own format, the gRPC community has already come up with an HTTP/1.1-compatible version: gRPC-web. gRPC-web is a modification of the original HTTP/2 based gRPC specification. The original purpose was to be used with the web browsers, which lack direct access HTTP/2 frames. With gRPC-web, the HTTP trailer is moved to the body, so we don’t need to worry about HTTP trailer support inside the proxy. It also comes with streaming support. The resulting HTTP/1.1 message can be still inspected by our security products, such as WAF and Bot Management, to provide the same level of security that Cloudflare brings to other HTTP traffic.
When an HTTP/2 gRPC message is received at Cloudflare’s edge proxy, the message is “converted” to HTTP/1.1 gRPC-web format. Once the gRPC message is converted, it goes through our pipeline, applying services such as WAF, Cache and Argo services the same way any normal HTTP request would.
Right before a gRPC-web message leaves the Cloudflare network, it needs to be “converted back” to HTTP/2 gRPC again. Requests that are converted by our system are marked so that our system won’t accidentally convert gRPC-web traffic originated from clients.
HTTP/2 Origin Support
One of the engineering challenges was to support using HTTP/2 to connect to origins. Before this project, Cloudflare didn’t have the ability to connect to origins via HTTP/2.
Therefore, we decided to build support for HTTP/2 origin support in-house. We built a standalone origin proxy that is able to connect to origins via HTTP/2. On top of this new platform, we implemented the conversion logic for gRPC. gRPC support is the first feature that takes advantage of this new platform. Broader support for HTTP/2 connections to origin servers is on the roadmap.
gRPC Streaming Support
As explained above, gRPC has a streaming mode that request body or response body can be sent in stream; in the lifetime of gRPC requests, gRPC message blocks can be sent at any time. At the end of the stream, there will be a HEADER frame indicating the end of the stream. When it’s converted to gRPC-web, we will send the body using chunked encoding and keep the connection open, accepting both sides of the body until we get a gRPC message block, which indicates the end of the stream. This requires our proxy to support bidirectional transfer.
For example, client streaming is an interesting mode where the server already responds with a response code and its header, but the client is still able to send the request body.
Interoperability Testing
Every new feature at Cloudflare needs proper testing before release. During initial development, we used the envoy proxy with its gRPC-web filter feature and official examples of gRPC. We prepared a test environment with envoy and a gRPC test origin to make sure that the edge proxy worked properly with gRPC requests. Requests from the gRPC test client are sent to the edge proxy and converted to gRPC-web, and forwarded to the envoy proxy. After that, envoy converts back to gRPC request and sends to gRPC test origin. We were able to verify the basic behavior in this way.
Once we had basic functionality ready, we also needed to make sure both ends’ conversion functionality worked properly. To do that, we built deeper interoperability testing.
We referenced the existing gRPC interoperability test cases for our test suite and ran the first iteration of tests between the edge proxy and the new origin proxy locally.
For the second iteration of tests we used different gRPC implementations. For example, some servers sent their final status (grpc-status) in a trailers-only response when there was an immediate error. This response would contain the HTTP/2 response headers and trailer in a single HEADERS frame block with both the END_STREAM and END_HEADERS flags set. Other implementations sent the final status as trailer in a separate HEADERS frame.
After verifying interoperability locally we ran the test harness against a development environment that supports all the services we have in production. We were then able to ensure no unintended side effects were impacting gRPC requests.
We love dogfooding! One of the first services we successfully deployed edge gRPC support to is the Cloudflare drand randomness beacon. Onboarding was easy and we’ve been running the beacon in production for the last few weeks without a hitch.
Conclusion
Supporting a new protocol is exciting work! Implementing support for new technologies in existing systems is exciting and intricate, often involving tradeoffs between speed of implementation and overall system complexity. In the case of gRPC, we were able to build support quickly and in a way that did not require significant changes to the Cloudflare edge. This was accomplished by carefully considering implementation options before settling on the idea of converting between HTTP/2 gRPC and HTTP/1.1 gRPC-web format. This design choice made service integration quicker and easier while still satisfying our user’s expectations and constraints.
If you are interested in using Cloudflare to secure and accelerate your gRPC service, you can read more here. And if you want to work on interesting engineering challenges like the one described in this post, apply!
gRPC® is a registered trademark of The Linux Foundation.
Today we’re excited to announce beta support for proxying gRPC, a next-generation protocol that allows you to build APIs at scale. With gRPC on Cloudflare, you get access to the security, reliability and performance features that you’re used to having at your fingertips for traditional APIs. Sign up for the beta today in the Network tab of the Cloudflare dashboard.
gRPC has proven itself to be a popular new protocol for building APIs at scale: it’s more efficient and built to offer superior bi-directional streaming capabilities. However, because gRPC uses newer technology, like HTTP/2, under the covers, existing security and performance tools did not support gRPC traffic out of the box. This meant that customers adopting gRPC to power their APIs had to pick between modernity on one hand, and things like security, performance, and reliability on the other. Because supporting modern protocols and making sure people can operate them safely and performantly is in our DNA, we set out to fix this.
When you put your gRPC APIs on Cloudflare, you immediately gain all the benefits that come with Cloudflare. Apprehensive of exposing your APIs to bad actors? Add security features such as WAF and Bot Management. Need more performance? Turn on Argo Smart Routing to decrease time to first byte. Or increase reliability by adding a Load Balancer.
And naturally, gRPC plugs in to API Shield, allowing you to add more security by enforcing client authentication and schema validation at the edge.
What is gRPC?
Protocols like JSON-REST have been the bread and butter of Internet facing APIs for several years. They’re great in that they operate over HTTP, their payloads are human readable, and a large body of tooling exists to quickly set up an API for another machine to talk to. However, the same things that make these protocols popular are also weaknesses; JSON, as an example, is inefficient to store and transmit, and expensive for computers to parse.
In 2015, Google introduced gRPC, a protocol designed to be fast and efficient, relying on binary protocol buffers to serialize messages before they are transferred over the wire. This prevents (normal) humans from reading them but results in much higher processing efficiency. gRPC has become increasingly popular in the era of microservices because it neatly addresses the shortfalls laid out above.
JSON
Protocol Buffers
{ “foo”: “bar” }
0b111001001100001011000100000001100001010
gRPC relies on HTTP/2 as a transport mechanism. This poses a problem for customers trying to deploy common security technologies like web application firewalls, as most reverse proxy solutions (including Cloudflare’s HTTP stack, until today) downgrade HTTP requests down to HTTP/1.1 before sending them off to an origin.
Beyond microservices in a datacenter, the original use case for gRPC, adoption has grown in many other contexts. Many popular mobile apps have millions of users, that all rely on messages being sent back and forth between mobile phones and servers. We’ve seen many customers wire up API connectivity for their mobile apps by using the same gRPC API endpoints they already have inside their data centers for communication with clients in the outside world.
While this solves the efficiency issues with running services at scale, it exposes critical parts of these customers’ infrastructure to the Internet, introducing security and reliability issues. Today we are introducing support for gRPC at Cloudflare, to secure and improve the experience of running gRPC APIs on the Internet.
How does gRPC + Cloudflare work?
The engineering work our team had to do to add gRPC support is composed of a few pieces:
Changes to the early stages of our request processing pipeline to identify gRPC traffic coming down the wire.
Additional functionality in our WAF to “understand” gRPC traffic, ensuring gRPC connections are handled correctly within the WAF, including inspecting all components of the initial gRPC connection request.
Adding support to establish HTTP/2 connections to customer origins for gRPC traffic, allowing gRPC to be proxied through our edge. HTTP/2 to origin support is currently limited to gRPC traffic, though we expect to expand the scope of traffic proxied back to origin over HTTP/2 soon.
What does this mean for you, a Cloudflare customer interested in using our tools to secure and accelerate your API? Because of the hard work we’ve done, enabling support for gRPC is a click of a button in the Cloudflare dashboard.
Using gRPC to build mobile apps at scale
Why does Cloudflare supporting gRPC matter? To dig in on one use case, let’s look at mobile apps. Apps need quick, efficient ways of interacting with servers to get the information needed to show on your phone. There is no browser, so they rely on APIs to get the information. An API stands for application programming interface and is a standardized way for machines (say, your phone and a server) to talk to each other.
Let’s say we’re a mobile app developer with thousands, or even millions of users. With this many users, using a modern protocol, gRPC, allows us to run less compute infrastructure than would be necessary with older, less efficient protocols like JSON-REST. But exposing these endpoints, naked, on the Internet is really scary. Up until now there were very few, if any, options for protecting gRPC endpoints against application layer attacks with a WAF and guarding against volumetric attacks with DDoS mitigation tools. That changes today, with Cloudflare adding gRPC to it’s set of supported protocols.
With gRPC on Cloudflare, you get the full benefits of our security, reliability and performance products:
WAF for inspection of incoming gRPC requests. Use managed rules or craft your own.
Load Balancing to increase reliability: configure multiple gRPC backends to handle the load, let Cloudflare distribute the load across them. Backend selection can be done in round-robin fashion, based on health checks or load.
Argo Smart Routing to increase performance by transporting your gRPC messages faster than the Internet would be able to route them. Messages are routed around congestion on the Internet, resulting in an average reduction of time to first byte by 30%.
And of course, all of this works with API Shield, an easy way to add mTLS authentication to any API endpoint.
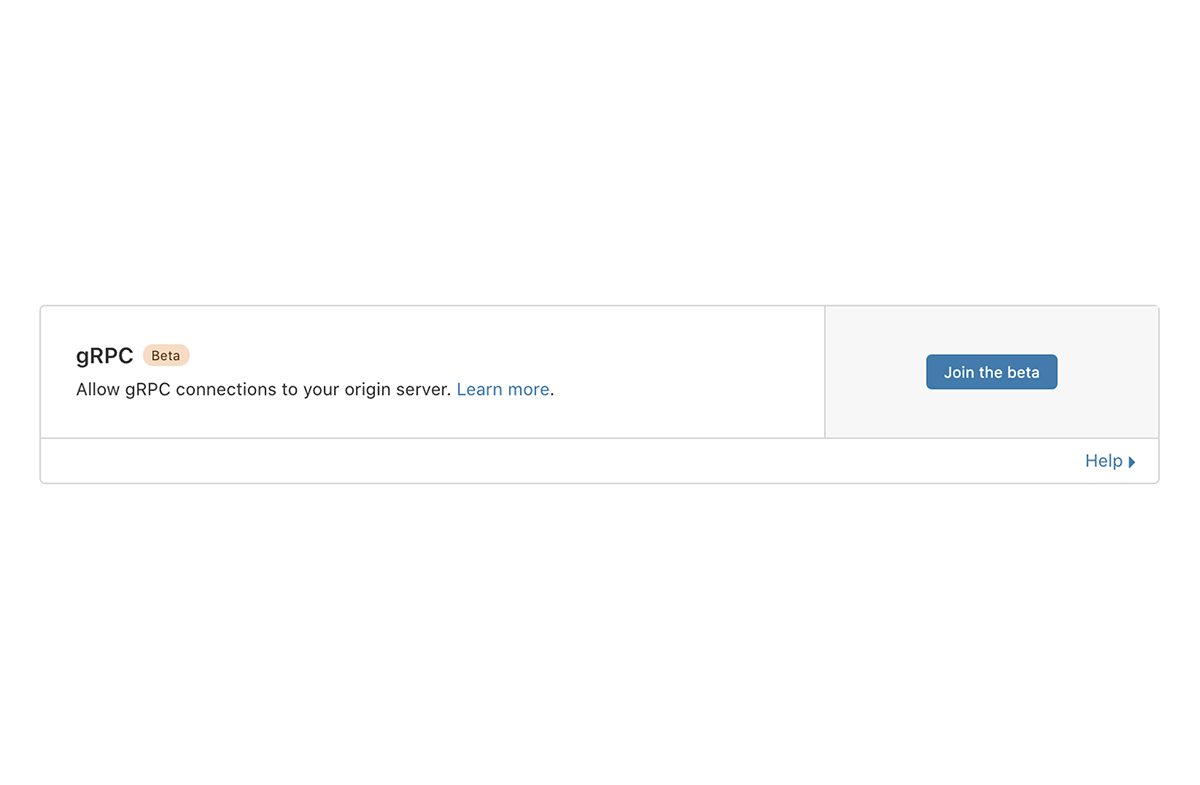
Enabling gRPC support
To enable gRPC support, head to the Cloudflare dashboard and go to the Network tab. From there you can sign up for the beta.
We have limited seats available at launch, but will open up more broadly over the next few weeks. After signing up and toggling gRPC support, you’ll have to enable Cloudflare proxying on your domain on the DNS tab to activate Cloudflare for your gRPC API.
We’re excited to bring gRPC support to the masses, allowing you to add the security, reliability and performance benefits that you’re used to getting with Cloudflare. Enabling is just a click away. Take it for a spin and let us know what you think!
The collective thoughts of the interwebz
Manage Consent
To provide the best experiences, we use technologies like cookies to store and/or access device information. Consenting to these technologies will allow us to process data such as browsing behavior or unique IDs on this site. Not consenting or withdrawing consent, may adversely affect certain features and functions.
Functional
Always active
The technical storage or access is strictly necessary for the legitimate purpose of enabling the use of a specific service explicitly requested by the subscriber or user, or for the sole purpose of carrying out the transmission of a communication over an electronic communications network.
Preferences
The technical storage or access is necessary for the legitimate purpose of storing preferences that are not requested by the subscriber or user.
Statistics
The technical storage or access that is used exclusively for statistical purposes.The technical storage or access that is used exclusively for anonymous statistical purposes. Without a subpoena, voluntary compliance on the part of your Internet Service Provider, or additional records from a third party, information stored or retrieved for this purpose alone cannot usually be used to identify you.
Marketing
The technical storage or access is required to create user profiles to send advertising, or to track the user on a website or across several websites for similar marketing purposes.