Tag Archives: Rust

Building an ARM64 Rust development environment using AWS Graviton2 and AWS CDK

Post Syndicated from Alistair McLean original https://aws.amazon.com/blogs/devops/building-an-arm64-rust-development-environment-using-aws-graviton2-and-aws-cdk/

2020 was the year that ARM chips made the headlines by moving from largely mobile form factors into the cloud thanks to AWS Graviton2, allowing you to have up to 40% better price performance over comparable current generation x86 Amazon Elastic Compute Cloud (Amazon EC2) and Amazon Relational Database Service (Amazon RDS) instances.

We speak to customers daily about Graviton2. One recurring question we hear is “Graviton2 is great, but how can my team develop for ARM natively without the complexity of cross-compilation or having to buy custom hardware on premises?” This post seeks to answer that question by setting up the Visual Studio Code-based Code Server IDE, running on a Graviton2 EC2 instance that enables native development in a cost-effective and secure manner accessed via your browser.

The Rust programming language has gained a huge amount of popularity recently. This post aims to show that you can use this environment for Rust development as well as hundreds of other supported languages. AWS has committed to supporting the Rust community and using the language to deliver fast and robust services to customers at scale, and we want to enable our customers to do the same.

We also include instructions for building and installing the rust-analyzer and CodeLLDB debugger plugins to add additional language features.

Solution overview

The following diagram illustrates our solution architecture.
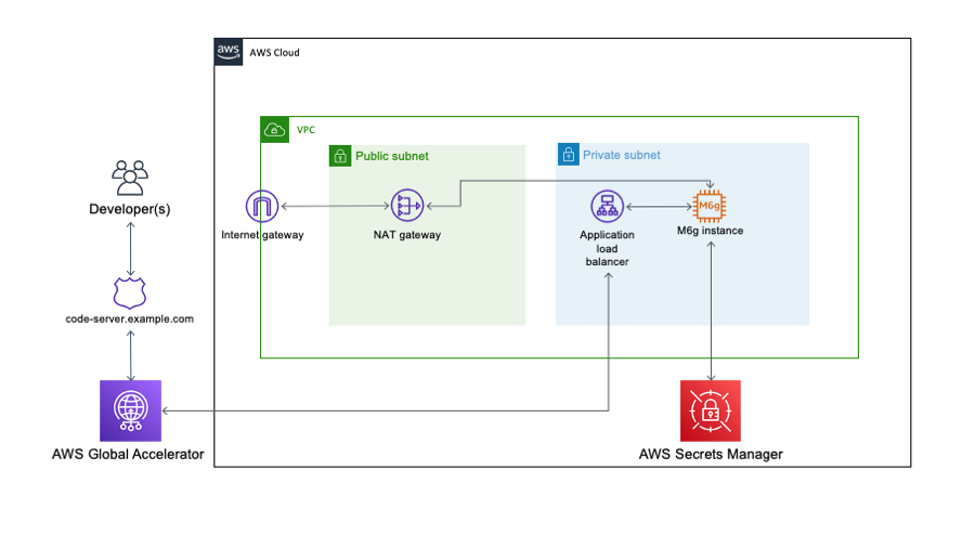
Architecture of the solution showing components and their linkages

The solution consists of an EC2 Graviton2 instance located in a private VPC subnet routed through an AWS Global Accelerator accelerator to provide routing optimization and keep packet loss, jitter, and latency lower by up to 60%. An internal facing Application Load Balancer containing the AWS Certificate Manager certificate decrypts and forwards traffic to this instance.

Code Server queries AWS Secrets Manager to initially set the login password on startup and allow for continued password-based authentication and easy password rotation. The EC2 instance has access to the internet through a NAT gateway and has no public IP address or key pair associated, and is accessible only through AWS Systems Manager Session Manager.

Prerequisites

For this walkthrough, the following are prerequisites:

AWS CDK stack

In order to deploy our architecture, I use the AWS CDK. As a developer, it’s more intuitive to me to define my infrastructure using a language and tooling with which I am familiar. I can also do things like environment variable injection and scripting as part of the stack creation to add stack parameters and customization points.

The AWS CDK application is comprised of five stacks. Each stack defines a separate part of the architecture:

  • Networking – Defines a VPC across two Availability Zones with the CIDR range of your choice. The routing and public/private subnet creation is done for us as part of the default configuration.
  • Certificate – This is the reason for the domain prerequisite. It’s a best practice to encrypt web applications using TLS, and for that we need a certificate and therefore a domain. This stack creates a certificate for the subdomain you specify as part of the stack creation and DNS validation in Route 53.
  • Amazon EC2 configuration – This defines both our AMI and the instance type and configuration. In this case, we’re using Amazon Linux 2 ARM64 edition. Here we also set the instance-managed roles that allow Session Manager connectivity and Secrets Manager access.
  • ALB configuration – Here we define the internal load balancer and specify the listener, certificate, and target configuration. I have injected the Amazon EC2 configuration as part of the class constructor so that I can reference it directly as a target.
  • Global accelerator configuration – Finally, the accelerator is defined here with two ports open, the ALB we defined in the ALB stack as a target, and most importantly adds in a CNAME DNS entry pointing to the DNS name of the accelerator.

Walkthrough overview

This walkthrough uses the AWS CDK command line tools to deploy the stack. Session Manager is enabled to allow access to the EC2 instance and configure the Code Server application and associated plugins.

The walkthrough specifically covers the following steps:

  1. Deploy the AWS CDK stacks via CloudShell to build out the application infrastructure and associated IAM roles.
  2. Launch Code Server via the official Docker container with the commands to get and set the password stored in Secrets Manager.
  3. Log in and build the rust-analyzer and CodeLLDB plugins from a terminal to allow for debugging within a “Hello World” application.

Start CloudShell and install the appropriate tooling

In this section, I use dummy values for the domain, the VPC CIDR, AWS Region, and the secret password. You need to submit real values as appropriate.

Sign in to CloudShell and enter the following commands:

sudo yum groupinstall -y "Development Tools"
sudo npm install aws-cdk -g
git clone https://github.com/aws-samples/cdk-graviton2-alb-aga-route53.git
cd cdk-graviton2-alb-aga-route53
python3 -m venv .
source bin/activate
python -m pip install -r requirements.txt
export VPC_CIDR=”10.0.0.1/16” #Substitute your CIDR here.
export CDK_DEPLOY_ACCOUNT=`aws sts get-caller-identity | jq -r '.Account'`
export CDK_DEPLOY_REGION=$AWS_REGION
export R53_DOMAIN=”code-server.example.com” #Substitute your domain here.
cdk bootstrap aws://$CDK_DEPLOY_ACCOUNT/$CDK_DEPLOY_REGION
cdk deploy --all

The deploy step takes around 10-15 mins to run and prompts a couple of times to add resources like security groups and IAM roles.

Log in to the new instance using Session Manager

Install the latest version of the Session Manager plugin for the AWS CLI:

cd ~
curl "https://s3.amazonaws.com/session-manager-downloads/plugin/latest/linux_64bit/session-manager-plugin.rpm" -o "session-manager-plugin.rpm"
sudo yum install -y session-manager-plugin.rpm

Now start a session, logging into the newly created EC2 instance and log in as ec2-user:

aws ssm start-session --target i-1234xyz7890abc #Substitute the instance id we just created here
#Once session is active:
sudo su - ec2-user

Add the password as a secret and start the container

Enter the following code to add the password as a secret in Secrets Manager and start the container:

aws secretsmanager create-secret --name CodeServerProd --secret-string Password123abc # Substitute the appropriate password here.
sudo docker run -d --name=code-server -e PUID=1000 -e PGID=1000 -e PASSWORD=`aws secretsmanager get-secret-value --secret-id CodeServerProd | jq -r '.SecretString'` -p 8080:8080 -v /home/ec2-user/.config:/config --restart unless-stopped codercom/code-server

Access and configure the web application for Rust development

So far, we have accomplished the following:

  • Created the infrastructure in the diagram via AWS CDK deployment
  • Configured the EC2 instance to run Docker and added this to the systemctl startup scripts
  • Created a secret in Secrets Manager to use as the application login password
  • Instantiated a Docker container running Code Server

Next, we access the running container via the web interface and install the required development tools.

Log in to the Code Server web application

To log in to the Code Server web application, complete the following steps:

  1. Browse to https://code-server.example.com, where example.com is the name of the domain you supplied in the AWS CDK step.
  2. Log in using the password you created in Secrets Manager.
  3. Create a new terminal by choosing the hamburger icon and, under Terminal, choosing New Terminal.
  4. Issue the following commands into the terminal to install the Rust programming language:
bash
sudo apt update && sudo apt upgrade -y
sudo apt install -y build-essential npm clang lldb
curl --proto '=https' --tlsv1.2 -sSf https://sh.rustup.rs | sh
source $HOME/.cargo/env

Install the rust-analyzer plugin

Open the extensions panel and enter Rust Analyzer in the search bar. Then install the plugin.

Install the debugger

Go back to the extensions panel in the Code Server application and enter CodeLLDB into the search bar. Then install this extension.

Create a sample application and open it in the Code Server window

To create and use our sample application, complete the following steps:

  • In the existing Code Server terminal, enter the following:
mkdir -p ~/src/
cd ~/src
cargo new helloworld --bin
  • Open the newly created folder in Code Server verifying that the helloworld directory was successfully created.

Open File or Folder dialog in Code Server

  • Rust-analyzer runs when you open up src/main.rs and index the file.
  • You can run the program by choosing Run in the editor.
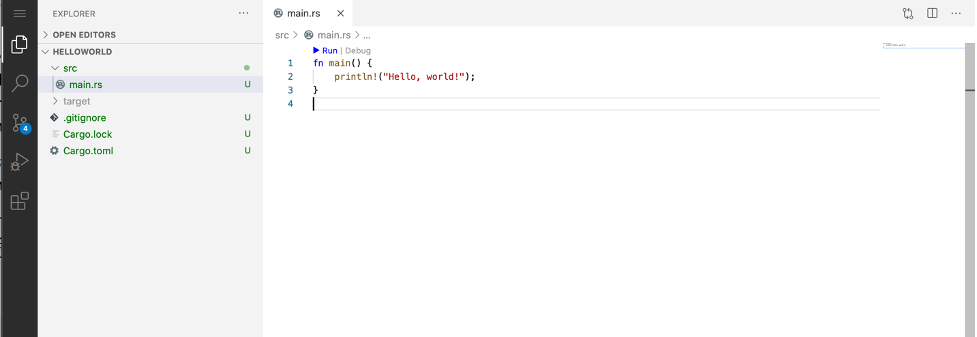
Main Code Server editor window showing helloworld Rust program code.

  • Similarly, to launch the debugger, choose Debug in the editor.

Code Server Debugger view

Troubleshooting

If the CloudShell session times out, you need to reset your environment variables in order to re-deploy, modify, and delete the stack deployment.

Clean up

This stack incurs an estimated monthly cost of $143.00.

To delete the stack, log in to CloudShell and enter the following commands:

cd cdk-graviton2-alb-aga-route53
source bin/activate

# Re-set the environment variables again if required
export VPC_CIDR=”10.0.0.1/16” #Substitute your CIDR here.
export CDK_DEPLOY_ACCOUNT=`aws sts get-caller-identity | jq -r '.Account'`
export CDK_DEPLOY_REGION=$AWS_REGION
export R53_DOMAIN=”code-server.example.com” #Substitute your domain here.
cdk destroy --all

This destroys all the resources created in the first step. You can verify this by browsing to the AWS CloudFormation console and noting the deletion of all the stacks.

Conclusion

AWS is a place where builders can reinvent the future. The future of development means supporting different chipsets depending on different business requirements. This post is designed to enable development targeting the ARM64 microarchitecture by utilizing AWS Graviton2. Happy building!

Author bio

Author portrait

Alistair is a Principal Solutions Architect at AWS focused on EdTech customers. Originally from the west coast of Scotland, Alistair now lives in Fairfield, Connecticut, with his wife and two daughters and enjoys spending time with his family, skiing, golfing, cycling, and using his pellet smoker.


Using One Cron Parser Everywhere With Rust and Saffron

Post Syndicated from Aaron Loyd original https://blog.cloudflare.com/using-one-cron-parser-everywhere-with-rust-and-saffron/

Using One Cron Parser Everywhere With Rust and Saffron

Using One Cron Parser Everywhere With Rust and Saffron

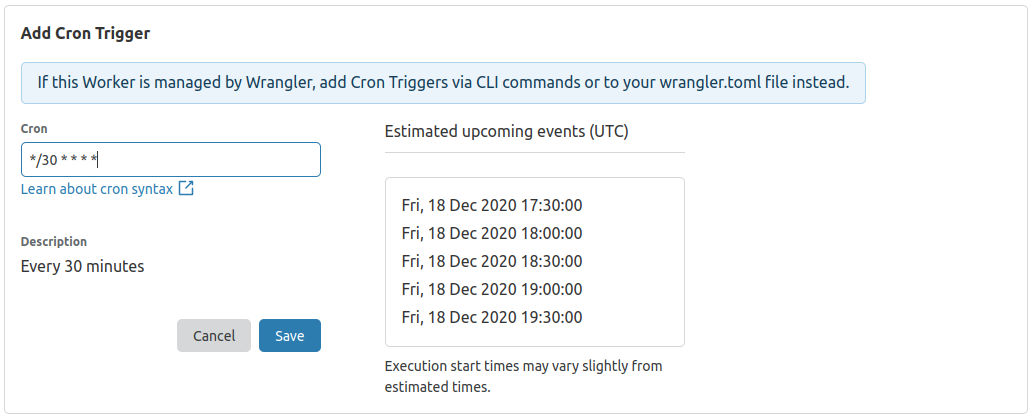
As part of the development for Cron Triggers on Cloudflare Workers, we had an interesting problem to tackle relating to parsers and the cron expression format. Cron expressions are the format used to write schedules in Cron Triggers, and extensions for cron expressions are everywhere. They vary between parsers and platforms as well, and aren’t standardized by a governing body, which means most parsers out there support many different feature sets, which isn’t good if you’d like something off the shelf that just works.

It can be tough to find the right parser for each part of the Cron Triggers stack, when its user interface, API, and edge service are all written in different languages. On top of that, it isn’t practical to reinvent the wheel multiple times by writing the same parser in different languages and make sure they all match perfectly. So you’re likely stuck with a less-than-perfect solution.

However, in the end, because we wrote our backend service in Rust, it took much less effort to solve this problem. Rust has a great ecosystem for working across multiple languages, which allows us to write a parser once and pull it from the backend to the frontend and everywhere in between with minimal glue code.

The Trouble with Cron

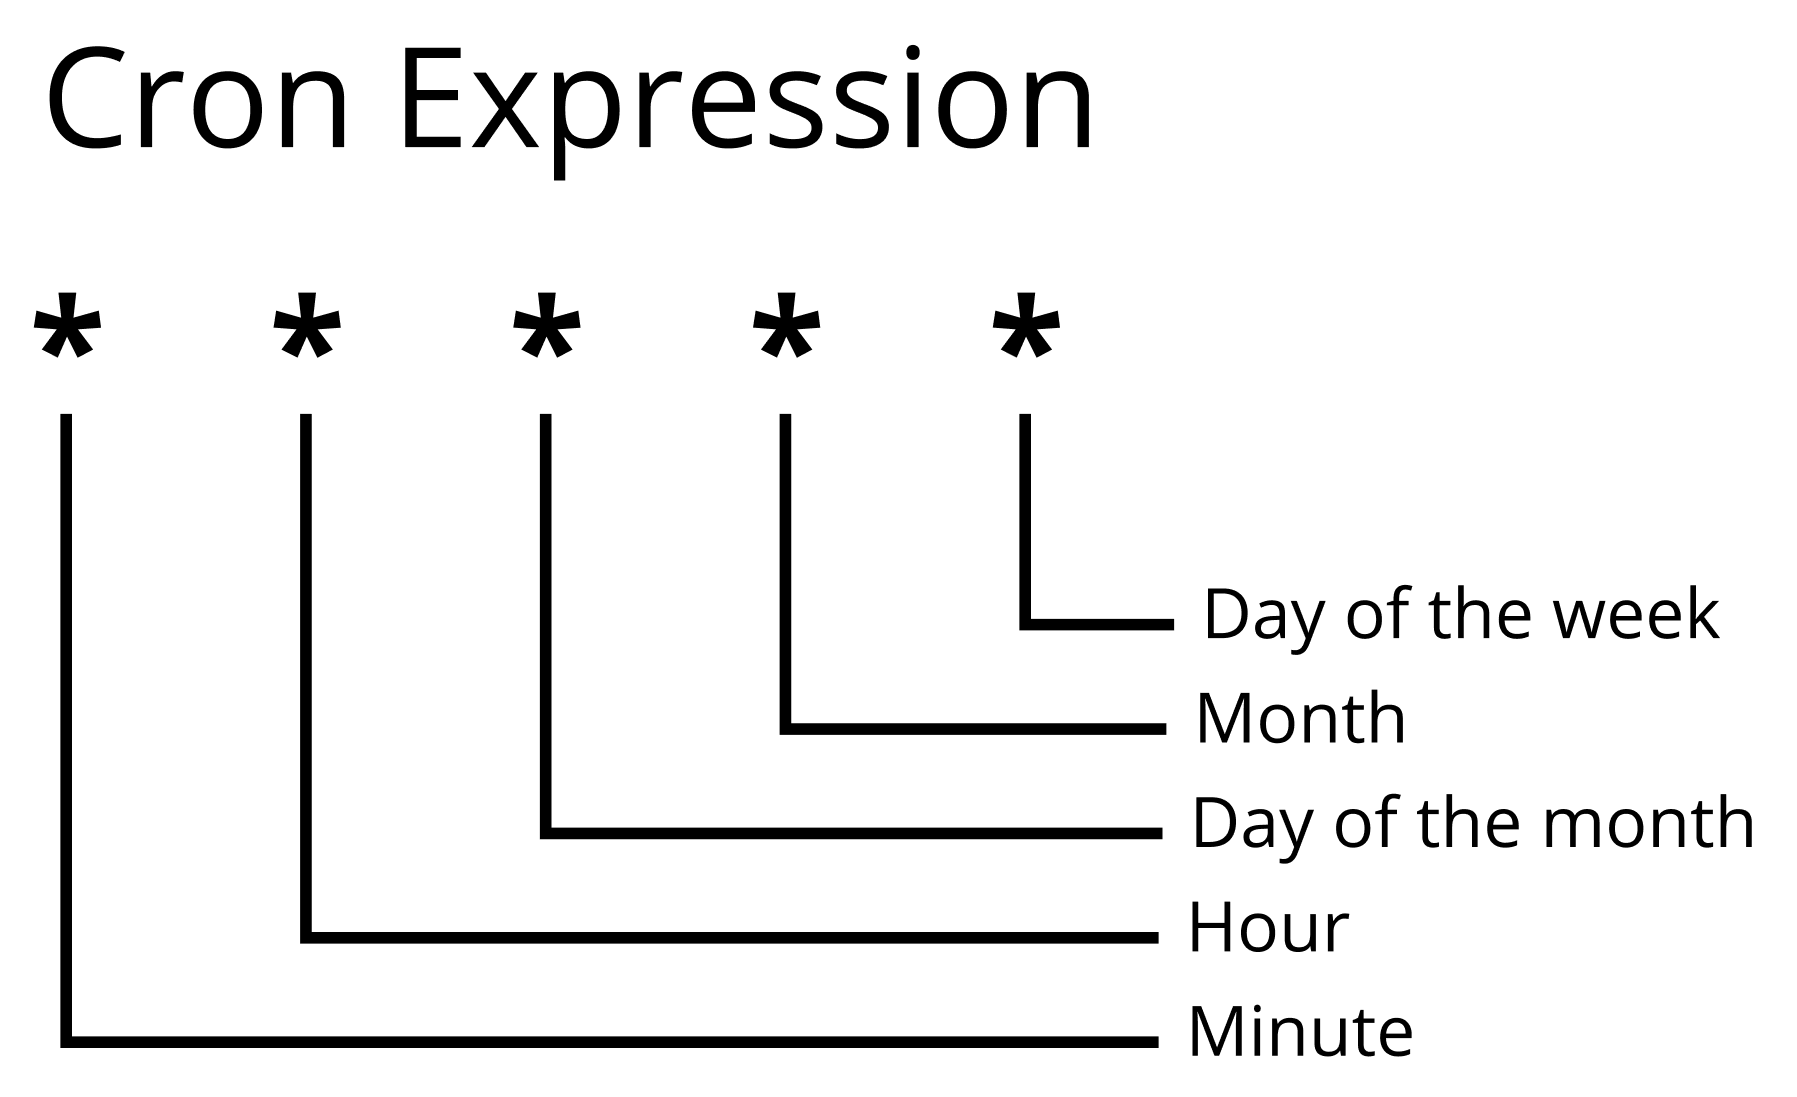
Cron expressions are a set of fields that represent a set of times. They act as a pattern that matches over the minute, hour, day of the month, month, and day of the week of a given time. Since cron is a simple format, it’s easy to extend with extra fields, so some parsers and platforms allow specifying seconds and years as well. However, seconds are a bit too granular and years are a bit too long, so we opted to not support them as part of Cron Triggers.

Using One Cron Parser Everywhere With Rust and Saffron

In the original cron program, the expressions supported were simple, each field could contain either:

  • A star (‘*’) representing all values,
  • A value (a number for all fields or a 3 letter abbreviation for months or days of the week, like JUN or FRI)
  • A range of values (i.e. ‘0-30’), or
  • A set of ranges and/or values (i.e. ‘0-15,30,45-50,55’)

This is a good start for specifying most time patterns, but many extensions exist out there to fill in some gaps. For example,

  • ‘L’ can be used for the day of the month position to specify the last day of the month, or in the day of the week position with a day value to specify the last of that weekday during the month (i.e. 7L, the last Saturday of the month).
  • ‘W’ can be used for the day of the month, and lets you specify “the closest weekday (MON-FRI) to a given day”, like 15W, or the closest weekday to the 15th of the month.
  • ‘/’ can be used for step values in any field. For example, */5 in the minute field is every 5th minute in the hour. This can be combined with a range to specify things such as ‘30-59/5’, or every 5th minute from minute 30 to minute 59 in the hour.
  • ‘#’ can be used with a day of the week value to specify the “nth day of the month”, such as ‘5#3’, or the 3rd Thursday of the month.

So far I’ve only listed extensions we currently support on Workers, but others exist such as ‘H’ in Jenkins and ‘?’ in some cron implementations for start-up time. Most libraries don’t support said extensions, however ‘?’ is used in some implementations in certain circumstances, but not as start-up time. With all these extensions and a lack of standardization, some libraries aren’t guaranteed to support them all.

The Multitude of Libraries

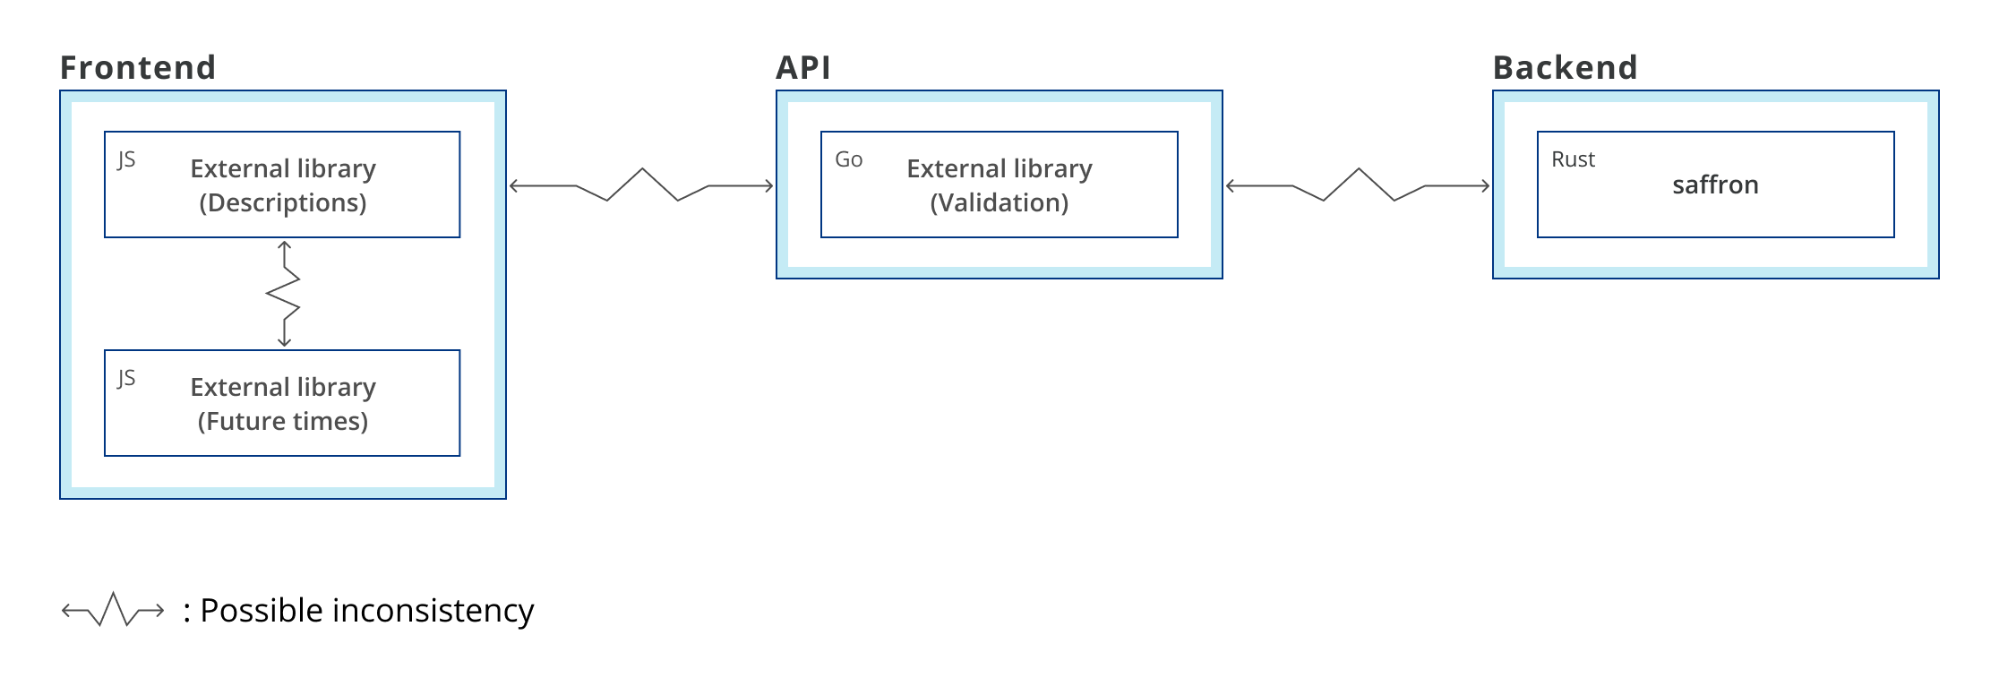
During the development of Cron Triggers, we needed some things to just work, and to do that, we opted to pull some libraries off the shelf from package repositories for different parts of the stack.

In the Rust backend, we needed a cron library that supported all the extensions we wanted, while also leaving off other field extensions like seconds and years, and had an API that let us simply check if a given time matched the expression pattern. None of the crates on crates.io offered these, so we had to write it ourselves. Using the nom crate, it was easy to draft a simple, fast, safe parser, named ‘saffron’. As time went on and we got closer to release, it became clearer which extensions we really wanted to support. It was incredibly easy to add support for the new features without worrying about safety since the compiler checked it for us, so all we had to do was extensive logic testing. Last offset weekdays (“L-XW”) and leap years were difficult to get right the first time, but testing them was easy with Rust.

#[test]
   fn parse_check_offset_weekend_start_months() {
       let cron = "0 0 L-30W * *";
 
       check_does_contain(
           cron,
           &["2021-05-3T00:00:00+00:00", "2022-01-3T00:00:00+00:00"],
       );
   }
   #[test]
   fn parse_check_offset_leap_days() {
       let cron = "0 0 L-1 FEB *";
 
       check_does_contain(
           cron,
           &[
               "2400-02-28T00:00:00+00:00",
               "2300-02-27T00:00:00+00:00",
               "2200-02-27T00:00:00+00:00",
               "2100-02-27T00:00:00+00:00",
               "2024-02-28T00:00:00+00:00",
               "2020-02-28T00:00:00+00:00",
               "2004-02-28T00:00:00+00:00",
               "2000-02-28T00:00:00+00:00",
           ],
       );
 
       check_does_not_contain(
           cron,
           &[
               "2400-02-29T00:00:00+00:00",
               "2300-02-28T00:00:00+00:00",
               "2200-02-28T00:00:00+00:00",
               "2100-02-28T00:00:00+00:00",
               "2024-02-29T00:00:00+00:00",
               "2020-02-29T00:00:00+00:00",
               "2004-02-29T00:00:00+00:00",
               "2000-02-29T00:00:00+00:00",
           ],
       );
   }

However, the UI had a different set of requirements. It didn’t need to know whether a given time matched a cron pattern — we wanted to provide information to the user about the cron expression they’d written, so it needed to provide a more human readable translation (description) of their cron expression and show them their next five executions (future times). But we were on a limited time budget — we needed something off the shelf.

Using One Cron Parser Everywhere With Rust and Saffron

We used two different JavaScript libraries for displaying info about given cron expressions: one gave us descriptions, the other gave us future times. Since these two libraries were tasked with parsing cron expressions, they also acted as validation; however, just using these two libraries for validation proved to be less than optimal. Both of the libraries supported extensions that were different both from each other and from the backend. Because of that they’d sometimes allow users to add schedules that would be rejected by the API on submit, which doesn’t translate into a good user experience. This validation should happen while the user writes their cron expression, not after they already hit submit! Because of this fracture in extension support, the UI parsers also sometimes didn’t parse expressions that should be supported and were accepted by the API!

Before release on the API side, we simply used a Go library for validation. This proved to be an easy solution, but we quickly noticed that the API accepted more than the schedule runner supported. This caused some triggers to be successfully added to the schedule, but were ignored by the runner because they failed to parse.

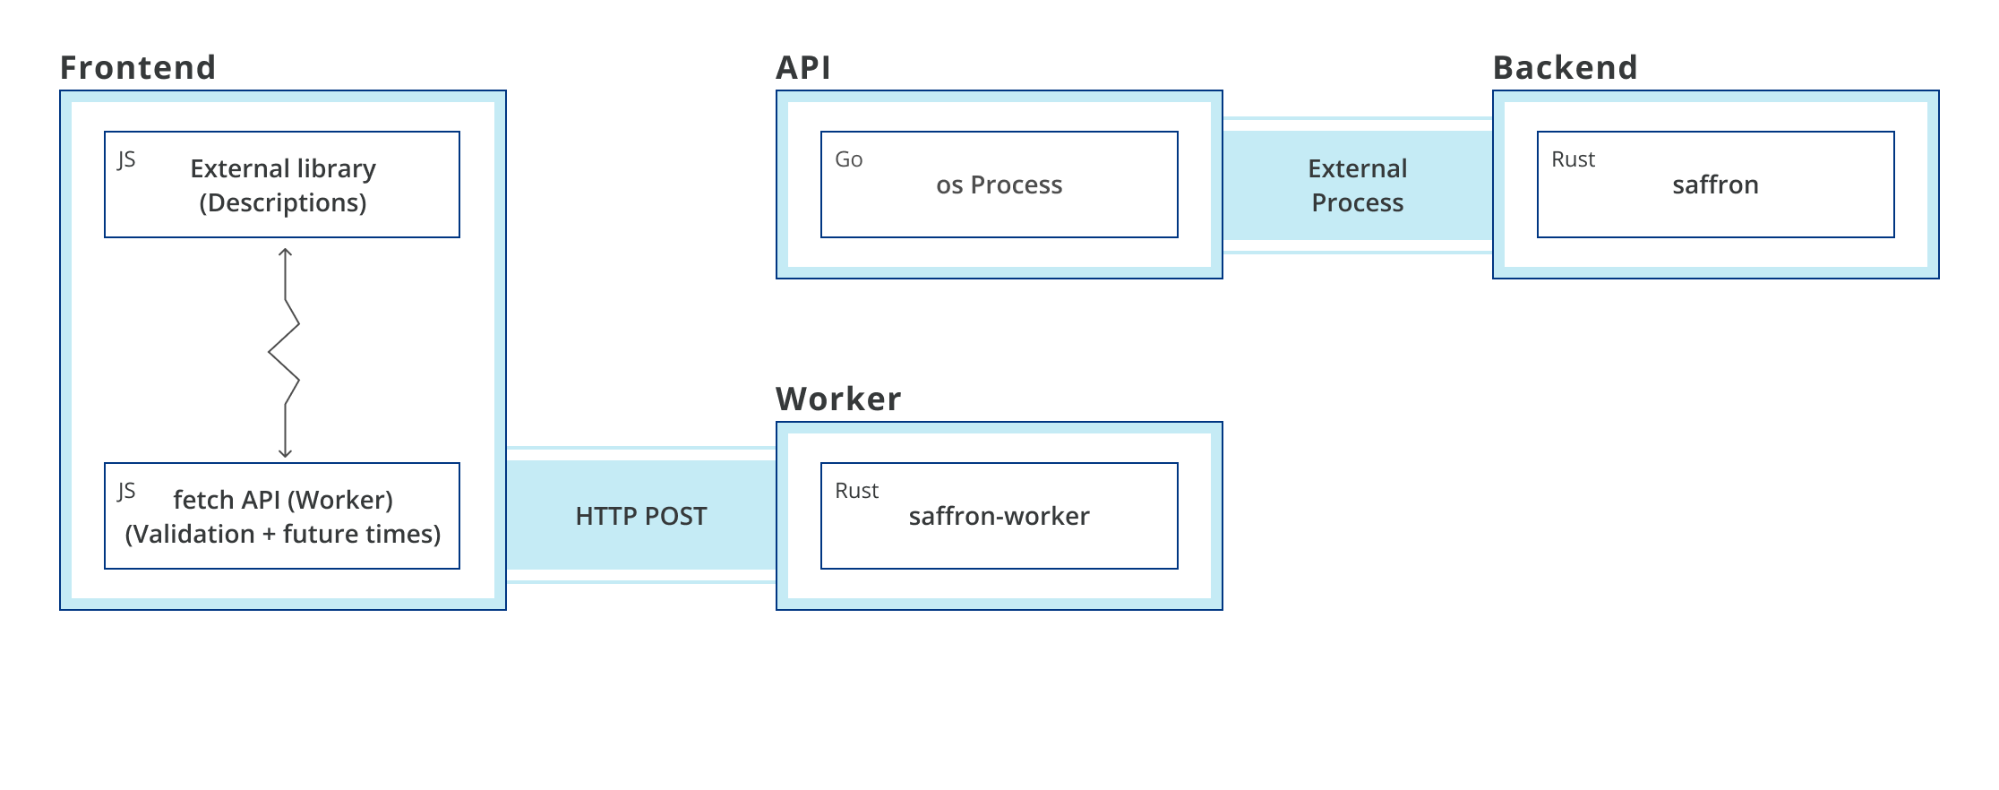
So before launch, we were using four completely different parsers! This probably wouldn’t be much of an issue if cron expressions were standardized. But because they aren’t, inconsistencies could exist at every step in the trigger creation process: between the two libraries we used on the frontend, between the frontend and API, and between the API and the backend.

Using One Cron Parser Everywhere With Rust and Saffron

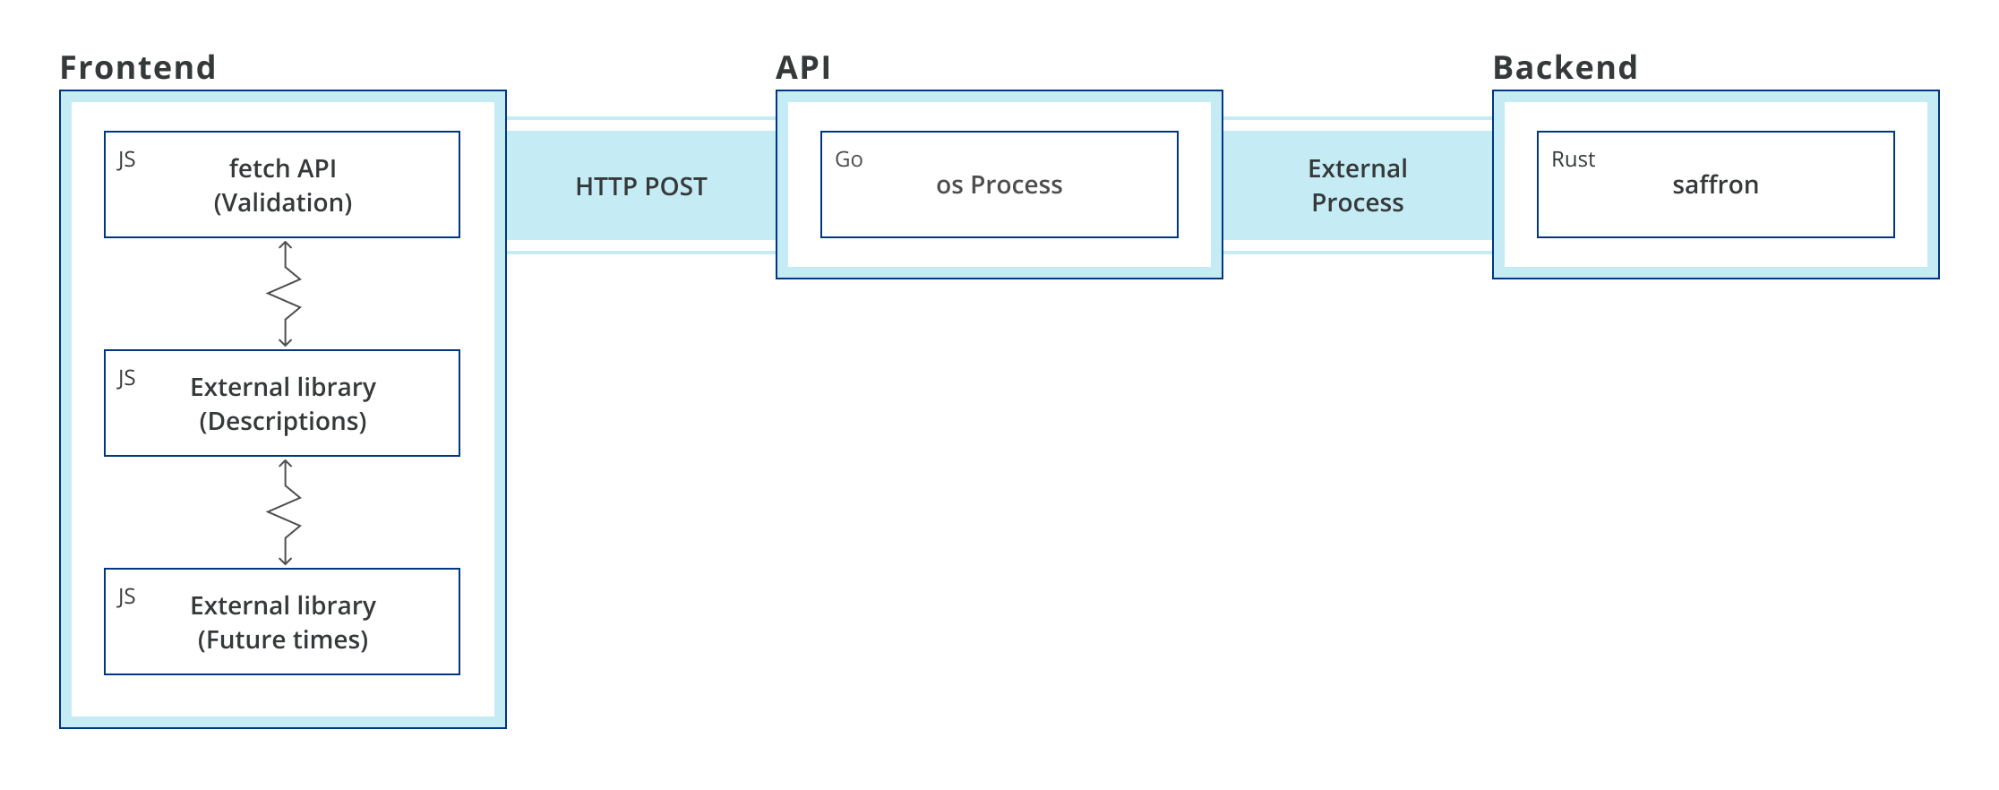
To solve these issues in the UI and API before release, we synced the API and backend with another schedule runner entrypoint that simply read a cron expression from stdio, parsed it, and returned whether it was valid, to make sure they perfectly matched. We also added a validation endpoint to the API that could be used by the UI to check a cron expression, to make sure the backend actually accepted it. This fixed all cases of the API and UI being too accepting of expressions that weren’t supported, but neither of these solutions were optimal.

For one, they weren’t performant. Each time we wanted to validate a cron expression in the UI, we’d have to parse the expression twice in JavaScript (once for a description, and again for future times) and make an request to the API, which would start an instance of the schedule runner, parse the expression, and return whether it properly parsed.

Another reason this was nonoptimal is we were still limited in the features we supported by one library. One of our UI libraries didn’t support the ‘L’ and ‘W’ extensions, and since we also programmed the UI to accept expressions based on whether all parsers accepted it, expressions that used those extensions couldn’t be added.

Using One Cron Parser Everywhere With Rust and Saffron

So even though we dropped it to three parsers before release, it still didn’t seem good enough. Soon after release, I made plans to remedy it and started working on saffron (originally this project was called cfron but Cloudflare’s CTO couldn’t resist suggesting renaming it to saffron because he loves puns) to fill in for the one library holding us back in the UI. It would’ve been OK if missing extension support was the only thing wrong after release, but soon some other issues came up.

Off By One

Saffron is based on the Quartz open source scheduler’s cron parser, which makes days of the week when specified as integers start from 1 (Sunday) and go to 7 (Saturday). Both parsers on the frontend follow the original values for cron, where days start from 0 and go to 6, and 7 could be used for Sunday as well. So when users entered 1-5, the UI told them they were entering a schedule from Monday to Friday, and the backend ended up executing Sunday to Thursday! This was missed when testing Cron Triggers initially and was caught by observant community members on the forum.

Fixing the issue turned out to be a bit difficult. While the library we were using for descriptions had the option to simply switch from 0-6 to 1-7 days of the week, our future times library did not have that option. Luckily, development was already halfway through with replacing it in Saffron. However, we couldn’t place it directly on the frontend yet, since web bindings didn’t exist and I didn’t have time to write them. We needed something easier to develop quickly.

Reintroducing: Cloudflare Workers!

Workers made it incredibly easy to take the existing code, add some wasm entry points for a makeshift API, and call with JavaScript. No need to build a whole separate API in Go! Just take your existing code and put it directly within 100ms of nearly everyone on the Internet. Why call all the way back home when the nearest PoP works just as well?

Plus, we don’t have to worry about building and publishing, wrangler does it for us! For example, our validation code is all written in Rust:

#[wasm_bindgen]
#[derive(Clone, Debug)]
pub struct ValidationResult {
   errors: Option<Vec<String>>,
}
 
#[wasm_bindgen]
pub fn validate(crons: JsArray) -> ValidationResult {
   set_panic_hook();
 
   let len = crons.length();
   let mut map = HashMap::with_capacity(len as usize);
   for i in 0..len {
       let string = match crons.get(i).as_string() {
           Some(string) => string,
           None => {
               return ValidationResult {
                   errors: Some(vec![format!("Element '{}' is not a string", i)]),
               }
           }
       };
 
       let cron: Cron = match string.parse() {
           Ok(cron) => cron,
           Err(err) => {
               return ValidationResult {
                   errors: Some(vec![format!(
                       "Failed to parse expression at index '{}': {}",
                       i, err
                   )]),
               }
           }
       };
 
       if let Some(old_str) = map.insert(cron, string.clone()) {
           return ValidationResult {
               errors: Some(vec![format!(
                   "Expression '{}' already exists in the form of '{}'",
                   string, old_str
               )]),
           };
       }
   }
 
   ValidationResult { errors: None }
}

and our code to handle processing the request and response is written in JavaScript:

  const path = new URL(request.url).pathname;
 switch (path) {
   case "/validate": {
     let body;
     try {
       body = await request.json()
     } catch (e) {
       return status(400, "Bad Request");
     }
     let crons = body.crons;
     if (!Array.isArray(crons)) {
       return status(400, "Bad Request");
     }
 
     let result = validate(crons).errors();
     let success = result == null;
     return apiResponse({}, success, result);
   }

After a week of dedicated development, a Worker was written, the future times were calculated, and the UI was fixed! On top of that, we also implicitly introduced support for more extensions by removing the old parser and replacing it with the same one used on the backend as part of the fix itself. But we’re still using two parsers, so inconsistencies may still exist out there that we haven’t seen yet (that we don’t already know about).

Using One Cron Parser Everywhere With Rust and Saffron

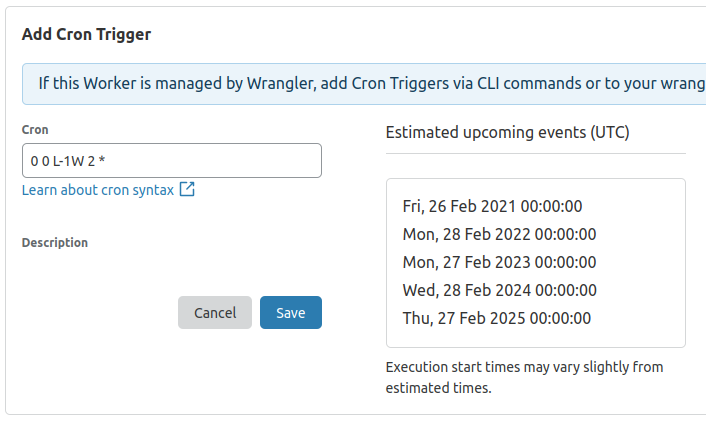
For example, this expression “0 0 L-1W 2 *”, or “12:00 AM on the closest weekday to the 2nd to last day of the month in February” cannot be parsed by the parser we use for descriptions, but it’s accepted by the API, backend, and Worker, so you can use it in your cron triggers, but the UI won’t give you a description for it.

Using One Cron Parser Everywhere With Rust and Saffron

The Quest for the One True Parser

This brings us to today. In the search of better and faster, we want to bring the number of parsers down from two to one. One source of truth for the entire stack. To make it all faster, we should do parsing on the frontend locally instead of making a call to a remote Worker (if possible). In the API, the separate entry point was a nice easy solution, but starting the schedule runner just to check if a cron string is valid every time a user adds one doesn’t seem like it’s the best it could be.

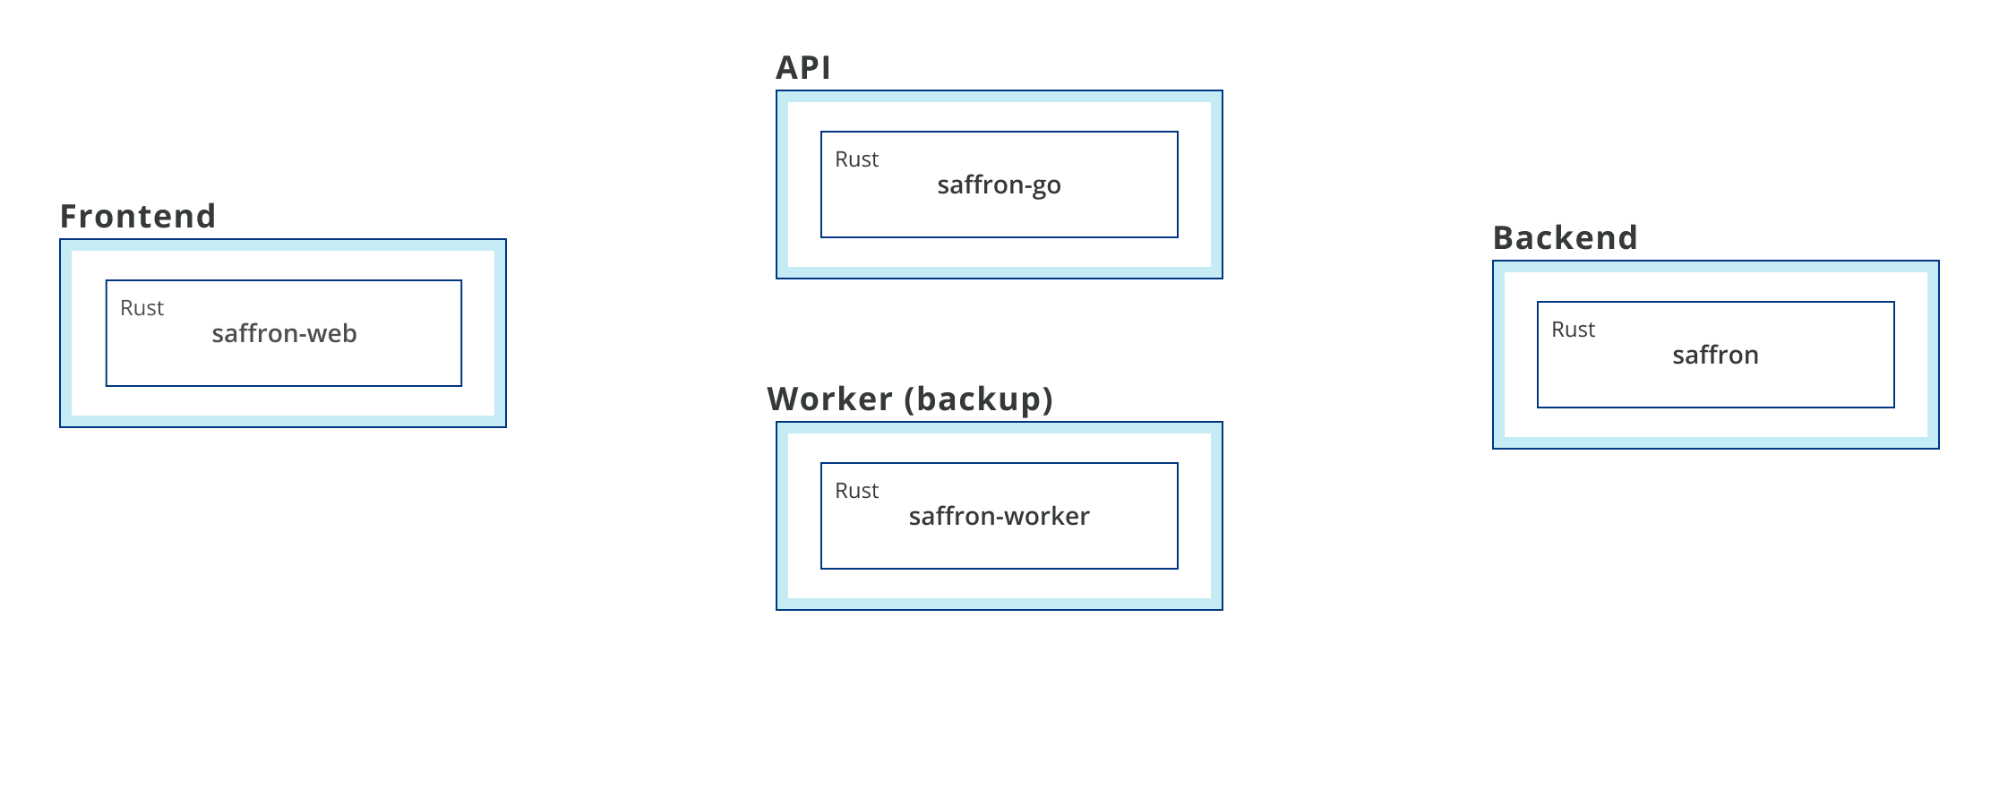
Luckily Rust has a vibrant ecosystem that can meet all these needs! To bring the parser to the UI, we can compile saffron to wasm and use generated bindings created with wasm-pack. This can be easily integrated with our existing webpack setup, making it simple to get future times and create descriptions of cron strings on the frontend. Then, to bring the parser closer to the API, we can use Rust’s ability to create C APIs that we can then integrate with Go using cgo.

With our parser everywhere, we can then focus exclusively on cron descriptions to replace the one other parser we’re using in the UI. At that point we will have one parser for the whole stack, a single source of truth that anyone can reference to understand how the frontend, API, and backend all work together. It also simplifies our graph. Now instead of multiple libraries written in different languages, we have one library with multiple language wrappers, each serving a different part of the stack. No inconsistencies will exist since they’re all using the same parser!

Using One Cron Parser Everywhere With Rust and Saffron

However, we wanted to do something before that…

We made it open source!

I think this project serves as a great example of Rust’s type system, its safety, and its extensibility across the entire stack. The project itself is simple, easy to understand, and easy to port and provide bindings for. By open sourcing, we can publish packages for these bindings on npm and crates.io, allowing anyone to use these bindings for whatever they want. It also means you can also follow along with development to see the finishing touches get added and maybe make some suggestions for future improvements in the UI and the parser itself.

You can view the project on GitHub at https://github.com/cloudflare/saffron.

Building even faster interpreters in Rust

Post Syndicated from Zak Cutner original https://blog.cloudflare.com/building-even-faster-interpreters-in-rust/

Building even faster interpreters in Rust

Building even faster interpreters in Rust

At Cloudflare, we’re constantly working on improving the performance of our edge — and that was exactly what my internship this summer entailed. I’m excited to share some improvements we’ve made to our popular Firewall Rules product over the past few months.

Firewall Rules lets customers filter the traffic hitting their site. It’s built using our engine, Wirefilter, which takes powerful boolean expressions written by customers and matches incoming requests against them. Customers can then choose how to respond to traffic which matches these rules. We will discuss some in-depth optimizations we have recently made to Wirefilter, so you may wish to get familiar with how it works if you haven’t already.

Minimizing CPU usage

As a new member of the Firewall team, I quickly learned that performance is important — even in our security products. We look for opportunities to make our customers’ Internet properties faster where it’s safe to do so, maximizing both security and performance.

Our engine is already heavily used, powering all of Firewall Rules. But we have bigger plans. More and more products like our Web Application Firewall (WAF) will be running behind our Wirefilter-based engine, and it will become responsible for eating up a sizable chunk of our total CPU usage before long.

How to measure performance?

Measuring performance is a notoriously tricky task, and as you can probably imagine trying to do this in a highly distributed environment (aka Cloudflare’s edge) does not help. We’ve been surprised in the past by optimizations that look good on paper, but, when tested out in production, just don’t seem to do much.

Our solution? Performance measurement as a service — an isolated and reproducible benchmark for our Firewall engine and a framework for engineers to easily request runs and view results. It’s worth noting that we took a lot of inspiration from the fantastic Rust Compiler benchmarks to build this.

Building even faster interpreters in Rust
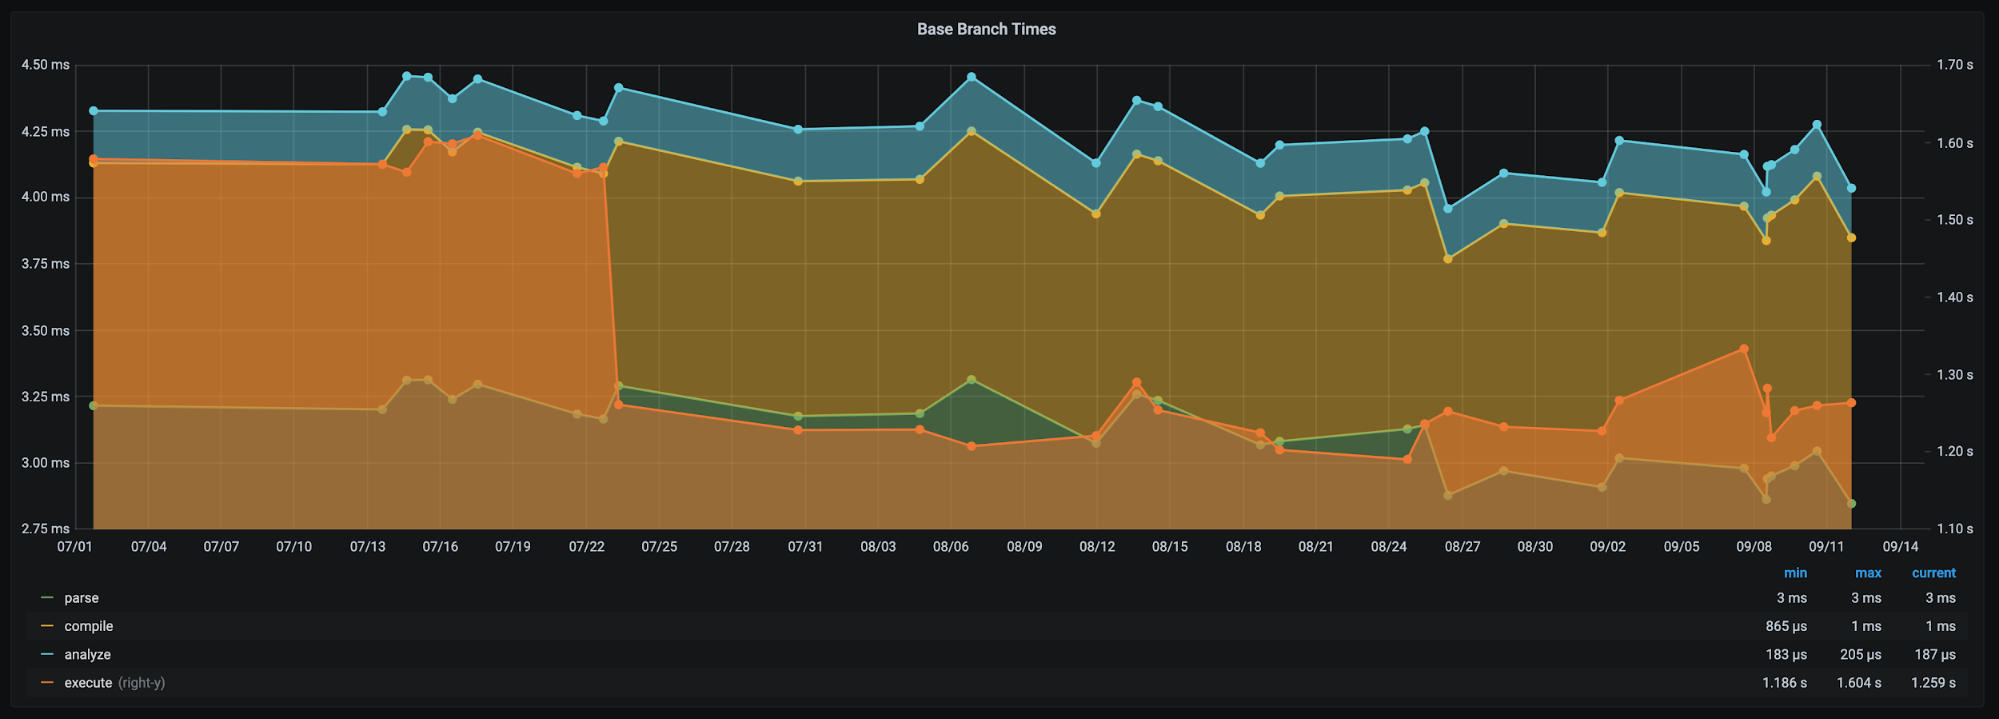
Our benchmarking framework, showing how performance during different stages of processing Wirefilter expressions has changed over time [1].

What to measure?

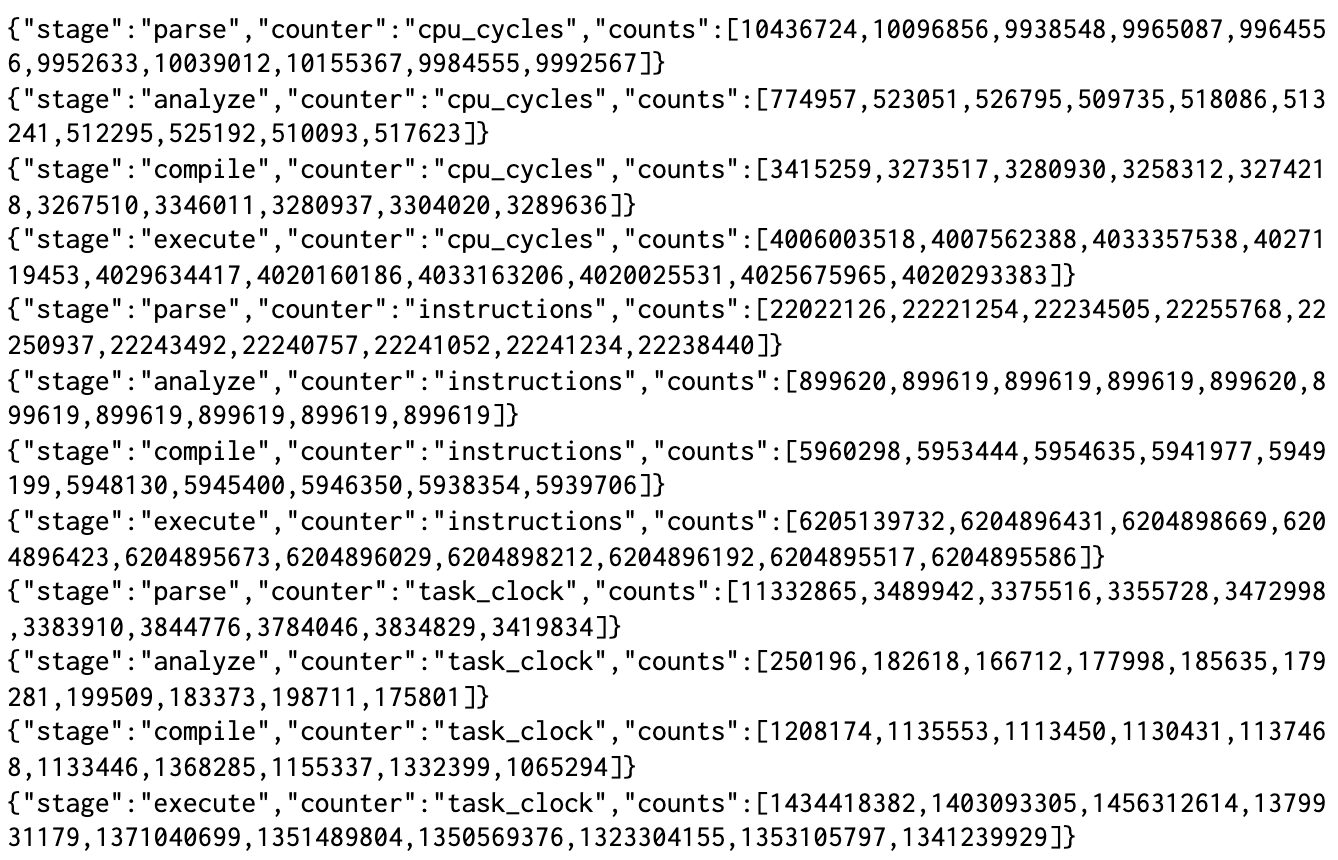
Our next challenge was to find some meaningful performance metrics. Some experimentation quickly uncovered that time was far too volatile a measure for meaningful comparisons, so we turned to hardware counters [2]. It’s not hard to find tools to measure these (perf and VTune are two such examples), although they (mostly) don’t allow control over which parts of the program are recorded. In our case, we wished to individually record measurements for different stages of filter processing — parsing, compilation, analysis, and execution.

Once again we took inspiration from the Rust compiler, and its self-profiling options, using the perf_event_open API to record counters from inside our binary. We then output something like the following, which our framework can easily ingest and store for later visualization.

Building even faster interpreters in Rust
Output of our benchmarks in JSON Lines format, showing a list of recordings for each combination of hardware counter and Wirefilter processing stage. We’ve used 10 repeats here for readability, but we use around 20, in addition to 5 warmup rounds, within our framework.

Whilst we mainly focussed on metrics relating to CPU usage, we also use a combination of getrusage and clear_refs to find the maximum resident set size (RSS). This is useful to understand the memory impact of particular algorithms in addition to CPU.

But the challenge was not over. Cloudflare’s standard CI agents use virtualization and sandboxing for security and convenience, but this makes accessing hardware counters virtually impossible. Running our benchmarks on a dedicated machine gave us access to these counters, and ensured more reproducible results.

Speeding up the speed test

Our benchmarks were designed from the outset to take an important place in our development process. For instance, we now perform a full benchmark run before releasing each new version to detect performance regressions.

But with our benchmarks in place, it quickly became clear that we had a problem. Our benchmarks simply weren’t fast enough — at least if we wanted to complete them in less than a few hours! The problem was we have a very large number  of filters. Since our engine would never usually execute requests against this many filters at once it was proving incredibly costly. We came up with a few tricks to cut this down…

  • Deduplication. It turns out that only around a third of filters are structurally unique (something that is easy to check as Wirefilter can helpfully serialize to JSON). We managed to cut down a great deal of time by ignoring duplicate filters in our benchmarks.
  • Sampling. Still, we had too many filters and random sampling presented an easy solution. A more subtle challenge was to make sure that the random sample was always the same to maintain reproducibility.
  • Partitioning. We worried that deduplication and sampling would cause us to miss important cases that are useful to optimize. By first partitioning filters by Wirefilter language feature, we can ensure we’re getting a good range of filters. It also helpfully gives us more detail about where specifically the impact of a performance change is.

Most of these are trade-offs, but very necessary ones which allow us to run continual benchmarks without development speed grinding to a halt. At the time of writing, we’ve managed to get a benchmark run down to around 20 minutes using these ideas.

Optimizing our engine

With a benchmarking framework in place, we were ready to begin testing optimizations. But how do you optimize an interpreter like Wirefilter? Just-in-time (JIT) compilation, selective inlining and replication were some ideas floating around in the word of interpreters that seemed attractive. After all, we previously wrote about the cost of dynamic dispatch in Wirefilter. All of these techniques aim to reduce that effect.

However, running some real filters through a profiler tells a different story. Most execution time, around 65%, is spent not resolving dynamic dispatch calls but instead performing operations like comparison and searches. Filters currently in production tend to be pretty light on functions, but throw in a few more of these and even less time would be spent on dynamic dispatch. We suspect that even a fair chunk of the remaining 35% is actually spent reading the memory of request fields.

Function CPU time
`matches` operator 0.6%
`in` operator 1.1%
`eq` operator 11.8%
`contains` operator 51.5%
Everything else 35.0%
Breakdown of CPU time while executing a typical production filter.

An adventure in substring searching

By now, you shouldn’t be surprised that the contains operator was one of the first in line for optimization. If you’ve ever written a Firewall Rule, you’re probably already familiar with what it does — it checks whether a substring is present in the field you are matching against. For example, the following expression would match when the host is “example.com” or “www.example.net”, but not when it is “cloudflare.com”. In string searching algorithms, this is commonly referred to as finding a ‘needle’ (“example”) within a ‘haystack’ (“example.com”).

http.host contains “example”

How does this work under the hood? Ordinarily, we may have used Rust’s `String::contains` function but Wirefilter also allows raw byte expressions that don’t necessarily conform to UTF-8.

http.host contains 65:78:61:6d:70:6c:65

We therefore used the memmem crate which performs a two-way substring search algorithm on raw bytes.

Sounds good, right? It was, and it was working pretty well, although we’d noticed that rewriting `contains` filters using regular expressions could bizarrely often make them faster.

http.host matches “example”

Regular expressions are great, but since they’re far more powerful than the `contains` operator, they shouldn’t be faster than a specialized algorithm in simple cases like this one.

Something was definitely up. It turns out that Rust’s regex library comes equipped with a whole host of specialized matchers for what it deems to be simple expressions like this. The obvious question was whether we could therefore simply use the regex library. Interestingly, you may not have realized that the popular ripgrep tool does just that when searching for fixed-string patterns.

However, our use case is a little different. Since we’re building an interpreter (and we’re using dynamic dispatch in any case), we would prefer to dispatch to a specialized case for `contains` expressions, rather than matching on some enum deep within the regex crate when the filter is executed. What’s more, there are some pretty cool things being done to perform substring searching that leverages SIMD instruction sets. So we wired up our engine to some previous work by Wojciech Muła and the results were fantastic.

Benchmark Improvement
Expressions using `contains` operator 72.3%
‘Simple’ expressions 0.0%
All expressions 31.6%
Improvements in instruction count using Wojciech Muła’s sse4-strstr library over the memmem crate with Wirefilter.

I encourage you to read more on “Algorithm 1”, which we used, but it works something like this (I’ve changed the order a little to help make it clearer). It’s worth reading up on SIMD instructions if you’re unfamiliar with them — they’re the essence behind what makes this algorithm fast.

  1. We fill one SIMD register with the first byte of the needle being searched for, simply repeated over and over.
  2. We load as much of our haystack as we can into another SIMD register and perform a bitwise equality operation with our previous register.
  3. Now, any position in the resultant register that is 0 cannot be the start of the match since it doesn’t start with the same byte of the needle.
  4. We now repeat this process with the last byte of the needle, offsetting the haystack, to rule out any positions that don’t end with the same byte as the needle.
  5. Bitwise ANDing these two results together, we (hopefully) have now drastically reduced our potential matches.
  6. Each of the remaining potential matches can be checked manually using a memcmp operation. If we find a match, then we’re done.
  7. If not, we continue with the next part of our haystack and repeat until we’ve checked the entire thing.

When it goes wrong

You may be wondering what happens if our haystack doesn’t fit neatly into registers. In the original algorithm, nothing. It simply continues reading into the oblivion after the end of the haystack until the last register is full, and uses a bitmask to ignore potential false-positives from this additional region of memory.

As we mentioned, security is our priority when it comes to optimizations, so we could never deploy something with this kind of behaviour. We ended up porting Muła’s library to Rust (we’ve also open-sourced the crate!) and performed an overlapping registers modification found in ARM’s blog.

It’s best illustrated by example — notice the difference between how we would fill registers on an imaginary SIMD instruction-set with 4-byte registers.

Before modification

Building even faster interpreters in Rust
How registers are filled in the original implementation for the haystack “abcdefghij”, red squares indicate out of bounds memory.

After modification

Building even faster interpreters in Rust
How registers are filled with the overlapping modification for the same haystack, notice how ‘g’ and ‘h’ each appear in two registers.

In our case, repeating some bytes within two different registers will never change the final outcome, so this modification is allowed as-is. However, in reality, we found it was better to use a bitmask to exclude repeated parts of the final register and minimize the number of memcmp calls.

What if the haystack is too small to even fill a single register? In this case, we can’t use our overlapping trick since there’s nothing to overlap with. Our solution is straightforward: while we were primarily targeting AVX2, which can store 32-bytes in a lane, we can easily move down to another instruction set with smaller registers that the haystack can fit into. In reality, we don’t currently go any smaller than SSE2. Beyond this, we instead use an implementation of the Rabin-Karp searching algorithm which appears to perform well.

Instruction set Register size
AVX2 32 bytes
SSE2 16 bytes
SWAR (u64) 8 bytes
SWAR (u32) 4 bytes
… …
Register sizes in different SIMD instruction sets [3]. We did not consider AVX512 since support for this is not widespread enough.

Is it always fast?

Choosing the first and last bytes of the needle to rule out potential matches is a great idea. It means that when it does come to performing a memcmp, we can ignore these, as we know they already match. Unfortunately, as Muła points out, this also makes the algorithm susceptible to a worst-case attack in some instances.

Let’s give an expression that a customer might write to illustrate this.

http.request.uri.path contains “/wp-admin/”

If we try to search for this within a very long sequence of ‘/’s, we will find a potential match in every position and make lots of calls to memcmp — essentially performing a slow bruteforce substring search.

Clearly we need to choose different bytes from the needle. But which ones should we choose? For each choice, an adversary can always find a slightly different, but equally troublesome, worst case. We instead use randomness to throw off our would-be adversary, picking the first byte of the needle as before, but then choosing another random byte to use.

Our new version is unsurprisingly slower than Muła’s, yet it still exhibits a great improvement over both the memmem and regex crates. Performance, but without sacrificing safety.

Benchmark Improvement
sse4-strstr (original) sliceslice (our version)
Expressions using `contains` operator 72.3% 49.1%
‘Simple’ expressions 0.0% 0.1%
All expressions 31.6% 24.0%
Improvements in instruction count of using sse4-strstr and sliceslice over the memmem crate with Wirefilter.

What’s next?

This is only a small taste of the performance work we’ve been doing, and we have much more yet to come. Nevertheless, none of this would have been possible without the support of my manager Richard and my mentor Elie, who contributed a lot of these ideas. I’ve learned so much over the past few months, but most of all that Cloudflare is an amazing place to be an intern!

[1] Since our benchmarks are not run within a production environment, results in this post do not represent traffic on our edge.

[2] We found instruction counts to be a particularly stable measure, and CPU cycles a particularly unstable one.

[3] Note that SWAR is technically not an instruction set, but instead uses regular registers like vector registers.