Tag Archives: Rust

Oxy: the journey of graceful restarts

Post Syndicated from Chris Branch original https://blog.cloudflare.com/oxy-the-journey-of-graceful-restarts/

Oxy: the journey of graceful restarts

Oxy: the journey of graceful restarts

Any software under continuous development and improvement will eventually need a new version deployed to the systems running it. This can happen in several ways, depending on how much you care about things like reliability, availability, and correctness. When I started out in web development, I didn’t think about any of these qualities; I simply blasted my new code over FTP directly to my /cgi-bin/ directory, which was the style at the time. For those of us producing desktop software, often you sidestep this entirely by having the user save their work, close the program and install an update – but they usually get to decide when this happens.

At Cloudflare we have to take this seriously. Our software is in constant use and cannot simply be stopped abruptly. A dropped HTTP request can cause an entire webpage to load incorrectly, and a broken connection can kick you out of a video call. Taking away reliability creates a vacuum filled only by user frustration.

The limitations of the typical upgrade process

There is no one right way to upgrade software reliably. Some programming languages and environments make it easier than others, but in a Turing-complete language few things are impossible.

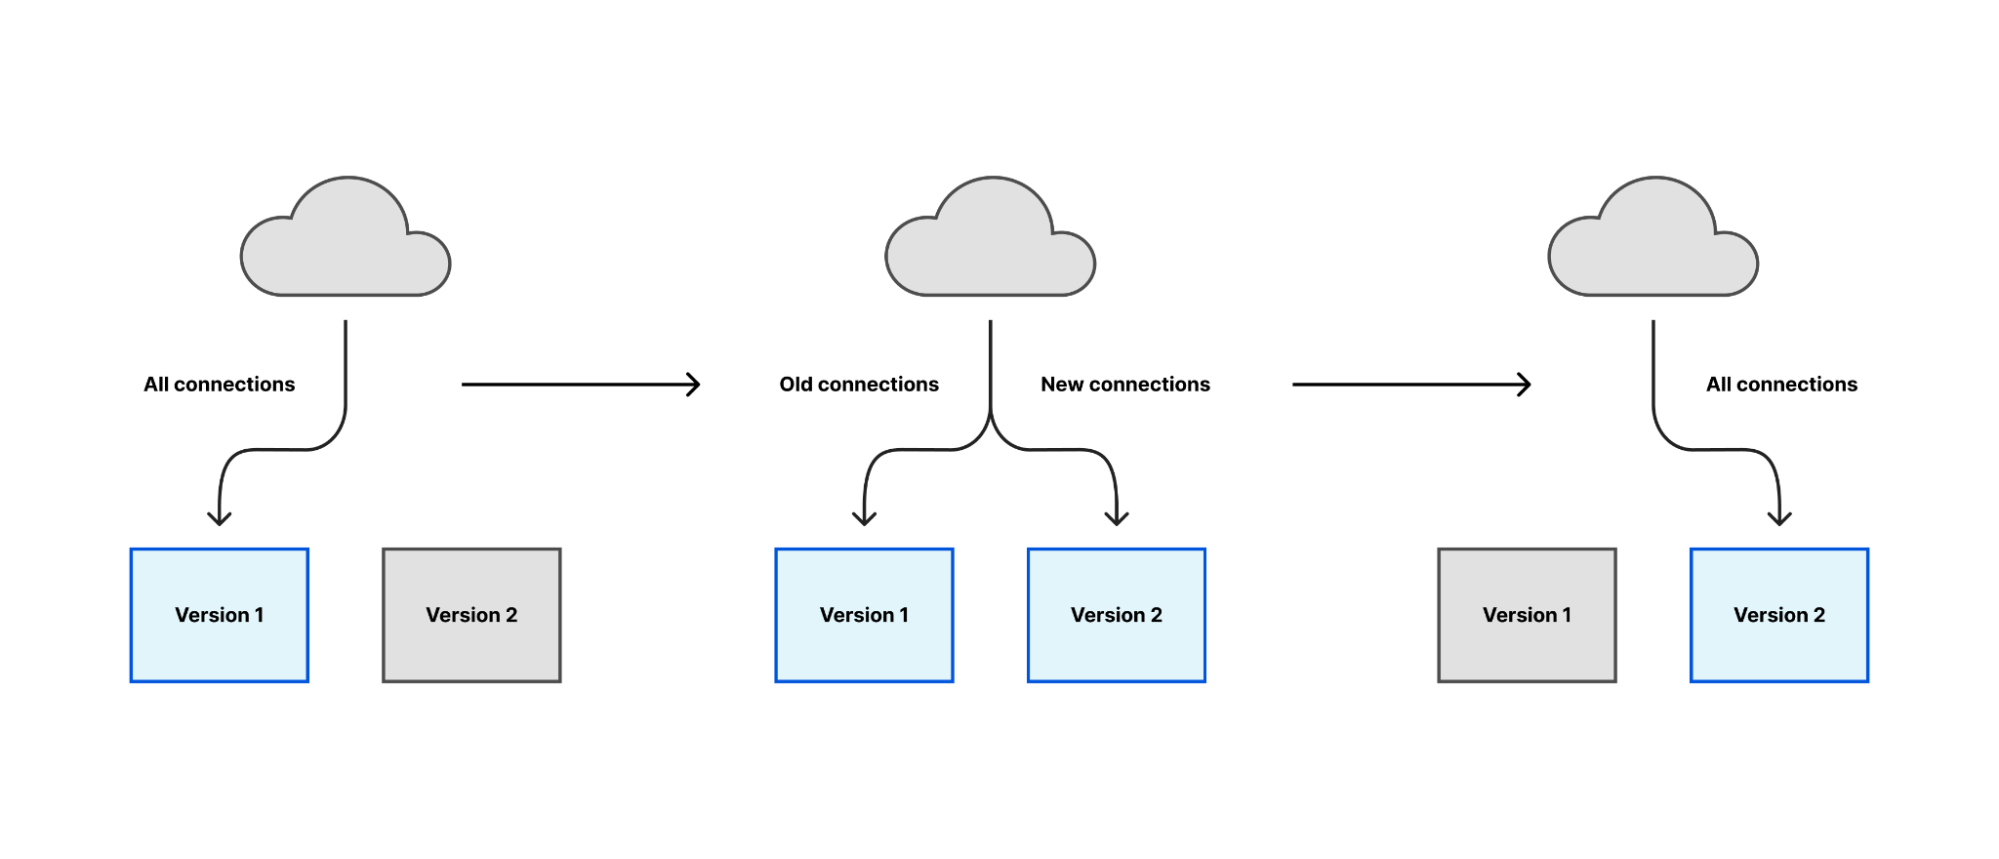
One popular and generally applicable approach is to start a new version of the software, make it responsible for a small number of tasks at first, and then gradually increase its workload until the new version is responsible for everything and the old version responsible for nothing. At that point, you can stop the old version.

Oxy: the journey of graceful restarts

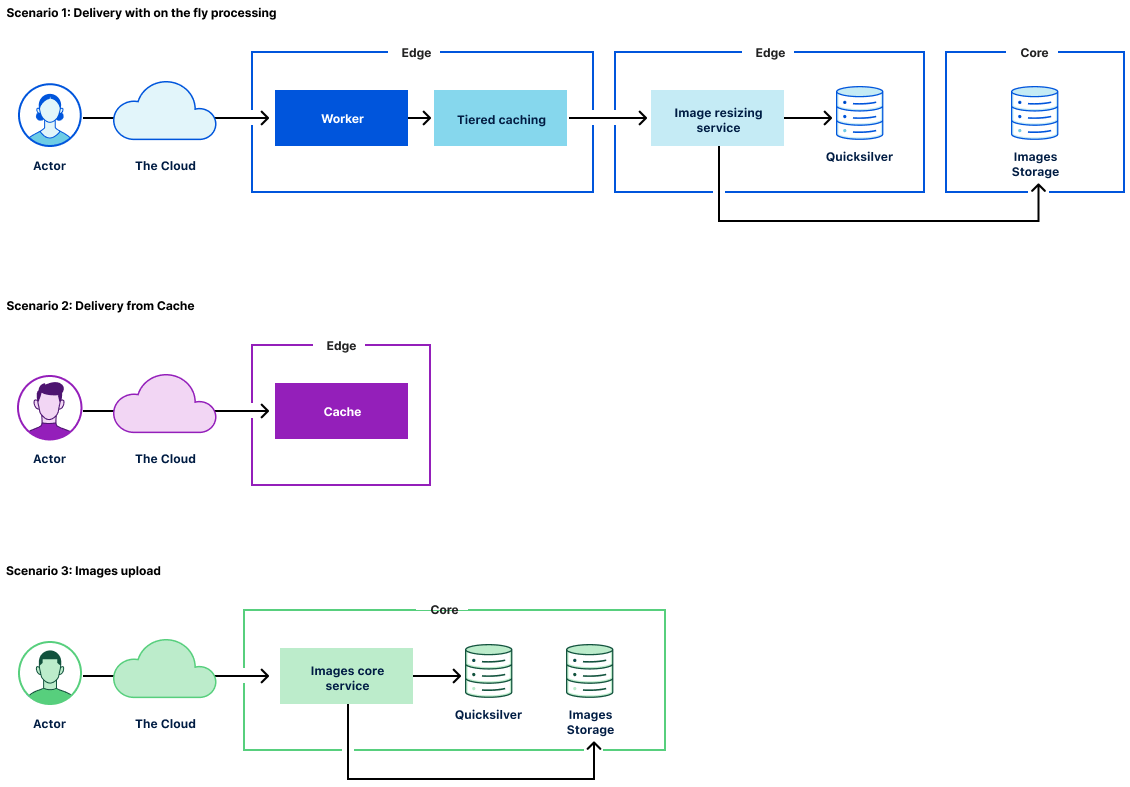
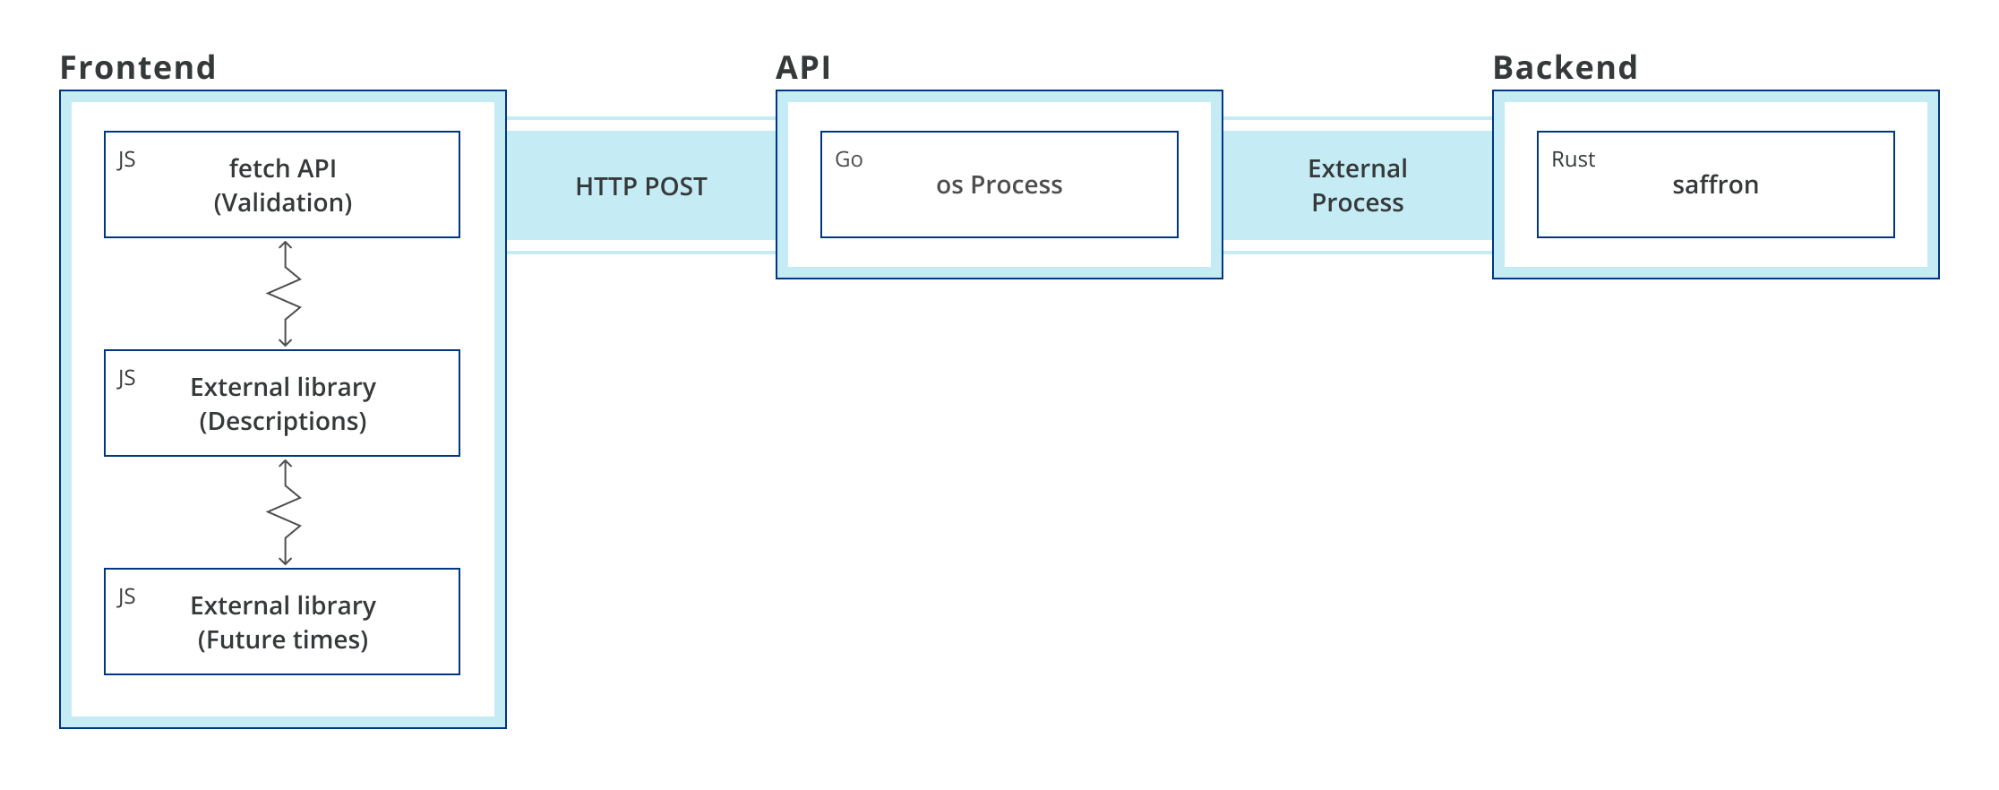
Most of Cloudflare’s proxies follow a similar pattern: they receive connections or requests from many clients over the Internet, communicate with other internal services to decide how to serve the request, and fetch content over the Internet if we cannot serve it locally. In general, all of this work happens within the lifetime of a client’s connection. If we aren’t serving any clients, we aren’t doing any work.

The safest time to restart, therefore, is when there is nobody to interrupt. But does such a time really exist? The Internet operates 24 hours a day and many users rely on long-running connections for things like backups, real-time updates or remote shell sessions. Even if you defer restarts to a “quiet” period, the next-best strategy of “interrupt the fewest number of people possible” will fail when you have a critical security fix that needs to be deployed immediately.

Despite this challenge, we have to start somewhere. You rarely arrive at the perfect solution in your first try.

(╯°□°)╯︵ ┻━┻

We have previously blogged about implementing graceful restarts in Cloudflare’s Go projects, using a library called tableflip. This starts a new version of your program and allows the new version to signal to the old version that it started successfully, then lets the old version clear its workload. For a proxy like any Oxy application, that means the old version stops accepting new connections once the new version starts accepting connections, then drives its remaining connections to completion.

Oxy: the journey of graceful restarts

This is the simplest case of the migration strategy previously described: the new version immediately takes all new connections, instead of a gradual rollout. But in aggregate across Cloudflare’s server fleet the upgrade process is spread across several hours and the result is as gradual as a deployment orchestrated by Kubernetes or similar.

tableflip also allows your program to bind to sockets, or to reuse the sockets opened by a previous instance. This enables the new instance to accept new connections on the same socket and let the old instance release that responsibility.

Oxy is a Rust project, so we can’t reuse tableflip. We rewrote the spawning/signaling section in Rust, but not the socket code. For that we had an alternative approach.

Socket management with systemd

systemd is a widely used suite of programs for starting and managing all of the system software needed to run a useful Linux system. It is responsible for running software in the correct order – for example ensuring the network is ready before starting a program that needs network access – or running it only if it is needed by another program.

Socket management falls in this latter category, under the term ‘socket activation’. Its intended and original use is interesting but ultimately irrelevant here; for our purposes, systemd is a mere socket manager. Many Cloudflare services configure their sockets using systemd .socket files, and when their service is started the socket is brought into the process with it. This is how we deploy most Oxy-based services, and Oxy has first-class support for sockets opened by systemd.

Oxy: the journey of graceful restarts

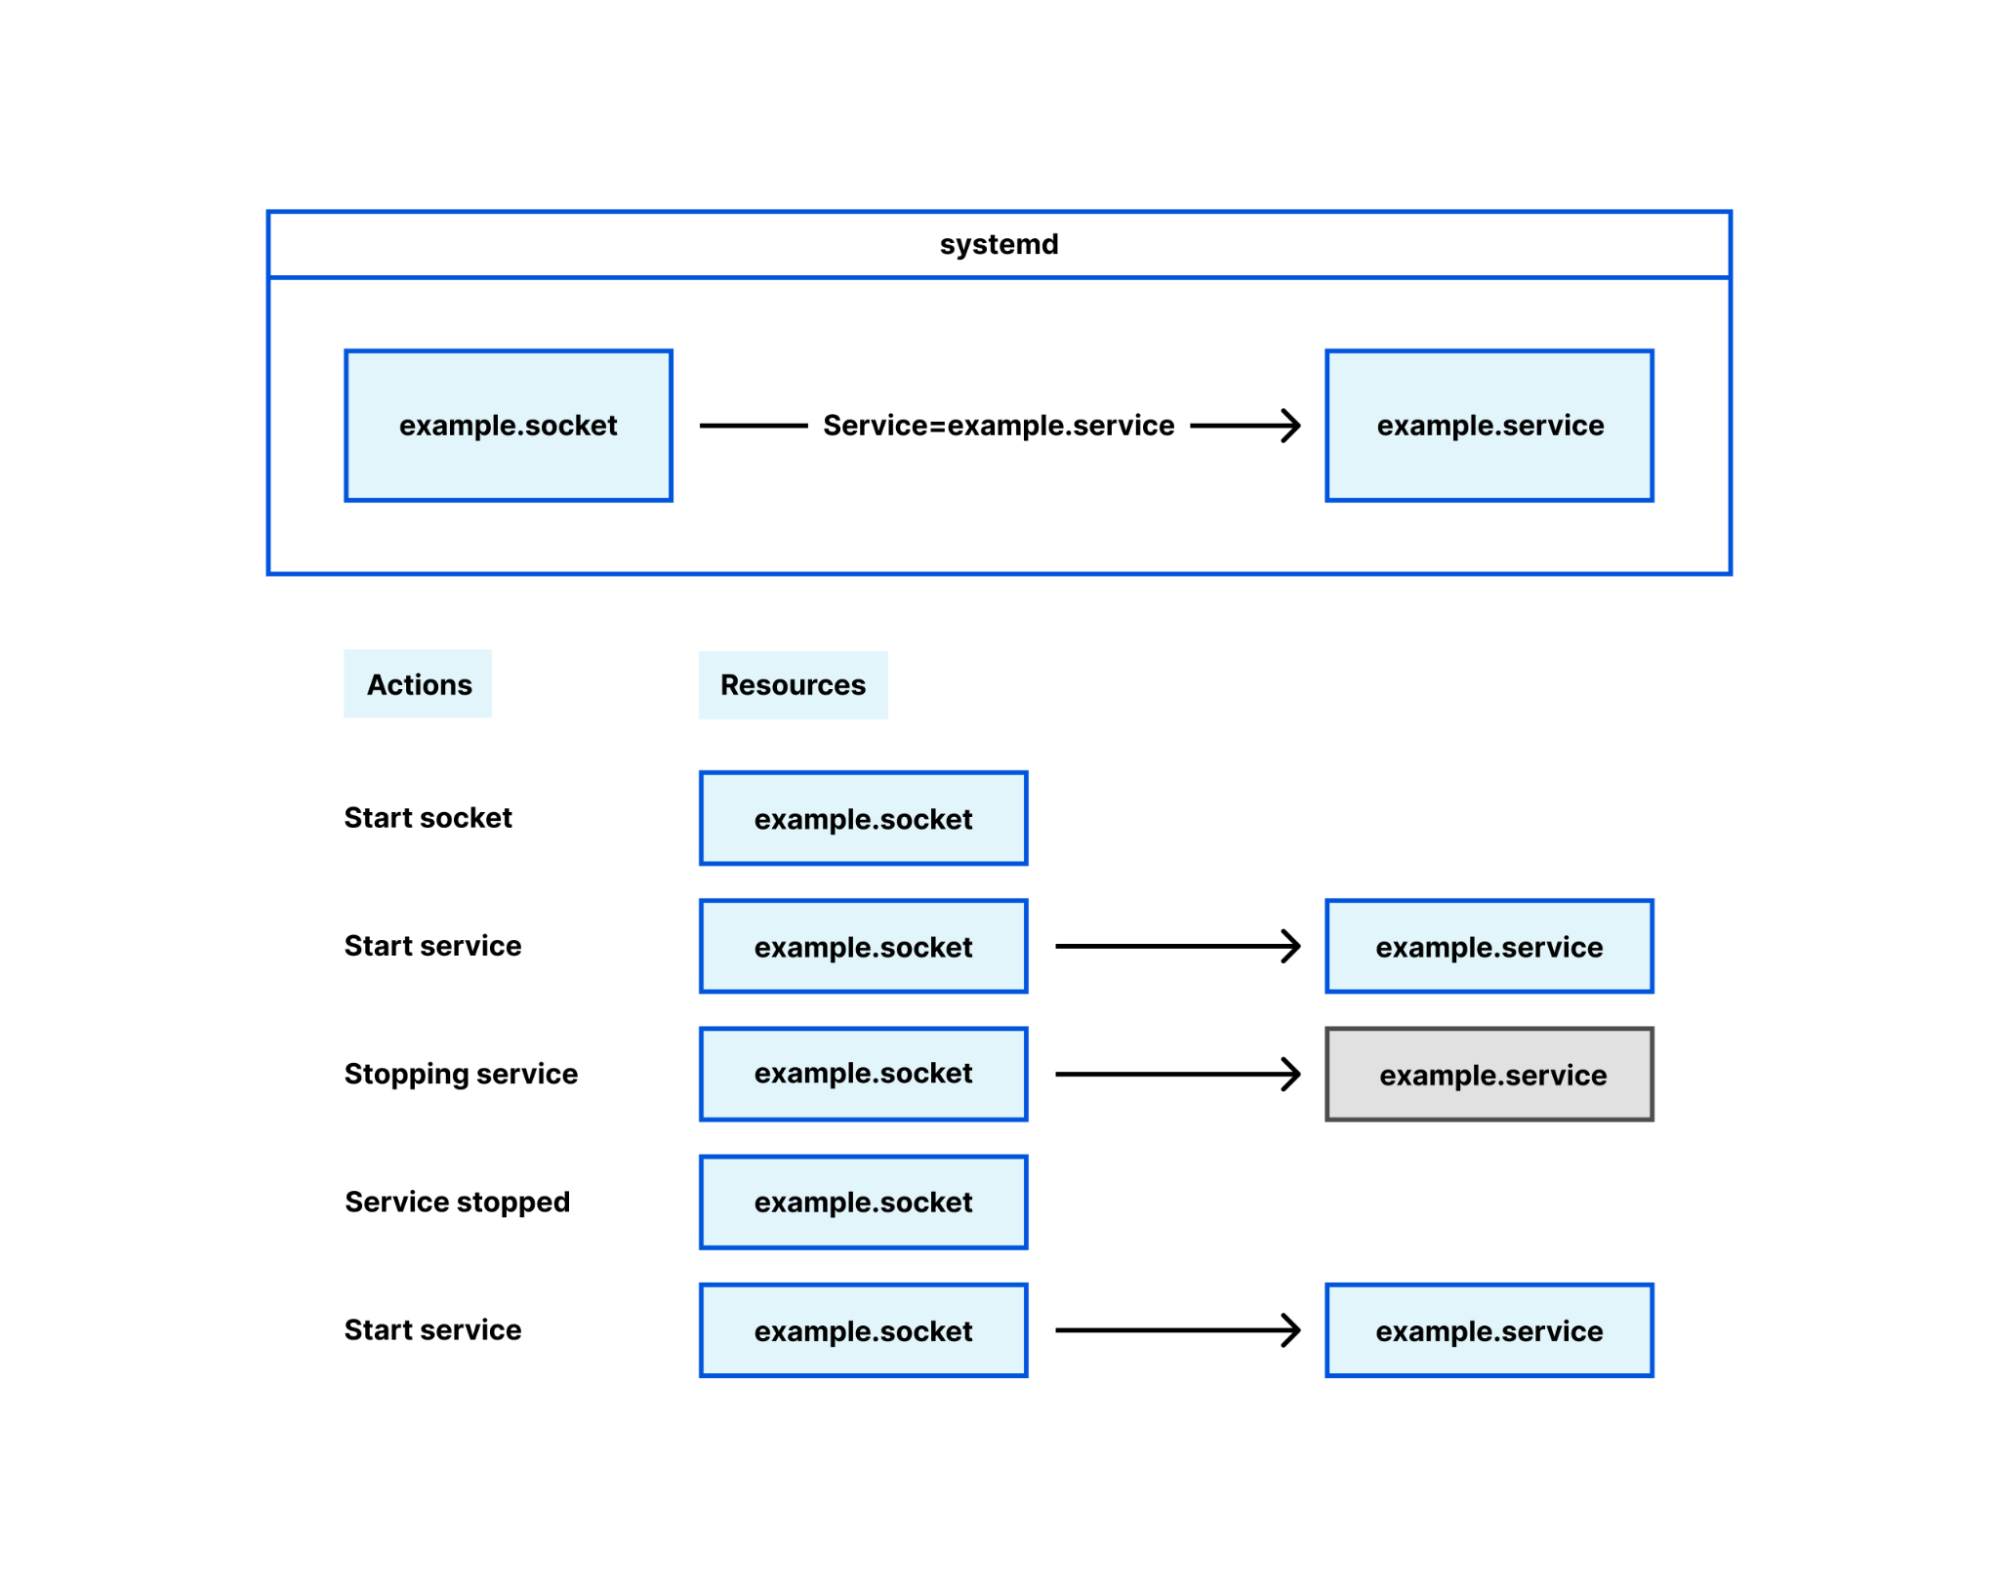
Using systemd decouples the lifetime of sockets from the lifetime of the Oxy application. When Oxy creates its sockets on startup, if you restart or temporarily stop the Oxy application the sockets are closed. When clients attempt to connect to the proxy during this time, they will get a very unfriendly “connection refused” error. If, however, systemd manages the socket, that socket remains open even while the Oxy application is stopped. Clients can still connect to the socket and those connections will be served as soon as the Oxy application starts up successfully.

Channeling your inner WaitGroup

A useful piece of library code our Go projects use is WaitGroups. These are essential in Go, where goroutines – asynchronously-running code blocks – are pervasive. Waiting for goroutines to complete before continuing another task is a common requirement. Even the example for tableflip uses them, to demonstrate how to wait for tasks to shut down cleanly before quitting your process.

There is not an out-of-the-box equivalent in tokio – the async Rust runtime Oxy uses – or async/await generally, so we had to create one ourselves. Fortunately, most of the building blocks to roll your own exist already. Tokio has multi-producer, single consumer (MPSC) channels, generally used by multiple tasks to push the results of work onto a queue for a single task to process, but we can exploit the fact that it signals to that single receiver when all the sender channels have been closed and no new messages are expected.

Oxy: the journey of graceful restarts

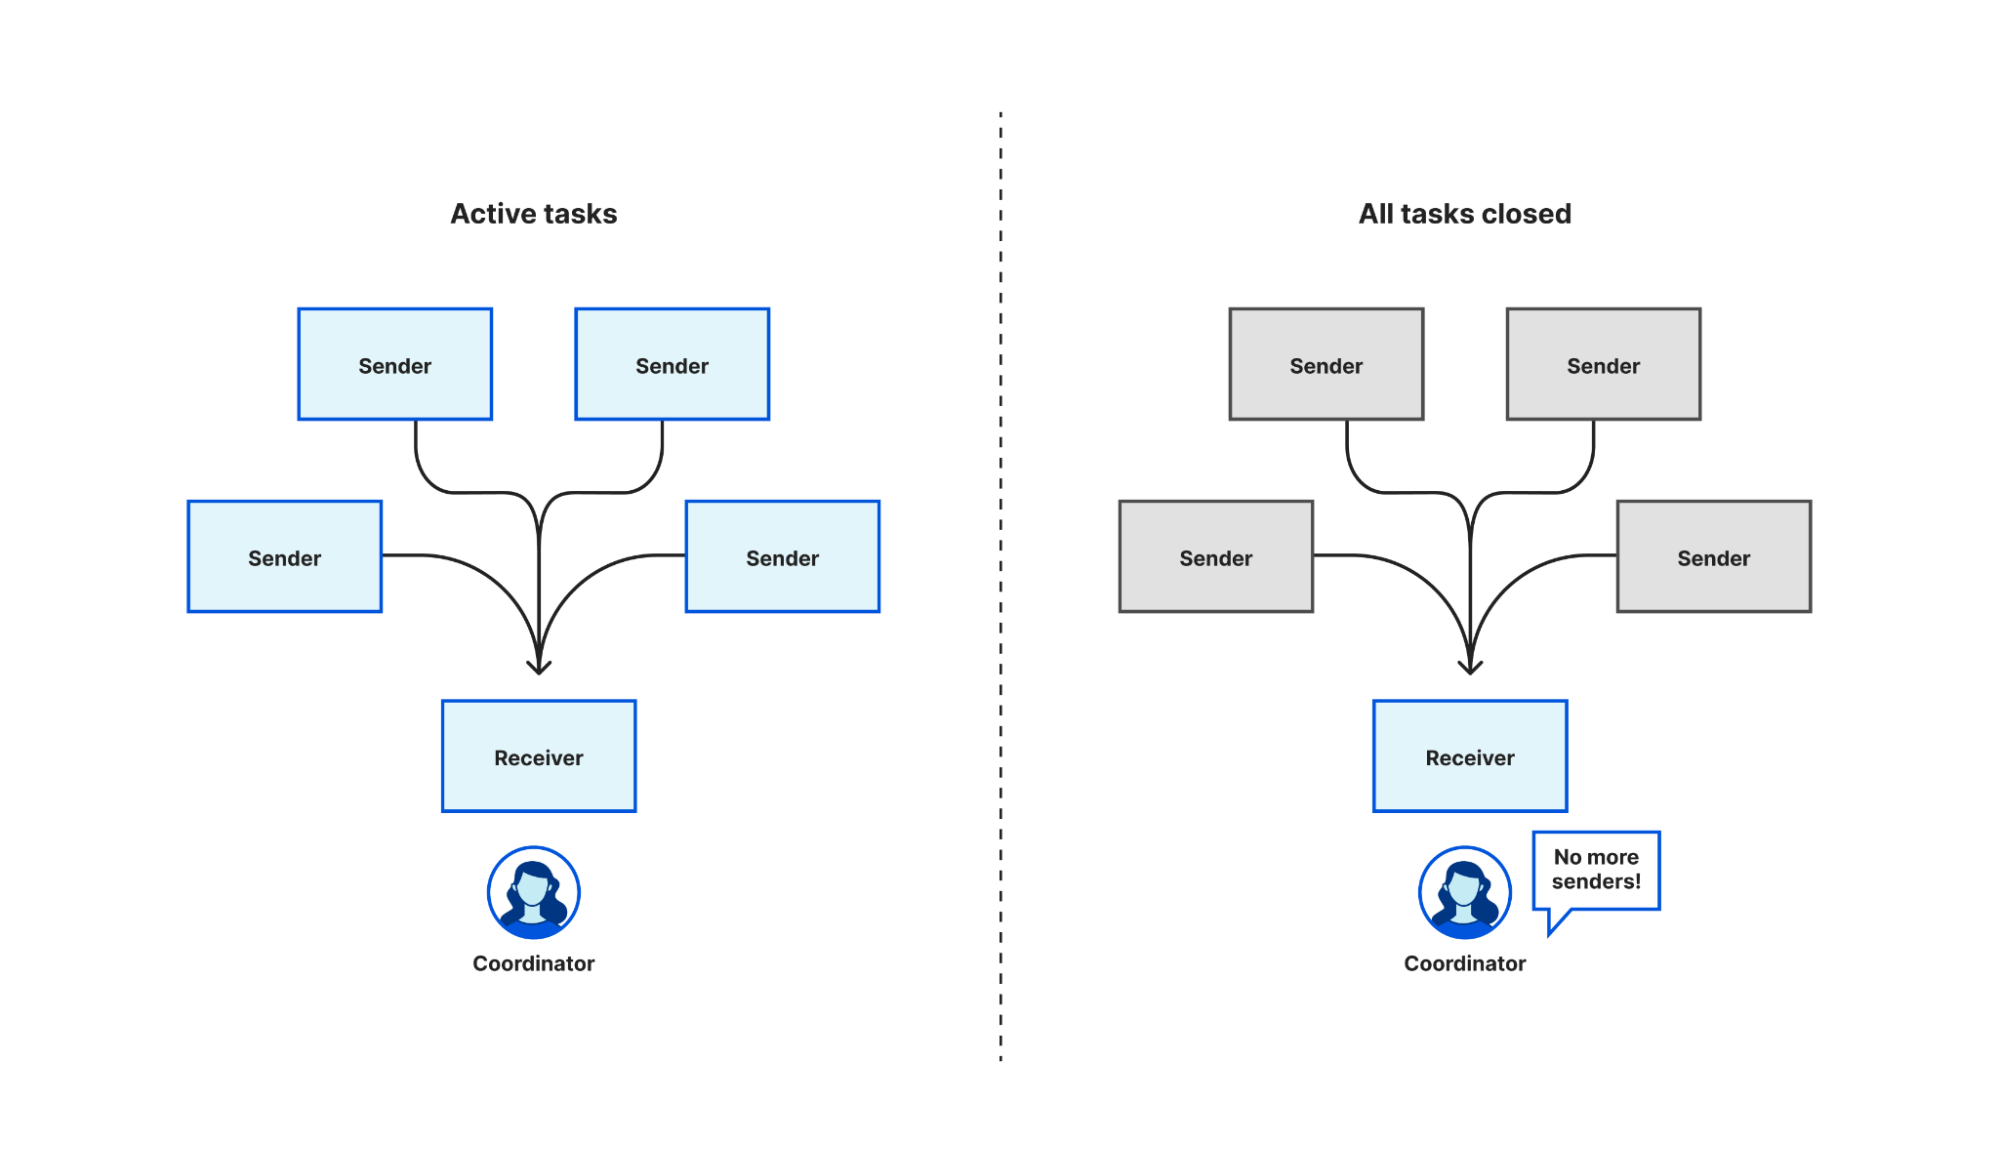
To start, we create an MPSC channel. Each task takes a clone of the producer end of the channel, and when that task completes it closes its instance of the producer. When we want to wait for all of the tasks to complete, we await a result on the consumer end of the MPSC channel. When every instance of the producer channel is closed – i.e. all tasks have completed – the consumer receives a notification that all of the channels are closed. Closing the channel when a task completes is an automatic consequence of Rust’s RAII rules. Because the language enforces this rule it is harder to write incorrect code, though in fact we need to write very little code at all.

Getting feedback on failure

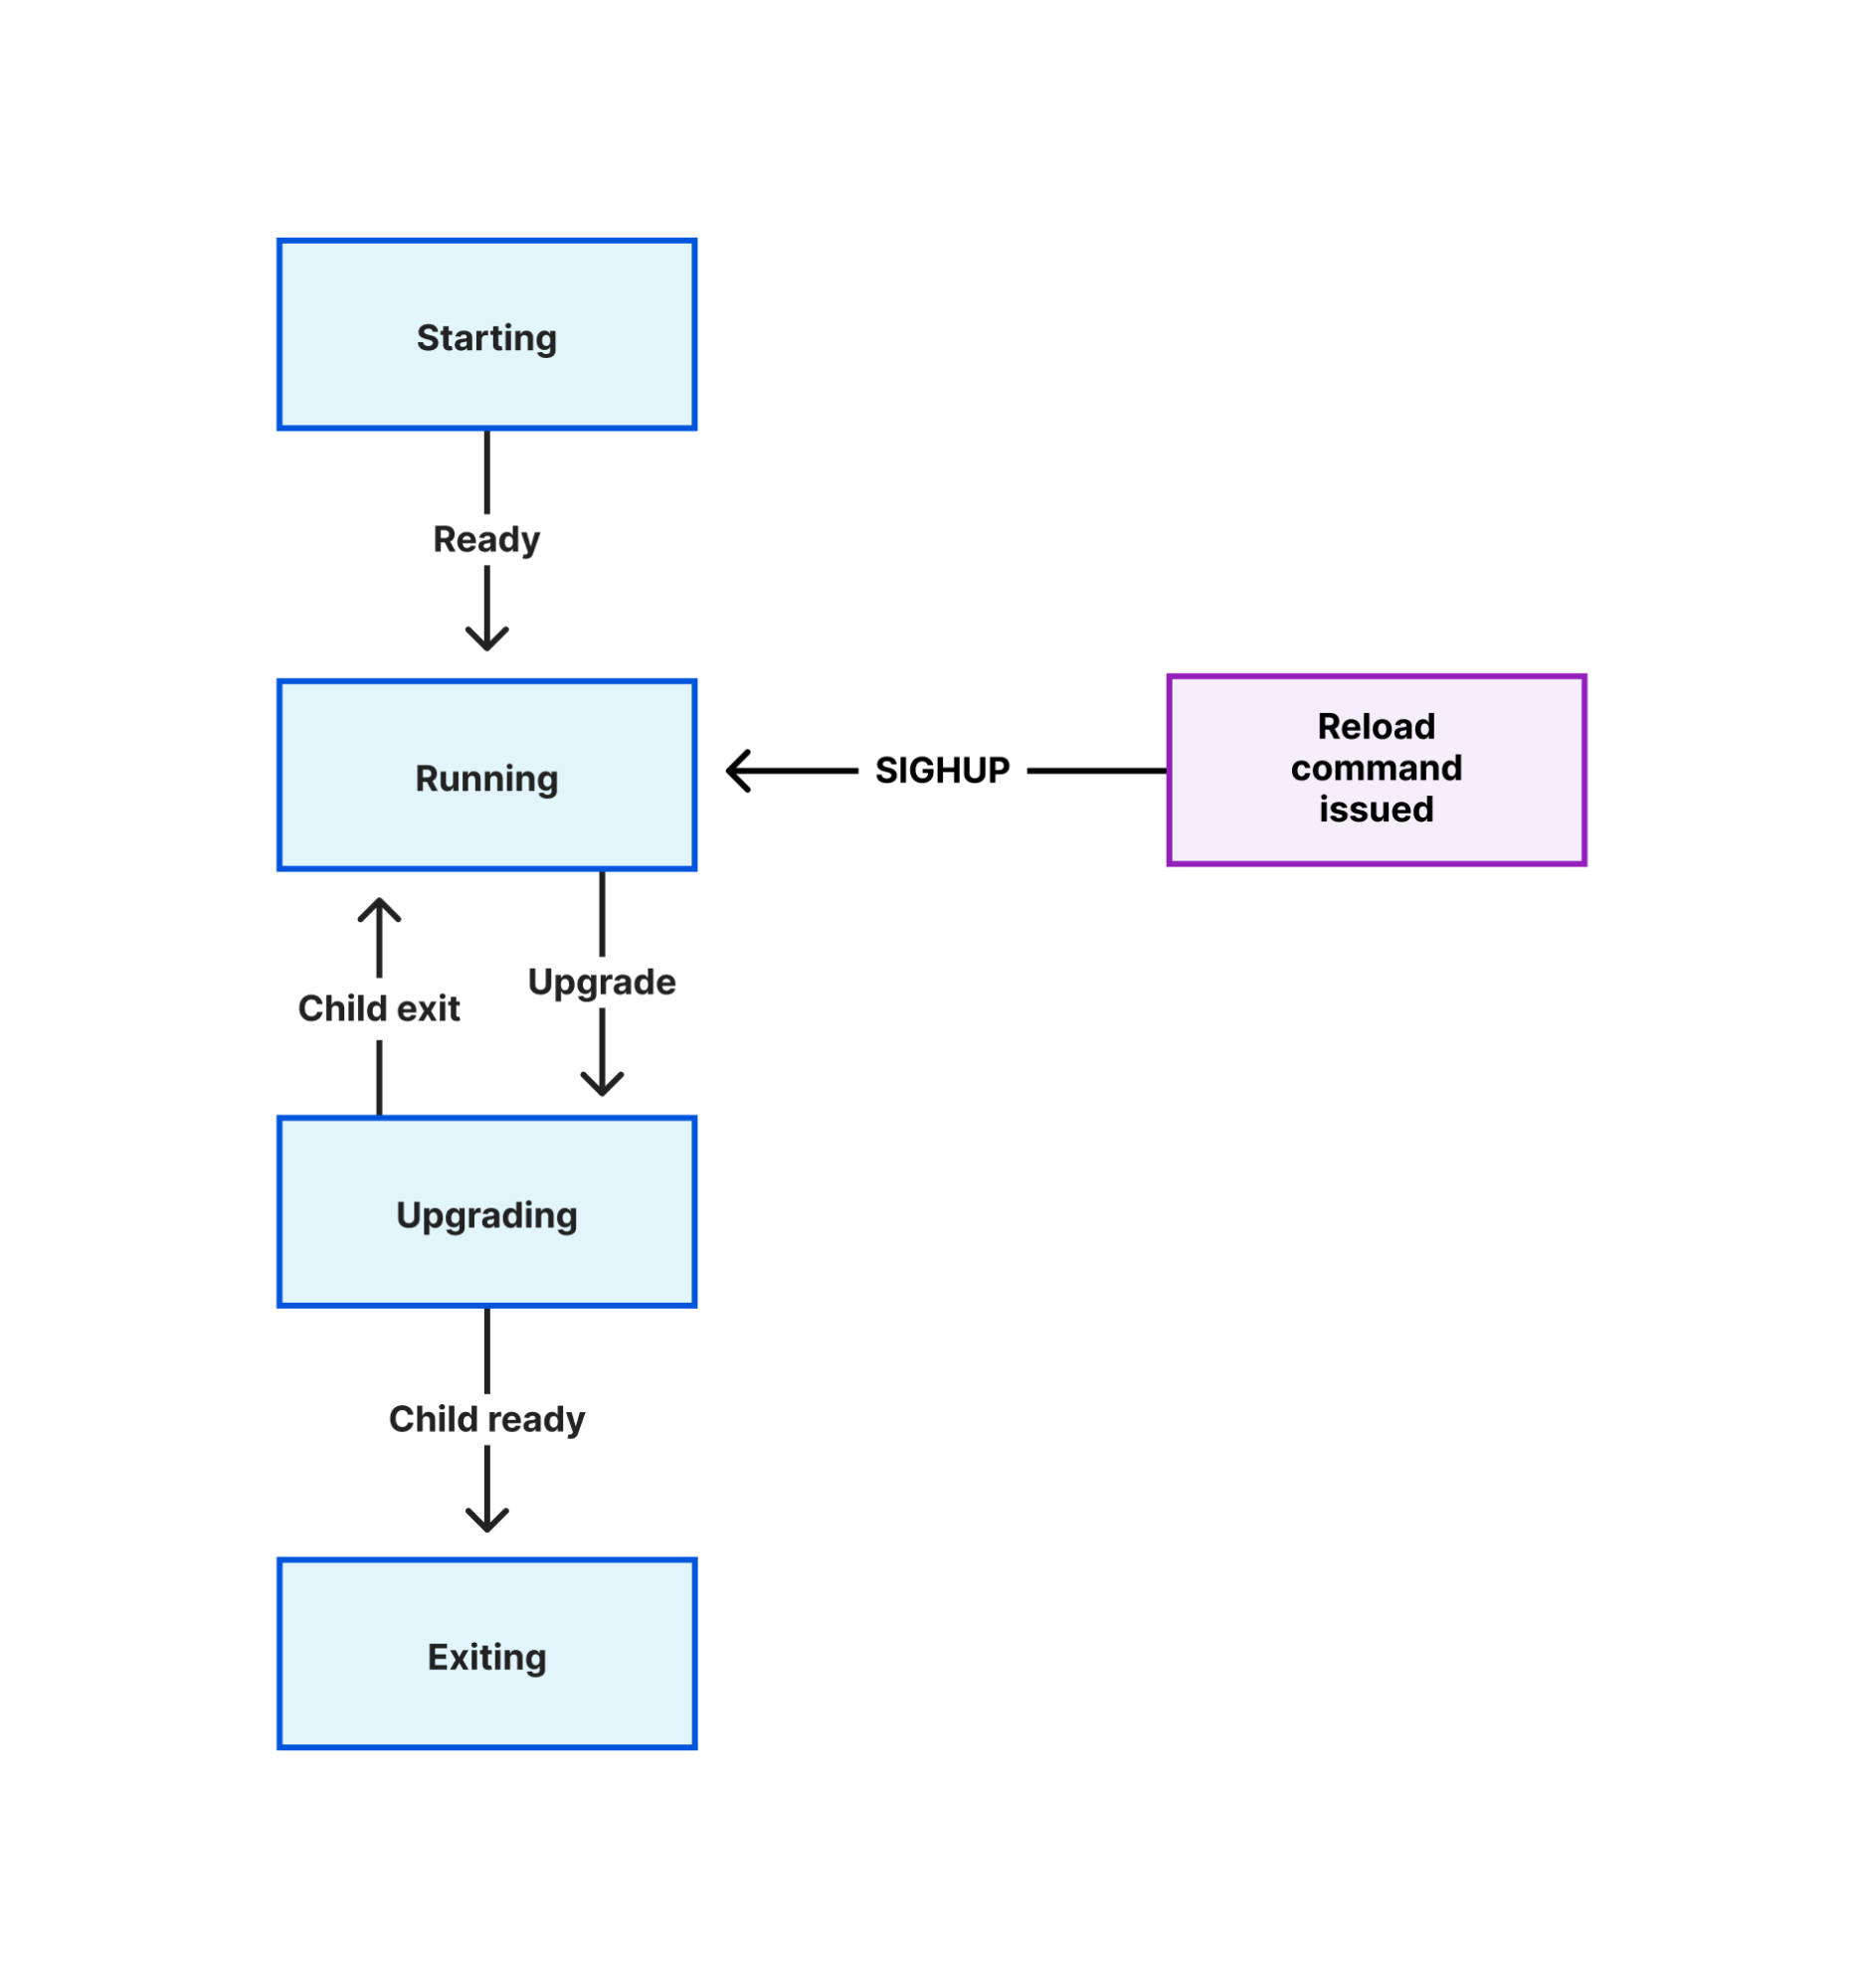
Many programs that implement a graceful reload/restart mechanism use Unix signals to trigger the process to perform an action. Signals are an ancient technique introduced in early versions of Unix to solve a specific problem while creating dozens more. A common pattern is to change a program’s configuration on disk, then send it a signal (often SIGHUP) which the program handles by reloading those configuration files.

The limitations of this technique are obvious as soon as you make a mistake in the configuration, or when an important file referenced in the configuration is deleted. You reload the program and wonder why it isn’t behaving as you expect. If an error is raised, you have to look in the program’s log output to find out.

This problem compounds when you use an automated configuration management tool. It is not useful if that tool makes a configuration change and reports that it successfully reloaded your program, when in fact the program failed to read the change. The only thing that was successful was sending the reload signal!

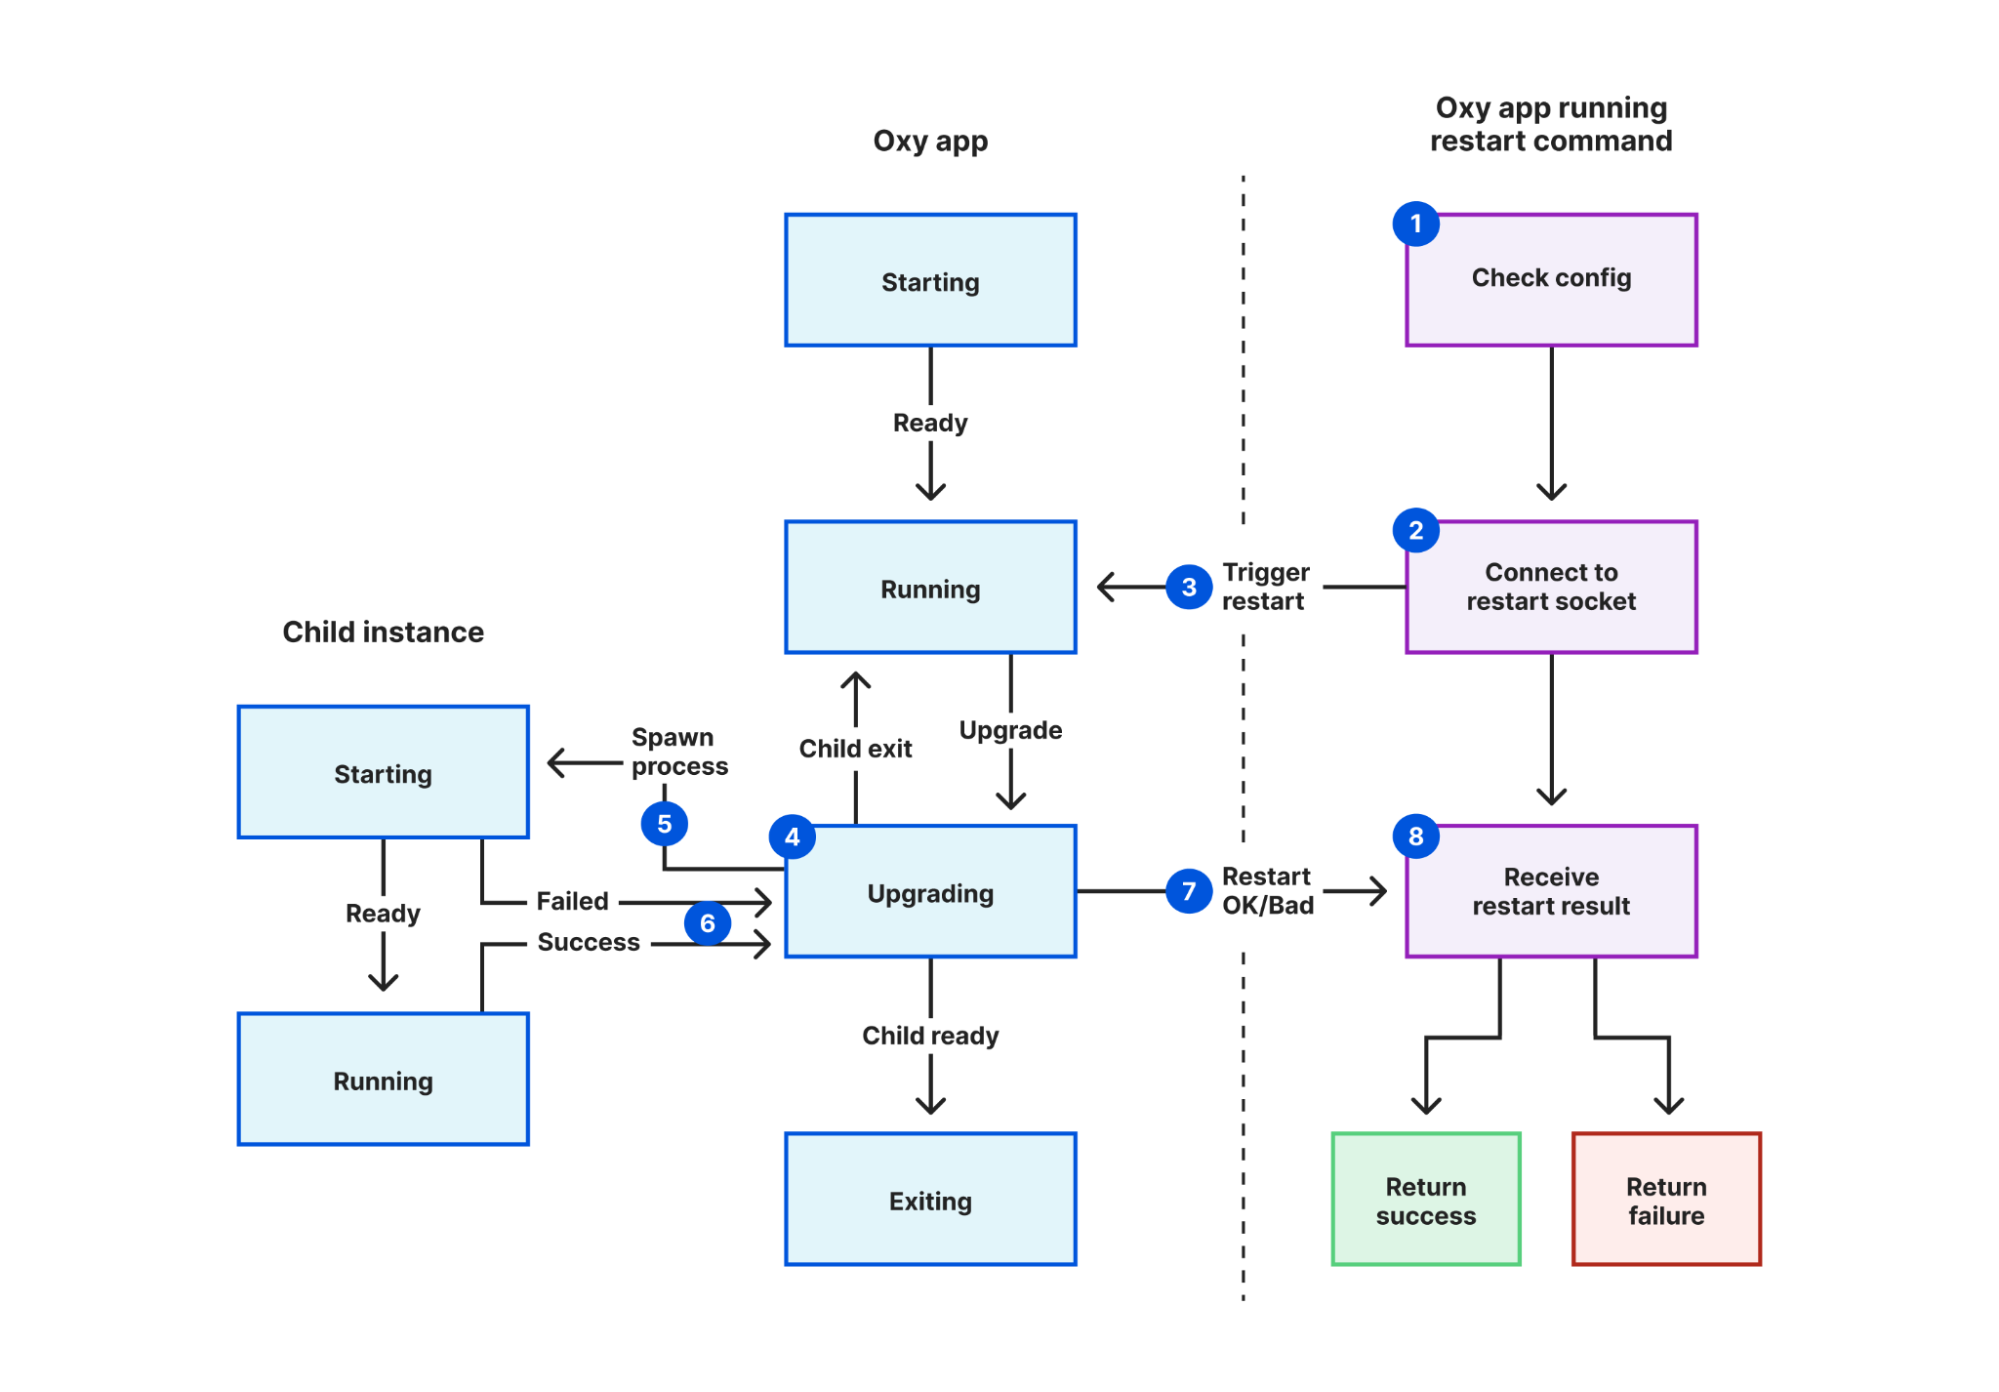
We solved this in Oxy by creating a Unix socket specifically for coordinating restarts, and adding a new mode to Oxy that triggers a restart. In this mode:

  1. The restarter process validates the configuration file.
  2. It connects to the restart coordination socket defined in that file.
  3. It sends a “restart requested” message.
  4. The current proxy instance receives this message.
  5. A new instance is started, inheriting a pipe it will use to notify its parent instance.
  6. The current instance waits for the new instance to report success or fail.
  7. The current instance sends a “restart response” message back to the restarter process, containing the result.
  8. The restarter process reports this result back to the user, using exit codes for automated systems to detect failure.
Oxy: the journey of graceful restarts

Now when we make a change to any of our Oxy applications, we can be confident that failures are detected using nothing more than our SREs’ existing tooling. This lets us discover failures earlier, narrow down root causes sooner, and avoid our systems getting into an inconsistent state.

This technique is described more generally in a coworker’s blog, using an internal HTTP endpoint instead. Yet HTTP is missing one important property of Unix sockets for the purpose of replacing signals. A user may only send a signal to a process if the process belongs to them – i.e. they started it – or if the user is root. This prevents another user logged into the same machine from you from terminating all of your processes. As Unix sockets are files, they also follow the Unix permission model. Write permissions are required to connect to a socket. Thus we can trivially reproduce the signals security model by making the restart coordination socket user writable only. (Root, as always, bypasses all permission checks.)

Leave no connection behind

We have put a lot of effort into making restarts as graceful as possible, but there are still certain limitations. After restarting, eventually the old process has to terminate, to prevent a build-up of old processes after successive restarts consuming excessive memory and reducing the performance of other running services. There is an upper bound to how long we’ll let the old process run for; when this is reached, any connections remaining are forcibly broken.

The configuration changes that can be applied using graceful restart is limited by the design of systemd. While some configuration like resource limits can now be applied without restarting the service it applies to, others cannot; most significantly, new sockets. This is a problem inherent to the fork-and-inherit model.

For UDP-based protocols like HTTP/3, there is not even a concept of listener socket. The new process may open UDP sockets, but by default incoming packets are balanced between all open unconnected UDP sockets for a given address. How does the old process drain existing sessions without receiving packets intended for the new process and vice versa?

Is there a way to carry existing state to a new process to avoid some of these limitations? This is a hard problem to solve generally, and even in languages designed to support hot code upgrades there is some degree of running old tasks with old versions of code. Yet there are some common useful tasks that can be carried between processes so we can “interrupt the fewest number of people possible”.

Let’s not forget the unplanned outages: segfaults, oomkiller and other crashes. Thankfully rare in Rust code, but not impossible.

You can find the source for our Rust implementation of graceful restarts, named shellflip, in its GitHub repository. However, restarting correctly is just the first step of many needed to achieve our ultimate reliability goals. In a follow-up blog post we’ll talk about some creative solutions to these limitations.

From IP packets to HTTP: the many faces of our Oxy framework

Post Syndicated from Nuno Diegues original https://blog.cloudflare.com/from-ip-packets-to-http-the-many-faces-of-our-oxy-framework/

From IP packets to HTTP: the many faces of our Oxy framework

From IP packets to HTTP: the many faces of our Oxy framework

We have recently introduced Oxy, our Rust-based framework for proxies powering many Cloudflare services and products. Today, we will explain why and how it spans various layers of the OSI model, by handling directly raw IP packets, TCP connections and UDP payloads, all the way up to application protocols such as HTTP and SSH.

On-ramping IP packets

An application built on top of Oxy defines — in a configuration file — the on-ramps that will accept ingress traffic to be proxied to some off-ramp. One of the possibilities is to on-ramp raw IP packets. But why operate at that layer?

The answer is: to power Cloudflare One, our network offering for customers to extend their private networks — such as offices, data centers, cloud networks and roaming users — with the Cloudflare global network. Such private networks operate based on Zero Trust principles, which means every access is authenticated and authorized, contrasting with legacy approaches where you can reach every private service after authenticating once with the Virtual Private Network.

To effectively extend our customer’s private network into ours, we need to support arbitrary protocols that rely on the Internet Protocol (IP). Hence, we on-ramp Cloudflare One customers’ traffic at (OSI model) layer 3, as a stream of IP packets. Naturally, those will often encapsulate TCP streams and UDP sessions. But nothing precludes other traffic from flowing through.

IP tunneling

Cloudflare’s operational model dictates that every service, machine and network be operated in an homogeneous way, usable by every one of our customers the same way. We essentially have a gigantic multi-tenanted system. Simply on-ramping raw IP packets does not suffice: we must always move the IP packets within the scope of the tenant they belong to.

This is why we introduced the concept of IP tunneling in Oxy: every IP packet handled has context associated with it; at the very least, the tenant that it belongs to. Other arbitrary contexts can be added, but that is up to each application (built on top of Oxy) to define, parse and consume in its Oxy hooks. This allows applications to extend and customize Oxy’s behavior.

You have probably heard of (or even used!) Cloudflare Zero Trust WARP: a client software that you can install on your device(s) to create virtual private networks managed and handled by Cloudflare. You begin by authenticating with your Cloudflare One account, and then the software will on-ramp your device’s traffic through the nearest Cloudflare data center: either to be upstreamed to Internet public IPs, or to other Cloudflare One connectors, such as another WARP device.

Today, WARP routes the traffic captured in your device (e.g. your smartphone) via a WireGuard tunnel that is terminated in a server in the nearest Cloudflare data center. That server then opens an IP tunnel to an Oxy instance running on the same server. To convey context about that traffic, namely the identity of the tenant, some context must be attached to the IP tunnel.

For this, we use a Unix SOCK_SEQPACKET, which is a datagram-oriented socket exposing a connection-based interface with reliable and ordered delivery — it only accepts connections locally within the machine where it is bound to. Oxy receives the context in the first datagram, which the application parses — could be any format the application using Oxy desires. Then all subsequent datagrams are assumed to be raw self-describing IP packets, with no overhead whatsoever.

Another example are the on-ramps of Magic WAN, such as GRE or IPsec tunnels, which also bring raw IP packets from customer’s networks to Cloudflare data centers. Unlike WARP, where its IP packets are decapsulated in user space, for GRE and IPsec we rely on the Linux kernel to do the job for us. Hence, we have no state whatsoever between two consecutive IP packets coming from the same customer, as the Linux kernel is routing them independently.

To accommodate the differences between IP packet handling in user space and the kernel, Oxy differentiates two types of IP tunnels:

  • Connected IP tunnels — as explained for WARP above, where the context is passed once, in the first datagram of the IP Tunnel SEQPACKET connection
  • Unconnected IP tunnels — used by Magic WAN, where each IP packet is encapsulated (using GUE, i.e. Generic UDP Encapsulation) to accommodate the context and unconnected UDP sockets are used

Encapsulating every IP packet comes at the cost of extra CPU usage. But moving the packet around to and from an Oxy instance does not change much regardless of the encapsulation, as we do not have MTU limitations inside our data centers. This way we avoid causing IP packet fragmentation, whose reassembly takes a toll on CPU and Memory usage.

Tracking IP flows

Once IP packets arrive to Oxy, regardless of how they on-ramp, we must decide what to do with them. We decided to rely on the idea of IP flows, as that is inherent to most protocols: a point to point interaction will generally be bounded in time and follow some type of state machine, either known by the transport or by the application protocol.

We perform flow tracking to detect IP flows. When handling an on-ramped IP packet, we parse its IP header and possible transport (i.e. OSI Model layer 4) header. We use the excellent etherparse Rust crate for this purpose, which parses the flow signature, with a source and destination IP address, ports (optional) and protocol. We then look up whether there is already a known IP flow for that signature: if so, then the packet is proxied through the path already determined for that flow towards its off-ramp. If the flow is new, then its upstream route is computed and memoized for future packets. This is in essence what routers do, and to some extent Oxy handling of IP packets is meant to operate as a router.

The interesting thing about tracking IP flows is that we can now expose their lifetime events to the application built on top of Oxy, via its hooks. Applications can then use these events for interesting operations, such as:

  • Applying Zero Trust principles before allowing the IP flow through, such as our Secure Web Gateway policies
  • Emitting audit logs that collect the decisions taken at the start of the IP flow
  • Collecting metadata about the traffic processed by the time the IP flow ends, e.g., to support billing calculations
  • Computing routing decisions of where to send the IP flow next, e.g. to another Cloudflare product/service, or off-ramped to the Internet, or to another Cloudflare One connector

From an IP flow to a TCP stream

You would think that most applications do not handle IP packets directly. That is a good hunch, and also a fact at Cloudflare: many systems operate at the application layer (OSI Model layer 7) where they can inspect traffic in a way much closer to what the end user is perceiving.

To get closer to that reality, Oxy can upgrade an IP flow to the transport layer (OSI Model layer 4). We first consider what this means for the case of TCP traffic. The problem that we want to solve is to process a given stream of raw IP packets, with the same TCP flow signature initiating a TCP handshake, and obtain as a result a TCP connection streaming data. Hence, we need a TCP protocol implementation that can be used from userspace.

The best Rust-native implementation is the smoltcp crate. However, its stated objectives do not match our needs, as it does not implement many of the performance and reliability enhancements of TCP that are expected of a first-class TCP, therefore not sufficing for the sheer amount of traffic and demands we have.

Instead, we rely on the Linux kernel to help us here. After all, it has the most battle-tested TCP protocol implementation in the world.

To leverage that, we set up a TUN interface, and add an IP route to forward traffic to that interface (more details below as to what IPs to use). A TUN interface is a virtual network device whose network data is generated by user-programmable software, rather than a device driver for a physically-connected network adapter. But otherwise it looks and works like a physical network adapter for all purposes.

We write the IP packets — meant to be upgraded to a TCP stream — to the file descriptor backing the TUN interface. However, that’s not enough, as the kernel in our machines will drop those packets since customer’s IP addresses only make sense in their infrastructure.

From IP packets to HTTP: the many faces of our Oxy framework
Transforming raw IP packets into a TCP stream

The step we are missing is that those packets must be transformed, i.e. Network Address Translated (NAT), so that the kernel routes them into the TUN interface. Hence, Oxy maintains its own stateful NAT: every IP flow desired to be upgraded to a TCP stream must claim a NAT slot (to be returned when the TCP stream finishes), and have its packets’ addresses rewritten for the IPs that the TUN interface route encompasses.

Once packets flow into the TUN interface with the right addresses, the kernel will process them as if they had entered the machine through your network card. This means that you can now bind a TCP listener to accept TCP connections in the IP address for which the NAT-ed IP packets are destined to, and voilà, we have our IP flows upgraded to TCP streams.

We are left with one question: what IP address should the NAT use? One option is to just reserve some machine-local IP address and hope that no other application running in that machine uses it, as otherwise unexpected traffic will show up in our TUN device.

Instead, we chose to not have to worry about that at all by relying on Linux network namespaces. A network namespace provides you with an isolated network in a machine, acting as a virtualization layer provided by the kernel. Even if you do not know what this is, you are likely using it, e.g. via Docker.

Hence, Oxy dynamically starts a network namespace to run its TUN interface for upgrading IP flows, where it can use all the local IP space and ports freely. After all, those TCP connections only matter locally, between Oxy’s NAT and Oxy’s L4 proxy.

An interesting aspect here is that the Oxy application itself runs in the default/root namespace, making it easily reachable for on-ramping traffic, and also able to off-ramp traffic to other services operating on the same machine in the default/root namespace. But that raises the question: how is Oxy able to operate simultaneously in the root namespace as well as in the namespace dedicated to upgrading IP flows to TCP connections? The trick is to:

  • Run the Oxy-based process in the root namespace, without any special permissions (no elevated permissions required).
  • That process calls clone into a new unnamed user and network namespace.
  • The child (cloned) and parent (original) processes communicate via a paired pipe.
  • The child brings up the TUN interface and establishes the IP routes to it.
  • The child process binds a TCP listener on an IP address that is bound to the TUN interface and passes that file descriptor to the parent process using SCM_RIGHTS.

This way, the Oxy process will now have a TCP listener, to obtain the upgraded IP flow connections from, while running in the default namespace and despite that TCP listener — and any connections accepted from it — operating in an unnamed dynamically created namespace.

From a TCP stream to HTTP

Once Oxy has a TCP stream, it may also upgrade it, in a sense, to be handled as HTTP traffic. Again, the framework provides the capabilities, but it is up to the application (built on top of Oxy) to make the decision. Analogously to the IP flow, the TCP stream start also triggers a hook to let the application know about a new connection, and to let it decide what to do with it. One of the choices is to treat it as HTTP(S) traffic, at which point Oxy will pass the connection through a Hyper server (possibly also doing TLS if necessary). If you are curious about this part, then rest assured we will have a blog post focused just on that soon.

What about UDP

While we have been focusing on TCP so far, all of the capabilities implemented for TCP are also supported for UDP as well. We’ve glossed over it so far because it is easier to handle, since converting an IP packet to UDP payloads requires only stripping the IP and UDP headers. We do this in Oxy logic, in user space, thereby replacing the idea employed for TCP that relies on the TUN interface. Everything else works the same way across TCP and UDP, with UDP traffic potentially being HTTPS for the case of QUIC-based HTTP/3.

From TCP/UDP back to IP flow

We have been looking at IP packets on-ramping in Oxy and converting from IP flows to TCP/UDP. Eventually that traffic is sent to an upstream that will respond back, and so we ought to obtain resulting IP packets to send to the client. This happens quite naturally in the code base as we only need to revert the operation done in the upgrade:

  • For UDP, we add the IP and UDP headers to the payload of each datagram and thereby obtain the IP packet to send to the client.
  • For TCP, writing to the upgraded TCP socket causes the kernel to generate IP packets routed to the TUN interface. We read these packets from the TUN interface and undo the NAT operation explained above — applied to packets being written to the TUN interface — thereby obtaining the IP packet to send to the client.

More interestingly, the application built on top of Oxy may also define that TCP/UDP traffic (handled as layer 4) is to be downgraded to IP flow (i.e. layer 3). To imagine where this would be usable, consider another Cloudflare One example, where a WARP client establishes an SSH session to a remote WARP device (which is now possible) and has configured SSH command audit logging — in that case, we will have the following steps:

  1. On-ramp the IP packets from WARP client device into the Oxy application.
  2. Oxy tracks the IP flows; per application mandate, then Oxy checks if it is a TCP IP flow with destination port 22, and as such it upgrades to TCP connection.
  3. The application is given control of the TCP connection and, in this case, our Secure Web Gateway (an Oxy application) parses the traffic to perform the SSH command logging.
  4. Since the upstream is determined to be another WARP device, Oxy is mandated to downgrade the TCP connection to IP packets, so that they can be off-ramped to the upstream as such.

Therefore, we need to provide the capability to do step 4, which we haven’t described yet. For UDP the operation is trivial: add or remove the IP/UDP headers as necessary.

For TCP, we will again resort to (another) TUN interface. This is slightly more complicated than upgrading, because when upgrading we use a single TCP listener from the network namespace where all upgraded connections appear, whereas to downgrade we need a TCP client connection from the network namespace per downgraded connection. Therefore we need to interact with the network namespace to obtain these on-demand TCP client connections at runtime, as explained next, making the process to downgrade more convoluted.

To enable that, we rely on the paired pipe maintained between the Oxy (parent) process and the cloned (child) process that operates inside the dynamic namespace: it is used for requesting the TCP client socket for a specific IP flow. This entails the following steps:

  1. The Oxy process reserves a NAT mapping for that IP flow for downgrade.
  2. It requests (via a pipe sendmsg) the cloned child process to establish a TCP connection to the NAT-ed addresses.
  3. By doing so, the child process inherently makes the Linux kernel TCP implementation issue a TCP handshake to the upstream, causing a SYN IP packet to show up in the TUN interface.
  4. The Oxy process is consuming packets from the downgrading namespace’s TUN interface, and hence will consume that packet, for which it promptly reverts the NAT. The IP packet is then off-ramped as explained in the next section.
  5. In the meantime, the child process will have sent back (via the paired pipe) the file descriptor for the TCP client socket, again using SCM_RIGHTS. The Oxy application will now proxy the client TCP connection (meant to be downgraded) into that obtained TCP connection, to result in the raw IP packets read from the TUN interface.

Despite being elaborate, this is quite intuitive, particularly if you’ve read through the upgrade section earlier that is a simpler version of this idea.

The overall picture

In the sections above we have covered the life of an IP packet entering Oxy and what happens to it until exiting towards its upstream destination. This is summarized in the following diagram illustrating the life cycle of such packets.

From IP packets to HTTP: the many faces of our Oxy framework
Life cycle of IP packets in and out of an Oxy instance

We are left with how to exit the traffic. Sending the proxied traffic towards its destination (referred to as upstream) is what we call off-ramping it. We support off-ramping traffic across the same OSI Model layers that we allow to on-ramp: that is, as IP packets, TCP or UDP sockets, or HTTP(S) directly.

It is up to the application logic (that uses the Oxy framework) to make that decision and instruct Oxy on which layer to use. There is a lot to be said about this part, such as what IPs to use when egressing to the Internet — so if you are curious for more details, then stay tuned for more blog posts about Oxy.

No software overview is complete without its tests. The one interesting thing to think about here is that, to test all of the above, we need to generate raw IP packets in our tests. That’s not ideal as one would like to just write plain Rust logic that establishes TCP connections towards the Oxy proxy. Hence, to simplify all of this, our tests actually reuse our internal library (described above) to create a dynamic network namespaces and downgrade/upgrade the TCP connections as necessary.

Therefore, our tests talk normal TCP against a TCP downgrader running together with the tests, which outputs raw IP packets that we pipe to the Oxy instance being tested. It is an elegant and simple way to work around the challenge while battle testing further the TUN interface logic.

Wrapping up

Covering proxying IP packets all the way to HTTP requests feels like an overly broad framework. We felt the same at first at Cloudflare, particularly because Oxy was not born in a day, and in fact it started first with HTTP proxying and then started to go down the OSI Model layers. In hindsight, doing it all feels the right decision: being able to upgrade and downgrade traffic as necessary has been very useful, and in fact our proxying logic shares the majority of code despite handling different layers (socket primitives, observability, security aspects, configurability, etc).

Today, all of the ideas above are powering Cloudflare One Zero Trust as well as plain WARP. This means they are battle-tested across millions of daily users exchanging most of their traffic (both to the Internet as well as towards private/corporate networks) through the Cloudflare global network.

If you’ve enjoyed reading this and are interested in working on similar challenges with Rust, then be sure to check our open positions as we continue to grow our team. Likewise, there will be more blog posts related to our learnings developing Oxy, so tag along the ride for more fun!

Oxy is Cloudflare’s Rust-based next generation proxy framework

Post Syndicated from Ivan Nikulin original https://blog.cloudflare.com/introducing-oxy/

Oxy is Cloudflare's Rust-based next generation proxy framework

Oxy is Cloudflare's Rust-based next generation proxy framework

In this blog post, we are proud to introduce Oxy – our modern proxy framework, developed using the Rust programming language. Oxy is a foundation of several Cloudflare projects, including the Zero Trust Gateway, the iCloud Private Relay second hop proxy, and the internal egress routing service.

Oxy leverages our years of experience building high-load proxies to implement the latest communication protocols, enabling us to effortlessly build sophisticated services that can accommodate massive amounts of daily traffic.

We will be exploring Oxy in greater detail in upcoming technical blog posts, providing a comprehensive and in-depth look at its capabilities and potential applications. For now, let us embark on this journey and discover what Oxy is and how we built it.

What Oxy does

We refer to Oxy as our “next-generation proxy framework”. But what do we really mean by “proxy framework”? Picture a server (like NGINX, that reader might be familiar with) that can proxy traffic with an array of protocols, including various predefined common traffic flow scenarios that enable you to route traffic to specific destinations or even egress with a different protocol than the one used for ingress. This server can be configured in many ways for specific flows and boasts tight integration with the surrounding infrastructure, whether telemetry consumers or networking services.

Now, take all of that and add in the ability to programmatically control every aspect of the proxying: protocol decapsulation, traffic analysis, routing, tunneling logic, DNS resolution, and so much more. And this is what Oxy proxy framework is: a feature-rich proxy server tightly integrated with our internal infrastructure that’s customizable to meet application requirements, allowing engineers to tweak every component.

This design is in line with our belief in an iterative approach to development, where a basic solution is built first and then gradually improved over time. With Oxy, you can start with a basic solution that can be deployed to our servers and then add additional features as needed, taking advantage of the many extensibility points offered by Oxy. In fact, you can avoid writing any code, besides a few lines of bootstrap boilerplate and get a production-ready server with a wide variety of startup configuration options and traffic flow scenarios.

Oxy is Cloudflare's Rust-based next generation proxy framework
High-level Oxy architecture

For example, suppose you’d like to implement an HTTP firewall. With Oxy, you can proxy HTTP(S) requests right out of the box, eliminating the need to write any code related to production services, such as request metrics and logs. You simply need to implement an Oxy hook handler for HTTP requests and responses. If you’ve used Cloudflare Workers before, then you should be familiar with this extensibility model.

Similarly, you can implement a layer 4 firewall by providing application hooks that handle ingress and egress connections. This goes beyond a simple block/accept scenario, as you can build authentication functionality or a traffic router that sends traffic to different destinations based on the geographical information of the ingress connection. The capabilities are incredibly rich, and we’ve made the extensibility model as ergonomic and flexible as possible. As an example, if information obtained from layer 4 is insufficient to make an informed firewall decision, the app can simply ask Oxy to decapsulate the traffic and process it with HTTP firewall.

The aforementioned scenarios are prevalent in many products we build at Cloudflare, so having a foundation that incorporates ready solutions is incredibly useful. This foundation has absorbed lots of experience we’ve gained over the years, taking care of many sharp and dark corners of high-load service programming. As a result, application implementers can stay focused on the business logic of their application with Oxy taking care of the rest. In fact, we’ve been able to create a few privacy proxy applications using Oxy that now serve massive amounts of traffic in production with less than a couple of hundred lines of code. This is something that would have taken multiple orders of magnitude more time and lines of code before.

As previously mentioned, we’ll dive deeper into the technical aspects in future blog posts. However, for now, we’d like to provide a brief overview of Oxy’s capabilities. This will give you a glimpse of the many ways in which Oxy can be customized and used.

On-ramps

On-ramp defines a combination of transport layer socket type and protocols that server listeners can use for ingress traffic.

Oxy supports a wide variety of traffic on-ramps:

  • HTTP 1/2/3 (including various CONNECT protocols for layer 3 and 4 traffic)
  • TCP and UDP traffic over Proxy Protocol
  • general purpose IP traffic, including ICMP

With Oxy, you have the ability to analyze and manipulate traffic at multiple layers of the OSI model – from layer 3 to layer 7. This allows for a wide range of possibilities in terms of how you handle incoming traffic.

One of the most notable and powerful features of Oxy is the ability for applications to force decapsulation. This means that an application can analyze traffic at a higher level, even if it originally arrived at a lower level. For example, if an application receives IP traffic, it can choose to analyze the UDP traffic encapsulated within the IP packets. With just a few lines of code, the application can tell Oxy to upgrade the IP flow to a UDP tunnel, effectively allowing the same code to be used for different on-ramps.

The application can even go further and ask Oxy to sniff UDP packets and check if they contain HTTP/3 traffic. In this case, Oxy can upgrade the UDP traffic to HTTP and handle HTTP/3 requests that were originally received as raw IP packets. This allows for the simultaneous processing of traffic at all three layers (L3, L4, L7), enabling applications to analyze, filter, and manipulate the traffic flow from multiple perspectives. This provides a robust toolset for developing advanced traffic processing applications.

Oxy is Cloudflare's Rust-based next generation proxy framework
Multi-layer traffic processing in Oxy applications

Off-ramps

Off-ramp defines a combination of transport layer socket type and protocols that proxy server connectors can use for egress traffic.

Oxy offers versatility in its egress methods, supporting a range of protocols including HTTP 1 and 2, UDP, TCP, and IP. It is equipped with internal DNS resolution and caching, as well as customizable resolvers, with automatic fallback options for maximum system reliability. Oxy implements happy eyeballs for TCP, advanced tunnel timeout logic and has the ability to route traffic to internal services with accompanying metadata.

Additionally, through collaboration with one of our internal services (which is an Oxy application itself!) Oxy is able to offer geographical egress — allowing applications to route traffic to the public Internet from various locations in our extensive network covering numerous cities worldwide. This complex and powerful feature can be easily utilized by Oxy application developers at no extra cost, simply by adjusting configuration settings.

Tunneling and request handling

We’ve discussed Oxy’s communication capabilities with the outside world through on-ramps and off-ramps. In the middle, Oxy handles efficient stateful tunneling of various traffic types including TCP, UDP, QUIC, and IP, while giving applications full control over traffic blocking and redirection.

Additionally, Oxy effectively handles HTTP traffic, providing full control over requests and responses, and allowing it to serve as a direct HTTP or API service. With built-in tools for streaming analysis of HTTP bodies, Oxy makes it easy to extract and process data, such as form data from uploads and downloads.

In addition to its multi-layer traffic processing capabilities, Oxy also supports advanced HTTP tunneling methods, such as CONNECT-UDP and CONNECT-IP, using the latest extensions to HTTP 3 and 2 protocols. It can even process HTTP CONNECT request payloads on layer 4 and recursively process the payload as HTTP if the encapsulated traffic is HTTP.

Oxy is Cloudflare's Rust-based next generation proxy framework
Recursive processing of HTTP CONNECT body payload in HTTP pipeline

TLS

The modern Internet is unimaginable without traffic encryption, and Oxy, of course, provides this essential aspect. Oxy’s cryptography and TLS are based on BoringSSL, providing both a FIPS-compliant version with a limited set of certified features and the latest version that supports all the currently available TLS features. Oxy also allows applications to switch between the two versions in real-time, on a per-request or per-connection basis.

Oxy’s TLS client is designed to make HTTPS requests to upstream servers, with the functionality and security of a browser-grade client. This includes the reconstruction of certificate chains, certificate revocation checks, and more. In addition, Oxy applications can be secured with TLS v1.3, and optionally mTLS, allowing for the extraction of client authentication information from x509 certificates.

Oxy has the ability to inspect and filter HTTPS traffic, including HTTP/3, and provides the means for dynamically generating certificates, serving as a foundation for implementing data loss prevention (DLP) products. Additionally, Oxy’s internal fork of BoringSSL, which is not FIPS-compliant, supports the use of raw public keys as an alternative to WebPKI, making it ideal for internal service communication. This allows for all the benefits of TLS without the hassle of managing root certificates.

Gluing everything together

Oxy is more than just a set of building blocks for network applications. It acts as a cohesive glue, handling the bootstrapping of the entire proxy application with ease, including parsing and applying configurations, setting up an asynchronous runtime, applying seccomp hardening and providing automated graceful restarts functionality.

With built-in support for panic reporting to Sentry, Prometheus metrics with a Rust-macro based API, Kibana logging, distributed tracing, memory and runtime profiling, Oxy offers comprehensive monitoring and analysis capabilities. It can also generate detailed audit logs for layer 4 traffic, useful for billing and network analysis.

To top it off, Oxy includes an integration testing framework, allowing for easy testing of application interactions using TypeScript-based tests.

Extensibility model

To take full advantage of Oxy’s capabilities, one must understand how to extend and configure its features. Oxy applications are configured using YAML configuration files, offering numerous options for each feature. Additionally, application developers can extend these options by leveraging the convenient macros provided by the framework, making customization a breeze.

Suppose the Oxy application uses a key-value database to retrieve user information. In that case, it would be beneficial to expose a YAML configuration settings section for this purpose. With Oxy, defining a structure and annotating it with the #[oxy_app_settings] attribute is all it takes to accomplish this:

///Application’s key-value (KV) database settings
#[oxy_app_settings]
pub struct MyAppKVSettings {
    /// Key prefix.
    pub prefix: Option<String>,
    /// Path to the UNIX domain socket for the appropriate KV 
    /// server instance.
    pub socket: Option<String>,
}

Oxy can then generate a default YAML configuration file listing available options and their default values, including those extended by the application. The configuration options are automatically documented in the generated file from the Rust doc comments, following best Rust practices.

Moreover, Oxy supports multi-tenancy, allowing a single application instance to expose multiple on-ramp endpoints, each with a unique configuration. But, sometimes even a YAML configuration file is not enough to build a desired application, this is where Oxy’s comprehensive set of hooks comes in handy. These hooks can be used to extend the application with Rust code and cover almost all aspects of the traffic processing.

To give you an idea of how easy it is to write an Oxy application, here is an example of basic Oxy code:

struct MyApp;

// Defines types for various application extensions to Oxy's
// data types. Contexts provide information and control knobs for
// the different parts of the traffic flow and applications can extend // all of them with their custom data. As was mentioned before,
// applications could also define their custom configuration.
// It’s just a matter of defining a configuration object with
// `#[oxy_app_settings]` attribute and providing the object type here.
impl OxyExt for MyApp {
    type AppSettings = MyAppKVSettings;
    type EndpointAppSettings = ();
    type EndpointContext = ();
    type IngressConnectionContext = MyAppIngressConnectionContext;
    type RequestContext = ();
    type IpTunnelContext = ();
    type DnsCacheItem = ();

}
   
#[async_trait]
impl OxyApp for MyApp {
    fn name() -> &'static str {
        "My app"
    }

    fn version() -> &'static str {
        env!("CARGO_PKG_VERSION")
    }

    fn description() -> &'static str {
        "This is an example of Oxy application"
    }

    async fn start(
        settings: ServerSettings<MyAppSettings, ()>
    ) -> anyhow::Result<Hooks<Self>> {
        // Here the application initializes various hooks, with each
        // hook being a trait implementation containing multiple
        // optional callbacks invoked during the lifecycle of the
        // traffic processing.
        let ingress_hook = create_ingress_hook(&settings);
        let egress_hook = create_egress_hook(&settings);
        let tunnel_hook = create_tunnel_hook(&settings);
        let http_request_hook = create_http_request_hook(&settings);
        let ip_flow_hook = create_ip_flow_hook(&settings);

        Ok(Hooks {
            ingress: Some(ingress_hook),
            egress: Some(egress_hook),
            tunnel: Some(tunnel_hook),
            http_request: Some(http_request_hook),
            ip_flow: Some(ip_flow_hook),
            ..Default::default()
        })
    }
}

// The entry point of the application
fn main() -> OxyResult<()> {
    oxy::bootstrap::<MyApp>()
}

Technology choice

Oxy leverages the safety and performance benefits of Rust as its implementation language. At Cloudflare, Rust has emerged as a popular choice for new product development, and there are ongoing efforts to migrate some of the existing products to the language as well.

Rust offers memory and concurrency safety through its ownership and borrowing system, preventing issues like null pointers and data races. This safety is achieved without sacrificing performance, as Rust provides low-level control and the ability to write code with minimal runtime overhead. Rust’s balance of safety and performance has made it popular for building safe performance-critical applications, like proxies.

We intentionally tried to stand on the shoulders of the giants with this project and avoid reinventing the wheel. Oxy heavily relies on open-source dependencies, with hyper and tokio being the backbone of the framework. Our philosophy is that we should pull from existing solutions as much as we can, allowing for faster iteration, but also use widely battle-tested code. If something doesn’t work for us, we try to collaborate with maintainers and contribute back our fixes and improvements. In fact, we now have two team members who are core team members of tokio and hyper projects.

Even though Oxy is a proprietary project, we try to give back some love to the open-source community without which the project wouldn’t be possible by open-sourcing some of the building blocks such as https://github.com/cloudflare/boring and https://github.com/cloudflare/quiche.

The road to implementation

At the beginning of our journey, we set out to implement a proof-of-concept  for an HTTP firewall using Rust for what would eventually become Zero Trust Gateway product. This project was originally part of the WARP service repository. However, as the PoC rapidly advanced, it became clear that it needed to be separated into its own Gateway proxy for both technical and operational reasons.

Later on, when tasked with implementing a relay proxy for iCloud Private Relay, we saw the opportunity to reuse much of the code from the Gateway proxy. The Gateway project could also benefit from the HTTP/3 support that was being added for the Private Relay project. In fact, early iterations of the relay service were forks of the Gateway server.

It was then that we realized we could extract common elements from both projects to create a new framework, Oxy. The history of Oxy can be traced back to its origins in the commit history of the Gateway and Private Relay projects, up until its separation as a standalone framework.

Since our inception, we have leveraged the power of Oxy to efficiently roll out multiple projects that would have required a significant amount of time and effort without it. Our iterative development approach has been a strength of the project, as we have been able to identify common, reusable components through hands-on testing and implementation.

Our small core team is supplemented by internal contributors from across the company, ensuring that the best subject-matter experts are working on the relevant parts of the project. This contribution model also allows us to shape the framework’s API to meet the functional and ergonomic needs of its users, while the core team ensures that the project stays on track.

Relation to Pingora

Although Pingora, another proxy server developed by us in Rust, shares some similarities with Oxy, it was intentionally designed as a separate proxy server with a different objective. Pingora was created to serve traffic from millions of our client’s upstream servers, including those with ancient and unusual configurations. Non-UTF 8 URLs or TLS settings that are not supported by most TLS libraries being just a few such quirks among many others. This focus on handling technically challenging unusual configurations sets Pingora apart from other proxy servers.

The concept of Pingora came about during the same period when we were beginning to develop Oxy, and we initially considered merging the two projects. However, we quickly realized that their objectives were too different to do that. Pingora is specifically designed to establish Cloudflare’s HTTP connectivity with the Internet, even in its most technically obscure corners. On the other hand, Oxy is a multipurpose platform that supports a wide variety of communication protocols and aims to provide a simple way to develop high-performance proxy applications with business logic.

Conclusion

Oxy is a proxy framework that we have developed to meet the demanding needs of modern services. It has been designed  to provide a flexible and scalable solution that can be adapted to meet the unique requirements of each project and by leveraging the power of Rust, we made it both safe and fast.

Looking forward, Oxy is poised to play one of the critical roles in our company’s larger effort to modernize and improve our architecture. It provides a solid block in foundation on which we can keep building the better Internet.

As the framework continues to evolve and grow, we remain committed to our iterative approach to development, constantly seeking out new opportunities to reuse existing solutions and improve our codebase. This collaborative, community-driven approach has already yielded impressive results, and we are confident that it will continue to drive the future success of Oxy.

Stay tuned for more tech savvy blog posts on the subject!

How we built Pingora, the proxy that connects Cloudflare to the Internet

Post Syndicated from Yuchen Wu original https://blog.cloudflare.com/how-we-built-pingora-the-proxy-that-connects-cloudflare-to-the-internet/

How we built Pingora, the proxy that connects Cloudflare to the Internet

Introduction

How we built Pingora, the proxy that connects Cloudflare to the Internet

Today we are excited to talk about Pingora, a new HTTP proxy we’ve built in-house using Rust that serves over 1 trillion requests a day, boosts our performance, and enables many new features for Cloudflare customers, all while requiring only a third of the CPU and memory resources of our previous proxy infrastructure.

As Cloudflare has scaled we’ve outgrown NGINX. It was great for many years, but over time its limitations at our scale meant building something new made sense. We could no longer get the performance we needed nor did NGINX have the features we needed for our very complex environment.

Many Cloudflare customers and users use the Cloudflare global network as a proxy between HTTP clients (such as web browsers, apps, IoT devices and more) and servers. In the past, we’ve talked a lot about how browsers and other user agents connect to our network, and we’ve developed a lot of technology and implemented new protocols (see QUIC and optimizations for http2) to make this leg of the connection more efficient.

Today, we’re focusing on a different part of the equation: the service that proxies traffic between our network and servers on the Internet. This proxy service powers our CDN, Workers fetch, Tunnel, Stream, R2 and many, many other features and products.

Let’s dig in on why we chose to replace our legacy service and how we developed Pingora, our new system designed specifically for Cloudflare’s customer use cases and scale.

Why build yet another proxy

Over the years, our usage of NGINX has run up against limitations. For some limitations, we optimized or worked around them. But others were much harder to overcome.

Architecture limitations hurt performance

The NGINX worker (process) architecture has operational drawbacks for our use cases that hurt our performance and efficiency.

First, in NGINX each request can only be served by a single worker. This results in unbalanced load across all CPU cores, which leads to slowness.

Because of this request-process pinning effect, requests that do CPU heavy or blocking IO tasks can slow down other requests. As those blog posts attest we’ve spent a lot of time working around these problems.

The most critical problem for our use cases is poor connection reuse. Our machines establish TCP connections to origin servers to proxy HTTP requests. Connection reuse speeds up TTFB (time-to-first-byte) of requests by reusing previously established connections from a connection pool, skipping TCP and TLS handshakes required on a new connection.

However, the NGINX connection pool is per worker. When a request lands on a certain worker, it can only reuse the connections within that worker. When we add more NGINX workers to scale up, our connection reuse ratio gets worse because the connections are scattered across more isolated pools of all the processes. This results in slower TTFB and more connections to maintain, which consumes resources (and money) for both us and our customers.

How we built Pingora, the proxy that connects Cloudflare to the Internet

As mentioned in past blog posts, we have workarounds for some of these issues. But if we can address the fundamental issue: the worker/process model, we will resolve all these problems naturally.

Some types of functionality are difficult to add

NGINX is a very good web server, load balancer or a simple gateway. But Cloudflare does way more than that. We used to build all the functionality we needed around NGINX, which is not easy to do while trying not to diverge too much from NGINX upstream codebase.

For example, when retrying/failing over a request, sometimes we want to send a request to a different origin server with a different set of request headers. But that is not something NGINX allows us to do. In cases like this, we spend time and effort on working around the NGINX constraints.

Meanwhile, the programming languages we had to work with didn’t provide help alleviating the difficulties. NGINX is purely in C, which is not memory safe by design. It is very error-prone to work with such a 3rd party code base. It is quite easy to get into memory safety issues, even for experienced engineers, and we wanted to avoid these as much as possible.

The other language we used to complement C is Lua. It is less risky but also less performant. In addition, we often found ourselves missing static typing when working with complicated Lua code and business logic.

And the NGINX community is not very active, and development tends to be “behind closed doors”.

Choosing to build our own

Over the past few years, as we’ve continued to grow our customer base and feature set, we continually evaluated three choices:

  1. Continue to invest in NGINX and possibly fork it to tailor it 100% to our needs. We had the expertise needed, but given the architecture limitations mentioned above, significant effort would be required to rebuild it in a way that fully supported our needs.
  2. Migrate to another 3rd party proxy codebase. There are definitely good projects, like envoy and others. But this path means the same cycle may repeat in a few years.
  3. Start with a clean slate, building an in-house platform and framework. This choice requires the most upfront investment in terms of engineering effort.

We evaluated each of these options every quarter for the past few years. There is no obvious formula to tell which choice is the best. For several years, we continued with the path of the least resistance, continuing to augment NGINX. However, at some point, building our own proxy’s return on investment seemed worth it. We made a call to build a proxy from scratch, and began designing the proxy application of our dreams.

The Pingora Project

Design decisions

To make a proxy that serves millions of requests per second fast, efficient and secure, we have to make a few important design decisions first.

We chose Rust as the language of the project because it can do what C can do in a memory safe way without compromising performance.

Although there are some great off-the-shelf 3rd party HTTP libraries, such as hyper, we chose to build our own because we want to maximize the flexibility in how we handle HTTP traffic and to make sure we can innovate at our own pace.

At Cloudflare, we handle traffic across the entire Internet. We have many cases of bizarre and non-RFC compliant HTTP traffic that we have to support. For example, hyper did not support HTTP status codes greater than 599 until late 2020, three years after people initially raised the issue and repeatedly argued that it was necessary. And we need more than being correct. We need a robust, permissive, customizable HTTP library that can survive the wilds of the Internet. The best way to guarantee that is to implement our own.

The next design decision was around our workload scheduling system. We chose multithreading over multiprocessing in order to share resources, especially connection pools, easily. We also decided that work stealing was required to avoid some classes of performance problems mentioned above. The Tokio async runtime turned out to be a great fit for our needs.

Finally, we wanted our project to be intuitive and developer friendly. What we build is not the final product, and should be extensible as a platform as more features are built on top of it. We decided to implement a “life of a request” event based programmable interface similar to NGINX/OpenResty. For example, the “request filter” phase allows developers to run code to modify or reject the request when a request header is received. With this design, we can separate our business logic and generic proxy logic cleanly. Developers who previously worked on NGINX can easily switch to Pingora and quickly become productive.

Pingora is faster in production

Let’s fast-forward to the present. Pingora handles almost every HTTP request that needs to interact with an origin server (for a cache miss, for example), and we’ve collected a lot of performance data in the process.

First, let’s see how Pingora speeds up our customer’s traffic. Overall traffic on Pingora shows 5ms reduction on median TTFB and 80ms reduction on the 95th percentile. This is not because we run code faster. Even our old service could handle requests in the sub-millisecond range.

The savings come from our new architecture which can share connections across all threads. This means a better connection reuse ratio, which spends less time on TCP and TLS handshakes.

How we built Pingora, the proxy that connects Cloudflare to the Internet

Across all customers, Pingora makes only a third as many new connections per second compared to the old service. For one major customer, it increased the connection reuse ratio from 87.1% to 99.92%, which reduced new connections to their origins by 160x. To present the number more intuitively, by switching to Pingora, we save our customers and users 434 years of handshake time every day.

More features

Having a developer friendly interface engineers are familiar with while eliminating the previous constraints allows us to develop more features, more quickly. Core functionality like new protocols act as building blocks to more products we can offer to customers.

As an example, we were able to add HTTP/2 upstream support to Pingora without major hurdles. This allowed us to offer gRPC  to our customers shortly afterwards. Adding this same functionality to NGINX would have required significantly more engineering effort and might not have materialized.

More recently we’ve announced Cache Reserve where Pingora uses R2 storage as a caching layer. As we add more functionality to Pingora, we’re able to offer new products that weren’t feasible before.

More efficient

In production, Pingora consumes about 70% less CPU and 67% less memory compared to our old service with the same traffic load. The savings come from a few factors.

Our Rust code runs more efficiently compared to our old Lua code. On top of that, there are also efficiency differences from their architectures. For example, in NGINX/OpenResty, when the Lua code wants to access an HTTP header, it has to read it from the NGINX C struct, allocate a Lua string and then copy it to the Lua string. Afterwards, Lua has to garbage-collect its new string as well. In Pingora, it would just be a direct string access.

The multithreading model also makes sharing data across requests more efficient. NGINX also has shared memory but due to implementation limitations, every shared memory access has to use a mutex lock and only strings and numbers can be put into shared memory. In Pingora, most shared items can be accessed directly via shared references behind atomic reference counters.

Another significant portion of CPU saving, as mentioned above, is from making fewer new connections. TLS handshakes are expensive compared to just sending and receiving data via established connections.

Safer

Shipping features quickly and safely is difficult, especially at our scale. It’s hard to predict every edge case that can occur in a distributed environment processing millions of requests a second. Fuzzing and static analysis can only mitigate so much. Rust’s memory-safe semantics guard us from undefined behavior and give us confidence our service will run correctly.

With those assurances we can focus more on how a change to our service will interact with other services or a customer’s origin. We can develop features at a higher cadence and not be burdened by memory safety and hard to diagnose crashes.

When crashes do occur an engineer needs to spend time to diagnose how it happened and what caused it. Since Pingora’s inception we’ve served a few hundred trillion requests and have yet to crash due to our service code.

In fact, Pingora crashes are so rare we usually find unrelated issues when we do encounter one. Recently we discovered a kernel bug soon after our service started crashing. We’ve also discovered hardware issues on a few machines, in the past ruling out rare memory bugs caused by our software even after significant debugging was nearly impossible.

Conclusion

To summarize, we have built an in-house proxy that is faster, more efficient and versatile as the platform for our current and future products.

We will be back with more technical details regarding the problems we faced, the optimizations we applied and the lessons we learned from building Pingora and rolling it out to power a significant portion of the Internet. We will also be back with our plan to open source it.

Pingora is our latest attempt at rewriting our system, but it won’t be our last. It is also only one of the building blocks in the re-architecting of our systems.

Interested in joining us to help build a better Internet? Our engineering teams are hiring.

Building Cloudflare Images in Rust and Cloudflare Workers

Post Syndicated from Yevgen Safronov original https://blog.cloudflare.com/building-cloudflare-images-in-rust-and-cloudflare-workers/

Building Cloudflare Images in Rust and Cloudflare Workers

Building Cloudflare Images in Rust and Cloudflare Workers

This post explains how we implemented the Cloudflare Images product with reusable Rust libraries and Cloudflare Workers. It covers the technical design of Cloudflare Image Resizing and Cloudflare Images. Using Rust and Cloudflare Workers helps us quickly iterate and deliver product improvements over the coming weeks and months.

Reuse of code in Rusty image projects

We developed Image Resizing in Rust. It’s a web server that receives HTTP requests for images along with resizing options, fetches the full-size images from the origin, applies resizing and other image processing operations, compresses, and returns the HTTP response with the optimized image.

Rust makes it easy to split projects into libraries (called crates). The image processing and compression parts of Image Resizing are usable as libraries.

We also have a product called  Polish, which is a Golang-based service that recompresses images in our cache. Polish was initially designed to run command-line programs like jpegtran and pngcrush. We took the core of Image Resizing and wrapped it in a command-line executable. This way, when Polish needs to apply lossy compression or generate WebP images or animations, it can use Image Resizing via a command-line tool instead of a third-party tool.

Reusing libraries has allowed us to easily unify processing between Image Resizing and Polish (for example, to ensure that both handle metadata and color profiles in the same way).

Cloudflare Images is another product we’ve built in Rust. It added support for a custom storage back-end, variants (size presets), support for signing URLs and more. We made it as a collection of Rust crates, so we can reuse pieces of it in other services running anywhere in our network. Image Resizing provides image processing for Cloudflare Images and shares libraries with Images to understand the new URL scheme, access the storage back-end, and database for variants.

How Image Resizing works

Building Cloudflare Images in Rust and Cloudflare Workers

The Image Resizing service runs at the edge and is deployed on every server of the Cloudflare global network. Thanks to Cloudflare’s global Anycast network, the closest Cloudflare data center will handle eyeball image resizing requests. Image Resizing is tightly integrated with the Cloudflare cache and handles eyeball requests only on a cache miss.

There are two ways to use Image Resizing. The default URL scheme provides an easy, declarative way of specifying image dimensions and other options. The other way is to use a JavaScript API in a Worker. Cloudflare Workers give powerful programmatic control over every image resizing request.

How Cloudflare Images work

Building Cloudflare Images in Rust and Cloudflare Workers

Cloudflare Images consists of the following components:

  • The Images core service that powers the public API to manage images assets.
  • The Image Resizing service responsible for image transformations and caching.
  • The Image delivery Cloudflare Worker responsible for serving images and passing corresponding parameters through to the Imaging Resizing service.
  • Image storage that provides access and storage for original image assets.

To support Cloudflare Images scenarios for image transformations, we made several changes to the Image Resizing service:

  • Added access to Cloudflare storage with original image assets.
  • Added access to variant definitions (size presets).
  • Added support for signing URLs.

Image delivery

The primary use case for Cloudflare Images is to provide a simple and easy-to-use way of managing images assets. To cover egress costs, we provide image delivery through the Cloudflare managed imagedelivery.net domain. It is configured with Tiered Caching to maximize the cache hit ratio for image assets. imagedelivery.net provides image hosting without a need to configure a custom domain to proxy through Cloudflare.

A Cloudflare Worker powers image delivery. It parses image URLs and passes the corresponding parameters to the image resizing service.

How we store Cloudflare Images

There are several places we store information on Cloudflare Images:

  • image metadata in Cloudflare’s core data centers
  • variant definitions in Cloudflare’s edge data centers
  • original images in core data centers
  • optimized images in Cloudflare cache, physically close to eyeballs.

Image variant definitions are stored and delivered to the edge using Cloudflare’s distributed key-value store called Quicksilver. We use a single source of truth for variants. The Images core service makes calls to Quicksilver to read and update variant definitions.

The rest of the information about the image is stored in the image URL itself:
https://imagedelivery.net/<encoded account id>/<image id>/<variant name>

<image id> contains a flag, whether it’s publicly available or requires access verification. It’s not feasible to store any image metadata in Quicksilver as the data volume would increase linearly with the number of images we host. Instead, we only allow a finite number of variants per account, so we responsibly utilize available disk space on the edge. The downside of storing image metadata as part of <image id> is that <image id> will change on access change.

How we keep Cloudflare Images up to date

The only way to access images is through the use of variants. Each variant is a named image resizing configuration. Once the image asset is fetched, we cache the transformed image in the Cloudflare cache. The critical question is how we keep processed images up to date. The answer is by purging the Cloudflare cache when necessary. There are two use cases:

  • access to the image is changed
  • the variant definition is updated

In the first instance, we purge the cache by calling a URL:
https://imagedelivery.net/<encoded account id>/<image id>

Then, the customer updates the variant we issue a cache purge request by tag:
account-id/variant-name

To support cache purge by tag, the image resizing service adds the necessary tags for all transformed images.

How we restrict access to Cloudflare Images

The Image resizing service supports restricted access to images by using URL signatures with expiration. URLs are signed with an SHA-256 HMAC key. The steps to produce valid signatures are:

  1. Take the path and query string (the path starts with /).
  2. Compute the path’s SHA-256 HMAC with the query string, using the Images’ URL signing key as the secret. The key is configured in the Dashboard.
  3. If the URL is meant to expire, compute the Unix timestamp (number of seconds since 1970) of the expiration time, and append ?exp= and the timestamp as an integer to the URL.
  4. Append ? or & to the URL as appropriate (? if it had no query string; & if it had a query string).
  5. Append sig= and the HMAC as hex-encoded 64 characters.

A signed URL looks like this:

Building Cloudflare Images in Rust and Cloudflare Workers

A signed URL with an expiration timestamp looks like this:

Building Cloudflare Images in Rust and Cloudflare Workers

Signature of /hello/world URL with a secret ‘this is a secret’ is 6293f9144b4e9adc83416d1b059abcac750bf05b2c5c99ea72fd47cc9c2ace34.

https://imagedelivery.net/hello/world?sig=6293f9144b4e9adc83416d1b059abcac750bf05b2c5c99ea72fd47cc9c2ace34

Building Cloudflare Images in Rust and Cloudflare Workers

Direct creator uploads with Cloudflare Worker and KV

Similar to Cloudflare Stream, Images supports direct creator uploads. That allow users to upload images without API tokens. Everyday use of direct creator uploads is by web apps, client-side applications, or mobile apps where users upload content directly to Cloudflare Images.

Once again, we used our serverless platform to support direct creator uploads. The successful API call stores the account’s information in Workers KV with the specified expiration date. A simple Cloudflare Worker handles the upload URL, which reads the KV value and grants upload access only on a successful call to KV.

Future Work

Cloudflare Images product has an exciting product roadmap. Let’s review what’s possible with the current architecture of Cloudflare Images.

Resizing hints on upload

At the moment, no image transformations happen on upload. That means we can serve the image globally once it is uploaded to Image storage. We are considering adding resizing hints on image upload. That won’t necessarily schedule image processing in all cases but could provide a valuable signal to resize the most critical image variants. An example could be to generate an AVIF variant for the most vital image assets.

Serving images from custom domains

We think serving images from a domain we manage (with Tiered Caching) is a great default option for many customers. The downside is that loading Cloudflare images requires additional TLS negotiations on the client-side, adding latency and impacting loading performance. On the other hand, serving Cloudflare Images from custom domains will be a viable option for customers who set up a website through Cloudflare. The good news is that we can support such functionality with the current architecture without radical changes in the architecture.

Conclusion

The Cloudflare Images product runs on top of the Cloudflare global network. We built Cloudflare Images in Rust and Cloudflare Workers. This way, we use Rust reusable libraries in several products such as Cloudflare Images, Image Resizing, and Polish. Cloudflare’s serverless platform is an indispensable tool to build Cloudflare products internally. If you are interested in building innovative products in Rust and Cloudflare Workers, we’re hiring.

Native Rust support on Cloudflare Workers

Post Syndicated from Steve Manuel original https://blog.cloudflare.com/workers-rust-sdk/

Native Rust support on Cloudflare Workers

Native Rust support on Cloudflare Workers

You can now write Cloudflare Workers in 100% Rust, no JavaScript required. Try it out: https://github.com/cloudflare/workers-rs

Cloudflare Workers has long supported the building blocks to run many languages using  WebAssembly. However, there has always been a challenging “trampoline” step required to allow languages like Rust to talk to JavaScript APIs such as fetch().

In addition to the sizable amount of boilerplate needed, lots of “off the shelf” bindings between languages don’t include support for Cloudflare APIs such as KV and Durable Objects. What we wanted was a way to write a Worker in idiomatic Rust, quickly, and without needing knowledge of the host JavaScript environment. While we had a nice “starter” template that made it easy enough to pull in some Rust libraries and use them from JavaScript, the barrier was still too high if your goal was to write a full program in Rust and ship it to our edge.

Not anymore!

Introducing the worker crate, available on GitHub and crates.io, which makes Rust developers feel right at home on the Workers platform by running code inside the V8 WebAssembly engine. In the snippet below, you can see how the worker crate does all the heavy lifting by providing Rustacean-friendly Workers APIs.

use worker::*;

#[event(fetch)]
pub async fn main(req: Request, env: Env) -> Result<Response> {
    console_log!(
        "{} {}, located at: {:?}, within: {}",
        req.method().to_string(),
        req.path(),
        req.cf().coordinates().unwrap_or_default(),
        req.cf().region().unwrap_or("unknown region".into())
    );

    if !matches!(req.method(), Method::Post) {
        return Response::error("Method Not Allowed", 405);
    }

    if let Some(file) = req.form_data().await?.get("file") {
        return match file {
            FormEntry::File(buf) => {
                Response::ok(&format!("size = {}", buf.bytes().await?.len()))
            }
            _ => Response::error("`file` part of POST form must be a file", 400),
        };
    }

    Response::error("Bad Request", 400)
}

Get your own Worker in Rust started with a single command:

# see installation instructions for our `wrangler` CLI at https://github.com/cloudflare/wrangler
# (requires v1.19.2 or higher)
$ wrangler generate --type=rust my-project

We’ve  stripped away all the glue code, provided an ergonomic HTTP framework, and baked in what you need to build small scripts or full-fledged Workers apps in Rust. You’ll find fetch, a router, easy-to-use HTTP functionality, Workers KV stores and Durable Objects, secrets, and environment variables too. It’s all open source, and we’d love your feedback!

Why are we doing this?

Cloudflare Workers is on a mission to simplify the developer experience. When we took a hard look at the previous experience writing non-JavaScript Workers, we knew we could do better. Rust happens to be a great language for us to kick-start our mission: it has first-class support for WebAssembly, and a wonderful, growing ecosystem. Tools like wasm-bindgen, libraries like web-sys, and Rust’s powerful macro system gave us a significant starting-off point. Plus, Rust’s popularity is growing rapidly, and if our own use of Rust at Cloudflare is any indication, there is no question that Rust is staking its claim as a must-have in the developer toolbox.

So give it a try, leave some feedback, even open a PR! By the way, we’re always on the lookout for great people to join us, and we are hiring for many open roles (including Rust engineers!) — take a look.

Pin, Unpin, and why Rust needs them

Post Syndicated from Adam Chalmers original https://blog.cloudflare.com/pin-and-unpin-in-rust/

Pin, Unpin, and why Rust needs them

Pin, Unpin, and why Rust needs them

Using async Rust libraries is usually easy. It’s just like using normal Rust code, with a little async or .await here and there. But writing your own async libraries can be hard. The first time I tried this, I got really confused by arcane, esoteric syntax like T: ?Unpin and Pin<&mut Self>. I had never seen these types before, and I didn’t understand what they were doing. Now that I understand them, I’ve written the explainer I wish I could have read back then. In this post, we’re gonna learn

  • What Futures are
  • What self-referential types are
  • Why they were unsafe
  • How Pin/Unpin made them safe
  • Using Pin/Unpin to write tricky nested futures

What are Futures?

A few years ago, I needed to write some code which would take some async function, run it and collect some metrics about it, e.g. how long it took to resolve. I wanted to write a type TimedWrapper that would work like this:

// Some async function, e.g. polling a URL with [https://docs.rs/reqwest]
// Remember, Rust functions do nothing until you .await them, so this isn't
// actually making a HTTP request yet.
let async_fn = reqwest::get("http://adamchalmers.com");

// Wrap the async function in my hypothetical wrapper.
let timed_async_fn = TimedWrapper::new(async_fn);

// Call the async function, which will send a HTTP request and time it.
let (resp, time) = timed_async_fn.await;
println!("Got a HTTP {} in {}ms", resp.unwrap().status(), time.as_millis())

I like this interface, it’s simple and should be easy for the other programmers on my team to use. OK, let’s implement it! I know that, under the hood, Rust’s async functions are just regular functions that return a Future. The Future trait is pretty simple. It just means a type which:

  • Can be polled
  • When it’s polled, it might return “Pending” or “Ready”
  • If it’s pending, you should poll it again later
  • If it’s ready, it responds with a value. We call this “resolving”.

Here’s a really easy example of implementing a Future. Let’s make a Future that returns a random u16.

use std::{future::Future, pin::Pin, task::Context}

/// A future which returns a random number when it resolves.
#[derive(Default)]
struct RandFuture;

impl Future for RandFuture {
	// Every future has to specify what type of value it returns when it resolves.
	// This particular future will return a u16.
	type Output = u16;

	// The `Future` trait has only one method, named "poll".
fn poll(self: Pin<&mut Self>, _cx: &mut Context) -> Poll<Self::Output  {
		Poll::ready(rand::random())
	}
}

Not too hard! I think we’re ready to implement TimedWrapper.

Trying and failing to use nested Futures

Let’s start by defining the type.

pub struct TimedWrapper<Fut: Future> {
	start: Option<Instant>,
	future: Fut,
}

OK, so a TimedWrapper is generic over a type Fut, which must be a Future. And it will store a future of that type as a field. It’ll also have a start field which will record when it first was first polled. Let’s write a constructor:

impl<Fut: Future> TimedWrapper<Fut> {
	pub fn new(future: Fut) -> Self {
		Self { future, start: None }
	}
}

Nothing too complicated here. The new function takes a future and wraps it in the TimedWrapper. Of course, we have to set start to None, because it hasn’t been polled yet. So, let’s implement the poll method, which is the only thing we need to implement Future and make it .awaitable.

impl<Fut: Future> Future for TimedWrapper<Fut> {
	// This future will output a pair of values:
	// 1. The value from the inner future
	// 2. How long it took for the inner future to resolve
	type Output = (Fut::Output, Duration);

	fn poll(self: Pin<&mut Self>, cx: &mut Context) -> Poll<Self::Output> {
		// Call the inner poll, measuring how long it took.
		let start = self.start.get_or_insert_with(Instant::now);
		let inner_poll = self.future.poll(cx);
		let elapsed = self.elapsed();

		match inner_poll {
			// The inner future needs more time, so this future needs more time too
			Poll::Pending => Poll::Pending,
			// Success!
			Poll::Ready(output) => Poll::Ready((output, elapsed)),
		}
	}
}

OK, that wasn’t too hard. There’s just one problem: this doesn’t work.

Pin, Unpin, and why Rust needs them

So, the Rust compiler reports an error on self.future.poll(cx), which is “no method named poll found for type parameter Fut in the current scope”. This is confusing, because we know Fut is a Future, so surely it has a poll method? OK, but Rust continues: Fut doesn’t have a poll method, but Pin<&mut Fut> has one. What is this weird type?

Well, we know that methods have a “receiver”, which is some way it can access self. The receiver might be self, &self or &mut self, which mean “take ownership of self,” “borrow self,” and “mutably borrow self” respectively. So this is just a new, unfamiliar kind of receiver. Rust is complaining because we have Fut and we really need a Pin<&mut Fut>. At this point I have two questions:

  1. What is Pin?
  2. If I have a T value, how do I get a Pin<&mut T>?

The rest of this post is going to be answering those questions. I’ll explain some problems in Rust that could lead to unsafe code, and why Pin safely solves them.

Self-reference is unsafe

Pin exists to solve a very specific problem: self-referential datatypes, i.e. data structures which have pointers into themselves. For example, a binary search tree might have self-referential pointers, which point to other nodes in the same struct.

Self-referential types can be really useful, but they’re also hard to make memory-safe. To see why, let’s use this example type with two fields, an i32 called val and a pointer to an i32 called pointer.

Pin, Unpin, and why Rust needs them

So far, everything is OK. The pointer field points to the val field in memory address A, which contains a valid i32. All the pointers are valid, i.e. they point to memory that does indeed encode a value of the right type (in this case, an i32). But the Rust compiler often moves values around in memory. For example, if we pass this struct into another function, it might get moved to a different memory address. Or we might Box it and put it on the heap. Or if this struct was in a Vec<MyStruct>, and we pushed more values in, the Vec might outgrow its capacity and need to move its elements into a new, larger buffer.

Pin, Unpin, and why Rust needs them

When we move it, the struct’s fields change their address, but not their value. So the pointer field is still pointing at address A, but address A now doesn’t have a valid i32. The data that was there was moved to address B, and some other value might have been written there instead! So now the pointer is invalid. This is bad — at best, invalid pointers cause crashes, at worst they cause hackable vulnerabilities. We only want to allow memory-unsafe behaviour in unsafe blocks, and we should be very careful to document this type and tell users to update the pointers after moves.

Unpin and !Unpin

To recap, all Rust types fall into two categories.

  1. Types that are safe to move around in memory. This is the default, the norm. For example, this includes primitives like numbers, strings, bools, as well as structs or enums entirely made of them. Most types fall into this category!
  2. Self-referential types, which are not safe to move around in memory. These are pretty rare. An example is the intrusive linked list inside some Tokio internals. Another example is most types which implement Future and also borrow data, for reasons explained in the Rust async book.

Types in category (1) are totally safe to move around in memory. You won’t invalidate any pointers by moving them around. But if you move a type in (2), then you invalidate pointers and can get undefined behaviour, as we saw before. In earlier versions of Rust, you had to be really careful using these types to not move them, or if you moved them, to use unsafe and update all the pointers. But since Rust 1.33, the compiler can automatically figure out which category any type is in, and make sure you only use it safely.

Any type in (1) implements a special auto trait called Unpin. Weird name, but its meaning will become clear soon. Again, most “normal” types implement Unpin, and because it’s an auto trait (like Send or Sync or Sized1), so you don’t have to worry about implementing it yourself. If you’re unsure if a type can be safely moved, just check it on docs.rs and see if it impls Unpin!

Types in (2) are creatively named !Unpin (the ! in a trait means “does not implement”). To use these types safely, we can’t use regular pointers for self-reference. Instead, we use special pointers that “pin” their values into place, ensuring they can’t be moved. This is exactly what the Pin type does.

Pin, Unpin, and why Rust needs them

Pin wraps a pointer and stops its value from moving. The only exception is if the value impls Unpin — then we know it’s safe to move. Voila! Now we can write self-referential structs safely! This is really important, because as discussed above, many Futures are self-referential, and we need them for async/await.

Using Pin

So now we understand why Pin exists, and why our Future poll method has a pinned &mut self to self instead of a regular &mut self. So let’s get back to the problem we had before: I need a pinned reference to the inner future. More generally: given a pinned struct, how do we access its fields?

The solution is to write helper functions which give you references to the fields. These references might be normal Rust references like &mut, or they might also be pinned. You can choose whichever one you need. This is called projection: if you have a pinned struct, you can write a projection method that gives you access to all its fields.

Projecting is really just getting data into and out of Pins. For example, we get the start: Option<Duration> field from the Pin<&mut self>, and we need to put the future: Fut into a Pin so we can call its poll method). If you read the Pin methods you’ll see this is always safe if it points to an Unpin value, but requires unsafe otherwise.

// Putting data into Pin
pub        fn new          <P: Deref<Target:Unpin>>(pointer: P) -> Pin<P>;
pub unsafe fn new_unchecked<P>                     (pointer: P) -> Pin<P>;

// Getting data from Pin
pub        fn into_inner          <P: Deref<Target: Unpin>>(pin: Pin<P>) -> P;
pub unsafe fn into_inner_unchecked<P>                      (pin: Pin<P>) -> P;

I know unsafe can be a bit scary, but it’s OK to write unsafe code! I think of unsafe as the compiler saying “hey, I can’t tell if this code follows the rules here, so I’m going to rely on you to check for me.” The Rust compiler does so much work for us, it’s only fair that we do some of the work every now and then. If you want to learn how to write your own projection methods, I can highly recommend this fasterthanli.me blog post on the topic. But we’re going to take a little shortcut.

Using pin-project instead

So, OK, look, it’s time for a confession: I don’t like using unsafe. I know I just explained why it’s OK, but still, given the option, I would rather not.

I didn’t start writing Rust because I wanted to carefully think about the consequences of my actions, damnit, I just want to go fast and not break things. Luckily, someone sympathized with me and made a crate which generates totally safe projections! It’s called pin-project and it’s awesome. All we need to do is change our definition:

#[pin_project::pin_project] // This generates a `project` method
pub struct TimedWrapper<Fut: Future> {
	// For each field, we need to choose whether `project` returns an
	// unpinned (&mut T) or pinned (Pin<&mut T>) reference to the field.
	// By default, it assumes unpinned:
	start: Option<Instant>,
	// Opt into pinned references with this attribute:
	#[pin]
	future: Fut,
}

For each field, you have to choose whether its projection should be pinned or not. By default, you should use a normal reference, just because they’re easier and simpler. But if you know you need a pinned reference — for example, because you want to call .poll(), whose receiver is Pin<&mut Self> — then you can do that with #[pin].

Now we can finally poll the inner future!

fn poll(self: Pin<&mut Self>, cx: &mut Context) -> Poll<Self::Output> {
	// This returns a type with all the same fields, with all the same types,
	// except that the fields defined with #[pin] will be pinned.
	let mut this = self.project();
	
    // Call the inner poll, measuring how long it took.
	let start = this.start.get_or_insert_with(Instant::now);
	let inner_poll = this.future.as_mut().poll(cx);
	let elapsed = start.elapsed();

	match inner_poll {
		// The inner future needs more time, so this future needs more time too
		Poll::Pending => Poll::Pending,
		// Success!
		Poll::Ready(output) => Poll::Ready((output, elapsed)),
	}
}

Finally, our goal is complete — and we did it all without any unsafe code.

Summary

If a Rust type has self-referential pointers, it can’t be moved safely. After all, moving doesn’t update the pointers, so they’ll still be pointing at the old memory address, so they’re now invalid. Rust can automatically tell which types are safe to move (and will auto impl the Unpin trait for them). If you have a Pin-ned pointer to some data, Rust can guarantee that nothing unsafe will happen (if it’s safe to move, you can move it, if it’s unsafe to move, then you can’t). This is important because many Future types are self-referential, so we need Pin to safely poll a Future. You probably won’t have to poll a future yourself (just use async/await instead), but if you do, use the pin-project crate to simplify things.

I hope this helped — if you have any questions, please ask me on Twitter. And if you want to get paid to talk to me about Rust and networking protocols, my team at Cloudflare is hiring, so be sure to visit careers.cloudflare.com.

References

Building an ARM64 Rust development environment using AWS Graviton2 and AWS CDK

Post Syndicated from Alistair McLean original https://aws.amazon.com/blogs/devops/building-an-arm64-rust-development-environment-using-aws-graviton2-and-aws-cdk/

2020 was the year that ARM chips made the headlines by moving from largely mobile form factors into the cloud thanks to AWS Graviton2, allowing you to have up to 40% better price performance over comparable current generation x86 Amazon Elastic Compute Cloud (Amazon EC2) and Amazon Relational Database Service (Amazon RDS) instances.

We speak to customers daily about Graviton2. One recurring question we hear is “Graviton2 is great, but how can my team develop for ARM natively without the complexity of cross-compilation or having to buy custom hardware on premises?” This post seeks to answer that question by setting up the Visual Studio Code-based Code Server IDE, running on a Graviton2 EC2 instance that enables native development in a cost-effective and secure manner accessed via your browser.

The Rust programming language has gained a huge amount of popularity recently. This post aims to show that you can use this environment for Rust development as well as hundreds of other supported languages. AWS has committed to supporting the Rust community and using the language to deliver fast and robust services to customers at scale, and we want to enable our customers to do the same.

We also include instructions for building and installing the rust-analyzer and CodeLLDB debugger plugins to add additional language features.

Solution overview

The following diagram illustrates our solution architecture.

Architecture of the solution showing components and their linkages

The solution consists of an EC2 Graviton2 instance located in a private VPC subnet routed through an AWS Global Accelerator accelerator to provide routing optimization and keep packet loss, jitter, and latency lower by up to 60%. An internal facing Application Load Balancer containing the AWS Certificate Manager certificate decrypts and forwards traffic to this instance.

Code Server queries AWS Secrets Manager to initially set the login password on startup and allow for continued password-based authentication and easy password rotation. The EC2 instance has access to the internet through a NAT gateway and has no public IP address or key pair associated, and is accessible only through AWS Systems Manager Session Manager.

Prerequisites

For this walkthrough, the following are prerequisites:

AWS CDK stack

In order to deploy our architecture, I use the AWS CDK. As a developer, it’s more intuitive to me to define my infrastructure using a language and tooling with which I am familiar. I can also do things like environment variable injection and scripting as part of the stack creation to add stack parameters and customization points.

The AWS CDK application is comprised of five stacks. Each stack defines a separate part of the architecture:

  • Networking – Defines a VPC across two Availability Zones with the CIDR range of your choice. The routing and public/private subnet creation is done for us as part of the default configuration.
  • Certificate – This is the reason for the domain prerequisite. It’s a best practice to encrypt web applications using TLS, and for that we need a certificate and therefore a domain. This stack creates a certificate for the subdomain you specify as part of the stack creation and DNS validation in Route 53.
  • Amazon EC2 configuration – This defines both our AMI and the instance type and configuration. In this case, we’re using Amazon Linux 2 ARM64 edition. Here we also set the instance-managed roles that allow Session Manager connectivity and Secrets Manager access.
  • ALB configuration – Here we define the internal load balancer and specify the listener, certificate, and target configuration. I have injected the Amazon EC2 configuration as part of the class constructor so that I can reference it directly as a target.
  • Global accelerator configuration – Finally, the accelerator is defined here with two ports open, the ALB we defined in the ALB stack as a target, and most importantly adds in a CNAME DNS entry pointing to the DNS name of the accelerator.

Walkthrough overview

This walkthrough uses the AWS CDK command line tools to deploy the stack. Session Manager is enabled to allow access to the EC2 instance and configure the Code Server application and associated plugins.

The walkthrough specifically covers the following steps:

  1. Deploy the AWS CDK stacks via CloudShell to build out the application infrastructure and associated IAM roles.
  2. Launch Code Server via the official Docker container with the commands to get and set the password stored in Secrets Manager.
  3. Log in and build the rust-analyzer and CodeLLDB plugins from a terminal to allow for debugging within a “Hello World” application.

Start CloudShell and install the appropriate tooling

In this section, I use dummy values for the domain, the VPC CIDR, AWS Region, and the secret password. You need to submit real values as appropriate.

Sign in to CloudShell and enter the following commands:

sudo yum groupinstall -y "Development Tools"
sudo npm install aws-cdk -g
git clone https://github.com/aws-samples/cdk-graviton2-alb-aga-route53.git
cd cdk-graviton2-alb-aga-route53
python3 -m venv .
source bin/activate
python -m pip install -r requirements.txt
export VPC_CIDR=”10.0.0.1/16” #Substitute your CIDR here.
export CDK_DEPLOY_ACCOUNT=`aws sts get-caller-identity | jq -r '.Account'`
export CDK_DEPLOY_REGION=$AWS_REGION
export R53_DOMAIN=”code-server.example.com” #Substitute your domain here.
cdk bootstrap aws://$CDK_DEPLOY_ACCOUNT/$CDK_DEPLOY_REGION
cdk deploy --all

The deploy step takes around 10-15 mins to run and prompts a couple of times to add resources like security groups and IAM roles.

Log in to the new instance using Session Manager

Install the latest version of the Session Manager plugin for the AWS CLI:

cd ~
curl "https://s3.amazonaws.com/session-manager-downloads/plugin/latest/linux_64bit/session-manager-plugin.rpm" -o "session-manager-plugin.rpm"
sudo yum install -y session-manager-plugin.rpm

Now start a session, logging into the newly created EC2 instance and log in as ec2-user:

aws ssm start-session --target i-1234xyz7890abc #Substitute the instance id we just created here
#Once session is active:
sudo su - ec2-user

Add the password as a secret and start the container

Enter the following code to add the password as a secret in Secrets Manager and start the container:

aws secretsmanager create-secret --name CodeServerProd --secret-string Password123abc # Substitute the appropriate password here.
sudo docker run -d --name=code-server -e PUID=1000 -e PGID=1000 -e PASSWORD=`aws secretsmanager get-secret-value --secret-id CodeServerProd | jq -r '.SecretString'` -p 8080:8080 -v /home/ec2-user/.config:/config --restart unless-stopped codercom/code-server

Access and configure the web application for Rust development

So far, we have accomplished the following:

  • Created the infrastructure in the diagram via AWS CDK deployment
  • Configured the EC2 instance to run Docker and added this to the systemctl startup scripts
  • Created a secret in Secrets Manager to use as the application login password
  • Instantiated a Docker container running Code Server

Next, we access the running container via the web interface and install the required development tools.

Log in to the Code Server web application

To log in to the Code Server web application, complete the following steps:

  1. Browse to https://code-server.example.com, where example.com is the name of the domain you supplied in the AWS CDK step.
  2. Log in using the password you created in Secrets Manager.
  3. Create a new terminal by choosing the hamburger icon and, under Terminal, choosing New Terminal.
  4. Issue the following commands into the terminal to install the Rust programming language:
bash
sudo apt update && sudo apt upgrade -y
sudo apt install -y build-essential npm clang lldb
curl --proto '=https' --tlsv1.2 -sSf https://sh.rustup.rs | sh
source $HOME/.cargo/env

Install the rust-analyzer plugin

Open the extensions panel and enter Rust Analyzer in the search bar. Then install the plugin.

Install the debugger

Go back to the extensions panel in the Code Server application and enter CodeLLDB into the search bar. Then install this extension.

Create a sample application and open it in the Code Server window

To create and use our sample application, complete the following steps:

  • In the existing Code Server terminal, enter the following:
mkdir -p ~/src/
cd ~/src
cargo new helloworld --bin
  • Open the newly created folder in Code Server verifying that the helloworld directory was successfully created.

Open File or Folder dialog in Code Server

  • Rust-analyzer runs when you open up src/main.rs and index the file.
  • You can run the program by choosing Run in the editor.

Main Code Server editor window showing helloworld Rust program code.

  • Similarly, to launch the debugger, choose Debug in the editor.

Code Server Debugger view

Troubleshooting

If the CloudShell session times out, you need to reset your environment variables in order to re-deploy, modify, and delete the stack deployment.

Clean up

This stack incurs an estimated monthly cost of $143.00.

To delete the stack, log in to CloudShell and enter the following commands:

cd cdk-graviton2-alb-aga-route53
source bin/activate

# Re-set the environment variables again if required
export VPC_CIDR=”10.0.0.1/16” #Substitute your CIDR here.
export CDK_DEPLOY_ACCOUNT=`aws sts get-caller-identity | jq -r '.Account'`
export CDK_DEPLOY_REGION=$AWS_REGION
export R53_DOMAIN=”code-server.example.com” #Substitute your domain here.
cdk destroy --all

This destroys all the resources created in the first step. You can verify this by browsing to the AWS CloudFormation console and noting the deletion of all the stacks.

Conclusion

AWS is a place where builders can reinvent the future. The future of development means supporting different chipsets depending on different business requirements. This post is designed to enable development targeting the ARM64 microarchitecture by utilizing AWS Graviton2. Happy building!

Author bio

Author portrait

Alistair is a Principal Solutions Architect at AWS focused on EdTech customers. Originally from the west coast of Scotland, Alistair now lives in Fairfield, Connecticut, with his wife and two daughters and enjoys spending time with his family, skiing, golfing, cycling, and using his pellet smoker.

Using One Cron Parser Everywhere With Rust and Saffron

Post Syndicated from Aaron Loyd original https://blog.cloudflare.com/using-one-cron-parser-everywhere-with-rust-and-saffron/

Using One Cron Parser Everywhere With Rust and Saffron

Using One Cron Parser Everywhere With Rust and Saffron

As part of the development for Cron Triggers on Cloudflare Workers, we had an interesting problem to tackle relating to parsers and the cron expression format. Cron expressions are the format used to write schedules in Cron Triggers, and extensions for cron expressions are everywhere. They vary between parsers and platforms as well, and aren’t standardized by a governing body, which means most parsers out there support many different feature sets, which isn’t good if you’d like something off the shelf that just works.

It can be tough to find the right parser for each part of the Cron Triggers stack, when its user interface, API, and edge service are all written in different languages. On top of that, it isn’t practical to reinvent the wheel multiple times by writing the same parser in different languages and make sure they all match perfectly. So you’re likely stuck with a less-than-perfect solution.

However, in the end, because we wrote our backend service in Rust, it took much less effort to solve this problem. Rust has a great ecosystem for working across multiple languages, which allows us to write a parser once and pull it from the backend to the frontend and everywhere in between with minimal glue code.

The Trouble with Cron

Cron expressions are a set of fields that represent a set of times. They act as a pattern that matches over the minute, hour, day of the month, month, and day of the week of a given time. Since cron is a simple format, it’s easy to extend with extra fields, so some parsers and platforms allow specifying seconds and years as well. However, seconds are a bit too granular and years are a bit too long, so we opted to not support them as part of Cron Triggers.

Using One Cron Parser Everywhere With Rust and Saffron

In the original cron program, the expressions supported were simple, each field could contain either:

  • A star (‘*’) representing all values,
  • A value (a number for all fields or a 3 letter abbreviation for months or days of the week, like JUN or FRI)
  • A range of values (i.e. ‘0-30’), or
  • A set of ranges and/or values (i.e. ‘0-15,30,45-50,55’)

This is a good start for specifying most time patterns, but many extensions exist out there to fill in some gaps. For example,

  • ‘L’ can be used for the day of the month position to specify the last day of the month, or in the day of the week position with a day value to specify the last of that weekday during the month (i.e. 7L, the last Saturday of the month).
  • ‘W’ can be used for the day of the month, and lets you specify “the closest weekday (MON-FRI) to a given day”, like 15W, or the closest weekday to the 15th of the month.
  • ‘/’ can be used for step values in any field. For example, */5 in the minute field is every 5th minute in the hour. This can be combined with a range to specify things such as ‘30-59/5’, or every 5th minute from minute 30 to minute 59 in the hour.
  • ‘#’ can be used with a day of the week value to specify the “nth day of the month”, such as ‘5#3’, or the 3rd Thursday of the month.

So far I’ve only listed extensions we currently support on Workers, but others exist such as ‘H’ in Jenkins and ‘?’ in some cron implementations for start-up time. Most libraries don’t support said extensions, however ‘?’ is used in some implementations in certain circumstances, but not as start-up time. With all these extensions and a lack of standardization, some libraries aren’t guaranteed to support them all.

The Multitude of Libraries

During the development of Cron Triggers, we needed some things to just work, and to do that, we opted to pull some libraries off the shelf from package repositories for different parts of the stack.

In the Rust backend, we needed a cron library that supported all the extensions we wanted, while also leaving off other field extensions like seconds and years, and had an API that let us simply check if a given time matched the expression pattern. None of the crates on crates.io offered these, so we had to write it ourselves. Using the nom crate, it was easy to draft a simple, fast, safe parser, named ‘saffron’. As time went on and we got closer to release, it became clearer which extensions we really wanted to support. It was incredibly easy to add support for the new features without worrying about safety since the compiler checked it for us, so all we had to do was extensive logic testing. Last offset weekdays (“L-XW”) and leap years were difficult to get right the first time, but testing them was easy with Rust.

#[test]
   fn parse_check_offset_weekend_start_months() {
       let cron = "0 0 L-30W * *";
 
       check_does_contain(
           cron,
           &["2021-05-3T00:00:00+00:00", "2022-01-3T00:00:00+00:00"],
       );
   }
   #[test]
   fn parse_check_offset_leap_days() {
       let cron = "0 0 L-1 FEB *";
 
       check_does_contain(
           cron,
           &[
               "2400-02-28T00:00:00+00:00",
               "2300-02-27T00:00:00+00:00",
               "2200-02-27T00:00:00+00:00",
               "2100-02-27T00:00:00+00:00",
               "2024-02-28T00:00:00+00:00",
               "2020-02-28T00:00:00+00:00",
               "2004-02-28T00:00:00+00:00",
               "2000-02-28T00:00:00+00:00",
           ],
       );
 
       check_does_not_contain(
           cron,
           &[
               "2400-02-29T00:00:00+00:00",
               "2300-02-28T00:00:00+00:00",
               "2200-02-28T00:00:00+00:00",
               "2100-02-28T00:00:00+00:00",
               "2024-02-29T00:00:00+00:00",
               "2020-02-29T00:00:00+00:00",
               "2004-02-29T00:00:00+00:00",
               "2000-02-29T00:00:00+00:00",
           ],
       );
   }

However, the UI had a different set of requirements. It didn’t need to know whether a given time matched a cron pattern we wanted to provide information to the user about the cron expression they’d written, so it needed to provide a more human readable translation (description) of their cron expression and show them their next five executions (future times). But we were on a limited time budget — we needed something off the shelf.

Using One Cron Parser Everywhere With Rust and Saffron

We used two different JavaScript libraries for displaying info about given cron expressions: one gave us descriptions, the other gave us future times. Since these two libraries were tasked with parsing cron expressions, they also acted as validation; however, just using these two libraries for validation proved to be less than optimal. Both of the libraries supported extensions that were different both from each other and from the backend. Because of that they’d sometimes allow users to add schedules that would be rejected by the API on submit, which doesn’t translate into a good user experience. This validation should happen while the user writes their cron expression, not after they already hit submit! Because of this fracture in extension support, the UI parsers also sometimes didn’t parse expressions that should be supported and were accepted by the API!

Before release on the API side, we simply used a Go library for validation. This proved to be an easy solution, but we quickly noticed that the API accepted more than the schedule runner supported. This caused some triggers to be successfully added to the schedule, but were ignored by the runner because they failed to parse.

So before launch, we were using four completely different parsers! This probably wouldn’t be much of an issue if cron expressions were standardized. But because they aren’t, inconsistencies could exist at every step in the trigger creation process: between the two libraries we used on the frontend, between the frontend and API, and between the API and the backend.

Using One Cron Parser Everywhere With Rust and Saffron

To solve these issues in the UI and API before release, we synced the API and backend with another schedule runner entrypoint that simply read a cron expression from stdio, parsed it, and returned whether it was valid, to make sure they perfectly matched. We also added a validation endpoint to the API that could be used by the UI to check a cron expression, to make sure the backend actually accepted it. This fixed all cases of the API and UI being too accepting of expressions that weren’t supported, but neither of these solutions were optimal.

For one, they weren’t performant. Each time we wanted to validate a cron expression in the UI, we’d have to parse the expression twice in JavaScript (once for a description, and again for future times) and make an request to the API, which would start an instance of the schedule runner, parse the expression, and return whether it properly parsed.

Another reason this was nonoptimal is we were still limited in the features we supported by one library. One of our UI libraries didn’t support the ‘L’ and ‘W’ extensions, and since we also programmed the UI to accept expressions based on whether all parsers accepted it, expressions that used those extensions couldn’t be added.

Using One Cron Parser Everywhere With Rust and Saffron

So even though we dropped it to three parsers before release, it still didn’t seem good enough. Soon after release, I made plans to remedy it and started working on saffron (originally this project was called cfron but Cloudflare’s CTO couldn’t resist suggesting renaming it to saffron because he loves puns) to fill in for the one library holding us back in the UI. It would’ve been OK if missing extension support was the only thing wrong after release, but soon some other issues came up.

Off By One

Saffron is based on the Quartz open source scheduler’s cron parser, which makes days of the week when specified as integers start from 1 (Sunday) and go to 7 (Saturday). Both parsers on the frontend follow the original values for cron, where days start from 0 and go to 6, and 7 could be used for Sunday as well. So when users entered 1-5, the UI told them they were entering a schedule from Monday to Friday, and the backend ended up executing Sunday to Thursday! This was missed when testing Cron Triggers initially and was caught by observant community members on the forum.

Fixing the issue turned out to be a bit difficult. While the library we were using for descriptions had the option to simply switch from 0-6 to 1-7 days of the week, our future times library did not have that option. Luckily, development was already halfway through with replacing it in Saffron. However, we couldn’t place it directly on the frontend yet, since web bindings didn’t exist and I didn’t have time to write them. We needed something easier to develop quickly.

Reintroducing: Cloudflare Workers!

Workers made it incredibly easy to take the existing code, add some wasm entry points for a makeshift API, and call with JavaScript. No need to build a whole separate API in Go! Just take your existing code and put it directly within 100ms of nearly everyone on the Internet. Why call all the way back home when the nearest PoP works just as well?

Plus, we don’t have to worry about building and publishing, wrangler does it for us! For example, our validation code is all written in Rust:

#[wasm_bindgen]
#[derive(Clone, Debug)]
pub struct ValidationResult {
   errors: Option<Vec<String>>,
}
 
#[wasm_bindgen]
pub fn validate(crons: JsArray) -> ValidationResult {
   set_panic_hook();
 
   let len = crons.length();
   let mut map = HashMap::with_capacity(len as usize);
   for i in 0..len {
       let string = match crons.get(i).as_string() {
           Some(string) => string,
           None => {
               return ValidationResult {
                   errors: Some(vec![format!("Element '{}' is not a string", i)]),
               }
           }
       };
 
       let cron: Cron = match string.parse() {
           Ok(cron) => cron,
           Err(err) => {
               return ValidationResult {
                   errors: Some(vec![format!(
                       "Failed to parse expression at index '{}': {}",
                       i, err
                   )]),
               }
           }
       };
 
       if let Some(old_str) = map.insert(cron, string.clone()) {
           return ValidationResult {
               errors: Some(vec![format!(
                   "Expression '{}' already exists in the form of '{}'",
                   string, old_str
               )]),
           };
       }
   }
 
   ValidationResult { errors: None }
}

and our code to handle processing the request and response is written in JavaScript:

  const path = new URL(request.url).pathname;
 switch (path) {
   case "/validate": {
     let body;
     try {
       body = await request.json()
     } catch (e) {
       return status(400, "Bad Request");
     }
     let crons = body.crons;
     if (!Array.isArray(crons)) {
       return status(400, "Bad Request");
     }
 
     let result = validate(crons).errors();
     let success = result == null;
     return apiResponse({}, success, result);
   }

After a week of dedicated development, a Worker was written, the future times were calculated, and the UI was fixed! On top of that, we also implicitly introduced support for more extensions by removing the old parser and replacing it with the same one used on the backend as part of the fix itself. But we’re still using two parsers, so inconsistencies may still exist out there that we haven’t seen yet (that we don’t already know about).

Using One Cron Parser Everywhere With Rust and Saffron

For example, this expression “0 0 L-1W 2 *”, or “12:00 AM on the closest weekday to the 2nd to last day of the month in February” cannot be parsed by the parser we use for descriptions, but it’s accepted by the API, backend, and Worker, so you can use it in your cron triggers, but the UI won’t give you a description for it.

Using One Cron Parser Everywhere With Rust and Saffron

The Quest for the One True Parser

This brings us to today. In the search of better and faster, we want to bring the number of parsers down from two to one. One source of truth for the entire stack. To make it all faster, we should do parsing on the frontend locally instead of making a call to a remote Worker (if possible). In the API, the separate entry point was a nice easy solution, but starting the schedule runner just to check if a cron string is valid every time a user adds one doesn’t seem like it’s the best it could be.

Luckily Rust has a vibrant ecosystem that can meet all these needs! To bring the parser to the UI, we can compile saffron to wasm and use generated bindings created with wasm-pack. This can be easily integrated with our existing webpack setup, making it simple to get future times and create descriptions of cron strings on the frontend. Then, to bring the parser closer to the API, we can use Rust’s ability to create C APIs that we can then integrate with Go using cgo.

With our parser everywhere, we can then focus exclusively on cron descriptions to replace the one other parser we’re using in the UI. At that point we will have one parser for the whole stack, a single source of truth that anyone can reference to understand how the frontend, API, and backend all work together. It also simplifies our graph. Now instead of multiple libraries written in different languages, we have one library with multiple language wrappers, each serving a different part of the stack. No inconsistencies will exist since they’re all using the same parser!

Using One Cron Parser Everywhere With Rust and Saffron

However, we wanted to do something before that…

We made it open source!

I think this project serves as a great example of Rust’s type system, its safety, and its extensibility across the entire stack. The project itself is simple, easy to understand, and easy to port and provide bindings for. By open sourcing, we can publish packages for these bindings on npm and crates.io, allowing anyone to use these bindings for whatever they want. It also means you can also follow along with development to see the finishing touches get added and maybe make some suggestions for future improvements in the UI and the parser itself.

You can view the project on GitHub at https://github.com/cloudflare/saffron.

Building even faster interpreters in Rust

Post Syndicated from Zak Cutner original https://blog.cloudflare.com/building-even-faster-interpreters-in-rust/

Building even faster interpreters in Rust

Building even faster interpreters in Rust

At Cloudflare, we’re constantly working on improving the performance of our edge — and that was exactly what my internship this summer entailed. I’m excited to share some improvements we’ve made to our popular Firewall Rules product over the past few months.

Firewall Rules lets customers filter the traffic hitting their site. It’s built using our engine, Wirefilter, which takes powerful boolean expressions written by customers and matches incoming requests against them. Customers can then choose how to respond to traffic which matches these rules. We will discuss some in-depth optimizations we have recently made to Wirefilter, so you may wish to get familiar with how it works if you haven’t already.

Minimizing CPU usage

As a new member of the Firewall team, I quickly learned that performance is important — even in our security products. We look for opportunities to make our customers’ Internet properties faster where it’s safe to do so, maximizing both security and performance.

Our engine is already heavily used, powering all of Firewall Rules. But we have bigger plans. More and more products like our Web Application Firewall (WAF) will be running behind our Wirefilter-based engine, and it will become responsible for eating up a sizable chunk of our total CPU usage before long.

How to measure performance?

Measuring performance is a notoriously tricky task, and as you can probably imagine trying to do this in a highly distributed environment (aka Cloudflare’s edge) does not help. We’ve been surprised in the past by optimizations that look good on paper, but, when tested out in production, just don’t seem to do much.

Our solution? Performance measurement as a service — an isolated and reproducible benchmark for our Firewall engine and a framework for engineers to easily request runs and view results. It’s worth noting that we took a lot of inspiration from the fantastic Rust Compiler benchmarks to build this.

Building even faster interpreters in Rust
Our benchmarking framework, showing how performance during different stages of processing Wirefilter expressions has changed over time [1].

What to measure?

Our next challenge was to find some meaningful performance metrics. Some experimentation quickly uncovered that time was far too volatile a measure for meaningful comparisons, so we turned to hardware counters [2]. It’s not hard to find tools to measure these (perf and VTune are two such examples), although they (mostly) don’t allow control over which parts of the program are recorded. In our case, we wished to individually record measurements for different stages of filter processing — parsing, compilation, analysis, and execution.

Once again we took inspiration from the Rust compiler, and its self-profiling options, using the perf_event_open API to record counters from inside our binary. We then output something like the following, which our framework can easily ingest and store for later visualization.

Building even faster interpreters in Rust
Output of our benchmarks in JSON Lines format, showing a list of recordings for each combination of hardware counter and Wirefilter processing stage. We’ve used 10 repeats here for readability, but we use around 20, in addition to 5 warmup rounds, within our framework.

Whilst we mainly focussed on metrics relating to CPU usage, we also use a combination of getrusage and clear_refs to find the maximum resident set size (RSS). This is useful to understand the memory impact of particular algorithms in addition to CPU.

But the challenge was not over. Cloudflare’s standard CI agents use virtualization and sandboxing for security and convenience, but this makes accessing hardware counters virtually impossible. Running our benchmarks on a dedicated machine gave us access to these counters, and ensured more reproducible results.

Speeding up the speed test

Our benchmarks were designed from the outset to take an important place in our development process. For instance, we now perform a full benchmark run before releasing each new version to detect performance regressions.

But with our benchmarks in place, it quickly became clear that we had a problem. Our benchmarks simply weren’t fast enough — at least if we wanted to complete them in less than a few hours! The problem was we have a very large number  of filters. Since our engine would never usually execute requests against this many filters at once it was proving incredibly costly. We came up with a few tricks to cut this down…

  • Deduplication. It turns out that only around a third of filters are structurally unique (something that is easy to check as Wirefilter can helpfully serialize to JSON). We managed to cut down a great deal of time by ignoring duplicate filters in our benchmarks.
  • Sampling. Still, we had too many filters and random sampling presented an easy solution. A more subtle challenge was to make sure that the random sample was always the same to maintain reproducibility.
  • Partitioning. We worried that deduplication and sampling would cause us to miss important cases that are useful to optimize. By first partitioning filters by Wirefilter language feature, we can ensure we’re getting a good range of filters. It also helpfully gives us more detail about where specifically the impact of a performance change is.

Most of these are trade-offs, but very necessary ones which allow us to run continual benchmarks without development speed grinding to a halt. At the time of writing, we’ve managed to get a benchmark run down to around 20 minutes using these ideas.

Optimizing our engine

With a benchmarking framework in place, we were ready to begin testing optimizations. But how do you optimize an interpreter like Wirefilter? Just-in-time (JIT) compilation, selective inlining and replication were some ideas floating around in the word of interpreters that seemed attractive. After all, we previously wrote about the cost of dynamic dispatch in Wirefilter. All of these techniques aim to reduce that effect.

However, running some real filters through a profiler tells a different story. Most execution time, around 65%, is spent not resolving dynamic dispatch calls but instead performing operations like comparison and searches. Filters currently in production tend to be pretty light on functions, but throw in a few more of these and even less time would be spent on dynamic dispatch. We suspect that even a fair chunk of the remaining 35% is actually spent reading the memory of request fields.

Function CPU time
`matches` operator 0.6%
`in` operator 1.1%
`eq` operator 11.8%
`contains` operator 51.5%
Everything else 35.0%
Breakdown of CPU time while executing a typical production filter.

An adventure in substring searching

By now, you shouldn’t be surprised that the contains operator was one of the first in line for optimization. If you’ve ever written a Firewall Rule, you’re probably already familiar with what it does — it checks whether a substring is present in the field you are matching against. For example, the following expression would match when the host is “example.com” or “www.example.net”, but not when it is “cloudflare.com”. In string searching algorithms, this is commonly referred to as finding a ‘needle’ (“example”) within a ‘haystack’ (“example.com”).

http.host contains “example”

How does this work under the hood? Ordinarily, we may have used Rust’s `String::contains` function but Wirefilter also allows raw byte expressions that don’t necessarily conform to UTF-8.

http.host contains 65:78:61:6d:70:6c:65

We therefore used the memmem crate which performs a two-way substring search algorithm on raw bytes.

Sounds good, right? It was, and it was working pretty well, although we’d noticed that rewriting `contains` filters using regular expressions could bizarrely often make them faster.

http.host matches “example”

Regular expressions are great, but since they’re far more powerful than the `contains` operator, they shouldn’t be faster than a specialized algorithm in simple cases like this one.

Something was definitely up. It turns out that Rust’s regex library comes equipped with a whole host of specialized matchers for what it deems to be simple expressions like this. The obvious question was whether we could therefore simply use the regex library. Interestingly, you may not have realized that the popular ripgrep tool does just that when searching for fixed-string patterns.

However, our use case is a little different. Since we’re building an interpreter (and we’re using dynamic dispatch in any case), we would prefer to dispatch to a specialized case for `contains` expressions, rather than matching on some enum deep within the regex crate when the filter is executed. What’s more, there are some pretty cool things being done to perform substring searching that leverages SIMD instruction sets. So we wired up our engine to some previous work by Wojciech Muła and the results were fantastic.

Benchmark Improvement
Expressions using `contains` operator 72.3%
‘Simple’ expressions 0.0%
All expressions 31.6%
Improvements in instruction count using Wojciech Muła’s sse4-strstr library over the memmem crate with Wirefilter.

I encourage you to read more on “Algorithm 1”, which we used, but it works something like this (I’ve changed the order a little to help make it clearer). It’s worth reading up on SIMD instructions if you’re unfamiliar with them — they’re the essence behind what makes this algorithm fast.

  1. We fill one SIMD register with the first byte of the needle being searched for, simply repeated over and over.
  2. We load as much of our haystack as we can into another SIMD register and perform a bitwise equality operation with our previous register.
  3. Now, any position in the resultant register that is 0 cannot be the start of the match since it doesn’t start with the same byte of the needle.
  4. We now repeat this process with the last byte of the needle, offsetting the haystack, to rule out any positions that don’t end with the same byte as the needle.
  5. Bitwise ANDing these two results together, we (hopefully) have now drastically reduced our potential matches.
  6. Each of the remaining potential matches can be checked manually using a memcmp operation. If we find a match, then we’re done.
  7. If not, we continue with the next part of our haystack and repeat until we’ve checked the entire thing.

When it goes wrong

You may be wondering what happens if our haystack doesn’t fit neatly into registers. In the original algorithm, nothing. It simply continues reading into the oblivion after the end of the haystack until the last register is full, and uses a bitmask to ignore potential false-positives from this additional region of memory.

As we mentioned, security is our priority when it comes to optimizations, so we could never deploy something with this kind of behaviour. We ended up porting Muła’s library to Rust (we’ve also open-sourced the crate!) and performed an overlapping registers modification found in ARM’s blog.

It’s best illustrated by example — notice the difference between how we would fill registers on an imaginary SIMD instruction-set with 4-byte registers.

Before modification

Building even faster interpreters in Rust
How registers are filled in the original implementation for the haystack “abcdefghij”, red squares indicate out of bounds memory.

After modification

Building even faster interpreters in Rust
How registers are filled with the overlapping modification for the same haystack, notice how ‘g’ and ‘h’ each appear in two registers.

In our case, repeating some bytes within two different registers will never change the final outcome, so this modification is allowed as-is. However, in reality, we found it was better to use a bitmask to exclude repeated parts of the final register and minimize the number of memcmp calls.

What if the haystack is too small to even fill a single register? In this case, we can’t use our overlapping trick since there’s nothing to overlap with. Our solution is straightforward: while we were primarily targeting AVX2, which can store 32-bytes in a lane, we can easily move down to another instruction set with smaller registers that the haystack can fit into. In reality, we don’t currently go any smaller than SSE2. Beyond this, we instead use an implementation of the Rabin-Karp searching algorithm which appears to perform well.

Instruction set Register size
AVX2 32 bytes
SSE2 16 bytes
SWAR (u64) 8 bytes
SWAR (u32) 4 bytes
Register sizes in different SIMD instruction sets [3]. We did not consider AVX512 since support for this is not widespread enough.

Is it always fast?

Choosing the first and last bytes of the needle to rule out potential matches is a great idea. It means that when it does come to performing a memcmp, we can ignore these, as we know they already match. Unfortunately, as Muła points out, this also makes the algorithm susceptible to a worst-case attack in some instances.

Let’s give an expression that a customer might write to illustrate this.

http.request.uri.path contains “/wp-admin/”

If we try to search for this within a very long sequence of ‘/’s, we will find a potential match in every position and make lots of calls to memcmp — essentially performing a slow bruteforce substring search.

Clearly we need to choose different bytes from the needle. But which ones should we choose? For each choice, an adversary can always find a slightly different, but equally troublesome, worst case. We instead use randomness to throw off our would-be adversary, picking the first byte of the needle as before, but then choosing another random byte to use.

Our new version is unsurprisingly slower than Muła’s, yet it still exhibits a great improvement over both the memmem and regex crates. Performance, but without sacrificing safety.

Benchmark Improvement
sse4-strstr (original) sliceslice (our version)
Expressions using `contains` operator 72.3% 49.1%
‘Simple’ expressions 0.0% 0.1%
All expressions 31.6% 24.0%
Improvements in instruction count of using sse4-strstr and sliceslice over the memmem crate with Wirefilter.

What’s next?

This is only a small taste of the performance work we’ve been doing, and we have much more yet to come. Nevertheless, none of this would have been possible without the support of my manager Richard and my mentor Elie, who contributed a lot of these ideas. I’ve learned so much over the past few months, but most of all that Cloudflare is an amazing place to be an intern!

[1] Since our benchmarks are not run within a production environment, results in this post do not represent traffic on our edge.

[2] We found instruction counts to be a particularly stable measure, and CPU cycles a particularly unstable one.

[3] Note that SWAR is technically not an instruction set, but instead uses regular registers like vector registers.