Updated on July 6, 2023: This post has been updated to reflect the current guidance around the usage of S3 ACL and to include S3 Access Points and the Block Public Access for accounts and S3 buckets.
Updated on April 27, 2023: Amazon S3 now automatically enables S3 Block Public Access and disables S3 access control lists (ACLs) for all new S3 buckets in all AWS Regions.
Updated on January 8, 2019: Based on customer feedback, we updated the third paragraph in the “What about S3 ACLs?” section to clarify permission management.
In this post, we will discuss Amazon S3 Bucket Policies and IAM Policies and its different use cases. This post will assist you in distinguishing between the usage of IAM policies and S3 bucket policies. We will also discuss how these policies integrate with some default S3 bucket security settings like automatically enabling S3 Block Public Access and disabling S3 access control lists (ACLs).
IAM policies vs. S3 bucket policies
AWS access is managed by setting IAM policies and linking them to IAM identities (users, groups of users, or roles) or AWS resources. A policy is an object in AWS that when associated with an identity or resource, defines their permissions. IAM policies specify what actions are allowed or denied on what AWS resources (e.g. user Alice can read objects from the “Production” bucket but can’t write objects in the “Dev” bucket whereas user Bob can have full access to S3).
S3 bucket policies, on the other hand, are resource-based policies that you can use to grant access permissions to your Amazon S3 buckets and the objects in it. S3 bucket policies can allow or deny requests based on the elements in the policy.(e.g. allow user Alice to PUT but not DELETE objects in the bucket).
Note: You attach S3 bucket policies at the bucket level (i.e. you can’t attach a bucket policy to an S3 object), but the permissions specified in the bucket policy apply to all the objects in the bucket. You can also specify permissions at the object level by putting an object as the resource in the Bucket policy.
IAM policies and S3 bucket policies are both used for access control and they’re both written in JSON using the AWS access policy language. Let’s look at an example policy of each type:
Sample S3 Bucket Policy
This S3 bucket policy enables any IAM principal (user or role) in account 111122223333 to use the Amazon S3 GET Bucket (List Objects) operation.
Note that the S3 bucket policy includes a “Principal” element, which lists the principals that bucket policy controls access for. The “Principal” element is unnecessary in an IAM policy, because the principal is by default the entity that the IAM policy is attached to.
S3 bucket policies (as the name would imply) only control access to S3 resources for the bucket they’re attached to, whereas IAM policies can specify nearly any AWS action. One of the neat things about AWS is that you can actually apply both IAM policies and S3 bucket policies simultaneously, with the ultimate authorization being the least-privilege union of all the permissions (more on this in the section below titled “How does authorization work with multiple access control mechanisms?”).
When to use IAM policies vs. S3 policies
Use IAM policies if:
You need to control access to AWS services other than S3. IAM policies will be easier to manage since you can centrally manage all of your permissions in IAM, instead of spreading them between IAM and S3.
You have numerous S3 buckets each with different permissions requirements. IAM policies will be easier to manage since you don’t have to define a large number of S3 bucket policies and can instead rely on fewer, more detailed IAM policies.
You prefer to keep access control policies in the IAM environment.
Your IAM policies bump up against the size limit (up to 2 kb for users, 5 kb for groups, and 10 kb for roles). S3 supports bucket policies of up 20 kb.
You prefer to keep access control policies in the S3 environment.
You want to apply common security controls to all principals who interact with S3 buckets, such as restricting the IP addresses or VPC a bucket can be accessed from.
If you’re still unsure of which to use, consider which audit question is most important to you:
If you’re more interested in “What can this user do in AWS?” then IAM policies are probably the way to go. You can easily answer this by looking up an IAM user and then examining their IAM policies to see what rights they have.
If you’re more interested in “Who can access this S3 bucket?” then S3 bucket policies will likely suit you better. You can easily answer this by looking up a bucket and examining the bucket policy.
Whichever method you choose, we recommend staying as consistent as possible. Auditing permissions becomes more challenging as the number of IAM policies and S3 bucket policies grows.
What about S3 ACLs?
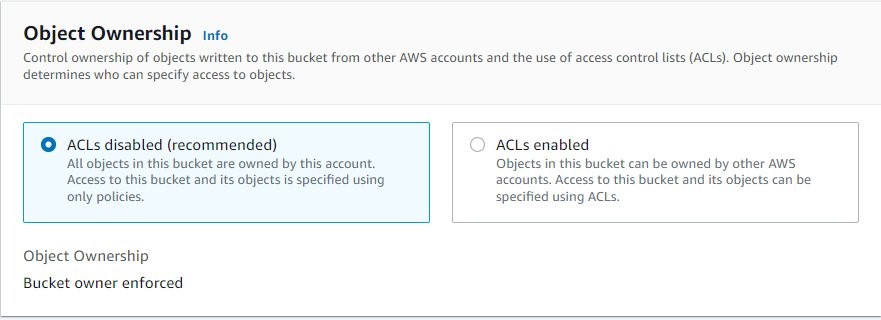
An S3 ACL is a sub-resource that’s attached to every S3 bucket and object. It defines which AWS accounts or groups are granted access and the type of access. You can attach S3 ACLs to both buckets and individual objects within a bucket to manage permissions for those objects. As a general rule, AWS recommends using S3 bucket policies or IAM policies for access control. S3 ACLs is a legacy access control mechanism that predates IAM. By default, Object Ownership is set to the Bucket owner enforced setting and all ACLs are disabled, as can be seen below.
A majority of modern use cases in Amazon S3 no longer require the use of ACLs, and we recommend that you keep ACLs disabled by applying the Bucket owner enforced setting. This approach simplifies permissions management: you can use policies to more easily control access to every object in your bucket, regardless of who uploaded the objects in your bucket. When ACLs are disabled, the bucket owner owns all the objects in the bucket and manages access to data exclusively using access management policies.
S3 bucket policies and IAM policies define object-level permissions by providing those objects in the Resource element in your policy statements. The statement will apply to those objects in the bucket. Consolidating object-specific permissions into one policy (as opposed to multiple S3 ACLs) makes it simpler for you to determine effective permissions for your users and roles.
You can disable ACLs on both newly created and already existing buckets. For newly created buckets, ACLs are disabled by default. In the case of an existing bucket that already has objects in it, after you disable ACLs, the object and bucket ACLs are no longer part of an access evaluation, and access is granted or denied on the basis of policies.
S3 Access Points and S3 Access
In some cases customers have use cases with complex entitlement: Amazon s3 is used to store shared datasets where data is aggregated and accessed by different applications, individuals or teams for different use cases. Managing access to this shared bucket requires a single bucket policy that controls access for dozens to hundreds of applications with different permission levels. As an application set grows, the bucket policy becomes more complex, time consuming to manage, and needs to be audited to make sure that changes don’t have an unexpected impact on another application.
These customers need additional policy space for access to their data, and that buckets. To support these use cases, Amazon S3 provides a feature called Amazon S3 Access Points. Amazon S3 access points simplify data access for any AWS service or customer application that stores data in S3.
Access points are named network endpoints that are attached to buckets that you can use to perform S3 object operations, such as GetObject and PutObject. Each access point has distinct permissions and network controls that S3 applies for any request that is made through that access point. Each access point enforces a customized access point policy that works in conjunction with the bucket policy that is attached to the underlying bucket.
Amazon S3 access points support AWS Identity and Access Management (IAM) resource policies that allow you to control the use of the access point by resource, user, or other conditions. For an application or user to be able to access objects through an access point, both the access point and the underlying bucket must permit the request.
Note that Adding an S3 access point to a bucket doesn’t change the bucket’s ehaviour when the bucket is accessed directly through the bucket’s name or Amazon Resource Name (ARN). All existing operations against the bucket will continue to work as before. Restrictions that you include in an access point policy apply only to requests made through that access point.
Sample Access point policy
This access point policy grants the IAM user Alice permissions to GET and PUT objects through the access point ‘my-access-point’ in account 111122223333.
Public access is granted to buckets and objects through access control lists (ACLs), bucket policies, access point policies, or all. In order to ensure that public access to this bucket and its objects is blocked, you can turn on Block all public on both the bucket level or the account level.
The Amazon S3 Block Public Access feature provides settings for access points, buckets, and accounts to help you manage public access to Amazon S3 resources. By default, new buckets, access points, and objects don’t allow public access. However, users can modify bucket policies, access point policies, or object permissions to allow public access. S3 Block Public Access settings override these policies and permissions so that you can limit public access to these resources.
With S3 Block Public Access, account administrators and bucket owners can easily set up centralized controls to limit public access to their Amazon S3 resources that are enforced regardless of how the resources are created.
If you apply a setting to an account, it applies to all buckets and access points that are owned by that account. Similarly, if you apply a setting to a bucket, it applies to all access points associated with that bucket.
Block Public Access for buckets
These settings apply only to this bucket and its access points. AWS recommends that you turn on Block all public access, but before applying any of these settings, ensure that your applications will work correctly without public access. If you require some level of public access to this bucket or objects within, you can customize the individual settings below to suit your specific storage use cases.
You can use the S3 console, AWS CLI, AWS SDKs, and REST API to grant public access to one or more buckets. This setting is on by default at the account creation, as can be seen below (using the S3 console).
Turning off this session will create a warning in the account, as AWS recommends this setting to be turned un unless public access is required for specific and verified use cases such as static website hosting.
This setting can also be turned on for existing buckets. In the AWS Management Console this is done by opening the Amazon S3 console at https://console.aws.amazon.com/s3/, choosing the name of the bucket you want, choosing the Permissions tab. And Choosing Edit to change the public access settings for the bucket.
Block Public Access for accounts
In order to ensure that public access to all your S3 buckets and objects is blocked, turn on Block all public access. These settings apply account-wide for all current and future buckets and access points. AWS recommends that you turn on Block all public access, but before applying any of these settings, ensure that your applications will work correctly without public access. If you require some level of public access to your buckets or objects, you can customize the individual settings below to suit your specific storage use cases.
You can use the S3 console, AWS CLI, AWS SDKs, and REST API to configure block public access settings for all the buckets in your account. This setting can be turned on in the AWS Management Console by opening the Amazon S3 console at https://console.aws.amazon.com/s3/, and clicking Block Public Access setting for this account on the left panel. And Choosing Edit to change the public access settings for the bucket.
When working with AWS organizations, you can prevent people from modifying the Block Public Access on the account level by adding a Service control policy (SCP) that denies editing this. An example of such a SCP can be seen below:
How does authorization work with multiple access control mechanisms?
Whenever an AWS principal issues a request to S3, the authorization decision depends on the union of all the IAM policies, S3 bucket policies, and S3 ACLs that apply as well as if Block Public Access is enabled on either the account, bucket or access point.
In accordance with the principle of least-privilege, decisions default to DENY and an explicit DENY always trumps an ALLOW. For example, if an IAM policy grants access to an object, the S3 bucket policies denies access to that object, and there is no S3 ACL, then access will be denied. Similarly, if no method specifies an ALLOW, then the request will be denied by default. Only if no method specifies a DENY and one or more methods specify an ALLOW will the request be allowed.
When Amazon S3 receives a request to access a bucket or an object, it determines whether the bucket or the bucket owner’s account has a block public access setting applied. If the request was made through an access point, Amazon S3 also checks for block public access settings for the access point. If there is an existing block public access setting that prohibits the requested access, Amazon S3 rejects the request.
This diagram illustrates the authorization process.
We hope that this post clarifies some of the confusion around the various ways you can control access to your S3 environment.
Using IAM Access Analyzer for S3 to review bucket access
Another interesting feature that can be used is IAM Access Analyzer for S3 to review bucket access. You can use IAM Access Analyzer for S3 to review buckets with bucket ACLs, bucket policies, or access point policies that grant public access. IAM Access Analyzer for S3 alerts you to buckets that are configured to allow access to anyone on the internet or other AWS accounts, including AWS accounts outside of your organization. For each public or shared bucket, you receive findings that report the source and level of public or shared access.
In IAM Access Analyzer for S3, you can block all public access to a bucket with a single click. You can also drill down into bucket-level permission settings to configure granular levels of access. For specific and verified use cases that require public or shared access, you can acknowledge and record your intent for the bucket to remain public or shared by archiving the findings for the bucket.
This blog post is written by Ruchi Nigam, Senior Cloud Support Engineer and Sumit Menaria, Senior Hybrid SA.
AWS Local Zones are a type of infrastructure deployment that places compute, storage, database, and other select AWS services close to large population and industry centers. With Local Zones close to large population centers in metro areas, customers can achieve the low latency required for use cases like video analytics, online gaming, virtual workstations, live streaming, remote healthcare, and augmented and virtual reality. They can also help customers operating in regulated sectors like healthcare, financial services, mining and resources, and public sector that might have preferences or requirements to keep data within a geographic boundary. In addition to low-latency and residency benefits, Local Zones can help organizations migrate additional workloads to AWS, supporting a hybrid cloud migration strategy and simplifying IT operations.
Your hybrid cloud migration strategy may involve storage requirements for data coming in from various on-premises sources, file sharing within the organization or backup on-premises files. These storage requirements can be met by using Amazon FSx for a feature-rich, high performance file system. You can deploy your workload in the nearest Local Zones and use Amazon FSx in the parent AWS Region for a cost-effective solution with four widely-used file systems: NetApp ONTAP, OpenZFS, Windows File Server, and Lustre.
If your workloads need low-latency access to your storage solution and operate in locations which are not close to an AWS Region, then you can consider AWS Storage Gateway as a set of hybrid cloud storage services to get access to virtually unlimited cloud storage in the region. There are options to deploy Storage Gateway directly in your on-premises environment as a virtual machine (VM) (VMware ESXi, Microsoft Hyper-V, Linux KVM) or as a pre-configured standalone hardware appliance. But you can also deploy it on an Amazon Elastic Compute Cloud (Amazon EC2) instance in Local Zones or the Region, depending where your data sources and users are. Deploying Storage Gateway on Amazon EC2 in Local Zones provides low latency access via local cache for your applications while taking away the undifferentiated heavy lifting of management of the power, space, and hardware for deploying it in the on-premises environment. Before choosing an appropriate location, you must note any data residency requirements with which you must comply. There may be situations where the Local Zone’s parent Region is in the same country. However, it is recommended to work with your compliance and security teams for confirmation, as the objects are stored in the Amazon S3 service in the Region.
Allow on-premises or EC2 instances to store files as objects in Amazon S3 and access them via NFS or SMB mount points
Volume Gateway Stored Mode
iSCSI
Asynchronous replication of on-premises data to Amazon S3
Volume Gateway Cached Mode
iSCSI
Primary data stored in Amazon S3 with frequently accessed data cached locally on-premises
Tape Gateway
ISCSI
Replace on-premises physical tapes with AWS-backed virtual tapes. Provides virtual media changer and tape drives to use with existing backup applications
FSx File Gateway
SMB
Low-latency, efficient connection for remote users when moving on-premises Windows file systems into the cloud.
We expand on how you can deploy Amazon S3 File Gateway in a Local Zones specific setup. However, a similar approach can be used for other deployment options.
Amazon S3 File Gateway on Local Zones
Amazon S3 File Gateway provides a seamless way to connect to the cloud to store application data files and backup images as durable objects in Amazon S3 cloud storage. Amazon S3 File Gateway supports a file interface into Amazon S3 and combines a service and a virtual software appliance. The gateway offers Server Message Block (SMB) or Network File System (NFS)-based access to data in Amazon S3 with local caching. This can be used for both on-premises and data-intensive Amazon EC2-based applications in Local Zones that require file protocol access to Amazon S3 object storage.
Architecture
In the previous architecture, Client connects to the Storage Gateway EC2 instance over a private/public connection. Storage Gateway EC2 instance can access the S3 bucket in the Region via the Storage Gateway service endpoint. The File Share associated with the Storage Gateway presents the S3 bucket as a locally mounted drive for the client to use.
There are few things we must note while deploying file gateway on Amazon EC2 in a Local Zone.
Since there are selected EC2 instance types available in the Local Zones, identify the instance types available in your desired Local Zone and select the appropriate one which meets the file gateway requirements from a memory perspective.
For example, to list the EC2 instance types offered in the ‘us-east-1-bos-la’ Availability Zone (AZ), use the following command:
Add another 150GiB storage apart from the root volume for cache storage.
Review and make sure that the Security Group has correct firewall ports open – SMB/NFS ports, HTTP port (for activation) are open in ingress.
For activation, if you must access the Storage Gateway over the Public network, then you must assign a Public IP address to the EC2 instance. If you plan to use an Elastic IP address, then make sure that you select the network-border group specific to the Local Zone.
For private connectivity, you can use an AWS Direct Connect connection at the supported Local Zones and also enable VPC endpoint for connectivity between Storage Gateway and service endpoints.
Setting up Amazon S3 File Gateway
1. Navigate to the Storage Gateway console and select the Create Gateway button. In the Gateway options, select the Gateway type as Amazon S3 File Gateway.
2. Under Platform options, select Amazon EC2 and select the option to Customize your settings.
Then, select the Launch instance button and complete launching the EC2 instance to be used as the Storage Gateway. Navigating to the launch instance wizard picks up the verified file gateway Amazon Machine Image (AMI) available in the Region. However, you can also find the AMI using the following AWS Command Line Interface (AWS CLI) command:
3. After launching the EC2 instance, check Confirm set up gateway and select Next.
4. Under Gateway connection options, choose the IP address radio button and enter the Public IP of the EC2 instance launched in Step 2.
5. For the Storage Gateway Service endpoint connection, you can create a VPC endpoint for Storage Gateway and specify the VPC endpoint ID from the dropdown selections for a private connection between the gateway and AWS Storage Services. Alternatively, you can choose the Publicly accessible option.
6. Review and activate the storage gateway.
7. Once the gateway is activated, you can allocate cache storage from the local disks. It is recommended to only use Amazon Elastic Block Store (Amazon EBS) volumes for the gateway storage.
Once the gateway is configured, the next steps show how to create a file share that can be accessed using the NFS or the SMB protocol.
8. A File Gateway can host multiple NFS and SMB file shares. For this example, we configure the NFS file share type. You can also select the corresponding S3 bucket in the Region which is going to be used for storing the data.
Once the file share is created, you can see the list of mount commands to be used on different clients.
On a Linux Client, use the following steps to mount the previously created NFS file share. Make sure you replace the IP address, S3 bucket name, and mount path with names specific to your configuration.
sudo mount -t nfs -o nolock,hard 10.0.32.151:/my-s3-bucket /my-
mount-path
You can verify that the file share has been mounted by running the following command:
Now you can also list the S3 objects as files on the locally mounted drive.
For reference, here are the objects stored in the S3 bucket in the Region.
To see a recently added object in the S3 bucket, select Refresh cache under the Actions options of the file share.
Depending on the client location, performance for access to the cached files is better as compared to direct access to the files in the parent Region. The clients can be either in your on-premises and accessed via Direct Connect to the Local Zone, or workload within the Local Zone, which can mount the file gateway for local access from the VPC.
Furthermore, you can look at Amazon S3 File Gateway performance for clients to select the appropriate EC2 instance type and EBS volume size and monitor Cache hit, Read/Write Time, and other performance metrics of the storage gateway by using CloudWatch Metrics.
Cleaning Up
Unmount the File Gateway from the local machine: unmount /your-mount-path
Delete the Storage Gateway from the Storage Gateway console
Delete the VPC Endpoint created for Storage Gateway service
Delete the EC2 instance from the Amazon EC2 console
Delete the files added to the S3 bucket from the Amazon S3 console
Conclusion
By deploying Amazon Storage Gateway on Local Zones, you can utilize the scalability, security, and cost-effectiveness of the AWS cloud, and simultaneously provide low-latency and high-performance access for on-premises applications and users. This can accelerate the migration your storage workloads to cloud while providing your users with low latency access via Local Zones in a truly hybrid manner. Read more about AWS Storage Gateway and AWS Local Zones in their respective documentation.
Today, we are launching Amazon S3 dual-layer server-side encryption with keys stored in AWS Key Management Service (DSSE-KMS), a new encryption option in Amazon S3 that applies two layers of encryption to objects when they are uploaded to an Amazon Simple Storage Service (Amazon S3) bucket. DSSE-KMS is designed to meet National Security Agency CNSSP 15 for FIPS compliance and Data-at-Rest Capability Package (DAR CP) Version 5.0 guidance for two layers of CNSA encryption. Using DSSE-KMS, you can fulfill regulatory requirements to apply multiple layers of encryption to your data.
Amazon S3 is the only cloud object storage service where customers can apply two layers of encryption at the object level and control the data keys used for both layers. DSSE-KMS makes it easier for highly regulated customers to fulfill rigorous security standards, such as US Department of Defense (DoD) customers.
With DSSE-KMS, you can specify dual-layer server-side encryption (DSSE) in the PUT or COPY request for an object or configure your S3 bucket to apply DSSE to all new objects by default. You can also enforce DSSE-KMS using IAM and bucket policies. Each layer of encryption uses a separate cryptographic implementation library with individual data encryption keys. DSSE-KMS helps protect sensitive data against the low probability of a vulnerability in a single layer of cryptographic implementation.
DSSE-KMS simplifies the process of applying two layers of encryption to your data, without having to invest in infrastructure required for client-side encryption. Each layer of encryption uses a different implementation of the 256-bit Advanced Encryption Standard with Galois Counter Mode (AES-GCM) algorithm. DSSE-KMS uses the AWS Key Management Service (AWS KMS) to generate data keys, allowing you to control your customer managed keys by setting permissions per key and specifying key rotation schedules. With DSSE-KMS, you can now query and analyze your dual-encrypted data with AWS services such as Amazon Athena, Amazon SageMaker, and more.
With this launch, Amazon S3 now offers four options for server-side encryption:
Server-side encryption with Amazon S3 managed keys (SSE-S3)
Server-side encryption with AWS KMS (SSE-KMS)
Server-side encryption with customer-provided encryption keys (SSE-C)
Dual-layer server-side encryption with keys stored in KMS (DSSE-KMS)
Let’s see how DSSE-KMS works in practice.
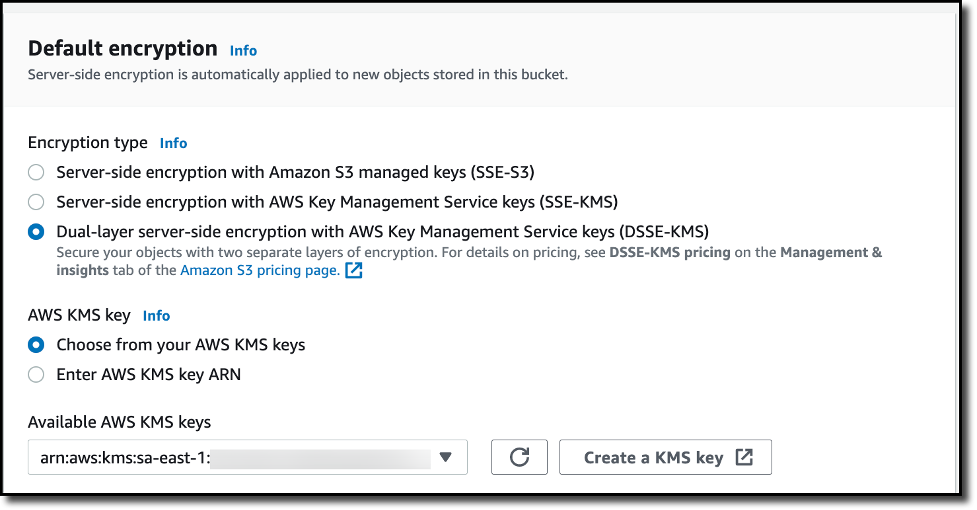
Create an S3 Bucket and Turn on DSSE-KMS To create a new bucket in the Amazon S3 console, I choose Buckets in the navigation pane. I choose Create bucket, and I select a unique and meaningful name for the bucket. Under Default encryption section, I choose DSSE-KMS as the encryption option. From the available AWS KMS keys, I select a key for my requirements. Finally, I choose Create bucket to complete the creation of the S3 bucket, encrypted by DSSE-KMS encryption settings.
Upload an Object to the DSSE-SSE enabled S3 Bucket In the Buckets list, I choose the name of the bucket that I want to upload an object to. On the Objects tab for the bucket, I choose Upload. Under Files and folders, I choose Add files. I then choose a file to upload, and then choose Open. Under Server-side encryption, I choose Do not specify an encryption key. I then choose Upload.
Once the object is uploaded to the S3 bucket, I notice that the uploaded object inherits the Server-side encryptionsettings from the bucket.
Download a DSSE-KMS Encrypted Object from an S3 Bucket I select the object that I previously uploaded and choose Download or choose Download as from the Object actions menu. Once the object is downloaded, I open it locally, and the object is decrypted automatically, requiring no change to client applications.
Now Available Amazon S3 dual-layer server-side encryption with keys stored in AWS KMS (DSSE-KMS) is available today in all AWS Regions. You can get started with DSSE-KMS via the AWS CLI or AWS Management Console. To learn more about all available encryption options on Amazon S3, visit the Amazon S3 User Guide. For pricing information on DSSE-KMS, visit the Amazon S3 pricing page (Storage tab) and the AWS KMS pricing page.
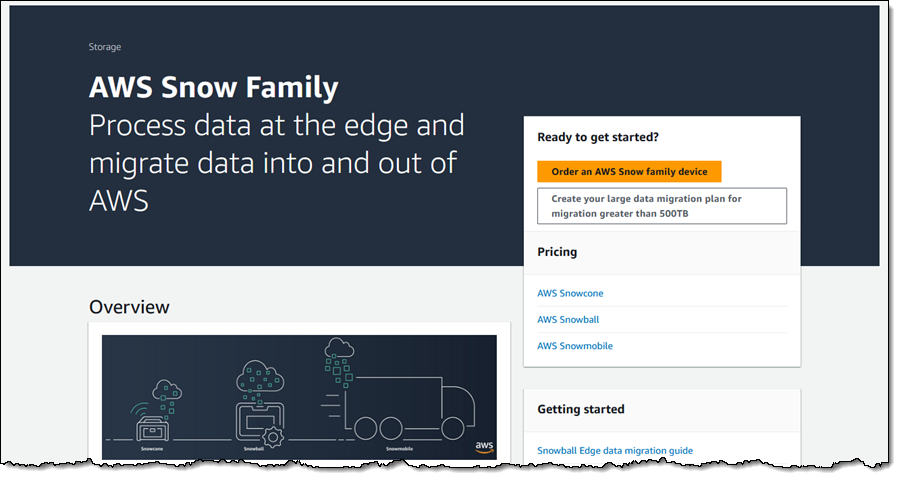
AWS Snow Family family devices are used to cost-effectively move data to the cloud and to process data at the edge. The enhanced Snowball Edge Storage Optimized devices are designed for your petabyte-scale data migration projects, with 210 terabytes of NVMe storage and the ability to transfer up to 1.5 gigabytes of data per second. The devices also include several connectivity options: 10GBASE-T, SFP48, and QSFP28.
Large Data Migration In order to make your migration as smooth and efficient as possible, we now have a well-defined Large Data Migration program. As part of this program, we will work with you to make sure that your site is able to support rapid data transfer, and to set up a proof-of-concept migration. If necessary, we will also recommend services and solutions from our AWS Migration Competency Partners. After successful completion of the proof-of-concept you will be familiar with the Snow migration process, and you will be ready to order devices using the process outlined below.
You can make use of the Large Data Migration program by contacting AWS Sales Support.
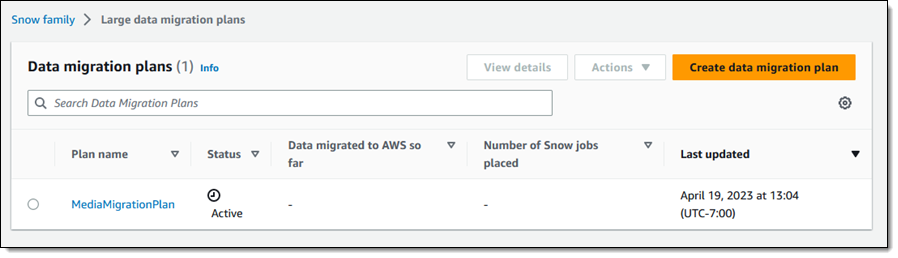
Ordering Devices While you can order and manage devices individually, you can save time and reduce complexity by using a large data migration plan. Let’s walk through the process of creating one. I open the AWS Snow Family Console and click Create your large data migration plan:
I enter a name for my migration plan (MediaMigrationPlan), and select or enter the shipping address of my data center:
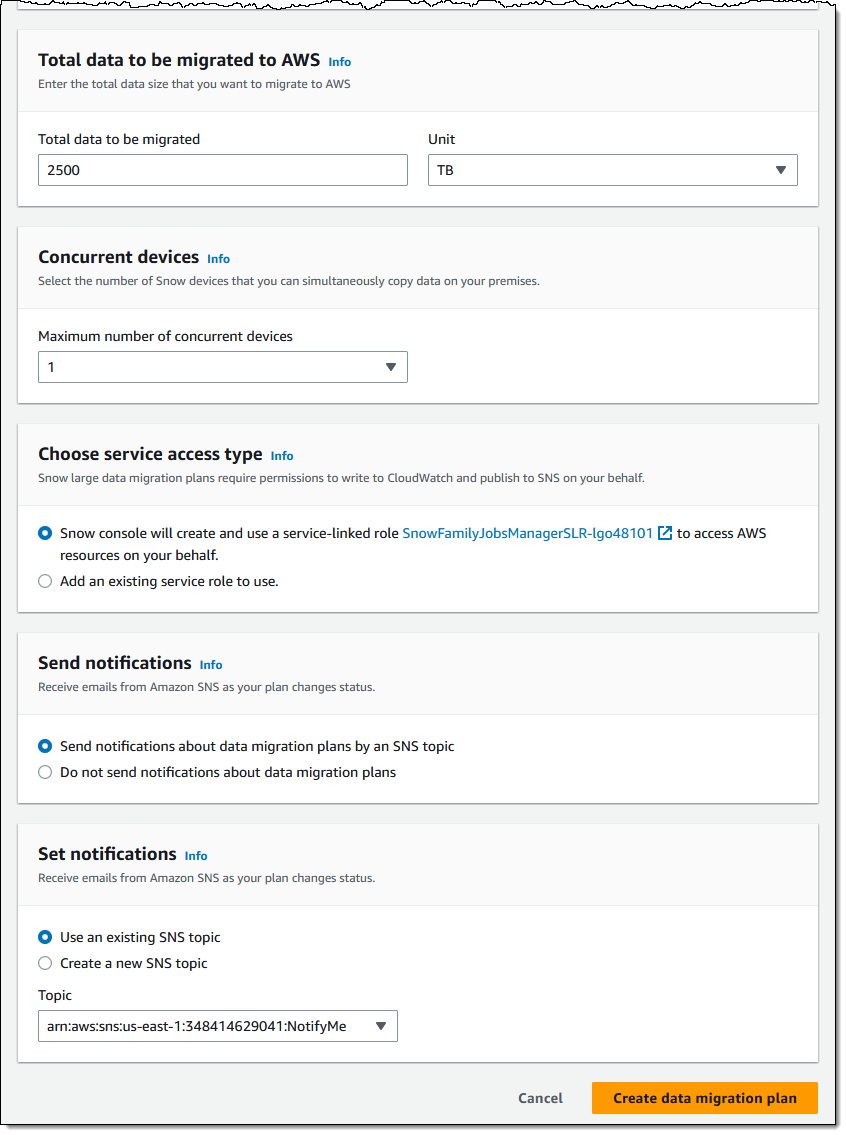
Then I specify the amount of data that I plan to migrate, and the number of devices that I want to use concurrently (taking into account space, power, bandwidth, and logistics within my data center):
When everything looks good I click Create data migration plan to proceed and my plan becomes active:
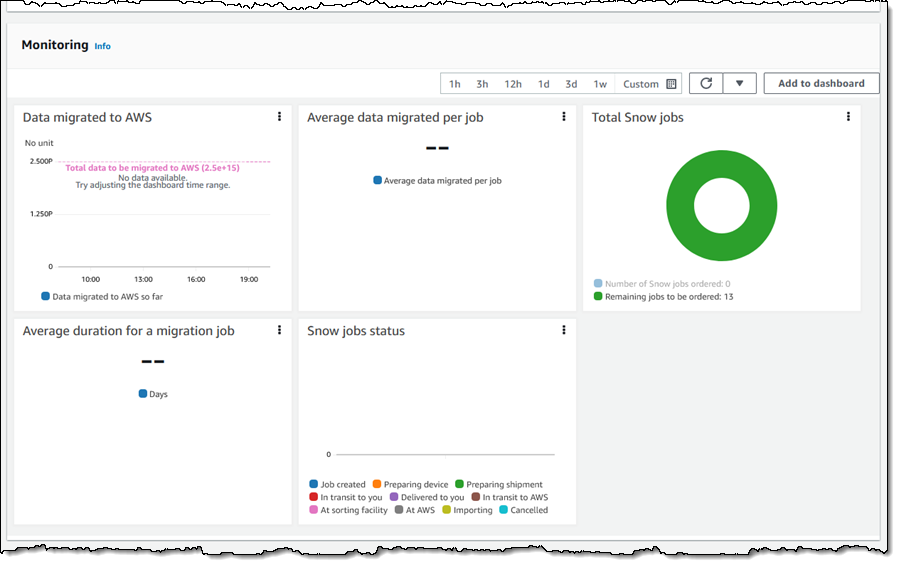
I can review the Monitoring section my my plan to see how my migration is going (these are simply Amazon CloudWatch metrics and I can add them to a dashboard, set alarms, and so forth):
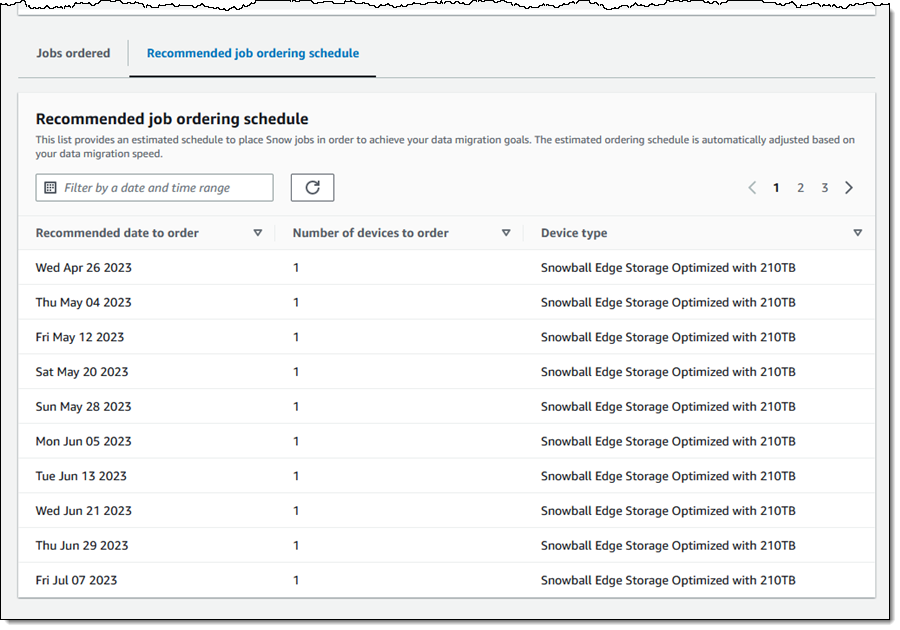
The Jobs section includes a recommended job ordering schedule that takes the maximum number of concurrent devices into account:
When I am ready to start transferring data, I visit the Jobs ordered tab and create a Snow job:
Things to Know Here are a couple of fun facts about this enhanced device:
Regions – Snowball Edge Storage Optimized Devices with 210 TB of storage are available in the US East (N. Virginia) and US West (Oregon) AWS Regions.
Pricing – You pay for the use of the device and for data transfer in and out of AWS, with on-demand and committed upfront pricing available. To learn more about pricing for Snowball Edge Storage Optimized 210 TB devices contact your AWS account team or AWS Sales Support.
To provide the best experiences, we use technologies like cookies to store and/or access device information. Consenting to these technologies will allow us to process data such as browsing behavior or unique IDs on this site. Not consenting or withdrawing consent, may adversely affect certain features and functions.
Functional
Always active
The technical storage or access is strictly necessary for the legitimate purpose of enabling the use of a specific service explicitly requested by the subscriber or user, or for the sole purpose of carrying out the transmission of a communication over an electronic communications network.
Preferences
The technical storage or access is necessary for the legitimate purpose of storing preferences that are not requested by the subscriber or user.
Statistics
The technical storage or access that is used exclusively for statistical purposes.The technical storage or access that is used exclusively for anonymous statistical purposes. Without a subpoena, voluntary compliance on the part of your Internet Service Provider, or additional records from a third party, information stored or retrieved for this purpose alone cannot usually be used to identify you.
Marketing
The technical storage or access is required to create user profiles to send advertising, or to track the user on a website or across several websites for similar marketing purposes.