In this blog post, I explore Amazon Q Developer’s latest enhancements to the IDE chat experience including increased context control, chat history and other conversation management features. On March 11th, 2025, my colleague published Take control of your code with Amazon Q Developer’s new context features detailing several improvements to the chat experience within VS Code. These included increased context transparency, the ability to select specific files or folders as context, prompt libraries for reusing prompts across conversations and projects, and project rules to help enforce coding standards and best practices across your teams.
Since then, Amazon Q Developer released additional features in VS Code to help provide users with more control over their conversations and enhance their ability to maintain development context across longer periods. These new capabilities make your interactions with Amazon Q Developer not just more efficient, but also more contextual and persistent—helping you maintain your development flow, even when work spans hours or days. Now, let’s jump in and explore some of the new features available today.
Conversation persistence
We’ve all been there—you’re deep in conversation with Amazon Q Developer, maybe you’re debugging an authentication problem, optimizing a complex database query, or designing a new API structure. You and Amazon Q Developer have been going back and forth, uncovering insights and piecing together solutions.
Then reality intervenes. You close your IDE to focus on another task, step away for a meeting, or maybe update your computer. When you finally return to your IDE, ready to dive back in, you’re met with a blank chat window. All that context, all those valuable exchanges—gone. You find yourself trying to reconstruct your train of thought, wasting precious time and momentum.
Amazon Q Developer now preserves your conversations across your IDE sessions. Instead of starting from scratch each time you open the IDE, you can now come back to your conversation and pick up right where you left off.
Conversation History Search
It isn’t just after a closed IDE session or coming back to your computer after a long-weekend that you want Amazon Q Developer to remember what you have been working on. Sometimes you need to reference a previous solution — maybe Amazon Q Developer gave you some good advice on optimizing your database queries that you want to use elsewhere, or maybe you decided to work on some front-end components so you could have fresh eyes for the API performance issue you’ve been working at.
Now, you can access your previous conversations with Amazon Q Developer by clicking on the search icon in the top right corner of your chat window. You can quickly locate specific discussions by typing keywords into the search bar, then either review the previous exchange or continue the conversation where you left off.
Fig 1 – View chat history feature in the Amazon Q Developer VS Code chat interface.
Conversation Export
But what if you need to share these insights with a teammate or want to keep a local record for future reference? You can now easily export your chat sessions as markdown files, preserving all the valuable information for offline use or collaboration. To do this, click the export button located directly to the right of the chat history button. Alternatively, when browsing your chat history, you can export individual sessions by clicking the three dots on the right side of each conversation entry.
Fig 2 – Export chat feature in the Amazon Q Developer VS Code chat interface.
Increasing your control over context
Last July, we announced the ability to use @workspace in your chat session to provide comprehensive context across your entire application within the IDE. To provide more control over what Amazon Q Developer uses as context, earlier this year we released the ability to use the @ symbol in the chat to include specific folders or files as context for your conversation.
We are now taking your level of control one step further to allow you to use @ in your conversation to find and include classes, functions, and global variables into the input context. Rather than leaving it up to Amazon Q to determine the relevant files, folders, or functions for your request, you can continue to be more explicit with your request to receive the most relevant and accurate responses.
Fig 3 – Context selection in Amazon Q Developer chat, using “@” to show relevant folders, files, functions.
Conclusion
Amazon Q Developer is continuing to evolve its features that help put developers in control of their coding experience. By offering conversation persistence, history search, and export capabilities, Amazon Q Developer works to create continuity that allows developers to maintain their momentum across sessions and easily revisit past solutions. The expanded context control features empower developers to fine-tune their interactions with Amazon Q Developer, and receive more precise and relevant responses.
To get started with these features in VS Code, visit the Amazon Q Developer Getting Started guide and explore the full range of capabilities that can help you create impressive software more efficiently.
In this blog post, I dive into the powerful new features of Amazon Q Developer that empower developers to take full control of their development workflow. These features, currently available in Visual Studio Code, allow you to leverage workspace context, explicit context, prompt libraries, and project rules to streamline your software projects, maintain coding standards, and boost your overall productivity. Developers working in other IDEs can expect support for these capabilities to come soon as well. Whether you’re an experienced developer or just starting out, these features will transform the way you approach your development tasks.
Background
For the past year, Amazon Q Developer has supported workspace context in the integrated development environment (IDE). This powerful feature allows Amazon Q Developer to automatically ingest and index all your code files, configurations, and project structure, giving the AI-powered assistant comprehensive context across your entire application.
By adding the @workspace modifier to your question, Amazon Q Developer can automatically include the most relevant chunks of your workspace code as additional context. This allows the assistant to provide more thorough and accurate responses, even for questions that require understanding the broader codebase, rather than just the current file.
To illustrate this, I will use code from the AWS CDK Immersion Day Workshop. In the following example, I ask Amazon Q Developer, “Which resources are deployed by the workshop stack?” Typically, the assistant would only have the current file open in the IDE as context to answer this question. However, by adding @workspace, Amazon Q Developer can include additional files to provide a more complete response, describing all the resources in the project, such as AWS Lambda functions, an Amazon API Gateway, and an Amazon DynamoDB table.
With this additional context, Amazon Q Developer can provide a more comprehensive answer, explaining the various resources that make up the workshop stack.
Context Transparency
Amazon Q Developer can’t review every file in a large project–that would take too long. The assistant determines relevance based on an index that is updated periodically. While this works great in most cases, there are times when I want to know which files Amazon Q picked. The new context transparency feature, gives me the insight I need.
Amazon Q Developer now includes the context information directly in the response, listing each file that was added. The context transparency feature allows me to see exactly which files the assistant used to formulate its answer. In the following example, you can see that Q Developer included four files from my project.
By expanding the context section, you can easily see the files that Amazon Q Developer used to provide the previous response, giving you greater insight into the assistant’s decision-making process.
Explicit Context
While Amazon Q Developer typically does a great job of picking the best files to augment the context, there are times when I want more control. The new explicit context feature allows me to choose individual files and folders that I want to add to the context.
By typing @ in the chat, Amazon Q Developer displays a user interface that lets you select the specific files and folders you want to include. This provides the assistant with access to the exact information that you know it needs to answer your question.
Let’s return to the prior example. While Q Developer properly identified all the resources in the stack, it did not include lib/hitcounter.ts where the DynamoDB table is defined. While the answer is correct, I want Q. Developer to see the source of the HitCounter. In the following example, I explicitly add the lib folder to the context because I know that is where the resources are defined.
Rather than allowing Q to choose the files, I can explicitly identify files and folders that I want to add to the context. In the following image you see that Q again answered my question correctly. However, with the source code to both files, Q was able to include additional information missing from the prior example. Notice that the HitCounterHandler now includes additional information about the runtime and version.
With the ability to explicitly define the context, I can tailor the information Amazon Q Developer uses to provide the most relevant and accurate response for my specific needs.
Prompt Library
In addition to controlling the context, Amazon Q Developer now allows you to build a library of common prompts. These prompts are stored as Markdown files in my ~/.aws/amazonq/prompts folder, making it easy to reuse them across multiple conversations and projects.
For example, let’s say you want to add a diagram to the README file for your project. While Amazon Q Developer’s /doc feature can already generate an infrastructure diagram, you may have other types of diagrams, like an Entity-Relationship (ER) diagram or a sequence diagram, that you use frequently. By storing these prompts in your library, you can easily add them to the context without having to retype the prompt each time. In the following example, I will create a sequence diagram.
In the prior image, you can see that I have again added the lib folder to the context in addition to a saved prompt named “Create Sequence Diagram”. Note that I can combine multiple modifiers adding additional context and prompts as needed. The stored prompt for “Create Sequence Diagram” is shown below.
Create a sequence diagram using Mermaid that shows the sequence of calls between resources.
Ignore supporting resources like IAM policies and security group rules.
Amazon Q Developer uses the prompt, and the two source code files in the lib folder to create the following sequence diagram.
The prompt library saves me time and reduces the chances of making mistakes when generating common artifacts, allowing me to focus on more complex and creative aspects of my development workflow.
Project Rules
The last feature we’ll explore is “Project Rules.” Similar to the prompt library, these rules are stored as Markdown files. Unlike the prompt library, which is specific to your user profile, project rules are stored in the .amazonq/rules folder of your project. Therfore, they are applied to all developers that share the project source code.
These rules allow you to enforce coding standards and best practices across your team. For example, you could have a rule that all Python code uses type hints, or that all Java code uses Javadocs comments. By storing these rules in your project, you can drive consistency across developers, regardless of their experience level.
To illustrate this, imagine that a junior developer asks Q to “Add an S3 bucket to the stack” as shown in the following image. This prompt is too simple and does not include our best practices This prompt is too simple and does not describe our best practices.
Despite the vague prompt, you might notice that Q Developer’s response mentions the “best practices” stored in “the rules file”. You might also notice that Q has added cdk.md to the context even though I did not include any modifiers in my prompt. This is the power of the project rule. It adds additional context to the prompt, even when the developer forgets to add it manually. .amazonq/rules/cdk.md includes the following text. In addition, context transparency makes it clear that the rule was included so the developer is aware.
All S3 Buckets must have encryption enabled, enforce SSL, and block public access.
All DynamoDB Tables must have encryption enabled.
All SNS Topics must have encryption enabled and enforce SSL.
All SQS Queues must enforce SSL.
Project rules empower you to maintain consistency and best practices across your entire development team, helping to improve the overall quality and maintainability of your codebase.
Conclusion
The new features in Amazon Q Developer give you powerful tools to simplify your software development workflow. By leveraging workspace context, explicit context, prompt libraries, and project rules, you can ensure your AI assistant has the information it needs to provide accurate and helpful responses, while also enforcing best practices and standards across your team.
To get started with these features, visit the Amazon Q Developer Getting Started guide and explore the full range of capabilities that can help you create impressive software more efficiently.
Terraform by HashiCorp is one of the most popular infrastructure-as-code (IaC) platforms. AWS Step Functions is a visual workflow service that helps developers use AWS services to build distributed applications, automate processes, orchestrate microservices, and create data and machine learning (ML) pipelines. In this blog, we showcase best practices for users leveraging Terraform to deploy workflows, also known as Step Functions state machines. We will create a state machine using Workflow Studio for AWS Step Functions, deploy the state machine with Terraform, and introduce best operating practices on topics such as project structure, modules, parameter substitution, and remote state.
We recommend that you have a working understanding of both Terraform and Step Functions before going through this blog. If you are brand new to Step Functions and/or Terraform, please visit the Introduction to Terraform on AWS Workshop and the Terraform option in the Managing State Machines with Infrastructure as Code section of The AWS Step Functions Workshop to learn more.
Step Functions and Terraform Project Structure
One of the most important parts of any software project is its structure. It must be clear and well-organized for yourself or any member of your team to pick up and start coding efficiently. A Step Functions project using Terraform can potentially have many moving parts and components, so it is especially important to modularize and label wherever possible. Let’s take a look at a project structure that will allow for modularization, re-usability, and extensibility:
mkdir sfn-tf-example
cd sfn-tf-example
mkdir -p -- statemachine modules functions/first-function/src
touch main.tf outputs.tf variables.tf .gitignore functions/first-function/src/lambda.py
tree
Before moving forward, let’s analyze the directory, subdirectories, and files created above:
/statemachine will hold our Amazon States Language (ASL) JSON code describing the Step Functions state machine definition. This is where the orchestration logic will reside, so it is prudent to keep it separated from the infrastructure code. If you are deploying multiple state machines in your project, each definition will have its own JSON file. If you prefer, you can specify separate folders for each state machine to further modularize and isolate the logic.
/functions subdirectory includes the actual code for AWS Lambda functions used in our state machine. Keeping this code here will be much easier to read than writing it inline in our main.tf file.
The last subdirectory we have is /modules. Terraform modules are higher level abstracts explaining new concepts in your architecture. However, do not fall into the trap of making a custom module for everything. Doing so will make your code harder to maintain, and AWS provider resources will often suffice. There are also very popular modules that you can use from the Terraform Registry, such as Terraform AWS modules. Whenever possible, one should re-use modules to avoid code duplication in your project.
The remaining files in the root of the project are common to all Terraform projects. There are going to be hidden files created by your Terraform project after running terraform init, so we will include a .gitignore. What you include in .gitignore is largely dependent on your codebase and what your tools silently create in the background. In a later section, we will explicitly call out *.tfstate files in our .gitignore, and go over best practices for managing Terraform state securely and remotely.
Initial Code and Project Setup
We are going to create a simple Step Functions state machine that will only execute a single Lambda function. However, we will need to create the Lambda function that the state machine will reference. We first need to create our Lambda function code and save it in the following the directory structure and file mentioned above: functions/first-function/src/lambda.py.
import boto3

def lambda_handler(event, context):
# Minimal function for demo purposes
	return True
In Terraform, the main configuration file is named main.tf. This is the file that the Terraform CLI will look for in the local directory. Although you can break down your template into multiple .tf files, main.tf must be one of them. In this file, we will define the required providers and their minimum version, along with the resource definition of our template. In the example below, we define the minimum resources needed for a simple state machine that only executes a Lambda function. We define the two AWS Identity and Access Management (IAM) roles that our Lambda function and state machine will use, respectively. We define a data resource that zips the Lambda function code, which is then used in the Lambda function definition. Also notice that we use the aws_iam_policy_document data source throughout. Using the official IAM policy document means both your integrated development environment (IDE) and Terraform can see if your policy is malformed before running terraform apply. Finally, we define an Amazon CloudWatch Log group that will be used by the Lambda function to store its execution logs.
Terraform {
  required_providers {
    aws = {
      source  = "hashicorp/aws"
      version = "~>4.0"
    }
  }
}

provider "aws" {}

provider "random" {}

data "aws_caller_identity" "current_account" {}

data "aws_region" "current_region" {}

resource "random_string" "random" {
  length  = 4
  special = false
}

data "aws_iam_policy_document" "lambda_assume_role_policy" {
  statement {
    effect = "Allow"

    principals {
      type        = "Service"
      identifiers = ["lambda.amazonaws.com"]
    }

    actions = [
      "sts:AssumeRole",
    ]
  }
}

resource "aws_iam_role" "function_role" {
  assume_role_policy  = data.aws_iam_policy_document.lambda_assume_role_policy.json
  managed_policy_arns = ["arn:aws:iam::aws:policy/service-role/AWSLambdaBasicExecutionRole"]
}

# Create the function
data "archive_file" "lambda" {
  type        = "zip"
  source_file = "functions/first-function/src/lambda.py"
  output_path = "functions/first-function/src/lambda.zip"
}

resource "aws_kms_key" "log_group_key" {}

resource "aws_kms_key_policy" "log_group_key_policy" {
  key_id = aws_kms_key.log_group_key.id
  policy = jsonencode({
    Id = "log_group_key_policy"
    Statement = [
      {
        Action = "kms:*"
        Effect = "Allow"
        Principal = {
          AWS = "arn:aws:iam::${data.aws_caller_identity.current_account.account_id}:root"
        }

        Resource = "*"
        Sid      = "Enable IAM User Permissions"
      },
      {
        Effect = "Allow",
        Principal = {
          Service : "logs.${data.aws_region.current_region.name}.amazonaws.com"
        },
        Action = [
          "kms:Encrypt*",
          "kms:Decrypt*",
          "kms:ReEncrypt*",
          "kms:GenerateDataKey*",
          "kms:Describe*"
        ],
        Resource = "*"
      }
    ]
    Version = "2012-10-17"
  })
}

resource "aws_lambda_function" "test_lambda" {
  function_name    = "HelloFunction-${random_string.random.id}"
  role             = aws_iam_role.function_role.arn
  handler          = "lambda.lambda_handler"
  runtime          = "python3.9"
  filename         = "functions/first-function/src/lambda.zip"
  source_code_hash = data.archive_file.lambda.output_base64sha256
}

# Explicitly create the function’s log group to set retention and allow auto-cleanup
resource "aws_cloudwatch_log_group" "lambda_function_log" {
  retention_in_days = 1
  name              = "/aws/lambda/${aws_lambda_function.test_lambda.function_name}"
  kms_key_id        = aws_kms_key.log_group_key.arn
}

# Create an IAM role for the Step Functions state machine
data "aws_iam_policy_document" "state_machine_assume_role_policy" {
  statement {
    effect = "Allow"

    principals {
      type        = "Service"
      identifiers = ["states.amazonaws.com"]
    }

    actions = [
      "sts:AssumeRole",
    ]
  }
}

resource "aws_iam_role" "StateMachineRole" {
  name               = "StepFunctions-Terraform-Role-${random_string.random.id}"
  assume_role_policy = data.aws_iam_policy_document.state_machine_assume_role_policy.json
}

data "aws_iam_policy_document" "state_machine_role_policy" {
  statement {
    effect = "Allow"

    actions = [
      "logs:CreateLogStream",
      "logs:PutLogEvents",
      "logs:DescribeLogGroups"
    ]

    resources = ["${aws_cloudwatch_log_group.MySFNLogGroup.arn}:*"]
  }

  statement {
    effect = "Allow"
    actions = [
      "cloudwatch:PutMetricData",
      "logs:CreateLogDelivery",
      "logs:GetLogDelivery",
      "logs:UpdateLogDelivery",
      "logs:DeleteLogDelivery",
      "logs:ListLogDeliveries",
      "logs:PutResourcePolicy",
      "logs:DescribeResourcePolicies",
    ]
    resources = ["*"]
  }

  statement {
    effect = "Allow"

    actions = [
      "lambda:InvokeFunction"
    ]

    resources = ["${aws_lambda_function.test_lambda.arn}"]
  }

}

# Create an IAM policy for the Step Functions state machine
resource "aws_iam_role_policy" "StateMachinePolicy" {
  role   = aws_iam_role.StateMachineRole.id
  policy = data.aws_iam_policy_document.state_machine_role_policy.json
}

# Create a Log group for the state machine
resource "aws_cloudwatch_log_group" "MySFNLogGroup" {
  name_prefix       = "/aws/vendedlogs/states/MyStateMachine-"
  retention_in_days = 1
  kms_key_id        = aws_kms_key.log_group_key.arn
}
Workflow Studio and Terraform Integration
It is important to understand the recommended steps given the different tools we have available for creating Step Functions state machines. You should use a combination of Workflow Studio and local development with Terraform. This workflow assumes you will define all resources for your application within the same Terraform project, and that you will be leveraging Terraform for managing your AWS resources.
Figure 1 – Workflow for creating Step Functions state machine via Terraform
You will write the Terraform definition for any resources you intend to call with your state machine, such as Lambda functions, Amazon Simple Storage Service (Amazon S3) buckets, or Amazon DynamoDB tables, and deploy them using the terraform apply command. Doing this prior to using Workflow Studio will be useful in designing the first version of the state machine. You can define additional resources after importing the state machine into your local Terraform project.
You can use Workflow Studio to visually design the first version of the state machine. Given that you should have created the necessary resources already, you can drag and drop all of the actions and states, link them, and see how they look. Finally, you can execute the state machine for testing purposes.
Once your initial design is ready, you will export the ASL file and save it in your Terraform project. You can use the Terraform resource type aws_sfn_state_machine and reference the saved ASL file in the definition field.
You will then need to parametrize the ASL file given that Terraform will dynamically name the resources, and the Amazon Resource Name (ARN) may eventually change. You do not want to hardcode an ARN in your ASL file, as this will make updating and refactoring your code more difficult.
Finally, you deploy the state machine via Terraform by running terraform apply.
Simple changes should be made directly in the parametrized ASL file in your Terraform project instead of going back to Workflow Studio. Having the ASL file versioned as part of your project ensures that no manual changes break the state machine. Even if there is a breaking change, you can easily roll back to a previous version. One caveat to this is if you are making major changes to the state machine. In this case, taking advantage of Workflow Studio in the console is preferable.
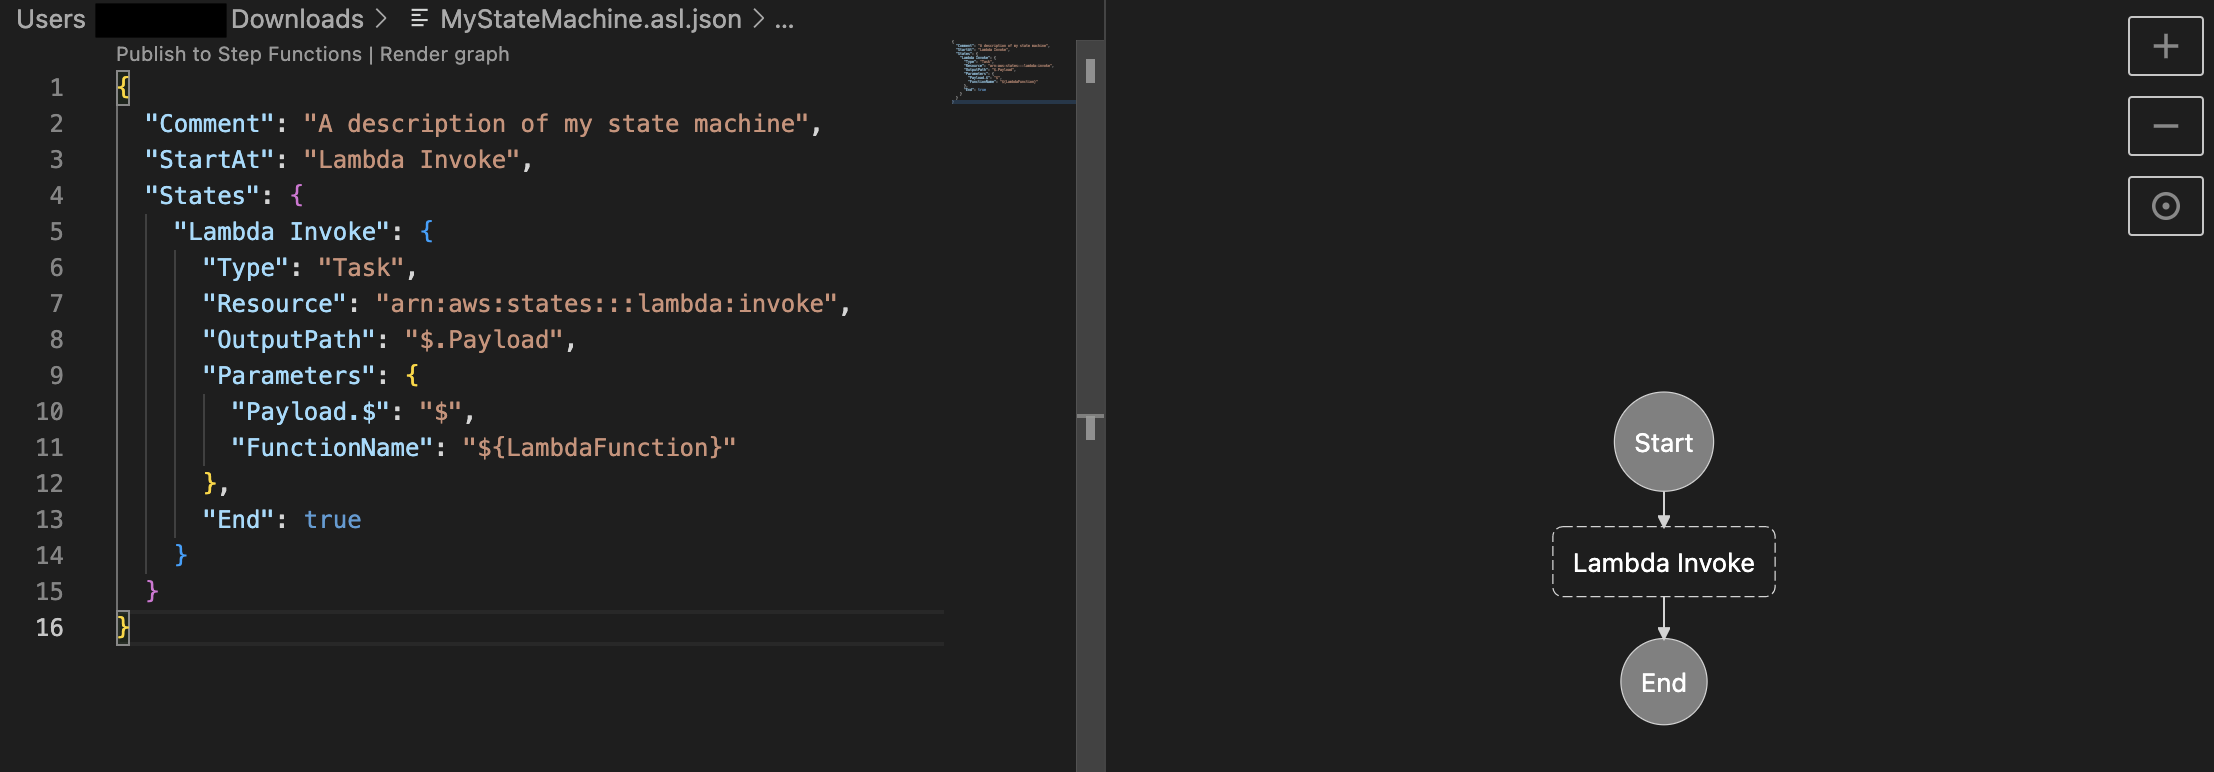
However, you will most likely want to continue seeing a visual representation of the state machine while developing locally. The good news is that you have another option directly integrated into Visual Studio Code (VS Code) that visually renders the state machine, similar to Workflow Studio. This functionality is part of the AWS Toolkit for VS Code. You can learn more about the state machine integration with the AWS Toolkit for VS Code here. Below is an example of a parametrized ASL file and its rendered visualization in VS Code.
Figure 2 – Step Functions state machine displayed visually in VS Code
Parameter Substitution
In the Terraform template, when you define the Step Functions state machine, you can either include the definition in the template or in an external file. Leaving the definition in the template can cause the template to be less readable and difficult to manage. As a best practice, it is recommended to keep the definition of the state machine in a separate file. This raises the question of how to pass parameters to the state machine. In order to do this, you can use the templatefile function of Terraform. The templatefile function reads a file and renders its content with the supplied set of variables. As shown in the code snippet below, we will use the templatefile function to render the state machine definition file with the Lambda function ARN and any other parameters to pass to the state machine.
Inside the state machine definition, you have to specify a string template using the interpolation sequences delimited with ${ … }. Similar to the code snippet below, you will define the state machine with the variable name that will be passed by the templatefile function.
After the templatefile function runs, it will replace the variable ${ProcessingLambda} with the actual Lambda function ARN generated when the template is deployed.
Remote Terraform State Management
Every time you run Terraform, it stores information about the managed infrastructure and configuration in a state file. By default, Terraform creates the state file called terraform.tfstate in the local directory. As mentioned earlier, you will want to include any .tfstate files in your .gitignore file. This will ensure you do not commit it to source control, which could potentially expose secrets and would most likely lead to errors in state. If you accidentally delete this local file, Terraform cannot track the infrastructure that was previously created. In that case, if you run terraform apply on an updated configuration, Terraform will create it from scratch, which will lead to conflicts. It is recommended that you store the Terraform state remotely in secure storage to enable versioning, encryption, and sharing. Terraform supports storing state in S3 buckets by using the backend configuration block. In order to configure Terraform to write the state file to an S3 bucket, you need to specify the bucket name, the region, and the key name.
It is also recommended that you enable versioning in the S3 bucket and MFA delete to protect the state file from accidental deletion. In addition, you need to make sure that Terraform has the right IAM permissions on the target S3 bucket. In case you have multiple developers working with the same infrastructure simultaneously, Terraform can also use state locking to prevent concurrent runs against the same state. You can use a DynamoDB table to control locking. The DynamoDB table you use must have a partition key named LockID with type String, and Terraform must have the right IAM permissions on the table.
With this remote state configuration, you will maintain the state securely stored in S3. With every change you apply to your infrastructure, Terraform will automatically pull the latest state from the S3 bucket, lock it using the DynamoDB table, apply the changes, push the latest state again to the S3 bucket and then release the lock.
Cleanup
If you were following along and deployed resources such as the Lambda function, the Step Functions state machine, the S3 bucket for backend state storage, or any of the other associated resources by running terraform apply, to avoid incurring charges on your AWS account, please run terraform destroy to tear these resources down and clean up your environment.
Conclusion
In conclusion, this blog provides a comprehensive guide to leveraging Terraform for deploying AWS Step Functions state machines. We discussed the importance of a well-structured project, initial code setup, integration between Workflow Studio and Terraform, parameter substitution, and remote state management. By following these best practices, developers can create and manage their state machines more effectively while maintaining clean, modular, and reusable code. Embracing infrastructure-as-code and using the right tools, such as Workflow Studio, VS Code, and Terraform, will enable you to build scalable and maintainable distributed applications, automate processes, orchestrate microservices, and create data and ML pipelines with AWS Step Functions.
If you would like to learn more about using Step Functions with Terraform, please check out the following patterns and workflows on Serverless Land and view the Step Functions Developer Guide.
While writing code to develop applications, developers must keep up with multiple programming languages, frameworks, software libraries, and popular cloud services from providers such as AWS. Even though developers can find code snippets on developer communities, to either learn from them or repurpose the code, manually searching for the snippets with an exact or even similar use case is a distracting and time-consuming process. They have to do all of this while making sure that they’re following the correct programming syntax and best coding practices.
Amazon CodeWhisperer, a machine learning (ML) powered coding aide for developers, lets you overcome those challenges. Developers can simply write a comment that outlines a specific task in plain English, such as “upload a file to S3.” Based on this, CodeWhisperer automatically determines which cloud services and public libraries are best-suited for the specified task, it creates the specific code on the fly, and then it recommends the generated code snippets directly in the IDE. And this isn’t about copy-pasting code from the web, but generating code based on the context of your file, such as which libraries and versions you have, as well as the existing code. Moreover, CodeWhisperer seamlessly integrates with your Visual Studio Code and JetBrains IDEs so that you can stay focused and never leave the development environment. At the time of this writing, CodeWhisperer supports Java, Python, JavaScript, C#, and TypeScript.
To make our application easier to digest, we’ll split it into three segments:
Image download – The user provides an image URL to the first API. A Lambda function downloads the image from the URL and stores it on an S3 bucket. Amazon S3 automatically sends a notification to an Amazon SNS topic informing that a new image is ready for processing. Amazon SNS then delivers the message to an Amazon SQS queue.
Image recognition – A second Lambda function handles the orchestration and processing of the image. It receives the message from the Amazon SQS queue, sends the image for Amazon Rekognition to process, stores the recognition results on a DynamoDB table, and sends a message with those results as JSON to a second Amazon SNS topic used in section three. A user can list the images and the objects present on each image by calling a second API which queries the DynamoDB table.
3rd-party integration – The last Lambda function reads the message from the second Amazon SQS queue. At this point, the Lambda function must deliver that message to a fictitious external e-mail server HTTP API that supports only XML payloads. Because of that, the Lambda function converts the JSON message to XML. Lastly, the function sends the XML object via HTTP POST to the e-mail server.
The following diagram depicts the architecture of our application:
Figure 1. Architecture diagram depicting the application architecture. It contains the service icons with the component explained on the text above.
Prerequisites
Before getting started, you must have the following prerequisites:
We already created the scaffolding for the application that we’ll build, which you can find on this Git repository. This application is represented by a CDK app that describes the infrastructure according to the architecture diagram above. However, the actual business logic of the application isn’t provided. You’ll implement it using CodeWhisperer. This means that we already declared using AWS CDK components, such as the API Gateway endpoints, DynamoDB table, and topics and queues. If you’re new to AWS CDK, then we encourage you to go through the CDK workshop later on.
Deploying AWS CDK apps into an AWS environment (a combination of an AWS account and region) requires that you provision resources that the AWS CDK needs to perform the deployment. These resources include an Amazon S3 bucket for storing files and IAM roles that grant permissions needed to perform deployments. The process of provisioning these initial resources is called bootstrapping. The required resources are defined in an AWS CloudFormation stack, called the bootstrap stack, which is usually named CDKToolkit. Like any CloudFormation stack, it appears in the CloudFormation console once it has been deployed.
After cloning the repository, let’s deploy the application (still without the business logic, which we’ll implement later on using CodeWhisperer). For this post, we’ll implement the application in Python. Therefore, make sure that you’re under the python directory. Then, use the cdk bootstrap command to bootstrap an AWS environment for AWS CDK. Replace {AWS_ACCOUNT_ID} and {AWS_REGION} with corresponding values first:
cdk bootstrap aws://{AWS_ACCOUNT_ID}/{AWS_REGION}
For more information about bootstrapping, refer to the documentation.
Let’s get started by implementing the first Lambda function, which is responsible for downloading an image from the provided URL and storing that image in an S3 bucket. Open the get_save_image.py file from the python/api/runtime/ directory. This file contains an empty Lambda function handler and the needed inputs parameters to integrate this Lambda function.
url is the URL of the input image provided by the user,
name is the name of the image provided by the user, and
S3_BUCKET is the S3 bucket name defined by our application infrastructure.
Write a comment in natural language that describes the required functionality, for example:
# Function to get a file from url
To trigger CodeWhisperer, hit the Enter key after entering the comment and wait for a code suggestion. If you want to manually trigger CodeWhisperer, then you can hit Option + C on MacOS or Alt + C on Windows. You can browse through multiple suggestions (if available) with the arrow keys. Accept a code suggestion by pressing Tab. Discard a suggestion by pressing Esc or typing a character.
You should get a suggested implementation of a function that downloads a file using a specified URL. The following image shows an example of the code snippet that CodeWhisperer suggests:
Figure 2. Screenshot of the code generated by CodeWhisperer on VS Code. It has a function called get_file_from_url with the implementation suggestion to download a file using the requests lib.
Be aware that CodeWhisperer uses artificial intelligence (AI) to provide code recommendations, and that this is non-deterministic. The result you get in your IDE may be different from the one on the image above. If needed, fine-tune the code, as CodeWhisperer generates the core logic, but you might want to customize the details depending on your requirements.
Let’s try another action, this time to upload the image to an S3 bucket:
# Function to upload image to S3
As a result, CodeWhisperer generates a code snippet similar to the following one:
Figure 3. Screenshot of the code generated by CodeWhisperer on VS Code. It has a function called upload_image with the implementation suggestion to download a file using the requests lib and upload it to S3 using the S3 client.
Now that you have the functions with the functionalities to download an image from the web and upload it to an S3 bucket, you can wire up both functions in the Lambda handler function by calling each function with the correct inputs.
Image recognition
Now let’s implement the Lambda function responsible for sending the image to Amazon Rekognition for processing, storing the results in a DynamoDB table, and sending a message with those results as JSON to a second Amazon SNS topic. Open the image_recognition.py file from the python/recognition/runtime/ directory. This file contains an empty Lambda and the needed inputs parameters to integrate this Lambda function.
queue_url is the URL of the Amazon SQS queue to which this Lambda function is subscribed,
table_name is the name of the DynamoDB table, and
topic_arn is the ARN of the Amazon SNS topic to which this Lambda function is published.
Using CodeWhisperer, implement the business logic of the next Lambda function as you did in the previous section. For example, to detect the labels from an image using Amazon Rekognition, write the following comment:
# Detect labels from image with Rekognition
And as a result, CodeWhisperer should give you a code snippet similar to the one in the following image:
Figure 4. Screenshot of the code generated by CodeWhisperer on VS Code. It has a function called detect_labels with the implementation suggestion to use the Rekognition SDK to detect labels on the given image.
You can continue generating the other functions that you need to fully implement the business logic of your Lambda function. Here are some examples that you can use:
# Save labels to DynamoDB
# Publish item to SNS
# Delete message from SQS
Following the same approach, open the list_images.py file from the python/recognition/runtime/ directory to implement the logic to list all of the labels from the DynamoDB table. As you did previously, type a comment in plain English:
# Function to list all items from a DynamoDB table
Other frequently used code
Interacting with AWS isn’t the only way that you can leverage CodeWhisperer. You can use it to implement repetitive tasks, such as creating unit tests and converting message formats, or to implement algorithms like sorting and string matching and parsing. The last Lambda function that we’ll implement as part of this post is to convert a JSON payload received from Amazon SQS to XML. Then, we’ll POST this XML to an HTTP endpoint.
Open the send_email.py file from the python/integration/runtime/ directory. This file contains an empty Lambda function handler. An event is a JSON-formatted document that contains data for a Lambda function to process. Type a comment with your intent to get the code snippet:
# Transform json to xml
As CodeWhisperer uses the context of your files to generate code, depending on the imports that you have on your file, you’ll get an implementation such as the one in the following image:
Figure 5. Screenshot of the code generated by CodeWhisperer on VS Code. It has a function called json_to_xml with the implementation suggestion to transform JSON payload into XML payload.
Repeat the same process with a comment such as # Send XML string with HTTP POST to get the last function implementation. Note that the email server isn’t part of this implementation. You can mock it, or simply ignore this HTTP POST step. Lastly, wire up both functions in the Lambda handler function by calling each function with the correct inputs.
Deploy and test the application
To deploy the application, run the command cdk deploy --all. You should get a confirmation message, and after a few minutes your application will be up and running on your AWS account. As outputs, the APIStack and RekognitionStack will print the API Gateway endpoint URLs. It will look similar to this example:
The first endpoint expects two string parameters: url (the image file URL to download) and name (the target file name that will be stored on the S3 bucket). Use any image URL you like, but remember that you must encode an image URL before passing it as a query string parameter to escape the special characters. Use an online URL encoder of your choice for that. Then, use the curl command to invoke the API Gateway endpoint:
curl -X GET 'https://examp1eid0.execute-api.eu-east-
2.amazonaws.com/prod?url={encoded-image-URL}&name={file-name}'
Replace {encoded-image-URL} and {file-name} with the corresponding values. Also, make sure that you use the correct API endpoint that you’ve noted from the AWS CDK deploy command output as mentioned above.
It will take a few seconds for the processing to happen in the background. Once it’s ready, see what has been stored in the DynamoDB table by invoking the List Images API (make sure that you use the correct URL from the output of your deployed AWS CDK stack):
curl -X GET 'https://examp1eid7.execute-api.eu-east-2.amazonaws.com/prod'
After you’re done, to avoid unexpected charges to your account, make sure that you clean up your AWS CDK stacks. Use the cdk destroy command to delete the stacks.
Conclusion
In this post, we’ve seen how to get a significant productivity boost with the help of ML. With that, as a developer, you can stay focused on your IDE and reduce the time that you spend searching online for code snippets that are relevant for your use case. Writing comments in natural language, you get context-based snippets to implement full-fledged applications. In addition, CodeWhisperer comes with a mechanism called reference tracker, which detects whether a code recommendation might be similar to particular CodeWhisperer training data. The reference tracker lets you easily find and review that reference code and see how it’s used in the context of another project. Lastly, CodeWhisperer provides the ability to run scans on your code (generated by CodeWhisperer as well as written by you) to detect security vulnerabilities.
During the preview period, CodeWhisperer is available to all developers across the world for free. Get started with the free preview on JetBrains, VS Code or AWS Cloud9.
About the author:
The collective thoughts of the interwebz
Manage Consent
To provide the best experiences, we use technologies like cookies to store and/or access device information. Consenting to these technologies will allow us to process data such as browsing behavior or unique IDs on this site. Not consenting or withdrawing consent, may adversely affect certain features and functions.
Functional
Always active
The technical storage or access is strictly necessary for the legitimate purpose of enabling the use of a specific service explicitly requested by the subscriber or user, or for the sole purpose of carrying out the transmission of a communication over an electronic communications network.
Preferences
The technical storage or access is necessary for the legitimate purpose of storing preferences that are not requested by the subscriber or user.
Statistics
The technical storage or access that is used exclusively for statistical purposes.The technical storage or access that is used exclusively for anonymous statistical purposes. Without a subpoena, voluntary compliance on the part of your Internet Service Provider, or additional records from a third party, information stored or retrieved for this purpose alone cannot usually be used to identify you.
Marketing
The technical storage or access is required to create user profiles to send advertising, or to track the user on a website or across several websites for similar marketing purposes.