Tag Archives: iac

Getting started with Projen and AWS CDK

Post Syndicated from Michael Tran original https://aws.amazon.com/blogs/devops/getting-started-with-projen-and-aws-cdk/

In the modern world of cloud computing, Infrastructure as Code (IaC) has become a vital practice for deploying and managing cloud resources. AWS Cloud Development Kit (AWS CDK) is a popular open-source framework that allows developers to define cloud resources using familiar programming languages. A related open source tool called Projen is a powerful project generator that simplifies the management of complex software configurations. In this post, we’ll explore how to get started with Projen and AWS CDK, and discuss the pros and cons of using Projen.

What is Projen?

Building modern and high quality software requires a large number of tools and configuration files to handle tasks like linting, testing, and automating releases. Each tool has its own configuration interface, such as JSON or YAML, and a unique syntax, increasing maintenance complexity.

When starting a new project, you rarely start from scratch, but more often use a scaffolding tool (for instance, create-react-app) to generate a new project structure. A large amount of configuration is created on your behalf, and you get the ownership of those files. Moreover, there is a high number of project generation tools, with new ones created almost everyday.

Projen is a project generator that helps developers to efficiently manage project configuration files and build high quality software. It allows you to define your project structure and configuration in code, making it easier to maintain and share across different environments and projects.

Out of the box, Projen supports multiple project types like AWS CDK construct libraries, react applications, Java projects, and Python projects. New project types can be added by contributors, and projects can be developed in multiple languages. Projen uses the jsii library, which allows us to write APIs once and generate libraries in several languages. Moreover, Projen provides a single interface, the projenrc file, to manage the configuration of your entire project!

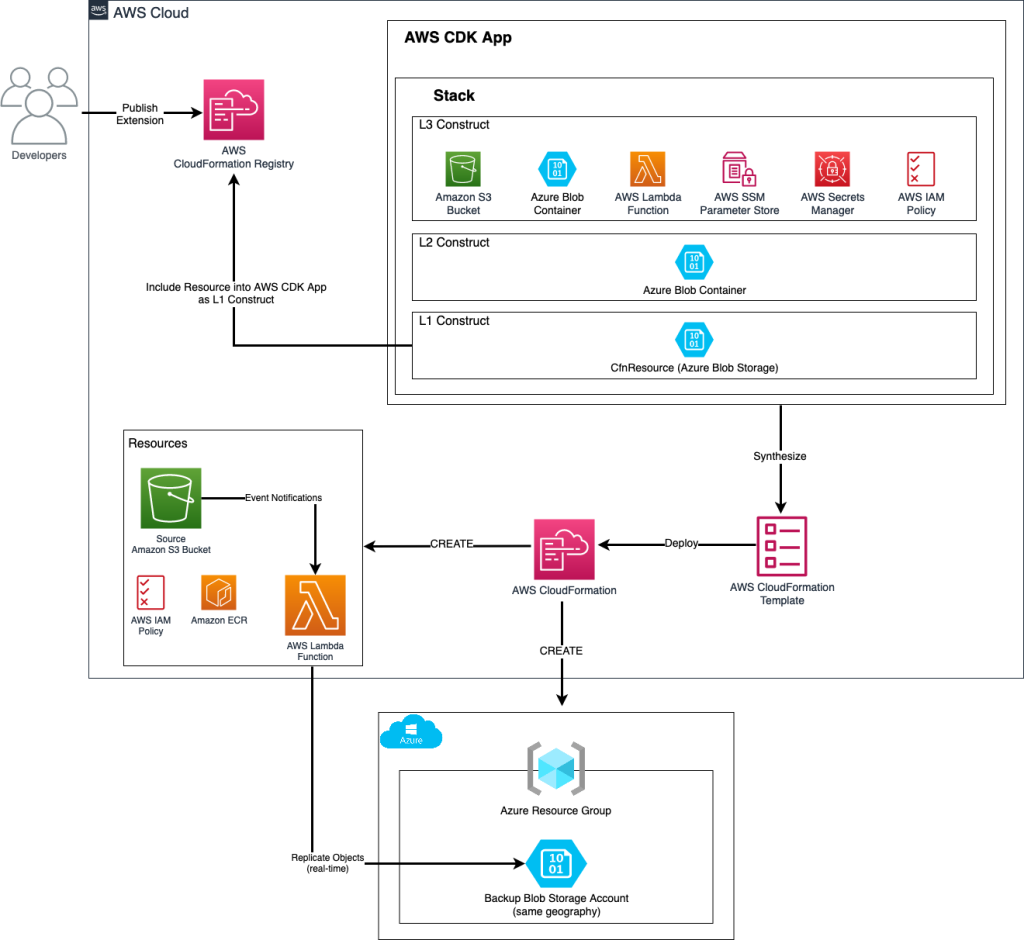
The diagram below provides an overview of the deployment process of AWS cloud resources using Projen:

Projen Overview of Deployment process of AWS Resources


  1. In this example, Projen can be used to generate a new project, for instance, a new CDK Typescript application.
  2. Developers define their infrastructure and application code using AWS CDK resources. To modify the project configuration, developers use the projenrc file instead of directly editing files like package.json.
  3. The project is synthesized to produce an AWS CloudFormation template.
  4. The CloudFormation template is deployed in a AWS account, and provisions AWS cloud resources.

Projen_Diagram
Diagram 1 – Projen packaged features: Projen helps gets your project started and allows you to focus on coding instead of worrying about the other project variables. It comes out of the box with linting, unit test and code coverage, and a number of Github actions for release and versioning and dependency management.

Pros and Cons of using Projen

Pros

  1. Consistency: Projen ensures consistency across different projects by allowing you to define standard project templates. You don’t need to use different project generators, only Projen.
  2. Version Control: Since project configuration is defined in code, it can be version-controlled, making it easier to track changes and collaborate with others.
  3. Extensibility: Projen supports various plugins and extensions, allowing you to customize the project configuration to fit your specific needs.
  4. Integration with AWS CDK: Projen provides seamless integration with AWS CDK, simplifying the process of defining and deploying cloud resources.
  5. Polyglot CDK constructs library: Build once, run in multiple runtimes. Projen can convert and publish a CDK Construct developed in TypeScript to Java (Maven) and Python (PYPI) with JSII support.
  6. API Documentation : Generate API documentation from the comments, if you are building a CDK construct

Cons

  1. Microsoft Windows support. There are a number of open issues about Projen not completely working with the Windows environment (https://github.com/projen/projen/issues/2427 and https://github.com/projen/projen/issues/498).
  2. The framework, Projen, is very opinionated with a lot of assumptions on architecture, best practices and conventions.
  3. Projen is still not GA, with the version at the time of this writing at v0.77.5.

Walkthrough

Step 1: Set up prerequisites

  • An AWS account
  • Download and install Node
  • Install yarn
  • AWS CLI : configure your credentials
  • Deploying stacks with the AWS CDK requires dedicated Amazon S3 buckets and other containers to be available to AWS CloudFormation during deployment (More information).

Note: Projen doesn’t need to be installed globally. You will be using npx to run Projen which takes care of all required setup steps. npx is a tool for running npm packages that:

  • live inside of a local node_modules folder
  • are not installed globally.

npx comes bundled with npm version 5.2+

Step 2: Create a New Projen Project

You can create a new Projen project using the following command:

mkdir test_project && cd test_project
npx projen new awscdk-app-ts

This command creates a new TypeScript project with AWS CDK support. The exhaustive list of supported project types is available through the official documentation: Projen.io, or by running the npx projen new command without a project type. It also supports npx projen new awscdk-construct to create a reusable construct which can then be published to other package managers.

The created project structure should be as follows:

test_project
| .github/
| .projen/
| src/
| test/
| .eslintrc
| .gitattributes
| .gitignore
| .mergify.yml
| .npmignore
| .projenrc.js
| cdk.json
| LICENSE
| package.json
| README.md
| tsconfig.dev.json
| yarn.lock

Projen generated a new project including:

  • Initialization of an empty git repository, with the associated GitHub workflow files to build and upgrade the project. The release workflow can be customized with projen tasks.
  • .projenrc.js is the main configuration file for project
  • tasks.json file for integration with Visual Studio Code
  • src folder containing an empty CDK stack
  • License and README files
  • A projen configuration file: projenrc.js
  • package.json contains functional metadata about the project like name, versions and dependencies.
  • .gitignore, .gitattributes file to manage your files with git.
  • .eslintrc identifying and reporting patterns on javascript.
  • .npmignore to keep files out of package manager.
  • .mergify.yml for managing the pull requests.
  • tsconfig.json configure the compiler options

Most of the generated files include a disclaimer:

# ~~ Generated by projen. To modify, edit .projenrc.js and run "npx projen".

Projen’s power lies in its single configuration file, .projenrc.js. By editing this file, you can manage your project’s lint rules, dependencies, .gitignore, and more. Projen will propagate your changes across all generated files, simplifying and unifying dependency management across your projects.

Projen generated files are considered implementation details and are not meant to be edited manually. If you do make manual changes, they will be overwritten the next time you run npx projen.

To edit your project configuration, simply edit .projenrc.js and then run npx projen to synthesize again. For more information on the Projen API, please see the documentation: http://projen.io/api/API.html.

Projen uses the projenrc.js file’s configuration to instantiate a new AwsCdkTypeScriptApp with some basic metadata: the project name, CDK version and the default release branch. Additional APIs are available for this project type to customize it (for instance, add runtime dependencies).

Let’s try to modify a property and see how Projen reacts. As an example, let’s update the project name in projenrc.js :

name: 'test_project_2',

and then run the npx projen command:

npx projen

Once done, you can see that the project name was updated in the package.json file.

Step 3: Define AWS CDK Resources

Inside your Projen project, you can define AWS CDK resources using familiar programming languages like TypeScript. Here’s an example of defining an Amazon Simple Storage Service (Amazon S3) bucket:

1. Navigate to your main.ts file in the src/ directory
2. Modify the imports at the top of the file as follow:

import { App, CfnOutput, Stack, StackProps } from 'aws-cdk-lib';
import * as s3 from 'aws-cdk-lib/aws-s3';
import { Construct } from 'constructs';

1. Replace line 9 “// define resources here…” with the code below:

const bucket = new s3.Bucket(this, 'MyBucket', {
  versioned: true,
});

new CfnOutput(this, 'TestBucket', { value: bucket.bucketArn });

Step 4: Synthesize and Deploy

Next we will bootstrap our application. Run the following in a terminal:

$ npx cdk bootstrap

Once you’ve defined your resources, you can synthesize a cloud assembly, which includes a CloudFormation template (or many depending on the application) using:

$ npx projen build

npx projen build will perform several actions:

  1. Build the application
  2. Synthesize the CloudFormation template
  3. Run tests and linter

The synth() method of Projen performs the actual synthesizing (and updating) of all configuration files managed by Projen. This is achieved by deleting all Projen-managed files (if there are any), and then re-synthesizing them based on the latest configuration specified by the user.

You can find an exhaustive list of the available npx projen commands in .projen/tasks.json. You can also use the projen API project.addTask to add a new task to perform any custom action you need ! Tasks are a project-level feature to define a project command system backed by shell scripts.

Deploy the CDK application:

$ npx projen deploy

Projen will use the cdk deploy command to deploy the CloudFormation stack in the configured AWS account by creating and executing a change set based on the template generated by CDK synthesis. The output of the step above should look as follow:

deploy | cdk deploy

✨ Synthesis time: 3.28s

toto-dev: start: Building 387a3a724050aec67aa083b74c69485b08a876f038078ec7ea1018c7131f4605:263905523351-us-east-1
toto-dev: success: Built 387a3a724050aec67aa083b74c69485b08a876f038078ec7ea1018c7131f4605:263905523351-us-east-1
toto-dev: start: Publishing 387a3a724050aec67aa083b74c69485b08a876f038078ec7ea1018c7131f4605:263905523351-us-east-1
toto-dev: success: Published 387a3a724050aec67aa083b74c69485b08a876f038078ec7ea1018c7131f4605:263905523351-us-east-1
toto-dev: deploying... [1/1]
toto-dev: creating CloudFormation changeset...

✅ testproject-dev

✨ Deployment time: 33.48s

Outputs:
testproject-dev.TestBucket = arn:aws:s3:::testproject-dev-mybucketf68f3ff0-1xy2f0vk0ve4r
Stack ARN:
arn:aws:cloudformation:us-east-1:263905523351:stack/testproject-dev/007e7b20-48df-11ee-b38d-0aa3a92c162d

✨ Total time: 36.76s

The application was successfully deployed in the configured AWS account! Also, the Amazon Resource Name (ARN) of the S3 bucket created is available through the CloudFormation stack Outputs tab, and displayed in your terminal under the ‘Outputs’ section.

Clean up

Delete CloudFormation Stack

To clean up the resources created in this section of the workshop, navigate to the CloudFormation console and delete the stack created. You can also perform the same task programmatically:

$ npx projen destroy

Which should produce the following output:

destroy | cdk destroy
Are you sure you want to delete: testproject-dev (y/n)? y
testproject-dev: destroying... [1/1]

✅ testproject-dev: destroyed

Delete S3 Buckets

The S3 bucket will not be deleted since its retention policy was set to RETAIN. Navigate to the S3 console and delete the created bucket. If you added files to that bucket, you will need to empty it before deletion. See the Deleting a bucket documentation for more information.

Conclusion

Projen and AWS CDK together provide a powerful combination for managing cloud resources and project configuration. By leveraging Projen, you can ensure consistency, version control, and extensibility across your projects. The integration with AWS CDK allows you to define and deploy cloud resources using familiar programming languages, making the entire process more developer-friendly.

Whether you’re a seasoned cloud developer or just getting started, Projen and AWS CDK offer a streamlined approach to cloud resource management. Give it a try and experience the benefits of Infrastructure as Code with the flexibility and power of modern development tools.

Alain Krok

Alain Krok is a Senior Solutions Architect with a passion for emerging technologies. His past experience includes designing and implementing IIoT solutions for the oil and gas industry and working on robotics projects. He enjoys pushing the limits and indulging in extreme sports when he is not designing software.


Dinesh Sajwan

Dinesh Sajwan is a Senior Solutions Architect. His passion for emerging technologies allows him to stay on the cutting edge and identify new ways to apply the latest advancements to solve even the most complex business problems. His diverse expertise and enthusiasm for both technology and adventure position him as a uniquely creative problem-solver.

Michael Tran

Michael Tran is a Sr. Solutions Architect with Prototyping Acceleration team at Amazon Web Services. He provides technical guidance and helps customers innovate by showing the art of the possible on AWS. He specializes in building prototypes in the AI/ML space. You can contact him @Mike_Trann on Twitter.

Best Practices for Writing Step Functions Terraform Projects

Post Syndicated from Patrick Guha original https://aws.amazon.com/blogs/devops/best-practices-for-writing-step-functions-terraform-projects/

Terraform by HashiCorp is one of the most popular infrastructure-as-code (IaC) platforms. AWS Step Functions is a visual workflow service that helps developers use AWS services to build distributed applications, automate processes, orchestrate microservices, and create data and machine learning (ML) pipelines. In this blog, we showcase best practices for users leveraging Terraform to deploy workflows, also known as Step Functions state machines. We will create a state machine using Workflow Studio for AWS Step Functions, deploy the state machine with Terraform, and introduce best operating practices on topics such as project structure, modules, parameter substitution, and remote state.

We recommend that you have a working understanding of both Terraform and Step Functions before going through this blog. If you are brand new to Step Functions and/or Terraform, please visit the Introduction to Terraform on AWS Workshop and the Terraform option in the Managing State Machines with Infrastructure as Code section of The AWS Step Functions Workshop to learn more.

Step Functions and Terraform Project Structure

One of the most important parts of any software project is its structure. It must be clear and well-organized for yourself or any member of your team to pick up and start coding efficiently. A Step Functions project using Terraform can potentially have many moving parts and components, so it is especially important to modularize and label wherever possible. Let’s take a look at a project structure that will allow for modularization, re-usability, and extensibility:

mkdir sfn-tf-example
cd sfn-tf-example
mkdir -p -- statemachine modules functions/first-function/src
touch main.tf outputs.tf variables.tf .gitignore functions/first-function/src/lambda.py
tree

Before moving forward, let’s analyze the directory, subdirectories, and files created above:

  • /statemachine will hold our Amazon States Language (ASL) JSON code describing the Step Functions state machine definition. This is where the orchestration logic will reside, so it is prudent to keep it separated from the infrastructure code. If you are deploying multiple state machines in your project, each definition will have its own JSON file. If you prefer, you can specify separate folders for each state machine to further modularize and isolate the logic.
  • /functions subdirectory includes the actual code for AWS Lambda functions used in our state machine. Keeping this code here will be much easier to read than writing it inline in our main.tf file.
  • The last subdirectory we have is /modules. Terraform modules are higher level abstracts explaining new concepts in your architecture. However, do not fall into the trap of making a custom module for everything. Doing so will make your code harder to maintain, and AWS provider resources will often suffice. There are also very popular modules that you can use from the Terraform Registry, such as Terraform AWS modules. Whenever possible, one should re-use modules to avoid code duplication in your project.
  • The remaining files in the root of the project are common to all Terraform projects. There are going to be hidden files created by your Terraform project after running terraform init, so we will include a .gitignore. What you include in .gitignore is largely dependent on your codebase and what your tools silently create in the background. In a later section, we will explicitly call out *.tfstate files in our .gitignore, and go over best practices for managing Terraform state securely and remotely.

Initial Code and Project Setup

We are going to create a simple Step Functions state machine that will only execute a single Lambda function. However, we will need to create the Lambda function that the state machine will reference. We first need to create our Lambda function code and save it in the following the directory structure and file mentioned above: functions/first-function/src/lambda.py.

import boto3

def lambda_handler(event, context):
# Minimal function for demo purposes
	return True

In Terraform, the main configuration file is named main.tf. This is the file that the Terraform CLI will look for in the local directory. Although you can break down your template into multiple .tf files, main.tf must be one of them. In this file, we will define the required providers and their minimum version, along with the resource definition of our template. In the example below, we define the minimum resources needed for a simple state machine that only executes a Lambda function. We define the two AWS Identity and Access Management (IAM) roles that our Lambda function and state machine will use, respectively. We define a data resource that zips the Lambda function code, which is then used in the Lambda function definition. Also notice that we use the aws_iam_policy_document data source throughout. Using the official IAM policy document means both your integrated development environment (IDE) and Terraform can see if your policy is malformed before running terraform apply. Finally, we define an Amazon CloudWatch Log group that will be used by the Lambda function to store its execution logs.

Terraform {
  required_providers {
    aws = {
      source  = "hashicorp/aws"
      version = "~>4.0"
    }
  }
}

provider "aws" {}

provider "random" {}

data "aws_caller_identity" "current_account" {}

data "aws_region" "current_region" {}

resource "random_string" "random" {
  length  = 4
  special = false
}

data "aws_iam_policy_document" "lambda_assume_role_policy" {
  statement {
    effect = "Allow"

    principals {
      type        = "Service"
      identifiers = ["lambda.amazonaws.com"]
    }

    actions = [
      "sts:AssumeRole",
    ]
  }
}

resource "aws_iam_role" "function_role" {
  assume_role_policy  = data.aws_iam_policy_document.lambda_assume_role_policy.json
  managed_policy_arns = ["arn:aws:iam::aws:policy/service-role/AWSLambdaBasicExecutionRole"]
}

# Create the function
data "archive_file" "lambda" {
  type        = "zip"
  source_file = "functions/first-function/src/lambda.py"
  output_path = "functions/first-function/src/lambda.zip"
}

resource "aws_kms_key" "log_group_key" {}

resource "aws_kms_key_policy" "log_group_key_policy" {
  key_id = aws_kms_key.log_group_key.id
  policy = jsonencode({
    Id = "log_group_key_policy"
    Statement = [
      {
        Action = "kms:*"
        Effect = "Allow"
        Principal = {
          AWS = "arn:aws:iam::${data.aws_caller_identity.current_account.account_id}:root"
        }

        Resource = "*"
        Sid      = "Enable IAM User Permissions"
      },
      {
        Effect = "Allow",
        Principal = {
          Service : "logs.${data.aws_region.current_region.name}.amazonaws.com"
        },
        Action = [
          "kms:Encrypt*",
          "kms:Decrypt*",
          "kms:ReEncrypt*",
          "kms:GenerateDataKey*",
          "kms:Describe*"
        ],
        Resource = "*"
      }
    ]
    Version = "2012-10-17"
  })
}

resource "aws_lambda_function" "test_lambda" {
  function_name    = "HelloFunction-${random_string.random.id}"
  role             = aws_iam_role.function_role.arn
  handler          = "lambda.lambda_handler"
  runtime          = "python3.9"
  filename         = "functions/first-function/src/lambda.zip"
  source_code_hash = data.archive_file.lambda.output_base64sha256
}

# Explicitly create the function’s log group to set retention and allow auto-cleanup
resource "aws_cloudwatch_log_group" "lambda_function_log" {
  retention_in_days = 1
  name              = "/aws/lambda/${aws_lambda_function.test_lambda.function_name}"
  kms_key_id        = aws_kms_key.log_group_key.arn
}

# Create an IAM role for the Step Functions state machine
data "aws_iam_policy_document" "state_machine_assume_role_policy" {
  statement {
    effect = "Allow"

    principals {
      type        = "Service"
      identifiers = ["states.amazonaws.com"]
    }

    actions = [
      "sts:AssumeRole",
    ]
  }
}

resource "aws_iam_role" "StateMachineRole" {
  name               = "StepFunctions-Terraform-Role-${random_string.random.id}"
  assume_role_policy = data.aws_iam_policy_document.state_machine_assume_role_policy.json
}

data "aws_iam_policy_document" "state_machine_role_policy" {
  statement {
    effect = "Allow"

    actions = [
      "logs:CreateLogStream",
      "logs:PutLogEvents",
      "logs:DescribeLogGroups"
    ]

    resources = ["${aws_cloudwatch_log_group.MySFNLogGroup.arn}:*"]
  }

  statement {
    effect = "Allow"
    actions = [
      "cloudwatch:PutMetricData",
      "logs:CreateLogDelivery",
      "logs:GetLogDelivery",
      "logs:UpdateLogDelivery",
      "logs:DeleteLogDelivery",
      "logs:ListLogDeliveries",
      "logs:PutResourcePolicy",
      "logs:DescribeResourcePolicies",
    ]
    resources = ["*"]
  }

  statement {
    effect = "Allow"

    actions = [
      "lambda:InvokeFunction"
    ]

    resources = ["${aws_lambda_function.test_lambda.arn}"]
  }

}

# Create an IAM policy for the Step Functions state machine
resource "aws_iam_role_policy" "StateMachinePolicy" {
  role   = aws_iam_role.StateMachineRole.id
  policy = data.aws_iam_policy_document.state_machine_role_policy.json
}

# Create a Log group for the state machine
resource "aws_cloudwatch_log_group" "MySFNLogGroup" {
  name_prefix       = "/aws/vendedlogs/states/MyStateMachine-"
  retention_in_days = 1
  kms_key_id        = aws_kms_key.log_group_key.arn
}

Workflow Studio and Terraform Integration

It is important to understand the recommended steps given the different tools we have available for creating Step Functions state machines. You should use a combination of Workflow Studio and local development with Terraform. This workflow assumes you will define all resources for your application within the same Terraform project, and that you will be leveraging Terraform for managing your AWS resources.

Workflow for creating Step Functions state machine via Terraform

Figure 1 – Workflow for creating Step Functions state machine via Terraform

  1. You will write the Terraform definition for any resources you intend to call with your state machine, such as Lambda functions, Amazon Simple Storage Service (Amazon S3) buckets, or Amazon DynamoDB tables, and deploy them using the terraform apply command. Doing this prior to using Workflow Studio will be useful in designing the first version of the state machine. You can define additional resources after importing the state machine into your local Terraform project.
  2. You can use Workflow Studio to visually design the first version of the state machine. Given that you should have created the necessary resources already, you can drag and drop all of the actions and states, link them, and see how they look. Finally, you can execute the state machine for testing purposes.
  3. Once your initial design is ready, you will export the ASL file and save it in your Terraform project. You can use the Terraform resource type aws_sfn_state_machine and reference the saved ASL file in the definition field.
  4. You will then need to parametrize the ASL file given that Terraform will dynamically name the resources, and the Amazon Resource Name (ARN) may eventually change. You do not want to hardcode an ARN in your ASL file, as this will make updating and refactoring your code more difficult.
  5. Finally, you deploy the state machine via Terraform by running terraform apply.

Simple changes should be made directly in the parametrized ASL file in your Terraform project instead of going back to Workflow Studio. Having the ASL file versioned as part of your project ensures that no manual changes break the state machine. Even if there is a breaking change, you can easily roll back to a previous version. One caveat to this is if you are making major changes to the state machine. In this case, taking advantage of Workflow Studio in the console is preferable.

However, you will most likely want to continue seeing a visual representation of the state machine while developing locally. The good news is that you have another option directly integrated into Visual Studio Code (VS Code) that visually renders the state machine, similar to Workflow Studio. This functionality is part of the AWS Toolkit for VS Code. You can learn more about the state machine integration with the AWS Toolkit for VS Code here. Below is an example of a parametrized ASL file and its rendered visualization in VS Code.

Step Functions state machine displayed visually in VS Code

Figure 2 – Step Functions state machine displayed visually in VS Code

Parameter Substitution

In the Terraform template, when you define the Step Functions state machine, you can either include the definition in the template or in an external file. Leaving the definition in the template can cause the template to be less readable and difficult to manage. As a best practice, it is recommended to keep the definition of the state machine in a separate file. This raises the question of how to pass parameters to the state machine. In order to do this, you can use the templatefile function of Terraform. The templatefile function reads a file and renders its content with the supplied set of variables. As shown in the code snippet below, we will use the templatefile function to render the state machine definition file with the Lambda function ARN and any other parameters to pass to the state machine.

resource "aws_sfn_state_machine" "sfn_state_machine" {
  name     = "MyStateMachine-${random_string.random.id}"
  role_arn = aws_iam_role.StateMachineRole.arn
  definition = templatefile("${path.module}/statemachine/statemachine.asl.json", {
    ProcessingLambda = aws_lambda_function.test_lambda.arn
    }
  )
  logging_configuration {
    log_destination        = "${aws_cloudwatch_log_group.MySFNLogGroup.arn}:*"
    include_execution_data = true
    level                  = "ALL"
  }
}

Inside the state machine definition, you have to specify a string template using the interpolation sequences delimited with ${}. Similar to the code snippet below, you will define the state machine with the variable name that will be passed by the templatefile function.

"Lambda Invoke": {
    "Type": "Task",
    "Resource": "arn:aws:states:::lambda:invoke",
    "Parameters": {
        "Payload.$": "$",
        "FunctionName": "${ProcessingLambda}"
    },
    "End": true
}

After the templatefile function runs, it will replace the variable ${ProcessingLambda} with the actual Lambda function ARN generated when the template is deployed.

Remote Terraform State Management

Every time you run Terraform, it stores information about the managed infrastructure and configuration in a state file. By default, Terraform creates the state file called terraform.tfstate in the local directory. As mentioned earlier, you will want to include any .tfstate files in your .gitignore file. This will ensure you do not commit it to source control, which could potentially expose secrets and would most likely lead to errors in state. If you accidentally delete this local file, Terraform cannot track the infrastructure that was previously created. In that case, if you run terraform apply on an updated configuration, Terraform will create it from scratch, which will lead to conflicts. It is recommended that you store the Terraform state remotely in secure storage to enable versioning, encryption, and sharing. Terraform supports storing state in S3 buckets by using the backend configuration block. In order to configure Terraform to write the state file to an S3 bucket, you need to specify the bucket name, the region, and the key name.

It is also recommended that you enable versioning in the S3 bucket and MFA delete to protect the state file from accidental deletion. In addition, you need to make sure that Terraform has the right IAM permissions on the target S3 bucket. In case you have multiple developers working with the same infrastructure simultaneously, Terraform can also use state locking to prevent concurrent runs against the same state. You can use a DynamoDB table to control locking. The DynamoDB table you use must have a partition key named LockID with type String, and Terraform must have the right IAM permissions on the table.

terraform {
    backend "s3" {
        bucket         = "mybucket"
        key            = "path/to/state/file"
        region         = "us-east-1"
        attach_deny_insecure_transport_policy = true # only allow HTTPS connections 
        encrypt        = true
        dynamodb_table = "Table-Name"
    }
}

With this remote state configuration, you will maintain the state securely stored in S3. With every change you apply to your infrastructure, Terraform will automatically pull the latest state from the S3 bucket, lock it using the DynamoDB table, apply the changes, push the latest state again to the S3 bucket and then release the lock.

Cleanup

If you were following along and deployed resources such as the Lambda function, the Step Functions state machine, the S3 bucket for backend state storage, or any of the other associated resources by running terraform apply, to avoid incurring charges on your AWS account, please run terraform destroy to tear these resources down and clean up your environment.

Conclusion

In conclusion, this blog provides a comprehensive guide to leveraging Terraform for deploying AWS Step Functions state machines. We discussed the importance of a well-structured project, initial code setup, integration between Workflow Studio and Terraform, parameter substitution, and remote state management. By following these best practices, developers can create and manage their state machines more effectively while maintaining clean, modular, and reusable code. Embracing infrastructure-as-code and using the right tools, such as Workflow Studio, VS Code, and Terraform, will enable you to build scalable and maintainable distributed applications, automate processes, orchestrate microservices, and create data and ML pipelines with AWS Step Functions.

If you would like to learn more about using Step Functions with Terraform, please check out the following patterns and workflows on Serverless Land and view the Step Functions Developer Guide.

About the authors

Ahmad Aboushady

Ahmad Aboushady is a Senior Technical Account Manager at AWS based in UAE. He works with Enterprise Support customers across the region to help them optimize their workloads on AWS and make the best out of their cloud journey.

Patrick Guha

Patrick Guha is a Solutions Architect at AWS based in Austin, TX. He supports non-profit, research customers focused on genomics, healthcare, and high-performance compute workloads in the cloud. Patrick has a BS in Electrical and Computer Engineering, and is currently working towards an MS in Engineering Management.

Aryam Gutierrez

Aryam Gutierrez is a Senior Partner Solutions Architect at AWS based in Madrid. He supports strategic partners to either build highly-scalable solutions or navigate through the various partner programs to differentiate their business, with the ultimate goal of growing business with AWS.

Using AWS CloudFormation and AWS Cloud Development Kit to provision multicloud resources

Post Syndicated from Aaron Sempf original https://aws.amazon.com/blogs/devops/using-aws-cloudformation-and-aws-cloud-development-kit-to-provision-multicloud-resources/

Customers often need to architect solutions to support components across multiple cloud service providers, a need which may arise if they have acquired a company running on another cloud, or for functional purposes where specific services provide a differentiated capability. In this post, we will show you how to use the AWS Cloud Development Kit (AWS CDK) to create a single pane of glass for managing your multicloud resources.

AWS CDK is an open source framework that builds on the underlying functionality provided by AWS CloudFormation. It allows developers to define cloud resources using common programming languages and an abstraction model based on reusable components called constructs. There is a misconception that CloudFormation and CDK can only be used to provision resources on AWS, but this is not the case. The CloudFormation registry, with support for third party resource types, along with custom resource providers, allow for any resource that can be configured via an API to be created and managed, regardless of where it is located.

Multicloud solution design paradigm

Multicloud solutions are often designed with services grouped and separated by cloud, creating a segregation of resource and functions within the design. This approach leads to a duplication of layers of the solution, most commonly a duplication of resources and the deployment processes for each environment. This duplication increases cost, and leads to a complexity of management increasing the potential break points within the solution or practice. 

Along with simplifying resource deployments, and the ever-increasing complexity of customer needs, so too has the need increased for the capability of IaC solutions to deploy resources across hybrid or multicloud environments. Through meeting this need, a proliferation of supported tools, frameworks, languages, and practices has created “choice overload”. At worst, this scares the non-cloud-savvy away from adopting an IaC solution benefiting their cloud journey, and at best confuses the very reason for adopting an IaC practice.

A single pane of glass

Systems Thinking is a holistic approach that focuses on the way a system’s constituent parts interrelate and how systems work as a whole especially over time and within the context of larger systems. Systems thinking is commonly accepted as the backbone of a successful systems engineering approach. Designing solutions taking a full systems view, based on the component’s function and interrelation within the system across environments, more closely aligns with the ability to handle the deployment of each cloud-specific resource, from a single control plane.

While AWS provides a list of services that can be used to help design, manage and operate hybrid and multicloud solutions, with AWS as the primary cloud you can go beyond just using services to support multicloud. CloudFormation registry resource types model and provision resources using custom logic, as a component of stacks in CloudFormation. Public extensions are not only provided by AWS, but third-party extensions are made available for general use by publishers other than AWS, meaning customers can create their own extensions and publish them for anyone to use.

The AWS CDK, which has a 1:1 mapping of all AWS CloudFormation resources, as well as a library of abstracted constructs, supports the ability to import custom AWS CloudFormation extensions, enabling customers and partners to create custom AWS CDK constructs for their extensions. The chosen programming language can be used to inherit and abstract the custom resource into reusable AWS CDK constructs, allowing developers to create solutions that contain native AWS extensions along with secondary hybrid or alternate cloud resources.

Providing the ability to integrate mixed resources in the same stack more closely aligns with the functional design and often diagrammatic depiction of the solution. In essence, we are creating a single IaC pane of glass over the entire solution, deployed through a single control plane. This lowers the complexity and the cost of maintaining separate modules and deployment pipelines across multiple cloud providers.

A common use case for a multicloud: disaster recovery

One of the most common use cases of the requirement for using components across different cloud providers is the need to maintain data sovereignty while designing disaster recovery (DR) into a solution.

Data sovereignty is the idea that data is subject to the laws of where it is physically located, and in some countries extends to regulations that if data is collected from citizens of a geographical area, then the data must reside in servers located in jurisdictions of that geographical area or in countries with a similar scope and rigor in their protection laws. 

This requires organizations to remain in compliance with their host country, and in cases such as state government agencies, a stricter scope of within state boundaries, data sovereignty regulations. Unfortunately, not all countries, and especially not all states, have multiple AWS regions to select from when designing where their primary and recovery data backups will reside. Therefore, the DR solution needs to take advantage of multiple cloud providers in the same geography, and as such a solution must be designed to backup or replicate data across providers.

The multicloud solution

A multicloud solution to the proposed use case would be the backup of data from an AWS resource such as an Amazon S3 bucket to another cloud provider within the same geography, such as an Azure Blob Storage container, using AWS event driven behaviour to trigger the copying of data from the primary AWS resource to the secondary Azure backup resource.

Following the IaC single pane of glass approach, the Azure Blob Storage container is created as a resource type in the CloudFormation Registry, and imported into the AWS CDK to be used as a construct in the solution. However, before the extension resource type can be used effectively in the CDK as a reusable construct and added to your private library, you will first need to go through the import into CDK process for creating Constructs.

There are three different levels of constructs, beginning with low-level constructs, which are called CFN Resources (or L1, short for “layer 1”). These constructs directly represent all resources available in AWS CloudFormation. They are named CfnXyz, where Xyz is name of the resource.

Layer 1 Construct

In this example, an L1 construct named CfnAzureBlobStorage represents an Azure::BlobStorage AWS CloudFormation extension. Here you also explicitly configure the ref property, in order for higher level constructs to access the Output value which will be the Azure blob container url being provisioned.

import { CfnResource } from "aws-cdk-lib";
import { Secret, ISecret } from "aws-cdk-lib/aws-secretsmanager";
import { Construct } from "constructs";

export interface CfnAzureBlobStorageProps {
  subscriptionId: string;
  clientId: string;
  tenantId: string;
  clientSecretName: string;
}

// L1 Construct
export class CfnAzureBlobStorage extends Construct {
  // Allows accessing the ref property
  public readonly ref: string;

  constructor(scope: Construct, id: string, props: CfnAzureBlobStorageProps) {
    super(scope, id);

    const secret = this.getSecret("AzureClientSecret", props.clientSecretName);
    
    const azureBlobStorage = new CfnResource(
      this,
      "ExtensionAzureBlobStorage",
      {
        type: "Azure::BlobStorage",
        properties: {
          AzureSubscriptionId: props.subscriptionId,
          AzureClientId: props.clientId,
          AzureTenantId: props.tenantId,
          AzureClientSecret: secret.secretValue.unsafeUnwrap()
        },
      }
    );

    this.ref = azureBlobStorage.ref;
  }

  private getSecret(id: string, secretName: string) : ISecret {  
    return Secret.fromSecretNameV2(this, secretName.concat("Value"), secretName);
  }
}

As with every CDK Construct, the constructor arguments are scope, id and props. scope and id are propagated to the cdk.Construct base class. The props argument is of type CfnAzureBlobStorageProps which includes four properties all of type string. This is how the Azure credentials are propagated down from upstream constructs.

Layer 2 Construct

The next level of constructs, L2, also represent AWS resources, but with a higher-level, intent-based API. They provide similar functionality, but incorporate the defaults, boilerplate, and glue logic you’d be writing yourself with a CFN Resource construct. They also provide convenience methods that make it simpler to work with the resource.

In this example, an L2 construct is created to abstract the CfnAzureBlobStorage L1 construct and provides additional properties and methods.

import { Construct } from "constructs";
import { CfnAzureBlobStorage } from "./cfn-azure-blob-storage";

// L2 Construct
export class AzureBlobStorage extends Construct {
  public readonly blobContainerUrl: string;

  constructor(
    scope: Construct,
    id: string,
    subscriptionId: string,
    clientId: string,
    tenantId: string,
    clientSecretName: string
  ) {
    super(scope, id);

    const azureBlobStorage = new CfnAzureBlobStorage(
      this,
      "CfnAzureBlobStorage",
      {
        subscriptionId: subscriptionId,
        clientId: clientId,
        tenantId: tenantId,
        clientSecretName: clientSecretName,
      }
    );

    this.blobContainerUrl = azureBlobStorage.ref;
  }
}

The custom L2 construct class is declared as AzureBlobStorage, this time without the Cfn prefix to represent an L2 construct. This time the constructor arguments include the Azure credentials and client secret, and the ref from the L1 construct us output to the public variable AzureBlobContainerUrl.

As an L2 construct, the AzureBlobStorage construct could be used in CDK Apps along with AWS Resource Constructs in the same Stack, to be provisioned through AWS CloudFormation creating the IaC single pane of glass for a multicloud solution.

Layer 3 Construct

The true value of the CDK construct programming model is in the ability to extend L2 constructs, which represent a single resource, into a composition of multiple constructs that provide a solution for a common task. These are Layer 3, L3, Constructs also known as patterns.

In this example, the L3 construct represents the solution architecture to backup objects uploaded to an Amazon S3 bucket into an Azure Blob Storage container in real-time, using AWS Lambda to process event notifications from Amazon S3.

import { RemovalPolicy, Duration, CfnOutput } from "aws-cdk-lib";
import { Bucket, BlockPublicAccess, EventType } from "aws-cdk-lib/aws-s3";
import { DockerImageFunction, DockerImageCode } from "aws-cdk-lib/aws-lambda";
import { PolicyStatement, Effect } from "aws-cdk-lib/aws-iam";
import { LambdaDestination } from "aws-cdk-lib/aws-s3-notifications";
import { IStringParameter, StringParameter } from "aws-cdk-lib/aws-ssm";
import { Secret, ISecret } from "aws-cdk-lib/aws-secretsmanager";
import { Construct } from "constructs";
import { AzureBlobStorage } from "./azure-blob-storage";

// L3 Construct
export class S3ToAzureBackupService extends Construct {
  constructor(
    scope: Construct,
    id: string,
    azureSubscriptionIdParamName: string,
    azureClientIdParamName: string,
    azureTenantIdParamName: string,
    azureClientSecretName: string
  ) {
    super(scope, id);

    // Retrieve existing SSM Parameters
    const azureSubscriptionIdParameter = this.getSSMParameter("AzureSubscriptionIdParam", azureSubscriptionIdParamName);
    const azureClientIdParameter = this.getSSMParameter("AzureClientIdParam", azureClientIdParamName);
    const azureTenantIdParameter = this.getSSMParameter("AzureTenantIdParam", azureTenantIdParamName);    
    
    // Retrieve existing Azure Client Secret
    const azureClientSecret = this.getSecret("AzureClientSecret", azureClientSecretName);

    // Create an S3 bucket
    const sourceBucket = new Bucket(this, "SourceBucketForAzureBlob", {
      removalPolicy: RemovalPolicy.RETAIN,
      blockPublicAccess: BlockPublicAccess.BLOCK_ALL,
    });

    // Create a corresponding Azure Blob Storage account and a Blob Container
    const azurebBlobStorage = new AzureBlobStorage(
      this,
      "MyCustomAzureBlobStorage",
      azureSubscriptionIdParameter.stringValue,
      azureClientIdParameter.stringValue,
      azureTenantIdParameter.stringValue,
      azureClientSecretName
    );

    // Create a lambda function that will receive notifications from S3 bucket
    // and copy the new uploaded object to Azure Blob Storage
    const copyObjectToAzureLambda = new DockerImageFunction(
      this,
      "CopyObjectsToAzureLambda",
      {
        timeout: Duration.seconds(60),
        code: DockerImageCode.fromImageAsset("copy_s3_fn_code", {
          buildArgs: {
            "--platform": "linux/amd64"
          }
        }),
      },
    );

    // Add an IAM policy statement to allow the Lambda function to access the
    // S3 bucket
    sourceBucket.grantRead(copyObjectToAzureLambda);

    // Add an IAM policy statement to allow the Lambda function to get the contents
    // of an S3 object
    copyObjectToAzureLambda.addToRolePolicy(
      new PolicyStatement({
        effect: Effect.ALLOW,
        actions: ["s3:GetObject"],
        resources: [`arn:aws:s3:::${sourceBucket.bucketName}/*`],
      })
    );

    // Set up an S3 bucket notification to trigger the Lambda function
    // when an object is uploaded
    sourceBucket.addEventNotification(
      EventType.OBJECT_CREATED,
      new LambdaDestination(copyObjectToAzureLambda)
    );

    // Grant the Lambda function read access to existing SSM Parameters
    azureSubscriptionIdParameter.grantRead(copyObjectToAzureLambda);
    azureClientIdParameter.grantRead(copyObjectToAzureLambda);
    azureTenantIdParameter.grantRead(copyObjectToAzureLambda);

    // Put the Azure Blob Container Url into SSM Parameter Store
    this.createStringSSMParameter(
      "AzureBlobContainerUrl",
      "Azure blob container URL",
      "/s3toazurebackupservice/azureblobcontainerurl",
      azurebBlobStorage.blobContainerUrl,
      copyObjectToAzureLambda
    );      

    // Grant the Lambda function read access to the secret
    azureClientSecret.grantRead(copyObjectToAzureLambda);

    // Output S3 bucket arn
    new CfnOutput(this, "sourceBucketArn", {
      value: sourceBucket.bucketArn,
      exportName: "sourceBucketArn",
    });

    // Output the Blob Conatiner Url
    new CfnOutput(this, "azureBlobContainerUrl", {
      value: azurebBlobStorage.blobContainerUrl,
      exportName: "azureBlobContainerUrl",
    });
  }

}

The custom L3 construct can be used in larger IaC solutions by calling the class called S3ToAzureBackupService and providing the Azure credentials and client secret as properties to the constructor.

import * as cdk from "aws-cdk-lib";
import { Construct } from "constructs";
import { S3ToAzureBackupService } from "./s3-to-azure-backup-service";

export class MultiCloudBackupCdkStack extends cdk.Stack {
  constructor(scope: Construct, id: string, props?: cdk.StackProps) {
    super(scope, id, props);

    const s3ToAzureBackupService = new S3ToAzureBackupService(
      this,
      "MyMultiCloudBackupService",
      "/s3toazurebackupservice/azuresubscriptionid",
      "/s3toazurebackupservice/azureclientid",
      "/s3toazurebackupservice/azuretenantid",
      "s3toazurebackupservice/azureclientsecret"
    );
  }
}

Solution Diagram

Diagram 1: IaC Single Control Plane, demonstrates the concept of the Azure Blob Storage extension being imported from the AWS CloudFormation Registry into AWS CDK as an L1 CfnResource, wrapped into an L2 Construct and used in an L3 pattern alongside AWS resources to perform the specific task of backing up from and Amazon s3 Bucket into an Azure Blob Storage Container.

Multicloud IaC with CDK

Diagram 1: IaC Single Control Plan

The CDK application is then synthesized into one or more AWS CloudFormation Templates, which result in the CloudFormation service deploying AWS resource configurations to AWS and Azure resource configurations to Azure.

This solution demonstrates not only how to consolidate the management of secondary cloud resources into a unified infrastructure stack in AWS, but also the improved productivity by eliminating the complexity and cost of operating multiple deployment mechanisms into multiple public cloud environments.

The following video demonstrates an example in real-time of the end-state solution:

Next Steps

While this was just a straightforward example, with the same approach you can use your imagination to come up with even more and complex scenarios where AWS CDK can be used as a single pane of glass for IaC to manage multicloud and hybrid solutions.

To get started with the solution discussed in this post, this workshop will provide you with the instructions you need to understand the steps required to create the S3ToAzureBackupService.

Once you have learned how to create AWS CloudFormation extensions and develop them into AWS CDK Constructs, you will learn how, with just a few lines of code, you can develop reusable multicloud unified IaC solutions that deploy through a single AWS control plane.

Conclusion

By adopting AWS CloudFormation extensions and AWS CDK, deployed through a single AWS control plane, the cost and complexity of maintaining deployment pipelines across multiple cloud providers is reduced to a single holistic solution-focused pipeline. The techniques demonstrated in this post and the related workshop provide a capability to simplify the design of complex systems, improve the management of integration, and more closely align the IaC and deployment management practices with the design.

About the authors:

Aaron Sempf

Aaron Sempf is a Global Principal Partner Solutions Architect, in the Global Systems Integrators team. With over twenty years in software engineering and distributed system, he focuses on solving for large scale integration and event driven systems. When not working with AWS GSI partners, he can be found coding prototypes for autonomous robots, IoT devices, and distributed solutions.

 
Puneet Talwar

Puneet Talwar

Puneet Talwar is a Senior Solutions Architect at Amazon Web Services (AWS) on the Australian Public Sector team. With a background of over twenty years in software engineering, he particularly enjoys helping customers build modern, API Driven software architectures at scale. In his spare time, he can be found building prototypes for micro front ends and event driven architectures.

Easily protect your AWS CDK-defined infrastructure with AWS WAFv2

Post Syndicated from Ramon Lopez Narvaez original https://aws.amazon.com/blogs/devops/easily-protect-your-aws-cdk-defined-infrastructure-with-aws-wafv2/

Security is a shared responsibility between AWS and the customer. When we use infrastructure as code (IaC) we want to describe workloads wholistically, and that includes the configuration of firewalls alongside the entrypoints to web applications. As we evolve the infrastructure that our application is built upon, we can adjust firewall rules in the same place.

In this post, you’ll learn how you can easily add a layer of protection to your web application that is defined in AWS Cloud Development Kit (AWS CDK) and built using Amazon CloudFront, Amazon API Gateway, Application Load Balancer, or AWS AppSync.

To accomplish this, we’ll use AWS WAFv2. Although it’s usually complex to write your own firewall rules, we can simply use AWS Managed Rules. No tedious setup required!

What is AWS WAFv2?

AWS WAFv2 is a managed web application firewall. It can be natively enabled on CloudFront, API Gateway, Application Load Balancer, or AWS AppSync and is deployed alongside these services. AWS services terminate the TCP/TLS connection, process incoming HTTP requests, and then pass the request to AWS WAF for inspection and filtering.

For example, you can use AWS WAFv2 to protect against attacks, such as cross-site request forgery (CSRF), cross-site scripting (XSS), and SQL injection (SQLi) among other threats in the OWASP Top 10.

AWS Managed Rules for AWS WAF is a set of AWS WAF rules curated and maintained by the AWS Threat Research Team that provides protection against common application vulnerabilities or other unwanted traffic, without having to write your own rules.

Prerequisites

For this walkthrough, you should have the following prerequisites:

  • An AWS account
  • An application fronted by one or more of the following services: Amazon Cloudfront, Amazon API Gateway, Application Load Balancer or AWS AppSync. From here on these are called ‘entrypoint’.
  • At least the above mentioned ‘entrypoint’ defined in AWS CDK.

Solution overview

When AWS WAF is applied to Amazon CloudFront, Amazon API Gateway, Application Load Balancer, or AWS AppSync, it inspects and filters requests before they’re forwarded to your compute infrastructure.

Figure 1. AWS WAFv2 can protect endpoints built by Amazon CloudFront, Amazon API Gateway, Application Load Balancer and AWS AppSync

Given that you have an existing web application defined in AWS CDK, we want to add a WAFv2 web ACL to its entrypoint. Instead of writing our own firewall rules to inspect and filter requests, we want to leverage an AWS Managed Rules rule group. Simultaneously, we must be able to disable or reconfigure some of the rules in the case that they cause undesirable behavior in the application.

A good first rule group to use is the core rule set (CRS) managed rule group, also named AWSManagedRulesCommonRuleSet. It contains rules that are generally applicable to web applications and provides protection against exploitation of various vulnerabilities, such as the ones described in the OWASP Top 10. You can later add more managed rule groups or write your own rules, which are specific to your application (e.g., for Windows, Linux, or WordPress).

Define the AWS WAFv2 web ACL

First, let’s give the AWS WAF module a nicely readable name:

import { aws_wafv2 as wafv2 } from 'aws-cdk-lib';

Then, we define the AWS WAFv2 web ACL in AWS CDK:

const cfnWebACL = new wafv2.CfnWebACL(this,'MyCDKWebAcl'
      defaultAction: {
        allow: {}
      },
      scope: 'REGIONAL',
      visibilityConfig: {
        cloudWatchMetricsEnabled: true,
        metricName:'MetricForWebACLCDK',
        sampledRequestsEnabled: true,
      },
      name:‘MyCDKWebAcl’,
      rules: [{
        name: 'CRSRule',
        priority: 0,
        statement: {
          managedRuleGroupStatement: {
            name:'AWSManagedRulesCommonRuleSet',
            vendorName:'AWS'
          }
        },
        visibilityConfig: {
          cloudWatchMetricsEnabled: true,
          metricName:'MetricForWebACLCDK-CRS',
          sampledRequestsEnabled: true,
        },
        overrideAction: {
          none: {}
        },
      }]
    });

The highlighted line references the CRS managed rule group as one Rule in the list. You could add more Rule elements, either referencing the managed rule groups or custom rules.

Note the scope attribute. If you want to attach this web ACL to an API Gateway, AWS AppSync API, or Application Load Balancer, then it will be REGIONAL. If you want to attach it to a CloudFront distribution, then make sure that your AWS WAFv2 web ACL is defined in the US East (N. Virginia) Region and the scope is CLOUDFRONT.

Attach the AWS WAFv2 web ACL to an Application Load Balancer, AWS AppSync API, or API Gateway

Now that we have a web ACL defined, we must attach it to a resource. This works exactly the same across API Gateway API’s, an AWS AppSync API, or an Application Load Balancer. We must create a CfnWebACLAssociation and point it to the previously created web ACL and the resource to protect:

const cfnWebACLAssociation = new wafv2.CfnWebACLAssociation(this,'MyCDKWebACLAssociation', {
      resourceArn:<ARN of resource to protect>,
      webAclArn:cfnWebACL.attrArn,
    });

Amazon Resource Names (ARNs) uniquely identify AWS resources. The highlighted line shows how AWS CDK lets you get the ARN of the previously defined CfnWebAcl.

Depending on what type of service you’re using, jump to one of the three following sections to learn how to retrieve the resourceArn of API Gateway, AWS AppSync, or Application Load Balancers.

Retrieving ARN for AWS AppSync API’s

To retrieve the ARN of an AWS AppSync API, call the .arn property:

const api = new appsync.GraphqlApi(…)
const cfnWebACLAssociation = new wafv2.CfnWebACLAssociation(this,'MyCDKWebACLAssociation', {
      resourceArn:api.arn,
      webAclArn: cfnWebACL.attrArn,
    });

Retrieving ARN for Amazon API Gateway REST API’s

In this case, we must specify which stage of the REST API we want to protect with the web ACL. Then, we reference the ARN of the stage:

const api = new apigateway.RestApi(…)
const deployment = new apigateway.Deployment(…)
const stage = apigateway.Stage(…)
const cfnWebACLAssociation = new wafv2.CfnWebACLAssociation(this,'MyCDKWebACLAssociation', {
      resourceArn:stage.stageArn,
      webAclArn: cfnWebACL.attrArn,
    });

Retrieving ARN for Application Load Balancers

If you’re dealing with an Application Load Balancer, then this is how you can retrieve its ARN:

const lb = new elbv2.ApplicationLoadBalancer(…)

const cfnWebACLAssociation = new wafv2.CfnWebACLAssociation(this,'MyCDKWebACLAssociation', {
      resourceArn:lb.loadBalancerArn,
      webAclArn: cfnWebACL.attrArn,
    });

Attach the AWS WAFv2 web ACL to a CloudFront distribution

Attaching a web ACL to CloudFront follows a different approach. Instead of defining a cfnWebACLAssociation, we reference the web ACL inside of the Distribution definition:

const distribution = new cloudfront.Distribution(this,'distro', {
      defaultBehavior: {
        origin: new origins.S3Origin(s3Bucket)
      },
     webAclId:cfnWebACL.attrArn
    });

Note that even though the property is called webAclId, because we’re using AWS WAFv2, we must supply the ARN of the web ACL.

Exclude rules from the web ACL

Lastly, let’s understand how we can customize the web ACL further. If a rule of the managed rule group causes undesired behavior in the application, then we can exclude it from the webACL. Assume that we want to exclude the SizeRestrictions_BODY rule, which limits the request body size to 8 KB.

Go back to the definition of the web ACL, and add the highlighted lines:

const cfnWebACL = new wafv2.CfnWebACL(this, 'MyCDKWebAcl', {
      defaultAction: {
        allow: {}
      },
      scope:'REGIONAL',
      visibilityConfig: {
        cloudWatchMetricsEnabled: true,
        metricName:'MetricForWebACLCDK',
        sampledRequestsEnabled: true,
      },
      name:'MyCDKWebAcl',
      rules: [{
        name:'CRSRule',
        priority: 0,
        statement: {
          managedRuleGroupStatement: {
            name: 'AWSManagedRulesCommonRuleSet',
            vendorName: 'AWS',
            excludedRules: [{
             ‘SizeRestrictions_BODY’ }]
          }
        },
        visibilityConfig: {
          cloudWatchMetricsEnabled: true,
          metricName:'MetricForWebACLCDK-CRS',
          sampledRequestsEnabled: true,
        },
        overrideAction: {
          none: {}
        },
      }]

    });

Other customizations you can do include pinning the version of the rule group and narrowing the scope of the request that the rule evaluates, using Scope-down statements.

Conclusion

In this post, you’ve seen how an AWS WAFv2 web ACL can be added to your existing infrastructure defined in AWS CDK. By using Managed Rules, your application benefits from a layer of protection that is curated and maintained by AWS security experts.

As a next step, you can learn how to include AWS WAFv2 metrics from Amazon CloudWatch into your application dashboards. This will give you perspective on how your web application is performing in conjunction with the AWS WAFv2 web ACL.

To learn more about AWS WAFv2 and how to manage web ACL’s, check out the official developer guide.

About the author:

Ramon Lopez

Ramon is a Senior Solutions Architect at AWS, where he guides, educates, and empowers customers of all sizes and industries to build successful businesses in the AWS cloud. He also built web services for 150+ million Amazon Prime customers and led a team of software engineers in a fast-paced global environment. After being immersed in one of the largest micro-service environments, he is a believer in the DevOps mantra of “You build it, you run it”.