All posts by Rafael Ramos

Develop a serverless application in Python using Amazon CodeWhisperer

Post Syndicated from Rafael Ramos original https://aws.amazon.com/blogs/devops/develop-a-serverless-application-in-python-using-amazon-codewhisperer/

While writing code to develop applications, developers must keep up with multiple programming languages, frameworks, software libraries, and popular cloud services from providers such as AWS. Even though developers can find code snippets on developer communities, to either learn from them or repurpose the code, manually searching for the snippets with an exact or even similar use case is a distracting and time-consuming process. They have to do all of this while making sure that they’re following the correct programming syntax and best coding practices.

Amazon CodeWhisperer, a machine learning (ML) powered coding aide for developers, lets you overcome those challenges. Developers can simply write a comment that outlines a specific task in plain English, such as “upload a file to S3.” Based on this, CodeWhisperer automatically determines which cloud services and public libraries are best-suited for the specified task, it creates the specific code on the fly, and then it recommends the generated code snippets directly in the IDE. And this isn’t about copy-pasting code from the web, but generating code based on the context of your file, such as which libraries and versions you have, as well as the existing code. Moreover, CodeWhisperer seamlessly integrates with your Visual Studio Code and JetBrains IDEs so that you can stay focused and never leave the development environment. At the time of this writing, CodeWhisperer supports Java, Python, JavaScript, C#, and TypeScript.

In this post, we’ll build a full-fledged, event-driven, serverless application for image recognition. With the aid of CodeWhisperer, you’ll write your own code that runs on top of AWS Lambda to interact with Amazon Rekognition, Amazon DynamoDB, Amazon Simple Notification Service (Amazon SNS), Amazon Simple Queue Service (Amazon SQS), Amazon Simple Storage Service (Amazon S3), and third-party HTTP APIs to perform image recognition. The users of the application can interact with it by either sending the URL of an image for processing, or by listing the images and the objects present on each image.

Solution overview

To make our application easier to digest, we’ll split it into three segments:

  1. Image download – The user provides an image URL to the first API. A Lambda function downloads the image from the URL and stores it on an S3 bucket. Amazon S3 automatically sends a notification to an Amazon SNS topic informing that a new image is ready for processing. Amazon SNS then delivers the message to an Amazon SQS queue.
  2. Image recognition – A second Lambda function handles the orchestration and processing of the image. It receives the message from the Amazon SQS queue, sends the image for Amazon Rekognition to process, stores the recognition results on a DynamoDB table, and sends a message with those results as JSON to a second Amazon SNS topic used in section three. A user can list the images and the objects present on each image by calling a second API which queries the DynamoDB table.
  3. 3rd-party integration – The last Lambda function reads the message from the second Amazon SQS queue. At this point, the Lambda function must deliver that message to a fictitious external e-mail server HTTP API that supports only XML payloads. Because of that, the Lambda function converts the JSON message to XML. Lastly, the function sends the XML object via HTTP POST to the e-mail server.

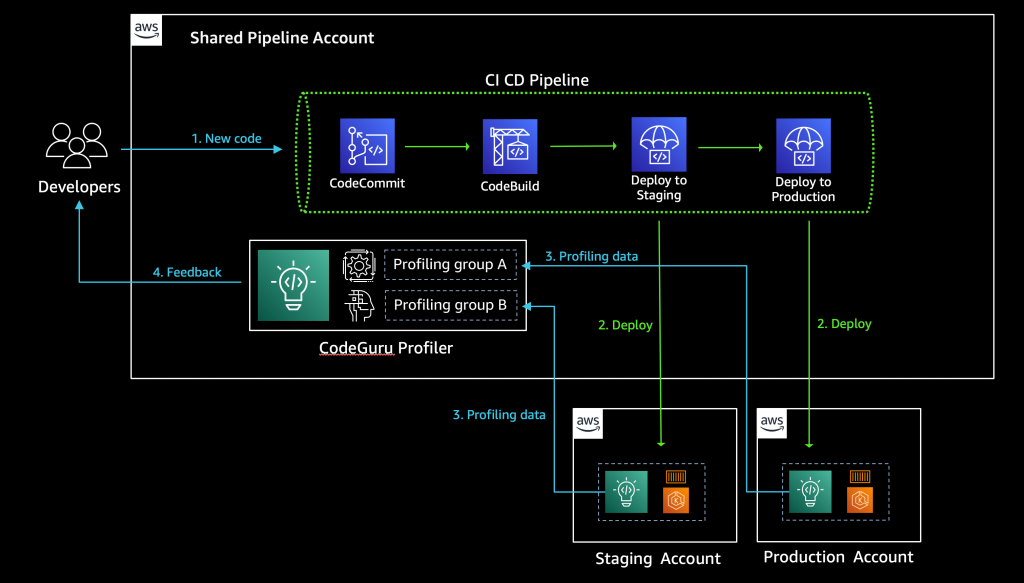
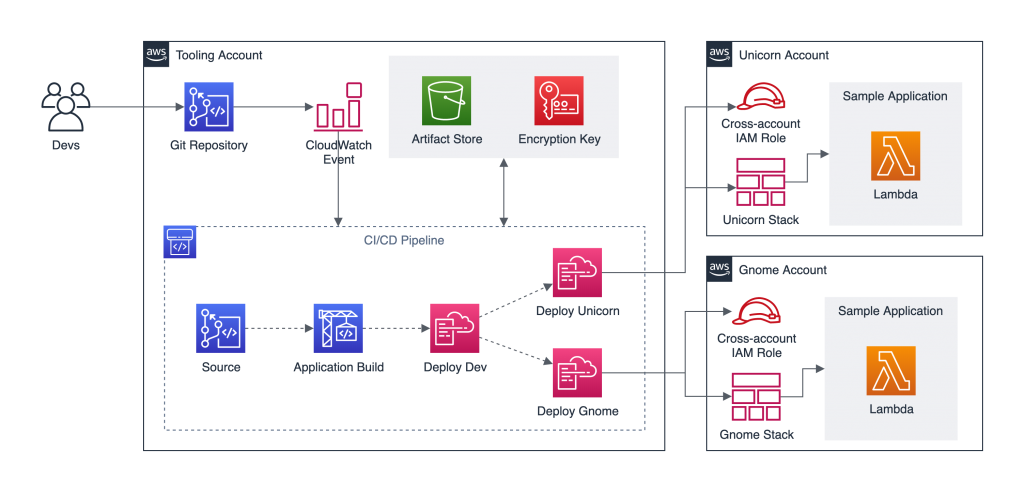
The following diagram depicts the architecture of our application:

Architecture diagram depicting the application architecture. It contains the service icons with the component explained on the text above

Figure 1. Architecture diagram depicting the application architecture. It contains the service icons with the component explained on the text above.

Prerequisites

Before getting started, you must have the following prerequisites:

Configure environment

We already created the scaffolding for the application that we’ll build, which you can find on this Git repository. This application is represented by a CDK app that describes the infrastructure according to the architecture diagram above. However, the actual business logic of the application isn’t provided. You’ll implement it using CodeWhisperer. This means that we already declared using AWS CDK components, such as the API Gateway endpoints, DynamoDB table, and topics and queues. If you’re new to AWS CDK, then we encourage you to go through the CDK workshop later on.

Deploying AWS CDK apps into an AWS environment (a combination of an AWS account and region) requires that you provision resources that the AWS CDK needs to perform the deployment. These resources include an Amazon S3 bucket for storing files and IAM roles that grant permissions needed to perform deployments. The process of provisioning these initial resources is called bootstrapping. The required resources are defined in an AWS CloudFormation stack, called the bootstrap stack, which is usually named CDKToolkit. Like any CloudFormation stack, it appears in the CloudFormation console once it has been deployed.

After cloning the repository, let’s deploy the application (still without the business logic, which we’ll implement later on using CodeWhisperer). For this post, we’ll implement the application in Python. Therefore, make sure that you’re under the python directory. Then, use the cdk bootstrap command to bootstrap an AWS environment for AWS CDK. Replace {AWS_ACCOUNT_ID} and {AWS_REGION} with corresponding values first:

cdk bootstrap aws://{AWS_ACCOUNT_ID}/{AWS_REGION}

For more information about bootstrapping, refer to the documentation.

The last step to prepare your environment is to enable CodeWhisperer on your IDE. See Setting up CodeWhisperer for VS Code or Setting up Amazon CodeWhisperer for JetBrains to learn how to do that, depending on which IDE you’re using.

Image download

Let’s get started by implementing the first Lambda function, which is responsible for downloading an image from the provided URL and storing that image in an S3 bucket. Open the get_save_image.py file from the python/api/runtime/ directory. This file contains an empty Lambda function handler and the needed inputs parameters to integrate this Lambda function.

  • url is the URL of the input image provided by the user,
  • name is the name of the image provided by the user, and
  • S3_BUCKET is the S3 bucket name defined by our application infrastructure.

Write a comment in natural language that describes the required functionality, for example:

# Function to get a file from url

To trigger CodeWhisperer, hit the Enter key after entering the comment and wait for a code suggestion. If you want to manually trigger CodeWhisperer, then you can hit Option + C on MacOS or Alt + C on Windows. You can browse through multiple suggestions (if available) with the arrow keys. Accept a code suggestion by pressing Tab. Discard a suggestion by pressing Esc or typing a character.

For more information on how to work with CodeWhisperer, see Working with CodeWhisperer in VS Code or Working with Amazon CodeWhisperer from JetBrains.

You should get a suggested implementation of a function that downloads a file using a specified URL. The following image shows an example of the code snippet that CodeWhisperer suggests:

Screenshot of the code generated by CodeWhisperer on VS Code. It has a function called get_file_from_url with the implementation suggestion to download a file using the requests lib

Figure 2. Screenshot of the code generated by CodeWhisperer on VS Code. It has a function called get_file_from_url with the implementation suggestion to download a file using the requests lib.

Be aware that CodeWhisperer uses artificial intelligence (AI) to provide code recommendations, and that this is non-deterministic. The result you get in your IDE may be different from the one on the image above. If needed, fine-tune the code, as CodeWhisperer generates the core logic, but you might want to customize the details depending on your requirements.

Let’s try another action, this time to upload the image to an S3 bucket:

# Function to upload image to S3

As a result, CodeWhisperer generates a code snippet similar to the following one:

Screenshot of the code generated by CodeWhisperer on VS Code. It has a function called upload_image with the implementation suggestion to download a file using the requests lib and upload it to S3 using the S3 client

Figure 3. Screenshot of the code generated by CodeWhisperer on VS Code. It has a function called upload_image with the implementation suggestion to download a file using the requests lib and upload it to S3 using the S3 client.

Now that you have the functions with the functionalities to download an image from the web and upload it to an S3 bucket, you can wire up both functions in the Lambda handler function by calling each function with the correct inputs.

Image recognition

Now let’s implement the Lambda function responsible for sending the image to Amazon Rekognition for processing, storing the results in a DynamoDB table, and sending a message with those results as JSON to a second Amazon SNS topic. Open the image_recognition.py file from the python/recognition/runtime/ directory. This file contains an empty Lambda and the needed inputs parameters to integrate this Lambda function.

  • queue_url is the URL of the Amazon SQS queue to which this Lambda function is subscribed,
  • table_name is the name of the DynamoDB table, and
  • topic_arn is the ARN of the Amazon SNS topic to which this Lambda function is published.

Using CodeWhisperer, implement the business logic of the next Lambda function as you did in the previous section. For example, to detect the labels from an image using Amazon Rekognition, write the following comment:

# Detect labels from image with Rekognition

And as a result, CodeWhisperer should give you a code snippet similar to the one in the following image:

Screenshot of the code generated by CodeWhisperer on VS Code. It has a function called detect_labels with the implementation suggestion to use the Rekognition SDK to detect labels on the given image

Figure 4. Screenshot of the code generated by CodeWhisperer on VS Code. It has a function called detect_labels with the implementation suggestion to use the Rekognition SDK to detect labels on the given image.

You can continue generating the other functions that you need to fully implement the business logic of your Lambda function. Here are some examples that you can use:

  • # Save labels to DynamoDB
  • # Publish item to SNS
  • # Delete message from SQS

Following the same approach, open the list_images.py file from the python/recognition/runtime/ directory to implement the logic to list all of the labels from the DynamoDB table. As you did previously, type a comment in plain English:

# Function to list all items from a DynamoDB table

Other frequently used code

Interacting with AWS isn’t the only way that you can leverage CodeWhisperer. You can use it to implement repetitive tasks, such as creating unit tests and converting message formats, or to implement algorithms like sorting and string matching and parsing. The last Lambda function that we’ll implement as part of this post is to convert a JSON payload received from Amazon SQS to XML. Then, we’ll POST this XML to an HTTP endpoint.

Open the send_email.py file from the python/integration/runtime/ directory. This file contains an empty Lambda function handler. An event is a JSON-formatted document that contains data for a Lambda function to process. Type a comment with your intent to get the code snippet:

# Transform json to xml

As CodeWhisperer uses the context of your files to generate code, depending on the imports that you have on your file, you’ll get an implementation such as the one in the following image:

Screenshot of the code generated by CodeWhisperer on VS Code. It has a function called json_to_xml with the implementation suggestion to transform JSON payload into XML payload

Figure 5. Screenshot of the code generated by CodeWhisperer on VS Code. It has a function called json_to_xml with the implementation suggestion to transform JSON payload into XML payload.

Repeat the same process with a comment such as # Send XML string with HTTP POST to get the last function implementation. Note that the email server isn’t part of this implementation. You can mock it, or simply ignore this HTTP POST step. Lastly, wire up both functions in the Lambda handler function by calling each function with the correct inputs.

Deploy and test the application

To deploy the application, run the command cdk deploy --all. You should get a confirmation message, and after a few minutes your application will be up and running on your AWS account. As outputs, the APIStack and RekognitionStack will print the API Gateway endpoint URLs. It will look similar to this example:

Outputs:
...
APIStack.RESTAPIEndpoint01234567 = https://examp1eid0.execute-
api.{your-region}.amazonaws.com/prod/
  1. The first endpoint expects two string parameters: url (the image file URL to download) and name (the target file name that will be stored on the S3 bucket). Use any image URL you like, but remember that you must encode an image URL before passing it as a query string parameter to escape the special characters. Use an online URL encoder of your choice for that. Then, use the curl command to invoke the API Gateway endpoint:
curl -X GET 'https://examp1eid0.execute-api.eu-east-
2.amazonaws.com/prod?url={encoded-image-URL}&name={file-name}'

Replace {encoded-image-URL} and {file-name} with the corresponding values. Also, make sure that you use the correct API endpoint that you’ve noted from the AWS CDK deploy command output as mentioned above.

  1. It will take a few seconds for the processing to happen in the background. Once it’s ready, see what has been stored in the DynamoDB table by invoking the List Images API (make sure that you use the correct URL from the output of your deployed AWS CDK stack):
curl -X GET 'https://examp1eid7.execute-api.eu-east-2.amazonaws.com/prod'

After you’re done, to avoid unexpected charges to your account, make sure that you clean up your AWS CDK stacks. Use the cdk destroy command to delete the stacks.

Conclusion

In this post, we’ve seen how to get a significant productivity boost with the help of ML. With that, as a developer, you can stay focused on your IDE and reduce the time that you spend searching online for code snippets that are relevant for your use case. Writing comments in natural language, you get context-based snippets to implement full-fledged applications. In addition, CodeWhisperer comes with a mechanism called reference tracker, which detects whether a code recommendation might be similar to particular CodeWhisperer training data. The reference tracker lets you easily find and review that reference code and see how it’s used in the context of another project. Lastly, CodeWhisperer provides the ability to run scans on your code (generated by CodeWhisperer as well as written by you) to detect security vulnerabilities.

During the preview period, CodeWhisperer is available to all developers across the world for free. Get started with the free preview on JetBrains, VS Code or AWS Cloud9.

About the author:

Rafael Ramos

Rafael is a Solutions Architect at AWS, where he helps ISVs on their journey to the cloud. He spent over 13 years working as a software developer, and is passionate about DevOps and serverless. Outside of work, he enjoys playing tabletop RPG, cooking and running marathons.

Caroline Gluck

Caroline is an AWS Cloud application architect based in New York City, where she helps customers design and build cloud native data science applications. Caroline is a builder at heart, with a passion for serverless architecture and machine learning. In her spare time, she enjoys traveling, cooking, and spending time with family and friends.

Jason Varghese

Jason is a Senior Solutions Architect at AWS guiding enterprise customers on their cloud migration and modernization journeys. He has served in multiple engineering leadership roles and has over 20 years of experience architecting, designing and building scalable software solutions. Jason holds a bachelor’s degree in computer engineering from the University of Oklahoma and an MBA from the University of Central Oklahoma.

Dmitry Balabanov

Dmitry is a Solutions Architect with AWS where he focuses on building reusable assets for customers across multiple industries. With over 15 years of experience in designing, building, and maintaining applications, he still loves learning new things. When not at work, he enjoys paragliding and mountain trekking.

Introducing new self-paced courses to improve Java and Python code quality with Amazon CodeGuru

Post Syndicated from Rafael Ramos original https://aws.amazon.com/blogs/devops/new-self-paced-courses-to-improve-java-and-python-code-quality-with-amazon-codeguru/

Amazon CodeGuru icon

During the software development lifecycle, organizations have adopted peer code reviews as a common practice to keep improving code quality and prevent bugs from reaching applications in production. Developers traditionally perform those code reviews manually, which causes bottlenecks and blocks releases while waiting for the peer review. Besides impacting the teams’ agility, it’s a challenge to maintain a high bar for code reviews during the development workflow. This is especially challenging for less experienced developers, who have more difficulties identifying defects, such as thread concurrency and resource leaks.

With Amazon CodeGuru Reviewer, developers have an automated code review tool that catches critical issues, security vulnerabilities, and hard-to-find bugs during application development. CodeGuru Reviewer is powered by pre-trained machine learning (ML) models and uses millions of code reviews on thousands of open-source and Amazon repositories. It also provides recommendations on how to fix issues to improve code quality and reduces the time it takes to fix bugs before they reach customer-facing applications. Java and Python developers can simply add Amazon CodeGuru to their existing development pipeline and save time and reduce the cost and burden of bad code.

If you’re new to writing code or an experienced developer looking to automate code reviews, we’re excited to announce two new courses on CodeGuru Reviewer. These courses, developed by the AWS Training and Certification team, consist of guided walkthroughs, gaming elements, knowledge checks, and a final course assessment.

About the course

During these courses, you learn how to use CodeGuru Reviewer to automatically scan your code base, identify hard-to-find bugs and vulnerabilities, and get recommendations for fixing the bugs and security issues. The course covers CodeGuru Reviewer’s main features, provides a peek into how CodeGuru finds code anomalies, describes how its ML models were built, and explains how to understand and apply its prescriptive guidance and recommendations. Besides helping on improving the code quality, those recommendations are useful for new developers to learn coding best practices, such as refactor duplicated code, correct implementation of concurrency constructs, and how to avoid resource leaks.

The CodeGuru courses are designed to be completed within a 2-week time frame. The courses comprise 60 minutes of videos, which include 15 main lectures. Four of the lectures are specific to Java, and four focus on Python. The courses also include exercises and assessments at the end of each week, to provide you with in-depth, hands-on practice in a lab environment.

Week 1

During the first week, you learn the basics of CodeGuru Reviewer, including how you can benefit from ML and automated reasoning to perform static code analysis and identify critical defects from coding best practices. You also learn what kind of actionable recommendations CodeGuru Reviewer provides, such as refactoring, resource leak, potential race conditions, deadlocks, and security analysis. In addition, the course covers how to integrate this tool on your development workflow, such as your CI/CD pipeline.

Topics include:

  • What is Amazon CodeGuru?
  • How CodeGuru Reviewer is trained to provide intelligent recommendations
  • CodeGuru Reviewer recommendation categories
  • How to integrate CodeGuru Reviewer into your workflow

Week 2

Throughout the second week, you have the chance to explore CodeGuru Reviewer in more depth. With Java and Python code snippets, you have a more hands-on experience and dive into each recommendation category. You use these examples to learn how CodeGuru Reviewer looks for duplicated lines of code to suggest refactoring opportunities, how it detects code maintainability issues, and how it prevents resource leaks and concurrency bugs.

Topics include (for both Java and Python):

  • Common coding best practices
  • Resource leak prevention
  • Security analysis

Get started

Developed at the source, this new digital course empowers you to learn about CodeGuru from the experts at AWS whenever, wherever you want. Advance your skills and knowledge to build your future in the AWS Cloud. Enroll today:

Rafael Ramos

Rafael Ramos

Rafael is a Solutions Architect at AWS, where he helps ISVs on their journey to the cloud. He spent over 13 years working as a software developer, and is passionate about DevOps and serverless. Outside of work, he enjoys playing tabletop RPG, cooking and running marathons.

Building a cross-account CI/CD pipeline for single-tenant SaaS solutions

Post Syndicated from Rafael Ramos original https://aws.amazon.com/blogs/devops/cross-account-ci-cd-pipeline-single-tenant-saas/

With the increasing demand from enterprise customers for a pay-as-you-go consumption model, more and more independent software vendors (ISVs) are shifting their business model towards software as a service (SaaS). Usually this kind of solution is architected using a multi-tenant model. It means that the infrastructure resources and applications are shared across multiple customers, with mechanisms in place to isolate their environments from each other. However, you may not want or can’t afford to share resources for security or compliance reasons, so you need a single-tenant environment.

To achieve this higher level of segregation across the tenants, it’s recommended to isolate the environments on the AWS account level. This strategy brings benefits, such as no network overlapping, no account limits sharing, and simplified usage tracking and billing, but it comes with challenges from an operational standpoint. Whereas multi-tenant solutions require management of a single shared production environment, single-tenant installations consist of dedicated production environments for each customer, without any shared resources across the tenants. When the number of tenants starts to grow, delivering new features at a rapid pace becomes harder to accomplish, because each new version needs to be manually deployed on each tenant environment.

This post describes how to automate this deployment process to deliver software quickly, securely, and less error-prone for each existing tenant. I demonstrate all the steps to build and configure a CI/CD pipeline using AWS CodeCommit, AWS CodePipeline, AWS CodeBuild, and AWS CloudFormation. For each new version, the pipeline automatically deploys the same application version on the multiple tenant AWS accounts.

There are different caveats to build such cross-account CI/CD pipelines on AWS. Because of that, I use AWS Command Line Interface (AWS CLI) to manually go through the process and demonstrate in detail the various configuration aspects you have to handle, such as artifact encryption, cross-account permission granting, and pipeline actions.

Single-tenancy vs. multi-tenancy

One of the first aspects to consider when architecting your SaaS solution is its tenancy model. Each brings their own benefits and architectural challenges. On multi-tenant installations, each customer shares the same set of resources, including databases and applications. With this mode, you can use the servers’ capacity more efficiently, which generally leads to significant cost-saving opportunities. On the other hand, you have to carefully secure your solution to prevent a customer from accessing sensitive data from another. Designing for high availability becomes even more critical on multi-tenant workloads, because more customers are affected in the event of downtime.

Because the environments are by definition isolated from each other, single-tenant solutions are simpler to design when it comes to security, networking isolation, and data segregation. Likewise, you can customize the applications per customer, and have different versions for specific tenants. You also have the advantage of eliminating the noisy-neighbor effect, and can plan the infrastructure for the customer’s scalability requirements. As a drawback, in comparison with multi-tenant, the single-tenant model is operationally more complex because you have more servers and applications to maintain.

Which tenancy model to choose depends ultimately on whether you can meet your customer needs. They might have specific governance requirements, be bound to a certain industry regulation, or have compliance criteria that influences which model they can choose. For more information about modeling your SaaS solutions, see SaaS on AWS.

Solution overview

To demonstrate this solution, I consider a fictitious single-tenant ISV with two customers: Unicorn and Gnome. It uses one central account where the tools reside (Tooling account), and two other accounts, each representing a tenant (Unicorn and Gnome accounts). As depicted in the following architecture diagram, when a developer pushes code changes to CodeCommit, Amazon CloudWatch Events  triggers the CodePipeline CI/CD pipeline, which automatically deploys a new version on each tenant’s AWS account. It ensures that the fictitious ISV doesn’t have the operational burden to manually re-deploy the same version for each end-customers.

Architecture diagram of a CI/CD pipeline for single-tenant SaaS solutions

For illustration purposes, the sample application I use in this post is an AWS Lambda function that returns a simple JSON object when invoked.

Prerequisites

Before getting started, you must have the following prerequisites:

Setting up the Git repository

Your first step is to set up your Git repository.

  1. Create a CodeCommit repository to host the source code.

The CI/CD pipeline is automatically triggered every time new code is pushed to that repository.

  1. Make sure Git is configured to use IAM credentials to access AWS CodeCommit via HTTP by running the following command from the terminal:
git config --global credential.helper '!aws codecommit credential-helper $@'
git config --global credential.UseHttpPath true
  1. Clone the newly created repository locally, and add two files in the root folder: index.js and application.yaml.

The first file is the JavaScript code for the Lambda function that represents the sample application. For our use case, the function returns a JSON response object with statusCode: 200 and the body Hello!\n. See the following code:

exports.handler = async (event) => {
    const response = {
        statusCode: 200,
        body: `Hello!\n`,
    };
    return response;
};

The second file is where the infrastructure is defined using AWS CloudFormation. The sample application consists of a Lambda function, and we use AWS Serverless Application Model (AWS SAM) to simplify the resources creation. See the following code:

AWSTemplateFormatVersion: '2010-09-09'
Transform: 'AWS::Serverless-2016-10-31'
Description: Sample Application.

Parameters:
    S3Bucket:
        Type: String
    S3Key:
        Type: String
    ApplicationName:
        Type: String
        
Resources:
    SampleApplication:
        Type: 'AWS::Serverless::Function'
        Properties:
            FunctionName: !Ref ApplicationName
            Handler: index.handler
            Runtime: nodejs12.x
            CodeUri:
                Bucket: !Ref S3Bucket
                Key: !Ref S3Key
            Description: Hello Lambda.
            MemorySize: 128
            Timeout: 10
  1. Push both files to the remote Git repository.

Creating the artifact store encryption key

By default, CodePipeline uses server-side encryption with an AWS Key Management Service (AWS KMS) managed customer master key (CMK) to encrypt the release artifacts. Because the Unicorn and Gnome accounts need to decrypt those release artifacts, you need to create a customer managed CMK in the Tooling account.

From the terminal, run the following command to create the artifact encryption key:

aws kms create-key --region <YOUR_REGION>

This command returns a JSON object with the key ARN property if run successfully. Its format is similar to arn:aws:kms:<YOUR_REGION>:<TOOLING_ACCOUNT_ID>:key/<KEY_ID>. Record this value to use in the following steps.

The encryption key has been created manually for educational purposes only, but it’s considered a best practice to have it as part of the Infrastructure as Code (IaC) bundle.

Creating an Amazon S3 artifact store and configuring a bucket policy

Our use case uses Amazon Simple Storage Service (Amazon S3) as artifact store. Every release artifact is encrypted and stored as an object in an S3 bucket that lives in the Tooling account.

To create and configure the artifact store, follow these steps in the Tooling account:

  1. From the terminal, create an S3 bucket and give it a unique name:
aws s3api create-bucket \
    --bucket <BUCKET_UNIQUE_NAME> \
    --region <YOUR_REGION> \
    --create-bucket-configuration LocationConstraint=<YOUR_REGION>
  1. Configure the bucket to use the customer managed CMK created in the previous step. This makes sure the objects stored in this bucket are encrypted using that key, replacing <KEY_ARN> with the ARN property from the previous step:
aws s3api put-bucket-encryption \
    --bucket <BUCKET_UNIQUE_NAME> \
    --server-side-encryption-configuration \
        '{
            "Rules": [
                {
                    "ApplyServerSideEncryptionByDefault": {
                        "SSEAlgorithm": "aws:kms",
                        "KMSMasterKeyID": "<KEY_ARN>"
                    }
                }
            ]
        }'
  1. The artifacts stored in the bucket need to be accessed from the Unicorn and Gnome Configure the bucket policies to allow cross-account access:
aws s3api put-bucket-policy \
    --bucket <BUCKET_UNIQUE_NAME> \
    --policy \
        '{
            "Version": "2012-10-17",
            "Statement": [
                {
                    "Action": [
                        "s3:GetBucket*",
                        "s3:List*"
                    ],
                    "Effect": "Allow",
                    "Principal": {
                        "AWS": [
                            "arn:aws:iam::<UNICORN_ACCOUNT_ID>:root",
                            "arn:aws:iam::<GNOME_ACCOUNT_ID>:root"
                        ]
                    },
                    "Resource": [
                        "arn:aws:s3:::<BUCKET_UNIQUE_NAME>"
                    ]
                },
                {
                    "Action": [
                        "s3:GetObject*"
                    ],
                    "Effect": "Allow",
                    "Principal": {
                        "AWS": [
                            "arn:aws:iam::<UNICORN_ACCOUNT_ID>:root",
                            "arn:aws:iam::<GNOME_ACCOUNT_ID>:root"
                        ]
                    },
                    "Resource": [
                        "arn:aws:s3:::<BUCKET_UNIQUE_NAME>/CrossAccountPipeline/*"
                    ]
                }
            ]
        }' 

This S3 bucket has been created manually for educational purposes only, but it’s considered a best practice to have it as part of the IaC bundle.

Creating a cross-account IAM role in each tenant account

Following the security best practice of granting least privilege, each action declared on CodePipeline should have its own IAM role.  For this use case, the pipeline needs to perform changes in the Unicorn and Gnome accounts from the Tooling account, so you need to create a cross-account IAM role in each tenant account.

Repeat the following steps for each tenant account to allow CodePipeline to assume role in those accounts:

  1. Configure a named CLI profile for the tenant account to allow running commands using the correct access keys.
  2. Create an IAM role that can be assumed from another AWS account, replacing <TENANT_PROFILE_NAME> with the profile name you defined in the previous step:
aws iam create-role \
    --role-name CodePipelineCrossAccountRole \
    --profile <TENANT_PROFILE_NAME> \
    --assume-role-policy-document \
        '{
            "Version": "2012-10-17",
            "Statement": [
                {
                    "Effect": "Allow",
                    "Principal": {
                        "AWS": "arn:aws:iam::<TOOLING_ACCOUNT_ID>:root"
                    },
                    "Action": "sts:AssumeRole"
                }
            ]
        }'
  1. Create an IAM policy that grants access to the artifact store S3 bucket and to the artifact encryption key:
aws iam create-policy \
    --policy-name CodePipelineCrossAccountArtifactReadPolicy \
    --profile <TENANT_PROFILE_NAME> \
    --policy-document \
        '{
            "Version": "2012-10-17",
            "Statement": [
                {
                    "Action": [
                        "s3:GetBucket*",
                        "s3:ListBucket"
                    ],
                    "Resource": [
                        "arn:aws:s3:::<BUCKET_UNIQUE_NAME>"
                    ],
                    "Effect": "Allow"
                },
                {
                    "Action": [
                        "s3:GetObject*",
                        "s3:Put*"
                    ],
                    "Resource": [
                        "arn:aws:s3:::<BUCKET_UNIQUE_NAME>/CrossAccountPipeline/*"
                    ],
                    "Effect": "Allow"
                },
                {
                    "Action": [ 
                        "kms:DescribeKey", 
                        "kms:GenerateDataKey*", 
                        "kms:Encrypt", 
                        "kms:ReEncrypt*", 
                        "kms:Decrypt" 
                    ], 
                    "Resource": "<KEY_ARN>",
                    "Effect": "Allow"
                }
            ]
        }'
  1. Attach the CodePipelineCrossAccountArtifactReadPolicy IAM policy to the CodePipelineCrossAccountRole IAM role:
aws iam attach-role-policy \
    --profile <TENANT_PROFILE_NAME> \
    --role-name CodePipelineCrossAccountRole \
    --policy-arn arn:aws:iam::<TENANT_ACCOUNT_ID>:policy/CodePipelineCrossAccountArtifactReadPolicy
  1. Create an IAM policy that allows to pass the IAM role CloudFormationDeploymentRole to CloudFormation and to perform CloudFormation actions on the application Stack:
aws iam create-policy \
    --policy-name CodePipelineCrossAccountCfnPolicy \
    --profile <TENANT_PROFILE_NAME> \
    --policy-document \
        '{
            "Version": "2012-10-17",
            "Statement": [
                {
                    "Action": [
                        "iam:PassRole"
                    ],
                    "Resource": "arn:aws:iam::<TENANT_ACCOUNT_ID>:role/CloudFormationDeploymentRole",
                    "Effect": "Allow"
                },
                {
                    "Action": [
                        "cloudformation:*"
                    ],
                    "Resource": "arn:aws:cloudformation:<YOUR_REGION>:<TENANT_ACCOUNT_ID>:stack/SampleApplication*/*",
                    "Effect": "Allow"
                }
            ]
        }'
  1. Attach the CodePipelineCrossAccountCfnPolicy IAM policy to the CodePipelineCrossAccountRole IAM role:
aws iam attach-role-policy \
    --profile <TENANT_PROFILE_NAME> \
    --role-name CodePipelineCrossAccountRole \
    --policy-arn arn:aws:iam::<TENANT_ACCOUNT_ID>:policy/CodePipelineCrossAccountCfnPolicy

Additional configuration is needed in the Tooling account to allow access, which you complete later on.

Creating a deployment IAM role in each tenant account

After CodePipeline assumes the CodePipelineCrossAccountRole IAM role into the tenant account, it triggers AWS CloudFormation to provision the infrastructure based on the template defined in the application.yaml file. For that, AWS CloudFormation needs to assume an IAM role that grants privileges to create resources into the tenant AWS account.

Repeat the following steps for each tenant account to allow AWS CloudFormation to create resources in those accounts:

  1. Create an IAM role that can be assumed by AWS CloudFormation:
aws iam create-role \
    --role-name CloudFormationDeploymentRole \
    --profile <TENANT_PROFILE_NAME> \
    --assume-role-policy-document \
        '{
            "Version": "2012-10-17",
            "Statement": [
                {
                    "Effect": "Allow",
                    "Principal": {
                        "Service": "cloudformation.amazonaws.com"
                    },
                    "Action": "sts:AssumeRole"
                }
            ]
        }'
  1. Create an IAM policy that grants permissions to create AWS resources:
aws iam create-policy \
    --policy-name CloudFormationDeploymentPolicy \
    --profile <TENANT_PROFILE_NAME> \
    --policy-document \
        '{
            "Version": "2012-10-17",
            "Statement": [
                {
                    "Action": "iam:PassRole",
                    "Resource": "arn:aws:iam::<TENANT_ACCOUNT_ID>:role/*",
                    "Effect": "Allow"
                },
                {
                    "Action": [
                        "iam:GetRole",
                        "iam:CreateRole",
                        "iam:DeleteRole",
                        "iam:AttachRolePolicy",
                        "iam:DetachRolePolicy"
                    ],
                    "Resource": "arn:aws:iam::<TENANT_ACCOUNT_ID>:role/*",
                    "Effect": "Allow"
                },
                {
                    "Action": "lambda:*",
                    "Resource": "*",
                    "Effect": "Allow"
                },
                {
                    "Action": "codedeploy:*",
                    "Resource": "*",
                    "Effect": "Allow"
                },
                {
                    "Action": [
                        "s3:GetObject*",
                        "s3:GetBucket*",
                        "s3:List*"
                    ],
                    "Resource": [
                        "arn:aws:s3:::<BUCKET_UNIQUE_NAME>",
                        "arn:aws:s3:::<BUCKET_UNIQUE_NAME>/*"
                    ],
                    "Effect": "Allow"
                },
                {
                    "Action": [
                        "kms:Decrypt",
                        "kms:DescribeKey"
                    ],
                    "Resource": "<KEY_ARN>",
                    "Effect": "Allow"
                },
                {
                    "Action": [
                        "cloudformation:CreateStack",
                        "cloudformation:DescribeStack*",
                        "cloudformation:GetStackPolicy",
                        "cloudformation:GetTemplate*",
                        "cloudformation:SetStackPolicy",
                        "cloudformation:UpdateStack",
                        "cloudformation:ValidateTemplate"
                    ],
                    "Resource": "arn:aws:cloudformation:<YOUR_REGION>:<TENANT_ACCOUNT_ID>:stack/SampleApplication*/*",
                    "Effect": "Allow"
                },
                {
                    "Action": [
                        "cloudformation:CreateChangeSet"
                    ],
                    "Resource": "arn:aws:cloudformation:<YOUR_REGION>:aws:transform/Serverless-2016-10-31",
                    "Effect": "Allow"
                }
            ]
        }'

The granted permissions in this IAM policy depend on the resources your application needs to be provisioned. Because the application in our use case consists of a simple Lambda function, the IAM policy only needs permissions over Lambda. The other permissions declared are to access and decrypt the Lambda code from the artifact store, use AWS CodeDeploy to deploy the function, and create and attach the Lambda execution role.

  1. Attach the IAM policy to the IAM role:
aws iam attach-role-policy \
    --profile <TENANT_PROFILE_NAME> \
    --role-name CloudFormationDeploymentRole \
    --policy-arn arn:aws:iam::<TENANT_ACCOUNT_ID>:policy/CloudFormationDeploymentPolicy

Configuring an artifact store encryption key

Even though the IAM roles created in the tenant accounts declare permissions to use the CMK encryption key, that’s not enough to have access to the key. To access the key, you must update the CMK key policy.

From the terminal, run the following command to attach the new policy:

aws kms put-key-policy \
    --key-id <KEY_ARN> \
    --policy-name default \
    --region <YOUR_REGION> \
    --policy \
        '{
             "Id": "TenantAccountAccess",
             "Version": "2012-10-17",
             "Statement": [
                {
                    "Sid": "Enable IAM User Permissions",
                    "Effect": "Allow",
                    "Principal": {
                        "AWS": "arn:aws:iam::<TOOLING_ACCOUNT_ID>:root"
                    },
                    "Action": "kms:*",
                    "Resource": "*"
                },
                {
                    "Effect": "Allow",
                    "Principal": {
                        "AWS": [
                            "arn:aws:iam::<GNOME_ACCOUNT_ID>:role/CloudFormationDeploymentRole",
                            "arn:aws:iam::<GNOME_ACCOUNT_ID>:role/CodePipelineCrossAccountRole",
                            "arn:aws:iam::<UNICORN_ACCOUNT_ID>:role/CloudFormationDeploymentRole",
                            "arn:aws:iam::<UNICORN_ACCOUNT_ID>:role/CodePipelineCrossAccountRole"
                        ]
                    },
                    "Action": [
                        "kms:Decrypt",
                        "kms:DescribeKey"
                    ],
                    "Resource": "*"
                }
             ]
         }'

Provisioning the CI/CD pipeline

Each CodePipeline workflow consists of two or more stages, which are composed by a series of parallel or serial actions. For our use case, the pipeline is made up of four stages:

  • Source – Declares CodeCommit as the source control for the application code.
  • Build – Using CodeBuild, it installs the dependencies and builds deployable artifacts. In this use case, the sample application is too simple and this stage is used for illustration purposes.
  • Deploy_Dev – Deploys the sample application on a sandbox environment. At this point, the deployable artifacts generated at the Build stage are used to create a CloudFormation stack and deploy the Lambda function.
  • Deploy_Prod – Similar to Deploy_Dev, at this stage the sample application is deployed on the tenant production environments. For that, it contains two actions (one per tenant) that are run in parallel. CodePipeline uses CodePipelineCrossAccountRole to assume a role on the tenant account, and from there, CloudFormationDeploymentRole is used to effectively deploy the application.

To provision your resources, complete the following steps from the terminal:

  1. Download the CloudFormation pipeline template:
curl -LO https://cross-account-ci-cd-pipeline-single-tenant-saas.s3.amazonaws.com/pipeline.yaml
  1. Deploy the CloudFormation stack using the pipeline template:
aws cloudformation deploy \
    --template-file pipeline.yaml \
    --region <YOUR_REGION> \
    --stack-name <YOUR_PIPELINE_STACK_NAME> \
    --capabilities CAPABILITY_IAM \
    --parameter-overrides \
        ArtifactBucketName=<BUCKET_UNIQUE_NAME> \
        ArtifactEncryptionKeyArn=<KMS_KEY_ARN> \
        UnicornAccountId=<UNICORN_TENANT_ACCOUNT_ID> \
        GnomeAccountId=<GNOME_TENANT_ACCOUNT_ID> \
        SampleApplicationRepositoryName=<YOUR_CODECOMMIT_REPOSITORY_NAME> \
        RepositoryBranch=<YOUR_CODECOMMIT_MAIN_BRANCH>

This is the list of the required parameters to deploy the template:

    • ArtifactBucketName – The name of the S3 bucket where the deployment artifacts are to be stored.
    • ArtifactEncryptionKeyArn – The ARN of the customer managed CMK to be used as artifact encryption key.
    • UnicornAccountId – The AWS account ID for the first tenant (Unicorn) where the application is to be deployed.
    • GnomeAccountId – The AWS account ID for the second tenant (Gnome) where the application is to be deployed.
    • SampleApplicationRepositoryName – The name of the CodeCommit repository where source changes are detected.
    • RepositoryBranch – The name of the CodeCommit branch where source changes are detected. The default value is master in case no value is provided.
  1. Wait for AWS CloudFormation to create the resources.

When stack creation is complete, the pipeline starts automatically.

For each existing tenant, an action is declared within the Deploy_Prod stage. The following code is a snippet of how these actions are configured to deploy the application on a different account:

RoleArn: !Sub arn:aws:iam::${UnicornAccountId}:role/CodePipelineCrossAccountRole
Configuration:
    ActionMode: CREATE_UPDATE
    Capabilities: CAPABILITY_IAM,CAPABILITY_AUTO_EXPAND
    StackName: !Sub SampleApplication-unicorn-stack-${AWS::Region}
    RoleArn: !Sub arn:aws:iam::${UnicornAccountId}:role/CloudFormationDeploymentRole
    TemplatePath: CodeCommitSource::application.yaml
    ParameterOverrides: !Sub | 
        { 
            "ApplicationName": "SampleApplication-Unicorn",
            "S3Bucket": { "Fn::GetArtifactAtt" : [ "ApplicationBuildOutput", "BucketName" ] },
            "S3Key": { "Fn::GetArtifactAtt" : [ "ApplicationBuildOutput", "ObjectKey" ] }
        }

The code declares two IAM roles. The first one is the IAM role assumed by the CodePipeline action to access the tenant AWS account, whereas the second is the IAM role used by AWS CloudFormation to create AWS resources in the tenant AWS account. The ParameterOverrides configuration declares where the release artifact is located. The S3 bucket and key are in the Tooling account and encrypted using the customer managed CMK. That’s why it was necessary to grant access from external accounts using a bucket and KMS policies.

Besides the CI/CD pipeline itself, this CloudFormation template declares IAM roles that are used by the pipeline and its actions. The main IAM role is named CrossAccountPipelineRole, which is used by the CodePipeline service. It contains permissions to assume the action roles. See the following code:

{
    "Action": "sts:AssumeRole",
    "Effect": "Allow",
    "Resource": [
        "arn:aws:iam::<TOOLING_ACCOUNT_ID>:role/<PipelineSourceActionRole>",
        "arn:aws:iam::<TOOLING_ACCOUNT_ID>:role/<PipelineApplicationBuildActionRole>",
        "arn:aws:iam::<TOOLING_ACCOUNT_ID>:role/<PipelineDeployDevActionRole>",
        "arn:aws:iam::<UNICORN_ACCOUNT_ID>:role/CodePipelineCrossAccountRole",
        "arn:aws:iam::<GNOME_ACCOUNT_ID>:role/CodePipelineCrossAccountRole"
    ]
}

When you have more tenant accounts, you must add additional roles to the list.

After CodePipeline runs successfully, test the sample application by invoking the Lambda function on each tenant account:

aws lambda invoke --function-name SampleApplication --profile <TENANT_PROFILE_NAME> --region <YOUR_REGION> out

The output should be:

{
    "StatusCode": 200,
    "ExecutedVersion": "$LATEST"
}

Cleaning up

Follow these steps to delete the components and avoid future incurring charges:

  1. Delete the production application stack from each tenant account:
aws cloudformation delete-stack --profile <TENANT_PROFILE_NAME> --region <YOUR_REGION> --stack-name SampleApplication-<TENANT_NAME>-stack-<YOUR_REGION>
  1. Delete the dev application stack from the Tooling account:
aws cloudformation delete-stack --region <YOUR_REGION> --stack-name SampleApplication-dev-stack-<YOUR_REGION>
  1. Delete the pipeline stack from the Tooling account:
aws cloudformation delete-stack --region <YOUR_REGION> --stack-name <YOUR_PIPELINE_STACK_NAME>
  1. Delete the customer managed CMK from the Tooling account:
aws kms schedule-key-deletion --region <YOUR_REGION> --key-id <KEY_ARN>
  1. Delete the S3 bucket from the Tooling account:
aws s3 rb s3://<BUCKET_UNIQUE_NAME> --force
  1. Optionally, delete the IAM roles and policies you created in the tenant accounts

Conclusion

This post demonstrated what it takes to build a CI/CD pipeline for single-tenant SaaS solutions isolated on the AWS account level. It covered how to grant cross-account access to artifact stores on Amazon S3 and artifact encryption keys on AWS KMS using policies and IAM roles. This approach is less error-prone because it avoids human errors when manually deploying the exact same application for multiple tenants.

For this use case, we performed most of the steps manually to better illustrate all the steps and components involved. For even more automation, consider using the AWS Cloud Development Kit (AWS CDK) and its pipeline construct to create your CI/CD pipeline and have everything as code. Moreover, for production scenarios, consider having integration tests as part of the pipeline.

Rafael Ramos

Rafael Ramos

Rafael is a Solutions Architect at AWS, where he helps ISVs on their journey to the cloud. He spent over 13 years working as a software developer, and is passionate about DevOps and serverless. Outside of work, he enjoys playing tabletop RPG, cooking and running marathons.