Post Syndicated from Chad Schmutzer original https://aws.amazon.com/blogs/compute/introducing-spot-blueprints-a-template-generator-for-frameworks-like-kubernetes-and-apache-spark/
This post is authored by Deepthi Chelupati, Senior Product Manager for Amazon EC2 Spot Instances, and Chad Schmutzer, Principal Developer Advocate for Amazon EC2
Customers have been using EC2 Spot Instances to save money and scale workloads to new levels for over a decade. Launched in late 2009, Spot Instances are spare Amazon EC2 compute capacity in the AWS Cloud available for steep discounts off On-Demand Instance prices. One thing customers love about Spot Instances is their integration across many services on AWS, the AWS Partner Network, and open source software. These integrations unlock the ability to take advantage of the deep savings and scale Spot Instances provide for interruptible workloads. Some of the most popular services used with Spot Instances include Amazon EC2 Auto Scaling, Amazon EMR, AWS Batch, Amazon Elastic Container Service (Amazon ECS), and Amazon Elastic Kubernetes Service (EKS). When we talk with customers who are early in their cost optimization journey about the advantages of using Spot Instances with their favorite workloads, they typically can’t wait to get started. They often tell us that while they’d love to start using Spot Instances right away, flipping between documentation, blog posts, and the AWS Management Console is time consuming and eats up precious development cycles. They want to know the fastest way to start saving with Spot Instances, while feeling confident they’ve applied best practices. Customers have overwhelmingly told us that the best way for them to get started quickly is to see complete workload configuration examples in infrastructure as code templates for AWS CloudFormation and Hashicorp Terraform. To address this feedback, we launched Spot Blueprints.
Spot Blueprints overview
Today we are excited to tell you about Spot Blueprints, an infrastructure code template generator that lives right in the EC2 Spot Console. Built based on customer feedback, Spot Blueprints guides you through a few short steps. These steps are designed to gather your workload requirements while explaining and configuring Spot best practices along the way. Unlike traditional wizards, Spot Blueprints generates custom infrastructure as code in real time within each step so you can easily understand the details of the configuration. Spot Blueprints makes configuring EC2 instance type agnostic workloads easy by letting you express compute capacity requirements as vCPU and memory. Then the wizard automatically expands those requirements to a flexible list of EC2 instance types available in the AWS Region you are operating. Spot Blueprints also takes high-level Spot best practices like Availability Zone flexibility, and applies them to your workload compute requirements. For example, automatically including all of the required resources and dependencies for creating a Virtual Private Cloud (VPC) with all Availability Zones configured for use. Additional workload-specific Spot best practices are also configured, such as graceful interruption handling for load balancer connection draining, automatic job retries, or container rescheduling.
Spot Blueprints makes keeping up with the latest and greatest Spot features (like the capacity-optimized allocation strategy and Capacity Rebalancing for EC2 Auto Scaling) easy. Spot Blueprints is continually updated to support new features as they become available. Today, Spot Blueprints supports generating infrastructure as code workload templates for some of the most popular services used with Spot Instances: Amazon EC2 Auto Scaling, Amazon EMR, AWS Batch, and Amazon EKS. You can tell us what blueprint you’d like to see next right in Spot Blueprints. We are excited to hear from you!
What are Spot best practices?
We’ve mentioned Spot best practices a few times so far in this blog. Let’s quickly review the best practices and how they relate to Spot Blueprints. When using Spot Instances, it is important to understand a couple of points:
- Spot Instances are interruptible and must be returned when EC2 needs the capacity back
- The location and amount of spare capacity available at any given moment is dynamic and continually changes in real time
For these reasons, it is important to follow best practices when using Spot Instances in your workloads. We like to call these “Spot best practices.” These best practices can be summarized as follows:
- Only run workloads that are truly interruption tolerant, meaning interruptible at both the individual instance level and overall application level
- Spot workloads should be flexible, meaning they can be shifted in real time to where the spare capacity currently is, or otherwise be paused until spare capacity is available again
- In practice, being flexible means qualifying a workload to run on multiple EC2 instance types (think big: multiple families, sizes, and generations), and in multiple Availability Zones, at any given time
Over the last few years, we’ve focused on making it easier to follow these best practices by adding features such as the following:
- EC2 Instance rebalance recommendation for Spot Instances: a signal that is sent when a Spot Instance is at elevated risk of interruption
- Mixed instances policy: an Auto Scaling group configuration to enhance availability by deploying across multiple instance types running in multiple Availability Zones
- Capacity Rebalancing for Amazon EC2 Auto Scaling: for proactively managing the Amazon EC2 Spot Instance lifecycle in an Auto Scaling group
- Capacity-optimized allocation strategy: designed to help find the most optimal spare capacity
- Amazon EC2 Instance Selector: a CLI tool and go library that recommends instance types based on resource criteria like vCPUs and memory
As mentioned prior, in addition to the Spot best practices we reviewed, there is an additional set of Spot best practices native to each workload that has integrated support for Spot Instances. For example, the ability to implement graceful interruption handling for:
- Load balancer connection draining
- Automatic job retries
- Container draining and rescheduling
Spot Blueprints are designed to quickly explain and generate templates with Spot best practices for each specific workload. The custom-generated workload templates can be downloaded in either AWS CloudFormation or HashiCorp Terraform format, allowing for further customization and learning before being deployed in your environment.
Next, let’s walk through configuring and deploying an example Spot blueprint.
Example tutorial
In this example tutorial, we use Spot Blueprints to configure an Apache Spark environment running on Amazon EMR, deploy the template as a CloudFormation stack, run a sample job, and then delete the CloudFormation stack.
First, we navigate to the EC2 Spot console and click on “Spot Blueprints”:

In the next screen, we select the EMR blueprint, and then click “Configure blueprint”:
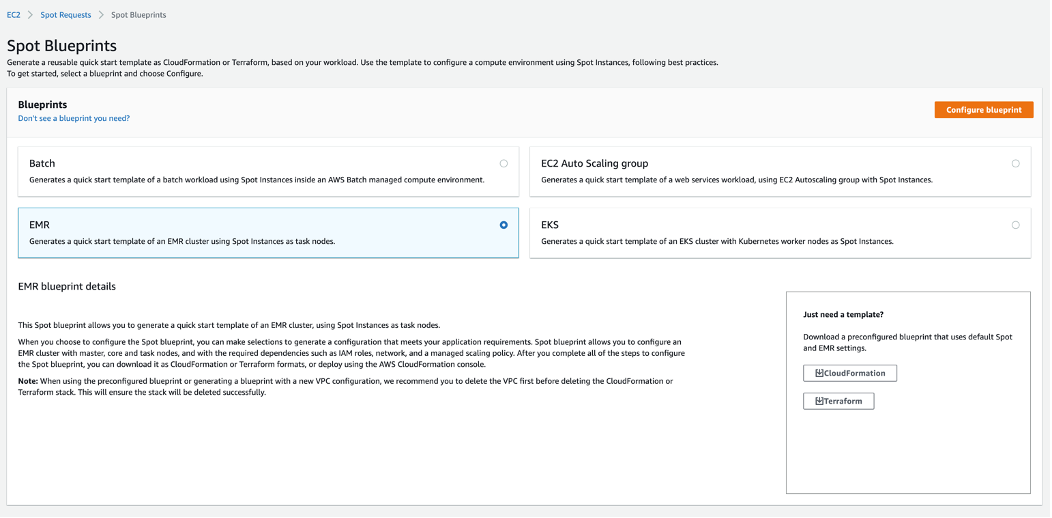
A couple of notes here:
- If you are in a hurry, you can grab a preconfigured template to get started quickly. The preconfigured template has default best practices in place and can be further customized as needed.
- If you have a suggestion for a new blueprint you’d like to see, you can click on “Don’t see a blueprint you need?” to give us feedback. We’d love to hear from you!
In Step 1, we give the blueprint a name and configure permissions. We have the blueprint create new IAM roles to allow Amazon EMR and Amazon EC2 compute resources to make calls to the AWS APIs on your behalf:

We see a summary of resources that will be created, along with a code snippet preview. Unlike traditional wizards, you can see the code generated in every step!

In Step 2, the network is configured. We create a new VPC with public subnets in all Availability Zones in the Region. This is a Spot best practice because it increases the number of Spot capacity pools, which increases the possibility for EC2 to find and provision the required capacity:

We see a summary of resources that will be created, along with a code snippet preview. Here is the CloudFormation code for our template, where you can see the VPC creation, including all dependencies such as the internet gateway, route table, and subnets:
attachGateway:
  DependsOn:
    - vpc
    - internetGateway
  Properties:
    InternetGatewayId:
      Ref: internetGateway
    VpcId:
      Ref: vpc
  Type: AWS::EC2::VPCGatewayAttachment
internetGateway:
  DependsOn:
    - vpc
  Type: AWS::EC2::InternetGateway
publicRoute:
  DependsOn:
    - publicRouteTable
    - internetGateway
    - attachGateway
  Properties:
    DestinationCidrBlock: 0.0.0.0/0
    GatewayId:
      Ref: internetGateway
    RouteTableId:
      Ref: publicRouteTable
  Type: AWS::EC2::Route
publicRouteTable:
  DependsOn:
    - vpc
    - attachGateway
  Properties:
    Tags:
      - Key: Name
        Value: Public Route Table
    VpcId:
      Ref: vpc
  Type: AWS::EC2::RouteTable
vpc:
  Properties:
    CidrBlock:
      Fn::FindInMap:
        - CidrMappings
        - vpc
        - CIDR
    EnableDnsHostnames: true
    EnableDnsSupport: true
    Tags:
      - Key: Name
        Value:
          Ref: AWS::StackName
  Type: AWS::EC2::VPC
publicSubnet1RouteTableAssociation:
  DependsOn:
    - publicRouteTable
    - publicSubnet1
    - attachGateway
  Type: AWS::EC2::SubnetRouteTableAssociation
  Properties:
    RouteTableId:
      Ref: publicRouteTable
    SubnetId:
      Ref: publicSubnet1
publicSubnet1:
  DependsOn:
    - attachGateway
  Type: AWS::EC2::Subnet
  Properties:
    VpcId:
      Ref: vpc
    AvailabilityZone: us-east-1a
    CidrBlock: 10.0.0.0/24
    MapPublicIpOnLaunch: true
    Tags:
      - Key: Name
        Value:
          Fn::Sub: ${EnvironmentName} Public Subnet (AZ1)
publicSubnet2RouteTableAssociation:
  DependsOn:
    - publicRouteTable
    - publicSubnet2
    - attachGateway
  Type: AWS::EC2::SubnetRouteTableAssociation
  Properties:
    RouteTableId:
      Ref: publicRouteTable
    SubnetId:
      Ref: publicSubnet2
publicSubnet2:
  DependsOn:
    - attachGateway
  Type: AWS::EC2::Subnet
  Properties:
    VpcId:
      Ref: vpc
    AvailabilityZone: us-east-1b
    CidrBlock: 10.0.1.0/24
    MapPublicIpOnLaunch: true
    Tags:
      - Key: Name
        Value:
          Fn::Sub: ${EnvironmentName} Public Subnet (AZ2)
publicSubnet3RouteTableAssociation:
  DependsOn:
    - publicRouteTable
    - publicSubnet3
    - attachGateway
  Type: AWS::EC2::SubnetRouteTableAssociation
  Properties:
    RouteTableId:
      Ref: publicRouteTable
    SubnetId:
      Ref: publicSubnet3
publicSubnet3:
  DependsOn:
    - attachGateway
  Type: AWS::EC2::Subnet
  Properties:
    VpcId:
      Ref: vpc
    AvailabilityZone: us-east-1c
    CidrBlock: 10.0.2.0/24
    MapPublicIpOnLaunch: true
    Tags:
      - Key: Name
        Value:
          Fn::Sub: ${EnvironmentName} Public Subnet (AZ3)
publicSubnet4RouteTableAssociation:
  DependsOn:
    - publicRouteTable
    - publicSubnet4
    - attachGateway
  Type: AWS::EC2::SubnetRouteTableAssociation
  Properties:
    RouteTableId:
      Ref: publicRouteTable
    SubnetId:
      Ref: publicSubnet4
publicSubnet4:
  DependsOn:
    - attachGateway
  Type: AWS::EC2::Subnet
  Properties:
    VpcId:
      Ref: vpc
    AvailabilityZone: us-east-1d
    CidrBlock: 10.0.3.0/24
    MapPublicIpOnLaunch: true
    Tags:
      - Key: Name
        Value:
          Fn::Sub: ${EnvironmentName} Public Subnet (AZ4)
publicSubnet5RouteTableAssociation:
  DependsOn:
    - publicRouteTable
    - publicSubnet5
    - attachGateway
  Type: AWS::EC2::SubnetRouteTableAssociation
  Properties:
    RouteTableId:
      Ref: publicRouteTable
    SubnetId:
      Ref: publicSubnet5
publicSubnet5:
  DependsOn:
    - attachGateway
  Type: AWS::EC2::Subnet
  Properties:
    VpcId:
      Ref: vpc
    AvailabilityZone: us-east-1e
    CidrBlock: 10.0.4.0/24
    MapPublicIpOnLaunch: true
    Tags:
      - Key: Name
        Value:
          Fn::Sub: ${EnvironmentName} Public Subnet (AZ5)
publicSubnet6RouteTableAssociation:
  DependsOn:
    - publicRouteTable
    - publicSubnet6
    - attachGateway
  Type: AWS::EC2::SubnetRouteTableAssociation
  Properties:
    RouteTableId:
      Ref: publicRouteTable
    SubnetId:
      Ref: publicSubnet6
publicSubnet6:
  DependsOn:
    - attachGateway
  Type: AWS::EC2::Subnet
  Properties:
    VpcId:
      Ref: vpc
    AvailabilityZone: us-east-1f
    CidrBlock: 10.0.5.0/24
    MapPublicIpOnLaunch: true
    Tags:
      - Key: Name
        Value:
          Fn::Sub: ${EnvironmentName} Public Subnet (AZ6)
In Step 3, we configure the compute environment. Spot Blueprints makes this easy by allowing us to simply define our capacity units and required compute capacity for each type of node in our EMR cluster. In this walkthrough we will use vCPUs. We select 4 vCPUs for the core node capacity, and 12 vCPUs for the task node capacity. Based on these configurations, Spot Blueprints will apply best practices to the EMR cluster settings. These include using On-Demand Instances for core nodes since interruptions to core nodes can cause instability in the EMR cluster, and using Spot Instances for task nodes because the EMR cluster is typically more tolerant to task node interruptions. Finally, task nodes are provisioned using the capacity-optimized allocation strategy because it helps find the most optimal Spot capacity:

You’ll notice there is no need to spend time thinking about which instance types to select – Spot Blueprints takes our application’s minimum vCPUs per instance and minimum vCPU to memory ratio requirements and automatically selects the optimal instance types. This instance type selection process applies Spot best practices by a) using instance types across different families, generations, and sizes, and b) using the maximum number of instance types possible for core (5) and task (15) nodes:

Here is the CloudFormation code for our template. You can see the EMR cluster creation, the applications being installed (Spark, Hadoop, and Ganglia), the flexible list of instance types and Availability Zones, and the capacity-optimized allocation strategy enabled (along with all dependencies):
emrSparkInstanceFleetCluster:
DependsOn:
- vpc
- publicRoute
- publicSubnet1RouteTableAssociation
- publicSubnet2RouteTableAssociation
- publicSubnet3RouteTableAssociation
- publicSubnet4RouteTableAssociation
- publicSubnet5RouteTableAssociation
- publicSubnet6RouteTableAssociation
- spotBlueprintsEmrRole
Properties:
Applications:
- Name: Spark
- Name: Hadoop
- Name: Ganglia
Instances:
CoreInstanceFleet:
InstanceTypeConfigs:
- InstanceType: c5.xlarge
WeightedCapacity: 4
- InstanceType: c4.xlarge
WeightedCapacity: 4
- InstanceType: c3.xlarge
WeightedCapacity: 4
- InstanceType: m5.xlarge
WeightedCapacity: 4
- InstanceType: m3.xlarge
WeightedCapacity: 4
Name:
Ref: AWS::StackName
TargetOnDemandCapacity: "4"
LaunchSpecifications:
OnDemandSpecification:
AllocationStrategy: lowest-price
Ec2SubnetIds:
- Ref: publicSubnet1
- Ref: publicSubnet2
- Ref: publicSubnet3
- Ref: publicSubnet4
- Ref: publicSubnet5
- Ref: publicSubnet6
MasterInstanceFleet:
InstanceTypeConfigs:
- InstanceType: c5.xlarge
- InstanceType: c4.xlarge
- InstanceType: c3.xlarge
- InstanceType: m5.xlarge
- InstanceType: m3.xlarge
Name:
Ref: AWS::StackName
TargetOnDemandCapacity: "1"
JobFlowRole:
Ref: spotBlueprintsEmrEc2InstanceProfile
Name:
Ref: AWS::StackName
ReleaseLabel: emr-5.30.1
ServiceRole:
Ref: spotBlueprintsEmrRole
Tags:
- Key: Name
Value:
Ref: AWS::StackName
VisibleToAllUsers: true
Type: AWS::EMR::Cluster
emrSparkInstanceTaskFleet:
DependsOn:
- emrSparkInstanceFleetCluster
Properties:
ClusterId:
Ref: emrSparkInstanceFleetCluster
InstanceFleetType: TASK
InstanceTypeConfigs:
- InstanceType: c5.xlarge
WeightedCapacity: 4
- InstanceType: c4.xlarge
WeightedCapacity: 4
- InstanceType: c3.xlarge
WeightedCapacity: 4
- InstanceType: m5.xlarge
WeightedCapacity: 4
- InstanceType: m3.xlarge
WeightedCapacity: 4
- InstanceType: m4.xlarge
WeightedCapacity: 4
- InstanceType: r4.xlarge
WeightedCapacity: 4
- InstanceType: r5.xlarge
WeightedCapacity: 4
- InstanceType: r3.xlarge
WeightedCapacity: 4
- InstanceType: c4.2xlarge
WeightedCapacity: 8
- InstanceType: c3.2xlarge
WeightedCapacity: 8
- InstanceType: c5.2xlarge
WeightedCapacity: 8
- InstanceType: m5.2xlarge
WeightedCapacity: 8
- InstanceType: m4.2xlarge
WeightedCapacity: 8
- InstanceType: m3.2xlarge
WeightedCapacity: 8
LaunchSpecifications:
SpotSpecification:
TimeoutAction: TERMINATE_CLUSTER
TimeoutDurationMinutes: 60
AllocationStrategy: capacity-optimized
Name: TaskFleet
TargetSpotCapacity: "12"
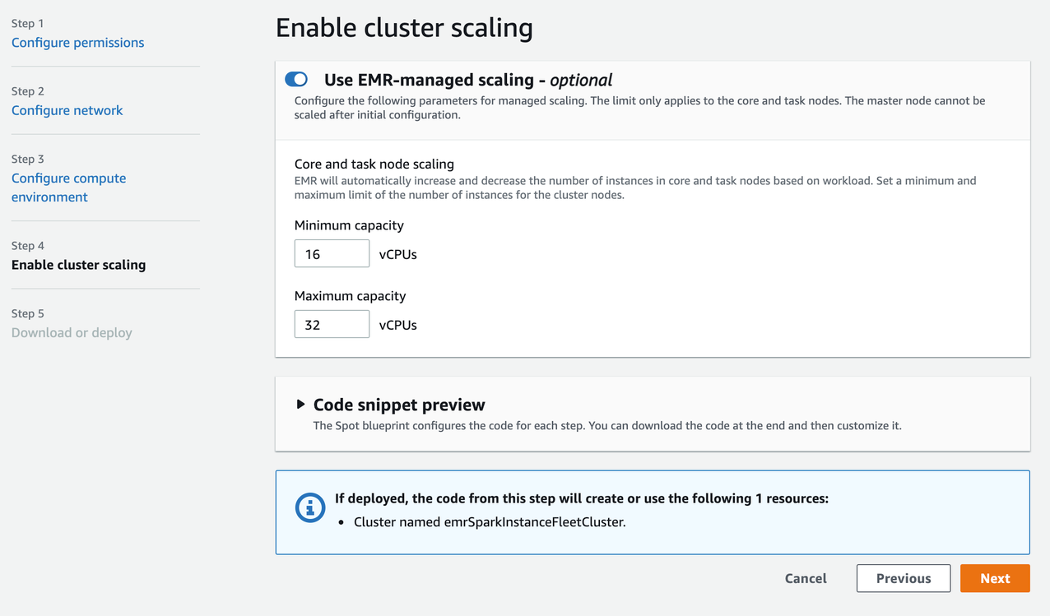
Type: AWS::EMR::InstanceFleetConfigIn Step 4, we have the option of enabling EMR managed scaling on the cluster. Enabling EMR managed scaling is a Spot best practice because this allows EMR to automatically increase or decrease the compute capacity in the cluster based on the workload, further optimizing performance and cost. EMR continuously evaluates cluster metrics to make scaling decisions that optimize the cluster for cost and speed. Spot Blueprints automatically configures minimum and maximum scaling values based on the compute requirements we defined in the previous step:
Here is the updated CloudFormation code for our template with managed scaling (ManagedScalingPolicy) enabled:
emrSparkInstanceFleetCluster:
  DependsOn:
    - vpc
    - publicRoute
    - publicSubnet1RouteTableAssociation
    - publicSubnet2RouteTableAssociation
    - publicSubnet3RouteTableAssociation
    - publicSubnet4RouteTableAssociation
    - publicSubnet5RouteTableAssociation
    - publicSubnet6RouteTableAssociation
    - spotBlueprintsEmrRole
  Properties:
    Applications:
      - Name: Spark
      - Name: Hadoop
      - Name: Ganglia
    Instances:
      CoreInstanceFleet:
        InstanceTypeConfigs:
          - InstanceType: c5.xlarge
            WeightedCapacity: 4
          - InstanceType: c4.xlarge
            WeightedCapacity: 4
          - InstanceType: c3.xlarge
            WeightedCapacity: 4
          - InstanceType: m5.xlarge
            WeightedCapacity: 4
          - InstanceType: m3.xlarge
            WeightedCapacity: 4
        Name:
          Ref: AWS::StackName
        TargetOnDemandCapacity: "4"
        LaunchSpecifications:
          OnDemandSpecification:
            AllocationStrategy: lowest-price
      Ec2SubnetIds:
        - Ref: publicSubnet1
        - Ref: publicSubnet2
        - Ref: publicSubnet3
        - Ref: publicSubnet4
        - Ref: publicSubnet5
        - Ref: publicSubnet6
      MasterInstanceFleet:
        InstanceTypeConfigs:
          - InstanceType: c5.xlarge
          - InstanceType: c4.xlarge
          - InstanceType: c3.xlarge
          - InstanceType: m5.xlarge
          - InstanceType: m3.xlarge
        Name:
          Ref: AWS::StackName
        TargetOnDemandCapacity: "1"
    JobFlowRole:
      Ref: spotBlueprintsEmrEc2InstanceProfile
    Name:
      Ref: AWS::StackName
    ReleaseLabel: emr-5.30.1
    ServiceRole:
      Ref: spotBlueprintsEmrRole
    Tags:
      - Key: Name
        Value:
          Ref: AWS::StackName
    VisibleToAllUsers: true
    ManagedScalingPolicy:
      ComputeLimits:
        MaximumCapacityUnits: "32"
        MinimumCapacityUnits: "16"
        MaximumOnDemandCapacityUnits: "4"
        MaximumCoreCapacityUnits: "4"
        UnitType: InstanceFleetUnits
  Type: AWS::EMR::Cluster
In Step 5, we can review and download the template code for further customization in either CloudFormation or Terraform format, review the instance configuration summary, and review a summary of the resources that would be created from the template. Spot Blueprints will also upload the CloudFormation template to an Amazon S3 bucket so we can deploy the template directly from the CloudFormation console or CLI. Let’s go ahead and click on “Deploy in CloudFormation,” copy the URL, and then click on “Deploy in CloudFormation” again:

Having copied the S3 URL, we go to the CloudFormation console to launch the CloudFormation stack:

We walk through the CloudFormation stack creation steps and the stack launches, creating all of the resources as configured in the blueprint. It takes roughly 15-20 minutes for our stack creation to complete:

Once the stack creation is complete, we navigate to the Amazon EMR console to view the EMR cluster configured with Spot best practices:

Next, let’s run a sample Spark application written in Python to calculate the value of pi on the cluster. We’ll do this by uploading the sample application code to an S3 bucket in our account and then adding a step to the cluster referencing the application location code with arguments:

The step runs and completes successfully:

The results of the calculation are sent to our S3 bucket as configured in the arguments:
{"tries":1600000,"hits":1256253,"pi":3.1406325}
Cleanup
Now that our job is done, we delete the CloudFormation stack in order to remove the AWS resources created. Please note that as a part of the EMR cluster creation, EMR creates some EC2 security groups that cannot be removed by CloudFormation since they were created by the EMR cluster and not by CloudFormation. As a result, the deletion of the CloudFormation stack will fail to delete the VPC on the first try. To solve this, we have the option of deleting the VPC manually by hand, or we can let the CloudFormation stack ignore the VPC and leave it (along with the security groups) in place for future use. We can then delete the CloudFormation stack a final time:

Conclusion
No matter if you are a first-time Spot user learning how to take advantage of the savings and scale offered by Spot Instances, or a veteran Spot user expanding your Spot usage into a new architecture, Spot Blueprints has you covered. We hope you enjoy using Spot Blueprints to quickly get you started generating example template frameworks for workloads like Kubernetes and Apache Spark with Spot best practices in place. Please tell us which blueprint you’d like to see next right in Spot Blueprints. We can’t wait to hear from you!