Tag Archives: Amazon EC2 Spot

Optimizing Amazon EC2 Spot Instances with Spot Placement Scores

Post Syndicated from Sheila Busser original https://aws.amazon.com/blogs/compute/optimizing-amazon-ec2-spot-instances-with-spot-placement-scores/

This blog post is written by Steve Cole, Principal Specialist SA, and Robert McCone, Sr. Specialist SA.

Getting the compute resources you need, even vCPUS numbering in the millions, and completing a workload using Amazon EC2 Spot Instances is just a configuration away. In this post you will learn how to use Spot placement scores to reduce interruptions, acquire greater capacity, and identify optimal configurations, times, and locations to run workloads on Spot Instances. Amazon EC2 Spot Instances let you take advantage of unused EC2 capacity in the AWS cloud and are available at up to a 90% discount compared to On-Demand prices. Spot placement scores is a feature that many customers use to identify optimal instance types or to choose the best Availability Zone (AZ) for ephemeral work like data analytics or high-performance computing. As a real-time tool, Spot placement scores are often integrated into deployment automation. However, because of its logging and graphic capabilities, you may find it be a valuable resource even before you launch a workload into the cloud. Now available through AWS Labs, a Github repository hosting tools for customers, the Spot placement score tracker tackles the undifferentiated heavy lifting and can do this for any customer.

About Spot placement score

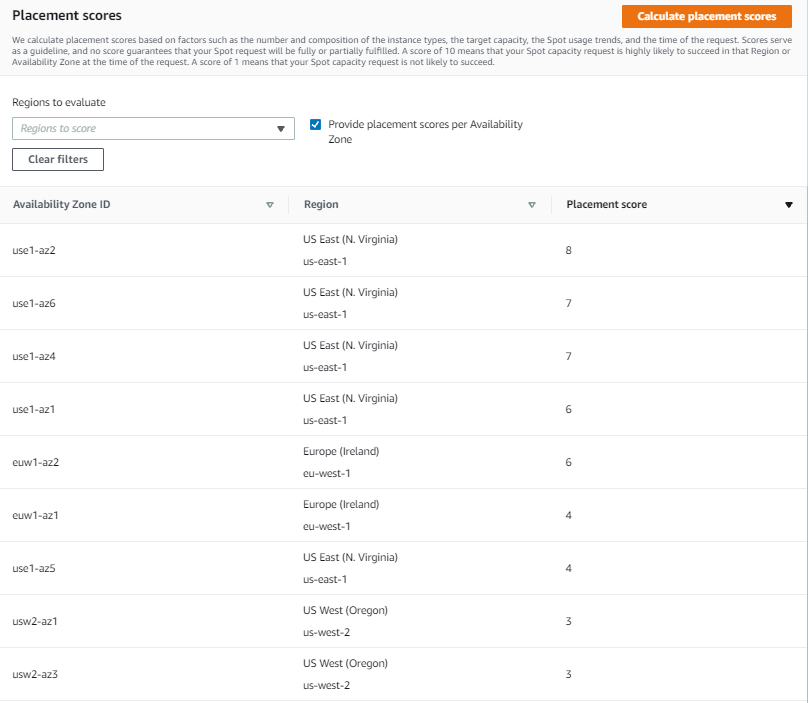
Spot placement scores are a feature available through AWS APIs – also implemented in the Amazon EC2 Spot requests console – that uses internal capacity and interruption data to scrutinize the size and shape of a Spot Instance request and responds with a “likelihood of success” rating of 1 to imply lower likelihood of success and 10 to imply higher likelihood of success. The score represents confidence in being able to acquire the desired capacity (size) using the instance configuration (shape) for the next few hours. The shape of the request can be a list of specific instances or can be requirements-based with attribute-based instance type selection. The size of the request can be instance count, number of vCPUs, or GB of RAM. It’s based on known capacity, allocation strategies, and the trending of capacities over time.

Before the release of Spot placement score, customers could track the trends of their existing workloads and configurations. This might have helped them to anticipate capacity constraints over time, but the ability to do something more meaningful when assessing configurations was something customers requested often. With the launch of Spot placement score, that capability was delivered and enabled customers to receive guidance on how a configuration change might affect the effectiveness of Spot Instances in a workload.

Customers immediately recognized the power of this new feature and started writing tooling around their workloads to incorporate the new functionality provided by Spot placement scores. For examples, customers leveraged Spot placement scores to find the highest scoring AZ in a region for work that requires low latency within a cluster. Customers running data analytics with services like Amazon EMR could more confidently launch clusters on Spot Instances. This reduces costs and the time necessary to process data because of fewer interruptions. Financial customers, health care and life sciences, and high tech were some of the early adopters of this strategy.

Benefits of Spot placement scores

One specific customer used tools like the Spot instance advisor and Spot pricing history tools to make decisions about what instances to run every night. If the customer’s analytics workload received too many interruptions, then it would inevitably be relaunched using On-Demand Instances, increasing costs and time-to-complete. The addition of Spot placement scores to the customer’s tooling allowed for more informed decisions about which configurations worked best and, more specifically, which AZ(s) to use. Ultimately, this led not only to higher confidence in using Spot instances, but also to significant cost savings over time.

Other customers tracked Spot placement scores over time with regular queries stored in time series databases to identify not only the best configuration or location, but also the best time-of-day or day-of-week to run their workloads. Different configurations of instance types were queried through automation and the results were logged into a time series database that could then be presented as graphs. These graphs were scrutinized, configurations were tuned, and ultimately these customers could take greater advantage of the cost optimization that Spot instances offer through fewer interruptions by running their workloads where and when scores were higher.

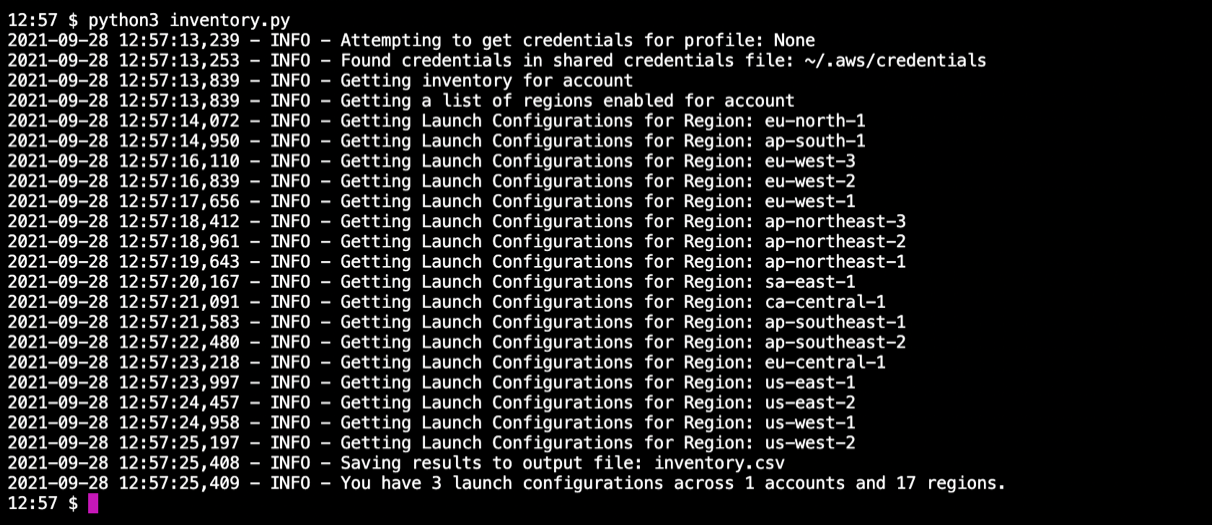
AWS was interested in how this solved problems for customers, and after some more research with customers and design ideation, led to the creation of an OSS tool that AWS has recently released: Spot placement score tracker. Spot placement score tracker helps customers evaluate different configurations against multiple times and locations. It’s an AWS-native solution that leverages the Spot placement score API along with AWS Lambda and Amazon CloudWatch to create a dashboard that enables any AWS customer to benefit from this model without having to write it themselves.

How to use the Spot placement score tracker

The project provides Infrastructure as Code (IaC) automation using the AWS Cloud Development Kit (AWS CDK) to deploy the infrastructure and permissions required to run Lambda. This gets executed every five minutes to collect the placement scores of as many diversified configurations as defined.

Architectural diagram: CDK building connections between EventBridge, Lambda, S3, and CloudWatch to generate dashboards

After installing the CloudWatch dashboard, and given some time to collect and record data, you will be provided valuable insights in an intuitive graph such as those in the following example.

Sample CloudWatch dashboard with four graphs showing Spot placement score results over time for different configurations

Insights available through the Spot placement score tracker

The first thing you may notice by observing data over time is that instance diversification is the primary driver of high placement scores. This has always been a best practice for the use of Spot Instances, and it extends to On-Demand Instances as well. In short, if you can only run on one instance type, then the likelihood of experiencing interruptions is far greater than if you can run on six or twelve. Sometimes the simple inclusion of -a, -d, and -n instance types (e.g. m5.large, m5a.large, m5d.large, m5d.large), previous generations (e.g., m5.large, m4.large), different sizes in a container environment (e.g., m5.large, m5.xlarge, m5.2xlarge), and even the inclusion of AWS Graviton will have a material impact on placement scores, which equates to fewer interruptions. This ultimately leads to more efficient use of resources through less restarted processes, resulting in increased efficiency and reduced costs.

The second insight that you can realize through the use of placement scores over time is identifying the optimal AZ in which an ephemeral process can be placed. Perhaps the best use case for this type of insight is data analytics clusters that are launched to complete many calculations overnight. This is common in financial institutions for various reasons including risk analysis and compliance, but could apply to medical research examining results of experiments during the day as well as other situations where a 24/7 presence isn’t required by the workload. These customers are typically using a single AZ to allow for faster communication between nodes and to reduce data transfer costs. Therefore, the ability for Spot placement scores to provide different scores for different AZs is highly advantageous.

Third, with access to placement scores over time, it becomes possible to identify exactly how large a workload’s footprint can be. By submitting identical configurations to Spot placement scores but with different sizes, you can surface the ideal workload size. Not too small, where perhaps the job takes too long to complete, but also not so large that the interruptions are too frequent and cause restarts too often. This can benefit not only ephemeral workloads, but also persistent clusters or fleets by understanding what the lowest score would be over time and giving you solid information regarding what they can expect from Spot Instances and where. This might inform you to be ready to launch On-Demand Instances to compensate when Spot Instance availability is lower. This can also help to forecast pricing and inform decisions about the consideration of AWS Savings Plans or On-Demand Capacity Reservations.

Finally, analyzing Spot placement scores over time can provide regional scoring. Through this lens it’s possible for you to identify entire regions that they may have overlooked without the knowledge that Spot Instances outside the your primary region(s) might offer lower interruptions during daylight hours due to them being off-peak. When it’s possible to place a workload in another region, unconstrained by local data access requirements, it’s quite possible to harness the compute of a significant footprint in locations that are otherwise un(der)-utilized. Workloads that require less data transfer and more compute can benefit tremendously from access to Spot Instances in other regions. For example, things like build servers might run extraordinarily well in Europe during North American business hours and the reduction in compute cost might offset the data transfer to complete the job.

Conclusion

Spot placement scores can be used to make decisions about how, when, and where Spot Instances can be most efficiently utilized to deliver business needs, and at greatly reduced prices. We’re very excited to release this tool to enable you to tap into information which was previously unavailable and make data-driven decisions for your business. The information in this post, combined with the output of placement scores over time, is a significant evolution.

Install the Spot placement score tracker today, configure it to match an existing Spot workload, and see how you might perform at different times or different locations.  Explore more robust options and discover greater capacity and lower interruptions. Or investigate how On-Demand workloads could migrate to Spot Instances.

Introducing the price-capacity-optimized allocation strategy for EC2 Spot Instances

Post Syndicated from Sheila Busser original https://aws.amazon.com/blogs/compute/introducing-price-capacity-optimized-allocation-strategy-for-ec2-spot-instances/

This blog post is written by Jagdeep Phoolkumar, Senior Specialist Solution Architect, Flexible Compute and Peter Manastyrny, Senior Product Manager Tech, EC2 Core.

Amazon EC2 Spot Instances are unused Amazon Elastic Compute Cloud (Amazon EC2) capacity in the AWS Cloud available at up to a 90% discount compared to On-Demand prices. One of the best practices for using EC2 Spot Instances is to be flexible across a wide range of instance types to increase the chances of getting the aggregate compute capacity. Amazon EC2 Auto Scaling and Amazon EC2 Fleet make it easy to configure a request with a flexible set of instance types, as well as use a Spot allocation strategy to determine how to fulfill Spot capacity from the Spot Instance pools that you provide in your request.

The existing allocation strategies available in Amazon EC2 Auto Scaling and Amazon EC2 Fleet are called “lowest-price” and “capacity-optimized”. The lowest-price allocation strategy allocates Spot Instance pools where the Spot price is currently the lowest. Customers told us that in some cases the lowest-price strategy picks the Spot Instance pools that are not optimized for capacity availability and results in more frequent Spot Instance interruptions. As an improvement over lowest-price allocation strategy, in August 2019 AWS launched the capacity-optimized allocation strategy for Spot Instances, which helps customers tap into the deepest Spot Instance pools by analyzing capacity metrics. Since then, customers have seen a significantly lower interruption rate with capacity-optimized strategy when compared to the lowest-price strategy. You can read more about these customer stories in the Capacity-Optimized Spot Instance Allocation in Action at Mobileye and Skyscanner blog post. The capacity-optimized allocation strategy strictly selects the deepest pools. Therefore, sometimes it can pick high-priced pools even when there are low-priced pools available with marginally less capacity. Customers have been telling us that, for an optimal experience, they would like an allocation strategy that balances the best trade-offs between lowest-price and capacity-optimized.

Today, we’re excited to share the new price-capacity-optimized allocation strategy that makes Spot Instance allocation decisions based on both the price and the capacity availability of Spot Instances. The price-capacity-optimized allocation strategy should be the first preference and the default allocation strategy for most Spot workloads.

This post illustrates how the price-capacity-optimized allocation strategy selects Spot Instances in comparison with lowest-price and capacity-optimized. Furthermore, it discusses some common use cases of the price-capacity-optimized allocation strategy.

Overview

The price-capacity-optimized allocation strategy makes Spot allocation decisions based on both capacity availability and Spot prices. In comparison to the lowest-price allocation strategy, the price-capacity-optimized strategy doesn’t always attempt to launch in the absolute lowest priced Spot Instance pool. Instead, price-capacity-optimized attempts to diversify as much as possible across the multiple low-priced pools with high capacity availability. As a result, the price-capacity-optimized strategy in most cases has a higher chance of getting Spot capacity and delivers lower interruption rates when compared to the lowest-price strategy. If you factor in the cost associated with retrying the interrupted requests, then the price-capacity-optimized strategy becomes even more attractive from a savings perspective over the lowest-price strategy.

We recommend the price-capacity-optimized allocation strategy for workloads that require optimization of cost savings, Spot capacity availability, and interruption rates. For existing workloads using lowest-price strategy, we recommend price-capacity-optimized strategy as a replacement. The capacity-optimized allocation strategy is still suitable for workloads that either use similarly priced instances, or ones where the cost of interruption is so significant that any cost saving is inadequate in comparison to a marginal increase in interruptions.

Walkthrough

In this section, we illustrate how the price-capacity-optimized allocation strategy deploys Spot capacity when compared to the other two allocation strategies. The following example configuration shows how Spot capacity could be allocated in an Auto Scaling group using the different allocation strategies:

{
    "AutoScalingGroupName": "myasg ",
    "MixedInstancesPolicy": {
        "LaunchTemplate": {
            "LaunchTemplateSpecification": {
                "LaunchTemplateId": "lt-abcde12345"
            },
            "Overrides": [
                {
                    "InstanceRequirements": {
                        "VCpuCount": {
                            "Min": 4,
                            "Max": 4
                        },
                        "MemoryMiB": {
                            "Min": 0,
                            "Max": 16384
                        },
                        "InstanceGenerations": [
                            "current"
                        ],
                        "BurstablePerformance": "excluded",
                        "AcceleratorCount": {
                            "Max": 0
                        }
                    }
                }
            ]
        },
        "InstancesDistribution": {
            "OnDemandPercentageAboveBaseCapacity": 0,
            "SpotAllocationStrategy": "spot-allocation-strategy"
        }
    },
    "MinSize": 10,
    "MaxSize": 100,
    "DesiredCapacity": 60,
    "VPCZoneIdentifier": "subnet-a12345a,subnet-b12345b,subnet-c12345c"
}

First, Amazon EC2 Auto Scaling attempts to balance capacity evenly across Availability Zones (AZ). Next, Amazon EC2 Auto Scaling applies the Spot allocation strategy using the 30+ instances selected by attribute-based instance type selection, in each Availability Zone. The results after testing different allocation strategies are as follows:

  • Price-capacity-optimized strategy diversifies over multiple low-priced Spot Instance pools that are optimized for capacity availability.
  • Capacity-optimize strategy identifies Spot Instance pools that are only optimized for capacity availability.
  • Lowest-price strategy by default allocates the two lowest priced Spot Instance pools that aren’t optimized for capacity availability

To find out how each allocation strategy fares regarding Spot savings and capacity, we compare ‘Cost of Auto Scaling group’ (number of instances x Spot price/hour for each type of instance) and ‘Spot interruptions rate’ (number of instances interrupted/number of instances launched) for each allocation strategy. We use fictional numbers for the purpose of this post. However, you can use the Cloud Intelligence Dashboards to find the actual Spot Saving, and the Amazon EC2 Spot interruption dashboard to log Spot Instance interruptions. The example results after a 30-day period are as follows:

Allocation strategy

Instance allocation

Cost of Auto Scaling group

Spot interruptions rate

price-capacity-optimized

40 c6i.xlarge

20 c5.xlarge

$4.80/hour 3%

capacity-optimized

60 c5.xlarge

$5.00/hour

2%

lowest-price

30 c5a.xlarge

30 m5n.xlarge

$4.75/hour

20%

As per the above table, with the price-capacity-optimized strategy, the cost of the Auto Scaling group is only 5 cents (1%) higher, whereas the rate of Spot interruptions is six times lower (3% vs 20%) than the lowest-price strategy. In summary, from this exercise you learn that the price-capacity-optimized strategy provides the optimal Spot experience that is the best of both the lowest-price and capacity-optimized allocation strategies.

Common use-cases of price-capacity-optimized allocation strategy

Earlier we mentioned that the price-capacity-optimized allocation strategy is recommended for most Spot workloads. To elaborate further, in this section we explore some of these common workloads.

Stateless and fault-tolerant workloads

Stateless workloads that can complete ongoing requests within two minutes of a Spot interruption notice, and the fault-tolerant workloads that have a low cost of retries, are the best fit for the price-capacity-optimized allocation strategy. This category has workloads such as stateless containerized applications, microservices, web applications, data and analytics jobs, and batch processing.

Workloads with a high cost of interruption

Workloads that have a high cost of interruption associated with an expensive cost of retries should implement checkpointing to lower the cost of interruptions. By using checkpointing, you make the price-capacity-optimized allocation strategy a good fit for these workloads, as it allocates capacity from the low-priced Spot Instance pools that offer a low Spot interruptions rate. This category has workloads such as long Continuous Integration (CI), image and media rendering, Deep Learning, and High Performance Compute (HPC) workloads.

Conclusion

We recommend that customers use the price-capacity-optimized allocation strategy as the default option. The price-capacity-optimized strategy helps Amazon EC2 Auto Scaling groups and Amazon EC2 Fleet provision target capacity with an optimal experience. Updating to the price-capacity-optimized allocation strategy is as simple as updating a single parameter in an Amazon EC2 Auto Scaling group and Amazon EC2 Fleet.

To learn more about allocation strategies for Spot Instances, visit the Spot allocation strategies documentation page.

Implementing Attribute-Based Instance Type Selection using Terraform

Post Syndicated from Sheila Busser original https://aws.amazon.com/blogs/compute/implementing-attribute-based-instance-type-selection-using-terraform/

This blog post is written by Christian Melendez, Senior Specialist Solutions Architect, Flexible Compute – EC2 Spot and Carlos Manzanedo Rueda, WW SA Leader, Flexible Compute – EC2 Spot.

In this blog post we will cover the release of Terraform support for Attribute-Based Instance Type Selection (ABS). ABS simplifies the configuration required to acquire compute capacity for Instance Flexible workloads. Terraform  is an open-source infrastructure as code software tool by HashiCorp. Hashicorp is an AWS Partner Network (APN) Advanced Technology Partner and member of the AWS DevOps Competency.

Introduction

Amazon EC2 provides a wide selection of instance types optimized to fit different use cases. Instance types comprise varying combinations of CPU, memory, storage, and networking capacity and give you the flexibility to choose the appropriate mix of resources for your applications.

Workloads such as continuous integration, analytics, microservices on containers, etc., can use multiple instance types. Customers have been telling us that simplifying the configuration of instance flexible workloads is important. For workloads that are instance flexible, AWS released ABS to express workload requirements as a set of instance attributes such as: vCPU, memory, type of processor, etc. ABS translates these requirements and selects all matching instance types that meet the criteria. To select which instance to launch, Amazon EC2 Auto Scaling Groups and EC2 Fleet chose instances based on the allocation strategy configured. Lowest-price allocation strategy is supported on both Amazon EC2 On-Demand Instances and Amazon EC2 Spot Instances. The recommendation for Spot Instances is to use capacity-optimized, which select the optimal instances that reduce the frequency of interruptions. ABS does also future-proof EC2 Auto Scaling Group and EC2 Fleet configurations: any new instance type we launch that matches the selected attributes, will be included in the list automatically. No need to update your EC2 Auto Scaling Group or EC2 Fleet configuration.

Following our commitment to open-source projects, AWS has added support for ABS in the AWS Terraform provider. You can use ABS for launch templates, EC2 Auto Scaling Group, and EC2 Fleet resources. The minimum required version of the AWS provider is v4.16.0.

Applying instance flexibility is key for running fault-tolerant, elastic, reliable, and cost optimized workloads. By selecting a diversified choice of instances that qualify for your workload, your application will be better prepared to avoid scenarios where lack of capacity on a specific instance type could be an issue. This applies both to On-Demand and Spot Instance-based workloads. For Spot Instances, applying diversification is key. Spot Instances are spare capacity that can be reclaimed by EC2 when it is required. ABS allows you to specify diversification in simple terms, allowing EC2 Auto Scaling Group and EC2 Fleet’s allocation strategy to replace reclaimed Spot Instances with instances from other pools where capacity is available.

Instance Requirement Attributes

To represent the instance requirements for your workload using ABS, there are a set of attributes you can use within the instance_requirements block. When using Terraform, the only two required attributes are memory_mib and vcpu_count. The rest of the attributes provide default values that adhere to Instance Flexible workloads best practices. For example, bare_metal attribute is by default excluded. You can see the full list of ABS attributes in the Terraform docs site.

Once ABS attributes are configured, ABS picks a list of instance types that match the criteria. This list is especially important when you’re using Spot Instances. One of Spot Instances best practices is to diversify the instance types which, in combination with the capacity-optimized allocation strategy, gives you access to the highest amount of Spot capacity pools. For On-Demand Instances, the instance types list is important as well. There might be scenarios where On-Demand Instance pools lack capacity. By applying instance flexibility using ABS, you can avoid the InsufficientInstanceCapacity error. And in combination with the lowest-price allocation strategy, you get the lowest price instance types from your diversified selection.

There are different places where we can specify ABS attributes. We can specify them at the launch templates level and declare a base mechanism to select instances. In most cases, the recommendation is to configure ABS attributes at the EC2 Auto Scaling Group and EC2 Fleet level. Let’s explore each of these options.

Configuring instance requirements within launch templates

Launch templates are instance configuration templates where you specify parameters like AMI ID, instance type, key pair, and security groups to launch instances. You can use ABS attributes in a launch template when you need to be prescriptive, and define sane defaults or guardrails for your workloads. This way, EC2 Auto Scaling Group or EC2 Fleet simply reference and use the launch template.

You should use ABS attributes in launch templates when you want to prevent users from overriding the resources specified by a launch template. Note that is still possible to override those requirements.

Let’s say that we have a Java application that requires a minimum of 4 vCPUs and 8 GiB of memory, and has been using the c5.xlarge instance type. After performance testing we’ve identified that runs better with current instance types generations. The following code snippet represents how to define these requirements in a Launch Template. To see the full list of attributes, visit the launch template doc site.

resource "aws_launch_template" "abs" {
  name_prefix = "abs"
  image_id    = data.aws_ami.abs.id

  instance_requirements {
    memory_mib {
      min = 8192
    }
    vcpu_count {
      min = 4
    }
    instance_generations = ["current"]
  }
}

Note by using instance_requirements block in a LaunchTemplate, you’ll need to use the mixed_instances_policy block in the EC2 Auto Scaling Group.

resource "aws_autoscaling_group" "on_demand" {
  availability_zones = ["us-east-1a", "us-east-1b", "us-east-1c"]
  max_size           = 1
  min_size           = 1
  mixed_instances_policy {
    launch_template {
      launch_template_specification {
        launch_template_id = aws_launch_template.abs.id
      }
    }
  }
}

The EC2 Auto Scaling Group will use instance types that match the requirements in the launch template.

You can preview what are the instances that the EC2 Auto Scaling Group will select. The section “How to Preview Matching Instances without Launching Them” of the ABS blog post, describes how to preview the instances that will be selected.

Launching EC2 Spot Instances with EC2 Auto Scaling

Launch templates are very powerful. They allow you to decouple the attributes such as user_data from the actual instance management. They are idempotent and can be versioned which is key for rolling out changes in the configuration and applying EC2 Auto Scaling Group Instance Refresh.

Our recommendation is to define ABS attributes as overrides within the mixed_instances_policy block in EC2 Auto Scaling Groups. For most of the applications, we recommend using EC2 Auto Scaling Group to provision EC2 instances.

Let’s get back to our previous example. Now we want to be more prescriptive for the instance requirements our Java application uses.

Let’s assume that the Java application is memory intensive, requires a vCPU to Memory ratio of 4GB for every vCPU, and has been using the m5.large instance type. Additionally, it does not need hardware accelerators like GPUs, FPGAs, etc. Our application does also require a minimum of 2 vCPUs, and the range of memory has been reduced to 32GB to avoid large garbage collection scenarios. This time, we’d like to launch only Spot Instances. As mentioned earlier in this blog post, diversification is key for Spot. To improve the experience with Spot, let’s enable the capacity rebalance feature from the EC2 Auto Scaling Group to proactively replace instances that are at an elevated risk of being interrupted. The following code snippet represents the ABS attributes we need for the more prescriptive workload:

resource “aws_autoscaling_group” “spot” {
  availability_zones = [“us-east-1a”, “us-east-1b”, “us-east-1c”]
  desired_capacity   = 1
  max_size           = 1
  min_size           = 1
  capacity_rebalance = true

  mixed_instances_policy {
    instances_distribution {
      spot_allocation_strategy = "capacity-optimized"
    }

    launch_template {
      launch_template_specification {
        launch_template_id = aws_launch_template.x86.id
      }

      override {
        instance_requirements {
          memory_mib {
            min = 4096
            max = 32768
          }

          vcpu_count {
            min = 2
          }

          memory_gib_per_vcpu {
            min = 4
            max = 4
          }

          accelerator_count {
            max = 0
          }
        }
      }
    }
  }
}

Launching EC2 Spot Instances with EC2 Fleet

Another method we have to launch EC2 instances is the EC2 Fleet API. We recommend to use EC2 Fleet for workloads that need granular controls to provision capacity. For example, tight HPC workloads where instances must be close together (single Availability Zone and within the same placement group) and need similar instance types. EC2 Fleet is also used by capacity orchestrators such as Karpenter or Atlassian Escalator that implement tuned up and optimized logic to provision capacity.

Let’s say that this time the workload is a CPU bound workload and has been using the c5.9xlarge instance type. The workload can be retried and the application supports checkpointing, so it qualifies to use Spot Instances. Given we’ll be using Spot Instances, we would like to benefit from the capacity rebalance feature as we did before in the EC2 Auto Scaling Group example. The application requires very prescriptive ranges of vCPU and memory and we also need a minimum of 100 GB SSD local storage. While in most cases EC2 Auto Scaling Groups are appropriate solution to procure and maintain capacity, in this case we will use EC2 Fleet.

The following code snippet represents the ABS attributes we need for this workload:

resource "aws_ec2_fleet" "spot" {
  target_capacity_specification {
    default_target_capacity_type = "spot"
    total_target_capacity        = 5
  }

  spot_options {
    allocation_strategy = "capacity-optimized"
    maintenance_strategies {
      capacity_rebalance {
        replacement_strategy = "launch"
      }
    }
  }

  launch_template_config {
    launch_template_specification {
      launch_template_id = aws_launch_template.x86.id
      version            = aws_launch_template.x86.latest_version
    }

    override {
      instance_requirements {
        memory_mib {
          min = 65536
          max = 73728
        }

        vcpu_count {
          min = 32
          max = 36
        }

        cpu_manufacturers   = ["intel"]
        local_storage       = "required"
        local_storage_types = ["ssd"]

        total_local_storage_gb {
          min = 100
        }
      }
    }
  }
}

Multi-Architecture workloads using Graviton and x86 with EC2 Auto Scaling Groups

Another recent feature from EC2 Auto Scaling Groups is that you can build multi-architecture workloads. EC2 Auto Scaling Group allows you to mix Graviton and x86 instance types in the same EC2 Auto Scaling Group. Unlike the x86_64 instances we have used so far, AWS Graviton processors are custom built by AWS using 64-bit Arm. You need to use different launch templates as each architecture needs to use a different AMI. This can be defined in within the override block.

In the example below, we use ABS to define different attributes depending on the CPU architecture. And what’s great about doing this is that we don’t need to exclude instance types. Instances will be launched with a compatible CPU architecture based on the AMI that you specify in our launch template.

Besides supporting mixing architectures, EC2 Auto Scaling Groups allows to combine purchase models. For our example, this time we’ll use a more complex scenario to showcase how powerful and feature rich EC2 Auto Scaling Group has become. The following code snippet applies many of the configurations we’ve seen before, but the key difference here is that we have two overrides. One is for Graviton instances, and another one for x86 instances.

resource "aws_autoscaling_group" "on_demand_spot" {
  availability_zones = ["us-east-1a", "us-east-1b", "us-east-1c"]
  desired_capacity   = 4
  max_size           = 10
  min_size           = 2
  capacity_rebalance = true

  mixed_instances_policy {
    instances_distribution {
      on_demand_base_capacity                  = 2
      on_demand_percentage_above_base_capacity = 0
      spot_allocation_strategy                 = "capacity-optimized"
    }

    launch_template {
      launch_template_specification {
        launch_template_id = aws_launch_template.arm.id
      }

      override {
        launch_template_specification {
          launch_template_id = aws_launch_template.arm.id
        }

        instance_requirements {
          memory_mib {
            min = 16384
            max = 16384
          }

          vcpu_count {
            max = 4
          }
        }
      }

      override {
        launch_template_specification {
          launch_template_id = aws_launch_template.x86.id
        }

        instance_requirements {
          memory_mib {
            min = 16384
          }

          vcpu_count {
            min = 4
          }
        }
      }
    }
  }
}

Multi-architecture workloads can also be applied to container orchestration. Thanks to the Amazon Elastic Container Registry (Ama­zon ECR) support for multi-architecture container images, you can use manifests to push both container images, and Amazon ECR will pull the proper image based on the CPU architecture. We have a workshop for Elastic Kubernetes Service (Amazon EKS) where you can learn more about how to deploy a multi-architecture workload in Amazon EKS.

Conclusion

In this post you’ve learned how to configure ABS to launch instances using Auto Scaling Groups and EC2 Fleet. You’ve learned and how to mix CPU architectures along with purchase models in the same EC2 Auto Scaling Group using Terraform while simplifying the configuration.

Our commitment with open-source projects such as Terraform is to help customers implement AWS best practices in a larger ecosystem easily. ABS support allows customers to get access to compute capacity by simply specifying the resource requirement attributes of their workloads rather than the instance names.

ABS simplifies the configuration for instance flexible workloads and removes the need to list the instances that qualify for your workload. Instead, it simplifies the configuration and future proof for scenarios where AWS includes new instances that qualify for the workload. For Spot workloads where instance diversification is key, ABS simplifies the selection of instances and helps to increase the total number of pools. For more information, visit the ABS user guide and Terraform documentation for Auto Scaling Groups and EC2 Fleet.

Implementing interruption tolerance in Amazon EC2 Spot with AWS Fault Injection Simulator

Post Syndicated from Pranaya Anshu original https://aws.amazon.com/blogs/compute/implementing-interruption-tolerance-in-amazon-ec2-spot-with-aws-fault-injection-simulator/

This post is written by Steve Cole, WW SA Leader for EC2 Spot, and David Bermeo, Senior Product Manager for EC2.

On October 20, 2021, AWS released new functionality to the Amazon Fault Injection Simulator that supports triggering the interruption of Amazon EC2 Spot Instances. This functionality lets you test the fault tolerance of your software by interrupting instances on command. The triggered interruption will be preceded with a Rebalance Recommendation (RBR) and Instance Termination Notification (ITN) so that you can fully test your applications as if an actual Spot interruption had occurred.

In this post, we’ll provide two examples of how easy it has now become to simulate Spot interruptions and validate the fault-tolerance of an application or service. We will demonstrate testing an application through the console and a service via CLI.

Engineering use-case (console)

Whether you are building a Spot-capable product or service from scratch or evaluating the Spot compatibility of existing software, the first step in testing is identifying whether or not the software is tolerant of being interrupted.

In the past, one way this was accomplished was with an AWS open-source tool called the Amazon EC2 Metadata Mock. This tool let customers simulate a Spot interruption as if it had been delivered through the Instance Metadata Service (IMDS), which then let customers test how their code responded to an RBR or an ITN. However, this model wasn’t a direct plug-and-play solution with how an actual Spot interruption would occur, since the signal wasn’t coming from AWS. In particular, the method didn’t provide the centralized notifications available through Amazon EventBridge or Amazon CloudWatch Events that enabled off-instance activities like launching AWS Lambda functions or other orchestration work when an RBR or ITN was received.

Now, Fault Injection Simulator has removed the need for custom logic, since it lets RBR and ITN signals be delivered via the standard IMDS and event services simultaneously.

Let’s walk through the process in the AWS Management Console. We’ll identify an instance that’s hosting a perpetually-running queue worker that checks the IMDS before pulling messages from Amazon Simple Queue Service (SQS). It will be part of a service stack that is scaled in and out based on the queue depth. Our goal is to make sure that the IMDS is being polled properly so that no new messages are pulled once an ITN is received. The typical processing time of a message with this example is 30 seconds, so we can wait for an ITN (which provides a two minute warning) and need not act on an RBR.

First, we go to the Fault Injection Simulator in the AWS Management Console to create an experiment.

AWS Fault Injection Simulator start screen in AWS Management console

At the experiment creation screen, we start by creating an optional name (recommended for console use) and a description, and then selecting an IAM Role. If this is the first time that you’ve used Fault Injection Simulator, then you’ll need to create an IAM Role per the directions in the FIS IAM permissions documentation. I’ve named the role that we created ‘FIS.’ After that, I’ll select an action (interrupt) and identify a target (the instance).

Experiment template screen in AWS Management console with description “interrupt queue worker,” name “interrupt queue worker,” and IAM role “FIS.”

First, I name the action. The Action type I want is to interrupt the Spot Instance: aws:ec2:send-spot-instance-interruptions. In the Action parameters, we are given the option to set the duration. The minimum value here is two minutes, below which you will receive an error since Spot Instances will always receive a two minute warning. The advantage here is that, by setting the durationBeforeInterruption to a value above two minutes, you will get the RBR (an optional point for you to respond) and ITN (the actual two minute warning) at different points in time, and this lets you respond to one or both.

New action form in the create experiment template screen with name, description, action type and durationBeforeInterruption fields filled.

The target instance that we launched is depicted in the following screenshot. It is a Spot Instance that was launched as a persistent request with its interruption action set to ‘stop’ instead of ‘terminate.’ The option to stop a Spot Instance, introduced in 2020, will let us restart the instance, log in and retrieve logs, update code, and perform other work necessary to implement Spot interruption handling.

Now that an action has been defined, we configure the target. We have the option of naming the target, which we’ve done here to match the Name tagged on the EC2 instance ‘qWorker’. The target method we want to use here is Resource ID, and then we can either type or select the desired instance from a drop-down list. Selection mode will be ‘all’, as there is only one instance. If we were using tags, which we will in the next example, then we’d be able to select a count of instances, up to five, instead of just one.

Edit target form in the create experiment template screen with name, resource type, and resource id fields filled. Name is “qWorker,” Resource type is “aws:ec2:spot-Instance,” Target method is “Resource IDs” Resource IDs is “i-019ea405f8f81742b” and Selection mode is “All.”

Once you’ve saved the Action, the Target, and the Experiment, then you’ll be able to begin the experiment by selecting the ‘Start from the Action’ menu at the top right of the screen.

Fault Injection Simulator Experiment template summary screen in the AWS Management console highlights experiment template ID, stop conditions, description, creation time, IAM role, and last update time.

After the experiment starts, you’ll be able to observe its state by refreshing the screen. Generally, the process will take just seconds, and you should be greeted by the Completed state, as seen in the following screenshot.

Fault Injection Simulator Experiment summary screen in the AWS Management console shows status as “Completed.”

In the following screenshot, having opened an interruption log group created in CloudWatch Event Logs, we can see the JSON of the RBR.

CloudWatch Event Logs screen in the AWS Management Console with information on the EC2 Rebalance Recommendation.

Two minutes later, we see the ITN in the same log group.

Cloudwatch Event Logs screen in the AWS Management console with information on the Instance Termination Notification.

Another two minutes after the ITN, we can see the EC2 instance is in the process of stopping (or terminating, if you elect).

EC2 Instance List screen in the AWS Management console with information on the instance that is stopping.

Shortly after the stop is issued by EC2, we can see the instance stopped. It would now be possible to restart the instance and view logs, make code changes, or do whatever you find necessary before testing again.

EC2 Instance List screen in the AWS Management console with information on the Instance that is stopped.

Now that our experiment succeeded in interrupting our Spot Instance, we can evaluate the performance of the code running on the instance. It should have completed the processing of any messages already retrieved at the ITN, and it should have not pulled any new messages afterward.

This experiment can be saved for later use, but it will require selecting the specific instance each time that it’s run. We can also re-use the experiment template by using tags instead of an instance ID, as we’ll show in the next example. This shouldn’t prove troublesome for infrequent experiments, and especially those run through the console. Or, as we did in our example, you can set the instance interruption behavior to stop (versus terminate) and re-use the experiment as long as that particular instance continues to exist. When the experiments get more frequent, it might be advantageous to automate the process, possibly as part of the test phase of a CI/CD pipeline. Doing this is programmatically possible through the AWS CLI or SDK.

Operations use-case (CLI)

Once the developers of our product validate the single-instance fault tolerance, indicating that the target workload is capable of running on Spot Instances, then the next logical step is to deploy the product as a service on multiple instances. This will allow for more comprehensive testing of the service as a whole, and it is a key process in collecting valuable information, such as performance data, response times, error rates, and other metrics to be used in the monitoring of the service. Once data has been collected on a non-interrupted deployment, it is then possible to use the Spot interruption action of the Fault Injection Simulator to observe how well the service can handle RBR and ITN while running, and to see how those events influence the metrics collected previously.

When testing a service, whether it is launched as instances in an Amazon EC2 Auto Scaling group, or it is part of one of the AWS container services, such as Amazon Elastic Container Service (Amazon ECS) or the Amazon Elastic Kubernetes Service (EKS), EC2 Fleet, Amazon EMR, or across any instances with descriptive tagging, you now have the ability to trigger Spot interruptions to as many as five instances in a single Fault Injection Simulator experiment.

We’ll use tags, as opposed to instance IDs, to identify candidates for interruption to interrupt multiple Spot Instances simultaneously. We can further refine the candidate targets with one or more filters in our experiment, for example targeting only running instances if you perform an action repeatedly.

In the following example, we will be interrupting three instances in an Auto Scaling group that is backing a self-managed EKS node group. We already know the software will behave as desired from our previous engineering tests. Our goal here is to see how quickly EKS can launch replacement tasks and identify how the service as a whole responds during the event. In our experiment, we will identify instances that contain the tag aws:autoscaling:groupName with a value of “spotEKS”.

The key benefit here is that we don’t need a list of instance IDs in our experiment. Therefore, this is a re-usable experiment that can be incorporated into test automation without needing to make specific selections from previous steps like collecting instance IDs from the target Auto Scaling group.

We start by creating a file that describes our experiment in JSON rather than through the console:

{
    "description": "interrupt multiple random instances in ASG",
    "targets": {
        "spotEKS": {
            "resourceType": "aws:ec2:spot-instance",
            "resourceTags": {
                "aws:autoscaling:groupName": "spotEKS"
            },
            "selectionMode": "COUNT(3)"
        }
    },
    "actions": {
        "interrupt": {
            "actionId": "aws:ec2:send-spot-instance-interruptions",
            "description": "interrupt multiple instances",
            "parameters": {
                "durationBeforeInterruption": "PT4M"
            },
            "targets": {
            "SpotInstances": "spotEKS"
            }
        }
    },
    "stopConditions": [
        {
            "source": "none"
        }
    ],
    "roleArn": "arn:aws:iam::xxxxxxxxxxxx:role/FIS",
    "tags": {
        "Name": "multi-instance"
    }
}

Then we upload the experiment template to Fault Injection Simulator from the command-line.

aws fis create-experiment-template --cli-input-json file://experiment.json

The response we receive returns our template along with an ID, which we’ll need to execute the experiment.

{
    "experimentTemplate": {
        "id": "EXT3SHtpk1N4qmsn",
        ...
    }
}

We then execute the experiment from the command-line using the ID that we were given at template creation.

aws fis start-experiment --experiment-template-id EXT3SHtpk1N4qmsn

We then receive confirmation that the experiment has started.

{
    "experiment": {
        "id": "EXPaFhEaX8GusfztyY",
        "experimentTemplateId": "EXT3SHtpk1N4qmsn",
        "state": {
            "status": "initiating",
            "reason": "Experiment is initiating."
        },
        ...
    }
}

To check the status of the experiment as it runs, which for interrupting Spot Instances is quite fast, we can query the experiment ID for success or failure messages as follows:

aws fis get-experiment --id EXPaFhEaX8GusfztyY

And finally, we can confirm the results of our experiment by listing our instances through EC2. Here we use the following command-line before and after execution to generate pre- and post-experiment output:

aws ec2 describe-instances --filters\
 Name='tag:aws:autoscaling:groupName',Values='spotEKS'\
 Name='instance-state-name',Values='running'\
 | jq .Reservations[].Instances[].InstanceId | sort

We can then compare this to identify which instances were interrupted and which were launched as replacements.

< "i-003c8d95c7b6e3c63"
< "i-03aa172262c16840a"
< "i-02572fa37a61dc319"
---
> "i-04a13406d11a38ca6"
> "i-02723d957dc243981"
> "i-05ced3f71736b5c95"

Summary

In the previous examples, we have demonstrated through the console and command-line how you can use the Spot interruption action in the Fault Injection Simulator to ascertain how your software and service will behave when encountering a Spot interruption. Simulating Spot interruptions will help assess the fault-tolerance of your software and can assess the impact of interruptions in a running service. The addition of events can enable more tooling, and being able to simulate both ITNs and RBRs, along with the Capacity Rebalance feature of Auto scaling groups, now matches the end-to-end experience of an actual AWS interruption. Get started on simulating Spot interruptions in the console.

Identifying optimal locations for flexible workloads with Spot placement score

Post Syndicated from Pranaya Anshu original https://aws.amazon.com/blogs/compute/identifying-optimal-locations-for-flexible-workloads-with-spot-placement-score/

This post is written by Jessie Xie, Solutions Architect for EC2 Spot, and Peter Manastyrny, Senior Product Manager for EC2 Auto Scaling and EC2 Fleet.

Amazon EC2 Spot Instances let you run flexible, fault-tolerant, or stateless applications in the AWS Cloud at up to a 90% discount from On-Demand prices. Since we introduced Spot Instances back in 2009, we have been building new features and integrations with a single goal – to make Spot easy and efficient to use for your flexible compute needs.

Spot Instances are spare EC2 compute capacity in the AWS Cloud available for steep discounts. In exchange for the discount, Spot Instances are interruptible and must be returned when EC2 needs the capacity back. The location and amount of spare capacity available at any given moment is dynamic and changes in real time. This is why Spot workloads should be flexible, meaning they can utilize a variety of different EC2 instance types and can be shifted in real time to where the spare capacity currently is. You can use Spot Instances with tools such as EC2 Fleet and Amazon EC2 Auto Scaling which make it easy to run workloads on multiple instance types.

The AWS Cloud spans 81 Availability Zones across 25 Regions with plans to launch 21 more Availability Zones and 7 more Regions. However, until now there was no way to find an optimal location (either a Region or Availability Zone) to fulfill your Spot capacity needs without trying to launch Spot Instances there first. Today, we are excited to announce Spot placement score, a new feature that helps you identify an optimal location to run your workloads on Spot Instances. Spot placement score recommends an optimal Region or Availability Zone based on the amount of Spot capacity you need and your instance type requirements.

Spot placement score is useful for workloads that could potentially run in a different Region. Additionally, because the score takes into account your instance type selection, it can help you determine if your request is sufficiently instance type flexible for your chosen Region or Availability Zone.

How Spot placement score works

To use Spot placement score you need to specify the amount of Spot capacity you need, what your instance type requirements are, and whether you would like a recommendation for a Region or a single Availability Zone. For instance type requirements, you can either provide a list of instance types, or the instance attributes, like the number of vCPUs and amount of memory. If you choose to use the instance attributes option, you can then use the same attribute configuration to request your Spot Instances in the recommended Region or Availability Zone with the new attribute-based instance type selection feature in EC2 Fleet or EC2 Auto Scaling.

Spot placement score provides a list of Regions or Availability Zones, each scored from 1 to 10, based on factors such as the requested instance types, target capacity, historical and current Spot usage trends, and time of the request. The score reflects the likelihood of success when provisioning Spot capacity, with a 10 meaning that the request is highly likely to succeed. Provided scores change based on the current Spot capacity situation, and the same request can yield different scores when ran at different times. It is important to note that the score serves as a guideline, and no score guarantees that your Spot request will be fully or partially fulfilled.

You can also filter your score by Regions or Availability Zones, which is useful for cases where you can use only a subset of AWS Regions, for example any Region in the United States.

Let’s see how Spot placement score works in practice through an example.

Using Spot placement score with AWS Management Console

To try Spot placement score, log into your AWS account, select EC2, Spot Requests, and click on Spot placement score to open the Spot placement score window.

Spot placement score screen in AWS Management Console.

Here, you need provide your target capacity and instance type requirements by clicking on Enter requirements. You can enter target capacity as a number of instances, vCPUs, or memory. vCPUs and memory options are useful for vertically scalable workloads that are sized for a total amount of compute resources and can utilize a wide range of instance sizes. Target capacity is limited and based on your recent Spot usage with accounting for potential usage growth. For accounts that do not have recent Spot usage, there is a default limit aligned with the Spot Instances limit.

For instance type requirements, there are two options. First option is to select Specify instance attributes that match your compute requirements tab and enter your compute requirements as a number of vCPUs, amount of memory, CPU architecture, and other optional attributes. Second option is to select Manually select instance types tab and select instance types from the list.

Please note that you need to select at least three different instance types (that is, different families, generations, or sizes). If you specify a smaller number of instance types, Spot placement score will always yield a low score. Spot placement score is designed to help you find an optimal location to request Spot capacity tailored to your specific workload needs, but it is not intended to be used for getting high-level Spot capacity information across all Regions and instance types.

Let’s try to find an optimal location to run a workload that can utilize r5.8xlarge, c5.9xlarge, and m5.8xlarge instance types and is sized at 2000 instances.

Spot placement score screen in AWS Management Console with selected target capacity at 2000 instances and selected r5.8xlarge, c5.9xlarge, and m5.8xlarge instance types..

Once you select 2000 instances under Target capacity, select r5.8xlarge, c5.9xlarge, and m5.8xlarge instances under Select instance types, and click Load placement score button, you will get a list of Regions sorted by score in a descending order. There is also an option to filter by specific Regions if needed.

The highest rated Region for your requirements turns out to be US East (N. Virginia) with a score of 8. The second closest contender is Europe (Ireland) with a score of 5. That tells you that right now the optimal Region for your Spot requirements is US East (N. Virginia).

Spot placement score screen in AWS Management Console with displayed scores on Region level scores.

Let’s now see if it is possible to get a higher score. Remember, the key best practice for Spot is to be flexible and utilize as many instance types as possible. To do that, press the Edit button on the Target capacity and instance type requirements tab. For the new request, keep the same target capacity at 2000, but expand the selection of instance types by adding similarly sized instance types from a variety of instance families and generations, i.e., r5.4xlarge, r5.12xlarge, m5zn.12xlarge, m5zn.6xlarge, m5n.8xlarge, m5dn.8xlarge, m5d.8xlarge, r5n.8xlarge, r5dn.8xlarge, r5d.8xlarge, c5.12xlarge, c5.4xlarge, c5d.12xlarge, c5n.9xlarge. c5d.9xlarge, m4.4xlarge, m4.16xlarge, m4.10xlarge, r4.8xlarge, c4.8xlarge.

After requesting the scores with updated requirements, you can see that even though the score in US East (N. Virginia) stays unchanged at 8, the scores for Europe (Ireland) and US West (Oregon) improved dramatically, both raising to 9. Now, you have a choice of three high-scored Regions to request your Spot Instances, each with a high likelihood to succeed.

To request Spot Instances based on the score, you can use EC2 Fleet or EC2 Auto Scaling. Please note, that the score implies that you use capacity-optimized Spot allocation strategy when requesting the capacity. If you use other allocation strategies, such as lowest-price, the result in the recommended Region or Availability Zone will not align with the score provided.

Spot placement score screen in AWS Management Console with selected target capacity at 2000 instances and selected r5.8xlarge, c5.9xlarge, m5.8xlarge, r5.4xlarge, r5.12xlarge, m5zn.12xlarge, m5zn.6xlarge, m5n.8xlarge, m5dn.8xlarge, m5d.8xlarge, r5n.8xlarge, r5dn.8xlarge, r5d.8xlarge, c5.12xlarge, c5.4xlarge, c5d.12xlarge, c5n.9xlarge. c5d.9xlarge, m4.4xlarge, m4.16xlarge, m4.10xlarge, r4.8xlarge, c4.8xlarge instance types.

You can also request the scores at the Availability Zone level. This is useful for running workloads that need to have all instances in the same Availability Zone, potentially to minimize inter-Availability Zone data transfer costs. Workloads such as Apache Spark, which involve transferring a high volume of data between instances, would be a good use case for this. To get scores per Availability Zone you can check the box Provide placement scores per Availability Zone.

When requesting instances based on Availability Zone recommendation, you need to make sure to configure EC2 Fleet or EC2 Auto Scaling request to only use that specific Availability Zone.

With Spot placement score, you can test different instance type combinations at different points in time, and find the most optimal Region or Availability Zone to run your workloads on Spot Instances.

Availability and pricing

You can use Spot placement score today in all public and AWS GovCloud Regions with the exception of those based in China, where we plan to release later. You can access Spot placement score using the AWS Command Line Interface (CLI), AWS SDKs, and Management Console. There is no additional charge for using Spot placement score, you will only pay EC2 standard rates if provisioning instances based on recommendation.

To learn more about using Spot placement score, visit the Spot placement score documentation page. To learn more about best practices for using Spot Instances, see Spot documentation.

Amazon EC2 Auto Scaling will no longer add support for new EC2 features to Launch Configurations

Post Syndicated from Pranaya Anshu original https://aws.amazon.com/blogs/compute/amazon-ec2-auto-scaling-will-no-longer-add-support-for-new-ec2-features-to-launch-configurations/

This post is written by Scott Horsfield, Principal Solutions Architect, EC2 Scalability and Surabhi Agarwal, Sr. Product Manager, EC2.

In 2010, AWS released launch configurations as a way to define the parameters of instances launched by EC2 Auto Scaling groups. In 2017, AWS released launch templates, the successor of launch configurations, as a way to streamline and simplify the launch process for Auto Scaling, Spot Fleet, Amazon EC2 Spot Instances, and On-Demand Instances. Launch templates define the steps required to create an instance, by capturing instance parameters in a resource that can be used across multiple services. Launch configurations have continued to live alongside launch templates but haven’t benefitted from all of the features we’ve added to launch templates.

Today, AWS is recommending that customers using launch configurations migrate to launch templates. We will continue to support and maintain launch configurations, but we will not be adding any new features to them. We will focus on adding new EC2 features to launch templates only. You can continue using launch configurations, and AWS is committed to supporting applications you have already built using them, but in order for you to take advantage of our most recent and upcoming releases, a migration to launch templates is recommended. Additionally, we plan to no longer support new instance types with launch configurations by the end of 2022. Our goal is to have all customers moved over to launch templates by then.

Moving to launch templates is simple to accomplish and can be done easily today. In this blog, we provide more details on how you can transition from launch configurations to launch templates. If you are unable to transition to launch templates due to lack of tooling or specific functions, or have any concerns, please contact AWS Support.

Launch templates vs. launch configurations

Launch configurations have been a part of Amazon EC2 Auto Scaling Groups since 2010. Customers use launch configurations to define Auto Scaling group configurations that include AMI and instance type definition. In 2017, AWS released launch templates, which reduce the number of steps required to create an instance by capturing all launch parameters within one resource that can be used across multiple services. Since then, AWS has released many new features such as Mixed Instance Policies with Auto Scaling groups, Targeted Capacity Reservations, and unlimited mode for burstable performance instances that only work with launch templates.

Launch templates provide several key benefits to customers, when compared to launch configurations, that can improve the availability and optimization of the workloads you host in Auto Scaling groups and allow you to access the full set of EC2 features when launching instances in an Auto Scaling group.

Some of the key benefits of launch templates when used with Auto Scaling groups include:

How to determine where you are using launch configurations

Use the Launch Configuration Inventory Script to find all of the launch configurations in your account. You can use this script to generate an inventory of launch configurations across all regions in a single account or all accounts in your AWS Organization.

The script can be run with a variety of options for different levels of account access. You can learn more about these options in this GitHub post. In its simplest form it will use the default credentials profile to inventory launch configurations across all regions in a single account.

Screenshot of Launch Configuration Inventory script

Once the script has completed, you can view the generated inventory.csv file to get a sense of how many launch configurations may need to be converted to launch templates or deleted.

Screenshot of script

How to transition to launch templates today

If you’re ready to move to launch templates now, making the transition is simple and mostly automated through the AWS Management Console. For customers who do not use the AWS Management Console, most popular Infrastructure as Code (IaC), such as CloudFormation and Terraform, already support launch templates, as do the AWS CLI and SDKs.

To perform this transition, you will need to ensure that your user has the required permissions.

Here are some examples to get you started.

AWS Management Console

  1. Open the EC2 Launch Configuration console. You must sign in if you are not already authenticated.
  2. From the Launch Configuration console, click on the Copy to launch template button and select Copy all.
    1. Alternatively, you can select individual launch configurations, and use the Copy selected option to selectively copy certain launch configurations.copy to launch template screenshot
  1. Review the list of templates and click on the Copy button when you’re ready to proceed.3. Review the list of templates and click on the Copy button when you’re ready to proceed.
  1. Once the copy process has completed, you can close the wizard.

4. Once the copy process has completed, you can close the wizard.

  1. Navigate to the EC2 Launch Template console to view your newly created launch templates.5. Navigate to the EC2 Launch Template console to view your newly created launch templates.
  1. Your launch templates are now ready to replace launch configurations in your Auto Scaling group configuration. Navigate to the Auto Scaling group console, select your Auto Scaling group, and click on the Edit.

. Navigate to the Auto Scaling group console, select your Auto Scaling group, and click on the Edit button.

  1. Next, scroll down to the Launch configuration section, and click Switch to launch template.7. Next, scroll down to the Launch configuration section, and click Switch to launch template.
  1. Select your newly created Launch template, review and confirm your configuration, and when ready scroll down to the bottom of the page and click the Update button.when ready scroll down to the bottom of the page and click the Update button.
  2. Now that you’ve migrated your launch configurations to launch templates you can prevent users from creating new launch configurations by updating their IAM permissions to deny the autoscaling:CreateLaunchConfiguration action.

Instances launched by this Auto Scaling group continue to run and are not automatically be replaced by making this change. Any instance launched after making this change uses the launch template for its configuration. As your Auto Scaling group scales up and down, the older instances are replaced. If you’d like to force an update, you can use Instance Refresh to ensure that all instances are running the same launch template and version.

CloudFormation and Terraform

If you use CloudFormation to create and manage your infrastructure, you should use the AWS::EC2::LaunchTemplate resource to create launch templates. After adding a launch template resource to your CloudFormation stack template file update your Auto Scaling group resource definition by adding a LaunchTemplate property and removing the existing LaunchConfigurationName property. We have several examples available to help you get started.

Using launch templates with Terraform is a similar process. Update your template file to include a aws_launch_template resource and then update your aws_autoscaling_group resources to reference the launch template.

In addition to making these changes, you may also want to consider adding a MixedInstancesPolicy to your Auto Scaling group. A MixedInstancesPolicy allows you to configure your Auto Scaling group with multiple instance types and purchase options. This helps improve the availability and optimization of your applications. Some examples of these benefits include using Spot Instances and On-Demand Instances within the same Auto Scaling group, combining CPU architectures such as Intel, AMD, and ARM (Graviton2), and having multiple instance types configured in case of a temporary capacity issue.

You can generate and configure example templates for CloudFormation and Terraform in the AWS Management Console.

AWS CLI

If you’re using the AWS CLI to create and manage your Auto Scaling groups, these examples will show you how to accomplish common tasks when using launch templates.

SDKs

AWS SDKs already include APIs for creating launch templates. If you’re using one of our SDKs to create and configure your Auto Scaling groups, you can find more information in the SDK documentation for your language of choice.

Next steps

We’re excited to help you take advantage of the latest EC2 features by making the transition to launch templates as seamless as possible. As we make this transition together, we’re here to help and will continue to communicate our plans and timelines for this transition. If you are unable to transition to launch templates due to lack of tooling or functionalities or have any concerns, please contact AWS Support. Also, stay tuned for more information on tools to help make this transition easier for you.

How to run massively multiplayer games with EC2 Spot using Aurora Serverless

Post Syndicated from Emma White original https://aws.amazon.com/blogs/compute/how-to-run-massively-multiplayer-games-with-ec2-spot-using-aurora-serverless/

This post is written by Yahav Biran, Principal Solutions Architect, and Pritam Pal, Sr. EC2 Spot Specialist SA

Massively multiplayer online (MMO) game servers must dynamically scale their compute and storage to create a world-scale persistence simulation with millions of dynamic objects, such as complex AR/VR synthetic environments that match real-world fidelity. The Elastic Kubernetes Service (EKS) powered by Amazon EC2 Spot and Aurora Serverless allow customers to create world-scale persistence simulations processed by numerous cost-effective compute chipsets, such as ARM, x86, or Nvidia GPU. It also persists them On-Demand — an automatic scaling configuration of open-source database engines like MySQL or PostgreSQL without managing any database capacity. This post proposes a fully open-sourced option to build, deploy, and manage MMOs on AWS. We use a Python-base game server to demonstrate the MMOs.

Challenge

Increasing competition in the gaming industry has driven game developers to architect cost-effective game servers that can scale up to meet player demands and scale down to meet cost goals. AWS enables MMO developers to scale their game beyond the limits of a single server. The game state (world) can spatially partition across many Regions based on the requested number of sessions or simulations using Amazon EC2 compute power. As the game progresses over many sessions, you must track the simulation’s global state. Amazon Aurora maintains the global game state in memory to manage complex interactions, such as hand-offs across instances and Regions. Amazon Aurora Serverless powers all of these for PostgreSQL or MySQL.

This blog shows how to use a commodity server using an ephemeral disk and decouple the game state from the game server. We store the game state in Aurora for PostgreSQL, but you can also use DynamoDB or KeySpaces for the NoSQL case.


Game overview

We use a Minecraft clone to demonstrate a distributed persistence simulation. The game server is python-based deployed on Agones, an open-source multiplayer dedicated game-server platform on Kubernetes. The Kubernetes cluster is powered by EC2 Spot Instances and configured with EC2 instances to auto-scale that expands and shrinks the compute seamlessly upon game-server allocation. We add a git-ops-based continuous delivery system that stores the game-server binaries and config in a git repository and deploys the game in a cluster deploy in one or more Regions to allow global compute scale. The following image is a diagram of the architecture.

The game server persists every object in an Aurora Serverless PostgreSQL-compatible edition. The serverless database configuration aids automatic start-up and scales capacity up or down as per player demand. The world is divided into 32×32 block chunks in the XYZ plane (Y is up). This allows it to be “infinite” (PostgreSQL Bigint type) and eases data management. Only visible chunks must be queried from the database.

The central database table is named “block” and has the columns p, q, x, y, z, w. (p, q) identifies the chunk, (x, y, z) identifies the block position, and (w) identifies the block type. 0 represents an empty block (air).

In the game, the chunks store their blocks in a hash map. An (x, y, z) key maps to a (w) value.

The y positions of blocks are limited to 0 <= y < 256. The upper limit is essentially an artificial limitation that prevents users from building tall structures. Users cannot destroy blocks at y = 0 to avoid falling underneath the world.

Solution overview

Kubernetes allows dedicated game server scaling and orchestration without limiting the compute platform spanning across many Regions and staying closer to the player. For simplicity, we use EKS to reduce operational overhead.

Amazon EC2 runs the compute simulation, which might require different EC2 instance types. These include compute-optimized instances for compute-bound applications benefiting from high-performance processors or accelerated compute (GPU), using hardware accelerators to perform functions like graphics processing or data pattern matching. In addition, the EC2 Auto Scaling  runs the game-server configured to use Amazon EC2 Spot Instances in order to allow up to 90% discount as compared to On-Demand Instance prices. However, Amazon EC2 can interrupt your Spot Instance when the demand for Spot Instances rises, when the supply of Spot Instances decreases, or when the Spot price exceeds your maximum price.

The following two mechanisms minimize the EC2 reclaim compute capacity impact:

  1. Pull interruption notifications and notify the game-server to replicate the session to another game server.
  2. Prioritize compute capacity based on availability.

Two Auto Scaling groups are deployed for method two. The first Auto Scaling group uses latest generation Spot Instances (C5, C5a, C5n, M5, M5a, and M5n) instances, and the second uses all generations x86-based instances (C4 and M4). We configure the cluster-autoscaler that controls the Auto Scaling group size with the Expander priority option in order to favor the latest generation Spot Auto Scaling group. The priority should be a positive value, and the highest value wins. For each priority value, a list of regular expressions should be given. The following example assumes an EKS cluster craft-us-west-2 and two ASGs. The craft-us-west-2-nodegroup-spot5 Auto Scaling group wins the priority. Therefore, new instances will be spawned from the EC2 Spot Auto Scaling group.

.…
- --expander=priority
- --node-group-auto-discovery=asg:tag=k8s.io/cluster-autoscaler/enabled,k8s.io/cluster-autoscaler/craft-us-west-2
….
---
apiVersion: v1
kind: ConfigMap
metadata:
  name: cluster-autoscaler-priority-expander
  namespace: kube-system
data:
  priorities: |-
    10:
      - .*craft-us-west-2-nodegroup-spot4*
    50:
      - .*craft-us-west-2-nodegroup-spot5*
---

The complete working spec is available in https://github.com/aws-samples/spotable-game-server/blob/master/specs/cluster_autoscaler.yml.

We propose the following two options to minimize player impact during interruption. The first is based on two-minute interruption notification, and the second on rebalance recommendations.

  1. Notify that that the instance will be shut down within two minutes.
  2. Notify when a Spot Instance is at elevated risk of interruption, this signal can arrive sooner than the two-minute Spot Instance interruption notice.

Choosing between the two depends on the transition you want for the player. Both cases deploy DaemonSet that listens to either notification and notifies every game server running on the EC2 instance. It also prevents new game-servers from running on this instance.

The daemon set pulls from the instance metadata every five seconds denoted by POLL_INTERVAL as follows:

while http_status=$(curl -o /dev/null -w '%{http_code}' -sL ${NOTICE_URL}); [ ${http_status} -ne 200 ]; do
  echo $(date): ${http_status}
  sleep ${POLL_INTERVAL}
done

where NOTICE_URL can be either

NOTICE_URL=”http://169.254.169.254/latest/meta-data/spot/termination-time”

Or, for the second option:

NOTICE_URL=”http://169.254.169.254/latest/meta-data/events/recommendations/rebalance”

The command that notifies all the game-servers about the interruption is:

kubectl drain ${NODE_NAME} --force --ignore-daemonsets --delete-local-data

From that point, every game server that runs on the instance gets notified by the Unix signal SIGTERM.

In our example server.py, we tell the OS to signal the Python process and complete the sig_handler function. The example prompts a message to every connected player regarding the incoming interruption.

def sig_handler(signum, frameframe):
  log('Signal handler called with signal',signum)
  model.send_talk("WARN game server maintenance is pending - your universe is saved")

def main():
    ..
    signal.signal(signal.SIGTERM,sig_handler)


Why Agones?

Agones orchestrates game servers via declarative configuration in order to manage groups of ready game-servers to play. It also offers integrated SDK for managing game server lifecycle, health, and configuration. Finally, it runs on Kubernetes, so it is an all-up open-source platform that runs anywhere. The Agones SDK is easily implemented. Furthermore, combining the compute platform AWS and Agones offers the most secure, resilient, scalable, and cost-effective method for running an MMO.


In our example, we implemented the /health in agones_health and /allocate in agones_allocate calls. Then, the agones_health() called upon the server init to indicate that it is ready to assign new players.

def agones_allocate(model):
  url="http://localhost:"+agones_port+"/allocate"
  req = urllib2.Request(url)
  req.add_header('Content-Type','application/json')
  req.add_data('')
  r = urllib2.urlopen(req)
  resp=r.getcode()
  log('agones- Response code from agones allocate was:',resp)
  model.send_talk("new player joined - reporting to agones the server is allocated") 

The agones_health() using the native health and relay its health to keep the game-server in a viable state.

def agones_health(model):
  url="http://localhost:"+agones_port+"/health"
  req = urllib2.Request(url)
  req.add_header('Content-Type','application/json')
  req.add_data('')
  while True:
    model.ishealthy()
    r = urllib2.urlopen(req)
    resp=r.getcode()
    log('agones- Response code from agones health was:',resp)
    time.sleep(10)

The main() function forks a new process that reports health. Agones manages the port allocation and maintains the game state, e.g., Allocated, Scheduled, Shutdown, Creating, and Unhealthy.

def main():
    …
    server = Server((host, port), Handler)
    server.model = model
    newpid=os.fork()
    if newpid ==0:
      log('agones-in child process about to call agones_health()')
      agones_health()
      log('agones-in child process called agones_health()')
    else:
      pids = (os.getpid(), newpid)
      log('agones server pid and health pid',pids)
    log('SERV', host, port)
    server.serve_forever()


Other ways than Agones on EKS?

Configuring an Agones group of ready game-servers behind a load balancer is difficult. Agones game-servers endpoint must be published so that players’ clients can connect and play. Agones creates game-servers endpoints that are an IP and port pair. The IP is the public IP of the EC2 Instance. The port results from PortPolicy, which generates a non-predictable port number. Hence, make it impossible to use with load balancer such as Amazon Network Load Balancer (NLB).

Suppose you want to use a load balancer to route players via a predictable endpoint. You could use the Kubernetes Deployment construct and configure a Kubernetes Service construct with NLB and no need to implement additional SDK or install any additional components on your EKS cluster.

The following example defines a service craft-svc that creates an NLB that will route TCP connections to Pod targets carrying the selector craft and listening on port 4080.

apiVersion: v1
kind: Service
metadata:
  name: craft-svc
  annotations:
    service.beta.kubernetes.io/aws-load-balancer-type: nlb
spec:
  selector:
    app: craft
  ports:
    - protocol: TCP
      port: 4080
      targetPort: 4080
  type: LoadBalancer

The game server Deployment set the metadata label for the Service load balancer and the port.

Furthermore, the Kubernetes readinessProbe and livenessProbe offer similar features as the Agones SDK /allocate and /health implemented prior, making the Deployment option parity with the Agones option.

apiVersion: extensions/v1beta1
kind: Deployment
metadata:
  labels:
    app: craft
  name: craft
spec:
…
    metadata:
      labels:
        app: craft
    spec:
      …
        readinessProbe:
          tcpSocket:
            port: 4080
          initialDelaySeconds: 5
          periodSeconds: 10
        livenessProbe:
          tcpSocket:
            port: 4080
          initialDelaySeconds: 5
          periodSeconds: 10

Overview of the Database

The compute layer running the game could be reclaimed at any time within minutes, so it is imperative to continuously store the game state as players progress without impacting the experience. Furthermore, it is essential to read the game state quickly from scratch upon session recovery from an unexpected interruption. Therefore, the game requires fast reads and lazy writes. More considerations are consistency and isolation. Developers could handle inconsistency via the game in order to relax hard consistency requirements. As for isolation, in our Craft example players can build a structure without other players seeing it and publish it globally only when they choose.

Choosing the proper database for the MMO depends on the game state structure, e.g., a set of related objects such as our Craft example or a single denormalized table. The former fits the relational model used with RDS or Aurora open-source databases such as MySQL or PostgreSQL. While the latter can be used with Keyspaces, an AWS managed Cassandra, or a key-value store such as DynamoDB. Our example includes two options to store the game state with Aurora Serverless for PostgreSQL or DynamoDB. We chose those because of the ACID support. PostgreSQL offers four isolation levels: dirty read, nonrepeatable read, phantom read, and serialization anomaly. DynamoDB offers two isolation levels: serializable and read-committed. Both databases’ options allow the game developer to implement the best player experience and avoid additional implementation efforts.

Moreover, both engines offer Restful connection methods to the database. Aurora uses Data API. The Data API doesn’t require a persistent DB cluster connection. Instead, it provides a secure HTTP endpoint and integration with AWS SDKs. Game developers can run SQL statements via the endpoint without managing connections. DynamoDB only supports a Restful connection. Finally, Aurora Serverless and DynamoDB scale the compute and storage to reduce operational overhead and pay only for what was played.


Conclusion

MMOs are unique because they require infrastructure features similar to other game types like FPS or casual games, and reliable persistence storage for the game-state. Unfortunately, this leads to expensive choices that make monetizing the game difficult. Therefore, we proposed an option with a fun game to help you, the developer, analyze what is best for your MMO. Our option is built upon open-source projects that allow you to build it anywhere, but we also show that AWS offers the most cost-effective and scalable option. We encourage you to read recent announcements about these topics, including several at AWS re:Invent 2021.


Proactively manage the Spot Instance lifecycle using the new Capacity Rebalancing feature for EC2 Auto Scaling

Post Syndicated from Chad Schmutzer original https://aws.amazon.com/blogs/compute/proactively-manage-spot-instance-lifecycle-using-the-new-capacity-rebalancing-feature-for-ec2-auto-scaling/

By Deepthi Chelupati and Chad Schmutzer

AWS now offers Capacity Rebalancing for Amazon EC2 Auto Scaling, a new feature for proactively managing the Amazon EC2 Spot Instance lifecycle in an Auto Scaling group. Capacity Rebalancing complements the capacity optimized allocation strategy (designed to help find the most optimal spare capacity) and the mixed instances policy (designed to enhance availability by deploying across multiple instance types running in multiple Availability Zones). Capacity Rebalancing increases the emphasis on availability by automatically attempting to replace Spot Instances in an Auto Scaling group before they are interrupted by Amazon EC2.

In order to proactively replace Spot Instances, Capacity Rebalancing leverages the new EC2 Instance rebalance recommendation, a signal that is sent when a Spot Instance is at elevated risk of interruption. The rebalance recommendation signal can arrive sooner than the existing two-minute Spot Instance interruption notice, providing an opportunity to proactively rebalance a workload to new or existing Spot Instances that are not at elevated risk of interruption.

Capacity Rebalancing for EC2 Auto Scaling provides a seamless and automated experience for maintaining desired capacity through the Spot Instance lifecycle. This includes monitoring for rebalance recommendations, attempting to proactively launch replacement capacity for existing Spot Instances when they are at elevated risk of interruption, detaching from Elastic Load Balancing if necessary, and running lifecycle hooks as configured. This post provides an overview of using Capacity Rebalancing in EC2 Auto Scaling to manage your Spot Instance backed workloads, and dives into an example use case for taking advantage of Capacity Rebalancing in your environment.

EC2 Auto Scaling and Spot Instances – a classic love story

First, let’s review what Spot Instances are and why EC2 Auto scaling provides an optimal platform to manage your Spot Instance backed workloads. This will help illustrate how Capacity Rebalancing can benefit these workloads.

Spot Instances are spare EC2 compute capacity in the AWS Cloud available for steep discounts off On-Demand prices. In exchange for the discount, Spot Instances come with a simple rule – they are interruptible and must be returned when EC2 needs the capacity back. Where does this spare capacity come from? Since AWS builds capacity for unpredictable demand at any given time (think all 350+ instance types across 77 Availability Zones and 24 Regions), there is often excess capacity. Rather than let that spare capacity sit idle and unused, it is made available to be purchased as Spot Instances.

As you can imagine, the location and amount of spare capacity available at any given moment is dynamic and continually changes in real time. This is why it is extremely important for Spot customers to only run workloads that are truly interruption tolerant. Additionally, Spot workloads should be flexible, meaning they can be shifted in real time to where the spare capacity currently is (or otherwise be paused until spare capacity is available again). In practice, being flexible means qualifying a workload to run on multiple EC2 instance types (think big: multiple families, sizes, and generations), and in multiple Availability Zones, at any given time.

This is where EC2 Auto Scaling comes in. EC2 Auto Scaling is designed to help you maintain application availability. It also allows you to automatically add or remove EC2 instances according to conditions you define. We’ve continued to innovate on behalf of our customers by adding new features to EC2 Auto Scaling to natively support flexible configurations for EC2 workloads. One of these innovations is the mixed instances policy (launched in 2018), which supports multiple instance types and purchase options in a single Auto Scaling group. Another innovation is the capacity optimized allocation strategy (launched in 2019), an allocation strategy designed to locate optimal spare capacity for Spot Instances backed workloads. These features are aimed at supporting flexible workload best practices, and reacting to the dynamic shifts in capacity automatically.

The next level – moving from reactive to proactive Spot Capacity Rebalancing in EC2 Auto Scaling

The default behavior for EC2 Auto Scaling is to take a reactive approach to Spot Instance interruptions. This means that EC2 Auto Scaling attempts to replace an interrupted Spot Instance with another Spot Instance only after the instance has been shut down by EC2 and the health check fails. The reactive approach to interruptions works fine for many workloads. However, we have received feedback from customers requesting that EC2 Auto Scaling take a more proactive approach to handling Spot Instance interruptions.

Capacity Rebalancing in EC2 Auto Scaling is the answer to this request. Capacity Rebalancing is designed to take a proactive approach in handling the dynamic nature of EC2 capacity. It does this by monitoring for the EC2 Instance rebalance recommendation signal in addition to the “final” two-minute Spot Instance interruption notice. When a rebalance recommendation signal is detected, it automatically attempts to get a head start in replacing Spot Instances with new Spot Instances before they are shut down. In addition to attempting to maintain desired capacity through interruptions by launching replacement Spot Instances, Capacity Rebalancing gives customers the opportunity to gracefully remove Spot Instances from an Auto Scaling group by taking Spot Instances through the normal shut down process, such as deregistering from a load balancer and running terminating lifecycle hooks.

Capacity Rebalancing in EC2 Auto Scaling works best when combined with a few best practices. Let’s quickly review them:

  1. Be flexible. Capacity Rebalancing thrives on flexibility, and works best when using the EC2 Auto Scaling mixed instances policy and as many instance types and Availability Zones as possible. Remember to think big and qualify multiple families, sizes, and generations for your workload, and use all Availability Zones if possible.
  2. Use the capacity optimized allocation strategy. Capacity rebalance works optimally when combined with the capacity optimized allocation strategy and a flexible list of instance types and Availability Zones, because the goal is to find the optimal spare capacity to rebalance your workload on.
  3. Take advantage of termination lifecycle hooks (optional). Termination lifecycle hooks are powerful in case you need to perform any final tasks before shutdown.

Example tutorial – Web application workload

Now that you understand the best practices for taking advantage of Capacity Rebalancing in EC2 Auto Scaling, let’s dive into the example workload. In this scenario, we have a web application powered by 75% Spot Instances and 25% On-Demand Instances in an Auto Scaling group, running behind an Application Load Balancer. We’d like to maintain availability, and have the Auto Scaling group automatically handle Spot Instance interruptions and rebalancing of capacity.

The Auto Scaling group configuration looks like this (note the best practices of instance type and Availability Zone flexibility combined with the capacity optimized allocation strategy in the mixed instances policy):

{
   "AutoScalingGroupName": "myAutoScalingGroup",
   "CapacityRebalance": true,
   "DesiredCapacity": 12,
   "MaxSize": 15,
   "MinSize": 12,
   "MixedInstancesPolicy": {
      "InstancesDistribution": {
         "OnDemandBaseCapacity": 0,
         "OnDemandPercentageAboveBaseCapacity": 25,
         "SpotAllocationStrategy": "capacity-optimized"
      },
      "LaunchTemplate": {
         "LaunchTemplateSpecification": {
            "LaunchTemplateName": "myLaunchTemplate",
            "Version": "$Default"
         },
         "Overrides": [
            {
               "InstanceType": "c5.large"
            },
            {
               "InstanceType": "c5a.large"
            },
            {
               "InstanceType": "m5.large"
            },
            {
               "InstanceType": "m5a.large"
            },
            {
               "InstanceType": "c4.large"
            },
            {
               "InstanceType": "m4.large"
            },
            {
               "InstanceType": "c3.large"
            },
            {
               "InstanceType": "m3.large"
            }
         ]
      }
   },
   "TargetGroupARNs": [
      "arn:aws:elasticloadbalancing:us-west-2:123456789012:targetgroup/my-targets/a1b2c3d4e5f6g7h8"
   ],
   "VPCZoneIdentifier": "mySubnet1,mySubnet2,mySubnet3"
}

Next, create the Auto Scaling group as follows:

aws autoscaling create-auto-scaling-group \
  --cli-input-json file://myAutoScalingGroup.json

We also use a lifecycle hook to download logs before an instance is shut down:

aws autoscaling put-lifecycle-hook \
  --lifecycle-hook-name myTerminatingHook \
  --auto-scaling-group-name myAutoScalingGroup \
  --lifecycle-transition autoscaling:EC2_INSTANCE_TERMINATING \
  --heartbeat-timeout 300

In this example scenario, let’s say that the above config results in nine Spot Instances and three On-Demand instances being deployed in the Auto Scaling group, three Spot Instances, and one On-Demand instance in each Availability Zone. With Capacity Rebalancing enabled, if any of the nine Spot Instances receive the EC2 Instance rebalance recommendation signal, EC2 Auto Scaling will automatically request a replacement Spot Instance according to the allocation strategy (capacity optimized), resulting in 10 running Spot Instances. When the new Spot Instance passes EC2 health checks, it is joined to the load balancer and placed into service. Upon placing the new Spot Instance in service, EC2 Auto Scaling then proceeds with the shutdown process for the Spot Instance that has received the rebalance recommendation signal. It detaches the instance from the load balancer, drains connections, and then carries out the terminating lifecycle hook. Once the terminating lifecycle hook is complete, EC2 Auto Scaling shuts down the instance, bringing capacity back to nine Spot Instances.

Conclusion

Consider using the new Capacity Rebalancing feature for EC2 Auto Scaling in your environment to proactively manage Spot Instance lifecycle. Capacity Rebalancing attempts to maintain workload availability by automatically rebalancing capacity as necessary, providing a seamless and hands-off experience for managing Spot Instance interruptions. Capacity Rebalancing works best when combined with instance type flexibility and the capacity optimized allocation strategy, and may be especially useful for workloads that can easily rebalance across shifting capacity, including:

  • Containerized workloads
  • Big data and analytics
  • Image and media rendering
  • Batch processing
  • Web applications

To learn more about Capacity Rebalancing for EC2 Auto Scaling, please visit the documentation.

To learn more about the new EC2 Instance rebalance recommendation, please visit the documentation.