All posts by Chad Schmutzer

Optimizing AWS Lambda cost and performance using AWS Compute Optimizer

Post Syndicated from Chad Schmutzer original https://aws.amazon.com/blogs/compute/optimizing-aws-lambda-cost-and-performance-using-aws-compute-optimizer/

This post is authored by Brooke Chen, Senior Product Manager for AWS Compute Optimizer, Letian Feng, Principal Product Manager for AWS Compute Optimizer, and Chad Schmutzer, Principal Developer Advocate for Amazon EC2

Optimizing compute resources is a critical component of any application architecture. Over-provisioning compute can lead to unnecessary infrastructure costs, while under-provisioning compute can lead to poor application performance.

Launched in December 2019, AWS Compute Optimizer is a recommendation service for optimizing the cost and performance of AWS compute resources. It generates actionable optimization recommendations tailored to your specific workloads. Over the last year, thousands of AWS customers reduced compute costs up to 25% by using Compute Optimizer to help choose the optimal Amazon EC2 instance types for their workloads.

One of the most frequent requests from customers is for AWS Lambda recommendations in Compute Optimizer. Today, we announce that Compute Optimizer now supports memory size recommendations for Lambda functions. This allows you to reduce costs and increase performance for your Lambda-based serverless workloads. To get started, opt in for Compute Optimizer to start finding recommendations.

Overview

With Lambda, there are no servers to manage, it scales automatically, and you only pay for what you use. However, choosing the right memory size settings for a Lambda function is still an important task. Computer Optimizer uses machine-learning based memory recommendations to help with this task.

These recommendations are available through the Compute Optimizer console, AWS CLI, AWS SDK, and the Lambda console. Compute Optimizer continuously monitors Lambda functions, using historical performance metrics to improve recommendations over time. In this blog post, we walk through an example to show how to use this feature.

Using Compute Optimizer for Lambda

This tutorial uses the AWS CLI v2 and the AWS Management Console.

In this tutorial, we setup two compute jobs that run every minute in AWS Region US East (N. Virginia). One job is more CPU intensive than the other. Initial tests show that the invocation times for both jobs typically last for less than 60 seconds. The goal is to either reduce cost without much increase in duration, or reduce the duration in a cost-efficient manner.

Based on these requirements, a serverless solution can help with this task. Amazon EventBridge can schedule the Lambda functions using rules. To ensure that the functions are optimized for cost and performance, you can use the memory recommendation support in Compute Optimizer.

In your AWS account, opt in to Compute Optimizer to start analyzing AWS resources. Ensure you have the appropriate IAM permissions configured – follow these steps for guidance. If you prefer to use the console to opt in, follow these steps. To opt in, enter the following command in a terminal window:

$ aws compute-optimizer update-enrollment-status --status Active

Once you enable Compute Optimizer, it starts to scan for functions that have been invoked for at least 50 times over the trailing 14 days. The next section shows two example scheduled Lambda functions for analysis.

Example Lambda functions

The code for the non-CPU intensive job is below. A Lambda function named lambda-recommendation-test-sleep is created with memory size configured as 1024 MB. An EventBridge rule is created to trigger the function on a recurring 1-minute schedule:

import json
import time

def lambda_handler(event, context):
  time.sleep(30)
  x=[0]*100000000
  return {
    'statusCode': 200,
    'body': json.dumps('Hello World!')
  }

The code for the CPU intensive job is below. A Lambda function named lambda-recommendation-test-busy is created with memory size configured as 128 MB. An EventBridge rule is created to trigger the function on a recurring 1-minute schedule:

import json
import random

def lambda_handler(event, context):
  random.seed(1)
  x=0
  for i in range(0, 20000000):
    x+=random.random()

  return {
    'statusCode': 200,
    'body': json.dumps('Sum:' + str(x))
  }

Understanding the Compute Optimizer recommendations

Compute Optimizer needs a history of at least 50 invocations of a Lambda function over the trailing 14 days to deliver recommendations. Recommendations are created by analyzing function metadata such as memory size, timeout, and runtime, in addition to CloudWatch metrics such as number of invocations, duration, error count, and success rate.

Compute Optimizer will gather the necessary information to provide memory recommendations for Lambda functions, and make them available within 48 hours. Afterwards, these recommendations will be refreshed daily.

These are recent invocations for the non-CPU intensive function:

Recent invocations for the non-CPU intensive function

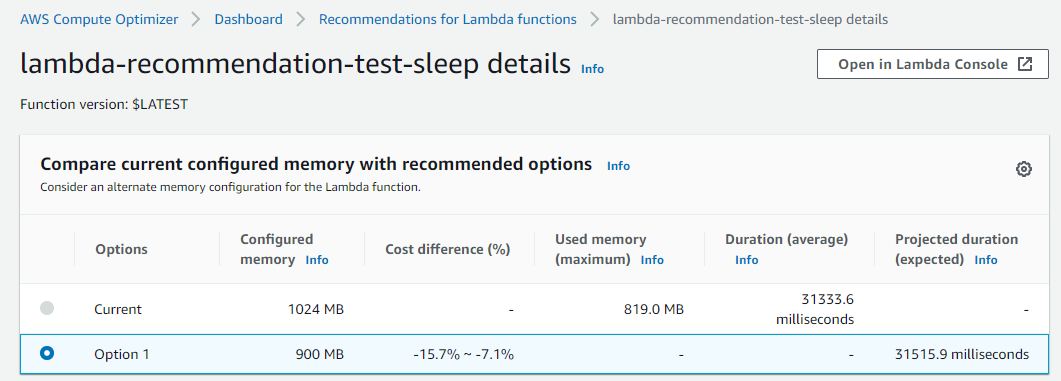
Function duration is approximately 31.3 seconds with a memory setting of 1024 MB, resulting in a duration cost of about $0.00052 per invocation. Here are the recommendations for this function in the Compute Optimizer console:

Recommendations for this function in the Compute Optimizer console

The function is Not optimized with a reason of Memory over-provisioned. You can also fetch the same recommendation information via the CLI:

$ aws compute-optimizer \
  get-lambda-function-recommendations \
  --function-arns arn:aws:lambda:us-east-1:123456789012:function:lambda-recommendation-test-sleep
{
    "lambdaFunctionRecommendations": [
        {
            "utilizationMetrics": [
                {
                    "name": "Duration",
                    "value": 31333.63587049883,
                    "statistic": "Average"
                },
                {
                    "name": "Duration",
                    "value": 32522.04,
                    "statistic": "Maximum"
                },
                {
                    "name": "Memory",
                    "value": 817.67049838188,
                    "statistic": "Average"
                },
                {
                    "name": "Memory",
                    "value": 819.0,
                    "statistic": "Maximum"
                }
            ],
            "currentMemorySize": 1024,
            "lastRefreshTimestamp": 1608735952.385,
            "numberOfInvocations": 3090,
            "functionArn": "arn:aws:lambda:us-east-1:123456789012:function:lambda-recommendation-test-sleep:$LATEST",
            "memorySizeRecommendationOptions": [
                {
                    "projectedUtilizationMetrics": [
                        {
                            "name": "Duration",
                            "value": 30015.113193697029,
                            "statistic": "LowerBound"
                        },
                        {
                            "name": "Duration",
                            "value": 31515.86878891883,
                            "statistic": "Expected"
                        },
                        {
                            "name": "Duration",
                            "value": 33091.662123300975,
                            "statistic": "UpperBound"
                        }
                    ],
                    "memorySize": 900,
                    "rank": 1
                }
            ],
            "functionVersion": "$LATEST",
            "finding": "NotOptimized",
            "findingReasonCodes": [
                "MemoryOverprovisioned"
            ],
            "lookbackPeriodInDays": 14.0,
            "accountId": "123456789012"
        }
    ]
}

The Compute Optimizer recommendation contains useful information about the function. Most importantly, it has determined that the function is over-provisioned for memory. The attribute findingReasonCodes shows the value MemoryOverprovisioned. In memorySizeRecommendationOptions, Compute Optimizer has found that using a memory size of 900 MB results in an expected invocation duration of approximately 31.5 seconds.

For non-CPU intensive jobs, reducing the memory setting of the function often doesn’t have a negative impact on function duration. The recommendation confirms that you can reduce the memory size from 1024 MB to 900 MB, saving cost without significantly impacting duration. The new duration cost per invocation saves approximately 12%.

The Compute Optimizer console validates these calculations:

Compute Optimizer console validates these calculations

These are recent invocations for the second function which is CPU-intensive:

Recent invocations for the second function which is CPU-intensive

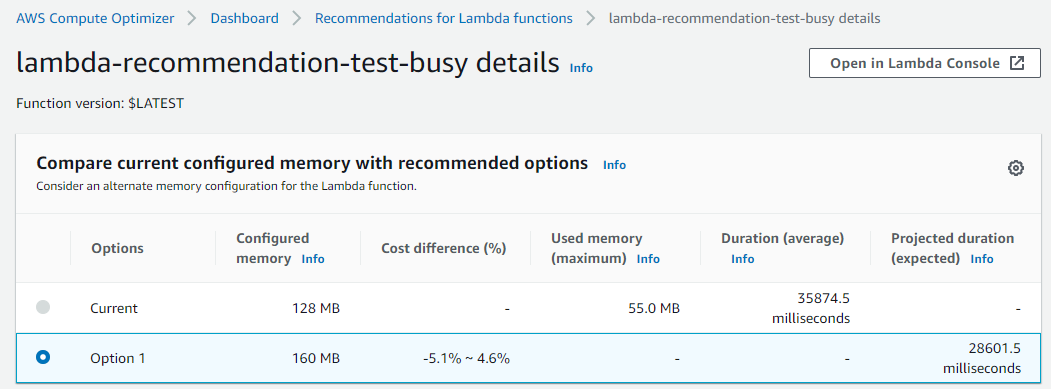
The function duration is about 37.5 seconds with a memory setting of 128 MB, resulting in a duration cost of about $0.000078 per invocation. The recommendations for this function appear in the Compute Optimizer console:

recommendations for this function appear in the Compute Optimizer console

The function is also Not optimized with a reason of Memory under-provisioned. The same recommendation information is available via the CLI:

$ aws compute-optimizer \
  get-lambda-function-recommendations \
  --function-arns arn:aws:lambda:us-east-1:123456789012:function:lambda-recommendation-test-busy
{
    "lambdaFunctionRecommendations": [
        {
            "utilizationMetrics": [
                {
                    "name": "Duration",
                    "value": 36006.85851551957,
                    "statistic": "Average"
                },
                {
                    "name": "Duration",
                    "value": 38540.43,
                    "statistic": "Maximum"
                },
                {
                    "name": "Memory",
                    "value": 53.75978407557355,
                    "statistic": "Average"
                },
                {
                    "name": "Memory",
                    "value": 55.0,
                    "statistic": "Maximum"
                }
            ],
            "currentMemorySize": 128,
            "lastRefreshTimestamp": 1608725151.752,
            "numberOfInvocations": 741,
            "functionArn": "arn:aws:lambda:us-east-1:123456789012:function:lambda-recommendation-test-busy:$LATEST",
            "memorySizeRecommendationOptions": [
                {
                    "projectedUtilizationMetrics": [
                        {
                            "name": "Duration",
                            "value": 27340.37604781184,
                            "statistic": "LowerBound"
                        },
                        {
                            "name": "Duration",
                            "value": 28707.394850202432,
                            "statistic": "Expected"
                        },
                        {
                            "name": "Duration",
                            "value": 30142.764592712556,
                            "statistic": "UpperBound"
                        }
                    ],
                    "memorySize": 160,
                    "rank": 1
                }
            ],
            "functionVersion": "$LATEST",
            "finding": "NotOptimized",
            "findingReasonCodes": [
                "MemoryUnderprovisioned"
            ],
            "lookbackPeriodInDays": 14.0,
            "accountId": "123456789012"
        }
    ]
}

For this function, Compute Optimizer has determined that the function’s memory is under-provisioned. The value of findingReasonCodes is MemoryUnderprovisioned. The recommendation is to increase the memory from 128 MB to 160 MB.

This recommendation may seem counter-intuitive, since the function only uses 55 MB of memory per invocation. However, Lambda allocates CPU and other resources linearly in proportion to the amount of memory configured. This means that increasing the memory allocation to 160 MB also reduces the expected duration to around 28.7 seconds. This is because a CPU-intensive task also benefits from the increased CPU performance that comes with the additional memory.

After applying this recommendation, the new expected duration cost per invocation is approximately $0.000075. This means that for almost no change in duration cost, the job latency is reduced from 37.5 seconds to 28.7 seconds.

The Compute Optimizer console validates these calculations:

Compute Optimizer console validates these calculations

Applying the Compute Optimizer recommendations

To optimize the Lambda functions using Compute Optimizer recommendations, use the following CLI command:

$ aws lambda update-function-configuration \
  --function-name lambda-recommendation-test-sleep \
  --memory-size 900

After invoking the function multiple times, we can see metrics of these invocations in the console. This shows that the function duration has not changed significantly after reducing the memory size from 1024 MB to 900 MB. The Lambda function has been successfully cost-optimized without increasing job duration:

Console shows the metrics from recent invocations

To apply the recommendation to the CPU-intensive function, use the following CLI command:

$ aws lambda update-function-configuration \
  --function-name lambda-recommendation-test-busy \
  --memory-size 160

After invoking the function multiple times, the console shows that the invocation duration is reduced to about 28 seconds. This matches the recommendation’s expected duration. This shows that the function is now performance-optimized without a significant cost increase:

Console shows that the invocation duration is reduced to about 28 seconds

Final notes

A couple of final notes:

  • Not every function will receive a recommendation. Compute optimizer only delivers recommendations when it has high confidence that these recommendations may help reduce cost or reduce execution duration.
  • As with any changes you make to an environment, we strongly advise that you test recommended memory size configurations before applying them into production.

Conclusion

You can now use Compute Optimizer for serverless workloads using Lambda functions. This can help identify the optimal Lambda function configuration options for your workloads. Compute Optimizer supports memory size recommendations for Lambda functions in all AWS Regions where Compute Optimizer is available. These recommendations are available to you at no additional cost. You can get started with Compute Optimizer from the console.

To learn more visit Getting started with AWS Compute Optimizer.


Proactively manage the Spot Instance lifecycle using the new Capacity Rebalancing feature for EC2 Auto Scaling

Post Syndicated from Chad Schmutzer original https://aws.amazon.com/blogs/compute/proactively-manage-spot-instance-lifecycle-using-the-new-capacity-rebalancing-feature-for-ec2-auto-scaling/

By Deepthi Chelupati and Chad Schmutzer

AWS now offers Capacity Rebalancing for Amazon EC2 Auto Scaling, a new feature for proactively managing the Amazon EC2 Spot Instance lifecycle in an Auto Scaling group. Capacity Rebalancing complements the capacity optimized allocation strategy (designed to help find the most optimal spare capacity) and the mixed instances policy (designed to enhance availability by deploying across multiple instance types running in multiple Availability Zones). Capacity Rebalancing increases the emphasis on availability by automatically attempting to replace Spot Instances in an Auto Scaling group before they are interrupted by Amazon EC2.

In order to proactively replace Spot Instances, Capacity Rebalancing leverages the new EC2 Instance rebalance recommendation, a signal that is sent when a Spot Instance is at elevated risk of interruption. The rebalance recommendation signal can arrive sooner than the existing two-minute Spot Instance interruption notice, providing an opportunity to proactively rebalance a workload to new or existing Spot Instances that are not at elevated risk of interruption.

Capacity Rebalancing for EC2 Auto Scaling provides a seamless and automated experience for maintaining desired capacity through the Spot Instance lifecycle. This includes monitoring for rebalance recommendations, attempting to proactively launch replacement capacity for existing Spot Instances when they are at elevated risk of interruption, detaching from Elastic Load Balancing if necessary, and running lifecycle hooks as configured. This post provides an overview of using Capacity Rebalancing in EC2 Auto Scaling to manage your Spot Instance backed workloads, and dives into an example use case for taking advantage of Capacity Rebalancing in your environment.

EC2 Auto Scaling and Spot Instances – a classic love story

First, let’s review what Spot Instances are and why EC2 Auto scaling provides an optimal platform to manage your Spot Instance backed workloads. This will help illustrate how Capacity Rebalancing can benefit these workloads.

Spot Instances are spare EC2 compute capacity in the AWS Cloud available for steep discounts off On-Demand prices. In exchange for the discount, Spot Instances come with a simple rule – they are interruptible and must be returned when EC2 needs the capacity back. Where does this spare capacity come from? Since AWS builds capacity for unpredictable demand at any given time (think all 350+ instance types across 77 Availability Zones and 24 Regions), there is often excess capacity. Rather than let that spare capacity sit idle and unused, it is made available to be purchased as Spot Instances.

As you can imagine, the location and amount of spare capacity available at any given moment is dynamic and continually changes in real time. This is why it is extremely important for Spot customers to only run workloads that are truly interruption tolerant. Additionally, Spot workloads should be flexible, meaning they can be shifted in real time to where the spare capacity currently is (or otherwise be paused until spare capacity is available again). In practice, being flexible means qualifying a workload to run on multiple EC2 instance types (think big: multiple families, sizes, and generations), and in multiple Availability Zones, at any given time.

This is where EC2 Auto Scaling comes in. EC2 Auto Scaling is designed to help you maintain application availability. It also allows you to automatically add or remove EC2 instances according to conditions you define. We’ve continued to innovate on behalf of our customers by adding new features to EC2 Auto Scaling to natively support flexible configurations for EC2 workloads. One of these innovations is the mixed instances policy (launched in 2018), which supports multiple instance types and purchase options in a single Auto Scaling group. Another innovation is the capacity optimized allocation strategy (launched in 2019), an allocation strategy designed to locate optimal spare capacity for Spot Instances backed workloads. These features are aimed at supporting flexible workload best practices, and reacting to the dynamic shifts in capacity automatically.

The next level – moving from reactive to proactive Spot Capacity Rebalancing in EC2 Auto Scaling

The default behavior for EC2 Auto Scaling is to take a reactive approach to Spot Instance interruptions. This means that EC2 Auto Scaling attempts to replace an interrupted Spot Instance with another Spot Instance only after the instance has been shut down by EC2 and the health check fails. The reactive approach to interruptions works fine for many workloads. However, we have received feedback from customers requesting that EC2 Auto Scaling take a more proactive approach to handling Spot Instance interruptions.

Capacity Rebalancing in EC2 Auto Scaling is the answer to this request. Capacity Rebalancing is designed to take a proactive approach in handling the dynamic nature of EC2 capacity. It does this by monitoring for the EC2 Instance rebalance recommendation signal in addition to the “final” two-minute Spot Instance interruption notice. When a rebalance recommendation signal is detected, it automatically attempts to get a head start in replacing Spot Instances with new Spot Instances before they are shut down. In addition to attempting to maintain desired capacity through interruptions by launching replacement Spot Instances, Capacity Rebalancing gives customers the opportunity to gracefully remove Spot Instances from an Auto Scaling group by taking Spot Instances through the normal shut down process, such as deregistering from a load balancer and running terminating lifecycle hooks.

Capacity Rebalancing in EC2 Auto Scaling works best when combined with a few best practices. Let’s quickly review them:

  1. Be flexible. Capacity Rebalancing thrives on flexibility, and works best when using the EC2 Auto Scaling mixed instances policy and as many instance types and Availability Zones as possible. Remember to think big and qualify multiple families, sizes, and generations for your workload, and use all Availability Zones if possible.
  2. Use the capacity optimized allocation strategy. Capacity rebalance works optimally when combined with the capacity optimized allocation strategy and a flexible list of instance types and Availability Zones, because the goal is to find the optimal spare capacity to rebalance your workload on.
  3. Take advantage of termination lifecycle hooks (optional). Termination lifecycle hooks are powerful in case you need to perform any final tasks before shutdown.

Example tutorial – Web application workload

Now that you understand the best practices for taking advantage of Capacity Rebalancing in EC2 Auto Scaling, let’s dive into the example workload. In this scenario, we have a web application powered by 75% Spot Instances and 25% On-Demand Instances in an Auto Scaling group, running behind an Application Load Balancer. We’d like to maintain availability, and have the Auto Scaling group automatically handle Spot Instance interruptions and rebalancing of capacity.

The Auto Scaling group configuration looks like this (note the best practices of instance type and Availability Zone flexibility combined with the capacity optimized allocation strategy in the mixed instances policy):

{
   "AutoScalingGroupName": "myAutoScalingGroup",
   "CapacityRebalance": true,
   "DesiredCapacity": 12,
   "MaxSize": 15,
   "MinSize": 12,
   "MixedInstancesPolicy": {
      "InstancesDistribution": {
         "OnDemandBaseCapacity": 0,
         "OnDemandPercentageAboveBaseCapacity": 25,
         "SpotAllocationStrategy": "capacity-optimized"
      },
      "LaunchTemplate": {
         "LaunchTemplateSpecification": {
            "LaunchTemplateName": "myLaunchTemplate",
            "Version": "$Default"
         },
         "Overrides": [
            {
               "InstanceType": "c5.large"
            },
            {
               "InstanceType": "c5a.large"
            },
            {
               "InstanceType": "m5.large"
            },
            {
               "InstanceType": "m5a.large"
            },
            {
               "InstanceType": "c4.large"
            },
            {
               "InstanceType": "m4.large"
            },
            {
               "InstanceType": "c3.large"
            },
            {
               "InstanceType": "m3.large"
            }
         ]
      }
   },
   "TargetGroupARNs": [
      "arn:aws:elasticloadbalancing:us-west-2:123456789012:targetgroup/my-targets/a1b2c3d4e5f6g7h8"
   ],
   "VPCZoneIdentifier": "mySubnet1,mySubnet2,mySubnet3"
}

Next, create the Auto Scaling group as follows:

aws autoscaling create-auto-scaling-group \
  --cli-input-json file://myAutoScalingGroup.json

We also use a lifecycle hook to download logs before an instance is shut down:

aws autoscaling put-lifecycle-hook \
  --lifecycle-hook-name myTerminatingHook \
  --auto-scaling-group-name myAutoScalingGroup \
  --lifecycle-transition autoscaling:EC2_INSTANCE_TERMINATING \
  --heartbeat-timeout 300

In this example scenario, let’s say that the above config results in nine Spot Instances and three On-Demand instances being deployed in the Auto Scaling group, three Spot Instances, and one On-Demand instance in each Availability Zone. With Capacity Rebalancing enabled, if any of the nine Spot Instances receive the EC2 Instance rebalance recommendation signal, EC2 Auto Scaling will automatically request a replacement Spot Instance according to the allocation strategy (capacity optimized), resulting in 10 running Spot Instances. When the new Spot Instance passes EC2 health checks, it is joined to the load balancer and placed into service. Upon placing the new Spot Instance in service, EC2 Auto Scaling then proceeds with the shutdown process for the Spot Instance that has received the rebalance recommendation signal. It detaches the instance from the load balancer, drains connections, and then carries out the terminating lifecycle hook. Once the terminating lifecycle hook is complete, EC2 Auto Scaling shuts down the instance, bringing capacity back to nine Spot Instances.

Conclusion

Consider using the new Capacity Rebalancing feature for EC2 Auto Scaling in your environment to proactively manage Spot Instance lifecycle. Capacity Rebalancing attempts to maintain workload availability by automatically rebalancing capacity as necessary, providing a seamless and hands-off experience for managing Spot Instance interruptions. Capacity Rebalancing works best when combined with instance type flexibility and the capacity optimized allocation strategy, and may be especially useful for workloads that can easily rebalance across shifting capacity, including:

  • Containerized workloads
  • Big data and analytics
  • Image and media rendering
  • Batch processing
  • Web applications

To learn more about Capacity Rebalancing for EC2 Auto Scaling, please visit the documentation.

To learn more about the new EC2 Instance rebalance recommendation, please visit the documentation.