Tag Archives: Infrastructure & Automation

Manage application security and compliance with the AWS Cloud Development Kit and cdk-nag

Post Syndicated from Rodney Bozo original https://aws.amazon.com/blogs/devops/manage-application-security-and-compliance-with-the-aws-cloud-development-kit-and-cdk-nag/

Infrastructure as Code (IaC) is an important part of Cloud Applications. Developers rely on various Static Application Security Testing (SAST) tools to identify security/compliance issues and mitigate these issues early on, before releasing their applications to production. Additionally, SAST tools often provide reporting mechanisms that can help developers verify compliance during security reviews.

cdk-nag integrates directly into AWS Cloud Development Kit (AWS CDK) applications to provide identification and reporting mechanisms similar to SAST tooling.

This post demonstrates how to integrate cdk-nag into an AWS CDK application to provide continual feedback and help align your applications with best practices.

Overview of cdk-nag

cdk-nag (inspired by cfn_nag) validates that the state of constructs within a given scope comply with a given set of rules. Additionally, cdk-nag provides a rule suppression and compliance reporting system. cdk-nag validates constructs by extending AWS CDK Aspects. If you’re interested in learning more about the AWS CDK Aspect system, then you should check out this post.

cdk-nag includes several rule sets (NagPacks) to validate your application against. As of this post, cdk-nag includes the AWS Solutions, HIPAA Security, NIST 800-53 rev 4, NIST 800-53 rev 5, and PCI DSS 3.2.1 NagPacks. You can pick and choose different NagPacks and apply as many as you wish to a given scope.

cdk-nag rules can either be warnings or errors. Both warnings and errors will be displayed in the console and compliance reports. Only unsuppressed errors will prevent applications from deploying with the cdk deploy command.

You can see which rules are implemented in each of the NagPacks in the Rules Documentation in the GitHub repository.

Walkthrough

This walkthrough will setup a minimal AWS CDK v2 application, as well as demonstrate how to apply a NagPack to the application, how to suppress rules, and how to view a report of the findings. Although cdk-nag has support for Python, TypeScript, Java, and .NET AWS CDK applications, we’ll use TypeScript for this walkthrough.

Prerequisites

For this walkthrough, you should have the following prerequisites:

  • A local installation of and experience using the AWS CDK.

Create a baseline AWS CDK application

In this section you will create and synthesize a small AWS CDK v2 application with an Amazon Simple Storage Service (Amazon S3) bucket. If you are unfamiliar with using the AWS CDK, then learn how to install and setup the AWS CDK by looking at their open source GitHub repository.

  1. Run the following commands to create the AWS CDK application:
mkdir CdkTest
cd CdkTest
cdk init app --language typescript
  1. Replace the contents of the lib/cdk_test-stack.ts with the following:
import { Stack, StackProps } from 'aws-cdk-lib';
import { Construct } from 'constructs';
import { Bucket } from 'aws-cdk-lib/aws-s3';

export class CdkTestStack extends Stack {
  constructor(scope: Construct, id: string, props?: StackProps) {
    super(scope, id, props);
    const bucket = new Bucket(this, 'Bucket')
  }
}
  1. Run the following commands to install dependencies and synthesize our sample app:
npm install
npx cdk synth

You should see an AWS CloudFormation template with an S3 bucket both in your terminal and in cdk.out/CdkTestStack.template.json.

Apply a NagPack in your application

In this section, you’ll install cdk-nag, include the AwsSolutions NagPack in your application, and view the results.

  1. Run the following command to install cdk-nag:
npm install cdk-nag
  1. Replace the contents of the bin/cdk_test.ts with the following:
#!/usr/bin/env node
import 'source-map-support/register';
import * as cdk from 'aws-cdk-lib';
import { CdkTestStack } from '../lib/cdk_test-stack';
import { AwsSolutionsChecks } from 'cdk-nag'
import { Aspects } from 'aws-cdk-lib';

const app = new cdk.App();
// Add the cdk-nag AwsSolutions Pack with extra verbose logging enabled.
Aspects.of(app).add(new AwsSolutionsChecks({ verbose: true }))
new CdkTestStack(app, 'CdkTestStack', {});
  1. Run the following command to view the output and generate the compliance report:
npx cdk synth

The output should look similar to the following (Note: SSE stands for Server-side encryption):

[Error at /CdkTestStack/Bucket/Resource] AwsSolutions-S1: The S3 Bucket has server access logs disabled. The bucket should have server access logging enabled to provide detailed records for the requests that are made to the bucket.

[Error at /CdkTestStack/Bucket/Resource] AwsSolutions-S2: The S3 Bucket does not have public access restricted and blocked. The bucket should have public access restricted and blocked to prevent unauthorized access.

[Error at /CdkTestStack/Bucket/Resource] AwsSolutions-S3: The S3 Bucket does not default encryption enabled. The bucket should minimally have SSE enabled to help protect data-at-rest.

[Error at /CdkTestStack/Bucket/Resource] AwsSolutions-S10: The S3 Bucket does not require requests to use SSL. You can use HTTPS (TLS) to help prevent potential attackers from eavesdropping on or manipulating network traffic using person-in-the-middle or similar attacks. You should allow only encrypted connections over HTTPS (TLS) using the aws:SecureTransport condition on Amazon S3 bucket policies.

Found errors

Note that applying the AwsSolutions NagPack to the application rendered several errors in the console (AwsSolutions-S1, AwsSolutions-S2, AwsSolutions-S3, and AwsSolutions-S10). Furthermore, the cdk.out/AwsSolutions-CdkTestStack-NagReport.csv contains the errors as well:

Rule ID,Resource ID,Compliance,Exception Reason,Rule Level,Rule Info
"AwsSolutions-S1","CdkTestStack/Bucket/Resource","Non-Compliant","N/A","Error","The S3 Bucket has server access logs disabled."
"AwsSolutions-S2","CdkTestStack/Bucket/Resource","Non-Compliant","N/A","Error","The S3 Bucket does not have public access restricted and blocked."
"AwsSolutions-S3","CdkTestStack/Bucket/Resource","Non-Compliant","N/A","Error","The S3 Bucket does not default encryption enabled."
"AwsSolutions-S5","CdkTestStack/Bucket/Resource","Compliant","N/A","Error","The S3 static website bucket either has an open world bucket policy or does not use a CloudFront Origin Access Identity (OAI) in the bucket policy for limited getObject and/or putObject permissions."
"AwsSolutions-S10","CdkTestStack/Bucket/Resource","Non-Compliant","N/A","Error","The S3 Bucket does not require requests to use SSL."

Remediating and suppressing errors

In this section, you’ll remediate the AwsSolutions-S10 error, suppress the  AwsSolutions-S1 error on a Stack level, suppress the  AwsSolutions-S2 error on a Resource level errors, and not remediate the  AwsSolutions-S3 error and view the results.

  1. Replace the contents of the lib/cdk_test-stack.ts with the following:
import { Stack, StackProps } from 'aws-cdk-lib';
import { Construct } from 'constructs';
import { Bucket } from 'aws-cdk-lib/aws-s3';
import { NagSuppressions } from 'cdk-nag'

export class CdkTestStack extends Stack {
  constructor(scope: Construct, id: string, props?: StackProps) {
    super(scope, id, props);
    // The local scope 'this' is the Stack. 
    NagSuppressions.addStackSuppressions(this, [
      {
        id: 'AwsSolutions-S1',
        reason: 'Demonstrate a stack level suppression.'
      },
    ])
    // Remediating AwsSolutions-S10 by enforcing SSL on the bucket.
    const bucket = new Bucket(this, 'Bucket', { enforceSSL: true })
    NagSuppressions.addResourceSuppressions(bucket, [
      {
        id: 'AwsSolutions-S2',
        reason: 'Demonstrate a resource level suppression.'
      },
    ])
  }
}
  1. Run the cdk synth command again:
npx cdk synth

The output should look similar to the following:

[Error at /CdkTestStack/Bucket/Resource] AwsSolutions-S3: The S3 Bucket does not default encryption enabled. The bucket should minimally have SSE enabled to help protect data-at-rest.

Found errors

The cdk.out/AwsSolutions-CdkTestStack-NagReport.csv contains more details about rule compliance, non-compliance, and suppressions.

Rule ID,Resource ID,Compliance,Exception Reason,Rule Level,Rule Info
"AwsSolutions-S1","CdkTestStack/Bucket/Resource","Suppressed","Demonstrate a stack level suppression.","Error","The S3 Bucket has server access logs disabled."
"AwsSolutions-S2","CdkTestStack/Bucket/Resource","Suppressed","Demonstrate a resource level suppression.","Error","The S3 Bucket does not have public access restricted and blocked."
"AwsSolutions-S3","CdkTestStack/Bucket/Resource","Non-Compliant","N/A","Error","The S3 Bucket does not default encryption enabled."
"AwsSolutions-S5","CdkTestStack/Bucket/Resource","Compliant","N/A","Error","The S3 static website bucket either has an open world bucket policy or does not use a CloudFront Origin Access Identity (OAI) in the bucket policy for limited getObject and/or putObject permissions."
"AwsSolutions-S10","CdkTestStack/Bucket/Resource","Compliant","N/A","Error","The S3 Bucket does not require requests to use SSL."

Moreover, note that the resultant cdk.out/CdkTestStack.template.json template contains the cdk-nag suppression data. This provides transparency with what rules weren’t applied to an application, as the suppression data is included in the resources.

{
  "Metadata": {
    "cdk_nag": {
      "rules_to_suppress": [
        {
          "id": "AwsSolutions-S1",
          "reason": "Demonstrate a stack level suppression."
        }
      ]
    }
  },
  "Resources": {
    "BucketDEB6E181": {
      "Type": "AWS::S3::Bucket",
      "UpdateReplacePolicy": "Retain",
      "DeletionPolicy": "Retain",
      "Metadata": {
        "aws:cdk:path": "CdkTestStack/Bucket/Resource",
        "cdk_nag": {
          "rules_to_suppress": [
            {
              "id": "AwsSolutions-S2",
              "reason": "Demonstrate a resource level suppression."
            }
          ]
        }
      }
    },
  ...
  },
  ...
}

Reflecting on the Walkthrough

In this section, you learned how to apply a NagPack to your application, remediate/suppress warnings and errors, and review the compliance reports. The reporting and suppression systems provide mechanisms for the development and security teams within organizations to work together to identify and mitigate potential security/compliance issues. Security can choose which NagPacks developers should apply to their applications. Then, developers can use the feedback to quickly remediate issues. Security can use the reports to validate compliances. Furthermore, developers and security can work together to use suppressions to transparently document exceptions to rules that they’ve decided not to follow.

Advanced usage and further reading

This section briefly covers some advanced options for using cdk-nag.

Unit Testing with the AWS CDK Assertions Library

The Annotations submodule of the AWS CDK assertions library lets you check for cdk-nag warnings and errors without AWS credentials by integrating a NagPack into your application unit tests. Read this post for further information about the AWS CDK assertions module. The following is an example of using assertions with a TypeScript AWS CDK application and Jest for unit testing.

import { Annotations, Match } from 'aws-cdk-lib/assertions';
import { App, Aspects, Stack } from 'aws-cdk-lib';
import { AwsSolutionsChecks } from 'cdk-nag';
import { CdkTestStack } from '../lib/cdk_test-stack';

describe('cdk-nag AwsSolutions Pack', () => {
  let stack: Stack;
  let app: App;
  // In this case we can use beforeAll() over beforeEach() since our tests 
  // do not modify the state of the application 
  beforeAll(() => {
    // GIVEN
    app = new App();
    stack = new CdkTestStack(app, 'test');

    // WHEN
    Aspects.of(stack).add(new AwsSolutionsChecks());
  });

  // THEN
  test('No unsuppressed Warnings', () => {
    const warnings = Annotations.fromStack(stack).findWarning(
      '*',
      Match.stringLikeRegexp('AwsSolutions-.*')
    );
    expect(warnings).toHaveLength(0);
  });

  test('No unsuppressed Errors', () => {
    const errors = Annotations.fromStack(stack).findError(
      '*',
      Match.stringLikeRegexp('AwsSolutions-.*')
    );
    expect(errors).toHaveLength(0);
  });
});

Additionally, many testing frameworks include watch functionality. This is a background process that reruns all of the tests when files in your project have changed for fast feedback. For example, when using the AWS CDK in JavaScript/Typescript, you can use the Jest CLI watch commands. When Jest watch detects a file change, it attempts to run unit tests related to the changed file. This can be used to automatically run cdk-nag-related tests when making changes to your AWS CDK application.

CDK Watch

When developing in non-production environments, consider using AWS CDK Watch with a NagPack for fast feedback. AWS CDK Watch attempts to synthesize and then deploy changes whenever you save changes to your files. Aspects are run during synthesis. Therefore, any NagPacks applied to your application will also run on save. As in the walkthrough, all of the unsuppressed errors will prevent deployments, all of the messages will be output to the console, and all of the compliance reports will be generated. Read this post for further information about AWS CDK Watch.

Conclusion

In this post, you learned how to use cdk-nag in your AWS CDK applications. To learn more about using cdk-nag in your applications, check out the README in the GitHub Repository. If you would like to learn how to create your own rules and NagPacks, then check out the developer documentation. The repository is open source and welcomes community contributions and feedback.

Author:

Arun Donti

Arun Donti is a Senior Software Engineer with Twitch. He loves working on building automated processes and tools that enable builders and organizations to focus on and deliver their mission critical needs. You can find him on GitHub.

Automated security and compliance remediation at HDI

Post Syndicated from Uladzimir Palkhouski original https://aws.amazon.com/blogs/devops/automated-security-and-compliance-remediation-at-hdi/

with Dr. Malte Polley (HDI Systeme AG – Cloud Solutions Architect)

At HDI, one of the biggest European insurance group companies, we use AWS to build new services and capabilities and delight our customers. Working in the financial services industry, the company has to comply with numerous regulatory requirements in the areas of data protection and FSI regulations such as GDPR, German Supervisory Requirements for IT (VAIT) and Supervision of Insurance Undertakings (VAG). The same security and compliance assessment process in the cloud supports development productivity and organizational agility, and helps our teams innovate at a high pace and meet the growing demands of our internal and external customers.

In this post, we explore how HDI adopted AWS security and compliance best practices. We describe implementation of automated security and compliance monitoring of AWS resources using a combination of AWS and open-source solutions. We also go through the steps to implement automated security findings remediation and address continuous deployment of new security controls.

Background

Data analytics is the key capability for understanding our customers’ needs, driving business operations improvement, and developing new services, products, and capabilities for our customers. We needed a cloud-native data platform of virtually unlimited scale that offers descriptive and prescriptive analytics capabilities to internal teams with a high innovation pace and short experimentation cycles. One of the success metrics in our mission is time to market, therefore it’s important to provide flexibility to internal teams to quickly experiment with new use cases. At the same time, we’re vigilant about data privacy. Having a secure and compliant cloud environment is a prerequisite for every new experiment and use case on our data platform.

Cloud security and compliance implementation in the cloud is a shared effort between the Cloud Center of Competence team (C3), the Network Operation Center (NoC), and the product and platform teams. The C3 team is responsible for new AWS account provisioning, account security, and compliance baseline setup. Cross-account networking configuration is established and managed by the NoC team. Product teams are responsible for AWS services configuration to meet their requirements in the most efficient way. Typically, they deploy and configure infrastructure and application stacks, including the following:

We were looking for security controls model that would allow us to continuously monitor infrastructure and application components set up by all the teams. The model also needed to support guardrails that allowed product teams to focus on new use case implementation, but also inherited the security and compliance best practices promoted and ensured within our company.

Security and compliance baseline definition

We started with the AWS Well-Architected Framework Security Pillar whitepaper, which provides implementation guidance on the essential areas of security and compliance in the cloud, including identity and access management, infrastructure security, data protection, detection, and incident response. Although all five elements are equally important for implementing enterprise-grade security and compliance in the cloud, we saw an opportunity to improve controls of on-premises environments by automating detection and incident response elements. The continuous monitoring of AWS infrastructure and application changes complemented by the automated incident response of the security baseline helps us foster security best practices and allows for a high innovation pace. Manual security reviews are no longer required to asses security posture.

Our security and compliance controls framework is based on GDPR and several standards and programs, including ISO 27001, C5. Translation of the controls framework into the security and compliance baseline definition in the cloud isn’t always straightforward, so we use a number of guidelines. As a starting point, we use CIS Amazon Web Services benchmarks, because it’s a prescriptive recommendation and its controls cover multiple AWS security areas, including identity and access management, logging and monitoring configuration, and network configuration. CIS benchmarks are industry-recognized cyber security best practices and recommendations that cover a wide range of technology families, and are used by enterprise organizations around the world. We also apply GDPR compliance on AWS recommendations and AWS Foundational Security Best Practices, extending controls recommended by CIS AWS Foundations Benchmarks in multiple control areas: inventory, logging, data protection, access management, and more.

Security controls implementation

AWS provides multiple services that help implement security and compliance controls:

  • AWS CloudTrail provides a history of events in an AWS account, including those originating from command line tools, AWS SDKs, AWS APIs, or the AWS Management Console. In addition, it allows exporting event history for further analysis and subscribing to specific events to implement automated remediation.
  • AWS Config allows you to monitor AWS resource configuration, and automatically evaluate and remediate incidents related to unexpected resources configuration. AWS Config comes with pre-built conformance pack sample templates designed to help you meet operational best practices and compliance standards.
  • Amazon GuardDuty provides threat detection capabilities that continuously monitor network activity, data access patterns, and account behavior.

With multiple AWS services to use as building blocks for continuous monitoring and automation, there is a strong need for a consolidated findings overview and unified remediation framework. This is where AWS Security Hub comes into play. Security Hub provides built-in security standards and controls that make it easy to enable foundational security controls. Then, Security Hub integrates with CloudTrail, AWS Config, GuardDuty, and other AWS services out of the box, which eliminates the need to develop and maintain integration code. Security Hub also accepts findings from third-party partner products and provides APIs for custom product integration. Security Hub significantly reduces the effort to consolidate audit information coming from multiple AWS-native and third-party channels. Its API and supported partner products ecosystem gave us confidence that we can adhere to changes in security and compliance standards with low effort.

While AWS provides a rich set of services to manage risk at the Three Lines Model, we were looking for wider community support in maintaining and extending security controls beyond those defined by CIS benchmarks and compliance and best practices recommendations on AWS. We came across Prowler, an open-source tool focusing on AWS security assessment and auditing and infrastructure hardening. Prowler implements CIS AWS benchmark controls and has over 100 additional checks. We appreciated Prowler providing checks that helped us meet GDPR and ISO 27001 requirements, specifically. Prowler delivers assessment reports in multiple formats, which makes it easy to implement reporting archival for future auditing needs. In addition, Prowler integrates well with Security Hub, which allows us to use a single service for consolidating security and compliance incidents across a number of channels.

We came up with the solution architecture depicted in the following diagram.

Automated remediation solution architecture HDI

Automated remediation solution architecture HDI

Let’s look closely into the most critical components of this solution.

Prowler is a command line tool that uses the AWS Command Line Interface (AWS CLI) and a bash script. Individual Prowler checks are bash scripts organized into groups by compliance standard or AWS service. By supplying corresponding command line arguments, we can run Prowler against a specific AWS Region or multiple Regions at the same time. We can run Prowler in multiple ways; we chose to run it as an AWS Fargate task for Amazon Elastic Container Service (Amazon ECS). Fargate is a serverless compute engine that runs Docker-compatible containers. ECS Fargate tasks are scheduled tasks that make it easy to perform periodic assessments of an AWS account and export findings. We configured Prowler to run every 7 days in every account and Region it’s deployed into.

Security Hub acts as a single place for consolidating security findings from multiple sources. When Security Hub is enabled in a given Region, CIS AWS Foundations Benchmark and Foundational Security Best Practices standards are enabled as well. Enabling these standards also configures integration with AWS Config and Guard Duty. Integration with Prowler requires enabling product integration on the Security Hub side by calling the EnableImportFindingsForProduct API action for a given product. Because Prowler supports integration with Security Hub out of the box, posting security findings is a matter of passing the right command line arguments: -M json-asff to format reports as AWS Security Findings Format and -S to ship findings to Security Hub.

Automated security findings remediation is implemented using AWS Lambda functions and the AWS SDK for Python (Boto3). The remediation function can be triggered in two ways: automatically in response to a new security finding, or by a security engineer from the Security Hub findings page. In both cases, the same Lambda function is used. Remediation functions implement security standards in accordance with recommendations, whether they’re CIS AWS Foundations Benchmark and Foundational Security Best Practices standards, or others.

The exact activities performed depend on the security findings type and its severity. Examples of activities performed include deleting non-rotated AWS Identity and Access Management (IAM) access keys, enabling server-side encryption for S3 buckets, and deleting unencrypted Amazon Elastic Block Store (Amazon EBS) volumes.

To trigger the Lambda function, we use Amazon EventBridge, which makes it easy to build an event-driven remediation engine and allows us to define Lambda functions as targets for Security Hub findings and custom actions. EventBridge allows us to define filters for security findings and therefore map finding types to specific remediation functions. Upon successfully performing security remediation, each function updates one or more Security Hub findings by calling the BatchUpdateFindings API and passing the corresponding finding ID.

The following example code shows a function enforcing an IAM password policy:

import boto3
import os
import logging
from botocore.exceptions import ClientError

iam = boto3.client("iam")
securityhub = boto3.client("securityhub")

log_level = os.environ.get("LOG_LEVEL", "INFO")
logging.root.setLevel(logging.getLevelName(log_level))
logger = logging.getLogger(__name__)


def lambda_handler(event, context, iam=iam, securityhub=securityhub):
    """Remediate findings related to cis15 and cis11.

    Params:
        event: Lambda event object
        context: Lambda context object
        iam: iam boto3 client
        securityhub: securityhub boto3 client
    Returns:
        No returns
    """
    finding_id = event["detail"]["findings"][0]["Id"]
    product_arn = event["detail"]["findings"][0]["ProductArn"]
    lambda_name = os.environ["AWS_LAMBDA_FUNCTION_NAME"]
    try:
        iam.update_account_password_policy(
            MinimumPasswordLength=14,
            RequireSymbols=True,
            RequireNumbers=True,
            RequireUppercaseCharacters=True,
            RequireLowercaseCharacters=True,
            AllowUsersToChangePassword=True,
            MaxPasswordAge=90,
            PasswordReusePrevention=24,
            HardExpiry=True,
        )
        logger.info("IAM Password Policy Updated")
    except ClientError as e:
        logger.exception(e)
        raise e
    try:
        securityhub.batch_update_findings(
            FindingIdentifiers=[{"Id": finding_id, "ProductArn": product_arn},],
            Note={
                "Text": "Changed non compliant password policy",
                "UpdatedBy": lambda_name,
            },
            Workflow={"Status": "RESOLVED"},
        )
    except ClientError as e:
        logger.exception(e)
        raise e

A key aspect in developing remediation Lambda functions is testability. To quickly iterate through testing cycles, we cover each remediation function with unit tests, in which necessary dependencies are mocked and replaced with stub objects. Because no Lambda deployment is required to check remediation logic, we can test newly developed functions and ensure reliability of existing ones in seconds.

Each Lambda function developed is accompanied with an event.json document containing an example of an EventBridge event for a given security finding. A security finding event allows us to verify remediation logic precisely, including deletion or suspension of non-compliant resources or a finding status update in Security Hub and the response returned. Unit tests cover both successful and erroneous remediation logic. We use pytest to develop unit tests, and botocore.stub and moto to replace runtime dependencies with mocks and stubs.

Automated security findings remediation

The following diagram illustrates our security assessment and automated remediation process.

Automated remediation flow HDI

The workflow includes the following steps:

  1. An existing Security Hub integration performs periodic resource audits. The integration posts new security findings to Security Hub.
  2. Security Hub reports the security incident to the company’s centralized Service Now instance by using the Service Now ITSM Security Hub integration.
  3. Security Hub triggers automated remediation:
    1. Security Hub triggers the remediation function by sending an event to EventBridge. The event has a source field equal to aws.securityhub, with the filter ID corresponding to the specific finding type and compliance status as FAILED. The combination of these fields allows us to map the event to a particular remediation function.
    2. The remediation function starts processing the security finding event.
    3. The function calls the UpdateFindings Security Hub API to update the security finding status upon completing remediation.
    4. Security Hub updates the corresponding security incident status in Service Now (Step 2)
  4. Alternatively, the security operations engineer resolves the security incident in Service Now:
    1. The engineer reviews the current security incident in Service Now.
    2. The engineer manually resolves the security incident in Service Now.
    3. Service Now updates the finding status by calling the UpdateFindings Security Hub API. Service Now uses the AWS Service Management Connector.
  5. Alternatively, the platform security engineer triggers remediation:
    1. The engineer reviews the currently active security findings on the Security Hub findings page.
    2. The engineer triggers remediation from the security findings page by selecting the appropriate action.
    3. Security Hub triggers the remediation function by sending an event with the source aws.securityhub to EventBridge. The automated remediation flow continues as described in the Step 3.

Deployment automation

Due to legal requirements, HDI uses the infrastructure as code (IaC) principle while defining and deploying AWS infrastructure. We started with AWS CloudFormation templates defined as YAML or JSON format. The templates are static by nature and define resources in a declarative way. We figured out that as our solution complexity grows, the CloudFormation templates also grow in size and complexity, because all the resources deployed have to be explicitly defined. We wanted a solution to increase our development productivity and simplify infrastructure definition.

The AWS Cloud Development Kit (AWS CDK) helped us in two ways:

  • The AWS CDK provides ready-to-use building blocks called constructs. These constructs include pre-configured AWS services following best practices. For example, a Lambda function always gets an IAM role with an IAM policy to be able to write logs to CloudWatch Logs.
  • The AWS CDK allows us to use high-level programming languages to define configuration of all AWS services. Imperative definition allows us to build our own abstractions and reuse them to achieve concise resource definition.

We found that implementing IaC with the AWS CDK is faster and less error-prone. At HDI, we use Python to build application logic and define AWS infrastructure. The imperative nature of the AWS CDK is truly a turning point in fulfilling legal requirements and achieving high developer productivity at the same time.

One of the AWS CDK constructs we use is AWS CDK pipeline. This construct creates a customizable continuous integration and continuous delivery (CI/CD) pipeline implemented with AWS CodePipeline. The source action is based on AWS CodeCommit. The synth action is responsible for creating a CloudFormation template from the AWS CDK project. The synth action also runs unit tests on remediations functions. The pipeline actions are connected via artifacts. Lastly, the AWS CDK pipeline constructs offer a self-mutating feature, which allows us to maintain the AWS CDK project as well as the pipeline in a single code repository. Changes of the pipeline definition as well as automated remediation solutions are deployed seamlessly. The actual solution deployment is also implemented as a CI/CD stage. Stages can be eventually deployed in cross-Region and cross-account patterns. To use cross-account deployments, the AWS CDK provides a bootstrap functionality to create a trust relationship between AWS accounts.

The AWS CDK project is broken down to multiple stacks. To deploy the CI/CD pipeline, we run the cdk deploy cicd-4-securityhub command. To add a new Lambda remediation function, we must add remediation code, optional unit tests, and finally the Lambda remediation configuration object. This configuration object defines the Lambda function’s environment variables, necessary IAM policies, and external dependencies. See the following example code of this configuration:

prowler_729_lambda = {
    "name": "Prowler 7.29",
    "id": "prowler729",
    "description": "Remediates Prowler 7.29 by deleting/terminating unencrypted EC2 instances/EBS volumes",
    "policies": [
        _iam.PolicyStatement(
            effect=_iam.Effect.ALLOW,
            actions=["ec2:TerminateInstances", "ec2:DeleteVolume"],
            resources=["*"])
        ],
    "path": "delete_unencrypted_ebs_volumes",
    "environment_variables": [
        {"key": "ACCOUNT_ID", "value": core.Aws.ACCOUNT_ID}
    ],
    "filter_id": ["prowler-extra729"],
 }

Remediation functions are organized in accordance with the security and compliance frameworks they belong to. The AWS CDK code iterates over remediation definition lists and synthesizes corresponding policies and Lambda functions to be deployed later. Committing Git changes and pushing them triggers the CI/CD pipeline, which deploys the newly defined remediation function and adjusts the configuration of Prowler.

We are working on publishing the source code discussed in this blog post.

Looking forward

As we keep introducing new use cases in the cloud, we plan to improve our solution in the following ways:

  • Continuously add new controls based on our own experience and improving industry standards
  • Introduce cross-account security and compliance assessment by consolidating findings in a central security account
  • Improve automated remediation resiliency by introducing remediation failure notifications and retry queues
  • Run a Well-Architected review to identify and address possible areas of improvement

Conclusion

Working on the solution described in this post helped us improve our security posture and meet compliancy requirements in the cloud. Specifically, we were able to achieve the following:

  • Gain a shared understanding of security and compliance controls implementation as well as shared responsibilities in the cloud between multiple teams
  • Speed up security reviews of cloud environments by implementing continuous assessment and minimizing manual reviews
  • Provide product and platform teams with secure and compliant environments
  • Lay a foundation for future requirements and improvement of security posture in the cloud

The content and opinions in this post are those of the third-party author and AWS is not responsible for the content or accuracy of this post.

About the Authors

Malte Polley - Cloud Solutions Architect

Malte Polley – Cloud Solutions Architect

Dr. Malte Polley

Dr. Malte Polley is a Cloud Solutions Architect of Modern Data Platform (MDP) at HDI Germany. MDP focuses on DevSecOps practices applied to data analytics and provides secure and compliant environment for every data product at HDI Germany. As a cloud enthusiast Malte runs AWS Hannover user group. When not working, Malte enjoys hiking with his family and improving his backyard vegetable garden.

Uladzimir Palkhouski - Sr. Solutions Architect

Uladzimir Palkhouski – Sr. Solutions Architect

Uladzimir Palkhouski

Uladzimir Palkhouski is a Sr. Solutions Architect at Amazon Web Services. Uladzimir supports German financial services industry customers on their cloud journey. He helps finding practical forward looking solutions to complex technical and business challenges.

Align with best practices while creating infrastructure using CDK Aspects

Post Syndicated from Om Prakash Jha original https://aws.amazon.com/blogs/devops/align-with-best-practices-while-creating-infrastructure-using-cdk-aspects/

Organizations implement compliance rules for cloud infrastructure to ensure that they run the applications according to their best practices. They utilize AWS Config to determine overall compliance against the configurations specified in their internal guidelines. This is determined after the creation of cloud resources in their AWS account. This post will demonstrate how to use AWS CDK Aspects to check and align with best practices before the creation of cloud resources in your AWS account.

The AWS Cloud Development Kit (CDK) is an open-source software development framework that lets you define your cloud application resources using familiar programming languages, such as TypeScript, Python, Java, and .NET. The expressive power of programming languages to define infrastructure accelerates the development process and improves the developer experience.

AWS Config is a service that enables you to assess, audit, and evaluate your AWS resource configurations. Config continuously monitors and records your AWS resource configurations, as well as lets you automate the evaluation of recorded configurations against desired configurations. React to non-compliant resources and change their state either automatically or manually.

AWS Config helps customers run their workloads on AWS in a compliant manner. Some customers want to detect it up front, and then only provision compliant resources. Some configurations are important for the customers, so they might not provision resources without having them compliant from the beginning. The following are examples of such configurations:

  • Amazon S3 bucket must not be created with public access
  • Amazon S3 bucket encryption must be enabled
  • Database deletion protection must be enabled

CDK Aspects

CDK Aspects are a way to apply an operation to every construct in a given scope. The aspect could verify something about the state of the constructs, such as ensuring that all buckets are encrypted, or it could modify the constructs, such as by adding tags.

An aspect is a class that implements the IAspect interface shown below. Aspects employ visitor patter, which allows them to add a new operation to existing object structures without modifying the structures. In object-oriented programming and software engineering, the visitor design pattern is a method for separating an algorithm from an object structure on which it operates.

interface IAspect {
   visit(node: IConstruct): void;
}

An AWS CDK app goes through the following lifecycle phases when you call cdk deploy. These phases are also shown in the diagram below. Learn more about the CDK application lifecycle at this page.

  1. Construction
  2. Preparation
  3. Validation
  4. Synthesis
  5. Deployment

Understanding the CDK Deploy

CDK Aspects become relevant during the Prepare phase, where it makes the final modifications round in the constructs to setup their final state. This Prepare phase happens automatically. All constructs have their internal list of Aspects which are called and applied during the Prepare phase. Add your custom aspects in a scope by calling the following method:

Aspects.of(myConstruct).add(new SomeAspect(...));

When you call the method above, constructs add the custom aspects to the list of internal aspects. When CDK application goes through the Prepare phase, then AWS CDK calls the visit method of the object for the constructs and all of its children in top-down order. The visit method is free to change anything in the construct.

How to align with or check configuration compliance using CDK Aspects

In the following sections, you will see how to implement CDK Aspects for some common use cases when provisioning the cloud resources. CDK Aspects are extensible, and you can extend it for any suitable use cases in order to implement additional rules. Apply CDK Aspects not only to verify against the best practices, but also to update the state before resource creation.

The code below creates the cloud resources to be verified against the best practices or to be updated using Aspects in the following sections.

export class AwsCdkAspectsStack extends cdk.Stack {
  constructor(scope: cdk.Construct, id: string, props?: cdk.StackProps) {
    super(scope, id, props);

    //Create a VPC with 3 availability zones
    const vpc = new ec2.Vpc(this, 'MyVpc', {
      maxAzs: 3,
    });

    //Create a security group
    const sg = new ec2.SecurityGroup(this, 'mySG', {
      vpc: vpc,
      allowAllOutbound: true
    })

    //Add ingress rule for SSH from the public internet
    sg.addIngressRule(ec2.Peer.anyIpv4(), ec2.Port.tcp(22), 'SSH access from anywhere')

    //Launch an EC2 instance in private subnet
    const instance = new ec2.Instance(this, 'MyInstance', {
      vpc: vpc,
      machineImage: ec2.MachineImage.latestAmazonLinux(),
      instanceType: new ec2.InstanceType('t3.small'),
      vpcSubnets: {subnetType: ec2.SubnetType.PRIVATE},
      securityGroup: sg
    })

    //Launch MySQL rds database instance in private subnet
    const database = new rds.DatabaseInstance(this, 'MyDatabase', {
      engine: rds.DatabaseInstanceEngine.mysql({
        version: rds.MysqlEngineVersion.VER_5_7
      }),
      vpc: vpc,
      vpcSubnets: {subnetType: ec2.SubnetType.PRIVATE},
      deletionProtection: false
    })

    //Create an s3 bucket
    const bucket = new s3.Bucket(this, 'MyBucket')
  }
}

In the first section, you will see the use cases and code where Aspects are used to verify the resources against the best practices.

  1. VPC CIDR range must start with specific CIDR IP
  2. Security Group must not have public ingress rule
  3. EC2 instance must use approved AMI
//Verify VPC CIDR range
export class VPCCIDRAspect implements IAspect {
    public visit(node: IConstruct): void {
        if (node instanceof ec2.CfnVPC) {
            if (!node.cidrBlock.startsWith('192.168.')) {
                Annotations.of(node).addError('VPC does not use standard CIDR range starting with "192.168."');
            }
        }
    }
}

//Verify public ingress rule of security group
export class SecurityGroupNoPublicIngressAspect implements IAspect {
    public visit(node: IConstruct) {
        if (node instanceof ec2.CfnSecurityGroup) {
            checkRules(Stack.of(node).resolve(node.securityGroupIngress));
        }

        function checkRules (rules :Array<IngressProperty>) {
            if(rules) {
                for (const rule of rules.values()) {
                    if (!Tokenization.isResolvable(rule) && (rule.cidrIp == '0.0.0.0/0' || rule.cidrIp == '::/0')) {
                        Annotations.of(node).addError('Security Group allows ingress from public internet.');
                    }
                }
            }
        }
    }
}

//Verify AMI of EC2 instance
export class EC2ApprovedAMIAspect implements IAspect {
    public visit(node: IConstruct) {
        if (node instanceof ec2.CfnInstance) {
            if (node.imageId != 'approved-image-id') {
                Annotations.of(node).addError('EC2 Instance is not using approved AMI.');
            }
        }
    }
}

In the second section, you will see the use cases and code where Aspects are used to update the resources in order to make them compliant before creation.

  1. S3 bucket encryption must be enabled. If not, then enable
  2. S3 bucket versioning must be enabled. If not, then enable
  3. RDS instance must have deletion protection enabled. If not, then enable
//Enable versioning of bucket if not enabled
export class BucketVersioningAspect implements IAspect {
    public visit(node: IConstruct): void {
        if (node instanceof s3.CfnBucket) {
            if (!node.versioningConfiguration
                || (!Tokenization.isResolvable(node.versioningConfiguration)
                    && node.versioningConfiguration.status !== 'Enabled')) {
                Annotations.of(node).addInfo('Enabling bucket versioning configuration.');
                node.addPropertyOverride('VersioningConfiguration', {'Status': 'Enabled'})
            }
        }
    }
}

//Enable server side encryption for the bucket if no encryption is enabled
export class BucketEncryptionAspect implements IAspect {
    public visit(node: IConstruct): void {
        if (node instanceof s3.CfnBucket) {
            if (!node.bucketEncryption) {
                Annotations.of(node).addInfo('Enabling default S3 server side encryption.');
                node.addPropertyOverride('BucketEncryption', {
                        "ServerSideEncryptionConfiguration": [
                            {
                                "ServerSideEncryptionByDefault": {
                                    "SSEAlgorithm": "AES256"
                                }
                            }
                        ]
                    }
                )
            }
        }
    }
}

//Enable deletion protection of DB instance if not already enabled
export class RDSDeletionProtectionAspect implements IAspect {
    public visit(node: IConstruct) {
        if (node instanceof rds.CfnDBInstance) {
            if (! node.deletionProtection) {
                Annotations.of(node).addInfo('Enabling deletion protection of DB instance.');
                node.addPropertyOverride('DeletionProtection', true);
            }
        }
    }
}

Once you create the aspects, add them in a particular scope. That scope can be App, Stack, or Construct. In the example below, all aspects are added in the scope of Stack.

const app = new cdk.App();

const stack = new AwsCdkAspectsStack(app, 'MyApplicationStack');

Aspects.of(stack).add(new VPCCIDRAspect());
Aspects.of(stack).add(new SecurityGroupNoPublicIngressAspect());
Aspects.of(stack).add(new EC2ApprovedAMIAspect());
Aspects.of(stack).add(new RDSDeletionProtectionAspect());
Aspects.of(stack).add(new BucketEncryptionAspect());
Aspects.of(stack).add(new BucketVersioningAspect());

app.synth();

Once you call cdk deploy for the above code with aspects added, you will see the output below. The deployment will not continue until you resolve the errors and modifications conducted to make some of the resources compliant.

Screenshot displaying CDK errors.

Also utilize Aspects to make general modifications to the resources regardless of any compliance checks. For example, use it apply mandatory tags to every taggable resource. Tags is an example of implementing CDK Aspects in order to achieve this functionality. Utilizing the code below, add or remove a tag from all taggable resources and their children in the scope of a Construct.

Tags.of(myConstruct).add('key', 'value');
Tags.of(myConstruct).remove('key');

Below is an example of adding the Department tag to every resource created in the scope of Stack.

Tags.of(stack).add('Department', 'Finance');

CDK Aspects are ways for developers to align with and check best practices in their infrastructure configurations using the programming language of choice. AWS CloudFormation Guard (cfn-guard) provides compliance administrators with a simple, policy-as-code language to author policies and apply them to enforce best practices. Aspects are applied before generation of the CloudFormation template in Prepare phase, but cfn-guard is applied after generation of the CloudFormation template and before the Deploy phase. Developers can use Aspects or cfn-guard or both as part of a CI/CD pipeline to stop deployment of non-compliant resources, but CloudFormation Guard is the way to go when you want to enforce compliances and prevent deployment of non-compliant resources.

Conclusion

If you are utilizing AWS CDK to provision your infrastructure, then you can start using Aspects to align with best practices before resources are created. If you are utilizing CloudFormation template to manage your infrastructure, then you can read this blog to learn how to migrate the CloudFormation template to AWS CDK. After the migration, utilize CDK Aspects not only to evaluate compliance of your resources against the best practices, but also modify their state to make them compliant before they are created.

About the Authors

Om Prakash Jha

Om Prakash Jha is a Solutions Architect at AWS. He helps customers build well-architected applications on AWS in the retail industry vertical. He has more than a decade of experience in developing, designing, and architecting mission critical applications. His passion is DevOps and application modernization. Outside of his work, he likes to read books, watch movies, and explore part of the world with his family.

Secure and analyse your Terraform code using AWS CodeCommit, AWS CodePipeline, AWS CodeBuild and tfsec

Post Syndicated from César Prieto Ballester original https://aws.amazon.com/blogs/devops/secure-and-analyse-your-terraform-code-using-aws-codecommit-aws-codepipeline-aws-codebuild-and-tfsec/

Introduction

More and more customers are using Infrastructure-as-Code (IaC) to design and implement their infrastructure on AWS. This is why it is essential to have pipelines with Continuous Integration/Continuous Deployment (CI/CD) for infrastructure deployment. HashiCorp Terraform is one of the popular IaC tools for customers on AWS.

In this blog, I will guide you through building a CI/CD pipeline on AWS to analyze and identify possible configurations issues in your Terraform code templates. This will help mitigate security risks within our infrastructure deployment pipelines as part of our CI/CD. To do this, we utilize AWS tools and the Open Source tfsec tool, a static analysis security scanner for your Terraform code, including more than 90 preconfigured checks with the ability to add custom checks.

Solutions Overview

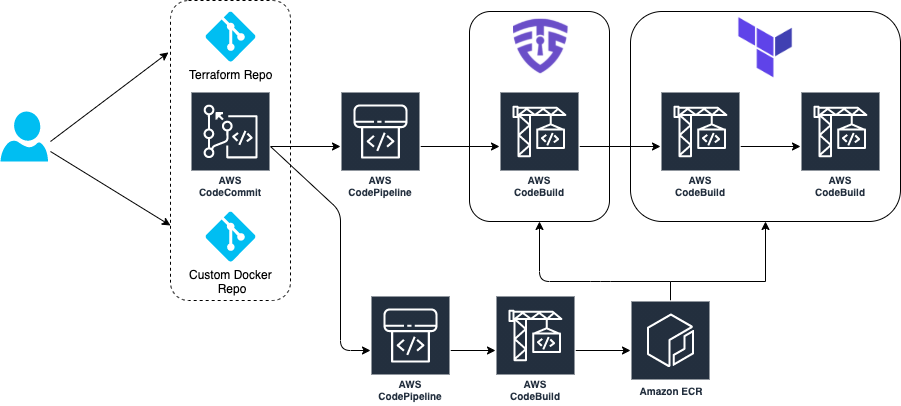
The architecture goes through a CI/CD pipeline created on AWS using AWS CodeCommit, AWS CodePipeline, AWS CodeBuild, and Amazon ECR.

Our demo has two separate pipelines:

  1. CI/CD Pipeline to build and push our custom Docker image to Amazon ECR
  2. CI/CD Pipeline where our tfsec analysis is executed and Terraform provisions infrastructure

The tfsec configuration and Terraform goes through a buildspec specification file defined within an AWS CodeBuild action. This action will calculate how many potential security risks we currently have within our Terraform templates, which will be displayed in our manual acceptance process for verification.

Architecture diagram

Provisioning the infrastructure

We have created an AWS Cloud Development Kit (AWS CDK) app hosted in a Git Repository written in Python. Here you can deploy the two main pipelines in order to manage this scenario. For a list of the deployment prerequisites, see the README.md file.

Clone the repo in your local machine. Then, bootstrap and deploy the CDK stack:

git clone https://github.com/aws-samples/aws-cdk-tfsec
cd aws-cdk-tfsec
pip install -r requirements.txt
cdk bootstrap aws://account_id/eu-west-1
cdk deploy --all

The infrastructure creation takes around 5-10 minutes due the AWS CodePipelines and referenced repository creation. Once the CDK has deployed the infrastructure, clone the two new AWS CodeCommit repos that have already been created and push the example code. First, one for the custom Docker image, and later for your Terraform code, like this:

git clone https://git-codecommit.eu-west-1.amazonaws.com/v1/repos/awsome-terraform-example-container
cd awsome-terraform-example-container
git checkout -b main
cp repos/docker_image/* .
git add .
git commit -am "First commit"
git push origin main

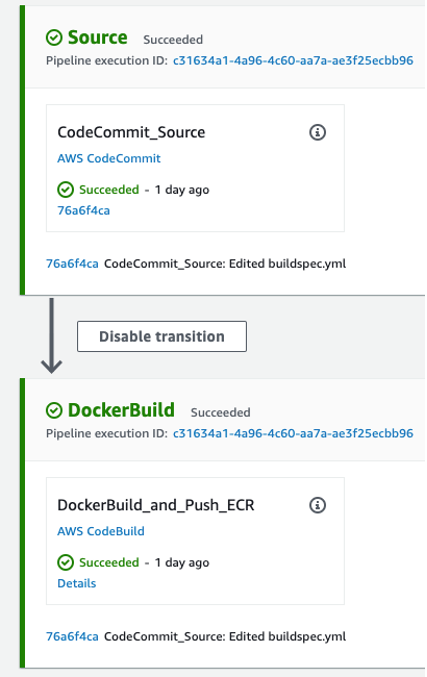
Once the Docker image is built and pushed to the Amazon ECR, proceed with Terraform repo. Check the pipeline process on the AWS CodePipeline console.

Screenshot of CI/CD Pipeline to build Docker Image

git clone https://git-codecommit.eu-west-1.amazonaws.com/v1/repos/awsome-terraform-example
cd awsome-terraform-example
git checkout -b main
cp -aR repos/terraform_code/* .
git add .
git commit -am "First commit"
git push origin main

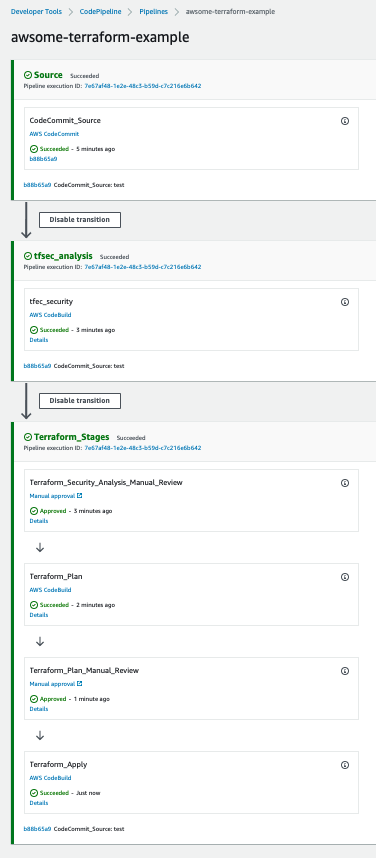
The Terraform provisioning AWS CodePipeline has the following aspect:

Screenshot of CodePipeline to run security and orchestrate IaC

The pipeline has three main stages:

  • Source – AWS CodeCommit stores the Terraform repository infrastructure and every time we push code to the main branch the AWS CodePipeline will be triggered.
  • tfsec analysis – AWS CodeBuild looks for a buildspec to execute the tfsec actions configured on the same buildspec.

Screenshot showing tfsec analysis

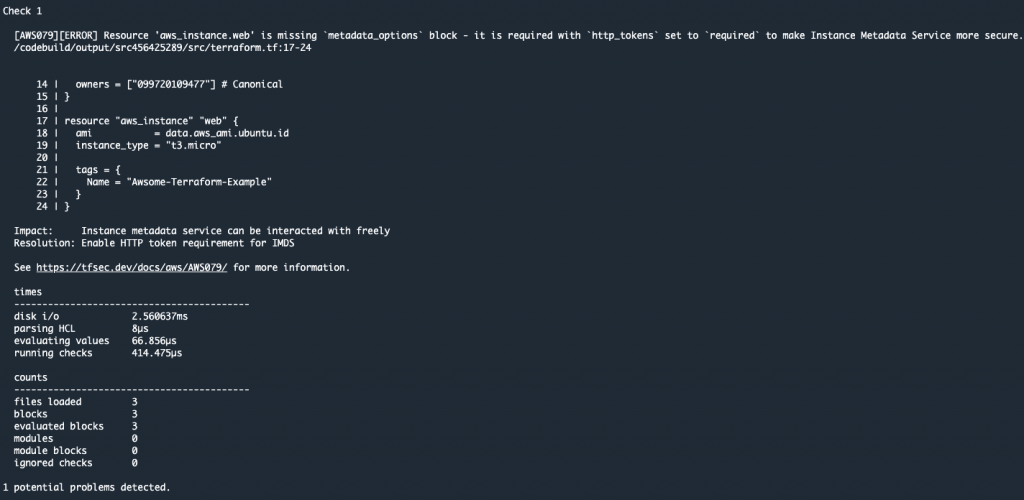
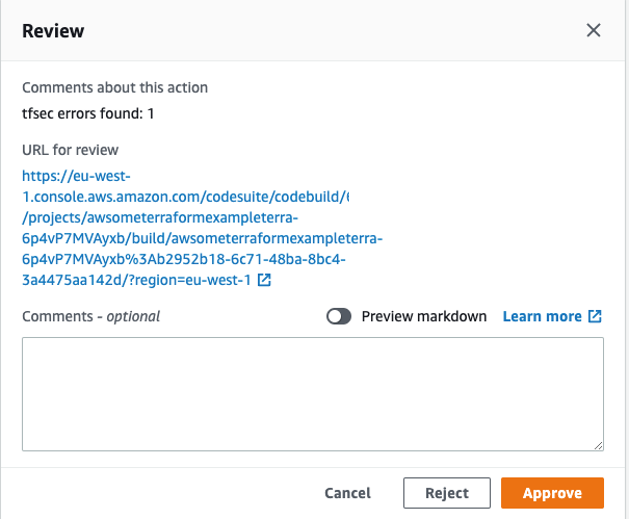
The output shows the potential security issues detected by tfsec for our Terraform code. The output is linking to the different security issues already defined on tfsec. Check the security checks defined by tfsec here. After tfsec execution, a manual approval action is set up to decide if we should go for the next steps or if we reject and stop the AWS CodePipeline execution.

The URL for review is linking to our tfsec output console.

Screenshot of tfsec output


  • Terraform plan and Terraform apply – This will be applied to our infrastructure plan. After the Terraform plan command and before the Terraform apply, a manual action is set up to decide if we can apply the changes.

After going through all of the stages, our Terraform infrastructure should be created.

Clean up

After completing your demo, feel free to delete your stack using the CDK cli:

cdk destroy --all

Conclusion

At AWS, security is our top priority. This post demonstrates how to build a CI/CD pipeline by using AWS Services to automate and secure your infrastructure as code via Terraform and tfsec.

Learn more about tfsec through the official documentation: https://tfsec.dev/

About the authors


César Prieto Ballester is a DevOps Consultant at Amazon Web Services. He enjoys automating everything and building infrastructure using code. Apart from work, he plays electric guitar and loves riding his mountain bike.


Bruno Bardelli is a Senior DevOps Consultant at Amazon Web Services. He loves to build applications and in his free time plays video games, practices aikido, and goes on walks with his dog.

Amazon CodeGuru Reviewer Updates: New Java Detectors and CI/CD Integration with GitHub Actions

Post Syndicated from Alex Casalboni original https://aws.amazon.com/blogs/aws/amazon_codeguru_reviewer_updates_new_java_detectors_and_cicd_integration_with_github_actions/

Amazon CodeGuru allows you to automate code reviews and improve code quality, and thanks to the new pricing model announced in April you can get started with a lower and fixed monthly rate based on the size of your repository (up to 90% less expensive). CodeGuru Reviewer helps you detect potential defects and bugs that are hard to find in your Java and Python applications, using the AWS Management Console, AWS SDKs, and AWS CLI.

Today, I’m happy to announce that CodeGuru Reviewer natively integrates with the tools that you use every day to package and deploy your code. This new CI/CD experience allows you to trigger code quality and security analysis as a step in your build process using GitHub Actions.

Although the CodeGuru Reviewer console still serves as an analysis hub for all your onboarded repositories, the new CI/CD experience allows you to integrate CodeGuru Reviewer more deeply with your favorite source code management and CI/CD tools.

And that’s not all! Today we’re also releasing 20 new security detectors for Java to help you identify even more issues related to security and AWS best practices.

A New CI/CD Experience for CodeGuru Reviewer
As a developer or development team, you push new code every day and want to identify security vulnerabilities early in the development cycle, ideally at every push. During a pull-request (PR) review, all the CodeGuru recommendations will appear as a comment, as if you had another pair of eyes on the PR. These comments include useful links to help you resolve the problem.

When you push new code or schedule a code review, recommendations will appear in the Security > Code scanning alerts tab on GitHub.

Let’s see how to integrate CodeGuru Reviewer with GitHub Actions.

First of all, create a .yml file in your repository under .github/workflows/ (or update an existing action). This file will contain all your actions’ step. Let’s go through the individual steps.

The first step is configuring your AWS credentials. You want to do this securely, without storing any credentials in your repository’s code, using the Configure AWS Credentials action. This action allows you to configure an IAM role that GitHub will use to interact with AWS services. This role will require a few permissions related to CodeGuru Reviewer and Amazon S3. You can attach the AmazonCodeGuruReviewerFullAccess managed policy to the action role, in addition to s3:GetObject, s3:PutObject and s3:ListBucket.

This first step will look as follows:

- name: Configure AWS Credentials
  uses: aws-actions/configure-aws-credentials@v1
  with:
    aws-access-key-id: ${{ secrets.AWS_ACCESS_KEY_ID }}
    aws-secret-access-key: ${{ secrets.AWS_SECRET_ACCESS_KEY }}
    aws-region: eu-west-1

These access key and secret key correspond to your IAM role and will be used to interact with CodeGuru Reviewer and Amazon S3.

Next, you add the CodeGuru Reviewer action and a final step to upload the results:

- name: Amazon CodeGuru Reviewer Scanner
  uses: aws-actions/codeguru-reviewer
  if: ${{ always() }} 
  with:
    build_path: target # build artifact(s) directory
    s3_bucket: 'codeguru-reviewer-myactions-bucket'  # S3 Bucket starting with "codeguru-reviewer-*"
- name: Upload review result
  if: ${{ always() }}
  uses: github/codeql-action/upload-sarif@v1
  with:
    sarif_file: codeguru-results.sarif.json

The CodeGuru Reviewer action requires two input parameters:

  • build_path: Where your build artifacts are in the repository.
  • s3_bucket: The name of an S3 bucket that you’ve created previously, used to upload the build artifacts and analysis results. It’s a customer-owned bucket so you have full control over access and permissions, in case you need to share its content with other systems.

Now, let’s put all the pieces together.

Your .yml file should look like this:

name: CodeGuru Reviewer GitHub Actions Integration
on: [pull_request, push, schedule]
jobs:
  CodeGuru-Reviewer-Actions:
    runs-on: ubuntu-latest
    steps:
      - name: Configure AWS Credentials
        uses: aws-actions/configure-aws-credentials@v1
        with:
          aws-access-key-id: ${{ secrets.AWS_ACCESS_KEY_ID }}
          aws-secret-access-key: ${{ secrets.AWS_SECRET_ACCESS_KEY }}
          aws-region: us-east-2
	  - name: Amazon CodeGuru Reviewer Scanner
        uses: aws-actions/codeguru-reviewer
        if: ${{ always() }} 
        with:
          build_path: target # build artifact(s) directory
          s3_bucket: 'codeguru-reviewer-myactions-bucket'  # S3 Bucket starting with "codeguru-reviewer-*"
      - name: Upload review result
        if: ${{ always() }}
        uses: github/codeql-action/upload-sarif@v1
        with:
          sarif_file: codeguru-results.sarif.json

It’s important to remember that the S3 bucket name needs to start with codeguru_reviewer- and that these actions can be configured to run with the pull_request, push, or schedule triggers (check out the GitHub Actions documentation for the full list of events that trigger workflows). Also keep in mind that there are minor differences in how you configure GitHub-hosted runners and self-hosted runners, mainly in the credentials configuration step. For example, if you run your GitHub Actions in a self-hosted runner that already has access to AWS credentials, such as an EC2 instance, then you don’t need to provide any credentials to this action (check out the full documentation for self-hosted runners).

Now when you push a change or open a PR CodeGuru Reviewer will comment on your code changes with a few recommendations.

Or you can schedule a daily or weekly repository scan and check out the recommendations in the Security > Code scanning alerts tab.

New Security Detectors for Java
In December last year, we launched the Java Security Detectors for CodeGuru Reviewer to help you find and remediate potential security issues in your Java applications. These detectors are built with machine learning and automated reasoning techniques, trained on over 100,000 Amazon and open-source code repositories, and based on the decades of expertise of the AWS Application Security (AppSec) team.

For example, some of these detectors will look at potential leaks of sensitive information or credentials through excessively verbose logging, exception handling, and storing passwords in plaintext in memory. The security detectors also help you identify several web application vulnerabilities such as command injection, weak cryptography, weak hashing, LDAP injection, path traversal, secure cookie flag, SQL injection, XPATH injection, and XSS (cross-site scripting).

The new security detectors for Java can identify security issues with the Java Servlet APIs and web frameworks such as Spring. Some of the new detectors will also help you with security best practices for AWS APIs when using services such as Amazon S3, IAM, and AWS Lambda, as well as libraries and utilities such as Apache ActiveMQ, LDAP servers, SAML parsers, and password encoders.

Available Today at No Additional Cost
The new CI/CD integration and security detectors for Java are available today at no additional cost, excluding the storage on S3 which can be estimated based on size of your build artifacts and the frequency of code reviews. Check out the CodeGuru Reviewer Action in the GitHub Marketplace and the Amazon CodeGuru pricing page to find pricing examples based on the new pricing model we launched last month.

We’re looking forward to hearing your feedback, launching more detectors to help you identify potential issues, and integrating with even more CI/CD tools in the future.

You can learn more about the CI/CD experience and configuration in the technical documentation.

Alex

Build and deploy .NET web applications to ARM-powered AWS Graviton 2 Amazon ECS Clusters using AWS CDK

Post Syndicated from Matt Laver original https://aws.amazon.com/blogs/devops/build-and-deploy-net-web-applications-to-arm-powered-aws-graviton-2-amazon-ecs-clusters-using-aws-cdk/

With .NET providing first-class support for ARM architecture, running .NET applications on an AWS Graviton processor provides you with more choices to help optimize performance and cost. We have already written about .NET 5 with Graviton benchmarks; in this post, we explore how C#/.NET developers can take advantages of Graviton processors and obtain this performance at scale with Amazon Elastic Container Service (Amazon ECS).

In addition, we take advantage of infrastructure as code (IaC) by using the AWS Cloud Development Kit (AWS CDK) to define the infrastructure .

The AWS CDK is an open-source development framework to define cloud applications in code. It includes constructs for Amazon ECS resources, which allows you to deploy fully containerized applications to AWS.

Architecture overview

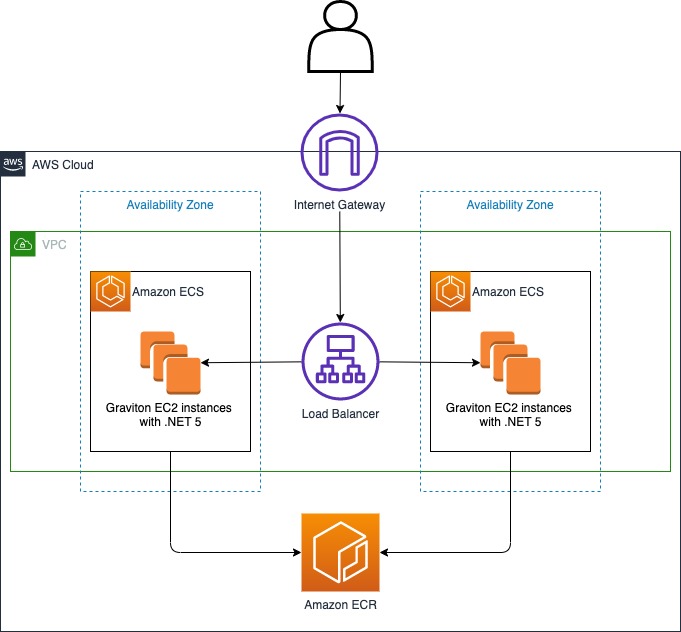
Our target architecture for our .NET application running in AWS is a load balanced ECS cluster, as shown in the following diagram.

Show load balanced Amazon ECS Cluster running .NET application

Figure: Show load balanced Amazon ECS Cluster running .NET application

We need to provision many components in this architecture, but this is where the AWS CDK comes in. AWS CDK is an open source-software development framework to define cloud resources using familiar programming languages. You can use it for the following:

  • A multi-stage .NET application container build
  • Create an Amazon Elastic Container Registry (Amazon ECR) repository and push the Docker image to it
  • Use IaC written in .NET to provision the preceding architecture

The following diagram illustrates how we use these services.

Show pplication and Infrastructure code written in .NET

Figure: Show Application and Infrastructure code written in .NET

Setup the development environment

To deploy this solution on AWS, we use the AWS Cloud9 development environment.

  1. On the AWS Cloud9 console, choose Create environment.
  2. For Name, enter a name for the environment.
  3. Choose Next step.
  4. On the Environment settings page, keep the default settings:
    1. Environment type – Create a new EC2 instance for the environment (direct access)
    2. Instance type – t2.micro (1 Gib RAM + 1 vCPU)
    3. Platform – Amazon Linux 2(recommended)
    Show Cloud9 Environment settings

    Figure: Show Cloud9 Environment settings

  5. Choose Next step.
  6. Choose Create environment.

When the Cloud9 environment is ready, proceed to the next section.

Install the .NET SDK

The AWS development tools we require will already be setup in the Cloud9 environment, however the .NET SDK will not be available.

Install the .NET SDK with the following code from the Cloud9 terminal:

curl -sSL https://dot.net/v1/dotnet-install.sh | bash /dev/stdin -c 5.0
export PATH=$PATH:$HOME/.local/bin:$HOME/bin:$HOME/.dotnet

Verify the expected version has been installed:

dotnet --version
Show installed .NET SDK version

Figure: Show installed .NET SDK version

Clone and explore the example code

Clone the example repository:

git clone https://github.com/aws-samples/aws-cdk-dotnet-graviton-ecs-example.git

This repository contains two .NET projects, the web application, and the IaC application using the AWS CDK.

The unit of deployment in the AWS CDK is called a stack. All AWS resources defined within the scope of a stack, either directly or indirectly, are provisioned as a single unit.

The stack for this project is located within /cdk/src/Cdk/CdkStack.cs. When we read the C# code, we can see how it aligns with the architecture diagram at the beginning of this post.

First, we create a virtual private cloud (VPC) and assign a maximum of two Availability Zones:

var vpc = new Vpc(this, "DotNetGravitonVpc", new VpcProps { MaxAzs = 2 });

Next, we define the cluster and assign it to the VPC:

var cluster = new Cluster(this, "DotNetGravitonCluster", new ClusterProp { Vpc = vpc });

The Graviton instance type (c6g.4xlarge) is defined in the cluster capacity options:

cluster.AddCapacity("DefaultAutoScalingGroupCapacity",
    new AddCapacityOptions
    {
        InstanceType = new InstanceType("c6g.4xlarge"),
        MachineImage = EcsOptimizedImage.AmazonLinux2(AmiHardwareType.ARM)
    });

Finally, ApplicationLoadBalancedEC2Service is defined, along with a reference to the application source code:

new ApplicationLoadBalancedEc2Service(this, "Service",
    new ApplicationLoadBalancedEc2ServiceProps
    {
        Cluster = cluster,
        MemoryLimitMiB = 8192,
        DesiredCount = 2,
        TaskImageOptions = new ApplicationLoadBalancedTaskImageOptions
        {
            Image = ContainerImage.FromAsset(Path.Combine(Directory.GetCurrentDirectory(), @"../app")),                        
        }                             
    });

With about 30 lines of AWS CDK code written in C#, we achieve the following:

  • Build and package a .NET application within a Docker image
  • Push the Docker image to Amazon Elastic Container Registry (Amazon ECR)
  • Create a VPC with two Availability Zones
  • Create a cluster with a Graviton c6g.4xlarge instance type that pulls the Docker image from Amazon ECR

The AWS CDK has several useful helpers, such as the FromAsset function:

Image =  ContainerImage.FromAsset(Path.Combine(Directory.GetCurrentDirectory(), @"../app")),  

The ContainerImage.FromAsset function instructs the AWS CDK to build the Docker image from a Dockerfile, automatically create an Amazon ECR repository, and upload the image to the repository.

For more information about the ContainerImage class, see ContainerImage.

Build and deploy the project with the AWS CDK Toolkit

The AWS CDK Toolkit, the CLI command cdk, is the primary tool for interaction with AWS CDK apps. It runs the app, interrogates the application model you defined, and produces and deploys the AWS CloudFormation templates generated by the AWS CDK.

If an AWS CDK stack being deployed uses assets such as Docker images, the environment needs to be bootstrapped. Use the cdk bootstrap command from the /cdk directory:

cdk bootstrap

Now you can deploy the stack into the AWS account with the deploy command:

cdk deploy

The AWS CDK Toolkit synthesizes fresh CloudFormation templates locally before deploying anything. The first time this runs, it has a changeset that reflects all the infrastructure defined within the stack and prompts you for confirmation before running.

When the deployment is complete, the load balancer DNS is in the Outputs section.

Show stack outputs

Figure: Show stack outputs

You can navigate to the load balancer address via a browser.

Browser navigating to .NET application

Figure: Show browser navigating to .NET application

Tracking the drift

Typically drift is a change that happens outside of the Infrastructure as Code, for example, code updates to the .NET application.

To support changes, the AWS CDK Toolkit queries the AWS account for the last deployed CloudFormation template for the stack and compares it with the locally generated template. Preview the changes with the following code:

cdk diff

If a simple text change within the application’s home page HTML is made (app/webapp/Pages/Index.cshtml), a difference is detected within the assets, but not all the infrastructure as per the first deploy.

Show cdk diff output

Figure: Show cdk diff output

Running cdk deploy again now rebuilds the Docker image, uploads it to Amazon ECR, and refreshes the containers within the ECS cluster.

cdk deploy
Show browser navigating to updated .NET application

Figure: Show browser navigating to updated .NET application

Clean up

Remove the resources created in this post with the following code:

cdk destroy

Conclusion

Using the AWS CDK to provision infrastructure in .NET provides rigor, clarity, and reliability in a language familiar to .NET developers. For more information, see Infrastructure as Code.

This post demonstrates the low barrier to entry for .NET developers wanting to apply modern application development practices while taking advantage of the price performance of ARM-based processors such as Graviton.

To learn more about building and deploying .NET applications on AWS visit our .NET Developer Center.

About the author

Author Matt Laver


Matt Laver is a Solutions Architect at AWS working with SMB customers in the UK. He is passionate about DevOps and loves helping customers find simple solutions to difficult problems.


Developing enterprise application patterns with the AWS CDK

Post Syndicated from Krishnakumar Rengarajan original https://aws.amazon.com/blogs/devops/developing-application-patterns-cdk/

Enterprises often need to standardize their infrastructure as code (IaC) for governance, compliance, and quality control reasons. You also need to manage and centrally publish updates to your IaC libraries. In this post, we demonstrate how to use the AWS Cloud Development Kit (AWS CDK) to define patterns for IaC and publish them for consumption in controlled releases using AWS CodeArtifact.

AWS CDK is an open-source software development framework to model and provision cloud application resources in programming languages such as TypeScript, JavaScript, Python, Java, and C#/.Net. The basic building blocks of AWS CDK are called constructs, which map to one or more AWS resources, and can be composed of other constructs. Constructs allow high-level abstractions to be defined as patterns. You can synthesize constructs into AWS CloudFormation templates and deploy them into an AWS account.

AWS CodeArtifact is a fully managed service for managing the lifecycle of software artifacts. You can use CodeArtifact to securely store, publish, and share software artifacts. Software artifacts are stored in repositories, which are aggregated into a domain. A CodeArtifact domain allows organizational policies to be applied across multiple repositories. You can use CodeArtifact with common build tools and package managers such as NuGet, Maven, Gradle, npm, yarn, pip, and twine.

Solution overview

In this solution, we complete the following steps:

  1. Create two AWS CDK pattern constructs in Typescript: one for traditional three-tier web applications and a second for serverless web applications.
  2. Publish the pattern constructs to CodeArtifact as npm packages. npm is the package manager for Node.js.
  3. Consume the pattern construct npm packages from CodeArtifact and use them to provision the AWS infrastructure.

We provide more information about the pattern constructs in the following sections. The source code mentioned in this blog is available in GitHub.

Note: The code provided in this blog post is for demonstration purposes only. You must ensure that it meets your security and production readiness requirements.

Traditional three-tier web application construct

The first pattern construct is for a traditional three-tier web application running on Amazon Elastic Compute Cloud (Amazon EC2), with AWS resources consisting of Application Load Balancer, an Autoscaling group and EC2 launch configuration, an Amazon Relational Database Service (Amazon RDS) or Amazon Aurora database, and AWS Secrets Manager. The following diagram illustrates this architecture.


Traditional stack architecture

Serverless web application construct

The second pattern construct is for a serverless application with AWS resources in AWS Lambda, Amazon API Gateway, and Amazon DynamoDB.

Serverless application architecture

Publishing and consuming pattern constructs

Both constructs are written in Typescript and published to CodeArtifact as npm packages. A semantic versioning scheme is used to version the construct packages. After a package gets published to CodeArtifact, teams can consume them for deploying AWS resources. The following diagram illustrates this architecture.

Pattern constructs

Prerequisites

Before getting started, complete the following steps:

  1. Clone the code from the GitHub repository for the traditional and serverless web application constructs:
    git clone https://github.com/aws-samples/aws-cdk-developing-application-patterns-blog.git
    cd aws-cdk-developing-application-patterns-blog
  2. Configure AWS Identity and Access Management (IAM) permissions by attaching IAM policies to the user, group, or role implementing this solution. The following policy files are in the iam folder in the root of the cloned repo:
    • BlogPublishArtifacts.json – The IAM policy to configure CodeArtifact and publish packages to it.
    • BlogConsumeTraditional.json – The IAM policy to consume the traditional three-tier web application construct from CodeArtifact and deploy it to an AWS account.
    • PublishArtifacts.json – The IAM policy to consume the serverless construct from CodeArtifact and deploy it to an AWS account.

Configuring CodeArtifact

In this step, we configure CodeArtifact for publishing the pattern constructs as npm packages. The following AWS resources are created:

  • A CodeArtifact domain named blog-domain
  • Two CodeArtifact repositories:
    • blog-npm-store – For configuring the upstream NPM repository.
    • blog-repository – For publishing custom packages.

Deploy the CodeArtifact resources with the following code:

cd prerequisites/
rm -rf package-lock.json node_modules
npm install
cdk deploy --require-approval never
cd ..

Log in to the blog-repository. This step is needed for publishing and consuming the npm packages. See the following code:

aws codeartifact login \
     --tool npm \
     --domain blog-domain \
     --domain-owner $(aws sts get-caller-identity --output text --query 'Account') \
     --repository blog-repository

Publishing the pattern constructs

  1. Change the directory to the serverless construct:
    cd serverless
  2. Install the required npm packages:
    rm package-lock.json && rm -rf node_modules
    npm install
    
  3. Build the npm project:
    npm run build
  4. Publish the construct npm package to the CodeArtifact repository:
    npm publish

    Follow the previously mentioned steps for building and publishing a traditional (classic Load Balancer plus Amazon EC2) web app by running these commands in the traditional directory.

    If the publishing is successful, you see messages like the following screenshots. The following screenshot shows the traditional infrastructure.

    Successful publishing of Traditional construct package to CodeArtifact

    The following screenshot shows the message for the serverless infrastructure.

    Successful publishing of Serverless construct package to CodeArtifact

    We just published version 1.0.1 of both the traditional and serverless web app constructs. To release a new version, we can simply update the version attribute in the package.json file in the traditional or serverless folder and repeat the last two steps.

    The following code snippet is for the traditional construct:

    {
        "name": "traditional-infrastructure",
        "main": "lib/index.js",
        "files": [
            "lib/*.js",
            "src"
        ],
        "types": "lib/index.d.ts",
        "version": "1.0.1",
    ...
    }

    The following code snippet is for the serverless construct:

    {
        "name": "serverless-infrastructure",
        "main": "lib/index.js",
        "files": [
            "lib/*.js",
            "src"
        ],
        "types": "lib/index.d.ts",
        "version": "1.0.1",
    ...
    }

Consuming the pattern constructs from CodeArtifact

In this step, we demonstrate how the pattern constructs published in the previous steps can be consumed and used to provision AWS infrastructure.

  1. From the root of the GitHub package, change the directory to the examples directory containing code for consuming traditional or serverless constructs.To consume the traditional construct, use the following code:
    cd examples/traditional

    To consume the serverless construct, use the following code:

    cd examples/serverless
  2. Open the package.json file in either directory and note that the packages and versions we consume are listed in the dependencies section, along with their version.
    The following code shows the traditional web app construct dependencies:

    "dependencies": {
        "@aws-cdk/core": "1.30.0",
        "traditional-infrastructure": "1.0.1",
        "aws-cdk": "1.47.0"
    }

    The following code shows the serverless web app construct dependencies:

    "dependencies": {
        "@aws-cdk/core": "1.30.0",
        "serverless-infrastructure": "1.0.1",
        "aws-cdk": "1.47.0"
    }
  3. Install the pattern artifact npm package along with the dependencies:
    rm package-lock.json && rm -rf node_modules
    npm install
    
  4. As an optional step, if you need to override the default Lambda function code, build the npm project. The following commands build the Lambda function source code:
    cd ../override-serverless
    npm run build
    cd -
  5. Bootstrap the project with the following code:
    cdk bootstrap

    This step is applicable for serverless applications only. It creates the Amazon Simple Storage Service (Amazon S3) staging bucket where the Lambda function code and artifacts are stored.

  6. Deploy the construct:
    cdk deploy --require-approval never

    If the deployment is successful, you see messages similar to the following screenshots. The following screenshot shows the traditional stack output, with the URL of the Load Balancer endpoint.

    Traditional CloudFormation stack outputs

    The following screenshot shows the serverless stack output, with the URL of the API Gateway endpoint.

    Serverless CloudFormation stack outputs

    You can test the endpoint for both constructs using a web browser or the following curl command:

    curl <endpoint output>

    The traditional web app endpoint returns a response similar to the following:

    [{"app": "traditional", "id": 1605186496, "purpose": "blog"}]

    The serverless stack returns two outputs. Use the output named ServerlessStack-v1.Api. See the following code:

    [{"purpose":"blog","app":"serverless","itemId":"1605190688947"}]

  7. Optionally, upgrade to a new version of pattern construct.
    Let’s assume that a new version of the serverless construct, version 1.0.2, has been published, and we want to upgrade our AWS infrastructure to this version. To do this, edit the package.json file and change the traditional-infrastructure or serverless-infrastructure package version in the dependencies section to 1.0.2. See the following code example:

    "dependencies": {
        "@aws-cdk/core": "1.30.0",
        "serverless-infrastructure": "1.0.2",
        "aws-cdk": "1.47.0"
    }

    To update the serverless-infrastructure package to 1.0.2, run the following command:

    npm update

    Then redeploy the CloudFormation stack:

    cdk deploy --require-approval never

Cleaning up

To avoid incurring future charges, clean up the resources you created.

  1. Delete all AWS resources that were created using the pattern constructs. We can use the AWS CDK toolkit to clean up all the resources:
    cdk destroy --force

    For more information about the AWS CDK toolkit, see Toolkit reference. Alternatively, delete the stack on the AWS CloudFormation console.

  2. Delete the CodeArtifact resources by deleting the CloudFormation stack that was deployed via AWS CDK:
    cd prerequisites
    cdk destroy –force
    

Conclusion

In this post, we demonstrated how to publish AWS CDK pattern constructs to CodeArtifact as npm packages. We also showed how teams can consume the published pattern constructs and use them to provision their AWS infrastructure.

This mechanism allows your infrastructure for AWS services to be provisioned from the configuration that has been vetted for quality control and security and governance checks. It also provides control over when new versions of the pattern constructs are released, and when the teams consuming the constructs can upgrade to the newly released versions.

About the Authors

Usman Umar


Usman Umar is a Sr. Applications Architect at AWS Professional Services. He is passionate about developing innovative ways to solve hard technical problems for the customers. In his free time, he likes going on biking trails, doing car modifications, and spending time with his family.


Krishnakumar Rengarajan


Krishnakumar Rengarajan is a DevOps Consultant with AWS Professional Services. He enjoys working with customers and focuses on building and delivering automated solutions that enables customers on their AWS cloud journeys.

Preview: AWS Proton – Automated Management for Container and Serverless Deployments

Post Syndicated from Alex Casalboni original https://aws.amazon.com/blogs/aws/preview-aws-proton-automated-management-for-container-and-serverless-deployments/

Today, we are excited to announce the public preview of AWS Proton, a new service that helps you automate and manage infrastructure provisioning and code deployments for serverless and container-based applications.

Maintaining hundreds – or sometimes thousands – of microservices with constantly changing infrastructure resources and configurations is a challenging task for even the most capable teams.

AWS Proton enables infrastructure teams to define standard templates centrally and make them available for developers in their organization. This allows infrastructure teams to manage and update infrastructure without impacting developer productivity.

How AWS Proton Works
The process of defining a service template involves the definition of cloud resources, continuous integration and continuous delivery (CI/CD) pipelines, and observability tools. AWS Proton will integrate with commonly used CI/CD pipelines and observability tools such as CodePipeline and CloudWatch. It also provides curated templates that follow AWS best practices for common use cases such as web services running on AWS Fargate or stream processing apps built on AWS Lambda.

Infrastructure teams can visualize and manage the list of service templates in the AWS Management Console.

This is what the list of templates looks like.

AWS Proton also collects information about the deployment status of the application such as the last date it was successfully deployed. When a template changes, AWS Proton identifies all the existing applications using the old version and allows infrastructure teams to upgrade them to the most recent definition, while monitoring application health during the upgrade so it can be rolled-back in case of issues.

This is what a service template looks like, with its versions and running instances.

Once service templates have been defined, developers can select and deploy services in a self-service fashion. AWS Proton will take care of provisioning cloud resources, deploying the code, and health monitoring, while providing visibility into the status of all the deployed applications and their pipelines.

This way, developers can focus on building and shipping application code for serverless and container-based applications without having to learn, configure, and maintain the underlying resources.

This is what the list of deployed services looks like.

Available in Preview
AWS Proton is now available in preview in US East (N. Virginia), US East (Ohio), US West (Oregon), Asia Pacific (Tokyo), and Europe (Ireland); it’s free of charge, as you only pay for the underlying services and resources. Check out the technical documentation.

You can get started using the AWS Management Console here.

Alex

Automate thousands of mainframe tests on AWS with the Micro Focus Enterprise Suite

Post Syndicated from Kevin Yung original https://aws.amazon.com/blogs/devops/automate-mainframe-tests-on-aws-with-micro-focus/

Micro Focus – AWS Advanced Technology Parnter, they are a global infrastructure software company with 40 years of experience in delivering and supporting enterprise software.

We have seen mainframe customers often encounter scalability constraints, and they can’t support their development and test workforce to the scale required to support business requirements. These constraints can lead to delays, reduce product or feature releases, and make them unable to respond to market requirements. Furthermore, limits in capacity and scale often affect the quality of changes deployed, and are linked to unplanned or unexpected downtime in products or services.

The conventional approach to address these constraints is to scale up, meaning to increase MIPS/MSU capacity of the mainframe hardware available for development and testing. The cost of this approach, however, is excessively high, and to ensure time to market, you may reject this approach at the expense of quality and functionality. If you’re wrestling with these challenges, this post is written specifically for you.

To accompany this post, we developed an AWS prescriptive guidance (APG) pattern for developer instances and CI/CD pipelines: Mainframe Modernization: DevOps on AWS with Micro Focus.

Overview of solution

In the APG, we introduce DevOps automation and AWS CI/CD architecture to support mainframe application development. Our solution enables you to embrace both Test Driven Development (TDD) and Behavior Driven Development (BDD). Mainframe developers and testers can automate the tests in CI/CD pipelines so they’re repeatable and scalable. To speed up automated mainframe application tests, the solution uses team pipelines to run functional and integration tests frequently, and uses systems test pipelines to run comprehensive regression tests on demand. For more information about the pipelines, see Mainframe Modernization: DevOps on AWS with Micro Focus.

In this post, we focus on how to automate and scale mainframe application tests in AWS. We show you how to use AWS services and Micro Focus products to automate mainframe application tests with best practices. The solution can scale your mainframe application CI/CD pipeline to run thousands of tests in AWS within minutes, and you only pay a fraction of your current on-premises cost.

The following diagram illustrates the solution architecture.

Mainframe DevOps On AWS Architecture Overview, on the left is the conventional mainframe development environment, on the left is the CI/CD pipelines for mainframe tests in AWS

Figure: Mainframe DevOps On AWS Architecture Overview


Best practices

Before we get into the details of the solution, let’s recap the following mainframe application testing best practices:

  • Create a “test first” culture by writing tests for mainframe application code changes
  • Automate preparing and running tests in the CI/CD pipelines
  • Provide fast and quality feedback to project management throughout the SDLC
  • Assess and increase test coverage
  • Scale your test’s capacity and speed in line with your project schedule and requirements

Automated smoke test

In this architecture, mainframe developers can automate running functional smoke tests for new changes. This testing phase typically “smokes out” regression of core and critical business functions. You can achieve these tests using tools such as py3270 with x3270 or Robot Framework Mainframe 3270 Library.

The following code shows a feature test written in Behave and test step using py3270:

# home_loan_calculator.feature
Feature: calculate home loan monthly repayment
  the bankdemo application provides a monthly home loan repayment caculator 
  User need to input into transaction of home loan amount, interest rate and how many years of the loan maturity.
  User will be provided an output of home loan monthly repayment amount

  Scenario Outline: As a customer I want to calculate my monthly home loan repayment via a transaction
      Given home loan amount is <amount>, interest rate is <interest rate> and maturity date is <maturity date in months> months 
       When the transaction is submitted to the home loan calculator
       Then it shall show the monthly repayment of <monthly repayment>

    Examples: Homeloan
      | amount  | interest rate | maturity date in months | monthly repayment |
      | 1000000 | 3.29          | 300                     | $4894.31          |


# home_loan_calculator_steps.py
import sys, os
from py3270 import Emulator
from behave import *

@given("home loan amount is {amount}, interest rate is {rate} and maturity date is {maturity_date} months")
def step_impl(context, amount, rate, maturity_date):
    context.home_loan_amount = amount
    context.interest_rate = rate
    context.maturity_date_in_months = maturity_date

@when("the transaction is submitted to the home loan calculator")
def step_impl(context):
    # Setup connection parameters
    tn3270_host = os.getenv('TN3270_HOST')
    tn3270_port = os.getenv('TN3270_PORT')
	# Setup TN3270 connection
    em = Emulator(visible=False, timeout=120)
    em.connect(tn3270_host + ':' + tn3270_port)
    em.wait_for_field()
	# Screen login
    em.fill_field(10, 44, 'b0001', 5)
    em.send_enter()
	# Input screen fields for home loan calculator
    em.wait_for_field()
    em.fill_field(8, 46, context.home_loan_amount, 7)
    em.fill_field(10, 46, context.interest_rate, 7)
    em.fill_field(12, 46, context.maturity_date_in_months, 7)
    em.send_enter()
    em.wait_for_field()    

    # collect monthly replayment output from screen
    context.monthly_repayment = em.string_get(14, 46, 9)
    em.terminate()

@then("it shall show the monthly repayment of {amount}")
def step_impl(context, amount):
    print("expected amount is " + amount.strip() + ", and the result from screen is " + context.monthly_repayment.strip())
assert amount.strip() == context.monthly_repayment.strip()

To run this functional test in Micro Focus Enterprise Test Server (ETS), we use AWS CodeBuild.

We first need to build an Enterprise Test Server Docker image and push it to an Amazon Elastic Container Registry (Amazon ECR) registry. For instructions, see Using Enterprise Test Server with Docker.

Next, we create a CodeBuild project and uses the Enterprise Test Server Docker image in its configuration.

The following is an example AWS CloudFormation code snippet of a CodeBuild project that uses Windows Container and Enterprise Test Server:

  BddTestBankDemoStage:
    Type: AWS::CodeBuild::Project
    Properties:
      Name: !Sub '${AWS::StackName}BddTestBankDemo'
      LogsConfig:
        CloudWatchLogs:
          Status: ENABLED
      Artifacts:
        Type: CODEPIPELINE
        EncryptionDisabled: true
      Environment:
        ComputeType: BUILD_GENERAL1_LARGE
        Image: !Sub "${EnterpriseTestServerDockerImage}:latest"
        ImagePullCredentialsType: SERVICE_ROLE
        Type: WINDOWS_SERVER_2019_CONTAINER
      ServiceRole: !Ref CodeBuildRole
      Source:
        Type: CODEPIPELINE
        BuildSpec: bdd-test-bankdemo-buildspec.yaml

In the CodeBuild project, we need to create a buildspec to orchestrate the commands for preparing the Micro Focus Enterprise Test Server CICS environment and issue the test command. In the buildspec, we define the location for CodeBuild to look for test reports and upload them into the CodeBuild report group. The following buildspec code uses custom scripts DeployES.ps1 and StartAndWait.ps1 to start your CICS region, and runs Python Behave BDD tests:

version: 0.2
phases:
  build:
    commands:
      - |
        # Run Command to start Enterprise Test Server
        CD C:\
        .\DeployES.ps1
        .\StartAndWait.ps1

        py -m pip install behave

        Write-Host "waiting for server to be ready ..."
        do {
          Write-Host "..."
          sleep 3  
        } until(Test-NetConnection 127.0.0.1 -Port 9270 | ? { $_.TcpTestSucceeded } )

        CD C:\tests\features
        MD C:\tests\reports
        $Env:Path += ";c:\wc3270"

        $address=(Get-NetIPAddress -AddressFamily Ipv4 | where { $_.IPAddress -Match "172\.*" })
        $Env:TN3270_HOST = $address.IPAddress
        $Env:TN3270_PORT = "9270"
        
        behave.exe --color --junit --junit-directory C:\tests\reports
reports:
  bankdemo-bdd-test-report:
    files: 
      - '**/*'
    base-directory: "C:\\tests\\reports"

In the smoke test, the team may run both unit tests and functional tests. Ideally, these tests are better to run in parallel to speed up the pipeline. In AWS CodePipeline, we can set up a stage to run multiple steps in parallel. In our example, the pipeline runs both BDD tests and Robot Framework (RPA) tests.

The following CloudFormation code snippet runs two different tests. You use the same RunOrder value to indicate the actions run in parallel.

#...
        - Name: Tests
          Actions:
            - Name: RunBDDTest
              ActionTypeId:
                Category: Build
                Owner: AWS
                Provider: CodeBuild
                Version: 1
              Configuration:
                ProjectName: !Ref BddTestBankDemoStage
                PrimarySource: Config
              InputArtifacts:
                - Name: DemoBin
                - Name: Config
              RunOrder: 1
            - Name: RunRbTest
              ActionTypeId:
                Category: Build
                Owner: AWS
                Provider: CodeBuild
                Version: 1
              Configuration:
                ProjectName : !Ref RpaTestBankDemoStage
                PrimarySource: Config
              InputArtifacts:
                - Name: DemoBin
                - Name: Config
              RunOrder: 1  
#...

The following screenshot shows the example actions on the CodePipeline console that use the preceding code.

Screenshot of CodePipeine parallel execution tests using a same run order value

Figure – Screenshot of CodePipeine parallel execution tests

Both DBB and RPA tests produce jUnit format reports, which CodeBuild can ingest and show on the CodeBuild console. This is a great way for project management and business users to track the quality trend of an application. The following screenshot shows the CodeBuild report generated from the BDD tests.

CodeBuild report generated from the BDD tests showing 100% pass rate

Figure – CodeBuild report generated from the BDD tests

Automated regression tests

After you test the changes in the project team pipeline, you can automatically promote them to another stream with other team members’ changes for further testing. The scope of this testing stream is significantly more comprehensive, with a greater number and wider range of tests and higher volume of test data. The changes promoted to this stream by each team member are tested in this environment at the end of each day throughout the life of the project. This provides a high-quality delivery to production, with new code and changes to existing code tested together with hundreds or thousands of tests.

In enterprise architecture, it’s commonplace to see an application client consuming web services APIs exposed from a mainframe CICS application. One approach to do regression tests for mainframe applications is to use Micro Focus Verastream Host Integrator (VHI) to record and capture 3270 data stream processing and encapsulate these 3270 data streams as business functions, which in turn are packaged as web services. When these web services are available, they can be consumed by a test automation product, which in our environment is Micro Focus UFT One. This uses the Verastream server as the orchestration engine that translates the web service requests into 3270 data streams that integrate with the mainframe CICS application. The application is deployed in Micro Focus Enterprise Test Server.

The following diagram shows the end-to-end testing components.

Regression Test the end-to-end testing components using ECS Container for Exterprise Test Server, Verastream Host Integrator and UFT One Container, all integration points are using Elastic Network Load Balancer

Figure – Regression Test Infrastructure end-to-end Setup

To ensure we have the coverage required for large mainframe applications, we sometimes need to run thousands of tests against very large production volumes of test data. We want the tests to run faster and complete as soon as possible so we reduce AWS costs—we only pay for the infrastructure when consuming resources for the life of the test environment when provisioning and running tests.

Therefore, the design of the test environment needs to scale out. The batch feature in CodeBuild allows you to run tests in batches and in parallel rather than serially. Furthermore, our solution needs to minimize interference between batches, a failure in one batch doesn’t affect another running in parallel. The following diagram depicts the high-level design, with each batch build running in its own independent infrastructure. Each infrastructure is launched as part of test preparation, and then torn down in the post-test phase.

Regression Tests in CodeBuoild Project setup to use batch mode, three batches running in independent infrastructure with containers

Figure – Regression Tests in CodeBuoild Project setup to use batch mode

Building and deploying regression test components

Following the design of the parallel regression test environment, let’s look at how we build each component and how they are deployed. The followings steps to build our regression tests use a working backward approach, starting from deployment in the Enterprise Test Server:

  1. Create a batch build in CodeBuild.
  2. Deploy to Enterprise Test Server.
  3. Deploy the VHI model.
  4. Deploy UFT One Tests.
  5. Integrate UFT One into CodeBuild and CodePipeline and test the application.

Creating a batch build in CodeBuild

We update two components to enable a batch build. First, in the CodePipeline CloudFormation resource, we set BatchEnabled to be true for the test stage. The UFT One test preparation stage uses the CloudFormation template to create the test infrastructure. The following code is an example of the AWS CloudFormation snippet with batch build enabled:

#...
        - Name: SystemsTest
          Actions:
            - Name: Uft-Tests
              ActionTypeId:
                Category: Build
                Owner: AWS
                Provider: CodeBuild
                Version: 1
              Configuration:
                ProjectName : !Ref UftTestBankDemoProject
                PrimarySource: Config
                BatchEnabled: true
                CombineArtifacts: true
              InputArtifacts:
                - Name: Config
                - Name: DemoSrc
              OutputArtifacts:
                - Name: TestReport                
              RunOrder: 1
#...

Second, in the buildspec configuration of the test stage, we provide a build matrix setting. We use the custom environment variable TEST_BATCH_NUMBER to indicate which set of tests runs in each batch. See the following code:

version: 0.2
batch:
  fast-fail: true
  build-matrix:
    static:
      ignore-failure: false
    dynamic:
      env:
        variables:
          TEST_BATCH_NUMBER:
            - 1
            - 2
            - 3 
phases:
  pre_build:
commands:
#...

After setting up the batch build, CodeBuild creates multiple batches when the build starts. The following screenshot shows the batches on the CodeBuild console.

Regression tests Codebuild project ran in batch mode, three batches ran in prallel successfully

Figure – Regression tests Codebuild project ran in batch mode

Deploying to Enterprise Test Server

ETS is the transaction engine that processes all the online (and batch) requests that are initiated through external clients, such as 3270 terminals, web services, and websphere MQ. This engine provides support for various mainframe subsystems, such as CICS, IMS TM and JES, as well as code-level support for COBOL and PL/I. The following screenshot shows the Enterprise Test Server administration page.

Enterprise Server Administrator window showing configuration for CICS

Figure – Enterprise Server Administrator window

In this mainframe application testing use case, the regression tests are CICS transactions, initiated from 3270 requests (encapsulated in a web service). For more information about Enterprise Test Server, see the Enterprise Test Server and Micro Focus websites.

In the regression pipeline, after the stage of mainframe artifact compiling, we bake in the artifact into an ETS Docker container and upload the image to an Amazon ECR repository. This way, we have an immutable artifact for all the tests.

During each batch’s test preparation stage, a CloudFormation stack is deployed to create an Amazon ECS service on Windows EC2. The stack uses a Network Load Balancer as an integration point for the VHI’s integration.

The following code is an example of the CloudFormation snippet to create an Amazon ECS service using an Enterprise Test Server Docker image:

#...
  EtsService:
    DependsOn:
    - EtsTaskDefinition
    - EtsContainerSecurityGroup
    - EtsLoadBalancerListener
    Properties:
      Cluster: !Ref 'WindowsEcsClusterArn'
      DesiredCount: 1
      LoadBalancers:
        -
          ContainerName: !Sub "ets-${AWS::StackName}"
          ContainerPort: 9270
          TargetGroupArn: !Ref EtsPort9270TargetGroup
      HealthCheckGracePeriodSeconds: 300          
      TaskDefinition: !Ref 'EtsTaskDefinition'
    Type: "AWS::ECS::Service"

  EtsTaskDefinition:
    Properties:
      ContainerDefinitions:
        -
          Image: !Sub "${AWS::AccountId}.dkr.ecr.us-east-1.amazonaws.com/systems-test/ets:latest"
          LogConfiguration:
            LogDriver: awslogs
            Options:
              awslogs-group: !Ref 'SystemsTestLogGroup'
              awslogs-region: !Ref 'AWS::Region'
              awslogs-stream-prefix: ets
          Name: !Sub "ets-${AWS::StackName}"
          cpu: 4096
          memory: 8192
          PortMappings:
            -
              ContainerPort: 9270
          EntryPoint:
          - "powershell.exe"
          Command: 
          - '-F'
          - .\StartAndWait.ps1
          - 'bankdemo'
          - C:\bankdemo\
          - 'wait'
      Family: systems-test-ets
    Type: "AWS::ECS::TaskDefinition"
#...

Deploying the VHI model

In this architecture, the VHI is a bridge between mainframe and clients.

We use the VHI designer to capture the 3270 data streams and encapsulate the relevant data streams into a business function. We can then deliver this function as a web service that can be consumed by a test management solution, such as Micro Focus UFT One.

The following screenshot shows the setup for getCheckingDetails in VHI. Along with this procedure we can also see other procedures (eg calcCostLoan) defined that get generated as a web service. The properties associated with this procedure are available on this screen to allow for the defining of the mapping of the fields between the associated 3270 screens and exposed web service.

example of VHI designer to capture the 3270 data streams and encapsulate the relevant data streams into a business function getCheckingDetails

Figure – Setup for getCheckingDetails in VHI

The following screenshot shows the editor for this procedure and is initiated by the selection of the Procedure Editor. This screen presents the 3270 screens that are involved in the business function that will be generated as a web service.

VHI designer Procedure Editor shows the procedure

Figure – VHI designer Procedure Editor shows the procedure

After you define the required functional web services in VHI designer, the resultant model is saved and deployed into a VHI Docker image. We use this image and the associated model (from VHI designer) in the pipeline outlined in this post.

For more information about VHI, see the VHI website.

The pipeline contains two steps to deploy a VHI service. First, it installs and sets up the VHI models into a VHI Docker image, and it’s pushed into Amazon ECR. Second, a CloudFormation stack is deployed to create an Amazon ECS Fargate service, which uses the latest built Docker image. In AWS CloudFormation, the VHI ECS task definition defines an environment variable for the ETS Network Load Balancer’s DNS name. Therefore, the VHI can bootstrap and point to an ETS service. In the VHI stack, it uses a Network Load Balancer as an integration point for UFT One test integration.

The following code is an example of a ECS Task Definition CloudFormation snippet that creates a VHI service in Amazon ECS Fargate and integrates it with an ETS server:

#...
  VhiTaskDefinition:
    DependsOn:
    - EtsService
    Type: AWS::ECS::TaskDefinition
    Properties:
      Family: systems-test-vhi
      NetworkMode: awsvpc
      RequiresCompatibilities:
        - FARGATE
      ExecutionRoleArn: !Ref FargateEcsTaskExecutionRoleArn
      Cpu: 2048
      Memory: 4096
      ContainerDefinitions:
        - Cpu: 2048
          Name: !Sub "vhi-${AWS::StackName}"
          Memory: 4096
          Environment:
            - Name: esHostName 
              Value: !GetAtt EtsInternalLoadBalancer.DNSName
            - Name: esPort
              Value: 9270
          Image: !Ref "${AWS::AccountId}.dkr.ecr.us-east-1.amazonaws.com/systems-test/vhi:latest"
          PortMappings:
            - ContainerPort: 9680
          LogConfiguration:
            LogDriver: awslogs
            Options:
              awslogs-group: !Ref 'SystemsTestLogGroup'
              awslogs-region: !Ref 'AWS::Region'
              awslogs-stream-prefix: vhi

#...

Deploying UFT One Tests

UFT One is a test client that uses each of the web services created by the VHI designer to orchestrate running each of the associated business functions. Parameter data is supplied to each function, and validations are configured against the data returned. Multiple test suites are configured with different business functions with the associated data.

The following screenshot shows the test suite API_Bankdemo3, which is used in this regression test process.

the screenshot shows the test suite API_Bankdemo3 in UFT One test setup console, the API setup for getCheckingDetails

Figure – API_Bankdemo3 in UFT One Test Editor Console

For more information, see the UFT One website.

Integrating UFT One and testing the application

The last step is to integrate UFT One into CodeBuild and CodePipeline to test our mainframe application. First, we set up CodeBuild to use a UFT One container. The Docker image is available in Docker Hub. Then we author our buildspec. The buildspec has the following three phrases:

  • Setting up a UFT One license and deploying the test infrastructure
  • Starting the UFT One test suite to run regression tests
  • Tearing down the test infrastructure after tests are complete

The following code is an example of a buildspec snippet in the pre_build stage. The snippet shows the command to activate the UFT One license:

version: 0.2
batch: 
# . . .
phases:
  pre_build:
    commands:
      - |
        # Activate License
        $process = Start-Process -NoNewWindow -RedirectStandardOutput LicenseInstall.log -Wait -File 'C:\Program Files (x86)\Micro Focus\Unified Functional Testing\bin\HP.UFT.LicenseInstall.exe' -ArgumentList @('concurrent', 10600, 1, ${env:AUTOPASS_LICENSE_SERVER})        
        Get-Content -Path LicenseInstall.log
        if (Select-String -Path LicenseInstall.log -Pattern 'The installation was successful.' -Quiet) {
          Write-Host 'Licensed Successfully'
        } else {
          Write-Host 'License Failed'
          exit 1
        }
#...

The following command in the buildspec deploys the test infrastructure using the AWS Command Line Interface (AWS CLI)

aws cloudformation deploy --stack-name $stack_name `
--template-file cicd-pipeline/systems-test-pipeline/systems-test-service.yaml `
--parameter-overrides EcsCluster=$cluster_arn `
--capabilities CAPABILITY_IAM

Because ETS and VHI are both deployed with a load balancer, the build detects when the load balancers become healthy before starting the tests. The following AWS CLI commands detect the load balancer’s target group health:

$vhi_health_state = (aws elbv2 describe-target-health --target-group-arn $vhi_target_group_arn --query 'TargetHealthDescriptions[0].TargetHealth.State' --output text)
$ets_health_state = (aws elbv2 describe-target-health --target-group-arn $ets_target_group_arn --query 'TargetHealthDescriptions[0].TargetHealth.State' --output text)          

When the targets are healthy, the build moves into the build stage, and it uses the UFT One command line to start the tests. See the following code:

$process = Start-Process -Wait  -NoNewWindow -RedirectStandardOutput UFTBatchRunnerCMD.log `
-FilePath "C:\Program Files (x86)\Micro Focus\Unified Functional Testing\bin\UFTBatchRunnerCMD.exe" `
-ArgumentList @("-source", "${env:CODEBUILD_SRC_DIR_DemoSrc}\bankdemo\tests\API_Bankdemo\API_Bankdemo${env:TEST_BATCH_NUMBER}")

The next release of Micro Focus UFT One (November or December 2020) will provide an exit status to indicate a test’s success or failure.

When the tests are complete, the post_build stage tears down the test infrastructure. The following AWS CLI command tears down the CloudFormation stack:


#...
	post_build:
	  finally:
	  	- |
		  Write-Host "Clean up ETS, VHI Stack"
		  #...
		  aws cloudformation delete-stack --stack-name $stack_name
          aws cloudformation wait stack-delete-complete --stack-name $stack_name

At the end of the build, the buildspec is set up to upload UFT One test reports as an artifact into Amazon Simple Storage Service (Amazon S3). The following screenshot is the example of a test report in HTML format generated by UFT One in CodeBuild and CodePipeline.

UFT One HTML report shows regression testresult and test detals

Figure – UFT One HTML report

A new release of Micro Focus UFT One will provide test report formats supported by CodeBuild test report groups.

Conclusion

In this post, we introduced the solution to use Micro Focus Enterprise Suite, Micro Focus UFT One, Micro Focus VHI, AWS developer tools, and Amazon ECS containers to automate provisioning and running mainframe application tests in AWS at scale.

The on-demand model allows you to create the same test capacity infrastructure in minutes at a fraction of your current on-premises mainframe cost. It also significantly increases your testing and delivery capacity to increase quality and reduce production downtime.

A demo of the solution is available in AWS Partner Micro Focus website AWS Mainframe CI/CD Enterprise Solution. If you’re interested in modernizing your mainframe applications, please visit Micro Focus and contact AWS mainframe business development at [email protected].

References

Micro Focus


Peter Woods

Peter Woods

Peter has been with Micro Focus for almost 30 years, in a variety of roles and geographies including Technical Support, Channel Sales, Product Management, Strategic Alliances Management and Pre-Sales, primarily based in Europe but for the last four years in Australia and New Zealand. In his current role as Pre-Sales Manager, Peter is charged with driving and supporting sales activity within the Application Modernization and Connectivity team, based in Melbourne.

Leo Ervin

Leo Ervin

Leo Ervin is a Senior Solutions Architect working with Micro Focus Enterprise Solutions working with the ANZ team. After completing a Mathematics degree Leo started as a PL/1 programming with a local insurance company. The next step in Leo’s career involved consulting work in PL/1 and COBOL before he joined a start-up company as a technical director and partner. This company became the first distributor of Micro Focus software in the ANZ region in 1986. Leo’s involvement with Micro Focus technology has continued from this distributorship through to today with his current focus on cloud strategies for both DevOps and re-platform implementations.

Kevin Yung

Kevin Yung

Kevin is a Senior Modernization Architect in AWS Professional Services Global Mainframe and Midrange Modernization (GM3) team. Kevin currently is focusing on leading and delivering mainframe and midrange applications modernization for large enterprise customers.

Snowflake: Running Millions of Simulation Tests with Amazon EKS

Post Syndicated from Keith Joelner original https://aws.amazon.com/blogs/architecture/snowflake-running-millions-of-simulation-tests-with-amazon-eks/

This post was co-written with Brian Nutt, Senior Software Engineer and Kao Makino, Principal Performance Engineer, both at Snowflake.

Transactional databases are a key component of any production system. Maintaining data integrity while rows are read and written at a massive scale is a major technical challenge for these types of databases. To ensure their stability, it’s necessary to test many different scenarios and configurations. Simulating as many of these as possible allows engineers to quickly catch defects and build resilience. But the Holy Grail is to accomplish this at scale and within a timeframe that allows your developers to iterate quickly.

Snowflake has been using and advancing FoundationDB (FDB), an open-source, ACID-compliant, distributed key-value store since 2014. FDB, running on Amazon Elastic Cloud Compute (EC2) and Amazon Elastic Block Storage (EBS), has proven to be extremely reliable and is a key part of Snowflake’s cloud services layer architecture. To support its development process of creating high quality and stable software, Snowflake developed Project Joshua, an internal system that leverages Amazon Elastic Kubernetes Service (EKS), Amazon Elastic Container Registry (ECR), Amazon EC2 Spot Instances, and AWS PrivateLink to run over one hundred thousand of validation and regression tests an hour.

About Snowflake

Snowflake is a single, integrated data platform delivered as a service. Built from the ground up for the cloud, Snowflake’s unique multi-cluster shared data architecture delivers the performance, scale, elasticity, and concurrency that today’s organizations require. It features storage, compute, and global services layers that are physically separated but logically integrated. Data workloads scale independently from one another, making it an ideal platform for data warehousing, data lakes, data engineering, data science, modern data sharing, and developing data applications.

Snowflake architecture

Developing a simulation-based testing and validation framework

Snowflake’s cloud services layer is composed of a collection of services that manage virtual warehouses, query optimization, and transactions. This layer relies on rich metadata stored in FDB.

Prior to the creation of the simulation framework, Project Joshua, FDB developers ran tests on their laptops and were limited by the number they could run. Additionally, there was a scheduled nightly job for running further tests.

Joshua at Snowflake

Amazon EKS as the foundation

Snowflake’s platform team decided to use Kubernetes to build Project Joshua. Their focus was on helping engineers run their workloads instead of spending cycles on the management of the control plane. They turned to Amazon EKS to achieve their scalability needs. This was a crucial success criterion for Project Joshua since at any point in time there could be hundreds of nodes running in the cluster. Snowflake utilizes the Kubernetes Cluster Autoscaler to dynamically scale worker nodes in minutes to support a tests-based queue of Joshua’s requests.

With the integration of Amazon EKS and Amazon Virtual Private Cloud (Amazon VPC), Snowflake is able to control access to the required resources. For example: the database that serves Joshua’s test queues is external to the EKS cluster. By using the Amazon VPC CNI plugin, each pod receives an IP address in the VPC and Snowflake can control access to the test queue via security groups.

To achieve its desired performance, Snowflake created its own custom pod scaler, which responds quicker to changes than using a custom metric for pod scheduling.

  • The agent scaler is responsible for monitoring a test queue in the coordination database (which, coincidentally, is also FDB) to schedule Joshua agents. The agent scaler communicates directly with Amazon EKS using the Kubernetes API to schedule tests in parallel.
  • Joshua agents (one agent per pod) are responsible for pulling tests from the test queue, executing, and reporting results. Tests are run one at a time within the EKS Cluster until the test queue is drained.

Achieving scale and cost savings with Amazon EC2 Spot

A Spot Fleet is a collection—or fleet—of Amazon EC2 Spot instances that Joshua uses to make the infrastructure more reliable and cost effective. ​ Spot Fleet is used to reduce the cost of worker nodes by running a variety of instance types.

With Spot Fleet, Snowflake requests a combination of different instance types to help ensure that demand gets fulfilled. These options make Fleet more tolerant of surges in demand for instance types. If a surge occurs it will not significantly affect tasks since Joshua is agnostic to the type of instance and can fall back to a different instance type and still be available.

For reservations, Snowflake uses the capacity-optimized allocation strategy to automatically launch Spot Instances into the most available pools by looking at real-time capacity data and predicting which are the most available. This helps Snowflake quickly switch instances reserved to what is most available in the Spot market, instead of spending time contending for the cheapest instances, at the cost of a potentially higher price.

Overcoming hurdles

Snowflake’s usage of a public container registry posed a scalability challenge. When starting hundreds of worker nodes, each node needs to pull images from the public registry. This can lead to a potential rate limiting issue when all outbound traffic goes through a NAT gateway.

For example, consider 1,000 nodes pulling a 10 GB image. Each pull request requires each node to download the image across the public internet. Some issues that need to be addressed are latency, reliability, and increased costs due to the additional time to download an image for each test. Also, container registries can become unavailable or may rate-limit download requests. Lastly, images are pulled through public internet and other services in the cluster can experience pulling issues.

​For anything more than a minimal workload, a local container registry is needed. If an image is first pulled from the public registry and then pushed to a local registry (cache), it only needs to pull once from the public registry, then all worker nodes benefit from a local pull. That’s why Snowflake decided to replicate images to ECR, a fully managed docker container registry, providing a reliable local registry to store images. Additional benefits for the local registry are that it’s not exclusive to Joshua; all platform components required for Snowflake clusters can be cached in the local ECR Registry. For additional security and performance Snowflake uses AWS PrivateLink to keep all network traffic from ECR to the workers nodes within the AWS network. It also resolved rate-limiting issues from pulling images from a public registry with unauthenticated requests, unblocking other cluster nodes from pulling critical images for operation.

Conclusion

Project Joshua allows Snowflake to enable developers to test more scenarios without having to worry about the management of the infrastructure. ​ Snowflake’s engineers can schedule thousands of test simulations and configurations to catch bugs faster. FDB is a key component of ​the Snowflake stack and Project Joshua helps make FDB more stable and resilient. Additionally, Amazon EC2 Spot has provided non-trivial cost savings to Snowflake vs. running on-demand or buying reserved instances.

If you want to know more about how Snowflake built its high performance data warehouse as a Service on AWS, watch the This is My Architecture video below.

Building, bundling, and deploying applications with the AWS CDK

Post Syndicated from Cory Hall original https://aws.amazon.com/blogs/devops/building-apps-with-aws-cdk/

The AWS Cloud Development Kit (AWS CDK) is an open-source software development framework to model and provision your cloud application resources using familiar programming languages.

The post CDK Pipelines: Continuous delivery for AWS CDK applications showed how you can use CDK Pipelines to deploy a TypeScript-based AWS Lambda function. In that post, you learned how to add additional build commands to the pipeline to compile the TypeScript code to JavaScript, which is needed to create the Lambda deployment package.

In this post, we dive deeper into how you can perform these build commands as part of your AWS CDK build process by using the native AWS CDK bundling functionality.

If you’re working with Python, TypeScript, or JavaScript-based Lambda functions, you may already be familiar with the PythonFunction and NodejsFunction constructs, which use the bundling functionality. This post describes how to write your own bundling logic for instances where a higher-level construct either doesn’t already exist or doesn’t meet your needs. To illustrate this, I walk through two different examples: a Lambda function written in Golang and a static site created with Nuxt.js.

Concepts

A typical CI/CD pipeline contains steps to build and compile your source code, bundle it into a deployable artifact, push it to artifact stores, and deploy to an environment. In this post, we focus on the building, compiling, and bundling stages of the pipeline.

The AWS CDK has the concept of bundling source code into a deployable artifact. As of this writing, this works for two main types of assets: Docker images published to Amazon Elastic Container Registry (Amazon ECR) and files published to Amazon Simple Storage Service (Amazon S3). For files published to Amazon S3, this can be as simple as pointing to a local file or directory, which the AWS CDK uploads to Amazon S3 for you.

When you build an AWS CDK application (by running cdk synth), a cloud assembly is produced. The cloud assembly consists of a set of files and directories that define your deployable AWS CDK application. In the context of the AWS CDK, it might include the following:

  • AWS CloudFormation templates and instructions on where to deploy them
  • Dockerfiles, corresponding application source code, and information about where to build and push the images to
  • File assets and information about which S3 buckets to upload the files to

Use case

For this use case, our application consists of front-end and backend components. The example code is available in the GitHub repo. In the repository, I have split the example into two separate AWS CDK applications. The repo also contains the Golang Lambda example app and the Nuxt.js static site.

Golang Lambda function

To create a Golang-based Lambda function, you must first create a Lambda function deployment package. For Go, this consists of a .zip file containing a Go executable. Because we don’t commit the Go executable to our source repository, our CI/CD pipeline must perform the necessary steps to create it.

In the context of the AWS CDK, when we create a Lambda function, we have to tell the AWS CDK where to find the deployment package. See the following code:

new lambda.Function(this, 'MyGoFunction', {
  runtime: lambda.Runtime.GO_1_X,
  handler: 'main',
  code: lambda.Code.fromAsset(path.join(__dirname, 'folder-containing-go-executable')),
});

In the preceding code, the lambda.Code.fromAsset() method tells the AWS CDK where to find the Golang executable. When we run cdk synth, it stages this Go executable in the cloud assembly, which it zips and publishes to Amazon S3 as part of the PublishAssets stage.

If we’re running the AWS CDK as part of a CI/CD pipeline, this executable doesn’t exist yet, so how do we create it? One method is CDK bundling. The lambda.Code.fromAsset() method takes a second optional argument, AssetOptions, which contains the bundling parameter. With this bundling parameter, we can tell the AWS CDK to perform steps prior to staging the files in the cloud assembly.

Breaking down the BundlingOptions parameter further, we can perform the build inside a Docker container or locally.

Building inside a Docker container

For this to work, we need to make sure that we have Docker running on our build machine. In AWS CodeBuild, this means setting privileged: true. See the following code:

new lambda.Function(this, 'MyGoFunction', {
  code: lambda.Code.fromAsset(path.join(__dirname, 'folder-containing-source-code'), {
    bundling: {
      image: lambda.Runtime.GO_1_X.bundlingDockerImage,
      command: [
        'bash', '-c', [
          'go test -v',
          'GOOS=linux go build -o /asset-output/main',
      ].join(' && '),
    },
  })
  ...
});

We specify two parameters:

  • image (required) – The Docker image to perform the build commands in
  • command (optional) – The command to run within the container

The AWS CDK mounts the folder specified as the first argument to fromAsset at /asset-input inside the container, and mounts the asset output directory (where the cloud assembly is staged) at /asset-output inside the container.

After we perform the build commands, we need to make sure we copy the Golang executable to the /asset-output location (or specify it as the build output location like in the preceding example).

This is the equivalent of running something like the following code:

docker run \
  --rm \
  -v folder-containing-source-code:/asset-input \
  -v cdk.out/asset.1234a4b5/:/asset-output \
  lambci/lambda:build-go1.x \
  bash -c 'GOOS=linux go build -o /asset-output/main'

Building locally

To build locally (not in a Docker container), we have to provide the local parameter. See the following code:

new lambda.Function(this, 'MyGoFunction', {
  code: lambda.Code.fromAsset(path.join(__dirname, 'folder-containing-source-code'), {
    bundling: {
      image: lambda.Runtime.GO_1_X.bundlingDockerImage,
      command: [],
      local: {
        tryBundle(outputDir: string) {
          try {
            spawnSync('go version')
          } catch {
            return false
          }

          spawnSync(`GOOS=linux go build -o ${path.join(outputDir, 'main')}`);
          return true
        },
      },
    },
  })
  ...
});

The local parameter must implement the ILocalBundling interface. The tryBundle method is passed the asset output directory, and expects you to return a boolean (true or false). If you return true, the AWS CDK doesn’t try to perform Docker bundling. If you return false, it falls back to Docker bundling. Just like with Docker bundling, you must make sure that you place the Go executable in the outputDir.

Typically, you should perform some validation steps to ensure that you have the required dependencies installed locally to perform the build. This could be checking to see if you have go installed, or checking a specific version of go. This can be useful if you don’t have control over what type of build environment this might run in (for example, if you’re building a construct to be consumed by others).

If we run cdk synth on this, we see a new message telling us that the AWS CDK is bundling the asset. If we include additional commands like go test, we also see the output of those commands. This is especially useful if you wanted to fail a build if tests failed. See the following code:

$ cdk synth
Bundling asset GolangLambdaStack/MyGoFunction/Code/Stage...
✓  . (9ms)
✓  clients (5ms)

DONE 8 tests in 11.476s
✓  clients (5ms) (coverage: 84.6% of statements)
✓  . (6ms) (coverage: 78.4% of statements)

DONE 8 tests in 2.464s

Cloud Assembly

If we look at the cloud assembly that was generated (located at cdk.out), we see something like the following code:

$ cdk synth
Bundling asset GolangLambdaStack/MyGoFunction/Code/Stage...
✓  . (9ms)
✓  clients (5ms)

DONE 8 tests in 11.476s
✓  clients (5ms) (coverage: 84.6% of statements)
✓  . (6ms) (coverage: 78.4% of statements)

DONE 8 tests in 2.464s

It contains our GolangLambdaStack CloudFormation template that defines our Lambda function, as well as our Golang executable, bundled at asset.01cf34ff646d380829dc4f2f6fc93995b13277bde7db81c24ac8500a83a06952/main.

Let’s look at how the AWS CDK uses this information. The GolangLambdaStack.assets.json file contains all the information necessary for the AWS CDK to know where and how to publish our assets (in this use case, our Golang Lambda executable). See the following code:

{
  "version": "5.0.0",
  "files": {
    "01cf34ff646d380829dc4f2f6fc93995b13277bde7db81c24ac8500a83a06952": {
      "source": {
        "path": "asset.01cf34ff646d380829dc4f2f6fc93995b13277bde7db81c24ac8500a83a06952",
        "packaging": "zip"
      },
      "destinations": {
        "current_account-current_region": {
          "bucketName": "cdk-hnb659fds-assets-${AWS::AccountId}-${AWS::Region}",
          "objectKey": "01cf34ff646d380829dc4f2f6fc93995b13277bde7db81c24ac8500a83a06952.zip",
          "assumeRoleArn": "arn:${AWS::Partition}:iam::${AWS::AccountId}:role/cdk-hnb659fds-file-publishing-role-${AWS::AccountId}-${AWS::Region}"
        }
      }
    }
  }
}

The file contains information about where to find the source files (source.path) and what type of packaging (source.packaging). It also tells the AWS CDK where to publish this .zip file (bucketName and objectKey) and what AWS Identity and Access Management (IAM) role to use (assumeRoleArn). In this use case, we only deploy to a single account and Region, but if you have multiple accounts or Regions, you see multiple destinations in this file.

The GolangLambdaStack.template.json file that defines our Lambda resource looks something like the following code:

{
  "Resources": {
    "MyGoFunction0AB33E85": {
      "Type": "AWS::Lambda::Function",
      "Properties": {
        "Code": {
          "S3Bucket": {
            "Fn::Sub": "cdk-hnb659fds-assets-${AWS::AccountId}-${AWS::Region}"
          },
          "S3Key": "01cf34ff646d380829dc4f2f6fc93995b13277bde7db81c24ac8500a83a06952.zip"
        },
        "Handler": "main",
        ...
      }
    },
    ...
  }
}

The S3Bucket and S3Key match the bucketName and objectKey from the assets.json file. By default, the S3Key is generated by calculating a hash of the folder location that you pass to lambda.Code.fromAsset(), (for this post, folder-containing-source-code). This means that any time we update our source code, this calculated hash changes and a new Lambda function deployment is triggered.

Nuxt.js static site

In this section, I walk through building a static site using the Nuxt.js framework. You can apply the same logic to any static site framework that requires you to run a build step prior to deploying.

To deploy this static site, we use the BucketDeployment construct. This is a construct that allows you to populate an S3 bucket with the contents of .zip files from other S3 buckets or from a local disk.

Typically, we simply tell the BucketDeployment construct where to find the files that it needs to deploy to the S3 bucket. See the following code:

new s3_deployment.BucketDeployment(this, 'DeployMySite', {
  sources: [
    s3_deployment.Source.asset(path.join(__dirname, 'path-to-directory')),
  ],
  destinationBucket: myBucket
});

To deploy a static site built with a framework like Nuxt.js, we need to first run a build step to compile the site into something that can be deployed. For Nuxt.js, we run the following two commands:

  • yarn install – Installs all our dependencies
  • yarn generate – Builds the application and generates every route as an HTML file (used for static hosting)

This creates a dist directory, which you can deploy to Amazon S3.

Just like with the Golang Lambda example, we can perform these steps as part of the AWS CDK through either local or Docker bundling.

Building inside a Docker container

To build inside a Docker container, use the following code:

new s3_deployment.BucketDeployment(this, 'DeployMySite', {
  sources: [
    s3_deployment.Source.asset(path.join(__dirname, 'path-to-nuxtjs-project'), {
      bundling: {
        image: cdk.BundlingDockerImage.fromRegistry('node:lts'),
        command: [
          'bash', '-c', [
            'yarn install',
            'yarn generate',
            'cp -r /asset-input/dist/* /asset-output/',
          ].join(' && '),
        ],
      },
    }),
  ],
  ...
});

For this post, we build inside the publicly available node:lts image hosted on DockerHub. Inside the container, we run our build commands yarn install && yarn generate, and copy the generated dist directory to our output directory (the cloud assembly).

The parameters are the same as described in the Golang example we walked through earlier.

Building locally

To build locally, use the following code:

new s3_deployment.BucketDeployment(this, 'DeployMySite', {
  sources: [
    s3_deployment.Source.asset(path.join(__dirname, 'path-to-nuxtjs-project'), {
      bundling: {
        local: {
          tryBundle(outputDir: string) {
            try {
              spawnSync('yarn --version');
            } catch {
              return false
            }

            spawnSync('yarn install && yarn generate');

       fs.copySync(path.join(__dirname, ‘path-to-nuxtjs-project’, ‘dist’), outputDir);
            return true
          },
        },
        image: cdk.BundlingDockerImage.fromRegistry('node:lts'),
        command: [],
      },
    }),
  ],
  ...
});

Building locally works the same as the Golang example we walked through earlier, with one exception. We have one additional command to run that copies the generated dist folder to our output directory (cloud assembly).

Conclusion

This post showed how you can easily compile your backend and front-end applications using the AWS CDK. You can find the example code for this post in this GitHub repo. If you have any questions or comments, please comment on the GitHub repo. If you have any additional examples you want to add, we encourage you to create a Pull Request with your example!

Our code also contains examples of deploying the applications using CDK Pipelines, so if you’re interested in deploying the example yourself, check out the example repo.


About the author

Cory Hall

Cory is a Solutions Architect at Amazon Web Services with a passion for DevOps and is based in Charlotte, NC. Cory works with enterprise AWS customers to help them design, deploy, and scale applications to achieve their business goals.