Post Syndicated from The Atlantic original https://www.youtube.com/watch?v=V53zpe5KpxQ
Yearly Archives: 2024
Tellico 4.0 released
Post Syndicated from jzb original https://lwn.net/Articles/988837/
Version 4.0 of the Tellico collection management
software has been released. This is the first release to use the
KDE Frameworks 6 and Qt6 libraries, with a fallback
available for Frameworks 5 and Qt5. Other notable changes in 4.0
include importing video collections from file metadata and correctly
importing multi-disc album data from Discogs, MusicBrainz, and iTunes. Users
of prior versions are advised to make a backup of their data before upgrading.
Build a mobile driver’s license solution based on ISO/IEC 18013-5 using AWS Private CA and AWS KMS
Post Syndicated from Ram Ramani original https://aws.amazon.com/blogs/security/build-a-mobile-drivers-license-solution-based-on-iso-iec-18013-5-using-aws-private-ca-and-aws-kms/
A mobile driver’s license (mDL) is a digital representation of a physical driver’s license that’s stored on a mobile device. An mDL is a significant improvement over physical credentials, which can be lost, stolen, counterfeited, damaged, or contain outdated information, and can expose unconsented personally identifiable information (PII). Organizations are working together to use mDLs across various situations, ranging from validating identity during airplane boarding to sharing information for age-restricted activities.
The trust in the mDL system is based on public-private key cryptography where mDLs are signed by issuing authorities using their private key and verified using the issuing authority’s public key. In this blog post, we show you how to build an mDL issuing authority in Amazon Web Services (AWS) using AWS Private Certificate Authority and AWS Key Management Service (AWS KMS) according to mDL specification ISO/IEC 18013-5:2021. These AWS services align with the cryptographic requirements placed on the issuing authorities by ISO/IEC 18013-5. While we have tailored this post to an mDL use case, the sign and verify mechanism using AWS Private CA and AWS KMS can be used for multiple kinds of digital identity verification.
Solution overview
AWS Private CA provides you with a highly available private certificate authority (CA) service without the initial investment and ongoing maintenance costs of operating your own private CA. CA administrators can use AWS Private CA to create a complete CA hierarchy, including online root and subordinate CAs, without needing external CAs. You can issue, rotate, and revoke certificates that are trusted within your organization using AWS Private CA.
AWS Private CA can issue certificates formatted as required by ISO/IEC 18013-5. You can build a certificate authority (CA) in AWS Private CA—referred to as the issuing authority certificate authority (IACA) in ISO/IEC 18013-5. We create an IACA self-signed root certificate and an mDL document signing certificate in AWS Private CA.
AWS KMS is a managed service that you can use to create and control the cryptographic keys that are used to protect your data. AWS KMS uses FIPS 140-2 Level 3 validated hardware security modules (HSMs) to protect AWS KMS keys, which is a requirement for building an issuing authority as described in ISO/IEC 18013-5. We create an asymmetric key pair in AWS KMS for signing and verification of the mDL document. We programmatically create a certificate signing request (CSR) that’s signed by the asymmetric key pair stored in AWS KMS. The CSR is sent to the AWS Private CA service for issuing the mDL document signing certificate that matches the certificate profile requirement specified for the document signing certificate in ISO/IEC 18013-5.
We sign an mDL document using the private key of the asymmetric key pair created in AWS KMS with a KeyUsage value of SIGN_VERIFY. The signed mDL document is delivered to a mobile device where it’s stored in a digital wallet and produced for verification by mDL readers. The mDL readers are configured with IACA certificates from various issuing authorities that allow them to verify the mDL documents signed by respective issuing authorities. An example of an issuing authority could be a state government agency that issues driver’s licenses.
Least privilege
The solution in this post uses AWS KMS and AWS Private CA services. Before you implement the process described in this post, ensure that the AWS Identity and Access Management (IAM) principal you choose follows the principle of least privilege and that permissions are scoped to the minimum required permissions required. See Security best practices in IAM to learn more.
Solution architecture
A sample solution architecture for building an mDL issuing authority in AWS is shown in Figure 1. The figure shows the step-by-step process starting from setting up a private CA and issuing an mDL document signing certificate to mDL issuance and verification. The infrastructure that’s built using this architecture includes a root certificate authority, which issues a document signer certificate. You can find the certificate requirements in section B.1 Certificate Profile of ISO/IEC 18013-5.

Figure 1: mDL issuing authority architecture and process flow in AWS
In this post, we use AWS Command Line Interface (AWS CLI) commands, but these can be replaced by AWS SDK API calls if needed. Along with the AWS CLI steps, a GitHub sample is provided that’s used to programmatically create and sign an mDL document signing CSR using AWS KMS.
See the AWS CLI commands documentation for AWS Private CA and AWS KMS for detailed information on the commands used in this solution.
Solution walkthrough
Use the following steps to create the infrastructure needed for mDL signing and verification.
Step 1: Create IACA CA in AWS Private CA
In this step, the root of trust IACA (issuing authority CA) will be created. The IACA root CA is the root of trust that will be used for verification of the mDL.
- Create a local
ca_config.txtfile with the following content. The contents of this file are derived from the Certificate profiles section (Annex B) within ISO/IEC 18013-5. You can change theCountryandCommonNamevalues in the file as needed for your requirements. - The IACA root certificate will be paired with a certificate revocation list (CRL). See Planning a certificate revocation list (CRL) for information about configuring CRLs. Create a local file called
revocation_config.txtwith the following information to configure a CRL. The values forCustomCnameandS3BucketNameare examples, update them with the values that you have created within your AWS account. UpdateExpirationInDaysto fit your requirements. We recommend configuring encryption on the Amazon Simple Storage Service (Amazon S3) bucket containing your CRLs. - Invoke an AWS CLI command to create a private certificate authority. Replace the
regionparameter as needed. Update thefile://paths in the following command to the locations where you’ve stored theca_config.txtandrevocation_config.txtfiles. - The command should produce the following output. The output contains the Amazon Resource Name (ARN) of the created CA. You will need this ARN in subsequent steps.
Step 2: Retrieve the CSR for IACA root certificate
You’ll create an IACA root certificate, which starts with retrieving a CSR. This step retrieves the CSR for the IACA root certificate. The certificate-authority-arn parameter carries the CA ARN that was generated in Step 1.
- The following command will output a Privacy-Enhanced Mail (PEM) formatted CSR.
- The following is the format of the output CSR:
- Store the output text in a file called
IACA.csr.
Step 3: Generate root certificate
- This step issues the IACA root certificate. Create a file named
extensions.txtusing the following contents, which are derived from the Certificate profiles section of ISO/IEC 18013-5.The
KeyUsageextension withKeyCertSignandCRLSignshould be set totrue. A custom extension for the CRL distribution point is set and the validity of the certificate should be set to 9 years or 3285 days (set in the next step). Because the IACA root certificate is only used to issued mDLs, a maximum validity period of 9 years is sufficient, as indicated in Table B.1 of ISO/IEC 18013-5. Additionally, a CRL distribution point extension must be present. In the following example, the CRL URL encoded in the CDP extension ishttp://example.com/crl/0116z123-dv7a-59b1-x7be-1231v72571136.crl, aligning with both the CA CRL configuration applied to the CA at creation and to the CA ID. For base-64 encoding of the CDP extension, you can refer to this java sample. - Issue the following command to AWS Private CA to create the certificate.
- The preceding command will produce the following output:
Note that the IACA root CA created with AWS Private CA currently doesn’t have a CRL distribution point (CDP) extension by default. However, that is a mandatory extension according to the IACA root certificate profile in ISO/IEC 18013-5. To implement this, we use a custom extension passed in using API passthrough, which embeds the CDP extension. The distribution point specified in that extension must be based on the CA ID, which is 0116z123-dv7a-59b1-x7be-1231v7257113 derived from the CA ARN that was created in Step 1.
Step 4: Retrieve root certificate
This step retrieves the IACA root certificate in PEM format.
- Use the following code to retrieve the IACA root certificate:
- The command output will be a PEM formatted certificate similar to the following:
- Store the output text in a file named
IACA-Root-CA-Cert.pem.
Step 5: Import root certificate
Use the following code to import the root certificate into AWS Private CA and make the certificate authority active and ready to issue certificates.
You should see success after running the command.
Step 6: Create an asymmetric key in AWS KMS
In this step, create an asymmetric signing key in AWS KMS which will be used to sign the mDL document signing CSR.
- Use the following command to create an asymmetric key:
- The command should produce the following output:
- Note the Arn value from the output. You will use it in Step 7 to configure the CSR creation utility for the mDL document signing certificate.
Step 7: Use the CSR creation utility to generate the document signing CSR
We published a sample utility in GitHub that creates a CSR signed by an AWS asymmetric key.
- Clone the GitHub repository and then follow the instructions in the README file from the repository to configure and run it.
- This program will output a PEM formatted CSR similar to the following:
- Copy the output and store it in a file named
document-signing-kms.csr. You will use the file in Step 8 to create the mDL document signing certificate based on this CSR.
Step 8: Generate an mDL document signing certificate
This step creates the document signing certificate from the CSR that’s signed using the AWS KMS asymmetric key.
- Create a file named
extensionSigner.txtwith the following contents. The contents of this file are derived from the Certificate profiles section of ISO/IEC 18013-5. The JSON snippet that follows shows the extension structure containing theKeyUsageextension withDigitalSignaturefield set totrue. - Use the following AWS CLI command to create the certificate.
- Output:
- You will use the
CertificateArnfrom the output in Step 9 to retrieve the mDL document signing certificate.
Step 9: Retrieve the mDL document signing certificate
This step retrieves the document signing certificate in PEM format from AWS Private CA.
- Use the following command to retrieve the document signing certificate:
- Store the output text in
document_signing_cert.pem.
You now have the mDL document signing certificate for packaging later with the Concise Binary Object Representation (CBOR) structure required by ISO/IEC 18013-5.
Step 10: mDL reader ingests issuing authority’s mDL signing certificate chain
An mDL reader can trust the mDL presented by a user after cryptographically verifying the mDL. This verification requires the reader to possess the mDL signing certificate chain of the issuing authority that issued the user the mDL. As required by the decentralized public key infrastructure (PKI) trust model specified in ISO/IEC 18013-5, the mDL reader will ingest the mDL signing certificate chain of the issuing authority.
Step 11: User makes an mDL signing request to the issuing authority
The user makes a request to the issuing authority to sign the mDL.
Step 12: Issuing authority issues signed mDL to the user
The issuing authority will authenticate the user’s identity and issue a signed mDL. The issuing authority provisions mDL data to the user’s device along with a CBOR encoded object known as a mobile security object (MSO). MSOs contain a digest algorithm, individual digests of mDL data elements, and a validity period. After this MSO has been generated and encoded as required by ISO/IEC 18013-5:2021 section 9.1.2.4, the MSO can be signed by the issuing authority. This signature can be generated in AWS KMS as shown in the following command. Generating the encoded MSO is out of scope for this post.
- Use the following command to produce the SHA-256 digest of encoded MSO object using the sha256sum utility.
- Sign the digest using the AWS KMS asymmetric key created in Step 6.
- This signature will be combined with the issuing authority certificate and the MSO to form a CBOR Object Signing and Encryption (COSE) signed message and will be presented with the mDL data elements to readers. Readers can validate this signature to confirm the integrity of the MSO.
Step 13: User presents their mDL to an mDL reader
The user presents their mDL to the mDL reader for identity verification, such as at an airport. This process is called mDL Initialization in ISO/IEC 18013-5:2021 section 6.3.2.2. The mDL is activated during this initialization step.
Step 14: An mDL reader requests mDL data from a user’s mobile device
The mDL reader issues an mDL retrieval request to the user’s mobile device. A key feature of mDLs is that they allow mDL holders to present a subset of their PII. An mDL reader will request specific attributes such as name and date of birth, requiring the mDL holder to consent to the release of this information. The mDL reader’s request contains the list of PII data element identifiers that it is requesting the mDL holder to share.
Step 15: User consents to share their mDL data
The user receives a prompt notifying them of mDL sharing request. This prompt shows the user the list of PII data elements that are being requested. The user consents to the request and the mDL data that includes the MSO is shared with the reader.
Step 16: Reader validates mDL integrity
The reader receives the mDL data and validates it for integrity. The inclusion of the MSO with the mDL data elements provides mDL readers with a mechanism for validating the integrity of the data they’ve received. The mDL reader can then hash and verify individual mDL data elements presented by the device. If all data elements match their corresponding entries in the MSO, the mDL device reader can attest that the data hasn’t been tampered with.
As an example, assume that the mDL contains the following data elements:
And a Mobile Security Object containing the following data element digests:
The MSO’s integrity would first confirm that the validity period of the MSO (not shown) has not expired. It can then verify the signature (not shown) with the issuing authority’s public key. After this has been established, both data elements need to be verified. The CBOR representation of each element (digestID, random, elementIdentifier, and elementValue) is encoded as bytes and then hashed using SHA-256. For example, the following should equal D6AA81E454036313A9A681809151DDDBDF702289094F18286DDC591C41C6434E.
Likewise, the following example should equal
4C3D83940CA8C5DE8060A23EB649C175E79B745B6A7D9939B4D16B3E46BB14D5.
If all data elements pass this hash verification check, then the presented mDL contents can be trusted by the mDL reader.
Summary
As you saw in this solution, mobile driver’s licenses (mDLs) provide increased security and flexible consent management to preserve privacy for individuals. The principles of cryptographic signing and verification aren’t new and both AWS KMS and AWS Private CA are well suited for supporting digital identity applications, whether it’s a driver’s license or some other kind of identification. To learn more about AWS KMS asymmetric keys and AWS Private CA, see Digital signing with the new asymmetric keys feature of AWS KMS and How to host and manage an entire private certificate infrastructure in AWS.
If you have feedback about this post, submit comments in the Comments section below. If you have questions about this post, start a new thread on the AWS Certificate Manager re:Post and AWS AWS Key Management Service re:Post, or contact AWS Support.
Stability AI’s best image generating models now in Amazon Bedrock
Post Syndicated from Danilo Poccia original https://aws.amazon.com/blogs/aws/stability-ais-best-image-generating-models-now-in-amazon-bedrock/
Starting today, you can use three new text-to-image models from Stability AI in Amazon Bedrock: Stable Image Ultra, Stable Diffusion 3 Large, and Stable Image Core. These models greatly improve performance in multi-subject prompts, image quality, and typography and can be used to rapidly generate high-quality visuals for a wide range of use cases across marketing, advertising, media, entertainment, retail, and more.
These models excel in producing images with stunning photorealism, boasting exceptional detail, color, and lighting, addressing common challenges like rendering realistic hands and faces. The models’ advanced prompt understanding allows it to interpret complex instructions involving spatial reasoning, composition, and style.
The three new Stability AI models available in Amazon Bedrock cover different use cases:
Stable Image Ultra – Produces the highest quality, photorealistic outputs perfect for professional print media and large format applications. Stable Image Ultra excels at rendering exceptional detail and realism.
Stable Diffusion 3 Large – Strikes a balance between generation speed and output quality. Ideal for creating high-volume, high-quality digital assets like websites, newsletters, and marketing materials.
Stable Image Core – Optimized for fast and affordable image generation, great for rapidly iterating on concepts during ideation.
This table summarizes the model’s key features:
| Features | Stable Image Ultra | Stable Diffusion 3 Large | Stable Image Core |
|---|---|---|---|
| Parameters | 16 billion | 8 billion | 2.6 billion |
| Input | Text | Text or image | Text |
| Typography | Tailored for large-scale display |
Tailored for large-scale display |
Versatility and readability across different sizes and applications |
| Visual aesthetics |
Photorealistic image output |
Highly realistic with finer attention to detail |
Good rendering; not as detail-oriented |
One of the key improvements of Stable Image Ultra and Stable Diffusion 3 Large compared to Stable Diffusion XL (SDXL) is text quality in generated images, with fewer errors in spelling and typography thanks to its innovative Diffusion Transformer architecture, which implements two separate sets of weights for image and text but enables information flow between the two modalities.
Here are a few images created with these models.
Stable Image Ultra – Prompt: photo, realistic, a woman sitting in a field watching a kite fly in the sky, stormy sky, highly detailed, concept art, intricate, professional composition.

Stable Diffusion 3 Large – Prompt: comic-style illustration, male detective standing under a streetlamp, noir city, wearing a trench coat, fedora, dark and rainy, neon signs, reflections on wet pavement, detailed, moody lighting.

Stable Image Core – Prompt: professional 3d render of a white and orange sneaker, floating in center, hovering, floating, high quality, photorealistic.

Use cases for the new Stability AI models in Amazon Bedrock
Text-to-image models offer transformative potential for businesses across various industries and can significantly streamline creative workflows in marketing and advertising departments, enabling rapid generation of high-quality visuals for campaigns, social media content, and product mockups. By expediting the creative process, companies can respond more quickly to market trends and reduce time-to-market for new initiatives. Additionally, these models can enhance brainstorming sessions, providing instant visual representations of concepts that can spark further innovation.
For e-commerce businesses, AI-generated images can help create diverse product showcases and personalized marketing materials at scale. In the realm of user experience and interface design, these tools can quickly produce wireframes and prototypes, accelerating the design iteration process. The adoption of text-to-image models can lead to significant cost savings, increased productivity, and a competitive edge in visual communication across various business functions.
Here are some example use cases across different industries:
Advertising and Marketing
- Stable Image Ultra for luxury brand advertising and photorealistic product showcases
- Stable Diffusion 3 Large for high-quality product marketing images and print campaigns
- Use Stable Image Core for rapid A/B testing of visual concepts for social media ads
E-commerce
- Stable Image Ultra for high-end product customization and made-to-order items
- Stable Diffusion 3 Large for most product visuals across an e-commerce site
- Stable Image Core to quickly generate product images and keep listings up-to-date
Media and Entertainment
- Stable Image Ultra for ultra-realistic key art, marketing materials, and game visuals
- Stable Diffusion 3 Large for environment textures, character art, and in-game assets
- Stable Image Core for rapid prototyping and concept art exploration
Now, let’s see these new models in action, first using the AWS Management Console, then with the AWS Command Line Interface (AWS CLI) and AWS SDKs.
Using the new Stability AI models in the Amazon Bedrock console
In the Amazon Bedrock console, I choose Model access from the navigation pane to enable access the three new models in the Stability AI section.
Now that I have access, I choose Image in the Playgrounds section of the navigation pane. For the model, I choose Stability AI and Stable Image Ultra.
As prompt, I type:
A stylized picture of a cute old steampunk robot with in its hands a sign written in chalk that says "Stable Image Ultra in Amazon Bedrock".
I leave all other options to their default values and choose Run. After a few seconds, I get what I asked. Here’s the image:

Using Stable Image Ultra with the AWS CLI
While I am still in the console Image playground, I choose the three small dots in the corner of the playground window and then View API request. In this way, I can see the AWS Command Line Interface (AWS CLI) command equivalent to what I just did in the console:
To use Stable Image Core or Stable Diffusion 3 Large, I can replace the model ID.
The previous command outputs the image in Base64 format inside a JSON object in a text file.
To get the image with a single command, I write the output JSON file to standard output and use the jq tool to extract the encoded image so that it can be decoded on the fly. The output is written in the img.png file. Here’s the full command:
Using Stable Image Ultra with AWS SDKs
Here’s how you can use Stable Image Ultra with the AWS SDK for Python (Boto3). This simple application interactively asks for a text-to-image prompt and then calls Amazon Bedrock to generate the image.
import base64
import boto3
import json
import os

MODEL_ID = "stability.stable-image-ultra-v1:0"

bedrock_runtime = boto3.client("bedrock-runtime", region_name="us-west-2")

print("Enter a prompt for the text-to-image model:")
prompt = input()

body = {
    "prompt": prompt,
    "mode": "text-to-image"
}
response = bedrock_runtime.invoke_model(modelId=MODEL_ID, body=json.dumps(body))

model_response = json.loads(response["body"].read())

base64_image_data = model_response["images"][0]

i, output_dir = 1, "output"
if not os.path.exists(output_dir):
    os.makedirs(output_dir)
while os.path.exists(os.path.join(output_dir, f"img_{i}.png")):
    i += 1

image_data = base64.b64decode(base64_image_data)

image_path = os.path.join(output_dir, f"img_{i}.png")
with open(image_path, "wb") as file:
    file.write(image_data)

print(f"The generated image has been saved to {image_path}")
The application writes the resulting image in an output directory that is created if not present. To not overwrite existing files, the code checks for existing files to find the first file name available with the img_<number>.png format.
More examples of how to use Stable Diffusion models are available in the Code Library of the AWS Documentation.
Customer voices
Learn from Ken Hoge, Global Alliance Director, Stability AI, how Stable Diffusion models are reshaping the industry from text-to-image to video, audio, and 3D, and how Amazon Bedrock empowers customers with an all-in-one, secure, and scalable solution.
Step into a world where reading comes alive with Nicolette Han, Product Owner, Stride Learning. With support from Amazon Bedrock and AWS, Stride Learning’s Legend Library is transforming how young minds engage with and comprehend literature using AI to create stunning, safe illustrations for children stories.
Things to know
The new Stability AI models – Stable Image Ultra, Stable Diffusion 3 Large, and Stable Image Core – are available today in Amazon Bedrock in the US West (Oregon) AWS Region. With this launch, Amazon Bedrock offers a broader set of solutions to boost your creativity and accelerate content generation workflows. See the Amazon Bedrock pricing page to understand costs for your use case.
You can find more information on Stable Diffusion 3 in the research paper that describes in detail the underlying technology.
To start, see the Stability AI’s models section of the Amazon Bedrock User Guide. To discover how others are using generative AI in their solutions and learn with deep-dive technical content, visit community.aws.
— Danilo
North Hollywood Shootout: The Crime that Changed American Policing Forever
Post Syndicated from Geographics original https://www.youtube.com/watch?v=XH9lB8Sc6r8
The latest AWS Heroes have arrived – September 2024
Post Syndicated from Taylor Jacobsen original https://aws.amazon.com/blogs/aws/the-latest-aws-heroes-have-arrived-september-2024/
The AWS Heroes program recognizes outstanding individuals who are making meaningful contributions within the AWS community. These technical experts generously share their insights, best practices, and innovative solutions to help others create efficiencies and build faster on AWS. Heroes are thought leaders who have demonstrated a commitment to empowering the broader AWS community through their significant contributions and leadership.
Meet our newest cohort of AWS Heroes!
Faye Ellis – London, United Kingdom
 Community Hero Faye Ellis is a Principal Training Architect at Pluralsight, where she specializes in helping organizations and individuals to develop their AWS skills, and has taught AWS to millions of people worldwide. She is also committed to make a rewarding cloud career achievable for people all around the world. With over a decade of experience in the IT industry, she uses her expertise in designing and supporting mission critical systems to help explain cloud technology in a way that is accessible and easy to understand.
Ilanchezhian Ganesamurthy – Chennai, India
 Community Hero Ilanchezhian Ganesamurthy is currently the Director – Generative AI (GenAI) and Conversational AI (CAI) at Tietoevry, a leading Nordic IT services company. Since 2015, he has been actively involved with the AWS User Group India, and in 2018, he took on the role of co-organizer for the AWS User Group Chennai, which has grown to 4,800 members. Ilan champions diversity and inclusion, recognizing the importance of fostering the next generation of cloud experts. He is a strong supporter of AWS Cloud Clubs, leveraging his industry connections to help the Chennai chapter organize events and networking to empower aspiring cloud professionals.
Jaehyun Shin – Seoul, Korea
 Community Hero Jaehyun Shin is a Site Reliability Engineer at MUSINSA, a Korean online fashion retailer. In 2017, he joined the AWS Korea User Group (AWSKRUG), where he has since served as a co-owner of the AWSKRUG Serverless and Seongsu Groups. During this time, Jaehyun was an AWS Community Builder, leveraging his expertise to mentor and nurture new Korea User Group leaders. He has also been an active event organizer for AWS Community Days and hands-on labs, further strengthening the AWS community in Korea.
Jimmy Dahlqvist – Malmö, Sweden
 Serverless Hero Jimmy Dahlqvist is a Lead Cloud Architect and Advisor at Sigma Technology Cloud, an AWS Advanced Tier Services Partner and one of Sweden’s major consulting companies. In 2024, he started Serverless-Handbook as the home base of all his serverless adventures. Jimmy is also an AWS Certification Subject Matter Expert, and regularly participates in workshops ensuring AWS Certifications are fair for everyone.
Lee Gilmore – Newcastle, United Kingdom
 Serverless Hero Lee Gilmore is a Principal Solutions Architect at Leighton, an AWS Consulting Partner based in Newcastle, North East England. With over two decades of experience in the tech industry, he has spent the past ten years specializing in serverless and cloud-native technologies. Lee is passionate about domain-driven design and event-driven architectures, which are central to his work. Additionally, he regularly authors in-depth articles on serverlessadvocate.com, shares open-source full solutions on GitHub, and frequently speaks at both local and international events.
Maciej Walkowiak – Berlin, Germany
 DevTools Hero Maciej Walkowiak is an independent Java consultant based in Berlin, Germany. For nearly two decades, he has been helping companies ranging from startups to enterprises in architecting and developing fast, scalable, and easy-to-maintain Java applications. The great majority of these applications are based on the Spring Framework and Spring Boot, which are his favorite tools for building software. Since 2015, he has been deeply involved in the Spring ecosystem, and leads the Spring Cloud AWS project on GitHub—the bridge between AWS APIs and the Spring programming model.
Minoru Onda – Tokyo, Japan
 Community Hero Minoru Onda is a Technology Evangelist at KDDI Agile Development Center Corporation (KAG). He joined the Japan AWS User Group (JAWS-UG) in 2021 and now leads the operations of three communities: the Tokyo chapter, the SRE chapter, and NW-JAWS. In recent years, he has been focusing on utilizing Generative AI on AWS, and co-authored an introductory technical book on Amazon Bedrock with community members, which was published in Japan.
Learn More
Visit the AWS Heroes website if you’d like to learn more about the AWS Heroes program or to connect with a Hero near you.
— Taylor
Use the AWS CDK with the Data Solutions Framework to provision and manage Amazon Redshift Serverless
Post Syndicated from Jan Michael Go Tan original https://aws.amazon.com/blogs/big-data/use-the-aws-cdk-with-the-data-solutions-framework-to-provision-and-manage-amazon-redshift-serverless/
In February 2024, we announced the release of the Data Solutions Framework (DSF), an opinionated open source framework for building data solutions on AWS. DSF is built using the AWS Cloud Development Kit (AWS CDK) to package infrastructure components into L3 AWS CDK constructs on top of AWS services. L3 constructs are implementations of common technical patterns and create multiple resources that are configured to work with each other.
In this post, we demonstrate how to use the AWS CDK and DSF to create a multi-data warehouse platform based on Amazon Redshift Serverless. DSF simplifies the provisioning of Redshift Serverless, initialization and cataloging of data, and data sharing between different data warehouse deployments. Using a programmatic approach with the AWS CDK and DSF allows you to apply GitOps principles to your analytics workloads and realize the following benefits:
- You can deploy using continuous integration and delivery (CI/CD) pipelines, including the definitions of Redshift objects (databases, tables, shares, and so on)
- You can roll out changes consistently across multiple environments
- You can bootstrap data warehouses (table creation, ingestion of data, and so on) using code and use version control to simplify the setup of testing environments
- You can test changes before deployment using AWS CDK built-in testing capabilities
In addition, DSF’s Redshift Serverless L3 constructs provide a number of built-in capabilities that can accelerate development while helping you follow best practices. For example:
- Running extract, transform, and load (ETL) jobs to and from Amazon Redshift is more straightforward because an AWS Glue connection resource is automatically created and configured. This means data engineers don’t have to configure this resource and can use it right away with their AWS Glue ETL jobs.
- Similarly, with discovery of data inside Amazon Redshift, DSF provides a convenient method to configure an AWS Glue crawler to populate the AWS Glue Data Catalog for ease of discovery as well as ease of referencing tables when creating ETL jobs. The configured AWS Glue crawler uses an AWS Identity and Access Management (IAM) role that follows least privilege.
- Sharing data between Redshift data warehouses is a common approach to improve collaboration between lines of business without duplicating data. DSF provides convenient methods for the end-to-end flow for both data producer and consumer.
Solution overview
The solution demonstrates a common pattern where a data warehouse is used as a serving layer for business intelligence (BI) workloads on top of data lake data. The source data is stored in Amazon Simple Storage Service (Amazon S3) buckets, then ingested into a Redshift producer data warehouse to create materialized views and aggregate data, and finally shared with a Redshift consumer running BI queries from the end-users. The following diagram illustrates the high-level architecture.

In the post, we use Python for the example code. DSF also supports TypeScript.
Prerequisites
Because we’re using the AWS CDK, complete the steps in Getting Started with the AWS CDK before you implement the solution.
Initialize the project and provision a Redshift Serverless namespace and workgroup
Let’s start with initializing the project and including DSF as a dependency. You can run this code in your local terminal, or you can use AWS Cloud9:
Open the project folder in your IDE and complete the following steps:
- Open the
app.pyfile. - In this file, make sure to uncomment the first
envThis configures the AWS CDK environment depending on the AWS profile used during the deployment. - Add a configuration flag in the
cdk.context.jsonfile at the root of the project (if it doesn’t exist, create the file):
Setting the @data-solutions-framework-on-aws/removeDataOnDestroy configuration flag to true makes sure resources that have the removal_policy parameter set to RemovalPolicy.DESTROY are destroyed when the AWS CDK stack is deleted. This is a guardrail DSF uses to prevent accidentally deleting data.
Now that the project is configured, you can start adding resources to the stack.
- Navigate to the
dsf_redshift_blogfolder and open thedsf_redshift_blog_stack.pyfile.
This is where we configure the resources to be deployed.
- To get started building the end-to-end demo, add the following import statements at the top of the file, which allows you to start defining the resources from both the AWS CDK core library as well as DSF:
We use several DSF-specific constructs to build the demo:
- DataLakeStorage – This creates three S3 buckets, named
Bronze,Silver, andGold, to represent the different data layers. - S3DataCopy – This manages the copying of data from one bucket to another bucket.
- RedshiftServerlessNamespace – This creates a Redshift Serverless namespace where database objects and users are stored.
- RedshiftServerlessWorkgroup – This creates a Redshift Serverless workgroup that contains compute- and network-related configurations for the data warehouse. This is also the entry point for several convenient functionalities that DSF provides, such as cataloging of Redshift tables, running SQL statements as part of the AWS CDK (such as creating tables, data ingestion, merging of tables, and more), and sharing datasets across different Redshift clusters without moving data.
- Now that you have imported the libraries, create a set of S3 buckets following the medallion architecture best practices with bronze, silver, and gold data layers.
The high-level definitions of each layer are as follows:
- Bronze represents raw data; this is where data from various source systems lands. No schema is needed.
- Silver is cleaned and potentially augmented data. The schema is enforced in this layer.
- Gold is data that’s further refined and aggregated to serve a specific business need.
Using the DataLakeStorage construct, you can create these three S3 buckets with the following best practices:
- Encryption at rest through AWS Key Management Service (AWS KMS) is turned on
- SSL is enforced
- The use of S3 bucket keys is turned on
- There’s a default S3 lifecycle rule defined to delete incomplete multipart uploads after 1 day
- After you create the S3 buckets, copy over the data using the S3DataCopy For this demo, we land the data in the
Silverbucket because it’s already cleaned: - In order for Amazon Redshift to ingest the data in Amazon S3, it needs an IAM role with the right permissions. This role will be associated with the Redshift Serverless namespace that you create next.
- To provision Redshift Serverless, configure two resources: a namespace and a workgroup. DSF provides L3 constructs for both:
Both constructs follow security best practices, including:
- The default virtual private cloud (VPC) uses private subnets (with public access disabled).
- Data is encrypted at rest through AWS KMS with automatic key rotation.
- Admin credentials are stored in AWS Secrets Manager with automatic rotation managed by Amazon Redshift.
- A default AWS Glue connection is automatically created using private connectivity. This can be used by AWS Glue crawlers as well as AWS Glue ETL jobs to connect to Amazon Redshift.
The
RedshiftServerlessWorkgroupconstruct is the main entry point for other capabilities, such as integration with the AWS Glue Data Catalog, Redshift Data API, and Data Sharing API.- In the following example, use the defaults provided by the construct and associate the IAM role that you created earlier to give Amazon Redshift access to the data lake for data ingestion:
Create tables and ingest data
To create a table, you can use the runCustomSQL method in the RedshiftServerlessWorkgroup construct. This method allows you to run arbitrary SQL statements when the resource is being created (such as create table or create materialized view) and when it’s being deleted (such as drop table or drop materialized view).
Add the following code after the RedshiftServerlessWorkgroup instantiation:
Given the asynchronous nature of some of the resource creation, we also enforce dependencies between some resources; otherwise, the AWS CDK would try to create them in parallel to accelerate the deployment. The preceding dependency statements establish the following:
- Before you load the data, the S3 data copy is complete, so the data exists in the source bucket of the ingestion
- Before you load the data, the target table has been created in the Redshift namespace
Bootstrapping example (materialized views)
The workgroup.run_custom_sql() method provides flexibility in how you can bootstrap your Redshift data warehouse using the AWS CDK. For example, you can create a materialized view to improve the queries’ performance by pre-aggregating data from the Amazon reviews:
materialized_view = workgroup.run_custom_sql('MvProductAnalysis',
    database_name='defaultdb',
    sql=f'''CREATE MATERIALIZED VIEW mv_product_analysis AS SELECT review_date, product_title, COUNT(1) AS review_total, SUM(star_rating) AS rating FROM amazon_reviews WHERE marketplace = 'US' GROUP BY 1,2;''',
    delete_sql='drop materialized view mv_product_analysis')

materialized_view.node.add_dependency(load_amazon_reviews_data)
Catalog tables in Amazon Redshift
The deployment of RedshiftServerlessWorkgroup automatically creates an AWS Glue connection resource that can be used by AWS Glue crawlers and AWS Glue ETL jobs. This is directly exposed from the workgroup construct through the glue_connection property. Using this connection, the workgroup construct exposes a convenient method to catalog the tables inside the associated Redshift Serverless namespace. The following an example code:
This single line of code creates a database in the Data Catalog named mv_product_analysis and the associated crawler with the IAM role and network configuration already configured. By default, it crawls all the tables inside the public schema in the default database indicated when the Redshift Serverless namespace was created. To override this, the third parameter in the catalogTables method allows you to define a pattern on what to crawl (see the JDBC data store in the include path).
You can run the crawler using the AWS Glue console or invoke it using the SDK, AWS Command Line Interface (AWS CLI), or AWS CDK using AwsCustomResource.
Data sharing
DSF supports Redshift data sharing for both sides (producers and consumers) as well as same account and cross-account scenarios. Let’s create another Redshift Serverless namespace and workgroup to demonstrate the interaction:
For producers
For producers, complete the following steps:
- Create the new share and populate the share with the schema or tables:
data_share = workgroup.create_share('DataSharing', 'defaultdb', 'defaultdbshare', 'public', ['mv_product_analysis']) data_share.new_share_custom_resource.node.add_dependency(materialized_view) - Create access grants:
-
- To grant to a cluster in the same account:
share_grant = workgroup.grant_access_to_share("GrantToSameAccount", data_share, namespace2.namespace_id) share_grant.resource.node.add_dependency(data_share.new_share_custom_resource) share_grant.resource.node.add_dependency(namespace2) - To grant to a different account:
- To grant to a cluster in the same account:
The last parameter in the grant_access_to_share method allows to automatically authorize the cross-account access on the data share. Omitting this parameter would default to no authorization; which means a Redshift administrator needs to authorize the cross-account share either using the AWS CLI, SDK, or Amazon Redshift console.
For consumers
For the same account share, to create the database from the share, use the following code:
For cross-account grants, the syntax is similar, but you need to indicate the producer account ID:
To see the full working example, follow the instructions in the accompanying GitHub repository.
Deploy the resources using the AWS CDK
To deploy the resources, run the following code:
You can review the resources created, as shown in the following screenshot.

Confirm the changes for the deployment to start. Wait a few minutes for the project to be deployed; you can keep track of the deployment using the AWS CLI or the AWS CloudFormation console.
When the deployment is complete, you should see two Redshift workgroups (one producer and one consumer).

Using Amazon Redshift Query Editor v2, you can log in to the producer Redshift workgroup using Secrets Manager, as shown in the following screenshot.

After you log in, you can see the tables and views that you created using DSF in the defaultdb database.

Log in to the consumer Redshift workgroup to see the shared dataset from the producer Redshift workgroup under the marketing database.

Clean up
You can run cdk destroy in your local terminal to delete the stack. Because you marked the constructs with a RemovalPolicy.DESTROY and configured DSF to remove data on destroy, running cdk destroy or deleting the stack from the AWS CloudFormation console will clean up the provisioned resources.
Conclusion
In this post, we demonstrated how to use the AWS CDK along with the DSF to manage Redshift Serverless as code. Codifying the deployment of resources helps provide consistency across multiple environments. Aside from infrastructure, DSF also provides capabilities to bootstrap (table creation, ingestion of data, and more) Amazon Redshift and manage objects, all from the AWS CDK. This means that changes can be version controlled, reviewed, and even unit tested.
In addition to Redshift Serverless, DSF supports other AWS services, such as Amazon Athena, Amazon EMR, and many more. Our roadmap is publicly available, and we look forward to your feature requests, contributions, and feedback.
You can get started using DSF by following our quick start guide.
About the authors

Jan Michael Go Tan is a Principal Solutions Architect for Amazon Web Services. He helps customers design scalable and innovative solutions with the AWS Cloud.
 Vincent Gromakowski is an Analytics Specialist Solutions Architect at AWS where he enjoys solving customers’ analytics, NoSQL, and streaming challenges. He has a strong expertise on distributed data processing engines and resource orchestration platform.
Accelerate data integration with Salesforce and AWS using AWS Glue
Post Syndicated from Ramakant Joshi original https://aws.amazon.com/blogs/big-data/accelerate-data-integration-with-salesforce-and-aws-using-aws-glue/
The rapid adoption of software as a service (SaaS) solutions has led to data silos across various platforms, presenting challenges in consolidating insights from diverse sources. Effective data analytics relies on seamlessly integrating data from disparate systems through identifying, gathering, cleansing, and combining relevant data into a unified format. AWS Glue, a serverless data integration service, has simplified this process by offering scalable, efficient, and cost-effective solutions for integrating data from various sources. With AWS Glue, you can streamline data integration, reduce data silos and complexities, and gain agility in managing data pipelines, ultimately unlocking the true potential of your data assets for analytics, data-driven decision-making, and innovation.
This post explores the new Salesforce connector for AWS Glue and demonstrates how to build a modern extract, transform, and load (ETL) pipeline with AWS Glue ETL scripts.
Introducing the Salesforce connector for AWS Glue
To meet the demands of diverse data integration use cases, AWS Glue now supports SaaS connectivity for Salesforce. This enables users to quickly preview and transfer their customer relationship management (CRM) data, fetch the schema dynamically on request, and query the data. With the AWS Glue Salesforce connector, you can ingest and transform your CRM data to any of the AWS Glue supported destinations, including Amazon Simple Storage Service (Amazon S3), in your preferred format, including Apache Iceberg, Apache Hudi, and Linux Foundation Delta Lake; data warehouses such as Amazon Redshift and Snowflake; and many more. Reverse ETL use cases are also supported, allowing you to write data back to Salesforce.
The following are key benefits of the Salesforce connector for AWS Glue:
- You can use AWS Glue native capabilities
- It is well tested with AWS Glue capabilities and is production ready for any data integration workload
- It works seamlessly on top of AWS Glue and Apache Spark in a distributed fashion for efficient data processing
Solution overview
For our use case, we want to retrieve the full load of a Salesforce account object in a data lake on Amazon S3 and capture the incremental changes. This solution also allows you to update certain fields of the account object in the data lake and push it back to Salesforce. To achieve this, you create two ETL jobs using AWS Glue with the Salesforce connector, and create a transactional data lake on Amazon S3 using Apache Iceberg.
In the first job, you configure AWS Glue to ingest the account object from Salesforce and save it into a transactional data lake on Amazon S3 in Apache Iceberg format. Then you update the account object data that is extracted from the first job in the transactional data lake in Amazon S3. Lastly, you run the second job to send that change back to Salesforce.
Prerequisites
Complete the following prerequisite steps:
- Create an S3 bucket to store the results.
- Sign up for a Salesforce account, if you don’t already have one.
- Create an AWS Identity and Access Management (IAM) role for the AWS Glue ETL job to use. The role must grant access to all resources used by the job, including Amazon S3 and AWS Secrets Manager. For this post, we name the role
AWSGlueServiceRole-SalesforceConnectorJob. Use the following policies:- AWS managed policies:
- Inline policy:
- Create the AWS Glue connection for Salesforce:
- The Salesforce connector supports two OAuth2 grant types:
JWT_BEARERandAUTHORIZATION_CODE. For this post, we use theAUTHORIZATION_CODEgrant type. - On the Secrets Manager console, create a new secret. Add two keys,
ACCESS_TOKENandREFRESH_TOKEN, and keep their values blank. These will be populated after you enter your Salesforce credentials.

- Configure the Salesforce connection in AWS Glue. Use
AWSGlueServiceRole-SalesforceConnectorJobwhile creating the Salesforce connection. For this post, we name the connectionSalesforce_Connection.

- In the Authorization section, choose Authorization Code and the secret you created in the previous step.

- Provide your Salesforce credentials when prompted. The
ACCESS_TOKENandREFRESH_TOKENkeys will be populated after you enter your Salesforce credentials.
- The Salesforce connector supports two OAuth2 grant types:
- Create an AWS Glue database. For this post, we name it
glue_etl_salesforce_db.


Create an ETL job to ingest the account object from Salesforce
Complete the following steps to create a new ETL job in AWS Glue Studio to transfer data from Salesforce to Amazon S3:
- On the AWS Glue console, create a new job (with the Script editor option). For this post, we name the job
Salesforce_to_S3_Account_Ingestion. - On the Script tab, enter the Salesforce_to_S3_Account_Ingestion script.


Make sure that the name, which you used to create the Salesforce connection, is passed as the connectionName parameter value in the script, as shown in the following code example:
The script fetches records from the Salesforce account object. Then it checks if the account table exists in the transactional data lake. If the table doesn’t exist, it creates a new table and inserts the records. If the table exists, it performs an upsert operation.
- On the Job details tab, for IAM role, choose
AWSGlueServiceRole-SalesforceConnectorJob.

- Under Advanced properties, for Additional network connection, choose the Salesforce connection.

- Set up the job parameters:
--conf:spark.sql.extensions=org.apache.iceberg.spark.extensions.IcebergSparkSessionExtensions --conf spark.sql.catalog.glue_catalog=org.apache.iceberg.spark.SparkCatalog --conf spark.sql.catalog.glue_catalog.catalog-impl=org.apache.iceberg.aws.glue.GlueCatalog --conf spark.sql.catalog.glue_catalog.io-impl=org.apache.iceberg.aws.s3.S3FileIO --conf spark.sql.catalog.glue_catalog.warehouse=file:///tmp/spark-warehouse--datalake-formats:iceberg--db_name:glue_etl_salesforce_db--s3_bucket_name: your S3 bucket--table_name: account

- Save the job and run it.


Depending on the size of the data in your account object in Salesforce, the job will take a few minutes to complete. After a successful job run, a new table called account is created and populated with Salesforce account information.
- You can use Amazon Athena to query the data:
Validate transactional capabilities
You can validate the transactional capabilities supported by Apache Iceberg. For testing, try three operations: insert, update, and delete:
- Create a new account object in Salesforce, rerun the AWS Glue job, then run the query in Athena to validate the new account is created.
- Delete an account in Salesforce, rerun the AWS Glue job, and validate the deletion using Athena.
- Update an account in Salesforce, rerun the AWS Glue job, and validate the update operation using Athena.
Create an ETL job to send updates back to Salesforce
AWS Glue also allows you to write data back to Salesforce. Complete the following steps to create an ETL job in AWS Glue to get updates from the transactional data lake and write them to Salesforce. In this scenario, you update an account record and push it back to Salesforce.
- On the AWS Glue console, create a new job (with the Script editor option). For this post, we name the job
S3_to_Salesforce_Account_Writeback. - On the Script tab, enter the S3_to_Salesforce_Account_Writeback script.


Make sure that the name, which you used to create the Salesforce connection, is passed as the connectionName parameter value in the script:
- On the Job details tab, for IAM role, choose
AWSGlueServiceRole-SalesforceConnectorJob. - Configure the job parameters:
--conf:
spark.sql.extensions=org.apache.iceberg.spark.extensions.IcebergSparkSessionExtensions --conf spark.sql.catalog.glue_catalog=org.apache.iceberg.spark.SparkCatalog --conf spark.sql.catalog.glue_catalog.catalog-impl=org.apache.iceberg.aws.glue.GlueCatalog --conf spark.sql.catalog.glue_catalog.io-impl=org.apache.iceberg.aws.s3.S3FileIO --conf spark.sql.catalog.glue_catalog.warehouse=file:///tmp/spark-warehouse--datalake-formats:iceberg--db_name:glue_etl_salesforce_db--table_name:account

- Run the update query in Athena to change the value of
UpsellOpportunity__cfor a Salesforce account to “Yes”: - Run the
S3_to_Salesforce_Account_WritebackAWS Glue job.

Depending on the size of the data in your account object in Salesforce, the job will take a few minutes to complete.
- Validate the object in Salesforce. The value of
UpsellOpportunityshould change.
You have now successfully validated the Salesforce connector.
Considerations
You can set up AWS Glue job triggers to run the ETL jobs on a schedule, so that the data is regularly synchronized between Salesforce and Amazon S3. You can also integrate the ETL jobs with other AWS services, such as AWS Step Functions, Amazon Managed Workflows for Apache Airflow (Amazon MWAA), AWS Lambda, or Amazon EventBridge, to create a more advanced data processing pipeline.
By default, the Salesforce connector doesn’t import deleted records from Salesforce objects. However, you can set the IMPORT_DELETED_RECORDS option to “true” to import all records, including the deleted ones. Refer to Salesforce connection options for different Salesforce connection options.
Clean up
To avoid incurring charges, clean up the resources used in this post from your AWS account, including the AWS Glue jobs, Salesforce connection, Secrets Manager secret, IAM role, and S3 bucket.
Conclusion
The AWS Glue connector for Salesforce simplifies the analytics pipeline, reduces time to insights, and facilitates data-driven decision-making. It empowers organizations to streamline data integration and analytics. The serverless nature of AWS Glue means there is no infrastructure management, and you pay only for the resources consumed while your jobs are running. As organizations increasingly rely on data for decision-making, this Salesforce connector provides an efficient, cost-effective, and agile solution to swiftly meet data analytics needs.
To learn more about the AWS Glue connector for Salesforce, refer to Connecting to Salesforce in AWS Glue Studio. In this user guide, we walk through the entire process, from setting up the connection to running the data transfer flow. For more information on AWS Glue, visit AWS Glue.
About the authors
 Ramakant Joshi is an AWS Solutions Architect, specializing in the analytics and serverless domain. He has a background in software development and hybrid architectures, and is passionate about helping customers modernize their cloud architecture.
 Kamen Sharlandjiev is a Sr. Big Data and ETL Solutions Architect, Amazon MWAA and AWS Glue ETL expert. He’s on a mission to make life easier for customers who are facing complex data integration and orchestration challenges. His secret weapon? Fully managed AWS services that can get the job done with minimal effort. Follow Kamen on LinkedIn to keep up to date with the latest Amazon MWAA and AWS Glue features and news!
 Debaprasun Chakraborty is an AWS Solutions Architect, specializing in the analytics domain. He has around 20 years of software development and architecture experience. He is passionate about helping customers in cloud adoption, migration and strategy.
Jay Ellis | Did Everyone Have an Imaginary Friend (or Just Me)? | Talks at Google
Post Syndicated from Talks at Google original https://www.youtube.com/watch?v=ztzi2BD7F-A
ASUS NUC 14 Pro Review A Refined Mini PC
Post Syndicated from Eric Smith original https://www.servethehome.com/asus-nuc-14-pro-review-intel-core/
The ASUS NUC 14 Pro shows a level of mini PC refinement that is refreshing with even small details covered in its design
The post ASUS NUC 14 Pro Review A Refined Mini PC appeared first on ServeTheHome.
Comic for 2024.09.04 – Wedding
Post Syndicated from Explosm.net original https://explosm.net/comics/wedding
New Cyanide and Happiness Comic
[$] Whither the Apple AGX graphics driver?
Post Syndicated from corbet original https://lwn.net/Articles/988438/
Much of the early Rust code for the kernel has taken the form of
reimplementations of existing drivers as a proof of concept. One project,
though, is entirely new: the driver for Apple GPUs written by Asahi Lina.
This driver has shipped with Asahi
Linux for some time and, by many accounts, is stable, usable, and a
shining example of how Rust can be used in a complex kernel subsystem.
That driver remains outside of the mainline kernel, though, and merging
currently looks like a distant prospect. The reasons for that state of
affairs highlight some of the difficulties inherent in integrating a new
language (and its associated development style) into the Linux kernel.
Seven stable kernel updates for Wednesday
Security updates for Wednesday
Post Syndicated from jzb original https://lwn.net/Articles/988746/
Security updates have been issued by AlmaLinux (buildah, gvisor-tap-vsock, nodejs:18, python-urllib3, and skopeo), Debian (firefox-esr and openssl), Fedora (apr and seamonkey), Red Hat (podman), Slackware (mozilla and seamonkey), SUSE (bubblewrap and flatpak, buildah, docker, dovecot23, ffmpeg, frr, go1.21-openssl, graphviz, java-1_8_0-openj9, kubernetes1.26, kubernetes1.27, kubernetes1.28, openssl-1_0_0, openssl-3, perl-DBI, python-aiohttp, python-Django, python-WebOb, thunderbird, tiff, ucode-intel, unbound, webkit2gtk3, and xen), and Ubuntu (drupal7 and twisted).
The 1837 Canadian Rebellions
Post Syndicated from The History Guy: History Deserves to Be Remembered original https://www.youtube.com/watch?v=unZGJKNQR8I
Security Researcher Sued for Disproving Government Statements
Post Syndicated from Bruce Schneier original https://www.schneier.com/blog/archives/2024/09/security-researcher-sued-for-disproving-government-statements.html
This story seems straightforward. A city is the victim of a ransomware attack. They repeatedly lie to the media about the severity of the breach. A security researcher repeatedly proves their statements to be lies. The city gets mad and sues the researcher.
Let’s hope the judge throws the case out, but—still—it will serve as a warning to others.
The Most Astounding Thing to be Pawned in History
Post Syndicated from The History Guy: History Deserves to Be Remembered original https://www.youtube.com/watch?v=CI8JdhGV7sA
Slingshots
Post Syndicated from xkcd.com original https://xkcd.com/2981/

AWS named as a Leader in the first Gartner Magic Quadrant for AI Code Assistants
Post Syndicated from Channy Yun (윤석찬) original https://aws.amazon.com/blogs/aws/aws-named-as-a-leader-in-the-first-gartner-magic-quadrant-for-ai-code-assistants/
On August 19th, 2024, Gartner published its first Magic Quadrant for AI Code Assistants, which includes Amazon Web Services (AWS). Amazon Q Developer qualified for inclusion, having launched in general availability on April 30, 2024. AWS was ranked as a Leader for its ability to execute and completeness of vision.
We believe this Leader placement reflects our rapid pace of innovation, which makes the whole software development lifecycle easier and increases developer productivity with enterprise-grade access controls and security.
The Gartner Magic Quadrant evaluates 12 AI code assistants based on their Ability to Execute, which measures a vendor’s capacity to deliver its products or services effectively, and Completeness of Vision, which assesses a vendor’s understanding of the market and its strategy for future growth, according to Gartner’s report, How Markets and Vendors Are Evaluated in Gartner Magic Quadrants.
Here is the graphical representation of the 2024 Gartner Magic Quadrant for AI Code Assistants.

Here is the quote from Gartner’s report:
Amazon Web Services (AWS) is a Leader in this Magic Quadrant. Its product, Amazon Q Developer (formerly CodeWhisperer), is focused on assisting and automating developer tasks using AI. For example, Amazon Q Developer helps with code suggestions and transformation, testing and security, as well as feature development. Its operations are geographically diverse, and its clients are of all sizes. AWS is focused on delivering AI-driven solutions that enhance the software development life cycle (SDLC), automating complex tasks, optimizing performance, ensuring security, and driving innovation.
My team focuses on creating content on Amazon Q Developer that directly supports software developers’ jobs-to-be-done, enabled and enhanced by generative AI in Amazon Q Developer Center and Community.aws.
I’ve had the chance to talk with our customers to ask why they choose Amazon Q Developer. They said it is available to accelerate and complete tasks across the SDLC much more than general AI code assistants—from coding, testing, and upgrading, to troubleshooting, performing security scanning and fixes, optimizing AWS resources, and creating data engineering pipelines.
Here are the highlights that customers talked about more often:
Available everywhere you need it – You can use Amazon Q Developer in any of the following integrated development environment (IDE), including Visual Studio Code, JetBrains IDEs, AWS Toolkit with Amazon Q, JupyterLab, Amazon EMR Studio, Amazon SageMaker Studio, or AWS Glue Studio. You can also use Amazon Q Developer in the AWS Management Console, AWS Command Line Interface (AWS CLI), AWS documentation, AWS Support, AWS Console Mobile Application, Amazon CodeCatalyst, or through Slack and Microsoft Teams with AWS Chatbot. According to Safe Software, “Amazon Q knows all the ways to make use of the many tools that AWS provides. Because we are now able to accomplish more, we will be able to extend our automations into other AWS services and make use of Amazon Q to help us get there.” To learn more, visit Amazon Q Developer features and Amazon Q Developer customers.
Customizing code recommendations – You can get code recommendations based on your internal code base. Amazon Q Developer accelerates onboarding to a new code base to generate even more relevant inline code recommendations and chat responses (in preview) by making it aware of your internal libraries, APIs, best practices, and architectural patterns. Your organization’s administrators can securely connect Amazon Q Developer to your internal code bases to create multiple customizations. According to National Australia Bank (NAB), NAB has now added specific suggestions using the Amazon Q customization capability that are tailored to the NAB coding standards. They’re seeing increased acceptance rates of 60 percent with customization. To learn more, visit Customizing suggestions in the AWS documentation.
Upgrading your Java applications – Amazon Q Developer Agent for code transformation automates the process of upgrading and transforming your legacy Java applications. According to an internal Amazon study, Amazon has migrated tens of thousands of production applications from Java 8 or 11 to Java 17 with assistance from Amazon Q Developer. This represents a savings of over 4,500 years of development work for over a thousand developers (when compared to manual upgrades) and performance improvements worth $260 million dollars in annual cost savings. Transformations from Windows to cross-platform .NET are also coming soon! To learn more, visit Upgrading language versions with the Amazon Q Developer Agent for code transformation in the AWS documentation.
Access the complete 2024 Gartner Magic Quadrant for AI Code Assistants report to learn more.
— Channy
Gartner Magic Quadrant for AI Code Assistants, Arun Batchu, Philip Walsh, Matt Brasier, Haritha Khandabattu, 19 August, 2024.
Gartner does not endorse any vendor, product or service depicted in its research publications and does not advise technology users to select only those vendors with the highest ratings or other designation. Gartner research publications consist of the opinions of Gartner’s research organization and should not be construed as statements of fact. Gartner disclaims all warranties, expressed or implied, with respect to this research, including any warranties of merchantability or fitness for a particular purpose.
GARTNER is a registered trademark and service mark of Gartner and Magic Quadrant is a registered trademark of Gartner, Inc. and/or its affiliates in the U.S. and internationally and are used herein with permission. All rights reserved.
Integrate Tableau and Microsoft Entra ID with Amazon Redshift using AWS IAM Identity Center
Post Syndicated from Debu Panda original https://aws.amazon.com/blogs/big-data/integrate-tableau-and-microsoft-entra-id-with-amazon-redshift-using-aws-iam-identity-center/
This post is co-written with Sid Wray, Jade Koskela, and Ravi Bhattiprolu from SalesForce.
Amazon Redshift and Tableau empower data analysis. Amazon Redshift is a cloud data warehouse that processes complex queries at scale and with speed. Its advanced query optimization serves results to Tableau. Tableau’s extensive capabilities and enterprise connectivity help analysts efficiently prepare, explore, and share data insights company-wide.
Customers can integrate Amazon Redshift with Tableau using single sign-on (SSO) capabilities enabled by AWS IAM Identity Center integration with trusted identity propagation. You can use this to seamlessly implement authentication with third-party identity providers (IdP) and authorization with Redshift. It positions Amazon Redshift as an AWS managed application, allowing you to take full advantage of the trusted identity propagation feature.
Amazon Web Services (AWS) collaborated with Tableau to enable SSO support for accessing Amazon Redshift from Tableau. Both Tableau Desktop 2023.3.9 and Tableau Server 2023.3.9 releases support trusted identity propagation with IAM Identity Center. This SSO integration is available for Tableau Desktop, Tableau Server, and Tableau Prep.
This blog post provides a step-by-step guide to integrating IAM Identity Center with Microsoft Entra ID as the IdP and configuring Amazon Redshift as an AWS managed application. Additionally, you’ll learn how to set up the Amazon Redshift driver in Tableau, enabling SSO directly within Tableau Desktop.
Solution overview
The following diagram illustrates the architecture of the Tableau SSO integration with Amazon Redshift, IAM Identity Center, and Microsoft Entra ID.
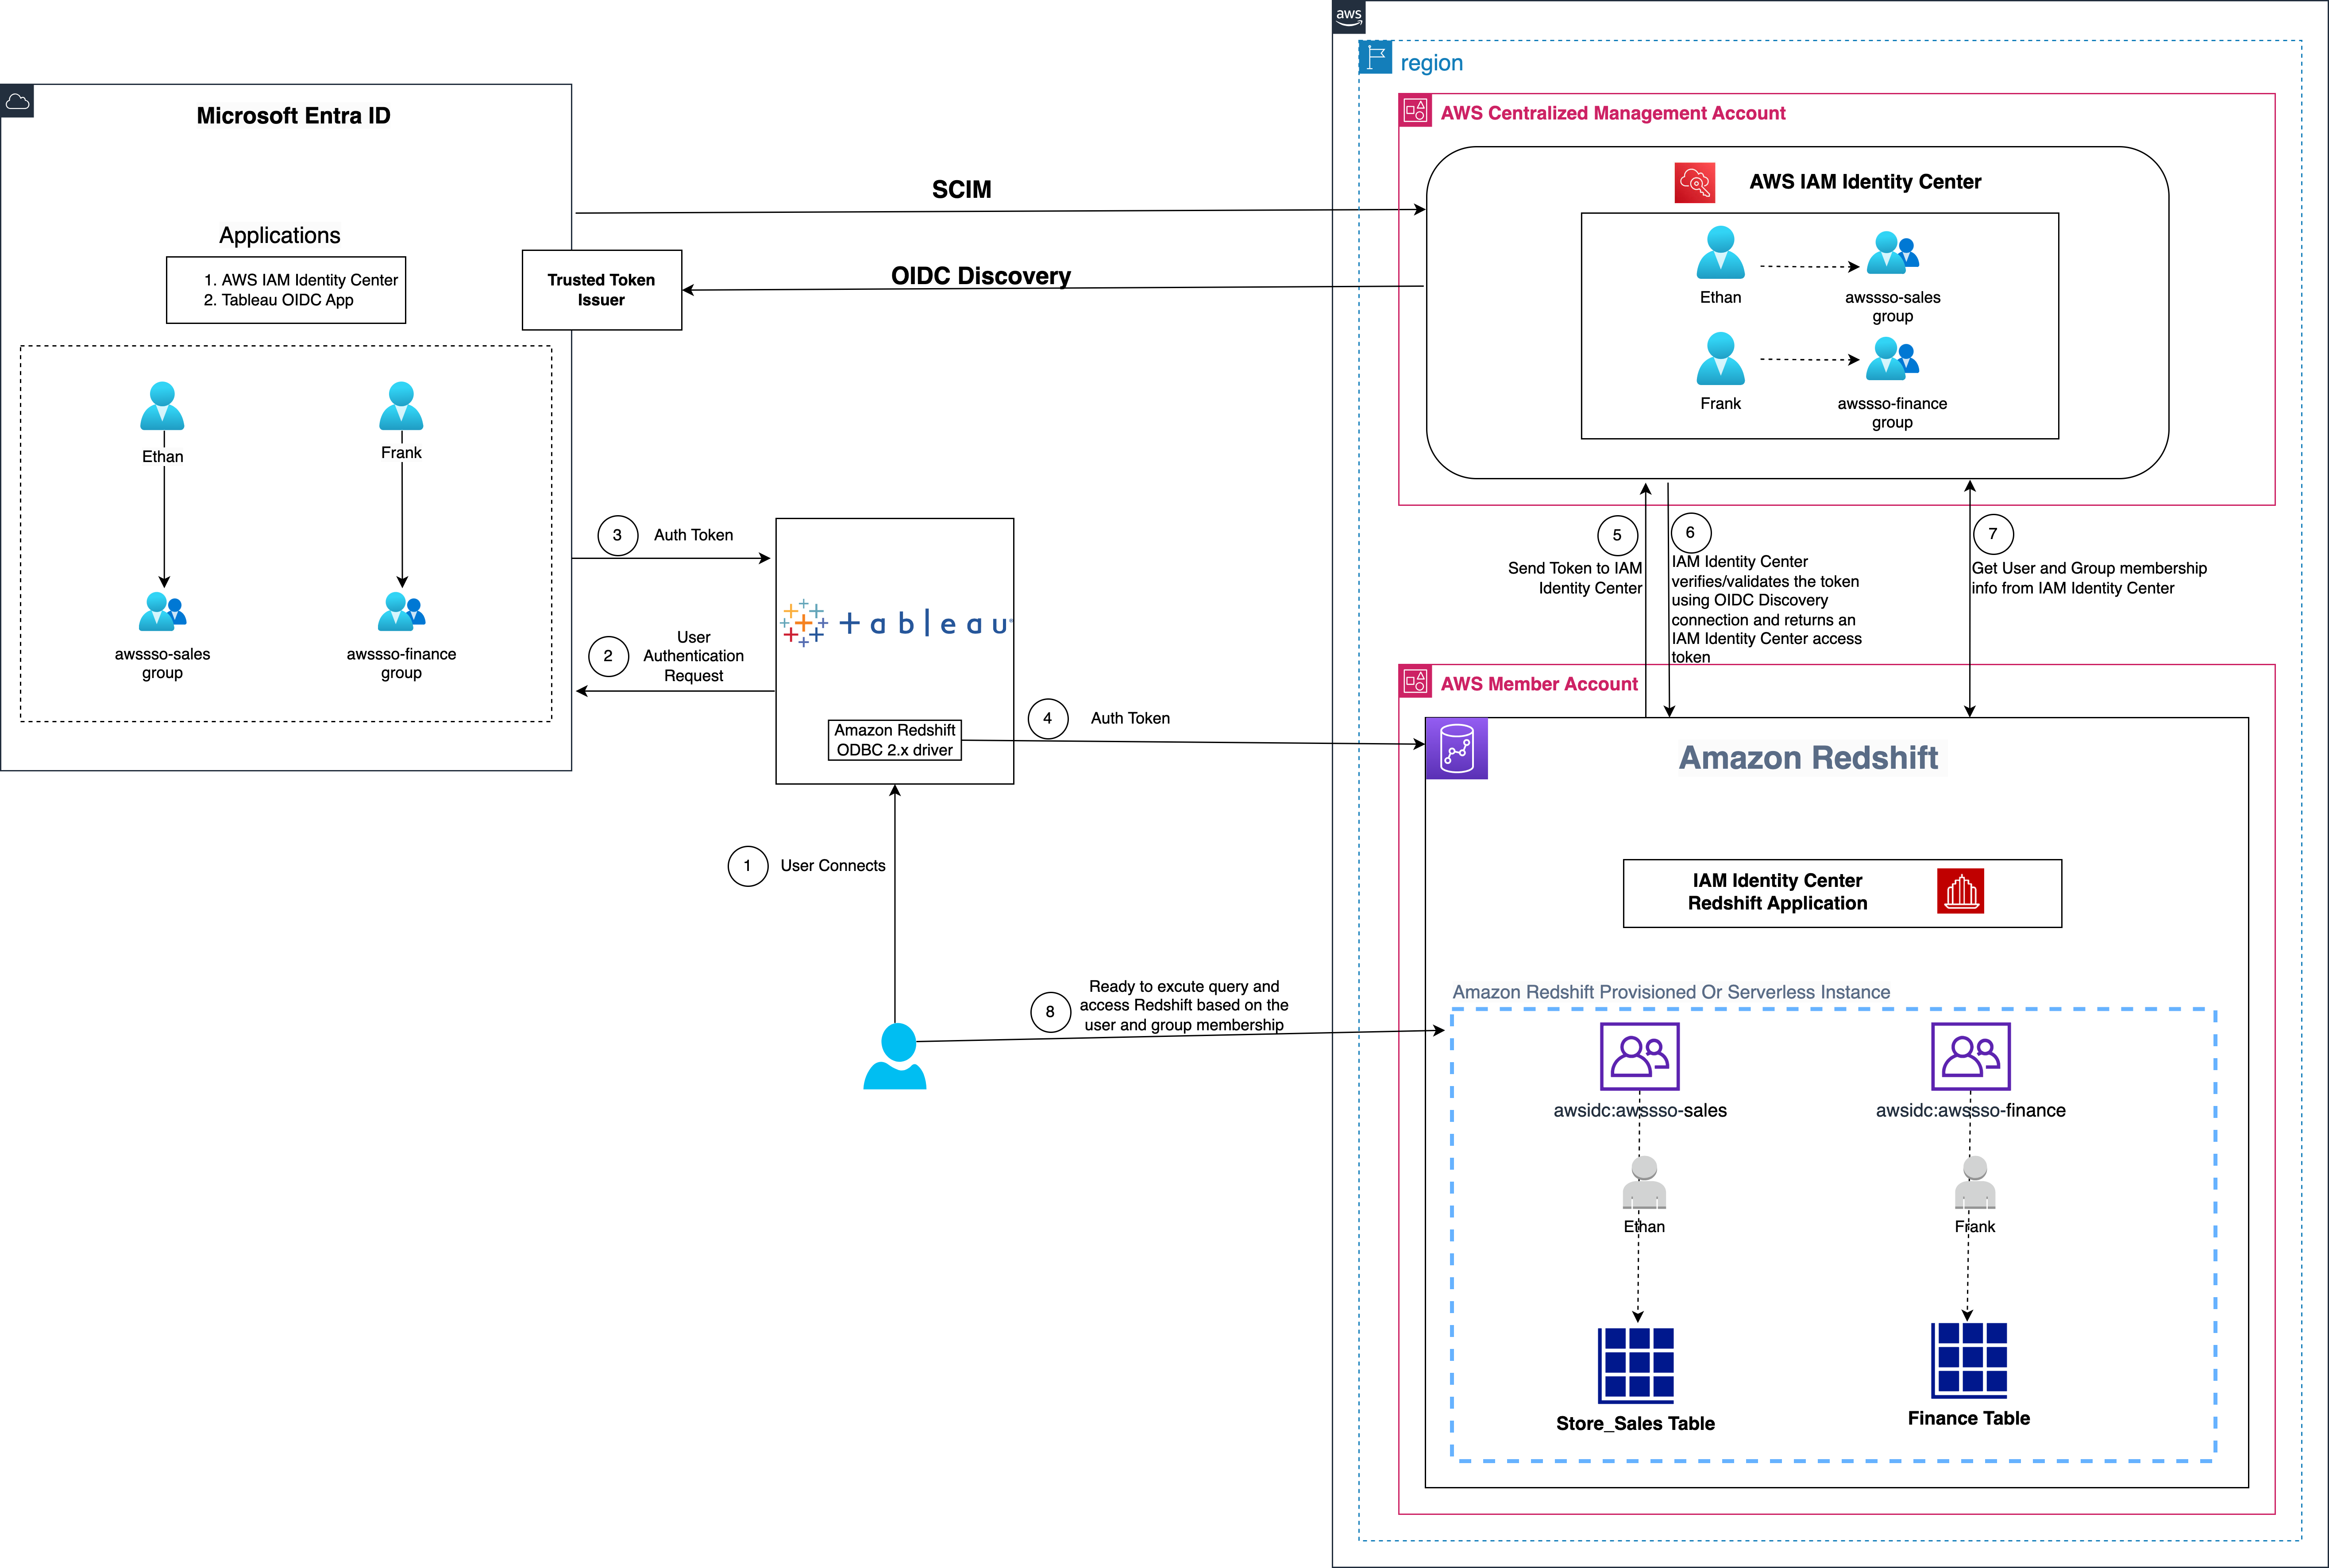
Figure 1: Solution overview for Tableau integration with Amazon Redshift using IAM Identity Center and Microsoft Entra ID
The solution depicted in Figure 1 includes the following steps:
- The user configures Tableau to access Amazon Redshift using IAM Identity Center.
- On a user sign-in attempt, Tableau initiates a browser-based OAuth flow and redirects the user to the Microsoft Entra ID sign-in page to enter the sign-in credentials.
- After successful authentication, Microsoft Entra ID issues authentication tokens (ID and access token) to Tableau.
- The Amazon Redshift driver then makes a call to the Amazon Redshift-enabled Identity Center application and forwards the access token.
- Amazon Redshift passes the token to IAM Identity Center for validation.
- IAM Identity Center first validates the token using the OpenID Connect (OIDC) discovery connection to the trusted token issuer (TTI) and returns an IAM Identity Center generated access token for the same user. In Figure 1, the TTI is the Microsoft Entra ID server.
- Amazon Redshift then uses the access token to obtain the user and group membership information from Identity Center.
- The Tableau user will be able to connect with Amazon Redshift and access data based on the user and group membership returned from IAM Identity Center.
Prerequisites
Before you begin implementing the solution, you must have the following in place:
- Set up IAM Identity Center and Amazon Redshift integration by following the steps in Integrate Identity Provider (IdP) with Amazon Redshift Query Editor V2 using AWS IAM Identity Center for seamless Single Sign-On.
- Download and install the latest ODBC 2.X Driver.
- Install Tableau Desktop 2023.3.9 or above version.
- Install Tableau Server 2023.3.9 or above version. For Tableau Server installation, see Install and Configure Tableau Server.
- Use an Entra ID account that has an active subscription. You need an admin role to set up the application on Entra ID. If you don’t have an Entra ID account, you can create an account for free.
Walkthrough
In this walkthrough, you will use the following steps to build the solution:
- Set up the Microsoft Entra ID OIDC application
- Collect Microsoft Entra ID information
- Set up a trusted token issuer in IAM Identity Center
- Set up client connections and trusted token issuers
- Set up the Tableau OAuth config files for Microsoft Entra ID
- Install the Tableau OAuth config file for Tableau Desktop
- Set up the Tableau OAuth config file for Tableau Server or Tableau Cloud
- Federate to Amazon Redshift from Tableau Desktop
- Federate to Amazon Redshift from Tableau Server
Set up the Microsoft Entra ID OIDC application
To create your Microsoft Entra application and service principal, follow these steps:
- Sign in to the Microsoft Entra admin center as Cloud Application Administrator (at the least).
- Browse to App registrations under Manage, and choose New registration.
- Enter a name for the application. For example,
Tableau-OIDC-App. - Select a supported account type, which determines who can use the application. For this example, select the first option in the list.
- Under Redirect URI, select Web for the type of application you want to create. Enter the URI where the access token is sent to. In this example, you’re using localhost, so enter http://localhost:55556/Callback and http://localhost/auth/add_oauth_token.
- Choose Register.
- In the navigation pane, choose Certificates & secrets.
- Choose New client secret.
- Enter a Description and select an expiration for the secret or specify a custom lifetime. For this example, keep the Microsoft recommended default expiration value of 6 months. Choose Add.
- Copy the secret value.
Note: It will only be presented one time; after that you cannot read it. - In the navigation pane, under Manage, choose Expose an API.
- If you’re setting up for the first time, you can see Set to the right of Application ID URI.
- Choose Set, and then choose Save.
- After the application ID URI is set up, choose Add a scope.
- For Scope name, enter a name. For example,
redshift_login. - For Admin consent display name, enter a display name. For example,
redshift_login. - For Admin consent description, enter a description of the scope.
- Choose Add scope.
For more information about setting up the Microsoft Entra app, see Register a Microsoft Entra app and create a service principal.
Collect Microsoft Entra ID information
To configure your IdP with IAM Identity Center and Amazon Redshift, collect the following parameters from Microsoft Entra ID. If you don’t have these parameters, contact your Microsoft Entra ID admin.
- Tenant ID,Client ID and Audience value: To get these values:
- Sign in to the Azure portal with your Microsoft account.
- Under Manage, choose App registrations.
- Choose the application that you created in previous sections.
- On the left panel, choose Overview, a new page will appear containing the Essentials section. You can find the Tenant ID,Client ID and Audience value (Application ID URI) as shown in the following figure:

Figure 2: Overview section of OIDC application

- Scope: To find your scope value:
- In the navigation pane of the OIDC application, under Manage, choose Expose an API.
- You will find the value under Scopes as shown in the following figure:

Figure 3: Application scope

Set up a trusted token issuer in IAM Identity Center
At this point, you have finished configurations in the Entra ID console; now you’re ready to add Entra ID as a TTI. You will start by adding a TTI so you can exchange tokens. In this step, you will create a TTI in the centralized management account. To create a TTI, follow these steps:
- Open the AWS Management Console and navigate to IAM Identity Center, and then to the Settings
- Select the Authentication tab and under Trusted token issuers, choose Create trusted token issuer.
- On the Set up an external IdP to issue trusted tokens page, under Trusted token issuer details, do the following:
- For Issuer URL, enter the OIDC discovery URL of the external IdP that will issue tokens for trusted identity propagation. The URL would be:
https://sts.windows.net/<tenantid>/. To find your Microsoft Entra tenant ID, see Collect Microsoft Entra ID information. - For Trusted token issuer name, enter a name to identify this TTI in IAM Identity Center and in the application console.
- Under Map attributes, do the following:
- For Identity provider attribute, select an attribute from the list to map to an attribute in the Identity Center identity store. You can choose Email, Object Identifier, Subject, and Other. This example uses Other where we’re specifying the upn (user principal name) as the Identity provider attribute to map with Email from the IAM identity Center attribute.
- For IAM Identity Center attribute, select the corresponding attribute for the attribute mapping.
- Under Tags (optional), choose Add new tag, specify a value for Key, and optionally for Value. For information about tags, see Tagging AWS IAM Identity Center resources.
- For Issuer URL, enter the OIDC discovery URL of the external IdP that will issue tokens for trusted identity propagation. The URL would be:
Figure 4 that follows shows the set up for TTI.

Figure 4: Create a trusted token issuer
- Choose Create trusted token issuer.
Set up client connections and trusted token issuers
A third-party application (such as Tableau) that isn’t managed by AWS exchanges the external token (JSON Web Token (JWT) for an IAM Identity Center token before calling AWS services.
The JWT must contain a subject (sub) claim, an audience (aud) claim, an issuer (iss), a user attribute claim, and a JWT ID (JTI) claim. The audience is a value that represents the AWS service that the application will use, and the audience claim value must match the value that’s configured in the Redshift application that exchanges the token.
In this section, you will specify the audience claim in the Redshift application, which you will get from Microsoft Entra ID. You will configure the Redshift application in the member account where the Redshift cluster or serverless instance is.
- Select IAM Identity Center connection from Amazon Redshift console menu.

Figure 5: Redshift IAM Identity Center connection
- Select the Amazon Redshift application that you created as part of the prerequisites.
- Select the Client connections tab and choose Edit.
- Choose Yes under Configure client connections that use third-party IdPs.
- Select the checkbox for Trusted token issuer that you created in the previous section.
- Enter the aud claim value under Configure selected trusted token issuers. For example,
api://1230a234-b456-7890-99c9-a12345bcc123. To get the audience value, see Collect Microsoft Entra ID information. - Choose Save.

Figure 6: Adding an audience claim for the TTI
Your IAM Identity Center, Amazon Redshift, and Microsoft Entra ID configuration is complete. Next, you need to configure Tableau.
Set up the Tableau OAuth config files for Microsoft Entra ID
To integrate Tableau with Amazon Redshift using IAM Identity Center, you need to use a custom XML. In this step, you use the following XML and replace the values starting with the $ sign and highlighted in bold. The rest of the values can be kept as they are, or you can modify them based on your use case. For detailed information on each of the elements in the XML file, see the Tableau documentation on GitHub.
Note: The XML file will be used for all the Tableau products including Tableau Desktop, Server, and Cloud. You can use the following XML or you can refer to Tableau’s github.
The following is an example XML file:
Install the Tableau OAuth config file for Tableau Desktop
After the configuration XML file is created, it must be copied to a location to be used by Amazon Redshift Connector from Tableau Desktop. Save the file from the previous step as .xml and save it under Documents\My Tableau Repository\OAuthConfigs.
Note: Currently, this integration isn’t supported in macOS because the Redshift ODBC 2.X driver isn’t supported yet for MAC. It will be supported soon.
Set up the Tableau OAuth config file for Tableau Server or Tableau Cloud
To integrate with Amazon Redshift using IAM Identity Center authentication, you must install the Tableau OAuth config file in Tableau Server or Tableau Cloud.
- Sign in to the Tableau Server or Tableau Cloud using admin credentials.
- Navigate to Settings.
- Go to OAuth Clients Registry and select Add OAuth Client
- Choose following settings:
- Connection Type: Amazon Redshift
- OAuth Provider: Custom_IdP
- Client Id: Enter your IdP client ID value
- Client Secret: Enter your client secret value
- Redirect URL: Enter
http://localhost/auth/add_oauth_token. This example uses localhost for testing in a local environment. You should use the full hostname with https. - Choose OAuth Config File. Select the XML file that you configured in the previous section.
- Select Add OAuth Client and choose Save.

Figure 7: Create an OAuth connection in Tableau Server or Cloud
Federate to Amazon Redshift from Tableau Desktop
Now you’re ready to connect to Amazon Redshift from Tableau as an Entra ID federated user. In this step, you create a Tableau Desktop report and publish it to Tableau Server.
- Open Tableau Desktop.
- Select Amazon Redshift Connector and enter the following values:
- Server: Enter the name of the server that hosts the database and the name of the database you want to connect to.
- Port: Enter 5439.
- Database: Enter your database name. This example uses dev.
- Authentication: Select OAuth.
- Federation Type: Select Identity Center.
- Identity Center Namespace: You can leave this value blank.
- OAuth Provider: This value should automatically be pulled from your configured XML. It will be the value from the element
oauthConfigId. - Select Require SSL.
- Choose Sign in.

Figure 8: Tableau Desktop OAuth connection

- Enter your IdP credentials in the browser pop-up window.

Figure 9: Microsoft Entra sign in page
- When authentication is successful, you will see the message shown in Figure 10 that follows.

Figure 10: Successful authentication using Tableau


Congratulations! You’re signed in using the IAM Identity Center integration with Amazon Redshift. Now you’re ready to explore and analyze your data using Tableau Desktop.

Figure 11: Successful connection using Tableau Desktop
After signing in, you can create your own Tableau Report on the desktop version and publish it to your Tableau Server. For this example, we created and published a report named SalesReport.
Federate to Amazon Redshift from Tableau Server
After you have published the report from Tableau Desktop to Tableau Server, sign in as a non-admin user and view the published report (SalesReport in this example) using IAM Identity Center authentication.
- Sign in to the Tableau Server site as a non-admin user.
- Navigate to Explore and go to the folder where your published report is stored.
- Select the report and choose Sign In.

Figure 12: User audit in sys_query_history
- To authenticate, enter your non-admin Microsoft Entra ID (Azure) credentials in the browser pop-up.
Figure 13: Tableau Server sign In
- After your authentication is successful, you can access the report.

Figure 14: Tableau report


Verify user identity from Amazon Redshift
As an optional step, you can audit the federated IAM Identity Center user from Amazon Redshift.
Figure 15 is a screenshot from the Amazon Redshift system table (sys_query_history) showing that user Ethan from Microsoft Entra ID is accessing the sales report.

Figure 15: User audit in sys_query_history
Clean up
Complete the following steps to clean up your resources:
- Delete the IdP applications that you created to integrate with IAM Identity Center.
- Delete the IAM Identity Center configuration.
- Delete the Amazon Redshift application and the Amazon Redshift provisioned cluster or serverless instance that you created for testing.
- Delete the AWS Identity and Access Management (IAM) role and IAM policy that you created as part of the prerequisites for IAM Identity Center and Amazon Redshift integration.
- Delete the permission set from IAM Identity Center that you created for Amazon Redshift Query Editor V2 in the management account.
Conclusion
This post explored a streamlined approach to access management for data analytics by using Tableau’s support for OIDC for SSO. The solution facilitates federated user authentication, where user identities from an external IdP are trusted and propagated to Amazon Redshift. You learned how to configure Tableau Desktop and Tableau Server to seamlessly integrate with Amazon Redshift using IAM Identity Center for SSO. By harnessing this integration between a third-party IdP and IAM Identity Center, users can securely access Amazon Redshift data sources within Tableau without managing separate database credentials.
The following are key resources to learn more about Amazon Redshift integration with IAM Identity Center:
- Connect Redshift with IAM Identity Center
- Integrate Identity Provider (IdP) with Amazon Redshift Query Editor V2 and SQL Client using AWS IAM Identity Center for seamless Single Sign-On
- Integrate Tableau and Okta with Amazon Redshift using AWS IAM Identity Center
- Simplify access management with Amazon Redshift and AWS Lake Formation
- Set up cross-account AWS Glue Data Catalog access using AWS Lake Formation and AWS IAM Identity Center with Amazon Redshift and Amazon QuickSight
About the Authors
 Debu Panda is a Senior Manager, Product Management at AWS. He is an industry leader in analytics, application platform, and database technologies, and has more than 25 years of experience in the IT world.
 Sid Wray is a Senior Product Manager at Salesforce based in the Pacific Northwest with nearly 20 years of experience in Digital Advertising, Data Analytics, Connectivity Integration and Identity and Access Management. He currently focuses on supporting ISV partners for Salesforce Data Cloud.
 Adiascar Cisneros is a Tableau Senior Product Manager based in Atlanta, GA. He focuses on the integration of the Tableau Platform with AWS services to amplify the value users get from our products and accelerate their journey to valuable, actionable insights. His background includes analytics, infrastructure, network security, and migrations.
 Jade Koskela is a Principal Software Engineer at Salesforce. He has over a decade of experience building Tableau with a focus on areas including data connectivity, authentication, and identity federation.
 Harshida Patel is a Principal Solutions Architect, Analytics with AWS.
 Maneesh Sharma is a Senior Database Engineer at AWS with more than a decade of experience designing and implementing large-scale data warehouse and analytics solutions. He collaborates with various Amazon Redshift Partners and customers to drive better integration.
 Ravi Bhattiprolu is a Senior Partner Solutions Architect at AWS. He collaborates with strategic independent software vendor (ISV) partners like Salesforce and Tableau to design and deliver innovative, well-architected cloud products, integrations, and solutions to help joint AWS customers achieve their business goals.