All posts by Arturs Lontons

Zabbix 6.2 is out now!

Post Syndicated from Arturs Lontons original https://blog.zabbix.com/zabbix-6-2-is-out-now/21602/

The Zabbix team is pleased to announce the release of the latest Zabbix major version – Zabbix 6.2! The latest version delivers features aimed at improving configuration management and performance on large Zabbix instances as well as extending the flexibility of the existing Zabbix functionality.

New features

A brief overview of the major new features available with the release of Zabbix 6.2:

  • Ability to suppress individual problems
    • Suppress problems indefinitely or until a specific point in time
  • Support of CyberArk vault for secret storage
  • Official AWS EC2 template
    • discover and monitor AWS EC2 performance statistics, alarms, and AWS EBS volumes
  • Ability to synchronize Zabbix proxy configuration directly from Zabbix frontend
    • Configuration synchronization is supported by active and passive proxies
  • Improved flexibility for hosts discovered from host prototypes
    • Link additional templates
    • Create and modify user macros
    • Populate the host with new tags
  • New items for VMware monitoring
  • The ability to further customize the hosts discovered by VMware discovery
  • Active agent check status can now be tracked from Zabbix frontend
  • Incremental configuration synchronization
    • Faster configuration synchronization
    • Reduced configuration synchronization performance impact
  • Newly created items are now checked within a minute after their creation
  • Execute now functionality is now available from the Latest data section
  • A warning message is now displayed when performing Execute now on items that do not support it
  • Templates are now grouped in template groups, instead of host groups
    • Improved host and template filtering
  • Multiple LDAP servers can now be defined and saved under Authentication – LDAP settings
  • Ability to collect Windows registry key values with the new registry monitoring items
  • New item for OS process discovery and collecting individual process statistics
  • New digital clock widget
  • The default Global view dashboard has been updated with the latest Zabbix widgets
  • The Graph widget has been further improved
    • Added stacked graph support
    • Legend now provides additional information
    • Added support of simple trigger display
  • UI forms now provide direct links to the relevant documentation sections
  • Many other improvements and features
Enhance the observability of your VMware infrastructure with the new items
Track your EC2 instances in a single pane of glass view
Suppress problems indefinitely or until a specific point in time
Track the active agent interface status from Zabbix frontend

New templates and integrations

Zabbix 6.2 comes pre-packaged with many new templates for the most popular vendors:

  • Envoy proxy
  • HashiCorp Consul
  • AWS EC2 Template
  • CockroachDB
  • TrueNAS
  • HPE MSA 2060 & 2040
  • HPE Primera
  • The S.M.A.R.T. monitoring template has received improvements

Zabbix 6.2 introduces a webhook integration for the GLPI IT Asset Management solution. This webhook can be used to forward problems created in Zabbix to the GLPi Assistance section

Zabbix 6.2 packages and images

The official Zabbix packages and images are available for:

  • Linux distributions for different hardware platforms on RHEL, CentOS, Oracle Linux, Debian, SUSE, Ubuntu, Raspbian, Alma Linux, Rocky Linux
  • Virtualization platforms based on VMware, VirtualBox, Hyper-V, XEN
  • Docker
  • Packages and precompiled agents for most popular platforms, including macOS and MSI packages for Windows

You can find the download instructions and download the new version on the Download page: https://www.zabbix.com/download

One-click deployments for the following cloud platforms are coming soon:

  • AWS, Azure, Google Cloud, Digital Ocean, Linode, Oracle Cloud, Red Hat OpenShift

Upgrading to Zabbix 6.2

In order to upgrade to Zabbix 6.2, you need to upgrade your repository package and download and install the new Zabbix component packages (Zabbix server, proxy, frontend, and other Zabbix components). When you start the Zabbix Server, an automatic database schema upgrade will be performed. Zabbix agents are backward compatible; therefore, it is not required to install the new agent versions. You can do it at a later time if needed.

If you’re using the official Docker container images – simply deploy a new set of containers for your Zabbix components. Once the Zabbix server container connects to the backend database, the database upgrade will be performed automatically.

You can find step-by-step instructions for the upgrade process to Zabbix 6.2 in the Zabbix documentation.

Join the webinar

If you wish to learn more about the Zabbix 6.2 features and improvements, we invite you to join our What’s new in Zabbix 6.2 public webinar.

During the webinar, you will get the opportunity to:

  • Learn about the Zabbix 6.2 features and improvements
  • See the latest Zabbix templates and integrations
  • Participate in a Q&A session with Zabbix founder and CEO Alexei Vladishev
  • Discuss the latest Zabbix version with Zabbix community and Zabbix team members
  • Anyone can sign up and attend the webinar at absolutely no cost

Don’t hesitate and sign up for the webinar now!

The post Zabbix 6.2 is out now! appeared first on Zabbix Blog.

Handy Tips #32: Deploying Zabbix in the Azure cloud platform

Post Syndicated from Arturs Lontons original https://blog.zabbix.com/handy-tips-32-deploying-zabbix-in-the-azure-cloud-platform/21355/

Deploy your Zabbix servers and proxies in the Azure cloud.

There are many use cases where deploying your Zabbix server or Zabbix proxies in the cloud can reduce costs, provide an additional layer of security and redundancy, and improve the available management toolset.

Deploy your Zabbix instance in the Azure cloud with the official Zabbix cloud images:

  • Cloud images are available for the latest Zabbix server and proxy versions
  • Deploy a fresh Zabbix instance in 5 minutes

  • Dynamically scale the cloud resources
  • Select the deployment options based on your budget

Check out the video to learn how to deploy Zabbix in the Microsoft Azure cloud platform:

How to deploy Zabbix in the Azure cloud platform:

  1. Navigate to the Zabbix Cloud Images page
  2. Select the Microsoft Azure vendor and Zabbix server cloud image
  3. Press the Get it now button and press Continue in the next window
  4. On the deployment page press the Create button
  5. Provide the virtual machine name, resource group, region
  6. Specify the administrator account settings
  7. Provide the disk, network, tag, and advanced settings
  8. Verify the provided settings
  9. Press Create to begin deploying the virtual machine
  10. For public key authentication: download and store the private key
  11. Once the deployment is complete, press the Go to resource button
  12. Save your public IP address and connect to it via SSH
  13. Save the initial frontend username and password
  14. Use the public IP address to connect to your Zabbix frontend
  15. Log in with the saved username and password obtained

Tips and best practices
  • The default SSH user is called azureuser
  • Remember to store your SSH private key in a secure location
  • You can access the Zabbix database by using the root user
  • The password for the MySQL database root user is stored in /root/.my.cnf configuration file

Feeling overwhelmed with deploying and managing your Zabbix instance?
Check out the Zabbix certified specialist courses, where under the guidance of a Zabbix certified trainer, you will learn how to deploy, configure and manage your Zabbix instance.

The post Handy Tips #32: Deploying Zabbix in the Azure cloud platform appeared first on Zabbix Blog.

Handy Tips #31: Detecting invalid metrics with Zabbix validation preprocessing

Post Syndicated from Arturs Lontons original https://blog.zabbix.com/handy-tips-31-detecting-invalid-metrics-with-zabbix-validation-preprocessing/21036/

Monitor and react to unexpected or faulty outputs from your monitoring targets by using Zabbix validation preprocessing.

In case of a failure, some monitoring endpoints like sensors or specific application or OS level counters can start outputting faulty metrics. Such behavior needs to be detected and reacted to as soon as possible.

Use Zabbix preprocessing to validate the collected metrics:

  • Select from and combine multiple preprocessing validation steps
  • Display a custom error message in case of an unexpected metric

  • Discard or change the value in case of an unexpected metric
  • Create an internal action to react to items becoming not supported

Check out the video to learn how to use preprocessing to detect invalid metrics.

Define preprocessing steps and react on invalid metrics:

  1. Navigate to ConfigurationHosts and find your host
  2. Click on the Items button
  3. Find the item for which the preprocessing steps will be defined
  4. Open the item and click on the Preprocessing tab
  5. For our example, we will use the Temperature item
  6. Select the In range preprocessing step
  7. Define the min and max preprocessing parameters
  8. Mark the Custom on fail checkbox
  9. Press the Set error to button and enter your custom error message
  10. Press the Update button
  11. Simulate an invalid metric by sending an out-of-range value to this item
  12. Navigate to ConfigurationHostsYour Host →  Items
  13. Observe the custom error message being displayed next to your item

Tips and best practices
  • Validation preprocessing can check for errors in JSON, XML, or unstructured text with JSONPath, XPath, or Regex
  • User macros and low-level discovery macros can be used to define the In range validation values
  • The Check for not supported value preprocessing step is always executed as the first preprocessing step
  • Internal actions can be used to define action conditions and receive alerts about specific items receiving invalid metrics

The post Handy Tips #31: Detecting invalid metrics with Zabbix validation preprocessing appeared first on Zabbix Blog.

Handy Tips #30: Detect continuous increase or decrease of values with monotonic history functions

Post Syndicated from Arturs Lontons original https://blog.zabbix.com/handy-tips-30-detect-continuous-increase-or-decrease-of-values-with-monotonic-history-functions-2/20867/

Analyze your incoming metrics and look for interruptions in continuously increasing or decreasing metrics with the monoinc and monodec history functions.

A continuous increase or decrease is the norm for metrics such as server uptime, time remaining until a task is executed, number of daily transactions, and many other such use cases. A software or hardware failure could impact these counters and we need to ensure that they are providing the data in an expected manner.

Use monoinc and monodec history functions and detect if value monotonicity is true or false:

  • Detect monotonicity over a number of values or a time period
  • Strict and weak modes of monotonicity detection

  • Receive alerts if a metric is not monotonic
  • The monotonicity check can be combined with other functions to create flexible problem generation logic

Check out the video to learn how to use the monoinc and monodec history functions

How to configure monoinc and monodec history functions:

  1. Identify the items for which you wish to detect monotonicity
  2. For this example, the system.uptime key is used
  3. Navigate to ConfigurationHostsYour hostTriggers
  4. Press the Create trigger button
  5. Provide the trigger name and severity
  6. Press the Add button to add the trigger expression
  7. Select the item, the monoinc function, evaluation period, mode and result
  8. For this example, we will use the strict mode
  9. An example expression: monoinc(/Linux server/system.uptime,1h,”strict”)=0
  10. Simulate a problem by restarting the host
  11. Navigate to MonitoringProblems
  12. Confirm that the problem has been generated

Tips and best practices
  • The functions return 1 if all elements in the evaluation period continuously decrease or increase, 0 otherwise
  • The default mode – weak, checks if every value is bigger/smaller or the same as the previous one
  • The strict mode checks if every value has increased/decreased
  • Relative and absolute time shifts can be used to analyze time periods for monotonicity

The post Handy Tips #30: Detect continuous increase or decrease of values with monotonic history functions appeared first on Zabbix Blog.

Handy Tips #29: Discovering hosts and services with network discovery

Post Syndicated from Arturs Lontons original https://blog.zabbix.com/handy-tips-29-discovering-hosts-and-services-with-network-discovery/20484/

Automate host creation and monitoring with Zabbix network discovery.

Creating hosts for a large number of monitoring endpoints can become a menial and time-consuming task. It is important to provide the end-users with the tools to automate such tasks to create and start monitoring hosts based on a user-defined set of rules and conditions.

Automate host onboarding and offboarding with Zabbix network discovery:

  • Discover monitoring endpoints and services in user defined IP ranges
  • Define a set of services that should be discovered

  • Provide custom workflows based on the received values
  • Onboard or offboard hosts based on the discovery status

Check out the video to learn how to discover your monitoring endpoints with Zabbix network discovery.

How to configure Zabbix network discovery:

  1. Navigate to ConfigurationDiscovery
  2. Press the Create discovery rule button service button
  3. Provide the discovery rule name, IP range and update interval
  4. Define discovery checks
  5. Press the Add button
  6. Navigate to ​​​​​​​ConfigurationActionsDiscovery actions
  7. Press the Create action button
  8. Provide the action name and action conditions
  9. Navigate to the Operations tab
  10. Define operations to assign templates and host groups
  11. Press the Add button
  12. Wait for the services to be discovered
  13. Navigate to MonitoringDiscovery and confirm the discovery status
  14. Confirm that the hosts have been created in Zabbix

Tips and best practices
  • A single discovery rule will always be processed by a single Discoverer process
  • Every check of a service and a host generates one of the following events: Host or service – Discovered/Up/Lost/Down
  • The hosts discovered by different proxies are always treated as different hosts
  • A host is also added, even if the Add host operation is missing, if you select operations resulting in actions on a host, such as enable/disable/add to host group/link template

The post Handy Tips #29: Discovering hosts and services with network discovery appeared first on Zabbix Blog.

Handy Tips #28: Keeping track of your services with business service monitoring

Post Syndicated from Arturs Lontons original https://blog.zabbix.com/handy-tips-28-keeping-track-of-your-services-with-business-service-monitoring/20307/

Configure and deploy flexible business services and monitor the availability of your business and its individual components.

The availability of a business service tends to depend on the state of many interconnected components. Therefore, detecting the current state of a business service requires a sufficiently complex and flexible monitoring logic.

Define flexible business service trees and stay informed about the state of your business services:

  • Business services can depend on an unlimited number of underlying components
  • Select from multiple business service status propagation rules

  •  Calculate the business service state based on the weight of the business service components
  • Receive alerts whenever your business service is unavailable

Check out the video to learn how to configure business service monitoring.

How to configure business service monitoring:

  1. Navigate to Services – Services
  2. Click the Edit button and then click the Create service button
  3. For this example, we will define an Online store business service
  4. Name your service and mark the Advanced configuration checkbox
  5. Click the Add button under the Additional rules
  6. Set the service status and select the conditions
  7. For this example, we will set the status to High
  8. We will use the condition “If weight of child services with Warning status or above is at least 6
  9. Set the Status calculation rule to Set status to OK
  10. Press the Add button
  11. Press the Add child service button
  12. For this example, we will define Web server child services
  13. Provide a child service name and a problem tag
  14. For our example, we will use node name Equals node # tag
  15. Mark the Advanced configuration checkbox and assign the service weight
  16. Press the Add button
  17. Repeat steps 12 – 17 and add additional child services
  18. Simulate a problem on your services so the summary weight is >= 6
  19. Navigate to Services – Services and check the parent service state

Tips and best practices
  • Service actions can be defined in the Services → Service actions menu section
  • Service root cause problem can be displayed in notifications with the {SERVICE.ROOTCAUSE} macro
  • Service status will not be propagated to the parent service if the status propagation rule is set to Ignore this service
  • Service-level tags are used to identify a service. Service-level tags are not used to map problems to the service

The post Handy Tips #28: Keeping track of your services with business service monitoring appeared first on Zabbix Blog.

Handy Tips #27: Tracking changes with the improved Zabbix Audit log

Post Syndicated from Arturs Lontons original https://blog.zabbix.com/handy-tips-27-tracking-changes-with-the-improved-zabbix-audit-log/20176/

Track the creation of new entities, updates to the existing configuration, and potential intrusion attempts with Zabbix audit log.

If your monitoring environment is managed by more than a single administrator, it can become hard to track the implemented changes and additions. Having a detailed audit log can help you analyze any potentially unwanted changes and detect potential intrusion attempts.

Use Zabbix audit log to track changes in your environment:

  • Track configuration changes and updates
  • Audit log displays information about Zabbix server and frontend operations

  • Identify potential intrusion attempts and their source
  •  Filter the audit log by action and resource types

Check out the video to learn how to track changes in Zabbix audit log.

How to track changes in Zabbix audit log:

  1. Navigate to Administration  General  Audit log
  2. Enable and configure your Zabbix audit log settings
  3. Perform a failed login attempt
  4. Check the related entries under Reports  Audit log
  5. Navigate to Configuration →  Hosts
  6. Import hosts or templates from a YAML file
  7. Check the related entries under Reports  Audit log
  8. Filter the entries by the Recordset ID
  9. Navigate to Configuration  Hosts
  10. Find a host with a low-level discovery rule on it
  11. Execute the low-level discovery rule
  12. Check the related entries under Reports  Audit log

Tips and best practices
  • Audit logging should be enabled in the Administration settings to collect audit records
  • Audit log entry storage period can be defined under Administration → General → Audit log
  • Each audit log entry belongs to a Recordset ID which is shared by entries created as a result of the same operation
  • auditlog.get API method can be used to obtain audit log entries via the Zabbix API

The post Handy Tips #27: Tracking changes with the improved Zabbix Audit log appeared first on Zabbix Blog.

Handy Tips #26: Displaying infrastructure status with the Geomap widget

Post Syndicated from Arturs Lontons original https://blog.zabbix.com/handy-tips-26-displaying-infrastructure-status-with-the-geomap-widget/20012/

Secure your Zabbix logins from brute-force and dictionary attacks by defining password complexity requirements.

Enforcing an organization-wide password policy can be extremely unreliable if we don’t have a toolset to enforce these policies. By using native password complexity settings, we can provide an additional layer of security and ensure that our users follow our organization’s password complexity policies.

Define custom Zabbix login password complexity rules:

  • Set the minimum password length in a range of 2 – 70 characters
  • Define password character set rules

  • A built-in password list secures users from dictionary attacks
  • Prevent usage of passwords containing first or last names and easy to guess words

Check out the video to learn how to configure Zabbix password complexity requirements.

How to configure Zabbix password complexity requirements:
 
  1. As a super admin navigate to Administration → Authentication
  2. Define the minimum password length
  3. Select the optional Password must contain requirements
  4. Mark Avoid easy-to-guess passwords option
  5. Navigate to Administration → Users
  6. Select use for which we will change the password
  7. Press the Change password button
  8. Try using  easy to guess passwords like zabbix or password
  9. Observe the error messages
  10. Define a password that fits the password requirements
  11. Press the Update button

Tips and best practices:
  • It is possible to restrict access to the ui/data/top_passwords.txt file, which contains the Zabbix password deny list
  • Passwords longer than 72 characters will be truncated
  • Password complexity requirements are only applied to the internal Zabbix authentication
  • Users can change their passwords in the user profile settings

The post Handy Tips #26: Displaying infrastructure status with the Geomap widget appeared first on Zabbix Blog.

Handy Tips #25: Securing Zabbix logins with password complexity settings

Post Syndicated from Arturs Lontons original https://blog.zabbix.com/handy-tips-25-securing-zabbix-logins-with-password-complexity-settings/19883/

Secure your Zabbix logins from brute-force and dictionary attacks by defining password complexity requirements.

Enforcing an organization-wide password policy can be extremely unreliable if we don’t have a toolset to enforce these policies. By using native password complexity settings, we can provide an additional layer of security and ensure that our users follow our organization’s password complexity policies.

Define custom Zabbix login password complexity rules:

  • Set the minimum password length in a range of 2 – 70 characters
  • Define password character set rules

  • A built-in password list secures users from dictionary attacks
  • Prevent usage of passwords containing first or last names and easy to guess words

Check out the video to learn how to configure Zabbix password complexity requirements.

How to configure Zabbix password complexity requirements:
 
  1. As a super admin navigate to Administration → Authentication
  2. Define the minimum password length
  3. Select the optional Password must contain requirements
  4. Mark Avoid easy-to-guess passwords option
  5. Navigate to Administration → Users
  6. Select use for which we will change the password
  7. Press the Change password button
  8. Try using  easy to guess passwords like zabbix or password
  9. Observe the error messages
  10. Define a password that fits the password requirements
  11. Press the Update button

Tips and best practices:
  • It is possible to restrict access to the ui/data/top_passwords.txt file, which contains the Zabbix password deny list
  • Passwords longer than 72 characters will be truncated
  • Password complexity requirements are only applied to the internal Zabbix authentication
  • Users can change their passwords in the user profile settings

The post Handy Tips #25: Securing Zabbix logins with password complexity settings appeared first on Zabbix Blog.

Zabbix security advisories regarding CVE-2022-23131 and CVE-2022-23134

Post Syndicated from Arturs Lontons original https://blog.zabbix.com/zabbix-security-advisories-regarding-cve-2022-23131-and-cve-2022-23134/19720/

Here at Zabbix, the security of our product is our top priority. It has come to our attention that two potential CVE issues have been highlighted in tech media outlets  –  CVE-2022-23131 and CVE-2022-23134.

The most critical issue – CVE-2022-23131, affects only Zabbix instances where SAML SSO authentication is in use. While CVE-2022-23134 Affects Zabbix 5.4.x releases older than Zabbix 5.4.9.

Zabbix is aware of the following vulnerabilities And they have since been fixed in Zabbix version 5.4.9 and the stable release of Zabbix 6.0 LTS.

  • CVE-2022-23131 – Unsafe client-side session storage leading to authentication bypass/instance takeover via Zabbix Frontend with configured SAML
    • Affected versions: 5.4.0 – 5.4.8; 6.0.0alpha1
  • CVE-2022-23134 – Possible view of the setup pages by unauthenticated users if config file already exists
    • Affected versions: 5.4.0 – 5.4.8; 6.0.0 – 6.0.0beta1

We urge everyone who is using the SAML SSO authentication features in your environment o update your Zabbix instance to one of the aforementioned versions where the security vulnerabilities have been resolved.

keep track of any potential Zabbix security issues, the affected versions, and the required updates, visit our public Zabbix Security Advisories and CVE database page.

The post Zabbix security advisories regarding CVE-2022-23131 and CVE-2022-23134 appeared first on Zabbix Blog.

Handy Tips #24: Preventing downtimes with The Zabbix HA cluster

Post Syndicated from Arturs Lontons original https://blog.zabbix.com/handy-tips-24-preventing-downtimes-with-the-zabbix-ha-cluster/19712/

Configure automated failover between Zabbix server nodes with the native Zabbix server HA cluster.

Preventing downtimes is as vital for a monitoring solution as it is for any other component of an organization’s IT infrastructure. High availability and automated failover can help you prevent unwanted downtimes by supporting multiple application nodes and failing over between them once a primary node has failed.

Deploy native Zabbix server High availability cluster:

  • Deploy two or more Zabbix server nodes
  • No external tools are required to deploy a Zabbix server HA cluster

  • Define custom failover delay before failing over to another node
  • Monitor the status of your Zabbix cluster on Zabbix dashboards

Check out the video to learn how to deploy the Zabbix server High availability cluster:

How to deploy the Zabbix server High availability cluster:
 
  1. Deploy two or more Zabbix server nodes
  2. On all cluster nodes open the Zabbix server configuration file – zabbix_server.conf
  3. On all cluster nodes provide arbitrary node name in the HANodeName parameter
  4. On both nodes provide the node address in the NodeAddress parameter
  5. Open your Zabbix frontend configuration file – zabbix.conf.php
  6. Comment out the //$ZBX_SERVER and $ZBX_SERVER_PORT parameters
  7. From the active node check the HA cluster status with zabbix_server -R ha_status command
  8. Open your Zabbix frontend GUI
  9. Navigate to Reports →  System information
  10. Confirm the Zabbix server HA cluster node status

Tips and best practices:
  • Specifying the HANodeName parameter in the Zabbix server configuration file enables the HA cluster mode
  • The NodeAddress parameter is used by the Zabbix frontend to connect to the active cluster node
  • Zabbix frontend configuration file parameters – $ZBX_SERVER and $ZBX_SERVER_PORT must be commented out for the frontend to automatically detect the active cluster node
  • The current status of the HA cluster can be managed using the dedicated runtime control options

The post Handy Tips #24: Preventing downtimes with The Zabbix HA cluster appeared first on Zabbix Blog.

Zabbix 6.0 LTS is out now!

Post Syndicated from Arturs Lontons original https://blog.zabbix.com/zabbix-6-0-lts-is-out-now/18757/

The Zabbix team is proud to announce the release of Zabbix 6.0 LTS. The latest version comes packed with many new features, improvements, new templates and integrations.

New features

  • Out-of-the-box High Availability cluster for Zabbix server with support for one or multiple standby nodes
  • Redesigned Services section, tailored for flexible Business Service monitoring with the ability to monitor over 100k services, define flexible service calculation rules, perform root cause analysis, receive service status change alerts, and more
  • New machine learning trend functions for baseline monitoring and anomaly detection
  • Monitor your Kubernetes instance with out-of-the-box Kubernetes monitoring for pods, nodes, and Kubernetes component monitoring
  • New Audit log schema enables detailed logging for both the Zabbix frontend and backend
  • Track your host status and location with the new Geomap widget
  • The Top hosts widget provides Top N and Bottom N host views sorted by item values
  • Ability to define custom Zabbix password complexity requirements
  • Multiple UI improvements. Hosts can now be created directly from the Monitoring section.
  • Zabbix Agent2 now supports loading stand-alone plugins without having to recompile the Agent2
  • Monitor SSL/TLS certificates with a new Zabbix Agent2 item
  • Performance improvements for Zabbix Server, Proxy, and Frontend
  • All of the official Zabbix templates are now stand-alone and do not require importing additional template dependencies

  • And many other improvements and features


This version also provides a set of new templates for the following vendors:

  • F5 BIG-IP

  • Cisco ASAv

  • HPE ProLiant servers

  • Cloudflare

  • InfluxDB

  • Travis CI

  • Dell PowerEdge

  • pfSense

  • Kubernetes

  • Mikrotik

  • Nginx Plus

  • VMware SD-WAN VeloCloud

  • GridGain

  • Systemd

  • As well as a new Github webhook integration

The latest LTS release will receive full official support for 3 years and limited support, which consists of bug fixes for 5 years.

Find out more about Zabbix 6.0 LTS by visiting our What’s new in Zabbix 6.0 LTS webinar, covering the most important new features and improvements: https://www.zabbix.com/webinars

An overview of the new features and changes can be found on our What’s new in Zabbix 6.0 page:

https://www.zabbix.com/whats_new_6_0

What’s new in Zabbix 6.0.0 documentation section:

https://www.zabbix.com/documentation/current/en/manual/introduction/whatsnew600

Take a look at the release notes to see the full list of new features and improvements:

https://www.zabbix.com/rn/rn6.0.0

Zabbix 6.0 LTS packages

The official Zabbix packages are available for:

  • Linux distributions for different hardware platforms on RHEL, CentOS, Oracle Linux, Debian, SuSE, Ubuntu, Raspbian
  • Virtualization platforms based on VMWare, VirtualBox, Hyper-V, XEN
  • Docker
  • Packages and pre-compiled agents for most popular platforms, including macOS and MSI packages for Windows

You can find the download instructions and download the new version on the download page: https://www.zabbix.com/download

One-click deployment is available for the following cloud platforms:

  • AWS, Azure, Google Cloud, Digital Ocean, Linode, Oracle Cloud, Red Hat OpenShift, Yandex Cloud

Zabbix 6.0 also incorporates the features added in Zabbix 5.2 and Zabbix 5.4 non-LTS versions.

Upgrading to Zabbix 6.0 LTS

In order to upgrade to Zabbix 6.0 LTS, you need to upgrade your repository package and download and install the new Zabbix component packages (Zabbix server, proxy, frontend, and other Zabbix components). When you start the Zabbix Server, an automatic database schema upgrade will be performed. Zabbix Agents are backward compatible; therefore, it is not required to install the new agent versions. You can do it at a later time if needed.

If you’re using the official Docker container images – simply deploy a new set of containers for your Zabbix components. Once the Zabbix server container connects to the backend database, the database upgrade will be performed automatically.

You can find step-by-step instructions for the upgrade process to Zabbix 6.0 LTS in the Zabbix documentation.

If you’re interested in a list of changes and an additional pre-upgrade checklist – the following blog post covers the nuances of the upgrade process and takes a look under the hood at what changes are performed during the upgrade.

The post Zabbix 6.0 LTS is out now! appeared first on Zabbix Blog.

Handy Tips #23: Suppressing problems with Zabbix maintenance periods

Post Syndicated from Arturs Lontons original https://blog.zabbix.com/handy-tips-23-suppressing-problems-with-zabbix-maintenance-periods/19458/

Suppress unwanted problems during planned maintenance by defining Zabbix maintenance periods.

Planned downtimes due to maintenance are a part of every administrator’s life. Be it updating your software or upgrading the underlying hardware – sooner or later we will need to schedule a planned downtime. We also need to find a way to suppress the problems that these planned maintenance jobs can cause.

Define maintenance periods in Zabbix:

  • Prevent alert storms during maintenance periods
  • Define scheduled or one-time downtimes

  • Define maintenance periods for hosts or host groups
  • Use tags to suppress only the matching problems

Check out the video to learn how to use Zabbix Sender to send custom metrics to your Zabbix instance.

How to define a Zabbix maintenance period:
 
  1. Navigate to Configuration → Maintenance
  2. Click on the Create maintenance period button
  3. Type in the maintenance period name
  4. Select the maintenance type and the activity time window
  5. Add a period during which your maintenance will take place
  6. Select hosts and/or host groups
  7. Optionally, specify tags to suppress only the matching problems 
  8. Add the maintenance period
  9. Wait until the configuration changes are picked up by the Zabbix server
  10. Navigate to Monitoring → Problems
  11. Confirm if the problems on the host are suppressed

Tips and best practices:
  • Suppressed problems can be displayed in the problems section by checking the Show suppressed problems checkbox
  • Host status is switched to/from maintenance only at the start of the minute
  • If you create a maintenance period with data collection, the triggers are processed as usual, but any related problems are suppressed
  • If you create a maintenance period with no data collection, no related metrics will be collected during the maintenance period 

The post Handy Tips #23: Suppressing problems with Zabbix maintenance periods appeared first on Zabbix Blog.

Handy Tips #22: Deploying Zabbix in the AWS cloud platform

Post Syndicated from Arturs Lontons original https://blog.zabbix.com/handy-tips-22-deploying-zabbix-in-the-aws-cloud-platform/19343/

Deploy a production-ready Zabbix instance in the AWS cloud platform with just a few clicks.

With a major paradigm shift to cloud IT infrastructures, many organizations opt-in to migrate their on-prem systems to the Cloud. Zabbix provides official cloud images for the most popular cloud vendors including the AWS cloud platform.

Deploy the complete Zabbix infrastructure in AWS:

  • Deploying a fully functional environment takes less than 5 minutes
  • Select between multiple geographical regions

  • Select the EC2 Instance type best fit for your Zabbix workloads
  • Perfect for both Q/A and Production environments

Check out the video to learn how to deploy Zabbix in AWS.

How to deploy a Zabbix instance in AWS:
 
  1. Open the Zabbix Cloud Images page and select the AWS Zabbix server image
  2. Click Continue to Subscribe and subscribe to use the image
  3. Read the terms and conditions and click Continue to Configuration
  4. Select the Region in which you wish to deploy a Zabbix instance
  5. Select the launch options and the EC2 instance Type
  6. Select a VPC, a subnet, a Security group, and a key pair
  7. Make sure that the selected security group allows traffic through ports 10051, 22 and 443
  8. Press Launch to launch the instance
  9. Check the instance address and connect to the instance 
  10. Copy the initial frontend username and password
  11. Sign-in into the frontend with your credentials

Tips and best practices:
  • The initial frontend password can be obtained by connecting to the instance terminal
  • By default, the Zabbix frontend uses the UTC timezone
  • The frontend timezone can be changed by editing the php_value[date.timezone] variable in /etc/php-fpm.d/zabbix.conf and restarting the php-fpm process
  • The MySQL root password is stored in /root/.my.cnf configuration file

The post Handy Tips #22: Deploying Zabbix in the AWS cloud platform appeared first on Zabbix Blog.

Handy Tips #21: Deploying Zabbix Server with Docker containers

Post Syndicated from Arturs Lontons original https://blog.zabbix.com/handy-tips-21-deploying-zabbix-server-with-docker-containers/18972/

Deploy Zabbix components in docker containers for advanced automation, scalability, and maintenance.

In the past few years, containers have gained prevalence and are being used for many different tasks – from application development to improving automation and management of existing software.

Deploy Zabbix components in Docker containers:

  • Official Docker images are available for individual components
  • Automate the deployment of your Zabbix containers

  • Use containers to quickly scale your environment
  • Upgrade to a newer Zabbix version by deploying containers from the latest container images

Check out the video to learn how to deploy the Zabbix server with Docker containers.

How to deploy Zabbix server with Docker containers:
 
  1. Connect to your Docker container host
  2. Create a new docker network. Specify the subnet and the IP range for containers.
  3. Deploy your Zabbix server container
    1. Give the container a name and assign it to the newly created network
    2. Pass the Database host, user, and password in environment variables
    3. Map the port 10051 on the host to the port 10051 on the container
    4. Select the required Docker image and tag
  4. Deploy your Zabbix frontend container
    1. Give the container a name and assign it to the newly created network
    2. Pass the Database host, user, and password in environment variables
    3. Pass the Zabbix server address in the environment variable
    4. Map port 80 on your host to port 8080 on the container
  5. Use docker ps and docker logs to check if the containers are running
  6. Connect to your Zabbix frontend and confirm that there are no issues with the environment

Tips and best practices:
  • Container logs can be accessed by using the docker logs command
  • Zabbix server checks for an existing Zabbix database. If it does not exist – it will get created.
  • Use the docker exec command to run commands inside a container
  • All of the supported container environment variables are available in https://hub.docker.com/u/zabbix

The post Handy Tips #21: Deploying Zabbix Server with Docker containers appeared first on Zabbix Blog.

Handy Tips #20: Agentless metric collection with SSH checks

Post Syndicated from Arturs Lontons original https://blog.zabbix.com/handy-tips-20-agentless-metric-collection-with-ssh-checks/18795/

Collect the results of SSH commands with Zabbix agentless SSH checks.

In environments where Zabbix agent installation is forbidden either by company policies or due to restrictions on the monitored device, we can utilize one of the multiple agentless metric collection methods. One such type of metric collection method is Zabbix SSH checks.

Collect metrics with Zabbix SSH checks:

  • SSH checks are completely agentless
  • SSH checks can be executed by Zabbix server or Zabbix proxy

  •  SSH checks support Password or Public key authentication
  • Multiple commands can be executed one after another

Check out the video to learn how to collect metrics by using SSH checks.

How to collect metrics by using SSH checks:
 
  1. Navigate to Configuration → Hosts and find your host
  2. Click on the Items button next to the host name
  3. Press Create item button
  4. Provide item NameKey and select the Type of information
  5. Select the required Authentication method
  6. Enter the authentication parameters
  7. Populate the Executed script field with your SSH command
  8. Click the Add button
  9. Wait for the data to get collected
  10. Navigate to Monitoring → Latest data and find your Host and item
  11. Check if the metric has been collected successfully

Tips and best practices:
  • Zabbix preprocessing can be used to transform the collected metrics
  • A dedicated OS user can be defined and used for Zabbix SSH checks
  • SSHKeyLocation configuration parameter defines the location of the public and private keys for Public key authentication
  • It is recommended to use libssh version >= 0.9.5 

The post Handy Tips #20: Agentless metric collection with SSH checks appeared first on Zabbix Blog.

Handy Tips #19: Preventing alert storms with trigger dependencies

Post Syndicated from Arturs Lontons original https://blog.zabbix.com/handy-tips-19-preventing-alert-storms-with-trigger-dependencies/18696/

Prevent receiving a flood of unwanted alerts and receive only the most critical notifications by defining trigger dependencies.

Every IT infrastructure has multiple elements, failure of which can cause a cascading set of problems across the particular infrastructure segment. It is important to prevent an unwanted alert storm and highlight only the root cause problem within the problem chain.

Define trigger dependencies to prevent alert storms:

  • Only the most critical problems will be displayed in Zabbix
  • Dependent triggers will not generate problems until the parent trigger is in an OK state

  • Each trigger can have multiple trigger dependencies
  • Trigger dependencies can be defined between triggers on different hosts

Check out the video to learn how to define trigger dependencies.

How to define a trigger dependency:
 
  1. Navigate to Configuration → Hosts
  2. Find the host for which you will define the trigger dependency
  3. Click on the triggers button next to the host
  4. Open the trigger for which you will define the dependency
  5. Click on the Dependencies tab
  6. Click add and select the host containing the parent trigger
  7. Select the trigger on which the current trigger will depend on
  8. If required, add more trigger dependencies
  9. Click the Update button
  10. Simulate a problem to test the dependency
  11. Navigate to Monitoring → Problems and observe the trigger dependency behavior

Tips and best practices:
  • The dependent trigger will only be re-evaluated once the related item receives new metrics
  • Trigger dependency may be added between host triggers as long as it wouldn’t result in a circular dependency
  • A trigger dependency chain between multiple hosts can be created
  • Zabbix will not execute actions for the dependent trigger if the parent trigger is in a problem state

The post Handy Tips #19: Preventing alert storms with trigger dependencies appeared first on Zabbix Blog.

Top 10 reasons to migrate to Zabbix 6.0 LTS by Dmitry Krupornitsky / Zabbix Summit Online 2021

Post Syndicated from Arturs Lontons original https://blog.zabbix.com/top-10-reasons-to-migrate-to-zabbix-6-0-lts-by-dmitry-krupornitsky-zabbix-summit-online-2021/18445/

Today we will take a look at the top 10 reasons to migrate to Zabbix 6.0 LTS. We will discuss features and changes included not only in Zabbix 6.0 LTS but also in intermediate major versions – Zabbix 5.2 and Zabbix 5.4.

The full recording of the speech is available on the official Zabbix Youtube channel.

High availability

With Zabbix 6.0 LTS, native support for Zabbix server high availability clusters is finally here. High availability setups can protect you from software and hardware failures and allow you to minimize downtime while performing maintenance tasks. Before Zabbix 6.0 LTS, users were required to use a dedicated piece of clustering software to enable high availability. Most users used a combination of Corosync + pacemaker software. This required additional knowledge related to these tools, to ensure a proper high availability cluster setup, configuration, maintenance, and other tasks related to managing your Zabbix high availability cluster. You could also use other 3rd party vendor solutions, but such solutions also require additional knowledge and in many cases incur additional licensing costs.

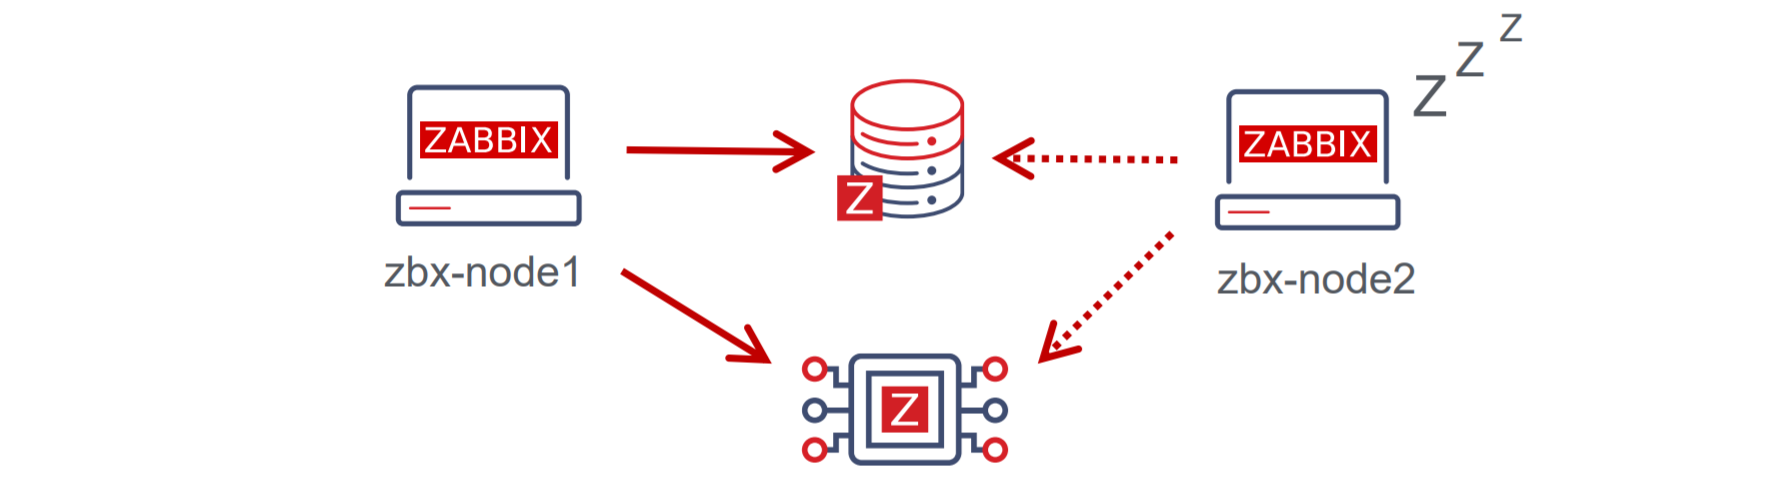
The native Zabbix server high availability cluster is an opt-in solution that provides high availability for the Zabbix server component. This solution consists of multiple Zabbix server instances – nodes, where each node is configured separately and uses the same database. Each node has two modes of operation – active or standby. Only a single node can be active at a time. The standby nodes do not perform any data collection, data processing, or any other Zabbix server activities. The standby nodes do not listen for connection on ports and have a minimal number of connections established to the Zabbix backend database. The high availability nodes are compatible with one another across different minor Zabbix server versions.

Learn how to deploy your own Zabbix server high availability cluster by following the steps provided in our Zabbix Summit blog post dedicated to this topic.

New Zabbix interface options

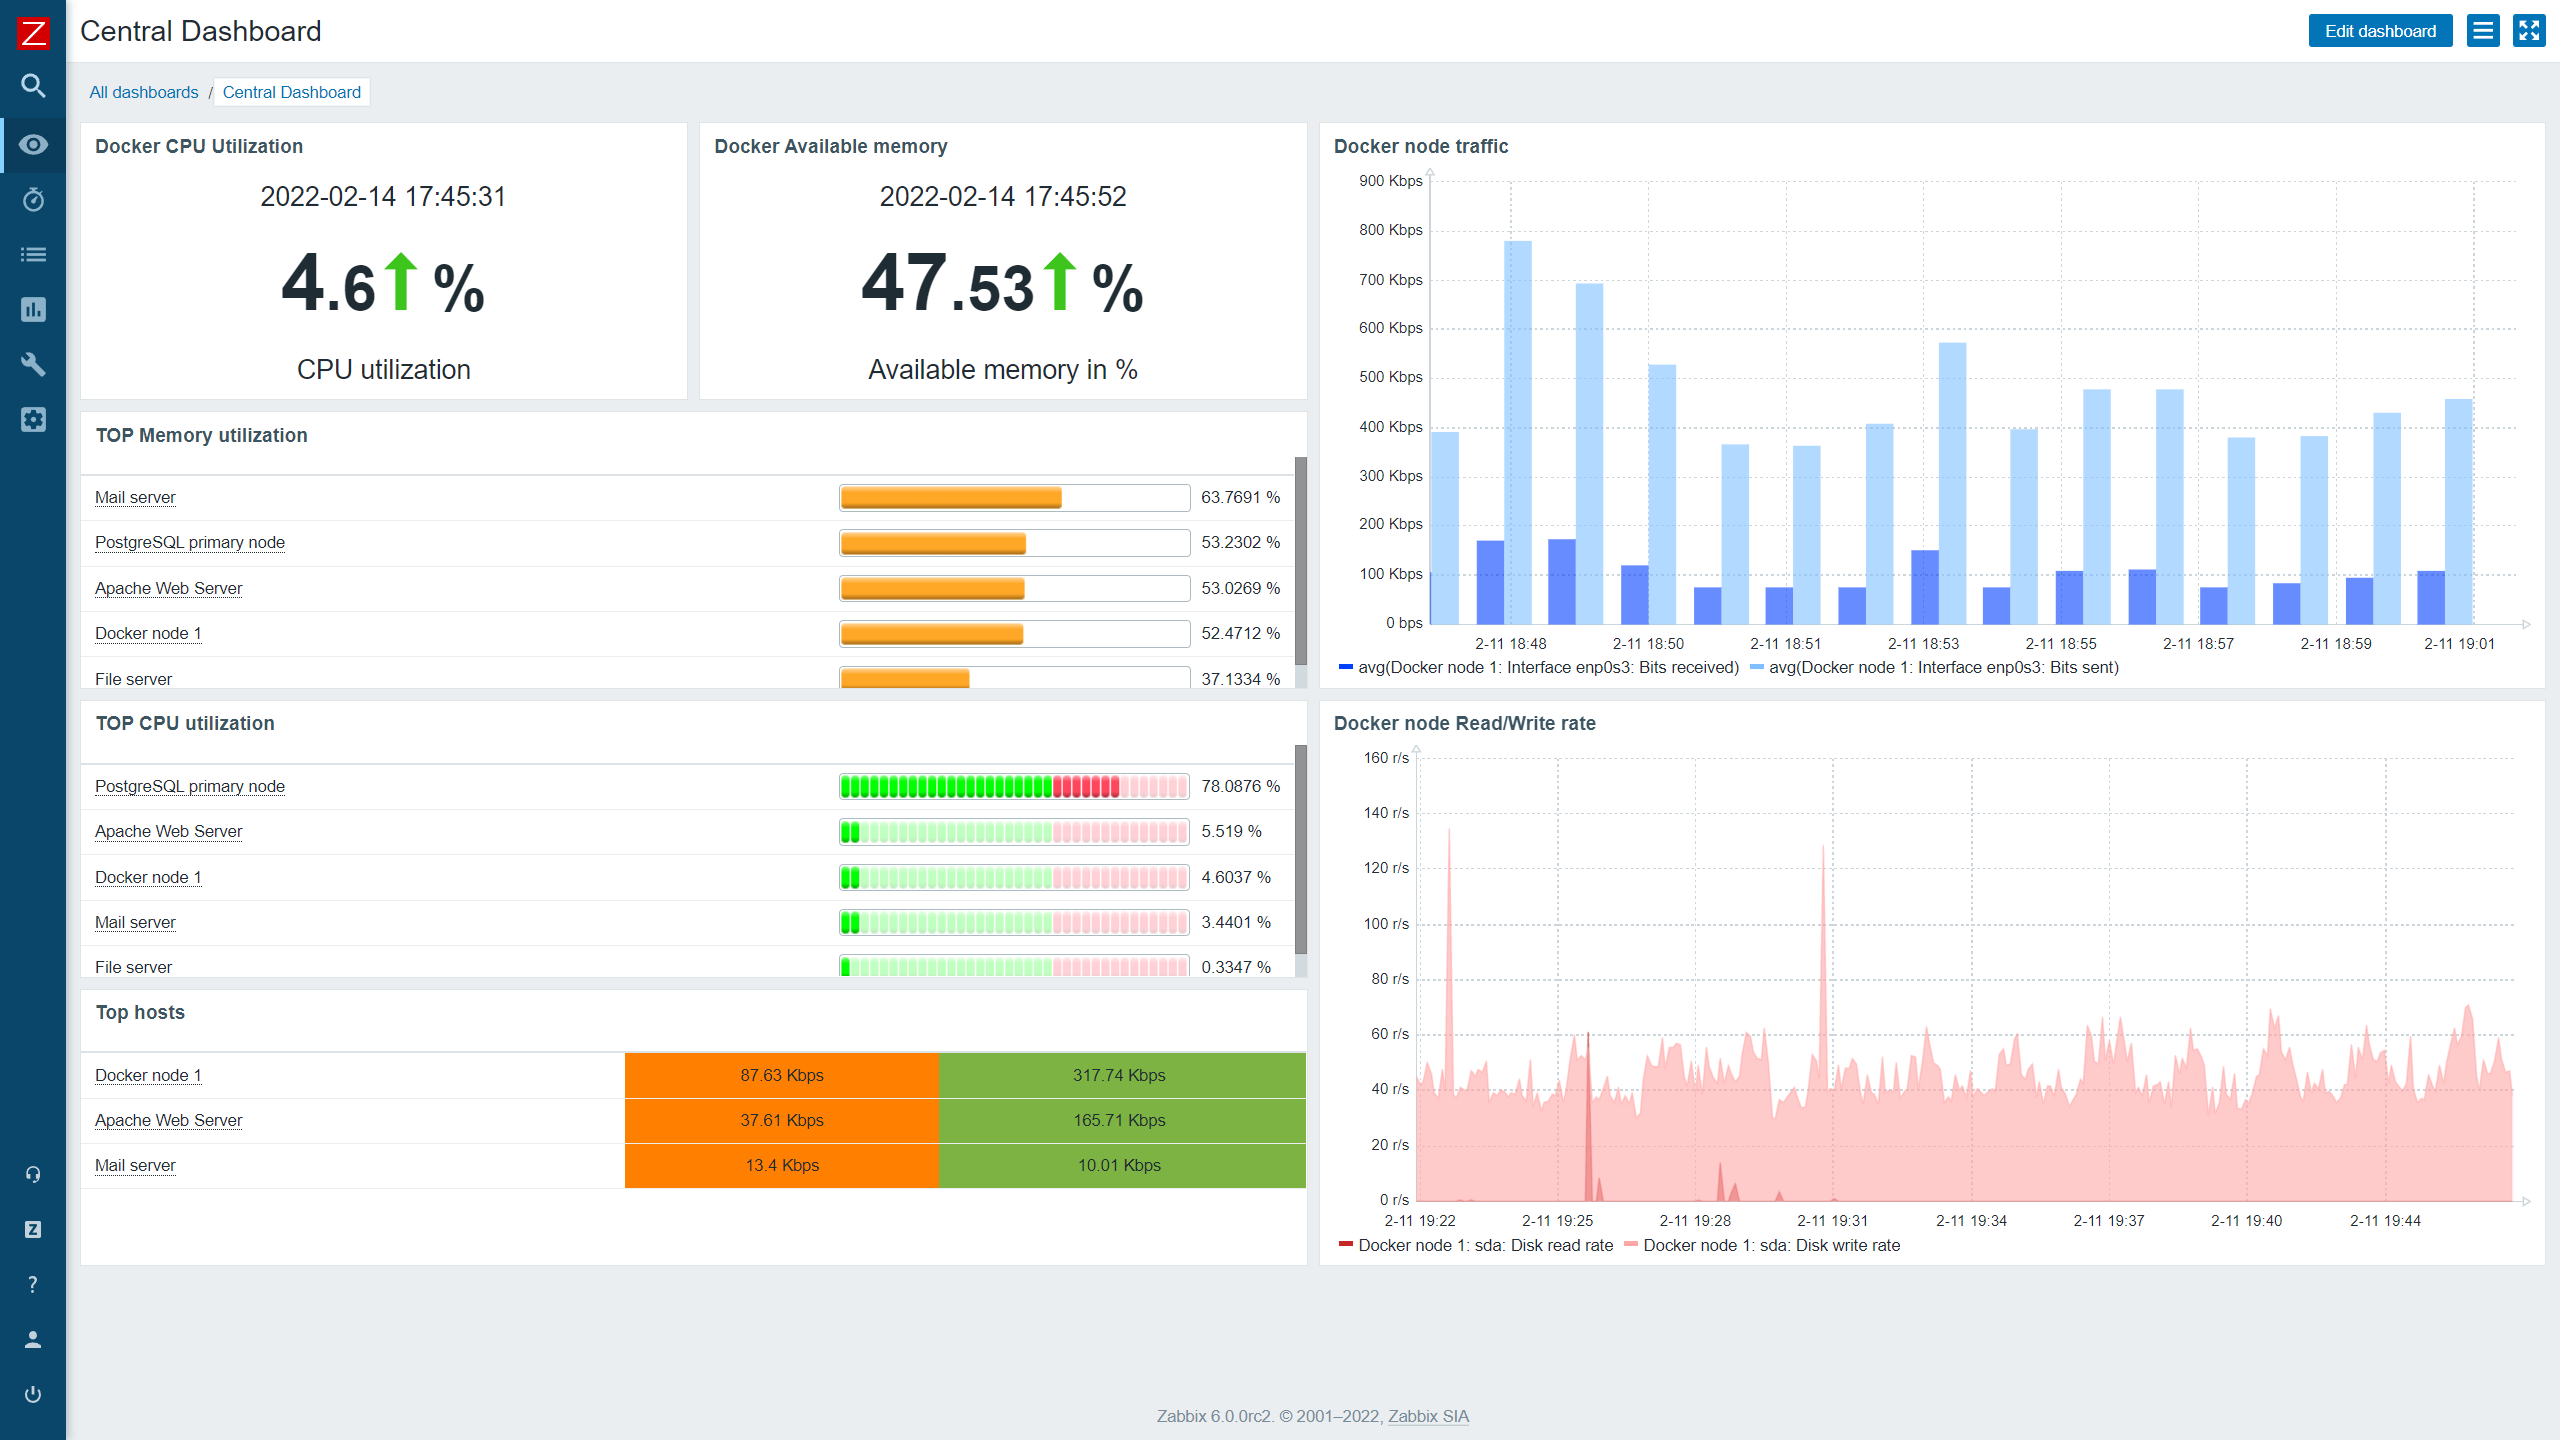
Zabbix 6.0 LTS provides multiple Zabbix interface improvements. One of the major changes that the users will notice when switching to Zabbix 6.0 LTS is the migration from screens to dashboards. The screens will be migrated to dashboards automatically during the upgrade. Dashboards consist of multiple highly customizable widgets, which can be placed on a dashboard with a click of a button. With Zabbix 6.0 LTS many new widgets will be available for different purposes – more flexible views of your metrics with the Single item value widget, a Geomap widget for a better overview of your infrastructure state, Top N/Bottom N views provide a whole new way to look at your metrics and more.

Now you will be able to save your favorite problem filters and access your filters in tabs for more simple filtering of the commonly accessed problem views.

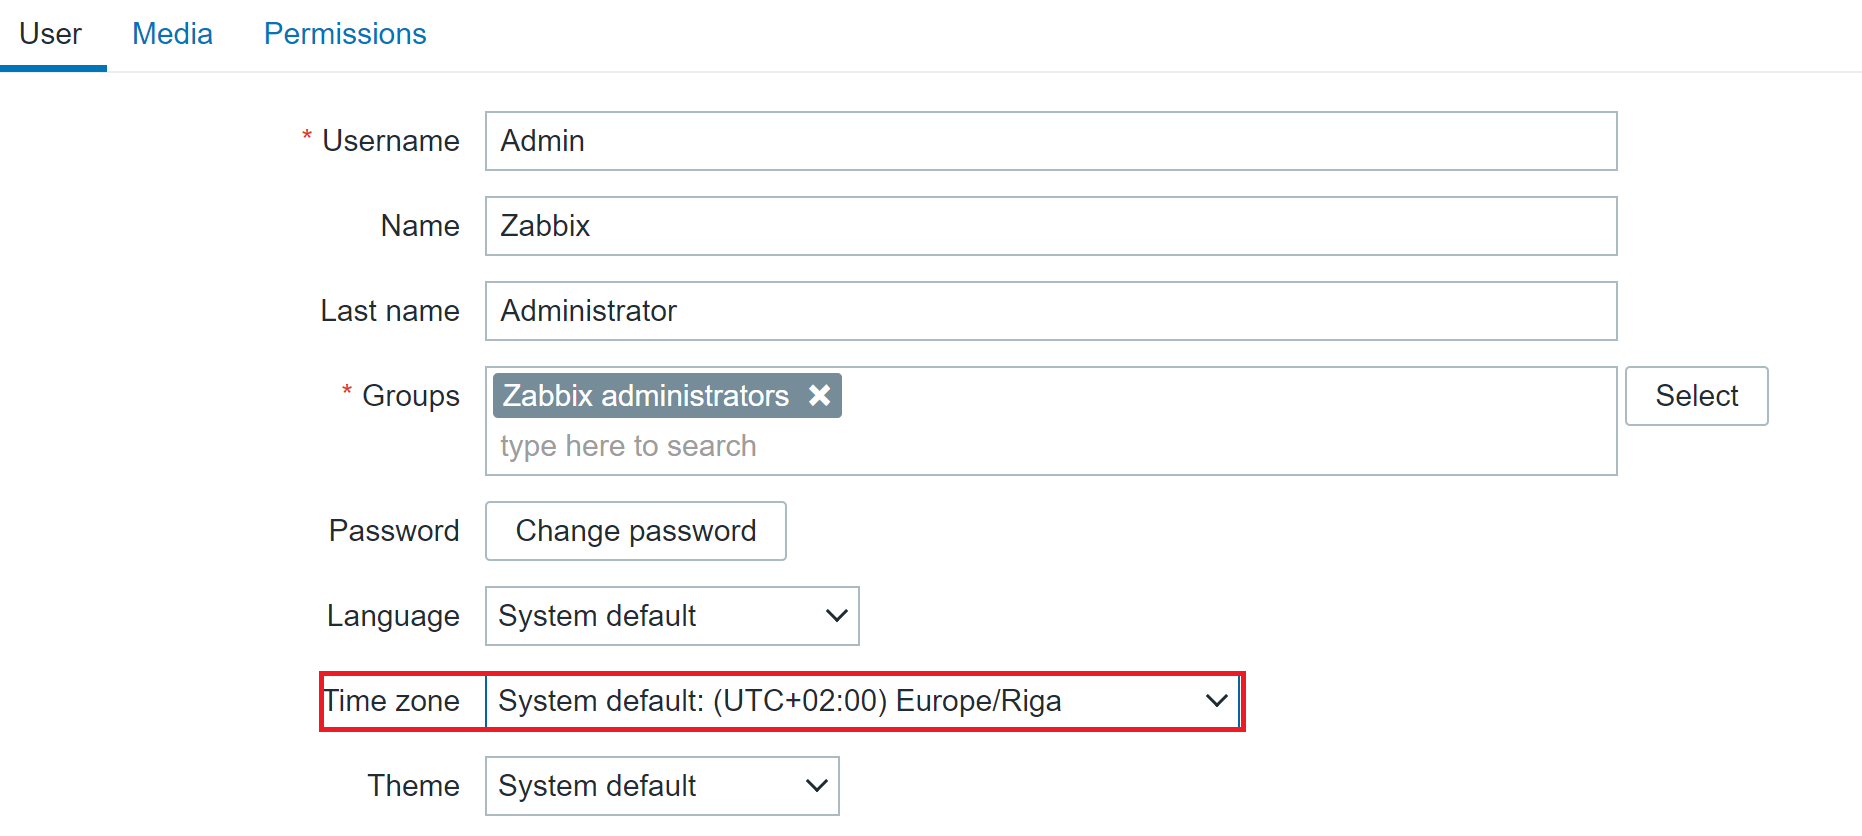
Zabbix 6.0 LTS introduces timezone configuration on a per-user basis. Users can now have their preferred timezone configured via the user settings in the Zabbix frontend. The same is also true for language – this can also now be configured individually for each user.

The Zabbix frontend is now more customizable than ever. There are several ways in which you can customize your Zabbix frontend:

  • Replace the Zabbix logo with your company’s branding
  • Hide links to Zabbix support/integration pages
  • Set a custom help page link
  • Change the copyright notice in the footer of the frontend.

Implementing these changes requires customizing the underlying PHP code – we tried to make this as simple and accessible as possible, so you can quickly make the necessary changes yourself.

There are also many other Interface improvements, such as multi-page dashboards, third-level menus, graph improvements, and many others.

Improved security

Security is always something that we focus on when developing Zabbix. Zabbix 6.0 LTS brings many new security-related improvements and features:

  • User roles allow you to define roles with granular permissions related to the frontend access and the actions that each user role is permitted to perform
    • Roles are still based on user types – Zabbix User, Admin, Super admin, and user type restrictions still apply, but can be further customized per each role
    • User group to host group permissions (Read, Read/Write, Deny) still need to be used in combination with roles to ensure granular access to your data
    • For example, now we can define users that have access to host configuration but restrict access to other configuration sections.

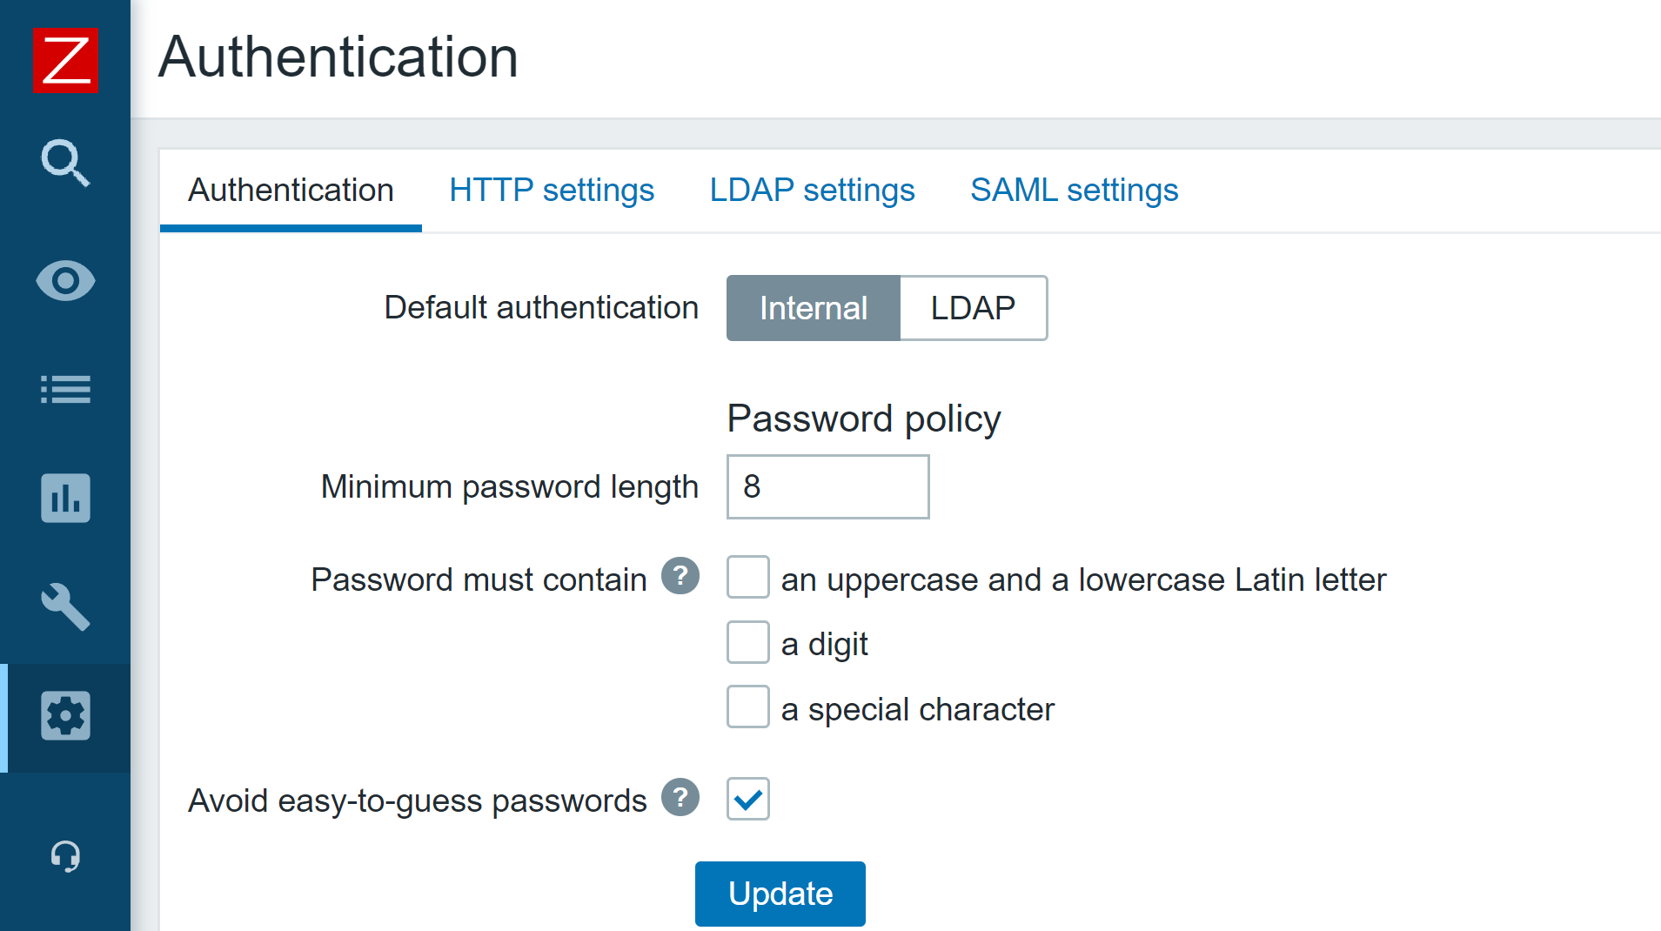
In Zabbix 6.0 LTS it is possible to define custom password complexity requirements for Zabbix frontend logins. We can define password length/complexity policies and prohibit the usage of easy to guess common passwords.

The Zabbix API has also seen some security improvements. Now it is possible to generate a persistent API token for a particular user, define an expiration date and use the token in your API calls, without the need to regularly re-issue a new API token.

Zabbix 5.2 release also added the ability to store sensitive information in an external vault. As of the release of Zabbix 6.0 LTS, only HashiCorp Vault is supported, but CyberArk Vault support is also coming in Zabbix 6.2 release.

A set of architectural and structural measures have been taken to completely restructure the Zabbix Audit log. The updated Audit log entry contains records of all configuration changes made by the Zabbix server and Zabbix frontend. The new Audit log also contains additional filtering options, such as filtering Audit log entries based on the operation during which the changes were performed. The new Audit log is not only more detailed but also reworked with minimum performance impact in mind.

Scalability improvements

Many scalability improvements have been introduced between the Zabbix 5.0 LTS release and Zabbix 6.0 LTS release. These improvements not only improve the performance of existing Zabbix instances but also lay the groundwork for the design of upcoming features in later releases.

Previously, trend-based trigger functions would always use database queries to obtain the required data. Starting from Zabbix 5.4, a new type of cache – Trend function cache, has been introduced. This cache stores the results of calculated trend functions. When processing the trend functions, the Zabbix server will check the Trend function cache for the cached results. In case of failure, the Zabbix server will read the data from the database and cache the results.

The scalability improvements allow for better parallel data processing on Zabbix servers with heavy loads. Zabbix Instances with tens of thousands or more new values per second will greatly benefit from the improved performance.

The introduction of the graceful startup of the Zabbix server can help you improve performance and prevent unwanted downtimes, especially with large distributed environments. Whenever a Zabbix server gets started up after downtime, the existing Zabbix proxies start sending the data backlog to the Zabbix server. it is extremely important to maintain the stability and performance of the Zabbix server during this time window. Graceful startup improves the Zabbix server data backlog handling logic during such situations.

To prevent unwanted delays and other issues when using zabbix_get and zabbix_sender command-line tools, it is now possible to define a custom Timeout parameter for these tools.

Advanced business service monitoring

The new Busines service monitoring features allow Zabbix users to not only define complex service trees but also receive alerts in situations where the status of a business service has been changed. This is valuable to every user that wishes to monitor their business services, no matter how simple or complex the service is.

Combined with a large number of new and improved service status calculation rules. By defining custom service weights and advanced service status propagation rules, the business services can be defined in an extremely flexible fashion. Services are also not linked to individual triggers anymore, instead, we use tag-based service mapping to map our services to problem events.

The service functionality has also received scalability improvements. Zabbix can support the monitoring of over 100 000 business services. The scalability improvements have been implemented from both the UI/UX and the performance perspectives.

The old all-or-nothing business service permission approach has been redesigned to a granular read/write permissions for individual business services. This is not only an improvement from the security perspective, but also adds the ability to define services in a multi-tenant fashion, where each tenant has access only to the services that they own.

With the redesign of the business services, we have added the support for root cause analysis, allowing users to see the underlying problem which caused a particular service to change its state.

You can read more about Business service monitoring in our Zabbix Summit blog post dedicated to this topic.

Tag and template improvements

Item applications have been replaced with tags. This design decision adds consistency to filtering, mapping, grouping, and other tag-related functions when it comes to different Zabbix entities. Tags can also be used to provide additional information related to your entities in a manner that is much more flexible than it was with applications.

Universal template IDs introduced for each of the template elements allow you to define much more robust template management workflows, especially when you combine this with a CI/CD template management approach. These IDs are unique and can be used to match a particular template entity, such as item, trigger, graph, and so on. By utilizing the Universal template IDs, Zabbix now understands which entity we are trying to update, which entity no longer exists, whether it is a new entity or we are adjusting an existing entity. The default template export format is now YAML, though JSON and XML formats are still supported. This was done to improve the template management usability since the YAML format is more user-friendly and easier to edit manually. All of the official Zabbix templates available on the Zabbix git page have already been converted to the YAML format.

The redesign of the templates has also allowed us to improve the visualization of the changes made when importing a template. Now users can see the list of changes in a diff-like display and understand the impact that the template import will have on the  Zabbix entities.

Value maps have been moved to host and template levels. This is another design decision that we made to enable support for fully self-contained templates, that are easy to manage and deploy, and can be easily imported into different Zabbix environments. While global value maps might be easy to manage in small environments, this is not the case in larger environments, where different teams are working with a single or between multiple Zabbix instances. Therefore, the global value maps have been removed.

Reporting and visualization

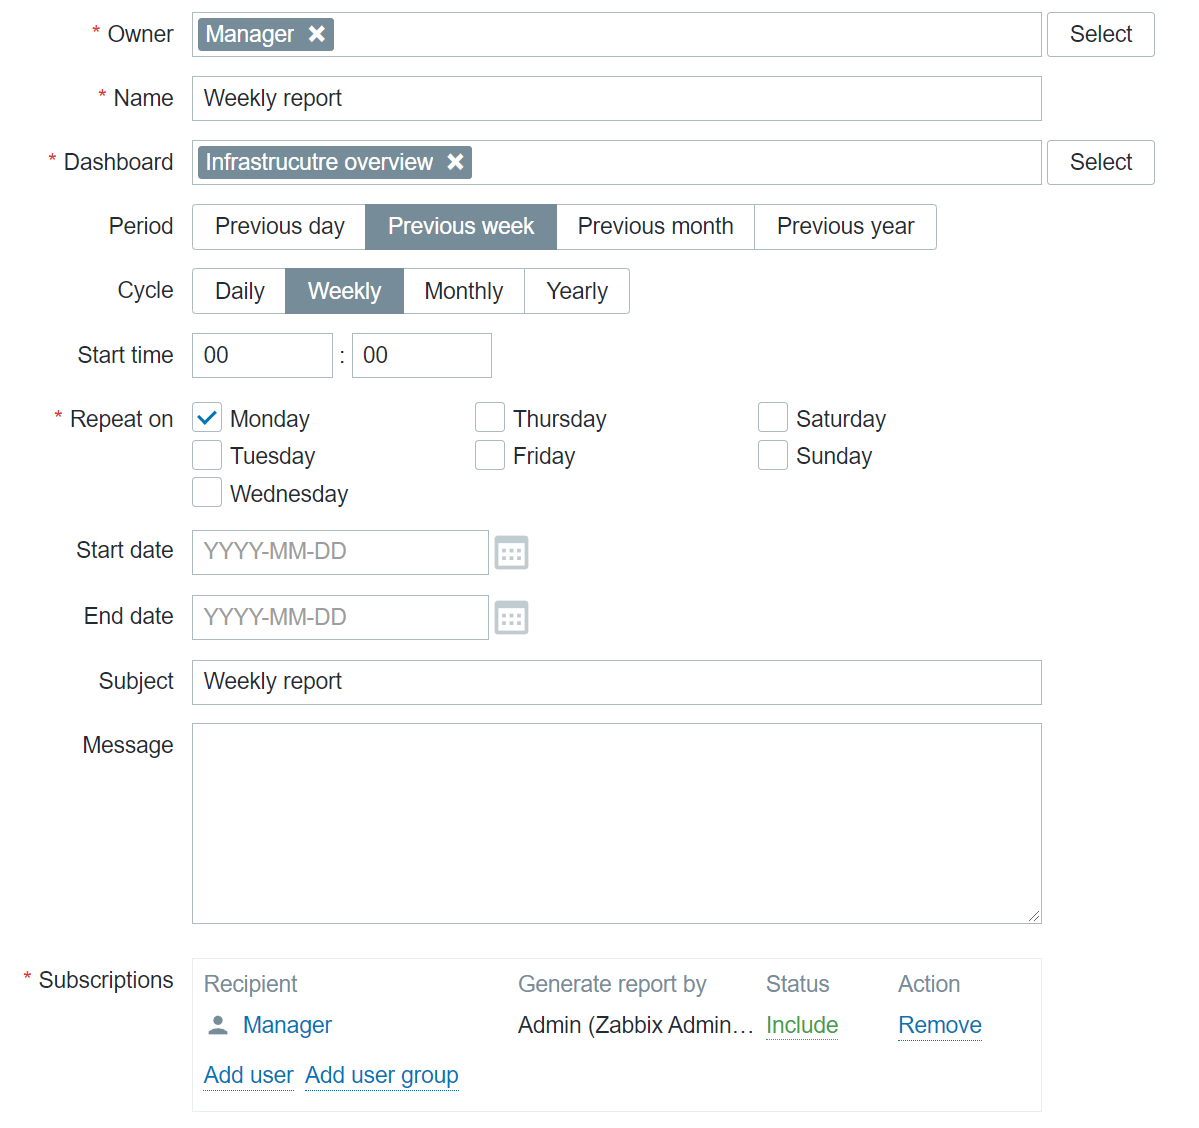
With the addition of Scheduled reports functionality, any dashboard can now be converted into a scheduled report. While this feature was originally added in Zabbix 5.4, with the release of Zabbix 6.0 LTS and a set of new widgets, the reporting functionality has gained a lot of additional value that these widgets grant specifically from the reporting perspective. Users can create scheduled reports and receive them in their mailbox at a specific time either on a daily, weekly, monthly, or yearly basis. The time period for which the report will provide the information can also be selected.

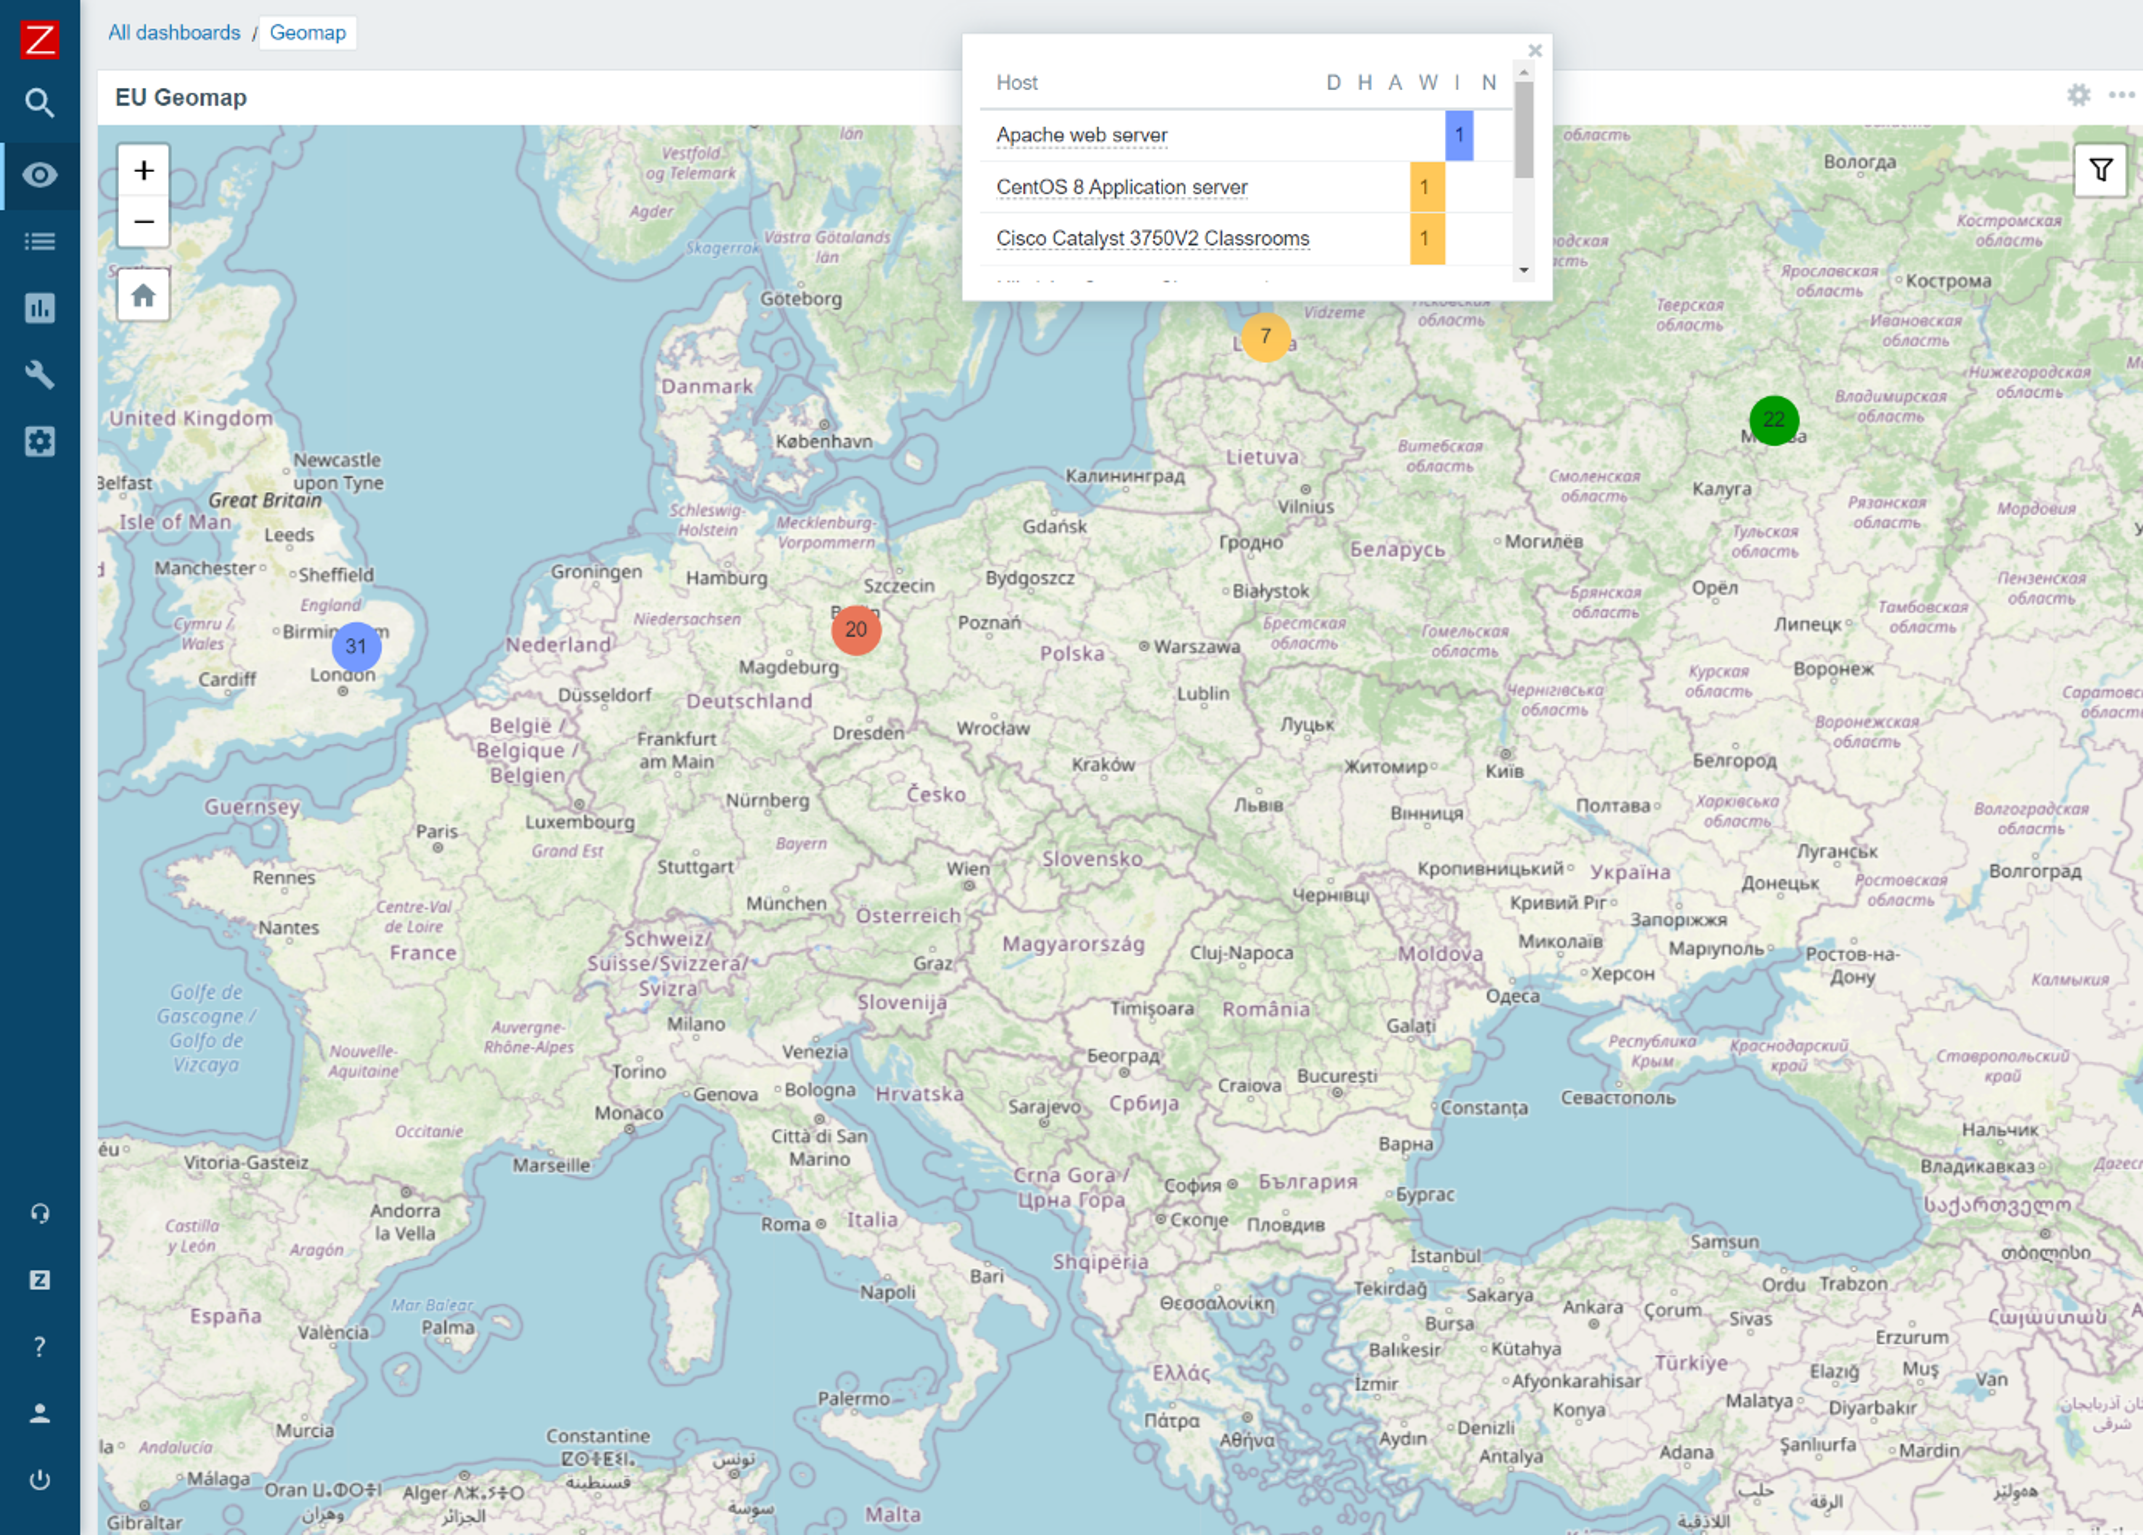
The new Geographical map widget allows you to quickly deploy a geomap with an overview of the state of your infrastructure. The geomap widget supports filters, so we can display only a particular part of your infrastructure. Zabbix uses an open-source Javascript interactive maps library called Leaflet and supports multiple map providers such as OpenStreetMap, OpenTopoMap, USGS US Topo, and more. Users also have the ability to define and use a custom map tile provider. The map will display your infrastructure and also highlight any detected problems as well as display problem counters. This is a major step forward from the old approach, which required users to use the regular map functionality together with Zabbix API scripting, to provide information on a geographical map.

Advanced problem detection

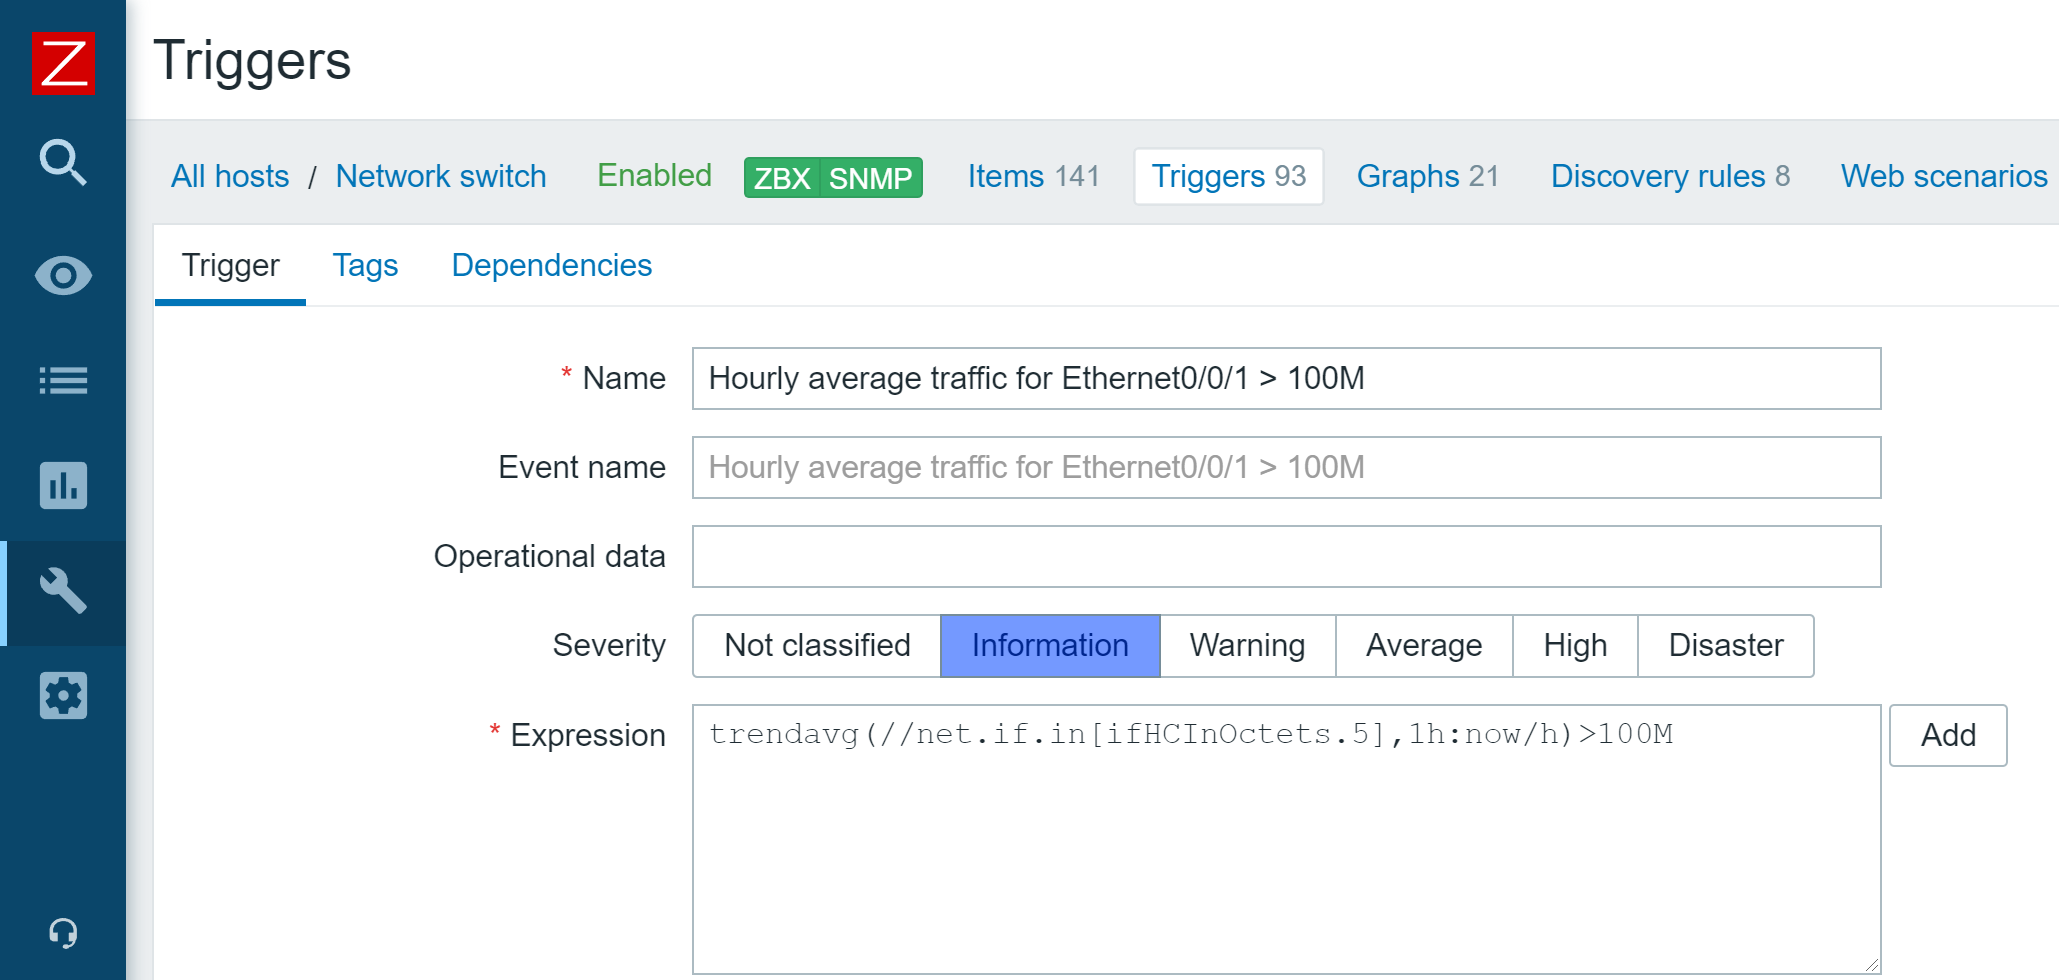
Zabbix 5.4 release introduced a new unified syntax for defining trigger expressions, calculated, and aggregated items. There are multiple benefits that come with the new trigger syntax. First off – the syntax is now unified and can be used for defining triggers, calculated items, and providing values in maps or graph names. The syntax also has a more functional approach, instead of being object-oriented. This allows us to solve many complex use cases, for example dynamically calculate or aggregate a value from all hosts tagged with a specific tag or belonging to a specific host group. Aggregated item type has also been removed and users can now define aggregate checks under the calculated item type.

New monitoring functionality and integrations

As with every major release, Zabbix 6.0 LTS comes with a set of new items and improves the functionality of already existing items:

  • It is now possible to monitor SSL certificate validity and expiration data, such as the expiry date, issuer, version, subject, and more
  • New Zabbix Agent 2 metrics allow you to collect file owner information, file properties, extended interface info, extended TCP info, SHA2 hashes for files, and more
  • New templates for NGINX+, HPE/Dell servers, CISCO ASAv, Cloudflare

Finally – Zabbix 6.0 LTS

Many of our users and customers prefer sticking with the LTS releases instead of upgrading between each major version. As with every LTS release, there are major benefits to sticking with Zabbix 6.0 LTS:

  • LTS release receive thorough testing and full long term support
    • 3 years of full support – general, critical, and security fixes/improvements
    • 5 years of limited support – critical and security fixes

Questions

Q: Which of the current versions are still supported and for how long are they going to remain supported? What updates can we expect these versions to receive?

A: Currently we have three supported major versions available. Zabbix 5.4, which will not be supported after the release of Zabbix 6.0 LTS. We also still provide support for Zabbix 5.0 LTS and Zabbix 4.0 LTS. Zabbix 5.0 LTS will continue receiving full support until the middle of 2023 and limited support until the middle of 2025, while Zabbix 4.0 LTS will receive limited support until November 2023.


Q: Could you elaborate on how tags are more flexible than applications and are there any other benefits to using tags?

A: Zabbix already supports tags for most of the essential Zabbix objects, such as triggers, hosts, host prototypes, and templates. With the introduction of tags for items, tags can now be found everywhere. This way you can have tags that provide different additional information and assign values for your objects. Tags have several usages – for example, we can use them to mark events. If we have an item with a tag, this tag will mark any problem related to this item. Problem events will inherit tags from the whole tag chain – hosts, templates, triggers, items, and more. Further down the line, we can use our actions to react to specific tags. If you recall, Business services are also mapped to problems based on the tag mapping. Of course, tags can also be used for filtering and grouping different Zabbix objects.


Q: Is there a guideline to the migration process from an older version to Zabbix 6.0 LTS? Is there a change list that I can look at to see what other features have received an overhaul?

A: Regarding the upgrade itself – our documentation contains guidelines for both upgrading from packages and upgrading from sources. The documentation may also contain upgrade notes regarding any extra steps or precautions required when upgrading to a particular version. Regarding the feature changes – we recommend reading through the major version release notes. For example, if you’re upgrading from Zabbix 5.0 LTS to Zabbix 6.0 LTS, make sure to familiarize yourself not only with the Zabbix 6.0 LTS release notes, but also read through the Zabbix 5.2 and Zabbix 5.4 release notes, since changes introduced in these versions will also be a part of Zabbix 6.0 LTS.

The post Top 10 reasons to migrate to Zabbix 6.0 LTS by Dmitry Krupornitsky / Zabbix Summit Online 2021 appeared first on Zabbix Blog.

Handy Tips #18: Distributed monitoring with a lightweight Zabbix SQLite proxy

Post Syndicated from Arturs Lontons original https://blog.zabbix.com/handy-tips-18-distributed-monitoring-with-a-lightweight-zabbix-sqlite-proxy/18401/

Distribute your monitoring by deploying a lightweight Zabbix SQLite proxy in 5 minutes.

Monitoring remote data centers can be challenging when the data collection is performed from a single location. Distributed monitoring can help us resolve potential issues such as loss of data in case of network outages, horizontal scalability, and much more.

Distribute and scale your monitoring with a lightweight Zabbix SQLite proxy:

  • Collect data in case of network outages between data centers
  • Deploy an unlimited number of Zabbix proxies

  • SQLite proxies are perfect for running on embedded hardware
  • Proxy connections can be encrypted

Check out the video to learn how to deploy a Zabbix SQLite proxy.

How to deploy a Zabbix SQLite proxy:

  1. Install the Zabbix repository and Zabbix proxy packages
  2. Locate and open the zabbix_proxy.conf configuration file
  3. Populate the Server, Hostname, and DBName parameters
  4. Enable and start the Zabbix proxy
  5. Open Administration Proxies and click the Create Proxy button
  6. Provide the proxy name and click the Add button
  7. Open the Zabbix agent configuration file
  8. Populate the Server and/or ServerActive parameters
  9. Restart the Zabbix agent
  10. Navigate to Configuration Hosts and open your host
  11. Select the proxy in the Monitored by proxy field and click the Update button
  12. Wait for the proxy to receive the configuration changes
  13. Navigate to Monitoring Latest data
  14. Check if the Zabbix proxy has collected the metrics 

Tips and best practices:
  • By default, Zabbix proxies receive configuration updates once an hour
  • Each Zabbix Proxy can use a different database engine
  • Monitor the proxy performance with the Zabbix proxy templates
  • Zabbix proxies will perform preprocessing tasks before sending the data to the Zabbix server

The post Handy Tips #18: Distributed monitoring with a lightweight Zabbix SQLite proxy appeared first on Zabbix Blog.

Handy Tips #17: Master and dependent items for bulk metric collection

Post Syndicated from Arturs Lontons original https://blog.zabbix.com/handy-tips-17-master-and-dependent-items-for-bulk-metric-collection/18291/

Collect metrics in bulk and reduce monitoring performance overhead with master and dependent items.

Data collection efficiency is an important aspect of monitoring. We need to ensure that our monitoring approach has a minimal impact both on the monitoring system and the system that is being monitored.

Improve your metric collection efficiency and reduce the performance overhead with master and dependent items:

  • Dependent items can extract data from a master item by using preprocessing
  • Combine multiple preprocessing steps for best results

  • Up to 3 dependency levels are supported
  • Up to 29999 dependent items for a single master item

Check out the video to learn how to define master and dependent items

How to define master and dependent items:


  1. Navigate to ConfigurationHosts and create a new host representing your API endpoint
  2. Input the Host name, Host group, and add an arbitrary interface
  3. Click the Add button
  4. In ConfigurationHosts Click on the Items button next to the host
  5. Click the Create item button
  6. Select the Type HTTP agent and populate the URL with your API endpoint address
  7. Select the Type of informationText
  8. Click the Add button
  9. Create another item of type Dependent item
  10. Define item Key and item Name with arbitrary values
  11. Open the Preprocessing tab
  12. Use a preprocessing step (ex. JSONPath) to extract the required value from the master item
  13. Click the Add button
  14. Navigate to MonitoringLatest data and filter by your host
  15. Observe the collected metrics

Tips and best practices:
  • Dependent items don’t have their own update intervals
  • Dependent item values get updated as soon as the master item receives a new value
  • Deleting a master item will also delete the items that depend on it
  • Item of any type can be used as a master item