Monitoring a Windows server helps verify and keep track of reboots, disk space, memory, CPU, communication loss, and high bandwidth consumption within the server – in fact, anything unusual that may require attention. In this post, we’ll see how to install and configure the Zabbix server and Zabbix agent on Windows, highlighting the key points that will keep your system running smoothly.
Check Zabbix server version
First, check which version of Zabbix server you’re using. This can be verified from the frontend in Reports > System information. In this example, we use version 7.0.9.
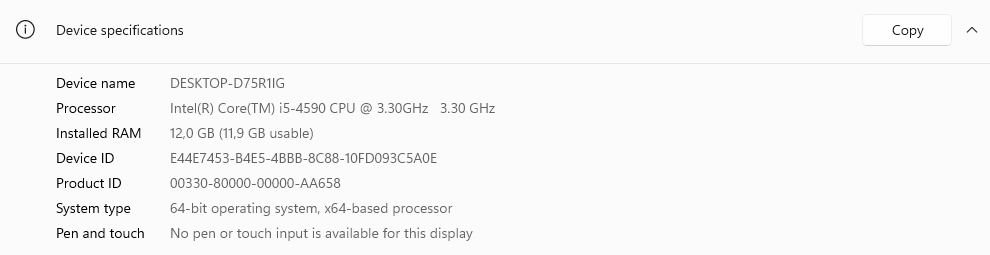
Before you begin, head over to your Windows server and verify the name and type of architecture.
This is critical to selecting the right agent during deployment.
Download the Zabbix agent
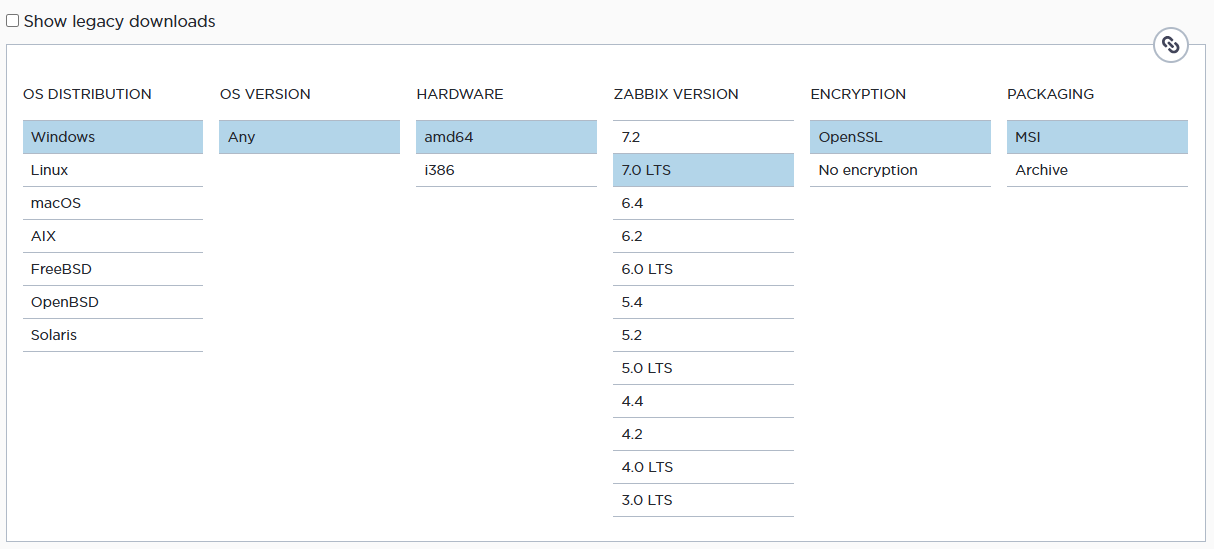
From the official Zabbix website, download the corresponding agent, taking into account the operating system (in this case, Windows), the hardware architecture (64 bits), the version of Zabbix server (ensuring compatibility with the version used), encryption (using OpenSSL as an encryption method), and the installation format (selecting the MSI file).
Select the current version of the release and download.
Install the Zabbix agent
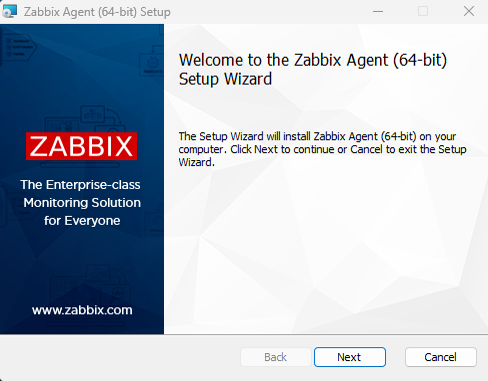
Start installing the Zabbix Agent on the Windows server.
Accept the terms and conditions.
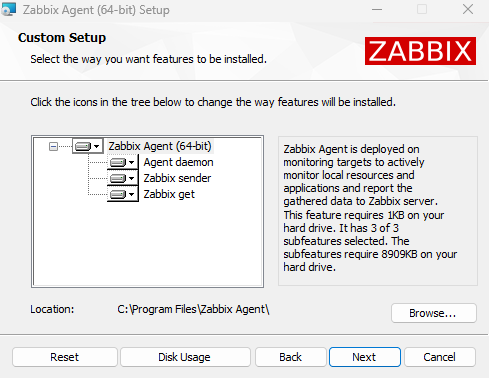
Check the components to be installed. You’ll need at least 8.70 MB of disk space.
The default installation path is C:\Program Files\Zabbix Agent\.
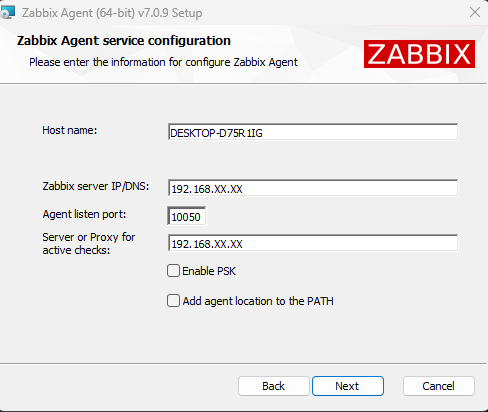
By default, the installer detects the name of the server. Enter the IP of your Zabbix Server. You can also use pre-shared keys.
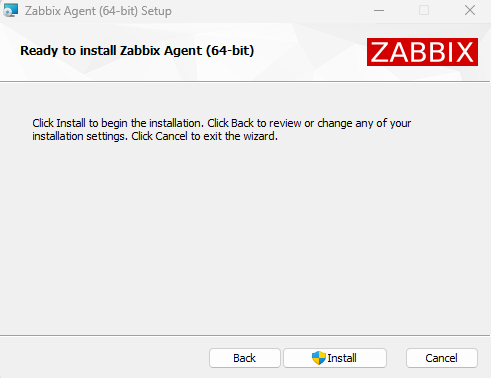
Start the installation and wait for it to finish.
Configure host in Zabbix Server
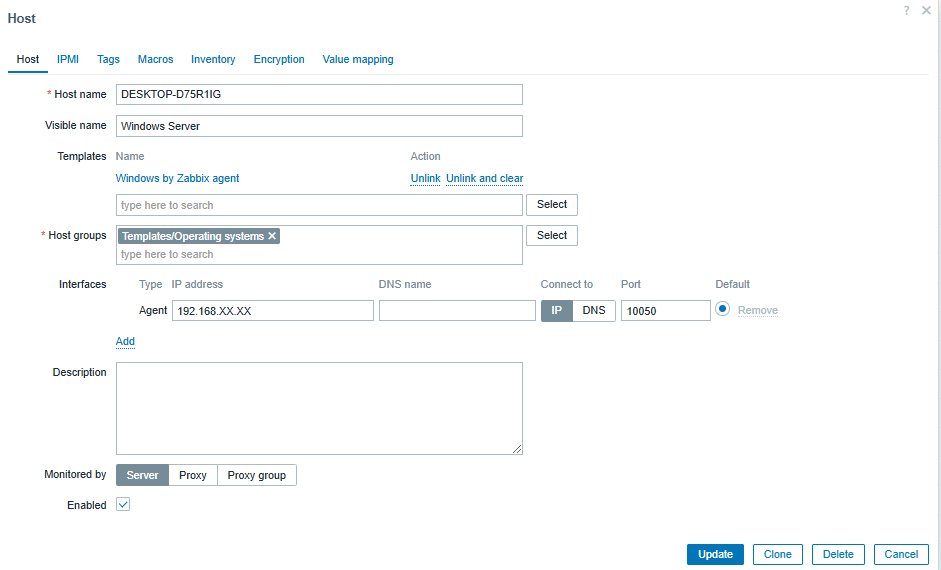
To set up a host on Zabbix Server, go to the Zabbix frontend and go to Data collection > Hosts.
Then, click Create host (located in the top right) and configure the following details:
• The hostname (DESKTOP-D75R1IG)
• An identifying display name (such as ‘Windows Server’)
• The template (select ‘Windows by Zabbix Agent’)
• The group (assigns the server to an appropriate group)
• The interface (choose the agent monitoring option and enter the IP of the server)
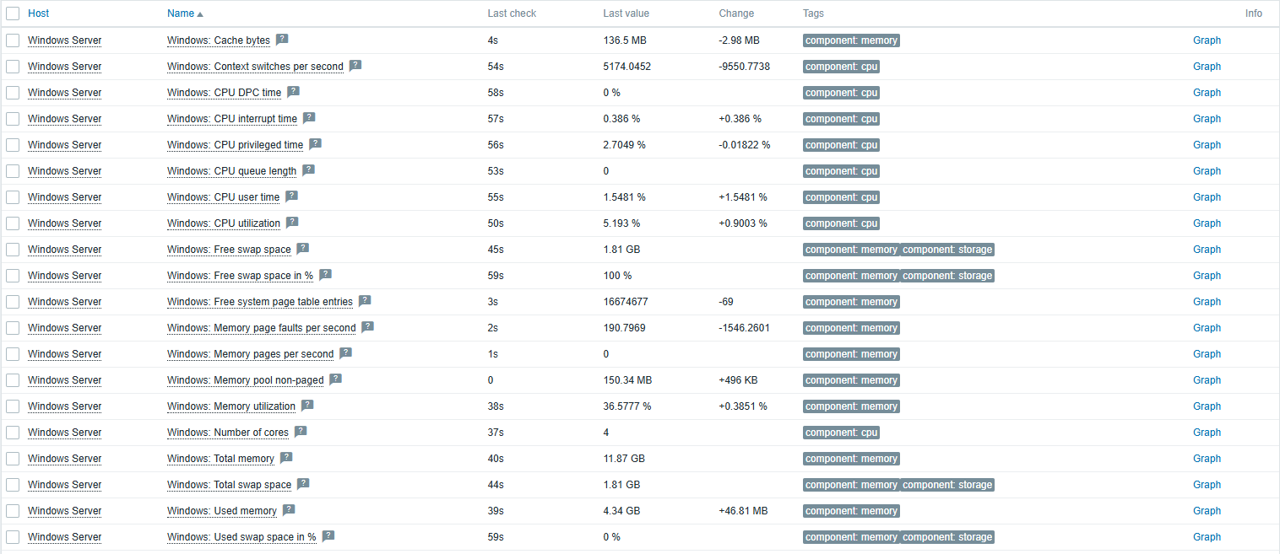
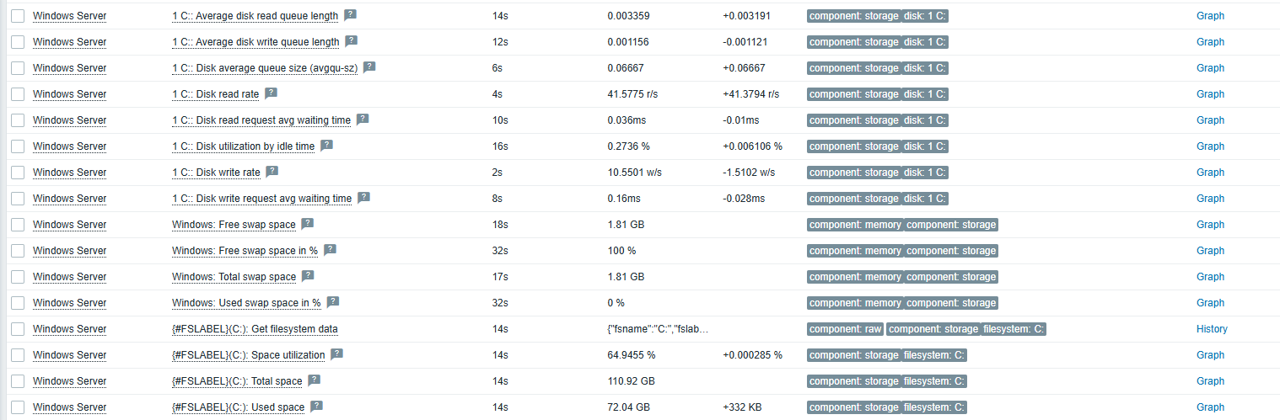
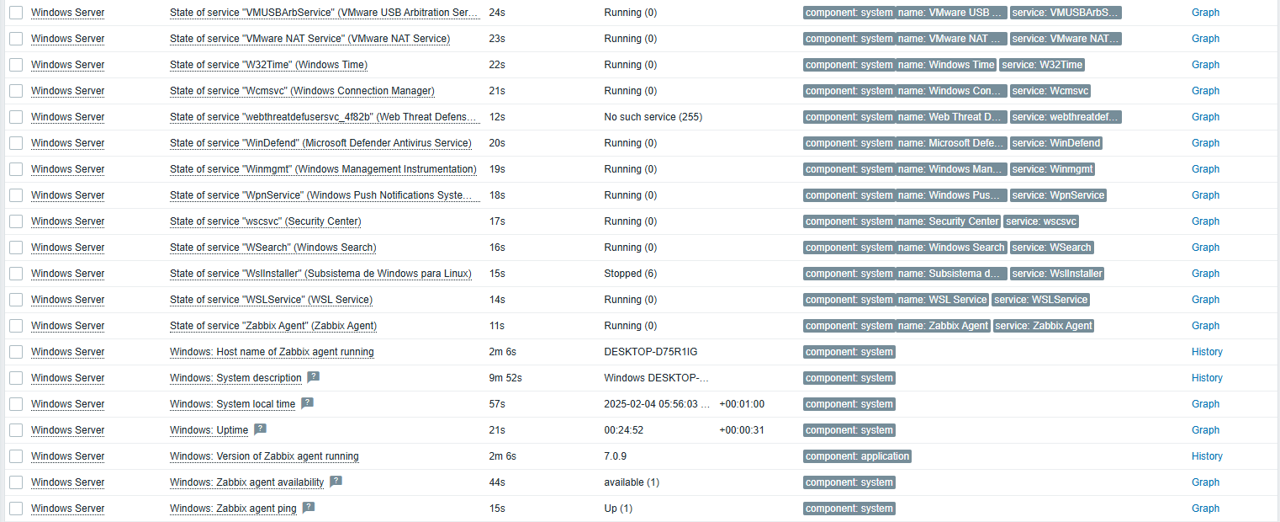
Monitoring and visualization
Once the host is configured, you will start receiving data from the server in Zabbix, including:
• Overall performance: CPU, memory, and disk status.
• Windows services and detailed host information.
• Bandwidth consumption
Conclusion
Zabbix provides an ideal template for a productive environments on Windows, making it a key tool for global monitoring of your servers.
In addition, you can extend and adapt the monitoring according to your needs, such as monitoring logs, ports, or specific events, while also checking for login failures or other critical issues in your systems.
Is Raspberry Pi 4 a goodbye or a good buy for running Zabbix? How is it performance-wise? Is it reliable? Here’s my nine-month review of it, with a splash of appliance/application performance monitoring.
In about April 2022 when it became clear that I am going to continue my home monitoring project, I bought a Raspberry Pi 4 to run the show. Here’s my opinion on how well it is suited for running Zabbix.
Installing Zabbix
Applying that delicious layer of Zabbix on top of your Raspberry Pi 4 cake is extremely straightforward, as just like for every other platform that Zabbix officially supports, they do have packages and instructions to set up what you’d like to run.
So many options to choose from!
After installing the packages, the next steps are just like with Zabbix running on any other platform, so I am not going to dive into that now.
Modifications to my Raspberry setup
As I do not need to run a graphical environment on my Raspberry, I did disable the graphical environment from starting at all to save some precious RAM and other resources.
After some time I did also purchase an external USB hard disk, as the memory card from where Raspberry Pi 4 runs its OS is not very snappy, especially with write operations, and can also run tight on free space.
Other than that, my Raspberry Pi 4 is running pretty much by default.
How about the performance?
The graphs that you are about to see are from nine months period of time, as that’s about as long I have had the device.
No problem with the CPU usage. It’s been creeping up a little bit over time though, as I have been adding new items to monitoring and also additional software, such as HomeBridge and Home Assistant.
It still has available memory, even though the device runs Zabbix server, MariaDB, Grafana, Mosquitto, Home Assistant and HomeBridge.
As you can see, the number of running processes has grown significantly as I have been adding other stuff than Zabbix.
It’s easy to see when I did switch from an internal memory card to an external USB drive. The disk I/O utilization percentage is hovering at very tolerable levels.
I/O latency has remained about the same.
With only Zabbix, MariaDB and Grafana running the device remained around the 55-60C area, but has been warming to about 70C with the additional software. Still not too bad.
Splash of APM
Have you ever wondered what happens to the memory usage of a wrapper shell script that runs other scripts in a loop and keeps doing that until it’s manually stopped? This happens, it’s boringly stable. The results are brought you to by Zabbix Agent 2 process discovery.
Really, it does not vary much.
But as I have been adding new stuff, clearly the OS needs to do some more swapping and even the script has more page faults than before.
There’s more than that to process discovery, but those were some examples.
Zabbix server itself is doing very well, here are some example stats.
My conclusion: Raspberry Pi 4 is an excellent Zabbix server for smaller environments and a very good Zabbix proxy candidate. It’s been rock solid.
This post was originally published on the author’s page.
Can you make sure your video streams are up with Zabbix? Of course, you can! By day, I am a monitoring technical lead in a global cyber security company. By night, I monitor my home with Zabbix & Grafana Labs and do some weird experiments with them. Welcome to my weekly blog about the project.
You might have a surveillance camera at home to record suspicious activities in your yard while you are away or so. Most of the time the cameras do work just fine but might require a hard reboot from time to time, for example, due to harsh weather, or not coming back after a network outage. A networked camera responding to ping does not 100% mean the camera is actually functional. I have seen our camera going black and refusing to connect to its stream even though it thinks it’s working just fine.
My post for this week is mostly to maybe give you a new approach for monitoring your cameras, not so much a functional solution as I’m still figuring out how to do this properly.
For example, I can connect to our camera via RTSP protocol and pass some credentials with it, so rtsp://myusername:[email protected]:443/myAddress
To figure out a connection address for your camera model, iSpyConnect has a nice camera database.
Playing the stream
To test if the video stream works, VLC and mplayer are good options; for visually verifying the stream works, try something like
or for those who like to use a GUI, in VLC, File –> Open Network –> enter your camera address.
For obvious reasons, I am not posting here an image from our camera. Anyway, trust me, this method should work if you have a compatible camera.
Let’s go next for the neat tricks part, which I’m still figuring out myself, too.
Making sure the stream works
To make sure the video stream is up and running, make your Zabbix server, Zabbix proxy, or a dedicated media server to continuously stream your video feed. For example:
The combination above would make mplayer play the stream with a null video driver; thus, the stream will be continuously played, but just with no visual video output generated. In other words, under perfect conditions, the mplayer process should be running on the server all the time. If anything goes wrong with the stream, mplayer quits itself, and the process goes away from the process list, too.
Using Zabbix to check the player status
Now that you have some server continuously playing the stream, it’s time to check the status with Zabbix.
From here, checking the stream status with Zabbix is simple, just
create a new item to check if for example mplayer process is around with Zabbix Agent item type and proc.num[,mplayer] key and
make your Zabbix alert about it if the number of mplayer processes is <1
Camera screenshots to your Zabbix user interface
Both mplayer and VLC can be controlled remotely, so here’s an idea I have not yet implemented but testing out.
If a motion sensor, either an external unit or a built-in, detects movement, make Zabbix send a command to the camera to record a screenshot of the camera stream, or possibly a short video. Then just make the script to save the photo or video in a directory that Zabbix can access and then show with its URL widget type.
mplayer has a slave mode for receiving commands from external programs, which might work together with a FIFO pipe.
Real-time video stream in your Zabbix user interface
At least VLC can transcode RTSP to HTTP stream in real-time, so in theory, then embedding the resulting stream to your Zabbix user interface should very much be doable with a short HTML file and Zabbix URL widget type. This one I did not yet even start to try out, though.
So, that’s all for this week’s blog post. I’m still building this thing out, but if you have successfully done something similar, please let me know!
I have been working at Forcepoint since 2014 and am a true fan of functional testing. — Janne Pikkarainen
This post was originally published on the author’s LinkedIn account.
Deploy your Zabbix servers and proxies in the Azure cloud.
There are many use cases where deploying your Zabbix server or Zabbix proxies in the cloud can reduce costs, provide an additional layer of security and redundancy, and improve the available management toolset.
Deploy your Zabbix instance in the Azure cloud with the official Zabbix cloud images:
Cloud images are available for the latest Zabbix server and proxy versions
Deploy a fresh Zabbix instance in 5 minutes
Dynamically scale the cloud resources
Select the deployment options based on your budget
Check out the video to learn how to deploy Zabbix in the Microsoft Azure cloud platform:
How to deploy Zabbix in the Azure cloud platform:
Navigate to the Zabbix Cloud Images page
Select the Microsoft Azure vendor and Zabbix server cloud image
Press the Get it now button and press Continue in the next window
On the deployment page press the Create button
Provide the virtual machine name, resource group, region
Specify the administrator account settings
Provide the disk, network, tag, and advanced settings
Verify the provided settings
Press Create to begin deploying the virtual machine
For public key authentication: download and store the private key
Once the deployment is complete, press the Go to resource button
Save your public IP address and connect to it via SSH
Save the initial frontend username and password
Use the public IP address to connect to your Zabbix frontend
Log in with the saved username and password obtained
Tips and best practices
The default SSH user is called azureuser
Remember to store your SSH private key in a secure location
You can access the Zabbix database by using the root user
The password for the MySQL database root user is stored in /root/.my.cnf configuration file
Feeling overwhelmed with deploying and managing your Zabbix instance? Check out the Zabbix certified specialist courses, where under the guidance of a Zabbix certified trainer, you will learn how to deploy, configure and manage your Zabbix instance.
Deploy Zabbix components in docker containers for advanced automation, scalability, and maintenance.
In the past few years, containers have gained prevalence and are being used for many different tasks – from application development to improving automation and management of existing software.
Deploy Zabbix components in Docker containers:
Official Docker images are available for individual components
Automate the deployment of your Zabbix containers
Use containers to quickly scale your environment
Upgrade to a newer Zabbix version by deploying containers from the latest container images
Check out the video to learn how to deploy the Zabbix server with Docker containers.
How to deploy Zabbix server with Docker containers:
Connect to your Docker container host
Create a new docker network. Specify the subnet and the IP range for containers.
Deploy your Zabbix server container
Give the container a name and assign it to the newly created network
Pass the Database host, user, and password in environment variables
Map the port 10051 on the host to the port 10051 on the container
Select the required Docker image and tag
Deploy your Zabbix frontend container
Give the container a name and assign it to the newly created network
Pass the Database host, user, and password in environment variables
Pass the Zabbix server address in the environment variable
Map port 80 on your host to port 8080 on the container
Use docker ps and docker logs to check if the containers are running
Connect to your Zabbix frontend and confirm that there are no issues with the environment
Tips and best practices:
Container logs can be accessed by using the docker logs command
Zabbix server checks for an existing Zabbix database. If it does not exist – it will get created.
Use the docker exec command to run commands inside a container
With the rapid evolution and proliferation of different cloud services, many organizations have decided to move parts of their infrastructures from on-prem to cloud. As an essential part of your infrastructure, Zabbix is no exception – you always have the option to either deploy Zabbix on-prem or select from one of the many supported cloud service providers to deploy your Zabbix Server or Zabbix Proxy on.
In this blog post, let’s look at how we can quickly deploy Zabbix Server and Zabbix Proxy nodes in Amazon Web Services cloud platform.
Deploying the Zabbix Server in AWS
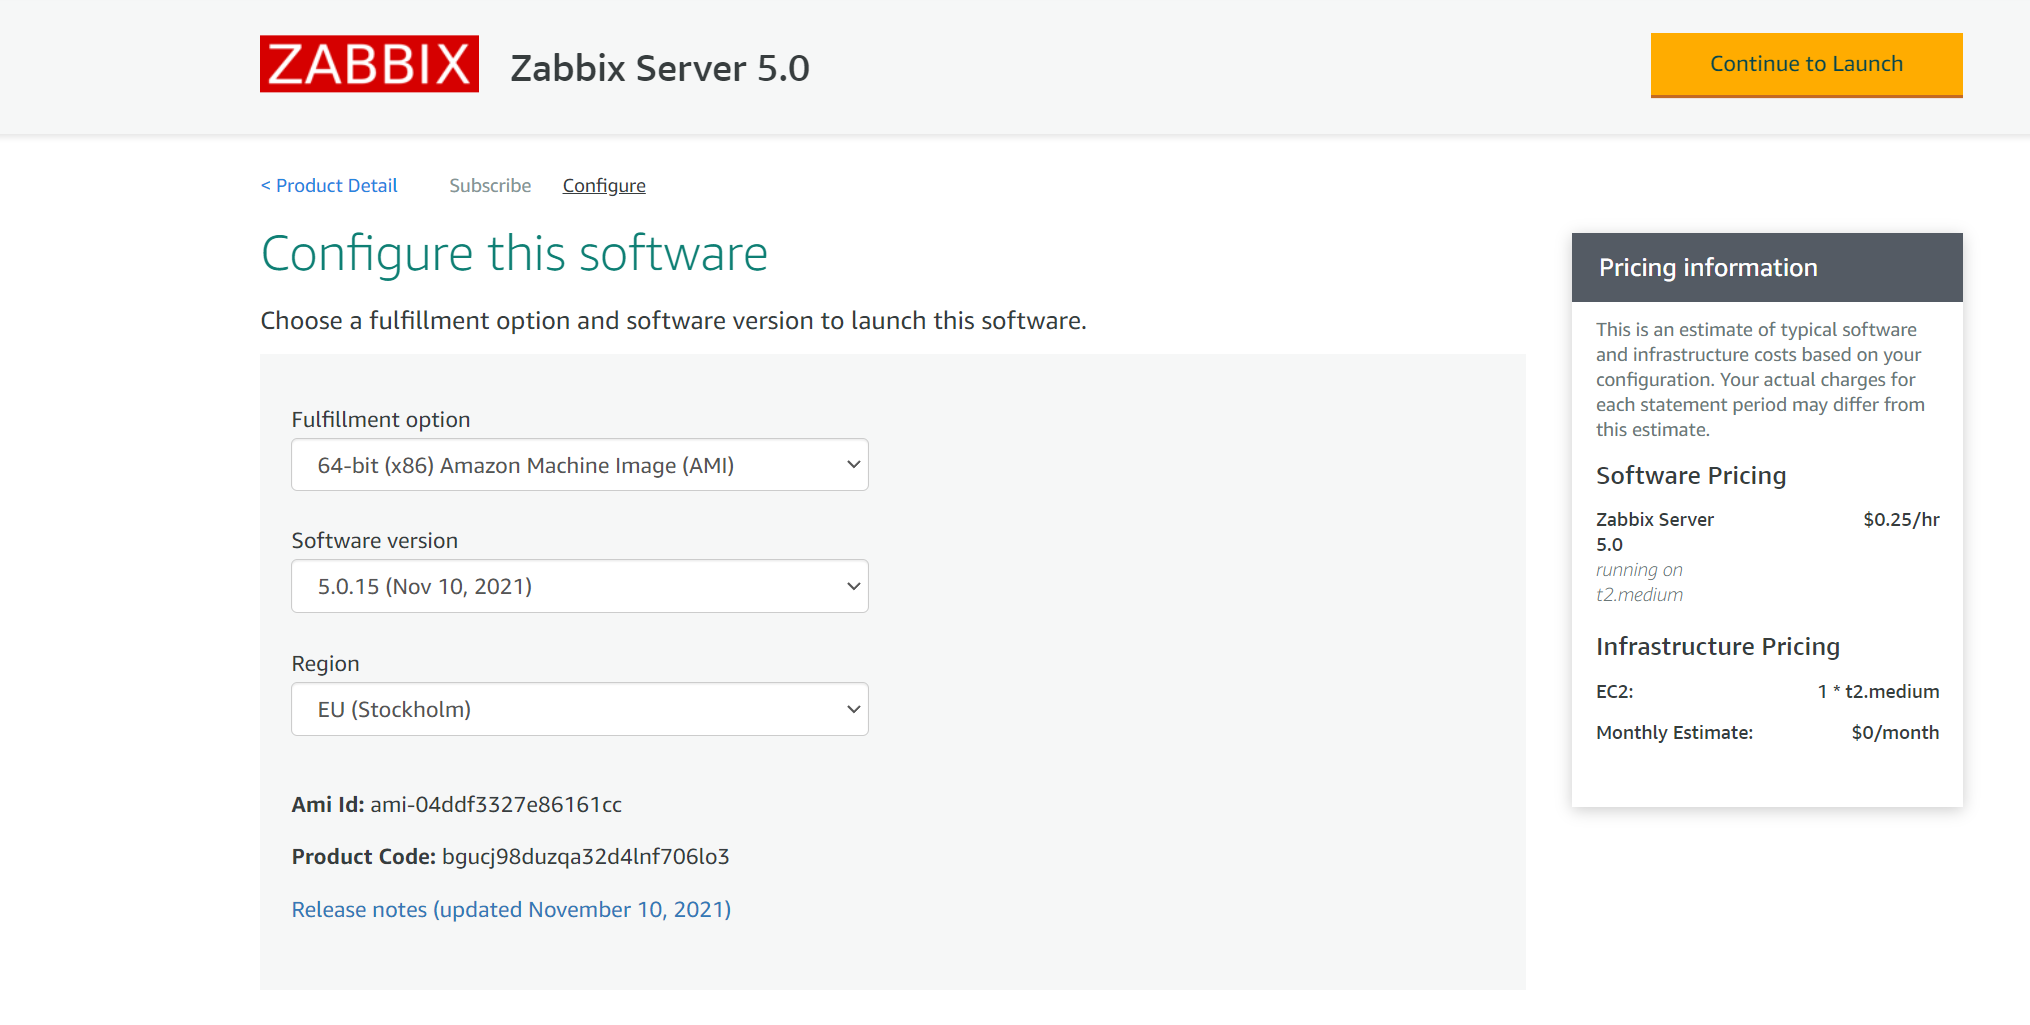
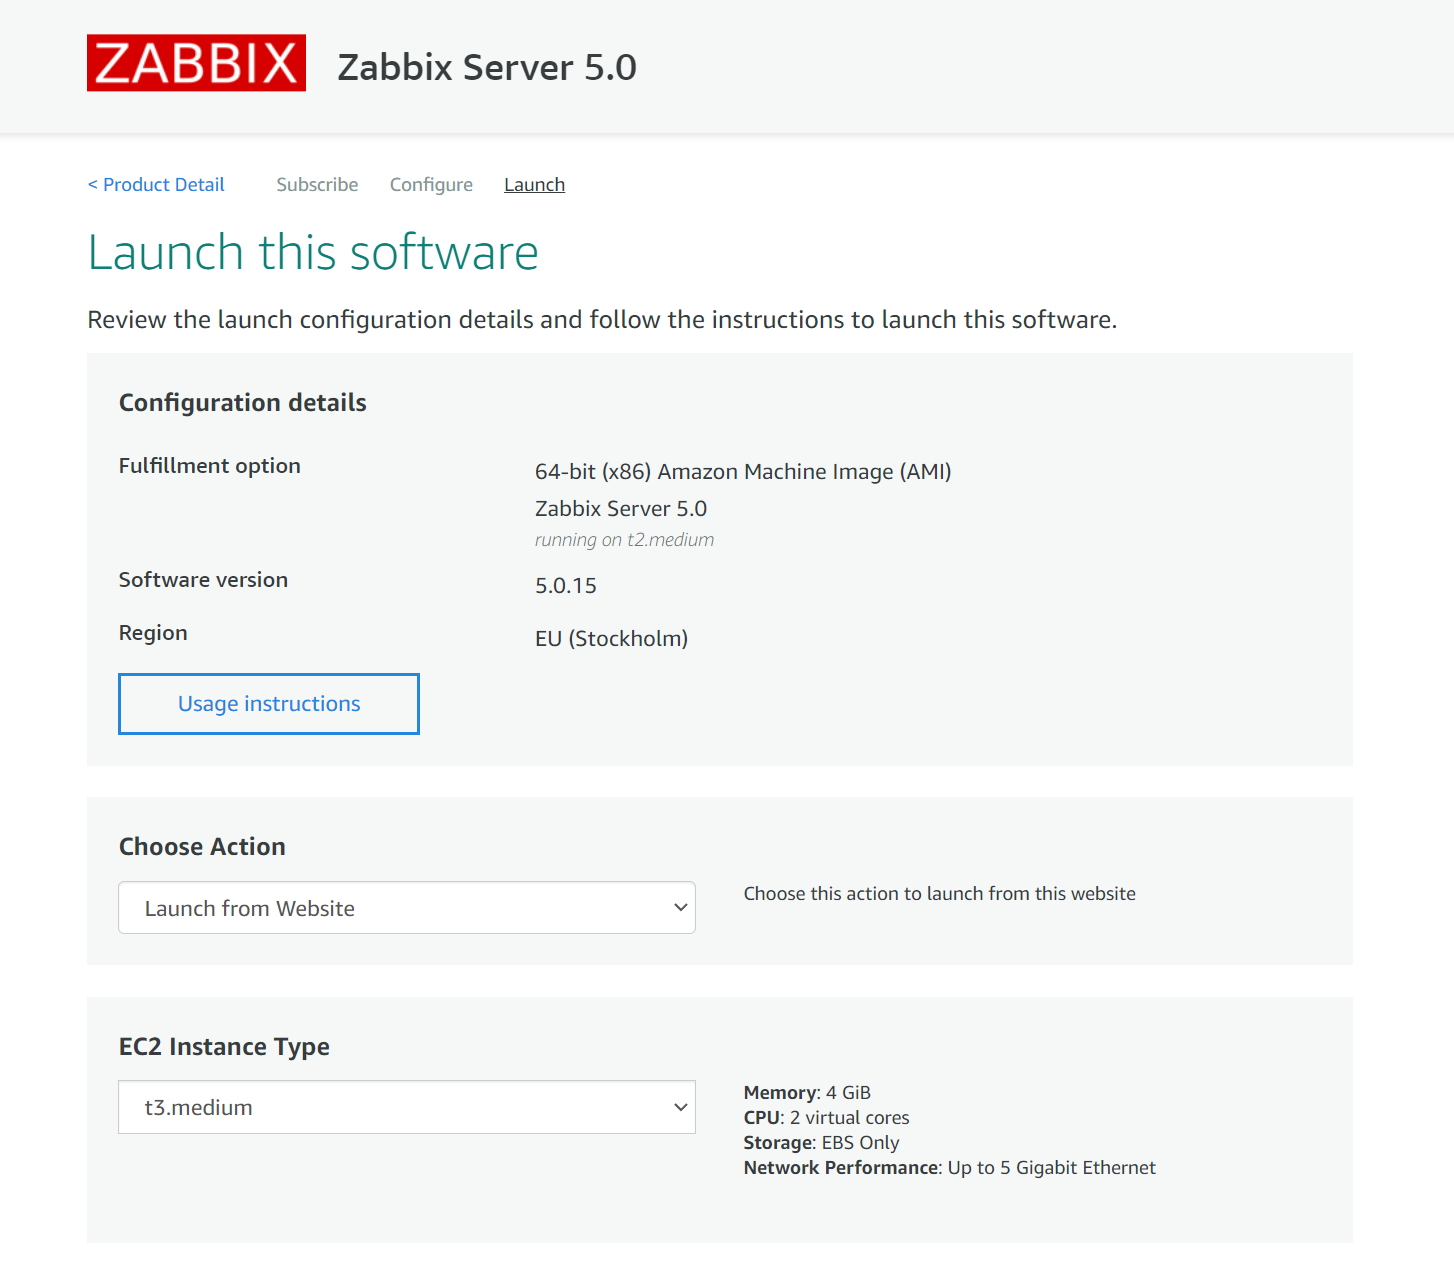
Let’s begin with the Zabbix download page. Under the Zabbix Cloud Images section, select the AWS cloud vendor and then the Cloud Image you wish to deploy. Let’s start with Zabbix Server 5.0 with MySQL DB backend and Nginx Web server backend for our frontend.
Next, we will be redirected to the AWS marketplace, where we will have to subscribe to the Zabbix Server 5.0 image.
Once we have subscribed to the Zabbix Server image, we can continue with the deployment configuration.
Next, we must select our Region, Zabbix minor version (usually the latest available), and the Fulfillment option. Once that is done, we can finalize the launch configuration.
Select the preferred Launch option, EC2 Instance Type, VPC, and Subent settings on the Launch page.
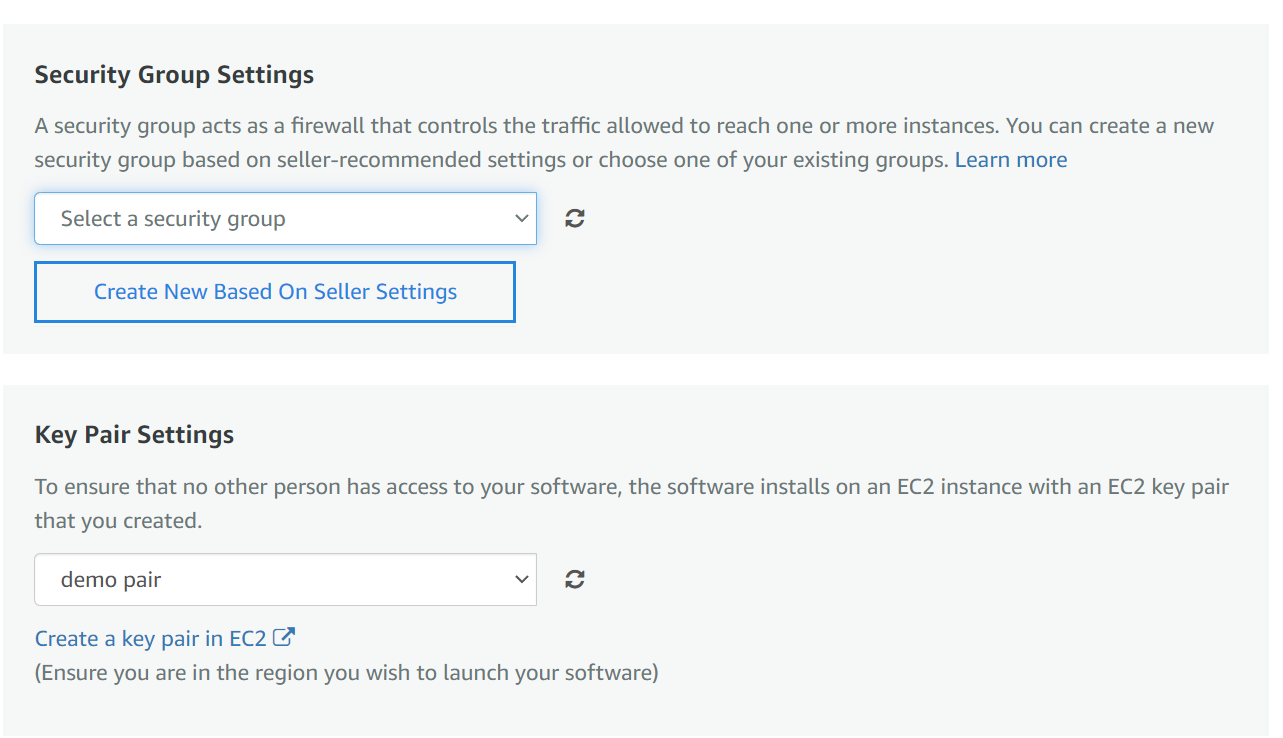
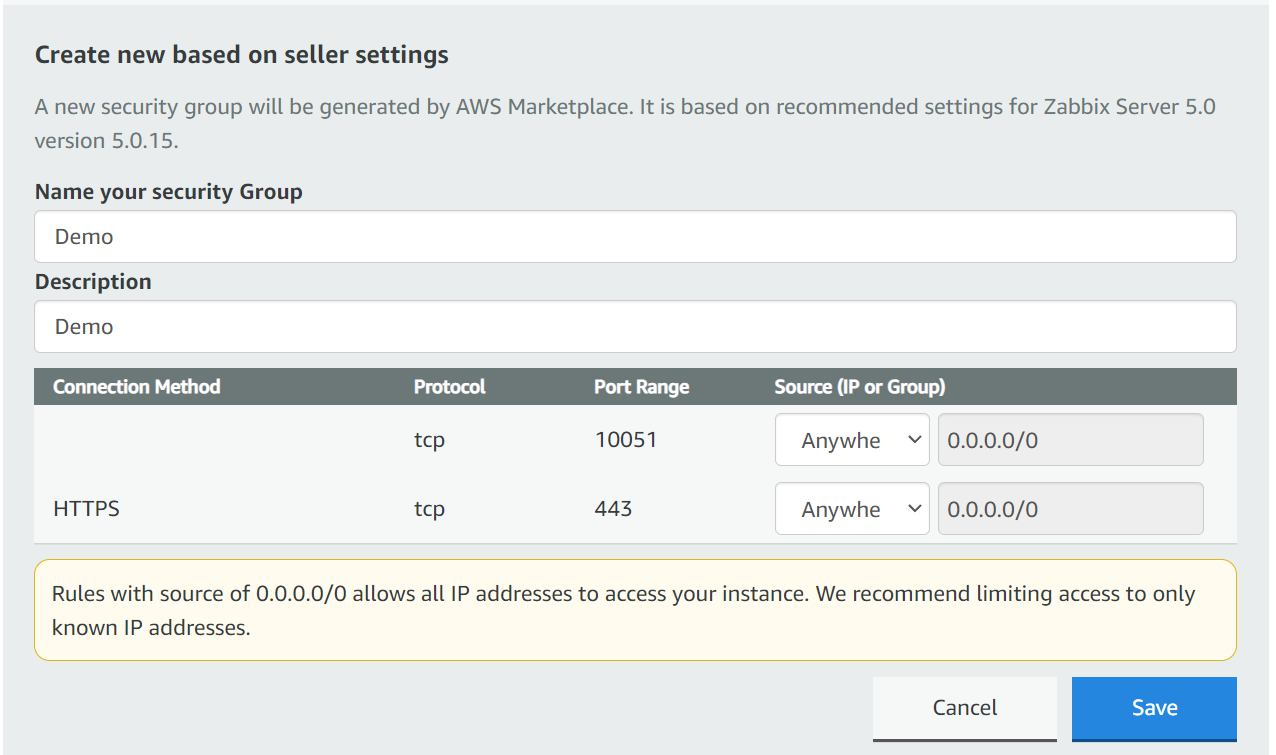
Next – We have to select or create a security group.
We also have to select or generate EC 2 Key pair – make sure to save your private key in a safe location!
Note that creating a security group based on seller settings does not guarantee that the group will have an inbound SSH access rule! Make sure to double-check the security group and manually add the SSH inbound rule if it hasn’t yet been added. We will need to access this instance via SSH to obtain the initial frontend login credentials!
Once you click on the Launch button, the deployment process for your Zabbix application will be initiated.
Accessing the application
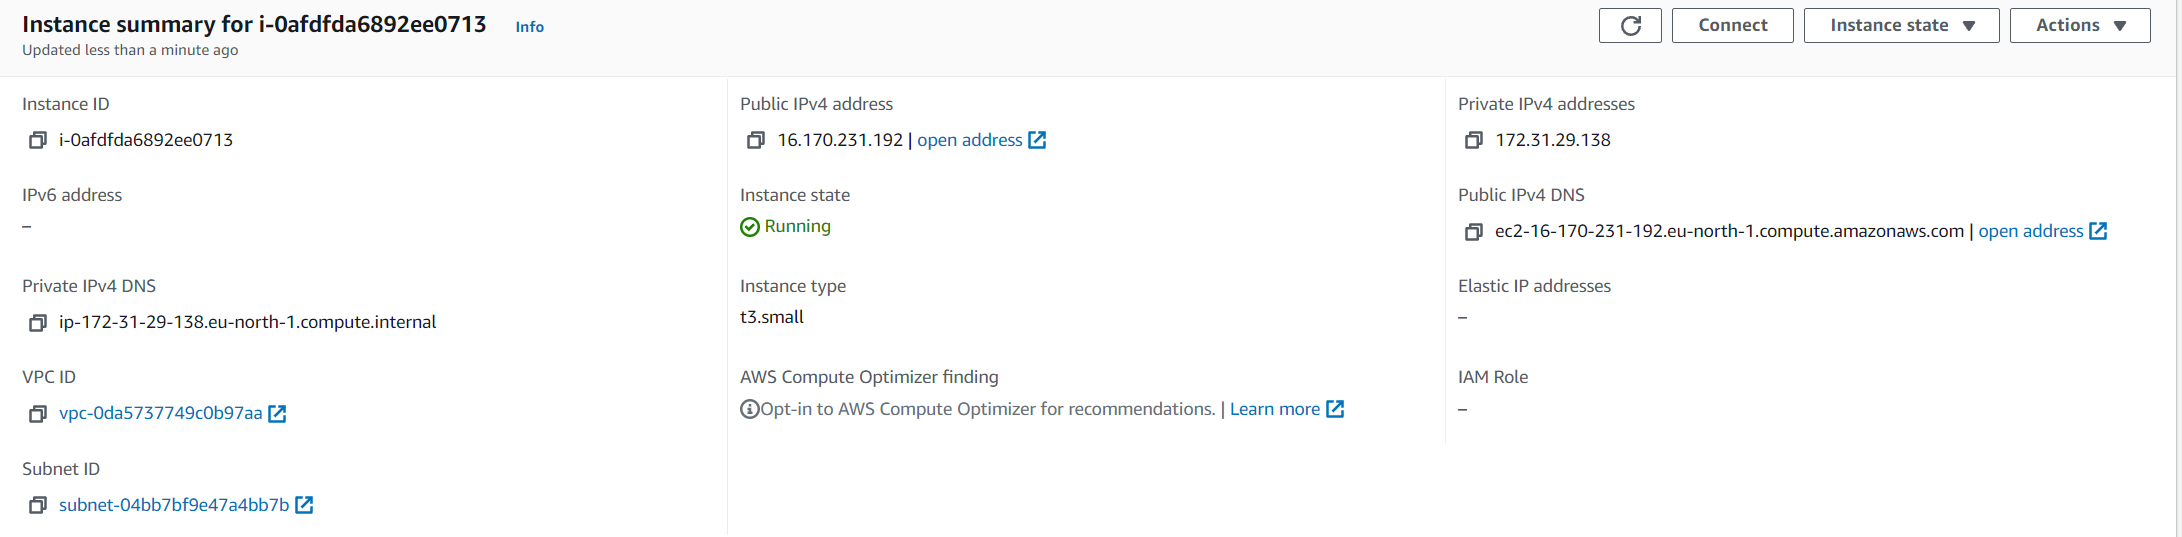
Let’s open up the Instances section and open our newly deployed Zabbix instance
We can access the Zabbix Frontend by opening the Public IPv4 address or Public IPv4 DNS of the Zabbix instance
Note that the Zabbix frontend password is still unknown to us. Recall how I mention that we will need to access the instance via SSH to obtain the frontend password. Let’s do so now.
Write down the login credentials and use them to log in to the Zabbix instance.
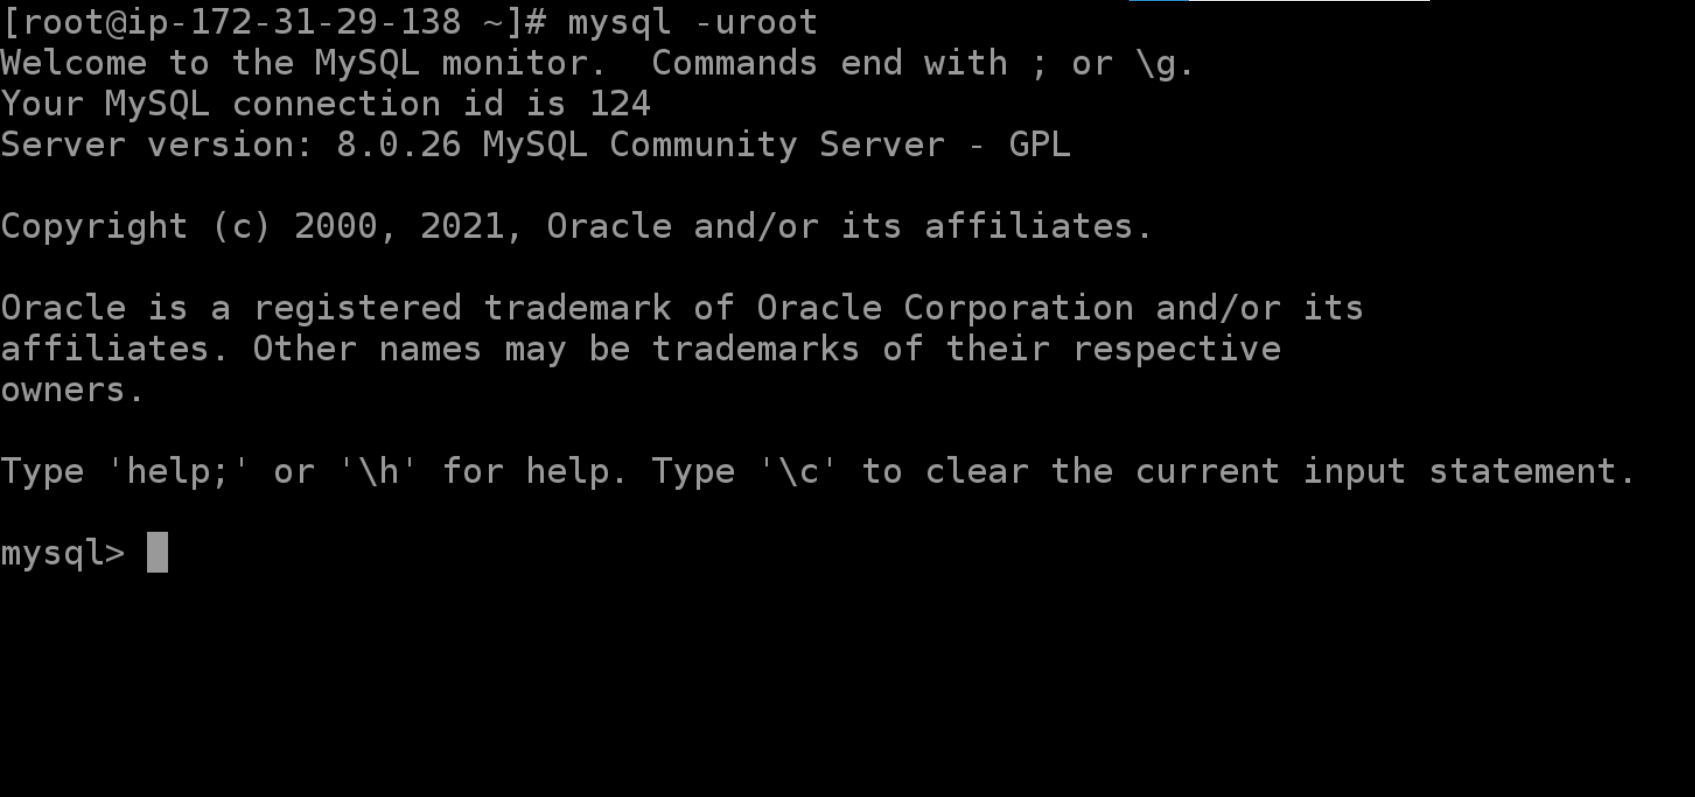
Accessing the database
In case we wish to access the Zabbix database backend, we can do so from the command line. Zabbix database can be accessed by using the root user. By default, it can be used without a password.
The MySQL root password is stored in /root/.my.cnf configuration file.
Modifying the Zabbix Frontend timezone
By default, the Zabbix frontend uses the “UTC” timezone. If you need to change it, edit php_value[date.timezone] PHP variable in /etc/php-fpm.d/zabbix.conf and restart php-fpm process:
systemctl restart php-fpm
Zabbix proxy
If you wish to deploy a Zabbix proxy instance in your AWS cloud, the deployment steps are very much the same. Most likely, you will still require SSH access if you wish to perform some configuration changes in the Zabbix proxy configuration file.
Note, that by default, the SQLite proxy database is stored in /tmp/zabbix_proxy.sqlite3
As always, don’t forget the point the proxy at your Zabbix server instance by modifying the Server parameter in the Zabbix proxy configuration file, located in /etc/zabbix/zabbix_proxy.conf
And that’s all! With just a few clicks, we are able to deploy a fully functional Zabbix instance or a small Zabbix proxy to distribute or scale our monitoring. Don’t forget that AWS is just one of the many cloud service providers you can use with Official Zabbix images. If you have any questions about the AWS deployment – you are very much encouraged to leave a comment under this blog post.
Today we are focusing more on the automation of installation and software configuration instead of using the manual approach. Installing and configuring software the manual way takes a lot more time, you can easily make more errors by forgetting steps or making typos, and it will probably be a bit boring when you need to do this for a large number of servers.
In this blog post, I will demonstrate how to install and configure a Zabbix environment with Ansible. Ansible has the potential to simplify many of your day-to-day tasks. As an alternative to Ansible, you may also opt in to use Puppet, Chef, and SaltStack to install and configure your Zabbix environment.
Ansible does not have any specific infrastructure requirements for it to do its job. We just need to make sure that the user exists on the target host, preferably configured with SSH keys. With tools like Puppet or Chef, you need to have a server running somewhere, and you will need to deploy an agent on your nodes. You can learn more about Ansible here: https://docs.ansible.com/ansible/latest/index.html.
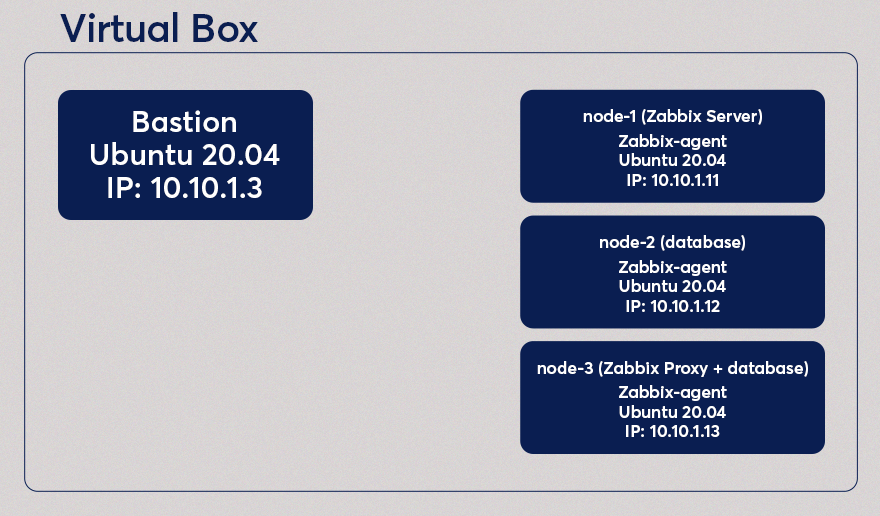
This post is the first in a series of three articles. We will set up a (MySQL) Database running on 1 node (“node-2”), Zabbix Server incl. Frontend, which will be running on a separate node (“node-1”). Once we have built this, we configure an action, media and we will create some users. In the following image you will see the environment we will create.
The environment we will create.
In the 2nd blog post, we will set up a Zabbix Proxy and a MySQL database on a new but the same node (“node-3”). In the 3rd blog post, we will install the Zabbix Agent on all of the 3 nodes we were using so far and configure some user parameters. Where the Zabbix Agent on “node-3” is using the Zabbix Proxy, the Zabbix Agent on the nodes “node-1” and “node-2” will be monitored by the Zabbix Server.
We have to update the hosts file. With the following line, we need to make sure that we can access the Zabbix Frontend.
10.10.1.11 zabbix.example.com
In the “ROOT” directory of the git repository which you cloned some moments ago, where you can also find the Vagrantfile, This Vagrantfile contains the configuration of the virtual machine of our setup. We will create 4 Virtual Machine’s running Ubuntu 20.04, each with 1 CPU and 1 GB of Ram which you can see in the first “config” block. In the 2nd config block, we configure our “bastion” host, which we discuss later. This node will get the ip 10.10.1.3 and we also mount the ansible directory in this Virtual Machine on location “/ansible”. For installing and configuring this node we will use a playbook bastion.yml to do this. With this playbook, we will install some packages like Python, git and Ansible inside this bastion virtual machine.
The 3rd config block is part of a loop that will configure and it will create 3 Virtual Machines. Each virtual machine is also an Ubuntu node, had its own ip (respectively 10.10.1.11 for the first node, 10.10.1.12 for the second and 10.10.1.13 for the 3rd node) and just like the “bastion” node, they have each 1 CPU and 1 GB of RAM.
You will have to execute the following command:
$ vagrant up
With this command, we will start our Virtual Machine’s. This might take a while, as it will download a VirtualBox image containing Ubuntu. The “vagrant up” command will start the “bastion” node and all other nodes as a part of this demo. Once that is done, we need to access a shell on the “bastion” node:
$ vagrant ssh bastion
This “bastion” node is a fundamental node on which we will execute Ansible, but we will not be installing anything on this host. We have opened a shell in the Virtual Machine we just created. You can compare it with creating an “ssh” connection. We have to go to the following directory before we can download the dependencies:
$ cd /ansible
As mentioned before, we have to download the Ansible dependencies. The installation depends on several Ansible Roles and an Ansible Collection. With the Ansible Roles and the Ansible Collection, we can install MySQL, Apache, and the Zabbix components. We have to execute the following command to download the dependencies:
$ ansible-galaxy install -r requirements.yml
Starting galaxy role install process
- downloading role 'mysql', owned by geerlingguy
- downloading role from https://github.com/geerlingguy/ansible-role-mysql/archive/3.3.0.tar.gz
- extracting geerlingguy.mysql to /home/vagrant/.ansible/roles/geerlingguy.mysql
- geerlingguy.mysql (3.3.0) was installed successfully
- downloading role 'apache', owned by geerlingguy
- downloading role from https://github.com/geerlingguy/ansible-role-apache/archive/3.1.4.tar.gz
- extracting geerlingguy.apache to /home/vagrant/.ansible/roles/geerlingguy.apache
- geerlingguy.apache (3.1.4) was installed successfully
- extracting wdijkerman.php to /home/vagrant/.ansible/roles/wdijkerman.php
- wdijkerman.php was installed successfully
Starting galaxy collection install process
Process install dependency map
Starting collection install process
Installing 'community.zabbix:1.2.0' to '/home/vagrant/.ansible/collections/ansible_collections/community/zabbix'
Created collection for community.zabbix at /home/vagrant/.ansible/collections/ansible_collections/community/zabbix
community.zabbix (1.2.0) was installed successfully
Your output may vary because of versions that might have been updated already since writing this blog post. We now have downloaded the dependencies and are ready to install the rest of our environment. But why do we need to download a role for MySQL, Apache and php? A role contains all the neccecerry tasks and files to configure that specific service. So in the case for the MySQL Ansible role, it will install the MySQL-server and all other packages that MySQL requires on the host, it will configure that the mysqld service is created and is running, but it will also create the databases, create and configure MySQL users and configure the root password. Using a role will help us install our environment and we don’t have to figure out ourselves on installing and configuring a MySQL server manually.
So what about the collection, the Ansible Community Zabbix Collection? Ansible has introduced this concept with Ansible 2.10 and is basically a “collection” of plugins, modules and roles for a specific service. In our case, with the Zabbix Collection, the collection contains the roles for installing the Zabbix Server, Proxy, Agent, Javagateway and the Frond-end. But it also contains a plugin to use a Zabbix environment as our inventory and contains modules for creating resources in Zabbix. All of these modules will work with the Zabbix API to configure these resources, like actions, triggers, groups. templates, proxies etc. Basically, everything we want to create and use can be done with a role or a collection.
Installing Zabbix Server
Now we can execute the following command, which will install the MySQL database on “node-2” and installs the Zabbix Server on “node-1”:
$ ansible-playbook -i hosts zabbix-server.yml
This might take a while, a minute, or 10 depending on the performance of your host. We execute the “ansible-playbook” command, and then “-i” we provide the location of the inventory file. Here you see the contents of the inventory file:
This inventory file contains basically all of our nodes and to which group the hosts belong. We can see in that file that there is a group called “zabbix_server” (The value between [] square brackets is the name for the group) and contains the “node-1” host. Because we have a group called “zabbix_server,” we also have a directory containing some files. These are all the properties (or variables) that will be used for all hosts (in our case, only the “node-1”) in the “zabbix_server” group.
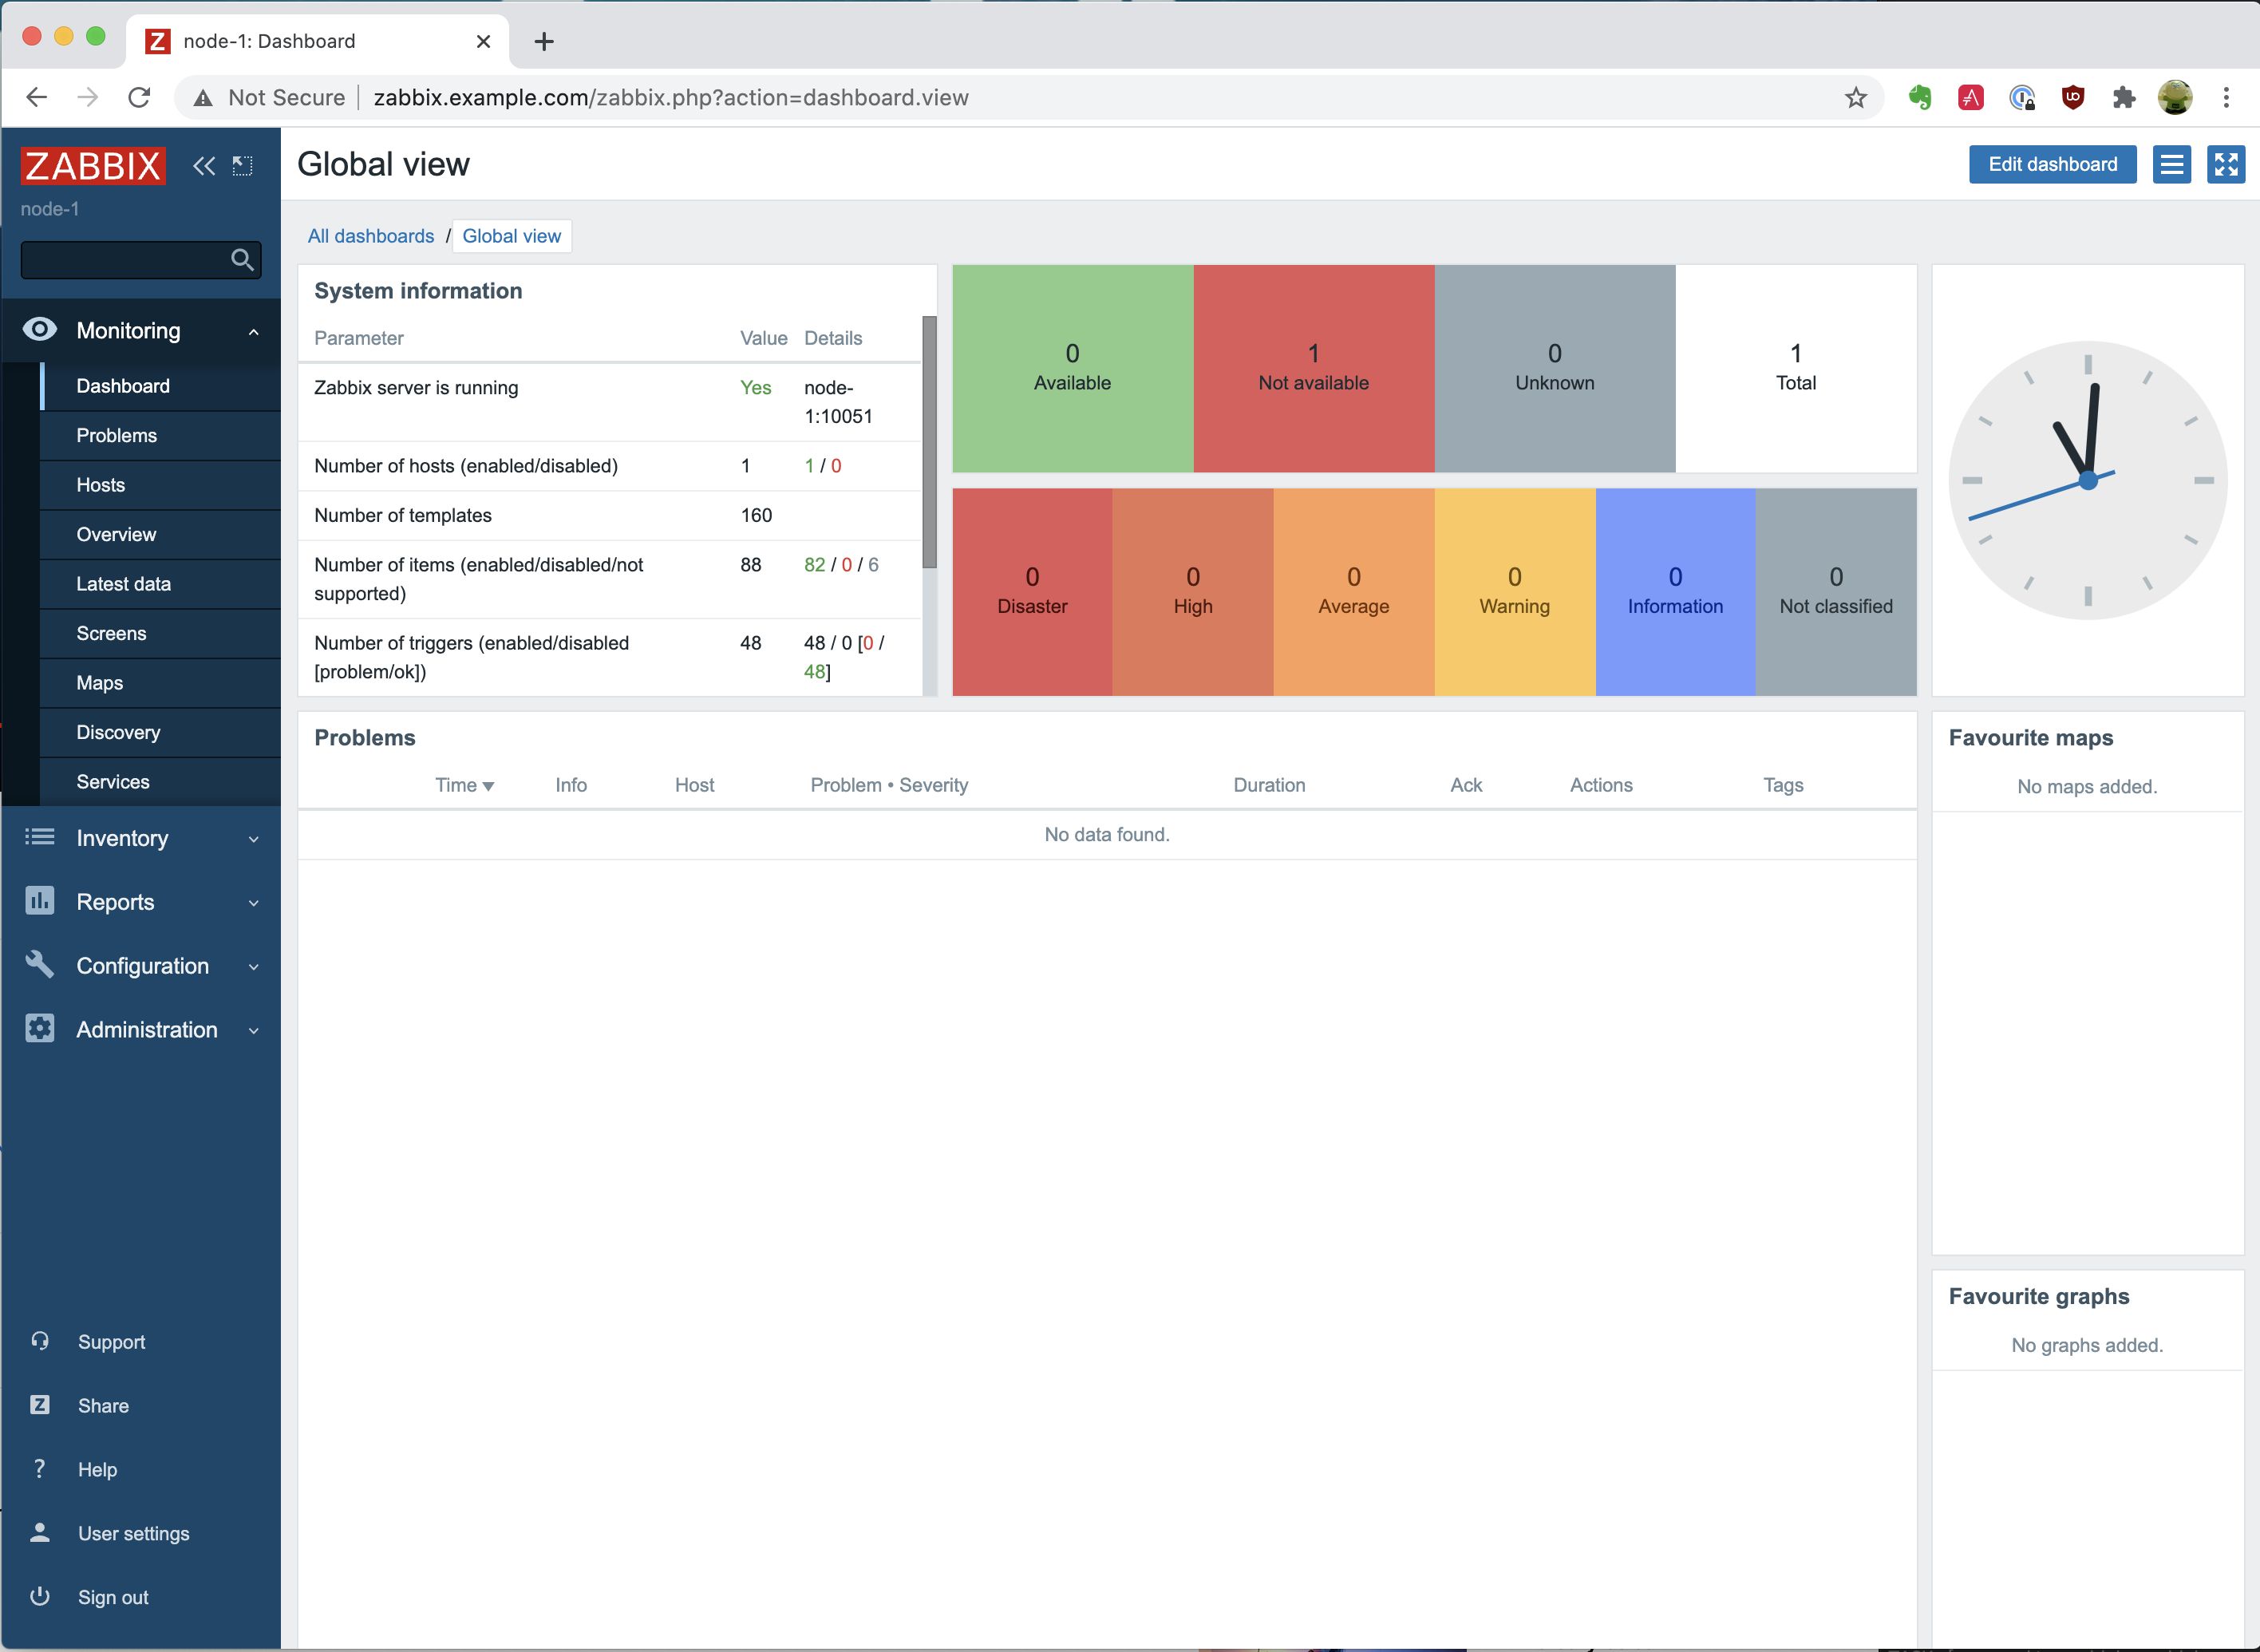
Web Interface
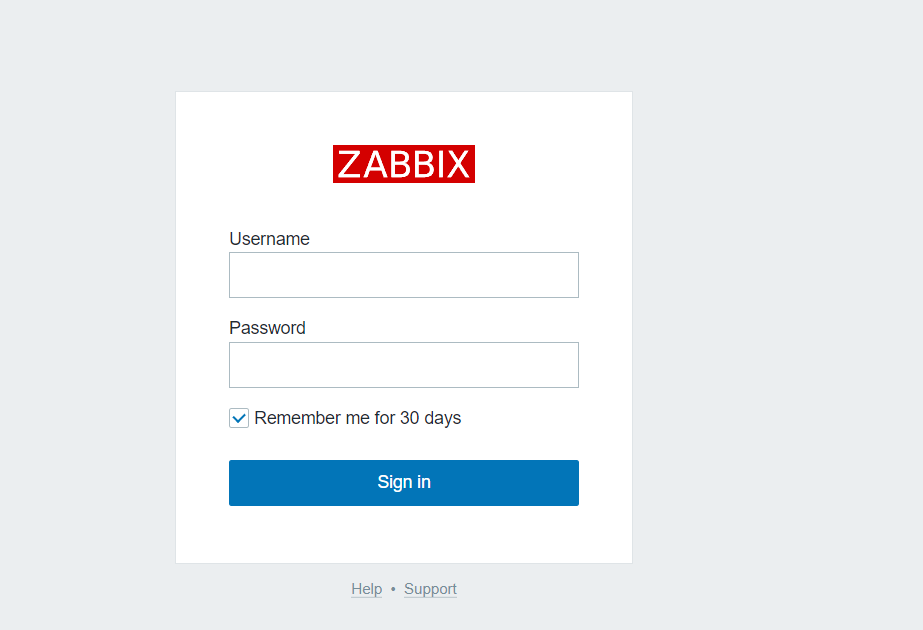
Now you can open your favorite browser and open “zabbix.example.com”, and you will see the Zabbix login screen. Please enter the default credentials:
Username: Admin
Password: zabbix
On the Dashboard, you will probably notice that it complains that it can not connect to the Zabbix Agent running on the Zabbix Server, which is fine as we haven’t installed it yet. We will do this in a later blog post.
Dashboard overview
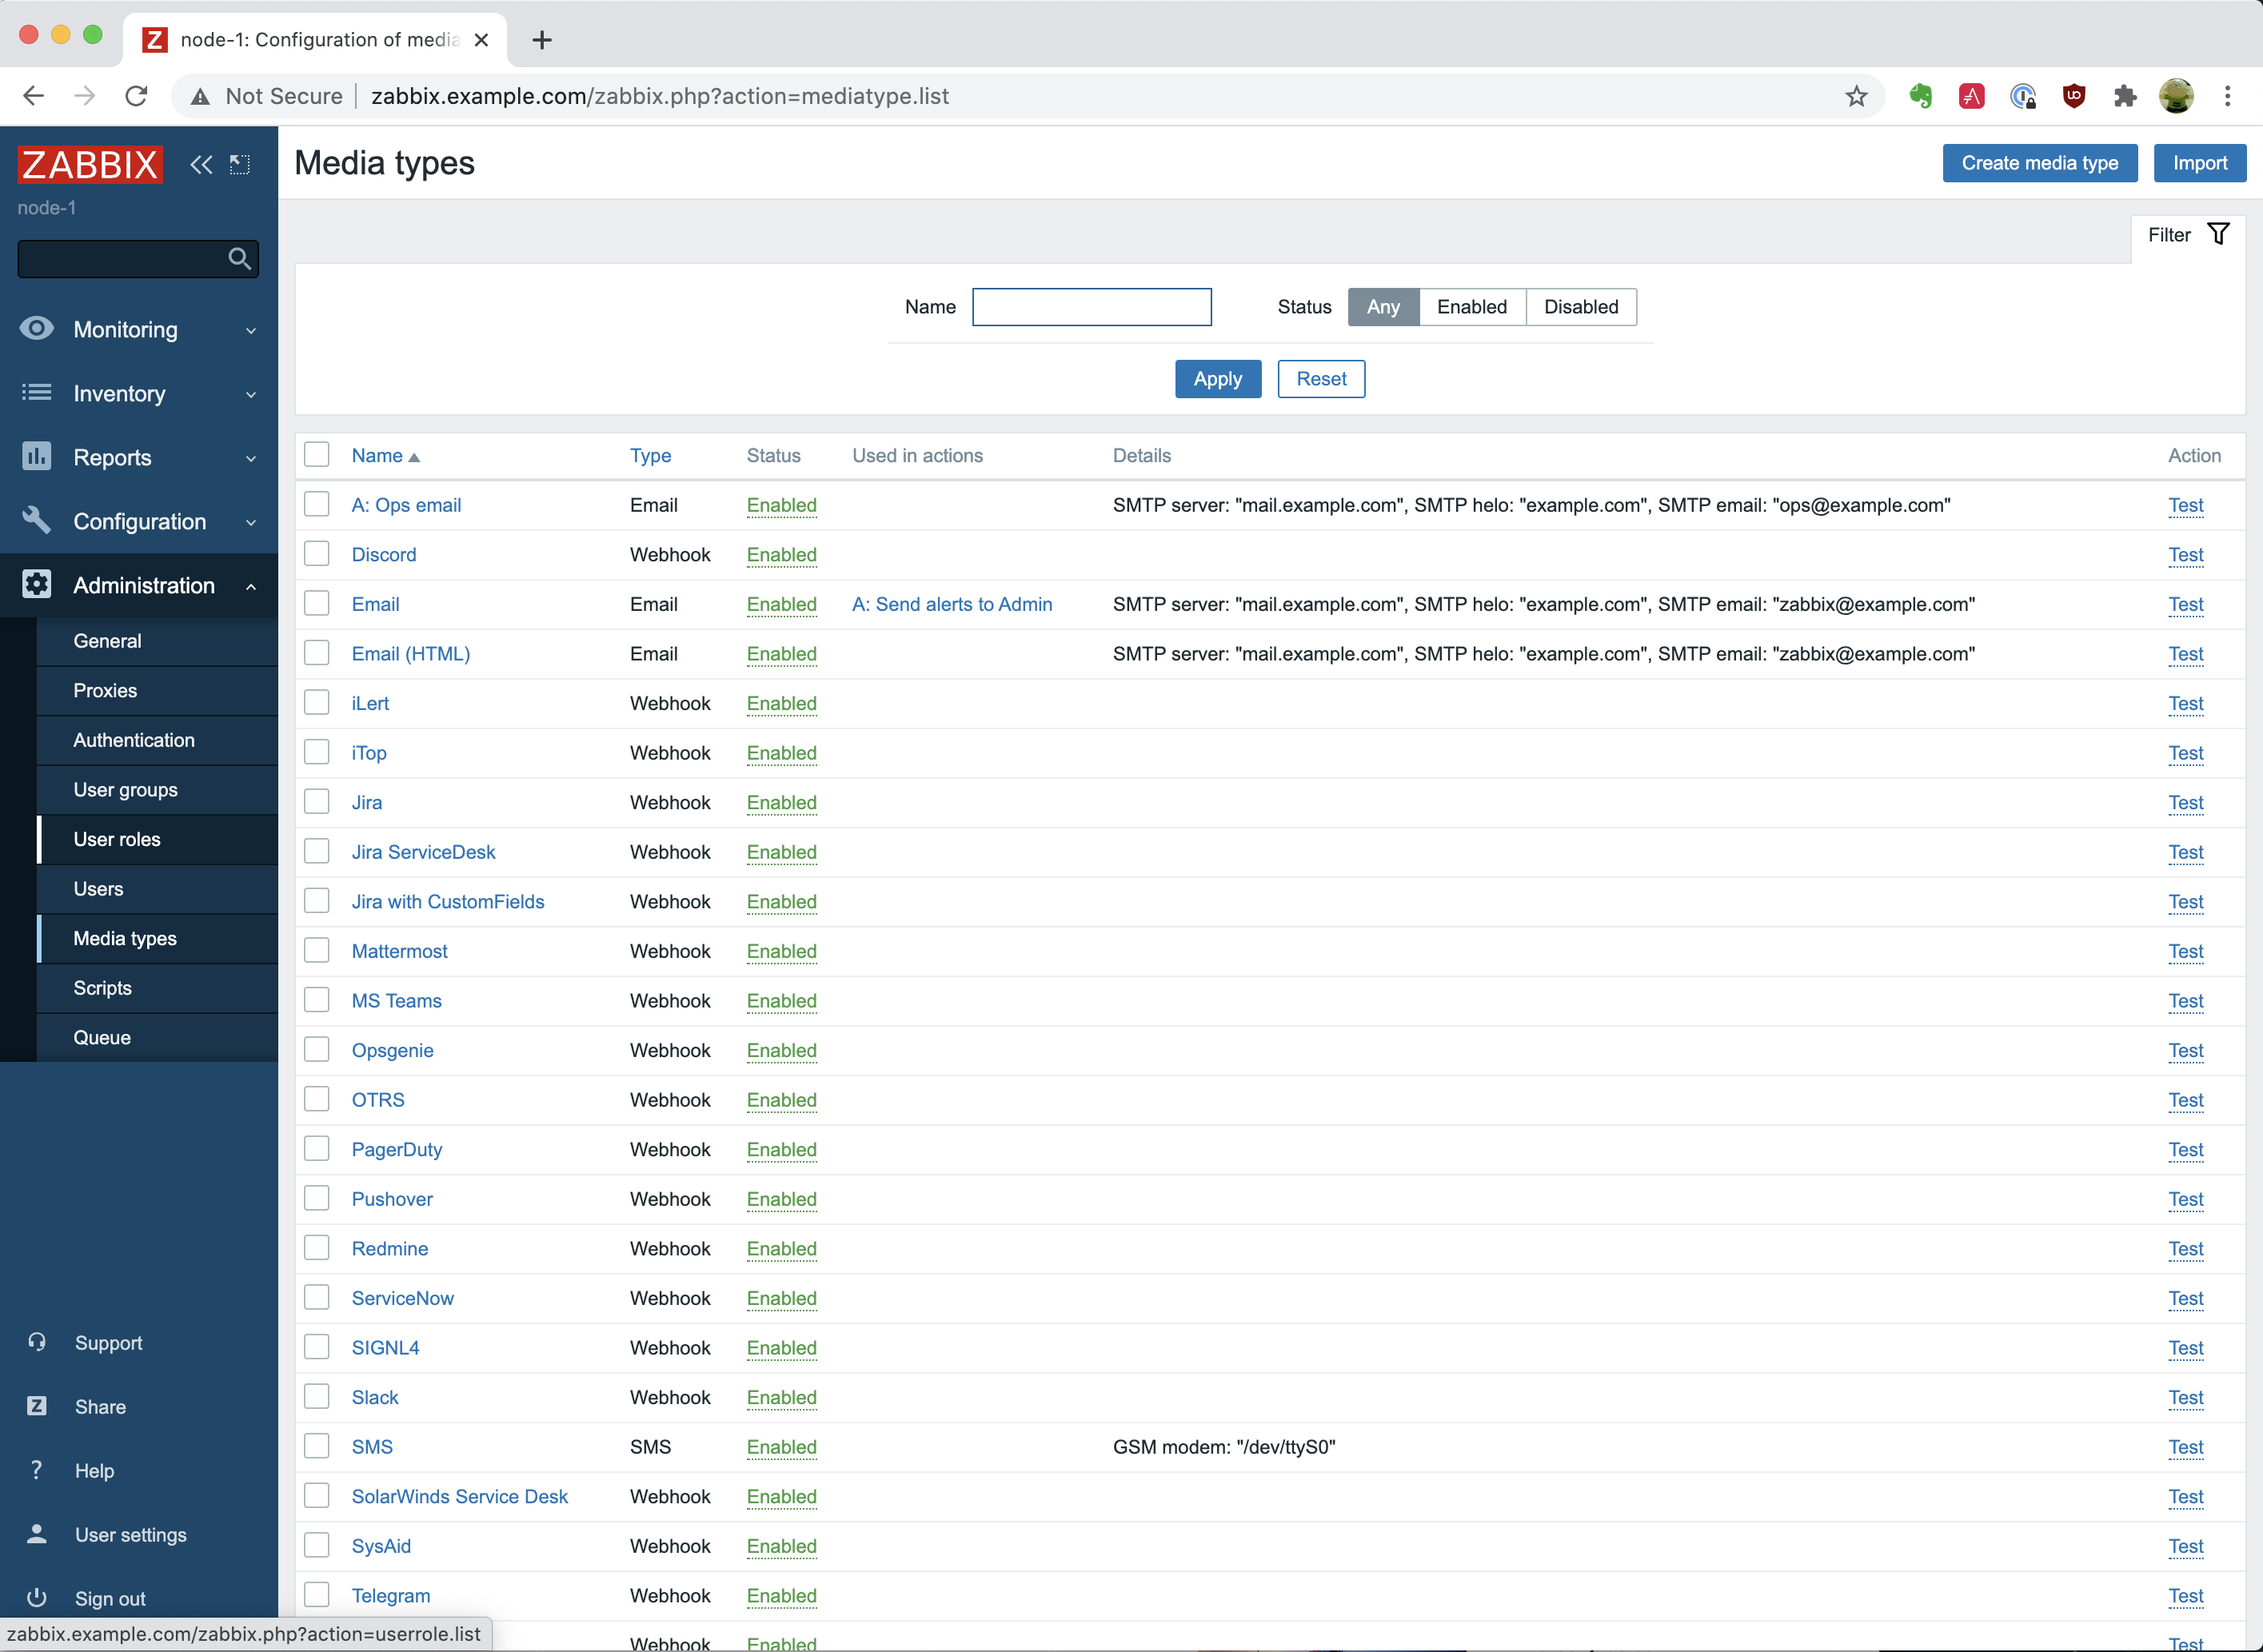
When we go to “Administration” and click on “Media types,” we will see a media type called “A: Ops email.” That is the one we have created. We can open the “/ansible/zabbix-server.yml” file and go to line 33, where we have configured the creation of the Mediatype. In this case, we have configured multiple templates for sending emails via the “mail.example.com” SMTP server.
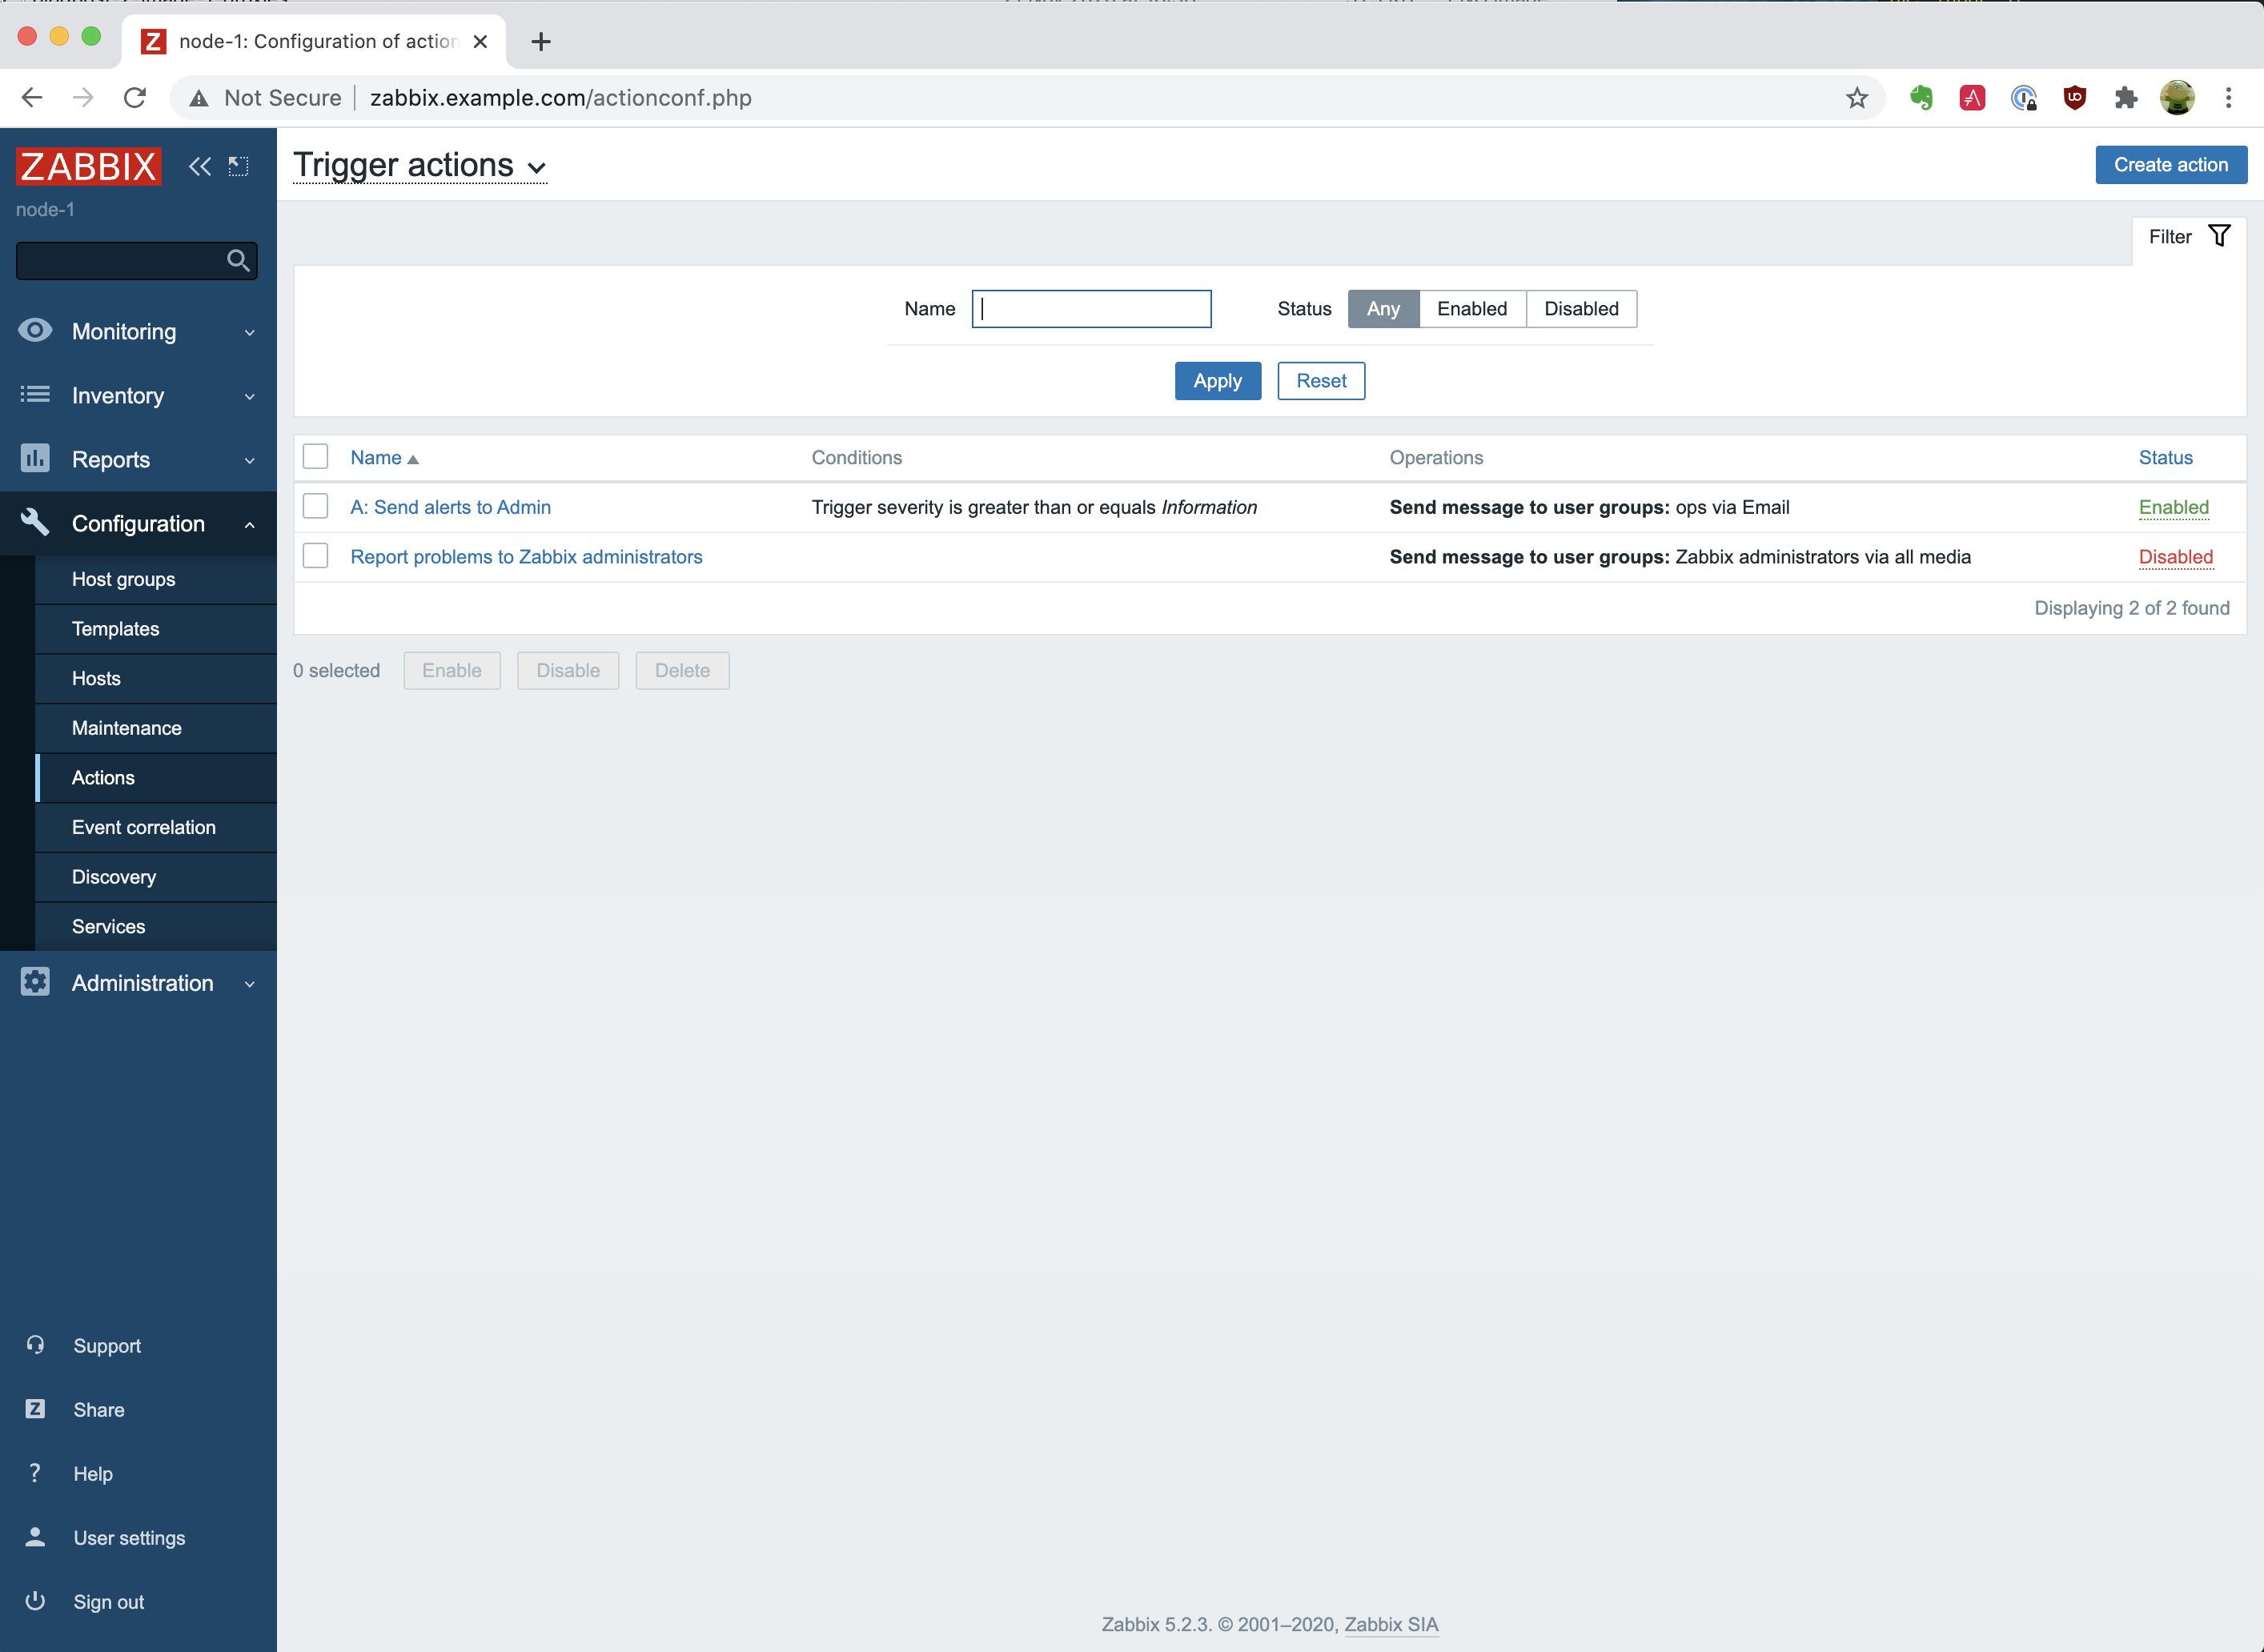
Now we have seen the media type, we will look at the trigger we just created. This trigger makes use of the media type we just saw. The trigger can be found in the “/ansible/zabbix-server.yml” file on line 69. When you go to “Configuration” and “Actions,” you will see our created trigger “A: Send alerts to Admin”. But we don’t want to run this in Production, and for demonstrating purposes, we have selected to be triggered when the severity is Information or higher.
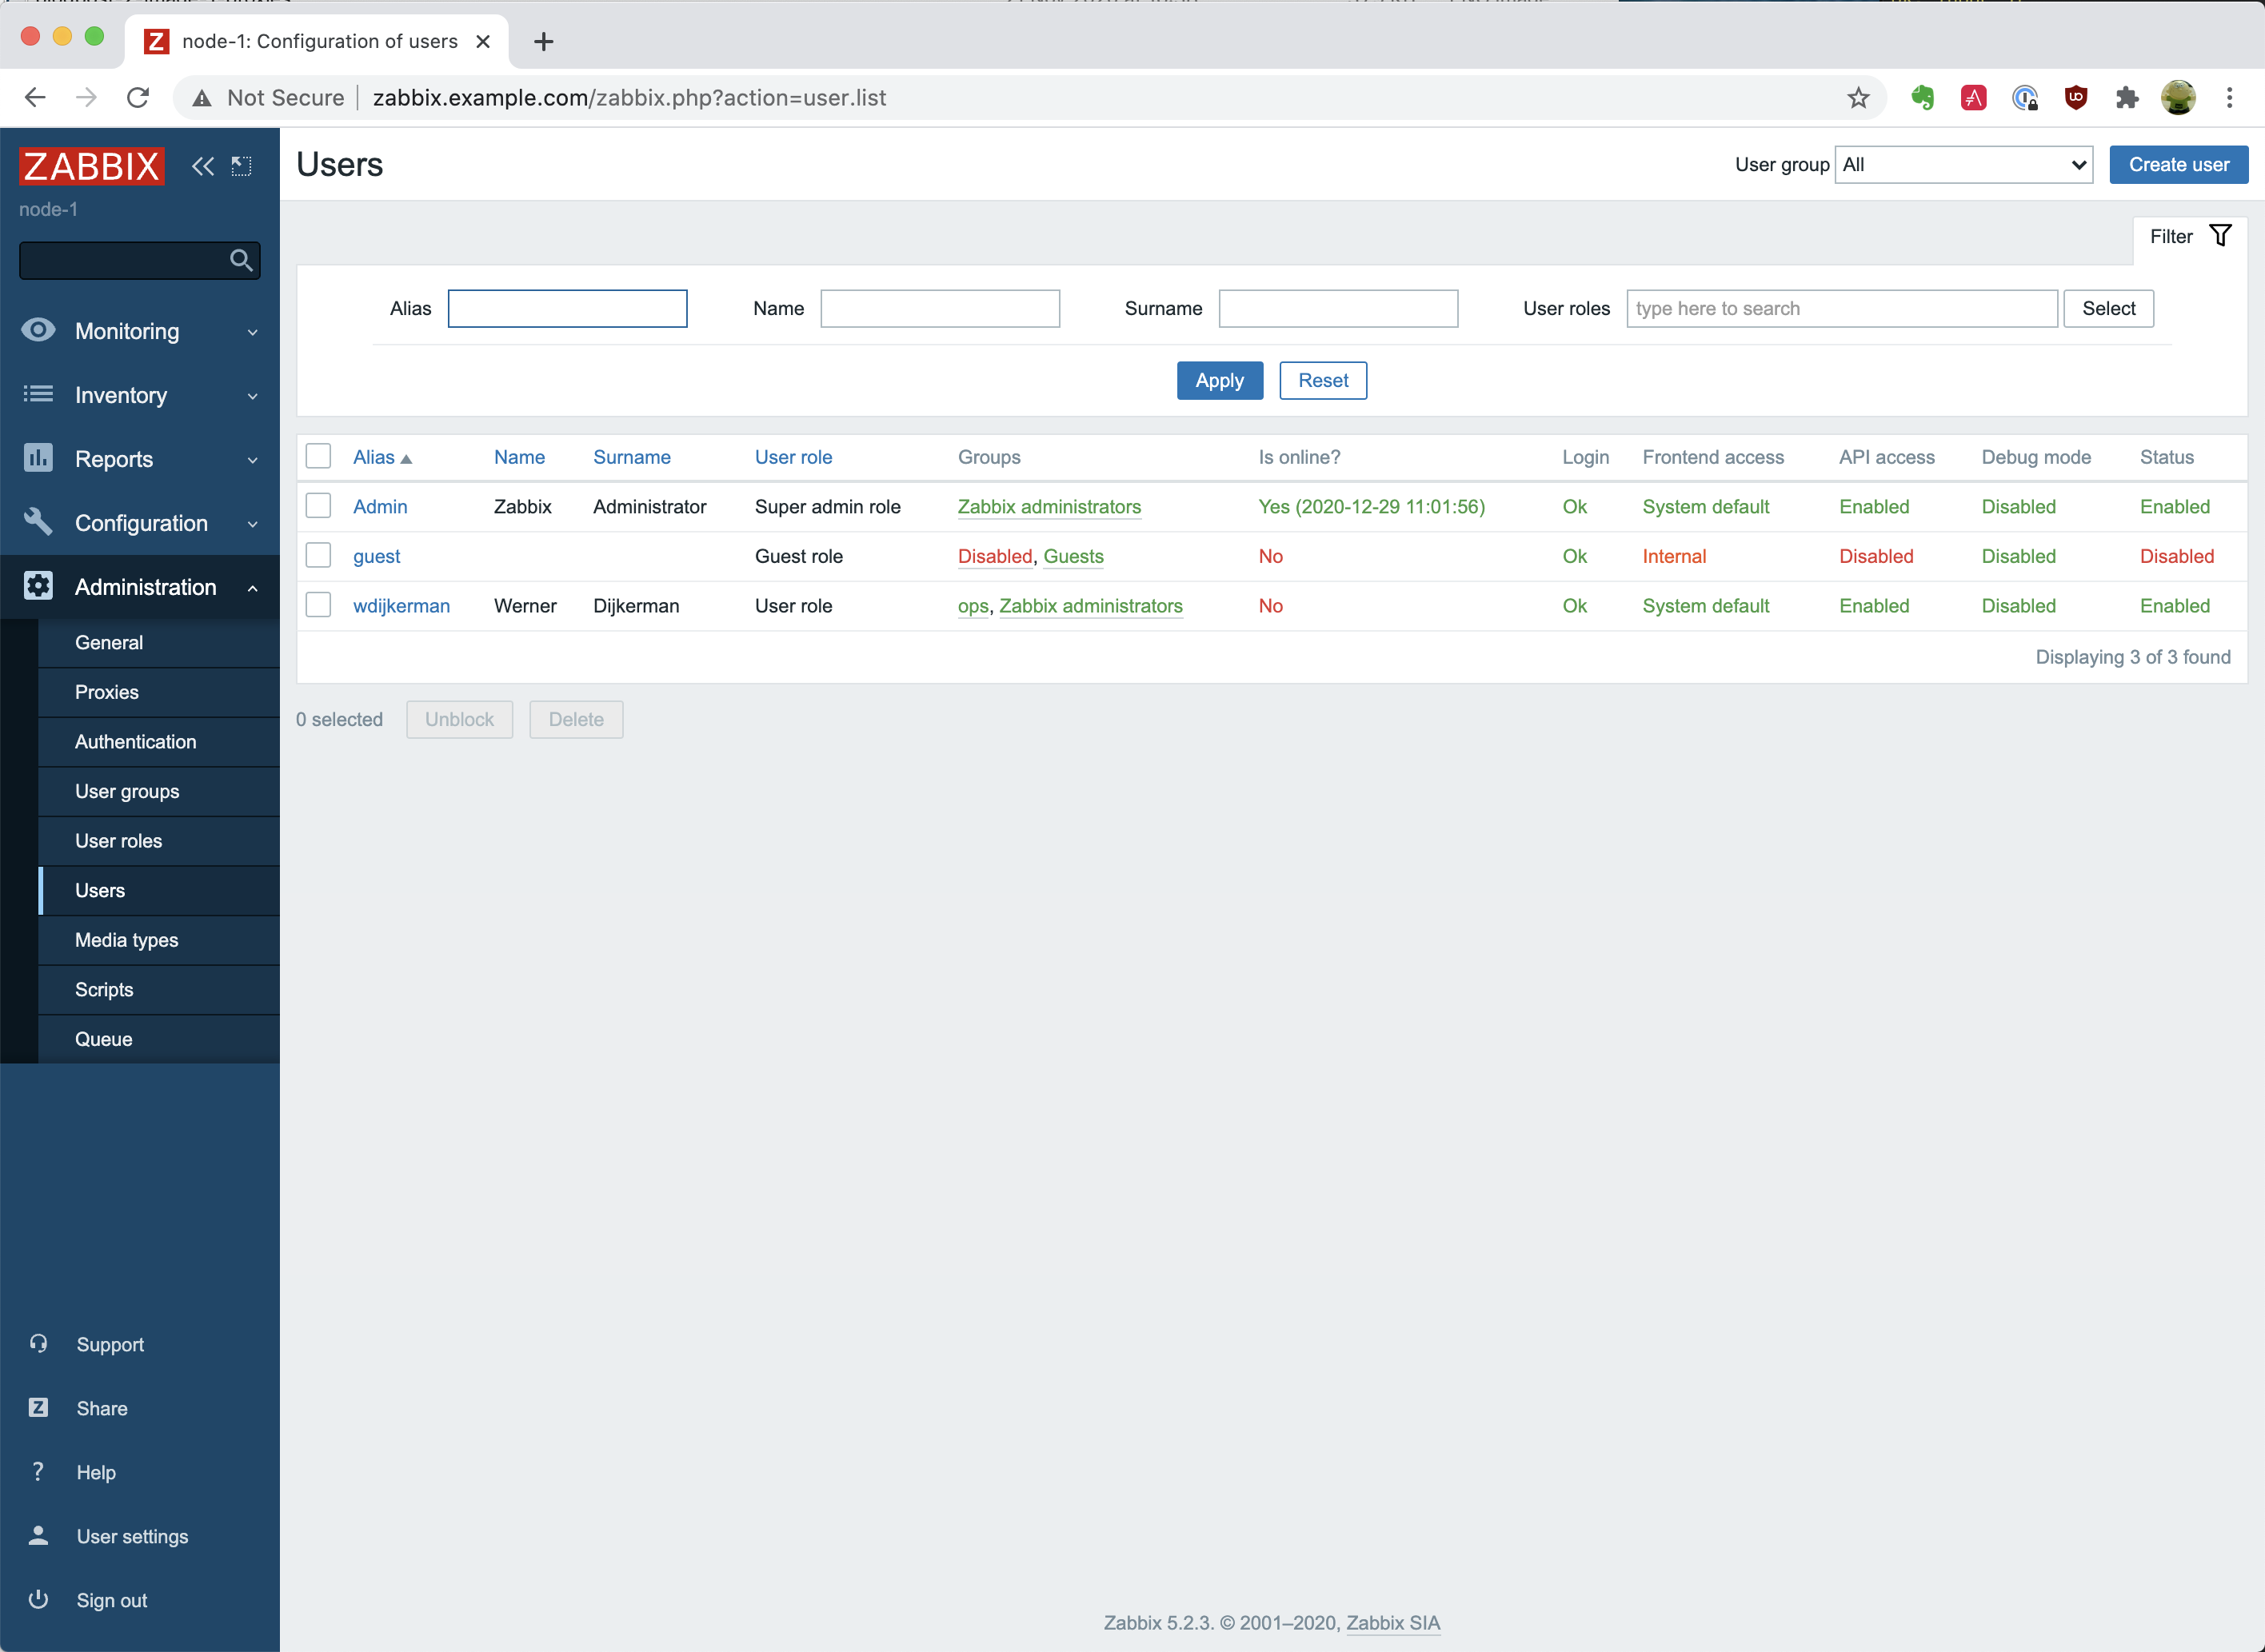
And lastly, we are going to see that we have also created new internal users. Navigate to “Administration” – “Users,” and you will see that we have created a user called “wdijkerman”, which can be found in the “/ansible/zabbix-server.yml” file on line 95. This user will be part of a group created earlier called “ops,”. The user type is Zabbix super admin and we have configured the email media type to be used 24×7.
We have defined a default password for this user – “password”. When you have changed the password in the Zabbix Frontend UI, executing the playbook would not change the password back again to “password.” So don’t worry about it. But if you would have removed – let’s say – the “ops” group, then, when you execute the playbook again, the group will be re-added to the user.
In the next post, we will install and configure the Zabbix Proxy.
The collective thoughts of the interwebz
Manage Consent
To provide the best experiences, we use technologies like cookies to store and/or access device information. Consenting to these technologies will allow us to process data such as browsing behavior or unique IDs on this site. Not consenting or withdrawing consent, may adversely affect certain features and functions.
Functional
Always active
The technical storage or access is strictly necessary for the legitimate purpose of enabling the use of a specific service explicitly requested by the subscriber or user, or for the sole purpose of carrying out the transmission of a communication over an electronic communications network.
Preferences
The technical storage or access is necessary for the legitimate purpose of storing preferences that are not requested by the subscriber or user.
Statistics
The technical storage or access that is used exclusively for statistical purposes.The technical storage or access that is used exclusively for anonymous statistical purposes. Without a subpoena, voluntary compliance on the part of your Internet Service Provider, or additional records from a third party, information stored or retrieved for this purpose alone cannot usually be used to identify you.
Marketing
The technical storage or access is required to create user profiles to send advertising, or to track the user on a website or across several websites for similar marketing purposes.