Tag Archives: zabbix proxy

What’s Up, Home? – Staring at the Video Stream

Post Syndicated from Janne Pikkarainen original https://blog.zabbix.com/whats-up-home-staring-at-the-video-stream/23882/

Can you make sure your video streams are up with Zabbix? Of course, you can! By day, I am a monitoring technical lead in a global cyber security company. By night, I monitor my home with Zabbix & Grafana Labs and do some weird experiments with them. Welcome to my weekly blog about the project.

You might have a surveillance camera at home to record suspicious activities in your yard while you are away or so. Most of the time the cameras do work just fine but might require a hard reboot from time to time, for example, due to harsh weather, or not coming back after a network outage. A networked camera responding to ping does not 100% mean the camera is actually functional. I have seen our camera going black and refusing to connect to its stream even though it thinks it’s working just fine.

Zabbix to the rescue!

Connecting to your camera

My post for this week is mostly to maybe give you a new approach for monitoring your cameras, not so much a functional solution as I’m still figuring out how to do this properly.

For example, I can connect to our camera via RTSP protocol and pass some credentials with it, so rtsp://myusername:[email protected]:443/myAddress

To figure out a connection address for your camera model, iSpyConnect has a nice camera database.

Playing the stream

To test if the video stream works, VLC and mplayer are good options; for visually verifying the stream works, try something like

mplayer ‘rtsp://myusername:[email protected]:443/myAddress’

or for those who like to use a GUI, in VLC, File –> Open Network –> enter your camera address.

For obvious reasons, I am not posting here an image from our camera. Anyway, trust me, this method should work if you have a compatible camera.

Let’s go next for the neat tricks part, which I’m still figuring out myself, too.

Making sure the stream works

To make sure the video stream is up and running, make your Zabbix server, Zabbix proxy, or a dedicated media server to continuously stream your video feed. For example:

mplayer -vo null ‘rtsp://myusername:[email protected]:443/myAddress’

The combination above would make mplayer play the stream with a null video driver; thus, the stream will be continuously played, but just with no visual video output generated. In other words, under perfect conditions, the mplayer process should be running on the server all the time. If anything goes wrong with the stream, mplayer quits itself, and the process goes away from the process list, too.

Using Zabbix to check the player status

Now that you have some server continuously playing the stream, it’s time to check the status with Zabbix.

From here, checking the stream status with Zabbix is simple, just

  • create a new item to check if for example mplayer process is around with Zabbix Agent item type and proc.num[,mplayer] key and
  • make your Zabbix alert about it if the number of mplayer processes is <1
Camera screenshots to your Zabbix user interface

Both mplayer and VLC can be controlled remotely, so here’s an idea I have not yet implemented but testing out.

If a motion sensor, either an external unit or a built-in, detects movement, make Zabbix send a command to the camera to record a screenshot of the camera stream, or possibly a short video. Then just make the script to save the photo or video in a directory that Zabbix can access and then show with its URL widget type.

mplayer has a slave mode for receiving commands from external programs, which might work together with a FIFO pipe.

Real-time video stream in your Zabbix user interface

At least VLC can transcode RTSP to HTTP stream in real-time, so in theory, then embedding the resulting stream to your Zabbix user interface should very much be doable with a short HTML file and Zabbix URL widget type. This one I did not yet even start to try out, though.

So, that’s all for this week’s blog post. I’m still building this thing out, but if you have successfully done something similar, please let me know!

I have been working at Forcepoint since 2014 and am a true fan of functional testing. — Janne Pikkarainen

This post was originally published on the author’s LinkedIn account.

The post What’s Up, Home? – Staring at the Video Stream appeared first on Zabbix Blog.

Handy Tips #32: Deploying Zabbix in the Azure cloud platform

Post Syndicated from Arturs Lontons original https://blog.zabbix.com/handy-tips-32-deploying-zabbix-in-the-azure-cloud-platform/21355/

Deploy your Zabbix servers and proxies in the Azure cloud.

There are many use cases where deploying your Zabbix server or Zabbix proxies in the cloud can reduce costs, provide an additional layer of security and redundancy, and improve the available management toolset.

Deploy your Zabbix instance in the Azure cloud with the official Zabbix cloud images:

  • Cloud images are available for the latest Zabbix server and proxy versions
  • Deploy a fresh Zabbix instance in 5 minutes

  • Dynamically scale the cloud resources
  • Select the deployment options based on your budget

Check out the video to learn how to deploy Zabbix in the Microsoft Azure cloud platform:

How to deploy Zabbix in the Azure cloud platform:

  1. Navigate to the Zabbix Cloud Images page
  2. Select the Microsoft Azure vendor and Zabbix server cloud image
  3. Press the Get it now button and press Continue in the next window
  4. On the deployment page press the Create button
  5. Provide the virtual machine name, resource group, region
  6. Specify the administrator account settings
  7. Provide the disk, network, tag, and advanced settings
  8. Verify the provided settings
  9. Press Create to begin deploying the virtual machine
  10. For public key authentication: download and store the private key
  11. Once the deployment is complete, press the Go to resource button
  12. Save your public IP address and connect to it via SSH
  13. Save the initial frontend username and password
  14. Use the public IP address to connect to your Zabbix frontend
  15. Log in with the saved username and password obtained

Tips and best practices
  • The default SSH user is called azureuser
  • Remember to store your SSH private key in a secure location
  • You can access the Zabbix database by using the root user
  • The password for the MySQL database root user is stored in /root/.my.cnf configuration file

Feeling overwhelmed with deploying and managing your Zabbix instance?
Check out the Zabbix certified specialist courses, where under the guidance of a Zabbix certified trainer, you will learn how to deploy, configure and manage your Zabbix instance.

The post Handy Tips #32: Deploying Zabbix in the Azure cloud platform appeared first on Zabbix Blog.

ZABBIX – Open-Source Monitoring Software for Automotive Monitoring

Post Syndicated from Dmitry Lambert original https://blog.zabbix.com/zabbix-open-source-monitoring-software-for-automotive-monitoring/18776/

In this article, I will try to cover the theoretical models on monitoring your vehicle fleet with minimal to no cost at all by using the ELM327 microcontroller, a python library to process the collected data and a Zabbix proxy running on a small Raspberry Pi device to store and sent the collected metrics to the central Zabbix server.

Expanding the scope of our Zabbix instance

The first thing that comes to mind when someone mentions a monitoring system is pretty simple. People think about server monitoring, and with servers, we usually mean Linux and Windows systems and also network monitoring for all kinds of flavors of switches, routers, firewalls, etc. But by putting so much focus on these standard things, we are someway limiting the possibilities of monitoring systems. Zabbix has proven itself as an extremely powerful monitoring tool that can combine and monitor all client infrastructure – no matter if we are talking about the aforementioned servers, network devices, services, applications, or anything else. And most important – Zabbix is truly a 100% open-source product, which allows anyone to use all listed functionalities for free.

Please, keep in mind that no doubt there are systems available that are created exactly for the same purpose I will cover here. Maybe they are more reliable. Perhaps they require less effort to achieve the desired result. But that is the exact reason why the presented model is mostly theoretical, with the primary goal being to show that it is hard to put Zabbix in some functionality boundaries. Usually, the only limitation is our imagination. And it is up to you to treat this information for pure entertainment or try to implement it in a place where you find it suitable.

Monitoring a car fleet

Let’s get straight to the point. You don’t need to own a huge logistics company with a thousand vehicle fleet to understand it. In simple words – if you or any of your relatives own a car, you should be aware that cars tend to break. Just like it usually happens, there could be many types of issues, starting with a flat tire and ending with some ongoing damage in the gearbox or engine. It is important to understand that vehicles themselves are becoming smarter. If in the past it was a purely mechanical device, then nowadays it is a highly complicated electronic system on top of that mechanical device that can diagnose the slightest deviations from accepted norms that are set by the manufacturer and inform about this malfunction either with an indicator light on your dash or simply with a log message that will be accessible only when read with specialized software or tools.

No alt text provided for this image


Keep in mind that malfunctions in vehicles are not as simple as boolean ( works or not ). In most cases an issue is noticed before the car is not able to move forward, and the purpose of that is to be informed and fix the issue before it has turned into a defect that actually prevents the vehicle from functioning.

And now think about this from an automotive business perspective. We may be talking about hundreds of vehicles that are always on the move to deliver something or someone in time. It should be straightforward that in such a niche business, each of these vehicles should be able to traverse close to a thousand kilometers per day.

No alt text provided for this image


Thankfully, as mentioned previously, the smart diagnostic system will let you know about all the potential problems. On the other hand, the driver of the vehicle usually has nothing to do with its repairs or technical condition. So in a perfect world, we should have a few technical employees that would simply ask returning driver whether everything is fine with the car after his shift – are there any errors, and connect with diagnostic software to read its logs to make sure that everything actually is ok. If it’s not ok, information should be passed to the technical department to move this vehicle to the maintenance.

Why such pressure? Well, remember that most of these notifications serve as a warning that something is not working as it should, but currently, it is not causing harm. However, if it is ignored, there is a high chance that at some point, the vehicle will not be able to continue its way to the destination.

No alt text provided for this image


So this is where Zabbix joins the conversation. Imagine if all this data transfer from the vehicle diagnostic system to the responsible employees would happen automatically, with potential error prioritization and escalation to further levels if any vehicle has an ongoing issue that remains active for multiple days. And remember that Zabbix is a completely free and open-source system, which means that we could achieve this result for free. And we are absolutely not limited to DTC ( Diagnostic Trouble Codes ) readings. Combining this ecosystem with the recent Zabbix 6.0 LTS release, we can create a geomap with the current location of any vehicle from our fleet. With a little effort, we can also get speed measurements, long stops, starts, and much more.

This is the part when the tested but still theoretical model comes into action. By now, we are aware that a car is way smarter than it may look, and it gathers and stores a lot of useful information. However, the Zabbix monitoring system as per the most common standard sits somewhere in our headquarters and monitors generic metrics of our IT infrastructure. So how could we potentially get this information from our vehicle to Zabbix?

No alt text provided for this image


Since all information is stored in ECU (Electronic Control Unit), there is also a way to read it. And it is achieved through OBD (On-Board Diagnostic) socket through the standardized protocol. Just like anything else, OBD has multiple versions or protocols of communications. Still, if we are talking about seamlessly modern cars, most likely we are talking about OBD-II, which included Electronic signaling and messaging format.

Using ELM327 to gather data

precisely OBD-II will help us to gather all information from the vehicle, to further transfer it to our Zabbix monitoring system. Initially, this may yet sound very unclear because we have some kind of socket to access our ECU, but how can we actually gather some meaningful data? For that, we will need ELM327

No alt text provided for this image


ELM327 is a programmed microcontroller produced by ELM Electronics for translating the OBD interface. Even today ELM327 command protocol is one of the most popular PC to OBD interface standards. Typically ELM abstracts the low-level protocol and presents a simple interface that can be called via UART, typically by a hand-held diagnostic tool or a computer program connected by USB, RS-232, Bluetooth, or WiFi. In our case, we don’t need and don’t have any dedicated diagnostic tool, so we will have to use something else to work with OBD-II and translate all incoming data. With the ELM-327, it is straightforward. You can purchase an ELM327 OBD2-Bluetooth adapter on Amazon for a couple of dollars, and it will be enough to provide the required functionality.

No alt text provided for this image

Data processing with Python-OBD and Raspberry Pi

As it usually happens, for all things that we need, we can find a Python library published under GPLv2. And as you already noticed from the screenshot, we are not limited to stored DTC values. In addition to that, we are able to read live data from our vehicle, such as speed, fuel pressure, coolant temperature, intake temperature, and much more.

No alt text provided for this image


The closer we get to the result, the simpler the task starts to look. At this point, we basically have everything that we need. We have the data, and we have the interface from which to read it. ELM327 allows us to transport this data to our device, and the python library will enable us to translate and process this information, therefore allowing sending clean data to our Zabbix. The only open question is what device should we use in our vehicle, on which we could run our Python script, and which would have GSM access to transfer gathered data to the Zabbix server. In my example choice was as simple as cheap – Raspberry Pi.

No alt text provided for this image


And then it’s a matter of choice when you have Raspberry set up on a vehicle, connected via Bluetooth or any other way to your ELM327, that is plugged into an OBD-II connector. With Python script running on Pi device to receive and process data from our ECM, we need to decide what piece of software from Zabbix we want on this device.

Zabbix proxy for data storage

Considering that the car could be driving through different areas where internet coverage could not be the best, but we also don’t want to lose any data simply because there was no connection, I think it is best to install Zabbix proxy on Raspberry Pi.

Zabbix proxy perfectly suits such a small setup and helps us with its main purpose. Proxy has a local database that stores all information that has to be sent to our Zabbix server. If because of some networking trouble this data can’t be passed to our server, it will be kept in the local database for a moment when a network connection is restored and data is sent. Luckily for us, Zabbix has Official Packages for Raspberry Pi OS, so we don’t need to tailor any magic around it.

The functionality of the Zabbix proxy allows us to choose between two modes ( Active and Passive ), which basically allows us to choose the direction of communication. It might not be the cheapest approach to purchase a static IP address for each unit. Therefore we will be using Zabbix Proxy (Active), which simply will connect to our Zabbix server and send all gathered information. Of course, there are security measures for validation to make sure that only designated devices will be able to send data to a server. If an even more secure approach is required, users may choose to use TLS encryption with PSK or Certificates.

No alt text provided for this image

Collecting the current latitude and longitude

Previously I mentioned, that with the new Geomap widget, it is possible to achieve a live view of the current location from all your fleet on a single dashboard. To do that, we obviously need live latitude and longitude readings, which ECU and stock Raspberry Pi are not able to provide. But this is the beauty of Raspberry Pi. With minimal investments, we can purchase a GPS unit and combine it with our Pi.

No alt text provided for this image

With a very simplified Python script, we can gather all required data, and move it to our Zabbix proxy that is installed on localhost, which then will parse this information to our Zabbix Server that will allow us to see it in the dashboard. As this is not a very native and straightforward approach to monitoring, we won’t be able to use native item types to collect this data. This means that all the collection must be done within the script, and then we need to pass this data using the Zabbix-sender utility. The purpose of this utility is very simple, without any complications, take data that is provided and send it to a specified Hostname.

No alt text provided for this image


Since Zabbix has a very powerful preprocessing engine, we don’t have to make our script over-complicated with data transformation to meet guidelines for data visualization within Zabbix. We can send raw data, just like it is, and then use any suitable preprocessing step in the Zabbix frontend to extract the value we need to visualize.

No alt text provided for this image

The many uses of the collected data

When the data arrives in the Latest data in our Zabbix frontend, consider the most complicated part of this task is done. And just like before the idea of automotive monitoring with Zabbix, the only limitation is your imagination. You can simply collect this data without any actions. Monitor it on your own, from time to time, just to see if you can do anything meaningful with it.

You are also able to utilize a wide list of trigger functions within Zabbix to define that it is a problem when some particular value is received. For example, when some DTC appeared on a device, or let’s say, the average speed of the vehicle exceeds a threshold. Maybe you want to set some borders for coordinates, and if a particular vehicle gets outside of a specified radius, it could raise a problem in your monitoring system.

It is up to you how to react to these triggers. It could be just a flashing light on your Problems view within the Zabbix frontend. It could also automatically create incidents for your maintenance team with a message that a particular vehicle has worn out brake pads that has to be replaced. But maybe if these brake pads are not replaced for a full week since the first time it was noticed, you want to receive a personalized message on your mobile phone so that you can escalate this issue further.

No secret that there are flaws and downsides. As I mentioned right in beginning, there are software and devices that are developed and adopted exactly for this purpose, however, my approach may not be 100% reliable. Data transfer from ECU is not as live as reading CPU utilization from your computer. All of this is just a reminder that monitoring is not limited to network devices and servers. And Zabbix, which is growing every year, provides more and more features to its users while remaining absolutely free and open-source, is here to support all your ideas and help them come to life.

The post ZABBIX – Open-Source Monitoring Software for Automotive Monitoring appeared first on Zabbix Blog.

Deploying Zabbix in Amazon Web Services cloud platform

Post Syndicated from Arturs Lontons original https://blog.zabbix.com/deploying-zabbix-in-amazon-web-services-cloud-platform/17283/

With the rapid evolution and proliferation of different cloud services, many organizations have decided to move parts of their infrastructures from on-prem to cloud. As an essential part of your infrastructure, Zabbix is no exception – you always have the option to either deploy Zabbix on-prem or select from one of the many supported cloud service providers to deploy your Zabbix Server or Zabbix Proxy on.

In this blog post, let’s look at how we can quickly deploy Zabbix Server and Zabbix Proxy nodes in Amazon Web Services cloud platform.

Deploying the Zabbix Server in AWS

Let’s begin with the Zabbix download page. Under the Zabbix Cloud Images section, select the AWS cloud vendor and then the Cloud Image you wish to deploy. Let’s start with Zabbix Server 5.0 with MySQL DB backend and Nginx Web server backend for our frontend.

Next, we will be redirected to the AWS marketplace, where we will have to subscribe to the Zabbix Server 5.0 image.

Once we have subscribed to the Zabbix Server image, we can continue with the deployment configuration.

Next, we must select our Region, Zabbix minor version (usually the latest available), and the Fulfillment option. Once that is done, we can finalize the launch configuration.

Select the preferred Launch option, EC2 Instance Type, VPC, and Subent settings on the Launch page.

Next – We have to select or create a security group.

We also have to select or generate EC 2 Key pair – make sure to save your private key in a safe location!

Note that creating a security group based on seller settings does not guarantee that the group will have an inbound SSH access rule! Make sure to double-check the security group and manually add the SSH inbound rule if it hasn’t yet been added. We will need to access this instance via SSH to obtain the initial frontend login credentials!

Once you click on the Launch button, the deployment process for your Zabbix application will be initiated.

Accessing the application

Let’s open up the Instances section and open our newly deployed Zabbix instance

We can access the Zabbix Frontend by opening the Public IPv4 address or Public IPv4 DNS of the Zabbix instance

Note that the Zabbix frontend password is still unknown to us. Recall how I mention that we will need to access the instance via SSH to obtain the frontend password. Let’s do so now.

Write down the login credentials and use them to log in to the Zabbix instance.

Accessing the database

In case we wish to access the Zabbix database backend, we can do so from the command line. Zabbix database can be accessed by using the root user. By default, it can be used without a password.

The MySQL root password is stored in /root/.my.cnf configuration file.

Modifying the Zabbix Frontend timezone

By default, the Zabbix frontend uses the “UTC” timezone. If you need to change it, edit php_value[date.timezone] PHP variable in /etc/php-fpm.d/zabbix.conf and restart php-fpm process:

systemctl restart php-fpm

Zabbix proxy

If you wish to deploy a Zabbix proxy instance in your AWS cloud, the deployment steps are very much the same. Most likely, you will still require SSH access if you wish to perform some configuration changes in the Zabbix proxy configuration file.

Note, that by default, the SQLite proxy database is stored in /tmp/zabbix_proxy.sqlite3

As always, don’t forget the point the proxy at your Zabbix server instance by modifying the Server parameter in the Zabbix proxy configuration file, located in /etc/zabbix/zabbix_proxy.conf

And that’s all! With just a few clicks, we are able to deploy a fully functional Zabbix instance or a small Zabbix proxy to distribute or scale our monitoring. Don’t forget that AWS is just one of the many cloud service providers you can use with Official Zabbix images. If you have any questions about the AWS deployment – you are very much encouraged to leave a comment under this blog post.

If you wish to learn more about the Zabbix Monitoring solution, check out the official documentation https://www.zabbix.com/documentation/current/manual/quickstart.

Zabbix frontend as a control panel for your devices

Post Syndicated from Aigars Kadiķis original https://blog.zabbix.com/zabbix-frontend-as-a-control-panel-for-your-devices/15545/

The ability to define and execute scripts on different Zabbix components in different scenarios can be extremely powerful. There are many different use cases where we can execute these scripts – to remediate an issue, forward our alerts to an external system, and much more. In this post, we will cover one of the lesser-known use cases – creating a control panel of sorts in which we can execute different scripts directly from our frontend.


Configuration cache

Let’s use two very popular Zabbix runtime commands for our use case –  ‘zabbix_server -R config_cache_reload’ and ‘zabbix_proxy -R config_cache_reload’. These commands can be used to force the Zabbix server and Zabbix proxy components to load the configuration changes on demand.

First, let’s discuss how these commands work:

It all starts with the configuration cache frequency, which is configured for the central Zabbix server. Have a look at the output:

grep CacheUpdateFrequency= /etc/zabbix/zabbix_server.conf

And on the Zabbix proxy side, there is a similar setting. Let’s take a look:

grep ConfigFrequency= /etc/zabbix/zabbix_proxy.conf

With a stock installation we have ‘CacheUpdateFrequency=60‘ for ‘zabbix-server‘ and we have ‘ConfigFrequency=3600‘ for ‘zabbix-proxy‘. This parameter represents how fast the Zabbix component will pick up the configuration changes that we have made in the GUI.

Apart from the frequency, we have also another variable which is: how long it actually takes to run one configuration sync cycle. To find the precise time value, we can use this command:

ps auxww | egrep -o "[s]ynced.*sec"

The output will produce a line like:

synced configuration in 14.295782 sec, idle 60 sec

This means that it takes approximately 14 seconds to load the configuration cache from the database. Then there is a break for the next 60 seconds. After that, the process repeats.

When the monitoring infrastructure gets big, we might need to start using larger values for ‘CacheUpdateFrequency‘ and ‘ConfigFrequency‘. By reducing the configuration reload frequency, we can offload our database. The best possible configuration performance-wise is to install ‘CacheUpdateFrequency=3600‘ in ‘zabbix_server.conf‘ and use ‘ConfigFrequency=3600‘ (it’s the default value) in ‘zabbix_proxy.conf‘.

Some repercussions arise with such a configuration. When we use values that are this large, there will be a delay of one hour until newly created entities are monitored or changes are applied to the existing entities.

Setting up the scripts

I would like to introduce a way we can force the configuration to be reloaded via GUI.
Some prerequisites must be configured:

1) Make sure the  ‘Zabbix server‘ host belongs to the “Zabbix servers” host group.

2) On the server where service ‘zabbix-server‘ runs, install a new sudoers rule:

cd /etc/sudoers.d
echo 'zabbix ALL=(ALL) NOPASSWD: /usr/sbin/zabbix_server -R config_cache_reload' | sudo tee zabbix_server_config_cache_reload
chmod 0440 zabbix_server_config_cache_reload

The sudoers file is required because out of the box the service ‘zabbix-server‘ runs with user ‘zabbix‘ which does not have access to interact with the local system.

3) We will also create Zabbix hosts representing our Zabbix proxies. These hosts must belong to the ‘Zabbix proxies’ host group.

Notice that in the screenshot the host ‘127.0.0.1′ is using ‘Monitored by proxy‘. This is extremely important since we do not care about the agent interface in the use case with proxies – the interface can contain an arbitrary address/DNS name. What we care about is the ‘Monitored by proxy’ field. Our command will be executed on the proxy that we select here.

4) On the server where service ‘zabbix-proxy‘ runs, install a new sudoers rule:

cd /etc/sudoers.d
echo 'zabbix ALL=(ALL) NOPASSWD: /usr/sbin/zabbix_proxy -R config_cache_reload' | sudo tee zabbix_proxy_config_cache_reload
chmod 0440 zabbix_proxy_config_cache_reload

5) Make the following changes in the ‘/etc/zabbix/zabbix_proxy.conf‘ proxy configuration file: ‘EnableRemoteCommands=1‘. Restart the ‘zabbix-proxy’ service afterwards.

6) Open ‘Administration’ => ‘Scripts’ and define the following commands:
For the ‘Zabbix servers’ host group:

sudo /usr/sbin/zabbix_server -R config_cache_reload	

Since this is a custom command that we will execute, the type of the script will be ‘Script’. The first script will be executed on the Zabbix server – we are forcing the central Zabbix server to reload its configuration cache. In this example, all users with at least ‘Read’ access to the Zabbix server host will be able to execute the script. You can limit this as per your internal Zabbix policies.

Below you can see how it should look:

For the ‘Zabbix proxies’ host group:

sudo /usr/sbin/zabbix_proxy -R config_cache_reload	

The only thing that we change for the proxy script is the ‘Command’ and ‘Execute on’ parameters, since now the command will be executed on the Zabbix proxy which is monitoring the target host:

Frontend as a control panel

I prefer to add an additional host group “Control panel” which contains the central Zabbix server and all Zabbix proxies.

Now when we need to reload our configuration cache, we can open ‘Monitoring’ => ‘Hosts‘ and filter out host group ‘Control panel’. Then click on the proxy host in question and select ‘config cache reload proxy’:

It takes 5 seconds to complete and then we will see the result of script execution. In this case – ‘command sent successfully’:

By the way, we can bookmark this page too 😉

With this approach, you can create ‘Control panel’ host groups and scripts for different types of tasks that you can execute directly from the Zabbix frontend! This allows us to use our Zabbix frontend not just for configuration and data overview, but also as a control panel of sorts for our hosts.
If you have any questions, comments, or wish to share your use cases for using scripts in the frontend – leave us a comment! Your use case could be the one to inspire many other Zabbix community members to give it a try.

Deploying and configuring Zabbix 5.4 in a multi-tenant environment

Post Syndicated from Arturs Lontons original https://blog.zabbix.com/deploying-and-configuring-zabbix-5-4-in-a-multi-tenant-environment/15109/

In this post and the video, we will discuss deploying and configuring Zabbix 5.4 in a multi-tenant environment and how Zabbix is finally ready for real multi-tenant use cases thanks to multiple features.

Contents

I. Monitoring requirements of multi-tenant environments (0:30)
II. Supported monitoring approaches (2:32)

III. Zabbix and multi-tenant environment (5:56)

IV. To-do list (21:36)
V. Questions & Answers (23:32)

Monitoring requirements of multi-tenant environments

Before talking Zabbix, let us first analyze the core requirements behind multi-tenant environments. Such environments can be quite complex with a particular set of prerequisites that we have to be sure we can satisfy before continuing further.

  • The core idea behind multi-tenancy is support for multiple customers. Therefore we need to support granular role/permission schema. The ability to define different roles for different customers and limit what they can access is key to success for such deployments.
  • Multiple customers means a lot of data. No matter if we’re talking about a single Zabbix instance or scaling by deploying multiple Zabbix instances (say, for different regions) we need to have the ability to process large amounts of data. 
  • On top of that, we must be able to scale upwards, ideally – both horizontally and vertically. More customers, different requirements, varying amounts of data to process – all of this needs to be accounted for in advance.
  • Redundancy is another key factor for us. As service providers, we absolutely cannot afford any downtime or data loss. While this may be acceptable in our own home labs or classrooms, this is not the case here. Unscheduled downtime could potentially result in a loss of a customer.

Supported monitoring approaches

Now that we have covered the architectural requirements, let’s focus on data collection. No matter the monitoring solution, the easiest approach in most cases would simply be to tell our customer to deploy an agent and be done with it. Unfortunately, this often doesn’t sit will with the end user and their security team. Let us also not forget that it is simply not possible to deploy an agent on some devices or environments – what then? Having a vast selection of monitoring methods is key for successful deployment of a multi-tenant monitoring service.

Let us take a look at this in the context of Zabbix.

Agent

  • With Zabbix agents we can obtain data in two ways – in passive (polling) and active modes (trapping). This is extremely useful while working with multiple customers, since each of them will have different internal network security policies. I have personally seen cases where only one of these approaches is supported, while the other is restricted by the security policies.
  • Agents also support deployment on different platforms (Windows, Unix, etc.), as well as execution of external third-party scripts either by way of User parameters or system.run item key.
  • Active agents are also capable of reading log files and event logs on Windows environments. This can be extremely useful, since many applications, even in-house ones, can provide a lot of monitoring data by logging it.

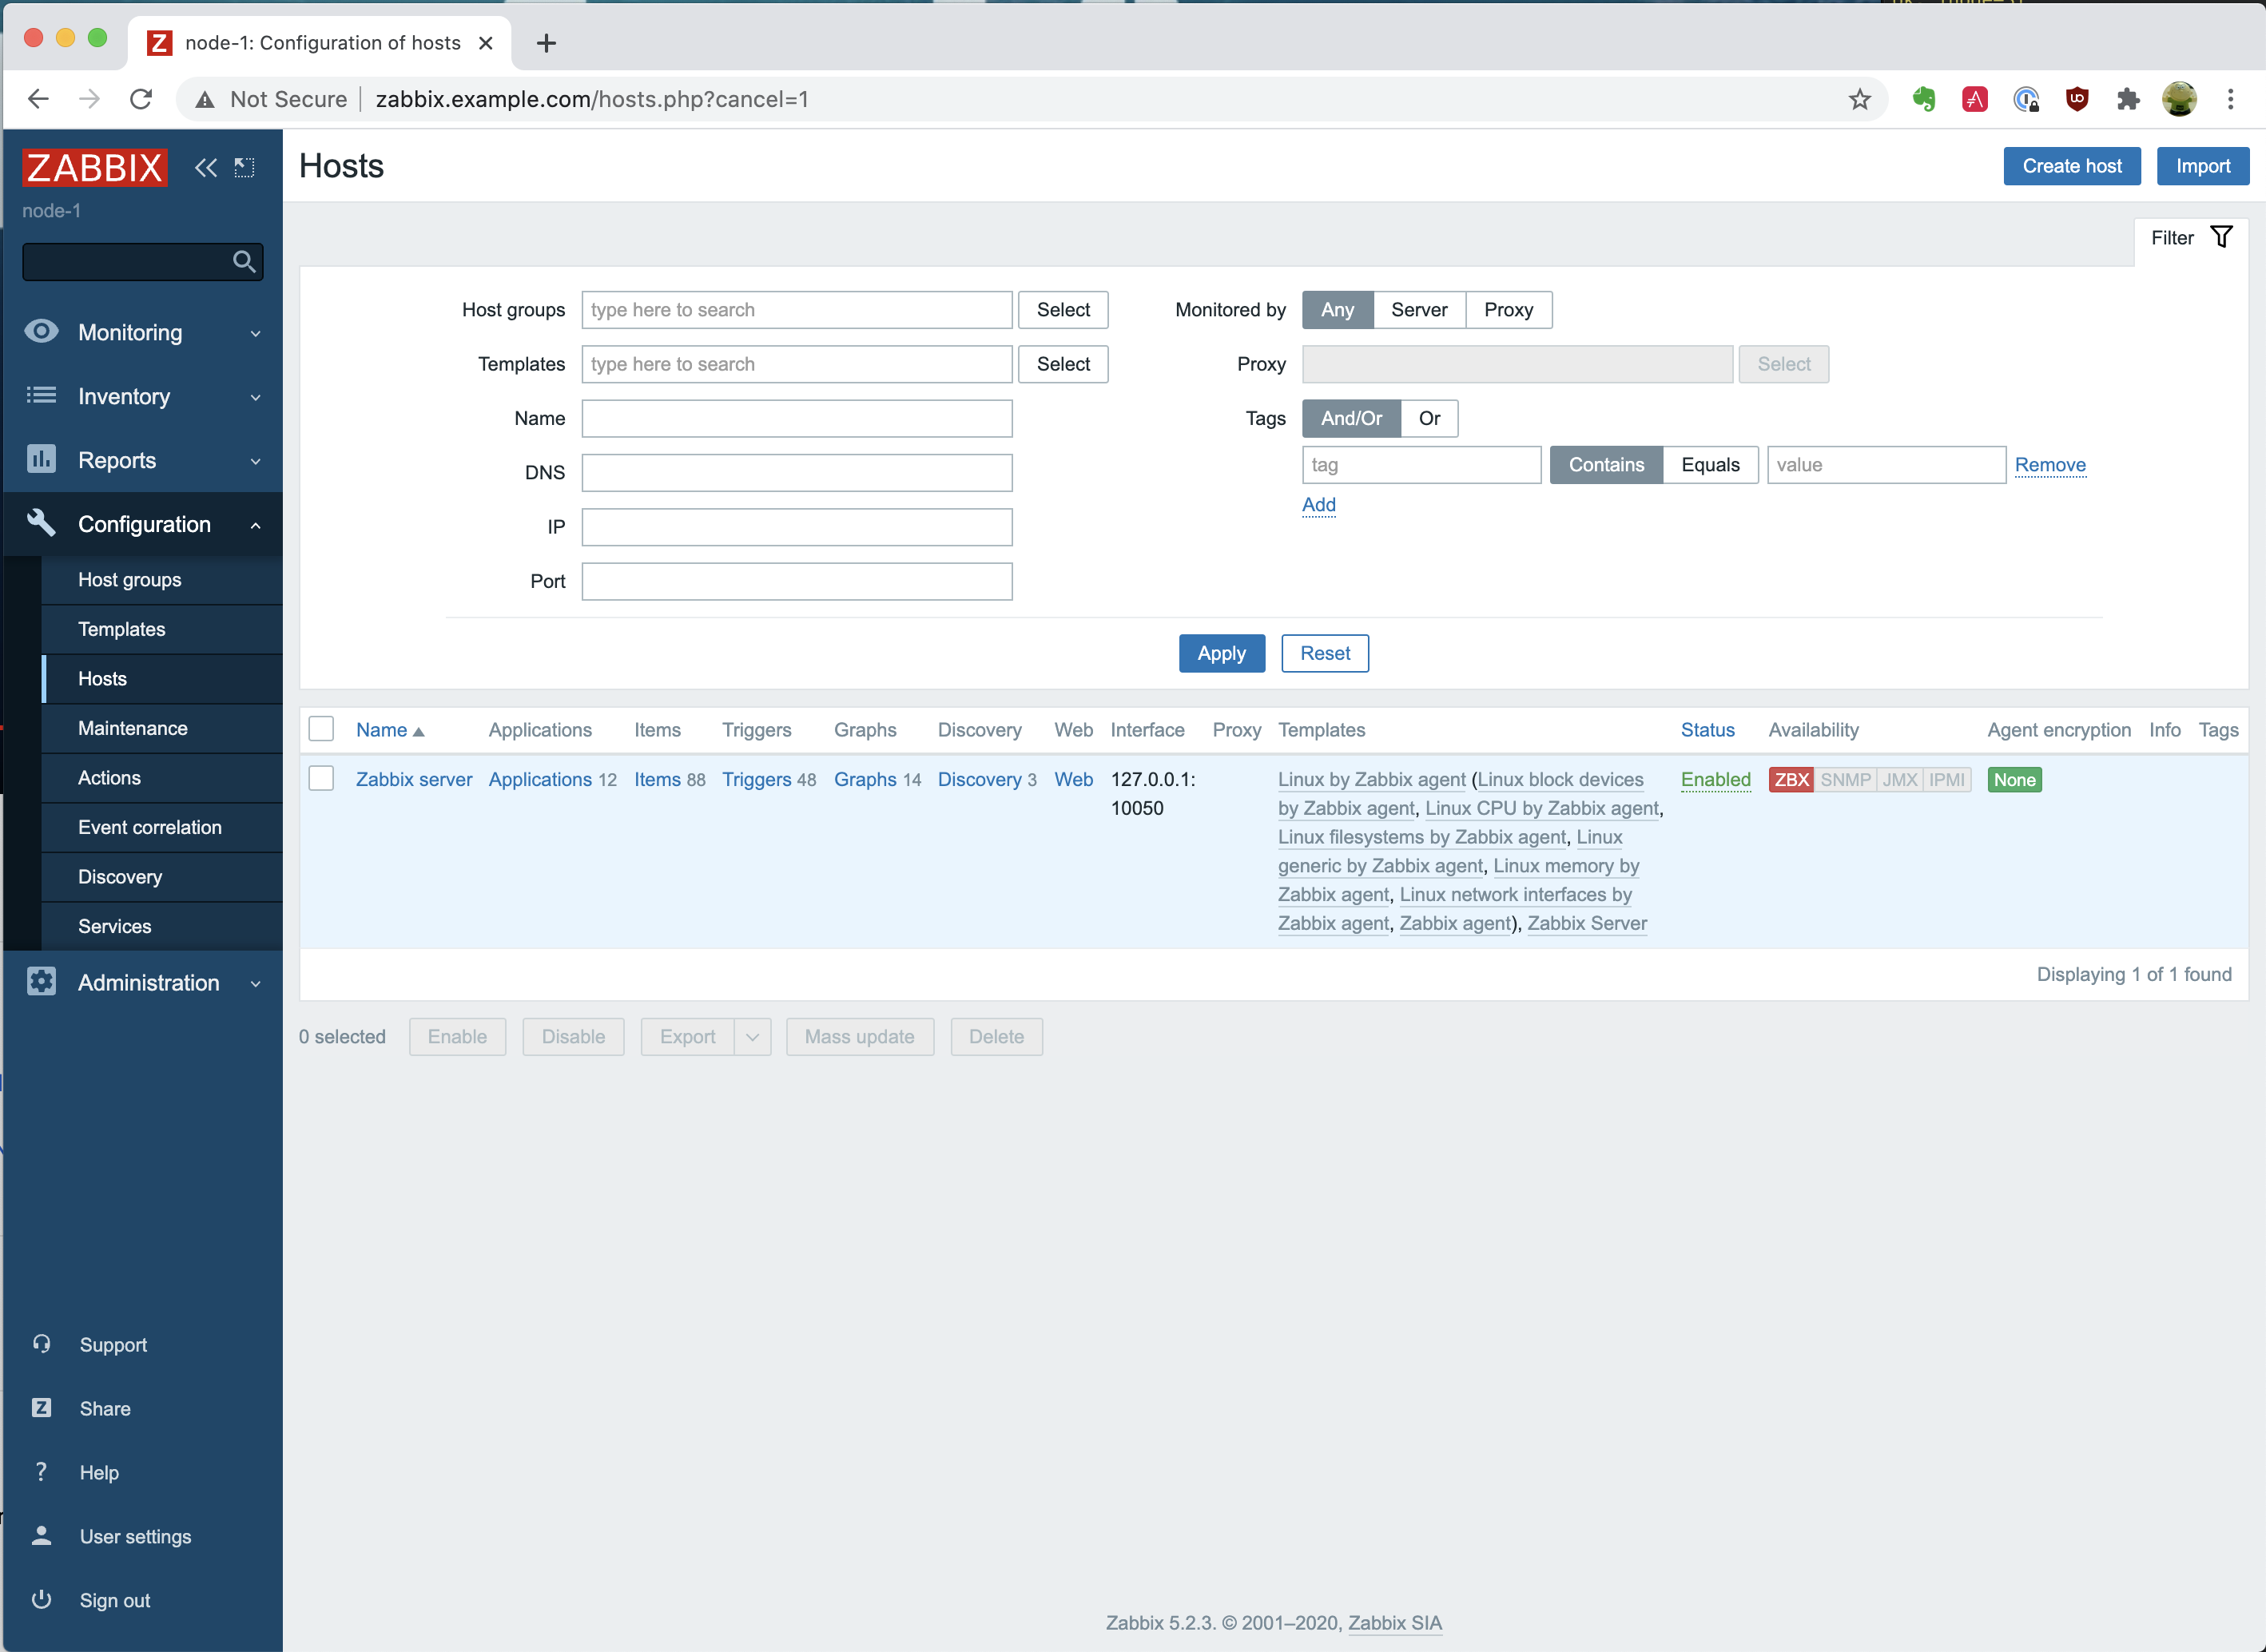
Agent-supported deployment on various platforms


Since we need to stay flexible, there are many other monitoring approaches supported by Zabbix that we can utilize:

  • SNMP, HTTP, IPMI and SSH agentless monitoring.
  • Simple checks (ICMP pings, port statuses).
  • Database and Java application monitoring.
  • External scripts (executed by the Zabbix server, Zabbix proxy or Zabbix agent).
  • Aggregations and calculations of existing data.
  • VMware monitoring and integration.
  • Web monitoring by creating web scenarios.
  • Synthetic monitoring for simulating real life user transactions.

Latest improvements

Why are we putting emphasis on multi tenancy just now? The reason is a couple of great features added in the last few releases. These features can finally allow us to utilize Zabbix in a truly multitenant environment:

Added in Zabbix 5.2:

  • Ability to create customizable user roles based on user types;
  • Secrets can now be stored in an, highly secure external vault;
  • Improvements in configuring frontend were also added. For example, each user can now select their time zone for frontend data display. This will be relevant for users in different geographical locations.

Added in Zabbix 5.4:

  • Users now have the ability to send scheduled reports. This is extremely useful for customers who may wish to receive scheduled reports about their environments. Now, instead of utilizing third-party scripts to export data and generate reports, you can use the native Zabbix functionality.
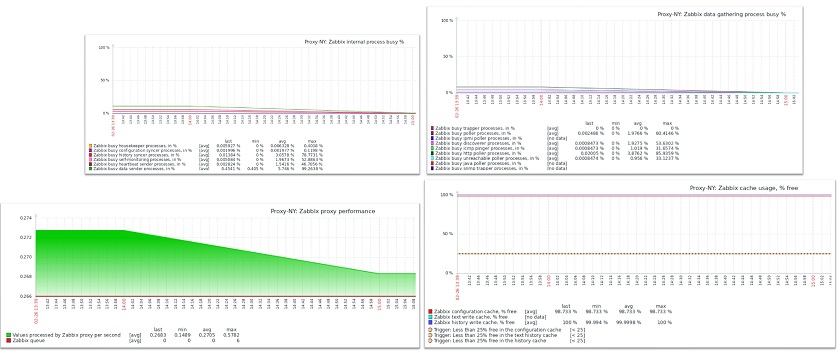
  • Major performance improvements have also been added, especially for really large instances with tens of thousands of new incoming values per second.

Zabbix and multi-tenant environment

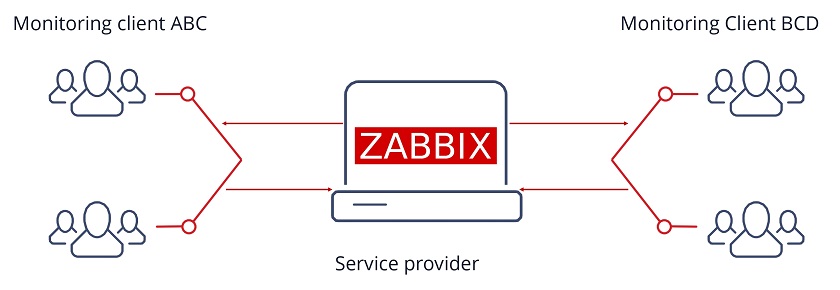
How do we use Zabbix in a multi-tenant environment? Essentially, we provide Zabbix as a service. We use the Zabbix monitoring tool to monitor our clients (ABC and BCD in the image). We monitor their network traffic, their operating system statistics, application statistics, log files, etc. For each tenant, these monitoring requirements are going to be different.

Multi-tenant environment

Zabbix proxy

Multi-tenancy would not be possible without Zabbix proxies. With Zabbix proxies we can deploy them in customer offices, data centers, organization branches and collect data locally. Since proxies also perform preprocessing, we can even utilize them to transform and normalize metrics or even discard some of the collected metrics before forwarding them to the central Zabbix backend server.

  • Proxies are capable of performing preprocessing ever since Zabbix version 5.0. This allows us to normalize and transform data, for example – change our textual data to numeric data, use throttling and other pre-processing approaches. Even custom JavaScript is supported nowadays to format or normalize the data before we send it to our central Zabbix backend server. So, instead of the server being responsible for all of the preprocessing and having quite a large preprocessing overhead, now the proxy can do it and then forward the data to the server.
  • In addition, on the proxy, the data gets compressed before forwarding to the server thus saving some network traffic overhead.
  • The proxy still continues collecting data and storing it in its own database even in case of a network outage on the customer’s site.
  • Once we collect the data by the proxy, it gets sent to the server via a single connection, which is a lot more feasible from the network security perspective. In this case we need to create only a single firewall rule as opposed to a wide array of rules if we were to monitor the customer’s site directly from the central Zabbix backend server.
  • We can execute remote scripts on the proxy.
  • We can also deploy multiple proxies to improve scalability. If a single proxy cannot handle the amount of data that we are gathering or preprocessing, we can always deploy an extra proxy. They are easy to deploy, and can even use out-of-the-box SQLite databases.

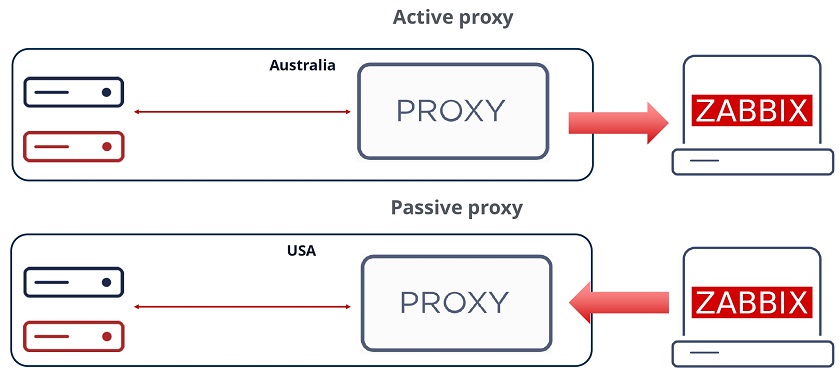
Passive and active proxies

With proxies can also select the direction of the connection. We can deploy passive proxies, which get polled by the Zabbix backend server. In that case, the Zabbix server pulls the data from the proxy. In this scenario the Zabbix server is the one responsible for establishing the connection to the proxy. This adds a minor performance overhead to the Zabbix backend server. On the other hand, we can also deploy active proxies, where we remove that overhead from the server and proxy sends the data autonomously to the server.

At the end of the day, similar to how it goes with agent requirements, the proxy mode will depend on the security policies of the customer. Don’t forget that we aren’t restricted to a single type of proxy –  we can have both of these proxy types running at the same time.

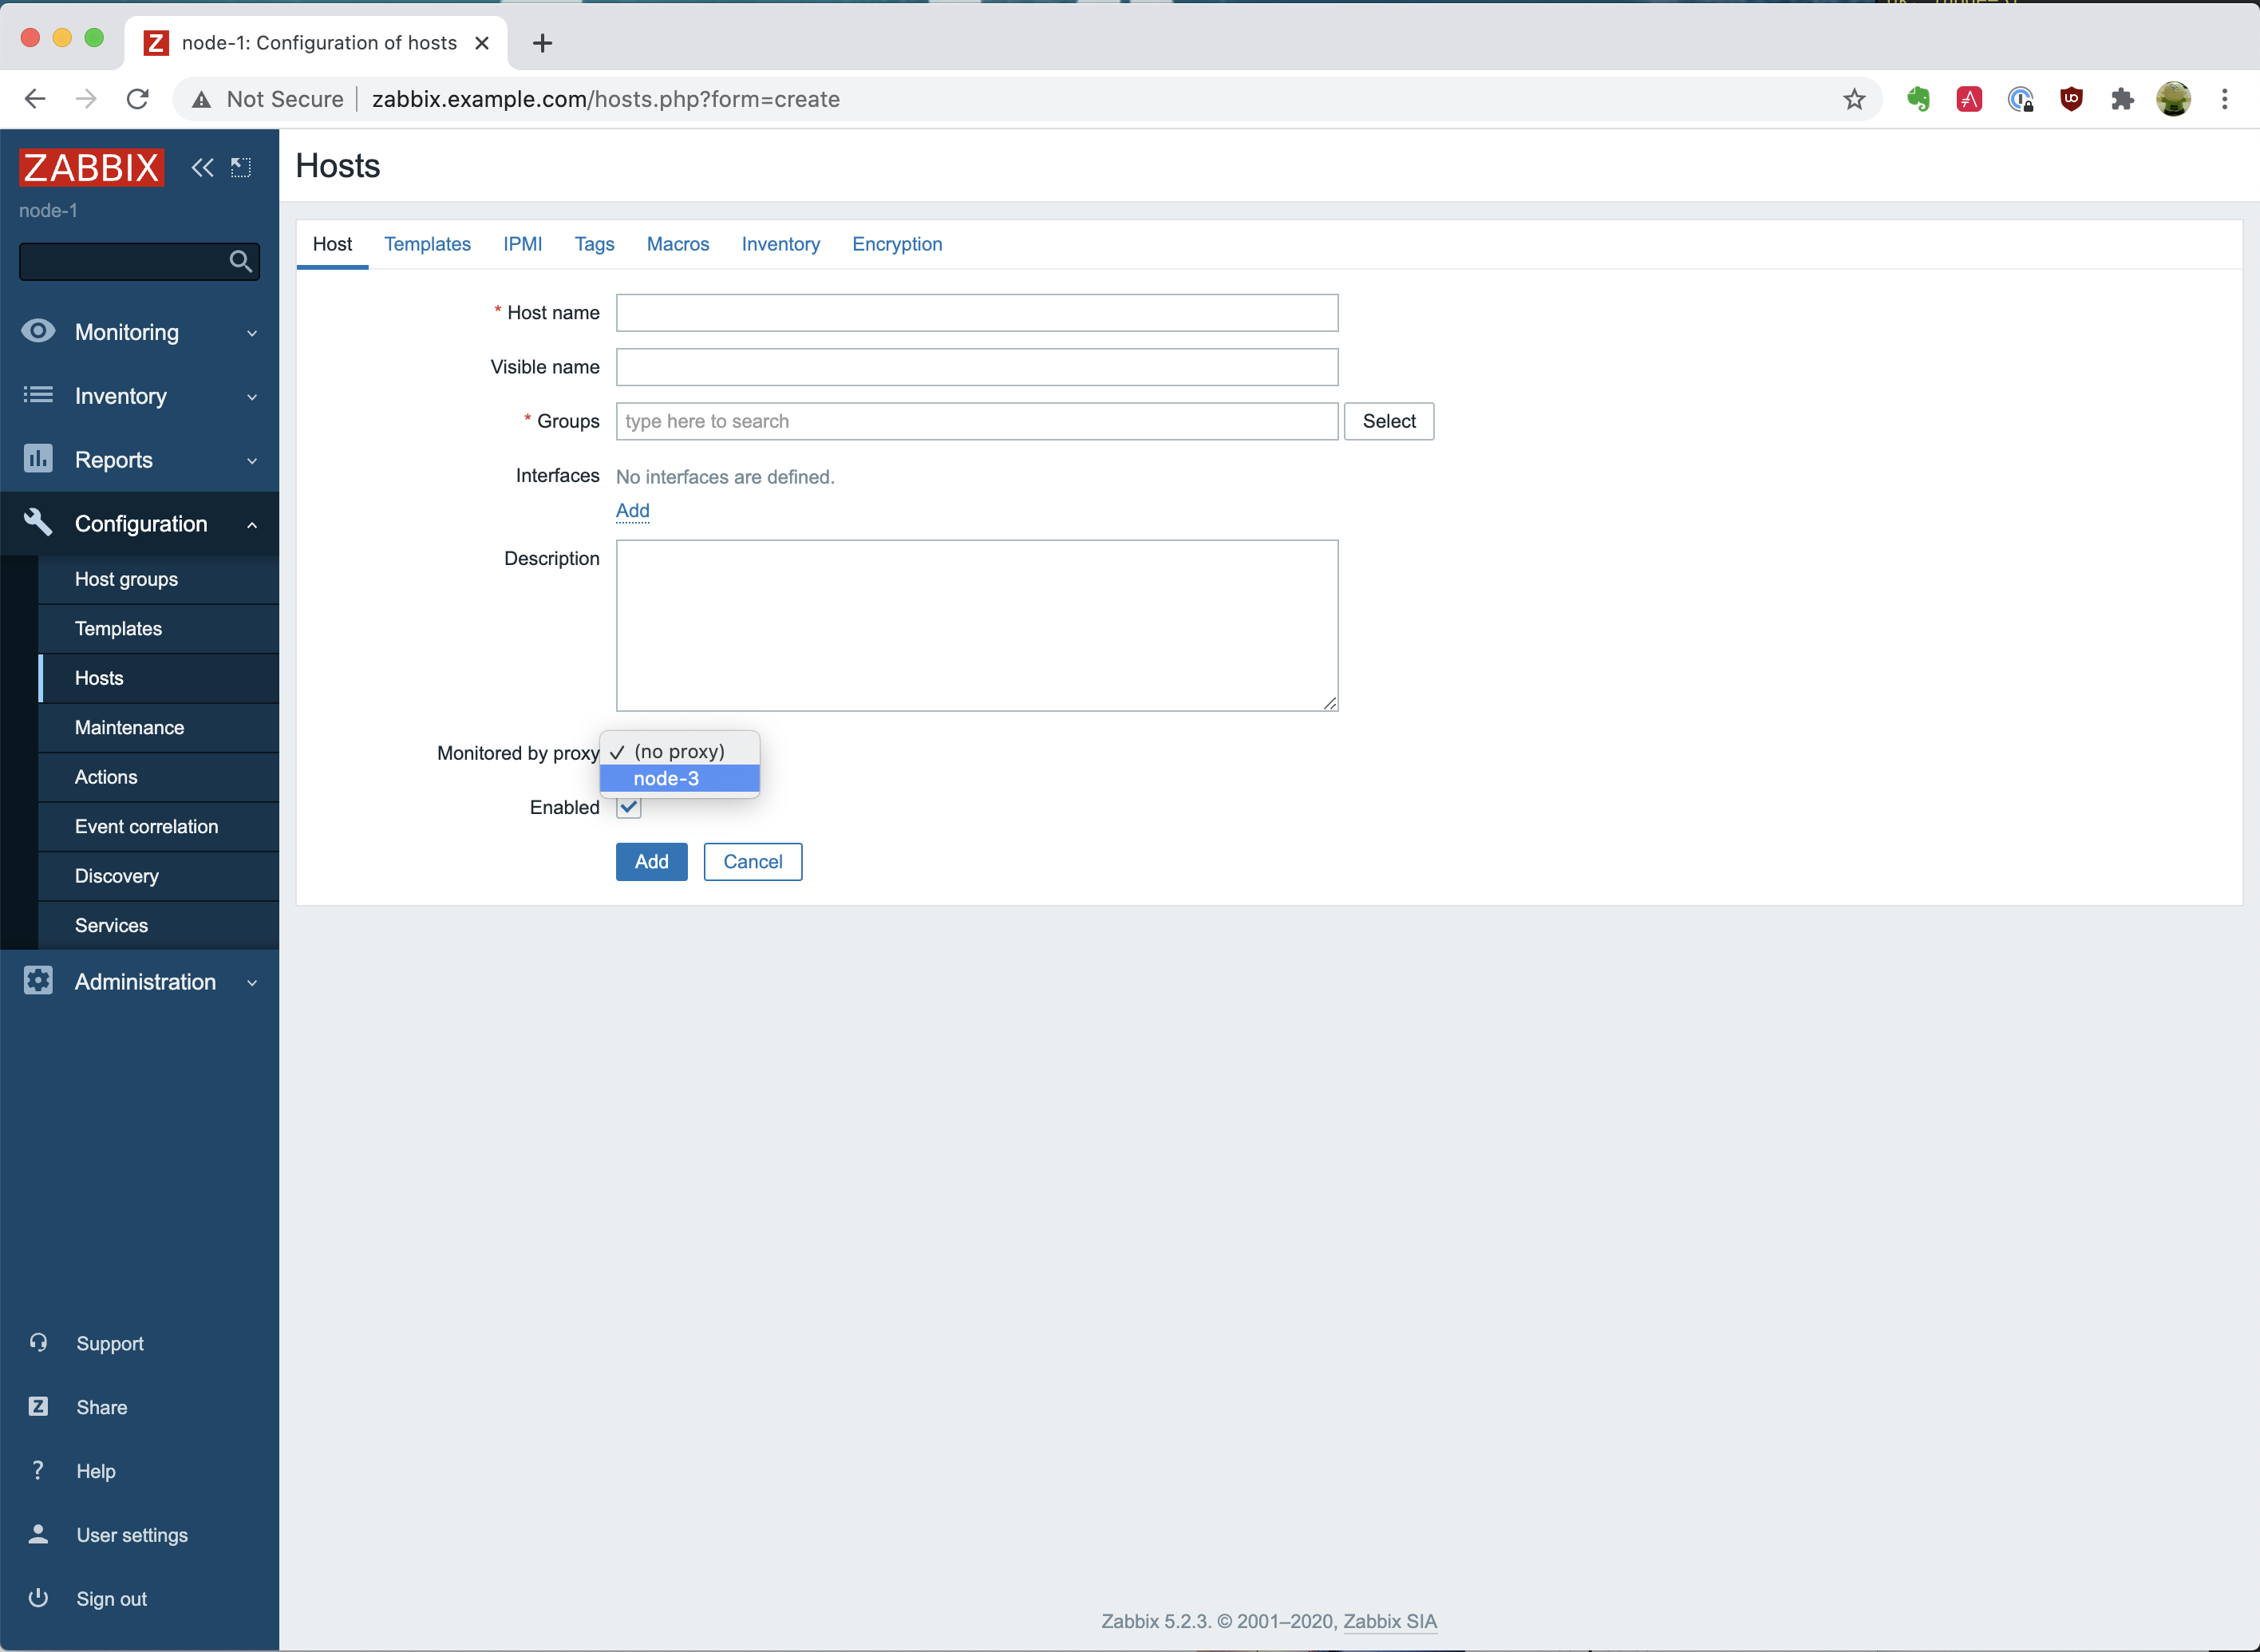
Selecting the connection direction

Data preprocessing — throttling

Preprocessing can help us not only normalize our data, but we can also utilize it to save up on storage and performance overhead, which is vital in large environments.

When monitoring a service or an application state, we are going to be obtaining discrete values such as 1, 2, or 3, or any number. These numbers have a tendency to repeat – if our server stays up, we are going to continue receiving a number which represents “Up”. By using the preprocessing method called throttling, we can decrease the amount of these numbers stored by discarding repeating values. Only status changes are stored, therefore we can potentially save some database space and remove unneeded data processing overhead.

Discarding unchanged values


At this point in time, this feature sees more and more usage in many Zabbix environments, though it was severely underutilized initially when Zabbix 5.0 came out. So, if you aren’t using throttling yet and you’re running on 5.0 or newer, I definitely suggest trying to implement it to some extent. It is available in Preprocessing section of the item configuration.

Permissions

Robust permission design is essential to a multi-tenant environment. Even though permission logic has seen an addition of roles, the user group to host group relations haven’t been abandoned and still play vital role in overall permission schema.

With roles we still have to utilize the three user types – Users, Admin, and Super admins.
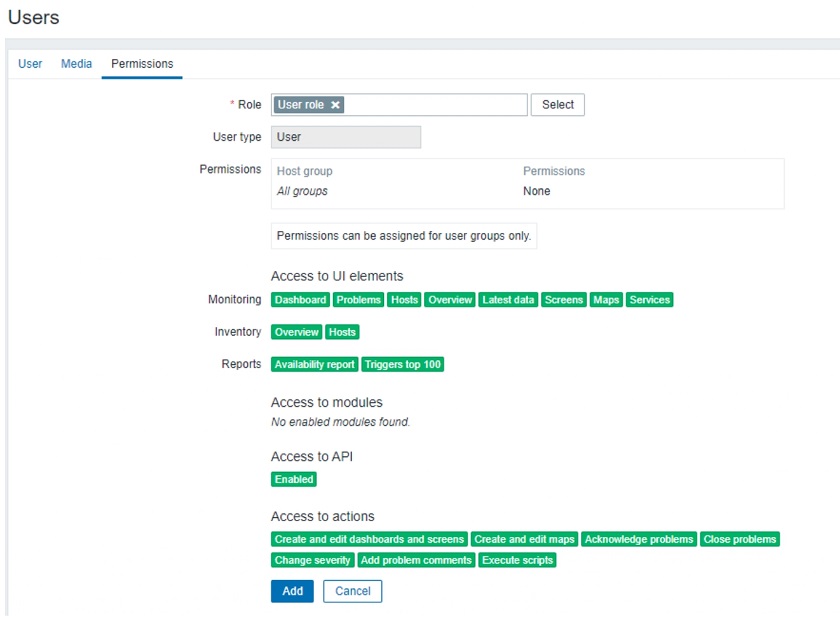
User role overview

Here you can see the user role and the UI elements the user has access to together with API restrictions and the actions the user can perform.

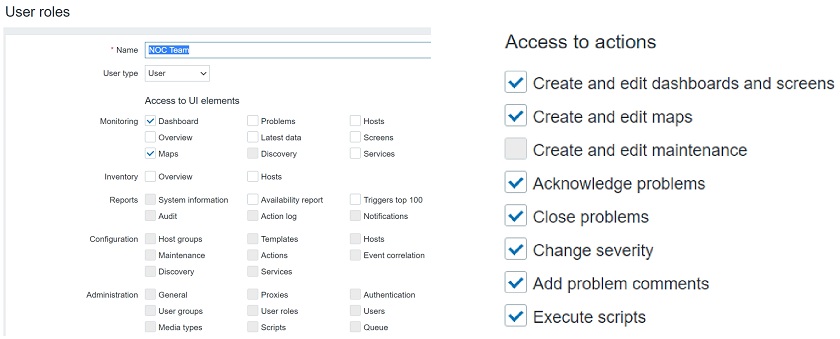
Roles grant the ability to configure access to specific UI elements, actions and restrict API calls in a granular fashion. So, when you’re configuring a role, you will see a screen similar to the one below:

Configuring user roles

User roles

Here you can select User type. The user type restrictions still apply. Users can get access only to Monitoring and Inventory, Admins can get access to except the Administration section, and Super admins can get access to every section, including Administration.

With roles we can further restrict these user types. You can have Super admins with some limitations, so that they could only do specific actions and access specific UI sections.

This option has two core benefits. The first one is security as we can limit what our customers can do and what they can access. The other benefit is in the UX, as we can simplify the UI for our users, especially people not experienced with Zabbix. We can restrict the visibility of the sections that the end users don’t have access to, so they will not be concerned with navigating through multiple sections and subsections that they are not familiar with.
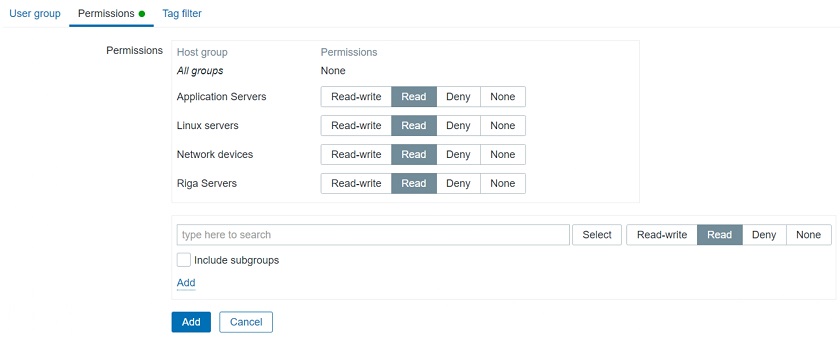
User groups

We still have user groups and user groups to host groups relations, which we have to take into consideration. Access to hosts is defined on User groups. So, we have to define our user groups and assign Full/Read only/Deny permissions on particular host groups. This is how we limit what specific customers can access.

User groups

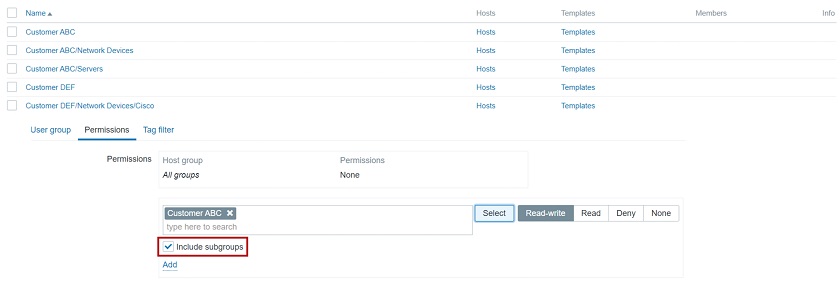
In addition, we can have host groups defined in a hierarchical manner. For instance, if you have two customers each of then having a “Network Devices” subgroup, we can select to include the root group and all of its subgroups when assigning user group to host group permissions. This is a really elegant and quick way to give a User or an Admin on the customer’s side access to all of their hosts or limit a specific organizational unit to only access what they need, e.g.: only permit access to network devices for network administrators.

Using group hierarchy

High availability

The next important decision is the HA implementation. Going without some sort of HA solution is simply too risky and therefore is not an option with such environments.

  • HA can be used to minimize downtime and add redundancy.
  • Zabbix supporst Linux HA tools – PCS, Corosync, Pacemaker, which are used to enable HA. You are also welcome to try and use other third-party tools for HA.
  • Out-of-the-box HA is planned for Zabbix 6.0.
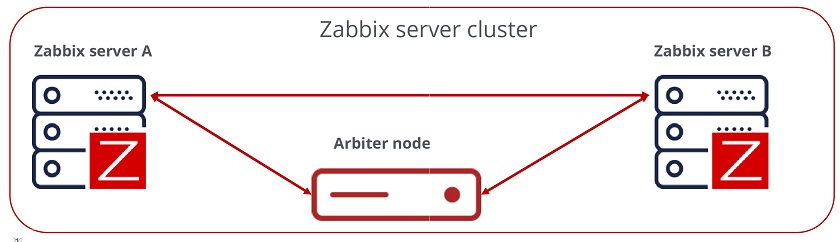
HA setup

To achieve a quorum in our HA environment, we will require an odd number of nodes. For Zabbix backend HA it is very much recommended to have at least three nodes. Does that mean that you have to deploy 3 Zabbix servers? Not really – our third node is going to be a really small arbitration node, which is simply going to be checking connections to the two other Zabbix nodes and giving a vote to achieve quorum in case of issues with one of the nodes.

In the end we will have three nodes:  Zabbix server A, Zabbix server B, and the Arbiter node

  • An odd number of nodes is recommended to achieve quorum.
  • Only Active/Passive cluster architecture is supported.
  • We cannot have two Zabbix nodes active running at the same time and talking to the same database. It is important to use some ‘shoot the other node in the head’ mechanism — STONITH to avoid such split-brain scenarios.

Failure to abide by these requirements can result in issues with database consistency, issues with underlying queries and cleaning up or inserting data. This can cause unexpected Zabbix backend server crashes down the line.

In addition, it is very common to have a requirement for proxies to be deployed with HA. Before implementing HA for proxies, we need to decide if we really do need it. HA adds a significant configuration management overhead. We can have hundreds if not thousands of proxies, and managing HA for each of those can add a significant overhead. Of course, the more comfortable you feel with the HA tools, the easier the deployment and the management of the environment.

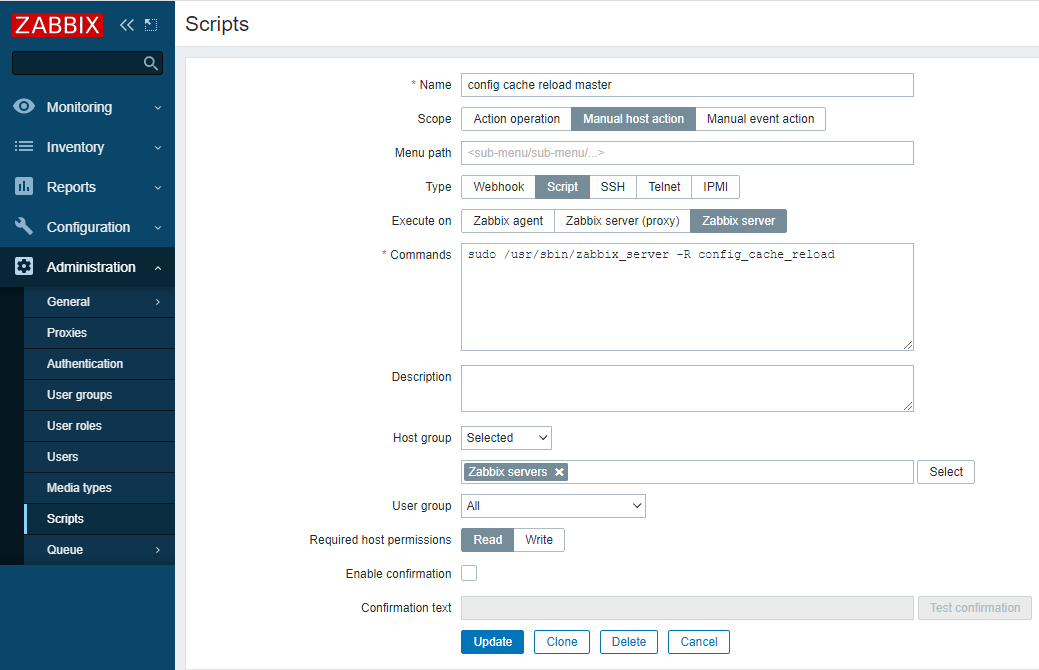
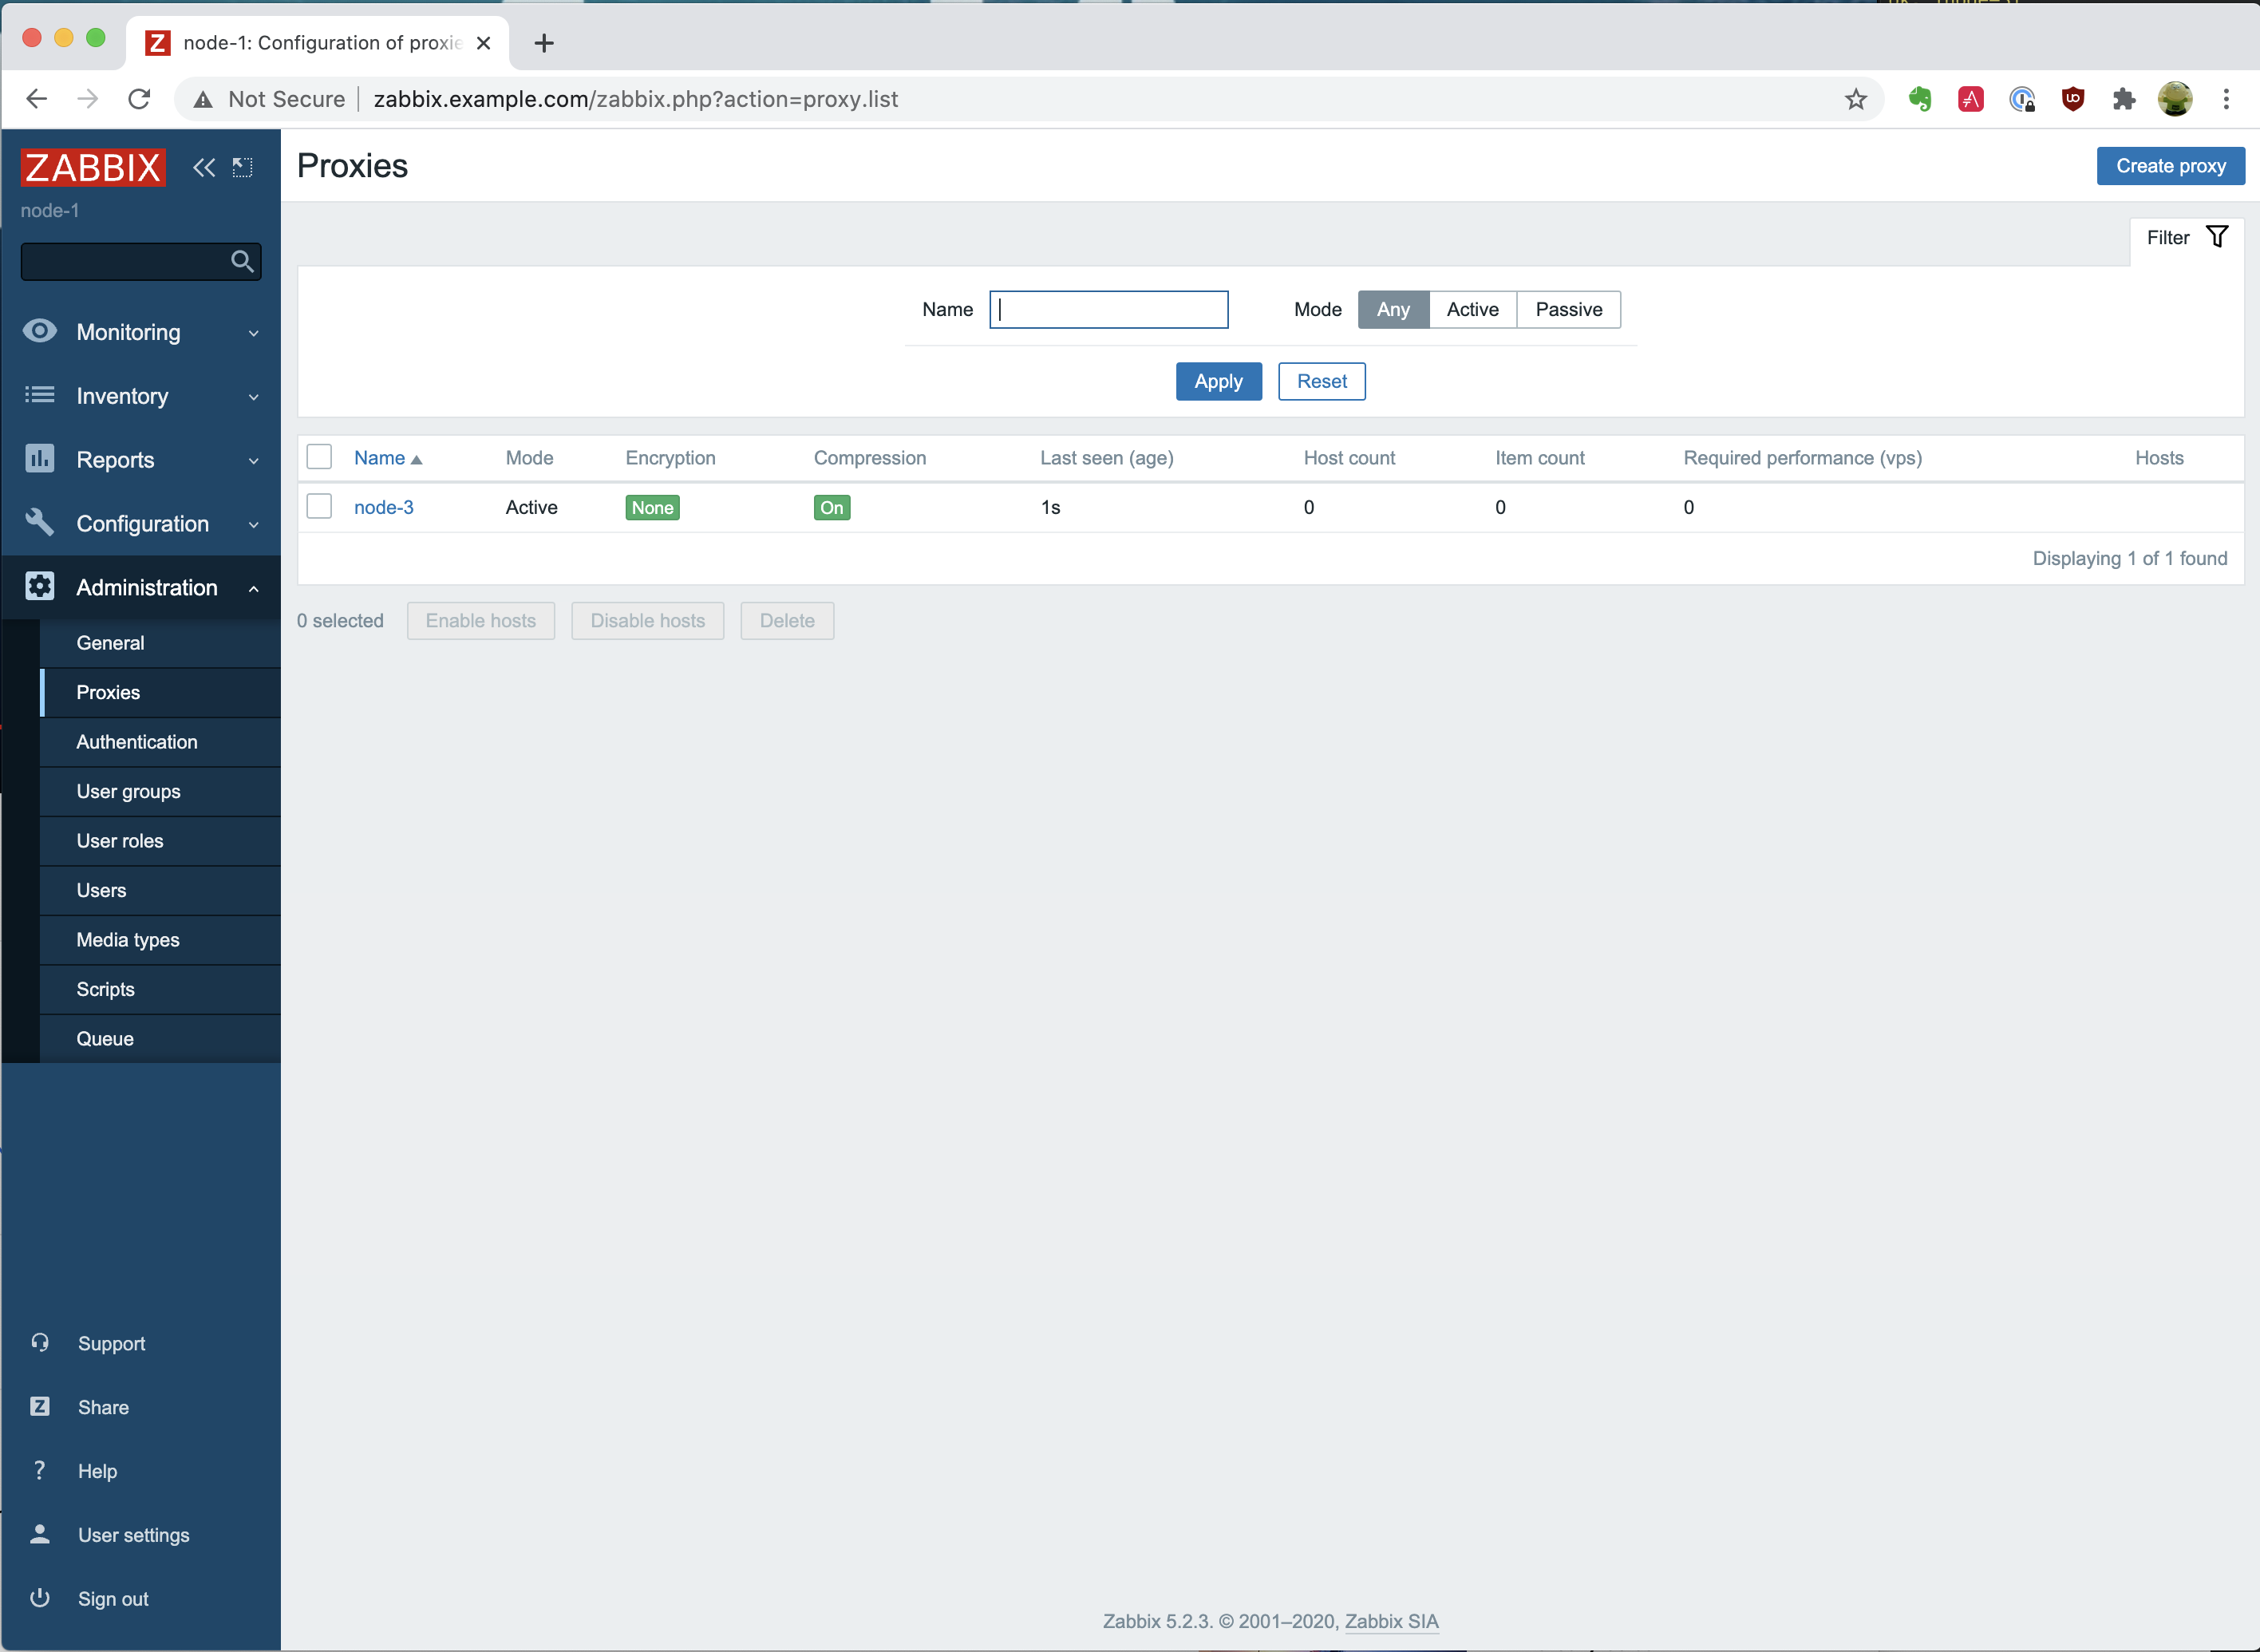
Another approach for  Zabbix proxy HA can also be implemented by using Zabbix API scripts. We can essentially have two proxies running without the need to have the HA suite. In this case, if proxy A is down, we can use Zabbix API to move a host from proxy A to proxy B.

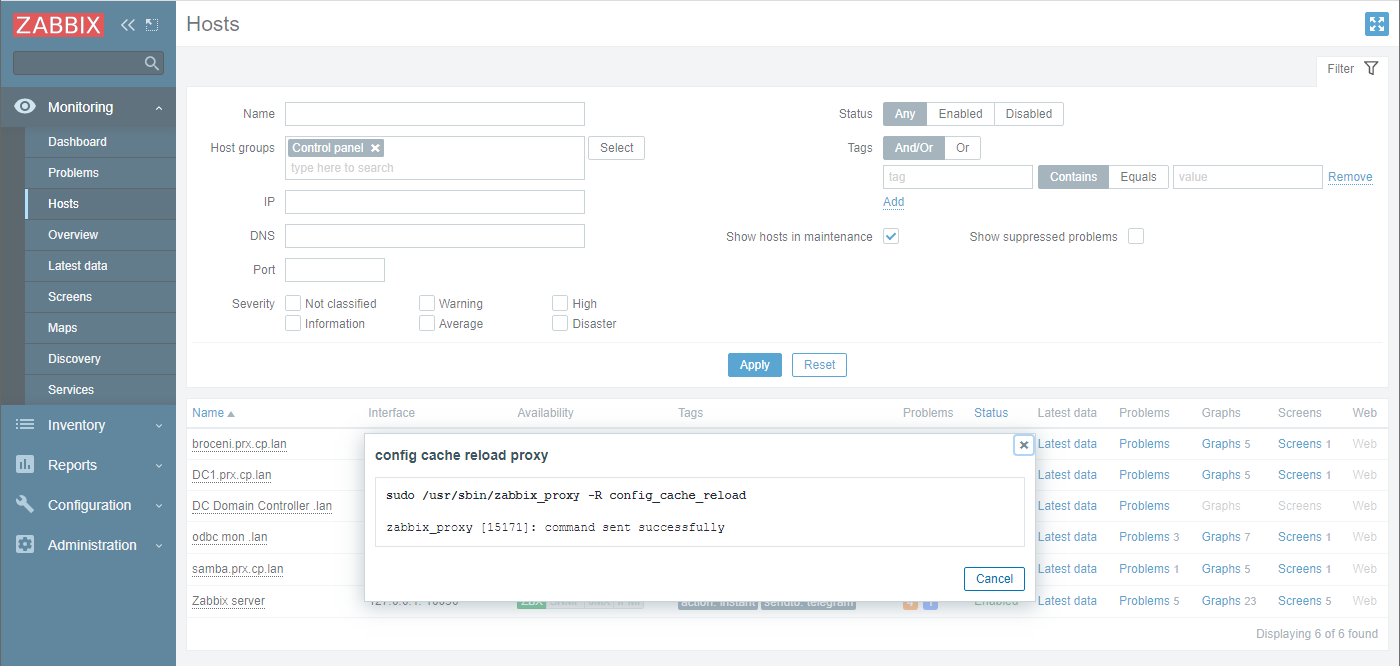
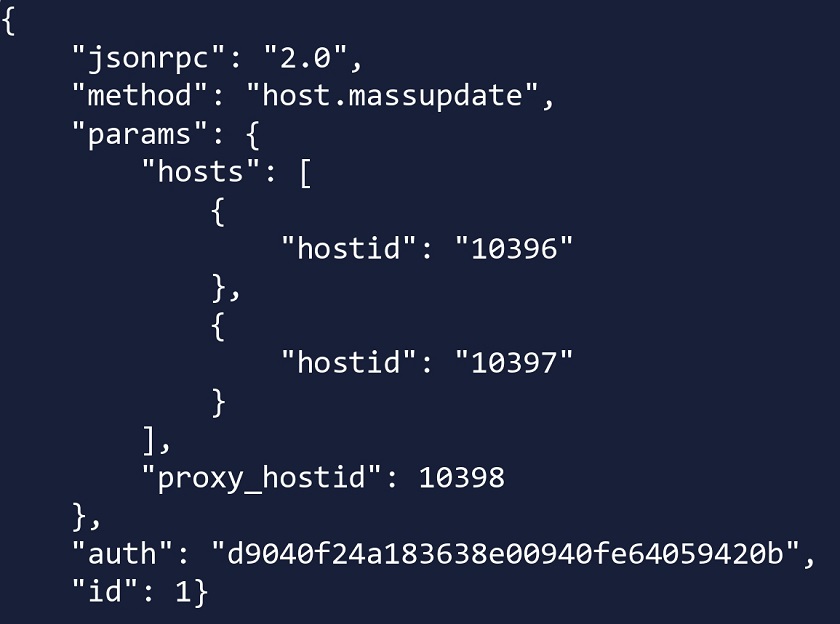
Using Zabbix API script to change the proxy

Here, host.massupdate is used to change the proxy on the hosts. Combine this with a robust scripting logic and you end up with a very viable approach to move your hosts between proxies in failover scenarios.

Database replication

We have covered the HA for Zabbix server backend and let’s remember that with frontend servers, we can simply bring up additional frontends, for instance, by utilizing Docker containers. But what about the DB redundancy?

  • Database replication can be used as a form of redundancy for the Zabbix DB. No matter the DB backend – Postgres, MySQL, Oracle, we can deploy multiple DB nodes and utilize the native DB replication or use third-party tools for replication, for instance, Galera Cluster.
  • I personally prefer using native replication tools as it is a bit more simple and you don’t have to concern yourself with another configuration and management layer that could potentially fail and be a bother to troubleshoot. But this will depend on your requirements, design and skillset.

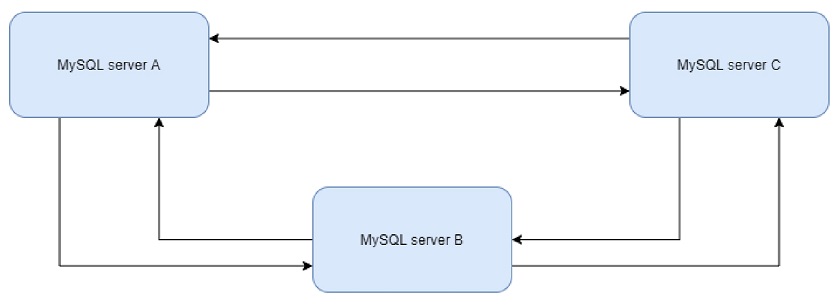
Let’s look at an example with MySQL replication. You can set it up in many different ways as multiple replication approaches are supported: master/slave, master/master, or even have multiple masters replicating to one another. It is completely up to you how to implement replication, especially if you are already experienced with such deployments.

Which approach is best? At the end of the day it will all depend on your company policies, database backend and a compromise between simplicty and extra redundancy. I definitely suggest delving deeper and studying use cases and articles for the DB backend of your choice, before you decide to go with any particular approach.

Database replication

Database performance tuning

Database tuning is vital for the long term stability of your Zabbix instance. The database defaults might be sufficient for your home office, but for large multi-tenant environments with tens of thousands new values per second they will not suffice. The database defaults depend on the database backend and the database version used, but ideally, these should be tuned and tested, preferably during the design stage, before you have deployed your Zabbix instance in production.

After installing the database backend we need to take a look at the hardware resources available. Ideally, you have already estimated the hardware resources required for your instance and ensured that DB hosts have sufficient memory, CPU resources and storage has been selected according to the I/O requirements. Now, you can move on to tuning your database backend.

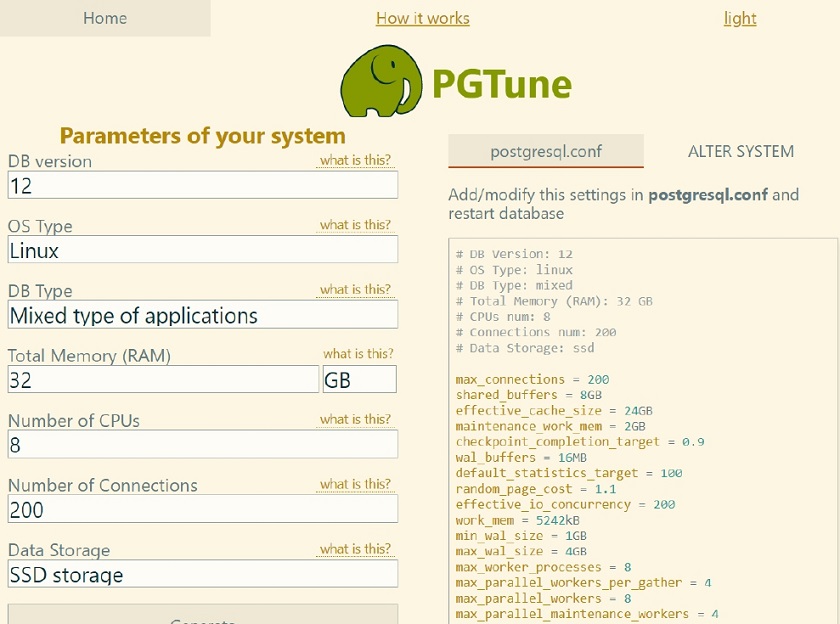
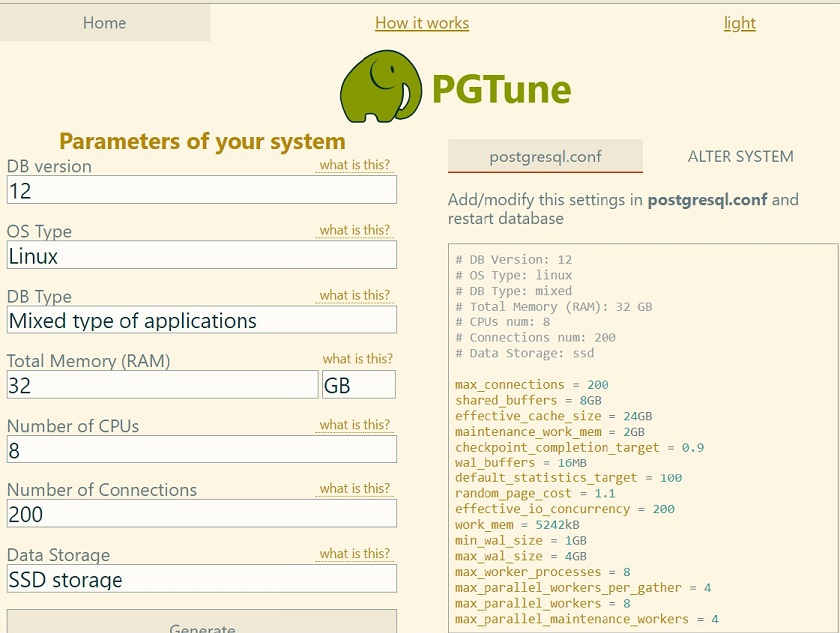
As an example with Postgres I used PGTune — an online database tuning tool. This is a simple estimate that should still provide you with a somewhat adequate configuration. Though ideally, you should have a DBA on board that is aware of what kind of data loads you will be dealing with to help you with an optimal database configuration.

Database performance tuning

History table partitioning

In such large environments, you will most likely see that housekeeper cannot keep up with the amount of data stored, unable to clean it up in a timely fashion with the housekeeper processes utilization reaching reaching 100 percent for 20-30 minutes at a time. This will have a negative effect on the overall database performance for the duration of housekeeping.

At this point, it is recommended to implement partitioning for history/trend tables. We can use Postgres with TimescaleDB plugin for this. Partitioning is supported out of the box, and you can configure it in Administration > General > Housekeeping.

For MySQL and Oracle backends we would have to rely on custom partitioning scripts or procedures. In addition, community-provided partitioning scripts are publicly available.

As always – don’t forget to test 3rd party scripts in a test environment before deploying it in production!

Community partitioning solution for MySQL

You can always create your own partitioning script, but you should be aware of what you’re doing and how things should be partitioned. We should always be partitioning only history and trend tables.

History table partitioning with TimescaleDB

  • TimescaleDB plugin for PostgreSQL DB backends supports out-of-the-box partitioning. You don’t have to rely on community scripts.
  • On TimescaleDB, we need to specify the chunk_time_interval parameter, which will define the partition chunk size.
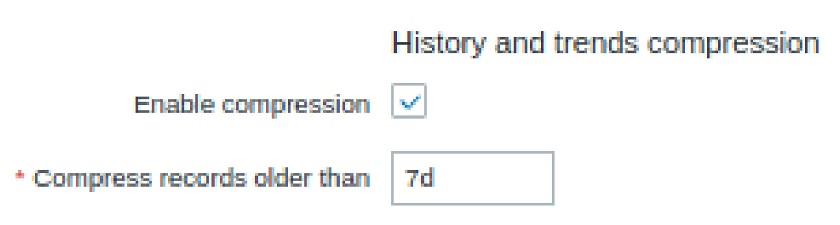
  • In addition, we can also add compression of history/trends, which helps to reduce the history table size by 60-80 percent. Again, in such scenarios, your database is going to be huge — terabytes in size with hundreds of customers, each having thousands of metrics per second. So, compression is a really valuable asset.
  • The only thing we have to take into account is that compressed data is read-only and cannot be changed post-compression. So, no more changes or inserts are possible for the compressed chunks.

History and trends compression

To-do list

  • Deploy the latest available Zabbix version. Ideally stick with an LTS version.
  • Deploy proxy servers, define and configure HA/Replication on Zabbix proxies, as well as on Zabbix servers and databases.
  • Implement partitioning to improve database performance.
  • Implement throttling to reduce the volume of the incoming data.
  • Tune your database! Either use online guides or consult with your DBA.

With our to-do list completed, we can have our Zabbix environment with deployed with redundancy in mind, providing monitoring as a service for hundreds of customers, multiple proxies running for each of the customers, HA in place, and Zabbix performing up to our expectations.

Questions & Answers

Question. Will Zabbix have its native HA solution? Will it be the whole package or does it involve installing individual components and maintaining them?

Answer. It’s planned on the roadmap to have a native HA solution in Zabbix 6.0. You should be able to get your hands on it when the 6.0 beta version gets released. Hopefully, you’ll be able to get your hands on it, test it out yourselves and give us feedback. From the looks of it it should be very much plug-and-play and will remove a lot of management overhead when comparing it with current HA implementation. Right now this is being developed only for the Zabbix backend server. As for the frontend – nothing is stopping you from having multiple frontends pointed at the same DB/Zabbix backend server. 

Question. Can I run Zabbix on a single server and sell monitoring service to several customers with fully isolated environments, not just GUI, but also items, triggers, etc.

Answer. Yes, you can. You can have a single Zabbix instance and multiple customers being monitored by this instance. The only extra step that might be required is deploying proxies on the customer’s side. By using permission restrictions, proxy servers, roles, etc., we can then monitor multiple customers from a single Zabbix instance.

Question. When we change proxy, the agent configuration has to be updated. What about HA configuration on the proxy?

Answer. That really depends on the approach. If the agent is getting pointed at the virtual IP address and HA is managed by PCS, Corosync, or Pacemaker, then it should be fine as is and the VIP should just be on the currently active host. So, you’ll be essentially rerouted. With the HA by way of API approach, you can simply allow your agent to accept connections from both proxies. With ServerActive we can also specify multiple endpoints, so agents can actually be prepared for such an environment.

Question. How to merge two different instances into a single monitoring instance?

Answer. This is a complex task. First off, both instances need to have the same major Zabbix backend version. You might simply migrate the history from one instance to another, but then you will have some problems with underlying element IDs. So, in one instance you have your own set of items, triggers, users, etc. with your own set of IDs. These will most likely conflict with the set of IDs on the other instance.

You can do partial migration or use the export function to export your templates, hosts, value maps, network maps. I would try to export as much as I can as migration on SQL level will be a real pain. It is possible if you’re stubborn enough, but it can end up being a really complex task that can take days if not weeks to fully implement and test.

Question. Do subgroups relate to templates as well?

Answer. Subgroups relate to templates in a way where we can also define permissions to reading and modifying templates. For templates, you can also create per-customer templates and assign them to host groups. Users that have access to these host groups can then read or modify the templates.

Zabbix proxy performance tuning and troubleshooting

Post Syndicated from Arturs Lontons original https://blog.zabbix.com/zabbix-proxy-performance-tuning-and-troubleshooting/14013/

Most Zabbix users use proxies, and those running medium to large instances might have encountered some performance issues. From this post and the video, you will learn more about the most common troubleshooting steps to resolve any proxy issues and to detect them as sometimes you might be unaware of an ongoing issue, as well as basic performance tuning to prevent such issues in the future.

Contents

I. Zabbix proxy (1:36)
II. Proxy performance issues (5:35)
III. Selecting and tuning the DB backend (13:27)
VI. General performance tuning (16:59)
V. Proxy network connectivity troubleshooting (20:43)

Zabbix proxy

Zabbix proxy can be deployed and most of the time is used to monitor distributed IT infrastructures, for instance, on a remote location to prevent data loss in case of network outages as the proxy collects the data locally and it is then pushed/pulled to/from Zabbix server.

Zabbix proxy supports active and passive modes, so we can push the data to the Zabbix server or have the Zabbix server pull the data from the proxy. Even if we don’t have any remote locations and have a single data center, it is still a good practice to delegate most of your data collection to a proxy running next to your server, especially in medium-sized and large instances. This allows for offloading our data collection and preprocessing performance overhead from the server to the proxy.

Active vs. passive

Whether an active or a passive mode is better for your company at the end of the day will depend on your security policies. We can use passive mode with the server pulling the data from the proxy or active mode with the proxy establishing the connection to the Zabbix server and pushing the data.

  • Active mode is the default configuration parameter as it is a bit more simple to configure — almost all of the configuration can be done only on the proxy side. Then, we need to add the proxy on the frontend and we’re good to go.
### Option: ProxyMode
#   Proxy operating mode.
#   0 - proxy in the active mode
#   1 - proxy in the passive mode
#
# Mandatory: no
# Default:
# ProxyMode=0
  • In the case of a passive proxy, we have to make some changes in the Zabbix server configuration file, which would involve a restart of the Zabbix server and, as a consequence, downtime.

Finally, it is all going to boil down to our networking team and the network and security policies, for instance, allowing for passive or active mode only. If both modes are supported, then the active mode is a bit more elegant.

Proxy versions

Another common question is about the proxy version to install and the database backend to use.

  • The main point here is that the major proxy version  should match the major version of the Zabbix server, while minor versions can differ. For instance, Proxy 5.0.4 can be used with Server 5.0.3 and Web 5.0.9 (in this example, the first and the second number should match). Otherwise, the proxy won’t be able to send the data to the server and you will see some error messages in your log files about version mismatch and data formatting not fitting your server requirements.
  • Proxies support: SQLite / MySQL/ PostgreSQL/ Oracle backends. To install the proxy, we need to select the proper package for either SQLite3, MySQL, PostgreSQL, or just compile proxy with Oracle database backend support.

— SQLite proxy package:

# yum install zabbix-proxy-sqlite3

— MySQL proxy package:

# yum install zabbix-proxy-mysql

— PostgreSQL proxy package:

# yum install zabbix-proxy-pgsql

For instance, if we do # yum install zabbix-proxy-sqlite3 or copy and paste the instructions from the Zabbix website for SQLite, we will later wonder why it is not working for MySQL as there are some unique dependencies for each of these packages.

NOTE. Don’t forget to select the proper package in relation to the proxy DB backend

Proxy performance issues

After we have installed everything and covered the basics of what needs to be done and how to set things up, we can start tuning or proxy and try to detect any potential  performance issues.

Detecting proxy performance issues

How can we find out what the root cause of performance issues is or if we are having them at all?

  1. First, we need to make sure that we are actually monitoring our proxy. So, we need to:
  • Create a host in Zabbix,
  • Assign this host to be monitored by the proxy. If the host is monitored by the server, it will report the wrong metrics — the Zabbix server metrics, not the Zabbix proxy metrics.

So, we need to create a host and configure it to be monitored by the proxy itself. Then we can use an out-of-the-box proxy monitoring template — Template Apps Zabbix Proxy.

Template App Zabbix Proxy

NOTE. Template Apps Zabbix Proxy gets updated on the git.zabbix page, when we add new components to Zabbix, new internal processes, new gathering processes, and so on, to support these new components.

If you are running an older version of Zabbix, for example, all the way back from version 2.0, make sure that you download the newer template from our git page not to stay in the blind about the newer internal component performance.

Once we have applied the template, we will see performance graphs with information about gathering processes, internal processes, cache usage, and proxy performance, and both the queue and the new values received per second. So, we can actually react to predefined triggers provided by the template, if there is an issue.

Performance graphs

  1. Then, we need to have a look at the administration queue. A large or growing proxy-specific queue can be a sign of performance issues or a misconfiguration. We might have failed to allow our agents to communicate with our proxies or we might have some network issue on our proxy preventing us from collecting data from the proxy.

An issue on the proxy

In this case:

  • Check the proxy status, graphs, and log files. In the example above, the proxy has been down for over a year, so it should be decommissioned and removed from the Zabbix environment.
  • Check the agent logs for issues related to connecting to the proxy. For instance, the proxy might be trying to pull the data but have no rights to do so due to no permissions in the agent configuration file.

Lack of server resources

In some cases, we might simply try to monitor way too much on a really small server, for instance, an older version of a Raspberry Pi device. So, we should use tools such as sar or top to identify resource bottlenecks on the proxy server  coming, for example, from the storage performance.

sar -wdp 3 5 > disk.perf.txt

sar is a part of a sysstat package, and this command can provide us with information about our storage performance, serialization, wait times, queues, input/output operations per second, and so on. sar can tell us when something might be overloaded especially if we have longer wait times.

NOTE. Don’t get confused by high %util, which is relevant on hard drives, but on an SSD or a RAID setup the utilization is normally very high. While hard drives can handle only one operation at a time, SSD disks or RAID setups support parallel operations. This can cause SSD or RAID util% to skyrocket, which might not necessarily be a sign of an issue.

Proxy queue

Another useful, though a bit hackish, indicator of the proxy performance is the proxy queue on the proxy database — the count of the metrics pending but not yet sent to the server.

  • We can observe this in real-time by queueing the proxy DB.
  • A constantly growing number means that we cannot catch up with our backlog — the network is down or there are some performance issues on the server or the proxy, so more data is getting backlogged than sent.
  • The list of unsent metrics is stored in proxy_history table.
  • The last sent metric is marked in the IDs table.
select count(*) from proxy_history where id>(select nextid from ids where
table_name="proxy_history");

This value will keep growing if the proxy is unable to send the data at all or due to performance issues. If the network is down, this is to be expected between the proxy and the server. However, if everything is working but the count still keeps growing, we need to investigate for any spamming items, thousands of log lines coming per second, or other performance issues with our storage and/or our database. There might be performance problems on the server due to the server being unable to ingest all of this data in time after a restart, a long downtime, etc. Such a problem should get resolved over time on its own. Otherwise, if there are no significant factors regarding the performance or any recent changes, we need to investigate deeper.

If this value is steadily decreasing, the proxy is actually catching up with the backlog and the incoming data, and is sending data to the server faster than it is collecting new metrics. So, this backlog will get resolved over time.

Configuration frequency

Don’t forget about the configuration frequency. Any configuration changes will be applied on the proxy after ConfigFrequency interval. By default, these changes get applied once an hour, so ConfigFrequency is 3600.

### Option: ConfigFrequency
#   How often proxy retrieves configuration data from Zabbix Server in seconds.
#   For a proxy in the passive mode this parameter will be ignored.
#
# Mandatory: no
# Range: 1-3600*24*7
# Default:
# ConfigFrequency=3600

On active proxies, we can force configuration cache reload by executing config_cache_reload for Zabbix proxy.

#zabbix_proxy -R config_cache_reload
#zabbix_proxy [1972]: command sent successfully

This is another good reason to use active proxies to pick up all of the configuration changes from the server. However, on passive proxies, the only thing we can do is a proxy restart to force a reload of the configuration changes, which is not a good idea. Otherwise, we have to wait for an hour or some other configuration interval until the changes are picked up by the proxy.

Selecting and tuning the DB backend

The next important step is a selection of the database.

SQLite

A common question, which has no clear answer is when to use SQLite and when should we switch to a more robust DB backend.

  • SQLite is perfect for small instances as it supports embedded hardware. So, if I were to run a proxy on Raspberry or an older desktop machine, I might use SQLite. Even embedded hardware aside, on smaller instances with fewer than 1,000 new values per second, SQLite backend should feel quite comfortable, though a lot will depend on the underlying hardware.
### Option: ConfigFrequency
#   How often proxy retrieves configuration data from Zabbix Server in seconds.
#   For a proxy in the passive mode this parameter will be ignored.
#
# Mandatory: no
# Range: 1-3600*24*7
# Default:
# ConfigFrequency=3600
  • So, in most cases, when proxies collect less than 1,000 NVPS per second, SQLite proxy DB backends are sufficient. With SQLite, you don’t need to additionally configure the database.
#zabbix_proxy -R config_cache_reload
#zabbix_proxy [1972]: command sent successfully
  • With SQLite, there’s no need to have additional database configuration, preparation, or tuning. In the proxy configuration file, we just point at the location of the SQLite file.
  • A single file is created at the proxy startup, which can be deleted if data cleanup is necessary.
### Option: DBName
#   Database name.
#   For SQLite3 path to database file must be provided. DBUser and DBPassword are ignored.
#   Warning: do not attempt to use the same database Zabbix server is using.
#
# Mandatory: yes
# Default:
# DBName=
DBName=/tmp/zabbix_proxy

All in all the SQLite backend comparatively easy to manage However, it comes with a set of negatives. If we need something more robust that we can tune and tweak, then SQLite won’t do. Essentially, if we reach over 1,000 new values per second, I would consider deploying something more robust — MySQL, PostgreSQL, or Oracle.

Other proxy DB backends

  • Any of the supported DB backends can be used for a proxy. In addition, the Zabbix server and Zabbix proxy can use different DB backends. The DB configuration parameters are very similar in Zabbix server and Zabbix proxy configuration files, so users should feel right at home with configuring the proxy DB backend.
  • DB and DB user should be created beforehand with the proper collation and permissions.
shell> mysql -uroot -p<password>
mysql> create database zabbix_proxy character set utf8 collate utf8_bin; 
mysql> create user 'zabbix'@'localhost' identified by '<password>'; 
mysql> grant all privileges on zabbix_proxy.* to 'zabbix'@'localhost'; 
mysql> quit;
  • DB schema import is also a prerequisite. The command for proxy schema import is very similar to the server import.
zcat /usr/share/doc/zabbix-proxy-mysql*/schema.sql.gz | mysql -uzabbix -p zabbix_proxy

DB Tuning

  • Make sure to use the DB backend you are most familiar with.
  • The same tuning rules apply to the Zabbix proxy DB as to the Zabbix server DB.
  • Default configuration parameters of the backend will depend on the version of the backend used. For instance, different MySQL versions will have different default parameters, so we need to have a look at MySQL documentation, the default parameters, and the way to tune them.
  • For PostgreSQL, it is possible to use the online tuner — PGTune. Though it is not an ideal instrument, it is a good starting point not to leave the proxy hanging without any tuning as we might encounter issues sooner rather than later. With tuning, the database will be more robust and will last longer before we will have to add any resources and rescale the database config.

PGTune

General performance tuning

Proxy configuration tuning

Database aside, how we can tune the proxy itself?

Proxy configuration is similar to the configuration of the Zabbix server: we still need to take into account and tune our gathering processes, internal processes, such as preprocessors, and our cache sizes. So, we need to have a look at our gathering graphs, internal process graphs, and our cache graphs to see how busy the processes and how full the graphs are and adjust accordingly. This is a lot easier to do on the proxy than on the server since proxy restart is usually quicker and a lot less critical, and less impactful than the server downtime.

In addition, these will differ on each of the proxy servers depending on the proxy size and types of items. For instance, if on proxy A we are capturing SNMP traps, we need to enable the SNMP trapper process and configure our trap handler — Perl, snmptrapd, etc.  If we are doing a lot of ICMP pings for another proxy, we’ll require many ICMP pingers. A really large proxy will need to have its History Syncers increased. So, each proxy will be different, and there is no one-fit-all configuration.

  • Since most of the time proxies handle fewer values since they are distributed and scaled out, we will have a lesser number of History Syncers on proxies in comparison with Zabbix server. In the vast majority of cases, the default number of History Syncers is more than sufficient. Though sometimes we might need to change the count of History Syncers on the proxy.
### Option: StartDBSyncers
#             Number of pre-forked instances of DB Syncers.
#
# Mandatory: no
# Range: 1-100
# Default:
# StartDBSyncers=4

There are always exceptions to the rule. For instance, we might want to have a single large-scale and robust proxy collecting the data from some very critical or very large location with many data points – such an infrastructure layout will still be supported.

  • If DB syncers do underperform on a seemingly small instance, chances are it is due to lack of hardware resources or, for SQLite, DB backend limitations

We need to monitor the resource usage via sar, or top, or any other tool to make sure that hardware resources aren’t overloaded.

Proxy data buffers

We also have the option to store the data on our proxies if the server is offline or store them even if the Zabbix server is reachable and the data has been sent to the server. we may want to keep our data in the proxy database and utilize it by other third-party tools or integrations.

On our proxies, we have a local buffer and an offline buffer, which determine for how long we can store the data. The size of Local and Offline buffers will affect the size and the performance of your database. The larger the time window for which we store the data, the larger the database is. So, the fewer resources we utilize, the better the performance is, the easier it is to scale up, etc.

  • Local buffer
### Option: ProxyLocalBuffer
#   Proxy will keep data locally for N hours, even if the data have already been synced with the server.
#
# Mandatory: no
# Range: 0-720
# Default:
# ProxyLocalBuffer=0
  • Offline buffer
### Option: ProxyOfflineBuffer
#   Proxy will keep data for N hours in case if no connectivity with Zabbix Server.
#   Older data will be lost.
#
# Mandatory: no
# Range: 1-720
# Default:
# ProxyOfflineBuffer=1

Proxy network connectivity troubleshooting

Detecting network issues

Sometimes we have network issues between proxies and the server: either the server cannot talk to proxies or proxies cannot talk to the server.

  • A good first step would be to test telnet connectivity to/from a proxy.
time telnet 192.168.1.101 10051
  • Another great method is to time your pings to see how long pinging takes or how long it takes to establish a telnet connection. This could point you towards network latency issues: slow networks, network outages, and so on.
  • Log file can help you figure out proxy connectivity issues.
125209:20210214:073505.803 cannot send proxy data to server at "192.168.1.101": ZBX_TCP_WRITE() timed out
  • Load balancers, Traffic inspectors, and other IDS/Firewall tools can hinder proxy traffic. Sometimes it can take hours troubleshooting an issue to find out that it boils down to a load balancer, a traffic inspector, or IDS/firewall tool.

Troubleshooting network issues

  • A great way to troubleshoot this would be to deploy a test proxy with a different firewall/load balancing configuration. From time to time, network connectivity drops seemingly for no reason. We can bring up another proxy with no load balancers or no traffic inspectors, and ideally, in the same network as the problematic proxies. We need to find out if the new proxy is experiencing the same problems, or if the issue is resolved after we remove the load balancers, IDS/firewall tools. If the problem gets resolved, then this might be a case of misconfigured firewall/IDS.
  • Another great approach of detecting networking issues due to transport problems, for instance, IDS/Firewalls cutting up our packets, is to perform a tcpdump on proxy and server to correlate network traffic with error messages in the log.

tcpdump on the proxy:

tcpdump -ni any host -w /tmp/proxytoserver

tcpdump on the server:

tcpdump -ni any host -w /tmp/servertoproxy

— Correlating retransmissions with errors in logs could signify a network issue.

Many retransmissions may be a sign of network issues. If there are a few of them, if we open Wireshark to find just a couple of retransmits, it might not be the root cause. However, if the majority of our packet capture result is read with duplicate packets, retransmits, acknowledges without data packets being received, etc., that can be a sign of an ongoing network issue.

Ideally, we could take a look at this packet capture and correlate it with our proxy log file to figure out if these error messages in our proxy logfile or server logfile (depending on the type of communication — active or passive) correlate with packet capture issues. If so, we can be quite sure that the networking issue is at fault and then we need to figure out what is causing it — IDS, load balancers, a shoddy network, or anything else.

Installing and configuring the Zabbix Proxy

Post Syndicated from Werner Dijkerman original https://blog.zabbix.com/installing-and-configuring-the-zabbix-proxy/13319/

In the previous blog post, we created a Zabbix Server setup, created several users, a media type, and an action. But today, we will install on a 3rd node the Zabbix Proxy. This Zabbix Proxy will have its database running on the same host, so the “node-3” host has both the MySQL and Zabbix Proxy running.

This blog post is the 2nd part of a 3 part series of blog posts where Werner Dijkerman gives us an example of how to set up your Zabbix infrastructure by using Ansible.
You can find part 1 of the blog post by clicking Here

A git repository containing the code of these blog posts is available, which can be found on https://github.com/dj-wasabi/blog-installing-zabbix-with-ansible. Before we run Ansible, we have opened a shell on the “bastion” node. We do that with the following command:

$ vagrant ssh bastion

Once we have opened the shell, go to the “/ansible” directory where we have all of our Ansible files present.

$ cd /ansible

With the previous blog post, we executed the “zabbix-server.yml” playbook. Now we use the “zabbix-proxy.yml” playbook. The playbook will deploy a MySQL database on “node-3” and also installs the Zabbix Proxy on the same host.

$ ansible-playbook -i hosts zabbix-proxy.yml

This playbook will run for a few minutes creating all services on the node. While it is running, we will explain some of the configuration options we have set.

The configuration which we will talk about can be found in “/ansible/group_vars/zabbix_proxy” directory. This is the directory that is only used when we deploy the Zabbix proxy and contains 2 files. 1 file called “secret”, and a file called “generic”. It doesn’t really matter what names the files have in this directory. I used a file called the “secret” for letting you know that this file contains secrets and should be encrypted with a tool like ansible-vault. As this is out of scope for this blog, I simply made sure the file is in plain text. So how do we know that this directory is used for the Zabbix Proxy node?

In the previous blog post, we mentioned that with the “-I” argument, we provided the location for the inventory file. This inventory file contains the hostnames and the groups that Ansible is using. If we open the inventory file “hosts”, we can see a group called “zabbix_proxy.” So Ansible uses the information in the “/ansible/group_vars/zabbix_proxy” directory as input for variables. But how does the “/ansible/zabbix-proxy.yml” file know which host or groups to use? At the beginning of this file, you will notice the following:

- hosts: zabbix_proxy
  become: true
  collections:
    - community.zabbix

Here you will see the that “hosts” key contains the value “zabbix_proxy”. All tasks and roles that we have configured in this play will be applied to all of the hosts that are part of the zabbix_proxy group. In our case, we have only 1 host part of the group. If you would have for example 4 different datacenters and within each datacenter you want to have a Zabbix Proxy running, executing this playbook will be done on these 4 hosts and at the end of the run you would have 4 Zabbix Proxy servers running.

Within the “/ansible/group_vars/zabbix_proxy/generic” the file, we have several options configured. Let’s discuss the following options:

* zabbix_server_host
* zabbix_proxy_name
* zabbix_api_create_proxy
* zabbix_proxy_configfrequency

zabbix_server_host

The first one, the “zabbix_server_host” property tells us where the Zabbix Proxy can find the Zabbix Server. This will allow the Zabbix Proxy and the Zabbix Server to communicate with each other. Normally you would have to configure the firewall (Iptables or Firewalld) as well to allow the traffic, but in this case, there is no need for that. Everything inside our environment which we have created with Vagrant has full access. When you are going to deploy a production-like environment, don’t forget to configure the firewall (Currently this configuration of the firewalls are not yet available as part of the Ansible Zabbix Collection for both the Zabbix Server and the Zabbix Proxy. So for now you should be creating a playbook in order to configure the local firewall to allow/deny traffic).

As you will notice, we didn’t configure the property with a value like an IP address or FQDN. We use some Ansible notation to do that for us, so we only have the Zabbix Server information in one place instead of multiple places. In this case, Ansible will get the information by reading the inventory file and looking for a host entry with the name “node-1” (Which is the hostname that is running the Zabbix Server), and we use the value found by the property named “ansible_host” (Which has a value “10.10.1.11”).

zabbix_proxy_name

This is the name of the Zabbix Proxy host, which will be shown in the Zabbix frontend. We will see this later in this blog when we will create a new host to be monitored. When you create a new host, you can configure if that new host should be monitored by a proxy and if so, you will see this name.

zabbix_api_create_proxy

When we deploy the Zabbix Proxy role, we will not only install the Zabbix Proxy package, the configuration file and start the service. We also perform an API call to the Zabbix Server to create a Zabbix Proxy entry. With this API call, we can configure hosts to be monitored via this new Zabbix Proxy.

zabbix_proxy_configfrequency

The last one is just for demonstration purposes. With a default installation/configuration of the Zabbix Proxy, it has a basic value of 3600. This means that the Zabbix Server sends the configuration every 3600 to the Zabbix Proxy. Because we are running a small demo here in this Vagrant setup, we have set this to 60 seconds.

Now the deployment of our Zabbix Proxy will be ready.

When we open the Zabbix Web interface again, we go to “Administration” and click on “Proxies”. Here we see the following:

We see an overview of all proxies available, and in our case, we only have 1. We have “node-3” configured, which has an “Active” mode. When you want to configure a “Passive” mode proxy, you’ll have to update the “/ansible/group_vars/zabbix_proxy” file and add somewhere in the file the following entry: “zabbix_proxy_status: passive”. Once you have updated and saved the file, you’ll have to rerun the “ansible-playbook -i hosts zabbix-proxy.yml” command. If you will then recheck the page, you will notice that it now has the “Passive” mode.

So let’s go to “Configuration” – “Hosts”. At the moment, you will only see 1 host, which is the “Zabbix server,” like in the following picture.

Let’s open the host creation page to demonstrate that you can now set the host to be monitored by a proxy. The actual creation of a host is something that we will do automatically when we deploy the Zabbix Agent with Ansible and not something we should do manually. 😉 As you will notice, you are able to click on the dropdown menu with the option “Monitored by proxy” and see the “node-3” appear. That is very good!

Summary

We have installed and configured both a Zabbix Server and a Zabbix Proxy, and we are all set now. With the Zabbix Proxy, we have installed both the MySQL database and the Zabbix Proxy on the same node. Whereas we did install them separately with the Zabbix Server. With the following blog post, we will go and install the Zabbix Agent on all nodes.