All posts by Eduardo Monich Fronza

Realtime monitoring of microservices and cloud-native applications with IBM Instana SaaS on AWS

Post Syndicated from Eduardo Monich Fronza original https://aws.amazon.com/blogs/architecture/realtime-monitoring-of-microservices-and-cloud-native-applications-with-ibm-instana-saas-on-aws/

Customers are adopting microservices architecture to build innovative and scalable applications on Amazon Web Services (AWS). These microservices applications are deployed across multiple AWS services, and customers are looking for comprehensive observability solutions that can help them effectively monitor and manage the performance of their applications in real-time.

IBM Instana is a fully automated application performance management (APM) solution, available to customers as a fully managed software as a service (SaaS) solution on AWS. It is specifically designed to help customers address the challenges of monitoring microservices and cloud-native applications in real-time. It uses artificial intelligence and machine learning to provide detailed insights into the health and behavior of applications, allowing developers and IT teams to gain real-time insights into their microservices applications, optimize performance, and quickly identify and troubleshoot issues.

This post explains the capabilities of IBM Instana to automatically collect observability metrics, traces, and events from microservices deployed on AWS cloud, as well as on-premises, to provide full visibility into the performance of individual components and applications as a whole.

IBM Instana solution overview

IBM Instana is designed to be highly scalable and adaptable to changing microservices applications environments. Its architecture (Figure 1) consists of several components that work together to provide comprehensive monitoring for microservices and cloud-native applications.

Instana’s main building blocks are host agents and agent sensors that are deployed in a customer’s AWS account and responsible for collecting, aggregating, and sending detailed monitoring information of applications and AWS services to the Instana SaaS backend.

The Instana SaaS backend services provide several key components, including data collectors, storage services, analytics engines, and user interfaces. It allows customers to process and analyze data in real-time, generate actionable insights, have a comprehensive view of their applications and infrastructure performance, enabling them to quickly identify and resolve issues and improve their overall operations.

IBM Instana architecture on AWS

Figure 1. IBM Instana architecture on AWS

Monitoring data

Instana monitors and observes microservices and cloud-native applications by collecting beacons, traces, and one-second metrics:

  • Beacons are small monitoring payloads that are transmitted by a JavaScript agent to the Instana servers, modeling specific events occurring within the lifecycle of a page view of a website; for example, page loading, resource retrieval, and HTTP requests.
  • Traces are detailed records of the requests and transactions that flow through a microservice architecture. They record the sequence of events that occur when a request is processed, including the services that are involved, the duration of each service, and any errors or exceptions that occur. Instana automatically correlates traces across services to provide a complete view of an entire transaction. This allows for easy identification and diagnosis of performance issues.
  • Metrics are numerical values that represent the performance and resource utilization of a microservice or infrastructure component. Metrics are collected by Instana Agents and sent to the Instana backend at regular intervals. Instana Agents collect hundreds of different metrics, including (but not limited to) CPU usage, memory usage, network traffic, and disk I/O.

This information is captured by Instana agents and sensors, which also collect application configurations and events, plus discover application building blocks, including clusters, containers, and services.

IBM Instana agents and sensors

The Instana host agent is a lightweight software component that collects and aggregates data from various sensors before sending the data to the Instana backend. It can be deployed to AWS services, including Amazon Elastic Compute Cloud (Amazon EC2), Amazon Elastic Kubernetes Service (Amazon EKS), AWS Fargate, AWS Lambda, or Red Hat OpenShift Service on AWS (ROSA). A single host agent, one per host, is used to collect data from monitored systems.

Once Instana agents are running, they automatically detect applications and services, such as containers running on Amazon EKS, and processes like Nginx, NodeJS, Spring Boot, Postgres, Elasticsearch, or Cassandra. For each component detected, different Instana sensors are automatically downloaded, installed, and configured to monitor the environment.

Instana sensors are small programs that are designed to attach and monitor one specific technology and pass their data to the agent. They are automatically managed, updated, loaded, and unloaded by the host agent.

These sensors can monitor several different AWS services like Lambda, Amazon DynamoDB, Amazon Simple Storage Service (Amazon S3), Amazon Aurora, Amazon Simple Queue Service, and Amazon Managed Streaming for Apache Kafka. They collect data—like request and error rates, latency, CPU utilization—via AWS APIs and Amazon CloudWatch.

Instana also provides sensors to collect data from applications running on AWS, like IBM MQ, IBM Db2, or Red Hat OpenShift Container Platform. Review IBM’s full list of supported technologies and AWS services.

Instana also provides tracers, which are used with runtimes like Java, .NET, NodeJS, plus others. They modify code execution to capture logs, traces at request level, and send those back to the Instana agent.

With the use of sensors, the host agent collects configuration data and monitors the applications it has detected. The host agent also handles communications with the Instana SaaS backend services. It collects, aggregates and sends logs, traces and records metrics (such as response times, error rates, and resource utilization) every second to the Instana SaaS backend in real-time, using secure and efficient communication protocols.

IBM Instana SaaS

The Instana SaaS backend is the heart of the Instana APM solution and responsible for processing, storing, and analyzing the monitoring data collected from the Instana agents and sensors installed in the customer’s infrastructure.

It consists of several components and services that work together to provide real-time monitoring and analysis of microservices applications, including:

  • Data collectors: Receive and process data from the Instana agents and sensors, and store it in the Instana backend for further analysis.
  • Analytics engine: Analyzes the data collected by the agents and sensors to provide insights into the performance and health of the microservices applications.
  • User interface: Web-based interface that customers use to view and analyze their monitoring data.
  • Alerting engine: Generates alerts when thresholds or anomalies are detected in the monitoring data.
  • Data storage: Time-series database that stores the monitoring data collected by the agents and sensors. Allows customers to query and analyze the data in real-time.
  • Integrations: Integrates with various third-party tools, such as Slack, PagerDuty, and ServiceNow, providing seamless alerting and incident management.

IBM Instana backend: making sense of the situation in real time

The Instana SaaS platform automatically ingests data from agents and continuously updates a dependency map (Figure 2). This map presents every dependency in context, giving users an easy way to understand the interrelationships between application components and services.

This understanding enables users to identify the upstream and downstream impacts of any issue, ensuring that they stay informed about any potential impacts.

An example of an IBM Instana dependency map

Figure 2. An example of an IBM Instana dependency map

Instana traces every request end-to-end without sampling. The traces are analyzed in real-time, providing metrics that make any performance problems immediately visible. In the event of an incident, Instana can illustrate how a single issue can generate a ripple effect and impact a number of directly and indirectly connected services. Using the relationship information from the Dynamic Graph, Instana’s automatic root-cause analysis can precisely aggregate the individual issues into a single incident.

Applications monitoring with IBM Instana

Figure 3. Applications monitoring with IBM Instana

Developers, IT operations, or site reliability engineers (SREs) can access the Instana backend end-user monitoring interface (Figure 3) or end-user monitoring (EUM) interface (Figure 4) to view monitoring data of their workloads. These can be websites, mobile applications, AWS services, and infrastructure levels. From this UI, these personas can access service dashboards that show key performance indicators (KPIs), like response time and error rate.

End-user monitoring with IBM Instana

Figure 4. End-user monitoring with IBM Instana

The following actions demonstrate how an EUM for a JavaScript application, deployed to Amazon S3 can be completed:

  • Developers inject Instana JavaScript code (Figure 5) into the static website (HTML).
  • When a user visits the website, the JavaScript agent sends beacons to the Instana backend.
  • Dashboards show specific events of the website lifecycle, including page loading, JS errors, and HTTP requests.
  • Teams access Instana UI to check performance matrices. They can configure Smart Alerts with custom alerting policies based on specific metrics and KPIs.
  • Smart Alerts can send alerts via various channels, such as email, Slack, or IBM Watson AIOps Webhook.
  • In case of an incident, teams can use Instana to retrieve various performance metrics for root-cause analysis.
  • Developers can resolve the issues and apply the patch.
IBM Instana EUM JavaScript agent

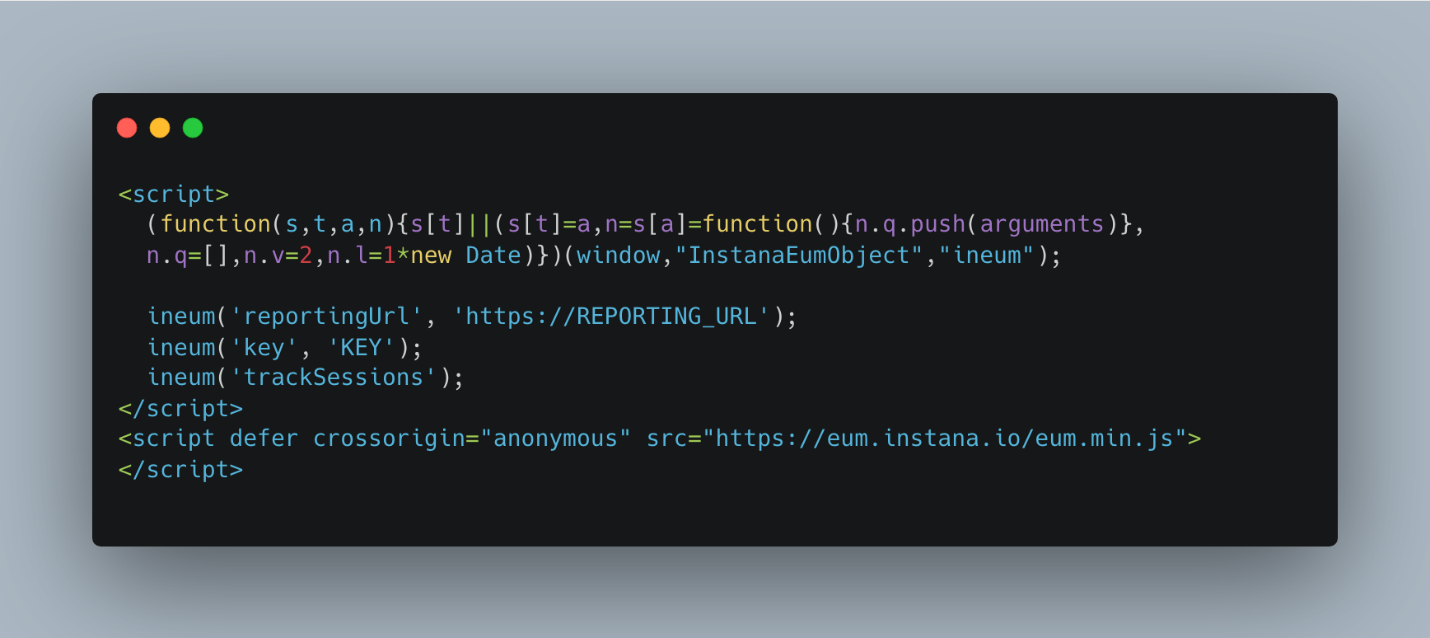
Figure 5. IBM Instana EUM JavaScript agent

Instana also offers Smart Alerts (Figure 6) to provide a more intuitive process of managing alerts. With Smart Alerts, customers can automatically generate alerting configurations using relevant KPIs and automatic threshold detection for use cases like website slowness or website errors.

IBM Instana Smart Alerts

Figure 6. IBM Instana Smart Alerts

Conclusion

In this post, we discussed how IBM Instana provides a comprehensive monitoring solution with the right tools to help you implement a real-time observability and monitoring solution. It allows you to gain insight into your microservices and cloud-native applications, including visibility into AWS services, containers, on-premises infrastructure, and other technologies. Instana can quickly identify and resolve issues before they impact end-users, ensuring that your applications are performing optimally.

As an IT administrator, developer, or business owner, IBM Instana on AWS give a deeper understanding of your applications and help you make data-driven decisions to improve overall performance.

Additional resources

Building a healthcare data pipeline on AWS with IBM Cloud Pak for Data

Post Syndicated from Eduardo Monich Fronza original https://aws.amazon.com/blogs/architecture/building-a-healthcare-data-pipeline-on-aws-with-ibm-cloud-pak-for-data/

Healthcare data is being generated at an increased rate with the proliferation of connected medical devices and clinical systems. Some examples of these data are time-sensitive patient information, including results of laboratory tests, pathology reports, X-rays, digital imaging, and medical devices to monitor a patient’s vital signs, such as blood pressure, heart rate, and temperature.

These different types of data can be difficult to work with, but when combined they can be used to build data pipelines and machine learning (ML) models to address various challenges in the healthcare industry, like the prediction of patient outcome, readmission rate, or disease progression.

In this post, we demonstrate how to bring data from different sources, like Snowflake and connected health devices, to form a healthcare data lake on Amazon Web Services (AWS). We also explore how to use this data with IBM Watson to build, train, and deploy ML models. You can learn how to integrate model endpoints with clinical health applications to generate predictions for patient health conditions.

Solution overview

The main parts of the architecture we discuss are (Figure 1):

  1. Using patient data to improve health outcomes
  2. Healthcare data lake formation to store patient health information
  3. Analyzing clinical data to improve medical research
  4. Gaining operational insights from healthcare provider data
  5. Providing data governance to maintain the data privacy
  6. Building, training, and deploying an ML model
  7. Integration with the healthcare system
Data pipeline for the healthcare industry using IBM CP4D on AWS

Figure 1. Data pipeline for the healthcare industry using IBM CP4D on AWS

IBM Cloud Pak for Data (CP4D) is deployed on Red Hat OpenShift Service on AWS (ROSA). It provides the components IBM DataStage, IBM Watson Knowledge Catalogue, IBM Watson Studio, IBM Watson Machine Learning, plus a wide variety of connections with data sources available in a public cloud or on-premises.

Connected health devices, on the edge, use sensors and wireless connectivity to gather patient health data, such as biometrics, and send it to the AWS Cloud through Amazon Kinesis Data Firehose. AWS Lambda transforms the data that is persisted to Amazon Simple Storage Service (Amazon S3), making that information available to healthcare providers.

Amazon Simple Notification Service (Amazon SNS) is used to send notifications whenever there is an issue with the real-time data ingestion from the connected health devices. In case of failures, messages are sent via Amazon SNS topics for rectifying and reprocessing of failure messages.

DataStage performs ETL operations and move patient historical information from Snowflake into Amazon S3. This data, combined with the data from the connected health devices, form a healthcare data lake, which is used in IBM CP4D to build and train ML models.

The pipeline described in architecture uses Watson Knowledge Catalogue, which provides data governance framework and artifacts to enrich our data assets. It protects sensitive patient information from unauthorized access, like individually identifiable information, medical history, test results, or insurance information.

Data protection rules define how to control access to data, mask sensitive values, or filter rows from data assets. The rules are automatically evaluated and enforced each time a user attempts to access a data asset in any governed catalog of the platform.

After this, the datasets are published to Watson Studio projects, where they are used to train ML models. You can develop models using Jupyter Notebook, IBM AutoAI (low-code), or IBM SPSS modeler (no-code).

For the purpose of this use case, we used logistic regression algorithm for classifying and predicting the probability of an event, such as disease risk management to assist doctors in making critical medical decisions. You can also build ML models using algorithms like Classification, Random Forest, and K-Nearest Neighbor. These are widely used to predict disease risk.

Once the models are trained, they are exposed as endpoints with Watson Machine Learning and integrated with the healthcare application to generate predictions by analyzing patient symptoms.

The healthcare applications are a type of clinical software that offer crucial physiological insights and predict the effects of illnesses and possible treatments. It provides built-in dashboards that display patient information together with the patient’s overall metrics for outcomes and treatments. This can help healthcare practitioners gain insights into patient conditions. It also can help medical institutions prioritize patients with more risk factors and curate clinical and behavioral health plans.

Finally, we are using IBM Security QRadar XDR SIEM to collect, process, and aggregate Amazon Virtual Private Cloud (Amazon VPC) flow logs, AWS CloudTrail logs, and IBM CP4D logs. QRadar XDR uses this information to manage security by providing real-time monitoring, alerts, and responses to threats.

Healthcare data lake

A healthcare data lake can help health organizations turn data into insights. It is centralized, curated, and securely stores data on Amazon S3. It also enables you to break down data silos and combine different types of analytics to gain insights. We are using the DataStage, Kinesis Data Firehose, and Amazon S3 services to build the healthcare data lake.

Data governance

Watson Knowledge Catalogue provides an ML catalogue for data discovery, cataloging, quality, and governance. We define policies in Watson Knowledge Catalogue to enable data privacy and overall access to and utilization of this data. This includes sensitive data and personal information that needs to be handled through data protection, quality, and automation rules. To learn more about IBM data governance, please refer to Running a data quality analysis (Watson Knowledge Catalogue).

Build, train, and deploy the ML model

Watson Studio empowers data scientists, developers, and analysts to build, run, and manage AI models on IBM CP4D.

In this solution, we are building models using Watson Studio by:

  1. Promoting the governed data from Watson Knowledge Catalogue to Watson Studio for insights
  2. Using ETL features, such as built-in search, automatic metadata propagation, and simultaneous highlighting, to process and transform large amounts of data
  3. Training the model, including model technique selection and application, hyperparameter setting and adjustment, validation, ensemble model development and testing; algorithm selection; and model optimization
  4. Evaluating the model based on metric evaluation, confusion matrix calculations, KPIs, model performance metrics, model quality measurements for accuracy and precision
  5. Deploying the model on Watson Machine Learning using online deployments, which create an endpoint to generate a score or prediction in real time
  6. Integrating the endpoint with applications like health applications, as demonstrated in Figure 1

Conclusion

In this blog, we demonstrated how to use patient data to improve health outcomes by creating a healthcare data lake and analyzing clinical data. This can help patients and healthcare practitioners make better, faster decisions and prioritize cases. We also discussed how to build an ML model using IBM Watson and integrate it with healthcare applications for health analysis.

Additional resources

Deploying IBM Cloud Pak for integration on Red Hat OpenShift Service on AWS

Post Syndicated from Eduardo Monich Fronza original https://aws.amazon.com/blogs/architecture/deploying-ibm-cloud-pak-for-integration-on-red-hat-openshift-service-on-aws/

Customers across many industries use IBM integration software, such as IBM MQ, DataPower, API Connect, and App Connect, as the backbone that integrates and orchestrates their business-critical workloads.

These customers often tell Amazon Web Services (AWS), they want to migrate their applications to AWS Cloud, as part of their business strategy: to lower costs, gain agility, and innovate faster.

In this blog, we will explore how customers, who are looking at ways to run IBM software on AWS, can use Red Hat OpenShift Service on AWS (ROSA) to deploy IBM Cloud Pak for Integration (CP4I) with modernized versions of IBM integration products.

As ROSA is a fully managed OpenShift service that is jointly supported by AWS and Red Hat, plus managed by Red Hat site reliability engineers, customers benefit from not having to manage the lifecycle of Red Hat OpenShift Container Platform (OCP) clusters.

This post explains the steps to:

  • Create a ROSA cluster
  • Configure persistent storage
  • Install CP4I and the IBM MQ 9.3 operator

Cloud Pak for integration architecture

In this blog, we are implementing a highly available ROSA cluster with three Availability Zones (AZ), three master nodes, three infrastructure nodes, and three worker nodes.

Review the AWS documentation for Regions and AZs and the regions where ROSA is available to choose the best region for your deployment.

Figure 1 demonstrates the solution’s architecture.

IBM Cloud Pak for Integration on ROSA architecture

Figure 1. IBM Cloud Pak for Integration on ROSA architecture

In our scenario, we are building a public ROSA cluster, with an internet-facing Classic Load Balancer providing access to Ports 80 and 443. Consider using a ROSA private cluster when you are deploying CP4I in your AWS account.

We are using Amazon Elastic File System (Amazon EFS) and Amazon Elastic Block Store (Amazon EBS) for our cluster’s persistent storage. Review the IBM CP4I documentation for information about supported AWS storage options.

Review AWS prerequisites for ROSA and AWS Security best practices in IAM documentation, before deploying CP4I for production workloads, to protect your AWS account and resources.

Cost

You are responsible for the cost of the AWS services used when deploying CP4I in your AWS account. For cost estimates, see the pricing pages for each AWS service you use.

Prerequisites

Before getting started, review the following prerequisites:

Installation steps

To deploy CP4I on ROSA, complete the following steps:

  1. From the AWS ROSA console, click Enable ROSA to active the service on your AWS account (Figure 2).

    Enable ROSA on your AWS account

    Figure 2. Enable ROSA on your AWS account

  2. Create an AWS Cloud9 environment to run your CP4I installation. We used a t3.small instance type.
  3. When it comes up, close the Welcome tab and open a new Terminal tab to install the required packages:
    curl "https://awscli.amazonaws.com/awscli-exe-linux-x86_64.zip" -o "awscliv2.zip"
    unzip awscliv2.zip
    sudo ./aws/install
    wget https://mirror.openshift.com/pub/openshift-v4/clients/rosa/latest/rosa-linux.tar.gz
    sudo tar -xvzf rosa-linux.tar.gz -C /usr/local/bin/
    
    rosa download oc
    sudo tar -xvzf openshift-client-linux.tar.gz -C /usr/local/bin/
    
    sudo yum -y install jq gettext
  4. Ensure the ELB service-linked role exists in your AWS account:
    aws iam get-role --role-name 
    "AWSServiceRoleForElasticLoadBalancing" || aws iam create-service-linked-role --aws-service-name 
    "elasticloadbalancing.amazonaws.com"
  5. Create an IAM policy named cp4i-installer-permissions with the following permissions:
    {
        "Version": "2012-10-17",
        "Statement": [
            {
                "Effect": "Allow",
                "Action": [
                    "autoscaling:*",
                    "cloudformation:*",
                    "cloudwatch:*",
                    "ec2:*",
                    "elasticfilesystem:*",
                    "elasticloadbalancing:*",
                    "events:*",
                    "iam:*",
                    "kms:*",
                    "logs:*",
                    "route53:*",
                    "s3:*",
                    "servicequotas:GetRequestedServiceQuotaChange",
                    "servicequotas:GetServiceQuota",
                    "servicequotas:ListServices",
                    "servicequotas:ListServiceQuotas",
                    "servicequotas:RequestServiceQuotaIncrease",
                    "sts:*",
                    "support:*",
                    "tag:*"
                ],
                "Resource": "*"
            }
        ]
    }
  6. Create an IAM role:
    1. Select AWS service and EC2, then click Next: Permissions.
    2. Select the cp4i-installer-permissions policy, and click Next.
    3. Name it cp4i-installer, and click Create role.
  7. From your AWS Cloud9 IDE, click the grey circle button on the top right, and select Manage EC2 Instance (Figure 3).

    Manage the AWS Cloud9 EC2 instance

    Figure 3. Manage the AWS Cloud9 EC2 instance

  8. On the Amazon EC2 console, select the AWS Cloud9 instance, then choose Actions / Security / Modify IAM Role.
  9. Choose cp4i-installer from the IAM Role drop down, and click Update IAM role (Figure 4).

    Attach the IAM role to your workspace

    Figure 4. Attach the IAM role to your workspace

  10. Update the IAM settings for your AWS Cloud9 workspace:
    aws cloud9 update-environment --environment-id $C9_PID --managed-credentials-action DISABLE
    rm -vf ${HOME}/.aws/credentials
  11. Configure the following environment variables:
    export ACCOUNT_ID=$(aws sts get-caller-identity --output text --query Account)
    export AWS_REGION=$(curl -s 169.254.169.254/latest/dynamic/instance-identity/document | jq -r '.region')
    export ROSA_CLUSTER_NAME=cp4iblog01
  12. Configure the aws cli default region:
    aws configure set default.region ${AWS_REGION}
  13. Navigate to the Red Hat Hybrid Cloud Console, and copy your OpenShift Cluster Manager API Token.
  14. Use the token and log in to your Red Hat account:
    rosa login --token=<your_openshift_api_token>
  15. Verify that your AWS account satisfies the quotas to deploy your cluster:
    rosa verify quota
  16. When deploying ROSA for the first time, create the account-wide roles:
    rosa create account-roles --mode auto --yes
  17. Create your ROSA cluster:
    rosa create cluster --cluster-name $ROSA_CLUSTER_NAME --sts \
      --multi-az \
      --region $AWS_REGION \
      --version 4.10.35 \
      --compute-machine-type m5.4xlarge \
      --compute-nodes 3 \
      --operator-roles-prefix cp4irosa \
      --mode auto --yes \
      --watch
  18. Once your cluster is ready, create a cluster-admin user (it takes approximately 5 minutes):
    rosa create admin --cluster=$ROSA_CLUSTER_NAME
  19. Log in to your cluster using the cluster-admin credentials. You can copy the command from the output of the previous step. For example:
    oc login https://<your_cluster_api_address>:6443 \
      --username cluster-admin \
      --password <your_cluster-admin_password>
  20. Create an IAM policy allowing ROSA to use Amazon EFS:
    cat <<EOF > $PWD/efs-policy.json
    {
      "Version": "2012-10-17",
      "Statement": [
     {
       "Effect": "Allow",
       "Action": [
         "elasticfilesystem:DescribeAccessPoints",
         "elasticfilesystem:DescribeFileSystems"
       ],
       "Resource": "*"
     },
     {
       "Effect": "Allow",
       "Action": [
         "elasticfilesystem:CreateAccessPoint"
       ],
       "Resource": "*",
       "Condition": {
         "StringLike": {
           "aws:RequestTag/efs.csi.aws.com/cluster": "true"
         }
       }
     },
     {
       "Effect": "Allow",
       "Action": "elasticfilesystem:DeleteAccessPoint",
       "Resource": "*",
       "Condition": {
         "StringEquals": {
           "aws:ResourceTag/efs.csi.aws.com/cluster": "true"
         }
       }
     }
      ]
    }
    EOF
    POLICY=$(aws iam create-policy --policy-name "${ROSA_CLUSTER_NAME}-cp4i-efs-csi" --policy-document file://$PWD/efs-policy.json --query 'Policy.Arn' --output text) || POLICY=$(aws iam list-policies --query 'Policies[?PolicyName==`cp4i-efs-csi`].Arn' --output text)
  21. Create an IAM trust policy:
    export OIDC_PROVIDER=$(oc get authentication.config.openshift.io cluster -o json | jq -r .spec.serviceAccountIssuer| sed -e "s/^https:\/\///")
    cat <<EOF > $PWD/TrustPolicy.json
    {
      "Version": "2012-10-17",
      "Statement": [
     {
       "Effect": "Allow",
       "Principal": {
         "Federated": "arn:aws:iam::${ACCOUNT_ID}:oidc-provider/${OIDC_PROVIDER}"
       },
       "Action": "sts:AssumeRoleWithWebIdentity",
       "Condition": {
         "StringEquals": {
           "${OIDC_PROVIDER}:sub": [
             "system:serviceaccount:openshift-cluster-csi-drivers:aws-efs-csi-driver-operator",
             "system:serviceaccount:openshift-cluster-csi-drivers:aws-efs-csi-driver-controller-sa"
           ]
         }
       }
     }
      ]
    }
    EOF
  22. Create an IAM role with the previously created policies:
    ROLE=$(aws iam create-role \
      --role-name "${ROSA_CLUSTER_NAME}-aws-efs-csi-operator" \
      --assume-role-policy-document file://$PWD/TrustPolicy.json \
      --query "Role.Arn" --output text)
    aws iam attach-role-policy \
      --role-name "${ROSA_CLUSTER_NAME}-aws-efs-csi-operator" \
      --policy-arn $POLICY
  23. Create an OpenShift secret to store the AWS access keys:
    cat <<EOF | oc apply -f -
    apiVersion: v1
    kind: Secret
    metadata:
      name: aws-efs-cloud-credentials
      namespace: openshift-cluster-csi-drivers
    stringData:
      credentials: |-
        [default]
        role_arn = $ROLE
        web_identity_token_file = /var/run/secrets/openshift/serviceaccount/token
    EOF
  24. Install the Amazon EFS CSI driver operator:
    cat <<EOF | oc create -f -
    apiVersion: operators.coreos.com/v1
    kind: OperatorGroup
    metadata:
      generateName: openshift-cluster-csi-drivers-
      namespace: openshift-cluster-csi-drivers
    ---
    apiVersion: operators.coreos.com/v1alpha1
    kind: Subscription
    metadata:
      labels:
        operators.coreos.com/aws-efs-csi-driver-operator.openshift-cluster-csi-drivers: ""
      name: aws-efs-csi-driver-operator
      namespace: openshift-cluster-csi-drivers
    spec:
      channel: stable
      installPlanApproval: Automatic
      name: aws-efs-csi-driver-operator
      source: redhat-operators
      sourceNamespace: openshift-marketplace
    EOF
  25. Track the operator installation:
    watch oc get deployment aws-efs-csi-driver-operator \
     -n openshift-cluster-csi-drivers
  26. Install the AWS EFS CSI driver:
    cat <<EOF | oc apply -f -
    apiVersion: operator.openshift.io/v1
    kind: ClusterCSIDriver
    metadata:
      name: efs.csi.aws.com
    spec:
      managementState: Managed
    EOF
  27. Wait until the CSI driver is running:
    watch oc get daemonset aws-efs-csi-driver-node \
     -n openshift-cluster-csi-drivers
  28. Create a rule allowing inbound NFS traffic from your cluster’s VPC Classless Inter-Domain Routing (CIDR):
    NODE=$(oc get nodes --selector=node-role.kubernetes.io/worker -o jsonpath='{.items[0].metadata.name}')
    VPC_ID=$(aws ec2 describe-instances --filters "Name=private-dns-name,Values=$NODE" --query 'Reservations[*].Instances[*].{VpcId:VpcId}' | jq -r '.[0][0].VpcId')
    CIDR=$(aws ec2 describe-vpcs --filters "Name=vpc-id,Values=$VPC_ID" --query 'Vpcs[*].CidrBlock' | jq -r '.[0]')
    SG=$(aws ec2 describe-instances --filters "Name=private-dns-name,Values=$NODE" --query 'Reservations[*].Instances[*].{SecurityGroups:SecurityGroups}' | jq -r '.[0][0].SecurityGroups[0].GroupId')
    aws ec2 authorize-security-group-ingress \
      --group-id $SG \
      --protocol tcp \
      --port 2049 \
      --cidr $CIDR | jq .
  29. Create an Amazon EFS file system:
    EFS_FS_ID=$(aws efs create-file-system --performance-mode generalPurpose --encrypted --region ${AWS_REGION} --tags Key=Name,Value=ibm_cp4i_fs | jq -r '.FileSystemId')
    SUBNETS=($(aws ec2 describe-subnets --filters "Name=vpc-id,Values=${VPC_ID}" "Name=tag:Name,Values=*${ROSA_CLUSTER_NAME}*private*" | jq --raw-output '.Subnets[].SubnetId'))
    for subnet in ${SUBNETS[@]}; do
      aws efs create-mount-target \
        --file-system-id $EFS_FS_ID \
        --subnet-id $subnet \
        --security-groups $SG
    done
  30. Create an Amazon EFS storage class:
    cat <<EOF | oc apply -f -
    kind: StorageClass
    apiVersion: storage.k8s.io/v1
    metadata:
      name: efs-sc
    provisioner: efs.csi.aws.com
    parameters:
      provisioningMode: efs-ap
      fileSystemId: $EFS_FS_ID
      directoryPerms: "750"
      gidRangeStart: "1000"
      gidRangeEnd: "2000"
      basePath: "/ibm_cp4i_rosa_fs"
    EOF
  31. Add the IBM catalog sources to OpenShift:
    cat <<EOF | oc apply -f -
    apiVersion: operators.coreos.com/v1alpha1
    kind: CatalogSource
    metadata:
      name: ibm-operator-catalog
      namespace: openshift-marketplace
    spec:
      displayName: IBM Operator Catalog
      image: 'icr.io/cpopen/ibm-operator-catalog:latest'
      publisher: IBM
      sourceType: grpc
      updateStrategy:
        registryPoll:
          interval: 45m
    EOF
  32. Get the console URL of your ROSA cluster:
    rosa describe cluster --cluster=$ROSA_CLUSTER_NAME | grep Console
  33. Copy your entitlement key from the IBM container software library.
  34. Log in to your ROSA web console, navigate to Workloads > Secrets.
  35. Set the project to openshift-config; locate and click pull-secret (Figure 5).

    Edit the pull-secret entry

    Figure 5. Edit the pull-secret entry

  36. Expand Actions and click Edit Secret.
  37. Scroll to the end of the page, and click Add credentials (Figure 6):
    1. Registry server address: cp.icr.io
    2. Username field: cp
    3. Password: your_ibm_entitlement_key

      Configure your IBM entitlement key secret

      Figure 6. Configure your IBM entitlement key secret


  38. Next, navigate to Operators > OperatorHub. On the OperatorHub page, use the search filter to locate the tile for the operators you plan to install: IBM Cloud Pak for Integration and IBM MQ. Keep all values as default for both installations (Figure 7). For example, IBM Cloud Pak for Integration:

    Figure 7. Install CP4I operators

    Figure 7. Install CP4I operators

  39. Create a namespace for each CP4I workload that will be deployed. In this blog, we’ve created for the platform UI and IBM MQ:
    oc new-project integration
    oc new-project ibm-mq
  40. Review the IBM documentation to select the appropriate license for your deployment.
  41. Deploy the platform UI:
    cat <<EOF | oc apply -f -
    apiVersion: integration.ibm.com/v1beta1
    kind: PlatformNavigator
    metadata:
      name: integration-quickstart
      namespace: integration
    spec:
      license:
        accept: true
        license: L-RJON-CD3JKX
      mqDashboard: true
      replicas: 3  # Number of replica pods, 1 by default, 3 for HA
      storage:
        class: efs-sc
      version: 2022.2.1
    EOF
  42. Track the deployment status, which takes approximately 40 minutes:
    watch oc get platformnavigator -n integration
  43. Create an IBM MQ queue manager instance:
    cat <<EOF | oc apply -f -
    apiVersion: mq.ibm.com/v1beta1
    kind: QueueManager
    metadata:
      name: qmgr-inst01
      namespace: ibm-mq
    spec:
      license:
        accept: true
        license: L-RJON-CD3JKX
        use: NonProduction
      web:
        enabled: true
      template:
        pod:
          containers:
            - env:
                - name: MQSNOAUT
                  value: 'yes'
              name: qmgr
      queueManager:
        resources:
          limits:
            cpu: 500m
          requests:
            cpu: 500m
        availability:
          type: SingleInstance
        storage:
          queueManager:
            type: persistent-claim
            class: gp3
            deleteClaim: true
            size: 2Gi
          defaultClass: gp3
        name: CP4IQMGR
      version: 9.3.0.1-r1
    EOF
  44. Check the status of the queue manager:
    oc describe queuemanager qmgr-inst01 -n ibm-mq

Validation steps

Let’s verify our installation!

  1. Run the commands to retrieve the CP4I URL and administrator password:
    oc describe platformnavigator integration-quickstart \
      -n integration | grep "^.*UI Endpoint" | xargs | cut -d ' ' -f3
    oc get secret platform-auth-idp-credentials \
      -n ibm-common-services -o jsonpath='{.data.admin_password}' \
      | base64 -d && echo
  2. Using the information from the previous step, access your CP4I web console.
  3. Select the option to authenticate with the IBM provided credentials (admin only) to login with your admin password.
  4. From the CP4I console, you can manage users and groups allowed to access the platform, install new operators, and view the components that are installed.
  5. Click qmgr-inst01 in the Messaging widget to bring up your IBM MQ setup (Figure 8).

    CP4I console features

    Figure 8. CP4I console features

  6. In the Welcome to IBM MQ panel, click the CP4IQMGR queue manager. This shows the state, resources, and allows you to configure your instances (Figure 9).

    Queue manager details

    Figure 9. Queue manager details

Congratulations! You have successfully deployed IBM CP4I on Red Hat OpenShift on AWS.

Post installation

Review the following topics, when you are installing CP4I on production environments:

Cleanup

Connect to your Cloud9 workspace, and run the following steps to delete the CP4I installation, including ROSA. This avoids incurring future charges on your AWS account:

EFS_EF_ID=$(aws efs describe-file-systems \
  --query 'FileSystems[?Name==`ibm_cp4i_fs`].FileSystemId' \
  --output text)
MOUNT_TARGETS=$(aws efs describe-mount-targets --file-system-id $EFS_EF_ID --query 'MountTargets[*].MountTargetId' --output text)
for mt in ${MOUNT_TARGETS[@]}; do
  aws efs delete-mount-target --mount-target-id $mt
done
aws efs delete-file-system --file-system-id $EFS_EF_ID

rosa delete cluster -c $ROSA_CLUSTER_NAME --yes --region $AWS_REGION

Monitor your cluster uninstallation logs, run:

rosa logs uninstall -c $ROSA_CLUSTER_NAME --watch

Once the cluster is uninstalled, remove the operator-roles and oidc-provider, as informed in the output of the rosa delete command. For example:

rosa delete operator-roles -c 1vepskr2ms88ki76k870uflun2tjpvfs --mode auto –yes
rosa delete oidc-provider -c 1vepskr2ms88ki76k870uflun2tjpvfs --mode auto --yes

Conclusion

This post explored how to deploy CP4I on AWS ROSA. We also demonstrated how customers can take full advantage of managed OpenShift service, focusing on further modernizing application stacks by using AWS managed services (like ROSA) for their application deployments.

If you are interested in learning more about ROSA, take part in the AWS ROSA Immersion Workshop.

Check out the blog on Running IBM MQ on AWS using High-performance Amazon FSx for NetApp ONTAP to learn how to use Amazon FSx for NetApp ONTAP for distributed storage and high availability with IBM MQ.

For more information and getting started with IBM Cloud Pak deployments, visit the AWS Marketplace for new offerings.

Further reading

Deploying IBM Cloud Pak for Data on Red Hat OpenShift Service on AWS

Post Syndicated from Eduardo Monich Fronza original https://aws.amazon.com/blogs/architecture/deploying-ibm-cloud-pak-for-data-on-red-hat-openshift-service-on-aws/

Amazon Web Services (AWS) customers who are looking for a more intuitive way to deploy and use IBM Cloud Pak for Data (CP4D) on the AWS Cloud, can now use the Red Hat OpenShift Service on AWS (ROSA).

ROSA is a fully managed service, jointly supported by AWS and Red Hat. It is managed by Red Hat Site Reliability Engineers and provides a pay-as-you-go pricing model, as well as a unified billing experience on AWS.

With this, customers do not manage the lifecycle of Red Hat OpenShift Container Platform clusters. Instead, they are free to focus on developing new solutions and innovating faster, using IBM’s integrated data and artificial intelligence platform on AWS, to differentiate their business and meet their ever-changing enterprise needs.

CP4D can also be deployed from the AWS Marketplace with self-managed OpenShift clusters. This is ideal for customers with requirements, like Red Hat OpenShift Data Foundation software defined storage, or who prefer to manage their OpenShift clusters.

In this post, we discuss how to deploy CP4D on ROSA using IBM-provided Terraform automation.

Cloud Pak for data architecture

Here, we install CP4D in a highly available ROSA cluster across three availability zones (AZs); with three master nodes, three infrastructure nodes, and three worker nodes.

Review the AWS Regions and Availability Zones documentation and the regions where ROSA is available to choose the best region for your deployment.

This is a public ROSA cluster, accessible from the internet via port 443. When deploying CP4D in your AWS account, consider using a private cluster (Figure 1).

IBM Cloud Pak for Data on ROSA

Figure 1. IBM Cloud Pak for Data on ROSA

We are using Amazon Elastic Block Store (Amazon EBS) and Amazon Elastic File System (Amazon EFS) for the cluster’s persistent storage. Review the IBM documentation for information about supported storage options.

Review the AWS prerequisites for ROSA, and follow the Security best practices in IAM documentation to protect your AWS account before deploying CP4D.

Cost

The costs associated with using AWS services when deploying CP4D in your AWS account can be estimated on the pricing pages for the services used.

Prerequisites

This blog assumes familiarity with: CP4D, Terraform, Amazon Elastic Compute Cloud (Amazon EC2), Amazon EBS, Amazon EFS, Amazon Virtual Private Cloud, and AWS Identity and Access Management (IAM).

You will need the following before getting started:

Installation steps

Complete the following steps to deploy CP4D on ROSA:

  1. First, enable ROSA on the AWS account. From the AWS ROSA console, click on Enable ROSA, as in Figure 2.

    Enabling ROSA on your AWS account

    Figure 2. Enabling ROSA on your AWS account

  2. Click on Get started. Redirect to the Red Hat website, where you can register and obtain a Red Hat ROSA token.
  3. Navigate to the AWS IAM console. Create an IAM policy named cp4d-installer-policy and add the following permissions:
    {
        "Version": "2012-10-17",
        "Statement": [
            {
                "Effect": "Allow",
                "Action": [
                    "autoscaling:*",
                    "cloudformation:*",
                    "cloudwatch:*",
                    "ec2:*",
                    "elasticfilesystem:*",
                    "elasticloadbalancing:*",
                    "events:*",
                    "iam:*",
                    "kms:*",
                    "logs:*",
                    "route53:*",
                    "s3:*",
                    "servicequotas:GetRequestedServiceQuotaChange",
                    "servicequotas:GetServiceQuota",
                    "servicequotas:ListServices",
                    "servicequotas:ListServiceQuotas",
                    "servicequotas:RequestServiceQuotaIncrease",
                    "sts:*",
                    "support:*",
                    "tag:*"
                ],
                "Resource": "*"
            }
        ]
    }
  4. Next, let’s create an IAM user from the AWS IAM console, which will be used for the CP4D installation:
    a. Specify a name, like ibm-cp4d-bastion.
    b. Set the credential type to Access key – Programmatic access.
    c. Attach the IAM policy created in Step 3.
    d. Download the .csv credentials file.
  5. From the Amazon EC2 console, create a new EC2 key pair and download the private key.
  6. Launch an Amazon EC2 instance from which the CP4D installer is launched:
    a. Specify a name, like ibm-cp4d-bastion.
    b. Select an instance type, such as t3.medium.
    c. Select the EC2 key pair created in Step 4.
    d. Select the Red Hat Enterprise Linux 8 (HVM), SSD Volume Type for 64-bit (x86) Amazon Machine Image.
    e. Create a security group with an inbound rule that allows connection. Restrict access to your own IP address or an IP range from your organization.
    f. Leave all other values as default.
  7. Connect to the EC2 instance via SSH using its public IP address. The remaining installation steps will be initiated from it.
  8. Install the required packages:
    $ sudo yum update -y
    $ sudo yum install git unzip vim wget httpd-tools python38 -y
    
    $ sudo ln -s /usr/bin/python3 /usr/bin/python
    $ sudo ln -s /usr/bin/pip3 /usr/bin/pip
    $ sudo pip install pyyaml
    
    $ curl "https://awscli.amazonaws.com/awscli-exe-linux-x86_64.zip" -o "awscliv2.zip"
    $ unzip awscliv2.zip
    $ sudo ./aws/install
    
    $ wget "https://github.com/stedolan/jq/releases/download/jq-1.6/jq-linux64"
    $ chmod +x jq-linux64
    $ sudo mv jq-linux64 /usr/local/bin/jq
    
    $ wget "https://mirror.openshift.com/pub/openshift-v4/clients/ocp/4.10.15/openshift-client-linux-4.10.15.tar.gz"
    $ tar -xvf openshift-client-linux-4.10.15.tar.gz
    $ chmod u+x oc kubectl
    $ sudo mv oc /usr/local/bin
    $ sudo mv kubectl /usr/local/bin
    
    $ sudo yum install -y yum-utils
    $ sudo yum-config-manager --add-repo $ https://rpm.releases.hashicorp.com/RHEL/hashicorp.repo
    $ sudo yum -y install terraform
    
    $ sudo subscription-manager repos --enable=rhel-7-server-extras-rpms
    $ sudo yum install -y podman
  9. Configure the AWS CLI with the IAM user credentials from Step 4 and the desired AWS region to install CP4D:
    $ aws configure
    
    AWS Access Key ID [None]: AK****************7Q
    AWS Secret Access Key [None]: vb************************************Fb
    Default region name [None]: eu-west-1
    Default output format [None]: json
  10. Clone the following IBM GitHub repository:
    https://github.com/IBM/cp4d-deployment.git

    $ cd ~/cp4d-deployment/managed-openshift/aws/terraform/
  11. For the purpose of this post, we enabled Watson Machine Learning, Watson Studio, and Db2 OLTP services on CP4D. Use the example in this step to create a Terraform variables file for CP4D installation. Enable CP4D services required for your use case:
    region			= "eu-west-1"
    tenancy			= "default"
    access_key_id 		= "your_AWS_Access_key_id"
    secret_access_key 	= "your_AWS_Secret_access_key"
    
    new_or_existing_vpc_subnet	= "new"
    az				= "multi_zone"
    availability_zone1		= "eu-west-1a"
    availability_zone2 		= "eu-west-1b"
    availability_zone3 		= "eu-west-1c"
    
    vpc_cidr 		= "10.0.0.0/16"
    public_subnet_cidr1 	= "10.0.0.0/20"
    public_subnet_cidr2 	= "10.0.16.0/20"
    public_subnet_cidr3 	= "10.0.32.0/20"
    private_subnet_cidr1 	= "10.0.128.0/20"
    private_subnet_cidr2 	= "10.0.144.0/20"
    private_subnet_cidr3 	= "10.0.160.0/20"
    
    openshift_version 		= "4.10.15"
    cluster_name 			= "your_ROSA_cluster_name"
    rosa_token 			= "your_ROSA_token"
    worker_machine_type 		= "m5.4xlarge"
    worker_machine_count 		= 3
    private_cluster 			= false
    cluster_network_cidr 		= "10.128.0.0/14"
    cluster_network_host_prefix 	= 23
    service_network_cidr 		= "172.30.0.0/16"
    storage_option 			= "efs-ebs" 
    ocs 				= { "enable" : "false", "ocs_instance_type" : "m5.4xlarge" } 
    efs 				= { "enable" : "true" }
    
    accept_cpd_license 		= "accept"
    cpd_external_registry 		= "cp.icr.io"
    cpd_external_username 	= "cp"
    cpd_api_key 			= "your_IBM_API_Key"
    cpd_version 			= "4.5.0"
    cpd_namespace 		= "zen"
    cpd_platform 			= "yes"
    
    watson_knowledge_catalog 	= "no"
    data_virtualization 		= "no"
    analytics_engine 		= "no"
    watson_studio 			= "yes"
    watson_machine_learning 	= "yes"
    watson_ai_openscale 		= "no"
    spss_modeler 			= "no"
    cognos_dashboard_embedded 	= "no"
    datastage 			= "no"
    db2_warehouse 		= "no"
    db2_oltp 			= "yes"
    cognos_analytics 		= "no"
    master_data_management 	= "no"
    decision_optimization 		= "no"
    bigsql 				= "no"
    planning_analytics 		= "no"
    db2_aaservice 			= "no"
    watson_assistant 		= "no"
    watson_discovery 		= "no"
    openpages 			= "no"
    data_management_console 	= "no"
  12. Save your file, and launch the commands below to install CP4D and track progress:
    $ terraform init -input=false
    $ terraform apply --var-file=cp4d-rosa-3az-new-vpc.tfvars \
       -input=false | tee terraform.log
  13. The installation runs for 4 or more hours. Once installation is complete, the output includes (as in Figure 3):
    a. Commands to get the CP4D URL and the admin user password
    b. CP4D admin user
    c. Login command for the ROSA cluster
CP4D installation output

Figure 3. CP4D installation output

Validation steps

Let’s verify the installation!

  1. Log in to your ROSA cluster using your cluster-admin credentials.
    $ oc login https://api.cp4dblog.17e7.p1.openshiftapps.com:6443 --username cluster-admin --password *****-*****-*****-*****
  2. Initiate the following command to get the cluster’s console URL (Figure 4):
    $ oc whoami --show-console

    ROSA console URL

    Figure 4. ROSA console URL

  3. Run the commands in this step to retrieve the CP4D URL and admin user password (Figure 5).
    $ oc extract secret/admin-user-details \
      --keys=initial_admin_password --to=- -n zen
    $ oc get routes -n zen

    Retrieve the CP4D admin user password and URL

    Figure 5. Retrieve the CP4D admin user password and URL

  4. Initiate the following commands to have the CP4D workloads in your ROSA cluster (Figure 6):
    $ oc get pods -n zen
    $ oc get deployments -n zen
    $ oc get svc -n zen 
    $ oc get pods -n ibm-common-services 
    $ oc get deployments -n ibm-common-services
    $ oc get svc -n ibm-common-services
    $ oc get subs -n ibm-common-services

    Checking the CP4D pods running on ROSA

    Figure 6. Checking the CP4D pods running on ROSA

  5. Log in to your CP4D web console using its URL and your admin password.
  6. Expand the navigation menu. Navigate to Services > Services catalog for the available services (Figure 7).

    Navigating to the CP4D services catalog

    Figure 7. Navigating to the CP4D services catalog

  7. Notice that the services set as “enabled” correspond with your Terraform definitions (Figure 8).

    Services enabled in your CP4D catalog

    Figure 8. Services enabled in your CP4D catalog

Congratulations! You have successfully deployed IBM CP4D on Red Hat OpenShift on AWS.

Post installation

Refer to the IBM documentation on setting up services, if you need to enable additional services on CP4D.

When installing CP4D on productive environments, please review the IBM documentation on securing your environment. Also, the Red Hat documentation on setting up identity providers for ROSA is informative. You can also consider enabling auto scaling for your cluster.

Cleanup

Connect to your bastion host, and run the following steps to delete the CP4D installation, including ROSA. This step avoids incurring future charges on your AWS account.

$ cd ~/cp4d-deployment/managed-openshift/aws/terraform/
$ terraform destroy -var-file="cp4d-rosa-3az-new-vpc.tfvars"

If you’ve experienced any failures during the CP4D installation, run these next steps:

$ cd ~/cp4d-deployment/managed-openshift/aws/terraform
$ sudo cp installer-files/rosa /usr/local/bin
$ sudo chmod 755 /usr/local/bin/rosa
$ Cluster_Name=`rosa list clusters -o yaml | grep -w "name:" | cut -d ':' -f2 | xargs`
$ rosa remove cluster --cluster=${Cluster_Name}
$ rosa logs uninstall -c ${Cluster_Name } –watch
$ rosa init --delete-stack
$ terraform destroy -var-file="cp4d-rosa-3az-new-vpc.tfvars"

Conclusion

In summary, we explored how customers can take advantage of a fully managed OpenShift service on AWS to run IBM CP4D. With this implementation, customers can focus on what is important to them, their workloads, and their customers, and less on managing the day-to-day operations of managing OpenShift to run CP4D.

Check out the IBM Cloud Pak for Data Simplifies and Automates How You Turn Data into Insights blog to learn how to use CP4D on AWS to unlock the value of your data.

Additional resources