For software developers, development teams and IT Professionals, the Amazon Q Developer Pro Tier is recommended. The pro tier offers higher limits, enterprise administration, an analytics dashboard, code customizations and IP indemnity. In addition, the Amazon Q Developer Pro Tier requires AWS IAM Identity Center. For most production deployments, an organization instances of IAM Identity Center is recommended. An organization instance supports identity aware sessions which are required to use the Pro tier in the AWS Console, in addition to the benefits outline in the IAM identity Center user guide.
However, what if your team would like to get started quickly to try out Amazon Q Developer Pro Tier on the IDE but there are constraints that are slowing you down such as:
You don’t have plans to adopt IAM Identity Center across your organization.
You have an organization instance of IAM Identity Center, but you want to deploy Amazon Q Developer Pro to an isolated set of users that are distinct from users in your organization instance.
You don’t control the AWS Organization in which you operate. For example, a third-party controls the AWS organization that manages your AWS accounts and it takes time to get changes approved.
To address these scenarios, we recently announced a new, simplified setup experience with two steps that makes it easier for teams that are looking to try out the features of Amazon Q Developer Pro in their Integrated Development Environment (IDE).
Management Account and AWS IAM Identity Center
Before we jump into a tour of the quick start setup, let’s take a step back and consider the AWS recommendation of using a multi-account setup to organize your workloads. The benefits can be seen in our AWS white paper on organizing Your AWS Environment Using Multiple Accounts and the recommended approach is to implement this with AWS Organizations. A management account is the AWS account you use to create your organization and this should be kept minimal and secure and only host essential administrative tools such as setting up AWS Organizations and implementing single sign on via IAM Identity Center.
IAM Identity Center is core to the Amazon Q Developer Pro setup. IAM Identity Center users can access AWS accounts and applications using their existing organizational credentials, without the need to create and manage separate AWS accounts and passwords.
For example, IAM Identity Center can connect and automatically provision users from standards-based identity providers including Microsoft Active Directory, Okta, Microsoft Entra ID, Google Workspace or another supported identity provider (IdP) via Security Assertion Markup Language (SAML) 2.0 or OIDC.
Figure 1. Manage Access to Amazon Q Developer via AWS IAM Identity Center.
This is a great experience for developers as they simply authorize their Q Developer session with their usual sign in process via the Identity source already in place in their business. Administrators benefit from features such as centralized access management, streamlined permissions management and enhanced administrator capabilities to view Amazon Q user activity.
Amazon Q Developer Pro Simplified Setup Experience
The above approach of setting up IAM Identity Center in a management account is ideal but not always viable, so we have created a new getting started experience makes it easier for teams that are looking to try out the features of Amazon Q Developer Pro in their Integrated Development Environment (IDE) starting with:
A standalone account that is not part of an organization managed by AWS Organizations.
A member account, other than the management account, that is part of an AWS Organization but doesn’t have organization level users managed in IAM Identity Center.
For both standalone and member accounts there is a two step process. The first step for setting up Amazon Q Developer Pro starts by navigating to the Amazon Q console and selecting Get started:
Figure 2. Amazon Q Console – Getting started with Amazon Q.
The setup will guide through creating the first user and activating a subscribing to Amazon Q Developer Pro in your account, this initial step also includes creating an account instance of IAM Identity Center and an AWS managed application instance of Amazon Q Developer. A detailed walkthrough is available in our documentation – Subscribing users to Amazon Q Developer Pro.
When complete, the first user can be seen within the Amazon Q Subscriptions:
Figure 3. Amazon Q Subscriptions.
The second step is to subscribe the additional team members to the account instance of IAM Identity Center and then subscribing them to Amazon Q Developer Pro via the Amazon Q console.
Figure 4. IAM Identity Center Users.
Once a user has been successfully subscribed, they will receive an email with instructions on how to activate their Amazon Q Developer Pro Subscription and start using the features.
Note that account instances of IAM Identity Center have limitations. For example, account instances don’t support console access. (Users can still use Amazon Q in the console, it’s just that they’ll be subject to the Free tier monthly limits.) If you want to use Amazon Q Developer Pro in the console and other AWS websites, you must be a user in an organization instance of IAM Identity Center, in a management account.
At this point, it should be noted, that IAM Identity Center can now be configured to change it’s identity source to a Federated Identity Provider (IdP), see our documentation pages on how to change your identity source.
Cleanup
To cleanup the resource created in this blog, first remove Amazon Q Developer Pro users by following our guide:
Getting started with Amazon Q Developer Pro is now even easier with the new, simplified setup experience, you can experience the pro features in your IDE such as higher limits on advanced features such as:
Chat, debug code, add tests and more in your integrated developer environment (IDE).
Accelerate tasks with the Amazon Q Developer agents for software development.
Upgrade apps in a fraction of the time with the Amazon Q Developer Agent for code transformation.
Read more about how the community are using Amazon Q to write code and build applications faster and easier with Amazon Q on community.aws and explore what we are building with Amazon Q Developer here.
Note that while this post focuses on Amazon Q Developer Pro, developers can get started at no cost and without an AWS account; Amazon Q Developer offers a perpetual Free Tier with monthly limits available to users, see our user guide for Amazon Q Developer Free tier.
AWS CodeBuild now supports managed self-hosted GitHub Action runners, allowing you to build powerful CI/CD capabilities right beside your code and quickly implement a build, test and deploy pipeline. Last year AWS announced that customers can define their GitHub Actions steps within any phase of a CodeBuild buildspec file but with a self-hosted runner, jobs execute from GitHub Actions on GitHub.com to a system you deploy and manage.
For customers managing their self-hosted runners on their own infrastructure, CodeBuild can now provide a secure, scalable and lower latency solution. In addition, CodeBuild managed self-hosted GitHub Action runners bring features, such as:
Available compute platforms including AWS Lambda, Windows, Linux, Linux GPU-enhanced and AWS Graviton Processors (Arm-based instances).
With the compute options available, customers can now run tests on hardware and operating system combinations that closely match production and reduce manual operational tasks by shifting the management of the runners to AWS.
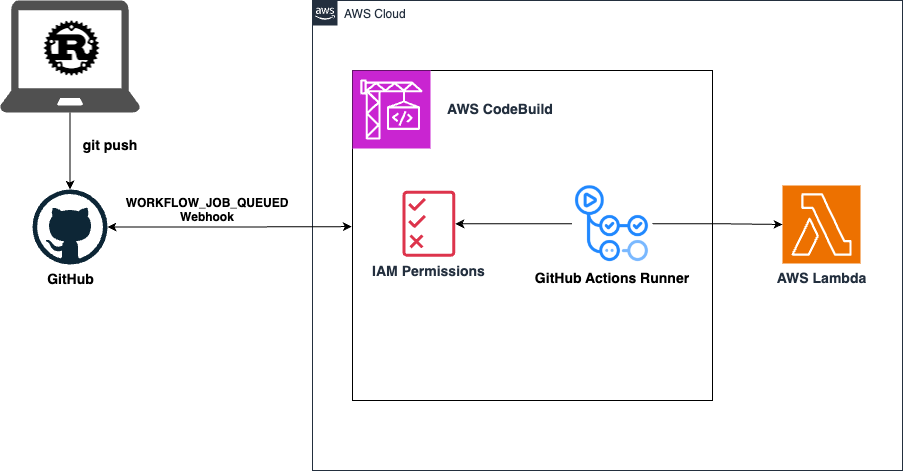
In this blog, I will explore how AWS managed GitHub Action self-hosted runners work by building and deploying an application to AWS using GitHub Actions.
Architecture overview
The architecture of what I’ll be building can be seen below:
The architecture above shows how a developer pushes code changes to GitHub. This triggers CodeBuild to detect the update. CodeBuild then runs the defined GitHub Action Workflow, which builds and deploys it to AWS Lambda.
Step 1. Build a AWS Lambda Function
I’ll start with a simple application to demonstrate how to build and deploy an application on AWS via a Managed Self-Hosted GitHub Actions runner. We’ve written before about why AWS is the best place to run Rust, Amazon CTO Werner Vogels has been an outspoken advocate for exploring energy-efficient programming languages like Rust and AWS have great guides on using Rust to build on AWS such as:
From the above cloned repository, install Cargo Lambda:For macOS & Linux:
brew tap cargo-lambda/cargo-lambda
brew install cargo-lambda
Windows users can follow the guide to see all the ways that you can install Cargo Lambda in your system.
Use Cargo lambda to create a new project
cargo lambda new new-lambda-project && cd new-lambda-project
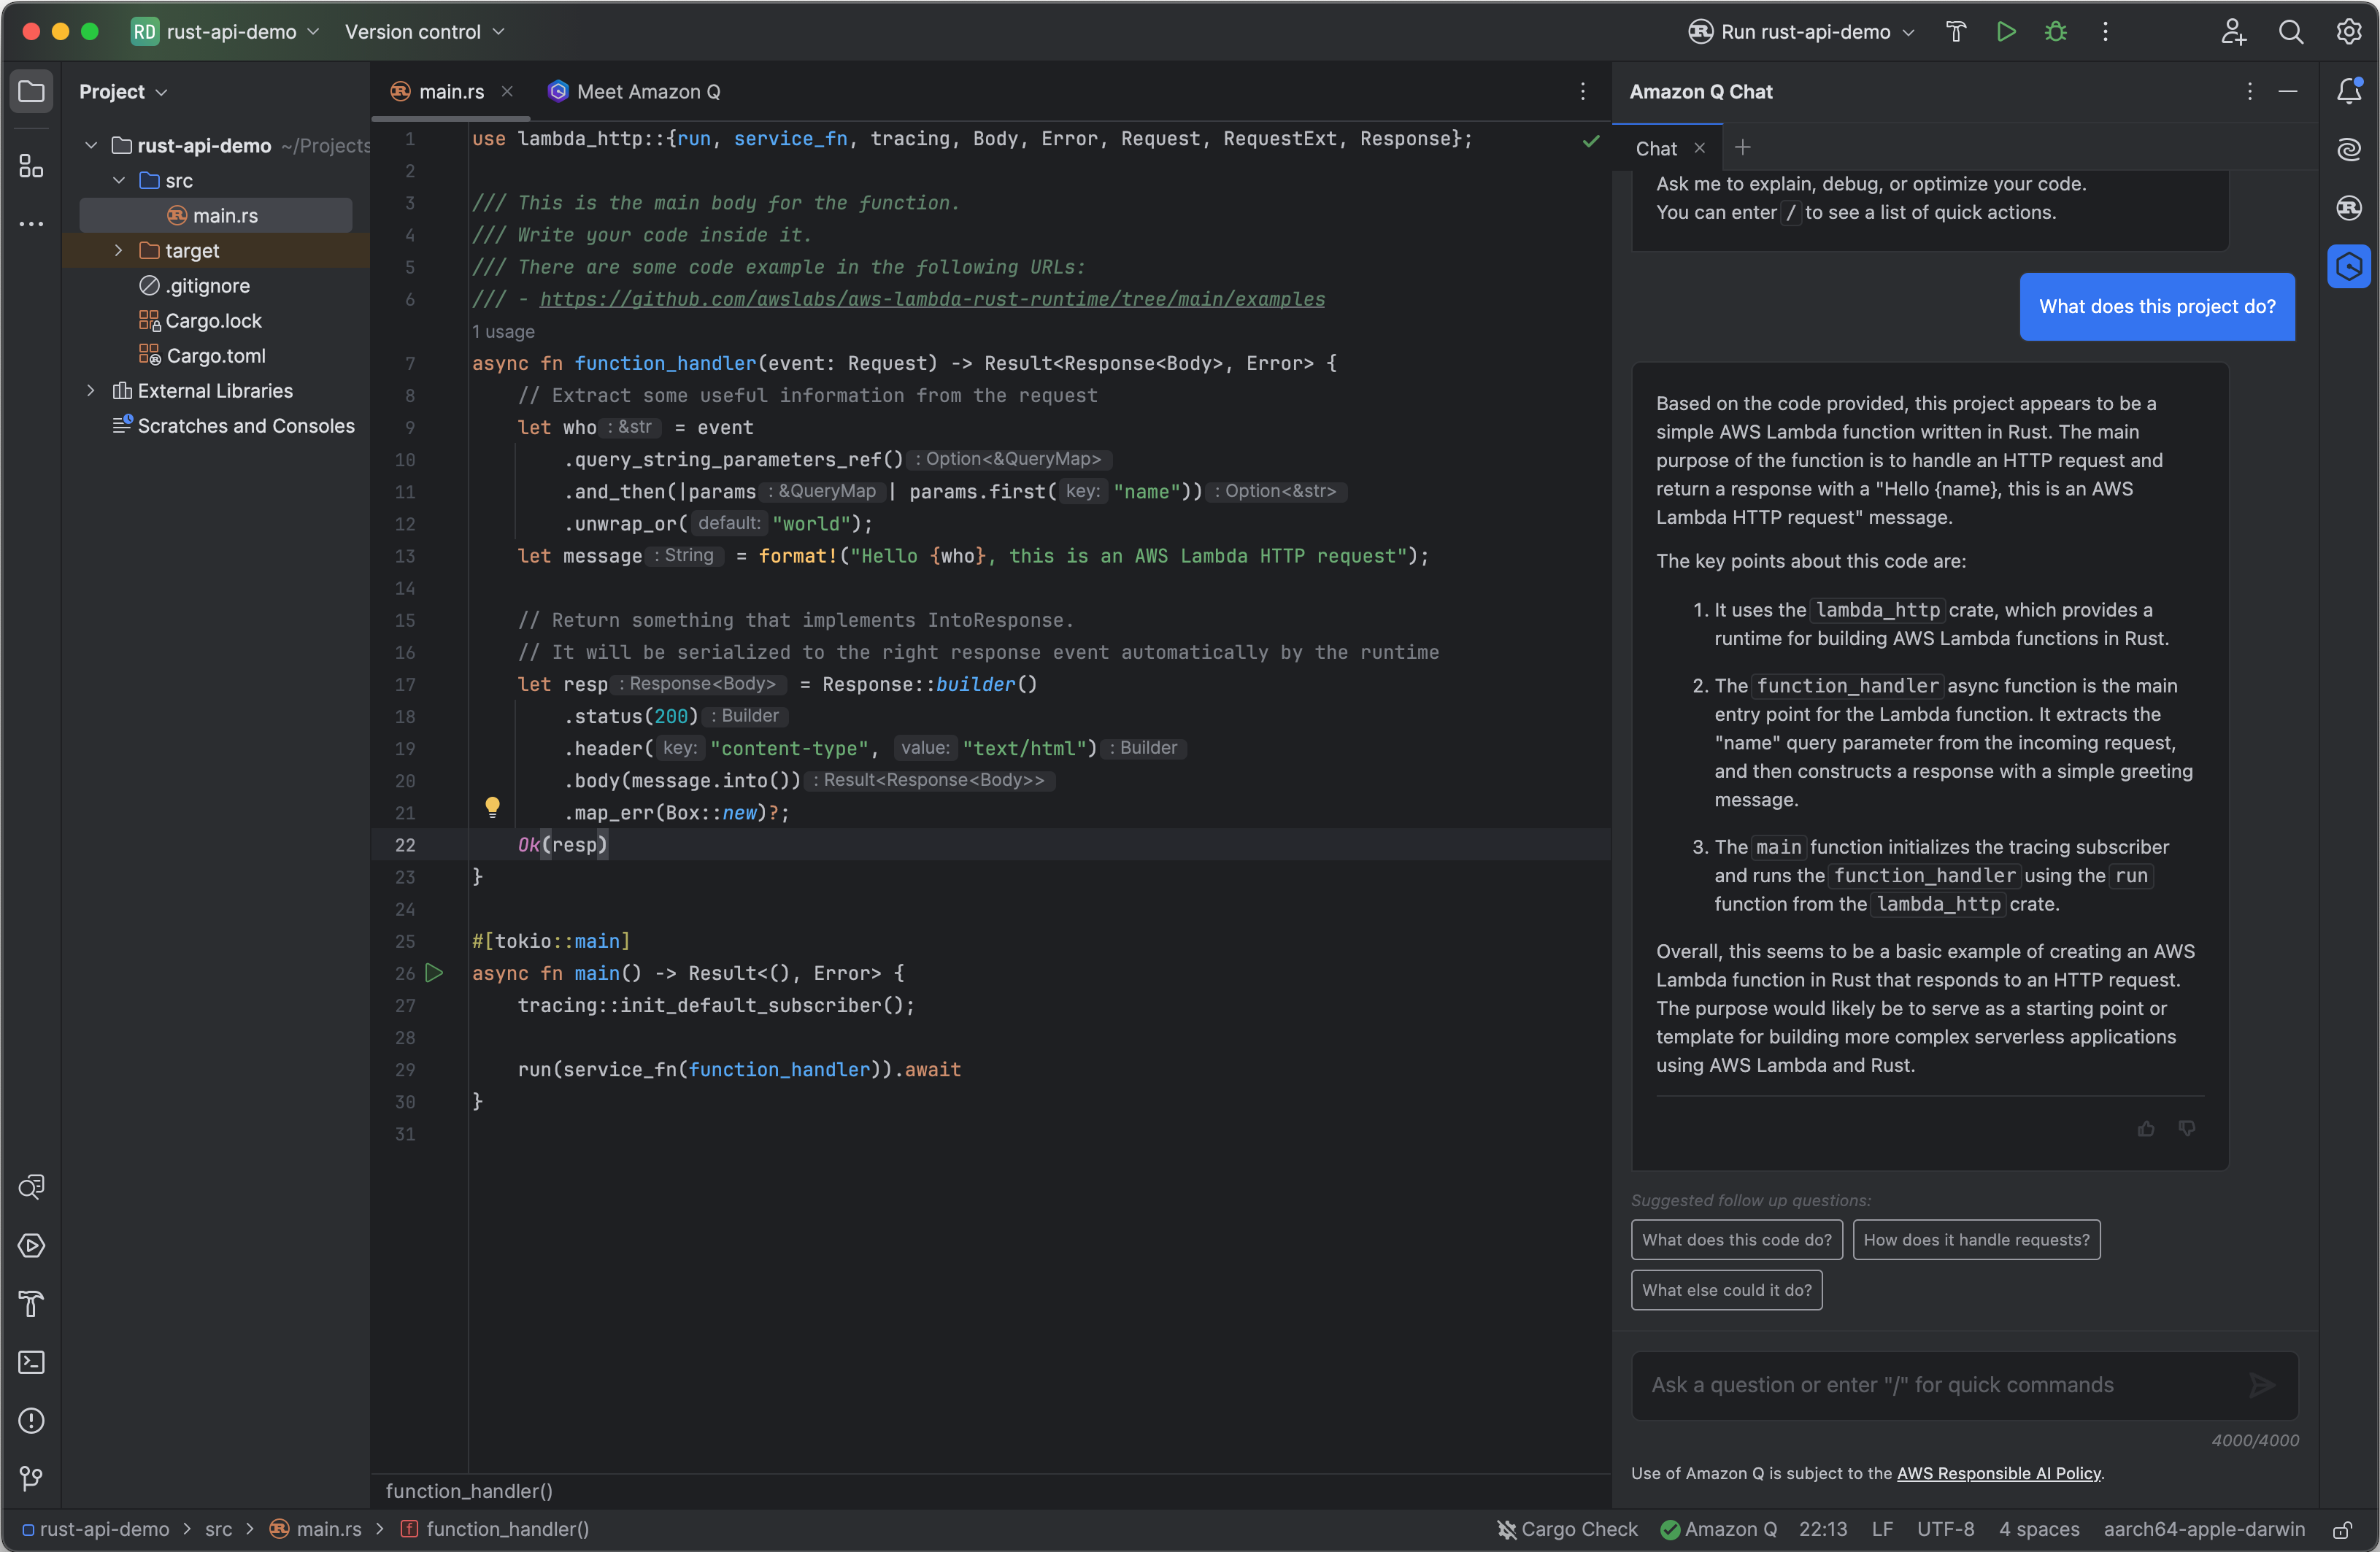
It’s now possible to explore the project, in this case I am using JetBrains RustRover with Amazon Q Developer installed to increase my productivity while working on the application:
Figure 3. JetBrains RustRover with Amazon Q Developer
I will create a new CodeBuild project as per the documentation to connect CodeBuild to our GitHub repository and correctly configure a webhook to trigger the GitHub Actions.
For Repository, choose Repository in my GitHub account.
For Repository URL, enter https://github.com/user-name/repository-name.
In Primary source webhook events:
For Webhook – optional, select Rebuild every time a code change is pushed to this repository.
For Event type, select WORKFLOW_JOB_QUEUED. Once this is enabled, builds will only be triggered by GitHub Actions workflow jobs events.
Figure 4. WORKFLOW_JOB_QUEUED Event Type
In Environment:
Choose a supported Environment image and Compute. Note that you have the option to override the image and instance settings by using a label in your GitHub Actions workflow YAML.
In Buildspec:
Note that your Buildspec will be ignored. Instead, CodeBuild will override it to use commands that will setup the self-hosted runner. This project’s primary responsibility is to set up a self-hosted runner in CodeBuild to run GitHub Actions workflow jobs.
Continue with the remaining default options and select Create build project.
CodeBuild Service Role Permissions
In order for the CodeBuild service role to be able to successfully create and deploy a Lambda function, the service role will require the necessary permissions. The Service role can be seen when editing the CodeBuild project:
Note that I do not need to manage IAM permissions outside of our AWS Account, for example GitHub does not need to know about our AWS permissions.
Step 3. Create a GitHub Action Workflow
GitHub Actions is a continuous integration and continuous deliver (CI/CD) platform that provides automation through building, testing and deploying applications. In this section we will create a GitHub Action Workflow to build and deploy our Lambda.
Navigate back to our GitHub project create a workflow within the .github/workflows directory, the Simple Workflow is a good starting point:
Figure 6. Create a Simple Workflow
Update the Job to include the tooling required to build our Rust Lambda function, the details can be found in the GitHub Actions section. Our workflow file should now look like this:
The above GitHub Actions Workflow currently runs on GitHub; However, I now want to make two further changes:
Define an AWS CodeBuild runner
Define Build and Deploy Lambda steps
Define an AWS CodeBuild runner
A GitHub Actions workflow is made up of one or more jobs, each job runs in a runner environment specified by runs-on. The value for runs-on to specify CodeBuild as a runner takes the format:
I will update the <CodeBuildProjectName> to the CodeBuild project name that was entered in Step2, e.g. “GitHubActionsDemo”.
When configuring CodeBuild as a runner environment, BuildSpecs are ignored. In order to define the specification of our build environments it is possible to pass in variables including:
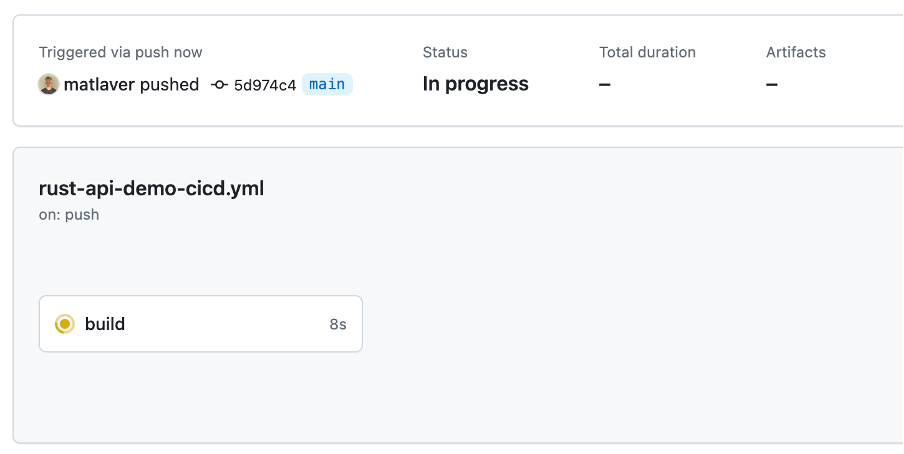
When I commit changes to the workflow to the main branch it will trigger the GitHub Action.
Step 4. Testing our GitHub Action Workflow.
The GitHub Action is currently triggered on all push and pull requests to main branch:
Figure 7. Trigger a build
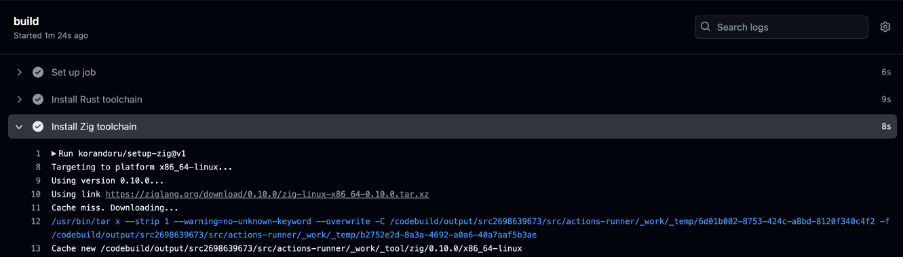
Note that GitHub is where the CI/CD process is being driven, the build logs are available in GitHub as the job is running:
Figure 8. GitHub Action Logs
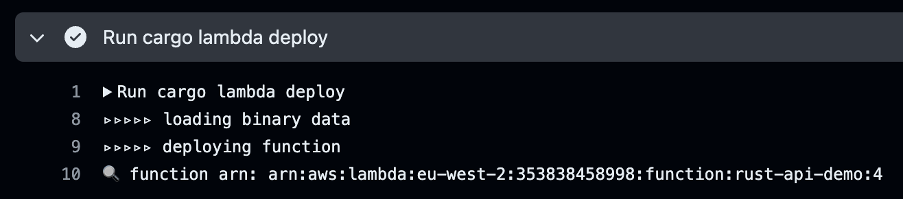
As the build progresses through the deployment step, the details of the Lambda function deployed are shown:
Figure 9. Deployment ARN
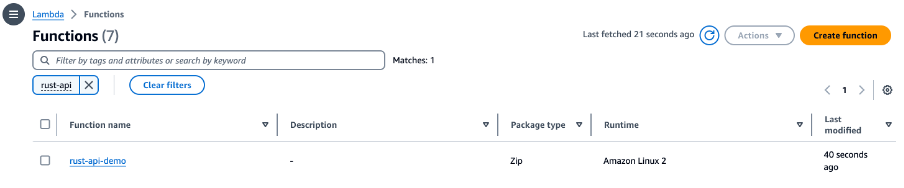
Navigating back to the AWS Console, the deployed Lambda Function can be seen:
Figure 10. Lambda Deployed
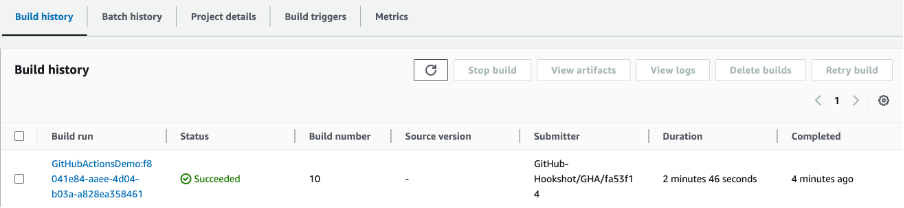
And finally, opening the CodeBuild console, it’s possible to observe the status of the Managed GitHub Actions Runner, the build number and also the duration:
Figure 11. Lambda Deployed via Managed Self-Hosted GitHub Action runner
Clean Up
To avoid incurring future charges:
Delete the Lambda created via the deployment in Step 4.
Delete the CodeBuild Project created in Step 2.
Conclusion
As I’ve shown in this blog, setting up GitHub Actions Workflows that run on AWS is now even easier to allow CodeBuild projects to receive GitHub Actions workflow job events and run them on CodeBuild ephemeral hosts. AWS customers can take advantage of natively integrating with AWS and providing security and convenience through features such as defining service role permissions with AWS IAM or passing credentials as environment variables to build jobs with AWS Secrets Manager.
Being able to use CodeBuild’s reserved capacity allows you to provision a fleet of CodeBuild hosts that persist your build environment. These hosts remain available to receive subsequent build requests, which reduces build start-up latencies but also make it possible to compile your software within your VPC and access resources such as Amazon Relational Database Service, Amazon ElastiCache, or any service endpoints that are only reachable from within a specific VPC.
CodeBuild-hosted GitHub Actions runners are supported in all CodeBuild regions and customers managing their CI/CD processes via GitHub Actions can use the compute platforms CodeBuild offers, including Lambda, Windows, Linux, Linux GPU-enhanced and Arm-based instances powered by AWS Graviton Processors.
It’s an established practice for development teams to build deployment pipelines, with services such as AWS CodePipeline, to increase the quality of application and infrastructure releases through reliable, repeatable and consistent automation.
Automating the deployment process helps build quality into our products by introducing continuous integration to build and test code as early as possible, aiming to catch errors before they reach production, but with all the best will in the world, issues can be missed and not caught until after a production release has been initiated.
“Implement an automatic rollback strategy to enhance system reliability and minimize service disruptions. The strategy should be defined as a proactive measure in case of an operational event, which prioritizes customer impact mitigation even before identifying whether the new deployment is the cause of the issue.”
When release problems occur, pressure is put on teams to fix the issue quickly which can be time consuming and stressful. Is the issue related to code in the last change? Has the environment changed? Should we manually fix-forward by urgently fixing the code and re-releasing?
AWS CodePipeline recently added a stage level rollback feature that enables customers to recover from a failed pipeline quickly by processing the source revisions that previously successfully completed the failed stage.
In this blog post I will cover how the rollback feature can be enabled and walk through two scenarios to cover both automatic and manual rollbacks.
AWS CodePipeline
AWS CodePipeline is a fully managed continuous delivery service that helps you automate your release pipelines for fast and reliable application and infrastructure updates.
Figure 1. AWS CodePipeline orchestration stages
CodePipeline has three core constructs:
Pipelines – A pipeline is a workflow construct that describes how software changes go through a release process. Each pipeline is made up of a series of stages.
Stages – A stage is a logical unit you can use to isolate an environment and to limit the number of concurrent changes in that environment. Each stage contains actions that are performed on the application artifacts.
Actions – An action is a set of operations performed on application code and configured so that the actions run in the pipeline at a specified point.
A pipeline execution is a set of changes released by a pipeline. Each pipeline execution is unique and has its own ID. An execution corresponds to a set of changes, such as a merged commit or a manual release of the latest commit.
Enable Automatic rollbacks
Automatic rollbacks can be enabled at the stage level within V2 type pipelines. When automatic rollbacks are enabled on a stage that has failed, CodePipeline will automatically select the source revisions from the most recent pipeline execution that successfully completed the stage and initiate the rollback.
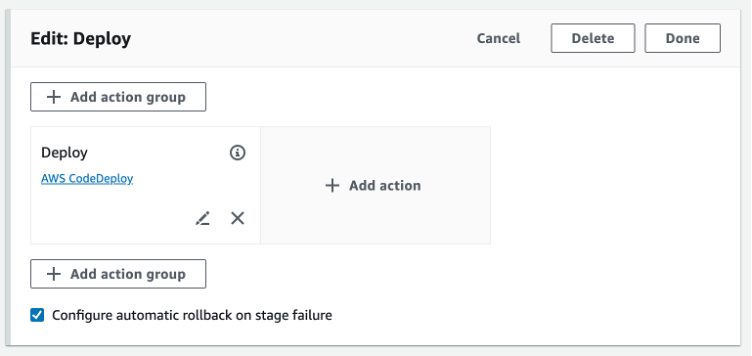
Enabling automatic rollbacks can be set on V2 pipeline creation by selecting Configure automatic rollback on stage failure on a given stage, as per Figure 2 below.
Figure 2. Enable automatic rollback feature on pipeline creation
Automated rollbacks can be enabled for any stage, except the “Source” stage.
For existing V2 pipelines, Automatic rollbacks can also be toggled by editing a stage and toggling Configure automatic rollback on stage failure, see Figure 3 below.
Figure 3. Enable automatic rollback feature on an existing pipeline
Enabling automatic rollback on an existing pipeline will change the pipeline configuration which means pipeline executions before this step will not be considered an eligible pipeline execution. Only successful pipeline executions from this point onwards will be able to be considered for a rollback.
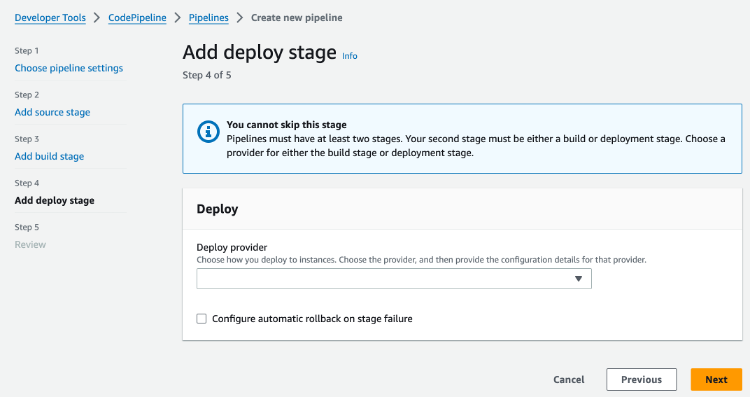
Ensure a V2 pipeline type is selected when creating the pipeline
When in the add deploy stage, select Configure automatic rollback on stage failure
Once the pipeline has been created, it should complete its first run within a few minutes.
Figure 4. Simple pipeline (S3 bucket)
Now I am going to simulate a deployment failure, and this is how:
Locate and un-zip either SampleApp_Windows.zip or SampleApp_Linux.zip depending on which server instances was selected when following the CodePipeline tutorial.
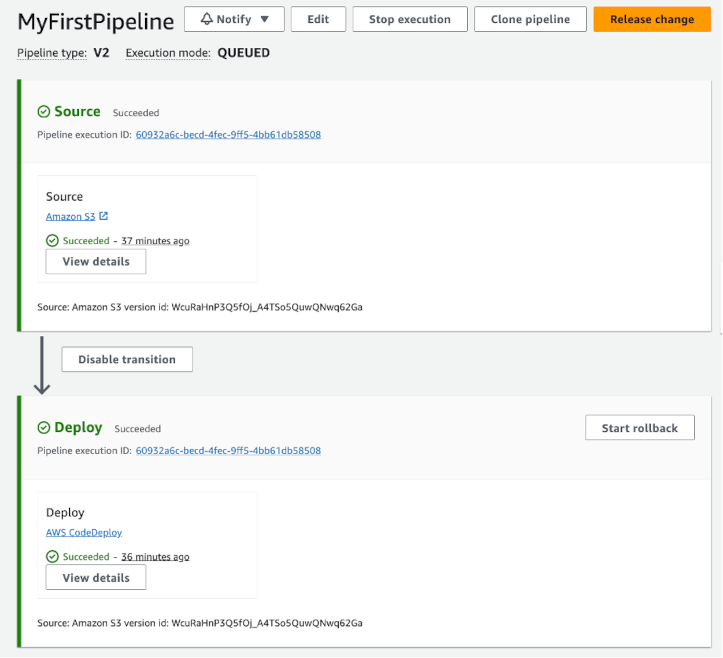
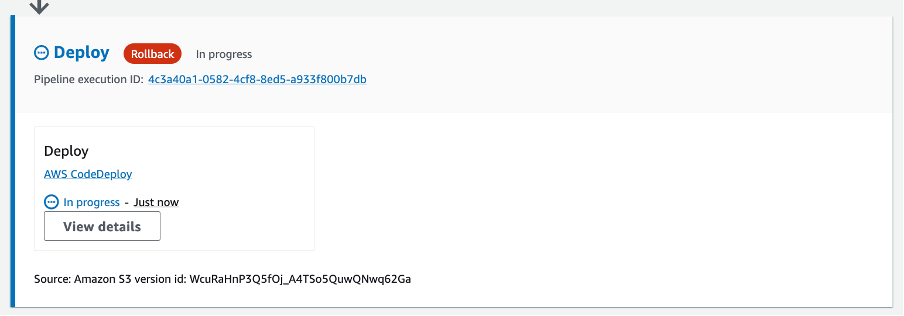
The pipeline will trigger again after the new archive is uploaded and after a few minutes the deployment will report a stage failure and trigger an automatic rollback on the “Deploy” stage.
It’s possible to observe the Rollback as it re-deploys the last successful pipeline execution, initially showing a status of “In-progress” as per Figure 5 below:
Figure 5. Rollback in-progress
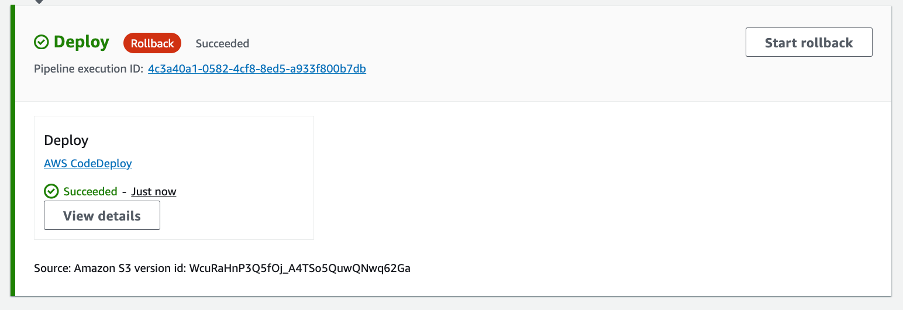
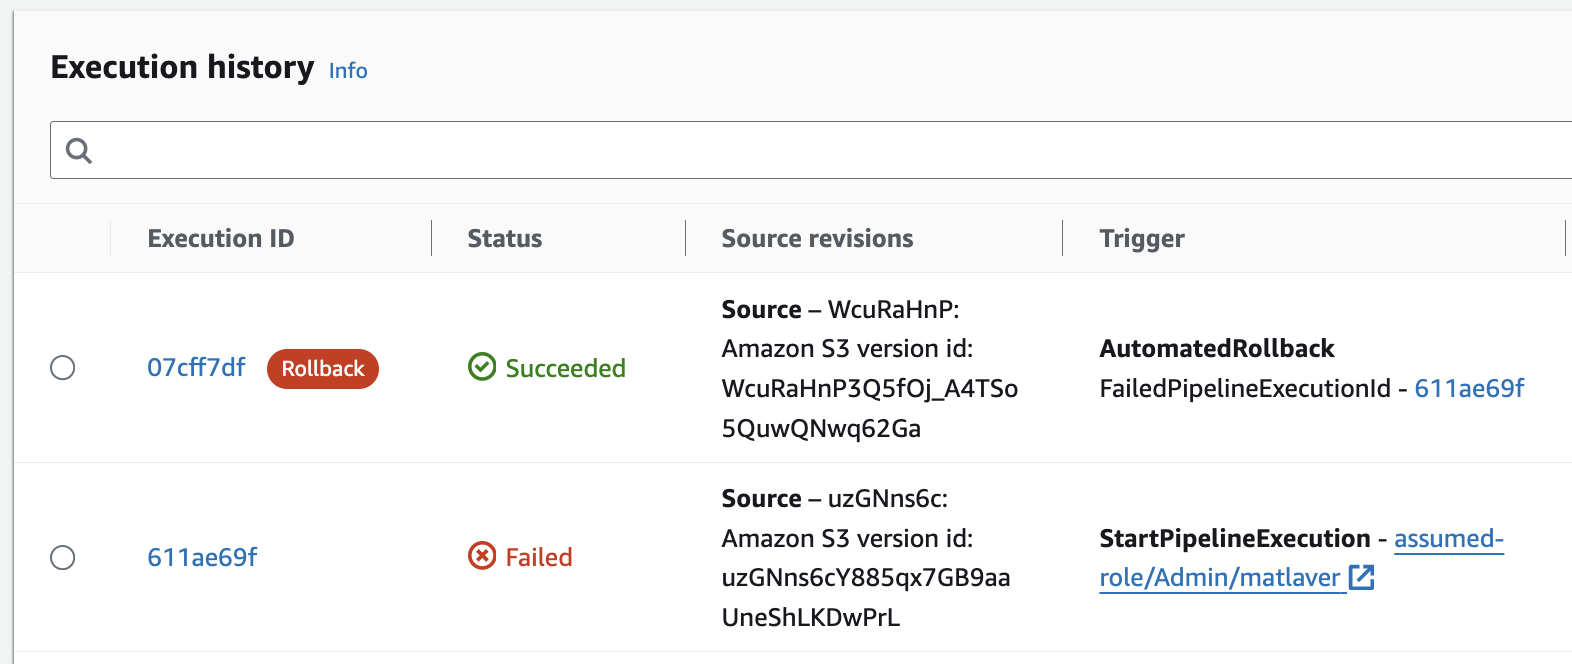
A new pipeline execution ID can be seen in the stage with the source revisions from the previous successfully completed pipeline execution. After a few minutes the rollback will be marked as “Succeeded”:
Figure 6. Rollback Succeeded
Note that the rollback started a new Pipeline execution ID but it used the artifacts and variables from the prior successful pipeline execution.
With our production systems back in a healthy state, I can begin the investigations into why the deploy failed, the execution history, see Figure 7 below, shows the failed execution and allows the Execution ID to be inspected for more details on the failure.
Figure 7. Execution history showing the failed pipeline execution.
Note that the Trigger column also reports the FailedPipelineExecutionId, we can use the provided link to start investigating the failure.
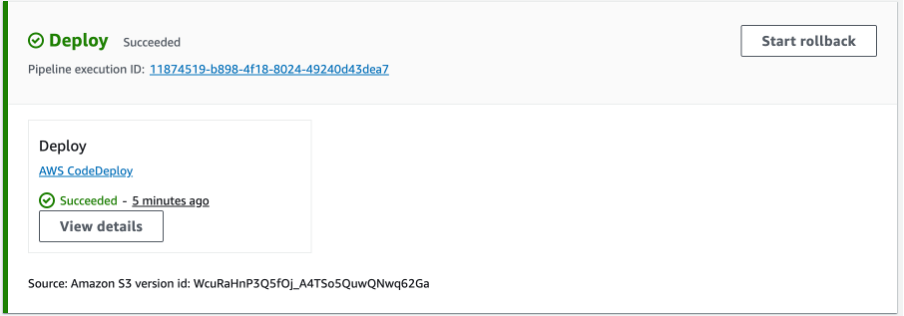
Example 2 – Manual Rollbacks
There may be cases where the pipeline release was successful but it caused application errors such as errors in logs and infrastructure alarms. In these scenarios a manual rollback can be initiated via the Start rollback button.
Figure 8. Start rollback
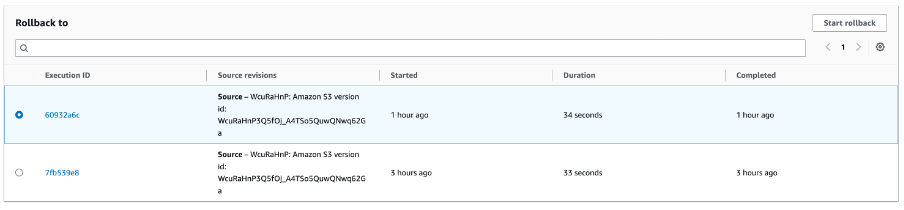
When manually triggering a rollback, it is possible to select a specific Execution ID and Source revision to re-deploy:
Figure 9. Select Execution ID
Selecting Start rollback will create a new Pipeline execution in the stage with the selected source revisions.
Clean up
Instructions on how to clean up the resources created in this blog can be found in the last step of the tutorial used to create the pipeline: Step 7: Clean up resources.
Conclusion
The absence of a rollback strategy can lead to prolonged service disruptions and compatibility issues. Introducing an automatic rollback mechanism to stages within a release pipeline can reduce downtime, maintain system reliability and can help return to a stable state in the event of a fault. Having a rollback plan for deployments, without any disruption for our customers, is critical in making a service reliable. Explicitly testing for rollback safety eliminates the need to rely on manual analysis, which can be error-prone.
To learn more about CodePipeline rollbacks, visit https://docs.aws.amazon.com/codepipeline/latest/userguide/stage-rollback.html.
AWS CodeBuild is a fully managed continuous integration service that compiles source code, runs tests, and produces ready-to-deploy software packages. With CodeBuild, you don’t need to provision, manage, and scale your own build servers. You just specify the location of your source code and choose your build settings, and CodeBuild will run your build scripts for compiling, testing, and packaging your code.
CodeBuild uses simple pay-as-you-go pricing. There are no upfront costs or minimum fees. You pay only for the resources you use. You are charged for compute resources based on the duration it takes for your build to execute.
There are three main factors that contribute to build costs with CodeBuild:
Build duration
Compute types
Additional services
Understanding how to balance these factors is key to optimizing costs on AWS and this blog post will take a look at each.
Compute Types
CodeBuild offers three compute instance types with different amounts of memory and CPU, for example the Linux GPU Large compute type has 255GB of memory and 32 vCPUs and enables you to execute CI/CD workflow for deep learning purpose (ML/AI) with AWS CodePipeline. Incremental changes in your code, data, and ML models can now be tested for accuracy, before the changes are released through your pipeline.
The Linux 2XLarge instance type is another instance type with 145GB of memory and 72 vCPUs and is suitable for building large and complex applications that require high memory and CPU resources. It can help reduce build time, speed up delivery, and support multiple build environments.
The GPU and 2XLarge compute types are powerful but are also the most expensive compute types per minute. For most build tasks the small, medium or large instance compute types are more than adequate. Using the pricing listed in US East (Ohio) we can see the price variance between the small, medium and large Linux instance types in Figure 1 below.
Figure 1. AWS CodeBuild small, medium and large compute types vs cost per minute
Analyzing the CodeBuild compute costs leads us to a number of cost optimization considerations.
Right Sizing AWS CodeBuild Compute Types to Match Workloads
Right sizing is the process of matching instance types and sizes to your workload performance and capacity requirements at the lowest possible cost. It’s also the process of looking at deployed instances and identifying opportunities to eliminate or downsize without compromising capacity or other requirements, which results in lower costs.
Right sizing is a key mechanism for optimizing AWS costs, but it is often ignored by organizations when they first move to the AWS Cloud. They lift and shift their environments and expect to right size later. Speed and performance are often prioritized over cost, which results in oversized instances and a lot of wasted spend on unused resources.
CodeBuild monitors build resource utilization on your behalf and reports metrics through Amazon CloudWatch. These include metrics such as
CPU
Memory
Disk I/O
These metrics can be seen within the CodeBuild console, for an example see Figure 2 below:
Figure 2. Resource utilization metrics
Leveraging observability to measuring build resource usage is key to understanding how to rightsize and CodeBuild makes this easy with CloudWatch metrics readily available through the CodeBuild console.
Consider ARM / Graviton
If we compare the costs of arm1.small and general1.small over a ten minute period we can see that the arm based compute type is 32% less expensive.
Figure 3. Comparison of small arm and general compute types
But cost per minute while building is not the only benefit here, ARM processors are known for their energy efficiency and high performance. Compiling code directly on an ARM processor can potentially lead to faster execution times and improved overall system performance.
AWS Graviton processors are custom built by Amazon Web Services using 64-bit Arm Neoverse cores to deliver the best price performance for your cloud workloads. The AWS Graviton Fast Start program helps you quickly and easily move your workloads to AWS Graviton in as little as four hours for applications such as serverless, containerized, database, and caching.
Consider migrating Windows workloads to Linux
If we compare the cost of a general1.medium Windows vs Linux compute type we can see that the Linux Compute type is 43% less expensive over ten minutes:
Figure 4. Build times on Windows compared to Linux
Migrating to Linux is one strategy to not only reduce the costs of building and testing code in CodeBuild but also the cost of running in production.
The effort required to re-platform from Windows to Linux varies depending on how the application was implemented. The key is to identify and target workloads with the right characteristics, balancing strategic importance and implementation effort.
For example, older .Net applications may be able to be migrated to later versions of .NET (previously named .Net Core) first before deploying to Linux. AWS have a Porting Assistant for .NET that is an analysis tool that scans .NET Framework applications and generates a cross-platform compatibility assessment, helping you port your applications to Linux faster.
One of the dimensions of the CodeBuild pricing is the duration of each build. This is calculated in minutes, from the time you submit your build until your build is terminated, rounded up to the nearest minute. For example: if your build takes a total of 35 seconds using one arm1.small Linux instance on US East (Ohio), each build will cost the price of the full minute, which is $0.0034 in that case. Similarly, if your build takes a total of 5 minutes and 20 seconds, you’ll be charged for 6 minutes.
When you define your CodeBuild project, within a buildspec file, you can specify some of the phases of your builds. The phases you can specify are install, pre-build, build, and post-build. See the documentation to learn more about what each of those phases represent. Besides that, you can define how and where to upload reports and artifacts each build generates. It means that on each of those steps, you should do only what is necessary for the task you want to achieve. Installing dependencies that you won’t need, running commands that aren’t related to your task, or performing tests that aren’t necessary will affect your build time and unnecessarily increase your costs. Packaging and uploading target artifacts with unnecessary large files would cause a similar result.
On top of the CodeBuild phases and steps that you are directly in control, each time you start a build, it takes additional time to queue the task, provision the environment, download the source code (if applicable), and finalize. See Figure 5 below a breakdown of a succeeded build:
Figure 5. AWS CodeBuild Phase details
In the above example, for each build, it takes approximately 42 seconds on top of what is specified in the buildspec file. Considering this overhead, having several smaller builds instead of fewer larger builds can potentially increase your costs. With this in mind, you have to keep your builds as short as possible, by doing only what is necessary, so that you can minimize the costs. Furthermore, you have to find a good balance between the duration and the frequency of your builds, so that the overhead doesn’t take a large proportion of your build time. Let’s explore some approaches you can factor in to find this balance.
Build caching
A common way to save time and cost on your CodeBuild builds is with build caching. With build caching, you are able to store reusable pieces of your build environment, so that you can save time next time you start a new build. There are two types of caching:
Amazon S3 — Stores the cache in an Amazon S3 bucket that is available across multiple build hosts. If you have build artifacts that are more expensive to build than to download, this is a good option for you. For large build artifacts, this may not be the best option, because it can take longer to transfer over your network.
Local caching — Stores a cache locally on a build host that is available to that build host only. When you choose this option, the cache is immediately available on the build host, making it a good option for large build artifacts that would take long network transfer time. If you choose local caching, there are multiple cache modes you can choose including source cache mode, docker layer cache mode and custom cache mode.
Docker specific optimizations
Another strategy to optimize your build time and reduce your costs is using custom Docker images. When you specify your CodeBuild project, you can either use one of the default Docker images provided by CodeBuild, or use your own build environment packaged as a Docker image. When you create your own build environment as a Docker image, you can pre-package it with all the tools, test assets, and required dependencies. This can potentially save a significant amount of time, because on the install phase you won’t need to download packages from the internet, and on the build phase, when applicable, you won’t need to download e.g., large static test datasets.
To achieve that, you must specify the image value on the environment configuration when creating or updating your CodeBuild project. See Docker in custom image sample for CodeBuild to learn more about how to configure that. Keep in mind that larger Docker images can negatively affect your build time, therefore you should aim to keep your custom build environment as lean as possible, with only the mandatory contents. Another aspect to consider is to use Amazon Elastic Container Registry (ECR) to store your Docker images. Downloading the image from within the AWS network will be, in most of the cases, faster than downloading it from the public internet and can avoid bottlenecks from public repositories.
Consider which tests to run on the feature branch
If you are using a feature-branch approach, consider carefully which build steps and tests you are going to run on your branches. Running unit tests is a good example of what you should run on the feature branches, but unless you have very specific requirements, you probably don’t need penetration or integration tests at this point. Usually the feature branch changes often, hence running all types of tests all the time is a potential waste. Prefer to have your complex, long-running tests at a later stage of your CI/CD pipeline, as you build confidence on the version that you are to release.
Build once, deploy everywhere
It’s widely considered a best practice to avoid environment-specific code builds, therefore consider a build once, deploy everywhere strategy. There are many benefits to separating environment configuration from the build including reducing build costs, improve maintainability, scalability, and reduce the risk of errors.
Build once, deploy everywhere can be seen in the AWS Deployment Pipeline Reference Architecture where the Beta, Gamma and Prod stages are created from a single artifact created in the Build Stage:
Amazon CloudWatch can be used to monitor your builds, report when something goes wrong, take automatic actions when appropriate or simply keep logs of your builds.
CloudWatch metrics show the behavior of your builds over time. For example, you can monitor:
How many builds were attempted in a build project or an AWS account over time.
How many builds were successful in a build project or an AWS account over time.
How many builds failed in a build project or an AWS account over time.
How much time CodeBuild spent running builds in a build project or an AWS account over time.
Build resource utilization for a build or an entire build project. Build resource utilization metrics include metrics such as CPU, memory, and storage utilization.
However, you may incur charges from Amazon CloudWatch Logs for build log streams. For more information, see Monitoring AWS Codebuild in the CodeBuild User Guide and the CloudWatch pricing page.
Storage Costs
You can create an CodeBuild build project with a set of output artifacts and publish then to S3 buckets. Using S3 as a repository for your artifacts, you only pay for what you use. Check the S3 pricing page.
Encryption
Cloud security at AWS is the highest priority and encryption is an important part of CodeBuild security. Some encryption, such as for data in-transit, is provided by default and does not require you to do anything. Other encryption, such as for data at-rest, you can configure when you create your project or build. Codebuild uses Amazon KMS to encrypt the data at-rest.
Build artifacts, such as a cache, logs, exported raw test report data files, and build results, are encrypted by default using AWS managed keys and are free of charge. Consider using these keys if you don’t need to create your own key.
If you do not want to use these KMS keys, you can create and configure a customer managed key. For more information, see the documentation on creating KMS Keys and AWS Key Management Service concepts in the AWS Key Management Service User Guide.
You may incur additional charges if your builds transfer data, for example:
Avoid routing traffic over the internet when connecting to AWS services from within AWS by using VPC endpoints
Traffic that crosses an Availability Zone boundary typically incurs a data transfer charge. Use resources from the local Availability Zone whenever possible.
Traffic that crosses a Regional boundary will typically incur a data transfer charge. Avoid cross-Region data transfer unless your business case requires it
Use the AWS Pricing Calculator to help estimate the data transfer costs for your solution.
Use a dashboard to better visualize data transfer charges – this workshop will show how.
In this blog post we discussed how compute types; build duration and use of additional services contribute to build costs with AWS CodeBuild.
We highlighted how right sizing compute types is an important practice for teams that want to reduce their build costs while still achieving optimal performance. The key to optimizing is by measuring and observing the workload and selecting the most appropriate compute instance based on requirements.
Further compute type cost optimizations can be found by targeting AWS Graviton processors and Linux environments. AWS Graviton Processors in particular offer several advantages over traditional x86-based instances and are designed by AWS to deliver the best price performance for your cloud workloads.
With .NET providing first-class support for ARM architecture, running .NET applications on an AWS Graviton processor provides you with more choices to help optimize performance and cost. We have already written about .NET 5 with Graviton benchmarks; in this post, we explore how C#/.NET developers can take advantages of Graviton processors and obtain this performance at scale with Amazon Elastic Container Service (Amazon ECS).
In addition, we take advantage of infrastructure as code (IaC) by using the AWS Cloud Development Kit (AWS CDK) to define the infrastructure .
The AWS CDK is an open-source development framework to define cloud applications in code. It includes constructs for Amazon ECS resources, which allows you to deploy fully containerized applications to AWS.
Architecture overview
Our target architecture for our .NET application running in AWS is a load balanced ECS cluster, as shown in the following diagram.
Figure: Show load balanced Amazon ECS Cluster running .NET application
We need to provision many components in this architecture, but this is where the AWS CDK comes in. AWS CDK is an open source-software development framework to define cloud resources using familiar programming languages. You can use it for the following:
A multi-stage .NET application container build
Create an Amazon Elastic Container Registry (Amazon ECR) repository and push the Docker image to it
Use IaC written in .NET to provision the preceding architecture
The following diagram illustrates how we use these services.
Figure: Show Application and Infrastructure code written in .NET
This repository contains two .NET projects, the web application, and the IaC application using the AWS CDK.
The unit of deployment in the AWS CDK is called a stack. All AWS resources defined within the scope of a stack, either directly or indirectly, are provisioned as a single unit.
The stack for this project is located within /cdk/src/Cdk/CdkStack.cs. When we read the C# code, we can see how it aligns with the architecture diagram at the beginning of this post.
First, we create a virtual private cloud (VPC) and assign a maximum of two Availability Zones:
var vpc = new Vpc(this, "DotNetGravitonVpc", new VpcProps { MaxAzs = 2 });
Next, we define the cluster and assign it to the VPC:
var cluster = new Cluster(this, "DotNetGravitonCluster", new ClusterProp { Vpc = vpc });
The Graviton instance type (c6g.4xlarge) is defined in the cluster capacity options:
cluster.AddCapacity("DefaultAutoScalingGroupCapacity",
    new AddCapacityOptions
    {
        InstanceType = new InstanceType("c6g.4xlarge"),
        MachineImage = EcsOptimizedImage.AmazonLinux2(AmiHardwareType.ARM)
    });
Finally, ApplicationLoadBalancedEC2Service is defined, along with a reference to the application source code:
new ApplicationLoadBalancedEc2Service(this, "Service",
    new ApplicationLoadBalancedEc2ServiceProps
    {
        Cluster = cluster,
        MemoryLimitMiB = 8192,
        DesiredCount = 2,
        TaskImageOptions = new ApplicationLoadBalancedTaskImageOptions
        {
            Image = ContainerImage.FromAsset(Path.Combine(Directory.GetCurrentDirectory(), @"../app")),
        }
    });
With about 30 lines of AWS CDK code written in C#, we achieve the following:
Build and package a .NET application within a Docker image
Push the Docker image to Amazon Elastic Container Registry (Amazon ECR)
Create a VPC with two Availability Zones
Create a cluster with a Graviton c6g.4xlarge instance type that pulls the Docker image from Amazon ECR
The AWS CDK has several useful helpers, such as the FromAsset function:
The ContainerImage.FromAsset function instructs the AWS CDK to build the Docker image from a Dockerfile, automatically create an Amazon ECR repository, and upload the image to the repository.
For more information about the ContainerImage class, see ContainerImage.
Build and deploy the project with the AWS CDK Toolkit
The AWS CDK Toolkit, the CLI command cdk, is the primary tool for interaction with AWS CDK apps. It runs the app, interrogates the application model you defined, and produces and deploys the AWS CloudFormation templates generated by the AWS CDK.
If an AWS CDK stack being deployed uses assets such as Docker images, the environment needs to be bootstrapped. Use the cdk bootstrap command from the /cdk directory:
cdk bootstrap
Now you can deploy the stack into the AWS account with the deploy command:
cdk deploy
The AWS CDK Toolkit synthesizes fresh CloudFormation templates locally before deploying anything. The first time this runs, it has a changeset that reflects all the infrastructure defined within the stack and prompts you for confirmation before running.
When the deployment is complete, the load balancer DNS is in the Outputs section.
Figure: Show stack outputs
You can navigate to the load balancer address via a browser.
Figure: Show browser navigating to .NET application
Tracking the drift
Typically drift is a change that happens outside of the Infrastructure as Code, for example, code updates to the .NET application.
To support changes, the AWS CDK Toolkit queries the AWS account for the last deployed CloudFormation template for the stack and compares it with the locally generated template. Preview the changes with the following code:
cdk diff
If a simple text change within the application’s home page HTML is made (app/webapp/Pages/Index.cshtml), a difference is detected within the assets, but not all the infrastructure as per the first deploy.
Figure: Show cdk diff output
Running cdk deploy again now rebuilds the Docker image, uploads it to Amazon ECR, and refreshes the containers within the ECS cluster.
cdk deploy
Figure: Show browser navigating to updated .NET application
Clean up
Remove the resources created in this post with the following code:
cdk destroy
Conclusion
Using the AWS CDK to provision infrastructure in .NET provides rigor, clarity, and reliability in a language familiar to .NET developers. For more information, see Infrastructure as Code.
This post demonstrates the low barrier to entry for .NET developers wanting to apply modern application development practices while taking advantage of the price performance of ARM-based processors such as Graviton.
To learn more about building and deploying .NET applications on AWS visit our .NET Developer Center.
About the author
Matt Laver is a Solutions Architect at AWS working with SMB customers in the UK. He is passionate about DevOps and loves helping customers find simple solutions to difficult problems.
The collective thoughts of the interwebz
Manage Consent
To provide the best experiences, we use technologies like cookies to store and/or access device information. Consenting to these technologies will allow us to process data such as browsing behavior or unique IDs on this site. Not consenting or withdrawing consent, may adversely affect certain features and functions.
Functional
Always active
The technical storage or access is strictly necessary for the legitimate purpose of enabling the use of a specific service explicitly requested by the subscriber or user, or for the sole purpose of carrying out the transmission of a communication over an electronic communications network.
Preferences
The technical storage or access is necessary for the legitimate purpose of storing preferences that are not requested by the subscriber or user.
Statistics
The technical storage or access that is used exclusively for statistical purposes.The technical storage or access that is used exclusively for anonymous statistical purposes. Without a subpoena, voluntary compliance on the part of your Internet Service Provider, or additional records from a third party, information stored or retrieved for this purpose alone cannot usually be used to identify you.
Marketing
The technical storage or access is required to create user profiles to send advertising, or to track the user on a website or across several websites for similar marketing purposes.