Well, it’s been another historic year! We’ve watched in awe as the use of real-world generative AI has changed the tech landscape, and while we at the Architecture Blog happily participated, we also made every effort to stay true to our channel’s original scope, and your readership this last year has proven that decision was the right one.
AI/ML carries itself in the top posts this year, but we’re also happy to see that foundational topics like resiliency and cost optimization are still of great interest to our audience.
(By the way, if you were hoping for more AI/ML content, head on over to our sister channel, the AWS Machine Learning Blog!).
Without further ado, here are our top posts from 2024!
In keeping with Let’s Architect! series, we have our first of three favorites for the year. This set of resources helps you apply Well-Architected standards in practice.
As I said, Let’s Architect! has a winning series, and they’ve got a finger on the pulse of the tech world. This post about machine learning showcases some of the most exciting things happening at AWS.
Figure 3. Let’s Architect
If you’re more interested in generative AI, you can also take a look at another post from 2024: Let’s Architect! GenAI
Preparedness is another common theme in this year’s favorites. Michael, John, and Saurabh are well-versed in multi-Region architecture, and they’re here to share some strategies to contain failure impact.
Figure 4. When the application experiences an impairment using S3 resources in the primary Region, it fails over to use an S3 bucket in the secondary Region.
Let’s talk cost optimization. This post about a three-tier architecture that relies on the AWS Free Tier is a must-read for anyone looking for tips to help them avoid unnecessary costs (and that’s everyone).
Figure 5. Example of a three-tier architecture on AWS
As usual, Haleh & team are pros at making sure the Well-Architected Framework is current and relevant. Take a look at the enhanced and expanded guidance in all six pillars.
One more winning post from Luca, Federica, Vittorio, and Zamira! This collection of developer resources includes new ideas in AWS Lambda, Amazon Q Developer, and Amazon DynamoDB.
Frugality AND Well-Architected? What a winning combo! This post, inspired by the 2023 re:Invent keynote, outlines the seven laws of Frugal Architecture.
And finally, our number one post of the year! Amit and Luiz showcase a customer solution with real-world applications that builds on the guidelines of other posts in this list! Well done!
Figure 10. The Pilot Light scenario for a 3-tier application that has application servers and a database deployed in two Regions
Thank you!
As always, thanks to our contributors for their dedication and desire to share, and to you, our readers! We would be nothing with you. Literally.
For other top post lists, see our Top 10 and Top 5 posts from previous years.
As part of the re:Invent 2023 keynote, Dr. Werner Vogels introduced the Frugal Architect mindset. This mindset emphasizes the importance of continuous learning, curiosity, and regular revision of architectural choices with a focus on cost and sustainability. Cost and sustainability should be treated as critical non-functional requirements, alongside factors like security, compliance, and performance. The Frugal Architect approach involves measuring and optimizing cost at every stage of the development process, which allows for innovation in parallel with promoting responsible resource usage. In the rapidly-evolving technology landscape, builders should adopt the Frugal Architect mindset to balance innovation with cost efficiency and environmental sustainability.
This blog discusses how the six pillars of the AWS Well-Architected Framework (operational excellence, security, reliability, performance efficiency, cost optimization, and sustainability) align with the seven Frugal Architect laws. It demonstrates how adhering to the principles and best practices outlined in these pillars can help architects and builders effectively implement the Frugal Architect laws in their projects. The Well-Architected Framework provides a comprehensive set of guidelines that embed the concepts of frugality, efficiency, and cost effectiveness, which are the core tenets of the Frugal Architect laws. By following the Framework’s pillars, architects can build secure, reliable, efficient, and cost-optimized systems and promote sustainability.
Non-functional requirements are criteria that evaluate a system’s operation instead of its specific features or functionality. This includes aspects like accessibility, availability, scalability, security, portability, maintainability, and compliance. However, one crucial non-functional requirement that is often overlooked is cost. Consider implications early on and throughout the design, development, and operation of your systems. Organizations can strike a balance between desired features, time-to-market, and operational efficiency through early prioritization of cost considerations. The Frugal Architect argues that you should treat cost as a fundamental non-functional requirement that should be given upfront consideration when planning and initiating system development projects.
The Cost Optimization Pillar of the AWS Well-Architected Framework provides guidance on how to optimize costs when using AWS Cloud services. It emphasizes treating cost as a key requirement, not an afterthought. The main principles focus on the importance of a robust financial management processes, adoption of a cloud consumption model that allows for flexible scaling and pay-per-use billing, continual measurement of outputs against costs to optimize efficiency, use of managed services to minimize operational overhead, and implementation of transparent cost attribution to tie cloud spending to revenue sources and workloads. Organizations that follow these practices can effectively manage and optimize their costs and benefit from the scalability and agility of cloud computing.
These cost optimization principles can help organizations maximize the financial benefits of using the AWS Cloud and avoid wasteful spending. Cost optimization is an ongoing process that includes rightsizing, higher output for the same cost, and use of the most cost-effective AWS services. The pillar promotes a disciplined approach to evaluate trade-offs between cost and other optimization areas like performance or reliability. Overall, you can use this pillar to make informed decisions to provision and operate AWS services cost-effectively.
The durability and longevity of a system are closely tied to how well its costs align with the underlying business model. During the creation of a system, consider revenue sources and profit drivers. The key is to identify the primary dimension or aspect that generates revenue, and then verify that the system architecture supports and optimizes for that revenue-generating dimension. Essentially, revenue and profitability considerations should be the primary forces behind cost decisions in system design.
The AWS Well-Architected Cost Optimization Pillar provides practices and guidance for organizations to accurately monitor their AWS costs and usage. This visibility helps users understand the profitability of different business units and products, which facilitates informed decisions on resource allocation across the organization. Organizations can implement these practices to gain insights into their AWS spending patterns, which aids in development of effective cost optimization strategies. Overall, accurate expenditure analysis and attribution are crucial for organizations to optimize cloud costs, measure ROI, and make data-driven resource allocation decisions.
It’s important to accurately identify and attribute cloud costs to specific workloads. The cloud allows for transparent cost attribution, which helps organizations link costs to individual revenue streams and workload owners. This granular cost attribution data empowers workload owners to measure return on investment (ROI) for their workloads. With detailed cost information, workload owners can optimize resource utilization and reduce costs by rightsizing resources, eliminating waste, and making informed decisions. Organizations must use accurate cost attribution to understand where their cloud spending is going and verify that resources are being used efficiently across different workloads and revenue streams.
Architectural decisions involve trade-offs, particularly between cost, resilience, and performance. Systems will inevitably fail, so investment in resilience is important but may impact performance. It’s important to find the right balance between technical requirements and business needs and align with risk tolerance and budget constraints. Frugality is about maximizing value, not just minimizing spend. Frugality means that you determine what you’re can pay for based on your priorities and make informed trade-off decisions. Ultimately, architectural choices require careful consideration of the tensions between different non-functional requirements.
The AWS Well-Architected Framework helps you make architectural trade-offs through its design principles and practices across its six pillars with your business requirements in mind. As you architect workloads, you make trade-offs between pillars based on your business context. You might optimize to improve the sustainability impact and reduce cost at the expense of reliability in development environments, or for mission-critical solutions. You might optimize reliability with increased costs and sustainability impact. In ecommerce solutions, performance can affect revenue and customer propensity to buy. Security generally is not a viable trade-off against the other pillars.
Rather than optimizing for any single pillar, the Framework guides a holistic evaluation across all pillars to determine the right architectural approach. Organizations can use AWS best practices while they find the optimal balance that aligns with their unique requirements. The key is making intentional trade-off decisions instead of following any uniform approach.
Without proper observation and measurement, the true operational costs of a system remain hidden, and wasteful practices can persist unnoticed. Just as exposing a utility meter prompts more mindful usage, visibility increases into costs can drive more sustainable behaviors. While implementing comprehensive monitoring requires upfront investment, the long-term benefits of conserving resources and optimizing efficiency make it a worthwhile endeavor. Ultimately, you should maintain cost awareness to foster a culture of responsible, sustainable practices.
The Operational Excellence Pillar of the AWS Well-Architected Framework emphasizes the importance of observability to gain actionable insights into workloads. This involves creation of key performance indicators (KPIs) and use of observability data telemetry to comprehensively understand workload behavior, performance, reliability, cost, and health. Organizations can implement observability best practices to make informed decisions and take prompt action when business outcomes are at risk due to issues with workload operation. Observability data provides visibility into the current state and helps identify areas for improvement. This means that organizations can be proactive in performance optimization, reliability enhancement, and cost reduction based on the actionable insights derived from observability telemetry data. Overall, observability is crucial for maintenance of operational excellence through the use of data-driven decision-making and continuous improvement of workloads.
Overall, monitoring guidance is a core component across multiple pillars of the Well-Architected Framework, as it helps organizations effectively manage and optimize their cloud workloads. For more detail on the monitoring principles of the AWS Well-Architected Framework, see Cost-Aware Architectures Implement Cost Controls (Law 5).
The key aspects of frugal architecture combine granular controls with robust monitoring to identify areas for optimization. This helps you optimize costs and maintain a good user experience. With a robust monitoring system, you can take action where improvements are needed.
The AWS Well-Architected Framework aligns with the concept of frugality, which focuses on maximizing value rather than just minimizing spending. The Framework helps businesses achieve maximum value by making architectural choices that meet their specific requirements.
The Cost Optimization Pillar emphasizes the continual monitoring of usage and costs to identify opportunities for efficiency improvements and cost savings. This includes expenditure analysis, adoption of consumption-based models, and implementation of cloud financial management practices.
The Security Pillar, Reliability Pillar, and Performance Efficiency Pillar reinforce the importance of monitoring systems, workloads, and costs in real-time to maintain security, automatically recover from failures, and optimize performance relative to cost.
The Sustainability Pillar focuses on measurement of a workload’s current and forecasted environmental impact. It recommends continual evaluation of new hardware and software offerings that can reduce the environmental footprint.
Overall, monitoring guidance spans multiple Well-Architected pillars to maximize value through optimization of cost, performance, security, reliability, and sustainability.
Cost efficiency is a continuous process, not a one-time goal. Regularly monitor your systems to identify inefficient patterns and areas for optimization. Revisit and refine systems periodically to find additional opportunities for improvement and further reduce costs over time.
The Cost Optimization Pillar covers principles like analysis and attribution of expenditure, measurement of overall efficiency, adoption of a consumption model, and implementation of cloud financial management practices.
Additionally, the Operational Excellence Pillar provides principles that apply not just to cost optimization but all pillars. These include observability for actionable insights, safe automation where possible, frequent small reversible changes, frequent refinement of operations procedures, anticipation of failure, and documentation and distribution of learning from operational events and metrics.
Organizations can follow these AWS Well-Architected Framework principles and their practices to continuously improve their cloud architectures and operations and optimize costs effectively.
We should continue to reevaluate past approaches, even those that were previously successful. Just because something worked before does not mean that it is still the best method. Grace Hopper, a computer scientist, mathematician, and United States Navy rear admiral, cautioned against blind adherence to tradition, saying that “we’ve always done it this way” is a dangerous mindset. We must be willing to question the old ways and explore new and potentially better methods.
The AWS Well-Architected Framework advocates for an evolutionary architecture approach to system design. Traditional architectures are often designed as static, with only a few major version updates during the system’s lifetime. However, as businesses and requirements change over time, initial architectural decisions can limit the ability to adapt and evolve the system. Cloud computing enables capabilities like automated testing and lower-risk design changes, which allows systems to evolve continually rather than being constrained by the original design. An evolutionary architecture positions businesses to take advantage of new innovations and changes as part of standard practice. Rather than being locked into original architectural choices, an evolutionary approach fosters ongoing adaptation and modernization as requirements shift. This contrasts with traditional fixed architectures that make it difficult to evolve over time and provides greater flexibility to evolve systems iteratively.
The Operational Excellence Pillar includes implementation of observability to understand system behavior, safe automation of processes, frequent but reversible changes, regular refinement of operations procedures, proactive anticipation potential failures proactively, and distribution of learnings from operational events and metrics to drive continuous improvement.
Overall, the Well-Architected Framework provides guidance on evolutionary architecture and operations processes to effectively manage increasing software complexity over time.
Conclusion
Frugality is about maximizing value, rather than just minimizing costs. Following AWS Well-Architected Framework best practices regarding security, reliability, and operational excellence can help realize frugal yet robust architectures. True frugality involves optimizing costs by aligning spending with areas that deliver the highest business value and impact. The Well-Architected Framework provides guidance for making architectural decisions that increase efficiency, lower risks, and maximize return on cloud investments. This involves determining priorities, understanding sources of value, and making informed trade-off decisions based on those priorities. It’s important to avoid indiscriminate cost-cutting and instead focus on resources on what matters most to drive value for the organization. By following Well-Architected best practices, companies can practice frugality in a strategic way that balances optimization with business goals.
This post was co-written with Shyam Narayan, a leader in the Accenture AWS Business Group, and Hui Yee Leong, a DevOps and platform engineer, both based in Australia. Hui and Shyam specialize in designing and implementing complex AWS transformation programs across a wide range of industries.
Enterprises that operate out of multiple locations such as in retail and telecom industries often deal with the complexities of processing several utility bills. These bills need to be verified for discrepancies before making payments. Business processes are often done by teams of people manually processing invoices in various formats.
Additionally, enterprises often need to meet Environmental, Social, and Governance (ESG) regulatory compliances, and utility bills are important elements relating to the reporting of electricity, water, and gas usage, which largely gets untapped as well.
Invoices are generated by utility providers in various formats, like PDF, XLS, and EML, have different layouts, and are often delivered as emails. This makes it difficult to standardize ingestion, process these invoices for anomalies such as seasonal usage patterns, compare contracted vs. billed rates, and finally process payments.
Due to this lack of usage data standardization, ingesting this data into a central ESG data lake becomes challenging.
In this post, we present a solution using Amazon Bedrock to address these challenges. The solution offers the following capabilities:
Provides flexibility to ingest utility bills in various formats and layouts
Standardizes bills into a single format and applies data quality controls
Integrates with existing systems through events
Automates repetitive tasks, which reduces human error and enhances efficiency
Enables predictive analysis, which enables informed decision-making with generative artificial intelligence (AI)
Integrates with existing data lakes, data warehouse, payments systems, and ESG reporting systems
Solution overview
The solution uses Amazon Bedrock to automate invoice processing, tariff extraction, validation, and reporting, as shown in Figure 1.
Figure 1. Diagram showing the Amazon Bedrock solution to simplify and automate billing
Some Utility providers send invoices directly to an email address enabled on Amazon SES, the PDF attachment is extracted and uploaded to a Amazon S3 bucket.
A Lambda function invoked by Amazon EventBridge scheduled rule fetches tariff data from external SFTP repository and stores in a S3 bucket.
Utility Data Extraction Step Functions is invoked by an S3 event. This process involves extracting data from various providers, which may be in different formats and units, to facilitate seamless integration with the business logic.
The tariff data is then stored in an Amazon DynamoDB table, which is used by the business logic Step Functions workflow.
The main business logic of checking invoices for usage anomalies and check for approved tariff is done in the Business Logic Step function. This Step function makes use of Amazon Bedrock, embeddings, extracted invoices and tariff data to check for anomalies, invoice accuracy and update the reporting database.
Reporting data is stored in an Amazon Aurora database and visualized using Amazon QuickSight for payment validation reports.
Amazon Q in QuickSight is used for enhanced and quick decision-making using generative BI capabilities.
The following screenshots show examples of the Amazon QuickSight visualizations.
Figure 2. QuickSight visualization showing physical location of invoiced locations, monthly combined usage and billed amount.
Figure 3. QuickSight Q animation demonstrating AI-driven answers to the questions on the data beyond what is presented in the dashboards
Benefits from the solution
This solution offers the following benefits:
Contextual understanding – With the Anthropic Claude 3 Sonnet model on Amazon Bedrock, this solution has the capability to understand, analyze, and interpret the context of your data beyond just text recognition.
Flexibility and adaptability – This solution enables flexibility to learn and adapt to new formats because Amazon Bedrock is able to understand the data contained within the invoices and adapt to the various changes of data representation.
Event-driven architecture – This is an event-driven, serverless architecture, which enables modularity and integration with external workflows specific to your organization.
Automated workflow – The solution reduces the need for manual intervention in data quality processes, such as data profiling, cleansing, and validation. This allows for faster processing and reduced human error.
Cost savings – Automation reduces the reliance on teams of people, resulting in cost savings for organizations.
Compliance and risk mitigation – Automated data quality processes help organizations maintain ESG compliance with regulatory requirements and industry standards.
Data governance – Automation facilitates the implementation of data governance policies and procedures. By automating data quality monitoring and reporting, organizations can enforce data governance standards more effectively and adhere to data quality guidelines.
Conclusion
In this post, we saw how automation paves the way for organizations to optimize utility bill processing and get additional ESG insights. We demonstrated how the application and the power of generative AI on Amazon Bedrock can simplify data extraction when the data isn’t presented in a standard format. Finally, we presented a serverless and event-driven solution that scales automatically based on your business needs.
SQL databases in Amazon Web Services (AWS), using services like Amazon Relational Database Service (Amazon RDS) and Amazon Aurora, offer software architects scalability, automated management, robust security, and cost-efficiency. This combination simplifies database management, improves performance, enhances security, and allows architects to create efficient and scalable software systems.
In this post, we introduce caching strategies and continue with real case studies that use services like Amazon ElastiCache or Amazon MemoryDB in real workloads where customers share the reasoning behind their approaches. It’s very important to understand the context for leveraging a specific solution or pattern, and these resources answer many commonly asked questions.
For software architects and developers, striking the right balance between operational complexity and cost efficiency is a perpetual challenge. Often, provisioning a separate database for each workload is the gold standard, offering unmatched isolation and granular operational controls. However, it’s not always the most cost-effective or operationally manageable approach. Through a real-world success story, we explore how Aurora played a pivotal role in helping VMware Aria Cost, powered by CloudHealth, consolidate a staggering 166 self-managed MySQL databases onto 62 Aurora clusters.
Amazon RDS Blue/Green Deployments revolutionizes the way you handle database updates, ensuring safety and simplicity, often achieving rapid updates in just a minute, with zero data loss. Meanwhile, Amazon RDS Optimized Writes turbocharges write transaction throughput by as much as double, without any additional extra cost. Amazon RDS Optimized Reads steps in to deliver a significant boost to database performance, processing queries up to 50% faster.
Discover how to leverage these capabilities of Amazon RDS in this one-hour video from re:Invent 2022.
In the world of mission-critical workloads, the importance of a robust disaster recovery (DR) strategy cannot be overstated. It’s the lifeline that ensures databases stay operational, even in the face of unexpected events. Discover the intricacies of crafting a dependable, cross-Region DR strategy tailored to Amazon RDS for SQL Server.
In this AWS Developers session, we uncover the best practices for efficiently managing and monitoring these cross-Region read replicas. From proactive monitoring to fine-tuning, you’ll gain the insights needed to keep your DR strategy finely tuned.
Aurora represents a paradigm shift in relational databases, boasting an architecture that decouples computational processes from data storage. It introduces advanced features, such as Global Database and low-latency read replicas, redefining the landscape of database management.
This modern database service excels in performance, scalability, and high availability on a large scale, offering compatibility with both MySQL and PostgreSQL open-source editions. Additionally, it provides an array of developer tools tailored for serverless and machine learning-driven applications.
This re:Invent 2022 session is an in-depth exploration of some of Aurora’s most compelling features, including Aurora Serverless v2 and Global Database. We also share the most recent innovations aimed at enhancing performance, scalability, and security while streamlining operational processes.
In-memory databases play a critical role in modern computing, particularly in reducing the strain on existing resources, scaling workloads efficiently, and minimizing the cost of infrastructure. The advanced performance capabilities of in-memory databases make them vital for demanding applications characterized by voluminous data, real-time analytics, and rapid response requirements.
In this edition of Let’s Architect!, we are introducing caching strategies and, further, examining case studies that use Amazon Web Services (AWS), like Amazon ElastiCache or Amazon MemoryDB for Redis, in real workloads where customers share the reasoning behind their approaches. It is very important understanding the context for leveraging a specific solution or pattern, and many common questions can be answered with these resources.
Many services built at Amazon rely on caching systems in the background to speed up performance, deal with low latency requirements, and avoid overloading on source databases and other microservices. Operating caches and adding caches into our systems may present complex challenges in terms of monitoring, data consistency, and load on the other components of the system. Indeed, a cache can give big benefits, but it’s also a new component to run and keep healthy. Furthermore, engineers may need to use empirical methods to choose the cache size, expiration policy, and eviction policy: we always have to perform tests and use the metrics to tune the setup.
With this Amazon Builder’s Library resource, you can learn strategies for using caching in your architecture and best practices directly from Amazon’s engineers.
Discover how Yahoo effectively leverages the power of Amazon ElastiCache and data tiering to process an astounding 1.3 million advertising data events per second, all while generating savings of up to 50% on their overall bill.
Data tiering is an ingenious method to scale up to hundreds of terabytes of capacity by intelligently managing data. It achieves this by automatically shifting the least-recently accessed data between RAM and high-performance SSDs.
In this video, you will gain insights into how data tiering operates and how you can unlock ultra-fast speeds and seamless scalability for your workloads in a cost-efficient manner. Furthermore, you can also learn how it’s implemented under the hood.
MemoryDB is a robust, durable database marked by microsecond reads, low single-digit millisecond writes, scalability, and fortified enterprise security. It guarantees an impressive 99.99% availability, coupled with instantaneous recovery without any data loss.
In this session, we explore multiple use cases across sectors, such as Financial Services, Retail, and Media & Entertainment, like payment processing, message brokering, and durable session store applications. Moreover, through a practical demonstration, you can learn how to utilize MemoryDB to establish a microservices message broker for a Media & Entertainment application.
MemoryDB offers the kind of ultra-fast performance that only an in-memory database can deliver, curtailing latency to microseconds and processing 160+ million requests per second —without data loss. In this re:Invent 2022 session, you will understand why Samsung SmartThings selected MemoryDB as the engine to power the next generation of their IoT device connectivity platform, one that processes millions of events every day.
You can also discover the intricate design of MemoryDB and how it ensures data durability without compromising the performance of in-memory operations, thanks to the utilization of a multi-AZ transactional log. This session is an enlightening deep-dive into durable, in-memory data operations.
In this edition of AWS Online Tech Talks, explore Amazon ElastiCache, a managed service that facilitates the seamless setup, operation, and scaling of widely used, open-source–compatible, in-memory datastores in the cloud environment. This service positions you to develop data-intensive applications or enhance the performance of your existing databases through high-throughput, low-latency, in-memory datastores. Learn how it is leveraged for caching, session stores, gaming, geospatial services, real-time analytics, and queuing functionalities.
This course can help cultivate a deeper understanding of Amazon ElastiCache, and how it can be used to accelerate your data processing while maintaining robustness and reliability.
Every software component built by engineers and architects is designed with a purpose: to offer particular functionalities and, ultimately, contribute to the generation of business value. We should consider fundamental factors, such as the scalability of the software and the ease of evolution during times of business changes. However, performance and cost are important factors as well since they can impact the business profitability.
This edition of Let’s Architect! follows a similar series post from 2022, which discusses optimizing the cost of an architecture. Today, we focus on architectural patterns, services, and best practices to design cost-optimized cloud workloads. We also want to identify solutions, such as the use of Graviton processors, for increased performance at lower price. Cost optimization is a continuous process that requires the identification of the right tools for each job, as well as the adoption of efficient designs for your system.
Govern cloud usage and avoid cost surprises without slowing down innovation within your organization. In this re:Invent 2022 session, you can learn how to set up guardrails and operationalize cost control within your organizations using services, such as AWS Budgets and AWS Cost Anomaly Detection, and explore the latest enhancements in the AWS cost control space. Additionally, Mercado Libre shares how they automate their cloud cost control through central management and automated algorithms.
Work backwards from team needs to define/deploy cloud governance in AWS environments
Compute optimization
When it comes to optimizing compute workloads, there are many tools available, such as AWS Compute Optimizer, Amazon EC2 Spot Instances, Amazon EC2 Reserved Instances, and Graviton instances. Modernizing your applications can also lead to cost savings, but you need to know how to use the right tools and techniques in an effective and efficient way.
For AWS Lambda functions, you can use the AWS Lambda Cost Optimization video to learn how to optimize your costs. The video covers topics, such as understanding and graphing performance versus cost, code optimization techniques, and avoiding idle wait time. If you are using Amazon Elastic Container Service (Amazon ECS) and AWS Fargate, you can watch a Twitch video on cost optimization using Amazon ECS and AWS Fargate to learn how to adjust your costs. The video covers topics like using spot instances, choosing the right instance type, and using Fargate Spot.
The choice of the hardware is a fundamental driver for performance, cost, as well as resource consumption of the systems we build. Graviton is a family of processors designed by AWS to support cloud-based workloads and give improvements in terms of performance and cost. This re:Invent 2022 presentation introduces Graviton and addresses the problems it can solve, how the underlying CPU architecture is designed, and how to get started with it. Furthermore, you can learn the journey to move different types of workloads to this architecture, such as containers, Java applications, and C applications.
The Cost Optimization section of the AWS Well Architected Workshop helps you learn how to optimize your AWS costs by using features, such as AWS Compute Optimizer, Spot Instances, and Reserved Instances. The workshop includes hands-on labs that walk you through the process of optimizing costs for different types of workloads and services, such as Amazon Elastic Compute Cloud, Amazon ECS, and Lambda.
AWS CodeBuild is a fully managed continuous integration service that compiles source code, runs tests, and produces ready-to-deploy software packages. With CodeBuild, you don’t need to provision, manage, and scale your own build servers. You just specify the location of your source code and choose your build settings, and CodeBuild will run your build scripts for compiling, testing, and packaging your code.
CodeBuild uses simple pay-as-you-go pricing. There are no upfront costs or minimum fees. You pay only for the resources you use. You are charged for compute resources based on the duration it takes for your build to execute.
There are three main factors that contribute to build costs with CodeBuild:
Build duration
Compute types
Additional services
Understanding how to balance these factors is key to optimizing costs on AWS and this blog post will take a look at each.
Compute Types
CodeBuild offers three compute instance types with different amounts of memory and CPU, for example the Linux GPU Large compute type has 255GB of memory and 32 vCPUs and enables you to execute CI/CD workflow for deep learning purpose (ML/AI) with AWS CodePipeline. Incremental changes in your code, data, and ML models can now be tested for accuracy, before the changes are released through your pipeline.
The Linux 2XLarge instance type is another instance type with 145GB of memory and 72 vCPUs and is suitable for building large and complex applications that require high memory and CPU resources. It can help reduce build time, speed up delivery, and support multiple build environments.
The GPU and 2XLarge compute types are powerful but are also the most expensive compute types per minute. For most build tasks the small, medium or large instance compute types are more than adequate. Using the pricing listed in US East (Ohio) we can see the price variance between the small, medium and large Linux instance types in Figure 1 below.
Figure 1. AWS CodeBuild small, medium and large compute types vs cost per minute
Analyzing the CodeBuild compute costs leads us to a number of cost optimization considerations.
Right Sizing AWS CodeBuild Compute Types to Match Workloads
Right sizing is the process of matching instance types and sizes to your workload performance and capacity requirements at the lowest possible cost. It’s also the process of looking at deployed instances and identifying opportunities to eliminate or downsize without compromising capacity or other requirements, which results in lower costs.
Right sizing is a key mechanism for optimizing AWS costs, but it is often ignored by organizations when they first move to the AWS Cloud. They lift and shift their environments and expect to right size later. Speed and performance are often prioritized over cost, which results in oversized instances and a lot of wasted spend on unused resources.
CodeBuild monitors build resource utilization on your behalf and reports metrics through Amazon CloudWatch. These include metrics such as
CPU
Memory
Disk I/O
These metrics can be seen within the CodeBuild console, for an example see Figure 2 below:
Figure 2. Resource utilization metrics
Leveraging observability to measuring build resource usage is key to understanding how to rightsize and CodeBuild makes this easy with CloudWatch metrics readily available through the CodeBuild console.
Consider ARM / Graviton
If we compare the costs of arm1.small and general1.small over a ten minute period we can see that the arm based compute type is 32% less expensive.
Figure 3. Comparison of small arm and general compute types
But cost per minute while building is not the only benefit here, ARM processors are known for their energy efficiency and high performance. Compiling code directly on an ARM processor can potentially lead to faster execution times and improved overall system performance.
AWS Graviton processors are custom built by Amazon Web Services using 64-bit Arm Neoverse cores to deliver the best price performance for your cloud workloads. The AWS Graviton Fast Start program helps you quickly and easily move your workloads to AWS Graviton in as little as four hours for applications such as serverless, containerized, database, and caching.
Consider migrating Windows workloads to Linux
If we compare the cost of a general1.medium Windows vs Linux compute type we can see that the Linux Compute type is 43% less expensive over ten minutes:
Figure 4. Build times on Windows compared to Linux
Migrating to Linux is one strategy to not only reduce the costs of building and testing code in CodeBuild but also the cost of running in production.
The effort required to re-platform from Windows to Linux varies depending on how the application was implemented. The key is to identify and target workloads with the right characteristics, balancing strategic importance and implementation effort.
For example, older .Net applications may be able to be migrated to later versions of .NET (previously named .Net Core) first before deploying to Linux. AWS have a Porting Assistant for .NET that is an analysis tool that scans .NET Framework applications and generates a cross-platform compatibility assessment, helping you port your applications to Linux faster.
One of the dimensions of the CodeBuild pricing is the duration of each build. This is calculated in minutes, from the time you submit your build until your build is terminated, rounded up to the nearest minute. For example: if your build takes a total of 35 seconds using one arm1.small Linux instance on US East (Ohio), each build will cost the price of the full minute, which is $0.0034 in that case. Similarly, if your build takes a total of 5 minutes and 20 seconds, you’ll be charged for 6 minutes.
When you define your CodeBuild project, within a buildspec file, you can specify some of the phases of your builds. The phases you can specify are install, pre-build, build, and post-build. See the documentation to learn more about what each of those phases represent. Besides that, you can define how and where to upload reports and artifacts each build generates. It means that on each of those steps, you should do only what is necessary for the task you want to achieve. Installing dependencies that you won’t need, running commands that aren’t related to your task, or performing tests that aren’t necessary will affect your build time and unnecessarily increase your costs. Packaging and uploading target artifacts with unnecessary large files would cause a similar result.
On top of the CodeBuild phases and steps that you are directly in control, each time you start a build, it takes additional time to queue the task, provision the environment, download the source code (if applicable), and finalize. See Figure 5 below a breakdown of a succeeded build:
Figure 5. AWS CodeBuild Phase details
In the above example, for each build, it takes approximately 42 seconds on top of what is specified in the buildspec file. Considering this overhead, having several smaller builds instead of fewer larger builds can potentially increase your costs. With this in mind, you have to keep your builds as short as possible, by doing only what is necessary, so that you can minimize the costs. Furthermore, you have to find a good balance between the duration and the frequency of your builds, so that the overhead doesn’t take a large proportion of your build time. Let’s explore some approaches you can factor in to find this balance.
Build caching
A common way to save time and cost on your CodeBuild builds is with build caching. With build caching, you are able to store reusable pieces of your build environment, so that you can save time next time you start a new build. There are two types of caching:
Amazon S3 — Stores the cache in an Amazon S3 bucket that is available across multiple build hosts. If you have build artifacts that are more expensive to build than to download, this is a good option for you. For large build artifacts, this may not be the best option, because it can take longer to transfer over your network.
Local caching — Stores a cache locally on a build host that is available to that build host only. When you choose this option, the cache is immediately available on the build host, making it a good option for large build artifacts that would take long network transfer time. If you choose local caching, there are multiple cache modes you can choose including source cache mode, docker layer cache mode and custom cache mode.
Docker specific optimizations
Another strategy to optimize your build time and reduce your costs is using custom Docker images. When you specify your CodeBuild project, you can either use one of the default Docker images provided by CodeBuild, or use your own build environment packaged as a Docker image. When you create your own build environment as a Docker image, you can pre-package it with all the tools, test assets, and required dependencies. This can potentially save a significant amount of time, because on the install phase you won’t need to download packages from the internet, and on the build phase, when applicable, you won’t need to download e.g., large static test datasets.
To achieve that, you must specify the image value on the environment configuration when creating or updating your CodeBuild project. See Docker in custom image sample for CodeBuild to learn more about how to configure that. Keep in mind that larger Docker images can negatively affect your build time, therefore you should aim to keep your custom build environment as lean as possible, with only the mandatory contents. Another aspect to consider is to use Amazon Elastic Container Registry (ECR) to store your Docker images. Downloading the image from within the AWS network will be, in most of the cases, faster than downloading it from the public internet and can avoid bottlenecks from public repositories.
Consider which tests to run on the feature branch
If you are using a feature-branch approach, consider carefully which build steps and tests you are going to run on your branches. Running unit tests is a good example of what you should run on the feature branches, but unless you have very specific requirements, you probably don’t need penetration or integration tests at this point. Usually the feature branch changes often, hence running all types of tests all the time is a potential waste. Prefer to have your complex, long-running tests at a later stage of your CI/CD pipeline, as you build confidence on the version that you are to release.
Build once, deploy everywhere
It’s widely considered a best practice to avoid environment-specific code builds, therefore consider a build once, deploy everywhere strategy. There are many benefits to separating environment configuration from the build including reducing build costs, improve maintainability, scalability, and reduce the risk of errors.
Build once, deploy everywhere can be seen in the AWS Deployment Pipeline Reference Architecture where the Beta, Gamma and Prod stages are created from a single artifact created in the Build Stage:
Amazon CloudWatch can be used to monitor your builds, report when something goes wrong, take automatic actions when appropriate or simply keep logs of your builds.
CloudWatch metrics show the behavior of your builds over time. For example, you can monitor:
How many builds were attempted in a build project or an AWS account over time.
How many builds were successful in a build project or an AWS account over time.
How many builds failed in a build project or an AWS account over time.
How much time CodeBuild spent running builds in a build project or an AWS account over time.
Build resource utilization for a build or an entire build project. Build resource utilization metrics include metrics such as CPU, memory, and storage utilization.
However, you may incur charges from Amazon CloudWatch Logs for build log streams. For more information, see Monitoring AWS Codebuild in the CodeBuild User Guide and the CloudWatch pricing page.
Storage Costs
You can create an CodeBuild build project with a set of output artifacts and publish then to S3 buckets. Using S3 as a repository for your artifacts, you only pay for what you use. Check the S3 pricing page.
Encryption
Cloud security at AWS is the highest priority and encryption is an important part of CodeBuild security. Some encryption, such as for data in-transit, is provided by default and does not require you to do anything. Other encryption, such as for data at-rest, you can configure when you create your project or build. Codebuild uses Amazon KMS to encrypt the data at-rest.
Build artifacts, such as a cache, logs, exported raw test report data files, and build results, are encrypted by default using AWS managed keys and are free of charge. Consider using these keys if you don’t need to create your own key.
If you do not want to use these KMS keys, you can create and configure a customer managed key. For more information, see the documentation on creating KMS Keys and AWS Key Management Service concepts in the AWS Key Management Service User Guide.
You may incur additional charges if your builds transfer data, for example:
Avoid routing traffic over the internet when connecting to AWS services from within AWS by using VPC endpoints
Traffic that crosses an Availability Zone boundary typically incurs a data transfer charge. Use resources from the local Availability Zone whenever possible.
Traffic that crosses a Regional boundary will typically incur a data transfer charge. Avoid cross-Region data transfer unless your business case requires it
Use the AWS Pricing Calculator to help estimate the data transfer costs for your solution.
Use a dashboard to better visualize data transfer charges – this workshop will show how.
In this blog post we discussed how compute types; build duration and use of additional services contribute to build costs with AWS CodeBuild.
We highlighted how right sizing compute types is an important practice for teams that want to reduce their build costs while still achieving optimal performance. The key to optimizing is by measuring and observing the workload and selecting the most appropriate compute instance based on requirements.
Further compute type cost optimizations can be found by targeting AWS Graviton processors and Linux environments. AWS Graviton Processors in particular offer several advantages over traditional x86-based instances and are designed by AWS to deliver the best price performance for your cloud workloads.
Written in collaboration with Ben Moses, AWS Senior Solutions Architect, and Michael Holtby, AWS Senior Manager Solutions Architecture
Designing an architecture is not a simple task. There are many dimensions and characteristics of a solution to consider, such as the availability, performance, or resilience.
In this Let’s Architect!, we explore cost optimization and ideas on how to rethink your AWS workloads, providing suggestions that span from compute to data transfer.
AWS Graviton processors are custom silicon from Amazon’s Annapurna Labs. Based on the Arm processor architecture, they are optimized for performance and cost, which allows customers to get up to 34% better price performance.
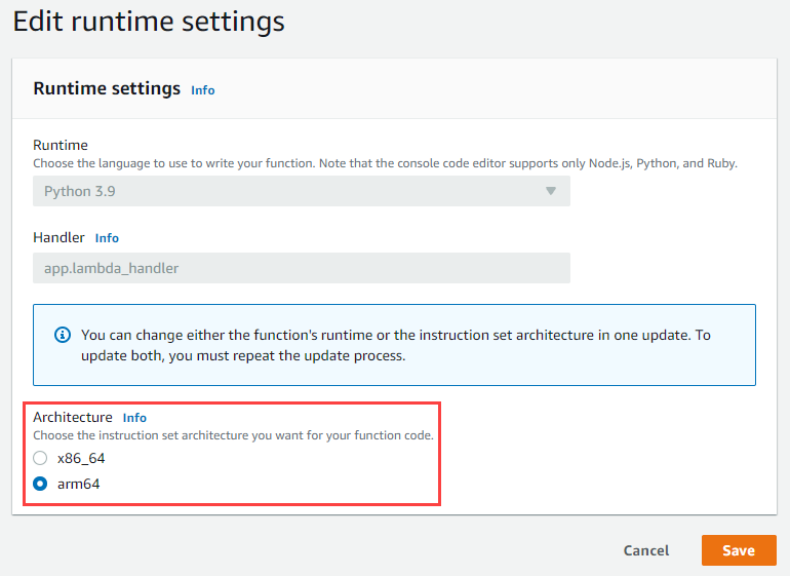
This AWS Compute Blog post discusses some of the differences between the x86 and Arm architectures, as well as methods for developing Lambda functions on Graviton2, including performance benchmarking.
Many serverless workloads can benefit from Graviton2, especially when they are not using a library that requires an x86 architecture to run.
Amazon Relational Database Service (Amazon RDS) and Amazon Aurora support a multitude of instance types to scale database workloads based on needs. Both services now support Arm-based AWS Graviton2 instances, which provide up to 52% price/performance improvement for Amazon RDS open-source databases, depending on database engine, version, and workload. They also provide up to 35% price/performance improvement for Amazon Aurora, depending on database size.
This AWS Database Blog post showcases strategies for updating RDS DB instances to make use of Graviton2 with minimal changes.
Data transfer charges are often overlooked while architecting an AWS solution. Considering data transfer charges while making architectural decisions can save costs. This AWS Architecture Blog post describes the different flows of traffic within a typical cloud architecture, showing where costs do and do not apply. For areas where cost applies, it shows best-practice strategies to minimize these expenses while retaining a healthy security posture.
This Architecture Blog post is a collection of best practices for cost management in AWS, including the relevant tools; plus, it is part of a series on cost optimization using an e-commerce example.
AWS Cost Explorer is used to first identify opportunities for optimizations, including data transfer, storage in Amazon Simple Storage Service and Amazon Elastic Block Store, idle resources, and the use of Graviton2 (Amazon’s Arm-based custom silicon). The post discusses establishing a FinOps culture and making use of Service Control Policies (SCPs) to control ongoing costs and guide deployment decisions, such as instance-type selection.
Applying SCPs on different environments for cost control
See you next time!
Thanks for joining us to discuss optimizing costs while architecting! This is the last Let’s Architect! post of 2022. We will see you again in 2023, when we explore even more architecture topics together.
Wishing you a happy holiday season and joyous new year!
This blog post is written by Shruti Koparkar, Senior Product Marketing Manager, Amazon EC2.
AWS re:Invent is the most transformative event in cloud computing and it is starting on November 28, 2022. AWS Compute team has many exciting sessions planned for you covering everything from foundational content, to technology deep dives, customer stories, and even hands on workshops. To help you build out your calendar for this year’s re:Invent, let’s look at some highlights from the AWS Compute track in this blog. Please visit the session catalog for a full list of AWS Compute sessions.
Learn what powers AWS Compute
AWS offers the broadest and deepest functionality for compute. Amazon Elastic Cloud Compute (Amazon EC2) offers granular control for managing your infrastructure with the choice of processors, storage, and networking.
If you are interested in learning about the diversity of compute options available, along with our latest offerings, attend our “CMP225: What’s New with Amazon EC2” session.
The AWS Nitro System is the underlying platform for our all our modern EC2 instances. It enables AWS to innovate faster, further reduce cost for our customers, and deliver added benefits like increased security and new instance types.
We often say that security is job zero at AWS. And Nitro System provides enhanced security that continuously monitors, protects, and verifies the instance hardware and firmware. Attend “CMP302: Confidential Computing with AWS compute” to learn how Nitro System helps AWS provide a secure environment for customer workloads.
Discover the benefits of AWS Silicon
AWS has invested years designing custom silicon optimized for the cloud. This investment helps us deliver high performance at lower costs for a wide range of applications and workloads using AWS services.
Explore the AWS journey into silicon innovation with our “CMP201: Silicon Innovation at AWS” session. We will cover some of the thought processes, learnings, and results from our experience building silicon for AWS Graviton, AWS Nitro System, and AWS Inferentia.
Amazon EC2 provides secure and resizable compute capacity for several different use-cases including general purpose computing for cloud native and enterprise applications, and accelerated computing for machine learning and high performance computing (HPC) applications.
High performance computing
HPC on AWS can help you design your products faster with simulations, predict the weather, detect seismic activity with greater precision, and more. To learn how to solve world’s toughest problems with extreme-scale compute come join us for “CMP205: HPC on AWS: Solve complex problems with pay-as-you-go infrastructure”.
Single on-premises general-purpose supercomputers can fall short when solving increasingly complex problems. Attend “CMP222: Redefining supercomputing on AWS” to learn how AWS is reimagining supercomputing to provide scientists and engineers with more access to world-class facilities and technology.
AWS offers many solutions to design, simulate, and verify the advanced semiconductor devices that are the foundation of modern technology. Attend “CMP320: Accelerating semiconductor design, simulation, and verification” to hear from ARM and Marvel about how they are using AWS to accelerate EDA workloads.
Machine Learning
Machine learning training is a complex problem requiring significant compute capacity and can benefit from specialized silicon. To hear more about the latest AWS designed silicon for deep learning training, attend “CMP313: Accelerate deep learning and innovate faster with AWS Trainium”. You will learn how Trainium delivers high performance and up to 50% savings in training costs over comparable GPU-based instances.
Do you want to host simple applications such phone systems, blogs, ecommerce sites etc. on the cloud? Amazon Lightsail is a cost-effective, easy-to-use cloud platform that’s ideal for simpler workloads and quick deployments. Attend “CMP218: Set your small business up for success with Amazon Lightsail” to learn how you can quickly deploy and configure virtually any application at a predictable monthly rate.
We have several sessions this year where AWS customers are taking the stage to share their stories and details of exciting innovations made possible by AWS.
Are you a machine learning (ML) startup trying to optimize your infrastructure costs? Attend “CMP226: How four customers reduced ML inference costs and drove innovation” to hear from Screening Eagle, Money Forward, Dataminr, and Actuate about how they have used Amazon EC2 Inf1 instances to get better performance at a lower cost per inference.
Want to learn about the techniques Standard Chartered Bank uses to reduce waste and optimize cost and performance at scale? Attend “CMP213: Building a budget-conscious culture at Standard Chartered Bank” to learn how they’ve used a combination of AWS Savings Plan and Amazon EC2 spot instances to build critical large systems such as scaling applications, container platforms, and their grid for calculating risk and analytics.
Come join us at “CMP208: Run large-scale graphics workloads with AWS, featuring Mircom and Snap” to learn about how Snap personalizes Bitmoji avatars and how Mircom creates digital twins of their fire alarm control panels and mission-critical smart building technologies. Learn how they leverage GPU-based instances in Amazon EC2 to unlock scalable graphics applications.
Nothing like a hands-on session where you can learn by doing and get started easily with AWS compute. Our speakers and workshop assistants will help you every step of the way. Just bring your laptop to get started!
Are you a developer or IT practitioner running Linux-based workloads in Amazon EC2 and looking for better price performance? Attend “CMP303: Get hands-on with AWS Graviton-based EC2 instances” to learn how to move a workload to AWS-Graviton based instances including containerized applications.
Would you like to gain a solid skills foundation to run common HPC workloads using cloud technologies? Join us at “CMP305: Best practices for high performance computing in the cloud” to get hands-on experience setting up your own cluster in the cloud and running a sample application.
You’ll get to meet the global cloud community at AWS re:Invent and get an opportunity to learn, get inspired, and rethink what’s possible. So build your schedule in the re:Invent portal and get ready to hit the ground running. We invite you to stop by the AWS Compute booth and chat with our experts. We look forward to seeing you in Las Vegas!
This blog is written by Rajesh Kesaraju, Sr. Solution Architect, EC2-Flexible Compute and Peter Manastyrny, Sr. Product Manager, EC2.
Today AWS is adding two new attributes for the attribute-based instance type selection (ABS) feature to make it even easier to create and manage instance type flexible configurations on Amazon EC2. The new network bandwidth attribute allows customers to request instances based on the network requirements of their workload. The new allowed instance types attribute is useful for workloads that have some instance type flexibility but still need more granular control over which instance types to run on.
Before exploring the new attributes in detail, let us review the core ABS capability.
ABS refresher
ABS lets you express your instance type requirements as a set of attributes, such as vCPU, memory, and storage when provisioning EC2 instances with ASG, EC2 Fleet, or Spot Fleet. Your requirements are translated by ABS to all matching EC2 instance types, simplifying the creation and maintenance of instance type flexible configurations. ABS identifies the instance types based on attributes that you set in ASG, EC2 Fleet, or Spot Fleet configurations. When Amazon EC2 releases new instance types, ABS will automatically consider them for provisioning if they match the selected attributes, removing the need to update configurations to include new instance types.
ABS helps you to shift from an infrastructure-first to an application-first paradigm. ABS is ideal for workloads that need generic compute resources and do not necessarily require the hardware differentiation that the Amazon EC2 instance type portfolio delivers. By defining a set of compute attributes instead of specific instance types, you allow ABS to always consider the broadest and newest set of instance types that qualify for your workload. When you use EC2 Spot Instances to optimize your costs and save up to 90% compared to On-Demand prices, instance type diversification is the key to access the highest amount of Spot capacity. ABS provides an easy way to configure and maintain instance type flexible configurations to run fault-tolerant workloads on Spot Instances.
We recommend ABS as the default compute provisioning method for instance type flexible workloads including containerized apps, microservices, web applications, big data, and CI/CD.
Now, let us dive deep on the two new attributes: network bandwidth and allowed instance types.
How network bandwidth attribute for ABS works
Network bandwidth attribute allows customers with network-sensitive workloads to specify their network bandwidth requirements for compute infrastructure. Some of the workloads that depend on network bandwidth include video streaming, networking appliances (e.g., firewalls), and data processing workloads that require faster inter-node communication and high-volume data handling.
The network bandwidth attribute uses the same min/max format as other ABS attributes (e.g., vCPU count or memory) that assume a numeric value or range (e.g., min: ‘10’ or min: ‘15’; max: ‘40’). Note that setting the minimum network bandwidth does not guarantee that your instance will achieve that network bandwidth. ABS will identify instance types that support the specified minimum bandwidth, but the actual bandwidth of your instance might go below the specified minimum at times.
Two important things to remember when using the network bandwidth attribute are:
ABS will only take burst bandwidth values into account when evaluating maximum values. When evaluating minimum values, only the baseline bandwidth will be considered.
For example, if you specify the minimum bandwidth as 10 Gbps, instances that have burst bandwidth of “up to 10 Gbps” will not be considered, as their baseline bandwidth is lower than the minimum requested value (e.g., m5.4xlarge is burstable up to 10 Gbps with a baseline bandwidth of 5 Gbps).
Alternatively, c5n.2xlarge, which is burstable up to 25 Gbps with a baseline bandwidth of 10 Gbps will be considered because its baseline bandwidth meets the minimum requested value.
Our recommendation is to only set a value for maximum network bandwidth if you have specific requirements to restrict instances with higher bandwidth. That would help to ensure that ABS considers the broadest possible set of instance types to choose from.
Using the network bandwidth attribute in ASG
In this example, let us look at a high-performance computing (HPC) workload or similar network bandwidth sensitive workload that requires a high volume of inter-node communications. We use ABS to select instances that have at minimum 10 Gpbs of network bandwidth and at least 32 vCPUs and 64 GiB of memory.
To get started, you can create or update an ASG or EC2 Fleet set up with ABS configuration and specify the network bandwidth attribute.
The following example shows an ABS configuration with network bandwidth attribute set to a minimum of 10 Gbps. In this example, we do not set a maximum limit for network bandwidth. This is done to remain flexible and avoid restricting available instance type choices that meet our minimum network bandwidth requirement.
Create the following configuration file and name it: my_asg_network_bandwidth_configuration.json
As a result, you have created an ASG that may include instance types m5.8xlarge, m5.12xlarge, m5.16xlarge, m5n.8xlarge, and c5.9xlarge, among others. The actual selection at the time of the request is made by capacity optimized Spot allocation strategy. If EC2 releases an instance type in the future that would satisfy the attributes provided in the request, that instance will also be automatically considered for provisioning.
Considered Instances (not an exhaustive list)
Instance Type Network Bandwidth m5.8xlarge “10 Gbps”
m5.12xlarge “12 Gbps”
m5.16xlarge “20 Gbps”
m5n.8xlarge “25 Gbps”
c5.9xlarge “10 Gbps”
c5.12xlarge “12 Gbps”
c5.18xlarge “25 Gbps”
c5n.9xlarge “50 Gbps”
c5n.18xlarge “100 Gbps”
…
Now let us focus our attention on another new attribute – allowed instance types.
How allowed instance types attribute works in ABS
As discussed earlier, ABS lets us provision compute infrastructure based on our application requirements instead of selecting specific EC2 instance types. Although this infrastructure agnostic approach is suitable for many workloads, some workloads, while having some instance type flexibility, still need to limit the selection to specific instance families, and/or generations due to reasons like licensing or compliance requirements, application performance benchmarking, and others. Furthermore, customers have asked us to provide the ability to restrict the auto-consideration of newly released instances types in their ABS configurations to meet their specific hardware qualification requirements before considering them for their workload. To provide this functionality, we added a new allowed instance types attribute to ABS.
The allowed instance types attribute allows ABS customers to narrow down the list of instance types that ABS considers for selection to a specific list of instances, families, or generations. It takes a comma separated list of specific instance types, instance families, and wildcard (*) patterns. Please note, that it does not use the full regular expression syntax.
For example, consider container-based web application that can only run on any 5th generation instances from compute optimized (c), general purpose (m), or memory optimized (r) families. It can be specified as “AllowedInstanceTypes”: [“c5*”, “m5*”,”r5*”].
Another example could be to limit the ABS selection to only memory-optimized instances for big data Spark workloads. It can be specified as “AllowedInstanceTypes”: [“r6*”, “r5*”, “r4*”].
Note that you cannot use both the existing exclude instance types and the new allowed instance types attributes together, because it would lead to a validation error.
Using allowed instance types attribute in ASG
Let us look at the InstanceRequirements section of an ASG configuration file for a sample web application. The AllowedInstanceTypes attribute is configured as [“c5.*”, “m5.*”,”c4.*”, “m4.*”] which means that ABS will limit the instance type consideration set to any instance from 4th and 5th generation of c or m families. Additional attributes are defined to a minimum of 4 vCPUs and 16 GiB RAM and allow both Intel and AMD processors.
Create the following configuration file and name it: my_asg_allow_instance_types_configuration.json
As a result, you have created an ASG that may include instance types like m5.xlarge, m5.2xlarge, c5.xlarge, and c5.2xlarge, among others. The actual selection at the time of the request is made by capacity optimized Spot allocation strategy. Please note that if EC2 will in the future release a new instance type which will satisfy the other attributes provided in the request, but will not be a member of 4th or 5th generation of m or c families specified in the allowed instance types attribute, the instance type will not be considered for provisioning.
Selected Instances (not an exhaustive list)
m5.xlarge
m5.2xlarge
m5.4xlarge
…
c5.xlarge
c5.2xlarge
…
m4.xlarge
m4.2xlarge
m4.4xlarge
…
c4.xlarge
c4.2xlarge
…
As you can see, ABS considers a broad set of instance types for provisioning, however they all meet the compute attributes that are required for your workload.
Cleanup
To delete both ASGs and terminate all the instances, execute the following commands:
In this post, we explored the two new ABS attributes – network bandwidth and allowed instance types. Customers can use these attributes to select instances based on network bandwidth and to limit the set of instances that ABS selects from. The two new attributes, as well as the existing set of ABS attributes enable you to save time on creating and maintaining instance type flexible configurations and make it even easier to express the compute requirements of your workload.
ABS represents the paradigm shift in the way that our customers interact with compute, making it easier than ever to request diversified compute resources at scale. We recommend ABS as a tool to help you identify and access the largest amount of EC2 compute capacity for your instance type flexible workloads.
This guest post was authored by Rana Ahsan and Chris Liu, Software Engineers at Coursera, and edited by Dave Sanderson and Adnan Bilwani, at AWS.
Coursera was launched in 2012 by two Stanford Computer Science professors, Daphne Koller and Andrew Ng, with a vision of providing universal access to world-class learning. It’s now one of the world’s leading online learning platforms with more than 77 million registered learners. Coursera partners with over 200 leading university and industry partners to offer a broad catalog of content and credentials, including Guided Projects, courses, Specializations, certificates, and accredited bachelor’s and master’s degrees. More than 6,000 institutions have used Coursera to transform their talent by upskilling and reskilling their employees, citizens, and students in the high-demand data science, technology, and business skills required to compete in today’s economy.
Coursera’s challenge
About a year and a half ago, we were debugging some performance bottlenecks for our microservices where some requests were too slow and often resulted in server errors due to timeout. Even after digging into the logs and looking through existing performance metrics of the underlying systems, we couldn’t determine the cause or explain the behavior. To compound the matter, we saw the issues across multiple applications, leading to a concern that the issue resided in code shared across applications.
To dig deeper into the problem, we started doing manual reviews of the code for the applications associated with these failures. This process turned out to be too laborious and time-consuming.
We also started building out our debugging solution utilizing shell scripts to capture a snapshot of the system and application state so we could analyze the details of these bottlenecks. Although the scripts provided some valuable insights, we started to run into issues of scale. The process of deploying the tooling and collecting the data became tedious and cumbersome. At the same time, the more data we received back from our scripts, the more demand we saw for this level of detail.
Solution with Amazon CodeGuru
It was at this point we decided to look into CodeGuru Profiler to determine if it could provide the same insights as our tooling while reducing the administrative burden associated with deploying, aggregating, and analyzing the data.
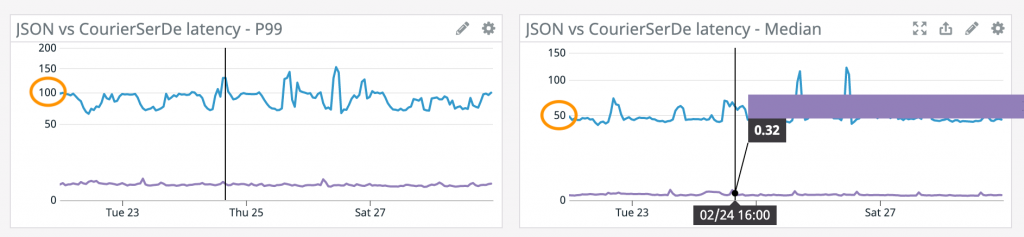
Quickly after deploying CodeGuru Profiler, we started to get valuable and actionable data regarding the issue. The profiler highlighted a high CPU usage during the deserialization process used for application communications (see the following screenshot). This confirmed our suspicions that the issue was indeed in the shared code, but it was also an unexpected find, because JSON deserialization is widespread and it hadn’t hit our radar as a potential candidate for the issue.
The deserialization performance was causing slow processing time for each request and increasing the overall communication latency. This led to performance degradation by causing the calls to slowly stack up over time until the request would time out. With CodeGuru Profiler, we were also able to establish a relationship between the size of the JSON document and the high CPU usage. As the document size increased, so did CPU usage. In some cases, this resulted in a resource starvation situation on the system, which in turn could cause other processes on the instance to crash, resulting in a sudden failure.
In addition to the performance and application instances failures, the high CPU usage during deserialization was quietly driving up costs. Because the issue was in shared code, the wasteful resource consumption was contributing to the need for additional instances to be added into the application cluster in order to meet throughput requirements.
Results
The details from CodeGuru Profiler enabled us to see and understand the underlying cause and move forward with a solution. Because the code is in the critical communication path for our microservices and shared across many applications, we decided to replace the JSON serialization with an alternative object serialization approach that was much more performant.
To get a deeper understanding of the performance impact of this change, we deployed the original code to a test environment. We used CodeGuru Profiler to evaluate the performance of the JSON and native object serialization. After we ran the same battery of tests against the new code, the deserialization CPU usage dropped between 30–40%.
This resulted in a corresponding decrease in serialization-deserialization latency of 5–50% depending on response payload size and workload.
As we roll out this optimization across our fleet, we anticipate seeing significant improvements in the performance and stability of our microservices platform as well as a reduction in CPU utilization cost.
Conclusion
CodeGuru Profiler provides additional application insights and helps us troubleshoot other issues in our applications, including resolving a case of flaky I/O errors and improving tail latency by recommending a different thread-pooling strategy.
CodeGuru Profiler was easy to maintain and scale across our fleet. It quickly identified these performance issues in our production environment and helped us verify and understand the impact of possible resolutions prior to releasing the code back into production.
About the authors
Rana Ahsan is a Staff Software Engineer at Coursera
Chris Liu is a Staff Software Engineer at Coursera
Adnan Bilwani is a Sr. Specialist Builders Experience at AWS
Dave Sanderson is a Sr. Technical Account Manager at AWS
This post is written by Kinnar Sen, Senior Solutions Architect, EC2 Spot
Apache Spark is an open-source, distributed processing system used for big data workloads. It provides API operations to perform multiple tasks such as streaming, extract transform load (ETL), query, machine learning (ML), and graph processing. Spark supports four different types of cluster managers (Spark standalone, Apache Mesos, Hadoop YARN, and Kubernetes), which are responsible for scheduling and allocation of resources in the cluster. Spark can run with native Kubernetes support since 2018 (Spark 2.3). AWS customers that have already chosen Kubernetes as their container orchestration tool can also choose to run Spark applications in Kubernetes, increasing the effectiveness of their operations and compute resources.
In this post, I illustrate the deployment of scalable, resilient, and cost optimized Spark application using Kubernetes via Amazon Elastic Kubernetes Service (Amazon EKS) and Amazon EC2 Spot Instances. Learn how to save money on big data workloads by implementing this solution.
Overview
Amazon EC2 Spot Instances
Amazon EC2 Spot Instances let you take advantage of unused EC2 capacity in the AWS Cloud. Spot Instances are available at up to a 90% discount compared to On-Demand Instance prices. Capacity pools are a group of EC2 instances that belong to particular instance family, size, and Availability Zone (AZ). If EC2 needs capacity back for On-Demand Instance usage, Spot Instances can be interrupted by EC2 with a two-minute notification. There are many graceful ways to handle the interruption to ensure that the application is well architected for resilience and fault tolerance. This can be automated via the application and/or infrastructure deployments. Spot Instances are ideal for stateless, fault tolerant, loosely coupled and flexible workloads that can handle interruptions.
Amazon Elastic Kubernetes Service
Amazon EKS is a fully managed Kubernetes service that makes it easy for you to run Kubernetes on AWS without needing to install, operate, and maintain your own Kubernetes control plane. It provides a highly available and scalable managed control plane. It also provides managed worker nodes, which let you create, update, or terminate shut down worker nodes for your cluster with a single command. It is a great choice for deploying flexible and fault tolerant containerized applications. Amazon EKS supports creating and managing Amazon EC2 Spot Instances using Amazon EKS-managed node groups following Spot best practices. This enables you to take advantage of the steep savings and scale that Spot Instances provide for interruptible workloads running in your Kubernetes cluster. Using EKS-managed node groups with Spot Instances requires less operational effort compared to using self-managed nodes. In addition to launching Spot Instances in managed node groups, it is possible to specify multiple instance types in EKS managed node groups. You can find more in this blog.
Apache Spark and Kubernetes
When a spark application is submitted to the Kubernetes cluster the following happens:
A Spark driver is created.
The driver and the run within pods.
The Spark driver then requests for executors, which are scheduled to run within pods. The executors are managed by the driver.
The application is launched and once it completes, the executor pods are cleaned up. The driver pod persists the logs and remains in a completed state until the pod is cleared by garbage collection or manually removed. The driver in a completed stage does not consume any memory or compute resources.
When a spark application runs on clusters managed by Kubernetes, the native Kubernetes scheduler is used. It is possible to schedule the driver/executor pods on a subset of available nodes. The applications can be launched either by a vanilla ‘spark submit’, a workflow orchestrator like Apache Airflow or the spark operator. I use vanilla ‘spark submit’ in this blog. is also able to schedule Spark applications on EKS clusters as described in this launch blog, but Amazon EMR on EKS is out of scope for this post.
Cost optimization
For any organization running big data workloads there are three key requirements: scalability, performance, and low cost. As the size of data increases, there is demand for more compute capacity and the total cost of ownership increases. It is critical to optimize the cost of big data applications. Big Data frameworks (in this case, Spark) are distributed to manage and process high volumes of data. These frameworks are designed for failure, can run on machines with different configurations, and are inherently resilient and flexible.
If Spark deploys on Kubernetes, the executor pods can be scheduled on EC2 Spot Instances and driver pods on On-Demand Instances. This reduces the overall cost of deployment – Spot Instances can save up to 90% over On-Demand Instance prices. This also enables faster results by scaling out executors running on Spot Instances. Spot Instances, by design, can be interrupted when EC2 needs the capacity back. If a driver pod is running on a Spot Instance, which is interrupted then the application fails and the application must be re-submitted. To avoid this situation, the driver pod can be scheduled on On-Demand Instances only. This adds a layer of resiliency to the Spark application running on Kubernetes. To cost optimize the deployment, all the executor pods are scheduled on Spot Instances as that’s where the bulk of compute happens. Spark’s inherent resiliency has the driver launch new executors to replace the ones that fail due to Spot interruptions.
There are a couple of key points to note here.
The idea is to start with minimum number of nodes for both On-Demand and Spot Instances (one each) and then auto-scale usingCluster Autoscaler and EC2 Auto Scaling Cluster Autoscaler for AWS provides integration with Auto Scaling groups. If there are not sufficient resources, the driver and executor pods go into pending state. The Cluster Autoscaler detects pods in pending state and scales worker nodes within the identified Auto Scaling group in the cluster using EC2 Auto Scaling.
The scaling for On-Demand and Spot nodes is exclusive of one another. So, if multiple applications are launched the driver and executor pods can be scheduled in different node groups independently per the resource requirements. This helps reduce job failures due to lack of resources for the driver, thus adding to the overall resiliency of the system.
Using EKS Managed node groups
This requires significantly less operational effort compared to using self-managed nodegroup and enables:
Auto enforcement of Spot best practices like Capacity Optimized allocation strategy, Capacity Rebalancing and use multiple instances types.
Proactive replacement of Spot nodes using rebalance notifications.
Managed draining of Spot nodes via re-balance recommendations.
The nodes are auto-labeled so that the pods can be scheduled with NodeAffinity.
eks.amazonaws.com/capacityType: SPOT
eks.amazonaws.com/capacityType: ON_DEMAND
Now that you understand the products and best practices of used in this tutorial, let’s get started.
Tutorial: running Spark in EKS managed node groups with Spot Instances
In this tutorial, I review steps, which help you launch cost optimized and resilient Spark jobs inside Kubernetes clusters running on EKS. I launch a word-count application counting the words from an Amazon Customer Review dataset and write the output to an Amazon S3 folder. To run the Spark workload on Kubernetes, make sure you have eksctl and kubectl installed on your computer or on an AWS Cloud9 environment. You can run this by using an AWS IAM user or role that has the AdministratorAccess policy attached to it, or check the minimum required permissions for using eksctl. The spot node groups in the Amazon EKS cluster can be launched both in a managed or a self-managed way, in this post I use the former. The config files for this tutorial can be found here. The job is finally launched in cluster mode.
Create Amazon S3 Access Policy
First, I must create an Amazon S3 access policy to allow the Spark application to read/write from Amazon S3. Amazon S3 Access is provisioned by attaching the policy by ARN to the node groups. This associates Amazon S3 access to the NodeInstanceRole and, hence, the node groups then have access to Amazon S3. Download the Amazon S3 policy file from here and modify the <<output folder>> to an Amazon S3 bucket you created. Run the following to create the policy. Note the ARN.
aws iam create-policy --policy-name spark-s3-policy --policy-document file://spark-s3.json
Cluster and node groups deployment
Create an EKS cluster using the following command:
The cluster takes approximately 15 minutes to launch.
Create the nodegroup using the nodeGroup config file. Replace the <<Policy ARN>> string using the ARN string from the previous step.
eksctl create nodegroup -f managedNodeGroups.yml
Scheduling driver/executor pods
The driver and executor pods can be assigned to nodes using affinity. PodTemplates can be used to configure the detail, which is not supported by Spark launch configuration by default. This feature is available from Spark 3.0.0, requiredDuringScheduling node affinity is used to schedule the driver and executor jobs. Sample podTemplates have been uploaded here.
Launching a Spark application
Create a service account. The spark driver pod uses the service account to create and watch executor pods using Kubernetes API server.
podTemplateFile is used here, which enables scheduling of the driver pods to On-Demand Instances and executor pods to Spot Instances.
Spark provides a mechanism to allocate dynamically resources dynamically based on workloads. In the latest release of Spark (3.0.0), dynamicAllocation can be used with Kubernetes cluster manager. The executors that do not store, active, shuffled files can be removed to free up the resources. DynamicAllocation works well in tandem with Cluster Autoscaler for resource allocation and optimizes resource for jobs. We are using dynamicAllocation here to enable optimized resource sharing.
The application file and output are both in Amazon S3.
Spark Event logs are redirected to Amazon S3. Spark on Kubernetes creates local temporary files for logs and removes them once the application completes. The logs are redirected to Amazon S3 and Spark History Server can be used to analyze the logs. Note, you can create more instrumentation using tools like Prometheus and Grafana to monitor and manage the cluster.
Observations
EC2 Spot Interruptions
The following diagram and log screenshot details from Spark History server showcases the behavior of a Spark application in case of an EC2 Spot interruption.
Four Spark applications launched in parallel in a cluster and one of the Spot nodes was interrupted. A couple of executor pods were terminated shut down in three of the four applications, but due to the resilient nature of Spark new executors were launched and the applications finished almost around the same time. The Spark Driver identified the shut down executors, which handled the shuffle files and relaunched the tasks running on those executors.
The Spark Driver identified the shut down executors, which handled the shuffle files and relaunched the tasks running on those executors.
Dynamic Allocation
Dynamic Allocation works with the caveat that it is an experimental feature.
Cost Optimization
Cost Optimization is achieved in several different ways from this tutorial.
Use of 100% Spot Instances for the Spark executors
Use of dynamicAllocation along with cluster autoscaler does make optimized use of resources and hence save cost
With the deployment of one driver and executor nodes to begin with and then scaling up on demand reduces the waste of a continuously running cluster
Cluster Autoscaling
Cluster Autoscaling is triggered as it is designed when there are pending (Spark executor) pods.
If you are trying out the tutorial, run the following steps to make sure that you don’t encounter unwanted costs.
Delete the EKS cluster and the nodegroups with the following command:
eksctl delete cluster --name sparkonk8
Delete the Amazon S3 Access Policy with the following command:
aws iam delete-policy --policy-arn <<POLICY ARN>>
Delete the Amazon S3 Output Bucket with the following command:
aws s3 rb --force s3://<<S3_BUCKET>>
Conclusion
In this blog, I demonstrated how you can run Spark workloads on a Kubernetes Cluster using Spot Instances, achieving scalability, resilience, and cost optimization. To cost optimize your Spark based big data workloads, consider running spark application using Kubernetes and EC2 Spot Instances.
The collective thoughts of the interwebz
Manage Consent
To provide the best experiences, we use technologies like cookies to store and/or access device information. Consenting to these technologies will allow us to process data such as browsing behavior or unique IDs on this site. Not consenting or withdrawing consent, may adversely affect certain features and functions.
Functional
Always active
The technical storage or access is strictly necessary for the legitimate purpose of enabling the use of a specific service explicitly requested by the subscriber or user, or for the sole purpose of carrying out the transmission of a communication over an electronic communications network.
Preferences
The technical storage or access is necessary for the legitimate purpose of storing preferences that are not requested by the subscriber or user.
Statistics
The technical storage or access that is used exclusively for statistical purposes.The technical storage or access that is used exclusively for anonymous statistical purposes. Without a subpoena, voluntary compliance on the part of your Internet Service Provider, or additional records from a third party, information stored or retrieved for this purpose alone cannot usually be used to identify you.
Marketing
The technical storage or access is required to create user profiles to send advertising, or to track the user on a website or across several websites for similar marketing purposes.