Senior leaders are visible by design. They speak at events, post on LinkedIn, sit on boards, and sign public filings. That visibility builds brands and drives growth. It also creates risk.
The findings are clear: an executive’s online footprint is not just a privacy issue. It is a business risk.
Across industries, we found that surface web data, public records, social media activity, and leaked credentials combine to create a detailed profile that threat actors can weaponize. In many cases, 60% of an individual’s digital risk exposure is retrievable through a simple surface web search. When paired with breached credentials circulating in criminal forums, that information fuels business email compromise, spear phishing, impersonation, and even hybrid cyber-physical threats.
Our research features the Rapid7 Exposure Prevention (REP) Score, a quantitative metric that measures executive exposure across four areas: general exposure, social media, public records, and leaked credentials. The data reveals meaningful differences by industry and geography, with U.S.-based executives generally more exposed than their European counterparts, particularly in public records and credential leaks.
High-profile incidents continue to show how small details can lead to large-scale impact. The takeaway for security leaders is direct: protecting executives requires more than awareness training. It demands continuous monitoring, strong authentication, proactive credential hygiene, and integration between cyber and physical risk programs.
Download the Rapid7 report
Download the full report to see how your organization compares and how to reduce executive exposure before attackers take advantage.
Politicians fixate on the global race for technological supremacy between US and China. They debate geopolitical implications of chip exports, latest model releases from each country, and military applications of AI. Someday, they believe, we might see advancements in AI tip the scales in a superpower conflict.
But the most important arms race of the 21st century is already happening elsewhere and, while AI is definitely the weapon of choice, combatants are distributed across dozens of domains.
Each of these is an arms race. Adversaries within a system iteratively seeking an edge against their competition by continuously expanding their use of a common technology.
Beneficiaries of these arms races are US mega-corporations capturing wealth from the rest of us at an unprecedented rate. A substantial fraction of global economy has reoriented around AI in just the past few years, and that trend is accelerating. In parallel, this industry’s lobbying interests are quickly becoming the object, rather than the subject, of US government power.
To understand these arms races, let’s look at an example of particular interest to democracies worldwide: how AI is changing the relationship between democratic government and citizens. Interactions that used to happen between people and elected representatives are expanding to a massive scale, with AIs taking the roles that humans once did.
In a notorious example from 2017, US Federal Communications Commission opened a comment platform on the web to get public input on internet regulation. It was quickly flooded with millions of comments fraudulently orchestrated by broadband providers to oppose FCC regulation of their industry. From the other side, a 19-yearold college student responded by submitting millions of comments of his own supporting the regulation. Both sides were using software primitive by the standards of today’s AI.
Nearly a decade later, it is getting harder for citizens to tell when they’re talking to a government bot, or when an online conversation about public policy is just bots talking to bots. When constituents leverage AI to communicate better, faster, and more, it pressures government officials to do the same.
This may sound futuristic, but it’s become a familiar reality in US. Staff in US Congress are using AI to make their constituent email correspondence more efficient. Politicians campaigning for office are adopting AI tools to automate fundraising and voter outreach. By one 2025 estimate, a fifth of public submissions to the Consumer Financial Protection Bureau were already being generated with AI assistance.
People and organizations are adopting AI here because it solves a real problem that has made mass advocacy campaigns ineffective in the past: quantity has been inversely proportional to both quality and relevance. It’s easy for government agencies to dismiss general comments in favour of more specific and actionable ones. That makes it hard for regular people to make their voices heard. Most of us don’t have the time to learn the specifics or to express ourselves in this kind of detail. AI makes that contextualization and personalization easy. And as the volume and length of constituent comments grow, agencies turn to AI to facilitate review and response.
That’s the arms race. People are using AI to submit comments, which requires those on the receiving end to use AI to wade through the comments received. To the extent that one side does attain an advantage, it will likely be temporary. And yet, there is real harm created when one side exploits another in these adversarial systems. Constituents of democracies lose out if their public servants use AI-generated responses to ignore and dismiss their voices rather than to listen to and include them. Scientific enterprise is weakened if fraudulent papers sloppily generated by AI overwhelm legitimate research.
As we write in our new book, Rewiring Democracy, the arms race dynamic is inevitable. Every actor in an adversarial system is incentivized and, in the absence of new regulation in this fast moving space, free to use new technologies to advance its own interests. Yet some of these examples are heartening. They signal that, even if you face an AI being used against you, there’s an opportunity to use the tech for your own benefit.
But, right now, it’s obvious who is benefiting most from AI. A handful of American Big Tech corps and their owners are extracting trillions of dollars from the manufacture of AI chips, development of AI data centers, and operation of so-called ‘frontier’ AI models. Regardless of which side pulls ahead in each arms race scenario, the house always wins. Corporate AI giants profit from the race dynamic itself.
As formidable as the near-monopoly positions of today’s Big Tech giants may seem, people and governments have substantial capability to fight back. Various democracies are resisting this concentration of wealth and power with tools of anti-trust regulation, protections for human rights, and public alternatives to corporate AI. All of us worried about the AI arms race and committed to preserving the interests of our communities and our democracies should think in both these terms: how to use the tech to our own advantage, and how to resist the concentration of power AI is being exploited to create.
This essay was written with Nathan E. Sanders, and originally appeared in The Times of India.
As previously announced, over the next two years we will be switching the default certificate lifetime from 90 days to 64 days, and then 45 days. This will ultimately double the number of certificate renewal requests each day: today we expect renewal around day 60 (of a 90-day certificate), while in the future we expect renewal around day 30 (of a 45-day certificate). If you use an ACME client that supports ARI, this will happen automatically.
The good news for subscribers is that you don’t need any changes to your rate limits, whether you are using our default limits or have requested an override. Our rate limits affect issuance for new domain names (or groups of domain names), but renewals are exempt. So, for instance, if you are managing a set of 15,000 certificates that you continually renew, and create 250 new certificates (with new domain names) each day, you will be well within our limits both before and after the transition. The 250 new certificates daily will still be well under our New Orders per Account limit of 300 per day. And the 15,000 existing certificates will continue to be unaffected by rate limits, whether your ACME client is renewing them every sixty days or every thirty.
Version
11.1.0 of the GNU Octave scientific programming language has been
released.
This major release contains many new and improved functions. Among
other things, it brings better support for classdef objects and
arrays, broadcasting for special matrix types (like sparse,
diagonal, or permutation matrices), updates for Matlab
compatibility (notably support for the nanflag, vecdim and other
parameters for many basic math and statistics functions), and
performance improvements in many functions.
When creating a project in Amazon SageMaker Unified Studio, users select a project profile to define resources and tools to be provisioned in the project. These are used by Amazon SageMaker Catalog to implement a data mesh pattern. Some users don’t want to take advantage of resources provisioned along with the project for various reasons. For instance, they may want to avoid making changes to their existing applications and data products.
This post shows you how to implement a data mesh pattern by using Amazon SageMaker Catalog while keeping your current data repositories and consumer applications unchanged.
Solution overview
In this post, you will simulate a scenario based on data producer and data consumer that exists before Amazon SageMaker Catalog adoption. For this purpose, you will use a sample dataset to simulate existing data and simulate an existing application using an AWS Lambda function. You can apply the same solution to your real-life data and workloads.
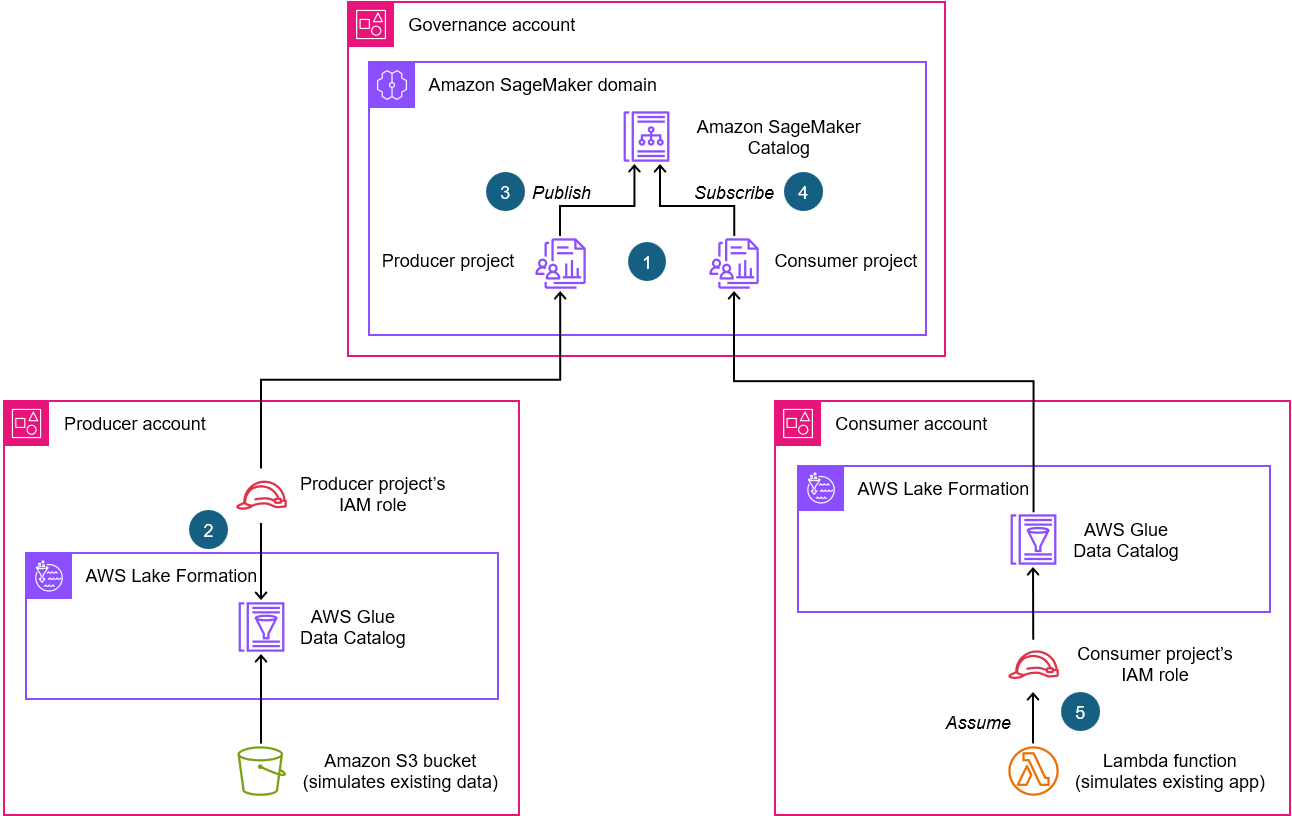
The following diagram illustrates the solution architecture’s key configurations. In this architecture, the Amazon Simple Storage Service (Amazon S3) bucket and the AWS Glue Data Catalog in the producer account simulate the existing data repository. The Lambda function in the consumer account simulates the existing consumer application.
Here is a description of the key configurations highlighted in the architecture:
As part of an Amazon SageMaker domain, create a producer project (associated to a producer account) and a consumer project (associated to a consumer account). Among other resources, a project AWS Identity and Access Management (IAM) role is created for each project in the associated account.
In the producer account, use AWS Lake Formation to grant producer project’s IAM role permissions to access the existing data asset.
Publish the data asset in the Amazon SageMaker Catalog from the producer project.
Subscribe the data asset from the consumer project.
In the consumer account, configure your Lambda function to assume consumer project’s IAM role to access the subscribed data asset.
The solution architecture is based on the following Amazon Web Services (AWS) services and features:
Amazon SageMaker Catalog offers you a way to discover, govern, and collaborate on data and AI securely.
Amazon SageMaker Unified Studio provides a single data and AI development environment to discover and build with your data. Amazon SageMaker Unified Studio projects provide collaborative boundaries for users to accomplish data and AI tasks.
AWS Lake Formation, which you can use centrally to govern, secure, and share data for analytics and machine learning.
AWS Glue Data Catalog is a persistent metadata store for your data assets. It contains table definitions, job definitions, schemas, and other control information to help you manage your AWS Glue environment.
Amazon S3 is an object storage service that offers industry-leading scalability, data availability, security, and performance.
Setting up resources
In this section, you will prepare the resources and configurations you need for this solution.
Three AWS accounts
To follow this solution, you need three AWS accounts, and it’s better if they’re part of the same organization in AWS Organizations:
Producer account – Hosts the data asset to be published
Consumer account – Hosts the application that consumes the data published from the producer account
Governance account – Where the Amazon SageMaker Unified Studio domain is configured
Each account must have an Amazon Virtual Private Cloud (Amazon VPC) with at least two private subnets in two different Availability Zones. For instruction, refer to Create a VPC plus other VPC resources. Make sure to create both VPCs in the same Region you plan to apply this solution.
A governance account is used for the sake of convenience, but it’s not strictly needed because Amazon SageMaker can be configured and managed in producer or consumer accounts.If you don’t have access to three accounts, you can still use this post to understand the key configurations required to implement a data mesh pattern with Amazon SageMaker Catalog while keeping your current data repositories and consumer applications unchanged.
Create a data repository in the producer account
First, create a sample dataset by following these instructions:
In the navigation pane, under Data Catalog, choose Databases.
Choose Add database.
For Name, enter collections.
For Description, enter This database contains collections of statistics for natural resources.
Choose Create database.
In the navigation pane, under Data Catalog, choose Tables.
Choose Add table.
In the table creation guided procedure, enter the following input for Step 1: Set table properties:
For Name, enter trees.
For Database, select collections.
For Description, enter This table captures ratings data related to the characteristics of various tree species.
For Table format, select Standard AWS Glue table (default).
For Select the type of source, select S3.
For Data location is specified in, select my account.
For Include path, enter s3://<bucket-name>/<prefix>/ where <bucket-name> is the name of the S3 bucket you created earlier in this procedure and <prefix> is the optional prefix for the trees.csv file you uploaded.
For Data format, select CSV.
For Delimeter, select Comma (,).
Choose Next.
For Step 2: Choose or define schema, enter the following:
For Schema, select Define or upload a schema.
Choose Edit schema as JSON and enter the following schema in the pop-up:
Create the Lambda function in the consumer account. This will simulate a data consumer application.First, in the consumer account create the IAM policy and the IAM role to be assigned to the Lambda function:
Create an IAM policy and name it smus_consumer_athena_execution by using the following policy. Make sure to replace placeholders <AWS_Region> and <AWS_account_ID_number> with your Region and consumer account ID number. You will replace the <workgroup_id> placeholder later. For IAM policy creation instructions, refer to Create IAM policies (console).
Create an IAM role for AWS Lambda service and name it smus_consumer_lambda. Assign to it the AWS managed permission AWSLambdaBasicExecutionRole and the permission named smus_consumer_athena_execution that you just created. For instructions, refer to Create a role to delegate permissions to an AWS service.
After the IAM role for the Lambda function is in place, you can create the Lambda function in the consumer account:
Choose Create function and enter the following information:
For Function name, enter consumer_function.
For Runtime, select Python 3.14.
Expand Change default execution role section.
For Execution role, select Use an existing role.
For Existing role, select smus_consumer_lambda.
Choose Create function.
Under the Code tab, in the Code source, replace the existing code with the following:
import boto3
import time
sts_client = boto3.client('sts')
role_arn = "<role_arn>"
session_name = "AthenaQuerySession"
catalog = "AwsDataCatalog"
database = "<database_name>"
workgroup = "<workgroup_id>"
query = "select * from "+catalog+"."+database+".trees"
def lambda_handler(event, context):
    # Assume SageMaker Unified Studio project role
    assumed_role_object = sts_client.assume_role(
        RoleArn=role_arn,
        RoleSessionName=session_name
    )
    # Get temporary credentials
    credentials = assumed_role_object['Credentials']
    # Create Athena client using temporary credentials
    athena = boto3.client(
        'athena',
        aws_access_key_id=credentials['AccessKeyId'],
        aws_secret_access_key=credentials['SecretAccessKey'],
        aws_session_token=credentials['SessionToken'],
        region_name='eu-west-1'
    )
    # Execute Athena Query
    response = athena.start_query_execution(
        QueryString=query,
        QueryExecutionContext={
            'Database': database,
            'Catalog': catalog
        },
        WorkGroup=workgroup
    )
    query_execution_id = response['QueryExecutionId']
    # Polling with exponential backoff
    wait_time = 0.25  # Start with 0.25 seconds
    max_wait = 8      # Maximum wait time of 8 seconds

    while True:
        result = athena.get_query_execution(QueryExecutionId=query_execution_id)
        state = result['QueryExecution']['Status']['State']
        if state in ['FAILED', 'CANCELLED']:
            raise Exception(f"Query {state}")
        elif state == 'SUCCEEDED':
            break
        elif state in ['QUEUED', 'RUNNING']:
            time.sleep(wait_time)
            wait_time = min(wait_time * 2, max_wait)  # Double wait time, cap at max_wait
    # Retrieve results
    results = athena.get_query_results(QueryExecutionId=query_execution_id)
    return results
Choose Deploy.
The code provided for the Lambda function includes some placeholders that you will replace later, after you have the required information. Don’t test the Lambda function at this time because it will fail because of the presence of the placeholders.
Create a user with administrative access
Amazon SageMaker Unified Studio supports two distinct domain types: AWS IAM Identity Center based domains and IAM based domains. At the time of writing this post, only IAM Identity Center based domains support multi-accounts association, therefore in this post you work with this type of domain that requires IAM Identity Center.
In the governance account, you enable IAM Identity Center and create an administrative user to create and manage the Amazon SageMaker Unified Studio domain. Create a user with administrative access:
Enable IAM Identity Center in the governance account. For instructions, refer to Enable IAM Identity Center.
To sign in with your IAM Identity Center user, use the sign-in URL that was sent to your email address when you created the IAM Identity Center user. For help signing in using an IAM Identity Center user, refer to Sign in to your AWS access portal.
After your domain is created, you can navigate to the Amazon SageMaker Unified Studio portal (a browser-based web application) where you can use your data and configured tools for analytics and AI. Save the Amazon SageMaker Unified Studio portal URL because you will use this URL later.
Solution steps
Now that you have the prerequisites in place, you can complete the following ten high-level steps to implement the solution.
Associate the producer and consumer accounts to the Amazon SageMaker Unified Studio domain
Start by associating the producer and consumer accounts to the newly created Amazon SageMaker Unified Studio domain. When you associate your producer and consumer accounts to the domain, make sure to select IAM users and roles can access APIs and IAM users can log in to Amazon SageMaker Unified Studio in the AWS RAM share managed permission section. For step-by-step instructions, refer to Associated accounts in Amazon SageMaker Unified Studio. If your AWS accounts are part of the same organization, your association requests are automatically accepted. However, if your AWS accounts aren’t part of the same organization, request association with the other AWS accounts in the governance account and then accept the association request in both the producer and consumer accounts.
Create two project profiles
Now, create two project profiles, one for the producer project and one for the consumer project.
In Amazon SageMaker Unified Studio, a project profile defines an uber template for projects in your Amazon SageMaker domain. A project profile is a collection of blueprints that provides reusable AWS CloudFormation templates used to create project resources.
A project profile is associated to a specific AWS account. This means, when a project is created the blueprints listed in the project profile are deployed in the associated AWS account. To use a project profile, you must enable its blueprints in the AWS account associated to the project profile.
Create the producer project profile
You’re going to create the producer project profile that is associated to the producer account. This project profile will be used to create the producer project. This profile includes by default the Tooling blueprint that creates resources for the project, including IAM user roles and security groups.
Before creating the project profile, you will enable the Tooling blueprint in the producer account using the following procedure:
Select the domain you created as part of prerequisites.
Under the Project profiles tab, choose Create and enter the following information:
For Project profile name, enter producer-project-profile.
For Project profile creation options, select Custom create.
DO NOT SELECT A BLUEPRINT for Blueprints because the Tooling blueprint is included by default in any project profile.
For Account, select Provide an account ID.
For Account ID, enter the producer account ID.
For Region, select Provide region name and then select the Region in which you’re working.
For Authorization, select Allow all users and groups.
For Project profile readiness, select Enable project profile on creation.
Choose Create project profile.
Create a consumer project profile
You also create a consumer project profile and associate it to the consumer account. This profile will be used to create the consumer project. The consumer project profile includes the LakeHouseDatabase blueprint, which is needed to create a lakehouse environment with an AWS Glue database for data management and an Amazon Athena workgroup for querying. The Tooling blueprint is included by default in the project profile.
Before creating the project profile, enable the Tooling and LakeHouseDatabase blueprints in the consumer account:
Select the domain you created as part of prerequisites.
Under Project profiles tab choose Create and enter the following information:
For Project profile name, enter consumer-project-profile.
For Project profile creation options, select Custom create.
For Blueprints, select LakeHouseDatabase.
For Account, select Provide an account ID.
For Account ID, enter the consumer account ID.
For Region, select Provide region name and then select the Region you are working.
For Authorization, select Allow all users and groups.
For Project profile readiness, select Enable project profile on creation.
Choose Create project profile.
Create SageMaker Unified Studio producer and consumer projects
In Amazon SageMaker Unified Studio, a project is a boundary within a domain where you can collaborate with other users to work on a business use case. In projects, you can create and share data and resources.To create producer and consumer projects in Amazon SageMaker Unified Studio use the following instructions:
Access the Amazon SageMaker Unified Studio portal.
Choose the Select a project dropdown list.
Choose Create project and enter the following information:
For Project name, enter Producer.
For Project profile, select producer-project-profile.
Choose Continue.
Choose Continue.
Choose Create project.
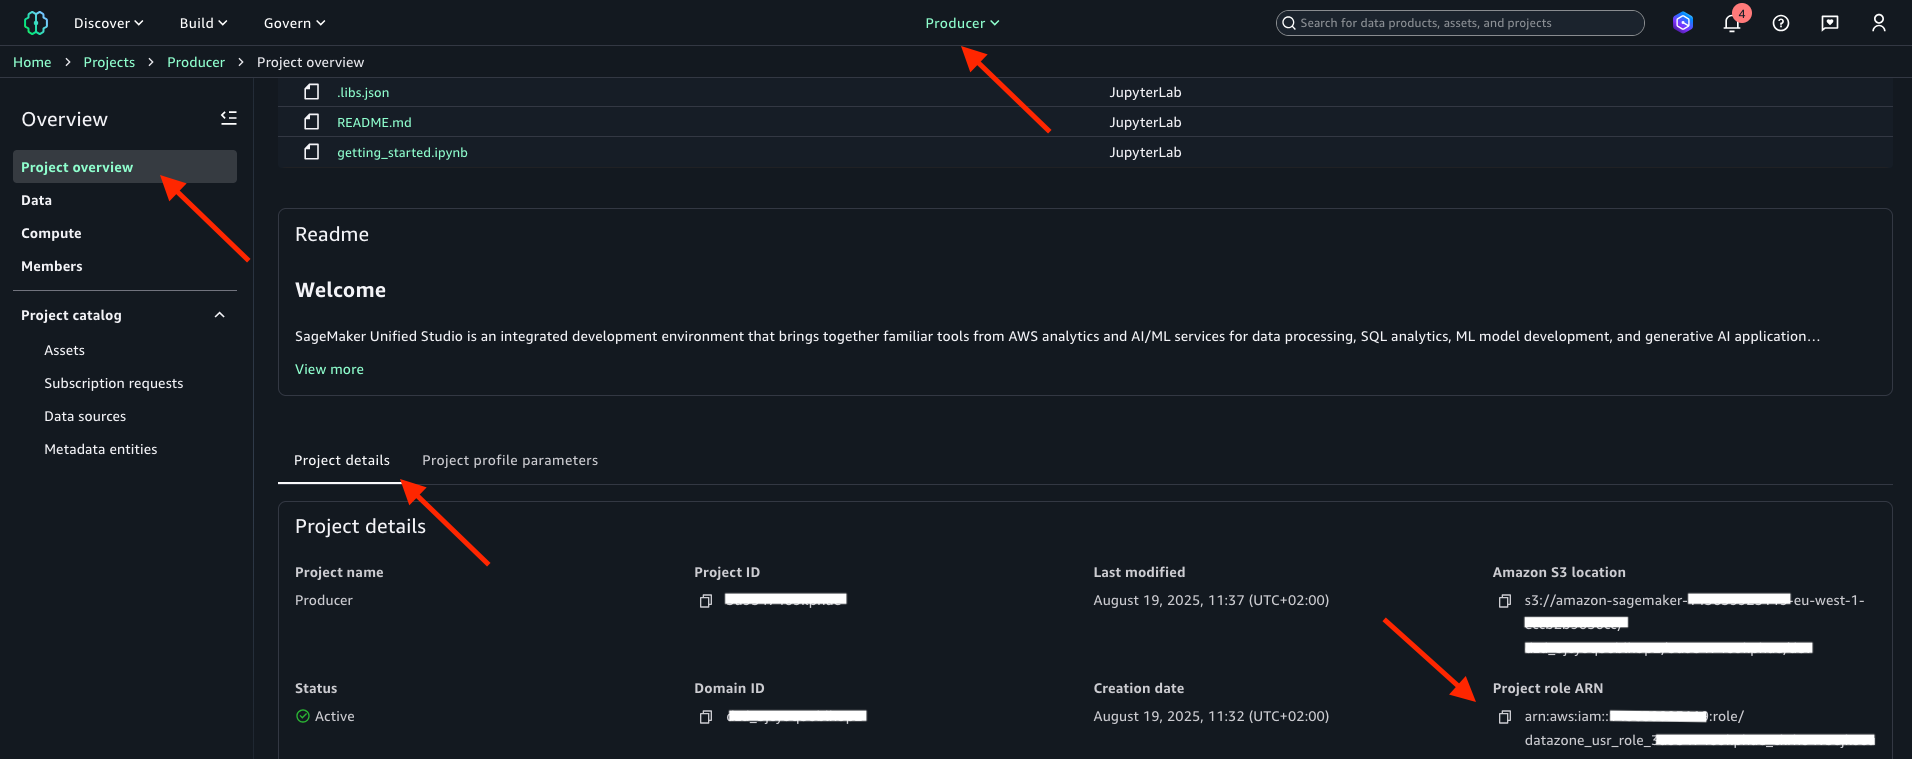
After you’ve created the Producer project, note in a text file the Project role ARN that is displayed in the Project overview. The following image is shown for reference. The project role name is the string that follows arn:aws:iam::<account_ID>:role/ in the project role Amazon Resource Name (ARN). You will use both project role name and ARN later.
Repeat the preceding procedure to create the Consumer project. Be sure to enter Consumer for Project name and then select consumer-project-profile for Project profile. After it’s created, note the Project role ARN in a text file. The project role name is the string that follows arn:aws:iam::<account_ID>:role/ in the project role ARN. You will use both project role name and ARN later.
Bring your own data from the producer account
Bring your own data to the Amazon SageMaker Unified Studio Producer project. AWS provides several options to achieve this onboarding. The first option is automated onboarding in Amazon SageMaker lakehouse, in which you ingest the Amazon SageMaker lakehouse metadata of datasets into Amazon SageMaker Catalog. With this option, you can onboard your Amazon SageMaker lakehouse data as part of creating a new Amazon SageMaker Unified Studio domain or for an existing domain.
For more information about automated onboarding of Amazon SageMaker lakehouse data, refer to Onboarding data in Amazon SageMaker Unified Studio. As other options, you can bring in existing resources to your Amazon SageMaker Unified Studio project by using the Data and Compute pages in your project, or by using scripts provided in GitHub. For more information about using the Data and Compute pages or about using scripts, refer to Bringing existing resources into Amazon SageMaker Unified Studio. In this post, you will use Amazon SageMaker lakehouse capabilities to import your trees AWS Glue table into the Producer project.
Register the Amazon S3 location for the table
To use Lake Formation permissions for fine-grained access control to the trees table, you need to register in Lake Formation the Amazon S3 location of the trees table. To do that, complete the following actions:
In the navigation pane under Administration, choose Data lake locations.
Choose Register location and enter the following information:
For S3 URI, enter s3://<bucket-name>/<prefix>/ where <bucket-name> is the name of the S3 bucket you created in the prerequisites and <prefix> is the optional prefix for the trees.csv file you uploaded as part of the prerequisite.
For IAM role, select AWSServiceRoleForLakeFormationDataAccess.
For Permission mode, select Lake Formation.
Choose Register location.
Grant Producer project role permissions on the database
Grant database access to the IAM role that is associated with your Producer project. This role is called the project role, and it was created in IAM upon project creation.
To access the AWS Glue Data Catalog collections database from the Producer project in the Amazon SageMaker Unified Studio, complete the following actions:
In the navigation pane under Data Catalog, choose Databases.
Choose the collections database.
From the Actions menu, choose Grant and enter the following information:
For IAM users and roles, select your Producer project’s role name. This is the string starting with datazone_usr_role_ that is part of the Producer project role ARN that you noted in step 3 “Create SageMaker Unified Studio producer and consumer projects”.
For Database permissions, select Describe.
Choose Grant.
Grant Producer project role permissions on the table
Grant trees table access to the IAM role that is associated with your Producer project. To grant these permissions use the following instructions:
In the navigation pane under Data Catalog, choose Tables and MVs.
Select the trees table.
From the Actions menu, choose Grant and enter the following information:
For IAM users and roles, select your Producer project’s role. This is the string starting with datazone_usr_role_ that is part of the Producerproject role ARN that you noted in step 3 “Create SageMaker Unified Studio producer and consumer projects”.
For Table permissions, select Select and Describe.
For Grantable permissions, select Select and Describe.
Choose Grant.
Revoke any existing permissions of IAMAllowedPrincipals
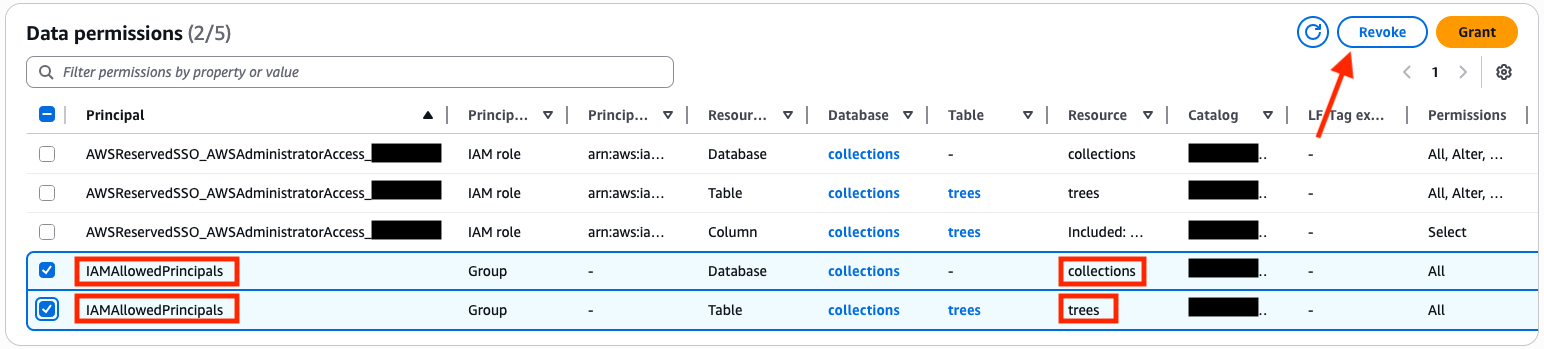
You must revoke the IAMAllowedPrincipals group permissions on both the database and table to enforce Lake Formation permission for access. For more information, refer to Revoking permission using the Lake Formation console.
In the navigation pane under Permission, choose Data permissions.
Select the entries where Principal is set to IAMAllowedPrincipals and Resource is set to collections or trees as in the following image:
Choose Revoke.
Enter revoke.
Choose Revoke again.
Verify that data is available in the Producer project
Verify that your collections database and trees table are accessible in the Producer project:
Access the Amazon SageMaker Unified Studio portal.
Choose the Select a project drop-down menu and choose the Producer project.
In the navigation pane under Overview, choose Data.
Choose Lakehouse.
Choose AwsDataCatalog.
Choose collections.
Choose tables.
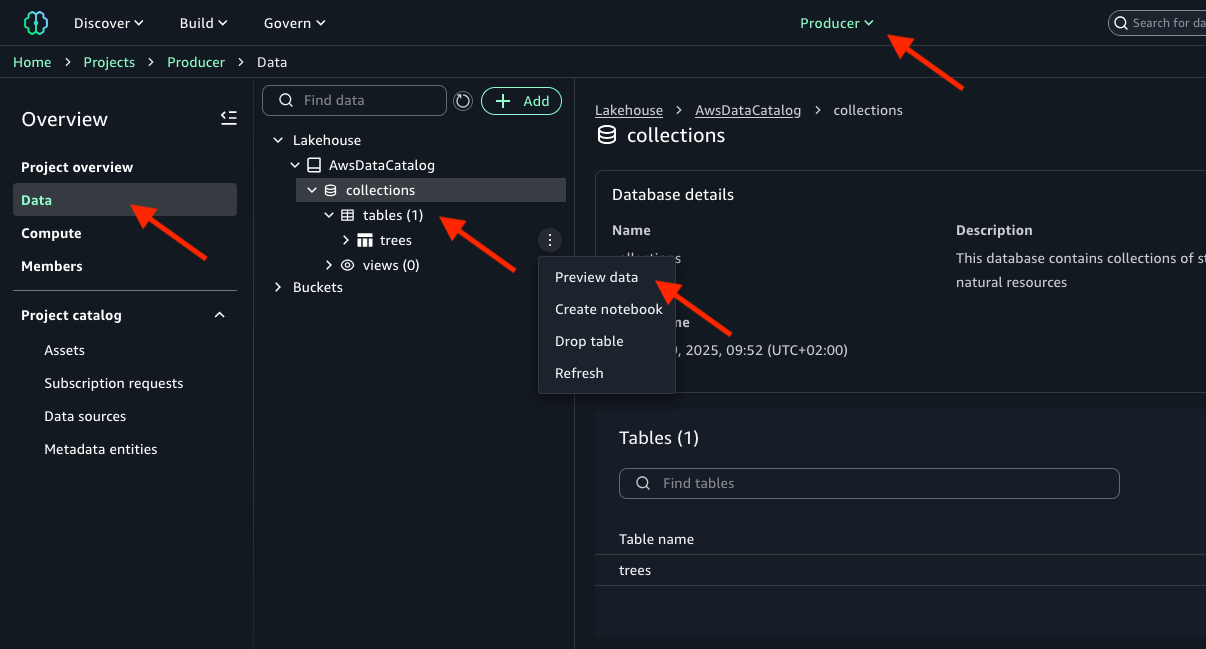
Choose the three-dot action menu next to your trees table and choose Preview data, as shown in the following image.
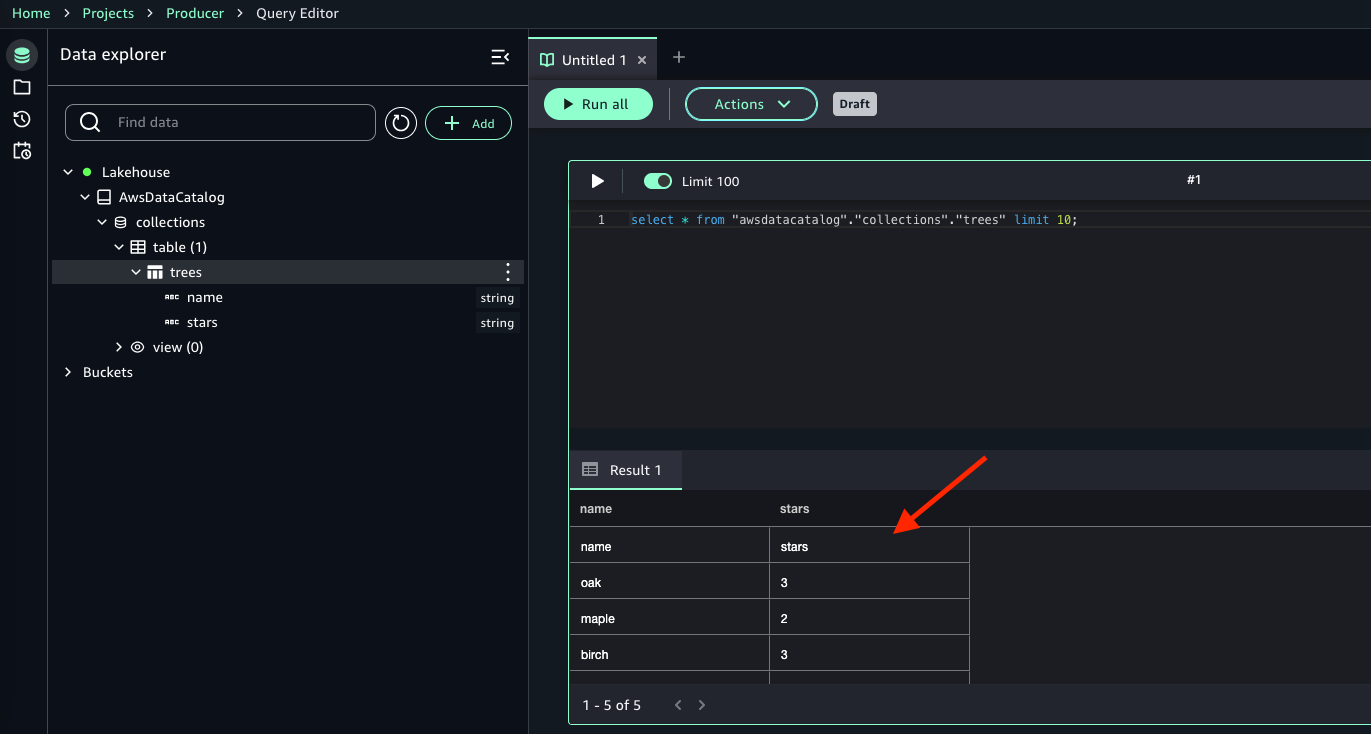
You’ll find data from the trees table as shown in the following image.
Create Amazon SageMaker Catalog asset
Even if it’s accessible in the project, to work with the trees table in Amazon SageMaker Catalog, you need to register the data source and create an Amazon SageMaker Catalog asset:
Access the Amazon SageMaker Unified Studio portal.
Choose the Select a project dropdown list and choose the Producer project.
On the project page, under Project catalog in the navigation pane, choose Data sources.
Choose Create Data Source and make the following selections:
For Name, enter collections.
For Data source type, select AWS Glue (Lakehouse).
For Database name, select collections.
Choose Next.
Choose Next.
Choose Next.
Choose Create.
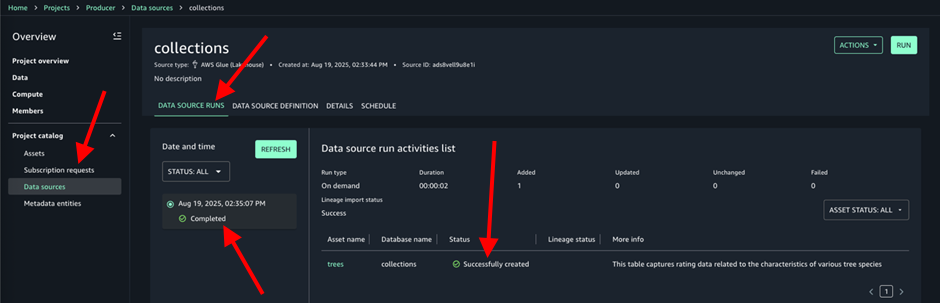
After the data source is created, you will be in the collections data source page, choose Run. This will import metadata and create the Amazon SageMaker Catalog asset.
In the collections data source, on the Data source runs tab, you’ll find your run marked as Completed and the trees asset Successfully created, as shown in the following image:
Publish the data asset in the Amazon SageMaker Catalog
Publishing a data asset manually is a one-time operation that you need to perform to allow others to access the data asset through the catalog:
Access the Amazon SageMaker Unified Studio portal.
Choose the Select a project dropdown list and choose the Producer project.
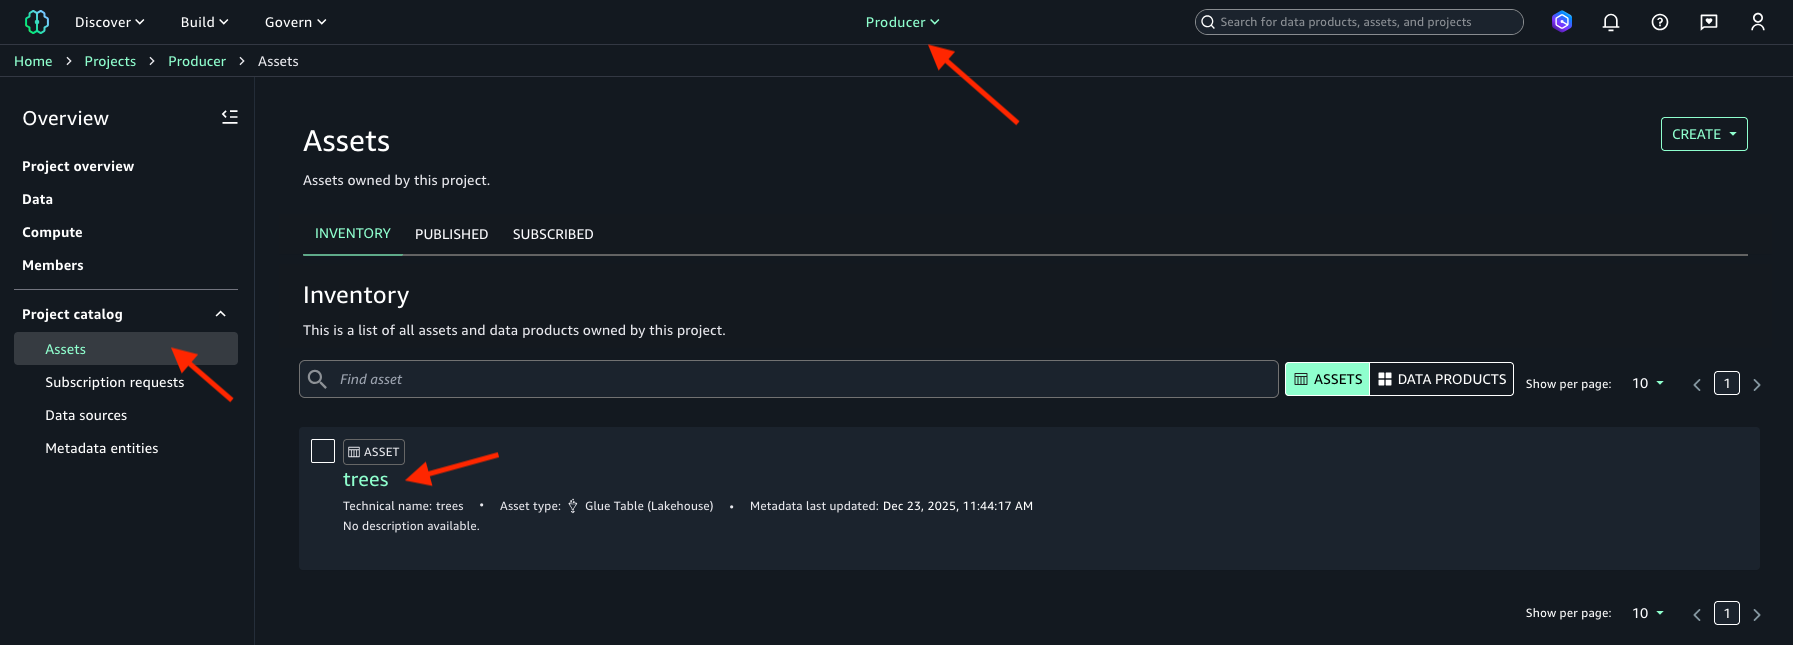
On the project page under Project catalog, choose Assets.
Select your trees data asset that is available on the Inventory tab. The following image is shown for reference.
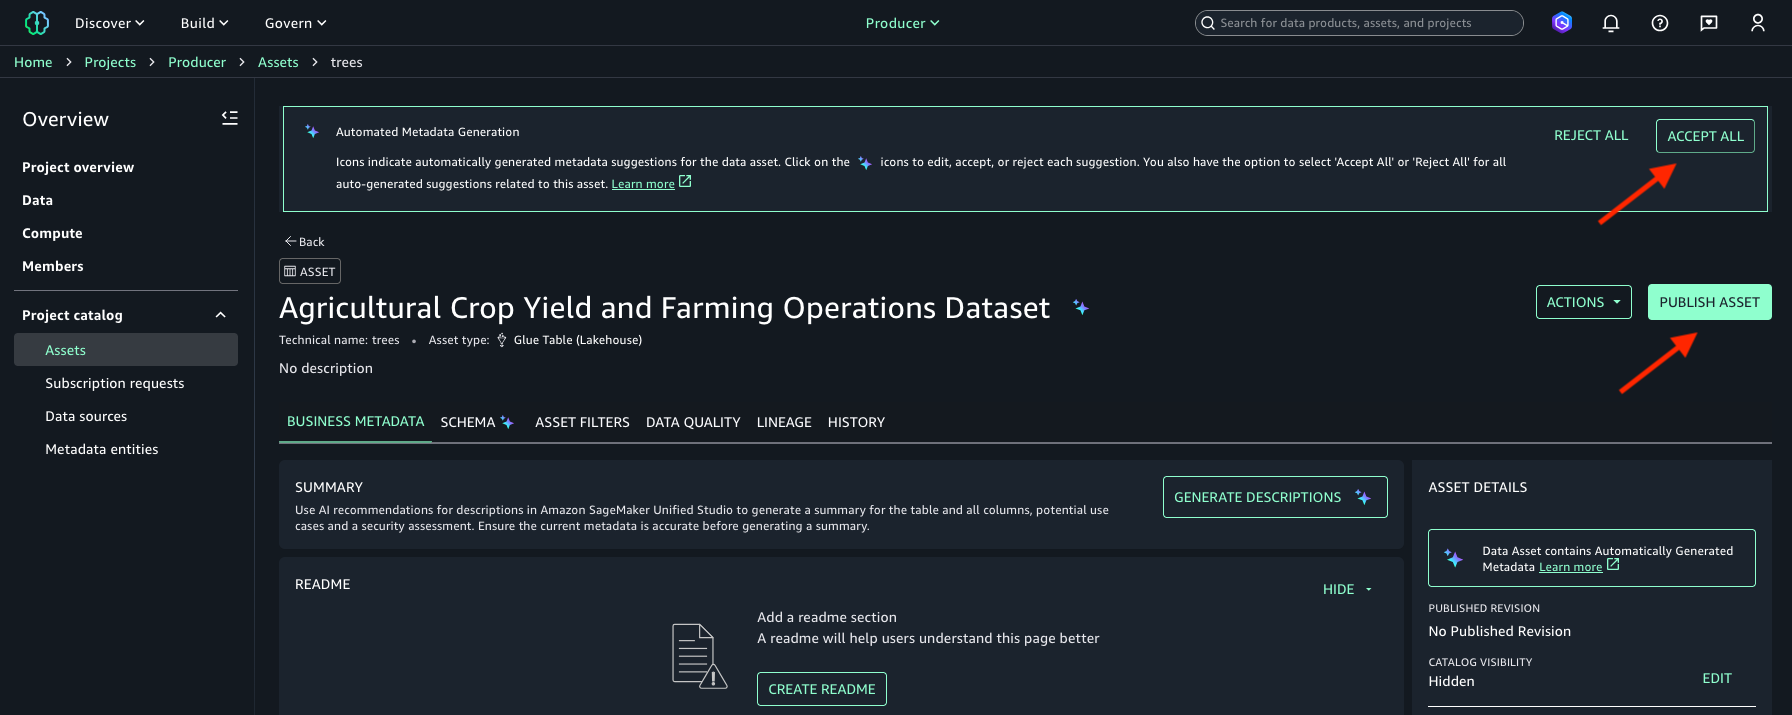
(Optional) If automated metadata generation is enabled when the data source is created, metadata for assets (such as the asset business name) is available to review and accept or reject. You can either choose Accept All or Reject All in the Automated Metadata Generation banner.
Choose Publish Asset. The following image is shown for reference.
Choose Publish Asset.
Subscribe to the data asset in the Amazon SageMaker Catalog
To consume data assets in the Consumer project, subscribe to the data asset by creating a subscription request:
Access the Amazon SageMaker Unified Studio portal.
Choose the Select a project dropdown list and choose Consumer project.
On the Discover menu, choose Catalog.
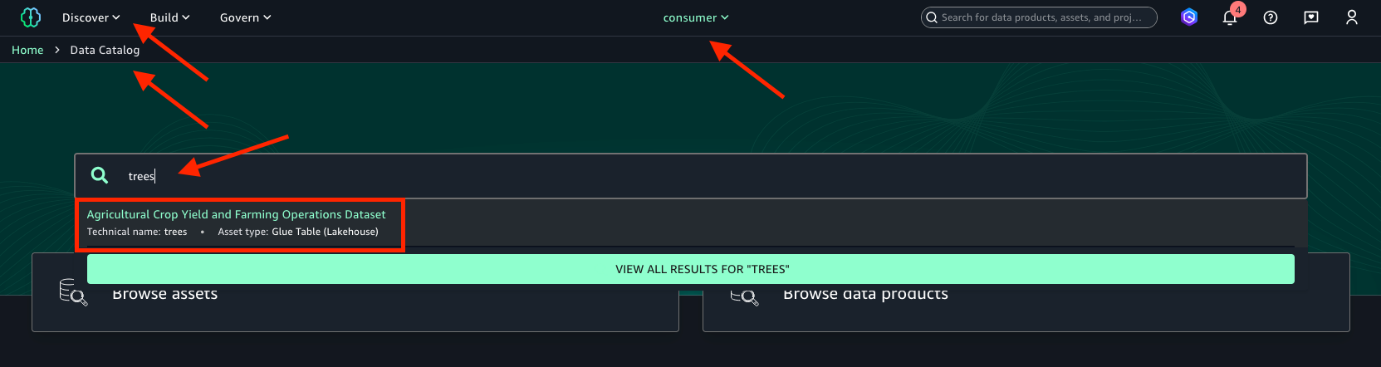
Enter trees in the search box and then select the data asset returned from the search. If in step 7 “Publish the data asset in the Amazon SageMaker Catalog” you chose Accept All in the Automated Metadata Generation banner, your data asset will have a different business name generated by the automated metadata recommendations feature. The data asset technical name is trees. For reference, refer to the following image.
Choose Subscribe.
For Comment, enter a justification such as This data asset is needed for model training purposes.
Choose Subscribe again.
By default, asset subscription requests require manual approval by a data owner. However, if the requester in the Consumer project is also a member of the Producer project, the subscription request is automatically approved. For information about approving subscription requests, refer to Approve or reject a subscription request in Amazon SageMaker Unified Studio.
Configure your Lambda IAM role to access the subscribed data access
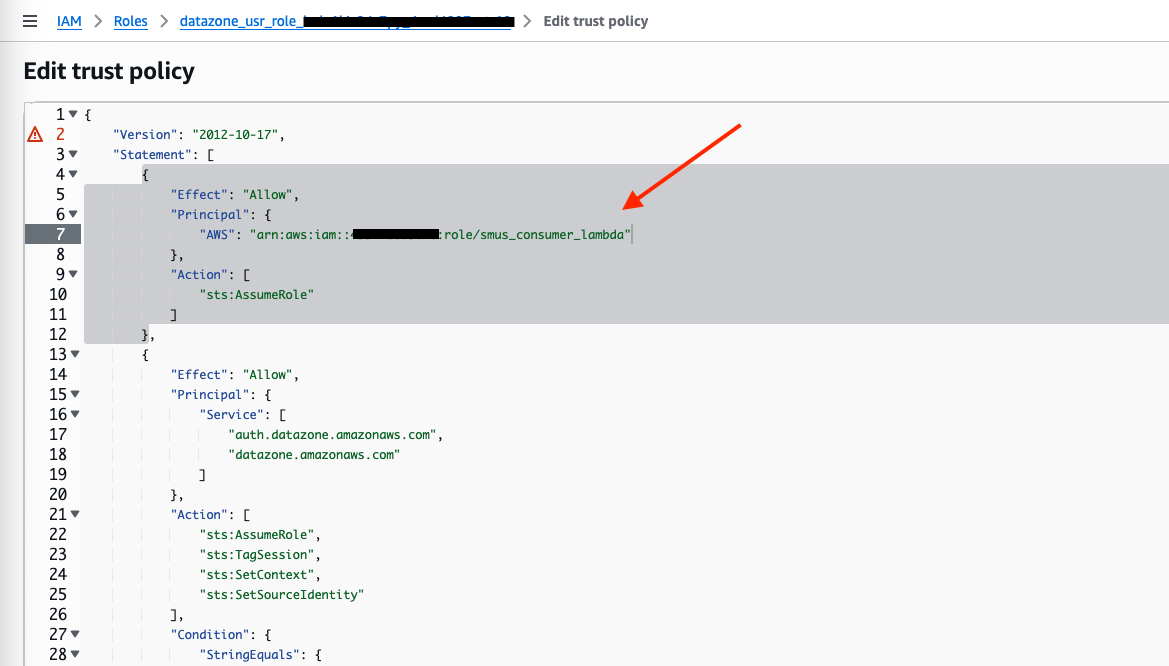
To enable your Lambda function access to the subscribed data asset, you need to allow the Lambda function to assume the Consumer project role. To do this, edit the Consumer project’s IAM role trust relationship:
Navigate to the IAM console in the consumer account.
In the navigation pane under Access management, choose Roles.
Select the Consumer project’s IAM role. This is the string starting with datazone_usr_role_ that is part of the Consumer project role ARN that you noted in step 3 “Create SageMaker Unified Studio producer and consumer projects”.
Under the Trust relationships tab, choose Edit trust policy.
For backup reasons, make a copy of the existing trust policy in a text file.
In the Edit trust policy window, add the following statement to the existing trust policy without removing or overwriting other existing statements in the trust policy. Be sure to replace the placeholder <account_id> with your consumer AWS account ID.
Test the Lambda function’s access to the subscribed data asset
Before you can test your Lambda function, you need to replace placeholders in the function code and in the IAM policy. There are three placeholders to be replaced: <role_arn>, <database_name> and <workgroup_id>. For <role_arn>, you already have the actual value, which is the Consumer project’s role ARN that you noted in step 3 “Create SageMaker Unified Studio producer and consumer projects”. The next sections provide instructions to retrieve values for the other placeholders.
Retrieve the AWS Glue Data Catalog database name
You need to find the name of the AWS Glue Data Catalog database that was created along with the Consumer project. You will then use this value to replace the <database_name> placeholder in the consumer_function Lambda function code. To retrieve the AWS Glue Data Catalog database name, follow these instructions:
Access the Amazon SageMaker Unified Studio portal.
Choose the Select a project dropdown list and choose Consumer project.
On the project page, under Overview, choose Data.
Choose Lakehouse.
Choose AwsDataCatalog.
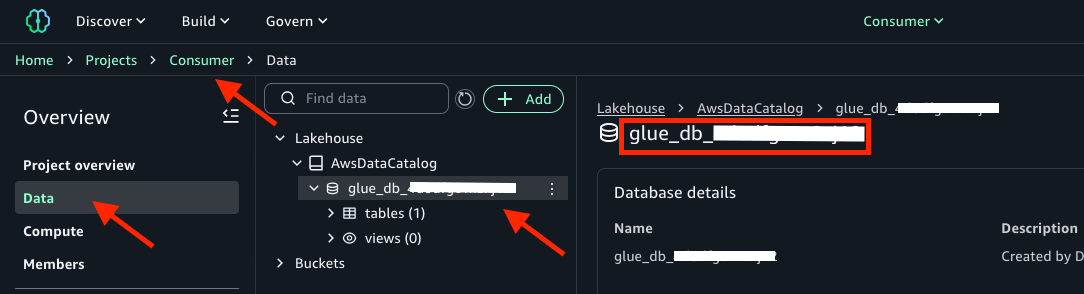
Copy the name of the database. It should be an alphanumerical string starting with glue_db, as in the following image:
Copy the Workgroup ARN and save to a text file. The Athena workgroup ID is the string that follows arn:aws:athena:<region>:<account_ID>:workgroup/ in the Workgroup ARN.
Replace placeholder in the smus_consumer_athena_execution IAM policy
To replace the <workgroup_id> placeholder in the smus_consumer_athena_execution IAM policy, use the following procedure:
In the search field enter smus_consumer_athena_execution.
Select the smus_consumer_athena_execution policy.
Choose Edit.
Replace <workgroup_id> with the value you noted earlier.
Choose Next.
Choose Save changes.
Replace placeholders in the Lambda function code and test it
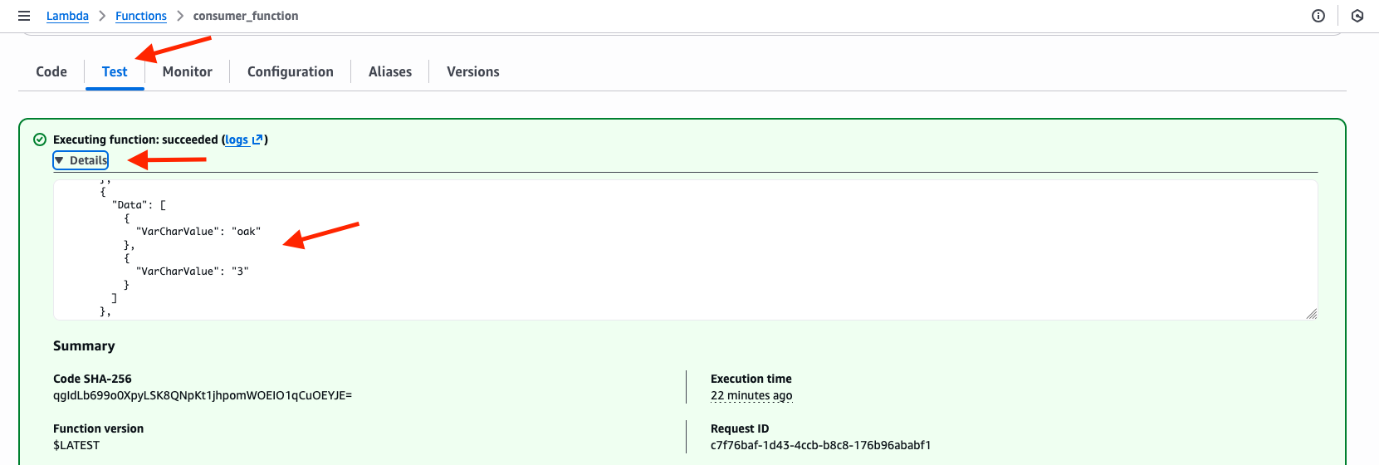
In this section, you will replace the <role_arn>, <database_name> and <workgroup_id> placeholders in the consumer_function Lambda function code, and then you can test the function ability to access data of the trees table.
After increasing the timeout, test the function again.
Clean up
If you no longer need the resources you created as you followed this post, delete them to prevent incurring additional charges. Start by deleting your Amazon SageMaker Unified Studio domain in the governance account. For more information, refer to Delete domains.
To remove the AWS Glue collections database from the producer account, follow these steps:
In the navigation pane under Data Catalog, choose Databases.
Select the collections database.
Choose Delete.
Choose Delete.
To remove the S3 bucket from the producer account, empty the bucket and then you can delete the bucket. For information about emptying the bucket, refer to Emptying a general purpose bucket. For information about deleting the bucket, refer to Deleting a general purpose bucket.
To remove the Lambda function from the consumer account, follow these steps:
Choose the Actions menu and then choose Delete function.
Enter confirm.
Choose Delete.
To complete the cleanup, delete the IAM role named smus_consumer_lambda, then delete the IAM policy named smus_consumer_athena_execution in the consumer account. For information about removing a IAM role, refer to Delete roles or instance profiles. For information about removing an IAM policy, refer to Delete IAM policies.
Conclusion
In this post, we covered adopting Amazon SageMaker Catalog for data governance without rearchitecting your existing applications and data repositories. We walked through how to onboard existing data in Amazon SageMaker Unified Studio, then publish it in a catalog, and then subscribe and consume the data from resources deployed outside the context of an Amazon SageMaker Unified Studio project. This solution can help you accelerate your implementation of a data mesh pattern with Amazon SageMaker Catalog to publish, find, and access data securely in your organization.
The 7.0 merge window
closed on February 22 with 11,588 non-merge commits total,
3,893 of which came in after the article covering the first half of the merge
window. The changes in the second half were weighted toward bug fixes over
new features, which is usual. There were still a handful of surprises, however, including
89 separate tiny code-cleanup changes from different people for the rtl8723bs
driver, a number that surprised
Greg Kroah-Hartman. It’s unusual for a WiFi-chip driver to receive that much
attention, especially a staging driver that is not yet ready for general use.
Over on the Collabora blog, Marius Vlad has an overview
of Weston 15.0, which was released on February 19. Weston is the
reference implementation of a Wayland compositor. The new
release comes with a new shell that can be programmed using the Lua language, a new, experimental Vulkan
renderer, smoother media playback, color-management additions, and more.
One of Weston’s fundamental pillars has always been making the most efficient use of display hardware. Over time, all the work we did to track and offload as much work as possible to this efficient fixed-function hardware has come at the cost of eating CPU time. In the last couple of release cycles, we’ve focused really hard on improving performance on even the most low-end of devices, so not only do we make the most efficient use of the GPU and display hardware, but we’re also really kind on your CPU now. As part of that and to improve our tooling, Weston 15 now comes with support for the Perfetto profiler.
Netflix’s core mission is to connect millions of members around the world with stories they’ll love. This requires not just an incredible catalog, but also a deep, machine-level understanding of every piece of content in that catalog, from the biggest blockbusters to the most niche documentaries. As we onboard new types of content such as live events and podcasts, the need to scalably understand these nuances becomes even more critical to our productions and member-facing experiences.
Many of these media-related tasks require sophisticated long-form video understanding e.g., identifying subtle narrative dependencies and emotional arcs that span entire episodes or films. Previous work has found that to truly grasp the content’s essence, our models must leverage the full multimodal signal. For example, the audio soundtrack is a crucial, non-visual modality that can help more precisely identify clip-level tones or when a new scene starts. Can we use our collection of shows and movies to learn how to a) fuse modalities like audio, video, and subtitle text together and b) develop robust representations that leverage the narrative structure that is present in long form entertainment? Consisting of tens of millions of individual shots across multiple titles, our diverse yet entertainment-specific dataset provides the perfect foundation to train multimodal media understanding models that enable many capabilities across the company such as ads relevancy, clip popularity prediction, and clip tagging.
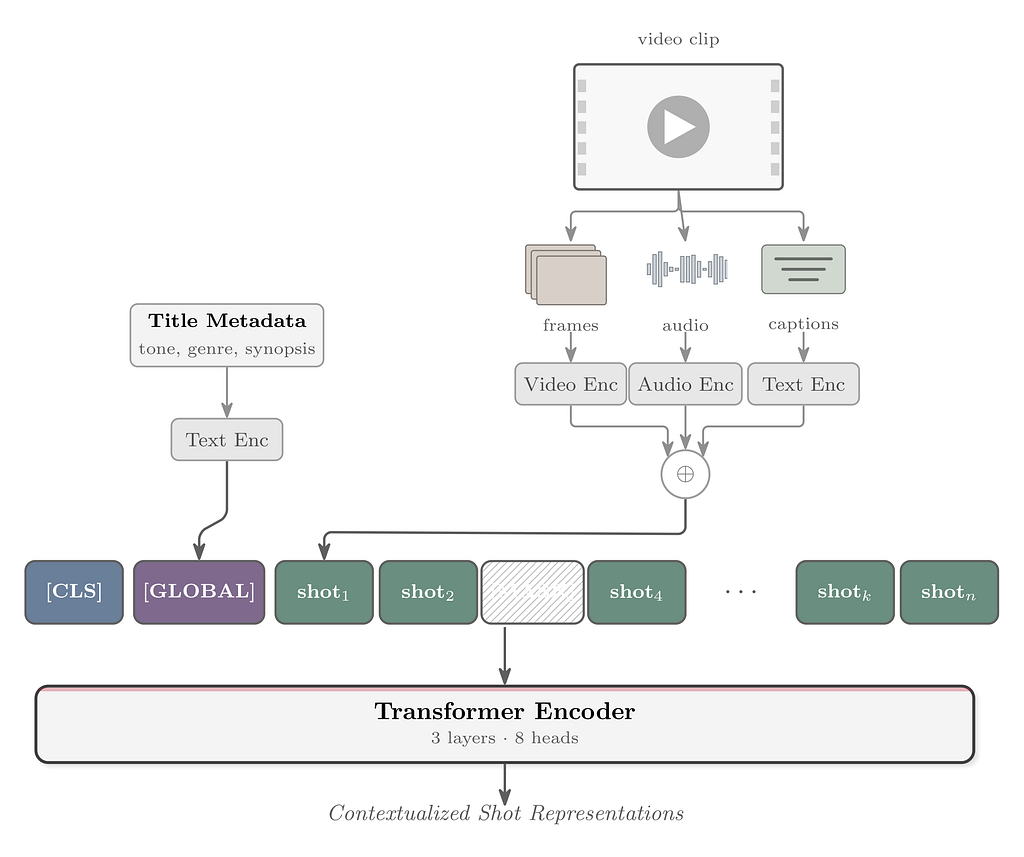
For these reasons, we developed the Netflix Media Foundational Model (MediaFM), our new, in-house, multimodal content embedding model. MediaFM is the first tri-modal (audio, video, text) model pretrained on portions of the Netflix catalog. Its core is a multimodal, Transformer-based encoder designed to generate rich, contextual embeddings¹ for shots from our catalog by learning the temporal relationships between them through integrating visual, audio, and textual information. The resulting shot-level embeddings are powerful representations designed to create a deeper, more nuanced, and machine-readable understanding of our content, providing the critical backbone for effective cold start of newly launching titles in recommendations, optimized promotional assets (like art and trailers), and internal content analysis tools.
Figure 1: MediaFM Architecture
Input Representation & Preprocessing
The model’s fundamental unit of input is a shot, derived by segmenting a movie or episode (collectively referred to as “title”) using a shot boundary detection algorithm. For each shot, we generate three distinct embeddings from its core modalities:
Video: an internal model called SeqCLIP (a CLIP-style model fine-tuned on video retrieval datasets) is used to embed frames sampled at uniform intervals from segmented shots
Audio: the audio samples from the same shots are embedded using Meta FAIR’s wav2vec2
Timed Text: OpenAI’s text-embedding-3-large model is used to encode the corresponding timed text (e.g., closed captions, audio descriptions, or subtitles) for each shot
For each shot, the three embeddings² are concatenated and unit-normed to form a single 2304-dimensional fused embedding vector. The transformer encoder is trained on sequences of shots, so each example in our dataset is a temporally-ordered sequence of these fused embeddings from the same movie or episode (up to 512 shots per sequence). We also have access to title-level metadata which is used to provide global context for each sequence (via the [GLOBAL]token). The title-level embedding is computed by passing title-level metadata (such as synopses and tags) through the text-embedding-3-large model.
Model Architecture and Training Objective
The core of our model is a transformer encoder, architecturally similar to BERT. A sequence of preprocessed shot embeddings is passed through the following stages:
Input Projection: The fused shot embeddings are first projected down to the model’s hidden dimension via a linear layer.
Sequence Construction & Special Tokens: Before entering the Transformer, two special embeddings are prepended to the sequence: • a learnable [CLS] embedding is added at the very beginning. • the title-level embedding is projected to the model’s hidden dimension and inserted after the [CLS] token as the [GLOBAL] token, providing title-level context to every shot in the sequence and participating in the self-attention process.
Contextualization: The sequence is enhanced with positional embeddings and fed through the Transformer stack to provide shot representations based on their surrounding context.
Output Projection: The contextualized hidden states from the Transformer are passed through a final linear layer, projecting them from the hidden layers back up to the 2304-dimensional fused embedding space for prediction.
We train the model using a Masked Shot Modeling (MSM) objective. In this self-supervised task, we randomly mask 20% of the input shot embeddings in each sequence by replacing them with a learnable [MASK] embedding. The model’s objective is to predict the original, unmasked fused embedding for these masked positions. The model is optimized by minimizing the cosine distance between its predicted embedding and the ground-truth embedding for each masked shot.
We optimized the hidden parameters with Muon and the remaining parameters with AdamW. It’s worth noting that the switch to Muon resulted in noticeable improvements.
Evaluation
To evaluate the learned embeddings, we learn task-specific linear layers on top of frozen representations (i.e., linear probes). Most of the tasks are clip-level, i.e., each example is a short clip ranging from a few seconds to a minute which are often presented to our members while recommending a title to them. When embedding these clips, we find that “embedding in context”, namely extracting the embeddings from within a larger sequence (e.g., the episode containing the clip), naturally does much better than embedding only the shots from a clip.
Our embeddings are foundational and we find that they bring value to applications across Netflix. Here are a few:
Ad Relevancy: A multilabel classification task to categorize Netflix clips for relevant ad placement, measured by Average Precision. In this task, these representations operate at the retrieval stage, where they help in identifying the candidate set and in turn are fed into the ad serving system for relevance optimization.
Clip Popularity Ranking: A ranking task to predict the relative performance (in click-through rate, CTR) of a media clip relative to other clips from that show or movie, measured by a ten-fold with Kendall’s tau correlation coefficient.
Clip Tone: A multi-label classification of hook clips into 100 tone categories (e.g., creepy, scary, humorous) from our internal Metadata & Ratings team, measured by micro Average Precision (averaged across tone categories).
Clip Genre: A multi-label classification of clips into eleven core genres (Action, Anime, Comedy, Documentary, Drama, Fantasy, Horror, Kids, Romance, Sci-fi, Thriller) derived from the genre of the parent title, measured by macro Average Precision (averaged across genres).
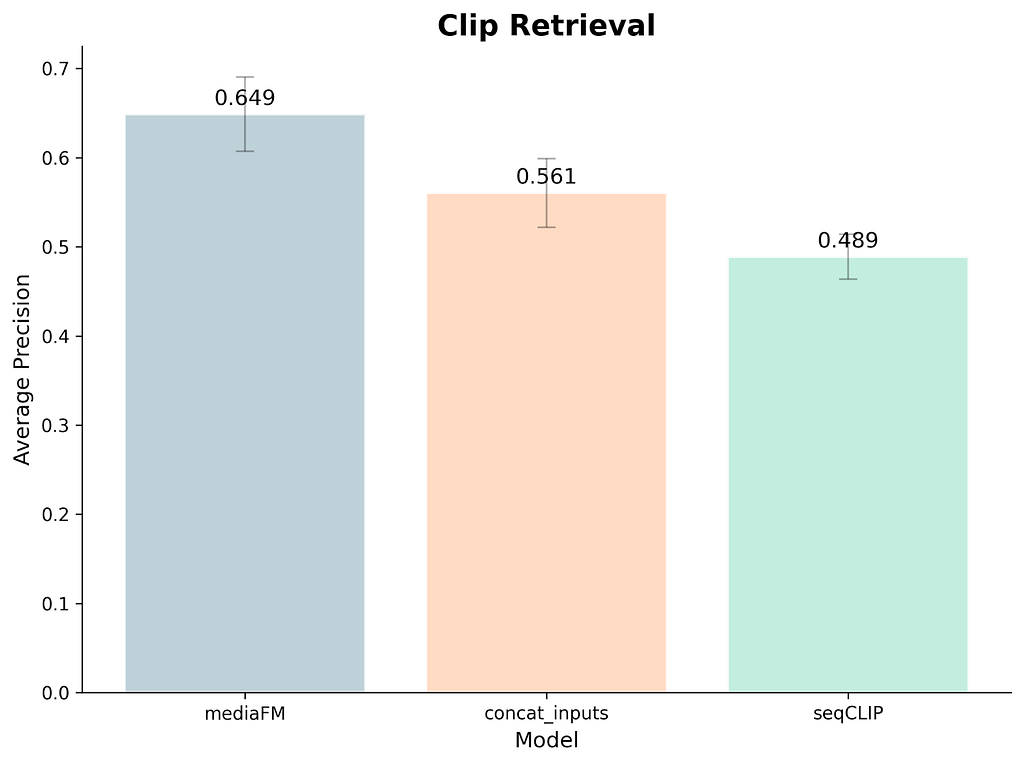
Clip Retrieval: a binary classification of clips from movies or episodes into “clip-worthy” (i.e., a good clip to showcase the title) or not, as determined by human annotators, and as measured by Average Precision. The positive to negative clip ratio is 1:3, and for each title we select 6–10 positive clips and the corresponding number of negatives.
It’s worth noting that for the tasks above (as well as other tasks that use our model), the model outputs are utilized as information that the relevant teams use when driving to a decision rather than being used in a completely end-to-end fashion. Many of the improvements are also in various stages of deployment.
Results
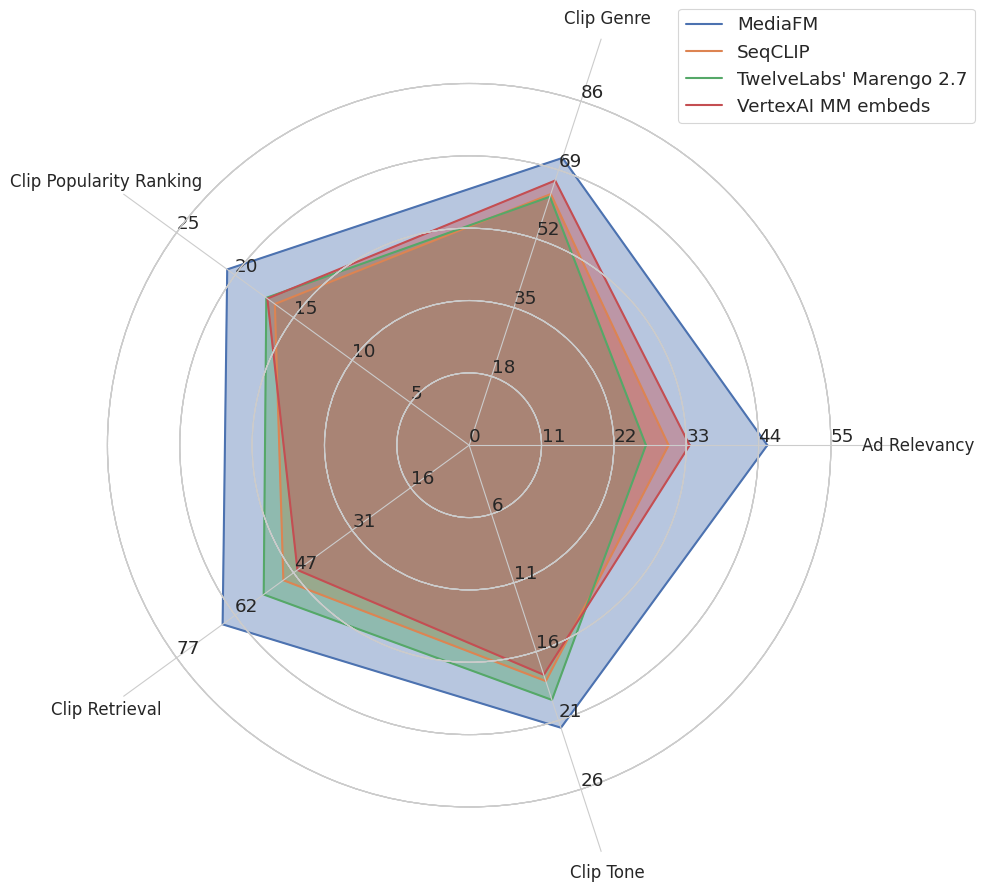
Figure 2³ compares MediaFM to several strong baselines:
The previously mentioned SeqCLIP, which also provides the video embedding input for MediaFM
Figure 2: Performance of MediaFM vs. external and internal models.
On all tasks, MediaFM is better than the baselines. Improvements seem to be larger for tasks that require more detailed narrative understanding e.g., predicting the most relevant ads for an ad break given the surrounding context. We look further into this next.
Ablations
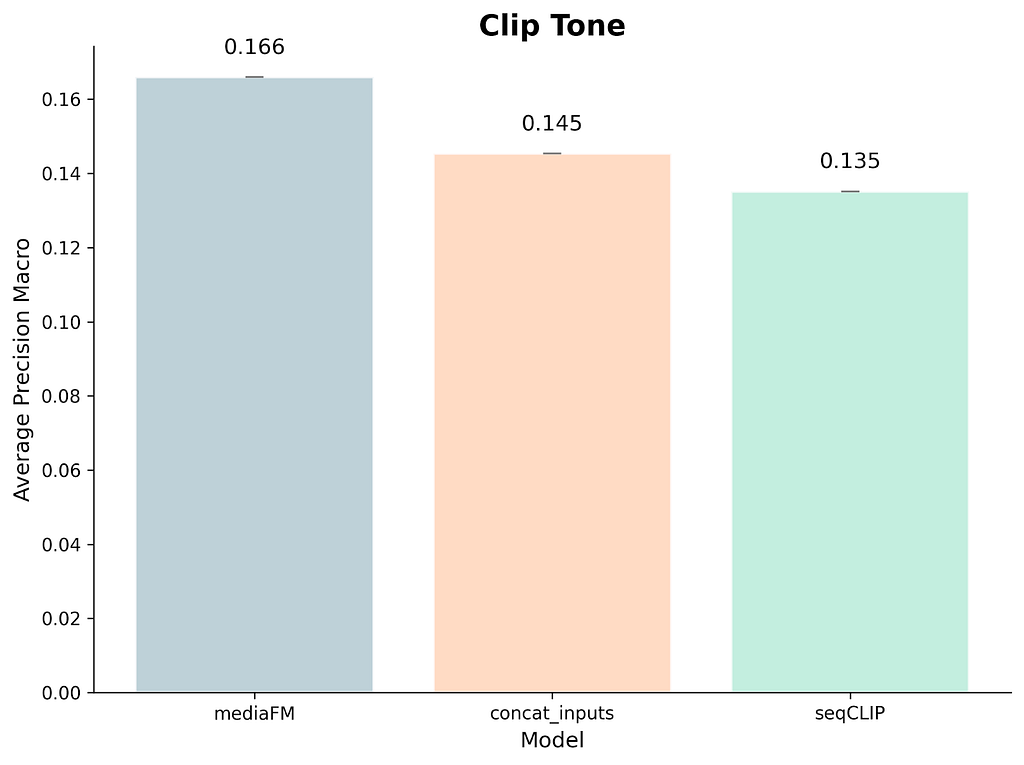
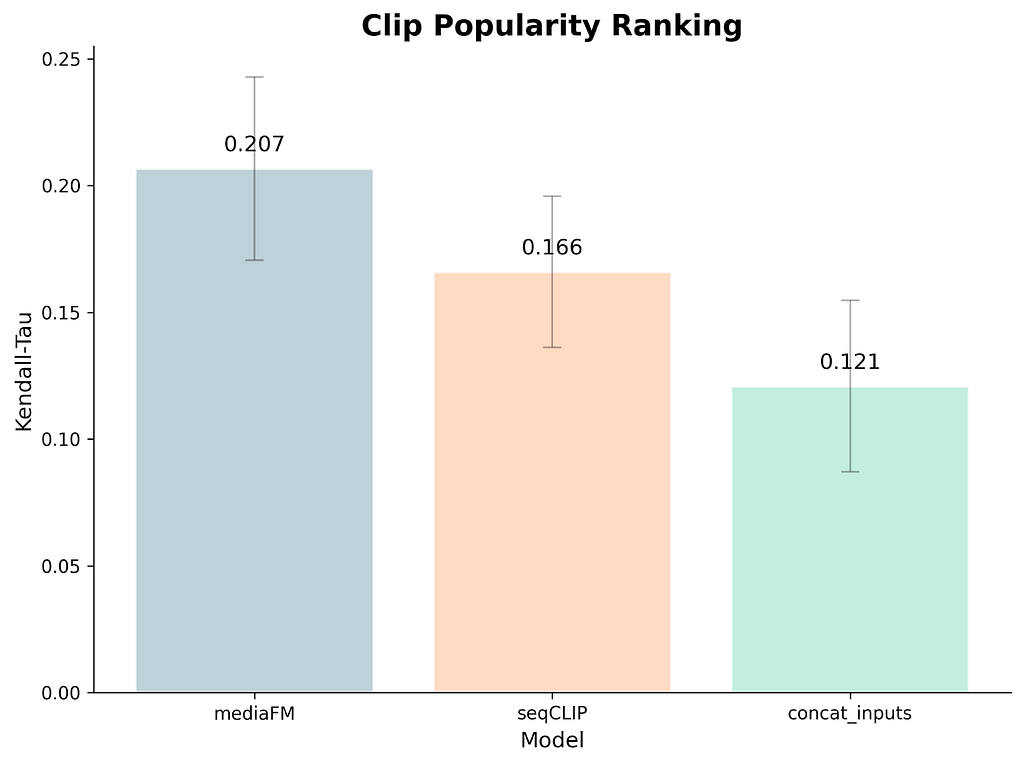
MediaFM’s primary improvements over previous Netflix work stem from two key areas: combining multiple modalities and learning to contextualize shot representations. To determine the contribution of each factor across different tasks, we compared MediaFM to a baseline. This baseline concatenates the three input embeddings, essentially providing the same complete, shot-level input as MediaFM but without the contextualization step. This comparison allows us to isolate which tasks benefit most from the contextualization aspect.
Additional modalities help somewhat for tone but the main improvement comes from contextualization.
Oddly, multiple uncontextualized modalities hurts the clip popularity ranking model, but adding contextualization significantly improves performance.
For clip retrieval we see a natural progression of around 15% for each improvement.
Next Steps
MediaFM presents a way to learn how to fuse and/or contextualize shot-level information by leveraging Netflix’s catalog in a self-supervised manner. With this perspective, we are actively investigating how pretrained multimodal (audio, video/image, text) LLMs like Qwen3-Omni, where the modality fusion has already been learned, can provide an even stronger starting point for subsequent model generations.
Next in this series of blog posts, we will present our method to embed title-level metadata and adapt it to our needs. Stay tuned!
Footnotes
We chose embeddings over generative text outputs to prioritize modular design. This provides a tighter, cleaner abstraction layer: we generate the representation once, and it is consumed across our entire suite of services. This avoids the architectural fragility of fine-tuning, allowing us to enhance our existing embedding-based workflows with new modalities more flexibly.
All of our data has audio and video; we zero-pad for missing timed text data, which is relatively likely to occur (e.g., in shots without dialogue).
The title-level tasks couldn’t be evaluated with the VertexAI MM and Marengo embedding models as the videos exceed the length limit set by the APIs.
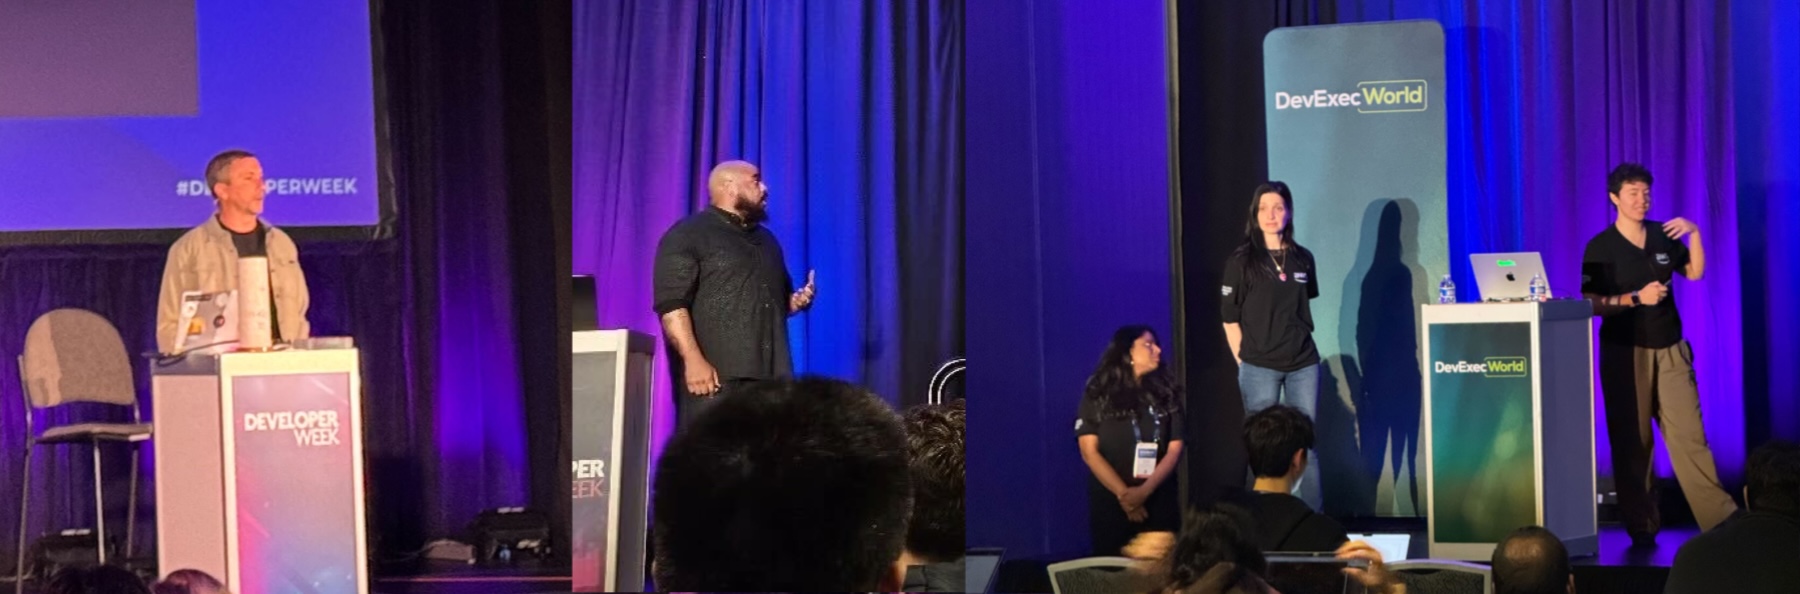
Last week, my team met many developers at Developer Week in San Jose. My colleague, Vinicius Senger delivered a great keynote about renascent software—a new way of building and evolving applications where humans and AI collaborate as co-developers using Kiro. Other colleagues spoke about building and deploying production-ready AI agents. Everyone stayed to ask and hear the questions related to agent memory, multi-agent patterns, meta-tooling and hooks. It was interesting how many developers were actually building agents.
We are continuing to meet developers and hear their feedback at third-party developer conferences. You can meet us at the dev/nexus, the largest and longest-running Java ecosystem conference on March 4-6 in Atlanta. My colleague, James Ward will speak about building AI Agents with Spring and MCP, and Vinicius Senger and Jonathan Vogel will speak about 10 tools and tips to upgrade your Java code with AI. I’ll keep sharing places for you to connect with us.
Last week’s launches Here are some of the other announcements from last week:
Claude Sonnet 4.6 model in Amazon Bedrock – You can now use Claude Sonnet 4.6 which offers frontier performance across coding, agents, and professional work at scale. Claude Sonnet 4.6 approaches Opus 4.6 intelligence at a lower cost. It enables faster, high-quality task completion, making it ideal for high-volume coding and knowledge work use cases.
Amazon EC2 Hpc8a instances powered by 5th Gen AMD EPYC processors – You can use new Hpc8a instances delivering up to 40% higher performance, increased memory bandwidth, and 300 Gbps Elastic Fabric Adapter networking. You can accelerate compute-intensive simulations, engineering workloads, and tightly coupled HPC applications.
Amazon SageMaker Inference for custom Amazon Nova models – You can now configure the instance types, auto-scaling policies, and concurrency settings for custom Nova model deployments with Amazon SageMaker Inference to best meet your needs.
Nested virtualization on virtual Amazon EC2 instances – You can create nested virtual machines by running KVM or Hyper-V on virtual EC2 instances. You can leverage this capability for use cases such as running emulators for mobile applications, simulating in-vehicle hardware for automobiles, and running Windows Subsystem for Linux on Windows workstations.
Server-Side Encryption by default in Amazon Aurora – Amazon Aurora further strengthens your security posture by automatically applying server-side encryption by default to all new databases clusters using AWS-owned keys. This encryption is fully managed, transparent to users, and with no cost or performance impact.
Kiro in AWS GovCloud (US) Regions – You can use Kiro for the development teams behind government missions. Developers in regulated environments can now leverage Kiro’s agentic AI tool with the rigorous security controls required.
For a full list of AWS announcements, be sure to keep an eye on the What’s New with AWS page.
Additional updates Here are some additional news items that you might find interesting:
Introducing Agent Plugins for AWS – You can see how new open-source Agent Plugins for AWS extend coding agents with skills for deploying applications to AWS. Using the deploy-on-aws plugin, you can generate architecture recommendations, cost estimates, and infrastructure-as-code directly from your coding agent.
A chat with Byron Cook on automated reasoning and trust in AI systems – You can hear how to verify AI systems doing the right thing using automated reasoning when they generate code or manage critical decisions. Byron Cook’s team has spent a decade proving correctness in AWS and apply those techniques to agentic systems.
Best practices for deploying AWS DevOps Agent in production – You can read best practices for setting up DevOps Agent Spaces that balance investigation capability with operational efficiency. According to Swami Sivasubramanian, AWS DevOps Agent, a frontier agent that resolves and proactively prevents incidents, has handled thousands of escalations, with an estimated root cause identification rate of over 86% within Amazon.
From AWS community Here are my personal favorite posts from AWS community:
Let an AI Agent Do Your Job Searching – Still manually checking career pages during a job search? AWS Hero Danielle H. built an AI agent that does the work for you.
Building the AWS Serverless Power for Kiro – A former AWS Serverless Hero, Gunnar Grosch built a Kiro Power to integrate 25 MCP tools, ten steering guides, and structured decision guidance for the full development lifecycle.
Join the AWS Builder Center to connect with community, share knowledge, and access content that supports your development.
Upcoming AWS events Check your calendar and sign up for upcoming AWS events:
AWS Summits – Join AWS Summits in 2026, free in-person events where you can explore emerging cloud and AI technologies, learn best practices, and network with industry peers and experts. Upcoming Summits include Paris (April 1), London (April 22), and Bengaluru (April 23–24).
Amazon Nova AI Hackathon – Join developers worldwide to build innovative generative AI solutions using frontier foundation models and compete for $40,000 in prizes across five categories including agentic AI, multimodal understanding, UI automation, and voice experiences during this six-week challenge from February 2nd to March 16th, 2026.
AWS Community Days – Community-led conferences where content is planned, sourced, and delivered by community leaders, featuring technical discussions, workshops, and hands-on labs. Upcoming events include Ahmedabad (February 28), JAWS Days in Tokyo (March 7), Chennai (March 7), Slovakia (March 11), and Pune (March 21).
The Ladybird browser project has announced a move to
the Rust programming language:
When we originally evaluated Rust back in 2024, we rejected it
because it’s not great at C++ style OOP. The web platform object
model inherits a lot of 1990s OOP flavor, with garbage collection,
deep inheritance hierarchies, and so on. Rust’s ownership model is
not a natural fit for that.
But after another year of treading water, it’s time to make the
pragmatic choice. Rust has the ecosystem and the safety guarantees
we need. Both Firefox and Chromium have already begun introducing
Rust into their codebases, and we think it’s the right choice for
Ladybird too.
Large language models are being used to translate existing code.
The collective thoughts of the interwebz
Manage Consent
To provide the best experiences, we use technologies like cookies to store and/or access device information. Consenting to these technologies will allow us to process data such as browsing behavior or unique IDs on this site. Not consenting or withdrawing consent, may adversely affect certain features and functions.
Functional
Always active
The technical storage or access is strictly necessary for the legitimate purpose of enabling the use of a specific service explicitly requested by the subscriber or user, or for the sole purpose of carrying out the transmission of a communication over an electronic communications network.
Preferences
The technical storage or access is necessary for the legitimate purpose of storing preferences that are not requested by the subscriber or user.
Statistics
The technical storage or access that is used exclusively for statistical purposes.The technical storage or access that is used exclusively for anonymous statistical purposes. Without a subpoena, voluntary compliance on the part of your Internet Service Provider, or additional records from a third party, information stored or retrieved for this purpose alone cannot usually be used to identify you.
Marketing
The technical storage or access is required to create user profiles to send advertising, or to track the user on a website or across several websites for similar marketing purposes.