Amazon Q Developer is the most capable AI-powered assistant for software development that reimagines the experience across the entire software development lifecycle, making it easier and faster to build, secure, manage, and optimize applications on AWS. Using your natural language input and your project context, Amazon Q Developer’s agent for software development autonomously implements multi-file features, bug fixes, and unit tests in your integrated development environment (IDE) workspace. For example, you can ask Amazon Q Developer to add a new checkout feature to your e-commerce app, and it will analyze your existing codebase, map out the implementation plan spanning multiple files, and upon your approval, execute all the required code changes and tests in minutes. To get started building with the Q Developer agent, install the Amazon Q extension and use the /dev command inside the chat window.
Amazon Q Developer is constantly improving and redefining what the state-of-the-art is for software development agents. The Amazon Q Developer agent for software development was one of the first agents to publish their results on the industry-recognized SWE-bench benchmark leaderboard. This benchmark is designed to measure the ability to solve real-world coding problems a Python software developer would encounter. This newest update to the Amazon Q Developer agent for software development out-performs the previous version released in May, resolving 51% more tasks on the SWE-bench verified dataset and 43% more on the full dataset. In just a few months, the agent’s scores have increased from 25.6% tasks resolved to 38.8% on the verified dataset and from 13.82% to 19.75% on the full dataset, making it the top performing agent on the leaderboard for 4 weeks. In our June 2024 blogpost, we provided an overview explaining how our first submission of Amazon Q Developer was able to top the benchmarks. Since then, the SWE-bench submission process has begun to require the publication of agent trajectories — meaning, a log of the steps taken by an agent to solve a given problem. We welcome this transparency as a critical ingredient of developer trust, so we are proud to share the trajectories of our newest agent.
This video demonstrates the kind of tasks you can now accomplish with the Amazon Q Developer agent for software development. For example, you can refactor a Lambda function to improve clarity and scalability of an app in mere minutes. In the prompt we provide a few specific requirements to the agent: split the logic into multiple Lambdas, avoid duplication of functionality, keep permissions locked down, and update the infrastructure as code to support the change. The agent gets to work and keeps you updated in real time about what it is doing. Once it is done, you can review the code and merge it with a single click.
We have reinvented our agent to take advantage of the new capabilities offered by state-of-the-art AI models, incorporate developer feedback, and bring together the results of dozens of experiments, with proven results. SWE-bench offers a tangible way to share performance measurements, but it is only one component of the way we evaluate the Amazon Q Developer agent for software development. The best way to measure the capabilities of the agent is to test it out for yourself on the tasks that you care about. This blog post shows you how to use the new agent and provides an overview of how the technology behind our reinvented agent works.
Getting started with the Amazon Q Developer agent
To get started, you need to have an AWS Builder ID or be part of an organization with an AWS IAM Identity Center instance set up that allows you to use Amazon Q. To use Amazon Q Developer agent for software development in Visual Studio Code, start by installing the Amazon Q extension. The extension is also available for JetBrains, Visual Studio (in preview), and in the Command Line on macOS. Find the latest version on the Amazon Q Developer page.
After authenticating, you can invoke the feature development agent by entering /dev in the chat field.
Let’s say you are exploring the amazon-science/auto-rag-eval GitHub repository. This repository contains a method to automatically evaluate retrieval-augmented language models as described in this amazon.science blog. This method constructs multiple choice questions based on the documents contained in a RAG index. Each question has a single correct answer and multiple incorrect answers, or distractors. You notice that the number of distractors is hard coded to be 3. You would like it to be a parameter instead, so you ask the agent to make this change.
The agent starts exploring your code base and shares updates in real-time summarizing its state, the changes that it is making, and the files being used. The agent starts by exploring the code base.
After a few steps, the agent has identified the key chunks of code to modify and how to modify them.
The agent iterates on implementing its modifications until it succeeds. At that point, you can see that one file auto-rag-eval/ExamGenerator/distractors_generator.py has been changed.
Once it is done, the agent shows you a list of the files that it has modified, here distractors_generator.py. Clicking on the file name opens a diff view in your IDE.
You can review the modifications in each file and decide whether to accept them. If the generated code could be improved, you can provide this feedback to the agent and request that it regenerates it.
Getting the most out of the AI-powered software development agent
The Amazon Q Developer agent for software development works at its best when requests are aimed and precise. This does not mean that you have to write very long requests, “add unit tests to MyMethod” is clear. When the task is more ambiguous, for example, when you want the agent to resolve a bug in your code, it is helpful to include an error trace. When you want the agent to develop new features, explaining the context, being specific about desired behavior, specifying where the change should be made when known, or even relevant snippets of code or pseudo-code helps the agent focus to achieve the best results.
How the improved Amazon Q Developer agent for software development works
The agent is continuously updated and improved to give you better performance. During the past months the ability of foundation models to drive agentic workflows and leverage large sets of tools to accomplish complex tasks has improved significantly. Guided by customer feedback, we have redesigned our agent to take advantage of these new abilities. Our inspiration is the workflow of experienced developers getting to work on an unfamiliar code base.
When developers want to accomplish a task on an unfamiliar code base, they start by getting a bird’s-eye view of the repository to obtain a general understanding of the project. They then dive deeper into the parts that are relevant to their task. Developers frequently rely on visual IDEs such as VSCode or IntelliJ to explore repositories and implement changes. Although some LLMs have the ability to interpret images, the fidelity of that interpretation, particularly for information-dense images, is far from what is required for an application as complex as software development agents.
AWS has developed a new framework for the Amazon Q Developer agent — textcode — which provides a text-based alternative to visual IDEs specifically designed for LLMs. It effectively equips the agent with its own IDE with which it interacts exclusively through text. The agent is able to use it similarly to how a developer would use a regular IDE to solve your tasks. textcode is designed to provide token-efficient text representations of code, code files, and code workspaces. It allows LLMs to interact with a code base in a similar manner to how a developer interacts with it in a visual IDE. This framework offers structured and efficient environment within which it is easy for the agent to use tools, take actions, and evaluate its progress towards the completion of the assigned task.
The agent is equipped with tools to explore the workspace, act on it, and evaluate its solutions. For example, the agent can open, create, and close files, select and deselect code chunks, find and replace code, and revert changes if needed. These tools allows the agent to navigate the workspace in order to identify and retain the critical pieces of information to solve your tasks while discarding superfluous code to not clog its context. We are continuously expanding the toolkit of the agent with more powerful tools.
When you use the \dev command in your IDE, the Q Developer agent for software development is initialized with your problem statement as well as some guidance on how to solve the problem and use the tools it is equipped with. The agent determines what actions to use on the workspace. It generally starts by exploring the workspace to discover the parts of the code relevant to solving your task. The agent takes action by using the tools it is equipped with. The response of the tools is incorporated in an updated prompt that is provided back to the LLM to decide its next actions.
The Q Developer agent is equipped with logic to prevent it from getting stuck in unproductive paths and help it progress towards a solution to your problem. The agent will autonomously decide that it has generated the appropriate changes (including writing unit tests and updating documentation) to fulfill your request. At that point, the agent exits its loop and returns the candidate code patches for your review. You can decide to accept them entirely or in part, or ask the agent to modify them. If you ask for modifications, the agent will resume its loop using your feedback as additional information about the problem statement.
Conclusion
This post introduced the updated Amazon Q Developer agent for software development. The agent autonomously implements features that you describe using natural language directly from your IDE. We gave you an overview of how the agent works behind the scenes and discussed its significantly increased accuracy.
You are now ready to explore the capabilities of Amazon Q Developer agent for software development and make it your AI coding assistant! Install the Amazon Q Developer extension in your IDE of choice and start using Amazon Q (including the agent for software development) for free using your AWS Builder ID or subscribe to Amazon Q Developer to unlock higher limits.
Established in 2021 and previously hosted by Amazon Web Services
(AWS), OpenSearch has recorded more than 700 million software
downloads and participation from thousands of contributors and more
than 200 project maintainers.
AWS created
the OpenSearch project as an open-source fork of ElasticSearch and
Kibana in 2021 after Elastic moved those projects to
non-free licenses. Elastic announced in August that it would
relicense the projects under the Affero GPL (AGPL).
The AWS Customer Incident Response Team (CIRT) has developed a methodology that you can use to investigate security incidents involving generative AI-based applications. To respond to security events related to a generative AI workload, you should still follow the guidance and principles outlined in the AWS Security Incident Response Guide. However, generative AI workloads require that you also consider some additional elements, which we detail in this blog post.
We start by describing the common components of a generative AI workload and discuss how you can prepare for an event before it happens. We then introduce the Methodology for incident response on generative AI workloads, which consists of seven elements that you should consider when triaging and responding to a security event on a generative AI workload. Lastly, we share an example incident to help you explore the methodology in an applied scenario.
Components of a generative AI workload
As shown in Figure 1, generative AI applications include the following five components:
An organization that owns or is responsible for infrastructure, generative AI applications, and the organization’s private data.
Infrastructure within an organization that isn’t specifically related to the generative AI application itself. This can include databases, backend servers, and websites.
Generative AI applications, which include the following:
Foundation models – AI models with a large number of parameters and trained on a massive amount of diverse data.
Custom models – models that are fine-tuned or trained on an organization’s specific data and use cases, tailored to their unique requirements.
Guardrails – mechanisms or constraints to help make sure that the generative AI application operates within desired boundaries. Examples include content filtering, safety constraints, or ethical guidelines.
Agents – workflows that enable generative AI applications to perform multistep tasks across company systems and data sources.
Knowledge bases – repositories of domain-specific knowledge, rules, or data that the generative AI application can access and use.
Training data – data used to train, fine-tune, or augment the generative AI application’s models, including data for techniques such as retrieval augmented generation (RAG).
Note: Training data is distinct from an organization’s private data. A generative AI application might not have direct access to private data, although this is configured in some environments.
Plugins – additional software components or extensions that you can integrate with the generative AI application to provide specialized functionalities or access to external services or data sources.
Private data refers to the customer’s privately stored, confidential data that the generative AI resources or applications aren’t intended to interact with during normal operation.
Users are the identities that can interact with or access the generative AI application. They can be human or non-human (such as machines).
Figure 1: Common components of an AI/ML workload
Prepare for incident response on generative AI workloads
You should prepare for a security event across three domains: people, process, and technology. For a summary of how to prepare, see the preparation items from the Security Incident Response Guide. In addition, your preparation for a security event that’s related to a generative AI workload should include the following:
People: Train incident response and security operations staff on generative AI – You should make sure that your staff is familiar with generative AI concepts and with the AI/ML services in use at your organization. AWS Skill Builder provides both free and paid courses on both of these subjects.
Process: Develop new playbooks – You should develop new playbooks for security events that are related to a generative AI workload. To learn more about how to develop these, see the following sample playbooks:
Important: Logs can contain sensitive information. To help protect this information, you should set up least privilege access to these logs, like you do for your other security logs. You can also protect sensitive log data with data masking. In Amazon CloudWatch, you can mask data natively through log group data protection policies.
Methodology for incident response on generative AI workloads
After you complete the preparation items, you can use the Methodology for incident response on generative AIworkloads for active response, to help you rapidly triage an active security event involving a generative AI application.
The methodology has seven elements, which we detail in this section. Each element describes a method by which the components can interact with another component or a method by which a component can be modified. Consideration of these elements will help guide your actions during the Operations phase of a security incident, which includes detection, analysis, containment, eradication, and recovery phases.
Access – Determine the designed or intended access patterns for the organization that hosts the components of the generative AI application, and look for deviations or anomalies from those patterns. Consider whether the application is accessible externally or internally because that will impact your analysis.
To help you identify anomalous and potential unauthorized access to your AWS environment, you can use Amazon GuardDuty. If your application is accessible externally, the threat actor might not be able to access your AWS environment directly and thus GuardDuty won’t detect it. The way that you’ve set up authentication to your application will drive how you detect and analyze unauthorized access.
If evidence of unauthorized access to your AWS account or associated infrastructure exists, determine the scope of the unauthorized access, such as the associated privileges and timeline. If the unauthorized access involves service credentials—for example, Amazon Elastic Compute Cloud (Amazon EC2) instance credentials—review the service for vulnerabilities.
Infrastructure changes – Review the supporting infrastructure, such as servers, databases, serverless computing instances, and internal or external websites, to determine if it was accessed or changed. To investigate infrastructure changes, you can analyze CloudTrail logs for modifications of in-scope resources, or analyze other operating system logs or database access logs.
AI changes – Investigate whether users have accessed components of the generative AI application and whether they made changes to those components. Look for signs of unauthorized activities, such as the creation or deletion of custom models, modification of model availability, tampering or deletion of generative AI logging capabilities, tampering with the application code, and removal or modification of generative AI guardrails.
Data store changes – Determine the designed or intended data access patterns, whether users accessed the data stores of your generative AI application, and whether they made changes to these data stores. You should also look for the addition or modification of agents to a generative AI application.
Invocation – Analyze invocations of generative AI models, including the strings and file inputs, for threats, such as prompt injection or malware. You can use the OWASP Top 10 for LLM as a starting point to understand invocation related threats, and you can use invocation logs to analyze prompts for suspicious patterns, keywords, or structures that might indicate a prompt injection attempt. The logs also capture the model’s outputs and responses, enabling behavioral analysis to help identify uncharacteristic or unsafe model behavior indicative of a prompt injection. You can use the timestamps in the logs for temporal analysis to help detect coordinated prompt injection attempts over time and collect information about the user or system that initiated the model invocation, helping to identify the source of potential exploits.
Private data – Determine whether the in-scope generative AI application was designed to have access to private or confidential data. Then look for unauthorized access to, or tampering with, that data.
Agency – Agency refers to the ability of applications to make changes to an organization’s resources or take actions on a user’s behalf. For example, a generative AI application might be configured to generate content that is then used to send an email, invoking another resource or function to do so. You should determine whether the generative AI application has the ability to invoke other functions. Then, investigate whether unauthorized changes were made or if the generative AI application invoked unauthorized functions.
The following table lists some questions to help you address the seven elements of the methodology. Use your answers to guide your response.
Topic
Questions to address
Access
Do you still have access to your computing environment? Is there continued evidence of unauthorized access to your organization?
Infrastructure changes
Were supporting infrastructure resources accessed or changed?
AI changes
Were your AI models, code, or resources accessed or changed?
Data store changes
Were your data stores, knowledge bases, agents, plugins, or training data accessed or tampered with?
Invocation
What data, strings, or files were sent as input to the model? What prompts were sent? What responses were produced?
Private data
What private or confidential data do generative AI resources have access to? Was private data changed or tampered with?
Agency
Can the generative AI application resources be used to start computing services in an organization, or do the generative AI resources have the authority to make changes? Were unauthorized changes made?
Example incident
To see how to use the methodology for investigation and response, let’s walk through an example security event where an unauthorized user compromises a generative AI application that’s hosted on AWS by using credentials that were exposed on a public code repository. Our goal is to determine what resources were accessed, modified, created, or deleted.
To investigate generative AI security events on AWS, these are the main log sources that you should review:
Analysis of access for a generative AI application is similar to that for a standard three-tier web application. To begin, determine whether an organization has access to their AWS account. If the password for the AWS account root user was lost or changed, reset the password. Then, we strongly recommended that you immediately enable a multi-factor authentication (MFA) device for the root user—this should block a threat actor from accessing the root user.
To analyze the infrastructure changes of an application, you should consider both the control plane and data plane. In our example, imagine that Amazon API Gateway was used for authentication to the downstream components of the generative AI application and that other ancillary resources were interacting with your application. Although you could review control plane changes to these resources in CloudTrail, you would need additional logging to be turned on to review changes made on the operating system of the resource. The following are some common names for control plane events that you could find in CloudTrail for this element:
ec2:RunInstances
ec2:StartInstances
ec2:TerminateInstances
ecs:CreateCluster
cloudformation:CreateStack
rds:DeleteDBInstance
rds:ModifyDBClusterSnapshotAttribute
AI changes
Unauthorized changes can include, but are not limited to, system prompts, application code, guardrails, and model availability. Internal user access to the generative AI resources that AWS hosts are logged in CloudTrail and appear with one of the following event sources:
amazonaws.com
amazonaws.com
amazonaws.com
amazonaws.com
The following are a couple examples of the event names in CloudTrail that would represent generative AI resource log tampering in our example scenario:
bedrock:PutModelInvocationLoggingConfiguration
bedrock:DeleteModelInvocationLoggingConfiguration
The following are some common event names in CloudTrail that would represent access to the AI/ML model service configuration:
bedrock:GetFoundationModelAvailability
bedrock:ListProvisionedModelThroughputs
bedrock:ListCustomModels
bedrock:ListFoundationModels
bedrock:ListProvisionedModelThroughput
bedrock:GetGuardrail
bedrock:DeleteGuardrail
In our example scenario, the unauthorized user has gained access to the AWS account. Now imagine that the compromised user has a policy attached that grants them full access to all resources. With this access, the unauthorized user can enumerate each component of Amazon Bedrock and identify the knowledge base and guardrails that are part of the application.
The unauthorized user then requests model access to other foundation models (FMs) within Amazon Bedrock and removes existing guardrails. The access to other foundation models could indicate that the unauthorized user intends to use the generative AI application for their own purposes, and the removal of guardrails minimizes filtering or output checks by the model. AWS recommends that you implement fine-grained access controls by using IAM policies and resource-based policies to restrict access to only the necessary Amazon Bedrock resources, AWS Lambda functions, and other components that the application requires. Also, you should enforce the use of MFA for IAM users, roles, and service accounts with access to critical components such as Amazon Bedrock and other components of your generative AI application.
Data store changes
Typically, you use and access a data store and knowledge base through model invocation, and for Amazon Bedrock, you include the API call bedrock:InvokeModel.
However, if an unauthorized user gains access to the environment, they can create, change, or delete the data sources and knowledge bases that the generative AI applications integrate with. This could cause data or model exfiltration or destruction, as well as data poisoning, and could create a denial-of-service condition for the model. The following are some common event names in CloudTrail that would represent changes to AI/ML data sources in our example scenario:
In this scenario, we have established that the unauthorized user has full access to the generative AI application and that some enumeration took place. The unauthorized user then identified the S3 bucket that was the knowledge base for the generative AI application and uploaded inaccurate data, which corrupted the LLM. For examples of this vulnerability, see the section LLM03 Training Data Poisoning in the OWASP TOP 10 for LLM Applications.
Invocation
Amazon Bedrock uses specific APIs to register model invocation. When a model in Amazon Bedrock is invoked, CloudTrail logs it. However, to determine the prompts that were sent to the generative AI model and the output response that was received from it, you must have configured model invocation logging.
These logs are crucial because they can reveal important information, such as whether a threat actor tried to get the model to divulge information from your data stores or release data that the model was trained or fine-tuned on. For example, the logs could reveal if a threat actor attempted to prompt the model with carefully crafted inputs that were designed to extract sensitive data, bypass security controls, or generate content that violates your policies. Using the logs, you might also learn whether the model was used to generate misinformation, spam, or other malicious outputs that could be used in a security event.
Note: For services such as Amazon Bedrock, invocation logging is disabled by default. We recommend that you enable data events and model invocation logging for generative AI services, where available. However, your organization might not want to capture and store invocation logs for privacy and legal reasons. One common concern is users entering sensitive data as input, which widens the scope of assets to protect. This is a business decision that should be taken into consideration.
In our example scenario, imagine that model invocation wasn’t enabled, so the incident responder couldn’t collect invocation logs to see the model input or output data for unauthorized invocations. The incident responder wouldn’t be able to determine the prompts and subsequent responses from the LLM. Without this logging enabled, they also couldn’t see the full request data, response data, and metadata associated with invocation calls.
Event names in model invocation logs that would represent model invocation logging in Amazon Bedrock include:
bedrock:InvokeModel
bedrock:InvokeModelWithResponseStream
bedrock:Converse
bedrock:ConverseStream
The following is a sample log entry for Amazon Bedrock model invocation logging:
Figure 2: sample model invocation log including prompt and response
Private data
From an architectural standpoint, generative AI applications shouldn’t have direct access to an organization’s private data. You should classify data used to train a generative AI application or for RAG use as data store data and segregate it from private data, unless the generative AI application uses the private data (for example, in the case where a generative AI application is tasked to answer questions about medical records for a patient). One way to help make sure that an organization’s private data is segregated from generative AI applications is to use a separate account and to authenticate and authorize access as necessary to adhere to the principle of least privilege.
Agency
Excessive agency for an LLM refers to an AI system that has too much autonomy or decision-making power, leading to unintended and potentially harmful consequences. This can happen when an LLM is deployed with insufficient oversight, constraints, or alignment with human values, resulting in the model making choices that diverge from what most humans would consider beneficial or ethical.
In our example scenario, the generative AI application has excessive permissions to services that aren’t required by the application. Imagine that the application code was running with an execution role with full access to Amazon Simple Email Service (Amazon SES). This could allow for the unauthorized user to send spam emails on the users’ behalf in response to a prompt. You could help prevent this by limiting permission and functionality of the generative AI application plugins and agents. For more information, see OWASP Top 10 for LLM, evidence of LLM08 Excessive Agency.
During an investigation, while analyzing the logs, both the sourceIPAddress and the userAgent fields will be associated with the generative AI application (for example, sagemaker.amazonaws.com, bedrock.amazonaws.com, or q.amazonaws.com). Some examples of services that might commonly be called or invoked by other services are Lambda, Amazon SNS, and Amazon SES.
Conclusion
To respond to security events related to a generative AI workload, you should still follow the guidance and principles outlined in the AWS Security Incident Response Guide. However, these workloads also require that you consider some additional elements.
You can use the methodology that we introduced in this post to help you address these new elements. You can reference this methodology when investigating unauthorized access to infrastructure where the use of generative AI applications is either a target of unauthorized use, the mechanism for unauthorized use, or both. The methodology equips you with a structured approach to prepare for and respond to security incidents involving generative AI workloads, helping you maintain the security and integrity of these critical applications.
It’s been an interesting week full of AWS news as usual, but also full of vibrant faces filling up the rooms in a variety of events happening this month.
Let’s start by covering some of the releases that have caught my attention this week.
Oracle Database@AWS has been announced as part of a strategic partnership between Amazon Web Services (AWS) and Oracle. This offering allows customers to access Oracle Autonomous Database and Oracle Exadata Database Service directly within AWS simplifying cloud migration for enterprise workloads. Key features include zero-ETL integration between Oracle and AWS services for real-time data analysis, enhanced security, and optimized performance for hybrid cloud environments. This collaboration addresses the growing demand for multi-cloud flexibility and efficiency. It will be available in preview later in the year with broader availability in 2025 as it expands to new Regions.
Amazon OpenSearch Service now supports version 2.15, featuring improvements in search performance, query optimization, and AI-powered application capabilities. Key updates include radial search for vector space queries, optimizations for neural sparse and hybrid search, and the ability to enable vector and hybrid search on existing indexes. Additionally, it also introduces new features like a toxicity detection guardrail and an ML inference processor for enriching ingest pipelines. Read this guide to see how you can upgrade your Amazon OpenSearch Service domain.
So simple yet so good These releases are simple in nature, but have a big impact.
AWS Resource Access Manager (RAM) now supports AWS PrivateLink – With this release, you can now securely share resources across AWS accounts with private connectivity, without exposing traffic to the public internet. This integration allows for more secure and streamlined access to shared services via VPC endpoints, improving network security and simplifying resource sharing across organizations.
AWS Network Firewall now supports AWS PrivateLink – another security quick-win, you can now securely access and manage Network Firewall resources without exposing traffic to the public internet.
AWS IAM Identity Center now enables users to customize their experience – You can set the language and visual mode preferences, including dark mode for improved readability and reduced eye strain. This update supports 12 different languages and enables users to adjust their settings for a more personalized experience when accessing AWS resources through the portal.
Others Amazon EventBridge Pipes now supports customer managed KMS keys – Amazon EventBridge Pipes now supports customer-managed keys for server-side encryption. This update allows customers to use their own AWS Key Management Service (KMS) keys to encrypt data when transferring between sources and targets, offering more control and security over sensitive event data. The feature enhances security for point-to-point integrations without the need for custom integration code. See instructions on how to configure this in the updated documentation.
Amazon SageMaker introduces sticky session routing for inference – This allows requests from the same client to be directed to the same model instance for the duration of a session improving consistency and reducing latency, particularly in real-time inference scenarios like chatbots or recommendation systems, where session-based interactions are crucial. Read about how to configure it in this documentation guide.
Events The AWS GenAI Lofts continue to pop up around the world! This week, developers in San Francisco had the opportunity to attend two very exciting events at the AWS Gen AI Loft in San Francisco including the “Generative AI on AWS” meetup last Tuesday, featuring discussions about extended reality, future AI tools, and more. Then things got playful on Thursday with the demonstration of an Amazon Bedrock-powered MineCraft bot and AI video game battles! If you’re around San Francisco before October 19th make sure to check out the schedule to see the list of events that you can join.
Make sure to check out the AWS GenAI Loft in Sao Paulo, Brazil, which opened recently, and the AWS GenAI Loft in London, which opens September 30th. You can already start registering for events before they fill up including one called “The future of development” that offers a whole day of targeted learning for developers to help them accelerate their skills.
Our AWS communities have also been very busy throwing incredible events! I was privileged to be a speaker at AWS Community Day Belfast where I got to finally meet all of the organizers of this amazing thriving community in Northern Ireland. If you haven’t been to a community day, I really recommend you check them out! You are sure to leave energized by the dedication and passion from communities leaders like Matt Coulter, Kristi Perreault, Matthew Wilson, Chloe McAteer, and their community members – not to mention the smiles all around. 🙂
Certifications If you’ve been postponing taking an AWS certification exam, now is the perfect time! Register free for the AWS Certified: Associate Challenge before December 12, 2024 and get a 50% discount voucher to take any of the following exams: AWS Certified Solutions Architect – Associate, AWS Certified Developer – Associate, AWS Certified SysOps Administrator – Associate, or AWS Certified Data Engineer – Associate. My colleague Jenna Seybold has posted a collection of study material for each exam; check it out if you’re interested.
Also, don’t forget that the brand new AWS Certified AI Practitioner exam is now available. It is in beta stage, but you can already take it. If you pass it before February 15, 2025, you get an Early Adopter badge to add to your collection.
The Fedora
Engineering Steering Committee (FESCo) has voted to
immediately remove the WolfSSL package from all of Fedora’s
repositories due to its maintainer failing to gain approval to package
a new cryptography library for Fedora. Its brief travels through
Fedora’s package system highlights gaps in documentation, as well as
in the package‑review process. The good news is that this may stir
Fedora to improve its documentation and revive a formal security
team.
Generative artificial intelligence (AI) is now a household topic and popular across various public applications. Users enter prompts to get answers to questions, write code, create images, improve their writing, and synthesize information. As people become familiar with generative AI, businesses are looking for ways to apply these concepts to their enterprise use cases in a simple, scalable, and cost-effective way. These same needs are shared by a variety of security stakeholders. For example, if security directors want to summarize their security posture in natural language, a security architect will need to triage alerts or findings and investigate AWS CloudTrail logs to identify high priority remediation actions or detect potential threat actors by identifying potentially malicious activity. There are many ways to deploy solutions for these use cases.
In this blog post, we review a fully serverless solution for querying data stored in Amazon Security Lake using natural language (human language) with Amazon Q in QuickSight. This solution has multiple use cases, such as generating visualizations and querying vulnerability information for vulnerability management using tools such as Amazon Inspector that feed into AWS Security Hub. The solution helps reduce the time from detection to investigation by using natural language to query CloudTrail logs and Amazon Virtual Private Cloud (VPC) Flow Logs, resulting in quicker response to threats in your environment.
Amazon Security Lake is a fully managed security data lake service that automatically centralizes security data from AWS environments, software as a service (SaaS) providers, and on-premises and cloud sources into a purpose-built data lake that’s stored in your AWS account. The data lake is backed by Amazon Simple Storage Service (Amazon S3) buckets, and you retain ownership over your data. Security Lake converts ingested data into Apache Parquet format and a standard open source schema called the Open Cybersecurity Schema Framework (OCSF). With OCSF support, Security Lake normalizes and combines security data from AWS and a broad range of enterprise security data sources.
Amazon QuickSight is a cloud-scale business intelligence (BI) service that delivers insights to stakeholders, wherever they are. QuickSight connects to your data in the cloud and combines data from a variety of different sources. With QuickSight, users can meet varying analytic needs from the same source of truth through interactive dashboards, reports, natural language queries, and embedded analytics. With Amazon Q in QuickSight, business analysts and users can use natural language to build, discover, and share meaningful insights.
The recent announcements for Amazon Q in QuickSight, Security Lake, and the OCSF present a unique opportunity to apply generative AI to fully managed hybrid multi-cloud security related logs and findings from over 100 independent software vendors and partners.
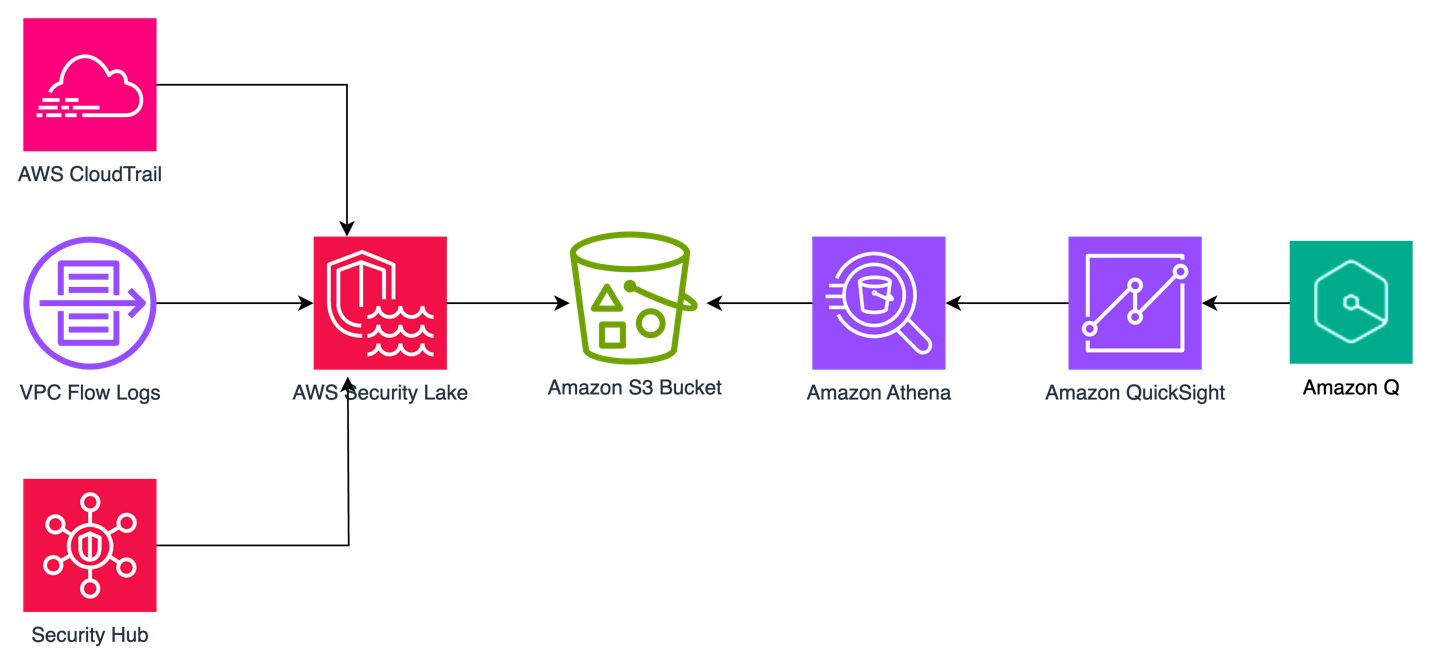
Solution overview
The solution uses Security Lake as the data lake which has native ingestion for CloudTrail, VPC Flow Logs, and Security Hub findings as shown in Figure 1. Logs from these sources are sent to S3 buckets in your AWS account and are maintained by Security Lake. We then create Amazon Athena views from tables created by Security Lake for Security Hub findings, CloudTrail logs, and VPC Flow Logs to define the interesting fields from each of the log sources. Each of these views are ingested into a QuickSight dataset. From these datasets, we generate analyses and dashboards. We use Amazon Q topics to label columns in the dataset that are human-readable and create a named entity to present contextual and multi-visual answers in response to questions. After the topics are created, users can perform their analysis using Q topics, QuickSight analyses, or QuickSight dashboards.
Figure 1: Solution architecture
You can use the rollup AWS Region feature in Security Lake to aggregate logs from multiple Regions into a single Region. Specifying a rollup Region can help you adhere to regional compliance requirements. If you use rollup Regions, you must set up the solution described in this post for datasets only in rollup Regions. If you don’t use a rollup Region, you must deploy this solution for each Region you that want to collect data from.
Prerequisites
To implement the solution described in this post, you must meet the following requirements:
Basic understanding of Security Lake, Athena, and QuickSight.
Security Lake is already deployed and accepting CloudTrail management events, VPC Flow Logs, and Security Hub findings as sources. If you haven’t deployed Security Lake yet, we recommend following the best practices established in the security reference architecture.
This solution uses Security Lake data source version 2 to create the dashboards and visualizations. If you aren’t already using data source version 2, you will see a banner in your Security Lake console with instructions to update.
An existing QuickSight deployment that will be used to visualize Security Lake data or an account that is able to sign up for QuickSight to create visualizations.
QuickSight Author Pro and Reader Pro licenses are needed for using Amazon Q features in QuickSight. Non-pro Authors and Readers can still access Q topics if an Author Pro or Admin Pro user shares the topic with them. Non-pro Authors and Readers can also access data stories if a Reader Pro, Author Pro, or Admin Pro shares one with them. Review Generative AI features supported by each QuickSight licensing tiers.
In the following section, we walk through the steps to ingest Security Lake data into QuickSight using Athena views and then using Amazon Q in QuickSight to create visualizations and query data using natural language.
Provide cross-account query access
In alignment with our security reference architecture, it’s a best practice to isolate the Security Lake account from the accounts that are running the visualization and querying workloads. It’s recommended that QuickSight for security use cases be deployed in the security tooling account. See How to visualize Amazon Security Lake findings with Amazon QuickSight for information on how to set up cross-account query access. Follow the steps in the Configure a Security Lake subscriber section and configure Athena to visualize your data section.
When you get to the create resource link steps, create a resource link for data source version 2 for Security Hub, CloudTrail, and VPC flow log tables for a total of three resource links. The way to identify data source version 2 tables is by their name; it ends in _2_0. For example:
For the remainder of this post, we will be referencing the database name security_lake_visualization and the resource link names for Security Hub findings, CloudTrail logs, and VPC Flow Logs respectively, as shown in Figure 2:
We will call the QuickSight account the visualization account. If you plan to use same account as the Security Lake delegated administrator and QuickSight, then skip this step and go to the next section where you will create views in Athena.
Create views in Athena
A view in Athena is a logical table that helps simplify your queries by working with only a subset of the relevant data. Follow these steps to create three views in Athena, one each for Security Hub findings, CloudTrail logs, and the VPC Flow Logs in the visualization account.
These queries default to the previous week’s data starting from the previous day, but you can change the time frame by modifying the last line in the query from 8 to the number of days you prefer. Keep in mind that there is a limitation on the size of each SPICE table of 1 TB. If you want to limit the volume of data, you can delete the rows that you find unnecessary. We included the fields customers have identified as relevant to reduce the burden of writing the parsing details yourself.
To create views:
Sign in to the AWS Management Console in the visualization account and navigate to the Athena console.
If a Security Lake rollup Region is used, select the rollup Region.
Choose Launch Query Editor.
If this is the first time you’re using Athena, you will need to choose a bucket to store your query results.
Choose Edit Settings.
Choose Browse S3.
Search for your bucket name.
Select the radio button next to the name of your bucket.
Select Choose.
For Data Source, select AWSDataCatalog.
Select Database as security_lake_visualization. If you used a different name for the database for cross account query access, then select that database.
Figure 3: Athena database selection
Copy the query for the security_hub_view from the GitHub repo for this post. If you’re using a different name for the database and table resource link than the one specified in this post, edit the FROM statement at the bottom of the query to reflect the correct names.
Paste the query in the query editor and then choose Run. The name of the view is set in the first line of the query which is security_insights_security_hub_vw2.
To confirm this view was created correctly, choose the three dots next to the view that was created and select Preview View.
Figure 4: Previewing the view
Repeat steps 5–9 to create the CloudTrail and VPC Flow Logs views. The queries for each can be found in the GitHub repo.
Figure 5: Athena views
Create QuickSight dataset
Now that you’ve created the views, use Athena as the data source to create a dataset in QuickSight. Repeat these steps for the Security Hub findings, CloudTrail logs, and VPC Flow Logs. Start by creating a dataset for the Security Hub findings.
To configure permissions on tables:
Sign in to the QuickSight console in the visualization account. If a Security Lake rollup Region is used, select the rollup Region.
Although there are multiple ways to sign in to QuickSight, we used IAM based access to build the dashboards. To use QuickSight with Athena and Lake Formation, you first need to authorize connections through Lake Formation.
When using a cross-account configuration with AWS Glue Data Catalog, you need to configure permissions on tables that are shared through Lake Formation. For the use case in this post, use the following steps to grant access on the cross-account tables in the Glue Catalog. You must perform these steps for each of the Security Hub, CloudTrail, and VPC Flow Logs tables that you created in the preceding cross-account query access section. Because granting permissions on a resource link doesn’t grant permissions on the target (linked) database or table, you will grant permission twice, once to the target (linked table) and then to the resource link.
In the Lake Formation console, navigate to the Tables section and select the resource link for the Security Hub table. For example:
Select Actions. Under Permissions, select Grant on target.
For the next step, you need the Amazon Resource Name (ARN) of the QuickSight users or groups that need access to the table. To obtain the ARN through the AWS Command Line Interface (AWS CLI), run following commands (replacing account ID and Region with that of the visualization account.) You can use AWS CloudShell for this purpose.
After you have the ARN of the user or group, copy it and go back to the LakeFormation console Grant on Target page. For Principals, select SAML users and groups, and then add the QuickSight user’s ARN.
Figure 6: Selecting principals
For LF-Tags or catalog resources, keep the default settings.
Figure 7: Table grant on target permissions
For Table permissions, select Select for both Table Permissions and Grantable Permissions, and then choose Grant.
Figure 8: Selecting table permissions
Navigate back to the Tables section and select the resource link for the Security Hub table. For example:
Select Actions. This time under Permissions, and then choose Grant.
For Principals, select SAML users and groups, and then add the QuickSight user’s ARN captured earlier.
For the LF-Tags or catalog resources section, use the default settings.
For Resource link permissions choose Describe for both Table Permissions and Grantable Permissions.
Repeat steps a–k for the CloudTrail and VPC Flow Logs resource links.
To create datasets from views:
After permissions are in place, you create three datasets from the views created earlier. Because both Quicksight and Lake Formation are Regional services, verify that you’re using QuickSight in the same Region where Lake Formation is sharing the data. The simplest way to determine your Region is to check the QuickSight URL in your web browser. The Region will be at the beginning of the URL, such as us-east-1. To change the Region, select the settings icon in the top right of the QuickSight screen and select the correct Region from the list of available Regions in the drop-down menu.
Navigate back to the QuickSight console.
Select Datasets, and then choose New dataset.
Select Athena from the list of available data sources.
Enter a Data source name, for example security_lake_securityhub_dataset and leave the Athena workgroup as [primary]. Choose Create data source.
At the Choose your table prompt, for Catalog, select AwsDataCatalog. For Database, select security_lake_visualization. If you used a different name for the database for cross-account query access, then select that database. For Tables, select the view name security_insights_security_hub_vw2 to build your dashboards for Security Hub findings. Then choose Select.
Figure 9: Choose a table during QuickSight dataset creation
At the Finish dataset creation prompt, select Import to SPICE for quicker analytics. Choose Visualize. This will create a new dataset in QuickSight using the name of the Athena view, which is security_insights_security_hub_vw2. You will be taken to the Analysis page, exit out of it.
Go back to the QuickSight console and repeat steps 3–8 for the CloudTrail and VPC Flow Log datasets.
Create a topic
Now that you have created a dataset, you can create a topic. Q topics are collections of one or more datasets that represent a subject area for your business users to ask questions. Topics allow users to ask questions in natural language and to build visualizations using natural language.
To create a Q topic:
Navigate to the QuickSight console.
Choose Topics in the left navigation pane.
Figure 10: QuickSight navigation pane
Choose New topic. Create one topic each for the Security Hub findings, CloudTrail logs, and VPC Flow Logs
Figure 11: QuickSight topic creation
On the New topic page, do the following:
For Topic name, enter a descriptive name for the topic. Name the first one SecurityHubTopic. Your business users will identify the topic by this name and use it to ask questions.
For Description, enter a description for the topic. Your users can use this description to get more details about the topic.
Choose Continue.
On the Add data to topic page, choose the dataset you created in the Create a QuickSight dataset section. Start with the Security Hub dataset security_insights_security_hub_vw2.
Choose Continue. It will take a few minutes to create the topic.
Now that your topic has been created, navigate to the Data tab of the topic.
Your Data Fields sub-tab should be selected already. If not, choose Data Fields.
Figure 12: Topics data fields
For each of the fields in the list, turn on Include to make sure that all fields are included. For this example, we selected all fields, but you can adjust the included columns as needed for your use case. Note, you might see a banner at the top of the page indicating that the indexing is in progress. Depending on the size of your data, it might take some time for Q to make those fields available for querying. Most of the time, indexing is complete in less than 15 minutes.
Review the Synonyms column. These alternate representations of your column name are automatically generated by Amazon Q. You can add and remove synonyms as needed for your use case.
At this point, you’re ready to ask questions about your data using Amazon Q in QuickSight. Choose Ask a question about SecurityHubTopic at the top of the page.
Figure 13: Ask questions using Q
You can now ask questions about Security Hub findings in the prompt. Enter Show me findings with compliance status failed along with control id.
Figure 14: Q answers
Under the question, you will see how it was interpreted by QuickSight.
Repeat steps 1–13 to create CloudTrail and VPC Flow Log QuickSight topics.
Create named entities for your topics
Now that you’ve created your topics, you will now add named entities. Named entities are optional, but we’re using them in the solution to help make queries more effective. The information contained in named entities, the ordering of fields, and their ranking make it possible to present contextual, multi-visual answers in response to even vague questions.
To create a named entity:
In the QuickSight console, navigate to Topics.
Select the Security Hub topic that you created in the previous section.
Under the Data tab, select the Named Entity subtab, and choose Add Named Entity.
Figure 15: Named entity subtab
Enter Security Findings as the entity name.
Select the following datafields: Status, Metadata Product Name, Finding Info Title, Region, Severity, Cloud Account Uid, Time Dt, Compliance Status, and AccountId. The order of the fields helps Q to prioritize the data, so rearrange your data fields as needed.
Choose Save in the top right corner to save your results.
Repeat steps 1–6 with the CloudTrail dataset using the following datafields: API operation, Time Dt, Region, Status, AccountId, API Response Error, Actor User Credential Uid, Actor User Name, Actor User Type, Api Service Name, Actor Idp Name, Cloud Provider, Session Issuer, and Unmapped.
Figure 17: CloudTrail named entity creation
Repeat steps 1–6 with the VPC Flow Log dataset using the following datafields: Src Endpoint IP, Src Endpoint Port, Dst Endpoint IP, Dst Endpoint Port, Connection Info Direction, Traffic Bytes, Action, Accountid, Time Dt, and Region.
Figure 18: VPC Flow log named entity creation
Create visualizations using natural language
After your topic is done indexing, you can start creating visualizations using natural language. In QuickSight, an analysis is the same thing as a dashboard, but is only accessible by the authors. You can keep it private and make it as robust and detailed as you want. When you decide to publish it, the shared version is called a dashboard.
To create visualizations:
Open the QuickSight console and navigate to the Analysis tab.
In the top right, select New analysis.
Select the dataset you created previously, it will have the same naming convention as the Athena view. For reference, the Athena view query created a Security Hub dataset called security_insights_security_hub_vw2.
Validate the information about the data set you’re going to use in the analysis and choose USE IN ANALYSIS.
On the pop up, select the interactive sheet option and choose Create.
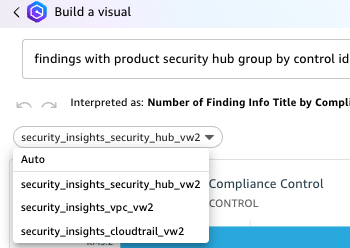
For datasets that have a corresponding Q topic, which you created in a previous step, choose Build visual at the top of the screen.
Figure 19: Build visual using natural language
Enter your prompt and choose BUILD. For example, enter findings with product security hub group by control id include count. Q automatically generates a visualization.
Figure 20: Q response
To add to your dashboard, choose ADD TO ANALYSIS to see your new visualization module in your current analysis.
The supplied questions are targeted towards a Security Hub findings topic, where you can ask questions about your security hub findings data. For example, show all Security Hub findings for critical severity for a specific resource or ARN.
If you use Amazon Inspector for software vulnerability management and you want to monitor top common vulnerabilities and exposures (CVEs) affecting your organization, choose Build visual and enter show all ACTIVE findings with product inspector group by Title add count in the prompt. We used the keyword ACTIVE because ACTIVE is a finding state in Security Hub that indicates the finding is still active as per the finding source and Amazon Inspector has not closed the finding yet. If Amazon Inspector has closed the finding, the finding will have a state of ARCHIVED.
Figure 21: Q Response for an Amazon Inspector findings question
To add the remaining datasets, which allows you to visualize data from multiple datasets in a single view, select the dropdown in the left navigation under Dataset.
Select Add a new dataset.
Search the name of the remaining datasets you created previously.
Select anywhere on the name of the dataset to make the radial button blue for the single dataset you want to add. Choose Select.
Repeat steps 7–12 in this section to add all the corresponding datasets you created previously.
Note: When you add additional datasets to the same Analysis and use Build visual to generate visualizations using natural language, the corresponding datasets with Q Topics are populated in the drop down under the prompt. Be sure to choose the correct dataset when asking questions.
Figure 22: Choosing a QuickSight dataset
To create dashboards:
After you’ve created the visual and are ready to publish the analysis as a dashboard, select PUBLISH in the top right corner.
Enter a name for your dashboard.
Choose Publish Dashboard.
After your dashboard is published, your users can ask questions about the data through the dashboard as well. This dashboard can be shared with other users. Users with QuickSight Reader Pro licenses can ask questions using Amazon Q.
To ask questions using the dashboard:
Navigate to the Dashboards section on the left navigation.
Select the dashboard you previously published.
Select Ask a question about [Topic Name] at the top of the screen. A module will open from the side of your screen. Questions can only be addressed to a single topic. To change the topic, select the name of the topic and a drop-down will appear. Select the name of the current topic to see other options and select the topic you want to ask a question about. For this example, select CloudTrailTopic.
Figure 23: Selecting a topic
Enter a question in the prompt. For this example, enter show top API operations in the last 24 hours with accessdenied.
Figure 24: CloudTrail question 1
Enter show all activity by user johndoe in the last 3 days.
Figure 25: CloudTrail question 2
Q will automatically build a small dashboard based on the questions provided.
Now change the topic to VPCFlowTopic as described in step 3.
Enter show me the top 5 dst ip by bytes for outbound traffic with dst port 443.
Figure 26: VPC Flow Log question
You can build executive summaries using QuickSight data stories, which also use generative AI. Data stories use Amazon Q prompts and visuals to produce a draft that incorporates the details that you provide. For example, you can create a data story about how a specific CVE affects your organization by asking Q questions, then add visuals from analyses you already created.
Conclusion
In this blog post, you learned how to use generative AI for your security use cases. We showed you how to use cross-account query access to allow a QuickSight visualization account to subscribe to Security Lake data for Security Hub findings, CloudTrail logs, and VPC Flow Logs. We then provided instructions for creating, Athena views, QuickSight datasets, Q topics, named entities, and for using natural language to build dashboards and query your data. You can customize the Athena views to create, update, or delete columns and column names as needed for your use case. You can also customize the Q topics and named entities to use naming conventions and structure responses based on your organization’s needs.
If you have feedback about this post, submit comments in the Comments section below. If you have questions about this post, contact AWS Support.
To provide the best experiences, we use technologies like cookies to store and/or access device information. Consenting to these technologies will allow us to process data such as browsing behavior or unique IDs on this site. Not consenting or withdrawing consent, may adversely affect certain features and functions.
Functional
Always active
The technical storage or access is strictly necessary for the legitimate purpose of enabling the use of a specific service explicitly requested by the subscriber or user, or for the sole purpose of carrying out the transmission of a communication over an electronic communications network.
Preferences
The technical storage or access is necessary for the legitimate purpose of storing preferences that are not requested by the subscriber or user.
Statistics
The technical storage or access that is used exclusively for statistical purposes.The technical storage or access that is used exclusively for anonymous statistical purposes. Without a subpoena, voluntary compliance on the part of your Internet Service Provider, or additional records from a third party, information stored or retrieved for this purpose alone cannot usually be used to identify you.
Marketing
The technical storage or access is required to create user profiles to send advertising, or to track the user on a website or across several websites for similar marketing purposes.