Tag Archives: Amazon SageMaker HyperPod

Automate SageMaker HyperPod incident triage and root-cause-analysis with AWS DevOps Agent

Post Syndicated from Tomonori Shimomura original https://aws.amazon.com/blogs/devops/automate-sagemaker-hyperpod-incident-triage-and-root-cause-analysis-with-aws-devops-agent/

Introduction

Large-scale machine learning workloads: training, fine-tuning, and inference run on clusters of hundreds to thousands of GPU instances for days or weeks at a stretch. Keeping operational visibility across a fleet of this size is a constant challenge: hardware health events, node lifecycle transitions, capacity fluctuations, and workload-level issues appear in the event stream around the clock, including nights and weekends.

Amazon SageMaker HyperPod is a purpose-built managed cluster service that lets you run distributed model training, fine-tuning, and inference across hundreds of accelerated instances. It provides built-in resiliency that automatically detects and replaces faulty hardware, so long-running jobs can continue with minimal interruption.

For teams operating these clusters, the scale still creates a fundamental tension: you need continuous visibility into your fleet, but you can’t afford to keep engineers watching the event stream 24/7. 

What HyperPod resiliency already handles

SageMaker HyperPod’s built-in resiliency layer automatically detects and self-heals instance-level GPU failures. When the Health Monitoring Agent (HMA) identifies a bad GPU, the HyperPod resiliency layer drains, reboots, or replaces the node depending on the error type, and the job resumes without human intervention. This is exactly what you want: routine hardware failures are handled automatically so your training runs keep going. 

This solution does not replace HMA or any part of HyperPod’s resiliency. It adds an autonomous investigation layer on top, using the cluster events and health signals that HMA and HyperPod already produce as its input. 

Operational conditions where a human still wants to be in the loop 

With that self-healing in place, there are operational conditions where a human still wants to be in the loop or decide: 

  • Configuration issues: a lifecycle-script change you made, a misconfigured mount, or a networking/security change that causes provisioning failures on every new node. 
  • Capacity conditions: a replacement waiting on capacity in the pool, where the operator needs to know recovery is in flight and can decide whether to intervene. 
  • Recurring hardware faults: each fault self-heals correctly, but the same GPU error signature recurring across three or more replacements on one instance group in a week is a pattern worth surfacing to an operator as a single signal. 
  • Workload-level conditions: Pods stuck in CrashLoopBackOff for hours, nodes sitting NotReady, or GPU allocation chronically low. 

Without automation, these conditions push operators into round-the-clock manual triage: correlating events across the SageMaker control plane, Amazon EKS, and Amazon CloudWatch, and deciding whether HyperPod is still recovering or needs a hand. 

Opportunity: AWS DevOps Agent as a 24/7 companion 

AWS DevOps Agent provides an autonomous incident-response platform that can be taught a domain’s operational model through custom skills. By wiring your HyperPod cluster into DevOps Agent, you get a 24/7 companion that complements HyperPod’s self-healing. It watches for the operational conditions that still need a human decision, triaging them, root-causing them, and delivering a clear verdict with recommended actions. 

By design, DevOps Agent is configured to run in observe-and-report mode for this integration – it is not granted SSM, SSH, or action-taking permissions against your cluster or its nodes. The agent reads cluster events, control-plane state, Kubernetes objects, and CloudWatch logs to reconstruct what happened; every corrective action (node reboots, replacements, drains) continues to be performed by HyperPod’s own resiliency layer or by an operator responding to the emailed verdict. This read-only boundary is deliberate: it keeps the agent’s blast radius zero while still delivering the correlation and triage value. 

In this post, you will learn how to connect any SageMaker HyperPod cluster (either the EKS or Slurm Orchestrator option) to AWS DevOps Agent. Conditions are auto-detected, triaged, root-caused from cluster state and CloudWatch logs, and emailed as a clear verdict. You will also see how the solution can be extended to detect additional conditions specific to your workloads. 

Solution Overview 

What this solution delivers 

This solution wires any SageMaker HyperPod cluster into AWS DevOps Agent so that operational conditions calling for a human decision are auto-detected, triaged, root-caused, and delivered as a human-readable verdict email. Specifically, you get: 

  • Autodetection of HyperPod conditions that complement resiliency self-healing, from the live SageMaker event stream and a periodic Kubernetes-state audit. 
  • Triage + root-cause analysis by the DevOps Agent, taught HyperPod’s operational model via two custom skills. It reconstructs the incident timeline and decides whether HyperPod is still recovering or needs an operator. 
  • Human-readable verdict emails: Monitor (recovery in flight, here’s the ETA), Escalate (you need to act, here’s why and what to do), or Resolved (auto-recovery closed the loop). Noise is filtered out. 
  • Extensibility: customize what conditions are detected (by modifying the periodic-audit Lambda) and how the agent reasons about them (by editing the plain-English skills). 

The following screenshot shows the DevOps Agent incident response dashboard with example verdict emails for three common fault types: 
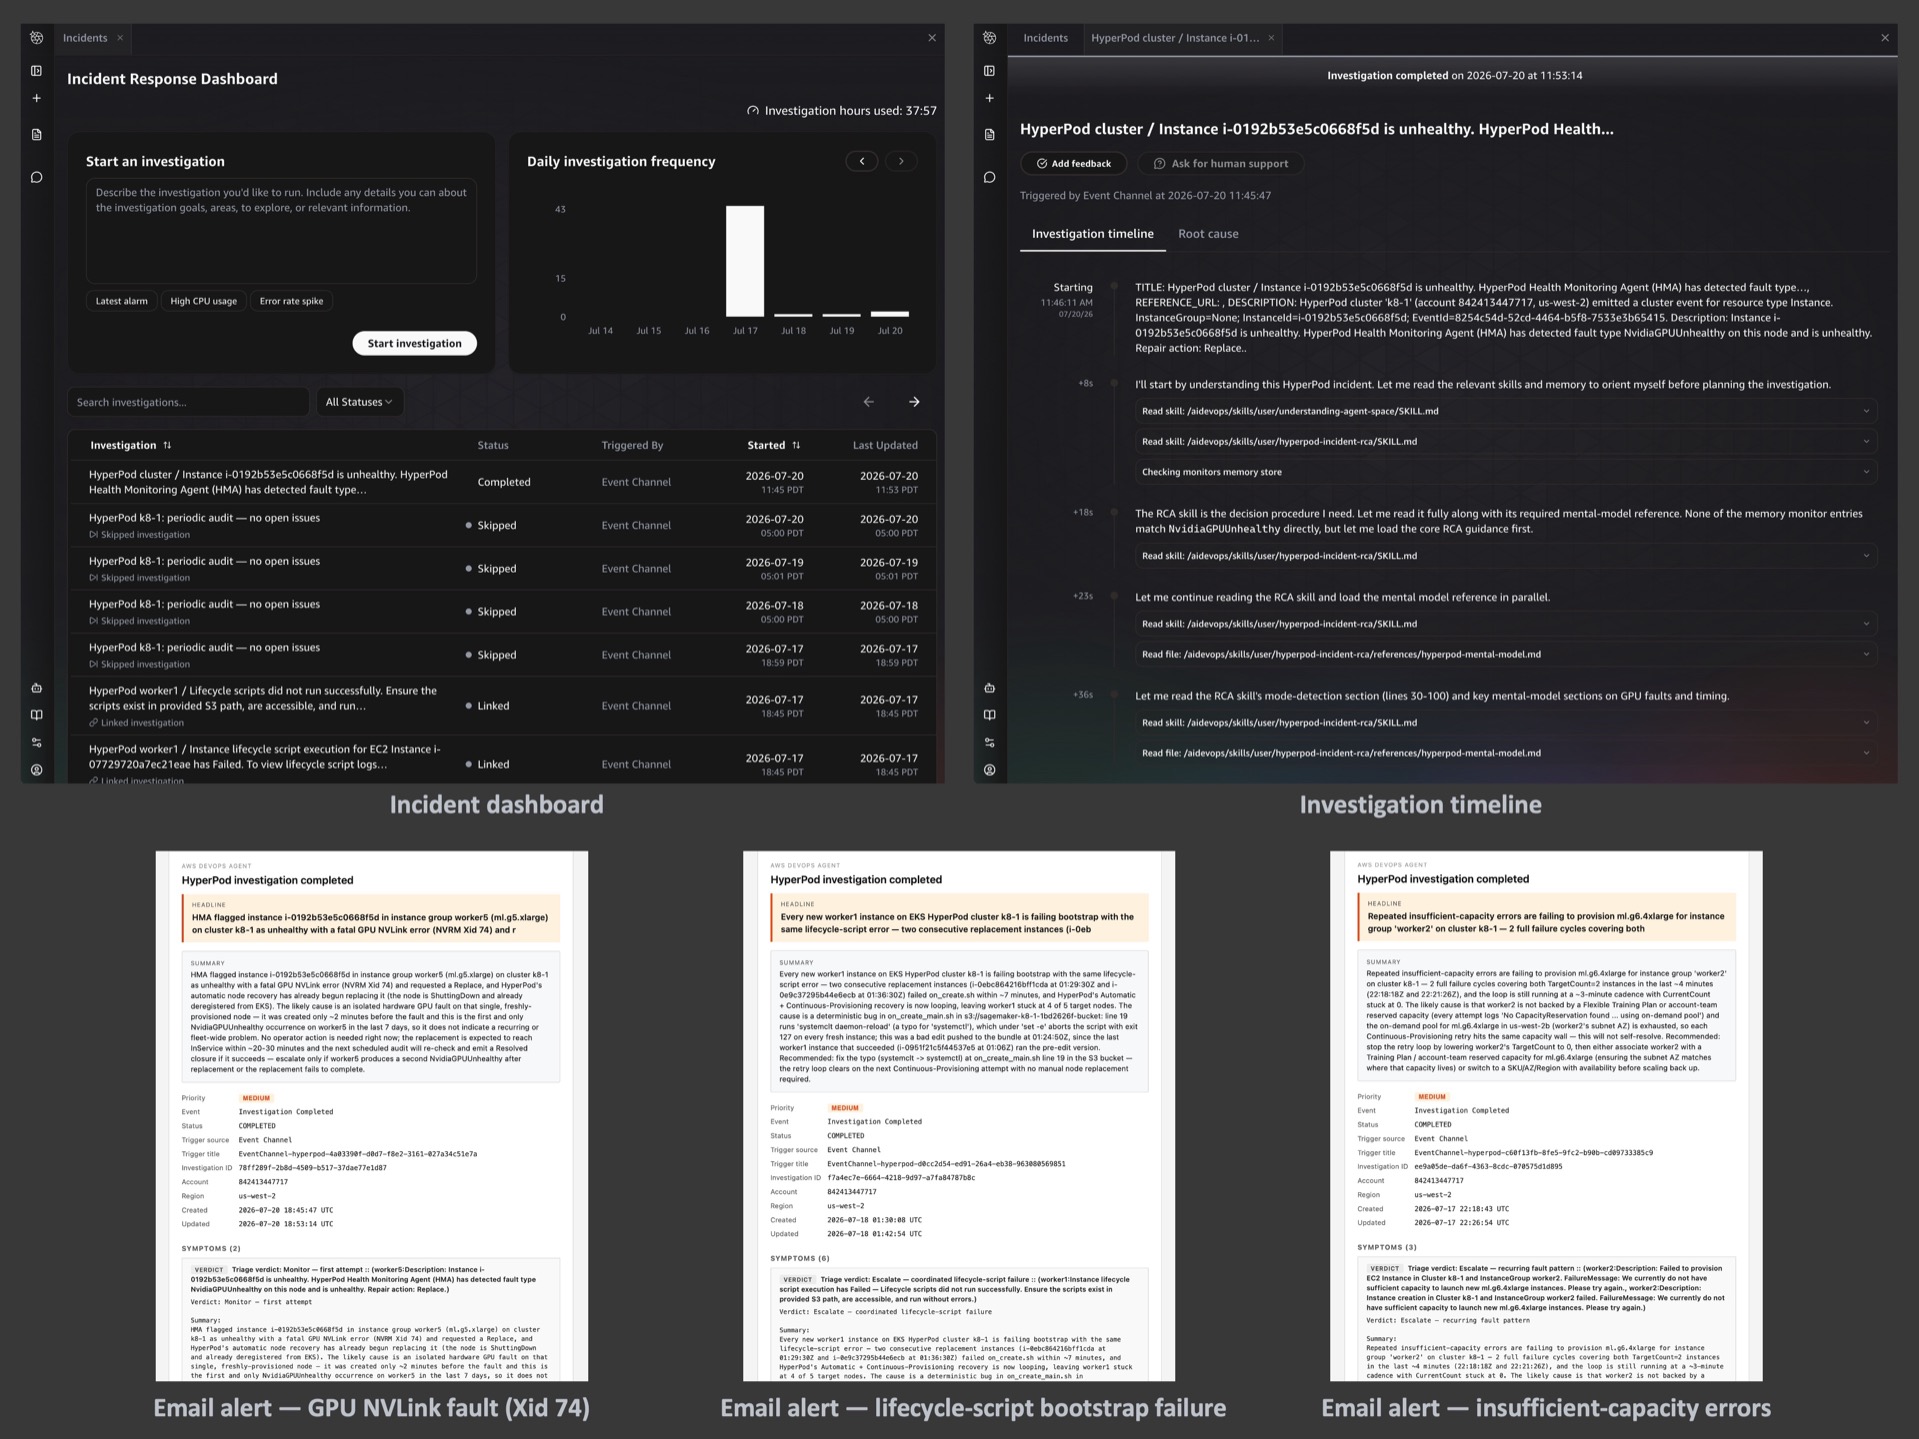
DevOps Agent incident response dashboard showing investigation list and timeline, with three email verdict examples for GPU NVLink fault, lifecycle-script bootstrap failure, and insufficient-capacity errors

DevOps Agent incident response dashboard showing investigation list and timeline, with three email verdict examples for GPU NVLink fault, lifecycle-script bootstrap failure, and insufficient-capacity errors

Architecture 

The whole solution deploys one AWS CloudFormation stack per cluster. Two event paths feed the DevOps Agent, and one path carries its verdicts back out to you. 
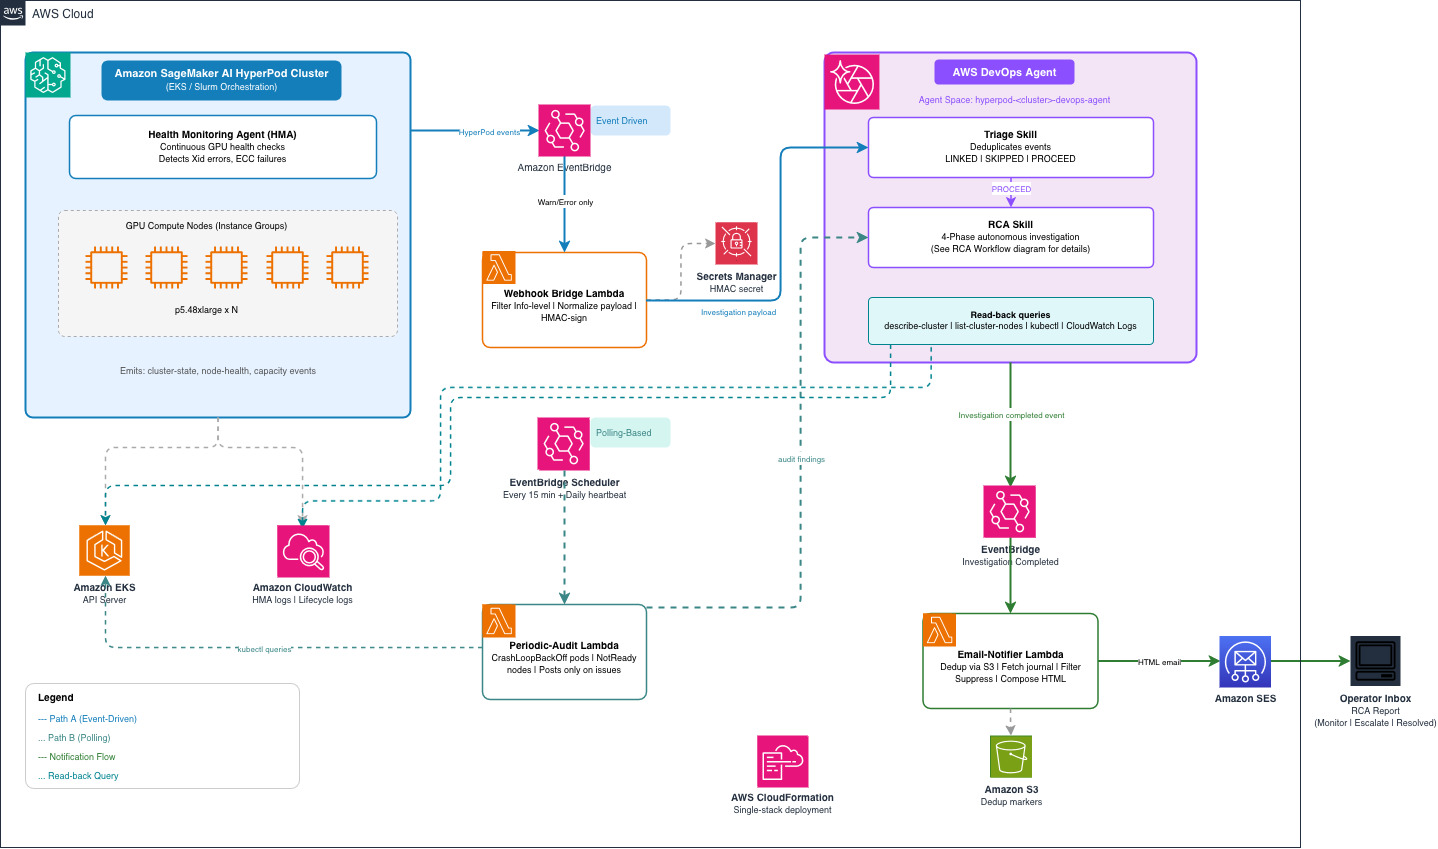
Architecture diagram showing the event flow from HyperPod Health Monitoring Agent through EventBridge to DevOps Agent and email notification

Architecture diagram showing the event flow from HyperPod Health Monitoring Agent through EventBridge to DevOps Agent and email notification

This architecture shows a 1:1 relationship between a HyperPod cluster and a DevOps Agent space, and the deployment instructions in this post follow that model. If you need to associate multiple clusters with a single Agent Space, you can customize the CloudFormation template and the ClusterFilter parameter to widen the allowlist of cluster names forwarded by the webhook bridge.

Event flow 

  1. Event-driven issue detection: HyperPod emits cluster-state, node-health, and capacity events to Amazon EventBridge. The webhook bridge Lambda drops routine Info-level noise, maps the rest into a DevOps Agent investigation payload, signs it with HMAC-SHA256 using a shared secret stored in AWS Secrets Manager, and POSTs it to the agent’s generic webhook. 
  1. Polling-based issue detection: A periodic-audit Lambda checks Kubernetes state (CrashLoopBackOff pods, NotReady nodes) every 15 minutes and fires only when it finds a real issue, plus a daily heartbeat confirming the pipeline is alive. On a healthy cluster, nothing is POSTed, so no investigation runs and no cost is incurred. 
  1. Investigation: DevOps Agent receives the payload and runs two custom skills: the triage skill decides whether to link (duplicate), skip (noise), or proceed (investigate). The RCA skill reconstructs the timeline using describe-cluster, list-cluster-nodes, list-cluster-events, kubectl, and CloudWatch logs (HMA health monitoring, lifecycle scripts), then classifies the incident as Suppress, Monitor, Escalate, or Resolved. 
  1. Notification: An Amazon Lambda function sends notification emails via Amazon SES. It listens on the aws.aidevops event stream for investigation completions, reads the verdict from the agent’s journal, and sends an email with the headline, what happened, likely cause, and recommended action. Suppress verdicts are filtered to avoid noise on healthy clusters. 

Getting started 

For a step-by-step walkthrough to deploy this solution, visit the DevOps Agent Integration guide. Once you have the solution running, the following sections explain how to customize detection, reasoning, and notifications for your environment. 

Prerequisites 

  • An AWS account with AWS CLI v2 configured for the target region. 
  • An existing SageMaker HyperPod cluster (EKS or Slurm orchestrator). 
  • IAM permissions to create roles, deploy CloudFormation, manage Secrets Manager, and call devops-agent:* and eks:CreateAccessEntry. 
  • For email notifications: a verified Amazon SES sender identity. You can verify an email address in the Amazon SES console or with the AWS CLI. After running the command below, the address owner will receive a verification email and must click the confirmation link:

    aws ses verify-email-identity --email-address [email protected]

    Recipients must also be verified if your SES account is still in sandbox mode. 

Deploying with CloudFormation

The solution deploys as a single CloudFormation stack. Clone the awsome-distributed-ai repository, create a params.json with your cluster name and email settings, and run: 

cd 1.architectures/5.sagemaker-hyperpod/tools/devops-agent

# 1. Set up a Python env with boto3 >= 1.43.25
python3 -m venv .venv && source .venv/bin/activate && pip install 'boto3>=1.43.25'

# 2. Fill in your cluster name and email addresses
cp deploy/params.example.json deploy/params.json
# edit: HyperPodClusterName, EmailSender, EmailRecipients 

# 3. Deploy
make deploy

This provisions the Agent Space with read-only EKS access (auto-discovered from the cluster’s orchestrator ARN), the EventBridge rule and webhook bridge Lambda, the periodic-audit scheduler, and the email notifier. For Slurm-orchestrated clusters, the EKS access step is skipped automatically. 

The webhook bridge — mapping HyperPod events to DevOps Agent 

An EventBridge rule captures HyperPod events and invokes a Lambda function. The Lambda forwards all Warn and Error level events, normalizing each into a DevOps Agent investigation payload. It extracts the failure message, instance group, and event metadata, then signs it with HMAC using a shared secret stored in AWS Secrets Manager, and POSTs it to the agent’s generic webhook endpoint. Info-level events are dropped at the bridge to avoid creating investigations for routine status updates. 

A cluster allowlist parameter lets you scope which HyperPod clusters trigger investigations, useful when multiple clusters share the same account and region. 

How the skills are defined — teaching the agent HyperPod’s operational model 

AWS DevOps Agent skills are plain-English instructions that teach the agent how to reason about a domain. This solution includes two complementary skills: 

Triage skill — LINKED / SKIPPED / PROCEED (view the skill document) 

The triage skill runs first on every incoming task. It decides whether to link the event to an existing investigation, skip it, or proceed to a full investigation. 

  • Why triage matters — a concrete example: When a single node fails, HyperPod’s replacement process emits multiple events in quick succession: “lost orchestration-ready status,” “provisioning started,” “capacity request initiated.” Without triage, each event would spawn a separate investigation. The triage skill recognizes these events belong to the same incident (same instance group + overlapping time window) and links them, so only one investigation runs. This saves investigation compute and avoids duplicate emails. 
  • When to SKIP: When a node is already being replaced and a follow-up “lost orchestration-ready status” event arrives with a generic “Request to service failed” message, the triage skill recognizes that a replacement is already in progress for that instance group and skips the event. No new investigation is created for what is simply a progress update of an existing recovery. 

RCA skill — timeline reconstruction and verdict (view the skill document) 

When triage produces PROCEED, the RCA skill takes over. It reads cluster state, events, and logs, reconstructs an incident timeline, and classifies the situation into one of four verdicts:
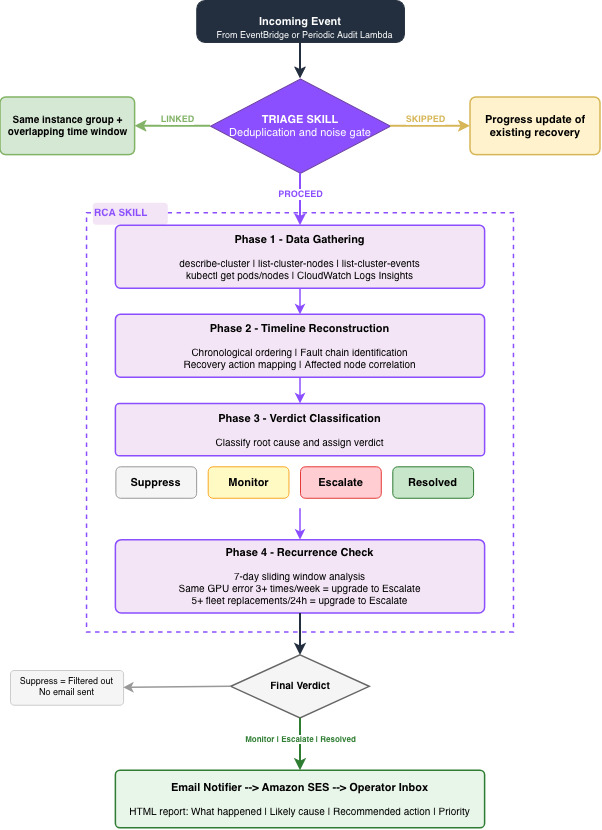
 RCA Flowchart showing the four phases of root-cause analysis: data gathering, timeline reconstruction, classification, and recurrence check

RCA Flowchart showing the four phases of root-cause analysis: data gathering, timeline reconstruction, classification, and recurrence check

  • Phase 1 — Data gathering: The skill reads describe-cluster, list-cluster-nodes, list-cluster-events, and CloudWatch log streams (HMA health monitoring, lifecycle scripts) to collect the raw facts. 
  • Phase 2 — Timeline reconstruction: It orders events chronologically and identifies the fault chain: what triggered what, which nodes were affected, and what recovery actions HyperPod took. 
  • Phase 3 — Classification: Based on the timeline, recurrence statistics, and HyperPod’s resiliency behavior, it assigns a verdict: 
    • Suppress — a non-issue (for example, a transient event that has already resolved). 
    • Monitor — recovery is in flight; here’s the expected resolution window. 
    • Escalate — you need to act; here’s the root cause and recommended action. 
  • Resolved — auto-recovery closed the loop; no action needed. 
  • Phase 4 — Recurrence check: The skill computes sliding-window statistics over the one week cluster event history. When thresholds are crossed, the verdict escalates to alert the operator of a systemic pattern. For example, the same GPU error signature on the same instance group three or more times in a week, or five or more replacements fleet-wide in 24 hours. 

The verdict is written to the agent’s investigation journal along with a human-readable report containing what happened, the likely cause, and recommended operator actions. 

The periodic-audit Lambda — Kubernetes state monitoring 

The periodic-audit Lambda fires every 15 minutes and inspects Kubernetes Pod/Node state directly (via the EKS API server). It checks for: 

  • Pods in CrashLoopBackOff (default: flagged when restart count reaches five and the last crash is within 15 minutes) 
  • NotReady nodes (default: flagged when a node has been NotReady for at least 15 minutes and at least 10% of nodes are affected) 

Namespace-aware filtering controls which pods are checked: 

  • Pods in kube-public and kube-node-lease are ignored entirely by default. 
  • Pods in kube-systemaws-hyperpod, and amazon-cloudwatch are tagged as system-workload issues (distinct from user-workload issues in the verdict). 

All thresholds and namespace lists are configurable via the CloudFormation stack parameters. 

The Lambda POSTs a webhook event to DevOps Agent only when a real issue is found. On a healthy cluster, nothing is POSTed, so no investigation runs and no cost is incurred. A separate daily heartbeat schedule confirms the monitoring pipeline itself is alive. The heartbeat is visible in the DevOps Agent console but deliberately not emailed on healthy runs — so silence in your inbox means the cluster is healthy, not that the pipeline is broken. 

Note: HyperPod infrastructure faults (node health, capacity errors, lifecycle-script failures) are handled event-driven by the webhook bridge. They come from the native HyperPod event stream in EventBridge. The periodic audit deliberately does not duplicate that path; it only covers Kubernetes workload state, which is not in the HyperPod event stream. 

Closing the loop — the email notifier

An EventBridge rule on the aws.aidevops event stream captures investigation lifecycle events. The email-notifier Lambda processes these events through the following steps: 

  1. Event filtering: Only “Investigation Completed” events are processed (one email per investigation lifecycle). The event payload contains the agent_space_id, task_id, and execution_id. 
  2. Dedup: The Lambda checks an S3 marker at s3://<bucket>/emailed/<execution_id>. If present, this investigation has already been emailed and the event is dropped. This prevents duplicate emails when the same completion event is re-emitted. 
  3. Fetching the investigation context: The Lambda calls two DevOps Agent APIs: 
    • get_backlog_task(agentSpaceId, taskId) — retrieves the task metadata (title, priority, timestamps). 
    • list_journal_records(agentSpaceId, executionId) — retrieves the investigation’s findings, symptoms, and investigation gaps from the agent’s journal. 
  4. Suppress-verdict filtering: If the investigation produced a Suppress verdict or no findings at all, no email is sent. 
  5. Email composition: The Lambda composes a single HTML email from the journal records: a short headline followed by a one-paragraph summary covering what happened, the likely cause, and the recommended action. 
  6. Send via SES: The formatted email is sent to the configured recipients. After successful delivery, the S3 dedup marker is written. 

The operator also has access to the full investigation in the DevOps Agent web console (see following “Viewing investigations” section). 

Viewing investigations in the DevOps Agent console 

For readers new to AWS DevOps Agent, here’s how to navigate to your investigations: 

  1. Open the AWS DevOps Agent console. 
  2. Select your Agent Space (named hyperpod-<cluster-name>-devops-agent by default). 
  3. From the Launch web app drop-down, choose an option to open the DevOps Agent web app. 
  4. Select Incidents from the left navigation pane to open the Incident Response Dashboard. It lists all investigations with their subject, status, and timestamp. 
  5. Select any investigation to see its full timeline, journal records, and the verdict report. 

Asking the agent directly — the DevOps Agent Chat UI 

Beyond the automated emails, you don’t have to wait for the next investigation to get answers about your cluster. You can open the DevOps Agent’s AI chat at any time and ask follow-up questions in plain English. The agent answers from the live cluster state, the investigation history, and the skills it has been taught. 

For example: 

  • “I got an email about a GPU failure in my cluster. Did it get resolved now with HyperPod’s resiliency?” — The agent checks the current cluster state, confirms whether the replacement succeeded, and provides a timeline of what happened (HMA detection  replacement initiated  node back in service), along with anything to watch for. 
  • “Are there unhealthy Pods on my cluster?” — The agent inspects the Kubernetes state and reports any CrashLoopBackOff pods or NotReady nodes. 
  • “I just triggered scaling up. Check if it is progressing well.” — The agent looks at the cluster’s current node counts vs. target counts and reports whether provisioning is on track. 
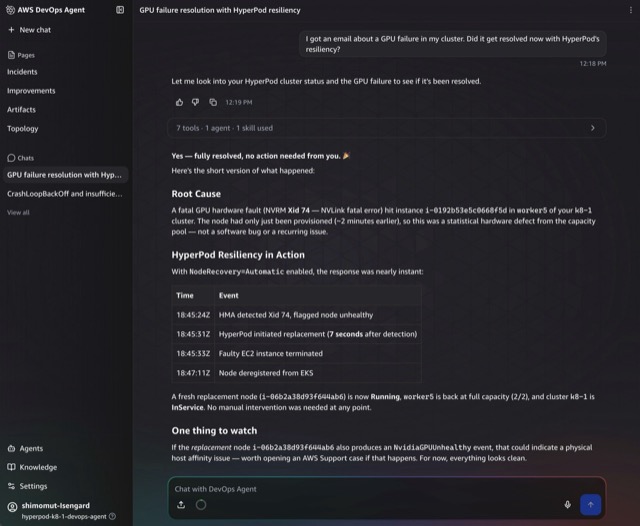
AWS DevOps Agent chat interface showing a natural language query about cluster health

AWS DevOps Agent chat interface showing a natural language query about cluster health

The chat conversations are stored per Agent Space, so you can revisit past interactions alongside the automated investigations. This makes the Agent Space a single pane of glass for both automated incident response and ad-hoc troubleshooting of your HyperPod cluster. 

Extending the solution — detection vs. reasoning 

The solution has two extension points, which serve different purposes: 

  1. Extending detection (what conditions are caught): 
    • Event-driven path: The webhook bridge Lambda drops Info-level events and forwards all Warn and Error level HyperPod events to DevOps Agent. This typically does not need modification. It already catches all actionable events. 
    • Polling-based path: The periodic-audit Lambda checks Kubernetes state. To detect additional conditions (for example, GPU allocation below a threshold or specific Pod labels stuck in error states), add that logic to the Lambda code. 
  2. Extending reasoning (how the agent investigates and classifies): edit the plain-English skill definitions. For example, you can teach the RCA skill new classification rules, add domain-specific context about your workload’s expected behavior, or adjust the recurrence thresholds. 

Detection is code; reasoning is natural language. Both are in the repo and designed to be customized independently. 

Investigation feedback 

After each investigation completes, a Feedback button appears in the DevOps Agent console. Clicking it opens the Investigation feedback dialog, where you can: 

  • Rate whether the root cause was correct 
  • Indicate whether human steering was needed during the investigation 
  • Provide written feedback explaining what could be improved 

This structured feedback is stored per investigation. An auto-learning mechanism that uses this feedback to improve future investigations is actively being developed. 

DevOps Agent APIs used by this solution 

For readers interested in the programmatic integration, here are the key DevOps Agent APIs this solution calls:

Component API Purpose
Webhook provisioner (deployment) register_service Register the generic webhook service with DevOps Agent
Webhook provisioner (deployment) associate_service Associate the webhook with the Agent Space
Skill uploader (deployment) list_assets Check if a skill already exists
Skill uploader (deployment) create_asset / update_asset Upload or update the triage and RCA skill definitions
Email notifier (runtime) get_backlog_task Retrieve task metadata (title, priority, timestamps)
Email notifier (runtime) list_journal_records Retrieve findings, symptoms, and gaps from the investigation journal
Teardown disassociate_service / deregister_service / delete_asset Clean up on stack deletion

Cleaning up 

To remove all resources created by this solution, run: 

make teardown-stack

This deletes the CloudFormation stack, removes the Agent Space, EKS access entries, secrets, and email configuration.

Additionally, if you no longer need the prerequisite resources, you can revert their setup, for example, deleting the verified Amazon SES email address identities you created for notifications.

Cost considerations 

This solution is designed to be near-zero cost on a healthy cluster and scales proportionally with fault volume. Cost scales with fault volume, not node count directly. At large scale (100+ nodes), the triage skill becomes critical. A single hardware fault can generate 5-10 correlated EventBridge events, most of which are filtered by the webhook bridge Lambda before reaching the agent. Where triage adds value is linking and deduplicating across similar faults that affect multiple instances, or repeated faults on the same instance over time, consolidating them into a single investigation instead of many. As an example, a 500-node training cluster might see 20-50 investigations per month after filtering and deduplication. 

  1. Filtering and triage are your cost savers at scale. The webhook bridge filters correlated events from a single node failure (5-10 EventBridge events reduced to 1 forwarded event), eliminating redundant investigations at the source. Triage then links similar faults across multiple instances into a single investigation. For example, if 5 nodes hit the same GPU error in a window, triage consolidates them into 1 investigation instead of 5 (saving 4 × $4 = $16). The bigger the cluster, the more both layers save. 
  2. Investigation duration grows sub-linearly. A 1000-node cluster investigation doesn’t take 100x longer than a 10-node one. The agent queries describe-cluster and list-cluster-events once regardless of size. The data returned is bigger, but the API call count is similar. 
  3. CloudWatch Logs queries are the variable. On large clusters, the agent may query more HMA log streams, which takes longer agent-seconds AND incurs CloudWatch Logs Insights charges on your account (not part of DevOps Agent pricing). 

DevOps Agent (the primary cost driver): Estimates based on 2 accelerator instances in a cluster 

Component Pricing Your cluster estimate
Investigations $0.0083/agent-second ~$4/investigation (at 8 min avg)
Chat (on-demand SRE tasks) $0.0083/agent-second ~$0.25/chat query (at 30 sec avg)
Daily heartbeat $0.0083/agent-second ~$1-2/day (short investigation confirming health)

On a healthy cluster with no faults, only the daily heartbeat fires, approximately $30-60/month in DevOps Agent time. On a cluster experiencing 5 real faults per week (typical for a large GPU fleet), expect ~20 investigations/month × $4 each = $80/month in investigation costs.

Free tier and credits:

New DevOps Agent customers receive a 2-month free trial (20 hours of investigations, 20 hours of chat per month). Enterprise Support customers receive monthly credits equal to 75% of their AWS Support charge toward DevOps Agent usage. 

Supporting infrastructure (secondary costs): 

Component Monthly Cost Estimates
Lambda invocations ~96/day (15-min audit) + event-driven = well within free tier
S3 (skills + dedup markers) < $0.01 (a few MB total)
Secrets Manager (1 secret) $0.40
EventBridge rules Negligible (per-event pricing)
SES emails $0.10/1000 emails — at most 1 per investigation
CloudWatch Logs (Lambda) < $1 (minimal log volume)

Total estimated monthly cost: 

Scenario DevOps Agent Infrastructure Total
Healthy cluster (no faults) ~$30-60 (heartbeat only) < $2 ~$32-62/month
Moderate faults (5/week) ~$80-120 < $2 ~$82-122/month
Heavy faults (20/week) ~$320-400 < $5 ~$325-405/month

How cluster size impacts cost 

Factor Small cluster (1-10 nodes) Large cluster (100-1000 nodes)
Fault frequency Rare (maybe 1-2/week) Constant (NVIDIA reports ~1 fault/2-3 hours at 10K GPU scale)
Events per fault Few (1 node replacement = 3-5 events) More (cascading replacements, capacity queuing)
Investigation duration Shorter (less state to read, fewer events in timeline) Longer (more nodes to describe, more events to correlate, larger CloudWatch log groups to query)
Triage value Low (few duplicates) High (one fault generates many correlated events — triage links them into 1 investigation)
Periodic audit Fast (few pods/nodes to check) Slower (more K8s state to inspect)
Cluster Size Faults/month Investigations Est. Agent Cost
1-10 nodes (your test) 2-5 2-5 + heartbeat $8-20/mo + ~$30 heartbeat
10-50 nodes (typical prod) 5-20 5-15 (triage dedup) $20-60/mo + ~$30 heartbeat
100-500 nodes (large training) 50-200 20-50 (heavy triage) $80-200/mo + ~$45 heartbeat
1000+ nodes (frontier) 200-700 50-100 (massive dedup) $200-500/mo + ~$60 heartbeat

Cost control levers: 

  1. Disable the periodic audit (EnablePeriodicAudit: false) to eliminate the heartbeat cost. Live event bridging still works. 
  2. Triage (LINK/SKIP decisions) runs at task creation time. No investigation cost is billed for deduplicated or skipped events. 
  3. Suppress verdicts filter email notifications but the investigation still runs. If you want to eliminate that cost, tune your EventBridge rule to drop more event types at the bridge level. 

Comparison to manual monitoring: 

Without automation, each fault requires an on-call engineer to manually correlate events across CloudWatch, EKS, and the SageMaker console, typically 30-45 minutes of triage before they even know whether HyperPod is self-healing or needs intervention. This solution delivers a root-caused verdict in minutes at ~$4 per investigation, while providing 24/7 coverage without human wake-ups. The cost savings compound with cluster scale: at 20 faults per month, that’s 10-15 hours of engineering triage replaced by automated verdicts. 

Conclusion 

In this post, we showed how to build an end-to-end agentic incident-response pipeline for SageMaker HyperPod using AWS DevOps Agent. The solution complements HyperPod’s built-in resiliency by watching for the operational conditions where a human still wants to be in the loop: configuration issues affecting provisioning, capacity-bound recoveries, recurring hardware fault patterns, and workload-level conditions. It delivers clear, root-caused verdicts to the operator’s inbox. 

The broader takeaway is a reusable pattern: teaching an AI agent a domain’s operational model through plain-English skills, so it can distinguish “the system is recovering on its own” from “this needs a human decision.” This pattern applies beyond HyperPod to any event-driven AWS service where operational conditions benefit from automated correlation and triage. 

What’s next 

To deploy the solution, follow the step-by-step instructions in the DevOps Agent Integration guide on the AI on SageMaker HyperPod site. Once it’s running, you can customize it for your environment: 

  • Adjust the CloudFormation parameters: tune the periodic-audit schedule, CrashLoopBackOff thresholds, NotReady node percentages, namespace filtering, and email recipients. No code changes required. 
  • Extend detection: modify the periodic-audit Lambda to check for additional Kubernetes conditions specific to your workloads (for example, GPU allocation below a threshold, specific Pod labels stuck in error states). 
  • Extend reasoning: edit the triage or RCA skill definitions to adjust classification rules, add domain context about your expected cluster behavior, or tune the recurrence thresholds. 
  • Add notification channels: connect Slack or PagerDuty via DevOps Agent’s built-in integrations or via a sibling EventBridge rule on the same aws.aidevops event stream. 

The skills are plain English. Iterate on them the same way you’d iterate on a runbook. 
About the authors

Tomonori Shimomura is a Principal Solutions Architect on the Amazon SageMaker AI team, where he provides in-depth technical consultation to SageMaker AI customers and suggests product improvements to the product team. Before joining Amazon, he worked on the design and development of embedded software for video game consoles, and now he leverages his in-depth skills in Cloud side technology. In his free time, he enjoys playing video games, reading books, and writing software.

Mayank Gupta is a Senior AI/ML Specialist with deep expertise in machine learning frameworks and enterprise AI architecture. He brings strong hands-on experience with AWS AI services, including SageMaker AI and SageMaker AI HyperPod, and leads the design and delivery of end-to-end AI solutions spanning model development, distributed training, and production-scale deployment. With deep experience in performance optimization and scalable ML architectures, Mayank partners with customers to translate complex business challenges into secure, high-impact, production-ready AI systems that drive measurable outcomes.

Deepthi Madamanchi is a Principal Technical Account Manager at AWS focused on AI Models, where she leads frontier AI segment through building and operating multi-thousand-node GPU clusters for foundation model training and inference. She specializes in distributed training, high-throughput networking, GPU fleet optimization, Amazon Bedrock adoption, helping them optimize performance, reliability, and cost efficiency from experimentation through production. In her free time, Deepthi explores functional health, experiments with new recipes, and travels with her family.

Dushyant Dubaria is a Senior Technical Account Manager on the AWS Frontier AI Startup team, where he supports frontier AI model builder companies deploying and operating large-scale GPU training infrastructure on Amazon SageMaker HyperPod and Amazon EKS. He specializes in distributed training orchestration, storage at petabyte scale (Amazon FSx for Lustre, Amazon S3), high-throughput networking, and operational resilience including cluster health monitoring, capacity planning, and proactive incident management for multi-thousand-node clusters. He helps organizations achieve reliable, high-performance ML workloads from initial cluster deployment through sustained production training. In his free time, he enjoys building automation tools, exploring new AI technologies, and playing cricket.

Shreyas Adiyodi is a Product Manager at AWS based out of Seattle. He is focused on enabling Gen AI model development on SageMaker HyperPod, partnering with customers to simplify cluster provisioning, accelerate foundation-model training, and strengthen security and compliance. Outside of work, he enjoys chess, MMA and watching movies.

Unlock efficient model deployment: Simplified Inference Operator setup on Amazon SageMaker HyperPod

Post Syndicated from Shreya Gangishetty original https://aws.amazon.com/blogs/architecture/unlock-efficient-model-deployment-simplified-inference-operator-setup-on-amazon-sagemaker-hyperpod/

Amazon SageMaker HyperPod offers an end-to-end experience supporting the full lifecycle of AI development—from interactive experimentation and training to inference and post-training workflows. The SageMaker HyperPod Inference Operator is a Kubernetes controller that manages the deployment and lifecycle of models on HyperPod clusters, offering flexible deployment interfaces (kubectl, Python SDK, SageMaker Studio UI, or HyperPod CLI), advanced autoscaling with dynamic resource allocation, and comprehensive observability that tracks critical metrics like time-to-first-token, latency, and GPU utilization.

Deploying inference workloads on Kubernetes-native infrastructure has traditionally required AI teams to navigate a maze of Helm charts, IAM role configurations, dependency management, and manual upgrades — often taking hours before a single model can serve predictions. Today, we’re announcing the Amazon SageMaker HyperPod Inference Operator as a native EKS add-on, enabling one-click installation and managed upgrades directly from the SageMaker console. This eliminates the need for manual Helm charts, complex IAM configuration tweaks, and downtime during upgrades.

In this post, we walk through the new installation experience, demonstrate three deployment methods (console, CLI, and Terraform), and show how features like multi-instance-type deployment and native node affinity give you fine-grained control over inference scheduling

Simplified installation experience

The new installation experience addresses three key customer scenarios with streamlined workflows:

New HyperPod clusters: Automatic installation

When creating new HyperPod clusters through the SageMaker console’s Quick Setup or Custom Setup workflows, the Inference Operator along with necessary dependencies is now installed through EKS add-on automatically as part of the cluster creation process. This eliminates the need for post-deployment configuration and ensures your cluster is ready for model deployments immediately upon creation along with one click upgrades.

Existing clusters: One-click installation

For existing HyperPod clusters, customers can install the Inference Operator with a single click through the SageMaker console. The installation automatically:

  • Creates required IAM roles with appropriate trust relationships and permissions
  • Sets up S3 buckets for TLS certificate storage
  • Configures VPC endpoints for secure S3 access
  • Installs dependency add-ons (cert-manager, S3 CSI driver, FSx CSI driver, metrics-server)
  • Deploys the Inference Operator as an EKS add-on

Managed upgrades and lifecycle

The EKS add-on integration provides standardized version management with one-click upgrades through the AWS console or CLI. This ensures customers can easily adopt new features and security updates without complex manual procedures.

The below prerequisite resources are needed to be setup before installing the Inference operator add-on. These prerequisites will be setup if SageMaker AI console is used to setup Inference operator. However, if EKS cli or console is used, these prerequisites will need to be created manually and passed to the add-on through configuration parameters. We discuss these approaches in Installation Methods.

List of prerequisites

  1. EKS add-ons (S3 Mountpoint csi driver add-on, FsX add-on, Cert Manager add-on, Metrics server add-on)
  2. IAM roles (Inference operator execution role, ALB role, KEDA role, Optional JumpStart Gated models role)
  3. Infrastructure (S3 bucket to manage TLS certificates, OIDC association on the cluster,

For more information refer to this trouble shooting guide.

Installation methods

Method 1: Install SageMaker HyperPod Inference Add-on through SageMaker UI (Recommended)

The SageMaker console provides the most streamlined experience with two installation options:

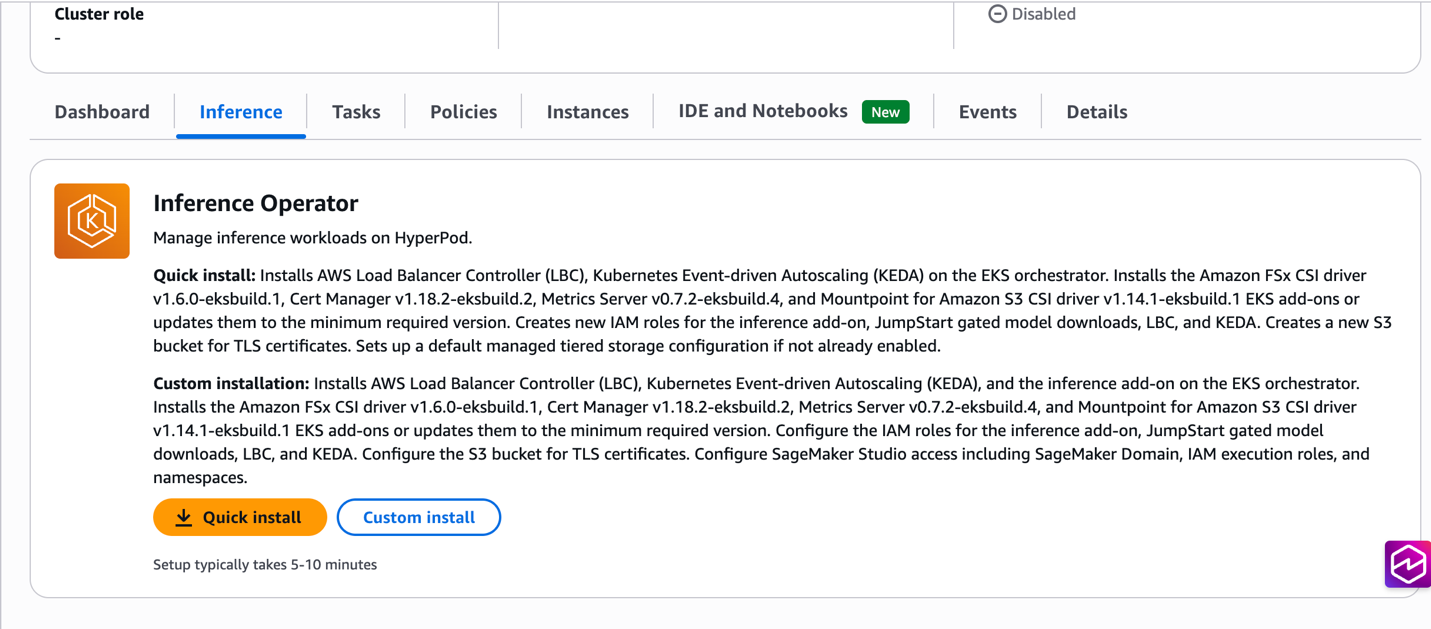
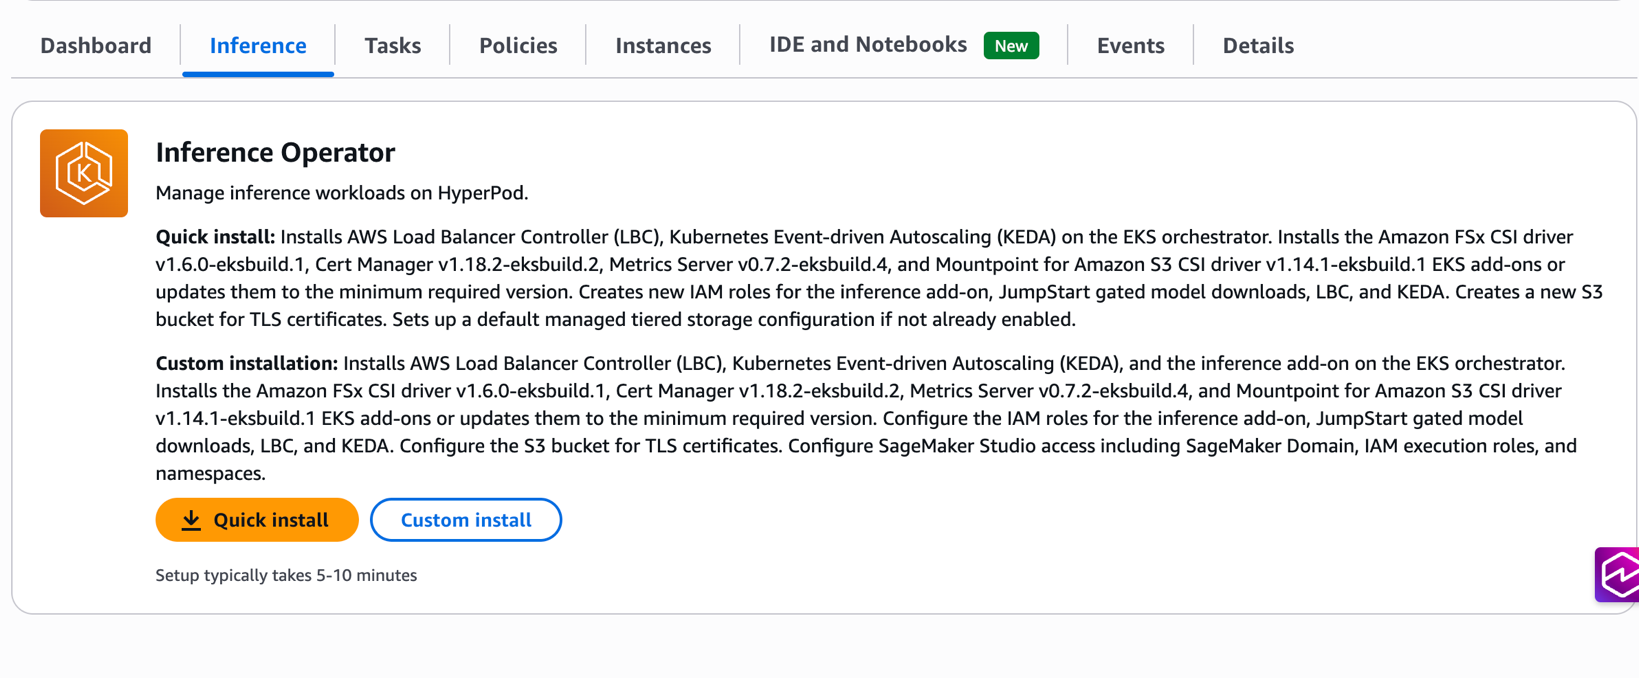
Quick install: Automatically creates all required resources with optimized defaults, including IAM roles, S3 buckets, and dependency add-ons. This option is ideal for getting started quickly with minimal configuration decisions.

Custom install: Provides flexibility to specify existing resources or customize configurations while maintaining the one-click experience. Customers can choose to reuse existing IAM roles, S3 buckets, or dependency add-ons based on their organizational requirements.

Amazon SageMaker HyperPod Inference Operator installation page showing Quick install and Custom install options with component details including AWS Load Balancer Controller, KEDA, and CSI drivers

Prerequisites

  • An existing Amazon SageMaker HyperPod cluster with EKS orchestration
  • IAM permissions for EKS cluster administration
  • kubectl configured for cluster access

Installation steps

  1. Navigate to the SageMaker Console: Go to HyperPod ClustersCluster Management
  2. Select Your Cluster: Choose the cluster where you want to install the Inference Operator

HyperPod Dashboard main page

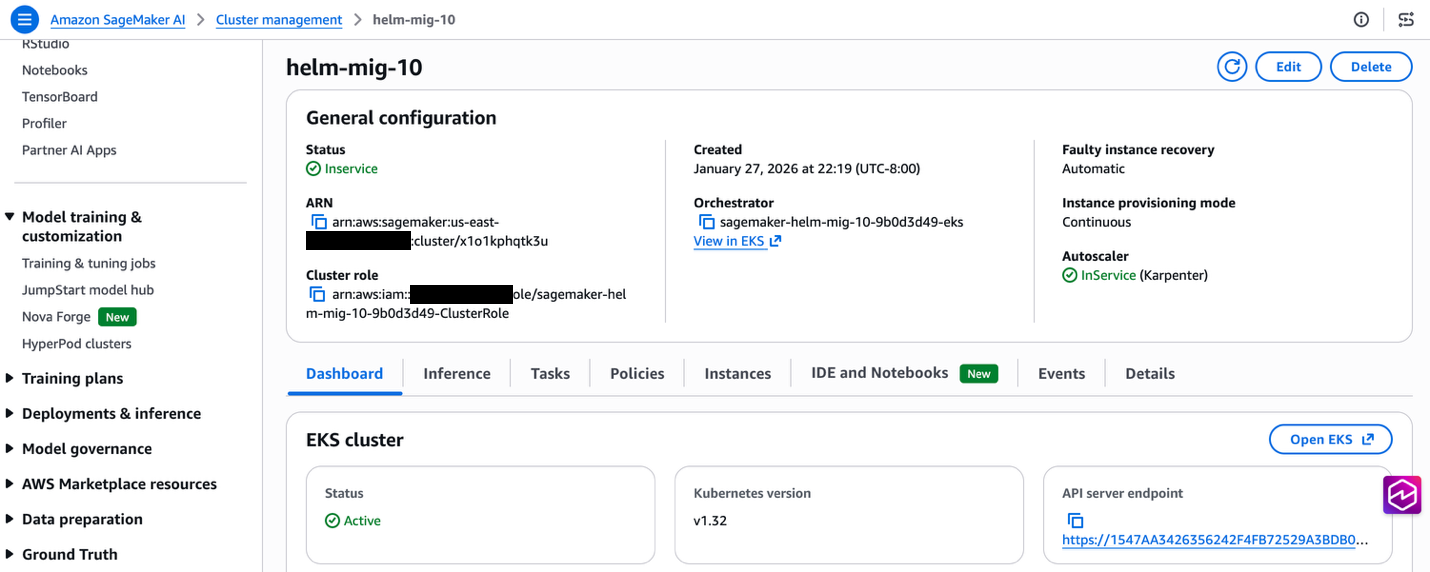
  1. Choose Installation Type: Navigate to Inference tab. Select Quick Install for automated setup or Custom Install for configuration flexibility

SageMaker HyperPod Inference tab interface showing disabled cluster role and installation options for managing inference workloads

  1. Configure Options: If choosing Custom Install, specify existing resources or customize settings as needed
  2. Install: Choose Install to begin the automated installation process
  3. Verify: Check the installation status through the console, or by running kubectl get pods -n hyperpod-inference-system, or by checking the add-on status with aws eks describe-addon --cluster-name CLUSTER-NAME --addon-name amazon-sagemaker-hyperpod-inference --region REGION

After the add-on is successfully installed, you can deploy models using the Model deployments document or navigate to Deploying Your First Model section below.

Method 2: Install SageMaker HyperPod Inference add-on through EKS APIs

For customers preferring command-line workflows, the Inference Operator can be installed directly using the EKS CLI. Note that all prerequisite resources (IAM roles, S3 buckets, VPC endpoints) and dependency add-ons must be created manually before installing the Inference Operator add-on. For detailed setup instructions, see the installation guide.

aws eks create-addon \
  --cluster-name my-hyperpod-cluster \
  --addon-name amazon-sagemaker-hyperpod-inference \
  --addon-version v1.0.0-eksbuild.1 \
  --configuration-values '{
    "executionRoleArn": "arn:aws:iam::ACCOUNT-ID:role/SageMakerHyperPodInference-inference-role",
    "tlsCertificateS3Bucket": "hyperpod-tls-certificate-bucket",
    "hyperpodClusterArn": "arn:aws:sagemaker:REGION:ACCOUNT-ID:cluster/CLUSTER-ID",
    "alb": {
      "serviceAccount": {
        "create": true,
        "roleArn": "arn:aws:iam::ACCOUNT-ID:role/alb-controller-role"
      }
    },
    "keda": {
      "auth": {
        "aws": {
          "irsa": {
            "roleArn": "arn:aws:iam::ACCOUNT-ID:role/keda-operator-role"
          }
        }
      }
    }
  }' \
  --region us-west-2

Method 3: Install SageMaker HyperPod Inference add-on through Terraform deployment

Organizations utilizing Terraform for Infrastructure as Code (IaC) can deploy HyperPod clusters using the provided modules in the awesome-distributed-training GitHub repository.

To enable the HyperPod inference operator, set the create_hyperpod_inference_operator_module variable to true within your custom.tfvars file, as shown below:

kubernetes_version    = "1.33"
eks_cluster_name      = "tf-eks-cluster"
hyperpod_cluster_name = "tf-hp-cluster"
resource_name_prefix  = "tf-eks-test"
aws_region            = "us-east-1"

instance_groups = [
    {
        name                      = "accelerated-instance-group-1"
        instance_type             = "ml.g5.8xlarge",
        instance_count            = 2,
        availability_zone_id      = "use1-az2",
        ebs_volume_size_in_gb     = 100,
        threads_per_core          = 1,
        enable_stress_check       = false,
        enable_connectivity_check = false,
        lifecycle_script          = "on_create.sh"
    }
]

create_hyperpod_inference_operator_module = true

In addition to the HyperPod inference operator add-on, the Terraform modules also support the task governance, training operator, and observability add-ons as well. Check out the documentation for enabling optional add-ons for more details.

Dependency management

The HyperPod inference operator includes several additional dependencies, which are enabled by default but can be toggled off if they already exist on your EKS cluster:

Dependency Module/Variable Toggle to Disable
cert-manager Installed via the HyperPod module enable_cert_manager = false
Amazon FSx for Lustre CSI Installed via FSx module create_fsx_module = false
Mountpoint for Amazon S3 CSI Bundled with Inference Operator Module enable_s3_csi_driver = false
AWS Load Balancer Controller Bundled with Inference Operator EKS add-on enable_alb_controller = false
KEDA Operator Bundled with Inference Operator EKS add-on enable_keda = false

Key benefits

Faster time to value

Teams can now deploy their first inference endpoint within minutes of cluster creation, compared to the previous multi-hour setup process. This acceleration enables faster experimentation and reduces the barrier to adoption for new teams.

Reduced complexity

The new installation experience eliminates the need to manually create and configure multiple AWS resources. Previously, customers needed to create IAM roles, policies, S3 buckets, VPC endpoints, and install multiple Kubernetes operators. Now, a single action handles all these requirements automatically.

Consistent configuration

Automated resource creation ensures consistent, secure configurations across environments. The installation process follows AWS best practices for IAM permissions, network security, and resource naming conventions.

Simplified upgrades

EKS Add-on integration provides standardized upgrade paths with rollback capabilities. Customers can confidently adopt new features and security updates through the familiar AWS console or CLI interfaces.

Advanced features integration

The simplified installation experience seamlessly integrates with advanced HyperPod inference capabilities:

Managed tiered KV cache

During installation, customers can optionally enable managed tiered KV cache with intelligent memory allocation based on instance types. This feature can reduce inference latency by up to 40% for long-context workloads while optimizing memory utilization across the cluster.

Intelligent routing

The installation automatically configures intelligent routing capabilities with multiple strategies (prefix-aware, KV-aware, round-robin) to maximize cache efficiency and minimize inference latency based on workload characteristics.

Observability integration

Built-in integration with HyperPod Observability provides immediate visibility into inference metrics, cache performance, and routing efficiency through Amazon Managed Grafana dashboards.

Deploying your first model

Once the add-on is installed, you can deploy models using the InferenceEndpointConfig or JumpStart models custom resources. Here’s an example configuration for deploying a Llama model:

apiVersion: inference.sagemaker.aws.amazon.com/v1
kind: JumpStartModel
metadata:
  name: deepseek-test-endpoint
spec:
  model:
    modelId: "deepseek-llm-r1-distill-qwen-1-5b"
  sageMakerEndpoint:
    name: deepseek-test-endpoint
  server:
    instanceType: "ml.g5.8xlarge"

New features

Multi-Instance Type Deployment HyperPod Inference supports multi-instance type deployment, enhancing deployment reliability and resource utilization. You can specify a prioritized list of instance types in your deployment configuration, and the system automatically selects from available alternatives when your preferred instance type lacks capacity. The Kubernetes scheduler evaluates instance types in priority order using node affinity rules based scheduling, seamlessly placing workloads on the highest-priority available instance type. In the example below, when deploying a model from S3, ml.p4d.24xlarge has the highest priority and will be selected first if memory capacity is available. If ml.p4d.24xlarge is unavailable, the scheduler automatically falls back to ml.g5.24xlarge, and finally to ml.g5.8xlarge as the last resort.

apiVersion: inference.sagemaker.aws.amazon.com/v1
kind: InferenceEndpointConfig
metadata:
  name: lmcache-test-1
  namespace: default
spec:
  replicas: 13
  modelName: Llama-3.1-8B-Instruct
  instanceTypes: ["ml.p4d.24xlarge","ml.g5.24xlarge","ml.g5.8xlarge"]

This is implemented using Kubernetes node affinity rules with requiredDuringSchedulingIgnoredDuringExecution to restrict scheduling to the specified instance types, and preferredDuringSchedulingIgnoredDuringExecution with descending weights to enforce priority ordering.

Node affinity
For scenarios requiring more granular scheduling control — such as excluding spot instances, preferring specific availability zones, or targeting nodes with custom labels — HyperPod Inference exposes Kubernetes’ native nodeAffinity directly in the InferenceEndpointConfig spec. This gives you the full expressiveness of Kubernetes scheduling primitives.

apiVersion: inference.sagemaker.aws.amazon.com/v1
kind: InferenceEndpointConfig
metadata:
  name: lmcache-test-1
  namespace: default
spec:
  replicas: 15
  modelName: Llama-3.1-8B-Instruct
  nodeAffinity:
    preferredDuringSchedulingIgnoredDuringExecution:
    - weight: 100
      preference:
        matchExpressions:
        - key: node.kubernetes.io/instanceType
          operator: In
          values: ["ml.g5.4xlarge"]
  worker:
    resources:
      limits:
        nvidia.com/gpu: "1"
      requests:
        cpu: "6"
        memory: 30Gi
        nvidia.com/gpu: "1"

Clean up

To clean up your environment after completing this walkthrough, follow these steps to remove the deployed models and uninstall the Inference Operator add-on from your HyperPod cluster.

Removing Inference Operator add-on

Through the SageMaker console:

  1. Navigate to SageMaker Console → HyperPod ClustersCluster Management
  2. Select your cluster and go to the Inference tab
  3. Choose Remove to uninstall the Inference Operator add-on and associated resources

Alternatively, using the AWS CLI:

aws eks delete-addon \
--cluster-name <my-hyperpod-cluster> \
--addon-name amazon-sagemaker-hyperpod-inference \
--region <region>

Delete the deployed models

# Delete JumpStartModel deployment
kubectl delete jumpstartmodel <model-name> -n <namespace>

# Or for InferenceEndpointConfig deployment
kubectl delete inferenceendpointconfig <endpoint-name> -n <namespace>

Migration path for existing users

Automated migration script is hosted in public GitHub that transitions the HyperPod Inference Operator from Helm to EKS add-on with built-in rollback capabilities if add-on installation fails. Backup files are stored in /tmp/hyperpod-migration-backup-<timestamp>/ for manual rollback if needed.

Key features

  • Auto-Discovery: Derives configuration from existing Helm deployment (roles, buckets, dependencies)
  • Safe Migration: Scales down Helm deployments before add-on installation, validates prerequisites
  • Dependency Handling: Migrates S3/FSx CSI drivers, cert-manager, and metrics-server to add-ons
  • Rollback Support: Preserves original resources and restores on failure

IAM Roles created

  1. Execution Role (Inference Operator + S3 TLS access)
  2. JumpStart Gated Model Role
  3. ALB Controller Role
  4. KEDA Operator Role

Examples for running the script

# to follow step by step guide
./helm_to_addon.sh --cluster-name <my-cluster> --region us-east-1 

# no prompts needed except for initiating rollback in case of failure
./helm_to_addon.sh --cluster-name <my-cluster> --region us-east-1 --auto-approve 

# To skip the dependencies FSX, S3, Metricsserver, cert manager migration from Inference operator helm to respective add-ons
./helm_to_addon.sh --cluster-name my-cluster —region us-east-1 --skip-dependencies-migration

Migration flow

  1. Validate existing Helm installation
  2. Auto-derive configuration and create new IAM roles
  3. Tag resources (ALBs, ACM certs, S3 objects) with CreatedBy: HyperPodInference
  4. Install dependency add-ons (S3, FSx, cert-manager) if dependent CRDs don’t exist
  5. Scale down Helm deployments for ALB, KEDA and Inference operator
  6. Install Inference Operator add-on with OVERWRITE flag
  7. Clean up old Helm resources
  8. Migrate Helm-installed dependencies that are installed through Inference operator main chart to add-ons. To skip this step provide --skip-dependencies flag.

Benefits

  • Simplified management through EKS console/APIs
  • Automated updates via EKS add-on mechanisms
  • Native EKS integration
  • Zero downtime migration with rollback safety

Conclusion

The streamlined Inference Operator installation experience for Amazon SageMaker HyperPod eliminates infrastructure complexity and accelerates time to value for machine learning teams. With one-click installation, automated resource management, and seamless upgrade capabilities, teams can focus on deploying and optimizing their inference workloads rather than managing underlying infrastructure.

The EKS Add-on integration provides enterprise-grade lifecycle management while maintaining the flexibility to customize configurations for specific organizational requirements. Combined with advanced features like managed tiered KV cache and intelligent routing, this simplified installation experience makes high-performance inference deployment accessible to teams of all sizes.

Get started today by creating a new HyperPod cluster with the Inference Operator pre-installed, or add it to your existing clusters with a single click through the SageMaker console. For detailed add-on installation instructions and configuration options see this guide and for troubleshooting see this guide.

Appendix


About the authors

Introducing checkpointless and elastic training on Amazon SageMaker HyperPod

Post Syndicated from Channy Yun (윤석찬) original https://aws.amazon.com/blogs/aws/introducing-checkpointless-and-elastic-training-on-amazon-sagemaker-hyperpod/

Today, we’re announcing two new AI model training features within Amazon SageMaker HyperPod: checkpointless training, an approach that mitigates the need for traditional checkpoint-based recovery by enabling peer-to-peer state recovery, and elastic training, enabling AI workloads to automatically scale based on resource availability.

  • Checkpointless training – Checkpointless training eliminates disruptive checkpoint-restart cycles, maintaining forward training momentum despite failures, reducing recovery time from hours to minutes. Accelerate your AI model development, reclaim days from development timelines, and confidently scale training workflows to thousands of AI accelerators.
  • Elastic training  – Elastic training maximizes cluster utilization as training workloads automatically expand to use idle capacity as it becomes available, and contract to yield resources as higher-priority workloads like inference volumes peak. Save hours of engineering time per week spent reconfiguring training jobs based on compute availability.

Rather than spending time managing training infrastructure, these new training techniques mean that your team can concentrate entirely on enhancing model performance, ultimately getting your AI models to market faster. By eliminating the traditional checkpoint dependencies and fully utilizing available capacity, you can significantly reduce model training completion times.

Checkpointless training: How it works
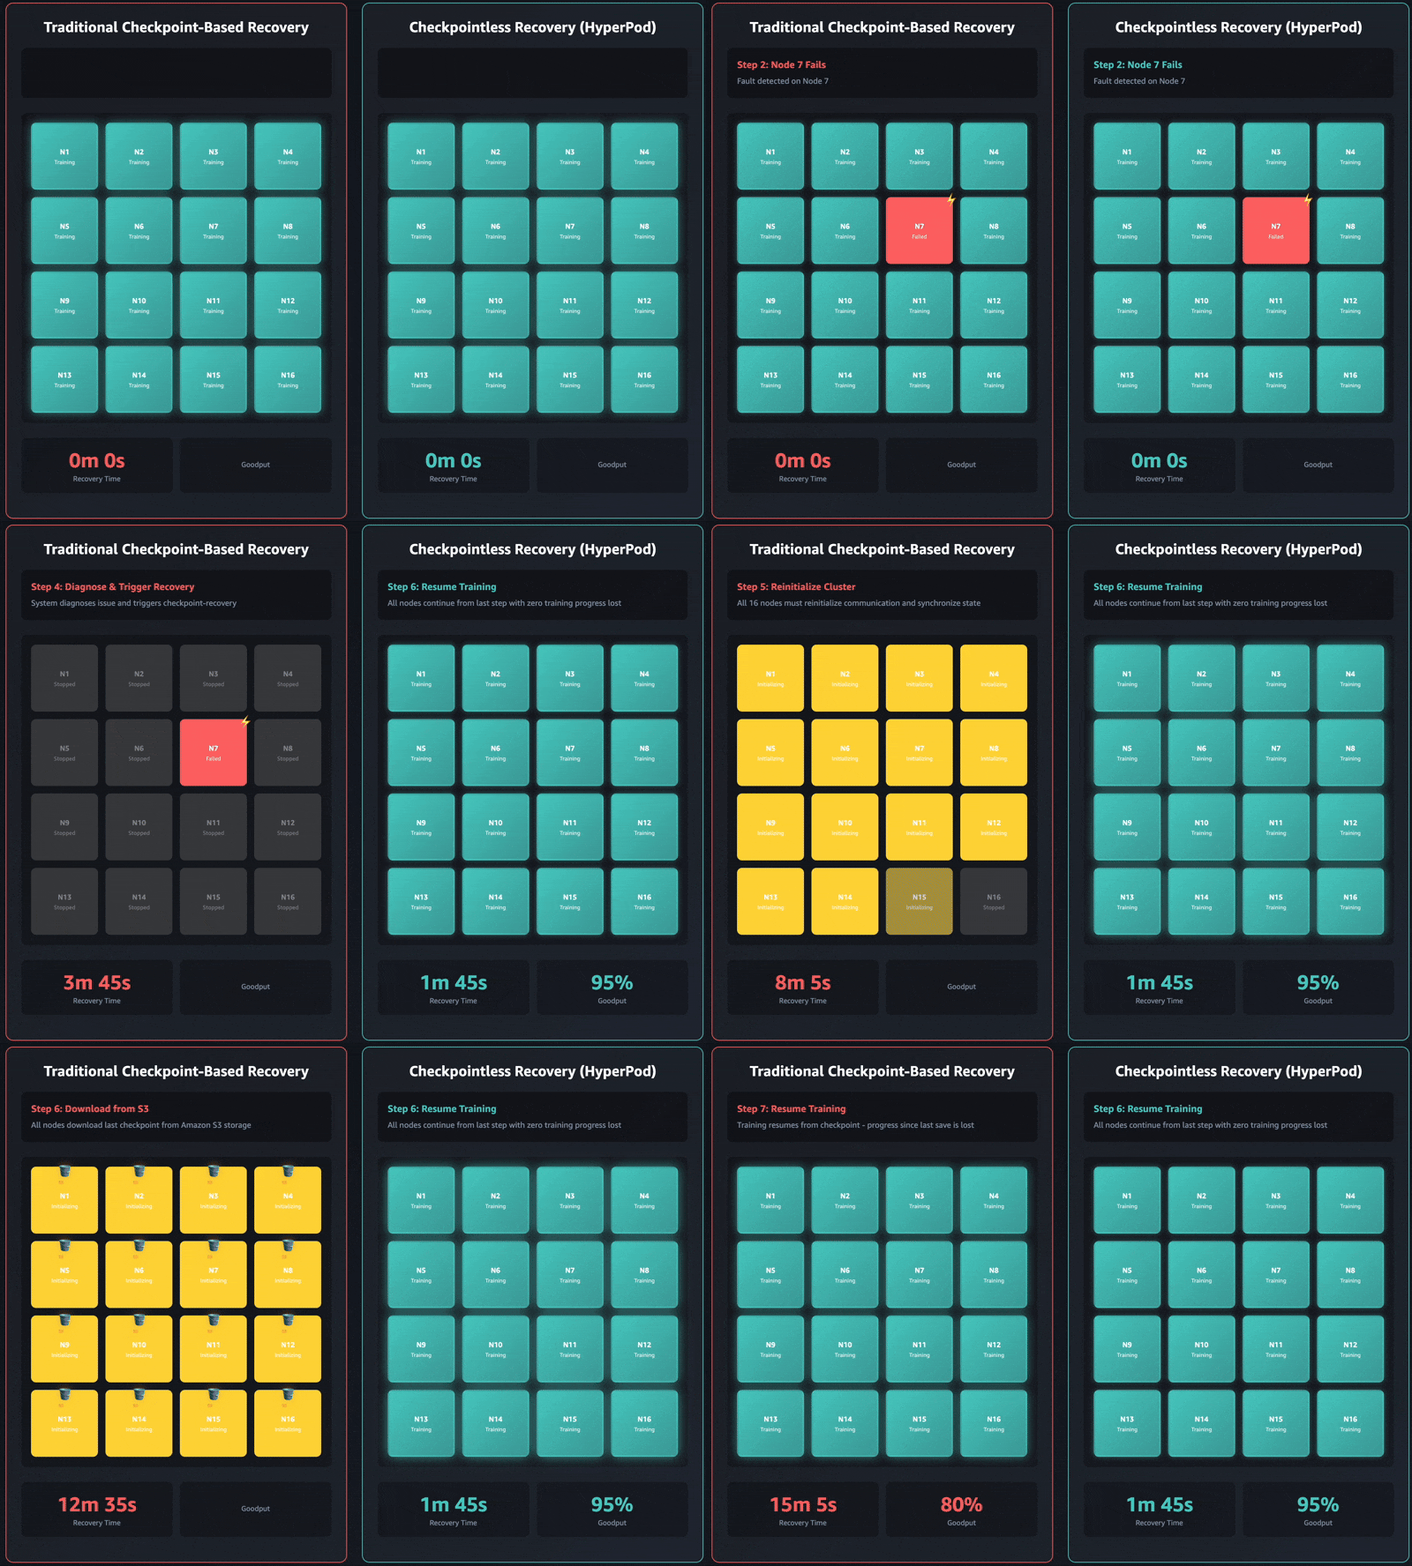
Traditional checkpoint-based recovery has these sequential job stages: 1) job termination and restart, 2) process discovery and network setup, 3) checkpoint retrieval, 4) data loader initialization, and 5) training loop resumption. When failures occur, each stage can become a bottleneck and training recovery can take up to an hour on self-managed training clusters. The entire cluster must wait for every single stage to complete before training can resume. This can lead to the entire training cluster sitting idle during recovery operations, which increases costs and extends the time to market.

Checkpointless training removes this bottleneck entirely by maintaining continuous model state preservation across the training cluster. When failures occur, the system instantly recovers by using healthy peers, avoiding the need for a checkpoint-based recovery that requires restarting the entire job. As a result, checkpointless training enables fault recovery in minutes.

Checkpointless training is designed for incremental adoption and built on four core components that work together: 1) collective communications initialization optimizations, 2) memory-mapped data loading that enables caching, 3) in-process recovery, and 4) checkpointless peer-to-peer state replication. These components are orchestrated through the HyperPod training operator that is used to launch the job. Each component optimizes a specific step in the recovery process, and together they enable automatic detection and recovery of infrastructure faults in minutes with zero manual intervention, even with thousands of AI accelerators. You can progressively enable each of these features as your training scales.

The latest Amazon Nova models were trained using this technology on tens of thousands of accelerators. Additionally, based on internal studies on cluster sizes ranging between 16 GPUs to over 2,000 GPUs, checkpointless training showcased significant improvements in recovery times, reducing downtime by over 80% compared to traditional checkpoint-based recovery.

To learn more, visit HyperPod Checkpointless Training in the Amazon SageMaker AI Developer Guide.

Elastic training: How it works
On clusters that run different types of modern AI workloads, accelerator availability can change continuously throughout the day as short-duration training runs complete, inference spikes occur and subside, or resources free up from completed experiments. Despite this dynamic availability of AI accelerators, traditional training workloads remain locked into their initial compute allocation, unable to take advantage of idle accelerators without manual intervention. This rigidity leaves valuable GPU capacity unused and prevents organizations from maximizing their infrastructure investment.

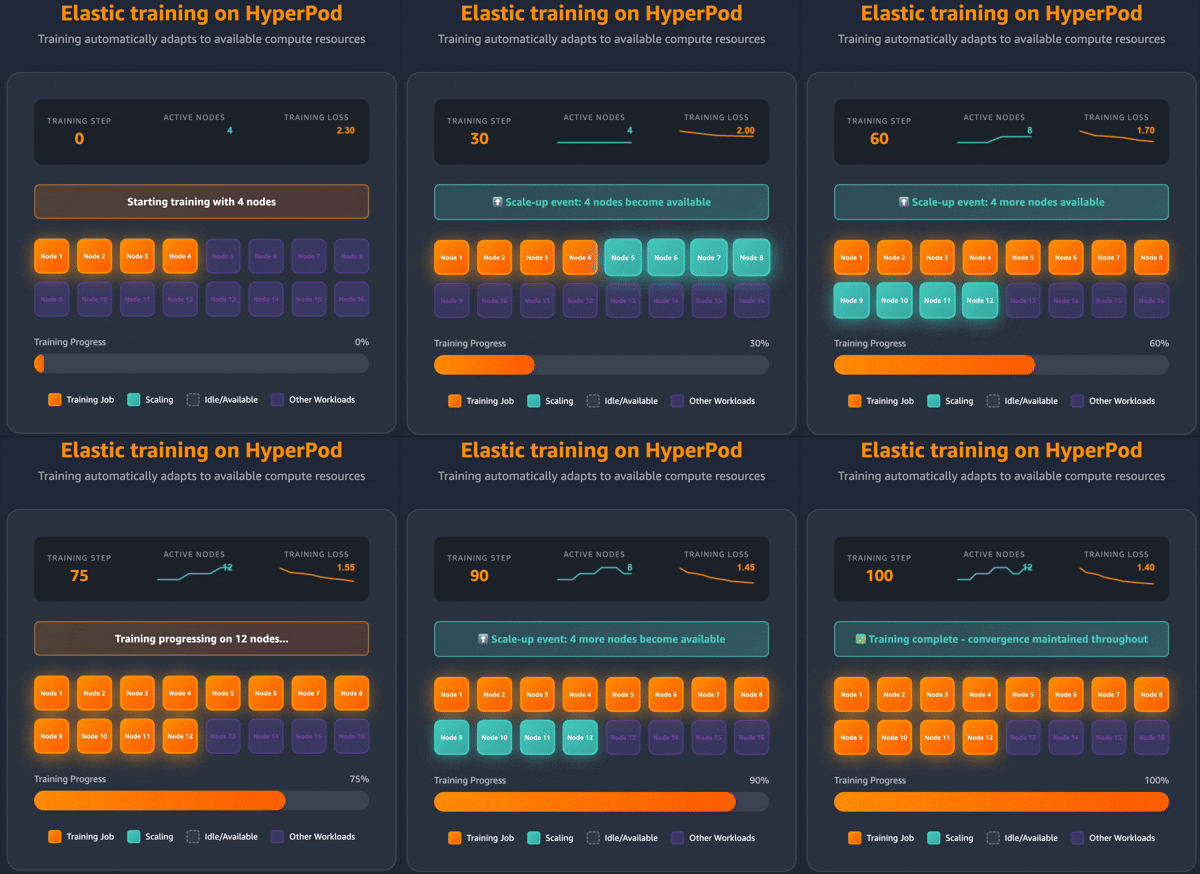
Elastic training transforms how training workloads interact with cluster resources. Training jobs can automatically scale up to utilize available accelerators and gracefully contract when resources are needed elsewhere, all while maintaining training quality.
Workload elasticity is enabled through the HyperPod training operator that orchestrates scaling decisions through integration with the Kubernetes control plane and resource scheduler. It continuously monitors cluster state through three primary channels: pod lifecycle events, node availability changes, and resource scheduler priority signals. This comprehensive monitoring enables near-instantaneous detection of scaling opportunities, whether from newly available resources or requests from higher-priority workloads.

The scaling mechanism relies on adding and removing data parallel replicas. When additional compute resources become available, new data parallel replicas join the training job, accelerating throughput. Conversely, during scale-down events (for example, when a higher-priority workload requests resources), the system scales down by removing replicas rather than terminating the entire job, allowing training to continue at reduced capacity.

Across different scales, the system preserves the global batch size and adapts learning rates, preventing model convergence from being adversely impacted. This enables workloads to dynamically scale up or down to utilize available AI accelerators without any manual intervention.

You can start elastic training through the HyperPod recipes for publicly available foundation models (FMs) including Llama and GPT-OSS. Additionally, you can modify your PyTorch training scripts to add elastic event handlers, which enable the job to dynamically scale.

To learn more, visit the HyperPod Elastic Training in the Amazon SageMaker AI Developer Guide. To get started, find the HyperPod recipes available in the AWS GitHub repository.

Now available
Both features are available in all the Regions in which Amazon SageMaker HyperPod is available. You can use these training techniques without additional cost. To learn more, visit the SageMaker HyperPod product page and SageMaker AI pricing page.

Give it a try and send feedback to AWS re:Post for SageMaker or through your usual AWS Support contacts.

Channy

Introducing Amazon Nova Forge: Build your own frontier models using Nova

Post Syndicated from Danilo Poccia original https://aws.amazon.com/blogs/aws/introducing-amazon-nova-forge-build-your-own-frontier-models-using-nova/

Organizations are rapidly expanding their use of generative AI across all parts of the business. Applications requiring deep domain expertise or specific business context need models that truly understand their proprietary knowledge, workflows, and unique requirements.

While techniques like prompt engineering and Retrieval Augmented Generation (RAG) work well for many use cases, they have fundamental limitations when it comes to embedding specialized knowledge into a model’s core understanding. Supervised fine-tuning and reinforcement learning help in customizing the model, but they operate too late in the development lifecycle, layering modifications on top of models that are a fully trained, and therefore difficult to steer to specific domains of interest.

When organizations attempt deeper customization through Continued Pre-Training (CPT) using only their proprietary data, they often encounter catastrophic forgetting, where models lose their foundational capabilities as they learn new content. At the same time, the data, compute, and cost needed for training a model from scratch are still a prohibitive barrier for most organizations.

Today, we’re introducing Amazon Nova Forge, a new service to build your own frontier models using Nova. Nova Forge customers can start their development from early model checkpoints, blend their datasets with Amazon Nova-curated training data, and host their custom models securely on AWS. Nova Forge is the easiest and most cost-effective way to build your own frontier model.

Use cases and applications
Nova Forge is designed for organizations with access to proprietary or industry-specific data who want to build AI that truly understands their domain. This includes:

  • Manufacturing and automation – Building models that understand specialized processes, equipment data, and industry-specific workflows
  • Research and development – Creating models trained on proprietary research data and domain-specific knowledge
  • Content and media – Developing models that understand brand voice, content standards, and specific moderation requirements
  • Specialized industries – Training models on industry-specific terminology, regulations, and best practices

Depending on the specific use cases, Nova Forge can be used to add differentiated capabilities, enhance task-specific accuracy, reduce costs, and lower latency.

How Nova Forge works
Nova Forge addresses the limitations of current customization approaches by allowing you to start model development from early checkpoints across pre-training, mid-training, and post-training phases. You can blend your proprietary data with Amazon Nova-curated data throughout all training phases, running training using proven recipes on Amazon SageMaker AI fully managed infrastructure. This data mixing approach significantly reduces catastrophic forgetting compared to training with raw data alone, helping preserve foundational skills—including core intelligence, general instruction following capabilities, and safety benefits—while incorporating your specialized knowledge.

Nova Forge provides the ability to use reward functions in your own environment for reinforcement learning (RL). This allows the model to learn from feedback generated in environments that are representative of your use cases. Beyond single-step evaluations, you can also use your own orchestrator to manage multi-turn rollouts, enabling RL training for complex agent workflows and sequential decision-making tasks. Whether you’re using chemistry tools to score molecular designs, or robotics simulations that reward efficient task completion and penalize collisions, you can connect your proprietary environments directly.

You can also take advantage of the built-in responsible AI toolkit available in Nova Forge to configure the safety and content moderation settings of your model. You can adjust settings to meet your specific business needs in areas like safety, security, and handling of sensitive content.

Getting started with Nova Forge
Nova Forge integrates seamlessly with your existing AWS workflows. You can use the familiar tools and infrastructure in Amazon SageMaker AI to run your training, then import your custom Nova models as private models on Amazon Bedrock. This gives you the same security, consistent APIs, and broader AWS integrations as any model in Amazon Bedrock.

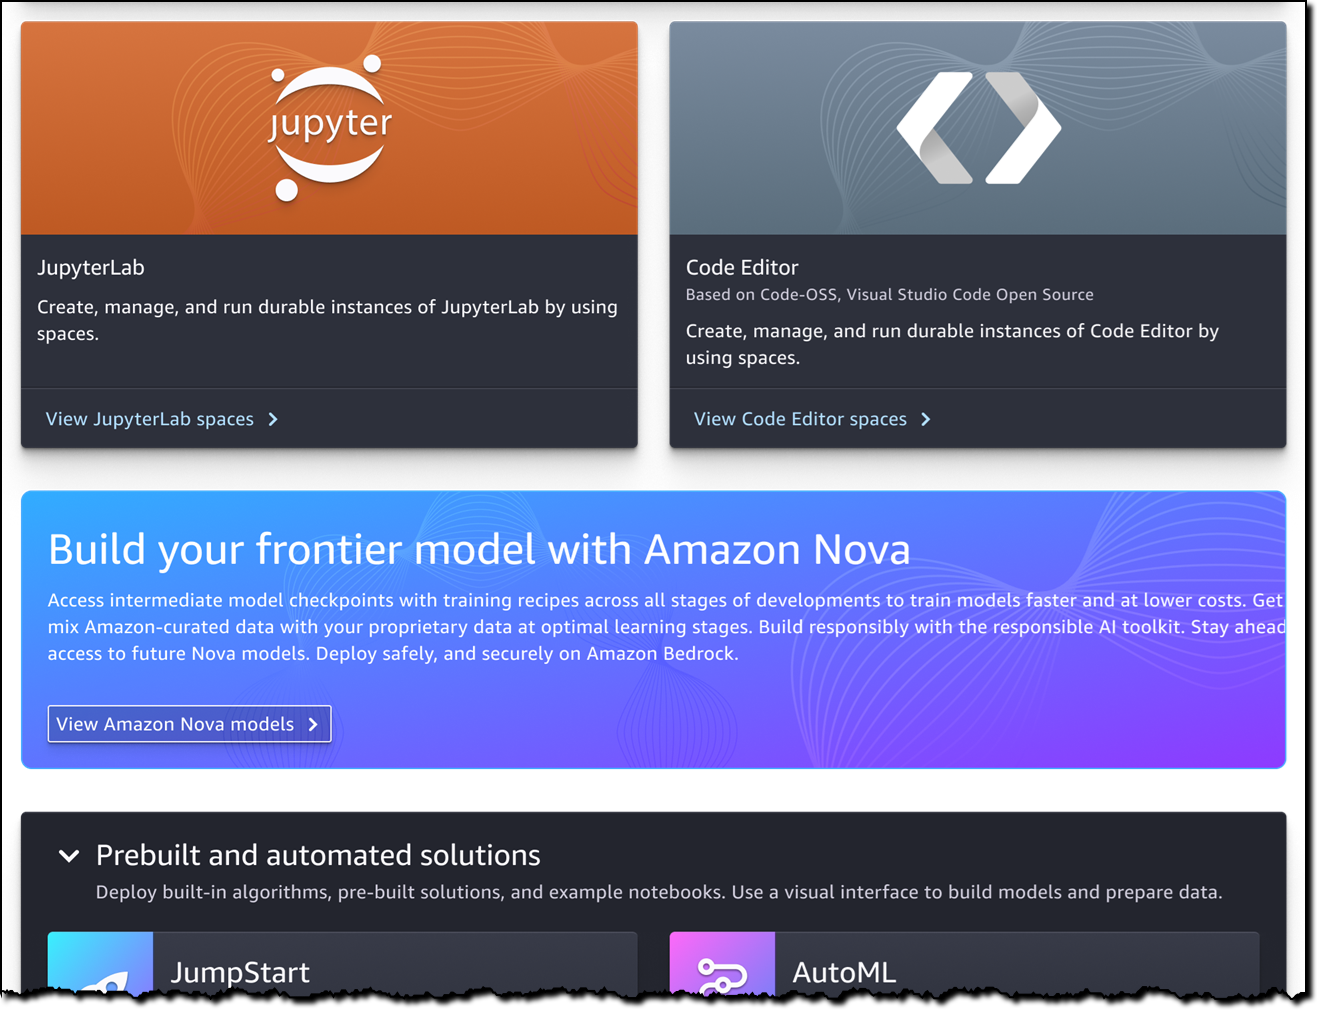
In Amazon SageMaker Studio, you can now build your frontier model with Amazon Nova.

Amazon Nova Forge in the SageMaker AI console

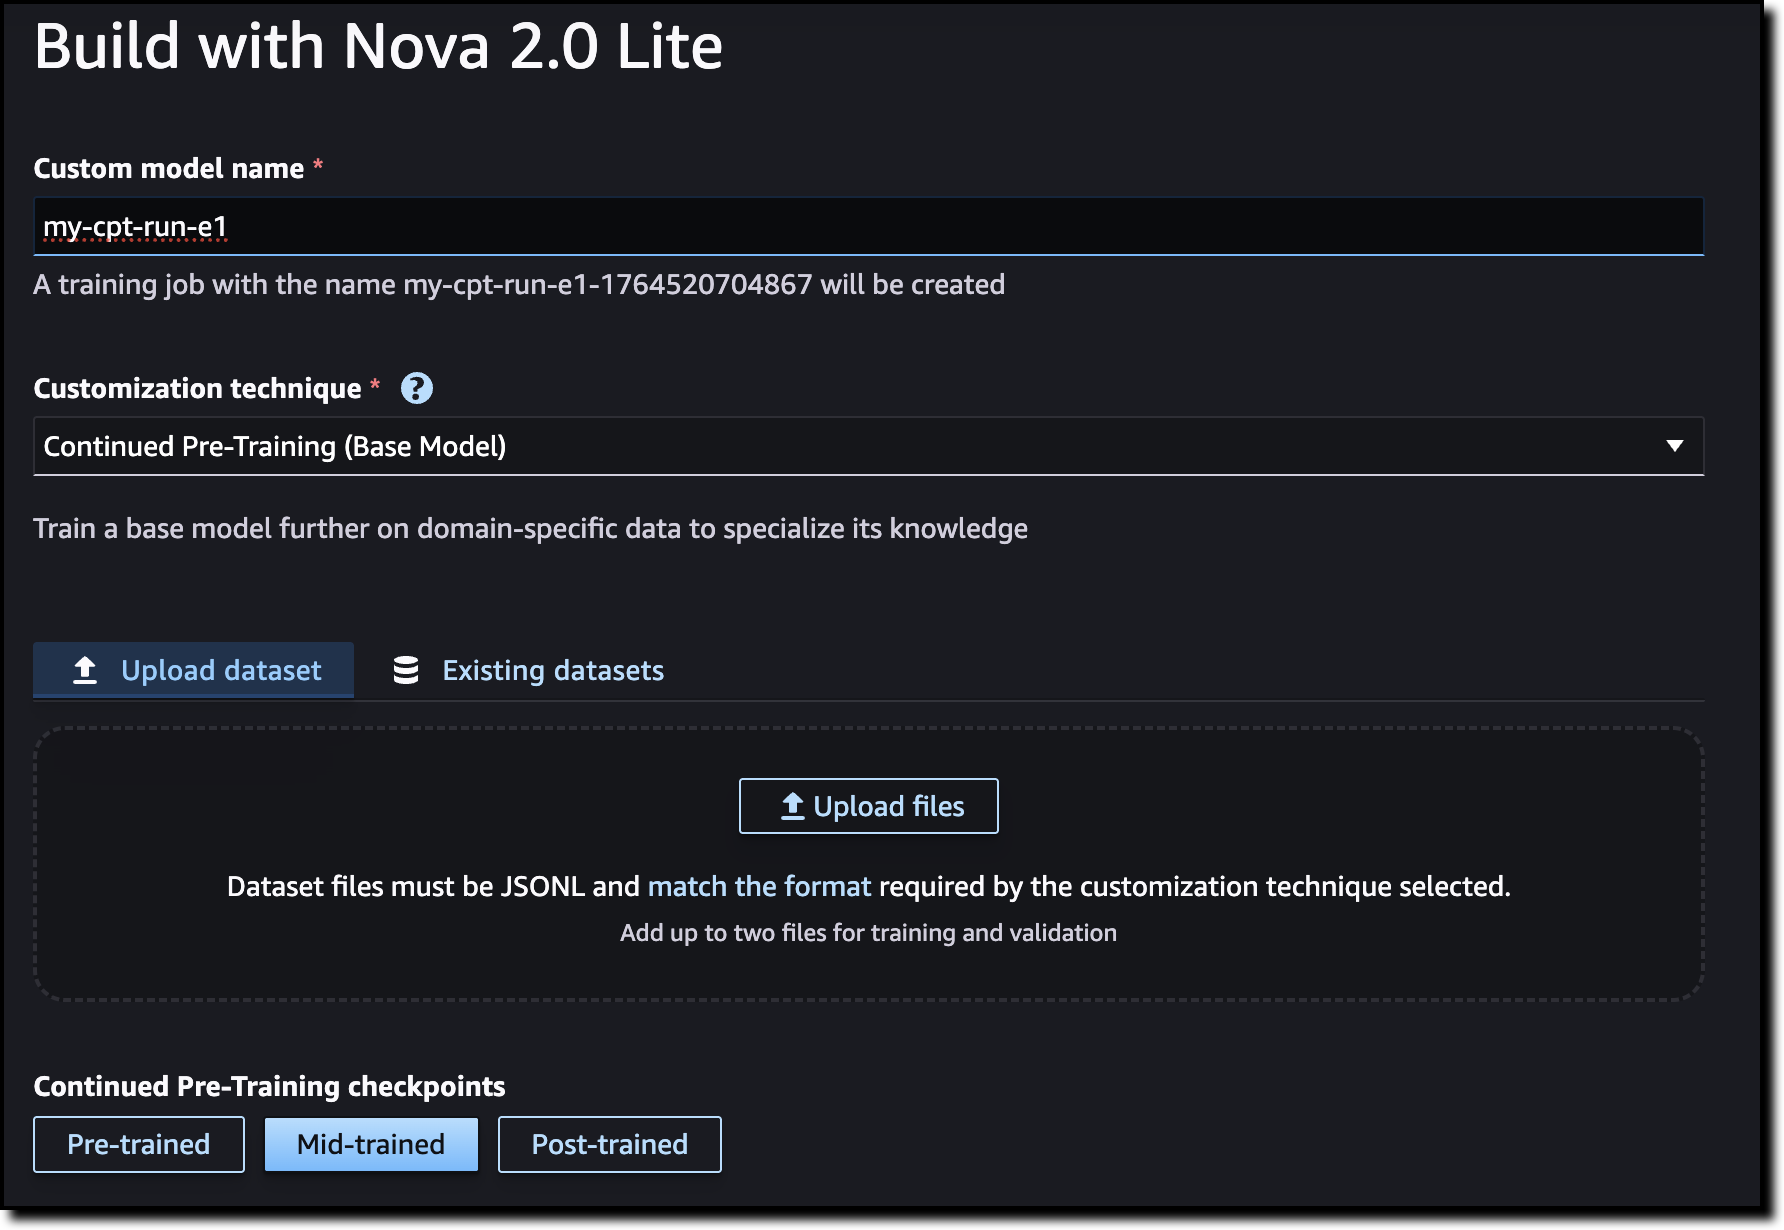
To start building the model, choose which checkpoint to use: pre-trained, mid-trained, or post-trained. You can also upload your dataset here or use existing datasets.

Amazon Nova Forge checkpoints

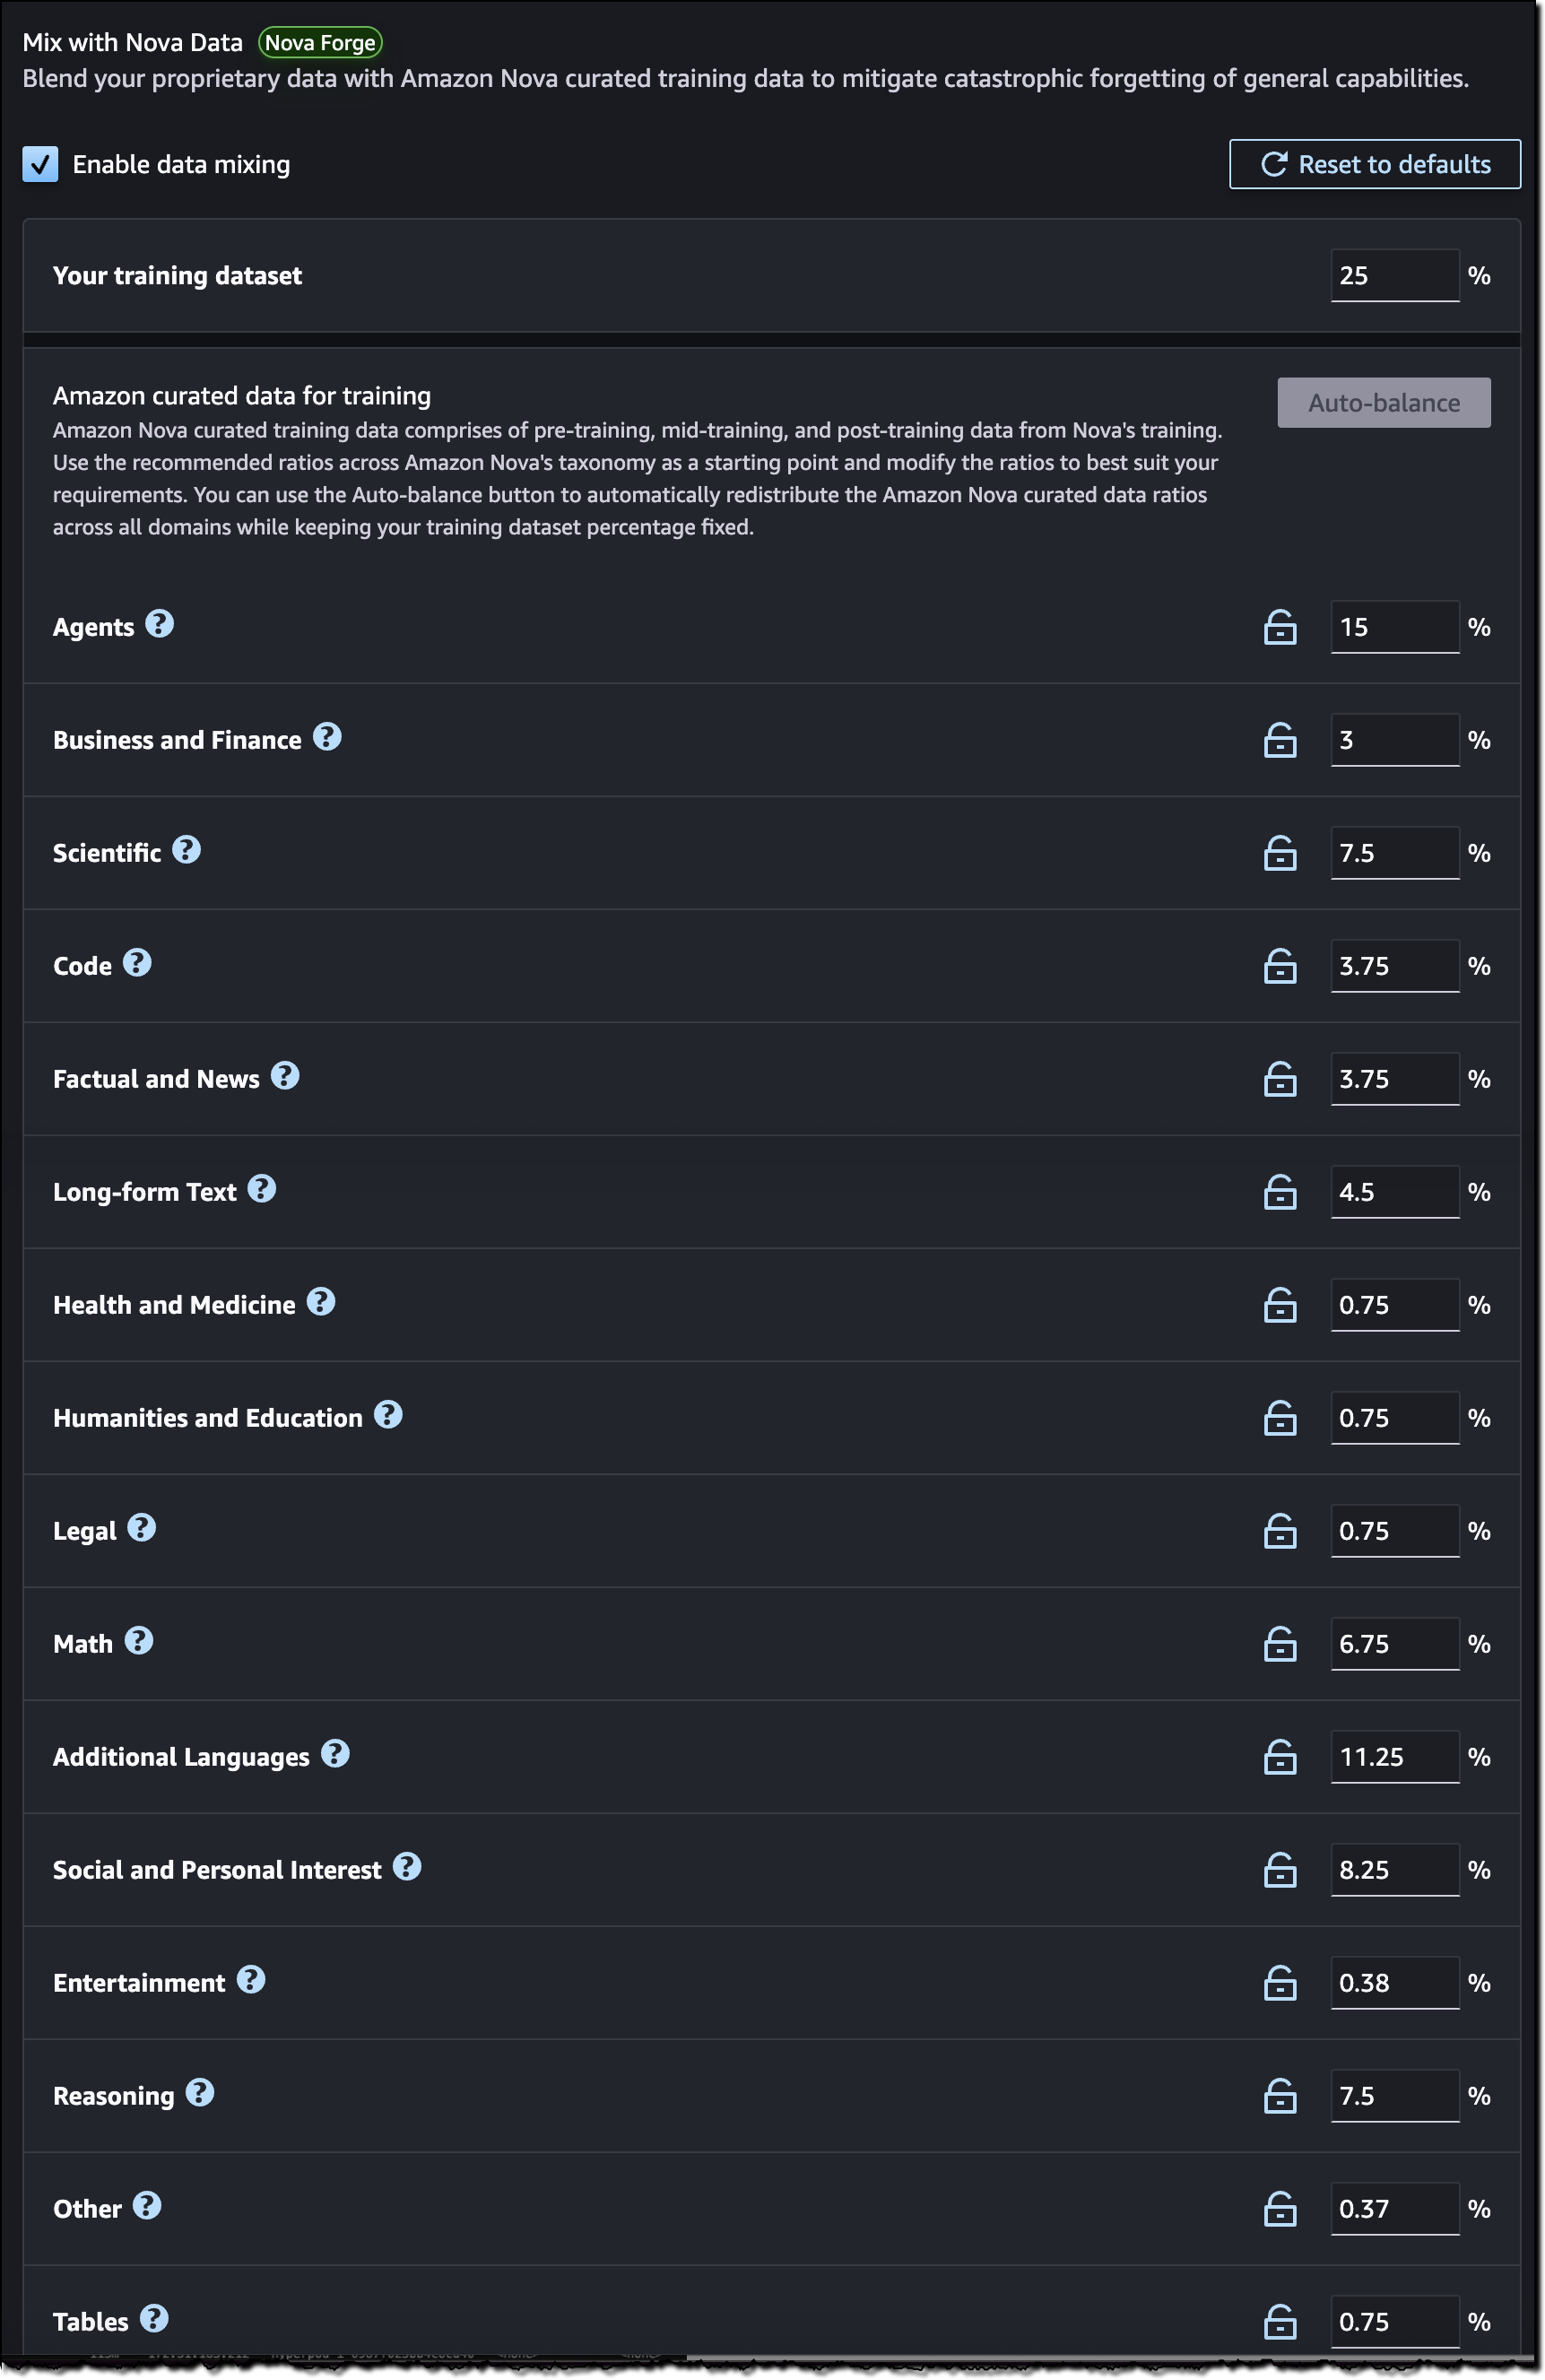
You can blend your training data by mixing in curated datasets provided by Nova. These datasets, categorized by domain, can help your model to preserve general performance and prevent overfitting or catastrophic forgetting.

Amazon Nova Forge data mixing

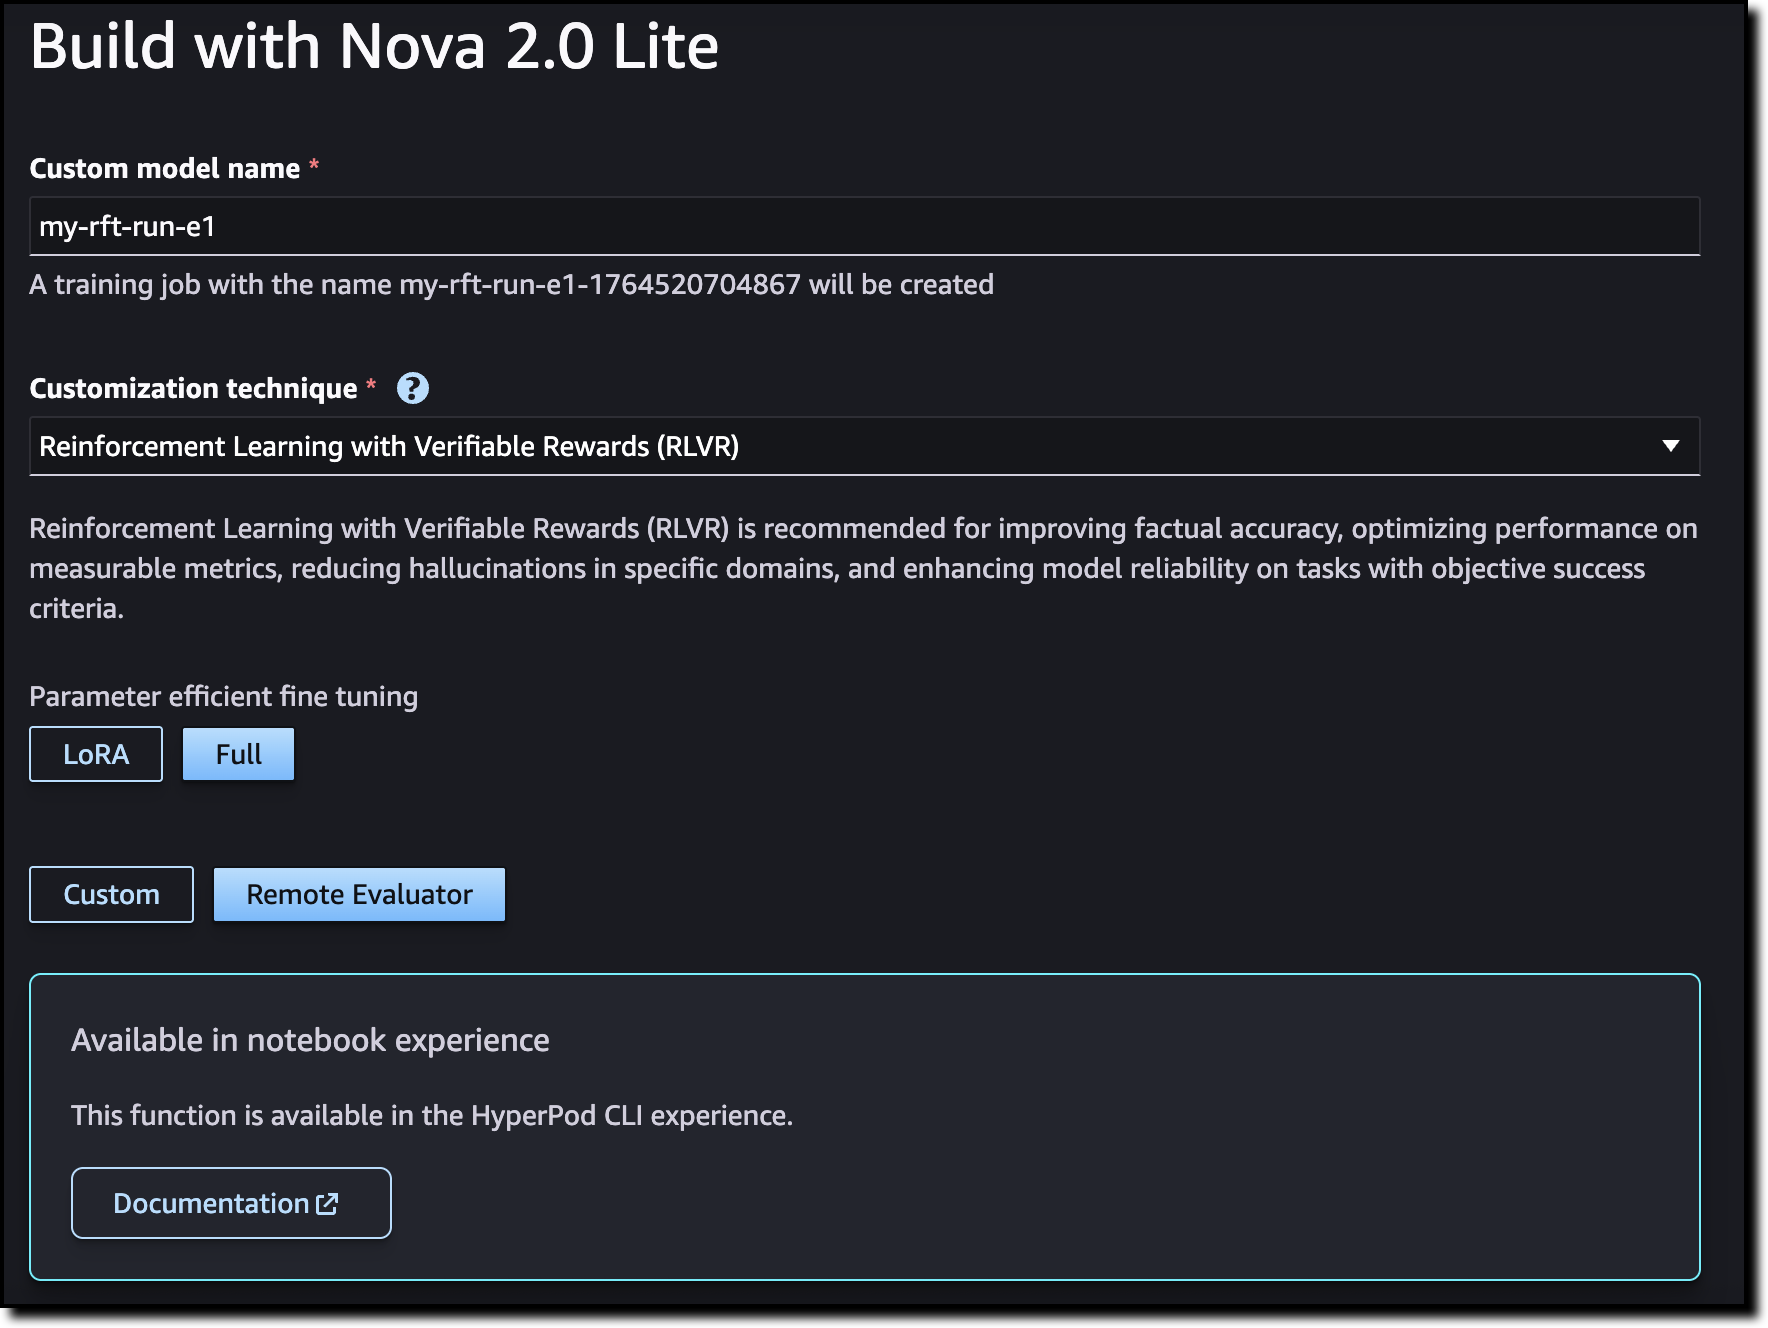
Optionally, you can choose to use Reinforcement Fine-Tuning (RFT) to improve factual accuracy and reduce hallucinations in specific domains.

When training completes, import the model into Amazon Bedrock and start using it in your applications.

Things to know
Amazon Nova Forge is available in the US East (N. Virginia) AWS Region. The program includes access to multiple Nova model checkpoints, training recipes to mix proprietary data with Amazon Nova-curated training data, proven training recipes, and integration with Amazon SageMaker AI and Amazon Bedrock.

Learn more in the Amazon Nova User Guide and explore Nova Forge from the Amazon SageMaker AI console.

Organizations interested in expert assistance can also reach out to our Generative AI Innovation Center for additional support with their model development initiatives.

Danilo

AWS Weekly Roundup: Single GPU P5 instances, Advanced Go Driver, Amazon SageMaker HyperPod and more (August 18, 2025)

Post Syndicated from Prasad Rao original https://aws.amazon.com/blogs/aws/aws-weekly-roundup-single-gpu-p5-instances-advanced-go-driver-amazon-sagemaker-hyperpod-and-more-august-18-2025/

Let me start this week’s update with something I’m especially excited about – the upcoming BeSA (Become a Solutions Architect) cohort. BeSA is a free mentoring program that I host along with a few other AWS employees on a volunteer basis to help people excel in their cloud careers. Last week, the instructors’ lineup was finalized for the 6-week cohort starting September 6. The cohort will focus on migration and modernization on AWS. Visit the BeSA website to learn more.

Another highlight for me last week was the announcement of six new AWS Heroes for their technical leadership and exceptional contributions to the AWS community. Read the full announcement to learn more about these community leaders.

Last week’s launches
Here are some launches from last week that got my attention:

  • Amazon EC2 Single GPU P5 instances are now generally available — You can right-size your machine learning (ML) and high performance computing (HPC) resources cost-effectively with the new Amazon Elastic Compute Cloud (Amazon EC2) P5 instance size with one NVIDIA H100 GPU.
  • AWS Advanced Go Driver is generally available — You can now use the AWS Advanced Go Driver with Amazon Relational Database Service (Amazon RDS) and Amazon Aurora PostgreSQL-Compatible and MySQL-Compatible database clusters for faster switchover and failover times, Federated Authentication, and authentication with AWS Secrets Manager or AWS Identity and Access Management (IAM). You can install the PostgreSQL and MySQL packages for Windows, Mac, or Linux, by following the installation guides in GitHub.
  • Expanded support for Cilium with Amazon EKS Hybrid Nodes — Cilium is a Cloud Native Computing Foundation (CNCF) graduated project that provides core networking capabilities for Kubernetes workloads. Now, you can receive support from AWS for a broader set of Cilium features when using Cilium with Amazon EKS Hybrid Nodes including application ingress, in-cluster load balancing, Kubernetes network policies, and kube-proxy replacement mode.
  • Amazon SageMaker AI now supports P6e-GB200 UltraServers — You can accelerate training and deployment of foundational models (FMs) at trillion-parameter scale by using up to 72 NVIDIA Blackwell GPUs under one NVLink domain with the new P6e-GB200 UltraServer support in Amazon SageMaker HyperPod and Model Training.
  • Amazon SageMaker HyperPod now supports fine-grained quota allocation of compute resources, topology-aware-scheduling of LLM tasks and custom Amazon Machine Images (AMIs) — You can allocate fine-grained compute quota for GPU, Trainium accelerator, vCPU, and vCPU memory within an instance to optimize compute resource distribution. With topology-aware scheduling, you can schedule your large language model (LLM) tasks on an optimal network topology to minimize network communication and enhance training efficiency. Using custom AMIs, you can deploy clusters with pre-configured, security-hardened environments that meet your specific organizational requirements.

Additional updates
Here are some additional news items and blog posts that I found interesting:

Upcoming AWS events
Check your calendars and sign up for upcoming AWS and AWS Community events:

  • AWS re:Invent 2025 (December 1-5, 2025, Las Vegas) — The AWS flagship annual conference offering collaborative innovation through peer-to-peer learning, expert-led discussions, and invaluable networking opportunities.
  • AWS Summits — Join free online and in-person events that bring the cloud computing community together to connect, collaborate, and learn about AWS. Coming up soon are summits in Johannesburg (August 20) and Toronto (September 4).
  • AWS Community Days — Join community-led conferences that feature technical discussions, workshops, and hands-on labs led by expert AWS users and industry leaders from around the world: Adria (September 5), Baltic (September 10), Aotearoa (September 18), and South Africa (September 20).

Join the AWS Builder Center to learn, build, and connect with builders in the AWS community. Browse here for upcoming in-person and virtual developer-focused events.

That’s all for this week. Check back next Monday for another Weekly Roundup!

Prasad

Announcing Amazon Nova customization in Amazon SageMaker AI

Post Syndicated from Betty Zheng (郑予彬) original https://aws.amazon.com/blogs/aws/announcing-amazon-nova-customization-in-amazon-sagemaker-ai/

Today, we’re announcing a suite of customization capabilities for Amazon Nova in Amazon SageMaker AI. Customers can now customize Nova Micro, Nova Lite, and Nova Pro across the model training lifecycle, including pre-training, supervised fine-tuning, and alignment. These techniques are available as ready-to-use Amazon SageMaker recipes with seamless deployment to Amazon Bedrock, supporting both on-demand and provisioned throughput inference.

Amazon Nova foundation models power diverse generative AI use cases across industries. As customers scale deployments, they need models that reflect proprietary knowledge, workflows, and brand requirements. Prompt optimization and retrieval-augmented generation (RAG) work well for integrating general-purpose foundation models into applications, however business-critical workflows require model customization to meet specific accuracy, cost, and latency requirements.

Choosing the right customization technique
Amazon Nova models support a range of customization techniques including: 1) supervised fine-tuning, 2) alignment, 3) continued pre-training, and 4) knowledge distillation. The optimal choice depends on goals, use case complexity, and the availability of data and compute resources. You can also combine multiple techniques to achieve your desired outcomes with the preferred mix of performance, cost, and flexibility.

Supervised fine-tuning (SFT) customizes model parameters using a training dataset of input-output pairs specific to your target tasks and domains. Choose from the following two implementation approaches based on data volume and cost considerations:

  • Parameter-efficient fine-tuning (PEFT) — updates only a subset of model parameters through lightweight adapter layers such as LoRA (Low-Rank Adaptation). It offers faster training and lower compute costs compared to full fine-tuning. PEFT-adapted Nova models are imported to Amazon Bedrock and invoked using on-demand inference.
  • Full fine-tuning (FFT) — updates all the parameters of the model and is ideal for scenarios when you have extensive training datasets (tens of thousands of records). Nova models customized through FFT can also be imported to Amazon Bedrock and invoked for inference with provisioned throughput.

Alignment steers the model output towards desired preferences for product-specific needs and behavior, such as company brand and customer experience requirements. These preferences may be encoded in multiple ways, including empirical examples and policies. Nova models support two preference alignment techniques:

  • Direct preference optimization (DPO) — offers a straightforward way to tune model outputs using preferred/not preferred response pairs. DPO learns from comparative preferences to optimize outputs for subjective requirements such as tone and style. DPO offers both a parameter-efficient version and a full-model update version. The parameter-efficient version supports on-demand inference.
  • Proximal policy optimization (PPO) — uses reinforcement learning to enhance model behavior by optimizing for desired rewards such as helpfulness, safety, or engagement. A reward model guides optimization by scoring outputs, helping the model learn effective behaviors while maintaining previously learned capabilities.

Continued pre-training (CPT) expands foundational model knowledge through self-supervised learning on large quantities of unlabeled proprietary data, including internal documents, transcripts, and business-specific content. CPT followed by SFT and alignment through DPO or PPO provides a comprehensive way to customize Nova models for your applications.

Knowledge distillation transfers knowledge from a larger “teacher” model to a smaller, faster, and more cost-efficient “student” model. Distillation is useful in scenarios where customers do not have adequate reference input-output samples and can leverage a more powerful model to augment the training data. This process creates a customized model of teacher-level accuracy for specific use cases and student-level cost-effectiveness and speed.

Here is a table summarizing the available customization techniques across different modalities and deployment options. Each technique offers specific training and inference capabilities depending on your implementation requirements.

Recipe Modality Training Inference
Amazon Bedrock Amazon SageMaker Amazon Bedrock On-demand Amazon Bedrock Provisioned Throughput
Supervised fine tuning Text, image, video
Parameter-efficient fine-tuning (PEFT) ✅ ✅ ✅ ✅
Full fine-tuning ✅ ✅
Direct preference optimization (DPO)  Text, image, video
Parameter-efficient DPO ✅ ✅ ✅
Full model DPO ✅ ✅
Proximal policy optimization (PPO)  Text-only ✅ ✅
Continuous pre-training  Text-only ✅ ✅
Distillation Text-only ✅ ✅ ✅ ✅

Early access customers, including Cosine AI, Massachusetts Institute of Technology (MIT) Computer Science and Artificial Intelligence Laboratory (CSAIL), Volkswagen, Amazon Customer Service, and Amazon Catalog Systems Service, are already successfully using Amazon Nova customization capabilities.

Customizing Nova models in action
The following walks you through an example of customizing the Nova Micro model using direct preference optimization on an existing preference dataset. To do this, you can use Amazon SageMaker Studio.

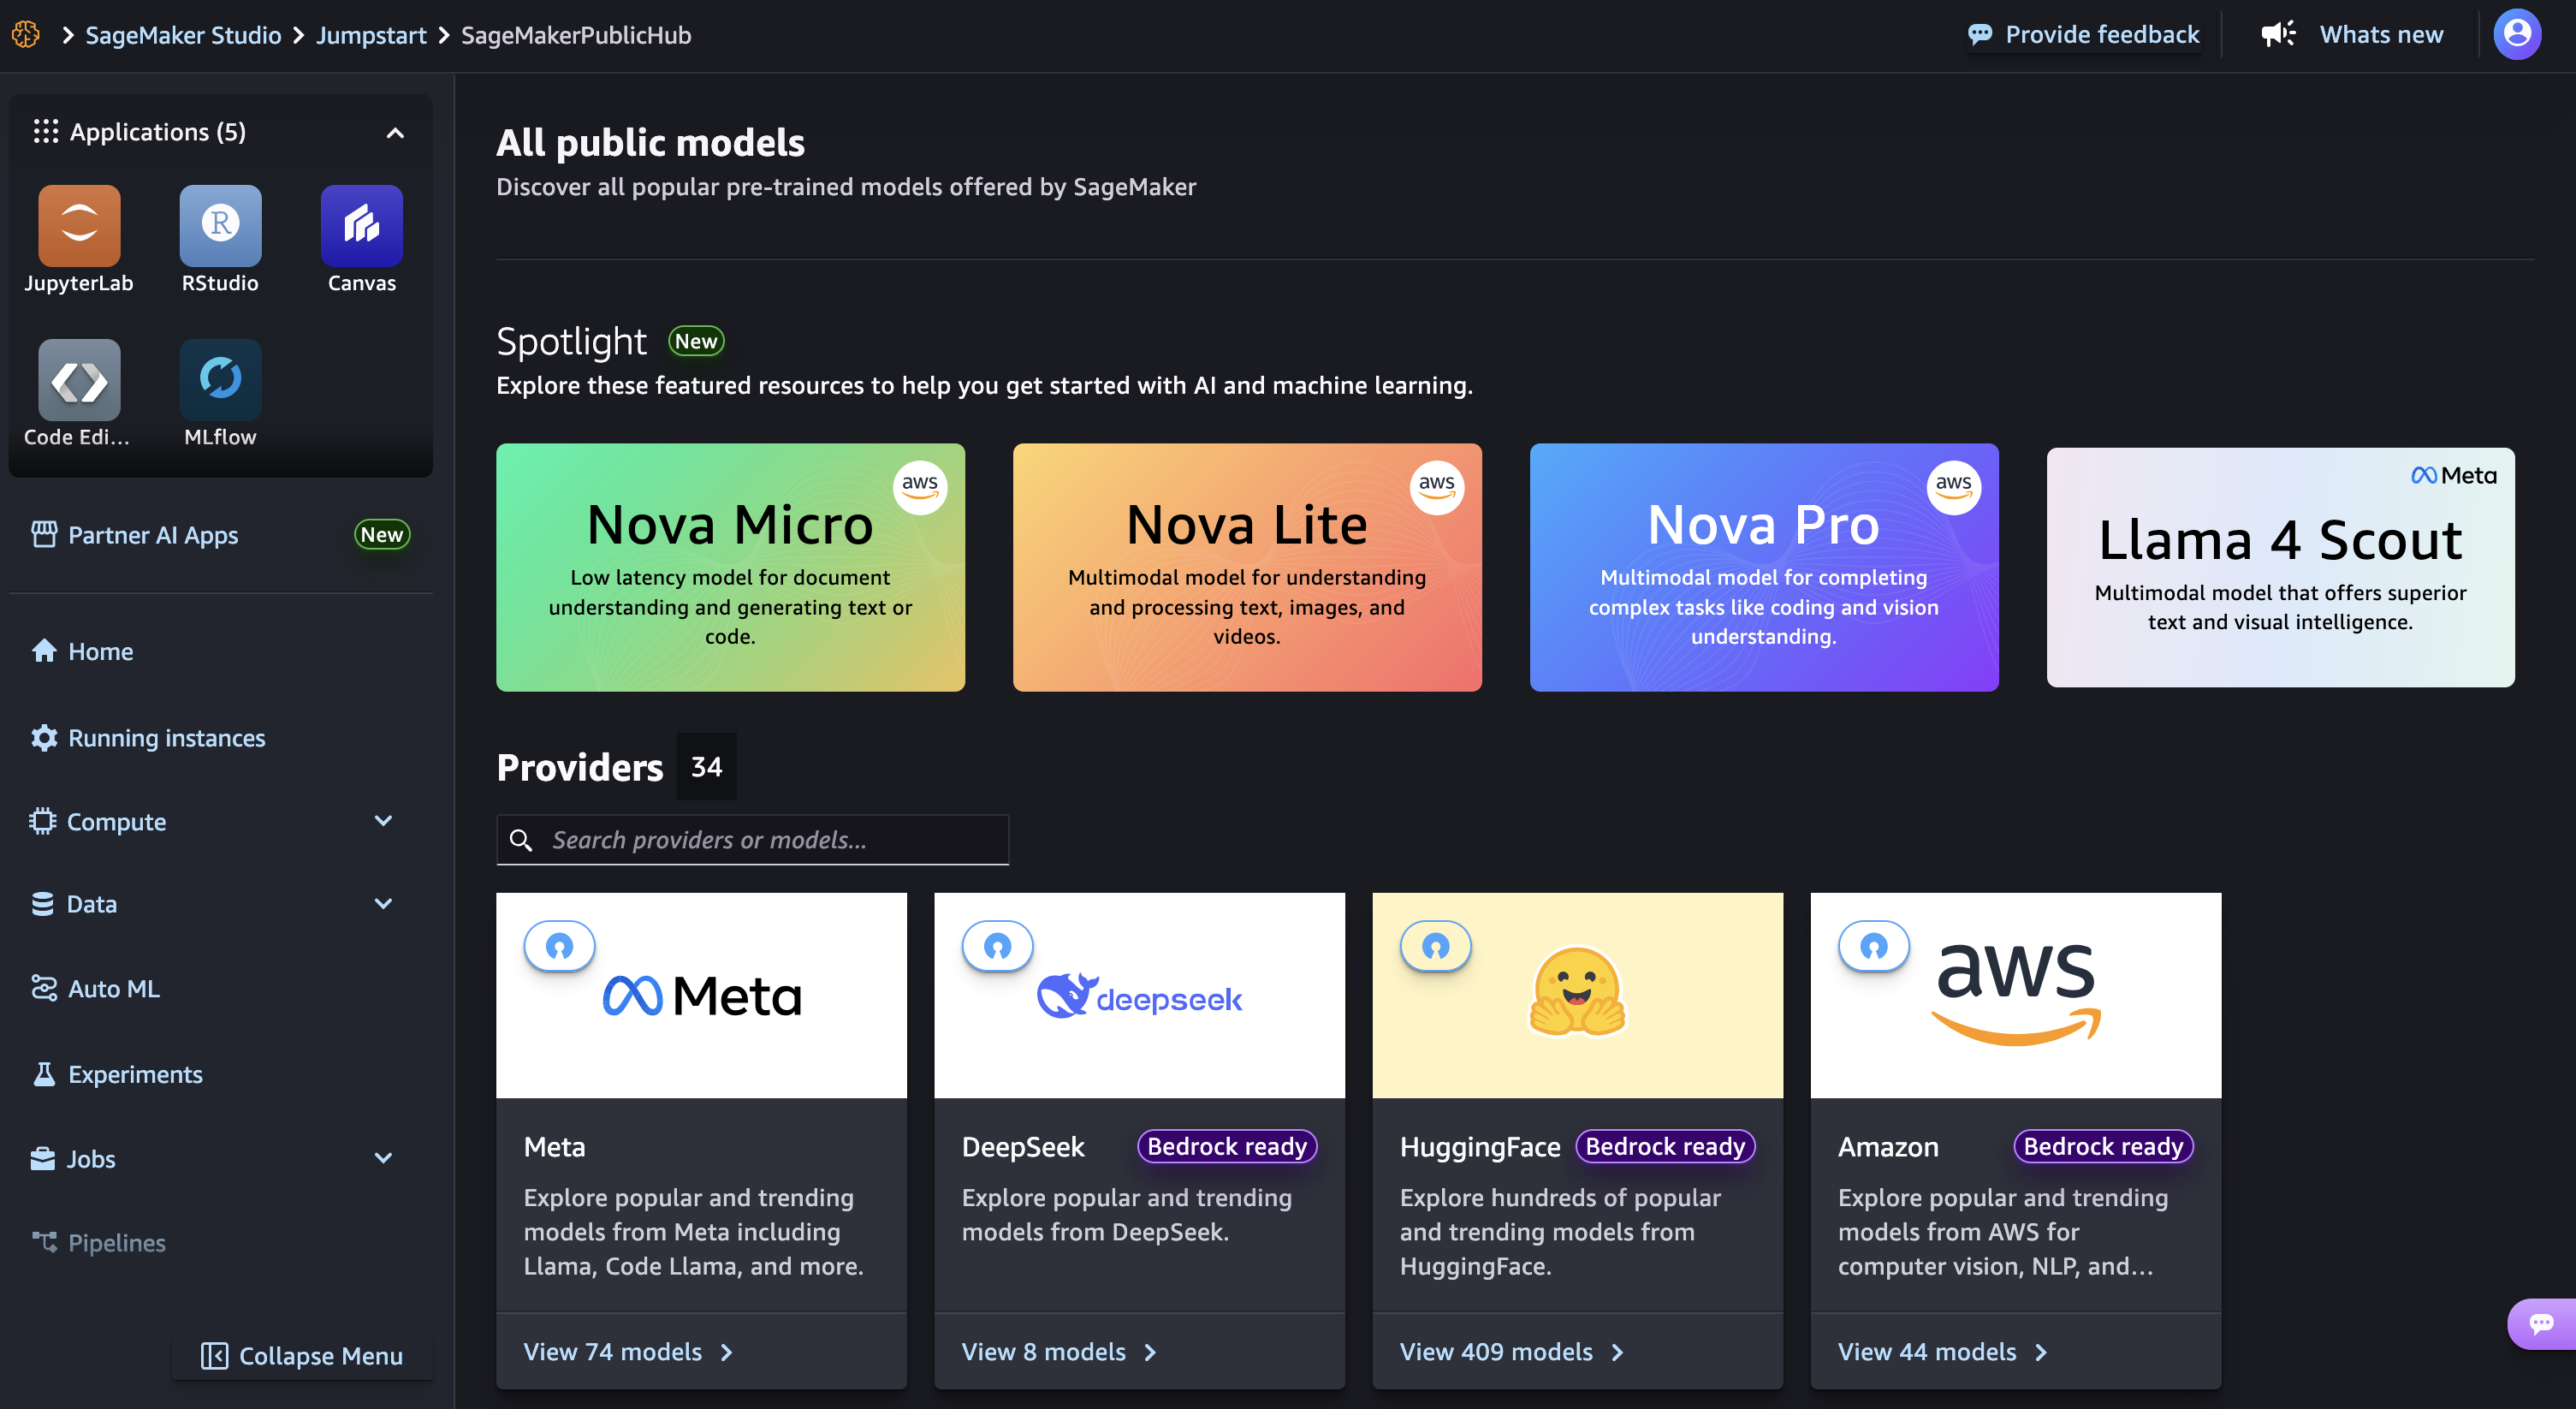
Launch your SageMaker Studio in the Amazon SageMaker AI console and choose JumpStart, a machine learning (ML) hub with foundation models, built-in algorithms, and pre-built ML solutions that you can deploy with a few clicks.

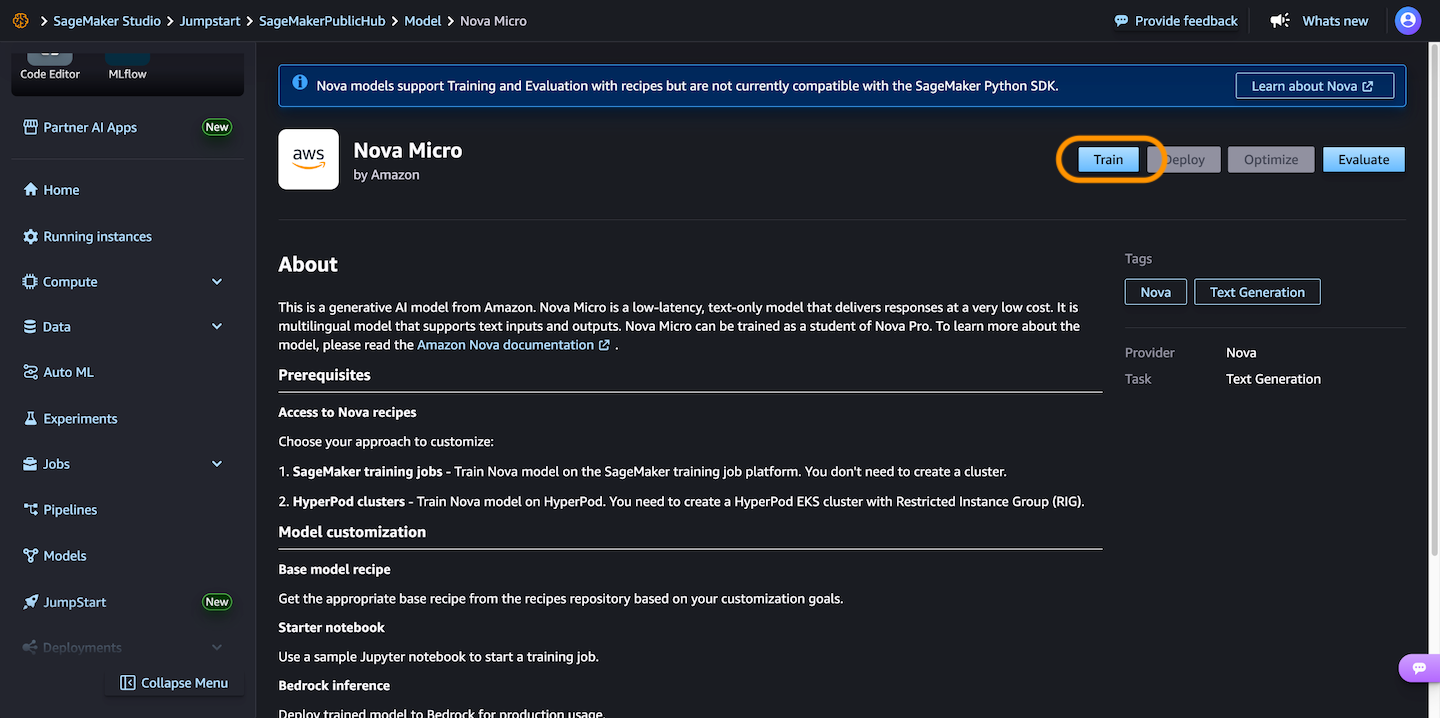
Then, choose Nova Micro, a text-only model that delivers the lowest latency responses at the lowest cost per inference among the Nova model family, and then choose Train.

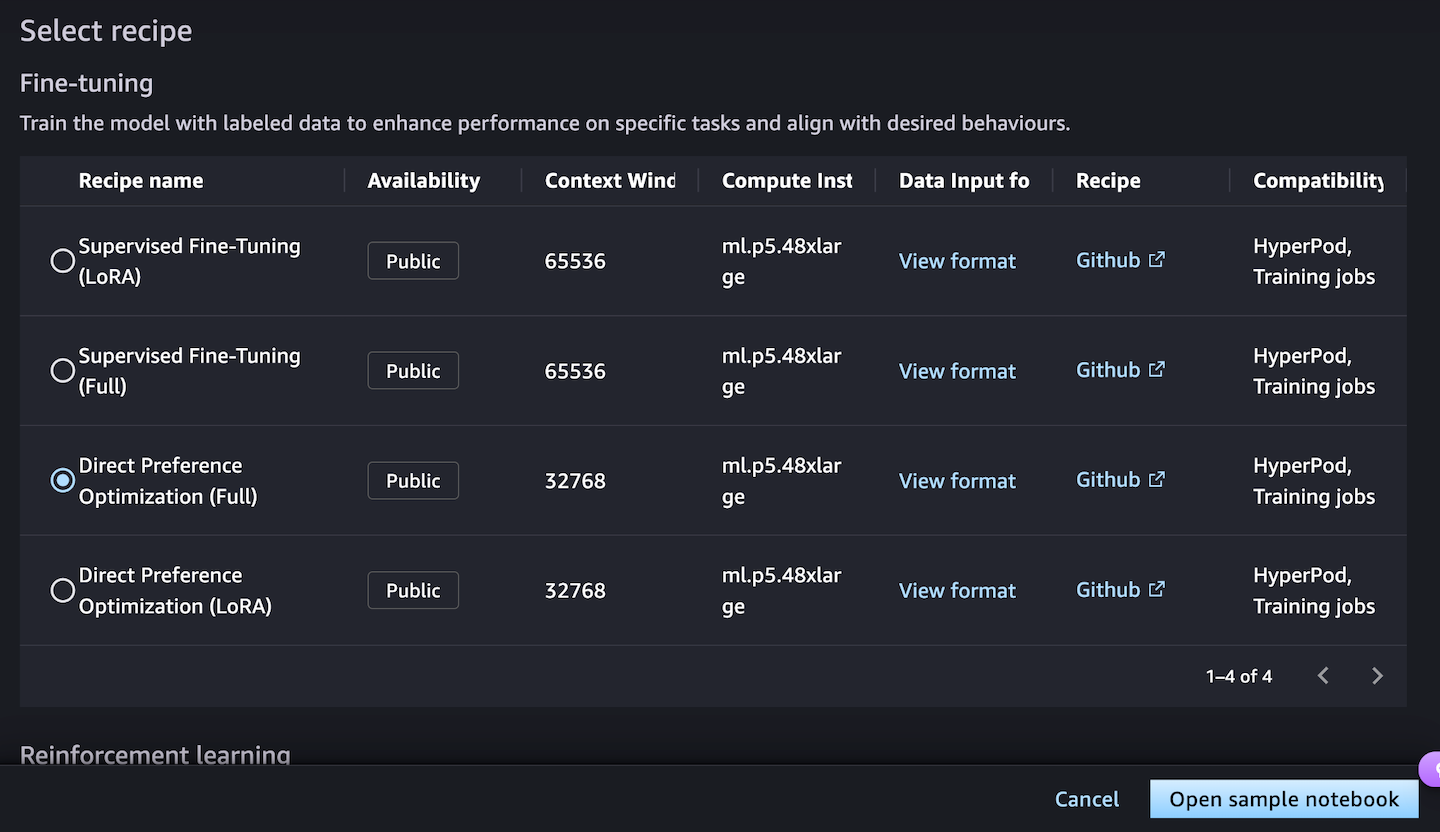
Next, you can choose a fine-tuning recipe to train the model with labeled data to enhance performance on specific tasks and align with desired behaviors. Choosing the Direct Preference Optimization offers a straightforward way to tune model outputs with your preferences.

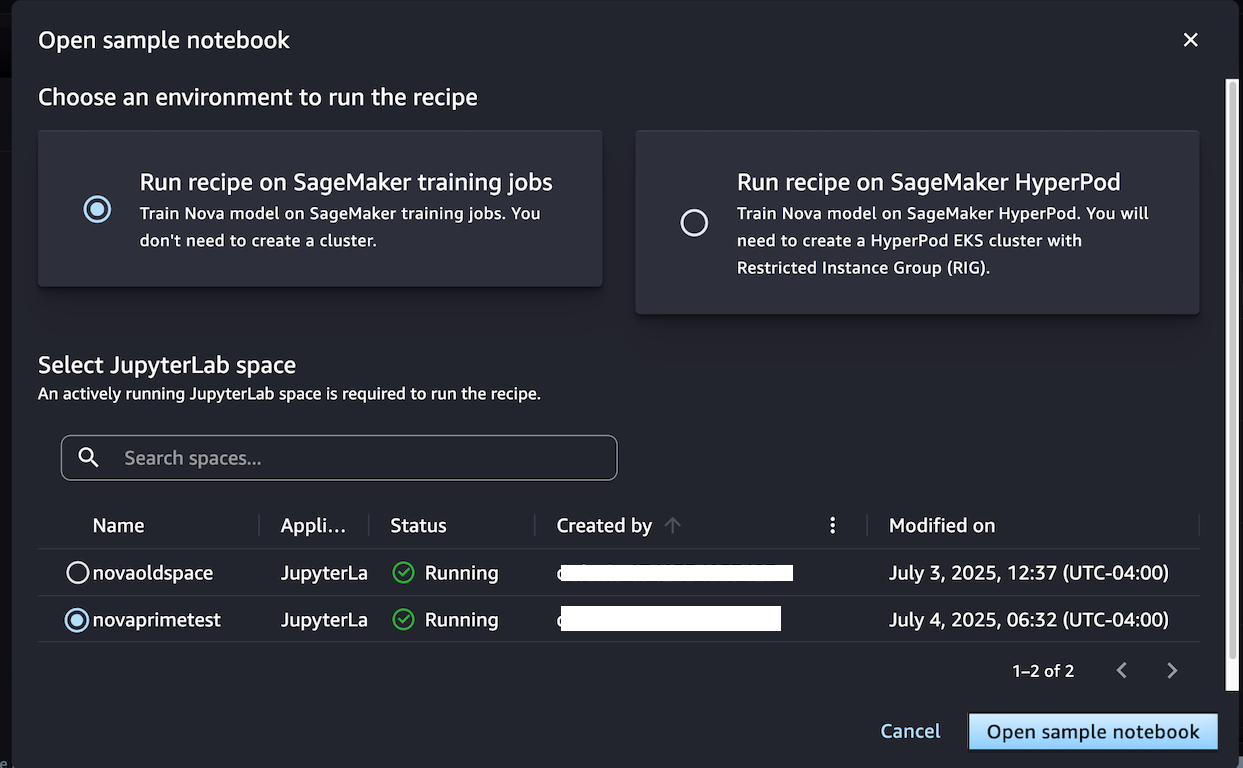
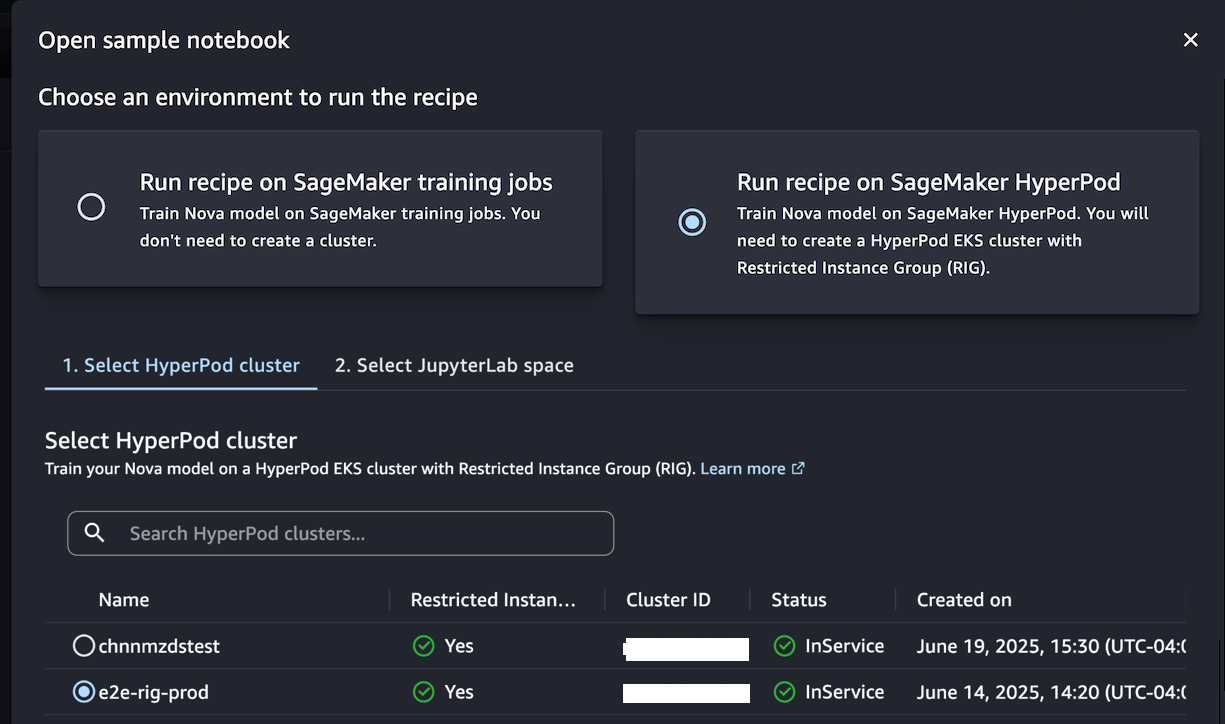
When you choose Open sample notebook, you have two environment options to run the recipe: either on the SageMaker training jobs or SageMaker Hyperpod:

Choose Run recipe on SageMaker training jobs when you don’t need to create a cluster and train the model with the sample notebook by selecting your JupyterLab space.

Alternately, if you want to have a persistent cluster environment optimized for iterative training processes, choose Run recipe on SageMaker HyperPod. You can choose a HyperPod EKS cluster with at least one restricted instance group (RIG) to provide a specialized isolated environment, which is required for such Nova model training. Then, choose your JupyterLabSpace and Open sample notebook.

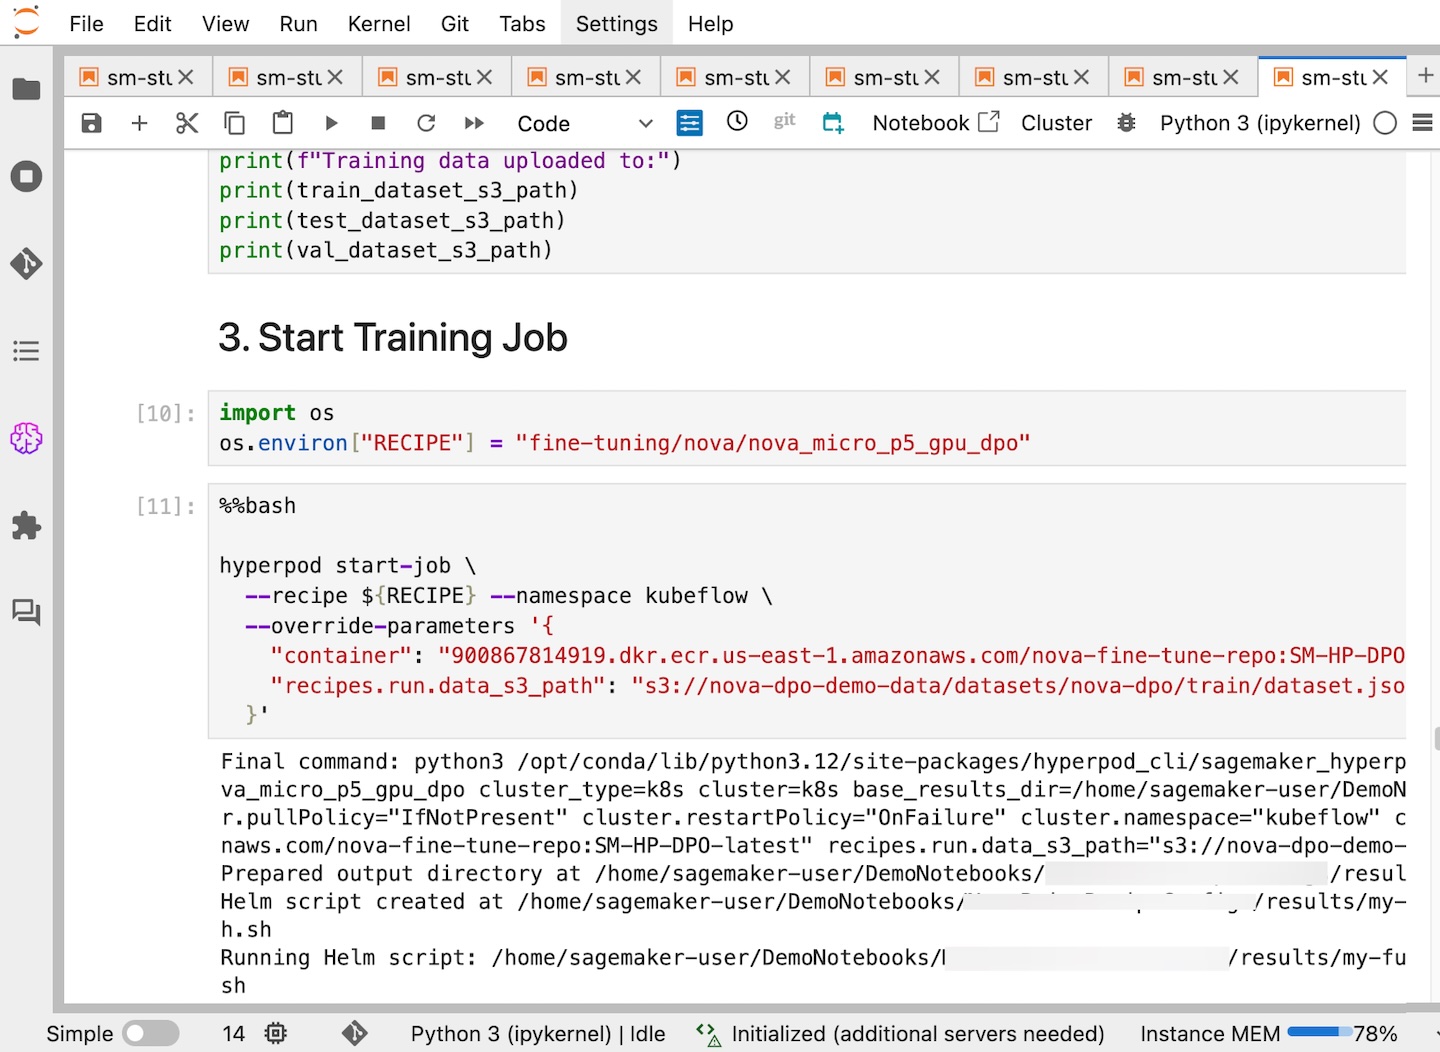
This notebook provides an end-to-end walkthrough for creating a SageMaker HyperPod job using a SageMaker Nova model with a recipe and deploying it for inference. With the help of a SageMaker HyperPod recipe, you can streamline complex configurations and seamlessly integrate datasets for optimized training jobs.

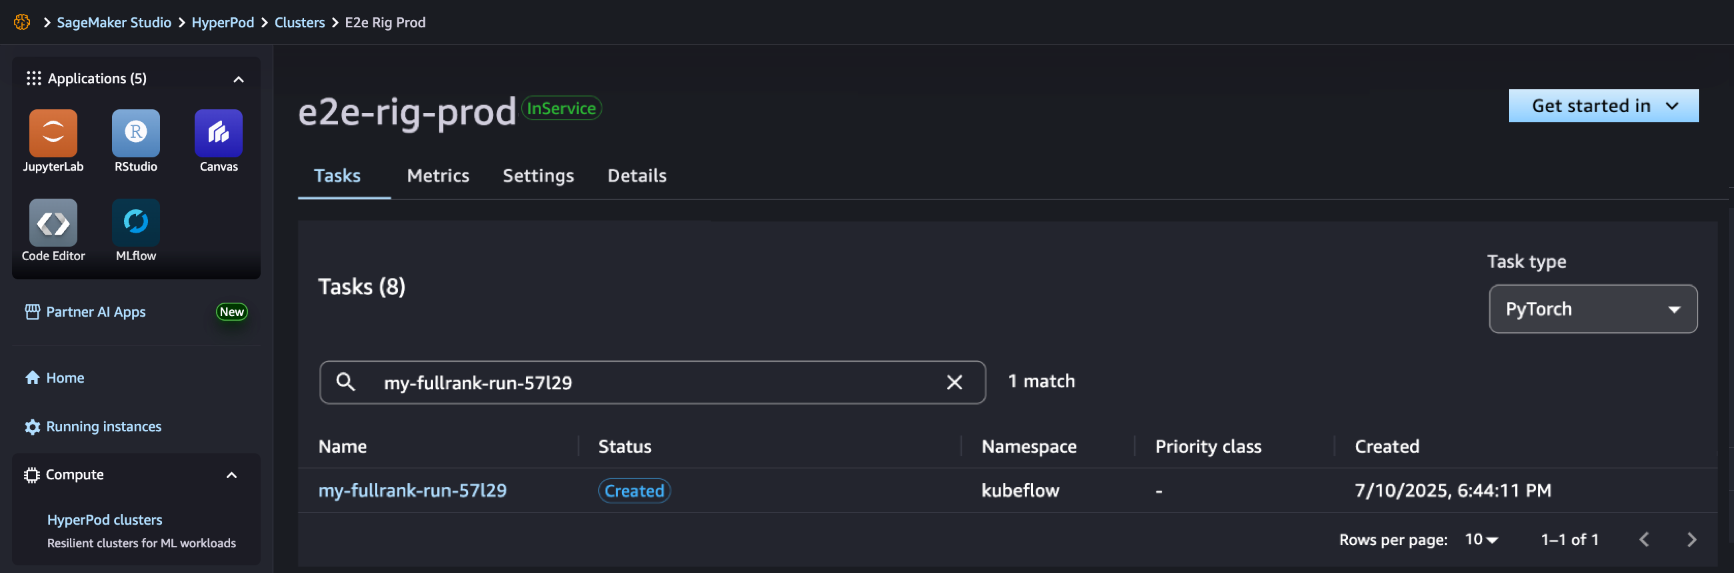
In SageMaker Studio, you can see that your SageMaker HyperPod job has been successfully created and you can monitor it for further progress.

After your job completes, you can use a benchmark recipe to evaluate if the customized model performs better on agentic tasks.

For comprehensive documentation and additional example implementations, visit the SageMaker HyperPod recipes repository on GitHub. We continue to expand the recipes based on customer feedback and emerging ML trends, ensuring you have the tools needed for successful AI model customization.

Availability and getting started
Recipes for Amazon Nova on Amazon SageMaker AI are available in US East (N. Virginia). Learn more about this feature by visiting the Amazon Nova customization webpage and Amazon Nova user guide and get started in the Amazon SageMaker AI console.

Betty

Accelerate foundation model training and fine-tuning with new Amazon SageMaker HyperPod recipes

Post Syndicated from Channy Yun (윤석찬) original https://aws.amazon.com/blogs/aws/accelerate-foundation-model-training-and-fine-tuning-with-new-amazon-sagemaker-hyperpod-recipes/

Today, we’re announcing the general availability of Amazon SageMaker HyperPod recipes to help data scientists and developers of all skill sets to get started training and fine-tuning foundation models (FMs) in minutes with state-of-the-art performance. They can now access optimized recipes for training and fine-tuning popular publicly available FMs such as Llama 3.1 405B, Llama 3.2 90B, or Mixtral 8x22B.

At AWS re:Invent 2023, we introduced SageMaker HyperPod to reduce time to train FMs by up to 40 percent and scale across more than a thousand compute resources in parallel with preconfigured distributed training libraries. With SageMaker HyperPod, you can find the required accelerated compute resources for training, create the most optimal training plans, and run training workloads across different blocks of capacity based on the availability of compute resources.

SageMaker HyperPod recipes include a training stack tested by AWS, removing tedious work experimenting with different model configurations, eliminating weeks of iterative evaluation and testing. The recipes automate several critical steps, such as loading training datasets, applying distributed training techniques, automating checkpoints for faster recovery from faults, and managing the end-to-end training loop.

With a simple recipe change, you can seamlessly switch between GPU- or Trainium-based instances to further optimize training performance and reduce costs. You can easily run workloads in production on SageMaker HyperPod or SageMaker training jobs.

SageMaker HyperPod recipes in action
To get started, visit the SageMaker HyperPod recipes GitHub repository to browse training recipes for popular publicly available FMs.

You only need to edit straightforward recipe parameters to specify an instance type and the location of your dataset in cluster configuration, then run the recipe with a single line command to achieve state-of-art performance.

You need to edit the recipe config.yaml file to specify the model and cluster type after cloning the repository.

$ git clone --recursive https://github.com/aws/sagemaker-hyperpod-recipes.git
$ cd sagemaker-hyperpod-recipes
$ pip3 install -r requirements.txt.
$ cd ./recipes_collections
$ vim config.yaml

The recipes support SageMaker HyperPod with Slurm, SageMaker HyperPod with Amazon Elastic Kubernetes Service (Amazon EKS), and SageMaker training jobs. For example, you can set up a cluster type (Slurm orchestrator), a model name (Meta Llama 3.1 405B language model), an instance type (ml.p5.48xlarge), and your data locations, such as storing the training data, results, logs, and so on.

defaults:
- cluster: slurm # support: slurm / k8s / sm_jobs
- recipes: fine-tuning/llama/hf_llama3_405b_seq8k_gpu_qlora # name of model to be trained
debug: False # set to True to debug the launcher configuration
instance_type: ml.p5.48xlarge # or other supported cluster instances
base_results_dir: # Location(s) to store the results, checkpoints, logs etc.

You can optionally adjust model-specific training parameters in this YAML file, which outlines the optimal configuration, including the number of accelerator devices, instance type, training precision, parallelization and sharding techniques, the optimizer, and logging to monitor experiments through TensorBoard.

run:
  name: llama-405b
  results_dir: ${base_results_dir}/${.name}
  time_limit: "6-00:00:00"
restore_from_path: null
trainer:
  devices: 8
  num_nodes: 2
  accelerator: gpu
  precision: bf16
  max_steps: 50
  log_every_n_steps: 10
  ...
exp_manager:
  exp_dir: # location for TensorBoard logging
  name: helloworld 
  create_tensorboard_logger: True
  create_checkpoint_callback: True
  checkpoint_callback_params:
    ...
  auto_checkpoint: True # for automated checkpointing
use_smp: True 
distributed_backend: smddp # optimized collectives
# Start training from pretrained model
model:
  model_type: llama_v3
  train_batch_size: 4
  tensor_model_parallel_degree: 1
  expert_model_parallel_degree: 1
  # other model-specific params

To run this recipe in SageMaker HyperPod with Slurm, you must prepare the SageMaker HyperPod cluster following the cluster setup instruction.

Then, connect to the SageMaker HyperPod head node, access the Slurm controller, and copy the edited recipe. Next, you run a helper file to generate a Slurm submission script for the job that you can use for a dry run to inspect the content before starting the training job.

$ python3 main.py --config-path recipes_collection --config-name=config

After training completion, the trained model is automatically saved to your assigned data location.

To run this recipe on SageMaker HyperPod with Amazon EKS, clone the recipe from the GitHub repository, install the requirements, and edit the recipe (cluster: k8s) on your laptop. Then, create a link between your laptop and running the EKS cluster and subsequently use the HyperPod Command Line Interface (CLI) to run the recipe.

$ hyperpod start-job –recipe fine-tuning/llama/hf_llama3_405b_seq8k_gpu_qlora \
--persistent-volume-claims fsx-claim:data \
--override-parameters \
'{
  "recipes.run.name": "hf-llama3-405b-seq8k-gpu-qlora",
  "recipes.exp_manager.exp_dir": "/data/<your_exp_dir>",
  "cluster": "k8s",
  "cluster_type": "k8s",
  "container": "658645717510.dkr.ecr.<region>.amazonaws.com/smdistributed-modelparallel:2.4.1-gpu-py311-cu121",
  "recipes.model.data.train_dir": "<your_train_data_dir>",
  "recipes.model.data.val_dir": "<your_val_data_dir>",
}'

You can also run recipe on SageMaker training jobs using SageMaker Python SDK. The following example is running PyTorch training scripts on SageMaker training jobs with overriding training recipes.

...
recipe_overrides = {
    "run": {
        "results_dir": "/opt/ml/model",
    },
    "exp_manager": {
        "exp_dir": "",
        "explicit_log_dir": "/opt/ml/output/tensorboard",
        "checkpoint_dir": "/opt/ml/checkpoints",
    },   
    "model": {
        "data": {
            "train_dir": "/opt/ml/input/data/train",
            "val_dir": "/opt/ml/input/data/val",
        },
    },
}
pytorch_estimator = PyTorch(
           output_path=<output_path>,
           base_job_name=f"llama-recipe",
           role=<role>,
           instance_type="p5.48xlarge",
           training_recipe="fine-tuning/llama/hf_llama3_405b_seq8k_gpu_qlora",
           recipe_overrides=recipe_overrides,
           sagemaker_session=sagemaker_session,
           tensorboard_output_config=tensorboard_output_config,
)
...

As training progresses, the model checkpoints are stored on Amazon Simple Storage Service (Amazon S3) with the fully automated checkpointing capability, enabling faster recovery from training faults and instance restarts.

Now available
Amazon SageMaker HyperPod recipes are now available in the SageMaker HyperPod recipes GitHub repository. To learn more, visit the SageMaker HyperPod product page and the Amazon SageMaker AI Developer Guide.

Give SageMaker HyperPod recipes a try and send feedback to AWS re:Post for SageMaker or through your usual AWS Support contacts.

Channy

Meet your training timelines and budgets with new Amazon SageMaker HyperPod flexible training plans

Post Syndicated from Channy Yun (윤석찬) original https://aws.amazon.com/blogs/aws/meet-your-training-timelines-and-budgets-with-new-amazon-sagemaker-hyperpod-flexible-training-plans/

Today, we’re announcing the general availability of Amazon SageMaker HyperPod flexible training plans to help data scientists train large foundation models (FMs) within their timelines and budgets and save them weeks of effort in managing the training process based on compute availability.

At AWS re:Invent 2023, we introduced SageMaker HyperPod to reduce the time to train FMs by up to 40 percent and scale across thousands of compute resources in parallel with preconfigured distributed training libraries and built-in resiliency. Most generative AI model development tasks need accelerated compute resources in parallel. Our customers struggle to find timely access to compute resources to complete their training within their timeline and budget constraints.

With today’s announcement, you can find the required accelerated compute resources for training, create the most optimal training plans, and run training workloads across different blocks of capacity based on the availability of the compute resources. Within a few steps, you can identify training completion date, budget, compute resources requirements, create optimal training plans, and run fully managed training jobs, without needing manual intervention.

SageMaker HyperPod training plans in action
To get started, go to the Amazon SageMaker AI console, choose Training plans in the left navigation pane, and choose Create training plan.

For example, choose your preferred training date and time (10 days), instance type and count (16 ml.p5.48xlarge) for SageMaker HyperPod cluster, and choose Find training plan.

SageMaker HyperPod suggests a training plan that is split into two five-day segments. This includes the total upfront price for the plan.

If you accept this training plan, add your training details in the next step and choose Create your plan.

After creating your training plan, you can see the list of training plans. When you’ve created a training plan, you have to pay upfront for the plan within 12 hours. One plan is in the Active state and already started, with all the instances being used. The second plan is Scheduled to start later, but you can already submit jobs that start automatically when the plan begins.

In the active status, the compute resources are available in SageMaker HyperPod, resume automatically after pauses in availability, and terminates at the end of the plan. There is a first segment currently running and another segment queued up to run after the current segment.

This is similar to the Managed Spot training in SageMaker AI, where SageMaker AI takes care of instance interruptions and continues the training with no manual intervention. To learn more, visit the SageMaker HyperPod training plans in the Amazon SageMaker AI Developer Guide.

Now available
Amazon SageMaker HyperPod training plans are now available in US East (N. Virginia), US East (Ohio), US West (Oregon) AWS Regions and support ml.p4d.48xlarge, ml.p5.48xlarge, ml.p5e.48xlargeml.p5en.48xlarge, and ml.trn2.48xlarge instances. Trn2 and P5en instances are only in US East (Ohio) Region. To learn more, visit the SageMaker HyperPod product page and SageMaker AI pricing page.

Give HyperPod training plans a try in the Amazon SageMaker AI console and send feedback to AWS re:Post for SageMaker AI or through your usual AWS Support contacts.

Channy

Maximize accelerator utilization for model development with new Amazon SageMaker HyperPod task governance

Post Syndicated from Channy Yun (윤석찬) original https://aws.amazon.com/blogs/aws/maximize-accelerator-utilization-for-model-development-with-new-amazon-sagemaker-hyperpod-task-governance/

Today, we’re announcing the general availability of Amazon SageMaker HyperPod task governance, a new innovation to easily and centrally manage and maximize GPU and Tranium utilization across generative AI model development tasks, such as training, fine-tuning, and inference.

Customers tell us that they’re rapidly increasing investment in generative AI projects, but they face challenges in efficiently allocating limited compute resources. The lack of dynamic, centralized governance for resource allocation leads to inefficiencies, with some projects underutilizing resources while others stall. This situation burdens administrators with constant replanning, causes delays for data scientists and developers, and results in untimely delivery of AI innovations and cost overruns due to inefficient use of resources.

With SageMaker HyperPod task governance, you can accelerate time to market for AI innovations while avoiding cost overruns due to underutilized compute resources. With a few steps, administrators can set up quotas governing compute resource allocation based on project budgets and task priorities. Data scientists or developers can create tasks such as model training, fine-tuning, or evaluation, which SageMaker HyperPod automatically schedules and executes within allocated quotas.

SageMaker HyperPod task governance manages resources, automatically freeing up compute from lower-priority tasks when high-priority tasks need immediate attention. It does this by pausing low-priority training tasks, saving checkpoints, and resuming them later when resources become available. Additionally, idle compute within a team’s quota can be automatically used to accelerate another team’s waiting tasks.

Data scientists and developers can continuously monitor their task queues, view pending tasks, and adjust priorities as needed. Administrators can also monitor and audit scheduled tasks and compute resource usage across teams and projects and, as a result, they can adjust allocations to optimize costs and improve resource availability across the organization. This approach promotes timely completion of critical projects while maximizing resource efficiency.

Getting started with SageMaker HyperPod task governance
Task governance is available for Amazon EKS clusters in HyperPod. Find Cluster Management under HyperPod Clusters in the Amazon SageMaker AI console for provisioning and managing clusters. As an administrator, you can streamline the operation and scaling of HyperPod clusters through this console.

When you choose a HyperPod cluster, you can see a new Dashboard, Tasks, and Policies tab in the cluster detail page.

1. New dashboard
In the new dashboard, you can see an overview of cluster utilization, team-based, and task-based metrics.

First, you can view both point-in-time and trend-based metrics for critical compute resources, including GPU, vCPU, and memory utilization, across all instance groups.

Next, you can gain comprehensive insights into team-specific resource management, focusing on GPU utilization versus compute allocation across teams. You can use customizable filters for teams and cluster instance groups to analyze metrics such as allocated GPUs/CPUs for tasks, borrowed GPUs/CPUs, and GPU/CPU utilization.

You can also assess task performance and resource allocation efficiency using metrics such as counts of running, pending, and preempted tasks, as well as average task runtime and wait time. To gain comprehensive observability into your SageMaker HyperPod cluster resources and software components, you can integrate with Amazon CloudWatch Container Insights or Amazon Managed Grafana.

2. Create and manage a cluster policy
To enable task prioritization and fair-share resource allocation, you can configure a cluster policy that prioritizes critical workloads and distributes idle compute across teams defined in compute allocations.

To configure priority classes and fair sharing of borrowed compute in cluster settings, choose Edit in the Cluster policy section.

You can define how tasks waiting in queue are admitted for task prioritization: First-come-first-serve by default or Task ranking. When you choose task ranking, tasks waiting in queue will be admitted in the priority order defined in this cluster policy. Tasks of same priority class will be executed on a first-come-first-serve basis.

You can also configure how idle compute is allocated across teams: First-come-first-serve or Fair-share by default. The fair-share setting enables teams to borrow idle compute based on their assigned weights, which are configured in relative compute allocations. This enables every team to get a fair share of idle compute to accelerate their waiting tasks.

In the Compute allocation section of the Policies page, you can create and edit compute allocations to distribute compute resources among teams, enable settings that allow teams to lend and borrow idle compute, configure preemption of their own low-priority tasks, and assign fair-share weights to teams.

In the Team section, set a team name and a corresponding Kubernetes namespace will be created for your data science and machine learning (ML) teams to use. You can set a fair-share weight for a more equitable distribution of unused capacity across your teams and enable the preemption option based on task priority, allowing higher-priority tasks to preempt lower-priority ones.

In the Compute section, you can add and allocate instance type quotas to teams. Additionally, you can allocate quotas for instance types not yet available in the cluster, allowing for future expansion.

You can enable teams to share idle compute resources by allowing them to lend their unused capacity to other teams. This borrowing model is reciprocal: teams can only borrow idle compute if they are also willing to share their own unused resources with others. You can also specify the borrow limit that enables teams to borrow compute resources over their allocated quota.

3. Run your training task in SageMaker HyperPod cluster
As a data scientist, you can submit a training job and use the quota allocated for your team, using the HyperPod Command Line Interface (CLI) command. With the HyperPod CLI, you can start a job and specify the corresponding namespace that has the allocation.

$ hyperpod start-job --name smpv2-llama2 --namespace hyperpod-ns-ml-engineers
Successfully created job smpv2-llama2
$ hyperpod list-jobs --all-namespaces
{
 "jobs": [
  {
   "Name": "smpv2-llama2",
   "Namespace": "hyperpod-ns-ml-engineers",
   "CreationTime": "2024-09-26T07:13:06Z",
   "State": "Running",
   "Priority": "fine-tuning-priority"
  },
  ...
 ]
}

In the Tasks tab, you can see all tasks in your cluster. Each task has different priority and capacity need according to its policy. If you run another task with higher priority, the existing task will be suspended and that task can run first.

OK, now let’s check out a demo video showing what happens when a high-priority training task is added while running a low-priority task.

To learn more, visit SageMaker HyperPod task governance in the Amazon SageMaker AI Developer Guide.

Now available
Amazon SageMaker HyperPod task governance is now available in US East (N. Virginia), US East (Ohio), US West (Oregon) AWS Regions. You can use HyperPod task governance without additional cost. To learn more, visit the SageMaker HyperPod product page.

Give HyperPod task governance a try in the Amazon SageMaker AI console and send feedback to AWS re:Post for SageMaker or through your usual AWS Support contacts.

Channy

P.S. Special thanks to Nisha Nadkarni, a senior generative AI specialist solutions architect at AWS for her contribution in creating a HyperPod testing environment.