Tag Archives: Amazon SageMaker AI

AWS Weekly Roundup: Welcome DuckLabs to the team, Agentic Resource Discovery (ARD), and more (August 31, 2026)

Post Syndicated from Daniel Abib original https://aws.amazon.com/blogs/aws/aws-weekly-roundup-welcome-ducklabs-to-the-team-agentic-resource-discovery-ard-and-more-august-31-2026/

The news that interested me the most last week was the DuckLabs acquisition. AWS has signed a definitive agreement to acquire DuckLabs, the Amsterdam-based company behind DuckDB, the popular open source analytical database that runs in-process and executes SQL directly against files like Parquet, CSV, and JSON. DuckDB stays open source under its independent foundation and the MIT license, and over time AWS plans to combine its speed at everyday queries with the enterprise scale of services like Amazon S3, Amazon Redshift, and Amazon Athena.

Co-founded by Hannes Mühleisen and Mark Raasveldt, DuckDB runs locally or on Amazon S3, which makes it remarkably fast for the everyday queries (a terabyte or less) that make up the bulk of real-world analytics. It also happens to pair beautifully with AI agents, which “poke” and experiment their way through data much like humans do. The co-founders will continue leading its technical direction while AWS combines DuckDB’s speed with analytics services like Amazon EMR, AWS Glue, and Amazon SageMaker. For the bigger picture on why this matters, Andy Warfield, Vice President and Distinguished Engineer shared his thoughts on the post DuckDB and the changing physics of analytics on All Things Distributed.

Now, let’s get into this week’s AWS news…

Last week’s launches
Here are some launches and updates from this past week that caught my attention:

  • Amazon ECS now automatically detects and recovers container instances that lose agent connectivity – Amazon ECS now continuously monitors agent connectivity to the control plane and surfaces a new AGENT_CONNECTIVITY health event across AWS Fargate, Amazon ECS Managed Instances, and Amazon ECS on EC2. On Fargate and Managed Instances, ECS handles recovery automatically, draining tasks, launching replacements, and deregistering the impaired instance. On EC2, you can wire the event into your own workflow. Available at no additional cost in all AWS Commercial and AWS GovCloud (US) Regions.
  • AWS Lambda introduces public preview runtimes, starting with Node.js 26 and Python 3.15 – You can now test upcoming Lambda runtimes before they reach general availability. Preview runtimes use the same identifier as the eventual GA version, so your functions graduate automatically with no action required. Third-party tools and deployment frameworks can also validate compatibility ahead of GA. Not meant for production yet (breaking changes are possible), but a great way to get ahead of your next upgrade. Available in all AWS commercial, AWS GovCloud (US), and China Regions.
  • AWS IoT Core adds a native InfluxDB rule action – You can now route time-series data from your IoT devices straight into InfluxDB (Amazon Timestream-managed or self-hosted) without writing custom code or standing up an intermediate service. IoT Core formats data into InfluxDB’s line protocol and supports device-side and server-side batching. Available in all AWS Regions where Amazon Timestream for InfluxDB is offered.
  • Amazon GameLift Servers now includes enhanced DDoS protection – Your game servers now get automatic protection against network and transport layer (layers 3 and 4) DDoS attacks – UDP reflection, SYN floods, and similar vectors – with nothing to enable or opt into. Built on top of AWS Shield Standard with gaming-optimized traffic shaping, it turns on the moment your servers start running (Server SDK 5) at no extra cost. It’s available in all supported GameLift Servers Regions except China (Beijing) and China (Ningxia).
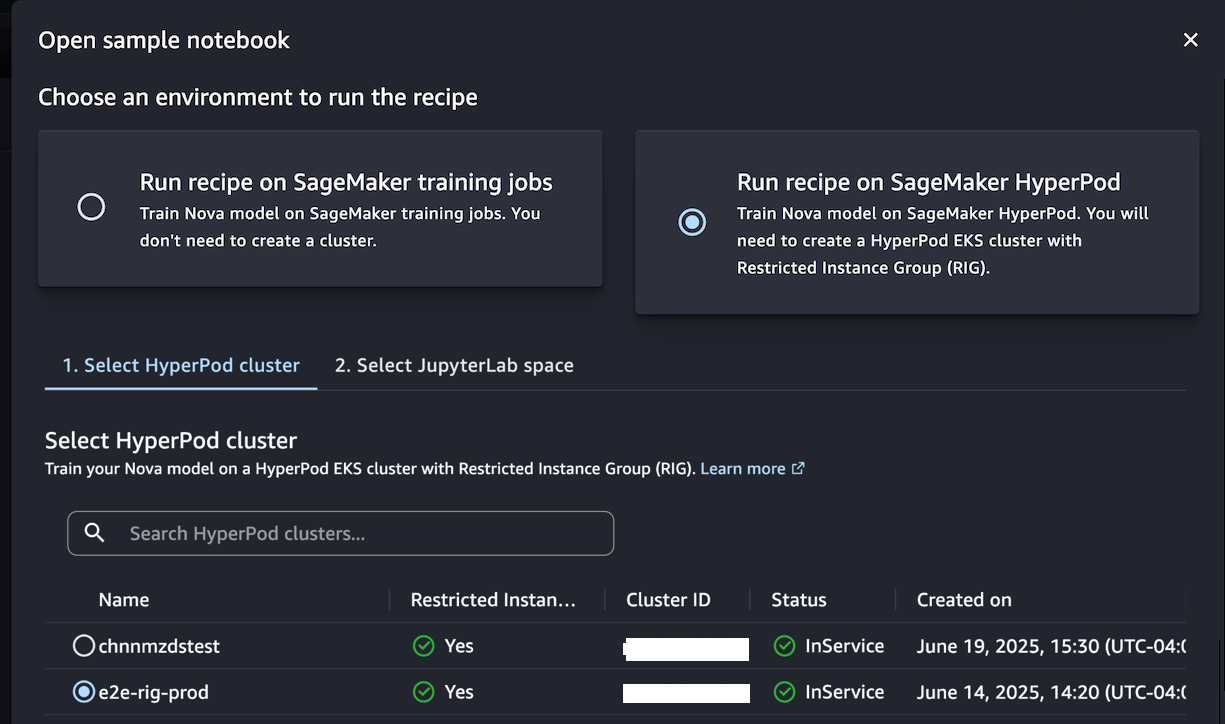
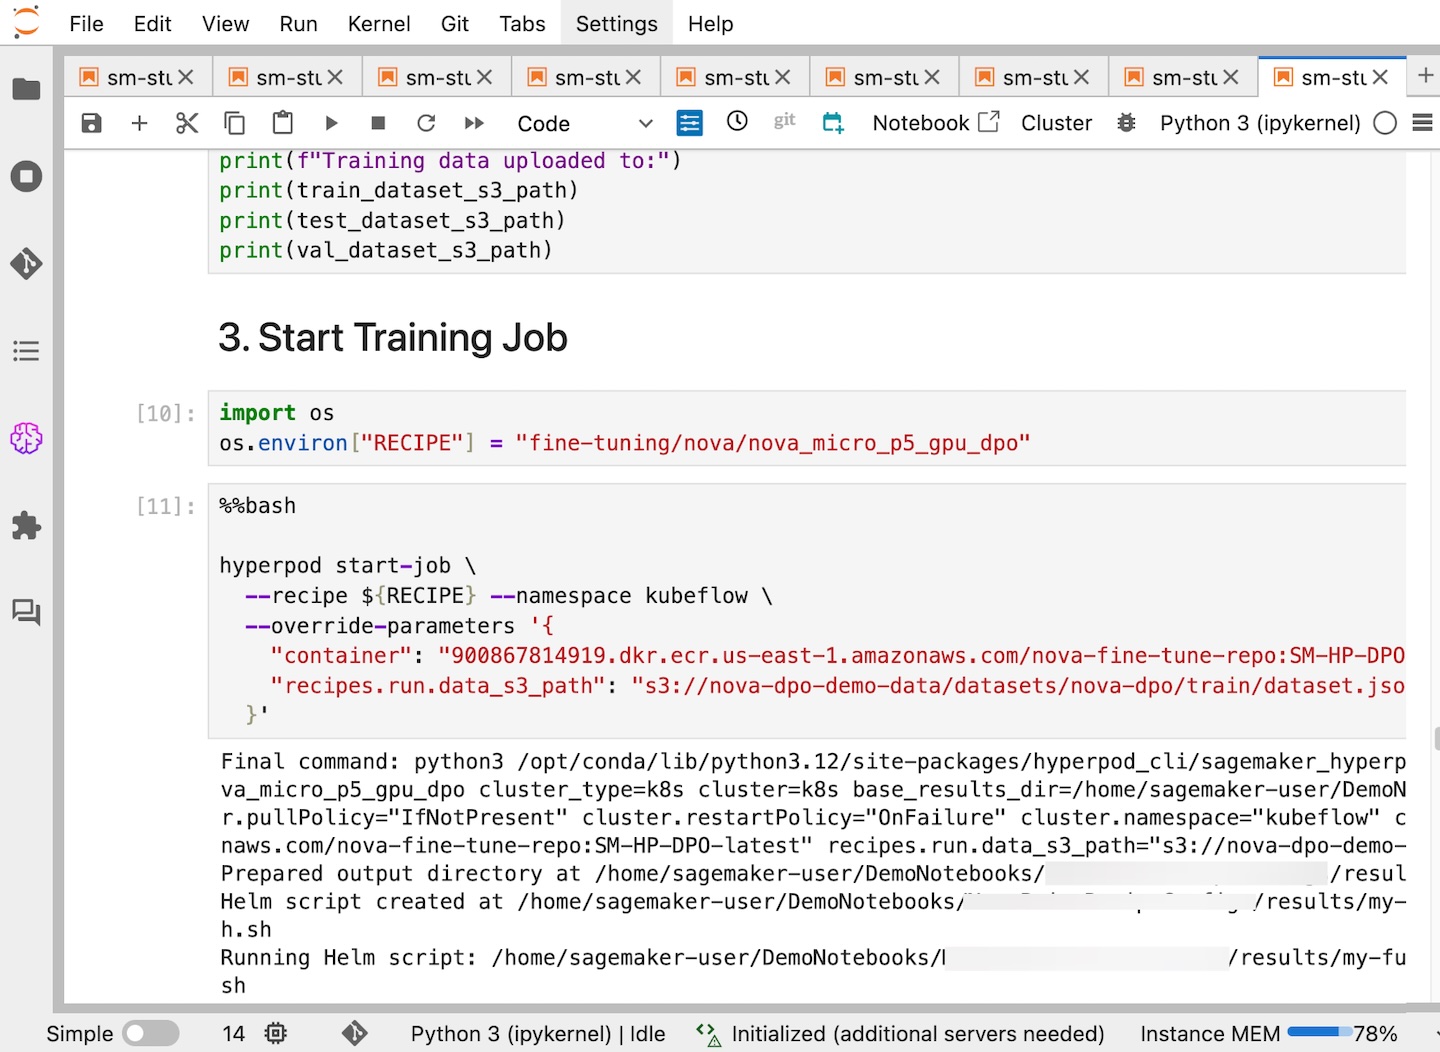
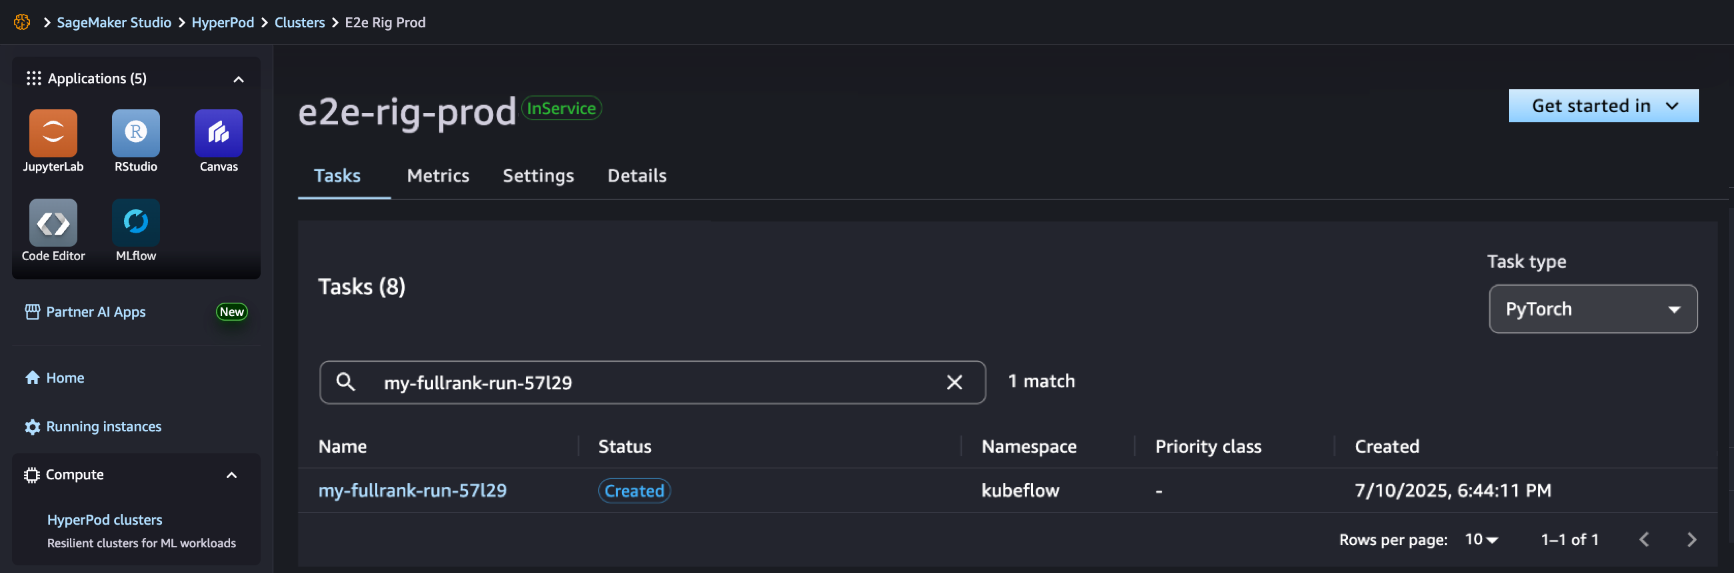
  • Amazon SageMaker HyperPod expands support for Ray – You can now run Ray workloads on SageMaker HyperPod with built-in observability, resilient training, and accelerated inference. Create and manage Ray clusters from Amazon SageMaker Studio, attach JupyterLab or your local IDE so a multi-node cluster behaves like a local dev environment, and get auto-provisioned Grafana dashboards. Node auto recovery, hung job detection, and tiered checkpointing keep large training runs healthy, while Ray Serve adds a tiered KV cache for inference. Your existing open source Ray code runs unchanged. Available for HyperPod clusters orchestrated by Amazon EKS.

For a full list of AWS announcements, be sure to keep an eye on the What’s New with AWS page.

Other AWS news
Here are some additional posts and resources that you might find interesting:

  • Happy 20th birthday, Amazon EC2! – Amazon EC2 turns 20. Channy Yun looks back at how EC2 grew from a single m1.small instance type in one Region to more than 1,200 instance types across 39 Regions, along with the custom silicon journey from the first Graviton to Graviton5 and Trainium3. A fun and worthwhile read on the service that still underpins so much of AWS – including Amazon ECS, Amazon EKS, AWS Lambda, Amazon SageMaker, and Amazon Bedrock.
  • Agentic Resource Discovery (ARD): an open specification for agent discovery – As organizations scale up agents, tools, and MCP servers, those resources end up scattered across clouds, on-premises infrastructure, and SaaS platforms – each with its own registry and metadata. ARD is a new open specification (Apache 2.0) that defines a common way to describe and discover agentic resources, so publishers “describe once” and consumers “discover everywhere” – think DNS, but for agents. AWS contributed feedback but doesn’t own the spec, and it complements the AWS Agent Registry by letting you federate across catalogs without migrating.
  • Get started with the Agent Toolkit for AWS in the AWS CLI – A single AWS CLI command (aws configure agent-toolkit) now equips AI coding agents like Kiro, Claude Code, Codex, and Cursor with curated, up-to-date AWS knowledge and a secure connection to thousands of AWS APIs through the AWS MCP Server. If you build with an AI coding assistant, this helps it choose the right services, use modern APIs, and follow security best practices – so it gets AWS code right more often the first time.

Upcoming AWS events
Check your calendar and sign up for upcoming AWS events:

  • AWS Summits – Free in-person events where builders come together to learn, connect, and explore the latest in cloud and AI. Upcoming stops include Zurich (September 2), São Paulo (September 3), Tel Aviv (September 10), and Dubai (September 30). Can’t attend in person? You can stream sessions through the Global Livestream and On-Demand Hub. I’ll be presenting two sessions on generative AI and Amazon Bedrock at the São Paulo Summit – if you’re there, come say hello.
  • AWS Community Days – Community-led conferences where content is planned, sourced, and delivered by community leaders. Upcoming events include JAWS SONIC 2026 in Tokyo (September 5) and Warsaw, Poland (September 8).

Join the AWS Builder Center to connect with builders, share solutions, and access content that supports your development. Browse here for upcoming AWS-led in-person and virtual events and developer-focused events.

That’s all for this week. Check back next Monday for another Weekly Roundup!

— Daniel Abib

This post is part of our Weekly Roundup series. Check back each week for a quick roundup of interesting news and announcements from AWS!

AWS Weekly Roundup: Local Zone in Athens, Claude Opus 5 on AWS, Lambda durable execution for .NET, and more (July 27, 2026)

Post Syndicated from Daniel Abib original https://aws.amazon.com/blogs/aws/aws-weekly-roundup-july-27-2026/

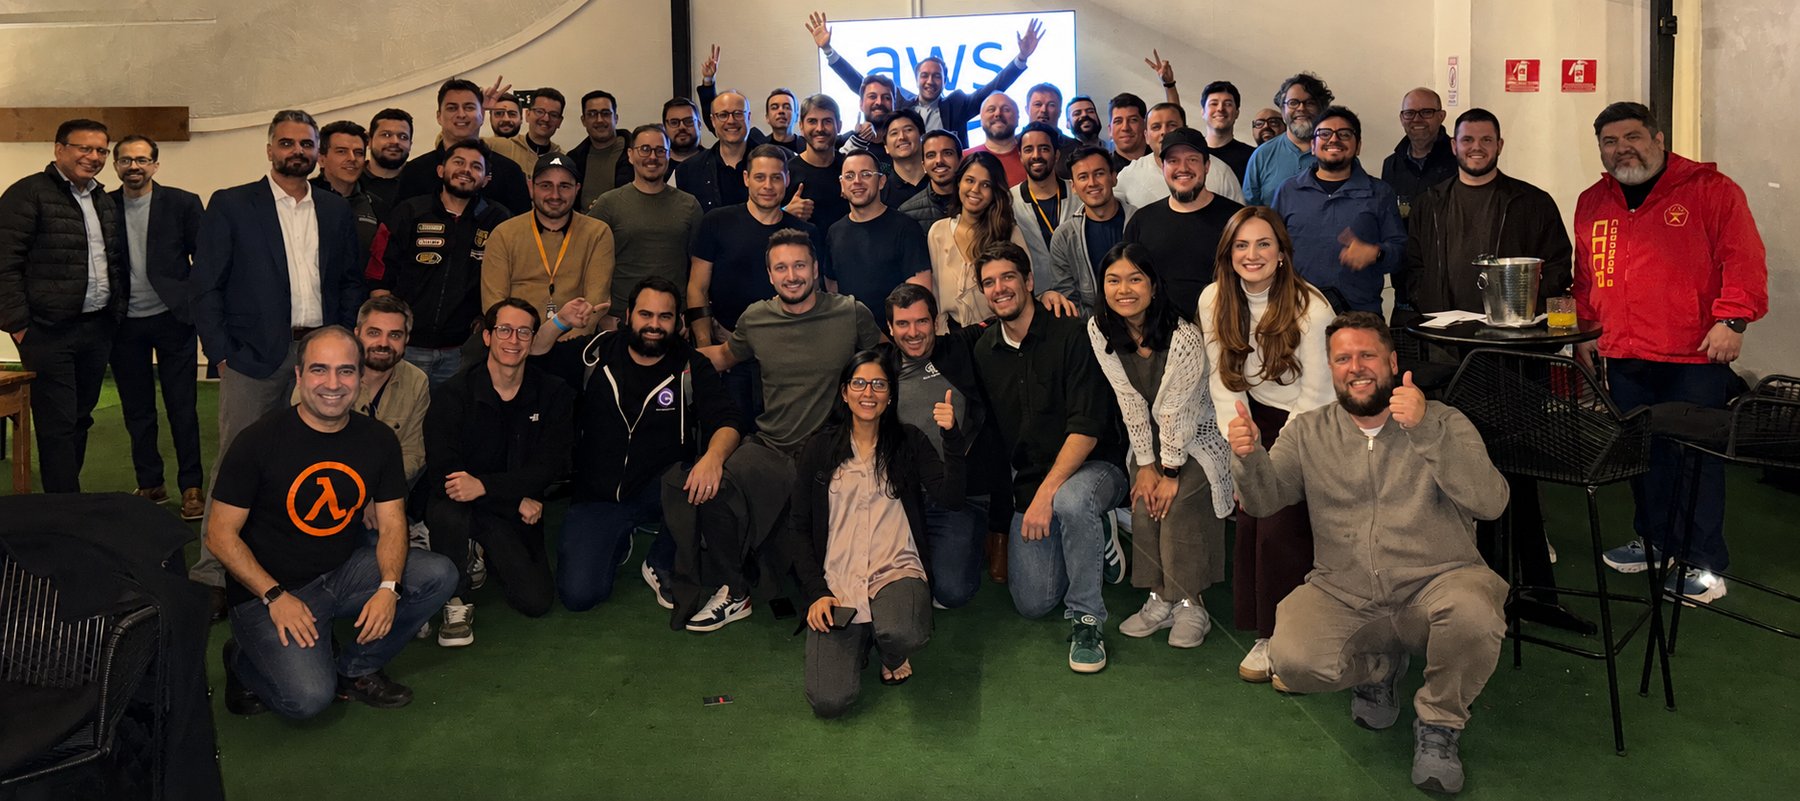
Last week I had the privilege of spending three days in São Paulo with technical builders from across Latin America, brought together for a regional tech event full of deep-dive sessions, hands-on workshops, and conversations with customers and partners. What struck me most wasn’t any single session, it was the energy of a technical community that so rarely gets to be in the same room. People traded architecture ideas over coffee, sketched out solutions on whiteboards, and left with a longer list of things to try than they arrived with. It’s a good reminder that, for all the tooling we build, the community around it is what makes the technology stick.

That community spirit connects nicely to the week’s biggest infrastructure news, which is all about bringing AWS closer to where builders actually are.

Now, let’s get into this week’s AWS news…

Headlines
AWS Local Zone in Athens, Greece: AWS has opened a new Local Zone in Athens, Greece, the second Local Zone in EMEA with support for Amazon S3 and Amazon EBS Local Snapshots, so you can store and process data within Greece to help meet local data residency requirements. The Athens Local Zone supports Amazon EC2 (C7i, M7i, and R7i instances), Amazon S3 with the One Zone-Infrequent Access storage class, Amazon EBS, and Amazon ECS.

Athens, Greece skyline

AWS Local Zones place AWS infrastructure much closer to large population and industry hubs, enabling applications that require single-digit millisecond latency, such as real-time gaming, media production, and financial services, to run where end users actually are. For builders in Greece, you can now run latency-sensitive workloads locally while connecting seamlessly to the nearest AWS Region for services that don’t require low latency, giving you the flexibility to architect hybrid, latency-optimized applications without managing your own data center infrastructure. To learn more, visit AWS Global Infrastructure and Sustainability Blog post.

Last week’s launches
Here are some launches and updates from this past week that caught my attention:

  • Claude Opus 5 on AWS: You can use Anthropic’s Claude Opus 5, the most advanced Opus model yet, matching Claude Fable 5’s top-tier intelligence in many domains at Opus-tier pricing. Amazon Bedrock offers Claude Opus 5 with zero data retention (ZDR) enabled by default, giving you Opus’ top-tier intelligence while meeting your data governance requirements unlike Claude Fable 5. You have two ways to access Claude Opus 5: Amazon Bedrock and Claude Platform on AWS. To learn more, visit the deep dive blog post.
  • AWS Lambda durable execution SDK for .NET is now generally available: You can now build resilient, long-running workflows in C# using Lambda durable functions, without implementing custom progress tracking or integrating an external orchestration service. The SDK is a natural fit for multi-step applications like payment processing pipelines, AI agent orchestration, and human-in-the-loop approvals, it checkpoints progress automatically and can pause execution for up to a year. If you’re a .NET developer building serverless workflows, this removes a lot of the plumbing you used to write by hand.
  • Amazon Bedrock AgentCore now delivers unified observability with traces and logs in a single log group: Amazon Bedrock AgentCore now delivers agent traces and prompts to the same Amazon CloudWatch log group as your agent’s logs. Previously, telemetry was split across destinations, trace spans went to a shared log group while prompts, inputs, and outputs went to a separate one, so debugging a single agent invocation meant searching in multiple places. You can now debug an invocation in one place, and apply fine-grained access control and customer-managed key (CMK) encryption at the individual agent level.
  • Amazon Connect delivers more natural agentic voice experiences: Amazon Connect now supports more natural, human-sounding agentic voice experiences across 50+ languages, including Portuguese, Spanish, French, Italian, Japanese, Korean, and Thai, with over 100 new voice options and conversational improvements that make AI interactions sound more fluid. Connect’s agentic self-service lets AI agents understand, reason, and take action across voice and digital channels, adapting to a customer’s tone and sentiment. You can now build contact center experiences that feel natural to callers in far more of the languages your customers actually speak.
  • Amazon SageMaker Unified Studio now supports Amazon OpenSearch: You can now query and analyze your search and log analytics data from Amazon OpenSearch directly alongside other data assets in Amazon SageMaker Unified Studio. With this connection, you can combine operational search data in OpenSearch with data from sources like Amazon Redshift, Amazon S3, and relational databases, all within a single, governed environment. It’s especially useful when you need to correlate analytical and operational workloads, such as joining application logs with transactional data to uncover insights.
  • Amazon CloudWatch announces coding agent insights: Amazon CloudWatch now gives engineering leaders visibility into how AI coding tools are driving value across their organization. Coding agent insights integrates with the Claude apps gateway for AWS to collect telemetry from Claude Code without additional instrumentation, and also supports agents like Codex and GitHub Copilot. As teams scale AI coding adoption, you can now measure the return on that investment with metrics built on OpenTelemetry, no custom instrumentation required.

For a full list of AWS announcements, be sure to keep an eye on the What’s New with AWS page.

Other AWS news
Here are some additional posts and resources that you might find interesting:

Upcoming AWS events
Check your calendar and sign up for upcoming AWS events:

  • AWS Summits: AWS Summits are free events that bring the cloud and AI community together to connect, learn, and explore the latest technologies. Browse the full calendar to find a Summit near you in the second half of 2026.
  • AWS Community Days: Community-led conferences where content is planned, sourced, and delivered by community leaders. If you’re in Latin America, don’t miss AWS Community Day Belo Horizonte on August 22, registration is open at awscommunityday.com.br.

Join the AWS Builder Center to connect with builders, share solutions, and access content that supports your development. Browse here for upcoming AWS-led in-person and virtual events and developer-focused events.

That’s all for this week. Check back next Monday for another Weekly Roundup!

This post is part of our Weekly Roundup series. Check back each week for a quick roundup of interesting news and announcements from AWS!

Architecting offline-first generative AI applications for edge deployments using AWS services

Post Syndicated from Ahmed Ewis original https://aws.amazon.com/blogs/architecture/architecting-offline-first-generative-ai-applications-for-edge-deployments-using-aws-services/

According to Siemens’ 2024 report The True Cost of Downtime, Fortune 500 companies lose an estimated $1.4 trillion annually because of unplanned downtime. This downtime is often worsened by a lack of skills to detect and resolve issues quickly. Generative AI offers a promising path to address this, but deploying these capabilities in industrial environments introduces a distinct architectural challenge: how do you bring the power of large-scale AI to locations where cloud connectivity is unreliable or unavailable?

The answer lies in an offline-first architecture, one that moves AI inference to the edge while using cloud services for model customization, deployment orchestration, and continuous improvement. This pattern requires careful coordination across multiple AWS services spanning artificial intelligence and machine learning (AI/ML), Internet of Things (IoT), and storage, and demands deliberate trade-offs between model capability, hardware constraints, and operational complexity.

The following are a few potential use cases that could benefit smart applications at the edge:

  • Maintenance crews struggle to correlate real-time log feeds with relevant machine manuals, and analyze situations in-hand.
  • Offshore platforms, remote drilling sites, and pipeline maintenance crews operating in areas with limited satellite connectivity requiring instant access to safety procedures, equipment manuals, and regulatory compliance documentation.
  • Remote agricultural facilities with precision farming equipment requiring access to machinery manuals, crop management protocols, and safety procedures.

In this post, we walk through a reference architecture for building and deploying a generative AI application at the edge using AWS services. We cover the end-to-end pattern, from model customization in the cloud using Amazon Bedrock and Amazon SageMaker AI, to edge deployment using AWS IoT Greengrass, to local inference orchestrated by Strands Agents. Along the way, we highlight the key architectural decisions and service integration patterns that make this approach work.

This post describes a reference architecture. It is not intended for direct production use. Perform a security review and implement controls appropriate to your workload before deploying to production.

Architectural decisions for offline-first AI

Designing an offline-first AI architecture starts with a critical decision: how to customize a language model for your domain while keeping it small enough to run on edge hardware. The model must fit within the compute and memory constraints of site-level devices (typically GPUs with 16 GB or more of VRAM), which means working with small language models (SLMs). The customization strategy you choose directly affects your architecture’s complexity, cost, and data pipeline requirements.

The following strategies represent increasing levels of architectural complexity, each with different infrastructure requirements and expected outcomes:

  • Model fine-tuning (FT): A relatively lightweight process to adapt a pre-trained model for specialized tasks. For example, you could fine-tune a model to answer troubleshooting questions about specific equipment using labeled Q&A pairs from maintenance tickets. Fine-tuning excels at teaching a model the format, style, and structure of the outputs you want. However, it’s less effective at injecting new domain knowledge that wasn’t in the base model’s original training data.
  • Continued pre-training (CPT): A more resource-intensive process that extends the base model’s training with domain-specific unlabeled data to embed new knowledge. For example, you could continue training on technical manuals, repair logs, and engineering documentation to teach the model equipment-specific terminology, failure patterns, and diagnostic procedures. This approach effectively injects domain knowledge into model parameters but requires significant computational resources and larger datasets compared to fine-tuning.
  • Hybrid approach (FT + RAG): Retrieval Augmented Generation (RAG) enhances model responses by retrieving relevant documents at inference time, which provides accurate, up-to-date answers with source citations and reduces hallucinations. For our edge implementation, we use ChromaDB (SQLite + HNSW defaults) with a sentence-transformer embedding model (384 dimensions) running on CPU. Documents are chunked at 512 tokens with 50-token overlap. With a dataset up to 5 GB, retrieval latency stays under 50 ms. The entire RAG pipeline lives on CPU/SSD with zero GPU VRAM consumption, keeping the full 16 GB dedicated to the large language model (LLM).
  • Hybrid approach (CPT + RAG + FT): Combines continued pre-training of the embedding model with fine-tuning of the language model to optimize the entire RAG pipeline. Through continuing training your embedding model on domain-specific queries to better understand domain-specific terminology and jargon, while fine-tuning your language model on Q&A pairs for the format and tone you want. For example, when an operator asks about the state of a cookie machine, they expect to get the application to check current state, throughput per minute, and visual quality of Cookies! This dual optimization ensures both accurate retrieval and high-quality responses, ideal for knowledge-intensive applications.

To decide on the right strategy for your application, you need to work backward from the use case requirements and expected outcomes.

Reference architecture

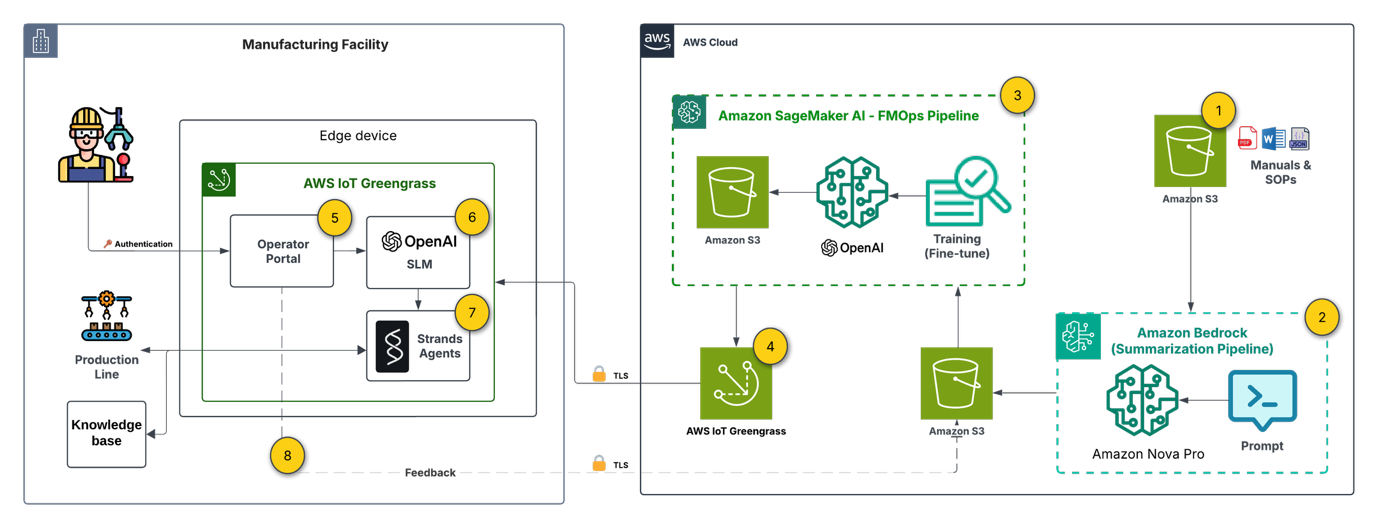
Let’s examine a reference architecture for an edge-deployed generative AI solution built on AWS. This architecture addresses a manufacturing use case where operators need instant access to equipment documentation, log correlation, and troubleshooting guidance, all without depending on cloud connectivity. We chose the hybrid approach (FT + RAG) because it balances two architectural concerns: keeping the on-device model compact through fine-tuning for task-specific behavior, while using RAG to provide up-to-date knowledge retrieval without retraining. The following diagram depicts the end-to-end architecture:

End-to-end offline-first generative AI edge architecture spanning cloud model customization and on-device inference

Note: The architecture spans two trust domains. On the cloud side, each service (Amazon Simple Storage Service (Amazon S3), Amazon Bedrock, SageMaker AI, IoT Greengrass) operates under a dedicated least-privilege AWS Identity and Access Management (IAM) role. All cloud-to-edge communication uses mutual TLS using IoT Greengrass device certificates. The operator portal requires authentication. On the edge device, the operator.

The architecture is organized into three layers: cloud-side preparation (steps 1–3), deployment orchestration (step 4), and edge-side inference (steps 5–9). Each layer uses specific AWS services chosen for their integration capabilities.

1. Document base setup

Technical manuals and Standard Operating Procedures (SOPs) are stored in Amazon S3, serving as the single source of truth for both the cloud-side training pipeline and the edge-side RAG knowledge base. The integration of Amazon S3 with both SageMaker AI and IoT Greengrass makes it the natural choice for artifacts that must flow between cloud and edge.

2. Preparing labeled data

Using Amazon Nova Pro on Amazon Bedrock, we process raw documentation into structured question-answer-context pairs for fine-tuning. This is a key architectural decision: rather than manually curating training data, we use a large foundation model (FM) in the cloud to generate high-quality labeled data at scale. The serverless inference of Amazon Bedrock keeps this step cost-effective, and the output feeds directly into the SageMaker AI pipeline.

3. Model customization (FMOps pipeline)

Amazon SageMaker AI Pipelines orchestrates an automated FMOps pipeline that fine-tunes gpt-oss-20b (Mixture of Experts (MoE) architecture: 21B total parameters, 3.6B active per token, 32 experts, 128k context length) on the domain-specific Q&A pairs. The pipeline pattern here is deliberate: it enables repeatable, versioned model customization that can be triggered whenever new documentation is added. The pipeline trains the model to understand equipment-specific terminology and response formats, then stores the customized model artifact in S3 for downstream deployment.

4. Edge deployment

The edge device (in our case, a g4dn.12xlarge with 4× NVIDIA T4 GPUs, 16 GiB each, 64 GiB total accelerator memory, 48 vCPUs, and 129 GiB system RAM) provides the GPU compute necessary for local inference. The hardware selection is an important architectural constraint that directly influences model viability and serving strategy. With gpt-oss-20b occupying 13 GB per T4 GPU, two deployment strategies are available depending on your throughput and latency priorities:

  • Model Replication — a full model copy on each of the four GPUs, which supports four concurrent client requests without queuing. This maximizes throughput at the cost of using 81 percent of each GPU’s memory for model weights alone.
  • Tensor Parallelism — the model is sharded across all four GPUs at 3.2 GB per GPU, leaving approximately 12.8 GB available on each GPU. This remaining memory serves as KV cache, supporting the full 128K context window for long-form interactions.

The choice between these strategies depends on your workload profile: replication suits high-concurrency, short-query environments, while tensor parallelism suits fewer concurrent users with longer, more complex interactions.

5. Edge device (manufacturing facility)

The edge device (in our case, NVIDIA Jetson Xavier) provides the GPU compute necessary for local inference. The hardware selection is an important architectural constraint: you need sufficient VRAM (16 GB or more) to run the quantized SLM, which directly influences which models are viable for your deployment.

6. User interface (Flask operator portal)

A Flask-based web interface running locally on the device allows maintenance operators and technicians to submit queries about equipment issues, safety procedures, or maintenance tasks. Running the UI on-device eliminates any dependency on external connectivity for the user-facing layer.

7. Off-cloud generative AI

The fine-tuned SLM runs on-premises using Ollama as the inference runtime. Ollama provides a lightweight, container-friendly serving layer that supports quantized model formats (GGUF) for efficient inference within the device’s memory constraints. This decouples the model serving infrastructure from any cloud dependency.

8. Generative AI orchestration

Strands Agents provides the orchestration layer that coordinates the query processing workflow. It routes requests to the appropriate tools: querying the on-site RAG knowledge base, collecting device telemetry data. This agent-based pattern provides extensibility. You can add new tools and data sources without modifying the core inference pipeline.

9. Continuous improvement (feedback loop)

When connectivity is available, user interactions and feedback flow back to the cloud, enabling ongoing model refinement through the FMOps pipeline. This creates a virtuous cycle: edge usage data improves the next model version, which Greengrass deploys back to the device. The architecture is designed to be resilient to connectivity gaps. Feedback is queued locally and synchronized opportunistically.

Prerequisites

To be able to implement a similar solution, you need:

  1. An AWS account. If you don’t already have an AWS account, you can create one.
  2. Your access to the AWS account must have IAM permissions to services including Amazon SageMaker AI, Amazon Bedrock, AWS IoT Greengrass, and Amazon S3.
  3. A hardware device preferably with a GPU that has a sufficient VRAM (>16 GB) to run an SLM.

Implementation overview

This section summarizes the key implementation steps. Each component uses standard AWS service configurations:

  • Data preparation – Amazon Nova Pro on Amazon Bedrock generates structured Q&A pairs from raw documentation, producing training data for the SageMaker AI fine-tuning pipeline.
  • Model fine-tuning – SageMaker AI Pipelines runs a QLoRA fine-tuning job on gpt-oss-20b using the generated dataset, then stores the customized model artifact in S3.
  • Edge deployment – AWS IoT Greengrass (or AWS Systems Manager) transfers the quantized model (GGUF format) to the edge device.
  • Local inference – Ollama serves the fine-tuned model with a domain-specific system prompt constraining responses to equipment-relevant answers.
  • Orchestration – Strands Agents coordinates the workflow, routing queries to the RAG knowledge base or telemetry tools as needed.

For the fine-tuning notebook, refer to this example notebook for fine-tuning an SLM using Amazon SageMaker AI.

Security considerations

Moving inference to the edge shifts the security perimeter. In a cloud-native deployment, AWS manages much of the infrastructure security. At the edge, you own the full stack, which spans physical device access through application-layer controls. This section outlines the security controls to implement when adapting this architecture for your environment.

Authentication and access control. The Flask operator portal runs on an isolated device, but physical proximity doesn’t replace authentication. Integrate with your organization’s identity provider (SAML/OIDC) or implement certificate-based mutual TLS. Enforce role-based access so that operators, administrators, and maintenance personnel each see only the interfaces relevant to their function.

Encryption at rest. Model artifacts and the ChromaDB vector database contain proprietary knowledge. Encrypt the edge device’s storage volume using full-disk encryption (for example, LUKS on Linux or BitLocker on Windows). Manage encryption keys through AWS IoT Greengrass secret manager or a hardware Trusted Platform Module (TPM) on the device.

Encryption in transit. All communication between the edge device and AWS (including the IoT Greengrass deployment channel and the feedback synchronization loop) must use TLS 1.2 or later. For internal communication between edge components (Flask portal to Ollama, Strands Agents to ChromaDB), enforce TLS even on the loopback interface to prevent local interception.

Input validation and prompt guardrails. The Strands Agents orchestration layer accepts natural language input from operators. Apply input validation to reject malformed or excessively long queries. Implement prompt guardrails to detect and block prompt injection attempts. On the output side, apply content filtering to prevent the model from surfacing sensitive information outside its intended scope.

Network segmentation. Separate edge components into distinct network zones: the operator-facing portal in a perimeter network, the inference runtime in a restricted zone, and the cloud sync channel on an isolated outbound-only interface. Use firewall rules to enforce that only the expected traffic flows between zones.

IAM least privilege. On the cloud side, each AWS service in the pipeline should operate with its own IAM role scoped to minimum required permissions. The IoT Greengrass core device role should only access the specific S3 prefixes and IoT topics it needs. SageMaker pipeline execution roles shouldn’t have access to production S3 buckets.

Logging and monitoring. Enable AWS CloudTrail and Amazon CloudWatch for all cloud-side services. On the edge device, log all operator queries, model responses, and sync events locally. When connectivity is available, forward edge logs to Amazon CloudWatch Logs or Amazon S3 for centralized analysis. Set up alerts for anomalous patterns such as unexpected query volumes, repeated authentication failures, or unauthorized access attempts.

Results

We evaluated the fine-tuned gpt-oss-20b model against the base model using 30 domain-specific question-answer pairs. Both configurations use the full RAG pipeline (ChromaDB + sentence-transformer embedding model) as the retrieval layer. The variable being tested is whether fine-tuning the language model improves generation quality when given the same retrieved context. Three LLM judges (Claude 4.5 Haiku and Claude 4.5 Sonnet using Amazon Bedrock, and Amazon Nova Pro) scored responses on a 12-point scale across accuracy, completeness, and relevance.


LLM Evaluator SLM Average score
Claude 4.5 Haiku Fine-tuned gpt-oss-20b + RAG 10.20/12 (85%)
Base gpt-oss-20b + RAG 8.20/12 (68.3%)
Claude 4.5 Sonnet Fine-tuned gpt-oss-20b + RAG 9.20/12 (76.7%)
Base gpt-oss-20b + RAG 7.49/12 (61.7%)
Nova Pro Fine-tuned gpt-oss-20b + RAG 9.90/12 (82.5%)
Base gpt-oss-20b +RAG 8.70/12 (72.5%)

These results support the hybrid approach (FT + RAG) outlined in our solution architecture, demonstrating that even with a relatively small fine-tuning dataset, significant performance improvements can be achieved for domain-specific applications at the edge.

Cleanup

The AWS services used in this architecture are fully managed services that follow a pay-as-you-go pricing model, meaning you only pay for actual invocations. Exception for this can be the storage costs for the labeled data and the finetuned model in Amazon S3 which you can consider to delete if not in use.

Conclusion

This post presents a reference architecture for deploying generative AI at the edge using AWS services. The key architectural patterns demonstrated include:

Cloud-side model factory – Using Amazon Bedrock for automated training data generation and Amazon SageMaker AI Pipelines for repeatable, versioned model customization, creating a scalable FMOps workflow that decouples model preparation from deployment.

Managed cloud-to-edge bridge – AWS IoT Greengrass provides the deployment orchestration layer, handling model packaging, versioning, and lifecycle management without requiring persistent connectivity to target devices.

Self-contained edge inference stack – A lightweight runtime (Ollama) combined with an agent-based orchestration framework (Strands Agents) supports local AI inference with extensible tool integration, all operating independently of cloud availability.

Feedback-driven continuous improvement – An asynchronous feedback loop synchronizes usage data back to the cloud when connectivity permits, for iterative model refinement without disrupting edge operations.

These patterns are applicable beyond manufacturing. Any environment with intermittent connectivity, strict latency requirements, or data locality constraints (offshore energy, remote agriculture, transportation, defense) can benefit from this architectural approach. The critical design decisions will vary by use case: selecting the right model customization strategy, sizing edge hardware to model requirements, and choosing between RAG and fine-tuning. The overall integration pattern remains consistent.

As with any reference architecture, we recommend that you conduct a security review before production deployment.

To explore this pattern, consider identifying a use case with clear connectivity constraints and working backward from your edge hardware requirements to select a model customization strategy. The hybrid (FT + RAG) approach described in this post offers the right balance of capability and complexity. Expand it as you validate operational improvements.

Ready to explore more? Join us at re:Invent for related sessions: Real-time insights for smart manufacturing with AWS Serverless (CNS375) and Implement Agentic AI at the edge for industrial automation (HMC317).


About the authors

AWS Weekly Roundup: Claude Sonnet 5 on AWS, Amazon WorkSpaces for AI agents, AWS service availability updates, and more (July 6, 2026)

Post Syndicated from Daniel Abib original https://aws.amazon.com/blogs/aws/aws-weekly-roundup-claude-sonnet-5-on-aws-amazon-workspaces-for-ai-agents-aws-service-availability-updates-and-more-july-6-2026/

A couple of editions ago I wrote about what I find so energizing about working with startups. Last week I got a fresh dose of it: I spent a few days with the AWS Startups team, listening to stories of founders talking about the problems they’re actually solving. One story that stayed with me came from Marco Negreiros, founder of EyeCare Health, a Brazilian healthtech expanding access to eye care. He shared a striking fact: more than 70% of Brazilian municipalities don’t have a single ophthalmologist. His answer was to put a vision test on the one device almost everyone already carries, the smartphone, so a basic eye screening no longer depends on living near a clinic. Watching a founder turn a gap that big into something that concrete is exactly why I love this space.

AWS Startups team get-together with founders in Brazil

This week, I’ll take a closer look at some key launches, and then cover the quarterly AWS Service Availability updates.

Last week’s launches
Here are some of the launches covered from this past week in the AWS News Blog:

Here are some launches and updates that caught my attention:

For a full list of AWS announcements, be sure to keep an eye on the What’s New with AWS page.

AWS Service Availability Updates
When the availability of an AWS service or feature changes, we provide customers guidance in AWS Product Lifecycle Changes on available alternatives and support for migration so that disruptions to your operations are minimized. The following lifecycle changes were updated on June 30, 2026.

Services moving to Maintenance (no longer accessible to new customers starting July 30, 2026):

Services entering Sunset:

Services reaching End of Support (as of June 30, 2026):

  • Amazon Chime SDK – Carrier Voice Focus
  • Amazon SageMaker AI – Ground Truth Plus

We understand that changes in availability can impact your operations. For specific guidance, consult the relevant service documentation or contact AWS Support.

Upcoming AWS events
Check your calendar and sign up for upcoming AWS events:

  • AWS Summits – AWS Summits are free events that bring the cloud and AI community together to connect, learn, and explore the latest technologies. Browse the full calendar to find a Summit near you in the second half of 2026.
  • AWS Community Days – Community-led conferences where content is planned, sourced, and delivered by community leaders. If you’re in Latin America, don’t miss AWS Community Day Belo Horizonte on August 22. Registration is open at awscommunityday.com.br.

Join the AWS Builder Center to connect with builders, share solutions, and access content that supports your development. Browse here for upcoming AWS-led in-person and virtual events and developer-focused events.

That’s all for this week. Check back next Monday for another Weekly Roundup!

– Daniel Abib

This post is part of our Weekly Roundup series. Check back each week for a quick roundup of interesting news and announcements from AWS!

Preventing data exfiltration in machine learning environments with Amazon SageMaker AI

Post Syndicated from Ajish Abraham original https://aws.amazon.com/blogs/architecture/preventing-data-exfiltration-in-machine-learning-environments-with-amazon-sagemaker-ai/

If you’re building machine learning solutions with sensitive data, you face a persistent challenge: preventing data exfiltration while enabling data scientists to work productively. iBusiness, an AI-driven fintech organization, needed its data scientists to work with sensitive data to fine-tune and improve machine learning models. As the data science team scaled, traditional air-gapped environments and monitored virtual desktops proved unsustainable, leading to high costs and operational complexity.

In this post, we demonstrate how iBusiness implemented a three-layered security architecture using Amazon SageMaker AI, virtual private cloud (VPC) endpoints, and Amazon WorkSpaces Secure Browser to prevent data exfiltration while maintaining data scientist productivity. You can adapt this approach to build secure machine learning environments that balance strict data protection with team scalability.

Historically, when access to sensitive data was required, iBusiness provided an isolated, air-gapped on-premises environment. However, with the shift to a remote workforce, this approach became impractical. The company locked down secure virtual desktops through device management policies and had them monitored by proctors to prevent inappropriate actions.

As the data science team scaled and expanded machine learning (ML) use cases, this approach proved unsustainable. Each user required a dedicated virtual desktop, even for temporary access, leading to increased costs. Additionally, maintaining ML tools, libraries, and patches in these locked-down environments was time-consuming and operationally complex.

To address these challenges, iBusiness adopted Amazon SageMaker Studio, a fully managed, web-based ML development environment. This removed the need to maintain in-house Jupyter environments while giving data scientists access to up-to-date tools. Furthermore, SageMaker AI’s integration with AWS services provided straightforward data sharing via AWS Lake Formation and Amazon Athena, reducing the need for manual data transfers.

Solution architecture

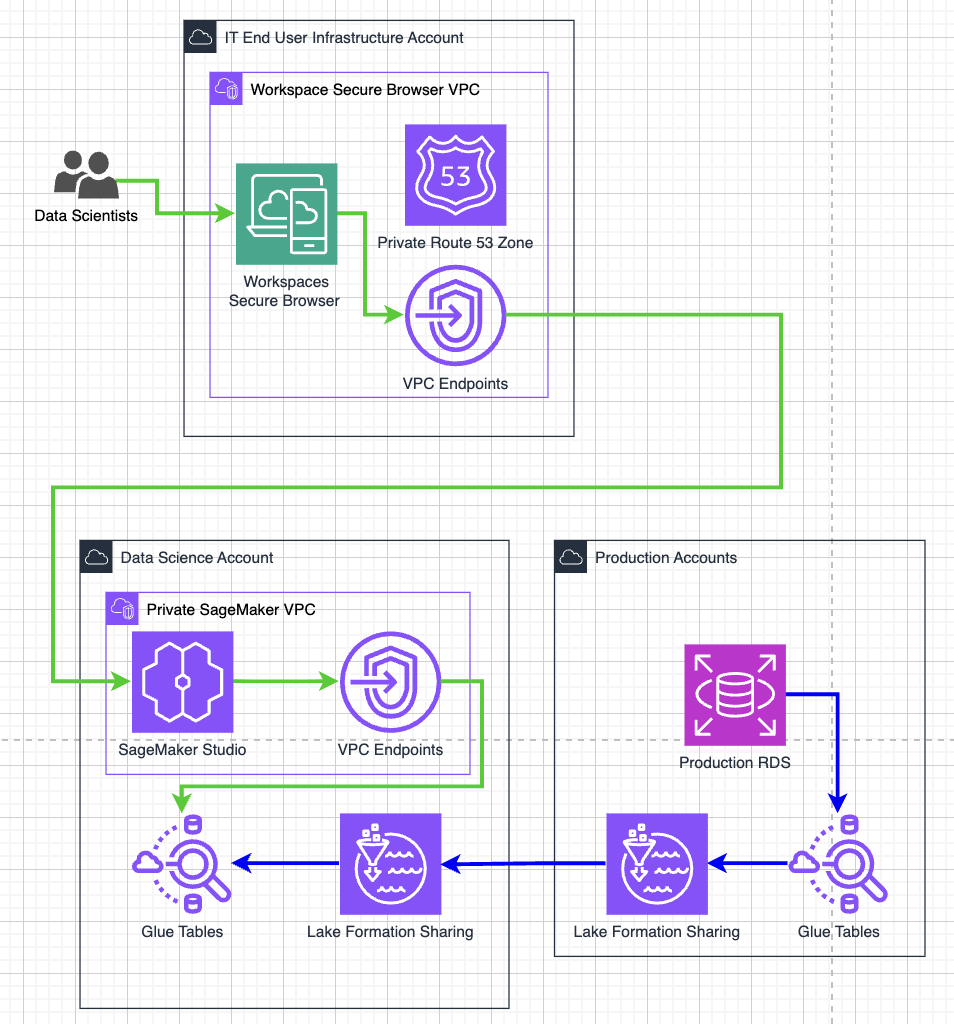
To achieve this, iBusiness implemented a three-layered security strategy that you can adapt for your own secure ML environments.

Three-layered security architecture for data exfiltration prevention
Figure 1: Three-layered security architecture for data exfiltration prevention

Layer 1: Securing access through WorkSpaces Secure Browser

iBusiness used Amazon WorkSpaces Secure Browser, a managed, locked-down browser environment. This managed service provides a controlled Chromium-based browser, offering a more cost-effective solution for the company’s use case.

The company configured the Secure Browser to run within a dedicated VPC and subnet in its IT infrastructure account, routing outbound traffic through a network address translation (NAT) gateway. In the secure data science account, iBusiness enforced AWS Identity and Access Management (IAM) policies that restrict access to requests originating only from AWS services or from the NAT gateway’s Elastic IP address. This configuration helps validate that access to the environment is only possible through the Secure Browser. It gives you confidence that data scientists cannot bypass security controls when you implement a similar approach.

Additionally, the Secure Browser was configured to disable file downloads and uploads, disable clipboard access, and disable printing. These controls help prevent data from being transferred to local machines.

Key Secure Browser controls configured:

  • Disable file downloads and uploads.
  • Disable clipboard access.
  • Disable printing.

Layer 2: Restricting browser activity and cross-account access

Building on this foundation, iBusiness restricted activity within the Secure Browser itself to address potential exfiltration through web-based channels.

Although the browser provides a temporary working directory, iBusiness prevented its misuse by implementing strict URL allowlisting. Users can only access *.aws.amazon.com and specific SageMaker AI domains. Other websites, including email and external storage platforms, are blocked, preventing users from uploading data to external services.

Permitted URL patterns:

  • *.aws.amazon.com.
  • Specific SageMaker AI domains.

Preventing cross-account data exfiltration

To help verify users cannot move data to other AWS accounts, iBusiness implemented VPC endpoints for AWS Management Console and AWS IAM Identity Center services. These endpoints route traffic privately within the VPC with no internet exposure. They also enforce endpoint policies restricting access to iBusiness’s specific AWS account, giving you control over which accounts data scientists can access.

The company also configured a private Amazon Route 53 hosted zone to redirect console.aws.amazon.com, *.console.aws.amazon.com, and signon.aws.amazon.com to the company’s VPC endpoints instead of public endpoints. To further mitigate DNS-based exfiltration risks, iBusiness configured Amazon Route 53 Resolver DNS Firewall in the SageMaker AI VPC to block DNS queries to non-approved domains, ensuring that only resolution of required AWS service endpoints is permitted.

This configuration helps verify that users can only authenticate into iBusiness’s secured data science account and that access to other AWS accounts is blocked. To further enforce this, iBusiness applied an IAM policy that enhances the IAM policy from Layer 1. This policy helps confirm actions are sourced from an IAM principal originating from a VPC endpoint and denies actions when the target resource belongs to another AWS account, with minimal exceptions for privileged users.

Layer 3: Securing the SageMaker AI environment

As a final layer of defense, iBusiness secured the SageMaker AI environment itself to prevent data exfiltration through the development environment’s terminal and integrated development environment (IDE) access.

Because SageMaker AI provides terminal and IDE access, it could potentially be used to move data externally. To mitigate this risk, the company removed direct internet access from the SageMaker AI VPC with no NAT gateway or internet routes and configured VPC endpoints for the required AWS services.

This configuration confirms that SageMaker AI can access AWS services internally and function normally while simultaneously blocking direct outbound internet traffic. iBusiness further restricted VPC endpoint policies to allow access only to resources within the organization, providing an additional safeguard against cross-account data movement. VPC endpoint policies allow for granular access to specific AWS resources. For example, allowing users restricted access for s3:PutObject API calls to specific Amazon Simple Storage Service (Amazon S3) buckets depending on the use case.

SageMaker AI network configuration:

  • No NAT gateway or internet routes in the SageMaker AI VPC.
  • VPC endpoints configured for all required AWS services.
  • Endpoint policies restricted to organization-owned resources only.

Conclusion

By implementing this three-layered security architecture, iBusiness achieved an 80% cost reduction, from $40+ per user monthly for individual VDI environments to $7 per user with Amazon WorkSpaces Secure Browser. The solution also transformed IT operations, reducing provisioning from a 2-day SLA to automatic setup within minutes while eliminating ongoing desktop maintenance overhead.

For data scientists, the approach improved both productivity and security by streamlining data access without compromising protection. This demonstrates how you can strengthen security controls while reducing costs and operational complexity.

Start by assessing your current data access controls, then progressively implement each security layer based on your organization’s specific compliance requirements and risk tolerance.


About the authors

Unlock efficient model deployment: Simplified Inference Operator setup on Amazon SageMaker HyperPod

Post Syndicated from Shreya Gangishetty original https://aws.amazon.com/blogs/architecture/unlock-efficient-model-deployment-simplified-inference-operator-setup-on-amazon-sagemaker-hyperpod/

Amazon SageMaker HyperPod offers an end-to-end experience supporting the full lifecycle of AI development—from interactive experimentation and training to inference and post-training workflows. The SageMaker HyperPod Inference Operator is a Kubernetes controller that manages the deployment and lifecycle of models on HyperPod clusters, offering flexible deployment interfaces (kubectl, Python SDK, SageMaker Studio UI, or HyperPod CLI), advanced autoscaling with dynamic resource allocation, and comprehensive observability that tracks critical metrics like time-to-first-token, latency, and GPU utilization.

Deploying inference workloads on Kubernetes-native infrastructure has traditionally required AI teams to navigate a maze of Helm charts, IAM role configurations, dependency management, and manual upgrades — often taking hours before a single model can serve predictions. Today, we’re announcing the Amazon SageMaker HyperPod Inference Operator as a native EKS add-on, enabling one-click installation and managed upgrades directly from the SageMaker console. This eliminates the need for manual Helm charts, complex IAM configuration tweaks, and downtime during upgrades.

In this post, we walk through the new installation experience, demonstrate three deployment methods (console, CLI, and Terraform), and show how features like multi-instance-type deployment and native node affinity give you fine-grained control over inference scheduling

Simplified installation experience

The new installation experience addresses three key customer scenarios with streamlined workflows:

New HyperPod clusters: Automatic installation

When creating new HyperPod clusters through the SageMaker console’s Quick Setup or Custom Setup workflows, the Inference Operator along with necessary dependencies is now installed through EKS add-on automatically as part of the cluster creation process. This eliminates the need for post-deployment configuration and ensures your cluster is ready for model deployments immediately upon creation along with one click upgrades.

Existing clusters: One-click installation

For existing HyperPod clusters, customers can install the Inference Operator with a single click through the SageMaker console. The installation automatically:

  • Creates required IAM roles with appropriate trust relationships and permissions
  • Sets up S3 buckets for TLS certificate storage
  • Configures VPC endpoints for secure S3 access
  • Installs dependency add-ons (cert-manager, S3 CSI driver, FSx CSI driver, metrics-server)
  • Deploys the Inference Operator as an EKS add-on

Managed upgrades and lifecycle

The EKS add-on integration provides standardized version management with one-click upgrades through the AWS console or CLI. This ensures customers can easily adopt new features and security updates without complex manual procedures.

The below prerequisite resources are needed to be setup before installing the Inference operator add-on. These prerequisites will be setup if SageMaker AI console is used to setup Inference operator. However, if EKS cli or console is used, these prerequisites will need to be created manually and passed to the add-on through configuration parameters. We discuss these approaches in Installation Methods.

List of prerequisites

  1. EKS add-ons (S3 Mountpoint csi driver add-on, FsX add-on, Cert Manager add-on, Metrics server add-on)
  2. IAM roles (Inference operator execution role, ALB role, KEDA role, Optional JumpStart Gated models role)
  3. Infrastructure (S3 bucket to manage TLS certificates, OIDC association on the cluster,

For more information refer to this trouble shooting guide.

Installation methods

Method 1: Install SageMaker HyperPod Inference Add-on through SageMaker UI (Recommended)

The SageMaker console provides the most streamlined experience with two installation options:

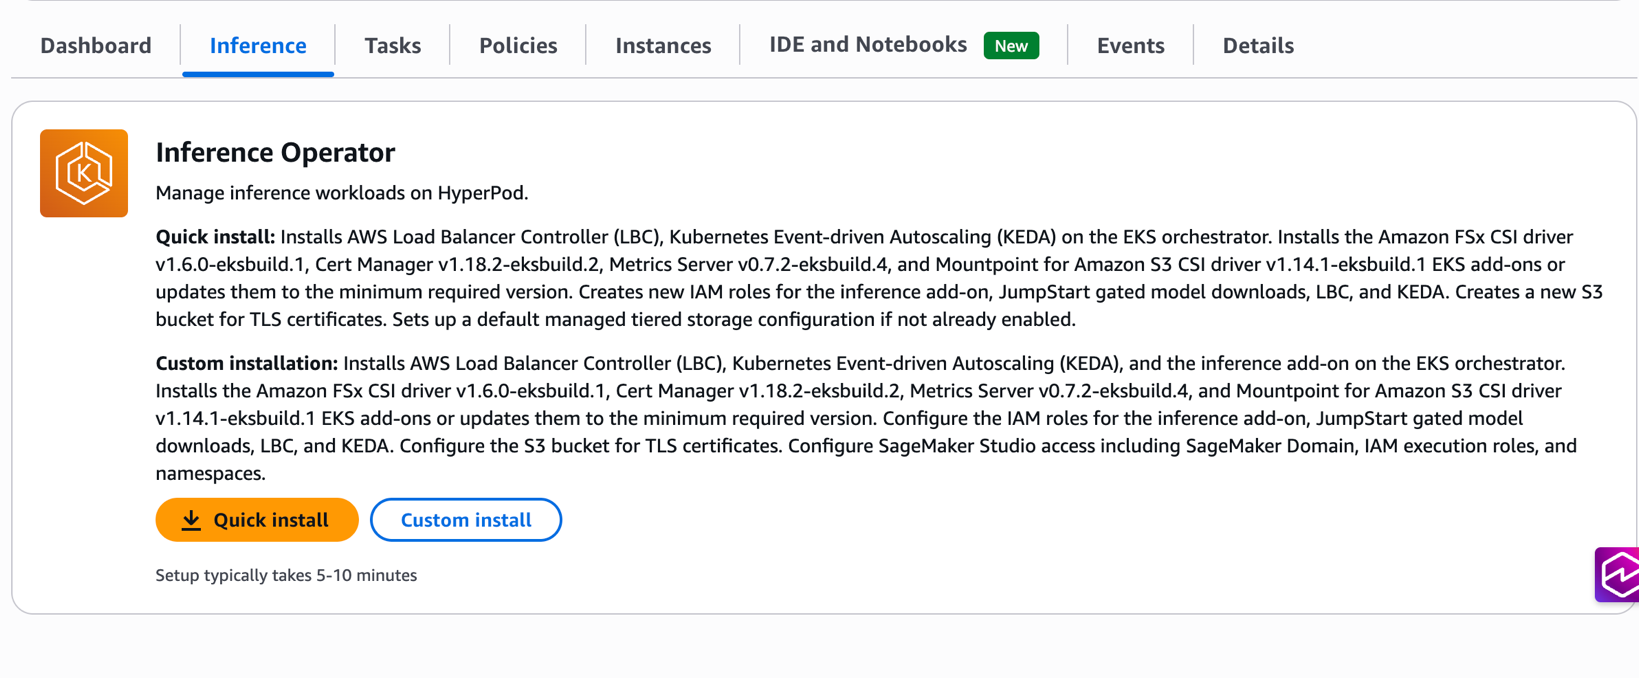
Quick install: Automatically creates all required resources with optimized defaults, including IAM roles, S3 buckets, and dependency add-ons. This option is ideal for getting started quickly with minimal configuration decisions.

Custom install: Provides flexibility to specify existing resources or customize configurations while maintaining the one-click experience. Customers can choose to reuse existing IAM roles, S3 buckets, or dependency add-ons based on their organizational requirements.

Amazon SageMaker HyperPod Inference Operator installation page showing Quick install and Custom install options with component details including AWS Load Balancer Controller, KEDA, and CSI drivers

Prerequisites

  • An existing Amazon SageMaker HyperPod cluster with EKS orchestration
  • IAM permissions for EKS cluster administration
  • kubectl configured for cluster access

Installation steps

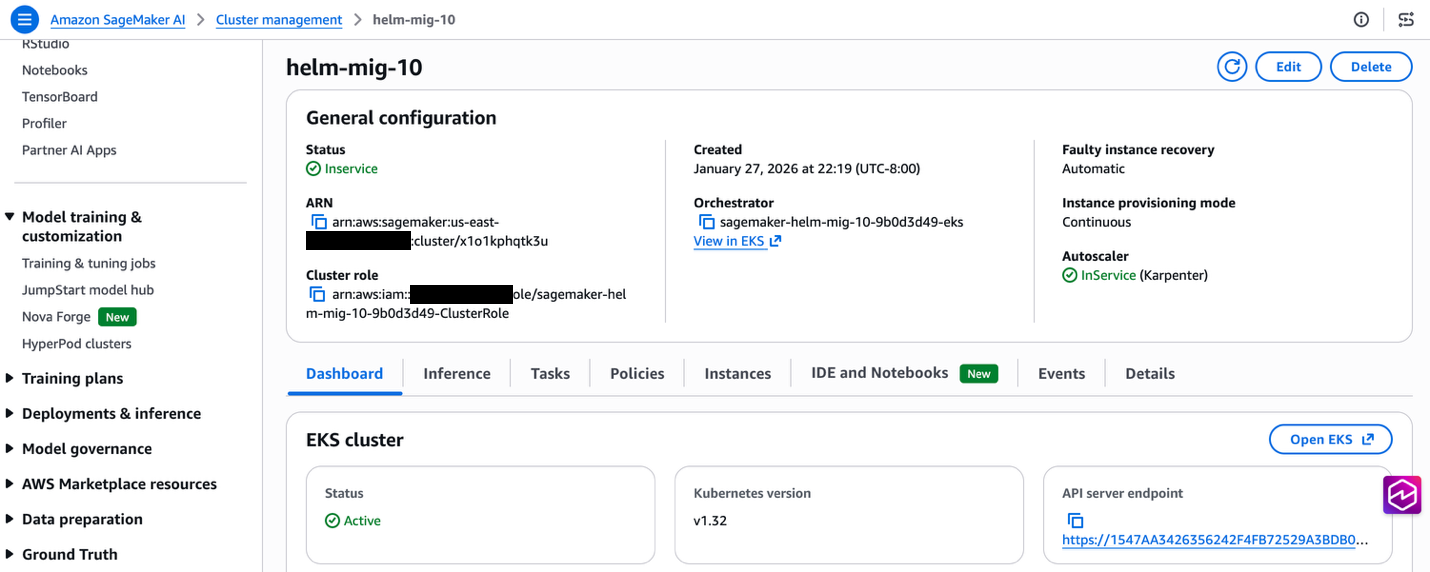
  1. Navigate to the SageMaker Console: Go to HyperPod ClustersCluster Management
  2. Select Your Cluster: Choose the cluster where you want to install the Inference Operator

HyperPod Dashboard main page

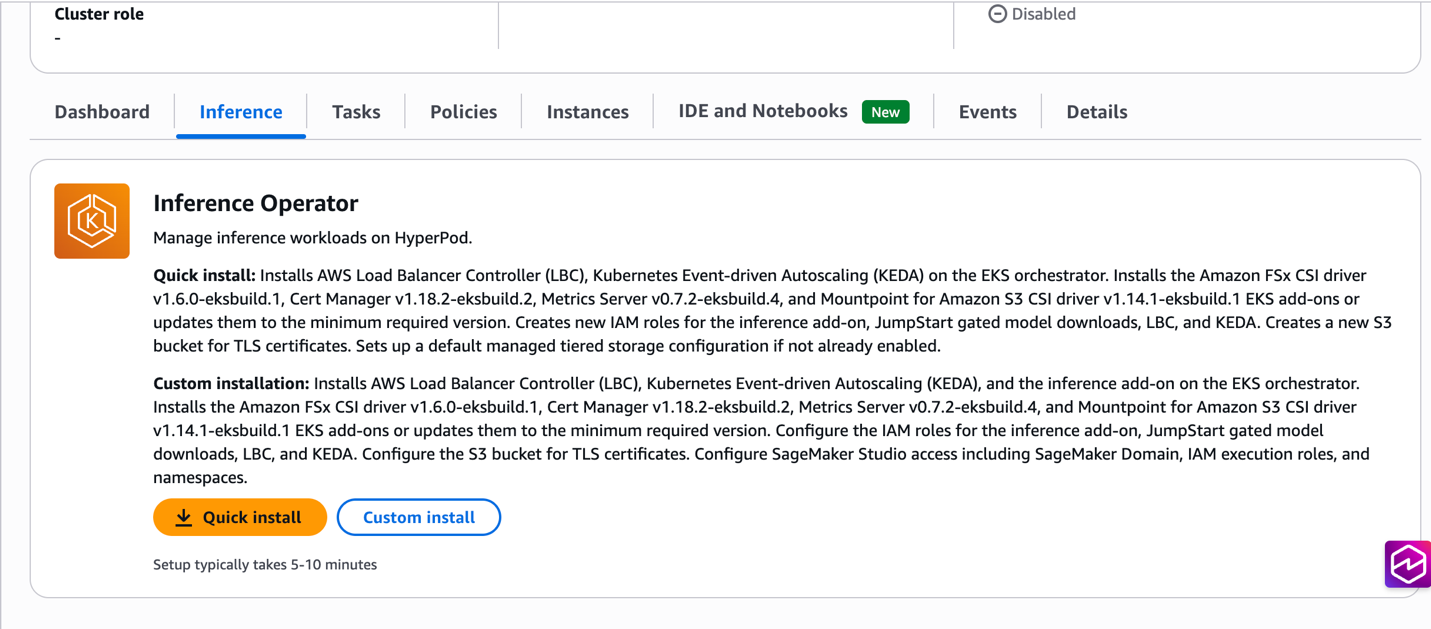
  1. Choose Installation Type: Navigate to Inference tab. Select Quick Install for automated setup or Custom Install for configuration flexibility

SageMaker HyperPod Inference tab interface showing disabled cluster role and installation options for managing inference workloads

  1. Configure Options: If choosing Custom Install, specify existing resources or customize settings as needed
  2. Install: Choose Install to begin the automated installation process
  3. Verify: Check the installation status through the console, or by running kubectl get pods -n hyperpod-inference-system, or by checking the add-on status with aws eks describe-addon --cluster-name CLUSTER-NAME --addon-name amazon-sagemaker-hyperpod-inference --region REGION

After the add-on is successfully installed, you can deploy models using the Model deployments document or navigate to Deploying Your First Model section below.

Method 2: Install SageMaker HyperPod Inference add-on through EKS APIs

For customers preferring command-line workflows, the Inference Operator can be installed directly using the EKS CLI. Note that all prerequisite resources (IAM roles, S3 buckets, VPC endpoints) and dependency add-ons must be created manually before installing the Inference Operator add-on. For detailed setup instructions, see the installation guide.

aws eks create-addon \
  --cluster-name my-hyperpod-cluster \
  --addon-name amazon-sagemaker-hyperpod-inference \
  --addon-version v1.0.0-eksbuild.1 \
  --configuration-values '{
    "executionRoleArn": "arn:aws:iam::ACCOUNT-ID:role/SageMakerHyperPodInference-inference-role",
    "tlsCertificateS3Bucket": "hyperpod-tls-certificate-bucket",
    "hyperpodClusterArn": "arn:aws:sagemaker:REGION:ACCOUNT-ID:cluster/CLUSTER-ID",
    "alb": {
      "serviceAccount": {
        "create": true,
        "roleArn": "arn:aws:iam::ACCOUNT-ID:role/alb-controller-role"
      }
    },
    "keda": {
      "auth": {
        "aws": {
          "irsa": {
            "roleArn": "arn:aws:iam::ACCOUNT-ID:role/keda-operator-role"
          }
        }
      }
    }
  }' \
  --region us-west-2

Method 3: Install SageMaker HyperPod Inference add-on through Terraform deployment

Organizations utilizing Terraform for Infrastructure as Code (IaC) can deploy HyperPod clusters using the provided modules in the awesome-distributed-training GitHub repository.

To enable the HyperPod inference operator, set the create_hyperpod_inference_operator_module variable to true within your custom.tfvars file, as shown below:

kubernetes_version    = "1.33"
eks_cluster_name      = "tf-eks-cluster"
hyperpod_cluster_name = "tf-hp-cluster"
resource_name_prefix  = "tf-eks-test"
aws_region            = "us-east-1"

instance_groups = [
    {
        name                      = "accelerated-instance-group-1"
        instance_type             = "ml.g5.8xlarge",
        instance_count            = 2,
        availability_zone_id      = "use1-az2",
        ebs_volume_size_in_gb     = 100,
        threads_per_core          = 1,
        enable_stress_check       = false,
        enable_connectivity_check = false,
        lifecycle_script          = "on_create.sh"
    }
]

create_hyperpod_inference_operator_module = true

In addition to the HyperPod inference operator add-on, the Terraform modules also support the task governance, training operator, and observability add-ons as well. Check out the documentation for enabling optional add-ons for more details.

Dependency management

The HyperPod inference operator includes several additional dependencies, which are enabled by default but can be toggled off if they already exist on your EKS cluster:

Dependency Module/Variable Toggle to Disable
cert-manager Installed via the HyperPod module enable_cert_manager = false
Amazon FSx for Lustre CSI Installed via FSx module create_fsx_module = false
Mountpoint for Amazon S3 CSI Bundled with Inference Operator Module enable_s3_csi_driver = false
AWS Load Balancer Controller Bundled with Inference Operator EKS add-on enable_alb_controller = false
KEDA Operator Bundled with Inference Operator EKS add-on enable_keda = false

Key benefits

Faster time to value

Teams can now deploy their first inference endpoint within minutes of cluster creation, compared to the previous multi-hour setup process. This acceleration enables faster experimentation and reduces the barrier to adoption for new teams.

Reduced complexity

The new installation experience eliminates the need to manually create and configure multiple AWS resources. Previously, customers needed to create IAM roles, policies, S3 buckets, VPC endpoints, and install multiple Kubernetes operators. Now, a single action handles all these requirements automatically.

Consistent configuration

Automated resource creation ensures consistent, secure configurations across environments. The installation process follows AWS best practices for IAM permissions, network security, and resource naming conventions.

Simplified upgrades

EKS Add-on integration provides standardized upgrade paths with rollback capabilities. Customers can confidently adopt new features and security updates through the familiar AWS console or CLI interfaces.

Advanced features integration

The simplified installation experience seamlessly integrates with advanced HyperPod inference capabilities:

Managed tiered KV cache

During installation, customers can optionally enable managed tiered KV cache with intelligent memory allocation based on instance types. This feature can reduce inference latency by up to 40% for long-context workloads while optimizing memory utilization across the cluster.

Intelligent routing

The installation automatically configures intelligent routing capabilities with multiple strategies (prefix-aware, KV-aware, round-robin) to maximize cache efficiency and minimize inference latency based on workload characteristics.

Observability integration

Built-in integration with HyperPod Observability provides immediate visibility into inference metrics, cache performance, and routing efficiency through Amazon Managed Grafana dashboards.

Deploying your first model

Once the add-on is installed, you can deploy models using the InferenceEndpointConfig or JumpStart models custom resources. Here’s an example configuration for deploying a Llama model:

apiVersion: inference.sagemaker.aws.amazon.com/v1
kind: JumpStartModel
metadata:
  name: deepseek-test-endpoint
spec:
  model:
    modelId: "deepseek-llm-r1-distill-qwen-1-5b"
  sageMakerEndpoint:
    name: deepseek-test-endpoint
  server:
    instanceType: "ml.g5.8xlarge"

New features

Multi-Instance Type Deployment HyperPod Inference supports multi-instance type deployment, enhancing deployment reliability and resource utilization. You can specify a prioritized list of instance types in your deployment configuration, and the system automatically selects from available alternatives when your preferred instance type lacks capacity. The Kubernetes scheduler evaluates instance types in priority order using node affinity rules based scheduling, seamlessly placing workloads on the highest-priority available instance type. In the example below, when deploying a model from S3, ml.p4d.24xlarge has the highest priority and will be selected first if memory capacity is available. If ml.p4d.24xlarge is unavailable, the scheduler automatically falls back to ml.g5.24xlarge, and finally to ml.g5.8xlarge as the last resort.

apiVersion: inference.sagemaker.aws.amazon.com/v1
kind: InferenceEndpointConfig
metadata:
  name: lmcache-test-1
  namespace: default
spec:
  replicas: 13
  modelName: Llama-3.1-8B-Instruct
  instanceTypes: ["ml.p4d.24xlarge","ml.g5.24xlarge","ml.g5.8xlarge"]

This is implemented using Kubernetes node affinity rules with requiredDuringSchedulingIgnoredDuringExecution to restrict scheduling to the specified instance types, and preferredDuringSchedulingIgnoredDuringExecution with descending weights to enforce priority ordering.

Node affinity
For scenarios requiring more granular scheduling control — such as excluding spot instances, preferring specific availability zones, or targeting nodes with custom labels — HyperPod Inference exposes Kubernetes’ native nodeAffinity directly in the InferenceEndpointConfig spec. This gives you the full expressiveness of Kubernetes scheduling primitives.

apiVersion: inference.sagemaker.aws.amazon.com/v1
kind: InferenceEndpointConfig
metadata:
  name: lmcache-test-1
  namespace: default
spec:
  replicas: 15
  modelName: Llama-3.1-8B-Instruct
  nodeAffinity:
    preferredDuringSchedulingIgnoredDuringExecution:
    - weight: 100
      preference:
        matchExpressions:
        - key: node.kubernetes.io/instanceType
          operator: In
          values: ["ml.g5.4xlarge"]
  worker:
    resources:
      limits:
        nvidia.com/gpu: "1"
      requests:
        cpu: "6"
        memory: 30Gi
        nvidia.com/gpu: "1"

Clean up

To clean up your environment after completing this walkthrough, follow these steps to remove the deployed models and uninstall the Inference Operator add-on from your HyperPod cluster.

Removing Inference Operator add-on

Through the SageMaker console:

  1. Navigate to SageMaker Console → HyperPod ClustersCluster Management
  2. Select your cluster and go to the Inference tab
  3. Choose Remove to uninstall the Inference Operator add-on and associated resources

Alternatively, using the AWS CLI:

aws eks delete-addon \
--cluster-name <my-hyperpod-cluster> \
--addon-name amazon-sagemaker-hyperpod-inference \
--region <region>

Delete the deployed models

# Delete JumpStartModel deployment
kubectl delete jumpstartmodel <model-name> -n <namespace>

# Or for InferenceEndpointConfig deployment
kubectl delete inferenceendpointconfig <endpoint-name> -n <namespace>

Migration path for existing users

Automated migration script is hosted in public GitHub that transitions the HyperPod Inference Operator from Helm to EKS add-on with built-in rollback capabilities if add-on installation fails. Backup files are stored in /tmp/hyperpod-migration-backup-<timestamp>/ for manual rollback if needed.

Key features

  • Auto-Discovery: Derives configuration from existing Helm deployment (roles, buckets, dependencies)
  • Safe Migration: Scales down Helm deployments before add-on installation, validates prerequisites
  • Dependency Handling: Migrates S3/FSx CSI drivers, cert-manager, and metrics-server to add-ons
  • Rollback Support: Preserves original resources and restores on failure

IAM Roles created

  1. Execution Role (Inference Operator + S3 TLS access)
  2. JumpStart Gated Model Role
  3. ALB Controller Role
  4. KEDA Operator Role

Examples for running the script

# to follow step by step guide
./helm_to_addon.sh --cluster-name <my-cluster> --region us-east-1 

# no prompts needed except for initiating rollback in case of failure
./helm_to_addon.sh --cluster-name <my-cluster> --region us-east-1 --auto-approve 

# To skip the dependencies FSX, S3, Metricsserver, cert manager migration from Inference operator helm to respective add-ons
./helm_to_addon.sh --cluster-name my-cluster —region us-east-1 --skip-dependencies-migration

Migration flow

  1. Validate existing Helm installation
  2. Auto-derive configuration and create new IAM roles
  3. Tag resources (ALBs, ACM certs, S3 objects) with CreatedBy: HyperPodInference
  4. Install dependency add-ons (S3, FSx, cert-manager) if dependent CRDs don’t exist
  5. Scale down Helm deployments for ALB, KEDA and Inference operator
  6. Install Inference Operator add-on with OVERWRITE flag
  7. Clean up old Helm resources
  8. Migrate Helm-installed dependencies that are installed through Inference operator main chart to add-ons. To skip this step provide --skip-dependencies flag.

Benefits

  • Simplified management through EKS console/APIs
  • Automated updates via EKS add-on mechanisms
  • Native EKS integration
  • Zero downtime migration with rollback safety

Conclusion

The streamlined Inference Operator installation experience for Amazon SageMaker HyperPod eliminates infrastructure complexity and accelerates time to value for machine learning teams. With one-click installation, automated resource management, and seamless upgrade capabilities, teams can focus on deploying and optimizing their inference workloads rather than managing underlying infrastructure.

The EKS Add-on integration provides enterprise-grade lifecycle management while maintaining the flexibility to customize configurations for specific organizational requirements. Combined with advanced features like managed tiered KV cache and intelligent routing, this simplified installation experience makes high-performance inference deployment accessible to teams of all sizes.

Get started today by creating a new HyperPod cluster with the Inference Operator pre-installed, or add it to your existing clusters with a single click through the SageMaker console. For detailed add-on installation instructions and configuration options see this guide and for troubleshooting see this guide.

Appendix


About the authors

Automate safety monitoring with computer vision and generative AI

Post Syndicated from Nika Mishurina original https://aws.amazon.com/blogs/architecture/automate-safety-monitoring-with-computer-vision-and-generative-ai/

Workplace safety has improved dramatically over the past several decades. According to the Bureau of Labor Statistics, occupational injury rates in the United States have declined by more than 60% since the early 1970s. This is driven by stronger regulations, better training programs, and a growing culture of safety-first operations. Despite this progress, the International Labour Organization reports that 395 million workers worldwide still sustain non-fatal occupational injuries each year, and the National Safety Council estimates that workplace injuries cost the US economy $176.5 billion in 2023.

The challenge is no longer a lack of safety commitment, it’s the limitations of traditional monitoring methods. Manual safety audits, while valuable, cover only a fraction of operational areas and produce point-in-time snapshots rather than continuous oversight. As organizations scale across hundreds of facilities, whether manufacturing floors, distribution centers, airport tarmacs, construction sites, or laboratory environments, maintaining consistent, real-time visibility into Personal Protective Equipment (PPE) compliance and zone-based hazard monitoring becomes increasingly difficult.

According to OSHA, struck-by vehicle fatalities and injuries are 100 percent preventable, yet they remain a leading cause of workplace fatalities. However, 90 percent of workplace eye injuries can be avoided by wearing eye protection, according to the American Academy of Ophthalmology.

Computer vision and generative AI represent the next evolution in workplace safety, not replacing existing safety programs, but augmenting them with continuous, automated monitoring that scales across facilities around the clock. This post describes a solution that uses fixed camera networks to monitor operational environments in near real-time, detecting potential safety hazards while capturing object floor projections and their relationships to floor markings. While we illustrate the approach through distribution center deployment examples, the underlying architecture applies broadly across industries. We explore the architectural decisions, strategies for scaling to hundreds of sites, reducing site onboarding time, synthetic data generation using generative AI tools like GLIGEN, and other critical technical hurdles we overcame.

Solution overview

Our computer vision solution uses a serverless, event-driven architecture designed to scale efficiently across thousands of cameras and process massive volumes of image data for risk detection. The system includes the following:

  • A machine learning (ML) model that identifies workplace safety hazards
  • Real-time visual data processing for emerging risks
  • A dual-detection annotation method that captures both object outlines and their floor projections relative to safety markings.

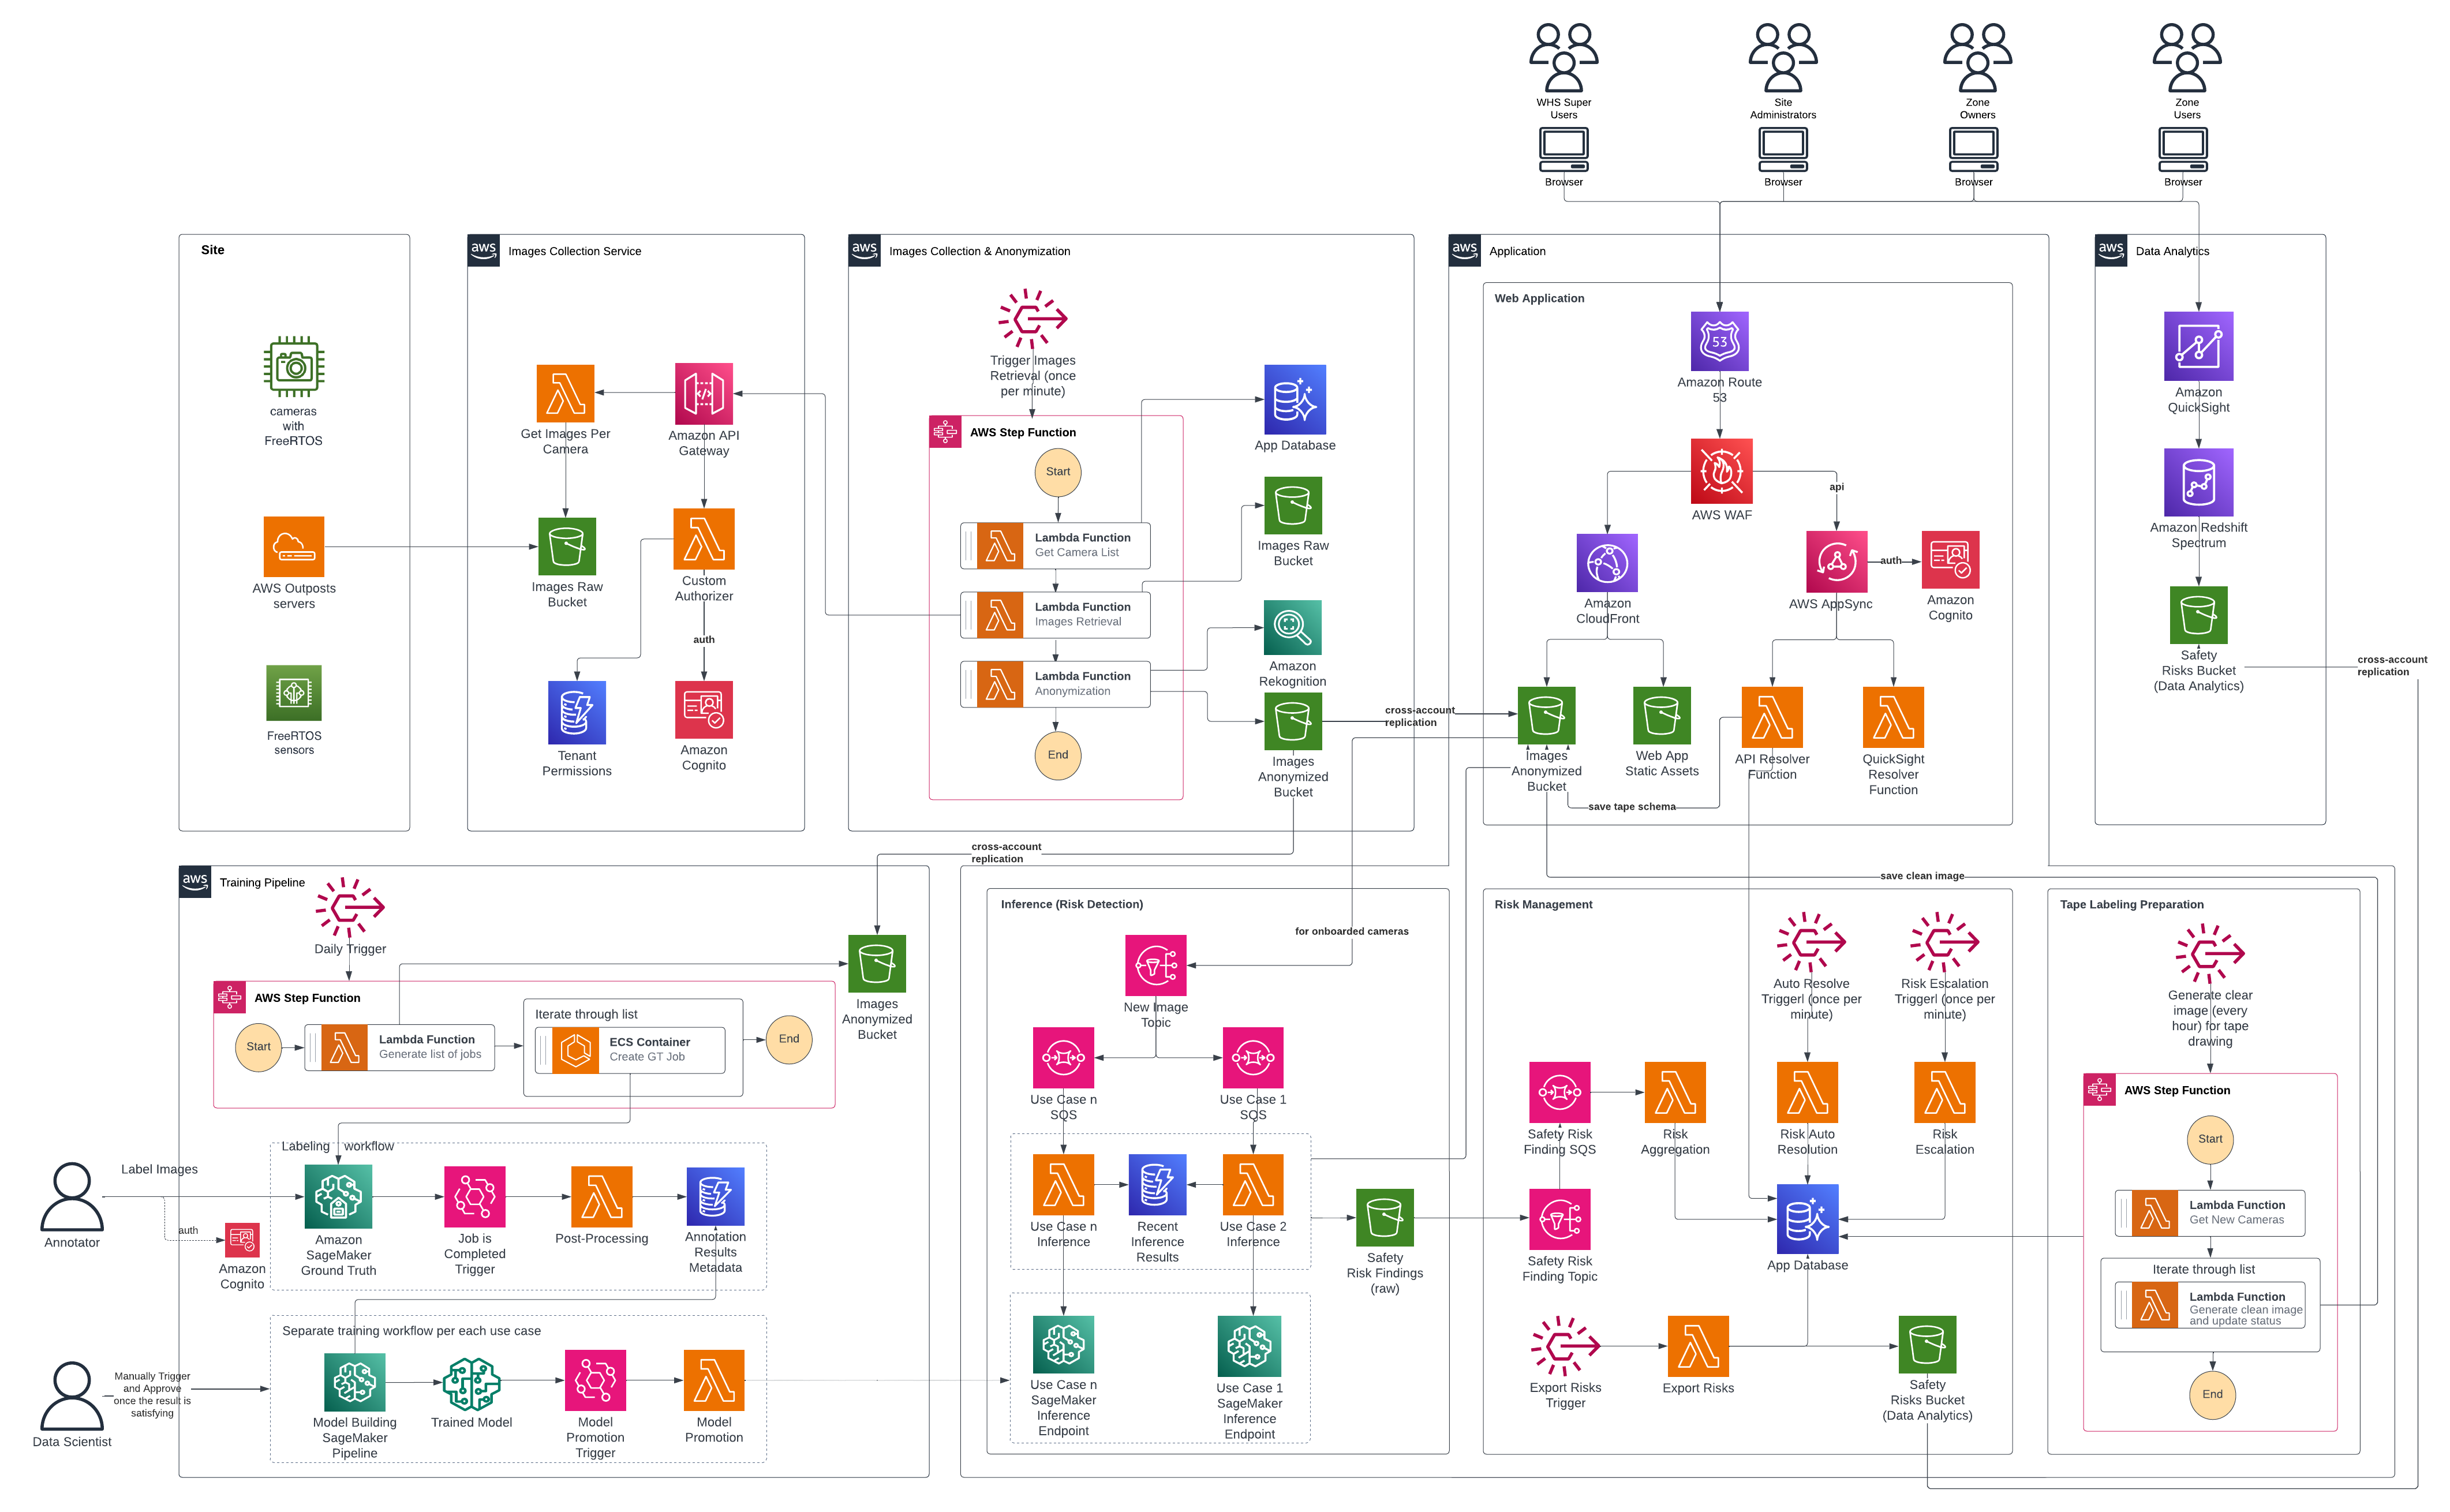
The system blurs human faces and identifiable features to help protect PII while maintaining hazard detection accuracy. To maintain proper security and operational segregation, the solution is distributed across multiple AWS accounts. We separated the training pipeline, image collection infrastructure, end-user web application, and created a dedicated analytics account for the BI team to develop reporting and insights solutions into distinct environments with appropriate access controls and data isolation. The system continuously learns to improve detection accuracy. Safety managers use monitoring dashboards to track and respond to hazards. The following architecture diagram illustrates how these components work together to create an end-to-end safety monitoring solution.

Architecture Diagram

The system implements a hierarchical role-based access control structure with four user types.

  • Super Users are system administrators with organization-wide visibility, responsible for site onboarding initialization and system health monitoring.
  • Site Administrators operate at the facility level, configuring zones and managing permissions within their site.
  • Zone Owners play a critical operational role—they receive and remediate safety risk notifications, complete tape labeling jobs to verify detection accuracy, and perform camera onboarding configuration. The system only begins automated risk detection after Zone Owners complete the full configuration process, so that parameters are properly set.
  • Zone Users have read-only access to risks and alerts without configuration capabilities.

Image collection and anonymization

The workflow begins with automated image collection from configured and authorized site cameras through a dedicated image service providing periodic image capture. Raw images are initially stored in an Amazon Simple Storage Service (Amazon S3) bucket in a separate, access-restricted account where they immediately undergo an anonymization process. After anonymization is complete, raw images are automatically purged from the bucket within days, as per organizational retention policies. Amazon Rekognition detects faces of individuals present in the images, and custom Python code then applies an overlay to blur the detected faces, helping to preserve privacy. The anonymized images are replicated across multiple AWS accounts serving different purposes: training computer vision models, running inference to detect safety hazards, and powering the end-user web application where Zone Users monitor and respond to detected risks. The web application displays the anonymized images, which are annotated with visual indicators for missing PPE as an example or other potential safety hazard. This clear visual feedback eliminates guesswork so that Zone Users can quickly understand what hazard was identified and where it’s located on the facility floor, facilitating rapid response and remediation. Additionally, they can adjust the floor plan organization that defines the exact regions where workers are required to wear PPE or different objects and equipment are to be placed as per 5S taping and rules.

Training pipeline and model promotion

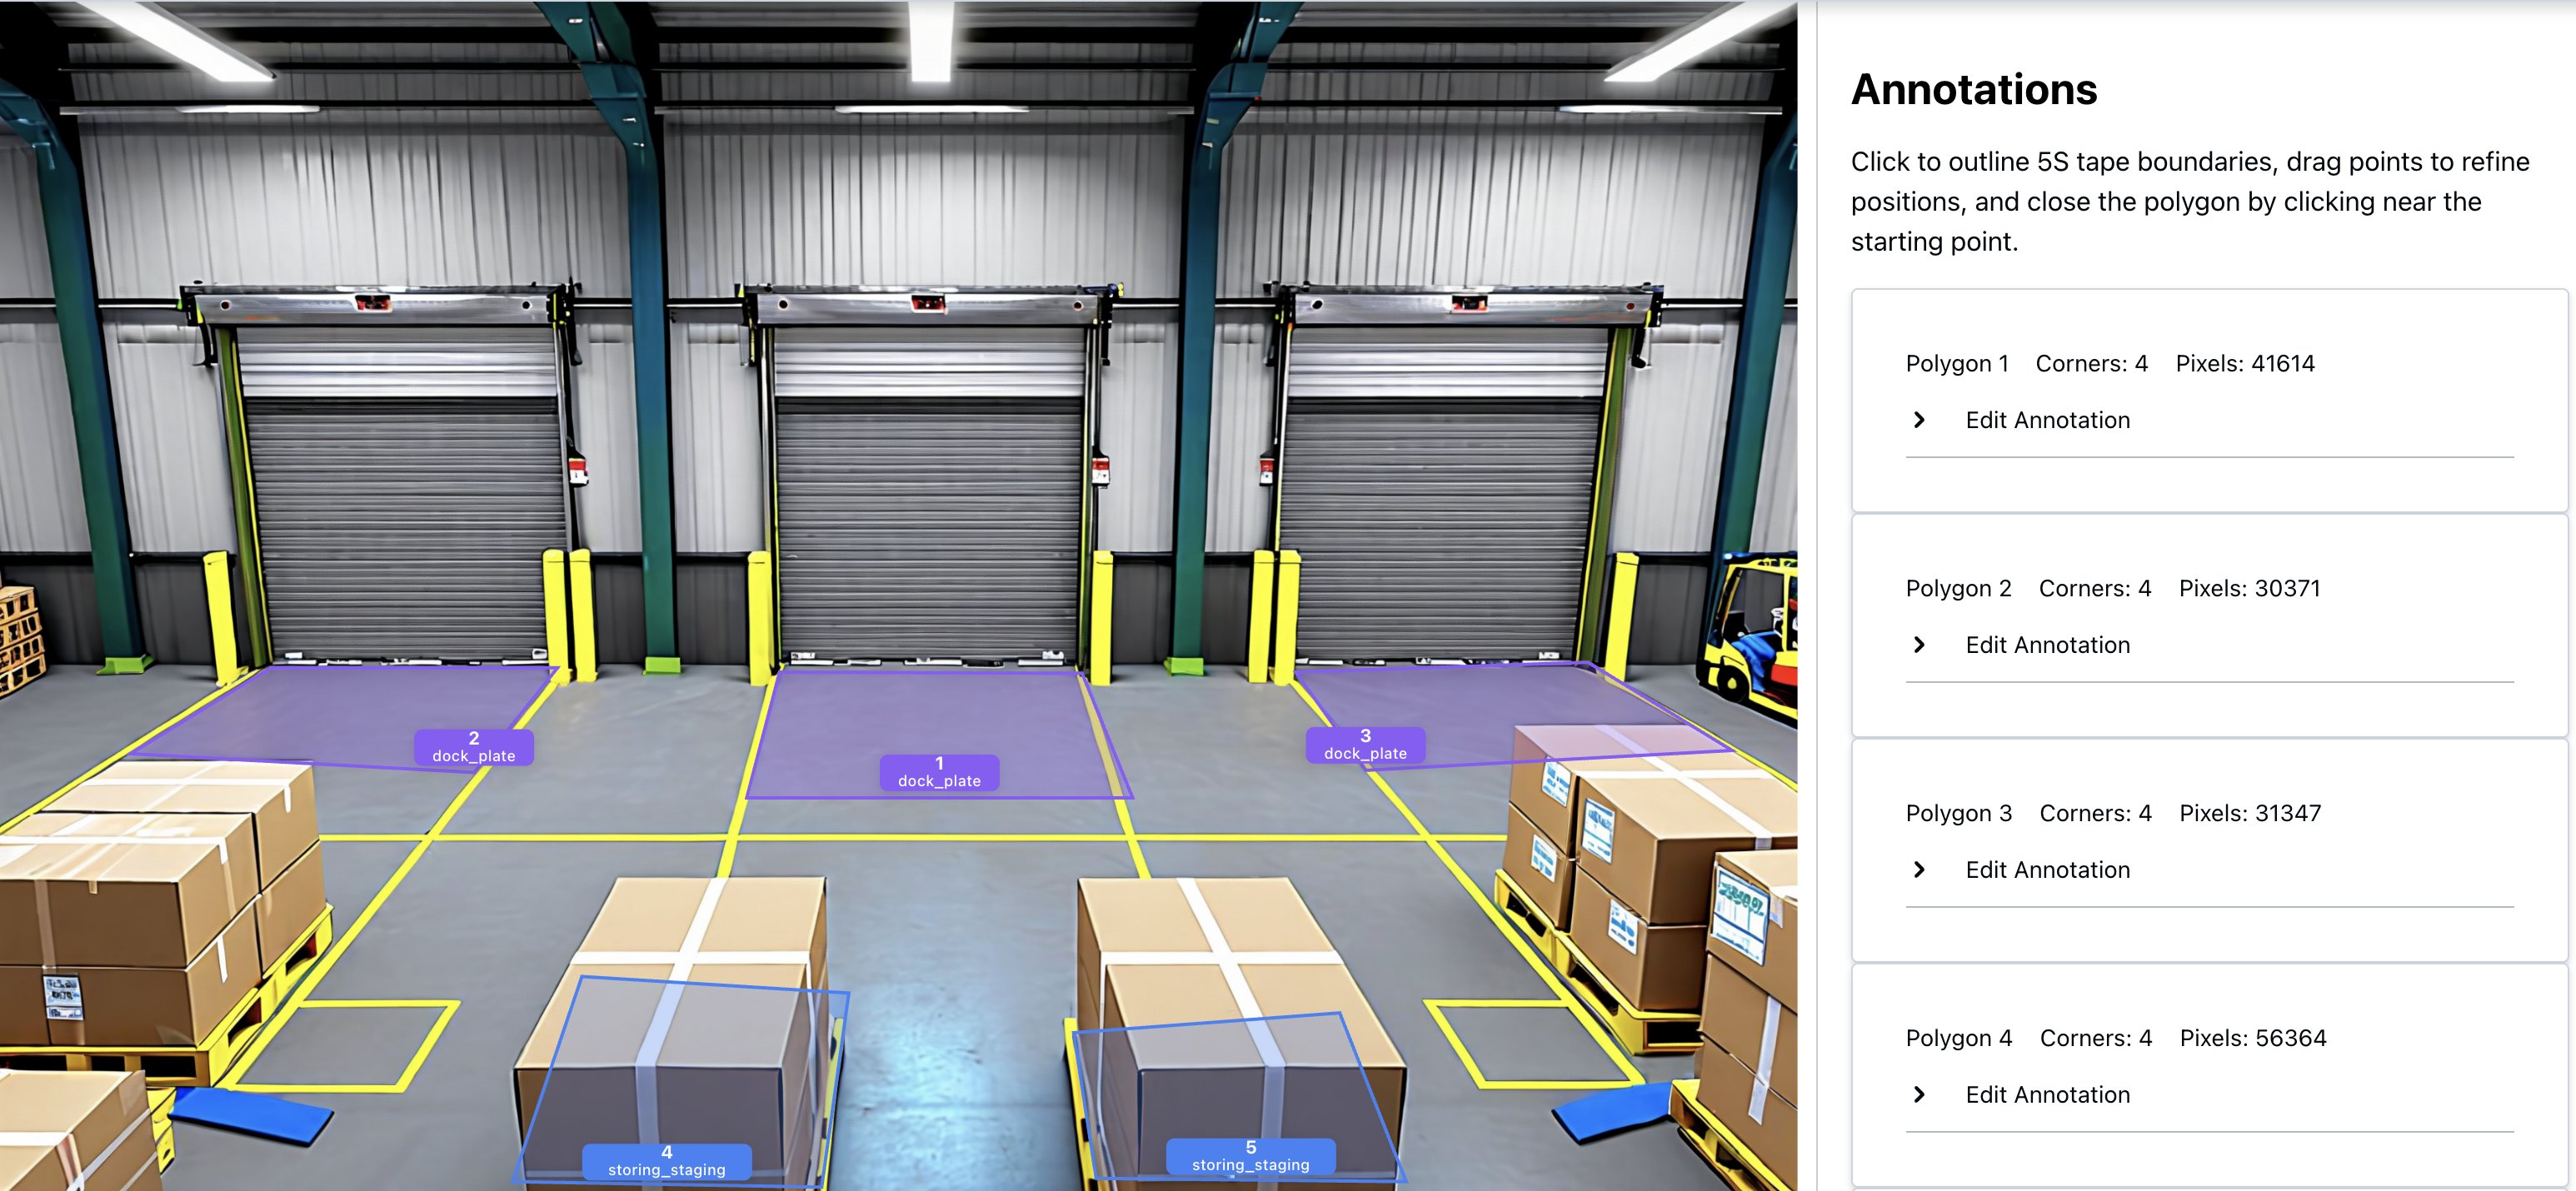
Machine learning systems need high-quality ground truth datasets. These labeled examples teach models to identify and classify safety hazards. Data labeling is the process of human annotators reviewing images and meticulously annotating objects, behaviors, and conditions of interest. For example, drawing bounding boxes around obstructions in walkways, identifying workers without proper PPE, or marking floor tape boundaries. Poor quality training data produces unreliable models that miss safety hazards or generate false alarms, eroding user trust. Conversely, investing in high-quality, accurately labeled training data—with clear, consistent annotations reviewed by domain experts—enables the model to detect genuine risks with precision and reliability. This ultimately determines the success or failure of the entire safety monitoring system. As described later in this post, synthetic data generation can complement or potentially substitute manual annotation for specific use cases where real-world examples are scarce or labor-intensive to collect.

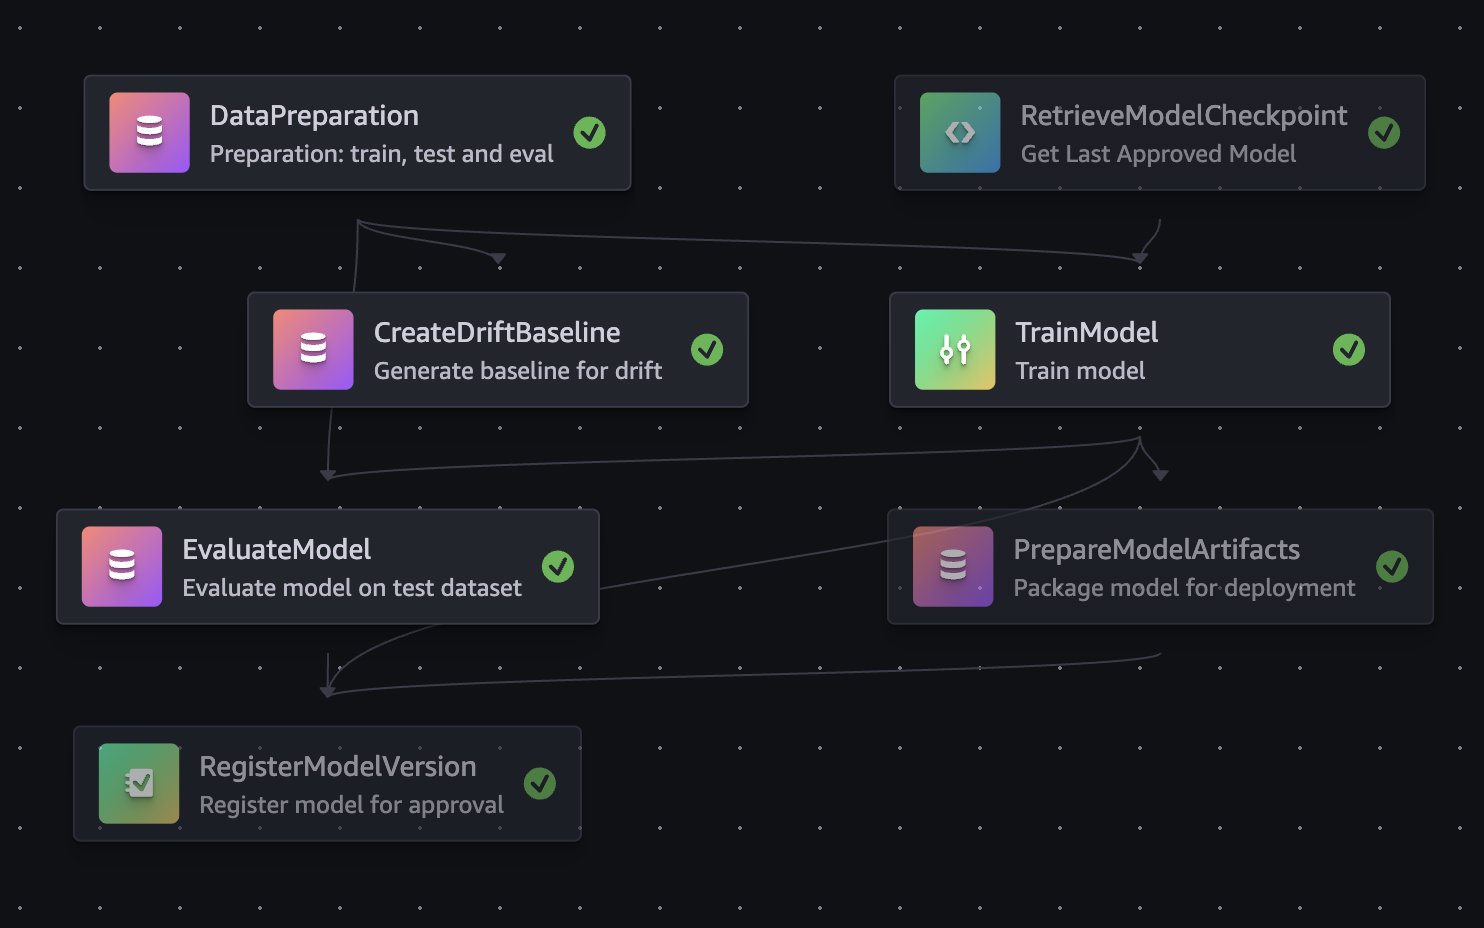
After anonymized images are collected and stored into Amazon S3, the GT Job creation AWS Step Functions workflow creates Amazon SageMaker Ground Truth labeling jobs for the required use cases and monitored sites and cameras. This step function is triggered at a regular, configurable, cadence by an Amazon EventBridge rule. It integrates with Zone User feedback and saved ML model predictions, so data scientists can prioritize different underperforming classes and cameras. A team of dedicated annotators then complete the jobs. Completed jobs undergo post-processing using AWS Lambda to transform them into a format suitable for training. The post-processing workflow stores job metadata like included cameras and classes, into Amazon DynamoDB, while annotations are stored in an S3 Bucket. After training data is ready, data scientists trigger Amazon SageMaker AI Pipelines model building workflows using scripts that allow for flexible hyper parameter and GT data selection. The SageMaker AI Pipeline consists of seven steps:

  • A checkpoint loading step
  • A data preparation and split step
  • A model training step
  • A generate drift baseline step
  • A model evaluation step
  • A model packaging step
  • A model register step

Sagemaker Pipeline

Data scientists review trained model evaluation metrics, and approve models that they want to use in the inference pipeline. Model approval fires off an EventBridge event that triggers the model promotion Lambda. The model promotion Lambda creates a code review against the application infrastructure code repository to update the Amazon S3 URI of the model used for the SageMaker AI endpoint. This workflow decouples the science and application updates. Scientists approve models when evaluation metrics meet acceptance criteria. Software engineers can then merge and manage the endpoint updates like other software and infrastructure changes through continuous integration and delivery (CI/CD) pipelines. After code review is passed, the system updates the SageMaker AI Endpoint accordingly and inference pipeline will use the updated endpoint. Approved models checkpoints are also used as the base for future retraining runs, enabling rapid incremental improvements without frequent long running training jobs.

Inference pipeline

Each use case operates through its own inference pipeline, working together to provide comprehensive safety oversight. The system functions as a digital safety supervisor, continuously monitoring facility operations and distinguishing between normal workflow and potential hazards. When an image lands in the anonymized S3 bucket, it triggers an Amazon Simple Notification Service (Amazon SNS) notification that routes to a dedicated Amazon Simple Queue Service (Amazon SQS) queue. Each use case processes independently through its own queue, which invokes a SageMaker AI Endpoint hosting a computer vision model tailored to that scenario. For example, detecting operational equipment, identifying workers with safety gear, or monitoring other safety-critical conditions. The “Intelligent Alarm Detection” section details how the system validates and escalates findings. Confirmed violations generate alerts containing the object type, precise location, and violation duration. Visual evidence includes both the original camera capture and an annotated version with color-coded overlays: blue outlines mark restricted zones, red outlines highlight violating objects, and confidence scores label each detection. Then, the system distributes alerts through parallel channels. DynamoDB stores structured violation records enabling fast queries. Amazon S3 events trigger downstream processing and notifications. Failures are tracked in use case specific Dead Letter Queues (DLQs) where they can later be analyzed or re-drove.

Risk management

When the inference pipeline detects potential hazards and saves them to the dedicated S3 bucket, it triggers a Lambda function using Amazon SNS and SQS. This function intelligently aggregates risks per camera per use case to avoid alert fatigue. Instead of bombarding safety teams with duplicate notifications, the system appends new occurrences to existing open risks. Every minute, an Amazon EventBridge schedule kicks off a Lambda function that checks whether risks still appear in the latest camera images. If a violation has been resolved, the system automatically closes it out. At the same time, another scheduled function monitors whether the SLA for risk resolution has been exceeded and sends notifications through zone’s configured preferred channels, Slack, email, or an internal ticket management system. The notification system includes escalation levels, so that the right people are alerted based on severity and how long an issue has been open. Every hour (though this schedule is flexible), the system exports risk data from the database reader endpoint and shares it with the BI team for deeper analysis and trend spotting.

Web application

Users review active and resolved risks through a React web application distributed via Amazon CloudFront and backed by an AWS AppSync API. The application follows AWS security best practices with Amazon Route 53 for DNS resolution and AWS WAF for protection against common web vulnerabilities. AWS AppSync uses AWS Lambda resolvers for embedding Amazon Quick Sight analytics and processing CRUD operations.

Site administrators can use a Site Management feature to configure use cases and notification parameters. Camera zones organize related risks into alerts for quick review. These can be acknowledged or marked as false positives, and the system automatically resolves alerts when risks are no longer detected. Users can also search historical risks, with both views displaying day-over-day trends, average resolution time, and false positive rates.

Tape labeling preparation

The Housekeeping use case fundamentally relies on understanding the spatial relationship between detected objects and the 5S floor tapes that define where equipment and materials should be positioned. Housekeeping, in this context, refers to maintaining a clean, organized, and safe workspace by keeping equipment, materials, and tools stored in their designated locations. A key advantage of this system is that it does not require pre-existing digital maps or floor plans. Instead, Zone Owners can define safety zones and organizational areas by referencing the physical tapes visible in camera images. Different color tapes represent places where certain objects belong and where restrictions exist. However, a practical challenge arises during normal facility operations: floor tapes frequently become obscured by equipment, materials, and personnel movement throughout the day. This occlusion makes it difficult for human annotators to accurately identify and label the tape boundaries when onboarding new cameras. To address this challenge, an intelligent tape labeling preparation workflow was developed that generates synthetic composite images showing clear, unobstructed views of the floor tapes. The system analyzes multiple camera frames captured at different times throughout the day, along with their corresponding object detection predictions. Using a voting mechanism, it identifies pixel regions with no detected objects and stitches these clear portions together into a composite image where the tapes are fully visible. This automated workflow runs hourly using AWS Step Functions. The first Lambda function identifies newly onboarded cameras requiring tape labeling, while the second generates composite images, saves them to Amazon S3, and updates camera status to indicate readiness for annotation. The Camera Onboarding process generates JSON files containing the coordinates of each 5S tape floor annotation for every camera. These annotations are accessible within the application, allowing users to inspect and modify them as needed when floor organization changes. During inference, the system overlays detected object positions onto floor tape boundaries and evaluates compliance against configured business and organizational rules. When violations are detected, Housekeeping alarms provide comprehensive context, including the outlined object in violation, the specific 5S taped area involved, and the rule that was broken. This detailed feedback enables operators to quickly localize issues and mark false positive alarms. The following image was generated by Amazon Nova to illustrate the tape labeling UI:

Tape Labeling UI

Data analytics component

Finally, this risk detection data gets turned into real business insights through Amazon Redshift Spectrum and Quick Sight. Redshift Spectrum lets the BI team query risk data sitting in S3 without the hassle of moving or loading it elsewhere, making historical analysis fast and straightforward.

Quick Sight dashboards give safety managers and operations leaders the full picture: which facility zones are hotspots for violations, how risks shift between day and night shifts, what types of objects cause the most problems, and whether your safety interventions are actually moving the needle. You can even compare performance across facilities to spot best practices worth replicating.

Intelligent Alarm Detection

The four-stage process

When an image arrives in the anonymized S3 bucket, the system processes it through four stages:

Stage 1: Object detection

The SageMaker Endpoint runs a computer vision model that detects operational equipment, materials, and worker safety gear. In the Housekeeping use case, the model identifies various equipment types such as transport devices, storage containers, and safety apparatus, along with materials commonly found in industrial environments. A critical capability is the model’s ability to distinguish between an object’s visible outline and its actual floor footprint.

Stage 2: Zone-based analysis with “Digital Tape”

Detection alone isn’t enough. The system must understand whether detected objects pose actual risks. Predefined zones, called “tapes,” mark restricted areas, walkways, and safety boundaries through labeling jobs. The system calculates the percentage overlap between each detected object’s footprint and these restricted zones. Configurable thresholds, typically 50% overlap, determine whether an object violates safety protocols, filtering out edge cases where objects barely touch boundary lines. For the PPE detection module, the system employs a YOLO-based computer vision model that performs simultaneous detection across multiple dimensions. It locates workers within the frame, classifies the presence or absence of required safety equipment, and applies contextual analysis to determine which PPE items are mandatory in specific areas. This contextual awareness allows the system to adapt its requirements to different zones within the operational environment.

Stage 3: The “Loiter Time” algorithm

To avoid false alarms from transient objects, the system tracks violations over time. It analyzes objects across consecutive time intervals, typically minute-by-minute, using mask similarity algorithms to confirm the same object persists rather than being replaced by similar items. This builds a “replication count” showing how many consecutive minutes an object has remained in violation. Different object types and risk zones have distinct acceptable loiter times—high-risk areas enforce shorter thresholds, while general workspace areas allow longer durations to accommodate normal operations.

Stage 4: Multilayered validation and alarm generation

Before generating an alert, the system applies final validation layers. Confidence thresholds filter out low-certainty detections based on object type complexity. Run-Length Encoding (RLE) mask comparison verifies that the tracked object is consistent across time intervals rather than different objects appearing in similar positions. Zone context determines the severity and routing of each alert. Once validated, an alert is generated with rich metadata:

{
    "violations_details": {
        "object_type": "equipment_footprint",
        "zone_identifier": "PEDESTRIAN_ZONE:AREA_A:001",
        "detection_count": 5,
        "object_dwell_time": 3,
        "confidence_score": 0.85,
        "annotated_image_uri": "s3://bucket/annotations/violation_image.jpg"
    }
}

Infrastructure scaling challenges

We designed the system to support thousands of cameras. This scale required careful architectural decisions.

Architectural foundation for scale

At the heart of our system is a serverless driver-worker pattern that proved essential for achieving the scale we needed. This pattern decouples image processing tasks, enabling independent scaling of different components while providing fault isolation. If one worker fails, it doesn’t impact the entire pipeline. The driver orchestrates work distribution while workers process images concurrently, allowing us to horizontally scale to handle simultaneous processing from hundreds of sites. This initial worker pulls the raw image and triggers a cascade of specialized downstream handlers that each contribute to the overall safety monitoring workflow.

The ML inference workflow acts as an intelligent gatekeeper in this architecture. Rather than flooding downstream components with every captured image, the inference layer only surfaces images where safety issues have been detected. This filtering is essential because it prevents components interacting with Amazon Aurora PostgreSQL from being overwhelmed by the raw volume of image data from hundreds of sites. For managing processing state, the ML inference components use DynamoDB, which provides the scalable, serverless state management needed to track inference operations across our distributed camera network.

Evolving our inference infrastructure

One of our most significant scaling challenges emerged as we transitioned from a proof-of-concept to production scale. Initially, we deployed SageMaker Serverless inference endpoints with approximately 50 cameras. However, as we scaled to processing images from hundreds of sites, we encountered critical limitations: SageMaker Serverless inference lacked GPU support and imposed a 6GB maximum memory configuration, leading to out-of-memory errors. The solution required pivoting to SageMaker Serverful inference endpoints configured with ml.g6 family instances and implementing auto scaling policies. Achieving scale also meant working with AWS service teams to increase limits for thousands of concurrent Lambda executions, optimizing memory allocation and multithreading, and tuning SQS batch sizes maximize throughput within memory constraints.

Optimizing Lambda and SQS for massive concurrency

Achieving the required scale also meant working closely with AWS service teams to increase limits supporting thousands of concurrent Lambda executions across our accounts. Beyond increasing limits, we invested significant effort in optimizing our Lambda configurations from memory allocation to processing logic that uses multithreading capabilities. The integration between Lambda and SQS required particular attention. We optimized Lambda functions for maximum consumption concurrency, refactored error handling to minimize failed containers, and tuned the maximum number of messages per batch to handle larger message volumes efficiently within memory constraints.

Data-driven ground truth curation at scale

While synthetic data generation significantly reduces the annotation burden, manual annotation remains important for addressing unique site conditions and onboarding new use cases. As the solution scales to new facilities, each site introduces distinct camera angles, lighting conditions, and equipment layouts that benefit from targeted real-world annotations to fine-tune model performance. Our approach to curating ground truth data for model training evolved significantly as we scaled. Initially, we implemented a straightforward but labor-intensive strategy: creating annotation jobs for every site on a daily basis. This approach worked well during early stages with limited sites, but as we expanded to hundreds of geographically distributed sites, the volume of manual annotation became untenable. The sheer number of daily labeling jobs – one per site per day – quickly overwhelmed our annotation capacity and created a significant operational bottleneck that threatened our ability to continuously improve model performance.

We fundamentally reimagined our workflow by using Amazon Athena to query and analyze massive volumes of inference results combined with customer feedback data at scale. We identified underperforming segments by aggregating false positive rates across camera types and deployment conditions, prioritizing retraining on image sources with elevated error rates. We also surfaced inferences where model confidence scores fell below established thresholds, flagging these uncertain predictions for targeted annotation and review. We further augmented this analysis with Claude multi-modal LLMs on Amazon Bedrock to analyze misclassified samples and detect underrepresented object classes in our existing training distribution. This directly informed our data collection strategy to address class imbalance and edge cases in future training jobs. This shift from blanket sampling to intelligent, performance-driven curation made our annotation workflow sustainable at scale. It also improved training efficiency by directing labeling efforts only where they would have the greatest impact on model improvement.

Images annotation at scale

Manual annotation of training data is challenging, especially for rare safety violations. The sheer volume of images combined with the labor-intensive nature of manual labeling, makes traditional annotation approaches impractical for certain use cases. Some safety violations are extremely rare in practice yet represent frequent sources of workplace injuries. A prime example is floor spill detection: despite examining and annotating over half a million images, only a few hundred examples of liquid spills or debris on walkways were identified. While this low occurrence rate is commendable from a safety perspective, it poses a fundamental challenge for model training. There aren’t enough real-world examples to train a robust detection model. Similarly, PPE detection presents a data diversity challenge. In the majority of captured images, PPE items appear in a single dominant color. However, workplace policies often permit variations, and workers occasionally wear acceptable PPE in different colors. Without sufficient training examples across color variations, the model risks failing to detect non-standard colored items, creating potential safety blind spots.

To address these challenges, we built a fully synthetic data generation and model training pipeline on AWS using GLIGEN (Grounded Language-to-Image Generation), a diffusion-based generative model deployed as Amazon SageMaker Batch Transform jobs. Using this approach, we produced a 75,000-image PPE dataset covering three classes: person, hard hat, and safety vest. The pipeline architecture is illustrated in the following image.

PPE Detection Pipeline

We also produced a 75,000-image Housekeeping dataset covering seven common facility object classes: pallet jack, go-cart, step ladder, trash can, safety cone, tote, and pallet. The pipeline architecture is illustrated in the following image.

Housekeeping Detection Flow

GLIGEN enables the creation of highly realistic, yet controlled, training datasets that address both rare event scarcity and data diversity gaps without requiring manual image collection or annotation. For floor spills, GLIGEN receives structured bounding box inputs specifying where objects should appear, generating photorealistic facility scenes with spills or debris placed in realistic facility floor contexts. For PPE color diversity, GLIGEN generates images of workers wearing safety equipment in varied colors, creating the diversity needed for robust detection across acceptable variations. For each image, GLIGEN received bounding box coordinates specifying object positions and generated photorealistic 512×512 facility scenes with ground truth annotations automatically embedded in the output, avoiding manual labeling entirely. Raw outputs were streamed from Amazon S3, decoded, and converted to YOLO annotation format using parallel Python workers, then uploaded back to S3 as training-ready datasets. We trained YOLOv8 models on Amazon SageMaker AI using PyTorch 2.1, with the final configuration using cosine learning rate scheduling and AdamW optimization. This is a combination that proved critical for stabilizing the larger YOLOv8l model variant and preventing gradient divergence during training. Beyond training data generation, GLIGEN ‘s synthetic images also enhance the inference by reducing false positive risk detections and providing more accurate, contextual understanding of the operational environment.

Conclusion

Our solution demonstrates strong accuracy. For use cases trained entirely on synthetic data generated by GLIGEN, the PPE model achieved 99.5% mean average precision (mAP@50) with 100% precision and recall across all three classes. The Housekeeping model reached 94.3% mAP@50 with 91.4% precision and 86.9% recall across seven more challenging facility object classes, all without a single manually annotated real image. Accuracy can be further improved by increasing the volume of training images used to build and train the custom model. Beyond accuracy, through testing on 10,000 synthetic images, we’ve seen our solution perform strongly across two critical dimensions:

  1. speed of up to 37 seconds, measured by the time elapsed between an image captured and notification delivery to Zone Operators.
  2. scale across 10,000+ cameras, validated through simultaneous processing of 10,000 images, if one camera produces one frame at a time.

While this post focuses on our warehouse deployment, the architecture we’ve described is intentionally industry-agnostic. The core capabilities, object detection, zone-based spatial reasoning, temporal violation tracking, and privacy-preserving image processing, are not specific to a single environment. The same detection pipeline that identifies PPE violations and housekeeping hazards on a distribution center floor could be adapted to monitor equipment boundaries on manufacturing floors, enforce clean room protocols in laboratories, or track safety compliance on construction sites. Each industry requires a domain-specific model training, tailored business rules, and unique zone configurations, but the underlying event-driven architecture, scaling patterns, and intelligent alarm detection framework remain constant. We look forward to exploring these extensions in future work.

For more information about AWS workforce safety solutions, see Delivering an integrated approach to safety: How AWS Workforce Safety solutions make work safer.


About the authors

How Aigen transformed agricultural robotics for sustainable farming with Amazon SageMaker AI

Post Syndicated from Purna Sanyal original https://aws.amazon.com/blogs/architecture/how-aigen-transformed-agricultural-robotics-for-sustainable-farming-with-amazon-sagemaker-ai/

This post is cowritten with Yuri Brigance, and Usman M. Khan from Aigen.

Aigen builds autonomous robots designed to help farmers remove herbicide-resistant weeds and improve crop yield through AI-driven technology. These robots operate without chemicals, using renewable energy, and provide real-time, field-level data to enhance decision-making. Using advanced computer vision AI, Aigen’s robots autonomously identify and remove weeds without harming crops, giving farmers an eco-friendly, cost-effective solution to traditional weed management and efficient farming. As its robotic fleet expanded, Aigen’s on-premises infrastructure became a bottleneck in scaling its model-building pipeline.

In this post, you will learn how Aigen modernized its machine learning (ML) pipeline with Amazon SageMaker AI to overcome industry-wide agricultural robotics challenges and scale sustainable farming. This post focuses on the strategies and architecture patterns that enabled Aigen to modernize its pipeline across hundreds of distributed edge solar robots and showcase the significant business outcomes unlocked through this transformation. By adopting automated data labeling and human-in-the-loop validation, Aigen increased image labeling throughput by 20x while reducing image labeling costs by 22.5x.

Key challenges of scaling field agricultural robots

Aigen’s initial ML pipeline was designed to build task-specific edge models for its field robots. Robot data was uploaded to Amazon Simple Storage Service (Amazon S3) for manual labeling. The annotated datasets were then used to train new task-specific edge models on Aigen’s on-premises infrastructure. However, this ML pipeline introduced several limitations:

  • Connectivity Constraints: Inconsistent internet in rural areas hampered communication between robots and cloud.
  • High Data Labeling Cost: Manual data labeling of thousands of new samples data per day proved prohibitively expensive and time-consuming.
  • Limited Computational Power: Training specialized edge models and fine-tuning foundation models (FMs) for specific tasks using on-premises hardware was a bottleneck due to limited parallelism and GPU compute power with on-premises RTX 3090 machines.
  • Scalability Issues: Model Training and data labeling batch Inference had to compete for the same RTX 3090 machines, causing delays either for the data science team for model training or the data labeling team for batch inference.

Solution

Aigen addresses these challenges by adopting an AWS AI-driven, cloud-native approach that enables scalable and automated operations:

  • Edge Computing: Robots use AWS IoT Core and cloud utilities to safely offload data to Amazon S3, even in low-connectivity regimes.
  • Automated Data Pipeline: Data collected by the robots flows through an Extract, Transform, and Load (ETL) pipeline for preprocessing. Data labeling is accelerated using an ensemble of vision foundation models (Grounding DINO, Owl-ViT, SAM2, CLIPSeg) along with custom expert vision models to automatically annotate large volumes of field imagery. Through active learning, the pipeline selects and down-samples the most informative samples, which are then reviewed and refined by human annotators before being passed downstream into the model training workflow.
  • Cloud native ML Pipeline: Aigen accelerates model training on Amazon SageMaker AI, using Distributed Data Parallel (DDP) across multi-GPU clusters to achieve faster iteration cycles and efficient hyperparameter tuning. By scaling training in the cloud, Aigen removes resource contention between model training and data labeling batch inference. This results in improved throughput, reduced wait times, and a more predictable ML workflow for data science and labeling teams.

Let’s take a closer look at how Aigen’s solution architecture is designed to meet diverse machine learning needs, from data labeling to real-time inference on autonomous field robots, starting with its model architecture.

Model architecture

Aigen’s models are classified in four hierarchical categories that form a progression from broad, general-purpose models to highly specialized models tailored for edge computing. Foundation Models (L1) are the starting point, with each subsequent category building on the previous model, adding specificity or performance enhancements.

Figure 1: Aigen Model Architecture

Figure 1: Aigen Model Architecture

  1. Foundation models use a combination of Aigen’s proprietary and open source foundation vision models to support plant detection, wheel detection, general object recognition, and segmentation. SAM2 is the primary model for generating segmentation masks, while Grounding DINO provides prompt-based annotation for objects like cars and people. Aigen employs a leading image generation model with ControlNet + Depth to create synthetic data with an option to fine-tune LoRA adapters to produce samples like field data. Aigen’s large vision models, trained on extensive field datasets, serve as robust foundations for crop identification and as high-quality starting points for building specialized pre-labeling models.
  2. Expert models are distilled from FMs and trained on annotated field images to perform precise, task-specific vision workloads. They generate high-quality pre-labels, bounding boxes, segmentation masks, and keypoint detections, which are then validated and refined by human annotators. Segmentation combined with key points allows the system to identify fine-grained plant anatomy, such as stems and other structural features. These models use both Vision Transformer and CNN-based architectures, and contain 10s of millions of parameters.
  3. Student models are compact, full-precision (FP32) models designed for ultra-low latency and minimal memory usage and are continuously fine-tuned on the latest data. Distilled from expert models, they remain extremely small, typically under 1.5M parameters, and are further improved through quantization-aware training (QAT), pruning, and other compression techniques. These optimizations enable efficient edge deployment, requiring as little as 2 Tera Operations Per Second (TOPS) while achieving real-time, double-digit frames per second (FPS) within the robot’s perception stack. Each student model is task-specific, tailored to individual crops (for example, tomato, cotton, sugar beets, soybeans) and various view angles such as top-down or intra-row.
  4. Edge models are built by further improving the full-precision student models for inference on the robot’s Neural Processing Unit (NPU). It undergoes QAT, followed by conversion to TFLite and INT8 quantization to reduce model size, lower power consumption, and increase inference throughput on the robot’s NPU. Purpose built for ultra-efficient edge inference, these models run on a 2.3-TOPS NPU using roughly 1.5W of power while sustaining real-time, double-digit FPS performance. These models contain 1M–1.2M parameters and occupy about 2 MB of memory.

This hybrid multi model ecosystem approach works well to balance model accuracy with edge computing constraints.

Modernized cloud native architecture for continuous model improvement

The modernized architecture forms a closed loop of nearly continuous model improvement, connecting field data collection from the robot to iterative training and rapid redeployment of updated models back onto the robot. This end-to-end cycle enables faster refinement, higher accuracy, and ongoing adaptation to real-world conditions.

Figure 2: Aigen modernized architecture

Figure 2: Aigen modernized architecture

The following sections describe the end-to-end process illustrated in the architecture diagram, from field data ingestion into AWS to continuous model delivery back to the robotic fleet. The workflow is organized into three key stages:

  1. Data Collection and Data Ingestion: Field Robots connect to AWS services using AWS IoT Core. Raw data, including navigation and crop-camera video (RGB + Depth), robot telemetry (odometry, frame timestamps), camera intrinsics/extrinsic, and job metadata, is continuously transmitted from the robots to Amazon S3 buckets. These data provide centralized storage for field, crop, and task specific downstream processing.
  2. Data Processing and Data Labeling: Aigen ETL unpacks the raw data, catalogs it, and stores it in Amazon S3. SageMaker AI processing jobs perform batch inference on this data and label the images using an ensemble of expert models running on the G5/G6 family of GPU instances. Aigen’s active learning process down-selects pre-labeled images and sends them for human review, where annotators validate and correct identified errors. Active learning analyzes images, embeddings, predictions, and other signals to identify the most informative samples for training. This approach removes the need to annotate every data point, often millions per field per season, by prioritizing images where the model struggles or those that add diversity. With multiple selection criteria, active learning helps keep dataset size manageable, control labeling effort, and verify only the most relevant samples are used to improve model performance.
  3. Model Training: The final annotated data is stored back in Amazon S3. SageMaker AI Training jobs pull this data from Amazon S3 and use multi-GPU instances to train expert, student and edge models. Edge-optimized models are deployed to the robots, while the newly finetuned expert models are used for the next cycle of data labeling.

Built on a cloud-native architecture, the workflow uses AWS services to deliver reliability, and robust performance, while effectively addressing the key challenges of scaling Aigen’s robotic fleet. The automated process collects data from field robot and use that in model training in the cloud, minimizing manual intervention while maintaining efficiency. Human-in-the-loop validation ensures high-quality training data by having annotators review and correct AI-generated pre-labels. Finally, active learning creates a positive feedback loop that continuously improves models by prioritizing the most relevant training data, enhancing robotic performance in real-world conditions.

Business benefits

This AI-powered solution delivered the following benefits:

  • Cost Efficiency: Reduced labeling costs from ~$2.00 to $0.089 per image, achieving a 22.5× cost reduction
  • Faster Annotation Pipeline: Reduced average annotation time from 14 minutes 57 seconds with manual labeling to just 41 seconds with SageMaker batch inference. This acceleration shortens model delivery for new crops from months to weeks, enabling quicker deployment and unlocking new business opportunities.
  • Rapid Scaling Gains: Experiment capacity increased from five per week on on-premises infrastructure to hundreds per week using Amazon SageMaker AI, achieving a 20× increase in throughput over previous hardware.
  • Innovation
    • The powerful GPU instances of Amazon SageMaker AI enabled the training and fine-tuning of advanced Vision Transformers models, which were not feasible on limited on-premises hardware. This access to state-of-the-art (SOTA) GPUs accelerates model innovation.
    • Scalable training infrastructure removes GPU bottlenecks by enabling parallel experimentation. This allows faster testing of new architectures and hyperparameters tuning, significantly speeding up model innovation compared to the slow, sequential workflow imposed by limited on-premises GPU capacity.

Key learnings

Amazon SageMaker AI has been instrumental in Aigen’s robotics system transformation, delivering significant benefits across the machine learning pipeline:

  • Self-Managed AI Infrastructure: SageMaker AI removes the need for Aigen to build and maintain auto scaling GPU compute infrastructure. This reduction in development costs allows Aigen to focus more on model development rather than infrastructure management, accelerating the production of deployment-ready models.
  • Streamlined ML Workflow: SageMaker AI streamlines the entire ML lifecycle, from data preparation to model deployment. Its flexibility supports the use of various built-in features and custom processes such as pre-labeling that cut down the time required to produce high-quality training data.
  • Efficient Resource Utilization: The managed infrastructure of SageMaker AI lowers operational overhead, supports continuous model updates, such as daily fine-tuning as plants grow, without resource bottlenecks. For example, when moving to a new customer’s cotton field with different soil, lighting, or crop varieties, the base cotton model may underperform. With SageMaker AI, Aigen can rapidly ingest new data and fine-tune models on this new condition to improve performance. Over multiple seasons and fields, this process builds a diverse, high-quality dataset that steadily strengthens the model family.

To achieve similar results in your organization, start by evaluating your current data labeling costs and consider implementing active learning techniques to reduce manual annotation overhead.

Conclusion

By using AWS services, particularly SageMaker AI, Aigen moved beyond the limitations of its on-premises infrastructure and established a foundation for continued growth and innovation. The new architecture delivers the scalability, efficiency, and intelligence needed to expand its fleet of eco-friendly agricultural robots, bringing sustainable farming practices to more fields worldwide. Aigen’s journey illustrates how generative AI can modernize machine learning pipelines for robotics, enabling more productive and environmentally sustainable agriculture. You can implement a similar architecture pattern to improve the machine learning pipeline.

Get started with model training and model inference by visiting Amazon SageMaker AI Studio. Creating your first Serverless ML flow pipeline is also supported in SageMaker AI Studio for additional workflow flexibility.


About the Authors

Amazon SageMaker AI now hosts NVIDIA Evo-2 NIM microservices

Post Syndicated from Malvika Viswanathan original https://aws.amazon.com/blogs/compute/amazon-sagemaker-ai-now-hosting-nvidia-evo-2-nim-microservices/

This post is co-written with Neel Patel, Abdullahi Olaoye, Kristopher Kersten, Aniket Deshpande from NVIDIA.

Today, we’re excited to announce that the NVIDIA Evo-2 NVIDIA NIM microservice are now listed in Amazon SageMaker JumpStart. You can use this launch to deploy accelerated and specialized NIM microservices to build, experiment, and responsibly scale your drug discovery workflows on Amazon Web Services (AWS).

In this post, we demonstrate how to get started with these models using Amazon SageMaker Studio.

NVIDIA NIM microservices on AWS

NVIDIA NIM integrates closely with AWS managed services, such as Amazon Elastic Compute Cloud (Amazon EC2), Amazon Elastic Kubernetes Service (Amazon EKS), and Amazon SageMaker AI, to support deployment of generative AI models at scale. As part of NVIDIA AI Enterprise, which is available in the AWS Marketplace, NVIDIA NIM is a set of microservices designed to accelerate the deployment of generative AI. These prebuilt containers support a broad spectrum of generative AI models, from open source community models, to NVIDIA Nemotron and custom models. NIM microservices are deployed with just a few lines of code, or with a few actions in the SageMaker Studio console. Engineered to facilitate seamless generative AI inferencing at scale, NIM ensures that generative AI applications can be deployed on various AWS services.

NVIDIA BioNeMo Evo 2 overview

NVIDIA BioNeMo is a platform of NIM microservices, developer tools, and AI models that accelerate building, adapting, and deploying biomolecular AI models for drug discovery. It packages curated training recipes, data loaders, and domain-optimized pretrained models for DNA, RNA, and proteins, alongside NVIDIA CUDA-X libraries such as NVIDIA cuEquivariance. These components power tasks such as 3D structure prediction, de novo design, virtual screening, docking, and property prediction with GPU-accelerated performance.

NVIDIA NIM microservices provide optimized, API-first inference that integrates directly into enterprise pipelines across on-premises and the cloud, providing scalable and secure deployment with faster time-to-market and lower Total Cost of Ownership (TCO). The Evo 2 NIM delivers a 40-billion parameter foundation model (FM) trained on a vast dataset of genomes that can be used to predict protein function, identify mutations, and accelerate bioengineering research. Furthermore, the Evo 2 NIM can be chained with other NIM microservices such as ESMFold to create end-to-end, containerized workflows that cut time-to-insight while streamlining deployment through consistent APIs.

SageMaker Studio overview

SageMaker Studio is a web-based integrated development environment (IDE) for machine learning (ML) that provides a unified visual interface for all of the tools that you need to complete each step of the ML development lifecycle. SageMaker Studio provides complete access, control, and visibility into each step of the ML workflow, from data preparation to model building, training, and deployment.

The key features of SageMaker Studio include:

  • Unified interface: Access all SageMaker capabilities through a single, web-based visual interface
  • Jupyter notebooks: Fully managed Jupyter notebooks with pre-configured kernels for popular ML frameworks
  • Model management: Browse, deploy, and manage models from AWS Marketplace and other sources through an intuitive interface
  • Collaboration: Share notebooks, experiments, and models with your team members
  • Built-in security: Integrated with AWS Identity and Access Management (IAM) for secure access control
  • Cost management: Monitor and control costs with built-in usage tracking and resource management tools

Amazon SageMaker JumpStart overview

SageMaker JumpStart is a fully managed service that offers state-of-the-art foundation models for various use cases such as content writing, code generation, question answering, copywriting, summarization, classification, and information retrieval. It provides a collection of pre-trained models that you can deploy quickly, accelerating the development and deployment of ML applications. One of the key components of SageMaker JumpStart is model hubs, which offer a vast catalog of pre-trained models, such as Mistral, for a variety of tasks. You can now discover and deploy Evo 2 NIM in Amazon SageMaker Studio or programmatically through the SageMaker Python SDK, so you can derive model performance and MLOps controls with Amazon SageMaker AI features such as Amazon SageMaker Pipelines, Amazon SageMaker Debugger, or container logs. The model is deployed in a secure AWS environment and in your VPC, helping to support data security for enterprise security needs.

Prerequisites

Before getting started with deployment, make sure that your IAM service role for SageMaker AI has the SageMakerFullAccess permission policy attached. To deploy the NVIDIA NIM microservices successfully, confirm one of the following:

Make sure that your IAM role has the following permissions, and that you have the authority to make AWS Marketplace subscriptions in the AWS account used:

  • aws-marketplace:ViewSubscriptions
  • aws-marketplace:Unsubscribe
  • aws-marketplace:Subscribe

If your account is already subscribed to the model, then you can skip to the following Deploy section. Otherwise, start by subscribing to the model package and move to the Deploy section after.

Subscribe to the model package

To subscribe to the model package, complete the following steps:

  1. Open the SageMaker Jumpstart portal from the SageMaker AI page.
  2. Search for Evo 2 NIM.
  3. Choose View model, and on the Model details page choose Subscribe. This will take you to the AWS Marketplace listing for the Evo 2 NIM.
  4. On the AWS Marketplace listing page, choose View purchase options, review the purchase terms and choose the Subscribe button if you and your organization agree with EULA, pricing, and support terms.
  5. Choose Continue to with the configuration and choose an AWS Region where you have the service quota for the desired instance type.

A product Amazon Resource Name (ARN) is displayed. This is the model package ARN that you need to specify while creating a deployable model using the SageMaker SDK.

Option 1: Deploy the Evo 2 NIM using SageMaker Studio

The following section outlines how to deploy the EVO 2 NIM using SageMaker Studio.

Getting started with SageMaker Studio

Begin by accessing the AWS Management Console and navigating to the SageMaker AI service. When you’re in the SageMaker AI console, locate Studio in the left navigation panel and choose Open Studio next to your user profile. If you haven’t set up a SageMaker Studio domain yet, then you must create a new domain and user profile first. This launches the web-based SageMaker Studio interface where you can manage all aspects of your ML workflow.

Navigating to model packages

Within SageMaker Studio, look for Models in the left sidebar and choose JumpStart base models tab within the Models interface. This section contains all available model packages in SageMaker JumpStart, including those from the AWS Marketplace

Locating the Evo-2 NIM model

Use the search functionality to find the NVIDIA Evo-2 NIM model by searching for terms such as “Evo-2” or “NVIDIA”. When you locate the model package in the filtered results, choose it to view the Model overview page. This page provides an overview of the model and can have a Notebooks tab that will show a sample notebook that contains an example showing how to use the NIM. You can choose Open in JupyterLab to open the notebook in JupyterLab and use it as a starting point for using the NIM.

Configuring the model deployment

On the model package overview page, choose the Deploy button on the top right to begin the deployment process. You must configure several important settings: provide a unique endpoint name (such as “Evo-2-nim-endpoint”), choose an appropriate instance type (ml.g6e.12xlarge is recommended for optimal performance), set the initial instance count (typically 1 for initial testing), and specify an endpoint configuration name. Review all of these settings carefully before proceeding.

Initiating and monitoring the deployment

After verifying your configuration settings, choose Deploy to start the deployment process for creating a Real-time inferance endpoint. Navigate to the Deployments section and then the Endpoints section in the left sidebar to monitor the deployment progress. The endpoint status initially shows Creating and typically takes 5–10 minutes to complete. You can track the progress and should see the status change to InService once the deployment is successful.

Testing and validation

When your endpoint is deployed and shows the In Service status, you can optionally test it directly through the SageMaker Studio interface. Choose your deployed endpoint from the endpoints list to access the Endpoint summary page. Scroll down and select the Playground tab. If available, you will see two options: Test the sample request and Use Python SDK example code. You can use either option to validate the deployment by using a sample protein sequence. This validates the endpoint is working correctly before integrating it into your applications.

Option 2: Deploy Evo 2 using the SageMaker SDK

In this section we walk through deploying the Evo-2 NIM through the SageMaker SDK. Make sure that you have the account-level service limit for using ml.g6e.12xlarge for endpoint usage as one or more instances. Furthermore, NVIDIA provides a list of supported instance types that support deployment. Refer to the AWS Marketplace listing for the model to see the supported instance types. To request a service quota increase, go to the AWS service quotas.

import sagemaker
import boto3
from sagemaker import ModelPackage, get_execution_role
import json
# Initialize SageMaker session and role
role = get_execution_role()
sagemaker_session = sagemaker.Session()
# Model Package ARN from your AWS Marketplace subscription
# Replace this with your actual Model Package ARN after subscription
model_package_arn = "arn:aws:sagemaker:<region>:<account-id>:model-package/Evo-2-nim-model"
# Create model from AWS Marketplace Model Package
model = ModelPackage(
    role=role, 
    model_package_arn=model_package_arn,
    sagemaker_session=sagemaker_session
)
# Deploy the model to an endpoint
predictor = model.deploy(
    initial_instance_count=1,
    instance_type="ml.g6e.12xlarge",  # Using recommended NVIDIA GPU instance
    endpoint_name="Evo-2-endpoint",
    wait=True
)

Run Inference with Evo 2 SageMaker endpoint

When you have the model, you can use a sample text to do an inference request. NIM on SageMaker supports the OpenAI API inference protocol inference request format. For an explanation of the supported parameters, go to the Evo-2 API documentation.

Real-time inference example

sm_runtime = boto3.client("sagemaker-runtime", region_name=region)

generate_payload = {

 "sequence": "ACGTACGTACGT",

 "num_tokens": 100,

 "temperature": 0.7,

 "top_k": 3,

}

response = sm_runtime.invoke_endpoint(

EndpointName='Evo2-40b-2-1-0',

ContentType="application/json",

Body=json.dumps(generate_payload),

)

result = json.loads(response["Body"].read())

print("Generated DNA:", result["sequence"])
print("Elapsed (ms):", result.get("elapsed_ms"))

Example output:

Generated DNA: ACGTACATATGTTCGTACATTCGCACAGACGCCATTTTGAAAAATGCTTTAAATGGATTCAGAATTGGTCAAAATGCATAAATCCATCAAAATTTTTTTC
Elapsed (ms): 10770

Cleaning up

To avoid unwanted charges, complete the steps in this section to clean up your resources.

Deleting the endpoint from SageMaker Studio

In SageMaker Studio, navigate to the Endpoints section in the left sidebar under Inference to view all your active endpoints. Locate your Evo-2 NIM endpoint in the list and select it to open the endpoint details page. On this page, there is a Delete button. Choose Delete and confirm the deletion when prompted. The endpoint status changes to Deleting and disappears from your endpoints list when the deletion is complete. This process typically takes a few minutes, and when it’s deleted the endpoint stops incurring charges immediately.

Delete the SageMaker endpoint

The SageMaker endpoint that you deployed incurs costs if you leave it running. Use the following code to delete the endpoint if you want to stop incurring charges. For more details, go to Delete endpoints and resources.

# Delete endpoint when done (important for cost management)
predictor.delete_endpoint()

Conclusion

The availability of NVIDIA Evo-2 NIM microservices on Amazon SageMaker Jumpstart represents a significant advancement for researchers and organizations working in drug discovery. This solution provides GPU-accelerated multiple sequence alignments and dramatically speeds up structure prediction pipelines that are critical for protein design and antibody research. Users can implement the flexible deployment options—through SageMaker Studio, or SageMaker SDK—to choose the approach that best fits their workflow and technical expertise. The optimized performance of these NIM microservices, combined with the scalability and security of SageMaker, enables faster time-to-insight while streamlining the deployment of complex biomolecular AI models. We encourage you to try the Evo-2 NIM today and look out for future release of MSA-search and Boltz-2 NIMs to accelerate your drug discovery workflows and use the power of NVIDIA’s specialized microservices on AWS infrastructure.

Announcing Amazon SageMaker Inference for custom Amazon Nova models

Post Syndicated from Channy Yun (윤석찬) original https://aws.amazon.com/blogs/aws/announcing-amazon-sagemaker-inference-for-custom-amazon-nova-models/

Since we launched Amazon Nova customization in Amazon SageMaker AI at AWS NY Summit 2025, customers have been asking for the same capabilities with Amazon Nova as they do when they customize open weights models in Amazon SageMaker Inference. They also wanted have more control and flexibility in custom model inference over instance types, auto-scaling policies, context length, and concurrency settings that production workloads demand.

Today, we’re announcing the general availability of custom Nova model support in Amazon SageMaker Inference, a production-grade, configurable, and cost-efficient managed inference service to deploy and scale full-rank customized Nova models. You can now experience an end-to-end customization journey to train Nova Micro, Nova Lite, and Nova 2 Lite models with reasoning capabilities using Amazon SageMaker Training Jobs or Amazon HyperPod and seamlessly deploy them with managed inference infrastructure of Amazon SageMaker AI.

With Amazon SageMaker Inference for custom Nova models, you can reduce inference cost through optimized GPU utilization using Amazon Elastic Compute Cloud (Amazon EC2) G5 and G6 instances over P5 instances, auto-scaling based on 5-minute usage patterns, and configurable inference parameters. This feature enables deployment of customized Nova models with continued pre-training, supervised fine-tuning, or reinforcement fine-tuning for your use cases. You can also set advanced configurations about context length, concurrency, and batch size for optimizing the latency-cost-accuracy tradeoff for your specific workloads.

Let’s see how to deploy customized Nova models on SageMaker AI real-time endpoints, configure inference parameters, and invoke your models for testing.

Deploy custom Nova models in SageMaker Inference
At AWS re:Invent 2025, we introduced new serverless customization in Amazon SageMaker AI for popular AI models including Nova models. With a few clicks, you can seamlessly select a model and customization technique, and handle model evaluation and deployment. If you already have a trained custom Nova model artifact, you can deploy the models on SageMaker Inference through the SageMaker Studio or SageMaker AI SDK.

In the SageMaker Studio, choose a trained Nova model in Models in your models in the Models menu. You can deploy the model by choosing Deploy button, SageMaker AI and Create new endpoint.

Choose the endpoint name, instance type, and advanced options such as instance count, max instance count, permission and networking, and Deploy button. At GA launch, you can use g5.12xlarge, g5.24xlarge, g5.48xlarge, g6.12xlarge, g6.24xlarge, g6.48xlarge, and p5.48xlarge instance types for the Nova Micro model, g5.24xlarge, g5.48xlarge, g6.24xlarge, g6.48xlarge, and p5.48xlarge for the Nova Lite model, and p5.48xlarge for the Nova 2 Lite model.

Creating your endpoint requires time to provision the infrastructure, download your model artifacts, and initialize the inference container.

After model deployment completes and the endpoint status shows InService, you can perform real-time inference using the new endpoint. To test the model, choose the Playground tab and input your prompt in the Chat mode.

You can also use the SageMaker AI SDK to create two resources: a SageMaker AI model object that references your Nova model artifacts, and an endpoint configuration that defines how the model will be deployed.

The following code creates a SageMaker AI model that references your Nova model artifacts:

# Create a SageMaker AI model
    model_response = sagemaker.create_model(
        ModelName= 'Nova-micro-ml-g5-12xlarge',
        PrimaryContainer={
            'Image': '123456789012.dkr.ecr.us-east-1.amazonaws.com/nova-inference-repo:v1.0.0',
            'ModelDataSource': {
                'S3DataSource': {
                   'S3Uri': 's3://your-bucket-name/path/to/model/artifacts/',
                   'S3DataType': 'S3Prefix',
                   'CompressionType': 'None'
                }
            },
            # Model Parameters
            'Environment': {
                'CONTEXT_LENGTH': 8000,
                'CONCURRENCY': 16,
                'DEFAULT_TEMPERATURE': 0.0,
                'DEFAULT_TOP_P': 1.0
            }
        },
        ExecutionRoleArn=SAGEMAKER_EXECUTION_ROLE_ARN,
        EnableNetworkIsolation=True
    )
    print("Model created successfully!")

Next, create an endpoint configuration that defines your deployment infrastructure and deploy your Nova model by creating a SageMaker AI real-time endpoint. This endpoint will host your model and provide a secure HTTPS endpoint for making inference requests.

# Create Endpoint Configuration
    production_variant = {
        'VariantName': 'primary',
        'ModelName': 'Nova-micro-ml-g5-12xlarge',
        'InitialInstanceCount': 1,
        'InstanceType': 'ml.g5.12xlarge',
    }
    
    config_response = sagemaker.create_endpoint_config(
        EndpointConfigName= 'Nova-micro-ml-g5-12xlarge-Config',
        ProductionVariants= production_variant
    )
    print("Endpoint configuration created successfully!")
    
# Deploy your Noval model
    endpoint_response = sagemaker.create_endpoint(
        EndpointName= 'Nova-micro-ml-g5-12xlarge-endpoint',
        EndpointConfigName= 'Nova-micro-ml-g5-12xlarge-Config'
    )
    print("Endpoint creation initiated successfully!")

After the endpoint is created, you can send inference requests to generate predictions from your custom Nova model. Amazon SageMaker AI supports synchronous endpoints for real-time with streaming/non-streaming modes and asynchronous endpoints for batch processing.

For example, the following code creates streaming completion format for text generation:

# Streaming chat request with comprehensive parameters
streaming_request = {
"messages": [
        {"role": "user", "content": "Compare our Q4 2025 actual spend against budget across all departments and highlight variances exceeding 10%"}
    ],
    "max_tokens": 512,
    "stream": True,
    "temperature": 0.7,
    "top_p": 0.95,
    "top_k": 40,
    "logprobs": True,
    "top_logprobs": 2,
    "reasoning_effort": "low",  # Options: "low", "high"
    "stream_options": {"include_usage": True}
}

invoke_nova_endpoint(streaming_request)

def invoke_nova_endpoint(request_body):
"""
    Invoke Nova endpoint with automatic streaming detection.
    
    Args:
        request_body (dict): Request payload containing prompt and parameters
    
    Returns:
        dict: Response from the model (for non-streaming requests)
        None: For streaming requests (prints output directly)
    """
    body = json.dumps(request_body)
    is_streaming = request_body.get("stream", False)
    
    try:
        print(f"Invoking endpoint ({'streaming' if is_streaming else 'non-streaming'})...")
        
        if is_streaming:
            response = runtime_client.invoke_endpoint_with_response_stream(
                EndpointName=ENDPOINT_NAME,
                ContentType='application/json',
                Body=body
            )
            
            event_stream = response['Body']
            for event in event_stream:
                if 'PayloadPart' in event:
                    chunk = event['PayloadPart']
                    if 'Bytes' in chunk:
                        data = chunk['Bytes'].decode()
                        print("Chunk:", data)
        else:
            # Non-streaming inference
            response = runtime_client.invoke_endpoint(
                EndpointName=ENDPOINT_NAME,
                ContentType='application/json',
                Accept='application/json',
                Body=body
            )
            
            response_body = response['Body'].read().decode('utf-8')
            result = json.loads(response_body)
            print("✅ Response received successfully")
            return result
    
    except ClientError as e:
        error_code = e.response['Error']['Code']
        error_message = e.response['Error']['Message']
        print(f"❌ AWS Error: {error_code} - {error_message}")
    except Exception as e:
        print(f"❌ Unexpected error: {str(e)}")

To use full code examples, visit Customizing Amazon Nova models on Amazon SageMaker AI. To learn more about best practices on deploying and managing models, visit Best Practices for SageMaker AI.

Now available
Amazon SageMaker Inference for custom Nova models is available today in US East (N. Virginia) and US West (Oregon) AWS Regions. For Regional availability and a future roadmap, visit the AWS Capabilities by Region.

The feature supports Nova Micro, Nova Lite, and Nova 2 Lite models with reasoning capabilities, running on EC2 G5, G6, and P5 instances with auto-scaling support. You pay only for the compute instances you use, with per-hour billing and no minimum commitments. For more information, visit Amazon SageMaker AI Pricing page.

Give it a try in Amazon SageMaker AI console and send feedback to AWS re:Post for SageMaker or through your usual AWS Support contacts.

Channy

New serverless customization in Amazon SageMaker AI accelerates model fine-tuning

Post Syndicated from Channy Yun (윤석찬) original https://aws.amazon.com/blogs/aws/new-serverless-customization-in-amazon-sagemaker-ai-accelerates-model-fine-tuning/

Today, I’m happy to announce new serverless customization in Amazon SageMaker AI for popular AI models, such as Amazon Nova, DeepSeek, GPT-OSS, Llama, and Qwen. The new customization capability provides an easy-to-use interface for the latest fine-tuning techniques like reinforcement learning, so you can accelerate the AI model customization process from months to days.

With a few clicks, you can seamlessly select a model and customization technique, and handle model evaluation and deployment—all entirely serverless so you can focus on model tuning rather than managing infrastructure. When you choose serverless customization, SageMaker AI automatically selects and provisions the appropriate compute resources based on the model and data size.

Getting started with serverless model customization
You can get started customizing models in Amazon SageMaker Studio. Choose Models in the left navigation pane and check out your favorite AI models to be customized.

Customize with UI
You can customize AI models in a only few clicks. In the Customize model dropdown list for a specific model such as Meta Llama 3.1 8B Instruct, choose Customize with UI.

You can select a customization technique used to adapt the base model to your use case. SageMaker AI supports Supervised Fine-Tuning and the latest model customization techniques including Direct Preference Optimization, Reinforcement Learning from Verifiable Rewards (RLVR), and Reinforcement Learning from AI Feedback (RLAIF). Each technique optimizes models in different ways, with selection influenced by factors such as dataset size and quality, available computational resources, task at hand, desired accuracy levels, and deployment constraints.

Upload or select a training dataset to match the format required by the customization technique selected. Use the values of batch size, learning rate, and number of epochs recommended by the technique selected. You can configure advanced settings such as hyperparameters, a newly introduced serverless MLflow application for experiment tracking, and network and storage volume encryption. Choose Submit to get started on your model training job.

After your training job is complete, you can see the models you created in the My Models tab. Choose View details in one of your models.

By choosing Continue customization, you can continue to customize your model by adjusting hyperparameters or training with different techniques. By choosing Evaluate, you can evaluate your customized model to see how it performs compared to the base model.

When you complete both jobs, you can choose either the SageMaker or Bedrock in the Deploy dropdown list to deploy your model.

You can choose Amazon Bedrock for serverless inference. Choose Bedrock and the model name to deploy the model into Amazon Bedrock. To find your deployed models, choose Imported models in the Bedrock console.

You can also deploy your model to a SageMaker AI inference endpoint if you want to control your deployment resources such as an instance type and instance count. After the SageMaker AI deployment is In service, you can use this endpoint to perform inference. In the Playground tab, you can test your customized model with a single prompt or chat mode.

With the serverless MLflow capability, you can automatically log all critical experiment metrics without modifying code and access rich visualizations for further analysis.

Customize with code
When you choose customizing with code, you can see a sample notebook to fine-tune or deploy AI models. If you want to edit the sample notebook, open it in JupyterLab. Alternatively, you can deploy the model immediately by choosing Deploy.

You can choose the Amazon Bedrock or SageMaker AI endpoint by selecting the deployment resources either from Amazon SageMaker Inference or Amazon SageMaker Hyperpod.

When you choose Deploy on the bottom right of the page, it will be redirected back to the model detail page. After the SageMaker AI deployment is in service, you can use this endpoint to perform inference.

Okay, you’ve seen how to streamline the model customization in the SageMaker AI. You can now choose your favorite way. To learn more, visit the Amazon SageMaker AI Developer Guide.

Now available
New serverless AI model customization in Amazon SageMaker AI is now available in US East (N. Virginia), US West (Oregon), Asia Pacific (Tokyo), and Europe (Ireland) Regions. You only pay for the tokens processed during training and inference. To learn more details, visit Amazon SageMaker AI pricing page.

Give it a try in Amazon SageMaker Studio and send feedback to AWS re:Post for SageMaker or through your usual AWS Support contacts.

Channy

Introducing Amazon Nova Forge: Build your own frontier models using Nova

Post Syndicated from Danilo Poccia original https://aws.amazon.com/blogs/aws/introducing-amazon-nova-forge-build-your-own-frontier-models-using-nova/

Organizations are rapidly expanding their use of generative AI across all parts of the business. Applications requiring deep domain expertise or specific business context need models that truly understand their proprietary knowledge, workflows, and unique requirements.

While techniques like prompt engineering and Retrieval Augmented Generation (RAG) work well for many use cases, they have fundamental limitations when it comes to embedding specialized knowledge into a model’s core understanding. Supervised fine-tuning and reinforcement learning help in customizing the model, but they operate too late in the development lifecycle, layering modifications on top of models that are a fully trained, and therefore difficult to steer to specific domains of interest.

When organizations attempt deeper customization through Continued Pre-Training (CPT) using only their proprietary data, they often encounter catastrophic forgetting, where models lose their foundational capabilities as they learn new content. At the same time, the data, compute, and cost needed for training a model from scratch are still a prohibitive barrier for most organizations.

Today, we’re introducing Amazon Nova Forge, a new service to build your own frontier models using Nova. Nova Forge customers can start their development from early model checkpoints, blend their datasets with Amazon Nova-curated training data, and host their custom models securely on AWS. Nova Forge is the easiest and most cost-effective way to build your own frontier model.

Use cases and applications
Nova Forge is designed for organizations with access to proprietary or industry-specific data who want to build AI that truly understands their domain. This includes:

  • Manufacturing and automation – Building models that understand specialized processes, equipment data, and industry-specific workflows
  • Research and development – Creating models trained on proprietary research data and domain-specific knowledge
  • Content and media – Developing models that understand brand voice, content standards, and specific moderation requirements
  • Specialized industries – Training models on industry-specific terminology, regulations, and best practices

Depending on the specific use cases, Nova Forge can be used to add differentiated capabilities, enhance task-specific accuracy, reduce costs, and lower latency.

How Nova Forge works
Nova Forge addresses the limitations of current customization approaches by allowing you to start model development from early checkpoints across pre-training, mid-training, and post-training phases. You can blend your proprietary data with Amazon Nova-curated data throughout all training phases, running training using proven recipes on Amazon SageMaker AI fully managed infrastructure. This data mixing approach significantly reduces catastrophic forgetting compared to training with raw data alone, helping preserve foundational skills—including core intelligence, general instruction following capabilities, and safety benefits—while incorporating your specialized knowledge.

Nova Forge provides the ability to use reward functions in your own environment for reinforcement learning (RL). This allows the model to learn from feedback generated in environments that are representative of your use cases. Beyond single-step evaluations, you can also use your own orchestrator to manage multi-turn rollouts, enabling RL training for complex agent workflows and sequential decision-making tasks. Whether you’re using chemistry tools to score molecular designs, or robotics simulations that reward efficient task completion and penalize collisions, you can connect your proprietary environments directly.

You can also take advantage of the built-in responsible AI toolkit available in Nova Forge to configure the safety and content moderation settings of your model. You can adjust settings to meet your specific business needs in areas like safety, security, and handling of sensitive content.

Getting started with Nova Forge
Nova Forge integrates seamlessly with your existing AWS workflows. You can use the familiar tools and infrastructure in Amazon SageMaker AI to run your training, then import your custom Nova models as private models on Amazon Bedrock. This gives you the same security, consistent APIs, and broader AWS integrations as any model in Amazon Bedrock.

In Amazon SageMaker Studio, you can now build your frontier model with Amazon Nova.

Amazon Nova Forge in the SageMaker AI console

To start building the model, choose which checkpoint to use: pre-trained, mid-trained, or post-trained. You can also upload your dataset here or use existing datasets.

Amazon Nova Forge checkpoints

You can blend your training data by mixing in curated datasets provided by Nova. These datasets, categorized by domain, can help your model to preserve general performance and prevent overfitting or catastrophic forgetting.

Amazon Nova Forge data mixing

Optionally, you can choose to use Reinforcement Fine-Tuning (RFT) to improve factual accuracy and reduce hallucinations in specific domains.

When training completes, import the model into Amazon Bedrock and start using it in your applications.

Things to know
Amazon Nova Forge is available in the US East (N. Virginia) AWS Region. The program includes access to multiple Nova model checkpoints, training recipes to mix proprietary data with Amazon Nova-curated training data, proven training recipes, and integration with Amazon SageMaker AI and Amazon Bedrock.

Learn more in the Amazon Nova User Guide and explore Nova Forge from the Amazon SageMaker AI console.

Organizations interested in expert assistance can also reach out to our Generative AI Innovation Center for additional support with their model development initiatives.

Danilo

Accelerate your data and AI workflows by connecting to Amazon SageMaker Unified Studio from Visual Studio Code

Post Syndicated from Lauren Mullennex original https://aws.amazon.com/blogs/big-data/accelerate-your-data-and-ai-workflows-by-connecting-to-amazon-sagemaker-unified-studio-from-visual-studio-code/

Developers and machine learning (ML) engineers can now connect directly to Amazon SageMaker Unified Studio from their local Visual Studio Code (VS Code) editor. With this capability, you can maintain your existing development workflows and personalized integrated development environment (IDE) configurations while accessing Amazon Web Services (AWS) analytics and artificial intelligence and machine learning (AI/ML) services in a unified data and AI development environment. This integration provides seamless access from your local development environment to scalable infrastructure for running data processing, SQL analytics, and ML workflows. By connecting your local IDE to SageMaker Unified Studio, you can optimize your data and AI development workflows without disrupting your established development practices.

In this post, we demonstrate how to connect your local VS Code to SageMaker Unified Studio so you can build complete end-to-end data and AI workflows while working in your preferred development environment.

Solution overview

The solution architecture consists of three main components:

  • Local computer – Your development machine running VS Code with AWS Toolkit for Visual Studio Code and Microsoft Remote SSH installed. You can connect through the Toolkit for Visual Studio Code extension in VS Code by browsing available SageMaker Unified Studio spaces and selecting their target environment.
  • SageMaker Unified Studio – Part of the next generation of Amazon SageMaker, SageMaker Unified Studio is a single data and AI development where you can find and access your data and act on it using familiar AWS tools for SQL analytics, data processing, model development, and generative AI application development.
  • AWS Systems Manager – A secure, scalable remote access and management service that enables seamless connectivity between your local VS Code and SageMaker Unified Studio spaces to streamline data and AI development workflows.

The following diagram shows the interaction between your local IDE and SageMaker Unified Studio spaces.
Architecture diagram showing the connection between VS Code, SageMaker Unified Studio, and AWS SSM

Prerequisites

To try the remote IDE connection, you must have the following prerequisites:

  • Access to a SageMaker Unified Studio domain with connectivity to the internet. For domains set up in virtual private cloud (VPC)-only mode, your domain should have a route out to the internet through a proxy or a NAT gateway. If your domain is completely isolated from the internet, refer to the documentation for setting up the remote connection. If you don’t have a SageMaker Unified Studio domain, you can create one using the quick setup or manual setup option.
  • A user with SSO credentials through IAM Identity Center is required. To configure SSO user access, review the documentation.
  • Access to or can create a SageMaker Unified Studio project.
  • A JupyterLab or Code Editor compute space with a minimum instance type requirement of 8 GB of memory. In this post, we use an ml.t3.large instance. SageMaker Distribution image version 2.8 or later is supported.
  • You have the latest stable VS Code with Microsoft Remote SSH (version 0.74.0 or later), and AWS Toolkit (version 3.74.0) extension installed on your local machine.

Solution implementation

To enable remote connectivity and connect to the space from VS Code, complete the following steps. To connect to a SageMaker Unified Studio space remotely, the space must have remote access enabled.

  1. Navigate to your JupyterLab or Code Editor space. If it’s running, stop the space and choose Configure space to enable remote access, as shown in the following screenshot.
    Shows how to configure space in SageMaker Unified Studio
  2. Turn on Remote access to enable the feature and choose Save and restart, as shown in the following screenshot.
    Enable the remote access toggle in SageMaker Unified Studio space
  3. Navigate to AWS Toolkit in your local VS Code installation.
    Navigating to AWS Toolkit in VS Code
  4. On the SageMaker Unified Studio tab, choose Sign in to get started and provide your SageMaker Unified Studio domain URL, that is, https://<domain-id>.sagemaker.<region>.on.aws.
    SageMaker Unified Studio sign-in in VS Code
  5. You will be prompted to be redirected to your web browser to allow access to AWS IDE extensions. Choose Open to open a new web browser tab.
    Notification to sign-in to SageMaker Unified Studio domain
  6. Choose Allow access to connect to the project through VS Code.
    Allow access to the SageMaker Unified Studio project from VS Code
  7. You’ll receive a Request approved notification, indicating that you now have permissions to access the domain remotely.
    Approval that VS Code has access to the SageMaker Unified Studio domain

You can now navigate back to your local VS Code to access your project to continue building ETL jobs and data pipelines, training and deploying ML models, or building generative AI applications. To connect to the project for data processing and ML development, follow these steps:

  1. Choose Select a project to view your data and compute resources. All projects in the domain are listed, but you’re only allowed access to projects where you’re a project member.

    Select a project in your local VS Code

    You can only view one domain and one project at a time. To switch projects or sign out of a domain, choose the ellipsis icon.

    Viewing data and compute resources and switching projects in local VS Code

    You can also view compute and data resources that you created previously.

  2. Connect your JupyterLab or Code Editor space by selecting the connectivity icon, as shown in the following image. Note: If this option does not show as available, then you may have remote access disabled in the space. If the space is in “Stopped” state, hover over the space and choose the connect button. This should enable remote access, start the space and connect to it. If the space is in “Running” state, the space must be restarted with remote access enabled. You can do this by stopping the space and connecting to it as shown below from the toolkit.
    Connectivity icon in local VS Code

    Another VS Code window will open that is connected to your SageMaker Unified Studio space using remote SSH.

  3. Navigate to the Explorer to view your space’s notebooks, files, and scripts. From the AWS Toolkit, you can also view your data sources.
    Explorer in local VS Code after remote SSH connection showing connectivity to SageMaker Unified Studio space

Use your custom VS Code setup with SageMaker Unified Studio resources

When you connect VS Code to SageMaker Unified Studio, you keep all your personal shortcuts and customizations. For example, if you use code snippets to quickly insert common analytics and ML code patterns, these continue to work with SageMaker Unified Studio managed infrastructure.

In the following graphic, we demonstrate using analytics workflow shortcuts. The “show-databases” code snippet queries Athena to show available databases, “show-glue-tables” lists tables in AWS Glue Data Catalog, and “query-ecommerce” retrieves data using Spark SQL for analysis.

Graphic showing how to use code snippets in local VS Code to query data resources in SageMaker Unified Studio

You can also use shortcuts to automate building and training an ML model on SageMaker AI. In the below graphic, the code snippets show data processing, configuring, and launching a SageMaker AI training job. This approach demonstrates how data practitioners can maintain their familiar development setup while using managed data and AI resources in SageMaker Unified Studio.

Graphic showing how to do data processing and train a SageMaker AI job remotely in VS Code using code snippets

Disabling remote access in SageMaker Unified Studio

As an administrator, if you want to disable this feature for your users, you can enforce it by adding the following policy to your project’s IAM role:

{
    "Version": "2012-10-17",
    "Statement": [
        {
            "Sid": "DenyStartSessionForSpaces",
            "Effect": "Deny",
            "Action": [
                "sagemaker:StartSession"
            ],
            "Resource": "arn:aws:sagemaker:*:*:space/*/*"
        }
    ]
}

Clean up

SageMaker Unified Studio by default shuts down idle resources such as JupyterLab and Code Editor spaces after 1 hour. If you’ve created a SageMaker Unified Studio domain for the purposes of this post, remember to delete the domain.

Conclusion

Connecting directly to Amazon SageMaker Unified Studio from your local IDE reduces the friction of moving between local development and scalable data and AI infrastructure. By maintaining your personalized IDE configurations, this reduces the need to adapt between different development environments. Whether you’re processing large datasets, training foundation models (FMs), or building generative AI applications, you can now work from your local setup while accessing the capabilities of SageMaker Unified Studio. Get started today by connecting your local IDE to SageMaker Unified Studio to streamline your data processing workflows and accelerate your ML model development.


About the authors
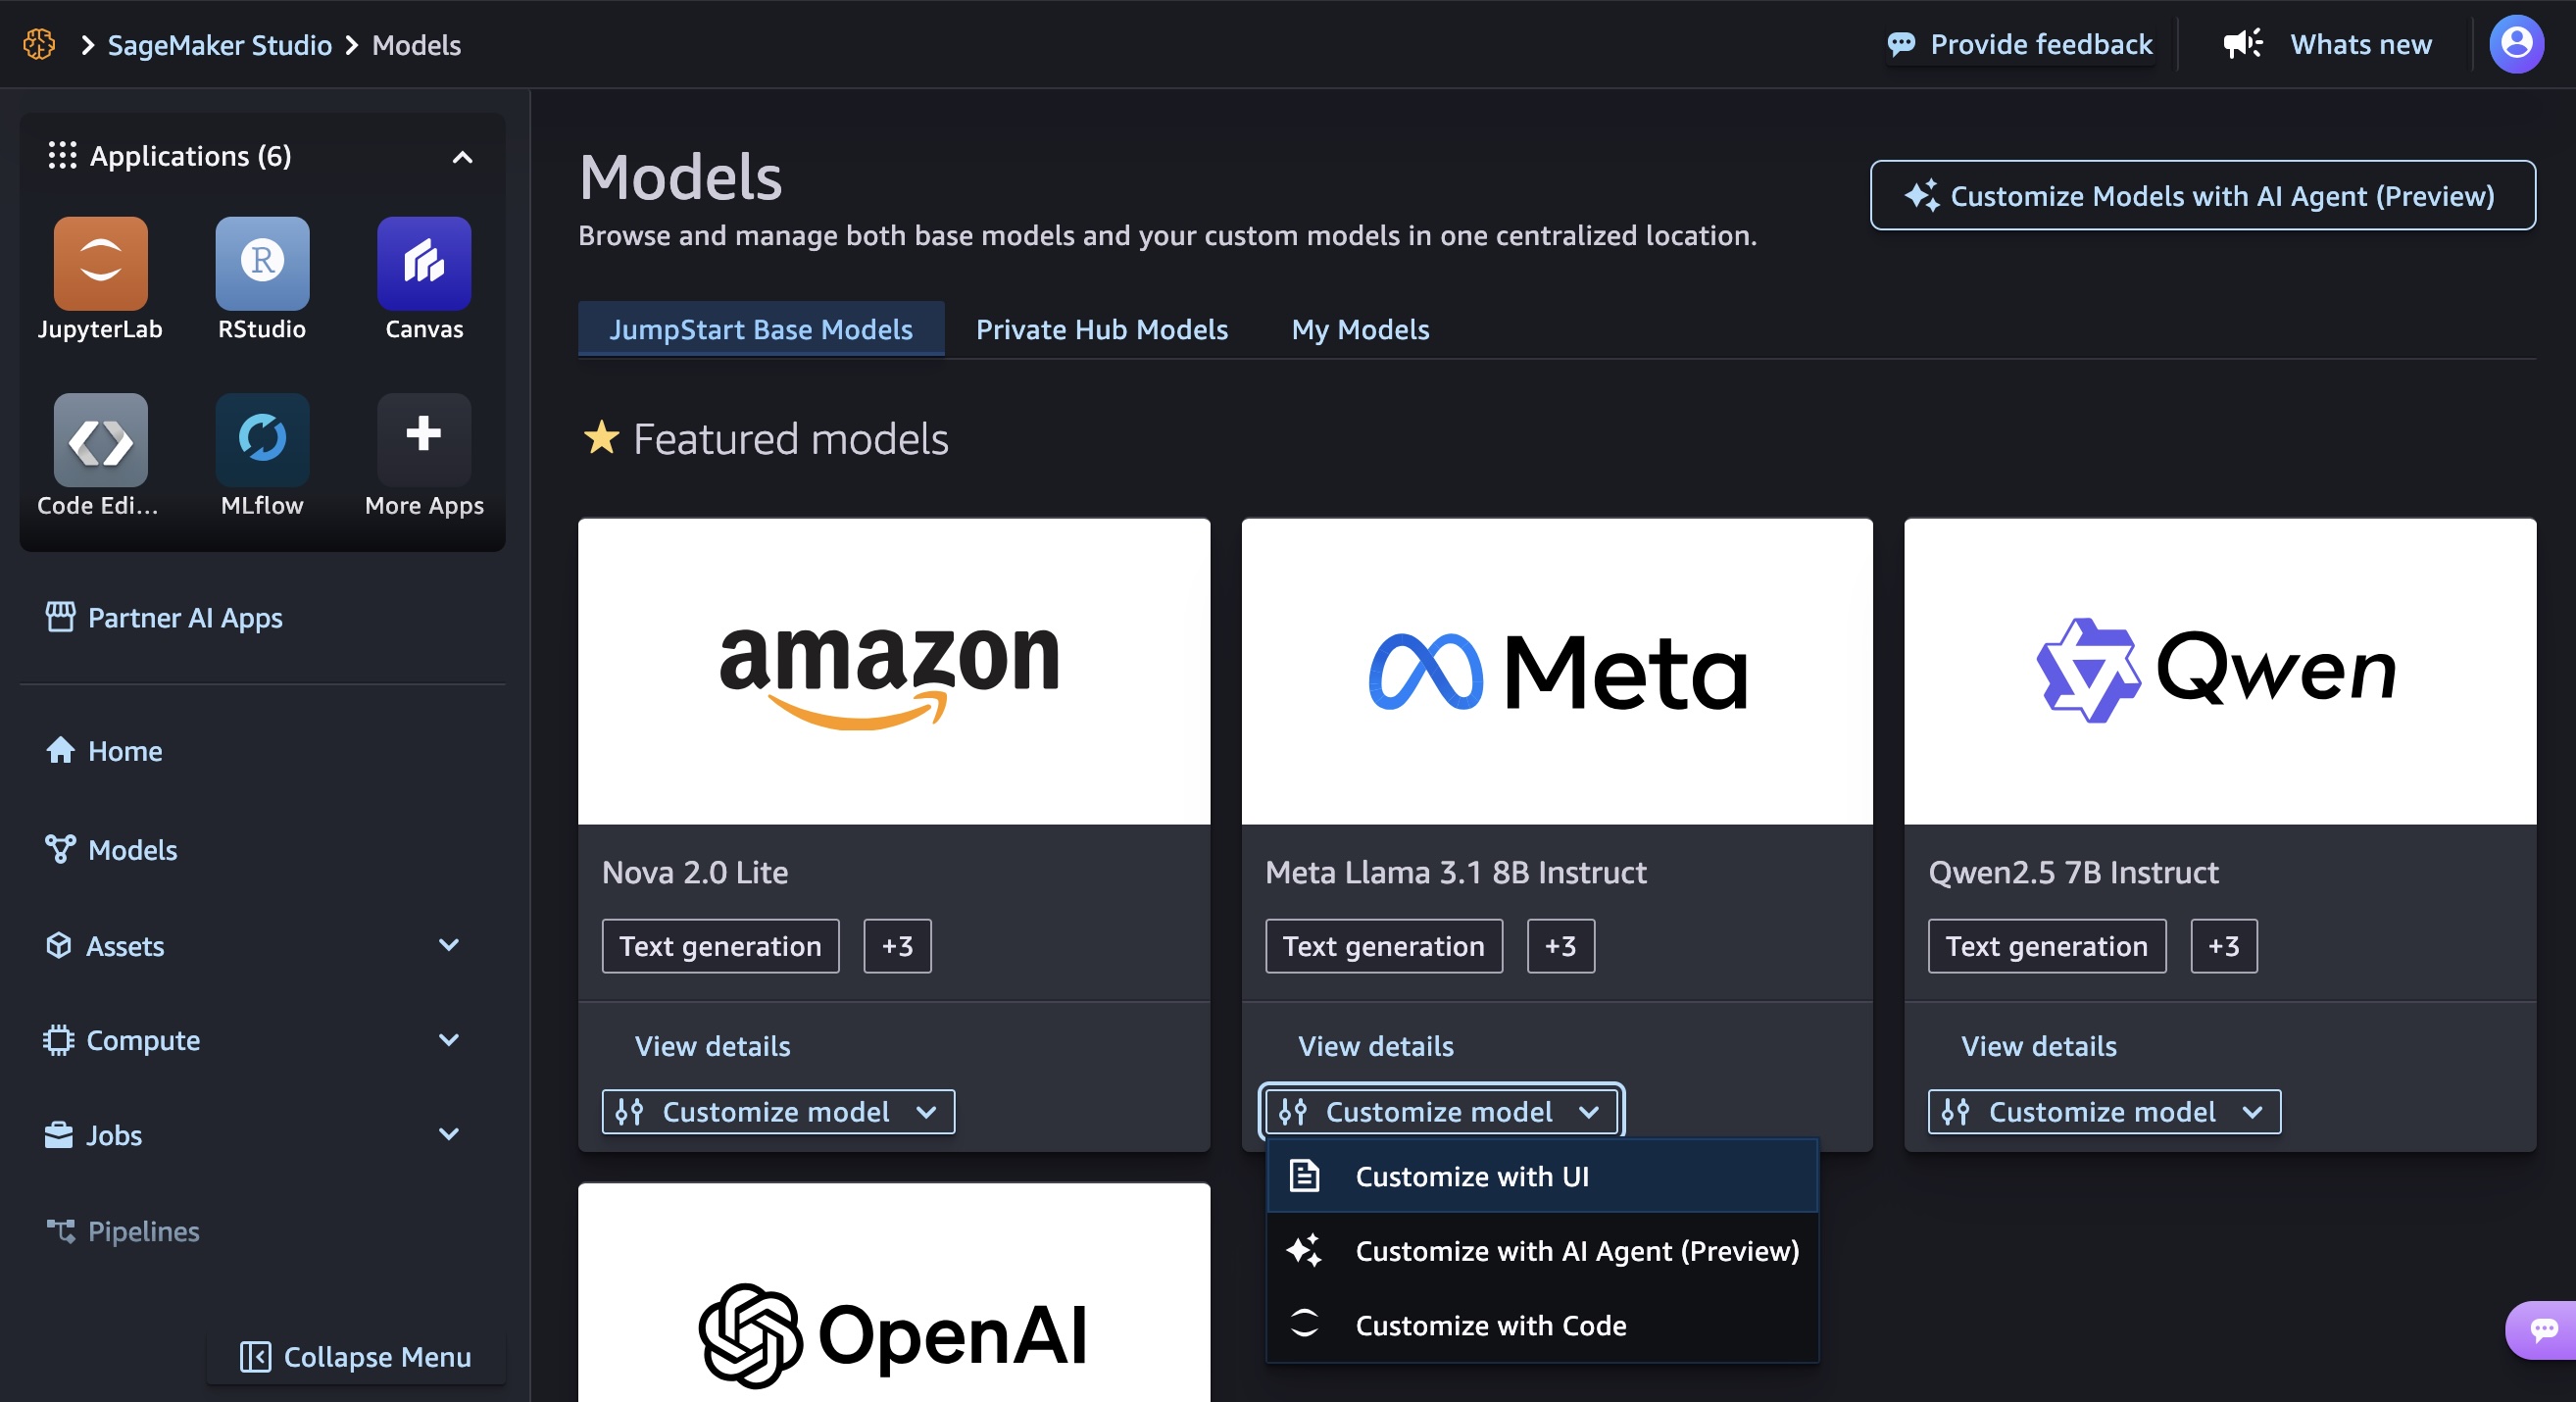
Lauren Mullennex

Lauren Mullennex

Lauren is a Senior GenAI/ML Specialist Solutions Architect at AWS. She has over a decade of experience in ML, DevOps, and infrastructure. She is a published author of a book on computer vision. Outside of work, you can find her traveling and hiking with her two dogs.

Bhargava Varadharajan

Bhargava Varadharajan

Bhargava is a Senior Software Engineer at Amazon Web Services, where he develops AI & ML products like SageMaker Studio, Studio Lab, and Unified Studio. Over five years, he’s focused on transforming complex AI & ML workflows into seamless experiences. When not architecting systems at scale, Bhargava pursues his goal of exploring all 63 U.S. National Parks and seeks adventures through climbing, football, and snowboarding. His downtime is split between tinkering with DIY projects and feeding his curiosity through books

Anagha Barve

Anagha Barve

Anagha is a Software Development Manager on the Amazon SageMaker Unified Studio team.

Anchit Gupta

Anchit Gupta

Anchit is aSenior Product Manager for Amazon SageMaker Unified Studio. She focuses on delivering products that make it easier to build machine learning solutions. In her spare time, she enjoys cooking, playing board/card games, and reading.

AWS Weekly Roundup: Single GPU P5 instances, Advanced Go Driver, Amazon SageMaker HyperPod and more (August 18, 2025)

Post Syndicated from Prasad Rao original https://aws.amazon.com/blogs/aws/aws-weekly-roundup-single-gpu-p5-instances-advanced-go-driver-amazon-sagemaker-hyperpod-and-more-august-18-2025/

Let me start this week’s update with something I’m especially excited about – the upcoming BeSA (Become a Solutions Architect) cohort. BeSA is a free mentoring program that I host along with a few other AWS employees on a volunteer basis to help people excel in their cloud careers. Last week, the instructors’ lineup was finalized for the 6-week cohort starting September 6. The cohort will focus on migration and modernization on AWS. Visit the BeSA website to learn more.

Another highlight for me last week was the announcement of six new AWS Heroes for their technical leadership and exceptional contributions to the AWS community. Read the full announcement to learn more about these community leaders.

Last week’s launches
Here are some launches from last week that got my attention:

  • Amazon EC2 Single GPU P5 instances are now generally available — You can right-size your machine learning (ML) and high performance computing (HPC) resources cost-effectively with the new Amazon Elastic Compute Cloud (Amazon EC2) P5 instance size with one NVIDIA H100 GPU.
  • AWS Advanced Go Driver is generally available — You can now use the AWS Advanced Go Driver with Amazon Relational Database Service (Amazon RDS) and Amazon Aurora PostgreSQL-Compatible and MySQL-Compatible database clusters for faster switchover and failover times, Federated Authentication, and authentication with AWS Secrets Manager or AWS Identity and Access Management (IAM). You can install the PostgreSQL and MySQL packages for Windows, Mac, or Linux, by following the installation guides in GitHub.
  • Expanded support for Cilium with Amazon EKS Hybrid Nodes — Cilium is a Cloud Native Computing Foundation (CNCF) graduated project that provides core networking capabilities for Kubernetes workloads. Now, you can receive support from AWS for a broader set of Cilium features when using Cilium with Amazon EKS Hybrid Nodes including application ingress, in-cluster load balancing, Kubernetes network policies, and kube-proxy replacement mode.
  • Amazon SageMaker AI now supports P6e-GB200 UltraServers — You can accelerate training and deployment of foundational models (FMs) at trillion-parameter scale by using up to 72 NVIDIA Blackwell GPUs under one NVLink domain with the new P6e-GB200 UltraServer support in Amazon SageMaker HyperPod and Model Training.
  • Amazon SageMaker HyperPod now supports fine-grained quota allocation of compute resources, topology-aware-scheduling of LLM tasks and custom Amazon Machine Images (AMIs) — You can allocate fine-grained compute quota for GPU, Trainium accelerator, vCPU, and vCPU memory within an instance to optimize compute resource distribution. With topology-aware scheduling, you can schedule your large language model (LLM) tasks on an optimal network topology to minimize network communication and enhance training efficiency. Using custom AMIs, you can deploy clusters with pre-configured, security-hardened environments that meet your specific organizational requirements.

Additional updates
Here are some additional news items and blog posts that I found interesting:

Upcoming AWS events
Check your calendars and sign up for upcoming AWS and AWS Community events:

  • AWS re:Invent 2025 (December 1-5, 2025, Las Vegas) — The AWS flagship annual conference offering collaborative innovation through peer-to-peer learning, expert-led discussions, and invaluable networking opportunities.
  • AWS Summits — Join free online and in-person events that bring the cloud computing community together to connect, collaborate, and learn about AWS. Coming up soon are summits in Johannesburg (August 20) and Toronto (September 4).
  • AWS Community Days — Join community-led conferences that feature technical discussions, workshops, and hands-on labs led by expert AWS users and industry leaders from around the world: Adria (September 5), Baltic (September 10), Aotearoa (September 18), and South Africa (September 20).

Join the AWS Builder Center to learn, build, and connect with builders in the AWS community. Browse here for upcoming in-person and virtual developer-focused events.

That’s all for this week. Check back next Monday for another Weekly Roundup!

Prasad

AWS AI League: Learn, innovate, and compete in our new ultimate AI showdown

Post Syndicated from Elizabeth Fuentes original https://aws.amazon.com/blogs/aws/aws-ai-league-learn-innovate-and-compete-in-our-new-ultimate-ai-showdown/

Since 2018, AWS DeepRacer has engaged over 560,000 builders worldwide, demonstrating that developers learn and grow through competitive experiences. Today, we’re excited to expand into the generative AI era with AWS Artificial Intelligence (AI) League.

This is a unique competitive experience – your chance to dive deep into generative AI regardless of your skill level, compete with peers, and build solutions that solve actual business problems through an engaging, competitive experience.

With AWS AI League, your organization hosts private tournaments where teams collaborate and compete to solve real-world business use cases using practical AI skills. Participants craft effective prompts and fine-tune models while building powerful generative AI solutions relevant for their business. Throughout the competition, participants’ solutions are evaluated against reference standards on a real-time leaderboard that tracks performance based on accuracy and latency.

The AWS AI League experience starts with a 2-hour hands-on workshop led by AWS experts. This is followed by self-paced experimentation, culminating in a gameshow-style grand finale where participants showcase their generative AI creations addressing business challenges. Organizations can set up their own AWS AI League within half a day. The scalable design supports 500 to 5,000 employees while maintaining the same efficient timeline.

Supported by up to $2 million in AWS credits and a $25,000 championship prize pool at AWS re:Invent 2025, the program provides a unique opportunity to solve real business challenges.

AWS AI League transforms how organizations develop generative AI capabilities
AWS AI League transforms how organizations develop generative AI capabilities by combining hands-on skills development, domain expertise, and gamification. This approach makes AI learning accessible and engaging for all skill levels. Teams collaborate through industry-specific challenges that mirror real organizational needs, with each challenge providing reference datasets and evaluation standards that reflect actual business requirements.

  • Customizable industry-specific challenges – Tailor competitions to your specific business context. Healthcare teams work on patient discharge summaries, financial services focus on fraud detection, and media companies develop content creation solutions.
  • Integrated AWS AI stack experience – Participants gain hands-on experience with AWS AI and ML tools, including Amazon SageMaker AI, Amazon Bedrock, and Amazon Nova, accessible from Amazon SageMaker Unified Studio. Teams work through a secure, cost-controlled environment within their organization’s AWS account.
  • Real-time performance tracking – The leaderboard evaluates submissions against established benchmarks and reference standards throughout the competition, providing immediate feedback on accuracy and speed so teams can iterate and improve their solutions. During the final round, this scoring includes expert evaluation where domain experts and a live audience participate in real-time voting to determine which AI solutions best solve real business challenges.

  • AWS AI League offers two foundational competition tracks:
    • Prompt Sage – The Ultimate Prompt Battle – Race to craft the perfect AI prompts that unlock breakthrough solutions. whether you detect financial fraud or streamlining healthcare workflows, every word counts as they climb the leaderboard using zero-shot learning and chain-of-thought reasoning.
    • Tune Whiz – The Model Mastery Showdown – Generic AI models meet their match as you sculpt them into industry-specific powerhouses. Armed with your domain expertise and specialized questions, competitors fine-tune models that speak your business language fluently. Victory goes to who achieve the perfect balance of blazing performance, lightning efficiency, and cost optimization.

As Generative AI continues to evolve, AWS AI League will regularly introduce new challenges and formats in addition to these tracks.

Get started today
Ready to get started? Organizations can host private competitions by applying through the AWS AI League page. Individual developers can join public competitions at AWS Summits and AWS re:Invent.

PS: Writing a blog post at AWS is always a team effort, even when you see only one name under the post title. In this case, I want to thank Natasya Idries, for her generous help with technical guidance, and expertise, which made this overview possible and comprehensive.

— Eli

Announcing Amazon Nova customization in Amazon SageMaker AI

Post Syndicated from Betty Zheng (郑予彬) original https://aws.amazon.com/blogs/aws/announcing-amazon-nova-customization-in-amazon-sagemaker-ai/

Today, we’re announcing a suite of customization capabilities for Amazon Nova in Amazon SageMaker AI. Customers can now customize Nova Micro, Nova Lite, and Nova Pro across the model training lifecycle, including pre-training, supervised fine-tuning, and alignment. These techniques are available as ready-to-use Amazon SageMaker recipes with seamless deployment to Amazon Bedrock, supporting both on-demand and provisioned throughput inference.

Amazon Nova foundation models power diverse generative AI use cases across industries. As customers scale deployments, they need models that reflect proprietary knowledge, workflows, and brand requirements. Prompt optimization and retrieval-augmented generation (RAG) work well for integrating general-purpose foundation models into applications, however business-critical workflows require model customization to meet specific accuracy, cost, and latency requirements.

Choosing the right customization technique
Amazon Nova models support a range of customization techniques including: 1) supervised fine-tuning, 2) alignment, 3) continued pre-training, and 4) knowledge distillation. The optimal choice depends on goals, use case complexity, and the availability of data and compute resources. You can also combine multiple techniques to achieve your desired outcomes with the preferred mix of performance, cost, and flexibility.

Supervised fine-tuning (SFT) customizes model parameters using a training dataset of input-output pairs specific to your target tasks and domains. Choose from the following two implementation approaches based on data volume and cost considerations:

  • Parameter-efficient fine-tuning (PEFT) — updates only a subset of model parameters through lightweight adapter layers such as LoRA (Low-Rank Adaptation). It offers faster training and lower compute costs compared to full fine-tuning. PEFT-adapted Nova models are imported to Amazon Bedrock and invoked using on-demand inference.
  • Full fine-tuning (FFT) — updates all the parameters of the model and is ideal for scenarios when you have extensive training datasets (tens of thousands of records). Nova models customized through FFT can also be imported to Amazon Bedrock and invoked for inference with provisioned throughput.

Alignment steers the model output towards desired preferences for product-specific needs and behavior, such as company brand and customer experience requirements. These preferences may be encoded in multiple ways, including empirical examples and policies. Nova models support two preference alignment techniques:

  • Direct preference optimization (DPO) — offers a straightforward way to tune model outputs using preferred/not preferred response pairs. DPO learns from comparative preferences to optimize outputs for subjective requirements such as tone and style. DPO offers both a parameter-efficient version and a full-model update version. The parameter-efficient version supports on-demand inference.
  • Proximal policy optimization (PPO) — uses reinforcement learning to enhance model behavior by optimizing for desired rewards such as helpfulness, safety, or engagement. A reward model guides optimization by scoring outputs, helping the model learn effective behaviors while maintaining previously learned capabilities.

Continued pre-training (CPT) expands foundational model knowledge through self-supervised learning on large quantities of unlabeled proprietary data, including internal documents, transcripts, and business-specific content. CPT followed by SFT and alignment through DPO or PPO provides a comprehensive way to customize Nova models for your applications.

Knowledge distillation transfers knowledge from a larger “teacher” model to a smaller, faster, and more cost-efficient “student” model. Distillation is useful in scenarios where customers do not have adequate reference input-output samples and can leverage a more powerful model to augment the training data. This process creates a customized model of teacher-level accuracy for specific use cases and student-level cost-effectiveness and speed.

Here is a table summarizing the available customization techniques across different modalities and deployment options. Each technique offers specific training and inference capabilities depending on your implementation requirements.

Recipe Modality Training Inference
Amazon Bedrock Amazon SageMaker Amazon Bedrock On-demand Amazon Bedrock Provisioned Throughput
Supervised fine tuning Text, image, video
Parameter-efficient fine-tuning (PEFT) ✅ ✅ ✅ ✅
Full fine-tuning ✅ ✅
Direct preference optimization (DPO)  Text, image, video
Parameter-efficient DPO ✅ ✅ ✅
Full model DPO ✅ ✅
Proximal policy optimization (PPO)  Text-only ✅ ✅
Continuous pre-training  Text-only ✅ ✅
Distillation Text-only ✅ ✅ ✅ ✅

Early access customers, including Cosine AI, Massachusetts Institute of Technology (MIT) Computer Science and Artificial Intelligence Laboratory (CSAIL), Volkswagen, Amazon Customer Service, and Amazon Catalog Systems Service, are already successfully using Amazon Nova customization capabilities.

Customizing Nova models in action
The following walks you through an example of customizing the Nova Micro model using direct preference optimization on an existing preference dataset. To do this, you can use Amazon SageMaker Studio.

Launch your SageMaker Studio in the Amazon SageMaker AI console and choose JumpStart, a machine learning (ML) hub with foundation models, built-in algorithms, and pre-built ML solutions that you can deploy with a few clicks.

Then, choose Nova Micro, a text-only model that delivers the lowest latency responses at the lowest cost per inference among the Nova model family, and then choose Train.

Next, you can choose a fine-tuning recipe to train the model with labeled data to enhance performance on specific tasks and align with desired behaviors. Choosing the Direct Preference Optimization offers a straightforward way to tune model outputs with your preferences.

When you choose Open sample notebook, you have two environment options to run the recipe: either on the SageMaker training jobs or SageMaker Hyperpod:

Choose Run recipe on SageMaker training jobs when you don’t need to create a cluster and train the model with the sample notebook by selecting your JupyterLab space.

Alternately, if you want to have a persistent cluster environment optimized for iterative training processes, choose Run recipe on SageMaker HyperPod. You can choose a HyperPod EKS cluster with at least one restricted instance group (RIG) to provide a specialized isolated environment, which is required for such Nova model training. Then, choose your JupyterLabSpace and Open sample notebook.

This notebook provides an end-to-end walkthrough for creating a SageMaker HyperPod job using a SageMaker Nova model with a recipe and deploying it for inference. With the help of a SageMaker HyperPod recipe, you can streamline complex configurations and seamlessly integrate datasets for optimized training jobs.

In SageMaker Studio, you can see that your SageMaker HyperPod job has been successfully created and you can monitor it for further progress.

After your job completes, you can use a benchmark recipe to evaluate if the customized model performs better on agentic tasks.

For comprehensive documentation and additional example implementations, visit the SageMaker HyperPod recipes repository on GitHub. We continue to expand the recipes based on customer feedback and emerging ML trends, ensuring you have the tools needed for successful AI model customization.

Availability and getting started
Recipes for Amazon Nova on Amazon SageMaker AI are available in US East (N. Virginia). Learn more about this feature by visiting the Amazon Nova customization webpage and Amazon Nova user guide and get started in the Amazon SageMaker AI console.

Betty

Optimizing fleet operations using Amazon SageMaker AI and Amazon Bedrock

Post Syndicated from Manny Sidhu original https://aws.amazon.com/blogs/architecture/optimizing-fleet-operations-using-amazon-sagemaker-ai-and-amazon-bedrock/

Every year in the United States, distracted driving claims thousands of lives and causes immense financial damage. More than 1.6 million accidents annually are caused by cell phone use while driving, and another 1.5 million result from drowsy drivers falling asleep at the wheel. These devastating—and preventable—accidents have sparked a major push for enhanced driver safety.

This initiative is particularly crucial in the commercial fleet industry, as accidents involving a large truck are often more dangerous and can cost hundreds of thousands of dollars. This post explores an innovative solution that leverages Amazon SageMaker AI and Amazon Bedrock to revolutionize driver coaching and enhance fleet efficiency. By harnessing the power of machine learning and artificial intelligence, we demonstrate how fleet operators can transform raw dashcam footage into actionable insights, empowering real-time driver monitoring and proactive safety measures – reducing costly accidents. Our approach combines AWS Artificial Intelligence (AI) and Internet of Things (IoT) services to create a comprehensive solution that not only detects distracted driving but also continuously improves its performance over time. Through this solution, we aim to show how fleet managers can significantly reduce distracted driving incidents, improve operational efficiency, and ultimately drive down costs in their commercial vehicle operations.

The Challenge: Effectively managing multiple dashcam feeds from commercial vehicle fleet

Today’s commercial vehicles are equipped with multi-camera systems that provide comprehensive coverage: inward-facing cameras monitor driver behavior, outward-facing cameras track oncoming traffic, and side/rear cameras detect cross-traffic and potential rear-end collisions. The sheer volume of video data generated by thousands of vehicles daily creates significant management and analysis challenges. While fleet operators traditionally use this dashcam footage for reactive purposes – such as law enforcement reporting, insurance claims, and driver exoneration – many organizations are missing a significant opportunity to leverage this data. As commercial fleets accumulate more miles, they generate rich datasets that can be used to train AI models capable of facilitating proactive safety improvements.

In this post, we’ll explore how to maximize the value of dashcam footage through best practices for implementing and managing Computer Vision systems in commercial fleet operations. We’ll demonstrate how to build and deploy edge-based machine learning models that provide real-time alerts for distracted driving behaviors, while effectively collecting, processing, and analyzing footage to train these AI models. This approach transforms fleet operations from reactive incident management to proactive safety enhancement, helping organizations convert raw video data into actionable insights that reduce safety incidents and improve overall fleet operational efficiency and cost-effectiveness.

Solution overview

A Distracted Driving Incident can occur when drivers engage in unsafe behaviors such as speeding, rolling stops, harsh braking, and aggressive acceleration. Fleet managers need to understand not just what happened during these incidents, but also the driver’s state of attention – whether they were focused on the road or distracted by activities like using a cellphone, eating, drinking, or experiencing fatigue common in long-haul driving.

Our solution leverages AWS services to create an end-to-end workflow capable of detecting and mitigating distracted driving. The steps involved include:

  1. Incident capture, ingestion, and labeling
  2. Model training, optimization, and deployment
  3. Continuous testing and improvement

Solution deep dive

This solution relies on a mix of AWS IoT, AI and generative AI services to build a scalable and cost-effective solution. Let’s start by looking at high level solution architecture and build the solution step-by-step.

Incident capture, ingestion, and labeling

To start the process of ingesting videos from a driver’s dashboard camera into the cloud, we capture the dashcam’s feed using the IoT Greengrass Kinesis Video Streamer Component. The video is streamed into the AWS Cloud using Kinesis Video Streams and stored in Amazon S3 by leveraging Kinesis Firehose. The videos are then converted into individual frames, analyzed by the Amazon Bedrock Nova Pro model to determine driver distraction, and sorted by an AWS Lambda function into an S3 bucket based on the analysis results. The sorted frames will next be used to train an AI model for edge deployment to detect distracted driving.

From a security perspective, it’s good practice to encrypt data in Amazon S3 buckets using AWS Key Management Service (KMS). You can enforce this by setting up SSE-KMS as the default encryption method to automatically encrypt uploaded objects. We also recommend implementing fine-grained AWS Identity & Access Management (IAM) roles to grant scoped access to images and videos. For data in transit between the edge and the cloud, you can use AWS IoT Greengrass certificates to encrypt your data and enforce identity verification. These measures can help protect against unauthorized access.

Edge-to-cloud architecture for real-time driver monitoring using AWS IoT, Kinesis, and ML services

With this process in place, we are continually collecting data from our fleet of commercial vehicles (while keeping security in mind). This data is automatically categorized and labeled based on the analysis from our Nova Pro model, and conveniently stored in S3, enabling us to seamlessly train an AI model – a process which we will describe next.

Model training, optimization, and deployment

The following diagram illustrates the process of training and deploying a distracted driver detection model. The process runs inside of an Amazon SageMaker Pipelines Workflow, which allows for seamless orchestration of other Amazon SageMaker AI services. This workflow begins with labeled driver images stored in Amazon S3, generated from the previously described workflow. This labeled dataset – consisting of driver images labeled as “distracted” or “not distracted’ – is used to train a ResNet50 model using Amazon SageMaker Training Jobs running on a Trn1 instance for price performance. As we train, the model learns how to identify distracted drivers. Once complete, the trained model is then quantized to INT8 using SageMaker Processing Jobs, and optimized for our specific type of edge hardware using SageMaker Neo. The optimized model is then stored in the SageMaker Model Registry for version control and governance (this will be helpful later when we iterate on our model with new training data). Finally, the model is pushed to S3 where AWS IoT Greengrass can initiate a deployment to the fleet of edge devices.

Running on the edge, the model performs inference multiple times a second on frames from the inward facing dashcam. (Inference speed calculated assuming edge compute has specs comparable to a Raspberry-Pi class of device.) If the driver is found to be distracted, the system alerts the driver by means of a noise. (ex. driver was falling asleep, and alert awakens them).

End-to-end AWS architecture for distracted driver detection: from model training to edge deployment

With this process in place, we have successfully leveraged the dataset we generated in the first diagram to train, optimize, and deploy our custom model to the ‘edge’ – in this case, to each vehicle in our fleet. Our model is now alerting drivers of dangerous behavior and helping to proactively prevent collisions. But our model likely isn’t perfect – perhaps it misses a dangerous behavior that wasn’t in the training dataset, or alerts unnecessarily. To validate our model is working well and further improve it to reduce errors, we implement continuous testing and improvement procedures.

Continuous testing and improvement

We need to continue to ingest driver dashcam data and compare our edge model’s predictions with our original source of ‘ground truth’ – Nova Pro.

The system collects frames for model validation in two scenarios: when vehicle telemetry detects incidents (hard braking, crashes) or when the edge model identifies distracted driving. These frames are sent to Amazon Bedrock for a ‘fact check’ to see if the edge model performed optimally. The comparative results between Amazon Bedrock and the edge model are stored in a dedicated S3 bucket for model evaluation. When sufficient new validated data is collected, or when the model’s agreement with Amazon Bedrock falls below a threshold, Amazon EventBridge triggers the previously described SageMaker Pipelines Workflow to fine tune, optimize, and re-deploy the improved model to the edge, now powered by our newly collected ‘disagreement data’.

Edge-to-cloud feedback loop for ML model validation using AWS IoT, Bedrock, and SageMaker services

We should also perform comparative analysis of our new model against our historical models stored in the Amazon SageMaker Model Registry to validate that our latest model actually performs better than historical models, verifying we don’t see a regression. If our latest model doesn’t outperform historical models, we should not deploy it, and instead investigate if we are suffering from overfitting or bad training data. In summary, we now have a model running inside fleet vehicles capable of alerting drivers to unsafe behavior. This could effectively reduce drowsy driving accidents by keeping drivers awake and alert, while also warning drivers about unsafe decisions like eating or using a cell phone while driving. This system is also self-training and self-improving, so it will continue to get better over time. Additionally, fleet management companies could aggregate safety data and reward top drivers to further incentivize safe driving habits.

Conclusion

In this post, we’ve explored an innovative solution that leverages AWS services to revolutionize driver coaching and fleet operations. By combining the power of Amazon SageMaker and Amazon Bedrock with AWS IoT and edge computing capabilities, we’ve demonstrated how to create a comprehensive, scalable solution for monitoring and improving driver behavior in real-time. This solution addresses the challenges of managing vast amounts of dashcam footage from commercial vehicle fleets, transforming raw video data into actionable insights. By implementing an end-to-end workflow that includes incident capture, categorization, model training, deployment, and continuous improvement, fleet operators can shift from reactive incident management to proactive safety enhancement. The benefits of this approach include:

  1. Enhanced safety: Real-time detection of distracted driving behaviors allows for immediate intervention and coaching.
  2. Improved efficiency: Automated analysis of dashcam footage reduces manual review time and costs.
  3. Scalability: The solution can handle large fleets and growing datasets with ease.
  4. Continuous improvement: The system learns and adapts over time, becoming more accurate and effective.
  5. Cost-effectiveness: By leveraging edge computing and optimized models, the solution minimizes compute costs.

As the transportation industry continues to evolve, solutions like this will play a crucial role in improving road safety, reducing operational costs, and enhancing overall fleet performance. By harnessing the power of AI and cloud computing, fleet operators can create safer, more efficient driving environments that benefit not only their businesses but also society as a whole. The future of fleet operations is here, and it’s driven by intelligent, data-driven systems that turn every mile driven into an opportunity for improvement and innovation.

Learn more by exploring AWS code samples to build hands-on SageMaker expertise. See the service in action through practical examples that demonstrate how to optimize model training and deployment across various use cases. Understand the financial advantages by conducting a cloud economics TCO analysis comparing traditional infrastructure against SageMaker’s managed services. This exercise reveals how SageMaker alleviates hidden costs while accelerating your ML development cycle.

Ready to take the next step? Connect with your AWS Solutions Architect to arrange a SageMaker AI Immersion Day tailored to your team’s specific challenges. These expert-led sessions provide personalized guidance that will help you implement SageMaker effectively within your organization’s unique context. For deeper dive into other relevant services Amazon Kinesis Video Streams, AWS IoT Greengrass, Amazon Bedrock


About the authors
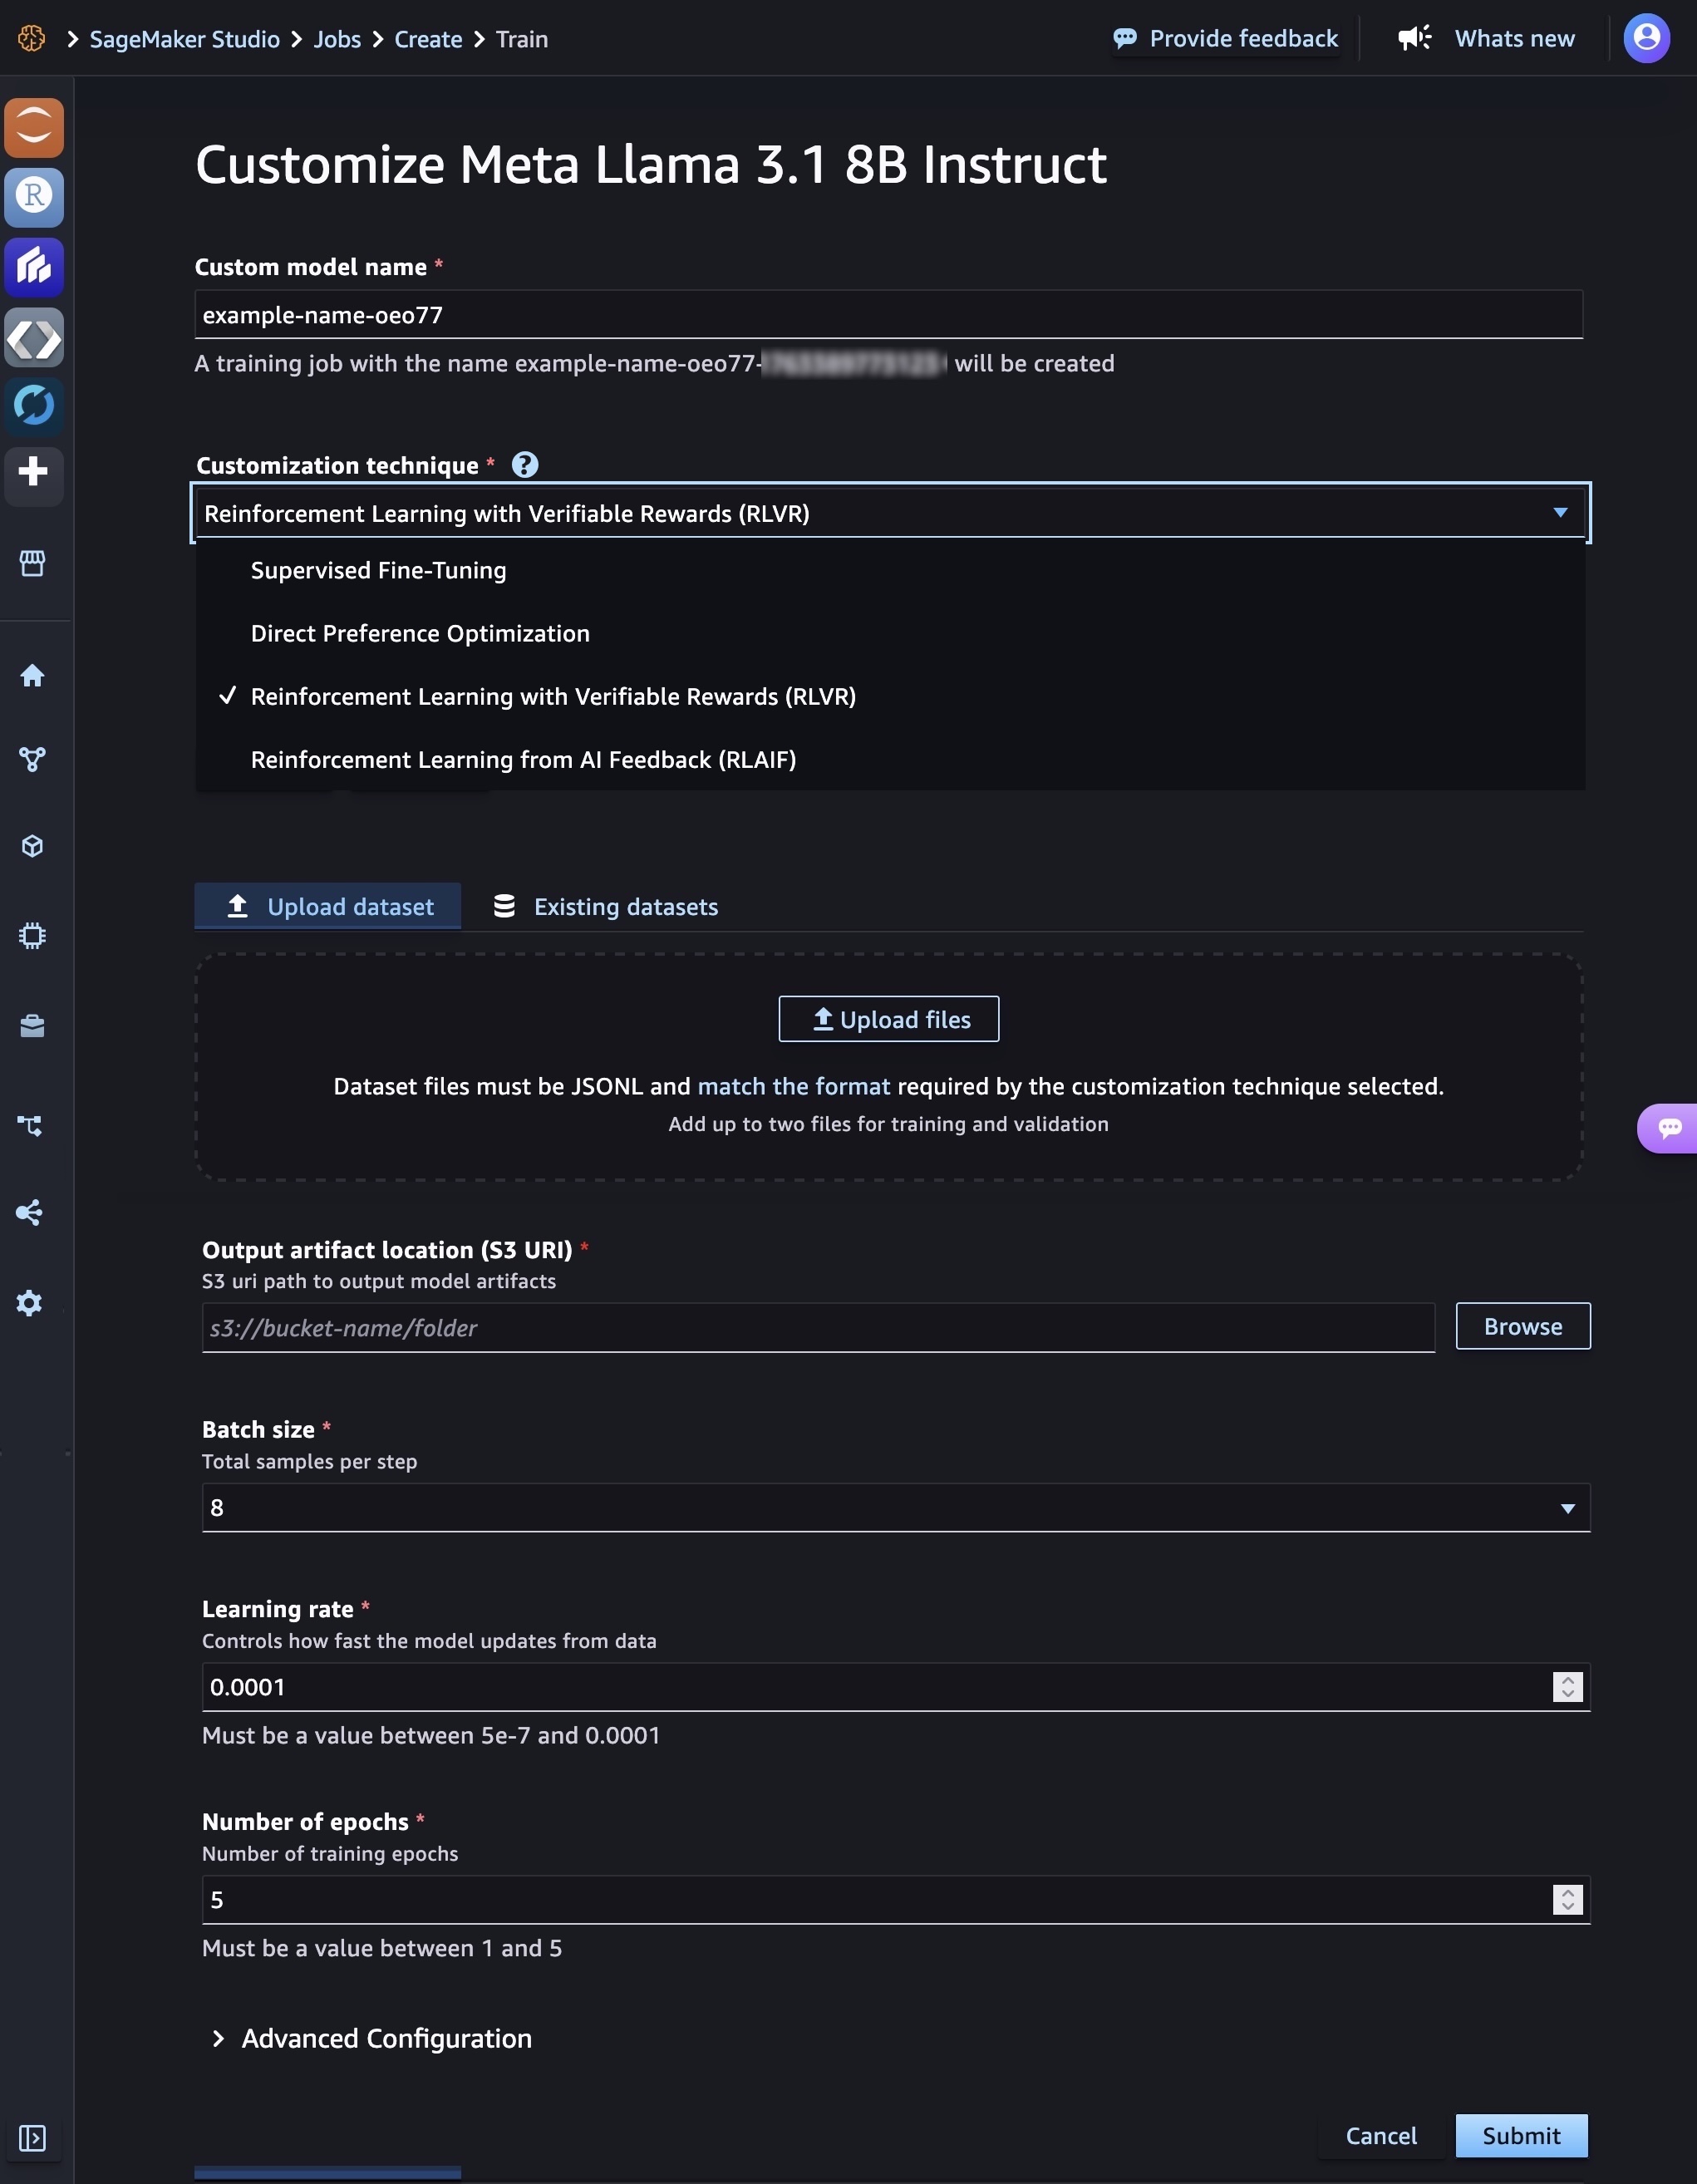
DeepSeek-R1 models now available on AWS

Post Syndicated from Channy Yun (윤석찬) original https://aws.amazon.com/blogs/aws/deepseek-r1-models-now-available-on-aws/

During this past AWS re:Invent, Amazon CEO Andy Jassy shared valuable lessons learned from Amazon’s own experience developing nearly 1,000 generative AI applications across the company. Drawing from this extensive scale of AI deployment, Jassy offered three key observations that have shaped Amazon’s approach to enterprise AI implementation.

First is that as you get to scale in generative AI applications, the cost of compute really matters. People are very hungry for better price performance. The second is actually quite difficult to build a really good generative AI application. The third is the diversity of the models being used when we gave our builders freedom to pick what they want to do. It doesn’t surprise us, because we keep learning the same lesson over and over and over again, which is that there is never going to be one tool to rule the world.
As Andy emphasized, a broad and deep range of models provided by Amazon empowers customers to choose the precise capabilities that best serve their unique needs. By closely monitoring both customer needs and technological advancements, AWS regularly expands our curated selection of models to include promising new models alongside established industry favorites. This ongoing expansion of high-performing and differentiated model offerings helps customers stay at the forefront of AI innovation.

This leads us to Chinese AI startup DeepSeek. DeepSeek launched DeepSeek-V3 on December 2024 and subsequently released DeepSeek-R1, DeepSeek-R1-Zero with 671 billion parameters, and DeepSeek-R1-Distill models ranging from 1.5–70 billion parameters on January 20, 2025. They added their vision-based Janus-Pro-7B model on January 27, 2025. The models are publicly available and are reportedly 90-95% more affordable and cost-effective than comparable models. Per Deepseek, their model stands out for its reasoning capabilities, achieved through innovative training techniques such as reinforcement learning.

Today, you can now deploy DeepSeek-R1 models in Amazon Bedrock and Amazon SageMaker AI. Amazon Bedrock is best for teams seeking to quickly integrate pre-trained foundation models through APIs. Amazon SageMaker AI is ideal for organizations that want advanced customization, training, and deployment, with access to the underlying infrastructure. Additionally, you can also use AWS Trainium and AWS Inferentia to deploy DeepSeek-R1-Distill models cost-effectively via Amazon Elastic Compute Cloud (Amazon EC2) or Amazon SageMaker AI.

With AWS, you can use DeepSeek-R1 models to build, experiment, and responsibly scale your generative AI ideas by using this powerful, cost-efficient model with minimal infrastructure investment. You can also confidently drive generative AI innovation by building on AWS services that are uniquely designed for security. We highly recommend integrating your deployments of the DeepSeek-R1 models with Amazon Bedrock Guardrails to add a layer of protection for your generative AI applications, which can be used by both Amazon Bedrock and Amazon SageMaker AI customers.

You can choose how to deploy DeepSeek-R1 models on AWS today in a few ways: 1/ Amazon Bedrock Marketplace for the DeepSeek-R1 model, 2/ Amazon SageMaker JumpStart for the DeepSeek-R1 model, 3/ Amazon Bedrock Custom Model Import for the DeepSeek-R1-Distill models, and 4/ Amazon EC2 Trn1 instances for the DeepSeek-R1-Distill models.

Let me walk you through the various paths for getting started with DeepSeek-R1 models on AWS. Whether you’re building your first AI application or scaling existing solutions, these methods provide flexible starting points based on your team’s expertise and requirements.

1. The DeepSeek-R1 model in Amazon Bedrock Marketplace
Amazon Bedrock Marketplace offers over 100 popular, emerging, and specialized FMs alongside the current selection of industry-leading models in Amazon Bedrock. You can easily discover models in a single catalog, subscribe to the model, and then deploy the model on managed endpoints.

To access the DeepSeek-R1 model in Amazon Bedrock Marketplace, go to the Amazon Bedrock console and select Model catalog under the Foundation models section. You can quickly find DeepSeek by searching or filtering by model providers.

After checking out the model detail page including the model’s capabilities, and implementation guidelines, you can directly deploy the model by providing an endpoint name, choosing the number of instances, and selecting an instance type.

You can also configure advanced options that let you customize the security and infrastructure settings for the DeepSeek-R1 model including VPC networking, service role permissions, and encryption settings. For production deployments, you should review these settings to align with your organization’s security and compliance requirements.

With Amazon Bedrock Guardrails, you can independently evaluate user inputs and model outputs. You can control the interaction between users and DeepSeek-R1 with your defined set of policies by filtering undesirable and harmful content in generative AI applications. The DeepSeek-R1 model in Amazon Bedrock Marketplace can only be used with Bedrock’s ApplyGuardrail API to evaluate user inputs and model responses for custom and third-party FMs available outside of Amazon Bedrock. To learn more, read Implement model-independent safety measures with Amazon Bedrock Guardrails.

Amazon Bedrock Guardrails can also be integrated with other Bedrock tools including Amazon Bedrock Agents and Amazon Bedrock Knowledge Bases to build safer and more secure generative AI applications aligned with responsible AI policies. To learn more, visit the AWS Responsible AI page.

Refer to this step-by-step guide on how to deploy the DeepSeek-R1 model in Amazon Bedrock Marketplace. To learn more, visit Deploy models in Amazon Bedrock Marketplace.

2. The DeepSeek-R1 model in Amazon SageMaker JumpStart
Amazon SageMaker JumpStart is a machine learning (ML) hub with FMs, built-in algorithms, and prebuilt ML solutions that you can deploy with just a few clicks. To deploy DeepSeek-R1 in SageMaker JumpStart, you can discover the DeepSeek-R1 model in SageMaker Unified Studio, SageMaker Studio, SageMaker AI console, or programmatically through the SageMaker Python SDK.

In the Amazon SageMaker AI console, open SageMaker Unified Studio or SageMaker Studio. In case of SageMaker Studio, choose JumpStart and search for “DeepSeek-R1” in the All public models page.

You can select the model and choose deploy to create an endpoint with default settings. When the endpoint comes InService, you can make inferences by sending requests to its endpoint.

You can derive model performance and ML operations controls with Amazon SageMaker AI features such as Amazon SageMaker Pipelines, Amazon SageMaker Debugger, or container logs. The model is deployed in an AWS secure environment and under your virtual private cloud (VPC) controls, helping to support data security.

As like Bedrock Marketpalce, you can use the ApplyGuardrail API in the SageMaker JumpStart to decouple safeguards for your generative AI applications from the DeepSeek-R1 model. You can now use guardrails without invoking FMs, which opens the door to more integration of standardized and thoroughly tested enterprise safeguards to your application flow regardless of the models used.

Refer to this step-by-step guide on how to deploy DeepSeek-R1 in Amazon SageMaker JumpStart. To learn more, visit Discover SageMaker JumpStart models in SageMaker Unified Studio or Deploy SageMaker JumpStart models in SageMaker Studio.

3. DeepSeek-R1-Distill models using Amazon Bedrock Custom Model Import
Amazon Bedrock Custom Model Import provides the ability to import and use your customized models alongside existing FMs through a single serverless, unified API without the need to manage underlying infrastructure. With Amazon Bedrock Custom Model Import, you can import DeepSeek-R1-Distill Llama models ranging from 1.5–70 billion parameters. As I highlighted in my blog post about Amazon Bedrock Model Distillation, the distillation process involves training smaller, more efficient models to mimic the behavior and reasoning patterns of the larger DeepSeek-R1 model with 671 billion parameters by using it as a teacher model.

After storing these publicly available models in an Amazon Simple Storage Service (Amazon S3) bucket or an Amazon SageMaker Model Registry, go to Imported models under Foundation models in the Amazon Bedrock console and import and deploy them in a fully managed and serverless environment through Amazon Bedrock. This serverless approach eliminates the need for infrastructure management while providing enterprise-grade security and scalability.

Refer to this step-by-step guide on how to deploy DeepSeek-R1 models using Amazon Bedrock Custom Model Import. To learn more, visit Import a customized model into Amazon Bedrock.

4. DeepSeek-R1-Distill models using AWS Trainium and AWS Inferentia
AWS Deep Learning AMIs (DLAMI) provides customized machine images that you can use for deep learning in a variety of Amazon EC2 instances, from a small CPU-only instance to the latest high-powered multi-GPU instances. You can deploy the DeepSeek-R1-Distill models on AWS Trainuim1 or AWS Inferentia2 instances to get the best price-performance.

To get started, go to Amazon EC2 console and launch a trn1.32xlarge EC2 instance with the Neuron Multi Framework DLAMI called Deep Learning AMI Neuron (Ubuntu 22.04).

Once you have connected to your launched ec2 instance, install vLLM, an open-source tool to serve Large Language Models (LLMs) and download the DeepSeek-R1-Distill model from Hugging Face. You can deploy the model using vLLM and invoke the model server.

To learn more, refer to this step-by-step guide on how to deploy DeepSeek-R1-Distill Llama models on AWS Inferentia and Trainium.

You can also visit the DeepSeek-R1-Distill-Llama-8B or deepseek-ai/DeepSeek-R1-Distill-Llama-70B model cards on Hugging Face. Choose Deploy and then Amazon SageMaker. From the AWS Inferentia and Trainium tab, copy the example code for deploy DeepSeek-R1-Distill Llama models.

Since the release of DeepSeek-R1, various guides of its deployment for Amazon EC2 and Amazon Elastic Kubernetes Service (Amazon EKS) have been posted. Here is some additional material for you to check out:

Things to know
Here are a few important things to know.

  • Pricing – For publicly available models like DeepSeek-R1, you are charged only the infrastructure price based on inference instance hours you select for Amazon Bedrock Markeplace, Amazon SageMaker JumpStart, and Amazon EC2. For the Bedrock Custom Model Import, you are only charged for model inference, based on the number of copies of your custom model is active, billed in 5-minute windows. To learn more, check out the Amazon Bedrock Pricing, Amazon SageMaker AI Pricing, and Amazon EC2 Pricing pages.
  • Data security – You can use enterprise-grade security features in Amazon Bedrock and Amazon SageMaker to help you make your data and applications secure and private. This means your data is not shared with model providers, and is not used to improve the models. This applies to all models—proprietary and publicly available—like DeepSeek-R1 models on Amazon Bedrock and Amazon SageMaker. To learn more, visit Amazon Bedrock Security and Privacy and Security in Amazon SageMaker AI.

Now available
DeepSeek-R1 is generally available today in Amazon Bedrock Marketplace and Amazon SageMaker JumpStart. You can also use DeepSeek-R1-Distill models using Amazon Bedrock Custom Model Import and Amazon EC2 instances with AWS Trainum and Inferentia chips.

Give DeepSeek-R1 models a try today in the Amazon Bedrock console, Amazon SageMaker AI console, and Amazon EC2 console, and send feedback to AWS re:Post for Amazon Bedrock and AWS re:Post for SageMaker AI or through your usual AWS Support contacts.

Channy