Post Syndicated from Artem Lovan original https://aws.amazon.com/blogs/security/three-most-important-aws-waf-rate-based-rules/
In this post, we explain what the three most important AWS WAF rate-based rules are for proactively protecting your web applications against common HTTP flood events, and how to implement these rules. We share what the Shield Response Team (SRT) has learned from helping customers respond to HTTP floods and show how all AWS WAF customers can benefit from these learnings.
When you have business-critical applications that are internet-facing, you need to protect them from risks such as distributed denial of service (DDoS) attacks. AWS Shield Advanced is a managed DDoS protection service that safeguards applications that are running behind Amazon Web Services (AWS) internet-facing resources. The backend origin of your application can exist anywhere, including on premises, and Shield Advanced can protect it. Shield Advanced provides DDoS protection for Layers 3–7. It also includes 24/7 access to the SRT to help you quickly respond to sophisticated unauthorized activity scenarios that might be unique to your application. To learn more about what resource types are supported to associate AWS WAF, see AWS WAF.
Increasingly, the SRT has been assisting customers in protecting against Layer 7 HTTP flood occurrences that negatively impact application availability or performance by overloading the application with an unusually high number of HTTP requests. In many cases, these malicious events can be automatically mitigated by using AWS WAF. In addition, AWS WAF has an easy-to-configure native rate-based rule capability, which detects source IP addresses that make large numbers of HTTP requests within a 5-minute time span, and automatically blocks requests from the offending source IP until the rate of requests falls below a set threshold. In this post, we show how you can pull insights from the AWS WAF logs to determine what your rate-based rule threshold should be.
The top three most important AWS WAF rate-based rules are:
- A blanket rate-based rule to protect your application from large HTTP floods.
- A rate-based rule to protect specific URIs at more restrictive rates than the blanket rate-based rule.
- A rate-based rule to protect your application against known malicious source IPs.
Solution overview
AWS WAF is a web application firewall that helps protect your web applications against common web exploits that might affect availability, compromise security, or consume excessive resources. AWS WAF gives you control over which web traffic reaches your applications. If you already know the request rates for your application, you have all the necessary information to start creating your AWS WAF rate-based rules. To learn more about how to create rules, see Creating a rule and adding conditions. However, if you don’t have this data and want to learn how to get started, this solution helps you determine appropriate rates for your applications, and how to create AWS WAF rate-based rules.
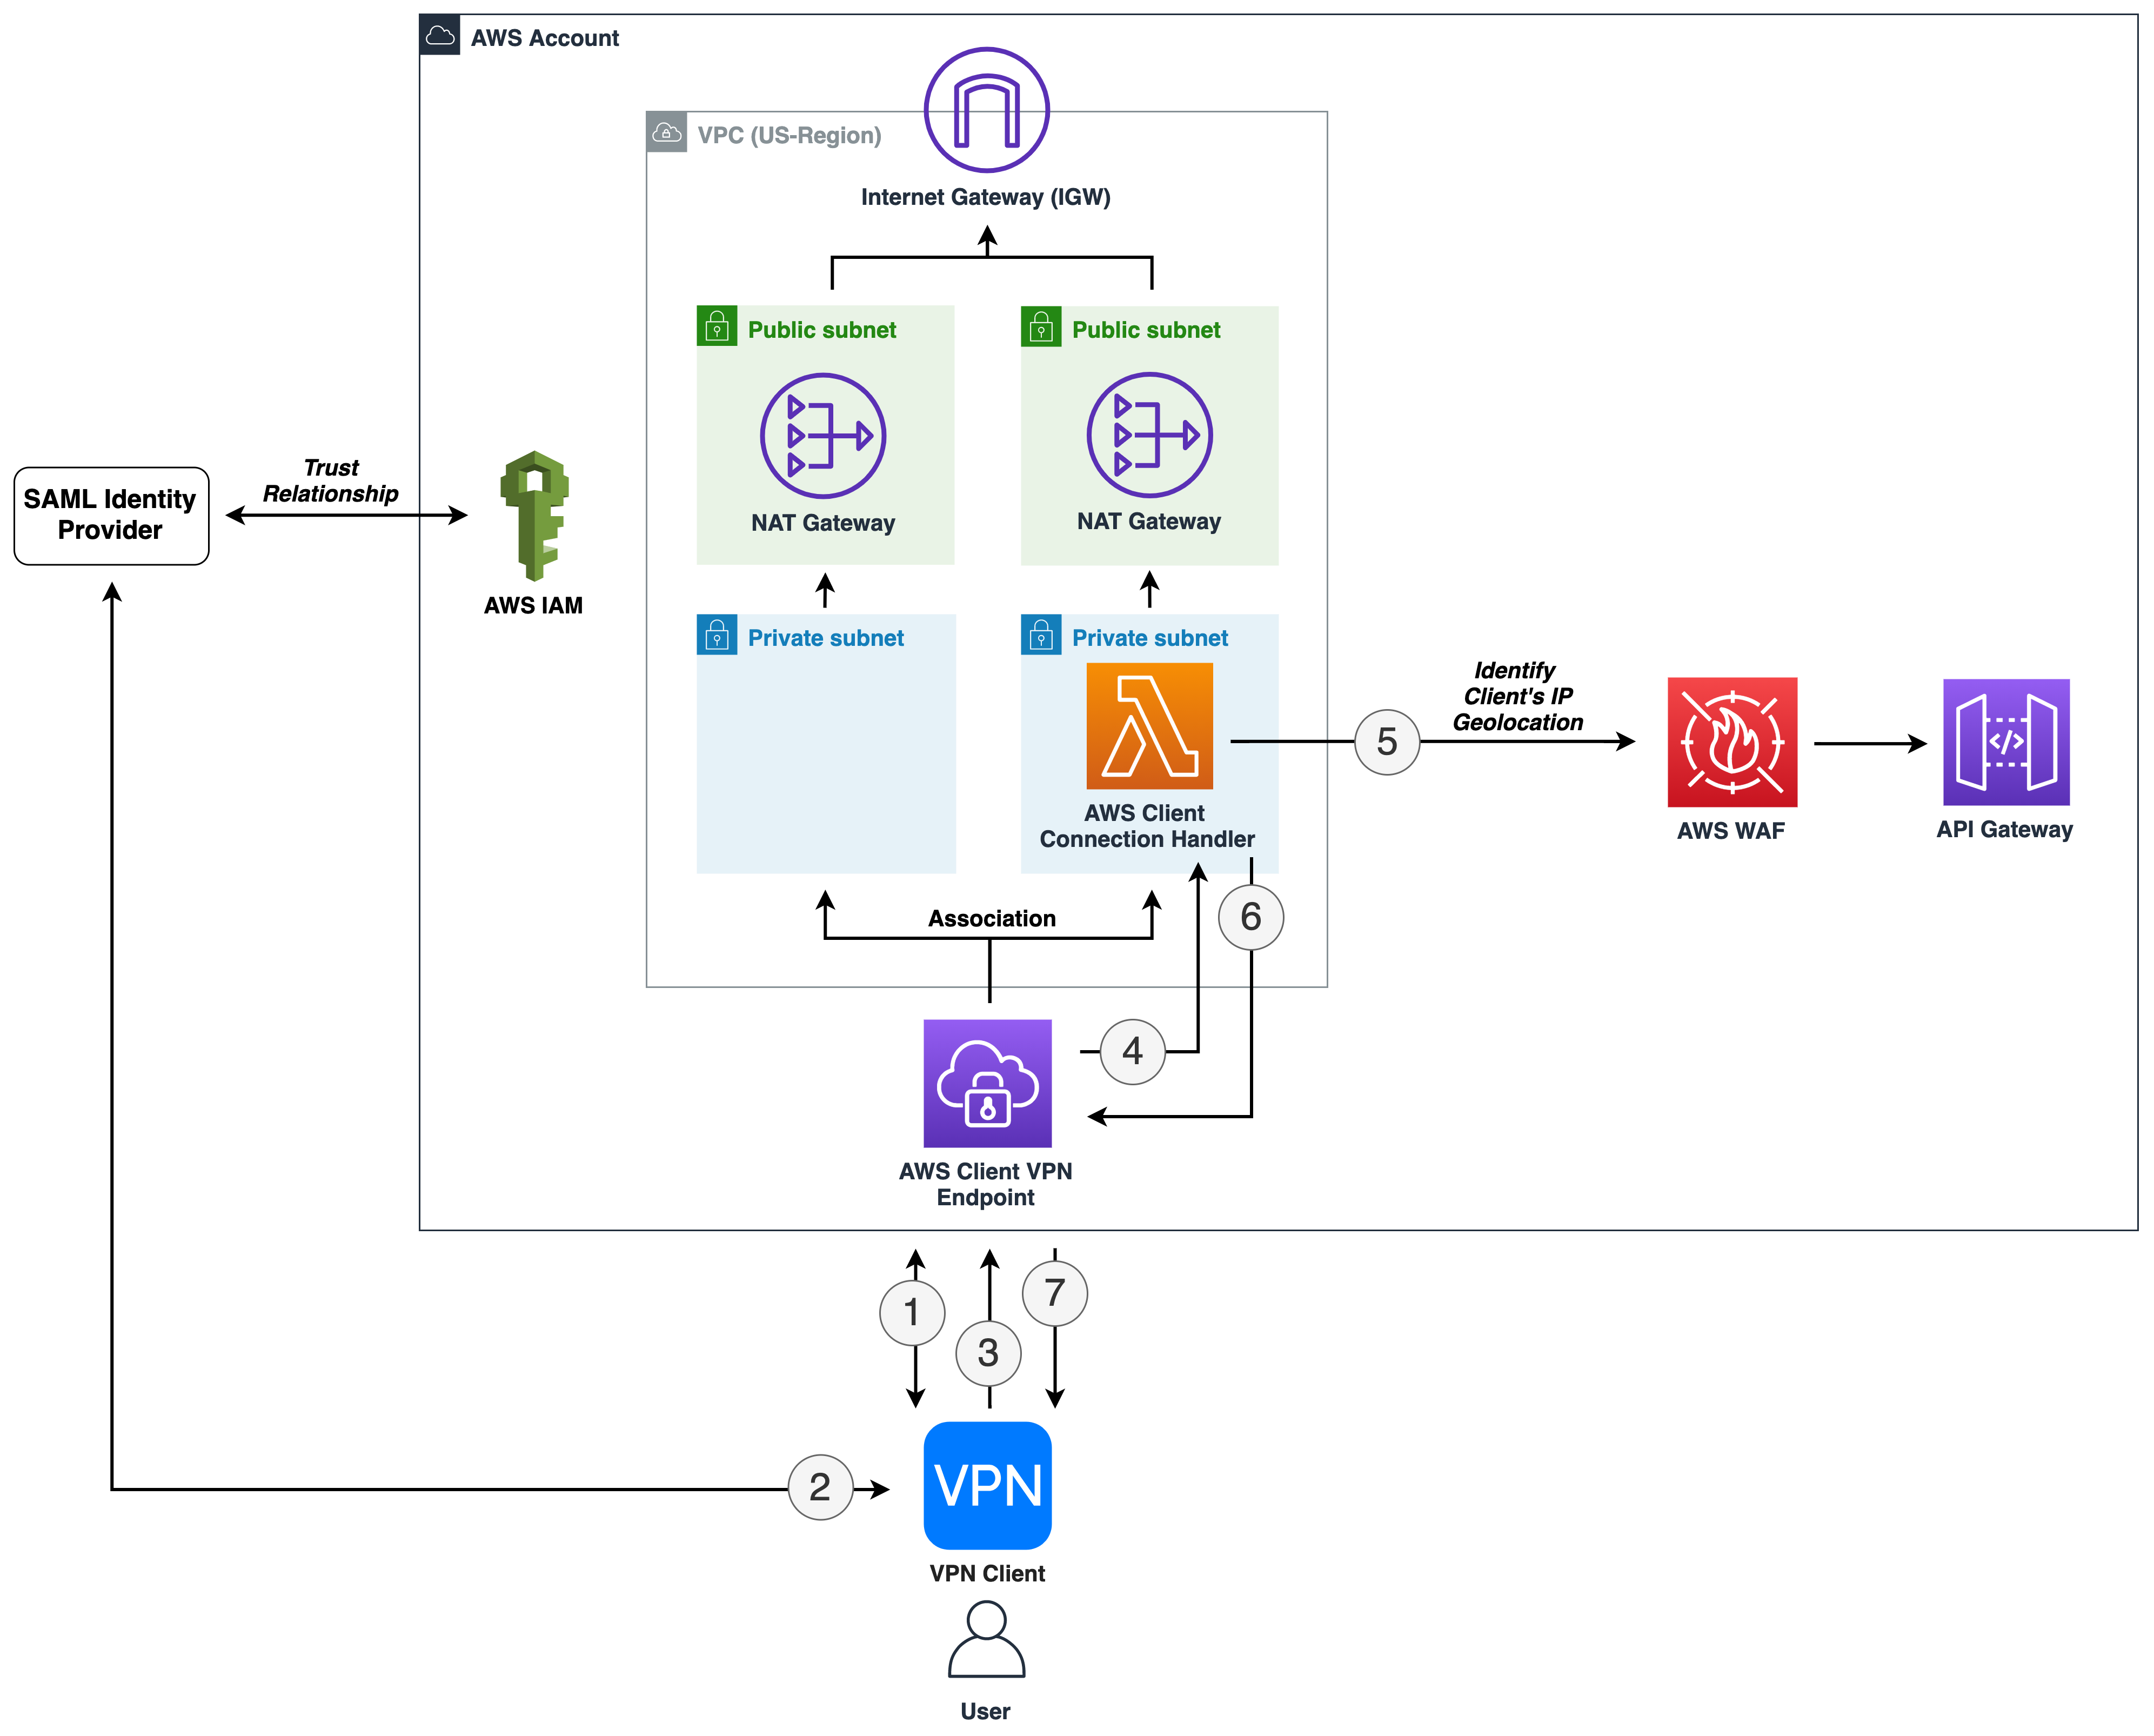
Figure 1 shows how incoming request information is captured so that the operations team can use it to determine rate-based rules.
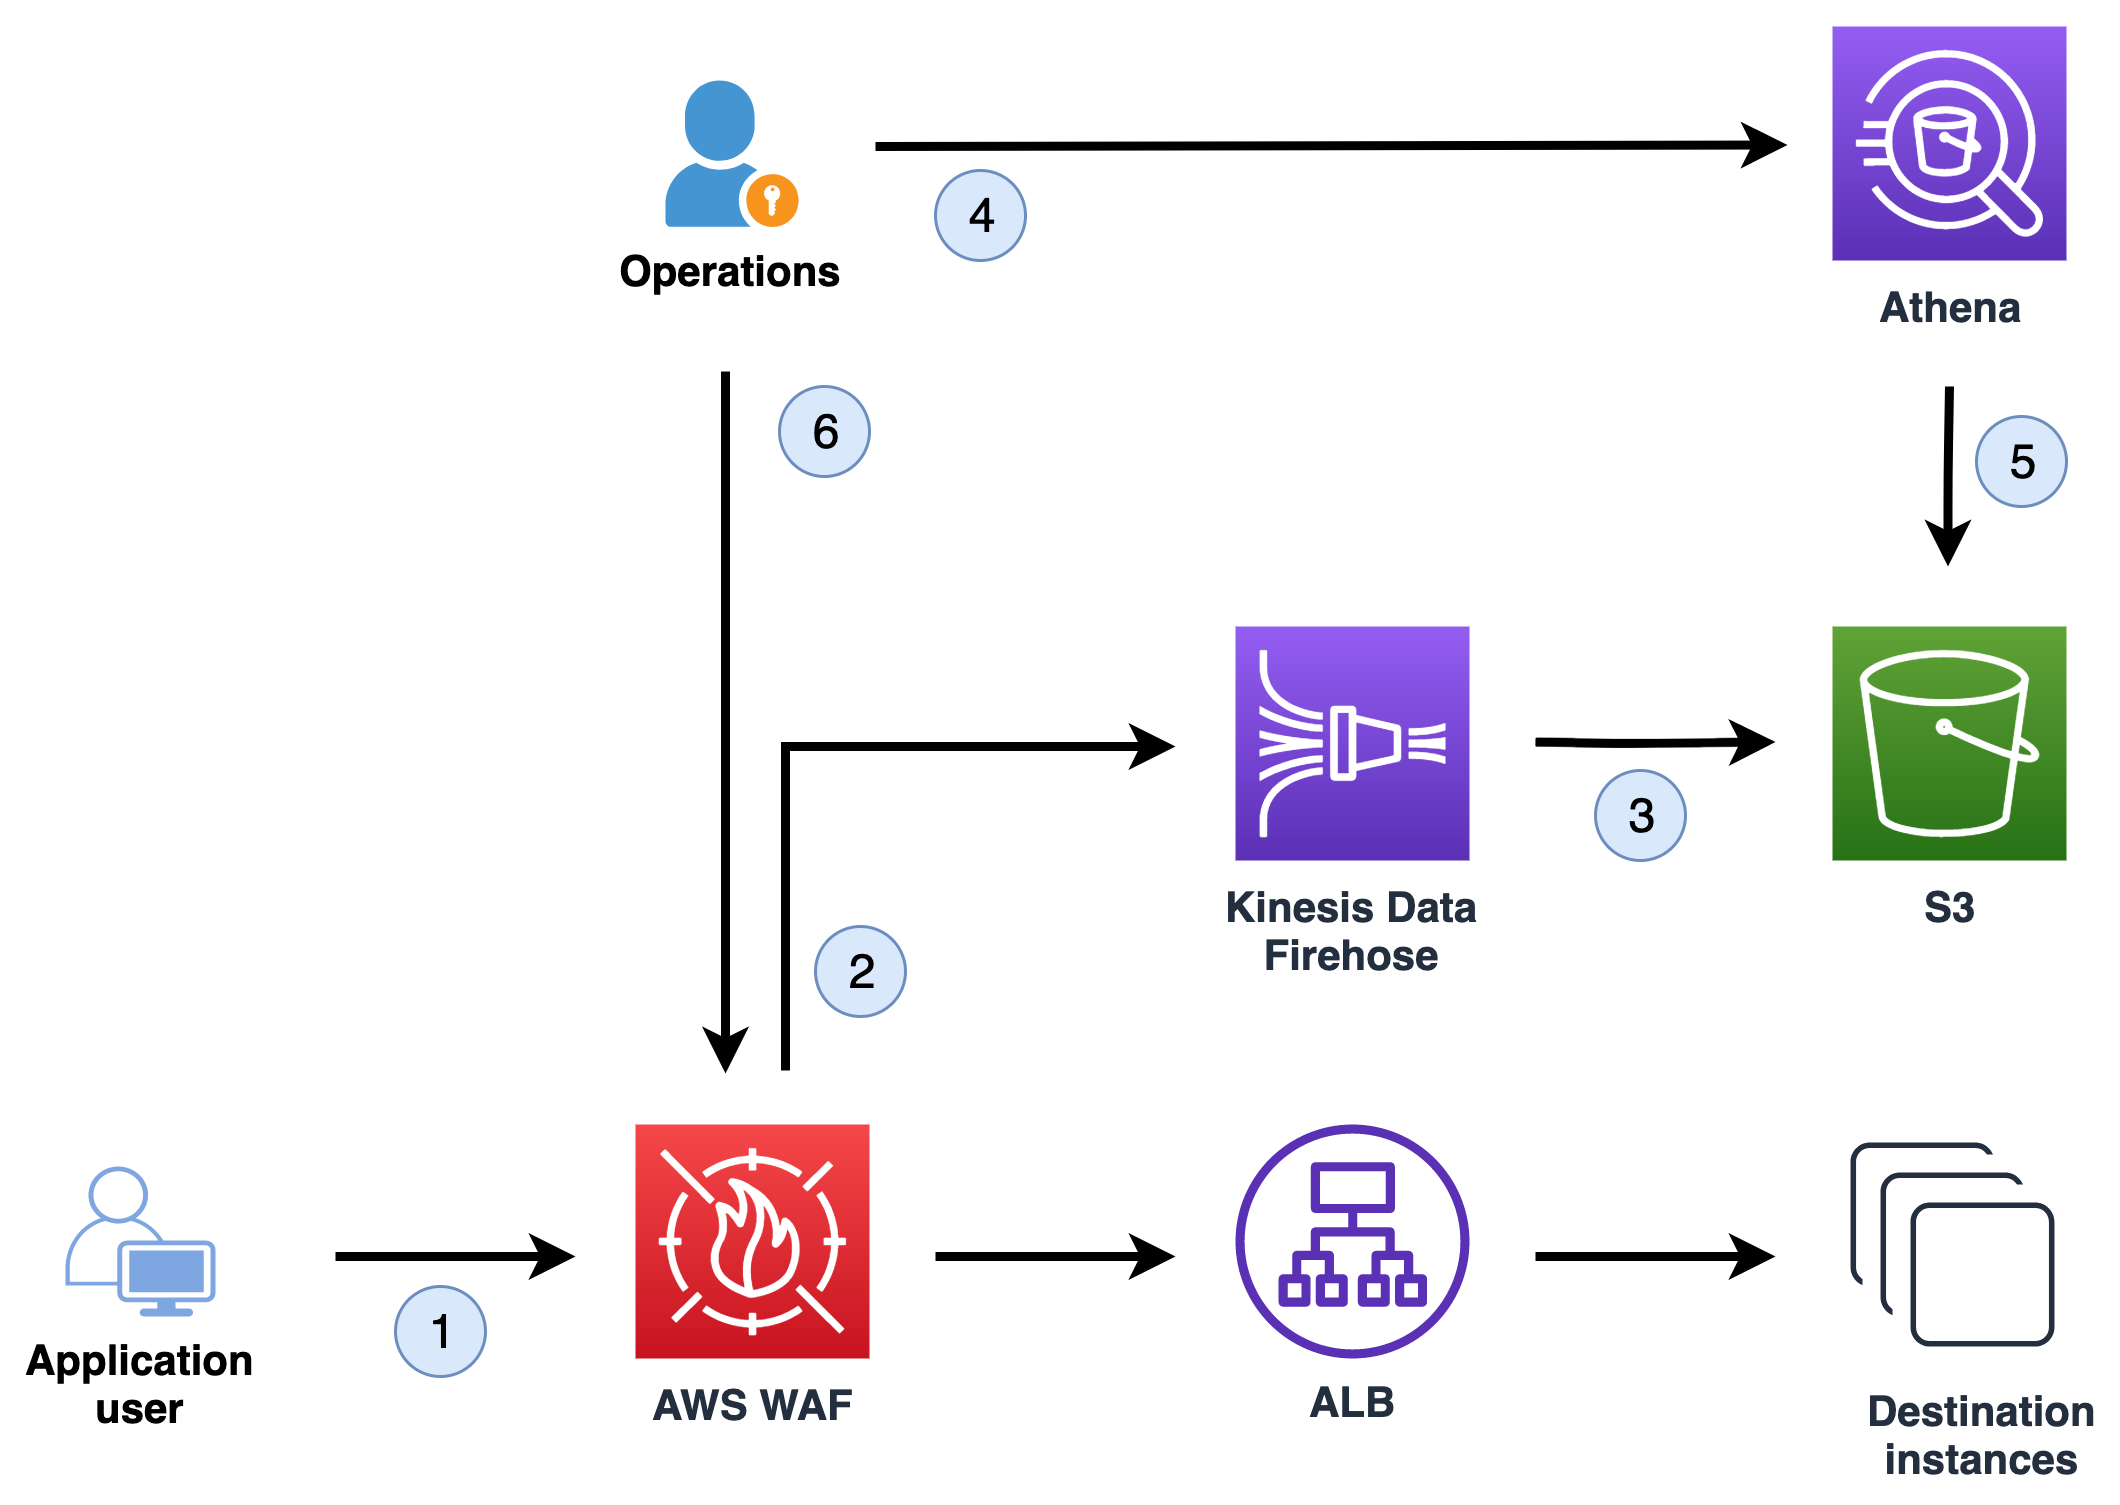
Figure 1: The workflow to collect and query logs and apply rate-based rules
Let’s go through the flow to better understand what’s happening at each step:
- An application user makes requests to the application.
- AWS WAF captures information about the incoming requests and sends this to Amazon Kinesis Data Firehose.
- Kinesis Data Firehose delivers the logs to an Amazon Simple Storage Service (Amazon S3) bucket, where they will be stored.
- The operations team uses Amazon Athena to analyze the logs with SQL queries.
- Athena queries the logs in the S3 bucket and shows the query results.
- The operations team uses the query results to determine the appropriate AWS WAF rate-based rule.
The three rate-based rules in detail
Each of the rules helps to protect web applications from unauthorized activity. Each of the rules focuses on a specific aspect of protection. The rules complement each other, and so when they’re combined, they can offer greater help in protecting your web application. We’ll look at each of the rules to understand what they do.
Blanket rate-based rule
A blanket rate-based rule is designed to prevent any single source IP address from negatively impacting the availability of a website. For example, if the threshold for the rate-based rule is set to 2,000, the rule will block all IPs that are making more than 2,000 requests in a rolling 5-minute period. This is the most basic rate-based rule, and one of the most valuable for AWS WAF customers to implement. The SRT often helps customers who are actively under a DDoS attack to quickly implement this rule. In past experiences with HTTP flood cases, if this rule were proactively in place, the customer would have been protected and wouldn’t have needed to reach out to the SRT for assistance. The blanket rate-based rule would have automatically blocked the attempt without any human intervention.
URI-specific rate-based rule
Some application URI endpoints typically receive a high request volume, but for others it would be unusual and suspicious to see a high request count. For example, multiple requests in a 5-minute period to an application’s login page is suspicious and indicates a potential brute force or credential-stuffing attack against the application. A URI-specific rule can prevent a single source IP address from connecting to the login page as few as 100 times per 5-minute period, while still allowing a much higher request volume to the rest of the application. Some applications naturally have computationally expensive URIs that, when called, require considerably more resources to process the request. An example of this could be a database query or search function. If a bad actor targets these computationally expensive URIs, this can quickly lead to application performance or availability issues. If you assign a URI-specific rate-based rule to these portions of your site, you can configure a much lower threshold than the blanket rate-based rule. It’s beyond the scope of this blog post, but some customers use Application Load Balancer access logs and the target_processing_time information to determine precisely which portions of the site are the slowest to respond and might represent a computationally expensive call. These customers then put additional rate-based rule protections on calls that are made to these URIs.
IP reputation rate-based rule
Many of the DDoS events the SRT assists customers with include HTTP floods that originate from known malicious source IPs. The AWS WAF Security Automations solution provides AWS WAF customers with a subscription to four open-source threat intelligence lists. Rate-based rules with low thresholds can be applied to requests coming from these suspect sources. Some customers feel comfortable completely blocking web requests from these IPs, but at the very least, requests from these IPs should be rate-limited to protect the application from these well-known malicious sources.
It’s also common to see HTTP floods originate from IP addresses within certain countries. You can use AWS WAF geographical matching rules to assign lower rate-based rule thresholds to requests that originate from certain countries, or countries that don’t contain your web application’s primary user base. For example, suppose your application primarily serves users in the United States. In that case, it could be beneficial to create a rate-based rule with a low threshold for requests that come from any country other than the United States. HTTP floods are also commonly seen originating from IP addresses classified as cloud hosting provider IPs. You can use AWS WAF’s “HostingProviderIPList” Managed Rule to label these requests and then assign a lower rate-based rule threshold to them as well.
Prerequisites
Before you implement the solution, verify that:
- AWS WAF is deployed in your AWS account and is associated with an Amazon CloudFront distribution or an Application Load Balancer.
- Your AWS WAF default action is set to Block. When you create and configure a web ACL, you set the web ACL default action, which determines how AWS WAF handles web requests that don’t match any rules in the web ACL. To learn more about default action for a web ACL, see Deciding on the default action for a web ACL.
- AWS WAF logging is configured and logs are being stored in an S3 bucket.
Note: You can follow these instructions to configure delivery of AWS WAF logs to your S3 bucket, and you can also use AWS Firewall Manager to configure centralized AWS WAF logging in a multi-account environment.
Set up Athena to analyze AWS WAF logs
Amazon Athena is an interactive query service that you can use to analyze data in Amazon S3 by using standard SQL. For this solution, you’ll use Athena to connect to the S3 bucket where AWS WAF logs are stored and query the AWS WAF logs. The first step is to open the Athena console and create a database.
Note: The Athena database and table creation is a once-off configuration process. You can then come back and run the queries and see the query results based on your latest AWS WAF log data.
To create an Athena database, you’ll use a data definition language (DDL) statement. Paste the following query in the Athena query editor, replacing values as described here:
- Replace <your-bucket-name> with the S3 bucket name that holds your AWS WAF logs.
- For <bucket-prefix-if-exist>, if AWS WAF logs are stored in an S3 bucket prefix, replace with your prefix name. Otherwise, remove this part from the query, including the slash “/” at the end.
Choose Run query to run the query and create the database. Successful completion will be indicated by the query result, as shown below.
Next, you’ll create a table inside the database. Paste the following query in the Athena query editor, replacing values as described here:
- Replace <your-bucket-name> with the S3 bucket name that holds your AWS WAF logs.
- For <bucket-prefix-if-exist>, if AWS WAF logs are stored in an S3 bucket prefix, replace with your prefix name. Otherwise, you can remove this part from the query, including the slash “/” at the end.
- For has_encrypted_data, if your AWS WAF log data is encrypted at rest, change the value to true, otherwise false is the correct value.
Run the query in the Athena console. After the query completes, Athena registers the waftable table, which makes the data in it available for queries.
Run SQL queries to identify rate-based rule thresholds
Now that you have a table in Athena, know where the data is located, and have the correct schema, you can run SQL queries for each of the rate-based rules and see the query results.
Blanket rate-based rule for all application endpoints
You’ll start with a SQL query that identifies the blanket rule. The critical factor in determining the blanket rule is to run the query against AWS WAF logs data that represents a healthy high request volume. The following query defines a time window of 6 hours in the evening, expressed as 2020-12-01 16:00:00 and 2020-12-01 22:00:00. Time windows can span a few hours or several days; however, this time window must be a good representation of your traffic volume, which you will use as the basis to identify the threshold. For example, if your application is busier during certain periods, you should evaluate the log data for that time. In the example shown here, we limit the query results to the top 100 IPs in our SQL queries. You can adjust the limit to your needs by updating the LIMIT value.
Update the time window to your needs and run the query in the Athena console. The results will show the top requesting IPs in any 5-minute period between two dates, as illustrated in Figure 2.
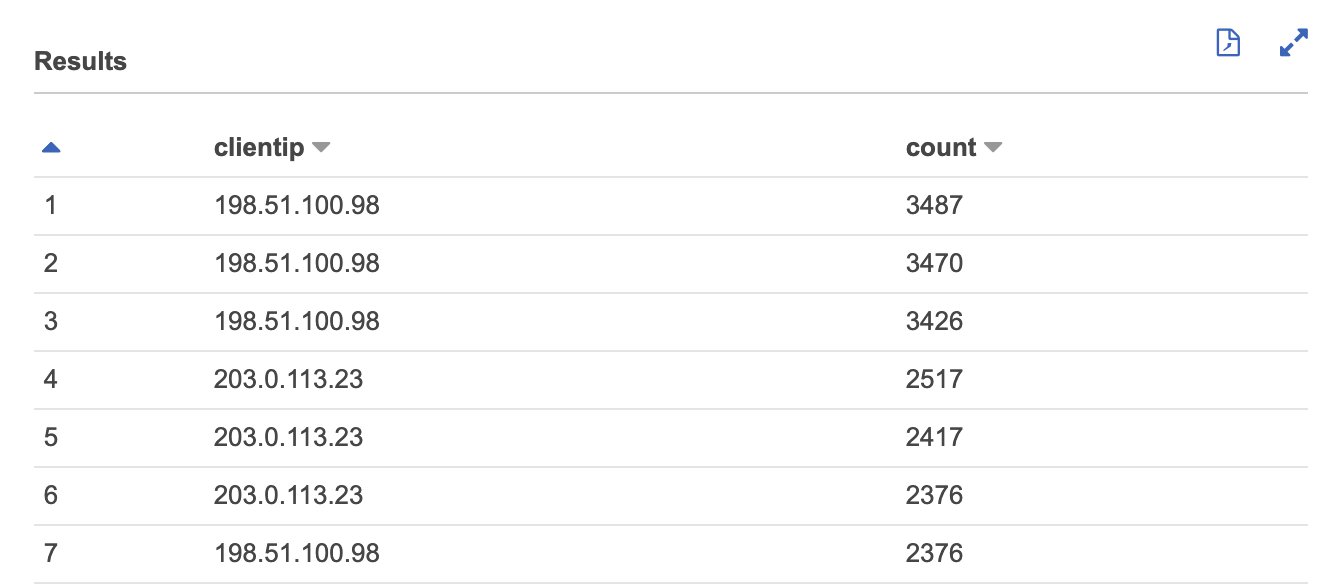
Figure 2: The top requesting IP in any 5-minute period between dates
You can visualize the results data to see a holistic view of the request count per IP. The chart in Figure 3 illustrates the SQL query results.
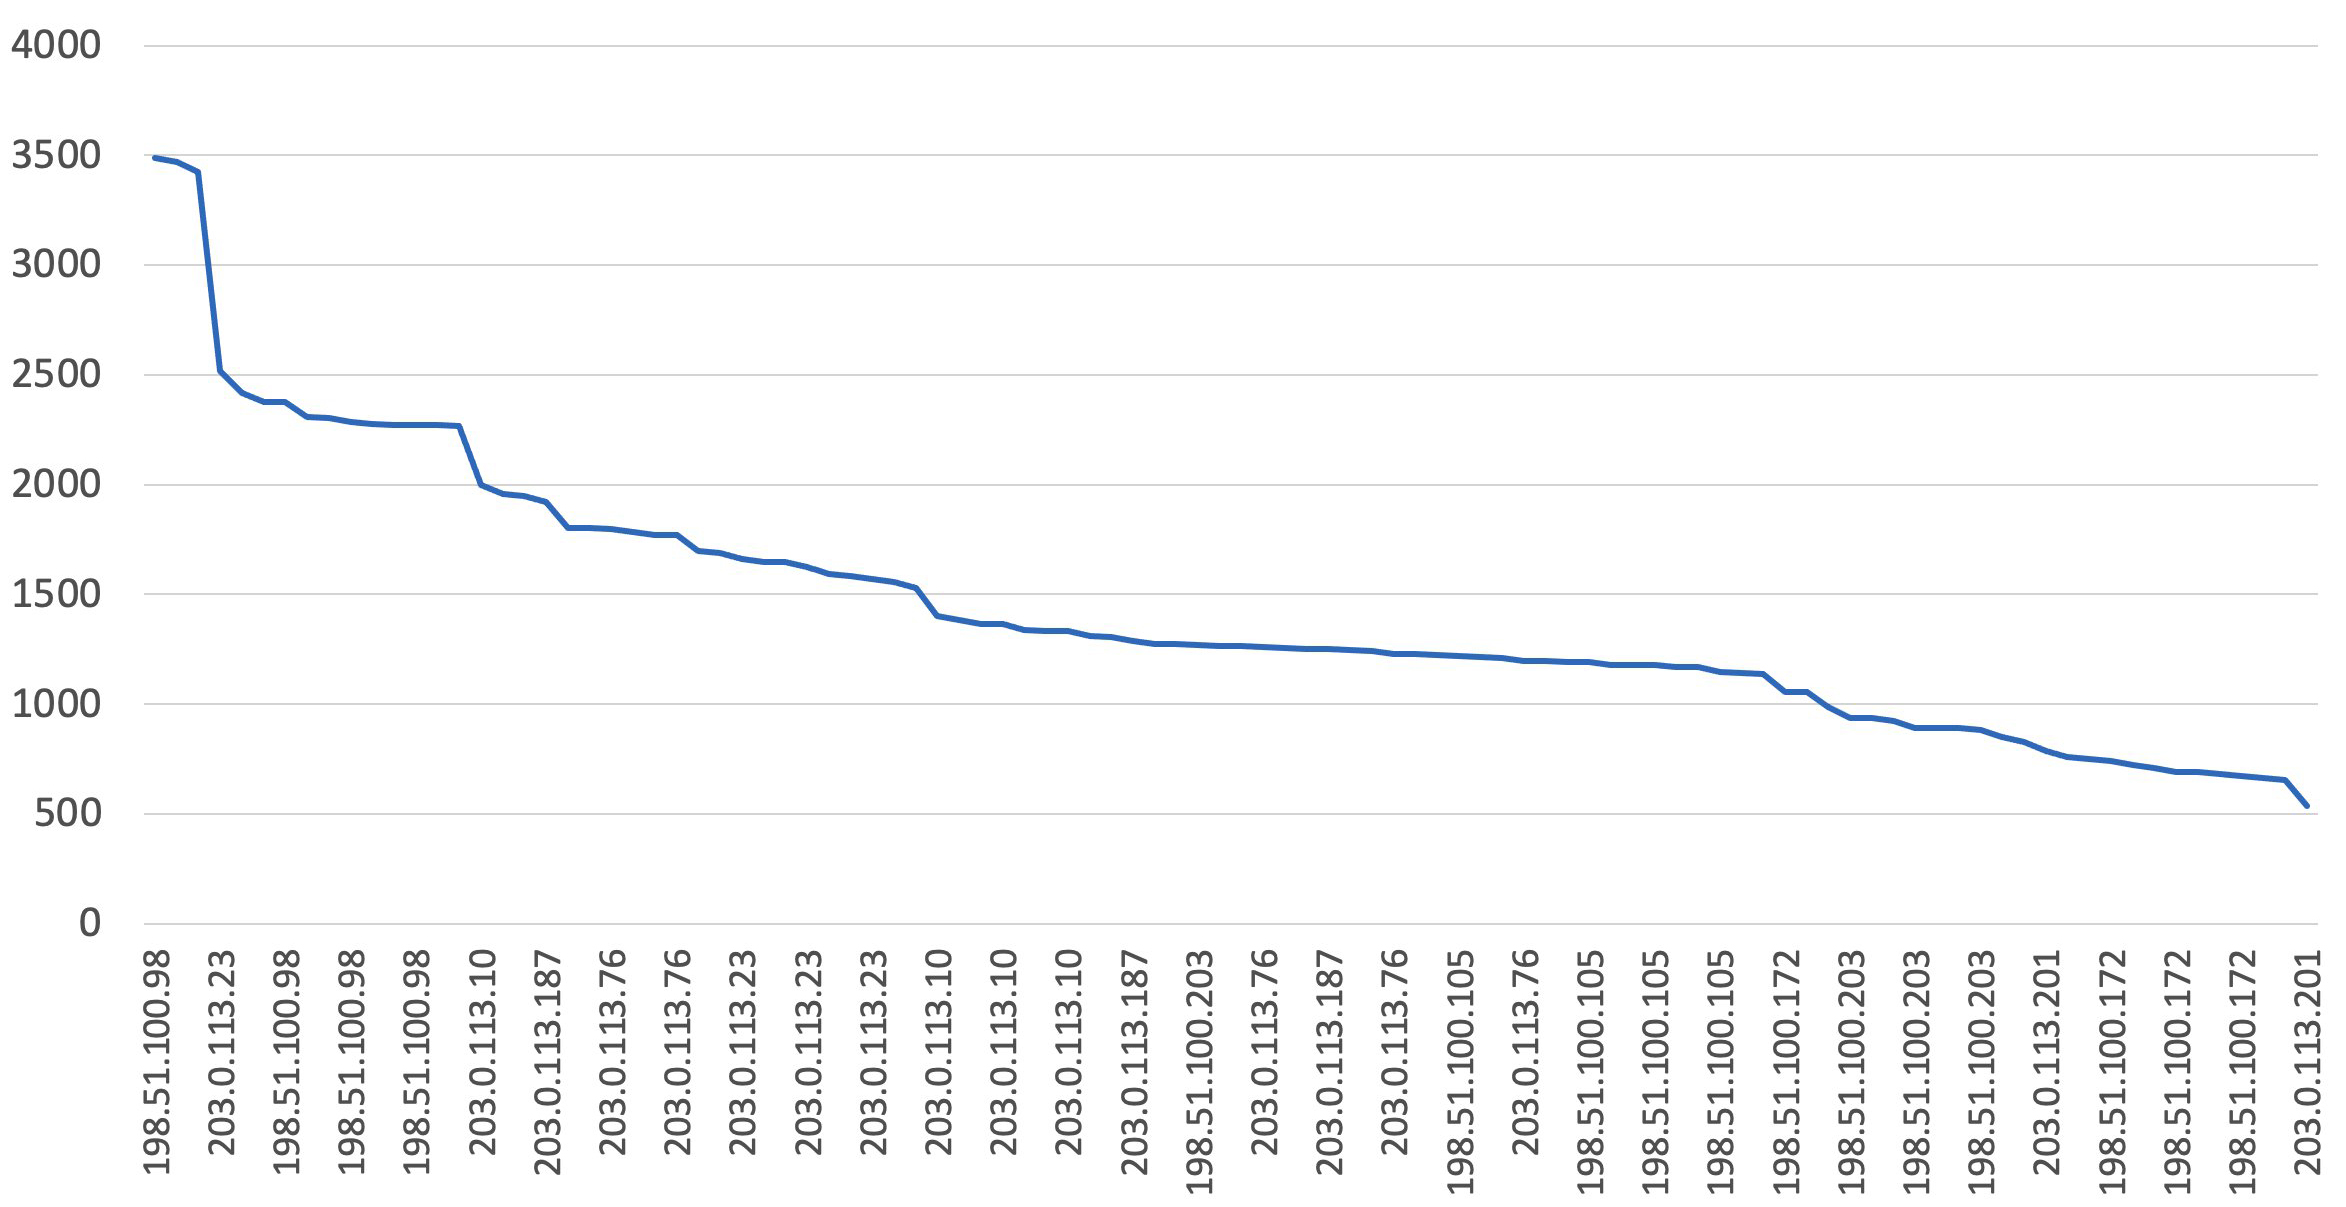
Figure 3: Chart: Top requesting IP in any 5-minute period between dates
The results are sorted by showing the IPs with the highest request volume for every 5-minute period. This means that the same IP could appear multiple times, if most of the requests were made within that 5-minute interval. In our example, looking at the result, an excellent first blanket rule would limit the request volume to about 7,000 requests within a 5-minute time period. You can either create the AWS WAF rule by using the following JSON and the JSON rule editor, or by using the AWS WAF visual rule editor and following these instructions. If you’re using the following JSON, make sure to replace the Limit value with the value that you identified by running the SQL query earlier.
Sometimes a client connects to an application through an HTTP proxy or a content delivery network (CDN), which obscures the client origin IP. It’s important to identify the client IP instead of the one from the proxy or CDN, because blocking source IPs can cause a wider unwanted impact. You can use many tools to help you identify whether the source IP might be a CDN. In this case, you would need to query and filter on the X-Forwarded-For, True-Client-IP, or other custom headers. CDN providers typically publish which headers they add to the requests, but X-Forwarded-For and True-Client-IP are common. The following query shows how you can reference these headers, illustrating with the X-Forwarded-For header, to write rate-based rules. You can replace X-Forwarded-For with the header you expect to hold the client IP.
URI-based rule for specific application endpoints
Suppose that you want to further limit requests to the login page on your website. To do this, you could add the following string match condition to a rate-based rule:
- The part of the request to filter on is URI
- The Match Type is Starts with
- A Value to match is /login (this needs to be whatever identifies the login page in the URI portion of the web request)
Next you have to identify what is a typical request volume to the /login URI for the application. The following SQL query does exactly that.
Replace the time window 2020-12-01 16:00:00 and 2020-12-01 22:00:00 and the httprequest.uri value, if applicable, and run the query in the Athena console. The results show the highest requesting IP and /login URI for every 5-minute period between dates, as illustrated in Figure 4.
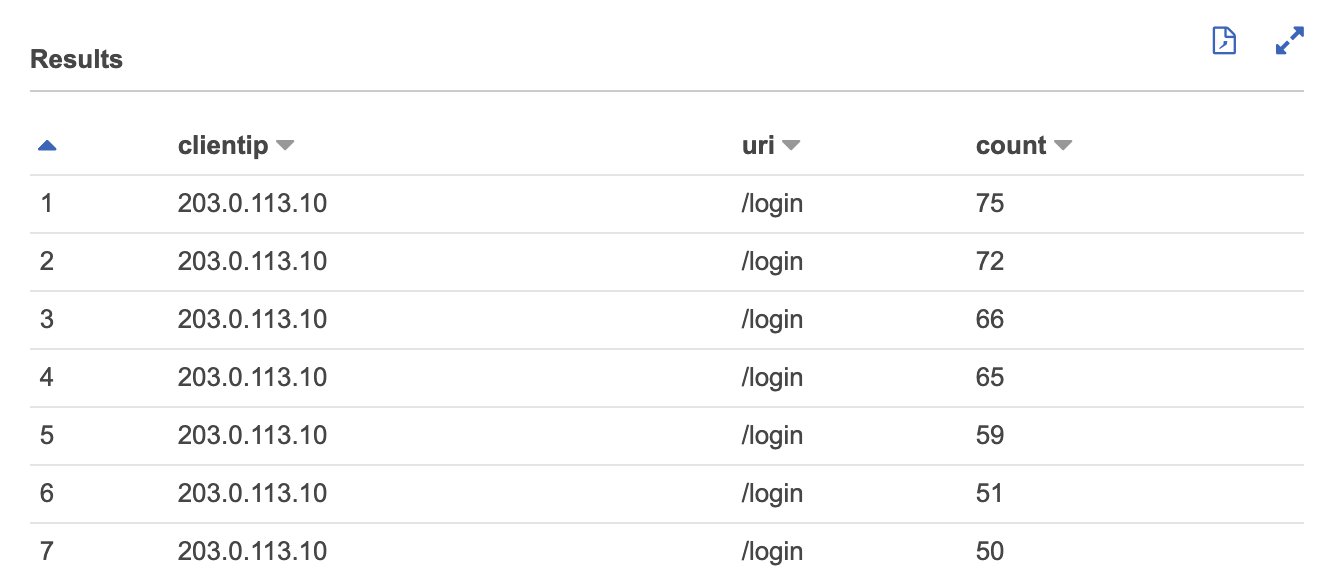
Figure 4: The highest requesting IP and /login URI for every 5-minute period between dates
Figure 5 illustrates a chart based on the query results for the highest requesting IP and /login URI for every 5-minute period between dates.
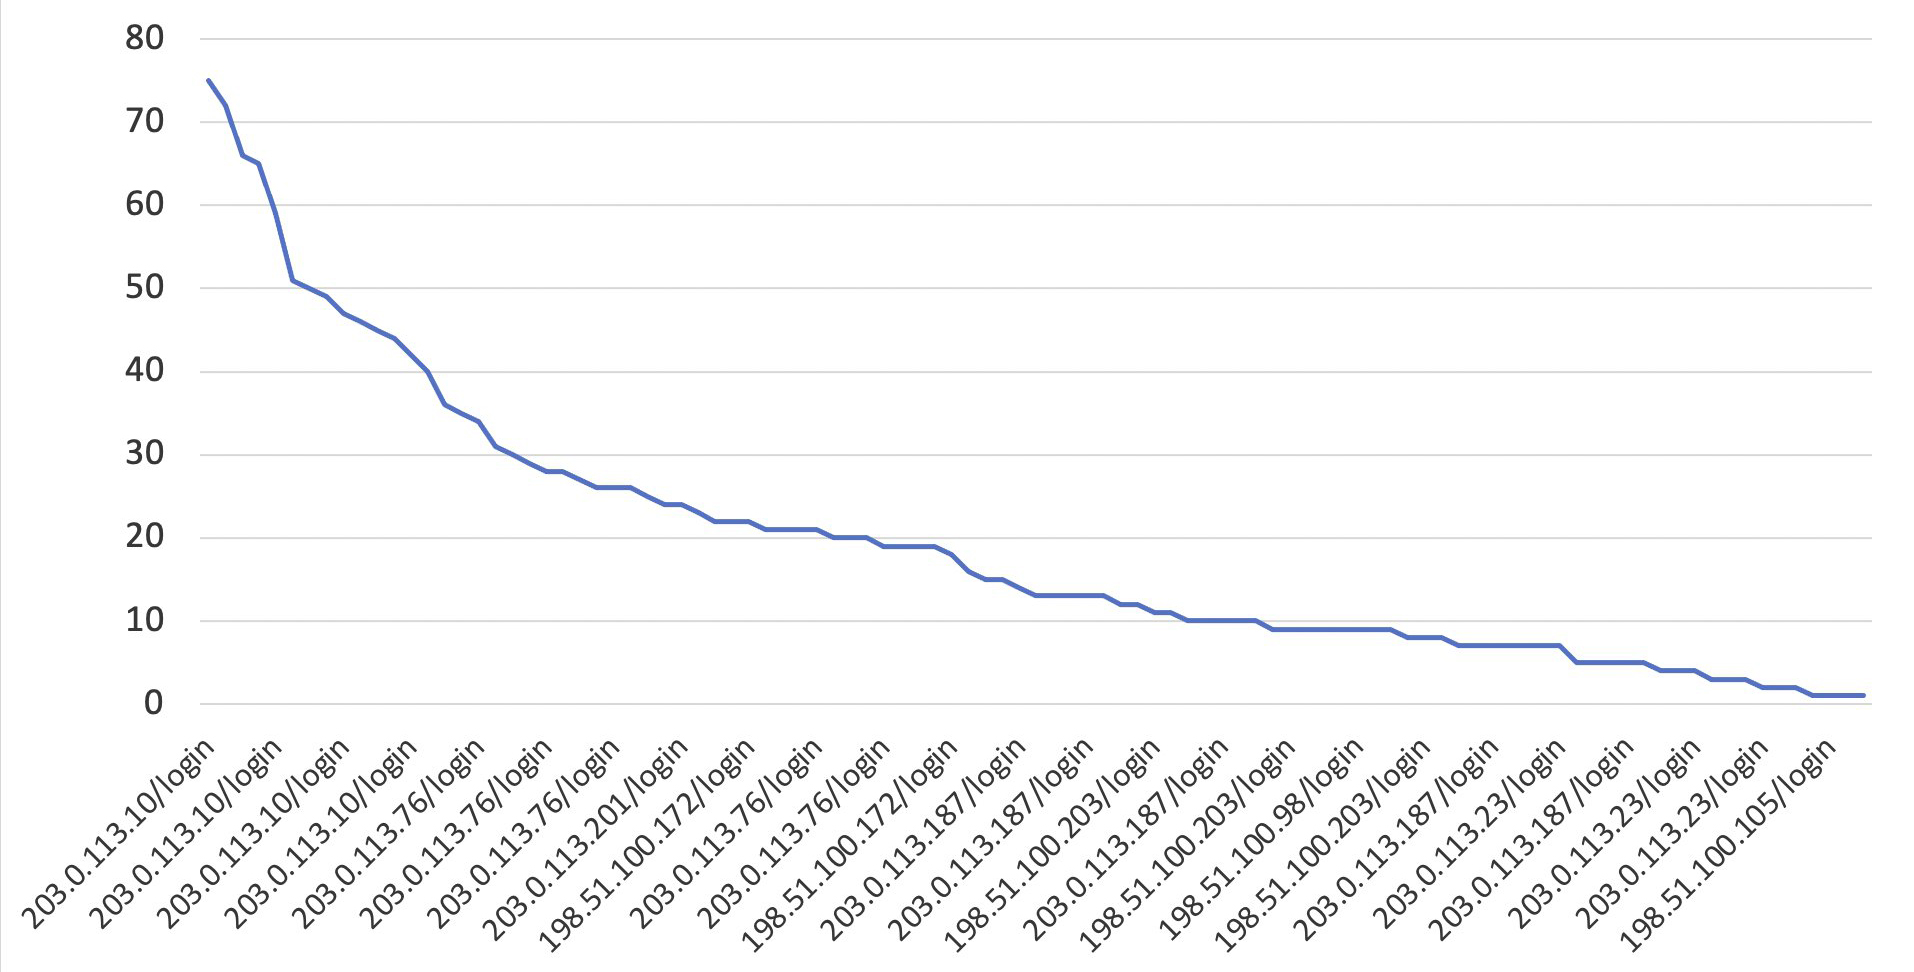
Figure 5: Chart: The highest requesting IP and /login URI for every 5-minute period between dates
Based on the SQL query results, you would specify a rate limit of 150 requests per 5 minutes. Adding this rate-based rule to a web ACL will limit requests to your login page per IP address without affecting the rest of your site. Once again, you can either create the AWS WAF rule by using the following JSON and the JSON rule editor, or by using the AWS WAF visual rule editor and following these instructions. If you’re using the following JSON, make sure to replace the Limit value with the value that you identified by running the SQL query earlier.
AWS WAF rules with a lower value for Priority are evaluated before rules with a higher value. For the AWS WAF rules to work as expected (first evaluating the more specific rule—the URI-based rule, and only after that, the more general blanket rule) you have to set the AWS WAF rule priority. You can do that by updating the JSON and setting the Priority value to 1 for the blanket rule and 0 for the URI-based rule, or by using the AWS WAF visual rule editor. The expected AWS WAF rule priority should be as illustrated in Figure 6.
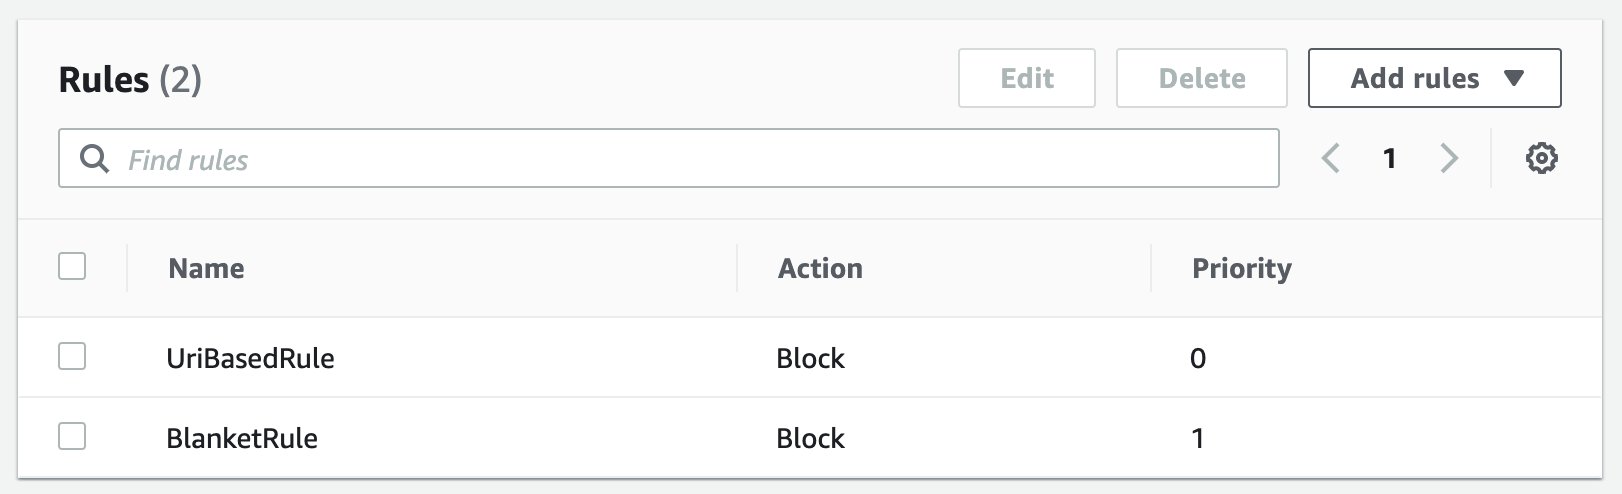
Figure 6: AWS WAF rules with priority for UriBasedRule
If you want to know the request volume across all application URIs, the following SQL will accomplish that.
Figure 7 shows a chart of what the SQL query results might look like.
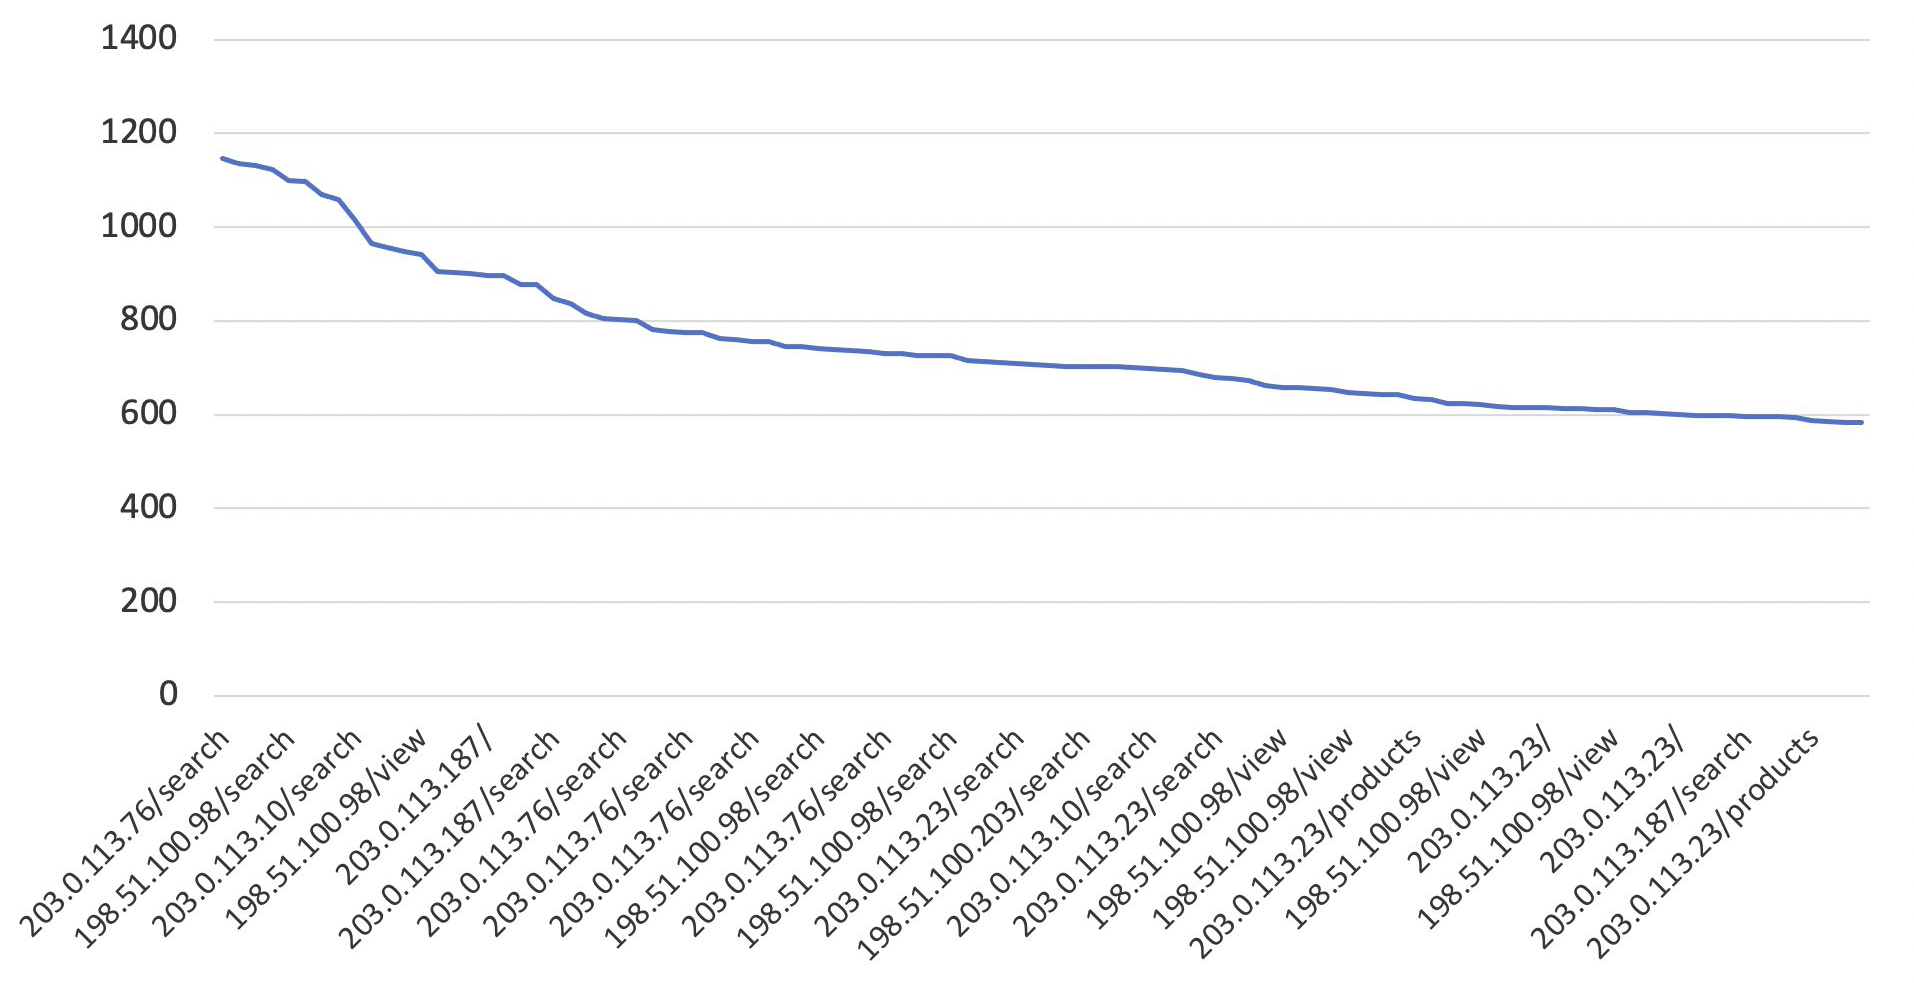
Figure 7: The highest requesting IP and URI for every 5-minute period between dates
IP reputation rule groups to block bots or other threats
You can use IP reputation rules to block requests based on their source. AWS WAF offers a wide selection of managed rule groups, and Amazon IP reputation list is the one that will help to reduce your exposure to bot traffic or exploitation attempts.
To add the Amazon IP reputation list rule to your web ACL
- Open the AWS WAF console and navigate to the managed rule groups view.

Figure 8: The managed rule group view in AWS WAF
- Expand AWS managed rule groups, and for Amazon IP reputation list, choose Add to web ACL.

Figure 9: Add the Amazon IP reputation list to the web ACL
- Scroll to the bottom of the page and choose Add rule.
- At this point, you should see the Set rule priority view. Move up the Amazon managed rule so that it has the highest priority. If a request originates from a bot, you want to deny the request as early as possible, and you achieve exactly that by assigning the highest priority to the Amazon IP reputation list rule. Your final AWS WAF rules order should be as shown in Figure 10.

Figure 10: Final AWS WAF rules ordered by priority


Considerations for rate-based rules
It’s important to note that the more specific AWS WAF rules should have a higher priority, because you want these rules to limit the request volume first. In our example, the rules strategy is first based on a specific URI, and then on a blanket rule that limits requests across the whole application.
The rate-based rules that we discussed here provide a solid foundation to help you protect your internet-facing applications from common basic HTTP request floods. However, the solution in this blog post shouldn’t be seen as a one-time setup but rather as an iterative activity.
You should determine a healthy time frame to rerun Amazon Athena queries to identify a new rate-based rule that aligns with the application’s growth and increasing request volume. Reviewing the rate-based rules on an iterative basis and incorporating it into your existing processes, such as software development life cycle, is a great way to schedule in the review process. Each AWS WAF rule can publish Amazon CloudWatch metrics, which can be used to trigger alerts before thresholds are crossed. You can use alerts to create tickets to operations teams based on thresholds you set. This alerts your operations teams to review the situation to see if it’s a DDoS attack being thwarted versus legitimate traffic being dropped.
After you define your request, add a buffer to allow for growth. Rate-based rules should have a reasonable buffer to account for near-future application growth. For instance, when an Athena query result shows a request volume of 500 requests, a rate-based rule with a limit of 1,000 requests gives a buffer for an additional 500 requests to account for application growth.
Summary
In this post, we introduced you to the top three most important AWS WAF rate-based rules to protect your web applications from common HTTP flood events. We also covered how to implement these rate-based rules and determined an appropriate request threshold for your application by using AWS WAF logs and Amazon Athena queries. To learn more about best practices that help you protect your websites and web applications against various attack vectors by using AWS WAF, see our whitepaper, Guidelines for Implementing AWS WAF.
You can learn more about AWS WAF in other AWS WAF–related Security Blog posts.
If you have feedback about this post, submit comments in the Comments section below. If you have questions about this post, start a new thread on the AWS WAF forum or contact AWS Support.
Want more AWS Security how-to content, news, and feature announcements? Follow us on Twitter.