Tag Archives: Step Functions

Implementing long running deployments with AWS CloudFormation Custom Resources using AWS Step Functions

Post Syndicated from DAMODAR SHENVI WAGLE original https://aws.amazon.com/blogs/devops/implementing-long-running-deployments-with-aws-cloudformation-custom-resources-using-aws-step-functions/

AWS CloudFormation custom resource provides mechanisms to provision AWS resources that don’t have built-in support from CloudFormation. It lets us write custom provisioning logic for resources that aren’t supported as resource types under CloudFormation. This post focusses on the use cases where CloudFormation custom resource is used to implement a long running task/job. With custom resources, you can manage these custom tasks (which are one-off in nature) as deployment stack resources.

The routine pattern used for implementing custom resources is via AWS Lambda function. However, when using the Lambda function as the custom resource provider, you must consider its trade-offs, such as its 15 minute timeout. Tasks involved in the provisioning of certain AWS resources can be long running and could span beyond the Lambda timeout. In these scenarios, you must look beyond the conventional Lambda function-based approach for custom resources.

In this post, I’ll demonstrate how to use AWS Step Functions to implement custom resources using AWS Cloud Development Kit (AWS CDK). Step Functions allow complex deployment tasks to be orchestrated as a step-by-step workflow. It also offers direct integration with any AWS service via AWS SDK integrations. By default the CloudFormation stack waits for 1 hour before timing out. The timeout can be increased to maximum 12 hours using wait conditions. In this post, you’ll also see how to use wait conditions with custom resource to run long running deployment tasks as part of a CloudFormation stack.

Prerequisites

Before proceeding any further, you must identify and designate an AWS account required for the solution to work. You must also create an AWS account profile in ~/.aws/credentials for the designated AWS account, if you don’t already have one. The profile must have sufficient permissions to run an AWS CDK stack. It should be your private profile and only be used during the course of this post. Therefore, it should be fine if you want to use admin privileges. Don’t share the profile details, especially if it has admin privileges. I recommend removing the profile when you’re finished with this walkthrough. For more information about creating an AWS account profile, see Configuring the AWS CLI.

Services and frameworks used in the post include CloudFormation, Step Functions, Lambda, DynamoDB, Amazon S3, and AWS CDK.
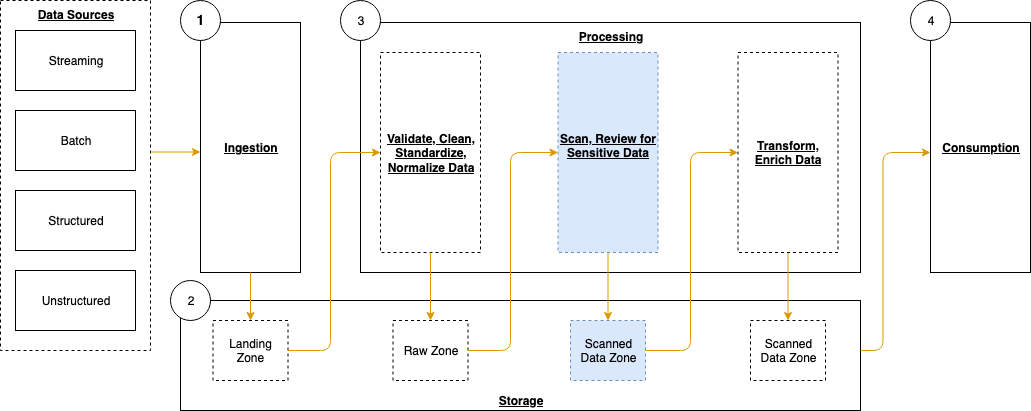
Solution overview

The following architecture diagram shows the application of Step Functions to implement custom resources.

Architecture diagram

Figure 1. Architecture diagram

  1. The user deploys a CloudFormation stack that includes a custom resource implementation.
  2. The CloudFormation custom resource triggers a Lambda function with the appropriate event which can be CREATE/UPDATE/DELETE.
  3. The custom resource Lambda function invokes Step Functions workflow and offloads the event handling responsibility. The CloudFormation event and context are wrapped inside the Step Function input at the time of invocation.
  4. The custom resource Lambda function returns SUCCESS back to CloudFormation stack indicating that the custom resource provisioning has begun. CloudFormation stack then goes into waiting mode where it waits for a SUCCESS or FAILURE signal to continue.
  5. In the interim, Step Functions workflow handles the custom resource event through one or more steps.
  6. Step Functions workflow prepares the response to be sent back to CloudFormation stack.
  7. Send Response Lambda function sends a success/failure response back to CloudFormation stack. This propels CloudFormation stack out of the waiting mode and into completion.

Solution deep dive

In this section I will get into the details of several key aspects of the solution

Custom Resource Definition

Following code snippet shows the custom resource definition which can be found here. Please note that we also define AWS::CloudFormation::WaitCondition and AWS::CloudFormation::WaitConditionHandle alongside the custom resource. AWS::CloudFormation::WaitConditionHandle resource sets up a pre-signed URL which is passed into the CallbackUrl property of the Custom Resource.

The final completion signal for the custom resource i.e. SUCCESS/FAILURE is received over this CallbackUrl. To learn more about wait conditions please refer to its user guide here. Note that, when updating the custom resource, you cannot use the existing WaitCondition-WaitConditionHandle resource pair. You need to create a new pair for tracking each update/delete operation on the custom resource.

/************************** Custom Resource Definition *****************************/
// When you intend to update CustomResource make sure that a new WaitCondition and 
// a new WaitConditionHandle resource is created to track CustomResource update.
// The strategy we are using here is to create a hash of Custom Resource properties.
// The resource names for WaitCondition and WaitConditionHandle carry this hash.
// Anytime there is an update to the custom resource properties, a new hash is generated,
// which automatically leads to new WaitCondition and WaitConditionHandle resources.
const resourceName: string = getNormalizedResourceName('DemoCustomResource');
const demoData = {
    pk: 'demo-sfn',
    sk: resourceName,
    ts: Date.now().toString()
};
const dataHash = hash(demoData);
const wcHandle = new CfnWaitConditionHandle(
    this, 
    'WCHandle'.concat(dataHash)
)
const customResource = new CustomResource(this, resourceName, {
    serviceToken: customResourceLambda.functionArn,
    properties: {
        DDBTable: String(demoTable.tableName),
        Data: JSON.stringify(demoData),
        CallbackUrl: wcHandle.ref
    }
});
        
// Note: AWS::CloudFormation::WaitCondition resource type does not support updates.
new CfnWaitCondition(
    this,
    'WC'.concat(dataHash),
    {
        count: 1,
        timeout: '300',
        handle: wcHandle.ref
    }
).node.addDependency(customResource)
/**************************************************************************************/

Custom Resource Lambda

Following code snippet shows how the custom resource lambda function passes the CloudFormation event as an input into the StepFunction at the time of invocation. CloudFormation event contains the CallbackUrl resource property I discussed in the previous section.

private async startExecution() {
    const input = {
        cfnEvent: this.event,
        cfnContext: this.context
    };
    const params: StartExecutionInput = {
        stateMachineArn: String(process.env.SFN_ARN),
        input: JSON.stringify(input)
    };
    let attempt = 0;
    let retry = false;
    do {
        try {
            const response = await this.sfnClient.startExecution(params).promise();
            console.debug('Response: ' + JSON.stringify(response));
            retry = false;

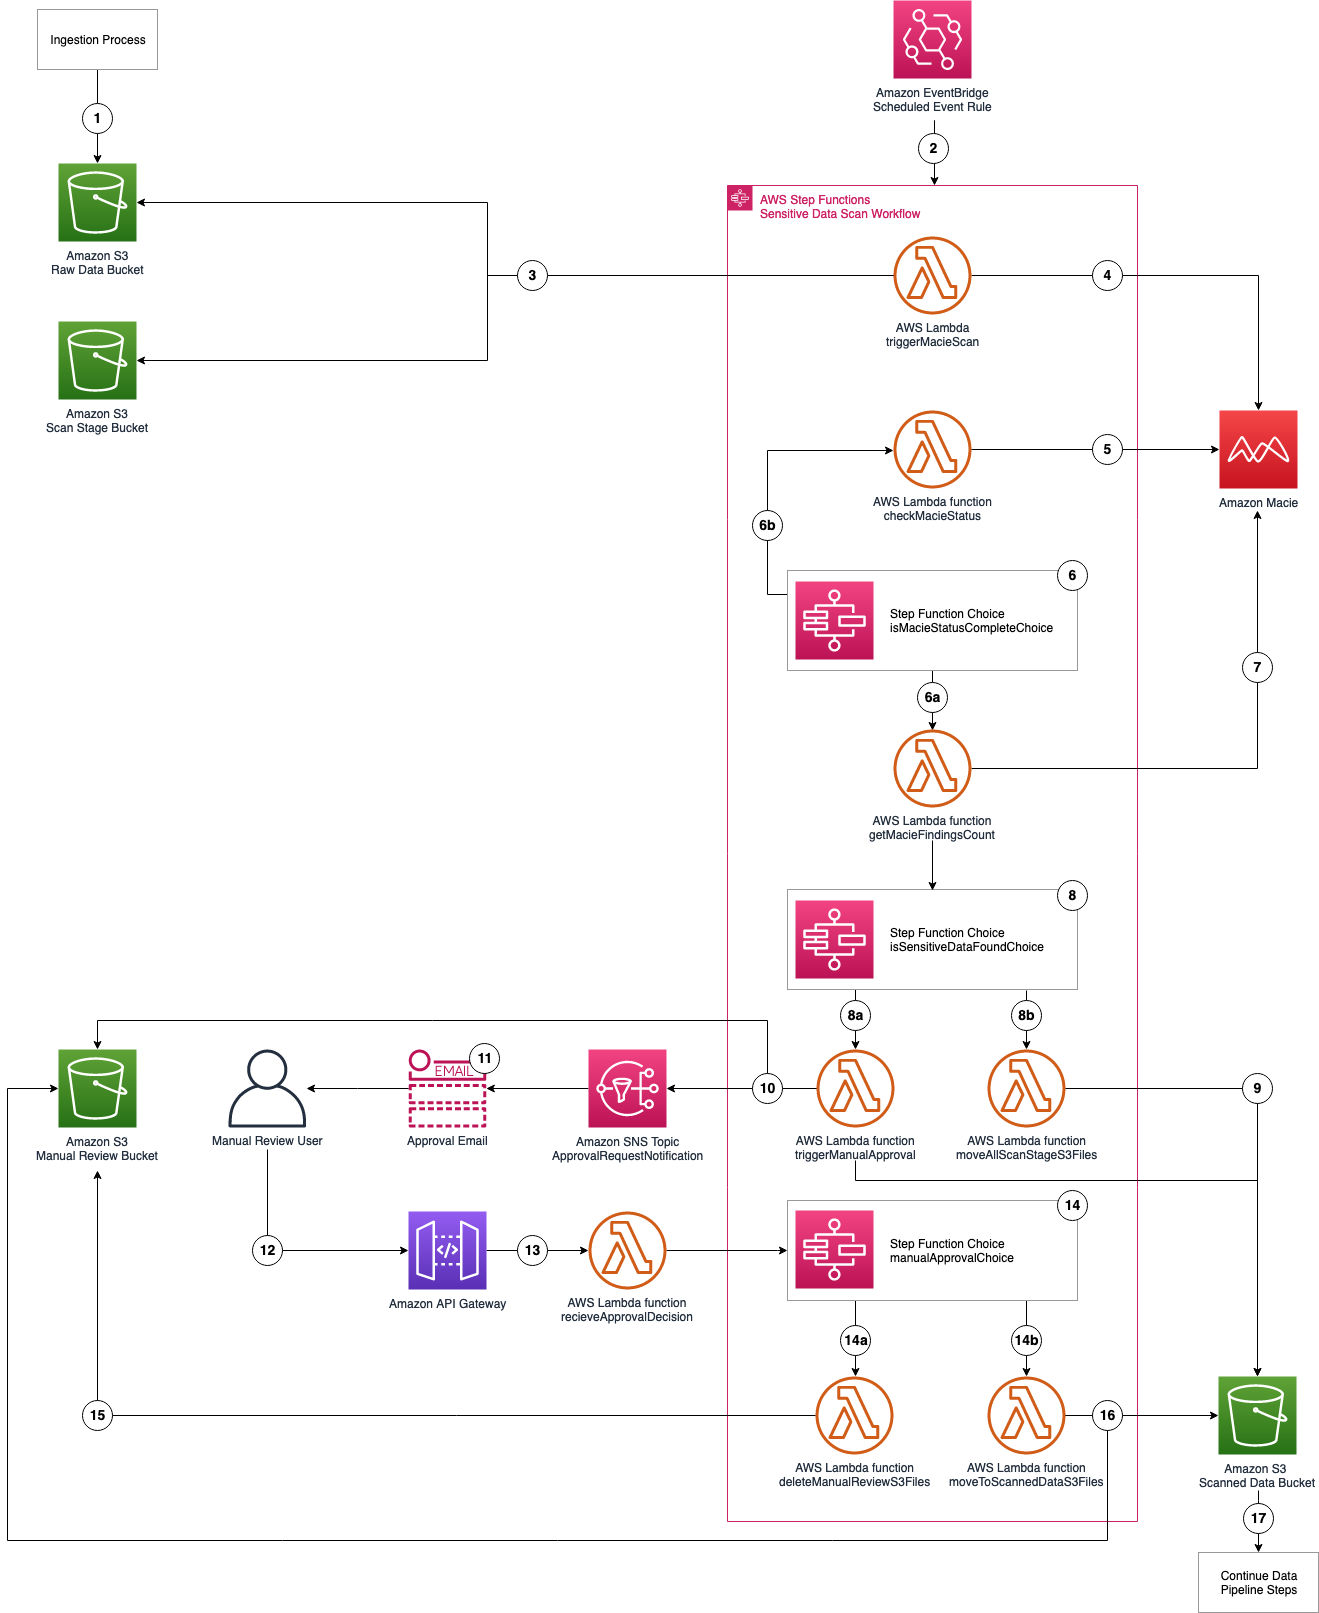
Custom Resource StepFunction

The StepFunction handles the CloudFormation event based on the event type. The CloudFormation event containing CallbackUrl is passed down the stages of StepFunction all the way to the final step. The last step of the StepFunction sends back the response over CallbackUrl via send-cfn-response lambda function as shown in the following code snippet.

/**
 * Send response back to cloudformation
 * @param event
 * @param context
 * @param response
 */
export async function sendResponse(event: any, context: any, response: any) {
    const responseBody = JSON.stringify({
        Status: response.Status,
        Reason: "Success",
        UniqueId: response.PhysicalResourceId,
        Data: JSON.stringify(response.Data)
    });
    console.debug("Response body:\n", responseBody);
    const parsedUrl = url.parse(event.ResourceProperties.CallbackUrl);
    const options = {
        hostname: parsedUrl.hostname,
        port: 443,
        path: parsedUrl.path,
        method: "PUT",
        headers: {
            "content-type": "",
            "content-length": responseBody.length
        }
    };
    await new Promise(() => {
        const request = https.request(options, function(response: any) {
	    console.debug("Status code: " + response.statusCode);
	    console.debug("Status message: " + response.statusMessage);
	    context.done();
    	})
	request.on("error", function(error) {
	    console.debug("send(..) failed executing https.request(..): " + error);
	    context.done();
	});
	request.write(responseBody);
	request.end();
    });
    return;
}

Demo

Clone the GitHub repo cfn-custom-resource-using-step-functions and navigate to the folder cfn-custom-resource-using-step-functions. Now, execute the script script-deploy.sh by passing the name of the AWS profile that you created in the prerequisites section above. This should deploy the solution. The commands are shown as follows for your reference. Note that if you don’t pass the AWS profile name ‘default’ the profile will be used for deployment.

git clone 
cd cfn-custom-resource-using-step-functions
./script-deploy.sh "<AWS- ACCOUNT-PROFILE-NAME>"

The deployed solution consists of 2 stacks as shown in the following screenshot

  1. cfn-custom-resource-common-lib: Deploys common components
    • DynamoDB table that custom resources write to during their lifecycle events
    • Lambda layer used across the rest of the stacks
  2. cfn-custom-resource-sfn: Deploys Step Functions backed custom resource implementation
CloudFormation stacks deployed

Figure 2. CloudFormation stacks deployed

For demo purposes, I implemented a custom resource that inserts data into the DynamoDB table. When you deploy the solution for the first time, like you just did in the previous step, it initiates a CREATE event resulting in the creation of a new custom resource using Step Functions. You should see a new record with unix epoch timestamp in the DynamoDB table, indicating that the resource was created as shown in the following screenshot. You can find the DynamoDB table name/arn from the SSM Parameter Store /CUSTOM_RESOURCE_PATTERNS/DYNAMODB/ARN

DynamoDB record indicating custom resource creation

Figure 3. DynamoDB record indicating custom resource creation

Now, execute the script script-deploy.sh again. This should initiate an UPDATE event, resulting in the update of custom resources. The code also automatically creates new WaitConditionHandle and WaitCondition resources required to wait for the update event to finish. Now you should see that the records in the DynamoDb table have been updated with new values for lastOperation and ts attributes as follows.

DynamoDB record indicating custom resource update

Figure 4. DynamoDB record indicating custom resource update

Cleaning up

To remove all of the stacks, run the script script-undeploy.sh as follows.

./script-undeploy.sh "<AWS- ACCOUNT-PROFILE-NAME>"

Conclusion

In this post I showed how to look beyond the conventional approach of building CloudFormation custom resources using a Lambda function. I discussed implementing custom resources using Step Functions and CloudFormation wait conditions. Try this solution in scenarios where you must execute a long running deployment task/job as part of your CloudFormation stack deployment.


About the author:

Damodar Shenvi

Damodar Shenvi Wagle is a Cloud Application Architect at AWS Professional Services. His areas of expertise include architecting serverless solutions, CI/CD and automation.

Use Macie to discover sensitive data as part of automated data pipelines

Post Syndicated from Brandon Wu original https://aws.amazon.com/blogs/security/use-macie-to-discover-sensitive-data-as-part-of-automated-data-pipelines/

Data is a crucial part of every business and is used for strategic decision making at all levels of an organization. To extract value from their data more quickly, Amazon Web Services (AWS) customers are building automated data pipelines—from data ingestion to transformation and analytics. As part of this process, my customers often ask how to prevent sensitive data, such as personally identifiable information, from being ingested into data lakes when it’s not needed. They highlight that this challenge is compounded when ingesting unstructured data—such as files from process reporting, text files from chat transcripts, and emails. They also mention that identifying sensitive data inadvertently stored in structured data fields—such as in a comment field stored in a database—is also a challenge.

In this post, I show you how to integrate Amazon Macie as part of the data ingestion step in your data pipeline. This solution provides an additional checkpoint that sensitive data has been appropriately redacted or tokenized prior to ingestion. Macie is a fully managed data security and privacy service that uses machine learning and pattern matching to discover sensitive data in AWS.

When Macie discovers sensitive data, the solution notifies an administrator to review the data and decide whether to allow the data pipeline to continue ingesting the objects. If allowed, the objects will be tagged with an Amazon Simple Storage Service (Amazon S3) object tag to identify that sensitive data was found in the object before progressing to the next stage of the pipeline.

This combination of automation and manual review helps reduce the risk that sensitive data—such as personally identifiable information—will be ingested into a data lake. This solution can be extended to fit your use case and workflows. For example, you can define custom data identifiers as part of your scans, add additional validation steps, create Macie suppression rules to archive findings automatically, or only request manual approvals for findings that meet certain criteria (such as high severity findings).

Solution overview

Many of my customers are building serverless data lakes with Amazon S3 as the primary data store. Their data pipelines commonly use different S3 buckets at each stage of the pipeline. I refer to the S3 bucket for the first stage of ingestion as the raw data bucket. A typical pipeline might have separate buckets for raw, curated, and processed data representing different stages as part of their data analytics pipeline.

Typically, customers will perform validation and clean their data before moving it to a raw data zone. This solution adds validation steps to that pipeline after preliminary quality checks and data cleaning is performed, noted in blue (in layer 3) of Figure 1. The layers outlined in the pipeline are:

  1. Ingestion – Brings data into the data lake.
  2. Storage – Provides durable, scalable, and secure components to store the data—typically using S3 buckets.
  3. Processing – Transforms data into a consumable state through data validation, cleanup, normalization, transformation, and enrichment. This processing layer is where the additional validation steps are added to identify instances of sensitive data that haven’t been appropriately redacted or tokenized prior to consumption.
  4. Consumption – Provides tools to gain insights from the data in the data lake.


Figure 1: Data pipeline with sensitive data scan

Figure 1: Data pipeline with sensitive data scan

The application runs on a scheduled basis (four times a day, every 6 hours by default) to process data that is added to the raw data S3 bucket. You can customize the application to perform a sensitive data discovery scan during any stage of the pipeline. Because most customers do their extract, transform, and load (ETL) daily, the application scans for sensitive data on a scheduled basis before any crawler jobs run to catalog the data and after typical validation and data redaction or tokenization processes complete.

You can expect that this additional validation will add 5–10 minutes to your pipeline execution at a minimum. The validation processing time will scale linearly based on object size, but there is a start-up time per job that is constant.

If sensitive data is found in the objects, an email is sent to the designated administrator requesting an approval decision, which they indicate by selecting the link corresponding to their decision to approve or deny the next step. In most cases, the reviewer will choose to adjust the sensitive data cleanup processes to remove the sensitive data, deny the progression of the files, and re-ingest the files in the pipeline.

Additional considerations for deploying this application for regular use are discussed at the end of the blog post.

Application components

The following resources are created as part of the application:

Note: the application uses various AWS services, and there are costs associated with these resources after the Free Tier usage. See AWS Pricing for details. The primary drivers of the solution cost will be the amount of data ingested through the pipeline, both for Amazon S3 storage and data processed for sensitive data discovery with Macie.

The architecture of the application is shown in Figure 2 and described in the text that follows.
 

Figure 2: Application architecture and logic

Figure 2: Application architecture and logic

Application logic

  1. Objects are uploaded to the raw data S3 bucket as part of the data ingestion process.
  2. A scheduled EventBridge rule runs the sensitive data scan Step Functions workflow.
  3. triggerMacieScan Lambda function moves objects from the raw data S3 bucket to the scan stage S3 bucket.
  4. triggerMacieScan Lambda function creates a Macie sensitive data discovery job on the scan stage S3 bucket.
  5. checkMacieStatus Lambda function checks the status of the Macie sensitive data discovery job.
  6. isMacieStatusCompleteChoice Step Functions Choice state checks whether the Macie sensitive data discovery job is complete.
    1. If yes, the getMacieFindingsCount Lambda function runs.
    2. If no, the Step Functions Wait state waits 60 seconds and then restarts Step 5.
  7. getMacieFindingsCount Lambda function counts all of the findings from the Macie sensitive data discovery job.
  8. isSensitiveDataFound Step Functions Choice state checks whether sensitive data was found in the Macie sensitive data discovery job.
    1. If there was sensitive data discovered, run the triggerManualApproval Lambda function.
    2. If there was no sensitive data discovered, run the moveAllScanStageS3Files Lambda function.
  9. moveAllScanStageS3Files Lambda function moves all of the objects from the scan stage S3 bucket to the scanned data S3 bucket.
  10. triggerManualApproval Lambda function tags and moves objects with sensitive data discovered to the manual review S3 bucket, and moves objects with no sensitive data discovered to the scanned data S3 bucket. The function then sends a notification to the ApprovalRequestNotification Amazon SNS topic as a notification that manual review is required.
  11. Email is sent to the email address that’s subscribed to the ApprovalRequestNotification Amazon SNS topic (from the application deployment template) for the manual review user with the option to Approve or Deny pipeline ingestion for these objects.
  12. Manual review user assesses the objects with sensitive data in the manual review S3 bucket and selects the Approve or Deny links in the email.
  13. The decision request is sent from the Amazon API Gateway to the receiveApprovalDecision Lambda function.
  14. manualApprovalChoice Step Functions Choice state checks the decision from the manual review user.
    1. If denied, run the deleteManualReviewS3Files Lambda function.
    2. If approved, run the moveToScannedDataS3Files Lambda function.
  15. deleteManualReviewS3Files Lambda function deletes the objects from the manual review S3 bucket.
  16. moveToScannedDataS3Files Lambda function moves the objects from the manual review S3 bucket to the scanned data S3 bucket.
  17. The next step of the automated data pipeline will begin with the objects in the scanned data S3 bucket.

Prerequisites

For this application, you need the following prerequisites:

You can use AWS Cloud9 to deploy the application. AWS Cloud9 includes the AWS CLI and AWS SAM CLI to simplify setting up your development environment.

Deploy the application with AWS SAM CLI

You can deploy this application using the AWS SAM CLI. AWS SAM uses AWS CloudFormation as the underlying deployment mechanism. AWS SAM is an open-source framework that you can use to build serverless applications on AWS.

To deploy the application

  1. Initialize the serverless application using the AWS SAM CLI from the GitHub project in the aws-samples repository. This will clone the project locally which includes the source code for the Lambda functions, Step Functions state machine definition file, and the AWS SAM template. On the command line, run the following:
    sam init --location gh: aws-samples/amazonmacie-datapipeline-scan
    

    Alternatively, you can clone the Github project directly.

  2. Deploy your application to your AWS account. On the command line, run the following:
    sam deploy --guided
    

    Complete the prompts during the guided interactive deployment. The first deployment prompt is shown in the following example.

    Configuring SAM deploy
    ======================
    
            Looking for config file [samconfig.toml] :  Found
            Reading default arguments  :  Success
    
            Setting default arguments for 'sam deploy'
            =========================================
            Stack Name [maciepipelinescan]:
    

  3. Settings:
    • Stack Name – Name of the CloudFormation stack to be created.
    • AWS RegionRegion—for example, us-west-2, eu-west-1, ap-southeast-1—to deploy the application to. This application was tested in the us-west-2 and ap-southeast-1 Regions. Before selecting a Region, verify that the services you need are available in those Regions (for example, Macie and Step Functions).
    • Parameter StepFunctionName – Name of the Step Functions state machine to be created—for example, maciepipelinescanstatemachine).
    • Parameter BucketNamePrefix – Prefix to apply to the S3 buckets to be created (S3 bucket names are globally unique, so choosing a random prefix helps ensure uniqueness).
    • Parameter ApprovalEmailDestination – Email address to receive the manual review notification.
    • Parameter EnableMacie – Whether you need Macie enabled in your account or Region. You can select yes or no; select yes if you need Macie to be enabled for you as part of this template, select no, if you already have Macie enabled.
  4. Confirm changes and provide approval for AWS SAM CLI to deploy the resources to your AWS account by responding y to prompts, as shown in the following example. You can accept the defaults for the SAM configuration file and SAM configuration environment prompts.
    #Shows you resources changes to be deployed and require a 'Y' to initiate deploy
    Confirm changes before deploy [y/N]: y
    #SAM needs permission to be able to create roles to connect to the resources in your template
    Allow SAM CLI IAM role creation [Y/n]: y
    ReceiveApprovalDecisionAPI may not have authorization defined, Is this okay? [y/N]: y
    ReceiveApprovalDecisionAPI may not have authorization defined, Is this okay? [y/N]: y
    Save arguments to configuration file [Y/n]: y
    SAM configuration file [samconfig.toml]: 
    SAM configuration environment [default]:
    

    Note: This application deploys an Amazon API Gateway with two REST API resources without authorization defined to receive the decision from the manual review step. You will be prompted to accept each resource without authorization. A token (Step Functions taskToken) is used to authenticate the requests.

  5. This creates an AWS CloudFormation changeset. Once the changeset creation is complete, you must provide a final confirmation of y to Deploy the changeset? [y/N] when prompted as shown in the following example.
    Changeset created successfully. arn:aws:cloudformation:ap-southeast-1:XXXXXXXXXXXX:changeSet/samcli-deploy1605213119/db681961-3635-4305-b1c7-dcc754c7XXXX
    
    
    Previewing CloudFormation changeset before deployment
    ======================================================
    Deploy this changeset? [y/N]:
    

Your application is deployed to your account using AWS CloudFormation. You can track the deployment events in the command prompt or via the AWS CloudFormation console.

After the application deployment is complete, you must confirm the subscription to the Amazon SNS topic. An email will be sent to the email address entered in Step 3 with a link that you need to select to confirm the subscription. This confirmation provides opt-in consent for AWS to send emails to you via the specified Amazon SNS topic. The emails will be notifications of potentially sensitive data that need to be approved. If you don’t see the verification email, be sure to check your spam folder.

Test the application

The application uses an EventBridge scheduled rule to start the sensitive data scan workflow, which runs every 6 hours. You can manually start an execution of the workflow to verify that it’s working. To test the function, you will need a file that contains data that matches your rules for sensitive data. For example, it is easy to create a spreadsheet, document, or text file that contains names, addresses, and numbers formatted like credit card numbers. You can also use this generated sample data to test Macie.

We will test by uploading a file to our S3 bucket via the AWS web console. If you know how to copy objects from the command line, that also works.

Upload test objects to the S3 bucket

  1. Navigate to the Amazon S3 console and upload one or more test objects to the <BucketNamePrefix>-data-pipeline-raw bucket. <BucketNamePrefix> is the prefix you entered when deploying the application in the AWS SAM CLI prompts. You can use any objects as long as they’re a supported file type for Amazon Macie. I suggest uploading multiple objects, some with and some without sensitive data, in order to see how the workflow processes each.

Start the Scan State Machine

  1. Navigate to the Step Functions state machines console. If you don’t see your state machine, make sure you’re connected to the same region that you deployed your application to.
  2. Choose the state machine you created using the AWS SAM CLI as seen in Figure 3. The example state machine is maciepipelinescanstatemachine, but you might have used a different name in your deployment.
     
    Figure 3: AWS Step Functions state machines console

    Figure 3: AWS Step Functions state machines console

  3. Select the Start execution button and copy the value from the Enter an execution name – optional box. Change the Input – optional value replacing <execution id> with the value just copied as follows:
    {
        “id”: “<execution id>”
    }
    

    In my example, the <execution id> is fa985a4f-866b-b58b-d91b-8a47d068aa0c from the Enter an execution name – optional box as shown in Figure 4. You can choose a different ID value if you prefer. This ID is used by the workflow to tag the objects being processed to ensure that only objects that are scanned continue through the pipeline. When the EventBridge scheduled event starts the workflow as scheduled, an ID is included in the input to the Step Functions workflow. Then select Start execution again.
     

    Figure 4: New execution dialog box

    Figure 4: New execution dialog box

  4. You can see the status of your workflow execution in the Graph inspector as shown in Figure 5. In the figure, the workflow is at the pollForCompletionWait step.
     
    Figure 5: AWS Step Functions graph inspector

    Figure 5: AWS Step Functions graph inspector

The sensitive discovery job should run for about five to ten minutes. The jobs scale linearly based on object size, but there is a start-up time per job that is constant. If sensitive data is found in the objects uploaded to the <BucketNamePrefix>-data-pipeline-upload S3 bucket, an email is sent to the address provided during the AWS SAM deployment step, notifying the recipient requesting of the need for an approval decision, which they indicate by selecting the link corresponding to their decision to approve or deny the next step as shown in Figure 6.
 

Figure 6: Sensitive data identified email

Figure 6: Sensitive data identified email

When you receive this notification, you can investigate the findings by reviewing the objects in the <BucketNamePrefix>-data-pipeline-manual-review S3 bucket. Based on your review, you can either apply remediation steps to remove any sensitive data or allow the data to proceed to the next step of the data ingestion pipeline. You should define a standard response process to address discovery of sensitive data in the data pipeline. Common remediation steps include review of the files for sensitive data, deleting the files that you do not want to progress, and updating the ETL process to redact or tokenize sensitive data when re-ingesting into the pipeline. When you re-ingest the files into the pipeline without sensitive data, the files will not be flagged by Macie.

The workflow performs the following:

  • If you select Approve, the files are moved to the <BucketNamePrefix>-data-pipeline-scanned-data S3 bucket with an Amazon S3 SensitiveDataFound object tag with a value of true.
  • If you select Deny, the files are deleted from the <BucketNamePrefix>-data-pipeline-manual-review S3 bucket.
  • If no action is taken, the Step Functions workflow execution times out after five days and the file will automatically be deleted from the <BucketNamePrefix>-data-pipeline-manual-review S3 bucket after 10 days.

Clean up the application

You’ve successfully deployed and tested the sensitive data pipeline scan workflow. To avoid ongoing charges for resources you created, you should delete all associated resources by deleting the CloudFormation stack. In order to delete the CloudFormation stack, you must first delete all objects that are stored in the S3 buckets that you created for the application.

To delete the application

  1. Empty the S3 buckets created in this application (<BucketNamePrefix>-data-pipeline-raw S3 bucket, <BucketNamePrefix>-data-pipeline-scan-stage, <BucketNamePrefix>-data-pipeline-manual-review, and <BucketNamePrefix>-data-pipeline-scanned-data).
  2. Delete the CloudFormation stack used to deploy the application.

Considerations for regular use

Before using this application in a production data pipeline, you will need to stop and consider some practical matters. First, the notification mechanism used when sensitive data is identified in the objects is email. Email doesn’t scale: you should expand this solution to integrate with your ticketing or workflow management system. If you choose to use email, subscribe a mailing list so that the work of reviewing and responding to alerts is shared across a team.

Second, the application is run on a scheduled basis (every 6 hours by default). You should consider starting the application when your preliminary validations have completed and are ready to perform a sensitive data scan on the data as part of your pipeline. You can modify the EventBridge Event Rule to run in response to an Amazon EventBridge event instead of a scheduled basis.

Third, the application currently uses a 60 second Step Functions Wait state when polling for the Macie discovery job completion. In real world scenarios, the discovery scan will take 10 minutes at a minimum, likely several orders of magnitude longer. You should evaluate the typical execution times for your application execution and tune the polling period accordingly. This will help reduce costs related to running Lambda functions and log storage within CloudWatch Logs. The polling period is defined in the Step Functions state machine definition file (macie_pipeline_scan.asl.json) under the pollForCompletionWait state.

Fourth, the application currently doesn’t account for false positives in the sensitive data discovery job results. Also, the application will progress or delete all objects identified based on the decision by the reviewer. You should consider expanding the application to handle false positives through automation rather than manual review / intervention (such as deleting the files from the manual review bucket or removing the sensitive data tags applied).

Last, the solution will stop the ingestion of a subset of objects into your pipeline. This behavior is similar to other validation and data quality checks that most customers perform as part of the data pipeline. However, you should test to ensure that this will not cause unexpected outcomes and address them in your downstream application logic accordingly.

Conclusion

In this post, I showed you how to integrate sensitive data discovery using Macie as an additional validation step in an automated data pipeline. You’ve reviewed the components of the application, deployed it using the AWS SAM CLI, tested to validate that the application functions as expected, and cleaned up by removing deployed resources.

You now know how to integrate sensitive data scanning into your ETL pipeline. You can use automation and—where required—manual review to help reduce the risk of sensitive data, such as personally identifiable information, being inadvertently ingested into a data lake. You can take this application and customize it to fit your use case and workflows, such as using custom data identifiers as part of your scans, adding additional validation steps, creating Macie suppression rules to define cases to archive findings automatically, or only request manual approvals for findings that meet certain criteria (such as high severity findings).

If you have feedback about this post, submit comments in the Comments section below. If you have questions about this post, start a new thread on the Amazon Macie forum.

Want more AWS Security how-to content, news, and feature announcements? Follow us on Twitter.

Author

Brandon Wu

Brandon is a security solutions architect helping financial services organizations secure their critical workloads on AWS. In his spare time, he enjoys exploring outdoors and experimenting in the kitchen.

Introducing larger state payloads for AWS Step Functions

Post Syndicated from Rob Sutter original https://aws.amazon.com/blogs/compute/introducing-larger-state-payloads-for-aws-step-functions/

AWS Step Functions allows you to create serverless workflows that orchestrate your business processes. Step Functions stores data from workflow invocations as application state. Today we are increasing the size limit of application state from 32,768 characters to 256 kilobytes of data per workflow invocation. The new limit matches payload limits for other commonly used serverless services such as Amazon SNS, Amazon SQS, and Amazon EventBridge. This means you no longer need to manage Step Functions payload limitations as a special case in your serverless applications.

Faster, cheaper, simpler state management

Previously, customers worked around limits on payload size by storing references to data, such as a primary key, in their application state. An AWS Lambda function then loaded the data via an SDK call at runtime when the data was needed. With larger payloads, you now can store complete objects directly in your workflow state. This removes the need to persist and load data from data stores such as Amazon DynamoDB and Amazon S3. You do not pay for payload size, so storing data directly in your workflow may reduce both cost and execution time of your workflows and Lambda functions. Storing data in your workflow state also reduces the amount of code you need to write and maintain.

AWS Management Console and workflow history improvements

Larger state payloads mean more data to visualize and search. To help you understand that data, we are also introducing changes to the AWS Management Console for Step Functions. We have improved load time for the Execution History page to help you get the information you need more quickly. We have also made backwards-compatible changes to the GetExecutionHistory API call. Now if you set includeExecutionData to false, GetExecutionHistory excludes payload data and returns only metadata. This allows you to debug your workflows more quickly.

Doing more with dynamic parallelism

A larger payload also allows your workflows to process more information. Step Functions workflows can process an arbitrary number of tasks concurrently using dynamic parallelism via the Map State. Dynamic parallelism enables you to iterate over a collection of related items applying the same process to each item. This is an implementation of the map procedure in the MapReduce programming model.

When to choose dynamic parallelism

Choose dynamic parallelism when performing operations on a small collection of items generated in a preliminary step. You define an Iterator, which operates on these items individually. Optionally, you can reduce the results to an aggregate item. Unlike with parallel invocations, each item in the collection is related to the other items. This means that an error in processing one item typically impacts the outcome of the entire workflow.

Example use case

Ecommerce and line of business applications offer many examples where dynamic parallelism is the right approach. Consider an order fulfillment system that receives an order and attempts to authorize payment. Once payment is authorized, it attempts to lock each item in the order for shipment. The available items are processed and their total is taken from the payment authorization. The unavailable items are marked as pending for later processing.

The following Amazon States Language (ASL) defines a Map State with a simplified Iterator that implements the order fulfillment steps described previously.


    "Map": {
      "Type": "Map",
      "ItemsPath": "$.orderItems",
      "ResultPath": "$.packedItems",
      "MaxConcurrency": 40,
      "Next": "Print Label",
      "Iterator": {
        "StartAt": "Lock Item",
        "States": {
          "Lock Item": {
            "Type": "Pass",
            "Result": "Item locked!",
            "Next": "Pull Item"
          },
          "Pull Item": {
            "Type": "Pass",
            "Result": "Item pulled!",
            "Next": "Pack Item"
          },
          "Pack Item": {
            "Type": "Pass",
            "Result": "Item packed!",
            "End": true
          }
        }
      }
    }

The following image provides a visualization of this workflow. A preliminary state retrieves the collection of items from a data store and loads it into the state under the orderItems key. The triple dashed lines represent the Map State which attempts to lock, pull, and pack each item individually. The result of processing each individual item impacts the next state, Print Label. As more items are pulled and packed, the total weight increases. If an item is out of stock, the total weight will decrease.

A visualization of a portion of an AWS Step Functions workflow that implements dynamic parallelism

Dynamic parallelism or the “Map State”

Larger state payload improvements

Without larger state payloads, each item in the $.orderItems object in the workflow state would be a primary key to a specific item in a DynamoDB table. Each step in the “Lock, Pull, Pack” workflow would need to read data from DynamoDB for every item in the order to access detailed item properties.

With larger state payloads, each item in the $.orderItems object can be a complete object containing the required fields for the relevant items. Not only is this faster, resulting in a better user experience, but it also makes debugging workflows easier.

Pricing and availability

Larger state payloads are available now in all commercial and AWS GovCloud (US) Regions where Step Functions is available. No changes to your workflows are required to use larger payloads, and your existing workflows will continue to run as before. The larger state is available however you invoke your Step Functions workflows, including the AWS CLI, the AWS SDKs, the AWS Step Functions Data Science SDK, and Step Functions Local.

Larger state payloads are included in existing Step Functions pricing for Standard Workflows. Because Express Workflows are priced by runtime and memory, you may see more cost on individual workflows with larger payloads. However, this increase may also be offset by the reduced cost of Lambda, DynamoDB, S3, or other AWS services.

Conclusion

Larger Step Functions payloads simplify and increase the efficiency of your workflows by eliminating function calls to persist and retrieve data. Larger payloads also allow your workflows to process more data concurrently using dynamic parallelism.

With larger payloads, you can minimize the amount of custom code you write and focus on the business logic of your workflows. Get started building serverless workflows today!