Tag Archives: Mainframe & Legacy

AWS Transform for mainframe introduces Reimagine capabilities and automated testing functionality

Post Syndicated from Channy Yun (윤석찬) original https://aws.amazon.com/blogs/aws/aws-transform-for-mainframe-introduces-reimagine-capabilities-and-automated-testing-functionality/

In May, 2025, we launched AWS Transform for mainframe, the first agentic AI service for modernizing mainframe workloads at scale. The AI-powered mainframe agent accelerates mainframe modernization by automating complex, resource-intensive tasks across every phase of modernization—from initial assessment to final deployment. You can streamline the migration of legacy mainframe applications, including COBOL, CICS, DB2, and VSAM to modern cloud environments—cutting modernization timelines from years to months.

Today, we’re announcing enhanced capabilities in AWS Transform for mainframe that include AI-powered analysis features, support for the Reimagine modernization pattern, and testing automation. These enhancements solve two critical challenges in mainframe modernization: the need to completely transform applications rather than merely move them to the cloud, and the extensive time and expertise required for testing.

  • Reimagining mainframe modernization – This is a new AI-driven approach that completely reimagines the customer’s application architecture using modern patterns or moving from batch process to real-time functions. By combining the enhanced business logic extraction with new data lineage analysis and automated data dictionary generation from the legacy source code through AWS Transform, customers transform monolithic mainframe applications written in languages like COBOL into more modern architectural styles, like microservices.
  • Automated testing – Customers can use new automated test plan generation, test data collection scripts, and test case automation scripts. AWS Transform for mainframe also provides functional testing tools for data migration, results validation, and terminal connectivity. These AI-powered capabilities work together to accelerate testing timelines and improve accuracy through automation.

Let’s learn more about reimagining mainframe modernization and automated testing capabilities.

How to reimagine mainframe modernization
We recognize that mainframe modernization is not a one-size-fits-all proposition. Whereas tactical approaches focus on augmentation and maintaining existing systems, strategic modernization offers distinct paths: Replatform, Refactor, Replace, or the new Reimagine.

In the Reimagine pattern, AWS Transform AI-powered analysis combines mainframe system analysis with organizational knowledge to create detailed business and technical documentation and architecture recommendations. This helps preserve critical business logic while enabling modern cloud-native capabilities.

AWS Transform provides new advanced data analysis capabilities that are essential for successful mainframe modernization, including data lineage analysis and automated data dictionary generation. These features work together to define the structure and meaning to accompany the usage and relationships of mainframe data. Customers gain complete visibility into their data landscape, enabling informed decision-making for modernization. Their technical teams can confidently redesign data architectures while preserving critical business logic and relationships.

The Reimagining strategy follows the principle of human in the loop validation, which means that AI-generated application specifications and code such as AWS Transform and Kiro are continuously validated by domain experts. This collaborative approach between AI capabilities and human judgment significantly reduces transformation risk while maintaining the speed advantages of AI-powered modernization.

The pathway has a three-phase methodology to transform legacy mainframe applications into cloud-native microservices:

  • Reverse engineering to extract business logic and rules from existing COBOL or job control language (JCL) code using AWS Transform for mainframe.
  • Forward engineering to generate microservice specification, modernized source code, infrastructure as code (IaC), and modernized database.
  • Deploy and test to deploy the generated microservices to Amazon Web Services (AWS) using IaC and to test the functionality of the modernized application.

Although microservices architecture offers significant benefits for mainframe modernization, it’s crucial to understand that it’s not the best solution for every scenario. The choice of architectural patterns should be driven by the specific requirements and constraints of the system. The key is to select an architecture that aligns with both current needs and future aspirations, recognizing that architectural decisions can evolve over time as organizations mature their cloud-native capabilities.

The flexible approach supports both do-it-yourself and partner-led development, so you can use your preferred tools while maintaining the integrity of your business processes. You get the benefits of modern cloud architecture while preserving decades of business logic and reducing project risk.

Automated testing in action
The new automated testing feature supports IBM z/OS mainframe batch application stack at launch, which helps organizations address a wider range of modernization scenarios while maintaining consistent processes and tooling.

Here are the new mainframe capabilities:

  • Plan test cases – Create test plans from mainframe code, business logic, and scheduler plans.
  • Generate test data collection scripts – Create JCL scripts for data collection from your mainframe to your test plan.
  • Generate test automation scripts – Generate execution scripts to automate testing of modernized applications running in the target AWS environment.

To get started with automated testing, you should set up a workspace, assign a specific role to each user, and invite them to onboard your workspace. To learn more, visit Getting started with AWS Transform in the AWS Transform User Guide.

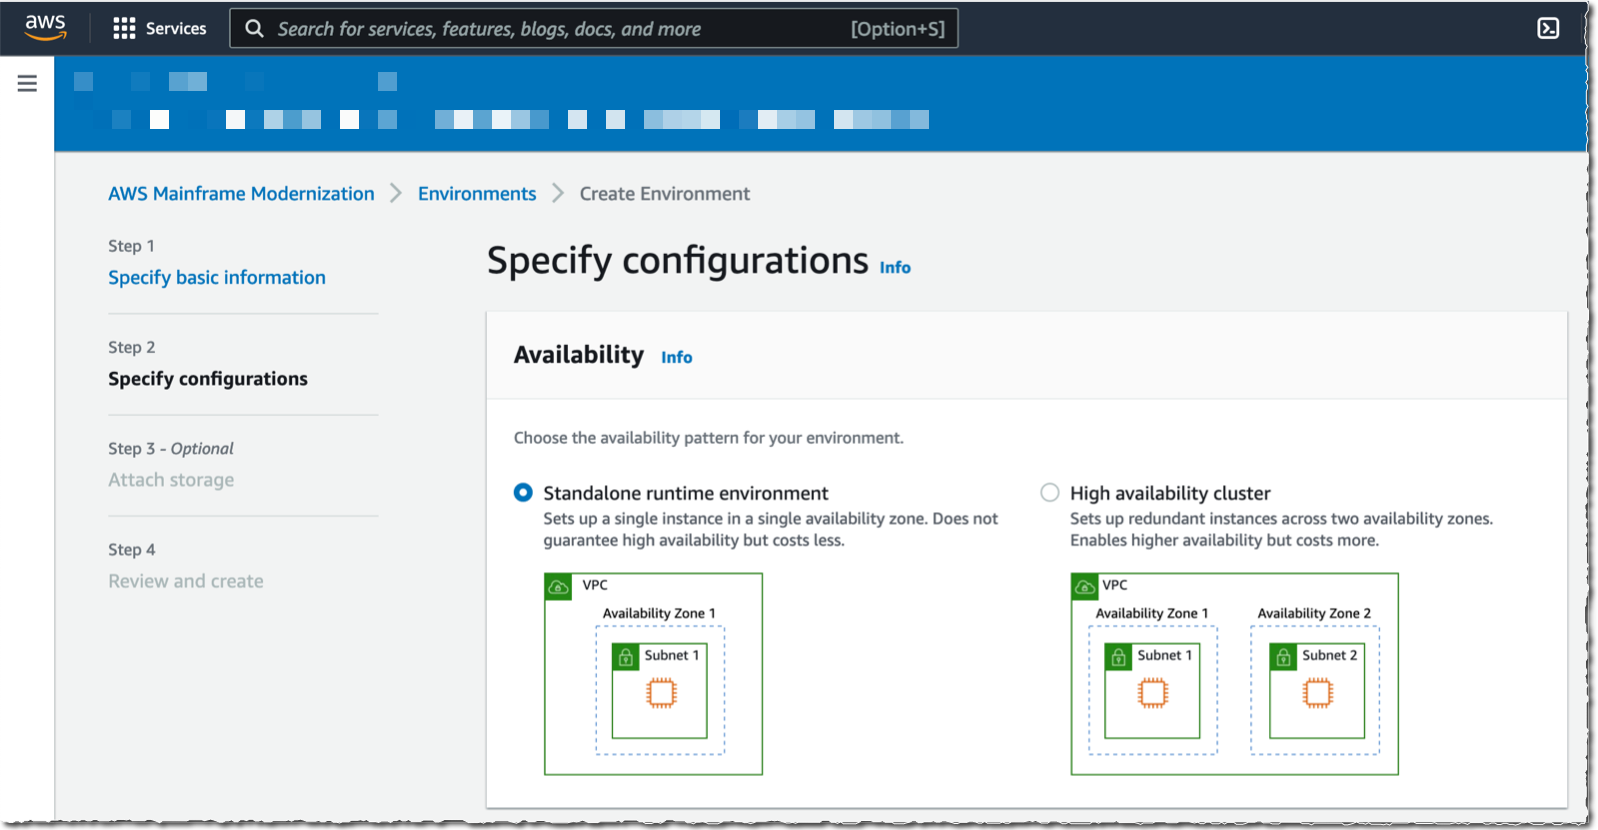
Choose Create job in your workspace. You can see all types of supported transformation jobs. For this example, I select the Mainframe Modernization job to modernize mainframe applications.

After a new job is created, you can kick off modernization for tests generation. This workflow is sequential and it is a place for you to answer the AI agent’s questions, providing the necessary input. You can add your collaborators and specify resource location where the codebase or documentation is located in your Amazon Simple Storage Service (Amazon S3) bucket.

I use a sample application for a credit card management system as the mainframe banking case with the presentation (BMS screens), business logic (COBOL) and data (VSAM/DB2), including online transaction processing and batch jobs.

After finishing the steps of analyzing code, extracting business logic, decomposing code, planning migration wave, you can experience new automated testing capabilities such as planning test cases, generating test data collection scripts, and test automation scripts.

The new testing workflow creates a test plan for your modernization project and generates test data collection scripts. You will have three planning steps:

  • Configure test plan inputs – You can link your test plan to your other job files. The test plan is generated based on analyzing the mainframe application code and can provide more details optionally using the extracted business logic, the technical documentation, the decomposition, and using a scheduler plan.
  • Define test plan scope – You can define the entry point, the specific program where the application’s execution flow begins. For example, the JCL for a batch job. In the test plan, each functional test case is designed to start the execution from a specific entry point.
  • Refine test plan – A test plan is made up of sequential test cases. You can reorder them, add new ones, merge multiple cases, or split one into two on the test case detail page. Batch test cases are composed of a sequence of JCLs following the scheduler plan.

Generating test data collection scripts collects test data from mainframe applications for functional equivalence testing. This step actively generates JCL scripts that will help you gather test data from the sample application’s various data sources (such as VSAM files or DB2 databases) for use in testing the modernized application. The step is designed to create automated scripts that can extract test data from VSAM datasets, query DB2 tables for sample data, collect sequential data sets, and generate data collection workflows. After this step is completed, you’ll have comprehensive test data collection scripts ready to use.

To learn more about automated testing, visit Modernization of mainframe applications in the AWS Transform User Guide.

Now available
The new capabilities in AWS Transform for mainframe are available today in all AWS Regions where AWS Transform for mainframe is offered. For Regional availability and future roadmap, visit the AWS Capabilities by Region. Currently, we offer our core features—including assessment and transformation—at no cost to AWS customers. To learn more, visit AWS Transform Pricing page.

Give it a try in the AWS Transform console. To learn more, visit the AWS Transform for mainframe product page and send feedback to AWS re:Post for AWS Transform for mainframe or through your usual AWS Support contacts.

Channy

Stream mainframe data to AWS in near real time with Precisely and Amazon MSK

Post Syndicated from Supreet Padhi original https://aws.amazon.com/blogs/big-data/stream-mainframe-data-to-aws-in-near-real-time-with-precisely-and-amazon-msk/

This is a guest post by Supreet Padhi, Technology Architect, and Manasa Ramesh, Technology Architect at Precisely in partnership with AWS.

Enterprises rely on mainframes to run mission-critical applications and store essential data, enabling real-time operations that help achieve business objectives. These organizations face a common challenge: how to unlock the value of their mainframe data in today’s cloud-first world while maintaining system stability and data quality. Modernizing these systems is critical for competitiveness and innovation.

The digital transformation imperative has made mainframe data integration with cloud services a strategic priority for enterprises worldwide. Organizations that can seamlessly bridge their mainframe environments with modern cloud platforms gain significant competitive advantages through improved agility, reduced operational costs, and enhanced analytics capabilities. However, implementing such integrations presents unique technical challenges that require specialized solutions. Some of the challenges include converting EBCDIC data to ASCII, where the handling of data types is unique to the mainframe, such as binary data and COMP data. Data stored in Virtual Storage Access Method (VSAM) files can be quite complex due to practices to store multiple different record types in a single file. To address these challenges, Precisely—a global leader in data integrity, serving over 12,000 customers—has partnered with Amazon Web Services (AWS) to enable real-time synchronization between mainframe systems and Amazon Relational Database Service (Amazon RDS). For more on this collaboration, check out our previous blog post: Unlock Mainframe Data with Precisely Connect and Amazon Aurora.

In this post, we introduce an alternative architecture to synchronize mainframe data to the cloud using Amazon Managed Streaming for Apache Kafka (Amazon MSK) for greater flexibility and scalability. This event-driven approach provides additional possibilities for mainframe data integration and modernization strategies.

A key enhancement in this solution is the use of the AWS Mainframe Modernization – Data Replication for IBM z/OS Amazon Machine Image (AMI) available in AWS Marketplace, which simplifies deployment and reduces implementation time.

Real-time processing and event-driven architecture benefits

Real-time processing makes data actionable within seconds rather than waiting for batch processing cycles. For example, financial institutions such as Global Payments have leveraged this solution to modernize mission-critical banking operations, including payments processing. By migrating these operations to the AWS Cloud, they enhanced user experience, improved scalability and maintainability, while enabling advanced fraud detection – all without impacting the performance of existing mainframe systems. Change data capture (CDC) enables this by identifying database changes and delivering them in real time to cloud environments.

CDC offers two key advantages for mainframe modernization:

  • Incremental data movement – Eliminates disruptive bulk extracts by streaming only changed data to cloud targets, minimizing system impact and ensuring data currency
  • Real-time synchronization – Keeps cloud applications in sync with mainframe systems, enabling immediate insights and responsive operations

Solution overview

In this post, we provide a detailed implementation guide for streaming mainframe data changes from DB2z through AWS Mainframe Modernization – Data Replication for IBM z/OS AMI to Amazon MSK and then applying those changes to Amazon Relational Database Service (Amazon RDS) for PostgreSQL using MSK Connect with the Confluent JDBC Sink Connector.

By introducing Amazon MSK into architecture and streamlining deployment through the AWS Marketplace AMI, we create new possibilities for data distribution, transformation, and consumption that expand upon our previously demonstrated direct replication approach. This streaming-based architecture offers several additional benefits:

  • Simplified deployment – Accelerate implementation using the preconfigured AWS Marketplace AMI
  • Decoupled systems – Separate the concern of data extraction from data consumption, allowing both sides to scale independently
  • Multi-consumer support – Enable multiple downstream applications and services to consume the same data stream according to their own requirements
  • Extensibility – Create a foundation that can be extended to support additional mainframe data sources such as IMS and VSAM, as well as additional AWS targets using MSK Connect sink connectors

The following diagram illustrates the solution architecture.

Precisely MSK architecture diagram

  1. Capture/Publisher – Connect CDC Capture/Publisher captures Db2 changes from Db2 logs using IFI 306 Read and communicates captured data changes to a target engine through TCP/IP.
  2. Controller Daemon – The Controller Daemon authenticates all connection requests, managing secure communication between the source and target environments.
  3. Apply Engine – The Apply Engine is a multifaceted and multifunctional component in the target environment. It receives the changes from the Publisher agent and applies the changed data to the target Amazon MSK.
  4. Connect CDC Single Message Transform (SMT) – Performs all necessary data filtering, transformation, and augmentation required by the sink connector.
  5. JDBC Sink Connector – As data arrives, an instance of the JDBC Sink Connector along with Apache Kafka writes the data to target tables in Amazon RDS.

This architecture provides a clean separation between the data capture process and the data consumption process, allowing each to scale independently. The use of MSK as an intermediary enables multiple systems to consume the same data stream, opening possibilities for complex event processing, real-time analytics, and integration with other AWS services.

Prerequisites

To complete the solution, you need the following prerequisites:

  1. Install AWS Mainframe Modernization – Data Replication for IBM z/OS
  2. Have access to Db2z on mainframe from AWS using your approved connectivity between AWS and your mainframe

Solution walkthrough

The following code content shouldn’t be deployed to production environments without additional security testing.

Configure the AWS Mainframe Modernization Data Replication with Precisely AMI on Amazon EC2

Follow the steps defined at Precisely AWS Mainframe Modernization Data Replication. Upon the initial launch of the AMI, use the following command to connect to the Amazon Elastic Compute Cloud (Amazon EC2) instance:

ssh -i ami-ec2-user.pem ec2-user@$AWS_AMI_HOST

Configure the serverless cluster

To create an Amazon Aurora PostgreSQL-Compatible Edition Serverless v2 cluster, complete the following steps:

  1. Create a DB cluster by using the following AWS Command Line Interface (AWS CLI) command. Replace the placeholder strings with values that correspond to your cluster’s subnet and subnet group IDs.
    aws rds create-db-cluster \
       --db-cluster-identifier cdc-serverless-pg-cluster \
       --engine aurora-postgresql \
       --serverless-v2-scaling-configuration MinCapacity=1,MaxCapacity=2 \
       --master-username connectcdcuser \
       --manage-master-user-password \
       --db-subnet-group-name "<subnet-security-group-id>" \
       --vpc-security-group-ids "<cluster-security-group-id>"

  2. Verify the status of the cluster by using the following command:
    aws rds describe-db-clusters --db-cluster-identifier cdc-serverless-pg-cluster

  3. Add a writer DB instance to the Aurora cluster:
    aws rds create-db-instance \
       --db-cluster-identifier cdc-serverless-pg-cluster \
       --db-instance-identifier cdc-serverless-pg-instance \
       --db-instance-class db.serverless \
       --engine aurora-postgresql

  4. Verify the status of the writer instance:
    aws rds describe-db-instances --db-instance-identifier cdc-serverless-pg-instance

Create a database in the PostgreSQL cluster

After your Aurora Serverless v2 cluster is running, you need to create a database for your replicated mainframe data. Follow these steps:

  1. Install the psql client:
    sudo yum install postgresql16

  2. Retrieve the password from secret manager:
    aws secretsmanager get-secret-value --secret-id '<cdc-serverless-pg-cluster-secret ARN>' --query 'SecretString' --output text

  3. Create a new database in PostgreSQL:
    PGPASSWORD="password" psql --host=<DATABASE-HOST> --username=connectcdcuser --dbname=postgres -c "CREATE DATABASE dbcdc"

Configure the serverless MSK cluster

To create a serverless MSK cluster, complete the following steps:

  1. Copy the following JSON and paste it into a new file create-msk-serverless-cluster.json. Replace the placeholder strings with values that correspond to your cluster’s subnet and security group IDs.
       {
         "VpcConfigs": [
           {
             "subnets": [
               "<cluster-subnet-1>",
               "<cluster-subnet-2>",
               "<cluster-subnet-3>"
             ],
             "securityGroups": ["<cluster-security-group-id>"]
           }
         ],
         "ClientAuthentication": {
           "Sasl": {
             "Iam": {
               "Enabled": true
             }
           }
         }
       }

  2. Invoke the following AWS CLI command in the folder where you saved the JSON file in the previous step:
    aws kafka create-cluster-v2 --cluster-name pgsqlmsk --serverless file://create-msk-serverless-cluster.json

  3. Verify cluster status by invoking the following AWS CLI command:
    aws kafka list-clusters-v2 --cluster-type-filter SERVERLESS

  4. Get the bootstrap broker address by invoking the following AWS CLI command:
    aws kafka get-bootstrap-brokers --cluster-arn "<msk-serverless-cluster-arn>"

  5. Define the environment variable to store the bootstrap servers of the MSK cluster and locally install Kafka in the path environment variable:
    export BOOTSTRAP_SERVERS=<kafka_bootstrap_servers_with_ports>

Create a topic on the MSK cluster

To create a Kafka topic, you need to install the Kafka CLI first. Follow these steps:

  1. Download the binary distribution of Apache Kafka and extract the archive in folder kafka:
    wget https://dlcdn.apache.org/kafka/3.9.0/kafka_2.13-3.9.0.tgz
       tar -xzf kafka_2.13-3.9.0.tgz
       ln -sfn kafka_2.13-3.9.0 kafka

  2. To use IAM to authenticate with the MSK cluster, download the Amazon MSK Library for IAM and copy to the local Kafka library directory as shown in the following code. For complete instructions, refer to Configure clients for IAM access control.
    wget https://github.com/aws/aws-msk-iam-auth/releases/download/v2.3.1/aws-msk-iam-auth-2.3.1-all.jar
    cp aws-msk-iam-auth-2.3.1-all.jar kafka/libs

  3. In the directory, create a file to configure a Kafka client to use IAM authentication for the Kafka console producer and consumers:
    security.protocol=SASL_SSL
       sasl.mechanism=AWS_MSK_IAM
       sasl.jaas.config=software.amazon.msk.auth.iam.IAMLoginModule required; sasl.client.callback.handler.class=software.amazon.msk.auth.iam.IAMClientCallbackHandler

  4. Create the Kafka topic, which you defined in the connector config:
    kafka/bin/kafka-topics.sh --create --bootstrap-server $BOOTSTRAP_SERVERS --command-config kafka/config/client-config.properties --partitions 1 --topic pgsql-sink-topic

Configure the MSK Connect plugin

Next, create a custom plugin available in the AMI at /opt/precisely/di/packages/sqdata-msk_connect_1.0.1.zip which contains the following:

  • JDBC Sink Connector from Confluent
  • MSK Config provider
  • AWS Mainframe Modernization – Data Repication for IBM z/OS Custom SMT

Follow these steps:

  1. Invoke the following to upload the .zip file to an S3 bucket to which you have access:
    aws s3 cp /opt/precisely/di/packages/sqdata-msk_connect_1.0.1.zip s3://<bucket>/

  2. Copy the following JSON and paste it into a new file create-custom-plugin.json. Replace the placeholder strings with values that correspond to your bucket.
    {
         "contentType": "ZIP",
         "description": "jdbc sink connector",
         "location": {
           "s3Location": {
             "bucketArn": "arn:aws:s3:::<bucket>",
             "fileKey": "sqdata-msk_connect_1.0.1.zip"
           }
         },
         "name": "jdbc-sink-connector"
       }

  3. Invoke the following AWS CLI command in the folder where you saved the JSON file in the previous step:
    aws kafkaconnect create-custom-plugin --cli-input-json file://create-custom-plugin.json

  4. Verify plugin status by invoking the following AWS CLI command:
    aws kafkaconnect list-custom-plugins

Configure the JDBC Sink Connector

To configure the JDBC Sink Connector, follow these steps:

  1. Copy the following JSON and paste it into a new file create-connector.json. Replace the placeholder strings with appropriate values:
    {
         "connectorConfiguration": {
           "connector.class": "io.confluent.connect.jdbc.JdbcSinkConnector",
           "connection.url": "jdbc:postgresql://<postgresql-endpoint>
    /dbcdc?currentSchema=public",
           "config.providers": "secretsmanager",
           "config.providers.secretsmanager.class": "com.amazonaws.kafka.config.providers.SecretsManagerConfigProvider",
           "connection.user": "${secretsmanager:MySecret-1234:username}",
           "connection.password": "${secretsmanager:MySecret-1234:password}",
           "config.providers.secretsmanager.param.region": "<region>",
           "tasks.max": "1",
           "topics": "pgsql-sink-topic",
           "insert.mode": "upsert",
           "delete.enabled": "true",
           "pk.mode": "record_key",
           "auto.evolve": "true",
           "auto.create": "true",
           "value.converter": "org.apache.kafka.connect.storage.StringConverter",
           "key.converter": "org.apache.kafka.connect.storage.StringConverter",
           "transforms": "ConnectCDCConverter",
           "transforms.ConnectCDCConverter.type": "com.precisely.kafkaconnect.ConnectCDCConverter",
           "transforms.ConnectCDCConverter.cdc.multiple.tables.enabled": "true",
           "transforms.ConnectCDCConverter.cdc.source.table.name.ignore.schema": "true"
         },
         "connectorName": "pssql-sink-connector",
         "kafkaCluster": {
           "apacheKafkaCluster": {
             "bootstrapServers": "<msk-bootstrap-servers-string>",
             "vpc": {
               "subnets": [
                 "<cluster-subnet-1>",
                 "<cluster-subnet-2>",
                 "<cluster-subnet-3>"
               ],
               "securityGroups": ["<cluster-security-group-id>"]
             }
           }
         },
         "capacity": {
           "provisionedCapacity": {
             "mcuCount": 1,
             "workerCount": 1
           }
         },
         "kafkaConnectVersion": "3.7.x",
         "serviceExecutionRoleArn": "<arn-of-a-role-that-msk-connect-can-assume>",
         "plugins": [
           {
             "customPlugin": {
               "customPluginArn": "<arn-of-custom-plugin-that-contains-connector-code>",
               "revision": 1
             }
           }
         ],
         "kafkaClusterEncryptionInTransit": {"encryptionType": "TLS"},
         "kafkaClusterClientAuthentication": {"authenticationType": "IAM"},
         "logDelivery": {
           "workerLogDelivery": {
             "cloudWatchLogs": {
               "enabled": true,
               "logGroup": "<loggroup>"
             }
           }
         }
       }

  2. Invoke the following AWS CLI command in the folder where you saved the JSON file in the previous step:
    aws kafkaconnect create-connector --cli-input-json file://create-connector.json

  3. Verify connector status by invoking the following AWS CLI command:
    aws kafkaconnect list-connectors

Set up Db2 Capture/Publisher on Mainframe

To establish the Db2 Capture/Publisher on the mainframe for capturing changes to the DEPT table, follow these structured steps that build upon our previous blog post, Unlock Mainframe Data with Precisely Connect and Amazon Aurora:

  1. Prepare the source table. Before configuring the Capture/Publisher, ensure the DEPT source table exists on your mainframe Db2 system. The table definition should match the structure defined at \$SQDATA_VAR_DIR/templates/dept.ddl. If you need to create this table on your mainframe, use the DDL from this file as a reference to ensure compatibility with the replication process.
  2. Access the Interactive System Productivity Facility (ISPF) interface. Sign in to your mainframe system and access the AWS Mainframe Modernization – Data Repication for IBM z/OS ISPF panels through the supplied ISPF application menu. Select option 3 (CDC) to access the CDC configuration panels, as demonstrated in our previous blog post.
  3. Add source tables for capture:
    1. From the CDC Primary Option Menu, choose option 2 (Define Subscriptions).
    2. Choose option 1 (Define Db2 Tables) to add source tables.
    3. On the (Add DB2 Source Table to CAB File panel), enter a wildcard value (%) or the specific table name DEPT in the (Table Name) field.
    4. Press Enter to display the list of available tables.
    5. Type S next to the DEPT table to select it for replication, then press Enter to confirm.

This process is like the table selection process shown in figure 3 and figure 4 of our previous post but now focuses specifically on the DEPT table structure.

With the completion of both the Db2 Capture/Publisher setup on the mainframe and the AWS environment configuration (Amazon MSK, Apply Engine, and MSK Connect JDBC Sink Connector), you now have a fully functional pipeline ready to capture data changes from the mainframe and stream them to the MSK topic. Inserts, updates, or deletions to the DEPT table on the mainframe will be automatically captured and pushed to the MSK topic in near real time. From there, the MSK Connect JDBC Sink Connector and the custom SMT will process these messages and apply the changes to the PostgreSQL database on Amazon RDS, completing the end-to-end replication flow.

Configure Apply Engine for Amazon MSK integration

Configure the AWS side components to receive data from the mainframe and forward it to Amazon MSK. Follow these steps to define and manage a new CDC pipeline from DB2 z/OS to Amazon MSK:

  1. Use the following command to switch to the connect user:
    sudo su connect

  2. Create the apply engine directories:
    mkdir -p \$SQDATA_VAR_DIR/apply/DB2ZTOMSK/ddl
         connect> mkdir -p \$SQDATA_VAR_DIR/apply/DB2ZTOMSK/scripts

  3. Copy the sample script from dept.ddl:
    cp \$SQDATA_VAR_DIR/templates/dept.ddl \$SQDATA_VAR_DIR/apply/DB2ZTOMSK/ddl/

  4. Copy the following content and paste it in a new file $SQDATA_VAR_DIR/apply/DB2ZTOMSK/scripts/DB2ZTOMSK.sqd. Replace the placeholder strings with values that correspond to the DB2z endpoint:
    -----------------------------------------------------------------------
       Name: DB2TOKAF: Z/OS DB2 To Kafka
       -----------------------------------------------------------------------
       SUBSTITUTION PARMS USED IN THIS SCRIPT:
       ---------------------------------------------------------------------
       JOBNAME DB2TOKAFKA;
       -----------------------------
       TABLE DESCRIPTIONS
       ---------------------------
       BEGIN GROUP SOURCE_TABLES;
       DESCRIPTION Db2SQL /var/precisely/di/sqdata/apply/DB2ZTOMSK/ddl/dept.ddl AS DEPT KEY IS DEPTNO;
       END GROUP;
       -------------------------------------------------------------
       DATASTORE SECTION
       -------------------------------------------------------------
       SOURCE DATASTORE
       DATASTORE cdc://<DB2z endpoint with port>/dbcg/DBCG_TBTSS388T6 OF UTSCDC AS CDCIN DESCRIBED BY GROUP SOURCE_TABLES;
       -- TARGET DATASTORE
       DATASTORE kafka:///pgsql-sink-topic/table_key OF JSON AS TARGET KEY IS DEPTNO DESCRIBED BY GROUP SOURCE_TABLES;
       ---------------------------------
       PROCESS INTO TARGET
       SELECT { REPLICATE(TARGET) } FROM CDCIN;

  5. Create the working directory:
    mkdir -p /var/precisely/di/sqdata_logs/apply/DB2ZTOMSK

  6. Add the following to $SQDATA_DAEMON_DIR/cfg/sqdagents.cfg:
    [DB2ZTOMSK]
       type=engine
       program=sqdata
       args=/var/precisely/di/sqdata/apply/DB2ZTOMSK/scripts/DB2ZTOMSK.prc --log-level=8
       working_directory=/var/precisely/di/sqdata_logs/apply/DB2ZTOMSK
       stdout_file=stdout.txt
       stderr_file=stderr.txt
       auto_start=0
       comment=Apply Engine for MSK from Db2z

  7. After the preceding code is added to the sqdagents.cfg section, reload for the changes to take effect:
    sqdmon reload

  8. Validate the apply engine job script by using the SQData parse command to create the compiled file expected by the SQData engine:
    sqdparse $SQDATA_VAR_DIR/apply/DB2ZTOMSK/scripts/DB2ZTOMSK.sqd $SQDATA_VAR_DIR/apply/DB2ZTOMSK/scripts/DB2ZTOMSK.prc

    The following is an example of the output that you get when you invoke the command successfully:

    SQDC042I mounting/running sqdparse with arguments:
    SQDC041I args[0]:sqdparse
    SQDC041I args[1]:/var/precisely/di/sqdata/apply/DB2ZTOMSK/scripts/DB2ZTOMSK.sqd
    SQDC041I args[2]:/var/precisely/di/sqdata/apply/DB2ZTOMSK/scripts/DB2ZTOMSK.prc
    SQDC000I *******************************************************
    SQDC021I sqdparse Version 5.0.1-rel (Linux-x86_64)
    SQDC022I Build-id 4f2d7c16728aa2e40c610db7d5a6e373476a9889
    SQDC023I (c) 2001, 2025 Syncsort Incorporated. All rights reserved.
    SQDC000I *******************************************************
    SQDC000I
    SQD0000I 2025-03-31 00:59:10
    >>> Start Preprocessed /var/precisely/di/sqdata/apply/DB2ZTOMSK/scripts/DB2ZTOMSK.sqd
    000001 ----------------------------------------------------------------------
    000002 -- Name: DB2TOKAF:  Z/OS DB2 To Kafka
    000003 ----------------------------------------------------------------------
    000004 --  SUBSTITUTION PARMS USED IN THIS SCRIPT:
    000005 ----------------------------------------------------------------------
    000006
    000007 JOBNAME DB2TOKAFKA;
    000008
    000009 ----------------------------
    000010 -- TABLE DESCRIPTIONS
    000011 ----------------------------
    000012 BEGIN GROUP SOURCE_TABLES;
    000013 DESCRIPTION Db2SQL /var/precisely/di/sqdata/apply/DB2ZTOMSK/ddl/dept.ddl  AS DEPT
    000014 KEY IS DEPTNO;
    000015 END GROUP;
    000016
    000017 ------------------------------------------------------------
    000018 --       DATASTORE SECTION
    000019 ------------------------------------------------------------
    000020
    000021 -- SOURCE DATASTORE
    000022 DATASTORE /var/precisely/di/sqdata/apply/DB2ZTOMSK/scripts/DB0A.ENGINE3.DEPT.COPY
    000023           OF UTSCDC
    000024           AS CDCIN
    000025           DESCRIBED BY GROUP SOURCE_TABLES;
    000026
    000027 -- TARGET DATASTORE
    000028 DATASTORE 
    000029           OF JSON
    000030           AS TARGET
    000031           KEY IS DEPTNO
    000032           DESCRIBED BY GROUP SOURCE_TABLES;
    000033
    000034 ----------------------------------
    000035
    000036 PROCESS INTO TARGET
    000037 SELECT
    000038 {
    000039     REPLICATE(TARGET)
    000040 }
    000041 FROM CDCIN;
    <<< End Preprocessed /var/precisely/di/sqdata/apply/DB2ZTOMSK/scripts/DB2ZTOMSK.sqd
    >>> Start Preprocessed /var/precisely/di/sqdata/apply/DB2ZTOMSK/ddl/dept.ddl
    000001 CREATE TABLE DEPARTMENT
    000002 (
    000003    DEPTNO char(3) NOT NULL,
    000004    DEPTNAME varchar(36) NOT NULL,
    000005    MGRNO char(6),
    000006    ADMRDEPT char(3) NOT NULL,
    000007    LOCATION char(16),
    000008    CONSTRAINT PK_DEPTNO PRIMARY KEY (DEPTNO)
    000009 ) ;
    <<< End Preprocessed /var/precisely/di/sqdata/apply/DB2ZTOMSK/ddl/dept.ddl
    Number of Data Stores...................: 2
    Data Store..............................: /var/precisely/di/sqdata/apply/DB2ZTOMSK/scripts/DB0A.ENGINE3.DEPT.COPY
      Alias.................................: CDCIN
      Type..................................: UTS Change Data Capture
      Number of Records.....................: 1
        Record Name.........................: DEPARTMENT
        Record Description Alias............: DEPT
        Record Description Length...........: 72
        Number of Fields....................: 5
          ................................... TYPE            OFF   LEN   XLEN  EXT
          ................................... ---------- ----- ----- ----- -----
          DEPTNO............................: CHAR(3)             0     3     3
          DEPTNAME..........................: VARCHAR(36)         3    38    38
          MGRNO.............................: CHAR(6)             7     6     6
          ADMRDEPT..........................: CHAR(3)            14     3     3
          LOCATION..........................: CHAR(16)           17    16    16
    Data Store..............................: 
      Alias.................................: TARGET
      Type..................................: JSON
      Number of Records.....................: 1
        Record Name.........................: DEPARTMENT
        Record Description Alias............: DEPT
        Record Description Length...........: 70
        Number of Fields....................: 5
          ................................... TYPE            OFF   LEN   XLEN  EXT
          ................................... ---------- ----- ----- ----- -----
          DEPTNO............................: CHAR(3)             0     3     3
          DEPTNAME..........................: VARCHAR(36)         3    38    38
          MGRNO.............................: CHAR(6)            41     6     6
          ADMRDEPT..........................: CHAR(3)            47     3     3
          LOCATION..........................: CHAR(16)           50    16    16
    Section.................................: SQDSTP000
      Number of steps.......................: 1
    SQDC017I sqdparse(pid=4023) terminated successfully

  9. Copy the following content and paste it in a new file /var/precisely/di/sqdata_logs/apply/DB2ZTOMSK/sqdata_kafka_producer.conf. Replace the placeholder strings with values that correspond to your bootstrap server and AWS Region.
    metadata.broker.list=<kafka_bootstrap_servers_with_ports>
         security.protocol=SASL_SSL
         sasl.mechanism=OAUTHBEARER
         sasl.oauthbearer.config="extension_AWSMSKCB=python3,/usr/lib64/python3.9/site-packages/aws_msk_iam_sasl_signer/cli.py,--region,<region>"
         sasl.oauthbearer.method="default"

  10. Start the apply engine using the controller daemon by using the following command:
    sqdmon start ///DB2ZTOMSK

  11. Monitor the apply engine through the controller daemon by using the following command:
    sqdmon display ///DB2ZTOMSK --format=details

    The following is an example of the output that you get when you invoke the command successfully:

    Engine..................................: DB2ZTOMSK
    version.................................: 5.0.1-rel (Linux-x86_64)
    git.....................................: f021c29a84c1a99f59144288aeeb2cb8fa494485
    jobname.................................: DB2TOKAFKA
    parsed..................................: 20250320172610278108
    started.................................: 2025-03-20.17.47.23.444474
    started (UTC)...........................: 2025-03-20.17.47.23.444474 (1742492843444)
    updated (UTC)...........................: 2025-03-20.17.47.25.901018 (1742492845901)
    Input Datastore.........................: /var/precisely/di/sqdata/apply/DB2ZTOMSK/scripts/DB0A.ENGINE3.DEPT.COPY
    Alias...................................: CDCIN
    Type....................................: UTS Change Data Capture
      Records Read..........................: 14
      Records Selected......................: 14
      Bytes Read............................: 2892
    Output Datastore........................: kafka:///pgsql-sink-topic/table_key
    Alias...................................: TARGET
    Type....................................: JSON
      Records Inserted......................: 14
      Records Updated.......................: 0
      Records Deleted.......................: 0
      Formatted bytes.......................: 3458
      Unformatted bytes.....................: 448
    Total Output Formatted bytes............: 3458
    Total Output Unformatted bytes..........: 448
    SQDC017I sqdmon(pid=123540) terminated successfully

    Logs can also be found at /var/precisely/di/sqdata_logs/apply/DB2ZTOMSK.

Verify data in the MSK topic

Invoke the Kafka CLI command to verify the JSON data in the MSK topic:

kafka/bin/kafka-console-consumer.sh --bootstrap-server $BOOTSTRAP_SERVERS --consumer.config kafka/config/client-config.properties --topic pgsql-sink-topic --from-beginning --property print.key=true

Verify data in the PostgreSQL database

Invoke the following command to verify the data in the PostgreSQL database:

PGPASSWORD="password" psql --host=<DATABASE-HOST> --username=<user> --dbname=<database> -c "select * from \"DEPT\""

With these steps completed, you’ve successfully set up end-to-end data replication from DB2z to RDS for PostgreSQL, using AWS Mainframe Modernization – Data Replication for IBM z/OS AMI, Amazon MSK, MSK Connect, and the Confluent JDBC Sink Connector.

Cleanup

When you’re finished testing this solution, you can clean up the resources to avoid incurring additional charges. Follow these steps in sequence to ensure proper cleanup.

Step 1: Delete the MSK Connect components

Follow these steps:

  1. List existing connectors:
    aws kafkaconnect list-connectors

  2. Delete the sink connector:
    aws kafkaconnect delete-connector --connector-arn "<arn-of-connector>"

  3. List custom plugins:
    aws kafkaconnect list-custom-plugins

  4. Delete the custom plugin:
    aws kafkaconnect delete-custom-plugin --custom-plugin-arn "<arn-of-custom-plugin>"

Step 2: Delete the MSK cluster

Follow these steps:

  1. List MSK clusters:
    aws kafka list-clusters-v2 --cluster-type-filter SERVERLESS

  2. Delete the MSK serverless cluster:
    aws kafka delete-cluster --cluster-arn "<arn-of-msk-serverless-cluster>"

Step 3: Delete the Aurora resources

Follow these steps:

  1. Delete the Aurora DB instance:
    aws rds delete-db-instance --db-instance-identifier cdc-serverless-pg-instance --skip-final-snapshot

  2. Delete the Aurora DB cluster:
    aws rds delete-db-cluster --db-cluster-identifier cdc-serverless-pg-cluster --skip-final-snapshot.

Conclusion

By capturing changed data from DB2z and streaming it to AWS targets, organizations can modernize their legacy mainframe data stores, enabling operational insights and AI initiatives. Businesses can use this solution to take advantage of cloud-based applications with mainframe data to provide scalability, cost-efficiency, and enhanced performance.

The integration of AWS Mainframe Modernization – Data Replication for IBM z/OS AMI with Amazon MSK and RDS for PostgreSQL provides an enhanced framework for real-time data synchronization that maintains data integrity. This architecture can be extended to support additional mainframe data sources such as VSAM and IMS, as well as other AWS targets. Organizations can then tailor their data integration strategy to specific business needs. Data consistency and latency challenges can be effectively managed through AWS and Precisely’s monitoring capabilities. By adopting this architecture, organizations keep their mainframe data continually available for analytics, machine learning (ML), and other advanced applications.Streaming mainframe data to AWS in near real time represents a strategic step toward modernizing legacy systems while unlocking new opportunities for innovation, with data transfers occurring in subseconds. With Precisely and AWS, organizations can effectively navigate their modernization journey and maintain their competitive advantage.

Learn more about AWS Mainframe Modernization – Data Replication for IBM z/OS AMI in the Precisely documentation. AWS Mainframe Modernization Data Replication is available for purchase in AWS Marketplace. For more information about the solution or to see a demonstration, contact Precisely.


About the authors

Supreet Padhi

Supreet Padhi

Supreet is a Technology Architect at Precisely. He has been with Precisely for more than 14 years, with specialty in streaming data use cases and technology, with emphasis on data warehouse architecture. He is responsible for research and development in areas such as Change Data Capture (CDC), streaming ETL, metadata management, and VectorDBs.

Manasa Ramesh

Manasa Ramesh

Manasa is a Technology Architect at Precisely, with over 15 years of experience in software development. She has worked on several innovation-driven projects in Metadata Management, Data Governance and Data Integration space. She is currently responsible for research, design and development of metadata discovery framework.

Tamara Astakhova

Tamara Astakhova

Tamara is a Sr. Partner Solutions Architect in Data and Analytics at AWS, brings over two decades of expertise in architecting and developing large-scale data analytics systems. In her current role, she collaborates with strategic partners to design and implement sophisticated AWS-optimized architectures. Her deep technical knowledge and experience make her an invaluable resource in helping organizations transform their data infrastructure and analytics capabilities.

Accelerate the modernization of Mainframe and VMware workloads with AWS Transform

Post Syndicated from Matheus Guimaraes original https://aws.amazon.com/blogs/aws/accelerate-the-modernization-of-mainframe-and-vmware-workloads-with-aws-transform/

Generative AI has brought many new possibilities to organizations. It has equipped them with new abilities to retire technical debt, modernize legacy systems, and build agile infrastructure to help unlock the value that is trapped in their internal data. However, many enterprises still rely heavily on legacy IT infrastructure, particularly mainframes and VMware-based systems. These platforms have been the backbone of critical operations for decades, but they hinder organizations’ ability to innovate, scale effectively, and reduce technical debt in an era where cloud-first strategies dominate. The need to modernize these workloads is clear, but the journey has traditionally been complex and risky.

The complexity spans multiple dimensions. Financially, organizations face mounting licensing costs and expensive migration projects. Technically, they must untangle legacy dependencies while meeting compliance requirements. Organizationally, they must manage the transition of teams who’ve built careers around legacy systems and navigate undocumented institutional knowledge.

AWS Transform directly addresses these challenges with purpose-built agentic AI that accelerates and de-risks your legacy modernization. It automates the assessment, planning, and transformation of both mainframe and VMware workloads into cloud based architectures, streamlining the entire process. Through intelligent insights, automated code transformation, and human-in-the-loop workflows, organizations can now tackle even the most challenging modernization projects with greater confidence and efficiency.

Mainframe workload migration
AWS Transform for mainframe is the first agentic AI service for modernizing mainframe workloads at scale. The specialized mainframe agent accelerates mainframe modernization by automating complex, resource-intensive tasks across every phase of modernization — from initial assessment to final deployment. It streamlines the migration of legacy applications built on IBM z/OS Db2, including COBOL, CICS, DB2, and VSAM, to modern cloud environments–cutting modernization timelines from years to months.

Let’s look at a few examples of how AWS Transform can help you through different aspects of the migration process.

Code analysis – AWS Transform provides comprehensive insights into your codebase, automatically examining mainframe codebases, creating detailed dependency graphs, measuring code complexity, and identifying component relationships

Documentation – AWS Transform for mainframe creates comprehensive technical and functional documentation of mainframe applications, preserving critical knowledge about features, program logic, and data flows. You can interact with the generated documentation through an AI-powered chat interface to discover and retrieve information quickly.

Business rule extraction – AWS Transform extracts and presents complex logic in plain language so you can gain visibility into business processes embedded within legacy applications. This enables both business and technical stakeholders to gain a greater understanding of application functionality.

Code decomposition – AWS Transform offers sophisticated code decomposition tools, including interactive dependency graphs and domain separation capabilities, enabling users to visualize and modify relationships between components while identifying key business functions. The solution also streamlines migration planning through an interactive wave sequence planner that considers user preferences to generate optimized migration strategies.

Modernization Wave Planning – With its specialized agent, AWS Transform for mainframe creates prioritized modernization wave sequences based on code and data dependencies, code volume, and business priorities. It enables modernization teams to make data-driven, customized migration plans that align to their specific organizational needs.

Code refactoring – AWS Transform can refactor millions of lines of mainframe code in minutes, converting COBOL, VSAM, and DB2 systems into modern Java Spring Boot applications while maintaining functional equivalence and transforming CICS transactions into web services and JCL batch processes into Groovy scripts. The solution provides high-quality output through configurable settings and bundled runtime capabilities, producing Java code that emphasizes readability, maintainability, and technical excellence.

Deployments – AWS Transform provides customizable deployment templates that streamline the deployment process through user-defined inputs. For added efficiency, the solution bundles the selected runtime version with the migrated application, enabling seamless deployment as a complete package.

By integrating intelligent documentation analysis, business rules extraction, and human-in-the-loop collaboration capabilities, AWS Transform helps organizations accelerate their mainframe transformation while reducing risk and maintaining business continuity.

VMware modernization
With rapid changes in VMware licensing and support model, organizations are increasingly exploring alternatives despite the difficulties associated with migrating and modernizing VMware workloads. This is aggravated by the fact that the accumulation of technical debt typically creates complex, poorly documented environments managed by multiple teams, leading to vendor lock-in and collaboration challenges that hinder migration efforts further.

AWS Transform is the first agentic AI service for VMware modernization of its kind that helps you to overcome those difficulties. It can offset risk and accelerate the modernization of VMware workloads by automating application discovery, dependency mapping, migration planning, network conversion, and EC2 instance optimization, reducing manual effort and accelerating cloud adoption.

The process is organized into four phases: inventory discovery, wave planning, network conversion, and server migration. It uses agentic AI capabilities to analyze and map complex VMware environments, converting network configurations into AWS built-in constructs and helps you to orchestrate dependency-aware migration waves for seamless cutovers. In addition, it also provides a collaborative web interface that keeps AWS teams, partners, and customers aligned throughout the modernization journey.

Let’s take a quick tour to see how this works.

Setting up
Before you can start using the service, you must first enable it by navigating to the AWS Transform console. AWS Transform requires AWS IAM Identity Center (IdC) to manage users and setup appropriate permissions. If you don’t yet have IdC set up it will ask you to configure it first and return to the AWS Transform console later to continue the process.

With IdC available, you can then proceed to choosing the encryption settings. AWS Transform gives you the option to use a default AWS managed key or you can use your own custom keys through AWS Key Management Service (AWS KMS).

After completing this step, AWS Transform will be enabled. You can manage admin access to the console by navigating to Users and using the search box to find them. You must create users or groups in IdC first if they don’t already exist. The service console will help admins provision users who will get access to the web app. Each provisioned user receives an email with a link to set password and get their personalized URL for the webapp.

You interact with AWS Transform through a dedicated web experience. To get the url, navigate to Settings where you can check your configurations and copy the links to the AWS Transform web experience where you and your teams can start using the service.

Discovery
AWS Transform can discover your VMware environment either automatically through AWS Application Discovery Service collectors or you can provide your own data by importing existing RVTools export files.

To get started, choose the Create or select connectors task and provide the account IDs for one or more AWS accounts that will be used for discovery. This will generate links that you can follow to authorize each account for usage within AWS Transform. You can then move on to the Perform discovery task, where you can choose to install AWS Application Discovery Service collectors or upload your own files such as exports from RVTools.

Provisioning
The steps for the provisioning phase are similar to the ones described earlier for discovery. You connect target AWS accounts by entering their account IDs and validating the authorization requests which will then enable the next steps such as the Generate VPC configuration step. Here, you can import your RVTools files or NSX exports from Import/Export from NSX, if applicable, and enable AWS Transform to understand your networking requirements.

You should then continue working through the job plan until you reach the point where it’s ready to deploy your Amazon Virtual Private Cloud (Amazon VPC). All the infrastructure as code (IaC) code is stored in Amazon Simple Storage Service (Amazon S3) buckets in the target AWS account.

Review the proposed changes and, if you’re happy, start the deployment process of the AWS resources to the target accounts.

Deployment
AWS Transform requires you to set up AWS Application Migration Service (MGN) in the target AWS accounts to automate the migration process. Choose the Initiate VM migration task and use the link to navigate to the service console, then follow the instructions to configure it.

After setting up service permissions, you’ll proceed to the implementation phase of the waves created by AWS Transform and start the migration process. For each wave, you’ll first be asked to make various choices such as setting the sizing preference and tenancy for the Amazon Elastic Compute Cloud (Amazon EC2) instances. Confirm your selections and continue following the instructions given by AWS Transform until you reach the Deploy replication agents stage, where you can start the migration for that wave.

After you start the waves migration process, you can switch to the dashboard at any time to check on progress.

With its agentic AI capabilities, AWS Transform offers a powerful solution for accelerating and de-risking mainframe and VMware modernization workloads. By automating complex assessment and transformation processes, AWS Transform reduces the time associated with legacy system migration while minimizing the potential for errors and business disruption enabling more agile, efficient, and future-ready IT environments within your organization.

Things to know
Availability –  AWS Transform for mainframe is available in US East (N. Virginia) and Europe (Frankfurt) Regions. AWS Transform for VMware offers different availability options for data collection and migrations. Please refer to the AWS Transform for VMware FAQ for more details.

Pricing –  Currently, we offer our core features—including assessment and transformation—at no cost to AWS customers.

Here are a few links for further reading.

Dive deeper into mainframe modernization and learn more about about AWS Transform for mainframe.

Explore more about VMware modernization and how to get started with your VMware migration journey.

Check out this interactive demo of AWS Transform for mainframe and this interactive demo of AWS Transform for VMware.

Matheus Guimaraes | @codingmatheus


How is the News Blog doing? Take this 1 minute survey!

(This survey is hosted by an external company. AWS handles your information as described in the AWS Privacy Notice. AWS will own the data gathered via this survey and will not share the information collected with survey respondents.)

Accelerate large-scale modernization of .NET, mainframe, and VMware workloads using Amazon Q Developer

Post Syndicated from Krishna Parab original https://aws.amazon.com/blogs/devops/accelerate-large-scale-modernization-of-net-mainframe-and-vmware-workloads-using-amazon-q-developer/

Software runs the world – not just the new software applications built in modern languages and deployed on the most optimized cloud infrastructure, but also legacy software built over years and barely understood by the teams that inherit them. These legacy applications may have snowballed into monolithic blocks or may be fragmented across siloed on-premises infrastructure. The significant maintenance, security, and compliance challenges caused can create lasting implications for business performance and competitiveness. Therefore, transformation of legacy applications using modern languages, new frameworks, and cloud services has become an organizational imperative.

Application modernization challenges

Modernization of software applications is a long and painful journey – requiring large teams of developers, domain experts, and consultants who first need to understand the application landscape, devise strategic modernization plans, and then tactically implement the plans in phases, typically over a span of many years. This process is linear, slow, and complex. Traditional labor-intensive modernization approaches incur significant costs and take years to leverage new cloud technologies and innovations for business-critical applications.

Generative AI can help with intelligent automation, domain expertise, and scalability to transform modernization journeys.

Introducing Amazon Q Developer transformation capabilities

Q Developer transformation capabilities powered by LLMs and domain-expert agents support human-agent interaction via an IDE experience for individual developers and a web experience for multifunctional teams.

Amazon Q Developer transformation capabilities

Amazon Q Developer, the most capable generative AI–powered assistant for software development, is now the first generative AI-powered assistant for large-scale modernization and migration of .NET, mainframe, and VMware workloads. This extends Q Developer’s transformation capabilities for Java upgrades launched in April 2024 to new types of workloads. Q Developer combines both foundational models and specialized tools based on AI and automated reasoning via autonomous agents that tackle workload-specific modernization steps spanning analysis, planning, and implementation.

Multifunctional teams, including consultants, IT experts, workload domain experts, and developers, can use a unified web experience to offload transformation tasks to Amazon Q Developer agents and transform hundreds of workloads at a time. The agents can port .NET Framework to cross-platform Linux-ready .NET, modernize COBOL applications on mainframes to Java applications on AWS, or virtualized workloads on VMware to scalable workloads on EC2. The modernization teams engage with Q Developer using natural language and share transformation objectives, code repositories, and context. Q Developer agents analyze artifacts like code segments, dependencies, and integrations, applying expertise from prior modernizations. They propose customized plans tailored to codebases, resource utilization, and objectives. The teams can then review, adjust, and approve the plans with iterative engagement with the agents. After the plans are approved, the agents implement the transformation keeping the modernization teams updated on milestones completed and blockers needing human guidance. The transformation journey is an interactive process between the modernization team and Q Developer, with modernization team maintaining control and visibility over the transformation.

Human team members interact with Q Developer generative AI agents using natural language chat.

Natural language chat with Q Developer AI agents

Faster, scalable, and better modernization

Amazon Q Developer enhances transformation in three primary ways – acceleration, scalability, and quality.

Amazon Q Developer automates and accelerates complex, multi-step processes. Agents conduct assessment and discovery of legacy artifacts to build documentation and dependency maps that improve the understanding of source assets. Most large-scale modernization projects are done in waves that need to be carefully planned. The agents develop modernization wave plans based on source dependencies, stated project goals, and teams can review and approve the plans. Thereafter, the goal-seeking autonomous agents handle implementation complexities to execute the plans. Customers using Amazon Q Developer can modernize Windows .NET applications to Linux up to four times faster than traditional methods and help customers realize up to 40% savings in licensing costs. Migration Planning for the sequence to transform monolith z/OS COBOL application code that takes months to accomplish with human subject matter experts, Amazon Q Developer generates in minutes. Q Developer agents convert on-premises VMware network configurations into modern AWS equivalents in hours vs. the weeks required with traditional manual approaches. The shorter time spent on manual modernization means more freedom for your team to focus on innovation.

Modernization has traditionally been a linear journey with multiple steps and dependencies on cross-functional teams with limited mechanisms for collaboration. This limits teams’ ability to tackle large-scale projects. Amazon Q Developer addresses the challenges by task parallelization and web-based collaboration. Multiple generative AI agents work simultaneously on tasks. Large monolithic applications can be decomposed along business functions like engineering, marketing, sales applications, and transformed in parallel. A unified web-based experience for large-scale transformation means multi-functional team members can collaborate with the autonomous agents, and review and approve key decisions in one place, enabling teams to execute larger and more complex projects in a given time.

Finally, the quality of transformation manifested in functional equivalence, security, and resilience of modernized applications determines the business outcomes like project ROI and operational performance. To ensure transformation quality, you need expertise in languages and frameworks like COBOL, Java, .NET; specialized steps like code base analysis, monolith decomposition, code refactoring, network translation; and domains like mainframe, virtualization, and cloud. You may not have the requisite expertise in your team. That is where Amazon Q Developer can help. Q Developer agents are trained with specific domain expertise to identify code dependencies and frameworks, replace deprecated code, upgrade to new language frameworks, incorporate security best practices, and validate upgraded workloads using workload-tailored plans. Your team can examine the agents’ recommendations, make informed decisions, and guide the modernization journey towards better outcomes like enhanced security, compliance, and performance.

Q Developer supports modernization of .NET Framework applications to cross-platform .NET applications, mainframe-based COBOL applications to Java applications on AWS, on-premises VMware workloads to workloads on EC2, and Java v8/11/17 to Java17/21.

Workloads supported by Amazon Q Developer transformation capabilities

Next steps

Amazon Q Developer transformation capabilities are now available in preview. To learn more, please visit Q Developer web page featuring short demo videos and documentation that can get you started. Read the AWS News blogs that walk you through the unified web experience and IDE experience. Dive deeper into the transformation of specific workloads by reading the workload-specific blogs related to transformation of .NET, mainframe, and VMware workloads.

About the author:

Elio Damaggio

Krishna Parab

Krishna B. Parab leads product marketing for Amazon Q Developer transformation capabilities. He has over 13 years of experience in product marketing and prior experience in engineering and product management. He has led marketing for Cisco Cloud, ServiceNow service management SaaS, Arm Pelion IoT platform, Automation Anywhere RPA platform, and AWS Mainframe Modernization service. Krishna’s educational background includes BTech, MS, and MBA degrees from IIT Bombay, UT Austin, and University of Michigan, respectively.

Elio Damaggio

Elio Damaggio

Elio Damaggio is the product lead for the transformation capabilities of Amazon Q Developer. With more than 15 years in tech, 11 patents, and a PhD in Computer Science, he is now looking for exciting ways to empower developers through AI.

Announcing Amazon Q Developer transformation capabilities for .NET, mainframe, and VMware workloads (preview)

Post Syndicated from Prasad Rao original https://aws.amazon.com/blogs/aws/announcing-amazon-q-developer-transformation-capabilities-for-net-mainframe-and-vmware-workloads-preview/

Today, we’re announcing the public preview of new Amazon Q Developer transformation capabilities for .NET, mainframe, and VMware workloads

Amazon Q Developer accelerates large-scale transformation of enterprise workloads with domain-expert generative AI agents supervised by modernization teams in a unified collaborative web experience.

Using the transformation capabilities of Amazon Q Developer, modernization teams can deliver large and complex projects, accelerating .NET porting, mainframe modernization, and VMware migration, while enhancing application security, resilience, performance, and scalability.

In this post, I give you a quick tour of the Amazon Q Developer transformation web experience.

Getting started with Amazon Q Developer transformation web experience
My organization’s Amazon Q Developer administrator previously provided me access to the web experience. The prerequisites are that I need to be part of the Amazon Q Developer Pro Tier subscription and a member of my organization’s AWS IAM Identity Center.

I sign in to the web experience using my credentials and create a new workspace. I’m presented with a page to create a transformation job with Amazon Q Developer.

I choose Ask Q to create a job, and it presents me with three options to choose from for creating a transformation job: Mainframe modernization, .NET modernization, and VMware migration.

Amazon Q Developer works collaboratively with me throughout the transformation journey spanning assessment, planning, and migration and modernization. I can add other team members to work alongside me, and Amazon Q Developer seamlessly integrates as a dependable part of my team. Amazon Q Developer helps me through every step of the transformation, including asset discovery, codebase analysis, wave planning, code refactoring, addressing incompatibilities, and implementing network automation.

Let’s have a closer look at the transformation process of each of the three workloads.

Porting of .NET applications from Windows to Linux
To start, I ask Amazon Q Developer to create a job for .NET modernization.

Amazon Q Developer provides a default name for the .NET modernization job and asks me if I would like to change anything before it creates the job. I continue with the default name and choose Create Job.

After the request is initiated, I can see the transformation steps and their progress in the left-side pane labeled Job Plan. On the right-side pane, I can see the details in the Dashboard section, any activities pending for me to act on in the Collaboration section, and the sequence of actions that have occurred in the Worklog section.

To begin the assessment, I connect Amazon Q Developer to my source code repositories using the steps outlined in the documentation. I was able to ask Amazon Q Developer about these steps, to receive in-product guidance as I progressed.

After connecting the source code repositories, Amazon Q Developer discovers the supported .NET applications. It then prepares for the transformation process by requesting from me specific inputs, such as selecting the target .NET version and choosing which repositories need to be transformed.

I provide the required inputs, save the information and choose Send to Q.

Amazon Q Developer automatically ports .NET applications I selected to the target version and commits the transformed code to a new branch in my repository when the task is complete, preserving the original source code. I can monitor the transformation’s progress on the Dashboard.

Modernization of mainframe applications
Now, let’s explore how Amazon Q Developer assists in the modernization of mainframe applications.

I ask Amazon Q Developer to create a new job for mainframe modernization. I see four phases in the Job Plan: Kick off modernization, Analyze code, Decompose code, and Plan migration wave.

I kick off the modernization by connecting my Amazon Web Services (AWS) account and specifying the resource location of mainframe applications by following the steps in the documentation.

Amazon Q Developer then analyzes the codebase, maps dependencies, and creates detailed documentation.

Next, Amazon Q Developer works with me to decompose my large monolith into simple and more loosely coupled business domains. I provide input on the files I need to group into different domains, and Amazon Q Developer decomposes them accordingly.

Then, using built-in mainframe and cloud domain expertise, Amazon Q Developer proposes a wave plan that I can review, update, and approve.

After approval, Amazon Q Developer implements automated refactoring of COBOL to Java, providing alerts when it needs input and status updates for tracking.

As you can see, Amazon Q Developer reduces timelines for large-scale assessment and modernization of mainframe applications through automated code analysis, documentation, decomposition, iterative planning, and refactoring.

Migration of VMware workloads
Let’s now examine how Amazon Q Developer helps me in migrating VMware applications.

I ask Amazon Q Developer to create a new job, and it creates an initial job plan for me to migrate my VMware virtual machines to Amazon Elastic Compute Cloud (Amazon EC2).

A typical VMware migration job consists of data discovery, application grouping, network migration and server migration steps. As the job progresses, Amazon Q Developer dynamically updates job plans and adds new steps, based on continual learning.

To discover on-premises data, I have an option to upload exports from tools such as RVtools, or I can use the AWS Application Discovery Service agentless or agent-based collectors to collect on-premises, server, and network traffic data.

Amazon Q Developer analyzes the discovered data, classifies it, and provides me a summary that includes data completeness indicators such as whether it has received enough network connection data to optimally group application servers and generate wave plans.

Amazon Q Developer then works collaboratively with me to build migration waves. It automatically suggests the waves and provides me with an option to edit by downloading the recommendations and uploading the new file.

Next, I select a target AWS account and ask Amazon Q Developer to use the uploaded network configuration to generate my AWS network. Amazon Q Developer translates the on-premises VMware network to generate the corresponding AWS network constructs.

Amazon Q Developer continues to work in collaboration with me to deploy the generated network and verifies its reach ability and performs reachability testing.

When the network migration is complete, Amazon Q Developer lets me select the waves I want to migrate. It prompts me to set Amazon EC2 instance preferences and generates a migration plan combining its previously generated artifacts. I can review and edit this plan according to my needs before uploading it to Amazon Q Developer to initiate migration with AWS Application Migration Service.

During the migration, I can track the overall transformation progress, including the state of network deployment and individual servers and waves, using the dashboard.

Join the preview
The transformation capabilities of Amazon Q Developer are available today in preview with an Amazon Q Developer Pro Tier subscription. To get started, visit the Amazon Q Developer User Guide.

Prasad

Modernize Your Mainframe Applications & Deploy Them In The Cloud

Post Syndicated from Sébastien Stormacq original https://aws.amazon.com/blogs/aws/modernize-your-mainframe-applications-deploy-them-in-the-cloud/

Today, we are launching AWS Mainframe Modernization service to help you modernize your mainframe applications and deploy them to AWS fully-managed runtime environments. This new service also provides tools and resources to help you plan and implement migration and modernization.

Since the introduction of System/360 on April 7 1964, mainframe computers have enabled many industries to transform themselves. The mainframe has revolutionized the way people buy things, how people book and purchase travel, and how governments manage taxes or deliver social services. Two thirds of the Fortune 100 companies have their core businesses located on a mainframe. And according to a 2018 estimate, $3 trillion ($3 x 10^12) in daily commerce flows through mainframes.

Mainframes are using their very own set of technologies: programming languages such as COBOL, PL/1, and Natural, to name a few, or databases and data files such as VSAM, DB2, IMS DB, or Adabas. They also run “application servers” (or transaction managers as we call them) such as CICS or IMS TM. Recent IBM mainframes also run applications developed in the Java programming language deployed on WebSphere Application Server.

Many of our customers running mainframes told us they want to modernize their mainframe-based applications to take advantage of the AWS cloud. They want to increase their agility and their capacity to innovate, gain access to a growing pool of talents with experience running workloads on AWS, and benefit from the continual AWS trend of improving cost/performance ratio.

Application modernization is a journey composed of four phases:

  • First, you assess the situation. Are you ready to migrate? You define the business case and educate the migration team.
  • Second, you mobilize. You kick off the project, identify applications for a proof of concept, and refine your migration plan and business cases.
  • Third, you migrate and modernize. For each application, you run in-depth discovery, decide on the right application architecture and migration journey, replatform or refactor the code base, and test and deploy to production.
  • Last, you operate and optimize. You monitor deployed applications, manage resources, and ensure that security and compliance are up to date.

AWS Mainframe Modernization helps you during each phase of your journey.

Assess and Mobilize
During the assessment and mobilization phase, you have access to analysis and development tools to discover the scope of your application portfolio and to transform source code as needed. Typically, the service helps you discover the assets of your mainframe applications and identify all the data and other dependencies. We provide you with integrated development environments where you can adapt or refactor your source code, depending on whether you are replatforming or refactoring your applications.

Application Automated Refactoring
You may choose to use the automated refactoring pattern, where mainframe application assets are automatically converted into a modern language and ecosystem. With automated refactoring, AWS Mainframe Modernization uses Blu Age tools to convert your COBOL, PL/1, or JCL code to Java services and scripts. It generates modern code, data access, and data format by implementing patterns and rules to transform screens, indexed files, and batch applications to a modern application stack.

AWS Mainfraime Modernization Refactoring

Application Replatforming
You may also choose to replatform your applications, meaning move them to AWS with minimal changes to the source code. When replatforming, the fully-managed runtime comes preinstalled with the Micro Focus mainframe-compatible components, such as transaction managers, data mapping tools, screen and maps readers, and batch execution environments, allowing you to run your application with minimum changes.

AWS Mainfraime Modernization Replatforming

This blog post can help you learn more about nuances between replatforming and refactoring.

DevOps For Your Mainframe Applications
AWS Mainframe Modernization service provides you with AWS CloudFormation templates to easily create continuous integration and continuous deployment pipelines. It also deploys and configures monitoring services to monitor the managed runtime. This allows you to maintain or continue to evolve your applications once migrated, using best practices from Agile and DevOps methodologies.

Managed Services
AWS Mainframe Modernization takes care of the undifferentiated heavy lifting and provides you with fully managed runtime environments based on 15 years of cloud architecture best practices in terms of security, high availability, scalability, system management, and using infrastructure as code. These are all important for the business-critical applications running on mainframes.

The analysis tools, development tools, and the replatforming or refactoring runtimes come preinstalled and ready to use. But there is much more than preinstalled environments. The service deploys and manages the whole infrastructure for you. It deploys the required network, load balancer, and configure log collection with Amazon CloudWatch, among others. It manages application versioning, deployments, and high availability dependencies. This saves you days of designing, testing, automating, and deploying your own infrastructure.

The fully managed runtime includes extensive automation and managed infrastructure resources that you can operate via the AWS console, the AWS Command Line Interface (CLI), and application programming interfaces (APIs). This removes the burden and undifferentiated heavy lifting of managing a complex infrastructure. It allows you to spend time and focus on innovating and building new capabilities.

Let’s Deploy an App
As usual, I like to show you how it works. I am using a demo banking application. The application has been replatformed and is available as two .zip files. The first one contains the application binaries, and the second one the data files. I uploaded the content of these zipped files to an Amazon Simple Storage Service (Amazon S3) bucket. As part of the prerequisites, I also created a PostgreSQL Aurora database, stored its username and password in AWS Secrets Manager, and I created an encryption key in AWS Key Management Service (KMS).

Sample Banking Application files

Create an Environment
Let’s deploy and run the BankDemo sample application in an AWS Mainframe Modernization managed runtime environment with the Micro Focus runtime engine. For brevity, I highlight only the main steps. The full tutorial is available as part of the service documentation.

I open the AWS Management Console and navigate to AWS Mainframe Modernization. I navigate to Environments and select Create environment.

AWS Mainframe Migration - Create EnvironmentI give the environment a name and select Micro Focus runtime since we are deploying a replatformed application. Then I select Next.

AWS Mainframe Modernization - Create Environment 2In the Specify Configurations section, I leave all the default values: a Standalone runtime environment, the M2.m5.large EC2 instance type, and the default VPC and subnets. Then I select Next.

AWS Mainframe Modernization - Create Environment 3

On the Attach Storage section, I mount an EFS endpoint as /m2/mount/demo. Then I select Next.

AWS Mainframe Modernization - Create Environment 4In the Review and create section, I review my configuration and select Create environment. After a while, the environment status switches to Available.

AWS Mainframe Modernization - environment available

Create an Application
Now that I have an environment, let’s deploy the sample banking application on it. I select the Applications section and select Create application.

AWS Mainframe Modernization - Create ApplicatioI give my application a name, and under Engine type, I select Micro Focus.

AWS Mainframe Modernization - Create Application 2In the Specify resources and configurations section, I enter a JSON definition of my application. The JSON tells the runtime environment where my application’s various files are located and how to access Secrets Manager. You can find a sample JSON file in the tutorial section of the documentation.

AWS Mainframe Modernization - Create Application 3In the last section, I Review and create the application. I select Create application. After a moment, the application becomes available.

AWS Mainframe Modernization - application is availableOnce available, I deploy the application to the environment. I select the AWSNewsBlog-SampleBanking app, then I select the Actions dropdown menu, and I select Deploy application.

AWS Mainframe Modernization - deploy the appAfter a while, the application status changes to Ready.

Import Data sets
The last step before starting the application is to import its data sets. In the navigation pane, I select Applications, then choose AWSNewsBlog-SampleBank. I then select the Data sets tab and select Import. I may either specify the data set configuration values individually using the console or provide the location of an S3 bucket that contains a data set configuration JSON file.

AWS Mainframe Modernization - import data setsI use the JSON file provided by the tutorial in the documentation. Before uploading the JSON file to S3, I replace the $S3_DATASET_PREFIX variable with the actual value of my S3 bucket and prefix. For this example, I use awsnewsblog-samplebank/catalog.

AWS Mainframe Modernization - import data sets 2After a while, the data set status changes to Completed.

My application and its data set are now deployed into the cloud.

Start the Application
The last step is to start the application. I navigate to the Applications section. I then select AWSNewsBlog-SampleBank. In the Actions dropdown menu, I select Start application. After a moment, the application status changes to Running.

AWS Mainframe Modernization - application running

Access the Application
To access the application, I need a 3270 terminal emulator. Depending on your platform, a couple of options are available. I choose to use a web-based TN3270 web-based client provided by Micro Focus and available on the AWS Marketplace. I configure the terminal emulator to point it to the AWS Mainframe Modernization environment endpoint, and I use port 6000.

TN3270 Configuration

Once the session starts, I receive the CICS welcome prompt. I type BANK and press ENTER to start the app. I authenticate with user BA0001 and password A. The main application menu is displayed. I select the first option of the menu and press ENTER.

TN3270 SampleBank demo

Congrats, your replatformed application has been deployed in the cloud and is available through a standard IBM 3270 terminal emulator.

Pricing and Availability
AWS Mainframe Modernization service is available in the following AWS Regions: US East (N. Virginia), US West (Oregon), Asia Pacific (Sydney), Canada (Central), Europe (Frankfurt), Europe (Ireland), and South America (São Paulo).

You only pay for what you use. There are no upfront costs. Third-party license costs are included in the hourly price. Runtime environments for refactored applications, based on Blu Age, start at $2.50/hour. Runtime environments for replatformed applications, based on Micro Focus, start at $5.55/hour. This includes the software licenses (Blu Age or Micro Focus). As usual, AWS Support plans are available. They also cover Blu Age and Micro Focus software.

Committed plans are available for pricing discounts. The pricing details are available on the service pricing page.

And now, go build 😉

— seb