Today, we are excited to announce Cloudflare Waiting Room! It will first be available to select customers through a new program called Project Fair Shot which aims to help with the problem of overwhelming demand for COVID-19 vaccinations causing appointment registration websites to fail. General availability in our Business and Enterprise plans will be added in the near future.
Wait, you’re excited about a… Waiting Room?
Most of us are familiar with the concept of a waiting room, and rarely are we excited about the idea of being in one. Usually our first experience of one is at a doctor’s office — yes, you have an appointment, but sometimes the doctor is running late (or one of the patients was). Given the doctor can only see one person at a time… the waiting room was born, as a mechanism to queue up patients.
While servers can handle more concurrent requests than a doctor can, they too can be overwhelmed. If, in a pre-COVID world, you’ve ever tried buying tickets to a popular concert or event, you’ve probably encountered a waiting room online. It limits requests inbound to an application, and places these requests into a virtual queue. Once the number of users in the application has reduced, new users are let in within the defined thresholds the application can handle. This protects the origin servers supporting the application from being inundated with too many requests, while also ensuring equity from a user perspective — users who try to access a resource when the system is overloaded are not unfairly dropped and forced to reconnect, hoping to join their chance in the queue.
Why Now?
Given not many of us are going to live concerts any time soon, why is Cloudflare doing this now?
Well, perhaps we aren’t going to concerts, but the second order effects of COVID-19 have created a huge need for waiting rooms. First of all, given social distancing and the closing of many places of business and government, customers and citizens have shifted to online channels, putting substantially more strain on business and government infrastructure.
Second, the pandemic and the flow-on consequences of it have meant many folks around the world have come to rely on resources that they didn’t need twelve months earlier. To be specific, these are often health or government-related resources — for example, unemployment insurance websites. The online infrastructure was set up to handle a peak load that didn’t foresee the impact of COVID-19. We’re seeing a similar pattern emerge with websites that are related to vaccines.
Historically, the number of organizations that needed waiting rooms was quite small. The nature of most businesses online usually involve a more consistent user load, rather than huge crushes of people all at once. Those organizations were able to build custom waiting rooms and were integrated deeply into their application (for example, buying tickets). With Cloudflare’s Waiting Room, no code changes to the application are necessary and a Waiting Room can be set up in a matter of minutes for any website without writing a single line of code.
Whether you are an engineering architect or a business operations analyst, setting up a Waiting Room is simple. We make it quick and easy to ensure your applications are reliable and protected from unexpected spikes in traffic. Other features we felt were important are automatic enablement and dynamic outflow. In other words, a waiting room should turn on automatically when thresholds are exceeded and as users finish their tasks in the application, let out different sized buckets of users and intake new ones already in the queue. It should just work. Lastly, we’ve seen the major impact COVID-19 has made on users and businesses alike, especially, but not limited to, the health and government sectors. We wanted to provide another way to ensure these applications remain available and functional so all users can receive the care that they need and not errors within their browser.
How does Cloudflare’s Waiting Room work?
We built Waiting Room on top of our edge network and our Workers product. By leveraging Workers and our new Durable Objects offerings, we were able to remove the need for any customer coding and provide a seamless, out of the box product that will ‘just work’. On top of this, we get the benefits of the scale and performance of our Workers product to ensure we maintain extremely low latency overhead, keep estimated times presented to end users accurate as can be and not keep any user in the queue longer than needed. But building a centralized system in a decentralized network is no easy task. When requests come into an application from around the world, we need to be able to get a broad, accurate view of what that load looks like inbound and outbound to a given application.
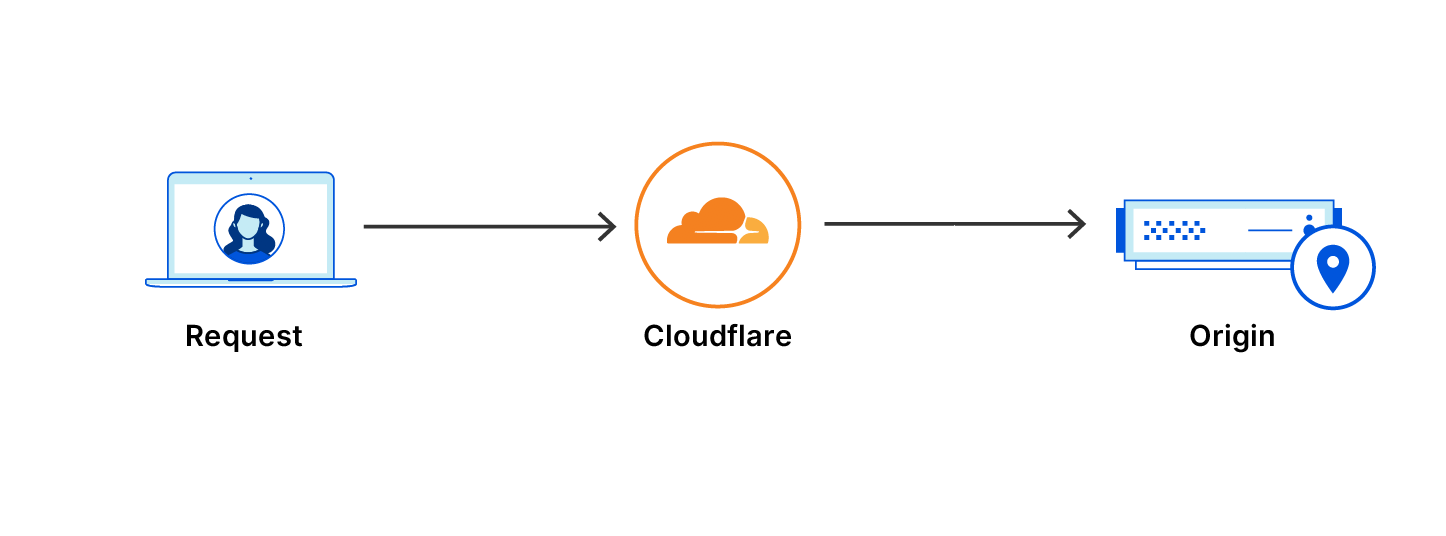
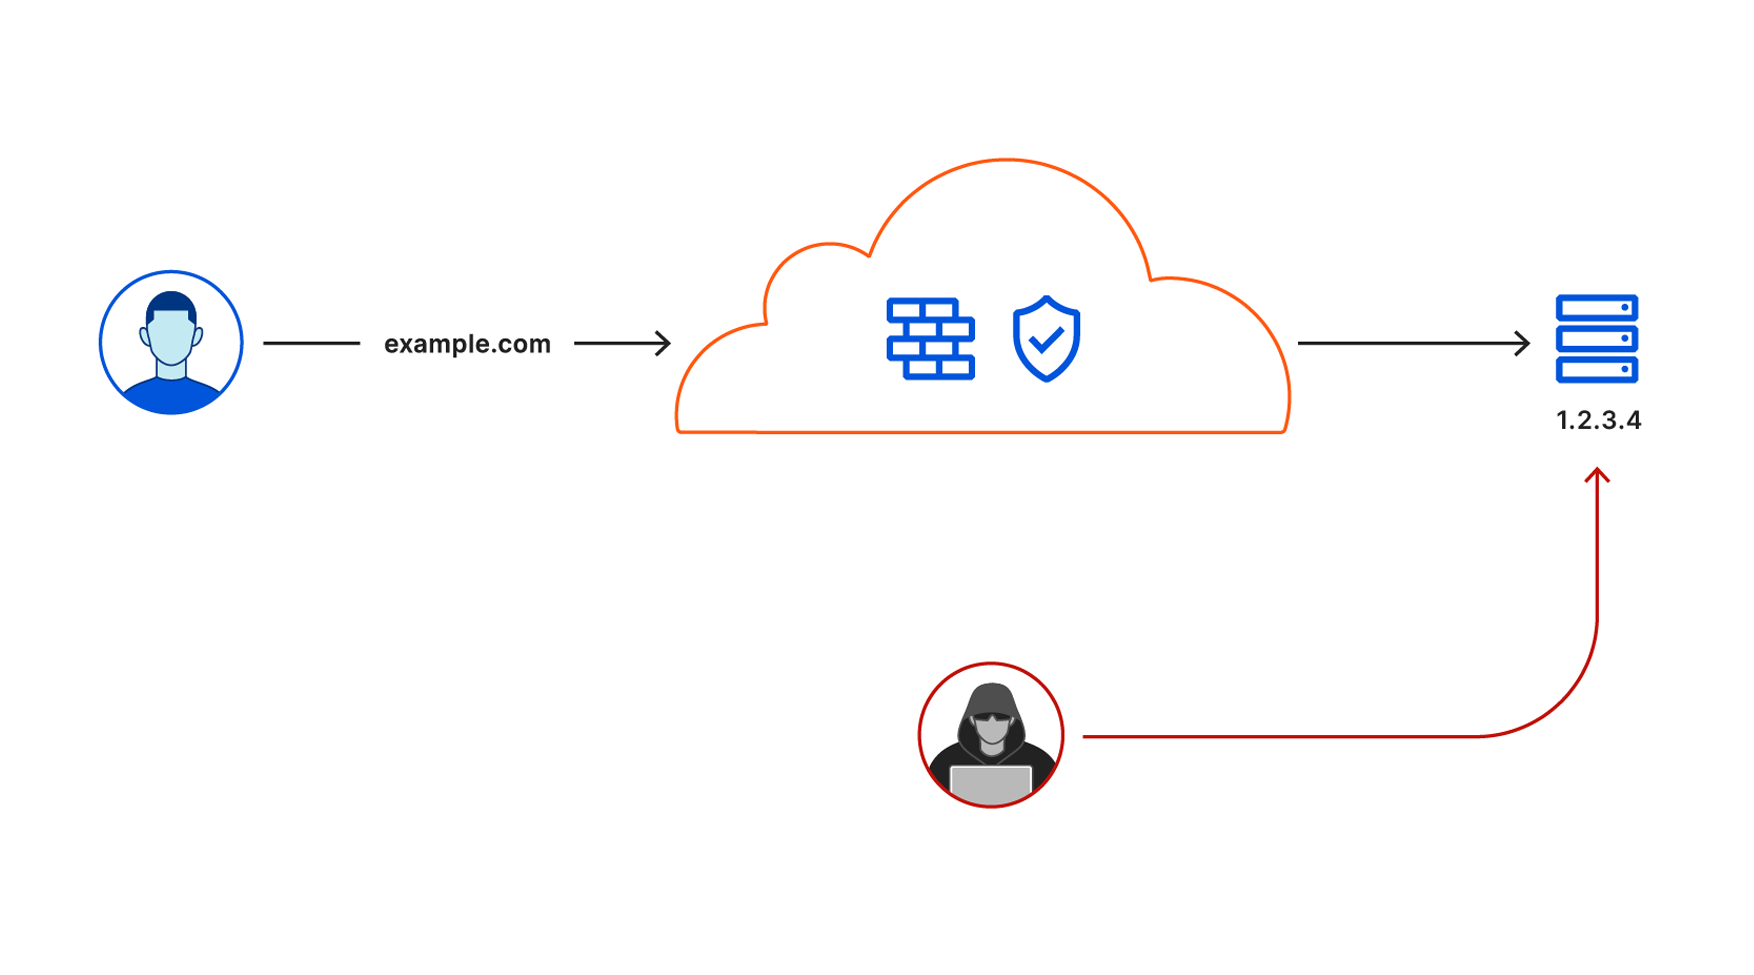
Request going through Cloudflare without a Waiting Room
These requests, as fast as they are, still take time to travel across the planet. And so, a unique edge case was presented. What if a website is getting reasonable traffic from North America and Europe, but then a sudden major spike of traffic takes place from South America – how do we know when to keep letting users into the application and when to kick in the Waiting Room to protect the origin servers from being overloaded?
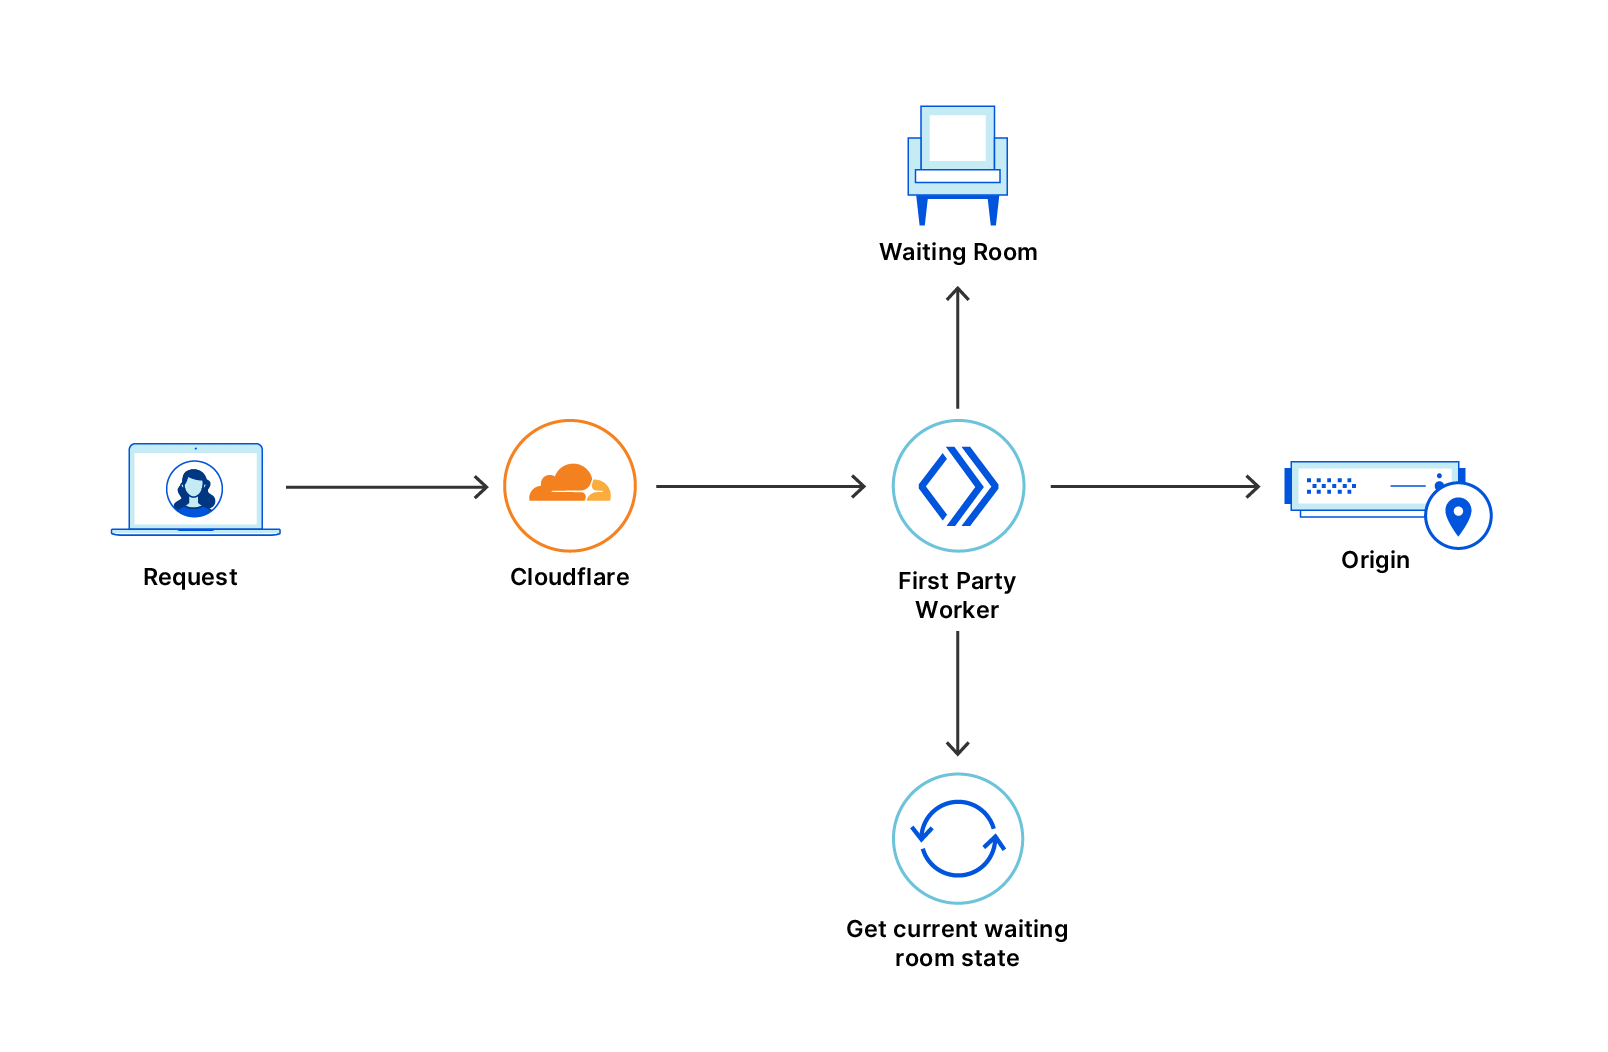
Thanks to some clever engineering and our Workers product, we were able to create a system that almost immediately keeps itself synced with global demand to an application giving us the necessary insight into when we should and should not be queueing users into the Waiting Room. By leveraging our global Anycast network and over 200+ data centers, we remove any single point of failure to protect our customers’ infrastructure yet also provide a great experience to end-users who have to wait a small amount of time to enter the application under high load.
Request going through Cloudflare with a Waiting Room
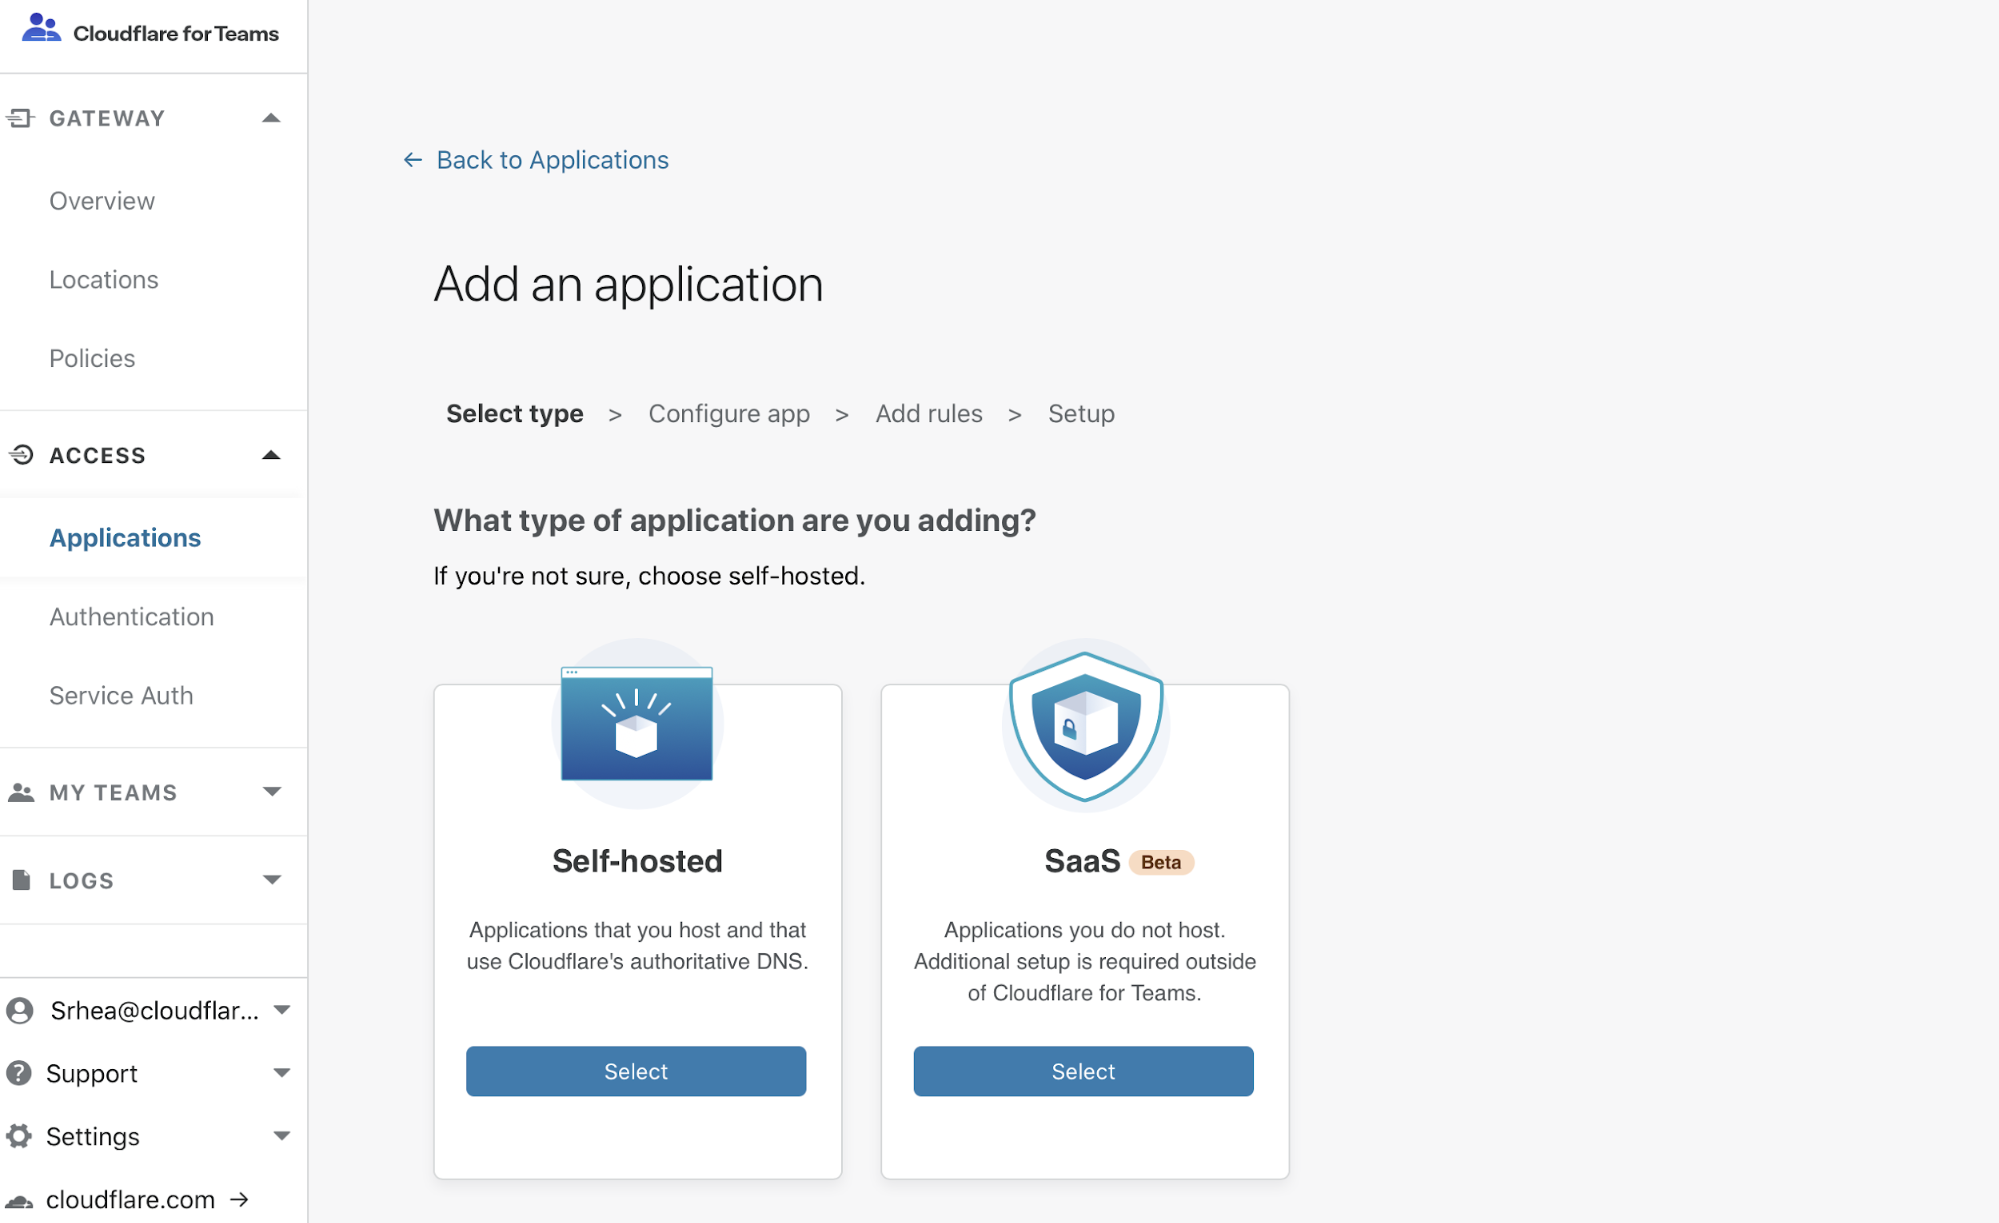
How to setup a Waiting Room
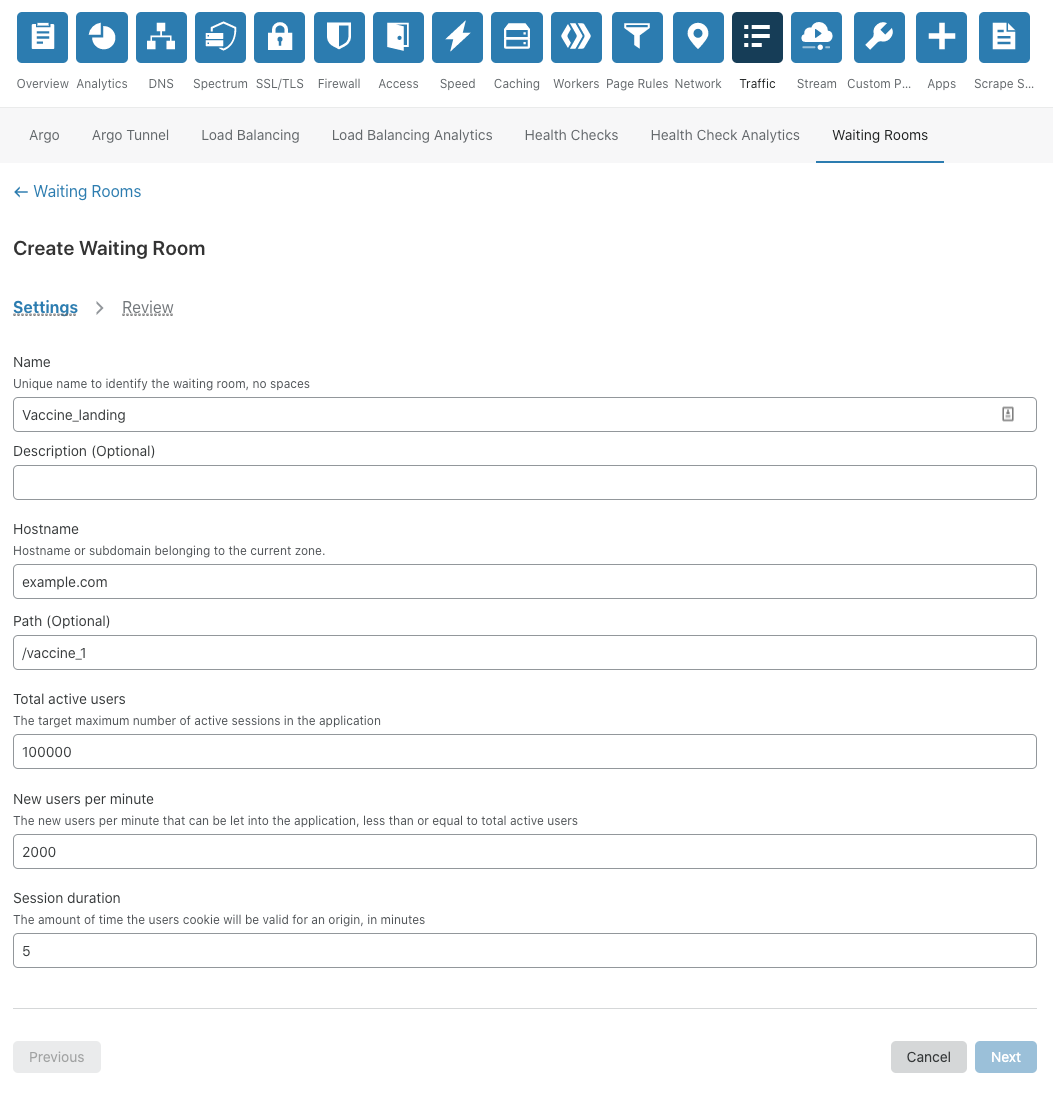
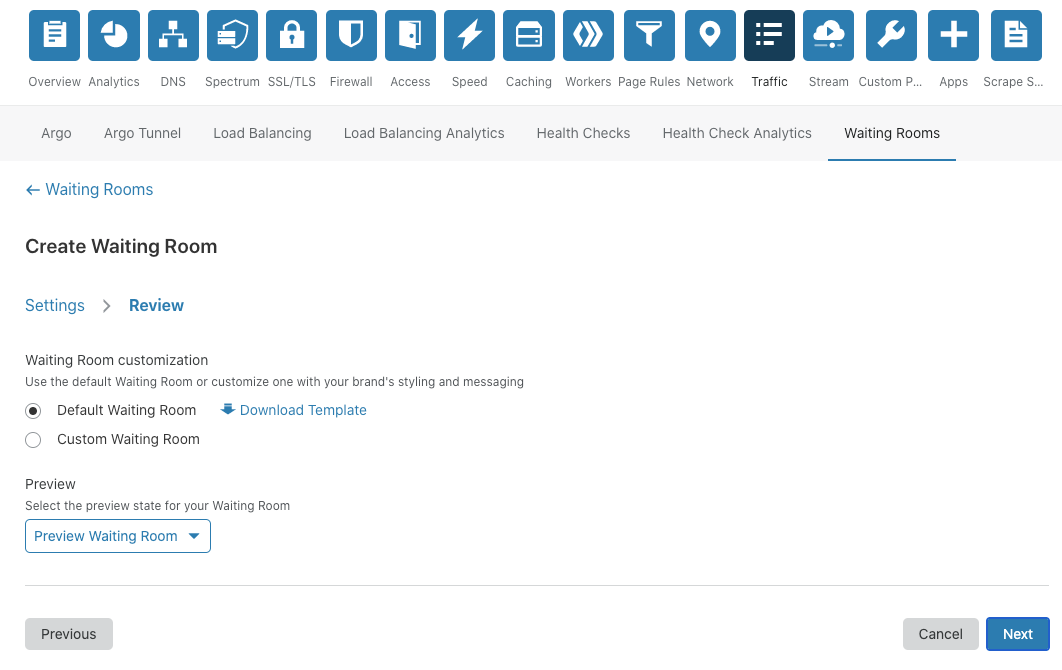
Setting up a Waiting Room is incredibly easy and very fast! At the easiest side of the scale, a user needs to fill out only five fields: 1) the name of the Waiting Room, 2) a hostname (which will already be pre-populated with the zone it’s being configured on), 3) the total active users that can be in the application at any given time, 4) the new users per minute allowed into the application, and 5) the session duration for any given user. No coding or any application changes are necessary.
We provide the option of using our default Waiting Room template for customers who don’t want to add additional branding. This simplifies the process of getting a Waiting Room up and running.
That’s it! Press save and the Waiting Room is ready to go!
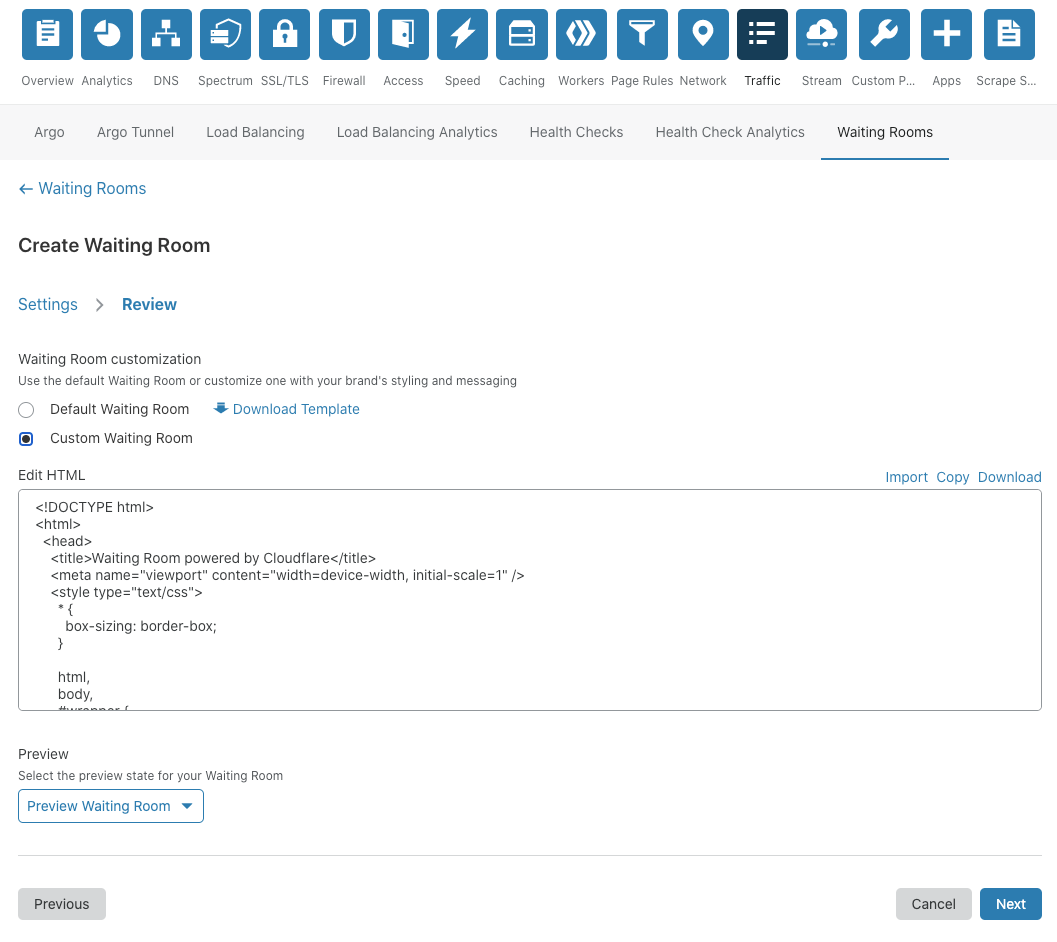
For customers with more time and technical ability, the same process is followed, except we give full customization capabilities to our users so they can brand the Waiting Room, ensuring it matches the look and feel of their overall product.
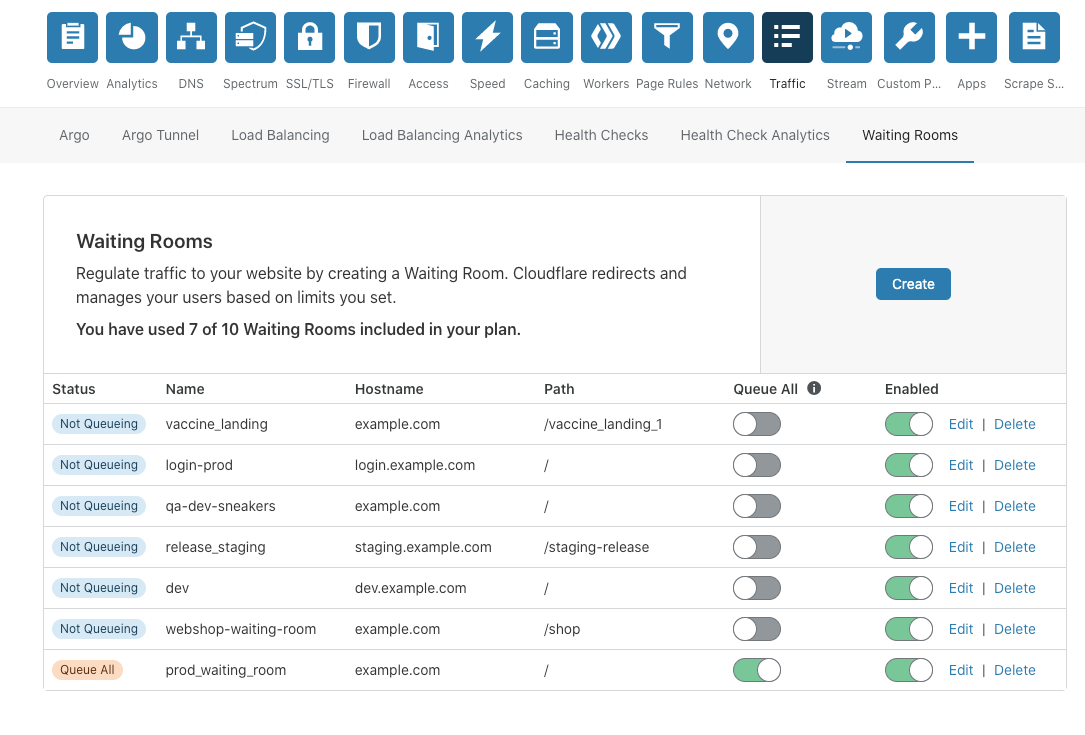
Lastly, managing different Waiting Rooms is incredibly easy. With our Manage Waiting Room table, at a glance you are able to get a full snapshot of which rooms are actively queueing, not queueing, and/or disabled.
We are very excited to put the power of our Waiting Room into the hands of our customers to ensure they continue to focus on their businesses and customers. Keep an eye out for another blog post coming soon with major updates to our Waiting Room product for Enterprise!
Cloudflare has always been about democratizing the Internet. For us, that means bringing the most powerful tools used by the largest of enterprises to the smallest development shops. Sometimes that looks like putting our global network to work defending against large-scale attacks. Other times it looks like giving Internet users simple and reliable privacy services like 1.1.1.1. Last week, it looked like Cloudflare Pages — a fast, secure and free way to build and host your JAMstack sites.
We see a huge opportunity with Cloudflare Pages. It goes beyond making it as easy as possible to deploy static sites, and extending that same ease of use to building full dynamic applications. By creating a seamless integration between Pages and Cloudflare Workers, we will be able to host the frontend and backend together, at the edge of the Internet and close to your users. The Linc team is joining Cloudflare to help us do just that.
Today, we’re excited to announce the acquisition of Linc, an automation platform to help front-end developers collaborate and build powerful applications. Linc has done amazing work with Frontend Application Bundles (FABs), making dynamic backends more accessible to frontend developers. Their approach offers a straightforward path to building end-to-end applications on Pages, with both frontend logic and powerful backend logic in one bundle. With the addition of Linc, we will accelerate Pages to enable richer and more powerful full-stack applications.
Combining Cloudflare’s edge network with Linc’s approach to server-side rendering, we’re able to set a new standard for performance on the web by delivering the speed of powerful servers close to users. Now, I’ll hand it over to Glen Maddern, who was the CTO of Linc, to share why they joined Cloudflare.
Linc and the Frontend Application Bundle (FAB) specification were designed with a single goal in mind: to give frontend developers the best possible tools to build, review, refine, and deploy their applications. An important piece of that is making server-side logic and rendering much more accessible, regardless of what type of app you’re building.
Static vs Dynamic frontends
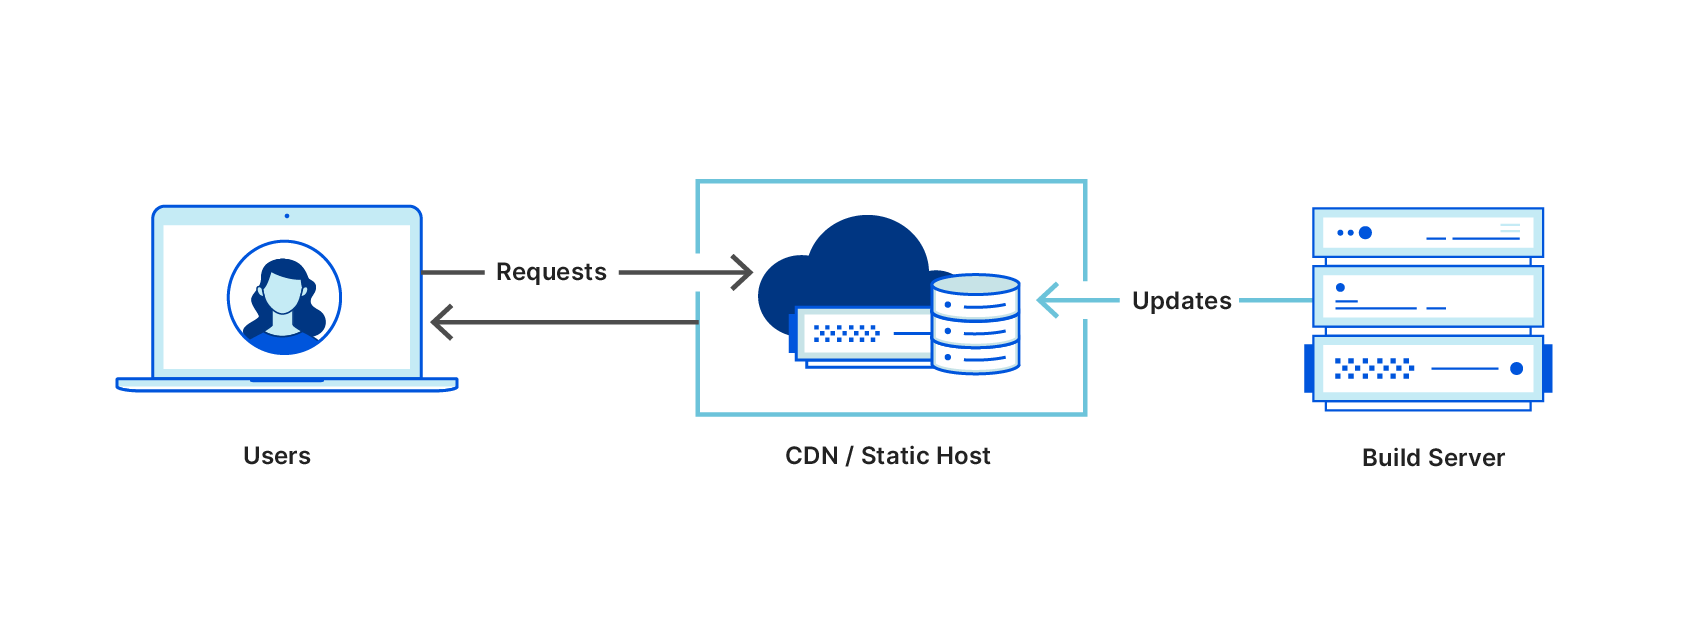
One of the biggest problems in frontend web development today is the dramatic difference in complexity when moving from generating static sites (e.g. building a directory full of HTML, JS, and CSS files) to hosting a full application (traditionally using NodeJS and a web server like Express). While you gain the flexibility of being able to render everything on-demand and customised for the current user, you increase your maintenance cost — you now have servers that you need to keep running. And unless you’re operating at a global scale already, you’ll often see worse end-user performance as your requests are only being served from one or maybe a couple of locations worldwide.
While serverless platforms have arisen to solve these problems for backend services and can be brought to bear on frontend apps, they’re much less cost-effective than using static hosting, especially if the bulk of your frontend assets are static. As such, we’ve seen a rise of technologies under the umbrella term of “JAMstack”; they aim at making static sites more powerful (like rebuilding based off CMS updates), or at making it possible to deploy small pieces of server-side APIs as “cloud functions”, along with each update of your app. But it’s still fundamentally a limited architecture — you always have a static layer between you and your users, so the more dynamic your needs, the more complex your build pipeline becomes, or the more you’re forced to rely on client-side logic.
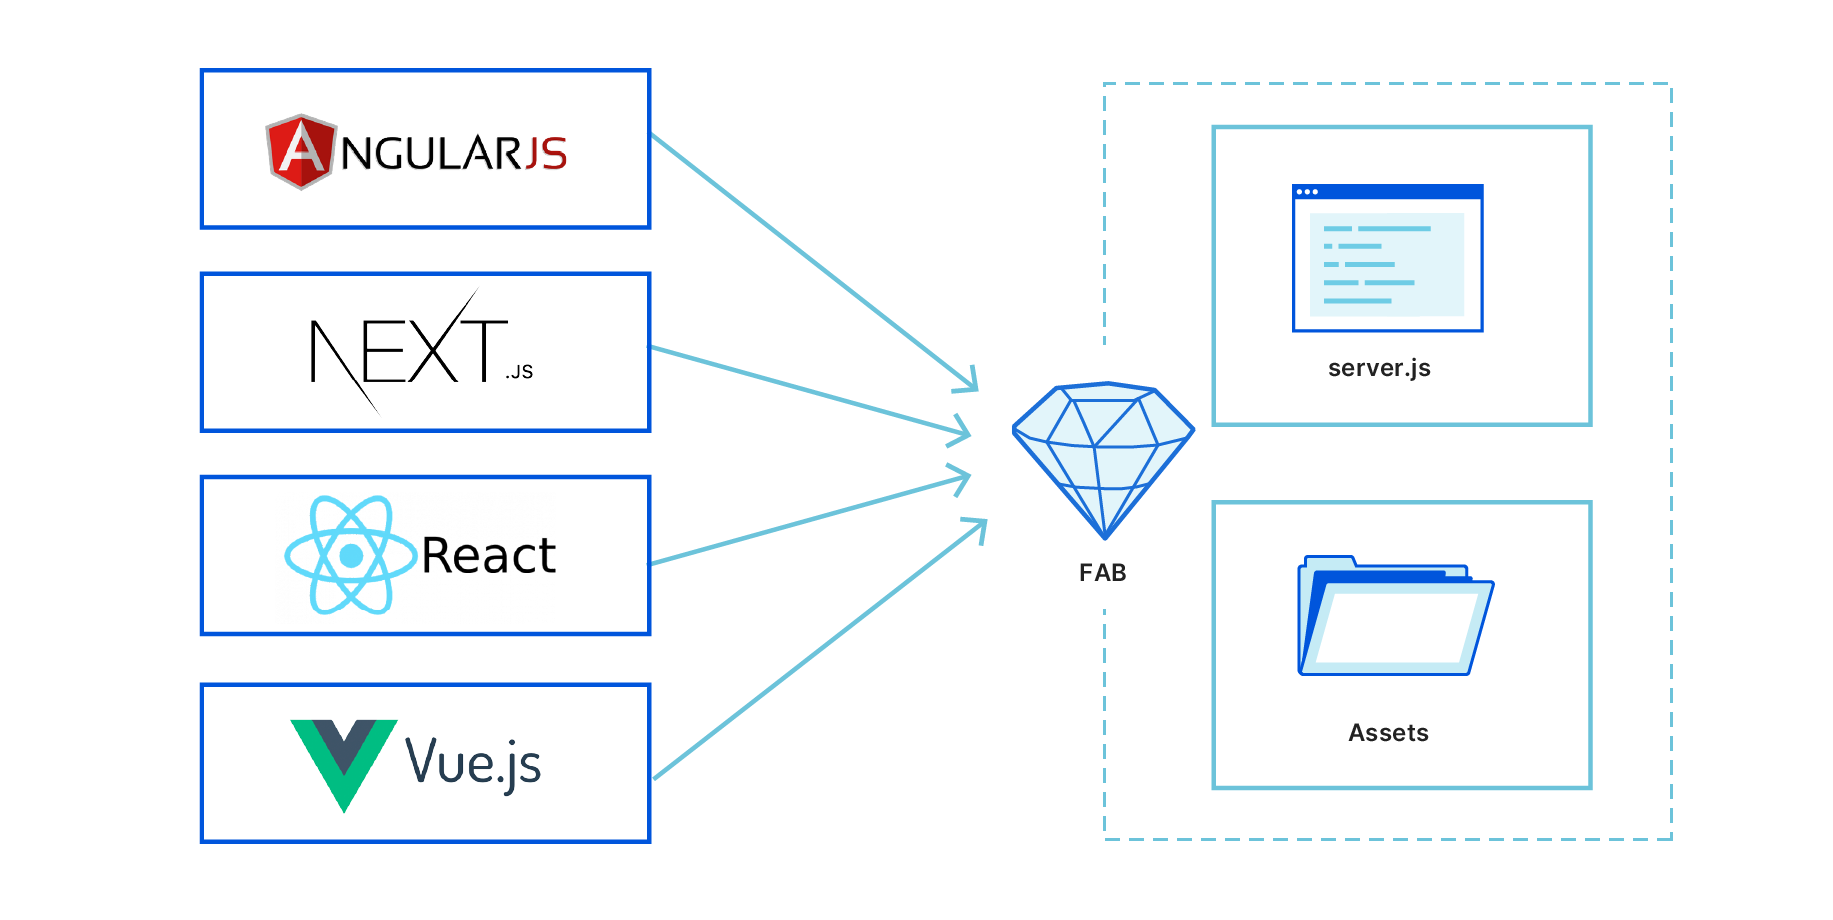
FABs took a different approach: a deployment artefact that could support the full range of server-side needs, from entirely static sites, apps with some API routes or cloud functions, all the way to full server-side streaming rendering. We also made it compatible with all the cloud hosting providers you might want, so that deploying becomes as easy as uploading a ZIP file. Then, as your needs change, as dynamic content becomes more important, as new frameworks arise that offer increasing performance or you look at moving which provider you’re hosting with, you never need to change your tooling and deployment processes.
The FAB approach
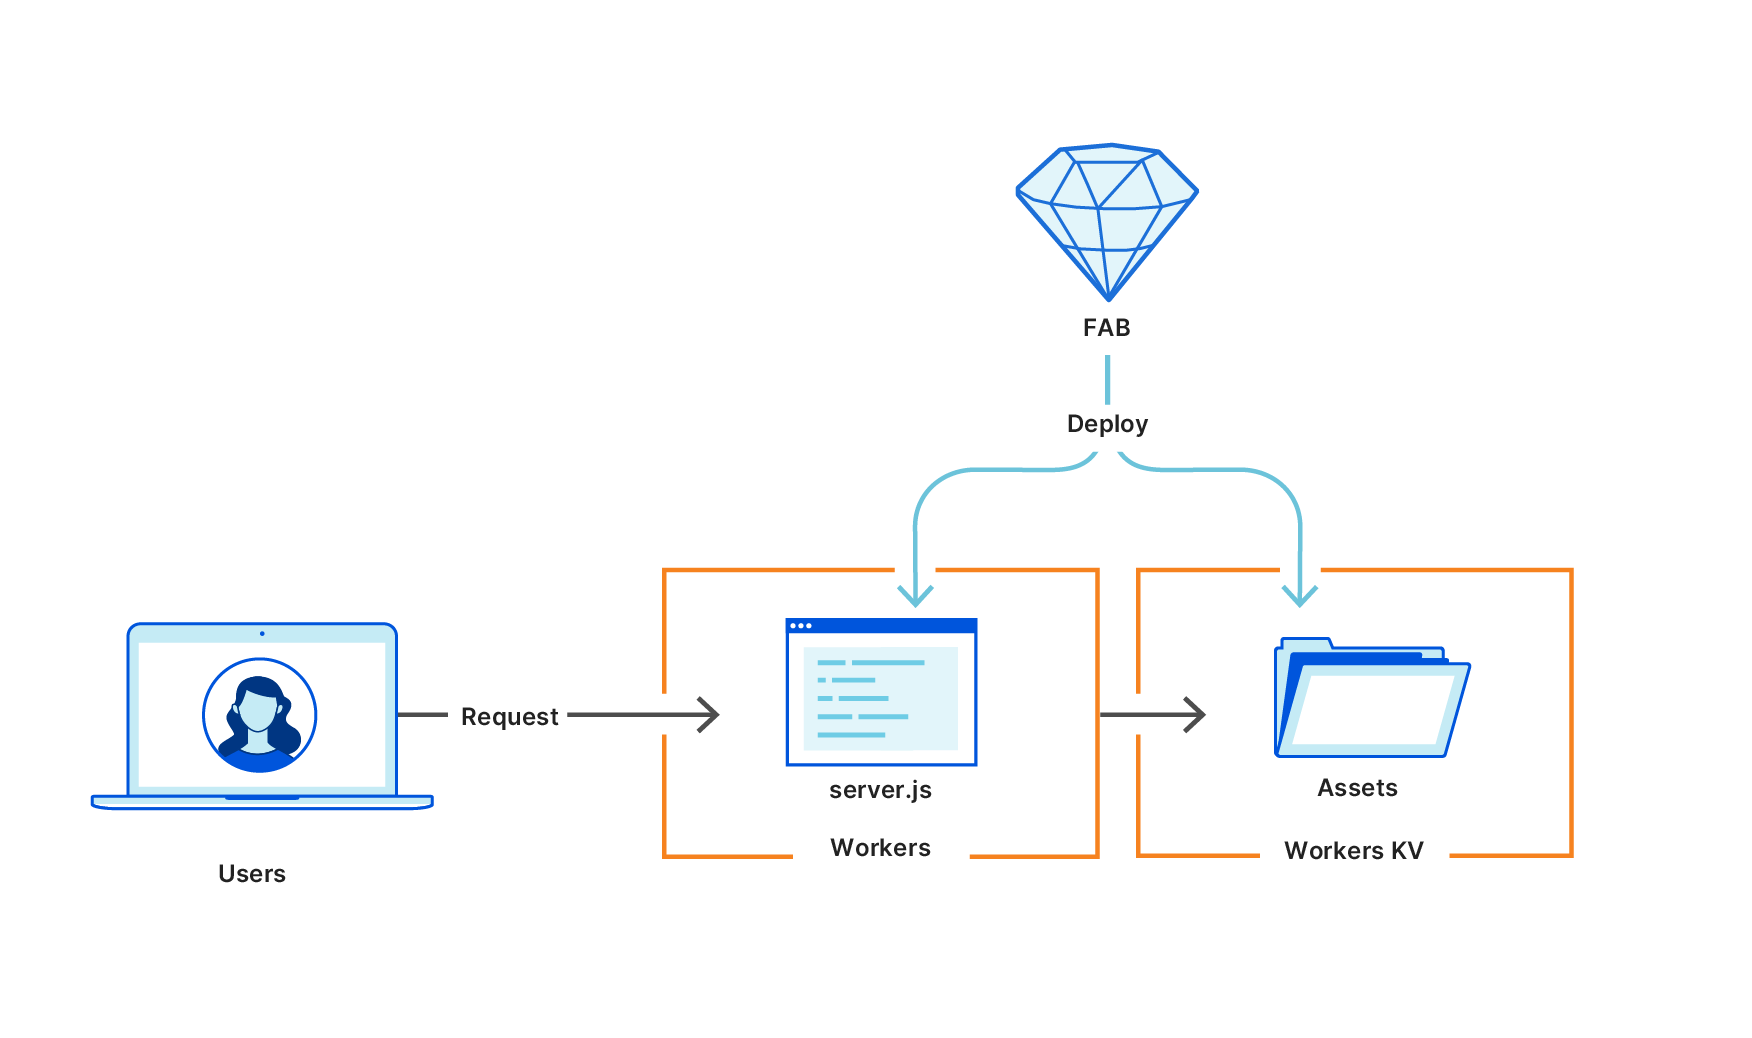
Regardless of what framework you’re working with, the FAB compiler generates a fab.zip file that has two components: a server.js file that acts as a server-side entry point, and an _assets directory that stores the HTML, CSS, JS, images, and fonts that are sent to the client.
This simple structure gives us enough flexibility to handle all kinds of apps. For example, a static site will have a server.js of only a few auto-generated lines of server-side code, just enough to add redirects for any files outside the _assets directory. On the other end of the spectrum, an app with full server rendering looks and works exactly the same. It just has a lot more code inside its server.js file.
On a server running NodeJS, serving a compiled FAB is as easy as fab serve fab.zip, but FABs are really designed with production class hosting in mind. They make use of world-class CDNs and the best serverless hosting platforms around.
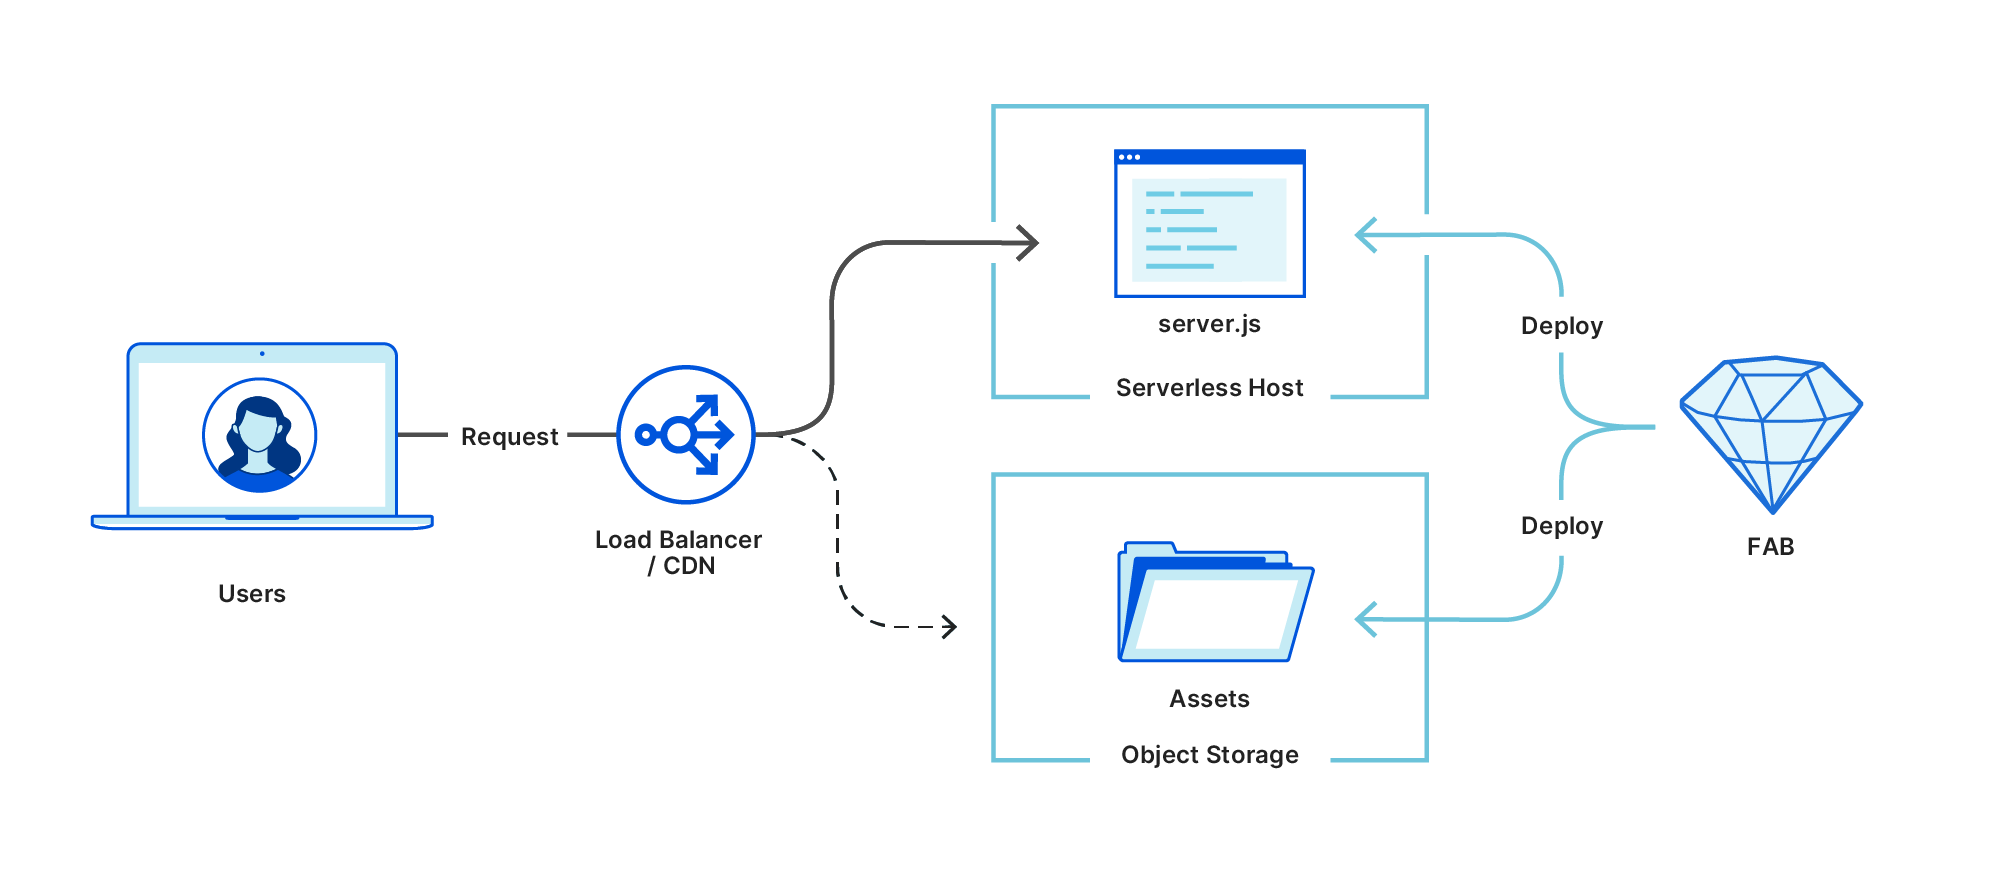
When a FAB is deployed, it’s often split into these component parts and deployed separately. Assets are sent to a low-cost object storage platform with a CDN in front of it, and the server component is sent to dedicated serverless hosting. It’s all deployed in an atomic, idempotent manner that feels as simple as uploading static files, but completely unlocks dynamic server-side code as part of your architecture.
That generic architecture works great and is compatible with virtually every hosting platform around, but it works slightly differently on Cloudflare Workers.
Workers, unlike other serverless platforms, truly runs at the edge: there is no CDN or load balancer in front of it to split off /_assets routes and send them directly to the Assets storage. This means that every request hits the worker, whether it’s triggering a full page render or piping through the bytes for an image file. It might feel like a downside, but with Workers’ performance and cost profile, it’s quite the opposite — it actually gives us much more flexibility in what we end up building, and gets us closer to the goal of fully unlocking server-side code.
To give just one example, we no longer need to store our asset files on a dedicated static file host — instead, we can use Cloudflare’s global key-value storage: Workers KV. Our server.js running inside a Worker can then map /_assets requests directly into the KV store and stream the result to the user. This results in significantly better performance than proxying to a third-party asset host.
What we’ve found is that Cloudflare offered the most “FAB-native” hosting option, and so it’s very exciting to have the opportunity to further develop what they can do.
Linc + Cloudflare
As we stated above, Linc’s goal was to give frontend developers the best tooling to build and refine their apps, regardless of which hosting they were using. But we started to notice an important trend — if a team had a free choice for where to host their frontend, they inevitably chose Cloudflare Workers. In some cases, for a period, teams even used Linc to deploy a FAB to Workers alongside their existing hosting to demonstrate the performance improvement before migrating permanently.
At the same time, we started to see more and more opportunities to fully embrace edge-rendering and make global serverless hosting more powerful and accessible. But the most exciting ideas required deep integration with the hosting providers themselves. Which is why, when we started talking to Cloudflare, everything fell into place.
We’re so excited to join the Cloudflare effort and work on expanding Cloudflare Pages to cover the full spectrum of applications. Not only do they share our goal of bringing sophisticated technology to every development team, but with innovations like Durable Objects starting to offer new storage paradigms, the potential for a truly next-generation deployment, review & hosting platform is tantalisingly close.
Across multiple cultures around the world, this time of year is a time of celebration and sharing of gifts with the people we care the most about. In that spirit, we thought we’d take this time to give back to the developer community that has been so supportive of Cloudflare for the last 10 years.
Today, the path from an idea to a website is paved with good intentions
Websites are the way we express ourselves on the web. It doesn’t matter if you’re a hobbyist with a blog, or the largest of corporations with millions of customers — if you want to reach people outside the confines of 140 280 characters, the web is the place to be.
As a frontend developer, it’s your responsibility to bring this expression to life. And make no mistake — with so many frontend frameworks, tooling, and static site generators at your disposal — it’s a great time to be in your line of work.
That is, of course, right up until the point when you’re ready to show your work off to the world. That’s when things can start to get a little hairy.
At this point, continuing to keep things local rather than committing to source starts to become… irresponsible. But then: how do you quickly iterate and maintain momentum? As you change things, you need to make sure those changes don’t get lost — saving them to source control — while keeping in sync with what’s currently deployed to production.
There are no great solutions.
If you’re in a larger organization, you might have a DevOps organization devoted to exactly that: automating deployments using Continuous Integration (CI) tooling.
Most CI tooling, however, is quite cumbersome, and for good reason — to allow organizations to customize their automation, regardless of their stack and setup. But for the purpose of developing a website, it can still feel like an unnecessary and frustrating diversion on the road to delivering your web project. Configuring a .yaml file, adding and removing commands, waiting minutes for each build to run, and praying to the CI gods at each one that these are the right commands. Hopelessly rerunning the same build over and over, and expecting a different result.
Often, hours are lost. The process stands in the way of you and doing your best work.
Cloudflare Pages: letting frontend devs do what they do best
We think there’s a better way.
With Cloudflare Pages, we set out to simplify every step along the journey by tying deployment to your existing development workflow.
Seamless Git integration, with builds built-in
With Cloudflare Pages, all you have to do is select your repo, and tell us which framework you’re using. We’ll take care of chanting CI incantations on your behalf, while you keep doing what you were already doing: git commit and git push your changes — we’ll build and deploy them for you.
As the project grows, so do the stakes, and the number of collaborators.
For a site in production, changes need to be reviewed thoroughly. As the reviewer, looking at the code, and skimming for red flags only gets you so far. To thoroughly review, you have to commit or git stash your changes, pull down locally, get it running to make sure it actually works — looking at code alone won’t catch everything!
The other developers on the team are not the only stakeholders. There are designers, marketers, PMs who want to provide feedback before the changes go out.
Unique preview URLs
With Cloudflare Pages, each commit gets its own unique URL. Preview URLs make it easier to get meaningful code reviews without the overhead of pulling down the branch. They also make it easier to get feedback from PMs, designers and marketers on the latest iteration, bridging the gap between mocks and code.
Infinite staging
“Does anyone mind if I take over staging?” might also sound like a familiar question. With Cloudflare Pages, each feature branch will have its own dedicated consistent alias, allowing you to have a consistent URL for the latest changes.
With Preview and Production environments, all feature branches and preview links will be built with preview variables, so you can experiment without impacting production data.
When you’re ready to deploy to production, we’ll redeploy to production for you with the updated production environment variables.
Collaboration for all
Collaboration is the key to building amazing websites and products — the more the merrier! As a security company, we definitely don’t want you sharing password and credentials. Which is why we provide multi user access for free for unlimited users — invite all your friends, on us!
Modern sites with modern standards
We all know premature optimization is a cardinal sin, but once your project is in front of customers you want to have the best performance possible. If it’s successful, you also want it to be available!
Today, this is time you have to spend optimizing performance (chasing those 100 lighthouse scores), and scaling, from a few to millions of users.
Luckily, we happen to know a thing or two about running a global network of 200 data centers though, so we’ve got you covered.
With Pages, your site is deployed directly to our edge, milliseconds away from customers, and at global scale.
The latest web standards are fun to read about on Hacker News but not fun to implement yourself. With Cloudflare Pages, we’ll do the heavy lifting to keep you ahead of the curve: IPv6, HTTP/3, TLS 1.3, all the latest image formats.
Oh, and one more thing
We’re really excited for developers and their teams to use Cloudflare Pages to collaborate on the best static sites together. There’s just one thing that didn’t sit quite right with us: why stop at static sites?
What if we could make building full-blown, dynamic applications just as easy?
Although APIs are a core part of the JAMstack, today that refers primarily to the robust API economy developers have access to. And while that’s great, it’s not always enough. If you want to build your own APIs, and store user or application data, you need more than third party APIs. What to do, though?
Well, this is the point at which it’s mighty helpful we’ve already built a global serverless platform: Cloudflare Workers. Workers allows frontend developers to easily write scalable backends to their applications in the same language as the frontend, JavaScript.
Over the coming months, we’ll be working on integrating Workers and Pages into a seamless experience. It’ll work the exact same way Pages does: just write your code, git push, and we’ll deploy it for you. The only difference is, it won’t just be your frontend, it’ll be your backend, too. And just to be clear: this is not just for stateless functions. With Workers KV and Durable Objects, we see a huge opportunity to really enable any web application to be built on this platform.
We’re super excited about the future of Pages, and how with the power of Cloudflare Workers behind it, it represents a bold vision for how new applications are going to be built on the web.
But you know the thing about gifts? They’re no good without someone to receive them. We’d love for you to sign up for our beta and try out Cloudflare Pages!
PS: we’re hiring!
Want to help us shape the future of development on the web? Join our team.
Over the past week, you’ve heard how Cloudflare is making it easy for our customers to control where their data is stored and protected.
We’re not the only ones building these data controls. Around the world, companies are working to figure out where and how to store customer data in a way that is compliant with data localization obligations. For developers, this means new deployment models and new headaches — wrangling infrastructure in multiple regions, partitioning user data based on location, and staying on top of the latest rules from regulators.
Durable Objects, currently in limited beta, already make it easy for customers to manage state on Cloudflare Workers without worrying about provisioning infrastructure. Today, we’re announcing Jurisdictional Restrictions for Durable Objects, which ensure that a Durable Object only stores and processes data in a given geographical region. Jurisdictional Restrictions make it easy for developers to build serverless, stateful applications that not only comply with today’s regulations, but can handle new and updated policies as new regulations are added.
How Jurisdictional Restrictions Work
When creating a Durable Object, developers generate a unique ID that lets a Cloudflare Worker communicate with the Object.
Let’s say I want to create a Durable Object that represents a specific user of my application:
async function handle(request) {
    let objectId = USERS.newUniqueId();
    let user = await USERS.get(objectId);
}
The unique ID encodes metadata for the Workers runtime, including a mapping to a specific Cloudflare data center. That data center is responsible for handling the creation of the Object and maintaining a routing table entry, so that a Worker can communicate with the Object if the Object migrates to another Cloudflare data center.
If the user is an EU data subject, I may want to ensure that the Durable Object that handles their data only stores and processes data inside of the EU. I can do that when I generate their Object ID, which encodes a restriction that this Durable Object can only be handled by a data center in the EU.
async function handle(request) {
    let objectId = USERS.newUniqueId({jurisdiction: "eu"});
    let user = await USERS.get(objectId);
}
There are no servers to spin up and no databases to maintain. Handling a new set of regional restrictions will be as easy as passing a different string at ID generation.
Today, we only support the EU jurisdiction, but we’ll be adding more based on developer demand.
By setting restrictions at a per-object level, it becomes easy to ensure compliance without sacrificing developer productivity. Applications running on Durable Objects just need to identify the jurisdictional rules a given Object should follow and set the corresponding rule at creation time. Gone is the need to run multiple clusters of infrastructure across cloud provider regions to stay compliant — Durable Objects are both globally accessible and capable of partitioning state with no infrastructure overhead.
In the future, we’ll add additional features to Jurisdictional Restrictions — including the ability to migrate your Objects between Jurisdictions to handle changes in regulations.
Under the hood with Durable Object ID generation
Durable Objects support two types of IDs: system-generated, where the system creates a unique ID for you, and user-generated, where a user passes in an identifier to access the Durable Object. You can think of the user-provided identifier as a seed to a hash function that determines the data center the object starts in.
By default with system-generated IDs, we construct the ID so that it maps to a data center near the Worker that generated the ID. This data center is responsible for creating the Object and storing a routing record if that Object migrates.
If the user passes in a Jurisdictional Restriction, we instead encode in the ID a mapping to a jurisdiction, which encodes a list of data centers that adhere to the rules of the Jurisdictional Restriction. We guarantee that the data center we select for creating the Object is in this list and that we will not migrate the Object to a data center that isn’t in this list. In the case of the ‘eu’ jurisdiction, that maps to one of Cloudflare’s data centers in the EU.
For user-generated IDs, though, we cannot encode this data in the ID, since we must use the string the user passed us to generate the ID! This is because requests may originate anywhere in the world, and they need to know where to find an Object without depending on coordination. For now, this means we do not support Jurisdictional Restrictions in combination with user-generated IDs.
Join the Durable Objects limited beta
Durable Objects are currently in an invite-only beta, while we scale up our systems and build out additional features. If you’re interested in using Durable Objects to meet your compliance requirements, reach out to us with your use case!
One of the great arts of software engineering is making updates and improvements to working systems without taking them offline. For some systems this can be rather easy, spin up a new web server or load balancer, redirect traffic and you’re done. For other systems, such as the core distributed data store which keeps millions of websites online, it’s a bit more of a challenge.
Quicksilver is the data store responsible for storing and distributing the billions of KV pairs used to configure the millions of sites and Internet services which use Cloudflare. In a previous post, we discussed why it was built and what it was replacing. Building it, however, was only a small part of the challenge. We needed to deploy it to production into a network which was designed to be fault tolerant and in which downtime was unacceptable.
We needed a way to deploy our new service seamlessly, and to roll back that deploy should something go wrong. Ultimately many, many, things did go wrong, and every bit of failure tolerance put into the system proved to be worth its weight in gold because none of this was visible to customers.
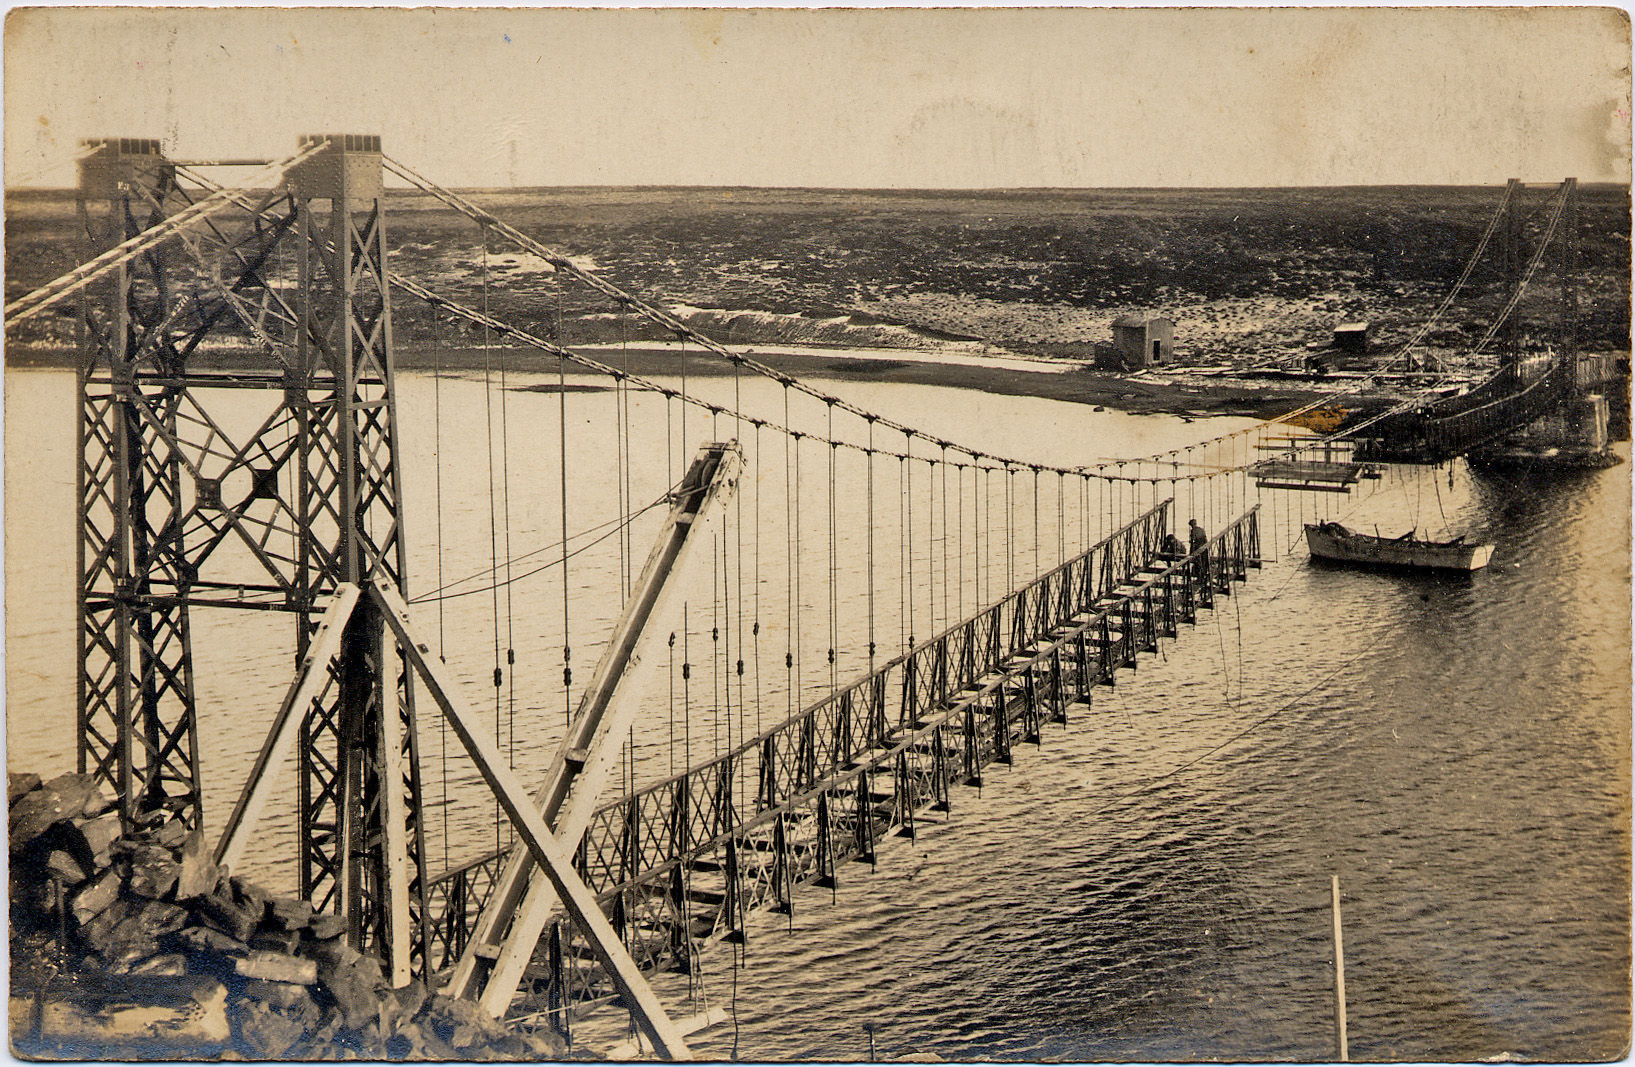
The Bridge
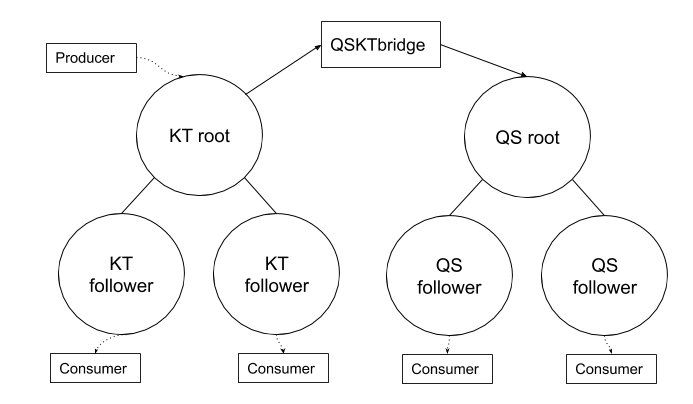
Our goal in deploying Quicksilver was to run it in parallel with our then existing KV distribution tool, Kyoto Tycoon. Once we had evaluated its performance and scalability, we would gradually phase out reads and writes to Kyoto Tycoon, until only Quicksilver was handling production traffic. To make this possible we decided to build a bridge – QSKTBridge.
Our bridge replicated from Kyoto Tycoon, sending write and delete commands to our Quicksilver root node. This bridge service was deployed on Kubernetes within our infrastructure, consumed the Kyoto Tycoon update feed, and wrote the batched changes every 500ms.
In the event of node failure or misconfiguration it was possible for multiple bridge nodes to be live simultaneously. To prevent duplicate entries we included a timestamp with each change. When writing into Quicksilver we used the Compare And Swap command to ensure that only one batch with a given timestamp would ever be written.
First Baby Steps In To Production
Gradually we began to point reads over a loopback interface from the Kyoto Tycoon port to the Quicksilver port. Fortunately we implemented the memcached and the KT HTTP protocol to make it transparent to the many client instances that connect to Kyoto Tycoon and Quicksilver.
We began with DOG, DOG is a virtual data center which serves traffic for Cloudflare employees only. It’s called DOG because we use it for dog-fooding. Testing releases on the dog-fooding data center helps prevent serious issues from ever reaching the rest of the world. Our DOG testing went suspiciously well, so we began to move forward with more of our data centers around the world. Little did we know this rollout would take more than a year!
Replication Saturation
To make life easier for SREs provisioning a new data center, we implemented a bootstrap mechanism that pulls an entire database from a remote server. This was an easy win because our datastore library – LMDB – provides the ability to copy an entire LMDB environment to a file descriptor. Quicksilver simply wrapped this code and sent a specific version of the DB to a network socket using its file descriptor.
When bootstrapping our Quicksilver DBs to more servers, Kyoto Tycoon was still serving production traffic in parallel. As we mentioned in the first blogpost, Kyoto Tycoon has an exclusive write lock that is sensitive to I/O. We were used to the problems this can cause such as write bursts slowing down reads. This time around we found the separate bootstrap process caused issues. It filled the page cache quickly, causing I/O saturation, which impacted all production services reading from Kyoto Tycoon.
There was no easy fix to that, to bootstrap Quicksilver DBs in a datacenter we’d have to wait until it was moved offline for maintenance, which pushed the schedule beyond our initial estimates. Once we had a data center deployment we could finally see metrics of Quicksilver running in the wild. It was important to validate that the performance was healthy before moving on to the next data center. This required coordination with the engineering teams that consume from Quicksilver.
The FL (front line) test candidate
Many requests reaching Cloudflare’s edge are forwarded to a component called FL, which acts as the “brain”. It uses multiple configuration values to decide what to do with the request. It might apply the WAF, pass the request to Workers and so on. FL requires a lot of QS access, so it was the perfect candidate to help validate Quicksilver performance in a real environment.
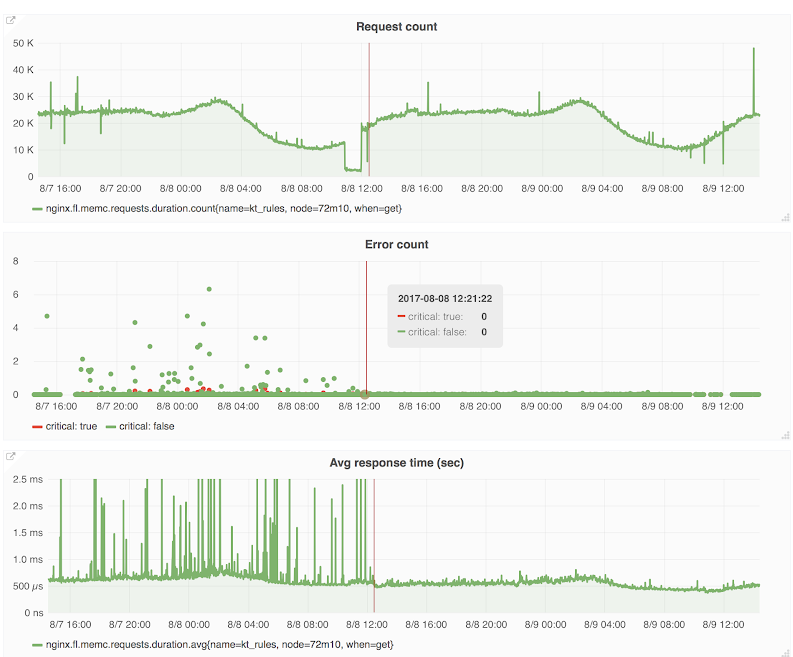
Here are some screenshots showing FL metrics. The vertical red line marks the switchover point, on the left of the line is Kyoto Tycoon, on the right is Quicksilver. The drop immediately before the line is due to the upgrade procedure itself. We saw an immediate and significant improvement in error rates and response time by migrating to Quicksilver.
The middle graph shows the error count. Green dot errors are non-critical errors: the first request to Kyoto Tycoon/Quicksilver failed so FL will try again. The red dot errors are the critical ones, they mean the second request also failed. In that case FL will return an error code to an end user. Both counts decreased substantially.
The bottom graph shows the read latency average from Kyoto Tycoon/Quicksilver. The average drops a lot and is usually around 500 microseconds and no longer reaches 1ms which it used to do quite often with Kyoto Tycoon.
Some readers may notice a few things. First of all, it was said earlier that the consumers were reading through the loopback interface. How come we experience errors there? How come we need 500us to read from Quicksilver?
At that time Cloudflare had some old SSDs and these could sometimes take hundreds of milliseconds to respond and this was affecting the response time from Quicksilver hence triggering read timeout from FL.
That was also obviously increasing the average response time above.
From there, some readers would ask why using averages and not percentiles? This screenshot dates back to 2017 and at that time the tool used for gathering FL metrics did not offer percentiles, only min, max and average.
Also, back then, all consumers were reading through TCP over loopback. Later on we switched to Unix socket.
Finally, we enabled memcached and KT HTTP malformed request detection. It appears that some consumers were sending us bogus requests and not monitoring the value returned properly, so they could not detect any error. We are now alerting on all bogus requests as this should never happen.
Spotting the wood for the trees
Removing Kyoto Tycoon on the edge took around a year. We’d done a lot of work already but rolling Quicksilver out to production services meant the project was just getting started. Thanks to the new metrics we put in place, we learned a lot about how things actually happen in the wild. And this let us come up with some ideas for improvement.
Our biggest surprise was that most of our replication delays were caused by saturated I/O and not network issues. This is something we could not easily see with Kyoto Tycoon. A server experiencing I/O contention could take seconds to write a batch to disk. It slowly became out of sync and then failed to propagate updates fast enough to its own clients, causing them to fall out of sync. The workaround was quite simple, if the latest received transaction log is over 30 seconds old, Quicksilver would disconnect and try the next server in the list of sources.
This was again an issue caused by aging SSDs. When a disk reaches that state it is very likely to be queued for a hardware replacement.
We quickly had to address another weakness in our codebase. A Quicksilver instance which was not currently replicating from a remote server would stop its own replication server, forcing clients to disconnect and reconnect somewhere else. The problem is this behavior has a cascading effect, if an intermediate server disconnects from its server to move somewhere else, it will disconnect all its clients, etc. The problem was compounded by an exponential backoff approach. In some parts of the world our replication topology has six layers, triggering the backoff many times caused significant and unnecessary replication lag. Ultimately the feature was fully removed.
Reads, writes, and sad SSDs
We discovered that we had been underestimating the frequency of I/O errors and their effect on performance. LMDB maps the database file into memory and when the kernel experiences an I/O error while accessing the SSD, it will terminate Quicksilver with a SIGBUS. We could see these in kernel logs. I/O errors are a sign of unhealthy disks and cause us to see spikes in Quicksilver’s read and write latency metrics. They can also cause spikes in the system load average, which affects all running services. When I/O errors occur, a check usually finds such disks are close to their maximum allowed write cycles, and further writes will cause a permanent failure.
Something we didn’t anticipate was LMDB’s interaction with our filesystem, causing high write amplification that increased I/O load and accelerated the wear and tear of our SSDs. For example, when Quicksilver wrote 1 megabyte, 30 megabytes were flushed to disk. This amplification is due to LMDB copy-on-write, writing a 2 byte key-value (KV) pair ends up copying the whole page. That was the price to pay for crashproof storage. We’ve seen amplification factors between 1.5X and 80X. All of this happens before any internal amplification that might happen in an SSD.
We also spotted that some producers kept writing the same KV pair over and over. Although we saw low rates of 50 writes per second, considering the amplification problem above, repetition increased pressure on SSDs. To fix this we just drop identical KV writes on the root node.
Where does a server replicate from?
Each small data center replicates from multiple bigger sites and these replicate from our two core data centers. To decide which data centers to use, we talk to the Network team, get an answer and hardcode the topology in Salt, the same place we configure all our infrastructure.
Each replication node is identified using IP addresses in our Salt configuration. This is quite a rigid way of doing things, wouldn’t DNS be easier? The interesting thing is that Quicksilver is a source of DNS for customers and Cloudflare infrastructure. We do not want Quicksilver to become dependent on itself, that could lead to problems.
While this somewhat rigid way of configuring topology works fine, as Cloudflare continues to scale there is room for improvement. Configuring Salt can be tricky and changes need to be thoroughly tested to avoid breaking things. It would be nicer for us to have a way to build the topology more dynamically, allowing us to more easily respond to any changes in network details and provision new data centers. That is something we are working on.
Removing Kyoto Tycoon from the Edge
Migrating services away from Kyoto Tycoon requires identifying them. There were some obvious candidates like FL and DNS which play a big part in day-to-day Cloudflare activity and do a lot of reads. But the tricky part to completely removing Kyoto Tycoon is in finding all the services that use it.
We informed engineering teams of our migration work but that was not enough. Some consumers get less attention because they were done during a research activity, or they run as part of a team’s side project. We added some logging code into Kyoto Tycoon so we could see who exactly was connecting and reached out directly to them. That’s a good way to catch the consumers that are permanently connected or connect often. However, some consumers only connect rarely and briefly, for example at startup time to load some configuration. So this takes time.
We also spotted some special cases that used exotic setups like using stunnel to read from the memcached interface remotely. That might have been a “quick-win” back in the day but its technical debt that has to be paid off; we now strictly enforce the methods that consumers use to access Quicksilver.
The migration activity was steady and methodical and it took a few months. We deployed Quicksilver per group of data centers and instance by instance, removing Kyoto Tycoon only when we deemed it ready. We needed to support two sets of configuration and alerting in parallel. That’s not ideal but it gave us confidence and ensured that customers were not disrupted. The only thing they might have noticed is the performance improvement!
Quicksilver, Core side, welcome to the mouth of technical debt madness
Once the edge migration was complete, it was time to take care of the core data centers. We just dealt with 200+ data centers so doing two should be easy right? Well no, the edge side of Quicksilver uses the reading interface, the core side is the writing interface so it is a totally different kind of job. Removing Kyoto Tycoon from the core was harder than the edge.
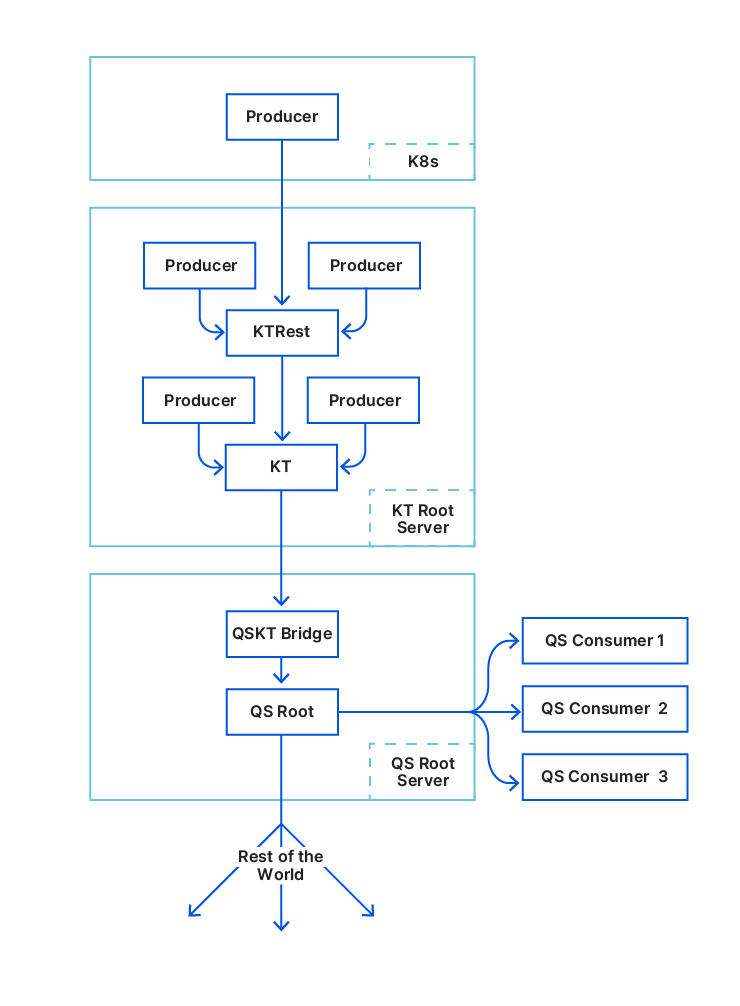
Many Kyoto Tycoon components were all running on a single physical server – the Kyoto Tycoon root node. This single point of failure had become a growing risk over the years. It had been responsible for incidents, for example it once completely disappeared due to faulty hardware. In that emergency we had to start all services on a backup server. The move to Quicksilver was a great opportunity to remove the Kyoto Tycoon root node server. This was a daunting task and almost all the engineering teams across the company got involved.
Note: Cloudflare’s migration from Marathon to Kubernetes was happening in parallel to this task so each time we refer to Kubernetes it is likely that the job was started on Marathon before being migrated later on.
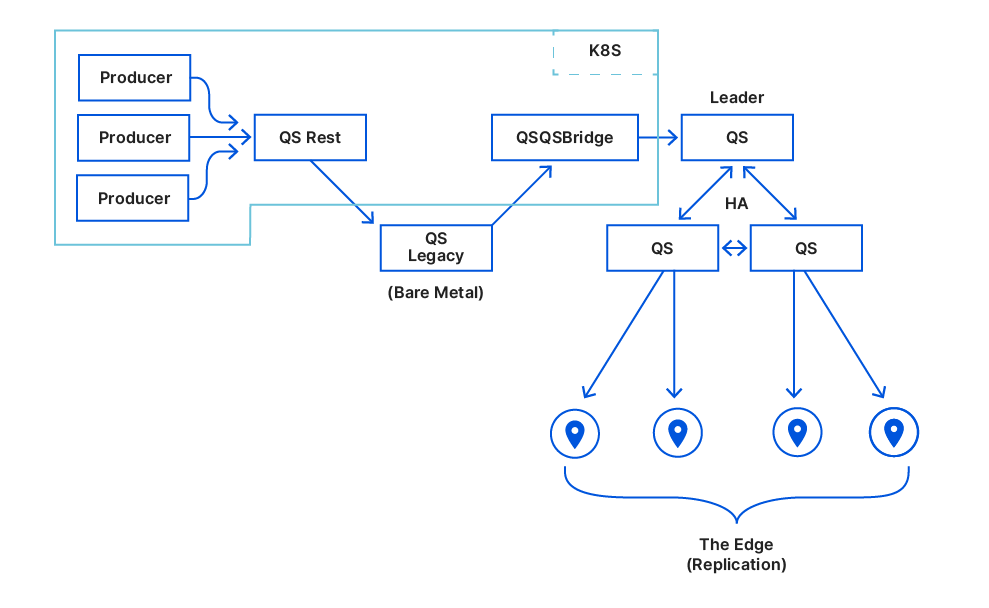
The diagram above shows how all components below interact with each other.
From KTrest to QSrest
KTrest is a stateless service providing a REST interface for writing and deleting KV pairs from Kyoto Tycoon. Its only purpose is to enforce access control (ACL) so engineering teams do not experience accidental keyspace overlap. Of course, sometimes keyspaces are shared on purpose but it is not the norm.
The Quicksilver team took ownership of KTrest and migrated it from the root server to Kubernetes. We asked all teams to move their KTrest producers to Kubernetes as well. This went smoothly and did not require code changes in the services.
Our goal was to move people to Quicksilver, so we built QSrest, a KTrest compatible service for Quicksilver. Remember the problem about disk load? The QSKTBridge was in charge of batching: aggregating 500ms of updates before flushing to Quicksilver, to help our SSDs cope with our sync frequency. If we moved people to QSrest, it needed to support batching too. So it does. We used QSrest as an opportunity to implement write quotas. Once a quota is reached, all further writes from the same producer would be slowed down until the quota goes back to normal.
We found that not all teams actually used KTrest. Many teams were still writing directly to Kyoto Tycoon. One reason for this is that they were sending large range read requests in order to read thousands of keys in one shot – a feature that KTrest did not provide. People might ask why we would allow reads on a write interface. This is an unfortunate historical artefact and we wanted to put things right. Large range requests would hurt Quicksilver (we learned this from our experience with the bootstrap mechanism) so we added a cluster of servers which would serve these range requests: the Quicksilver consumer nodes. We asked the teams to switch their writes to KTrest and their reads to Quicksilver consumers.
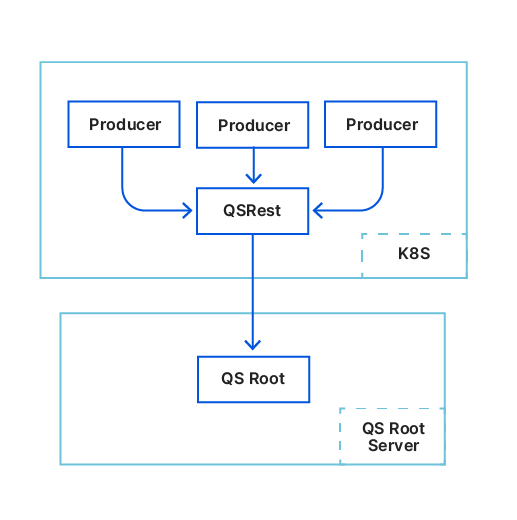
Once the migration of the producers out of the root node was complete, we asked teams to start switching from KTrest to QSrest. Once the move was started, moving back would be really hard: our Kyoto Tycoon and Quicksilver DB were now inconsistent. We had to move over 50 producers, owned by teams in different time zones. So we did it one after another while carefully babysitting our servers to spot any early warning which could end up in an incident.
Once we were all done, we then started to look at Kyoto Tycoon transaction logs: is there something still writing to it? We found an obsolete heartbeat mechanism which was shut down.
Finally, Kyoto Tycoon root processes were turned off to never be turned on again.
Removing Kyoto Tycoon from all over Cloudflare ended up taking four years.
No hardware single point of failure
We have made great progress, Kyoto Tycoon is no longer among us, we smoothly moved all Cloudflare services to Quicksilver, our new KV store. And things now look more like this.
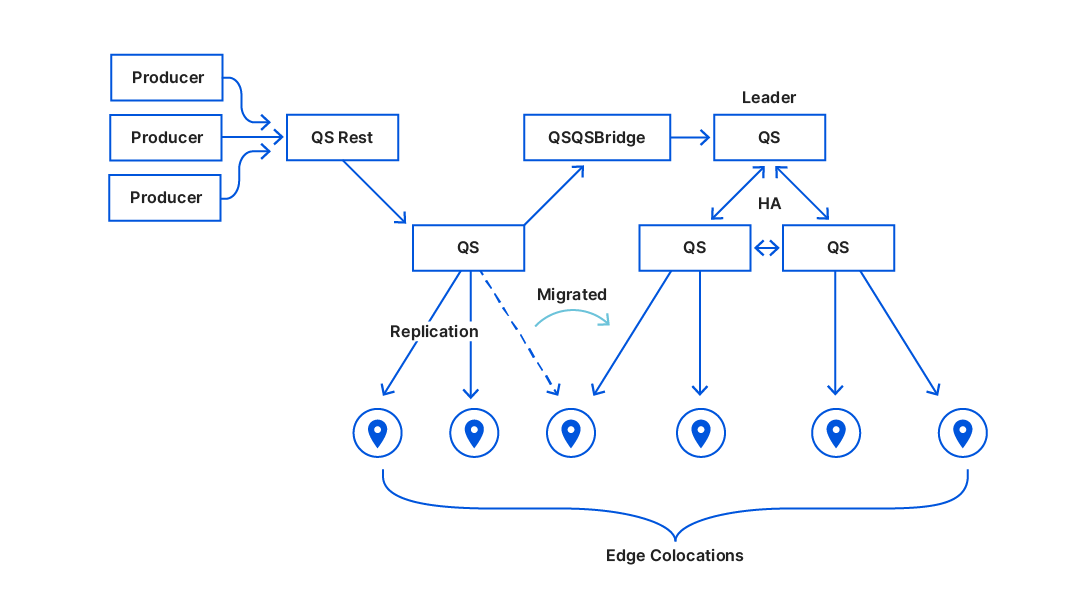
The job is still far from done though. The Quicksilver root server was still a single point of failure, so we decided to build Quicksilver Raft – a Raft-enabled root cluster using the etcd Raft package. It was harder than I originally thought. Adding Raft into Quicksilver required proper synchronization between the Raft snapshot and the current Quicksilver DB. Sometimes there are situations where Quicksilver needs to fall back to asynchronous replication to catch up before doing proper Raft synchronous writes. Getting all of this to work required deep changes in our code base, which also proved to be hard to build proper unit and integration tests. But removing single points of failure is worth it.
Introducing QSQSBridge
We like to test our components in an environment very close to production before releasing it. How do we test the core side/writer interface of Quicksilver then? Well the days of Kyoto Tycoon, we used to have a second Quicksilver root node feeding from Kyoto Tycoon through the KTQSbridge. In turn, some very small data centers were being fed from that root node. When Kyoto Tycoon was removed we lost that capability, limiting our testing. So we built QSQSbridge, which replicates from a Quicksilver instance and writes to a Quicksilver root node.
Removing the Quicksilver legacy top-main
With Quicksilver Raft and QSQSbridge in place, we tested three small data centers replicating from the test Raft cluster over the course of weeks. We then wanted to promote the high availability (HA) cluster and make the whole world replicate from it. In the same way we did for Kyoto Tycoon removal, we wanted to be able to roll back at any time if things go wrong.
Ultimately we reworked the QSQSbridge so that it builds compatible transaction logs with the feeding root node. That way, we started to move groups of data centers underneath the Raft cluster and we could, at any time, move them back to the legacy lop-main.
We started with this:
We moved our 10 QSrest instances one after another from the legacy root node to write against the HA cluster. We did this slowly without any significant issue and we were finally able to turn off the legacy top-main.This is what we ended up with:
And that was it, Quicksilver was running in the wild without a hardware single point of failure.
First signs of obsolescence
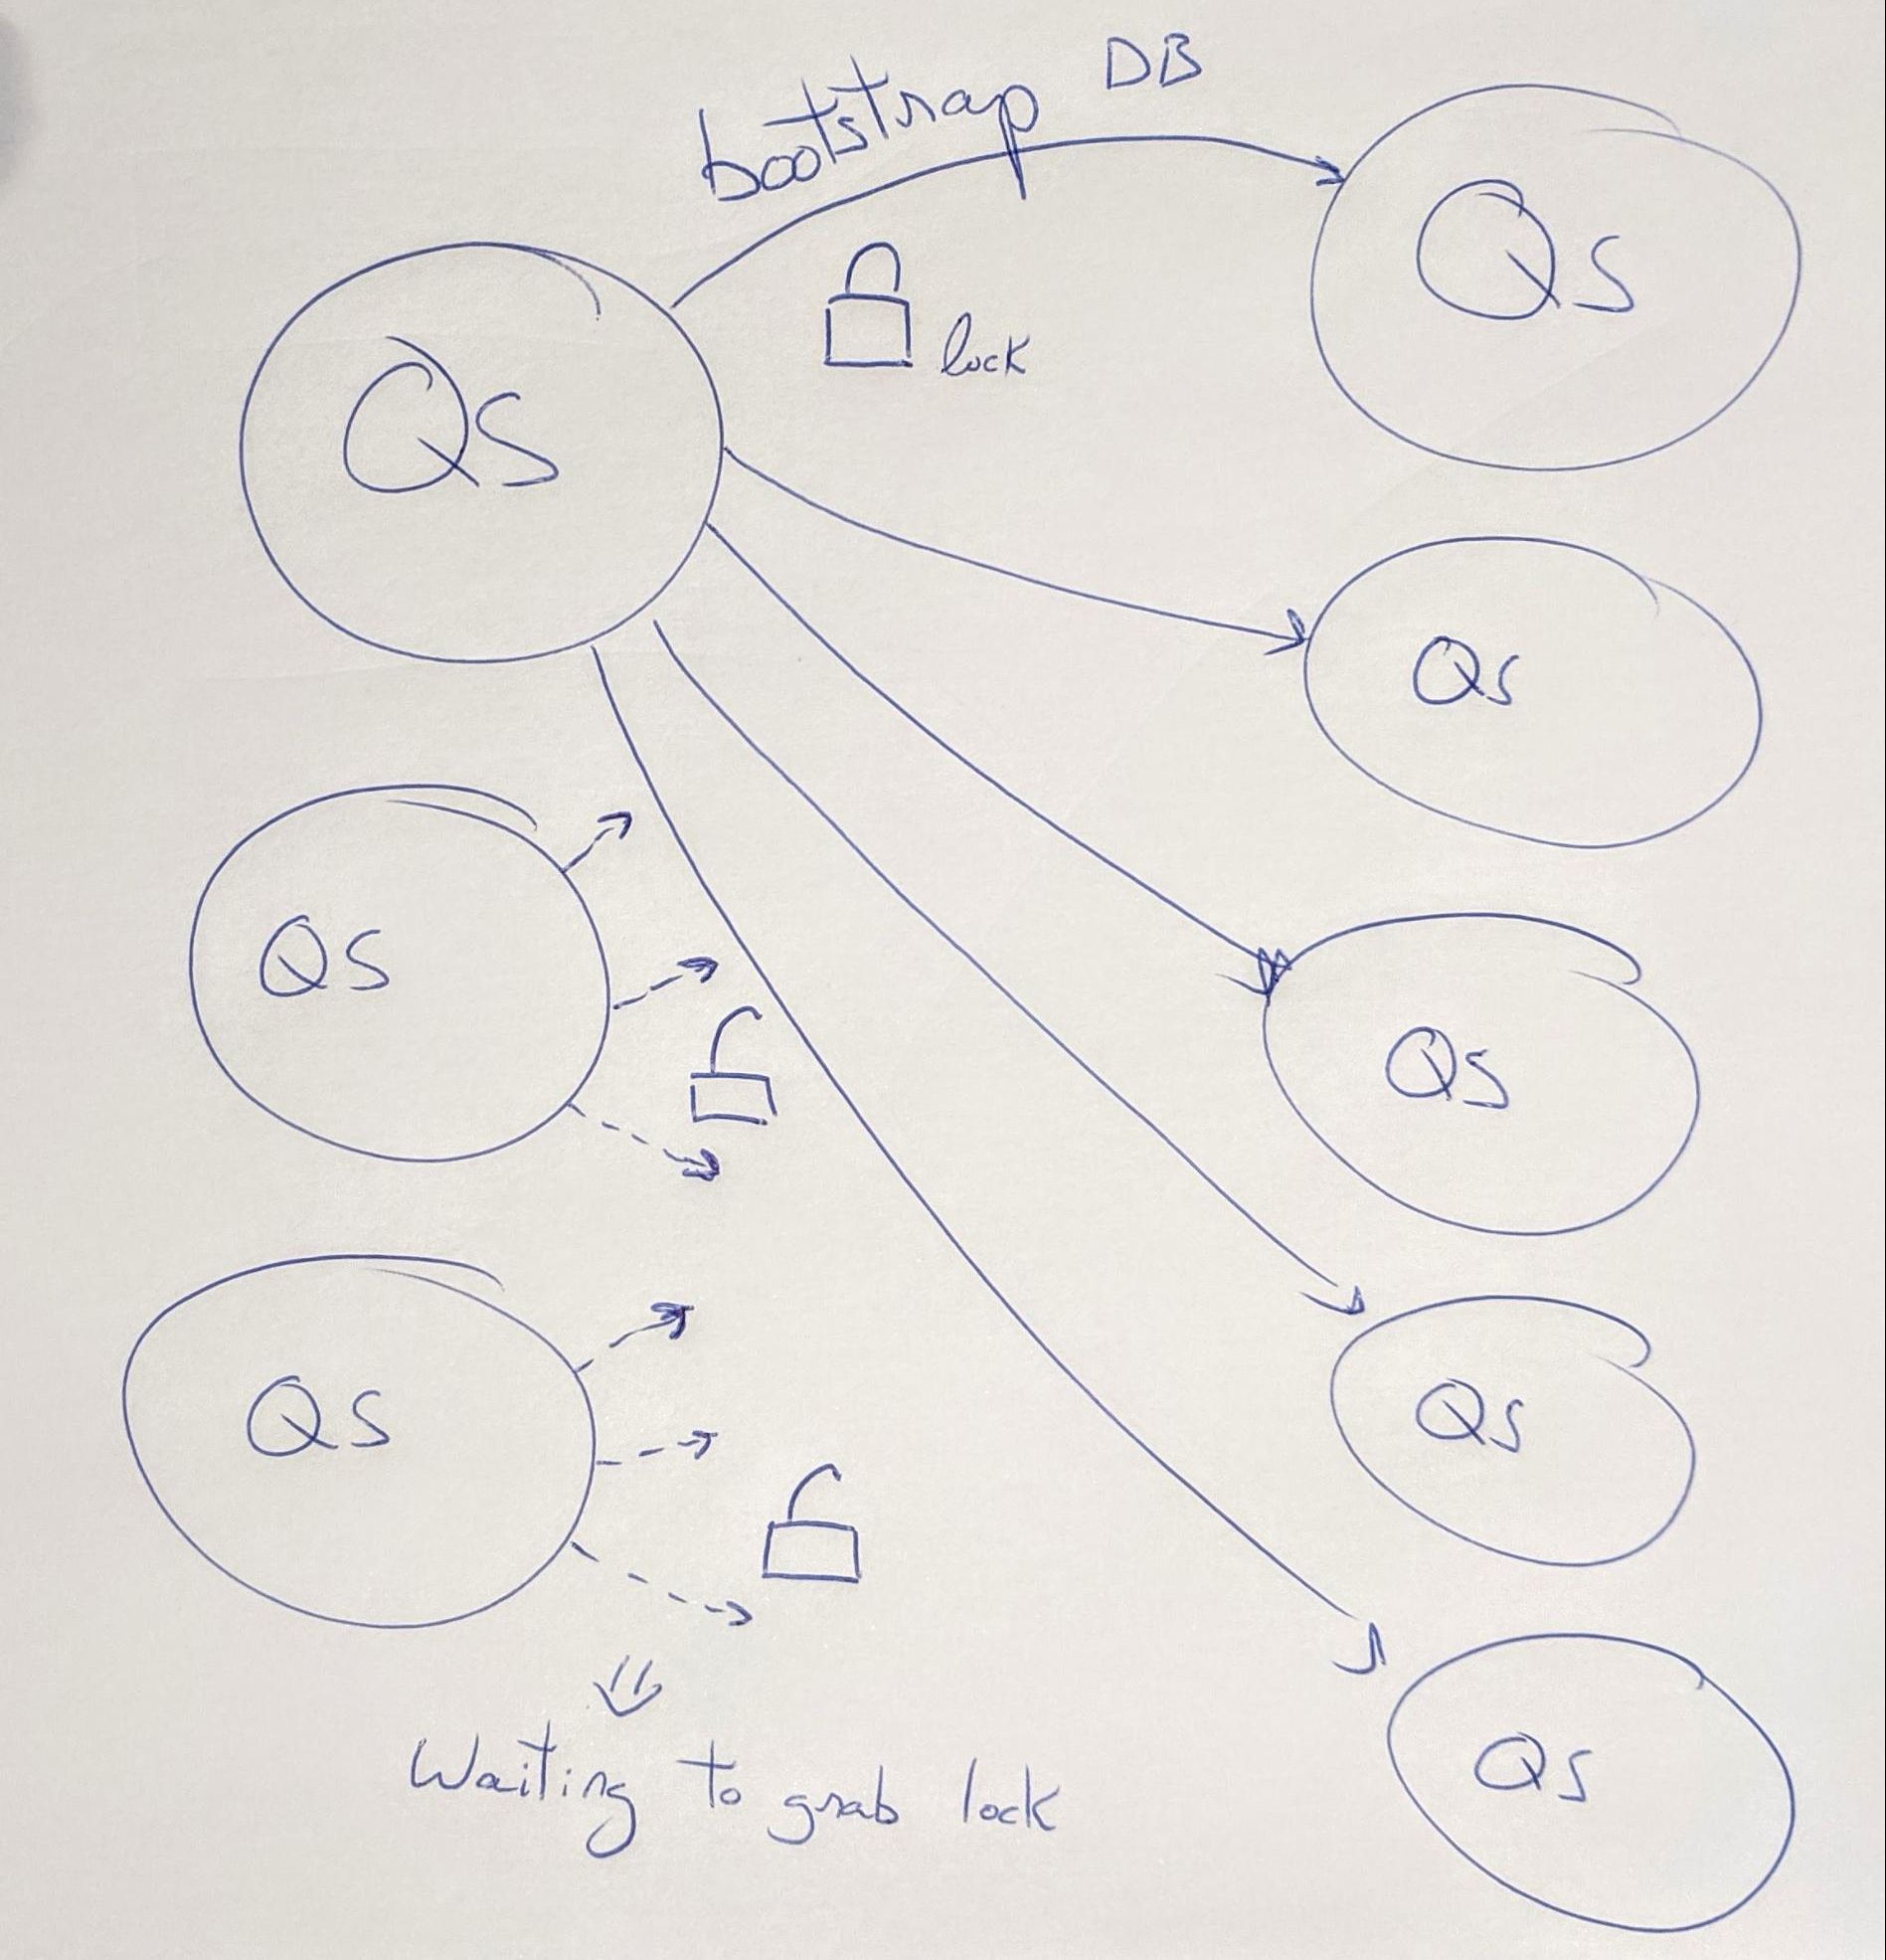
The Quicksilver bootstrap mechanism we built to make SRE life better worked by pulling a full copy of a database but it had pains. When bootstrapping begins, a long lived read transaction is opened on the server, it must keep the DB version requested intact while also applying new log entries. This causes two problems. First, if the read is interrupted by something like a network glitch the read transaction is closed and the version of the DB is not available anymore. The entire process has to start from scratch. Secondly, it causes fragmentation in the source DB, which requires somebody to go and compact it.
For the first six months, the databases were fairly small and everything worked fine. However, as our databases continued to grow, these two problems came to fruition. Longer transfers are at risk of network glitches and the problem compounds, especially for more remote data centers. Longer transfers mean more fragmentation and more time compacting it. Bootstrapping was becoming a pain.
One day an SRE reported than manually bootstrapping instances one after another was much faster than bootstrapping all together in parallel. We investigated and saw that when all Quicksilver instances were bootstrapping at the same time the kernel and SSD were overwhelmed swapping pages. There was page cache contention caused by the ratio of the combined size of the DBs vs. available physical memory.
The workaround was to serialize bootstrapping across instances. We did this by implementing a lock between Quicksilver processes, a client grabs the lock to bootstrap and gives it back once done, ready for the next client. The lock moves around in round robin fashion forever.
Unfortunately, we hit another page cache thrashing issue. We know that LMDB mostly does random I/O but we turned on readahead to load as much DB as possible into memory. But again as our DBs grew, the readahead started evicting useful pages. So we improved the performance by… disabling it.
Our biggest issue by far though is more fundamental: disk space and wear and tear! Each and every server in Cloudflare stores the same data. So a piece of data one megabyte in size consumes at least 10 gigabytes globally. To accommodate continued growth you can add more disks, replace dying disks, and use bigger disks. That’s not a very sustainable solution. It became clear that the Quicksilver design we came up with five years ago was becoming obsolete and needed a rethink. We approach that problem both in the short term and long term.
The long and short of it
In the long term we are now working on a sharded version of Quicksilver. This will avoid storing all data on all machines but guarantee the entire dataset is in each data center.
In the shorter term we have addressed our storage size problems with a few approaches.
Many engineering teams did not even know how many bytes of Quicksilver they used. Some might have had an impression that storage is free. We built a service named “QSusage” which uses the QSrest ACL to match KV with their owner and computes the total disk space used per producer, including Quicksilver metadata. This service allows teams to better understand their usage and pace of growth.
We also built a service name “QSanalytics” to help answer the question “How do I know which of my KV pairs are never used?”. It gathers all keys being accessed all over Cloudflare, aggregates these and pushes these into a ClickHouse cluster and we store these information over a 30 days rolling window. There’s no sampling here, we keep track of all read access. We can easily report back to engineering teams responsible for unused keys, they can consider if these can be deleted or must be kept.
Some of our issues are caused by the storage engine LMDB. So we started to look around and got quickly interested in RocksDB. It provides built in compression, online defragmentation and other features like prefix deduplication.
We ran some tests using representative Quicksilver data and they seemed to show that RocksDB could store the same data in 40% of the space compared to LMDB. Read latency was a little bit higher in some cases but nothing too serious. CPU usage was also higher, using around 150% of CPU time compared to LMDBs 70%. Write amplification appeared to be much lower, giving some relief to our SSD and the opportunity to ingest more data.
We decided to switch to RocksDB to help sustain our growing product and customer bases. In a follow-up blog we’ll do a deeper dive into performance comparisons and explain how we managed to switch the entire business without impacting customers at all.
Conclusion
Migrating from Kyoto Tycoon to Quicksilver was no mean feat. It required company-wide collaboration, time and patience to smoothly roll out a new system without impacting customers. We’ve removed single points of failure and improved the performance of database access, which helps to deliver a better experience.
In the process of moving to Quicksilver we learned a lot. Issues that were unknown at design time were surfaced by running software and services at scale. Furthermore, as the customer and product base grows and their requirements change, we’ve got new insight into what our KV store needs to do in the future. Quicksilver gives us a solid technical platform to do this.
Route many different local services through many different URLs, with only one cloudflared
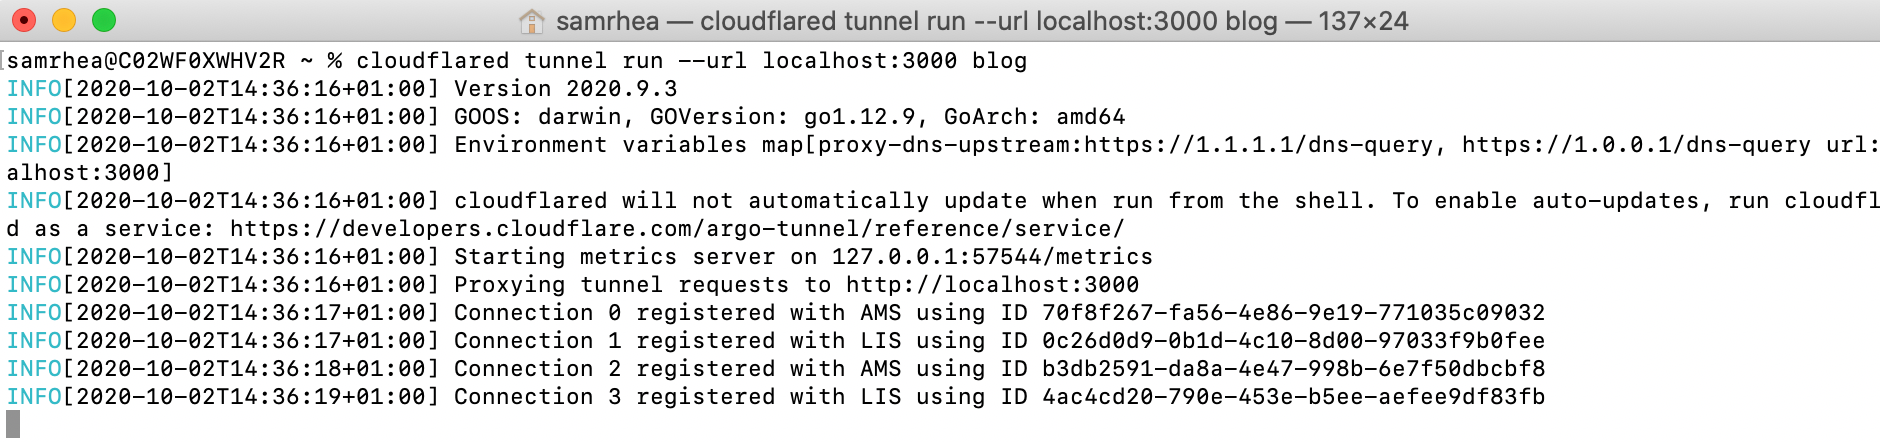
I work on the Argo Tunnel team, and we make a program called cloudflared, which lets you securely expose your web service to the Internet while ensuring that all its traffic goes through Cloudflare.
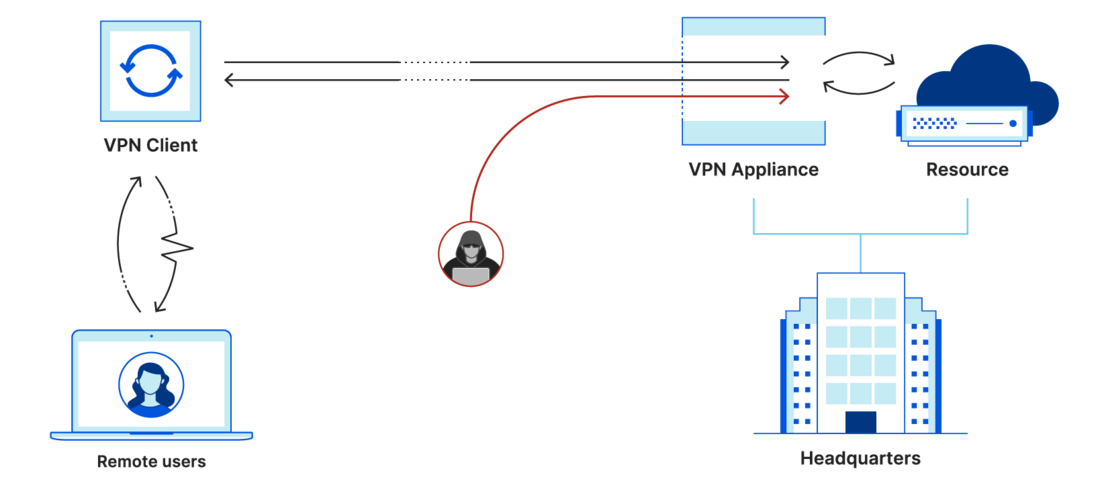
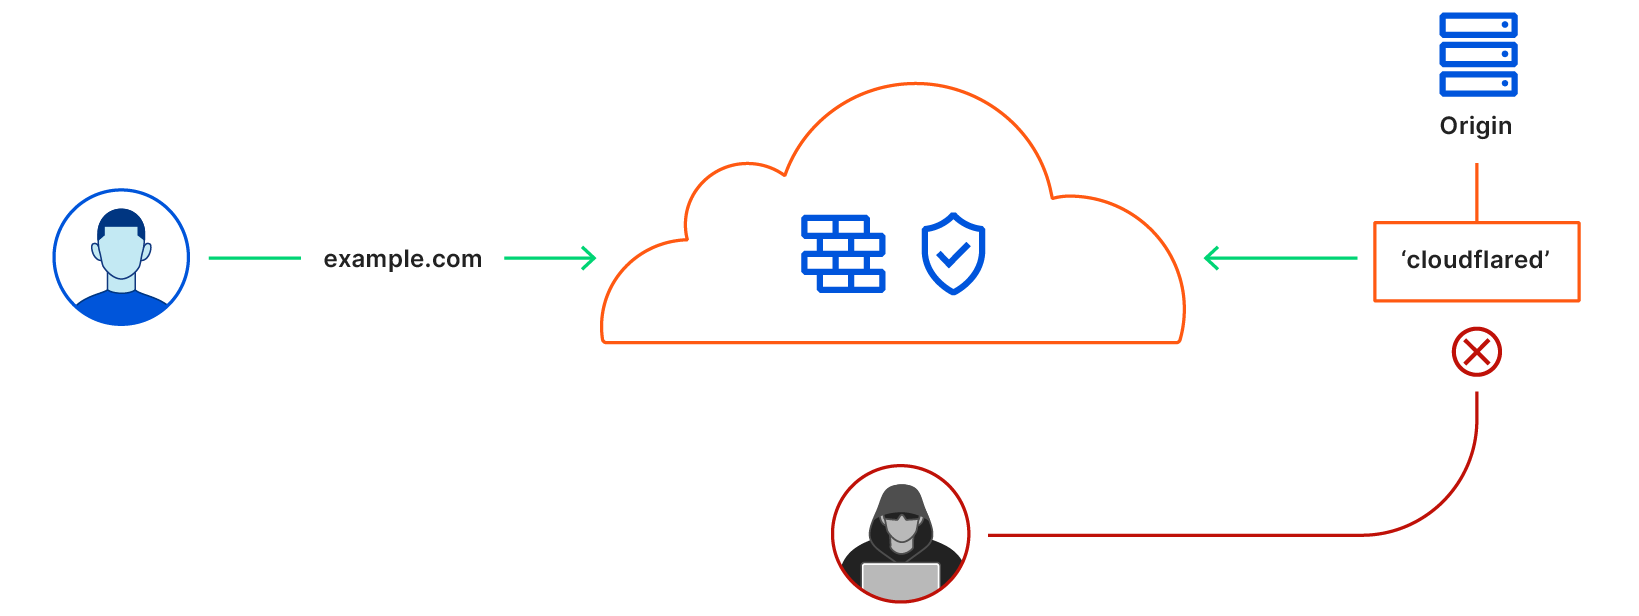
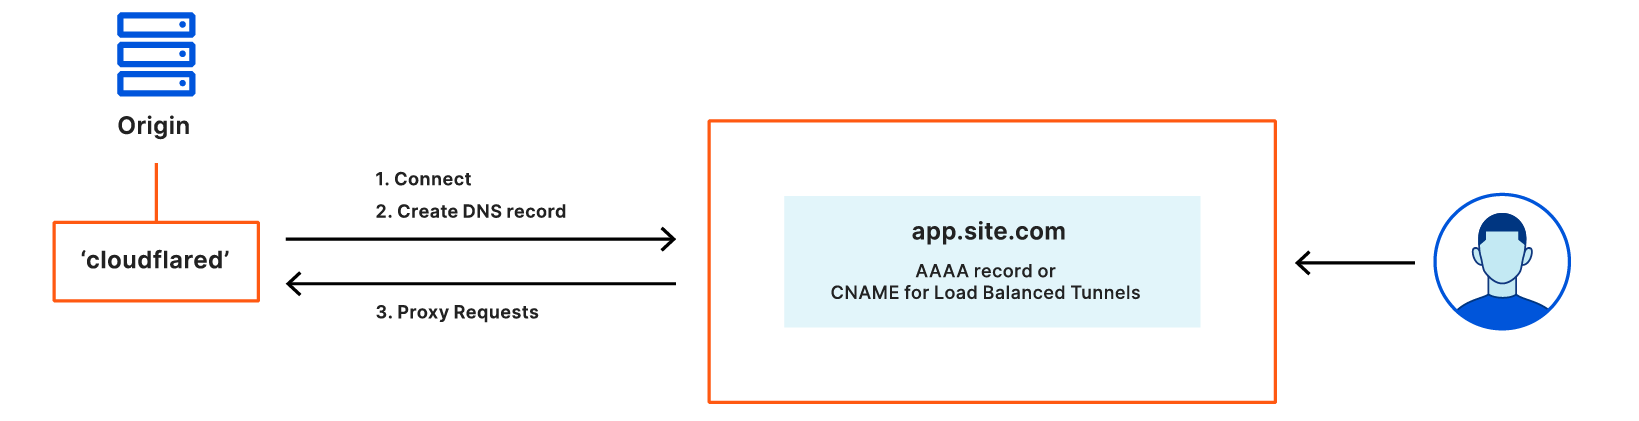
Say you have some local service (a website, an API, a TCP server, etc), and you want to securely expose it to the internet using Argo Tunnel. First, you run cloudflared, which establishes some long-lived TCP connections to the Cloudflare edge. Then, when Cloudflare receives a request for your chosen hostname, it proxies the request through those connections to cloudflared, which in turn proxies the request to your local service. This means anyone accessing your service has to go through Cloudflare, and Cloudflare can do caching, rewrite parts of the page, block attackers, or build Zero Trust rules to control who can reach your application (e.g. users with a @corp.com email). Previously, companies had to use VPNs or firewalls to achieve this, but Argo Tunnel aims to be more flexible, more secure, and more scalable than the alternatives.
Some of our larger customers have deployed hundreds of services with Argo Tunnel, but they’re consistently experiencing a pain point with these larger deployments. Each instance of cloudflared can only proxy a single service. This means if you want to put, say, 100 services on the internet, you’ll need 100 instances of cloudflaredrunning on your server. This is inefficient (because you’re using 100x as many system resources) and, even worse, it’s a pain to manage 100 long-lived services!
Today, we’re thrilled to announce our most-requested feature: you can now expose unlimited services using one cloudflared. Any customer can start using this today, at no extra cost, using the Named Tunnels we released a few months ago.
Named Tunnels
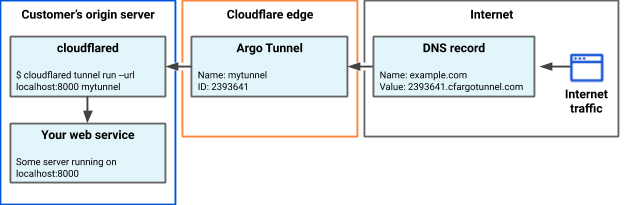
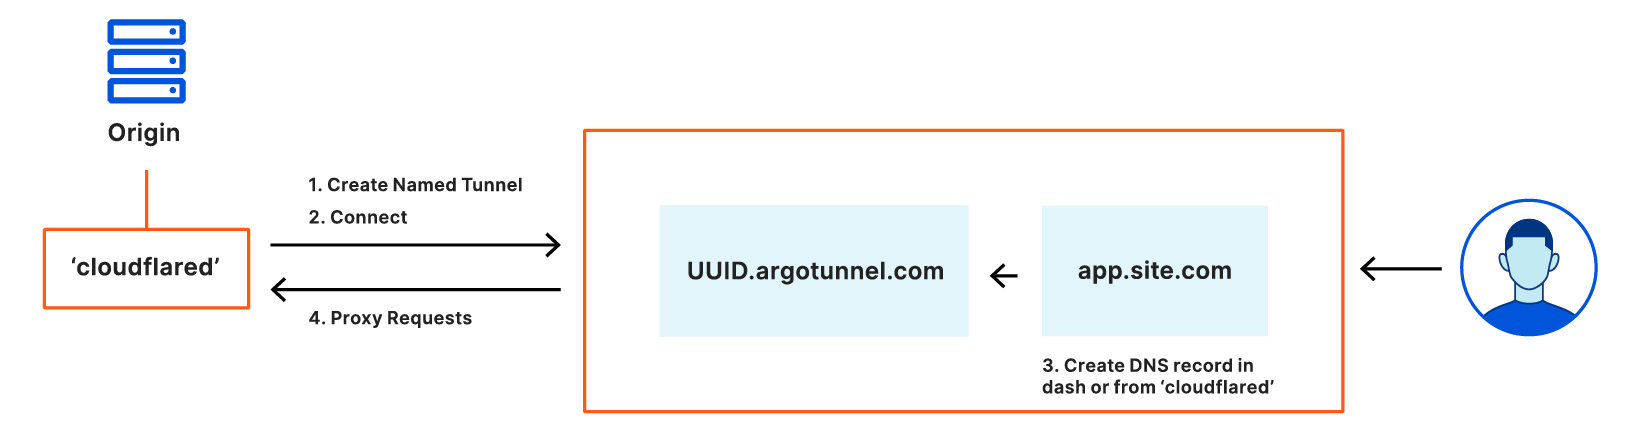
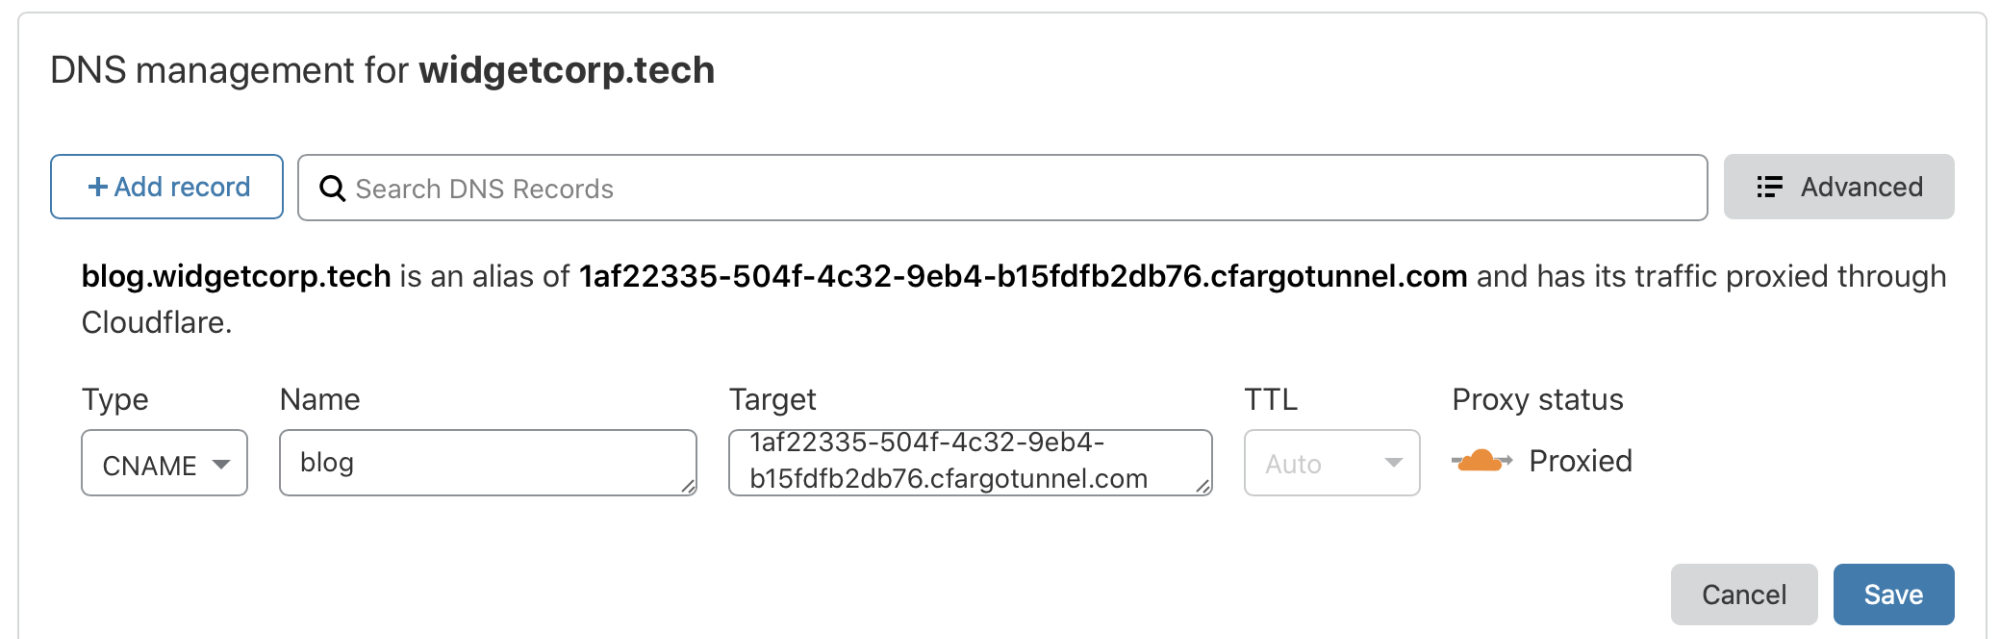
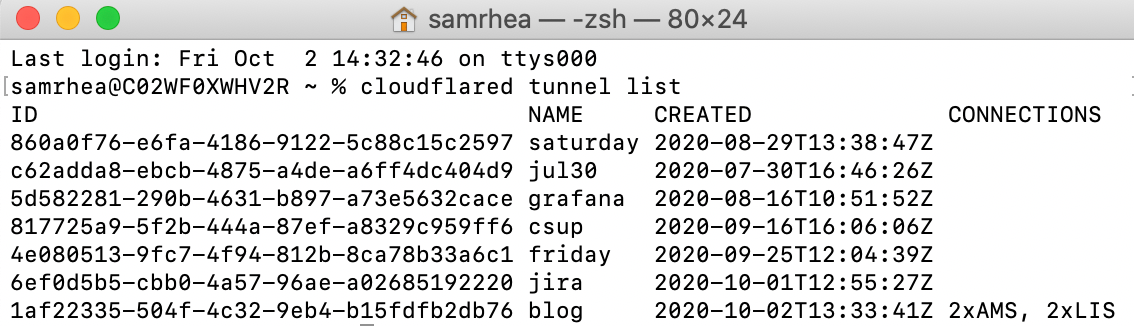
Earlier this year, we announced Named Tunnels—tunnels with immutables ID that you can run and stop as you please. You can route traffic into the tunnel by adding a DNS or Cloudflare Load Balancer record, and you can route traffic from the tunnel into your local services by running cloudflared.
You can create a tunnel by running $ cloudflared tunnel create my_tunnel_name. Once you’ve got a tunnel, you can use DNS records or Cloudflare Load Balancers to route traffic into the tunnel. Once traffic is routed into the tunnel, you can use our new ingress rules to map traffic to local services.
Map traffic with ingress rules
An ingress rule basically says “send traffic for this internet URL to this local service.” When you invoke cloudflared it’ll read these ingress rules from the configuration file. You write ingress rules under the ingresskey of your config file, like this:
$ cat ~/cloudflared_config.yaml

tunnel: my_tunnel_name
credentials-file: .cloudflared/e0000000-e650-4190-0000-19c97abb503b.json
ingress:
 # Rules map traffic from a hostname to a local service:
 - hostname: example.com
   service: https://localhost:8000
 # Rules can match the request's path to a regular expression:
 - hostname: static.example.com
   path: /images/*\.(jpg|png|gif)
   service: https://machine1.local:3000
 # Rules can match the request's hostname to a wildcard character:
 - hostname: "*.ssh.foo.com"
   service: ssh://localhost:2222
 # You can map traffic to the built-in “Hello World” test server:
 - hostname: foo.com
   service: hello_world
 # This “catch-all” rule doesn’t have a hostname/path, so it matches everything
 - service: http_status:404
This example maps traffic to three different local services. But cloudflaredcan map traffic to more than just addresses: it can respond with a given HTTP status (as in the last rule) or with the built-in Hello World test server (as in the second-last rule). See the docs for a full list of supported services.
You can match traffic using the hostname, a path regex, or both. If you don’t use any filters, the ingress rule will match everything (so if you have DNS records from different zones routing into the tunnel, the rule will match all their URLs). Traffic is matched to rules from top to bottom, so in this example, the last rule will match anything that wasn’t matched by an earlier rule. We actually require the last rule to match everything; otherwise, cloudflaredcould receive a request and not know what to respond with.
Testing your rules
To make sure all your rules are valid, you can run
$ cat ~/cloudflared_config_invalid.yaml

ingress:
 - hostname: example.com
   service: https://localhost:8000

$ cloudflared tunnel ingress validate
Validating rules from /usr/local/etc/cloudflared/config.yml
Validation failed: The last ingress rule must match all URLs (i.e. it should not have a hostname or path filter)
This will check that all your ingress rules use valid regexes and map to valid services, and it’ll ensure that your last rule (and only your last rule) matches all traffic. To make sure your ingress rules do what you expect them to do, you can run
$ cloudflared tunnel ingress rule https://static.example.com/images/dog.gif
Using rules from ~/cloudflared_config.yaml
Matched rule #2
        Hostname: static.example.com
        path: /images/*\.(jpg|png|gif)
This will check which rule matches the given URL, almost like a dry run for the ingress rules (no tunnels are run and no requests are actually sent). It’s helpful for making sure you’re routing the right URLs to the right services!
Per-rule configuration
Whenever cloudflaredgets a request from the internet, it proxies that request to the matching local service on your origin. Different services might need different configurations for this request; for example, you might want to tweak the timeout or HTTP headers for a certain origin. You can set a default configuration for all your local services, and then override it for specific ones, e.g.
ingress:
  # Set configuration for all services
  originRequest:
    connectTimeout: 30s
 # This service inherits all the default (root-level) configuration
 - hostname: example.com
   service: https://localhost:8000
 # This service overrides the default configuration
 - service: https://localhost:8001
   originRequest:
     connectTimeout: 10s
     disableChunkedEncoding: true
For a full list of configuration options, check out the docs.
What’s next?
We really hope this makes Argo Tunnel an even easier way to deploy services onto the Internet. If you have any questions, file an issue on our GitHub. Happy developing!
Bots — both good and bad — are everywhere on the Internet. Roughly 40% of Internet traffic is automated. Fortunately, Cloudflare offers a tool that can detect and block unwanted bots: we call it Bot Management. This is the most recent platform in our long history of detecting bots for our customers. In fact, Cloudflare has always offered some form of bot detection. Over the past two years, our team has focused on building advanced detection engines, innovating as bots become more sophisticated, and creating new features.
Today, we are releasing Bot Analytics to help you visualize your automated traffic.
Background
It’s worth including some background for those who are new to bots.
Many websites expect human behavior. When I shop online, I behave as anyone else would: I might search for a few items, read reviews when I find something interesting, and eventually complete an order. This is expected. It is a standard use of the Internet.
Unfortunately, without protection these sites can be ripe for exploitation. Those shoes I was looking at? They are limited edition sneakers that resell for five times the price. Sneaker hoarders clamor at the chance to buy a pair (or fifty). Or perhaps I just added a book to my cart: there are probably hundreds of online retailers that sell the same book, each one eager to offer the best price. These retailers desperately want to know what their competitors’ prices are.
You can see where this is going. While most humans make good use of the Internet, some use automated tools to perform abuse at scale. For example, attackers will deplete sneaker inventories by using automated bots to check out quickly. By the time humans click “add to cart,” bots have already paid for shipping. Humans hardly stand a chance. Similarly, online retailers keep track of their competitors with “price scraping” bots that collect pricing information. So when one retailer lowers a book price to $10, another retailer’s bot will respond by pricing at $9.99. This is how we end up with weird prices like $12.32 for toilet paper. Worst of all, malicious bots are incentivized to hide their identities. They’re hidden among us.
Not all bots are bad. Cloudflare maintains a list of verified good bots that we keep separated from the rest. Verified bots are usually transparent about who they are: DuckDuckGo, for example, publicly lists the IP addresses it uses for its search engine. This is a well-intentioned service that happens to be automated, so we verified it. We also verify bots for error monitoring and other tools.
Enter: Bot Analytics
As discussed earlier, we built a Bot Management platform that intelligently detects bots on the Internet, allowing our customers to block bad ones and allow good ones. If you’re curious about how our solution works, read here.
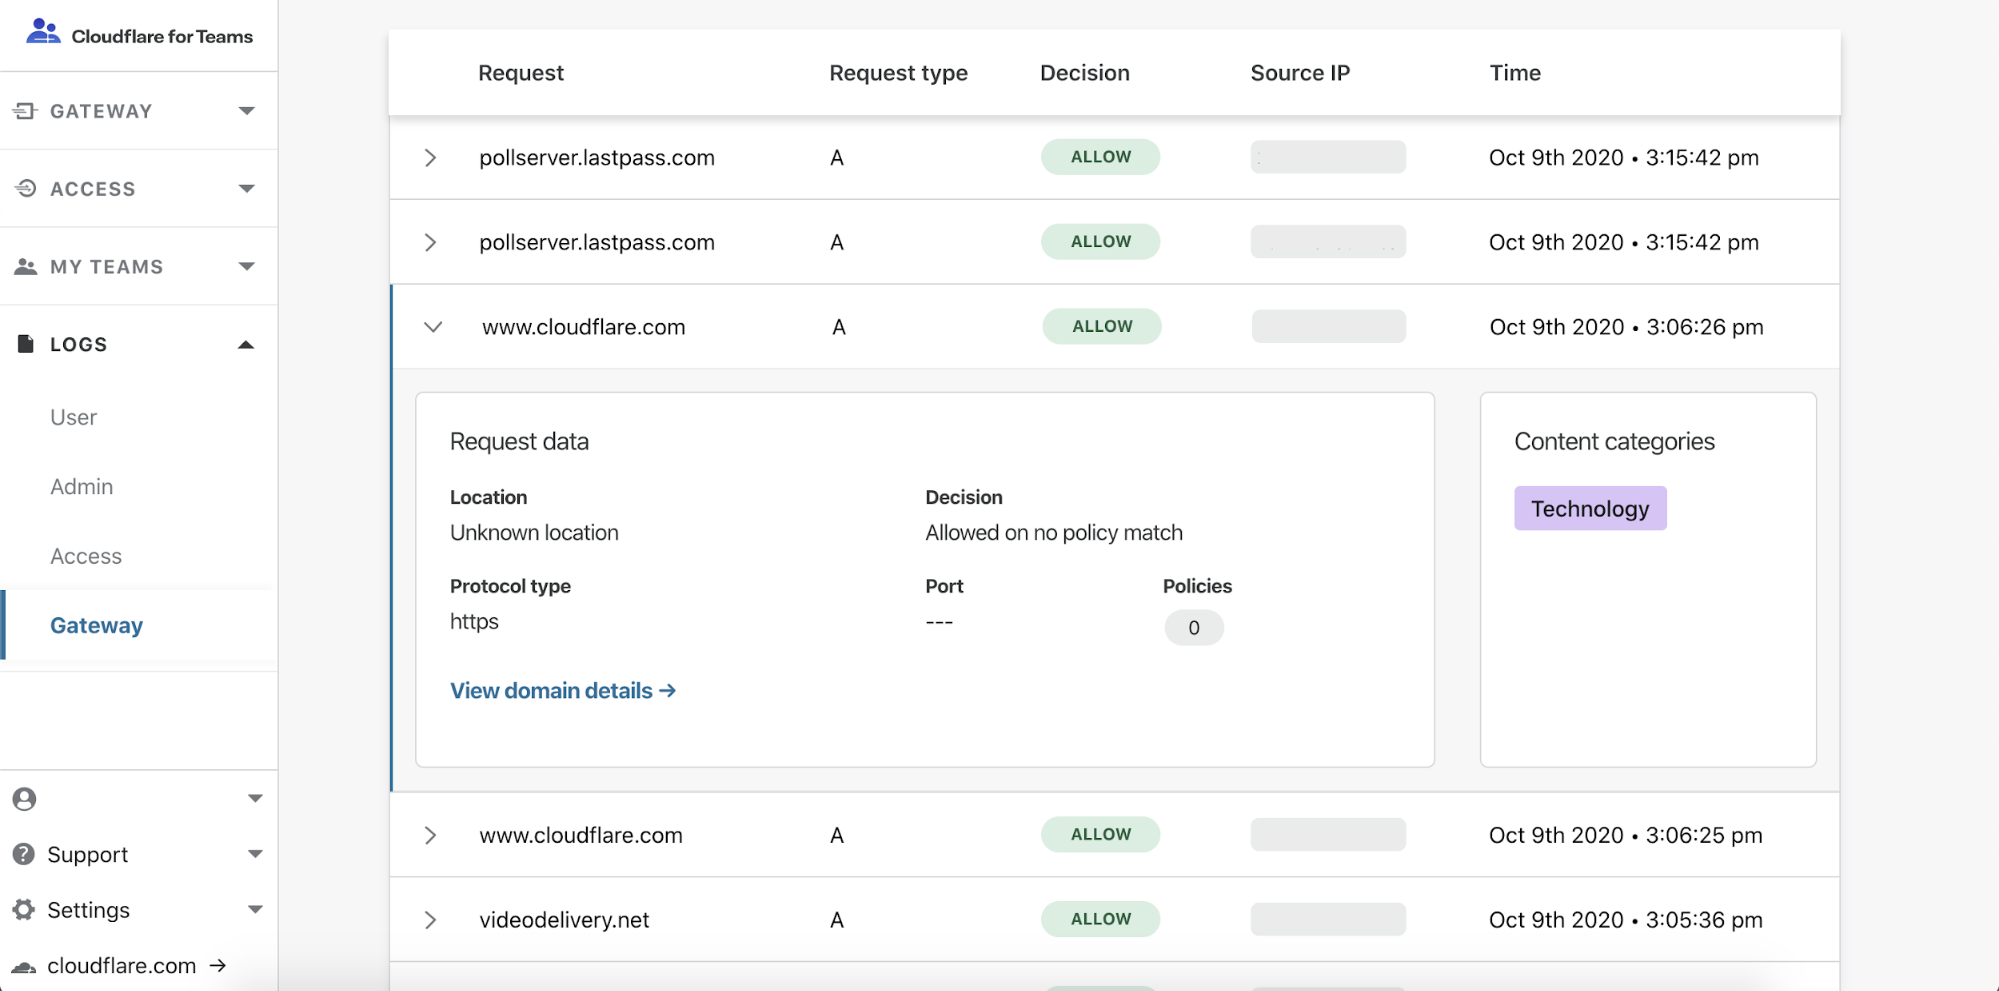
Beginning today, we are going to show you the bots that reach your website. You can see these bots with a new tool called Bot Analytics. It’s fast, accurate, and loaded with information. You can query data up to one month in the past with no noticeable lag. To accomplish this, we exposed the data with GraphQL and paired it with adaptive bitrate (ABR) technology to dynamically load content. If you already have Bot Management added to your Cloudflare account, Bot Analytics is included in your service. Open up your dashboard and let’s take a tour…
The Tour
First: where to go? Bot Analytics lives under the Firewall tab of the dashboard. Once you’re in the Firewall, go to “Overview” and click the second thumbnail on the left. Remember, Bot Management must be added to your account for full access to analytics.
It’s worth noting that Enterprise sites without Bot Management can see a snapshot of their bot traffic. This data is updated in real time and should help you determine if you have a bot problem. Generally speaking, if you have a double-digit percentage of automated traffic, you might be spending more on origin costs than you have to. More importantly, you might be losing revenue or sensitive information to inventory hoarding and credential stuffing.
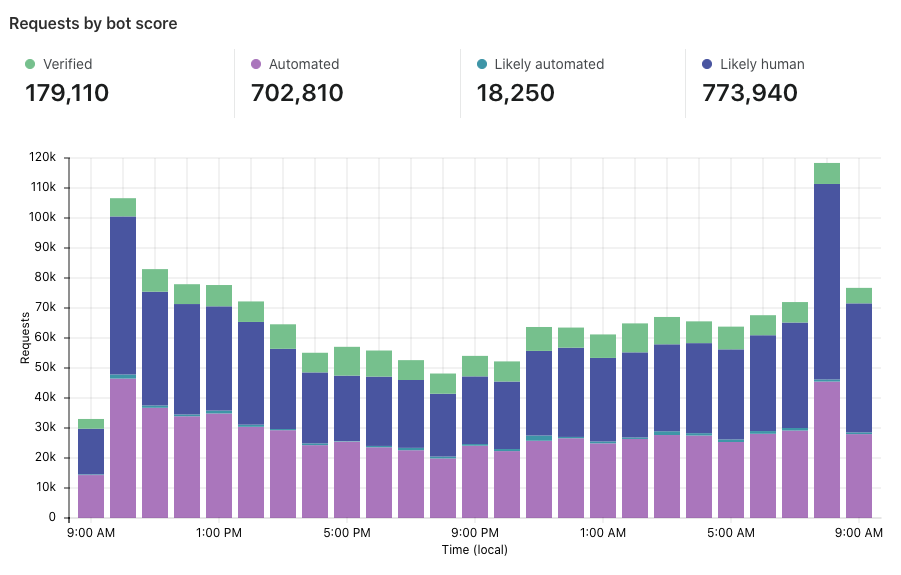
“Requests by bot score” is the first section on the page. Here, we show traffic over time, but we split it vertically by the traffic type. Green segments represent verified bots, while shades of purple and blue show varying degrees of bot/human likelihood.
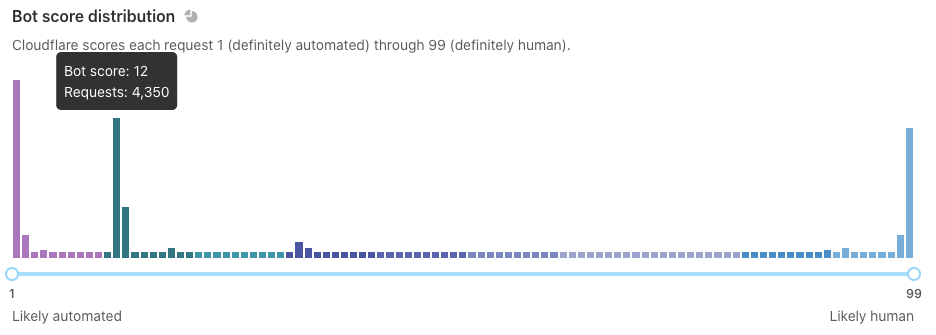
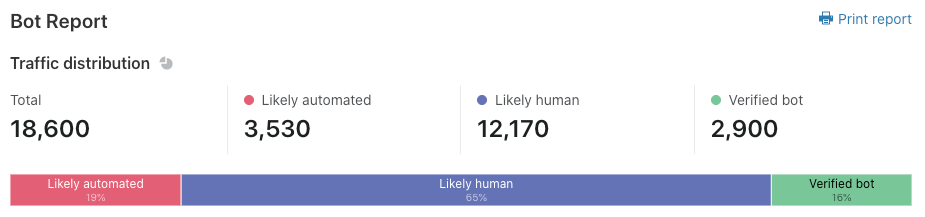
“Bot score distribution” is next. This shows similar data, but we display it horizontally without the notion of time. Use the slider below to filter on subsets of traffic and watch the rest of the page adapt.
We recommend that you use the slider to find your ideal bot threshold. In other words: what is the cutoff for suspicious traffic on your site? We generally consider traffic below 30 to be automated, but customers might choose to challenge traffic below 40 or block traffic below 10 (you can even do both!). You should set a threshold that is ambitious but not too aggressive. If your traffic looks like the example below, consider setting a threshold at a “drop off” point like 3 or 14. Why? Notice that the request density is very high near scores 1-2 and 12-13. Many of these requests will have similar characteristics, meaning that the scores immediately above them (3 and 14) offer some differentiating quality. These are the most promising places to segment your bot rules. Notably, not every graph is this pronounced.
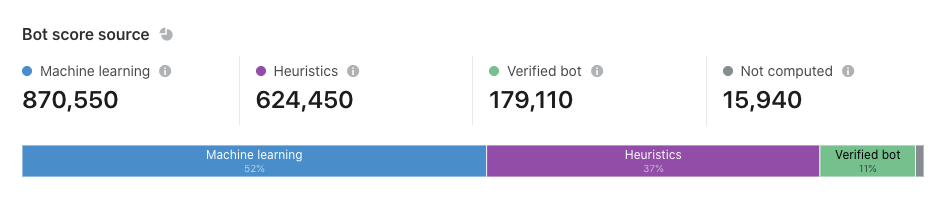
“Bot score source” sits lower on the page. Here, you can examine the detection engines that are responsible for scoring your traffic. If you can’t remember the purpose of each engine, simply hover over the tooltip to view a brief description. Customers may wonder why some requests are flagged as “not computed.” This commonly occurs when Cloudflare has issued an error page on your behalf. Perhaps a visitor’s request was met with a gateway timeout (error 504), in which case Cloudflare responded with a branded error page. The error page would not have warranted a challenge or a block, so we did not spend time calculating a bot score. We published another blog post that provides an overview of the most common sources, including machine learning and heuristics.
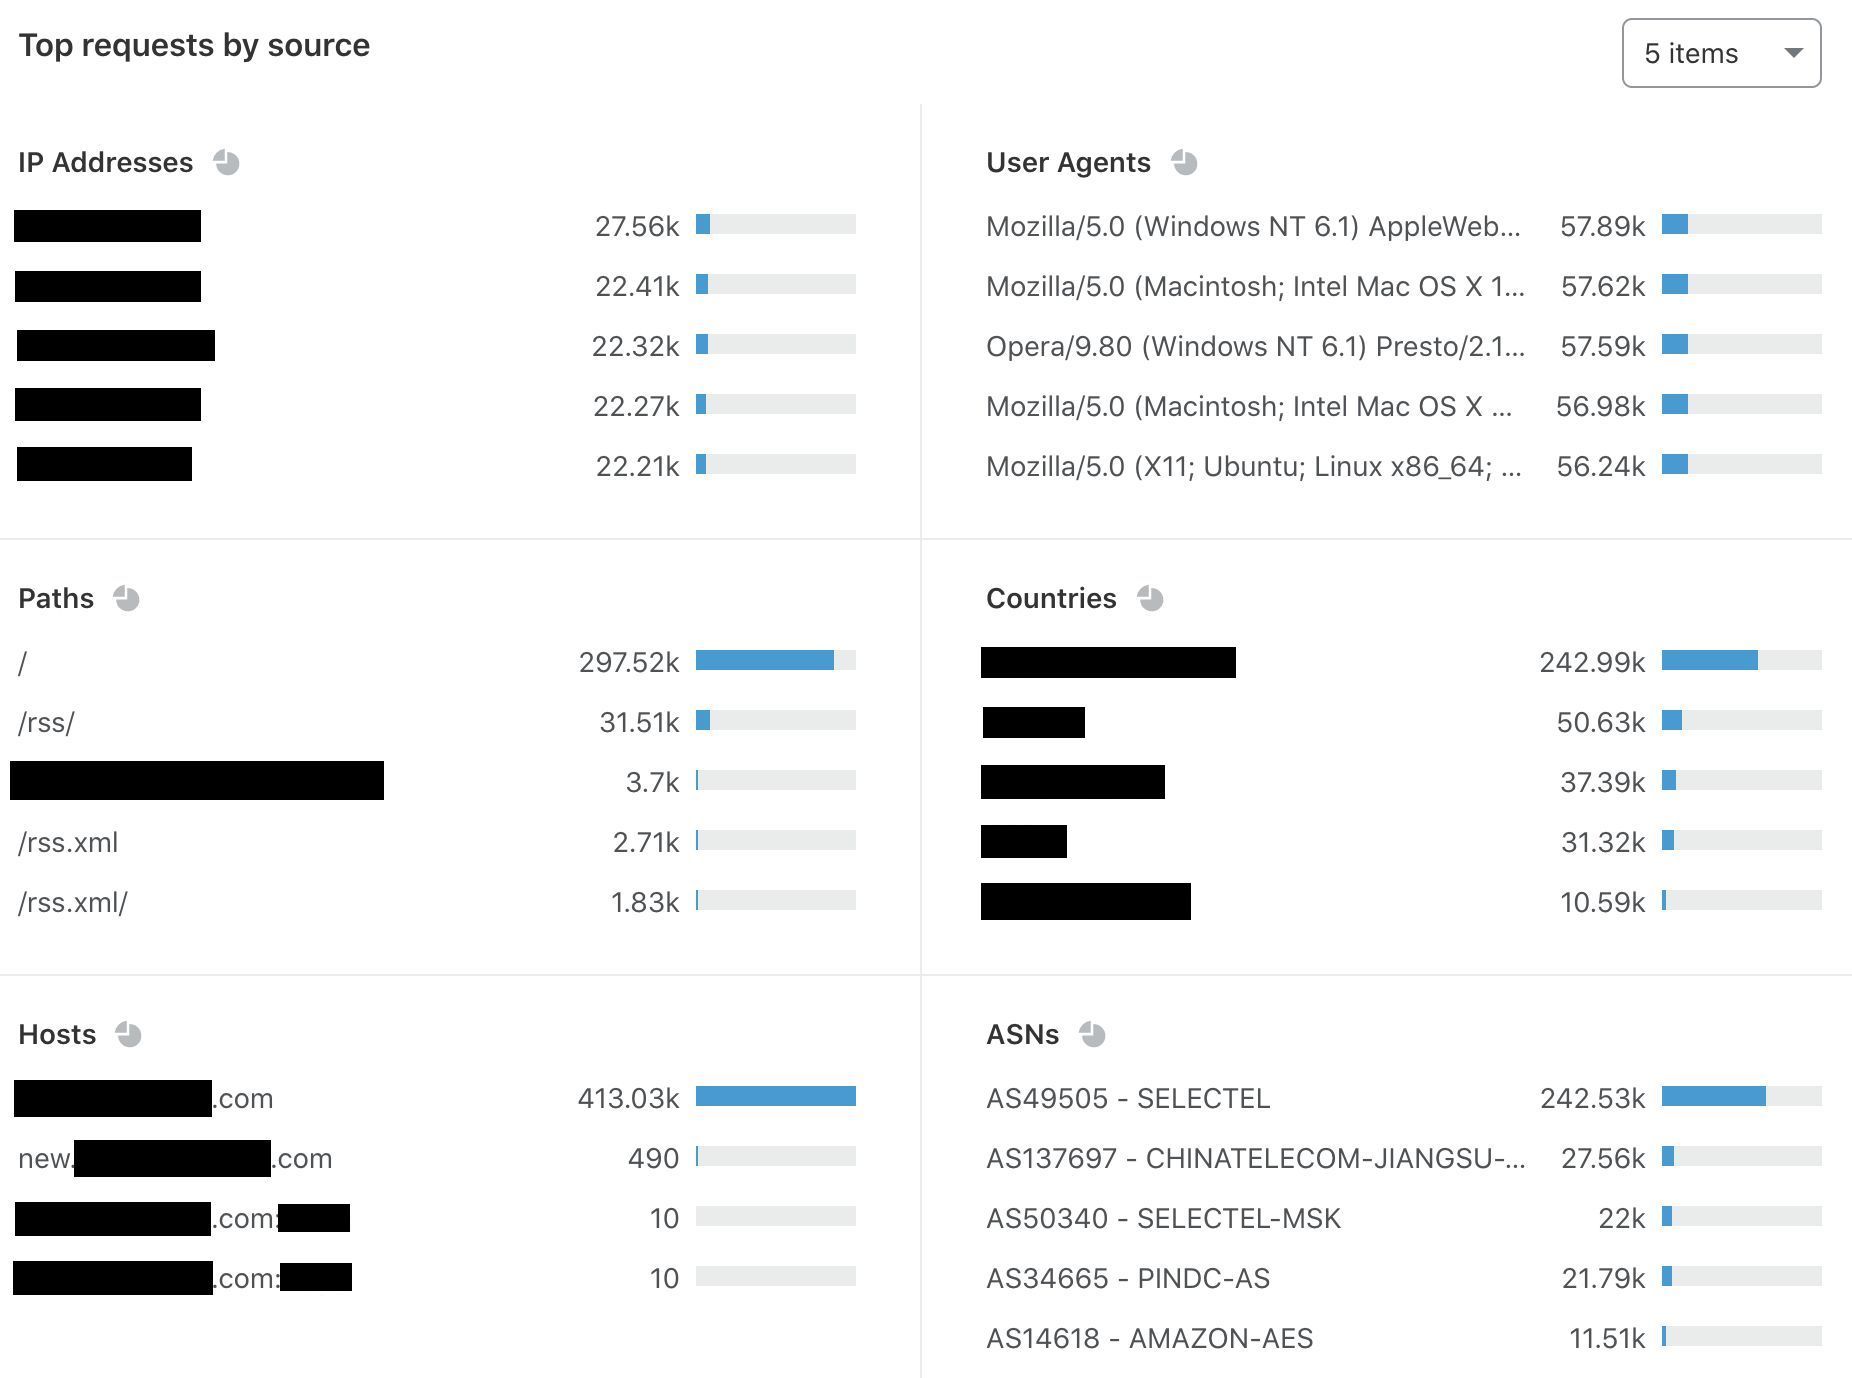
“Top requests by source” is the final section of Bot Analytics. Although it’s not quite as colorful as the sections above, this section grounds Bot Analytics in highly specific data. You can filter or exclude request attributes, including IP addresses, user agents, and ASNs. In the next section, we’ll use this to spot a bot attack.
Let’s Spot A Bot Attack!
First, I’m going to use the “bot score source” tool to select the most obvious bot requests — those detected by our heuristics engine. This provides us with the following information, some of which has been redacted for privacy reasons:
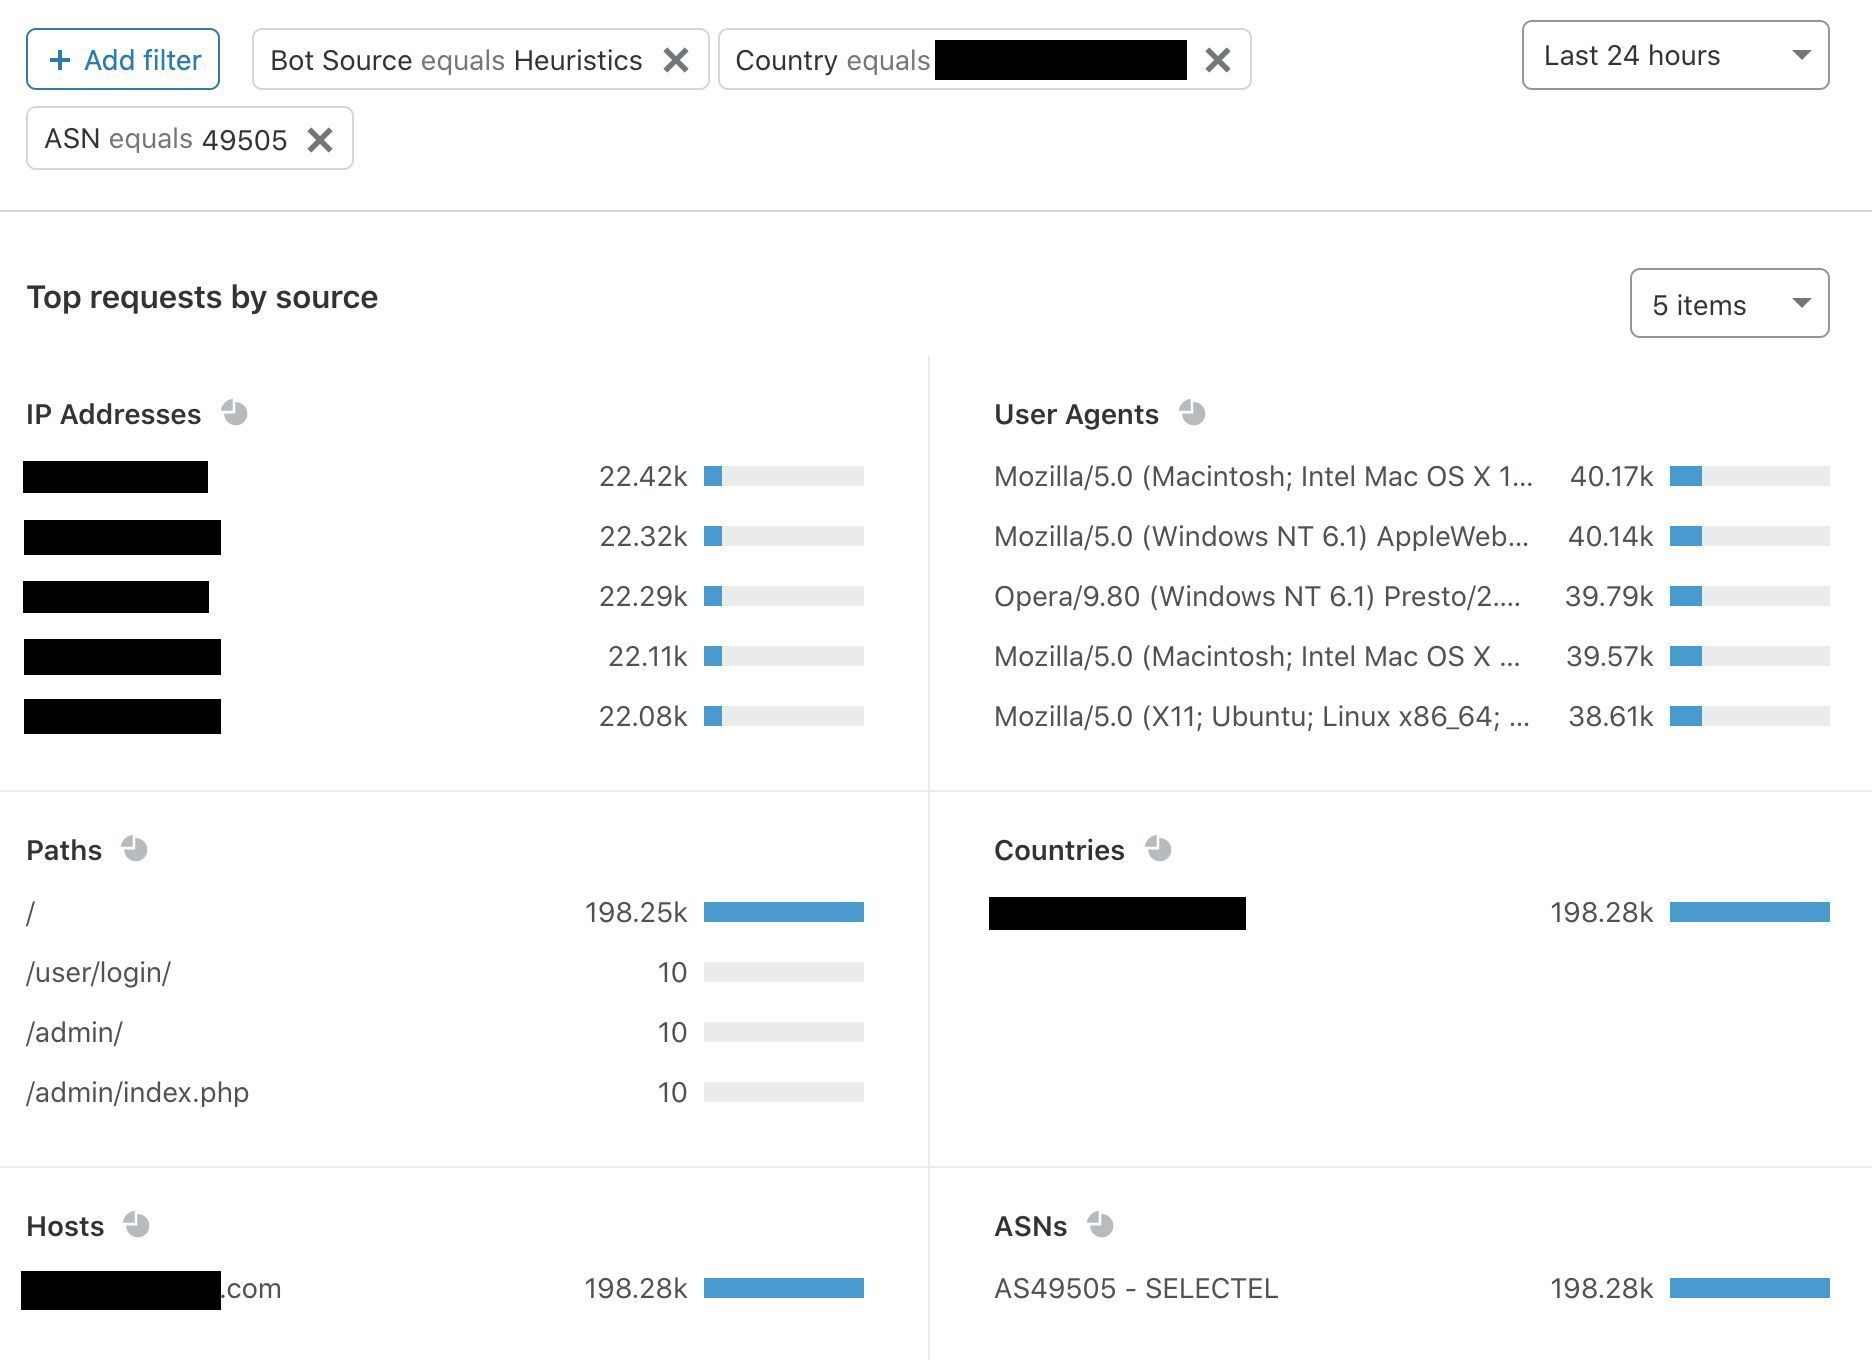
I already suspect a correlation between a few of these attributes. First, the IP addresses all have very similar request counts. No human would access a site 22,000 times, and the uniformity across IPs 2-5 suggests foul play. Not surprisingly, the same pattern occurs for user agents on the right. User agents tell us about the browser and device associated with a particular request. When Bot Analytics shows this much uniformity and presents clear anomalies in country and ASN, I get suspicious (and you should too). I’m now going to filter on these anomalies to see if my instinct is right:
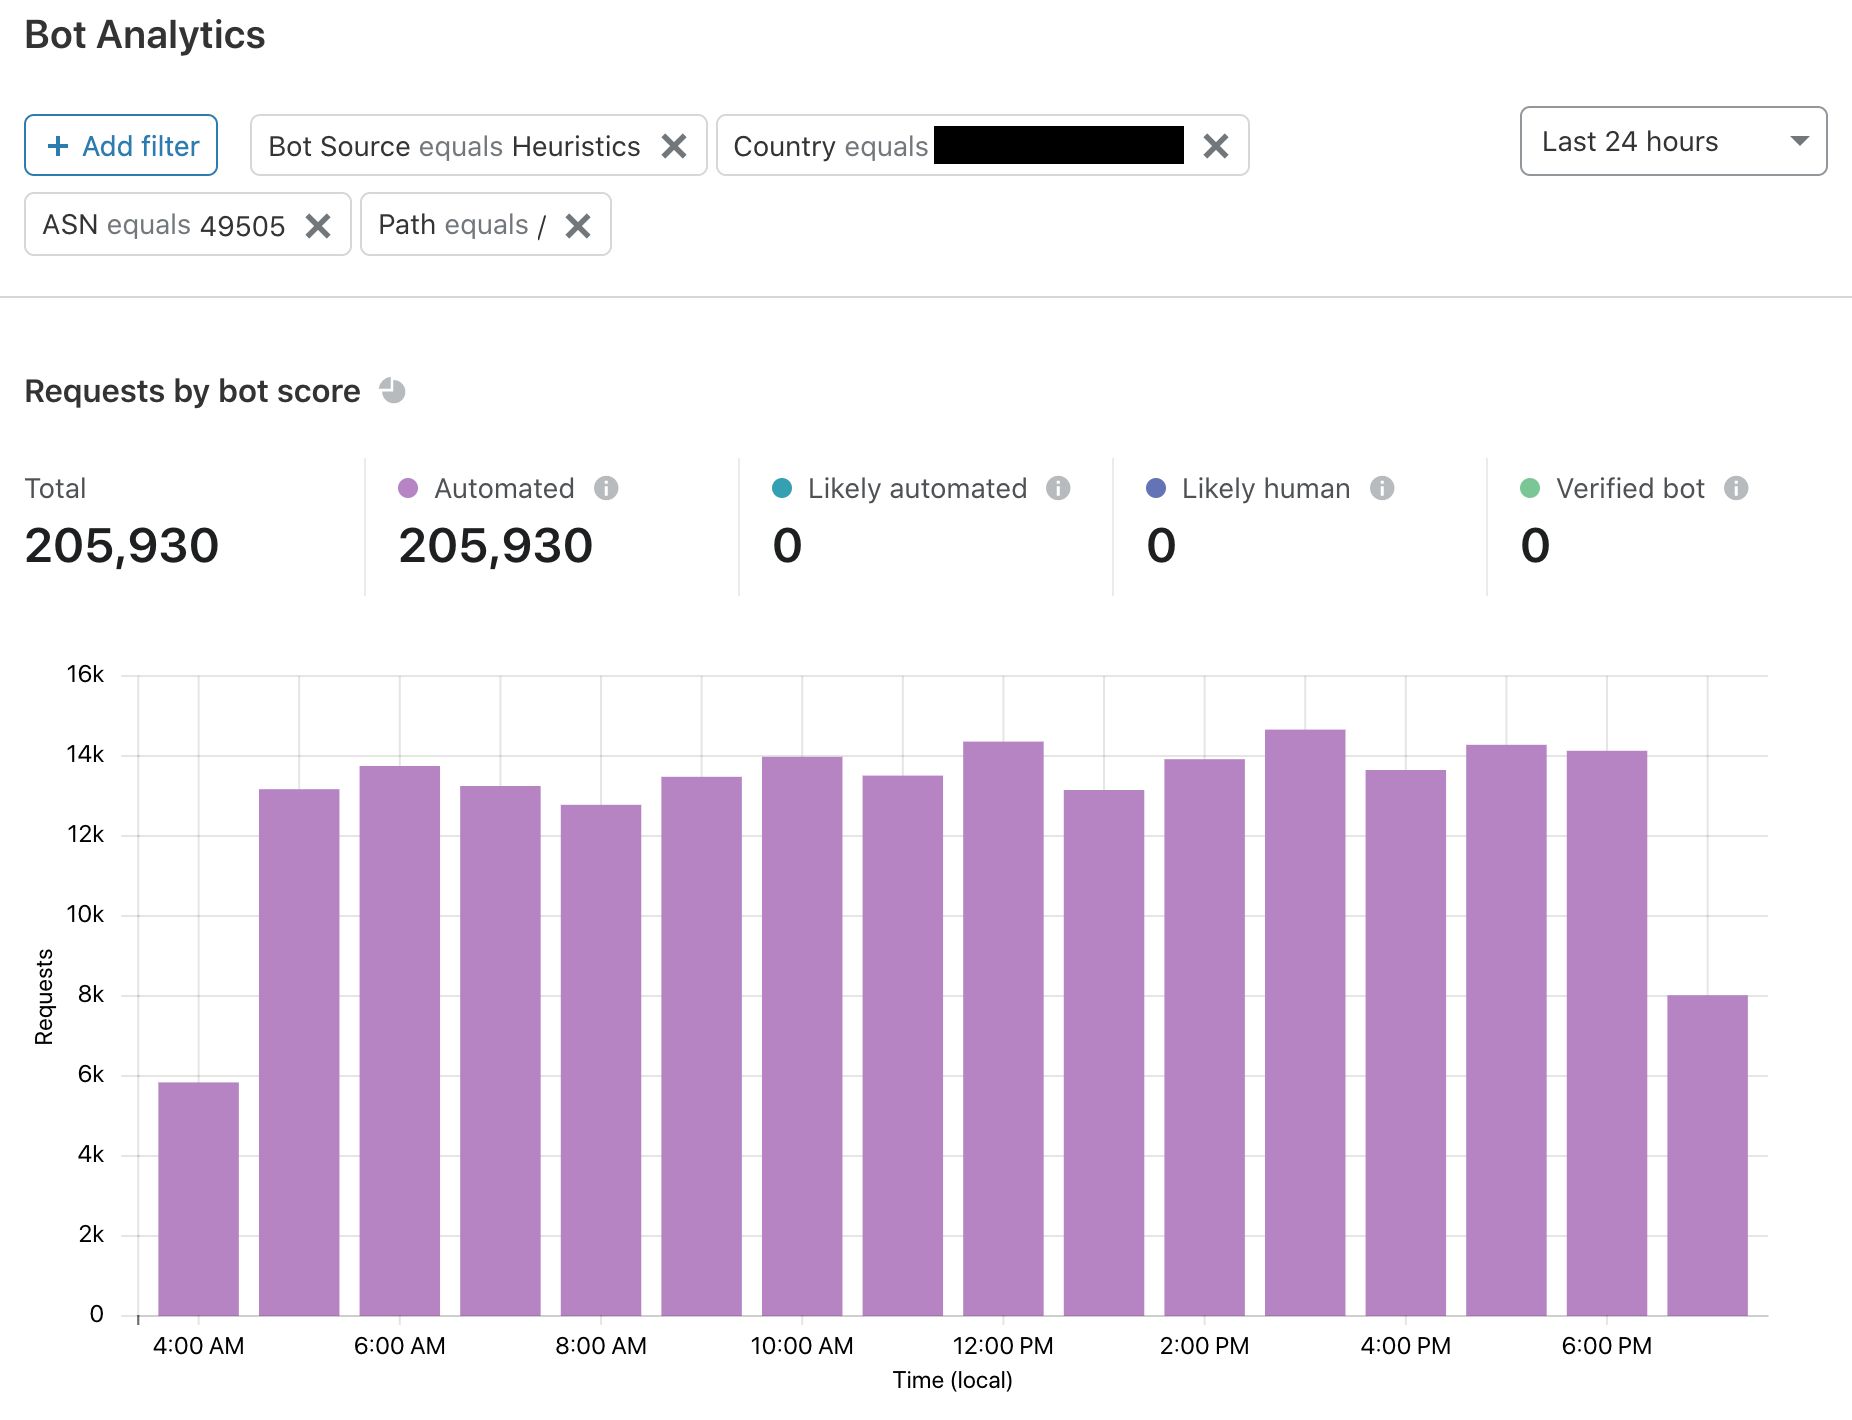
The trends hold true — to be sure, I briefly expanded the table and found nine separate IP addresses exhibiting the same behavior. This is likely an aggressive content scraper. Notably, it is not marked as a verified bot, so Bot Management issued the lowest possible score and flagged it as “automated.” At the top of Bot Analytics, I will narrow down the traffic and keep the time period at 24 hours:
The most severe attacks come and go. This traffic is clearly sustained, and my best guess is that someone is frequently scraping the homepage for content. This isn’t the most malicious of attacks, but content is still being taken. If I wanted to, I could set a firewall rule to target this bot score or any of the filters I used.
Try It Out
As a reminder, all Enterprise customers will be able to see a snapshot of their bot traffic. Even if you don’t have Bot Management for your site, visit the Firewall for some high-level insights that are updated in real time.
And for those of you with Bot Management — check out Bot Analytics! It’s live now, and we hope you’ll have fun using it. Keep your eyes open for new analytics features in the coming months.
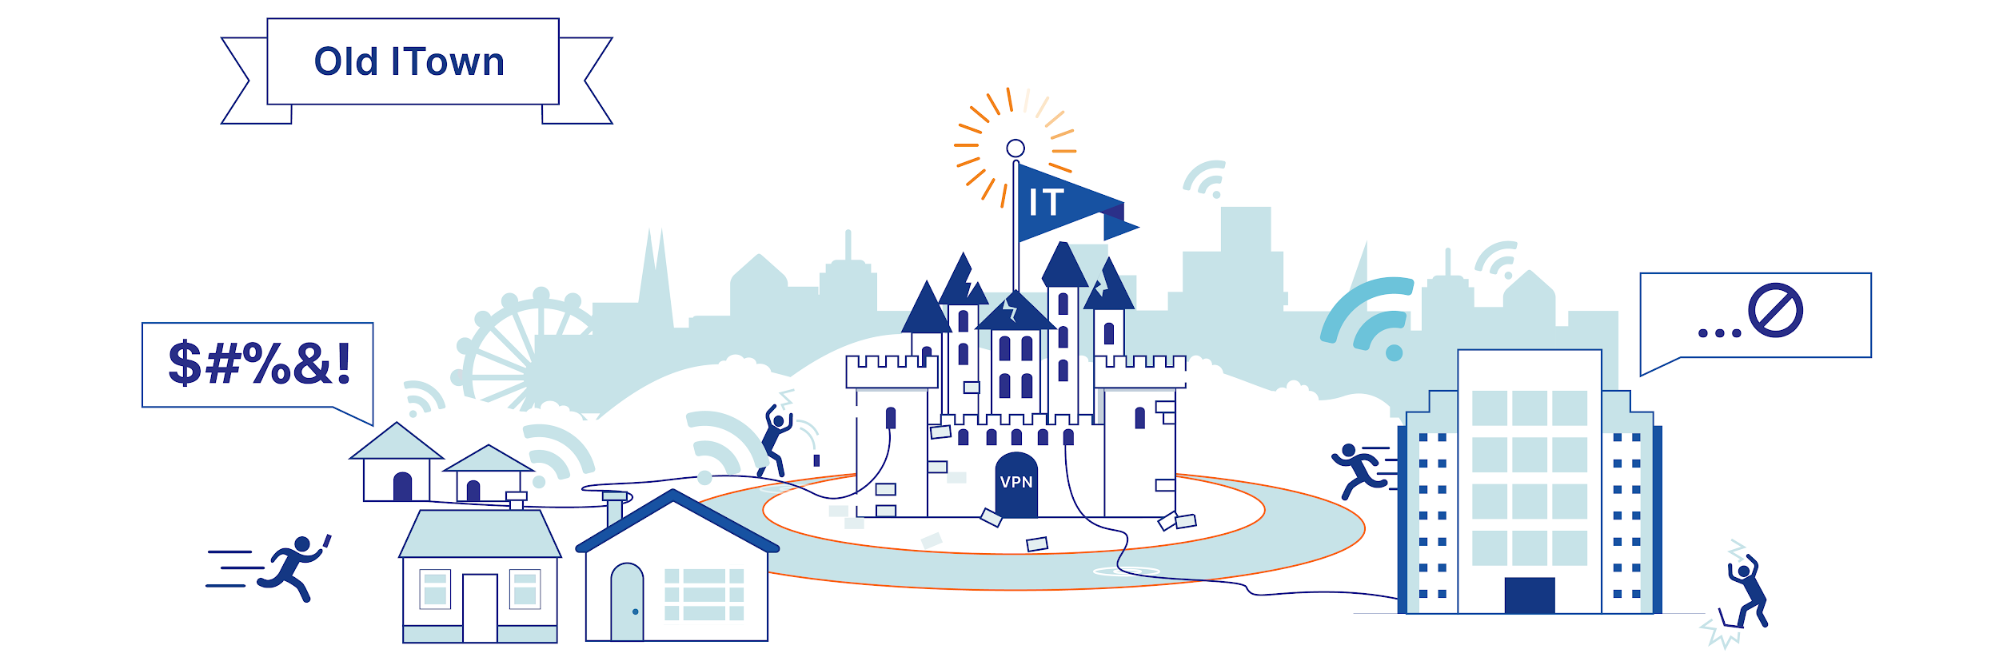
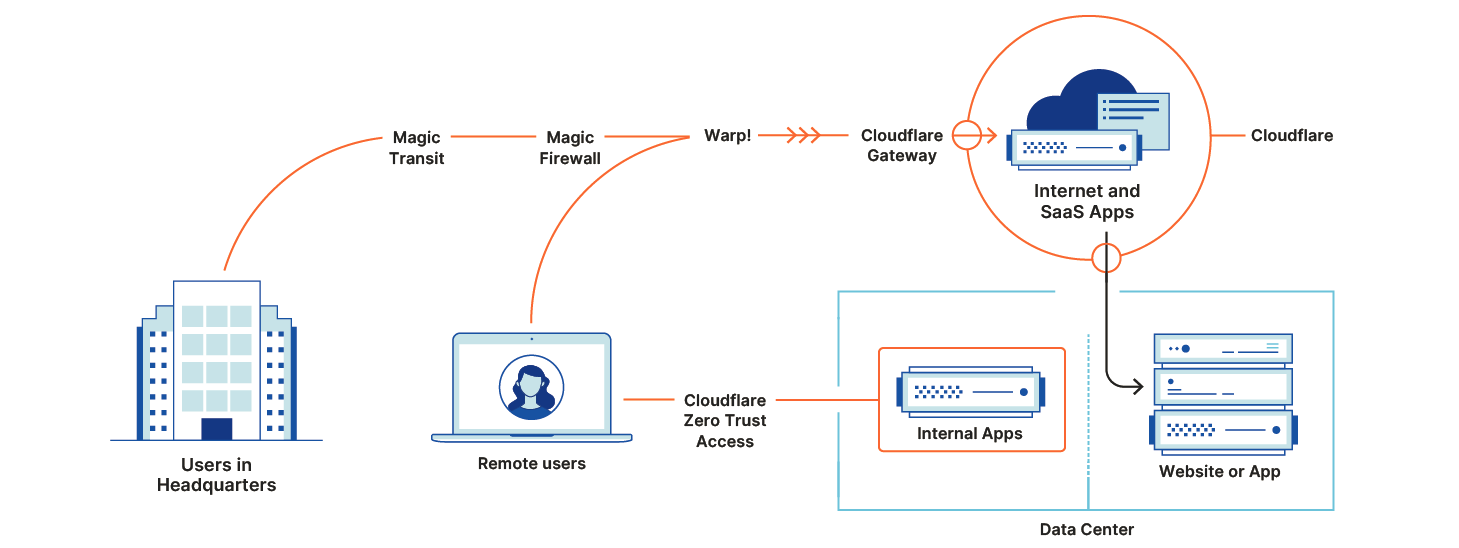
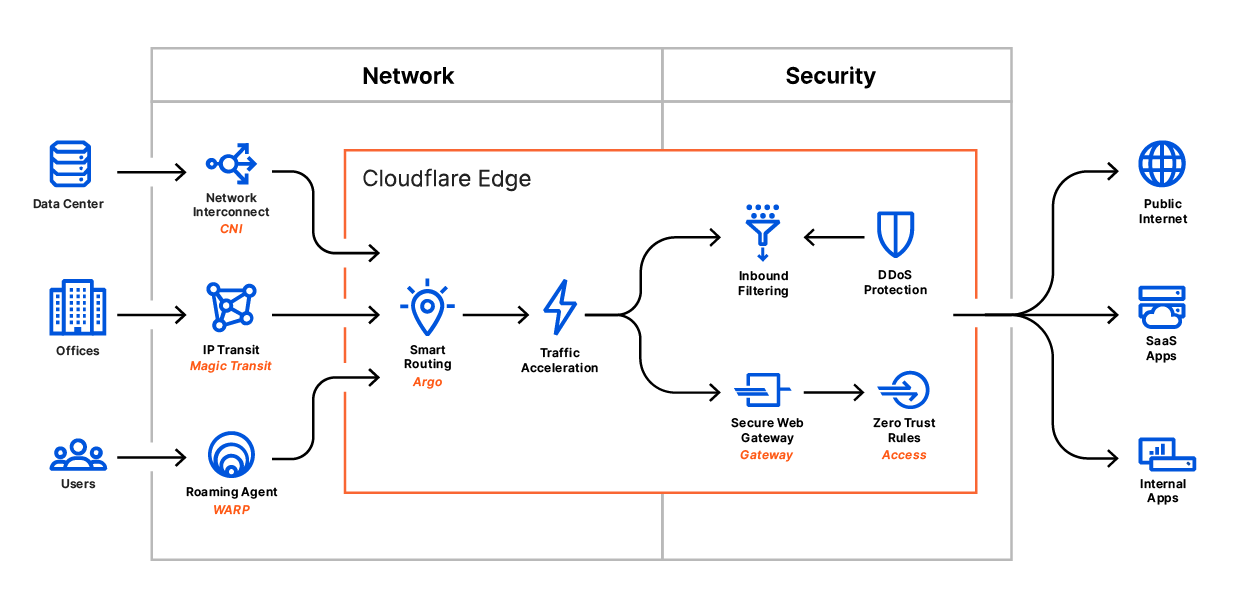
Earlier this week, we announced Cloudflare One™, a unified approach to solving problems in enterprise networking and security. With Cloudflare One, your organization’s data centers, offices, and devices can all be protected and managed in a single control plane. Cloudflare’s network is central to the value of all of our products, and today I want to dive deeper into how our network powers Cloudflare One.
Over the past ten years, Cloudflare has encountered the same challenges that face every organization trying to grow and protect a global network: we need to protect our infrastructure and devices from attackers and malicious outsiders, but traditional solutions aren’t built for distributed networks and teams. And we need visibility into the activity across our network and applications, but stitching together logging and analytics tools across multiple solutions is painful and creates information gaps.
We’ve architected our network to meet these challenges, and with Cloudflare One, we’re extending the advantages of these decisions to your company’s network to help you solve them too.
Distribution
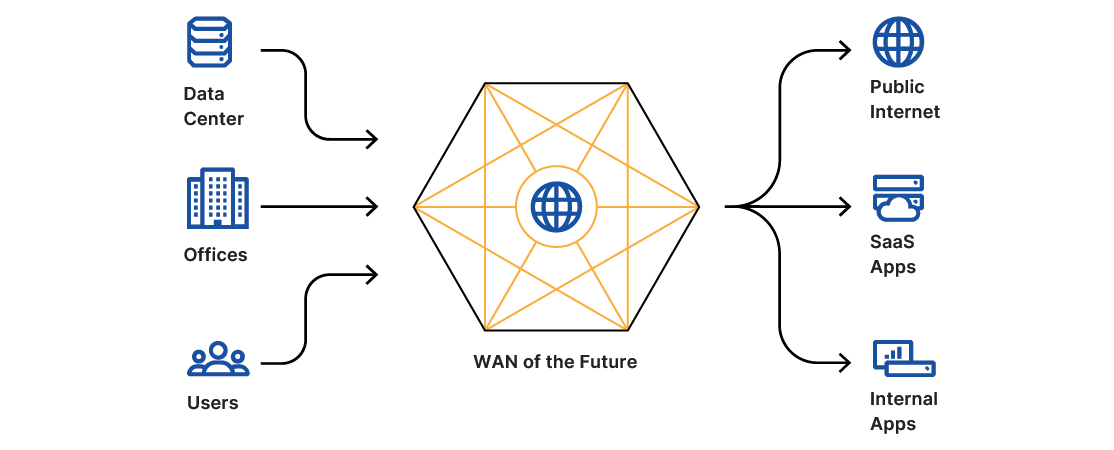
Enterprises and some small organizations alike have team members around the world. Legacy models of networking forced traffic back through central choke points, slowing down users and constraining network scale. We keep hearing from our customers who want to stop buying appliances and expensive MPLS links just to try and outpace the increased demand their distributed teams place on their network.
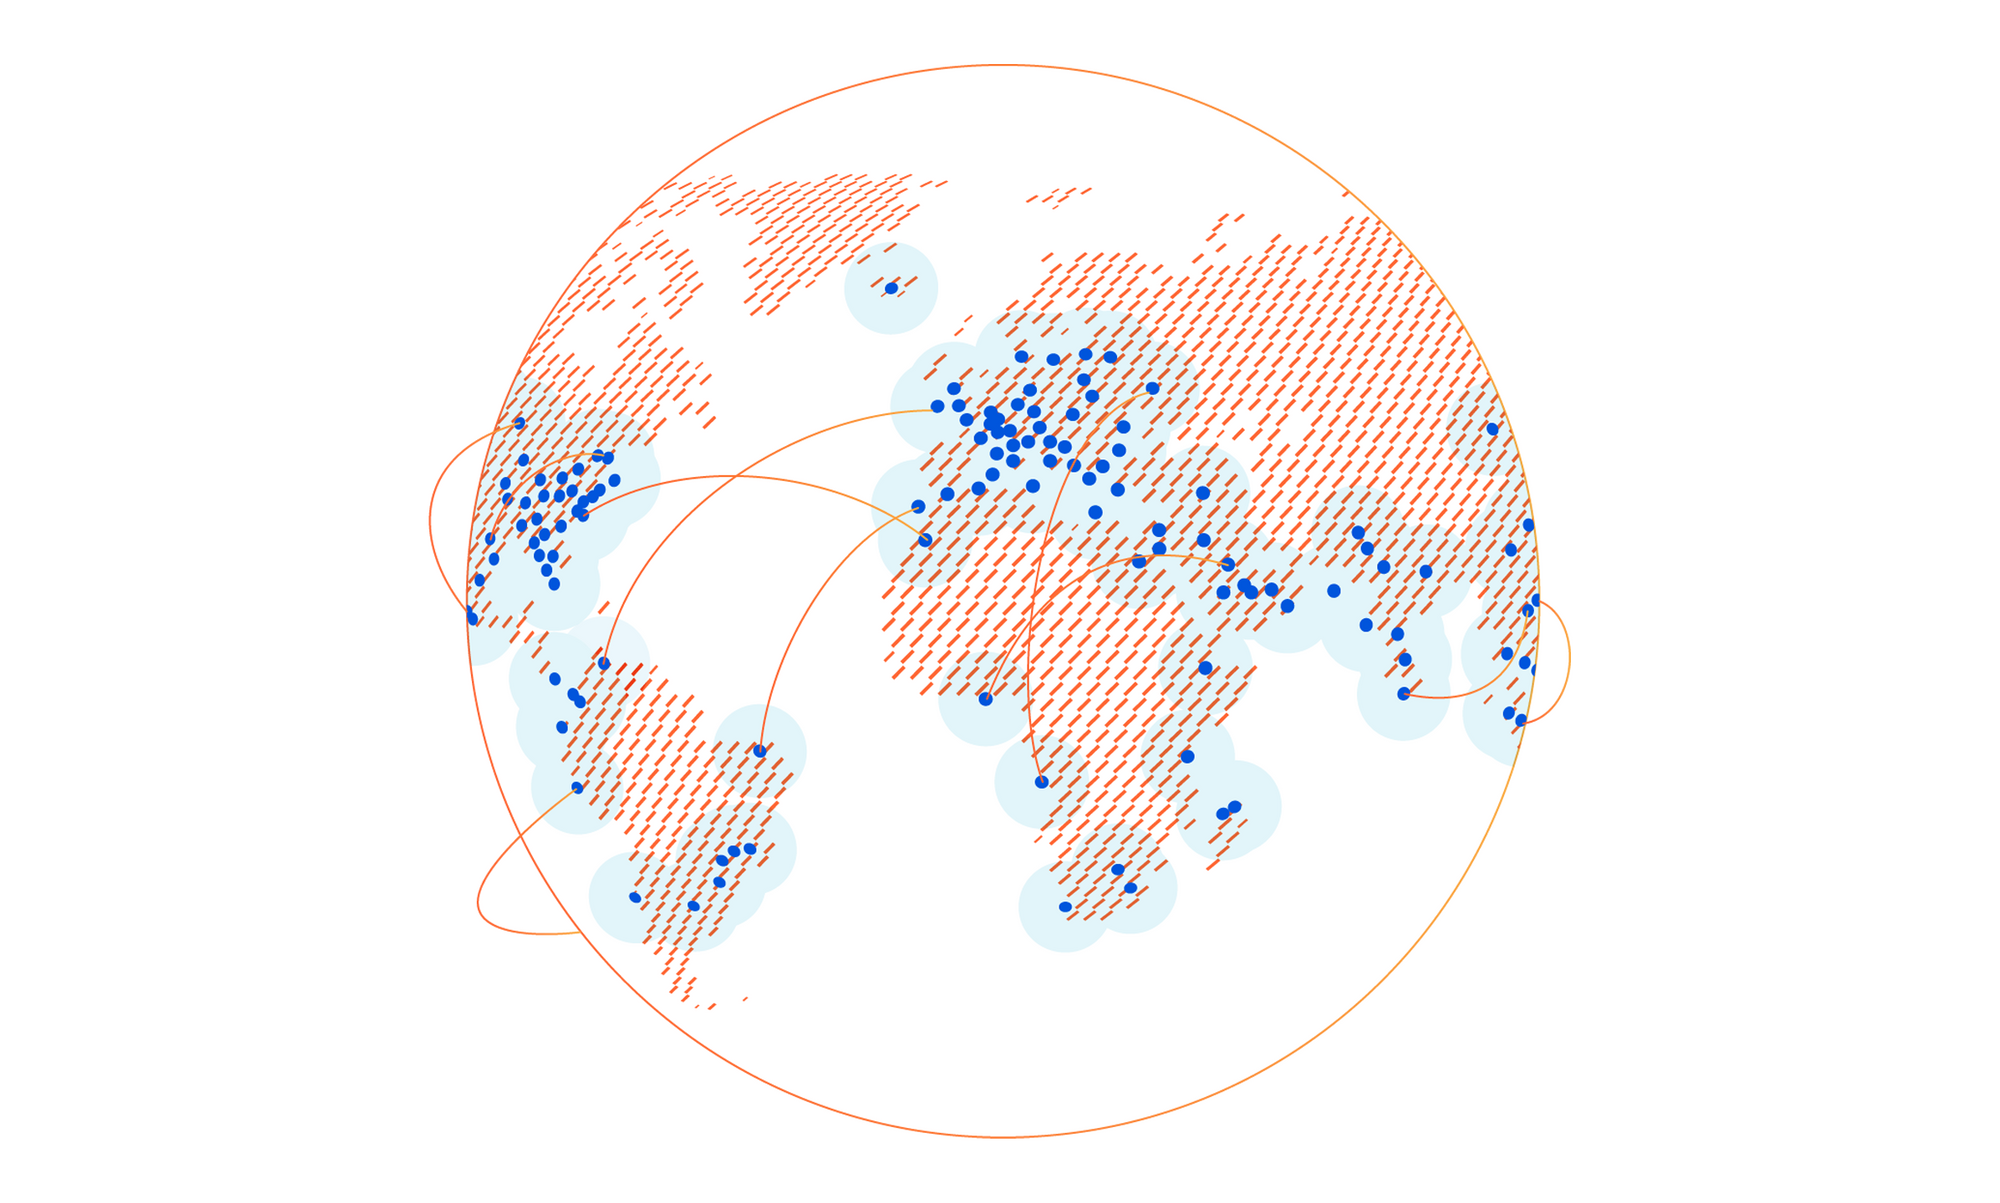
Wherever your users are, we are too
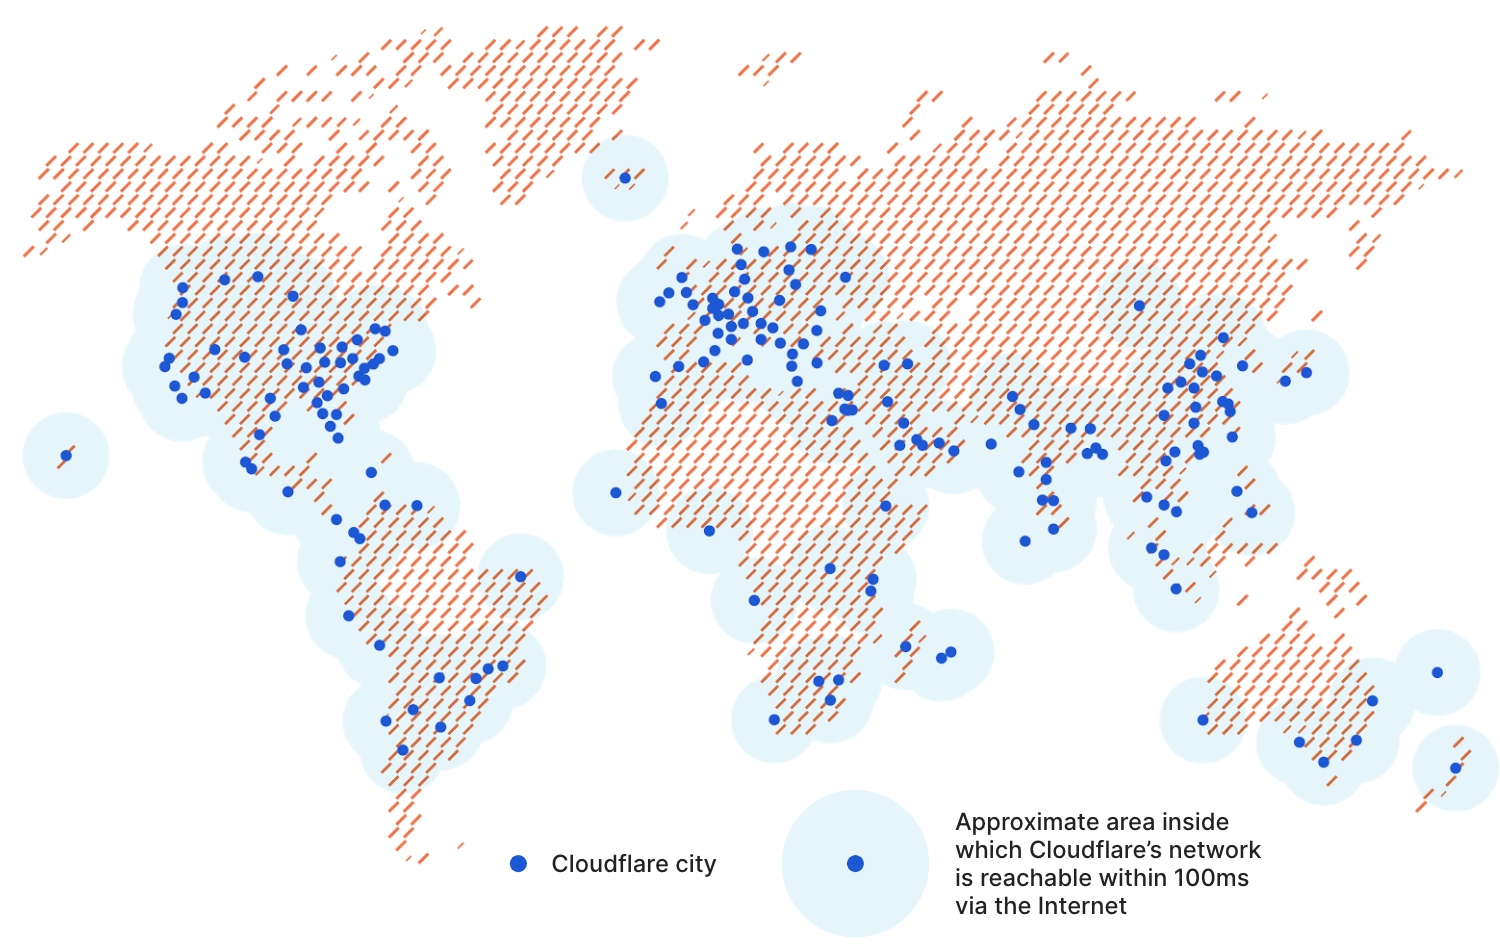
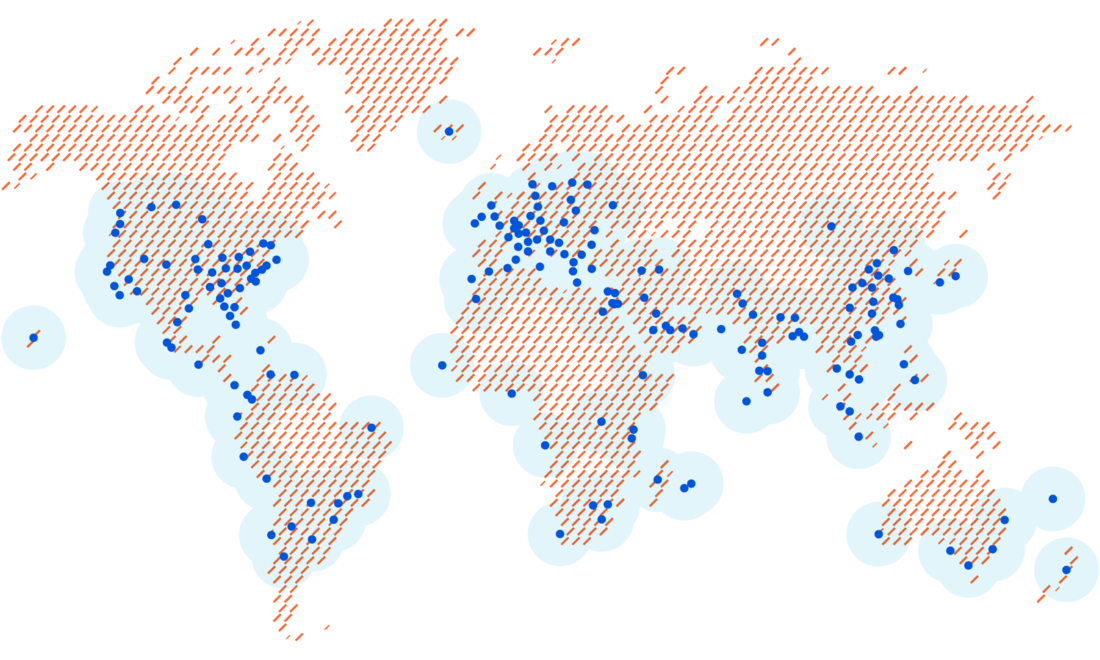
Global companies have enough of a challenge managing widely distributed corporate networks, let alone the additional geographic dispersity introduced as users are enabled to work from home or from anywhere. Because Cloudflare has data centers close to Internet users around the world, all traffic can be processed close to its source (your users), regardless of their location. This delivers performance benefits across all of our products.
We built our network to meet users where they are. Today, we have data centers in over 200 cities and over 100 countries. As the geographical reach of Cloudflare’s network has expanded, so has our capacity, which currently tops 42 Tbps. This reach and capacity is extended to your enterprise with Cloudflare One.
The same Cloudflare, everywhere
Traditional solutions for securing enterprise networks often involve managing a plethora of regional providers with different capabilities. This means that traffic from two users in different parts of the world may be treated completely differently, for example, with respect to quality of DDoS attack detection. With Cloudflare One, you can manage security for your entire global network from one place, consolidating and standardizing control.
Capacity for the good & the bad
With 42 Tbps of network capacity, you can rest assured that Cloudflare can handle all of your traffic – the clean, legitimate traffic you want, and the malicious and attack traffic you don’t.
Scalability
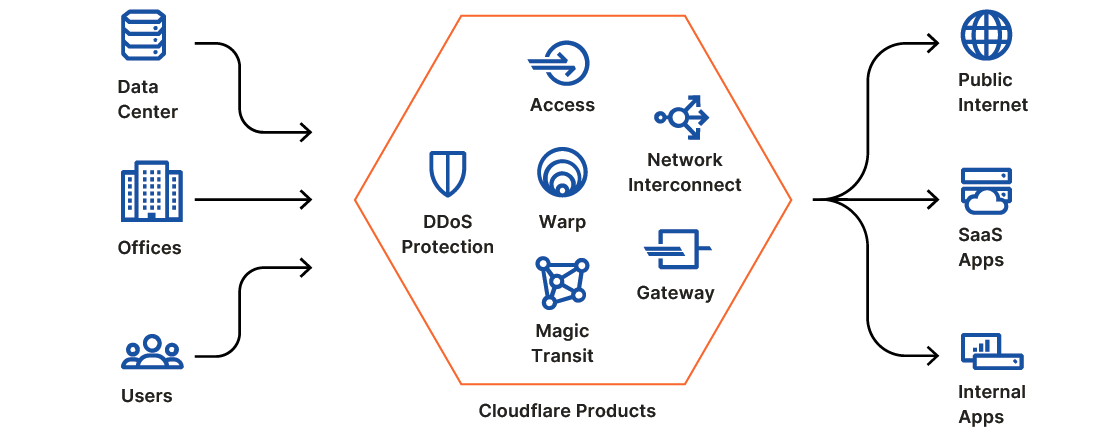
Every product on every server
All of Cloudflare’s services are standardized across our entire network. Every service runs on every server, which means that traffic through all of the products you use can be processed close to its source, rather than being sent around to different locations for different services. This also means that as our network continues to grow, all products benefit: new data centers will automatically process traffic for every service you use.
For example, your users who connect to the Internet through Cloudflare Gateway in South America connect to one of our data centers in the region, rather than backhauling to another location. When those users need to reach an origin located on the other side of the world, we can also route them over our private backbone to get them there faster.
Commodity hardware, software-based functions
We built our network using commodity hardware, which allows us to scale quickly without relying on one single vendor or getting stuck in supply chain bottlenecks. And the services that process your traffic are software-based – no specialized, third-party hardware performing specific functions. This means that the development, maintenance, and support for the products you use all lives within Cloudflare, reducing the complexity of getting help when you need it.
This approach also lets us build efficiency into our network. We use that efficiency to serve customers on our free plan and deliver a more cost-effective platform to our larger customers.
Connectivity
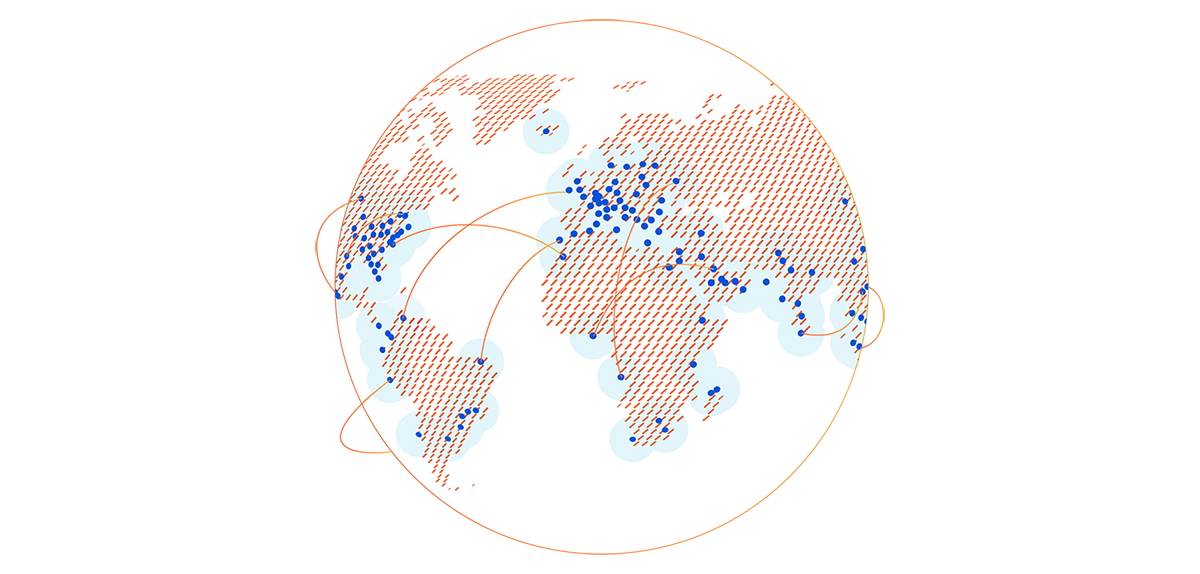
Cloudflare interconnects with over 8,800 networks globally, including major ISPs, cloud services, and enterprises. Because we’ve built one of the most interconnected networks in the world, Cloudflare One can deliver a better experience for your users and applications, regardless of your network architecture or connectivity/transit vendors.
Broad interconnectivity with eyeball networks
Because of our CDN product (among others), being close to end users (“eyeballs”) has always been critical for our network. Now that more people than ever are working from home, eyeball → datacenter connectivity is more crucial than ever. We’ve spoken to customers who, since transitioning to a work-from-home model earlier this year, have had congestion issues with providers who are not well-connected with eyeball networks. With Cloudflare One, your employees can do their jobs from anywhere with Cloudflare smoothly keeping their traffic (and your infrastructure) secure.
Extensive presence in peering facilities
Earlier this year, we announced Cloudflare Network Interconnect (CNI), the ability for you to connect your network with Cloudflare’s via a secure physical or virtual connection. Using CNI means more secure, reliable traffic to your network through Cloudflare One. With our highly-connected network, there’s a good chance we’re colocated with your organization in at least one peering facility, making CNI setup a no-brainer. We’ve also partnered with five interconnect platforms to provide even more flexibility with virtual (software-defined layer 2) connections with Cloudflare. Finally, we peer with major cloud providers all over the world, providing even more flexibility for organizations at any stage of hybrid/cloud transition.
Making the Internet smarter
Traditional approaches to creating secure and reliable network connectivity involve relying on expensive MPLS links to provide point to point connection. Cloudflare is built from the ground-up on the Internet, relying on and improving the same Internet links that customers use today. We’ve built software and techniques that help us be smarter about how we use the Internet to deliver better performance and reliability to our customers. We’ve also built the Cloudflare Global Private Backbone to help us even further enhance our software and techniques to deliver even more performance and reliability where it’s needed the most.
This approach allows us to use the variety of connectivity options in our toolkit intelligently, building toward a more performant network than what we could accomplish with a traditional MPLS solution. And because we use transit from a wide variety of providers, chances are that whoever your ISP is, you already have high-quality connectivity to Cloudflare’s network.
Insight
Diverse traffic workload yields attack intelligence
We process all kinds of traffic thanks to our network’s reach and the diversity of our customer base. That scale gives us unique insight into the Internet. We can analyze trends and identify new types of attacks before they hit the mainstream, allowing us to better prepare and protect customers as the security landscape changes.
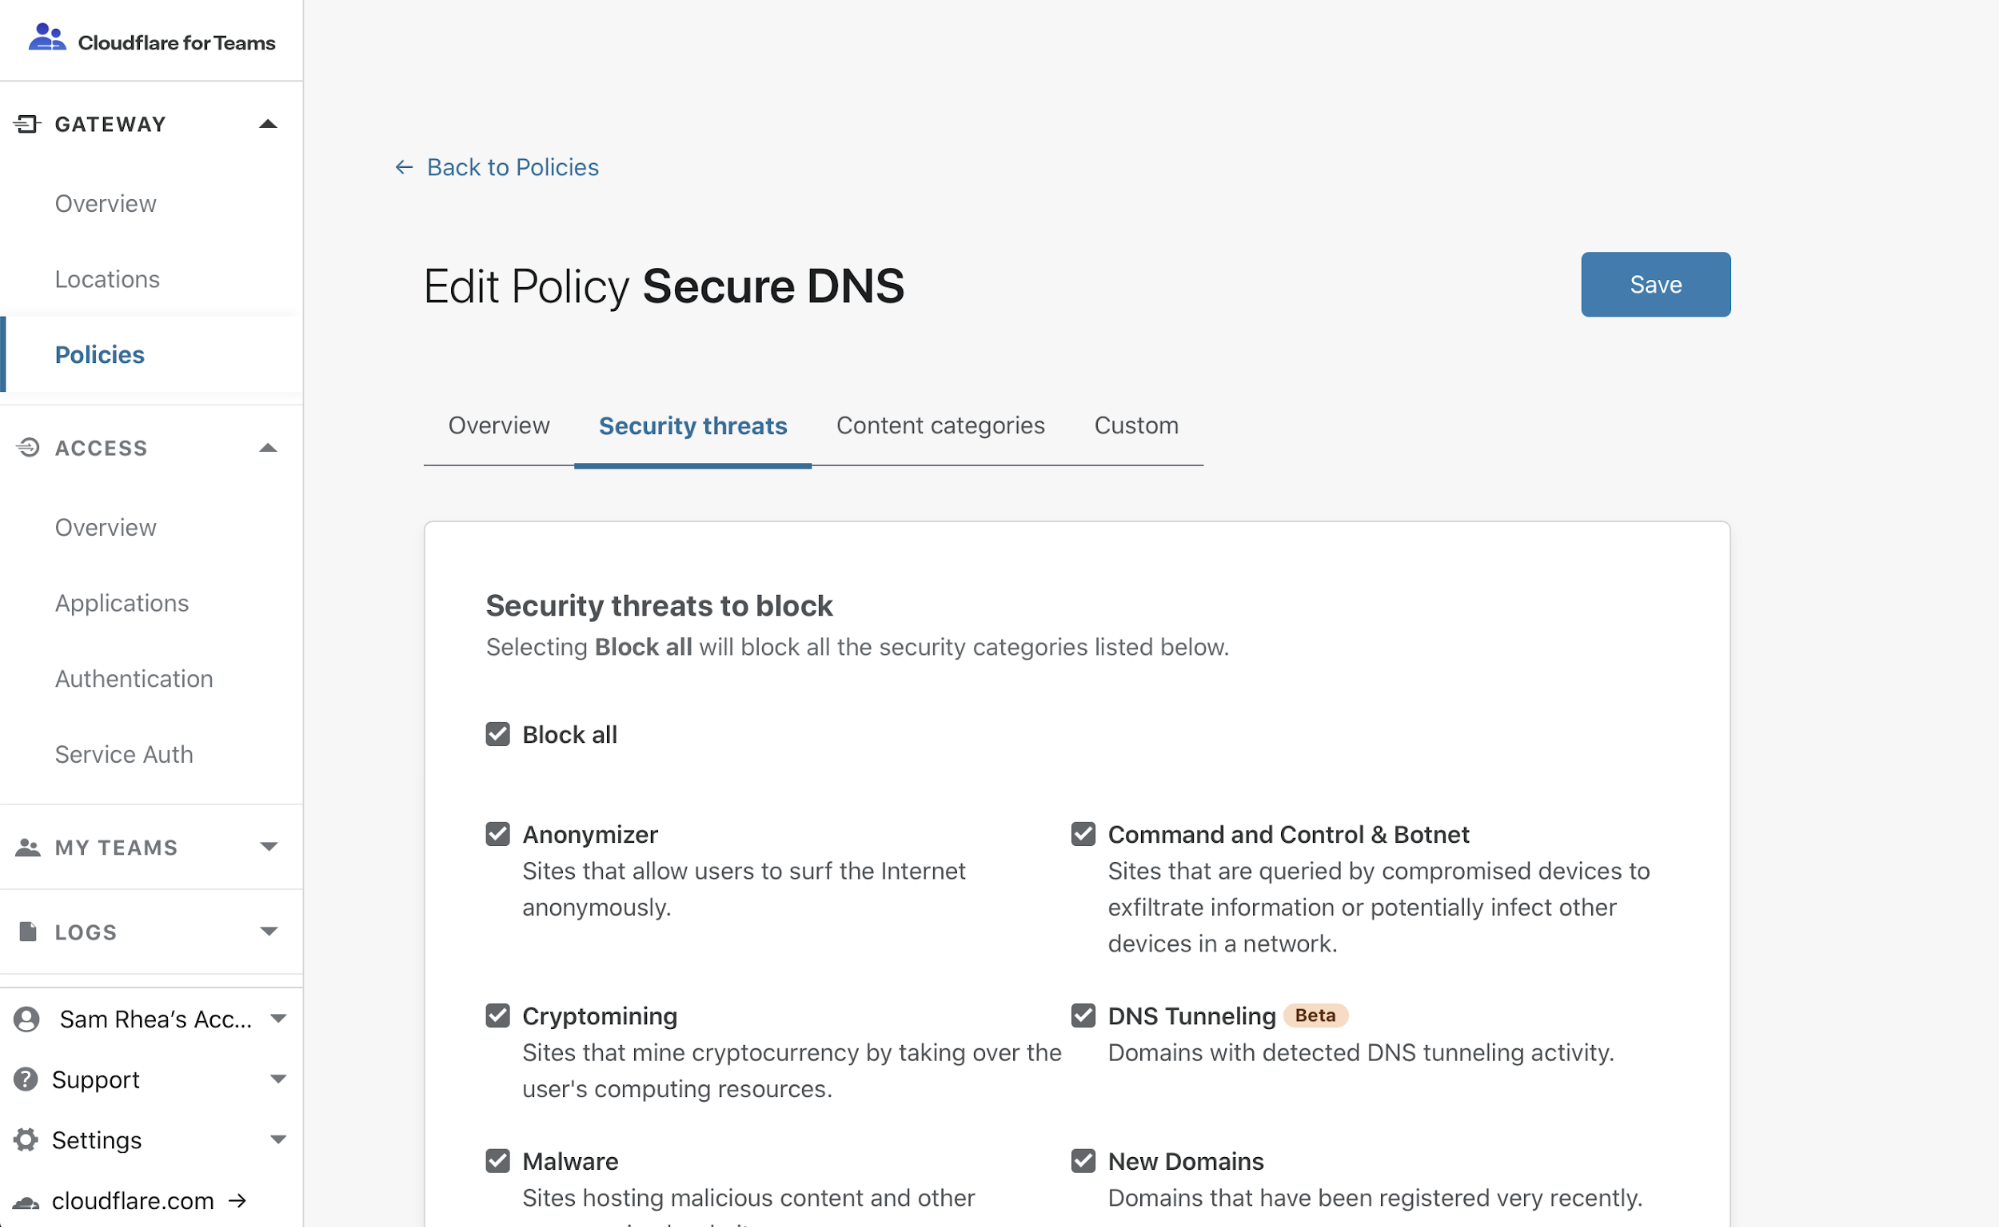
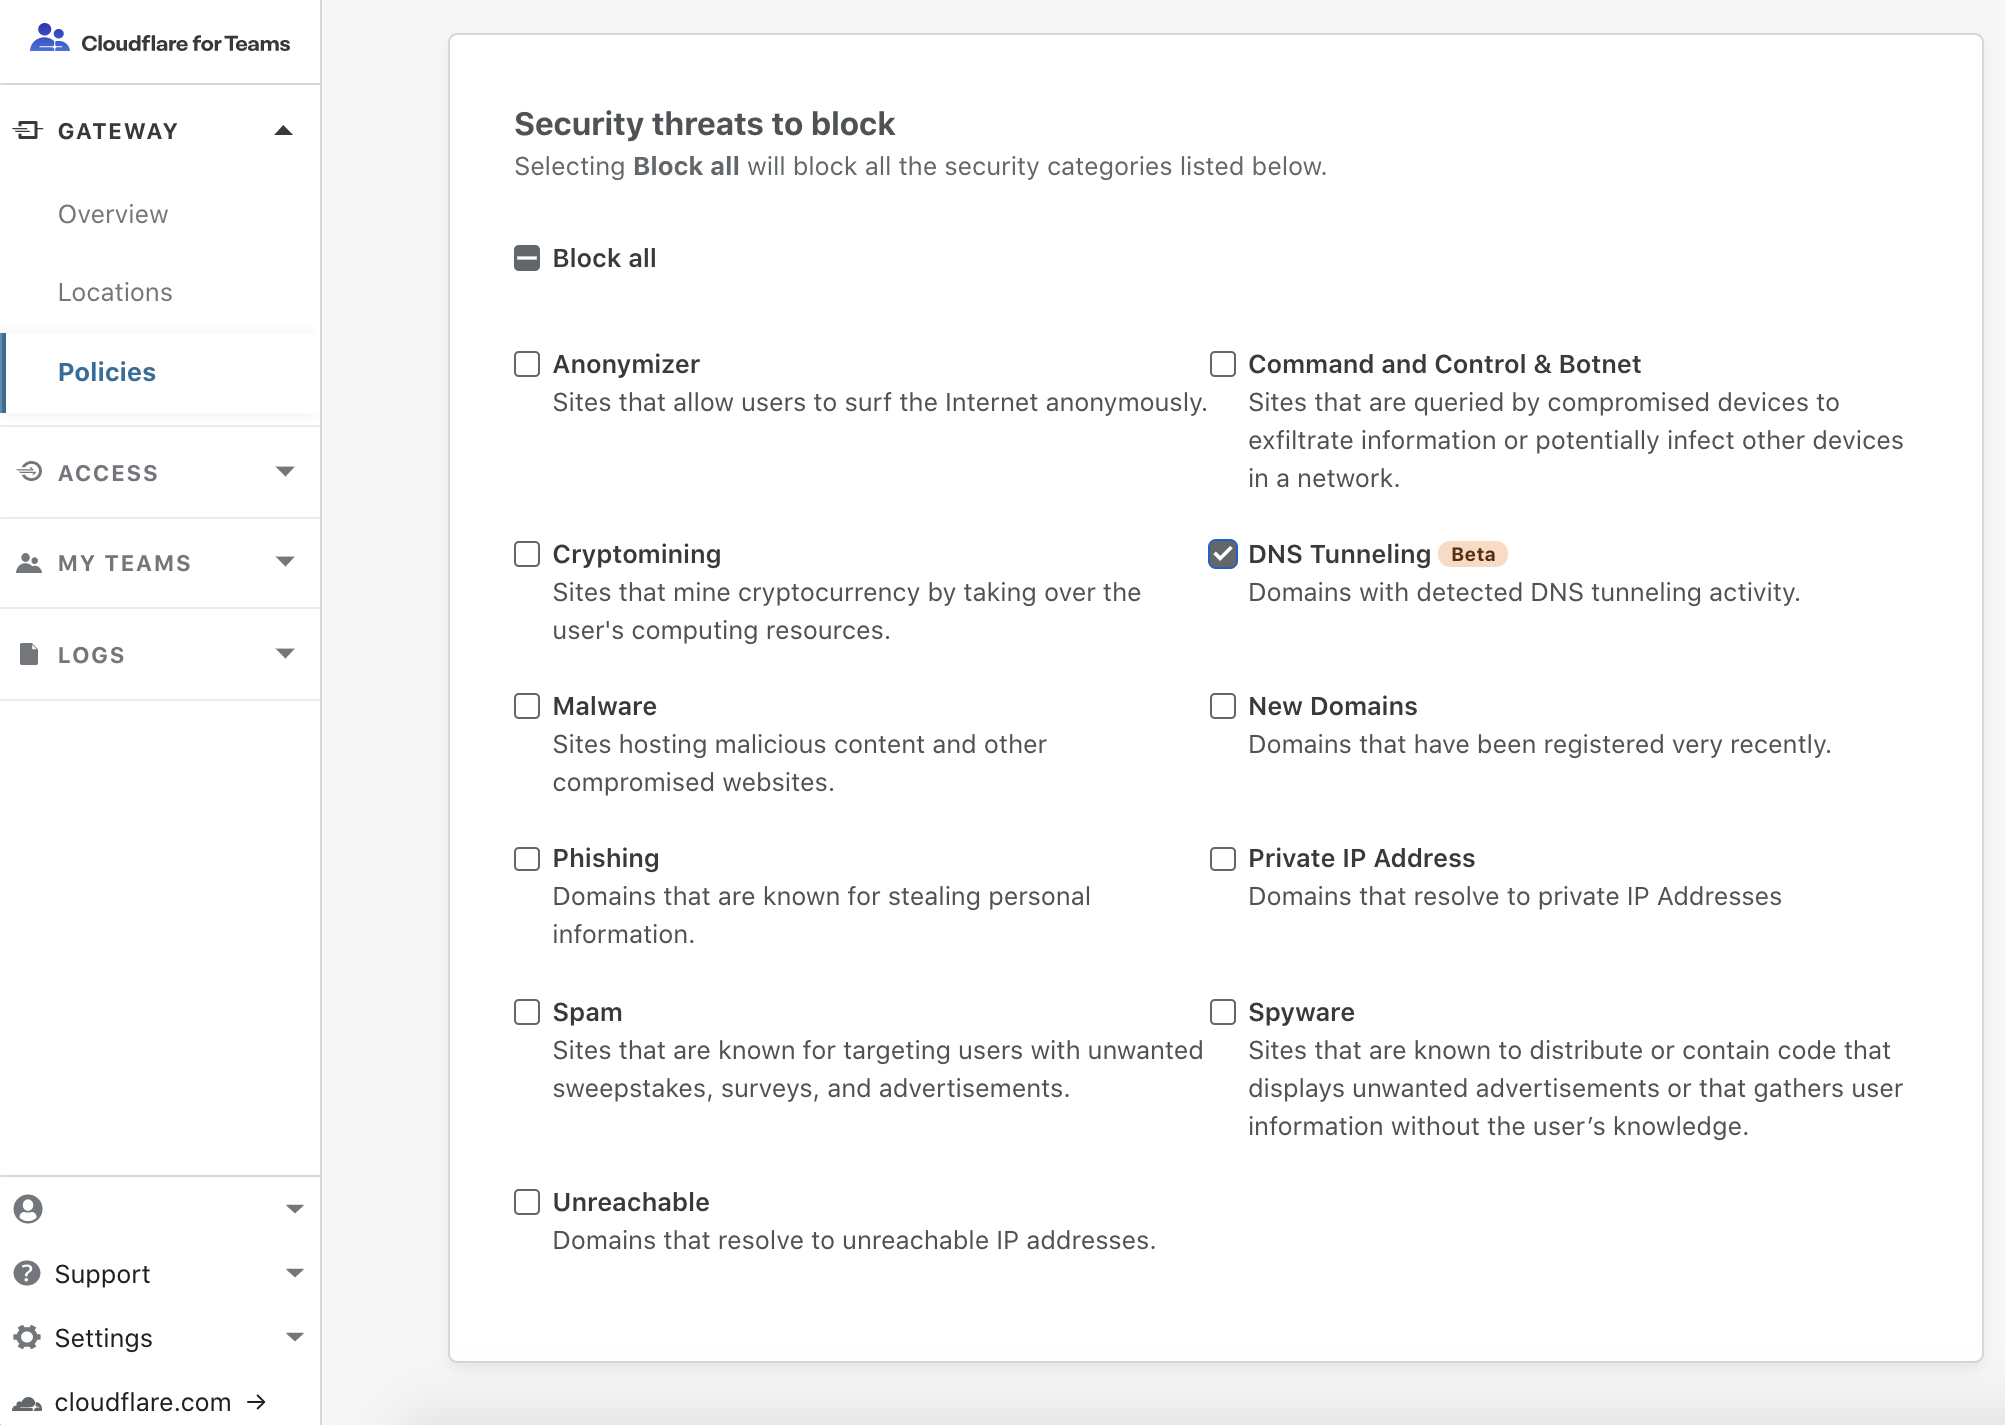
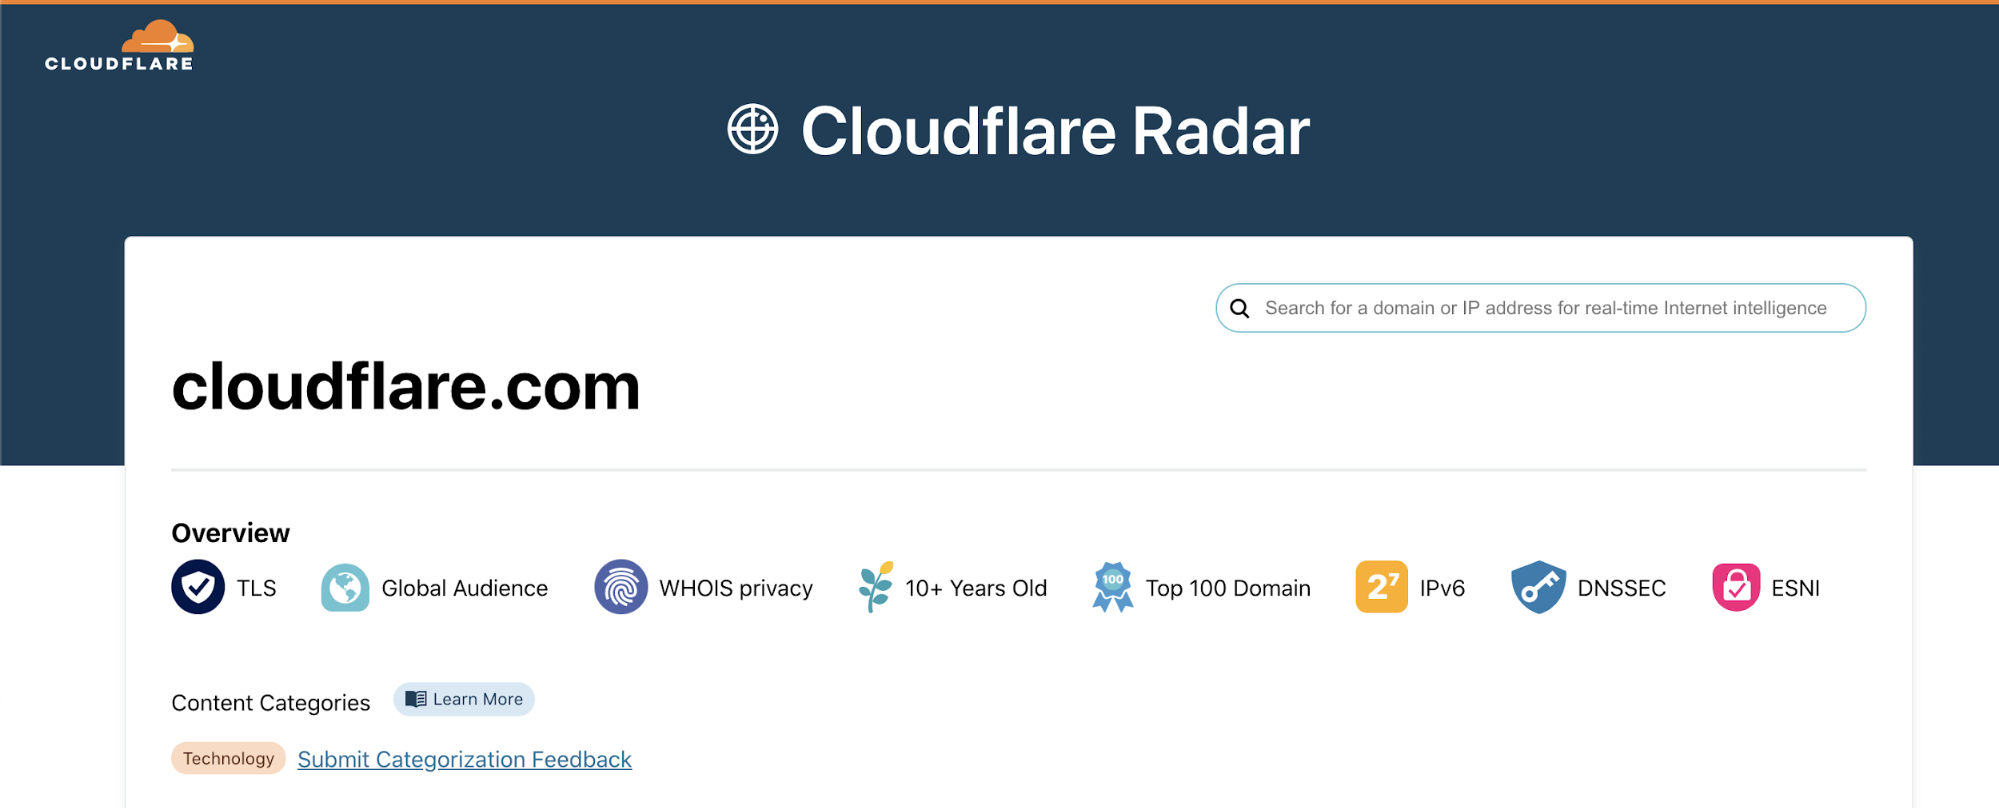
We also provide you with visibility into these network and threat intelligence insights with tools like Cloudflare Radar and Cloudflare One Intel. Earlier this week, we launched a feature to block DNS tunneling attempts. We analyze a tremendous number of DNS queries and have built a model of what they should look like. We use that model to block suspicious queries which might leak data from devices.
Unique network visibility enables Smart Routing
In addition to attacks and malicious traffic across our network, we’re paying attention to the state of the Internet. Visibility across carriers throughout the world allows us to identify congestion and automatically route traffic along the fastest and most reliable paths. Contrary to the experience delivered by traditional scrubbing providers, Magic Transit customers experience minimal latency and sometimes even performance improvements with Cloudflare in path, thanks to our extensive connectivity and transit diversity.
Argo Smart Routing, powered by our extensive network visibility, improves performance for web assets by 30% on average; we’re excited to bring these benefits to any traffic through Cloudflare One with Argo Smart Routing for Magic Transit (coming soon!).
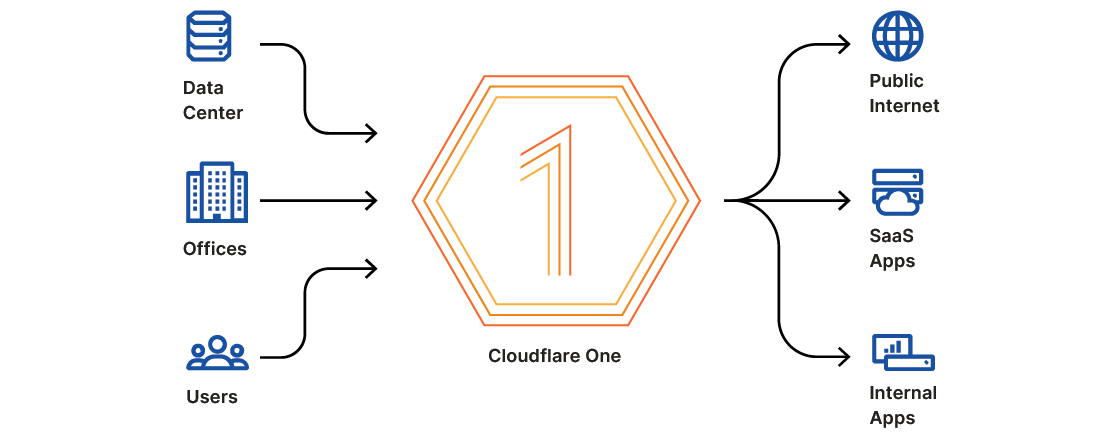
What’s next?
Cloudflare’s network is the foundation of the value and vision for Cloudflare One. With Cloudflare One, you can put our network between the Internet and your entire enterprise, gaining the powerful benefits of our global reach, scalability, connectivity, and insight. All of the products we’ve launched this week, like everything we’ve built so far, benefit from the unique advantages of our network.
We’re excited to see these effects multiply as organizations adopt Cloudflare One to protect and accelerate all of their traffic. And we’re just getting started: we’re going to continue to expand our network, and the products that run on it, to deliver an even faster, more secure, more reliable experience across all of Cloudflare One.
Earlier this week, we announced Cloudflare One™, our comprehensive, cloud-based network-as-a-service solution. Cloudflare One improves network performance and security while reducing cost and complexity for companies of all sizes.
Cloudflare One is built to handle the scale and complexity of the largest corporate networks. But when it comes to network security and performance, the industry has focused all too often on the largest of customers with significant budgets and technology teams. At Cloudflare, we think it’s our opportunity and responsibility to serve everyone, and help companies of all sizes benefit from a better Internet.
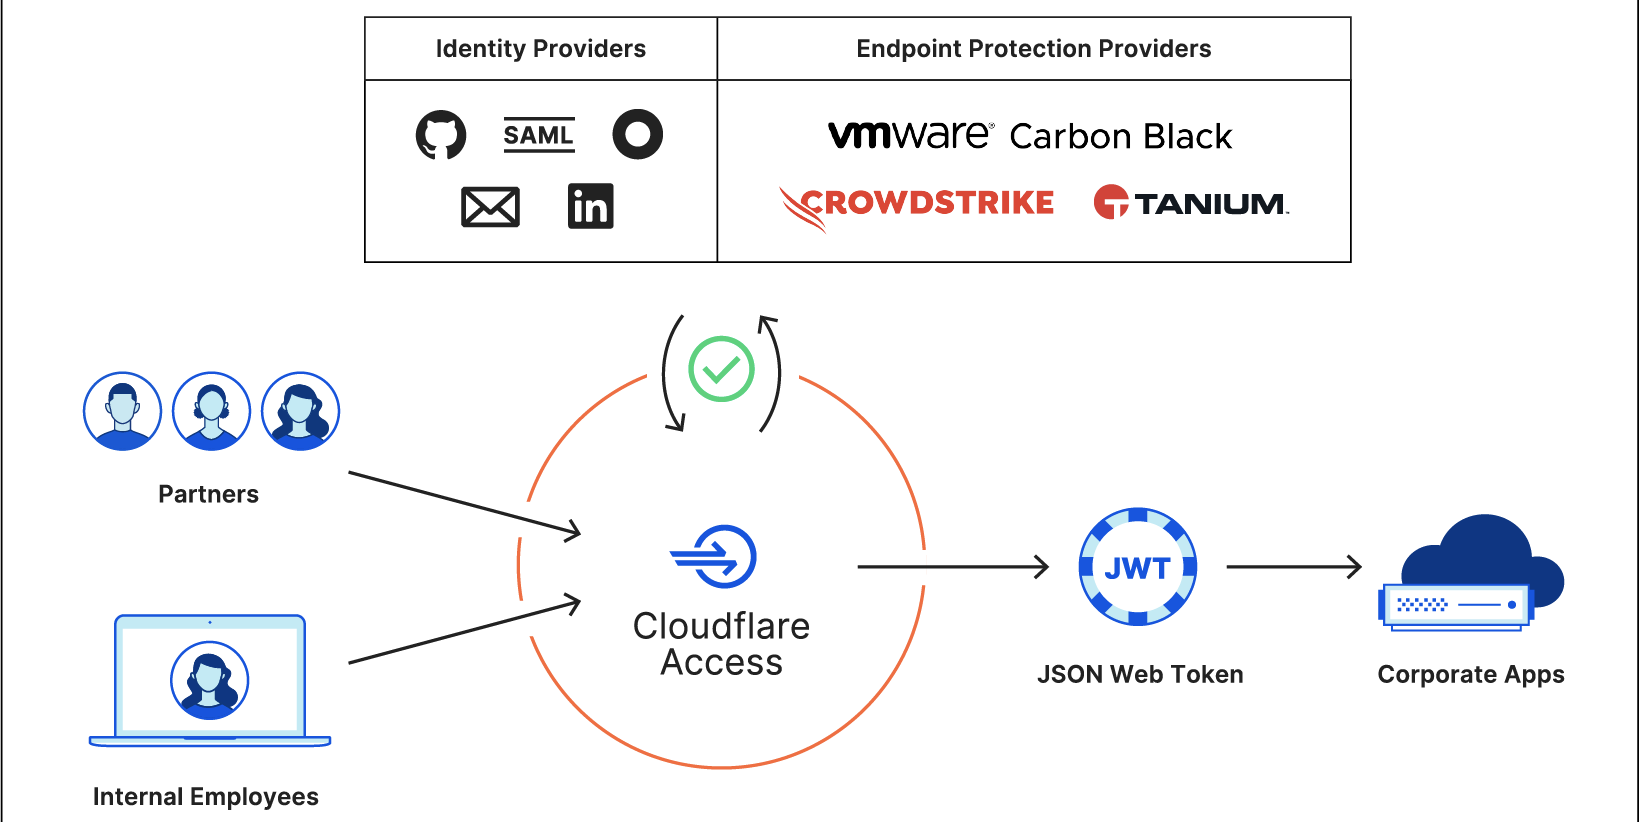
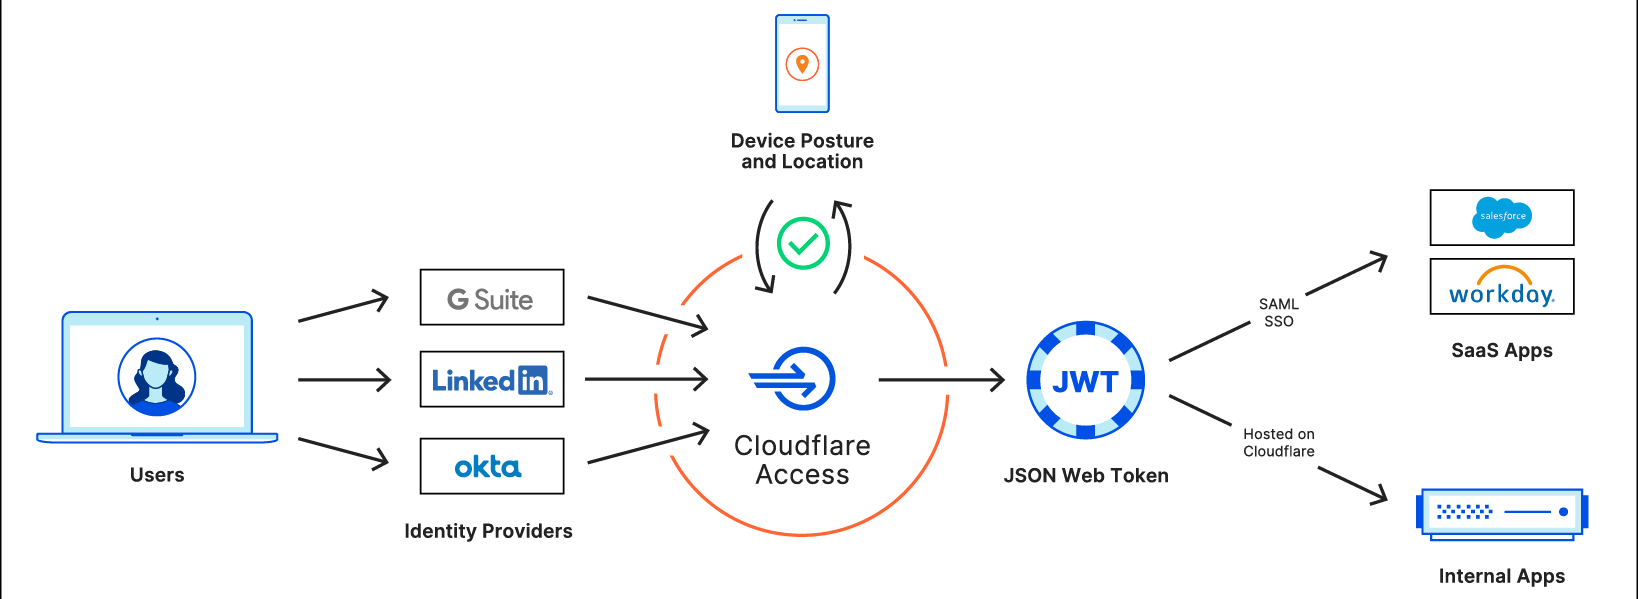
This is Zero Trust Week at Cloudflare, and we’ve already talked about our mantra of Zero Trust for Everyone. As a quick refresher, Zero Trust is a security framework that assumes all networks, devices, and Internet destinations are inherently compromised and therefore should not be trusted. Cloudflare One facilitates Zero Trust security by securing how your users connect to corporate applications and the Internet at large.
As a small business network administrator, there are fundamentally three things you need to protect: devices, applications, and the network itself. Below, I’ll outline how you can secure devices whether they are in your office (DNS Filtering) or remote (WARP+ and Gateway), as well as applications and your network by moving to a Zero Trust model of security (Access).
By design, Cloudflare One is accessible to teams of any size. You shouldn’t need a massive IT department or a Fortune 500 budget to connect to your tools safely. On Tuesday, we announced a new free plan which provides many of the features of Cloudflare One, including DNS filtering, Zero Trust access, and a management dashboard – for up to 50 users at no cost.
Starting now, your team can begin deploying Cloudflare One in your organization in just a few simple steps.
Step 1: Protect offices from threats on the Internet with DNS Filtering (10 minutes) Step 2: Secure remote workers connecting to the Internet with Cloudflare WARP+ (30 minutes) Step 3: Connect users to applications without a VPN with Cloudflare Access (1 hour) Step 4: Block threats and data loss on devices with a Secure Web Gateway (1 hour) Step 5: Add Zero Trust to your SaaS applications (2 hours)
1. Start blocking malicious sites and phishing attempts in 10 minutes
The Internet can be a dangerous place with malware and threats lurking everywhere. Protecting employees from threats on the Internet requires a way to inspect and filter their traffic. That starts with DNS-level filtering that can quickly and easily eliminate known malicious sites as well as restrict access to potentially dangerous neighborhoods on the Internet.
When your devices connect to a website, they start by sending a DNS query to a DNS resolver to find the IP address of the hostname for that site. The resolver responds and the device initiates the connection. That initial query creates two challenges for your team’s security:
Most DNS queries are unencrypted. ISPs can spy on DNS queries made by your employees and corporate devices while they work from home. Even worse, a malicious actor could modify responses to launch an attack.
DNS queries can resolve to malicious hostnames. Team members can click on links that lead to phishing attacks or malware downloads.
Cloudflare One can help keep that first query private and stop devices from inadvertently requesting a known malicious hostname.
Start by signing up for a Cloudflare account and navigating to the Cloudflare for Teams dashboard.
Next, set up a location. You’ll be prompted to create a location which you can do if you want to protect the DNS queries of an office network. Simply deploy Gateway’s DNS filtering for your office by changing your network’s router to point to the assigned Gateway IP address.
Cloudflare operates 1.1.1.1, the world’s fastest DNS resolver. We’ve built Cloudflare Gateway’s DNS filtering tools on top of that same architecture so that your team has faster and safer DNS.
Now you can easily create a Gateway DNS policy to filter security threats or specific content categories.
Then use the Gateway dashboard to monitor queries that are allowed or blocked.
Then navigate to the dashboard on the “Overview” tab and see your traffic including what you are blocking and allowing.
2.Next, protect all of your remote employees and send all traffic through Cloudflare over an encrypted connection
Employees who used to connect to the Internet through your office network now connect from hundreds or thousands of different home networks or mobile hotspots to do their jobs. That traffic relies on connections that might not be private.
You can use Cloudflare One to route all team member traffic over an encrypted, accelerated path to the Internet with Cloudflare WARP. Cloudflare WARP is available as an application that your team members can install on macOS, Windows, iOS, and Android. The client will route all of their device’s traffic to a nearby Cloudflare data center over Cloudflare’s implementation of a technology called WireGuard.
When they connect, Cloudflare One uses WARP+, our implementation of WARP that uses the Argo Smart Routing service to find the shortest path through our global network of data centers to reach the user’s destination.
Your team can begin using Cloudflare WARP today. Navigate to the Cloudflare for Teams dashboard and purchase the Cloudflare Gateway or Cloudflare for Teams Standard plan. Once purchased, you can create a rule to determine who in your organization can use Cloudflare WARP.
Your end users can launch the client, input your team’s organization name, and login to begin using WARP+. Alternatively, you can deploy the application with settings preconfigured using an device management solution like JAMF or InTune.
Cloudflare WARP seamlessly integrates with Gateway’s DNS filtering to bring secure, encrypted, DNS resolution to roaming devices. Users can input the DoH subdomain of a location in your Cloudflare for Teams account to begin using your organization’s DNS filtering settings wherever they work.
3. Replace your VPN with Cloudflare Access
When we were a smaller team and relied on a VPN, our IT help desk received hundreds of tickets complaining about our VPN. Some of these descriptions might look familiar.
We built Cloudflare Access as a way to replace using a VPN as the gatekeeper to applications. Cloudflare Access follows a model known as Zero Trust security where Cloudflare’s network, by default, does not trust any connection. Every user attempting to reach an application has to prove they should be allowed to access that application based on rules that administrators configure. With our new Teams free plan, up to 50 seats of Access are available at no cost.
That sounds like adding a burden, but Cloudflare Access integrates with your team’s identity provider and single sign-on (SSO) options to make any application feel as seamless as a SaaS application with SSO. Even if your team does not have a corporate identity provider, you can integrate Access with free services like GitHub and LinkedIn, so your employees and partners can authenticate without adding cost.
For hosted applications, you can connect your origin to Cloudflare’s network without opening holes in your firewall using Argo Tunnel. Cloudflare’s network will accelerate the traffic from that origin to your users along fast lanes using our global private backbone.
When your team members need to connect to an application, they can visit it directly or start from a custom app launcher for your team. When they arrive, they’ll be prompted to login with your identity provider and Access will check their identity, and other characteristics like country of login, against rules that you create in the Cloudflare for Teams dashboard.
Cloudflare’s free plan includes up to 50 seats of Cloudflare Access at no cost so that your team can begin
4. Add a Secure Web Gateway to block threats and file loss
With Cloudflare WARP, all of the traffic leaving your devices now routes through Cloudflare’s network. However, threats and data loss can hide inside of that traffic. You can add Cloudflare Gateway’s HTTP filtering to your team’s Cloudflare WARP usage to block threats and file loss. For example, if your team uses Box you can restrict all file uploads to other cloud based storage services to ensure everything stays in one, approved place.
To get started, navigate to the Policies section of the Cloudflare for Teams dashboard. Select the HTTP tab to begin building rules that inspect traffic for potential issues like known malicious URLs or files being uploaded to unapproved destinations.
To inspect traffic, you’ll need to download and install a certificate on the enrolled devices. Once installed, you can enable HTTP filtering from the Policies tab to begin enforcing the policies that you created and capturing event logs.
5. Bring Zero Trust rules to your SaaS applications
If you don’t have self-hosted applications, or also use SaaS applications, you can still bring the same Zero Trust rules to the SaaS applications that your team uses with Cloudflare Access for SaaS – wherever they live. With Access for SaaS, companies can now centrally manage user access and security monitoring for all applications.
You can integrate Cloudflare Access as an identity provider to any SaaS application that supports SAML SSO. That integration will send all login attempts through Cloudflare’s network to your configured identity providers and enforce rules that you control.
Access for SaaS still includes the ability to run multiple identity providers simultaneously. When users login to the SaaS application, they’ll be prompted to pick the identity provider they need, or we’ll send them directly to the only provider you want to use for that application.
Once deployed, Access for SaaS gives your team high visibility, with low effort, into every login to both internal and SaaS applications. You can use the new Access for SaaS feature as part of the Cloudflare for Teams free plan for up to 50 users.
6. Soon: Protect small business office networks
Cloudflare’s Magic Transit™ product takes everything we learned protecting our own network from IP-layer attacks and extends that security to our customers who operate their own IP address space. By protecting that network, customers also benefit from performant and reliable IP connectivity to the Internet.
Today, some of the largest enterprises in the world rely on Magic Transit to keep their business safe from attack. We plan to extend that same protection and connectivity to teams who operate smaller networks in upcoming releases.
What’s next?
Cloudflare One represents our vision for the future of the corporate network, and we’re just getting started adding products and features that help teams move to that model. That said, your team shouldn’t have to wait to begin connecting through Cloudflare and securing your data and applications with our network.
To get started, sign up for a Cloudflare account and follow the steps above. If you have any questions on setting up Cloudflare One as a small business, or large enterprise, please let us know in this community forum post.
Web browsers are the culprit behind 70% of endpoint compromises. The same application that connects users to the entire Internet also connects you to all of the potentially harmful parts of the Internet. It’s an open door to nearly every connected system on the planet, which is powerful and terrifying.
We also rely on browsers more than ever. Most applications that we use live in a browser and that will continue to increase. For more and more organizations, a corporate laptop is just a managed web browser machine.
To keep those devices safe, and the data they hold or access, enterprises have started to deploy “browser isolation” services where the browser itself doesn’t run on the machine. Instead, the browser runs on a virtual machine in a cloud provider somewhere. By running away from the device, threats from the browser stay on that virtual machine somewhere in the cloud.
However, most isolation solutions take one of two approaches that both ruin the convenience and flexibility of a web browser:
Record the isolated browser and send a live stream of it to the user, which is slow and makes it difficult to do basic things like input text to a form.
Unpack the webpage, inspect it, repack it and send it to the user – sometimes missing threats or more often failing to repack the webpage in a way that it still works.
Today, we’re excited to open up a beta of a third approach to keeping web browsing safe with Cloudflare Browser Isolation. Browser sessions run in sandboxed environments in Cloudflare data centers in 200 cities around the world, bringing the remote browser milliseconds away from the user so it feels like local web browsing.
Instead of streaming pixels to the user, Cloudflare Browser Isolation sends the final output of a browser’s web page rendering. The approach means that the only thing ever sent to the device is a package of draw commands to render the webpage, which also makes Cloudflare Browser Isolation compatible with any HTML5 compliant browser.
The result is a browser that just feels like a browser, while keeping threats far away from the device.
We’re inviting users to sign up for the beta today as part of Zero Trust week at Cloudflare. If you’re interested in signing up now, visit the bottom of this post. If you’d like to find out how this works, keep reading.
The unexpected universal productivity application
While it never quite became the replacement operating system Marc Andreessen predicted in 1995, the web browser is perhaps the most important application today on end-user devices. In the workplace, many people spend the majority of their at-work computer time entirely within a web browser connected to internal apps and external SaaS applications and services. As this has occurred, browsers have needed to become increasingly complex — to address the expanding richness of the web and the demands of modern web applications such as Office 365 and Google Workplace.
However, despite the pivotal and ubiquitous role of web browsers, they are the least controlled application in the enterprise. Businesses struggle to control how users interact with web browsers. It’s all too easy for a user to inadvertently download an infected file, install a malicious extension, upload sensitive company data or click a malicious zero-day link in an email or on a webpage.
Making the problem worse is the growing prevalence of BYOD. It makes it difficult to enforce which browsers are used or if they are properly patched. Mobile device management (MDM) is a step in the right direction, but just like the slow patching cycles of on-premise firewalls, MDM can often be too slow to protect against zero day threats. I’ve been the recipient of many mass emails from CISO’s reminding everyone to patch their browser and to do it right now because this time it’s “really important” (CVE-2019-5786).
Reimagining the browser
Earlier this week we announced Cloudflare One, which is our vision for the future of the corporate network. The fundamental approach we’ve taken is a blank sheet: to zero out all the assumptions of the old model (like castle-and-moat) and usher in a new model based on the complex nature of today’s corporate networking and the shift to Zero Trust, cloud-based networking-as-a-service.
It would be impossible to do this without thinking about the browser. Remote computing technologies have offered the promise of fixing the problems of the browser for some time — a future where anyone can benefit from the security and scale of cloud computing on their personal device. The reality has been that getting a generally performant solution is much more difficult than it sounds. It requires sending a user’s input over the Internet, computing that input, retrieving resources off the web, and then streaming them back to the user. And it all must occur in milliseconds, to create an illusion of using a local piece of software.
The general experience has been terrible, and many implementations have created nothing but angry emails and help-desk tickets for IT folks.
It is a tough problem, and it’s something we’ve been hard at work at solving. By delivering a vector-based stream that scales across any display size without requiring high bandwidth connections we’re able to reproduce the native browser experience remotely. Users experience the website as it was intended, without all the compatibility issues introduced by scrubbing HTML, CSS and JavaScript. And performance issues are aided tremendously by the fact that the managed browser is hosted only milliseconds away on our network.
How secure remote browsing fits in with Cloudflare for Teams
Before Cloudflare Browser Isolation, Cloudflare for Teams consisted of two core services:
Cloudflare Access creates a Zero Trust network perimeter that allows users to access corporate applications without needing to poke holes in their internal network with a legacy VPN appliance.
Cloudflare Gateway creates a Secure Web Gateway that protects users from threats on any website.
These tools are excellent for protecting private Internet properties from unauthorized access and web browsing activity from known malicious websites. But what about unknown and unforeseeable threats?
Cloudflare Browser Isolation answers this question by sandboxing a web browser in a remote container that is easily disposed of at the end of the user’s browsing session or when compromised.
Should an unknown threat such as a zero day vulnerability or malicious website exploit any of the hundreds of Web APIs, the attack is limited to a browser running in a supervised cloud environment leaving the end-user’s device unaffected.
The Network is the Computer®
Web browsers are the foundation that the shift to the cloud has been built on. It’s just that they’ve always run in the wrong place.
In the same way that it made no sense for a developer to run and maintain the hardware that their application runs on, the same exact case can be made for the other side of the cloud’s equation: the browser. Funnily enough, the solution is exactly the same: like the developer’s application, the browser needed to move to the cloud. However, as with all disruptions, it takes time and investment for the performance of the new technology to catch up to the old one. When AWS was first launched in 2006, the inherent limitations meant that for most developers, it made sense to continue to run on-premise solutions.
At some point though, the technology improves to the point where the disruption can start taking over from the previous paradigm.
The limiting factor until today for a cloud-based browser has often been the experience of using it. A user’s experience is limited by the speed of light; it limits the time it takes a user’s input to travel to the remote data center and be returned to their display. In a perfect world, this needs to occur within milliseconds to deliver a real time experience.
Cloudflare has one very big advantage in solving that problem.
To deliver real-time remote computing experiences, each of our 200+ data centers are capable of serving remote browsing sessions within the blink of an eye of nearly everyone connected to the Internet. This allows us to deliver a low latency, responsive stream of a webpage regardless of where you’re physically located.
What’s next?
But that’s enough talking about it. We’d love for you to try it! Please complete the form here to sign up to be one of the first users of this new technology in our network. We’ll be in touch as we expand the beta to more users.
Earlier this week, we announced Cloudflare One, a single platform for networking and security management. Cloudflare One extends the speed, reliability, and security we’ve brought to Internet properties and applications over the last decade to make the Internet the new enterprise WAN.
Underpinning Cloudflare One is Cloudflare’s global network – today, our network spans more than 200 cities worldwide and is within milliseconds of nearly everyone connected to the Internet. Our network handles, on average, 18 million HTTP requests and 6 million DNS requests per second. With 1 billion unique IP addresses connecting to the Cloudflare network each day, we have one of the broadest views on Internet activity worldwide.
We see a large diversity of Internet traffic across our entire product suite. Every day, we block 72 billion cyberthreats. This visibility provides us with a unique position to understand and mitigate Internet threats, and enables us to see new threats and malware before anyone else.
At the beginning of this month, as part of our 10th Birthday Week, we launched Cloudflare Radar, which shares high-level trends with the general public based on our network’s aggregate data. The same data that powers that view of the Internet also gives us the ability to create new insights to keep your team safer.
Today, we are excited to announce the next phase of network and threat intelligence at Cloudflare: the launch of Cloudflare One Intel. Cloudflare One Intel streamlines network and security operations by converting the data we can gather on our network into actionable insights.
The challenge with the traditional security operations
Most enterprises use a large array of point solutions to ensure that the corporate network remains fast, available and secure. Security teams typically aggregate logs from these point solutions into their SIEM and create custom alerts for incident detection.
Once an incident has been detected, security teams will quickly respond with remediating actions to prevent data loss, such as removing a compromised device’s access controls or adding a malicious hostname or URL to a block list.
Along with incident remediation, security teams will conduct an investigation of the incident to uncover more details about the attacker. Pivoting across historical DNS records, SSL certificate fingerprints, malware samples, and other indicators of compromise, security researchers will try to uncover more details about an attacker. Linked indicators then get fed back onto block lists in point solutions to prevent subsequent attacks.
However, there are several challenges with traditional incident detection and response. Security operations teams are often overwhelmed by the plethora of logs and alerts. With threat intelligence, SIEMs, and control planes all in different platforms, incident detection, remediation and forensics can be slow, arduous, and expensive.
Improving Incident Response with Cloudflare One
We want to make network and security operations as streamlined as possible. Cloudflare One Intel helps network and security teams detect and respond to incidents more efficiently. That means bringing together insights from your network activity, global Internet intelligence, and automated remediation in a single platform.
As part of the mission to help security teams detect and block emerging security threats more efficiently we are releasing two features within Cloudflare Gateway: DNS tunneling detection and domain insights.
What is DNS Tunneling?
DNS tunneling is the misuse of the Domain Name System (DNS) protocol to encode another protocol’s data into a series of DNS queries and response messages. DNS tunneling is often used to circumvent a corporate firewall. For example, DNS tunneling might be used to visit a website that is blocked on the corporate firewall, distribute malware from a command & control server, or exfiltrate sensitive data.
DNS tunneling isn’t only used for malicious activities. One of the most common uses of DNS tunneling is by antivirus software, which will often use DNS tunneling to look up file signatures.
Blocking DNS tunneling using Cloudflare Gateway
Starting today, customers using Cloudflare Gateway can block hostnames associated with DNS tunneling using the “DNS Tunneling” filter in Gateway’s DNS filtering policies. This feature is available to all Gateway users at no additional cost.
You can begin using the filter by navigating to the Policies section of the Gateway product and selecting the “Security Threats” tab. Once you check the “DNS Tunneling” box, Gateway will automatically block any requests made by your organization’s users to domains on this list. Should you want to manually override any specific domains, you can use the “Domain Override” feature to remove the block policy on a specific domain.
We previously included known malicious DNS tunnels in our “Anonymizer” category within Gateway’s security threat categories. We are now pulling that into its own category so that customers can have more granular visibility into threats on their network. Further, we are expanding the filter beyond known malicious DNS tunnels to include newly emerging threats, so that customers can block these threats as soon as we see them on our network.
How we use machine learning to detect DNS tunneling
Using machine learning, Cloudflare detects anomalous DNS request patterns and flags these requests as suspected DNS tunneling. Our model analyzes requests and detects anomalous behavior at a frequency of every five minutes.
Once a set of requests is flagged, we add the associated hostname to our “DNS Tunneling” category. We do not add hostnames of commonly allowed DNS tunnels to this list, such as those used by antivirus software.
Our model not only blocks hostnames associated with DNS tunneling seen on your network, but across the entire Cloudflare network. Processing over 500 billion DNS queries each day, we have unique insight into global DNS traffic patterns.
Adding transparency to security
Cloudflare’s unique insight into global Internet traffic is what powers the intelligence behind Cloudflare One. DNS tunneling detection is one example of how we use aggregated data from our network to improve Internet security for everyone. But, until now, that has been opaque to users.
Security teams investigating the threats that impact their organization need more transparency. Cloudflare One Intel consolidates the information we have about the potentially harmful sites and properties that can target your organization.
Starting today, with a single click, administrators reviewing logs in Cloudflare Gateway can get a comprehensive breakdown of any site being allowed or blocked.
In this expanded view, you can now click the “View Domain Insights” button, which will take you to the Cloudflare Radar Domain Insights page for the requested hostname. This feature is available to all Gateway users at no additional cost.
What’s Next
These new features are just the beginning of Cloudflare One Intel. Over the coming weeks and months, we’ll be rolling out more features across the Cloudflare One platform that will make our Internet intelligence more accessible and actionable. Stay tuned for premium features available in Cloudflare Radar for Cloudflare Gateway customers.
Get started now
Cloudflare Radar is available to everyone for free – you can check it out here and start exploring our Internet intelligence.
To protect your team from threats on the Internet that utilize DNS tunnelling, sign up for a Cloudflare Gateway account and use the Security filter setting to block DNS tunnelling attempts. DNS-based security and content filtering is available for free across every Gateway plan.
Cloudflare launched ten years ago to keep web-facing properties safe from attack and fast for visitors. Cloudflare customers owned Internet properties that they placed on our network. Visitors to those sites and applications enjoyed a faster experience, but that speed was not consistent for accessing Internet properties outside the Cloudflare network.
Over the last few years, we began building products that could help deliver a faster and safer Internet to everyone, not just visitors to sites on our network. We started with the first step to visiting any website, a DNS query, and released the world’s fastest public DNS resolver, 1.1.1.1. Any Internet user could improve the speed to connect to any website simply by changing their resolver.
While making the Internet faster for users, we also focused on making it more private. We built 1.1.1.1 to accelerate the last mile of connections, from user to our edge or other destinations on the Internet. Unlike other providers, we did not build it to sell ads.
Last year we went one step further to make the entire connection from a device both faster and safer when we launched Cloudflare WARP. With the push of a button, users could connect their mobile device to the entire Internet using a WireGuard tunnel through a Cloudflare data center near to them. Traffic to sites behind Cloudflare became even faster and a user’s experience with the rest of the Internet became more secure and private.
We brought that experience to desktops in beta earlier this year, and are excited to announce the general availability of Cloudflare WARP for desktop users today. The entire Internet can now be more secure and private regardless of how you connect.
Bringing the power of WARP to security teams everywhere
WARP made the Internet faster and more private for individual users everywhere. But as businesses embraced remote work models at scale, security teams struggled to extend the security controls they had enabled in the office to their remote workers. Today, we’re bringing everything our users have come to expect from WARP to security teams. The release also enables new functionality in our Cloudflare Gateway product.
Customers can use the Cloudflare WARP application to connect corporate desktops to Cloudflare Gateway for advanced web filtering. The Gateway features rely on the same performance and security benefits of the underlying WARP technology, now with security filtering available to the connection.
The result is a simple way for enterprises to protect their users wherever they are without requiring the backhaul of network traffic to a centralized security boundary. Instead, organizations can configure the WARP client application to securely and privately send remote users’ traffic through a Cloudflare data center near them. Gateway administrators apply policies to outbound Internet traffic proxied through the client, allowing organizations to protect users from threats on the Internet, and stop corporate data from leaving their organization.
Privacy, Security and Speed for Everyone
WARP was built on the philosophy that even people who don’t know what “VPN” stands for should be able to still easily get the protection a VPN offers. For those of us unfortunately very familiar with traditional corporate VPNs, something better was needed. Enter our own WireGuard implementation called BoringTun.
The WARP application uses BoringTun to encrypt all the traffic from your device and send it directly to Cloudflare’s edge, ensuring that no one in between is snooping on what you’re doing. If the site you are visiting is already a Cloudflare customer, the content is immediately sent down to your device. With WARP+ we use Argo Smart Routing to to devise the shortest path through our global network of data centers to reach whomever you are talking to.
Combined with the power of 1.1.1.1 (the world’s fastest public DNS resolver), WARP keeps your traffic secure, private and fast. Since nearly everything you do on the Internet starts with a DNS request, choosing the fastest DNS server across all your devices will accelerate almost everything you do online. Speed isn’t everything though, and while the connection between your application and a website may be encrypted, DNS lookups for that website were not. This allowed anyone, even your Internet Service Provider, to potentially snoop (and sell) on where you are going on the Internet.
Cloudflare will never snoop or sell your personal data. And if you use DNS-over-HTTPS or DNS-over-TLS to our 1.1.1.1 resolver, your DNS request will be sent over a secure channel. This means that if you use the 1.1.1.1 resolver then in addition to our privacy guarantees an eavesdropper can’t see your DNS requests. Don’t take our word for it though, earlier this year we published the results of a third-party privacy examination, something we’ll keep doing and wish others would do as well.
For Gateway customers, we are committed to privacy and trust and will never sell your personal data to third parties. While your administrator will have the ability to audit your organization’s traffic, create rules around how long data is retained, or create specific policies about where they can go, Cloudflare will never sell your personal data or use your personal data to retarget you with advertisements. Privacy and control of your organization’s data is in your hands.
Now integrated with Cloudflare Gateway
Traditionally, companies have used VPN solutions to gate access to corporate resources and keep devices secure with their filtering rules. These connections quickly became a point of failure (and intrusion vector) as organizations needed to manage and scale up VPN servers as traffic through their on premise servers grew. End users didn’t like it either. VPN servers were usually overwhelmed at peak times, the client was bulky and they were rarely made with performance in mind. And once a bad actor got in, they had access to everything.
Traditional VPN architecture
In January 2020, we launched Cloudflare for Teams as a replacement to this model. Cloudflare for Teams is built around two core products. Cloudflare Access is a Zero Trust solution allowing organizations to connect internal (and now, SaaS) applications to Cloudflare’s edge and build security rules to enforce safe access to them. No longer were VPNs a single entry point to your organization; users could work from anywhere and still get access. Cloudflare Gateway’s first features focused on protecting users from threats on the Internet with a DNS resolver and policy engine built for enterprises.
The strength and power of WARP clients, used today by millions of users around the world, will enable incredible new use cases for security teams:
Encrypt all user traffic – Regardless of your users’ location, all traffic from their device is encrypted with WARP and sent privately to the nearest WARP endpoint. This keeps your users and your organizations protected from whomever may be snooping. If you still used a traditional VPN on top of Access to encrypt user traffic, that is no longer needed.
WARP+ – Cloudflare offers a premium WARP+ service for customers who want additional speed benefits. That now comes packaged into Teams deployments. Any Teams customer who deploys the Teams client applications will automatically receive the premium speed benefits of WARP+.
Gateway for remote workers – Until today, Gateway required that you keep track of all your users’ IP addresses and build policies per location. This made it difficult to enforce policy or provide malware protection when a user took their device to a new location. With the client installed, these policies can be enforced anywhere.
L7 Firewall and user based policies – Today’s announcement of Cloudflare Gateway SWG and Secure DNS allows your organization to enforce device authentication to your Teams account, enabling you to build user-specific policies and force all traffic through the firewall.
Device and User auditing – Along with user and device policies, administrators will also be able to audit specific user and device traffic. Used in conjunction with logpush, this will allow your organization to do detailed level tracing in case of a breach or audit.
Enroll your organization to use the WARP client with Cloudflare for Teams
We know how hard it can be to deploy another piece of software in your organization, so we’ve worked hard to make deployment easy. To get started, just navigate to our sign-up page and create an account. If you already have an active account, you can bypass this step and head straight to the Cloudflare for Teams dashboard where you’ll be dropped directly into our onboarding flow. After you have signed up and configured your team, setup a Gateway policy and then choose one of the three ways to install the clients to enforce that policy from below:
Self Install If you are a small organization without an IT department, asking your users to download the client themselves and type in the required settings is the fastest way to get going.
Manually join an organization
Scripted Install Our desktop installers support the ability to quickly script the installation. In the case of Windows, this is as easy as this command line:
Cloudflare_WARP_Release-x64.msi /quiet ORGANIZATION="<insert your org>" SERVICE_MODE="warp" ENABLE="true" GATEWAY_UNIQUE_ID="<insert your gateway DoH domain>" SUPPORT_URL=”<mailto or http of your support person>"
Managed Device Organizations with MDM tools like Intune or JAMF can deploy WARP to their entire fleet of devices from a single operation. Just as you preconfigure all other device settings, WARP can be set so that all end users need to do is login with your team’s identity provider by clicking on the Cloudflare WARP client after it has been deployed.
Microsoft Intune Configuration
For a complete list of the installation options, required fields and step by step instructions for all platforms see the WARP Client documentation.
What’s coming next
There is still more we want to build for both our consumer users of WARP and our Cloudflare for Teams customers. Here’s a sneak peek at some of the ones we are most excited about (and allowed to share):
New partner integrations with CrowdStrike and VMware Carbon Black (Tanium available today) will allow you to build even more comprehensive Cloudflare Access policies that check for device health before allowing users to connect to applications
Split Tunnel support will allow you or your organization to specify applications, sites or IP addresses that should be excluded from WARP. This will allow content like games, streaming services, or any application you choose to work outside the connection.
BYOD device support, especially for mobile clients. Enterprise users that are not on the clock should be able to easily toggle off “office mode,” so corporate policies don’t limit personal use of their personal devices.
We are still missing one major operating system from our client portfolio and Linux support is coming.
Download now
We are excited to finally share these applications with our customers. We’d especially like to thank our Cloudflare MVP’s, the 100,000+ beta users on desktop, and the millions of existing users on mobile who have helped grow WARP into what it is today.
In January 2020, we launched Cloudflare for Teams—a new way to protect organizations and their employees globally, without sacrificing performance. Cloudflare for Teams centers around two core products – Cloudflare Access and Cloudflare Gateway.
In March 2020, Cloudflare launched the first feature of Cloudflare Gateway, a secure DNS filtering solution powered by the world’s fastest DNS resolver. Gateway’s DNS filtering feature kept users safe by blocking DNS queries to potentially harmful destinations associated with threats like malware, phishing, or ransomware. Organizations could change the router settings in their office and, in about five minutes, keep the entire team safe.
Shortly after that launch, entire companies began leaving their offices. Users connected from initially makeshift home offices that have become permanent in the last several months. Protecting users and data has now shifted from a single office-level setting to user and device management in hundreds or thousands of locations.
Security threats on the Internet have also evolved. Phishing campaigns and malware attacks have increased in the last six months. Detecting those types of attacks requires looking deeper than just the DNS query.
Starting today, we’re excited to announce two features in Cloudflare Gateway that solve those new challenges. First, Cloudflare Gateway now integrates with the Cloudflare WARP desktop client. We built WARP around WireGuard, a modern, efficient VPN protocol that is much more efficient and flexible than legacy VPN protocols.
Second, Cloudflare Gateway becomes a Secure Web Gateway and performs L7 filtering to inspect traffic for threats that hide below the surface. Like our DNS filtering and 1.1.1.1 resolver, both features are powered by everything we’ve learned by offering Cloudflare WARP to millions of users globally.
Securing the distributed workforce
Our customers are largely distributed workforces with employees split between corporate offices and their homes. Due to the pandemic, this is their operating environment for the foreseeable future.
The fact that users aren’t located at fixed, known locations (with remote workers allowed by exception) has created challenges for already overworked IT staff:
VPNs are an all-or-nothing approach to providing remote access to internal applications. We address this with Cloudflare Access and our Zero Trust approach to security for internal applications and now SaaS applications as well.
VPNs are slow and expensive. However, backhauling traffic to a centralized security boundary has been the primary approach to enforcing corporate content and security policies to protect roaming users. Cloudflare Gateway was created to tackle this problem for our customers.
Until today, Cloudflare Gateway has provided security for our customers through DNS filtering. While this provides a level of security and content control that’s application-agnostic, it still leaves our customers with a few challenges:
Customers need to register the source IP address of all locations that send DNS queries to Gateway, so their organization’s traffic can be identified for policy enforcement. This is tedious at best, if not intractable for larger organizations with hundreds of locations.
DNS policies are relatively coarse, with enforcement performed with an all-or-nothing approach per domain. Organizations lack the ability to, for example, allow access to a cloud storage provider but block the download of harmful files from known-malicious URLs.
Organizations that register IP addresses frequently use Network Address Translation (NAT) traffic in order to share public IP addresses across many users. This results in a loss of visibility into DNS activity logs at the individual user level. So while IT security admins can see that a malicious domain was blocked, they must leverage additional forensic tools to track down a potentially compromised device.
Starting today, we are taking Cloudflare Gateway beyond a secure DNS filtering solution by pairing the Cloudflare for Teams client with a cloud L7 firewall. Now our customers can toss out another hardware appliance in their centralized security boundary and provide enterprise-level security for their users directly from the Cloudflare edge.
Protecting users and preventing corporate data loss
DNS filtering provides a baseline level of security across entire systems and even networks, since it’s leveraged by all applications for Internet communications. However, application-specific protection offers granular policy enforcement and visibility into whether traffic should be classified as malicious.
Today we’re excited to extend the protection we offer through DNS filtering by adding an L7 firewall that allows our customers to apply security and content policies to HTTP traffic. This provides administrators with a better tool to protect users through granular controls within HTTP sessions, and with visibility into policy enforcement. Just as importantly, it also gives our customers greater control over where their data resides. By building policies, customers can specify whether to allow or block a request based on file type, on whether the request was to upload or download a file, or on whether the destination is an approved cloud storage provider for the organization.
Enterprises protect their users’ Internet traffic wherever they are by connecting to Cloudflare with the Cloudflare for Teams client. This client provides a fast, secure connection to the Cloudflare data center nearest them, and it relies on the same Cloudflare WARP application millions of users connect through globally. Because the client uses the same WARP application under the hood, enterprises can be sure it has been tested at scale to provide security without compromising on performance. Cloudflare WARP optimizes network performance by leveraging WireGuard for the connection to the Cloudflare edge.
The result is a secure, performant connection for enterprise users wherever they are without requiring the backhaul of network traffic to a centralized security boundary. By connecting to Cloudflare Gateway with the Cloudflare for Teams client, enterprise users are protected through filtering policies applied to all outbound Internet traffic–protecting users as they navigate the Internet and preventing the loss of corporate data.
Cloudflare Gateway now supports HTTP traffic filtering based on a variety of criteria including:
To complement DNS filtering policies, IT admins can now create L7 firewall rules to apply granular policies on HTTP traffic.
For example, an admin may want to allow users to navigate to useful parts of Reddit, but block undesirable subreddits.
Or to prevent data loss, an admin could create a rule that allows users to receive content from popular cloud storage providers but not upload select file types from corporate devices.
Another admin might want to prevent malicious files from being smuggled in through zip file downloads, so they may decide to configure a rule to block downloads of compressed file types.
Having used our DNS filtering categories to protect internal users, an admin may want to simply block security threats based on the classification of full URLs. Malware payloads are frequently disseminated from cloud storage and with DNS filtering an admin has to choose whether to allow or deny access to the entire domain for a given storage provider. URL filtering gives admins the ability to filter requests for the exact URLs where malware payloads reside, allowing customers to continue to leverage the usefulness of their chosen storage provider.
And because all of this is made possible with the Cloudflare for Teams client, distributed workforces with roaming clients receive this protection wherever they are through a secure connection to the Cloudflare data center nearest them.
We’re excited to protect teams as they browse the Internet by inspecting HTTP traffic, but what about non-HTTP traffic? Later this year, we will extend Cloudflare Gateway by adding support for IP, port, and protocol filtering with a cloud L4 firewall. This will allow administrators to apply rules to all Internet-bound traffic, like rules that allow outbound SSH, or rules that determine whether to send HTTP traffic arriving on a non-standard port to the L7 firewall for HTTP inspection.
At launch, Cloudflare Gateway will allow administrators to create policies that filter DNS and HTTP traffic across all users in an organization. This creates a great baseline for security. However, exceptions are part of reality: a one-size-fits-all approach to content and security policy enforcement rarely matches the specific needs of all users.
To address this, we’re working on supporting rules based on user and group identity by integrating Cloudflare Access with a customer’s existing identity provider. This will let administrators create granular rules that also leverage context around the user, such as:
Deny access to social media to all users. But if John Doe is in the marketing group, allow him to access these sites in order to perform his job role.
Only allow Jane Doe to connect to specific SaaS applications through Cloudflare Gateway, or a certain device posture.
The need for policy enforcement and logging visibility based on identity arises from the reality that users aren’t tied to fixed, known workplaces. We meet that need by integrating identity and protecting users wherever they are with the Cloudflare for Teams client.
What’s next
People do not start businesses to deal with the minutiae of information technology and security. They have a vision and a product or service they want to get out in the world, and we want to get them back to doing that. We can help eliminate the hard parts around implementing advanced security tools that are usually reserved for larger, more sophisticated organizations, and we want to make them available to teams regardless of size.
The launch of both the Cloudflare for Teams client and L7 firewall lays the foundation for an advanced Secure Web Gateway with integrations including anti-virus scanning, CASB, and remote browser isolation—all performed at the Cloudflare edge. We’re excited to share this glimpse of the future our team has built—and we’re just getting started.
Get started now
All of these new capabilities are ready for you to use today. The L7 firewall is available in Gateway standalone, Teams Standard, and Teams Enterprise plans. You can get started by signing up for a Gateway account and following the onboarding directions.
Cloudflare secures your origin servers by proxying requests to your DNS records through our anycast network and to the external IP of your origin. However, external IP addresses can provide attackers with a path around Cloudflare security if they discover those destinations.
We launched Argo Tunnel as a secure way to connect your origin to Cloudflare without a publicly routable IP address. With Tunnel, you don’t send traffic to an external IP. Instead, a lightweight daemon runs in your infrastructure and creates outbound-only connections to Cloudflare’s edge. With Argo Tunnel, you can quickly deploy infrastructure in a Zero Trust model by ensuring all requests to your resources pass through Cloudflare’s security filters.
Originally, your Argo Tunnel connection corresponded to a DNS record in your account. Requests to that hostname hit Cloudflare’s network first and our edge sends those requests over the Argo Tunnel to your origin. Since these connections are outbound-only, you no longer need to poke holes in your infrastructure’s firewall. Your origins can serve traffic through Cloudflare without being vulnerable to attacks that bypass Cloudflare.
However, fitting an outbound-only connection into a reverse proxy creates some ergonomic and stability hurdles. The original Argo Tunnel architecture attempted to both manage DNS records and create connections. When connections became disrupted, Argo Tunnel would recreate the entire deployment. Additionally, Argo Tunnel connections could not be treated like regular origin servers in Cloudflare’s control plane and had to be managed directly from the server-side software.
Today, we’re introducing a new architecture that treats Argo Tunnel connections like a true origin server without the risk of exposure to the rest of the Internet. Now, when you create a Tunnel connection, you can point DNS records for any hostname in your account, or load balancer pools, to that connection from the Cloudflare dashboard. You can also run Argo Tunnel connections without the need for leaving certificates and service tokens on your servers.
Keeping persistent objects persistent
Argo Tunnel has objects that tend to stay persistent (DNS records) and objects that deliberately change and recreate (connections from `cloudflared` to Cloudflare). Argo Tunnel previously conflated the two categories, which led to some issues.
The edge vs. the control plane
Cloudflare as a whole consists of two components: the edge network and the control plane that manages the configuration of that network.
The data centers in 200 cities around the world that proxy traffic to your origin make up the edge network. These data centers are highly available and, thanks to Anycast IP routing, can gracefully handle traffic if one or more data centers go offline.
When you make a change to something in Cloudflare (whether via the UI in Cloudflare’s dashboard, or the API) our control plane receives it, authenticates it, and then pushes it to our edge.
If the control plane goes down, the edge should not be degraded – traffic will continue to be served using the most recent configuration. At launch, Argo Tunnel muddled the two in some places, which meant that control plane issues could become edge issues for Tunnel users.
Starting every Tunnel from scratch
Regardless of whether a Tunnel is connecting for the first time or the 100th, the operation repeated a series of high-level steps in the original architecture:
cloudflared connects to an Argo Tunnel service running in Cloudflare’s control plane. That service registers your Tunnel and its connections.
cloudflared creates a public DNS record for your hostname which points to a randomly generated CNAME record for load balanced Tunnels or an IPv6 for traditional Tunnels. The ephemeral CNAME record represents your Tunnel.
The control plane then tells Cloudflare’s edge about these DNS entries and where the CNAME or IP address should send traffic. Traffic can now be routed to cloudflared.
If the Tunnel disconnects, for any reason, the Argo Tunnel service unregistered the Tunnel and deleted the DNS record.
The last step is an issue. In most cases, you create an Argo Tunnel for a service meant to run indefinitely. The DNS record should stay persistent – it’s an app that you manage that should not change. However, a simple restart or disconnection meant that cloudflared had to follow every step and start itself from scratch. If any of those upstream services were degraded, the Tunnel would fail to reconnect.
This model also introduces other shortcomings. You cannot gracefully change the DNS record of a Tunnel; instead, you had to stop cloudflared and rerun the service. Visibility was limited. Load balancing introduced complications with how origins were counted.
Phase 1: Improving stability
The team started by reducing the impact of those dependencies. Over the last year, Argo Tunnel has quietly replaced single points of failure with distributed systems that are more fault tolerant.
Tunnels now live longer. Argo Tunnel has migrated to Cloudflare’s Unimog platform, which has increased the average life of a connection from minutes to days. When connections live longer, they restart less, and are then subject to fewer upstream hiccups.
Additionally, some Tunnels no longer need to follow the entire creation flow. If your Tunnel reconnects, we opportunistically try to reestablish it with the records already at our edge.
These changes have dramatically improved the stability of Argo Tunnel as a platform, but still left a couple of core problems: Tunnel reconnections were treated like new connections and managing those connections added friction.
Phase 2: Named Tunnels that outlive connections
Starting today, Argo Tunnel’s architecture distinguishes between the persistent objects (DNS records, cloudflared) from the ephemeral objects (the connections). To do that, this release introduces the concept of a permanent name that you assign to a Tunnel.
In the old model, cloudflaredcreated both the DNS record entries and established the connections from the server to Cloudflare’s network. DNS records became tied to those connections and could not be changed. Even worse, each time cloudflared restarted, we treated it like a new Tunnel and had to propagate this information into DNS and Load Balancer systems. If those had delays, the restart could become an outage.
Today’s release separates DNS creation from connection creation to make tunnels more stable and more simple to manage. In this model, you can use `cloudflared` to create an Argo Tunnel that has a persistent, stable name, that can be entirely unrelated to the hostname.
Once created, you can point DNS records in your account to a stable subdomain that relies on a UUID tied to that persistent name. Since the name and UUID do not change, your DNS record never needs to be cleaned up or recreated when Argo Tunnel restarts. In the event of a restart, the enrolled instance of cloudflared connects back to that UUID address.
You can also treat named Argo Tunnels like origin servers in this architecture – except these origins can only be connected to via a DNS record in your account. You can delete a DNS record and create a new one that points to the UUID address and traffic will be served – all without touching cloudflared.
How it works
You can begin using this new architecture today with the following steps. First, you’ll need to upgrade to the latest version of cloudflared.
1. Login to Cloudflare from `cloudflared`
Run cloudflared tunnel login and authenticate to your Cloudflare account. This step will generate a cert.pem file. That certificate contains a token that gives your instance of cloudflared the ability to create Named Tunnels in your account, as well as the ability to eventually point DNS records to them.
2. Create your Tunnel
You can now create a Tunnel that has a persistent name. Run cloudflared tunnel create <name> to do so. The name does not have to be a hostname. For example, you can assign a name that represents the application, the particular server, or the cloud environment where it runs.
cloudflared will create a Tunnel with the name that you give it and a UUID. This name will be associated with your account. Only DNS records in your account will proxy traffic to the connection. Additionally, the name will not be removed unless you actively delete it. The connections can stop and restart and will use the same name and UUID.
Creating a named Tunnel also generates a credentials file that is distinct from the cert.pem issued during the login. You only need the credentials file to run the Tunnel. If you do not want to create additional named Tunnels or DNS records from cloudflared, you can delete the cert.pem file to avoid leaving API tokens and certificates in your environment.
3. Configure Tunnel details
Configure your instance of cloudflared, including the URL that cloudflared will proxy traffic to in the configuration file. Alternatively, you can run the Tunnel in an ad hoc mode from the command line using the steps below.
4. Run your Tunnel
You can begin running the Tunnel with the command, cloudflared tunnel run <name> or cloudflared tunnel run <UUID> and it will start proxying traffic. If you are running the Tunnel without the cert.pem file and only the credentials file, you must use cloudflared tunnel run <UUID>.
5. Send traffic to your Tunnel
You can now decide how to send traffic to this persistent Tunnel. If you want to create a long-lived DNS record in the Cloudflare dashboard, you can point it to the Tunnel UUID subdomain in the format UUID.cfargotunnel.com. You can do the same in the Cloudflare Load Balancer panel to add this object to a load balanced pool where it will be treated as just one additional origin.
Alternatively, you can continue to create DNS records from cloudflared. Run the following command, cloudflared tunnel route dns <name> <hostname> or cloudflared tunnel route dns <UUID> <hostname> to associate the DNS record with the Tunnel address. You will only be able to create a DNS record from cloudflared for the zone name you selected when authenticating. Unlike the previous architecture, this DNS record will not be deleted if the Tunnel disconnects.
When this instance of cloudflared restarts, the name, UUID, and DNS record will not need to be recreated. The connection will reestablish and begin serving traffic.
[Optional] Check what Tunnels exist
You can also use this architecture to see your active Tunnels. Run cloudflared tunnel list to view the Tunnels created and their connection status. You can delete Tunnels, as well, by running cloudflared tunnel delete <name> or cloudflare tunnel delete <UUID>. To delete Tunnels, you do need the cert.pem file.
Credential and cert management
Once you have created a named Tunnel, you no longer need the cert.pem file to run that Tunnel and connect it to Cloudflare’s network. If you’re running the tunnel on a remote server or in a container, you can copy the credential file without sharing cert.pem outside your computer.
Similarly, if you want to let another person on your team run the Tunnel, you can send them the credentials file without sharing the cert.pem file as well. The cert.pem file is still required to create additional Tunnels, list existing tunnels, manage DNS records, or delete Tunnels.
The credentials file contains a secret scoped to the specific Tunnel UUID which establishes a connection from cloudflared to Cloudflare’s network. cloudflared operates like a client and establishes a TLS connection from your infrastructure to Cloudflare’s edge.
What’s next?
The new Argo Tunnel architecture is available today. You’ll need cloudflared version 2020.9.3 or later to begin using these features. The latest version of cloudflared is backwards compatible with the legacy model of Argo Tunnel. Additional documentation is available here.
We launched Cloudflare for Teams to make Zero Trust security accessible for all organizations, regardless of size, scale, or resources. Starting today, we are excited to take another step on this journey by announcing our new Teams plans, and more specifically, our Cloudflare for Teams Free plan, which protects up to 50 users at no cost. To get started, sign up today.
If you’re interested in how and why we’re doing this, keep scrolling.
Our Approach to Zero Trust
Cloudflare Access is one-half of Cloudflare for Teams – a Zero Trust solution that secures inbound connections to your protected applications. Cloudflare Access works like a bouncer, checking identity at the door to all of your applications.
The other half of Cloudflare for Teams is Cloudflare Gateway which, as our clever name implies, is a Secure Web Gateway protecting all of your users’ outbound connections to the Internet. To continue with this analogy, Cloudflare Gateway is your organization’s bodyguard, securing your users as they navigate the Internet.
Together, these two solutions provide a powerful, single dashboard to protect your users, networks, and applications from malicious actors.
A Mission-Driven Solution
At Cloudflare, our mission is to help build a better Internet. That means a better Internet for everyone, regardless of size, scale, or resources. With Cloudflare for Teams, our part in this mission is to keep your team members secure from unknown threats and your applications safe from attack, so that your team can focus on your business.
Earlier this year, shortly after we launched Cloudflare for Teams, organizations suddenly had to change the way they worked. Users left offices, and the security provided by those offices, to work from home. This accelerated the pace of IT transformation from years to days, or even hours.
To alleviate that burden, we provided Cloudflare for Teams for everyone at no cost, and with no restrictions until September 1, 2020. We also offered free one-on-one onboarding to make adoption seamless, and used those sessions to improve the product for our current users as well.
Moving forward, users will continue to work from home, and applications will continue to move away from managed data centers. While our initial free program is no longer available, our team wanted to find a new way to continue helping organizations of any size adjust to this new security model that seems to be here to stay.
The New Free Plan
Today, we are launching the Cloudflare for Teams Free plan, which brings the features of enterprise Zero Trust products and Secure Web Gateways to small teams as well.
Cloudflare for Teams Free offers robust Zero Trust security features for both internal and SaaS applications, and supports integration with a myriad of social and enterprise identity providers like AzureAD or Github. Our Free plan also includes DNS content and security filtering for multiple network locations, complete with 24 hour log retention. By offering Cloudflare for Teams Free, our goal is to empower you to take your first step on a journey to Zero Trust with us.
What You Can Do with Teams Free
With up to 50 seats of Access and Gateway, we’ve seen that the possibilities are endless. In fact, here are some of our favorite ways users are already getting the most out of Cloudflare for Teams Free today.
Collaborate on your startup. Build your product without worrying about security. Use Access to protect your development environment.
Secure your home Wi-Fi network. Point your home Wi-Fi router’s traffic to Gateway, and set up simple filtering rules to block malware and phishing attacks.
Protect the backend of your personal website. Lock down your WordPress admin panel pages, and invite collaborators to work on your blog by using Access’ one-time-pin feature.
Safeguard a guest Wi-Fi network. Shield a retail location with Gateway by enforcing your Acceptable Use Policy on your network.
Standalone and Standard
In addition to our new Cloudflare for Teams Free plan, we’re also making it easier to continue your Zero Trust journey by offering enhanced features in our standalone Cloudflare Access or Cloudflare Gateway plans.
With standalone Access, you can easily scale up or down with as many users as you need at any time for $3 per user.
Similarly, with Gateway standalone, you can safely and securely deploy DNS or HTTP security controls from 1 up to 20 different locations for $5 per user without compromising on reliability or performance.
Last but not least, we’re excited to finally give users a way to bundle with Teams Standard, which brings together everything from Access and Gateway under one simple plan at $7 per user.
Getting Started
To get started, just navigate to our sign-up page and create an account. If you already have an active account, you can head straight to the Cloudflare for Teams dashboard, where you’ll be dropped directly into our self-guided onboarding flow. From here, you’re just three steps away from deploying Access or Gateway but, in our opinion, you can’t go wrong kicking off with either.
We built Cloudflare Access™ as a tool to solve a problem we had inside of Cloudflare. We rely on a set of applications to manage and monitor our network. Some of these are popular products that we self-host, like the Atlassian suite, and others are tools we built ourselves. We deployed those applications on a private network. To reach them, you had to either connect through a secure WiFi network in a Cloudflare office, or use a VPN.
That VPN added friction to how we work. We had to dedicate part of Cloudflare’s onboarding just to teaching users how to connect. If someone received a PagerDuty alert, they had to rush to their laptop and sit and wait while the VPN connected. Team members struggled to work while mobile. New offices had to backhaul their traffic. In 2017 and early 2018, our IT team triaged hundreds of help desk tickets with titles like these:
While our IT team wrestled with usability issues, our Security team decided that poking holes in our private network was too much of a risk to maintain. Once on the VPN, users almost always had too much access. We had limited visibility into what happened on the private network. We tried to segment the network, but that was error-prone.
Around that time, Google published its BeyondCorp paper that outlined a model of what has become known as Zero Trust Security. Instead of trusting any user on a private network, a Zero Trust perimeter evaluates every request and connection for user identity and other variables.
We decided to create our own implementation by building on top of Cloudflare. Despite BeyondCorp being a new concept, we had experience in this field. For nearly a decade, Cloudflare’s global network had been operating like a Zero Trust perimeter for applications on the Internet – we just didn’t call it that. For example, products like our WAF evaluated requests to public-facing applications. We could add identity as a new layer and use the same network to protect applications teams used internally.
We began moving our self-hosted applications to this new project. Users logged in with our SSO provider from any network or location, and the experience felt like any other SaaS app. Our Security team gained the control and visibility they needed, and our IT team became more productive. Specifically, our IT teams have seen ~80% reduction in the time they spent servicing VPN-related tickets, which unlocked over $100K worth of help desk efficiency annually. Later in 2018, we launched this as a product that our customers could use as well.
By shifting security to Cloudflare’s network, we could also make the perimeter smarter. We could require that users login with a hard key, something that our identity provider couldn’t support. We could restrict connections to applications from specific countries. We added device posture integrations. Cloudflare Access became an aggregator of identity signals in this Zero Trust model.
As a result, our internal tools suddenly became more secure than the SaaS apps we used. We could only add rules to the applications we could place on Cloudflare’s reverse proxy. When users connected to popular SaaS tools, they did not pass through Cloudflare’s network. We lacked a consistent level of visibility and security across all of our applications. So did our customers.
Starting today, our team and yours can fix that. We’re excited to announce that you can now bring the Zero Trust security features of Cloudflare Access to your SaaS applications. You can protect any SaaS application that can integrate with a SAML identity provider with Cloudflare Access.
Even though that SaaS application is not deployed on Cloudflare, we can still add security rules to every login. You can begin using this feature today and, in the next couple of months, you’ll be able to ensure that all traffic to these SaaS applications connects through Cloudflare Gateway.
Standardizing and aggregating identity in Cloudflare’s network
Support for SaaS applications in Cloudflare Access starts with standardizing identity. Cloudflare Access aggregates different sources of identity: username, password, location, and device. Administrators build rules to determine what requirements a user must meet to reach an application. When users attempt to connect, Cloudflare enforces every rule in that checklist before the user ever reaches the app.
The primary rule in that checklist is user identity. Cloudflare Access is not an identity provider; instead, we source identity from SSO services like Okta, Ping Identity, OneLogin, or public apps like GitHub. When a user attempts to access a resource, we prompt them to login with the provider configured. If successful, the provider shares the user’s identity and other metadata with Cloudflare Access.
A username is just one part of a Zero Trust decision. We consider additional rules, like country restrictions or device posture via partners like Tanium or, soon, additional partners CrowdStrike and VMware Carbon Black. If the user meets all of those criteria, Cloudflare Access summarizes those variables into a standard proof of identity that our network trusts: a JSON Web Token (JWT).
A JWT is a secure, information-dense way to share information. Most importantly, JWTs follow a standard, so that different systems can trust one another. When users login to Cloudflare Access, we generate and sign a JWT that contains the decision and information about the user. We store that information in the user’s browser and treat that as proof of identity for the duration of their session.
Every JWT must consist of three Base64-URL strings: the header, the payload, and the signature.
The header defines the cryptographic operation that encrypts the data in the JWT.
The payload consists of name-value pairs for at least one and typically multiple claims, encoded in JSON. For example, the payload can contain the identity of a user.
The signature allows the receiving party to confirm that the payload is authentic.
We store the identity data inside of the payload and include the following details:
User identity: typically the email address of the user retrieved from your identity provider.
Authentication domain: the domain that signs the token. For Access, we use “example.cloudflareaccess.com” where “example” is a subdomain you can configure.
amr: If available, the multifactor authentication method the login used, like a hard key or a TOTP code.
Country: The country where the user is connecting from.
Audience: The domain of the application you are attempting to reach.
Expiration: the time at which the token is no longer valid for use.
Some applications support JWTs natively for SSO. We can send the token to the application and the user can login. In other cases, we’ve released plugins for popular providers like Atlassian and Sentry. However, most applications lack JWT support and rely on a different standard: SAML.
Converting JWT to SAML with Cloudflare Workers
You can deploy Cloudflare’s reverse proxy to protect the applications you host, which puts Cloudflare Access in a position to add identity checks when those requests hit our edge. However, the SaaS applications you use are hosted and managed by the vendors themselves as part of the value they offer. In the same way that I cannot decide who can walk into the front door of the bakery downstairs, you can’t build rules about what requests should and shouldn’t be allowed.
When those applications support integration with your SSO provider, you do have control over the login flow. Many applications rely on a popular standard, SAML, to securely exchange identity data and user attributes between two systems. The SaaS application does not need to know the details of the identity provider’s rules.
Cloudflare Access uses that relationship to force SaaS logins through Cloudflare’s network. The application itself thinks of Cloudflare Access as the SAML identity provider. When users attempt to login, the application sends the user to login with Cloudflare Access.
That said, Cloudflare Access is not an identity provider – it’s an identity aggregator. When the user reaches Access, we will redirect them to the identity provider in the same way that we do today when users request a site that uses Cloudflare’s reverse proxy. By adding that hop through Access, though, we can layer the additional contextual rules and log the event.
We still generate a JWT for every login providing a standard proof of identity. Integrating with SaaS applications required us to convert that JWT into a SAML assertion that we can send to the SaaS application. Cloudflare Access runs in every one of Cloudflare’s data centers around the world to improve availability and avoid slowing down users. We did not want to lose those advantages for this flow. To solve that, we turned to Cloudflare Workers.
The core login flow of Cloudflare Access already runs on Cloudflare Workers. We built support for SaaS applications by using Workers to take the JWT and convert its content into SAML assertions that are sent to the SaaS application. The application thinks that Cloudflare Access is the identity provider, even though we’re just aggregating identity signals from your SSO provider and other sources into the JWT, and sending that summary to the app via SAML.
Integrate with Gateway for comprehensive logging (coming soon)
Cloudflare Gateway keeps your users and data safe from threats on the Internet by filtering Internet-bound connections that leave laptops and offices. Gateway gives administrators the ability to block, allow, or log every connection and request to SaaS applications.
However, users are connecting from personal devices and home WiFi networks, potentially bypassing Internet security filtering available on corporate networks. If users have their password and MFA token, they can bypass security requirements and reach into SaaS applications from their own, unprotected devices at home.
To ensure traffic to your SaaS apps only connects over Gateway-protected devices, Cloudflare Access will add a new rule type that requires Gateway when users login to your SaaS applications. Once enabled, users will only be able to connect to your SaaS applications when they use Cloudflare Gateway. Gateway will log those connections and provide visibility into every action within SaaS apps and the Internet.
Every identity provider is now capable of SAML SSO
Identity providers come in two flavors and you probably use both every day. One type is purpose-built to be an identity provider, and the other accidentally became one. With this release, Cloudflare Access can convert either into a SAML-compliant SSO option.
Corporate identity providers, like Okta or Azure AD, manage your business identity. Your IT department creates and maintains the account. They can integrate it with SaaS Applications for SSO.
The second type of login option consists of SaaS providers that began as consumer applications and evolved into public identity providers. LinkedIn, GitHub, and Google required users to create accounts in their applications for networking, coding, or email.
Over the last decade, other applications began to trust those public identity provider logins. You could use your Google account to log into a news reader and your GitHub account to authenticate to DigitalOcean. Services like Google and Facebook became SSO options for everyone. However, most corporate applications only supported integration with a single SAML provider, something public identity providers do not provide. To rely on SSO as a team, you still needed a corporate identity provider.
Cloudflare Access converts a user login from any identity provider into a JWT. With this release, we also generate a standard SAML assertion. Your team can now use the SAML SSO features of a corporate identity provider with public providers like LinkedIn or GitHub.
Multi-SSO meets SaaS applications
We describe Cloudflare Access as a Multi-SSO service because you can integrate multiple identity providers, and their SSO flows, into Cloudflare’s Zero Trust network. That same capability now extends to integrating multiple identity providers with a single SaaS application.
Most SaaS applications will only integrate with a single identity provider, limiting your team to a single option. We know that our customers work with partners, contractors, or acquisitions which can make it difficult to standardize around a single identity option for SaaS logins.
Cloudflare Access can connect to multiple identity providers simultaneously, including multiple instances of the same provider. When users are prompted to login, they can choose the option that their particular team uses.
We’ve taken that ability and extended it into the Access for SaaS feature. Access generates a consistent identity from any provider, which we can now extend for SSO purposes to a SaaS application. Even if the application only supports a single identity provider, you can still integrate Cloudflare Access and merge identities across multiple sources. Now, team members who use your Okta instance and contractors who use LinkedIn can both SSO into your Atlassian suite.
All of your apps in one place
Cloudflare Access released the Access App Launch as a single destination for all of your internal applications. Your team members visit a URL that is unique to your organization and the App Launch displays all of the applications they can reach. The feature requires no additional administrative configuration; Cloudflare Access reads the user’s JWT and returns only the applications they are allowed to reach.
That experience now extends to all applications in your organization. When you integrate SaaS applications with Cloudflare Access, your users will be able to discover them in the App Launch. Like the flow for internal applications, this requires no additional configuration.
How to get started
To get started, you’ll need a Cloudflare Access account and a SaaS application that supports SAML SSO. Navigate to the Cloudflare for Teams dashboard and choose the “SaaS” application option to start integrating your applications. Cloudflare Access will walk through the steps to configure the application to trust Cloudflare Access as the SSO option.
Do you have an application that needs additional configuration? Please let us know.
Protect SaaS applications with Cloudflare for Teams today
We will begin expanding the Gateway beta program to integrate Gateway’s logging and web filtering with the Access for SaaS feature before the end of the year.
Today we’re announcing Cloudflare One™. It is the culmination of engineering and technical development guided by conversations with thousands of customers about the future of the corporate network. It provides secure, fast, reliable, cost-effective network services, integrated with leading identity management and endpoint security providers.
Over the course of this week, we’ll be rolling out the components that enable Cloudflare One, including our WARP Gateway Clients for desktop and mobile, our Access for SaaS solution, our browser isolation product, and our next generation network firewall and intrusion detection system.
The old model of the corporate network has been made obsolete by mobile, SaaS, and the public cloud. The events of 2020 have only accelerated the need for a new model. Zero Trust networking is the future and we are proud to be enabling that future. Having worked on the components of what is Cloudflare One for the last two years, we’re excited to unveil today how they’ve come together into a robust SASE solution and share how customers are already using it to deliver the more secure and productive future of the corporate network.
What Is Cloudflare One? Secure, Optimized Global Networking
Cloudflare One is a comprehensive, cloud-based network-as-a-service solution that is designed to be secure, fast, reliable and define the future of the corporate network. It replaces a patchwork of appliances and WAN technologies with a single network that provides cloud-based security, performance, and control through one user interface.
Cloudflare One brings together how users connect, on ramps for branch offices, secure connectivity for applications, and controlled access to SaaS into a single platform.
Cloudflare One reflects the complex nature of corporate networking today: mobile and remote users, SaaS applications, a mix of applications hosted in private data centers and public cloud, as well the challenge of employees using the broader Internet securely from their corporate and personal devices.
Whether you call this SASE or simply the new reality, today’s enterprise needs flexibility at every layer of the network and application stack. Secure and authenticated access is needed for users wherever they are: at the office, on a mobile device or working from home. Corporate network architectures need to reflect the state of modern computing that requires secure, filtered Internet access to get to SaaS or public cloud, secure application connectivity to protect against hackers and DDoS, and fast, reliable branch and home office access.
And the new corporate network needs to be global. No matter where applications are hosted, or employees reside, connectivity needs to be secure and fast. With Cloudflare’s massive global presence, traffic is secured, routed, and filtered over an optimized backbone that uses real time Internet intelligence to protect against the latest threats and route traffic around bad Internet weather and outages.
However, you’re only as strong as your weakest link. It doesn’t matter how secure your network is if you allow the wrong people access, or your end user’s devices are compromised. That is why we’re incredibly excited to announce that Cloudflare One takes the power of Cloudflare’s network and combines it with best-of-breed identity management and device integrity to create a complete solution that encompasses the entire corporate network of today and tomorrow.
Partner ecosystem: Identity Management
Most organizations already have one or more identity management systems. Rather than requiring them to change, we are integrating with all the major providers. This week we’re announcing partnerships with Okta, Ping Identity, and OneLogin. We support nearly all the other leading identity providers including Microsoft Active Directory and Google Workspace, as well as broadly adopted consumer and developer identity platforms like Github, LinkedIn, and Facebook.
Powerfully, Cloudflare One does not require you to standardize on just one identity provider. We see multiple companies that may have one identity provider for full-time employees and another for contractors. Or one they chose themselves and another they inherited from an acquisition. Cloudflare One will integrate with one or more identity providers and allow you to then set consistent policies across all your applications.
The metaphor that makes sense to me is that the identity provider issues passports and Cloudflare One is the border agent that checks that they’re valid. At any particular moment, different passports from different providers may be allowed or forbidden to enter just by updating the instructions the border agent follows.
Partner ecosystem: Device Integrity
In addition to identity, device integrity and endpoint security are an important part of a zero trust solution. This week we’re announcing partnerships with CrowdStrike, VMware Carbon Black, SenitnelOne, and Tanium. These providers run on devices and ensure that they haven’t been compromised. Again, organizations can centralize around a single vendor for device integrity or can mix and match with Cloudflare One providing a consistent control plane.
Extending the border control analogy, it’s like having a temperature screening and COVID-19 test when you enter a country. Even if you have a valid passport, if you’re not healthy then you will be turned away. By partnering with the leading identity and device integrity providers, Cloudflare One provides a robust identity and access management solution that fully delivers on the promise of Zero Trust.
We’re thrilled to partner with these leading identity management and endpoint security companies to make Cloudflare One flexible and robust.
With this as an introduction to Cloudflare One, I wanted to provide some context on why the existing paradigm doesn’t work, what the future of the enterprise network looks like, and where we go from here. In order to understand the power of Cloudflare One, you first have to understand the way we used to build and secure corporate networks and how the transition to mobile, cloud, and remote work have all forced this fundamental change in the paradigm.
The Middle(box) Ages: How Corporate Security Used to Work
The Internet was designed to be a massive, decentralized network. Any computer could connect to that network and route data from one location to another. The model provided resiliency, but did not guarantee fast or available connections. The early Internet also lacked a framework for security.
As a result, enterprises did not trust the Internet as a platform for their businesses. To keep employees productive, network connections had to be fast and available. Those connections also had to be secure. So, businesses built their own shadow versions of the Internet:
Companies purchased dedicated, private connections between offices and across their data centers in the form of expensive MPLS links.
IT teams managed complex routing across offices, VPN hardware, and clients.
Security teams deployed physical firewall boxes and DDoS appliances to keep the private network safe.
When employees had to use the Internet, security teams backhauled traffic through a central location to filter outbound connections with yet more hardware: Internet gateways.
Legacy corporate security followed a castle and moat approach. You put all your sensitive applications and data in the castle, you required all your employees to come to work in the castle every day, and then you built a metaphorical moat around the castle using firewalls, DDoS appliances, gateways and more: an unmanageable mess of devices and vendors.
The Middle(box) Ages Are Long Gone
While smarter attackers finding ways to breach moats were always a concern for the castle and moat approach, ultimately they weren’t what caused the approach to fail. Instead the change came from transformation of the technical landscape. Smartphones made workers increasingly mobile, letting them venture outside the moat. SaaS and the public cloud moved data and corporate applications out of the metaphorical castle.
And, in 2020, COVID-19 changed everything by forcing everyone who could to work remotely. If the employees weren’t coming to work in the castle anymore, the whole paradigm completely breaks down. This transition was happening already, but this year poured gasoline on the already smoldering fire. Increasingly companies are realizing that the only way forward is to embrace the fact that employees, servers and applications are now “on the Internet” and not “in the castle.” This new paradigm is known as “Zero Trust.”
Google’s seminal paper, “BeyondCorp: A New Approach to Enterprise Security,” published in 2014, brought the idea of Zero Trust security into the mainstream. Google’s insight in 2014 was that you could solve the challenges of every employee and application being on the Internet by ensuring that every application would inherently distrust every connection. If there was zero trust inherent to what network you were on, then every user of every application would be continuously authenticated. Powerfully, that would simultaneously enhance security while enabling more use of cloud applications as well as mobile and remote work.
The Future LAN: A Secure WAN
What we realized talking to customers was that even the analyst and competitor framing of the future corporate network didn’t fully recognize some challenges that come with a Zero Trust model. One of the benefits of embracing a Zero Trust model is that it makes enabling branch and home offices easier and less expensive. Rather than having to lease expensive MPLS circuits to connect branch offices — something that is literally impossible as people work from home — you instead require every use of every application to be authenticated.
This lines up with something else we’ve heard from our customers over the last six months: “maybe the Internet is almost good enough.” Like physical offices, many MPLS or SD-WAN deployments are currently sitting idle. And yet, employees continue to be productive. If users could move to a model that runs on the Internet, and one that improves the Internet, teams can stop spending money on legacy routing. Rather than trying to build more private networks, the corporate network of the future leverages the Internet but with heightened security, performance, and reliability.
That sounds great, but it opens a whole new can of worms. Inherently to do this you need to expose more of your applications to the Internet. While they may be safe from unauthorized use if you’ve properly implemented Zero Trust, that opens them to many less sophisticated, but highly disruptive challenges.
At the end of 2019 we saw a disturbing new trend begin to emerge. DDoS attackers shifted their focus from embarrassing companies by knocking their websites offline to increasingly targeting internal applications and networks. Unfortunately, we’ve seen more of these attacks launched throughout the pandemic.
It’s not a coincidence. It’s the direct result of companies being forced to expose more of their internal applications to the Internet in order to support remote work. To our surprise, it has turned out that while we anticipated Access and Gateway being the natural pairing of products, equally often customers looking to move to a Zero Trust model are bundling Cloudflare’s DDoS and WAF products.
It makes sense. If you are exposing more of your applications to the Internet, then the problems that Internet-facing applications have had to deal with in the past now become the problems of your internal applications as well. It’s become clear to us that the future of a SASE or Zero Trust network needs to also include DDoS mitigation and WAF as well.
Making the Internet Secure and Reliable Enough for the Enterprise
We agree with the customers we’ve talked to who say that the Internet is almost good enough to replace a corporate network. We’ve been building products to fill in the gaps where it needs to be better. Virtual appliances in regional public cloud providers are not sufficient. Enterprises need a global, distributed network that accelerates traffic in any location.
We’ve spent the last decade building Cloudflare’s network; bringing the Internet closer to users around the world and supporting incredible scale. According to W3Techs, more than 14% of the web already relies on our network. We can also use that to constantly measure the Internet at scale and find faster routes. That scale allows us to deliver Cloudflare One to any organization, no matter where they are located or how global their workforce, and ensure their network and applications are secure, fast, and reliable.
Foreshadowing Cloudflare One
The same lessons we’ve learned handling traffic for the websites on our network can be applied to how enterprises connect to everything else. We started that journey last year when we launched Cloudflare WARP, a consumer product that routes all connections leaving a personal device through Cloudflare’s network, where we can encrypt and accelerate it. This week, we’ll show how the WARP Client is now one of the on-ramps to get employee traffic onto Cloudflare One.
We launched WARP on mobile devices because we knew they would prove to be the most difficult to get right. Traditionally, VPN clients are clunky battery sucks designed for desktops and, if they have mobile versions at all, they’ve been clumsily ported over. We set out to build WARP to work great on mobile, not burning battery life or slowing connections down, because we knew if we could pull that off then it would be easy to port it to the less limited constraints of the desktop.
We also launched it for consumers first because they are the best QA team you could ever assemble. More than 10 million consumers have been putting WARP through its paces for the last year. We’ve seen edge cases from every corner of the Internet and used them to iron the bugs out. We knew that if we could make the WARP Client something that consumers loved to use then it would be a stark contrast to every other enterprise solution in the market.
Meanwhile, we built products to deliver the same improvements to data centers and offices. We announced Magic Transit last year to provide secure, performant, and reliable IP connectivity to the Internet. Earlier this year, we expanded that model when we launched Cloudflare Network Interconnect (CNI) to allow our customers to interconnect branch offices and data centers directly with Cloudflare.
Cloudflare Access starts by introducing identity into Cloudflare’s network. We apply filters based on identity and context to both inbound and outbound connections. Every login, request, and response proxies through Cloudflare’s network regardless of the location of the server or user.
Cloudflare Gateway keeps connections to the rest of the Internet safe. By routing all traffic through Cloudflare’s network first, customers can deprecrate on-premise firewalls eliminating Internet backhaul requirements that slow down users.
Pulling the Pieces Together
We think about the products in Cloudflare One in two categories:
On-ramps: the products that connect a user, device, or location to Cloudflare’s edge. WARP for endpoints, Magic Transit and CNI for networks, Argo Smart Routing to accelerate traffic.
Filters: the products that shield networks from attacks, inspect traffic for threats, and apply least privilege rules to data and applications. Access for Zero Trust rules, Gateway for traffic filtering, Magic Firewall for network filtering.
Most competitors in this space focus on one area, which loses out on the efficiencies of combining them in a single solution. Cloudflare One brings those together on our network. By integrating both sides of the challenge, we can give administrators a single place to manage and secure their network.
What Differentiates Cloudflare One
Easy to Deploy, Manage, and Use
We’ve always offered free and pay-as-you-go plans that teams of any size could sign up for with a credit card. Those customers lack the systems integrators or IT departments of large enterprises. To serve those teams, we had to build a control plane and dashboard that was accessible and easy to use.
The products in Cloudflare One follow that same approach; comprehensive enough for enterprises but easy to use to make these products accessible to any team. We’ve also extended that to end users; the client application that powers Gateway is built on what we learned creating Cloudflare WARP for consumer users.
Unified Solution
Cloudflare One puts the entire corporate network behind a single pane of glass. By integrating with leading identity providers and endpoint security solutions, Cloudflare One enables companies to enforce a consistent set of policies across all their applications. Since the network is the common denominator of all applications, by building control into the network Cloudflare One ensures consistent policies whether an application is new or legacy, run on-premise or in the cloud, and delivered from your own infrastructure or a multi-tenant SaaS provider.
Cloudflare One also helps rationalize complicated deployments. While it would be great if every app and every employee and contractor used the same identity provider, for example, that isn’t always possible. Acquisitions, skunkworks projects, and internal disagreements can cause multiple different solutions to be present inside one company. Cloudflare One allows you to plug different providers into one unified network control plane to ensure consistent policies.
Significant ROI
Our core tenet of serving the entire Internet has always forced us to obsess over costs. Efficiency is in the DNA of Cloudflare and we use our efficiency to pass along customer-friendly, fixed-rate pricing. Cloudflare One builds on that experience to deliver a platform that is more cost-effective than combining point solution vendors. The differences are especially apparent versus other providers who have tried to build on top of public cloud platforms and inherit their cost and inconsistent network performance.
To achieve the level of efficiency needed to compete with hardware appliances required us to invent a new type of platform. That platform needed to be built our own network where we could drive costs down and ensure the highest level of performance. It needed to be architected so any server in any city that made up Cloudflare’s network could run every one of our services. That means that Cloudflare One runs across Cloudflare’s global network spanning more than 200 cities worldwide. Even your farthest flung branch offices and remote workers are likely within milliseconds of servers powering Cloudflare One, ensuring our service works well wherever your team works.
Leverages Cloudflare’s Scale
Cloudflare already sits in front of a huge portion of the Internet. That allows us to see and respond to new security threats continuously. It also means that Cloudflare One customers’ traffic can be more efficiently routed, even when going to applications that would appear to be on the public Internet.
For instance, an employee behind Cloudflare One who is catching up on holiday shopping during their lunch break can have their traffic routed from a corporate branch office, across Cloudflare’s Magic Transit, over Cloudflare’s global backbone, across Cloudflare’s Network Interconnect, and to the ecommerce provider. Because Cloudflare handles the packets end-to-end, we can ensure they are encrypted, optimally routed, and efficiently delivered. As more of the Internet uses Cloudflare, the experience of surfing the Internet for Cloudflare One customers will grow even more exceptional.
What Does Cloudflare One Replace?
Instead of expensive MPLS links or complex SD-WAN deployments, Cloudflare One provides two on-ramps to your applications and the entire Internet: WARP and Magic Transit. WARP connects employees from any device, and any location, to Cloudflare’s network. Magic Transit allows broad deployments across whole offices or data centers.
Cloudflare Access replaces private-networks-as-security with Zero Trust controls. Later this week, we’ll announce how you can extend Access to any application, including SaaS applications.
Finally, Cloudflare One eliminates traditional network firewalls and web gateways. Cloudflare Gateway inspects traffic leaving any device in your organization to block threats on the Internet and prevent data from leaving. Magic Firewall will give your networks the same security, filtering traffic at the transport layer to replace the top-of-rack firewalls that block data exfiltration or attacks from unsecure network protocols.
What Comes Next?
Your team can start using Cloudflare One today. Add Zero Trust control to your applications with Cloudflare Access and secure DNS queries with Cloudflare Gateway. Keep networks safe from DDoS attacks with Magic Transit and connect your applications through Cloudflare with Argo Tunnel.
Over the course of the week, we’ll be launching new features and products to start to complete this vision. On Tuesday, we’ll extend the Zero Trust security of Cloudflare Access to all of your applications. Starting Wednesday, teams will be able to use Cloudflare WARP to proxy all employee traffic to Cloudflare where Gateway will now secure more than just DNS queries. You’ll be invited to sign up for Cloudflare’s browser isolation beta on Thursday and we’ll wrap the week with new APIs to control how Magic Transit secures your network.
It’s going to be a busy week, but we’re just getting started. Replacing a corporate network should not also mean you lose control over how that network operates. Magic WAN is our solution to complex SD-WAN deployments.
Security for that entire network should also work in both directions. Magic Firewall is our alternative to the clunky “next-generation firewall” appliances that secure outbound traffic. Data loss prevention (DLP) is another space that has lacked innovation and where we plan to extend Cloudflare One.
Finally, you should have visibility into that network. We’ll be launching new tools to detect and mitigate intrusion attempts that happen anywhere on your network, including unauthorized access to any SaaS applications you use. Now that we’ve built the on-ramps onto Cloudflare One, we’re excited to continue to innovate to provide more functionality and control to solve our customers biggest network security, performance, and reliability challenges.
Delivering the Network Customers Need Today
Over the last 10 years, Cloudflare has built one of the fastest, most reliable, most secure networks in the world. We’ve seen the power of using that network internally to enable our own teams to innovate quickly and securely. With the launch of Cloudflare One, we’re extending the power of Cloudflare’s network to meet the challenges of any company. The move to Zero Trust is a paradigm shift but the changes to how we work we believe has made it inevitable for every company. We’re proud of how we’ve been able to help some of Cloudflare One’s first customers reinvent their corporate networks. It makes sense to close with their own words.
“JetBlue Travel Products needed a way to give crew-members secure and simple access to internally-managed benefit apps. Cloudflare gave us all that and more — a much more efficient way to connect business partners and crew-members to critical internal tools.” — Vitaliy Faida, General Manager, Data/DevSecOps at JetBlue Travel Products.
“OneTrust relies on Cloudflare to maintain our network perimeter, so we can focus on delivering technology that helps our customers be more trusted. “With Cloudflare, we can easily build context-aware Zero Trust policies for secure access to our developer tools. Employees can connect to the tools they need so simply teams don’t even know Cloudflare is powering the backend. It just works.” — Blake Brannon, CTO of OneTrust.
“Discord is where the world builds relationships. Cloudflare helps us deliver on that mission, connecting our internal engineering team to the tools they need. With Cloudflare, we can rest easy knowing every request to our critical apps is evaluated for identity and context — a true Zero Trust approach.” — Mark Smith, Director of Infrastructure at Discord.
“When you’re a fast-growing, security-focused company like Area 1, anything that slows development down is the enemy. With Cloudflare, we’ve found a simpler, more secure way to connect our employees to the tools they need to keep us growing – and the experience is lightning-fast.” — Blake Darché, CSO at Area 1 Security.
“We launched quickly in April 2020 to bring remote learning to children throughout the UK during the coronavirus pandemic, Cloudflare Access made it fast and simple to authenticate a huge network of teachers and developers into our production sites and we set it up in literally less than an hour. Cloudflare’s WAF helped ensure the security and resilience of our public-facing website from day one.” — John Roberts, Technology Director at Oak National Academy.
“With Cloudflare, we’ve been able to reduce our dependence on VPNs and IP allow-listing for development environments. Our developers and testers aren’t required to login from specific locations, and we’ve been able to deploy an SSO solution to simplify the login process. Access is easier to manage than VPNs and other remote access solutions, which has removed pressure from our IT teams. They can focus on internal projects instead of spending time managing remote access.” — Alexandre Papadopoulos, Director of Cyber Security, INSEAD.
Running a secure enterprise network is really difficult. Employees spread all over the world work from home. Applications are run from data centers, hosted in public cloud, and delivered as services. Persistent and motivated attackers exploit any vulnerability.
Enterprises used to build networks that resembled a castle-and-moat. The walls and moat kept attackers out and data in. Team members entered over a drawbridge and tended to stay inside the walls. Trust folks on the inside of the castle to do the right thing, and deploy whatever you need in the relative tranquility of your secure network perimeter.
The Internet, SaaS, and “the cloud” threw a wrench in that plan. Today, more of the workloads in a modern enterprise run outside the castle than inside. So why are enterprises still spending money building more complicated and more ineffective moats?
Today, we’re excited to share Cloudflare One™, our vision to tackle the intractable job of corporate security and networking.
Cloudflare One combines networking products that enable employees to do their best work, no matter where they are, with consistent security controls deployed globally.
Starting today, you can begin replacing traffic backhauls to security appliances with Cloudflare WARP and Gateway to filter outbound Internet traffic. For your office networks, we plan to bring next-generation firewall capabilities to Magic Transit with Magic Firewall to let you get rid of your top-of-shelf firewall appliances.
With multiple on-ramps to the Internet through Cloudflare, and the elimination of backhauled traffic, we plan to make it simple and cost-effective to manage that routing compared to MPLS and SD-WAN models. Cloudflare Magic WAN will provide a control plane for how your traffic routes through our network.
You can use Cloudflare One today to replace the other function of your VPN: putting users on a private network for access control. Cloudflare Access delivers Zero Trust controls that can replace private network security models. Later this week, we’ll announce how you can extend Access to any application – including SaaS applications. We’ll also preview our browser isolation technology to keep the endpoints that connect to those applications safe from malware.
Finally, the products in Cloudflare One focus on giving your team the logs and tools to both understand and then remediate issues. As part of our Gateway filtering launch this week we’re including logs that provide visibility into the traffic leaving your organization. We’ll be sharing how those logs get smarter later this week with a new Intrusion Detection System that detects and stops intrusion attempts.
Many of those components are available today, some new features are arriving this week, and other pieces will be launching soon. All together, we’re excited to share this vision and for the future of the corporate network.
Problems in enterprise networking and security
The demands placed on a corporate network have changed dramatically. IT has gone from a back-office function to mission critical. In parallel with networks becoming more integral, users spread out from offices to work from home. Applications left the datacenter and are now being run out of multiple clouds or are being delivered by vendors directly over the Internet.
Direct network paths became hairpin turns
Employees sitting inside of an office could connect over a private network to applications running in a datacenter nearby. When team members left the office, they could use a VPN to sneak back onto the network from outside the walls. Branch offices hopped on that same network over expensive MPLS links.
When applications left the data center and users left their offices, organizations responded by trying to force that scattered world into the same castle-and-moat model. Companies purchased more VPN licenses and replaced MPLS links with difficult SD-WAN deployments. Networks became more complex in an attempt to mimic an older model of networking when in reality the Internet had become the new corporate network.
Defense-in-depth splintered
Attackers looking to compromise corporate networks have a multitude of tools at their disposal, and may execute surgical malware strikes, throw a volumetric kitchen sink at your network, or any number of things in between. Traditionally, defense against each class of attack was provided by a separate, specialized piece of hardware running in a datacenter.
Security controls used to be relatively easy when every user and every application sat in the same place. When employees left offices and workloads left data centers, the same security controls struggled to follow. Companies deployed a patchwork of point solutions, attempting to rebuild their topside firewall appliances across hybrid and dynamic environments.
High-visibility required high-effort
The move to a patchwork model sacrificed more than just defense-in-depth — companies lost visibility into what was happening in their networks and applications. We hear from customers that this capture and standardization of logs has become one of their biggest hurdles. They purchased expensive data ingestion, analysis, storage, and analytics tools.
Enterprises now rely on multiple point solutions that one of the biggest hurdles is the capture and standardization of logs. Increasing regulatory and compliance pressures place more emphasis on data retention and analysis. Splintered security solutions become a data management nightmare.
Fixing issues relied on best guesses
Without visibility into this new networking model, security teams had to guess at what could go wrong. Organizations who wanted to adopt an “assume breach” model struggled to determine what kind of breach could even occur, so they threw every possible solution at the problem.
We talk to enterprises who purchase new scanning and filtering services, delivered in virtual appliances, for problems they are unsure they have. These teams attempt to remediate every possible event manually, because they lack visibility, rather than targeting specific events and adapting the security model.
How does Cloudflare One fit?
Over the last several years, we’ve been assembling the components of Cloudflare One. We launched individual products to target some of these problems one-at-a-time. We’re excited to share our vision for how they all fit together in Cloudflare One.
Flexible data planes
Cloudflare launched as a reverse proxy. Customers put their Internet-facing properties on our network and their audience connected to those specific destinations through our network. Cloudflare One represents years of launches that allow our network to process any type of traffic flowing in either the “reverse” or “forward” direction.
In 2019, we launchedCloudflare WARP — a mobile application that kept Internet-bound traffic private with an encrypted connection to our network while also making it faster and more reliable. We’re now packaging that same technology into an enterprise version launching this week to connect roaming employees to Cloudflare Gateway.
Your data centers and offices should have the same advantage. We launchedMagic Transit last year to secure your networks from IP-layer attacks. Our initial focus with Magic Transit has been delivering best-in-class DDoS mitigation to on-prem networks. DDoS attacks are a persistent thorn in network operators’ sides, and Magic Transit effectively diffuses their sting without forcing performance compromises. That rock-solid DDoS mitigation is the perfect platform on which to build higher level security functions that apply to the same traffic already flowing across our network.
Earlier this year, we expanded that model when we launchedCloudflare Network Interconnect (CNI) to allow our customers to interconnect branch offices and data centers directly with Cloudflare. As part of Cloudflare One, we’ll apply outbound filtering to that same connection.
Cloudflare One should not just help your team move to the Internet as a corporate network, it should be faster than the Internet. Our network is carrier-agnostic, exceptionally well-connected and peered, and delivers the same set of services globally. In each of these on-ramps, we’re adding smarter routing based on our Argo Smart Routing technology, which has been shown to reduce latency by 30% or more in the real-world. Security + Performance, because they’re better together.
A single, unified control plane
When users connect to the Internet from branch offices and devices, they skip the firewall appliances that used to live in headquarters altogether. To keep pace, enterprises need a way to secure traffic that no longer lives entirely within their own network. Cloudflare One applies standard security controls to all traffic – regardless of how that connection starts or where in the network stack it lives.
Cloudflare Access starts by introducing identity into Cloudflare’s network. Teams apply filters based on identity and context to both inbound and outbound connections. Every login, request, and response proxies through Cloudflare’s network regardless of the location of the server or user. The scale of our network and its distribution can filter and log enterprise traffic without compromising performance.
Cloudflare Gateway keeps connections to the rest of the Internet safe. Gateway inspects traffic leaving devices and networks for threats and data loss events that hide inside of connections at the application layer. Launching soon, Gateway will bring that same level of control lower in the stack to the transport layer.
You should have the same level of control over how your networks send traffic. We’re excited to announce Magic Firewall, a next-generation firewall for all traffic leaving your offices and data centers. With Gateway and Magic Firewall, you can build a rule once and run it everywhere, or tailor rules to specific use cases in a single control plane.
We know some attacks can’t be filtered because they launch before filters can be built to stop them. Cloudflare Browser, our isolated browser technology gives your team a bulletproof pane of glass from threats that can evade known filters. Later this week, we’ll invite customers to sign up to join the beta to browse the Internet on Cloudflare’s edge without the risk of code leaping out of the browser to infect an endpoint.
Finally, the PKI infrastructure that secures your network should be modern and simpler to manage. We heard from customers who described certificate management as one of the core problems of moving to a better model of security. Cloudflare works with, not against, modern encryption standards like TLS 1.3. Cloudflare made it easy to add encryption to your sites on the Internet with one click. We’re going to bring that ease-of-management to the network functions you run on Cloudflare One.
One place to get your logs, one location for all of your security analysis
Cloudflare’s network serves 18 million HTTP requests per second on average. We’ve built logging pipelines that make it possible for some of the largest Internet properties in the world to capture and analyze their logs at scale. Cloudflare One builds on that same capability.
Cloudflare Access and Gateway capture every request, inbound or outbound, without any server-side code changes or advanced client-side configuration. Your team can export those logs to the SIEM provider of your choice with our Cloudflare Logpush service – the same pipeline that exports HTTP request events at scale for public sites. Magic Transit expands that logging capability to entire networks and offices to ensure you never lose visibility from any location.
We’re going beyond just logging events. Available today for your websites, Cloudflare Web Analytics converts logs into insights. We plan to keep expanding that visibility into how your network operates, as well. Just as Cloudflare has replaced the “band-aid boxes” that performed disparate network functions and unified them into a cohesive, adaptable edge, we intend to do the same for the fragmented, hard to use, and expensive security analytics ecosystem. More to come on this soon.Smarter, faster remediation
Data and analytics should surface events that a team can remediate. Log systems that lead to one-click fixes can be powerful tools, but we want to make that remediation automatic.
Launching into a closed preview later this week, Cloudflare Intrusion Detection System (IDS) will proactively scan your network for anomalous events and recommend actions or, better yet, take actions for you to remediate problems. We plan to bring that same proactive scanning and remediation approach to Cloudflare Access and Cloudflare Gateway.
Run your network on our globally scaled network
Over 25 million Internet properties rely on Cloudflare’s network to reach their audiences. More than 10% of all websites connect through our reverse proxy, including 16% of the Fortune 1000. Cloudflare accelerates traffic for huge chunks of the Internet by delivering services from datacenters around the world.
We deliver Cloudflare One from those same data centers. And critically, every datacenter we operate delivers the same set of services, whether that is Cloudflare Access, WARP, Magic Transit, or our WAF. As an example, when your employees connect through Cloudflare WARP to one of our data centers, there is a real chance they never have to leave our network or that data center to reach the site or data they need. As a result, their entire Internet experience becomes extraordinarily fast, no matter where they are in the world.
We expect that performance bonus to become even more meaningful as browsing moves to Cloudflare’s edge with Cloudflare Browser. The isolated browsers running in Cloudflare’s data centers can request content that sits just centimeters away. Even further, as more web properties rely on Cloudflare Workers to power their applications, entire workflows can stay inside of a data center within 100 ms of your employees.
What’s next?
While many of these features are available today, we’re going to be launching several new features over the next several days as part of Cloudflare’s Zero Trust week. Stay tuned for announcements each day this week that add new pieces to the Cloudflare One featureset.
Today we’re announcing the availability of DDoS attack alerts. The alerts are available for free for all Cloudflare’s customers on paid plans.
Unmetered DDoS protection
Last week we celebrated Cloudflare’s 10th birthday in what we call Birthday Week. Every year, on each day of Birthday Week, we announce a new product with the goal of helping make the Internet a better place — one that is safer and faster. To do that, over the years we’ve democratized many products that were previously only available to large enterprises by making them available for free (or at very low cost) to all. For example, on Cloudflare’s 7th birthday in 2017, we announced free unmetered DDoS protection as part of every Cloudflare product and every plan, including the free plan.
DDoS attacks aim to take down websites or online services and make them unavailable to the public. We wanted to make sure that every organization and every website is available and accessible, regardless if they can or can’t afford enterprise-grade DDoS protection. This has been a core part of our mission. We’ve been heavily investing in our DDoS protection capabilities over the last 10 years, and we will continue to do so in the future.
Real-time DDoS attack alerts
I’ve recently published a few blogs that provide a look under the hood of our DDoS protection systems. These systems run autonomously, they detect and mitigate attacks without any human intervention. As was the case with the 654 Gbps attack in July, and the 754 Mpps attack in June. We’ve been successful at blocking DDoS attacks and also providing our users with important analytics and insights about the attacks, but our customers also want to be notified in real-time when they are targeted by DDoS attacks.
So today, we’re excited to announce the availability of DDoS alerts. The current delivery methods by Cloudflare plan type are listed in the table below. Additional delivery methods will be made available in the future.
Delivery methods by plan
Delivery method
Plan
Free
Pro
Business
Enterprise
Email
❌
✅
✅
✅
PagerDuty
❌
❌
✅
✅
There are two types of DDoS alerts: HTTP DDoS alerts and L3/4 DDoS alerts. Whether you are eligible to one or both depends on the Cloudflare services that you are subscribed to. The table below lists the alert types by the Cloudflare service.
Alert types by service
Alert type
Service
WAF/CDN
Spectrum
Spectrum BYOIP
Magic Transit
HTTP DDoS alerts
✅
❌
❌
❌
L3/4 DDoS alerts
Coming soon
Coming soon
✅
✅
Creating a DDoS alert policy
In order to receive alerts on DDoS attacks that target your Cloudflare-protected Internet property, you must first create a notification policy. That’s fast and easy:
In the Account Home page, navigate to the Notifications tab
In the Notifications card, click Create
Give your notification a name, add an optional description, and the email addresses of the recipients.
If you are on the Business plan or higher, you’ll need to connect to PagerDuty before creating the alert policy. Once you’ve done so, you’ll have the option to send the alert to your PagerDuty service.
Receive the alert, view the attack, and give feedback
When developing and designing the alert template, we interviewed many of our customers to understand what information is important to them, what would make the alert useful and easy to understand. We’ve intentionally made the alert short. The email subject is also straightforward: DDoS Attack Detected, and it will only be sent from our official email address: [email protected][dot]com. Add this email to your list of trusted email addresses to assure you don’t miss the alerts.
The alert includes the following information:
A short description of what happened
The date and time the attack was initially detected and mitigated by our systems
The attack type
The max rate of the attack when the alert was triggered
The attack target
The attack may be ongoing when you receive the alert and so we also include a link to view the attack in the Cloudflare dashboard and also a link to provide feedback on the protection and visibility.
We’d love to get your feedback!
We’d love your feedback on our DDoS protection solution. When you receive a DDoS alert, you’ll be provided with a link to submit your feedback. Measuring user satisfaction helps us build better products. Your feedback helps us measure user satisfaction for Cloudflare’s DDoS protection and the attack analytics that we provide in the dashboard. User satisfaction rates are one of the main Key Performance Indicators (KPIs) for our DDoS protection service that we monitor closely. So give your feedback, and help us make DDoS protection better for everyone.
Not a Cloudflare customer yet? Sign up to get started.
We’ve always used birthdays as an opportunity to give back to the Internet. But this year — a year in which the Internet has been so central to giving us all some degree of connectedness and normalcy — it feels like giving back to the Internet has been more important than ever.
And while we couldn’t celebrate in person, we were humbled by some of the incredible minds that joined us online to talk about how the Internet has changed over the last ten years — and what we might see over the next ten.
With that, let’s recap the key announcements from Birthday Week 2020.
Day 1, Monday: Workers
During Birthday Week in 2017, Cloudflare announced Workers — a serverless platform that represented a completely new way to build applications: by writing your code directly onto our network edge. On Monday of this year’s Birthday Week, we announced Durable Objects and Cron Triggers — both of which continue to expand the use cases that Workers can address.
Many folks associate the serverless paradigm with functions as a service — which, at its core, is stateless. Workers KV started down the path of changing this, providing high availability storage on the edge. However, there are use cases where consistency (a client making a request to a database will get the same view of data) is more important than availability (a client making a request to a database requests always receives a response). Say you want to sell tickets to a concert — you don’t want to allow two people to be able to purchase the same ticket. With a traditional application, with a database running in one location, that’s relatively easy to ensure. But with Workers running in Cloudflare’s data centers all over the world, ensuring consistency is a little bit more challenging. Workers Durable Objects solves for this for developers: giving them access to high consistency storage when they’re building on the Workers platform.
Similarly, triggering Workers has historically needed a user to do something, A user visiting a URL, for example. But developers have use cases when they want a Worker to run, independent of a user doing something right now. Syncing for example. Batch jobs. Or perhaps doing something 24 hours after a user has done something. And this is where Cron Triggers come in — now, for developers on the Workers platform, there’s no more need to rely on an eyeball to get things rolling.
Day 2, Tuesday: Analytics
There are a lot of website analytics products out there on the market. Many of those products are, not surprisingly, very good.
But the way they’ve been implemented often leaves a lot to be desired. Most of them operate by tracking individual users, using client-side state like cookies or localStorage — or even fingerprints. This is increasingly a problem. There’s the principle of it: we don’t want to be tracked individually — why would we want visitors to our web properties to feel tracked either? Beyond that though, because so many people are feeling uncomfortable with how they’re being tracked around the web, they’re simply blocking a lot of these analytics products. As a result, all these analytics products are increasingly becoming less accurate.
On Tuesday, we announced a new Web Analytics product that allows you to get the best of both worlds — detailed and accurate analytics, without compromising on the privacy of your users. We don’t use any client-side state, like cookies or localStorage, for the purposes of tracking users. And we don’t “fingerprint” individuals via their IP address, User Agent string, or any other data for the purpose of displaying analytics (we consider fingerprinting even more intrusive than cookies, because users have no way to opt out). Because Cloudflare’s business has never been built around tracking users or selling advertising, we don’t do it. Just the metrics, ma’am.
That wasn’t all on Tuesday, though. Another crucial aspect of owning a web property is website performance. Not only does it impact user experience, Google uses a blended measure of performance to inform site ranking in their search results. Google’s Chrome team has been doing some great work on metricizing site performance, and that’s culminated in Web Vitals. We’ve worked with the Chrome team to integrate Web Vitals in our Browser Insights product. You’ve always gotten edge-side performance analytics from Cloudflare, but now, you’re not just seeing the server side view of your web performance: it’s blended with how your users perceive performance, too. We take all that data and present it in a pragmatic way to help you figure out what you need to do to optimize the performance of your site.
Day 3, Wednesday: Cloudflare Radar and Speeding up HTTPS/HTTP3
As of today, Cloudflare sits in front of 14.5% of the world’s top 10 million websites. The privilege of getting to serve so many different customers means we get visibility into a lot of things on the web. Wednesday of birthday week was about us taking advantage of that for everyone who is out on the web today.
If you think about the traffic flowing through a city at any given time, it’s like a living, breathing creature. It ebbs and flows; it has rhythms that follow the sun and moon. Unusual events can cause traffic jams; as can accidents. Many cities have traffic reporting services for exactly this reason; knowing what’s going on can help immensely those that need to navigate the city streets. The web is like a global version of this, and given the role that the Internet now plays for humanity, understanding what’s going on probably equals in importance to all those city traffic reports all around the world.
And yet, when you want to get the equivalent of that traffic report, where do you go?
Cloudflare Radar is our answer to that question. Each second, Cloudflare handles on average 18 million HTTP requests and 6 million DNS requests. We block 72 billion cyberthreats every day. Add to that 1 billion unique IP addresses connecting to Cloudflare’s network, we have one of the most representative views on Internet traffic worldwide. Before Radar, all this activity, good and bad, was only available internally at Cloudflare: we used it to help improve our service and protect our customers. With the release of Radar, however, we’re exposing it externally: shining a light on the Internet’s patterns for the world to see.
On the subject of spotting interesting patterns. Back in late June, our team noticed a weird spike in DNS requests for the 65479 Resource Record. It turns out, these spikes were a part of Apple’s iOS14 beta release — Apple were testing out a new SVCB/HTTPS record type. The aim: to patch a limitation that’s been inherent in the HTTPS and HTTP3 protocol. When a user types in a URL without specifying the protocol (e.g. HTTPS), the initial negotiation happens in plaintext because browsers will start with HTTP. Only once it’s established that an HTTPS or HTTP3 resource exists will the browser transition over to that. The problem here is twofold: latency, and also security.
But you know what happens before any HTTP negotiation can happen? A DNS request. And that’s what Apple had implemented that created this interesting pattern: the DNS request was effectively asking whether the site supported HTTPS, or HTTP3. As of Wednesday during birthday week, Cloudflare’s DNS servers will now automatically generate HTTPS records on the fly to advertise whether a particular zone supports HTTP/3 and/or HTTP/2, based on whether those features are enabled on the zone. The result: better performance, and improved security. Who says you need to pick just one?
Day 4, Thursday: API day
Nobody has ever doubted the importance of user interfaces. Finding ways for humans and computers to engage each other has been an area of focus since the very first computers were invented. But as the web has grown, data has become the new oil, and applications have proliferated, there’s another interface that has grown in importance: the interface between different types of applications. Day 4 of Birthday Week was all about APIs.
The first announcement was beta support for gRPC: a new type of protocol that’s intended for building APIs at scale. Most REST APIs use HTTPS and JSON to communicate values. The problem with these is that they’re really designed for that other type of interface mentioned above: for humans to talk to computers. The upside is it makes things human readable; the downside is they’re really inefficient, and as the use of APIs only continues to explode this inefficiency proliferates. The gRPC protocol is an answer to this: it’s an efficient protocol for computers to talk to each other. But up until now, that also came at a price: because gRPC uses newer technology (like HTTP/2) under the covers, existing security and performance tools did not support gRPC traffic out of the box. This meant that customers adopting gRPC to power their APIs had to pick between modernity on one hand, and things like security, performance, and reliability on the other.
Cloudflare’s announcement of support of gPRC fixes this trade-off: when you put your gPRC APIs on Cloudflare, you get all the traditional benefits of Cloudflare along with it. Apprehensive of exposing your APIs to bad actors? Need more performance? Turn on Argo Smart Routing to decrease time to first byte. Increase reliability by adding a Load Balancer. Or add security features such as Bot Management and the WAF.
Speaking of the WAF. If you think about the way our WAF works, it secures web application from attacks by looking for attack patterns — say, bot patterns that try to imitate human patterns, or abuse of how a browser interacts with a site; in both instances, the attack is intended to break something. But because what computers need to talk to each other is different from what computers need to talk to humans, the attack vectors are different. Therefore protecting APIs isn’t quite the same as protecting websites.
API Shieldis purpose-built for just this. It makes it simple to secure APIs through the use of strong client certificate-based authentication, and strict schema-based validation. On the authentication side, API shield uses mutual TLS — which is not vulnerable to the reuse or sharing of passwords or tokens. And once developers can be sure that only legitimate clients (with SSL certificates in hand) are connecting to their APIs, the next step in API Shield is making sure that those clients are making valid requests. It works by matching the contents of API requests—the query parameters that come after the URL and contents of the POST body—against a contract or “schema” that contains the rules for what is expected. If validation fails, the API call is blocked protecting the origin from an invalid request or a malicious payload.
And, as you’d expect from Cloudflare, gRPC and API Shield support each other out of the box.
Day 5, Friday: Automatic Platform Optimization (starting with WordPress)
The idea of caching static assets is not new, and it’s something Cloudflare has supported from its inception. It works wonders in speeding up websites: particularly if your origin is slow and/or your user is far from the origin server, then all your performance metrics will be affected. Caching also also has the added benefit of reducing load on origin servers.
However, things get a little more tricky when it comes to dynamic assets: if the asset could change, shouldn’t you go back to the origin just to make sure? For this reason, by default, Cloudflare doesn’t cache HTML content: there’s a chance it’s going to change for each user. The reality is though, most HTML isn’t really dynamic. It needs to be able to change relatively quickly when the site is updated but for a huge portion of the web, the content is static for months or years at a time. There are special cases like when a user is logged-in (as the admin or otherwise) where the content needs to differ but the vast majority of visits are of anonymous users.
Automatic Platform Optimization, which was announced on Friday, brings more intelligence to this — allowing us to figure out when we should be caching HTML, and when we shouldn’t. The advantage of this is it moves more content closer to the user, and it does it automagically — there’s no configuration required. The benefits aren’t trivial: a 72% reduction in Time to First Byte (TTFB), 23% reduction to First Contentful Paint, and 13% reduction in Speed Index for desktop users at the 90th percentile. We’re starting off with support for WordPress — 38% of all websites, but the plan is to expand this to other platforms in the near future.
All day, every day: Cloudflare TV
Ten years is a long time. The milestone for Cloudflare seemed to be the perfect opportunity to look back over the last ten years of the Internet — what’s changed, what’s surprised us? And more than that: what’s coming over the next ten years?
To look back and then peer out into the future, we were humbled to be joined by some of the most celebrated names in tech and beyond. Among the highlights: Apple co-founder Steve Wozniak, Zoom CEO Eric Yuan, OpenTable CEO Debby Soo, Stripe co-founder and President John Collison, Former CEO & Executive Chairman of Google and Co-Founder of Schmidt Futures Eric Schmidt, former McAfee CEO Chris Young, former Seal Team 6 Commander Dave Cooper, Project Include CEO Ellen Pao, and so many more. All told, it was 24 hours of live discussions over the course of the week.
And with that, it’s a wrap! To everyone who has been a part of the Cloudflare journey over the past 10 years: our customers, folks on the team, friends and supporters, and our partners all around the world: thank you. It’s been an incredible ride.
And, as our co-founder Michelle likes to say, we’re just getting started.
The collective thoughts of the interwebz
Manage Consent
To provide the best experiences, we use technologies like cookies to store and/or access device information. Consenting to these technologies will allow us to process data such as browsing behavior or unique IDs on this site. Not consenting or withdrawing consent, may adversely affect certain features and functions.
Functional
Always active
The technical storage or access is strictly necessary for the legitimate purpose of enabling the use of a specific service explicitly requested by the subscriber or user, or for the sole purpose of carrying out the transmission of a communication over an electronic communications network.
Preferences
The technical storage or access is necessary for the legitimate purpose of storing preferences that are not requested by the subscriber or user.
Statistics
The technical storage or access that is used exclusively for statistical purposes.The technical storage or access that is used exclusively for anonymous statistical purposes. Without a subpoena, voluntary compliance on the part of your Internet Service Provider, or additional records from a third party, information stored or retrieved for this purpose alone cannot usually be used to identify you.
Marketing
The technical storage or access is required to create user profiles to send advertising, or to track the user on a website or across several websites for similar marketing purposes.