Tag Archives: telecommunications

AWS Week in Review – February 27, 2023

Post Syndicated from Antje Barth original https://aws.amazon.com/blogs/aws/aws-week-in-review-february-27-2023/

A couple days ago, I had the honor of doing a live stream on generative AI, discussing recent innovations and concepts behind the current generation of large language and vision models and how we got there. In today’s roundup of news and announcements, I will share some additional information—including an expanded partnership to make generative AI more accessible, a blog post about diffusion models, and our weekly Twitch show on Generative AI. Let’s dive right into it!

Last Week’s Launches
Here are some launches that got my attention during the previous week:

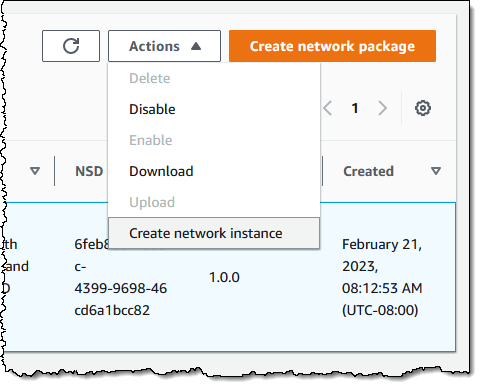
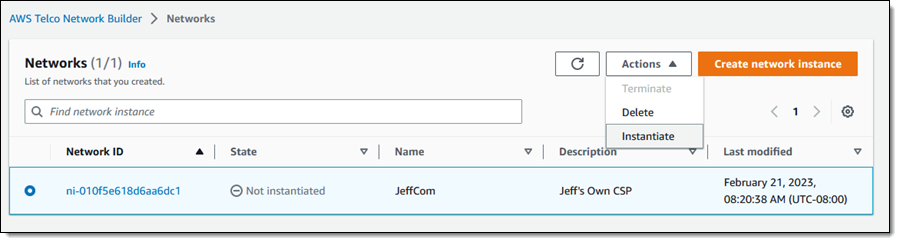
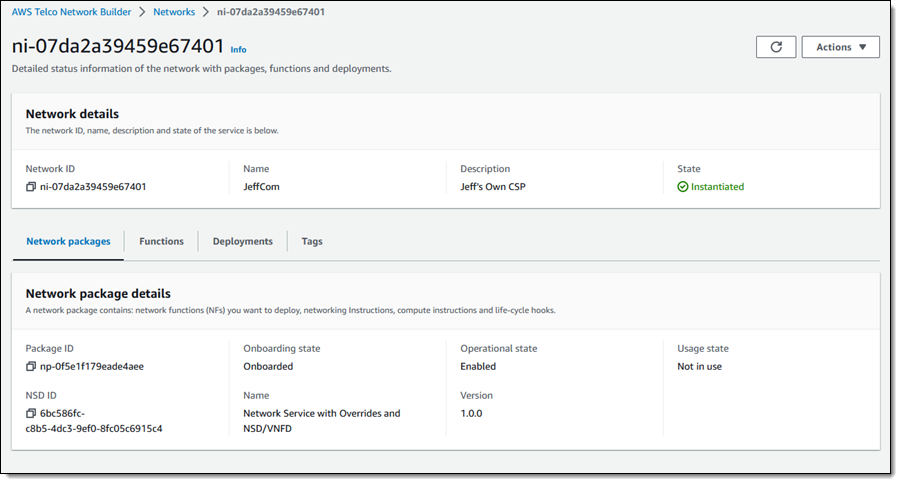
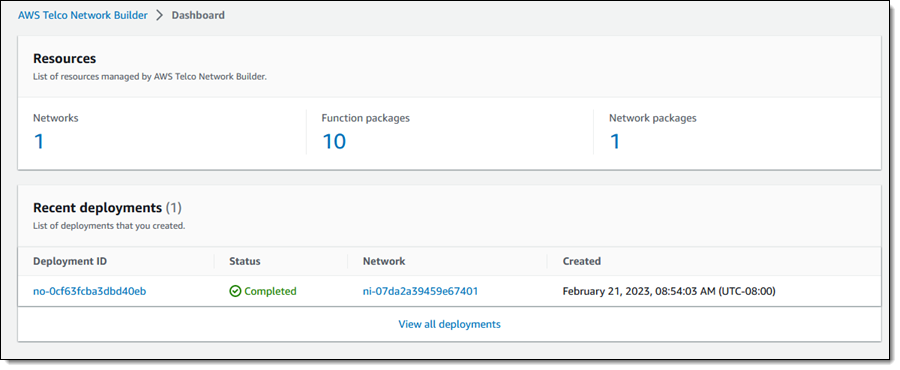
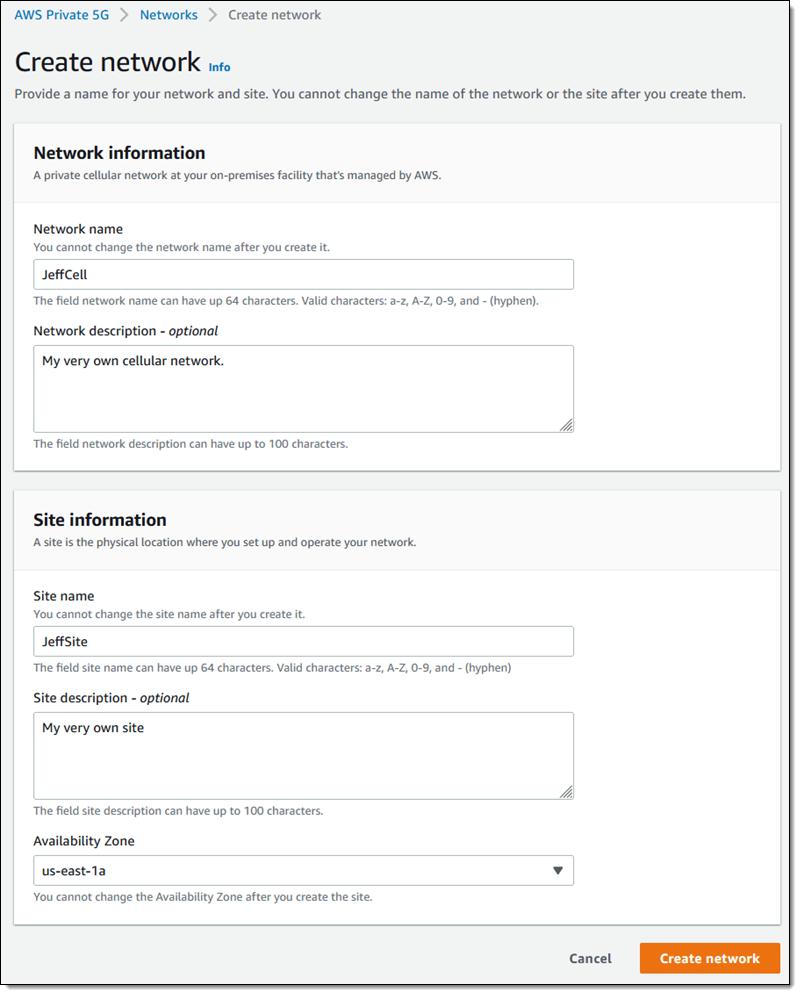
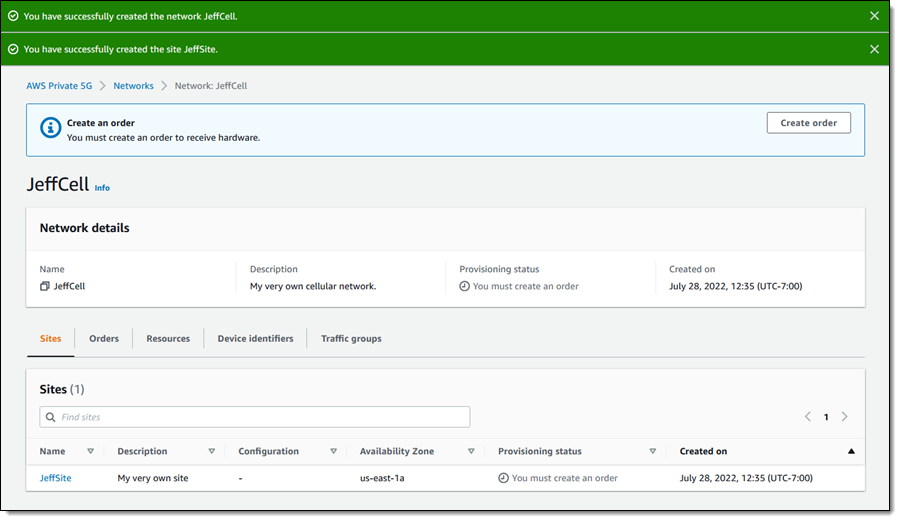
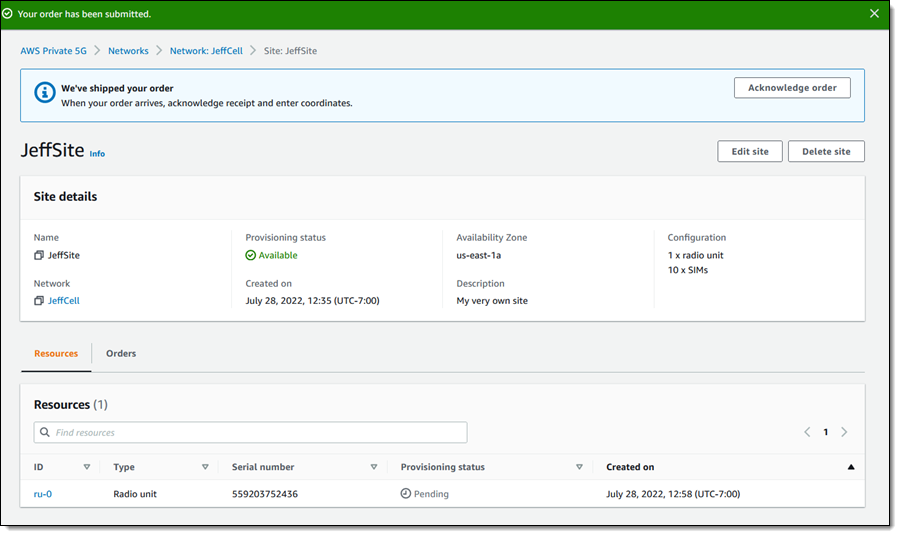
Integrated Private Wireless on AWS – The Integrated Private Wireless on AWS program is designed to provide enterprises with managed and validated private wireless offerings from leading communications service providers (CSPs). The offerings integrate CSPs’ private 5G and 4G LTE wireless networks with AWS services across AWS Regions, AWS Local Zones, AWS Outposts, and AWS Snow Family. For more details, read this Industries Blog post and check out this eBook. And, if you’re attending the Mobile World Congress Barcelona this week, stop by the AWS booth at the Upper Walkway, South Entrance, at the Fira Barcelona Gran Via, to learn more.

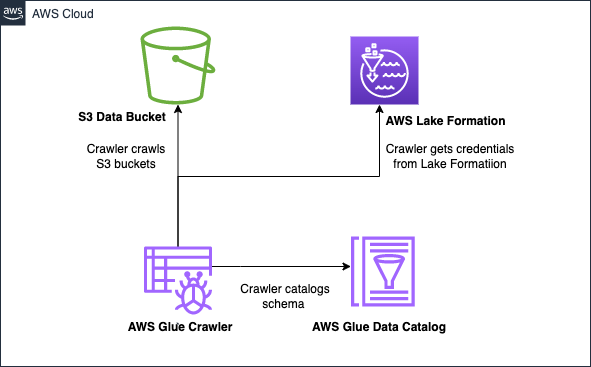
AWS Glue Crawlers – Now integrate with Lake Formation. AWS Glue Crawlers are used to discover datasets, extract schema information, and populate the AWS Glue Data Catalog. With this Glue Crawler and Lake Formation integration, you can configure a crawler to use Lake Formation permissions to access an S3 data store or a Data Catalog table with an underlying S3 location within the same AWS account or another AWS account. You can configure an existing Data Catalog table as a crawler’s target if the crawler and the Data Catalog table reside in the same account. To learn more, check out this Big Data Blog post.

AWS Glue Crawlers now support integration with AWS Lake Formation

Amazon SageMaker Model Monitor – You can now launch and configure Amazon SageMaker Model Monitor from the SageMaker Model Dashboard using a code-free point-and-click setup experience. SageMaker Model Dashboard gives you unified monitoring across all your models by providing insights into deviations from expected behavior, automated alerts, and troubleshooting to improve model performance. Model Monitor can detect drift in data quality, model quality, bias, and feature attribution and alert you to take remedial actions when such changes occur.

Amazon EKS – Now supports Kubernetes version 1.25. Kubernetes 1.25 introduced several new features and bug fixes, and you can now use Amazon EKS and Amazon EKS Distro to run Kubernetes version 1.25. You can create new 1.25 clusters or upgrade your existing clusters to 1.25 using the Amazon EKS console, the eksctl command line interface, or through an infrastructure-as-code tool. To learn more about this release named “Combiner,” check out this Containers Blog post.

Amazon Detective – New self-paced workshop available. You can now learn to use Amazon Detective with a new self-paced workshop in AWS Workshop Studio. AWS Workshop Studio is a collection of self-paced tutorials designed to teach practical skills and techniques to solve business problems. The Amazon Detective workshop is designed to teach you how to use the primary features of Detective through a series of interactive modules that cover topics such as security alert triage, security incident investigation, and threat hunting. Get started with the Amazon Detective Workshop.

For a full list of AWS announcements, be sure to keep an eye on the What’s New at AWS page.

Other AWS News
Here are some additional news items and blog posts that you may find interesting:

🤗❤☁ AWS and Hugging Face collaborate to make generative AI more accessible and cost-efficient – This previous week, we announced an expanded collaboration between AWS and Hugging Face to accelerate the training, fine-tuning, and deployment of large language and vision models used to create generative AI applications. Generative AI applications can perform a variety of tasks, including text summarization, answering questions, code generation, image creation, and writing essays and articles. For more details, read this Machine Learning Blog post.

If you are interested in generative AI, I also recommend reading this blog post on how to Fine-tune text-to-image Stable Diffusion models with Amazon SageMaker JumpStart. Stable Diffusion is a deep learning model that allows you to generate realistic, high-quality images and stunning art in just a few seconds. This blog post discusses how to make design choices, including dataset quality, size of training dataset, choice of hyperparameter values, and applicability to multiple datasets.

AWS open-source news and updates – My colleague Ricardo writes this weekly open-source newsletter in which he highlights new open-source projects, tools, and demos from the AWS Community. Read edition #146 here.

Upcoming AWS Events
Check your calendars and sign up for these AWS events:

Build On AWS - Generative AI#BuildOn Generative AI – Join our weekly live Build On Generative AI Twitch show. Every Monday morning, 9:00 US PT, my colleagues Emily and Darko take a look at aspects of generative AI. They host developers, scientists, startup founders, and AI leaders and discuss how to build generative AI applications on AWS.

In today’s episode, my colleague Chris walked us through an end-to-end ML pipeline from data ingestion to fine-tuning and deployment of generative AI models. You can watch the video here.

AWS Pi Day 2023 SmallAWS Pi Day – Join me on March 14 for the third annual AWS Pi Day live, virtual event hosted on the AWS On Air channel on Twitch as we celebrate the 17th birthday of Amazon S3 and the cloud.

We will discuss the latest innovations across AWS Data services, from storage to analytics and AI/ML. If you are curious about how AI can transform your business, register here and join my session.

AWS Innovate Data and AI/ML edition – AWS Innovate is a free online event to learn the latest from AWS experts and get step-by-step guidance on using AI/ML to drive fast, efficient, and measurable results. Register now for EMEA (March 9) and the Americas (March 14).

You can browse all upcoming AWS-led in-person, virtual events and developer focused events such as Community Days.

That’s all for this week. Check back next Monday for another Week in Review!

— Antje

This post is part of our Week in Review series. Check back each week for a quick roundup of interesting news and announcements from AWS!

New: AWS Telco Network Builder – Deploy and Manage Telco Networks

Post Syndicated from Jeff Barr original https://aws.amazon.com/blogs/aws/new-aws-telco-network-builder-deploy-and-manage-telco-networks/

Over the course of more than one hundred years, the telecom industry has become standardized and regulated, and has developed methods, technologies, and an entire vocabulary (chock full of interesting acronyms) along the way. As an industry, they need to honor this tremendous legacy while also taking advantage of new technology, all in the name of delivering the best possible voice and data services to their customers.

Today I would like to tell you about AWS Telco Network Builder (TNB). This new service is designed to help Communications Service Providers (CSPs) deploy and manage public and private telco networks on AWS. It uses existing standards, practices, and data formats, and makes it easier for CSPs to take advantage of the power, scale, and flexibility of AWS.

Today, CSPs often deploy their code to virtual machines. However, as they look to the future they are looking for additional flexibility and are increasingly making use of containers. AWS TNB is intended to be a part of this transition, and makes use of Kubernetes and Amazon Elastic Kubernetes Service (EKS) for packaging and deployment.

Concepts and Vocabulary
Before we dive in to the service, let’s take a look some concepts and vocabulary that are unique to this industry, and are relevant to AWS TNB:

European Telecommunications Standards Institute (ETSI) – A European organization that defines specifications suitable for global use. AWS TNB supports multiple ETSI specifications including ETSI SOL001 through ETSI SOL005, and ETSI SOL007.

Communications Service Provider (CSP) – An organization that offers telecommunications services.

Topology and Orchestration Specification for Cloud Applications (TOSCA) – A standardized grammar that is used to describe service templates for telecommunications applications.

Network Function (NF) – A software component that performs a specific core or value-added function within a telco network.

Virtual Network Function Descriptor (VNFD) – A specification of the metadata needed to onboard and manage a Network Function.

Cloud Service Archive (CSAR) – A ZIP file that contains a VNFD, references to container images that hold Network Functions, and any additional files needed to support and manage the Network Function.

Network Service Descriptor (NSD) – A specification of the compute, storage, networking, and location requirements for a set of Network Functions along with the information needed to assemble them to form a telco network.

Network Core – The heart of a network. It uses control plane and data plane operations to manage authentication, authorization, data, and policies.

Service Orchestrator (SO) – An external, high-level network management tool.

Radio Access Network (RAN) – The components (base stations, antennas, and so forth) that provide wireless coverage over a specific geographic area.

Using AWS Telco Network Builder (TNB)
I don’t happen to be a CSP, but I will do my best to walk you through the getting-started experience anyway! The primary steps are:

  1. Creating a function package for each Network Function by uploading a CSAR.
  2. Creating a network package for the network by uploading a Network Service Descriptor (NSD).
  3. Creating a network by selecting and instantiating an NSD.

To begin, I open the AWS TNB Console and click Get started:

Initially, I have no networks, no function packages, and no network packages:

My colleagues supplied me with sample CSARs and an NSD for use in this blog post (the network functions are from Free 5G Core):

Each CSAR is a fairly simple ZIP file with a VNFD and other items inside. For example, the VNFD for the Free 5G Core Session Management Function (smf) looks like this:

tosca_definitions_version: tnb_simple_yaml_1_0

topology_template:

  node_templates:

    Free5gcSMF:
      type: tosca.nodes.AWS.VNF
      properties:
        descriptor_id: "4b2abab6-c82a-479d-ab87-4ccd516bf141"
        descriptor_version: "1.0.0"
        descriptor_name: "Free5gc SMF 1.0.0"
        provider: "Free5gc"
      requirements:
        helm: HelmImage

    HelmImage:
      type: tosca.nodes.AWS.Artifacts.Helm
      properties:
        implementation: "./free5gc-smf"

The final section (HelmImage) of the VNFD points to the Kubernetes Helm Chart that defines the implementation.

I click Function packages in the console, then click Create function package. Then I upload the first CSAR and click Next:

I review the details and click Create function package (each VNFD can include a set of parameters that have default values which can be overwritten with values that are specific to a particular deployment):

I repeat this process for the nine remaining CSARs, and all ten function packages are ready to use:

Now I am ready to create a Network Package. The Network Service Descriptor is also fairly simple, and I will show you several excerpts. First, the NSD establishes a mapping from descriptor_id to namespace for each Network Function so that the functions can be referenced by name:

vnfds:
  - descriptor_id: "aa97cf70-59db-4b13-ae1e-0942081cc9ce"
    namespace: "amf"
  - descriptor_id: "86bd1730-427f-480a-a718-8ae9dcf3f531"
    namespace: "ausf"
...

Then it defines the input variables, including default values (this reminds me of a AWS CloudFormation template):

  inputs:
    vpc_cidr_block:
      type: String
      description: "CIDR Block for Free5GCVPC"
      default: "10.100.0.0/16"

    eni_subnet_01_cidr_block:
      type: String
      description: "CIDR Block for Free5GCENISubnet01"
      default: "10.100.50.0/24"
...

Next, it uses the variables to create a mapping to the desired AWS resources (a VPC and a subnet in this case):

   Free5GCVPC:
      type: tosca.nodes.AWS.Networking.VPC
      properties:
        cidr_block: { get_input: vpc_cidr_block }
        dns_support: true

    Free5GCENISubnet01:
      type: tosca.nodes.AWS.Networking.Subnet
      properties:
        type: "PUBLIC"
        availability_zone: { get_input: subnet_01_az }
        cidr_block: { get_input: eni_subnet_01_cidr_block }
      requirements:
        route_table: Free5GCRouteTable
        vpc: Free5GCVPC

Then it defines an AWS Internet Gateway within the VPC:

    Free5GCIGW:
      type: tosca.nodes.AWS.Networking.InternetGateway
      capabilities:
        routing:
          properties:
            dest_cidr: { get_input: igw_dest_cidr }
      requirements:
        route_table: Free5GCRouteTable
        vpc: Free5GCVPC

Finally, it specifies deployment of the Network Functions to an EKS cluster; the functions are deployed in the specified order:

    Free5GCHelmDeploy:
      type: tosca.nodes.AWS.Deployment.VNFDeployment
      requirements:
        cluster: Free5GCEKS
        deployment: Free5GCNRFHelmDeploy
        vnfs:
          - amf.Free5gcAMF
          - ausf.Free5gcAUSF
          - nssf.Free5gcNSSF
          - pcf.Free5gcPCF
          - smf.Free5gcSMF
          - udm.Free5gcUDM
          - udr.Free5gcUDR
          - upf.Free5gcUPF
          - webui.Free5gcWEBUI
      interfaces:
        Hook:
          pre_create: Free5gcSimpleHook

I click Create network package, select the NSD, and click Next to proceed. AWS TNB asks me to review the list of function packages and the NSD parameters. I do so, and click Create network package:

My network package is created and ready to use within seconds:

Now I am ready to create my network instance! I select the network package and choose Create network instance from the Actions menu:

I give my network a name and a description, then click Next:

I make sure that I have selected the desired network package, review the list of functions packages that will be deployed, and click Next:

Then I do one final review, and click Create network instance:

I select the new network instance and choose Instantiate from the Actions menu:

I review the parameters, and enter any desired overrides, then click Instantiate network:

AWS Telco Network Builder (TNB) begins to instantiate my network (behind the scenes, the service creates a AWS CloudFormation template, uses the template to create a stack, and executes other tasks including Helm charts and custom scripts). When the instantiation step is complete, my network is ready to go. Instantiating a network creates a deployment, and the same network (perhaps with some parameters overridden) can be deployed more than once. I can see all of the deployments at a glance:

I can return to the dashboard to see my networks, function packages, network packages, and recent deployments:

Inside an AWS TNB Deployment
Let’s take a quick look inside my deployment. Here’s what AWS TNB set up for me:

Network – An Amazon Virtual Private Cloud (Amazon VPC) with three subnets, a route table, a route, and an Internet Gateway.

Compute – An Amazon Elastic Kubernetes Service (EKS) cluster.

CI/CD – An AWS CodeBuild project that is triggered every time a node is added to the cluster.

Things to Know
Here are a couple of things to know about AWS Telco Network Builder (TNB):

Access – In addition to the console access that I showed you above, you can access AWS TNB from the AWS Command Line Interface (AWS CLI) and the AWS SDKs.

Deployment Options – We are launching with the ability to create a network that spans multiple Availability Zones in a single AWS Region. Over time we expect to add additional deployment options such as Local Zones and Outposts.

Pricing – Pricing is based on the number of Network Functions that are managed by AWS TNB and on calls to the AWS TNB APIs, but the first 45,000 API requests per month in each AWS Region are not charged. There are also additional charges for the AWS resources that are created as part of the deployment. To learn more, read the TNB Pricing page.

Getting Started
To learn more and to get started, visit the AWS Telco Network Builder (TNB) home page.

Jeff;

AWS Wickr – A Secure, End-to-End Encrypted Communication Service For Enterprises With Auditing And Regulatory Requirements

Post Syndicated from Sébastien Stormacq original https://aws.amazon.com/blogs/aws/aws-wickr-a-secure-end-to-end-encrypted-communication-service-for-enterprises-with-auditing-and-regulatory-requirements/

I am excited to announce the availability of AWS Wickr, an enterprise communications service with end-to-end encryption, that allows businesses and public sector organizations to communicate more securely, enabling customers to meet auditing and regulatory requirements like e-discovery, legal hold, and FOIA requests. Unlike many enterprise communication tools, Wickr uses end-to-end encryption mechanisms to ensure your messages, files, voice, or video calls are solely accessible to their intended recipients.

The flexible administrative controls make it easy for your Wickr administrator to manage the communication channels and retain information to meet regulatory requirements when required. The information retained is stored on the servers you choose and stays entirely under your control.

End-to-End Encryption
Wickr provides secure communication between two or more correspondents. It means that the system provides authenticity and confidentiality: no unauthorized party can inject a message into the system, and no unintended party can access or understand the communications without being given them by one of the correspondents.

Each message gets a unique AES encryption key and a unique ECDH public key to negotiate the key exchange with other recipients. The message content (text, files, audio, or video) is encrypted on the sending device (your iPhone, for example) using the message-specific AES key. The message-specific AES key is exchanged with recipients via a Diffie-Hellman elliptic curve key exchange (EDCH521) mechanism. This ensures that only intended recipients have the message-specific AES key to decrypt the message.

Message-specific keys are passed through a key derivation function that binds the key exchange to a recipient device. When the recipient adds devices to their account later on (for example, I add a macOS client to my Wickr account, in addition to my iPhone), the new device will not see the message history by default. There is a way to migrate history from your old device to your new device if you have the two devices at hand and single sign-on (SSO) configured.

I drew the below diagram to show how the key exchange works at a high level.

wickr key exchange

The Wickr secure messaging protocol is open and documented, allowing the community to inspect it. The source code we use in Wickr clients to implement the secure messaging protocol is available to audit and review.

Wickr Client Application
The Wickr client application is very familiar to end users and easy to get started with. It is available for Windows, macOS, Linux, Android, and iOS devices. Once downloaded from a preferred app store and registered, users can create chat rooms or send messages to individual recipients. They may use emoticons to react to messages, exchange files, and make audio and video calls.

Here I am on macOS connected with me on iOS in my kitchen.

Wickr text message Wickr video calls

Wickr for the Administrator
Wickr administration is now integrated and available in the AWS Management Console. You can control access to Wickr administration using familiar AWS Identity and Access Management (IAM) access control and policies. It is integrated with AWS Cloud Development Kit (AWS CDK) and Amazon CloudWatch for monitoring.

A Wickr administrator manages networks. A network is a group of users and its related configuration, similar to Slack workspaces. Users might be added manually or imported. Most organizations will federate users through an existing identity system. Wickr will federate users with any OpenID Connect-compliant system.

A Wickr network is also the place where Wickr administrators configure security groups to manage messaging, calling, security, and federation settings. It also allows Wickr administrators to configure logging, data retention, and bots.

To get started, I select Wickr in the AWS Management Console. Then, I select Create a network. I enter a Network name, and I select Continue.

Wickr from AWS console Wickr - Create a network

The Wickr page of the Management Console lets you configure the Wickr network, the user federation with other Wickr networks, and more.

The Wickr consoleIn this demo, I don’t use single sign-on. I manually add two users by selecting Create new user. Once added, the user receives an invitation email with links to the client app. The client app asks the user to define a password at first use.

Customer-Controlled Data Retention and Bots
Wickr allows administrators to selectively retain information that must be maintained for regulatory needs into a secure, controlled data store that they manage. No one other than the recipient—including AWS—has access to keys to decrypt conversations or documents, giving organizations full control over their data. It helps organizations in the public sector to use Wickr for their secure collaboration needs.

Data retention is implemented as a process added to conversations, like a participant. The data retention process participates in the key exchange, just like any recipient, allowing it to decrypt the messages. The data retention process can run anywhere: on-premises, on an Amazon Elastic Compute Cloud (Amazon EC2) virtual machine, or at any location of your choice. Once data retention is configured in the console, Wickr administrators may start the data retention process and register it with their Wickr network.

Wickr Compliance Architecture schema

The data retention process is available as a Docker container for ease of deployment. The process stores clear text messages on the storage of your choice: a local or remote file system or Amazon Simple Storage Service (Amazon S3).

To try this process, I follow the documentation. I open the Wickr administration page and selected Data Retention under Network Settings.

Wickr Data retention

I copy the docker command, the Username, and the Password (not shown in the previous screenshot). Then, I connect to a Linux EC2 instance I created beforehand. I create a local directory for data retention, and I start the container.

docker run -v 
       /home/ec2-user/retention_34908291_bot:/tmp/retention_34908291_bot
       --restart on-failure:5 
       --name="retention_34908291_bot"
       -it 
       -e WICKRIO_BOT_NAME='retention_34908291_bot'
       wickr/bot-retention-cloud:5.109.08.03

The application prompts for the username and password collected in the console. When the process starts, I return to the console and activate the Data Retention switch at the bottom of the screen.

Note that for this demo, I choose to store data on the local file system. In reality, you might want to use S3 to securely store all your organization communications, encrypt the data at rest, and use the mechanisms you already have in place to control access to this data. The data retention process natively supports integration with AWS Secrets Manager and S3.

As a user, I exchange a few messages in a Wickr room. Then, as an administrator, I look at the data captured. I can observe that the data retention process captured the message and its metadata in JSON format.

Wickr Compliance data

When configuring the data retention capability, compliance and security officers can audit and review communications in a secure and controlled data store.

The retention bot is not the only bot available for Wickr. The Wickr Broadcast Bot allows you to broadcast messages to all of the members of your network or specific security groups. Developers can create workflows using Wickr Bots to automate chat-based workflows and integrate them with other systems. Similarly, a bot is a process integrated into conversation or chat rooms that can receive and act upon messages. Developers write bots with NodeJS. Bot processes securely integrate with a Wickr network, as defined by the network administrator. They are typically packaged as Docker containers for ease of deployment at the location of your choice. If you are a developer, have a look at the Wickr bot developer documentation to learn all the details.

Pricing and availability
Wickr is available in the US East (N. Virginia) AWS Region.

Wickr is free for individuals and teams of up to 30 users looking for a more secure workspace for the first 3 months. For organizations with more than 30 users, there is a standard plan available starting at $5 per user per month and a premium plan for $15 per user per month. The premium plan adds features and retention capabilities like granular administrative controls, client-side data expiration timer of up to 1 year, data retention, and e-discovery. As usual, there are no upfront fees or long-term engagement. You pay per user and per month (annual billing is available, contact us). Have a look at the pricing page for details.

Create your first Wickr network today!

— seb

New – AWS Private 5G – Build Your Own Private Mobile Network

Post Syndicated from Jeff Barr original https://aws.amazon.com/blogs/aws/new-aws-private-5g-build-your-own-private-mobile-network/

Back in the mid-1990’s, I had a young family and 5 or 6 PCs in the basement. One day my son Stephen and I bought a single box that contained a bunch of 3COM network cards, a hub, some drivers, and some cables, and spent a pleasant weekend setting up our first home LAN.

Introducing AWS Private 5G
Today I would like to introduce you to AWS Private 5G, the modern, corporate version of that very powerful box of hardware and software. This cool new service lets you design and deploy your own private mobile network in a matter of days. It is easy to install, operate, and scale, and does not require any specialized expertise. You can use the network to communicate with the sensors & actuators in your smart factory, or to provide better connectivity for handheld devices, scanners, and tablets for process automation.

The private mobile network makes use of CBRS spectrum. It supports 4G LTE (Long Term Evolution) today, and will support 5G in the future, both of which give you a consistent, predictable level of throughput with ultra low latency. You get long range coverage, indoors and out, and fine-grained access control.

AWS Private 5G runs on AWS-managed infrastructure. It is self-service and API-driven, and can scale with respect to geographic coverage, device count, and overall throughput. It also works nicely with other parts of AWS, and lets you use AWS Identity and Access Management (IAM) to control access to both devices and applications.

Getting Started with AWS Private 5G
To get started, I visit the AWS Private 5G Console and click Create network:

I assign a name to my network (JeffCell) and to my site (JeffSite) and click Create network:

The network and the site are created right away. Now I click Create order:

I fill in the shipping address, agree to the pricing (more on that later), and click Create order:

Then I await delivery, and click Acknowledge order to proceed:

The package includes a radio unit and ten SIM cards. The radio unit requires AC power and wired access to the public Internet, along with basic networking (IPv4 and DHCP).

When the order arrives, I click Acknowledge order and confirm that I have received the desired radio unit and SIMs. Then I engage a Certified Professional Installer (CPI) to set it up. As part of the installation process, the installer will enter the latitude, longitude, and elevation of my site.

Things to Know
Here are a couple of important things to know about AWS Private 5G:

Partners – Planning and deploying a private wireless network can be complex and not every enterprise will have the tools to do this work on their own. In addition, CBRS spectrum in the United States requires Certified Professional Installation (CPI) of radios. To address these needs, we are building an ecosystem of partners that can provide customers with radio planning, installation, CPI certification, and implementation of customer use cases. You can access these partners from the AWS Private 5G Console and work with them through the AWS Marketplace.

Deployment Options – In the demo above, I showed you the cloud–based deployment option, which is designed for testing and evaluation purposes, for time-limited deployments, and for deployments that do not use the network in latency-sensitive ways. With this option, the AWS Private 5G Mobile Core runs within a specific AWS Region. We are also working to enable on-premises hosting of the Mobile Core on a Private 5G compute appliance.

CLI and API Access – I can also use the create-network, create-network-site, and acknowledge-order-receipt commands to set up my AWS Private 5G network from the command line. I still need to use the console to place my equipment order.

Scaling and Expansion – Each network supports one radio unit that can provide up to 150 Mbps of throughput spread across up to 100 SIMs. We are working to add support for multiple radio units and greater number of SIM cards per network.

Regions and Locations – We are launching AWS Private 5G in the US East (Ohio), US East (N. Virginia), and US West (Oregon) Regions, and are working to make the service available outside of the United States in the near future.

Pricing – Each radio unit is billed at $10 per hour, with a 60 day minimum.

To learn more, read about AWS Private 5G.

Jeff;

Architecture Monthly Magazine: 5G

Post Syndicated from Jane Scolieri original https://aws.amazon.com/blogs/architecture/architecture-monthly-magazine-5g/

In our 5G issue, we discuss the evolution, implementation and trends for 5G. We’ve included some case studies from Verizon and Ericsson, and take a look at Ribbon SBC SWe and network-slicing with Cloudify. There are detailed Reference Architectures for you to check out, and videos on DISH, Verizon, AWS Wavelength, VR, Automotive, and Telefónica.

We’d like to thank Young Jung, our Expert, for his contribution to this issue. We hope you find it useful and informative.

Please give us your feedback! Include your comments on the Amazon Kindle page. You can view past issues and reach out to [email protected] anytime with your questions and comments.

In this month’s 5G issue:

  • Ask an Expert: Young Jung, Ph.D., Principal Solutions Architect, 5G & NFV
  • Case Study: Verizon Accelerates 5G Network Capability Launch Using AWS
  • Quick Start: Ribbon SBC SWe on AWS
  • Blog: Implementing 5G Network Slicing with Cloudify on AWS
  • Whitepaper: 5G Network Evolution with AWS
  • Reference Architecture: Deploying 5G Core on AWS
  • Case Study: Ericsson Delivers Low-Latency Communication with 5G at the Edge Using AWS Outposts
  • Reference Architecture: Deploying E2E 5G Network with AWS
  • Blog: Open source mobile core network implementation on Amazon Elastic Kubernetes Service
  • Whitepaper: Continuous Integration and Continuous Delivery for 5G Networks on AWS
  • Videos: DISH; Verizon; AWS Wavelength; VR Adoption; All Things Automotive, Telefónica

Download the Magazine

How to access the magazine

View and download past issues as PDFs on the AWS Architecture Monthly webpage.
Readers in the US, UK, Germany, and France can subscribe to the Kindle version of the magazine at Kindle Newsstand.
Visit Flipboard, a personalized mobile magazine app that you can also read on your computer.
We hope you’re enjoying Architecture Monthly, and we’d like to hear from you—leave us star rating and comment on the Amazon Kindle Newsstand page or contact us anytime at [email protected].

New improved version of the node-netflowv9 module for Node.JS

Post Syndicated from Anonymous original http://deliantech.blogspot.com/2014/06/new-improved-version-of-node-netflowv9.html

As I have mentioned before, I have implemented a NetFlowV9 compatible library for decode of Cisco NetFlow version 9 packets for Node.JS.
Now I am upgrading it to version 0.1 which has few updates:
  • bug fixes (including avoidance of an issue that happens with ASR9k and IOS XR 4.3)
  • now you can start the collector (with a second parameter of true) in a mode where you want to receive only one call back per packet instead of one callback per flow (the default mode). That could be useful if you want to count the lost packets (otherwise the relation netflow packet – callback is lost)
  • decrease of the code size
  • now the module compiles the templates dynamically into a function (using new Function). I like this approach very much, as it creates really fast functions (in contrast to eval, Function is always JIT processed) and it allows me to spare loops, function calls and memory copy. I like to do things like that with every data structure that allows it. Anyway, as an effect of this, the new module is about 3 times faster with all the live tests I was able to perform

Simple example for Node.JS sflow collector

Post Syndicated from Anonymous original http://deliantech.blogspot.com/2014/06/simple-example-for-nodejs-sflow.html

Sometimes you can use the SFlow or Netflow to extra add intelligence to your network. The collectors available on internet are usually there just to collect and store data used for accounting or nice graphics. But the collectors are either not allowing you to execute your own code in case of certain rules/thresholds reached, or do not react in real time (in general, the protocols delays you too. You cannot expect NetFlow accounting to be used in real time at all, while SFlow has modes that are bit more fast to react, by design, it is still not considered to be real-time sampling/accounting).
Just imagine you have a simple goal – you want to automatically detect floods and notify the operators or you can even automatically apply filters.
If you have an algorithm that can distinguish the incorrect traffic from the normal traffic from NetFlow/SFlow sampling you may like to execute an operation immediately when that happens.
The modern DoS attacks and floods may be complex and hard to detect. But mainly it is hard to make the currently available NetFlow/SFlow collector software to do that for you and then trigger/execute external application.
However, it is very easy to program it yourself.
I am giving you a simple example that uses the node-sflow module to collect packet samples, measure how many of them match a certain destination ip address and if they are above certain pps thresholds to execute an external program (that is supposed to block that traffic). Then after a period of time it will execute another program (that is supposed to unblock the traffic).
This program is very small – about 120 lines of code and allows you to use complex configuration file where you can define a list of rules that can match optionally vlans and networks for the sampled packet and then count how many samples you have per destination for that rule. The rule list is executed until first match in the configured order within the array, so that allows you to create black and white lists and different thresholds per networks and vlans, or to have different rules per overlapped ip addresses as long as they belong to different vlans.
Keep in mind this is just an example software there just for your example, showing you how to use node-sflow and pcap modules together! It is not supposed to be used in production, unless you definitely know what you are doing!
The goal of this example it here just to show you how easy is to add extra logic within your network.
The code is available on git-hub here https://github.com/delian/sflow-collector/

SFlow version 5 module for Node.JS

Post Syndicated from Anonymous original http://deliantech.blogspot.com/2014/06/sflow-version-5-module-for-nodejs.html

Unfortunately, as with NetFlow Version 9, SFlow version 5 (and SFlow in general) has not been very well supported by the Node.JS community up to now.
I needed modern SFlow version 5 compatible module, so I had to write one on my own.
Please welcome the newest module in Node.JS’s NPM that can decode SFlow version 5 packets and be used in the development of simple and easy SFlow collectors! The module is named node-sflow and you can look at its code here https://github.com/delian/node-sflow
Please be careful, as in the next days I may change the object structure of the flow representation to simplify it! Any tests and experiments are welcome.
The sflow module is available in the public npm (npm install node-sflow) repository.
To use it you have to do:
var Collector = require('node-sflow');

Collector(function(flow) {
    console.log(flow);
}).listen(3000); 
In general SFlow is much more powerful protocol than NetFlow, even it its latest version (version 9). It can represent more complex counters, report about errors, drops, full packet headers (not only their properties), collect information from interfaces, flows, vlans, and combine them in a much more complex reports.

However, the SFlow support in the agents – the networking equipment is usually extremely simplified – far from the richness and complexity the SFlow protocol may provide. Most of the vendors just do packet sampling and send them over SFlow as raw packet/frame header with an associated unclear counter.

In case of you having the issue specified above, this module cannot help much. You will just get the raw packet header (usually Ethernet + IP header) as a Node.JS buffer and then you have to decode it on your own. I want to keep the node-sflow module simple and I don’t plan to decode raw packet headers there as this feature is not a feature of the SFlow itself.

If you need to decode the raw packet header I can suggest one easy solution for you. You can use the pcap module from the npm repository and decode the raw header with it:

var Collector = require('node-sflow');
var pcap = require('pcap');

Collector(function(flow) {
    if (flow && flow.flow.records && flow.flow.records.length>0) {
        flow.flow.records.forEach(function(n) {
            if (n.type == 'raw') {
                if (n.protocolText == 'ethernet') {
                    try {
                        var pkt = pcap.decode.ethernet(n.header, 0);
                        if (pkt.ethertype!=2048) return;
                        console.log('VLAN',pkt.vlan?pkt.vlan.id:'none','Packet',pkt.ip.protocol_name,pkt.ip.saddr,':',pkt.ip.tcp?pkt.ip.tcp.sport:pkt.ip.udp.sport,'->',pkt.ip.daddr,':',pkt.ip.tcp?pkt.ip.tcp.dport:pkt.ip.udp.dport)
                    } catch(e) { console.log(e); }
                }
            }
        });
    }
}).listen(3000);