Brendan Jackman started his memory-management-track session at the 2024 Linux Storage,
Filesystem, Memory-Management and BPF Summit by saying that, for some
years now, the kernel community has been stuck in a reactive posture with
regard to hardware vulnerabilities. Each problem shows up with its own
scary name, and kernel developers find a way to mitigate it, usually losing
performance in the process. Jackman said that it is time to take back the
initiative against these vulnerabilities by reconsidering the more
general use of address-space isolation.
Optimizing the kernel’s memory use is made much easier if developers have
an accurate idea of how memory is being used, but the kernel’s
instrumentation is not as good as it could be. When Suren Baghdasaryan and
Kent Overstreet presented their
memory-allocation profiling work, which is meant to address this
shortcoming, at the 2023 Linux Storage, Filesystem, Memory Management, and
BPF Summit, their objective was uncontroversial but the proposed solution
ran into opposition that played out at length on the mailing lists (example)
over the last year. So it may be a bit surprising that, when the two
returned to the memory-management track in the 2024 gathering, the
controversy was gone and the discussion focused on improving details of the
implementation.
In the preceding scenario, neither single-user rotation nor alternating-user rotation would meet your security or compliance standards. Single-user rotation uses database user credentials in the secret to rotate itself (assuming the user has change-password permissions). Alternating-user rotation uses Amazon RDS admin credentials from another secret to create and update a _clone user credential, which means there are two valid user credentials with identical permissions.
In this post, you will learn how to implement a modified alternating-user solution that uses Amazon RDS admin user credentials to rotate database credentials while not creating an identical _clone user. This modified rotation strategy creates a short lag between when the password in the database changes and when the secret is updated. During this brief lag before the new password is updated, database calls using the old credentials might be denied. Test this in your environment to determine if the lag is within an acceptable range.
Walkthrough
In this walkthrough, you will learn how to implement the modified rotation strategy by modifying the existing alternating-user rotation template. To accomplish this, you need to complete the following:
Configure alternating-user rotation on the database credential secret for which you want to implement the modified rotation strategy.
Modify your AWS Lambda rotation function template code to implement the modified rotation strategy.
Test the modified rotation strategy on your database credential secret and verify that the secret was rotated while also not creating a _clone user.
To configure alternating-user rotation on the database credential secret
When configuring rotation for the database user secret in the Secrets Manager console, clear the checkbox for Rotate immediately when the secret is stored. The next rotation will begin on your schedule in the Rotation schedule tab. Make sure that no _clone user is created by the default alternating-user rotation code through your database’s user tables.
Figure 1: Clear the checkbox for Rotate immediately when the secret is stored
To modify your Lambda function rotation Lambda template to implement the modified rotation strategy
In the Secrets Manager console, select the Secrets menu from the left pane. Then, select the new database user secret’s name from the Secret name column.
Figure 2: Select the new database user secret
Select the Rotation tab on the Secrets page, and then choose the link under Lambda rotation function.
Figure 3: Select the Lambda rotation function
From the rotation Lambda menu, Download select Download function code.zip.
Figure 4: Select Download function code .zip from Download
Unzip the .zip file. Open the lambda_function.py file in a code editor and make the following code changes to implement the modified rotation strategy.
The following code changes show how to modify a rotation function for the MySQL alternating-user rotation code template. You must make similar changes in the CreateSecret and SetSecret steps of the alternating-user rotation code template for your database’s engine type.
To make the needed changes, remove the lines of code that are in grey italic and add the lines of code that are bold.
Consider using AWS Lambda function versions to enable reverting your Lambda function to previous iterations in case this modified rotation strategy goes wrong.
In create_secret()
The following code suggestion removes the creation of _clone-suffixed usernames.
Remove:
-- # Get the alternate username swapping between the original user and the user with _clone appended to it
-- current_dict['username'] = get_alt_username(current_dict['username'])
In set_secret()
The following code suggestions remove the creation of _clone-suffixed usernames and subsequent checks for such usernames in conditional logic.
Keep:
# Get username character limit from environment variable
username_limit = int(os.environ.get('USERNAME_CHARACTER_LIMIT', '16'))
Remove:
-- # Get the alternate username swapping between the original user and the user with _clone appended to it
-- current_dict['username'] = get_alt_username(current_dict['username'])
Keep:
# Check that the username is within correct length requirements for version
Remove:
-- if current_dict['username'].endswith('_clone') and len(current_dict['username']) > username_limit:
Add:
++ if len(current_dict[‘username’]) > username_limit:
Keep:
raise ValueError("Unable to clone user, username length with _clone appended would exceed %s character
s" % username_limit)
# Make sure the user from current and pending match
Remove:
-- if get_alt_username(current_dict['username']) != pending_dict['username']:
Add:
++ if current_dict['username'] != pending_dict['username']:
Remove:
-- def get_alt_username(current_username):
--   """Gets the alternate username for the current_username passed in
--
--   This helper function gets the username for the alternate user based on the passed in current username.
--
--   Args:
--       current_username (client): The current username
--
--   Returns:
--      AlternateUsername: Alternate username
--
--   Raises:
--      ValueError: If the new username length would exceed the maximum allowed
--
--   """
--   clone_suffix = "_clone"
--   if current_username.endswith(clone_suffix):
--       return current_username[:(len(clone_suffix) * -1)]
--   else:
--       return current_username + clone_suffix
--
The following code suggestions remove the logic of creating a new _clone user within the database, and rotates the existing user’s password.
Keep:
with conn.cursor() as cur:
Remove:
--   cur.execute("SELECT User FROM mysql.user WHERE User = %s", pending_dict['username'])
--   # Create the user if it does not exist
--   if cur.rowcount == 0:
--      cur.execute("CREATE USER %s IDENTIFIED BY %s", (pending_dict['username'], pending_dict['password']))
--
--   # Copy grants to the new user
--   cur.execute("SHOW GRANTS FOR %s", current_dict['username'])
--   for row in cur.fetchall():
--       grant = row[0].split(' TO ')
--       new_grant_escaped = grant[0].replace('%', '%%')  # % is a special character in Python format strings.
--       cur.execute(new_grant_escaped + " TO %s", (pending_dict['username'],))
Keep:
    # Get the version of MySQL
    cur.execute("SELECT VERSION()")
    ver = cur.fetchone()[0]
Remove:
--   # Copy TLS options to the new user
--   escaped_encryption_statement = get_escaped_encryption_statement(ver)
--   cur.execute("SELECT ssl_type, ssl_cipher, x509_issuer, x509_subject FROM mysql.user WHERE User = %s", current_dict['username'])
--   tls_options = cur.fetchone()
--   ssl_type = tls_options[0]
--   if not ssl_type:
--       cur.execute(escaped_encryption_statement + " NONE", pending_dict['username'])
--   elif ssl_type == "ANY":
--       cur.execute(escaped_encryption_statement + " SSL", pending_dict['username'])
--   elif ssl_type == "X509":
--       cur.execute(escaped_encryption_statement + " X509", pending_dict['username'])
--   else:
--       cur.execute(escaped_encryption_statement + " CIPHER %s AND ISSUER %s AND SUBJECT %s", (pending_dict['username'], tls_options[1], tls_options[2], tls_options[3]))
Keep:
    # Set the password for the user and commit
    password_option = get_password_option(ver)
    cur.execute("SET PASSWORD FOR %s = " + password_option, (pending_dict['username'], pending_dict['password']))
    conn.commit()
    logger.info("setSecret: Successfully set password for %s in MySQL DB for secret arn %s." % (pending_dict['username'], arn))
Re-zip the folder with the local code changes. From the rotation Lambda menu, under the Code tab, choose Upload from and select .zip file. Upload the new .zip file.
Figure 5: Use Upload from to upload the new .zip file as the Code source
To test the modified rotation strategy
During the next scheduled rotation for the new database user secret, the modified rotation code will run. To test this immediately, select the Rotation tab within the Secrets menu and choose Rotate secret immediately in the Rotation configuration section.
Figure 6: Choose Rotate secret immediately to test the new rotation strategy
To verify that the modified rotation strategy worked, verify the sign-in details in both the secret and the database itself.
To verify the Secrets Manager secret, select the Secrets menu in the Secrets Manager console and choose Retrieve secret value under the Overview tab. Verify that the username doesn’t have a _clone suffix and that there is a new password. Alternatively, make a get-secret-value call on the secret through the AWS Command Line Interface (AWS CLI) and verify the username and password details.
Figure 7: Use the secret details page for the database user secret to verify that the value of the username key is unchanged
To verify the sign-in details in the database, sign in to the database with admin credentials. Run the following database command to verify that no users with a _clone suffix exist: SELECT * FROM mysql.user;. Make sure to use the commands appropriate for your database engine type.
Also, verify that the new sign-in credentials in the secret work by signing in to the database with the credentials.
Clean up the resources
Follow the Clean up the resources section from the AWS Security Blog post used at the start of this walkthrough.
Conclusion
In this post, you’ve learned how to configure rotation of Amazon RDS database users using a modified alternating-users rotation strategy to help meet more specific security and compliance standards. The modified strategy ensures that database users don’t rotate themselves and that there are no duplicate users created in the database.
If you have feedback about this post, submit comments in the Comments section below. If you have questions about this post, start a new thread on AWS Secrets Manager re:Post or contact AWS Support.
This post is co-written with Mike Russo from AVB Marketing.
AVB Marketing delivers custom digital solutions for their members across a wide range of products. LINQ, AVB’s proprietary product information management system, empowers their appliance, consumer electronics, and furniture retailer members to streamline the management of their product catalog.
A key challenge for AVB’s members is the ability to retrieve, sort, and search through product data, which is crucial for sales activities within their stores. Floor sales use AVB’s Hub, a custom in-store customer relationship management (CRM) product, which relies on LINQ. Initially, searches from Hub queried LINQ’s Microsoft SQL Server database hosted on Amazon Elastic Compute Cloud (Amazon EC2), with search times averaging 3 seconds, leading to reduced adoption and negative feedback.
In this post, we share how AVB reduced their average search time from 3 seconds to 300 milliseconds in LINQ by adopting Amazon OpenSearch Service while processing 14.5 million record updates daily.
Overview of solution
To meet the demands of their users, the LINQ team set a goal to reduce search time response to under 2 seconds while supporting retrieval of over 60 million product data records. Additionally, the team aimed to reduce operational costs, reduce administrative overhead, and scale the solution to meet demand, especially during peak retail periods. Over a 6-month period, the team evaluated multiple architecture options, eventually moving forward with a solution using OpenSearch Service, Amazon EventBridge, AWS Lambda, Amazon Simple Queue Service (Amazon SQS), and AWS Step Functions.
During implementation, the LINQ team worked with OpenSearch Service specialists to optimize the OpenSearch Service cluster configuration to maximize performance and optimize cost of the solution. Following the best practices section of the OpenSearch Service Developer Guide, AVB selected an optimal cluster configuration with three dedicated cluster manager nodes and six data nodes, across three Availability Zones, while keeping shard size between 10–30 GiB.
Updates to the primary LINQ database come from various sources, including partner APIs for manufacturer metadata updates, LINQ’s frontend, and LINQ PowerTools. A Lambda function reads the updates from change data capture (CDC) tables on a schedule, which sends the updated records to a Step Functions workflow. This workflow prepares and indexes the record into OpenSearch Service in JSON format, allowing for individual customizations of the record on a per-customer basis. The LINQ team exposes access to the OpenSearch Service index through a search API hosted on Amazon EC2. The following figure outlines the solution.
AVB developed the LINQ Product Data Search solution with the expertise of a diverse team including software engineers and database administrators. Despite their limited experience with AWS, they set a timeline to complete the project in 6 months. AVB had several goals for this new workload, including search APIs to support in-store sales floor associates’ ability to quickly find products based on customer requirements, scalability to support future growth, and real-time analytics to support AVB’s needs around understanding their data.
AVB split this project into three key phases:
Research and development
Proof of concept
Implementation and iteration
Research and development
AVB’s LINQ team received a task to identify the most efficient solution to expedite product searches across AVB’s suite of software products. The team completed a comprehensive evaluation of various technologies and techniques to meet their requirements, including a close examination of various NoSQL databases and caching mechanisms. Following this exploration, AVB selected OpenSearch Service, an open source, distributed search and analytics suite, for use in a proof of concept. AVB chose OpenSearch Service for its powerful search capabilities, including full-text search and complex query support, as well as its ability to integrate seamlessly with other AWS services.
Proof of concept
In the proof of concept phase, the AVB team focused on validating the effectiveness of their chosen technology stack, with a particular emphasis on data loading and synchronization processes. This was essential to achieve real-time data consistency with their primary system of record to provide correct and up-to-date information to floor sales agents. A significant part of this phase involved the innovative process of data flattening, a technique crucial for managing complex product data.
For example, let’s explore a use case of a refrigerator listed in the SQL Server database. This product is linked to several related tables: one for basic details like model number and manufacturer, another for pricing, and another for features such as energy efficiency and capacity. The original database stores elements separately but connected through relational keys. The following figure provides an example data schema of the SQL Server database.
To enhance search capabilities in OpenSearch Service, the team merged all these disparate data elements into a single, comprehensive JSON document. This document includes both standard manufacturer details and member-specific customizations, like special pricing or additional features. This results in an optimized record for each product for quick and efficient search in OpenSearch Service. The following figure shows the data schema in OpenSearch Service.
Transforming relational data into a consolidated, searchable format allowed the LINQ team to ingest the data into OpenSearch Service. In the proof of concept, AVB shifted to updating data by using reference IDs, which are directly linked to the primary IDs of the product records or their relational entities in the SQL database. This approach allows updates to be executed independently and asynchronously. Crucially, it supports non-first in, first out (FIFO) processing models, which are vital in high-scale environments susceptible to data discrepancies like drops or replays. By using reference IDs, the system fetches the most current data for each entity at the time a change occurs, ensuring that the latest data is always used when processed. This method maintains data integrity by preventing outdated data from superseding newer information, thereby keeping the database accurate and current. A noteworthy technique used in the proof of concept was index aliases, allowing for zero downtime re-indexes for adding new fields or fixing bugs. AVB built robust performance monitoring and alerts using Amazon CloudWatch and Splunk, which enabled swift identification of issues.
The proof of concept improved search relevance by flattening relational data, which improved indexing and queryability. This restructuring reduced search response latency to 300 milliseconds, which was well under the 2-second goal set for this proof of concept. With this successful proof of concept demonstrating the effectiveness of the architectural approach, AVB moved on to the next phase of implementation and iteration.
Implementation and iteration
With AVB exceeding their initial goal of reducing search latency to under 2 seconds, the team then adopted an iterative approach to implement the complete solution, with a series of deployments designed to make data available in OpenSearch Service from different business verticals. Each business vertical has records consisting of different attributes, and this incremental approach allowed AVB to bring in and inspect data to make sure the documents in OpenSearch Service are what the team expected. Each deployment focused on specific data categories and included refinements to the indexing process from lessons learned in prior deployments. AVB also places a strong emphasis on cost optimization and security of the solution, and deployed OpenSearch Service into a private VPC to allow strict access control. Access to the new search capabilities is controlled through their Hub product using a middleware service provided by LINQ’s API. AVB uses robust API keys and tokens to provide API security to the new search product. This systematic progression meant that the completed LINQ Product Data Search catalog met AVB’s speed and accuracy requirements.
Conclusion
In this post, you learned how AVB reduced their average search time from 3 seconds to 300 milliseconds in LINQ by adopting OpenSearch Service while processing 14.5 million record updates daily, resulting in a 500% increase in adoption by AVB’s internal teams. Tim Hatfield, AVB Marketing’s VP of Engineering, reflected on the project and stated, “By partnering with AWS, we’ve not only supercharged Hub’s search speeds but also forged a cost-efficient foundation for LINQ’s future, where swift searches translate into reduced operating costs and maintain the competitive edge in retail technology.”
Mike Russo is a Director of Software Engineering at AVB Marketing. He leads the software delivery for AVB’s e-commerce and product catalog solutions. Outside work, Mike enjoys spending time with his family and playing basketball.
Patrick Duffy is a Senior Solutions Architect in the at AWS. He is passionate about raising awareness and increasing security of AWS workloads. Outside work, he loves to travel and try new cuisines, and you may match up against him in a game on Magic Arena.
The AlmaLinux project has announced
the formation of the AlmaLinux Engineering
Steering Committee (ALESCo):
[It] is dedicated to guiding the technical direction of the
AlmaLinux distribution on a day-to-day basis within the guidelines set
forth by the board, ensuring its robustness, reliability,
sustainability, and relevance in the open-source ecosystem. ALESCo
will work collaboratively with, and oversee relevant technical-focused
Special Interest Groups (SIGs) to achieve these goals. It is “air
traffic control” for engineering matters.
The initial members of ALESCo appointed by the AlmaLinux OS
Foundation board are Andrew Lukoshko, Ben Thomas, Cody Robertson,
Elkhan Mammadli, Jonathan Wright, and Neal Gompa. The AlmaLinux Wiki has
more information on the committee’s activities and how to get involved.
Increasing storage density is a fancy way of saying we are replacing one drive with another drive of a larger capacity; for example replacing a 4TB drive with a 16TB drive—same space, four times the storage. You’ve probably copied or cloned a drive or two over the years, so you understand the general process. Now imagine having 270,000 drives that over the next several years will need to be replaced, or migrated as is often the term used. That’s a lot of work. And when you finish—well actually you’ll never finish as the process is continuous for as long as you are in the cloud storage business. So, how does Backblaze manage this ABC (Always Be Copying) process? Let me introduce you to CVT Copy or CVT for short.
CVT Copy is our in-house purpose-built application used to perform drive migrations at scale. CVT stands for Cluster, Vault, Tome, which is engineering vernacular mercifully shortened to CVT.
Before we jump in, let’s take a minute to define a few terms in the context of how we organize storage.
Drive: The basic unit of storage ranging in our case from 4TB to 22TB in size.
Storage Server: A collection of drives in a single server. We have servers of 26, 45, and 60 drives. All drives in a storage server are the same logical size.
Backblaze Vault: A logical collection of 20 Storage Pods or servers. Each storage server in a Vault will have the same number of drives.
Tome: A tome is a logical collection of 20 drives, with each drive being in one of the 20 storage servers in a given Vault. If the storage servers in a Vault have 60 drives each, then there will be 60 unique tomes in that Vault.
Cluster: A logical collection of Vaults, grouped together to share other resources such as networking equipment and utility servers.
Based on this, a Vault consisting of 20, 60-drive storage servers will have 1,200 drives, a Vault with 45-drive storage servers will have 900 drives, and a Vault with 26-drive servers will have 520 drives. A cluster can have any combination of Vault sizes.
A Quick Review on How Backblaze Stores Data
Data is uploaded to one of the 20 drives within a tome. The data is then divided into parts, called data shards. At this point, we use our own Reed-Solomon erasing coding algorithm to compute the parity shards for that data. The number of data shards plus the number of parity shards will equal 20, i.e. the number of drives in a tome. The data and parity shards are written to their assigned drives, one shard per drive. The ratios of data shards to parity shards we currently use are 17/3, 16/4, and 15/5 depending primarily on the size of the drives being used to store the data—the larger the drive, the higher the parity.
Using parity allows us to restore (i.e. read) a file using less than 20 drives. For example, when a tome is 17/3 (data/parity), we only need data from any 17 of the 20 drives in that tome to restore a file. This dramatically increases the durability of the files stored.
CVT Overview
For CVT, the basic unit of migration is a tome, with all of the tomes in a source Vault being copied simultaneously to a new destination Vault which is typically new hardware. For each tome, the data, in the form of files, is copied file-by-file from the source tome to the destination tome.
The CVT Process
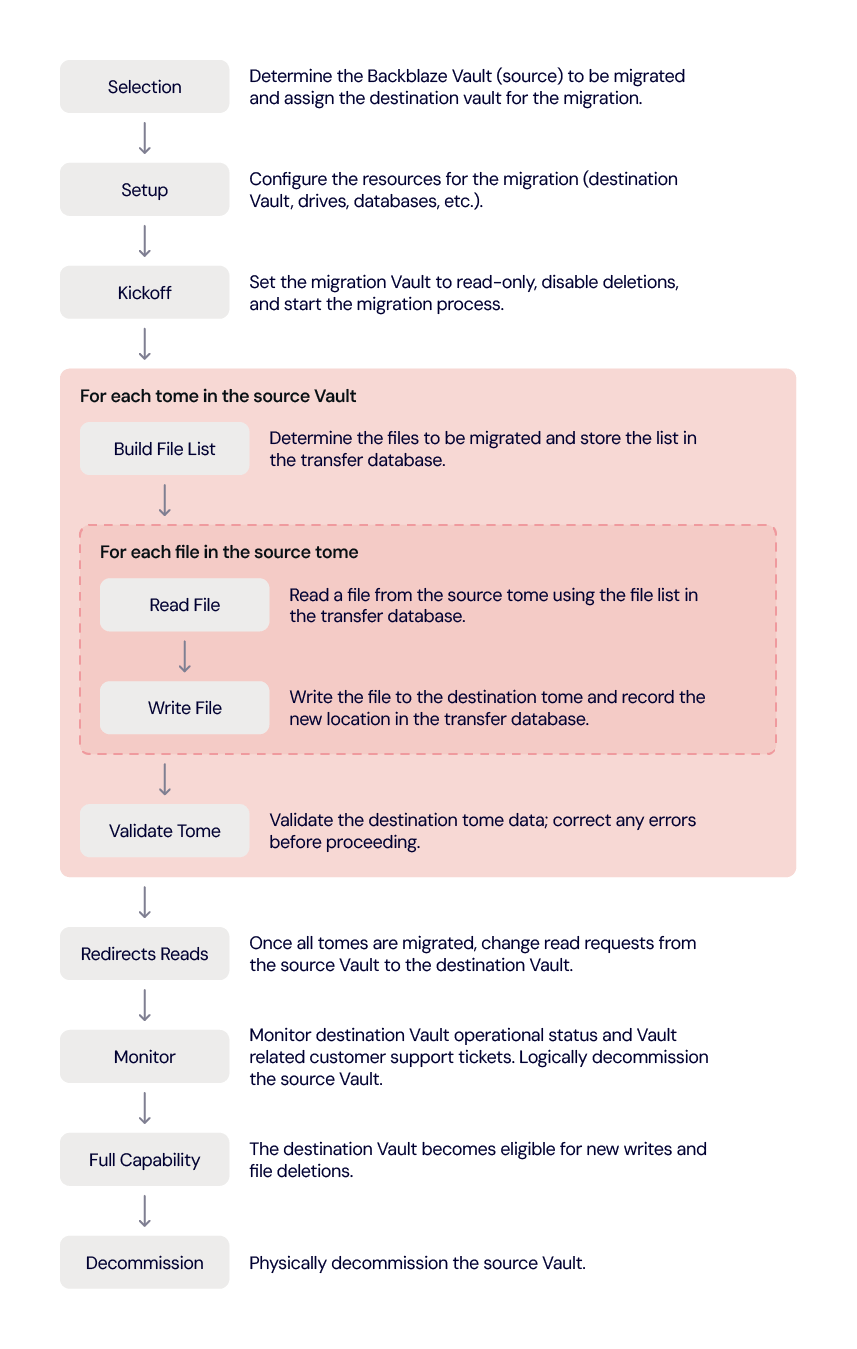
An overview of the CVT process is below, followed by an explanation of each task noted.
Selection
Selecting a Vault to migrate involves considering several factors. We start by reviewing current drive failure rates and predicted drive failure rates over time. We also calculate and consider overall Vault durability; that is, our ability to safeguard data from loss. In addition, we need to consider operational needs. For example, we still have Vaults using 45-drive Storage Pods. Upgrading these to 60-drive storage servers increases drive density in the same rack space. These factors taken together determine the next Vault to migrate.
Currently we are migrating systems with 4TB drives, which means we are migrating up to 3.6 petabytes (PB) of data for a 900 drive Vault or 4.8PB of data for a 1,200 drive Vault. Actually, there are no limitations as to the size of the source system drives, so Vaults with 6TB, 8TB, and larger sized drives can be migrated using CVT with minimal setup and configuration changes.
Once we’ve identified a source Vault to migrate we need to identify the target or destination system. Currently, we are using destination vaults containing 16TB drives. There is no limitation as to the size of the drives of the destination Vault, so long as they are at least as large as those in the source Vault. You can migrate the data from any sized source Vault to any sized destination Vault as long as there is adequate room on the destination Vault.
Setup
Once the source Vault and destination Vault are selected, the various Technical Operations and Data Center folks get to work on setting things up. If we are not using an existing destination Vault, then a new destination Vault is provisioned. This brings up one of the features of CVT: The migration can be to a new clean Vault or an existing Vault; that is, one with data from a previous migration on it. In the latter case, the new data is just added and does not replace any of the existing data. The chart below are examples of the different ways a destination Vault can be filled from one or more source Vaults.
In any of these scenarios, the free space can be used for another migration destination or for a Vault where new customer data can be written.
Kickoff
With the source and destination Vaults identified and setup, we are now ready to kick-off the CVT process. The first step is to put the source Vault in a read-only state and to disable file deletions on both the source and destination Vaults. It is possible that some older source Vaults may have already been placed in read-only state to reduce their workload. A Vault in a read-only state continues to perform other operations such as running shard integrity checks, reporting Drive Stats statistics and so on.
CVT and Drive Stats
We record Drive Stats data from the drives in the source Vault until the migration is complete and verified. At that point we begin recording Drive Stats data from the drives in the destination Vault and stop recording Drive Stats data from the drives in the source Vault. The drives in the source Vault are not marked as failed.
Build the File List
This step and the next three steps (read files, write files, and validate) are done as a consecutive group of steps for each tome in a source Vault. For our purpose here, we’ll call this group of steps the tome migration process, although they really don’t have such a name in the internal documentation. The tome migration process is for a single tome, but, in general, all tomes in a Vault are migrated at the same time, although due to their unique contents, they most likely will complete at different times.
For each tome, the source file list is copied to a file transfer database and each entry is mapped to its new location in the destination tome. This process allows us to maintain the same upload path while copying the data as the customer used to initially upload their data. This ensures that from the customer point of view, nothing changes in how they work with their files even though we have migrated them from one Vault to another.
Read Files
For each tome, we use the file location database to read the files. One file at a time. We use the same code in this process that we use when a user requests their data from the Backblaze B2 Storage Cloud. As noted earlier, the data is sharded across multiple drives using the preset data/parity scheme, for example 17/3. That means, in this case we only need data from 17 of the drives to read the file.
When we read a file, one advantage we get by using our standard read process is a pristine copy of the file to migrate. While we regularly run shard integrity checks on the stored data to ensure a given shard of data is good, media degradation, cosmic rays and so on can affect data sitting on a hard drive. By using the standard read process, we get a completely clean version of each file to migrate.
Write Files
The restored file is sent to the destination vault, there is no intermediate location where the file resides. The transfer is done over an encrypted network connection typically within the same data center, preferably on the same network segment. If the transfer is done between data centers, it is done over an encrypted dark fiber connection.
The file is then written to the destination tome. The write process is the same one used by our customers when they upload a file and given that process has successfully written hundreds of billions of files we didn’t need to invent anything new.
At this point, you could be thinking that’s a lot of work to copy each file one by one. Why not copy and transfer block by block, for example? The answer lies in the flexibility we get by using the standard file-based read and write processes.
We can change the number of tomes. Let’s say we have 45 tomes in the source Vault and 60 tomes in the destination Vault. If we had copied blocks of data the destination Vault would have 15 empty tomes. This creates load balancing and other assorted performance problems when that destination Vault is opened up for new data writes at a later date. By using standard read and write calls for each file, all 60 of the destination Vault’s tomes fill up evenly, just like they do when we receive customer data.
We can change parity of the data. The source 4TB drive Vaults have a data/parity ratio of 17/3. By using our standard process to write the files, the data/parity ratio can be set to whatever ratio we want for the destination Vault. Currently, the data/parity ratio for the 16TB destination Vaults is set to 15/5. This ratio ensures that the durability of the destination Vault and therefore the recoverability of the files therein is maintained as a result of migrating the data to larger drives.
We can maximize parity economics. Increasing the number of parity drives in a tome from three to five decreases the number of data drives in that tome. That would seem to increase the cost of storage, but the opposite is true in this case. Here’s how:
Using 4TB drives for 16TB of data stored
Our average cost for a 4TB drive was $120 or $0.03 per GB.
Our cost of 16TB of storage, using 4TB drives, was $480 (4 x $120).
Using a 17/3 data/parity scheme means:
Data storage: We have 13.6TB of data storage at $0.03/GB ($30/TB) which costs us $408.
Parity storage: We have 2.4TB of parity storage at $0.03/GB ($30/TB) which costs us $72.
Using 16TB drives for 16TB of data stored
Our average cost for a 16TB drive is $232 or $0.0145 per GB.
Our cost of 16TB of storage is $232.
Using a 15/5 data/parity scheme means:
Data storage: We have 12.0TB of data storage at $0.0145/GB ($14.5/TB) which costs us $174.
Data parity: We have 4.0TB of parity storage at $0.0145/GB ($14.5/TB) which costs us $58.
In summary, increasing the data/parity ratio to 15/5 for the 16TB drives is less expensive ($58) than the cost of parity when using our 4TB drives ($72) to provide the same 16TB of storage. The lower cost per TB of the 16TB drives allows us to increase the number of parity drives in a tome. Therefore, the cost of increasing the parity of the destination tome not only enhances data durability, it is economically sound.
Obviously a 16TB drive actually holds a bit less data due to formatting and overhead and four 4TB drives hold even less data. In other words, even with formatting and so on, the math still works out in favor of using the 16TB drives.
Validate Tome
The last step in migrating a tome is to validate the destination tome is the same as the source tome. This is done for each tome as they complete their copy process. If the source and destination tomes are not consistent, shard integrity check data can be reviewed to determine any errors and the system can retransfer individual files, up to and including the entire tome.
Redirect Reads
Once all of the tomes within the Vault have completed their individual migrations and have passed their validation checks, we are ready to redirect customer reads (download requests) to the destination Vault. This process is completely invisible to the customer as they will use the same file handle as before. This redirection or swap process can be done tome by tome, but is usually done once the entire destination Vault is ready.
Monitor
At this point all download requests are handled by the destination Vault. We monitor the operational status of the Vault, as well as any failed download requests. We also review inputs from customer support and sales support to see if there are any customer related issues.
Once we are satisfied that the destination Vault is handling customer requests, we will logically decommission the source Vault. Basically, that means while the source Vault continues to run, it is no longer externally reachable. If a significant problem were to arise with the new destination Vault, we can swap in the source Vault. At this point, both Vaults are read-only, so the swap would be straightforward. We have not had to do this in our production environment.
Full Capability
Once we are satisfied there are no issues with the destination Vault, we can proceed one or two ways.
Another migration: We can prepare for the migration of another source Vault to this destination Vault. If this is the case, we return to the Selection step of the CVT process with the Vault once again being assigned as a destination Vault.
Allow new data: We allow the destination Vault to accept new data from customers. Typically, the contents of multiple source Vaults have been migrated to the destination Vault before this is done. Once new customer writes have been allowed on a destination Vault, we won’t use it as a destination Vault again.
Decommission
After three months the source Vault is eligible to be physically decommissioned. That is, we turn it off, disconnect it from power and networking, and schedule it to be disassembled. This includes wiping the drives and recycling the remaining parts either internally or externally. In practice, we will wait to decommission at least two Vaults at once as it is more economical in dealing with our recycling partners.
Automation
You’re probably wondering how much of this process is automated or uses some type of orchestration to align and accomplish tasks. We currently have monitoring tools, dashboards, scripts, and such, but humans, real ones not AI generated, are in control. That said, we are working on orchestration of the setup and provisioning processes as well as upleveling the automation in the tome migration process. Over time, we expect the entire migration process to be automated, but only when we are sure it works—the “run fast, break things” approach is not appropriate when dealing with customer data.
Not for the Faint of Heart
The basic idea of copying the contents of a drive to another larger drive is straightforward and well understood. As you scale this process, complexity creeps in as you have to consider how the data is organized and stored while keeping it secure and available to the end user.
If your organization manages your data in-house, the never-ending task of simultaneously migrating hundreds or perhaps thousands of drives falls to you or perhaps the contractor you hired to perform the task if you lack the experience or staffing. And this is just one of the tasks you are faced with in operating, maintaining, and upgrading your own storage infrastructure.
In addition to managing a storage infrastructure, there are the growing environmental concerns of data storage. The amount of data generated and stored each year continues to skyrocket and tools such as CVT allow us to scale and optimize our resources in a cost efficient, yet environmentally sensitive way.
To do this, we start with data durability. Using our Drive Stats data and other information, we optimize the length of time a Vault should be in operation before the drives need to be replaced, that is before the drive failure rate impacts durability. We then consider data density, how much data can we pack into a given space. Migrating data from 4TB to 16TB drives, for example, not only increases data density, it uses less electricity per stored terabyte of data and reduces the amount of waste if, for example, we had continued to buy and use 4TB drives instead of upgrading to 16TB drives.
In summary, CVT is more than just a fancy data migration tool: It is part of our overall infrastructure management program addressing scalability, durability, and environmental challenges faced by the ever-increasing amounts of data we are asked to store and protect each day.
Kudos
The CVT program is run by Bryan with the wonderfully descriptive title of Senior Manager, Operations Analysis and Capacity Management. He is assisted by folks from across the organization. They are, in no particular order, Bach, Lorelei (Lo), Madhu, Mitch, Ben, Rodney, Vicky, Ryan, David M., Sudhi, David W., Zoe, Mike, and unnamed others who pitch in as the process rolls along. Each person brings their own expertise to the process which Bryan coordinates. To date, the CVT Team has migrated 24 Vaults containing over 60PB of data—and that’s just the beginning.
The kernel stack is a scarce and tightly constrained resource; kernel
developers often have to go far out of their way to avoid using too much
stack space. The size of the stack is also fixed, leading to situations
where it is too small for some code paths, while wastefully large for
others. At the 2024 Linux Storage,
Filesystem, Memory Management, and BPF Summit, Pasha Tatashin proposed
making the kernel stack size dynamic, making more space available when
needed while saving memory overall. This change is not as easy to
implement as it might seem, though.
Today, during our Take Command Summit, we released our 2024 Attack Intelligence Report, which pulls in expertise from our researchers, our detection and response teams, and threat intelligence teams. The result is the clearest picture yet of the expanding attack surface and the threats security professionals face every day.
Since the end of 2020, we’ve seen a significant increase in zero-day exploitation, ransomware attacks, and mass compromise incidents impacting many organizations worldwide. We have seen changes in adversary behaviors with ransomware groups and state-sponsored threat actors using novel persistence mechanisms and zero-day exploits to great effect.
Our 2024 Attack Intelligence Report is a 14-month look at data for marquee vulnerabilities and attack patterns. From it, we identified trends that are helpful for every security professional to understand.
Some key findings include:
A consistently high level of zero-day exploitation over the last three years. Since 2020, our vulnerability research team has tracked both scale and speed of exploitation. For two of the last three years, more mass compromise events have arisen from zero-day exploits than from n-day exploits. 53% of widely exploited CVEs in 2023 and early 2024 started as zero-day attacks.
Network Edge Device Exploitation has increased. Large-scale compromises stemming from network edge device exploitation has nearly doubled in 2023. We found that 36% of the widely exploited vulnerabilities we tracked occurred within network edge technology. Of those, 60% were zero day exploits. These technologies represent a weak spot in our collective defenses.
Ransomware is still big business. We tracked more than 5,600 ransomware attacks between January 2023 and February 2024. And those are the attacks we know about, as many attacks may go unreported for a number of reasons. The ones we were able to track indicated trends in attacker motive and behavior. For instance, we saw an increase in what we term “smash-and-grab” attacks, particularly those involving file transfer solutions. A smash-and-grab attack sees adversaries gaining access to sensitive data and performing exfiltration as quickly as possible. While most ransomware incidents Rapid7 observed were still “traditional” attacks where data was encrypted, smash-and-grab extortion is becoming more common.
Attackers are preferring to exploit simple vulnerability classes. While attackers still target tougher-to-exploit vuln classes like memory corruption, most of the widely exploited CVEs we have tracked over the last few years have arisen from simpler root causes. For instance, 75% of widespread threat CVEs Rapid7 has analyzed since 2020 have improper access control issues, like remotely accessible APIs and authentication bypasses, and injection flaws (like OS command injection) as their root causes.
These are just a few of the key findings in our 2024 Attack Intelligence report. The report was released today in conjunction with our Take Command Summit — a day-long virtual cybersecurity summit, of which the report features as a keynote. The summit includes some of the most impactful members of the security community taking part in some of the most critical conversations at this critical time. You can read the report here.
The page
structure is a complicated beast, but some parts of it are more
intimidating than others. The mapcount field is one of the
scarier parts. It allegedly records the number of references to the page
in page tables, but, as David Hildenbrand described during the
memory-management track at the 2024 Linux Storage,
Filesystem, Memory Management, and BPF Summit, things are more
complicated than that. Few people truly understand the semantics of this
field, but the situation will hopefully get better over time.
Security updates have been issued by AlmaLinux (firefox, nodejs, and thunderbird), Fedora (uriparser), Oracle (firefox and thunderbird), Slackware (mariadb), SUSE (cairo, gdk-pixbuf, krb5, libosinfo, postgresql14, and python310), and Ubuntu (firefox, linux-aws, linux-aws-5.15, and linux-azure).
Several Bluetooth tag companies have committed to making their future products compatible with the new standard. Apple and Google said they will continue collaborating with the Internet Engineering Task Force to further develop this technology and address the issue of unwanted tracking.
This seems like a good idea, but I worry about false alarms. If I am walking with a friend, will it alert if they have a Bluetooth tracking device in their pocket?
During this special onboarding, we added two additional AWS Regions (Israel (Tel Aviv)) and Canada West (Calgary)) and three additional AWS services to the scope since the last certification issued on Nov 22, 2023. The following are the three additional services:
For a full list of AWS services that are certified under ISO and CSA Star, see the AWS ISO and CSA STAR Certified page. Customers can also access the certifications in the AWS Management Console through AWS Artifact.
If you have feedback about this post, submit comments in the Comments section below.
Want more AWS Security how-to content, news, and feature announcements? Follow us on X.
There are two fundamental levels of memory allocator in the Linux kernel:
the page allocator, which allocates memory in units of pages, and the slab
allocator, which allocates arbitrarily-sized chunks that are usually (but
not necessarily) smaller than a page. The slab allocator is the one that
stands behind commonly used kernel functions like kmalloc(). At
the 2024 Linux
Storage, Filesystem, Memory Management, and BPF Summit, slab maintainer
Vlastimil Babka provided an update on recent changes at the slab level and
discussed the changes that are yet to come.
The collective thoughts of the interwebz
Manage Consent
To provide the best experiences, we use technologies like cookies to store and/or access device information. Consenting to these technologies will allow us to process data such as browsing behavior or unique IDs on this site. Not consenting or withdrawing consent, may adversely affect certain features and functions.
Functional
Always active
The technical storage or access is strictly necessary for the legitimate purpose of enabling the use of a specific service explicitly requested by the subscriber or user, or for the sole purpose of carrying out the transmission of a communication over an electronic communications network.
Preferences
The technical storage or access is necessary for the legitimate purpose of storing preferences that are not requested by the subscriber or user.
Statistics
The technical storage or access that is used exclusively for statistical purposes.The technical storage or access that is used exclusively for anonymous statistical purposes. Without a subpoena, voluntary compliance on the part of your Internet Service Provider, or additional records from a third party, information stored or retrieved for this purpose alone cannot usually be used to identify you.
Marketing
The technical storage or access is required to create user profiles to send advertising, or to track the user on a website or across several websites for similar marketing purposes.