David Vernet kicked off the BPF track at 2024’s BPF track at the Linux Storage,
Filesystem, Memory Management, and BPF Summit
with a
talk about polymorphic kfuncs — or, with less jargon, kernel functions that can
be called from BPF which use different implementations depending on context.
He explained how this would be useful to
the sched_ext BPF scheduling framework,
but expected it to be helpful in
other areas as well.
AWS Summit season is in full swing around the world, with last week’s events in Bengaluru, Berlin, and Seoul, where my blog colleague Channy delivered one of the keynotes.
Last week’s launches Here are some launches that got my attention:
Amazon S3 will no longer charge for several HTTP error codes – A customer reported how he was charged for Amazon S3 API requests he didn’t initiate and which resulted in AccessDenied errors. The Amazon Simple Storage Service (Amazon S3) service team updated the service to not charge such API requests anymore. As always when talking about pricing, the exact wording is important, so please read the What’s New post for the details.
Introducing Amazon EC2 C7i-flex instances – These instances delivers up to 19 percent better price performance compared to C6i instances. Using C7i-flex instances is the easiest way for you to get price performance benefits for a majority of compute-intensive workloads. The new instances are powered by the 4th generation Intel Xeon Scalable custom processors (Sapphire Rapids) that are available only on AWS and offer 5 percent lower prices compared to C7i.
Application Load Balancer launches IPv6 only support for internet clients – Application Load Balancer now allows customers to provision load balancers without IPv4s for clients that can connect using just IPv6s. To connect, clients can resolve AAAA DNS records that are assigned to Application Load Balancer. The Application Load Balancer is still dual stack for communication between the load balancer and targets. With this new capability, you have the flexibility to use both IPv4s or IPv6s for your application targets while avoiding IPv4 charges for clients that don’t require it.
Amazon VPC Lattice now supports TLS Passthrough – We announced the general availability of TLS passthrough for Amazon VPC Lattice, which allows customers to enable end-to-end authentication and encryption using their existing TLS or mTLS implementations. Prior to this launch, VPC Lattice supported HTTP and HTTPS listener protocols only, which terminates TLS and performs request-level routing and load balancing based on information in HTTP headers.
Amazon DocumentDB zero-ETL integration with Amazon OpenSearch Service – This new integration provides you with advanced search capabilities, such as fuzzy search, cross-collection search and multilingual search, on your Amazon DocumentDB (with MongoDB compatibility) documents using the OpenSearch API. With a few clicks in the AWS Management Console, you can now synchronize your data from Amazon DocumentDB to Amazon OpenSearch Service, eliminating the need to write any custom code to extract, transform, and load the data.
Amazon EventBridge now supports customer managed keys (CMK) for event buses – This capability allows you to encrypt your events using your own keys instead of an AWS owned key (which is used by default). With support for CMK, you now have more fine-grained security control over your events, satisfying your company’s security requirements and governance policies.
Other AWS news Here are some additional news items, open source projects, and Twitch shows that you might find interesting:
The Four Pillars of Managing Email Reputation – Dustin Taylor is the manager of anti-abuse and email deliverability for Amazon Simple Email Service (SES). He wrote a remarkable post exploring Amazon SES approach to managing domain and IP reputation. Maintaining a high reputation ensures optimal recipient inboxing. His post outlines how Amazon SES protects its network reputation to help you deliver high-quality email consistently. A worthy read, even if you’re not sending email at scale. I learned a lot.
Build On Generative AI – Season 3 of your favorite weekly Twitch show about all things generative artificial intelligence (AI) is in full swing! Streaming every Monday, 9:00 AM US PT, my colleagues Tiffany and Darko discuss different aspects of generative AI and invite guest speakers to demo their work.
AWS open source news and updates – My colleague Ricardo writes this weekly open source newsletter, in which he highlights new open source projects, tools, and demos from the AWS Community.
Upcoming AWS events
AWS Summits – Join free online and in-person events that bring the cloud computing community together to connect, collaborate, and learn about AWS. Register in your nearest city: Hong Kong (May 22), Milan (May 23), Stockholm (June 4), and Madrid (June 5).
AWS re:Inforce – Explore 2.5 days of immersive cloud security learning in the age of generative AI at AWS re:Inforce, June 10–12 in Pennsylvania.
AWS Community Days – Join community-led conferences that feature technical discussions, workshops, and hands-on labs led by expert AWS users and industry leaders from around the world: Midwest | Columbus (June 13), Sri Lanka (June 27), Cameroon (July 13), Nigeria (August 24), and New York (August 28).
In this post, we discuss how to architect Zero Trust based remote connectivity to your applications hosted within Amazon Web Services (AWS). Specifically, we show you how to integrate AWS Verified Access with Jamf as a device trust provider. This post is an extension of our previous post explaining how to integrate AWS Verified Access with CrowdStrike. In this post, we also look at how to troubleshoot Verified Access policies and integration issues for when a user with valid access receives access denied or unauthorized error messages.
Verified Access is a networking service that is built on Zero Trust principles and provides secured access to corporate applications without needing a virtual private network (VPN). This enables your corporate users to be able to access their applications from anywhere with a complaint device. Verified Access reduces IT operations overhead because it is built on an open environment and integrates with your existing trust providers and lets you use your existing implementations.
Verified Access lets you centrally define access policies for your applications with additional context beyond only IP address, using claims from user identity and user device coming from the trust providers. Using these access policies, Verified Access evaluates each access request at scale in real time and records each access request centrally, making it easier and quicker for you to respond to security incidents or audit requests.
Jamf is an Apple mobile device management (MDM) software and security provider. Organizations can use Jamf to manage their corporate devices and maintain security posture. Jamf’s Zero Trust product—Jamf Trust—monitors device security posture and reports it back to the administrators on the Jamf Protect console. It monitors the device’s OS settings, patch level, and device settings against an organization’s defined policy and calculates device posture from secure to high risk.
Verified Access integrates with third-party device management providers such as Jamf to gather additional security claims from the device in addition to user identity to either allow or deny access.
Solution overview
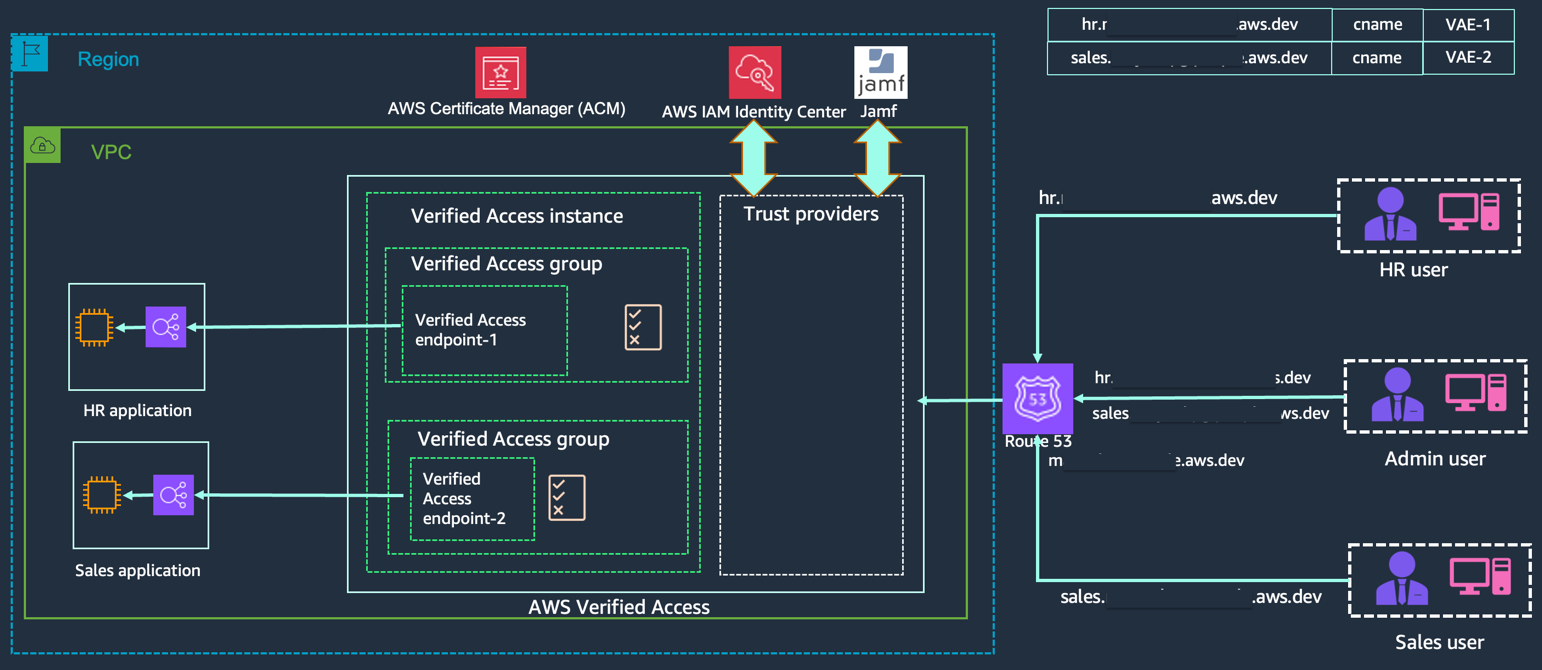
In this example, you will set up remote access to a sales application and an HR application. Through the solution, you want to make sure only users from the sales group can access the sales application, and only users from the HR group are able to access the HR application.
You will onboard the applications to Verified Access, and access policies will be defined based on the security requirements using Cedar as the policy language. After you have onboarded the applications and have defined the access policies, engineers and users will be able to access the application from anywhere using the Verified Access endpoint without needing a VPN.
You will also use the claims coming from the device in the access policies to make sure that device is managed by Jamf and is secure—for example, that the device is at the right patch level or there are no security vulnerabilities—before granting user access to the respective application.
Figure 1: High-level solution architecture
Prerequisites
To integrate Verified Access with Jamf device trust provider, you need to have the following prerequisites.
Have users created and mapped to respective groups under AWS IAM Identity Center
Apple device (EC2 Mac for this demo)
Subscription with Jamf Pro and Jamf Security (RADAR)
Jamf tenant ID
Jamf:
Managed devices with Jamf Pro
Volume purchasing for app deployment
MacOS 12 or later
Walkthrough
For this demo, you will use Amazon Elastic Compute Cloud (Amazon EC2) Mac instances, which will be enrolled and managed by Jamf. Because EC2 Mac instances don’t come with MDM capabilities out of the box, you can use the following steps to enroll an EC2 Mac instance with Jamf.
Enroll EC2 Mac instance with Jamf
To start, you need to create some credentials and store them in AWS Secrets Manager. These credentials are Jamf endpoint, Jamf user and password with enrollment privileges, and the EC2 Mac instance local admin and the password. We have used AWS Secrets Manager for this demo, but if desired, you could use Parameter Store, a capability of AWS Systems Manager. You can find AWS CloudFormation and Terraform templates for both Secrets Manager and Systems Manager at our sample code on GitHub.
The CloudFormation template will create:
jamfServerDomain – This is your organization’s Jamf URL, the endpoint for your device to get the enrollment from.
jamfEnrollmentUser – This is the authorized user within Jamf with device enrollment permissions.
jamfEnrollmemtPassword – This is the password for the enrollment user provided in number 2.
localAdmin – This is the admin user on your EC2 Mac instance, with the permissions to install required profiles and apply changes.
localAdminPassword – This is the password for the admin user on your EC2 Mac instance provided in number 4.
To allocate a Dedicated Host and launch an EC2 Mac instance
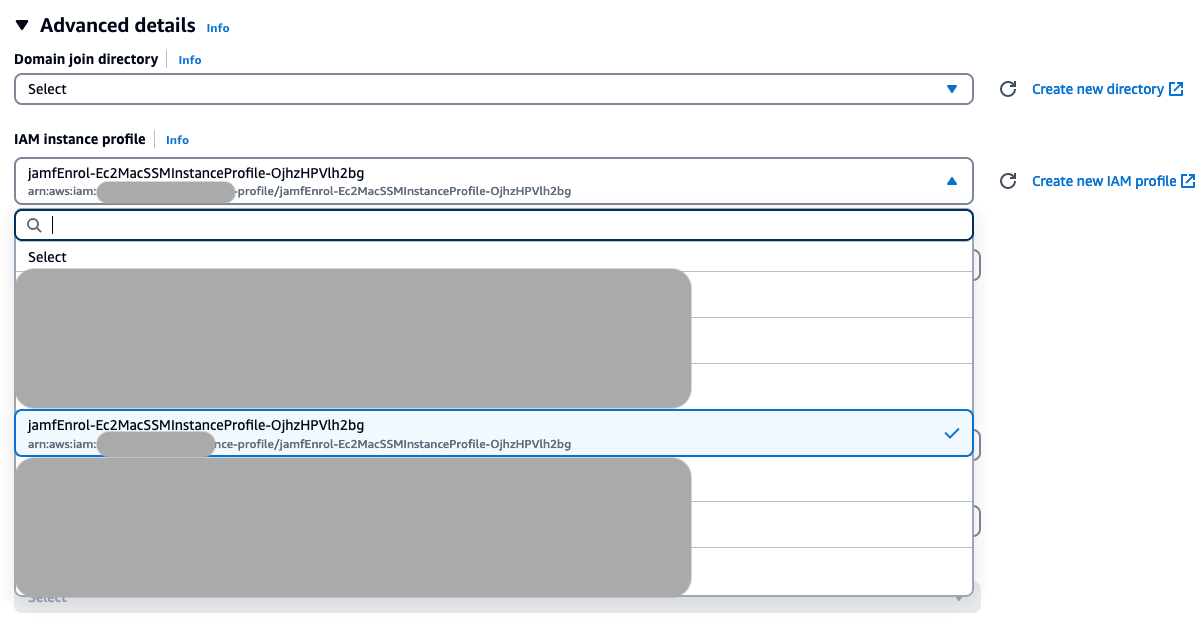
After you complete deploying the CloudFormation template, allocate an Amazon EC2 Dedicated Host for Mac and launch an EC2 Mac instance on the host. On the Launch an instance screen, after providing the basic details, expand the Advanced details section and select the IAM instance profile that was created as part of CloudFormation deployment.
Figure 2: Advanced details pane showing the selected IAM instance profile
To configure the instance:
Connect to your EC2 Mac instance using Secure Shell (SSH).
Figure 3: The steps for connecting to the instance using SSH client
Enable screen sharing and set the admin password to the one you used when creating credentials. Use the following command:
After screen sharing is enabled, connect to the EC2 Mac instance using VNC Viewer or a similar tool and enable automatic login from System Settings – > Users & Groups
Place the AppleScript provided on the GitHub in /Users/Shared:
You can either download the script to your local machine and then copy it over or download the script directly to the EC2 Mac instance.
If you are using VNC Viewer to connect to the instance, you should be able to drag and drop the file from your local machine to the EC2 Mac instance.
Edit and update the AppleScript with the secret ID from Secrets Manager for the MMSecret variable:
MMSecret is the secret from the Secrets Manager that was created as part of the CloudFormation template deployment. Copy the secret Amazon Resource Name (ARN) from the Secrets Manager console or use the AWS Command Line Interface (AWS CLI) to get the ARN and update it in the AppleScript.
Run the AppleScript using the following command and allow access to Accessibility, App Management, and Disk Access permissions for the script. While the script is running, the screen might flash a few times.
After you see the Successful message, choose OK and restart the instance. After the instance has restarted, sign in to the instance and the enrollment will proceed.
The enrollment will take a few minutes and your EC2 Mac instance will receive the profiles and policies from the Jamf instance as configured by your administrator.
Jamf end setup for Verified Access
In this section, you will be working on your Jamf security portal, RADAR, to integrate Verified Access with Jamf, and then onboard your applications to Verified Access and define access policies. You begin this walkthrough by enabling Verified Access on Jamf first.
Jamf Protect and Jamf Trust are the components that collect device claims and share them with Verified Access. The following section illustrates how to make Jamf ready to send claims over to Verified Access. This section needs to be completed on Jamf Security and Jamf Pro Portals. Jamf UI can differ depending on the Jamf Pro version used.
To enable Verified Access profile and deploy Jamf Trust and Verified Access browser extensions
Create an AWS Verified Access activation profile:
Go to Jamf RADAR portal -> Devices -> Activation profiles.
Choose Create profile. If presented with an option, choose Jamf Trust.
Select Device identity from the options available and choose Next.
Select Without identity provider and Assign random identifier and choose Next.
Leave the following sections as they are and continue to choose Next until you reach the review screen.
Choose Save and Create.
Download the manifest files:
Select the profile created in Step 1.
Select your UEM (Jamf Pro in our case).
Select your OS (macOS in our case).
Download Configuration profiles and Browser manifests.
Deploy Jamf Trust using Jamf Pro:
For Jamf Trust, go to the App Store apps in your Jamf Pro instance.
Search for and add Jamf Trust for deployment.
For deployment method, select Install Automatically.
Define scope for target computers and save.
Deploy configuration profiles using Jamf Pro:
Navigate to Configuration Profiles.
Choose Upload and select the configuration file downloaded from the RADAR portal and upload it.
In the General payload configuration tab, select basic settings and distribution method.
Define scope for target computers and choose Save.
Deploy browser extensions using Jamf Pro:
Navigate to Settings -> computer management, choose Packages, and choose New.
Use the general pane to define basic settings.
Select Choose File and select the Verified Access PKG file downloaded from the RADAR portal to upload and choose Save.
Navigate to Policies under Computers and choose New to create a new policy and use the general pane to define basic settings.
Select Packages and choose Configure.
Choose Add for the package you want to install and choose Install under Actions.
Define scope for target computers and choose Save.
Create and deploy Verified Access browser extensions (Google Chrome):
In Jamf Pro, at the top of the sidebar, select Computers. In the sidebar, select Configuration Profiles and choose New.
In General, use the default basic settings, including the level at which to apply the profile and the distribution method.
Select the Application & Custom Settings, and then choose External Applications and choose Add.
In the Source section, from the Choose source pop-up menu, choose Jamf Repository.
In the Application Domain section, choose com.google.chrome. Select the default options for version and variant choices.
Choose Add/Remove properties and deselect the Cloud Management Enrollment Token and, in the Custom Property field, enter ExtensionInstallForcelist, then choose Add and choose Apply.
In the ExtensionInstallForcelist pop-up menu, select Array. For item 1, select String from the pop-up menu, and enter the following ID for the Google Chrome browser extension: aepkkaojepmbeifpjmonopnjcimcjcbd.
Select the Scope tab and configure the scope of the profile and choose Save.
Create and deploy Verified Access browser extensions (Firefox):
In Jamf Pro, at the top of the sidebar, select Computers.
Select Configuration Profiles in the sidebar and choose New.
In General, use the default basic settings, including the level at which to apply the profile and the distribution method.
Select the Application & Custom Settings payload, choose External Applications > Upload, and choose Add.
In the Preference Domain field, enter org.mozilla.firefox.
Use the following code to create the desired policies for browser extension behavior. Key-value pairs in the following sample PLIST can be modified to match desired policy options.
Navigate to Reports -> Security -> Device view to review current device posture of your managed devices.
Figure 5: Device posture within Jamf
Verified Access setup
There are four steps to onboard your applications to Verified Access:
Onboard Verified Access trust providers.
Create a Verified Access instance.
Create one or more Verified Access groups.
Onboard your application and create Verified Access endpoints.
The following steps explain in detail how to onboard your applications to Verified Access.
Step 1: Onboard Verified Access trust providers
Create a user trust provider
Open the Amazon VPC console. In the navigation pane, choose Verified Access trust providers, and then Create Verified Access trust provider.
Provide a Name and Description. The screenshot shows identitycenter-trust-provider as the name and Identity Center as trust provider as the description.
Provide a Policy Reference name that you will use later while defining policies. This screenshot shows idcpolicy as the policy reference name.
Select User Trust Provider.
Select IAM Identity Center.
Provide additional tags.
Choose Create Verified Access trust provider.
Figure 6: This screenshot shows that user identity trust providers have been created
Create a device trust provider
Open the Amazon VPC console. In the navigation pane, choose Verified Access trust providers, and then Create Verified Access trust provider.
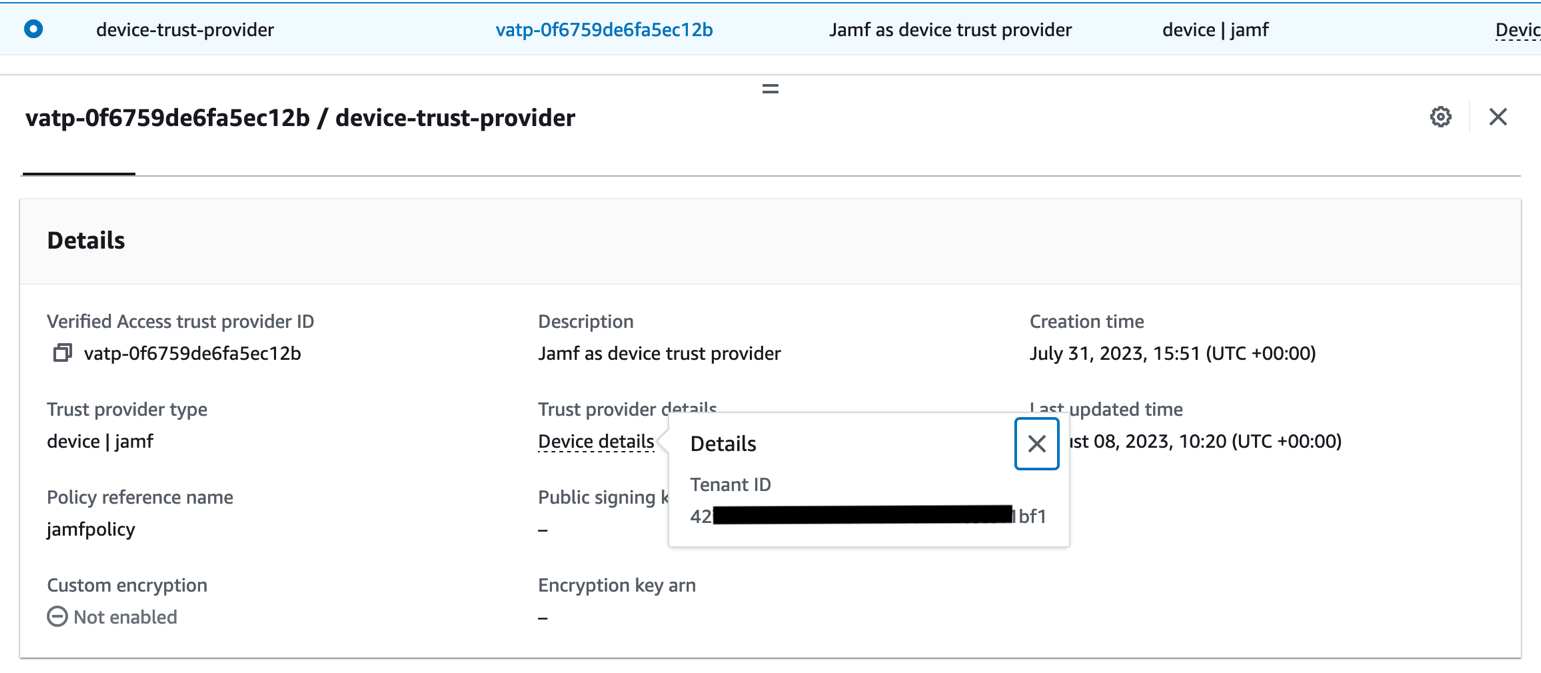
Provide a Name and Description. The screenshot shows device-trust-provider as the name and Jamf as device trust provider as the description.
Provide a Policy Reference name that you will use later while defining policies. The screenshot shows jamfpolicy as the policy reference name.
Select Device trust provider.
In Device details, provide the Jamf tenant ID that you obtained from the Jamf Security console.
Provide additional tags.
Choose Create Verified Access trust provider.
Figure 7: This screenshot shows the device trust provider has been created
Step 2: Create a Verified Access instance
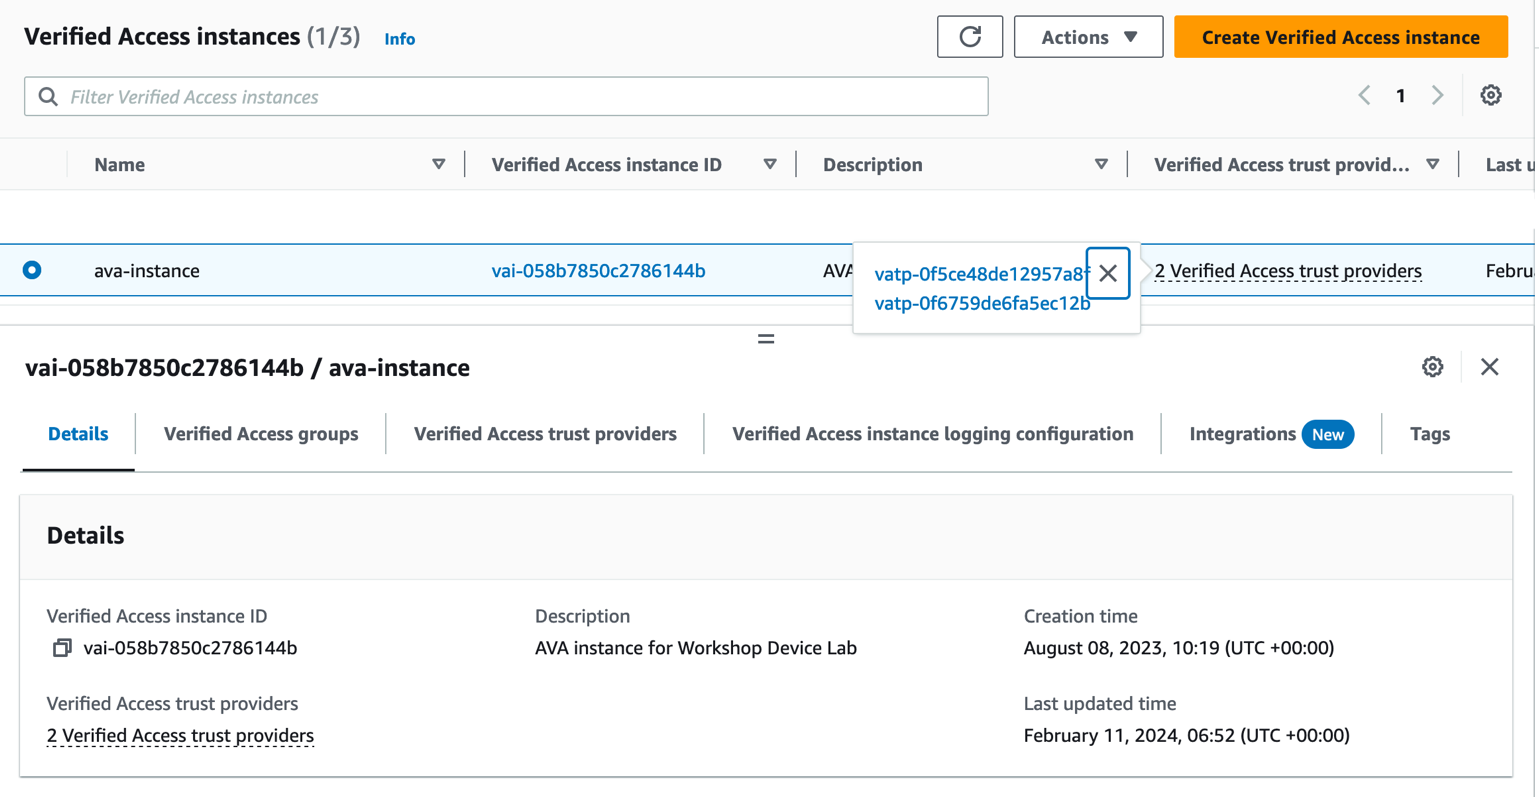
Open the Amazon VPC console. In the navigation pane, choose Verified Access instances, and then Create Verified Access instance. Provide a Name and Description.
From the dropdown list, select one of the trust providers you created in Step 1. You can only select one trust provider at the time of instance creation.
Provide additional tags and choose Create Verified Access instance.
After the instance is created, select the instance and choose Actions.
Choose Attach Verified Access trust provider.
Select the other trust provider from the dropdown list and choose Attach Verified Access trust provider.
Figure 8: The Verified Access instance has been created with both trust providers attached
Step 3: Create Verified Access groups
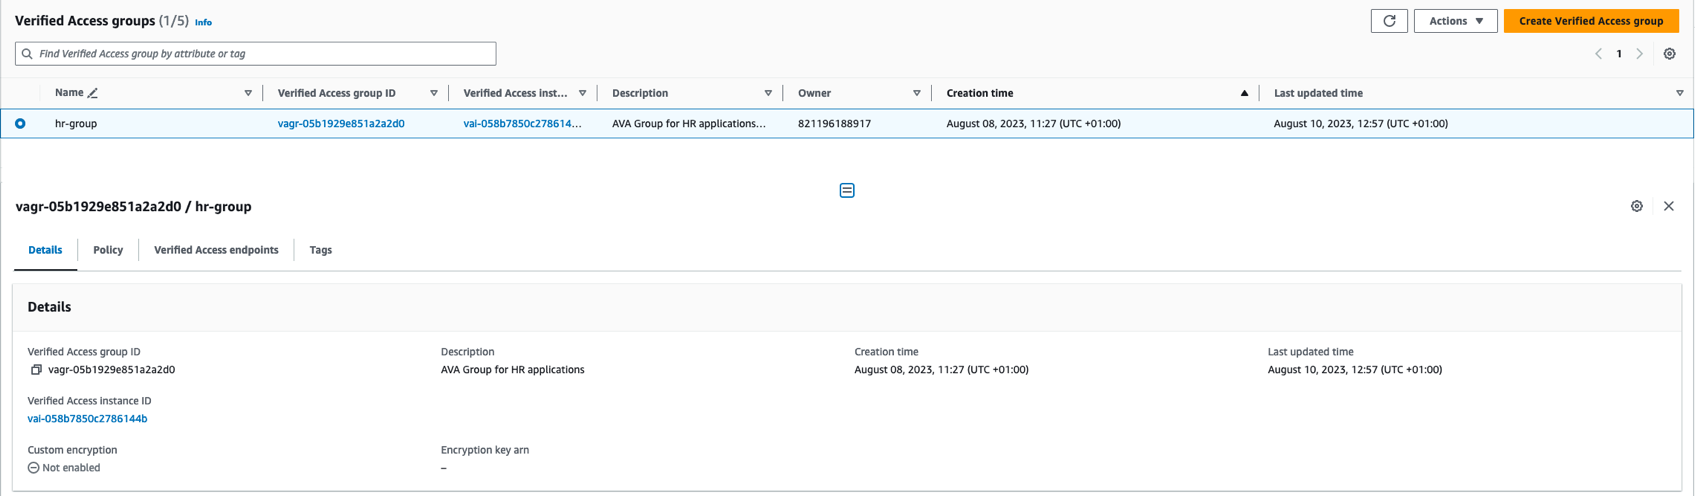
Open the Amazon VPC console. In the navigation pane, choose Verified Access groups, and then Create Verified Access group.
Provide a Name and Description. The screenshot shows hr-group for the name and AVA Group for HR application as the description.
Select the Verified Access instance from the dropdown list that you created in Step 2.
Leave policy empty for now. You will define the access policy later.
Choose Create Verified Access group.
You need to repeat the preceding steps for HR applications, creating two groups, one for each application.
Figure 9: HR group successfully created
Step 4: Create Verified Access endpoints
Before proceeding with the endpoint creation, make sure you have your application deployed with an internal Application Load Balancer, and you have requested an ACM certificate for your public domain that your users will use to access the application.
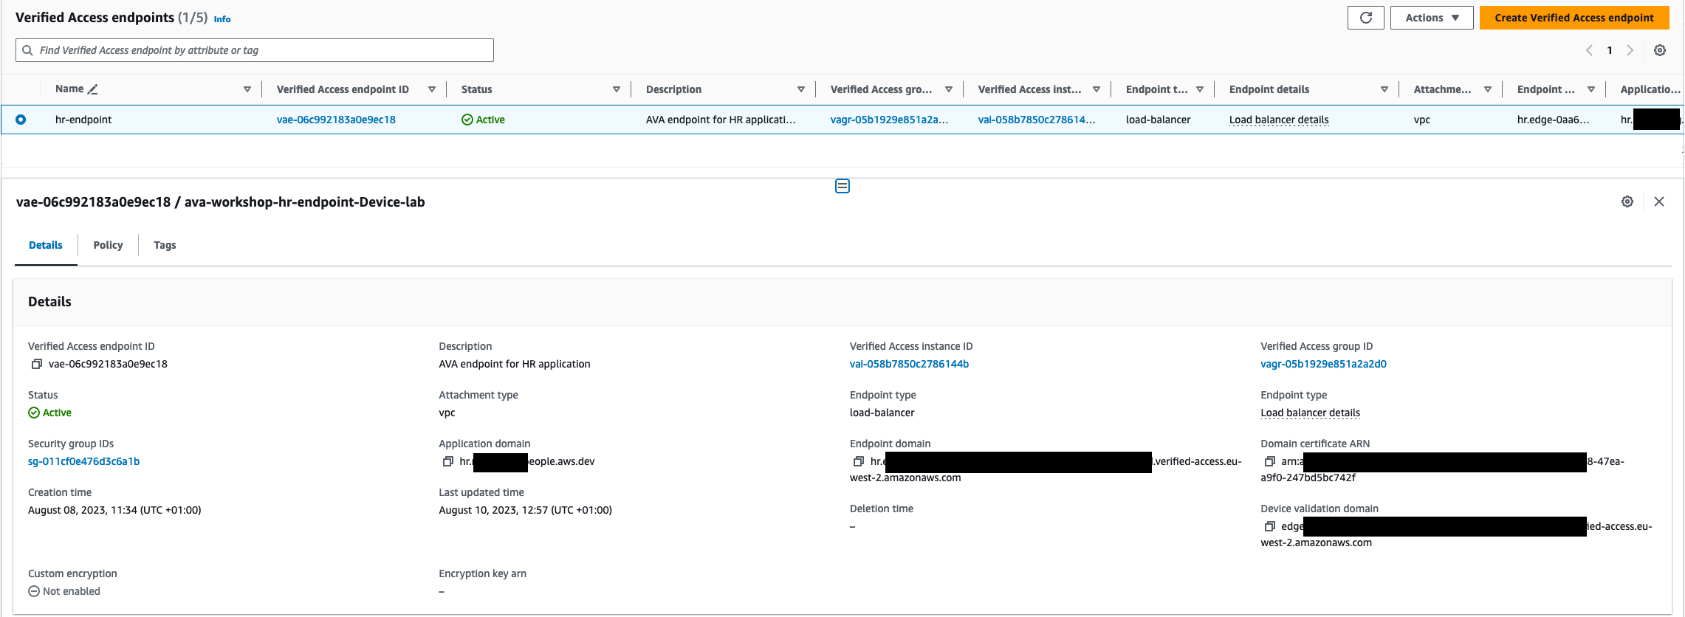
Open the Amazon VPC console. In the navigation pane, choose Verified Access endpoints and then Create Verified Access endpoint.
Provide a Name and Description. The example has hr-endpoint for name and AVA endpoint for HR application as the description.
Select the HR Group that you created in Step 3 from the dropdown list.
Under Application Domain, provide the public DNS name for your application and then select the public TLS certificate created and stored to the ACM. For example: hr.xxxxx.people.aws.dev.
Verified Access supports wildcard certificates, which means that you can use a wildcard certificate for all your endpoints, but it doesn’t support wildcard endpoints, which means you cannot have a single endpoint mapping to multiple hostnames.
For attachment type, select VPC.
Select the Security group to be used for the endpoint. Traffic from the endpoint that enters your load balancer is associated with this security group.
For Endpoint type, choose Load balancer. Select the HTTP, port 80, load balancer ARN, and subnet.
Choose Create Verified Access Endpoint.
Repeat the same steps to create an endpoint for the HR application.
It can take a few minutes for the endpoint to become active. Your endpoints are active when you see Active in the Status field.
Figure 10: The HR application endpoint has been created
Create Verified Access policies using trust data from user and device trust providers
Before you make the application available on your public domain for your users, define the access policies for your applications.
Verified Access policies are written in Cedar, an AWS policy language. Review the Verified Access policies documentation for details on policy syntax. The context that is available to use in policies varies based on the trust provider. You can review Trust data from trust providers to learn more about the available trust data for supported trust providers.
To Create or modify group level policy:
You now need to define an access policy for your applications at the group level.
In the Amazon VPC console, select Verified Access groups.
Select one of the groups you created earlier for your application.
From Actions, choose Modify Verified Access Group Policy.
In the policy document, provide the following policy:
permit(principal,action,resource)
when {
    context.idcpolicy.groups has "d6e20264-4081-7021-48df-def4276a19fe" &&
    context.idcpolicy.user.email.address like "*@example.com" &&
    context has "jamfpolicy" &&
    context.jamfpolicy has "risk" &&
    ["LOW","SECURE"].contains(context.jamfpolicy.risk)
};
Choose Modify Verified Access group policy.
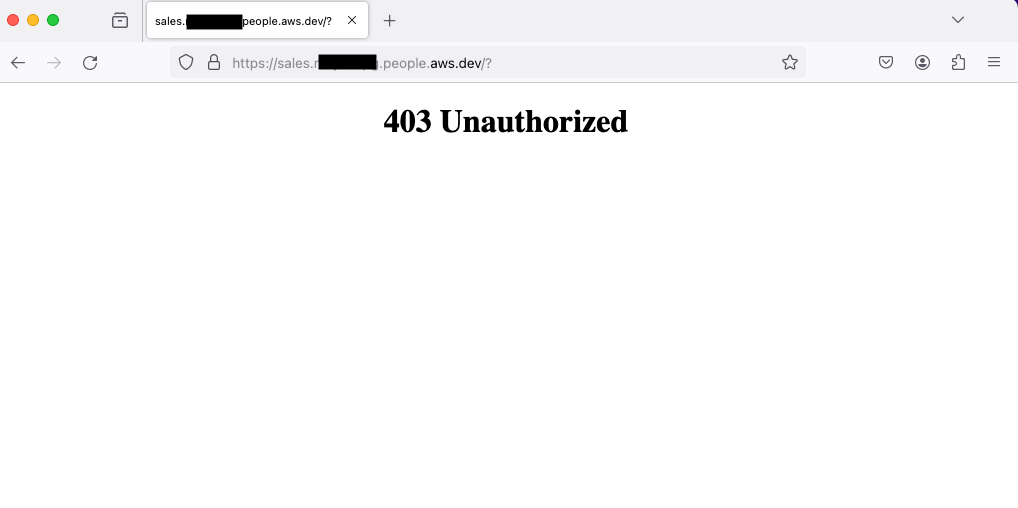
The policy checks for claims received from the user trust provider (IAM Identity Center) and the device trust provider (Jamf). Based on these claims, it makes a decision whether the user is authorized to access the application. In the preceding policy, you check whether the user who is trying to access this application belongs to a certain group and has an email ending with example.com in IAM Identity Center by referencing to the idcpolicy context, which you defined while creating the user trust provider. Similarly, you use the jamfpolicy to reference the context coming from Jamf to validate whether the device used for accessing this application is secure or not. If access criteria aren’t matched, the user will receive a 403 Unauthorized error.
You need to repeat the preceding steps for the other group, defining the access policy with relevant group ID and claims for the application.
Amazon Route 53 configuration
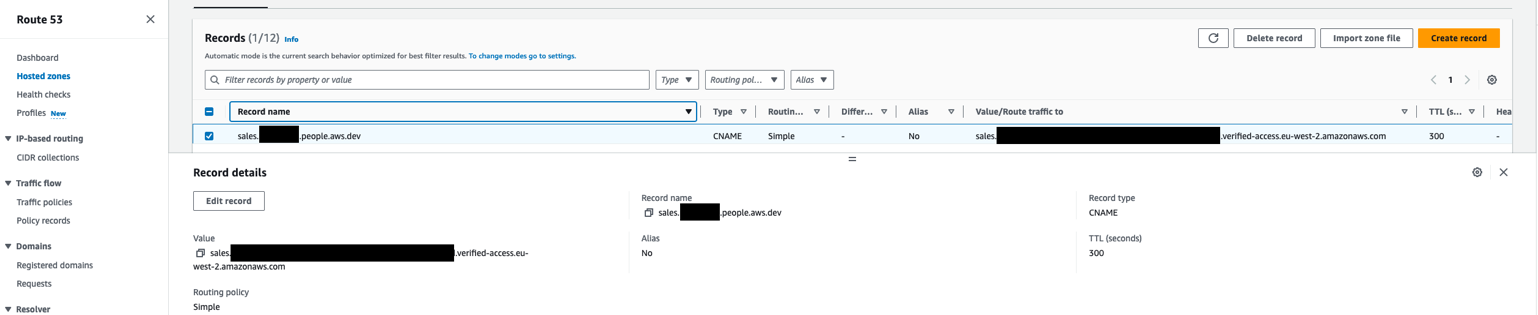
After you complete your Verified Access setup and have defined your access policies, you will make your application public for your users to be able to access from anywhere, without a VPN and in a secure manner. For that, you will update your Amazon Route 53 records with the endpoints you created in Step 4: Create Verified Access endpoints.
Select one of the endpoints you created earlier for your application.
From the Details section, make a note of the Endpoint domain. Repeat these two steps for the other endpoint as well and make a note of the endpoint domain.
Go to the Amazon Route53 console and in your hosted zone, choose Click Record.
Provide a Record name. This is the subdomain your users will use to access the application.
For Record type select CNAME.
In the Value section, provide the endpoint domain that you copied from Verified Access endpoints. Leave everything else as the default settings and choose Create records. Repeat these steps for the other endpoint and provide the relevant subdomain and value to the record.
Figure 11: The Route 53 record has been created
And that’s it. You have finished integrating Jamf Trust and Jamf Pro with Verified Access, and your users can now access their applications using the above CNAMES from their managed computers.
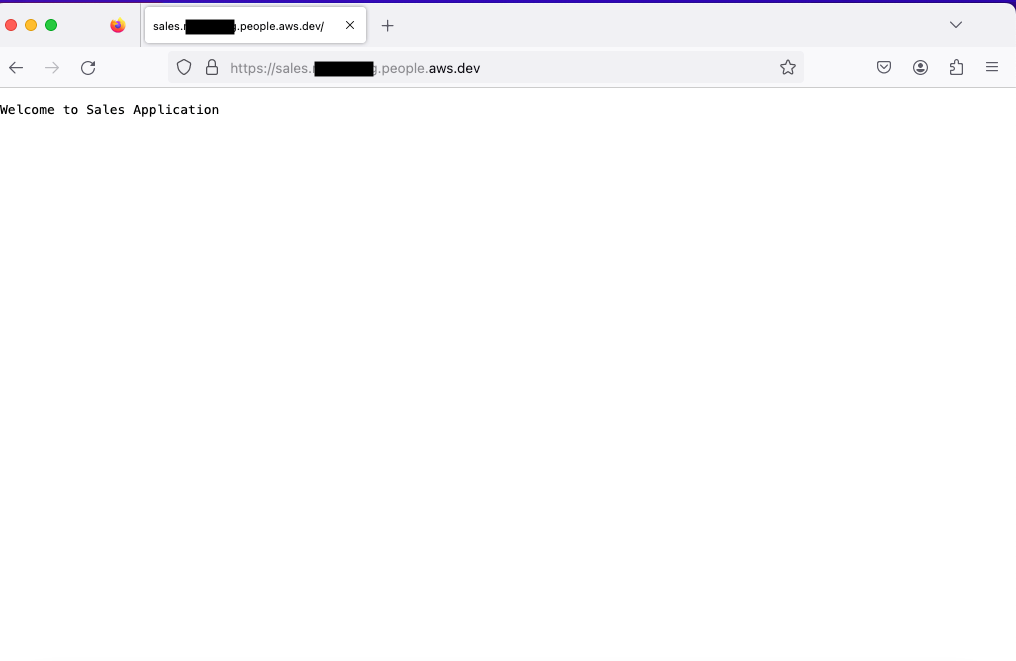
Test the solution
To test, use your browser (Firefox or Chrome) on one of your Jamf managed computers with the Verified Access extension installed to access one or both applications. The user will first be directed to the IAM Identity Center sign-in screen to sign in to the application. Then Verified Access will evaluate the user and the device posture before either granting or denying access to the user.
Figure 12: Access has been granted to the user based on identity and device posture
If the user meets the requirements, they will be presented with the application page. If the user doesn’t meet the requirements, they will receive a 403 Unauthorized error.
Figure 13: Access has been denied to the user based on identity and device posture
Troubleshooting on EC2 Mac
During testing or later, if your users receive a 403 Unauthorized error or the Verified Access extension isn’t forwarding the request, use the following steps to verify the browser extension being used and installed on the device is correct.
To verify the extension using Google Chrome:
Verify that the browser extension is installed and is the latest version. If not, update the browser extension.
Verify that Jamf Trust is installed and your device has the corresponding profiles for Jamf Trust. If not, install Jamf Trust and push the Jamf Trust profile to the device.
If the problem persists, verify your local Jamf JSON configuration file and validate that the Chrome extension ID is correct. Follow these steps:
Go to Chrome and select Manage Extensions.
Enable Developer mode.
Check the value of ID for your installed Verified Access browser extension.
Open your terminal.
Use the following command to change your directory to /Library/Google/Chrome/NativeMessagingHosts
cd /Library/Google/Chrome/NativeMessagingHosts
Verify that the value for chrome-extension matches the ID of the installed browser extension.
To verify the extension using Firefox:
Verify that the browser extension is installed and is the latest version. If not, update the browser extension.
Verify that Jamf Trust is installed and your device has the corresponding profiles for Jamf Trust. If not, install Jamf Trust and push the Jamf Trust profile to the device.
If the problem persists, verify your local Jamf JSON configuration file and validate that it points to the correct Verified Access Firefox browser extension deployment.
Open your terminal.
Use the following command to change your directory to /Library/Application\ Support/Mozilla/NativeMessagingHosts:
cd /Library/Application\ Support/Mozilla/NativeMessagingHosts
Verify that the value for allowed_extensions is pointing to verified-access@amazonaws.
Conclusion
In this blog post, you learned how to use additional claims from a device trust provider such as Jamf in addition to user identity to provide access to corporate applications with AWS Verified Access. The access policies defined at Verified Access level consider the user identity and the device posture to determine and grant access to a user. Verified Access aligns with the principles of Zero Trust and evaluates each access request at scale in real time for user identity and device posture. Verified Access helps you keep your applications hosted in AWS securely without relying solely on a network perimeter for protection. To get started with Verified Access, visit the Amazon VPC console.
If you have feedback about this post, submit comments in the Comments section below. If you have questions about this post, contact AWS Support.
Want more AWS Security news? Follow us on Twitter.
The term “memory tiering” refers to the management of memory placement on
systems with multiple types of memory, each of which has its own
performance characteristics. On such systems, poor placement can lead to
significantly worse performance. A memory-management-track discussion at
the 2024 Linux Storage,
Filesystem, Memory Management, and BPF Summit took yet another look at
tiering challenges with a focus on upcoming technologies that may simplify
(or complicate) the picture.
As the shiny new KDE Plasma 6 desktop makes its way into distribution
releases, a small group of developers is still trying to preserve the
KDE experience circa 2008. The Trinity Desktop Environment
(TDE), is a continuation of KDE 3 that has maintained the
old-school desktop with semi-regular releases since 2010. The most
recent release, R14.1.2,
was announced
on April 28. TDE does deliver a usable retro desktop, but with
some limitations that hamper its usability on modern systems.
Bundles are multiple buffers used in a single operation. On the
receive side, this means a single receive may utilize multiple
buffers, reducing the roundtrip through the networking stack from N
per N buffers to just a single one. On the send side, this also
enables better handling of how an application deals with sends from
a socket, eliminating the need to serialize sends on a single
socket. Bundles work with provided buffers, hence this feature also
adds support for provided buffers for send operations.
Security updates have been issued by Debian (bind9, chromium, and thunderbird), Fedora (buildah, chromium, firefox, mingw-python-werkzeug, and suricata), Mageia (golang), Oracle (firefox and nodejs:20), Red Hat (firefox, httpd:2.4, nodejs, and thunderbird), and SUSE (firefox, git-cliff, and ucode-intel).
– Добър ден, ще гласувате ли?
– А, не. Седяхте в скута не Пеевски и пихте мазни турски кафета. Няма да гласувам за вас!
– Вярвате ли на Пеевски?
– Не, разбира се!
– Ами това за кафетата и скутовете той го каза, значи му вярвате?
– Е, то се виждаше, че си говорите с тях
– Да, за Конституцията. Вие знаехте ли, че ще правим промени в Конституцията?
– Да, ама защо тях?
– А с кого? С „Възраждане“ и „Има такъв народ“? То даже не стига математически
– Ама изпрахте Борисов и Пеевски!
– Ние не перем и не можем да перем. Само българските избиратели и съдебната система могат.
– Ама седяхте с тях на една маса!
– А обърнахте ли внимание кога Пеевски каза това за скутовете и кафетата?
– Не, кога?
– Когато излязохме с нашия меморандум за ротацията, в който пишеше, че няма гарантирано място за ДПС в съдебната власт
– Ама вие променихте Конституцията с тях!
– Да, те гласуваха нашите промени в Конституцията, за които говорим от години. И когато видяха, че това не им гарантира контрол в съдебната власт, започнаха да ни атакуват
– Видяхме ви Конституцията, ГЕРБ и ДПС си назначиха служебен кабинет!
– А последния служебен кабинет на Радев помните ли? „Хаос и разруха в енергетиката“, „6% дефицит“ и други глупости
– Е, да..
– Но голямата промяна в Конституцията не е служебния кабинет, а главата „съдебна власт“.
– Е, и какво като я променихте, съдебната власт пак си е тяхна!
– Ами за да я променим и да не е тяхна, трябва те да нямат мнозинство. Помислете дали да гласувате
– Ще помисля…
– Приятен ден!
IBM is selling its QRadar product suite to Palo Alto Networks, for an undisclosed—but probably surprisingly small—sum.
I have a personal connection to this. In 2016, IBM bought Resilient Systems, the startup I was a part of. It became part if IBM’s cybersecurity offerings, mostly and weirdly subservient to QRadar.
That was what seemed to be the problem at IBM. QRadar was IBM’s first acquisition in the cybersecurity space, and it saw everything through the lens of that SIEM system. I left the company two years after the acquisition, and near as I could tell, it never managed to figure the space out.
In a previous post, we introduced our systems for running marketing campaigns. Although we sent millions of messages daily, we had little insight into their effectiveness. Did they engage our users with our promotions? Did they encourage more transactions and bookings?
As Grab’s business expanded and the number of marketing campaigns increased, understanding the impact of these campaigns became crucial. This knowledge enables campaign managers to design more effective campaigns and avoid wasteful ones that degrade user experience.
Initially, campaign managers had to consult marketing analysts to gauge the impact of campaigns. However, this approach soon proved unsustainable:
Manual analysis doesn’t scale with an increasing number of campaigns.
Different analysts might assess the business impact in slightly different ways, leading to inconsistent results over time.
Thus, we recognised the need for a centralised solution allowing campaign managers to view their campaign impact analyses.
Marketing attribution model
The marketing analyst team designed a Marketing attribution model (MAM) for estimating the business impact of any campaign that sends messages to users. It quantifies business impact in terms of generated gross merchandise value (GMV), revenue, etc.
Unlike traditional models that only credit the last touchpoint (i.e. the last message user reads before making a transaction), MAM offers a more nuanced view. It recognises that users are exposed to various marketing messages (emails, pushes, feeds, etc.) throughout their decision-making process. As shown in Fig 1, MAM assigns credit to each touchpoint that influences a conversion (e.g., Grab usage) based on two key factors:
Relevance: Content directly related to the conversion receives a higher weightage. Imagine a user opening a GrabFood push notification before placing a food order. This push would be considered highly relevant and receive significant credit.
Recency: Touchpoints closer in time to the conversion hold more weight. For instance, a brand awareness email sent weeks before the purchase would be less impactful than a targeted GrabFood promotion right before the order.
By factoring in both relevance and recency, MAM avoids crediting the same touchpoint twice and provides a more accurate picture of which marketing campaigns are driving higher conversions.
Fig 1. How MAM does business attribution
While MAM is effective for comparing the impacts of different campaigns, it struggles with the assessment of a single campaign because it does not account for negative impacts. For example, consider a message stating, “Hey, don’t use Grab.” Clearly, not all messages positively impact business.
Hold-out group
To better evaluate the impact of a single campaign, we divide targeted users into two groups:
Hold-out (control): do not send any message
Treatment: send the message
Fig 2. Campaign setup with hold-out group
We then compare the business performance of sending versus not sending messages. For the treatment group, we ideally count only the user transactions potentially linked to the message (i.e., transactions occurring within X days of message receipt). However, since the hold-out group receives no messages, there are no equivalent metrics for comparison.
The only business metrics available for the hold-out group are the aggregated totals of GMV, revenue, etc., over a given time, divided by the number of users. We must calculate the same for the treatment group to ensure a fair comparison.
Fig 3. Metrics calculation for both hold-out and treatment group
The comparison might seem unreliable due to:
The metrics are raw aggregations, lacking attribution logic.
The aggregated GMV and revenue might be skewed by other simultaneous campaigns involving the same users.
Here, we have to admit that figuring out true business impact is difficult. All we can do is try our best to get as close to the truth as possible. To make the comparison more precise, we employed the following strategies:
Stratify the two groups, so that both groups contain roughly the same distribution of users.
Calculate statistical significance to rule out the difference caused by random factors.
Allow users to narrow down the business metrics to compare according to campaign set-up. For example, we don’t compare ride bookings if the campaign is promoting food.
Statistical significance is a common, yet important technique for evaluating the result of controlled experiments. Let’s see how it’s used in our case.
Statistical significance
When we do an A/B testing, we cannot simply conclude that A is better than B when A’s result is better than B. The difference could be due to other random factors. If you did an A/A test, you will still see differences in the results even without doing anything different to the two groups.
Statistical significance is a method to calculate the probability that the difference between two groups is really due to randomness. The lower the probability, the more confidently we can say our action is truly making some impact.
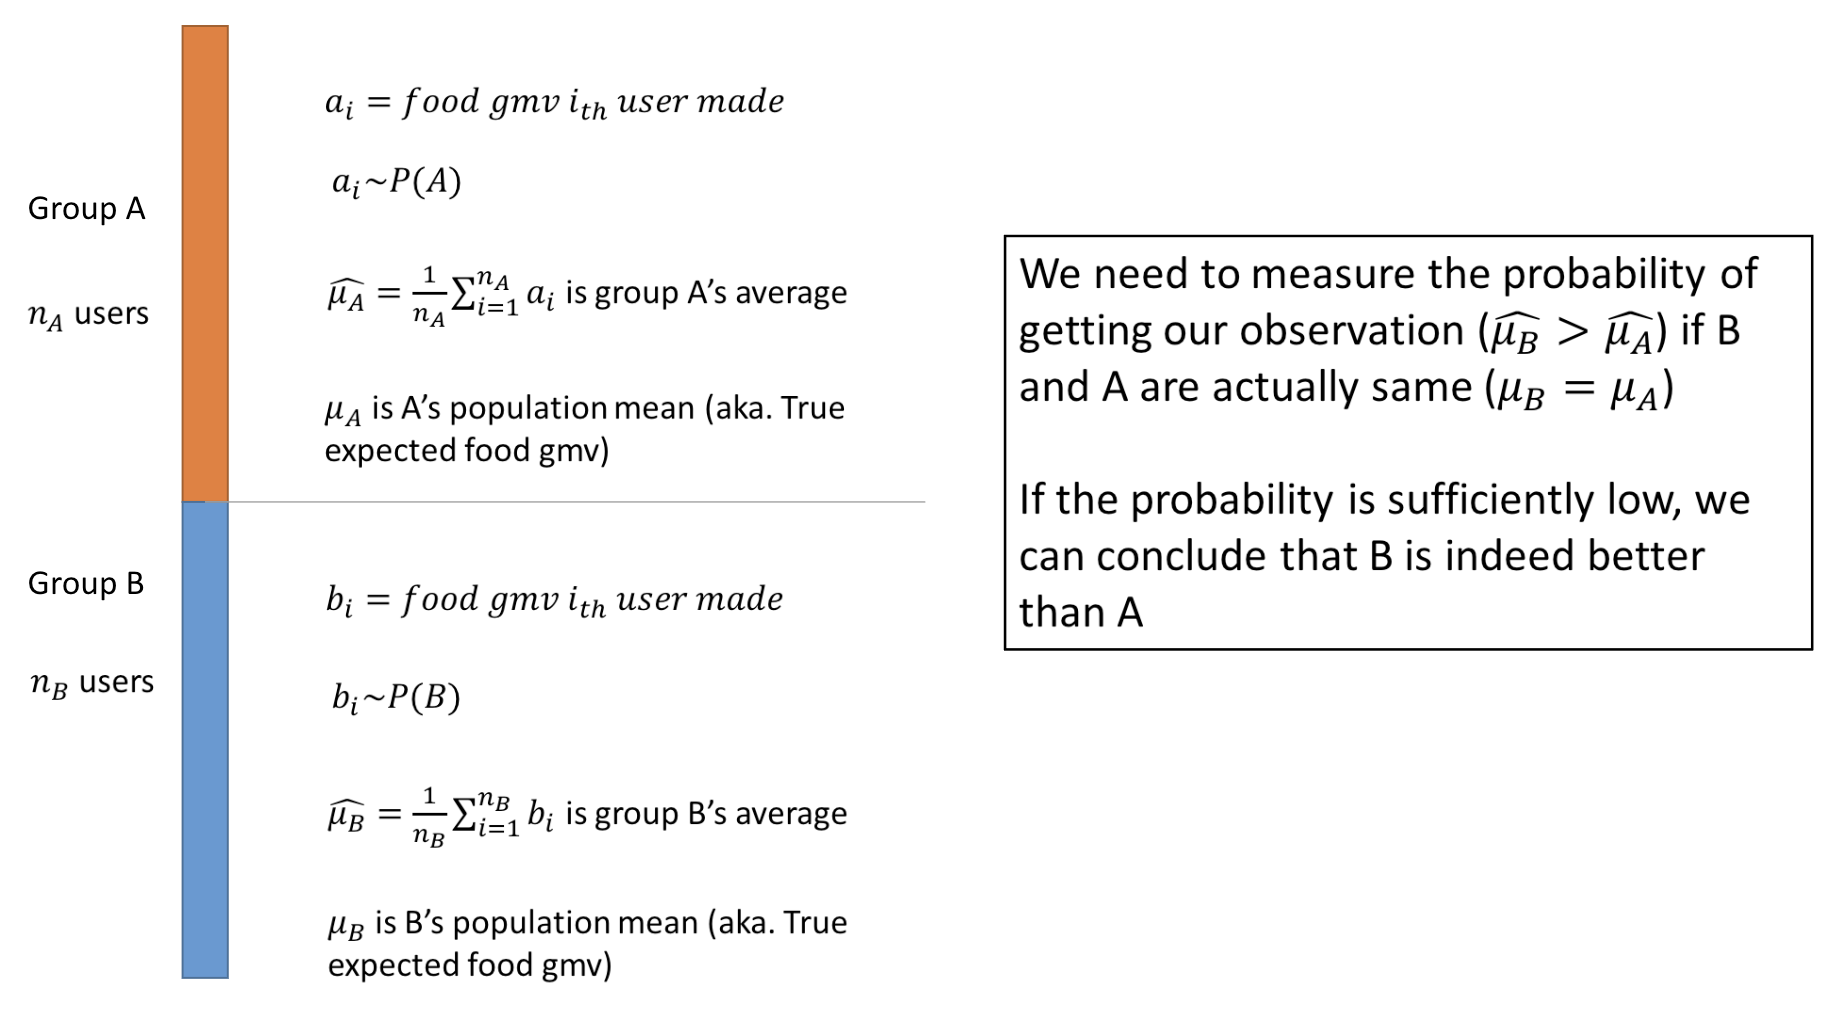
In our case, to derive statistical significance, we assume:
Our hold-out and treatment group are two sets of samples drawn from two populations, A and B.
A and B are the same except that B received our message. We can’t 100% prove this, but can reasonably guess this is close to true, since we split with stratification.
Assuming the business metrics we are comparing is food GMV, the base numbers can be formulated as shown in Fig 4.
Fig 4. Formulation for calculating statistical significance
To calculate the probability, we then use a formula derived from the central limit theorem (CLT). The mathematical derivation of the formula is beyond the scope of this post. Programmatically, we use the popular jStat library for the calculation.
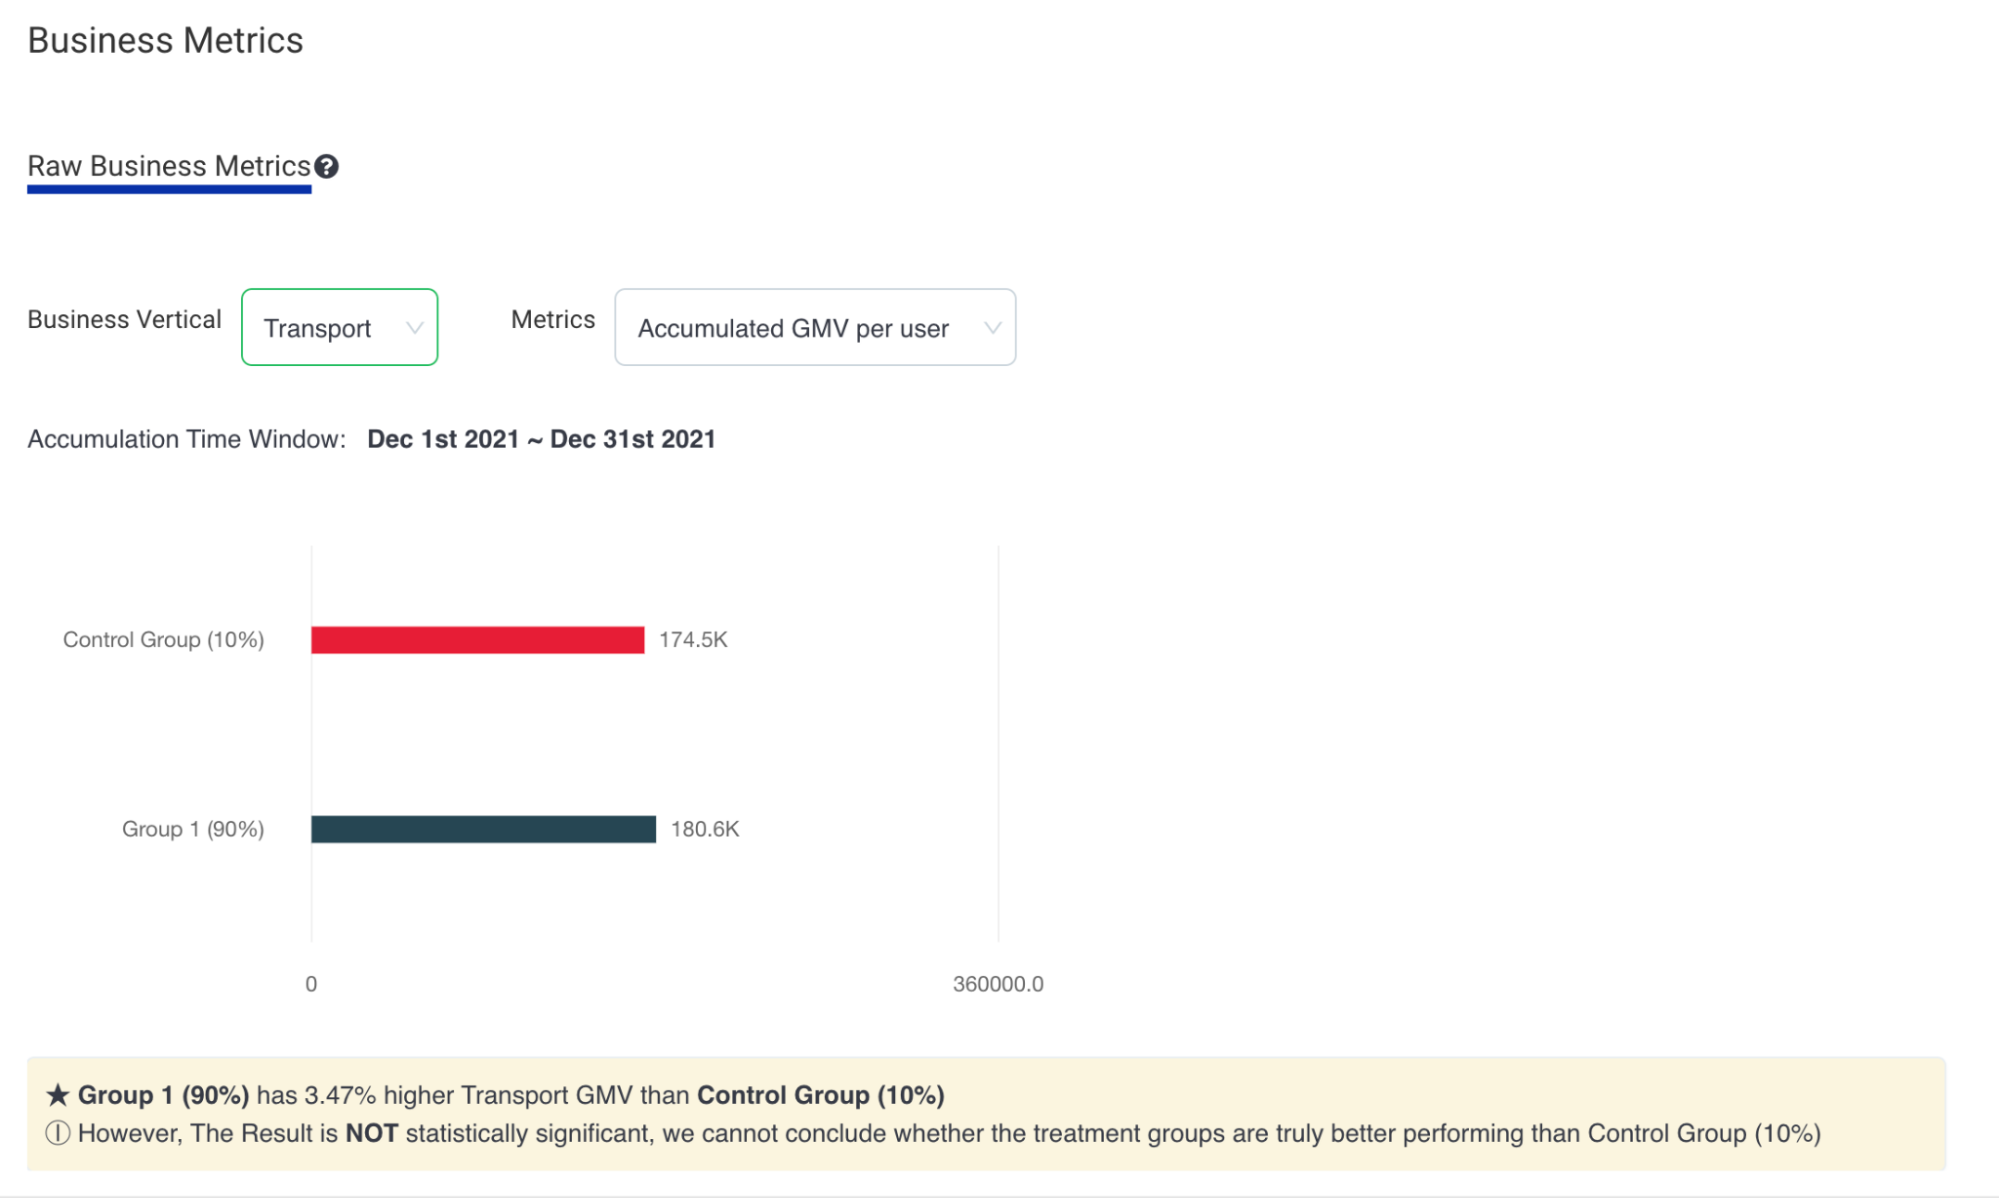
The calculation result of statistical significance as a special notice to the campaign owners is shown in Fig 5.
Fig 5. Display of business impact analysis with statistical significance
What’s next
Evaluating the true business impact remains challenging. We continue to refine our methodology and address potential biases, such as the assumption that both groups are of the same distribution, which might not hold true, especially in smaller group sizes. Furthermore, consistently reserving a 10% hold-out in each campaign is impractical for some campaigns, as sometimes campaign owners require messages to reach all targeted users.
We are committed to advancing our business impact evaluation solutions and will continue improving our existing solutions. We look forward to sharing more insights in future blogs.
Join us
Grab is the leading superapp platform in Southeast Asia, providing everyday services that matter to consumers. More than just a ride-hailing and food delivery app, Grab offers a wide range of on-demand services in the region, including mobility, food, package and grocery delivery services, mobile payments, and financial services across 428 cities in eight countries.
Powered by technology and driven by heart, our mission is to drive Southeast Asia forward by creating economic empowerment for everyone. If this mission speaks to you, join our team today!
The collective thoughts of the interwebz
Manage Consent
To provide the best experiences, we use technologies like cookies to store and/or access device information. Consenting to these technologies will allow us to process data such as browsing behavior or unique IDs on this site. Not consenting or withdrawing consent, may adversely affect certain features and functions.
Functional
Always active
The technical storage or access is strictly necessary for the legitimate purpose of enabling the use of a specific service explicitly requested by the subscriber or user, or for the sole purpose of carrying out the transmission of a communication over an electronic communications network.
Preferences
The technical storage or access is necessary for the legitimate purpose of storing preferences that are not requested by the subscriber or user.
Statistics
The technical storage or access that is used exclusively for statistical purposes.The technical storage or access that is used exclusively for anonymous statistical purposes. Without a subpoena, voluntary compliance on the part of your Internet Service Provider, or additional records from a third party, information stored or retrieved for this purpose alone cannot usually be used to identify you.
Marketing
The technical storage or access is required to create user profiles to send advertising, or to track the user on a website or across several websites for similar marketing purposes.