Post Syndicated from James Beswick original https://aws.amazon.com/blogs/compute/protecting-an-aws-lambda-function-url-with-amazon-cloudfront-and-lambdaedge/
This post is written by Jerome Van Der Linden, Senior Solutions Architect Builder.
A Lambda function URL is a dedicated HTTPs endpoint for an AWS Lambda function. When configured, you can invoke the function directly with an HTTP request. You can choose to make it public by setting the authentication type to NONE for an open API. Or you can protect it with AWS IAM, setting the authentication type to AWS_IAM. In that case, only authenticated users and roles are able to invoke the function via the function URL.
Lambda@Edge is a feature of Amazon CloudFront that can run code closer to the end user of an application. It is generally used to manipulate incoming HTTP requests or outgoing HTTP responses between the user client and the application’s origin. In particular, it can add extra headers to the request (‘Authorization’, for example).
This blog post shows how to use CloudFront and Lambda@Edge to protect a Lambda function URL configured with the AWS_IAM authentication type by adding the appropriate headers to the request before it reaches the origin.
Overview
There are four main components in this example:
- Lambda functions with function URLs enabled: This is the heart of the ‘application’, the functions that contain the business code exposed to the frontend. The function URL is configured with AWS_IAM authentication type, so that only authenticated users/roles can invoke it.
- A CloudFront distribution: CloudFront is a content delivery network (CDN) service used to deliver content to users with low latency. It also improves the security with traffic encryption and built-in DDoS protection. In this example, using CloudFront in front of the Lambda URL can add this layer of security and potentially cache content closer to the users.
- A Lambda function at the edge: CloudFront also provides the ability to run Lambda functions close to the users: Lambda@Edge. This example does this to sign the request made to the Lambda function URL and adds the appropriate headers to the request so that invocation of the URL is authenticated with IAM.
- A web application that invokes the Lambda function URLs: The example also contains a single page application built with React, from which the users make requests to one or more Lambda function URLs. The static assets (for example, HTML and JavaScript files) are stored in Amazon S3 and also exposed and cached by CloudFront.
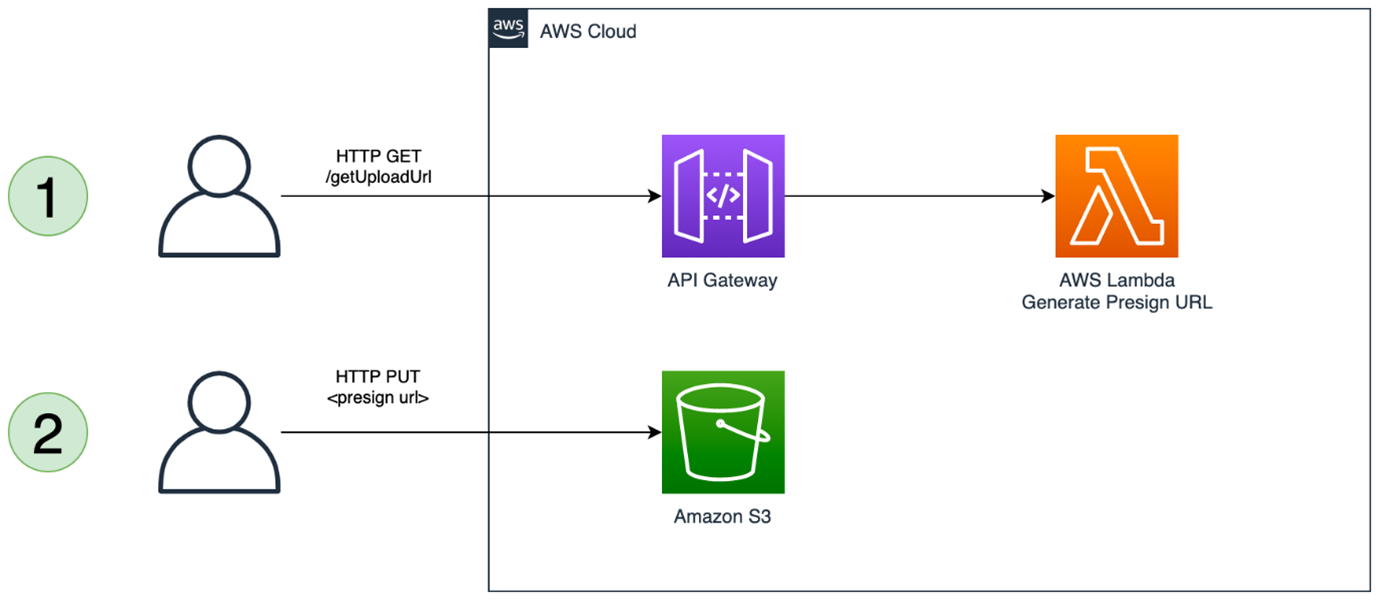
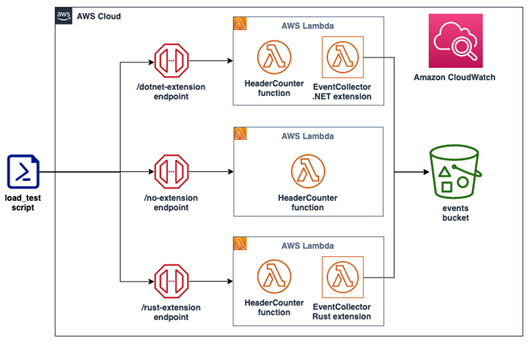
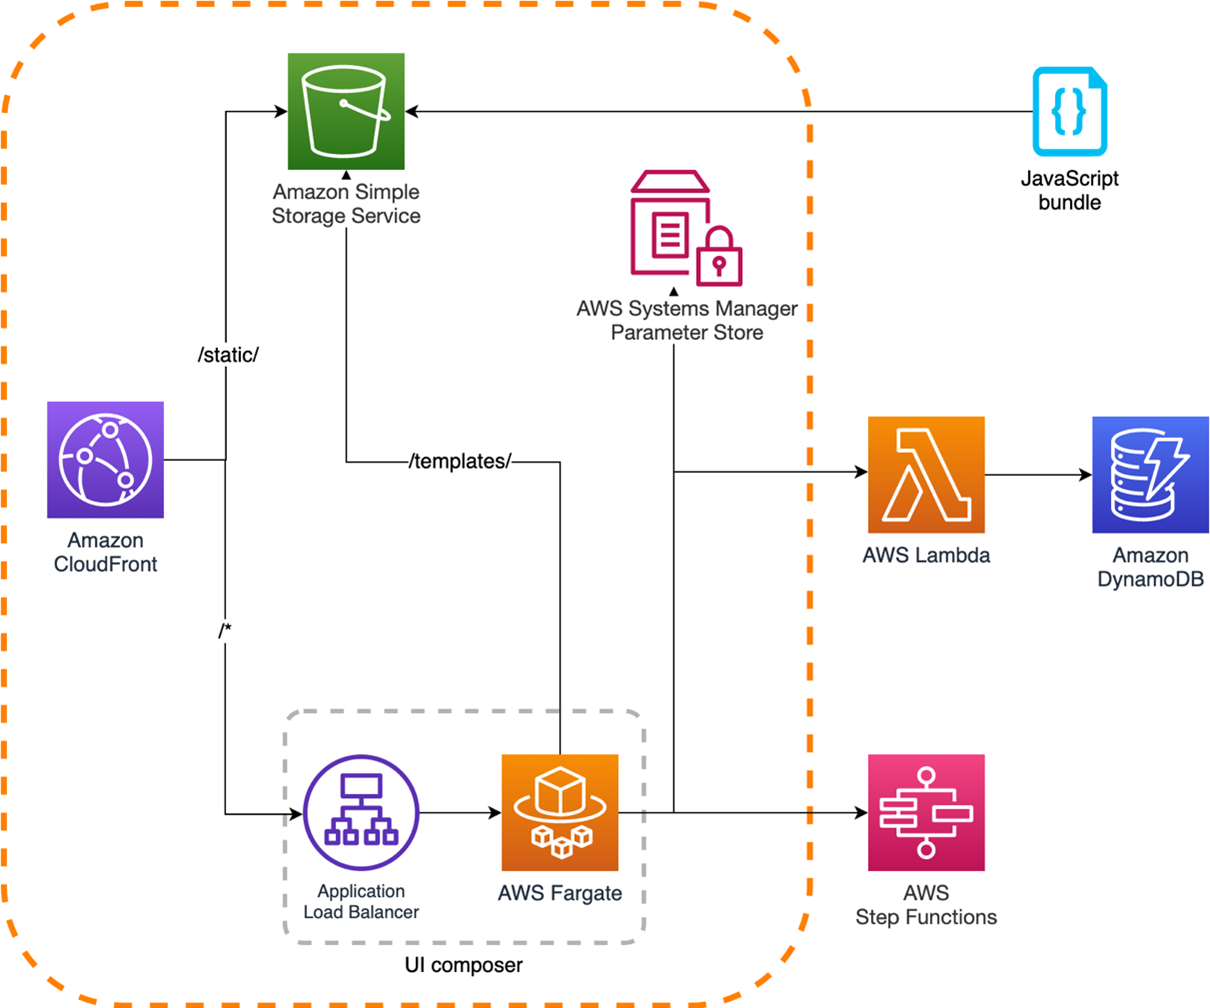
This is the example architecture:

The request flow is:
- The user performs requests via the client to reach static assets from the React application or Lambda function URLs.
- For a static asset, CloudFront retrieves it from S3 or its cache and returns it to the client.
- If the request is for a Lambda function URL, it first goes to a Lambda@Edge. The Lambda@Edge function has the
lambda:InvokeFunctionUrlpermission on the target Lambda function URL and uses this to sign the request with the signature V4. It adds theAuthorization,X-Amz-Security-Token, andX-Amz-Dateheaders to the request. - After the request is properly signed, CloudFront forwards it to the Lambda function URL.
- Lambda triggers the execution of the function that performs any kind of business logic. The current solution is handling books (create, get, update, delete).
- Lambda returns the response of the function to CloudFront.
- Finally, CloudFront returns the response to the client.
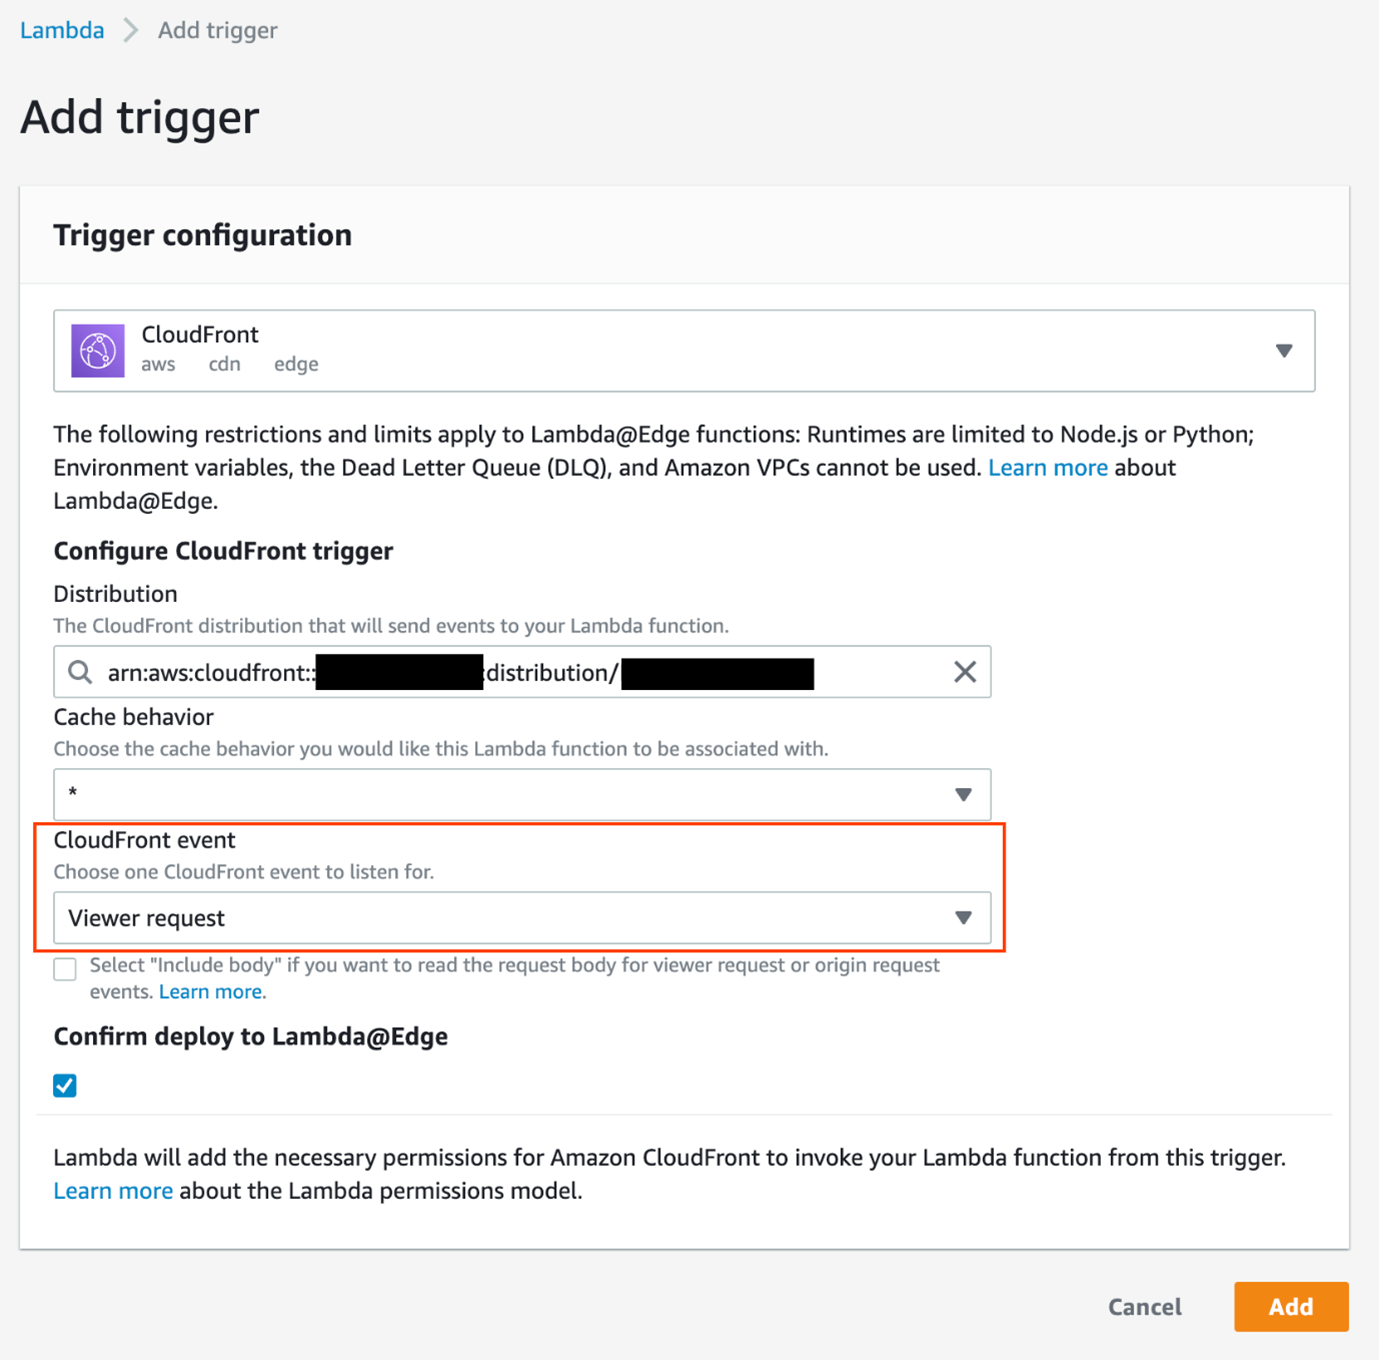
There are several types of events where a Lambda@Edge function can be triggered:

- Viewer request: After CloudFront receives a request from the client.
- Origin request: Before the request is forwarded to the origin.
- Origin response: After CloudFront receives the response from the origin.
- Viewer response: Before the response is sent back to the client.
The current example, to update the request before it is sent to the origin (the Lambda function URL), uses the “Origin Request” type.
You can find the complete example, based on the AWS Cloud Development Kit (CDK), on GitHub.
Backend stack
The backend contains the different Lambda functions and Lambda function URLs. It uses the AWS_IAM auth type and the CORS (Cross Origin Resource Sharing) definition when adding the function URL to the Lambda function. Use a more restrictive allowedOrigins for a real application.
const getBookFunction = new NodejsFunction(this, 'GetBookFunction', {
    runtime: Runtime.NODEJS_18_X,
    memorySize: 256,
    timeout: Duration.seconds(30),
    entry: path.join(__dirname, '../functions/books/books.ts'),
    environment: {
      TABLE_NAME: bookTable.tableName
    },
    handler: 'getBookHandler',
    description: 'Retrieve one book by id',
});
bookTable.grantReadData(getBookFunction);
const getBookUrl = getBookFunction.addFunctionUrl({
    authType: FunctionUrlAuthType.AWS_IAM,
    cors: {
        allowedOrigins: ['*'],
        allowedMethods: [HttpMethod.GET],
        allowedHeaders: ['*'],
        allowCredentials: true,
    }
});
Frontend stack
The Frontend stack contains the CloudFront distribution and the Lambda@Edge function. This is the Lambda@Edge definition:
const authFunction = new cloudfront.experimental.EdgeFunction(this, 'AuthFunctionAtEdge', {
    handler: 'auth.handler',
    runtime: Runtime.NODEJS_16_X,
    code: Code.fromAsset(path.join(__dirname, '../functions/auth')),
 });
The following policy allows the Lambda@Edge function to sign the request with the appropriate permission and to invoke the function URLs:
authFunction.addToRolePolicy(new PolicyStatement({
    sid: 'AllowInvokeFunctionUrl',
    effect: Effect.ALLOW,
    actions: ['lambda:InvokeFunctionUrl'],
    resources: [getBookArn, getBooksArn, createBookArn, updateBookArn, deleteBookArn],
    conditions: {
        "StringEquals": {"lambda:FunctionUrlAuthType": "AWS_IAM"}
    }
}));
The function code uses the AWS JavaScript SDK and more precisely the V4 Signature part of it. There are two important things here:
- The service for which we want to sign the request: Lambda
- The credentials of the function (with the
InvokeFunctionUrlpermission)
const request = new AWS.HttpRequest(new AWS.Endpoint(`https://${host}${path}`), region);
// ... set the headers, body and method ...
const signer = new AWS.Signers.V4(request, 'lambda', true);
signer.addAuthorization(AWS.config.credentials, AWS.util.date.getDate());
You can get the full code of the function here.
CloudFront distribution and behaviors definition
The CloudFront distribution has a default behavior with an S3 origin for the static assets of the React application.
It also has one behavior per function URL, as defined in the following code. You can notice the configuration of the Lambda@Edge function with the type ORIGIN_REQUEST and the behavior referencing the function URL:
const getBehaviorOptions: AddBehaviorOptions  = {
    viewerProtocolPolicy: ViewerProtocolPolicy.HTTPS_ONLY,
    cachePolicy: CachePolicy.CACHING_DISABLED,
    originRequestPolicy: OriginRequestPolicy.CORS_CUSTOM_ORIGIN,
    responseHeadersPolicy: ResponseHeadersPolicy.CORS_ALLOW_ALL_ORIGINS_WITH_PREFLIGHT,
    edgeLambdas: [{
        functionVersion: authFunction.currentVersion,
        eventType: LambdaEdgeEventType.ORIGIN_REQUEST,
        includeBody: false, // GET, no body
    }],
    allowedMethods: AllowedMethods.ALLOW_GET_HEAD_OPTIONS,
}
this.distribution.addBehavior('/getBook/*', new HttpOrigin(Fn.select(2, Fn.split('/', getBookUrl)),), getBehaviorOptions);
Regional consideration
The Lambda@Edge function must be in the us-east-1 Region (N. Virginia), as does the frontend stack. If you deploy the backend stack in another Region, you’ll must pass the Lambda function URLs (and ARNs) to the frontend. Using a custom resource in CDK, it’s possible to create parameters in AWS Systems Manager Parameter Store in the us-east-1 Region containing this information. For more details, review the code in the GitHub repo.
Walkthrough
Before deploying the solution, follow the README in the GitHub repo and make sure to meet the prerequisites.
Deploying the solution
- From the solution directory, install the dependencies:
npm install - Start the deployment of the solution (it can take up to 15 minutes):
cdk deploy --all - Once the deployment succeeds, the outputs contain both the Lambda function URLs and the URLs “protected” behind the CloudFront distribution:


Testing the solution
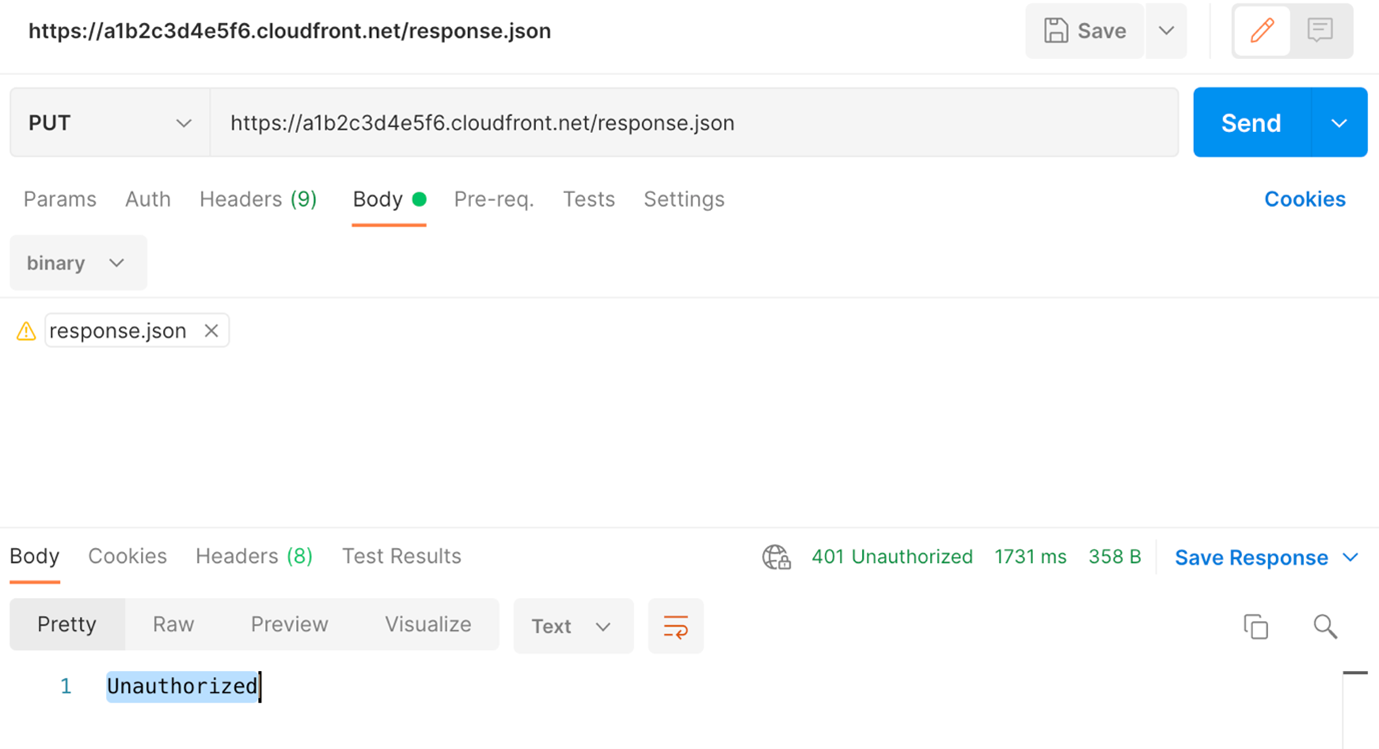
- Using cURL, query the Lambda Function URL to retrieve all books (
GetBooksFunctionURLin the CDK outputs):curl -v https://qwertyuiop1234567890.lambda-url.eu-west-1.on.aws/You should get the following output. As expected, it’s forbidden to directly access the Lambda function URL without the proper IAM authentication:

- Now query the “protected” URL to retrieve all books (
GetBooksURLin the CDK outputs):curl -v https://q1w2e3r4t5y6u.cloudfront.net/getBooksThis time you should get a HTTP 200 OK with an empty list as a result.


The logs of the Lambda@Edge function (search for “AuthFunctionAtEdge” in CloudWatch Logs in the closest Region) show:
- The incoming request:

- The signed request, with the additional headers (
Authorization,X-Amz-Security-Token, andX-Amz-Date). These headers make the difference when the Lambda URL receives the request and validates it with IAM.


You can test the complete solution throughout the frontend, using the FrontendURL in the CDK outputs.
Cleaning up
The Lambda@Edge function is replicated in all Regions where you have users. You must delete the replicas before deleting the rest of the solution.
To delete the deployed resources, run the cdk destroy --all command from the solution directory.
Conclusion
This blog post shows how to protect a Lambda Function URL, configured with IAM authentication, using a CloudFront distribution and Lambda@Edge. CloudFront helps protect from DDoS, and the function at the edge adds appropriate headers to the request to authenticate it for Lambda.
Lambda function URLs provide a simpler way to invoke your function using HTTP calls. However, if you need more advanced features like user authentication with Amazon Cognito, request validation or rate throttling, consider using Amazon API Gateway.
For more serverless learning resources, visit Serverless Land.


