All posts by Kristian Freeman

Magic in minutes: how to build a ChatGPT plugin with Cloudflare Workers

Post Syndicated from Kristian Freeman original http://blog.cloudflare.com/magic-in-minutes-how-to-build-a-chatgpt-plugin-with-cloudflare-workers/

Magic in minutes: how to build a ChatGPT plugin with Cloudflare Workers

Magic in minutes: how to build a ChatGPT plugin with Cloudflare Workers

Today, we're open-sourcing our ChatGPT Plugin Quickstart repository for Cloudflare Workers, designed to help you build awesome and versatile plugins for ChatGPT with ease. If you don’t already know, ChatGPT is a conversational AI model from OpenAI which has an uncanny ability to take chat input and generate human-like text responses.

With the recent addition of ChatGPT plugins, developers can create custom extensions and integrations to make ChatGPT even more powerful. Developers can now provide custom flows for ChatGPT to integrate into its conversational workflow – for instance, the ability to look up products when asking questions about shopping, or retrieving information from an API in order to have up-to-date data when working through a problem.

That's why we're super excited to contribute to the growth of ChatGPT plugins with our new Quickstart template. Our goal is to make it possible to build and deploy a new ChatGPT plugin to production in minutes, so developers can focus on creating incredible conversational experiences tailored to their specific needs.

How it works

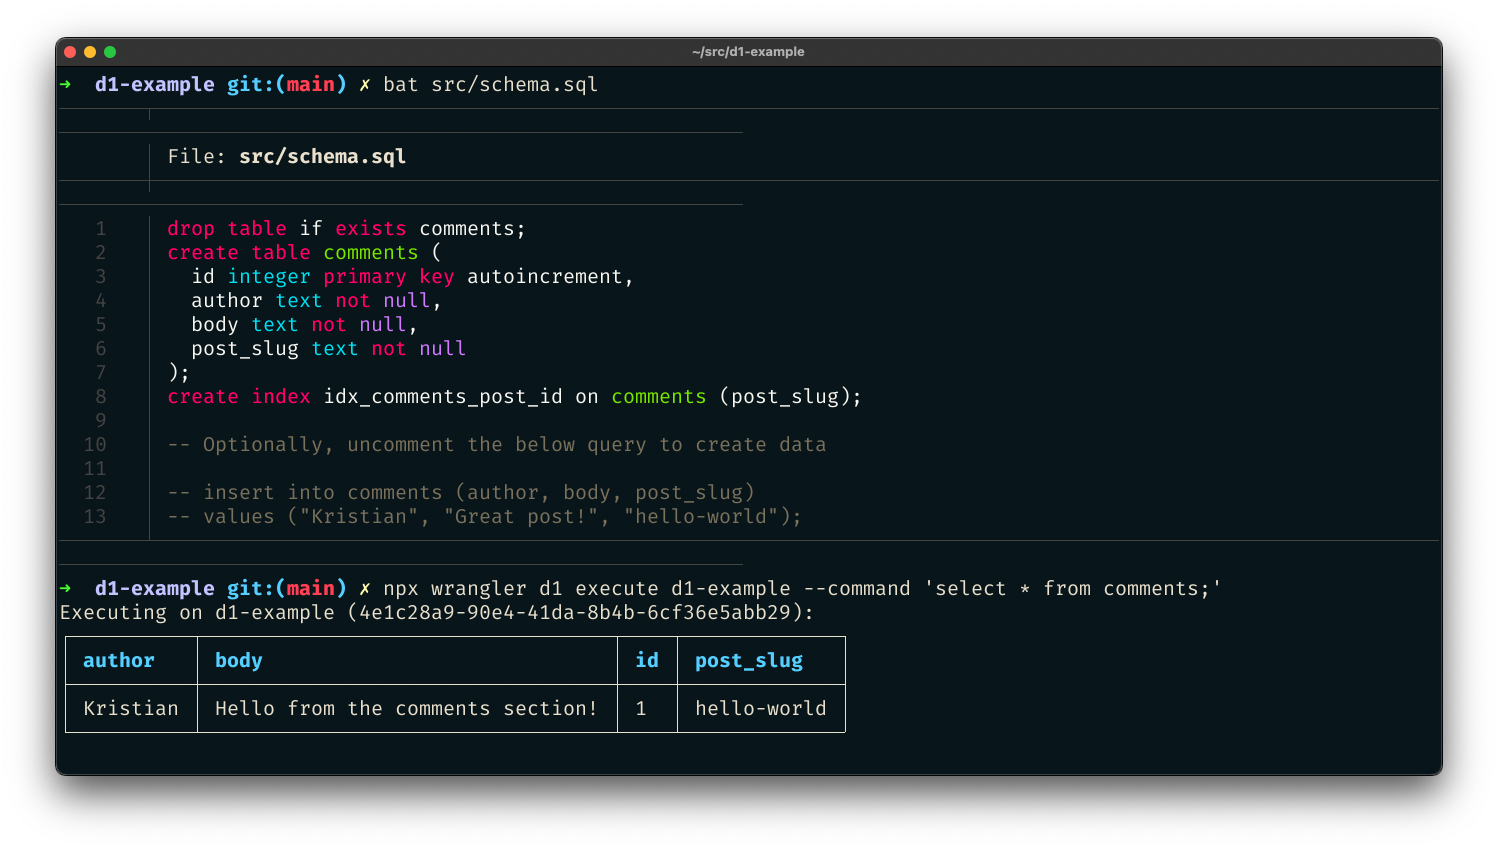
Our Quickstart is designed to work seamlessly with Cloudflare Workers. Under the hood, it uses our command-line tool wrangler to create a new project and deploy it to Workers.

When building a ChatGPT plugin, there are three things you need to consider:

  1. The plugin's metadata, which includes the plugin's name, description, and other info
  2. The plugin's schema, which defines the plugin's input and output
  3. The plugin's behavior, which defines how the plugin responds to user input

To handle all of these parts in a simple, easy-to-understand API, we've created the @cloudflare/itty-router-openapi package, which makes it easy to manage your plugin's metadata, schema, and behavior. This package is included in the ChatGPT Plugin Quickstart, so you can get started right away.

To show how the package works, we'll look at two key files in the ChatGPT Plugin Quickstart: index.js and search.js. The index.js file contains the plugin's metadata and schema, while the search.js file contains the plugin's behavior. Let's take a look at each of these files in more detail.

In index.js, we define the plugin's metadata and schema. The metadata includes the plugin's name, description, and version, while the schema defines the plugin's input and output.

The configuration matches the definition required by OpenAI's plugin manifest, and helps ChatGPT understand what your plugin is, and what purpose it serves.

Here's what the index.js file looks like:

import { OpenAPIRouter } from "@cloudflare/itty-router-openapi";
import { GetSearch } from "./search";

export const router = OpenAPIRouter({
  schema: {
    info: {
      title: 'GitHub Repositories Search API',
      description: 'A plugin that allows the user to search for GitHub repositories using ChatGPT',
      version: 'v0.0.1',
    },
  },
  docs_url: '/',
  aiPlugin: {
    name_for_human: 'GitHub Repositories Search',
    name_for_model: 'github_repositories_search',
    description_for_human: "GitHub Repositories Search plugin for ChatGPT.",
    description_for_model: "GitHub Repositories Search plugin for ChatGPT. You can search for GitHub repositories using this plugin.",
    contact_email: '[email protected]',
    legal_info_url: 'http://www.example.com/legal',
    logo_url: 'https://workers.cloudflare.com/resources/logo/logo.svg',
  },
})

router.get('/search', GetSearch)

// 404 for everything else
router.all('*', () => new Response('Not Found.', { status: 404 }))

export default {
  fetch: router.handle
}

In the search.js file, we define the plugin's behavior. This is where we define how the plugin responds to user input. It also defines the plugin's schema, which ChatGPT uses to validate the plugin's input and output.

Importantly, this doesn't just define the implementation of the code. It also automatically generates an OpenAPI schema that helps ChatGPT understand how your code works — for instance, that it takes a parameter "q", that it is of "String" type, and that it can be described as "The query to search for". With the schema defined, the handle function makes any relevant parameters available as function arguments, to implement the logic of the endpoint as you see fit.

Here's what the search.js file looks like:

import { ApiException, OpenAPIRoute, Query, ValidationError } from "@cloudflare/itty-router-openapi";

export class GetSearch extends OpenAPIRoute {
  static schema = {
    tags: ['Search'],
    summary: 'Search repositories by a query parameter',
    parameters: {
      q: Query(String, {
        description: 'The query to search for',
        default: 'cloudflare workers'
      }),
    },
    responses: {
      '200': {
        schema: {
          repos: [
            {
              name: 'itty-router-openapi',
              description: 'OpenAPI 3 schema generator and validator for Cloudflare Workers',
              stars: '80',
              url: 'https://github.com/cloudflare/itty-router-openapi',
            }
          ]
        },
      },
    },
  }

  async handle(request: Request, env, ctx, data: Record<string, any>) {
    const url = `https://api.github.com/search/repositories?q=${data.q}`

    const resp = await fetch(url, {
      headers: {
        'Accept': 'application/vnd.github.v3+json',
        'User-Agent': 'RepoAI - Cloudflare Workers ChatGPT Plugin Example'
      }
    })

    if (!resp.ok) {
      return new Response(await resp.text(), { status: 400 })
    }

    const json = await resp.json()

    // @ts-ignore
    const repos = json.items.map((item: any) => ({
      name: item.name,
      description: item.description,
      stars: item.stargazers_count,
      url: item.html_url
    }))

    return {
      repos: repos
    }
  }
}

The quickstart smooths out the entire development process, so you can focus on crafting custom behaviors, endpoints, and features for your ChatGPT plugins without getting caught up in the nitty-gritty. If you aren't familiar with API schemas, this also means that you can rely on our schema and manifest generation tools to handle the complicated bits, and focus on the implementation to build your plugin.

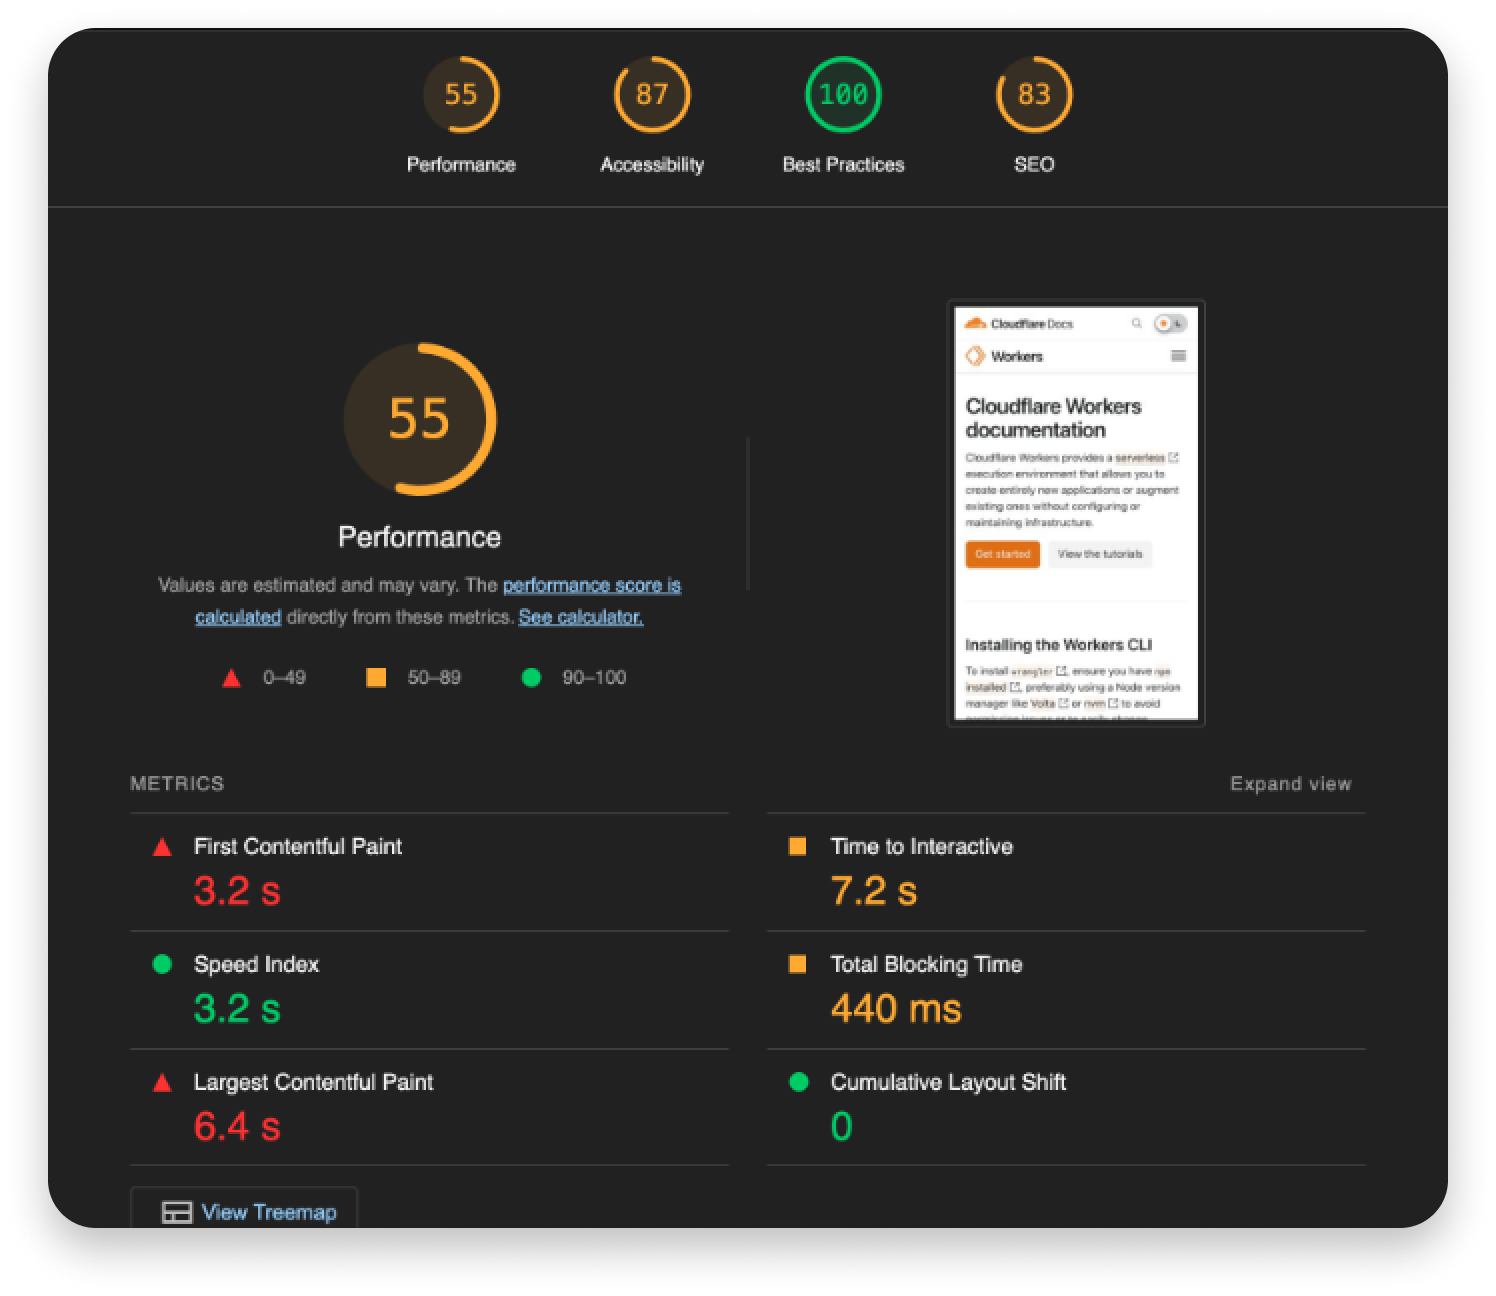
Besides making development a breeze, it's worth noting that you're also deploying to Workers, which takes advantage of Cloudflare's vast global network. This means your ChatGPT plugins enjoy low-latency access and top-notch performance, no matter where your users are located. By combining the strengths of Cloudflare Workers with the versatility of ChatGPT plugins, you can create conversational AI tools that are not only powerful and scalable but also cost-effective and globally accessible.

Example

To demonstrate the capabilities of our quickstarts, we've created two example ChatGPT plugins. The first, which we reviewed above, connects ChatGPT with the GitHub Repositories Search API. This plugin enables users to search for repositories by simply entering a search term, returning useful information such as the repository's name, description, star count, and URL.

One intriguing aspect of this example is the property where the plugin could go beyond basic querying. For instance, when asked "What are the most popular JavaScript projects?", ChatGPT was able to intuitively understand the user's intent and craft a new query parameter for querying both by the number of stars (measuring popularity), and the specific programming language (JavaScript) without requiring any explicit prompting. This showcases the power and adaptability of ChatGPT plugins when integrated with external APIs, providing more insightful and context-aware responses.

Magic in minutes: how to build a ChatGPT plugin with Cloudflare Workers

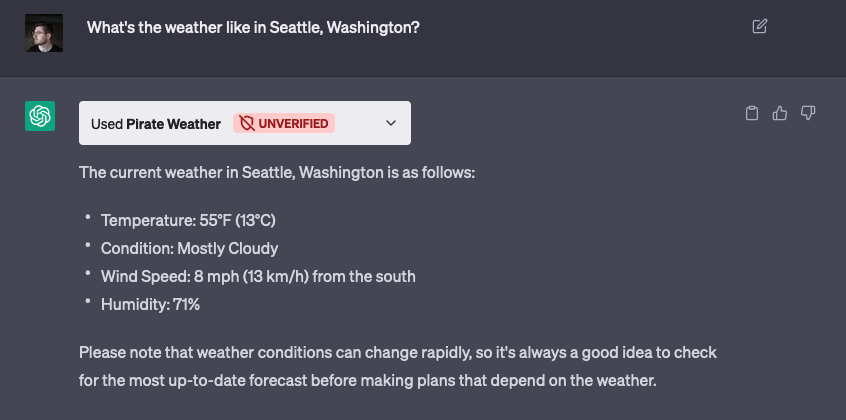
The second plugin uses the Pirate Weather API to retrieve up-to-date weather information. Remarkably, OpenAI is able to translate the request for a specific location (for instance, “Seattle, Washington”) into longitude and latitude values – which the Pirate Weather API uses for lookups – and make the correct API request, without the user needing to do any additional work.

Magic in minutes: how to build a ChatGPT plugin with Cloudflare Workers

With our ChatGPT Plugin Quickstarts, you can create custom plugins that connect to any API, database, or other data source, giving you the power to create ChatGPT plugins that are as unique and versatile as your imagination. The possibilities are endless, opening up a whole new world of conversational AI experiences tailored to specific domains and use cases.

Get started today

The ChatGPT Plugin Quickstarts don’t just make development a snap—it also offers seamless deployment and scaling thanks to Cloudflare Workers. With the generous free plan provided by Workers, you can deploy your plugin quickly and scale it infinitely as needed.

Our ChatGPT Plugin Quickstarts are all about sparking creativity, speeding up development, and empowering developers to create amazing conversational AI experiences. By leveraging Cloudflare Workers' robust infrastructure and our streamlined tooling, you can easily build, deploy, and scale custom ChatGPT plugins, unlocking a world of endless possibilities for conversational AI applications.

Whether you're crafting a virtual assistant, a customer support bot, a language translator, or any other conversational AI tool, our ChatGPT Plugin Quickstarts are a great place to start. We're excited to provide this Quickstart, and would love to see what you build with it. Join us in our Discord community to share what you're working on!

How we built an open-source SEO tool using Workers, D1, and Queues

Post Syndicated from Kristian Freeman original https://blog.cloudflare.com/how-we-built-an-open-source-seo-tool-using-workers-d1-and-queues/

How we built an open-source SEO tool using Workers, D1, and Queues

How we built an open-source SEO tool using Workers, D1, and Queues

Building applications on Cloudflare Workers has always been fun. Workers applications have low latency response times by default, and easy developer ergonomics thanks to Wrangler. It’s no surprise that for years now, developers have been going from idea to production with Workers in just a few minutes.

Internally, we’re no different. When a member of our team has a project idea, we often reach for Workers first, and not just for the MVP stage, but in production, too. Workers have been a secret ingredient to Cloudflare’s innovation for some time now, allowing us to build products like Access, Stream and Workers KV. Even better, when we have new ideas and we can use new Cloudflare products to build them, it’s a great way to give feedback on those products.

We’ve discussed this in the past on the Cloudflare blog – in May last year, I wrote how we rebuilt Cloudflare’s developer documentation using many of the tools that had recently been released in the Workers ecosystem: Cloudflare Pages for hosting, and Bulk Redirects for the redirect rules. In November, we released a new version of our API documentation, which again used Pages for hosting, and Pages functions for intelligent caching and transformation of our API schema.

In this blog post, I’m excited to show off some of the new tools in Cloudflare’s developer arsenal, D1 and Queues, to prototype and ship an internal tool for our SEO experts at Cloudflare. We’ve made this project, which we’re calling Prospector, open-source too – check it out in our cloudflare/templates repo on GitHub. Whether you’re a developer looking to understand how to use multiple parts of Cloudflare’s developer stack together, or an SEO specialist who may want to deploy the tool in production, we’ve made it incredibly easy to get up and running.

How we built an open-source SEO tool using Workers, D1, and Queues

What we’re building

Prospector is a tool that allows Cloudflare’s SEO experts to monitor our blog and marketing site for specific keywords. When a keyword is matched on a page, Prospector will notify an email address. This allows our SEO experts to stay informed of any changes to our website, and take action accordingly.

Using MailChannels’ integration with Workers, we can quickly and easily send emails from our application using a single API call. This allows us to focus on the core functionality of the application, and not worry about the details of sending emails.

Prospector uses Cloudflare Workers as the user-facing API for the application. It uses D1 to store and retrieve data in real-time, and Queues to handle the fetching of all URLs and the notification process. We’ve also included an intuitive user interface for the application, which is built with HTML, CSS, and JavaScript.

How we built an open-source SEO tool using Workers, D1, and Queues

Why we built it

It is widely known in SEO that both internal and external links help Google and other search engines understand what a website is about, which impacts keyword rankings. Not only do these links guide readers to additional helpful information, they also allow web crawlers for search engines to discover and index content on the site.

Acquiring external links is often a time-consuming process and at the discretion of third parties, whereas website owners typically have much more control over internal links. As a result, internal linking is one of the most useful levers available in SEO.

In an ideal world, every piece of content would be fully formed upon publication, replete with helpful internal links throughout the piece. However, this is often not the case. Many times, content is edited after the fact or additional pieces of relevant content come along after initial publication. These situations result in missed opportunities for internal linking.

Like other large organizations, Cloudflare has published thousands of blogs and web pages over the years. We share new content every time a product/technology is introduced and improved. Ultimately, that also means it’s become more challenging to identify opportunities for internal linking in a timely, automated fashion. We needed a tool that would allow us to identify internal linking opportunities as they appear, and speed up the time it takes to identify new internal linking opportunities.

Although we tested several tools that might solve this problem, we found that they were limited in several ways. First, some tools only scanned the first 2,000 characters of a web page. Any opportunities found beyond that limit would not be detected. Next, some tools did not allow us to limit searches to certain areas of the site and resulted in many false positives. Finally, other potential solutions required manual operation, leaving the process at the mercy of human memory.

To solve our problem (and ultimately, improve our SEO), we needed an automated tool that could discover and notify us of new instances of targeted phrases on a specified range of pages.

How it works

Data model

First, let’s explore the data model for Prospector. We have two main tables: notifiers and urls. The notifiers table stores the email address and keyword that we want to monitor. The urls table stores the URL and sitemap that we want to scrape. The notifiers table has a one-to-many relationship with the urls table, meaning that each notifier can have many URLs associated with it.

In addition, we have a sitemaps table that stores the sitemap URLs that we’ve scraped. Many larger websites don’t just have a single sitemap: the Cloudflare blog, for instance, has a primary sitemap that contains four sub-sitemaps. When the application is deployed, a primary sitemap is provided as configuration, and Prospector will parse it to find all of the sub-sitemaps.

Finally, notifier_matches is a table that stores the matches between a notifier and a URL. This allows us to keep track of which URLs have already been matched, and which ones still need to be processed. When a match has been found, the notifier_matches table is updated to reflect that, and “matches” for a keyword are no longer processed. This saves our SEO experts from a crowded inbox, and allows them to focus and act on new matches.

Connecting the pieces with Cloudflare Queues
Cloudflare Queues acts as the work queue for Prospector. When a new notifier is added, a new job is created for it and added to the queue. Behind the scenes, Queues will distribute the work across multiple Workers, allowing us to scale the application as needed. When a job is processed, Prospector will scrape the URL and check for matches. If a match is found, Prospector will send an email to the notifier’s email address.

Using the Cron Triggers functionality in Workers, we can schedule the scraping process to run at a regular interval – by default, once a day. This allows us to keep our data up-to-date, and ensures that we’re always notified of any changes to our website. It also allows the end-user to configure when they receive emails in case they want to receive them more or less frequently, or at the beginning of their workday.

The Module Workers syntax for Workers makes accessing the application bindings – the constants available in the application for querying D1, Queues, and other services – incredibly easy. src/index.ts, the entrypoint for the application, looks like this:

import { DBUrl, Env } from './types'

import {
  handleQueuedUrl,
  scheduled,
} from './functions';

import h from './api'

export default {
  async fetch(
	request: Request,
	env: Env,
	ctx: ExecutionContext
  ): Promise<Response> {
	return h.fetch(request, env, ctx)
  },

  async queue(
	batch: MessageBatch<Error>,
	env: Env
  ): Promise<void> {
	for (const message of batch.messages) {
  	const url: DBUrl = JSON.parse(message.body)
  	await handleQueuedUrl(url, env.DB)
	}
  },

  async scheduled(
	env: Env,
  ): Promise<void> {
	await scheduled({
  	authToken: env.AUTH_TOKEN,
  	db: env.DB,
  	queue: env.QUEUE,
  	sitemapUrl: env.SITEMAP_URL,
	})
  }
};

With this syntax, we can see where the various events incoming to the application – the fetch event, the queue event, and the scheduled event – are handled. The fetch event is the main entrypoint for the application, and is where we handle all of the API routes. The queue event is where we handle the work that’s been added to the queue, and the scheduled event is where we handle the scheduled scraping process.

Central to the application, of course, is Workers – acting as the API gateway and coordinator. We’ve elected to use the popular open-source framework Hono, an Express-style API for Workers, in Prospector. With Hono, we can quickly map out a REST API in just a few lines of code. Here’s an example of a few API routes and how they’re defined with Hono:

const app = new Hono()

app.get("/", (context) => {
  return context.html(index)
})

app.post("/notifiers", async context => {
  try {
	const { keyword, email } = await context.req.parseBody()
	await context.env.DB.prepare(
  	"insert into notifiers (keyword, email) values (?, ?)"
	).bind(keyword, email).run()
	return context.redirect('/')
  } catch (err) {
	context.status(500)
	return context.text("Something went wrong")
  }
})

app.get('/sitemaps', async (context) => {
  const query = await context.env.DB.prepare(
	"select * from sitemaps"
  ).all();
  const sitemaps: Array<DBSitemap> = query.results
  return context.json(sitemaps)
})

Crucial to the development of Prospector are the improved TypeScript bindings for Workers. As announced in November of last year, TypeScript bindings for Workers are now automatically generated based on our open source runtime, workerd. This means that whenever we use the types provided from the @cloudflare/workers-types package in our application, we can be sure that the types are always up-to-date.

With these bindings, we can define the types for our environment variables, and use them in our application. Here’s an example of the Env type, which defines the environment variables that we use in the application:

export interface Env {
  AUTH_TOKEN: string
  DB: D1Database
  QUEUE: Queue
  SITEMAP_URL: string
}

Notice the types of the DB and QUEUE bindings – D1Database and Queue, respectively. These types are automatically generated, complete with type signatures for each method inside of the D1 and Queue APIs. This means that we can be sure that we’re using the correct methods, and that we’re passing the correct arguments to them, directly from our text editor – without having to refer to the documentation.

How we built an open-source SEO tool using Workers, D1, and Queues

How to use it

One of my favorite things about Workers is that deploying applications is quick and easy. Using `wrangler.toml` and some simple build scripts, we can deploy a fully-functional application in just a few minutes. Prospector is no different. With just a few commands, we can create the necessary D1 database and Queues instance, and deploy the application to our account.

First, you’ll need to clone the repository from our cloudflare/templates repository:

git clone $URL

If you haven’t installed wrangler yet, you can do so by running:

npm install @cloudflare/wrangler -g

With Wrangler installed, you can login to your account by running:

wrangler login

After you’ve done that, you’ll need to create a new D1 database, as well as a Queues instance. You can do this by running the following commands:

wrangler d1 create $DATABASE_NAME
wrangler queues create $QUEUE_NAME

Configure your wrangler.toml with the appropriate bindings (see [the README](URL) for an example):

[[ d1_databases ]]
binding = "DB"
database_name = "keyword-tracker-db"
database_id = "ab4828aa-723b-4a77-a3f2-a2e6a21c4f87"
preview_database_id = "8a77a074-8631-48ca-ba41-a00d0206de32"
	
[[queues.producers]]
  queue = "queue"
  binding = "QUEUE"

[[queues.consumers]]
  queue = "queue"
  max_batch_size = 10
  max_batch_timeout = 30
  max_retries = 10
  dead_letter_queue = "queue-dlq"

Next, you can run the bin/migrate script to create the tables in your database:

bin/migrate

This will create all the needed tables in your database, both in development (locally) and in production. Note that you’ll even see the creation of a honest-to-goodness .sqlite3 file in your project directory – this is the local development database, which you can connect to directly using the same SQLite CLI that you’re used to:

$ sqlite3 .wrangler/state/d1/DB.sqlite3
sqlite> .tables notifier_matches  notifiers     sitemaps       urls

Finally, you can deploy the application to your account:

npm run deploy

With a deployed application, you can visit your Workers URL to see the user interface. From there, you can add new notifiers and URLs, and see the results of your scraping process. When a new keyword match is found, you’ll receive an email with the details of the match instantly:

How we built an open-source SEO tool using Workers, D1, and Queues

Conclusion

For some time, there have been a great deal of applications that were hard to build on Workers without relational data or background task tooling. Now, with D1 and Queues, we can build applications that seamlessly integrate between real-time user interfaces, geographically distributed data, background processing, and more, all using the same developer ergonomics and low latency that Workers is known for.

D1 has been crucial for building this application. On larger sites, the number of URLs that need to be scraped can be quite large. If we were to use Workers KV, our key-value store, for storing this data, we would quickly struggle with how to model, retrieve, and update the data needed for this use-case. With D1, we can build relational data models and quickly query just the data we need for each queued processing task.

Using these tools, developers can build internal tools and applications for their companies that are more powerful and more scalable than ever before. With the integration of Cloudflare’s Zero Trust suite, developers can make these applications secure by default, and deploy them to Cloudflare’s global network. This allows developers to build applications that are fast, secure, and reliable, all without having to worry about the underlying infrastructure.

Prospector is a great example of how easy it is to build applications on Cloudflare Workers. With the recent addition of D1 and Queues, we’ve been able to build fully-functional applications that require real-time data and background processing in just a few hours. We’re excited to share the open-source code for Prospector, and we’d love to hear your feedback on the project.

If you have any questions, feel free to reach out to us on Twitter at @cloudflaredev, or join us in the Cloudflare Workers Discord community, which recently hit 20k members and is a great place to ask questions and get help from other developers.

Making static sites dynamic with Cloudflare D1

Post Syndicated from Kristian Freeman original https://blog.cloudflare.com/making-static-sites-dynamic-with-cloudflare-d1/

Making static sites dynamic with Cloudflare D1

Introduction

Making static sites dynamic with Cloudflare D1

There are many ways to store data in your applications. For example, in Cloudflare Workers applications, we have Workers KV for key-value storage and Durable Objects for real-time, coordinated storage without compromising on consistency. Outside the Cloudflare ecosystem, you can also plug in other tools like NoSQL and graph databases.

But sometimes, you want SQL. Indexes allow us to retrieve data quickly. Joins enable us to describe complex relationships between different tables. SQL declaratively describes how our application’s data is validated, created, and performantly queried.

D1 was released today in open alpha, and to celebrate, I want to share my experience building apps with D1: specifically, how to get started, and why I’m excited about D1 joining the long list of tools you can use to build apps on Cloudflare.

Making static sites dynamic with Cloudflare D1

D1 is remarkable because it’s an instant value-add to applications without needing new tools or stepping out of the Cloudflare ecosystem. Using wrangler, we can do local development on our Workers applications, and with the addition of D1 in wrangler, we can now develop proper stateful applications locally as well. Then, when it’s time to deploy the application, wrangler allows us to both access and execute commands to your D1 database, as well as your API itself.

What we’re building

In this blog post, I’ll show you how to use D1 to add comments to a static blog site. To do this, we’ll construct a new D1 database and build a simple JSON API that allows the creation and retrieval of comments.

As I mentioned, separating D1 from the app itself – an API and database that remains separate from the static site – allows us to abstract the static and dynamic pieces of our website from each other. It also makes it easier to deploy our application: we will deploy the frontend to Cloudflare Pages, and the D1-powered API to Cloudflare Workers.

Building a new application

First, we’ll add a basic API in Workers. Create a new directory and in it a new wrangler project inside it:

$ mkdir d1-example && d1-example
$ wrangler init

In this example, we’ll use Hono, an Express.js-style framework, to rapidly build our API. To use Hono in this project, install it using NPM:

$ npm install hono

Then, in src/index.ts, we’ll initialize a new Hono app, and define a few endpoints – GET /API/posts/:slug/comments, and POST /get/api/:slug/comments.

import { Hono } from 'hono'
import { cors } from 'hono/cors'

const app = new Hono()

app.get('/api/posts/:slug/comments', async c => {
  // do something
})

app.post('/api/posts/:slug/comments', async c => {
  // do something
})

export default app

Now we’ll create a D1 database. In Wrangler 2, there is support for the wrangler d1 subcommand, which allows you to create and query your D1 databases directly from the command line. So, for example, we can create a new database with a single command:

$ wrangler d1 create d1-example

With our created database, we can take the database name ID and associate it with a binding inside of wrangler.toml, wrangler’s configuration file. Bindings allow us to access Cloudflare resources, like D1 databases, KV namespaces, and R2 buckets, using a simple variable name in our code. Below, we’ll create the binding DB and use it to represent our new database:

[[ d1_databases ]]
binding = "DB" # i.e. available in your Worker on env.DB
database_name = "d1-example"
database_id = "4e1c28a9-90e4-41da-8b4b-6cf36e5abb29"

Note that this directive, the [[d1_databases]] field, currently requires a beta version of wrangler. You can install this for your project using the command npm install -D wrangler/beta.

With the database configured in our wrangler.toml, we can start interacting with it from the command line and inside our Workers function.

First, you can issue direct SQL commands using wrangler d1 execute:

$ wrangler d1 execute d1-example --command "SELECT name FROM sqlite_schema WHERE type ='table'"
Executing on d1-example:
┌─────────────────┐
│ name │
├─────────────────┤
│ sqlite_sequence │
└─────────────────┘

You can also pass a SQL file – perfect for initial data seeding in a single command. Create src/schema.sql, which will create a new comments table for our project:

drop table if exists comments;
create table comments (
  id integer primary key autoincrement,
  author text not null,
  body text not null,
  post_slug text not null
);
create index idx_comments_post_id on comments (post_slug);

-- Optionally, uncomment the below query to create data

-- insert into comments (author, body, post_slug)
-- values ("Kristian", "Great post!", "hello-world");

With the file created, execute the schema file against the D1 database by passing it with the flag --file:

$ wrangler d1 execute d1-example --file src/schema.sql

We’ve created a SQL database with just a few commands and seeded it with initial data. Now we can add a route to our Workers function to retrieve data from that database. Based on our wrangler.toml config, the D1 database is now accessible via the DB binding. In our code, we can use the binding to prepare SQL statements and execute them, for instance, to retrieve comments:

app.get('/api/posts/:slug/comments', async c => {
  const { slug } = c.req.param()
  const { results } = await c.env.DB.prepare(`
    select * from comments where post_slug = ?
  `).bind(slug).all()
  return c.json(results)
})

In this function, we accept a slug URL query parameter and set up a new SQL statement where we select all comments with a matching post_slug value to our query parameter. We can then return it as a simple JSON response.

So far, we’ve built read-only access to our data. But “inserting” values to SQL is, of course, possible as well. So let’s define another function that allows POST-ing to an endpoint to create a new comment:

app.post('/API/posts/:slug/comments', async c => {
  const { slug } = c.req.param()
  const { author, body } = await c.req.json<Comment>()

  if (!author) return c.text("Missing author value for new comment")
  if (!body) return c.text("Missing body value for new comment")

  const { success } = await c.env.DB.prepare(`
    insert into comments (author, body, post_slug) values (?, ?, ?)
  `).bind(author, body, slug).run()

  if (success) {
    c.status(201)
    return c.text("Created")
  } else {
    c.status(500)
    return c.text("Something went wrong")
  }
})

In this example, we built a comments API for powering a blog. To see the source for this D1-powered comments API, you can visit cloudflare/templates/worker-d1-api.

Making static sites dynamic with Cloudflare D1

Conclusion

One of the things most exciting about D1 is the opportunity to augment existing applications or websites with dynamic, relational data. As a former Ruby on Rails developer, one of the things I miss most about that framework in the world of JavaScript and serverless development tools is the ability to rapidly spin up full data-driven applications without needing to be an expert in managing database infrastructure. With D1 and its easy onramp to SQL-based data, we can build true data-driven applications without compromising on performance or developer experience.

This shift corresponds nicely with the advent of static sites in the last few years, using tools like Hugo or Gatsby. A blog built with a static site generator like Hugo is incredibly performant – it will build in seconds with small asset sizes.

But by trading a tool like WordPress for a static site generator, you lose the opportunity to add dynamic information to your site. Many developers have patched over this problem by adding more complexity to their build processes: fetching and retrieving data and generating pages using that data as part of the build.

This addition of complexity in the build process attempts to fix the lack of dynamism in applications, but it still isn’t genuinely dynamic. Instead of being able to retrieve and display new data as it’s created, the application rebuilds and redeploys whenever data changes so that it appears to be a live, dynamic representation of data. Your application can remain static, and the dynamic data will live geographically close to the users of your site, accessible via a queryable and expressive API.

We rebuilt Cloudflare’s developer documentation – here’s what we learned

Post Syndicated from Kristian Freeman original https://blog.cloudflare.com/new-dev-docs/

We rebuilt Cloudflare's developer documentation - here's what we learned

We rebuilt Cloudflare's developer documentation - here's what we learned

We recently updated developers.cloudflare.com, the Cloudflare Developers documentation website, to a new version of our custom documentation engine. This change consisted of a significant migration from Gatsby to Hugo and converged a collection of Workers Sites into a single Cloudflare Pages instance. Together, these updates brought developer experience, performance, and quality of life improvements for our engineers, technical writers, and product managers.

In this blog post, we’ll cover the history of Cloudflare’s developer docs, why we made this recent transition, and why we continue to dogfood Cloudflare’s products as we develop applications internally.

What are Cloudflare’s Developer Docs?

Cloudflare’s Developer Docs, which are open source on GitHub, comprise documentation for all of Cloudflare’s products. The documentation is written by technical writers, product managers, and engineers at Cloudflare. Like many open source projects, contributions to the docs happen via Pull Requests (PRs). At time of writing, we have 1,600 documentation pages and have accepted almost 4,000 PRs, both from Cloudflare employees and external contributors in our community.

The underlying documentation engine we’ve used to build these docs has changed multiple times over the years. Documentation sites are often built with static site generators and, at Cloudflare, we’ve used tools like Hugo and Gatsby to convert thousands of Markdown pages into HTML, CSS, and JavaScript.

When we released the first version of our Docs Engine in mid-2020, we were excited about the facelift to our Developer Documentation site and the inclusion of dev-friendly features like dark mode and proper code syntax highlighting.

We rebuilt Cloudflare's developer documentation - here's what we learned

Most importantly, we also used this engine to transition all of Cloudflare’s products with documentation onto a single engine. This allowed all Cloudflare product documentation to be developed, built, and deployed using the same core foundation. But over the next eighteen months and thousands of PRs, we realized that many of the architecture decisions we had made were not scaling.

While the user interface that we had made for navigating the documentation continued to receive great feedback from our users and product teams, decisions like using client-side rendering for docs had performance implications, especially on resource-constrained devices.

At the time, our decision to dogfood Workers Sites — which served as a precursor to Cloudflare Pages — meant that we could rapidly deploy our documentation across all of Cloudflare’s network in a matter of minutes. We implemented this by creating a separate Cloudflare Workers deployment for each product’s staging and production instances. Effectively, this meant that more than a hundred Workers were regularly updated, which caused significant headaches when trying to understand the causes and downstream effects of any failed deployments.

Finally, we struggled with our choice of underlying static site generator, Gatsby. We still think Gatsby is a great tool of choice for certain websites and applications, but we quickly found it to be the wrong match for our content-heavy documentation experience. Gatsby inherits many dependency chains to provide its featureset, but running the dependency-heavy toolchain locally on contributors’ machines proved to be an incredibly difficult and slow task for many of our documentation contributors.

When we did get to the point of deploying new docs changes, we began to be at the mercy of Gatsby’s long build times – in the worst case, almost an entire hour – just to compile Markdown and images into HTML. This negatively impacted our team’s ability to work quickly and efficiently as they improved our documentation. Ultimately, we were unable to find solutions to many of these issues, as they were core assumptions and characteristics of the underlying tools that we had chosen to build on — it was time for something new.

Built using Go, Hugo is incredibly fast at building large sites, has an active community, and is easily installable on a variety of operating systems. In our early discovery work, we found that Hugo would build our docs content in mere seconds. Since performance was a core motive for pursuing a rewrite, this was a significant factor in our decision.

How we migrated

When comparing frameworks, the most significant difference between Hugo and Gatsby – from a user’s standpoint – is the allowable contents of the Markdown files themselves. For example, Gatsby makes heavy use of MDX, allowing developers to author and import React components within their content pages. While this can be effective, MDX unfortunately is not CommonMark-compliant and, in turn, this means that its flavor of Markdown is required to be very flexible and permissive. This posed a problem when migrating to any other non-MDX-based solution, including Hugo, as these frameworks don’t grant the same flexibilities with Markdown syntax. Because of this, the largest technical challenge was converting the existing 1,600 markdown pages from MDX to a stricter, more standard Markdown variant that Hugo (or almost any framework) can interpret.

Not only did we have to convert 1,600 Markdown pages so that they’re rendered correctly by the new framework, we had to make these changes in a way that minimized the number of merge conflicts for when the migration itself was ready for deployment. There was a lot of work to be done as part of this migration – and work takes time! We could not stall or block the update cycles of the Developer Documentation repository, so we had to find a way to rename or modify every single file in the repository without gridlocking deployments for weeks.

The only way to solve this was through automation. We created a migration script that would apply all the necessary changes on the morning of the migration release day. Of course, this meant that we had to identify and apply the changes manually and then record that in JavaScript or Bash commands to make sweeping changes for the entire project.

For example, when migrating Markdown content, the migrator needs to take the file contents and parse them into an abstract syntax tree (AST) so that other functions can access, traverse, and modify a collection of standardized objects representing the content instead of resorting to a sequence string manipulations… which is scary and error-prone.

Since the project started with MDX, we needed a MDX-compatible parser which, in turn, produces its own AST with its own object standardizations. From there, one can “walk” – aka traverse – through the AST and add, remove, and/or edit objects and object properties. With the updated AST and a final traversal, a “stringifier” function can convert each object representation back to its string representation, producing updated file contents that differ from the original.

Below is an example snippet that utilizes mdast-util-from-markdown and mdast-util-to-markdown to create and stringify, respectively, the MDX AST and astray to traverse the AST with our custom modifications. For this example, we’re looking for heading and anchor nodes – both names are provided by the mdast-* utilities – so that we can read the primary header (<h1>) text and ensure that all internal Developer Documentation links are consistent:

import * as fs from 'fs';
import * as astray from 'astray';
import { toMarkdown } from 'mdast-util-to-markdown';
import { fromMarkdown } from 'mdast-util-from-markdown';

/**
 * @param {string} file The "*.md" file path.
 */
export async function modify(file) {
  let content = await fs.promises.read(file, 'utf8');
  let AST = fromMarkdown(content);
  let title = '';

  astray.walk(AST, {
    /**
     * Read the page's <h1> to determine page's title.
     */
    heading(node) {
      // ignore if not <h1> header
      if (node.depth !== 1) return;

      astray.walk(node, {
        text(t: MDAST.Text) {
          // Grab the text value of the H1
          title += t.value;
        },
      });

      return astray.SKIP;
    },
    
    /**
     * Update all anchor links (<a>) for consistent internal linking.
     */
    link(node) {
      let value = node.url;
      
      // Ignore section header links (same page)
      if (value.startsWith('#')) return;

      if (/^(https?:)?\/\//.test(value)) {
        let tmp = new URL(value);
        // Rewrite our own "https://developers.cloudflare.com" links
        // so that they are absolute, path-based links instead.
        if (tmp.origin === 'https://developers.cloudflare.com') {
          value = tmp.pathname + tmp.search + tmp.hash;
        }
      }
      
      // ... other normalization logic ...
      
      // Update the link's `href` value
      node.url = value;
    }
  });
  
  // Now the AST has been modified in place.
  // AKA, the same `AST` variable is (or may be) different than before.
  
  // Convert the AST back to a final string.
  let updated = toMarkdown(AST);
  
  // Write the updated markdown file
  await fs.promises.writeFile(file, updated);
}

https://gist.github.com/lukeed/d63a4561ce9859765d8f0e518b941642#file-cfblog-devdocs-0-js

The above is an abbreviated snippet of the modifications we needed to make during our migration. You may find all the AST traversals and manipulations we created as part of our migration on GitHub.

We also took this opportunity to analyze the thousands and thousands of code snippets we have throughout the codebase. These serve an important role as they are crucial aides in reference documentation or are presented alongside tutorials as recipes or examples. So we added a code formatter script that utilizes Prettier to apply a consistent code style across all code snippets. As a bonus side effect, Prettier would throw errors if any snippets had invalid syntax for their given language. Any of these were fixed manually and the `format` script has been added as part of our own CI process to ensure that all JavaScript, TypeScript, Rust, JSON, and/or C++ code we publish is syntactically valid!

Finally, we created a Makefile that coordinated the series of Node scripts and git commands we needed to make. This orchestrated the entire migration, boiling down all our work into a single make run command.

In effect, the majority of the migration Pull Request was the result of automated commits – over one million changes were applied across nearly 5,000 files in less than two minutes. With the help of product owners, we reviewed the newly generated documentation site and applied any fine-tuning adjustments where necessary.

Previously, with the Gatsby-based Workers Sites architecture, each Cloudflare product needed to be built and deployed as its own individual documentation site. These sites would then be managed and proxied by an umbrella Worker, listening on developers.cloudflare.com, which ensured that all requests were handled by the appropriate product-specific Worker Site. This worked well for our production needs, but made it complicated for contributors to replicate a similar setup during local development. With the move to Hugo, we were able to merge everything into a single project – in other words, 48 moving pieces became 1 single piece! This made it extremely easy to build and develop the entire Developer Docs locally, which is a big confidence booster when working.

A unified Hugo project also means that there’s only one build command and one deployable unit… This allowed us to move the Developer Docs to Cloudflare Pages! With Pages attached and configured for the GitHub repository, we immediately began making use of preview deployments as part of our PR review process and our production branch commits automatically queued new production deployments to the live site.

Why we’re excited

After all the changes were in place, we ended up with a near-identical replica of the Developer Documentation site. However, upon closer inspection, a number of major improvements had been made:

  1. Our application now has fewer moving pieces for development and deployment, which makes it significantly easier to understand and onboard other contributors and team members.
  2. Our development flow is a lot snappier and fully replicated the production behavior. This hugely increased our iteration speed and confidence.
  3. Our application was now built as an HTML-first static site. Even though it was always a content site, we are now shipping 90% less JavaScript bytes, which means that our visitors’ browsers are doing less work to view the same content.

The last point speaks to our web pages’ performance, which has real-world implications. These days, websites with faster page-load times are preferred over competitor sites with slower response times. This is true for human and bot users alike! In fact, this is so true that Google now takes page speed into consideration when ranking search results and offers tools like WebMasters and Lighthouse to help site owners track and improve their scores. Below, you can see the before-after comparison of our previous JS-first site to our HTML-first replacement:

We rebuilt Cloudflare's developer documentation - here's what we learned

Here you can see that our Performance grade has significantly improved! It’s this figure, which is a weighted score of the Metrics like First Contentful Paint, that is tied to Page Speed. While this does have SEO impact, the SEO score in a Lighthouse report has to do with Google Crawler’s ability to parse and understand the page’s metadata. This remains unchanged because the content (and its metadata) were not changed as part of the migration.

Conclusion

Developer documentation is incredibly important to the success of any product. At Cloudflare, we believe that technical docs are a product – one that we can continue to iterate on, improve, and make more useful for our customers.

One of the most effective ways to improve documentation is to make it easier for our writers to contribute to them. With our new Documentation Engine, we’re giving our product content team the ability to validate content faster with instantaneous local builds. Preview links via Cloudflare Pages allows stakeholders like product managers and engineering teams the ability to quickly review what the docs will actually look like in production.

As we invest more into our build and deployment pipeline, we expect to further develop our ability to validate both the content and technical implementation of docs as part of review – tools like automatic spell checking, link validation, and visual diffs are all things we’d like to explore in the future.

Importantly, our documentation continues to be 100% open source. If you read Cloudflare’s developer documentation, and have feedback, feel free to check out the project on GitHub and submit suggestions!

Announcing our Spring Developer Speaker Series

Post Syndicated from Kristian Freeman original https://blog.cloudflare.com/announcing-our-spring-developer-speaker-series/

Announcing our Spring Developer Speaker Series

Announcing our Spring Developer Speaker Series

We love developers.

Late last year, we hosted Full Stack Week, with a focus on new products, features, and partnerships to continue growing Cloudflare’s developer platform. As part of Full Stack Week, we also hosted the Developer Speaker Series, bringing 12 speakers in the web dev community to our 24/7 online TV channel, Cloudflare TV. The talks covered topics across the web development ecosystem, which you can rewatch at any time.

We loved organizing the Developer Speaker Series last year. But as developers know far too well, our ecosystem changes rapidly: what may have been cutting edge back in November 2021 can be old news just a few months later in 2022. That’s what makes conferences and live speaking events so valuable: they serve as an up-to-date reference of best practices and future-facing developments in the industry. With that in mind, we’re excited to announce a new edition of our Developer Speaker Series for 2022!

Check out the eleven expert web dev speakers, developers, and educators that we’ve invited to speak live on Cloudflare TV! Here are the talks you’ll be able to watch, starting tomorrow morning (May 9 at 09:00 PT):

The Bootcampers Companion – Caitlyn Greffly
In her recent book, The Bootcamper’s Companion, Caitlyn dives into the specifics of how to build connections in the tech field, understand confusing tech jargon, and make yourself a stand-out candidate when looking for your first job. She’ll talk about some top tips and share a bit about her experience as well as what she has learned from navigating tech as a career changer.

Engaging Ecommerce with the Visual Web – Colby Fayock
Experiences on the web have grown increasingly visual, from displaying product images to interactive NFTs, but not paying attention to how media is delivered can impact Core Web Vitals, creating a bad UX with slow-loading pages, hurting your store’s conversion and potentially losing sales.

How can we effectively leverage media to showcase products creating engaging experiences for our store? We’ll talk about the media’s role in ecomm and how we can take advantage of it while optimizing delivery.

Testing Web Applications with Playwright – Debbie O’Brien
Testing is hard, testing takes time to learn and to write, and time is money. As developers, we want to test. We know we should, but we don’t have time. So how can we get more developers to do testing? We can create better tools.

Let me introduce you to Playwright, a reliable tool for end-to-end cross browser testing for modern web apps, by Microsoft and fully open source. Playwright’s codegen generates tests for you in JavaScript, TypeScript, Dot Net, Java or Python. Now you really have no excuses. It’s time to play your tests wright.

Building serverless APIs: how Fauna and Workers make it easy – Rob Sutter
Building APIs has always been tricky when it comes to setting up architecture. FaunaDB and Workers remove that burden by letting you write code and watch it run everywhere.

Business context is developer productivity – John Feminella
A major factor in developer productivity is whether they have the context to make decisions on their own, or if instead they can only execute someone else’s plan. But how do organizations give engineers the appropriate context to make those decisions when they weren’t there from the beginning?

On the edge of my server – Brian Rinaldi
Edge functions can be potentially game changing. You get the power of serverless functions but running at the CDN level – meaning the response is incredibly fast. With Cloudflare Workers, every worker is an edge function. In this talk, we’ll explore why edge functions can be powerful and explore examples of how to use them to do things a normal serverless function can’t do.

Ten things I love about Wrangler 2 – Sunil Pai
We spent the last six months rewriting wrangler, the CLI for building and deploying Cloudflare Workers. Almost every single feature has been upgraded to be more powerful and user-friendly, while still remaining backward compatible with the original version of wrangler. In this talk, we’ll go through some of the best parts about the rewrite, and how it provides the foundation for all the things we want to build in the future.

L is for Literacy – Henri Helvetica
It’s 2022, and web performance is now abundantly important, with an abundance of available metrics, used by — you guessed it — an abundance of developers, new and experienced. All quips aside, the complexities of the web has led to increased complexities in web performance. Understanding, or literacy in web performance is as important as the four basic language skills. ‘L is for Literacy’ is a lively look at performance lexicon, backed by enlightening data all will enjoy.

Cloudflare Pages Updates – Greg Brimble
Greg Brimble, a Systems Engineer working on Pages, will showcase some of this week’s announcements live on Cloudflare TV. Tune in to see what is now possible for your Cloudflare Pages projects. We’re excited to show you what the team has been working on!

Migrating to Cloudflare Pages: A look into git control, performance, and scalability – James Ross
James Ross, CTO of Nodecraft, will discuss how moving to Pages brought an improved experience for both users and his team building the future of game servers.

If you want to see the full schedule for the Developer Speaker Series, go to our landing page. It shows each talk, including speaker info and timing, as well as time zones for international viewers. When a talk goes live, tuning in is simple – just visit cloudflare.tv to start watching.

New this year, we’ve also prepared a Discord channel to follow the live conversation with other viewers! If you haven’t joined Cloudflare’s Discord server, get your invite.

Announcing native support for Stripe’s JavaScript SDK in Cloudflare Workers

Post Syndicated from Kristian Freeman original https://blog.cloudflare.com/announcing-stripe-support-in-workers/

Announcing native support for Stripe’s JavaScript SDK in Cloudflare Workers

This post is also available in 日本語, 简体中文.

Announcing native support for Stripe’s JavaScript SDK in Cloudflare Workers

Handling payments inside your apps is crucial to building a business online. For many developers, the leading choice for handling payments is Stripe. Since my first encounter with Stripe about seven years ago, the service has evolved far beyond simple payment processing. In the e-commerce example application I shared last year, Stripe managed a complete seller marketplace, using the Connect product. Stripe’s product suite is great for developers looking to go beyond accepting payments.

Earlier versions of Stripe’s SDK had core Node.js dependencies, like many popular JavaScript packages. In Stripe’s case, it interacted directly with core Node.js libraries like net/http, to handle HTTP interactions. For Cloudflare Workers, a V8-based runtime, this meant that the official Stripe JS library didn’t work; you had to fall back to using Stripe’s (very well-documented) REST API. By doing so, you’d lose the benefits of using Stripe’s native JS library — things like automatic type-checking in your editor, and the simplicity of function calls like stripe.customers.create(), instead of manually constructed HTTP requests, to interact with Stripe’s various pieces of functionality.

In April, we wrote that we were focused on increasing the number of JavaScript packages that are compatible with Workers:

We won’t stop until our users can import popular Node.js libraries seamlessly. This effort will be large-scale and ongoing for us, but we think it’s well worth it.

I’m excited to announce general availability for the stripe JS package for Cloudflare Workers. You can now use the native Stripe SDK directly in your projects! To get started, install stripe in your project: npm i stripe.

This also opens up a great opportunity for developers who have deployed sites to Cloudflare Pages to begin using Stripe right alongside their applications. With this week’s announcement of serverless function support in Cloudflare Pages, you can accept payments for your digital product, or handle subscriptions for your membership site, with a few lines of JavaScript added to your Pages project. There’s no additional configuration, and it scales automatically, just like your Pages site.

To showcase this, we’ve prepared an example open-source repository, showing how you can integrate Stripe Checkout into your Pages application. There’s no additional configuration needed — as we announced yesterday, Pages’ new Workers Functions features allows you to deploy infinitely-scalable functions just by adding a new functions folder to your project. See it in action at stripe.pages.dev, or check out the open-source repository on GitHub.

With the SDK installed, you can begin accepting payments directly in your applications. The below example shows how to initiate a new Checkout session and redirect to Stripe’s hosted checkout page:

const Stripe = require("stripe");

const stripe = Stripe(STRIPE_API_KEY, {
  httpClient: Stripe.createFetchHttpClient()
});

export default {
  async fetch(request) {
    const session = await stripe.checkout.sessions.create({
      line_items: [{
        price_data: {
          currency: 'usd',
          product_data: {
            name: 'T-shirt',
          },
          unit_amount: 2000,
        },
        quantity: 1,
      }],
      payment_method_types: [
        'card',
      ],
      mode: 'payment',
      success_url: `${YOUR_DOMAIN}/success.html`,
      cancel_url: `${YOUR_DOMAIN}/cancel.html`,
    });

    return Response.redirect(session.url)
  }
}

With support for the Stripe SDK natively in Cloudflare Workers, you aren’t just limited to payment processing either. Any JavaScript example that’s currently in Stripe’s extensive documentation works directly in Workers, without needing to make any changes.

In particular, using Workers to handle the multitude of available Stripe webhooks means that you can get better visibility into how your existing projects are working, without needing to spin up any new infrastructure. The below example shows how you can securely validate incoming webhook requests to a Workers function, and perform business logic by parsing the data inside that webhook:

const Stripe = require("stripe");

const stripe = Stripe(STRIPE_API_KEY, {
  httpClient: Stripe.createFetchHttpClient()
});

export default {
  async fetch(request) {
    const body = await request.text()
    const sig = request.headers.get('stripe-signature')
    const event = stripe.webhooks.constructEvent(body, sig, secret)

    // Handle the event
    switch (event.type) {
      case 'payment_intent.succeeded':
        const paymentIntent = event.data.object;
        // Then define and call a method to handle the successful payment intent.
        // handlePaymentIntentSucceeded(paymentIntent);
        break;
      case 'payment_method.attached':
        const paymentMethod = event.data.object;
        // Then define and call a method to handle the successful attachment of a PaymentMethod.
        // handlePaymentMethodAttached(paymentMethod);
        break;
      // ... handle other event types
      default:
        console.log(`Unhandled event type ${event.type}`);
    }

    // Return a response to acknowledge receipt of the event
    return new Response(JSON.stringify({ received: true }), {
      headers: { 'Content-type': 'application/json' }
    })
  }
}

We’re also announcing a new Workers template in partnership with Stripe. The template will help you get up and running with Stripe and Workers, using our best practices.

In less than five minutes, you can begin accepting payments for your next digital product or membership business. You can also handle and validate incoming webhooks at the edge, from a single codebase. This comes with no upfront cost, server provisioning, or any of the standard scaling headaches. Take your serverless functions, deploy them to Cloudflare’s edge, and start making money!

“We’re big fans of Cloudflare Workers over here at Stripe. Between the wild performance at the edge and fantastic serverless development experience, we’re excited to see what novel ways you all use Stripe to make amazing apps.”
Brian Holt, Stripe

We’re thrilled with this incredible update to Stripe’s JavaScript SDK. We’re also excited to see what you’ll build with native Stripe support in Workers. Join our Discord server and share what you’ve built in the #what-i-built channel — get your invite here.

Developer Spotlight: Chris Coyier, CodePen

Post Syndicated from Kristian Freeman original https://blog.cloudflare.com/developer-spotlight-codepen/

Developer Spotlight: Chris Coyier, CodePen

Developer Spotlight: Chris Coyier, CodePen

Chris Coyier has been building on the web for over 15 years. Chris made his mark on the web development world with CSS-Tricks in 2007, one of the web’s leading publications for frontend and full-stack developers.

In 2012, Chris co-founded CodePen, which is an online code editor that lives in the browser and allows developers to collaborate and share code examples written in HTML, CSS, and JavaScript.

Due to the nature of CodePen — namely, hosting code and an incredibly popular embedding feature, allowing developers to share their CodePen “pens” around the world — any sort of optimization can have a massive impact on CodePen’s business. Increasingly, CodePen relies on the ability to both execute code and store data on Cloudflare’s network as a first stop for those optimizations. As Chris puts it, CodePen uses Cloudflare Workers for “so many things”:

“We pull content from an external CMS and use Workers to manipulate HTML before it arrives to the user’s browser. For example, we fetch the original page, fetch the content, then stitch them together for a full response.”

Workers allows you to work with responses directly using the native Request/Response classes and, with the addition of our streaming HTMLRewriter engine, you can modify, combine, and parse HTML without any loss in performance. Because Workers functions are deployed to Cloudflare’s network, CodePen has the ability to instantly deploy highly-intelligent middleware in-between their origin servers and their clients, without needing to spin up any additional infrastructure.

In a popular YouTube video on Chris Coyier’s YouTube channel, he sits down with a front-end engineer at CodePen, and covers how they use Cloudflare Workers to build crucial CodePen features. Here’s Chris:

“Cloudflare Workers are like serverless functions that always run at the edge, making them incredibly fast. Not only that, but the tooling around them is really nice. They can run at particular routes on your own website, removing any awkward CORS troubles, and helping you craft clean APIs. But they also have special superpowers, like access to KV storage (also at the edge), image manipulation and optimization, and HTML rewriting.”

CodePen also leverages Workers KV to store data. This allows them to avoid an immense amount of repetitive processing work by caching results and making them accessible on Cloudflare’s network, geographically near their users:

“We use Workers combined with the KV Store to run expensive jobs. For example, we check the KV Store to see if we need to do some processing work, or if that work has already been done. If we need to do the work, we do it and then update KV to know it’s been done and where the result of that work is.”

In a follow-up video on his YouTube channel, Chris dives into Workers KV and shows how you can build a simple serverless function — with storage — and deploy it to Cloudflare. With the addition of Workers KV, you can persist complex data structures side-by-side with your Workers function, without compromising on performance or scalability.

Chris and the CodePen team are invested in Workers and, most importantly, they enjoy developing with Cloudflare’s developer tooling. “The DX around them is suspiciously nice. Coming from other cloud functions services, there seems to be a just-right amount of tooling to do the things we need to do.”

CodePen is a great example of what’s possible when you integrate the Cloudflare Workers developer environment into your stack. Across all parts of the business, Workers, and tools like Workers KV and HTMLRewriter, allow CodePen to build highly-performant applications that look towards the future.

If you’d like to learn more about Cloudflare Workers, and deploy your own serverless functions to Cloudflare’s network, check out workers.cloudflare.com!

Developer Spotlight: James Ross, Nodecraft

Post Syndicated from Kristian Freeman original https://blog.cloudflare.com/developer-spotlight-nodecraft/

Developer Spotlight: James Ross, Nodecraft

Developer Spotlight: James Ross, Nodecraft

Nodecraft allows gamers to host dedicated servers for their favorite games. James Ross is the Chief Technology Officer for Nodecraft and has advocated for Cloudflare — particularly Cloudflare Workers —  within the company.

“We use Workers for all kinds of things. We use Workers to optimize our websites, handle redirects, and deal with image content negotiation for our main website. We’re very fortunate that the majority of our users are using modern web browsers, so we can serve images in formats like JPEG XL and AVIF to users through a Workers script”.

Developer Spotlight: James Ross, Nodecraft

Nodecraft also maintains a number of microsites and APIs that are relied upon by the gaming community to retrieve game information. PlayerDB provides a JSON API for looking up information on user profiles for a number of gaming services, and MCUUID and SteamID are wrapped frontends for users of those services to interact with that API. Each of these is written and deployed as a Cloudflare Worker:

“Whenever a player joins a Minecraft server, we want to get their information — like their name and player image — and show it to our users. That API receives a hundred million requests a month. And we use the same API endpoint for three other websites that display that data to our users.”

Developer Spotlight: James Ross, Nodecraft

We love these kinds of integrations between Workers and developers’ existing infrastructures because it serves as a great way to onboard a team onto the Workers platform. You can look for existing parts of your infrastructure that may be resource-intensive, slow, or expensive, and port them to Workers. In Nodecraft’s case, this relieved them of managing an incredibly high amount of maintenance cost, and the result is, simply put, peace of mind:

“Handling three hundred millions a month in our own infrastructure would be really tough, but when we throw it all into a Worker, we don’t need to worry about scale. Occasionally, someone will write a Worker, and it will service 30 million requests in a single hour… we won’t even notice until we look at the stats in the Cloudflare dashboard.”

Nodecraft has been using Cloudflare for almost ten years. They first explored Workers to simplify their application’s external image assets. Their very first Worker replaced an image proxy they had previously hosted in their infrastructure and, since then, Workers has changed the way they think about building applications.

“With the advent of Jamstack, we started using Workers Sites and began moving towards a static architecture. But many of our Workers Sites projects had essentially an infinite number of pages. For instance, Minecraft has 15 million (and growing) user profiles. It’s hard to build a static page for each of those. Now, we use HTMLRewriter to inject a static page with dynamic user content.”

For James, Workers has served as a catalyst for how he understands the future of web applications. Cloudflare and the Workers development environment allows his team to stop worrying about scaling and infrastructure, and that means that Nodecraft builds on Cloudflare by default:

“Workers has definitely changed how we think about building applications. Now, we think about how we can build our applications to be deployed directly to Cloudflare’s edge.”

As a community moderator and incredibly active member of our Discord community, James is excited about the future of Cloudflare’s stack. As we’ve been teasing it over the past few months, James has been looking forward to integrating Workers functions with Nodecraft’s Pages applications. The release of that feature allows Nodecraft to move entirely to a Pages-driven deployment for their sites. He’s also looking forward to the release of Cloudflare R2, our storage product, because Nodecraft makes heavy use of similar storage products and would like to move entirely onto Cloudflare’s tooling wherever possible.

If you’d like to learn more about Cloudflare Workers, and deploy your own serverless functions to Cloudflare’s network, check out workers.cloudflare.com!

Get started Building Web3 Apps with Cloudflare

Post Syndicated from Kristian Freeman original https://blog.cloudflare.com/get-started-web3/

Get started Building Web3 Apps with Cloudflare

Get started Building Web3 Apps with Cloudflare

For many developers, the term Web3 feels like a buzzword — it’s the sort of thing you see on a popular “Things you need to learn in 2021” tweet. As a software developer, I’ve spent years feeling the same way. In the last few months, I’ve taken a closer look at the Web3 ecosystem, to better understand how it works, and why it matters.

Web3 can generally be described as a decentralized evolution of the Internet. Instead of a few providers acting as the mediators of how your interactions and daily life on the web should work, a Web3-based future would liberate your data from proprietary databases and operate without centralization via the incentive structure inherent in blockchains.

The Web3 space in 2021 looks and feels much different from what it did a few years ago. Blockchains like Ethereum are handling incredible amounts of traffic with relative ease — although some improvements are needed — and newer blockchains like Solana have entered the space as genuine alternatives that could alleviate some of the scaling issues we’ve seen in the past few years.

Cloudflare is incredibly well-suited to empower developers to build the future with Web3. The announcement of Cloudflare’s Ethereum gateway earlier today will enable developers to build scalable Web3 applications on Cloudflare’s reliable network. Today, we’re also releasing an open-source example showing how to deploy, mint, and render NFTs, or non-fungible tokens, using Cloudflare Workers and Cloudflare Pages. You can try it out here, or check out the open-source codebase on GitHub to get started deploying your own NFTs to production.

The problem Web3 solves

When you begin to read about Web3 online, it’s easy to get excited about the possibilities. As a software developer, I found myself asking: “What actually is a Web3 application? How do I build one?

Most traditional applications make use of three pieces: the database, a code interface to that database, and the user interface. This model — best exemplified in the Model-View-Controller (MVC) architecture — has served the web well for decades. In MVC, the database serves as the storage system for your data models, and the controller determines how clients interact with that data. You define views with HTML, CSS and JavaScript that take that data and display it, as well as provide interactions for creating and updating that data.

Imagine a social media application with a billion users. In the MVC model, the data models for this application include all the user-generated content that are created daily: posts, friendships, events, and anything else. The controllers written for that application determine who can interact with that data internally; for instance, only the two users in a private conversation can access that conversation. But those controllers — and the application as a whole — don’t allow external access to that data. The social media application owns that data and leases it out “for free” in exchange for viewing ads or being tracked across the web.

This was the lightbulb moment for me: understanding how Web3 offers a compelling solution to these problems. If the way MVC-based, Web 2.0 applications has presented itself is as a collection of “walled gardens” — meaning disparate, closed-off platforms with no interoperability or ownership of data — Web3 is, by design, the exact opposite.

In Web3 applications, there are effectively two pieces. The blockchain (let’s use Ethereum as our example), and the user interface. The blockchain has two parts: an account, for a user, a group of users, or an organization, and the blockchain itself, which serves as an immutable system of record of everything taking place on the network.

One crucial aspect to understand about the blockchain is the idea that code can be deployed to that blockchain and that users of that blockchain can execute the code. In Ethereum, this is called a “smart contract”. Smart contracts executed against the blockchain are like the controller of our MVC model. Instead of living in shrouded mystery, smart contracts are verifiable, and the binary code can be viewed by anyone.

For our hypothetical social media application, that means that any actions taken by a user are not stored in a central database. Instead, the user interacts with the smart contract deployed on the blockchain network, using a program that can be verified by anyone. Developers can begin building user interfaces to display that information and easily interact with it, with no walled gardens or platform lock-in. In fact, another developer could come up with a better user interface or smart contract, allowing users to move between these interfaces and contracts based on which aligns best with their needs.

Operating with these smart contracts happens via a wallet (for instance, an Ethereum wallet managed by MetaMask). The wallet is owned by a user and not by the company providing the service. This means you can take your wallet (the final authority on your data) and do what you want with it at any time. Wallets themselves are another programmable aspect of the blockchain — while they can represent a single user, they can also be complex multi-signature wallets that represent the interests of an entire organization. Owners of that wallet can choose to make consensus decisions about what to do with their data.


The rise of non-fungible tokens

One of the biggest recent shifts in the Web3 space has been the growth of NFTs — non-fungible tokens. Non-fungible tokens are unique assets stored on the blockchain that users can trade and verify ownership of. In 2019, Cloudflare was already writing about NFTs, as part of our announcement of the Cloudflare Ethereum Gateway. Since then, NFTs have exploded in popularity, with projects like CryptoPunks and Bored Ape Yacht Club trading millions of dollars in volume monthly.

NFTs are a fascinating addition to the Web3 space because they represent how ownership of data and community can look in a post-walled garden world. If you’ve heard of NFTs before, you may know them as a very visual medium: CryptoPunks and Bored Ape Yacht Club are, at their core, art. You can buy a Punk or Ape and use it as your profile picture on social media. But underneath that, owning an Ape isn’t just owning a profile picture; they also have exclusive ownership of a blockchain-verified asset.

It should be noted that the proliferation of NFT contracts led to an increase in the number of scams. Blockchain-based NFTs are a medium of conveying ownership, based on a given smart contract. This smart contract can be deployed by anyone, and associated with any content. There is no guarantee of authenticity, until you verify the trustworthiness and identity of the contract you are interacting with. Some platforms may support Verified accounts, while others are only allowing a set of trusted partners to appear on their platform. NFTs are flexible enough to allow multiple approaches, but these trust assumptions have to be communicated clearly.

That asset, tied to a smart contract deployed on Ethereum, can be traded, verified, or used as a way to gate access to programs. An NFT developer can hook into the trade event for their NFTs and charge a royalty fee, or when “minting”, or creating an NFT, they can charge a mint price, generating revenue on sales and trades to fund their next big project. In this way, NFTs can create strong incentive alignment between developers and community members, more so than your average web application.

What we built

To better understand Web3 (and how Cloudflare fits into the puzzle), we needed to build something using the Web3 stack, end-to-end.

To allow you to do the same, we’re open-sourcing a full-stack application today, showing you how to mint and manage an NFT from start to finish. The smart contract for the application is deployed and verified on Ethereum’s Rinkeby network, which is a testing environment for Ethereum projects and smart contracts. The Rinkeby test network allows you to test the smart contract off of the main blockchain, using the exact same workflow, without using real ethers. When your project is ready to be deployed on Ethereum’s Mainnet, you can take the same contract, deploy and verify it, and begin using it in production.

Once deployed, the smart contract will provide the ability to manage your NFT project, compliant with the ERC-721 spec, that can be minted by users, displayed on NFT marketplaces like OpenSea and your own web applications. We also provided a web interface and example code for minting these NFTs — as a user, you can visit the web application with a compatible Ethereum wallet installed and claim a NFT.

Once you’ve minted the NFT, the example user interface will render the metadata for each claimed NFT. According to the ERC-721 (NFT) spec, a deployed token must have a corresponding URL that provides JSON metadata. This JSON endpoint, which we’ve built with Cloudflare Workers, returns a name and description for each unique NFT, as well as an image. To host this image, we’ve used Infura to pin the service, and Cloudflare IPFS Gateway to serve it. Our NFT identifies the content via its hash, making it not replaceable with something different in the future.

This open-source project provides all the tools that you need to build an NFT project. By building on Workers and Pages, you have all the tools you need to scale a successful NFT launch, and always provide up-to-date metadata for your NFT assets as users mint and trade them between wallets.

Get started Building Web3 Apps with Cloudflare
Architecture diagram of Cloudflare’s open-source NFT project

Cloudflare + Web3

Cloudflare’s developer platform — including Workers, Pages, and the IPFS gateway — works together to provide scalable solutions at each step of your NFT project’s lifecycle. When you move your NFT project to production, Cloudflare’s Ethereum and IPFS gateways are available to handle any traffic that your project may have.

We’re excited about Web3 at Cloudflare. The world is shifting back to a decentralized model of the Internet, the kind envisioned in the early days of the World Wide Web. As we say a lot around Cloudflare, The Network is the Computer — we believe that whatever form Web3 may take, whether through projects like Metaverses, DAOs (decentralized autonomous organizations) and NFTs for community and social networking, DeFi (decentralized finance) applications for managing money, and a whole class of decentralized applications that we probably haven’t even thought of…  Cloudflare will be foundational to that future.

Modernizing a familiar approach to REST APIs, with PostgreSQL and Cloudflare Workers

Post Syndicated from Kristian Freeman original https://blog.cloudflare.com/modernizing-a-familiar-approach-to-rest-apis-with-postgresql-and-cloudflare-workers/

Modernizing a familiar approach to REST APIs, with PostgreSQL and Cloudflare Workers

Postgres is a ubiquitous open-source database technology. It contains a vast number of features and offers rock-solid reliability. It’s also one of the most popular SQL database tools in the industry. As the industry builds “modern” developer experience tools—real-time and highly interactive—Postgres has also served as a great foundation. Projects like Hasura, which offers a real-time GraphQL engine, and Supabase, an open-source Firebase alternative, use Postgres under the hood. This makes Postgres a technology that every developer should know, and consider using in their applications.

For many developers, REST APIs serve as the primary way we interact with our data. Language-specific libraries like pg allow developers to connect with Postgres in their code, and directly interact with their databases. Yet in almost every case, developers reinvent the wheel, building the same connection logic on an app-by-app basis.

Many developers building applications with Cloudflare Workers, our serverless functions platform, have asked how they can use Postgres in Workers functions. Today, we’re releasing a new tutorial for Workers that shows how to connect to Postgres inside Workers functions. Built on PostgREST, you’ll write a REST API that communicates directly with your database, on the edge.

This means that you can entirely build applications on Cloudflare’s edge — using Workers as a performant and globally-distributed API, and Cloudflare Pages, our Jamstack deployment platform, as the host for your frontend user interface. With Workers, you can add new API endpoints and handle authentication in front of your database without needing to alter your Postgres configuration. With features like Workers KV and Durable Objects, Workers can provide globally-distributed caching in front of your Postgres database. Features like WebSockets can be used to build real-time interactions for your applications, without having to migrate from Postgres to a new database-as-a-service platform.

PostgREST is an open-source tool that generates a standards-compliant REST API for your Postgres databases. Many growing database-as-a-service startups like Retool and Supabase use PostgREST under the hood. PostgREST is fast and has great defaults, allowing you to access your Postgres data using standard REST conventions.

It’s great to be able to access your database directly from Workers, but do you really want to expose your database directly to the public Internet? Luckily, Cloudflare has a solution for this, and it works great with PostgREST: Cloudflare Tunnel. Cloudflare Tunnel is one of my personal favorite products at Cloudflare. It creates a secure tunnel between your local server and the Cloudflare network. We want to expose our PostgREST endpoint, without making our entire database available on the public internet. Cloudflare Tunnel allows us to do that securely.

Modernizing a familiar approach to REST APIs, with PostgreSQL and Cloudflare Workers

By using PostgREST with Postgres, we can build REST API-based applications. In particular, it’s an excellent fit for Cloudflare Workers, our serverless function platform. Workers is a great place to build REST APIs. With the open-source JavaScript library postgrest-js, we can interact with a PostgREST endpoint from inside our Workers function, using simple JS-based primitives.

By the way — if you haven’t built a REST API with Workers yet, check out our free video course with Egghead: “Building a Serverless API with Cloudflare Workers”.

Scaling applications built on Postgres is an incredibly common problem that developers face. Often, this means duplicating your Postgres database and distributing reads between your primary database, and a fleet of “read replicas”. With PostgREST and Workers, we can begin to explore a different approach to solving the scaling problem. Workers’ unique architecture allows us to deploy hyper-performant functions in front of Postgres databases. With tools like Workers KV and Durable Objects, exposed in Workers as basic JavaScript APIs, we can build intelligent caches for our databases, without sacrificing performance or developer experience.

If you’d like to learn more about building REST APIs in Cloudflare Workers using PostgREST, check out our new tutorial! We’ve also provided two open-source libraries to help you get started. cloudflare/postgres-postgrest-cloudflared-example helps you set up a Cloudflare Tunnel-backed Postgres + PostgREST endpoint. postgrest-worker-example is an example of using postgrest-js inside of Cloudflare Workers, to build REST APIs with your Postgres databases.

Modernizing a familiar approach to REST APIs, with PostgreSQL and Cloudflare Workers

With postgrest-js, you can build dynamic queries and request data from your database using the JS primitives you know and love:

// Get all users with at least 100 followers
const { data: users, error } = await client
.from('users')
.select(‘*’)
.gte('followers', 100)

You can also join our Cloudflare Developers Discord community! Learn more about what you can build with Cloudflare Workers, and meet our wonderful community of developers from around the world. Get your invite link here.

Building Black Friday e-commerce experiences with JAMstack and Cloudflare Workers

Post Syndicated from Kristian Freeman original https://blog.cloudflare.com/building-black-friday-e-commerce-experiences-with-jamstack-and-cloudflare-workers/

Building Black Friday e-commerce experiences with JAMstack and Cloudflare Workers

The idea of serverless is to allow developers to focus on writing code rather than operations — the hardest of which is scaling applications. A predictably great deal of traffic that flows through Cloudflare’s network every year is Black Friday. As John wrote at the end of last year, Black Friday is the Internet’s biggest online shopping day. In a past case study, we talked about how Cordial, a marketing automation platform, used Cloudflare Workers to reduce their API server latency and handle the busiest shopping day of the year without breaking a sweat.

The ability to handle immense scale is well-trodden territory for us on the Cloudflare blog, but scale is not always the first thing developers think about when building an application — developer experience is likely to come first. And developer experience is something Workers does just as well; through Wrangler and APIs like Workers KV, Workers is an awesome place to hack on new projects.

Over the past few weeks, I’ve been working on a sample open-source e-commerce app for selling software, educational products, and bundles. Inspired by Humble Bundle, it’s built entirely on Workers, and it integrates powerfully with all kinds of first-class modern tooling: Stripe, an API for accepting payments (both from customers and to authors, as we’ll see later), and Sanity.io, a headless CMS for data management.

This kind of project is perfectly suited for Workers. We can lean into Workers as a static site hosting platform (via Workers Sites), API server, and webhook consumer, all within a single codebase, and deployed instantly around the world on Cloudflare’s network.

If you want to see a deployed version of this template, check out ecommerce-example.signalnerve.workers.dev.

Building Black Friday e-commerce experiences with JAMstack and Cloudflare Workers
The frontend of the e-commerce Workers template.

In this blog post, I’ll dive deeper into the implementation details of the site, covering how Workers continues to excel as a JAMstack deployment platform. I’ll also cover some new territory in integrating Workers with Stripe. The project is open-source on GitHub, and I’m actively working on improving the documentation, so that you can take the codebase and build on it for your own e-commerce sites and use cases.

The frontend

As I wrote last year, Workers continues to be an amazing platform for JAMstack apps. When I started building this template, I wanted to use some things I already knew — Sanity.io for managing data, and of course, Workers Sites for deploying — but some new tools as well.

Workers Sites is incredibly simple to use: just point it at a directory of static assets, and you’re good to go. With this project, I decided to try out Nuxt.js, a Vue-based static site generator, to power the frontend for the application.

Using Sanity.io, the data representing the bundles (and the products inside of those bundles) is stored on Sanity.io’s own CDN, and retrieved client-side by the Nuxt.js application.

Building Black Friday e-commerce experiences with JAMstack and Cloudflare Workers
Managing data inside Sanity.io’s headless CMS interface.

When a potential customer visits a bundle, they’ll see a list of products from Sanity.io, and a checkout button provided by Stripe.

Responding to new checkout sessions and purchases

Making API requests with Stripe’s Node SDK isn’t currently supported in Workers (check out the GitHub issue where we’re discussing a fix), but because it’s just REST underneath, we can easily make REST requests using the library.

When a user clicks the checkout button on a bundle page, it makes a request to the Cloudflare Workers API, and securely generates a new session for the user to checkout with Stripe.

import { json, stripe } from '../helpers'

export default async (request) => {
  const body = await request.json()
  const { price_id } = body

  const session = await stripe('/checkout/sessions', {
    payment_method_types: ['card'],
    line_items: [{
        price: price_id,
        quantity: 1,
      }],
    mode: 'payment'
  }, 'POST')

  return json({ session_id: session.id })
}

This is where Workers excels as a JAMstack platform. Yes, it can do static site hosting, but with just a few extra lines of routing code, I can deploy a highly scalable API right alongside my Nuxt.js application.

Webhooks and working with external services

This idea extends throughout the rest of the checkout process. When a customer is successfully charged for their purchase, Stripe sends a webhook back to Cloudflare Workers. In order to complete the transaction on our end, the Workers application:

  • Validates the incoming data from Stripe to ensure that it’s legitimate. This means that every incoming webhook request is explicitly validated using your Stripe account details, and can be confirmed to be valid before the function acts on it.
  • Distributes payments to the authors using Stripe Connect. When a customer buys a bundle for $20, that $20 (minus Stripe fees) gets distributed evenly between the authors in that bundle — all of this calculation and the associated transfer requests happen inside the Worker.
  • Sends a unique download link to the customer. Using Workers KV, a unique token is set up that corresponds to the customer’s email, which can be used to retrieve the content the customer purchased. This integration uses Mailgun to construct an email and send it entirely over REST APIs.

By the time the purchase is complete, the Workers serverless API will have interfaced with four distinct APIs, persisting records, sending emails, and handling and distributing payments to everyone involved in the e-commerce transaction. With Workers, this all happens in a single codebase, with low latency and a superb developer experience. The entire API is type-checked and validated before it ever gets shipped to production, thanks to our TypeScript template.

Building Black Friday e-commerce experiences with JAMstack and Cloudflare Workers

Each of these tasks involves a pretty serious level of complexity, but by using Workers, we can abstract each of them into smaller pieces of functionality, and compose powerful, on-demand, and infinitely scalable webhooks directly on the serverless edge.

Conclusion

I’m really excited about the launch of this template and, of course, it wouldn’t have been possible to ship something like this in just a few weeks without using Cloudflare Workers. If you’re interested in digging into how any of the above stuff works, check out the project on GitHub!

With the recent announcement of our Workers KV free tier, this project is perfect to fork and build your own e-commerce products with. Let me know what you build and say hi on Twitter!