All posts by Micah Walter

Announcing Amazon ECS Managed Instances for containerized applications

Post Syndicated from Micah Walter original https://aws.amazon.com/blogs/aws/announcing-amazon-ecs-managed-instances-for-containerized-applications/

Today, we’re announcing Amazon ECS Managed Instances, a new compute option for Amazon Elastic Container Service (Amazon ECS) that enables developers to use the full range of Amazon Elastic Compute Cloud (Amazon EC2) capabilities while offloading infrastructure management responsibilities to Amazon Web Service (AWS). This new offering combines the operational simplicity of offloading infrastructure with the flexibility and control of Amazon EC2, which means customers can focus on building applications that drive innovation, while reducing total cost of ownership (TCO) and maintaining AWS best practices.

Customers running containerized workloads told us they want to combine the simplicity of serverless with the flexibility of self-managed EC2 instances. Although serverless options provide an excellent general-purpose solution, some applications require specific compute capabilities, such as GPU acceleration, particular CPU architectures, or enhanced networking performance. Additionally, customers with existing Amazon EC2 capacity investments through EC2 pricing options couldn’t fully use these commitments with serverless offerings.

Amazon ECS Managed Instances provides a fully managed container compute environment that supports a broad range of EC2 instance types and deep integration with AWS services. By default, it automatically selects the most cost-optimized EC2 instances for your workloads, but you can specify particular instance attributes or types when needed. AWS handles all aspects of infrastructure management, including provisioning, scaling, security patching, and cost optimization, enabling you to concentrate on building and running your applications.

Let’s try it out

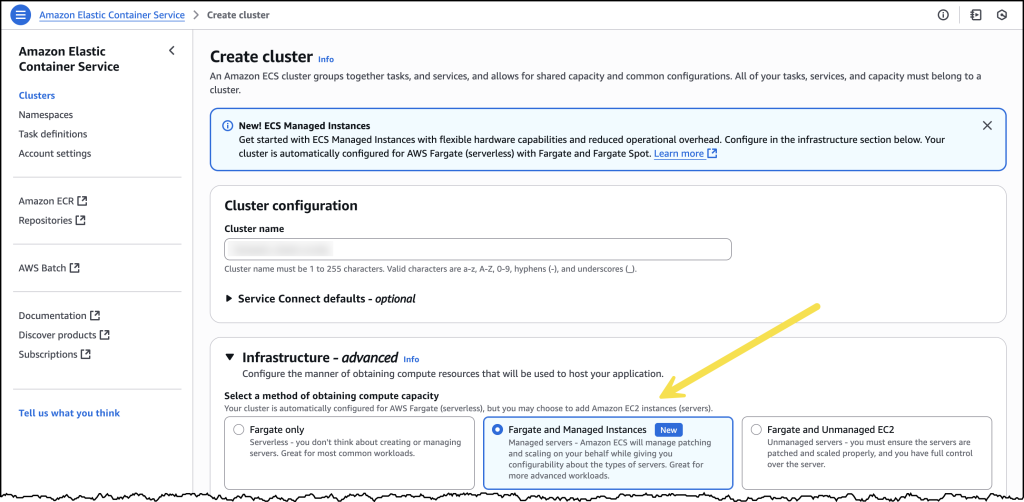
Looking at the AWS Management Console experience for creating a new Amazon ECS cluster, I can see the new option for using ECS Managed Instances. Let’s take a quick tour of all the new options.

Creating a ECS cluster with Managed Instances

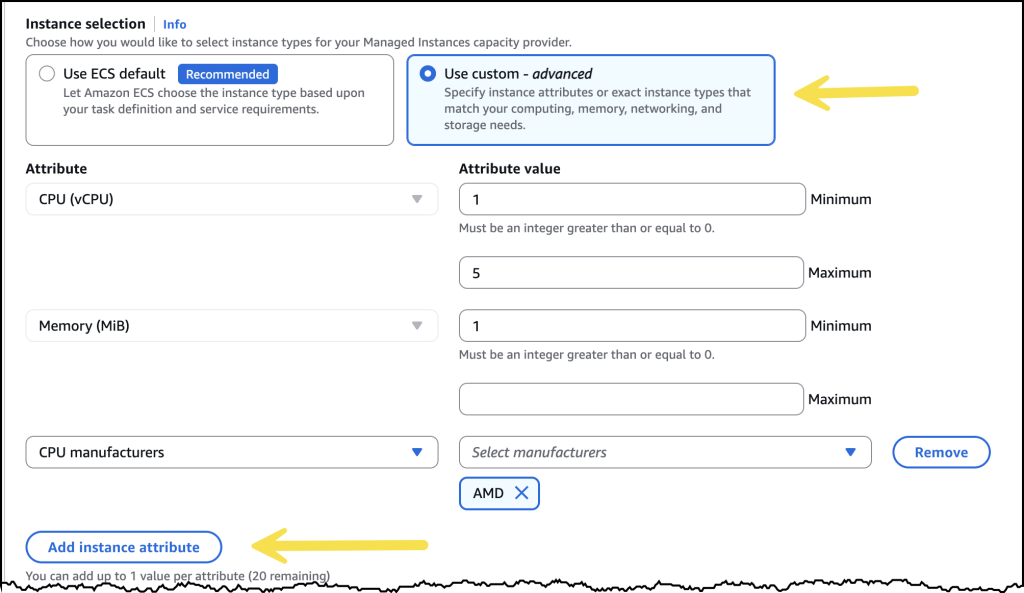
After I’ve selected Fargate and Managed Instances, I’m presented with two options. If I select Use ECS default, Amazon ECS will choose general purpose instance types based on grouping together pending Tasks, and picking the optimum instance type based on cost and resilience metrics. This is the most straightforward and recommended way to get started. Selecting Use custom – advanced opens up additional configuration parameters, where I can fine-tune the attributes of instances Amazon ECS will use.

Creating a ECS cluster with Managed Instances

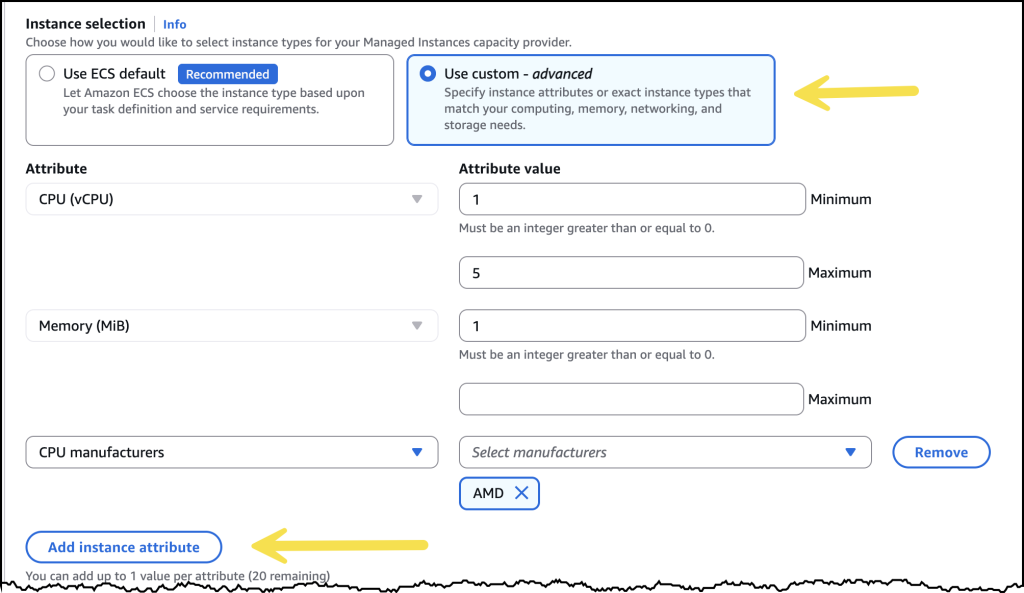
By default, I see CPU and Memory as attributes, but I can select from 20 additional attributes to continue to filter the list of available instance types Amazon ECS can access.

Creating a ECS cluster with Managed Instances

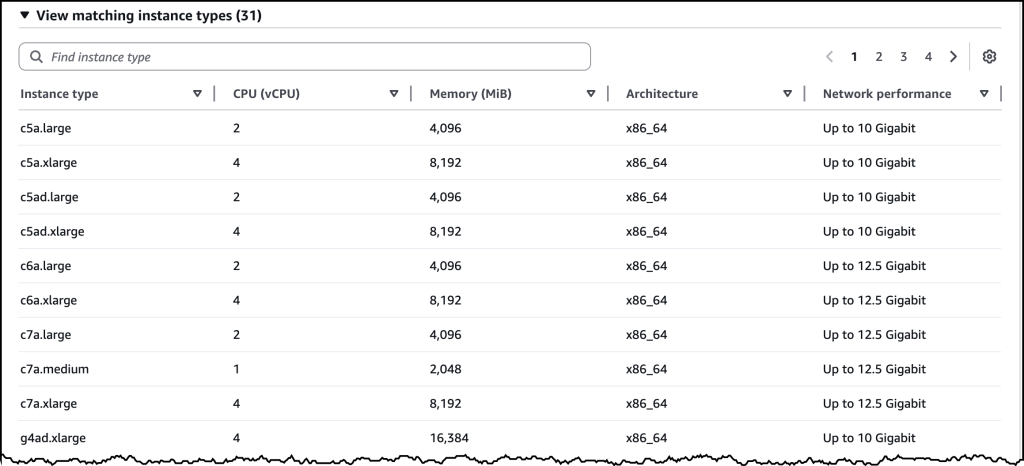
After I’ve made my attribute selections, I see a list of all the instance types that match my choices.

Creating a ECS cluster with Managed Instances

From here, I can create my ECS cluster as usual and Amazon ECS will provision instances for me on my behalf based on the attributes and criteria I’ve defined in the previous steps.

Key features of Amazon ECS Managed Instances

With Amazon ECS Managed Instances, AWS takes full responsibility for infrastructure management, handling all aspects of instance provisioning, scaling, and maintenance. This includes implementing regular security patches initiated every 14 days (due to instance connection draining, the actual lifetime of the instance may be longer), with the ability to schedule maintenance windows using Amazon EC2 event windows to minimize disruption to your applications.

The service provides exceptional flexibility in instance type selection. Although it automatically selects cost-optimized instance types by default, you maintain the power to specify desired instance attributes when your workloads require specific capabilities. This includes options for GPU acceleration, CPU architecture, and network performance requirements, giving you precise control over your compute environment.

To help optimize costs, Amazon ECS Managed Instances intelligently manages resource utilization by automatically placing multiple tasks on larger instances when appropriate. The service continually monitors and optimizes task placement, consolidating workloads onto fewer instances to dry up, utilize and terminate idle (empty) instances, providing both high availability and cost efficiency for your containerized applications.

Integration with existing AWS services is seamless, particularly with Amazon EC2 features such as EC2 pricing options. This deep integration means that you can maximize existing capacity investments while maintaining the operational simplicity of a fully managed service.

Security remains a top priority with Amazon ECS Managed Instances. The service runs on Bottlerocket, a purpose-built container operating system, and maintains your security posture through automated security patches and updates. You can see all the updates and patches applied to the Bottlerocket OS image on the Bottlerocket website. This comprehensive approach to security keeps your containerized applications running in a secure, maintained environment.

Available now

Amazon ECS Managed Instances is available today in US East (North Virginia), US West (Oregon), Europe (Dublin), Africa (Cape Town), Asia Pacific (Singapore), and Asia Pacific (Tokyo) AWS Regions. You can start using Managed Instances through the AWS Management Console, AWS Command Line Interface (AWS CLI), or infrastructure as code (IaC) tools such as AWS Cloud Development Kit (AWS CDK) and AWS CloudFormation. You pay for the EC2 instances you use plus a management fee for the service.

To learn more about Amazon ECS Managed Instances, visit the documentation and get started simplifying your container infrastructure today.

Announcing AWS Outposts third-party storage integration with Dell and HPE

Post Syndicated from Micah Walter original https://aws.amazon.com/blogs/aws/announcing-aws-outposts-third-party-storage-integration-with-dell-and-hpe/

Since announcing second-generation AWS Outposts racks in April with breakthrough performance and scalability, we’ve continued to innovate on behalf of our customers at the edge of the cloud. Today, we’re expanding AWS Outposts third-party storage integration program to include Dell PowerStore and HPE Alletra Storage MP B10000 systems, joining our list of existing integrations with NetApp on-premises enterprise storage arrays and Pure Storage FlashArray. This program makes it easy for customers to use AWS Outposts with third-party storage arrays through AWS native tooling. The solution integration is particularly important for organizations migrating VMware workloads to AWS who need to maintain their existing storage infrastructure during the transition, and for those who must meet strict data residency requirements by keeping their data on-premises while using AWS services.

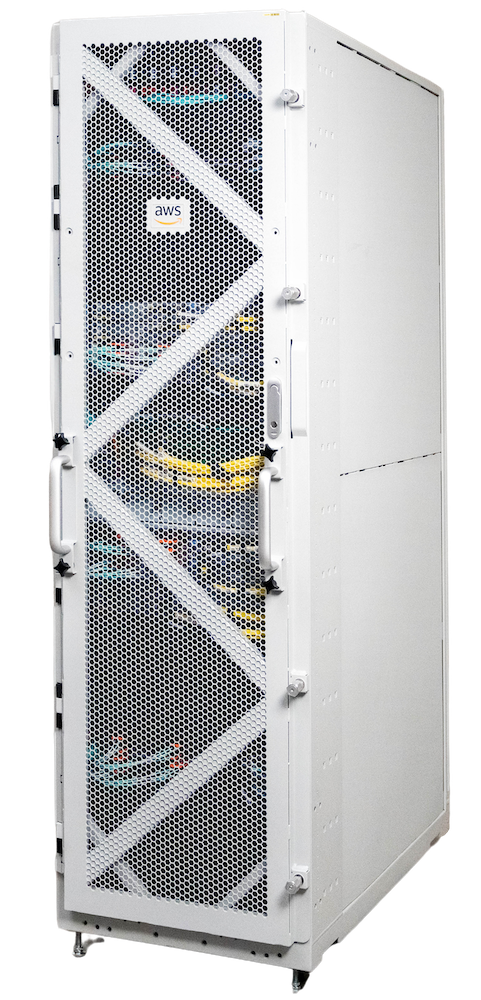
Outposts compute rack_Gen2_front_45This announcement builds upon two significant storage integration milestones we achieved in the past year. In December 2024, we introduced the ability to attach block data volumes from third-party storage arrays to Amazon EC2 instances on Outposts directly through the AWS Management Console. Then in July 2025, we enabled booting Amazon EC2 instances directly from these external storage arrays. Now, with the addition of Dell and HPE, customers have even more choice in how they integrate their on-premises storage investments with AWS Outposts.
Enhanced storage integration capabilities

Our third-party storage integration supports both data and boot volumes, offering two boot methods: iSCSI SANboot and Localboot. The iSCSI SANboot option enables both read-only and read-write boot volumes, while Localboot supports read-only boot volumes using either iSCSI or NVMe-over-TCP protocols. With this comprehensive approach, customers can centrally manage their storage resources while maintaining the consistent hybrid experience that Outposts provides.

Through the Amazon EC2 Launch Instance Wizard in the AWS Management Console, customers can configure their instances to use external storage from any of our supported partners. For boot volumes, we provide AWS-verified AMIs for Windows Server 2022 and Red Hat Enterprise Linux 9, with automation scripts available through AWS Samples to simplify the setup process.

Support for various Outposts configurations

All third-party storage integration features are supported on Outposts 2U servers and both generations of Outposts racks. Support for second-generation Outposts racks means customers can combine the enhanced performance of our latest EC2 instances on Outposts—including twice the vCPU, memory, and network bandwidth—with their preferred storage solutions. The integration works seamlessly with both our new simplified network scaling capabilities and specialized Amazon EC2 instances designed for ultra-low latency and high throughput workloads.

Things to know

Customers can begin using these capabilities today with their existing Outposts deployments or when ordering new Outposts through the AWS Management Console. If you are using third-party storage integration with Outposts servers, you can have either your onsite personnel or a third-party IT provider install the servers for you. After the Outposts servers are connected to your network, AWS will remotely provision compute and storage resources so you can start launching applications. For Outposts rack deployments, the process involves a setup where AWS technicians verify site conditions and network connectivity before the rack installation and activation. Storage partners assist with the implementation of the third-party storage components.

Third-party storage integration for Outposts with all compatible storage vendors is available at no additional charge in all AWS Regions where Outposts is supported. See the FAQs for Outposts servers and Outposts racks for the latest list of supported Regions.

This expansion of our Outposts third-party storage integration program demonstrates our continued commitment to providing flexible, enterprise-grade hybrid cloud solutions, meeting customers where they are in their cloud migration journey. To learn more about this capability and our supported storage vendors, visit the AWS Outposts partner page and our technical documentation for Outposts servers, second-generation Outposts racks, and first-generation Outposts racks. To learn more about partner solutions, check out Dell PowerStore integration with AWS Outposts and HPE Alletra Storage MP B10000 integration with AWS Outposts.

Accelerate serverless testing with LocalStack integration in VS Code IDE

Post Syndicated from Micah Walter original https://aws.amazon.com/blogs/aws/accelerate-serverless-testing-with-localstack-integration-in-vs-code-ide/

Today, we’re announcing LocalStack integration in the AWS Toolkit for Visual Studio Code that makes it easier than ever for developers to test and debug serverless applications locally. This enhancement builds upon our recent improvements to the AWS Lambda development experience, including the console to IDE integration and remote debugging capabilities we launched in July 2025, continuing our commitment to simplify serverless development on Amazon Web Services (AWS).

When building serverless applications, developers typically focus on three key areas to streamline their testing experience: unit testing, integration testing, and debugging resources running in the cloud. Although AWS Serverless Application Model Command Line Interface (AWS SAM CLI) provides excellent local unit testing capabilities for individual Lambda functions, developers working with event-driven architectures that involve multiple AWS services, such as Amazon Simple Queue Service (Amazon SQS), Amazon EventBridge, and Amazon DynamoDB, need a comprehensive solution for local integration testing. Although LocalStack provided local emulation of AWS services, developers had to previously manage it as a standalone tool, requiring complex configuration and frequent context switching between multiple interfaces, which slowed down the development cycle.

LocalStack integration in AWS Toolkit for VS Code
To address these challenges, we’re introducing LocalStack integration so developers can connect AWS Toolkit for VS Code directly to LocalStack endpoints. With this integration, developers can test and debug serverless applications without switching between tools or managing complex LocalStack setups. Developers can now emulate end-to-end event-driven workflows involving services such as Lambda, Amazon SQS, and EventBridge locally, without needing to manage multiple tools, perform complex endpoint configurations, or deal with service boundary issues that previously required connecting to cloud resources.

The key benefit of this integration is that AWS Toolkit for VS Code can now connect to custom endpoints such as LocalStack, something that wasn’t possible before. Previously, to point AWS Toolkit for VS Code to their LocalStack environment, developers had to perform manual configuration and context switching between tools.

Getting started with LocalStack in VS Code is straightforward. Developers can begin with the LocalStack Free version, which provides local emulation for core AWS services ideal for early-stage development and testing. Using the guided application walkthrough in VS Code, developers can install LocalStack directly from the toolkit interface, which automatically installs the LocalStack extension and guides them through the setup process. When it’s configured, developers can deploy serverless applications directly to the emulated environment and test their functions locally, all without leaving their IDE.

Let’s try it out
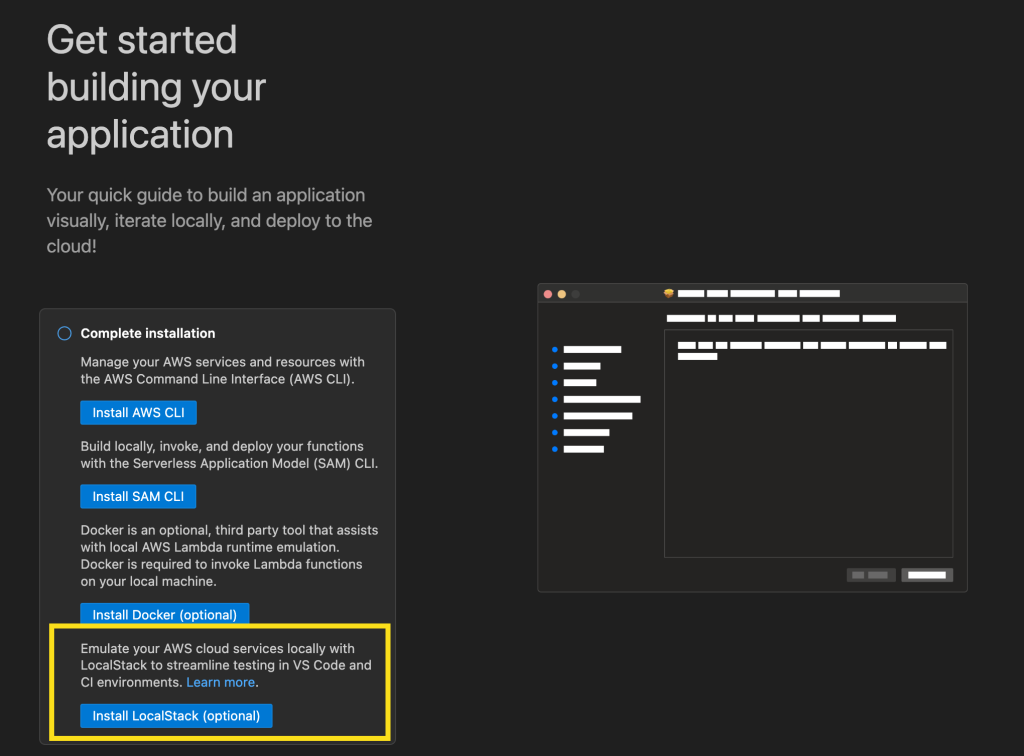
First, I’ll update my copy of the AWS Toolkit for VS Code to the latest version. Once, I’ve done this, I can see a new option when I go to Application Builder and click on Walkthrough of Application Builder. This allows me to install LocalStack with a single click.

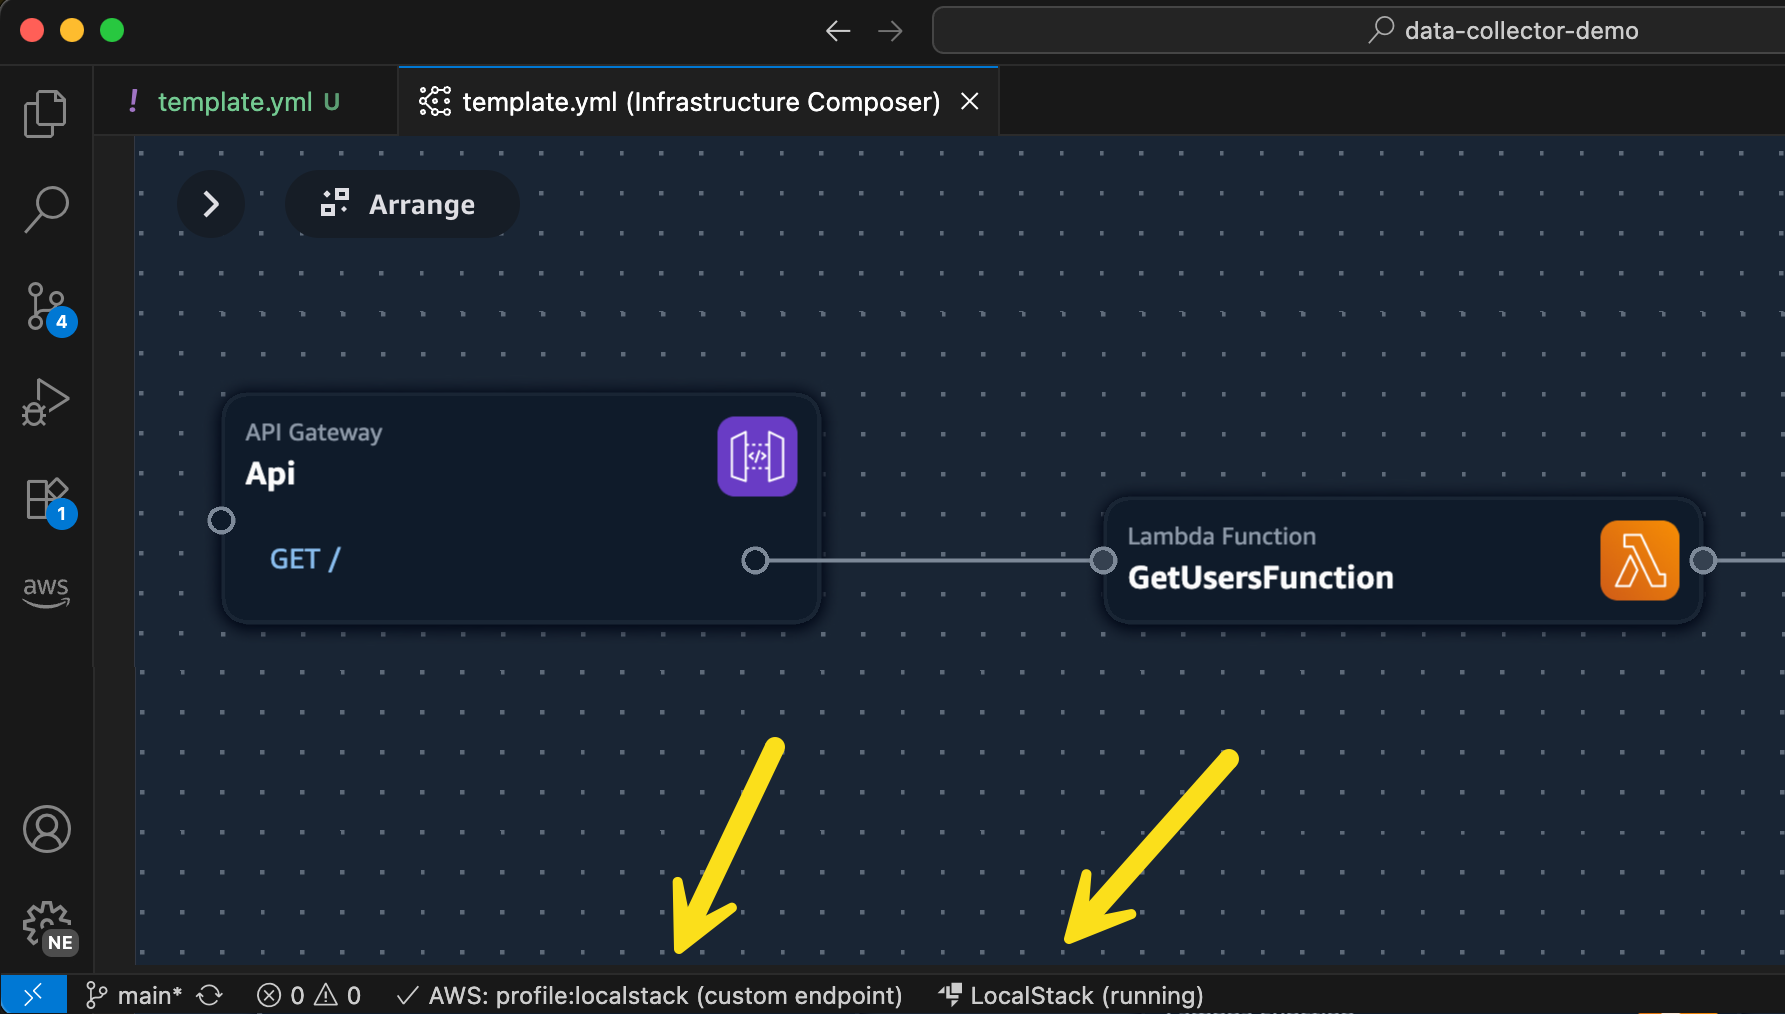
Once I’ve completed the setup for LocalStack, I can start it up from the status bar and then I’ll be able to select LocalStack from the list of my configured AWS profiles. In this illustration, I am using Application Composer to build a simple serverless architecture using Amazon API Gateway, Lambda, and DynamoDB. Normally, I’d deploy this to AWS using AWS SAM. In this case, I’m going to use the same AWS SAM command to deploy my stack locally.

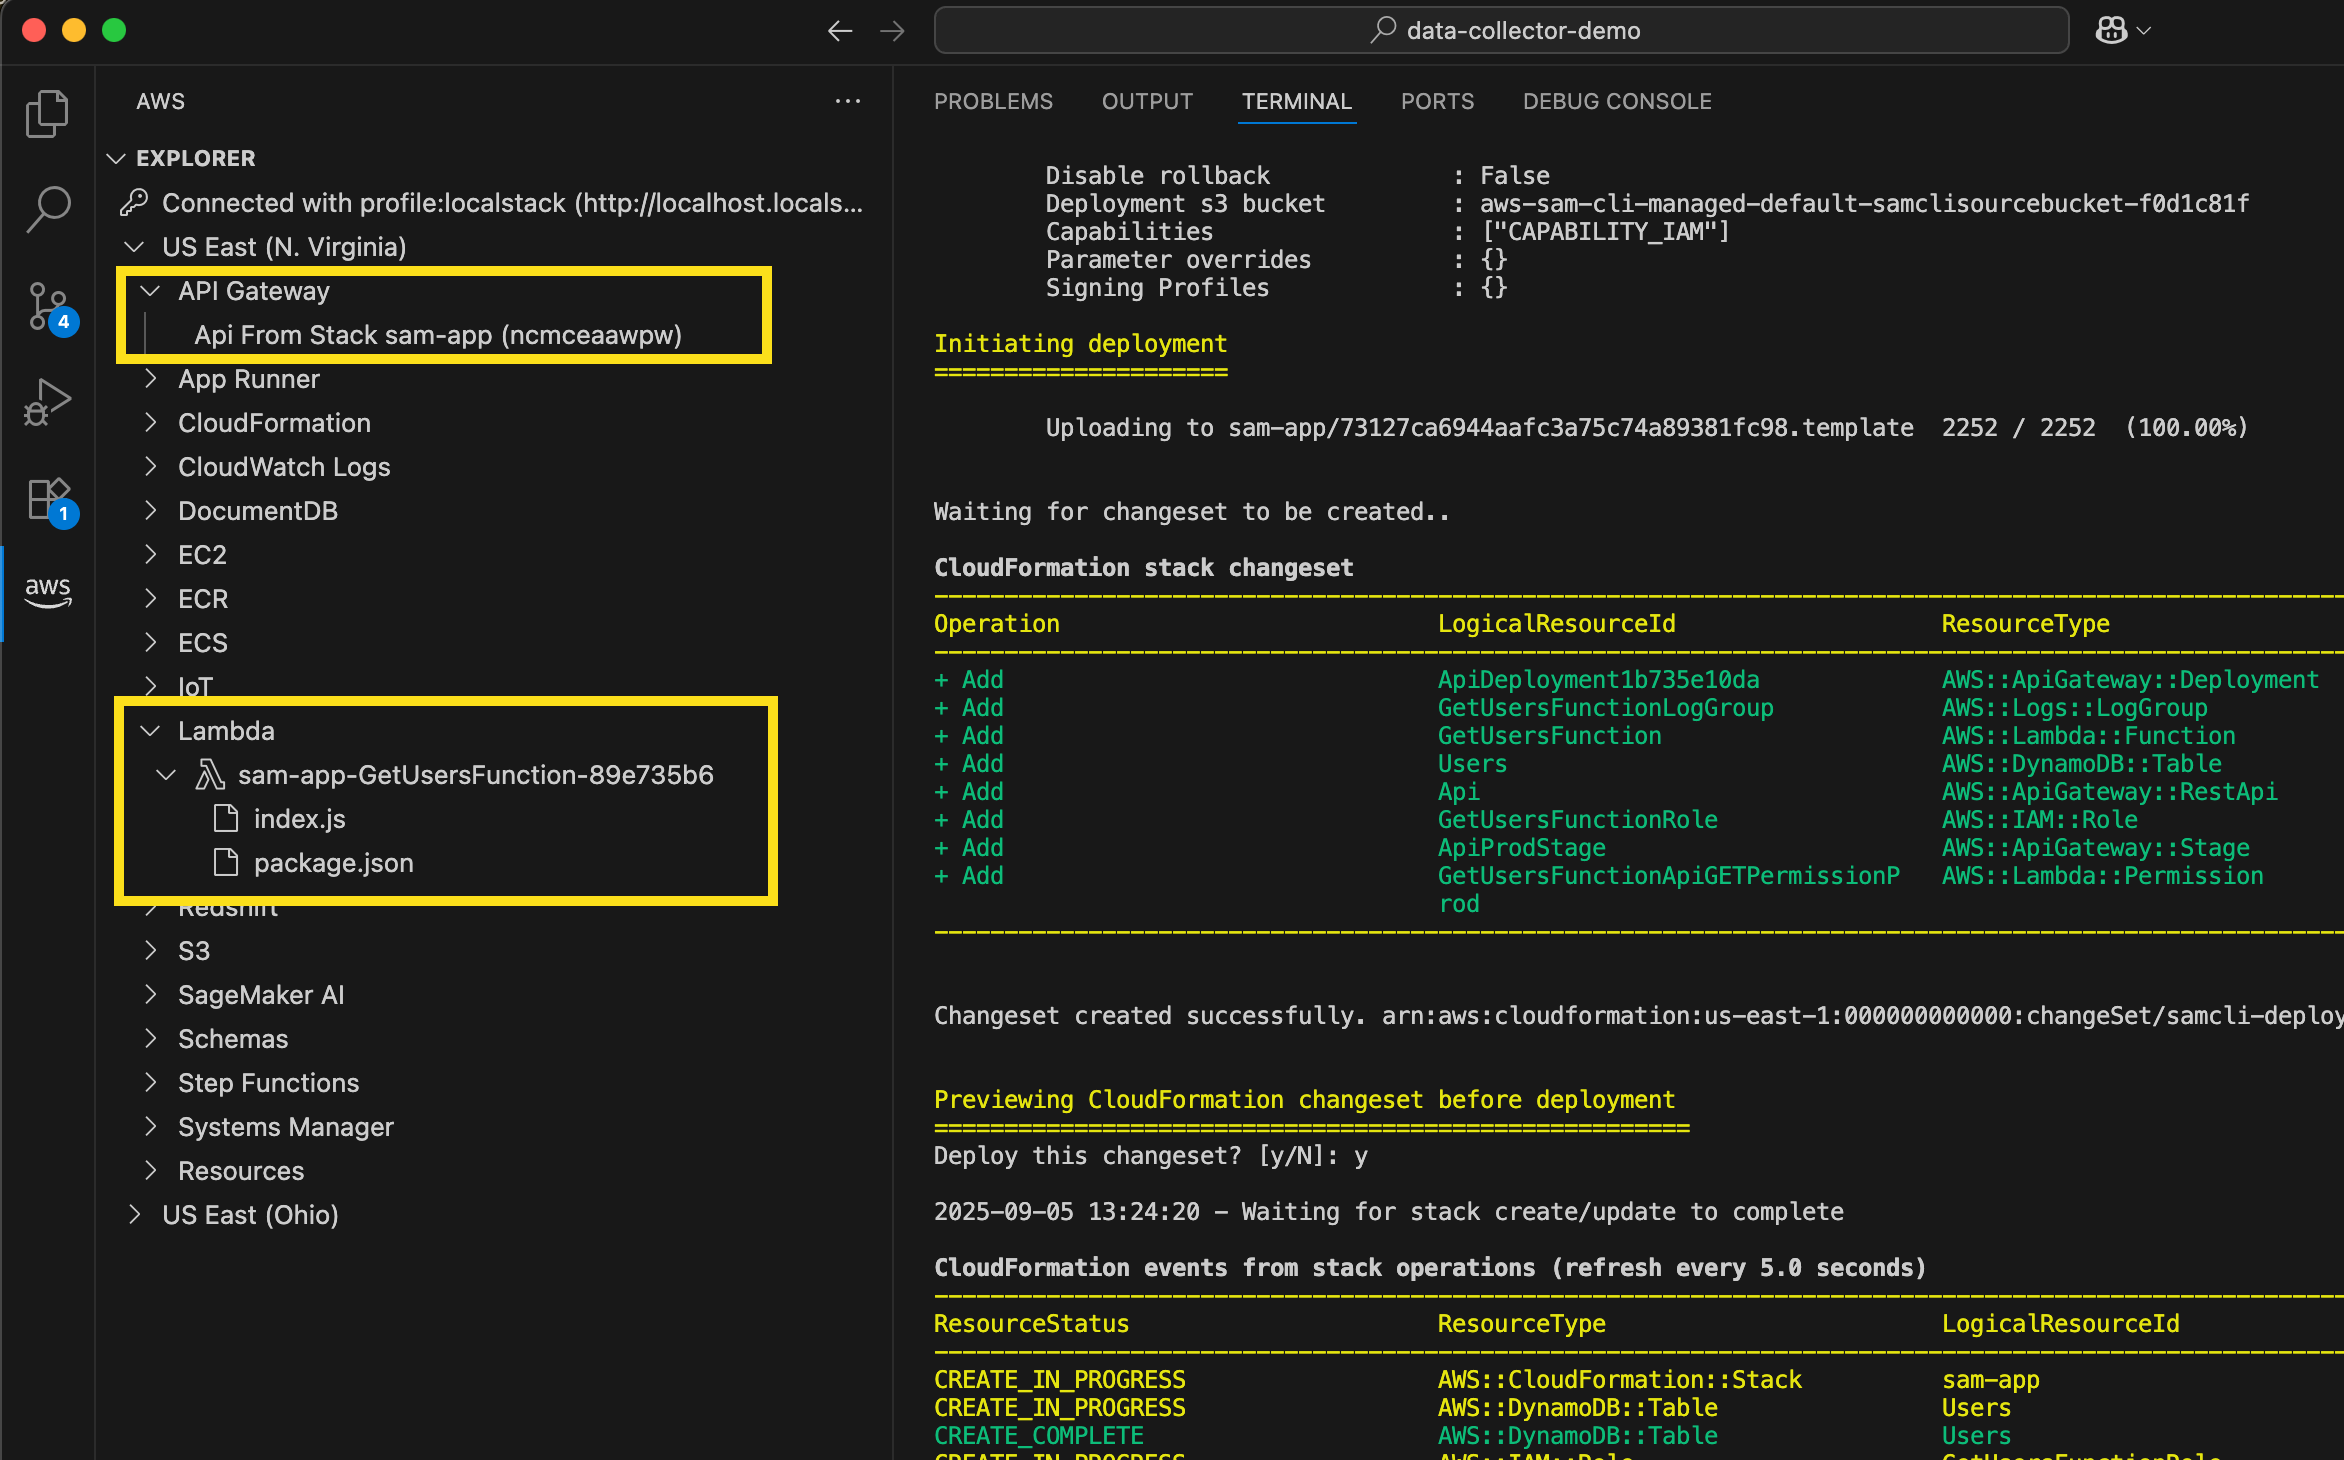
I just do `sam deploy –guided –profile localstack` from the command line and follow the usual prompts. Deploying to LocalStack using AWS SAM CLI provides the exact same experience I’m used to when deploying to AWS. In the screenshot below, I can see the standard output from AWS SAM, as well as my new LocalStack resources listed in the AWS Toolkit Explorer.

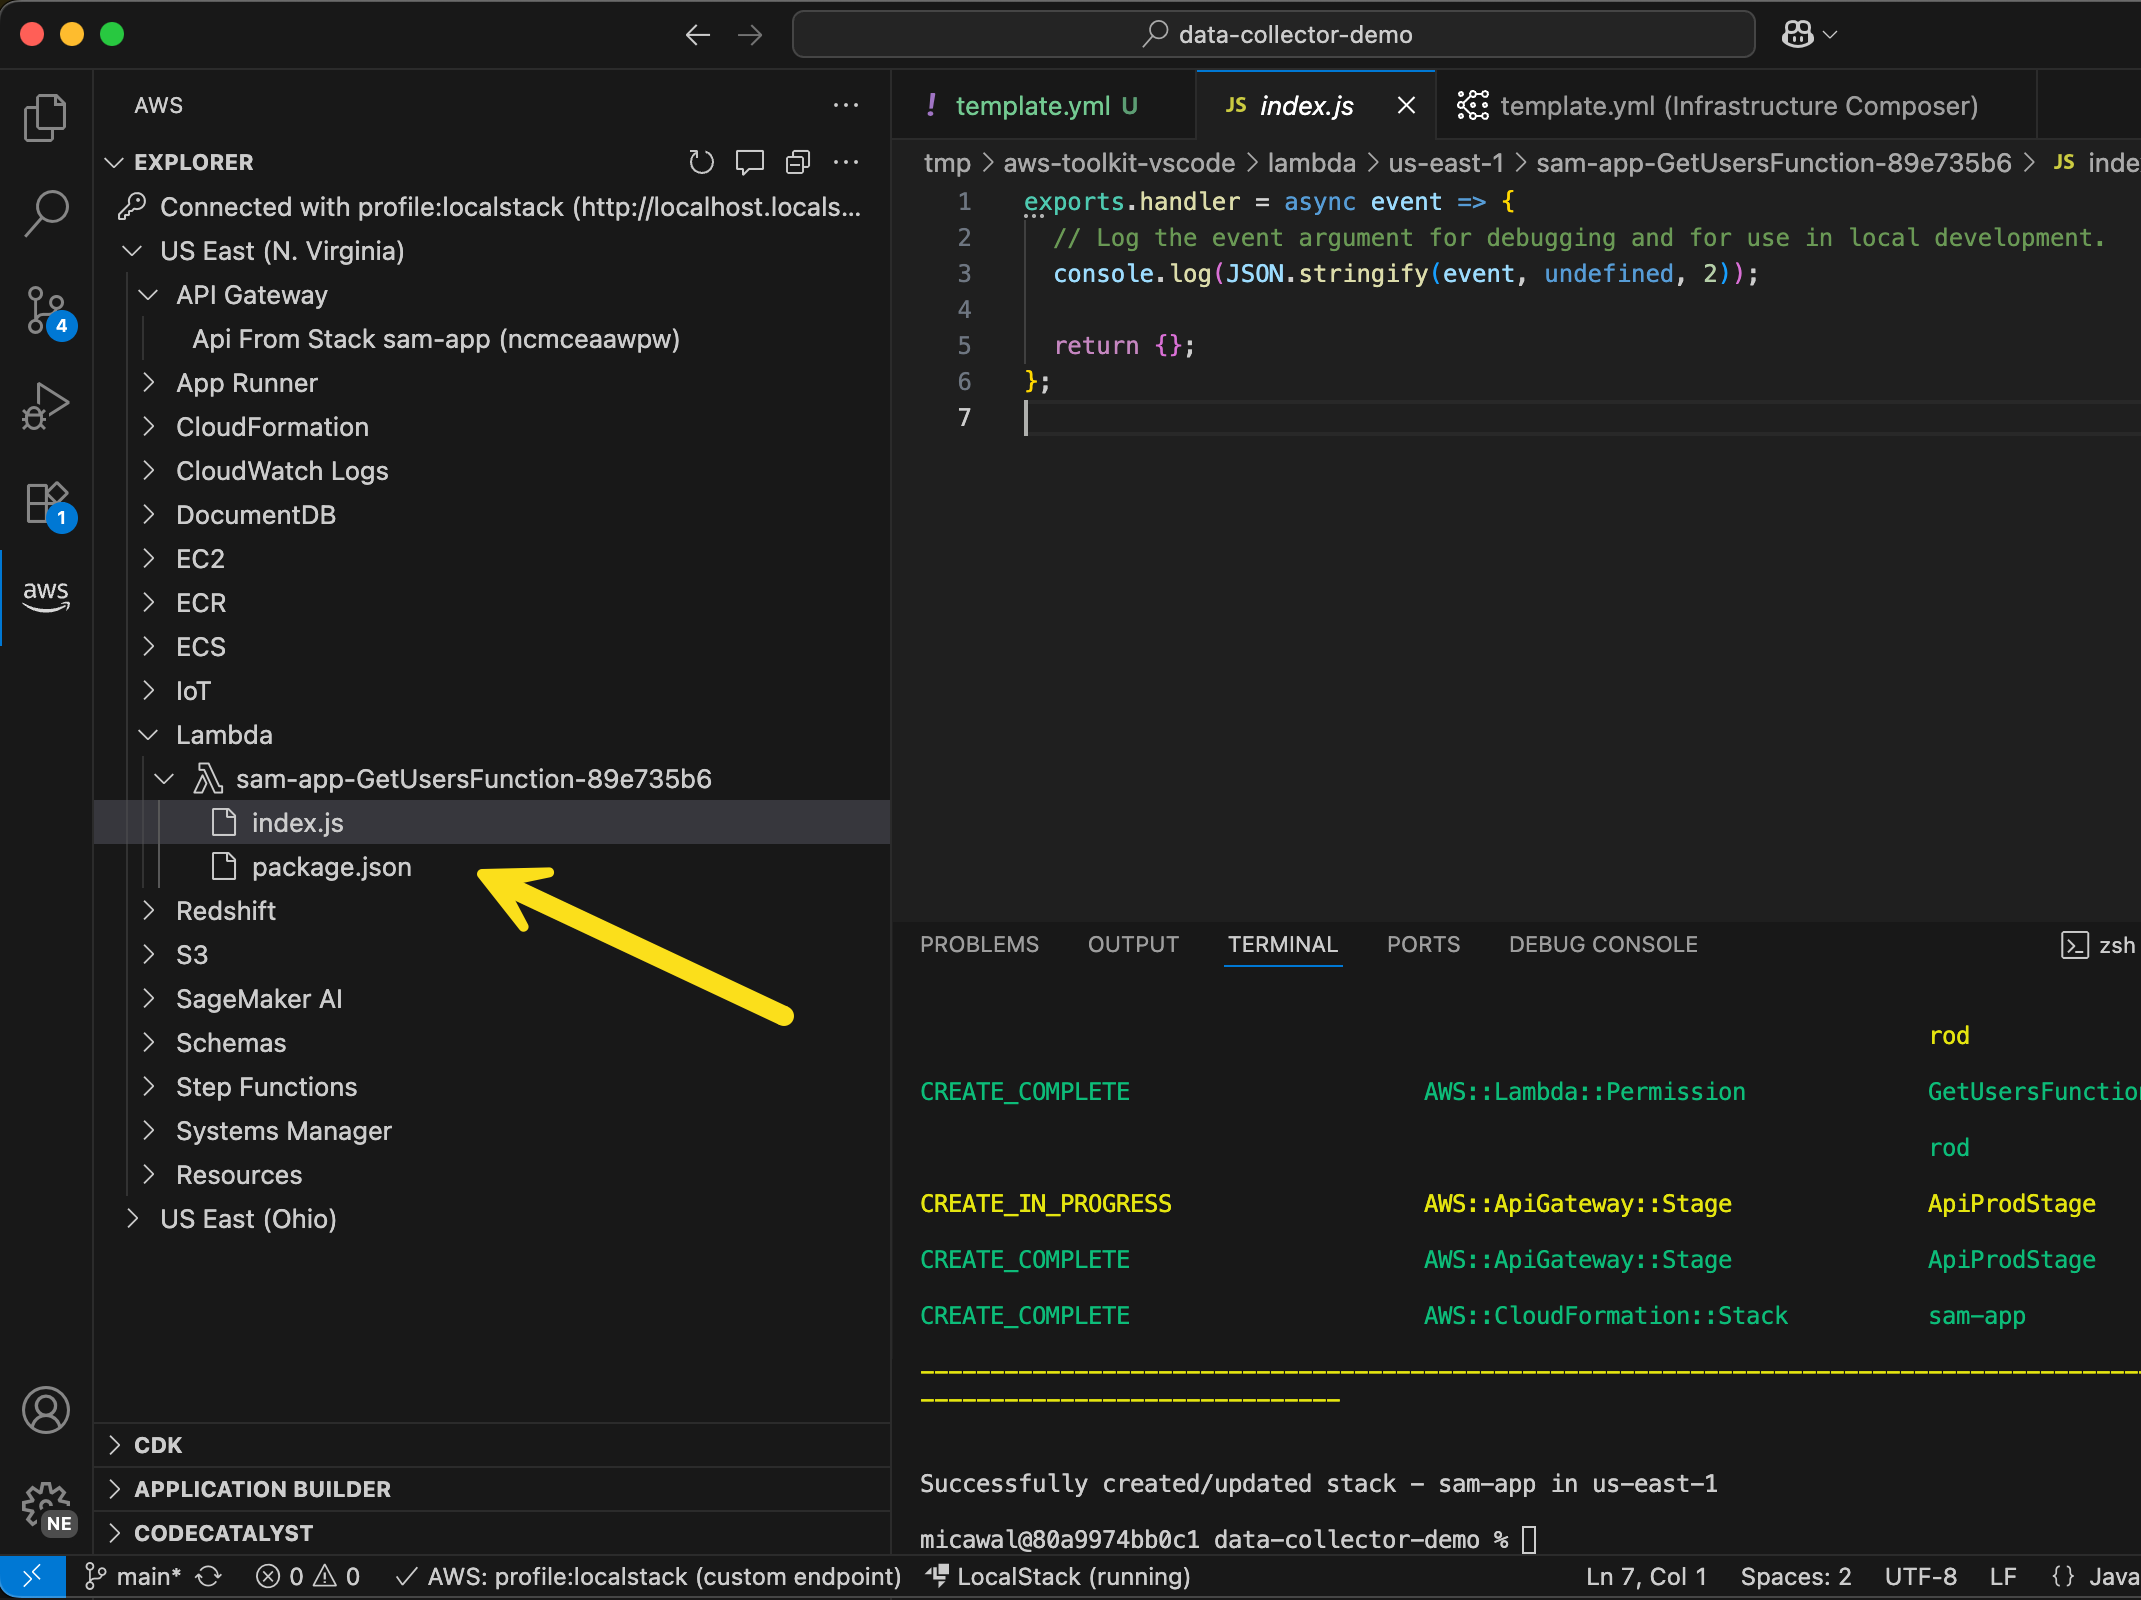
I can even go in to a Lambda function and edit the function code I’ve deployed locally!

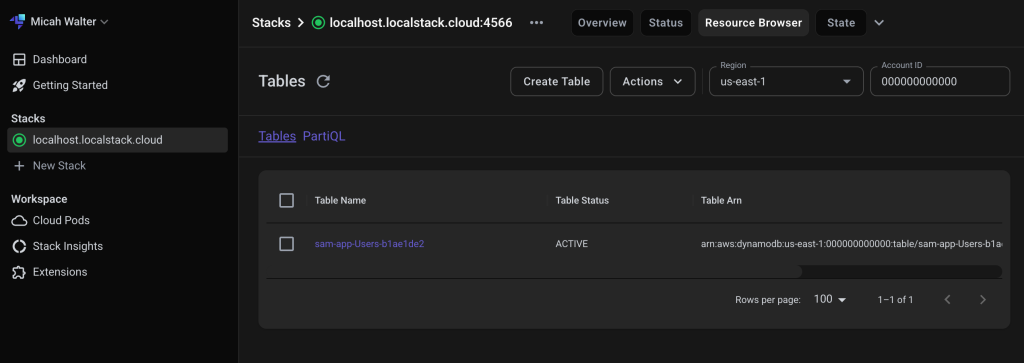
Over on the LocalStack website, I can login and take a look at all the resources I have running locally. In the screenshot below, you can see the local DynamoDB table I just deployed.

Enhanced development workflow
These new capabilities complement our recently launched console-to-IDE integration and remote debugging features, creating a comprehensive development experience that addresses different testing needs throughout the development lifecycle. AWS SAM CLI provides excellent local testing for individual Lambda functions, handling unit testing scenarios effectively. For integration testing, the LocalStack integration enables testing of multiservice workflows locally without the complexity of AWS Identity and Access Management (IAM) permissions, Amazon Virtual Private Cloud (Amazon VPC) configurations, or service boundary issues that can slow down development velocity.

When developers need to test using AWS services in development environments, they can use our remote debugging capabilities, which provide full access to Amazon VPC resources and IAM roles. This tiered approach frees up developers to focus on business logic during early development phases using LocalStack, then seamlessly transition to cloud-based testing when they need to validate against AWS service behaviors and configurations. The integration eliminates the need to switch between multiple tools and environments, so developers can identify and fix issues faster while maintaining the flexibility to choose the right testing approach for their specific needs.

Now available
You can start using these new features through the AWS Toolkit for VS Code by updating to v3.74.0. The LocalStack integration is available in all commercial AWS Regions except AWS GovCloud (US) Regions. To learn more, visit the AWS Toolkit for VS Code and Lambda documentation.

For developers who need broader service coverage or advanced capabilities, LocalStack offers additional tiers with expanded features. There are no additional costs from AWS for using this integration.

These enhancements represent another significant step forward in our ongoing commitment to simplifying the serverless development experience. Over the past year, we’ve focused on making VS Code the tool of choice for serverless developers, and this LocalStack integration continues that journey by providing tools for developers to build and test serverless applications more efficiently than ever before.

Introducing Amazon Elastic VMware Service for running VMware Cloud Foundation on AWS

Post Syndicated from Micah Walter original https://aws.amazon.com/blogs/aws/introducing-amazon-elastic-vmware-service-for-running-vmware-cloud-foundation-on-aws/

Today, we’re announcing the general availability of Amazon Elastic VMware Service (Amazon EVS), a new AWS service that lets you run VMware Cloud Foundation (VCF) environments directly within your Amazon Virtual Private Cloud (Amazon VPC). With Amazon EVS, you can deploy fully functional VCF environments in just hours using a guided workflow, while running your VMware workloads on qualified Amazon Elastic Compute Cloud (Amazon EC2) bare metal instances and seamlessly integrating with AWS services such as Amazon FSx for NetApp ONTAP.

Many organizations running VMware workloads on premises want to move to the cloud to benefit from improved scalability, reliability, and access to cloud services, but migrating these workloads often requires substantial changes to applications and infrastructure configurations. Amazon EVS lets customers continue using their existing VMware expertise and tools without having to re-architect applications or change established practices, thereby simplifying the migration process while providing access to AWS’s scale, reliability, and broad set of services.

With Amazon EVS, you can run VMware workloads directly in your Amazon VPC. This gives you full control over your environments while being on AWS infrastructure. You can extend your on-premises networks and migrate workloads without changing IP addresses or operational runbooks, reducing complexity and risk.

Key capabilities and features

Amazon EVS delivers a comprehensive set of capabilities designed to streamline your VMware workload migration and management experience. The service enables seamless workload migration without the need for replatforming or changing hypervisors, which means you can maintain your existing infrastructure investments while moving to AWS. Through an intuitive, guided workflow on the AWS Management Console, you can efficiently provision and configure your EVS environments, significantly reducing the complexity to migrate your workloads to AWS.

With Amazon EVS, you can deploy a fully functional VCF environment running on AWS in a few hours. This process eliminates many of the manual steps and potential configuration errors that often occur during traditional deployments. Furthermore, with Amazon EVS you can optimize your virtualization stack on AWS. Given the VCF environment runs inside your VPC, you have full full administrative access to the environment and the associated management appliances. You also have the ability to integrate third-party solutions, from external storage such as Amazon FSx for NetApp ONTAP or Pure Cloud Block Store or backup solutions such as Veeam Backup and Replication.

The service also gives you the ability to self-manage or work with AWS Partners to build, manage, and operate your environments. This provides you with flexibility to match your approach with your overall goals.

Setting up a new VCF environment

Organizations can streamline their setup process by ensuring they have all the necessary pre-requisites in place ahead of creating a new VCF environment. These prerequisites include having an active AWS account, configuring the appropriate AWS Identity and Access Management (IAM) permissions, and setting up a Amazon VPC with sufficient CIDR space and two Route Server endpoints, with each endpoint having its own peer. Additionally, customers will need to have their VMware Cloud Foundation license keys ready, secure Amazon EC2 capacity reservations specifically for i4i.metal instances, and prepare their VLAN subnet information planning.

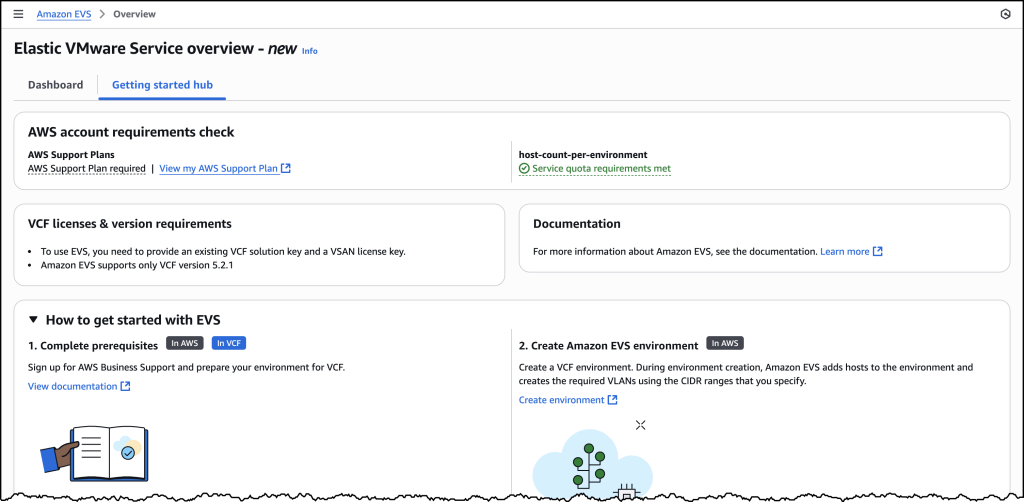
To help ensure a smooth deployment process, we’ve provided a Getting started hub, which you can access from the EVS homepage as well as a comprehensive guide in our documentation. By following these preparation steps, you can avoid potential setup delays and ensure a successful environment creation.

Screenshots of EVS onboarding

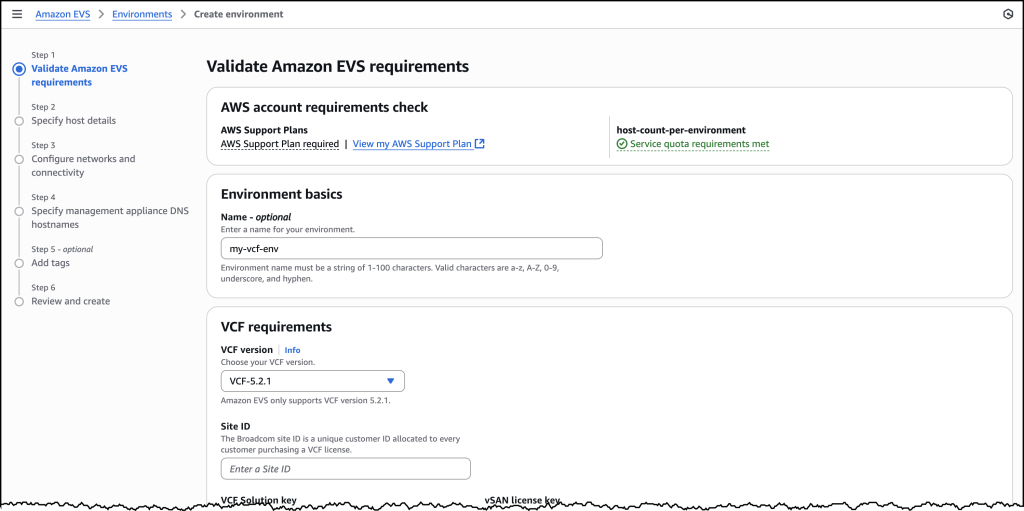
Let’s walk through the process of setting up a new VCF environment using Amazon EVS.

Screenshots of EVS onboarding

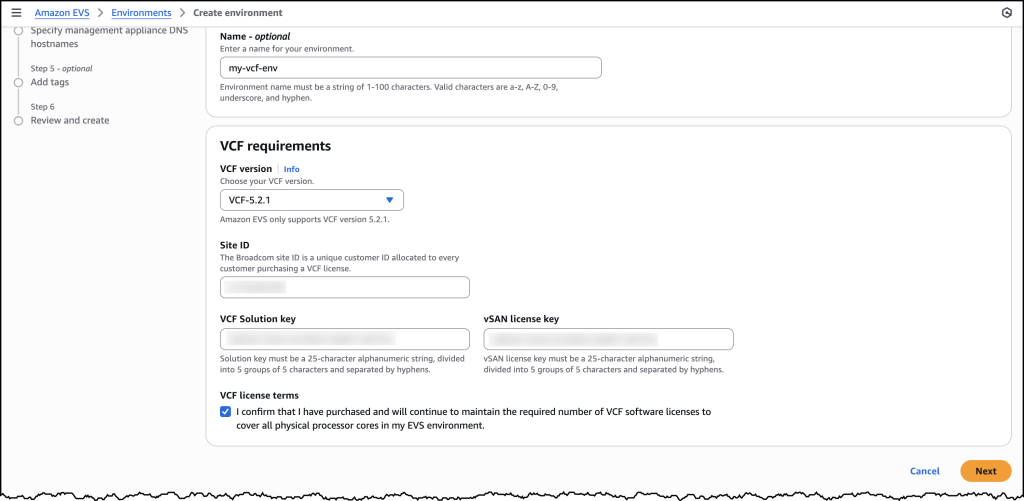
You will need to provide your Site ID, which is allocated by Broadcom when purchasing VCF licenses, along with your license keys. To ensure a successful initial deployment, you should verify you have sufficient licensing coverage for a minimum of 256 cores. This translates to at least four i4i.metal instances, with each instance providing 64 physical cores.

This licensing requirement helps you maintain optimal performance and ensures your environment meets the necessary infrastructure specifications. By confirming these requirements upfront, you can avoid potential deployment delays and ensure a smooth setup process.

Screenshots of EVS onboarding

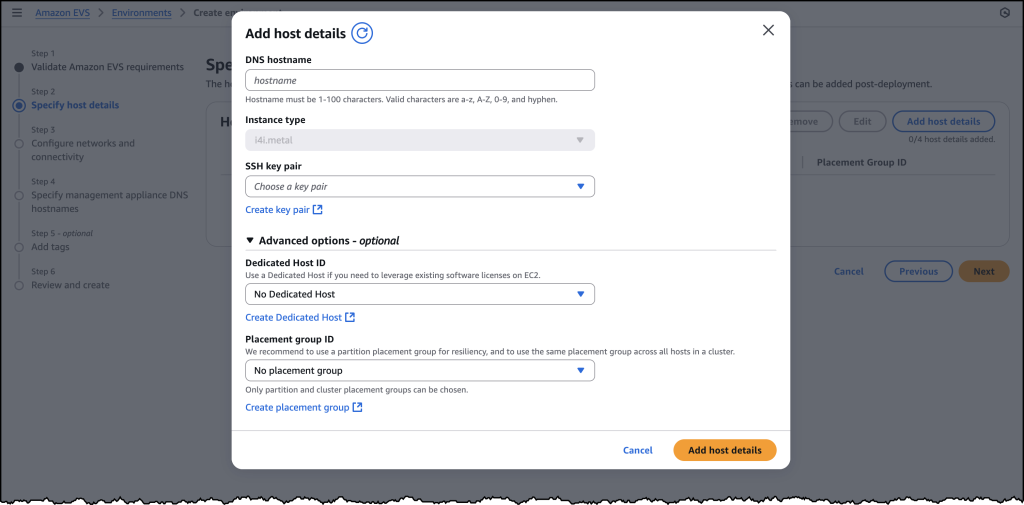
Once you have provided all the required details, you will be prompted to specify your host details. These are the underlying Amazon EC2 instances that your VCF environment will get deployed in.

Screenshots of EVS onboarding

Once you have filled out details for each of your host instances, you will need to configure your networking and management appliance DNS details. For further information on how to create a new VCF environment on Amazon EVS, follow the documentation here.

Screenshots of EVS onboarding

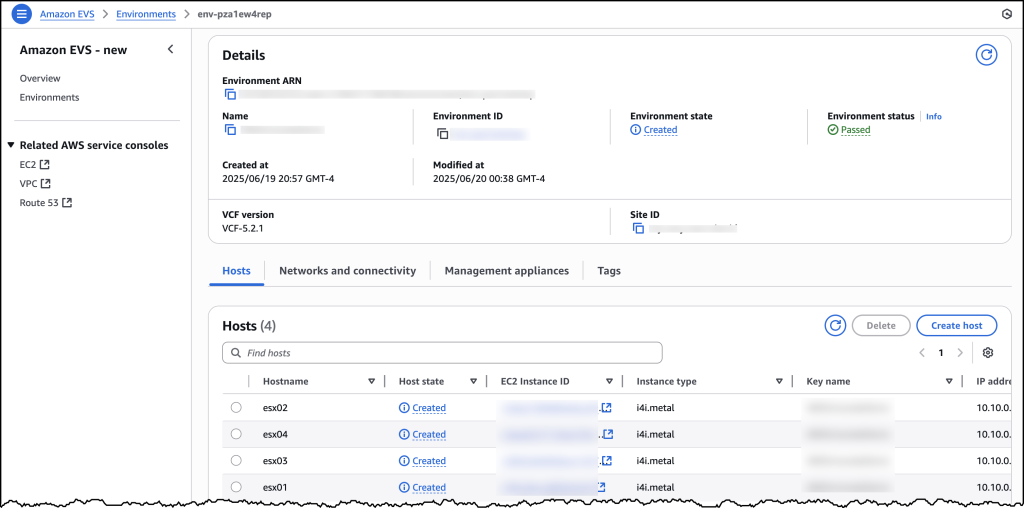
After you have created your VCF environment, you will be able to look over all of the host and configuration details through the AWS Console.

Additional things to know

Amazon EVS currently supports VCF version 5.2.1 and runs on i4i.metal instances. Future releases will expand VCF versions, licensing options, and more instance type support to provide even more flexibility for your deployments.

Amazon EVS provides flexible storage options. Your Amazon EVS local Instance storage is powered by VMware’s vSAN solution, which pools local disks across multiple ESXi hosts into a single distributed datastore. To scale your storage, you can leverage external Network File System (NFS) or iSCSI-based storage solutions. For example, Amazon FSx for NetApp ONTAP is particularly well-suited for use as an NFS datastore or shared block storage over iSCSI.

Additionally, Amazon EVS makes connecting your on-premises environments to AWS simple. You can connect from on-premises vSphere environment into Amazon EVS using a Direct Connect connection or a VPN that terminates into a transit gateway. Amazon EVS also manages the underlying connectivity from your VLAN subnets into your VMs.

AWS provides comprehensive support for all AWS services deployed by Amazon EVS, handling direct customer support while engaging with Broadcom for advanced support needs. Customers must maintain AWS Business Support on accounts running the service.

Availability and pricing

Amazon EVS is now generally available in US East (N. Virginia), US East (Ohio), US West (Oregon), Europe (Frankfurt), Europe (Ireland), and Asia Pacific (Tokyo) AWS Regions, with additional Regions coming soon. Pricing is based on the Amazon EC2 instances and AWS resources you use, with no minimum fees or upfront commitments.

To learn more, visit the Amazon EVS product page.

AWS Weekly Roundup: SQS fair queues, CloudWatch generative AI observability, and more (July 28, 2025)

Post Syndicated from Micah Walter original https://aws.amazon.com/blogs/aws/aws-weekly-roundup-sqs-fair-queues-cloudwatch-generative-ai-observability-and-more-july-28-2025/

To be honest, I’m still recovering from the AWS Summit in New York, doing my best to level up on launches like Amazon Bedrock AgentCore (Preview) and Amazon Simple Storage Service (S3) Vectors. There’s a lot of new stuff to learn!

Meanwhile, it’s been an exciting week for AWS builders focused on reliability and observability. The standout announcement has to be Amazon SQS fair queues, which tackles one of the most persistent challenges in multi-tenant architectures: the “noisy neighbor” problem. If you’ve ever dealt with one tenant’s message processing overwhelming shared infrastructure and affecting other tenants, you’ll appreciate how this feature enables more balanced message distribution across your applications.

On the AI front, we’re also seeing AWS continue to enhance our observability capabilities with the preview launch of Amazon CloudWatch generative AI observability. This brings AI-powered insights directly into your monitoring workflows, helping you understand infrastructure and application performance patterns in new ways. And for those managing Amazon Connect environments, the addition of AWS CloudFormation for message template attachments makes it easier to programmatically deploy and manage email campaign assets across different environments.

Last week’s launches

  • Amazon SQS Fair Queues — AWS launched Amazon SQS fair queues to help mitigate the “noisy neighbor” problem in multi-tenant systems, enabling more balanced message processing and improved application resilience across shared infrastructure.
  • Amazon CloudWatch Generative AI Observability (Preview) — AWS launched a preview of Amazon CloudWatch generative AI observability, enabling users to gain AI-powered insights into their cloud infrastructure and application performance through advanced monitoring and analysis capabilities.
  • Amazon Connect CloudFormation Support for Message Template Attachments —AWS has expanded the capabilities of Amazon Connect by introducing support for AWS CloudFormation for Outbound Campaign message template attachments, enabling customers to programmatically manage and deploy email campaign attachments across different environments.
  • Amazon Connect Forecast Editing — Amazon Connect introduces a new forecast editing UI that allows contact center planners to quickly adjust forecasts by percentage or exact values across specific date ranges, queues, and channels for more responsive workforce planning.
  • Bloom Filters for Amazon ElastiCache — Amazon ElastiCache now supports Bloom filters in version 8.1 for Valkey, offering a space-efficient way to quickly check if an item is in a set with over 98% memory efficiency compared to traditional sets.
  • Amazon EC2 Skip OS Shutdown Option — AWS has introduced a new option for Amazon EC2 that allows customers to skip the graceful operating system shutdown when stopping or terminating instances, enabling faster application recovery and instance state transitions.
  • AWS HealthOmics Git Repository Integration — AWS HealthOmics now supports direct Git repository integration for workflow creation, allowing researchers to seamlessly pull workflow definitions from GitHub, GitLab, and Bitbucket repositories while enabling version control and reproducibility.
  • AWS Organizations Tag Policies Wildcard Support — AWS Organizations now supports a wildcard statement (ALL_SUPPORTED) in Tag Policies, allowing users to apply tagging rules to all supported resource types for a given AWS service in a single line, simplifying policy creation and reducing complexity.

Blogs of note

Beyond IAM Access Keys: Modern Authentication Approaches — AWS recommends moving beyond traditional IAM access keys to more secure authentication methods, reducing risks of credential exposure and unauthorized access by leveraging modern, more robust approaches to identity management.

Upcoming AWS events

AWS re:Invent 2025 (December 1-5, 2025, Las Vegas) — AWS’s flagship annual conference offering collaborative innovation through peer-to-peer learning, expert-led discussions, and invaluable networking opportunities.

AWS Summits — Join free online and in-person events that bring the cloud computing community together to connect, collaborate, and learn about AWS. Register in your nearest city: Mexico City (August 6) and Jakarta (August 7).

AWS Community Days — Join community-led conferences that feature technical discussions, workshops, and hands-on labs led by expert AWS users and industry leaders from around the world: Singapore (August 2), Australia (August 15), Adria (September 5), Baltic (September 10), and Aotearoa (September 18).

Simplify serverless development with console to IDE and remote debugging for AWS Lambda

Post Syndicated from Micah Walter original https://aws.amazon.com/blogs/aws/simplify-serverless-development-with-console-to-ide-and-remote-debugging-for-aws-lambda/

Today, we’re announcing two significant enhancements to AWS Lambda that make it easier than ever for developers to build and debug serverless applications in their local development environments: console to IDE integration and remote debugging. These new capabilities build upon our recent improvements to the Lambda development experience, including the enhanced in-console editing experience and the improved local integrated development environment (IDE) experience launched in late 2024.

When building serverless applications, developers typically focus on two areas to streamline their workflow: local development environment setup and cloud debugging capabilities. While developers can bring functions from the console to their IDE, they’re looking for ways to make this process more efficient. Additionally, as functions interact with various AWS services in the cloud, developers want enhanced debugging capabilities to identify and resolve issues earlier in the development cycle, reducing their reliance on local emulation and helping them optimize their development workflow.

Console to IDE integration

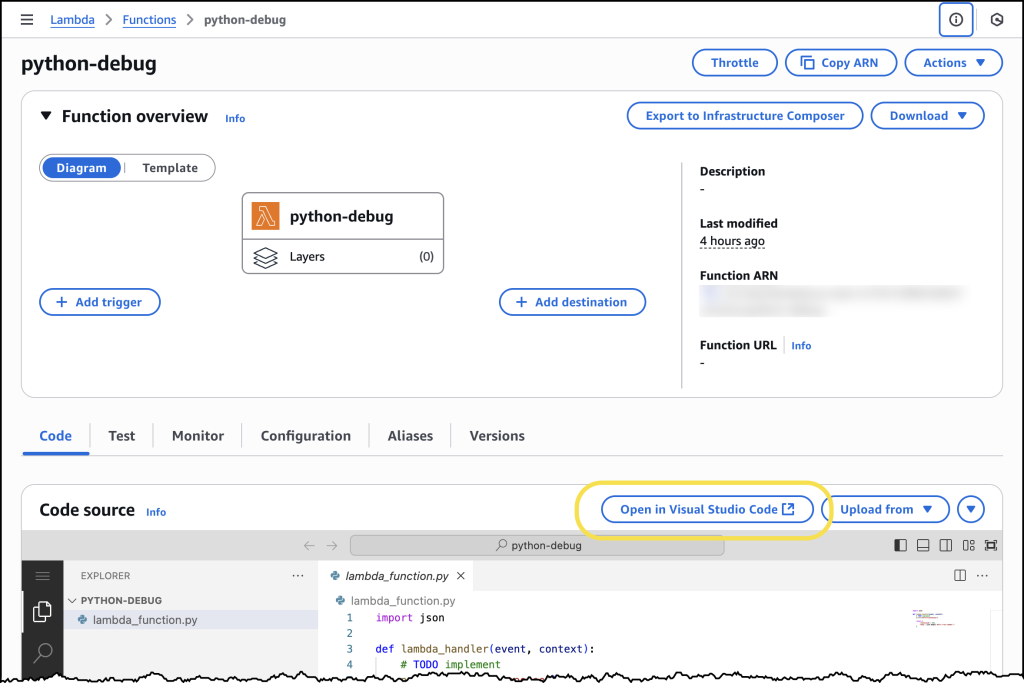
To address the first challenge, we’re introducing console to IDE integration, which streamlines the workflow from the AWS Management Console to Visual Studio Code (VS Code). This new capability adds an Open in Visual Studio Code button to the Lambda console, enabling developers to quickly move from viewing their function in the browser to editing it in their IDE, eliminating the time-consuming setup process for local development environments.

The console to IDE integration automatically handles the setup process, checking for VS Code installation and the AWS Toolkit for VS Code. For developers that have everything already configured, choosing the button immediately opens their function code in VS Code, so they can continue editing and deploy changes back to Lambda in seconds. If VS Code isn’t installed, it directs developers to the download page, and if the AWS Toolkit is missing, it prompts for installation.

To use console to IDE, look for the Open in VS Code button in either the Getting Started popup after creating a new function or the Code tab of existing Lambda functions. After selecting, VS Code opens automatically (installing AWS Toolkit if needed). Unlike the console environment, you now have access to a full development environment with integrated terminal – a significant improvement for developers who need to manage packages (npm install, pip install), run tests, or use development tools like linters and formatters. You can edit code, add new files/folders, and any changes you make will trigger an automatic deploy prompt. When you choose to deploy, the AWS Toolkit automatically deploys your function to your AWS account.

Screenshot showing Console to IDE

Remote debugging

Once developers have their functions in their IDE, they can use remote debugging to debug Lambda functions deployed in their AWS account directly from VS Code. The key benefit of remote debugging is that it allows developers to debug functions running in the cloud while integrated with other AWS services, enabling faster and more reliable development.

With remote debugging, developers can debug their functions with complete access to Amazon Virtual Private Cloud (VPC) resources and AWS Identity and Access Management (AWS IAM) roles, eliminating the gap between local development and cloud execution. For example, when debugging a Lambda function that interacts with an Amazon Relational Database Service (Amazon RDS) database in a VPC, developers can now debug the execution environment of the function running in the cloud within seconds, rather than spending time setting up a local environment that might not match production.

Getting started with remote debugging is straightforward. Developers can select a Lambda function in VS Code and enable debugging in seconds. AWS Toolkit for VS Code automatically downloads the function code, establishes a secure debugging connection, and enables breakpoint setting. When debugging is complete, AWS Toolkit for VS Code automatically cleans up the debugging configuration to prevent any impact on production traffic.

Let’s try it out

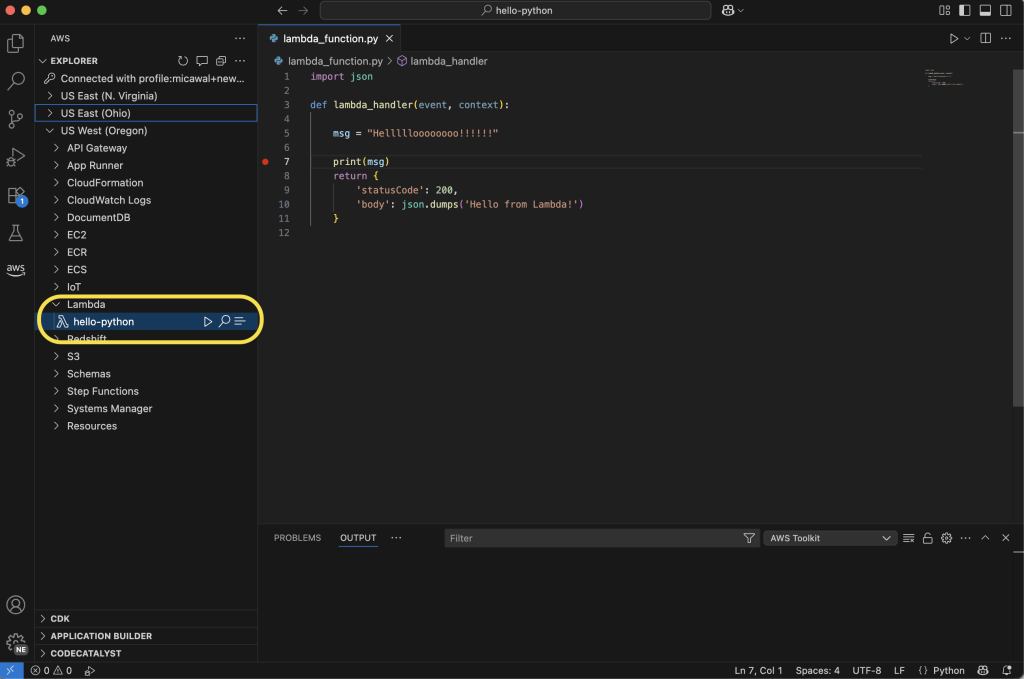
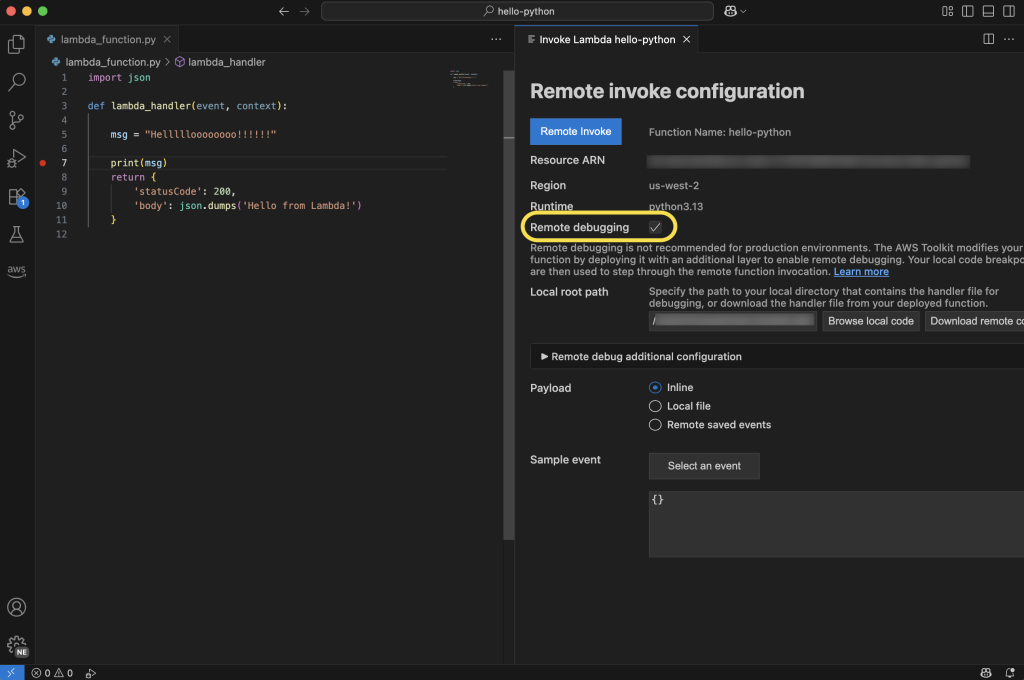
To take remote debugging for a spin, I chose to start with a basic “hello world” example function, written in Python. I had previously created the function using the AWS Management Console for AWS Lambda. Using the AWS Toolkit for VS Code, I can navigate to my function in the Explorer pane. Hovering over my function, I can right-click (ctrl-click in Windows) to download the code to my local machine to edit the code in my IDE. Saving the file will ask me to decide if I want to deploy the latest changes to Lambda.

Screenshot view of the Lambda Debugger in VS Code

From here, I can select the play icon to open the Remote invoke configuration page for my function. This dialog will now display a Remote debugging option, which I configure to point at my local copy of my function handler code. Before choosing Remote invoke, I can set breakpoints on the left anywhere I want my code to pause for inspection.

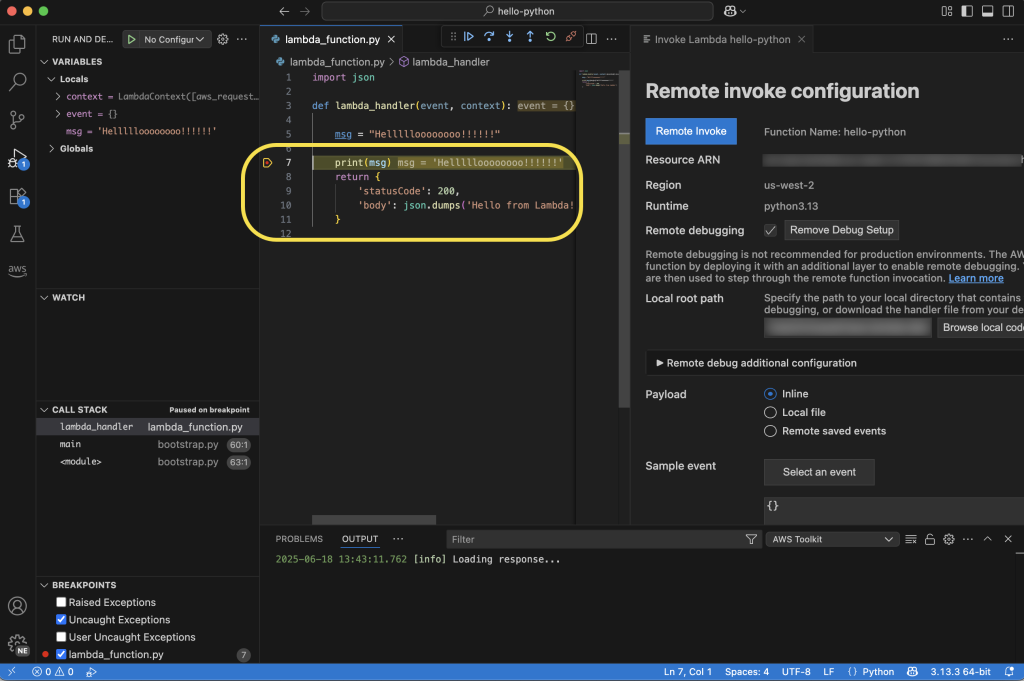
My code will be running in the cloud after it’s invoked, and I can monitor its status in real time in VS Code. In the following screenshot, you can see I’ve set a breakpoint at the print statement. My function will pause execution at this point in my code, and I can inspect things like local variable values before either continuing to the next breakpoint or stepping into the code line by line.

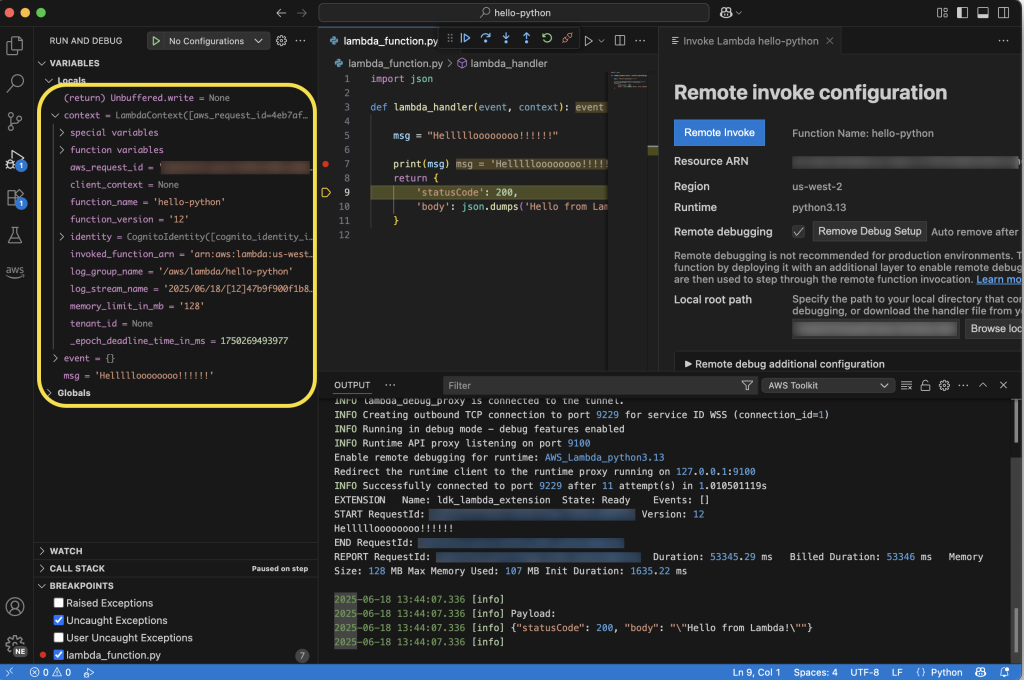
Here, you can see that I’ve chosen to step into the code, and as I go through it line by line, I can see the context and local and global variables displayed on the left side of the IDE. Additionally, I can follow the logs in the Output tab at the bottom of the IDE. As I step through, I’ll see any log messages or output messages from the execution of my function in real time.

Enhanced development workflow

These new capabilities work together to create a more streamlined development experience. Developers can start in the console, quickly transition to VS Code using the console to IDE integration, and then use remote debugging to debug their functions running in the cloud. This workflow eliminates the need to switch between multiple tools and environments, helping developers identify and fix issues faster.

Now available

You can start using these new features through the AWS Management Console and VS Code with the AWS Toolkit for VS Code (v3.69.0 or later) installed. Console to IDE integration is available in all commercial AWS Regions where Lambda is available, except AWS GovCloud (US) Regions. Learn more about it in Lambda and AWS Toolkit for VS Code documentation. To learn more about remote debugging capability, including AWS Regions it is available in, visit the AWS Toolkit for VS Code and Lambda documentation.

Console to IDE and remote debugging are available to you at no additional cost. With remote debugging, you pay only for the standard Lambda execution costs during debugging sessions. Remote debugging will support Python, Node.js, and Java runtimes at launch, with plans to expand support to additional runtimes in the future.

These enhancements represent a significant step forward in simplifying the serverless development experience, which means developers can build and debug Lambda functions more efficiently than ever before.

Amazon CloudFront simplifies web application delivery and security with new user-friendly interface

Post Syndicated from Micah Walter original https://aws.amazon.com/blogs/aws/amazon-cloudfront-simplifies-web-application-delivery-and-security-with-new-user-friendly-interface/

Today, we’re announcing a new simplified onboarding experience for Amazon CloudFront that developers can use to accelerate and secure their web applications in seconds. This new experience, along with improvements to the AWS WAF console experience, makes it easier than ever for developers to configure content delivery and security services without requiring deep technical expertise.

Setting up content delivery and security for web applications traditionally required navigating multiple Amazon Web Services (AWS) services and making numerous configuration decisions. With this new CloudFront onboarding experience, developers can now create a fully configured distribution with DNS and a TLS certificate in just a few clicks.

Amazon CloudFront offers compelling benefits for organizations of all sizes looking to deliver content and applications globally. As a content delivery network (CDN), CloudFront significantly improves application performance by serving content from edge locations closest to your users, reducing latency and improving user experience. Beyond performance, CloudFront provides built-in security features that protect your applications from distributed denial of service (DDoS) attacks and other threats at the edge, preventing malicious traffic from reaching your origin infrastructure. The service automatically scales with your traffic demands without requiring any manual intervention, handling both planned and unexpected traffic spikes with ease. Whether you’re running a small website or a large-scale application, the CloudFront integration with other AWS services and the new simplified console experience makes it easier than ever to implement these essential capabilities for your web applications.

Streamlined CloudFront configuration

The new CloudFront console experience guides developers through a simplified workflow that starts with the domain name they want to use for their distribution. When using Amazon Route 53, the experience automatically handles TLS certificate provisioning and DNS record configuration, while incorporating security best practices by default. This unified approach eliminates the need to switch between multiple services like AWS Certificate Manager, Route 53, and AWS WAF, and offers developers a faster time to production without the need to dive deep on the nuanced configuration options of each service.

For example, a developer can now create a secure CloudFront distribution for their applications fronted by a load balancer by entering their domain name and selecting their load balancer as the origin. The console automatically recommends optimal CDN and security configurations based on the application type and requirements, and developers can deploy with confidence knowing they’re following AWS best practices.

For developers who wish to host a static website on Amazon Simple Storage Service (Amazon S3), CloudFront provides several important benefits. First, it improves your website’s performance by caching content at edge locations closer to your users, reducing latency and improving page load times. Second, it helps protect your S3 bucket by acting as a security layer—CloudFront can be configured to be the only way to access your content, preventing direct access to your S3 bucket. The new experience automatically configures these security best practices for you.

Enhanced security integration with AWS WAF

Complementing the new CloudFront experience, we’re also introducing an improved AWS WAF console that features intelligent Rule Packs—curated sets of security rules based on application type and security requirements. These Rule Packs enable developers to implement comprehensive security controls without needing to be security experts.

When creating a CloudFront distribution, developers can now enable AWS WAF protection through an integrated experience that uses these new Rule Packs. The console provides clear recommendations for security configurations that developers can use to preview and validate their settings before deployment.

Web applications face numerous security threats today, including SQL injection attacks, cross-site scripting (XSS), and other OWASP Top 10 vulnerabilities. With the new AWS WAF integration, you automatically get protection against these common attack vectors. The recommended Rule Packs provide immediate protection against malicious bot traffic, common web exploits, and known bad actors while preventing direct-to-origin attacks that could overwhelm your infrastructure.

Let’s take a look

If you’ve ever created an Amazon CloudFront distribution, you’ll immediately notice that things have changed. The new experience is straightforward to follow and understand. For my example, I chose to create a distribution for a static website using Amazon S3 as my origin.

New onboarding experience for Amazon CloudFront

In Step 1, I give my distribution a name and select from Single website or app or the new Multi-tenant architecture option, which I can use to configure distributions that use multiple domains but share a common configuration. I choose Single website or app and enter an optional domain name. With the new experience, I can use the Check domain button to verify I have my domain as a Route 53 zone file.

Next, I select the origin for the distribution, which is where CloudFront will fetch the content to serve and cache. For my Origin type, I select Amazon S3. As the preceding screenshot shows, there are several additional options to choose from. Each of the options is designed to make configuration as straightforward as possible for the most popular use cases. Next, I select my S3 bucket, either by typing in the bucket name or using the Browse S3 button.

Next, I have several settings related to using Amazon S3 as my origin. The Grant CloudFront access to origin option is an important one. This option (selected by default) will update my S3 bucket policy to allow CloudFront to access my bucket and will configure my bucket for origin access control. This way, I can use a completely private bucket and know that assets in my bucket can only be accessed through CloudFront. This is a critical step to keeping my bucket and assets secure.

In the next step, I’m presented with the option to configure AWS WAF. With AWS WAF enabled, my web servers are better protected because it inspects each incoming request for potential threats before allowing them to make their way to my web servers. There is a cost to enabling AWS WAF, and as you can see in the following screenshot, there is a calculator to help estimate additional charges.

New onboarding experience for Amazon CloudFront

Now available

The new CloudFront onboarding experience and enhanced AWS WAF console are available today in all AWS Regions where these services are offered. You can start using these new features through the AWS Management Console. There are no additional charges for using these new experiences—you pay only for the CloudFront and AWS WAF resources you use, based on their respective pricing models.

To learn more about the new CloudFront onboarding experience and AWS WAF improvements, visit the Amazon CloudFront Documentation and AWS WAF Documentation. Start building faster, more secure web applications today with these simplified experiences.

Verify internal access to critical AWS resources with new IAM Access Analyzer capabilities

Post Syndicated from Micah Walter original https://aws.amazon.com/blogs/aws/verify-internal-access-to-critical-aws-resources-with-new-iam-access-analyzer-capabilities/

Today, we’re announcing a new capability in AWS IAM Access Analyzer that helps security teams verify which AWS Identity and Access Management (IAM) roles and users have access to their critical AWS resources. This new feature provides comprehensive visibility into access granted from within your Amazon Web Services (AWS) organization, complementing the existing external access analysis.

Security teams in regulated industries, such as financial services and healthcare, need to verify access to sensitive data stores like Amazon Simple Storage Service (Amazon S3) buckets containing credit card information or healthcare records. Previously, teams had to invest considerable time and resources conducting manual reviews of AWS Identity and Access Management (IAM) policies or rely on pattern-matching tools to understand internal access patterns.

The new IAM Access Analyzer internal access findings identify who within your AWS organization has access to your critical AWS resources. It uses automated reasoning to collectively evaluate multiple policies, including service control policies (SCPs), resource control policies (RCPs), and identity-based policies, and generates findings when a user or role has access to your S3 buckets, Amazon DynamoDB tables, or Amazon Relational Database Service (Amazon RDS) snapshots. The findings are aggregated in a unified dashboard, simplifying access review and management. You can use Amazon EventBridge to automatically notify development teams of new findings to remove unintended access. Internal access findings provide security teams with the visibility to strengthen access controls on their critical resources and help compliance teams demonstrate access control audit requirements.

Let’s try it out

To begin using this new capability, you can enable IAM Access Analyzer to monitor specific resources using the AWS Management Console. Navigate to IAM and select Analyzer settings under the Access reports section of the left-hand navigation menu. From here, select Create analyzer.

Screenshot of creating an Analyzer in the AWS Console

From the Create analyzer page, select the option of Resource analysis – Internal access. Under Analyzer details, you can customize your analyzer’s name to whatever you prefer or use the automatically generated name. Next, you need to select your Zone of trust. If your account is the management account for an AWS organization, you can choose to monitor resources across all accounts within your organization or the current account you’re logged in to. If your account is a member account of an AWS organization or a standalone account, then you can monitor resources within your account.

The zone of trust also determines which IAM roles and users are considered in scope for analysis. An organization zone of trust analyzer evaluates all IAM roles and users in the organization for potential access to a resource, whereas an account zone of trust only evaluates the IAM roles and users in that account.

For this first example, we assume our account is the management account and create an analyzer with the organization as the zone of trust.

Screenshot of creating an Analyzer in the AWS Console

Next, we need to select the resources we wish to analyze. Selecting Add resources gives us three options. Let’s first examine how we can select resources by identifying the account and resource type for analysis.

Screenshot of creating an Analyzer in the AWS Console

You can use Add resources by account dialog to choose resource types through a new interface. Here, we select All supported resource types and select the accounts we wish to monitor. This will create an analyzer that monitors all supported resource types. You can either select accounts through the organization structure (shown in the following screenshot) or paste in account IDs using the Enter AWS account ID option.

Screenshot of creating an Analyzer in the AWS Console

You can also choose to use the Define specific resource types dialog, which you can use to pick from a list of supported resource types (as shown in the following screenshot). By creating an analyzer with this configuration, IAM Access Analyzer will continually monitor both existing and new resources of the selected type within the account, checking for internal access.

Screenshot of creating an Analyzer in the AWS Console

After you’ve completed your selections, choose Add resources.

Screenshot of creating an Analyzer in the AWS Console

Alternatively, you can use the Add resources by resource ARN option.

Screenshot of creating an Analyzer in the AWS Console

Or you can use the Add resources by uploading a CSV file option to configure monitoring a list of specific resources at scale.

Screenshot of creating an Analyzer in the AWS Console

After you’ve completed the creation of your analyzer, IAM Access Analyzer will analyze policies daily and generate findings that show access granted to IAM roles and users within your organization. The updated IAM Access Analyzer dashboard now provides a resource-centric view. The Active findings section summarizes access into three distinct categories: public access, external access outside of the organization (requires creation of a separate external access analyzer), and access within the organization. The Key resources section highlights the top resources with active findings across the three categories. You can see a list of all analyzed resources by selecting View all active findings or Resource analysis on the left-hand navigation menu.

Screenshot of Access Analyzer findings

On the Resource analysis page, you can filter the list of all analyzed resources for further analysis.

Screenshot of creating an Analyzer in the AWS Console

When you select a specific resource, any available external access and internal access findings are listed on the Resource details page. Use this feature to evaluate all possible access to your selected resource. For each finding, IAM Access Analyzer provides you with detailed information about allowed IAM actions and their conditions, including the impact of any applicable SCPs and RCPs. This means you can verify that access is appropriately restricted and meets least-privilege requirements.

Screenshot of creating an Analyzer in the AWS Console

Pricing and availability

This new IAM Access Analyzer capability is available today in all commercial Regions. Pricing is based on the number of critical AWS resources monitored per month. External access analysis remains available at no additional charge. Pricing for EventBridge applies separately.

To learn more about IAM Access Analyzer and get started with analyzing internal access to your critical resources, visit the IAM Access Analyzer documentation.

Centralize visibility of Kubernetes clusters across AWS Regions and accounts with EKS Dashboard

Post Syndicated from Micah Walter original https://aws.amazon.com/blogs/aws/centralize-visibility-of-kubernetes-clusters-across-aws-regions-and-accounts-with-eks-dashboard/

Today, we are announcing EKS Dashboard, a centralized display that enables cloud architects and cluster administrators to maintain organization-wide visibility across their Kubernetes clusters. With EKS Dashboard, customers can now monitor clusters deployed across different AWS Regions and accounts through a unified view, making it easier to track cluster inventory, assess compliance, and plan operational activities like version upgrades.

As organizations scale their Kubernetes deployments, they often run multiple clusters across different environments to enhance availability, ensure business continuity, or maintain data sovereignty. However, this distributed approach can make it challenging to maintain visibility and control, especially in decentralized setups spanning multiple Regions and accounts. Today, many customers resort to third-party tools for centralized cluster visibility, which adds complexity through identity and access setup, licensing costs, and maintenance overhead.

EKS Dashboard simplifies this experience by providing native dashboard capabilities within the AWS Console. The Dashboard provides insights into 3 different resources including clusters, managed node groups, and EKS add-ons, offering aggregated insights into cluster distribution by Region, account, version, support status, forecasted extended support EKS control plane costs, and cluster health metrics. Customers can drill down into specific data points with automatic filtering, enabling them to quickly identify and focus on clusters requiring attention.

Setting up EKS Dashboard

Customers can access the Dashboard in EKS console through AWS Organizations’ management and delegated administrator accounts. The setup process is straightforward and includes simply enabling trusted access as a one-time setup in the Amazon EKS console’s organizations settings page. Trusted access is available from the Dashboard settings page. Enabling trusted access will allow the management account to view the Dashboard. For more information on setup and configuration, see the official AWS Documentation.

Screenshot of EKS Dashboard settings

A quick tour of EKS Dashboard

The dashboard provides both graphical, tabular, and map views of your Kubernetes clusters, with advanced filtering, and search capabilities. You can also export data for further analysis or custom reporting.

Screenshot of EKS Dashboard interface

EKS Dashboard overview with key info about your clusters.

Screenshot of EKS Dashboard interface

There is a wide variety of available widgets to help visualize your clusters.

Screenshot of EKS Dashboard interface

You can visualize your managed node groups by instance type distribution, launch templates, AMI versions, and more

Screenshot of EKS Dashboard interface

There is even a map view where you can see all of your clusters across the globe.

Beyond EKS clusters

EKS Dashboard isn’t limited to just Amazon EKS clusters; it can also provide visibility into connected Kubernetes clusters running on-premises or on other cloud providers. While connected clusters may have limited data fidelity compared to native Amazon EKS clusters, this capability enables truly unified visibility for organizations running hybrid or multi-cloud environments.

Available now

EKS Dashboard is available today in the US East (N. Virginia) Region and is able to aggregate data from all commercial AWS Regions. There is no additional charge for using the EKS Dashboard. To learn more, visit the Amazon EKS documentation.

This new capability demonstrates our continued commitment to simplifying Kubernetes operations for our customers, enabling them to focus on building and scaling their applications rather than managing infrastructure. We’re excited to see how customers use EKS Dashboard to enhance their Kubernetes operations.

— Micah;

AWS Weekly Roundup: South America expansion, Q Developer in OpenSearch, and more (May 12, 2025)

Post Syndicated from Micah Walter original https://aws.amazon.com/blogs/aws/aws-weekly-roundup-south-america-expansion-q-developer-in-opensearch-and-more-may-12-2025/

I’ve always been fascinated by how quickly we’re able to stand up new Regions and Availability Zones at AWS. Today there are 36 launched Regions and 114 launched Availability Zones. That’s amazing!

This past week at AWS was marked by significant expansion to our global infrastructure. The announcement of a new Region in the works for South America means customers will have more options for meeting their low latency and data residency requirements. Alongside the expansion, AWS announced the availability of numerous instance types in additional Regions.

In addition to the infrastructure expansion, AWS is also expanding the reach of Amazon Q Developer into Amazon OpenSearch Service.

Last week’s launches

Instance announcements

AWS expanded instance availability for an array of instance types across additional Regions.

Additional updates

Upcoming events

We are in the middle of AWS Summit season! AWS Summits run throughout the summer in cities all around the world. Be sure to check the calendar to find out when a AWS Summit is happening near you. Here are the remaining Summits for May, 2025.


How is the News Blog doing? Take this 1 minute survey!

(This survey is hosted by an external company. AWS handles your information as described in the AWS Privacy Notice. AWS will own the data gathered via this survey and will not share the information collected with survey respondents.)

Announcing second-generation AWS Outposts racks with breakthrough performance and scalability on-premises

Post Syndicated from Micah Walter original https://aws.amazon.com/blogs/aws/announcing-second-generation-aws-outposts-racks-with-breakthrough-performance-and-scalability-on-premises/

Today we’re announcing the general availability of second-generation AWS Outposts racks, which marks the latest innovation from AWS for edge computing. This new generation includes support for the latest x86-powered Amazon Elastic Compute Cloud (Amazon EC2) instances, new simplified network scaling and configuration, and accelerated networking instances designed specifically for ultra-low latency and high-throughput workloads. These enhancements deliver greater performance for a broad range of on-premises workloads, such as core trading systems of financial services and telecom 5G Core workloads.

Customers like athenahealth, FanDuel, First Abu Dhabi Bank, Mercado Libre, Liberty Latin America, Riot Games, Vector Limited, and Wiwynn are already using Outposts racks for workloads that need to stay on-premises. The second-generation Outposts rack can provide low latency, local data processing, or data residency needs, such as game servers for multi-player online games, customer transaction data, medical records, industrial and manufacturing control systems, telecom Business Support Systems (BSS), and edge inference of a variety of machine learning (ML) models. Customers can now take advantage of the latest generation of processors and more advanced configurations of Outposts racks to support faster processing, higher memory capacity, and increased network bandwidth.

Latest generation EC2 instances

We’re excited to announce local support for the latest generation (7th generation) of x86-powered Amazon EC2 instances on AWS Outposts racks, starting with C7i compute-optimized instances, M7i general-purpose instances, and R7i memory-optimized instances. These new instances deliver twice the vCPU, memory, and network bandwidth while providing up to 40% better performance compared to C5, M5, and R5 instances on previous generation Outposts racks. They are powered by 4th Gen Intel Xeon Scalable processors and are ideal for a broad range of on-premises workloads requiring enhanced performance such as larger databases, more memory-intensive applications, advanced real-time big data analytics, high-performance video encoding and streaming, and CPU-based edge inference with more sophisticated ML models. Support for more latest generation EC2 instances, including GPU-enabled instances, is coming soon.

Simplified network scaling and configuration

We’ve completely reimagined networking in our latest Outposts generation, making it simpler and more scalable than ever. At the heart of this upgrade is our new Outposts network rack, which acts as a central hub for all your compute and storage traffic.

This new design brings three major benefits to the table. First, you can now scale your compute resources independently from your networking infrastructure, giving you more flexibility and cost efficiency as your workloads grow. Second, we’ve built in network resilience from the ground up, with the network rack automatically handling device failures to keep your systems running smoothly. Third, connecting to your on-premises environment and AWS Regions is now a breeze – you can configure everything from IP addresses to VLAN and BGP settings through straightforward APIs or our updated console interface.

Image of an AWS Outposts rack device

Specialized Amazon EC2 instances with accelerated networking

We’re introducing a new category of specialized Amazon EC2 instances on Outposts racks with accelerated networking. These instances are purpose built for the most latency-sensitive, compute-intensive, and throughput-intensive mission-critical workloads on-premises. To deliver the best possible performance, in addition to the Outpost logical network, these instances feature a secondary physical network with network accelerator cards connected to top-of-rack (TOR) switches.

First in this category are bmn-sf2e instances, designed for ultra-low latency with deterministic performance. The new instances run on Intel’s latest Sapphire Rapids processors (4th Gen Xeon Scalable), delivering 3.9 GHz sustained performance across all cores with generous memory allocation – 8GB of RAM for every CPU core. We’ve equipped bmn-sf2e instances with AMD Solarflare X2522 network cards that connect directly to top-of-rack switches.

For financial services customers, especially capital market firms, these instances offer deterministic networking through native Layer 2 (L2) multicast, precision time protocol (PTP), and equal cable lengths. This enables customers to meet regulatory requirements around fair trading and equal access while easily connecting to their existing trading infrastructure.

Instance Name vCPUs Memory (DDR5) Network Bandwidth NVMe SSD Storage Accelerated Network Cards Accelerated Bandwidth (Gbps)
bmn-sf2e.metal-16xl 64 512 GiB 25 Gbps 2 x 8 TB (16 TB) 2 100
bmn-sf2e.metal-32xl 128 1024 GiB 50 Gbps 4 x 8 TB (32 TB) 4 200

The second instance type, bmn-cx2, is optimized for high throughput and low latency. This instance features NVIDIA ConnectX-7 400G NICs physically connected to high-speed top-of-rack switches, delivering up to 800 Gbps bare metal network bandwidth operating at near line rate. With native Layer 2 (L2) multicast and hardware PTP support, this instance is ideal for high-throughput workloads like real-time market data distribution, risk analytics, and telecom 5G core network applications.

Instance Name vCPUs Memory (DDR5) Network Bandwidth NVMe SSD Storage Accelerated Network Cards Accelerated Bandwidth (Gbps)
bmn-cx2.metal-48xl 192 1536 GiB 50 Gbps 4 x 4 TB (16 TB) 2 800

Bottom line, the new generation of Outposts racks deliver enhanced performance, scalability, and resiliency for a broad range of on-premises workloads, even for mission-critical workloads with the most stringent latency and throughput requirements. You can make your selection and initiate your order from the AWS Management Console. The new instances maintain consistency with regional deployments by supporting the same APIs, AWS Management Console, automation, governance policies, and security controls in the cloud and on-premises, improving developer productivity and IT efficiency.

Things to know

At launch, second-generation Outposts racks can be shipped to US and Canada and be parented back to 6 AWS Regions including US East (N. Virginia and Ohio), US West (Oregon), EU West (London and France) and Asia Pacific (Singapore). Support for more countries and territories and AWS Regions is coming soon. At launch, second-generation Outposts racks locally support a subset of AWS services found in previous generation Outposts racks. Support for more EC2 instance types and more AWS services is coming soon.

To learn more, visit the AWS Outposts racks product page and user guide. You can also talk to an Outposts expert if you are ready to discuss your on-premises needs.

— Micah;


How is the News Blog doing? Take this 1 minute survey!

(This survey is hosted by an external company. AWS handles your information as described in the AWS Privacy Notice. AWS will own the data gathered via this survey and will not share the information collected with survey respondents.)

Enhance real-time applications with AWS AppSync Events data source integrations

Post Syndicated from Micah Walter original https://aws.amazon.com/blogs/aws/enhance-real-time-applications-with-aws-appsync-events-data-source-integrations/

Today, we are announcing that AWS AppSync Events now supports data source integrations for channel namespaces, enabling developers to create more sophisticated real-time applications. With this new capability you can associate AWS Lambda functions, Amazon DynamoDB tables, Amazon Aurora databases, and other data sources with channel namespace handlers. With AWS AppSync Events, you can build rich, real-time applications with features like data validation, event transformation, and persistent storage of events.

With these new capabilities, developers can create sophisticated event processing workflows by transforming and filtering events using Lambda functions or save batches of events to DynamoDB using the new AppSync_JS batch utilities. The integration enables complex interactive flows while reducing development time and operational overhead. For example, you can now automatically persist events to a database without writing complex integration code.

First look at data source integrations

Let’s walk through how to set up data source integrations using the AWS Management Console. First, I’ll navigate to AWS AppSync in the console and select my Event API (or create a new one).

Screenshot of the AWS Console

Persisting event data directly to DynamoDB

There are multiple kinds of data source integrations to choose from. For this first example, I’ll create a DynamoDB table as a data source. I’m going to need a DynamoDB table first, so I head over to DynamoDB in the console and create a new table called event-messages. For this example, all I need to do is create the table with a Partition Key called id. From here, I can click Create table and accept the default table configuration before I head back to AppSync in the console.

Screenshot of the AWS Console for DynamoDB

Back in the AppSync console, I return to the Event API I set up previously, select Data Sources from the tabbed navigation panel and click the Create data source button.

Screenshot of the AWS Console

After giving my Data Source a name, I select Amazon DynamoDB from the Data source drop down menu. This will reveal configuration options for DynamoDB.

Screenshot of the AWS Console

Once my data source is configured, I can implement the handler logic. Here’s an example of a Publish handler that persists events to DynamoDB:

import * as ddb from '@aws-appsync/utils/dynamodb'
import { util } from '@aws-appsync/utils'

const TABLE = 'events-messages'

export const onPublish = {
  request(ctx) {
    const channel = ctx.info.channel.path
    const timestamp = util.time.nowISO8601()
    return ddb.batchPut({
      tables: {
        [TABLE]: ctx.events.map(({id, payload}) => ({
          channel, id, timestamp, ...payload,
        })),
      },
    })
  },
  response(ctx) {
    return ctx.result.data[TABLE].map(({ id, ...payload }) => ({ id, payload }))
  },
}

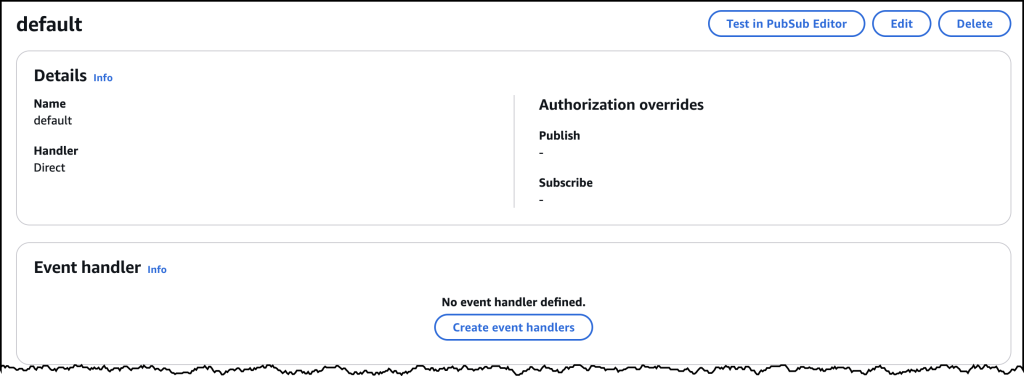
To add the handler code, I go the tabbed navigation for Namespaces where I find a new default namespace already created for me. If I click to open the default namespace, I find the button that allows me to add an Event handler just below the configuration details.

Screenshot of the AWS Console

Clicking on Create event handlers brings me to a new dialog where I choose Code with data source as my configuration, and then select the DynamoDB data source as my publish configuration.

Screenshot of the AWS Console

After saving the handler, I can test the integration using the built-in testing tools in the console. The default values here should work, and as you can see below, I’ve successfully written two events to my DynamoDB table.

Screenshot of the AWS Console

Here’s all my messages captured in DynamoDB!

Screenshot of the AWS Console

Error handling and security

The new data source integrations include comprehensive error handling capabilities. For synchronous operations, you can return specific error messages that will be logged to Amazon CloudWatch, while maintaining security by not exposing sensitive backend information to clients. For authorization scenarios, you can implement custom validation logic using Lambda functions to control access to specific channels or message types.

Available now

AWS AppSync Events data source integrations are available today in all AWS Regions where AWS AppSync is available. You can start using these new features through the AWS AppSync console, AWS command line interface (CLI), or AWS SDKs. There is no additional cost for using data source integrations – you pay only for the underlying resources you use (such as Lambda invocations or DynamoDB operations) and your existing AppSync Events usage.

To learn more about AWS AppSync Events and data source integrations, visit the AWS AppSync Events documentation and get started building more powerful real-time applications today.

— Micah;


How is the News Blog doing? Take this 1 minute survey!

(This survey is hosted by an external company. AWS handles your information as described in the AWS Privacy Notice. AWS will own the data gathered via this survey and will not share the information collected with survey respondents.)

New Amazon EC2 Graviton4-based instances with NVMe SSD storage

Post Syndicated from Micah Walter original https://aws.amazon.com/blogs/aws/new-amazon-ec2-graviton4-based-instances-with-nvme-ssd-storage/

Since the launch of AWS Graviton processors in 2018, we have continued to innovate and deliver improved performance for our customers’ cloud workloads. Following the success of our Graviton3-based instances, we are excited to announce three new Amazon Elastic Compute Cloud (Amazon EC2) instance families powered by AWS Graviton4 processors with NVMe-based SSD local storage: compute optimized (C8gd), general purpose (M8gd), and memory optimized (R8gd) instances. These instances deliver up to 30% better compute performance, 40% higher performance for I/O intensive database workloads, and up to 20% faster query results for I/O intensive real-time data analytics than comparable AWS Graviton3-based instances.

Let’s look at some of the improvements that are now available in our new instances. These instances offer larger instance sizes with up to 3x more vCPUs (up to 192 vCPUs), 3x the memory (up to 1.5 TiB), 3x the local storage (up to 11.4TB of NVMe SSD storage), 75% higher memory bandwidth, and 2x more L2 cache compared to their Graviton3-based predecessors. These features help you to process larger amounts of data, scale up your workloads, improve time to results, and lower your total cost of ownership (TCO). These instances also offer up to 50 Gbps network bandwidth and up to 40 Gbps Amazon Elastic Block Store (Amazon EBS) bandwidth, a significant improvement over Graviton3-based instances. Additionally, you can now adjust the network and Amazon EBS bandwidth on these instances by up to 25% using EC2 instance bandwidth weighting configuration, providing you greater flexibility with the allocation of your bandwidth resources to better optimize your workloads.

Built on AWS Graviton4, these instances are great for storage intensive Linux-based workloads including containerized and micro-services-based applications built using Amazon Elastic Kubernetes Service (Amazon EKS), Amazon Elastic Container Service (Amazon ECS), Amazon Elastic Container Registry (Amazon ECR), Kubernetes, and Docker, as well as applications written in popular programming languages such as C/C++, Rust, Go, Java, Python, .NET Core, Node.js, Ruby, and PHP. AWS Graviton4 processors are up to 30% faster for web applications, 40% faster for databases, and 45% faster for large Java applications than AWS Graviton3 processors.

Instance specifications

These instances also offer two bare metal sizes (metal-24xl and metal-48xl), allowing you to right size your instances and deploy workloads that benefit from direct access to physical resources. Additionally, these instances are built on the AWS Nitro System, which offloads CPU virtualization, storage, and networking functions to dedicated hardware and software to enhance the performance and security of your workloads. In addition, Graviton4 processors offer you enhanced security by fully encrypting all high-speed physical hardware interfaces.

The instances are available in 10 sizes per family, as well as two bare metal configurations each:

Instance Name vCPUs Memory (GiB) (C/M/R) Storage (GB) Network Bandwidth (Gbps) EBS Bandwidth (Gbps)
medium 1 2/4/8* 1 x 59 Up to 12.5 Up to 10
large 2 4/8/16* 1 x 118 Up to 12.5 Up to 10
xlarge 4 8/16/32* 1 x 237 Up to 12.5 Up to 10
2xlarge 8 16/32/64* 1 x 474 Up to 15 Up to 10
4xlarge 16 32/64/128* 1 x 950 Up to 15 Up to 10
8xlarge 32 64/128/256* 1 x 1900 15 10
12xlarge 48 96/192/384* 3 x 950 22.5 15
16xlarge 64 128/256/512* 2 x 1900 30 20
24xlarge 96 192/384/768* 3 x 1900 40 30
48xlarge 192 384/768/1536* 6 x 1900 50 40
metal-24xl 96 192/384/768* 3 x 1900 40 30
metal-48xl 192 384/768/1536* 6 x 1900 50 40

*Memory values are for C8gd/M8gd/R8gd respectively

Availability and pricing

M8gd, C8gd, and R8gd instances are available today in US East (N. Virginia, Ohio) and US West (Oregon) Regions. These instances can be purchased as On-Demand instances, Savings Plans, Spot instances, or as Dedicated instances or Dedicated hosts.

Get started today

You can launch M8gd, C8gd and R8gd instances today in the supported Regions through the AWS Management Console, AWS Command Line Interface (AWS CLI), or AWS SDKs. To learn more, check out the collection of Graviton resources to help you start migrating your applications to Graviton instance types. You can also visit the Graviton Getting Started Guide to begin your Graviton adoption journey.

— Micah;


How is the News Blog doing? Take this 1 minute survey!

(This survey is hosted by an external company. AWS handles your information as described in the AWS Privacy Notice. AWS will own the data gathered via this survey and will not share the information collected with survey respondents.)

Get Started with Amazon S3 Event Driven Design Patterns

Post Syndicated from Micah Walter original https://aws.amazon.com/blogs/architecture/get-started-with-amazon-s3-event-driven-design-patterns/

Event driven programs use events to initiate succeeding steps in a process. For example, the completion of an upload job may then initiate an image processing job. This allows developers to create complex architectures by using the principle of decoupling. Decoupling is preferable for many workflows, as it allows each component to perform its tasks independently, which improves efficiency. Examples are ecommerce order processing, image processing, and other long running batch jobs.

Amazon Simple Storage Service (S3) is an object-based storage solution from Amazon Web Services (AWS) that allows you to store and retrieve any amount of data, at any scale. Amazon S3 Event Notifications provides users a mechanism for initiating events when certain actions take place inside an S3 bucket.

In this blog post, we will illustrate how you can use Amazon S3 Event Notifications in combination with a powerful suite of Amazon messaging services. This will allow you to implement an event driven architecture for a variety of common use cases.

Setting up Amazon S3 Event Notifications

We first must understand the types of events that can be initiated with Amazon S3 Event Notifications. Events can be initiated by uploading, modifying, deleting an object, or other actions. When an event is initiated, a payload is created containing the event metadata. This includes information about the object that initiated the event itself.

To enable notifications, you must first add a notification configuration that identifies the events you want Amazon S3 to publish. Specify the destinations where you want Amazon S3 to send the notifications. This configuration is stored in the notification subresource, which you can find under the Properties tab within your S3 bucket, see Figure 1.

Figure 1. Properties tab showing S3 Event Notifications subresource

Figure 1. Properties tab showing S3 Event Notifications subresource

An event notification can be initiated anytime an object is uploaded, modified, or deleted, depending on your configuration details. You can create multiple notification configurations for different scenarios, shown in Figure 2. For example, one configuration can handle new or modified objects, and another configuration can handle deletions. You can specify that events will only be initiated when objects contain a specific prefix, or following the restoration of an object. For a complete listing of all the configuration options and event types, read documentation on supported event types.

Figure 2. S3 Event Notifications subresource details and options

Figure 2. S3 Event Notifications subresource details and options

When all of the conditions in your configuration have been met, a new event will be initiated and sent to the destination you specify. An S3 event destination can be an AWS Lambda function, an Amazon Simple Queue Service (SQS) queue, or an Amazon Simple Notification Service (SNS) topic, see Figure 3.

Figure 3. S3 Event Notifications subresource destination settings

Figure 3. S3 Event Notifications subresource destination settings

Event driven design patterns

There are many common design patterns for building event driven programs with Amazon S3 Event Notifications. Once you have set up your notification configuration, the next step is to consume the event. The following describes a few typical architectures you might consider, depending on the needs of your application.

Synchronous and reliable point-to-point processing

Figure 4. Point-to-point processing with S3 and Lambda as a destination

Figure 4. Point-to-point processing with S3 and Lambda as a destination

One common use case for event driven processing, is when synchronous and reliable information is required. For example, a mobile application processes images uploaded by users and automatically tags the images with the detected objects using Artificial Intelligence/Machine Learning (AI/ML). From an architectural perspective (Figure 4), an image is uploaded to an S3 bucket, which generates an event notification. This initiates a Lambda function that sends the details of the uploaded image to Amazon Rekognition for tagging. Results from Amazon Rekognition could be further processed by the Lambda function and stored in a database like Amazon DynamoDB.

With this type of architecture, there is no contingency for dealing with multiple images arriving simultaneously in the S3 bucket. If this application sends too many requests to Lambda, events can start to pile up. This can cause a failure to process some of the images. To make our program more fault tolerant, adding an Amazon SQS queue would help, as shown in Figure 5.

Asynchronous and queued point-to-point processing 

Figure 5. Queued point-to-point processing with S3, SQS, and Lambda

Figure 5. Queued point-to-point processing with S3, SQS, and Lambda

Architectures that require the processing of information in an asynchronous fashion can use this pattern. Building off the first example, a mobile application might provide a solution to allow end users to bulk upload thousands of images simultaneously. It can then use AWS Lambda to send the images to Amazon Rekognition for tagging.

By providing a queue-based asynchronous solution, the Lambda function can retrieve work from the SQS queue at its own pace. This allows it to control the processing flow by processing files sequentially without risk of being overloaded. This is especially useful if the application must handle incomplete or partial uploads when a connection is temporarily lost.

Currently, Amazon S3 Event Notifications only work with standard SQS queues, and first-in-first-out (FIFO) SQS queues are not supported. Read more about how to configure S3 event notification with an SQS queue as a destination. Your Lambda function in this architecture must be adjusted to handle the message payload arriving from SQS. This is because it will have a slightly different form than the original event notification body generated from S3.

Parallel processing with “Fan Out” architecture

Figure 6. Fan out design pattern with S3, SNS, and SQS before sending to a Lambda function

Figure 6. Fan out design pattern with S3, SNS, and SQS before sending to a Lambda function

To create a “fan out” style architecture where a single event is propagated to many destinations in parallel, SNS is combined with SQS. Configure your S3 event notification to use an SNS topic as its destination, as shown in Figure 6. You can then direct multiple subsequent processes to act on the same event. This is especially useful if you aim to do parallel processing on the same object in S3.

For example, if you wanted to process a source image into multiple target resolutions, you could create a Lambda function. The function will use the “fan-out” pattern to process all images at the same time, at each resolution. You could then subscribe an SQS queue to your SNS topics. This ensures that Event Notifications sent to SNS are verified as complete by SQS, once they’ve been processed by your Lambda function.

Figure 7. Fan out design pattern including secondary pipeline for deleting images

Figure 7. Fan out design pattern including secondary pipeline for deleting images

To extend the use case of image processing even further, you could create multiple SNS topics to handle different types of events from the same S3 bucket. As depicted in Figure 7, this architecture would allow your program to handle creations and updates differently than deletions. You could also process images differently based on their S3 prefix.

Adjust your Lambda code to handle messages making their way through SNS and SQS. Their payloads will be slightly different than the original S3 Event Notification payload.

Real-time notifications

Figure 8. Event driven design pattern for real-time notifications

Figure 8. Event driven design pattern for real-time notifications

In addition to application-to-application messaging, Amazon SNS provides application-to-person (A2P) communication (see Figure 8). Amazon SNS can send SMS text messages to mobile subscribers in over 100 countries. It can also send push notifications to Android and Apple devices and emails over SMTP. Using A2P, uploading an image to an Amazon S3 bucket can generate a notification to a group of users via their choice of Amazon SNS A2P platform.

Conclusion

In this blog post, we’ve shown you the basic design patterns for developing an event driven architecture using Amazon S3 Event Notifications. You can create many more complicated architecture patterns to suit your needs. By using Amazon SQS, Amazon SNS, and AWS Lambda, you can design an event driven program that is fault tolerant, scalable, and smartly decoupled. But don’t stop there! Consider expanding your program further by utilizing AWS Lambda destinations. Or combine parallel image processing with highly scalable A2P notifications, which will alert your users when a task is complete.

For further reading: