Tag Archives: Amazon Rekognition

Unstructured data management and governance using AWS AI/ML and analytics services

Post Syndicated from Sakti Mishra original https://aws.amazon.com/blogs/big-data/unstructured-data-management-and-governance-using-aws-ai-ml-and-analytics-services/

Unstructured data is information that doesn’t conform to a predefined schema or isn’t organized according to a preset data model. Unstructured information may have a little or a lot of structure but in ways that are unexpected or inconsistent. Text, images, audio, and videos are common examples of unstructured data. Most companies produce and consume unstructured data such as documents, emails, web pages, engagement center phone calls, and social media. By some estimates, unstructured data can make up to 80–90% of all new enterprise data and is growing many times faster than structured data. After decades of digitizing everything in your enterprise, you may have an enormous amount of data, but with dormant value. However, with the help of AI and machine learning (ML), new software tools are now available to unearth the value of unstructured data.

In this post, we discuss how AWS can help you successfully address the challenges of extracting insights from unstructured data. We discuss various design patterns and architectures for extracting and cataloging valuable insights from unstructured data using AWS. Additionally, we show how to use AWS AI/ML services for analyzing unstructured data.

Why it’s challenging to process and manage unstructured data

Unstructured data makes up a large proportion of the data in the enterprise that can’t be stored in a traditional relational database management systems (RDBMS). Understanding the data, categorizing it, storing it, and extracting insights from it can be challenging. In addition, identifying incremental changes requires specialized patterns and detecting sensitive data and meeting compliance requirements calls for sophisticated functions. It can be difficult to integrate unstructured data with structured data from existing information systems. Some view structured and unstructured data as apples and oranges, instead of being complementary. But most important of all, the assumed dormant value in the unstructured data is a question mark, which can only be answered after these sophisticated techniques have been applied. Therefore, there is a need to being able to analyze and extract value from the data economically and flexibly.

Solution overview

Data and metadata discovery is one of the primary requirements in data analytics, where data consumers explore what data is available and in what format, and then consume or query it for analysis. If you can apply a schema on top of the dataset, then it’s straightforward to query because you can load the data into a database or impose a virtual table schema for querying. But in the case of unstructured data, metadata discovery is challenging because the raw data isn’t easily readable.

You can integrate different technologies or tools to build a solution. In this post, we explain how to integrate different AWS services to provide an end-to-end solution that includes data extraction, management, and governance.

The solution integrates data in three tiers. The first is the raw input data that gets ingested by source systems, the second is the output data that gets extracted from input data using AI, and the third is the metadata layer that maintains a relationship between them for data discovery.

The following is a high-level architecture of the solution we can build to process the unstructured data, assuming the input data is being ingested to the raw input object store.
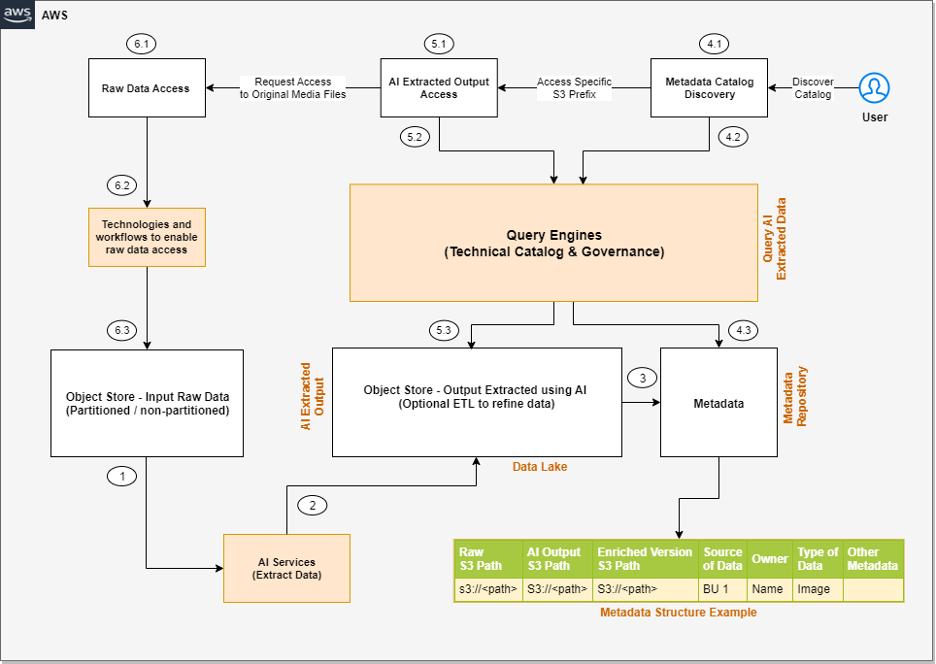
Unstructured Data Management - Block Level Architecture Diagram

The steps of the workflow are as follows:

  1. Integrated AI services extract data from the unstructured data.
  2. These services write the output to a data lake.
  3. A metadata layer helps build the relationship between the raw data and AI extracted output. When the data and metadata are available for end-users, we can break the user access pattern into additional steps.
  4. In the metadata catalog discovery step, we can use query engines to access the metadata for discovery and apply filters as per our analytics needs. Then we move to the next stage of accessing the actual data extracted from the raw unstructured data.
  5. The end-user accesses the output of the AI services and uses the query engines to query the structured data available in the data lake. We can optionally integrate additional tools that help control access and provide governance.
  6. There might be scenarios where, after accessing the AI extracted output, the end-user wants to access the original raw object (such as media files) for further analysis. Additionally, we need to make sure we have access control policies so the end-user has access only to the respective raw data they want to access.

Now that we understand the high-level architecture, let’s discuss what AWS services we can integrate in each step of the architecture to provide an end-to-end solution.

The following diagram is the enhanced version of our solution architecture, where we have integrated AWS services.

Unstructured Data Management - AWS Native Architecture

Let’s understand how these AWS services are integrated in detail. We have divided the steps into two broad user flows: data processing and metadata enrichment (Steps 1–3) and end-users accessing the data and metadata with fine-grained access control (Steps 4–6).

  1. Various AI services (which we discuss in the next section) extract data from the unstructured datasets.
  2. The output is written to an Amazon Simple Storage Service (Amazon S3) bucket (labeled Extracted JSON in the preceding diagram). Optionally, we can restructure the input raw objects for better partitioning, which can help while implementing fine-grained access control on the raw input data (labeled as the Partitioned bucket in the diagram).
  3. After the initial data extraction phase, we can apply additional transformations to enrich the datasets using AWS Glue. We also build an additional metadata layer, which maintains a relationship between the raw S3 object path, the AI extracted output path, the optional enriched version S3 path, and any other metadata that will help the end-user discover the data.
  4. In the metadata catalog discovery step, we use the AWS Glue Data Catalog as the technical catalog, Amazon Athena and Amazon Redshift Spectrum as query engines, AWS Lake Formation for fine-grained access control, and Amazon DataZone for additional governance.
  5. The AI extracted output is expected to be available as a delimited file or in JSON format. We can create an AWS Glue Data Catalog table for querying using Athena or Redshift Spectrum. Like the previous step, we can use Lake Formation policies for fine-grained access control.
  6. Lastly, the end-user accesses the raw unstructured data available in Amazon S3 for further analysis. We have proposed integrating Amazon S3 Access Points for access control at this layer. We explain this in detail later in this post.

Now let’s expand the following parts of the architecture to understand the implementation better:

  • Using AWS AI services to process unstructured data
  • Using S3 Access Points to integrate access control on raw S3 unstructured data

Process unstructured data with AWS AI services

As we discussed earlier, unstructured data can come in a variety of formats, such as text, audio, video, and images, and each type of data requires a different approach for extracting metadata. AWS AI services are designed to extract metadata from different types of unstructured data. The following are the most commonly used services for unstructured data processing:

  • Amazon Comprehend – This natural language processing (NLP) service uses ML to extract metadata from text data. It can analyze text in multiple languages, detect entities, extract key phrases, determine sentiment, and more. With Amazon Comprehend, you can easily gain insights from large volumes of text data such as extracting product entity, customer name, and sentiment from social media posts.
  • Amazon Transcribe – This speech-to-text service uses ML to convert speech to text and extract metadata from audio data. It can recognize multiple speakers, transcribe conversations, identify keywords, and more. With Amazon Transcribe, you can convert unstructured data such as customer support recordings into text and further derive insights from it.
  • Amazon Rekognition – This image and video analysis service uses ML to extract metadata from visual data. It can recognize objects, people, faces, and text, detect inappropriate content, and more. With Amazon Rekognition, you can easily analyze images and videos to gain insights such as identifying entity type (human or other) and identifying if the person is a known celebrity in an image.
  • Amazon Textract – You can use this ML service to extract metadata from scanned documents and images. It can extract text, tables, and forms from images, PDFs, and scanned documents. With Amazon Textract, you can digitize documents and extract data such as customer name, product name, product price, and date from an invoice.
  • Amazon SageMaker – This service enables you to build and deploy custom ML models for a wide range of use cases, including extracting metadata from unstructured data. With SageMaker, you can build custom models that are tailored to your specific needs, which can be particularly useful for extracting metadata from unstructured data that requires a high degree of accuracy or domain-specific knowledge.
  • Amazon Bedrock – This fully managed service offers a choice of high-performing foundation models (FMs) from leading AI companies like AI21 Labs, Anthropic, Cohere, Meta, Stability AI, and Amazon with a single API. It also offers a broad set of capabilities to build generative AI applications, simplifying development while maintaining privacy and security.

With these specialized AI services, you can efficiently extract metadata from unstructured data and use it for further analysis and insights. It’s important to note that each service has its own strengths and limitations, and choosing the right service for your specific use case is critical for achieving accurate and reliable results.

AWS AI services are available via various APIs, which enables you to integrate AI capabilities into your applications and workflows. AWS Step Functions is a serverless workflow service that allows you to coordinate and orchestrate multiple AWS services, including AI services, into a single workflow. This can be particularly useful when you need to process large amounts of unstructured data and perform multiple AI-related tasks, such as text analysis, image recognition, and NLP.

With Step Functions and AWS Lambda functions, you can create sophisticated workflows that include AI services and other AWS services. For instance, you can use Amazon S3 to store input data, invoke a Lambda function to trigger an Amazon Transcribe job to transcribe an audio file, and use the output to trigger an Amazon Comprehend analysis job to generate sentiment metadata for the transcribed text. This enables you to create complex, multi-step workflows that are straightforward to manage, scalable, and cost-effective.

The following is an example architecture that shows how Step Functions can help invoke AWS AI services using Lambda functions.
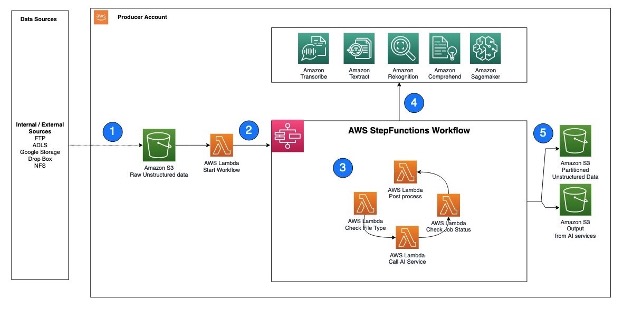
AWS AI Services - Lambda Event Workflow -Unstructured Data

The workflow steps are as follows:

  1. Unstructured data, such as text files, audio files, and video files, are ingested into the S3 raw bucket.
  2. A Lambda function is triggered to read the data from the S3 bucket and call Step Functions to orchestrate the workflow required to extract the metadata.
  3. The Step Functions workflow checks the type of file, calls the corresponding AWS AI service APIs, checks the job status, and performs any postprocessing required on the output.
  4. AWS AI services can be accessed via APIs and invoked as batch jobs. To extract metadata from different types of unstructured data, you can use multiple AI services in sequence, with each service processing the corresponding file type.
  5. After the Step Functions workflow completes the metadata extraction process and performs any required postprocessing, the resulting output is stored in an S3 bucket for cataloging.

Next, let’s understand how can we implement security or access control on both the extracted output as well as the raw input objects.

Implement access control on raw and processed data in Amazon S3

We just consider access controls for three types of data when managing unstructured data: the AI-extracted semi-structured output, the metadata, and the raw unstructured original files. When it comes to AI extracted output, it’s in JSON format and can be restricted via Lake Formation and Amazon DataZone. We recommend keeping the metadata (information that captures which unstructured datasets are already processed by the pipeline and available for analysis) open to your organization, which will enable metadata discovery across the organization.

To control access of raw unstructured data, you can integrate S3 Access Points and explore additional support in the future as AWS services evolve. S3 Access Points simplify data access for any AWS service or customer application that stores data in Amazon S3. Access points are named network endpoints that are attached to buckets that you can use to perform S3 object operations. Each access point has distinct permissions and network controls that Amazon S3 applies for any request that is made through that access point. Each access point enforces a customized access point policy that works in conjunction with the bucket policy that is attached to the underlying bucket. With S3 Access Points, you can create unique access control policies for each access point to easily control access to specific datasets within an S3 bucket. This works well in multi-tenant or shared bucket scenarios where users or teams are assigned to unique prefixes within one S3 bucket.

An access point can support a single user or application, or groups of users or applications within and across accounts, allowing separate management of each access point. Every access point is associated with a single bucket and contains a network origin control and a Block Public Access control. For example, you can create an access point with a network origin control that only permits storage access from your virtual private cloud (VPC), a logically isolated section of the AWS Cloud. You can also create an access point with the access point policy configured to only allow access to objects with a defined prefix or to objects with specific tags. You can also configure custom Block Public Access settings for each access point.

The following architecture provides an overview of how an end-user can get access to specific S3 objects by assuming a specific AWS Identity and Access Management (IAM) role. If you have a large number of S3 objects to control access, consider grouping the S3 objects, assigning them tags, and then defining access control by tags.
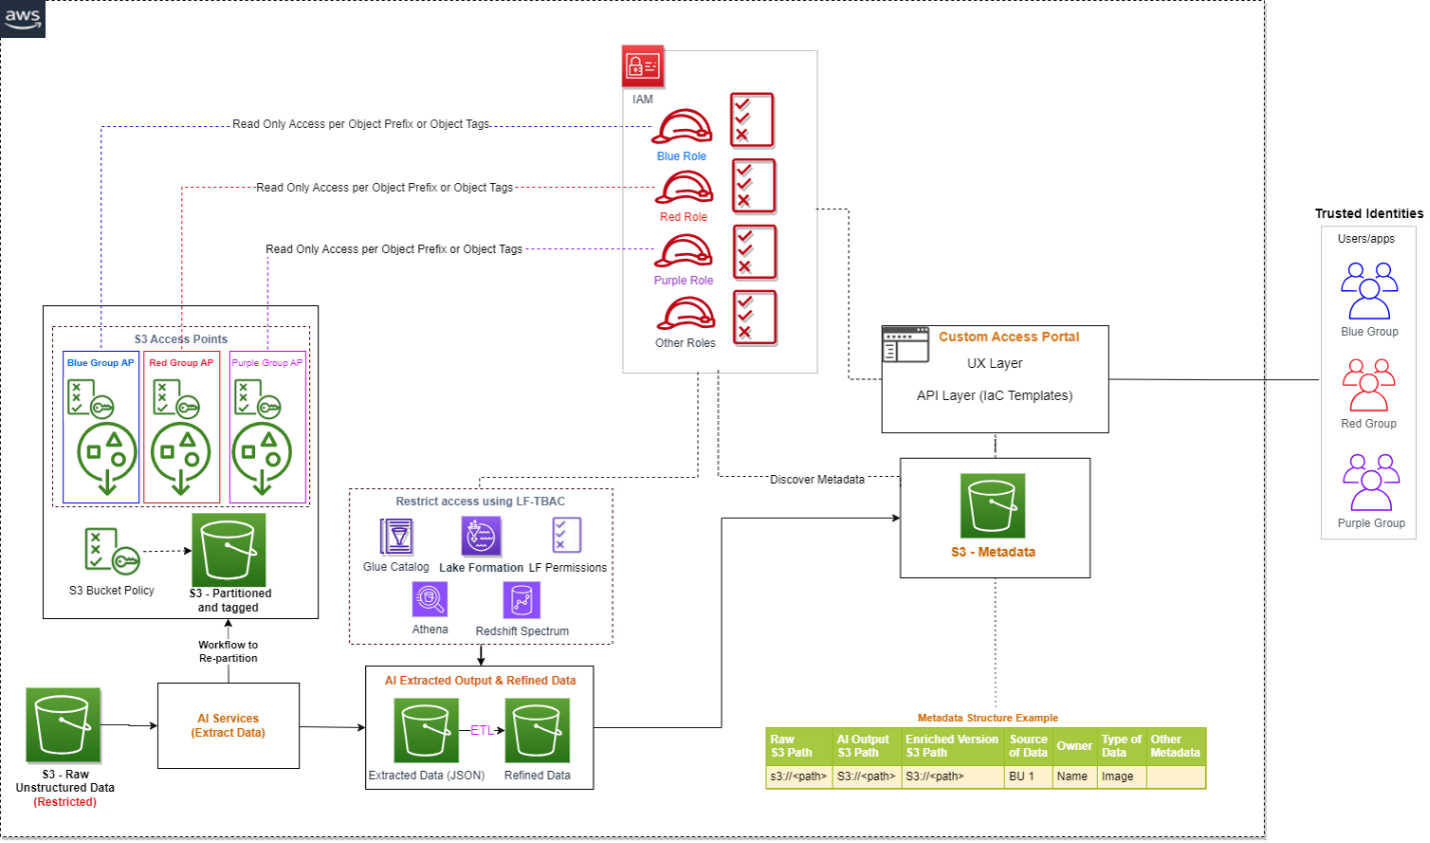
S3 Access Points - Unstructured Data Management - Access Control

If you are implementing a solution that integrates S3 data available in multiple AWS accounts, you can take advantage of cross-account support for S3 Access Points.

Conclusion

This post explained how you can use AWS AI services to extract readable data from unstructured datasets, build a metadata layer on top of them to allow data discovery, and build an access control mechanism on top of the raw S3 objects and extracted data using Lake Formation, Amazon DataZone, and S3 Access Points.

In addition to AWS AI services, you can also integrate large language models with vector databases to enable semantic or similarity search on top of unstructured datasets. To learn more about how to enable semantic search on unstructured data by integrating Amazon OpenSearch Service as a vector database, refer to Try semantic search with the Amazon OpenSearch Service vector engine.

As of writing this post, S3 Access Points is one of the best solutions to implement access control on raw S3 objects using tagging, but as AWS service features evolve in the future, you can explore alternative options as well.


About the Authors

Sakti Mishra is a Principal Solutions Architect at AWS, where he helps customers modernize their data architecture and define their end-to-end data strategy, including data security, accessibility, governance, and more. He is also the author of the book Simplify Big Data Analytics with Amazon EMR. Outside of work, Sakti enjoys learning new technologies, watching movies, and visiting places with family.

Bhavana Chirumamilla is a Senior Resident Architect at AWS with a strong passion for data and machine learning operations. She brings a wealth of experience and enthusiasm to help enterprises build effective data and ML strategies. In her spare time, Bhavana enjoys spending time with her family and engaging in various activities such as traveling, hiking, gardening, and watching documentaries.

Sheela Sonone is a Senior Resident Architect at AWS. She helps AWS customers make informed choices and trade-offs about accelerating their data, analytics, and AI/ML workloads and implementations. In her spare time, she enjoys spending time with her family—usually on tennis courts.

Daniel Bruno is a Principal Resident Architect at AWS. He had been building analytics and machine learning solutions for over 20 years and splits his time helping customers build data science programs and designing impactful ML products.

AWS Week in Review: New Service for Generative AI and Amazon EC2 Trn1n, Inf2, and CodeWhisperer now GA – April 17, 2023

Post Syndicated from Antje Barth original https://aws.amazon.com/blogs/aws/aws-week-in-review-new-service-for-generative-ai-and-amazon-ec2-trn1n-inf2-and-codewhisperer-now-ga-april-17-2023/

I could almost title this blog post the “AWS AI/ML Week in Review.” This past week, we announced several new innovations and tools for building with generative AI on AWS. Let’s dive right into it.

Last Week’s Launches
Here are some launches that got my attention during the previous week:

Announcing Amazon Bedrock and Amazon Titan models Amazon Bedrock is a new service to accelerate your development of generative AI applications using foundation models through an API without managing infrastructure. You can choose from a wide range of foundation models built by leading AI startups and Amazon. The new Amazon Titan foundation models are pre-trained on large datasets, making them powerful, general-purpose models. You can use them as-is or privately to customize them with your own data for a particular task without annotating large volumes of data. Amazon Bedrock is currently in limited preview. Sign up here to learn more.

Building with Generative AI on AWS

Amazon EC2 Trn1n and Inf2 instances are now generally availableTrn1n instances, powered by AWS Trainium accelerators, double the network bandwidth (compared to Trn1 instances) to 1,600 Gbps of Elastic Fabric Adapter (EFAv2). The increased bandwidth delivers even higher performance for training network-intensive generative AI models such as large language models (LLMs) and mixture of experts (MoE). Inf2 instances, powered by AWS Inferentia2 accelerators, deliver high performance at the lowest cost in Amazon EC2 for generative AI models, including LLMs and vision transformers. They are the first inference-optimized instances in Amazon EC2 to support scale-out distributed inference with ultra-high-speed connectivity between accelerators. Compared to Inf1 instances, Inf2 instances deliver up to 4x higher throughput and up to 10x lower latency. Check out my blog posts on Trn1 instances and Inf2 instances for more details.

Amazon CodeWhisperer, free for individual use, is now generally availableAmazon CodeWhisperer is an AI coding companion that generates real-time single-line or full-function code suggestions in your IDE to help you build applications faster. With GA, we introduce two tiers: CodeWhisperer Individual and CodeWhisperer Professional. CodeWhisperer Individual is free to use for generating code. You can sign up with an AWS Builder ID based on your email address. The Individual Tier provides code recommendations, reference tracking, and security scans. CodeWhisperer Professional—priced at $19 per user, per month—offers additional enterprise administration capabilities. Steve’s blog post has all the details.

Amazon GameLift adds support for Unreal Engine 5Amazon GameLift is a fully managed solution that allows you to manage and scale dedicated game servers for session-based multiplayer games. The latest version of the Amazon GameLift Server SDK 5.0 lets you integrate your Unreal 5-based game servers with the Amazon GameLift service. In addition, the latest Amazon GameLift Server SDK with Unreal 5 plugin is built to work with Amazon GameLift Anywhere so that you can test and iterate Unreal game builds faster and manage game sessions across any server hosting infrastructure. Check out the release notes to learn more.

Amazon Rekognition launches Face Liveness to deter fraud in facial verification – Face Liveness verifies that only real users, not bad actors using spoofs, can access your services. Amazon Rekognition Face Liveness analyzes a short selfie video to detect spoofs presented to the camera, such as printed photos, digital photos, digital videos, or 3D masks, as well as spoofs that bypass the camera, such as pre-recorded or deepfake videos. This AWS Machine Learning Blog post walks you through the details and shows how you can add Face Liveness to your web and mobile applications.

For a full list of AWS announcements, be sure to keep an eye on the What’s New at AWS page.

Other AWS News
Here are some additional news items and blog posts that you may find interesting:

Updates to the AWS Well-Architected Framework – The most recent content updates and improvements focus on providing expanded guidance across the AWS service portfolio to help you make more informed decisions when developing implementation plans. Services that were added or expanded in coverage include AWS Elastic Disaster Recovery, AWS Trusted Advisor, AWS Resilience Hub, AWS Config, AWS Security Hub, Amazon GuardDuty, AWS Organizations, AWS Control Tower, AWS Compute Optimizer, AWS Budgets, Amazon CodeWhisperer, and Amazon CodeGuru. This AWS Architecture Blog post has all the details.

Amazon releases largest dataset for training “pick and place” robots – In an effort to improve the performance of robots that pick, sort, and pack products in warehouses, Amazon has publicly released the largest dataset of images captured in an industrial product-sorting setting. Where the largest previous dataset of industrial images featured on the order of 100 objects, the Amazon dataset, called ARMBench, features more than 190,000 objects. Check out this Amazon Science Blog post to learn more.

AWS open-source news and updates – My colleague Ricardo writes this weekly open-source newsletter in which he highlights new open-source projects, tools, and demos from the AWS Community. Read edition #153 here.

Upcoming AWS Events
Check your calendars and sign up for these AWS events:

Build On AWS - Generative AI#BuildOn Generative AI – Join our weekly live Build On Generative AI Twitch show. Every Monday morning, 9:00 US PT, my colleagues Emily and Darko take a look at aspects of generative AI. They host developers, scientists, startup founders, and AI leaders and discuss how to build generative AI applications on AWS.

In today’s episode, Emily walks us through the latest AWS generative AI announcements. You can watch the video here.

Dot Net Developer Day.NET Developer Day.NET Enterprise Developer Day EMEA 2023 (April 25) is a free, one-day virtual event providing enterprise developers with the most relevant information to swiftly and efficiently migrate and modernize their .NET applications and workloads on AWS.

AWS Developer Innovation DayAWS Developer Innovation DayAWS Developer Innovation Day (April 26) is a new, free, one-day virtual event designed to help developers and teams be productive and collaborate from discovery to delivery, to running software and building applications. Get a first look at exciting product updates, technical deep dives, and keynotes.

AWS Global Summits – Check your calendars and sign up for the AWS Summit close to where you live or work: Tokyo (April 20–21), Singapore (May 4), Stockholm (May 11), Hong Kong (May 23), Tel Aviv (May 31), Amsterdam (June 1), London (June 7), Washington, DC (June 7–8), Toronto (June 14), Madrid (June 15), and Milano (June 22).

You can browse all upcoming AWS-led in-person and virtual events and developer-focused events such as Community Days.

That’s all for this week. Check back next Monday for another Week in Review!

— Antje

This post is part of our Week in Review series. Check back each week for a quick roundup of interesting news and announcements from AWS!

Detecting solar panel damage with Amazon Rekognition Custom Labels

Post Syndicated from Ramakant Joshi original https://aws.amazon.com/blogs/architecture/detecting-solar-panel-damage-with-amazon-rekognition-custom-labels/

Enterprises perform quality control to ensure products meet production standards and avoid potential brand reputation damage. As the cost of sensors decreases and connectivity increases, industries adopt real-time imagery analysis to detect quality issues.

At the same time, artificial intelligence (AI) advancements enable advanced automation, reduce overall cost and project time, and produce accurate defect detection results in manufacturing plants. As these technologies mature, AI-driven inspections are more common outside of the plant environment.

Overview of solution

This post describes our SOLVED (Solar Roving Eye Detector) project leveraging machine learning (ML) to identify damaged solar panels using Amazon Rekognition Custom Labels and alert operators to take corrective action.

As solar adoption increases, so does the need to detect panel damage. Applying AWS-managed AI services is a simpler, more cost-effective approach than human solar panel inspection or custom-built production applications.

Customers can capture and process videos from the field and build effective computer vision models without creating a dedicated data science team. This approach can be generalized for use cases across industries to detect defects in wind turbines, cell phone towers, automotive parts, and other field components.

Amazon Rekognition Custom Labels builds off of existing service capabilities already trained to identify the objects and scenes in millions of cross-category images. You upload a small set of training images—typically a few hundred or less—into our console. The solution automatically loads and inspects the training data, selects the right ML algorithms, trains a model, and provides model performance metrics. You can then integrate your custom model into your applications through the Amazon Rekognition Custom Labels API.

Walkthrough

This post introduces the SOLVED project featured at the re:Invent 2021 Builders Fair. It will:

  • Review the need for solar panel damage detection
  • Discuss a cloud-based approach to ingest, store, process, analyze, and detect damaged solar panels
  • Present a diagram streaming videos from a Raspberry Pi, storing them on Amazon Simple Storage Service (Amazon S3), processing them using an AWS video-on-demand solution, and inferring damage using Amazon Rekognition
  • Introduce a console to mimic an operation center for appropriate action
  • Demonstrate the integration of AWS IoT Core with a Philips Hue bulb for operator alerts

Prerequisites

Before getting started, review the following prerequisites for this solution:

The SOLVED project

The SOLVED project leverages ML to identify damaged solar panels using Amazon Rekognition Custom Labels. It involves four steps:

  1. Data ingestion: Live solar panel video ingested from moving rover into an Amazon S3 bucket
  2. Pre-processing: Captured video split into thumbnail images
  3. Processing and visualization: ML models making real-time inferences to identify defective panels with a dashboard to review images and prediction scores
  4. Alerting: Defective panels result in notification sent through MQTT messages to light a smart bulb

Figure 1 shows the SOLVED project system architecture.

The SOLVED project system architecture

Figure 1. The SOLVED project system architecture

Installation steps

Let’s review each of the steps in this use case.

Data ingestion

The data ingestion layer of the SOLVED project consists of a continuous video stream captured as a rover moves through a field of solar panels.

We used a Freenove 4WD Smart Car rover with Raspberry Pi. The mounted camera captures video as it moves through the field. We installed an Amazon Kinesis Video Streams Producer on the Pi and streamed the live video to a Kinesis Video Stream named reinventbuilder2021.

Figure 2 shows the Kinesis Video Stream setup window for reinventbuilder2021.

Kinesis Video Stream setup for reinventbuilder2021

Figure 2. Kinesis Video Stream setup for reinventbuilder2021

To start streaming, use the following steps.

  1. Create a new Kinesis Video Stream using this Amazon Kinesis Video Streams Developer Guide
  2. Make a note of the Amazon Resource Name (ARN)
  3. On the Pi, access the command prompt and use aws sts get-session-token for temporary credentials. The IAM user should have the permissions for Kinesis Video Streams PutMedia.
  4. Set the following environment variables:
    export AWS_DEFAULT_REGION="us-east-1"
    export AWS_ACCESS_KEY_ID="xxxxx"
    export AWS_SECRET_ACCESS_KEY="yyyyy"
    export AWS_SESSION_TOKEN=“zzzzz”
  5. Start the streamer using the following command:
    cd ~/amazon-kinesis-video-streams-producer-sdk-cpp/build
    ./kvs_gstreamer_sample reinventbuilder2021
  6. Validate the captured stream by viewing the Media playback on the console.

Figure 3 shows the video stream console, including the Media playback option.

Video stream console with Media playback option

Figure 3. Video stream console with Media playback option

There are two ways to clip video snippets, which we’ll do next.

You can use the Download clip button on the video stream console as shown in Figure 4.

Choose your video streaming clip duration

Figure 4. Choose your video streaming clip duration

Alternately, you can use a script from the following command line:

ONE_MIN_AGO=$(date -v -30S -u "+%FT%T+0000")
NOW=$(date -u "+%FT%T+0000")

FILE_NAME=reinventbuilder-solved-$RANDOM.mp4
echo $FILE_NAME
S3_PATH=s3://videoondemandsplitter-source-e6lyof9qjv1j/

aws kinesis-video-archived-media get-clip --endpoint-url $KVS_DATA_ENDPOINT \
--stream-name reinventbuilder2021 \
--clip-fragment-selector "FragmentSelectorType=SERVER_TIMESTAMP,TimestampRange={StartTimestamp=$ONE_MIN_AGO,EndTimestamp=$NOW}" \
$FILE_NAME

echo "Running get-clip for stream"

sleep 45

aws s3 cp $FILE_NAME $S3_PATH
echo "copying file $FILE_NAME TO $S3_PATH"

The clip is available in the Amazon S3 source folder created using AWS CloudFormation, as shown in Figure 5.

Access your clip in the Amazon S3 source folder

Figure 5. Access your clip in the Amazon S3 source folder

Pre-processing

To process the video, we leverage Video on Demand at AWS. This solution encodes video files with AWS Elemental MediaConvert. Out of the box, it:

1. Automatically transcodes videos uploaded to Amazon S3 into formats suitable for playback on a range of devices using MediaConvert
2. Customizes MediaConvert job settings by uploading a custom file and using different settings per input
3. Stores transcoded files in a destination Amazon S3 bucket and uses CloudFront to deliver them to end viewers
4. Provides outputs including input file metadata, job settings, and output details in addition to transcoded video. These outputs are stored in a separate JSON file, available for further processing

For our use case, we used the frame capture feature to create a set of thumbnails from the source videos. The thumbnails are stored in the Amazon S3 bucket with the video output.

To deploy this solution, use the CloudFormation stack.

Processing and visualization

Every trained ML model requires quality training data. We began with publicly available solar panel images that were categorized as “good” or “defective” and uploaded the images to an Amazon S3 bucket into corresponding folders.

Next, we configured Amazon Rekognition Custom Labels with the folders to indicate the labels to use in training and deploying the model. Using the rover images, we tested the model.

We used the rover to record videos of good and damaged solar panels over an extended period and label the outcome favorably. The video was then split into individual frames using MediaConvert, giving us a well-labeled dataset that we trained our model with using Amazon Rekognition Custom Labels.

We used the model endpoint to infer outcomes on solar panels with varying damage footprints across multiple locations. AWS Elemental Mediaconvert expedited the process of curating the training set, and creating the model and endpoint using Amazon Rekognition was straightforward.

As shown in Figure 6, we used a training set of 7,000 images with an even mix of good and damaged panels.

A training set of images

Figure 6. A training set of images

Examples of good panel images are depicted in Figure 7.

Good panel images

Figure 7. Good panel images

Examples of damaged panel images are depicted in Figure 8.

Damaged panel images

Figure 8. Damaged panel images

In this use case, 90 percent model accuracy was achieved.

To visualize the results, we leveraged AWS Amplify to provide an operator interface to identify the damaged panels.

Figure 9 shows screenshots from the operator dashboard with output from the Amazon Custom Labels Rekognition model for good and defective panels.

Operator dashboard in AWS Amplify

Figure 9. Operator dashboard in AWS Amplify

Alerting

Maintenance teams must be notified of defective panels to take corrective action. To create alerts, we configured AWS IoT Core to send MQTT messages to a Philips Hue smart bulb, with red bulbs indicating defective panels. To set up the Philips Hue API, use the How to develop for Hue guide.

For example, here’s the API to change color:

PUT https://192.xx.xx.xx/api/xxxxxxx/lights/1/state

{"on":true, "sat":254, "bri":254,"hue":20000} 

turns color to green

{"on":true, "sat":254, "bri":254,"hue":1000}

turns to red.

We set up a client on the Pi that listens on an AWS IoT Core MQTT topic and makes an API request to Philips Hue.

To connect a device to AWS IoT, complete these steps:

  1. Create an IoT thing, a device certificate, and an AWS IoT policy. An AWS IoT thing represents a physical device (in this case, Raspberry Pi) and contains static device metadata, as shown in Figure 10.
    AWS IoT Thing

    Figure 10. AWS IoT Thing

    2. Create a device certificate, required to connect to and authenticate with AWS IoT. An example is shown in Figure 11.

Device certificate

Figure 11. Device certificate

3. Associate an AWS IoT policy with each device certificate. They determine which AWS IoT resources the device can access. In this case, we allowed iot.*, giving the device access to all IoT resources, as shown in Figure 12.

IoT policy

Figure 12. IoT policy

Devices and other clients use an AWS IoT root CA certificate to authenticate the server they’re communicating with. For more on how devices authenticate with AWS IoT Core, see Server authentication in the AWS IoT Core Developer Guide. Copy the certificate chain to the Raspberry Pi.

For communication with the Philips Hue, we used the Qhue wrapper as shown in Figure 13.

Qhue wrapper

Figure 13. Qhue wrapper

The authors presented a demo of this solution at re:Invent 2021 Builder’s Fair.

Author demo at re:Invent 2021 Builder's Fair

Figure 14. Author demo at re:Invent 2021 Builder’s Fair

Clean up

If you used the CloudFormation stack, delete it to avoid unexpected future charges. Delete Amazon S3 buckets and terminate Amazon Rekognition jobs to stop accruing charges.

Conclusion

Amazon Rekognition helps customers collect images in the field and apply AI-based analysis to interpret the condition of assets within the images.

In this post, you learned how to configure the Kinesis Video Stream producer on a Raspberry Pi to upload captured videos to Amazon Kinesis Video streams. You also learned how to save video streams to Amazon S3 and leverage the Video on Demand at AWS solution.

Using AWS MediaConvert, we transcoded the videos and create a set of thumbnails from the source videos. We then used Amazon Rekognition Custom Labels to train and deploy models for solar panel damage detection. Finally, we configured AWS IoT core to send MQTT messages to a Philips Hue smart bulb for notifications.

In this post, we presented a serverless architecture on AWS to detect defective solar panels. The reference architecture diagram is adaptable to solve inspection and damage detection problems across other industries.

Get Started with Amazon S3 Event Driven Design Patterns

Post Syndicated from Micah Walter original https://aws.amazon.com/blogs/architecture/get-started-with-amazon-s3-event-driven-design-patterns/

Event driven programs use events to initiate succeeding steps in a process. For example, the completion of an upload job may then initiate an image processing job. This allows developers to create complex architectures by using the principle of decoupling. Decoupling is preferable for many workflows, as it allows each component to perform its tasks independently, which improves efficiency. Examples are ecommerce order processing, image processing, and other long running batch jobs.

Amazon Simple Storage Service (S3) is an object-based storage solution from Amazon Web Services (AWS) that allows you to store and retrieve any amount of data, at any scale. Amazon S3 Event Notifications provides users a mechanism for initiating events when certain actions take place inside an S3 bucket.

In this blog post, we will illustrate how you can use Amazon S3 Event Notifications in combination with a powerful suite of Amazon messaging services. This will allow you to implement an event driven architecture for a variety of common use cases.

Setting up Amazon S3 Event Notifications

We first must understand the types of events that can be initiated with Amazon S3 Event Notifications. Events can be initiated by uploading, modifying, deleting an object, or other actions. When an event is initiated, a payload is created containing the event metadata. This includes information about the object that initiated the event itself.

To enable notifications, you must first add a notification configuration that identifies the events you want Amazon S3 to publish. Specify the destinations where you want Amazon S3 to send the notifications. This configuration is stored in the notification subresource, which you can find under the Properties tab within your S3 bucket, see Figure 1.

Figure 1. Properties tab showing S3 Event Notifications subresource

Figure 1. Properties tab showing S3 Event Notifications subresource

An event notification can be initiated anytime an object is uploaded, modified, or deleted, depending on your configuration details. You can create multiple notification configurations for different scenarios, shown in Figure 2. For example, one configuration can handle new or modified objects, and another configuration can handle deletions. You can specify that events will only be initiated when objects contain a specific prefix, or following the restoration of an object. For a complete listing of all the configuration options and event types, read documentation on supported event types.

Figure 2. S3 Event Notifications subresource details and options

Figure 2. S3 Event Notifications subresource details and options

When all of the conditions in your configuration have been met, a new event will be initiated and sent to the destination you specify. An S3 event destination can be an AWS Lambda function, an Amazon Simple Queue Service (SQS) queue, or an Amazon Simple Notification Service (SNS) topic, see Figure 3.

Figure 3. S3 Event Notifications subresource destination settings

Figure 3. S3 Event Notifications subresource destination settings

Event driven design patterns

There are many common design patterns for building event driven programs with Amazon S3 Event Notifications. Once you have set up your notification configuration, the next step is to consume the event. The following describes a few typical architectures you might consider, depending on the needs of your application.

Synchronous and reliable point-to-point processing

Figure 4. Point-to-point processing with S3 and Lambda as a destination

Figure 4. Point-to-point processing with S3 and Lambda as a destination

One common use case for event driven processing, is when synchronous and reliable information is required. For example, a mobile application processes images uploaded by users and automatically tags the images with the detected objects using Artificial Intelligence/Machine Learning (AI/ML). From an architectural perspective (Figure 4), an image is uploaded to an S3 bucket, which generates an event notification. This initiates a Lambda function that sends the details of the uploaded image to Amazon Rekognition for tagging. Results from Amazon Rekognition could be further processed by the Lambda function and stored in a database like Amazon DynamoDB.

With this type of architecture, there is no contingency for dealing with multiple images arriving simultaneously in the S3 bucket. If this application sends too many requests to Lambda, events can start to pile up. This can cause a failure to process some of the images. To make our program more fault tolerant, adding an Amazon SQS queue would help, as shown in Figure 5.

Asynchronous and queued point-to-point processing 

Figure 5. Queued point-to-point processing with S3, SQS, and Lambda

Figure 5. Queued point-to-point processing with S3, SQS, and Lambda

Architectures that require the processing of information in an asynchronous fashion can use this pattern. Building off the first example, a mobile application might provide a solution to allow end users to bulk upload thousands of images simultaneously. It can then use AWS Lambda to send the images to Amazon Rekognition for tagging.

By providing a queue-based asynchronous solution, the Lambda function can retrieve work from the SQS queue at its own pace. This allows it to control the processing flow by processing files sequentially without risk of being overloaded. This is especially useful if the application must handle incomplete or partial uploads when a connection is temporarily lost.

Currently, Amazon S3 Event Notifications only work with standard SQS queues, and first-in-first-out (FIFO) SQS queues are not supported. Read more about how to configure S3 event notification with an SQS queue as a destination. Your Lambda function in this architecture must be adjusted to handle the message payload arriving from SQS. This is because it will have a slightly different form than the original event notification body generated from S3.

Parallel processing with “Fan Out” architecture

Figure 6. Fan out design pattern with S3, SNS, and SQS before sending to a Lambda function

Figure 6. Fan out design pattern with S3, SNS, and SQS before sending to a Lambda function

To create a “fan out” style architecture where a single event is propagated to many destinations in parallel, SNS is combined with SQS. Configure your S3 event notification to use an SNS topic as its destination, as shown in Figure 6. You can then direct multiple subsequent processes to act on the same event. This is especially useful if you aim to do parallel processing on the same object in S3.

For example, if you wanted to process a source image into multiple target resolutions, you could create a Lambda function. The function will use the “fan-out” pattern to process all images at the same time, at each resolution. You could then subscribe an SQS queue to your SNS topics. This ensures that Event Notifications sent to SNS are verified as complete by SQS, once they’ve been processed by your Lambda function.

Figure 7. Fan out design pattern including secondary pipeline for deleting images

Figure 7. Fan out design pattern including secondary pipeline for deleting images

To extend the use case of image processing even further, you could create multiple SNS topics to handle different types of events from the same S3 bucket. As depicted in Figure 7, this architecture would allow your program to handle creations and updates differently than deletions. You could also process images differently based on their S3 prefix.

Adjust your Lambda code to handle messages making their way through SNS and SQS. Their payloads will be slightly different than the original S3 Event Notification payload.

Real-time notifications

Figure 8. Event driven design pattern for real-time notifications

Figure 8. Event driven design pattern for real-time notifications

In addition to application-to-application messaging, Amazon SNS provides application-to-person (A2P) communication (see Figure 8). Amazon SNS can send SMS text messages to mobile subscribers in over 100 countries. It can also send push notifications to Android and Apple devices and emails over SMTP. Using A2P, uploading an image to an Amazon S3 bucket can generate a notification to a group of users via their choice of Amazon SNS A2P platform.

Conclusion

In this blog post, we’ve shown you the basic design patterns for developing an event driven architecture using Amazon S3 Event Notifications. You can create many more complicated architecture patterns to suit your needs. By using Amazon SQS, Amazon SNS, and AWS Lambda, you can design an event driven program that is fault tolerant, scalable, and smartly decoupled. But don’t stop there! Consider expanding your program further by utilizing AWS Lambda destinations. Or combine parallel image processing with highly scalable A2P notifications, which will alert your users when a task is complete.

For further reading:

Creating a serverless face blurring service for photos in Amazon S3

Post Syndicated from James Beswick original https://aws.amazon.com/blogs/compute/creating-a-serverless-face-blurring-service-for-photos-in-amazon-s3/

Many workloads process photos or imagery from web applications or mobile applications. For privacy reasons, it can be useful to identify and blur faces in these photos. This blog post shows how to build a serverless face blurring service for photos uploaded to an Amazon S3 bucket.

The example application uses the AWS Serverless Application Model (AWS SAM), enabling you to deploy the application more easily in your own AWS account. This walkthrough creates resources covered in the AWS Free Tier but usage beyond the Free Tier allowance may incur cost. To set up the example, visit the GitHub repo and follow the instructions in the README.md file.

Overview

Using a serverless approach, this face blurring microservice runs on demand in response to new photos being uploaded to S3. The solution uses the following architecture:

Reference architecture

  1. When an image is uploaded to the source S3 bucket, S3 sends a notification event to an Amazon SQS queue.
  2. The Lambda service polls the SQS queue and invokes an AWS Lambda function when messages are available.
  3. The Lambda function uses Amazon Rekognition to detect faces in the source image. The service returns the coordinates of faces to the function.
  4. After blurring the faces in the source image, the function stores the resulting image in the output S3 bucket.

Deploying the solution

Before deploying the solution, you need:

To deploy:

  1. From a terminal window, clone the GitHub repo:
    git clone https://github.com/aws-samples/serverless-face-blur-service
  2. Change directory:
    cd ./serverless-face-blur-service
  3. Download and install dependencies:
    sam build
  4. Deploy the application to your AWS account:
    sam deploy --guided
  5. During the guided deployment process, enter unique names for the two S3 buckets. These names must be globally unique.

To test the application, upload a JPG file containing at least one face into the source S3 bucket. After a few seconds, the destination bucket contains the output file, with the same name. The output file shows blur content when the faces are detected:

Blurred faces output

How the face blurring Lambda function works

The Lambda function receives messages from the SQS queue when available. These messages contain metadata about the JPG object uploaded to S3:

{
    "Records": [
        {
            "messageId": "e9a12dd2-1234-1234-1234-123456789012",
            "receiptHandle": "AQEBnjT2rUH+kmEXAMPLE",
            "body": "{\"Records\":[{\"eventVersion\":\"2.1\",\"eventSource\":\"aws:s3\",\"awsRegion\":\"us-east-1\",\"eventTime\":\"2021-06-21T19:48:14.418Z\",\"eventName\":\"ObjectCreated:Put\",\"userIdentity\":{\"principalId\":\"AWS:AROA3DTKMEXAMPLE:username\"},\"requestParameters\":{\"sourceIPAddress\":\"73.123.123.123\"},\"responseElements\":{\"x-amz-request-id\":\"AZ39QWJFVEQJW9RBEXAMPLE\",\"x-amz-id-2\":\"MLpNwwQGQtrNai/EXAMPLE\"},\"s3\":{\"s3SchemaVersion\":\"1.0\",\"configurationId\":\"5f37ac0f-1234-1234-82f12343-cbc8faf7a996\",\"bucket\":{\"name\":\"s3-face-blur-source\",\"ownerIdentity\":{\"principalId\":\"EXAMPLE\"},\"arn\":\"arn:aws:s3:::s3-face-blur-source\"},\"object\":{\"key\":\"face.jpg\",\"size\":3541,\"eTag\":\"EXAMPLE\",\"sequencer\":\"123456789\"}}}]}",
            "attributes": {
                "ApproximateReceiveCount": "6",
                "SentTimestamp": "1624304902103",
                "SenderId": "AIDAJHIPREXAMPLE",
                "ApproximateFirstReceiveTimestamp": "1624304902103"
            },
            "messageAttributes": {},
            "md5OfBody": "12345",
            "eventSource": "aws:sqs",
            "eventSourceARN": "arn:aws:sqs:us-east-1:123456789012:s3-lambda-face-blur-S3EventQueue-ABCDEFG01234",
            "awsRegion": "us-east-1"
        }
    ]
}

The body attribute contained a serialized JSON object with an array of records, containing the S3 bucket name and object keys. The Lambda handler in app.js uses the JSON.parse method to create a JSON object from the string:

  const s3Event = JSON.parse(event.Records[0].body)

The handler extracts the bucket and key information. Since the S3 key attribute is URL encoded, it must be decoded before further processing:

const Bucket = s3Event.Records[0].s3.bucket.name
const Key = decodeURIComponent(s3Event.Records[0].s3.object.key.replace(/\+/g, " "))

There are three steps in processing each image: detecting faces in the source image, blurring faces, then storing the output in the destination bucket.

Detecting faces in the source image

The detectFaces.js file contains the detectFaces function. This accepts the bucket name and key as parameters, then uses the AWS SDK for JavaScript to call the Amazon Rekognition service:

const AWS = require('aws-sdk')
AWS.config.region = process.env.AWS_REGION 
const rekognition = new AWS.Rekognition()

const detectFaces = async (Bucket, Name) => {

  const params = {
    Image: {
      S3Object: {
       Bucket,
       Name
      }
     }    
  }

  console.log('detectFaces: ', params)

  try {
    const result = await rekognition.detectFaces(params).promise()
    return result.FaceDetails
  } catch (err) {
    console.error('detectFaces error: ', err)
    return []
  }  
}

The detectFaces method of the Amazon Rekognition API accepts a parameter object defining a reference to the source S3 bucket and key. The service returns a data object with an array called FaceDetails:

{
    "BoundingBox": {
        "Width": 0.20408163964748383,
        "Height": 0.4340078830718994,
        "Left": 0.727995753288269,
        "Top": 0.3109045922756195
    },
    "Landmarks": [
        {
            "Type": "eyeLeft",
            "X": 0.784351646900177,
            "Y": 0.46120116114616394
        },
        {
            "Type": "eyeRight",
            "X": 0.8680923581123352,
            "Y": 0.5227685570716858
        },
        {
            "Type": "mouthLeft",
            "X": 0.7576283812522888,
            "Y": 0.617080807685852
        },
        {
            "Type": "mouthRight",
            "X": 0.8273565769195557,
            "Y": 0.6681531071662903
        },
        {
            "Type": "nose",
            "X": 0.8087539672851562,
            "Y": 0.5677543878555298
        }
    ],
    "Pose": {
        "Roll": 23.821317672729492,
        "Yaw": 1.4818285703659058,
        "Pitch": 2.749311685562134
    },
    "Quality": {
        "Brightness": 83.74250793457031,
        "Sharpness": 89.85481262207031
    },
    "Confidence": 99.9793472290039
}

The Confidence score is the percentage confidence that the image contains a face. This example uses the BoundingBox coordinates to find the location of the face in the image. The response also includes positional data for facial features like the mouth, nose, and eyes.

Blurring faces in the source image

In the blurFaces.js file, the blurFaces function uses the open source GraphicsMagick library to process the source image. The function takes the bucket and key as parameters with the metadata returned by the Amazon Rekognition service:

const AWS = require('aws-sdk')
AWS.config.region = process.env.AWS_REGION 
const s3 = new AWS.S3()
const gm = require('gm').subClass({imageMagick: process.env.localTest})

const blurFaces = async (Bucket, Key, faceDetails) => {

  const object = await s3.getObject({ Bucket, Key }).promise()
  let img = gm(object.Body)

  return new Promise ((resolve, reject) => {
    img.size(function(err, dimensions) {
        if (err) reject(err)
        console.log('Image size', dimensions)

        faceDetails.map((faceDetail) => {
            const box = faceDetail.BoundingBox
            const width  = box.Width * dimensions.width
            const height = box.Height * dimensions.height
            const left = box.Left * dimensions.width
            const top = box.Top * dimensions.height

            img.region(width, height, left, top).blur(0, 70)
        })

        img.toBuffer((err, buffer) => resolve(buffer))
    })
  })
}

The function loads the source object from S3 using the getObject method of the S3 API. In the response, the Body attribute contains a buffer with the image data – this is used to instantiate a ‘gm’ object for processing.

Amazon Rekognition’s bounding box coordinates are percentage-based relative to the size of the image. This code converts these percentages to X- and Y-based coordinates and uses the region method to identify a portion of the image. The blur method uses a Gaussian operator based on the inputs provided. Once the transformation is complete, the function returns a buffer with the new image.

Using GraphicsMagick with Lambda functions

The GraphicsMagick package contains operating system-specific binaries. Depending on the operating system of your development machine, you may install binaries locally that are not compatible with Lambda. The Lambda service uses Amazon Linux 2 (AL2).

To simplify local testing and deployment, the sample application uses Lambda layers to package this library. This open source Lambda layer repo shows how to build, deploy, and test GraphicsMagick as a Lambda layer. It also publishes public layers to help you use the library in your Lambda functions.

When testing this function locally with the test.js script, the GM npm package uses the binaries on the local development machine. When the function is deployed to the Lambda service, the package uses the Lambda layer with the AL2-compatible binaries.

Limiting throughput with Amazon Rekognition

Both S3 and Lambda are highly scalable services and in this example can handle thousands of image uploads a second. In this configuration, S3 sends Event Notifications to an SQS queue each time an object is uploaded. The Lambda function processes events from this queue.

When using downstream services in Lambda functions, it’s important to note the quotas and throughputs in place for those services. This can help avoid throttling errors or overwhelming non-serverless services that may not be able to handle the same level of traffic.

The Amazon Rekognition service sets default transaction per second (TPS) rates for AWS accounts. For the DetectFaces API, the default is between 5-50 TPS depending upon the AWS Region. If you need a higher throughput, you can request an increase in the Service Quotas console.

In the AWS SAM template of the example application, the definition of the Lambda function uses two attributes to control the throughput. The ReservedConcurrentExecutions attribute is set to 1, which prevents the Lambda service from scaling beyond one instance of the function. The BatchSize in event source mapping is also set to 1, so each invocation contains only a single S3 event from the SQS queue:

  BlurFunction:
    Type: AWS::Serverless::Function
    Properties:
      CodeUri: src/
      Handler: app.handler
      Runtime: nodejs14.x
      Timeout: 10
      MemorySize: 2048
      ReservedConcurrentExecutions: 1
      Policies:
        - S3ReadPolicy:
            BucketName: !Ref SourceBucketName
        - S3CrudPolicy:
            BucketName: !Ref DestinationBucketName
        - RekognitionDetectOnlyPolicy: {}
      Environment:
        Variables:
          DestinationBucketName: !Ref DestinationBucketName
      Events:
        MySQSEvent:
          Type: SQS
          Properties:
            Queue: !GetAtt S3EventQueue.Arn
            BatchSize: 1

The combination of these two values means that this function processes images one at a time, regardless of how many images are uploaded to S3. By increasing these values, you can change the scaling behavior and number of messages processed per invocation. This allows you to control the throughput of the number of the messages sent to Amazon Rekognition for processing.

Conclusion

A serverless face blurring service can provide a simpler way to process photos in workloads with large amounts of traffic. This post introduces an example application that blurs faces when images are saved in an S3 bucket. The S3 PutObject event invokes a Lambda function that uses Amazon Rekognition to detect faces and GraphicsMagick to process the images.

This blog post shows how to deploy the example application and walks through the functions that process the images. It explains how to use GraphicsMagick and how to control throughput in the SQS event source mapping.

For more serverless learning resources, visit Serverless Land.

Scaling Ad Verification with Machine Learning and AWS Inferentia

Post Syndicated from Julien Simon original https://aws.amazon.com/blogs/aws/scaling-ad-verification-with-machine-learning-and-aws-inferentia/

Amazon Advertising helps companies build their brand and connect with shoppers, through ads shown both within and beyond Amazon’s store, including websites, apps, and streaming TV content in more than 15 countries. Businesses or brands of all sizes including registered sellers, vendors, book vendors, Kindle Direct Publishing (KDP) authors, app developers, and agencies on Amazon marketplaces can upload their own ad creatives, which can include images, video, audio, and of course products sold on Amazon. To promote an accurate, safe, and pleasant shopping experience, these ads must comply with content guidelines.

Here’s a simple example. Can you figure out why two of the following ads would not be compliant?

Amazon Ads

The ad in the center doesn’t feature the product in context. It also shows the same product multiple times. The ad on the right looks much better, but it contains text, which is not allowed for this ad format.

New ad creatives come in many sizes, shapes, and languages, and at very large scale. Assuming it would even be possible, verifying them manually would be a complex, slow, and error-prone process. Machine learning (ML) to the rescue!

Using Machine Learning to Verify Ad Creatives
Each ad must be evaluated against many rules, which no single model could reasonably learn. In fact, it takes many models to check ad properties, for example:

  • Media-specific models that analyze images, video, audio, and text that describe the advertised products.
  • Content-specific models that detect headlines, text, backgrounds, and objects.
  • Language-specific models that validate syntax and grammar, and flag unapproved language.

Some of these capabilities are readily available in AWS AI services. For example, Amazon Advertising teams use Amazon Rekognition to extract metadata information from images and videos.

Other capabilities require custom models trained on in-house datasets. For this purpose, Amazon teams labeled large ad datasets with Amazon SageMaker Ground Truth, using a combination of manual labeling, and automatic labeling with active learning. Using these datasets, teams then used Amazon SageMaker to train models, and deploy them automatically on real-time prediction endpoints with the AWS Cloud Development Kit (AWS CDK) and Amazon SageMaker Pipelines.

When a business uploads a new ad, relevant models are invoked simultaneously to process specific ad components, extract signals, and output a quality score. All scores are then consolidated, and sent to a final model that predicts whether the ad should be manually reviewed.

Thanks to this process, most new ads can be verified and published automatically, which means businesses can quickly promote their brand and products, and Amazon can maintain a high-quality shopping experience.

However, faced with a growing number of more complex models, Amazon Advertising teams started to look for a solution that could increase prediction throughput while reducing costs. They found it in AWS Inferentia.

What is AWS Inferentia?
Available in Amazon EC2 Inf1 instances, AWS Inferentia is a custom chip built by AWS to accelerate ML inference workloads, and optimize their cost. Each AWS Inferentia chip contains four NeuronCores. Each NeuronCore implements a high-performance systolic array matrix multiply engine, which massively speeds up typical deep learning operations such as convolution and transformers. NeuronCores are also equipped with a large on-chip cache, which helps to cut down on external memory accesses, reduce latency, and increase throughput.

Thanks to AWS Neuron, a software development kit for ML inference, AWS Inferentia can be used natively from ML frameworks like TensorFlow, PyTorch, and Apache MXNet. It consists of a compiler, runtime, and profiling tools that enable you to run high-performance and low latency inference. For many trained models, compilation is a one-liner with the Neuron SDK, not requiring any additional application code changes. The result is a high performance inference deployment, that can easily scale while keeping costs under control. You’ll find many examples in the Neuron documentation. Alternatively, thanks to Amazon SageMaker Neo, you can also compile models directly in SageMaker.

Scaling Ad Verification with AWS Inferentia
Amazon Advertising teams started compiling their models for Inferentia, and deploying them on SageMaker endpoints powered by Inf1 instances. They compared the Inf1 endpoints to the GPU endpoints they had been using so far. They found that large deep learning models like BERT run more effectively on Inferentia, which decreases latency by 30%, and reduces costs by 71%. A few months ago, ML teams working on Amazon Alexa came to the same conclusions.

What about prediction quality? GPU models are typically trained with single-precision floating-point data (FP32). Inferentia uses the shorter FP16, BF16, and INT8 data types, which can create slight differences in predicted output. Running both GPU and Inferentia models in parallel, teams analyzed probability distributions, tweaked prediction thresholds for their Inferentia models, and made sure that these models would predict ads just like GPU models did. You can learn more about these techniques in the Performance Tuning section of the documentation.

With these final adjustments out of the way, the Amazon Advertising teams started phasing out GPU models. All text data is now predicted on Inferentia, and the migration of computer vision pipelines is in progress.

AWS Customers Are Successful with AWS Inferentia
In addition to Amazon teams, customers also report very nice results on scaling and optimizing their ML workloads with Inferentia.

Binghui Ouyang, Senior Data Scientist at Autodesk: “Autodesk is advancing the cognitive technology of our AI-powered virtual assistant, Autodesk Virtual Agent (AVA) by using Inferentia. AVA answers over 100,000 customer questions per month by applying natural language understanding (NLU) and deep learning techniques to extract the context, intent, and meaning behind inquiries. Piloting Inferentia, we are able to obtain a 4.9x higher throughput over G4dn for our NLU models, and look forward to running more workloads on the Inferentia-based Inf1 instances.

Paul Fryzel, Principal Engineer, AI Infrastructure at Condé Nast: “Condé Nast’s global portfolio encompasses over 20 leading media brands, including Wired, Vogue, and Vanity Fair. Within a few weeks, our team was able to integrate our recommendation engine with AWS Inferentia chips. This union enables multiple runtime optimizations for state-of-the-art natural language models on SageMaker’s Inf1 instances. As a result, we observed a 72% reduction in cost than the previously deployed GPU instances.”

Getting Started
You can get started with Inferentia and Inf1 instances today, either on Amazon SageMaker or with the Neuron SDK. This self-paced workshop walks you through both options.

Give it a try, and let us know what you think. As always, we look forward to your feedback. You can send it through your usual AWS Support contacts, post it on the AWS Forum for SageMaker, or on the Neuron SDK Github repository.

– Julien

Field Notes: Building an Automated Image Processing and Model Training Pipeline for Autonomous Driving

Post Syndicated from Antonia Schulze original https://aws.amazon.com/blogs/architecture/field-notes-building-an-automated-image-processing-and-model-training-pipeline-for-autonomous-driving/

In this blog post, we demonstrate how to build an automated and scalable data pipeline for autonomous driving. This solution was built with the goal of accelerating the process of analyzing recorded footage and training a model to improve the experience of autonomous driving.

We will demonstrate the extraction of images from ROS bag file by using Amazon Rekognition to label the images for cataloging, and build a searchable database using Amazon DynamoDB. This is so we can find relevant images for training computer vision Machine Learning (ML) algorithms. Next, we show you how to use the database to find suitable images, create a labeling job with Amazon SageMaker Ground Truth, and train a machine learning model to detect cars. The following diagram shows the architecture for this solution.

Overview of the solution

Figure 1 - Architecture Showing how to build an automated Image Processing and Model Training pipeline

Figure 1 – Architecture Showing how to build an automated Image Processing and Model Training pipeline

Prerequisites

This post uses an AWS Cloud Development Kit (AWS CDK) stack written in Python. Follow the instructions in the CDK Getting Started guide to set up your environment.

Deployment

The full pipeline can be deployed with one command: * `bash deploy.sh deploy true`. We can follow the progress of deployment on the command line, but also in the CloudFormation section of the AWS console. Once the pipeline is deployed, we must upload bag files to the rosbag-ingest bucket to launch the pipeline. Once the pipeline has finished, we can clone the repository to the SageMaker Notebook instance ros-bag-demo-notebook.

Walkthrough

  • The Robot Operating System (ROS) is a collection of open source middleware, which provides tools and libraries for building robotic systems. The middleware uses a Publish/Subscribe (pub/sub) architecture, which can be used for the transportation of sensor data to any software modules, which need to operate on that data.
    • Each sensor publishes its data as a topic, and then any module which needs that data subscribes to that topic.
  • This Pub/Sub architecture lends itself well to recording data from multiple sensors of varying modalities (camera, LIDAR, RADAR) into a single file which can be replayed for testing and diagnostic purposes. ROS supports this capability with its ROS bag module which stores data in an ROS bag format file.
    • An ROS bag file includes a collection of topics, each with a set of time-stamped messages. These files can be replayed on an ROS system, with the timestamps, ensuring that messages are published to the topics in real time and the order they were recorded.
  • The input for this example is a set of ROS bag files, each one is approximately 10 GB.
    • To extract the image data from our input ROS bag files, you create a Docker container based on an ROS image.
    • You then create an ROS launch configuration file to extract images to .png files based on the ROS bag tutorial instructions. The Docker container is stored in an Amazon Elastic Container Registry (Amazon ECR), ready to run as an AWS Fargate task.

AWS Fargate is a serverless compute engine for containers that work with both Amazon Elastic Container Service (Amazon ECS) and Amazon Elastic Kubernetes Service (EKS). By using Fargate, we can create and run the Docker containers with our ROS environment, and have many containers running in parallel with each processing a single ROS bag file.

When you have the individual images, you need a way to assess their contents to build a searchable image catalog. This objective allows ML data scientists to search through the recorded images to find, for example, images containing pedestrians. The catalog can also be extended with data from other sources, such as weather data, location data, and so forth. You use Amazon Rekognition to process the images, and it helps add image and video analysis to your applications. When you provide an image or video to the Amazon Rekognition API, the service identifies objects, people, text, scenes, and activities. By requesting that Amazon Rekognition label each image, you receive a large amount of information to catalog the image.

The image ingestion pipeline is largely event driven. Many of the AWS services you use have limits on job concurrency and API access rates. To resolve these issues, you place all events into an Amazon Simple Queue Service (Amazon SQS) queue, invoke a Lambda function on queue, and make the appropriate API call (for example, Amazon Rekognition DetectLabels). If the API call is successful, you delete the message from the queue, otherwise (for example, the rate is exceeded) you exit the Lambda function and the message will be returned to the queue. One benefit is that when service limits change, depending on the account configuration or Region, the pipeline will automatically scale to accommodate these changes.

  • The pipeline is launched when an ROS bag file is uploaded to the Amazon Simple Storage Service (Amazon S3) bucket which has been configured to post an object creation event to an SQS queue.
  • A Lambda function is invoked from the SQS queue and it starts a Step Functions step, which runs our dockerized container on a Fargate cluster. An extracted image is stored in an S3 bucket, which invokes a second SQS queue to start a Lambda function. The Lambda function calls the DetectLabels function of the Amazon Rekognition API which, returns labels for everything that Amazon Rekognition can detect in the scene.
  • This also includes the confidence level for each label. The labels and confidence scores are stored in a DynamoDB data catalog table. You can query all images for specific objects that you are interested in and filter to create subsets that are of interest.
Figure 2 - DynamoDB table containing detected objects and confidence scores

Figure 2 – DynamoDB table containing detected objects and confidence scores

Because you will use a public workforce for labeling in the next section, you will need to create anonymized versions of images where faces and license plates are blurred out. Amazon Rekognition has a DetectFaces API call to find any faces in the image. There is no corresponding call for detecting license plates, so you detect all text in the image with the DetectText API. Use the write of the .json output file to invoke a Lambda function which calls the Amazon Rekognition APIs and blurs the relevant Regions before saving them to S3.

Image labeling with Amazon SageMaker Ground Truth

Since the images are now stored in their raw and anonymized format we can start the data labeling step. We will sample the images we want to label. The data catalog in DynamoDB lets you query the table based on your parameters and sub-area you want to optimize your model on. For example, you could query the DynamoDB table for images having a crowd of pedestrians and specifically label these images and allow your model to improve in these particular circumstances. Once we have identified the images of interest, we can copy them to a specific S3 folder and start the SageMaker Ground Truth job on an object detection task. You can find a detailed blog post on streamlining data for object detection in Amazon SageMaker Ground Truth.

The result of a SageMaker Ground Truth job is a manifest file containing the S3 Path, bounding box coordinates, and class labels (per image). This is automatically uploaded to S3. We need to replace the anonymized images with the raw image S3 Path since we want to train the model on raw images. We have provided you a sample manifest file in the repository and you can follow along the blogpost with the Jupyter Notebook provided in `object-detection/Transfer-Learning.iypnb`. First, we can verify that the annotations are high quality by viewing the following sample image.

Visualization of annotations from SageMaker Ground Truth job

Figure 3 – Visualization of annotations from SageMaker Ground Truth job

Fine-tune a GluonCV model with SageMaker Script Mode

The ML technique transfer learning allows us to use neural networks that have previously been trained on large datasets of similar applications, and fine-tune them based on a smaller custom annotated data. Frameworks such as GluonCV provide a model zoo for object detection, that allows us to have a quick access to these pre-trained models. In this case, we have selected a YOLOv3 model that has been pre-trained on the COCO dataset. Based on empirical analysis, other networks such as Faster-RCNN outperform YOLOv3, but tend to have slower inference times as measured in frames per second, which is a key aspect for real-time applications.

The preferred object detection format for GluonCV is based on .lst file format, and converts to the RecordIO design, providing faster disk access and compact storage. GluonCV provides a tutorial on how to convert a .lst file format into a RecordIO file.

To train a customized neural network we will use Amazon SageMaker Script Mode, allowing us to use your own training algorithms and the straightforward SageMaker UI.

from sagemaker import get_execution_role
sagemaker_session = sagemaker.Session()
role = get_execution_role()
s3_output_path = "s3://<path to bucket where model weights will be saved>/"

model_estimator = MXNet(
    entry_point="train_yolov3.py",
    role=role,
    train_instance_count=1,  
    train_instance_type="ml.p3.8xlarge",
    framework_version="1.8.0",
    output_path=s3_output_path,
    py_version="py37"
)

model_estimator.fit("s3://<bucket path for train and validation record-io files>/")

Hyperparameter optimization on SageMaker

While training neural networks, there are many parameters that can be optimized to the use case and the custom dataset. We refer to this as automatic model tuning in SageMaker or hyperparameter optimization. SageMaker launches multiple training jobs with a unique combination of hyperparameters, and search for the configuration achieving the highest mean average precision (mAP) on our held-out test data.

hyperparameter_ranges = {
    "lr": ContinuousParameter(0.001, 0.1),
    "wd": ContinuousParameter(0.0001, 0.001),
    "batch-size": CategoricalParameter([8, 16])
    }
metric_definitions = [
    {"Name": "val:car mAP", "Regex": "val:mAP=(.*?),"},
    {"Name": "test:car mAP", "Regex": "test:mAP=(.*?),"},
    {"Name": "BoxCenterLoss", "Regex": "BoxCenterLoss=(.*?),"},
    {"Name": "ObjLoss", "Regex": "ObjLoss=(.*?),"},
    {"Name": "BoxScaleLoss", "Regex": "BoxScaleLoss=(.*?),"},
    {"Name": "ClassLoss", "Regex": "ClassLoss=(.*?),"},
]
objective_metric_name = "val:car mAP"

hpo_tuner = HyperparameterTuner(
    model_estimator,
    objective_metric_name,
    hyperparameter_ranges,
    metric_definitions,
    max_jobs=10,  # maximum jobs that should be ran
    max_parallel_jobs=2
)

hpo_tuner.fit("s3://<bucket path for train and validation record-io files>/")

Model compilation

Although we don’t have hard constraints for a model environment when training in the cloud, we should mind the production environment when running inference with trained models: no powerful GPUs and limited storage are common challenges. Fortunately, Amazon SageMaker Neo allows you to train once and run anywhere in the cloud and at the edge, while reducing the memory footprint of your model.

best_estimator = hpo_tuner.best_estimator()
compiled_model = best_estimator.compile_model(
    target_instance_family="ml_c4",
    role=role,
    input_shape={"data": [1, 3, 512, 512]},
    output_path=s3_output_path,
    framework="mxnet",
    framework_version="1.8",
    env={"MMS_DEFAULT_RESPONSE_TIMEOUT": "500"}
)

Deploying the model

Deploying a model requires a few additional lines of code for hosting.

from sagemaker.serializers import JSONSerializer
from sagemaker.deserializers import JSONDeserializer

predictor = compiled_model.deploy(
initial_instance_count=1, instance_type="ml.c4.xlarge", endpoint_name="YOLO-DEMO-endpoint", deserializer=JSONDeserializer(),serializer=JSONSerializer()
)

Run inference

Once the model is deployed with an endpoint, we can test some inference. As the model has been trained on 512×512 pixel images, we need to format inference images respectively, before serializing the data and making a prediction request to the SageMaker endpoint.

import PIL.Image
import numpy as np
test_image = PIL.Image.open("test.png")
test_image = np.asarray(test_image.resize((512, 512))) 
endpoint_response = predictor.predict(test_image)

We can then visualize the response and show the confidence score associated with the prediction on the test image.

Figure 4 - Visualization of the response and confidence score associated with the prediction on the test image.

Figure 4 – Visualization of the response and confidence score associated with the prediction on the test image.

Clean Up

To clean up the deployment you should run bash deploy.sh destroy false. In Addition to that, you also need to delete the SageMaker Endpoint. Some resources like S3 buckets and DynamoDB tables must be manually emptied and deleted through the console to be fully removed.

Conclusion

This post described how to extract images at large scale from ROS bag files and label a subset of them with SageMaker Ground Truth. With this labeled training dataset, we fine-tuned an object detection neural network using SageMaker Script Mode. To deploy the model in the autonomous driving vehicle, we compiled the model with SageMaker Neo, reducing the storage size and optimizing the model graph on the specific hardware. Finally, you ran some test inference predictions and visualized them in a SageMaker Notebook. You can find the code for this blog post in this GitHub repository.

Field Notes provides hands-on technical guidance from AWS Solutions Architects, consultants, and technical account managers, based on their experiences in the field solving real-world business problems for customers.

Building a serverless multiplayer game that scales: Part 2

Post Syndicated from James Beswick original https://aws.amazon.com/blogs/compute/building-a-serverless-multiplayer-game-that-scales-part-2/

This post is written by Vito De Giosa, Sr. Solutions Architect and Tim Bruce, Sr. Solutions Architect, Developer Acceleration.

This series discusses solutions for scaling serverless games, using the Simple Trivia Service, a game that relies on user-generated content. Part 1 describes the overall architecture, how to deploy to your AWS account, and different communications methods.

This post discusses how to scale via automation and asynchronous processes. You can use automation to minimize the need to scale personnel to review player-generated content for acceptability. It also introduces asynchronous processing, which allows you to run non-critical processes in the background and batch data together. This helps to improve resource usage and game performance. Both scaling techniques can also reduce overall spend.

To set up the example, see the instructions in the GitHub repo and the README.md file. This example uses services beyond the AWS Free Tier and incurs charges. Instructions to remove the example application from your account are also in the README.md file.

Technical implementation

Games require a mechanism to support auto-moderated avatars. Specifically, this is an upload process to allow the player to send the content to the game. There is a content moderation process to remove unacceptable content and a messaging process to provide players with a status regarding their content.

Here is the architecture for this feature in Simple Trivia Service, which is combined within the avatar workflow:

Architecture diagram

This architecture processes images uploaded to Amazon S3 and notifies the user of the processing result via HTTP WebPush. This solution uses AWS Serverless services and the Amazon Rekognition moderation API.

Uploading avatars

Players start the process by uploading avatars via the game client. Using presigned URLs, the client allows players to upload images directly to S3 without sharing AWS credentials or exposing the bucket publicly.

The URL embeds all the parameters of the S3 request. It includes a SignatureV4 generated with AWS credentials from the backend allowing S3 to authorize the request.

S3 upload process

  1. The front end retrieves the presigned URL invoking an AWS Lambda function through an Amazon API Gateway HTTP API endpoint.
  2. The front end uses the URL to send a PUT request to S3 with the image.

Processing avatars

After the upload completes, the backend performs a set of activities. These include content moderation, generating the thumbnail variant, and saving the image URL to the player profile. AWS Step Functions orchestrates the workflow by coordinating tasks and integrating with AWS services, such as Lambda and Amazon DynamoDB. Step Functions enables creating workflows without writing code and handles errors, retries, and state management. This enables traffic control to avoid overloading single components when traffic surges.

The avatar processing workflow runs asynchronously. This allows players to play the game without being blocked and enables you to batch the requests. The Step Functions workflow is triggered from an Amazon EventBridge event. When the user uploads an image to S3, an event is published to EventBridge. The event is routed to the avatar processing Step Functions workflow.

The single avatar feature runs in seconds and uses Step Functions Express Workflows, which are ideal for high-volume event-processing use cases. Step Functions can also support longer running processes and manual steps, depending on your requirements.

To keep performance at scale, the solution adopts four strategies. First, it moderates content automatically, requiring no human intervention. This is done via Amazon Rekognition moderation API, which can discover inappropriate content in uploaded avatars. Developers do not need machine learning expertise to use this API. If it identifies unacceptable content, the Step Functions workflow deletes the uploaded picture.

Second, it uses avatar thumbnails on the top navigation bar and on leaderboards. This speeds up page loading and uses less network bandwidth. Image-editing software runs in a Lambda function to modify the uploaded file and store the result in S3 with the original.

Third, it uses Amazon CloudFront as a content delivery network (CDN) with the S3 bucket hosting images. This improves performance by implementing caching and serving static content from locations closer to the player. Additionally, using CloudFront allows you to keep the bucket private and provide greater security for the content stored within S3.

Finally, it stores profile picture URLs in DynamoDB and replicates the thumbnail URL in an Amazon Cognito user attribute named picture. This allows the game to retrieve the avatar URL as part of the login process, saving an HTTP GET request for the player profile.

The last step of the workflow publishes the result via an event to EventBridge for downstream systems to consume. The service routes the event to the notification component to inform the player about the moderation status.

Notifying users of the processing result

The result of the avatar workflow to the player is important but not urgent. Players want to know the result but not impact their gameplay experience. A solution for this challenge is to use HTTP web push. It uses the HTTP protocol and does not require a constant communication channel between backend and front end. This allows players to play games without being blocked or by introducing latency to the game communications channel.

Applications requiring low latency fully bidirectional communication, such as highly interactive multi-player games, typically use WebSockets. This creates a persistent two-way channel for front end and backend to exchange information. The web push mechanism can provide non-urgent data and messages to the player without interrupting the WebSockets channel.

The web push protocol describes how to use a consolidated push service as a broker between the web-client and the backend. It accepts subscriptions from the client and receives push message delivery requests from the backend. Each browser vendor provides a push service implementation that is compliant with the W3C Push API specification and is external to both client and backend.

The web client is typically a browser where a JavaScript application interacts with the push service to subscribe and listen for incoming notifications. The backend is the application that notifies the front end. Here is an overview of the protocol with all the parties involved.

Notification process

  1. A component on the client subscribes to the configured push service by sending an HTTP POST request. The client keeps a background connection waiting for messages.
  2. The push service returns a URL identifying a push resource that the client distributes to backend applications that are allowed to send notifications.
  3. Backend applications request a message delivery by sending an HTTP POST request to the previously distributed URL.
  4. The push service forwards the information to the client.

This approach has four advantages. First, it reduces the effort to manage the reliability of the delivery process by off-loading it to an external and standardized component. Second, it minimizes cost and resource consumption. This is because it doesn’t require the backend to keep a persistent communication channel or compute resources to be constantly available. Third, it keeps complexity to a minimum because it relies on HTTP only without requiring additional technologies. Finally, HTTP web push addresses concepts such as message urgency and time-to-live (TTL) by using a standard.

Serverless HTTP web push

The implementation of the web push protocol requires the following components, per the Push API specification. First, the front end is required to create a push subscription. This is implemented through a service worker, a script running in the origin of the application. The service worker exposes operations to access the push service either creating subscriptions or listening for push events.

Serverless HTTP web push

  1. The client uses the service worker to subscribe to the push service via the Push API.
  2. The push service responds with a payload including a URL, which is the client’s push endpoint. The URL is used to create notification delivery requests.
  3. The browser enriches the subscription with public cryptographic keys, which are used to encrypt messages ensuring confidentiality.
  4. The backend must receive and store the subscription for when a delivery request is made to the push service. This is provided by API Gateway, Lambda, and DynamoDB. API Gateway exposes an HTTP API endpoint that accepts POST requests with the push service subscription as payload. The payload is stored in DynamoDB alongside the player identifier.

This front end code implements the process:

//Once service worker is ready
navigator.serviceWorker.ready
  .then(function (registration) {
    //Retrieve existing subscription or subscribe
    return registration.pushManager.getSubscription()
      .then(async function (subscription) {
        if (subscription) {
          console.log('got subscription!', subscription)
          return subscription;
        }
        /*
         * Using Public key of our backend to make sure only our
         * application backend can send notifications to the returned
         * endpoint
         */
        const convertedVapidKey = self.vapidKey;
        return registration.pushManager.subscribe({
          userVisibleOnly: true,
          applicationServerKey: convertedVapidKey
        });
      });
  }).then(function (subscription) {
    //Distributing the subscription to the application backend
    console.log('register!', subscription);
    const body = JSON.stringify(subscription);
    const parms = {jwt: jwt, playerName: playerName, subscription: body};
    //Call to the API endpoint to save the subscription
    const res = DataService.postPlayerSubscription(parms);
    console.log(res);
  });


Next, the backend reacts to the avatar workflow completed custom event to create a delivery request. This is accomplished with EventBridge and Lambda.

Backend process after avater workflow completed

  1. EventBridge routes the event to a Lambda function.
  2. The function retrieves the player’s agent subscriptions, including push endpoint and encryption keys, from DynamoDB.
  3. The function sends an HTTP POST to the push endpoint with the encrypted message as payload.
  4. When the push service delivers the message, the browser activates the service worker updating local state and displaying the notification.

The push service allows creating delivery requests based on the knowledge of the endpoint and the front end allows the backend to deliver messages by distributing the endpoint. HTTPS provides encryption for data in transit while DynamoDB encrypts all your data at rest to provide confidentiality and security for the endpoint.

Security of WebPush can be further improved by using Voluntary Application Server Identification (VAPID). With WebPush, the clients authenticate messages at delivery time. VAPID allows the push service to perform message authentication on behalf of the web client avoiding denial-of-service risk. Without the additional security of VAPID, any application knowing the push service endpoint might successfully create delivery requests with an invalid payload. This can cause the player’s agent to accept messages from unauthorized services and, possibly, cause a denial-of-service to the client by overloading its capabilities.

VAPID requires backend applications to own a key pair. In Simple Trivia Service, a Lambda function, which is an AWS CloudFormation custom resource, generates the key pair when deploying the stack. It securely saves values in AWS System Manager (SSM) Parameter Store.

Here is a representation of VAPID in action:

VAPID process architecture

  1. The front end specifies which backend the push service can accept messages from. It does this by including the public key from VAPID in the subscription request.
  2. When requesting a message delivery, the backend self-identifies by including the public key and a token signed with the private key in the HTTP Authorization header. If the keys match and the client uses the public key at subscription, the message is sent. If not, the message is blocked by the push service.

The Lambda function that sends delivery requests to the push service reads the key values from SSM. It uses them to generate the Authorization header to include in the request, allowing for successful delivery to the client endpoint.

Conclusion

This post shows how you can add scaling support for a game via automation. The example uses Amazon Rekognition to check images for unacceptable content and uses asynchronous architecture patterns with Step Functions and HTTP WebPush. These scaling approaches can help you to maximize your technical and personnel investments.

For more serverless learning resources, visit Serverless Land.

Intelligently Search Media Assets with Amazon Rekognition and Amazon ES

Post Syndicated from Sridhar Chevendra original https://aws.amazon.com/blogs/architecture/intelligently-search-media-assets-with-amazon-rekognition-and-amazon-es/

Media assets have become increasingly important to industries like media and entertainment, manufacturing, education, social media applications, and retail. This is largely due to innovations in digital marketing, mobile, and ecommerce.

Successfully locating a digital asset like a video, graphic, or image reduces costs related to reproducing or re-shooting. An efficient search engine is critical to quickly delivering something like the latest fashion trends. This in turn increases customer satisfaction, builds brand loyalty, and helps increase businesses’ online footprints, ultimately contributing towards revenue.

This blog post shows you how to build automated indexing and search functions using AWS serverless managed artificial intelligence (AI)/machine learning (ML) services. This architecture provides high scalability, reduces operational overhead, and scales out/in automatically based on the demand, with a flexible pay-as-you-go pricing model.

Automatic tagging and rich metadata with Amazon ES

Asset libraries for images and videos are growing exponentially. With Amazon Elasticsearch Service (Amazon ES), this media is indexed and organized, which is important for efficient search and quick retrieval.

Adding correct metadata to digital assets based on enterprise standard taxonomy will help you narrow down search results. This includes information like media formats, but also richer metadata like location, event details, and so forth. With Amazon Rekognition, an advanced ML service, you do not need to tag and index these media assets. This automatic tagging and organization frees you up to gain insights like sentiment analysis from social media.

Figure 1 is tagged using Amazon Rekognition. You can see how rich metadata (Apparel, T-Shirt, Person, and Pills) is extracted automatically. Without Amazon Rekognition, you would have to manually add tags and categorize the image. This means you could only do a keyword search on what’s manually tagged. If the image was not tagged, then you likely wouldn’t be able to find it in a search.

Figure 1. An image tagged automatically with Amazon Rekognition

Figure 1. An image tagged automatically with Amazon Rekognition

Data ingestion, organization, and storage with Amazon S3

As shown in Figure 2, use Amazon Simple Storage Service (Amazon S3) to store your static assets. It provides high availability and scalability, along with unlimited storage. When you choose Amazon S3 as your content repository, multiple data providers are configured for data ingestion for future consumption by downstream applications. In addition to providing storage, Amazon S3 lets you organize data into prefixes based on the event type and captures S3 object mutations through S3 event notifications.

Figure 2. Solution overview diagram

Figure 2. Solution overview diagram

S3 event notifications are invoked for a specific prefix, suffix, or combination of both. They integrate with Amazon Simple Queue Service (Amazon SQS), Amazon Simple Notification Service (Amazon SNS), and AWS Lambda as targets. (Refer to the Amazon S3 Event Notifications user guide for best practices). S3 event notification targets vary across use cases. For media assets, Amazon SQS is used to decouple the new data objects ingested into S3 buckets and downstream services. Amazon SQS provides flexibility over the data processing based on resource availability.

Data processing with Amazon Rekognition

Once media assets are ingested into Amazon S3, they are ready to be processed. Amazon Rekognition determines the entities within each asset. Amazon Rekognition then extracts the entities in JSON format and assigns a confidence score.

If the confidence score is below the defined threshold, use Amazon Augmented AI (A2I) for further review. A2I is an ML service that helps you build the workflows required for human review of ML predictions.

Amazon Rekognition also supports custom modeling to help identify entities within the images for specific business needs. For instance, a campaign may need images of products worn by a brand ambassador at a marketing event. Then they may need to further narrow their search down by the individual’s name or age demographic.

Using our solution, a Lambda function invokes Amazon Rekognition to extract the entities from the ingested assets. Lambda continuously polls the SQS queue for any new messages. Once a message is available, the Lambda function invokes the Amazon Rekognition endpoint to extract the relevant entities.

The following is a sample output from detect_labels API call in Amazon Rekognition and the transformed output that will be updated to downstream search engine:

{'Labels': [{'Name': 'Clothing', 'Confidence': 99.98137664794922, 'Instances': [], 'Parents': []}, {'Name': 'Apparel', 'Confidence': 99.98137664794922,'Instances': [], 'Parents': []}, {'Name': 'Shirt', 'Confidence': 97.00833129882812, 'Instances': [], 'Parents': [{'Name': 'Clothing'}]}, {'Name': 'T-Shirt', 'Confidence': 76.36670684814453, 'Instances': [{'BoundingBox': {'Width': 0.7963646650314331, 'Height': 0.6813027262687683, 'Left':
0.09593021124601364, 'Top': 0.1719706505537033}, 'Confidence': 53.39663314819336}], 'Parents': [{'Name': 'Clothing'}]}], 'LabelModelVersion': '2.0', 'ResponseMetadata': {'RequestId': '3a561e82-badc-4ba0-aa77-39a13f1bb3a6', 'HTTPStatusCode': 200, 'HTTPHeaders': {'content-type': 'application/x-amz-json-1.1', 'date': 'Mon, 17 May 2021 18:32:27 GMT', 'x-amzn-requestid': '3a561e82-badc-4ba0-aa77-39a13f1bb3a6','content-length': '542', 'connection': 'keep-alive'}, 'RetryAttempts': 0}}

As shown, the Lambda function submits an API call to Amazon Rekognition, where a T-shirt image in .jpeg format is provided as the input. Based on your confidence score threshold preference, Amazon Rekognition will prompt you to initiate a human review using Amazon A2I. It will also prompt you to use Amazon Rekognition Custom Labels to train the custom models. Lambda then identifies and arranges the labels and updates the specified index.

Indexing with Amazon ES

Amazon ES is a managed search engine service that provides enterprise-grade search engine capability for applications. In our solution, assets are searched based on entities that are used as metadata to update the index. Amazon ES is hosted as a public endpoint or a VPC endpoint for secure access within the specified AWS account.

Labels are identified and marked as tags, which are assigned to .jpeg formatted images. The following sample output shows the query on one of the tags issued on an Amazon ES cluster.

Query:

curl-XGET https://<ElasticSearch Endpoint>/<_IndexName>/_search?q=T-Shirt

Output:

{"took":140,"timed_out":false,"_shards":{"total":5,"successful":5,"skipped":0,"failed":0},"hits":{"total":{"value":1,"relation":"eq"},"max_score":0.05460011,"hits":[{"_index":"movies","_type":"_doc","_id":"15","_score":0.05460011,"_source":{"fileName":"s7-1370766_lifestyle.jpg","objectTags":["Clothing","Apparel","Sailor
Suit","Sleeve","T-Shirt","Shirt","Jersey"]}}]}}

In addition to photos, Amazon Rekognition also detects the labels on videos. It can recognize labels and identify characters and entities. These are then added to Amazon ES to enhance search capability. This allows users to skip to specific parts of a video for quick searchability. For instance, a marketer may need images of cashmere sweaters from a fashion show that was streamed and recorded.

Once the raw video clip is identified, it is then converted using Amazon Elastic Transcoder to play back on mobile devices, tablets, web browsers, and connected televisions. Elastic Transcoder is a highly scalable and cost-effective media transcoding service in the cloud. Segmented output renditions are created for delivery using the multiple protocols to compatible devices.

Conclusion

This blog describes AWS services that can be applied to diverse set of use cases for tagging and efficient search of images and videos. You can build automated indexing and search using AWS serverless managed AI/ML services. They provide high scalability, reduce operational overhead, and scale out/in automatically based on the demand, with a flexible pay-as-you-go pricing model.

To get started, use these references to create your own sample architectures:

Using AppStream 2.0 to Deliver PACS and Image Analysis in Clinical Trials

Post Syndicated from Chris Fuller original https://aws.amazon.com/blogs/architecture/using-appstream-2-0-to-deliver-pacs-and-image-analysis-in-clinical-trials/

Hospitals and clinical trial sites manage sensitive patient data. They are often required to grant remote access to custom Windows-based applications for patient record review and medical image analysis. This typically requires providing physicians and staff with remote access to on-premises workstations over VPN, with some flavor of remote desktop software. This can be both costly and inefficient, since it requires licensing custom 3rd party remote access tools, configuring network access for each researcher, and training individuals at each site for every trial. In combination with other AWS services, Amazon AppStream 2.0 can be used to build better workflows. Applications delivered via AppStream 2.0 can be used to review patient data, such as medical images, videos, and patient records. At the same time, this approach offers greater protection of patient data, without the cost and complexity of a remote desktop solution. In this blog, we will present a high-level architecture and several example use cases for leveraging AppStream 2.0 for medical image analysis.

Background – managing patient data security

Picture archiving and communications systems (PACS) and vendor neutral archives (VNAs) are used extensively for storing and managing medical images and related metadata. These systems are critical for sharing images among modern medical teams collaborating on patient care. Furthermore, researchers and clinicians can access images from PACS and view them at a workstation in an office or clinic setting.

While data sharing is critical for healthcare and research workflows, HIPAA-covered entities are responsible for protecting patient’s personally identifiable information (PII) as protected health information (PHI). As such, HIPAA-covered entities are bound to protect any information about a patient’s healthcare, health status, and payment history for services.

Data sovereignty leads to further complications. Clinical trials play an essential role in vouching for the safety and efficacy of medical products and innovations. The increasing transparency in clinical trial data makes sharing this information among researchers, clinicians, patients, and trial subjects possible. However, this also makes it a challenge to maintain stakeholder’s control over their data. With laws like General Data Protection Regulation (GDPR) and the emphasis on data localization, data sovereignty is interpreted based on the location of the data. Further, regulations like 21 CFR Part 11 impose strict guidelines on data protection, authentication, and validation for any FDA-regulated entity or use case.

If you are a healthcare organization or software provider, you understand the struggle to innovate and drive change, while maintaining your security and compliance posture for your applications. Your end users (physicians, radiologists, researchers, and remote operators) require IT environments that are easily accessible and can automatically scale globally on demand.

The network of professionals involved in image management and review is widely distributed, yet applications for review and analysis are still largely desktop-based. This means that a common use case for the healthcare industry is to use desktop applications from anywhere. Let’s use the following example to look more closely into a use case where AppStream 2.0 is helpful.

Data flow through the image management architecture

In this use case, the hospital’s on-premises systems are connected to the AWS Cloud using a private network connection, such as AWS Direct Connect, or an AWS Site-to-Site VPN. The images and files generated from the PACS server and the Electronic Medical Record (EMR) server are placed on an Amazon Simple Storage Service (Amazon S3). Amazon S3 is an object storage service that offers scalability, availability, security, and performance. All of the images and files are read from a secure S3 bucket, accessible only by the PACS. They are then de-identified and written back to a separate bucket accessible by other systems for review.

In our workflow, text-based PII is extracted from the images using Amazon Comprehend Medical. Amazon Rekognition helps to identify and detect “burned-in” PHI data (text that is actually part of the image). In addition, Amazon Rekognition can assist with entity identification within images. For example, in a batch of thousands of shoulder MRIs, Amazon Rekognition can identify a knee. Amazon SageMaker is an end-to-end machine learning platform that enables trial administrators and data management teams to prepare training data. It can also be used to build machine learning models quickly with pre-built algorithms.  With Amazon SageMaker notebooks, the resulting de-identified image and text are written to the S3 bucket, and can then be used by the desktop applications.

AppStream 2.0 is a fully managed application streaming service that provides users with instant access to desktop applications from anywhere, regardless of what device is being used for access. An AppStream 2.0 image builder is used to install, add, and test your applications, and then create a software image or package. The software image contains applications that you can stream to your users. Default Windows and application settings allow your users to get started with their applications quickly. A fleet consists of fleet instances (also known as streaming instances) that run the software image that you specify. A stack consists of an associated fleet, user access policies, and storage configurations. A streaming instance (also known as a fleet instance) is an Amazon EC2 instance that is made available to a single user for application streaming.

Secure user interactions for image analysis and review

We’ve covered secure storage and anonymization of the image data that’s managed by the PACS, with images residing in Amazon S3. The next challenge is to provide secure, role-based access to those images for review by physicians, radiologists, or researchers. However, many of the applications used for image review and annotation are proprietary desktop applications that only run on specific operating systems. Traditionally, reviewers access these applications via remote desktop sessions to an on-premises workstation. This creates cost, management, network security, and data privacy concerns for the application hosts. Using Amazon AppStream 2.0, we can provide secure access to these proprietary applications in the cloud.

Authentication and access to the applications is as follows:

  • When end users sign in with the provided AppStream 2.0 URL, they are authenticated against Active Directory.
  • After the users are authenticated, the browser receives a Security Assertion Markup Language (SAML) assertion as an authentication response from Amazon Cognito, which controls access to AWS resources.
  • The response is then posted by the browser to the AWS sign-in SAML endpoint. Temporary security credentials are issued after the assertion and the embedded attributes are validated.
  • The temporary credentials are then used to create the sign-in URL.
  • The user is redirected to the AppStream 2.0 streaming session and is granted access permissions based on the role assigned to them. After this, they can log into the AppStream 2.0 instance and access their applications.

The application configurations are stored as persistent data using Amazon FSx, which can provide every user a unique storage drive within AppStream 2.0 streaming sessions. A user will have permissions to access only their directory. The drive is automatically mounted at the start of a streaming session. Files added or updated to the drive are automatically persisted between streaming sessions.

Figure 1. Architecture for managing, anonymizing, and analyzing medical image data

Figure 1. Architecture for managing, anonymizing, and analyzing medical image data

Conclusion

In our high-level use case, we reviewed how a combination of AWS services can be used to increase efficiency and reduce cost. While managing and reviewing patient data using custom applications such as PACS or image viewers, AWS services also provide an improved end user experience. This architecture provides a scalable, reliable, and secure foundation to develop your solution, leveraging the image analysis applications you already use. Your applications are available through a standard web browser, and you can manage users, access, and data with existing Active Directory group memberships and credentials.

AppStream 2.0 manages the AWS resources required to host and run your applications, scales automatically, and provides access to users on demand. AWS services can be managed using configuration as code best practices through AWS CloudFormation. CloudFormation lets you define text-based templates used to spin up cloud architectures. In a more complex setup, AWS Glue, Amazon CloudWatch, and AWS CloudTrail configured with a centralized logging account can be added to achieve 21 CFR Part 11 and GxP compliance.

For additional information, check out the following resources or contact your AWS account manager.

Field Notes: Speed Up Redaction of Connected Car Data by Multiprocessing Video Footage with Amazon Rekognition

Post Syndicated from Sandeep Kulkarni original https://aws.amazon.com/blogs/architecture/field-notes-speed-up-redaction-of-connected-car-data-by-multiprocessing-video-footage-with-amazon-rekognition/

In the blog, Redacting Personal Data from Connected Cars Using Amazon Rekognition, we demonstrated how you can redact personal data such as human faces using Amazon Rekognition. Traversing the video, frame by frame, and identifying personal information in each frame takes time. This solution is great for small video clips, where you do not need a near real-time response. However, in some use cases like object detection, real time traffic monitoring, you may need to process this information in near real-time and keep up with the input video stream.

In this blog post, we introduce how to leverage “multiprocessing” to speed up the redaction process and provide a response in near real time. We also compare the process run times using a variety of Amazon SageMaker instances to give users various options to process video using Amazon Rekognition.

For example, the ml.c5.4xlarge instance has 16 vCPUs, so we could theoretically have 16 processes, working in parallel, to process the video stream, which will significantly reduce the processing time. Our test against the sample video shows that we reduce the process run time by a factor of 11x, using the ml.c5.4xlarge instance.

Architecture Overview

Video Redaction - Multiprocessing

Walkthrough: 6 Steps

1. We will assume that the video data from the car was ingested and is stored in a “Raw” Amazon S3 bucket. (For real time analytics, video data will likely be ingested from the connected vehicles into an Amazon Kinesis Video Stream)

2.  In this architecture we will use an Amazon SageMaker notebook instance, which is a machine learning (ML) compute instance running the Jupyter Notebook App.

3. Additionally an AWS Identity and Access Management (IAM) role created with appropriate permissions is leveraged to provide temporary security credentials required for this program.

4. The individual frames are analyzed by calling the “DetectFaces” Amazon Rekognition API, which analyzes and provides metadata about the frame. If a face is detected in the frame, then Amazon Rekognition returns a bounding box per face.

5.  We write a function multi_process_video to blur the detected face for each frame and distribute the processing job equally among all available CPUs in the SageMaker instance

6. We run the multi_process function for the input video and write the output video to S3 bucket for further analysis.

Detailed Steps

For the 5 steps mentioned previously, we provide the input video, code samples and the corresponding output video.

Step 1: Login to the AWS console with your user credentials.

  • Upload the sample video to your S3 bucket.
    Name it face1.mp4. I’ve included the following example of the video input.

Step 2: In this block, we will create a SageMaker notebook.

Notebook instance:

  • Notebook instance name: VideoRedaction
    Notebook instance class: choose “ml.t3.large” from drop down
    Elastic inference: None

Permissions:

  • IAM role: Select Create a new role from the drop-down menu. This will open a new screen, click next and the new role will be created. The role name will start with AmazonSageMaker-ExecutionRole-xxxxxxxx.
  • Root access: Select Enable
  • Assume defaults for the rest, and select the orange “Create notebook instance” button at the bottom.

This will take you to the next screen, which shows that your notebook instance is being created. It will take a few minutes and you can monitor the status, which will show a green “InService” state, when the notebook is ready.

Step 3:  Next, we need to provide additional permissions to the new role that you created in Step 2.

  • Select the VideoRedaction notebook.
    This will open a new screen. Scroll down to the 3 block – “Permissions and encryption” and click on the IAM role ARN link.

This will open a screen where you can attach additional policies. It will already be populated with “AmazonSageMakerFullAccess”

  • Select the blue Attach policies button.
  • This will open a new screen, which will allow you to add permissions to your execution role.
    • Under “Filter policies” search for S3full. AmazonS3FullAccess. Check the box next to it.
    • Under “Filter policies” search for Rekognition. Check the box next to AmazonRekognitionFullAccess and AmazonRekognitionServiceRole.
    • Click blue Attach Policies button at the bottom. This will populate a screen which will show you the five policies attached as follows:

Permissions policies

  • Click on the Add inline policy link on the right and then click on the JSON tab on the next screen. Paste the following policy replacing the <account number> with your AWS account number:
{
    "Version": "2012-10-17",
    "Statement": [
        {
            "Sid": "MySid",
            "Effect": "Allow",
            "Action": "iam:PassRole",
            "Resource": "arn:aws:iam::<accountnumber>:role/serviceRekognition"
        }
    ]
}

On the next screen enter VideoInlinePolicy for the name and select the blue Create Policy button at the bottom.

Permissions Policies - 6 Policies Applied

Step 3a:  Navigate to SageMaker in the console:

  • Select “Notebook instances” in the menu on left. This will show your VideoRedaction notebook.
  • Select Open Jupyter blue link under Actions. This will open a new tab titled, Jupyter.

Step 3b: In the upper right corner, click on drop down arrow next to “New” and choose conda_tensorflow_p36 as the kernel for your notebook.

Your screen will look at follows:

Jupyter

Install ffmpeg

First, we need to install ffmpeg for multiprocessing video. It’s a free and open-source software project consisting of a large suite of libraries and programs for handling video, audio, and other multimedia files and streams. We use it to concatenate all the subset videos processed by each vCPU and generate the final output.

Install ffmpeg using the following command:

!conda install x264=='1!152.20180717' ffmpeg=4.0.2 -c conda-forge --yes  

Import libraries – We import additional libraries to help with multi-processing capability.

import cv2  
import os  
from PIL import ImageFilter  
import boto3  
import io  
from PIL import Image, ImageDraw, ExifTags, ImageColor  
import numpy as np  
from os.path import isfile, join  
import time  
import sys  
import time  
import subprocess as sp  
import multiprocessing as mp  
from os import remove  

Step 4: Identify personal data (faces) in the individual frames

Amazon Rekognition “Detect_Faces” detects the 100 largest faces in the image. For each face detected, the operation returns face details. These details include a bounding box of the face, a confidence value (that the bounding box contains a face), and a fixed set of attributes such as facial landmarks (for example, coordinates of eye and mouth), presence of beard, sunglasses, and so on.

You pass the input image either as base64-encoded image bytes or as a reference to an image in an Amazon S3 bucket. In this code, we pass the image as jpg to Amazon Rekognition since we want to see each frame of this video. We also show how you can expand the bounding boxes returned by Amazon Rekognition, if required, to blur an enlarged portion of the face.

	def detect_blur_face_local_file(photo,blurriness):      
	      
	    client=boto3.client('rekognition')      
	          
	    # Call DetectFaces      
	    with open(photo, 'rb') as image:      
	        response = client.detect_faces(Image={'Bytes': image.read()})      
	          
	    image=Image.open(photo)      
	    imgWidth, imgHeight = image.size        
	    draw = ImageDraw.Draw(image)         
	              
	    # Calculate and display bounding boxes for each detected face             
	    for faceDetail in response['FaceDetails']:      
	              
	        box = faceDetail['BoundingBox']      
	        left = imgWidth * box['Left']      
	        top = imgHeight * box['Top']      
	        width = imgWidth * box['Width']      
	        height = imgHeight * box['Height']      
	              
	        #blur faces inside the enlarged bounding boxes
	        #you can also keep the original bounding boxes    
	        x1=left-0.1*width  
	        y1=top-0.1*height  
	        x2=left+width+0.1*width  
	        y2=top+height+0.1*height  
	              
	        mask = Image.new('L', image.size, 0)      
	        draw = ImageDraw.Draw(mask)      
	        draw.rectangle([ (x1,y1), (x2,y2) ], fill=255)      
	        blurred = image.filter(ImageFilter.GaussianBlur(blurriness))      
	        image.paste(blurred, mask=mask)      
	        image.save      
	       
	          
	    return image      

Step 5: Redact the face bounding box and distribute the processing among all CPUs

By passing the group_number of the multi_process_video function, you can distribute the video processing job among all available CPUs of the instance equally and therefore largely reduce the process time.

	def multi_process_video(group_number):  
	    cap = cv2.VideoCapture(input_file)  
	    cap.set(cv2.CAP_PROP_POS_FRAMES, frame_jump_unit * group_number)  
	    proc_frames = 0  
	    width = int(cap.get(cv2.CAP_PROP_FRAME_WIDTH))  
	    height = int(cap.get(cv2.CAP_PROP_FRAME_HEIGHT))  
	    fps = cap.get(cv2.CAP_PROP_FPS)  
	    out = cv2.VideoWriter(  
	        "{}.{}".format(group_number, 'mp4'),  
	        cv2.VideoWriter_fourcc(*'MP4V'),  
	        fps,  
	        (width, height),  
	    )  
	  
	    while proc_frames < frame_jump_unit:  
	        ret, frame = cap.read()  
	        if ret == False:  
	            break  
	          
	        f=str(group_number)+'_'+str(proc_frames)+'.jpg'  
	        cv2.imwrite(f,frame)  
	        #Define the blurriness  
	        blurriness=20  
	        blurred_img=detect_blur_face_local_file(f,blurriness)  
	        blurred_frame=cv2.cvtColor(np.array(blurred_img), cv2.COLOR_BGR2RGB)    
	          
	        out.write(blurred_frame)  
	        proc_frames += 1  
	    else:  
	        print('Group '+str(group_number)+' finished processing!')  
	          
	    cap.release()  
	    cap.release()  
	    out.release()  
	    return None  

Step 6: Run multi-processing video function and write the redacted video to the output bucket

  • Then we multi-process the video and generate the output using multiprocessing function and ffmpeg in python.
  • We take a record of each video processed by a CPU in the format of ‘1.mp4’, ‘2.mp4’ … in a file called multiproc_files and then use subprocess to call ffmpeg to concatenate these videos based on these videos’ order in multiproc_files.
  • After the final video is generated, we remove all the intermediate results and upload the face-blurred result to a S3 bucket.
	start_time = time.time()  
	# Connect to S3  
	s3_client = boto3.client('s3')  
	      
	# Download S3 video to local. Enter your bucketname and file name below
	bucket='yourbucketname'  
	file='face1.mp4'    
	s3_client.download_file(bucket, file, './'+file)  
	      
	input_file='face1.mp4'    
	num_processes = mp.cpu_count()  
	cap = cv2.VideoCapture(input_file)  
	frame_jump_unit = cap.get(cv2.CAP_PROP_FRAME_COUNT) // num_processes  
	  
	# Multiprocessing video across all vCPUs    
	p = mp.Pool(num_processes)  
	p.map(multi_process_video, range(num_processes))  
	  
	# Generate multiproc_files to record the subset videos in the right order    
	multiproc_files = ["{}.{}".format(i, 'mp4') for i in range(num_processes)]  
	with open("multiproc_files.txt", "w") as f:  
	    for t in multiproc_files:  
	        f.write("file {} \n".format(t))  
	  
	# Use ffmpeg to concatenate all the subset videos according to multiproc_files   
	local_filename='blurface_multiproc_827.mp4'  
	  
	ffmpeg_command="ffmpeg -f concat -safe 0 -i multiproc_files.txt -c copy "  
	ffmpeg_command += local_filename  
	  
	cmd = sp.Popen(ffmpeg_command, stdout=sp.PIPE, stderr=sp.PIPE, shell=True)  
	cmd.communicate()  
	  
	# Remove all the intermediate results    
	for f in multiproc_files:  
	    remove(f)  
	remove("multiproc_files.txt")  
	  
	mydir=os.getcwd()  
	filelist = [ f for f in os.listdir(mydir) if f.endswith(".jpg") ]  
	for f in filelist:  
	    os.remove(os.path.join(mydir, f))  
	  
	# Upload face-blurred video to s3  
	s3_filename='blurface_multiproc_827.mp4'  
	response = s3_client.upload_file(local_filename, bucket, s3_filename)   
	  
	finish_time = time.time()  
	print( "Total Process Time:",finish_time-start_time,'s')  

Output:

Group 13 finished processing!

Group 15 finished processing!

Group 14 finished processing!

Group 12 finished processing!

Group 11 finished processing!

Group 9 finished processing!

Group 10 finished processing!

Group 1 finished processing!

Group 3 finished processing!

Group 4 finished processing!

Group 8 finished processing!

Group 5 finished processing!

Group 2 finished processing!

Group 7 finished processing!

Group 6 finished processing!

Group 0 finished processing!

Total Process Time: 15.709482431411743 s

Using the same instance, we reduce the process time from 168s to 15.7s. As we mentioned, ml.c5.4xlarge has 16 vCPUs and you can even further reduce the process time if you have an instance that has 32 or 64 CPUs.

Note: Choosing the right instance will depend on your requirement for process time and cost. As this result demonstrates, multiprocessing video using Amazon Rekognition is an efficient way to leverage the benefits of Amazon Rekognition state-of-the-art ML model and powerful multi-core Amazon SageMaker instances.

Comparison of Amazon SageMaker Instances in Terms of Process Time and Cost

Here is the comparison table generated when processing a 6.5 seconds video with multiple faces on different SageMaker instances. Following is a video screenshot:

Video screenshot with faces of 5 people blurred

Based on the following table, you learn that instances with 16 vCPU (4xlarge) are better options in terms of faster processing capability, while optimized for cost.

Table with SageMaker Instance Types

Depending on the size of your input video file and the requirements for real-time processing, you can break the input video file into smaller chunks and then scale instances to process those chunks in parallel. While this example is focused on blurring faces, you can also use AWS Rekognition for other use cases like someone wielding a gun, smoking a cigarette, suggestive content and the like.  These and many other moderation activities are all supported by Rekognition content moderation APIs.

Conclusion

In this blog post, we showed how you can leverage multiple cores in large machine learning instances, along with Amazon Rekognition. Doing this can significantly speed up the process of redacting personally identifiable information from videos collected by connected vehicles. The ability to provide near-real-time information unlocks additional value from the video that is ingested. For example, in smart cities, information is collected about the environment, such as road traffic and weather. This data can be visualized in near-real-time to help city management make decisions that can optimize traffic and improve residents’ quality of life.

Field Notes provides hands-on technical guidance from AWS Solutions Architects, consultants, and technical account managers, based on their experiences in the field solving real-world business problems for customers.

Fast and Cost-Effective Image Manipulation with Serverless Image Handler

Post Syndicated from Ajay Swamy original https://aws.amazon.com/blogs/architecture/fast-and-cost-effective-image-manipulation-with-serverless-image-handler/

As a modern company, you most likely have both a web-based and mobile app platform to provide content to customers who view it on a range of devices. This means you need to store multiple versions of images, depending on the device. The resulting image management can be a headache as it can be expensive and cumbersome to manage.

Serverless Image Handler (SIH) is an AWS Solution Implementation you use to store a single version of every image featured in your content, while dynamically delivering different versions at runtime based on your end user’s device. The solution simplifies code, saves on storage costs, and is ideal for use with web applications and mobile apps. SIH features include the ability to resize images, change background colors, apply formatting, and add watermarks.

Architecture overview

The SIH solution utilizes an AWS CloudFormation template to deploy the solution within minutes, and it’s for those of you who have multiple image assets needing an option to dynamically change or manipulate customer-facing images. SIH deploys best-in-class AWS services such as Amazon CloudFront, Amazon API Gateway, and AWS Lambda functions, and it connects to your Amazon Simple Storage Service (Amazon S3) bucket for storage.

Deploying this solution with the default parameters builds the following environment in AWS Cloud:

SIH: Emvironment in AWS Cloud-2

SIH uses the following AWS services:

  • Amazon CloudFront to quickly and securely  deliver images to your end users at scale
  • AWS Lambda to run code for image manipulation without the need for provisioning or managing servers (thereby reducing costs and overhead)
  • Your Amazon S3 bucket for storage of your image assets
  • AWS Secrets Manager to support the signing of image URLs so that image access is protected

How does Serverless Image Handler work?

When an HTTP request is received from a customer device, it is passed from CloudFront to API Gateway, and then forwarded to the Lambda function for processing. If the image is cached by CloudFront because of an earlier request, CloudFront will return the cached image instead of forwarding the request to the API Gateway. This reduces latency and eliminates the cost of reprocessing the image.

Requests that are not cached are passed to the API Gateway, and the entire request is forwarded to the Lambda function. The Lambda function retrieves the original image from your Amazon S3 bucket and uses Sharp (the open source image processing software) to return a modified version of the image to the API Gateway. SIH also utilizes Thumbor to apply dynamic filters on the fly. Additionally, the solution generates a CloudFront domain name that supports caching in CloudFront. The newly manipulated image is now cached at CloudFront for easy access and retrieval. The end-to-end request and response can be secured by using the solution’s signed URL feature via AWS Secrets Manager, which allows you to prevent unauthorized use of your proprietary images.

Lastly, SIH uses Amazon Rekognition for face detection in images submitted for smart cropping, allowing for easy cropping for specific content and image needs.

Code example of image manipulation

Please refer to the SIH implementation guide to quickly set up and use SIH. Using Node.js, you can create an image request as illustrated below. The code block specifies the image location as myImageBucket and specifies edits of grayscale :true to change the image to grayscale.

const imageRequest = JSON.stringify({
    bucket: “myImageBucket”,
    key: “myImage.jpg”,
    edits: {
        grayscale: true
    }
});

const url = `${CloudFrontUrl}/${Buffer.from(imageRequest).toString(‘base64’)}`;

With the generated URL, SIH can serve the grayscale image.

Conclusion

If you’re looking for a fast and cost-effective solution for image management, Serverless Image Handler provides a great way to manipulate and serve images on the fly with speed and security. Learn more about SIH and watch the accompanying Solving with AWS Solutions video below.

Using serverless backends to iterate quickly on web apps – part 3

Post Syndicated from James Beswick original https://aws.amazon.com/blogs/compute/using-serverless-backends-to-iterate-quickly-on-web-apps-part-3/

This series is about building flexible backends for web applications. The example is Happy Path, a web app that allows park visitors to upload and share maps and photos, to help replace printed materials.

In part 1, I show how the application works and walk through the backend architecture. In part 2, you deploy a basic image-processing workflow. To do this, you use an AWS Serverless Application Model (AWS SAM) template to create an AWS Step Functions state machine.

In this post, I show how to deploy progressively more complex workflow functionality while using minimal code. This solution in this web app is designed for 100,000 monthly active users. Using this approach, you can introduce more sophisticated workflows without affecting the existing backend application.

The code and instructions for this application are available in the GitHub repo.

Introducing image moderation

In the first version, users could upload any images to parks on the map. One of the most important feature requests is to enable moderation, to prevent inappropriate images from appearing on the app. To handle a large number of uploaded images, using human moderation would be slow and labor-intensive.

In this section, you use Amazon ML services to automate analyzing the images for unsafe content. Amazon Rekognition provides an API to detect if an image contains moderation labels. These labels are categorized into different types of unsafe content that would not be appropriate for this app.

Version 2 of the workflow uses this API to automate the process of checking images. To install version 2:

  1. From a terminal window, delete the v1 workflow stack:
    aws cloudformation delete-stack --stack-name happy-path-workflow-v1
  2. Change directory to the version 2 AWS SAM template in the repo:
    cd .\workflows\templates\v2
  3. Build and deploy the solution:
    sam build
    sam deploy --guided
  4. The deploy process prompts you for several parameters. Enter happy-path-workflow-v2 as the Stack Name. The other values are the outputs from the backend deployment process, detailed in the repo’s README. Enter these to complete the deployment.

From VS Code, open the v2 state machine in the repo from workflows/statemachines/v2.asl.json. Choose the Render graph option in the CodeLens to see the workflow visualization.

Serverless workflow visualization

This new workflow introduces a Moderator step. This invokes a Moderator Lambda function that uses the Amazon Rekognition API. If this API identifies any unsafe content labels, it returns these as part of the function output.

The next step in the workflow is a Moderation result choice state. This evaluates the output of the previous function – if the image passes moderation, the process continues to the Resizer function. If it fails, execution moves to the RecordFailState step.

Step Functions integrates directly with some AWS services so that you can call and pass parameters into the APIs of those services. The RecordFailState uses an Amazon DynamoDB service integration to write the workflow failure to the application table, using the arn:aws:states:::dynamodb:updateItem resource.

Testing the workflow

To test moderation, I use an unsafe image with suggestive content. This is an image that is not considered appropriate for this application. To test the deployed v2 workflow:

  1. Open the frontend application at https://localhost:8080 in your browser.
  2. Select a park location, choose Show Details, and then choose Upload images.
  3. Select an unsafe image to upload.
  4. Navigate to the Step Functions console. This shows the v2StateMachine with one successful execution:State machine result
  5. Select the state machine, and choose the execution to display more information. Scroll down to the Visual workflow panel.Visual workflow panel

This shows that the moderation failed and the path continued to log the failed state in the database. If you open the Output resource, this displays more details about why the image is considered unsafe.

Checking the image size and file type

The upload component in the frontend application limits file selection to JPG images but there is no check to reject images that are too small. It’s prudent to check and enforce image types and sizes on the backend API in addition to the frontend. This is because it’s possible to upload images via the API without using the frontend.

The next version of the workflow enforces image sizes and file types. To install version 3:

  1. From a terminal window, delete the v2 workflow stack:
    aws cloudformation delete-stack --stack-name happy-path-workflow-v2
  2. Change directory to the version 3 AWS SAM template in the repo:
    cd .\workflows\templates\v3
  3. Build and deploy the solution:
    sam build
    sam deploy --guided
  4. The deploy process prompts you for several parameters. Enter happy-path-workflow-v3 as the Stack Name. The other values are the outputs from the backend deployment process, detailed in the repo’s README. Enter these to complete the deployment.

From VS Code, open the v3 state machine in the repo from workflows/statemachines/v3.asl.json. Choose the Render graph option in the CodeLens to see the workflow visualization.

v3 state machine

This workflow changes the starting point of the execution, introducing a Check Dimensions step. This invokes a Lambda function that checks the size and types of the Amazon S3 object using the image-size npm package. This function uses environment variables provided by the AWS SAM template to compare against a minimum size and allowed type array.

The output is evaluated by the Dimension Result choice state. If the image is larger than the minimum size allowed, execution continues to the Moderator function as before. If not, it passes to the RecordFailState step to log the result in the database.

Testing the workflow

To test, I use an image that’s narrower than the mixPixels value. To test the deployed v3 workflow:

  1. Open the frontend application at https://localhost:8080 in your browser.
  2. Select a park location, choose Show Details, and then choose Upload images.
  3. Select an image with a width smaller than 800 pixels. After a few seconds, a rejection message appears:"Image is too small" message
  4. Navigate to the Step Functions console. This shows the v3StateMachine with one successful execution. Choose the execution to show more detail.Execution output

The execution shows that the Check Dimension step added the image dimensions to the event object. Next, the Dimensions Result choice state rejected the image, and logged the result at the RecordFailState step. The application’s DynamoDB table now contains details about the failed upload:

DynamoDB item details

Pivoting the application to a new concept

Until this point, the Happy Path web application is designed to help park visitors share maps and photos. This is the development team’s original idea behind the app. During the product-market fit stage of development, it’s common for applications to pivot substantially from the original idea. For startups, it can be critical to have the agility to modify solutions quickly to meet the needs of customers.

In this scenario, the original idea has been less successful than predicted, and park visitors are not adopting the app as expected. However, the business development team has identified a new opportunity. Restaurants would like an app that allows customers to upload menus and food photos. How can the development team create a new proof-of-concept app for restaurant customers to test this idea?

In this version, you modify the application to work for restaurants. While features continue to be added to the parks workflow, it now supports business logic specifically for the restaurant app.

To create the v4 workflow and update the frontend:

  1. From a terminal window, delete the v3 workflow stack:
    aws cloudformation delete-stack --stack-name happy-path-workflow-v3
  2. Change directory to the version 4 AWS SAM template in the repo:
    cd .\workflows\templates\v4
  3. Build and deploy the solution:
    sam build
    sam deploy --guided
  4. The deploy process prompts you for several parameters. Enter happy-path-workflow-v4 as the Stack Name. The other values are the outputs from the backend deployment process, detailed in the repo’s README. Enter these to complete the deployment.
  5. Open frontend/src/main.js and update the businessType variable on line 63. Set this value to ‘restaurant’.Change config to restaurants
  6. Start the local development server:
    npm run serve
  7. Open the application at http://localhost:8080. This now shows restaurants in the local area instead of parks.

In the Step Functions console, select the v4StateMachine to see the latest workflow, then open the Definition tab to see the visualization:

Workflow definition

This workflow starts with steps that apply to both parks and restaurants – checking the image dimensions. Next, it determines the place type from the placeId record in DynamoDB. Depending on place type, it now follows a different execution path:

  • Parks continue to run the automated moderator process, then resizer and publish the result.
  • Restaurants now use Amazon Rekognition to determine the labels in the image. Any photos containing people are rejected. Next, the workflow continues to the resizer and publish process.
  • Other business types go to the RecordFailState step since they are not supported.

Testing the workflow

To test the deployed v4 workflow:

  1. Open the frontend application at https://localhost:8080 in your browser.
  2. Select a restaurant, choose Show Details, and then choose Upload images.
  3. Select an image from the test photos dataset. After a few seconds, you see a message confirming the photo has been added.
  4. Next, select an image that contains one or more people. The new restaurant workflow rejects this type of photo:"Image rejected" message
  5. In the Step Functions console, select the last execution for the v4StateMachine to see how the Check for people step rejected the image:v4 workflow

If other business types are added later to the application, you can extend the Step Functions workflow accordingly. The cost of Step Functions is based on the number of transitions in a workflow, not the number of total steps. This means you can branch by business type in the Happy Path application. This doesn’t affect the overall cost of running an execution, if the total transitions are the same per execution.

Conclusion

Previously in this series, you deploy a simple workflow for processing image uploads in the Happy Path web application. In this post, you add progressively more complex functionality by deploying new versions of workflows.

The first iteration introduces image moderation using Amazon Rekognition, providing the ability to automate the evaluation of unsafe content. Next, the workflow is modified to check image size and file type. This allows you to reject any images that are too small or do not meet the type requirements. Finally, I show how to expand the logic further to accept other business types with their own custom workflows.

To learn more about building serverless web applications, see the Ask Around Me series.