Automate marketing campaigns with real-time customer data using Amazon Pinpoint

Post Syndicated from Rushabh Lokhande original https://aws.amazon.com/blogs/messaging-and-targeting/automate-marketing-campaigns-with-real-time-customer-data-using-amazon-pinpoint/

Amazon Pinpoint offers marketers and developers one customizable tool to deliver customer communications across channels, segments, and campaigns at scale. Amazon Pinpoint makes it easy to run targeted campaigns and drive customer communications across different channels: email, SMS, push notifications, in-app messaging, or custom channels. Amazon Pinpoint campaigns enables you define which users to target, determine which messages to send, schedule the best time to deliver the messages, and then track the results of your campaign.

In many cases, the customer data resides in a third-party system such as a CRM, Customer Data Platform, Point of Sales, database and data warehouse. This customer data represents a valuable asset for your organization. Your marketing team needs to leverage each piece of this data to elevate the customer experience.

In this blog post we will demonstrate how you can leverage users’ clickstream data stored in database to build user segments and launch campaigns using Amazon Pinpoint. Also, we will showcase the full architecture of the data pipeline including other AWS services such as Amazon RDS, AWS Data Migration Service, Amazon Kinesis and AWS Lambda.

Let us understand our case study with an example: a customer currently has digital touch points such as a Website and a Mobile App to collect the users’ clickstreams and behavioral data where they are storing them in a MySQL database. Marketing teams want to leverage the collected data to deliver a personalized experience by leveraging Amazon Pinpoint capabilities.

You can find below the detail of a specific use case covered by the proposed solution:

  • All the clickstream and customer data are stored in MySQL DB
  • Your marketing team wants to create a personalized Amazon Pinpoint campaigns based on the user status and experience. Ex:
    • Customers who interested in specific offering to activate for them campaign based on their interest
    • Communicate with the preferred language of the user

Please note that this use case is used to showcase the proposed solution capabilities. However, it is not limited to this specific use case since you can leverage any customer collected dimension/attribute to create specific campaign to achieve a specific marketing use case.

In this post, we provide a guided journey on how marketers can collect, segment, and activate audience segments in real-time to increase their agility in managing campaigns.

Overview of solution

The use case covered in this post, focuses on demonstrating the flexibility offered by Amazon Pinpoint in both inbound (Ingestion) and outbound (Activation) stream of customer data. For the inbound stream, Amazon Pinpoint gives you a variety of ways to import your customer data, including:

  1. CSV/JSON import from the AWS console
  2. API operation to create a single or multiple endpoints
  3. Programmatically create and execute import jobs

We will focus on building a real-time inbound stream of customer data available within an Amazon RDS MySQL database specifically. It is important to mention that similar approach can be implemented to ingest data from third-party systems if any.

For the outbound stream, activating customer data using Amazon Pinpoint can be achieved using the following two methods:

  1. Campaign: a campaign is a messaging initiative that engages a specific audience segment.
  2. Journey: a journey is a customized, multi-step engagement experience.

The result of customer data activation cannot be completed without specifying the targeted channel. A channel represents the platform through which you engage your audience segment with messages. For example, Amazon Pinpoint customers can optimize how they target notifications to prospective customers through LINE message and email. They can deliver notifications with more information on prospected customer’s product information such as sales, new products etc. to the appropriate audience.

Amazon Pinpoint supports the following channels:

  • Push notifications
  • Email
  • SMS
  • Voice
  • In-app messages

In addition to these channels, you can also extend the capabilities to meet your specific use case by creating custom channels. You can use custom channels to send messages to your customers through any service that has an API including third-party services. For example, you can use custom channels to send messages through third-party services such as WhatsApp or Facebook Messenger. We will focus on developing an Amazon Pinpoint connector using custom channel to target your customers on third-party services through API.

Solution Architecture

The below diagram illustrates the proposed architecture to address the use case. Moving from left to right:

Fig 1: Architecture Diagram for the Solution

Fig 1: Architecture Diagram for the Solution

  1. Amazon RDS: This hosts customer database where you can have one or many tables contains customer data.
  2. AWS Data Migration Service (DMS): This acts as the glue between Amazon RDS MySQL and the downstream services by replicating any transformation that happens at the record level in the configured customer tables.
  3. Amazon Kinesis Data Streams: This is the destination endpoint for AWS DMS. It will carry all the transformed records for the next stage of the pipeline.
  4. AWS Lambda (inbound): The inbound AWS Lambda triggers the Kinesis Data Streams, process the mutated records, and ingest them in Amazon Pinpoint.
  5. Amazon Pinpoint: This act as the centralized place to define customer segments and launch campaigns.
  6. AWS Lambda (outbound): This act as the custom channel destination for the campaigns activated from Amazon Pinpoint.

To illustrate how to set up this architecture, we’ll walk you through the following steps:

  1. Deploying an AWS CDK stack to provision the following AWS Resources
  2. Validate the Deployment.
  3. Run a Sample Workflow – This workflow will run an AWS Glue PySpark job that uses a custom Python library, and an upgraded version of boto3.
  4. Cleaning up your resources.

Prerequisites

Make sure that you complete the following steps as prerequisites:

The Solution

Launching your AWS CDK Stack

Step 1a: Open your device’s command line or Terminal.

Step1b: Checkout Git repository to a local directory on your device:

git clone https://github.com/aws-samples/amazon-pinpoint-realtime-campaign-optimization-example.git

Step 2: Change directories to the new directory code location:

cd amazon-pinpoint-realtime-campaign-optimization-example

Step 3: Update your AWS account number and region:

  1. Edit config.py with your choice to tool or command line
  2. look for section “Account Setup” and update your account number and region

    Fig 2: Configuring config.py for account-id and region

    Fig 2: Configuring config.py for account-id and region

  3. look for section “VPC Parameters” and update your VPC and subnet info

    Fig 3: Configuring config.py for VPC and subnet information

    Fig 3: Configuring config.py for VPC and subnet information

Step 4: Verify if you are in the directory where app.py file is located:

ls -ltr app.py

Step 5: Create a virtual environment:

macOS/Linux:

python3 -m venv .env

Windows:

python -m venv .env

Step 6: Activate the virtual environment after the init process completes and the virtual environment is created:

macOS/Linux:

source .env/bin/activate

Windows:

.env\Scripts\activate.bat

Step 7: Install the required dependencies:

pip3 install -r requirements.txt

Step 8: Bootstrap the cdk app using the following command:

cdk bootstrap aws://<AWS_ACCOUNTID>/<AWS_REGION>

Replace the place holder AWS_ACCOUNTID and AWS_REGION with your AWS account ID and the region to be deployed.
This step provisions the initial resources, including an Amazon S3 bucket for storing files and IAM roles that grant permissions needed to perform deployments.

Fig 4: Bootstrapping CDK environment

Fig 4: Bootstrapping CDK environment

Please note, if you have already bootstrapped the same account previously, you cannot bootstrap account, in such case skip this step or use a new AWS account.

Step 9: Make sure that your AWS profile is setup along with the region that you want to deploy as mentioned in the prerequisite. Synthesize the templates. AWS CDK apps use code to define the infrastructure, and when run they produce or “synthesize” a CloudFormation template for each stack defined in the application:

cdk synthesize

Step 10: Deploy the solution. By default, some actions that could potentially make security changes require approval. In this deployment, you’re creating an IAM role. The following command overrides the approval prompts, but if you would like to manually accept the prompts, then omit the –require-approval never flag:

cdk deploy "*" --require-approval never

While the AWS CDK deploys the CloudFormation stacks, you can follow the deployment progress in your terminal.
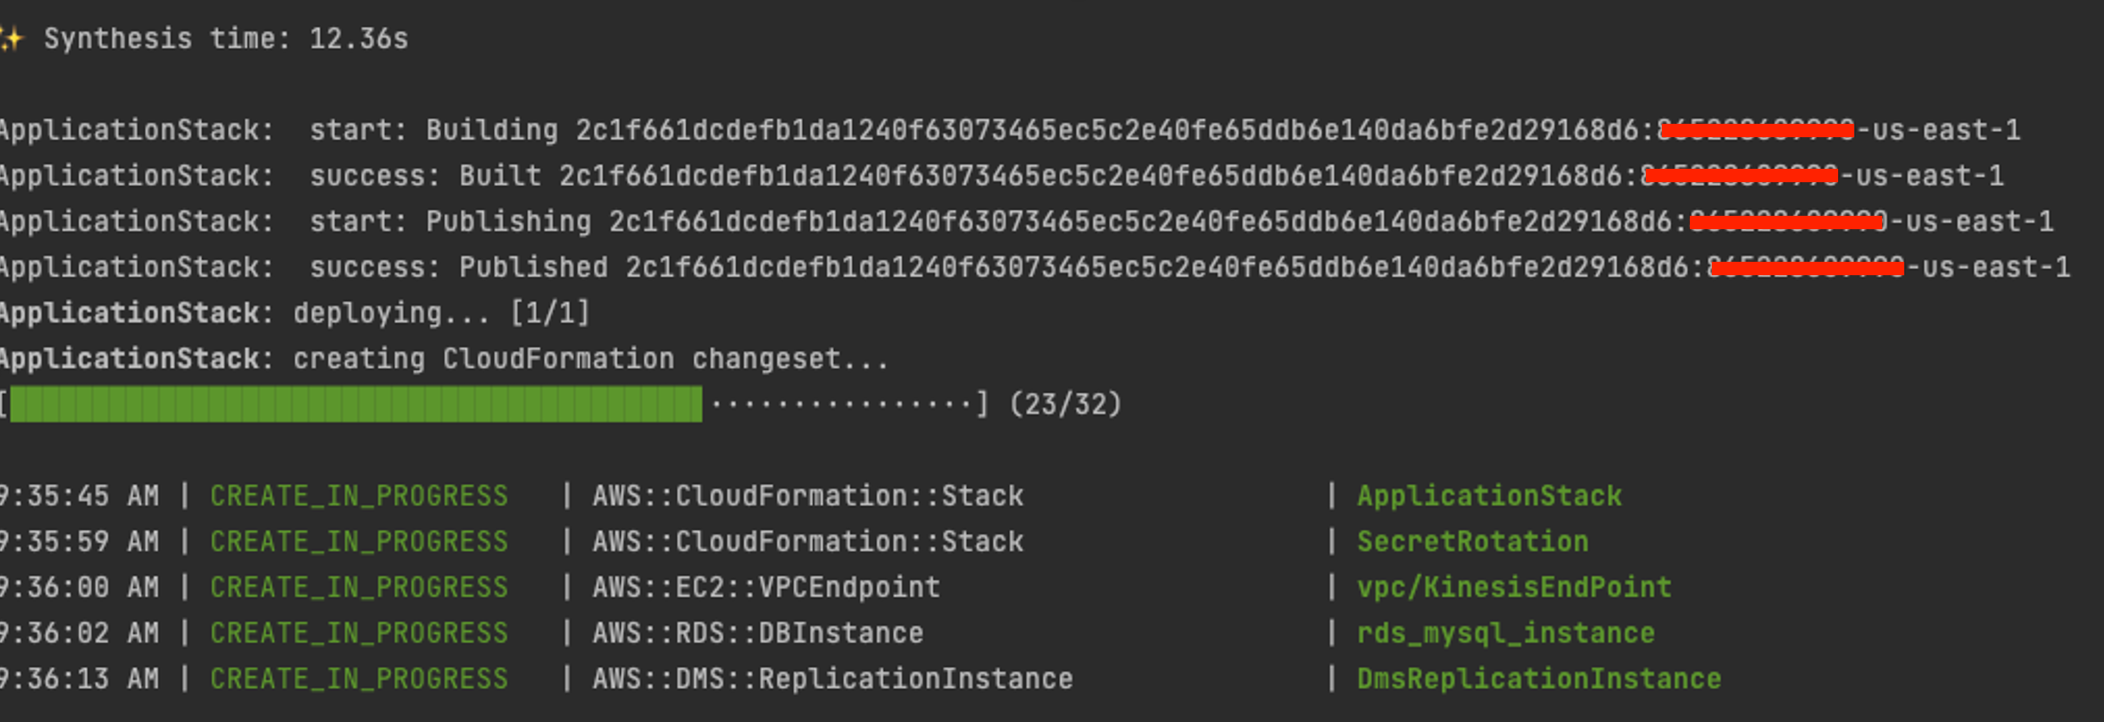
Fig 5: AWS CDK Deployment progress in terminal

Fig 5: AWS CDK Deployment progress in terminal

Once the deployment is successful, you’ll see the successful status as follows:
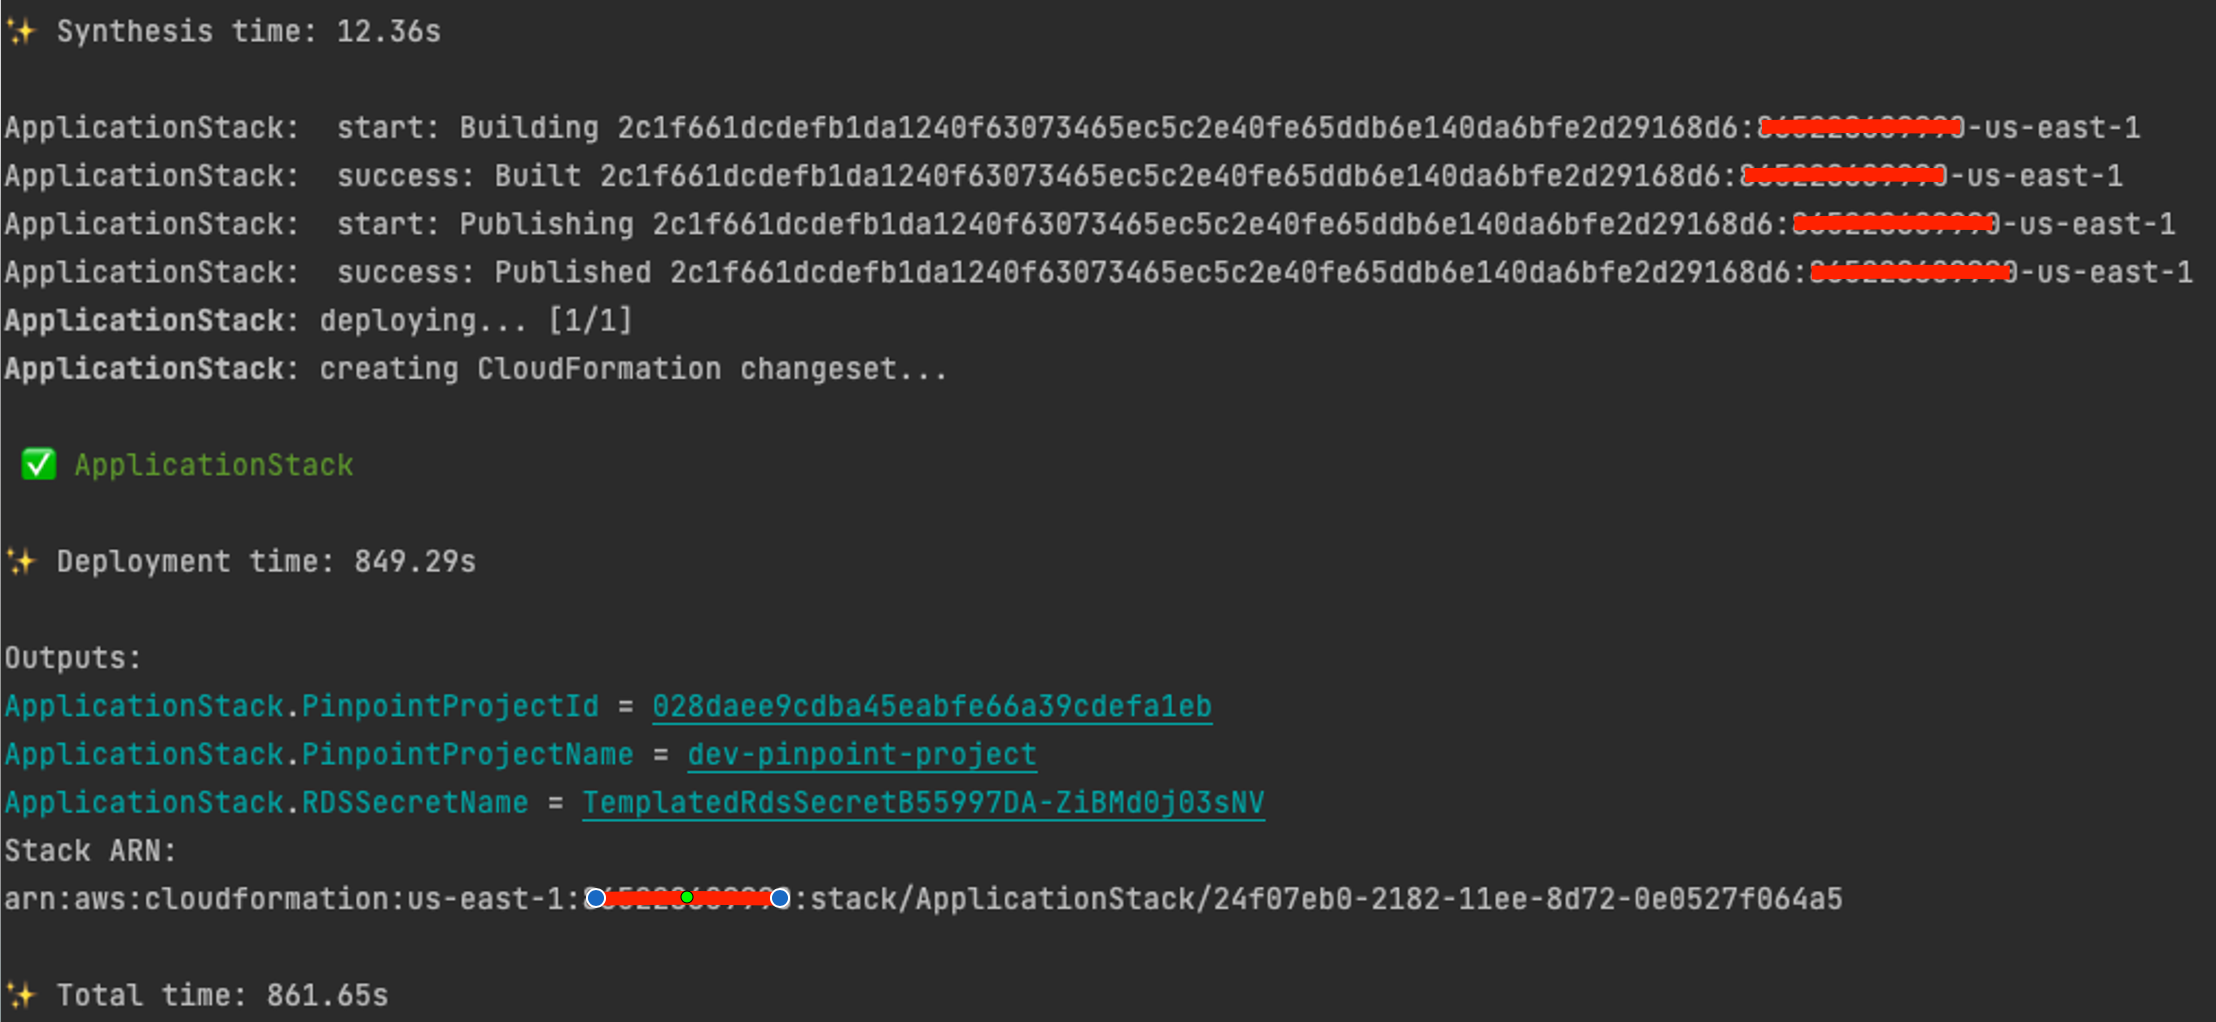
Fig 6: AWS CDK Deployment completion success

Fig 6: AWS CDK Deployment completion success

Step 11: Log in to the AWS Console, go to CloudFormation, and see the output of the ApplicationStack:
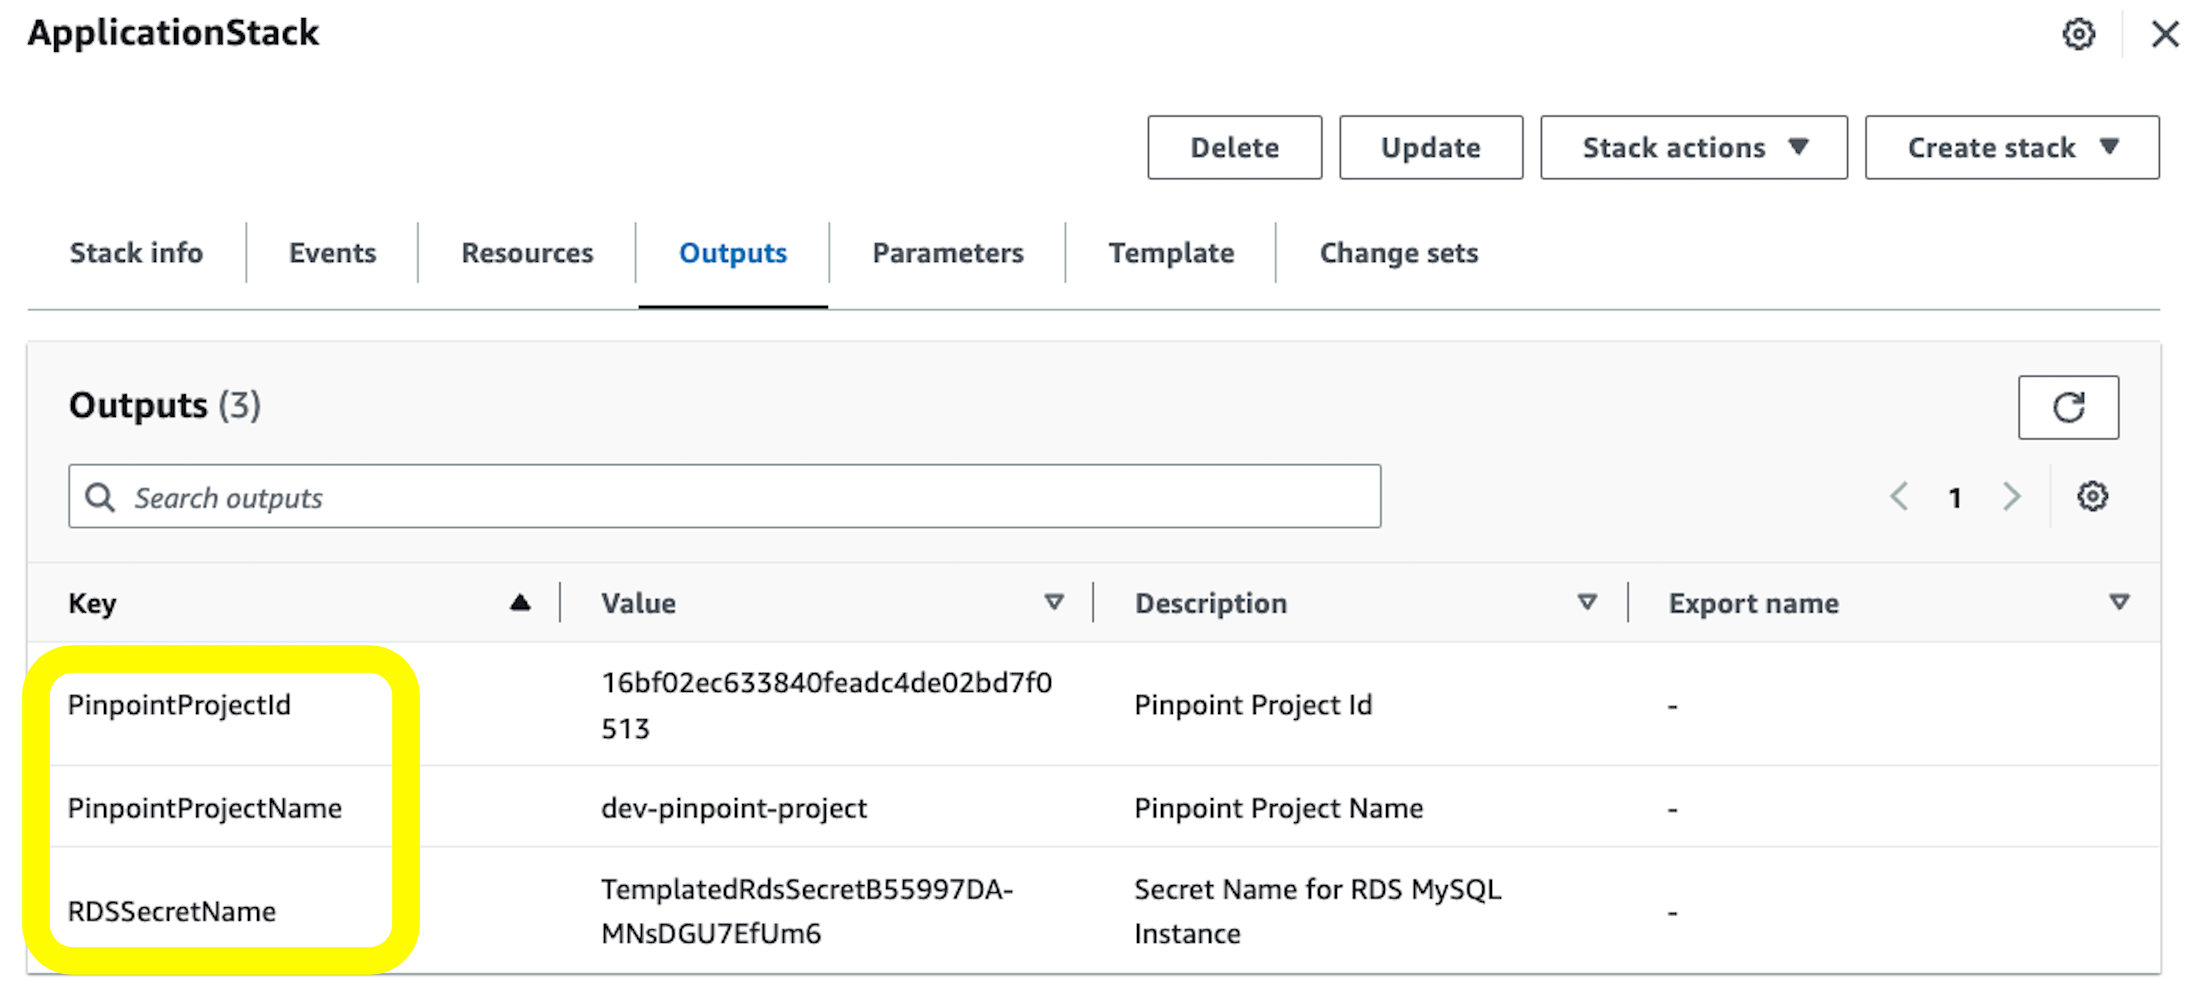
Fig 7: AWS CloudFormation stack output

Fig 7: AWS CloudFormation stack output

Note the values of PinpointProjectId, PinpointProjectName, and RDSSecretName variables. We’ll use them in the next step to upload our artifacts

Testing The Solution

In this section we will create a full data flow using the below steps:

  1. Ingest data in the customer_tb table within the Amazon RDS MySQL DB instance
  2. Validate that AWS Data Migration Service created task is replicating the changes to the Amazon Kinesis Data Streams
  3. Validate that endpoints are created within Amazon Pinpoint
  4. Create Amazon Pinpoint Segment and Campaign and activate data to Webhook.site endpoint URL

Step 1: Connect to MySQL DB instance and create customer database

    1. Sign in to the AWS Management Console and open the AWS Cloud9 console at https://console.aws.amazon.com/cloud9 
    2. Click Create environment
      • Name: mysql-cloud9-01 (for example)
      • Click Next
      • Environment type: Create a new EC2 instance for environment (direct access)
      • Instance type: t2.micro
      • Timeout: 30 minutes
      • Platform: Amazon Linux 2
      • Network settings under VPC settings select the same VPC where the MySQL DB instance was created. (this is the same VPC and Subnet from step 3.3)
      • Click Next
      • Review and click Create environment
    3. Select the created AWS Cloud9 from the AWS Cloud9 console at https://console.aws.amazon.com/cloud9  and click Open in Cloud9. You will have access to AWS Cloud9 Linux shell.
    4. From Linux shell, update the operating system and :
      sudo yum update -y
    5. From Linux shell, update the operating system and :
      sudo yum install -y mysql
    6. To connect to the created MySQL RDS DB instance, use the below command in the AWS Cloud9 Linux shell:
      mysql -h <<host>> -P 3308 --user=<<username>> --password=<<password>>
      • To get values for dbInstanceIdentifier, username, and password
        • Navigate to the AWS Secrets Manager service
        • Open the secret with the name created by the CDK application
        • Select ‘Reveal secret value’ and copy the respective values and replace in your command
      • After you enter the password for the user, you should see output similar to the following.
      • Welcome to the MariaDB monitor.  Commands end with ; or \g.
        Your MySQL connection id is 27
        Server version: 8.0.32 Source distribution
        Copyright (c) 2000, 2018, Oracle, MariaDB Corporation Ab and others.
        Type 'help;' or '\h' for help. Type '\c' to clear the current input statement.
        MySQL [(none)]>

Step 2: Ingest data in the customer_tb table within the Amazon RDS MySQL DB instance Once the connection to the MySQL DB instance established, using the same AWS Cloud9 Linux shell connected to the MySQL RDS DB execute following commands.

  • Create database pinpoint-test-db:
    CREATE DATABASE `pinpoint-test-db`;
  • Create table customer-tb:
    Use `pinpoint-test-db`;
    CREATE TABLE `customer_tb` (`userid` int NOT NULL,
                                `email` varchar(150) DEFAULT NULL,
                                `language` varchar(45) DEFAULT NULL,
                                `favourites` varchar(250) DEFAULT NULL,
                                PRIMARY KEY (`userid`);
  • You can verify the schema using the below SQL command:
  1. DESCRIBE `pinpoint-test-db`.customer_tb;
    Fig 8: Verify schema for customer_db table

    Fig 8: Verify schema for customer_db table

    • Insert records in customer_tb table:
    Use `pinpoint-test-db`;
    insert into customer_tb values (1,'[email protected]','english','football');
    insert into customer_tb values (2,'[email protected]','english','basketball');
    insert into customer_tb values (3,'[email protected]','french','football');
    insert into customer_tb values (4,'[email protected]','french','football');
    insert into customer_tb values (5,'[email protected]','french','basketball');
    insert into customer_tb values (6,'[email protected]','french','football');
    insert into customer_tb values (7,'[email protected]','french',null);
    insert into customer_tb values (8,'[email protected]','english','football');
    insert into customer_tb values (9,'[email protected]','english','football');
    insert into customer_tb values (10,'[email protected]','english',null);
    • Verify records in customer_tb table:
    select * from `pinpoint-test-db`.`customer_tb`;
    Fig 9: Verify data for customer_db table

    Fig 9: Verify data for customer_db table

    Step 3: Validate that AWS Data Migration Service created task is replicating the changes to the Amazon Kinesis Data Streams

      1. Sign in to the AWS Management Console and open the AWS DMS console at https://console.aws.amazon.com/dms/v2 
      2. From the navigation panel, choose Database migration tasks.
      3. Click on the created task created by CDK code ‘dmsreplicationtask-*’
      4. Start the replication task

        Fig 10: Starting AWS DMS Replication Task

        Fig 10: Starting AWS DMS Replication Task

      5. Make sure that Status is Replication ongoing

        Fig 11: AWS DMS Replication statistics

        Fig 11: AWS DMS Replication statistics

      6. Navigate to Table Statistics and make sure that the number of Inserts is equal to 10 and Load state is Table completed*

        Fig 12: AWS DMS Replication statistics

        Fig 12: AWS DMS Replication statistics

    Step 4: Validate that endpoints are created within Amazon Pinpoint

    1. Sign in to the AWS Management Console and open the Amazon Pinpoint console at https://console.aws.amazon.com/pinpoint/ 
    2. Click on Amazon Pinpoint Project Demo created by CDK stack “dev-pinpoint-project”
    3. From the left menu, click on Analytics and validate that the Active targetable endpoints are equal to 10 as shown below:
    Fig 13: Amazon Pinpoint endpoint summary

    Fig 13: Amazon Pinpoint endpoint summary

    Step 5: Create Amazon Pinpoint Segment and Campaign

    Step 5.1: Create Amazon Pinpoint Segment

    • Sign in to the AWS Management Console and open the Amazon Pinpoint console at https://console.aws.amazon.com/pinpoint/ 
    • Click on Amazon Pinpoint Project Demo created by CDK stack “dev-pinpoint-project”
    • from the left menu, click on Segments and click Create a segment
    • create Segment using the below configurations:
      • Name: English Speakers
      • Under criteria:
    • Attribute: Language
    • Operator: Conatins
    • Value: english
    Fig 14: Amazon Pinpoint segment summary

    Fig 14: Amazon Pinpoint segment summary

    • Click create segment

    Step 5.2: Create Amazon Pinpoint Campaign

    • from the left menu, click on Campaigns and click Create a campaign
    • set the Campaign name to test campaign and select Custom option for Channel as shown below:
    Fig 15: Amazon Pinpoint create campaign

    Fig 15: Amazon Pinpoint create campaign

    • Click Next
    • Select English Speakers from Segment as shown below and click Next:
    Fig 16: Amazon Pinpoint segment

    Fig 16: Amazon Pinpoint segment

    • Choose Lambda function channel type and select outbound lambda function with name pattern as ApplicationStack-lambdaoutboundfunction* from the dropdown as shown below:
    Fig 17: Amazon Pinpoint message creation

    Fig 17: Amazon Pinpoint message creation

    • Click Next
    • Choose At a specific time option and immediately to send the campaign as show below:
    Fig 18: Amazon Pinpoint campaign scheduling

    Fig 18: Amazon Pinpoint campaign scheduling

    If you push more messages or records into Amazon RDS (from step 2.4), you will need to create a new campaign (from step 4.2) to process the new messages.

    • Click Next, review the configuration and click Launch campaign.
    • Navigate to dev-pinpoint-project and select the campaign created in previous step. You should see status as ‘Complete’
    Fig 19: Amazon Pinpoint campaign processing status

    Fig 19: Amazon Pinpoint campaign processing status

    • Navigate to dev-pinpoint-project dashboard and select your campaign in ‘Campaign metrics’ dashboard, you will see the statistics for the processing.
    Fig 20: Amazon Pinpoint campaign metrics

    Fig 20: Amazon Pinpoint campaign metrics

    Accomplishments

    This is a quick summary of what we accomplished:

    1. Created an Amazon RDS MySQL DB instance and define customer_tb table schema
    2. Created an Amazon Kinesis Data Stream
    3. Replicated database changes from the Amazon RDS MySQL DB to Amazon Kinesis Data Stream
    4. Created an AWS Lambda function triggered by Amazon Kinesis Data Stream to ingest database records in Amazon Pinpoints as User endpoints using AWS SDK
    5. Created an Amazon Pinpoint Project, segment and campaign
    6. Created an AWS Lambda function as custom channel for Amazon Pinpoint campaign
    7. Tested end-to-end data flow from Amazon RDS MySQL DB instance to third party endpoint

    Next Steps

    You have now gained a good understanding of Amazon Pinpoint agnostic data flow but there are still many areas left for exploration. What this workshop hasn’t covered is the operation of other communication channels such as Email, SMS, Push notification and Voice outbound. You can enable the channels that are pertinent to your use case and send messages using campaigns or journeys.

    Clean Up

    Make sure that you clean up all of the other AWS resources that you created in the AWS CDK Stack deployment. You can delete these resources via the AWS CDK Destroy command as follows or the CloudFormation console.

    To destroy the resources using AWS CDK, follow these steps:

    • Follow Steps 1-5 from the ‘Launching your CDK Stack’ section.
    • Destroy the app by executing the following command:
    cdk destroy

    Summary

    In this post, you have now gained a good understanding of Amazon Pinpoint flexible real-time data flow. By implementing the steps detailed in this blog post, you can achieve a seamless integration of your customer data from Amazon RDS MySQL database to Amazon Pinpoint where you can leverage segments and campaigns to activate data using custom channels to third-party services via API. The demonstrated use case focuses on Amazon RDS MySQL database as a data source. However, there are still many areas left for exploration. What this post hasn’t covered is the operation of integrating customer data from other type of data sources such as MongoDB, Microsoft SQL Server, Google Cloud, etc. Also, other communication channels such as Email, SMS, Push notification and Voice outbound can be used in the activation layer. You can enable the channels that are pertinent to your use case and send messages using campaigns or journeys, and get a complete view of their customers across all touchpoints and can lead to less relevant marketing campaigns.

    About the Authors

  2. Bret Pontillo is a Senior Data Architect with AWS Professional Services Analytics Practice. He helps customers implement big data and analytics solutions. Outside of work, he enjoys spending time with family, traveling, and trying new food.
    Rushabh Lokhande is a Data & ML Engineer with AWS Professional Services Analytics Practice. He helps customers implement big data, machine learning, and analytics solutions. Outside of work, he enjoys spending time with family, reading, running, and golf.
    Ghandi Nader is a Senior Partner Solution Architect focusing on the Adtech and Martech industry. He helps customers and partners innovate and align with the market trends related to the industry. Outside of work, he enjoys spending time cycling and watching formula one.

[$] Recent improvements in GCC diagnostics

Post Syndicated from corbet original https://lwn.net/Articles/946733/

The primary job of a compiler is to translate source code into a binary
form that can be run by a computer. Increasingly, though, developers want
more from their tools, compilers included. Since the compiler must
understand the code it is being asked to translate, it is in a good
position to provide information about how that code will execute — and
where things might go wrong. At the 2023 GNU Tools Cauldron,
David Malcolm talked about recent work to improve the diagnostic output
from the GCC compiler.

OpenWrt 23.05.0 released

Post Syndicated from corbet original https://lwn.net/Articles/947727/

Version
23.05.0
of the OpenWrt distribution has been released: “OpenWrt
23.05 supports over 1790 devices. Support for over 200 new devices was
added in addition to the device support by OpenWrt 22.03
“. Along with
new device support, this release features a switch to the mbedtls
cryptographic library, the ability to include utilities written in Rust, an
updated toolchain, and more.

Security updates for Friday

Post Syndicated from corbet original https://lwn.net/Articles/947710/

Security updates have been issued by Debian (chromium, tomcat9, and webkit2gtk), Fedora (cacti, cacti-spine, grafana-pcp, libcue, mbedtls, samba, and vim), Oracle (kernel, libvpx, and thunderbird), Red Hat (bind and galera, mariadb), SUSE (exiv2, go1.20, go1.21, and kernel), and Ubuntu (ffmpeg).

За кого скачат синдикатите?

Post Syndicated from Емилия Милчева original https://www.toest.bg/za-kogo-skachat-sindikatite/

За кого скачат синдикатите?

Всеки път, когато българските синдикати скачат, а лидерите им напускат добре уредените си кабинети на бюрократи, за да се включат в хореографията със знамената и свирките, светва червена лампа: „Този път за(д) кого?“ 

Този път зад т.нар. опозиция – извънпарламентарната „Левицата“, също и БСП и „Възраждане“, поискали в разгара на предизборната кампания за местни избори вот на недоверие на кабинета на ПП–ДБ заради провал в сектор „Eнергетика“. Но синдикатите обслужиха и вътрешната опозиция в мнозинството – ГЕРБ и ДПС, които също недоволстват от политиките на управляващите, но няма да развалят сглобката. Неслучайно при трите кабинета на ГЕРБ и Бойко Борисов ярки профсъюзни протести нямаше, ако не броим редовното годишно недоволство на полицаите от заплатите.

Сега кулминацията на 14-дневните протести и блокади на миньори и енергетици от въглищната индустрия беше не националният протест, готвен за 12 октомври, а политическият инструмент – вотът на недоверие, дебатите по който се състояха в същия ден. И ето, КНСБ и КТ „Подкрепа“ обявиха, че нямат решение за участие в националния протест в защита на въгледобива, макар че техни представители излязоха на няколко места в страната. Политическата им обвързаност не е тайна, БНТ разкри имена на активни в протестите синдикалисти в листи за общински съветници на „Левицата“, на „Възраждане“ и БСП. 

Странен вот на недоверие, както го определи по БНР главният икономист на Центъра за изследване на демокрацията Руслан Стефанов. 

Странен, защото реално няма някаква промяна в политиката в тази сфера от 2005 г. насам. Просто дойде моментът на решение, когато повече не може да се отлага, защото страната ще губи средства. 

За политици и за синдикати няма и капка съмнение, че въглищната индустрия си отива. Знаят го отдавна. КНСБ и КТ „Подкрепа“ са партньори на всяко правителство, участват в Националния съвет за тристранно сътрудничество, в безброй консултации и браншови съвети, работят в дружествата и са наясно с огромните загуби. Пазарът не иска скъпия ток от въглищата и индустрията може още малко да оцелее на изкуствено дишане – държавата е в състояние да я подпомага до 2025 г. Но вината на синдикатите пред онези, които им плащат членски внос и очакват от тях защита, е, че не си мръднаха пръста при управлението на ГЕРБ и Бойко Борисов да поискат информационна кампания и разяснения при подготовката на териториалните планове, да отстояват правото на хората да са наясно какво бъдеще ги очаква. Главното – да не им спестят истината, че трансформацията ще е болезнена, и с тяхна помощ да опитат да я проведат по-леко.

В Благоевград лидерът на КНСБ Пламен Димитров направи неумел опит да разграничи синдикалното от политическото: 

Оттук нататък въпросът е кой и дали иска да употреби миньорите. Политическият елемент на употреба според мен е доста сериозен. Толкова силна партийна зависимост в синдикален протест не е имало от времето на Луканов. 

Затова пък в синдикалните протести неизменно присъства корпоративната зависимост. Било от бос като Христо Ковачки, чиито бизнеси във въглищната индустрия се водят собственост на офшорки, било от други.

Българските синдикати не спасяват работници

Синдикатите не надигаха глас срещу нарушенията в мини и тецове на Ковачки, като забавени възнаграждения, натрупани дългове, в т.ч. и милиони за осигуровки, част от които правителствата разсрочваха. 

Синдикалните протести в България не спасиха „Кремиковци“, но попречиха да го вземе стратегически инвеститор – защото играха с Валентин Захариев, който запази позициите на синдикатите (а те имаха думата дори кой да държи лавките в комбината). В определения за ликвидация комбинат, преди Захариев да го купи за 1 лев, работеха над 15 000 души – колкото са заетите във въглищната индустрия. 

Синдикатите не спасиха от затваряне и уранодобивната и оловно-цинковата индустрия, но протестите на докараните в София миньори свалиха правителството на Филип Димитров през 1992 г. 

Синдикалните протести не позволиха „Булгартабак“ да бъде продаден на стратегически инвеститор като British American Tobacco, а вместо това попадна в ръцете на Пеевски и сие, които му видяха сметката за шест години.

Покритието на работещите с колективни трудови договори в България е едва 28%, докато европейската Директива за адекватните минимални работни заплати изисква този дял да е поне 70%. Но профсъюзите не се борят за членове. Когато изгубят енергетиците и миньорите, на КНСБ ще им останат учителите, а златната кокошка – имотите им – никой не може да им я отнеме. Проблемът обаче е, че имотите не могат да бъдат вдигнати, за да блокират магистрали. Нито пък учителите – дори Янка Такева да ги предвожда.

Скъсаните връзки

На теория целта на синдикалното движение е трансформация от капитализъм в изграждане на безкласово общество – някакъв вид либертариански социализъм с работническо самоуправление на индустрията. Химера. В България я опаковаха на два пъти като политико-икономическа оферта – един път със зелените бонови книжки от масовата приватизация, втори път с т.нар. работническо-мениджърска приватизация. И в двата случая работниците пиха по една студена вода, нацията от акционери не се състоя, а определени лица прибраха цели предприятия срещу смешни суми и няколко чувала със зелени книжки.

На пръв поглед синдикатите си подхождат с „Левицата“ и БСП. Все пак в биографичен план левите и профсъюзите имат едно и също работническо ДНК, но синдикатите постепенно се бюрократизират, а левицата става хайверна. Профсъюзите се сдобиват с платена йерархия и с партньори в лицето на представителите на капитала и политиците и вече избягват да рискуват с унищожителни стачки, за да не изгуби платената администрация привилегиите си. 

Синдикатите изостават от социалната структура на обществото, която е силно променена – „бели якички“, служители в корпорации и държавни чиновници, работническа класа, прекариат – трудови мигранти без постоянна работа, а следователно и без съответните социални гаранции и кариерно развитие, а наред с тях едри и дребни предприемачи и др. Ако искат да оцелеят, профсъюзите също се нуждаят от болезнена трансформация – на първо място, от солидарност между самите работници, които да поискат да се самоорганизират в нов тип съюзи в името на радикална социална промяна. 

На българските синдикати и така им е добре. Превърнали са се в административен придатък на управлението. 

След като вотът на недоверие премина, блокадите на магистрали са свалени, а синдикалните знамена – свити. Политическата задача е изпълнена с внушенията, че правителството на ПП–ДБ е застрашило енергийната сигурност на България и така е предало националните интереси. Сега профсъюзните деятели имат значително по-прагматични цели – да се включат в преквалификацията на работниците от въглищната индустрия (бизнес, в който са умели), също и в предприятието за рекултивация на терените (става въпрос за 250 кв.км в Маришкия басейн), където ще се съсредоточат значителни ресурси. И за двете се предвиждат стотици милиони европейски средства.

Ако трябва да се скача, ще поскачат – колко му е.

Научни новини: Нобелови награди 2023

Post Syndicated from Михаил Ангелов original https://www.toest.bg/nauchni-novini-nobelovi-nagradi-2023/

Научни новини: Нобелови награди 2023

Октомври идва с вълнуващи новини от научния свят, свързани с обявяването на Нобеловите награди – едно от най-престижните признания за учените и своеобразно тържество на познанието, което ни позволява да надникнем в лабораториите и да разберем върху какво работят изследователите. 

По традиция лауреатите се обявяват в началото на октомври, а церемонията за връчване на наградите ще се проведе на 10 декември – датата на смъртта на техния учредител Алфред Нобел.

Медицина/физиология

Научни новини: Нобелови награди 2023
Носителите на Нобеловата награда за медицина/физиология за 2023 г. – Каталин Карико и Дрю Вайсман. Niklas Elmehed © Nobel Prize Outreach

Наградата за медицина/физиология е присъдена на Каталин Карико и Дрю Вайсман за работата им по модификацията на нуклеозиди, която промени изцяло разбирането ни как информационната РНК (иРНК) взаимодейства с имунната система. Това откритие даде път за разработката на първите иРНК ваксини срещу COVID-19 през 2020 г.

Преди пандемията от 2019 г. създаването на ваксини беше дълъг и труден процес, свързан с доста технологични стъпки. Класическият подход е използването на инактивиран вирус, който не е патогенен, но може да бъде разпознат от имунната система. С напредъка в молекулярната биология и биотехнологиите са разработени ваксини, съдържащи само отделни вирусни компоненти, което драстично намалява риска от грешка в производството и от заразяване на ваксинираните. За целта се взема генетичната последователност, кодираща частта на вируса, към която учените искат да създадат имунитет (най-често капсидната обвивка на вируса), и от нея се синтезира т.нар. рекомбинантен протеин. Този тип ваксини се понасят много добре от организма и може да се прилагат и при хора с отслабена имунна система. Техен недостатък е нуждата от реимунизации.

Друг вид са векторните ваксини – при тях се използва вирус, който е „обезвреден“ чрез премахване на патогенната му способност, и в него е вмъкната генетичната последователност, описана по-горе. След като този вирус ни „зарази“, в клетките ни започват да се произвеждат части от капсида на вируса, срещу който е ваксината. Пример за това е вече добре познатата ваксина на AstraZeneca срещу COVID-19. Въпреки впечатляващите подобрения в технологиите за бързото производство на обеми, достатъчни за справяне с пандемия, са нужни сериозни мощности, които не бяха налични през 2020 г.

Информационната РНК е „матрицата“, по която се изработват протеините в човешкото тяло (както и в почти всички живи организми на планетата). Технологиите за получаване на иРНК в лабораторни условия без използването на клетки (инвитро транскрипция) започват развитието си през 80-те години на миналия век. Още тогава се появяват идеи за приложението на синтетична иРНК в медицината, но учените срещат спънка: клетките на гостоприемника дават силен възпалителен отговор. Въпреки това Карико още тогава смята, че иРНК има терапевтичен потенциал, и когато се запознава с нов колега в Университета на Пенсилвания – имунолога Дрю Вайсман, започва сътрудничество, което ще се окаже много продуктивно.

Един от обектите, към които Вайсман проявява интерес, са дендритните клетки – те са част от имунната система и имат роля при активацията на имунен отговор към ваксини. След като започват да работят заедно, Карико и Вайсман откриват, че тези клетки имат очаквана реакция към стандартната инвитро иРНК, но не и към иРНК от бозайник, която приемат без проблем. Една от спецификите на втората е, че някои от съставните ѝ части са модифицирани. След като правят химична модификация в една от нуклеозидните бази на синтетичната иРНК, сходна с тази при бозайниците, възпалителният отговор на дендритните клетки почти изчезва. Двамата учени осъзнават, че това е липсващото парче от пъзела и потенциалът за терапевтично приложение може да се разгърне. В последващите им разработки се установява, че количеството на отделените протеини в клетките се увеличава вследствие на модификацията. Скоро след публикуването на тези данни започва разработването на иРНК ваксини срещу зика и MERS-CoV.

Това се оказва ключово при избухването на епидемията от COVID-19, защото технологията позволява бързо да се разработи ваксина срещу вируса. Само година след началото на пандемията резултатите са впечатляващи – 95% ефективност на защитата. Успехът потвърждава тезата на Карико, че иРНК терапиите могат да бъдат незаменими в медицината въпреки скептицизма на немалко нейни колеги, и дава поле за пълното разгръщане на потенциала им. BioNTech – компанията, разработила първата одобрена иРНК ваксина (срещу SARS-CoV-2), в момента работи по осем нови (сред тях срещу инфлуенца, туберкулоза и малария), а в Moderna, другата компания с иРНК ваксина срещу заболяването, също тече активна развойна дейност върху над 20 различни терапии.

Освен срещу вируси, технологията позволява да се създадат ваксини и срещу бактерии, както и срещу някои видове ракови заболявания. Изследва се и възможността за удължаване на теломерите, чието скъсяване може би има връзка със стареенето. Възможността за вмъкване на иРНК и синтез на нови протеини съдържа огромен потенциал, който предстои да бъде използван в пълен мащаб. Много е вероятно откритието на Карико и Вайсман, което вече заслужено се описва като историческо, тепърва да донесе много изненади.

Физика

Научни новини: Нобелови награди 2023
Носителите на Нобеловата награда за физика за 2023 г. – Пиер Агостини, Ференц Краус и Ан Л’Юийе. Niklas Elmehed © Nobel Prize Outreach

Наградата за физика е присъдена на Пиер Агостини, Ференц Краус и Ан Л’Юийе за внедряването на нови подходи за изследване на света на електроните в атомите и молекулите. Тримата учени са открили начин за излъчване на изключително къси импулси светлина, които могат да се използват за мигновените процеси на движение на електроните или за преминаването им в различни енергийни нива.

Човешкото възприятие е сравнително бързо – зрителната ни система може да различи отделни премигвания на светлина с честота между 50 и 90 Hz. При птиците зрението е още по-развито, като един от рекордите е при жалобната мухоловка, която може да различава светлинни импулси с честота, достигаща 145 Hz, почти три пъти по-бързо от нас. Това е и една от причините гълъбите, които стоят на пътя ни, да излитат в последния възможен момент. Тяхното зрение е толкова бързо, че за тях ние се движим на забавен каданс. Най-вероятно има и доза мързел и арогантност.

Но дори и за жалобната мухоловка движението на електроните ще бъде абсолютно размазано и неясно. При тях промените стават за части от атосекундата. Атосекундата е с продължителност една квинтилионна от секундата (10-18) – толкова кратка, че в една секунда се съдържат толкова атосекунди, колкото секунди са изминали от създаването на Вселената при Големия взрив преди 13,8 млрд. години.

Тази скорост кара Вернер Хайзенберг (известен с принципа на неопределеност) да изкаже през 1925 г. мнението, че светът на електроните ще остане недостижим за науката. Все пак технологиите напредват и през 80-те години на миналия век са изобретени лазери, които могат да произвеждат импулси с продължителност от порядъка на фемтосекунди (в една фемтосекунда има 1000 атосекунди), с помощта на които може да се наблюдава движението на „тежките и бавни“ атомни ядра.

През 1987 г. Ан Л’Юийе открива, че при преминаването на светлината от инфрачервен лазер през инертен газ се получават много обертонове на светлината – всеки от тях с по-бързо трептене от основната честота на лазера, подобно на обертоновете при струнните инструменти. Това се дължи на взаимодействия на светлината с атомите на газа, придаващи на електроните в тях допълнителна енергия, която впоследствие се излъчва като светлинни вълни. При определени условия те се наслагват, като усилват интензитета на лазерната светлина и я карат да пулсира с период от няколкостотин атосекунди.

Благодарение на продължаващата работа на изследователката през 2001 г. Пиер Агостини успява да получи пулсираща светлина в порядъка на атосекунди. Екипът му постига това, като раздвоява лазерния лъч. След като единият новополучен лъч се пропусне през интернет газ, той започва да пулсира. При събирането на двата лъча получените импулси са с продължителност 250 атосекунди. Междувременно, избирайки различен експериментален подход, Ференц Краус успява да изолира единичен светлинен импулс с продължителност 650 атосекунди, използвайки го да проследи как електроните се отделят от атомите.

Благодарение на постиженията на лауреатите вече можем да наблюдаваме някои изключително бързи процеси в ядрата на атомите – нещо, което доскоро беше невъзможно. За момента изглежда, че основното приложение на откритията ще бъде във фундаменталната наука за изследване на движението на електроните между атоми и изучаване на протичането на химични реакции на атомно ниво. Въпреки това потенциал има и за приложната наука и технологиите. В електрониката биха могли да бъдат използвани за изучаване и контролиране на движението на електроните в даден материал, което би било полезно за производството на по-добри полупроводници. С помощта на атосекундните импулси може да се определят и най-различни молекули, което би имало приложение във фундаменталните и приложните изследвания, както и в медицината.

Химия

Научни новини: Нобелови награди 2023
Носителите на Нобеловата награда за химия за 2023 г. – Мунги Бавенди, Луис Брус и Алексей Екимов. Niklas Elmehed © Nobel Prize Outreach

Третата присъдена награда е в областта на химията, където победители са Мунги Бавенди, Луис Брус и Алексей Екимов за откритието и синтеза на квантовите точки. Те са изключително малки полупроводникови частици с диаметър от няколко нанометра. Благодарение на тези малки мащаби при тях се проявяват квантови ефекти, които им придават подобрени електрически и оптични свойства. При осветяването им квантовите точки излъчват ярка светлина, чийто цвят зависи от размера на частиците – по-големите излъчват по-червена, а по-малките – по-синя, което позволява с регулиране на размера им да се контролира цветът на светлината, която излъчват.

За възможността за възникване на квантови ефекти в зависимост от размера на частиците учените предполагат още от откриването на квантовата механика. Въпреки че в лабораторни условия може да се създават материали, покрити с тънкослойни квантови точки, за това се изискват изключително висок вакуум и много ниска температура, което е пречка за индустриалното производство.

Първият пробив е в началото на 80-те години на миналия век, когато Екимов установява, че при вариране на температурата и времето за нагряване при добавяне на меден хлорид, в стъклото се получават частици с различен размер, които променят цвета му. Това донякъде е вдъхновено от древните стъклари, които влагат различни метали в разтопеното стъкло, за да му придадат различен цвят. Няколко години по-късно, без да знае за експеримента на Екимов, Луис Брус успява да постигне същите квантови ефекти при частици кадмиев сулфид, които са свободно суспендирани в течност.

Третият лауреат – Мунги Бавенди, постдокторант в лабораторията на Брус, започва работа върху възможността за създаване на квантови точки с прецизни размери. До момента получените размери са случайни и няма как да бъдат използвани в практиката. Бавенди открива, че прецизното контролиране на температурата по време на нарастване на кристали от кадмиев селенид позволява да се регулира скоростта на нарастване и съответно размерът им. Тази технология се оказва решение за създаването на нанокристали с много равномерна форма и размер, които може да се вложат в производството на различна техника.

В момента квантовите точки се използват за създаване на по-добри светодиоди (на тях се базират QLED дисплеите), на прозорци, които са и слънчеви панели, а в областта на биохимията и медицината – за наблюдение на специфични тъкани и органели. Както и при другите наградени открития, учените считат, че това е само началото и то тепърва ще има принос за развитието на много нови технологии, като гъвкава електроника, по-малки сензори, по-тънки слънчеви панели и подобрения в квантовата криптография.

Hacking the High School Grading System

Post Syndicated from Bruce Schneier original https://www.schneier.com/blog/archives/2023/10/hacking-the-high-school-grading-system.html

Interesting New York Times article about high-school students hacking the grading system.

What’s not helping? The policies many school districts are adopting that make it nearly impossible for low-performing students to fail—they have a grading floor under them, they know it, and that allows them to game the system.

Several teachers whom I spoke with or who responded to my questionnaire mentioned policies stating that students cannot get lower than a 50 percent on any assignment, even if the work was never done, in some cases. A teacher from Chapel Hill, N.C., who filled in the questionnaire’s “name” field with “No, no, no,” said the 50 percent floor and “NO attendance enforcement” leads to a scenario where “we get students who skip over 100 days, have a 50 percent, complete a couple of assignments to tip over into 59.5 percent and then pass.”

It’s a basic math hack. If a student needs two-thirds of the points—over 65%—to pass, then they have to do two-thirds of the work. But if doing zero work results in a 50% grade, then they only have to do a little bit of work to get over the pass line.

I know this is a minor thing in the universe of problems with secondary education and grading, but I found the hack interesting. (And this is exactly the sort of thing I explore in my latest book: A Hacker’s Mind.

Българското кино на „Златна роза“ 2023

Post Syndicated from Петя Славова original https://www.toest.bg/bugarskoto-kino-na-zlatna-roza-2023/

Българското кино на „Златна роза“ 2023

Темата за миграцията, или по-скоро за стремежа към нея, беше сред водещите в 43-тото издание на фестивала за българско кино „Златна роза“. По традиция и тази година най-големият форум за местни продукции се състоя във Варна, а в програмата (20–28 септември) бяха включени 59 български филма, от които 53 игрални, два документални и четири сериала, подбрани от селекционната комисия на Националния филмов център.

В основния конкурс участваха 12 пълнометражни проекта, произведени след последния фестивал през 2022 г., някои от които вече бяха показани в киносалоните, като „Чалга“ на Мариан Вълев, испанският (копродукция с България) дебют на Авелина Прат „Васил“ и още един дебют в игралното кино – на аниматора Тео Ушев „Ф 1.618“, за чиято оригинална сценография Сабина Христова получи отличие за специални постижения. Сред тези, които тепърва ще се разпространяват в кината у нас, са

големите победители в конкурса – „Уроците на Блага“ на Стефан Командарев и „Диада“ на Яна Титова, които си поделиха „Златна роза“ за най-добър български филм.

И в двете продукции присъства темата за невъзможността да се намери изход от скотското битуване в България. Липсата на шанс за най-безпомощните е представена чрез безпътицата на главните героини (едната – възрастна жена, другата – тепърва навлизаща в живота), за които измъкването от средата им е неосъществимо.

Българското кино на „Златна роза“ 2023
Кадър от „Уроците на Блага“ © „Златна роза“

В „Уроците на Блага“ главната роля е поверена на Ели Скорчева („Адаптация“, „Ева на третия етаж“), която се завръща в киното след 30-годишно отсъствие. Филмът дойде със заявка да е фаворит на „Златна роза“ след успеха в Карлови Вари, където получи „Златен кристал“, както и Наградата за най-добра женска роля за изпълнението на Скорчева.

С продукцията си Стефан Командарев завършва замислената трилогия (след „Посоки“ и „В кръг“) за икономическата и моралната криза в посттоталитарна България. Главната героиня е наскоро овдовяла пенсионирана учителка, чиито принципи, свързани с правилната употреба на българския език, са изострени до педантични изисквания към всеки неин събеседник. Това качество ясно онагледява житейските ѝ възгледи и стремежа ѝ към правотата и истината. Устоите на Блага обаче са разклатени, когато става жертва на телефонна измама.

Командарев внимателно наблюдава вътрешната трансформация на пенсионираната учителка, принудена да зачеркне етиката си заради смазващата среда, в която живее. Камерата на Веселин Христов следва плътно Блага в нейните колебания да заживее с новото си аз. На места сюжетът е наситен с хорър елементи, което само допълва идеята за обреченост и безпомощност. А изведената тема, както и заглавието на филма напомнят за друга българска продукция – „Урок“ на режисьорския тандем Кристина Грозева и Петър Вълчанов (отново част от трилогия), който също изобличава суровата действителност у нас чрез образ на учител.

Именно обречеността на беззащитните е изведена и в „Диада“, но фокусът тук е поставен върху младите, което прави посланието още по-тревожно. Филмът съвсем очаквано намери топъл прием на фестивала и си подели „Златна роза“ с продукцията на Командарев. За „Диада“ Яна Титова взе и Наградата на критиката.

И в „Диада“ сюжетът се разгръща в малък град. 16-годишната Дида мечтае да замине за Америка и да се избави от съжителството с неспособния да се грижи за нея баща. Там тя планира да учи рисуване и прави всичко възможно (морално или недотам), за да събере пари и да осъществи стремежите си. Двете главни героини (изиграни от Маргарита Стойкова и Петра Църноречка) отразяват утопичния плам на подрастващия млад човек в снизяващия контекст на провинциален манталитет и изкривени ценности. И ако в тези филми копнежът по живота извън България изпъква като тема, то в програмата на „Златна роза“ се появи и своеобразен отговор чрез сюжетите за емигранти, осъществили мечтата за живот в чужбина, но ненамерили търсеното удовлетворение.

В игралния дебют на документалиста Тонислав Христов „Добрият шофьор“ главният герой Иван (Малин Кръстев) не се е справил с живота във Финландия. Завърнал се тук, той работи като таксиметров шофьор на Златни пясъци, но само за да събере пари и отново да замине с надежда да поправи грешките, които е допуснал в миналото. Тонислав Христов рисува пореден образ на смутната действителност в България, където оцеляването на обикновения човек е трудно постижимо и бягството изглежда единствен шанс. За участието си в този филм Герасим Георгиев – Геро получи Наградата за най-добра поддържаща мъжка роля. Актьорът взе и Диплом за специални постижения за изпълнението си на телефонен измамник в „Уроците на Блага“.

Животът на българите в чужбина е основен фокус и в дебюта на Сиси Денкова „Аромат на липа“. Емигрирала в САЩ на 10 години, режисьорката прекарва десетилетие в Ню Йорк, където учи и работи в независимото кино. Филмът, заснет почти изцяло в интериор, наблюдава неспособността на сънародниците ни да се впишат в чуждоезичното общество. Докато използва клишетата за нашенеца в чужбина, крепящи се на носталгични изблици, Денкова представя твърде повърхностен поглед върху търсенията на мигранта, неуспял да се отстрани от байганьовщината, пренасящ родния си кич и предразсъдъци, жертва на евтин трапезен патриотизъм. Дори главният герой Стефан (Иван Бърнев), уж по-различен, уж опитващ да се влее в другата култура, постепенно осъзнава, че приятелството и подкрепата от сънародниците му в чужбина е по-ценна от така желаната независимост.

Разликата между този образ на мигрант и другия, изпълняван от Бърнев в испанската драма „Васил“, е отчетлива. В дебютния си филм Авелина Прат изгражда своя герой като единак, който с лекота привлича симпатията на местните във Валенсия. Способен, скромен и търсещ, Васил създава сърдечни запознанства чрез изключителните си успехи в шаха и бриджа. Образът на българина е твърде различен от нашите представи, а критиката на режисьорката е отправена към собствения ѝ народ. Освен тромавата бюрокрация (нещо, с което и ние можем да „се гордеем“), Испания е представена чрез консервативното отношение към чужденците, уж имащи европейски права, но в действителност съвсем неполучаващи очакваното равноправие. В този свят присъствието на героя на Бърнев е ключово: сякаш испанците, описани във филма, се нуждаят от именно такъв „чудак“, който да ги извади от инерцията и да им припомни, че близостта между хората има значение.

Българското кино на „Златна роза“ 2023
Кадър от „Васил“ © „Златна роза“

Иван Бърнев, чието екранно присъствие се усещаше в по-голямата част от представените продукции във Варна, получи Наградата за главна мъжка роля именно за тази своя роля и бе отличен за още три участия в рамките на конкурсната програма – за образа на Стефан в „Аромат на липа“ и за второстепенните роли на следователя в „Уроците на Блага“ и на учителя Сираков в „Диада“.

В късометражния конкурс, в който участваха 25 филма, Голямата награда отиде при „Тихо в снега“ на Стефан Ганов,

чийто проект също е свързан с темата за пътя, но в екзистенциална посока, разнищваща връзката между живота и смъртта. Наситени с поетична атмосфера кадри проследяват изменчивото отношение между майка и нейния син в процеса на осъзнаване, че животът на родителя скоро ще приключи.

Българското кино на „Златна роза“ 2023
Кадър от „Тихо в снега“ © „Златна роза“

Другата награда, връчена от журито на късометражните проекти, отиде при „13 август“ на режисьора и сценарист Венцислав Сариев,

който разработва вече подетата тема за агресията в съвремието. Действието се развива в краен градски квартал, където двамата аутсайдери Виктор и Таня се опитват да се справят с предизвикателствата около себе си. Именно заради

умението да открои нежността в една жестока среда и вярата, че жертвата винаги има възможен ход срещу насилника,

филмът получи и своето отличие.

Наградата на критиката в късометражния конкурс бе връчена на Майя Виткова-Косев за филма ѝ „Любима“.

Операторът Крум Родригес е избрал топли нюанси, за да заснеме поетична история за млада жена, изоставена от партньора си. Нейната болка от самотата я извисява до облаците, но се оказва голяма и тежка като слон. Буквално.

За първа година на фестивала бе присъдена и награда за български сериал. Журито на късометражната конкурсна програма я връчи на „Есента на Демона“ (режисьор Павел Веснаков).

Продължението на „Дяволското гърло“ отново среща бившите полицаи Миа (Теодора Духовникова) и Филип (Владо Карамазов), като този път мястото на действието е Велико Търново. Средновековната българска столица заприличва на загадъчен Рим, докато главните герои разследват жестоко убийство на местна съдийка. С усет към детайлите Веснаков следва правилата в жанровото кино, докато потапя зрителя в стряскащи ритуални екзекуции.

Българското кино на „Златна роза“ 2023
Кадър от „Есента на демона“ © Dream Team Group

Специалната награда на журито бе присъдена на режисьора Георги Дюлгеров, който представи последния си проект за Георги Бенковски – „Записки по едно предателство“.

Верен на историческите писания на Захари Стоянов, но без излишен патриотичен патос, филмът проследява ареста на предателя дядо Вълю и помилването му, а камерата на оператора Веселин Христов често остава субективна, близка до погледа на Захари Стоянов, за да доближи зрителя максимално до гласа на летописеца.

Успоредно с конкурсната програма, се състоя и прожекцията на „Татул“ от 1972 г. с участието на актрисата Меглена Караламбова, чиято 80-годишнина беше отбелязана на фестивала. Плакатът на „Златна роза“, създаден от Николай Тонков, също беше с нейния образ в кадър от филма.

От почти 60-те показани нови продукции, отличените – малко на брой, изпъкнаха пред останалите заглавия с опита си да уловят автентичния ритъм на съвремието и да изследват търсенията и тегобите на обикновения човек. И макар че сложните житейски решения, представени във филмите, често отвеждат героите в грешна посока, ценни са усетът и интуицията на авторите за невинаги лицеприятната реалност. Ценна е и надеждата им разказаните истории да послужат като ориентир в един свят, отровен от консуматорство, фалш и евтини блянове.

Orchestrate Amazon EMR Serverless jobs with AWS Step functions

Post Syndicated from Naveen Balaraman original https://aws.amazon.com/blogs/big-data/orchestrate-amazon-emr-serverless-jobs-with-aws-step-functions/

Amazon EMR Serverless provides a serverless runtime environment that simplifies the operation of analytics applications that use the latest open source frameworks, such as Apache Spark and Apache Hive. With EMR Serverless, you don’t have to configure, optimize, secure, or operate clusters to run applications with these frameworks. You can run analytics workloads at any scale with automatic scaling that resizes resources in seconds to meet changing data volumes and processing requirements. EMR Serverless automatically scales resources up and down to provide just the right amount of capacity for your application, and you only pay for what you use.

AWS Step Functions is a serverless orchestration service that enables developers to build visual workflows for applications as a series of event-driven steps. Step Functions ensures that the steps in the serverless workflow are followed reliably, that the information is passed between stages, and errors are handled automatically.

The integration between AWS Step Functions and Amazon EMR Serverless makes it easier to manage and orchestrate big data workflows. Before this integration, you had to manually poll for job statuses or implement waiting mechanisms through API calls. Now, with the support for “Run a Job (.sync)” integration, you can more efficiently manage your EMR Serverless jobs. Using .sync allows your Step Functions workflow to wait for the EMR Serverless job to complete before moving on to the next step, effectively making job execution part of your state machine. Similarly, the “Request Response” pattern can be useful for triggering a job and immediately getting a response back, all within the confines of your Step Functions workflow. This integration simplifies your architecture by eliminating the need for additional steps to monitor job status, making the whole system more efficient and easier to manage.

In this post, we explain how you can orchestrate a PySpark application using Amazon EMR Serverless and AWS Step Functions. We run a Spark job on EMR Serverless that processes Citi Bike dataset data in an Amazon Simple Storage Service (Amazon S3) bucket and stores the aggregated results in Amazon S3.

Solution Overview

We demonstrate this solution with an example using the Citi Bike dataset. This dataset includes numerous parameters such as Rideable type, Start station, Started at, End station, Ended at, and various other elements about Citi Bikers ride. Our objective is to find the minimum, maximum, and average bike trip duration in a given month.

In this solution, the input data is read from the S3 input path, transformations and aggregations are applied with the PySpark code, and the summarized output is written to the S3 output path s3://<bucket-name>/serverlessout/.

The solution is implemented as follows:

  • Creates an EMR Serverless application with Spark runtime. After the application is created, you can submit the data-processing jobs to that application. This API step waits for Application creation to complete.
  • Submits the PySpark job and waits for its completion with the StartJobRun (.sync) API. This allows you to submit a job to an Amazon EMR Serverless application and wait until the job completes.
  • After the PySpark job completes, the summarized output is available in the S3 output directory.
  • If the job encounters an error, the state machine workflow will indicate a failure. You can inspect the specific error within the state machine. For a more detailed analysis, you can also check the EMR job failure logs in the EMR studio console.

Prerequisites

Before you get started, make sure you have the following prerequisites:

  • An AWS account
  • An IAM user with administrator access
  • An S3 bucket

Solution Architecture

To automate the complete process, we use the following architecture, which integrates Step Functions for orchestration and Amazon EMR Serverless for data transformations. Summarized output is then written to Amazon S3 bucket.

The following diagram illustrates the architecture for this use case

Deployment steps

Before beginning this tutorial, ensure that the role being used to deploy has all the relevant permissions to create the required resources as part of the solution. The roles with the appropriate permissions will be created through a CloudFormation template using the following steps.

Step 1: Create a Step Functions state machine

You can create a Step Functions State Machine workflow in two ways— either through the code directly or through the Step Functions studio graphical interface. To create a state machine, you can follow the steps from either option 1 or option 2 below.

Option 1: Create the state machine through code directly

To create a Step Functions state machine along with the necessary IAM roles, complete the following steps:

  1. Launch the CloudFormation stack using this link. On the Cloud Formation console, provide a stack name and accept the defaults to create the stack. Once the CloudFormation deployment completes, the following resources are created, in addition EMR Service Linked Role will be automatically created by this CloudFormation stack to access EMR Serverless:
    • S3 bucket to upload the PySpark script and write output data from EMR Serverless job. We recommend enabling default encryption on your S3 bucket to encrypt new objects, as well as enabling access logging to log all requests made to the bucket. Following these recommendations will improve security and provide visibility into access of the bucket.
    • EMR Serverless Runtime role that provides granular permissions to specific resources that are required when EMR Serverless jobs run.
    • Step Functions Role to grant AWS Step Functions permissions to access the AWS resources that will be used by its state machines.
    • State Machine with EMR Serverless steps.

  1. To prepare the S3 bucket with PySpark script, open AWS Cloudshell from the toolbar on the top right corner of AWS console and run the following AWS CLI command in CloudShell (make sure to replace <<ACCOUNT-ID>> with your AWS Account ID):

aws s3 cp s3://aws-blogs-artifacts-public/artifacts/BDB-3594/bikeaggregator.py s3://serverless-<<ACCOUNT-ID>>-blog/scripts/

  1. To prepare the S3 bucket with Input data, run the following AWS CLI command in CloudShell (make sure to replace <<ACCOUNT-ID>> with your AWS Account ID):

aws s3 cp s3://aws-blogs-artifacts-public/artifacts/BDB-3594/201306-citibike-tripdata.csv s3://serverless-<<ACCOUNT-ID>>-blog/data/ --copy-props none

Option 2: Create the Step Functions state machine through Workflow Studio

Prerequisites

Before creating the State Machine though Workshop Studio, please ensure that all the relevant roles and resources are created as part of the solution.

  1. To deploy the necessary IAM roles and S3 bucket into your AWS account, launch the CloudFormation stack using this link. Once the CloudFormation deployment completes, the following resources are created:
    • S3 bucket to upload the PySpark script and write output data. We recommend enabling default encryption on your S3 bucket to encrypt new objects, as well as enabling access logging to log all requests made to the bucket. Following these recommendations will improve security and provide visibility into access of the bucket.
    • EMR Serverless Runtime role that provides granular permissions to specific resources that are required when EMR Serverless jobs run.
    • Step Functions Role to grant AWS Step Functions permissions to access the AWS resources that will be used by its state machines.

  1. To prepare the S3 bucket with PySpark script, open AWS Cloudshell from the toolbar on the top right of the AWS console and run the following AWS CLI command in CloudShell (make sure to replace <<ACCOUNT-ID>> with your AWS Account ID):

aws s3 cp s3://aws-blogs-artifacts-public/artifacts/BDB-3594/bikeaggregator.py s3://serverless-<<ACCOUNT-ID>>-blog/scripts/

  1. To prepare the S3 bucket with Input data, run the following AWS CLI command in CloudShell (make sure to replace <<ACCOUNT-ID>> with your AWS Account ID):

aws s3 cp s3://aws-blogs-artifacts-public/artifacts/BDB-3594/201306-citibike-tripdata.csv s3://serverless-<<ACCOUNT-ID>>-blog/data/ --copy-props none

To create a Step Functions state machine, complete the following steps:

  1. On the Step Functions console, choose Create state machine.
  2. Keep the Blank template selected, and click Select.
  3. In the Actions Menu on the left, Step Functions provides a list of AWS services APIs that you can drag and drop into your workflow graph in the design canvas. Type EMR Serverless in the search and drag the Amazon EMR Serverless CreateApplication state to the workflow graph:

  1. In the canvas, select Amazon EMR Serverless CreateApplication state to configure its properties. The Inspector panel on the right shows configuration options. Provide the following Configuration values:
    • Change the State name to Create EMR Serverless Application
    • Provide the following values to the API Parameters. This creates an EMR Serverless Application with Apache Spark based on Amazon EMR release 6.12.0 using default configuration settings.
      {
          "Name": "ServerlessBikeAggr",
          "ReleaseLabel": "emr-6.12.0",
          "Type": "SPARK"
      }

    • Click the Wait for task to complete – optional check box to wait for EMR Serverless Application creation state to complete before executing the next state.
    • Under Next state, select the Add new state option from the drop-down.
  2. Drag EMR Serverless StartJobRun state from the left browser to the next state in the workflow.
    • Rename State name to Submit PySpark Job
    • Provide the following values in the API parameters and click Wait for task to complete – optional (make sure to replace <<ACCOUNT-ID>> with your AWS Account ID).
{
"ApplicationId.$": "$.ApplicationId",
    "ExecutionRoleArn": "arn:aws:iam::<<ACCOUNT-ID>>:role/EMR-Serverless-Role-<<ACCOUNT-ID>>",
    "JobDriver": {
        "SparkSubmit": {
            "EntryPoint": "s3://serverless-<<ACCOUNT-ID>>-blog/scripts/bikeaggregator.py",
            "EntryPointArguments": [
                "s3://serverless-<<ACCOUNT-ID>>-blog/data/",
                "s3://serverless-<<ACCOUNT-ID>>-blog/serverlessout/"
            ],
            "SparkSubmitParameters": "--conf spark.hadoop.hive.metastore.client.factory.class=com.amazonaws.glue.catalog.metastore.AWSGlueDataCatalogHiveClientFactory"
        }
    }
}

  1. Select the Config tab for the state machine from the top and change the following configurations:
    • Change State machine name to EMRServerless-BikeAggr found in Details.
    • In the Permissions section, select StateMachine-Role-<<ACCOUNT-ID>> from the dropdown for Execution role. (Make sure that you replace <<ACCOUNT-ID>> with your AWS Account ID).
  2. Continue to add steps for Check Job Success from the studio as shown in the following diagram.

  1. Click Create to create the Step Functions State Machine for orchestrating the EMR Serverless jobs.

Step 2: Invoke the Step Functions

Now that the Step Function is created, we can invoke it by clicking on the Start execution button:

When the step function is being invoked, it presents its run flow as shown in the following screenshot. Because we have selected Wait for task to complete config (.sync API) for this step, the next step would not start wait until EMR Serverless Application is created (blue represents the Amazon EMR Serverless Application being created).

After successfully creating the EMR Serverless Application, we submit a PySpark Job to that Application.

When the EMR Serverless job completes, the Submit PySpark Job step changes to green. This is because we have selected the Wait for task to complete configuration (using the .sync API) for this step.

The EMR Serverless Application ID as well as PySpark Job run Id from Output tab for Submit PySpark Job step.

Step 3: Validation

To confirm the successful completion of the job, navigate to EMR Serverless console and find the EMR Serverless Application Id. Click the Application Id to find the execution details for the PySpark Job run submitted from the Step Functions.

To verify the output of the job execution, you can check the S3 bucket where the output will be stored in a .csv file as shown in the following graphic.

Cleanup

Log in to the AWS Management Console and delete any S3 buckets created by this deployment to avoid unwanted charges to your AWS account. For example: s3://serverless-<<ACCOUNT-ID>>-blog/

Then clean up your environment, delete the CloudFormation template you created in the Solution configuration steps.

Delete Step function you created as part of this solution.

Conclusion

In this post, we explained how to launch an Amazon EMR Serverless Spark job with Step Functions using Workflow Studio to implement a simple ETL pipeline that creates aggregated output from the Citi Bike dataset and generate reports.

We hope this gives you a great starting point for using this solution with your datasets and applying more complex business rules to solve your transient cluster use cases.

Do you have follow-up questions or feedback? Leave a comment. We’d love to hear your thoughts and suggestions.

References


About the Authors

Naveen Balaraman is a Sr Cloud Application Architect at Amazon Web Services. He is passionate about Containers, Serverless, Architecting Microservices and helping customers leverage the power of AWS cloud.

Karthik Prabhakar is a Senior Big Data Solutions Architect for Amazon EMR at AWS. He is an experienced analytics engineer working with AWS customers to provide best practices and technical advice in order to assist their success in their data journey.

Parul Saxena is a Big Data Specialist Solutions Architect at Amazon Web Services, focused on Amazon EMR, Amazon Athena, AWS Glue and AWS Lake Formation, where she provides architectural guidance to customers for running complex big data workloads over AWS platform. In her spare time, she enjoys traveling and spending time with her family and friends.

Achieve higher query throughput: Auto scaling in Amazon OpenSearch Serverless now supports shard replica scaling

Post Syndicated from Prashant Agrawal original https://aws.amazon.com/blogs/big-data/achieve-higher-query-throughput-auto-scaling-in-amazon-opensearch-serverless-now-supports-shard-replica-scaling/

Amazon OpenSearch Serverless is the serverless option for Amazon OpenSearch Service that makes it simple for you to run search and analytics workloads without having to think about infrastructure management. We recently announced new enhancements to autoscaling in OpenSearch Serverless that scales capacity automatically in response to your query loads.

At launch, OpenSearch Serverless supported increasing capacity automatically in response to growing data sizes. With the new shard replica scaling feature, OpenSearch Serverless automatically detects shards under duress due to sudden spikes in query rates and dynamically adds new shard replicas to handle the increased query throughput while maintaining fast response times. This approach proves to be more cost-efficient than simply adding new index replicas. With the expanded support for more replicas, OpenSearch Serverless can now handle thousands of query transactions per minute. OpenSearch Serverless will also seamlessly scale the shard replicas back to a minimum of two active replicas across the Availability Zones when the workload demand decreases.

Scaling overview

Consider an ecommerce website that uses OpenSearch Serverless as a backend search engine to host its product catalog.

In the following figure, an index has four shards to handle the product catalog. All four shards fit into one OpenSearch Capacity Unit (OCU). Because OpenSearch Serverless is designed to cater to production systems, it will automatically create an additional set of replicas for these four shards, which are hosted in a separate Availability Zone. Both sets of search replicas will actively respond to the incoming traffic load.
When new products are launched, they often generate more interest, resulting in increased traffic and search queries on the website in the days following the launch. In this scenario, the shards containing the data for the new product will receive significantly higher volume of search requests than other shards within the same index. OpenSearch Serverless will identify these shards as hot shards because they’re close to breaching the system thresholds.
To handle the spike in search requests, OpenSearch Serverless will vertically scale the OCUs and then move the hot shards to a new OCU if required to balance the high query rates. The following figure shows how the shards would be moved to a new OCU along with other normally loaded shards.
If OpenSearch Serverless keeps receiving additional search requests for shards, it will add new replicas for the shard until all shard replicas can effectively handle the incoming query rates without exceeding the system thresholds. Even after the traffic is successfully handled by OpenSearch Serverless, it continues to evaluate the shard state. When the load on the shards reduces, OpenSearch Serverless will scale down the shard replicas to maintain the minimum OCU and replicas required for the workload.

Search performance with replica scale-out

We ran a performance test on a search corpus representing a product catalog with 600,000 documents and approximately 500 MB. The queries were a mix of term, fuzzy, and aggregation queries. OpenSearch Serverless was able to handle 613 transactions per second (TPS) with P50 latency of 2.8 seconds, whereas with replica scaling, we saw the search throughput scale to 1423 TPS with a 100% increase in throughput and P50 latency of 690 milliseconds, leading to a 75% improvement in response times. The following table summarizes our results. Note that you can configure the max OCU limit to control your costs.

. Initial OCUs Scaled OCUs TPS P50 Latency Number of Replicas
With no replica scaling 2 26 613 2.8 secs 2
With replica scaling 2 100 1423 619ms Replica scaling scales the hot shards up to 8 replicas

The following graphs show that under the same load profile, the new autoscaling feature handled a higher number of queries in the period of 24 hours while consistently maintaining lower latency.

The first graph shows the system performance profile without auto scaling.

The second graph shows the system performance profile with replica scaling.

Conclusion

In this post, we showed how the OpenSearch Serverless new shard replica scale-out feature for auto scaling helps you achieve higher throughput while maintaining cost-efficiency for search and time series collections. It automatically scales the replicas for those shards under duress instead of adding replicas for the entire index.

If you have feedback about this post, share it in the comments section. If you have questions about this post, start a new thread on the Amazon OpenSearch Service forum or contact AWS Support.


About the Authors

Prashant Agrawal is a Sr. Search Specialist Solutions Architect with Amazon OpenSearch Service. He works closely with customers to help them migrate their workloads to the cloud and helps existing customers fine-tune their clusters to achieve better performance and save on cost. Before joining AWS, he helped various customers use OpenSearch and Elasticsearch for their search and log analytics use cases. When not working, you can find him traveling and exploring new places. In short, he likes doing Eat → Travel → Repeat.

Satish Nandi is a Senior Technical Product Manager for Amazon OpenSearch Service.

Pavani Baddepudi is a Principal Product Manager working in search services at AWS. Her interests include distributed systems, networking, and security.

The collective thoughts of the interwebz