Sign-in resource-based policies and RCPs support several security objectives: restricting console sign-in to corporate networks, limiting which principals can sign-in to the console, and applying consistent network perimeter controls across an entire AWS Organizations organization.
In this post, we walk through a common use case: a financial services company restricting console access to its corporate network for regulatory compliance. We show you how to implement this using a sign-in resource-based policy for a single account, verify the controls with AWS CloudTrail, and explain how these policies integrate with AWS Management Console Private Access and the broader AWS data perimeter framework.
Restricting console sign-in access to a corporate network
Consider a financial services company that requires access to AWS Management Console sign-in to originate from the corporate network. The company has the following requirements:
Users sign in to the console only from the corporate VPN, office network, or customer VPC.
Sign-in attempts from personal networks, public Wi-Fi, or other unexpected locations must be denied.
A designated principal should retain access from any network to prevent lockout.
All sign-in attempts (allowed and denied) must be logged to CloudTrail for compliance evidence.
In the steps that follow, we show you how to create a resource-based policy to enforce these requirements on a single account.
Permission to manage Sign-in resource policies. Attach the AWS managed policyAWSSignInResourcePolicyManagementor grant permissions to the following actions to respective principals:
Most resource-based policies require the author to input the full policy document (JSON statements). A Sign-in resource permission statement is different: you provide parameters, and AWS Sign-In generates the policy for you.
The following command provides your corporate IP range, your VPC, and an excluded principal as parameters. AWS Sign-In uses these parameters to generate a policy that restricts console sign-in to those networks, while letting the excluded principal sign in from any network. You control the parameter values, not the policy structure. You can review the generated policy at any time with the get-resource-policy command.
Note: Creating resource permission statements has no effect until console authorization is enabled in Step 2, so you can review the complete policy before it takes effect. Write operations must target us-east-1.
To create resource permission statements
1. Open your terminal and ensure you have the latest AWS CLI installed. 2. Run the following command, replacing the placeholder values <my-vpc>, <my-vpc-region>, <my-corporate-cidr>, and <excluded-IAM-principal-arn> with your specific configuration:
The generated policy contains four statements, grouped into two pairs. The first pair restricts access by network source—it denies any principal making a request from outside your corporate IP range (<my-corporate-cidr>) or your VPC (<my-vpc>). The second pair restricts which AWS Region your VPC can target—it denies requests originating from <my-vpc> unless they are directed at <my-vpc-region>. This Region binding is necessary because VPC IDs are only unique within a single Region.
AWS Sign-In evaluates these policies in two phases: before authentication and after authentication. The post-authentication evaluation repeats each time the console session requests new credentials. Within each pair, one statement covers the pre-authentication phase and one covers the post-authentication phase.
The pre-authentication statement evaluates the signin:Authenticate action. Since the principal is not yet authenticated in this phase, the statement uses the signin:PrincipalArn condition key to exempt your excluded principal. This key supports all principal types: root user, AWS Identity and Access Management (IAM) user, federated user, and role.
The post-authentication statement evaluates the signin:AuthorizeOAuth2Access and signin:CreateOAuth2Token actions. AWS Sign-In evaluates these actions after authentication, when it issues the tokens that establish the console session. These actions do not support the signin:PrincipalArn key. Instead, they use aws:PrincipalArn, which resolves to the authenticated principal.
Step 2: Turn on sign-in policy enforcement for your account
This step turns on enforcement of the policy you created in Step 1. Until you run this step, the resource permission statements you created in Step 1 have no effect.
5. Turn on enforcement of sign-in policies using the following command:
Now that enforcement is active, sign-in attempts are evaluated against your resource-based policy. Verify the behavior by testing sign-in from different network conditions.
Scenario 1: Allowed sign-in from the corporate network
A principal signing in from the allowed corporate IP range or VPC succeeds normally. The CloudTrail event shows ConsoleLogin:Success
Example CloudTrail event details for successful console sign-in:
Scenario 2: Denied sign-in from an unexpected network
A principal signing in from a network other than the allowed IP address range or a VPC endpoint attached to the source VPC, is blocked. The CloudTrail event shows ConsoleLogin: Failure with an error message identifying the policy that caused the denial:
Example CloudTrail event details for failed console sign-in:
{
"userIdentity": {
    "type": "IAMUser",
    "accountId": "123456789123",
    "accessKeyId": "",
    "userName": "Dev1"
    },
    "eventTime": "2026-06-09T19:20:38Z",
    "eventSource": "signin.amazonaws.com",
    "eventName": "ConsoleLogin",
    "awsRegion": "us-east-1",
    "sourceIPAddress": "198.51.100.76",
    "userAgent": "Mozilla/5.0 (Macintosh; Intel Mac OS X 10_15_7) AppleWebKit/537.36 (KHTML, like Gecko) Chrome/148.0.0.0 Safari/537.36",
    "errorCode": "AccessDenied",
    "errorMessage": "Authorization denied because of a resource-based policy",
    "requestParameters": null,
    "responseElements": {
        "ConsoleLogin": "Failure"
    },
"eventID": "d88a7543-ae89-4186-b1b6-d3116413f2ee",
"readOnly": false,
"eventType": "AwsConsoleSignIn",
"managementEvent": true,
"recipientAccountId": "123456789123",
"eventCategory": "Management"
}
The error message field shows the policy type that caused the denial: “Authorization denied because of a resource-based policy”.
Scaling with RCPs
The steps above apply a Sign-in resource-based policy to a single account. For organizations managing many accounts, RCPs offer a better path: they can be attached at the organization, OU, or account level in AWS Organizations and apply automatically to every account in scope. To view an RCP example, see here .
When a sign-in to the console is denied because of an RCP, the error message field shows the denial as “Authorization denied because of a resource control policy”.
Extending with Console Private Access and data perimeters
The sign-in resource-based policy you created controls which networks can reach your account’s sign-in flow. AWS Management Console Private Access adds a complementary control: from within your network, it limits console access to a known set of AWS accounts, preventing sign-in to unexpected AWS accounts.
Together, these capabilities contribute to a data perimeter for console access:
Network perimeter: Sign-in resource-based policies and RCPs restrict console sign-in to expected networks (corporate IP ranges, VPCs).
Identity perimeter: Sign-in resource-based policy and RCP ensure only trusted identities can sign in to the console. Console VPC endpoint policy and Sign-in VPC endpoint policy ensure only trusted identities can use the console from your VPC.
Resource perimeter: Sign-in VPC endpoint policy and Console VPC endpoint policy restrict which AWS accounts are reachable from your network.
By using sign-in resource-based policies and RCPs, you can restrict AWS Management Console access to expected networks. These controls are available at no additional cost in all AWS commercial Regions.
We are at Qualcomm Investor Day 2026 where the company is talking High Bandwidth Compute, its HBM alternative, Its Dragonfly C1000 CPU, and AI accelerators
Learn how to implement cost-effective multi-tenant search using Amazon OpenSearch Serverless next-generation architecture with scale-to-zero compute and simplified routing through per-account, regional endpoints.
Building multi-tenant search architectures requires balancing data isolation with operational cost and complexity. In this post, we provide code examples for an implementation of multi-tenant search using a collection-per-tenant model with Amazon OpenSearch Serverless per-account, regional endpoints. Collection-per-tenant provides data and workload isolation. The regional endpoint simplifies routing requests for indexing and searching data.
Amazon OpenSearch Serverless is a serverless deployment option for Amazon OpenSearch Service that simplifies infrastructure management, index tuning, and data lifecycle management. OpenSearch Serverless automatically provisions and scales resources to provide consistently fast data ingestion rates and millisecond query response times during changing usage patterns and application demand.
The multi-tenant search problem
In search workloads, a tenant is a logical unit of data and the queries against that data. An eCommerce site has product categories. Each category is a tenant. A blog-hosting platform has blogs. Each blog is a tenant. Tenants map to resources in different ways. In the siloed model, each tenant gets its own container: a domain, collection, or index. In the pooled model, tenants share a container. The hybrid model silos large tenants and pools smaller ones together. Regardless of model, you need a mapping between tenant identifiers and the containers that hold their data, so your application routes requests correctly.
OpenSearch Serverless classic offered a collection-per-tenant strategy that simplified, but did not remove, the need for maintaining a tenant-container mapping. In addition, the cost structure of maintaining collection-per-tenant in classic was not ideal. Classic shared hardware across collections with the same AWS Key Management Service (AWS KMS) key. Tenants with different keys could not share hardware. The cost of the solution was the minimum monthly collection cost multiplied by the tenant count. Building for hundreds or thousands of tenants was cost-prohibitive. Collection groups improved this by allowing hardware sharing across AWS KMS keys, but compute costs were still driven by your indexed data, even during idle periods.
With the next-generation architecture, collection groups scale compute to zero. You pay for compute only when a tenant is actively indexing or searching (storage charges still apply). The addition of the regional endpoint further simplifies multi-tenant workloads by routing traffic to any collection through a single hostname. Together, scale-to-zero compute and the regional endpoint make the collection-per-tenant model both economically viable and operationally straightforward.
The OpenSearch Serverless per-account endpoint
OpenSearch Serverless next generation introduces a per-account, regional endpoint that serves all collections through a single hostname:
https://<account-id>.aoss.<region>.on.aws
The x-amz-aoss-collection-name or x-amz-aoss-collection-id header identifies the target collection on each request. This means one connection pool, one TLS session, and one endpoint to manage regardless of how many collections you have.
From a client perspective, you create a single OpenSearch client pointed at the regional endpoint and route requests by setting a header:
This is a significant improvement over the classic architecture, where each collection had its own endpoint and you needed to manage separate connections for each.
Collection per tenant with query routing
The architecture is straightforward: one collection group holds all tenant collections, and the regional endpoint handles routing.
When you set minIndexingCapacityInOCU and minSearchCapacityInOCU to 0, OpenSearch Serverless scales down your compute to 0 OpenSearch Compute Units (OCUs) when they are idle for 10 minutes. You pay only for the storage for your indices. If you want to maintain compute and avoid cold starts, set minIndexingCapacityInOCU or minSearchCapacityInOCU to a value greater than 0.
Create one collection per tenant
Each product category maps to its own collection within the group:
When choosing a collection name for your tenants, consider privacy, name length, and future ease of upgrading your application. You can use a hash function to map tenant identifiers to collection names.
import hashlib

def collection_name_for_tenant(tenant_id: str) -> str:
    """Generate an opaque collection name from a tenant identifier."""
    return hashlib.sha256(tenant_id.encode()).hexdigest()[:16]
Collection names are visible in API calls and logs. If your tenant ID contains personally identifiable information (PII), that information is also visible in logs. Hashing the tenant ID obfuscates the sensitive information.
OpenSearch Serverless has a 64-character limit on collection names. Your tenant ID can be longer than that. Hashing helps stay within this limit.
You might also want to add a prefix to collection names so that you can use wildcard patterns in access policies. For example, naming collections pqa-a1b2c3d4 lets you write a single data access policy matching collection/pqa-*. Including a version component in the name (such as pqa-v2-a1b2c3d4) makes it straightforward to create new collections during schema migrations without disrupting existing tenants.
Index data using the regional endpoint
A single OpenSearch client handles all collections. The x-amz-aoss-collection-name header routes each request to the correct collection:
The application layer maps a tenant ID (in this case, a product category) to a collection name, and the regional endpoint handles the rest. No connection pool management, no endpoint lookups, no per-tenant client instances.
Limitations
There are practical constraints to consider when adopting this pattern.
Cold start latency. When a collection group has scaled to zero compute, the first request takes approximately 10 seconds while capacity provisions. For latency-sensitive tenants, you can send a lightweight warmup query (such as a match_all with size=1) before production traffic arrives.
Collection group limits. There are account-level limits on the number of collections and collection groups. Check the Amazon OpenSearch Serverless quotas for current numbers if you are planning thousands of tenants.
Security policy size. Encryption, network, and data access policies list collection resource patterns. Because tenant count grows, these policy documents grow linearly. Use wildcard patterns to stay within OpenSearch Serverless policy size limits.
No cross-collection queries. Each search request targets exactly one collection. If you need to query across tenants for analytics or global search, you need an aggregation layer or a separate shared collection.
Conclusion
In this post, we showed how the next-generation OpenSearch Serverless architecture makes the collection-per-tenant model practical for multi-tenant search. Scale-to-zero reduces the minimum cost for inactive tenants, fitting the compute resources to the demands of tenants. The regional endpoint eliminates the operational complexity of managing per-tenant connections. You get full data isolation between tenants, independent scaling for each tenant’s workload, and a single endpoint to manage in your application code.
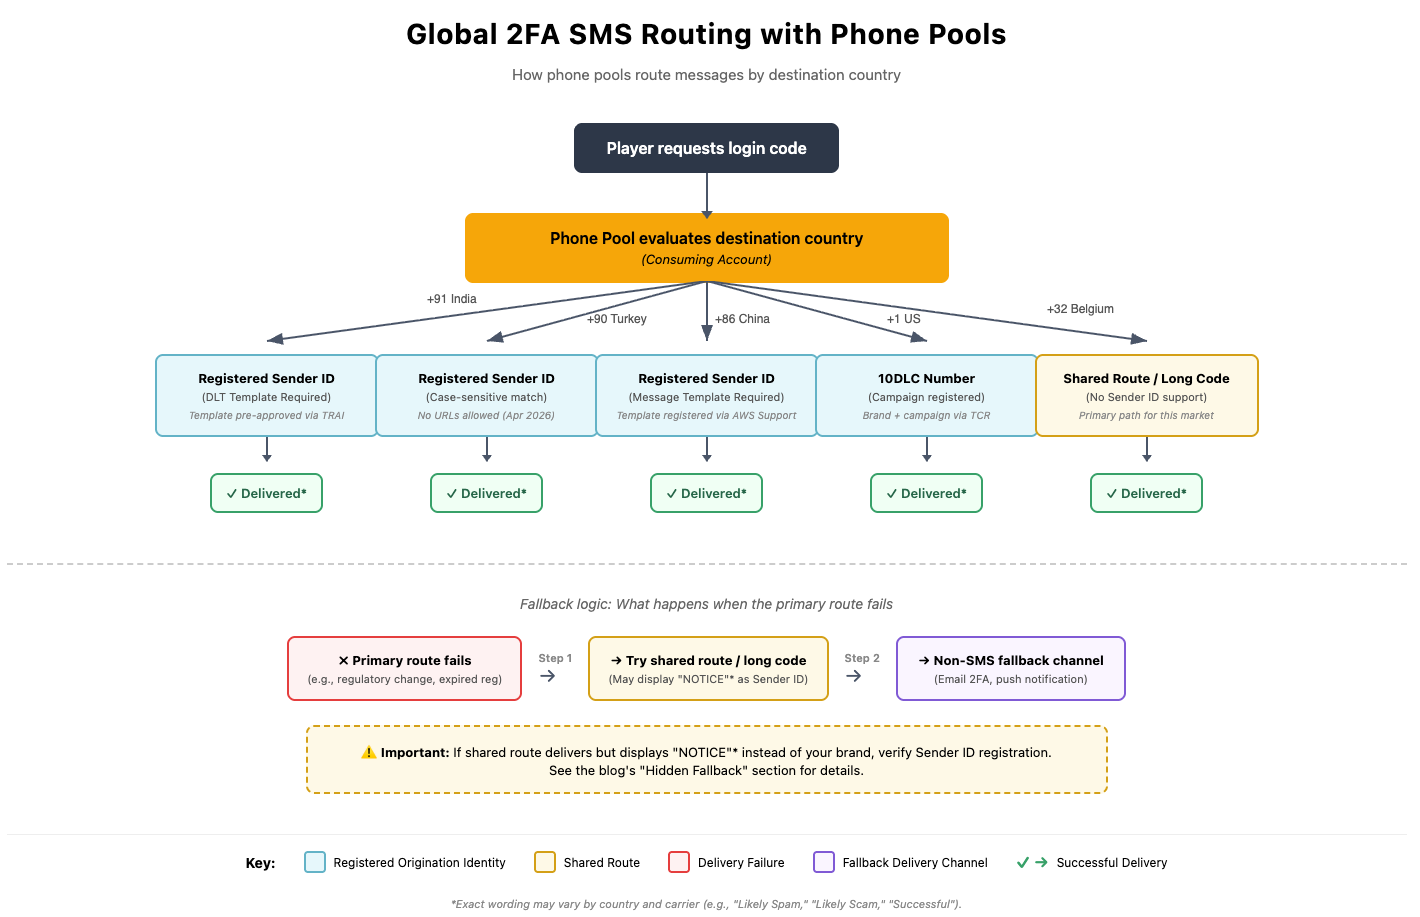
When a player in Turkey, Brazil, or India tries to log in, they expect a verification code on their phone within seconds. If it doesn’t arrive, that’s a lost session, a support ticket, or worse, a player who doesn’t come back. For gaming studios operating across 100+ countries, delivering those SMS messages reliably is a complex operational challenge involving country-specific regulations, carrier registrations, and routing rules that can change overnight.
This post shares practical lessons from a real-world migration of a global gaming SMS platform from Amazon Simple Notification Service (Amazon SNS) to AWS End User Messaging. You’ll learn how to use resource sharing to avoid months of re-registration, how to build a country inventory that survives regulatory changes, and how to avoid the operational pitfalls that surface only when you migrate production traffic across accounts. Although the examples here are drawn from gaming, the operational challenges are universal. Any organization delivering SMS at international scale will face the same complexities, whether your users are players, customers, or patients.
Why gaming studios migrate SMS accounts
Before diving into the how, it’s worth understanding the why. Gaming studios commonly need to move SMS workloads between AWS accounts for several reasons:
Security and scope isolation — Separating messaging infrastructure from game servers and backend services into a dedicated account reduces the impact of a security incident in either environment.
Organizational changes — Studio acquisitions, team restructuring, or moving from a shared corporate account to a studio-owned account.
Service evolution — Migrating from Amazon SNS (which supports SMS as one of many pub/sub capabilities) to AWS End User Messaging (purpose-built for SMS/MMS/voice with features like phone pools, protect configurations, and event destinations)
Compliance boundaries — Isolating messaging resources to meet data residency or audit requirements.
Whatever the reason, the challenge is the same: you have a working global SMS setup with phone numbers, Sender IDs, short codes, and carrier registrations spread across dozens of countries, and you need to move it without disrupting millions of players’ 2FA flows.
Resource sharing: A faster migration path
The traditional approach would be to re-register every origination identity (that is, phone numbers, Sender IDs, short codes, see Choosing an origination identity) in the consuming account from scratch. For a global gaming platform, this is impractical:
The single most important preparation step is building a complete inventory of your SMS footprint, country by country. AWS publishes a comprehensive reference table listing supported countries, origination identity types, and registration requirements.
This inventory becomes invaluable for future account transitions, incident response, and onboarding new team members.
Plan for regulatory change, not just today’s rules
The global SMS regulatory landscape is not static. It’s tightening. Countries that previously had relaxed requirements are increasingly introducing mandatory Sender ID registration, content filtering, and message format restrictions. A migration is the ideal time to future-proof your setup, not just replicate what worked yesterday.
For help navigating the registration process for specific countries, see Registration support.
In April 2026, Turkey’s Information and Communications Technologies Authority (BTK) began enforcing a regulation that blocks all international A2P SMS messages containing URLs, hyperlinks, or shortened links. For gaming studios that include account recovery links, promotional URLs, or support links in their SMS messages, this type of regulatory change can mean immediate delivery failure to an entire market.
This type of regulatory shift is becoming more common:
Optional to mandatory Sender ID registration. Australia is mandating Sender ID registration with ACMA by mid-2026. AWS now supports Australia sender ID registration directly through the EUM console.
Content template registration. India requires DLT registration through TRAI, and China requires message template pre-registration through AWS Support.
Content filtering and URL restrictions. Carriers in multiple markets are implementing automated filtering that rejects messages containing URLs or specific patterns, even from registered senders. Your country inventory shouldn’t just document what works today. It should also track regulatory change dates, upcoming requirements, content restrictions, and your fallback plan for each market. For each country, ask: “If the rules change tomorrow, how quickly can we adapt?” If the answer is weeks, that country should have a fallback channel (email, push notification) ready to activate immediately.
Lessons learned: What can go wrong at scale
Even with careful planning, migrating global SMS infrastructure surfaces unexpected issues. The following sections cover the most common pitfalls we encountered.
Sender ID case sensitivity
As documented by AWS, Sender ID values are case-sensitive at the carrier and aggregator level. In countries with mandatory registration (Turkey, UK, India, Australia), carriers might perform exact-match validation. If your application sends STUDIONAME but the carrier has StudioName on file, the message can be rejected.
The AWS End User Messaging console displays all Sender IDs in uppercase regardless of registration casing, which is something to watch out for. Always verify casing against the Registrations section of the console, which preserves the original value. Countries can also begin enforcing stricter matching overnight as regulations tighten, turning previously-working messages into failures.
What to watch for:
Test delivery to countries with mandatory Sender ID registration before rolling out any casing changes globally.
Phone pools are the recommended way to manage origination identities (that is, phone numbers, Sender IDs, short codes, see Choosing an origination identity) at scale with AWS End User Messaging. A pool automatically selects the appropriate identity based on the destination country code, handling failover between identities for the same country.
Plan ahead: Inventory your origination identities before creating your pool, and request the quota increase before you start associating resources. Hitting the quota mid-migration creates unnecessary delays.
Batch your RAM sharing operations
When sharing a large number of origination identities through RAM (50+), the RAM API creates resource-based policies on each shared resource. The order of operations matters: add the consuming account (principal) to the resource share first, then add resources incrementally. If you create a resource share with hundreds of resources and then add the consuming account afterward, RAM attempts to set resource-based policies on all resources simultaneously. This is the most common trigger for throttling at scale. In severe cases, this throttling can result in resources with empty or corrupted resource policies, making them inaccessible to the consuming account until manually remediated.
Best practice:
Add the consuming account (principal) to the resource share before adding any resources. Batch resource associations in groups of 10 or fewer.
After each batch, verify that all resources have reached ASSOCIATED status.
From the consuming account, confirm that shared resources are visible using the describe-* CLI commands with the --owner SHARED flag.
Retain AWS CloudTrail logs for troubleshooting if any associations don’t complete as expected.
If you suspect corrupted policies, verify the resource policies on affected resources and re-associate them individually.
Not everything transfers through RAM
RAM sharing covers the “what you send with”: phone numbers, Sender IDs, pools, and opt-out lists. But several critical components are account-specific and must be recreated in the consuming account:
Note on Protect Configurations: Protect Configurations apply at three levels: account default, configuration set, and per-message. A common mistake when setting up a consuming account is checking only the account-level default and missing a restriction at the configuration set level, resulting in unexpectedly blocked destination countries. When recreating your configuration in the consuming account, verify protect settings at all three levels.
Production mode requirement: Both the sharing account and the consuming account must be in Production mode. If the consuming account is still in the SMS sandbox, it can only send messages to verified destination phone numbers, which means shared production-ready resources cannot be used for real-world traffic. Verify production status in the consuming account before beginning your migration.
One tip worth highlighting: The registration process for certain countries’ message templates (notably China) is handled through AWS Support cases. After the registration is approved, retain a copy of the approved template details, the case correspondence, and the registration parameters. Support case history might not be accessible indefinitely. If you need to re-register in a new account later, having your own records of what was approved and the exact template content saves significant time.
Countries without Sender ID support
Not every country supports Sender IDs. If your phone pool is configured with Sender IDs and a message is routed to a country that doesn’t support them (for example, Belgium or Puerto Rico), the delivery will fail, and the error might not clearly indicate that the issue is Sender ID incompatibility.
Build an exclusion list: For countries that don’t support Sender IDs you have two options:
Route those messages through a different origination identity (long code or short code) if available.
Exclude those countries from Sender ID routing and allow them to fall back to shared routes.
The country capabilities table is your definitive reference for which countries support which origination identity types.
The “hidden fallback” discovery
A common surprise during migration is that your existing setup might have been silently falling back to shared routes in countries where you assumed you had branded Sender ID delivery. When SMS is sent through Amazon SNS with automatic origination identity selection, the service quietly falls back to shared routes (often displaying “NOTICE” as the Sender ID) if no registered identity is available for the destination country.
This fallback is invisible in normal operations. Messages still deliver, and unless you’re checking the Sender ID displayed on the recipient’s device, there’s no visible indication. But when you migrate to a phone pool with explicit Sender ID routing, these gaps become visible as delivery failures.
Before migrating, audit your actual delivery patterns, not just your configuration. Check delivery reports for countries where you expect branded Sender ID delivery and verify that the Sender ID displayed matches your brand, not “NOTICE” or a generic shared route.
Operational recommendations
The following practices help you avoid disruptions during migration and maintain reliable delivery afterward.
Have a fallback channel ready during migration
Before you begin migrating traffic, ensure you have an alternative authentication channel (typically email-based 2FA) ready to activate on short notice per-country. When an issue is detected, disable SMS for that country and fall back to email while you investigate, rather than leaving players locked out.
Build your country registry
Maintain a living document that tracks what you have (identity type, registration status, exact casing, account location), what you chose and why, what gaps exist (countries relying on shared routes), and registration details (approval dates, case references, template content). This registry is your migration playbook.
Before scaling traffic, test delivery to representative countries from each category: mandatory Sender ID registration, no Sender ID support, optional Sender IDs, message template registration, and carrier-specific content restrictions. A successful test to the US doesn’t validate your Turkey configuration.
Conclusion
Global SMS for gaming works reliably until something needs to change. Migrations, account restructuring, and service upgrades expose the complexity that was previously hidden behind automatic fallbacks and “it just works” behavior.
In this post, we covered how to use RAM sharing to avoid months of re-registration, how to build a country inventory that accounts for regulatory change, and how to navigate the operational pitfalls of migrating production SMS traffic across accounts. The key takeaways:
Know your country landscape before you start. The country capabilities table is your starting point, but build your own registry with registration details, exact Sender ID values, and decision rationale.
Respect the details. Case sensitivity, phone pool quotas, RAM batching limits, non-shareable resources, and record retention can each independently block your migration.
Monitor from day one and plan for regulatory change. Set up delivery tracking before sending production traffic, and track what’s changing in each market.
What matters to players is that their verification code arrives in seconds, every time, regardless of location. The operational discipline described in this post helps make that happen and keeps it working through whatever infrastructure changes come next. Although this post is framed around gaming, the lessons apply broadly. Whether your users are players, shoppers, or account holders, reliable global SMS delivery requires the same operational rigor.
Organizations with lines of business operating across multiple AWS Regions increasingly run analytics workloads on globally distributed data. These organizations want to manage users and groups centrally, typically in the AWS Organizations management account and in a single Region, while still letting each line of business access data from the Region where its workloads run. Organizations should govern access based on the actual workforce user and their group memberships in the corporate directory.
With multi-Region support for AWS IAM Identity Center, organizations can federate workforce identities into a single organization instance in their primary Region. After you replicate this instance to additional Regions, member accounts running services such as Amazon Redshift or Amazon Athena in those Regions can integrate with IAM Identity Center locally, to resolve the same centrally managed users and groups.
This solution uses Trusted Identity Propagation (TIP), a capability that passes a user’s Identity Center identity and group memberships through a chain of AWS services. With TIP, when a user authenticates through Identity Center, that identity context flows to downstream services like AWS Lake Formation and Amazon S3 Access Grants. With this approach, you get consistent, identity-based access control without additional AWS Identity and Access Management (IAM) role configurations.
In Part 1 of this series, we showed how to simplify enterprise data access using the Amazon Redshift integration with Amazon S3 Access Grants. We demonstrated how to grant Amazon Simple Storage Service (Amazon S3) permissions to AWS IAM Identity Center users and groups using S3 Access Grants, and tested the integration using a federated user to unload and load data between Amazon Redshift and Amazon S3 within a single AWS Region.
In this post, we extend that solution across AWS Regions. We introduce a fictional company, AnyCompany Global, to illustrate how organizations with global operations can use AWS IAM Identity Center Multi-Region to set up consistent, identity-based access to Amazon Redshift and Amazon S3 Tables across Regions.
Specifically, we demonstrate:
How IAM Identity Center Multi-Region replicates identity data so that the same users and groups are available in each enabled Region.
How AWS Lake Formation grants fine-grained table-level and column-level access to S3 Tables based on group membership.
How S3 Access Grants controls UNLOAD/COPY operations to Amazon S3 based on the same identity.
We also show how to connect with your preferred SQL client.
Fictional scenario: AnyCompany Global
AnyCompany Global is a retail analytics company with a centralized IT team and distributed analytics teams. They use the following personas:
Alice — IT administrator (manages IAM Identity Center and AWS accounts).
Bob — platform engineer (sets up data infrastructure in us-west-2).
Ethan — data analyst (member of the awssso-sales group, queries data).
AnyCompany Global has two AWS accounts:
Account A (us-east-1) — management account with IAM Identity Center.
Account B (us-west-2) — analytics account with Amazon Redshift, Amazon S3, and the AWS Glue Data Catalog.
The same IAM Identity Center user (Ethan) authenticates once and accesses data in Account B (us-west-2) using the same credentials and group memberships — you don’t need additional user provisioning because IAM Identity Center replicates identities to the secondary Region.
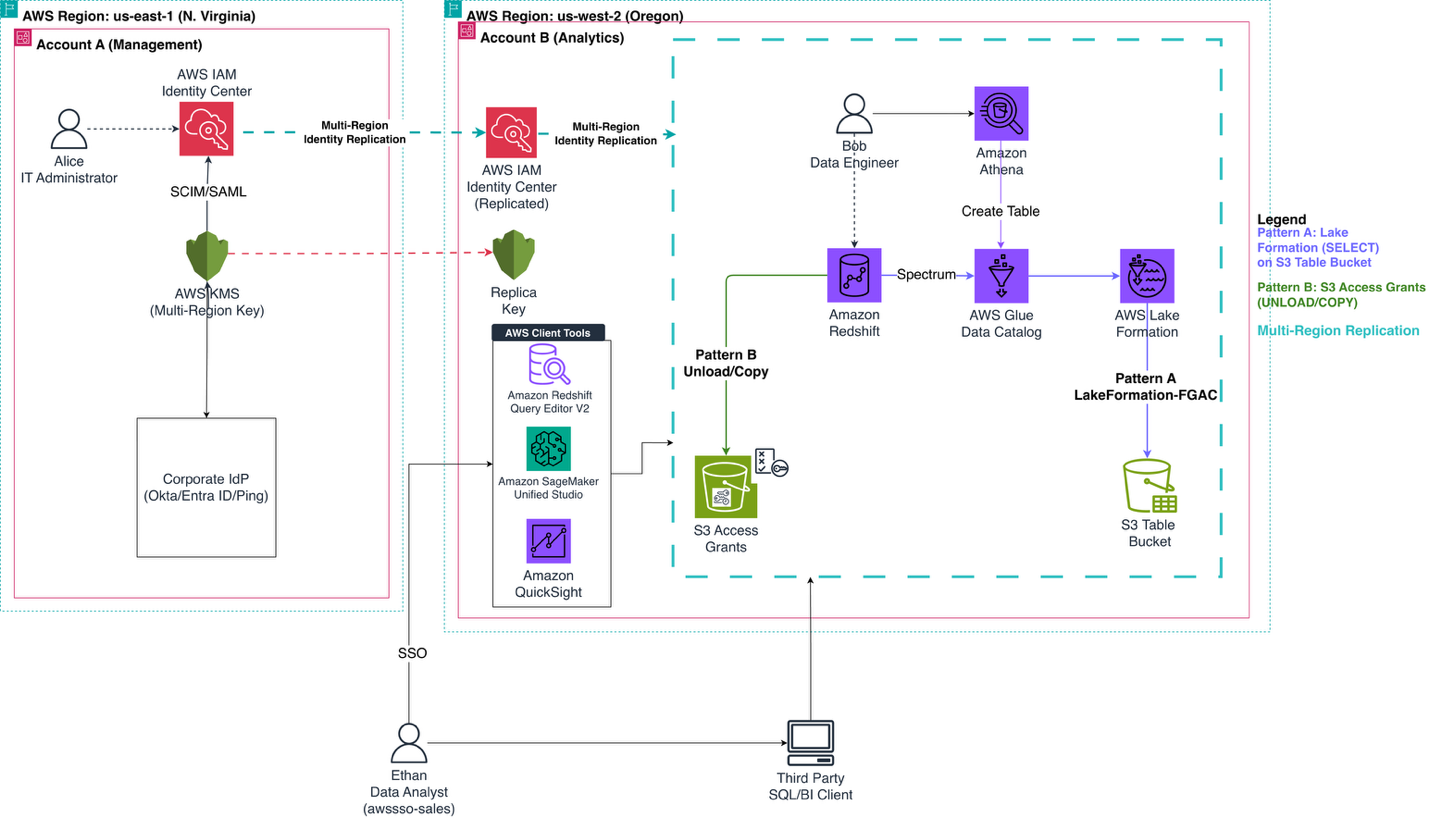
Solution overview
The following diagram illustrates the multi-account, multi-Region architecture. Account A (us-east-1) hosts IAM Identity Center, which replicates identities to us-west-2 where Account B runs the analytics workloads.
Figure 1: Multi-account, multi-Region architecture with S3 Access Grants, AWS Lake Formation, and IAM Identity Center.
This solution demonstrates two complementary data access patterns, both controlled by the end user identity:
Pattern
Access method
Permission controlled by
Pattern A
SELECT on S3 table bucket through Amazon Redshift Spectrum
Lake Formation
Pattern B
UNLOAD/COPY to and from Amazon S3
S3 Access Grants
The solution workflow includes the following steps:
Ethan connects from Amazon Redshift Query Editor v2 in us-west-2 and authenticates via the IAM Identity Center endpoint (replicated to us-west-2) using his corporate IdP credentials.
For Pattern A (SELECT): Amazon Redshift queries the Amazon S3 Tables catalog (s3tablescatalog). Lake Formation evaluates Ethan’s IAM Identity Center group membership and grants access to the cataloged data.
For Pattern B (UNLOAD/COPY): Amazon Redshift requests temporary credentials from S3 Access Grants in us-west-2. S3 Access Grants evaluates the request, matches Ethan’s identity and group membership, and vends scoped temporary credentials for the authorized S3 location.
Ethan runs SELECT to query data through Lake Formation, and UNLOAD to write data to Amazon S3 through S3 Access Grants. You don’t need an IAM role ARN in the commands.
Walkthrough
The following sections walk you through enabling IAM Identity Center Multi-Region, configuring Amazon S3 Tables with Lake Formation in the secondary Region, testing both access patterns, and verifying the result with AWS CloudTrail. Start with the prerequisites, then complete each step in order.
Prerequisites
You should have the following prerequisites already set up:
AWS Organizations enabled with at least two AWS accounts – Centralized Account(Region 1) and Member Account(Region2)
IAM Identity Center enabled in the management account (Account A, us-east-1) with a delegated administration account
Corporate IdP integrated with IAM Identity Center (users and groups synced, for example, awssso-sales and awssso-finance groups).
Resource sharing enabled in your organization with AWS Resource Access Manager (AWS RAM)
Complete solution from Part 1 replicated in us-west-2 (Account B), including:
Amazon Redshift cluster (in us-west-2) with IAM Identity Center integration enabled (using the replicated Identity Center endpoint in us-west-2).
S3 Access Grants instance configured with IAM Identity Center association
Amazon S3 bucket (for example, amzn-s3-demo-bucket-west) with folders for each group (for example, awssso-sales/, awssso-finance/).
IAM role for S3 Access Grants (for example, iamidcs3accessgrant) with trust policy and permissions policy.
S3 Access Grants location registered and grant created for the awssso-sales group.
S3 Access Grants enabled on the Amazon Redshift managed application under Trusted identity propagation
Cross-account resource sharing via AWS RAM (if Amazon Redshift and S3 Access Grants are in different accounts)
Lake Formation enabled on the Amazon Redshift managed application under Trusted identity propagation
Lake Formation and Glue permissions added to the IAM role used in the Amazon Redshift managed application (for example, IAMIDCRedshiftRole). For the required permissions, see Querying data through AWS Lake Formation.
Note: Creating and using AWS resources in this tutorial incurs charges, including AWS Key Management Service (AWS KMS) keys, S3 table buckets, Amazon Redshift clusters, and Amazon S3 storage. See the cleanup section at the end of this post to avoid ongoing charges.
Step 1: Set up IAM Identity Center Multi-Region
Alice performs this step in the management account (Account A, us-east-1). IAM Identity Center uses encryption at rest for identity data. To enable multi-Region, you must first create a multi-Region customer-managed AWS Key Management Service (AWS KMS) key and replicate it to the additional Region.
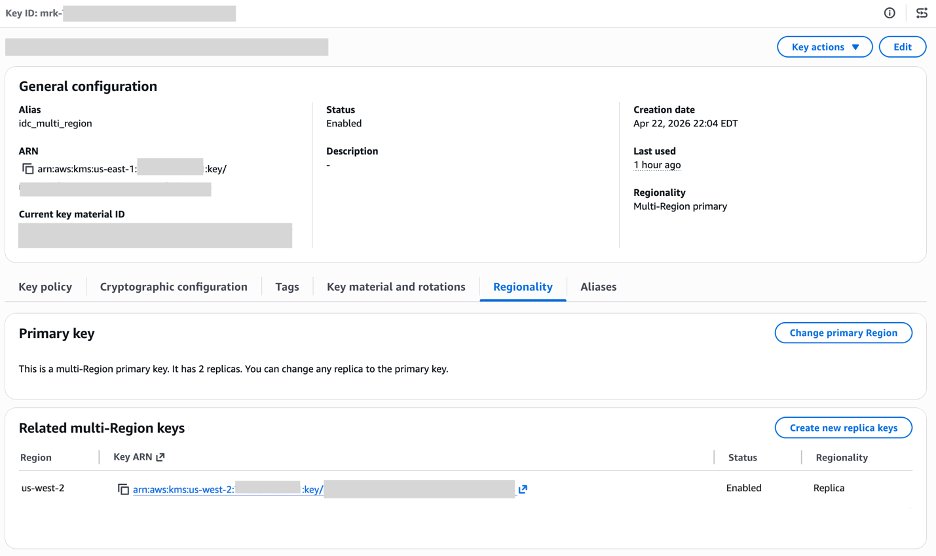
Create a multi-Region AWS KMS key
On the AWS KMS console in us-east-1, choose Create key.
For Key type, select Symmetric.
For Key usage, select Encrypt and decrypt.
Under Advanced options, select Multi-Region key.
Provide an alias (for example, idc-multi-region-key).
Figure 2: Replica key configured for the additional Region.
Add us-west-2 to IAM Identity Center
On the IAM Identity Center console in us-east-1, in the navigation pane, choose Settings.
Choose Add Region.
From the Region list, select US West (Oregon) us-west-2. The list shows Regions where you replicated the customer-managed AWS KMS key.
Choose Add Region.
A blue banner indicates that Identity Center is replicating your workforce identities, configuration, and metadata to the new Region. After the initial replication, the Replication Status column changes to Replicated. Your Identity Center endpoints in us-west-2 are now active.
Figure 3: IAM Identity Center settings showing the multi-Region replica key added for us-west-2.
Update your IdP configuration for the additional Region
You’ve successfully replicated your Identity Center instance to the Oregon (us-west-2) Region. Your workforce identities are now available in that additional Region and can use the new AWS access portal endpoint.
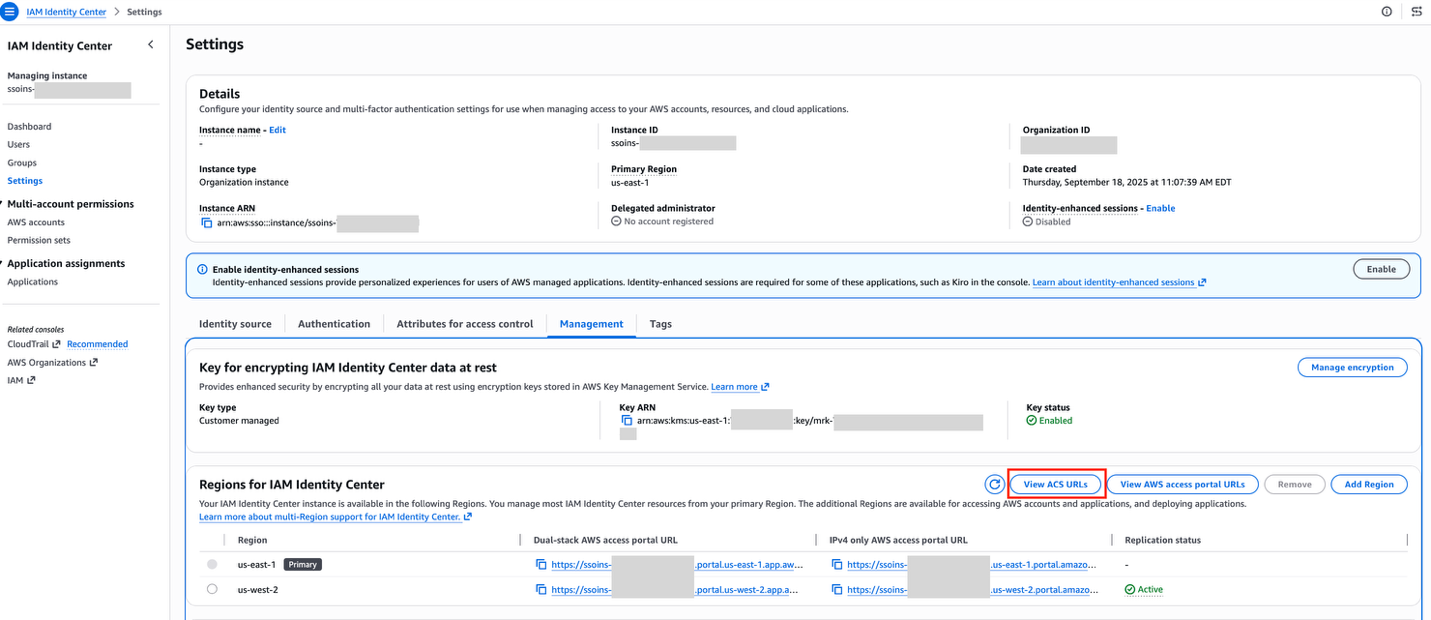
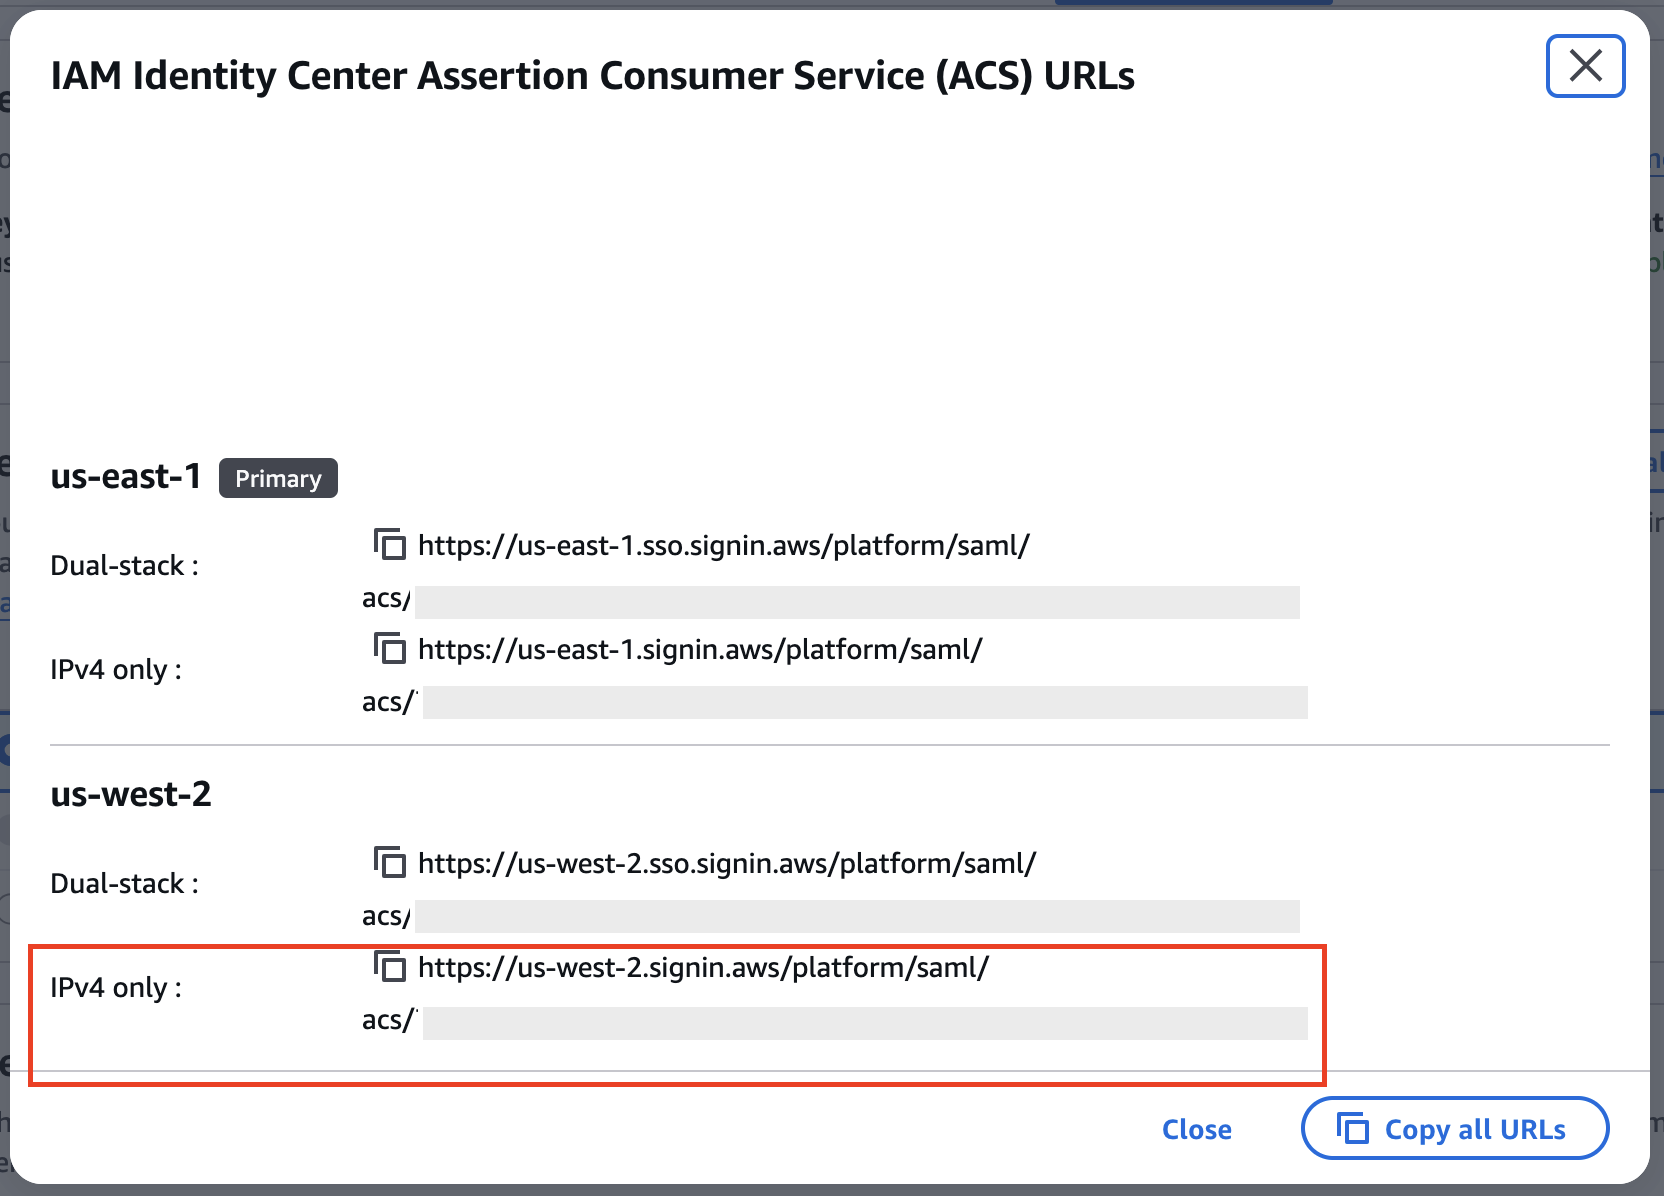
To make sure AWS managed application (service provider-initiated) authentication redirect user to respective application, add the ACS URL for the additional Region so that the app contains both Regional ACS URLs.
In the following section highlighted in red, you can view all ACS URL information:
Figure 4: IAM Identity Center settings showing the View ACS URLs option.
Copy the respective ACS URL as shown in the following figure:
Figure 5: IAM Identity Center settings showing the ACS URLs for both Regions.
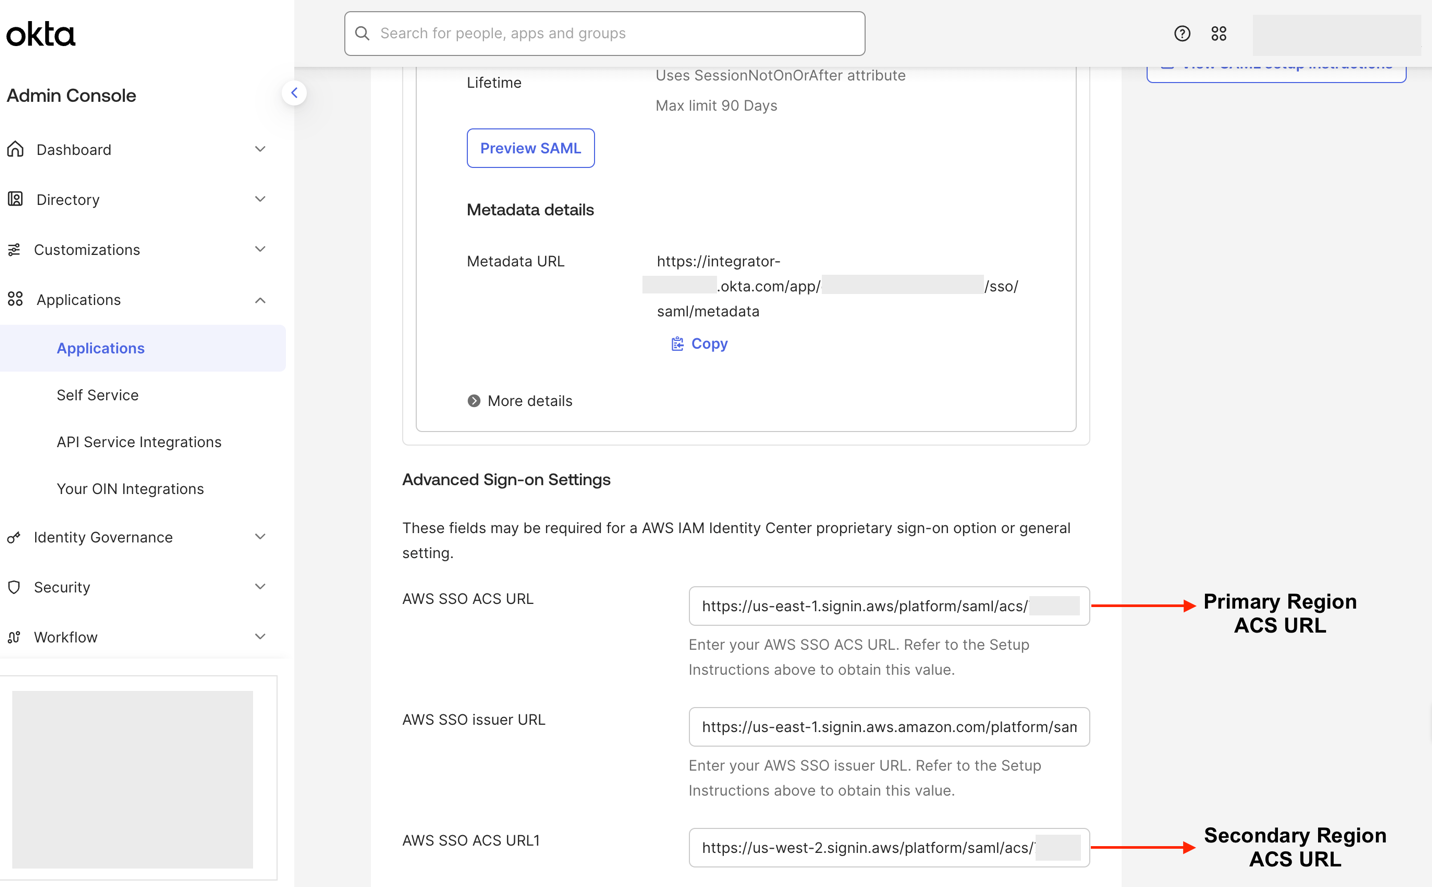
Use the following instructions to add the ACS URL for the additional Region in your Identity Center application in Okta:
Log in to the Okta portal as an Admin.
Expand the Applications drop-down in the left pane, then choose Applications
Choose your Identity Center Application
Select the Sign-on tab and choose Edit in the Settings windows.
In the AWS SSO ACS URL1 box under Advanced Sign-on Settings – add the additional ACS URL
Choose Save.
Figure 6: Okta application for IAM Identity Center Sign-on tab to add ACS URLs.
Create a permission set for the secondary Region
Create a permission set in the management account to grant federated users console access to Amazon Redshift Query Editor V2 in the secondary Region (us-west-2). For more information about permission sets, see Permission sets.
Choose Next. Enter a permission set name (for example, Redshift-QEV2-West).
Under Relay state, set the default to the Query Editor V2 URL for the secondary Region: https://us-west-2.console.aws.amazon.com/sqlworkbench/home.
Choose Next, then Create.
After creation, assign this permission set to the relevant IAM Identity Center group (for example, awssso-sales) for Account B (us-west-2).
Step 2: Set up Amazon S3 Tables integration with AWS Glue Data Catalog and Lake Formation in Account B (us-west-2)
In this step, the data lake administrator (Bob) sets up Amazon S3 Tables with Lake Formation for fine-grained access control. He completes the following tasks:
Create an S3 tables bucket.
Enable S3 Tables integration with AWS Glue Data Catalog and Lake Formation.
Register the table bucket with Lake Formation (removes default IAM-based access).
Grant Lake Formation permissions to an IAM Identity Center group (awssso-sales) so that only authorized users can query data through Trusted Identity Propagation.
Step 2.1: Remove default Lake Formation permissions
Before creating S3 Tables resources, disable the default IAMAllowedPrincipals grants that Lake Formation applies to new databases and tables. By default, Lake Formation grants IAMAllowedPrincipals access to new resources, which means that standard IAM policies (rather than Lake Formation permissions) control access. For identity-based access through Trusted Identity Propagation, you need Lake Formation to be the sole arbiter of access.
The order matters. If you remove these defaults before registering the S3 Tables resource, Lake Formation will not apply IAMAllowedPrincipals to your S3 Tables catalog or its children. If you register the resource first, you need to manually revoke the IAMAllowedPrincipals grants from each resource.
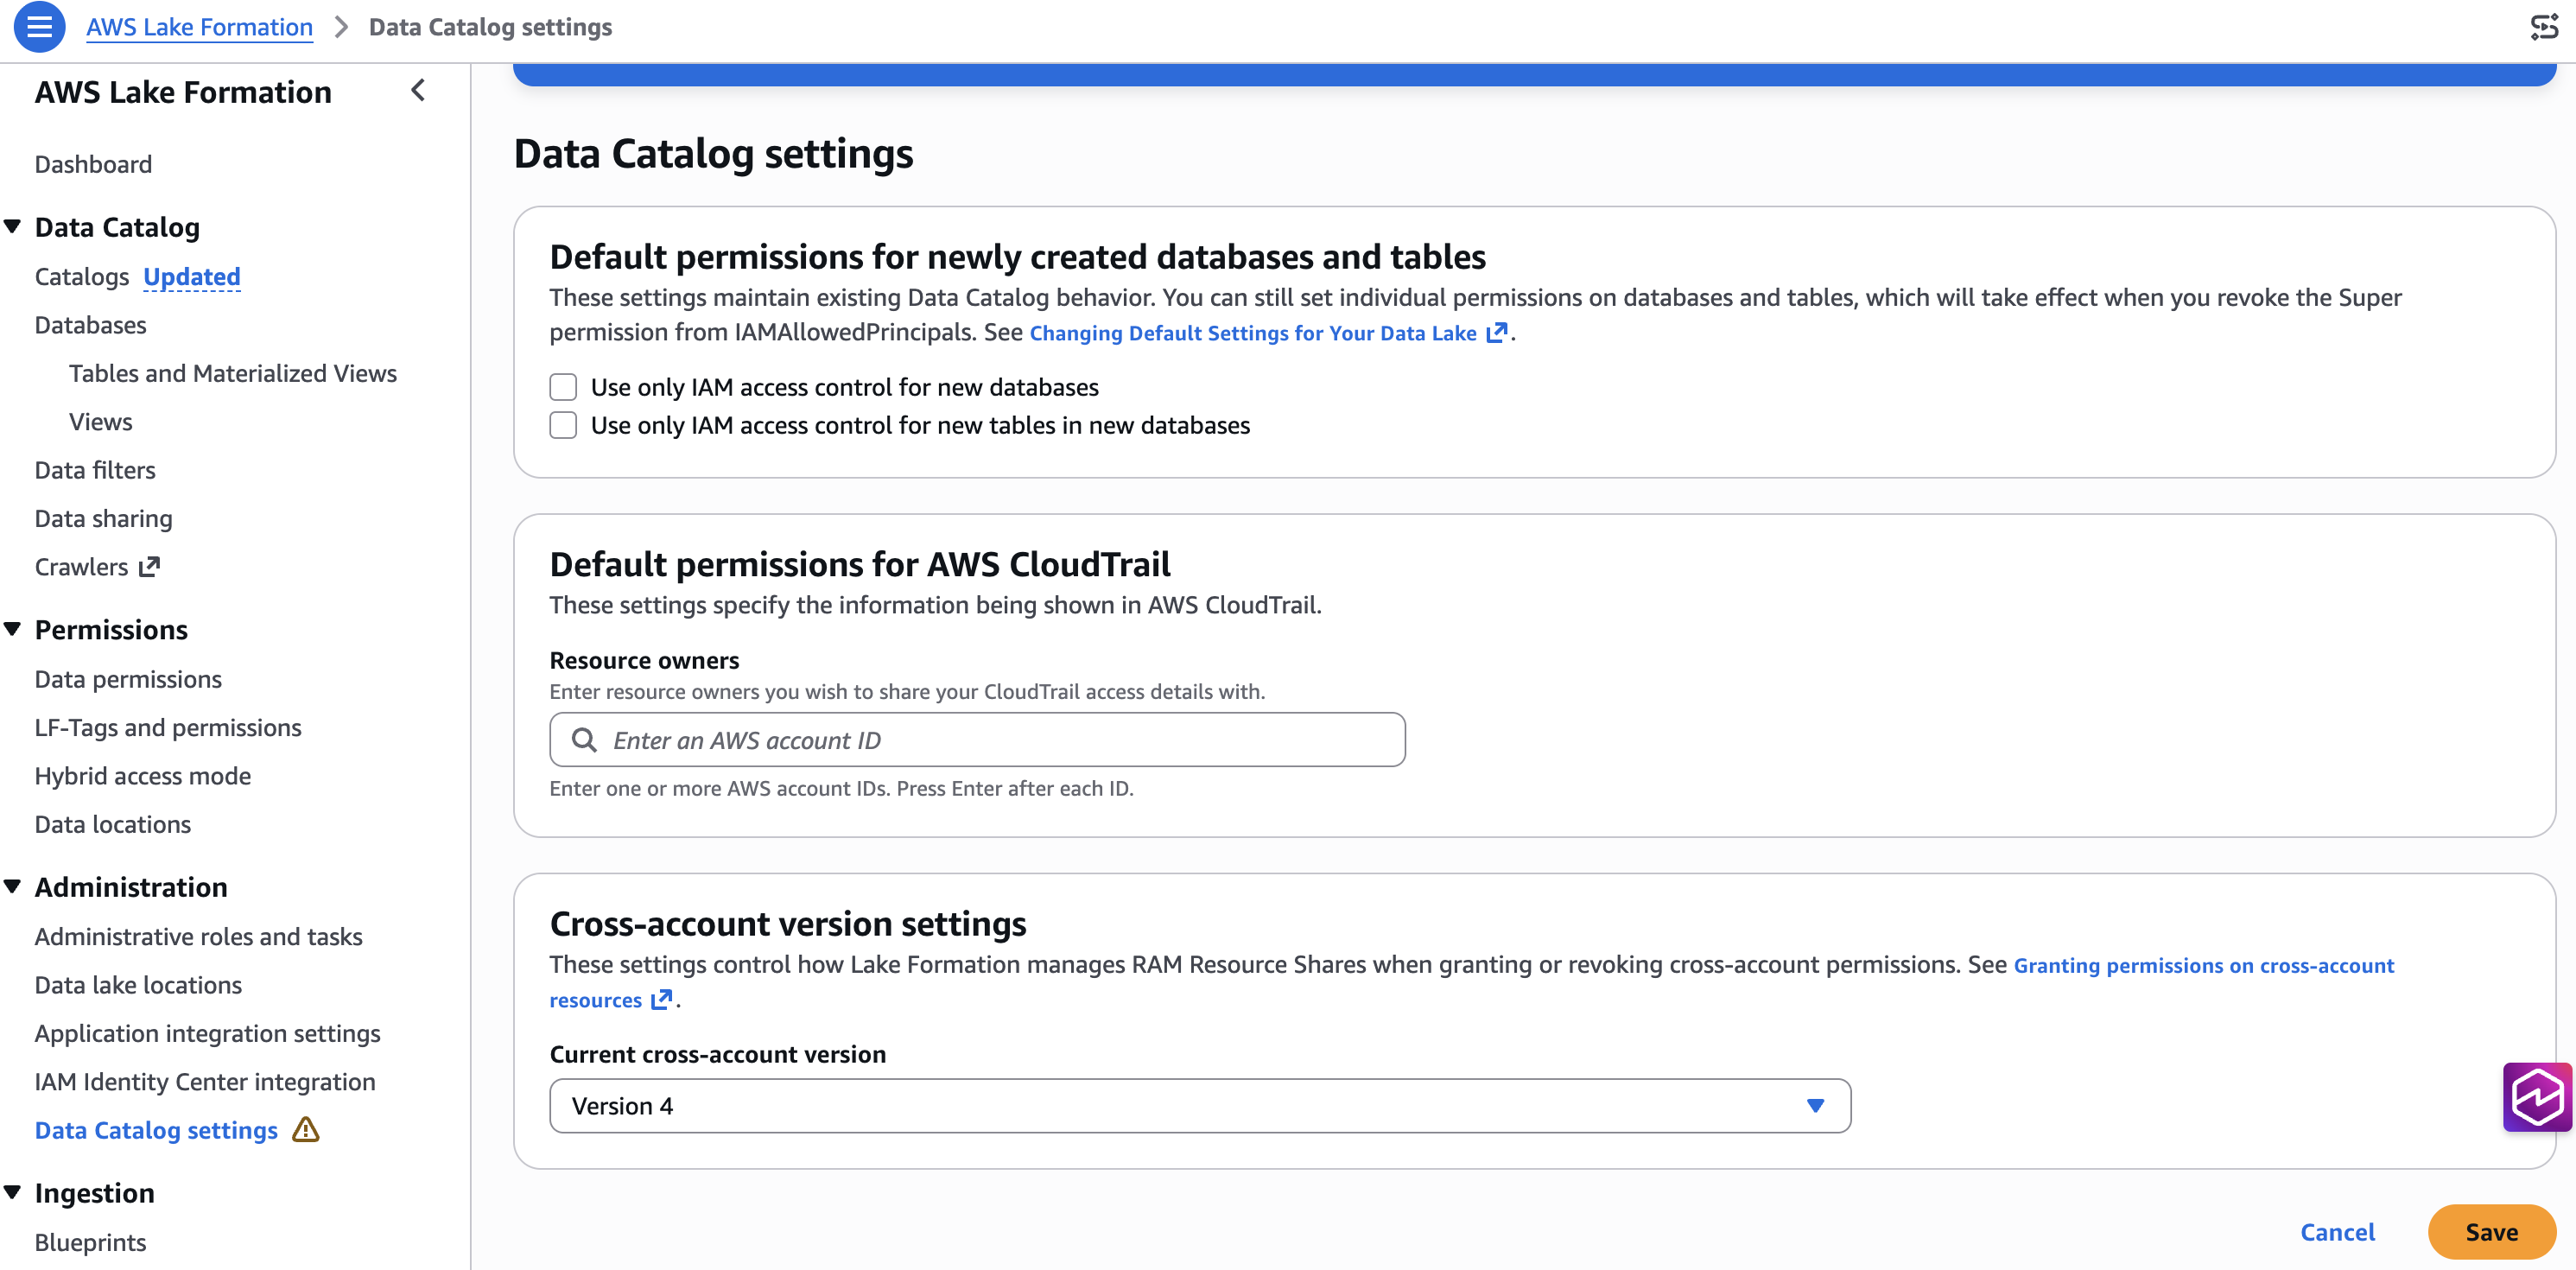
From the console
Open the Lake Formation console in your target Region (for example, us-west-2).
In the left navigation, choose Administration → Data Catalog settings.
Uncheck both options:
Use only IAM access control for new databases
Use only IAM access control for new tables in new databases
Choose Save.
Figure 7: Lake Formation Data Catalog settings with default IAM access control disabled.
Optional: Verify Lake Formation default permissions through the AWS CLI
Confirm both CreateDatabaseDefaultPermissions and CreateTableDefaultPermissions are empty arrays ([]).
Add AWSServiceRoleForRedshift as a read-only admin
If you plan to query S3 Tables from Amazon Redshift Query Editor V2, you must add the Amazon Redshift service-linked role as a Read-Only Admin in Lake Formation. Complete the following steps:
In the Lake Formation console, go to Administration → Administrative roles and tasks.
Under Data lake administrators, choose Add. Choose Read only administrator.
From the menu, choose AWSServiceRoleForRedshift.
Choose Confirm.
Important: Without this, Amazon Redshift Query Editor V2 doesn’t display external databases from s3tablescatalog. The Amazon Redshift service-linked role needs read-only admin access to browse the Data Catalog on behalf of users.
Step 2.2: Create the Lake Formation data access role for S3 Tables
Create an IAM role that Lake Formation assumes to generate temporary, scoped credentials on behalf of users requesting access to S3 Tables data. Lake Formation uses this role (instead of its service-linked role) because Trusted Identity Propagation requires sts:SetContext in the trust policy, which is not available on the service-linked role. Without a custom role with this permission, Lake Formation cannot propagate the user’s IAM Identity Center identity when accessing S3 Tables.
Register the S3 Tables resource with Lake Formation using the data access role. This step lets Lake Formation manage access to S3 Tables through the Data Catalog and creates the s3tablescatalog federated catalog automatically.
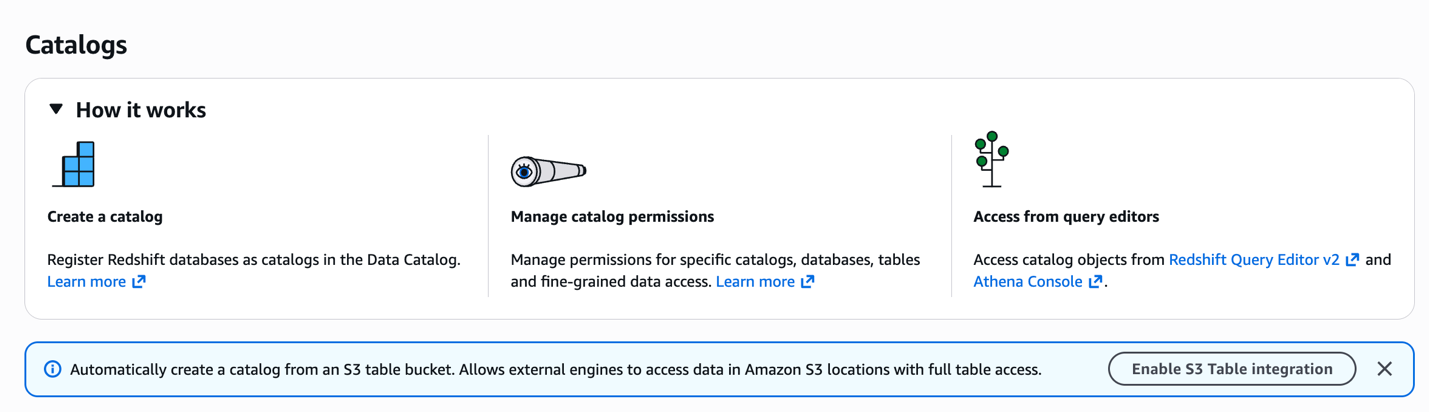
Open the Lake Formation console and complete the following steps:
Choose Catalogs in the navigation pane and choose Enable S3 Table integration.
Figure 8: Lake Formation Catalogs page with the Enable S3 Table integration option.
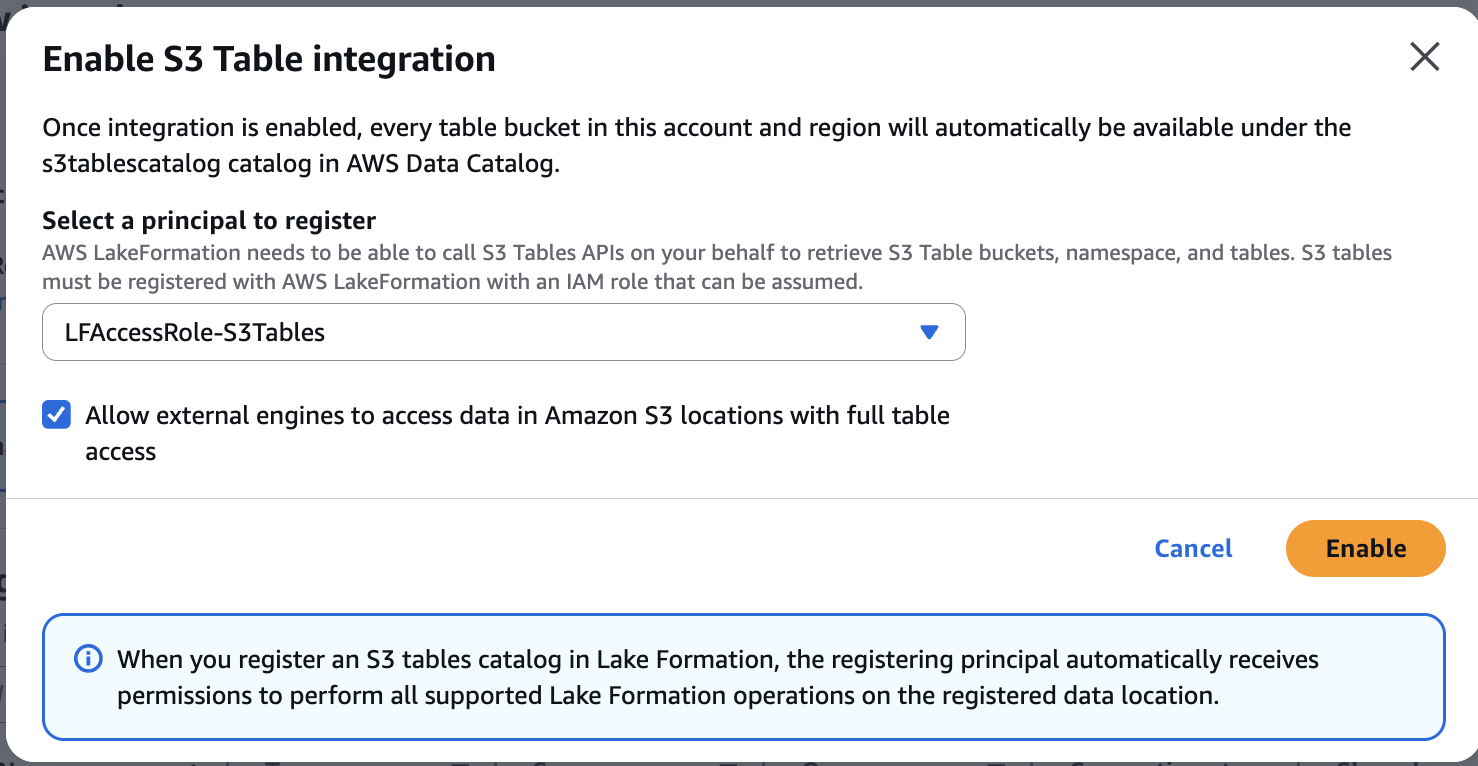
Select the IAM role and select Allow external engines to access data in Amazon S3 locations with full table access. Choose Enable.
Figure 9: Enable S3 Table integration dialog with the IAM role and external-engine access configured.
Important: Verify that the --role-arn matches the exact ARN of the role created in Step 2.2 (including the path). A mismatch (e.g., role/service-role/LFAccessRole-S3Tables vs role/LFAccessRole-S3Tables) will cause credential vending failures later.
Confirm the S3 Tables entry shows WithFederation: true and the correct role ARN.
Step 2.4: Create the S3 table bucket and namespace
Create an S3 table bucket and a namespace. Complete the following steps on the Amazon S3 console:
In the navigation pane, choose Table buckets.
Choose Create table bucket.
On the next page, enter the bucket name as <TABLE_BUCKET_NAME>.
Keep the other options as default and choose Create table bucket.
After you create it, the AWS Management Console redirects you to the list of table buckets. Choose the table bucket <TABLE_BUCKET_NAME>.
Choose Create table with Athena.
Create a namespace in S3 Tables (equivalent to a database in AWS Glue Data Catalog). Enter the namespace (database) name as <NAMESPACE_NAME> and choose Create namespace.
After you remove default permissions, you need to give your Admin role explicit Lake Formation permissions to create tables. Because your Admin role is a Data Lake Admin, you can already see s3tablescatalog in the Amazon Athena console, but creating tables requires an explicit grant.
From the console
Open the Lake Formation console in your Region.
Choose Data permissions → Grant.
Under Principals, select IAM users and roles and choose your Admin role.
Under LF-Tags or catalog resources, select Named Data Catalog resources.
For Catalogs, choose <Account ID>:s3tablescatalog/<Table_Bucket_Name>.
For Databases, select your database (for example, customer_ns_db).
Select Super for Database permissions and Grantable permissions.
Choose Grant.
After this grant, you can create and insert data into tables from the Athena console.
Note: Your Admin role must be a Data Lake Admin (configured in Step 2.1) to browse s3tablescatalog in Athena. You need the explicit database grant for write operations (CREATE TABLE, INSERT).
Step 2.6: Create a table from the Athena console
Open the Amazon Athena console in your Region.
In the Data source menu, select AwsDataCatalog.
For Catalog, choose s3tablescatalog/<Table_Bucket_Name>.
Step 2.7: Grant permissions to the IAM Identity Center group
Give your IAM Identity Center group access to query tables. This step enables Trusted Identity Propagation (TIP) for this group. When users in the group access data through TIP-integrated services like Amazon Redshift, Lake Formation evaluates their IAM Identity Center group membership and enforces table-level and column-level permissions accordingly.
From the console
Grant DESCRIBE on the database:
Open the Lake Formation console in your Region.
Choose Data permissions → Grant.
Under Principals, select IAM Identity Center and choose your IAM Identity Center group (for example, awssso-sales).
Under LF-Tags or catalog resources, select Named Data Catalog resources.
For Catalogs, choose <Account ID>:s3tablescatalog/<Table_Bucket_Name>.
For Databases, select your database (for example, customer_ns_db).
For Database permissions, select Describe.
Choose Grant.
Grant SELECT and DESCRIBE on tables:
Choose Data permissions → Grant.
Under Principals, select IAM Identity Center and choose your IAM Identity Center group (for example, awssso-sales).
Under LF-Tags or catalog resources, select Named Data Catalog resources.
For Catalogs, choose <Account ID>:s3tablescatalog/<Table_Bucket_Name>.
For Databases, select your database (for example, customer_ns_db).
For Tables, select All tables (or a specific table).
For Table permissions, select Select and Describe.
Choose Grant.
Tip: You can also configure column-level or row-level permissions for fine-grained access control. When granting on a specific table, additional options for Column permissions and Data filters become available.
Step 2.8: Optional: Verify the Lake Formation permissions
Your Admin role with ALL permissions at the database level.
Your IAM Identity Center group with DESCRIBE permissions at the database level.
Your IAM Identity Center group with DESCRIBE on ALL_TABLES and SELECT on ALL_TABLES (with ColumnWildcard) at the table level.
No IAM_ALLOWED_PRINCIPALS entries.
Step 2.9: Create Amazon Redshift tables and grant permissions
Connect to the Amazon Redshift cluster in us-west-2 as an admin user and create Redshift local tables. Grant permissions on those local resources to IAM Identity Center groups.
Create a schema and table
CREATE SCHEMA IF NOT EXISTS sales_schema;

CREATE TABLE IF NOT EXISTS
sales_schema.store_sales (
  customer_id INTEGER ENCODE az64,
  product VARCHAR(50),
  sales_amount INTEGER ENCODE az64
)
DISTSTYLE AUTO;

-- Insert sample data
INSERT INTO sales_schema.store_sales VALUES
  (1, 'Laptop', 1200),
  (2, 'Phone', 800),
  (3, 'Tablet', 450),
  (4, 'Monitor', 350),
  (5, 'Keyboard', 120);
Grant permissions to the IAM Identity Center group
GRANT USAGE ON SCHEMA sales_schema TO ROLE "awsidc:awssso-sales";
GRANT SELECT, INSERT FOR TABLES IN SCHEMA sales_schema TO ROLE "awsidc:awssso-sales";

-- Grant access to the S3 Tables external database in Redshift (for Lake Formation queries on customer profiles)
GRANT USAGE ON DATABASE "customers3tables@s3tablescatalog" TO ROLE "awsidc:awssso-sales";
Step 3: Test the solution
In the management account, navigate to the IAM Identity Center console and copy the AWS access portal URL (for example, https://d-1234560789.awsapps.com/start) from the dashboard.
Log out from the management account and paste the AWS access portal URL in a new browser window.
A pop-up redirects you to your IdP login page. Enter Ethan’s IdP credentials.
After successful authentication, you’re logged into the AWS console as a federated user. Select the QEV2 permission set for the secondary Region (us-west-2).
In Query Editor V2, open the context (right-click) menu on your Amazon Redshift instance, choose Create connection, and for Authentication, select IAM Identity Center.
Because your IdP credentials are already cached, the browser reuses them automatically. You’re now connected to Amazon Redshift.
Pattern A: Query the S3 table catalog using Lake Formation permissions
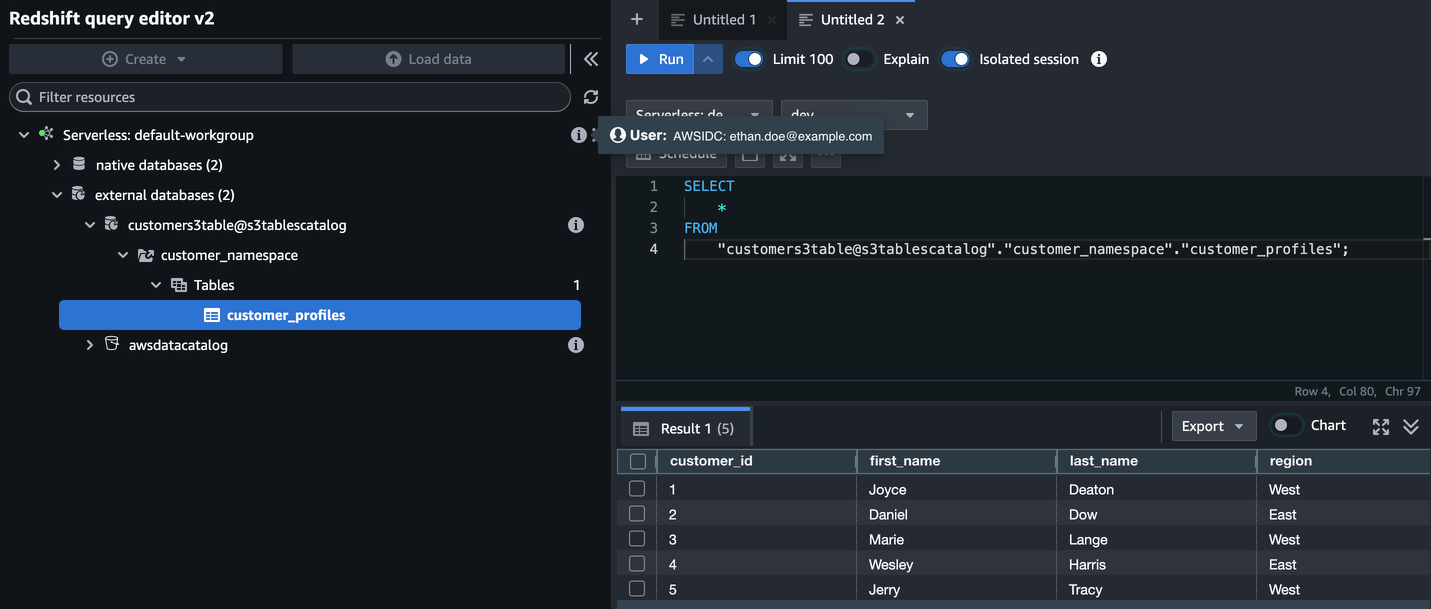
Query the customer profile data through s3tablescatalog. Lake Formation enforces access based on Ethan’s IAM Identity Center group membership:
SELECT *
FROM "customers3tables@s3tablescatalog"."customer_ns_db"."customer_profiles";
Figure 10: Query results from s3tablescatalog returned through Lake Formation in Amazon Redshift Query Editor V2.
This query reads customer profile data from Amazon S3 through Amazon Redshift Spectrum, with Lake Formation controlling who can access which tables and columns.
Pattern B: Unload data to Amazon S3 using S3 Access Grants
Run the UNLOAD command to write data from Amazon Redshift to the S3 bucket:
UNLOAD ('SELECT * FROM "dev"."sales_schema"."store_sales"')
TO 's3://west-idc-amzn-s3-demo-bucket/awssso-sales/';
You don’t need an IAM role ARN in the command. S3 Access Grants handles authorization based on Ethan’s IAM Identity Center identity and group membership, propagated across Regions using IAM Identity Center Multi-Region support.
Verify the data in Amazon S3
On the Amazon S3 console, navigate to s3://west-idc-amzn-s3-demo-bucket/awssso-sales/ and verify that the unloaded data files are present.
Join Lake Formation data with locally loaded Amazon Redshift data
Combine customer profile data (queried via Lake Formation) with sales data (loaded via S3 Access Grants) using the shared customer_id column:
SELECT c.first_name, c.last_name, c.membership_tier,
  s.product, s.sales_amount
FROM "customers3tables@s3tablescatalog"."customer_ns_db"."customer_profiles" c
JOIN  dev.sales_schema.store_sales s ON c.customer_id = s.customer_id
ORDER BY s.sales_amount DESC;
Figure 11: Joined results from S3 Tables and Amazon Redshift local data, ordered by sales amount.
This shows that you can join S3 Tables data with Amazon Redshift using the same IAM Identity Center identity.
Verify access control
To confirm that S3 Access Grants is enforcing access, try accessing a folder Ethan does not have a grant for:
UNLOAD ('SELECT * FROM "dev"."sales_schema"."store_sales"')
TO 's3://west-idc-amzn-s3-demo-bucket/awssso-finance/';
This should return an access denied error, confirming that S3 Access Grants is controlling access based on the user’s identity and group membership.
Step 4: Verify with AWS CloudTrail
You can verify that Amazon Redshift used both S3 Access Grants and Lake Formation for authorization by checking AWS CloudTrail:
On the CloudTrail console, choose Event history.
Filter by Event source: s3.amazonaws.com. Look for GetDataAccess events (S3 Access Grants).
Filter by Event source: lakeformation.amazonaws.com. Look for GetDataAccess events (Lake Formation).
Both event types show Ethan’s IAM Identity Center user identity, confirming trusted identity propagation works end-to-end for both access patterns.
Other related integration guides
The following table lists related blog posts and integration guides covering additional identity-based access patterns with Amazon Redshift. Although many of these were written for single-Region deployments, you can extend them to multi-Region environments by first enabling IAM Identity Center Multi-Region as described in Step 1 of this post. Use the table to find the guide that matches your identity provider and tooling:
Integration / use case
Identity provider
What it covers
Blog link
Amazon Redshift federated permissions
Any
Centralize permission management across multiple Amazon Redshift clusters within a Region using IAM Identity Center-linked database roles.
When implementing this multi-Region architecture, keep the following operational and configuration considerations in mind. These reflect common challenges and design decisions encountered during deployment:
IAM Identity Center Multi-Region requires a customer-managed multi-Region AWS KMS key replicated to each additional Region before you can add the Region to Identity Center.
S3 Access Grants instances are regional. You need a separate instance in each Region where your users access data. A bucket must be in the same Region as the Access Grants instance that manages it.
IAM Identity Center Multi-Region provides the same user and group identities across Regions, so you can use the same group IDs in grants across Regions.
You must register Lake Formation data locations with a customer-managed role that includes sts:SetContext in its trust policy. For S3 Tables, use aws lakeformation register-resource with the --with-federation flag and the resource ARN format arn:aws:s3tables:<REGION>:<ACCOUNT_ID>:bucket/*. Using the service-linked role causes the error: Cannot vend credentials from service-linked role to Identity Center principal.
SELECT and UNLOAD use different permission models. Lake Formation controls query-time access to cataloged data (SELECT through Spectrum). S3 Access Grants controls direct Amazon S3 access (COPY/UNLOAD). Both use the same IAM Identity Center identity.
The Amazon Redshift managed application IAM role must include sts:SetContext in its trust policy and have both Lake Formation/Glue and S3 Access Grants permissions.
Cross-account setup requires AWS RAM resource sharing for S3 Access Grants and proper IAM Identity Center application configuration in the analytics account.
Scoped vs object-level permissions in Amazon Redshift. When granting permissions with GRANT ... FOR TABLES IN SCHEMA, use REVOKE ... FOR TABLES IN SCHEMA to remove them. The REVOKE ... ON ALL TABLES IN SCHEMA syntax only removes object-level permissions, not scoped permissions.
The Lake Formation data access role for S3 Tables requires sts:SetContext in its trust policy (for TIP) and s3tables:* permissions on the table bucket resources.
AWSServiceRoleForRedshift must be a Read-Only Admin in Lake Formation for Amazon Redshift Query Editor V2 to display external databases from s3tablescatalog.
Federated catalog CatalogId format. When using CLI commands for S3 Tables resources in Lake Formation, use the full path format: <ACCOUNT_ID>:s3tablescatalog/<TABLE_BUCKET_NAME>. Using the account ID alone returns empty results.
Clean up
To avoid ongoing charges, clean up the resources created in this post:
Delete the S3 table bucket (delete tables → namespaces → bucket using aws s3tables CLI commands).
Deregister the S3 Tables resource from Lake Formation (aws lakeformation deregister-resource --resource-arn "arn:aws:s3tables:<REGION>:<ACCOUNT_ID>:bucket/*").
Delete s3tablescatalog from Glue (aws glue delete-catalog --catalog-id "s3tablescatalog").
Delete the LFAccessRole-S3Tables IAM role and associated policies.
Delete the S3 Access Grants instance and grants in us-west-2.
Delete the S3 bucket used for UNLOAD/COPY in us-west-2.
Delete the iamidcs3accessgrant IAM role and associated policies.
Deregister the S3 data location from Lake Formation.
Delete the Lake Formation IAM Identity Center integration.
Delete the Amazon Redshift cluster in us-west-2 if you created one for testing.
Remove us-west-2 from IAM Identity Center Multi-Region (if no longer needed).
Schedule deletion of the AWS KMS replica key in us-west-2 (minimum 7-day waiting period).
Conclusion
In this post, we extended the Amazon Redshift and S3 Access Grants integration to a multi-Region setup using IAM Identity Center Multi-Region replication. We demonstrated two complementary data access patterns: SELECT through Lake Formation for fine-grained access control on S3 Tables data, and UNLOAD/COPY through S3 Access Grants for direct Amazon S3 access. Both patterns use the same IAM Identity Center identity for access control. We also showed how to set up a customer-managed multi-Region AWS KMS key, enable IAM Identity Center in an additional Region, configure Amazon S3 Tables with Lake Formation for identity-based access control using Trusted Identity Propagation, and replicate the complete S3 Access Grants setup in a different Region and account.
With this approach, AnyCompany Global’s analysts authenticate once and access data in any enabled Region while Lake Formation and S3 Access Grants enforce per-user, per-group access policies.
For additional guidance, refer to the following resources:
… ако питате ходжата, рогатият е навсякъде, особено като стане дума за хевиметъл.
Стига да имаш ищах (от арабското иштияк, „желание“) да го търсиш, изборът е голям, направо безкраен. Така казва и Умберто Еко в „Името на розата“ в диалозите между Уилям от Баскервил и инквизитора Бернар Ги. Може да откриеш Иблиса и в турски банди като „Курбан“(„Жертва“, да не си мислите, че става въпрос за мазна овнешка чорба), „Кърмъзъ“(„Червено“, ако ви се прииска феминистки трашметъл), „маНга“, „Мор ве Отеси“ и един бюлюк други.
А че търсенето на шейтана в метъла може да има тежки последици, усеща на гърба си първата иракска трашбанда със звучното име „Акрасикауда“ (Acrassicauda, „Черен скорпион“). Нейната история въобще не е толкова гладка като рок сцената в Турция. И пак има късмет, защото попада в полезрението на медийната платформа „Вайс“ (VICE, „Порок“!) след падането на Саддам Хюсеин през 2003 г. и гражданската война. Тогава за малко да се озова там като „лингвист, способстващ за администрацията на следвоенен Ирак“, така поне вървеше офертата на военните за арабисти като мен. Добре че не заминах, за разлика от други мои колеги, които после пострадаха тежко. Но през 2006 г. Суруш Алви, съосновател на „Вайс“, и продуцентът Еди Морети заминават за Багдад през Ербил, Кюрдистан, за да снимат филм за траша в следвоенен Ирак. Неслучаен избор, предвид статията на „Вайс“ за „Акрасикауда“ през 2003 г. А 2006-та е лош избор за време за пътуване до Двуречието. Но пък благодатно за улавяне на новите културни феномени. Нови, ала не безпроблемни. Резултатът е документалният филм „Хевиметълът в Багдад“, който излиза през 2007 г.
Вижте ги. Момчета с кози брадички в хаоса на следвоенен Ирак, които свирят с китарите си в мазе и се самоопределят като мюсюлмани, ама не твърде посветени. Мазето прилича малко на мазето на пазарджишката гимназия, където тамошните групари свиреха, докато аз драсках с маркери графити по стените. Но обстановката не прилича на Пазарджик, пък било и през 90-те. Не може да ходиш по улиците на Багдад току-така. Може да те застрелят, защото седиш сам на едно място. Може да те застрелят, защото се движиш подозрително. Може да те застрелят, защото се събираш с хора. Може да те застрелят, защото говориш на английски – едно от най-опасните неща. Може да те застрелят, защото пътуваш. Може да те застрелят, защото не пътуваш. Може да те застрелят, защото не спазваш вечерния час. Може да те застрелят, защото си религиозен. Или защото не си религиозен. И да, защото правиш шейтанска музика. Може да си чужд агент. Не може да си пуснеш дълга коса или да носиш тежки тениски, защото веднага се набиваш на очи.
Да, правят компромис с режима на Саддам преди това. Пишат песен за иракския диктатор. Нещо като да споменеш Енгелс, когато издаваш превод на средновековния философ Пиер Абелар в България¹. „За да избегнеш дявола, пей за него“, гласи една арабска поговорка. Не знам каква точно е тя, но според мен е фриволна интерпретация на мюсюлманското схващане, че дяволът може да бъде неутрализиран чрез подходящите молитви и напевно споменаване (зикр) на Аллах.
Но истинските обвинения в сатанизъм идват после. Най-малкото защото „главотръскането“ приличало на религиозен ритуал, особено на еврейската молитва. Тъй де, има си йерархия на шейтаните. И ако приличаш на юдейския шейтан, си най за осъждане.
Но през 2005 г. групата успява да изнесе концерт в багдадски хотел. Това все пак е оптимистична история. Всички членове на „Черен скорпион“, да не се лъжем, са представители на образованата младежка висока средна класа, имат собствени инструменти и оборудване, говорят отличен английски. В крайна сметка бягат през Сирия (където изнасят концерт в Дамаск), после до Турция и стигат до САЩ като тяхна обетована земя, подпомогнати от „Вайс“. През 2009 г. даже лично идолът им Джеймс Хетфилд от „Металика“ им подарява китара, а през 2015 г. официално излиза дебютният им албум „Гилгамеш“. Името отново е препратка към славното минало, този път на Месопотамия. Разбира се, че няма да е „Халифат“, нито „Абасид“, дори и „Харун ар-Рашид“ не е. Никакви асоциации със средновековното мюсюлманско наследство на Ирак. И без това „поклонниците на дявола“ вече са натрупали достатъчно негативи…
Но да мръднем още пò на юг и да сгъстим тъмните краски.
„Черният скорпион“ все пак отървава кожата. Историята на групата прилича на рисково приключение с щастлив край. Но не може да кажем същото за феновете на тежката музика в Египет малко по-назад в миналото.
През 1997 г., докато ние минаваме през Виденовата зима, в Египет избухва първата публична „сатанинска паника“ от хевиметъла.
Описва я Марк Ливайн в най-интересната монография по въпроса, на която съм попадал². Не само за Египет, но и за Мароко („Когато музиката бъде забранена, започва истинският сатанизъм“!), Израел, Палестина, Ливан, Иран, Пакистан.
А хевиметъл сцена има в Египет още от 90-те въпреки традиционния религиозен пласт, който съставлява огромното мнозинство от обществото. Да не забравяме също, че Египет е един от големите центрове за продукция на филми, музика и телевизия в арабския свят. Затова и египетският диалект впрочем е един от най-използваните. Само че борбата на метълите за признание и място в обществото минава през сложна политическа ситуация по времето на Хосни Мубарак и влиянието на ислямистки движения като „Мюсюлмански братя“. Същите тези, на които Саид Кутб с „Под сенките на Корана“ е идеолог.
Та сенките на Корана не се оказват благодатна шарена сянка за младежите, които гледат навън през призмата на рок културата. На 22 януари 1997 г. правителството подема кампания срещу метъл общността, след като във вестниците излизат снимки на концерти, на които уж се показва как се носят обърнати кръстове. И мюсюлмански, и християнски религиозни служители се скандализират. Макар че мен ако питате, мюсюлманските активисти би трябвало да са доволни – нали християнският кръст като цяло е пълен харам в исляма? Но да речем, че обърнатият кръст говори за шейтанопоклонничество.
Стотина фенове на тежката музика са окошарени. Десетки са прибрани от старата изоставена къща на белгийския барон генерал от XIX век в Кайро, където младежи се събират да слушат музика, да пръскат графити и да купонясват. Това пък води и до описанието на мястото в египетските медии като пълно с татуирани поклонници на дявола, които правят оргии, дерат котки и пишат имената си с кръв от плъхове по стените. Че даже и египетският мюфтия Наср Фарид Уасил призовава към покаяние на задържаните или смъртна казън, полагаща се за отстъпничество от исляма. Отгоре на всичко „сатанинската афера“ се случва в същата година, в която терористи удрят туристически места в Луксор и Кайро.
Събитието е с такава значимост за сцената, че някои банди дори изгарят или изхвърлят инструментите си, за да избегнат арести и обвинения, а историята на тежката музика в Египет се разделя на преди и след 1997 г. Едва десетина години по-късно, през 2008-ма, „Ройтерс“ публикува статия за хевиметъла, който предпазливо се завръща в Египет. Завръща се, ала не много решително, тъй като демонизацията продължава. През 2010 г. дори бившият съветник на главния мюфтия Тухами Мунтасир твърди, че метъл сцената в Египет е финансирана от „ционистите“. Че то кое лошо нещо в арабския свят не е, да сипя и аз сол в раната?! В крайна сметка и „Протоколите на ционските мъдреци“, този доказан фалшификат, все още е популярно четиво там.
През 2016 г. отново се надига брожение с цел да се възбрани музиката на „поклонниците на дявола“. „Таймс“ отразява полицейско нахлуване по време на хевиметъл концерт в Кайро с обвинения към организаторите, че участват в „сатанински ритуали“ и се подготвя „сатанинско парти“. „Сепултура“ отменят участието си в събитието.
А обвързването на метъла с шейтана става стереотипна част от сцената не само в Египет. В Мароко изплуват обвинения в сатанизъм и арести по време на фестивала в Сиди Касем, да не говорим за Иран, където хеви- и блекметълът се инкриминират по най-различни линии, включително защото вървят със сатанински ритуали и притежаване на наркотици. И ако на музиката в средите на мюсюлманите по принцип се гледа като нещо греховно и възбранено, както твърди една фетва тук, нейният тежък пласт направо потъва и удря дъното в обиталището на самия Иблис. Ето как тече разговорът с богословите от популярния и авторитетен сайт за фетви на катарското Министерство на религиозните дарения и дела.
Какво означава метълист (миталджи)?
(Метълджия. Харесва ми като словообразуване на арабски. Западна дума с турска наставка за професия, подобно на чорбаджия, бозаджия, ваксаджия, скъпчия.)
В какво вярват метълите? –
продължава запитването от анонимен вярващ, свързани ли са с кланянето на шейтана, как трябва да се отнасяме с тях и какво правят по време на събиранията си? Тъй де, звучи като ударен курс относно „що е метъл и какво да правим с него“.
Отговорът върви така. Думата миталджи означава някой, който слуша или изпълнява с музикални инструменти вид музика, наречена „метъл“, отличаваща се с голяма извратеност. Откъде мюфтията знае това? Много лесно – „научихме го от прочита на някои техни форуми и сайтове в интернет, които не подобава да слагаме тук като линкове, защото би било насърчаване на порицаеми действия“. Обаче не е задължително всеки, който слуша тази греховна, възбранена музика, да бъде поклонник на дявола. Само че поклонниците на дявола слушат тази музика. А тя, особено във вариацията хевиметъл, насърчава подобни поведенчески модели, сатанински действия, ритуали и начин на живот по време на упадъчните им събирания. Песните изразяват вярванията им, които се основават на освещаването, възвеличаването и поклонението пред дявола, призиви към разврат, убийство и самоунищожение. За да могат накрая, по техните собствени твърдения, да бъдат удостоени с наградата да влязат в Ада през някоя от неговите седем двери. Други видове музика, които слушат по време на своите сбирки, са блекметълът (ал-блак митал) и хардрокът (ал-хард рук). И именно тази музика се свързва със странните им ритуали, които са противни на естеството, че и на всички религии, дори и на извратените. Сред ритуалите им са вземане на наркотици, пиене на алкохол, сексуална перверзия, оскверняване на мъртвите и пиене на човешка кръв. Добави към това и „истерично танцуване почти до степен на припадък и притъпяване на човешките сетива“ и става ясно, че миталджиите не са поели по добър път.
В катарския сайт цитират даже статия относно „Историческите корени на сатанизма“, публикувана в журнала на Ислямския университет в Газа. А за повече информация как да се отнасяме с метълите се препраща към фетва, която отговаря на въпроса как да се противопоставим на „интелектуалната инвазия“ (газуу фикри), тоест на външните атаки, с цел отслабване на силите на мюсюлманската общност и подриване на нейните морални устои. Не стига моралната и верска развала, ами и метълите са натоварени с основна роля в офанзивата срещу здравите основи на самата умма и разгръщането на мисията ѝ в хода на историята.
Очевидно такава гледна точка не отчита разликите между музикалните жанрове. Тъй де, все едно вие да правите разлика между правните школи на шафиити, ханбалити, маликити и ханифити в исляма. Някакви ходжи там се карат, но отвън на нас всичко ни изглежда едно и също. Та и тук така. Да, знаем за любимия жест на Рони Джеймс Дио, който напомня на рогатия. Или пък за адския електронен амбианс на „Бурзум“ (вокално-инструментален състав „Тъмнина“, да спазим правилото за превод на имената). За дет- и блекметъла в Скандинавието, че дори и в арабския свят. А и за турците от „Пентаграм“ – най-малкото заради символа. Те може и да пасват на фетвата от Катар. Ала очакваме ли същото ниво на „шейтанство“ за всички групи и концерти? Еднакъв призив към пиянство, разврат, „седемте порти на Ада“, „оскверняване на мъртвите“ и „пиене на човешка кръв“? Е да, концертите може и да вървят с порочно пиене на бира и съмнителни общувания между двата пола. Ама то е по акциденция, не е същностно, както би отсъдил кадията Ибн Рушд от Кордоба, известен ни като Авероес. А какво да кажем за възприемащия се за християнски „бял метъл“?
И тук е време да пристъпим в една по-оптимистична, макар и ничия територия, където тежката музика и ислямът се припокриват.
Обитателите на тази територия се опитват да изградят положителен разказ за успеха, който удържа жицата в едно с правоверието. Шейховете може и да не харесват това. И то наистина звучи малко като философски разказ за невъзможно смесване на същностите. Русалка. Кентавър. Химера. Соева наденица. Халален алкохол. Позволено прасе.
Но има музиканти, които упорито настояват, че е възможно да бъдеш добър мюсюлманин и миталджи едновременно.
През 2003 г. американският автор Майкъл Мухаммад Найт, приел исляма, измисля термина такуакор, който става заглавие на едноименната му книга, рекламирана като „Спасителя в ръжта за млади мюсюлмани“. Много е просто – такуа на арабски е „благочестие“, „богобоязливост“, а кор идва от „хардкор“. Книгата разказва за измислени герои, мюсюлмански бунтари – суфи с пънк гребени, скинхедс шиити, ъндърграунд феминистки с бурки. Измислени, но вдъхновяват реална музикална сцена. Пънк с мюсюлмански привкус. През 2009 г. излиза и документалният филм за американското движение под заглавие „Такуакор: раждането на пънк исляма“.
В рамките на това екзотично движение се пръкват и американски групи със забавни имена като „Дъ Коминас“ („Келешите“ на урду), „Ас-Саура“ („Революция“ на арабски), „Воут Хезболла“ („Гласувайте за Хизбулла“). И добре че този творчески фюжън е в САЩ, защото в Египет, Ирак или Пакистан няма как да изкласи. Само ще припомня, че втората книга на Майкъл Мухаммад Найт е озаглавена „Осама Ван Хейлън“.
А на другия край на света, в Индонезия, сме свидетели на друг феномен – тежък метъл и забрадки.
Момичетата от „Войс ъв бачепрот“ (V.O.B., „Гласът на шума“ на местния им език) не съзират противоречие в това да правят кавъри на „Металика“, докато носят консервативно изглеждащи хиджаби. През 2014 г. се събират в Гарут, провинция Западна Ява в Индонезия. (А Индонезия е най-голямата страна с мюсюлманско мнозинство в света – над 270 млн. жители, около 90% от които са мюсюлмани.) Ерза Сатия, техният учител по музика, който открива метъл таланта им и поема ролята на пръв мениджър, опровергава разпространените мнения, че музиката била сатанинска. Тя е всъщност начин учениците да избегнат пороци като наркотиците и непозволения от исляма предбрачен секс.
Все пак една забрадка халал не прави, ако трябва да перифразирам нашенската поговорка за едната птичка и пролетта. И тях постоянно ги заплашват със смърт. Така де, един от най-лесните начини да си докараш смъртна присъда по Свещения закон на исляма е да те обвинят в богохулство или отстъпничество. Механизмът е много ясен, отработен, вековен и води обикновено до един-единствен резултат. Не че това пречи на миловидните момичета с хиджаби да правят турнета и да ги канят на фестивала във Вакен, тази германска Мека на метъла.
От Мароко до Пакистан, от Турция до Субсахарска Африка и Саудитска Арабия, от САЩ до Индонезия: всяка банда има своята история като част от местния контекст. Дали ще е следвоенен Ирак, кемалистка Турция, Арабската пролет – очевидно е, че тежката музика няма да си отиде въпреки благочестивото ѝ очерняне. Като казахме очерняне, препрочитам един разказ на Орхан Памук, в който говори за рисунките на Сиях Калем – „Черния писец“. Легендарен илюстратор, група от художници или стил на едни много разпознаваеми картинки от XV век. Вижте този сюжет от колекцията на музея в Кливланд.
Не е ли това демонът на тежката музика в „дома на исляма“?
Със зачервените си очи, увиснали клепачи и тъжни зъбати бърни изглежда хем грозен, хем нещастен. Хем опасен, хем безпомощен. От едната му страна стои мъжка фигура, която го налага. Уж това е фигурата на добрия, който се бори със злото. От другата страна е женски силует, който пристяга верига около шията му. Само че колкото повече ги гледаш, толкова повече се чудиш кой е по-зъбат, по-страшен и по-злочест – окованият или тези, които са го оковали. Както казва и Памук, хем се боим от ония дяволи, хем осъзнаваме, че с тях сме замесени от едно и също тесто³. Пък и съгласете се, Сиях Калем звучи като чудесен избор за име на метъл банда. С дебютен албум „Гул“ или „Див“(„Демон“) и тази картинка за обложка. Напълно съответства на традициите в жанра.
1 Абелар, Пиер. Избрани съчинения. София: Наука и изкуство, 1986, с. 21 – 22.
2 LeVine, Mark. Heavy Metal Islam. Rock, Resistance, and the Struggle for the Soul of Islam. Oakland: University of California Press, 2022.
3 Памук, Орхан. Други цветове. София: Еднорог, с. 363.
В рубриката „Ориент кафе“ Атанас Шиников поднася любопитни теми, свързани не толкова с горещата политика, колкото с историята и културата на Близкия изток. А той, древен и днешен, е по-близко до нас и съвремието ни, отколкото си представяме.
Compromised accounts are one of the most common ways that attackers
can sneak malware into the open-source supply chain. One way to
reduce account compromise is for projects to require two-factor
authentication (2FA) or multi-factor authentication (MFA), but that is
easier said than done. However, Fedora is currently discussing putting
2FA requirements in place soon, following an an alleged account
compromise that led to an AI agent causing a number of problems
for the project. After some discussion, Fedora will begin by requiring
packagers in the “provenpackager”
group to enable 2FA within the next three months or so.
BPF arenas are areas of memory (potentially shared with user space)
where programs have free reign to build their
own data structures, unburdened by the verifier’s bounds checks. Many of those
data structures are potentially usable in multiple programs. Emil Tsalapatis
brought his work on libarena, a library containing generic utilities for use in
BPF arenas, to the 2026
Linux Storage, Filesystem, Memory-Management, and BPF
Summit. Although the library is already available as part of the kernel, it
is still in its early stages and he has more work planned.
The Power Management
and Scheduling in the Linux Kernel Summit, which still goes by the
historical acronym OSPM, was held in Cambridge, UK, in mid-April. As has
become traditional, the presenters at that event have since written
summaries of their sessions, and this work has kindly been made available
to LWN for publication. The second day’s sessions covered a wide range of
topics, including device frequency scaling, using time-slice duration for
CPU selection, scheduling domains on multi-cluster Arm systems, the LAVD
scheduler, and more.
Learn how Amazon S3 Files simplifies Lambda functions by eliminating transfer code and /tmp constraints. See three modernization patterns with code examples for image processing, ETL pipelines, and multi-agent AI workloads.
AWS Lambda functions that interact with Amazon Simple Storage Service (Amazon S3) typically follow a familiar pattern: download an object to /tmp, process it locally, and upload the result back to S3. This pattern is well-understood and reliable, but it requires you to write code for managing transfers, monitoring /tmp capacity, and cleaning up ephemeral storage alongside your actual processing logic.
Amazon S3 Files changes this by letting your Lambda function mount an S3 bucket as a file system. Your function reads and writes files at a local mount path (such as /mnt/data), and the file system handles synchronization with S3 automatically. The transfer and storage management code goes away, and what remains is your processing logic working directly with files.
In this post, we walk through three common Lambda + S3 workloads and show how to modernize each one by using S3 Files. You will see how the code gets shorter, the /tmp size constraint disappears, and the developer experience improves.
Walkthrough
Prerequisites
Before you begin, make sure you have:
An AWS account with permissions to create Lambda functions, S3 file systems, and VPC resources.
An existing VPC with private subnets and appropriate security groups.
Getting started
To integrate a Lambda function with S3 Files, you can follow these three steps:
Add the file system configuration to your Lambda function. Specify the access point ARN and local mount path (for example, /mnt/data). Your function must be in a VPC with access to the mount target. For optimal throughput on large files, configure your function with 512 MB or more of memory to enable direct reads from S3.
If you are modernizing your existing Lambda function’s code, replace boto3 transfer code with file paths. Change s3.download_file(bucket, key, '/tmp/file') to open('/mnt/data/' + key) and remove upload and cleanup logic.
Your function’s execution role needs s3files:ClientMount and s3files:ClientWritepermissions (included in the AmazonS3FilesClientReadWriteAccess managed policy). For direct S3 reads on large files, also add s3:GetObject and s3:GetObjectVersion.
Pattern 1: Multi-agent shared workspace
Agentic AI workloads, where multiple autonomous agents collaborate on a task, require shared mutable state. Agents need to read each other’s outputs, write intermediate artifacts, and coordinate without tight coupling. With Lambda today, this typically means serializing state to S3 objects or Amazon DynamoDB between every step, adding latency and code for each handoff.
S3 Files gives multiple Lambda functions a shared file system. Agents communicate through the file system itself, with no S3 API calls and no serialization overhead.
Example: Collaborative research agents
Three Lambda functions mount the same S3 bucket at /mnt/workspace. An orchestrator prepares the task, research agents work in parallel, and a synthesis agent combines their findings:
import os
import json

WORKSPACE = "/mnt/workspace"

# --- Orchestrator Agent ---
def orchestrator_handler(event, context):
    session_id = event["session_id"]
    session_dir = f"{WORKSPACE}/sessions/{session_id}"

    os.makedirs(f"{session_dir}/research", exist_ok=True)
    os.makedirs(f"{session_dir}/output", exist_ok=True)

    # Write task assignments directly to shared workspace
    with open(f"{session_dir}/manifest.json", "w") as f:
        json.dump({
            "query": event["research_query"],
            "agents": ["market_analysis", "technical_review", "competitor_scan"],
            "status": "in_progress"
        }, f)

    return {"session_dir": session_dir}


# --- Research Agent (one of many, running in parallel) ---
def research_agent_handler(event, context):
    session_dir = event["session_dir"]
    agent_name = event["agent_name"]

    # Read task from shared workspace (no S3 GET call)
    manifest = json.load(open(f"{session_dir}/manifest.json"))

    # Perform research (invoke Amazon Bedrock, search, etc.)
    # TODO: Implement perform_research() for your use case
    findings = perform_research(manifest["query"], agent_name)

    # Write results to shared workspace (no S3 PUT call)
    with open(f"{session_dir}/research/{agent_name}.json", "w") as f:
        json.dump(findings, f, indent=2)

    return {"status": "complete", "agent": agent_name}


# --- Synthesis Agent ---
def synthesis_handler(event, context):
    session_dir = event["session_dir"]

    # Read all research outputs from shared directory
    all_findings = {}
    for f in os.listdir(f"{session_dir}/research"):
        with open(f"{session_dir}/research/{f}") as fh:
            all_findings[f.replace(".json", "")] = json.load(fh)

    # Synthesize and write final report
    # TODO: Implement synthesize_findings() for your use case
    report = synthesize_findings(all_findings)
    with open(f"{session_dir}/output/report.md", "w") as f:
        f.write(report)

    return {"report_path": f"{session_dir}/output/report.md"}
In the traditional approach, each agent would need to call s3.get_object() to read the manifest, s3.put_object() to write findings, and the synthesis agent would need to call s3.list_objects() then s3.get_object() for each result. That’s eight or more S3 API calls per workflow run replaced by file I/O.
What the shared workspace pattern gives you:
Agents discover each other’s outputs by listing a directory (no coordination logic needed).
Sessions, agents, and outputs map to directories, not flat object key conventions.
Close-to-open consistency means that when an agent closes a file after writing, the next agent to open it sees the complete content.
No need to marshal state into S3 PutObject calls between steps.
Pattern 2: Image thumbnail generation
The S3 thumbnail generator is a common Lambda + S3 pattern. An image is uploaded to S3, a Lambda function is triggered, it downloads the image, resizes it with Pillow, and uploads the thumbnail to a destination bucket.
The traditional approach
import boto3
import os
import uuid
from urllib.parse import unquote_plus
from PIL import Image

s3_client = boto3.client('s3')

def resize_image(image_path, resized_path):
    with Image.open(image_path) as image:
        image.thumbnail(tuple(x / 2 for x in image.size))
        image.save(resized_path)

def handler(event, context):
    for record in event['Records']:
        bucket = record['s3']['bucket']['name']
        key = unquote_plus(record['s3']['object']['key'])
        tmpkey = key.replace('/', '')
        download_path = '/tmp/{}{}'.format(uuid.uuid4(), tmpkey)
        upload_path = '/tmp/resized-{}'.format(tmpkey)

        s3_client.download_file(bucket, key, download_path)
        resize_image(download_path, upload_path)
        s3_client.upload_file(
            upload_path, '{}-resized'.format(bucket), 'resized-{}'.format(key)
        )
What this approach requires you to manage beyond the core resize logic:
Transfer orchestration: Downloading the source, uploading the result, and handling partial transfer failures.
Storage capacity: Both the source and resized image must fit in /tmp simultaneously.
Ephemeral storage cleanup: If the function fails mid-execution or is reused across invocations, orphaned files can accumulate in /tmp.
Redundant downloads: If the same image triggers a retry, it must be downloaded again.
With the file system approach
import os
from urllib.parse import unquote_plus
from PIL import Image

MOUNT = "/mnt/images"

def resize_image(image_path, resized_path):
    with Image.open(image_path) as image:
        image.thumbnail(tuple(x / 2 for x in image.size))
        image.save(resized_path)

def handler(event, context):
    for record in event['Records']:
        key = unquote_plus(record['s3']['object']['key'])
        input_path = f"{MOUNT}/source/{key}"
        output_path = f"{MOUNT}/resized/resized-{os.path.basename(key)}"

        os.makedirs(os.path.dirname(output_path), exist_ok=True)
        resize_image(input_path, output_path)
What changed
The function moves from a download-process-upload pipeline to direct file I/O. No boto3 client, no /tmp management, no upload step. The resize_image function is unchanged because it always worked with file paths. The difference is that those paths now point to a mounted S3 file system instead of ephemeral local storage.
You still handle errors in your processing logic (for example, invalid image formats). What you no longer need to handle are transfer-specific failure modes like partial downloads, failed uploads, or /tmp capacity checks.
Metric
Traditional
S3 Files
Lines of code (non-blank)
22
15
S3 API calls per invocation
2 (GET + PUT)
0
Max image size
Source + output files share /tmp
No /tmp constraint
boto3 dependency
Required
Not needed
Pattern 3: CSV-to-Parquet ETL pipeline
Another commonly used serverless ETL pattern is an S3 event triggers a Lambda function when CSV files land in a bucket. The function downloads the CSV, transforms it to Parquet by using pandas and pyarrow, and uploads the result.
The traditional approach
import boto3
import pandas as pd
import os

s3 = boto3.client("s3")
BUCKET = "data-pipeline-bucket"

def handler(event, context):
    key = event["Records"][0]["s3"]["object"]["key"]
    filename = os.path.basename(key)
    local_input = f"/tmp/{filename}"
    local_output = f"/tmp/{filename.replace('.csv', '.parquet')}"

    try:
        # Download from S3
        s3.download_file(BUCKET, key, local_input)

        # Check /tmp space (10 GB limit)
        tmp_usage = sum(
            os.path.getsize(f"/tmp/{f}")
            for f in os.listdir("/tmp") if os.path.isfile(f"/tmp/{f}")
        )
        if tmp_usage > 9 * 1024**3:  # 9 GB safety margin
            raise RuntimeError("Approaching /tmp storage limit")

        # Transform
        df = pd.read_csv(local_input)
        df["processed_at"] = pd.Timestamp.now()
        df.to_parquet(local_output, engine="pyarrow", compression="snappy")

        # Upload result back to S3
        output_key = key.replace("raw/", "processed/").replace(".csv", ".parquet")
        s3.upload_file(local_output, BUCKET, output_key)

        return {"status": "success", "output_key": output_key}

    finally:
        # Clean up /tmp
        for f in [local_input, local_output]:
            if os.path.exists(f):
                os.remove(f)
What this approach requires you to manage beyond the core transform logic:
With this change, a developer reading this code sees only the transform logic (read CSV, add column, write Parquet). The storage mechanics are handled by the file system.
Metric
Traditional
S3 Files
Lines of code (non-blank)
33
14
S3 API calls per invocation
2 (GET + PUT)
0
Max file size
Source + output share /tmp
No /tmp constraint
Cleanup logic required
Yes
No
/tmp space monitoring
Yes
No
Choosing the right approach: file system mounts vs. traditional access
Use case
Recommendation
Lambda reads/writes files from S3
S3 Files (eliminates transfer boilerplate)
Multiple functions share data
S3 Files (shared mount replaces API coordination)
Files > 10 GB
S3 Files (no /tmp size constraint)
Event-driven processing (trigger on upload)
S3 Files (S3 event triggers still work, function reads from mount)
Direct S3 API features (presigned URLs, S3 Select, multipart upload)
Traditional (these require the S3 API)
Functions outside a VPC
Traditional (S3 Files requires VPC connectivity)
Cleaning up
If you created resources while following along with this post, delete them to avoid incurring future costs. Start by removing the file system configuration from your Lambda function settings. Next, remove the S3 file system, which also deletes its associated mount targets and access points. Then delete the S3 buckets used for source and output data, along with the Lambda functions created for the examples. Finally, remove the IAM roles and policies created for Lambda execution or, if you added the S3 Files permissions (s3files:ClientMount, s3files:ClientWrite, s3:GetObject, s3:GetObjectVersion) to an existing role, remove these permissions. Additionally, If you created a new VPC for this tutorial, delete the VPC, which will also remove the associated private subnets, security groups, and route tables. If you used an existing VPC, remove the security groups and subnets created for this testing.
Warning: Deletion of an S3 bucket and its contents permanently deletes all objects in the buckets and cannot be undone. Make sure you have backed up any data you need to retain before proceeding.
Conclusion
In this post, we demonstrated how to modernize three common Lambda + S3 workloads by using Amazon S3 Files. Across image thumbnail generation, ETL pipelines, and multi-agent AI workloads, the migration follows the same principle: replace S3 API transfer logic with native file I/O and let the file system handle synchronization.
The improvements are consistent:
Less code: Transfer and cleanup logic goes away, leaving only your processing logic.
No /tmp size constraint: Process large files without local storage limits.
Zero S3 API calls for data access: Reads and writes go through the file system mount.
Fewer failure modes to handle: Transfer-specific issues (partial downloads, failed uploads, orphaned temp files) no longer apply.
For teams running Lambda + S3 workloads today, S3 Files isn’t a new architecture to learn. It’s transfer code you can remove. To learn more, see the S3 Files section in the Lambda documentation. To track upcoming features on the AWS Lambda roadmap, you can refer to the AWS Lambda roadmap.
The _index.js payload begins with a large JavaScript block comment containing fake system instructions and policy-triggering content. Because it is inside a comment, it does not affect JavaScript execution. The runtime skips it. The real malware begins after the comment with a try{eval(…)} wrapper around a large character-code array and a ROT-style substitution function.
This header appears designed for AI-mediated analysis, not for Node, Bun, or Python. It attempts to derail scanners or analyst copilots that feed the beginning of a file to a language model without clearly isolating the content as untrusted data. In weak pipelines, this can cause refusal behavior, prompt confusion, context pollution, or premature classification before the scanner reaches the actual malware.
This is not a magical bypass against static detection. YARA rules, entropy checks, AST parsing, string extraction, deobfuscation, and behavioral rules still work. But it is a practical anti-analysis trick against naive LLM-first triage systems.
Ако нещо непрекъснато се повтаря и ако държавата се държи, сякаш то е факт, е много вероятно хората да повярват, че то наистина е факт, и да забравят каква всъщност е реалността. Затова в тази статия ще става дума само за факти (и малко логика) – защото подмяната на фактите и абсурдните от логическа гледна точка аргументи са изпитана рецепта за манипулиране на общественото мнение.
Православна ли е България според Конституцията и законите?
Една държава е православна, ако православието е държавна религия. Така е например в Гърция. Какво казва обаче Конституцията на Република България по темата?
Православието се споменава в Основния закон само веднъж – в чл. 13, ал. 3, която гласи:
Традиционна религия в Република България е източноправославното вероизповедание.
Традиционна обаче не означава официална или държавна.
В същия член 13 се казва и че религиозните институции са отделени от държавата (ал. 2, получерният шрифт тук и по-нататък е мой – б.а.) и че те, както и верските убеждения, не могат да се използват за политически цели (чл. 4).
В ал. 1 на чл. 13 се подчертава, че вероизповеданията са свободни. Тази идея се доразвива и в чл. 37, според който свободата „на съвестта, свободата на мисълта и изборът на вероизповедание и на религиозни или атеистични възгледи са ненакърними“, а държавата „съдейства за поддържане на търпимост и уважение между вярващите от различните вероизповедания, както и между вярващи и невярващи“. Втората алинея на чл. 37 постановява, че свободата „на съвестта и на вероизповеданието не може да бъде насочена срещу националната сигурност, обществения ред, народното здраве и морала или срещу правата и свободите на други граждани“.
В него се подчертава ролята на Българската православна църква (БПЦ). В преамбюла се изтъква „традиционната роля“ на БПЦ „в историята на България за формирането и развитието на нейната духовност и култура“. През 2025 г. в чл. 10 е включено, че източното православие „има историческа роля за българската държава и актуално значение за държавния ѝ живот“ и че негов единствен изразител и представител е БПЦ.
В същото време още в преамбюла на закона се говори и за „правото на всяко лице на свобода на съвестта и вярата, а така също и равенството пред закона без оглед на религиозната принадлежност и убеждения“. Изразява се „уважение към християнството, исляма, юдаизма и другите религии“ и се призовава към взаимно разбирателство и търпимост.
Въпреки „традиционната“ и „историческа“ роля на православието, в чл. 4, ал. 1 се повтаря това, което пише и в Конституцията – че религиозните институции са отделени от държавата. Текстове от Основния закон се възпроизвеждат и в чл. 7, в който са посочени границите на религиозната свобода. Тя не може да е насочена „срещу националната сигурност, обществения ред, народното здраве и морала или срещу правата и свободите на други лица“, нито да се ползва „за политически цели“.
Извод:
Православието не е държавна религия, т.е. българската държава не е православна. Конституцията и Законът за вероизповеданията ясно разграничават религията от политиката.
Православно ли е да се подкрепя руският патриарх Кирил?
Нека се върнем към думите на Илияна Йотова. След като заявява, че България е православна държава, тя допълва:
Ние искаме българските вярващи да не бъдат разделени по тази линия, защото православието е толкова дълбоко вкоренено в нашата история, че по тази линия не ми се иска да има конфликт.
Тоест според Йотова, понеже православието е вкоренено в историята ни, всички православни християни би следвало да подкрепят руския патриарх, а ако България подкрепи санкциите срещу него, това би внесло разделение между тях. От думите ѝ човек остава с впечатлението, че цялото православие е на страната на патриарх Кирил, както и всички православни християни.
Ала така ли е в действителност?
Кой е патриарх Кирил, когото ЕС иска да санкционира?
Макар Румен Радев да е против санкциите срещу него, защото времето на кръстоносните походи е приключило, Кирил, чието гражданско име е Владимир Гундяев, е привърженик на войните в името на вярата и смята, че за тях една от основните Божии заповеди – не убивай – не важи. Татяна Ваксберг обобщава важни факти за него в статия за „Свободна точка“:
Според руския патриарх войната в Сирия е „свещена“, а на руснаците, биещи се срещу Украйна (в която впрочем православието е преобладаващата религия), Бог „ще измие всички грехове“ и ще им даде „вечен живот“. По повод на войната в Грузия през 2008 г. той казва, че готовността на войниците да умрат е „висша проява на жертвената християнска любов“.
Не само войнолюбството (казано по Румен Радев) е отличителна черта на Кирил, която би повдигнала въпроси у някой непредубеден православен християнин. Руският патриарх е и почитател на Йосиф Сталин и дори нарежда да го изографисат в катедрала (ликът на Сталин по-късно е заличен, защото той е бил враг на църквата). Кирил е имал и тесни връзки с КГБ и се смята, че притежава към 2,7 млн. евро.
Един от най-противоречащите на православните канони факти, свързани с руския патриарх, е, че той от половин век има жена (с която не е сключил брак). Тя се казва Лидия Леонова, живее с него и го придружава навсякъде. Да припомним, че според православието патриарсите са част от монашеството и са дали обет за безбрачие.
Отношението на вселенския патриарх Вартоломей към патриарх Кирил
Най-висшият представител на православната църква е вселенският патриарх, макар да няма ръководни функции като католическия папа, а да се смята за „пръв между равни“. От 1991 г. на този пост е Вартоломей.
През 2018 г. вселенският патриарх призна независимостта на Украинската православна църква, а в началото на следващата година подписа томос (декрет), с който ѝ се предоставя автокефалия. Според Кирил „подписването на томоса е нищожно от канонична гледна точка и е трагично за Вартоломей“. Руската православна църква реагира, като прекрати отношенията си с Вселенската патриаршия.
Когато през 2022 г. Кирил заяви, че руските войници, загинали в Украйна, са се жертвали като Христос и греховете им са простени, Вартоломей изрази силно неодобрение. Той каза, че идеята, че убитите във войната стават мъченици, „не съответства на православното учение“, и нарече войната на Русия срещу Украйна „дяволска и нечестива“.
Отношението към Кирил на патриарсите на другите страни от ЕС с преобладаващо православно население
Въпреки че според външната министърка има и друга държава членка, която изразява резерви за включването в санкциите на „всякакъв вид политически лица и лица, които са в обществения живот в Русия“, без да споменава коя е тази държава, към момента България е единствената страна в ЕС, която се противопоставя на включването на руския патриарх в 21-вия пакет санкции. България обаче не е единствената държава с преобладаващо православно население в Съюза – такива са още Гърция, Румъния и Кипър. Какво е отношението на патриарсите на тези държави към главата на Руската православна църква?
Кипърският патриарх Георгий III встъпва в длъжност през 2023 г. – след като Кипър, също като Гърция, подкрепя решението на вселенския патриарх да даде независимост на Украинската църква по времето на предишния патриарх – Хризостом II. Съответно Руската църква скъсва отношения и с кипърската. По повод на войната на Русия срещу Украйна Хризостом II остро критикува руския президент:
Как може г-н Путин да ходи на църква, да се покайва, да държи високо кръста си и да се причестява, докато в същото време убива? Това ли е неговото православие?
Православието не е идентично с подкрепата за руския патриарх Кирил. Никой патриарх на страна от ЕС с преобладаващо православно население освен България не го подкрепя. Това важи и за вселенския патриарх. Руската патриаршия от своя страна е скъсала отношения с вселенската.
Православие, политика и логика
Вече стана ясно, че православното християнство не означава автоматично подкрепа за руския патриарх. Още повече че той е в конфликт с Вселенската патриаршия, а покрай нея – с всички православни църкви, подкрепили независимостта на украинската. Сега да проследим аргументацията на Румен Радев, с която той обосновава решението България да се противопостави на санкциите срещу Кирил:
Мен не ме интересува руският патриарх, мен ме интересува, че той е предстоятел на Руската православна църква, която е източноправославна като нашата църква. […] защото руското православие има принос за нашето освобождение от петвековно османско робство. Мен ме интересува цялото руско общество, което има тази църква, […] ние сме от едно семейство. Тук трябва да има мнение и Българската православна църква, когато говорим за такъв тип санкции.
Тъй като в тази статия разглеждам само достоверността на факти и твърдения, няма да влизам в исторически интерпретации какви са били целите на Русия и на Руската православна църква по отношение на Османската империя и т.н. Вместо това ще проследя аргументацията на премиера, за да се види какво точно той твърди и как издържа то на фактологична проверка.
Радев всъщност казва две неща:
Държавата има такава позиция заради Църквата, а Църквата трябва да каже каква да е позицията на държавата.
Русия е помагала на България и с нея сме от едно семейство, затова е права и трябва да сме на нейна страна.
Първата теза представлява това, което в логиката се нарича порочен кръг (circulus vitiosus на латински). Ето пример за порочен кръг: Православието е правилната християнска религия, защото това казва православният канон, а канонът не греши, защото православието е правилната религия. Порочният кръг не може да бъде фактологично проверен.
Втората теза също представлява порочен кръг – Русия е добра, защото ни помага, а ни помага, защото е добра. Ако излезем от мисловната въртележка, в която ни вкарва Радев, може да си зададем логичен въпрос:
Дори Русия съвсем безкористно да е помагала на България и никога да не я е окупирала, ако някой ти е помагал и ако сте от едно семейство, това означава ли, че е прав? С подобни аргументи се защитава мафията. И олигархията, която „Прогресивна България“ обещаваше да демонтира в предизборната си програма.
Но да не влизаме в полето на коментарите, а в обобщение да се върнем към основните факти:
По Конституция:
в България религиозните институции са отделени от държавата;
православието не е официална, нито държавна религия;
религията не може да се използва за политически цели.
В православната църква:
вселенският патриарх е „пръв между равни“;
руският патриарх не е глава на православната църква;
руският патриарх бойкотира Вселенската патриаршия, както и патриаршиите, които подкрепят независимостта на Украинската православна църква.
България е единствената страна от ЕС с преобладаващо православно население, която се противопоставя на санкциите срещу руския патриарх Кирил.
И за финал – понеже рационалният спор с новата „прогресивна“ власт е невъзможен, да припомним думите на Христос (Мат 5:37):
Но думата ви да бъде: да, да; не, не; а каквото е повече от това, то е от лукавия.
Cloudflare provides services that help run 20% of the web, but we don’t do it alone. Developers on our platform use a myriad of tools and services from other companies too. Cloudflare provides a rich API for our platform that enables developers to create automations, CI/CD, and integrations that glue together the various parts of their infrastructure. Earlier this month, we announced self-managed OAuth, making it easier for customers to create and manage their own OAuth clients for delegated access to the Cloudflare API.
Cloudflare isn’t new to OAuth. If you’ve used Wrangler, or used integrations from partners like PlanetScale, then you’ve already used it. However, until now, third-party OAuth was only available through a small number of manually onboarded integrations, and was not available to developers more broadly. That meant developers building their own integrations had to rely on API tokens, which are harder to manage and a poor fit for many delegated application flows.
Over the last year, we onboarded a growing number of early partners while improving the consent, revocation, and security model behind Cloudflare OAuth. But as our Developer Platform grew and agentic tools drove demand for delegated access, it became clear that opening up OAuth to all customers was critical to the success of our platform.
With self-managed OAuth, developers can now offer a standard OAuth flow where customers grant scoped access directly, making it easier to build SaaS integrations, internal developer platforms, and agentic tools while giving users clearer consent, easier revocation, and more control over what an application can do.
Scaling the ecosystem securely
While our earlier OAuth solution was sufficient for a small number of carefully managed partners, we realized that our permissions model, our consent experience, and our ways of mitigating potential abuse vectors were not mature enough.
Earlier this year we updated our consent experience to make it clearer which application is requesting access, and what permissions it will receive. We also added revocation to the dashboard so developers can easily control which applications have access to their data, and made app ownership more visible to prevent OAuth phishing attacks.
Opening self-managed OAuth to all customers also required major upgrades to our underlying OAuth engine. This process required a large amount of planning to do with minimal user interruption, while also ensuring data stability and security.
Planning the upgrade to our OAuth engine
Years ago, we deployed Hydra, an open-source OAuth engine, to power Cloudflare OAuth under the hood. That deployment served us well when usage was limited, but as the developer platform grew and agentic workflows became more common, it became clear that we needed a major upgrade to unlock new capabilities and improve performance.
As we planned the upgrade, we decided to do two smaller sequential upgrades rather than doing one large upgrade. First, we would move to the latest 1.X release, evaluate any behavior or performance changes, and then proceed with the 2.X upgrade.
During our upgrade planning, it became clear that even the 1.X upgrade wouldstill impact customers because the Hydra database required extensive schema migrations that:
Created indexes in a manner that would claim an exclusive lock on critical tables, preventing active users from performing important OAuth operations
Added columns to critical tables, and moved other columns to new tables
There was also a quirk in the version of Hydra we were using in which the SDK would perform SELECT * operations, causing deserialization issues with the schema changes.
To prevent user impact, we rewrote the SQL migrations to use features such as CREATE INDEX CONCURRENTLY, and built a custom version of Hydra which selected explicit columns rather than SELECT *.
With the latest 1.X upgrade planned out, we now needed to create a plan for the even larger 2.X upgrade. We identified three potential options, and weighed the benefits and drawbacks of each one. Doing an in-place upgrade was not going to work for us, due to the sheer amount of schema changes the major version bump brought with it. We decided that a blue-green strategy would work, but there was more that needed to be done than simply flipping a switch to start using the new version. The upgrade and migration process would take multiple hours, and we needed the system to continue functioning correctly in that time window.
The first blue-green option would involve disabling writes to the database, preventing any new authorizations from occurring. This means they would not be lost in the transition, but it also meant that nobody would be able to use existing OAuth apps unless they already had a valid credential. It also presented another large problem: if users needed to revoke access from an application for any reason, it would not be possible while the upgrade was being performed.
To combat these issues, we came up with a way to leave writes to the database enabled, at the cost of losing some of them in the switch to the green version. The first thing to solve was minimizing the number of writes for new tokens. There was an operational lever we pulled: increasing the expiry time of tokens to multiple hours. This would allow apps that received new tokens before the upgrade to continue using them without needing to refresh.
With reducing writes solved, we needed to come up with a way to not lose any revocations our users performed during the upgrade window. To do this, we created a queue system (using Cloudflare Queues!) which, after a revocation event, would have a record written into the queue with information about that revocation. This would allow us to drain the queue with the database flipped to the green version, replaying all revocation events that took place in the time window in which they would have been lost. This was critical to get right, otherwise applications that users had revoked would inadvertently have their access restored.
Executing the upgrade
Upgrading to 1.X
From an operational point of view, our first upgrade to the last 1.X release went off without any hitches. Our custom database migrations ran faster than we expected, with no user impact. We had to do a hard cutover to the new version because the old version was unable to introspect tokens that were created by the newer version.
After the cutover, we saw an increase in refresh token errors that we had not seen before. This ended up being due to stricter refresh invalidation behaviors in the new version; if a refresh token was reused, Hydra would invalidate the whole access and refresh token chain. This is problematic for Wrangler and MCP clients. These clients both have a high request volume, and a single reused refresh token would invalidate the entire session.
We mitigated this by adding refresh token coalescing behavior to our Worker which routes OAuth traffic to the correct destination. This allowed us to briefly cache the refresh token request before it reached Hydra, so that if we detected a retry we could short-circuit the request and respond without invalidating the tokens. Fortunately, 2.X versions of Hydra have a configurable “refresh token grace period”, which resolves this by allowing a refresh token to be retried for a period of time without invalidating the whole chain.
Upgrading to 2.X
Since multiple hours of high user-facing impact would not be acceptable, we had our blue-green upgrade strategy set. At a high level, this sounds simple; the migrations would run on a copy of our production database, and then cut over along with the new Hydra version after they complete. In reality, there were a lot more moving parts:
Enable revocation replay capture queue
Copy and restore our database to the new target
Targeted data cleanup — existing data violated some new constraints introduced in the newer versions, which could prevent migrations from succeeding
Perform cutovers on the Hydra service along with two additional critical internal systems simultaneously to prevent any errors
Post-cutover monitoring and validation
We chose an upgrade window when Hydra had the lowest request volume per second to minimize lost token writes. Other than some timeout tuning, our production migrations ran well against the new database: the net runtime in production was approximately three hours. After the migrations completed, we carefully rolled out the new version of the Hydra service, along with two additional system configs to flip our systems to use the new SDK version.
Shortly after cutting traffic over, we observed that a data cleanup job in our authorization service (which relies on the Hydra consent session API) was being overeager in its purging of OAuth policy data. After investigation, we discovered that there was an issue in one of the Hydra migrations that corrupted the state of certain valid OAuth sessions, which resulted in the migration marking them as invalid. The valid sessions being corrupted caused a disagreement between Hydra and our authorization service, manifesting as an increase in 403s. To mitigate this, we did data restorations and began work on improvements for OAuth authorization behaviors to remove reliance on static policy data.
Beyond the data cleanup issue, there were some additional small fixes more driven by specific client behaviors which we landed quickly.
With the Hydra version upgrade complete, OAuth traffic has remained stable with improved system performance and reliability for our customers. It also brought production onto the same foundation our newer OAuth APIs had already been validated against in staging, clearing the way for our self-managed OAuth release on June 3.
Performance improvements
After completing a large upgrade like this, it is always rewarding and illuminating to look at some broad metrics about the impact. We gathered additional metrics during the database migrations, and observed considerable performance improvements after the upgrade was complete.
Database
Metric
Approx. Value
Rows updated
132.5M
Rows inserted
114.7M
Temp bytes
136.97GB
Transaction commits
22.2k
Hydra performance
Metric (avg)
Before
After
Change
API P95
185ms
101ms
-45%
RSS memory
888MB
763MB
-14%
Go heap alloc
449MB
271MB
-40%
Goroutines
4015
3076
-23%
CPU
1.07 cores
0.67 cores
-37%
Self-managed OAuth for all
Opening up OAuth to all customers is an important step toward a broader Cloudflare app ecosystem. Today, any Cloudflare customer can create their own OAuth applications and build integrations on top of Cloudflare. We’re extremely excited to launch Cloudflare self-managed OAuth for all.
To get started, take a look at our documentation or jump straight to the OAuth apps page in the dashboard and create your first OAuth app.
The collective thoughts of the interwebz
Manage Consent
To provide the best experiences, we use technologies like cookies to store and/or access device information. Consenting to these technologies will allow us to process data such as browsing behavior or unique IDs on this site. Not consenting or withdrawing consent, may adversely affect certain features and functions.
Functional
Always active
The technical storage or access is strictly necessary for the legitimate purpose of enabling the use of a specific service explicitly requested by the subscriber or user, or for the sole purpose of carrying out the transmission of a communication over an electronic communications network.
Preferences
The technical storage or access is necessary for the legitimate purpose of storing preferences that are not requested by the subscriber or user.
Statistics
The technical storage or access that is used exclusively for statistical purposes.The technical storage or access that is used exclusively for anonymous statistical purposes. Without a subpoena, voluntary compliance on the part of your Internet Service Provider, or additional records from a third party, information stored or retrieved for this purpose alone cannot usually be used to identify you.
Marketing
The technical storage or access is required to create user profiles to send advertising, or to track the user on a website or across several websites for similar marketing purposes.