Post Syndicated from Matt Granger original https://www.youtube.com/watch?v=Lq3cfUyFt4s
Identity Theft from 1965 Uncovered through Face Recognition
Post Syndicated from Bruce Schneier original https://www.schneier.com/blog/archives/2023/08/identity-theft-from-1965-uncovered-through-face-recognition.html
Interesting story:
Napoleon Gonzalez, of Etna, assumed the identity of his brother in 1965, a quarter century after his sibling’s death as an infant, and used the stolen identity to obtain Social Security benefits under both identities, multiple passports and state identification cards, law enforcement officials said.
[…]
A new investigation was launched in 2020 after facial identification software indicated Gonzalez’s face was on two state identification cards.
The facial recognition technology is used by the Maine Bureau of Motor Vehicles to ensure no one obtains multiple credentials or credentials under someone else’s name, said Emily Cook, spokesperson for the secretary of state’s office.
Get ready for Moonhack 2023: Bringing space down to Earth
Post Syndicated from Isabel Ronaldson original https://www.raspberrypi.org/blog/moonhack-2023/
Moonhack is a free global, online coding challenge by our partner Code Club Australia, powered by Telstra Foundation. It runs once a year for young learners worldwide. In 2022, almost 44,000 young people from 63 countries registered to take part.

This year, Moonhack will happen from 10 to 26 October, to coincide with World Space Week 2023. The challenge is open to all young learners, wherever they are in the world, and features six brand-new projects that focus on space and innovation. We caught up with Kaye North, Community and Engagement Manager at Code Club Australia, to find out more.
What’s new for 2023?
Moonhack 2023 offers access to engaging new projects for Scratch, micro:bit, and Python. For the first time ever, young people will also have the option to follow a project brief to code their own solution to a space-based issue, using a programming language of their choice.

In keeping with this year’s theme — which was inspired by the World Space Week 2023 theme of ‘Space and Entrepreneurship’ — the new Moonhack projects showcase inventions that were created for space exploration but are now used in everyday life, such as mobile phone cameras and LEDs.
Kaye shared that in Australia, inventions created for space travel and exploration are part of the science curriculum at primary school level. She hopes that this year’s Moonhack will help more young people understand how space exploration and coding are connected to their daily lives.
What will young people gain from taking part in Moonhack?
Moonhack features six unique coding projects, giving young people of all ages and experience levels the opportunity to engage and learn. The project brief introduced this year encourages participants to be creative, coding a solution on any platform they choose.

Coders who respond to the project brief will also be in with a chance of having their project selected to be developed into an official Code Club Australia project, for other young people and educators around the world to enjoy.
Kaye emphasised that Moonhack is about more than just taking part in a global event; it also helps young people to better understand the real-world opportunities that coding can offer.
“The more kids we expose this to, the better, expanding coding past just coding and having purpose behind it. And I do try to link things in so that we’re connecting with real-world context, careers…”
Kaye North
How your young coders can get involved
Registration for Moonhack 2023 is open now. The challenge runs from 10 to 26 October, and projects can be submitted until 30 November. Participation is free and open to any young coder, whether they are part of a Code Club or not. The 2023 projects are already available in English, Arabic, Croatian, Dutch, Filipino, French, Greek, Hindi, Indonesian, Mandarin, Portuguese, and Spanish, and will be available in more languages soon.
To find out more and register to take part, visit the Moonhack website.
Code Club Australia is powered by Telstra Foundation as part of a strategic partnership with us at the Raspberry Pi Foundation.
The post Get ready for Moonhack 2023: Bringing space down to Earth appeared first on Raspberry Pi Foundation.
SiFive P870 RISC-V Processor at Hot Chips 2023
Post Syndicated from Eric Smith original https://www.servethehome.com/sifive-p870-risc-v-processor-at-hot-chips-2023/
At Hot Chips 2023, we learned about the upcoming SiFive P870 performance RISC-V core and hints of next-gen Napa performance cores
The post SiFive P870 RISC-V Processor at Hot Chips 2023 appeared first on ServeTheHome.
Unix sockets, Cygwin, SSH agents, and sadness
Post Syndicated from Matthew Garrett original https://mjg59.dreamwidth.org/67402.html
Work involves supporting Windows (there’s a lot of specialised hardware design software that’s only supported under Windows, so this isn’t really avoidable), but also involves git, so I’ve been working on extending our support for hardware-backed SSH certificates to Windows and trying to glue that into git. In theory this doesn’t sound like a hard problem, but in practice oh good heavens.
Git for Windows is built on top of msys2, which in turn is built on top of Cygwin. This is an astonishing artifact that allows you to build roughly unmodified POSIXish code on top of Windows, despite the terrible impedance mismatches inherent in this. One is that until 2017, Windows had no native support for Unix sockets. That’s kind of a big deal for compatibility purposes, so Cygwin worked around it. It’s, uh, kind of awful. If you’re not a Cygwin/msys app but you want to implement a socket they can communicate with, you need to implement this undocumented protocol yourself. This isn’t impossible, but ugh.
But going to all this trouble helps you avoid another problem! The Microsoft version of OpenSSH ships an SSH agent that doesn’t use Unix sockets, but uses a named pipe instead. So if you want to communicate between Cygwinish OpenSSH (as is shipped with git for Windows) and the SSH agent shipped with Windows, you need something that bridges between those. The state of the art seems to be to use npiperelay with socat, but if you’re already writing something that implements the Cygwin socket protocol you can just use npipe to talk to the shipped ssh-agent and then export your own socket interface.
And, amazingly, this all works? I’ve managed to hack together an SSH agent (using Go’s SSH agent implementation) that can satisfy hardware backed queries itself, but forward things on to the Windows agent for compatibility with other tooling. Now I just need to figure out how to plumb it through to WSL. Sigh.
 comments
Intel Granite Rapids Xeon Held at Hot Chips 2023
Post Syndicated from Patrick Kennedy original https://www.servethehome.com/intel-granite-rapids-xeon-held-at-hot-chips-2023/
This is the HUGE new Intel Xeon Granite Rapids CPU that will arrive in 2024 and that will offer a much higher level of performance
The post Intel Granite Rapids Xeon Held at Hot Chips 2023 appeared first on ServeTheHome.
Intel Xeon E-Cores for Next Gen Sierra Forest and More at Hot Chips 2023
Post Syndicated from Patrick Kennedy original https://www.servethehome.com/intel-xeon-e-cores-for-next-gen-sierra-forest-and-more-at-hot-chips-2023/
At Hot Chips 2023, Intel went into more details around its most important CPU of 2024, Sierra Forest based on Sierra Glen E-cores
The post Intel Xeon E-Cores for Next Gen Sierra Forest and More at Hot Chips 2023 appeared first on ServeTheHome.
Comic for 2023.08.28 – Depressing Comic Week 15
Post Syndicated from Explosm.net original https://explosm.net/comics/depressing-comic-week-15
New Cyanide and Happiness Comic
Generate security insights from Amazon Security Lake data using Amazon OpenSearch Ingestion
Post Syndicated from Muthu Pitchaimani original https://aws.amazon.com/blogs/big-data/generate-security-insights-from-amazon-security-lake-data-using-amazon-opensearch-ingestion/
Amazon Security Lake centralizes access and management of your security data by aggregating security event logs from AWS environments, other cloud providers, on premise infrastructure, and other software as a service (SaaS) solutions. By converting logs and events using Open Cybersecurity Schema Framework, an open standard for storing security events in a common and shareable format, Security Lake optimizes and normalizes your security data for analysis using your preferred analytics tool.
Amazon OpenSearch Service continues to be a tool of choice by many enterprises for searching and analyzing large volume of security data. In this post, we show you how to ingest and query Amazon Security Lake data with Amazon OpenSearch Ingestion, a serverless, fully managed data collector with configurable ingestion pipelines. Using OpenSearch Ingestion to ingest data into your OpenSearch Service cluster, you can derive insights quicker for time sensitive security investigations. You can respond swiftly to security incidents, helping you protect your business critical data and systems.
Solution overview
The following architecture outlines the flow of data from Security Lake to OpenSearch Service.

The workflow contains the following steps:
- Security Lake persists OCSF schema normalized data in an Amazon Simple Storage Service (Amazon S3) bucket determined by the administrator.
- Security Lake notifies subscribers through the chosen subscription method, in this case Amazon Simple Queue Service (Amazon SQS).
- OpenSearch Ingestion registers as a subscriber to get the necessary context information.
- OpenSearch Ingestion reads Parquet formatted security data from the Security Lake managed Amazon S3 bucket and transforms the security logs into JSON documents.
- OpenSearch Ingestion ingests this OCSF compliant data into OpenSearch Service.
- Download and import provided dashboards to analyze and gain quick insights into the security data.
OpenSearch Ingestion provides a serverless ingestion framework to easily ingest Security Lake data into OpenSearch Service with just a few clicks.
Prerequisites
Complete the following prerequisite steps:
- Create an Amazon OpenSearch Service domain. For instructions, refer to Creating and managing Amazon OpenSearch Service domains.
- You must have access to the AWS account in which you wish to set up this solution.
Set up Amazon Security Lake
In this section, we present the steps to set up Amazon Security Lake, which includes enabling the service and creating a subscriber.
Enable Amazon Security Lake
Identify the account in which you want to activate Amazon Security Lake. Note that for accounts that are part of organizations, you have to designate a delegated Security Lake administrator from your management account. For instructions, refer to Managing multiple accounts with AWS Organizations.
- Sign in to the AWS Management Console using the credentials of the delegated account.
- On the Amazon Security Lake console, choose your preferred Region, then choose Get started.
Amazon Security Lake collects log and event data from a variety of sources and across your AWS accounts and Regions.

Now you’re ready to enable Amazon Security Lake.
- You can either select All log and event sources or choose specific logs by selecting Specific log and event sources.
- Data is ingested from all Regions. The recommendation is to select All supported regions so activities are logged for accounts that you might not frequently use as well. However, you also have the option to select Specific Regions.
- For Select accounts, you can select the accounts in which you want Amazon Security Lake enabled. For this post, we select All accounts.

- You’re prompted to either create a new AWS Identity and Access Management (IAM) role or use an existing IAM role. This gives required permissions to Amazon Security Lake to collect the logs and events. Choose the option appropriate for your situation.
- Choose Next.
- Optionally, specify the Amazon S3 storage class for the data in Amazon Security Lake. For more information, refer to Lifecycle management in Security Lake.
- Choose Next.
- Review the details and create the data lake.
Create an Amazon Security Lake subscriber
To access and consume data in your Security Lake managed Amazon S3 buckets, you must set up a subscriber.
Complete the following steps to create your subscriber:
- On the Amazon Security Lake console, choose Summary in the navigation pane.
Here, you can see the number of Regions selected.
- Choose Create subscriber.

A subscriber consumes logs and events from Amazon Security Lake. In this case, the subscriber is OpenSearch Ingestion, which consumes security data and ingests it into OpenSearch Service.
- For Subscriber name, enter
OpenSearchIngestion. - Enter a description.
- Region is automatically populated based on the current selected Region.
- For Log and event sources, select whether the subscriber is authorized to consume all log and event sources or specific log and event sources.
- For Data access method, select S3.
- For Subscriber credentials, enter the subscriber’s
<AWS account ID>andOpenSearchIngestion-<AWS account ID>. - For Notification details, select SQS queue.
This prompts Amazon Security Lake to create an SQS queue that the subscriber can poll for object notifications.
- Choose Create.

Install templates and dashboards for Amazon Security Lake data
Your subscriber for OpenSearch Ingestion is now ready. Before you configure OpenSearch Ingestion to process the security data, let’s configure an OpenSearch sink (destination to write data) with index templates and dashboards.
Index templates are predefined mappings for security data that selects the correct OpenSearch field types for corresponding Open Cybersecurity Schema Framework (OCSF) schema definition. In addition, index templates also contain index-specific settings for a particular index patterns. OCSF classifies security data into different categories such as system activity, findings, identity and access management, network activity, application activity and discovery.
Amazon Security Lake publishes events from four different AWS sources: AWS CloudTrail with subsets for AWS Lambda and Amazon Simple Storage Service (Amazon S3), Amazon Virtual Private Cloud(Amazon VPC) Flow Logs, Amazon Route 53, and AWS Security Hub. The following table details the event sources and their corresponding OCSF categories and OpenSearch index templates.
| Amazon Security Lake Source | OCSF Category ID | OpenSearch Index Pattern |
| CloudTrail (Lambda and Amazon S3 API subsets) | 3005 | ocsf-3005* |
| VPC Flow Logs | 4001 | ocsf-4001* |
| Route 53 | 4003 | ocsf-4003* |
| Security Hub | 2001 | ocsf-2001* |
To easily identify OpenSearch indices containing Security Lake data, we recommend following a structured index naming pattern that includes the log category and its OCSF defined class in the name of the index. An example is provided below
Complete the following steps to install the index templates and dashboards for your data:
- Download the component_templates.zip and index_templates.zip files and unzip them on your local device.
Component templates are composable modules with settings, mappings, and aliases that can be shared and used by index templates.
- Upload the component templates before the index templates. For example, the following Linux command line shows how to use the OpenSearch
_component_templateAPI to upload to your OpenSearch Service domain (change the domain URL and the credentials to appropriate values for your environment): - Once the component templates are successfully uploaded, proceed to upload the index templates:
- Verify whether the index templates and component templates are uploaded successfully, by navigating to OpenSearch Dashboards, choose the hamburger menu, then choose Index Management.

- In the navigation pane, choose Templates to see all the OCSF index templates.

- Choose Component templates to verify the OCSF component templates.

- After successfully uploading the templates, download the pre-built dashboards and other components required to visualize the Security Lake data in OpenSearch indices.
- To upload these to OpenSearch Dashboards, choose the hamburger menu, and under Management, choose Stack Management.
- In the navigation pane, choose Saved Objects.

- Choose Import.

- Choose Import, navigate to the downloaded file, then choose Import.
- Confirm the dashboard objects are imported correctly, then choose Done.

All the necessary index and component templates, index patterns, visualizations, and dashboards are now successfully installed.
Configure OpenSearch Ingestion
Each OpenSearch Ingestion pipeline will have a single data source with one or more sub-pipelines, processors, and sink. In our solution, Security Lake managed Amazon S3 is the source and your OpenSearch Service cluster is the sink. Before setting up OpenSearch Ingestion, you need to create the following IAM roles and set up the required permissions:
- Pipeline role – Defines permissions to read from Amazon Security Lake and write to the OpenSearch Service domain
- Management role – Defines permission to allow the user to create, update, delete, validate the pipeline and perform other management operations
The following figure shows the permissions and roles you need and how they interact with the solution services.

Before you create an OpenSearch Ingestion pipeline, the principal or the user creating the pipeline must have permissions to perform management actions on a pipeline (create, update, list, and validate). Additionally, the principal must have permission to pass the pipeline role to OpenSearch Ingestion. If you are performing these operations as a non-administrator, add the following permissions to the user creating the pipelines:
Configure a read policy for the pipeline role
Security Lake subscribers only have access to the source data in the Region you selected when you created the subscriber. To give a subscriber access to data from multiple Regions, refer to Managing multiple Regions. To create a policy for read permissions, you need the name of the Amazon S3 bucket and the Amazon SQS queue created by Security Lake.
Complete the following steps to configure a read policy for the pipeline role:
- On the Security Lake console, choose Regions in the navigation pane.
- Choose the S3 location corresponding to the Region of the subscriber you created.

- Make a note of this Amazon S3 bucket name.

- Choose Subscribers in the navigation pane.
- Choose the subscriber
OpenSearchIngestionthat you created earlier.

- Take note of the Amazon SQS queue ARN under Subscription endpoint.

- On the IAM console, choose Policies in the navigation pane.
- Choose Create policy.
- In the Specify permissions section, choose JSON to open the policy editor.
- Remove the default policy and enter the following code (replace the S3 bucket and SQS queue ARN with the corresponding values):
- Choose Next.
- For policy name, enter
read-from-securitylake. - Choose Create policy.
You have successfully created the policy to read data from Security Lake and receive and delete messages from the Amazon SQS queue.
The complete process is shown below.

Configure a write policy for the pipeline role
We recommend using fine-grained access control (FGAC) with OpenSearch Service. When you use FGAC, you don’t have to use a domain access policy; you can skip the rest of this section and proceed to creating your pipeline role with the necessary permissions. If you use a domain access policy, you need to create a second policy (for this post, we call it write-to-opensearch) as an added step to the steps in the previous section. Use the following policy code:

If the configured role has permissions to access Amazon S3 and Amazon SQS across accounts, OpenSearch Ingestion can ingest data across accounts.
Create the pipeline role with necessary permissions
Now that you have created the policies, you can create the pipeline role. Complete the following steps:
- On the IAM console, choose Roles in the navigation pane.
- Choose Create role.
- For Use cases for other AWS services, select OpenSearch Ingestion pipelines.
- Choose Next.
- Search for and select the policy
read-from-securitylake. - Search for and select the policy
write-to-opensearch(if you’re using a domain access policy). - Choose Next.
- For Role Name, enter
pipeline-role. - Choose Create.
Keep note of the role name; you will be using it while configuring opensearch-pipeline.

Now you can map the pipeline role to an OpenSearch backend role if you’re using FGAC. You can map the ingestion role to one of predefined roles or create your own with necessary permissions. For example, all_access is a built-in role that grants administrative permission to all OpenSearch functions. When deploying to a production environment, make sure to use a role with just enough permissions to write to your Amazon OpenSearch Service domain.

Create the OpenSearch Ingestion pipeline
In this section, you use the pipeline role you created to create an OpenSearch Ingestion pipeline. Complete the following steps:
- On the OpenSearch Service console, choose OpenSearch Ingestion in the navigation pane.
- Choose Create pipeline.
- For Pipeline name, enter a name, such as
security-lake-osi. - In the Pipeline configuration section, choose Configuration blueprints and choose
AWS-SecurityLakeS3ParquetOCSFPipeline.

- Under source, update the following information:
- Update the
queue_urlin the sqs section. (This is the SQS queue that Amazon Security Lake created when you created a subscriber. To get the URL, navigate to the Amazon SQS console and look for the queue ARN created with the formatAmazonSecurityLake-abcde-Main-Queue.) - Enter the Region to use for aws credentials.
- Update the

- Under sink, update the following information:
- Replace the hosts value in the OpenSearch section with the Amazon OpenSearch Service domain endpoint.
- For
sts_role_arn, enter the ARN of pipeline-role. - Set region as
us-east-1. - For index, enter the index name that was defined in the template created in the previous section (
"ocsf-cuid-${/class_uid}-${/metadata/product/name}-${/class_name}-%{yyyy.MM.dd}").
- Choose Validate pipeline to verify the pipeline configuration.
If the configuration is valid, a successful validation message appears; you can now proceed to the next steps.

- Under Network, select Public for this post. Our recommendation is to select VPC access for an inherent layer of security.
- Choose Next.
- Review the details and create the pipeline.
When the pipeline is active, you should see the security data ingested into your Amazon OpenSearch Service domain.
Visualize the security data
After OpenSearch Ingestion starts writing your data into your OpenSearch Service domain, you should be able to visualize the data using the pre-built dashboards you imported earlier. Navigate to dashboards and choose any one of the installed dashboards.

For example, choosing DNS Activity will give you dashboards of all DNS activity published in Amazon Security Lake.

This dashboard shows the top DNS queries by account and hostname. It also shows the number of queries per account. OpenSearch Dashboards are flexible; you can add, delete, or update any of these visualizations to suit your organization and business needs.
Clean up
To avoid unwanted charges, delete the OpenSearch Service domain and OpenSearch Ingestion pipeline, and disable Amazon Security Lake.
Conclusion
In this post, you successfully configured Amazon Security Lake to send security data from different sources to OpenSearch Service through serverless OpenSearch Ingestion. You installed pre-built templates and dashboards to quickly get insights from the security data. Refer to Amazon OpenSearch Ingestion to find additional sources from which you can ingest data. For additional use cases, refer to Use cases for Amazon OpenSearch Ingestion.
About the authors
 Muthu Pitchaimani is a Search Specialist with Amazon OpenSearch Service. He builds large-scale search applications and solutions. Muthu is interested in the topics of networking and security, and is based out of Austin, Texas.
 Aish Gunasekar is a Specialist Solutions architect with a focus on Amazon OpenSearch Service. Her passion at AWS is to help customers design highly scalable architectures and help them in their cloud adoption journey. Outside of work, she enjoys hiking and baking.
 Jimish Shah is a Senior Product Manager at AWS with 15+ years of experience bringing products to market in log analytics, cybersecurity, and IP video streaming. He’s passionate about launching products that offer delightful customer experiences, and solve complex customer problems. In his free time, he enjoys exploring cafes, hiking, and taking long walks.
Comic for 2023.08.28 – Agoraphobia
Post Syndicated from Explosm.net original https://explosm.net/comics/agoraphobia
New Cyanide and Happiness Comic
Arm Neoverse CSS Makes Neoverse N2 Cores Drop-in at Hot Chips 2023
Post Syndicated from Eric Smith original https://www.servethehome.com/arm-neoverse-css-makes-neoverse-n2-cores-drop-in-at-hot-chips-2023/
The Arm Neoverse CSS will make dropping Neoverse N2 cores into silicon designs much easier. This new offering was detailed at Hot Chips 2023
The post Arm Neoverse CSS Makes Neoverse N2 Cores Drop-in at Hot Chips 2023 appeared first on ServeTheHome.
Intel on Changing its Xeon CPU Architecture at Hot Chips 2023
Post Syndicated from Patrick Kennedy original https://www.servethehome.com/intel-on-changing-its-xeon-cpu-architecture-at-hot-chips-2023/
Intel detailed how it is completely changing its Xeon CPU architecture at Hot Chips 2023 in designs for Granite Rapids and Sierra Forest CPUs
The post Intel on Changing its Xeon CPU Architecture at Hot Chips 2023 appeared first on ServeTheHome.
AWS Weekly Roundup – AWS Dedicated Zones, Events and More – August 28, 2023
Post Syndicated from Sébastien Stormacq original https://aws.amazon.com/blogs/aws/aws-weekly-roundup-aws-dedicated-zones-events-and-more-august-28-2023/
This week, I will meet our customers and partners at the AWS Summit Mexico. If you are around, please come say hi at the community lounge and at the F1 Game Day where I will spend most of my time. I would love to discuss your developer experience on AWS and listen to your stories about building on AWS.
Last Week’s Launches
I am amazed at how quickly service teams are deploying services to the new il-central-1 Region, aka AWS Israel (Tel-Aviv) Region. I counted no fewer than 25 new service announcements since we opened the Region on August 1, including ten just for last week!
In addition to these developments in the new Region, here are some launches that got my attention during the previous week.
AWS Dedicated Local Zones – Just like Local Zones, Dedicated Local Zones are a type of AWS infrastructure that is fully managed by AWS. Unlike Local Zones, they are built for exclusive use by you or your community and placed in a location or data center specified by you to help comply with regulatory requirements. I think about them as a portion of AWS infrastructure dedicated to my exclusive usage.
Enhanced search on AWS re:Post – AWS re:Post is a cloud knowledge service. The enhanced search experience helps you locate answers and discover articles more quickly. Search results are now presenting a consolidated view of all AWS knowledge on re:Post. The view shows AWS Knowledge Center articles, question and answers, and community articles that are relevant to the user’s search query.
Amazon QuickSight supports scheduled programmatic export to Microsoft Excel – Amazon QuickSight now supports scheduled generation of Excel workbooks by selecting multiple tables and pivot table visuals from any sheet of a dashboard. Snapshot Export APIs will now also support programmatic export to Excel format, in addition to Paginated PDF and CSV.
Amazon WorkSpaces announced a new client to support Ubuntu 20.04 and 22.04 – The new client, powered by WorkSpaces Streaming Protocol (WSP), improves the remote desktop experience by offering enhanced web conferencing functionality, better multi-monitor support, and a more user-friendly interface. To get started, simply download the new Linux client versions from Amazon WorkSpaces client download website.
Amazon Sagemaker CPU/GPU profiler – We launched the preview of Amazon SageMaker Profiler, an advanced observability tool for large deep learning workloads. With this new capability, you are able to access granular compute hardware-related profiling insights for optimizing model training performance.
Amazon Sagemaker rolling deployments strategy – You can now update your Amazon SageMaker Endpoints using a rolling deployment strategy. Rolling deployment makes it easier for you to update fully-scaled endpoints that are deployed on hundreds of popular accelerated compute instances.
For a full list of AWS announcements, be sure to keep an eye on the What’s New at AWS page.
Other AWS News
Some other updates and news that you might have missed:
On-demand Container Loading in AWS Lambda – This one is not new from this week, but I spotted it while I was taking a few days of holidays. Marc Brooker and team were awarded Best Paper by USENIX Association for On-demand Container Loading in AWS Lambda (pdf). They explained in detail the challenges of loading (huge) container images in AWS Lambda. A must-read if you’re curious how Lambda functions work behind the scenes (pdf).
The Official AWS Podcast – Listen each week for updates on the latest AWS news and deep dives into exciting use cases. There are also official AWS podcasts in several languages. Check out the ones in French, German, Italian, and Spanish.
AWS Open Source News and Updates – This is a newsletter curated by my colleague Ricardo to bring you the latest open source projects, posts, events, and more.
Upcoming AWS Events
Check your calendars and sign up for these AWS events:
AWS Hybrid Cloud & Edge Day (August 30) – Join a free-to-attend one-day virtual event to hear the latest hybrid cloud and edge computing trends, emerging technologies, and learn best practices from AWS leaders, customers, and industry analysts. To learn more, see the detail agenda and register now.
AWS Global Summits – The 2023 AWS Summits season is almost ending with the last two in-person events in Mexico City (August 30) and Johannesburg (September 26).
AWS re:Invent – But don’t worry because re:Invent season (November 27–December 1) is coming closer. Join us to hear the latest from AWS, learn from experts, and connect with the global cloud community. Registration is now open.
AWS Community Days  – Join a community-led conference run by AWS user group leaders in your region: Aotearoa (September 6), Lebanon (September 9), Munich (September 14), Argentina (September 16), Spain (September 23), and Chile (September 30). Visit the landing page to check out all the upcoming AWS Community Days.
CDK Day (September 29) – A community-led fully virtual event with tracks in English and Spanish about CDK and related projects. Learn more at the website.
That’s all for this week. Check back next Monday for another Week in Review!
Home Assistant 2023.9 Release Party
Post Syndicated from Home Assistant original https://www.youtube.com/watch?v=JSNRrWk9IHs
Ventana Veyron V1 RISC-V Data Center Processor Hot Chips 2023
Post Syndicated from Patrick Kennedy original https://www.servethehome.com/ventana-veyron-v1-risc-v-data-center-processor-hot-chips-2023/
The Ventana Veyron V1 is a new data-center class RISC-V CPU utilizing chiplets to hit up to 192 cores or domain-specific acceleration
The post Ventana Veyron V1 RISC-V Data Center Processor Hot Chips 2023 appeared first on ServeTheHome.
AMD Siena Shown at Hot Chips 2023 A Smaller EPYC for Telco and Edge
Post Syndicated from Patrick Kennedy original https://www.servethehome.com/amd-siena-shown-at-hot-chips-2023-a-smaller-epyc-for-telco-and-edge/
AMD Siena was shown at Hot Chips 2023 with only six DDR5 channels and up to 64 cores with 70W-225W TDP for the telco/ edge markets
The post AMD Siena Shown at Hot Chips 2023 A Smaller EPYC for Telco and Edge appeared first on ServeTheHome.
Arm Neoverse V2 at Hot Chips 2023
Post Syndicated from Eric Smith original https://www.servethehome.com/arm-neoverse-v2-at-hot-chips-2023/
At Hot Chips 2023, Arm is presenting the Arm Neoverse V2 (used in the NVIDIA Grace CPU) and its performance gains over Neoverse V1 processors
The post Arm Neoverse V2 at Hot Chips 2023 appeared first on ServeTheHome.
Samsung Processing in Memory Technology at Hot Chips 2023
Post Syndicated from Patrick Kennedy original https://www.servethehome.com/samsung-processing-in-memory-technology-at-hot-chips-2023/
At Hot Chips 2023, Samsung showed its Processing in/near Memory ranging from PIM-HBM in AMD MI100 test GPUs to LPDDR-PIM and CXL-PNM modules
The post Samsung Processing in Memory Technology at Hot Chips 2023 appeared first on ServeTheHome.
SK hynix AI Memory at Hot Chips 2023
Post Syndicated from Patrick Kennedy original https://www.servethehome.com/sk-hynix-ai-memory-at-hot-chips-2023/
At Hot Chips 2023, SK hynix showed off its Accelerator-in-Memory (AiM) architecture for in-memory module AI compute
The post SK hynix AI Memory at Hot Chips 2023 appeared first on ServeTheHome.
10 things you didn’t know you could do with GitHub Projects
Post Syndicated from Kedasha Kerr original https://github.blog/2023-08-28-10-things-you-didnt-know-you-could-do-with-github-projects/
GitHub Projects has been adopted by program managers, OSS maintainers, enterprises, and individual developers alike for its user-friendly design and efficiency. We all know that managing issues and pull requests in our repositories can be challenging.
To help you optimize your usage of GitHub Projects to plan and track your work from start to finish, I’ll be sharing 10 things you can do with GitHub Projects to make it easier to keep track of your issues and pull requests.
1. Manage your projects with the CLI
If you prefer to work from your terminals, we’ve made it more convenient for you to manage and automate your project workflows with the GitHub CLI project command. This essentially allows you to work more collaboratively with your team to keep your projects updated with your existing toolkit.
For example, if I wanted to add a draft issue to my project “Learning Ruby,” I would do this by first ensuring that I have the CLI installed and I’m authenticated with the project scope. Once authenticated, I need to find the number of the project I want to manage with the CLI. You can find the project number by looking at the project URL. For example, https://github.com/orgs/That-Lady-Dev/projects/4 the project number here is “4.” Now that we have the project number, we can use it to add a draft issue to the project! The command will look like this:
gh project item-create 4 --owner That-Lady-Dev --title "Test Adding Draft" --body "I added this draft issue with GitHub CLI"
When we run this, a new draft issue is added to the project:
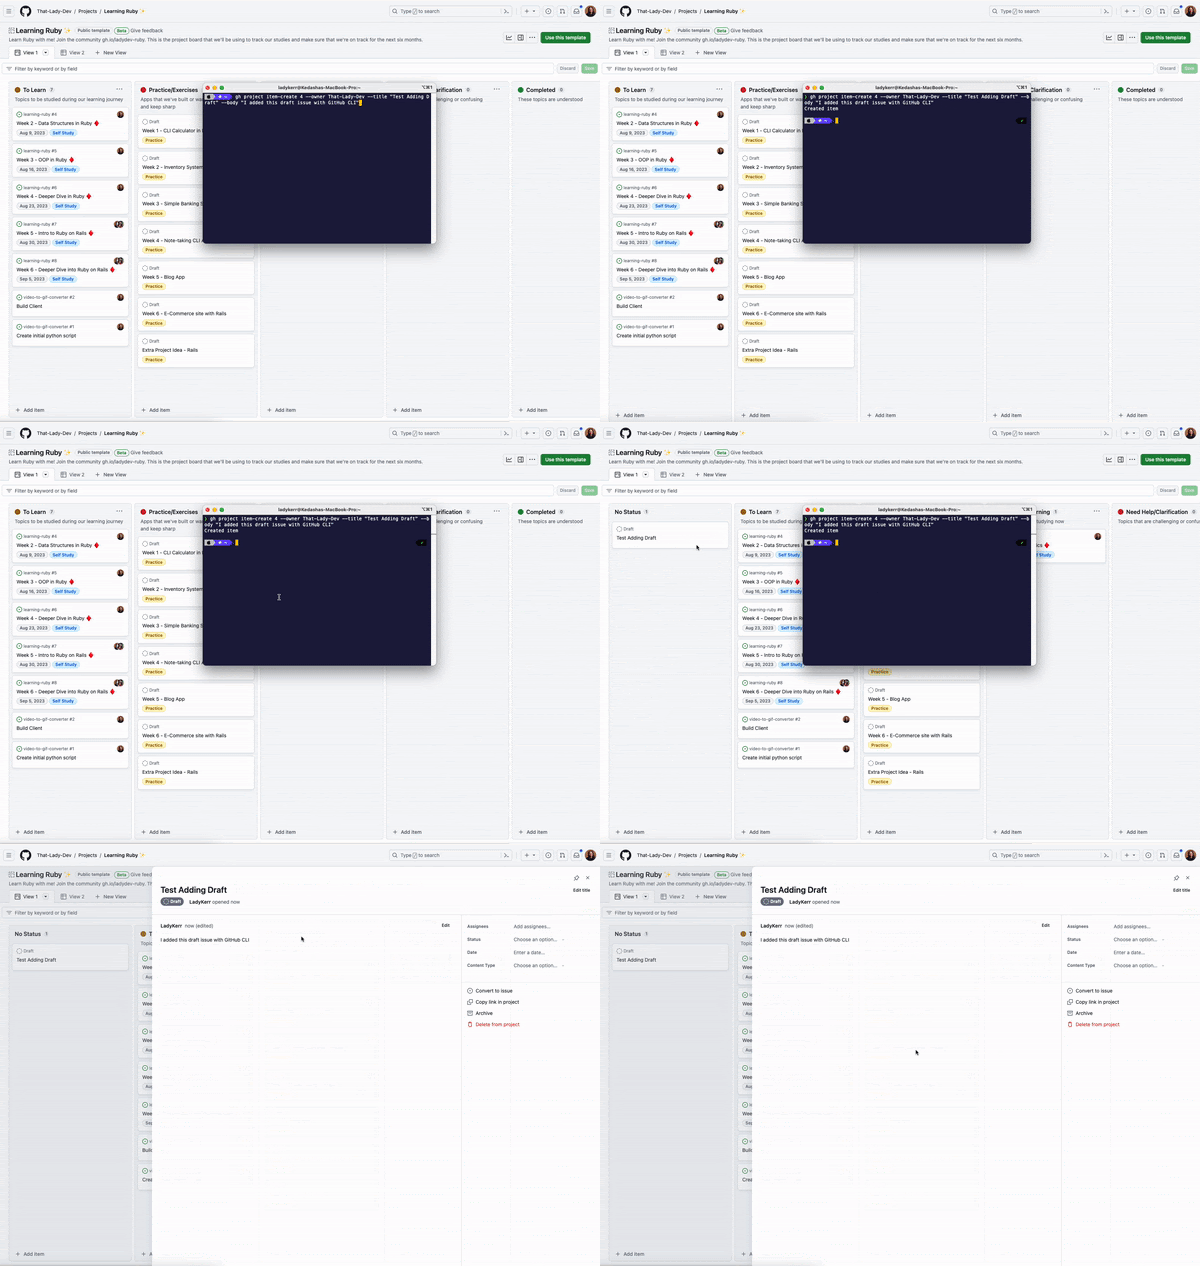
You can do a lot more with the GitHub CLI and GitHub projects. Check out our documentation to see all the possibilities of interacting with your projects from the terminal.
2. Export your projects to TSV
If you ever need your project data, you can export your project view to a file, which can then be imported into Figjam, Google Sheets, Excel, or any other platform that supports TSV files.
Go to any view of your project and click the arrow next to the view name, then select Export view data. This will give you a TSV file that you can use.
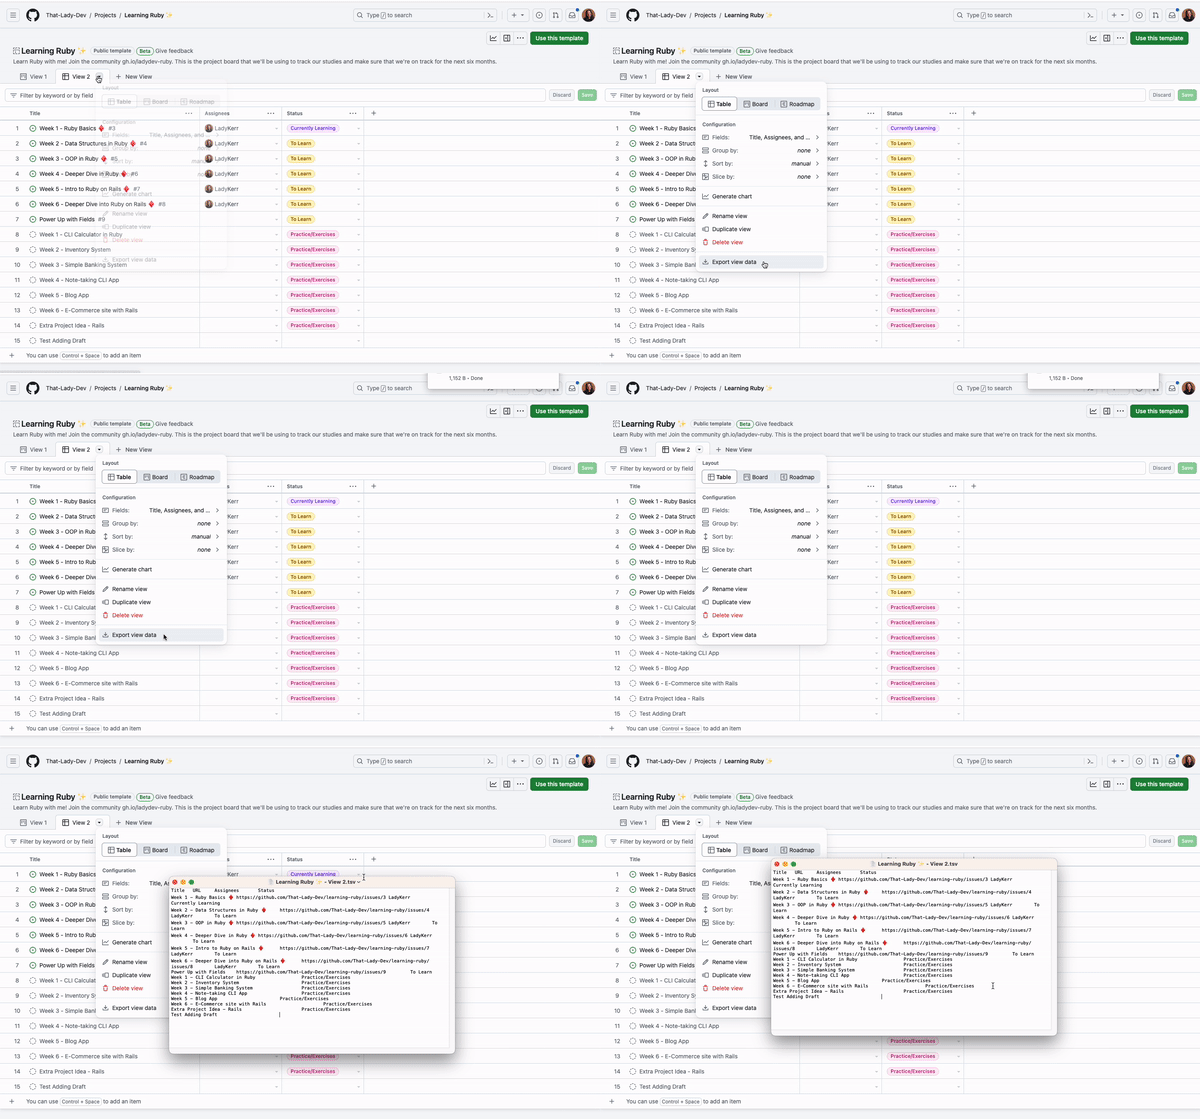
Though TSV offers much better formatting than a CSV file, you can ask GitHub Copilot Chat how to convert a TSV file to a CSV file, copy the code, run it, and get your new CSV document, if CSV is your jam.
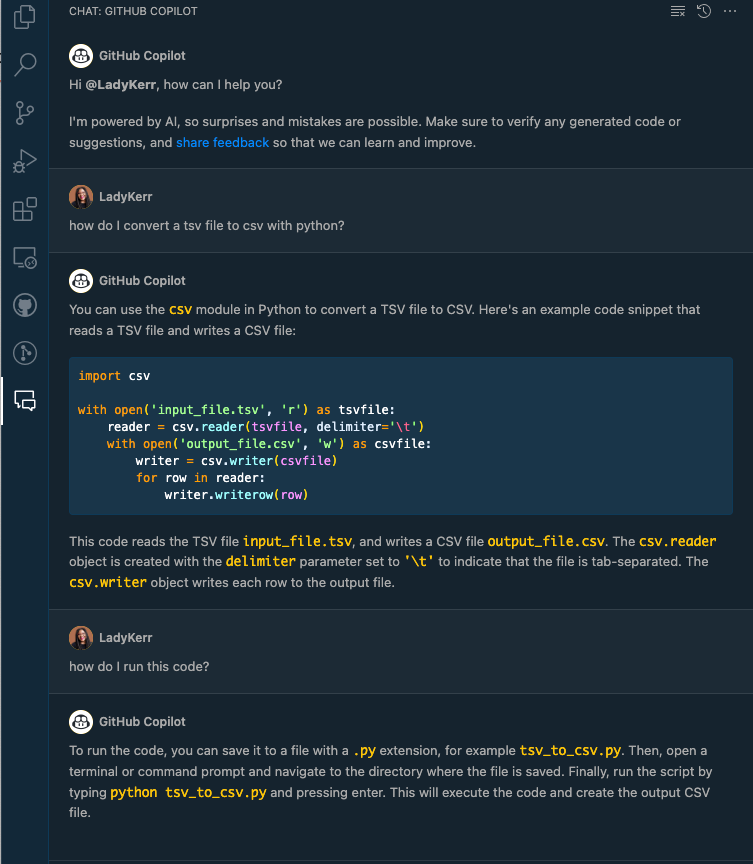
Here’s a quick gist of how I converted a TSV to a CSV with GitHub Copilot Chat!
3. Create reusable project templates
If you often find yourself recreating projects with similar content and structure, you can set a project as a template so you and others can use it as a base when creating new projects.
To set your project as a template, navigate to the project “Settings” page, and under the “Templates” section toggle on Make template.
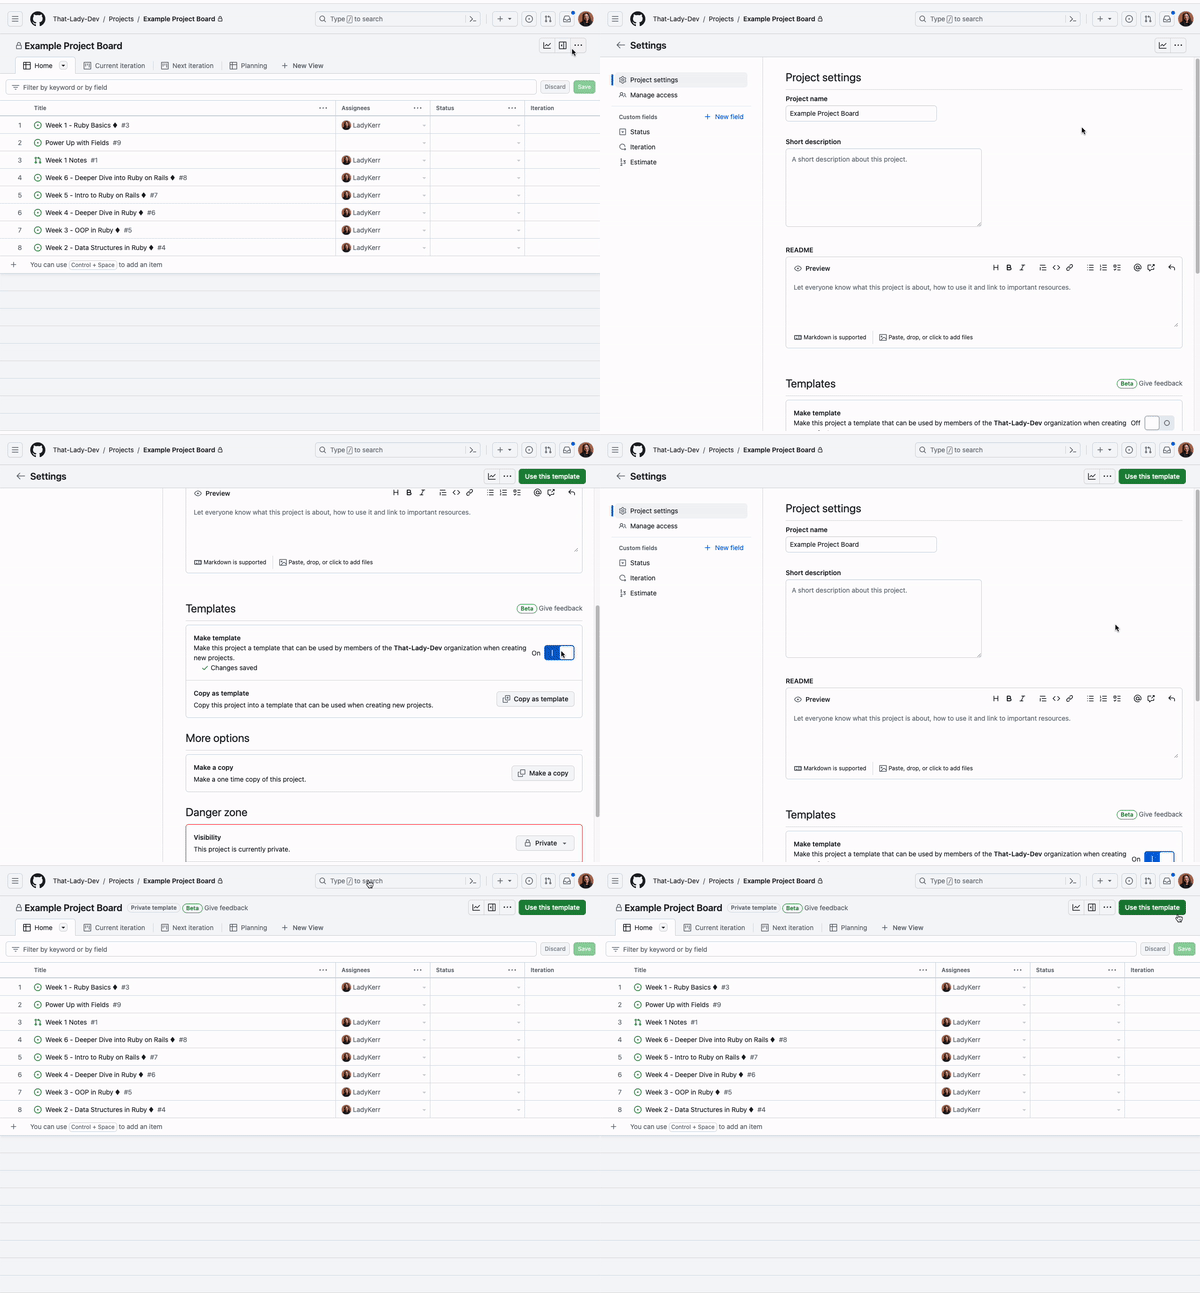
This will turn the project into a template that can be used with the green Use this template button at the top of your project, or when creating a new project. Building a library of templates that can be reused across your organization can help you and your teams share best practices and inspiration when getting started with a project!
4. Make a copy of a project
In addition to making your project a template that can be reused, you can also make a one-time copy of an existing project that will contain the fields, views, any configured workflows, insights, and draft items from the original project!
To copy a project, navigate to the project you want to copy, click the three dots to open the menu, and select Make a copy. This will open up a dialog where you can set the Owner, name the project, and click whether you want draft issues copied over or not. Once that’s all set, your new project is ready to be used!
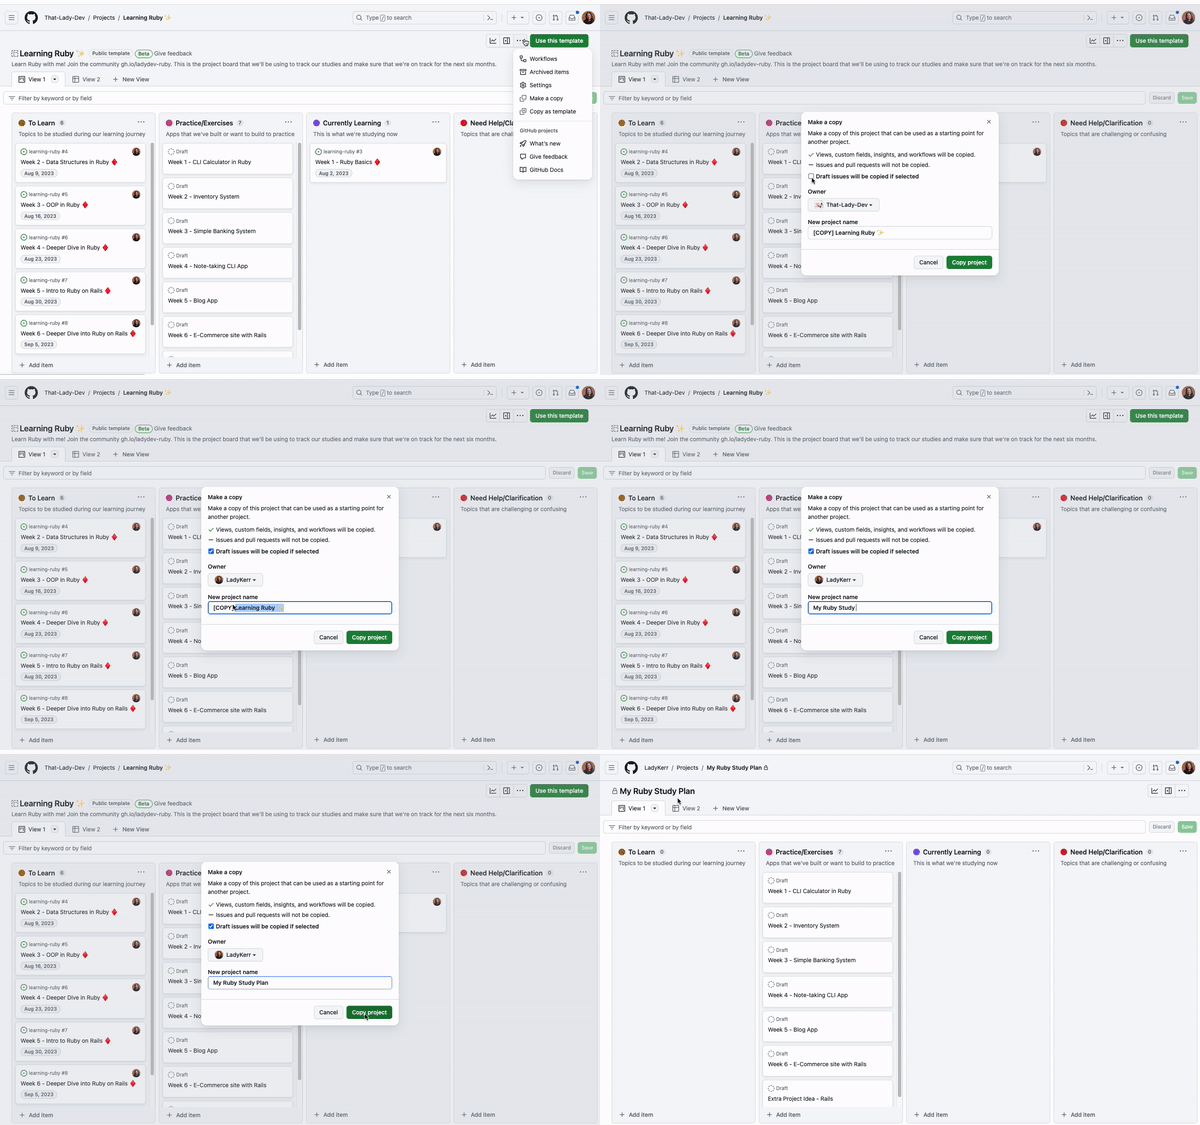
You can also do this with the CLI. The command will look like this:
gh project copy 1 --source-owner That-Lady-Dev --target-owner Demos-and-Donuts --title "copied project"
5. Automate your project with workflows
If you want an issue to be automatically added to a project or if you want to set the status of an issue to “completed” when it is closed, you can do this automatically with built-in project workflows!
Go to the menu and click “Workflows.” This will show you a list of default workflows you can enable on your projects. To automatically add an issue to your project from a repository, you can enable the “Auto-add to project” workflow. To automatically set the status of a closed issue to “complete,” you can enable the “item closed” workflow.
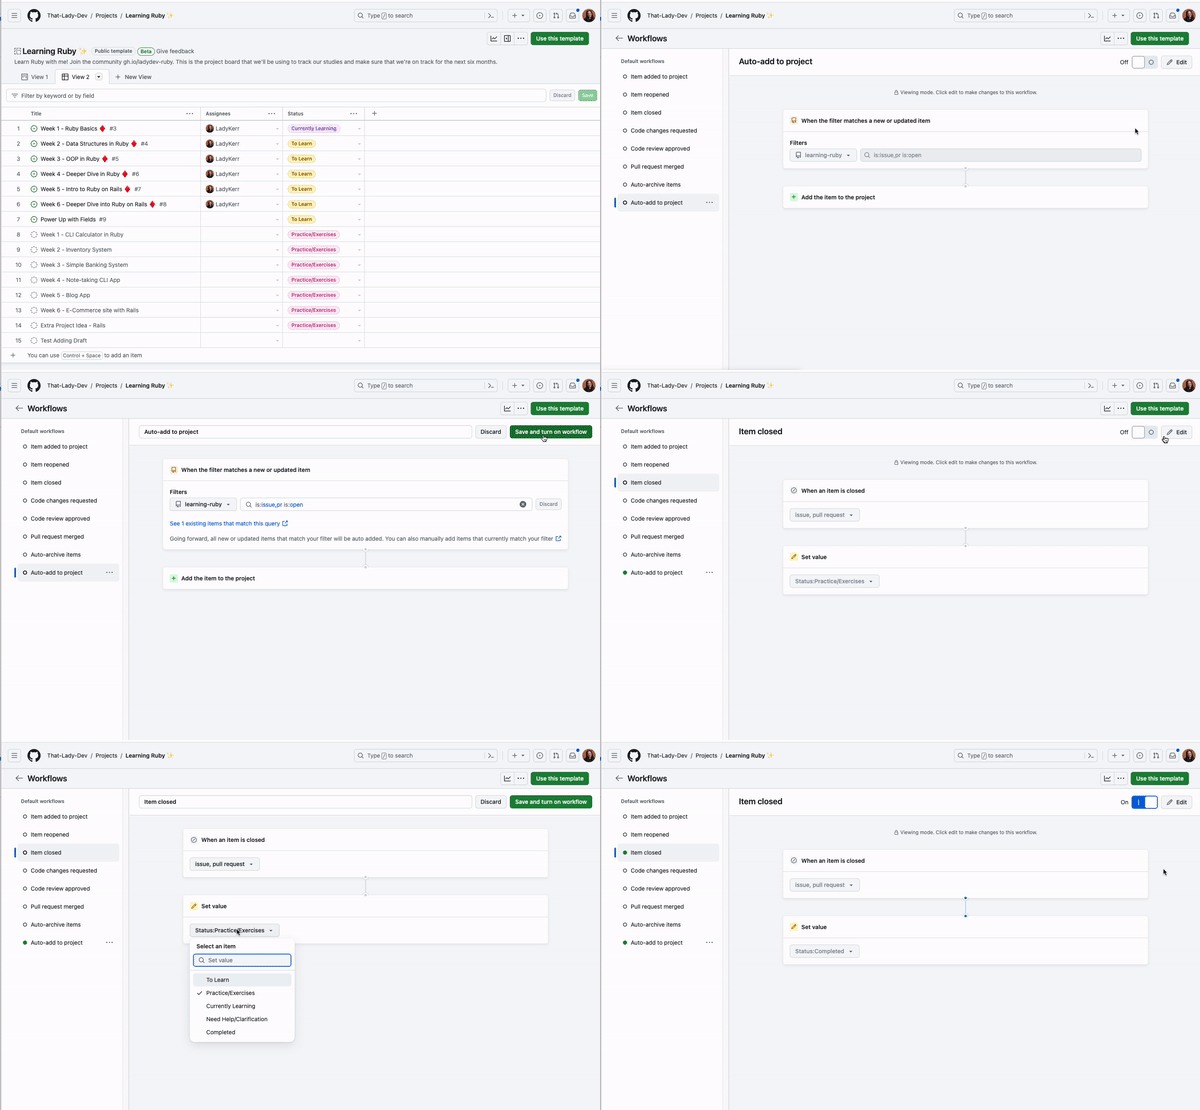
Explore more built-in workflows by reading our documentation where you can also learn how to automate your projects with GitHub Actions.

6. Add colors and description to custom fields
Custom fields help you organize and categorize items in your projects, with flexible field types including text, number, date, single select, and iteration. If you want to add a splash of color to your project or more details about a specific field, you can add colors and descriptions to your single select fields!
To add a color and a description to a new single select field, navigate to the project settings, and add a new field. From there, you can add options to the field where you can select colors and add a description so everyone on your team knows what those options in the field mean and how they can be used.
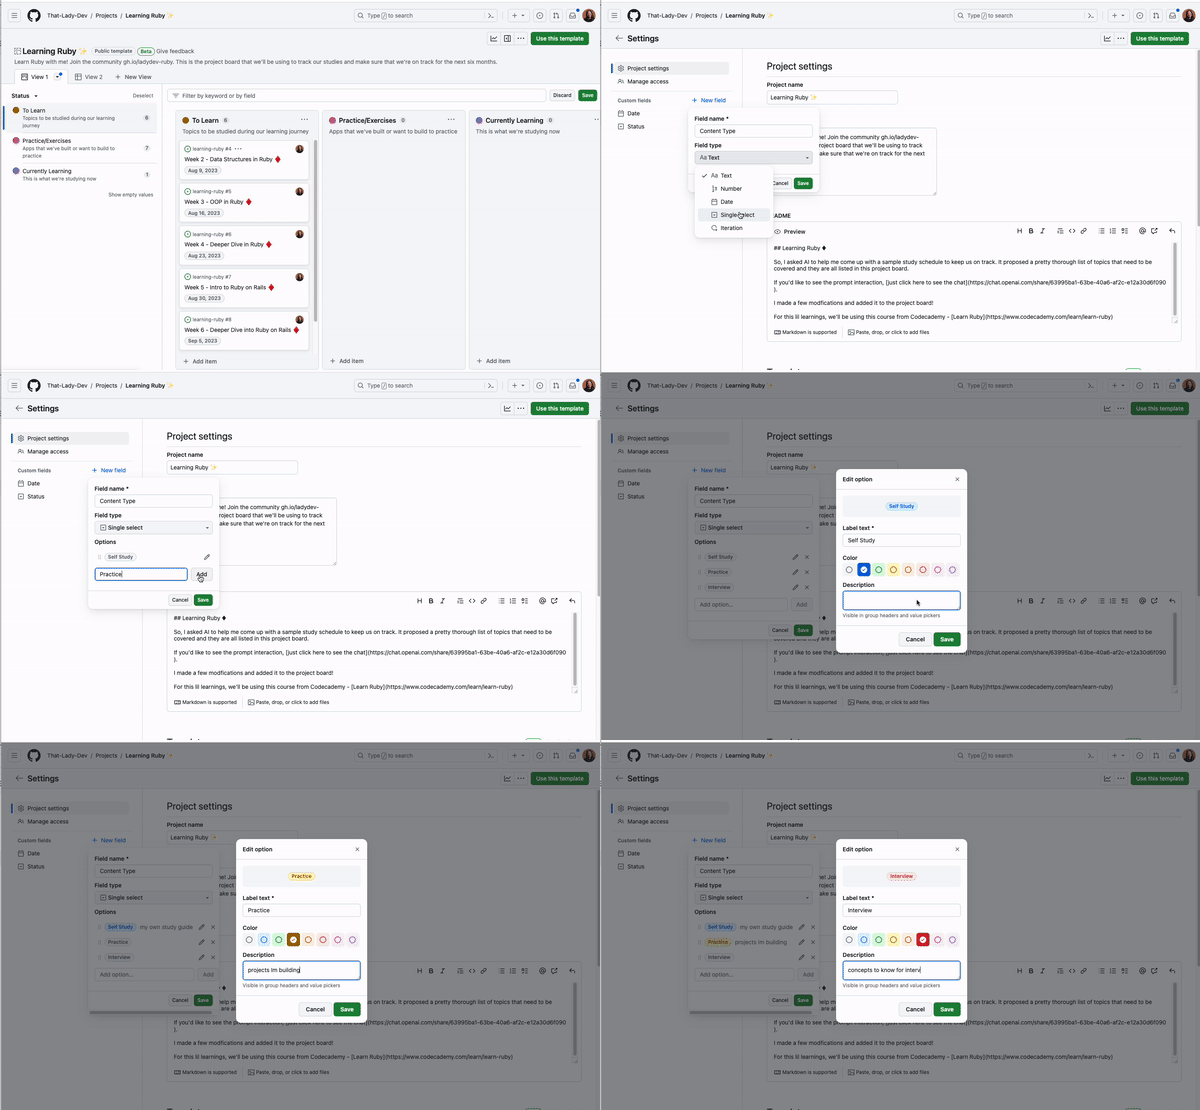
You can also update field descriptions and colors directly from the project view by selecting Edit details from the group or column menus.
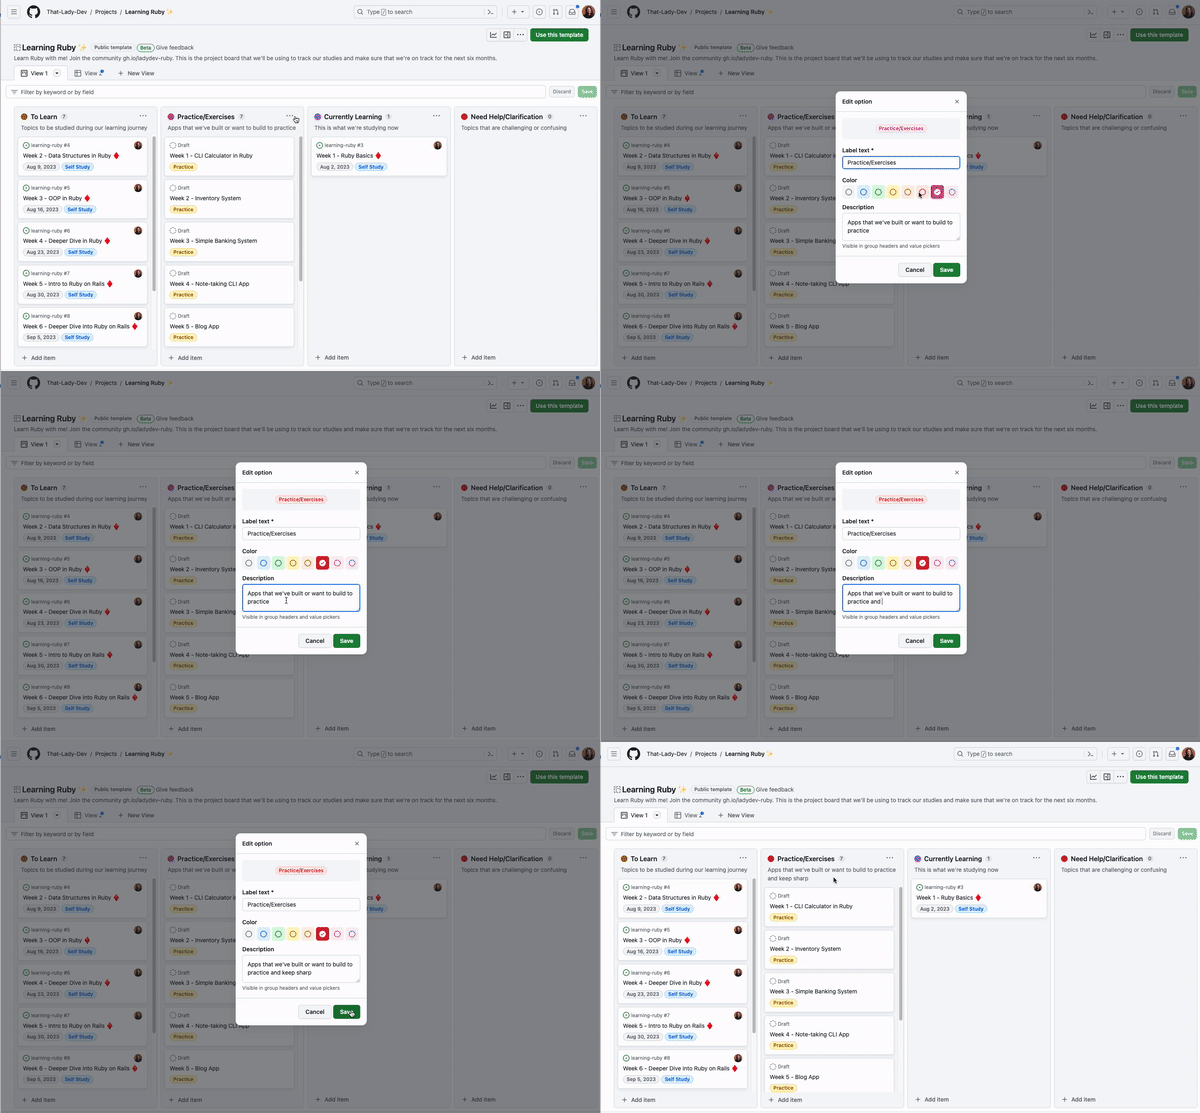
7. Add Issues from any organization
If you’re an open source maintainer, or a developer with multiple clients, you may be working across multiple organizations at a time. This means you have multiple issues to keep track of and need a way to combine these issues in one cohesive manner.
This is where GitHub Projects come in! You can collate issues from any organization onto a single project.
For example, I’m a part of the That-Lady-Dev and the Demos-and-Donuts organizations. I have the issues I want to track on my project board from That-Lady-Dev, but I also want to add the issues I have from the other organization to the same board. I can do this in one of two ways—I can either copy the issue link from the Demos-and-Donuts organization and paste it into the project, or I can search for the Demos-and-Donuts organization and repository from the project using # and select the issues I want to add.
This is a lot to take in—take a look at the gif below.
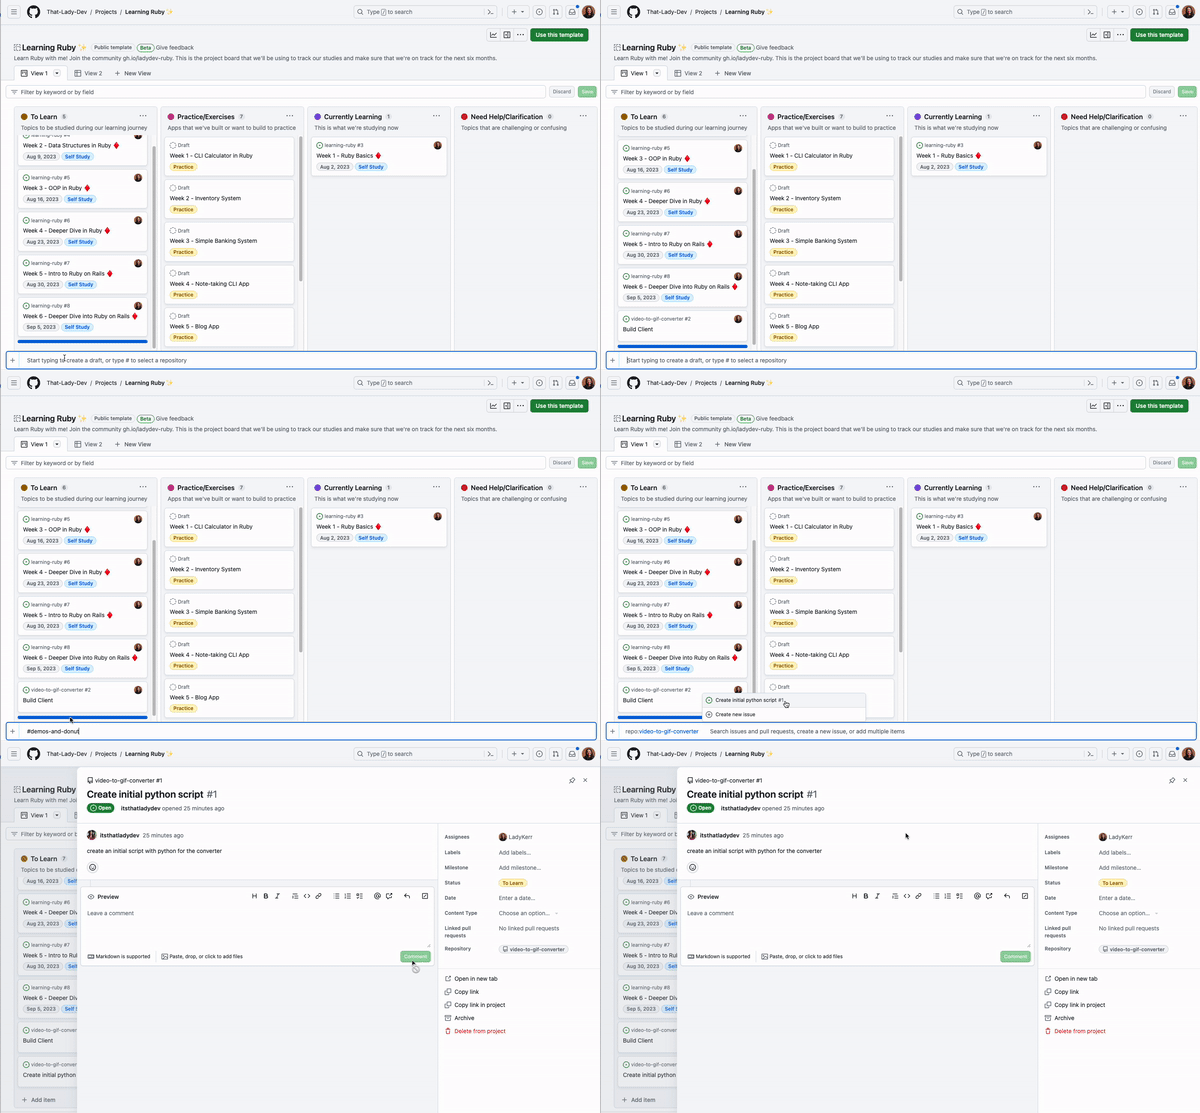
You can also add an issue or pull request to a project with the CLI. The command will look like this:
gh project item-add 4 --owner That-Lady-Dev --url https://github.com/Demos-and-Donuts/video-to-gif-converter/issues/1
8. Edit multiple items at once
Rather than spending time manually updating individual items, you can edit multiple items in one go with our bulk editing feature on GitHub Projects.
Let’s say you wanted to assign multiple issues to yourself. On the table layout, assign one issue and with the cell highlighted, and copy the contents of the cell. Select all the remaining items you want to be assigned and paste the copied contents. You just assigned yourself to multiple issues at once, and this can be undone at the click of a button or using keyboard commands as well.
This is demonstrated in the gif below.
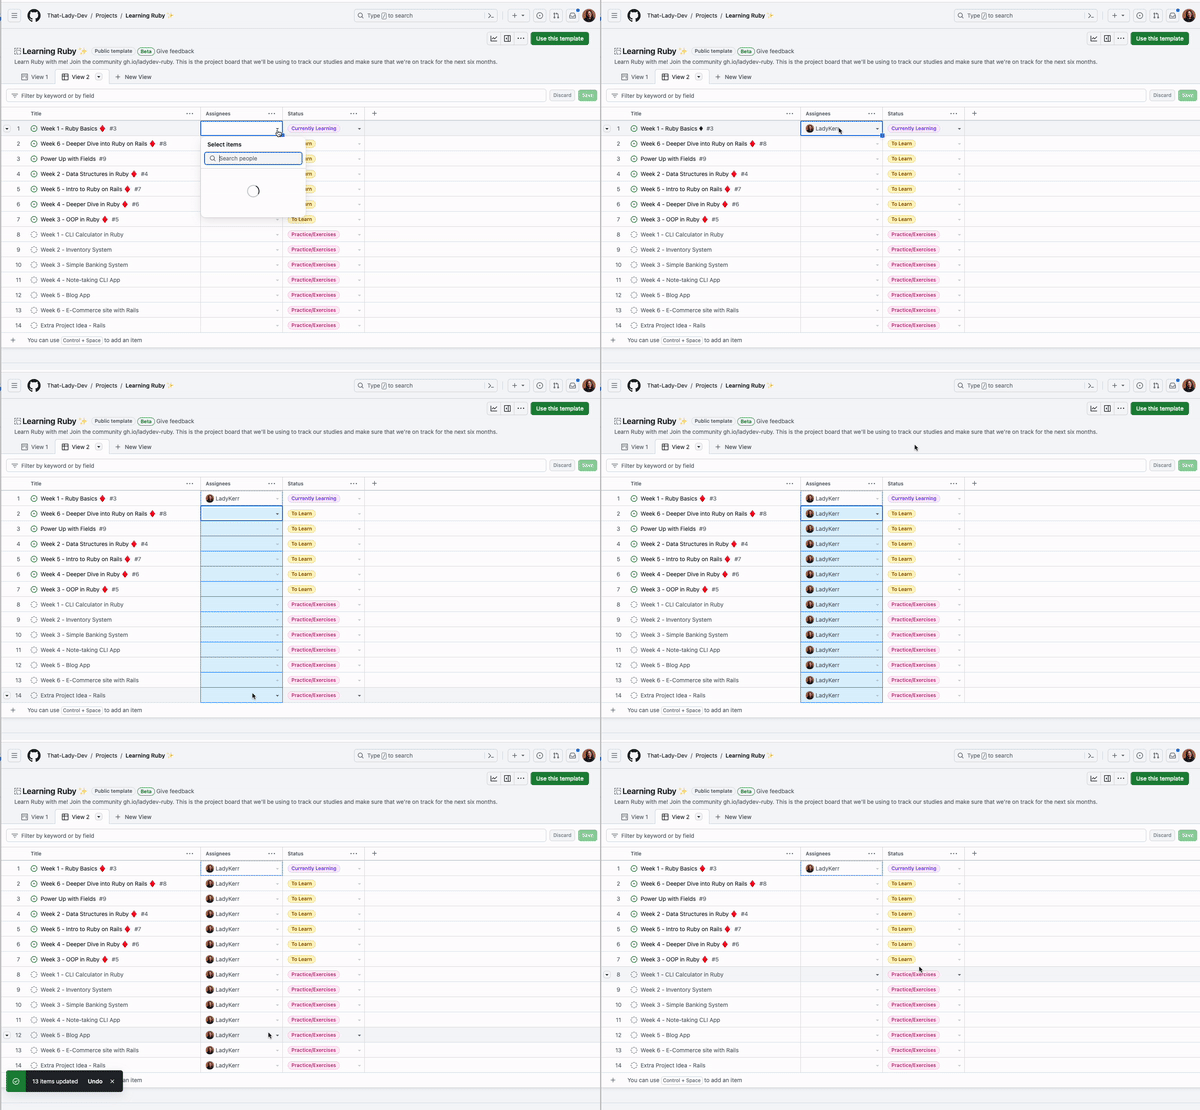
You can also drag and drop multiple items on a project board to different columns.

9. Reorder fields
With a growing list of fields in your project, you’ll want to make sure your fields are organized and you see the most important ones up top. To change the order in how they appear on the side panel and on the issues page, you can rearrange the order of the fields from the project settings by dragging and dropping them in the “Custom fields” list.
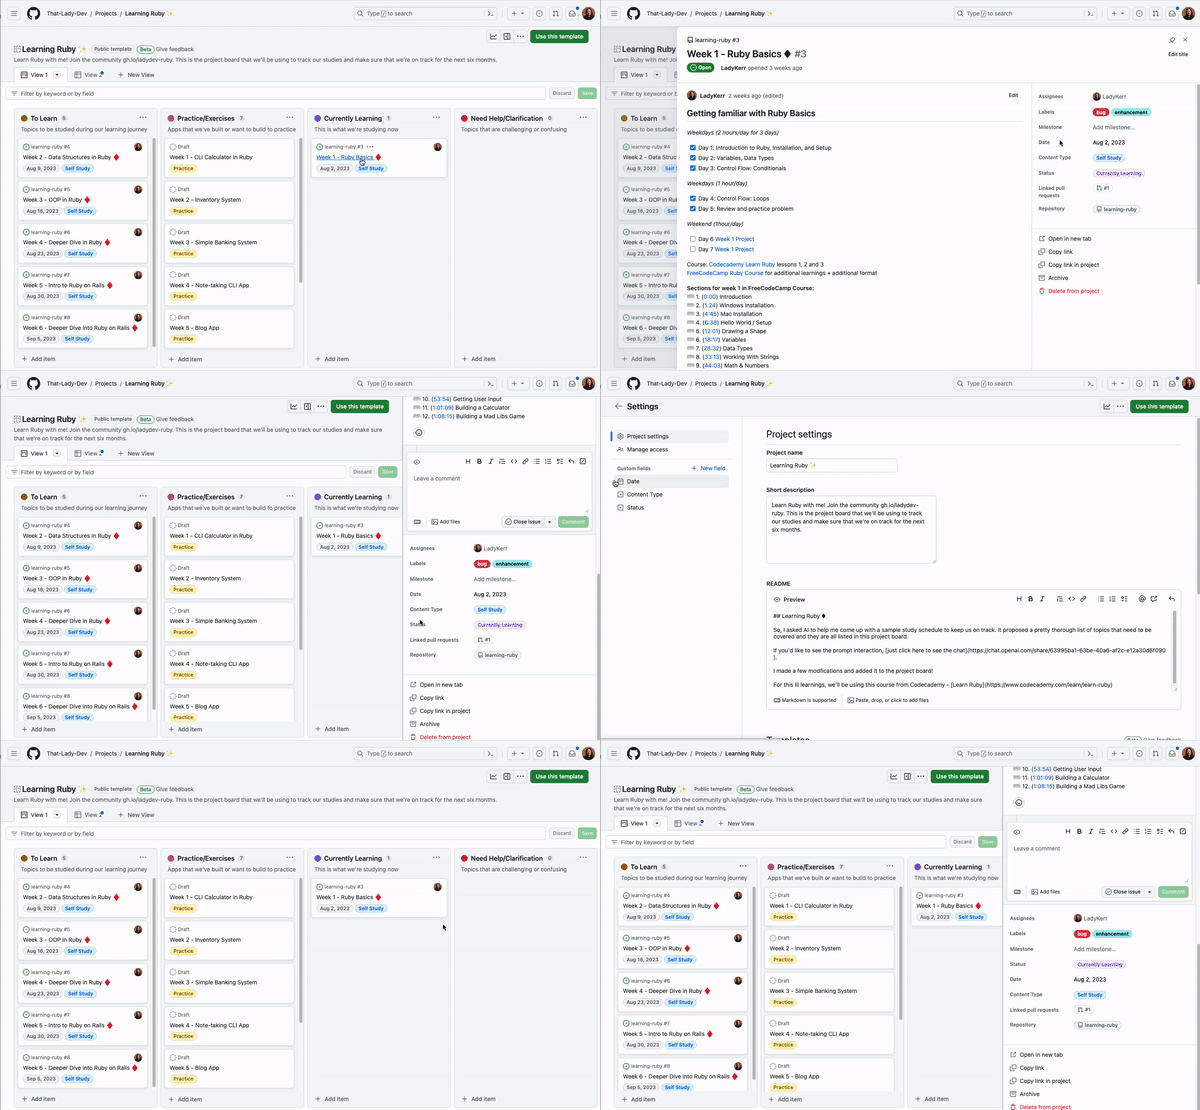
10. See what you want to see with slice by
If you find yourself with multiple views and filters to see how items are spread among various teams, labels, or assignees, you can configure a slice field to break down and quickly toggle through your items. You can choose a Slice by field that will pull the field values into a panel on the left of your view, and clicking each value will adjust the items in the project view on the right. See the gif below for how this works.
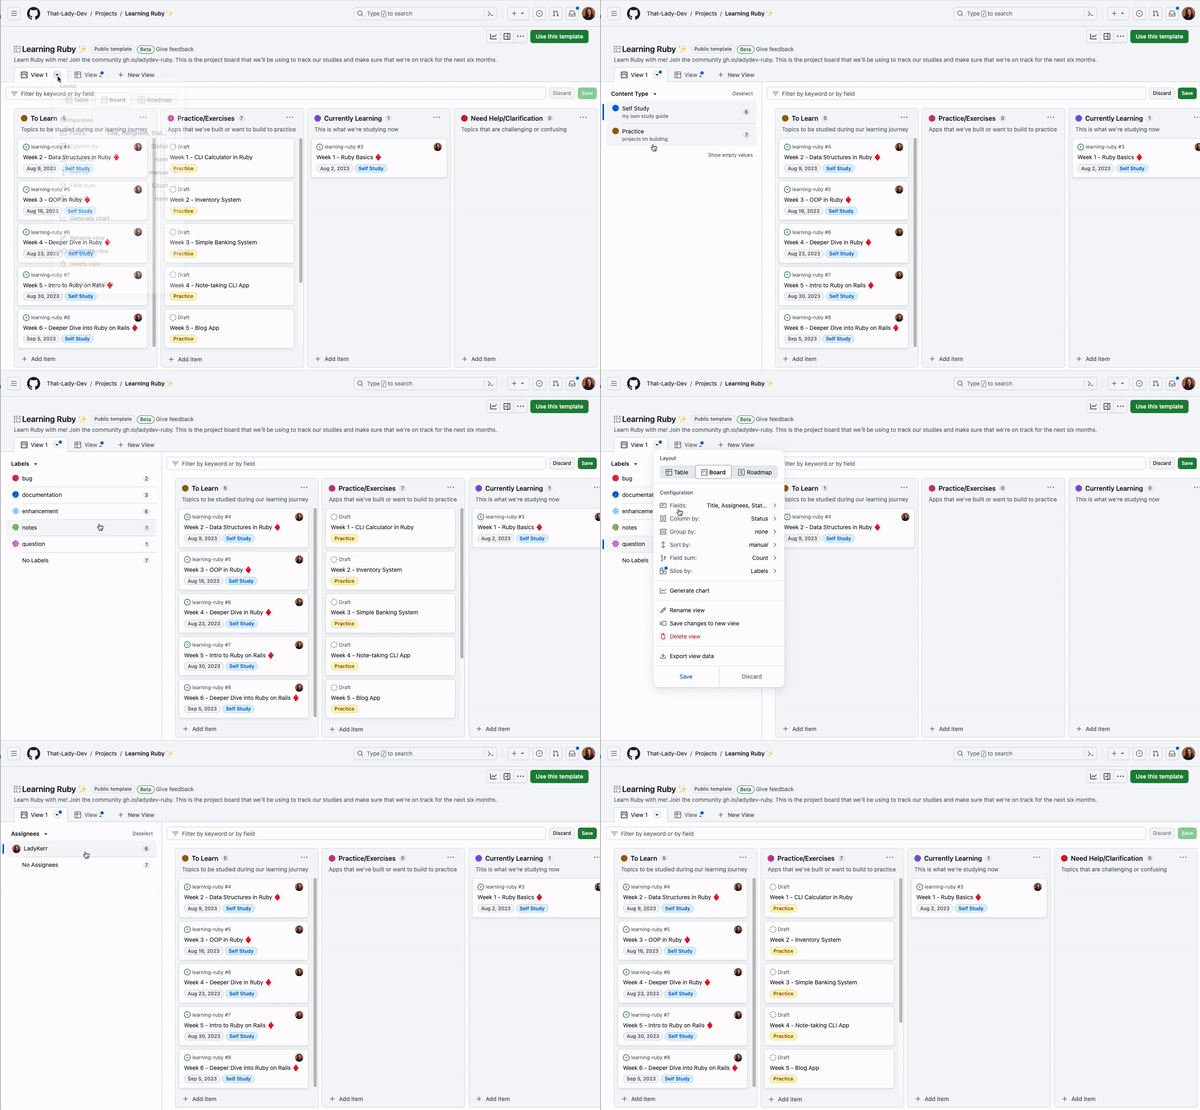
Try out slicing by different fields to unlock a new way to organize your items!
Bonus tip: Deep linking
Let’s say you want to send a specific issue from your project to a teammate. You can use the Copy link to project button to send them a direct link to that particular issue in the project without having them sift through to find the issue you mentioned. See what I mean in this gif.

Wrap-up
And there you have it—10 things you didn’t know you could do with GitHub Projects. The team is continuing to work on more amazing features to make tracking your issues with pull requests as seamless and painless as possible. GitHub Projects is a powerful, flexible, and efficient way to keep track of your items while staying on top of your work.
Do let me know if you have any questions about GitHub Projects; I’m happy to jump in and assist.
The post 10 things you didn’t know you could do with GitHub Projects appeared first on The GitHub Blog.