Post Syndicated from The Hook Up original https://www.youtube.com/watch?v=lKdMlPNxTq0
One-Click Docker Containers Just Hit Project NOMAD
Post Syndicated from Crosstalk Solutions original https://www.youtube.com/watch?v=dwaM6vDPFfA
Maximize Amazon EC2 Capacity Reservations with Capacity Manager data exports
Post Syndicated from Venu Geddam original https://aws.amazon.com/blogs/compute/maximize-amazon-ec2-capacity-reservations-with-capacity-manager-data-exports/
In our previous post, we introduced Amazon EC2 Capacity Manager and its data export capability. Amazon EC2 Capacity Manager provides centralized visibility into your Amazon Elastic Compute Cloud (Amazon EC2) capacity usage across all accounts and Regions in your organization. It tracks capacity usage for three types of EC2 capacity: On-Demand instances, Spot instances, and On-Demand Capacity Reservations (ODCR). On the AWS Management Console, it provides 90 days of historical capacity data. With data exports to Amazon Simple Storage Service (Amazon S3), you can retain and analyze capacity trends beyond this period using your preferred analytics tools.
In this post, we demonstrate how to configure EC2 Capacity Manager data exports to Amazon S3 and query historical capacity data using Amazon Athena. This approach helps you identify long-term usage patterns, plan capacity needs, and optimize resource allocation across your organization.
Solution overview
The following diagram illustrates the solution architecture. EC2 Capacity Manager exports capacity data to Amazon S3, where Amazon Athena queries it using SQL with automatic partition discovery.

The solution involves the following steps:
- Set up an S3 bucket for capacity data export.
- Configure EC2 Capacity Manager data export.
- Set up Amazon Athena to query the exported data.
- Run queries to analyze capacity patterns.
Prerequisites:
- An AWS account with permissions to create S3 buckets and configure EC2 Capacity Manager.
- AWS Command Line Interface (AWS CLI) installed and configured (optional, for CLI-based setup).
- Familiarity with SQL for querying data in Athena.
Setting up data export to Amazon S3
EC2 Capacity Manager can export capacity data in compressed CSV (Gzip) or compressed Parquet (Snappy) format. Use Parquet format for query performance in Athena (Parquet’s columnar format is designed to optimize analytical queries).
Configure the data export
You can configure data export through the EC2 Capacity Manager console or AWS CLI.
To configure data export using the console:
- Open the Amazon EC2 console at https://console.aws.amazon.com/ec2/.
- In the navigation pane, choose Capacity Manager.
- Choose the Data exports tab.
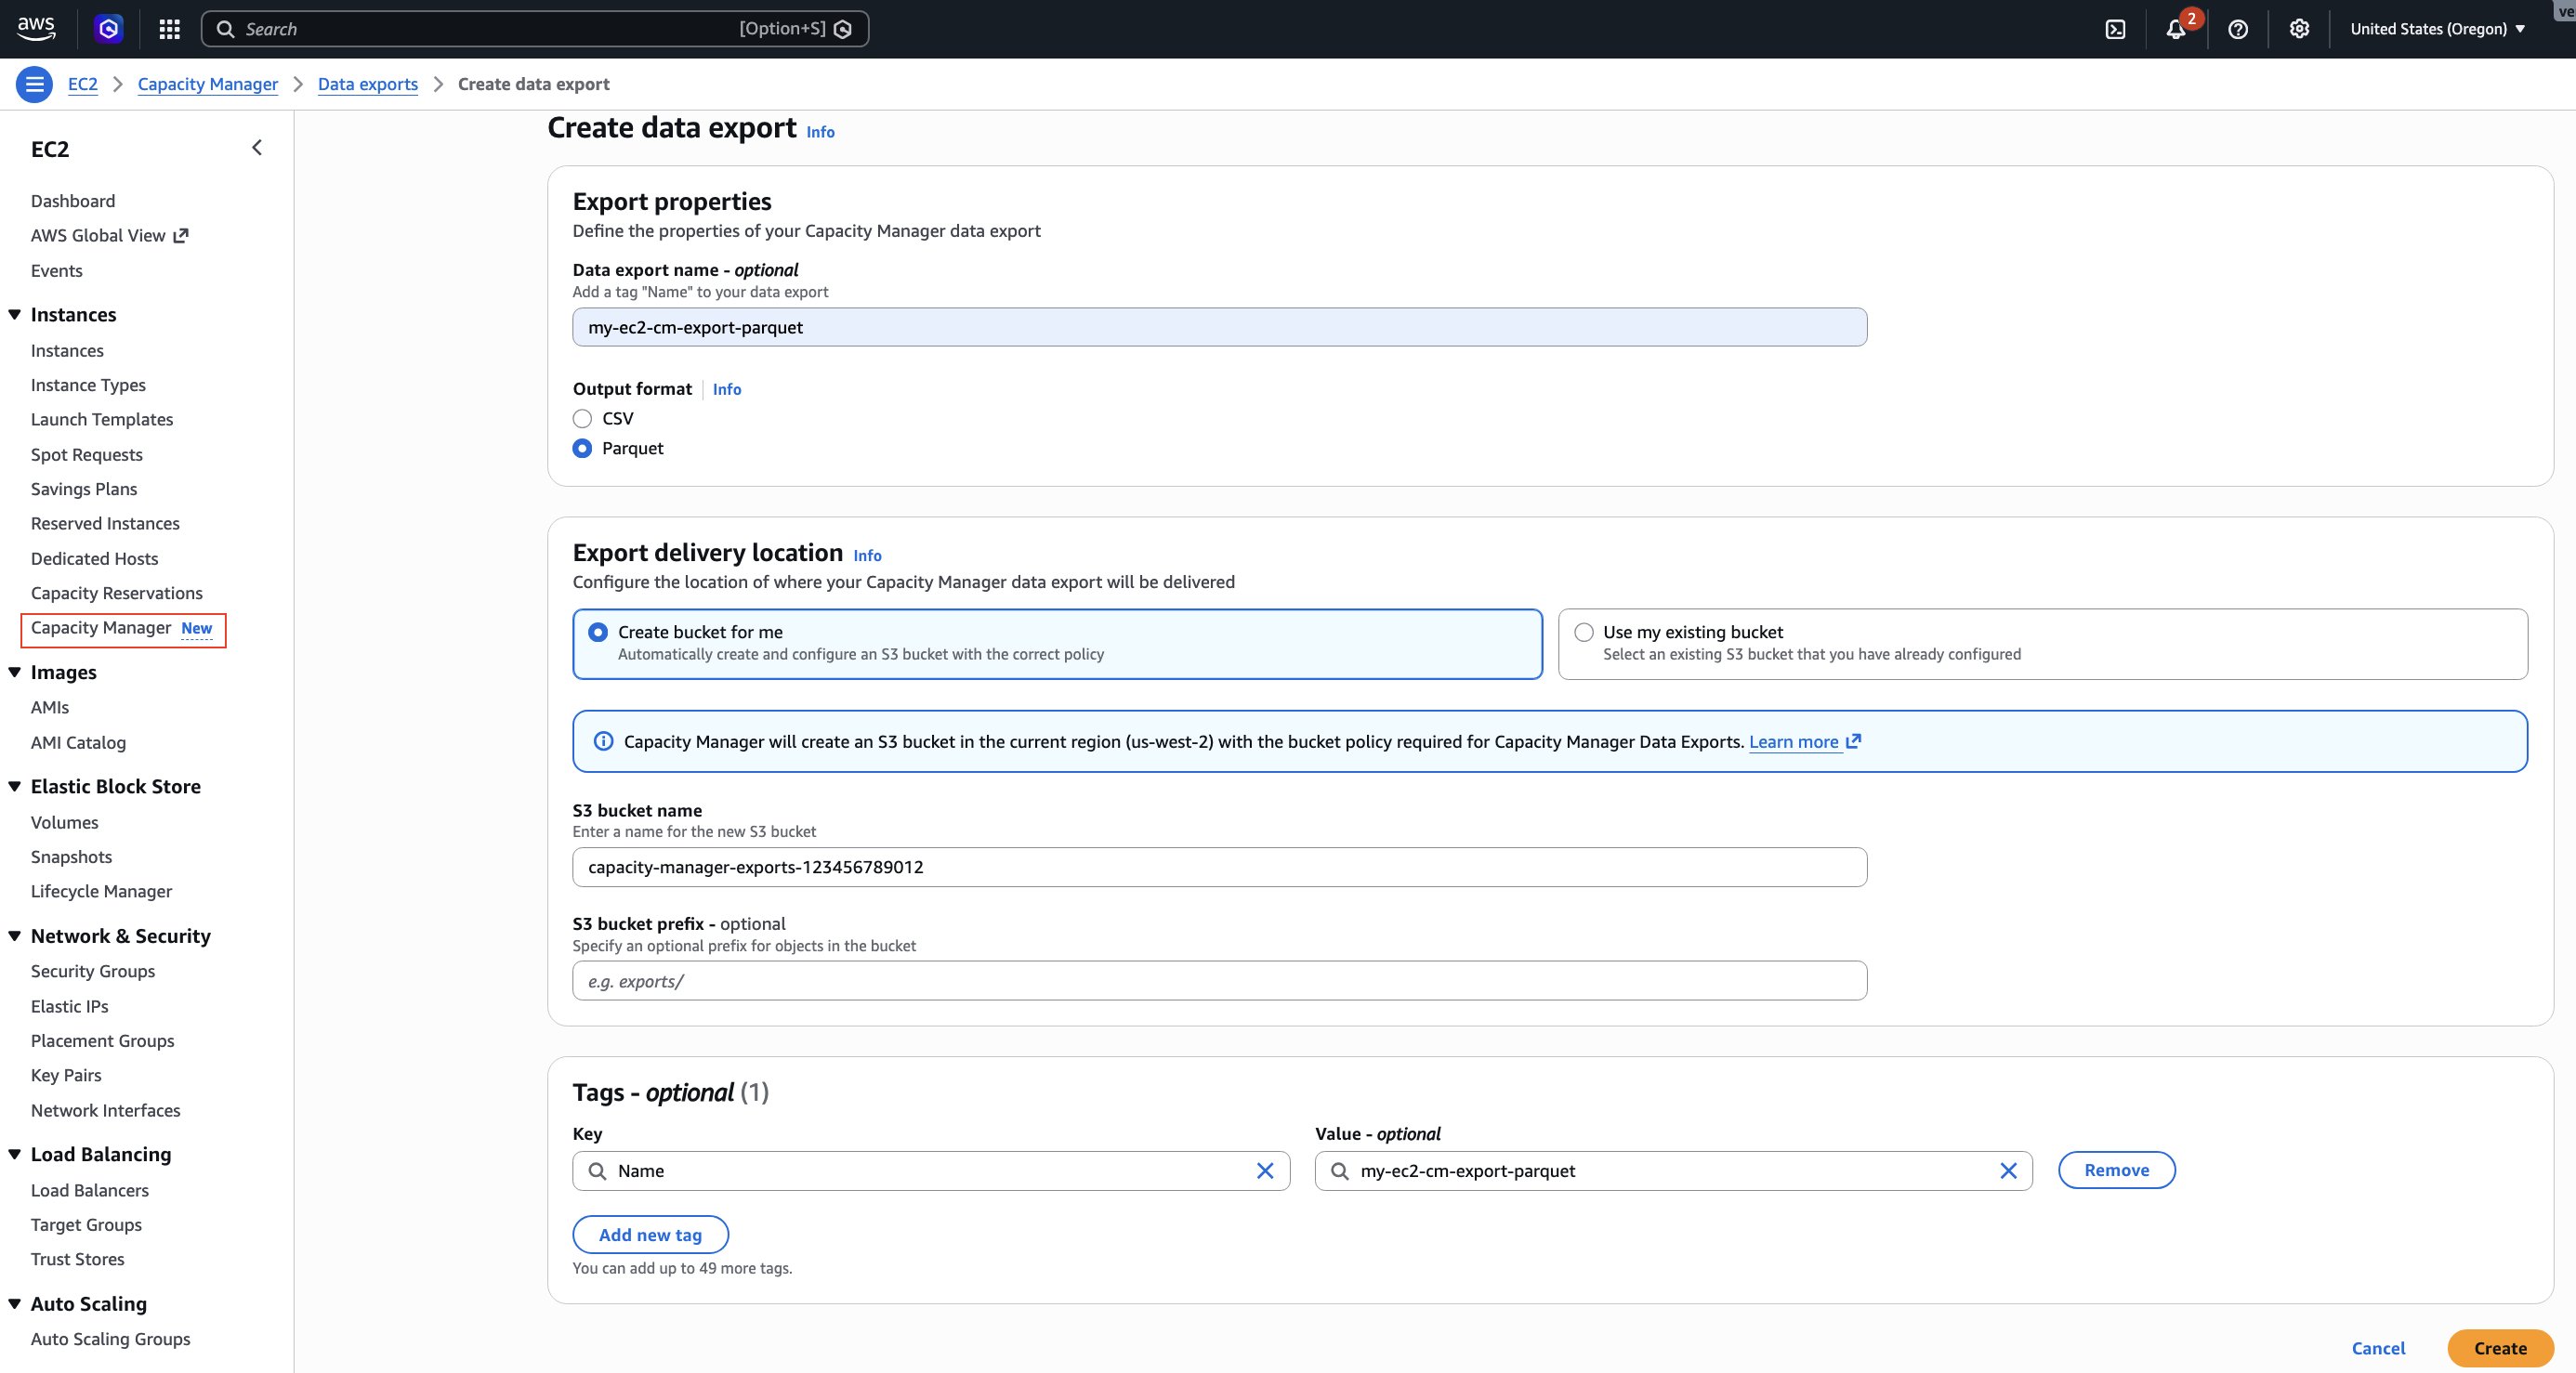
- Choose Create data export.
- For Output format, select Parquet.
- For S3 bucket, choose Create bucket for me to create a new bucket with the required permissions, or select an existing bucket from the list.
- If you selected an existing bucket, add the bucket policy shown in the following section to grant EC2 Capacity Manager write access.
- (Optional) For S3 prefix, enter a prefix to organize your exported files (for example,
capacity-data/). - For Schedule, select Hourly.
- Choose Create.
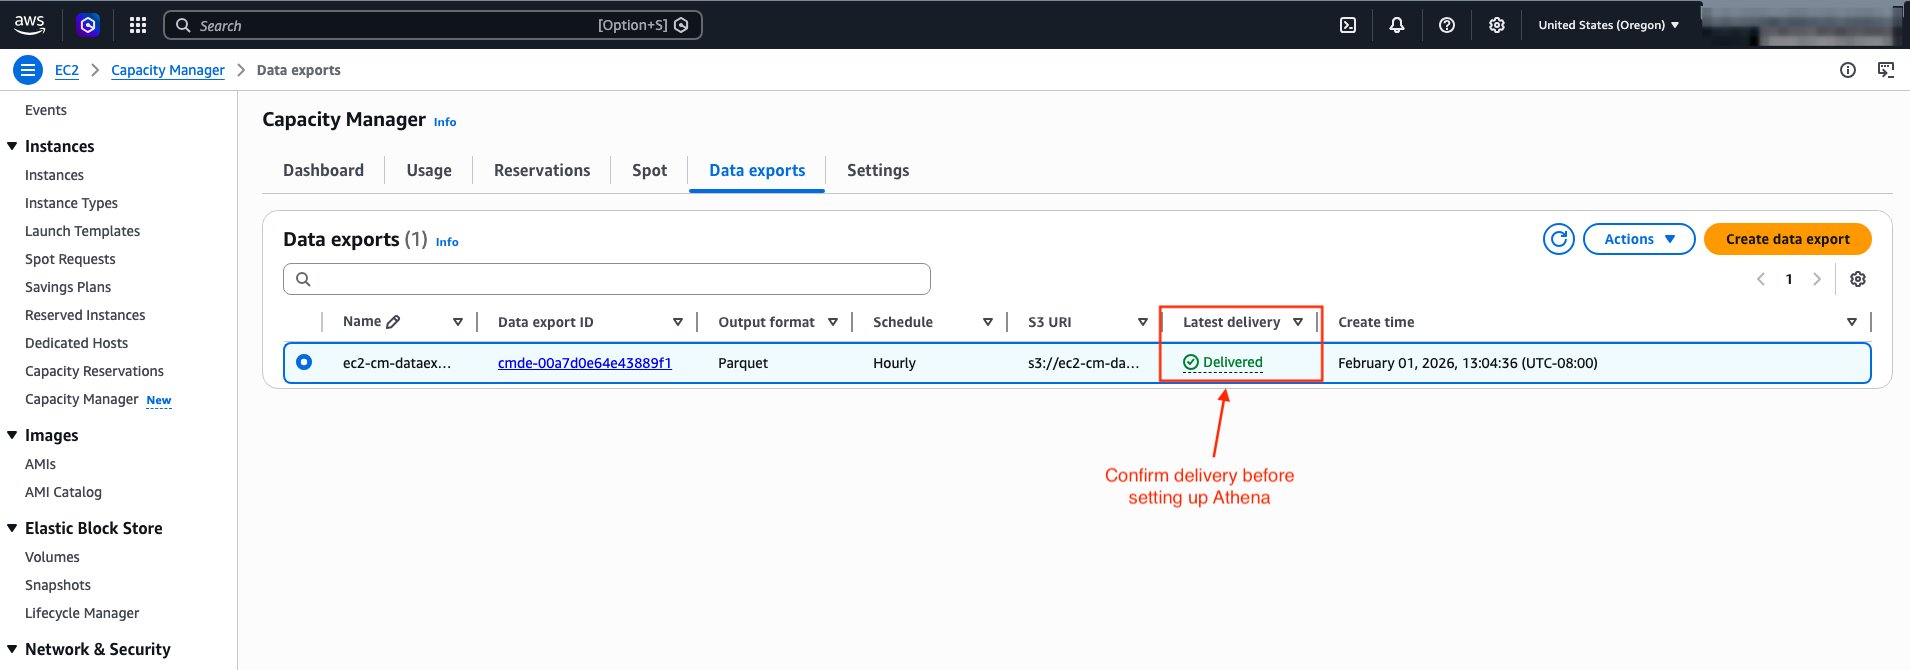
After you create the data export, EC2 Capacity Manager displays the export details.
Update the S3 bucket policy (existing buckets only)
If you use an existing S3 bucket, you must add the bucket policy shown in the following example to grant EC2 Capacity Manager write access.
Replace <AWS_ACCOUNT_NUMBER> with your AWS account number, <AWS_REGION> with your AWS Region (for example, us-west-2), and <BUCKET_NAME> with your bucket name.
To configure data export using the AWS CLI :
After creating the data export, wait for the first export to complete before proceeding to set up Athena. You can check the export status using the following command:
The command returns details about your data export configuration, including the delivery status:
Wait until LatestDeliveryStatus shows "delivered" before proceeding to the next section. The first export typically appears in your S3 bucket in a couple of hours. Subsequent exports follow your configured schedule.
Setting up Amazon Athena to query capacity data
After EC2 Capacity Manager exports data to your S3 bucket, you can use Amazon Athena to query the data using standard SQL. Athena uses AWS Glue as its metadata store. Specifically, it relies on the AWS Glue Data Catalog, which contains table definitions that tell Athena where you have stored your data in S3 and how you have structured it. When you create tables in Athena, you’re actually creating metadata entries in the Data Catalog that Athena references when running queries.
Create an Athena database and table
You can create the table using AWS Glue crawler or manually with SQL. AWS Glue crawler automatically discovers the complete schema from your exported Parquet files, including optional fields like resource tags if enabled. It helps minimize manual schema definition efforts. If the export format changes in the future, you can re-run the crawler to update the table definition. For detailed instructions on creating a Glue Crawler, see Use a crawler to add a table in the Amazon Athena User Guide.
In this post, we create the table manually using a SQL statement. We also use partition projection for automatic partition discovery. We do this because EC2 Capacity Manager continuously adds new partitions to the S3 bucket according to your configured schedule. As new partitions arrive in S3, Athena doesn’t know about them until you run MSCK REPAIR TABLE or ALTER TABLE ADD PARTITION to update the AWS Glue Data Catalog. This becomes an overhead when data arrives frequently.
With partition projection, you define the partition scheme and specify its range/rules in the table properties. Athena then computes the partitions at query time instead of looking them up in the Glue Data Catalog. So partition projection automatically makes new partitions visible as soon as EC2 Capacity Manager exports the data to S3, eliminating the need for you to update metadata. The CREATE TABLE statement that follows defines the schema for EC2 Capacity Manager exports. If your capacity reservations are already tagged, add the corresponding tag columns (for example, tag_environment string or tag_costcenter string). Alternatively, use an AWS Glue crawler to automatically discover your complete schema, including tag columns.
- Open the Athena console at https://console.aws.amazon.com/athena/
- If prompted, configure a query result location in S3. This is where Athena writes query output. It is separate from the S3 bucket that stores your capacity data.
- Run the following query to create a database:
- Create a table for Parquet format data:
Replace <BUCKET_NAME> in the LOCATION clause and storage.location.template property with your bucket name, and capacity-data/ with table name of your choice.
Now that your table is set up, you can explore how to query the exported data.
Example queries for common use cases
The following queries demonstrate how to analyze your EC2 capacity data for cost optimization and capacity planning. The queries use date values (year=‘2026’, month=‘04’) and table name capacity_data. Adjust the partition values to match your actual data’s time period and table name to match your value. When querying EC2 Capacity Manager export data:
- Metric group filtering: EC2 Capacity Manager exports contain two types of data that the
metricgroupnamecolumn identifies:Reservation Usagefor analyzing ODCR utilization and optimization opportunities, andInstance Usagefor analyzing overall capacity consumption across reserved, unreserved, and Spot instances. Always filter by the appropriate metric group for your analysis needs. - Partition filtering: Always include partition filters (
y,m,d,h) to improve query performance. - Numeric operations: Use
CASTto convert string columns to numeric types for proper comparison and sorting (for example,CAST(reservationavgutilizationinst AS double)). - NULL handling: Use
COALESCEto handle NULL values in calculations (for example,COALESCE(CAST(column AS double), 0)) to prevent NULL results in totals. WithoutCOALESCE, when you add a column value NULL to a non-NULL value, the result is NULL.
Use case 1: Identify underutilized ODCRs
Discover On-Demand Capacity Reservations with low utilization that are generating cost waste. Identify specific reservations to downsize, cancel, or share with other teams to reduce unnecessary spending.
Sample output:
| reservationid | instancetype | region | az-id | reservationstate | utilization_pct | total_capacity_hrs | unused_capacity_hrs | wasted_cost_usd |
| cr-041aedfba865106c1 | m5.8xlarge | us-west-2 | usw2-az2 | active | 0 | 1 | 1 | 1.536 |
| cr-089f17dc178e993a8 | m5.8xlarge | us-west-2 | usw2-az1 | active | 0 | 1 | 1 | 1.536 |
| cr-089f17dc178e993a8 | m5.8xlarge | us-west-2 | usw2-az1 | active | 0 | 1 | 1 | 1.536 |
Use case 2: ODCR utilization summary by instance type
Get a comprehensive view of ODCR utilization across instance types to identify which instance families have the worst utilization rates. This helps prioritize optimization efforts on the reservations with the highest cost impact.
Sample output:
| instancetype | account_count | reservation_count | total_odcr_capacity | total_unused_capacity | avg_utilization_pct | total_unused_cost_usd |
| m5.8xlarge | 1 | 2 | 311.99 | 311.99 | 0.0 | 479.22 |
| c5.9xlarge | 1 | 1 | 211.0 | 211.0 | 0.0 | 322.83 |
| t3.micro | 1 | 1 | 1055.0 | 1055.0 | 0.0 | 10.97 |
Use case 3: Identify peak usage patterns
Analyze average hourly usage patterns across reserved, unreserved, and Spot capacity to identify when your workloads typically hit peak demand. This breakdown helps you understand your capacity mix, plan for peak periods, and optimize your purchasing strategy.
Sample output:
| hour | avg_reserved_usage_hours | avg_unreserved_usage_hours | avg_spot_usage_hours | avg_total_usage_hours |
| 09 | 0.75 | 0.5 | 0 | 1.25 |
| 10 | 0.75 | 0.5 | 0 | 1.25 |
| 15 | 0.75 | 0.5 | 0 | 1.25 |
Use case 4: Regional capacity distribution
Understand how your ODCR capacity is distributed across AWS Regions and instance types. This geographic view helps you identify Regions with excess capacity that could be redistributed or consolidated to improve utilization and reduce costs.
Sample output:
| region | instancetype | total_reserved_capacity | unused_reserved_capacity | avg_utilization_pct |
| us-west-2 | t2.nano | 1484.0 | 1060.0 | 33.34 |
| us-west-2 | t3.micro | 1060.0 | 1060.0 | 0.0 |
| us-west-2 | t2.micro | 848.0 | 636.0 | 25.0 |
Use case 5: Unused capacity reservations by Region and Availability Zone
Pinpoint exactly where you have unused ODCR capacity at the Availability Zone level. This granular view enables you to share unused capacity with other teams in the same AZ or modify reservations to better match actual usage patterns.
Sample output:
| region | az-id | instancetype | unused_capacity_instances | avg_utilization_pct | unused_cost_usd |
| us-west-2 | usw2-az1 | c5.9xlarge | 212.0 | 0.0 | 324.36 |
| us-west-2 | usw2-az2 | m5.8xlarge | 157.0 | 0.0 | 241.15 |
| us-west-2 | usw2-az1 | m5.8xlarge | 157.0 | 0.0 | 241.15 |
Clean up
To avoid incurring future charges, delete the resources you created:
Warning: This permanently deletes the table definition. Verify that you no longer need to query this data before proceeding.
- Delete the Athena table by running the following query:
DROP TABLE IF EXISTS capacity_manager_db.capacity_data; - Delete the database by running the following query:
DROP DATABASE IF EXISTS capacity_manager_db; - Navigate to the Athena console settings.
- Note the query result location S3 bucket.
- If you created this bucket specifically for this tutorial:
- Empty the S3 bucket by running:
aws s3 rm s3://<QUERY_RESULT_BUCKET_NAME> --recursive - Delete the S3 bucket by running:
aws s3 rb s3://<QUERY_RESULT_BUCKET_NAME>
- Empty the S3 bucket by running:
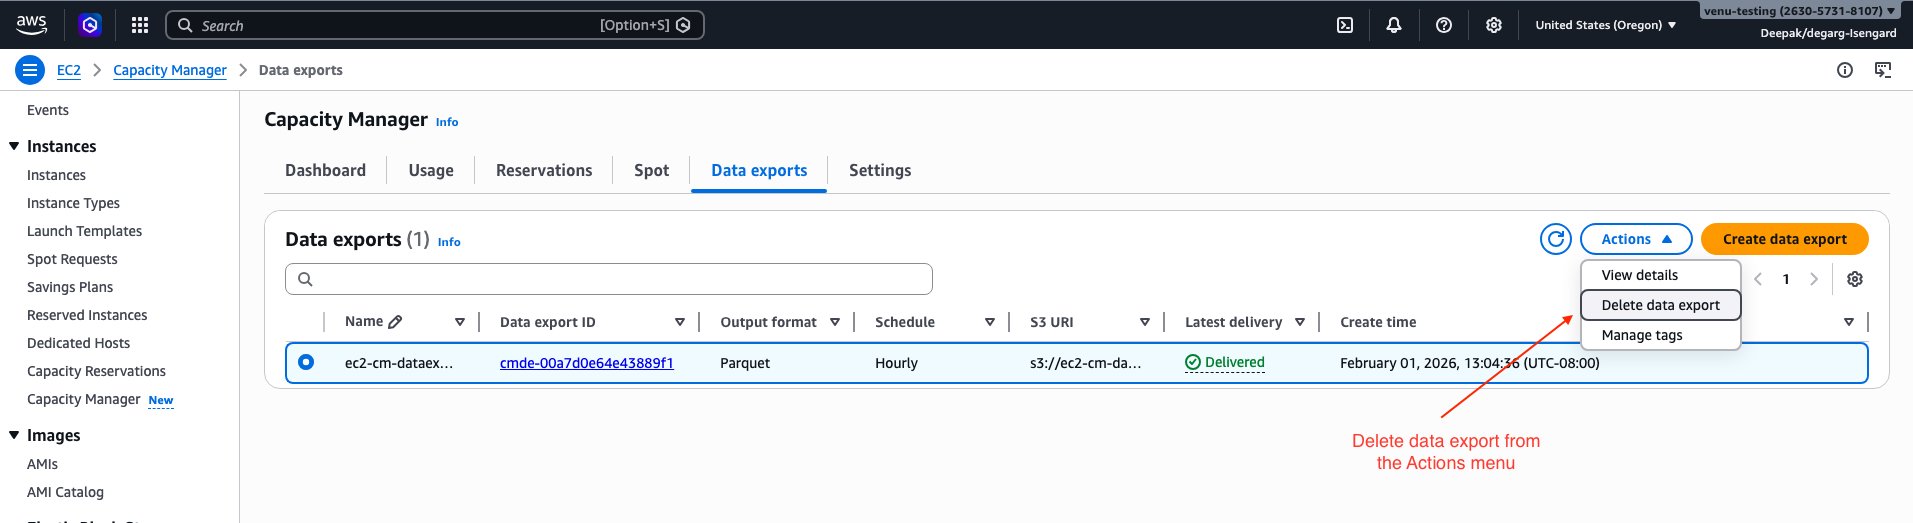
- Delete the data export configuration by using AWS Management Console or AWS CLI.
- If using AWS Console, select the “Delete data export” option in the Actions menu.
- To delete the configuration using AWS CLI:
Replace
<EXPORT_ID>with your data export ID and<AWS_REGION>with your AWS Region.Warning: Deleting the S3 bucket permanently removes all exported capacity data. Verify that you have backed up any data you need before proceeding.
- (Optional) Delete the S3 bucket and data: If you no longer need the exported data, complete the following steps:
- Empty the S3 bucket by running:
aws s3 rm s3://<BUCKET_NAME> --recursive - Delete the S3 bucket by running:
aws s3 rb s3://<BUCKET_NAME>
- Empty the S3 bucket by running:
Conclusion
In this post, we demonstrated how to configure EC2 Capacity Manager data exports to Amazon S3 and query historical capacity data using Amazon Athena. This approach enables you to retain capacity data beyond the 90-day console limit.
As you scale your capacity management practices, consider integrating these exports with your existing analytics and monitoring workflows. By combining EC2 Capacity Manager data with your broader infrastructure metrics, you can make data-driven decisions about capacity allocation and optimization across your organization.
To deepen your understanding, explore the EC2 Capacity Manager documentation for additional features, learn more about Amazon Athena for advanced query capabilities, and review EC2 capacity optimization best practices. Share your feedback and tell us how you’re using EC2 Capacity Manager data exports to optimize your capacity planning in the comments.
[$] Hardening the kernel with allocation tokens and bootpatch-SLR
Post Syndicated from corbet original https://lwn.net/Articles/1078699/
There is a lot of work going into eliminating exploitable bugs from the
kernel and preventing the addition of new ones. Even if this work is
maximally successful, though, there is no chance that the kernel will be
free of these bugs anytime soon. Thus, there is also ongoing interest in
hardening the kernel to make the existing bugs more difficult to exploit.
The upcoming 7.2 kernel release will include a change to how dynamically
allocated structures are placed in memory to make them harder to overwrite,
while a project to randomize structure layout at boot time has a rather
longer timeline.
Как Русия унищожава българската идентичност в окупираните територии на Украйна
Post Syndicated from original https://www.toest.bg/kak-rusiya-unishtozhava-bulgarskata-identichnost-v-okupiranite-teritorii-na-ukrayna/

Украинските българи са най-голямата историческа българска общност извън границите на държавата. Общият им брой е над 200 000, а по-голямата част от тях живеят в Одеска област. Около 30 000 етнически българи населяват Запорожка, Херсонска и Донецка област и след февруари 2022 г. се намират под временна руска военна окупация. За съдбата на тези 30 000 души през последните четири години се знае твърде малко, а българското общество и политиците у нас очевидно смятат темата за доста неудобна заради нуждата от пряка конфронтация с руската държава.
Крайно време е това да се промени.
Украинските българи са успели да запазят народните си обичаи, езика и културата си още от средата на XIX век, когато на вълни се преместват от Балканите на север към дивата степ, каквато е представлявала тогава Южна Украйна. Техните общности са преминали през изключителни исторически изпитания, включително сталинския терор в СССР, Гладомор и целенасочена съветска политика за изличаване на българската им идентичност. България като свободна страна, членка на ЕС и НАТО е длъжна да защити украинските българи под руска окупация чрез максимален дипломатически натиск върху Русия и чрез допълнителна военна помощ за Киев и да не допусне унищожаване на националната им идентичност. Това е въпрос на национален интерес, но преди всичко на морал.
Руската доктрина за изличаване на идентичност
За да се разбере в дълбочина трагедията на българското малцинство, живеещо в момента под вражеска окупация в Украйна, случващото се трябва да бъде разгледано през призмата на общата стратегия на Кремъл. Руската политика във временно окупираните области на Украйна не се изчерпва с военен контрол на територии и заграбване на ресурси. Целта ѝ е пълно асимилиране на местното население с целенасочена, системна и брутална кампания.
В анализ на Atlantic Council тези действия от страна на Москва се дефинират като опит за „изличаване на идентичността“ на окупираното население. Крайната цел на Владимир Путин е изграждането на нова изкуствена демографска реалност, в която няма място за национално самоопределяне, различно от официалния имперски наратив на Москва.
В тази доктрина на културен геноцид образованието и администрацията са превърнати в оръжие. Веднага след установяването на военен контрол в Запорожка, Херсонска и Донецка област окупационните власти задействат насилствена русификация. Местните училищни програми са заменени с руските държавни стандарти. Руският език е наложен като единствен език на администрацията, образованието и публичните институции, а използването на украински е системно ограничавано и репресирано.
Този жесток подход не е нов. Исторически е познат от германизацията на окупираните полски територии през Втората световна война, русификацията на Полша, Литва и Украйна в Руската империя през XIX век, съветизацията на балтийските държави след 1940 г., дори и отвъд океана, в САЩ и Канада през XIX и XX век, когато деца от коренните народи са извеждани насилствено от семействата им и са настанявани в интернати, където им се забранява да говорят на родния си език и да практикуват традиционната си култура в опит да им се наложи нова национална идентичност. В тези интернати много от тях загиват.
Руската окупационна политика е насочена както срещу украинците като по-голяма част от населението на окупираните територии, така и срещу десетки хиляди хора, които не са етнически украинци, но представляват неразделна част от културната мозайка на региона. Такива са местните българи, гърци, татари и др. Именно в капана на тази безмилостна машина за заличаване на идентичност и език днес са уловени и 30-те хиляди таврийски българи, чиито вековни традиции са на път да бъдат унищожени от Русия.
Българската реакция – твърде скромна и много закъсняла
Преди руската инвазия през 2022 г. таврийските българи в Украйна имат пълни граждански права и свободно се възползват от образование на български език и от широко развити български културни дейности. Местните общности с подкрепата на властите в Киев активно работят за запазване на българското народно самосъзнание в Запорожка област, координирайки откриването на неделни училища и културни центрове с подкрепата на София.
Сред най-важните места на тези общности са училище „Васил Левски“ в Бердянск, неделното българско училище в Мелитопол и украинско-българският лицей в град Приморск. През 2023 г. образователният център в Приморск е ограбен от руски военни, които изнасят от сградата компютърна техника и ценно имущество, както свидетелстват очевидци. Учебното заведение има 27-годишна история, като близо половината от неговите над 1000 завършили ученици са продължили образованието си в университети в България.
След разпадането на СССР и обявяването на украинската независимост таврийските българи успяват да изградят мемориална мрежа, посветена на националните ни герои, а тези паметници стават центрове на ежегодни събори, фестивали и чествания на Деня на бесарабските българи. До началото на войната регионът се развива като свободна и сигурна среда, в която българската култура и език съжителстват в пълен синхрон с украинската гражданска идентичност.
Населените с българи украински територии в Запорожка област са окупирани от руската армия още в първите дни и седмици на пълномащабната инвазия след 24 февруари 2022 г. През юли 2022 г. разследване на „Свободна Европа“ разкрива руската окупационна политика в Южна Украйна, под чиито удари попадат всички български училища и културни центрове в региона. Москва прехвърля пропагандни методи, които десетилетия наред са прилагани в самата Русия.
Според документирани свидетелства на Human Rights Watch и други международни организации окупационните власти са налагали руските учебни програми чрез натиск върху родители и учители. В отделни случаи родители са били заплашвани с глоби, задържане или отнемане на родителски права, ако откажат да запишат децата си в училища под руски контрол или ако продължат обучението им по украинската програма.
Тази принудителна русификация и заличаване на украинския, българския и други езици в областта протича в почти пълен информационен вакуум поради блокирани комуникации с външния свят в условията на война. През септември 2022 г. в интервю по Нова телевизия проф. Владимир Милчев, етнически българин и декан на Историческия факултет в Запорожкия университет, за първи път официално алармира, че в окупираните територии руските власти са наложили пълна забрана на българския език.
Всички неделни училища, културни центрове и дружества в Мелитополски и Бердянски район – сърцето на таврийските българи, са затворени. Учебните програми по български език, история и традиции са ликвидирани, а на местните преподаватели е поставен ултиматум: да преминат изцяло към руските държавни стандарти или да напуснат.
Тази политика на етническо заличаване на българите от страна на руските нашественици в Украйна получава своето институционално потвърждение в България няколко месеца по-късно. През декември 2022 г. Агенцията за българите в чужбина официално обобщава мащаба на образователната катастрофа под руска окупация. Данните сочат, че руската окупационна администрация е прекратила дейността на 13 български неделни училища в Запорожка област, в които дотогава са се обучавали над 1000 деца.
Според руската посланичка у нас Елеонора Митрофанова забрана за изучаване на български език в училищата в Запорожка област, Мариупол и Бердянск няма. Има специфична организация.
Нямаме никакви забрани за изучаване на езици, но имаме специфична система за организиране на този процес. По-конкретно, това зависи от броя на децата, които искат да изучават български, литовски, грузински или друг език. Ако се достигне необходимият брой деца, училището винаги ще се съобрази с техните желания. Но тъй като българската страна повдигна този въпрос, аз, разбира се, ще изясня ситуацията с ръководството и хората, отговорни за тези региони, за да се разбере реалната ситуация,
казва Митрофанова в интервю за ТАСС, цитирано от OffNews.bg.
Физически терор, репресии и заплахи за сексуално насилие
Зад фасадата на административните забрани и затварянето на училища обаче се крие далеч по-мрачна реалност – физически терор, изтезания и страх за живота, които принуждават местните българи масово да напускат домовете си. Специален доклад на украинския омбудсман за правата на националните малцинства в условията на руска агресия разкрива шокиращи лични свидетелства на етнически българи, преминали през ада на окупацията в Запорожка и Херсонска област.
Един от основните мотиви за бягство на жените от българската общност е постоянният страх от сексуално насилие от страна на руските окупатори. За армията на Путин изнасилванията на жени в Украйна са просто още едно оръжие във войната, средство за унижение и мъчение на нападната страна. Цитирана в доклада представителка на българското малцинство от окупираната част на Запорожието разказва пред разследващите за системния натиск, на който са подложени жените на публични места в Мелитопол от страна на руските военни формирования и в частност от т.нар. кадировци:
Пътувах от селото до пазара в Мелитопол, за да продавам мляко и да изкарам пари. Често вземах дъщеря си с мен, защото училището в селото вече не работеше – окупаторите го превърнаха във военна база, а ме беше страх да я оставя сама. В един момент в града дойдоха много кадировци. Постоянно се заканваха и тормозеха младите жени на пазара, по улиците, по спирките. Пияни, с оръжие в ръце, те се държаха с нас като с робини и демонстрираха пълната си власт.
Българите в окупираните територии са обект на политически репресии, филтрация и затваряне в тайни центрове за изтезания (т.нар. мъчилища). В доклада е документиран тежкият случай на мъж с български корени от Херсон, задържан от руските сили заради участие в проукраински протести, доброволческа дейност и изразяване на позиции в социалните мрежи. Той отказва да напусне града преди окупацията, защото се грижи за 77-годишния си баща, болен от рак. Свидетелството му за момента на ареста показва абсолютната безмилостност на окупационния режим:
Към 5 сутринта се събудих от ярка светлина в прозореца и крясъци в двора, последвани от силно блъскане по вратата. Петима въоръжени окупатори с маски нахлуха в къщата, докато други петима чакаха отвън. Наредиха на мен и баща ми да седнем на дивана, докато обискират. Когато ме натикаха в колата, видях как баща ми изскочи на улицата – викаше и плачеше. Той е на 77 години, с онкологично заболяване, много слаб. Един от войниците го удари с автомат в гърдите. Видях как падна на земята. Това беше последният път, в който го видях.
Тези и други свидетелства, събрани от кабинета на украинския омбудсман, категорично доказват, че руската окупационна политика спрямо таврийските българи е част от кампания на терор, при която отстояването на човешкото достойнство, свободната воля или каквато и да е идентичност, различна от наложената от Кремъл, се наказват с насилие, отвличания и масов страх.
Срещу това унищожаване на българската идентичност държавата ни реагира едва през 2025 г., когато в отговор на депутатски въпрос Георг Георгиев, министър на външните работи, потвърждава, че над 30 000 таврийски българи в окупираните Запорожка, Херсонска и Донецка област са подложени на системно и грубо погазване на основните човешки права от страна на Москва.
България официално отчита, че окупационните власти целенасочено унищожават възможностите за изучаване на майчиния език и затварят българските неделни училища и центрове. От външното ни министерство подчертават, че тези действия на Кремъл представляват грубо нарушение на международното хуманитарно право и са директен опит за насилствено заличаване на етническата и културна идентичност на българската общност в Украйна.
България на Радев като съучастник във войната срещу българите
В контекста на доказаното унищожаване на част от най-старата българска общност, опазила българския дух от XIX век насам, позицията на държавата изглежда, меко казано, неадекватна и клони към национално предателство. Румен Радев практически от началото на политическата си кариера повтаря опорните точки на руската пропаганда и се доказва като един от най-близките до Путин европейски политици.
Руският терор срещу българите под окупация е тема, която властта активно прикрива с мълчанието си, помагайки по този начин за унищожаването на общността на таврийските българи. Това престъпно мълчание превръща българските управляващи в директни съучастници в етническото прочистване на нашите сънародници под руска окупация. Докато таврийските българи биват подложени на терор и насилствена русификация, София позорно си затваря очите заради зависимостта на Румен Радев от Москва. Подобно абдикиране от националния интерес е исторически срам и унижение, което с всеки изминал ден заличава вековната история на българите в Украйна и обрича сънародниците ни на забвение.
Security updates for Thursday
Post Syndicated from jzb original https://lwn.net/Articles/1079551/
Security updates have been issued by AlmaLinux (libpng, libsolv, libtasn1, libxml2, libxslt, python3.14, tigervnc, and vim), Debian (cloud-init, postgresql-13, and yelp), Mageia (nats-server), Oracle (.NET 10.0, .NET 8.0, .NET 9.0, bind9.18, cockpit, compat-openssl11, dnsmasq, dovecot, evince, expat, flatpak, freerdp, gimp, golang, grafana, grafana-pcp, httpd, jmc, jq, kernel, libsndfile, libsoup, libtiff, mod_http2, mysql:8.0, nginx, nginx:1.24, openexr, php:8.2, poppler, pyOpenSSL, python-markdown, redis:7, samba, thunderbird, tigervnc, unbound, and vim), Red Hat (libpng, libpng12, and libpng15), SUSE (apptainer, bind, crun, freeipmi, ghc-crypton-x509-store, ghc-crypton-x509-system, google-guest-agent, google-osconfig-agent, GraphicsMagick, gstreamer-plugins-bad, hamlib, iproute2, java-1_8_0-openjdk, kubevirt1, libarchive, libheif, libpng15, mbedtls, mbedtls-2, openssl-1_1, python-biopython, python-PyJWT, tar, webkit2gtk3, and xen), and Ubuntu (ffmpeg, libdbi-perl, and perl).
How we built saga rollbacks for Cloudflare Workflows
Post Syndicated from Vaishnav Kavitha original https://blog.cloudflare.com/rollbacks-for-workflows/
Cloudflare Workflows allows you to build durable, multi-step applications with built-in retries and state persistence across long-running processes. When a Workflow executes, each step can call external systems, retry failures, and persist state across restarts. But if one step fails, it may leave earlier work from completed steps in an inconsistent or partial state.
Today we’re shipping saga rollbacks for Workflows, allowing you to declare rollback logic within the step itself, in case of failure.
For example, consider a workflow for transferring funds between accounts at two different banks:
-
Debit from account at Bank A
-
Credit to account at Bank B
-
Send email confirmation to both account owners
What happens if Step 2, the credit to account at Bank B, fails? Once the debit succeeds at Bank A, the transaction is committed and the money has left its system. As the orchestrator of the transaction, you cannot simply “undo” the operation in Bank A’s system. Instead, the money must be credited back to the account at Bank A through a new operation that semantically reverses the first one.

This pairing of an operation and its compensation logic is called the saga pattern.
Before today, developers had to implement their own compensation logic to track what succeeded, what failed, and what actions should be taken upon failure, outside of the steps’ direct definitions. Now, you can define compensation logic for each step.do() as an argument within the steps themselves, maintaining your workflow’s durability for the rollback as well.
// track what completed so we know what to undo
let debitA;
let creditB;
try {
  debitA = await step.do("debit-bank-a", () => bankA.debit(from, amount));
  creditB = await step.do("credit-bank-b", () => bankB.credit(to, amount));
  await step.do("notify", () => notifyBoth(from, to, amount));
} catch (error) {
  // unwind in reverse. each undo is its own durable step,
  // must be idempotent, and must keep going if one fails.
  if (creditB) {
    try {
      await step.do("reverse-credit-b", () => bankB.debit(to, amount, creditB.id));
    } catch (e) {
      await alertOnCall("reverse-credit-b failed", e);
    }
  }
  if (debitA) {
    try {
      await step.do("refund-debit-a", () => bankA.credit(from, amount, debitA.id));
    } catch (e) {
      await alertOnCall("refund-debit-a failed", e);
    }
  }
  throw error;
}
Without rollbacks
// each step ships with its own undo. add a step,
// add its rollback right here. no growing catch
// block, no manual ordering, no replay logic.
await step.do("debit-bank-a", () => bankA.debit(from, amount), {
  rollback: async ({ output }) => bankA.credit(from, amount, output.id),
});
await step.do("credit-bank-b", () => bankB.credit(to, amount), {
  rollback: async ({ output }) => bankB.debit(to, amount, output.id),
});
await step.do("notify", () => notifyBoth(from, to, amount));
With rollbacks
To use rollbacks, just pass an options object containing a rollback function as the last argument to step.do().
const debit = await step.do(
  "debit-account-a",
  async () => {
    return await bankA.debit({
      accountId: fromAccountId,
      amount,
      idempotencyKey: `${transferId}:debit-account-a`,
    });
  },
  {
    rollback: async () => {
      await bankA.credit({
        accountId: fromAccountId,
        amount,
        idempotencyKey: `${transferId}:rollback-debit-account-a`,
      });
    },
  }
);

// The idempotency keys make both the forward operations and rollback operations safe to retry without duplicating the transfer

const credit = await step.do(
  "credit-account-b",
  async () => {
    return await bankB.credit({
      accountId: toAccountId,
      amount,
      idempotencyKey: `${transferId}:credit-account-b`,
    });
  },
  {
    rollback: async ({ output }) => {
      if (output === undefined) {
        return;
      }

      await bankB.debit({
        accountId: toAccountId,
        amount,
        idempotencyKey: `${transferId}:rollback-credit-account-b`,
      });
    },
  }
);


// If we fail here, we may want to revert all previous payments. Users should not have to wrap their code in complex try-catch logic just to revert two small payments (see below)

await step.do("send-confirmation", async () => {
  await sendTransferConfirmation({ ... });
});
Rollback functions should be idempotent, just like regular Workflow steps. If you refund a charge, use the payment provider’s idempotency key. If you release inventory, make the release safe to call more than once.
If any step fails, the rollback handlers will execute in reverse step-start order. It sounds simple: run the undo steps when something fails. In practice, there are a few details that make the API and execution model important.
1. The failed step may still need rollback. A failed step.do() can still be rollback-eligible if it registered a rollback handler.
The rollback will not start if user code catches an error and the Workflow continues, but if a step error is caught and the Workflow later fails for another reason, rollback can still run for previously registered handlers, which execute in reverse step-start order.
Why? The step may have partially interacted with an external system before failing. For example, a payment provider may capture a charge, but the step may fail before returning the chargeId to Workflows. That is why rollback handlers receive output, but must handle output === undefined.
2. Rollback only starts when the Workflow fails. Adding a rollback handler does not mean every step error triggers rollback. If user code catches an error and continues, the Workflow continues. Rollback starts when the Workflow itself is about to fail terminally.
When rollback starts, Workflows finds eligible step.do() calls, runs their rollback handlers, then records the final Workflow failure.
3. Ordering has to be predictable. For sequential Workflows, rollback order feels obvious:
-
Reserve inventory.
-
Charge card.
-
Create shipment.
-
If shipment fails, refund the card and release the inventory.
Parallel steps make this more subtle. Completion order can differ from start order, so Workflows uses reverse step-start order instead of reverse completion order.
The practical rules are:
-
Any started or completed steps with rollback handlers are eligible.
-
The failing
step.do()is also eligible if it registered a rollback handler. -
Handlers run in reverse step-start order, not completion order.
Once we had the expected behavior in mind, we had to add this new pattern into the Workflows API. Rollbacks went through a few iterations before we landed on rollback options.
The first approach was a fluent form: step.do(...).rollback(...) It reads well. The forward action and the compensation sit next to each other, and the call site looks like ordinary JavaScript chaining.
The problem is that step.do() already has an important meaning: it starts a durable step and returns a Promise for the step output. In Workers, promise-like values are especially meaningful because Workers RPC supports promise pipelining, a pattern inherited from systems like Cap’n Proto.
Promise pipelining lets code call a method on a future value before that value has fully returned to the caller. For example:
const session = api.authenticate(apiKey);
const name = await session.whoami();
Here, session is not the real session object yet. It is more like a handle to the session that will exist soon. When you call session.whoami(), Workers can send that call to the remote side early and say: “once authentication creates the session, call whoami() on it.”

That saves a round trip. The caller does not need to wait for authenticate() to fully finish before asking for whoami().
We considered a fluent API:
step.do("charge-card", chargeCard).rollback(refundCharge);
To a reader, that can look like “call .rollback() on the result of charge-card.” But rollback is not part of the step’s output. It is part of the step.do() options, registered before the step starts, so Workflows knows how to compensate the step if a later step fails.
A fluent API also makes step timing harder to reason about. Today, step.do() starts the step when it is called, so developers can start a step, do other work, and await the first step later:
const first = step.do("first", () => serviceA.call());

await step.do("second", () => serviceB.call());

await first;
With today’s execution model, first starts immediately, before second. A fluent API would complicate that. Workflows would need to wait and see whether .rollback() gets attached before it knows the full step definition. That could delay when the step is sent to the engine.
In the earlier example, first could start at await first instead of at step.do("first", ...), after second has already completed.
That makes concurrent Workflows harder to reason about: step timing would depend on when the returned Promise is consumed, not just where step.do() is called.
We also considered a builder-style API:
const charge = await step
	.saga("charge")
	.do(() => chargeCard())
	.rollback(() => refundCharge())
	.run();
A builder API avoids the Promise ambiguity. It also gives us an obvious place for future step-level options, and makes it clear that the forward action and rollback action belong to the same saga step.
But it adds ceremony. Every step needs a final .run(), forgetting .run() would be easy and hard to spot without tooling, and simple one-step cases start to look like configuration chains. It also introduces a new step.saga() builder, breaking from the existing step.<action> pattern. Most importantly, it makes step.do() feel like an older API rather than the primary Workflows primitive. The goal of rollback was to extend step.do(), not replace it.
step.do(..., { rollback })Ultimately, we chose the explicit form where rollback is metadata on the step.
This way, each rollback is defined within the forward step itself. Each handler receives the error that caused the rollback to start, the step context, and the output, which is either the persisted value returned by the forward step (which can be undefined) or undefined if the step failed before persisting a value.
Rollbacks emit lifecycle events, so you can tell whether compensation started, which rollback handler failed, and whether rollback completed successfully.
Crucially, the original Workflow failure remains separate: rollback is what Workflows does after the failure, not the reason the Workflow failed.
Just as you can define custom retry and timeout behavior in the step configuration via WorkflowStepConfig, you add rollback-specific values in rollbackConfig.
{
  rollback: async ({ output }) => {
    await bankA.credit({ accountId: fromAccountId, amount, transferId: `${transferId}-reversal` });
  },
  rollbackConfig: {
    retries: { limit: 10, delay: '30 seconds', backoff: 'exponential' },
    timeout: '2 minutes',
  },
}
This matches the lifecycle-event mental model we wanted. A step.do() already describes a durable unit of work that Workflows records, retries, and later shows in logs. Rollback is another lifecycle behavior for that same unit of work. It should travel with the step definition, not live in a separate wrapper or builder.
-
The step still starts when
step.do()normally starts. -
The returned promise still represents the step output.
-
Concurrent Workflow code keeps the same execution model.
-
Retry and timeout options for rollback live next to the rollback handler.
-
Existing
step.do()calls keep working exactly as they do today.
This shape is slightly more explicit than the fluent API, but that explicitness is useful. The operation and its compensation are still in one place, and the API does not introduce a new step builder or a new kind of promise. Developers who already understand step.do() only need to learn one additional options object.
This is less magical, but it is simpler to adopt, and clearer to understand.
Rollback feels like a small API addition, but it changes what Workflows needs to record about each step.
A regular step.do() already has a durable record. Workflows records that the step started, whether it completed, what it returned, and whether it should be skipped instead of repeated if the Workflow resumes later.
Rollbacks add one more thing to that record: whether the step registered compensation logic.
This means Workflows has two pieces of information to bring together if the Workflow fails.
The first is durable step history. The Workflow engine stores data to know what ran, what completed, what output was saved, and whether rollback was registered.
The second is the rollback handler itself, which is the function written to compensate for that step. Workflows does not save the text of that function as data. Instead, it keeps a callable reference to the handler while the Workflow is running.
In Workers RPC, this kind of callable reference is called a stub. A stub lets one part of the system call code that is running somewhere else. Stubs also have lifetimes such that they can be disposed when a call or execution context ends. If you need to keep a stub past that point, Workers RPC provides a dup() method, which creates another handle to the same target.
For rollback, that model is useful. The durable step history records what needs compensation. The rollback stub gives Workflows a way to invoke the compensation code. And because rollback handlers may need to outlive the immediate step.do() call that registered them, Workflows keeps its own callable reference to the handler for the rollback phase.
In the common case, when a Workflow enters rollback in the same engine lifetime, Workflows already has the rollback stubs it needs. It can use the durable step history to find eligible steps, then invoke the rollback stubs that were registered during forward execution.
This gets more subtle when Workflows has to recover after a restart.
If the engine is evicted, crashes, or restarts while rollback is needed, Workflows still has the durable step history, but it may no longer have the in-memory rollback stubs. To recover, Workflows uses replay: a recovery mode where it can re-run the Workflow code without re-executing completed forward step bodies.
When replay reaches a completed step.do(), Workflows reads the persisted result instead of running the step body again. For rollback recovery, Workflows only needs to rebuild handlers for steps that had rollback attached and are eligible for rollback. As those step.do() calls are encountered, their rollback options can register the callable stubs again
That lets Workflows recover the rollback handlers it needs without duplicating the original external side effects.

With those pieces in place, rollback can work whether the handler is still available in memory or has to be rebuilt during recovery.
When the workflow is about to fail, Workflows does not ask your application to reconstruct what happened. It already has the step history. It can look at the persisted record and answer the important questions:
-
Which steps started?
-
Which steps finished?
-
Which failed step may still need cleanup?
-
Which steps registered rollback handlers?
-
What output should each rollback handler receive?
-
What order should compensation run in?
Then Workflows invokes each rollback stub with a rollback context: the original error, the step context, and the step output, if one was persisted.
The ordering detail matters. In normal JavaScript, especially with Promise.all(), completion order is not always the same as start order. If step A starts first and step B starts second, step B might finish first. For rollback, Workflows uses the persisted start order as the stable source of truth, then unwinds it in reverse.
Rollback handlers also run through Workflows’ normal step machinery. That means compensation gets the same operational properties you expect from Workflows: retries, timeouts, lifecycle events, logs, and a final recorded outcome. If a rollback handler keeps failing after its configured retries, Workflows records the rollback outcome as failed, stops running the remaining rollback handlers, and the Workflow instance ultimately ends in the Errored state.
This is the main difference between saga rollbacks and a catch block. A catch block only knows what is still in memory at its exact point in your JavaScript execution. Workflows rollback uses persisted step history to decide what already happened, invokes the stubs it already has in the common case, and safely rebuilds missing stubs during recovery when it needs to.
That is also why the API puts rollback on step.do() itself. Rollback is not a separate global error handler — it is metadata attached to the durable unit of work Workflows already understands.
Our first iteration of rollbacks includes:
-
Explicit per-step rollback handlers for
step.do() -
Sequential rollback execution
-
Retry and timeout configuration for compensation
Next, we want to explore:
-
Rollback support for
waitForEvent -
Support for parallel rollback execution
-
Rollback support for Python Workflows
When a multi-step application fails halfway through, the hardest part is often not knowing that it failed. It is knowing what already happened, and what needs to happen next.
Saga rollbacks let you put that answer directly beside each step. If you are building multi-step applications with Workflows, try saga rollbacks and tell us what compensation patterns you want next. Get started with the Workflows documentation and share feedback in the Cloudflare Community.
Experts on Experts: Why AI and Compliance Are Forcing A New Security Operating Model
Post Syndicated from Corey Thomas original https://www.rapid7.com/blog/post/it-experts-video-series-ai-compliance-force-new-security-operating-models
This week on Experts on Experts, I sat down with Sabeen Malik, Rapid7’s VP of Global Government Affairs and Public Policy, to discuss a shift security leaders can’t afford to treat as separate threads: frontier AI, vulnerability discovery, cybersecurity compliance, and operational resilience.
AI is changing how quickly vulnerabilities can be found, validated, and potentially exploited. At the same time, regulators, boards, and customers are asking for stronger proof that controls are working and risk is being reduced. Security leaders are being pushed to move at machine speed while proving the business is resilient.
AI vulnerability discovery is moving faster than security standards
Sabeen and I started with the policy question. Many of the systems security teams rely on today were designed for a slower era of human-led discovery. Vulnerability disclosure processes, scoring systems, prioritization frameworks, and regulatory expectations all assume organizations have time to assess, verify, and respond.
Frontier AI challenges that assumption. If models can help find and chain vulnerabilities faster, the industry needs stronger standards around verification, access, disclosure, and accountability. Access to powerful models matters, but access alone does not solve the governance problem. The bigger question is whether the ecosystem can responsibly validate, prioritize, and act on what these systems produce.
AI in cybersecurity must move from discovery to risk reduction
For defenders, faster discovery is only useful if it leads to faster action. Finding more vulnerabilities does not automatically make organizations safer. In many cases, it creates more noise for teams already under pressure.
The real challenge is exploitability. Security teams need to understand which risks are actually reachable, which issues matter most in their environment, and where action will reduce exposure fastest. That is where the shift from reactive security to preemptive security becomes critical. The goal is to use data, context, AI, and expertise to act earlier, not simply respond faster after something happens.
Cybersecurity compliance is becoming continuous
We also discussed how the compliance environment is changing. Organizations are no longer being asked to prove readiness once a year. Increasingly, they need to provide detailed evidence on shorter timelines across a growing set of regulatory and assurance requirements.
That creates a real challenge when evidence is collected manually or disconnected from live security operations. Leaders need to show what changed, what was fixed, who owns the response, and what risk remains. Static snapshots are no longer enough.
Cyber GRC connects security operations, risk, and compliance
One of the clearest themes from the conversation is that the future of security operations will be AI-driven, but human-led. AI can help teams move faster, surface what matters, and respond with greater scale and consistency. But governance, accountability, and judgment still matter.
That same principle applies to compliance. Security and compliance teams need live operational context, not disconnected reports. They need to connect what they detect, what they fix, and what they can prove.
Watch the full episode to hear our conversation on what this moment means for AI in cybersecurity, cybersecurity compliance, and resilient security operations:
⠀
Interesting Paper Exploring Prompt Injection
Post Syndicated from Bruce Schneier original https://www.schneier.com/blog/archives/2026/06/interesting-paper-exploring-prompt-injection.html
This is a fascinating explotation of how LLMs fall for prompt injection attacks. It turns out that they learn to recognize the style of text in different role/instruction blocks, and not just the tags.
Their conclusion:
Role tags were a formatting trick that became the security architecture and the cognitive scaffolding of modern LLMs. We’ve shown that this architecture doesn’t survive into the model’s actual representations, and that such role confusion is linked to prompt injection.
Unless LLMs achieve genuine role perception, we think injection defense will remain a perpetual whack-a-mole game. And the continuous nature of role boundaries opens the threat of injections designed to subtly shift LLM states through seemingly innocuous text, legally and at scale.
More generally, roles are quietly one of the most important abstractions in the LLM stack, providing the boundaries meant to separate self from other, thought from communication, instruction from data. They’re human-controlled switches in an otherwise continuous system. We think they deserve a lot more study than they’ve gotten.
Full paper: “Prompt Injection as Role Confusion.” Simon Willison comments.
How the World Cup Explains the World
Post Syndicated from The Atlantic original https://www.youtube.com/watch?v=AsOMKR2jjlM
IBM Outlines Sub-1nm Nanostack Transistor Technology: Building the Next Gen By Going Up
Post Syndicated from Ryan Smith original https://www.servethehome.com/ibm-outlines-sub-1nm-nanostack-transistor-technology/
Today IBM is unveiling their nanostack transistor architecture. Meant to drive chip construction in the sub-1nm era in the 2030s, nanostack aims for building better and smaller chips by building them taller via wafer stacking
The post IBM Outlines Sub-1nm Nanostack Transistor Technology: Building the Next Gen By Going Up appeared first on ServeTheHome.
Pre-Release Not a Release Party 📱
Post Syndicated from Home Assistant original https://www.youtube.com/watch?v=bdTaIlEjNqo
Pre-Release Not a Release Party
Post Syndicated from Home Assistant original https://www.youtube.com/watch?v=n3HghFZQCiA
Celebrating over 15,000 young creators at the Coolest Projects 2026 online showcase
Post Syndicated from Helen Gardner original https://www.raspberrypi.org/blog/celebrating-over-15000-young-creators-at-the-coolest-projects-2026-online-showcase/
From first-time coders to seasoned makers, this year every single Coolest Projects creator brought all their creativity to their tech projects and made something to be proud of. Over 15,000 young people showcased more than 4,500 creations on a global stage. With participants from 40 countries and 47% girls, this year’s online showcase is a true reflection of what the next generation of tech creators looks like.
Yesterday our global livestream brought together the whole Coolest Projects community to celebrate the young people’s creations with some very special guests.
Meet our 2026 VIP judges and their favourite projects
Every year, we invite new special VIP judges to choose their favourite projects from each of the seven Coolest Projects categories. Meet our 2026 judges and find out about the projects they picked.
Ronit Levavi Morad, Chief of Staff at Google Research
Ronit’s role involves reimagining the future of learning and she is a passionate advocate for technology in service of pedagogy, leading Google Research’s global Al literacy initiatives. She champions a human-centered vision for technology, leading programmes like Al Quests, a gamified experience designed to teach teens how Al can be applied to humanity’s greatest challenges.
Ronit’s favourite projects are:
- Scratch: FishyFighter by Julian from Ireland
- Web: Ulearn by Zoe from Japan
- Games: Find the Bug by Jibraan from South Africa
- Mobile apps: LumiCycle- Erasing Period Stigma for Younger Generations made by perTech by Rianna, Sana, Xintong, and Melania from Japan
- Hardware: DIY Raspberry Pi Air Quality Monitor: Helping Leonidas Breathe Better by Katerina and Leonidas from Greece
- Advanced programming: Curva by Elaina from the USA
- AI: Ornimetrics – A Raspberry Pi Smart Bird Feeder Powered by AI Vision by Baichen from the USA
Ben Powley, Senior Developer at Jagex
Ben is a senior developer at British video game company Jagex, working on RuneScape to deliver immersive experiences for both new and existing players. He previously worked at Ubisoft on the Assassin’s Creed series and the Avatar Frontiers of Pandora game. Ben learned to code at 12 through making mods for Minecraft, and he has been passionate about game development ever since.
Ben’s favourite projects are:
- Scratch: Cool little game by Rumyana from Bulgaria
- Web: ECOSORT AI by Dyllan and Francis from Kenya
- Games: Sub Racers by Haseeb from the UK
- Mobile apps: HopeLink by Daniel from Canada
- Hardware: Binardo Binstein by Shlok Bharadwaj and Anhad Mahajan from India
- Advanced programming: Redrose Linux by Juraj from Slovakia
- AI: MultiRisk by Chiara and Sofia from Argentina
Akari Kawaguchi, youth mentor, CoderDojo Japan
Akari is a 16-year-old CoderDojo member from Japan who has showcased her own projects at Coolest Projects seven times. She knows exactly what it takes to make something special for the showcase, and we’re so excited to have a young creator’s perspective on the judging panel!
Akari’s favourite projects are:
- Scratch: Glitch by Daniel from Armenia
- Web: Dot & Box Game by Shrija from India
- Games: VR Immersive Buddhist Debate: Digital Inheritance of Tibetan Buddhist Culture by Yuhan from China
- Mobile apps: SyncFit by Riho, Sara, Kaho, Ran, and Yuiko from Japan
- Hardware: AquaGuard by Kyle from the USA
- Advanced programming: TGSW crop disease detection system by Dasari Vaishnavi, Kondrapally Jhansi, and Alimineti Kalpana from India
- AI: TideGuard AI by Vladimir from the Russian Federation
Sebin Sunny, CEO, EIC IIITM-K
Sebin is CEO of the Entrepreneurship and Innovation Center (EIC) and the Centre of Excellence in loT Sensors at the Indian Institute of Information Technology and Management – Kerala (IIITM-K). A passionate advocate for innovation, he is committed to empowering entrepreneurs, creating sustainable solutions, and shaping the future of technology-driven industries.
Sebin’s favourite projects are:
- Scratch: Click and Win by Sarthak from India
- Web: coolsongs by Moksh from India
- Games: red line green line (version of snakes and ladders) by Moksh from India
- Mobile apps: Accomplit by Audrey and Maggie from the USA
- Hardware: Project Code Cloud by Tiarna and Chloe from Australia
- Advanced programming: Visture by Lionel from Indonesia
- AI: Project Albatross: Bio-Inspired Reactive Control Strategies for Atmospheric Energy Harvesting in Fixed-Wing UAVs by Akshara from the USA
Broadcom Coding with Commitment® award
The Broadcom Coding With Commitment® award shines a light on creators who use coding to support and strengthen their communities with a project that aligns with 17 sustainable development goals of the United Nations.

This year’s Broadcom Coding with Commitment® recipient for the online showcase is Egehan from Türkiye, with their Scratch project Viridia – Back to the World, an educational game designed to teach players about the importance of water and how to use it responsibly.
Get inspired and keep creating!
Browse the Coolest Projects 2026 online gallery to discover thousands of incredible projects from young people all over the world.
Inspired to make your own project? Or encourage a young person you know? To get you started, we offer over 200 free coding projects, in English and many other languages.
Want to know more about next year’s showcase?
Coolest Projects will be back online in 2027. Sign up to the newsletter to be the first to hear about dates, deadlines, and exciting updates.

And did you know there are in-person Coolest Projects events around the globe? There is still time to take part in Coolest Projects India and other partner events this year. Find out more.
Thank you to the Coolest Projects sponsors
We want to say a big thank you to Broadcom Foundation, Allianz, Amazon Future Engineer, Qube-RT, Avnet, and GoTo for sponsoring Coolest Projects 2026 and helping to celebrate young tech creators around the world.
The post Celebrating over 15,000 young creators at the Coolest Projects 2026 online showcase appeared first on Raspberry Pi Foundation.
[$] LWN.net Weekly Edition for June 25, 2026
Post Syndicated from jzb original https://lwn.net/Articles/1078380/
Inside this week’s LWN.net Weekly Edition:
- Front: Free-threaded Python; AUR attacks; Fedora 2FA; 7.2 merge window; BPF arenas; BPF coroutines; BPF JIT; RMR and BRMR; OSPM.
- Briefs: Tor deprecations; GIMP 0.54.1 flatpak; Mastodon 4.6; Systemd v261; Xfce on Wayland; Quotes; …
- Announcements: Newsletters, conferences, security updates, patches, and more.
Restrict AWS Management Console access to expected networks with sign-in resource-based policies and RCPs
Post Syndicated from Swara Gandhi original https://aws.amazon.com/blogs/security/restrict-aws-management-console-access-to-expected-networks-with-sign-in-resource-based-policies-and-rcps/
Amazon Web Services (AWS) recently announced support for resource-based policies and resource control policies (RCPs) for AWS Sign-In. By using resource-based policies and RCPs, you can restrict access to the AWS Management Console sign-in and aws login CLI sessions to requests from your expected networks, your on-premises data center networks, and your Amazon Virtual Private Cloud (Amazon VPC) VPCs.
Sign-in resource-based policies and RCPs support several security objectives: restricting console sign-in to corporate networks, limiting which principals can sign-in to the console, and applying consistent network perimeter controls across an entire AWS Organizations organization.
In this post, we walk through a common use case: a financial services company restricting console access to its corporate network for regulatory compliance. We show you how to implement this using a sign-in resource-based policy for a single account, verify the controls with AWS CloudTrail, and explain how these policies integrate with AWS Management Console Private Access and the broader AWS data perimeter framework.
Restricting console sign-in access to a corporate network
Consider a financial services company that requires access to AWS Management Console sign-in to originate from the corporate network. The company has the following requirements:
- Users sign in to the console only from the corporate VPN, office network, or customer VPC.
- Sign-in attempts from personal networks, public Wi-Fi, or other unexpected locations must be denied.
- A designated principal should retain access from any network to prevent lockout.
- All sign-in attempts (allowed and denied) must be logged to CloudTrail for compliance evidence.
In the steps that follow, we show you how to create a resource-based policy to enforce these requirements on a single account.
Prerequisites
- AWS Command Line Interface (AWS CLI) installed and configured with the latest version.
- Permission to manage Sign-in resource policies. Attach the AWS managed policy
AWSSignInResourcePolicyManagementor grant permissions to the following actions to respective principals:- Manage resource permission statements:
signin:PutResourcePermissionStatement,signin:DeleteResourcePermissionStatement,signin:ListResourcePermissionStatements,signin:GetResourcePolicy. - Manage console authorization:
signin:PutConsoleAuthorizationConfiguration,signin:GetConsoleAuthorizationConfiguration,signin:DeleteConsoleAuthorizationConfiguration
- Manage resource permission statements:
- Identified corporate network: IP CIDR range or VPC ID.
- Designated principal Amazon Resource Name (ARN) to exclude, so it retains access if network conditions change.
Note: For the complete list of AWS Sign-In actions see Actions, resources, and condition keys for AWS Sign-In in the Service Authorization Reference.
Step 1: Create resource permission statements
Most resource-based policies require the author to input the full policy document (JSON statements). A Sign-in resource permission statement is different: you provide parameters, and AWS Sign-In generates the policy for you.
The following command provides your corporate IP range, your VPC, and an excluded principal as parameters. AWS Sign-In uses these parameters to generate a policy that restricts console sign-in to those networks, while letting the excluded principal sign in from any network. You control the parameter values, not the policy structure. You can review the generated policy at any time with the get-resource-policy command.
Note: Creating resource permission statements has no effect until console authorization is enabled in Step 2, so you can review the complete policy before it takes effect. Write operations must target
us-east-1.
To create resource permission statements
1. Open your terminal and ensure you have the latest AWS CLI installed.
2. Run the following command, replacing the placeholder values <my-vpc>, <my-vpc-region>, <my-corporate-cidr>, and <excluded-IAM-principal-arn> with your specific configuration:
3. Verify the command succeeded by checking for a statementId in the output.
Example output:
{
“statementId":"b2HfHli9qCF1P4eGNll13CrZtusXlcPxxVBqz2aYLjlAcWtWQHP6Hg0"
}
4. Review the complete resource-based policy by running get-resource-policy command.
aws signin get-resource-policy
Example output:
The generated policy contains four statements, grouped into two pairs. The first pair restricts access by network source—it denies any principal making a request from outside your corporate IP range (<my-corporate-cidr>) or your VPC (<my-vpc>). The second pair restricts which AWS Region your VPC can target—it denies requests originating from <my-vpc> unless they are directed at <my-vpc-region>. This Region binding is necessary because VPC IDs are only unique within a single Region.
AWS Sign-In evaluates these policies in two phases: before authentication and after authentication. The post-authentication evaluation repeats each time the console session requests new credentials. Within each pair, one statement covers the pre-authentication phase and one covers the post-authentication phase.
The pre-authentication statement evaluates the signin:Authenticate action. Since the principal is not yet authenticated in this phase, the statement uses the signin:PrincipalArn condition key to exempt your excluded principal. This key supports all principal types: root user, AWS Identity and Access Management (IAM) user, federated user, and role.
The post-authentication statement evaluates the signin:AuthorizeOAuth2Access and signin:CreateOAuth2Token actions. AWS Sign-In evaluates these actions after authentication, when it issues the tokens that establish the console session. These actions do not support the signin:PrincipalArn key. Instead, they use aws:PrincipalArn, which resolves to the authenticated principal.
The aws:ResourceAccount value is the recipient account ID. AWS Sign-In pulls it automatically from your caller credentials, so you do not set it yourself. For the full list of supported actions and condition keys, including which keys apply at each phase and to each principal type, see Controlling console access with resource-based policies and resource control policies and AWS Sign-In condition keys reference.
Step 2: Turn on sign-in policy enforcement for your account
This step turns on enforcement of the policy you created in Step 1. Until you run this step, the resource permission statements you created in Step 1 have no effect.
5. Turn on enforcement of sign-in policies using the following command:
6. Verify the command succeeded by checking for a “consoleAuthorizationEnabled": true in the output.
Example output:
{
“Output": {
“consoleAuthorizationEnabled": true,
“scope": “ACCOUNT”,
“targetId": "<account-id>"
}
}
7. You can also verify the configuration by executing the get-console-authorization-configuration command as shown below:
8. To disable enforcement or remove individual statements, use delete-console-authorization-configuration or delete-resource-permission-statement. For more details, see Controlling console access with resource-based policies and resource control policies in the AWS Sign-In User Guide.
Verifying the implementation
Now that enforcement is active, sign-in attempts are evaluated against your resource-based policy. Verify the behavior by testing sign-in from different network conditions.
Scenario 1: Allowed sign-in from the corporate network
A principal signing in from the allowed corporate IP range or VPC succeeds normally. The CloudTrail event shows ConsoleLogin:Success
Example CloudTrail event details for successful console sign-in:
Scenario 2: Denied sign-in from an unexpected network
A principal signing in from a network other than the allowed IP address range or a VPC endpoint attached to the source VPC, is blocked. The CloudTrail event shows ConsoleLogin: Failure with an error message identifying the policy that caused the denial:
Example CloudTrail event details for failed console sign-in:
The error message field shows the policy type that caused the denial: “Authorization denied because of a resource-based policy”.
Scaling with RCPs
The steps above apply a Sign-in resource-based policy to a single account. For organizations managing many accounts, RCPs offer a better path: they can be attached at the organization, OU, or account level in AWS Organizations and apply automatically to every account in scope. To view an RCP example, see here .
When a sign-in to the console is denied because of an RCP, the error message field shows the denial as “Authorization denied because of a resource control policy”.
Extending with Console Private Access and data perimeters
The sign-in resource-based policy you created controls which networks can reach your account’s sign-in flow. AWS Management Console Private Access adds a complementary control: from within your network, it limits console access to a known set of AWS accounts, preventing sign-in to unexpected AWS accounts.
Together, these capabilities contribute to a data perimeter for console access:
- Network perimeter: Sign-in resource-based policies and RCPs restrict console sign-in to expected networks (corporate IP ranges, VPCs).
- Identity perimeter: Sign-in resource-based policy and RCP ensure only trusted identities can sign in to the console. Console VPC endpoint policy and Sign-in VPC endpoint policy ensure only trusted identities can use the console from your VPC.
- Resource perimeter: Sign-in VPC endpoint policy and Console VPC endpoint policy restrict which AWS accounts are reachable from your network.
The controls in this post focus on console access. To extend these perimeters to other AWS services and broader implementation scenarios, see the Data perimeter policy examples repository and the Data Perimeters Blog Post Series.
Conclusion
By using sign-in resource-based policies and RCPs, you can restrict AWS Management Console access to expected networks. These controls are available at no additional cost in all AWS commercial Regions.
To get started, see the AWS Sign-in User Guide. For organization-wide enforcement, see Resource control policies in the AWS Organizations User Guide.
If you have feedback about this post, submit comments in the Comments section below.
Qualcomm Investor Day 2026 Data Center Announcements CPUs, AI Accelerators, and More
Post Syndicated from Patrick Kennedy original https://www.servethehome.com/qualcomm-investor-day-2026-data-center-announcements-cpus-ai-accelerators-and-more/
We are at Qualcomm Investor Day 2026 where the company is talking High Bandwidth Compute, its HBM alternative, Its Dragonfly C1000 CPU, and AI accelerators
The post Qualcomm Investor Day 2026 Data Center Announcements CPUs, AI Accelerators, and More appeared first on ServeTheHome.
What Gulf Allies Are Saying About Potential Iran Peace Terms
Post Syndicated from The Atlantic original https://www.youtube.com/shorts/Czj6HscamSg
Implement multi-tenant search with Amazon OpenSearch Serverless next generation
Post Syndicated from Jon Handler original https://aws.amazon.com/blogs/big-data/implement-multi-tenant-search-with-amazon-opensearch-serverless-next-generation/
Learn how to implement cost-effective multi-tenant search using Amazon OpenSearch Serverless next-generation architecture with scale-to-zero compute and simplified routing through per-account, regional endpoints.
Building multi-tenant search architectures requires balancing data isolation with operational cost and complexity. In this post, we provide code examples for an implementation of multi-tenant search using a collection-per-tenant model with Amazon OpenSearch Serverless per-account, regional endpoints. Collection-per-tenant provides data and workload isolation. The regional endpoint simplifies routing requests for indexing and searching data.
Amazon OpenSearch Serverless is a serverless deployment option for Amazon OpenSearch Service that simplifies infrastructure management, index tuning, and data lifecycle management. OpenSearch Serverless automatically provisions and scales resources to provide consistently fast data ingestion rates and millisecond query response times during changing usage patterns and application demand.
The multi-tenant search problem
In search workloads, a tenant is a logical unit of data and the queries against that data. An eCommerce site has product categories. Each category is a tenant. A blog-hosting platform has blogs. Each blog is a tenant. Tenants map to resources in different ways. In the siloed model, each tenant gets its own container: a domain, collection, or index. In the pooled model, tenants share a container. The hybrid model silos large tenants and pools smaller ones together. Regardless of model, you need a mapping between tenant identifiers and the containers that hold their data, so your application routes requests correctly.
OpenSearch Serverless classic offered a collection-per-tenant strategy that simplified, but did not remove, the need for maintaining a tenant-container mapping. In addition, the cost structure of maintaining collection-per-tenant in classic was not ideal. Classic shared hardware across collections with the same AWS Key Management Service (AWS KMS) key. Tenants with different keys could not share hardware. The cost of the solution was the minimum monthly collection cost multiplied by the tenant count. Building for hundreds or thousands of tenants was cost-prohibitive. Collection groups improved this by allowing hardware sharing across AWS KMS keys, but compute costs were still driven by your indexed data, even during idle periods.
With the next-generation architecture, collection groups scale compute to zero. You pay for compute only when a tenant is actively indexing or searching (storage charges still apply). The addition of the regional endpoint further simplifies multi-tenant workloads by routing traffic to any collection through a single hostname. Together, scale-to-zero compute and the regional endpoint make the collection-per-tenant model both economically viable and operationally straightforward.
The OpenSearch Serverless per-account endpoint
OpenSearch Serverless next generation introduces a per-account, regional endpoint that serves all collections through a single hostname:
https://<account-id>.aoss.<region>.on.awsThe x-amz-aoss-collection-name or x-amz-aoss-collection-id header identifies the target collection on each request. This means one connection pool, one TLS session, and one endpoint to manage regardless of how many collections you have.
From a client perspective, you create a single OpenSearch client pointed at the regional endpoint and route requests by setting a header:
Every subsequent request includes the routing header to target a specific collection:
This is a significant improvement over the classic architecture, where each collection had its own endpoint and you needed to manage separate connections for each.
Collection per tenant with query routing
The architecture is straightforward: one collection group holds all tenant collections, and the regional endpoint handles routing.
Create a collection group with scale-to-zero
When you set minIndexingCapacityInOCU and minSearchCapacityInOCU to 0, OpenSearch Serverless scales down your compute to 0 OpenSearch Compute Units (OCUs) when they are idle for 10 minutes. You pay only for the storage for your indices. If you want to maintain compute and avoid cold starts, set minIndexingCapacityInOCU or minSearchCapacityInOCU to a value greater than 0.
Create one collection per tenant
Each product category maps to its own collection within the group:
When choosing a collection name for your tenants, consider privacy, name length, and future ease of upgrading your application. You can use a hash function to map tenant identifiers to collection names.
Collection names are visible in API calls and logs. If your tenant ID contains personally identifiable information (PII), that information is also visible in logs. Hashing the tenant ID obfuscates the sensitive information.
OpenSearch Serverless has a 64-character limit on collection names. Your tenant ID can be longer than that. Hashing helps stay within this limit.
You might also want to add a prefix to collection names so that you can use wildcard patterns in access policies. For example, naming collections pqa-a1b2c3d4 lets you write a single data access policy matching collection/pqa-*. Including a version component in the name (such as pqa-v2-a1b2c3d4) makes it straightforward to create new collections during schema migrations without disrupting existing tenants.
Index data using the regional endpoint
A single OpenSearch client handles all collections. The x-amz-aoss-collection-name header routes each request to the correct collection:
Query a specific tenant’s data
Searching works the same way. Set the header to target the tenant’s collection:
The application layer maps a tenant ID (in this case, a product category) to a collection name, and the regional endpoint handles the rest. No connection pool management, no endpoint lookups, no per-tenant client instances.
Limitations
There are practical constraints to consider when adopting this pattern.
Cold start latency. When a collection group has scaled to zero compute, the first request takes approximately 10 seconds while capacity provisions. For latency-sensitive tenants, you can send a lightweight warmup query (such as a match_all with size=1) before production traffic arrives.
Collection group limits. There are account-level limits on the number of collections and collection groups. Check the Amazon OpenSearch Serverless quotas for current numbers if you are planning thousands of tenants.
Security policy size. Encryption, network, and data access policies list collection resource patterns. Because tenant count grows, these policy documents grow linearly. Use wildcard patterns to stay within OpenSearch Serverless policy size limits.
No cross-collection queries. Each search request targets exactly one collection. If you need to query across tenants for analytics or global search, you need an aggregation layer or a separate shared collection.
Conclusion
In this post, we showed how the next-generation OpenSearch Serverless architecture makes the collection-per-tenant model practical for multi-tenant search. Scale-to-zero reduces the minimum cost for inactive tenants, fitting the compute resources to the demands of tenants. The regional endpoint eliminates the operational complexity of managing per-tenant connections. You get full data isolation between tenants, independent scaling for each tenant’s workload, and a single endpoint to manage in your application code.
For more information, see the Amazon OpenSearch Serverless documentation.
About the author
Global SMS strategy for gaming: Lessons from migrating 2FA across 100+ countries
Post Syndicated from Jose Velazquez Hernandez original https://aws.amazon.com/blogs/messaging-and-targeting/global-sms-strategy-for-gaming-lessons-from-migrating-2fa-across-100-countries/
When a player in Turkey, Brazil, or India tries to log in, they expect a verification code on their phone within seconds. If it doesn’t arrive, that’s a lost session, a support ticket, or worse, a player who doesn’t come back. For gaming studios operating across 100+ countries, delivering those SMS messages reliably is a complex operational challenge involving country-specific regulations, carrier registrations, and routing rules that can change overnight.
This post shares practical lessons from a real-world migration of a global gaming SMS platform from Amazon Simple Notification Service (Amazon SNS) to AWS End User Messaging. You’ll learn how to use resource sharing to avoid months of re-registration, how to build a country inventory that survives regulatory changes, and how to avoid the operational pitfalls that surface only when you migrate production traffic across accounts. Although the examples here are drawn from gaming, the operational challenges are universal. Any organization delivering SMS at international scale will face the same complexities, whether your users are players, customers, or patients.
Why gaming studios migrate SMS accounts
Before diving into the how, it’s worth understanding the why. Gaming studios commonly need to move SMS workloads between AWS accounts for several reasons:
- Security and scope isolation — Separating messaging infrastructure from game servers and backend services into a dedicated account reduces the impact of a security incident in either environment.
- Organizational changes — Studio acquisitions, team restructuring, or moving from a shared corporate account to a studio-owned account.
- Service evolution — Migrating from Amazon SNS (which supports SMS as one of many pub/sub capabilities) to AWS End User Messaging (purpose-built for SMS/MMS/voice with features like phone pools, protect configurations, and event destinations)
- Compliance boundaries — Isolating messaging resources to meet data residency or audit requirements.
Whatever the reason, the challenge is the same: you have a working global SMS setup with phone numbers, Sender IDs, short codes, and carrier registrations spread across dozens of countries, and you need to move it without disrupting millions of players’ 2FA flows.
Resource sharing: A faster migration path
The traditional approach would be to re-register every origination identity (that is, phone numbers, Sender IDs, short codes, see Choosing an origination identity) in the consuming account from scratch. For a global gaming platform, this is impractical:
- Sender ID registrations can take days to weeks. See Estimated registration times for current timelines.
- Short code provisioning can take 10–12 weeks in some markets.
- China message template registrations require AWS Support involvement and can take 15+ days.
- 10DLC campaigns (US) require brand and campaign registration through The Campaign Registry.
Multiply these timelines across every country where you operate, and a “clean” re-registration migration could take months.
AWS Resource Access Manager (RAM) offers a better path. Instead of re-registering, you share your existing origination identities from the sharing account to the consuming account, which can immediately begin sending. For the step-by-step setup including CLI commands, AWS Identity and Access Management (IAM) policies, and architecture diagrams, see A Complete Guide to Resource Sharing for AWS End User Messaging. This post focuses on the operational challenges that surface at global scale.
Know your country landscape before you start
The single most important preparation step is building a complete inventory of your SMS footprint, country by country. AWS publishes a comprehensive reference table listing supported countries, origination identity types, and registration requirements.
For a ready-made planning template, download the Global SMS Planning Sheet from How to Manage Global Sending of SMS with AWS End User Messaging. Your inventory should go beyond what’s published: document exact registered values (case matters), fallback behavior, carrier/aggregator, and why you chose each approach.
This inventory becomes invaluable for future account transitions, incident response, and onboarding new team members.
Plan for regulatory change, not just today’s rules
The global SMS regulatory landscape is not static. It’s tightening. Countries that previously had relaxed requirements are increasingly introducing mandatory Sender ID registration, content filtering, and message format restrictions. A migration is the ideal time to future-proof your setup, not just replicate what worked yesterday.
For help navigating the registration process for specific countries, see Registration support.
Example: Turkey’s URL blocking regulation (April 2026)
In April 2026, Turkey’s Information and Communications Technologies Authority (BTK) began enforcing a regulation that blocks all international A2P SMS messages containing URLs, hyperlinks, or shortened links. For gaming studios that include account recovery links, promotional URLs, or support links in their SMS messages, this type of regulatory change can mean immediate delivery failure to an entire market.
This type of regulatory shift is becoming more common:
- Optional to mandatory Sender ID registration. Australia is mandating Sender ID registration with ACMA by mid-2026. AWS now supports Australia sender ID registration directly through the EUM console.
- Content template registration. India requires DLT registration through TRAI, and China requires message template pre-registration through AWS Support.
- Content filtering and URL restrictions. Carriers in multiple markets are implementing automated filtering that rejects messages containing URLs or specific patterns, even from registered senders. Your country inventory shouldn’t just document what works today. It should also track regulatory change dates, upcoming requirements, content restrictions, and your fallback plan for each market. For each country, ask: “If the rules change tomorrow, how quickly can we adapt?” If the answer is weeks, that country should have a fallback channel (email, push notification) ready to activate immediately.
Lessons learned: What can go wrong at scale
Even with careful planning, migrating global SMS infrastructure surfaces unexpected issues. The following sections cover the most common pitfalls we encountered.
Sender ID case sensitivity
As documented by AWS, Sender ID values are case-sensitive at the carrier and aggregator level. In countries with mandatory registration (Turkey, UK, India, Australia), carriers might perform exact-match validation. If your application sends STUDIONAME but the carrier has StudioName on file, the message can be rejected.
The AWS End User Messaging console displays all Sender IDs in uppercase regardless of registration casing, which is something to watch out for. Always verify casing against the Registrations section of the console, which preserves the original value. Countries can also begin enforcing stricter matching overnight as regulations tighten, turning previously-working messages into failures.
What to watch for:
- Test delivery to countries with mandatory Sender ID registration before rolling out any casing changes globally.
- Check the country capabilities table for countries marked “Registration required.”
Phone pool quotas for global operations
Phone pools are the recommended way to manage origination identities (that is, phone numbers, Sender IDs, short codes, see Choosing an origination identity) at scale with AWS End User Messaging. A pool automatically selects the appropriate identity based on the destination country code, handling failover between identities for the same country.
You can find the default quota for origination identities per phone pool in Quotas for AWS End User Messaging SMS. You can request increases through the Service Quotas console, or contact AWS Support for larger increases.
Plan ahead: Inventory your origination identities before creating your pool, and request the quota increase before you start associating resources. Hitting the quota mid-migration creates unnecessary delays.
Batch your RAM sharing operations
When sharing a large number of origination identities through RAM (50+), the RAM API creates resource-based policies on each shared resource. The order of operations matters: add the consuming account (principal) to the resource share first, then add resources incrementally. If you create a resource share with hundreds of resources and then add the consuming account afterward, RAM attempts to set resource-based policies on all resources simultaneously. This is the most common trigger for throttling at scale. In severe cases, this throttling can result in resources with empty or corrupted resource policies, making them inaccessible to the consuming account until manually remediated.
Best practice:
- Add the consuming account (principal) to the resource share before adding any resources. Batch resource associations in groups of 10 or fewer.
- After each batch, verify that all resources have reached
ASSOCIATEDstatus. - From the consuming account, confirm that shared resources are visible using the
describe-*CLI commands with the--owner SHAREDflag. - Retain AWS CloudTrail logs for troubleshooting if any associations don’t complete as expected.
- If you suspect corrupted policies, verify the resource policies on affected resources and re-associate them individually.
Not everything transfers through RAM
RAM sharing covers the “what you send with”: phone numbers, Sender IDs, pools, and opt-out lists. But several critical components are account-specific and must be recreated in the consuming account:
- Configuration Sets.
- Event Destinations.
- Message Template Registrations (China).
- Protect Configurations.
- Account-level settings (sandbox/production status, spend limits).
Note on Protect Configurations: Protect Configurations apply at three levels: account default, configuration set, and per-message. A common mistake when setting up a consuming account is checking only the account-level default and missing a restriction at the configuration set level, resulting in unexpectedly blocked destination countries. When recreating your configuration in the consuming account, verify protect settings at all three levels.
Production mode requirement: Both the sharing account and the consuming account must be in Production mode. If the consuming account is still in the SMS sandbox, it can only send messages to verified destination phone numbers, which means shared production-ready resources cannot be used for real-world traffic. Verify production status in the consuming account before beginning your migration.
One tip worth highlighting: The registration process for certain countries’ message templates (notably China) is handled through AWS Support cases. After the registration is approved, retain a copy of the approved template details, the case correspondence, and the registration parameters. Support case history might not be accessible indefinitely. If you need to re-register in a new account later, having your own records of what was approved and the exact template content saves significant time.
Countries without Sender ID support
Not every country supports Sender IDs. If your phone pool is configured with Sender IDs and a message is routed to a country that doesn’t support them (for example, Belgium or Puerto Rico), the delivery will fail, and the error might not clearly indicate that the issue is Sender ID incompatibility.
Build an exclusion list: For countries that don’t support Sender IDs you have two options:
- Route those messages through a different origination identity (long code or short code) if available.
- Exclude those countries from Sender ID routing and allow them to fall back to shared routes.
The country capabilities table is your definitive reference for which countries support which origination identity types.
The “hidden fallback” discovery
A common surprise during migration is that your existing setup might have been silently falling back to shared routes in countries where you assumed you had branded Sender ID delivery. When SMS is sent through Amazon SNS with automatic origination identity selection, the service quietly falls back to shared routes (often displaying “NOTICE” as the Sender ID) if no registered identity is available for the destination country.
This fallback is invisible in normal operations. Messages still deliver, and unless you’re checking the Sender ID displayed on the recipient’s device, there’s no visible indication. But when you migrate to a phone pool with explicit Sender ID routing, these gaps become visible as delivery failures.
Before migrating, audit your actual delivery patterns, not just your configuration. Check delivery reports for countries where you expect branded Sender ID delivery and verify that the Sender ID displayed matches your brand, not “NOTICE” or a generic shared route.
Operational recommendations
The following practices help you avoid disruptions during migration and maintain reliable delivery afterward.
Have a fallback channel ready during migration
Before you begin migrating traffic, ensure you have an alternative authentication channel (typically email-based 2FA) ready to activate on short notice per-country. When an issue is detected, disable SMS for that country and fall back to email while you investigate, rather than leaving players locked out.
Build your country registry
Maintain a living document that tracks what you have (identity type, registration status, exact casing, account location), what you chose and why, what gaps exist (countries relying on shared routes), and registration details (approval dates, case references, template content). This registry is your migration playbook.
Set up delivery monitoring from day one
In the consuming account, configure Configuration Sets with Event Destinations before sending your first message. Consider using the Message Feedback API to track actual OTP conversion, not just carrier delivery. See Track OTP Success with AWS End User Messaging SMS Feedback for implementation details.
Test country by country, not just “it works”
Before scaling traffic, test delivery to representative countries from each category: mandatory Sender ID registration, no Sender ID support, optional Sender IDs, message template registration, and carrier-specific content restrictions. A successful test to the US doesn’t validate your Turkey configuration.
Conclusion
Global SMS for gaming works reliably until something needs to change. Migrations, account restructuring, and service upgrades expose the complexity that was previously hidden behind automatic fallbacks and “it just works” behavior.
In this post, we covered how to use RAM sharing to avoid months of re-registration, how to build a country inventory that accounts for regulatory change, and how to navigate the operational pitfalls of migrating production SMS traffic across accounts. The key takeaways:
- Use RAM sharing to avoid months of re-registration. See A Complete Guide to Resource Sharing for AWS End User Messaging for the step-by-step setup.
- Know your country landscape before you start. The country capabilities table is your starting point, but build your own registry with registration details, exact Sender ID values, and decision rationale.
- Respect the details. Case sensitivity, phone pool quotas, RAM batching limits, non-shareable resources, and record retention can each independently block your migration.
- Monitor from day one and plan for regulatory change. Set up delivery tracking before sending production traffic, and track what’s changing in each market.
What matters to players is that their verification code arrives in seconds, every time, regardless of location. The operational discipline described in this post helps make that happen and keeps it working through whatever infrastructure changes come next. Although this post is framed around gaming, the lessons apply broadly. Whether your users are players, shoppers, or account holders, reliable global SMS delivery requires the same operational rigor.
References
- A Complete Guide to Resource Sharing for AWS End User Messaging — AWS Messaging Blog
- Supported countries and regions for SMS messaging — AWS Documentation
- How to Manage Global Sending of SMS with AWS End User Messaging — AWS Messaging Blog
- AWS End User Messaging SMS User Guide — AWS Documentation
- Track OTP Success with AWS End User Messaging SMS Feedback — AWS Messaging Blog