Exploitation of Unpatched Zero-Day Remote Code Execution Vulnerability in Zimbra Collaboration Suite (CVE-2022-41352)

Post Syndicated from Ron Bowes original https://blog.rapid7.com/2022/10/06/exploitation-of-unpatched-zero-day-remote-code-execution-vulnerability-in-zimbra-collaboration-suite-cve-2022-41352/

Exploitation of Unpatched Zero-Day Remote Code Execution Vulnerability in Zimbra Collaboration Suite (CVE-2022-41352)

CVE-2022-41352 is an unpatched remote code execution vulnerability in Zimbra Collaboration Suite discovered in the wild due to active exploitation. The vulnerability is due to the method (cpio) in which Zimbra’s antivirus engine (Amavis) scans inbound emails. Zimbra has provided a workaround, which is to install the pax utility and restart the Zimbra services. Note that pax is installed by default on Ubuntu, so Ubuntu-based Zimbra installations are not vulnerable by default.

Note: This vulnerability, CVE-2022-41352 is effectively identical to CVE-2022-30333 but leverages a different file format (.cpio and .tar as opposed to .rar). It is also a byproduct of a much older (unfixed) vulnerability, CVE-2015-1197. While the original CVE-2015-1197 affects most major Linux distros, our research team found that it is not exploitable unless a secondary application – such as Zimbra, in this case – uses cpio to extract untrusted archives; therefore, this blog is only focusing on Zimbra CVE-2022-41352.

Rapid7 has published technical documentation, including proof-of-concept (PoC) and indicator-of-compromise (IoC) information, regarding CVE-2022-41352 on AttackerKB.

Background

To exploit this vulnerability, an attacker would email a .cpio, .tar, or .rpm to an affected server. When Amavis inspects it for malware, it uses cpio to extract the file. Since cpio has no mode where it can be securely used on untrusted files, the attacker can write to any path on the filesystem that the Zimbra user can access. The most likely outcome is for the attacker to plant a shell in the web root to gain remote code execution, although other avenues likely exist.

As of October 6, 2022, CVE-2022-41352 is not patched, but Zimbra has acknowledged the risk of relying on cpio in a blog post where they recommend mitigations. CVE-2022-41352 was discovered in the wild due to active exploitation. Recently, CISA and others have warned of multiple threat actors leveraging other vulnerabilities in Zimbra, which makes it likely that threat actors would logically move to exploit this latest unpatched vulnerability, too. In August, Rapid7 reported on the active exploitation of multiple vulnerabilities in Zimbra Collaboration Suite.

Affected products

Please note that information on affected versions or requirements for exploitability may change as we learn more about the threat.

To be exploitable, two conditions must exist:

  1. A vulnerable version of cpio must be installed, which is the case on basically every system (see CVE-2015-1197)
  2. The pax utility must not be installed, as Amavis prefers pax and pax is not vulnerable

Unfortunately, pax is not installed by default on Red Hat-based distros, and therefore they are vulnerable by default. We tested all (current) Linux distros that Zimbra officially supports in their default configurations and determined the following:

Linux Distro Vulnerable?
Oracle Linux 8 Vulnerable
Red Hat Enterprise Linux 8 Vulnerable
Rocky Linux 8 Vulnerable
CentOS 8 Vulnerable
Ubuntu 20.04 Not vulnerable (pax is installed by default)
Ubuntu 18.04 Not vulnerable (pax is installed, cpio has Ubuntu’s custom patch)

Zimbra says that their plan is to remove the dependency on cpio entirely by making pax a prerequisite for Zimbra Collaboration Suite. Moving to pax is the best option since cpio cannot be used securely (because most major operating systems removed a security patch).

Mitigation

Organizations that use an impacted version of Zimbra Collaboration Suite should apply their recommended workaround, which is to install the pax archive utility, then restart Zimbra or reboot while monitoring for further software updates from Zimbra.

Rapid7 customers

InsightVM and Nexpose customers will be able to assess their exposure to CVE-2022-41352 via an authenticated vulnerability check (supported by Agent- and Scanner-based assessments) expected to be available in the October 6 content release. This check will identify systems with an affected version of Zimbra Collaboration Suite installed where the pax package is not available.

NEVER MISS A BLOG

Get the latest stories, expertise, and news about security today.

Ingest streaming data to Apache Hudi tables using AWS Glue and Apache Hudi DeltaStreamer

Post Syndicated from Vishal Pathak original https://aws.amazon.com/blogs/big-data/ingest-streaming-data-to-apache-hudi-tables-using-aws-glue-and-apache-hudi-deltastreamer/

In today’s world with technology modernization, the need for near-real-time streaming use cases has increased exponentially. Many customers are continuously consuming data from different sources, including databases, applications, IoT devices, and sensors. Organizations may need to ingest that streaming data into data lakes built on Amazon Simple Storage Service (Amazon S3). You may also need to achieve analytics and machine learning (ML) use cases in near-real time. To ensure consistent results in those near-real-time streaming use cases, incremental data ingestion and atomicity, consistency, isolation, and durability (ACID) properties on data lakes have been a common ask.

To address such use cases, one approach is to use Apache Hudi and its DeltaStreamer utility. Apache Hudi is an open-source data management framework designed for data lakes. It simplifies incremental data processing by enabling ACID transactions and record-level inserts, updates, and deletes of streaming ingestion on data lakes built on top of Amazon S3. Hudi is integrated with well-known open-source big data analytics frameworks, such as Apache Spark, Apache Hive, Presto, and Trino, as well as with various AWS analytics services like AWS Glue, Amazon EMR, Amazon Athena, and Amazon Redshift. The DeltaStreamer utility provides an easy way to ingest streaming data from sources like Apache Kafka into your data lake.

This post describes how to run the DeltaStreamer utility on AWS Glue to read streaming data from Amazon Managed Streaming for Apache Kafka (Amazon MSK) and ingest the data into S3 data lakes. AWS Glue is a serverless data integration service that makes it easy to discover, prepare, and combine data for analytics, ML, and application development. With AWS Glue, you can create Spark, Spark Streaming, and Python shell jobs to extract, transform, and load (ETL) data. You can create AWS Glue Spark streaming ETL jobs using either Scala or PySpark that run continuously, consuming data from Amazon MSK, Apache Kafka, and Amazon Kinesis Data Streams and writing it to your target.

Solution overview

To demonstrate the DeltaStreamer utility, we use fictional product data that represents product inventory including product name, category, quantity, and last updated timestamp. Let’s assume we stream the data from data sources to an MSK topic. Now we want to ingest this data coming from the MSK topic into Amazon S3 so that we can run Athena queries to analyze business trends in near-real time.

The following diagram provides the overall architecture of the solution described in this post.

To simulate application traffic, we use Amazon Elastic Compute Cloud (Amazon EC2) to send sample data to an MSK topic. Amazon MSK is a fully managed service that makes it easy to build and run applications that use Apache Kakfa to process streaming data. To consume the streaming data from Amazon MSK, we set up an AWS Glue streaming ETL job that uses the Apache Hudi Connector 0.10.1 for AWS Glue 3.0, with the DeltaStreamer utility to write the ingested data to Amazon S3. The Apache Hudi Connector 0.9.0 for AWS Glue 3.0 also supports the DeltaStreamer utility.

As the data is being ingested, the AWS Glue streaming job writes the data into the Amazon S3 base path. The data in Amazon S3 is cataloged using the AWS Glue Data Catalog. We then use Athena, which is an interactive query service, to query and analyze the data using standard SQL.

Prerequisites

We use an AWS CloudFormation template to provision some resources for our solution. The template requires you to select an EC2 key pair. This key is configured on an EC2 instance that lives in the public subnet. We use this EC2 instance to ingest data to the MSK cluster running in a private subnet. Make sure you have a key in the AWS Region where you deploy the template. If you don’t have one, you can create a new key pair.

Create the Apache Hudi connection

To add the Apache Hudi Connector for AWS Glue, complete the following steps:

  1. On the AWS Glue Studio console, choose Connectors.
  2. Choose Go to AWS Marketplace.
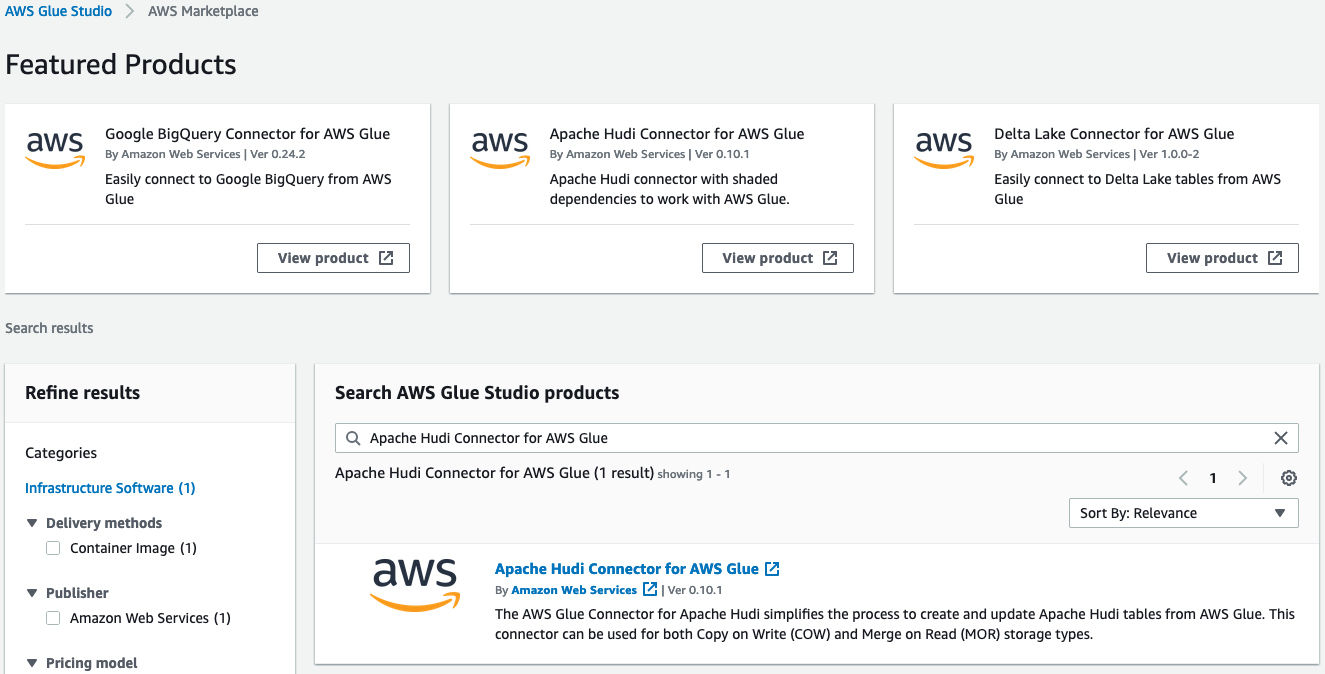
  3. Search for and choose Apache Hudi Connector for AWS Glue.
  4. Choose Continue to Subscribe.
  5. Review the terms and conditions, then choose Accept Terms.

    After you accept the terms, it takes some time to process the request.
    When the subscription is complete, you see the Effective date populated next to the product.
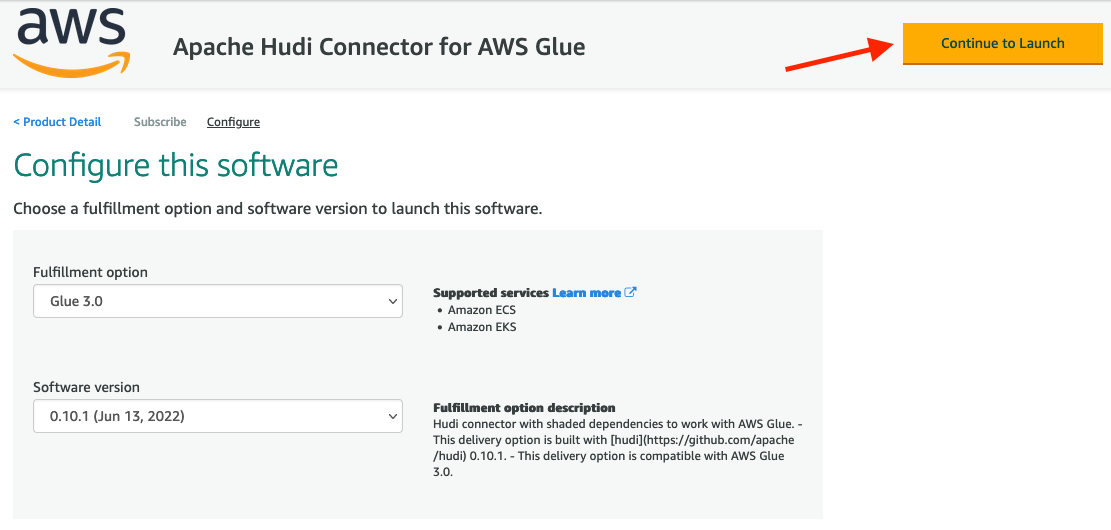
  6. Choose Continue to Configuration.
  7. For Fulfillment option, choose Glue 3.0.
  8. For Software version, choose 0.10.1.
  9. Choose Continue to Launch.
  10. Choose Usage instructions, and then choose Activate the Glue connector from AWS Glue Studio.

    You’re redirected to AWS Glue Studio.
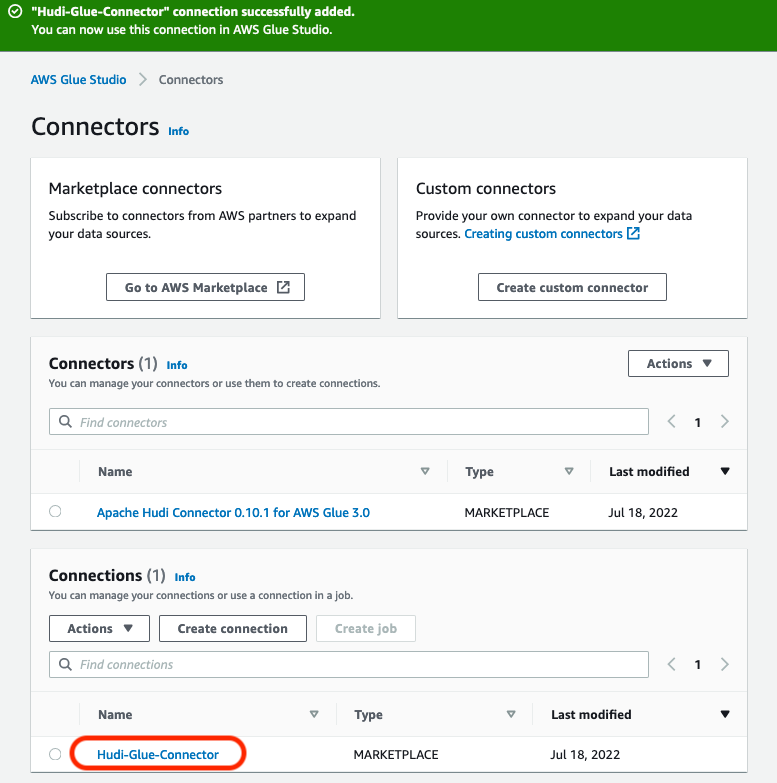
  11. For Name, enter Hudi-Glue-Connector.
  12. Choose Create connection and activate connector.

A message appears that the connection was successfully created. Verify that the connection is visible on the AWS Glue Studio console.

Launch the CloudFormation stack

For this post, we provide a CloudFormation template to create the following resources:

  • VPC, subnets, security groups, and VPC endpoints
  • AWS Identity and Access Management (IAM) roles and policies with required permissions
  • An EC2 instance running in a public subnet within the VPC with Kafka 2.12 installed and with the source data initial load and source data incremental load JSON files
  • An Amazon MSK server running in a private subnet within the VPC
  • An AWS Glue Streaming DeltaStreamer job to consume the incoming data from the Kafka topic and write it to Amazon S3
  • Two S3 buckets: one of the buckets stores code and config files, and other is the target for the AWS Glue streaming DeltaStreamer job

To create the resources, complete the following steps:

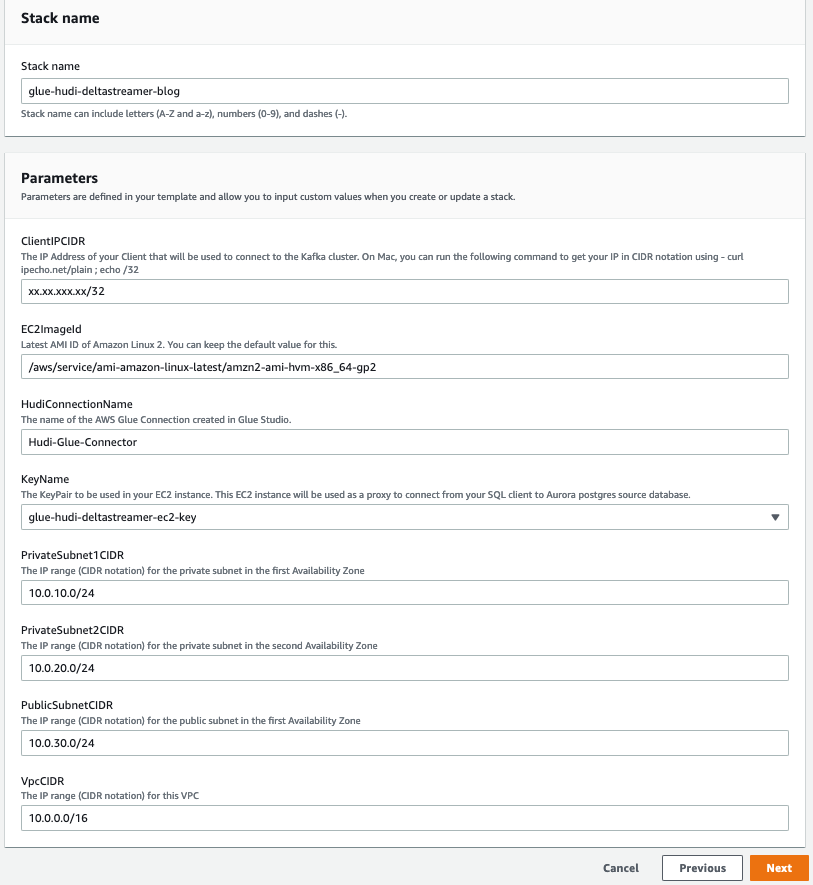
  1. Choose Launch Stack:
  2. For Stack name, enter hudi-deltastreamer-glue-blog.
  3. For ClientIPCIDR, enter the IP address of your client that you use to connect to the EC2 instance.
  4. For HudiConnectionName, enter the AWS Glue connection you created earlier (Hudi-Glue-Connector).
  5. For KeyName, choose the name of the EC2 key pair that you created as a prerequisite.
  6. For VpcCIDR, leave as is.
  7. Choose Next.
  8. Choose Next.
  9. On the Review page, select I acknowledge that AWS CloudFormation might create IAM resources with custom names.
  10. Choose Create stack.

After the CloudFormation template is complete and the resources are created, the Outputs tab shows the following information:

  • HudiDeltastreamerGlueJob – The AWS Glue streaming job name
  • MSKCluster – The MSK cluster ARN
  • PublicIPOfEC2InstanceForTunnel – The public IP of the EC2 instance for tunnel
  • TargetS3Bucket – The S3 bucket name

Create a topic in the MSK cluster

Next, SSH to Amazon EC2 using the key pair you created and run the following commands:

  1. SSH to the EC2 instance as ec2-user:
    ssh -i <KeyName> ec2-user@<PublicIPOfEC2InstanceForTunnel>

    You can get the KeyName value on the Parameters tab and the public IP of the EC2 instance for tunnel on the Outputs tab of the CloudFormation stack.

  2. For the next command, retrieve the bootstrap server endpoint of the MSK cluster by navigating to msk-source-cluster on the Amazon MSK console and choosing View client information.
  3. Run the following command to create the topic in the MSK cluster hudi-deltastream-demo:
    ./kafka_2.12-2.6.2/bin/kafka-topics.sh --create \
    --topic hudi-deltastream-demo \
    --bootstrap-server "<replace text with value under private endpoint on MSK>" \
    --partitions 1 \
    --replication-factor 2 \
    --command-config ./config_file.txt

  4. Ingest the initial data from the deltastreamer_initial_load.json file into the Kafka topic:
    ./kafka_2.12-2.6.2/bin/kafka-console-producer.sh \
    --broker-list "<replace text with value under private endpoint on MSK>" \
    --topic hudi-deltastream-demo \
    --producer.config ./config_file.txt < deltastreamer_initial_load.json

The following is the schema of a record ingested into the Kafka topic:

{
  "type":"record",
  "name":"products",
  "fields":[{
     "name": "id",
     "type": "int"
  }, {
     "name": "category",
     "type": "string"
  }, {
     "name": "ts",
     "type": "string"
  },{
     "name": "name",
     "type": "string"
  },{
     "name": "quantity",
     "type": "int"
  }
]}

The schema uses the following parameters:

  • id – The product ID
  • category – The product category
  • ts – The timestamp when the record was inserted or last updated
  • name – The product name
  • quantity – The available quantity of the product in the inventory

The following code gives an example of a record:

{
    "id": 1, 
    "category": "Apparel", 
    "ts": "2022-01-02 10:29:00", 
    "name": "ABC shirt", 
    "quantity": 4
}

Start the AWS Glue streaming job

To start the AWS Glue streaming job, complete the following steps:

  1. On the AWS Glue Studio console, find the job with the value for HudiDeltastreamerGlueJob.
  2. Choose the job to review the script and job details.
  3. On the Job details tab, replace the value of the --KAFKA_BOOTSTRAP_SERVERS key with the Amazon MSK bootstrap server’s private endpoint.
  4. Choose Save to save the job settings.
  5. Choose Run to start the job.

When the AWS Glue streaming job runs, the records from the MSK topic are consumed and written to the target S3 bucket created by AWS CloudFormation. To find the bucket name, check the stack’s Outputs tab for the TargetS3Bucket key value.

The data in Amazon S3 is stored in Parquet file format. In this example, the data written to Amazon S3 isn’t partitioned, but you can enable partitioning by specifying hoodie.datasource.write.partitionpath.field=<column_name> as the partition field and setting hoodie.datasource.write.hive_style_partitioning to True in the Hudi configuration property in the AWS Glue job script.

In this post, we write the data to a non-partitioned table, so we set the following two Hudi configurations:

  • hoodie.datasource.hive_sync.partition_extractor_class is set to org.apache.hudi.hive.NonPartitionedExtractor
  • hoodie.datasource.write.keygenerator.class is set to org.apache.hudi.keygen.NonpartitionedKeyGenerator

DeltaStreamer options and configuration

DeltaStreamer has multiple options available; the following are the options set in the AWS Glue streaming job used in this post:

  • continuous – DeltaStreamer runs in continuous mode running source-fetch.
  • enable-hive-sync – Enables table sync to the Apache Hive Metastore.
  • schemaprovider-class – Defines the class for the schema provider to attach schemas to the input and target table data.
  • source-class – Defines the source class to read data and has many built-in options.
  • source-ordering-field – The field used to break ties between records with the same key in input data. Defaults to ts (the Unix timestamp of record).
  • target-base-path – Defines the path for the target Hudi table.
  • table-type – Indicates the Hudi storage type to use. In this post, it’s set to COPY_ON_WRITE.

The following are some of the important DeltaStreamer configuration properties set in the AWS Glue streaming job:

# Schema provider props (change to absolute path based on your installation)
hoodie.deltastreamer.schemaprovider.source.schema.file=s3://" + args("CONFIG_BUCKET") + "/artifacts/hudi-deltastreamer-glue/config/schema.avsc
hoodie.deltastreamer.schemaprovider.target.schema.file=s3://" + args("CONFIG_BUCKET") + "/artifacts/hudi-deltastreamer-glue/config/schema.avsc

# Kafka Source
hoodie.deltastreamer.source.kafka.topic=hudi-deltastream-demo

#Kafka props
bootstrap.servers=args("KAFKA_BOOTSTRAP_SERVERS")
auto.offset.reset=earliest
security.protocol=SSL

The configuration contains the following details:

  • hoodie.deltastreamer.schemaprovider.source.schema.file – The schema of the source record
  • hoodie.deltastreamer.schemaprovider.target.schema.file – The schema for the target record.
  • hoodie.deltastreamer.source.kafka.topic – The source MSK topic name
  • bootstap.servers – The Amazon MSK bootstrap server’s private endpoint
  • auto.offset.reset – The consumer’s behavior when there is no committed position or when an offset is out of range

Hudi configuration

The following are some of the important Hudi configuration options, which enable us to achieve in-place updates for the generated schema:

  • hoodie.datasource.write.recordkey.field – The record key field. This is the unique identifier of a record in Hudi.
  • hoodie.datasource.write.precombine.field – When two records have the same record key value, Apache Hudi picks the one with the largest value for the pre-combined field.
  • hoodie.datasource.write.operation – The operation on the Hudi dataset. Possible values include UPSERT, INSERT, and BULK_INSERT.

AWS Glue Data Catalog table

The AWS Glue job creates a Hudi table in the Data Catalog mapped to the Hudi dataset on Amazon S3. Because the hoodie.datasource.hive_sync.table configuration parameter is set to product_table, the table is visible under the default database in the Data Catalog.

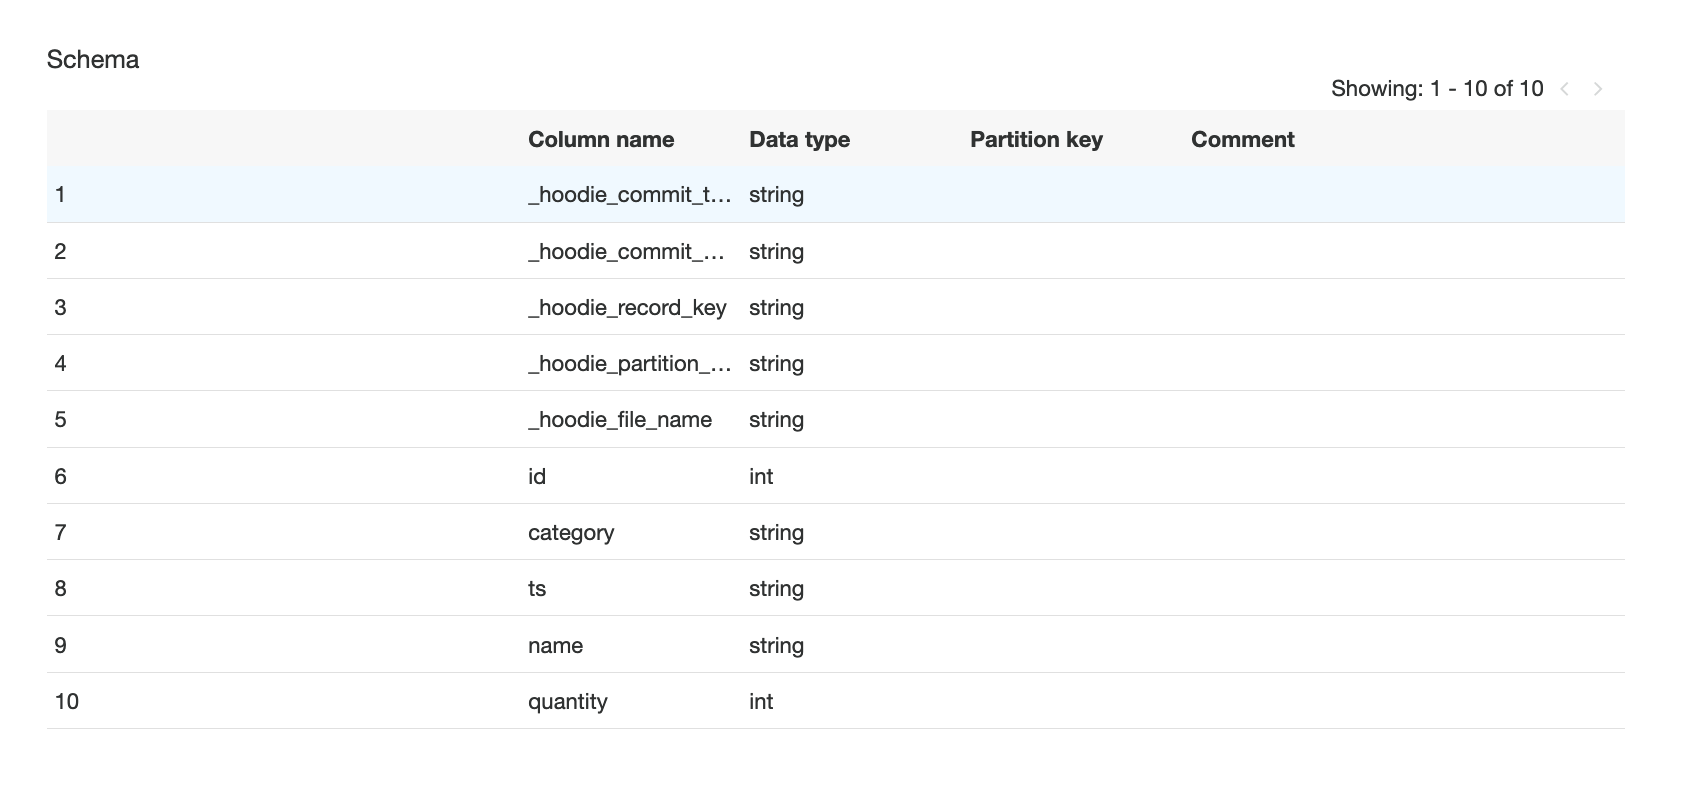
The following screenshot shows the Hudi table column names in the Data Catalog.

Query the data using Athena

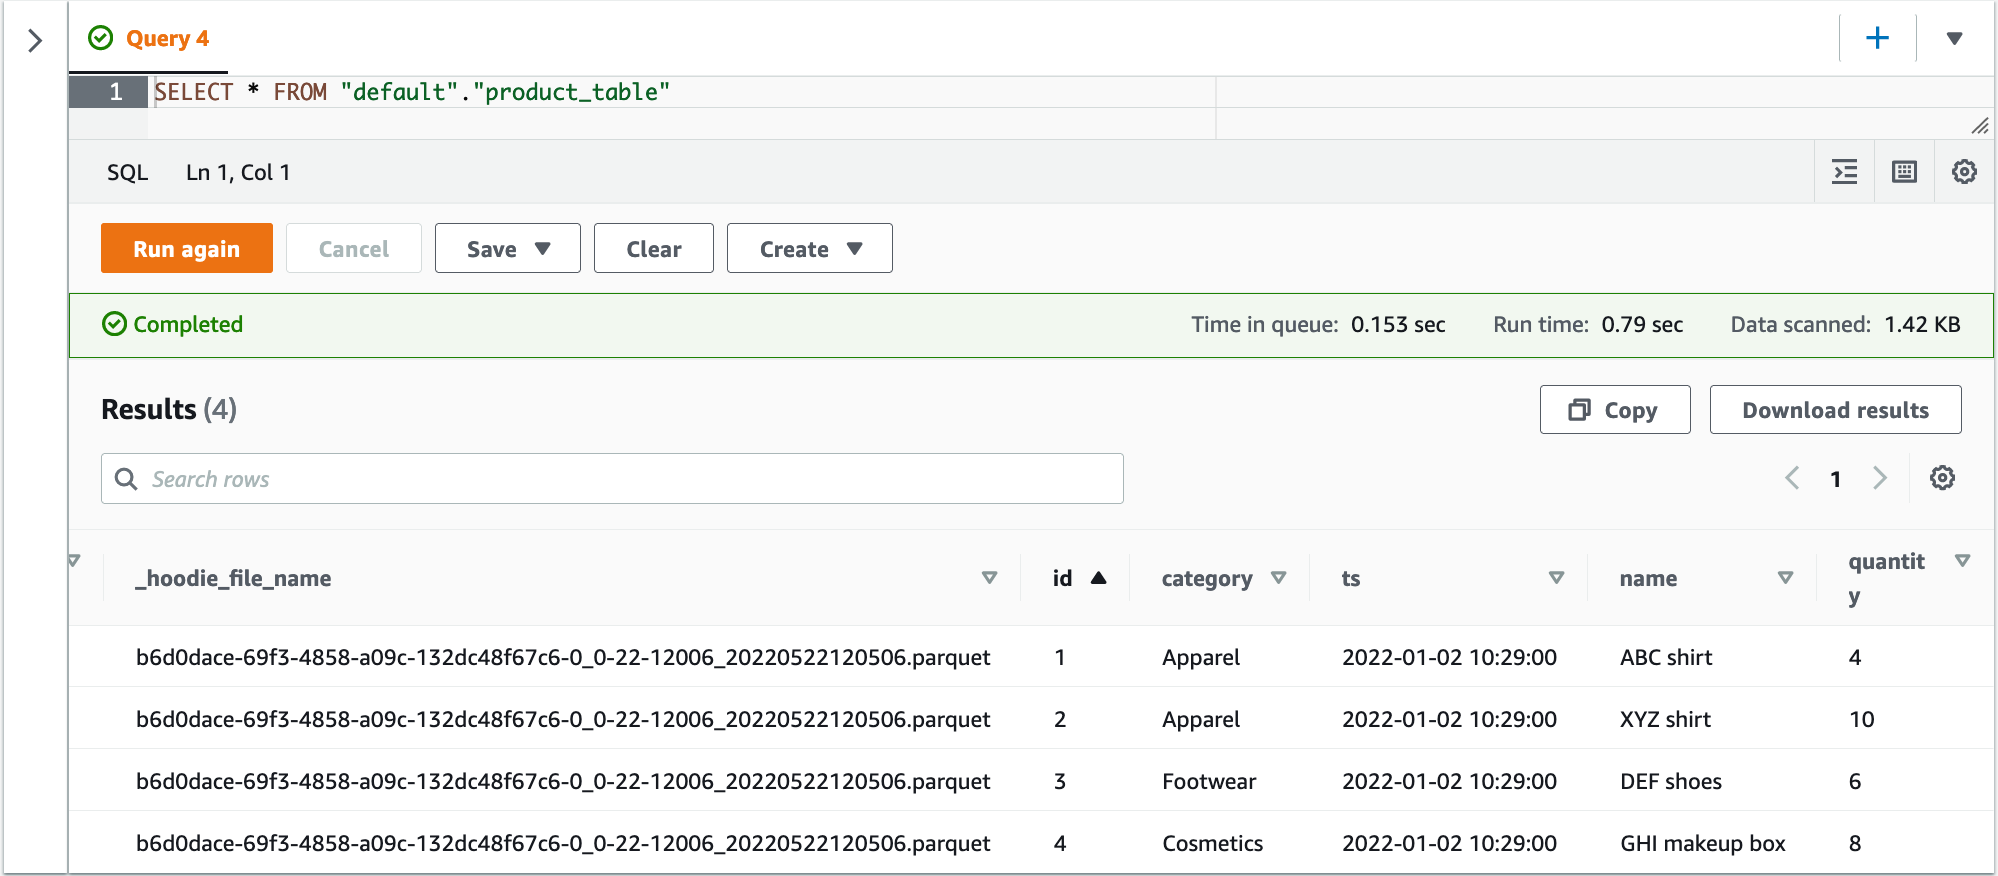
With the Hudi datasets available in Amazon S3, you can query the data using Athena. Let’s use the following query:

SELECT * FROM "default"."product_table";

The following screenshot shows the query output. The table product_table has four records from the initial ingestion: two records for the category Apparel, one for Cosmetics, and one for Footwear.

Load incremental data into the Kafka topic

Now suppose that the store sold some quantity of apparel and footwear and added a new product to its inventory, as shown in the following code. The store sold two items of product ID 1 (Apparel) and one item of product ID 3 (Footwear). The store also added the Cosmetics category, with product ID 5.

{"id": 1, "category": "Apparel", "ts": "2022-01-02 10:45:00", "name": "ABC shirt", "quantity": 2}
{"id": 3, "category": "Footwear", "ts": "2022-01-02 10:50:00", "name": "DEF shoes", "quantity": 5}
{"id": 5, "category": "Cosmetics", "ts": "2022-01-02 10:55:00", "name": "JKL Lip gloss", "quantity": 7}

Let’s ingest the incremental data from the deltastreamer_incr_load.json file to the Kafka topic and query the data from Athena:

./kafka_2.12-2.6.2/bin/kafka-console-producer.sh \
--broker-list "<replace text with value under private endpoint on MSK>" \
--topic hudi-deltastream-demo \
--producer.config ./config_file.txt < deltastreamer_incr_load.json

Within a few seconds, you should see a new Parquet file created in the target S3 bucket under the product_table prefix. The following is the screenshot from Athena after the incremental data ingestion showing the latest updates.

Additional considerations

There are some hard-coded Hudi options in the AWS Glue Streaming job scripts. These options are set for the sample table that we created for this post, so update the options based on your workload.

Clean up

To avoid any incurring future charges, delete the CloudFormation stack, which deletes all the underlying resources created by this post, except for the product_table table created in the default database. Manually delete the product_table table under the default database from the Data Catalog.

Conclusion

In this post, we illustrated how you can add the Apache Hudi Connector for AWS Glue and perform streaming ingestion into an S3 data lake using Apache Hudi DeltaStreamer with AWS Glue. You can use the Apache Hudi Connector for AWS Glue to create a serverless streaming pipeline using AWS Glue streaming jobs with the DeltaStreamer utility to ingest data from Kafka. We demonstrated this by reading the latest updated data using Athena in near-real time.

As always, AWS welcomes feedback. If you have any comments or questions on this post, please share them in the comments.


About the authors

Vishal Pathak is a Data Lab Solutions Architect at AWS. Vishal works with customers on their use cases, architects solutions to solve their business problems, and helps them build scalable prototypes. Prior to his journey in AWS, Vishal helped customers implement business intelligence, data warehouse, and data lake projects in the US and Australia.

Noritaka Sekiyama is a Principal Big Data Architect on the AWS Glue team. He enjoys learning different use cases from customers and sharing knowledge about big data technologies with the wider community.

Anand Prakash is a Senior Solutions Architect at AWS Data Lab. Anand focuses on helping customers design and build AI/ML, data analytics, and database solutions to accelerate their path to production.

Welcoming Chief Human Resources Officer Robert Fitt to Backblaze

Post Syndicated from Patrick Thomas original https://www.backblaze.com/blog/welcoming-chief-human-resources-officer-robert-fitt-to-backblaze/

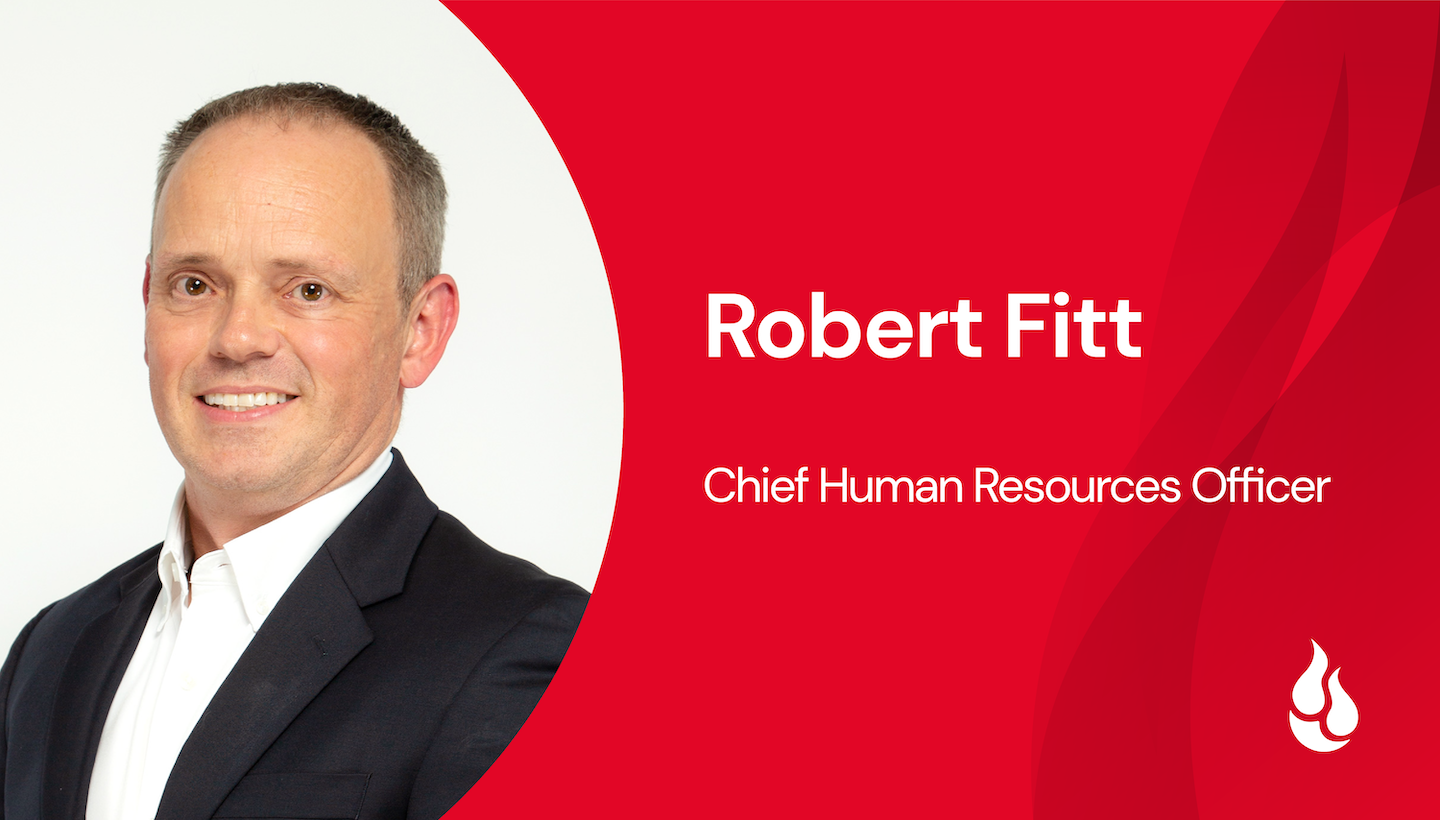
Backblaze is happy to announce that Robert Fitt has joined our team as our first Chief Human Resources Officer (CHRO). Robert will lead the company’s strategic advancement for all aspects of human resources (HR), including hiring, people management and development, engagement, health and wellness initiatives, and outreach to the community.

We’re Growing—But We’re Still The Same Backblaze

Backblaze is recognized for talent retention and company culture—in the past few years we’ve received numerous awards for culture, diversity, and leadership from places like Comparably, Inc., Great Place to Work, and others. The addition of a seasoned CHRO will help us to continue this excellent trend as well as enabling our next phase of growth initiatives following our recent IPO in November 2021.

“Culture is critical in times of rapid growth and we want to continue scaling our world-class organization and great team alongside our growth as the leading independent storage cloud.” Gleb Budman, our CEO and Chairperson commented. “Robert is an experienced leader with the skills to help us do that. We are excited to welcome him to Backblaze.”

The Skills Robert Brings to Backblaze

Robert has a long track record of success in helping organizations scale rapidly while also championing healthy company culture. His executive experience includes leading HR functions at Turntide Technologies, 360 Behavioral Health, Mobilite, Broadcom Corporation and others. Additionally, Robert founded and managed Green Talent Co, an independent talent and HR advisory firm. Robert has scaled and led HR teams across the US, Canada, Asia, and Europe in software, hardware, telecomms, and healthcare industries. He brings a people first philosophy to everything he does, and is fiercely passionate about the employee and candidate experience.

“I’m proud to be joining a company that is committed to developing talent at all levels of the organization,” Robert said in reference to joining Backblaze. “I’m looking forward to working with leaders who have been recognized for promoting diversity, culture, and inclusion as we continue to focus on people and culture as a strategic priority.”

Robert earned his bachelor’s degree in Human Resources Management from Staffordshire University, and his Master’s degree in employment law from the University of East Anglia. He also volunteers as a pro bono HR consultant for Catchafire, a social good platform that matches professionals with nonprofits to volunteer their services.

Originally from the UK, Robert and his family hit the road 14 years ago and he is now based in Los Angeles, where he resides with wife, three boys, (ages 8, 17, 20) and two dogs. Taking advantage of the wonderful Southern California weather, Robert enjoys keeping fit, cycling, and sharing his eclectic music taste.

Backblaze Is Hiring

From day one, Backblaze has worked hard to bring our values to life, creating a transparent, sustainable, innovative (and dare we say flat-out good) place to work. Want to join the team? Check out our open opportunities.

The post Welcoming Chief Human Resources Officer Robert Fitt to Backblaze appeared first on Backblaze Blog | Cloud Storage & Cloud Backup.

Announcing Tech Day ‘22: Live Tech Talks, Demos, and Dialogues

Post Syndicated from Amrit Singh original https://www.backblaze.com/blog/announcing-tech-day-22-live-tech-talks-demos-and-dialogues/

For those looking to build and grow blazing applications and do more with their data, we’d like to welcome you to this year’s Tech Day ‘22. We have a great community that works with Backblaze B2 Cloud Storage, including our internal team, IT professionals, developers, tech decision makers, cloud partners and more—and we felt it was high time to bring you all together again to share ideas, discuss upcoming changes, win some swag, and network.

Join our Technical Evangelists in live interactive sessions, demos, and tech talks that help you unlock your cloud potential and put B2 Cloud Storage to work for you. Whatever your role in the tech world—or if you’re simply curious about leveraging the Backblaze B2 platform—we invite you to join us!

➔ Register Now

Here’s What to Expect at Tech Day ’22

Tech Day ’22 is happening October 31, 10 a.m. PT. Can’t make it? Sign up anyway and we’ll share the event recording straight to your inbox.

IaaS Unboxed

A live chat about leveraging the independent cloud ecosystem for storage, compute, delivery, and backup, along with a customer showcase.

Sneak Peek

An early look at the Q3 2022 Drive Stats data with Andy Klein as he walks through the latest learnings to inform your thinking and purchase decisions.

Hands-On Demos

Pat Patterson (Chief Technical Evangelist), and Greg Hamer (Senior Developer Evangelist) team up to facilitate an action-packed set of interactive sessions aimed at helping you do more in the cloud. If you don’t have an account already, you’ll definitely want to create a free Backblaze B2 account so you can follow along. All you need to do is sign up with your email and create a password—it’s really that easy.

  • Scaling a Social App with Appwrite: Appwrite is a self-hosted backend-as-a-service platform that provides developers with all the core APIs required to build any application. Appwrite’s storage abstraction allows developers to store project files in a range of devices, including Backblaze B2. In this session, you’ll learn how to get started with Appwrite, and quickly build a social app that stores user-generated content in a Backblaze B2 Bucket.
  • Go Serverless with Fastly Compute@Edge: Fastly has long been a Backblaze partner—mutual customers are able to serve assets stored in Backblaze B2 Buckets via Fastly’s global content delivery network with zero download charges from Backblaze B2. Compute@Edge leverages Fastly’s network to enable developers to create high-scale, globally-distributed applications, and execute code at the edge. Discover how to build a simple serverless application in JavaScript and deploy it globally with a single command.
  • Provisioning Resources with the Backblaze B2 Terraform Provider: Hashicorp Terraform is an open-source infrastructure-as-code software tool that enables you to safely and predictably create, change, and improve infrastructure. Learn how our Terraform Provider unlocks Backblaze B2’s capabilities for DevOps engineers, allowing you to create, list, and delete Buckets and application keys, as well as upload and download objects.
  • Storing and Querying Analytical Data with Trino: Trino is a SQL-compliant query engine that supports a wide range of business intelligence and analytical tools, allowing you to write queries against structured and semi-structured data in a variety of formats and storage locations. We’ll share how we optimized Backblaze’s Drive Stats data for queries and used Trino to gain new insights into nine years of real-world data.

And So Much More

Join the live Q&A and our user community of tech leaders, IT pros, and developers like you. Register for free to grab your spot (and swag) and we’ll see you on October 31.

➔ Register Now

The post Announcing Tech Day ‘22: Live Tech Talks, Demos, and Dialogues appeared first on Backblaze Blog | Cloud Storage & Cloud Backup.

Data ethics for computing education through ballet and biometrics

Post Syndicated from Sue Sentance original https://www.raspberrypi.org/blog/data-ethics-computing-education-ballet-biometrics-research-seminar/

For our seminar series on cross-disciplinary computing, it was a delight to host Genevieve Smith-Nunes this September. Her research work involving ballet and augmented reality was a perfect fit for our theme.

Genevieve Smith-Nunes.
Genevieve Smith-Nunes

Genevieve has a background in classical ballet and was also a computing teacher for several years before starting Ready Salted Code, an educational initiative around data-driven dance. She is now coming to the end of her doctoral studies at the University of Cambridge, in which she focuses on raising awareness of data ethics using ballet and brainwave data as narrative tools, working with student Computing teachers.

Why dance and computing?

You may be surprised that there are links between dance, particularly ballet, and computing. Genevieve explained that classical ballet has a strict repetitive routine, using rule-based choreography and algorithms. Her work on data-driven dance had started at the time of the announcement of the new Computing curriculum in England, when she realised the lack of gender balance in her computing classroom. As an expert in both ballet and computing, she was driven by a desire to share the more creative elements of computing with her learners.

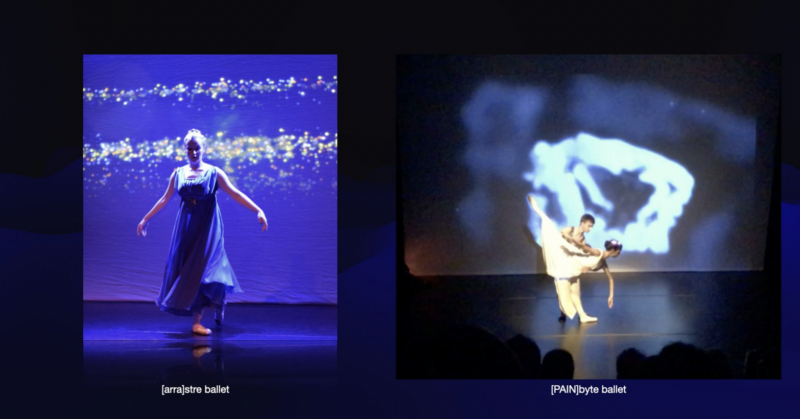
Two photographs of data-driven ballets.
Two of Genevieve’s data-driven ballet dances: [arra]stre and [PAIN]byte

Genevieve has been working with a technologist and a choreographer for several years to develop ballets that generate biometric data and include visualisation of such data — hence her term ‘data-driven dance’. This has led to her developing a second focus in her PhD work on how Computing students can discuss questions of ethics based on the kind of biometric and brainwave data that Genevieve is collecting in her research. Students need to learn about the ethical issues surrounding data as part of their Computing studies, and Genevieve has been working with student teachers to explore ways in which her research can be used to give examples of data ethics issues in the Computing curriculum.

Collecting data during dances

Throughout her talk, Genevieve described several examples of dances she had created. One example was [arra]stre, a project that involved a live performance of a dance, plus a series of workshops breaking down the computer science theory behind the performance, including data visualisation, wearable technology, and images triggered by the dancers’ data.

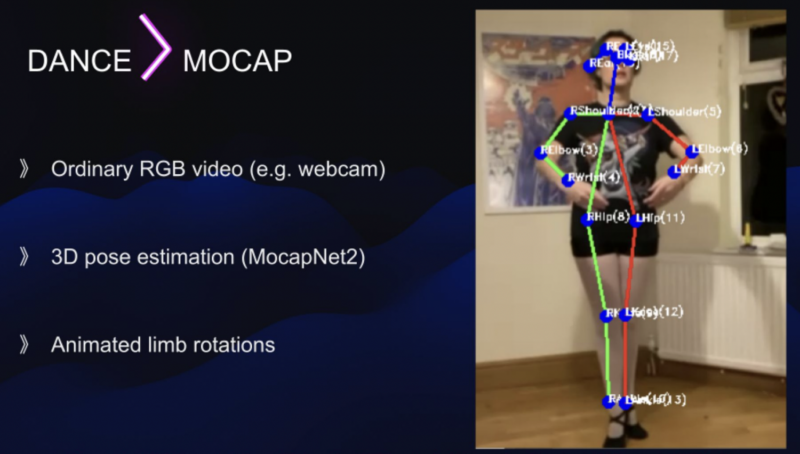
A presentation slide describing technologies necessary for motion capture of ballet.

Much of Genevieve’s seminar was focused on the technologies used to capture movement data from the dancers and the challenges this involves. For example, some existing biometric tools don’t capture foot movement — which is crucial in dance — and also can’t capture movements when dancers are in the air. For some of Genevieve’s projects, dancers also wear headsets that allow collection of brainwave data.

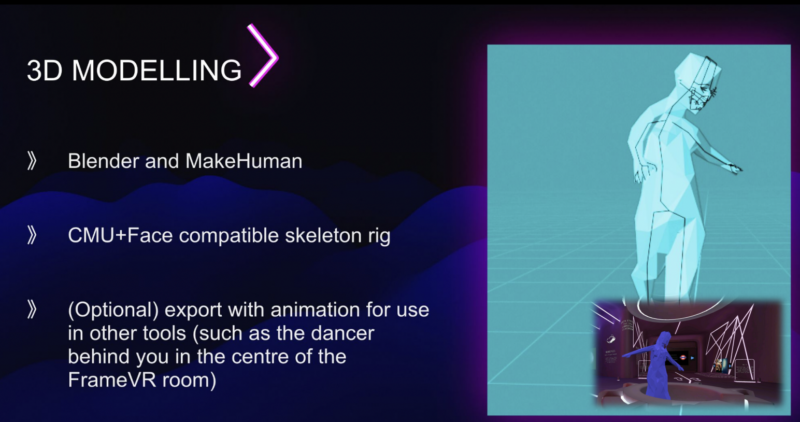
A presentation slide describing technologies necessary for turning motion capture data into 3D models.

Due to interruptions to her research design caused by the COVID-19 pandemic, much of Genevieve’s PhD research took place online via video calls. New tools had to be created to capture dance performances within a digital online setting. Her research uses webcams and mobile phones to record the biometric data of dancers at 60 frames per second. A number of processes are then followed to create a digital representation of the dance: isolating the dancer in the raw video; tracking the skeleton data; using post pose estimation machine learning algorithms; and using additional software to map the joints to the correct place and rotation.

A presentation slide describing technologies necessary turning a 3D computer model into an augmented reality object.

Are your brainwaves personal data?

It’s clear from Genevieve’s research that she is collecting a lot of data from her research participants, particularly the dancers. The projects include collecting both biometric data and brainwave data. Ethical issues tied to brainwave data are part of the field of neuroethics, which comprises the ethical questions raised by our increasing understanding of the biology of the human brain.

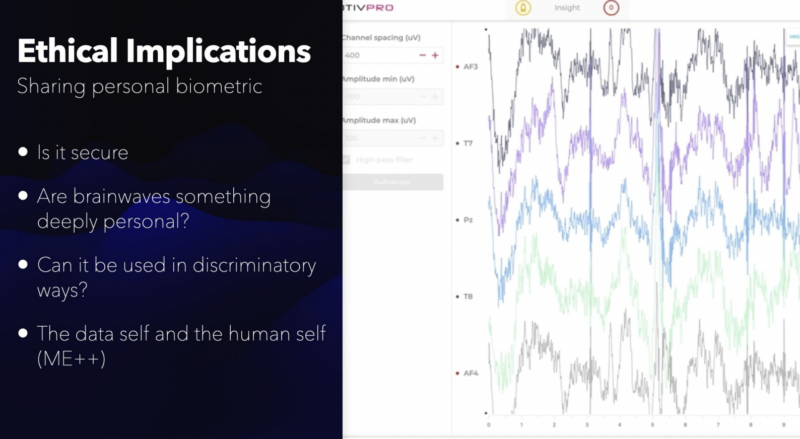
A graph of brainwaves placed next to ethical questions related to brainwave data.

Teaching learners to be mindful about how to work with personal data is at the core of the work that Genevieve is doing now. She mentioned that there are a number of ethics frameworks that can be used in this area, and highlighted the UK government’s Data Ethics Framework as being particularly straightforward with its three guiding principles of transparency, accountability, and fairness. Frameworks such as this can help to guide a classroom discussion around the security of the data, and whether the data can be used in discriminatory ways.

Brainwave data visualisation using the Emotiv software.

Data ethics provides lots of material for discussion in Computing classrooms. To exemplify this, Genevieve recorded her own brainwaves during dance, research, and rest activities, and then shared the data during workshops with student computing teachers. In our seminar Genevieve showed two visualisations of her own brainwave data (see the images above) and discussed how the student computing teachers in her workshops had felt that one was more “personal” than the other. The same brainwave data can be presented as a spreadsheet, or a moving graph, or an image. Student computing teachers felt that the graph data (shown above) felt more medical, and more like permanent personal data than the visualisation (shown above), but that the actual raw spreadsheet data felt the most personal and intrusive.

Watch the recording of Genevieve’s seminar to see her full talk:

You can also access her slides and the links she shared in her talk.

More to explore

There are a variety of online tools you can use to explore augmented reality: for example try out Posenet with the camera of your device.

Genevieve’s seminar used the title ME++, which refers to the data self and the human self: both are important and of equal value. Genevieve’s use of this term is inspired by William J. Mitchell’s book Me++: The Cyborg Self and the Networked City. Within his framing, the I in the digital world is more than the I of the physical world and highlights the posthuman boundary-blurring of the human and non-human. 

Genevieve’s work is also inspired by Luciani Floridi’s philosophical work, and his book Ethics of Information might be something you want to investigate further. You can also read ME++ Data Ethics of Biometrics Through Ballet and AR, a paper by Genevieve about her doctoral work

Join our next seminar

In our final two seminars for this year we are exploring further aspects of cross-disciplinary computing. Just this week, Conrad Wolfram of Wolfram Technologies joined us to present his ideas on maths and a core computational curriculum. We will share a summary and recording of his talk soon.

On 2 November, Tracy Gardner and Rebecca Franks from our team will close out this series by presenting work we have been doing on computing education in non-formal settings. Sign up now to join us for this session:

We will shortly be announcing the theme of a brand-new series of seminars starting in January 2023.  

The post Data ethics for computing education through ballet and biometrics appeared first on Raspberry Pi.

Cloud desktops aren’t as good as you’d think

Post Syndicated from original https://mjg59.dreamwidth.org/61535.html

Fast laptops are expensive, cheap laptops are slow. But even a fast laptop is slower than a decent workstation, and if your developers want a local build environment they’re probably going to want a decent workstation. They’ll want a fast (and expensive) laptop as well, though, because they’re not going to carry their workstation home with them and obviously you expect them to be able to work from home. And in two or three years they’ll probably want a new laptop and a new workstation, and that’s even more money. Not to mention the risks associated with them doing development work on their laptop and then drunkenly leaving it in a bar or having it stolen or the contents being copied off it while they’re passing through immigration at an airport. Surely there’s a better way?

This is the thinking that leads to “Let’s give developers a Chromebook and a VM running in the cloud”. And it’s an appealing option! You spend far less on the laptop, and the VM is probably cheaper than the workstation – you can shut it down when it’s idle, you can upgrade it to have more CPUs and RAM as necessary, and you get to impose all sorts of additional neat security policies because you have full control over the network. You can run a full desktop environment on the VM, stream it to a cheap laptop, and get the fast workstation experience on something that weighs about a kilogram. Your developers get the benefit of a fast machine wherever they are, and everyone’s happy.

But having worked at more than one company that’s tried this approach, my experience is that very few people end up happy. I’m going to give a few reasons here, but I can’t guarantee that they cover everything – and, to be clear, many (possibly most) of the reasons I’m going to describe aren’t impossible to fix, they’re simply not priorities. I’m also going to restrict this discussion to the case of “We run a full graphical environment on the VM, and stream that to the laptop” – an approach that only offers SSH access is much more manageable, but also significantly more restricted in certain ways. With those details mentioned, let’s begin.

The first thing to note is that the overall experience is heavily tied to the protocol you use for the remote display. Chrome Remote Desktop is extremely appealing from a simplicity perspective, but is also lacking some extremely key features (eg, letting you use multiple displays on the local system), so from a developer perspective it’s suboptimal. If you read the rest of this post and want to try this anyway, spend some time working with your users to find out what their requirements are and figure out which technology best suits them.

Second, let’s talk about GPUs. Trying to run a modern desktop environment without any GPU acceleration is going to be a miserable experience. Sure, throwing enough CPU at the problem will get you past the worst of this, but you’re still going to end up with users who need to do 3D visualisation, or who are doing VR development, or who expect WebGL to work without burning up every single one of the CPU cores you so graciously allocated to their VM. Cloud providers will happily give you GPU instances, but that’s going to cost more and you’re going to need to re-run your numbers to verify that this is still a financial win. “But most of my users don’t need that!” you might say, and we’ll get to that later on.

Next! Video quality! This seems like a trivial point, but if you’re giving your users a VM as their primary interface, then they’re going to do things like try to use Youtube inside it because there’s a conference presentation that’s relevant to their interests. The obvious solution here is “Do your video streaming in a browser on the local system, not on the VM” but from personal experience that’s a super awkward pain point! If I click on a link inside the VM it’s going to open a browser there, and now I have a browser in the VM and a local browser and which of them contains the tab I’m looking for WHO CAN SAY. So your users are going to watch stuff inside their VM, and re-compressing decompressed video is going to look like shit unless you’re throwing a huge amount of bandwidth at the problem. And this is ignoring the additional irritation of your browser being unreadable while you’re rapidly scrolling through pages, or terminal output from build processes being a muddy blur of artifacts, or the corner case of “I work for Youtube and I need to be able to examine 4K streams to determine whether changes have resulted in a degraded experience” which is a very real job and one that becomes impossible when you pass their lovingly crafted optimisations through whatever codec your remote desktop protocol has decided to pick based on some random guesses about the local network, and look everyone is going to have a bad time.

The browser experience. As mentioned before, you’ll have local browsers and remote browsers. Do they have the same security policy? Who knows! Are all the third party services you depend on going to be ok with the same user being logged in from two different IPs simultaneously because they lost track of which browser they had an open session in? Who knows! Are your users going to become frustrated? Who knows oh wait no I know the answer to this one, it’s “yes”.

Accessibility! More of your users than you expect rely on various accessibility interfaces, be those mechanisms for increasing contrast, screen magnifiers, text-to-speech, speech-to-text, alternative input mechanisms and so on. And you probably don’t know this, but most of these mechanisms involve having accessibility software be able to introspect the UI of applications in order to provide appropriate input or expose available options and the like. So, I’m running a local text-to-speech agent. How does it know what’s happening in the remote VM? It doesn’t because it’s just getting an a/v stream, so you need to run another accessibility stack inside the remote VM and the two of them are unaware of each others existence and this works just as badly as you’d think. Alternative input mechanism? Good fucking luck with that, you’re at best going to fall back to “Send synthesized keyboard inputs” and that is nowhere near as good as “Set the contents of this text box to this unicode string” and yeah I used to work on accessibility software maybe you can tell. And how is the VM going to send data to a braille output device? Anyway, good luck with the lawsuits over arbitrarily making life harder for a bunch of members of a protected class.

One of the benefits here is supposed to be a security improvement, so let’s talk about WebAuthn. I’m a big fan of WebAuthn, given that it’s a multi-factor authentication mechanism that actually does a good job of protecting against phishing, but if my users are running stuff inside a VM, how do I use it? If you work at Google there’s a solution, but that does mean limiting yourself to Chrome Remote Desktop (there are extremely good reasons why this isn’t generally available). Microsoft have apparently just specced a mechanism for doing this over RDP, but otherwise you’re left doing stuff like forwarding USB over IP, and that means that your USB WebAuthn no longer works locally. It also doesn’t work for any other type of WebAuthn token, such as a bluetooth device, or an Apple TouchID sensor, or any of the Windows Hellow support. If you’re planning on moving to WebAuthn and also planning on moving to remote VM desktops, you’re going to have a bad time.

That’s the stuff that comes to mind immediately. And sure, maybe each of these issues is irrelevant to most of your users. But the actual question you need to ask is what percentage of your users will hit one or more of these, because if that’s more than an insignificant percentage you’ll still be staffing all the teams that dealt with hardware, handling local OS installs, worrying about lost or stolen devices, and the glorious future of just being able to stop worrying about this is going to be gone and the financial benefits you promised would appear are probably not going to work out in the same way.

A lot of this falls back to the usual story of corporate IT – understand the needs of your users and whether what you’re proposing actually meets them. Almost everything I’ve described here is a corner case, but if your company is larger than about 20 people there’s a high probability that at least one person is going to fall into at least one of these corner cases. You’re going to need to spend a lot of time understanding your user population to have a real understanding of what the actual costs are here, and I haven’t seen anyone do that work before trying to launch this and (inevitably) going back to just giving people actual computers.

There are alternatives! Modern IDEs tend to support SSHing out to remote hosts to perform builds there, so as long as you’re ok with source code being visible on laptops you can at least shift the “I need a workstation with a bunch of CPU” problem out to the cloud. The laptops are going to need to be more expensive because they’re also going to need to run more software locally, but it wouldn’t surprise me if this ends up being cheaper than the full-on cloud desktop experience in most cases.

Overall, the most important thing to take into account here is that your users almost certainly have more use cases than you expect, and this sort of change is going to have direct impact on the workflow of every single one of your users. Make sure you know how much that’s going to be, and take that into consideration when suggesting it’ll save you money.

comment count unavailable comments

AWS Local Zones Expansion: Taipei and Delhi

Post Syndicated from Jeff Barr original https://aws.amazon.com/blogs/aws/aws-local-zones-expansion-taipei-and-delhi/

In late 2019 I told you about the AWS Local Zone in Los Angeles, California. In that post I described Local Zones as a new type of AWS infrastructure deployment that brings select AWS services very close to a particular geographic area. A year after that launch, I announced our plans to add 3 more Local Zones in 2020, and 12 more in 2021. Right now, we are working to bring Local Zones to 33 cities in 27 countries including 6 in Latin America.

Applications hosted in a Local Zone benefit from very low (single-digit millisecond) latency access to EC2 instances and other AWS services. Local Zones also give AWS customers additional choices regarding data residency, giving them the ability to store and process sensitive data (often financial or personal in nature) in-country.

Going Global
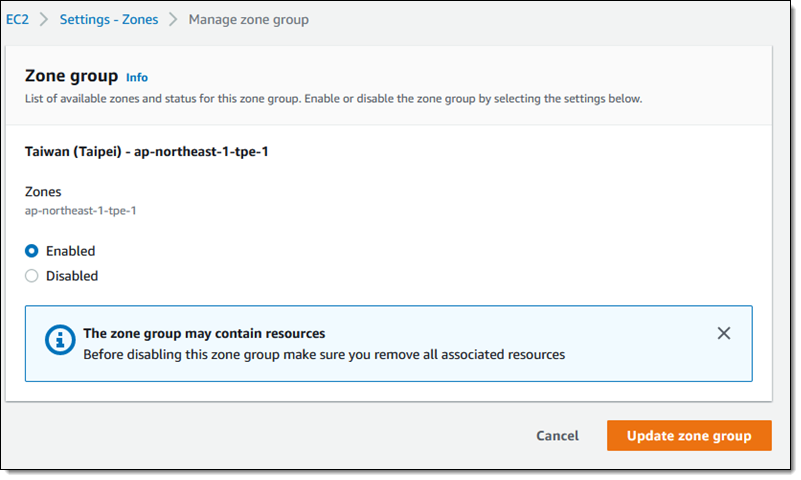
Today I am happy to announce the launch of Local Zones in Taipei (Taiwan) and Delhi (India). Like the existing Local Zones in the US, you start by enabling them in the AWS Management Console:

After you do this, you can launch Amazon Elastic Compute Cloud (Amazon EC2) instances, create Amazon Elastic Block Store (Amazon EBS) volumes,and make use of other services including Amazon Elastic Container Service (Amazon ECS), Amazon Elastic Kubernetes Service (Amazon EKS), and Amazon Virtual Private Cloud (Amazon VPC). The new Local Zones include T3, C5, M5, R5, and G4dn instances in select sizes, along with General Purpose SSD (gp2) EBS volumes.

Local Zones in Action
AWS customers are working to put Local Zones to use. Here are a few use cases:

AdvaHealth Solutions – This digital health care & life sciences company supports radiology, oncology, ophthalmology and other medical imaging applications with AdvaPACS, a cloud-native image archive. The new Local Zones will allow them to deliver diagnostic image data with low latency in order to improve the point-of-care experience for patients and health care providers across Asia, and will also support expansion into new markets.

M2P Fintech specializes in building financial infrastructure and is an API infrastructure platform for Banking, Lending and Payments products. More than 600 Fintechs, 100 Banks & 100 Financial Institutions across MENA and APAC regions rely on M2P’s platform to power their own branded products including category leaders across ride-hailing, food delivery, and credit cards. M2P uses Local Zones instead of bearing the burden of setting up their own data centers and to meet local requirements for data processing and storage.

NaranjaX – This financial services company is the primary credit card issuer in Argentina. They are engaged in a digital transformation with the target of delivering an improved financial solution to their commercial customers, and believe that using Local Zones will give these customers a strategic advantage.

Pluto XR is the developer of the PlutoSphere OS that enables gamers, developers and operators to live stream XR applications to any XR device. In order to deliver a high quality streaming experience, they run their application as close to their end users as possible. The new Local Zones will allow them to serve millions of users in new metro areas

Riot Games is an American video game developer, publisher and entertainment company based in Los Angeles, California. Their games deliver an optimal player experience through ultra low latency for their MOBA (Multiplayer Online Battle Arena) League of Legends and their first-person tactical shooter VALORANT. By deploying their games into Local Zones, Riot is able to serve players at low latency without the need for operating on-premises compute.

Zenga Media is one of the largest media-tech companies in India. They provide live streaming and over-the-top distribution of entertainment content to millions of users globally, while using cloud-based video editing and sharing to process content destined for TV shows, sports broadcasts, news, and movies. They will use Local Zones to provide local connectivity to their editors and customers, thereby speeding processing and delivering a superior video streaming experience to customers.

Local Zones Resources
Here are a few resources to help you learn more about designing, building, and using Local Zones:

I am always interested in hearing about how our customers are making use of Local Zones. Leave me a comment or track me down online and let me know what you are working on!

— Jeff;

[$] NVIDIA and nouveau

Post Syndicated from original https://lwn.net/Articles/910343/

The release of source code for NVIDIA
graphics hardware was perhaps something of a surprise; at least at a quick
glance, it seems
like that could lead to an in-tree, officially supported driver. For many
years, though, the nouveau
project
has been working on an upstream driver for NVIDIA hardware, so an
obvious question is what happens with nouveau in light of the NVIDIA
announcement. Kernel graphics maintainer Dave Airlie gave a talk at the
2022 Linux Plumbers Conference (LPC) to
help shed some light on that subject.

October Is Cybersecurity Awareness Month

Post Syndicated from Bruce Schneier original https://www.schneier.com/blog/archives/2022/10/october-is-cybersecurity-awareness-month.html

For the past nineteen years, October has been Cybersecurity Awareness Month here in the US, and that event that has always been part advice and part ridicule. I tend to fall on the apathy end of the spectrum; I don’t think I’ve ever mentioned it before. But the memes can be funny.

Here’s a decent rundown of some of the chatter.

Join our upcoming live roadshow series: ‘Zero Trust, Zero Nonsense’

Post Syndicated from Selam Negatu original https://blog.cloudflare.com/join-our-upcoming-live-roadshow-series-zero-trust-zero-nonsense/

Join our upcoming live roadshow series: ‘Zero Trust, Zero Nonsense’

Join our upcoming live roadshow series: ‘Zero Trust, Zero Nonsense’

Many companies now believe that Zero Trust is the answer to common perimeter network infrastructure problems. But they sometimes struggle to make the progress they’d like, frequently pushing adoption timelines back.

The most common reason we hear from our customers is: “We aren’t sure how to get started.” There’s a lot of Zero Trust talk in the market, but comparatively little substance — leading to uncertainty about how to proceed.

Businesses need a strategy for tackling Zero Trust adoption and security modernization one step at a time. Cloudflare wants to help. So we’re hosting in-person discussions with security and IT leaders to do just that.

We’re hosting a series of Zero Trust Roadshows in various North American cities. These events will feature Cloudflare executives, industry experts, and other organizations like yours, and focus on ways of breaking the Zero Trust roadmap into manageable pieces, allowing organizations to make steps towards:

  • Augmenting (or replacing) a VPN: Provide simple, secure access to resources and maintain a great employee experience, while mitigating risk of lateral movement—a favorite hacker and ransomware tactic.
  • Streamlining SaaS security: Empower IT with the visibility and controls of SaaS apps and email they deserve to better care for their employees, catching shadow IT, misconfigurations, and business email compromise before it spirals out of control.
  • Strengthening threat and data protection: Keep your data safe against modern threats starting with simple DNS filtering, then extending Zero Trust principles to the Internet and email with remote browser isolation.

We hope you’ll be able to join us. See the full list of events, and register to attend, here.

Bringing the best live video experience to Cloudflare Stream with AV1

Post Syndicated from Renan Dincer original https://blog.cloudflare.com/av1-cloudflare-stream-beta/

Bringing the best live video experience to Cloudflare Stream with AV1

Bringing the best live video experience to Cloudflare Stream with AV1

Consumer hardware is pushing the limits of consumers’ bandwidth.

VR headsets support 5760 x 3840 resolution — 22.1 million pixels per frame of video. Nearly all new TVs and smartphones sold today now support 4K — 8.8 million pixels per frame. It’s now normal for most people on a subway to be casually streaming video on their phone, even as they pass through a tunnel. People expect all of this to just work, and get frustrated when it doesn’t.

Consumer Internet bandwidth hasn’t kept up. Even advanced mobile carriers still limit streaming video resolution to prevent network congestion. Many mobile users still have to monitor and limit their mobile data usage. Higher Internet speeds require expensive infrastructure upgrades, and 30% of Americans still say they often have problems simply connecting to the Internet at home.

We talk to developers every day who are pushing up against these limits, trying to deliver the highest quality streaming video without buffering or jitter, challenged by viewers’ expectations and bandwidth. Developers building live video experiences hit these limits the hardest — buffering doesn’t just delay video playback, it can cause the viewer to get out of sync with the live event. Buffering can cause a sports fan to miss a key moment as playback suddenly skips ahead, or find out in a text message about the outcome of the final play, before they’ve had a chance to watch.

Today we’re announcing a big step towards breaking the ceiling of these limits — support in Cloudflare Stream for the AV1 codec for live videos and their recordings, available today to all Cloudflare Stream customers in open beta. Read the docs to get started, or watch an AV1 video from Cloudflare Stream in your web browser. AV1 is an open and royalty-free video codec that uses 46% less bandwidth than H.264, the most commonly used video codec on the web today.

What is AV1, and how does it improve live video streaming?

Every piece of information that travels across the Internet, from web pages to photos, requires data to be transmitted between two computers. A single character usually takes one byte, so a two-page letter would be 3600 bytes or 3.6 kilobytes of data transferred.

One pixel in a photo takes 3 bytes, one each for red, green and blue in the pixel. A 4K photo would take 8,294,400 bytes, or 8.2 Megabytes. A video is like a photo that changes 30 times a second, which would make almost 15 Gigabytes per minute. That’s a lot!

To reduce the amount of bandwidth needed to stream video, before video is sent to your device, it is compressed using a codec. When your device receives video, it decodes this into the pixels displayed on your screen. These codecs are essential to both streaming and storing video.

Video compression codecs combine multiple advanced techniques, and are able to compress video to one percent of the original size, with your eyes barely noticing a difference. This also makes video codecs computationally intensive and hard to run. Smartphones, laptops and TVs have specific media decoding hardware, separate from the main CPU, optimized to decode specific protocols quickly, using the minimum amount of battery life and power.

Every few years, as researchers invent more efficient compression techniques, standards bodies release new codecs that take advantage of these improvements. Each generation of improvements in compression technology increases the requirements for computers that run them. With higher requirements, new chips are made available with increased compute capacity. These new chips allow your device to display higher quality video while using less bandwidth.

AV1 takes advantage of recent advances in compute to deliver video with dramatically fewer bytes, even compared to other relatively recent video protocols like VP9 and HEVC.

AV1 leverages the power of new smartphone chips

One of the biggest developments of the past few years has been the rise of custom chip designs for smartphones. Much of what’s driven the development of these chips is the need for advanced on-device image and video processing, as companies compete on the basis of which smartphone has the best camera.

This means the phones we carry around have an incredible amount of compute power. One way to think about AV1 is that it shifts work from the network to the viewer’s device. AV1 is fewer bytes over the wire, but computationally harder to decode than prior formats. When AV1 was first announced in 2018, it was dismissed by some as too slow to encode and decode, but smartphone chips have become radically faster in the past four years, more quickly than many saw coming.

AV1 hardware decoding is already built into the latest Google Pixel smartphones as part of the Tensor chip design. The Samsung Exynos 2200 and MediaTek Dimensity 1000 SoC mobile chipsets both support hardware accelerated AV1 decoding. It appears that Google will require that all devices that support Android 14 support decoding AV1. And AVPlayer, the media playback API built into iOS and tvOS, now includes an option for AV1, which hints at future support. It’s clear that the industry is heading towards hardware-accelerated AV1 decoding in the most popular consumer devices.

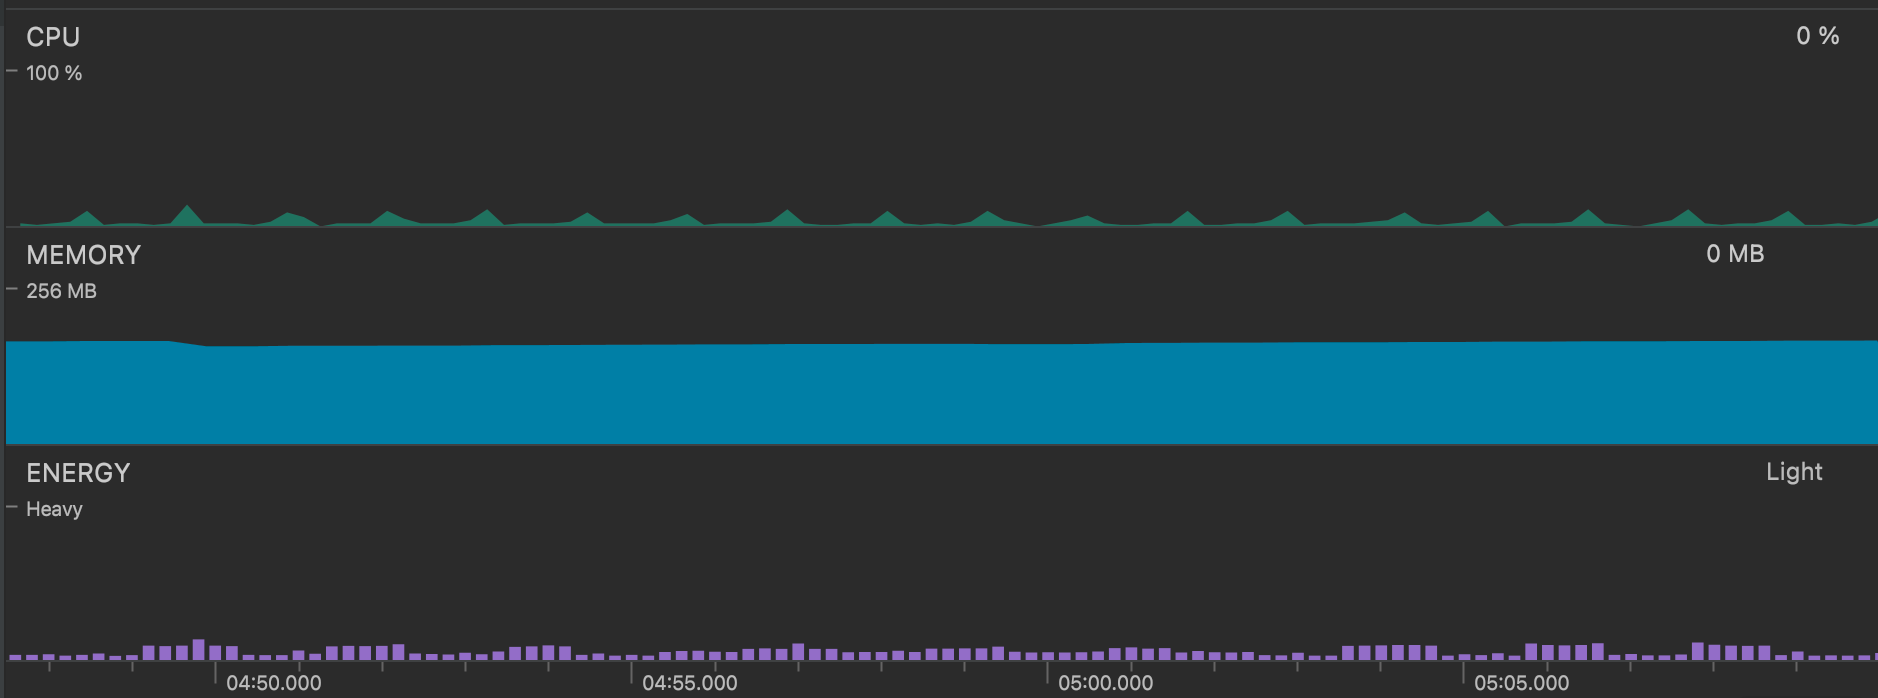
With hardware decoding comes battery life savings — essential for both today’s smartphones and tomorrow’s VR headsets. For example, a Google Pixel 6 with AV1 hardware decoding uses only minimal battery and CPU to decode and play our test video:

Bringing the best live video experience to Cloudflare Stream with AV1

AV1 encoding requires even more compute power

Just as decoding is significantly harder for end-user devices, it is also significantly harder to encode video using AV1. When AV1 was announced in 2018, many doubted whether hardware would be able to encode it efficiently enough for the protocol to be adopted quickly enough.

To demonstrate this, we encoded the 4K rendering of Big Buck Bunny (a classic among video engineers!) into AV1, using an AMD EPYC 7642 48-Core Processor with 256 GB RAM. This CPU continues to be a workhorse of our compute fleet, as we have written about previously. We used the following command to re-encode the video, based on the example in the ffmpeg AV1 documentation:

ffmpeg -i bbb_sunflower_2160p_30fps_normal.mp4 -c:v libaom-av1 -crf 30 -b:v 0 -strict -2 av1_test.mkv

Using a single core, encoding just two seconds of video at 30fps took over 30 minutes. Even if all 48 cores were used to encode, it would take at minimum over 43 seconds to encode just two seconds of video. Live encoding using only CPUs would require over 20 servers running at full capacity.

Special-purpose AV1 software encoders like rav1e and SVT-AV1 that run on general purpose CPUs can encode somewhat faster than libaom-av1 with ffmpeg, but still consume a huge amount of compute power to encode AV1 in real-time, requiring multiple servers running at full capacity in many scenarios.

Cloudflare Stream encodes your video to AV1 in real-time

At Cloudflare, we control both the hardware and software on our network. So to solve the CPU constraint, we’ve installed dedicated AV1 hardware encoders, designed specifically to encode AV1 at blazing fast speeds. This end to end control is what lets us encode your video to AV1 in real-time. This is entirely out of reach to most public cloud customers, including the video infrastructure providers who depend on them for compute power.

Encoding in real-time means you can use AV1 for live video streaming, where saving bandwidth matters most. With a pre-recorded video, the client video player can fetch future segments of video well in advance, relying on a buffer that can be many tens of seconds long. With live video, buffering is constrained by latency — it’s not possible to build up a large buffer when viewing a live stream. There is less margin for error with live streaming, and every byte saved means that if a viewer’s connection is interrupted, it takes less time to recover before the buffer is empty.

Stream lets you support AV1 with no additional work

AV1 has a chicken or the egg dilemma. And we’re helping solve it.

Companies with large video libraries often re-encode their entire content library to a new codec before using it. But AV1 is so computationally intensive that re-encoding whole libraries has been cost prohibitive. Companies have to choose specific videos to re-encode, and guess which content will be most viewed ahead of time. This is particularly challenging for apps with user generated content, where content can suddenly go viral, and viewer patterns are hard to anticipate.

This has slowed down the adoption of AV1 — content providers wait for more devices to support AV1, and device manufacturers wait for more content to use AV1. Which will come first?

With Cloudflare Stream there is no need to manually trigger re-encoding, re-upload video, or manage the bulk encoding of a large video library. This is a unique approach that is made possible by integrating encoding and delivery into a single product — it is not possible to encode on-demand using the old way of encoding first, and then pointing a CDN at a bucket of pre-encoded files.

We think this approach can accelerate the adoption of AV1. Consider a video app with millions of minutes of user-generated video. Most videos will never be watched again. In the old model, developers would have to spend huge sums of money to encode upfront, or pick and choose which videos to re-encode. With Stream, we can help anyone incrementally adopt AV1, without re-encoding upfront. As we work towards making AV1 Generally Available, we’ll be working to make supporting AV1 simple and painless, even for videos already uploaded to Stream, with no special configuration necessary.

Open, royalty-free, and widely supported

At Cloudflare, we are committed to open standards and fighting patent trolls. While there are multiple competing options for new video codecs, we chose to support AV1 first in part because it is open source and has royalty-free licensing.

Other encoding codecs force device manufacturers to pay royalty fees in order to adopt their standard in consumer hardware, and have been quick to file lawsuits against competing video codecs. The group behind the open and royalty-free VP8 and VP9 codecs have been pushing back against this model for more than a decade, and AV1 is the successor to these codecs, with support from all the biggest technology companies, both software and hardware. Beyond its technical accomplishments, AV1 is a clear message from the industry that the future of video encoding should be open, royalty-free, and free from patent litigation.

Try AV1 right now with your live stream or live recording

Support for AV1 is currently in open beta. You can try using AV1 on your own live video with Cloudflare Stream right now — just add the ?betaCodecSuggestion=av1 query parameter to the HLS or DASH manifest URL for any live stream or live recording created after October 1st in Cloudflare Stream. Read the docs to get started. If you don’t yet have a Cloudflare account, you can sign up here and start using Cloudflare Stream in just a few minutes.

We also have a recording of a live video, encoded using AV1, that you can watch here. Note that Safari does not yet support AV1.

We encourage you to try AV1 with your test streams, and we’d love your feedback. Join our Discord channel and tell us what you’re building, and what kinds of video you’re interested in using AV1 with. We’d love to hear from you!

Common streaming data enrichment patterns in Amazon Kinesis Data Analytics for Apache Flink

Post Syndicated from Ali Alemi original https://aws.amazon.com/blogs/big-data/common-streaming-data-enrichment-patterns-in-amazon-kinesis-data-analytics-for-apache-flink/

Stream data processing allows you to act on data in real time. Real-time data analytics can help you have on-time and optimized responses while improving overall customer experience.

Apache Flink is a distributed computation framework that allows for stateful real-time data processing. It provides a single set of APIs for building batch and streaming jobs, making it easy for developers to work with bounded and unbounded data. Apache Flink provides different levels of abstraction to cover a variety of event processing use cases.

Amazon Kinesis Data Analytics is an AWS service that provides a serverless infrastructure for running Apache Flink applications. This makes it easy for developers to build highly available, fault tolerant, and scalable Apache Flink applications without needing to become an expert in building, configuring, and maintaining Apache Flink clusters on AWS.

Data streaming workloads often require data in the stream to be enriched via external sources (such as databases or other data streams). For example, assume you are receiving coordinates data from a GPS device and need to understand how these coordinates map with physical geographic locations; you need to enrich it with geolocation data. You can use several approaches to enrich your real-time data in Kinesis Data Analytics depending on your use case and Apache Flink abstraction level. Each method has different effects on the throughput, network traffic, and CPU (or memory) utilization. In this post, we cover these approaches and discuss their benefits and drawbacks.

Data enrichment patterns

Data enrichment is a process that appends additional context and enhances the collected data. The additional data often is collected from a variety of sources. The format and the frequency of the data updates could range from once in a month to many times in a second. The following table shows a few examples of different sources, formats, and update frequency.

Data Format Update Frequency
IP address ranges by country CSV Once a month
Company organization chart JSON Twice a year
Machine names by ID CSV Once a day
Employee information Table (Relational database) A few times a day
Customer information Table (Non-relational database) A few times an hour
Customer orders Table (Relational database) Many times a second

Based on the use case, your data enrichment application may have different requirements in terms of latency, throughput, or other factors. The remainder of the post dives deeper into different patterns of data enrichment in Kinesis Data Analytics, which are listed in the following table with their key characteristics. You can choose the best pattern based on the trade-off of these characteristics.

Enrichment Pattern Latency Throughput Accuracy if Reference Data Changes Memory Utilization Complexity
Pre-load reference data in Apache Flink Task Manager memory Low High Low High Low
Partitioned pre-loading of reference data in Apache Flink state Low High Low Low Low
Periodic Partitioned pre-loading of reference data in Apache Flink state Low High Medium Low Medium
Per-record asynchronous lookup with unordered map Medium Medium High Low Low
Per-record asynchronous lookup from an external cache system Low or Medium (Depending on Cache storage and implementation) Medium High Low Medium
Enriching streams using the Table API Low High High Low – Medium (depending on the selected join operator) Low

Enrich streaming data by pre-loading the reference data

When the reference data is small in size and static in nature (for example, country data including country code and country name), it’s recommended to enrich your streaming data by pre-loading the reference data, which you can do in several ways.

To see the code implementation for pre-loading reference data in various ways, refer to the GitHub repo. Follow the instructions in the GitHub repository to run the code and understand the data model.

Pre-loading of reference data in Apache Flink Task Manager memory

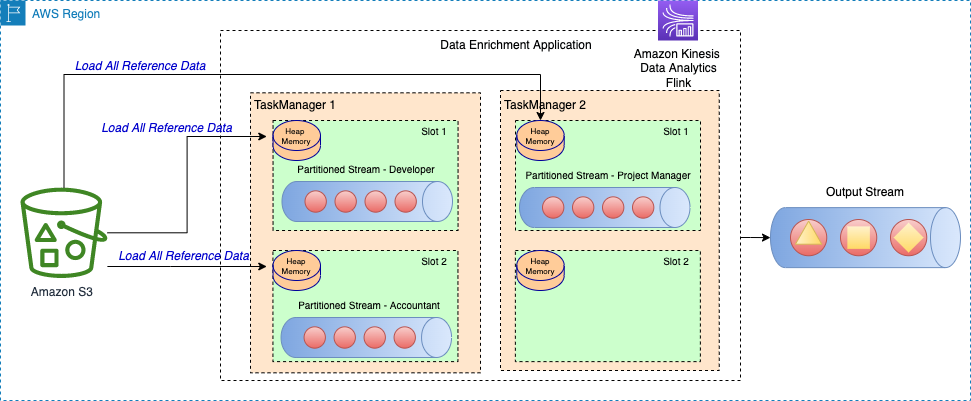
The simplest and also fastest enrichment method is to load the enrichment data into each of the Apache Flink task managers’ on-heap memory. To implement this method, you create a new class by extending the RichFlatMapFunction abstract class. You define a global static variable in your class definition. The variable could be of any type, the only limitation is that it should extend java.io.Serializable—for example, java.util.HashMap. Within the open() method, you define a logic that loads the static data into your defined variable. The open() method is always called first, during the initialization of each task in Apache Flink’s task managers, which makes sure the whole reference data is loaded before the processing begins. You implement your processing logic by overriding the processElement() method. You implement your processing logic and access the reference data by its key from the defined global variable.

The following architecture diagram shows the full reference data load in each task slot of the task manager.

diagram shows the full reference data load in each task slot of the task manager.

This method has the following benefits:

  • Easy to implement
  • Low latency
  • Can support high throughput

However, it has the following disadvantages:

  • If the reference data is large in size, the Apache Flink task manager may run out of memory.
  • Reference data can become stale over a period of time.
  • Multiple copies of the same reference data are loaded in each task slot of the task manager.
  • Reference data should be small to fit in the memory allocated to a single task slot. In Kinesis Data Analytics, each Kinesis Processing Unit (KPU) has 4 GB of memory, out of which 3 GB can be used for heap memory. If ParallelismPerKPU in Kinesis Data Analytics is set to 1, one task slot runs in each task manager, and the task slot can use the whole 3 GB of heap memory. If ParallelismPerKPU is set to a value greater than 1, the 3 GB of heap memory is distributed across multiple task slots in the task manager. If you’re deploying Apache Flink in Amazon EMR or in a self-managed mode, you can tune taskmanager.memory.task.heap.size to increase the heap memory of a task manager.

Partitioned pre-loading of reference data in Apache Flink State

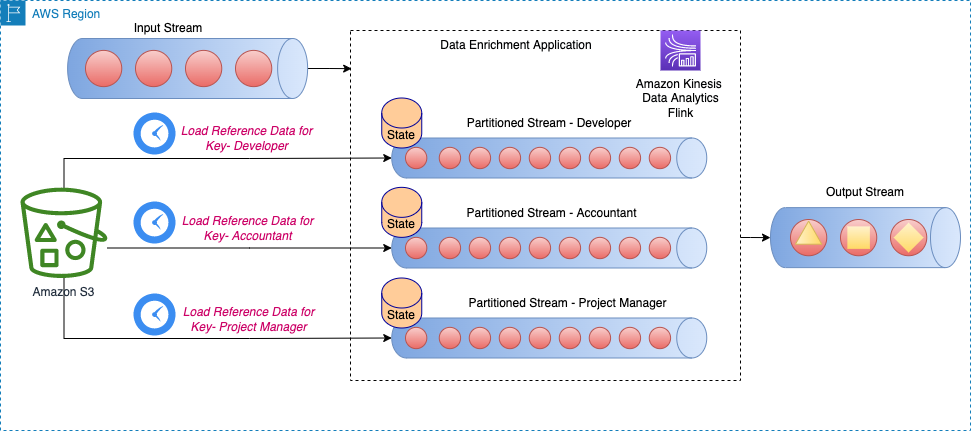
In this approach, the reference data is loaded and kept in the Apache Flink state store at the start of the Apache Flink application. To optimize the memory utilization, first the main data stream is divided by a specified field via the keyBy() operator across all task slots. Furthermore, only the portion of the reference data that corresponds to each task slot is loaded in the state store.

This is achieved in Apache Flink by creating the class PartitionPreLoadEnrichmentData, extending the RichFlatMapFunction abstract class. Within the open method, you override the ValueStateDescriptor method to create a state handle. In the referenced example, the descriptor is named locationRefData, the state key type is String, and the value type is Location. In this code, we use ValueState compared to MapState because we only hold the location reference data for a particular key. For example, when we query Amazon S3 to get the location reference data, we query for the specific role and get a particular location as a value.

In Apache Flink, ValueState is used to hold a specific value for a key, whereas MapState is used to hold a combination of key-value pairs.

This technique is useful when you have a large static dataset that is difficult to fit in memory as a whole for each partition.

The following architecture diagram shows the load of reference data for the specific key for each partition of the stream.

diagram shows the load of reference data for the specific key for each partition of the stream.

For example, our reference data in the sample GitHub code has roles which are mapped to each building. Because the stream is partitioned by roles, only the specific building information per role is required to be loaded for each partition as the reference data.

This method has the following benefits:

  • Low latency.
  • Can support high throughput.
  • Reference data for specific partition is loaded in the keyed state.
  • In Kinesis Data Analytics, the default state store configured is RocksDB. RocksDB can utilize a significant portion of 1 GB of managed memory and 50 GB of disk space provided by each KPU. This provides enough room for the reference data to grow.

However, it has the following disadvantages:

  • Reference data can become stale over a period of time

Periodic partitioned pre-loading of reference data in Apache Flink State

This approach is a fine-tune of the previous technique, where each partitioned reference data is reloaded on a periodic basis to refresh the reference data. This is useful if your reference data changes occasionally.

The following architecture diagram shows the periodic load of reference data for the specific key for each partition of the stream.

diagram shows the periodic load of reference data for the specific key for each partition of the stream.

In this approach, the class PeriodicPerPartitionLoadEnrichmentData is created, extending the KeyedProcessFunction class. Similar to the previous pattern, in the context of the GitHub example, ValueState is recommended here because each partition only loads a single value for the key. In the same way as mentioned earlier, in the open method, you define the ValueStateDescriptor to handle the value state and define a runtime context to access the state.

Within the processElement method, load the value state and attach the reference data (in the referenced GitHub example, buildingNo to the customer data). Also register a timer service to be invoked when the processing time passes the given time. In the sample code, the timer service is scheduled to be invoked periodically (for example, every 60 seconds). In the onTimer method, update the state by making a call to reload the reference data for the specific role.

This method has the following benefits:

  • Low latency.
  • Can support high throughput.
  • Reference data for specific partitions is loaded in the keyed state.
  • Reference data is refreshed periodically.
  • In Kinesis Data Analytics, the default state store configured is RocksDB. Also, 50 GB of disk space provided by each KPU. This provides enough room for the reference data to grow.

However, it has the following disadvantages:

  • If the reference data changes frequently, the application still has stale data depending on how frequently the state is reloaded
  • The application can face load spikes during reload of reference data

Enrich streaming data using per-record lookup

Although pre-loading of reference data provides low latency and high throughput, it may not be suitable for certain types of workloads, such as the following:

  • Reference data updates with high frequency
  • Apache Flink needs to make an external call to compute the business logic
  • Accuracy of the output is important and the application shouldn’t use stale data

Normally, for these types of use cases, developers trade-off high throughput and low latency for data accuracy. In this section, you learn about a few of common implementations for per-record data enrichment and their benefits and disadvantages.

Per-record asynchronous lookup with unordered map

In a synchronous per-record lookup implementation, the Apache Flink application has to wait until it receives the response after sending every request. This causes the processor to stay idle for a significant period of processing time. Instead, the application can send a request for other elements in the stream while it waits for the response for the first element. This way, the wait time is amortized across multiple requests and therefore it increases the process throughput. Apache Flink provides asynchronous I/O for external data access. While using this pattern, you have to decide between unorderedWait (where it emits the result to the next operator as soon as the response is received, disregarding the order of the element on the stream) and orderedWait (where it waits until all inflight I/O operations complete, then sends the results to the next operator in the same order as original elements were placed on the stream). Usually, when downstream consumers disregard the order of the elements in the stream, unorderedWait provides better throughput and less idle time. Visit Enrich your data stream asynchronously using Kinesis Data Analytics for Apache Flink to learn more about this pattern.

The following architecture diagram shows how an Apache Flink application on Kinesis Data Analytics does asynchronous calls to an external database engine (for example Amazon DynamoDB) for every event in the main stream.

diagram shows how an Apache Flink application on Kinesis Data Analytics does asynchronous calls to an external database engine (for example Amazon DynamoDB) for every event in the main stream.

This method has the following benefits:

  • Still reasonably simple and easy to implement
  • Reads the most up-to-date reference data

However, it has the following disadvantages:

  • It generates a heavy read load for the external system (for example, a database engine or an external API) that hosts the reference data
  • Overall, it might not be suitable for systems that require high throughput with low latency

Per-record asynchronous lookup from an external cache system

A way to enhance the previous pattern is to use a cache system to enhance the read time for every lookup I/O call. You can use Amazon ElastiCache for caching, which accelerates application and database performance, or as a primary data store for use cases that don’t require durability like session stores, gaming leaderboards, streaming, and analytics. ElastiCache is compatible with Redis and Memcached.

For this pattern to work, you must implement a caching pattern for populating data in the cache storage. You can choose between a proactive or reactive approach depending your application objectives and latency requirements. For more information, refer to Caching patterns.

The following architecture diagram shows how an Apache Flink application calls to read the reference data from an external cache storage (for example, Amazon ElastiCache for Redis). Data changes must be replicated from the main database (for example, Amazon Aurora) to the cache storage by implementing one of the caching patterns.

diagram shows how an Apache Flink application calls to read the reference data from an external cache storage (for example, Amazon ElastiCache for Redis). Data changes must be replicated from the main database (for example, Amazon Aurora) to the cache storage by implementing one of the caching patterns.

Implementation for this data enrichment pattern is similar to the per-record asynchronous lookup pattern; the only difference is that the Apache Flink application makes a connection to the cache storage, instead of connecting to the primary database.

This method has the following benefits:

  • Better throughput because caching can accelerate application and database performance
  • Protects the primary data source from the read traffic created by the stream processing application
  • Can provide lower read latency for every lookup call
  • Overall, might not be suitable for medium to high throughput systems that want to improve data freshness

However, it has the following disadvantages:

  • Additional complexity of implementing a cache pattern for populating and syncing the data between the primary database and the cache storage
  • There is a chance for the Apache Flink stream processing application to read stale reference data depending on what caching pattern is implemented
  • Depending on the chosen cache pattern (proactive or reactive), the response time for each enrichment I/O may differ, therefore the overall processing time of the stream could be unpredictable

Alternatively, you can avoid these complexities by using the Apache Flink JDBC connector for Flink SQL APIs. We discuss enrichment stream data via Flink SQL APIs in more detail later in this post.

Enrich stream data via another stream

In this pattern, the data in the main stream is enriched with the reference data in another data stream. This pattern is good for use cases in which the reference data is updated frequently and it’s possible to perform change data capture (CDC) and publish the events to a data streaming service such as Apache Kafka or Amazon Kinesis Data Streams. This pattern is useful in the following use cases, for example:

  • Customer purchase orders are published to a Kinesis data stream, and then join with customer billing information in a DynamoDB stream
  • Data events captured from IoT devices should enrich with reference data in a table in Amazon Relational Database Service (Amazon RDS)
  • Network log events should enrich with the machine name on the source (and the destination) IP addresses

The following architecture diagram shows how an Apache Flink application on Kinesis Data Analytics joins data in the main stream with the CDC data in a DynamoDB stream.

diagram shows how an Apache Flink application on Kinesis Data Analytics joins data in the main stream with the CDC data in a DynamoDB stream.

To enrich streaming data from another stream, we use a common stream to stream join patterns, which we explain in the following sections.

Enrich streams using the Table API

Apache Flink Table APIs provide higher abstraction for working with data events. With Table APIs, you can define your data stream as a table and attach the data schema to it.

In this pattern, you define tables for each data stream and then join those tables to achieve the data enrichment goals. Apache Flink Table APIs support different types of join conditions, like inner join and outer join. However, you want to avoid those if you’re dealing with unbounded streams because those are resource intensive. To limit the resource utilization and run joins effectively, you should use either interval or temporal joins. An interval join requires one equi-join predicate and a join condition that bounds the time on both sides. To better understand how to implement an interval join, refer to Get started with Apache Flink SQL APIs in Kinesis Data Analytics Studio.

Compared to interval joins, temporal table joins don’t work with a time period within which different versions of a record are kept. Records from the main stream are always joined with the corresponding version of the reference data at the time specified by the watermark. Therefore, fewer versions of the reference data remain in the state.

Note that the reference data may or may not have a time element associated with it. If it doesn’t, you may need to add a processing time element for the join with the time-based stream.

In the following example code snippet, the update_time column is added to the currency_rates reference table from the change data capture metadata such as Debezium. Furthermore, it’s used to define a watermark strategy for the table.

CREATE TABLE currency_rates (
    currency STRING,
    conversion_rate DECIMAL(32, 2),
    update_time TIMESTAMP(3) METADATA FROM `values.source.timestamp` VIRTUAL,
        WATERMARK FOR update_time AS update_time,
    PRIMARY KEY(currency) NOT ENFORCED
) WITH (
   'connector' = 'kafka',
   'value.format' = 'debezium-json',
   /* ... */
);

This method has the following benefits:
  • Easy to implement
  • Low latency
  • Can support high throughput when reference data is a data stream

SQL APIs provide higher abstractions over how the data is processed. For more complex logic around how the join operator should process, we recommend you always start with SQL APIs first and use DataStream APIs if you really need to.

Conclusion

In this post, we demonstrated different data enrichment patterns in Kinesis Data Analytics. You can use these patterns and find the one that addresses your needs and quickly develop a stream processing application.

For further reading on Kinesis Data Analytics, visit the official product page.


About the Authors

About the author Ali AlemiAli Alemi is a Streaming Specialist Solutions Architect at AWS. Ali advises AWS customers with architectural best practices and helps them design real-time analytics data systems that are reliable, secure, efficient, and cost-effective. He works backward from customers’ use cases and designs data solutions to solve their business problems. Prior to joining AWS, Ali supported several public sector customers and AWS consulting partners in their application modernization journey and migration to the cloud.

About the author Subham RakshitSubham Rakshit is a Streaming Specialist Solutions Architect for Analytics at AWS based in the UK. He works with customers to design and build search and streaming data platforms that help them achieve their business objective. Outside of work, he enjoys spending time solving jigsaw puzzles with his daughter.

About the author Dr. Sam MokhtariDr. Sam Mokhtari is a Senior Solutions Architect in AWS. His main area of depth is data and analytics, and he has published more than 30 influential articles in this field. He is also a respected data and analytics advisor who led several large-scale implementation projects across different industries, including energy, health, telecom, and transport.

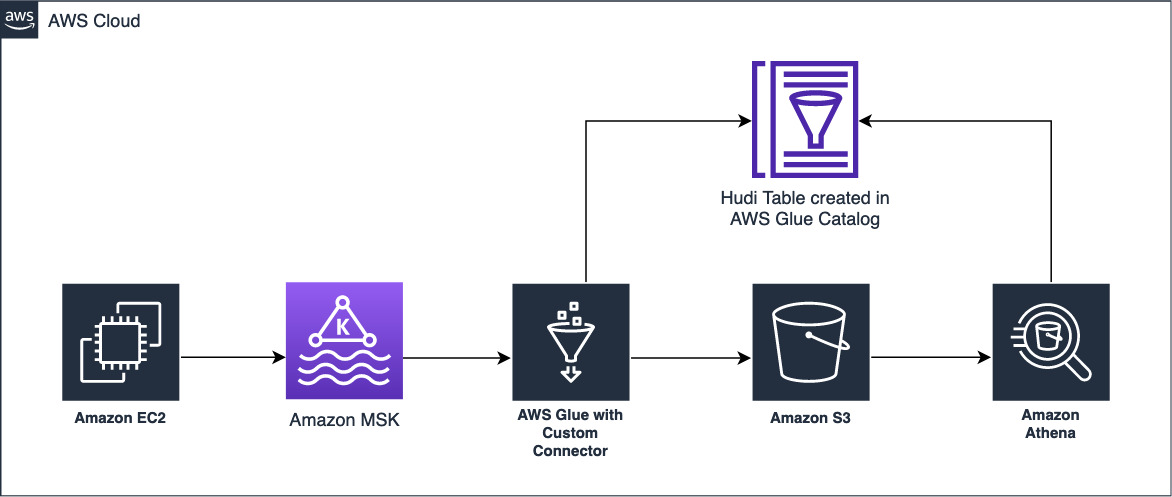
The Storage Pod Story: Innovation to Commodity

Post Syndicated from original https://www.backblaze.com/blog/the-storage-pod-story-innovation-to-commodity/

It has been over six years since we released Storage Pod 6.0. Yes, we have improved that system since then, several times. We’ve added more memory, upgraded the CPU, and of course deployed larger disks. I suppose we could have written blog posts about those improvements, a Storage Pod 6.X post or two or three, but somehow that felt a bit hollow.

About 18 months ago, we talked about The Next Backblaze Storage Pod. We had started using Dell servers in our Amsterdam data center, although we were still building and deploying the version 6.X storage pods in our U.S. data centers. That changed about six months ago and we haven’t built or deployed a Backblaze Storage Pod since that time. Here’s what we’ve done instead.

A Backblaze-Worthy Storage Server

In September of 2019, we wrote a blog post to celebrate the 10 year anniversary of open sourcing our Storage Pod design. In that post we mused about the build/buy decision and stated the criteria we needed to consider if we were going to buy storage servers from someone else: cost, ease of maintenance, the use of commodity parts, ability to scale production, and so on. Also in that post, we compiled a list of storage servers on the market at the time which were similar to our Storage Pod design.

We then proceeded to test several different storage servers from the list and elsewhere. The testing was done over a period of about a year using the criteria noted earlier. The process progressed and one server, a 60-drive Supermicro server, was selected to move on to the next stage, production performance testing.

Here we would observe the server’s performance and test its compatibility with our operational architecture. We built a vault of 20 Supermicro servers and placed it into production, and at the same time we placed a standard Storage Pod vault into production. The two vaults ran the same software and we would track each vault’s performance throughout.

When a Backblaze Vault enters production, 60 tomes of storage come online at the same time joining thousands of other tomes ready to receive data. Each vault has the same opportunity to load data, but this will vary depending on the performance of the vault to process the requests received. In general, the more performant the vault, the more data it can upload each day.

The comparison of how much data each vault uploaded each day is shown below. Vault 1084 is composed of 20 Supermicro servers and Vault 1085 is composed of 20 Backblaze Storage Pods.

The Supermicro vault (1084) started with a limit of 2,500 simultaneous connections allowed for the first seven days. Once that limit was lifted and both vaults were set to 5,000 simultaneous connections, the Supermicro vault generally outperformed the Backblaze vault over the remainder of the observation period.

What happened to the data once the test was over? It stayed in the Supermicro vault and that vault became a permanent part of our production environment. It is still in operation today, joined by over 1,100 additional Supermicro servers. Safe to say, we moved ahead with using the Supermicro servers in our environment in place of building new Storage Pods.

The Server Model We Use

The Supermicro model we order from Supermicro is the PIO-5049P-E1CR60L (PIO-5049). That model is not sold via the Supermicro website. That said, model SSG-6049P-E1CR60L (SSG-6049) is similar and is widely available. Both models have 60 drives, but the chassis is slightly different, and the motherboards are different with the PIO-5049 model having a single CPU slot, and the SSG-6049 model having two CPU slots. Let’s compare the basics of the two models below.

In practice, the Supermicro SSG-6049 model supports newer components such as the latest CPUs and allows more memory versus the Supermicro PIO-5049 model, but the latter is more than capable of supporting our needs.

Can You Build It?

A little over 13 years ago, we wrote the Petabytes on a Budget blog post introducing Backblaze Storage Pods to the world and open sourcing the design. Since then, many individuals, organizations, and businesses have taken the various storage pod designs we published over the years and built their own storage servers. That’s awesome.

We know building a Storage Pod was not easy. Oh, the assembly was simple enough, but getting all the parts you needed was a challenge: searching endlessly for 5-port backplanes (minimum order quantity 1,000-ouch, sorry) or having to build your own power supply cables. While many of you enjoyed the challenge; many didn’t.
For the Supermicro system, let’s work with the Supermicro SSG-6049 model as it is available to everyone and see what it would take for you to acquire/assemble/build a single Supermicro storage server.

Option One: Go Standard

The easiest thing to do is to order a pre-configured SSG-6049 model from Supermicro or you can try one of their online reseller sites such as Canada Computers & Electronics or ComputerLink, which offer the same “complete system”. In these cases, the ability to customize the server is minimal and requires direct contact with the vendor for most changes. If that works for you, then you’re all set.

Option Two: Configure

If you want to design your own system you can try Supermicro resellers such as IT Creations (US) and Server Simply (EU) which have configurators that allow you to select your CPU, motherboard, network cards, memory, and various other components. This is a great option but given the number of different options and the possibility of incompatibilities between components, you need to be careful here. Don’t rely on the configurator to catch a component mismatch.

Option Three: Create

Here you might buy the most stripped-down server you can find and replace nearly everything inside—motherboard, CPU, fans, switches, cables and so on. You’ll probably void any warranty you had on the system, but we suspect you knew that already. Regardless, you can take the base system and stuff it full of smoking-fast everything so that your copy of “Ferris Buellers Day Off” downloads in picoseconds. That’s the fun part of building your own storage server, when you are done it is uniquely yours.

Which option you choose is, of course, your choice, and while ordering a standard system from Supermicro may not be as satisfying as soldering heat sinks to the motherboard or neatly tying off your SATA cable runs, it will give you more time to watch Ferris, so there’s that.

FYI, Supermicro has an extensive network of resellers around the world. While the options above fall neatly into three categories, each reseller has their own way of working with their clients. If you are going to buy or build your own Supermicro storage server or have already done so, share your experience with your colleagues in the comments below or on your favorite forum or community site.

What About Pricing

Supermicro does not publish prices and we are not going to out them here, but we wanted to see if we could determine the street price for the Supermicro SSG-6049 system by surveying reseller websites. It was not pretty. In our research, we saw prices for the Supermicro SSG-6049 model range from $6K to 40K on different reseller sites. On the website with the $6K price they started with a fictitious base system that you could not order, and then listed the various components you were required to add, such as CPU, memory, hard drives, etc. At the $40K website the reseller didn’t bother to list any of the components; it just had the model and the price—no specs or technical information. Classic buyer beware scenarios in both cases.

The other variable that made the street price hard to determine was that resellers often bundled other services into the price of the system such as installation, annual maintenance, and even shipping. All are reasonable services for a reseller to offer, but they cloud the picture when trying to determine the actual cost of the product you are trying to buy. At best, we can say that the street price is somewhere between $20K and $30K, but we are not very confident with that range.

Storage Server Pricing Over Time

Since 2009 we have tracked the cost per GB of each Storage Pod version we have produced. We’ve updated the chart below to add both Storage Pod version 6.X, our most current Storage Pod configuration, and the Supermicro storage server we are buying, model PIO-5049.

The cost per GB is computed by taking the total hardware cost of a storage server, including the hard drives, and dividing by the total storage in the server at the time. When Storage Pod 1.0 was released in September 2009, the system cost was about $0.12/GB, and as you can see that has decreased over time to $0.02/GB in the Supermicro systems.

One point to note is that both the Storage Pod 6.X ($0.028/GB) and Supermicro ($0.020/GB) servers use the same 16TB hard drive models. We believe the difference between the cost per GB of the two cohorts ($0.008) is primarily based on the operational efficiency obtained by Supermicro in making and selling tens of thousands of units a month versus Backblaze assembling a hundred 6.X Storage Pods on our own. In other words, Supermicro’s scale of production has enabled us to get performant systems for less than if we continued to build them ourselves.

What’s Next for Storage Pods

No one here at Backblaze is ready to write the obituary for our beloved red Backblaze Storage Pods. Afterall, the innovation that was the Storage Pod created the opportunity for Backblaze to change the dynamics of the storage market. Now that the Storage Pod hardware has been commoditized, our cloud storage software platform is what enables us to continue to deliver value to businesses and individuals alike.

All that means is that our next Storage Pod probably won’t be an incremental change, but instead something completely new, at least for us. It may not even be a Storage Pod—who knows? That said, we will continue to upgrade our existing Storage Pods with new CPUs, memory, and such, and they’ll be around for years to come. At which point we may give them away or crush them (again). In the meantime, we’ll probably do another blog post or two so we can post a few pictures and tell a few stories. Or maybe we’ll just move on. Hard to say right now.

Thanks to all our Storage Pod readers for your comments and suggestions over the years. You’ve made us better along the way and we look forward to continuing to hear from you as our journey continues.

The post The Storage Pod Story: Innovation to Commodity appeared first on Backblaze Blog | Cloud Storage & Cloud Backup.

GitHub Availability Report: September 2022

Post Syndicated from Jakub Oleksy original https://github.blog/2022-10-05-github-availability-report-september-2022/

In September, we experienced one incident that resulted in significant impact and degraded state of availability to multiple GitHub services. We also experienced one incident resulting in significant impact to Codespaces. We are still investigating that incident and will include it in next month’s report. This report also sheds light into an incident that impacted Codespaces in August and an incident that impacted GitHub Actions in August.

September 8 19:44 UTC (lasting 5 hours and 11 minutes)

On September 8, 2022 at 19:44 UTC, our monitoring detected an increase in the number of pull request merge failures. The impact was concentrated on Enterprise Managed Users (EMUs) with a small number of bot accounts also affected.

Within 45 minutes, we traced the cause to a data transition that removed inconsistent data from profile records. Unfortunately, the transition incorrectly operated on EMU accounts, removing some data that is required to successfully merge pull requests via the UI and our API. CLI merges were unaffected.

We restored the data from backup, but this took longer than we had anticipated. We simultaneously pursued a workaround in code, but opted not to proceed with it as it could introduce data inconsistencies. Our restore operation resolved the issue with our pull request monitors having recovered by September 9, 2022 at 00:55 UTC.

Following this incident, we have made changes to our data transition procedures to allow for faster restores and transitions that can be automatically rolled back without relying on backups. We are also working on multiple improvements to our testing processes as they relate to EMUs.

September 28 03:53 UTC (lasting 1 hour and 16 minutes)

Our alerting systems detected an incident that impacted most Codespaces customers. Due to the recency of this incident, we are still investigating the contributing factors and will provide a more detailed update on cause and remediation in the October Availability Report, which we will publish the first Wednesday of November.

Follow up to August 29 12:51 UTC (lasting 5 hours and 40 minutes)

On August 29, 2022 at 12:51 UTC, our monitoring detected an increase in Codespaces create and start errors. We also started seeing DNS-related networking errors in some running Codespaces where outbound DNS resolutions were failing. At 14:19 UTC, we updated the status for Codespaces from yellow to red due to broad user impact.

This incident was caused by an Ubuntu security patch in systemd that broke DNS resolution. In recent versions of Ubuntu, unattended upgrades for security fixes are enabled by default. Codespaces host VMs were using the default recommended settings to apply security patches automatically on running VMs. When this patch was published, Codespaces host VMs started installing and applying the patch after the VM was created. Once the patch was installed on a VM, DNS resolution was broken. Depending on the timing of when the patch was installed on the host VM, this led to a few different failure modes, including failure creating/starting Codespaces or failure, making outbound network calls inside of a codespace that was already running.

Once we identified systemd’s DNS resolver configuration as the source of these errors, we were able to mitigate the issue by disabling systemd’s DNS resolver and manually configuring an upstream DNS resolver IP address. We deployed a change to the DNS configuration on the host VMs at 18:13 UTC. By 18:21 UTC, we started seeing positive signs of recovery in our metrics and changed the status to yellow. Ten minutes later, at 18:31 UTC, all metrics were fully healthy and the incident was resolved.

Following this incident, we are updating our DNS configuration to reduce dependencies on systemd’s DNS resolver. We are also investigating whether we should continue to use unattended upgrades for security patches. Disabling unattended upgrades will give us more deterministic behavior at runtime, preventing external changes from breaking Codespaces. We will remain fully capable of quickly patching VMs across our fleet even with unattended upgrades disabled.

Follow up to August 18 14:33 UTC (lasting 3 hours and 23 minutes)

This incident occurred in August but was left out of the August report because it did not result in a widespread outage. Several GitHub Actions customers experienced issues because of the degradation so we decided to include it retroactively.

At 14:13 UTC, there was a sudden spike in traffic to GitHub Actions which resulted in a higher than usual write load on our services. A majority of our services handled this graciously, but one of our internal services that is used for generating security tokens started returning 503 Service Unavailable errors to requests, triggering an alert to the engineering team. Further investigation revealed that the token database was experiencing a performance degradation which, compounded by the increased load, caused us to hit the database’s max concurrent connections limit. This was made worse due to a mismatch between our client-side throttling limits and database capacity, which resulted in our throttling thresholds allowing more traffic than this database had capacity to handle.

We mitigated the issue by scaling up the impacted database while also allowing a higher number of concurrent connections to it. The impacted service went back to a healthy state and the incident was considered resolved at 17:36 UTC. In addition to the immediate actions, we have improved our monitoring and alerting to allow faster remediation. We are also evaluating changes to our throttling mechanisms to better account for this traffic pattern.

In summary

Please follow our status page for real-time updates on status changes. To learn more about what we’re working on, check out the GitHub Engineering Blog.

The collective thoughts of the interwebz