Post Syndicated from original https://xkcd.com/2522/
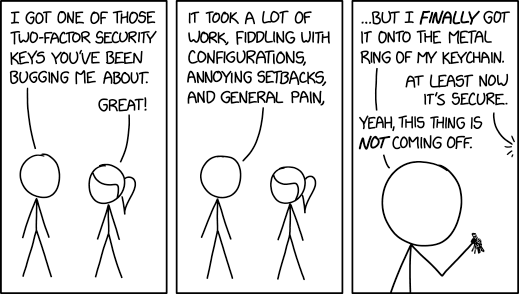
Post Syndicated from original https://xkcd.com/2522/
Post Syndicated from arp242.net original https://www.arp242.net/rimworld-mod-linux.html
This describes how to create RimWorld mods on Linux; this is an introduction to
both RimWorld modding and developing C♯ with Mono; it’s essentially the steps I
followed to get started.
This doesn’t assume any knowledge of Unity, Mono, or C♯ but some familiarity
with Linux and general programming is assumed; if you’re completely new to
programming then this probably isn’t a good resource. A lot of this will work on
Windows or macOS too; it’s just the C♯ build steps that are really
Linux-specific, as are various pathnames etc.
RimWorld mods consist of two parts:
A set of XML definitions (“Defs”) which defines everything from items, actions
you can take, research projects, weather, etc. This is the “glue” that
actually makes stuff appear in the game, applies effects, etc.
For (very) simple mods this may actually be enough, and no “real” coding is
required. You can use XML files to both add new stuff, and RimWorld has
facilities to patch existing in-game content.
C♯ code which either adds entire new stuff, or monkey-patches existing code.
As an example we’ll make a little mod that makes it rain blood. Why? It seemed
easy enough to do while also exploring some of the core concepts. Also, I was
playing Slayer when I started on this. The complete example mod is on
GitHub, but I encourage people to modify things manually (and maybe play
around with things a bit) rather than copy/paste stuff from there; it’s just a
better way to learn things.
Before we start with the C♯ stuff let’s set up a basic mod which adds a new
weather type; we just need to edit some XML for this.
Mods are located in the Mods/ directory in your RimWorld installation
directory; I’m using the version I bought from the RimWorld website and
extracted to ~/rimworld so that’s nice and simple. GOG.com games usually store
the actual game data in a game/ subdirectory, and I don’t know where Steam
stores things 🤷
This directory should already exist with a Mods/Place mods here.txt. A mod
must have an About/About.xml file; a minimal version looks like:
<?xml version="1.0" encoding="utf-8"?>
<ModMetaData>
    <!-- Must contain a dot; usually <author>.<modname> -->
    <packageId>arp242.RainingBlood</packageId>
    <name>Raining blood</name>

    <!-- Game versions this mod supports. More on game versions later. -->
    <supportedVersions>
        <li>1.1</li>
        <li>1.2</li>
        <li>1.3</li>
    </supportedVersions>
</ModMetaData>
See ModUpdating.txt in the RimWorld installation directory for a full
description of the About.xml fields. For now, this is enough.
The official content uses essentially the same structure as a mod except that
it’s in the Data/ directory; e.g. Data/Core/ contains the base game,
Data/Royalty the Royalty expansion, etc. To find the weather definitions I
just used:
[~/rimworld/Data/Core]% ls (#i)**/*weather*.xml
Defs/WeatherDefs/Weathers.xml
The (#i) makes things case-insensitive in zsh, FYI. zsh is nice. You can also
use find -iname if you enjoy more typing.
Weathers.xml seems to define all the weather types. I copied the definition of
“rain” to Mods/RainingBlood/Defs/WeatherDefs/RainingBlood.xml with some
modifications:
<?xml version="1.0" encoding="utf-8" ?>
<Defs>
<WeatherDef>
	<defName>RainingBlood</defName>
	<label>raining blood</label>
	<description>It's raining blood; what the hell?!</description>

    <!-- ThoughtDefs/RainingBlood.xml -->
    <!-- <exposedThought>SoakingWet</exposedThought> -->
	<exposedThought>BloodCovered</exposedThought>

	<!-- Copied from rain -->
	<temperatureRange>0~100</temperatureRange>
	<windSpeedFactor>1.5</windSpeedFactor>
	<accuracyMultiplier>0.8</accuracyMultiplier>
	<favorability>Neutral</favorability>
	<perceivePriority>1</perceivePriority>

	<rainRate>1</rainRate>
	<moveSpeedMultiplier>0.9</moveSpeedMultiplier>
	<ambientSounds>
		<li>Ambient_Rain</li>
	</ambientSounds>
	<overlayClasses>
		<li>WeatherOverlay_Rain</li>
	</overlayClasses>
	<commonalityRainfallFactor>
		<points>
			<li>(0, 0)</li>
			<li>(1300, 1)</li>
			<li>(4000, 3.0)</li>
		</points>
	</commonalityRainfallFactor>

	<!-- Colours modified to be reddish; just a crude effect. -->
	<skyColorsDay>
		<sky>(0.8,0.2,0.2)</sky>
		<shadow>(0.92,0.2,0.2)</shadow>
		<overlay>(0.7,0.2,0.2)</overlay>
		<saturation>0.9</saturation>
	</skyColorsDay>

	<skyColorsDusk>
		<sky>(1,0,0)</sky>
		<shadow>(0.92,0.2,0.2)</shadow>
		<overlay>(0.6,0.2,0.2)</overlay>
		<saturation>0.9</saturation>
	</skyColorsDusk>

	<skyColorsNightEdge>
		<sky>(0.35,0.10,0.15)</sky>
		<shadow>(0.92,0.22,0.22)</shadow>
		<overlay>(0.5,0.1,0.1)</overlay>
		<saturation>0.9</saturation>
	</skyColorsNightEdge>

	<skyColorsNightMid>
		<sky>(0.35,0.20,0.25)</sky>
		<shadow>(0.92,0.22,0.22)</shadow>
		<overlay>(0.5,0.2,0.2)</overlay>
		<saturation>0.9</saturation>
	</skyColorsNightMid>
</WeatherDef>
</Defs>
The location where you store it doesn’t actually matter as long as it’s in
Defs; Defs/xxx.xml will work too. Internally all XML files in Defs/ are
scanned in the same data structure; it just recursively searches for *.xml
files and uses <defName>RainingBlood</defName> to identify them rather than
the path.
It’s not very fancy. We also need a new “exposed thought”; that’s the mood
modifier that shows up in the “needs” tab; “Soaking wet” doesn’t really seem
applicable if you’re “soaking wet in blood” 🙃
Let’s grep for it:
[~/rimworld/Data/Core]% rg SoakingWet
Defs/TerrainDefs/Terrain_Water.xml
12:    <traversedThought>SoakingWet</traversedThought>

Defs/ThoughtDefs/Thoughts_Memory_Misc.xml
297:    <defName>SoakingWet</defName>

Defs/WeatherDefs/Weathers.xml
98:    <exposedThought>SoakingWet</exposedThought>
202:    <exposedThought>SoakingWet</exposedThought>
267:    <exposedThought>SoakingWet</exposedThought>
Thoughts_Memory_Misc.xml seems to be what we want, so make a copy of that to
Mods/RainingBlood/Defs/ThoughtDefs/RainingBlood.xml:
<?xml version="1.0" encoding="utf-8" ?>
<Defs>
<ThoughtDef>
    <defName>BloodCovered</defName>
    <durationDays>0.1</durationDays>
    <stackLimit>1</stackLimit>
    <stages>
        <li>
            <label>blood covered</label>
            <description>I'm covered in blood; yuk!</description>
            <baseMoodEffect>-30</baseMoodEffect>
        </li>
    </stages>
</ThoughtDef>
</Defs>
The meaning of the fields in both XML files should be mostly self-explanatory,
but if you want to know what exactly something does you’ll need to decompile
the game to read the source code. We’ll cover that later.
At this point, the basic mod should be done; let’s test it.
Start the name normally and select the mod in the Mods panel. After this you can
start the game with ./RimworldLinux -quicktest, which will start the game in a
new small map with the last selected mods.
You can select “Development mode” in options, which will give you a few buttons
at the top, it will also allow you to open the console with ` and
you can speed up things a wee bit more by pressing 4 (ludicrous speed!) Most
of the buttons etc. should be self-explanatory; there’s some more information
on the RimWorld wiki.
Click the “debug actions” button at the top, which has “Change Weather” (filter
in the top-left corner; you may need to scroll down). After clicking RainBlood
it takes a few seconds for the weather to transition and the status to show up
in your colonists.
It’s all very good that we can select this from our magical debug actions, but
does it actually appear in a regular game? Let’s search where the
RainyThunderstorm weather is referenced (as that’s a bit more unique than just
“rain”):
[~/rimworld/Data/Core]% rg RainyThunderstorm
Defs/BiomeDefs/Biomes_Cold.xml
101:      <RainyThunderstorm>1</RainyThunderstorm>
234:      <RainyThunderstorm>1</RainyThunderstorm>
389:      <RainyThunderstorm>1</RainyThunderstorm>
513:      <RainyThunderstorm>0</RainyThunderstorm>
611:      <RainyThunderstorm>0</RainyThunderstorm>

Defs/BiomeDefs/Biomes_Temperate.xml
104:      <RainyThunderstorm>1</RainyThunderstorm>
262:      <RainyThunderstorm>1</RainyThunderstorm>

Defs/BiomeDefs/Biomes_Warm.xml
109:      <RainyThunderstorm>1.7</RainyThunderstorm>
277:      <RainyThunderstorm>1.7</RainyThunderstorm>

Defs/BiomeDefs/Biomes_WarmArid.xml
79:      <RainyThunderstorm>1</RainyThunderstorm>
204:      <RainyThunderstorm>1</RainyThunderstorm>
312:      <RainyThunderstorm>1</RainyThunderstorm>

Defs/WeatherDefs/Weathers.xml
193:    <defName>RainyThunderstorm</defName>
e.g. Biomes_Cold.xml has:
<baseWeatherCommonalities>
    <Clear>18</Clear>
    <Fog>1</Fog>
    <Rain>2</Rain>
    <DryThunderstorm>1</DryThunderstorm>
    <RainyThunderstorm>1</RainyThunderstorm>
    <FoggyRain>1</FoggyRain>
    <SnowGentle>4</SnowGentle>
    <SnowHard>4</SnowHard>
</baseWeatherCommonalities>
Now let’s try adding our bloody rain with a high chance of spawning:
<baseWeatherCommonalities>
    <Clear>18</Clear>
    <Fog>1</Fog>
    <Rain>2</Rain>
    <DryThunderstorm>1</DryThunderstorm>
    <RainyThunderstorm>1</RainyThunderstorm>
    <FoggyRain>1</FoggyRain>
    <SnowGentle>4</SnowGentle>
    <SnowHard>4</SnowHard>

    <RainingBlood>64</RainBlood> <!-- References the defName -->
</baseWeatherCommonalities>
Why 64? Well, the other numbers add up to 32 and if they’re relative weights
then 64 means a 2/3rd chance of our raining blood weather. “Trying it and seeing
what happens” is pretty much what I’m doing here. Throw enough macaroni at a
wall and sooner or later some of it will stick.[1]
The easiest way to override this is to copy the XML file to your
Mods/[..]/Defs/ directory. Again, the path doesn’t matter, it just looks at
the defName attribute; the last one overrides any previous ones.
This is pretty useful for testing, debugging, etc. as you can focus on just the
XML without worrying if it’s patched correctly. The obvious downside is that you
won’t include any future updates (which may break the game due to missing fields
etc.), and if someone decides to make a “RainingMen” mod then one will override
the other, and you can’t have both mods. You never want to do this in a
published mod, but for testing it’s useful.
Testing this is a bit annoying, since you need to wait for it to take effect.
Also, it seems the game always sets the initial weather for at least 10 in-game
days, so you may want to load a save game instead of using -quicktest.
Remember You can press 4 for if you enabled the dev console, which speeds up
the game to 15× (3 is 6×). You can also make 4 speed it up to a whopping
150× by going to the “TweakValues” developer menu and enabling
TickManager.UltraSpeedBoost. I am disappointed this is called UltraFast and
UltraSpeedBoost instead of RidiculousSpeed and LudicrousSpeed.
After confirming that our “override it all”-method works let’s properly patch
stuff. There are several ways of patching XML resources; I’ll use XPath
here, which is the easiest if you just need to patch some XML. Any XML file in
Patches/ is treated as patch.
Our patch will just all biomes in Patches/Biomes.xml, but you can select for
[defName=..] if you only want to patch specific ones. Remember to remove the
overrides if you have any.
<?xml version="1.0" encoding="utf-8" ?>
<Patch>
<!-- Class, not class! -->
<Operation Class="PatchOperationAdd">
    <xpath>/Defs/BiomeDef/baseWeatherCommonalities</xpath>
    <value>
        <RainingBlood>64</RainingBlood>
    </value>
</Operation>
</Patch>
As previously mentioned all XML files in Defs/ are in the same data structure,
so don’t worry about the pathnames. There are a number of other operations you
can do; see the full documentation for more details on how patching
works.
You can use xmllint from libxml2 to test queries on the commandline:
% xmllint --xpath '/Defs/BiomeDef/baseWeatherCommonalities' \
    Data/Core/Defs/BiomeDefs/Biomes_Cold.xml
Let’s expand the mod a bit by making cannibals like raining blood and give
them a mood boost, rather than a mood penalty. There isn’t any way to express
that in the XML defs, so we need some code for that.
Some of the game’s source code is in the installation directory (e.g.
~/rimworld/Source) but it’s not a lot; there’s
Source/Verse/Defs/DefTypes/WeatherDef.cs, but it’s not all that useful. You
can more or less ignore this directory.
To actually figure out how to write mods we’ll need to decompile the C♯ code in
RimWorldLinux_Data/Managed/Assembly-CSharp.dll.[2] There are several
tools for this; I’ll use ILSpy. This doesn’t seem packaged in most
distros but there are Linux binaries for the GUI available as
AvaloniaILSpy. This seems to work well enough, but I prefer to extract all the
code at once so I can use Vim and grep and whatnot, and the GUI doesn’t seem to
do that (there is “save code”, but that doesn’t seem to do anything).
You need to build the ilspycmd binary from source, there isn’t a pre-compiled
version as far as I can find. Basic instructions:
# The ".NET home".
% export DOTNET_ROOT=$HOME/dotnet
% mkdir -p $DOTNET_ROOT

# Needs .NET SDK 5 and .NET Core 3.1; binaries from:
#   https://dotnet.microsoft.com/download/dotnet/5.0
#   https://dotnet.microsoft.com/download/dotnet/3.1
# Versions may be different; this is just indicative.
% tar xf dotnet-sdk-5.0.401-linux-x64.tar.gz -C $DOTNET_ROOT
% tar xf dotnet-sdk-3.1.413-linux-x64.tar.gz -C $DOTNET_ROOT

# Add the dotnet path, the binaries we compile later will be in ~/.dotnet/tools
% export PATH=$PATH:$HOME/dotnet:$HOME/.dotnet/tools

# Just the "source code" tar.gz from the GitHub release:
# https://github.com/icsharpcode/ILSpy/archive/refs/tags/v7.1.tar.gz
% tar xf ILSpy-7.1.tar.gz
% cd ILSpy-7.1
% dotnet tool install ilspycmd -g

# Now decompile the lot to src.
% cd ~/rimworld
% mkdir src
% ilspycmd ./RimWorldLinux_Data/Managed/Assembly-CSharp.dll -p -o src

# Hurray!
% ls src
Assembly-CSharp.csproj       FleckUtility.cs         RimWorld/
ComplexWorker_Ancient.cs     HistoryEventUtility.cs  Verse/
ComplexWorker.cs             Ionic/                  WeaponClassDef.cs
DarknessCombatUtility.cs     Properties/             WeaponClassPairDef.cs
FleckParallelizationInfo.cs  ResearchUtility.cs
You only need to do this once. Note that the DOTNET_ROOT is a runtime
dependencies of ilspycmd, so don’t remove it unless you’re sure you don’t need
to run it again.
The decompiled source doesn’t have any comments, and some variables seem changed
from the original (e.g. num1, num2, num3, etc.) but it’s mostly fairly
readable. The versions in Source do have comments, but the paths don’t quite
match up (it seems many subdirs are lost in the decompile?) I considered copying
them over to src but I’m not sure if the code in Source matches the exact
version.
“Assembly” is C♯ speak for any compiled output such as an executable (.exe) or
shared library (.dll). We need to set up a “build solution” (C♯ “Makefiles”) to
build them. Let’s start by just setting up a basic example before we start
actually writing code.
By convention the source code lives in Mods/.../Source/, but I don’t think
this is required since the game doesn’t do anything with it directly. The
resulting DLL files should be in Mods/.../Assemblies/. Note that you will use
a .dll file on Linux as well – it’s just how Mono/C♯ on Linux works. They are
cross-platform, an assembly built on Linux should also work on Windows and
vice-versa.
The game code lives in two namespaces: Verse and RimWorld. Verse is the
game engine and RimWorld is the game built on that. At least, I think that was
the intention at some point as all sort of RimWorld-specific things seem to be
in Verse (which also references the RimWorld namespace frequently) and there
isn’t really a clear dividing line, but mostly: general “engine-y things” are in
Verse and “RimWorld-y things” are in RimWorld, except when they’re not.
In Source/RainingBlood.cs we’ll add a simple example to log something to the
developer console:
namespace RainingBlood {
    [Verse.StaticConstructorOnStartup]
    public static class RainingBlood {
        static RainingBlood() {
            Verse.Log.Message("Hello, world!");
        }
    }
}
The [Verse.StaticConstructorOnStartup] annotation makes the code run when the game
starts. Basically, the game searches for all static constructors with this
annotation and startup and executes them. If you really want to know how it
works you can use something like rg '[^\[]StaticConstructorOnStartup'.
Another way is inheriting from the Verse.Mod class, which allows some more
advanced things (most notably implementing settings), but I’m not
going to cover that here.
To build this we’ll need to set up a “build solution”, which consists of a
.csproj XML file and a .sln file. This is something I mostly just copied and
modified from other projects; it seems that most people are auto-generating this
from Visual Studio or MonoDevelop, with little instructions on how to write
these things manually. There’s probably a better way of doing some things (not a
huge fan of the hard-coded paths instead of using some LDPATH analogue), but I
haven’t dived in to this yet.
Anyway, here’s what I ended up with in Mods/RainingBlood/RainingBlood.csproj:
<?xml version="1.0" encoding="utf-8"?>
<Project ToolsVersion="14.0" DefaultTargets="Build" xmlns="http://schemas.microsoft.com/developer/msbuild/2003">

    <Import
        Project="$(MSBuildExtensionsPath)/$(MSBuildToolsVersion)/Microsoft.Common.props"
        Condition="Exists('$(MSBuildExtensionsPath)/$(MSBuildToolsVersion)/Microsoft.Common.props')"
    />

    <PropertyGroup>
        <RootNamespace>RainingBlood</RootNamespace>
        <AssemblyName>RainingBlood</AssemblyName>
        <!-- You probably want to modify this GUID for your mod, as it's supposed to be unique.
             This is also referenced in the .sln file.
             My system has "uuidgen" to generate UUIDs. -->
        <ProjectGuid>{7196d15e-d480-441a-a2e0-87b9696dd38f}</ProjectGuid>

        <Configuration Condition=" '$(Configuration)' == '' ">Debug</Configuration>
        <Platform Condition=" '$(Platform)' == '' ">AnyCPU</Platform>
        <OutputType>Library</OutputType>
        <AppDesignerFolder>Properties</AppDesignerFolder>
        <TargetFrameworkVersion>v4.7.2</TargetFrameworkVersion>
        <FileAlignment>512</FileAlignment>
        <TargetFrameworkProfile />
    </PropertyGroup>

    <!-- Debug build -->
    <PropertyGroup Condition=" '$(Configuration)|$(Platform)' == 'Debug|AnyCPU' ">
        <DebugSymbols>false</DebugSymbols>
        <DebugType>none</DebugType>
        <Optimize>false</Optimize>
        <OutputPath>Assemblies/</OutputPath>
        <DefineConstants>DEBUG;TRACE</DefineConstants>
        <ErrorReport>prompt</ErrorReport>
        <WarningLevel>4</WarningLevel>
        <UseVSHostingProcess>false</UseVSHostingProcess>
        <Prefer32Bit>false</Prefer32Bit>
    </PropertyGroup>
    <!-- Release build -->
    <PropertyGroup Condition=" '$(Configuration)|$(Platform)' == 'Release|AnyCPU' ">
        <DebugType>none</DebugType>
        <Optimize>true</Optimize>
        <OutputPath>Assemblies/</OutputPath>
        <DefineConstants>TRACE</DefineConstants>
        <ErrorReport>prompt</ErrorReport>
        <WarningLevel>3</WarningLevel>
        <Prefer32Bit>false</Prefer32Bit>
    </PropertyGroup>

    <!-- Dependencies -->
    <ItemGroup>
        <!-- The main game code (RimWorld and Verse) -->
        <Reference Include="Assembly-CSharp">
            <HintPath>../../RimWorldLinux_Data/Managed/Assembly-CSharp.dll</HintPath>
            <Private>False</Private>
        </Reference>

        <!-- C#/.NET stdlib -->
        <Reference Include="System" />
        <Reference Include="System.Core" />
        <Reference Include="System.Runtime.InteropServices.RuntimeInformation" />
        <Reference Include="System.Xml.Linq" />
        <Reference Include="System.Data.DataSetExtensions" />
        <Reference Include="Microsoft.CSharp" />
        <Reference Include="System.Data" />
        <Reference Include="System.Net.Http" />
        <Reference Include="System.Xml" />
    </ItemGroup>

    <!-- File list -->
    <ItemGroup>
        <Compile Include="Source/RainingBlood.cs" />
    </ItemGroup>

    <Import Project="$(MSBuildToolsPath)/Microsoft.CSharp.targets" />
</Project>
And Mods/RainingBlood/RainingBlood.sln:
Microsoft Visual Studio Solution File, Format Version 12.00
# Visual Studio 15
VisualStudioVersion = 15.0.27703.2035
MinimumVisualStudioVersion = 10.0.40219.1
Project("{57073194-e8b4-4a20-b60c-ee0e10947af0}") = "RainingBlood", "RainingBlood.csproj", "{7196d15e-d480-441a-a2e0-87b9696dd38f}"
EndProject
Global
    GlobalSection(SolutionConfigurationPlatforms) = preSolution
        Debug|Any CPU = Debug|Any CPU
        Release|Any CPU = Release|Any CPU
    EndGlobalSection
    GlobalSection(ProjectConfigurationPlatforms) = postSolution
        {7196d15e-d480-441a-a2e0-87b9696dd38f}.Debug|Any CPU.ActiveCfg = Debug|Any CPU
        {7196d15e-d480-441a-a2e0-87b9696dd38f}.Debug|Any CPU.Build.0 = Debug|Any CPU
        {7196d15e-d480-441a-a2e0-87b9696dd38f}.Release|Any CPU.ActiveCfg = Release|Any CPU
        {7196d15e-d480-441a-a2e0-87b9696dd38f}.Release|Any CPU.Build.0 = Release|Any CPU
    EndGlobalSection
    GlobalSection(SolutionProperties) = preSolution
        HideSolutionNode = FALSE
    EndGlobalSection
    GlobalSection(ExtensibilityGlobals) = postSolution
        SolutionGuid = {31005EA7-3F04-446F-80B2-016137708540}
    EndGlobalSection
EndGlobal
To build it you’ll need msbuild, which is not included in the Standard Mono
installation. It does have xbuild, but that gives a deprecated warning
pointing towards msbuild. Maybe it works as well, but I didn’t try it. Luckily
msbuild does seem commonly packaged, so I just installed it from there.
I put the solution files in the project root; other people prefer to put it in
the Source/ directory, but you’ll need to modify some of the paths if you put
it there. To build it, simply run msbuild from the directory, or use msbuild to specify a path. After this you should have
Mods/RainingBlood
Assemblies/RainingBlood.dll.
After starting the game now and opening the developer console you should see
“Hello, world!” in there.
Alrighty, now that all the plumbing is working we can actually start doing some
stuff. Let’s see what grepping for exposedThought gives us:
[~/rimworld/src]% rg exposedThought
Verse/AI/Pawn_MindState.cs
415: if (curWeatherLerped.exposedThought != null && !pawn.Position.Roofed(pawn.Map))
417:     pawn.needs.mood.thoughts.memories.TryGainMemoryFast(curWeatherLerped.exposedThought);

Verse/WeatherDef.cs
35: public ThoughtDef exposedThought;
Verse/AI/Pawn_MindState.cs seems to be what we want, and reading through
MindStateTick() the logic seems straightforward enough:
namespace Verse.AI {
    public class Pawn_MindState : IExposable {
        // [..]

        public void MindStateTick() {
            // [..]

            if (Find.TickManager.TicksGame % 123 == 0 &&
                pawn.Spawned && pawn.RaceProps.IsFlesh && pawn.needs.mood != null
            ) {
                TerrainDef terrain = pawn.Position.GetTerrain(pawn.Map);
                if (terrain.traversedThought != null) {
                    pawn.needs.mood.thoughts.memories.TryGainMemoryFast(terrain.traversedThought);
                }

                WeatherDef curWeatherLerped = pawn.Map.weatherManager.CurWeatherLerped;
                if (curWeatherLerped.exposedThought != null && !pawn.Position.Roofed(pawn.Map)) {
                    pawn.needs.mood.thoughts.memories.TryGainMemoryFast(curWeatherLerped.exposedThought);
                }
            }

            // [..]
        }
    }
}
So every 123rd “tick” it checks the terrain and weather and applies any mood
effects. Digging a bit deeper:
The Pawn class describes a person or animal (“pawn”) in the game; every Pawn
has a MindState attached to it.
On every “tick” it calls the MindStateTick() method on the attached MindState
instsance as long as the pawn isn’t dead (as well as a number of other
things).
One “tick” corresponds to 1/60th real second, which is 1.44 minutes in-game
time. This is the game’s Planck time: everything that happens will take at
least 1.44 minutes in-game.
There are also “rare ticks” (= 250 ticks = 4.15 real seconds = 6 hours
in-game, or 1/4th of a day) and “long ticks” (= 1000 ticks = 33.33 real
seconds = 1 day in-game) that you can hook in to various places.
If you speed up the game then ticks are just emitted faster: 3× or 6×. So
instead of emitting a tick once every 1/60th second it becomes once every
1/180th second or 1/360th second.
You can find a bit more about this in Verse/Tick*.cs. It’s not really needed
to know this for a simple mod like this, but it’s useful to know if you want to
write actual real mods.
Anyway, so how to add our custom logic? Let’s first add a new “thought” we want
to apply to Defs/ThoughtDefs/RainingBlood.xml we created earlier:
<ThoughtDef>
    <defName>BloodCoveredCannibal</defName>
    <durationDays>0.1</durationDays>
    <stackLimit>1</stackLimit>
    <stages>
        <li>
            <label>blood covered</label>
            <description>Reigning in blood!</description>
            <baseMoodEffect>10</baseMoodEffect>
        </li>
    </stages>
</ThoughtDef>
And in the Defs/WeatherDefs/RainingBlood.xml let’s add some new fields next to
the exposedThought we already have:
<modExtensions>
	<!-- Class, not class! -->
	<li Class="RainingBlood.WeatherDefExtension">
		<exposedThoughtCannibal>BloodCoveredCannibal</exposedThoughtCannibal>
	</li>
</modExtensions>
The way the XML maps to C♯ code is that every entry in the XML file is expected
to be a field in the *Def class (inherits from Verse.Def), for example for
the existing exposedThought the WeatherDef class has:
public ThoughtDef exposedThought;
If you were to just add exposedThoughtCannibal you’d get an error telling you
that exposedThoughtCannibal isn’t a field in the class:
<exposedThoughtCannibal>[...] doesn't correspond to any field in in type WeatherDef
But RimWorld comes with the modExtensions field to extend Defs. In this case
we’re adding it to an entire new Def, but you can also patch existing Defs with
XPath and PatchOperationAddModExtension.
You’ll also need to add a new class inhereting from Verse.DefModExtension:
namespace RainingBlood {
    public class WeatherDefExtension : Verse.DefModExtension {
        public RimWorld.ThoughtDef exposedThoughtCannibal;
    }
}
The Class attribute in the XML links the XML fields to this class. The name
can be anything. We can get the value in C♯ with the GetModExtension<T>()
method on any Def class, where T is the type (class name) you want. For
example, GetModExtension<WeatherDefExtension>() in this case. By using the
type system multiple mods can attach their own extensions and not conflict.
To make this actually do something we need to hook in some code; RimWorld
itself doesn’t really have a “mod system” for this, but we can use Harmony.
Harmony is a C♯ library to patch existing code and can do a number of things,
but the most useful (and least error-prone) is to run code before or after a
method. In our case, we want to run code after
Pawn_MindState.MindStateTick() to apply the exposedThoughtCannibal thought.
To use this we’ll need to register it as a dependency in our About/About.xml file:
<modDependencies>
    <li>
        <packageId>brrainz.harmony</packageId>
        <displayName>Harmony</displayName>
        <steamWorkshopUrl>steam://url/CommunityFilePage/2009463077</steamWorkshopUrl>
        <downloadUrl>https://github.com/pardeike/HarmonyRimWorld/releases/latest</downloadUrl>
    </li>
</modDependencies>
We’ll also have to add it to the RainingBlood.csproj file as a dependency
before the Assembly-CSharp dependency:
<!-- Dependencies -->
<ItemGroup>
    <!-- Harmony must be loaded first -->
    <Reference Include="0Harmony">
        <HintPath>../HarmonyRimWorld/Current/Assemblies/0Harmony.dll</HintPath>
        <Private>False</Private>
    </Reference>

    <!-- The main game code (RimWorld and Verse) -->
    <Reference Include="Assembly-CSharp">
        <HintPath>../../RimWorldLinux_Data/Managed/Assembly-CSharp.dll</HintPath>
        <Private>False</Private>
    </Reference>

    [..]
Now we can use it to run some code after the Pawn_MindState.MindStateTick()
method:
namespace RainingBlood {
    public class WeatherDefExtension : Verse.DefModExtension {
        public RimWorld.ThoughtDef exposedThoughtCannibal;
    }

    [Verse.StaticConstructorOnStartup]
    public static class Patch {
        static Patch() {
            // Get the method we want to patch.
            var m = typeof(Verse.AI.Pawn_MindState).GetMethod("MindStateTick");

            // Get the method we want to run after the original.
            var post = typeof(RainingBlood.Patch).GetMethod("PostMindStateTick",
                       System.Reflection.BindingFlags.Static|System.Reflection.BindingFlags.Public);

            // Patch stuff! The string passed to the Harmony constructor can be
            // anything, and can be used to identify/remove patches if need be.
            new HarmonyLib.Harmony("arp242.rainingblood").Patch(m,
                postfix: new HarmonyLib.HarmonyMethod(post));
        }

        // The special __instance parameter has the original class instance
        // we're extending. This is based on the argument name.
        public static void PostMindStateTick(Verse.AI.Pawn_MindState __instance) {
            var pawn = __instance.pawn;

            // Same condition as MindStateTick, but inversed for early return.
            if (Verse.Find.TickManager.TicksGame % 123 != 0 ||
                !pawn.Spawned || !pawn.RaceProps.IsFlesh || pawn.needs.mood == null)
                return;

            // Is this pawn a cannibal? If not, then there's nothing to do. You
            // can also expand this by checking for the Ideology cannibalism
            // memes, but this just checks the "cannibalism" trait on colonists.
            if (!pawn.story.traits.HasTrait(RimWorld.TraitDefOf.Cannibal))
                return;

            // Let's see if the current weather has our new exposedThoughtCannibal.
            var w = pawn.Map.weatherManager.CurWeatherLerped;
            if (!w.HasModExtension<WeatherDefExtension>())
                return;
            var t = w.GetModExtension<WeatherDefExtension>().exposedThoughtCannibal;
            if (t == null)
                return;

            // Remove any existing thought that was applied and apply our
            // cannibalistic thoughts.
            if (w.exposedThought != null)
                pawn.needs.mood.thoughts.memories.RemoveMemoriesOfDef(w.exposedThought);
            pawn.needs.mood.thoughts.memories.TryGainMemoryFast(t);
        }
    }
}
I use the “manual method” here as that’s a bit easier to debug if you did
something wrong, but you can also use the annotations. Again, see the Harmony
documentation. One thing you need to watch out for is getting the
BindingFlags.[..] right. If you don’t then the reflection library won’t find
your method and it’ll return null. See the GetMethod() documentation. This
part actually took me quite a bit to get working. Unfortunately RimWorld doesn’t
have a REPL or console (AFAIK?) but you can use some printf-debugging with
Verse.Log.Message($"{var}") and the like.
I’m not going to step through the rest of the code in more detail here; I think
most of it should be obvious. I mostly just found this be looking through
various code and some strategic grepping. You can test this by using the Debug
Actions menu, which allows assigning the Cannibalism trait to a colonist.
The above wasn’t really all that useful as such, and there are many more parts
of RimWorld modding – most of which I haven’t looked at in detail yet – but this
should at least give a decent base to get started with.
I have to say that I found a lot of documentation and guides on the topic to be
of, ehm, less-than-stellar quality :-/ The RimWorld wiki has a whole bunch of
pages, but – with a few exceptions linked in the article here – I found many are
unclear, outdated, or both, and in a few cases just downright wrong. Keep that
in mind if something doesn’t work: usually it’s a mistake to assume the
documentation is wrong instead of you, but here it might actually be the case.
I’ll see if I’ll write some more if I keep up interest in this.
Some additional reading for topics not covered:
Details how to make a mod compatible with both 1.2 and 1.3. I elided this for
simplicity, and also because quite frankly I don’t really care as I’m just
interested in writing some mods that work for me to fix/improve some things 🤷
The original PSD files for all art in RimWorld. Useful if you want to use a
modified version in your mod.
Covers some things not used in this example, such as sounds, textures, and
i18n.
TDBug adds some debug things which
seem useful. Haven’t tried it yet.
And some things I’d still like to improve/figure out:
I would really really like a REPL, debugger, or some other way to speed up the
dev cycle. RimWorld takes fairly long to start (almost a minute on my laptop)
and toying around with things is kinda annoying and time-consuming.
The closest I found is How I got RimWorld debugging to work; the CLI
works on Linux (run with dnSpy.Console.exe, from the .NET download) but the
GUI doesn’t (and never will, as the Windows-specific GUI toolkit things aren’t
implemented on Linux), but this doesn’t support the debugger (just
decompilation).
I tried the generic sdb Mono debugger, but the game doesn’t load directly
with Mono but rather via the 32M UnityPlayer.so, so using that seems
difficult. Using gdb works, but actually doing useful stuff with it (i.e.
breakpoints, calling functions, displaying variable values) seems harder, but
I haven’t spent that much time with it yet.
Making the game start faster would help too, or an automatic “script” to run
on startup (i.e. to apply certain debug actions).
On Linux the Assemblies are in RimWorldLinux_Data/, but on Windows and macOS
this directory is RimWorldWin64_Data/ and RimWorldMac_Data/. Right now the
build solution builds just on Linux, but I’d like to be able to make it build
on all systems.
Hard-coding this path seems common; to get other mods to build I had to
manually s/Win64/Linux/ some things, which is not ideal. I couldn’t figure out
how to make it cross-platform.
There are probably some other C♯/.NET things that could be improved. I’m
really a n00b at this.
Although I later did confirm that they’re relative weights, see
Verse.TryRandomElementByWeight(), which can be examined after
decompiling the source, which we’ll cover later. ↩
Explicitly allowed in the EULA it
turns out: “You’re allowed to ‘decompile’ our game assets and look
through our code, art, sound, and other resources for learning
purposes, or to use our resources as a basis or reference for a Mod.
However, you’re not allowed to rip these resources out and pass them
around independently.” I wish they’d just make this easier by
distributing more code, but ah well. ↩
Post Syndicated from Sahitya Pandiri original https://aws.amazon.com/blogs/big-data/coming-january-2022-an-updated-amazon-quicksight-sign-in-experience/
Starting January 2022, the Amazon QuickSight will undergo minor updates, such as changes in the sign-in domain and a new look and feel while signing in. This won’t impact your access to QuickSight. In this post, we walk through changes to expect in the sign-in experience and domains to allow on your organization’s network to sign in to QuickSight.
If your QuickSight account is integrated with an identity provider such as Okta, this change is not applicable to you. If you sign in to QuickSight either using AWS root, AWS Identity and Access Management (IAM), corporate Active Directory, or your native QuickSight credentials, please keep reading.
The QuickSight sign-in process will be a three-step experience.
Step 1: The first page requires your QuickSight account name.

Step 2: The second step asks for your user name.
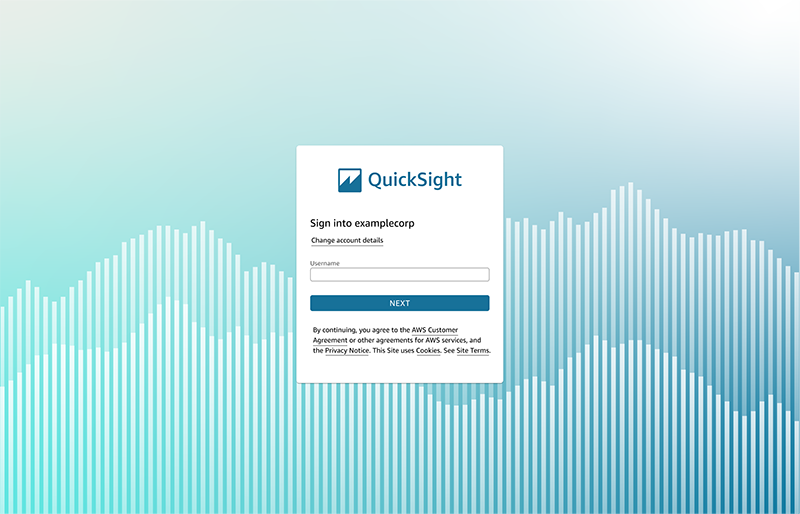
Step 3: The third step varies depending on the user type you sign in as: native QuickSight or Active Directory user, AWS root user, or IAM user.
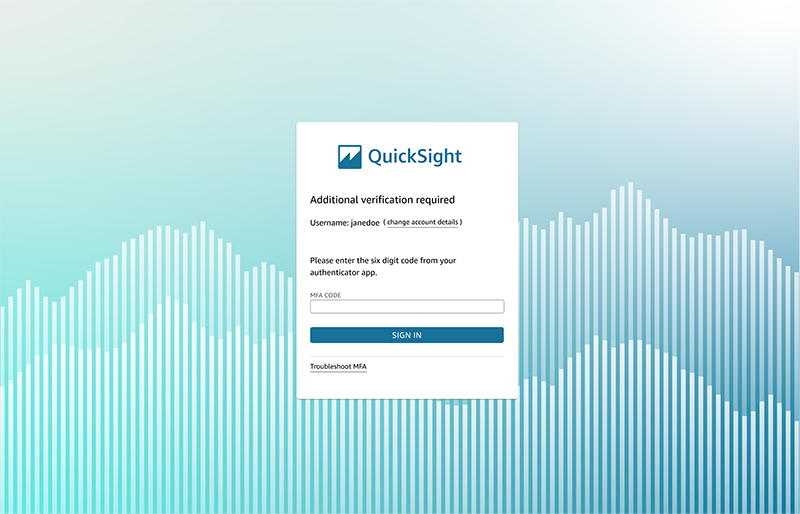
If you’re signing in as a native QuickSight user or use your corporate Active Directory credentials, you’re redirected to signin.aws, which prompts you to enter your password with the user name prefilled.

If your account is Multi-Factor Authentication enabled, you will be prompted to enter the MFA code as below,
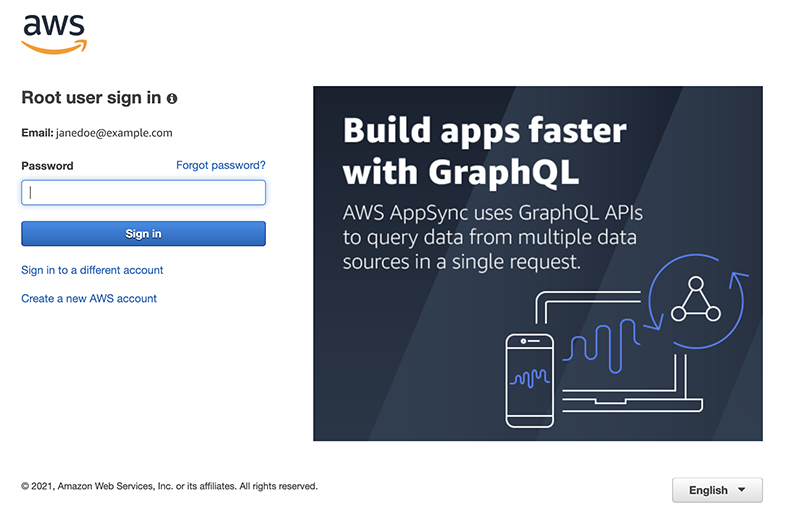
If you’re signing in as an AWS root user, you’re redirected to signin.aws.amazon.com (or amazon.com) to complete the sign-in process. This page has your username prefilled. On selecting next, it prompts you to enter password.

If signing in as an IAM user, you’re redirected to a sign-in page that prompts password with IAM user name pre-filled.
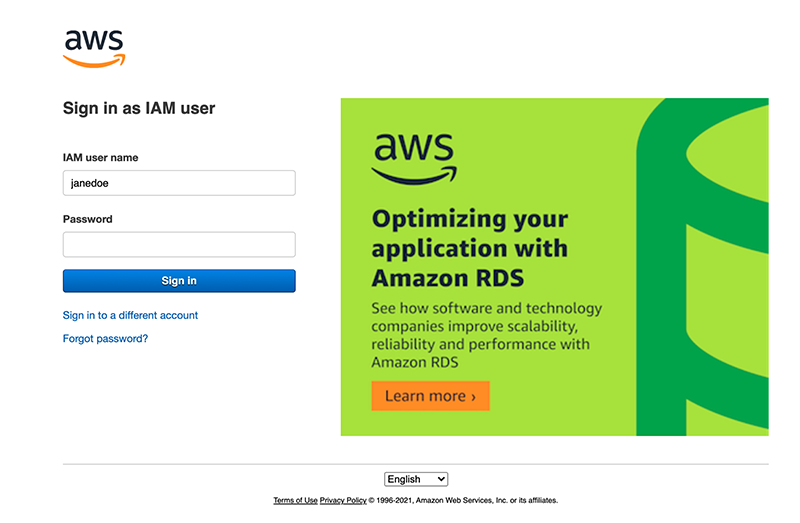
These changes to the QuickSight sign-in experience will be effective starting January, 2022. Please note the four new domains below you may encounter depending on who you sign in as. As a network administrator, please allow-list these domains within your organization network.
| User type | Domain to allow list |
| Native QuickSight user and Active Directory users | signin.aws and awsapps.com |
| AWS root user | signin.aws.amazon.com and amazon.com |
| AWS IAM user | signin.aws.amazon.com |
If you have any questions, please reach out to AWS Support via the Support Center on the AWS Management Console.
Post Syndicated from original https://lwn.net/Articles/870478/rss
A controversy about the handling of the Time Zone Database (tzdb) has
been brewing since May, but has come to a head in recent weeks.
Changes that were proposed to simplify the main database file have some
consequences in terms of time-zone history and changes to the
representation of some zones. Those changes have upset a number of users
of the database—to the point where some have called for a fork. A
September 25 release of tzdb with some, but not
all, of the changes seems unlikely to resolve the conflict.
Post Syndicated from original https://yurukov.net/blog/2021/antivax-opredelenie/
Сякаш колкото повече ваксини биват изхвърлени заради минал срок на годност, колкото повече се отдалечаваме от нивото на имунизация на другите европейски държави и колкото повече смъртни случаи виждаме от поредната вълна на коронавирус, толкова повече четем възмущения какво правила държавата и реторични въпроси „Антиваксър ли съм, ако…“. На първо място, почти винаги когато някой започва така статус, то той или тя си е антиваксър. Въпросът обаче има доста смисъл. Какво всъщност е антиваксър?
Следя движението им от много години и от също толкова време предупреждавам, че ще достигне измерения поставящи обществото ни под риск. Не очаквах да е толкова скоро. От друга страна, малко неща, които видяхме в последната година, бяха очаквани или предвидими. Едно нещо обаче неизменно следваше пандемията и това бяха отричащите я – диагнозите, данните, смъртността и не на последно място – ваксините.
В началото на 2019-та WHO включва „отричащите ваксините“ в списъка си за глобалните заплахи срещу общественото здраве. Това беше година преди пандемията – време, в което антиваксърите бяха просто лунатици подвизаващи се в тайни фейс групи, развяваше странни плакати, време в което само шепа доктори, включително Мангъров, яростно защитаваха имунизационния календар и нуждата от масова имунизация.
Никой обаче не даде ясна дефиниция на „антиваксър“. По онова време разделението беше някак ясно. Светът се обърна и дезинформацията блуждаеща преди в сенките на мрежата се разля в медии и политика до степен невиждана в здравната сфера от десетилетия. Дали да се носи маска и да се ваксинираш придоби политически оттенък. Заговори се за дискриминация, фашизъм и контрол над населението.
В действителност дефиницията е изключително проста и мисля, че важи изцяло за последните 300 години. Зависи изцяло от това каква е позицията на даден човек към следното твърдение. Формулирах го преди няколко години в безкрайните си дебати с малката тогава клика:
Трябва да се постигне възможно най-високо ниво на имунизация максимално бързо изключвайки само тези с медицински противопоказания.
Това, разбира се, показва моята представа за въпроса. Както казах, няма единна дефиниция и се използва най-вече като нарицателно. Предвид това, че имам значително повече опит от мнозинството по темата, мога дори да разделя антиваксърите на няколко категории според вярванията, отдадеността на движението и развитието им през времето. Тук обаче по-важно е как стигнах до това разграничение.
В началото на 2015-та националистически партии взаимстват дословно законопроект и аргументите към него от най-голямата антивакс група. В същността си той отменя задължителния характер на ваксините, санкциите за пропускането им и поставяше бариери пред възможността здравните власти да реагират адекватно при епидемия като тези от морбили.
Покрай този законопроект дойде отново на дневен ред дали задължителните ваксини отговарят на Конвенцията за правата на човека и защо са препоръчителни в „развитите държави“. По първия въпрос – да отговарят на Конвенцията и има няколко дела, които са потвърдили това. Причината е, че рискът е нищожен докато в същото време гарантират здравословен живот на децата. Същото, впрочем беше потвърдено и за евентуалната задължителна ваксинация срещу коронавирус.
Въпросът дали трябва да са задължителни е по-сложен. Моят отговор, който многократно съм отстоявал, е не. Тук говорим не само за COVID19 ваксините, но за всички от имунизационния календар. Причината за тази ми позиция е, че със задължението се прехвърля отговорността към родителите, вместо лекарите да инвестират повече време в работа с тях, разяснения и следене за нежелани реакции.
В същото време обаче имаме ситуация, в която ваксините са задължителни в доста държави, включително България. На хартия поне – в България ваксините са повече от препоръчителни гледайки колко глоби падат в съда и колко безотговорно подхождат градини и ясли. Но промяната към препоръчителна форма сама по себе си няма да помогне на нивото на имунизация. От друга страна доста държави като Италия, Австралия, Германия и Франция минаха на задължителна форма за поне някои ваксини, защото видяха, че нивата падат.
Когато спорех с антиваксърите им казах, че още утре ще изляза с плакати пред министерството да протестирам за отмяна на задължителните ваксини, ако ми покажат ясно как това ще увеличи покритието на ваксините. Защото това е идеята независимо от юридическата форма и мерките, нали – повече деца да са защитени. Отговорът им беше красноречив – че целта им е точно обратното.
Тук идва разграничението в „антивакс теста“, който дефинирах горе. Ваксините, независимо дали говорим за туберколоза, морбили, HPV, полио или коронавирус, имат две страни. От медицинска гледна точка имаме препоръки, варианти, противопоказания и схема на приемане, всички съобразени със спецификите на болестта, демографията, заболеваемостта, та дори и климата в дадена държава. Другата страна е чисто психологическа и обществена – как да защитим максимален брой хора, отсявайки надеждно тези с алергии към препаратите и други противопоказания, взимайки предвид икономическия, социалния и историческия контекст.
Антиваксърите отричат първата страна – че има нужда от ваксините, че работят и че рискът е минимален и съобразен със заболяването, което предотвратяват. Скептиците са тези, които поставят под въпрос втората част – дали моделът на ваксиниране е оптимален. Скептиците не влизат в ролята на „тоалетни изследователи“ изравяйки изречения извадени от контекст от случайни трудове, за да покажат, че всъщност във ваксините има отрови и всичко е конспирация за печелене на пари и контрол над населението. Разграничението идва в това дали се доверяваш в науката, но имаш съмнения как следва да се подходи в обществото.
И с право трябва да имаме съмнения. Една от основните причини да се прибягва към задължителна имунизация е продължаващия десетилетия провал на здравните власти да поддържат квалификацията на лекарите. Особено личните лекари са в немалка степен в основата на антивакс настроенията срещу ваксината за коронавирус. Докато повечето от тях ще застанат твърдо зад тези от задължителния календар, липсата на разбиране на материята и доверие в здравните авторитети довежда до същия чисто човешки цинизъм, който ще срещнете у всеки бакшиш настояващ, че „я скапаха тая държава“.
Тази некадърност на чиновниците, пренебрегване на тлеещ от години проблем, затваряне на очите пред всякакви хомеопатични, нутриционистични и холистични залитания на уж сериозни лекари и активно подкопаване на капацитета и доверието у здравните институции доведе до ситуация, в която нямаме кой да поведе борбата срещу една съвсем реална заплаха за обществото ни. В такава ситуация автоматичната реакция на повечето политици и чиновници е да се издават забрани, задължения и регистри. Това виждаме и сега.
От друга страна, в държави, където уж се славят с добрата си здравна култура и система, виждаме подобни стъпки. Истината е, че недоверието в науката и особено медицината има доста дълбоки корени и е сложен феномен, който наблюдаваме едва в последните няколко поколения. Липсата на т.н. споделена реалност пречи да се разговаря с такива хора, тъй като отричат основни постулати в науката и как работи човешкото тяло. Този феномен наблюдаваме специално при ваксините много преди да навлезе в сфера на политиката покрай Тръмп и дори в космологията покрай плоскоземците. Прави задачата толкова по-трудна, но е оправдава бездействието на чиновниците ни не само преди пандемията, а и година след началото ѝ.
Нормално е хората да се притесняват. Оставяйки настрана страшната информация, която ни залива отвсякъде, дори страничните ефекти и противопоказанията изглеждат стряскащи. Свикнали сме да очакваме медицината да знае всичко, ваксините да са просто ежедневие, а за всяка болест да има лечение. Дори СПИН вече не е смъртна присъда, а хепатит B и C вече се лекуват с голяма успеваемост. С короната се върнахме обаче няколко поколения назад, когато пра-бабите ни са водили с радост децата да получат ваксинация срещу туберколоза и полио. Още 300 години назад и много хора са инокулирали децата си, за да ги предпазят от едра шарка. Самата процедура в началото си водело до 2% смъртност, но е това е било далеч по-добре от смъртността от болестта. Говорим и за време, където 40% от децата не са доживявали пубертет.
По онова време също е имало противници на ваксините. Рисували са колко противоестествено било да се поставя така препарат в тялото, нищо, че същото се е практикувало в България, например, от стотици години. В известен смисъл и следвайки дефиницията ми горе, грешно е обаче да наричаме тези хора антиваксъри. В мнозинството си те не са вярвали, че процедурата не работи или не е нужна. Някои са вярвали обаче, че подобна болест, както много други, са нужни, за да „прочистят“ обществото от „слабите“. Такива настроения виждаме и сред антиваксърите днес, макар преди няколко години да беше избутано встрани от основните послания в рамките на усилията им за ребрандиране към „ние искаме само избор“.
Основната част от противниците на ваксините при въвеждането на инокулацията са настоявали, че само бедните и затворниците следва да поемат този риск. Те, бидейки издигнати и знатни, нямало нужда да си правят труда. Вариация на тази тематика виждаме и днес в България, особено в припокриващата се общност на антиваксърите и неонационалистите.
В огромната си степен хората, които не са се ваксинирали още, не са антиваксъри. Повечето не поставят под въпрос препоръката за ваксината или не са се замисляли просто. Някои се притесняват за ефектите, други не смятат, че болестта представлява риск за тях, трети подават ухо на слухове, а повечето не знаят какво да мислят. Тази какафония е в основата на това да сме в плачевно положение като ниво на имунизация тичайки по хълма на поредната вълна от смъртност. Дори загубата на близък или ежедневното броене на труповете не помага. Виждаме провал в комуникацията на властите, доверието в институциите и медицинската етика на твърде много лекари.
Провалът е факт. Въпросът е какво следва. Ако отговорим положително на дефиницията ми горе и целим максимално ниво на имунизация, какво следва тогава? Как го постигаме? Гоним ли до дупка всеки лекар съветващ пациентите си да не се ваксинират и да рискуваме още по-сериозен недостиг на кадри в системата? Въвеждаме ли задължение в система, която не успяваше да го наложи дори преди пандемията? При неработещи институции, прокуратура и съд какво според вас следва да направим, за да убедим повече съмняващи се, че си струва да защитят себе си и близките си.
Защото това е целта в крайна сметка. Антиваксъри е имало и ще има винаги. Въпросът е какво да направим, за да се намали влиянието им над другите, които просто се притесняват за семействата си. Как да го направим с една очевидно счупена система, но с премного надъхани и всеотдайни хора в нея, които не получават достатъчно подкрепа?
The post Какво разделя антиваксърите и скептиците? first appeared on Блогът на Юруков.
Post Syndicated from The Atlantic original https://www.youtube.com/watch?v=7ITk9NhDdBU
Post Syndicated from The Atlantic original https://www.youtube.com/watch?v=zD6i8XObzng
Post Syndicated from The History Guy: History Deserves to Be Remembered original https://www.youtube.com/watch?v=Z0JKAuvzFaU
Post Syndicated from The Atlantic original https://www.youtube.com/watch?v=MBMPMD24UVM
Post Syndicated from The Atlantic original https://www.youtube.com/watch?v=jsrVe6KnkG4
Post Syndicated from Temi Adebambo original https://aws.amazon.com/blogs/security/introducing-the-ransomware-risk-management-on-aws-whitepaper/
AWS recently released the Ransomware Risk Management on AWS Using the NIST Cyber Security Framework (CSF) whitepaper. This whitepaper aligns the National Institute of Standards and Technology (NIST) recommendations for security controls that are related to ransomware risk management, for workloads built on AWS. The whitepaper maps the technical capabilities to AWS services and implementation guidance. While this whitepaper is primarily focused on managing the risks associated with ransomware, the security controls and AWS services outlined are consistent with general security best practices.
The National Cybersecurity Center of Excellence (NCCoE) at NIST has published Practice Guides (NIST 1800-11, 1800-25, and 1800-26) to demonstrate how organizations can develop and implement security controls to combat the data integrity challenges posed by ransomware and other destructive events. Each of the Practice Guides include a detailed set of goals that are designed to help organizations establish the ability to identify, protect, detect, respond, and recover from ransomware events.
The Ransomware Risk Management on AWS Using the NIST Cyber Security Framework (CSF) whitepaper helps AWS customers confidently meet the goals of the Practice Guides the following categories:
To achieve the above goals, the Practice Guides outline a set of technical capabilities that should be established, and provide a mapping between the generic application term and the security controls that the capability provides.
AWS services can be mapped to theses technical capabilities as outlined in the Ransomware Risk Management on AWS Using the NIST Cyber Security Framework (CSF) whitepaper. AWS offers a comprehensive set of services that customers can implement to establish the necessary technical capabilities to manage the risks associated with ransomware. By following the mapping in the whitepaper, AWS customers can identify which services, features, and functionality can help their organization identify, protect, detect, respond, and from ransomware events. If you’d like additional information about cloud security at AWS, please contact us.
If you have feedback about this post, submit comments in the Comments section below.
Want more AWS Security how-to content, news, and feature announcements? Follow us on Twitter.
Post Syndicated from Jose Kunnackal original https://aws.amazon.com/blogs/big-data/create-stunning-pixel-perfect-dashboards-with-the-new-free-form-layout-mode-in-amazon-quicksight/
The latest update of Amazon QuickSight introduces a new free-form dashboard layout option, along with granular per-visual interaction controls and conditional rendering options that open up a range of creative possibilities for dashboard authors. In this post, we look at the new capabilities available and how you can use them to create and share stunning dashboards, whether for QuickSight readers in your organization or to embed in your application for end-users.

Layout modes in QuickSight determine how visuals in a dashboard are sized and presented to end-users, and the degree of flexibility authors have in modifying the dashboard to meet their visual styling needs. QuickSight now supports three layout options for dashboards:
Existing dashboards will remain in classic mode until authors explicitly modify and republish them in tiled or free-form mode as necessary.
You can get started with free-form mode in five easy steps:
When using mouse to move the visuals, they still snap to the closest grid for ease of alignment. Try using the arrow keys for finer adjustments.

Wondering if you can switch your existing analysis to free-form mode? Sure thing! Choose Settings on the left panel of the analysis and choose Free-form from the Layout options.
Now that you know the basics, let’s dive deeper. Four groups of settings are key to building in free-form layout: placement, style, interactions, and rules.
You can access these settings from each visual’s Format visual panel.

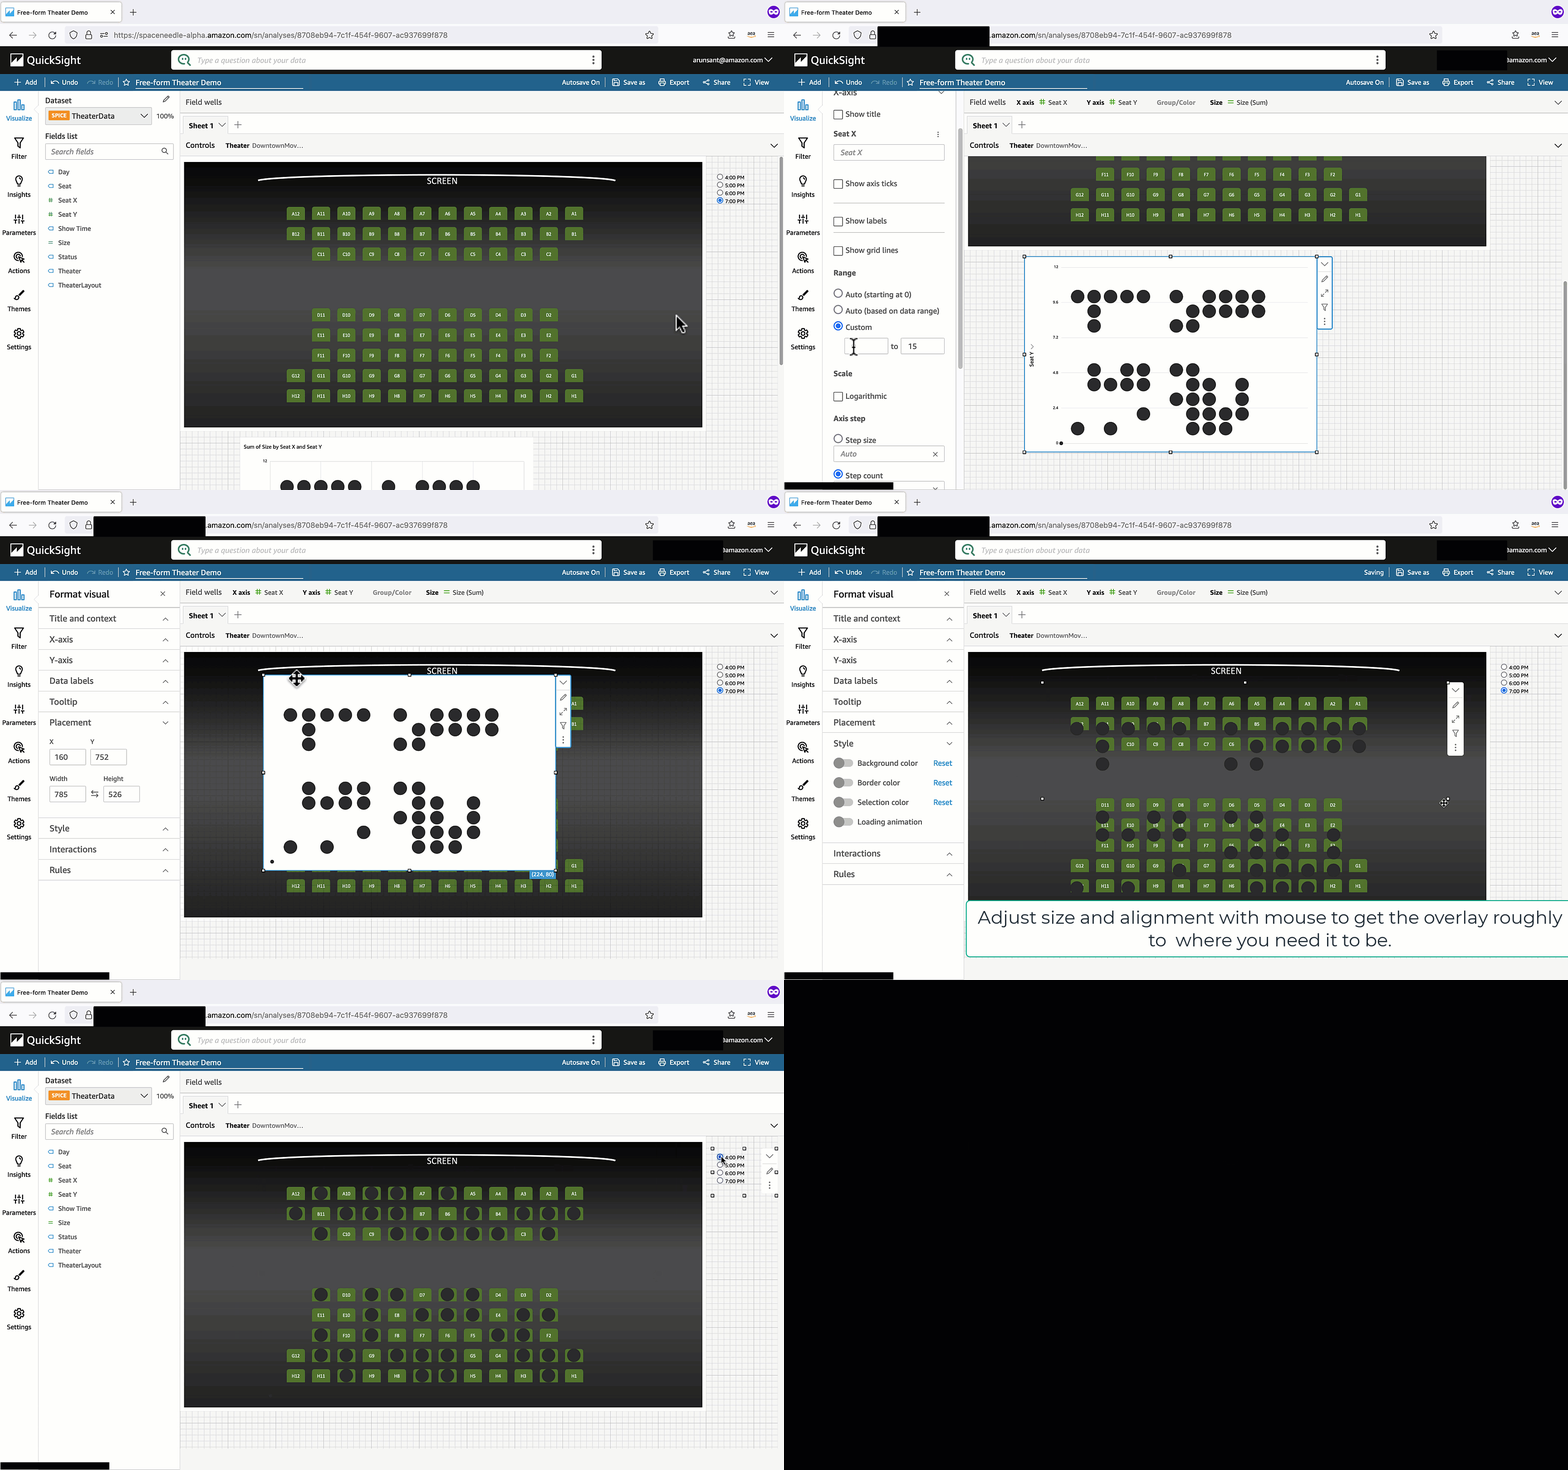
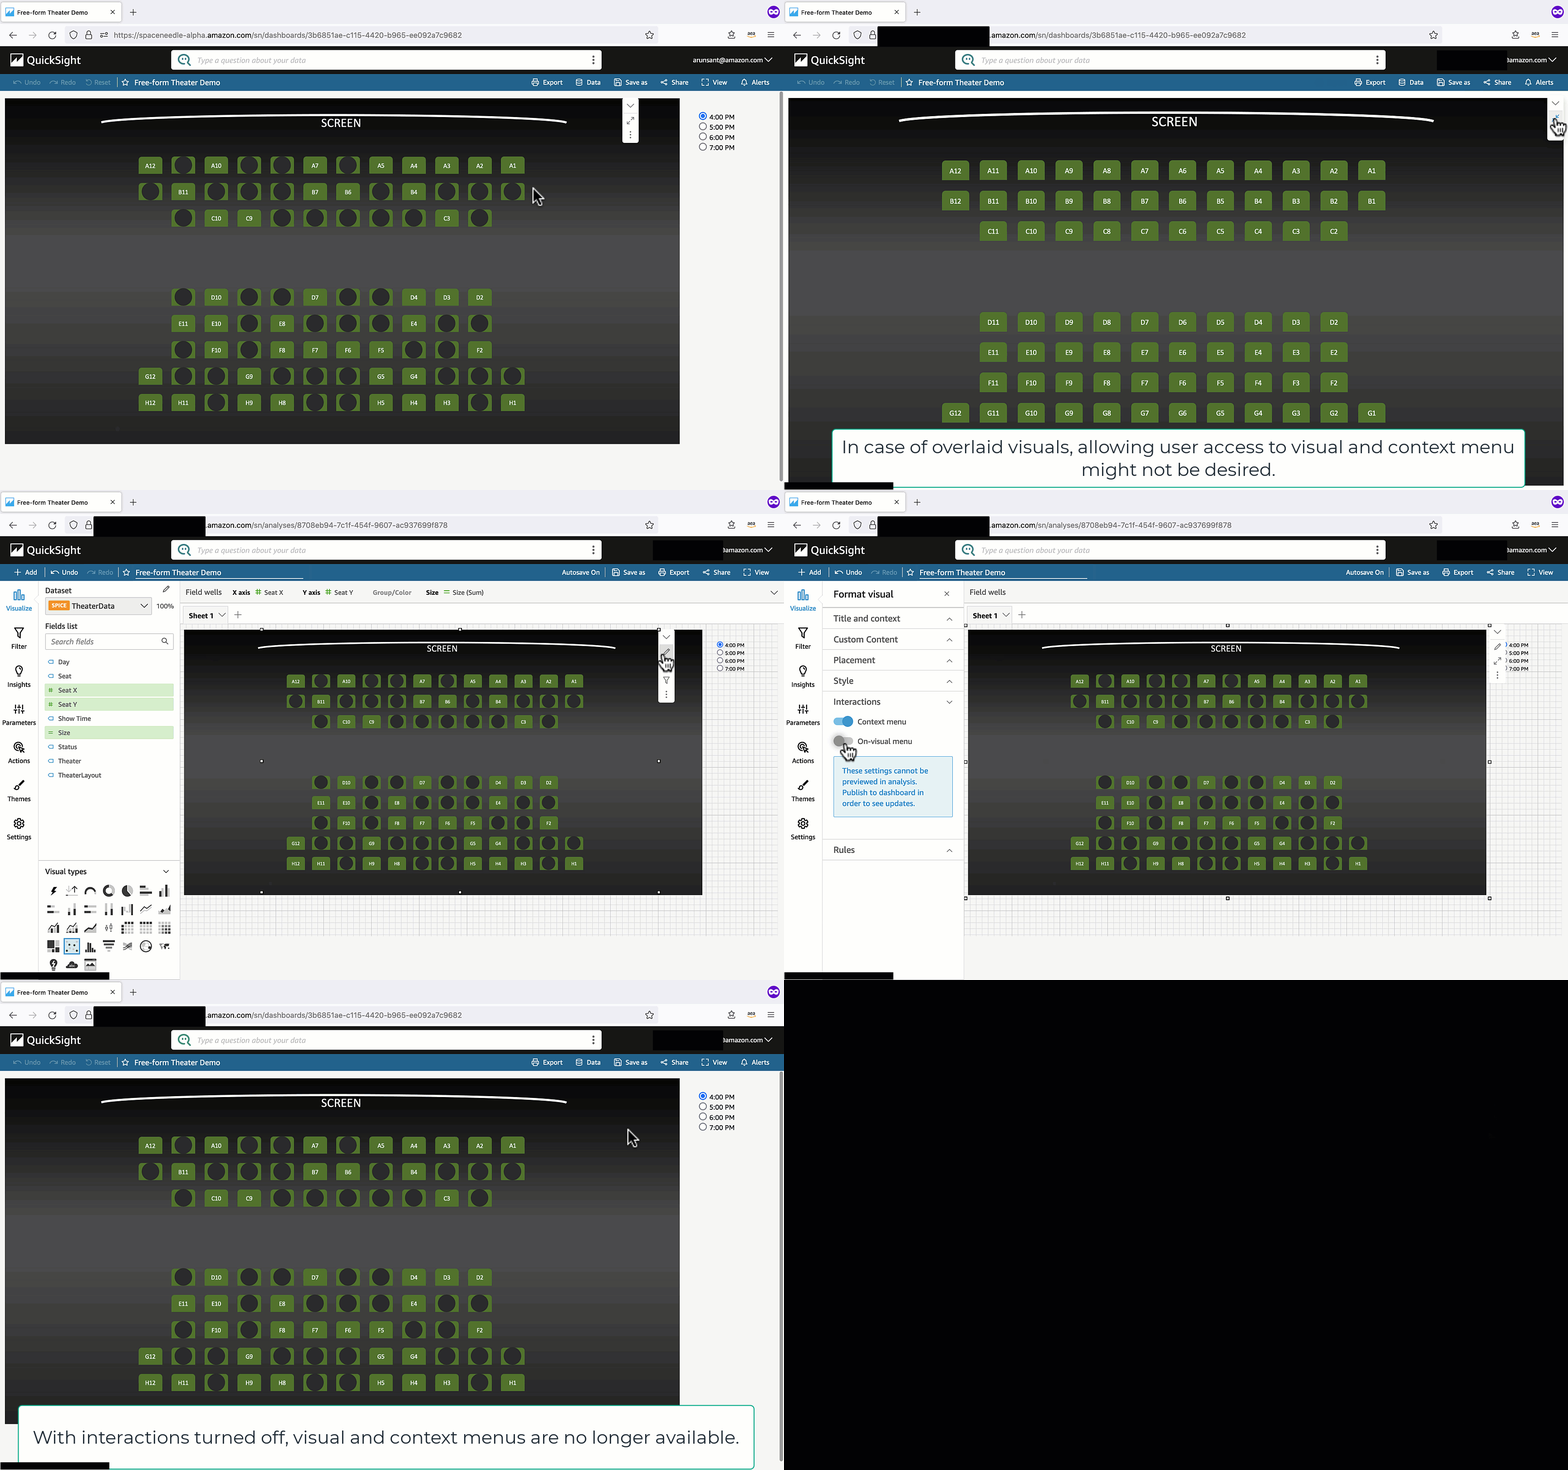

You can explore a sample dashboard for inspiration, and examine the analysis view to see how it is built.
Also check out the QuickSight dashboard gallery with samples from our partners.
With the new free-form layout, QuickSight enables you to build dashboards that can be tailored to meet your exact dashboard specifications, which can then be distributed to hundreds of thousands of users via the QuickSight portal, mobile app, email, or embedded within your own applications.
 Jose Kunnackal, is a principal product manager for Amazon QuickSight, AWS’ cloud-native, fully managed BI service. Jose started his career with Motorola, writing software for telecom and first responder systems. Later he was Director of Engineering at Trilibis Mobile, where he built a SaaS mobile web platform using AWS services. Jose is excited by the potential of cloud technologies and looks forward to helping customers with their transition to the cloud.
 Arun Santhosh is a Senior Solution Architect for Amazon QuickSight. Arun started his career at IBM as a developer and progressed on to be an Application Architect. Later, he worked as a Technical Architect at Cognizant. Business Intelligence has been his core focus in these prior roles as well.
Post Syndicated from The Atlantic original https://www.youtube.com/watch?v=6TaeJzn7_qM
Post Syndicated from The Atlantic original https://www.youtube.com/watch?v=vdo3d_md0bo
Post Syndicated from The Atlantic original https://www.youtube.com/watch?v=Gdq2MEMHh-w
Post Syndicated from original https://lwn.net/Articles/871105/rss
The Free Software Foundation Europe (FSFE) is organizing the coding
competition “Youth Hacking 4 Freedom” (YH4F) for European teenagers
(14-18). Six winners will receive a cash prize and a trip to Brussels.
There will be an opening event October 10 and registration will remain open
until October 31.
On Monday 1 November 2021, a five-month coding phase starts and the participants focus on coding until March 2022. Participants may bring all their imagination to the competition; they may code any type of software they want, as long as it is Free Software. The software project can be a stand-alone program written from scratch, or you can modify or combine existing programs. Everything is welcome! The participants will have the chance to briefly follow each other’s work and exchange ideas.
Post Syndicated from The Atlantic original https://www.youtube.com/watch?v=NrSK0paJWZg
Post Syndicated from The Atlantic original https://www.youtube.com/watch?v=peWKTkihuow
Post Syndicated from The History Guy: History Deserves to Be Remembered original https://www.youtube.com/watch?v=8KOfxU9FlyE
Post Syndicated from Ashok Srirama original https://aws.amazon.com/blogs/architecture/migrate-resources-between-aws-accounts/
Have you ever wondered how to move resources between Amazon Web Services (AWS) accounts? You can really view this as a migration of resources. Migrating resources from one AWS account to another may be desired or required due to your business needs. Following are a few scenarios where this may be of benefit:
This process may involve migrating the infrastructure either partially or completely.
In this blog, we will discuss various approaches to migrating resources based on type, configuration, and workload needs. Usually, the first consideration is infrastructure. What’s in your environment? What are the interdependencies? How will you migrate each resource?
Using this information, you can outline a plan on how you will approach migrating each of the resources in your portfolio, and in what order.
Here are some considerations to address for a typical migration:
Let’s look at each of these considerations in detail.
To migrate infrastructure that includes ephemeral resources, you can use one of the following Infrastructure as Code (IaC) approaches, shown in Figure 1. IaC templates are like programming scripts that automate the provisioning of IT resources.
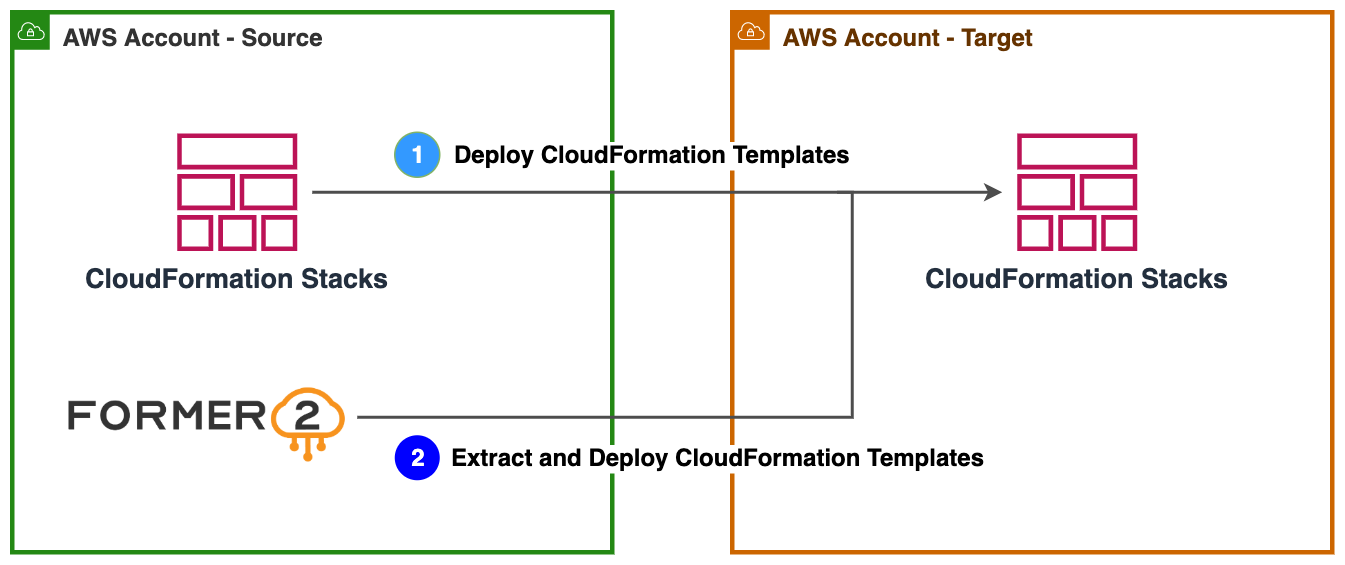
Figure 1. Approaches to migrate infrastructure using IaC
1. If you are already using AWS CloudFormation templates, you can easily import the existing templates to the target AWS account.
AWS CloudFormation simplifies provisioning and management on AWS. You can create templates for quick and reliable provisioning of services or applications (called “stacks”).
2. You can use tools like Former2 to templatize your existing resources in the source AWS account and deploy them in the target account.
Former2 is an open-source project that allows you to generate IaC templates. For example, AWS CloudFormation or HashiCorp Terraform can be generated from the existing resources within your AWS account. Read Accelerate infrastructure as code development with open source Former2 for step-by-step guidance.
To migrate compute resources that have a persistent state, you can use one of the following approaches, shown in Figure 2. These provide a virtual computing environment, allowing you to launch instances with a variety of operating systems.
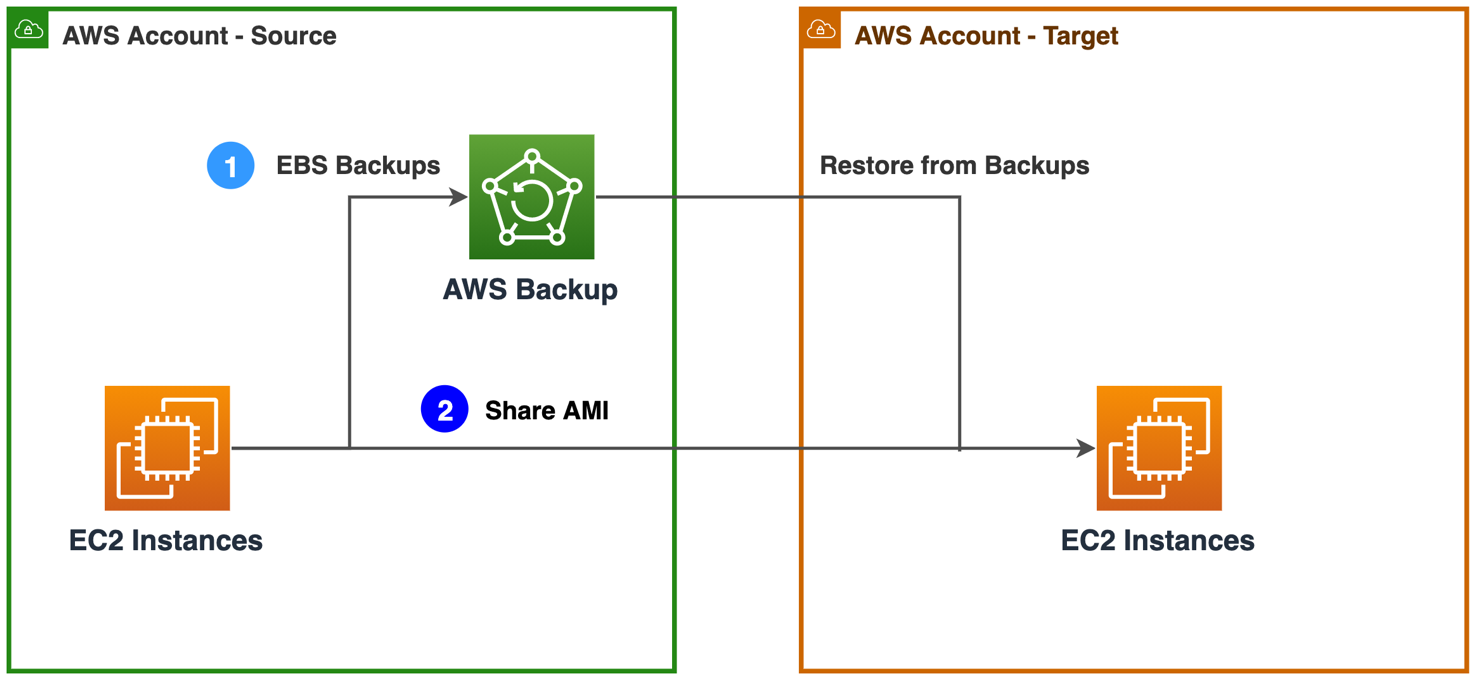
Figure 2. Approaches to migrate compute resources
1. If you are already using AWS Backup service and AWS Organizations to centrally manage backup policies, you can enable AWS Backup cross-account management feature. This manages, monitors, restores your backup, and copies jobs across AWS accounts. Ensure you have both accounts in same AWS Organization. Once the backups are available in the target account, you can restore EC2 instances. Follow detailed instructions at Creating backup copies across AWS accounts.
AWS Backup is a fully managed data protection service that centralizes and automates data across AWS services, in the cloud, and on-premises. You can configure backup policies and monitor activity for your AWS resources. You can automate and consolidate backup tasks that were previously performed service-by-service. This removes the need to create custom scripts and use manual processes.
2. Create an Amazon Machine Image of your EC2 instances and share it with the target account. You can launch new EC2 instances using the shared AMI. Follow step-by-step instructions: How do I transfer an Amazon EC2 instance or AMI to a different AWS account?
Amazon Machine Image (AMI) provides the information required to launch an instance. Specify an AMI and then launch multiple instances from a single AMI with the same configuration. You can use different AMIs to launch instances when you need instances with different configurations.
For migrating non-persistent compute resources, refer Migrating Infrastructure section.
AWS offers various storage services including object, file, and block storage. To migrate objects from a S3 bucket, you can take the following approaches, shown in Figure 3a.
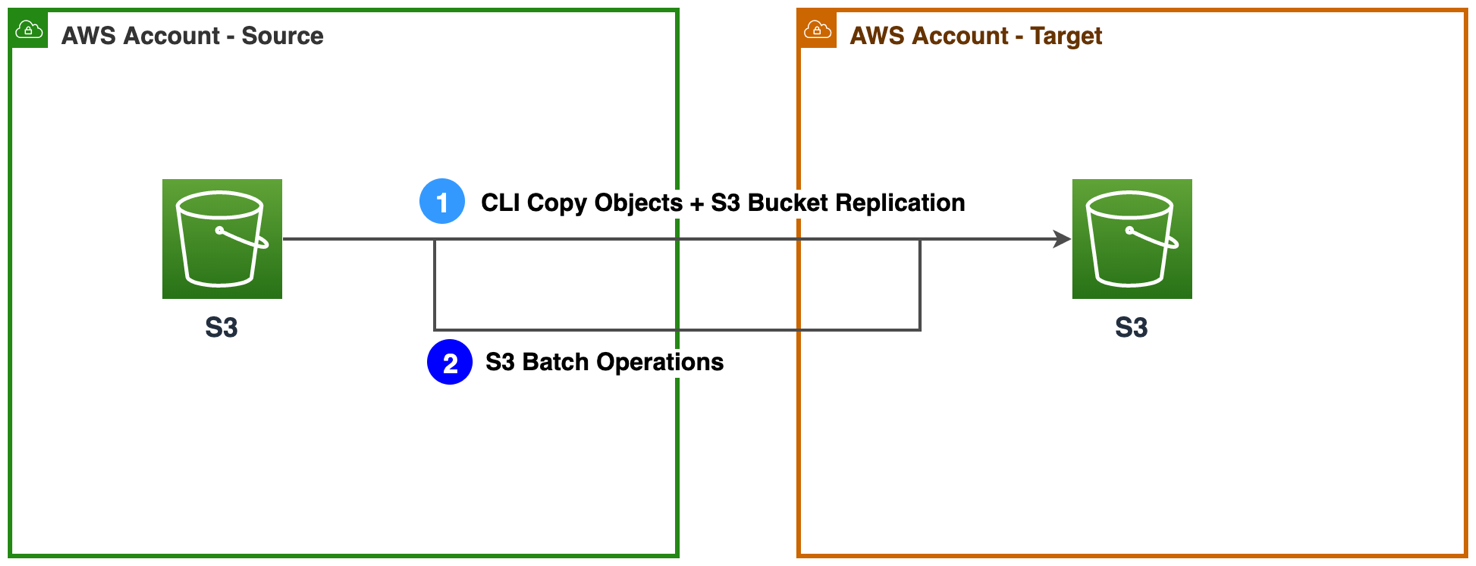
Figure 3a. Approaches to migrate S3 buckets
1. Use Amazon S3 command line interface (CLI) commands to copy the initial load of objects from the source account to the target account. Read How can I copy S3 objects from another AWS account? After the initial copy, you can enable Amazon S3 replication feature to continuously replicate object changes across accounts. Add a bucket policy to grant source bucket permission to replicate objects in destination bucket. Read this walkthrough on how to configure replications.
2. If the S3 bucket contains large number of objects, use Amazon S3 Batch operations to copy objects across AWS accounts in bulk. Read Cross-account bulk transfer of files using Amazon S3 Batch Operations.
To migrate files from an Amazon EFS file system, you can take the following approach, shown in Figure 3b.
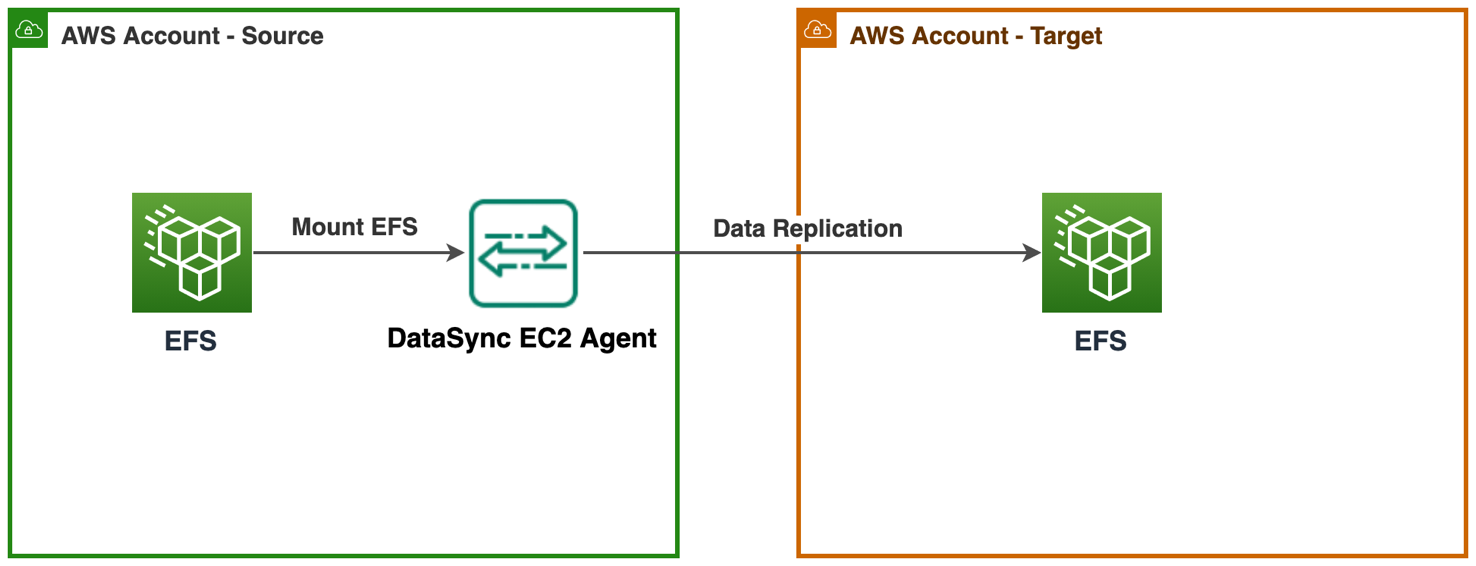
Figure 3b. Approach to migrate EFS file systems
Use AWS DataSync agent to transfer data from one EFS file system to another. AWS DataSync is an online transfer service that simplifies moving, copying, and synchronizing large amounts of data between on-premises storage systems and AWS storage services. Read Transferring file data across AWS Regions and accounts using AWS DataSync for step-by-step guidance.
AWS offers various purpose-built database engines. These include relational, key-value, document, in-memory, graph, time series, wide column, and ledger databases. To migrate relational databases, you can take one of the following approaches, shown in Figure 4.
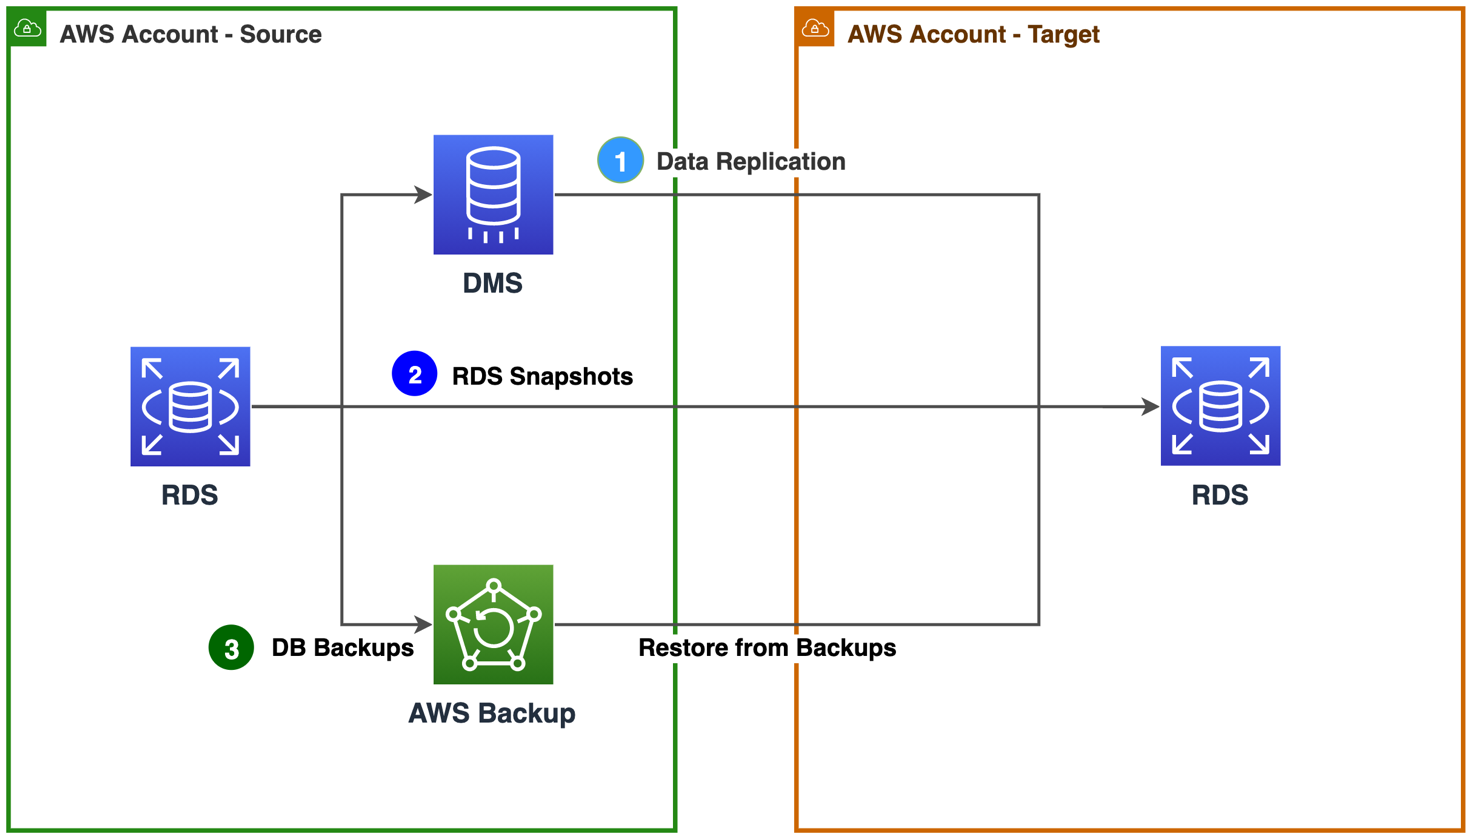
Figure 4. Approaches to migrate relational database resources
1. If you want to continuously replicate data changes, use AWS Database Migration Service (AWS DMS) to replicate your data across AWS accounts with high availability. The source database remains fully operational during the migration, minimizing downtime to applications that rely on the database. You can set up a DMS task for either one-time migration or on-going replication. An on-going replication task keeps your source and target databases in sync. Once set up, the on-going replication task will continuously apply source changes to the target with minimal latency. Learn how to Set Up AWS DMS for Cross-Account Migration.
AWS DMS is a cloud service that streamlines the migration of relational databases, data warehouses, NoSQL databases, and other types of data stores. You can use AWS DMS to migrate your data into the AWS Cloud or between combinations of cloud and on-premises setups.
2. Use RDS Snapshots to create and share database backups across AWS accounts. Use the shared snapshots to launch new Amazon Relational Database Service (RDS) instances in the target account. Read step-by-step instructions: How can I share an encrypted Amazon RDS DB snapshot with another account?
3. Use AWS Backup to create backup policies that automatically back up your AWS resources. Use AWS Backup cross-account management feature to manage and monitor your backup, restore, and copy jobs across AWS accounts. Once the backups are available in the target account, you can restore RDS instances. Learn about Creating backup copies across AWS accounts.
In this section, we discussed relational databases migration. You can also use AWS DMS for migrating other databases. Read supported AWS DMS source and target databases.
In this blog post, we discussed various approaches you can take to migrate resources from one account to another depending upon the resource type and configuration. Additionally, you can also explore CloudEndure Migration for continuous data replication. Learn more about Migrating workloads across AWS Regions with CloudEndure Migration.